THIS INSTRUCTION BOOKLET CONTAINS IMPORTANT SAFETY INFORMATION. PLEASE READ AND KEEP FOR FUTURE REFERENCE.
EN FR
USER'S MANUAL/MANUEL DE L'UTILISATEUR
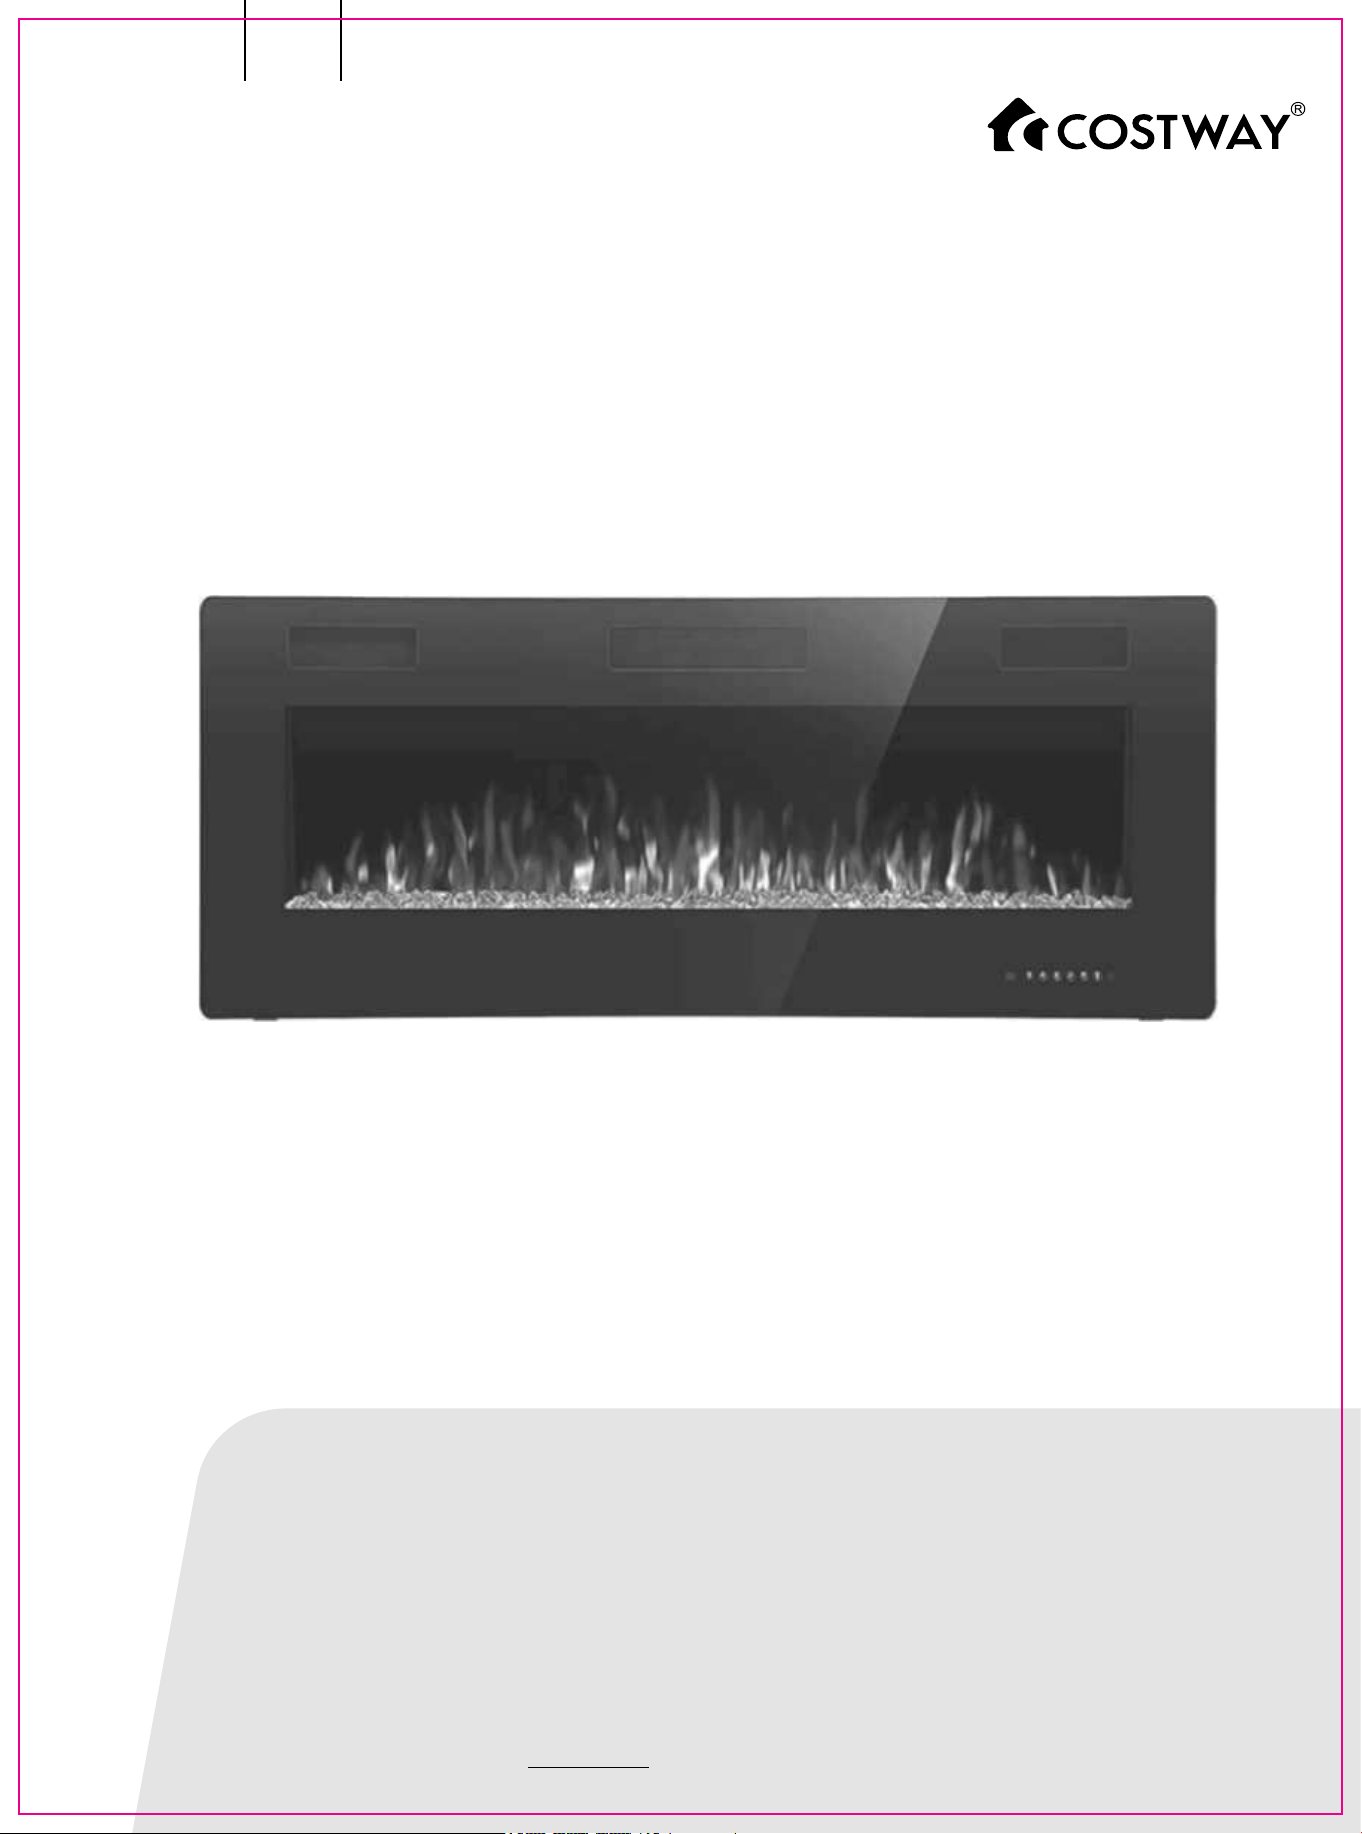
FP10165/FP10166/FP10167
Electric Fireplace / Cheminée Électrique
EN
CERTIFIED UNDER CANADIAN AND AMERICAN
NATIONAL STANDARDS: ETL
• Please read all instructions carefully.
• Retain instructions for future reference.
• Separate and count all parts and hardware.
• A Read through each step carefully and follow the proper order.
• We recommend that, where possible, all items are assembled near to the
area in which they will be placed in use, to avoid moving the product
unnecessarily once assembled.
• Always place the product on a flat, steady and stable surface.
• Keep all small parts and packaging materials for this product away from
babies and children as they potentially pose a serious choking hazard.
Contact Us!
Do NOT return this item.
Contact our friendly customer service department for help first.
E-mail
US: cs.us@costway.com
UK: cs.uk@costway.com
Before You Start
NO VENTING REQUIRED
WARNING
Read and understand this entire owner's
manual, including all safety information
before plugging in or using this appliance.
Failure to do so could result in fire, electric
shock, or serious personal injury.
02
IMPORTANT SAFETY INSTRUCTIONS
WARNING
These instructions should be carefully read before installation and
retained by the user. The booklet must be kept and delivered to the
new user in case of disposal of the heater. The Manufacturer reserves
the right to vary the features of the product without prior notice. The
technical data are indicative only.
1.THIS APPLIANCE IS HOT WHEN OPERATED AND CAN CAUSE SEVERE
BURNS IF TOUCHED.
2.Do not operate the appliance before reading and understanding operating
instructions. Failure to operate the appliance according to operating
instructions could cause fire or injury.
3.Keep combustible materials, such as furniture, pillows, bedding, papers,
clothes and curtains at least 3 feet (0.9 m) from the front of this appliance
and keep away from the sides and the rear. WARNING: In order to avoid
overheating, do not cover the heater. The clearance may be inadequate
when installed in a Recreational Vehicle with the slide-out closed.
4.Risk of burns. Power to the appliance should be turned off, and the
appliance should be allowed to cool before servicing. To disconnect the
appliance from the power supply, turn off the controls, and then remove the
plug from the outlet.
5.Do not install damaged, incomplete or substitute components.
6.Young children should be carefully supervised when they are in the same
room with the appliance.Toddlers, young children, and others may be
susceptible to accidental contact burns.
7.To prevent accidental swallowing, media bed kits should be kept away
from children and infants.
8.The remote control contains small batteries. Keep them away from
children. If swallowed, seek medical assistance immediately.
9.Do not install battery backwards, charge, put in fire or mix with used or
other battery types-may explode or leak causing injury.
10.Ensure that you have incorporated adequate safety measures to protect
infants/toddlers from touching hot surfaces.
11.It is imperative that the control compartments, circulating blower and its
passageway in the appliance and are kept clean. The appliance should be
inspected before use and at least annually by a qualified service person.
EN
03

12.Under no circumstances should this appliance be modified.
13.Do not use this appliance if any part has been in contact with water.
Immediately call a qualified service technician to inspect the appliance and
to replace any part of the control system which has been in contact with
water.
14.Do not operate the appliance with the glass door removed, cracked or
broken. Replacement of the glass should be done by a licensed or qualified
service person.
15.Do not strike or slam shut the appliance's glass door.
16.Keep the packaging material out of reach of children and dispose of the
material in a safe manner. As with all plastic bags, these are not toys and
should be kept away from children and infants.
17.Servicing should be done only while the appliance is disconnected from
the power supply circuit.
18.Always unplug the appliance when not in use.
19.Do not operate this appliance with a damaged cord or plug after the
appliance has been defective, dropped, or damaged in any manner. Return
the appliance to the authorized service facility for examination, electrical or
mechanical adjustment, or repair.
20.Do not use the appliance outdoors.
21.Never place the appliance where it may fall into a bathtub or other water
container.
22.Do not run cord under carpeting. Do not cover the cord with throw rugs,
runners, etc. Arrange the cord away from high-traffic areas to avoid a
tripping hazard.
23.Connect to properly grounded outlets only.
24.Do not insert or allow foreign objects to enter any ventilation or exhaust
opening as this may cause an electric shock or fire, or damage the
appliance.
25.To prevent a possible fire, do not block air intakes or exhaust in any
manner. Do not use on soft surfaces, like a carpet, where openings may
become blocked.
26.Always plug appliances directly into a wall outlet/receptacle. Never use
an extension cord or relocatable power tap (outlet/power strip).
EN
SAVE THESE INSTRUCTIONS
04

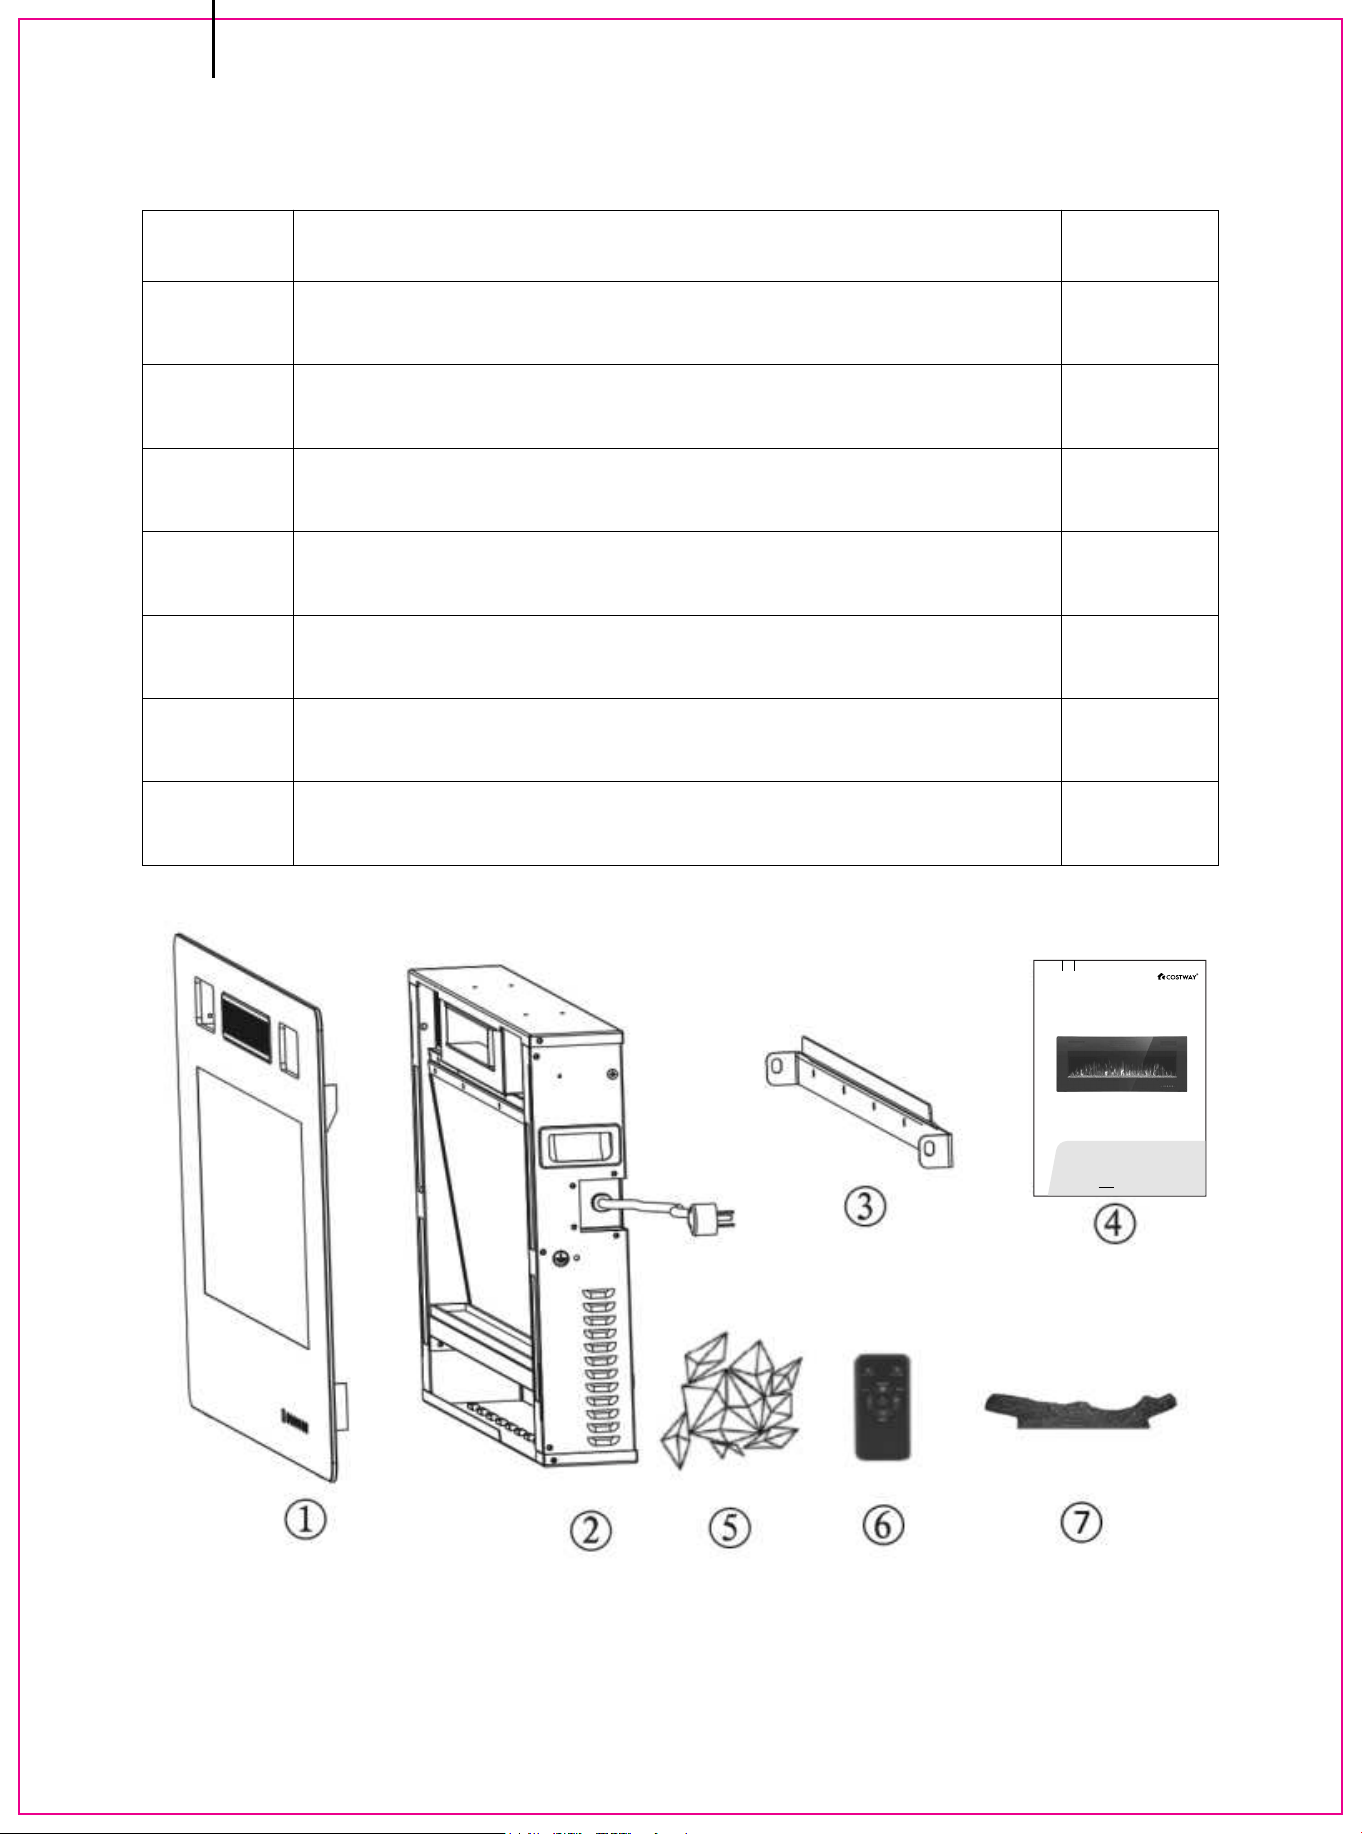
1.0 PACKING LIST
No.
1
2
3
4
5
6
7
Quantity
1 pc
1 pc
1 pc
1 pc
Varies
1 pc
Varies
Description
Front Frame
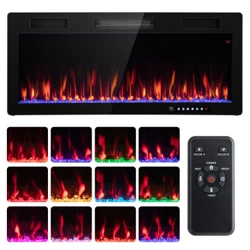
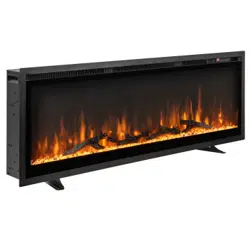
Electric Fireplace
Mounting Bracket (Pre-attached)
Manual
Decorative Stuff( crystal)
Remote Control(Battery included)
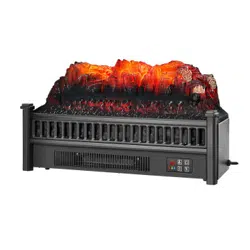
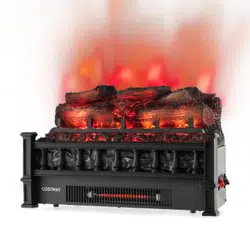
Decorative Stuff( Log )
EN
05
THIS INSTRUCTION BOOKLET CONTAINS IMPORTANT SA FETY INFORMATION. PLEA SE READ AND KEEP FOR FUTURE REFERENCE.
EN FR
USER'S MANUAL/MANUEL DE L'UTILISATEUR
FP10165/FP10166/FP10167
Electric Fireplace / Cheminée Électrique

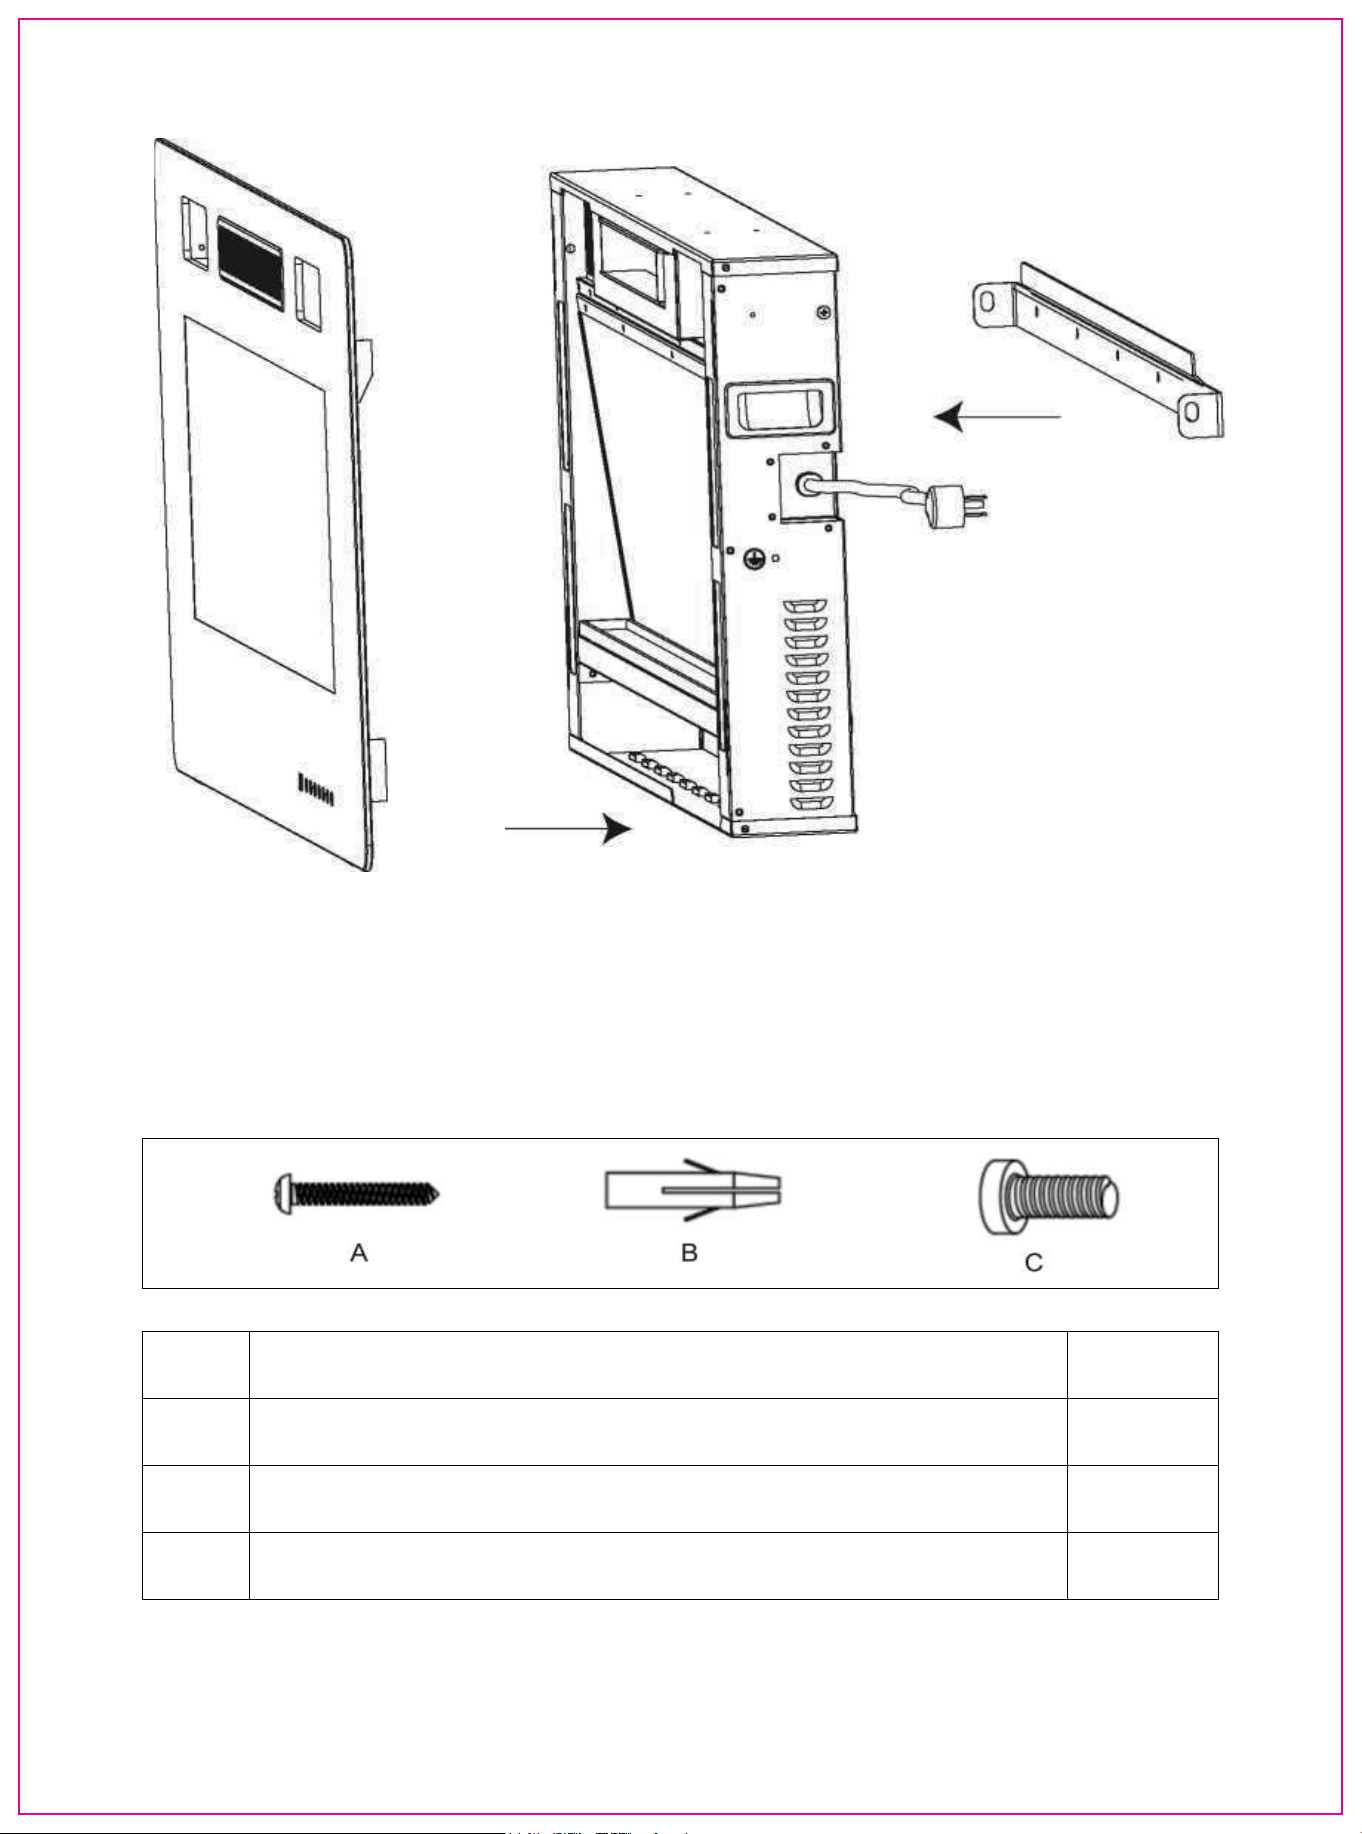
Part
A
B
C
Description
Anchor Screw
Wall Anchor
M4 x12 Screw
Quantity
5 PCS
5 PCS
1 PC
HANRDWARE INCLUDE
06
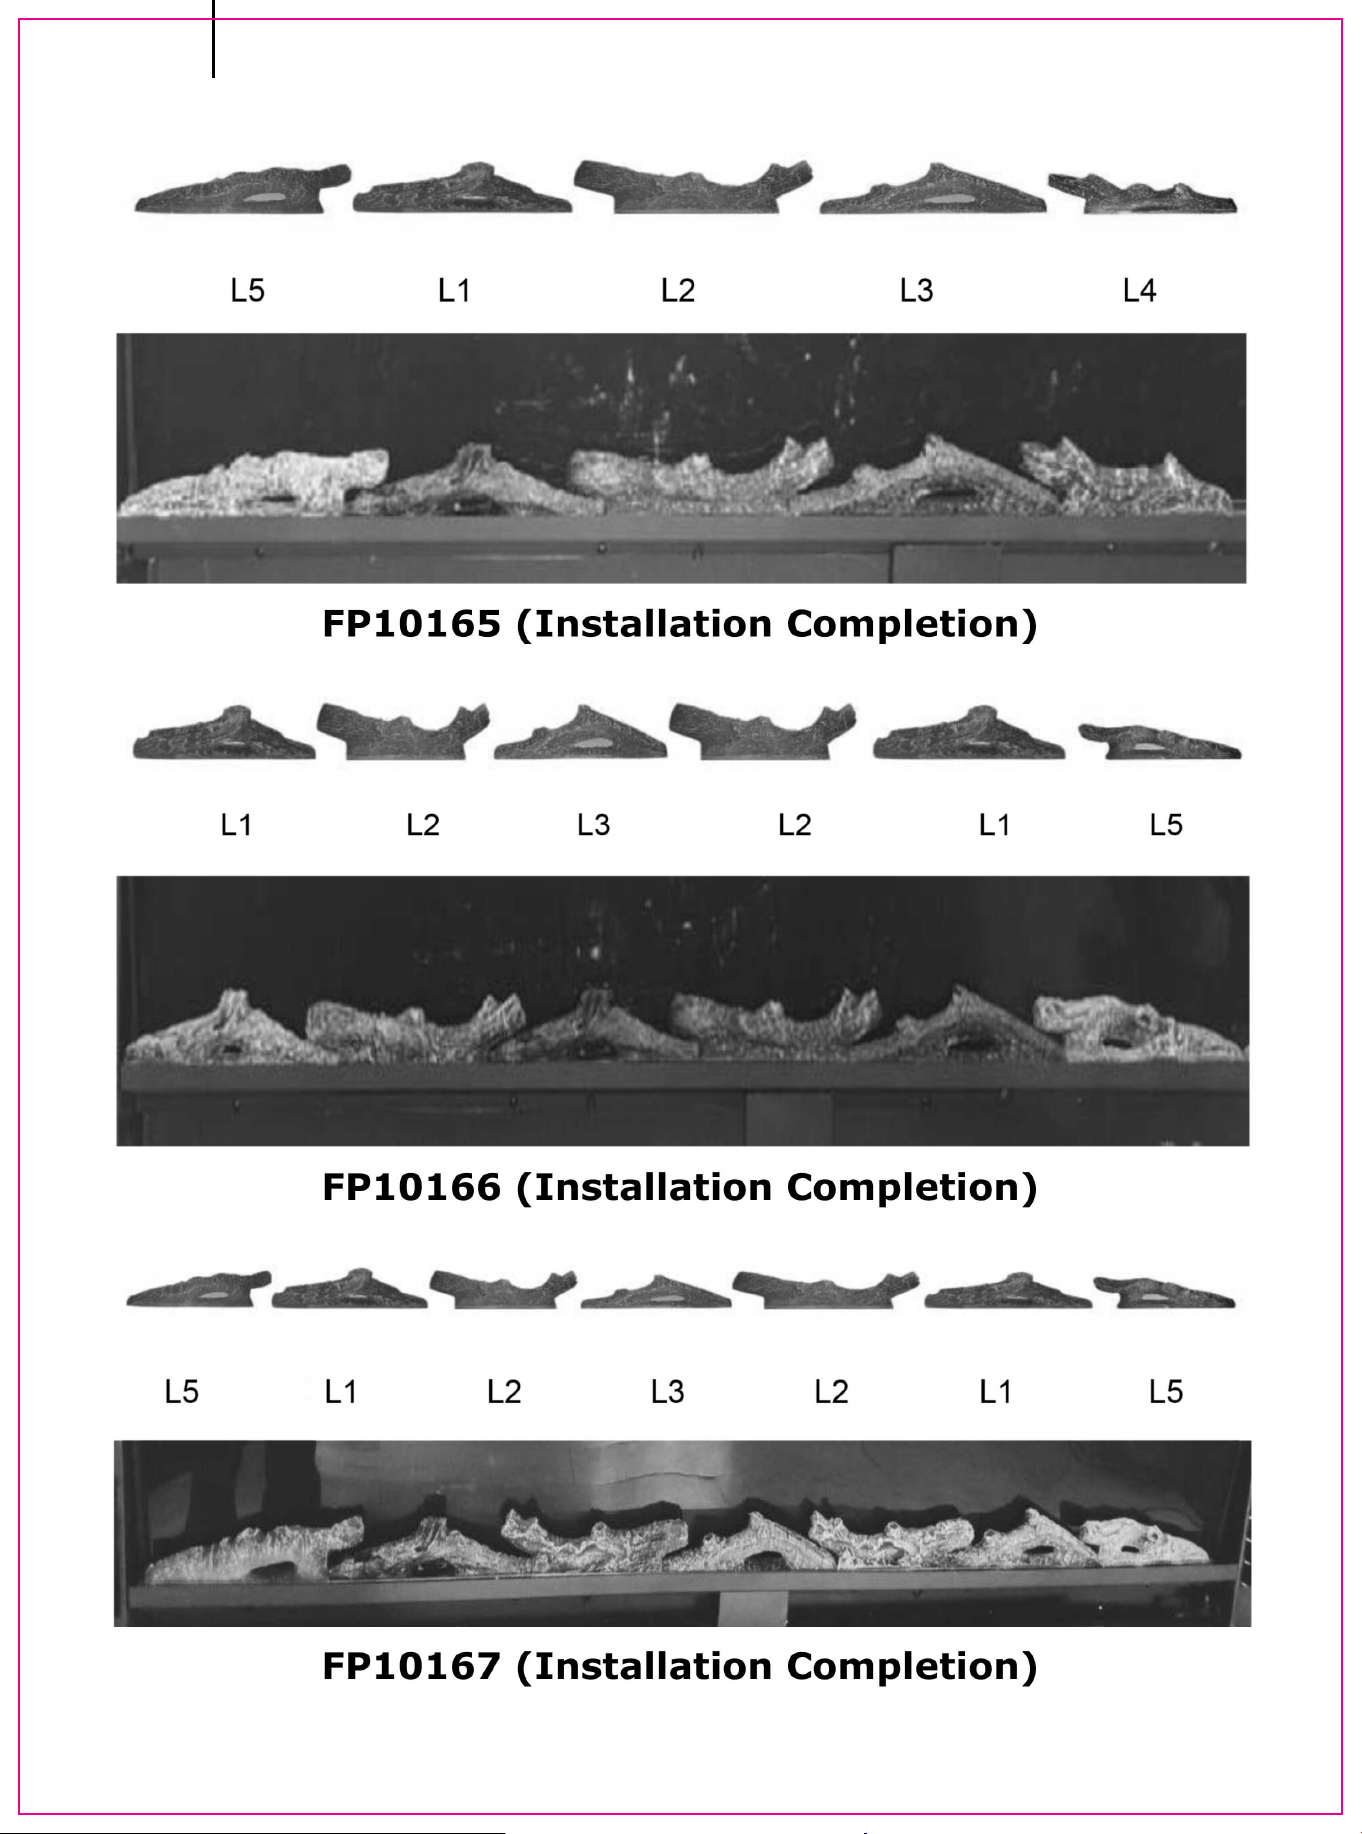
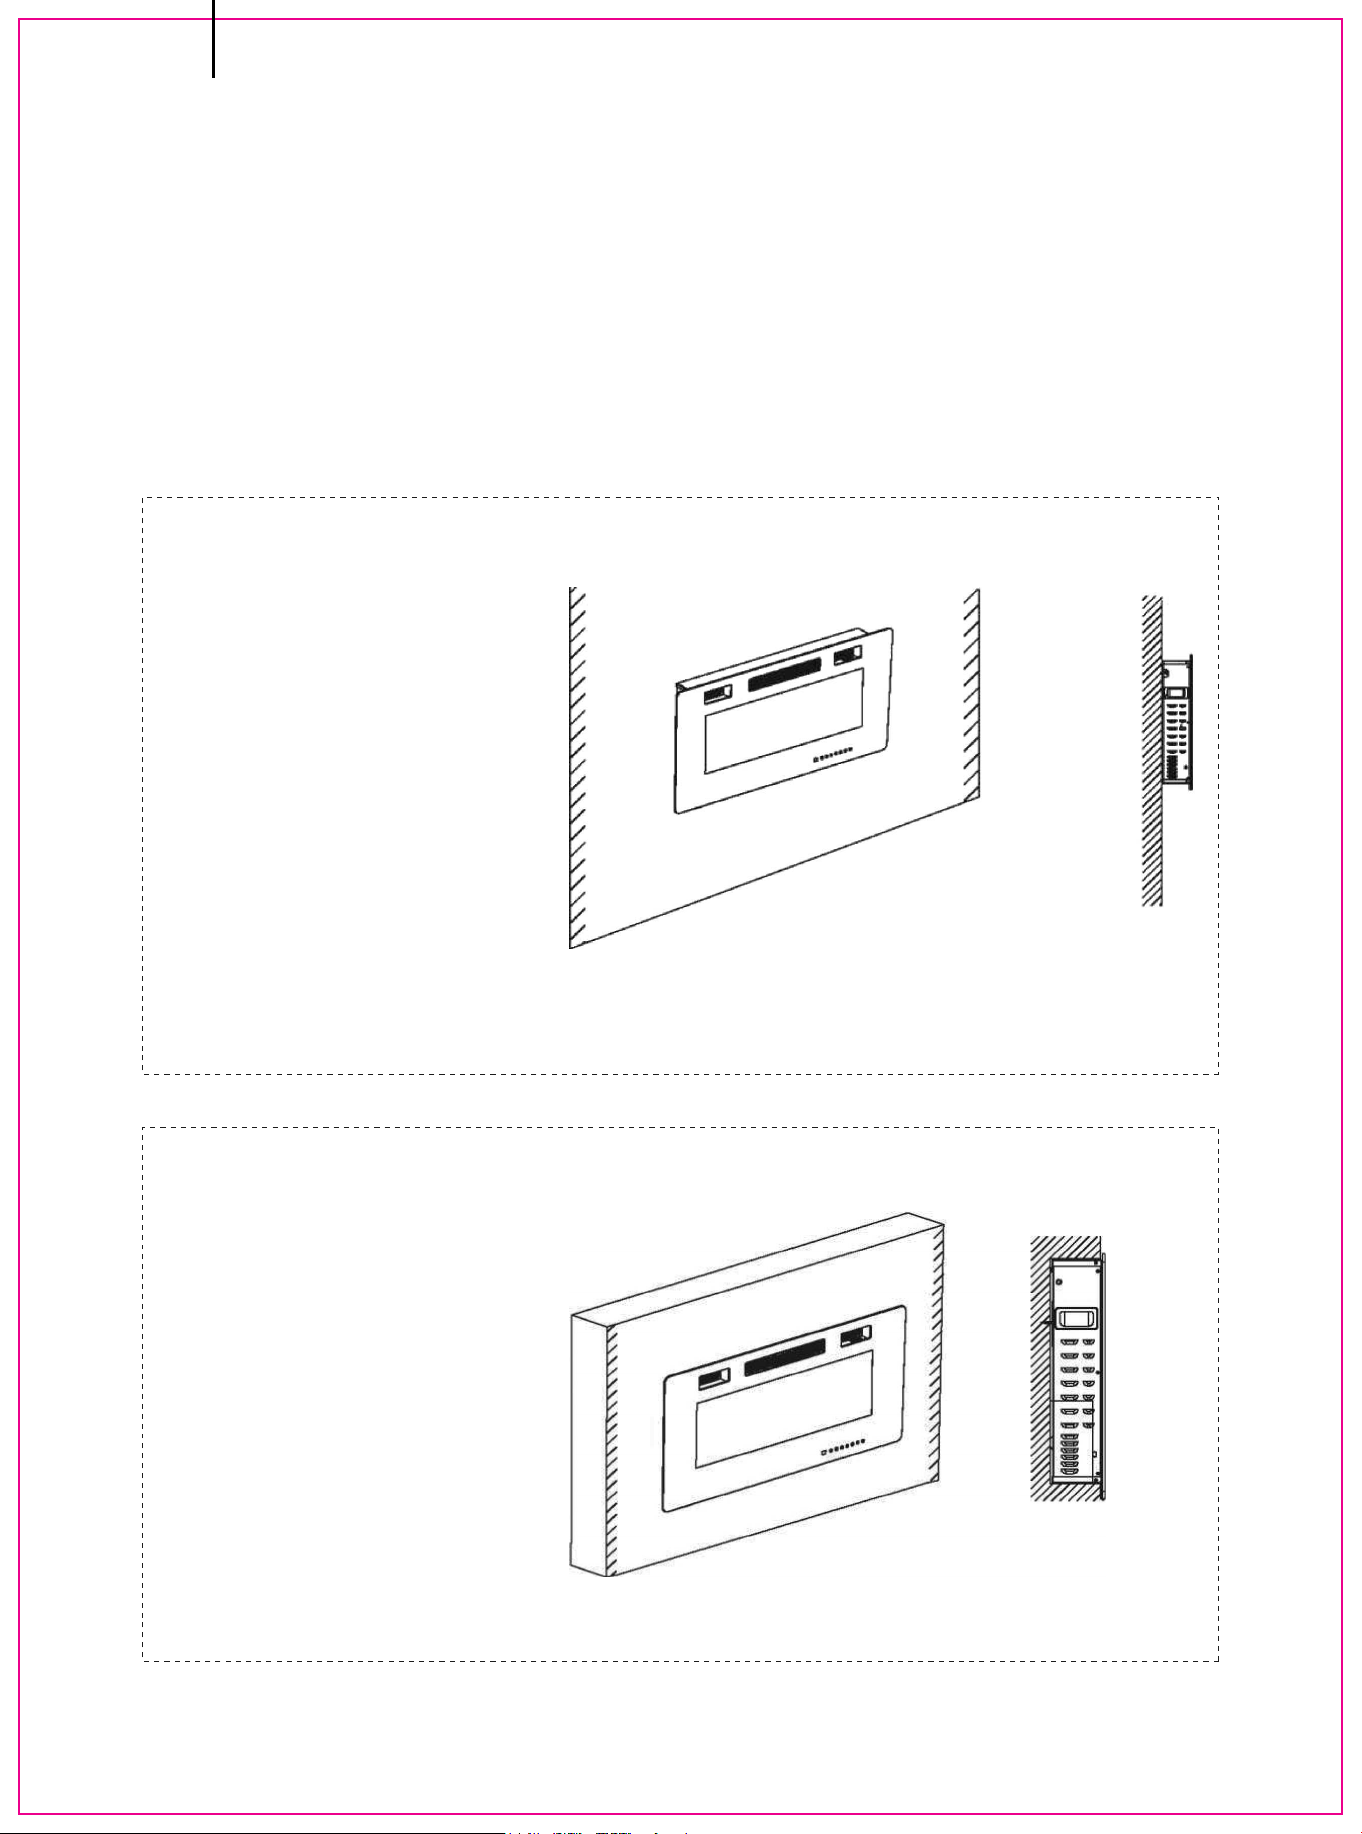
FP10166 (Installation Completion)
FP10165 (Installation Completion)
FP10167 (Installation Completion)
EN
07
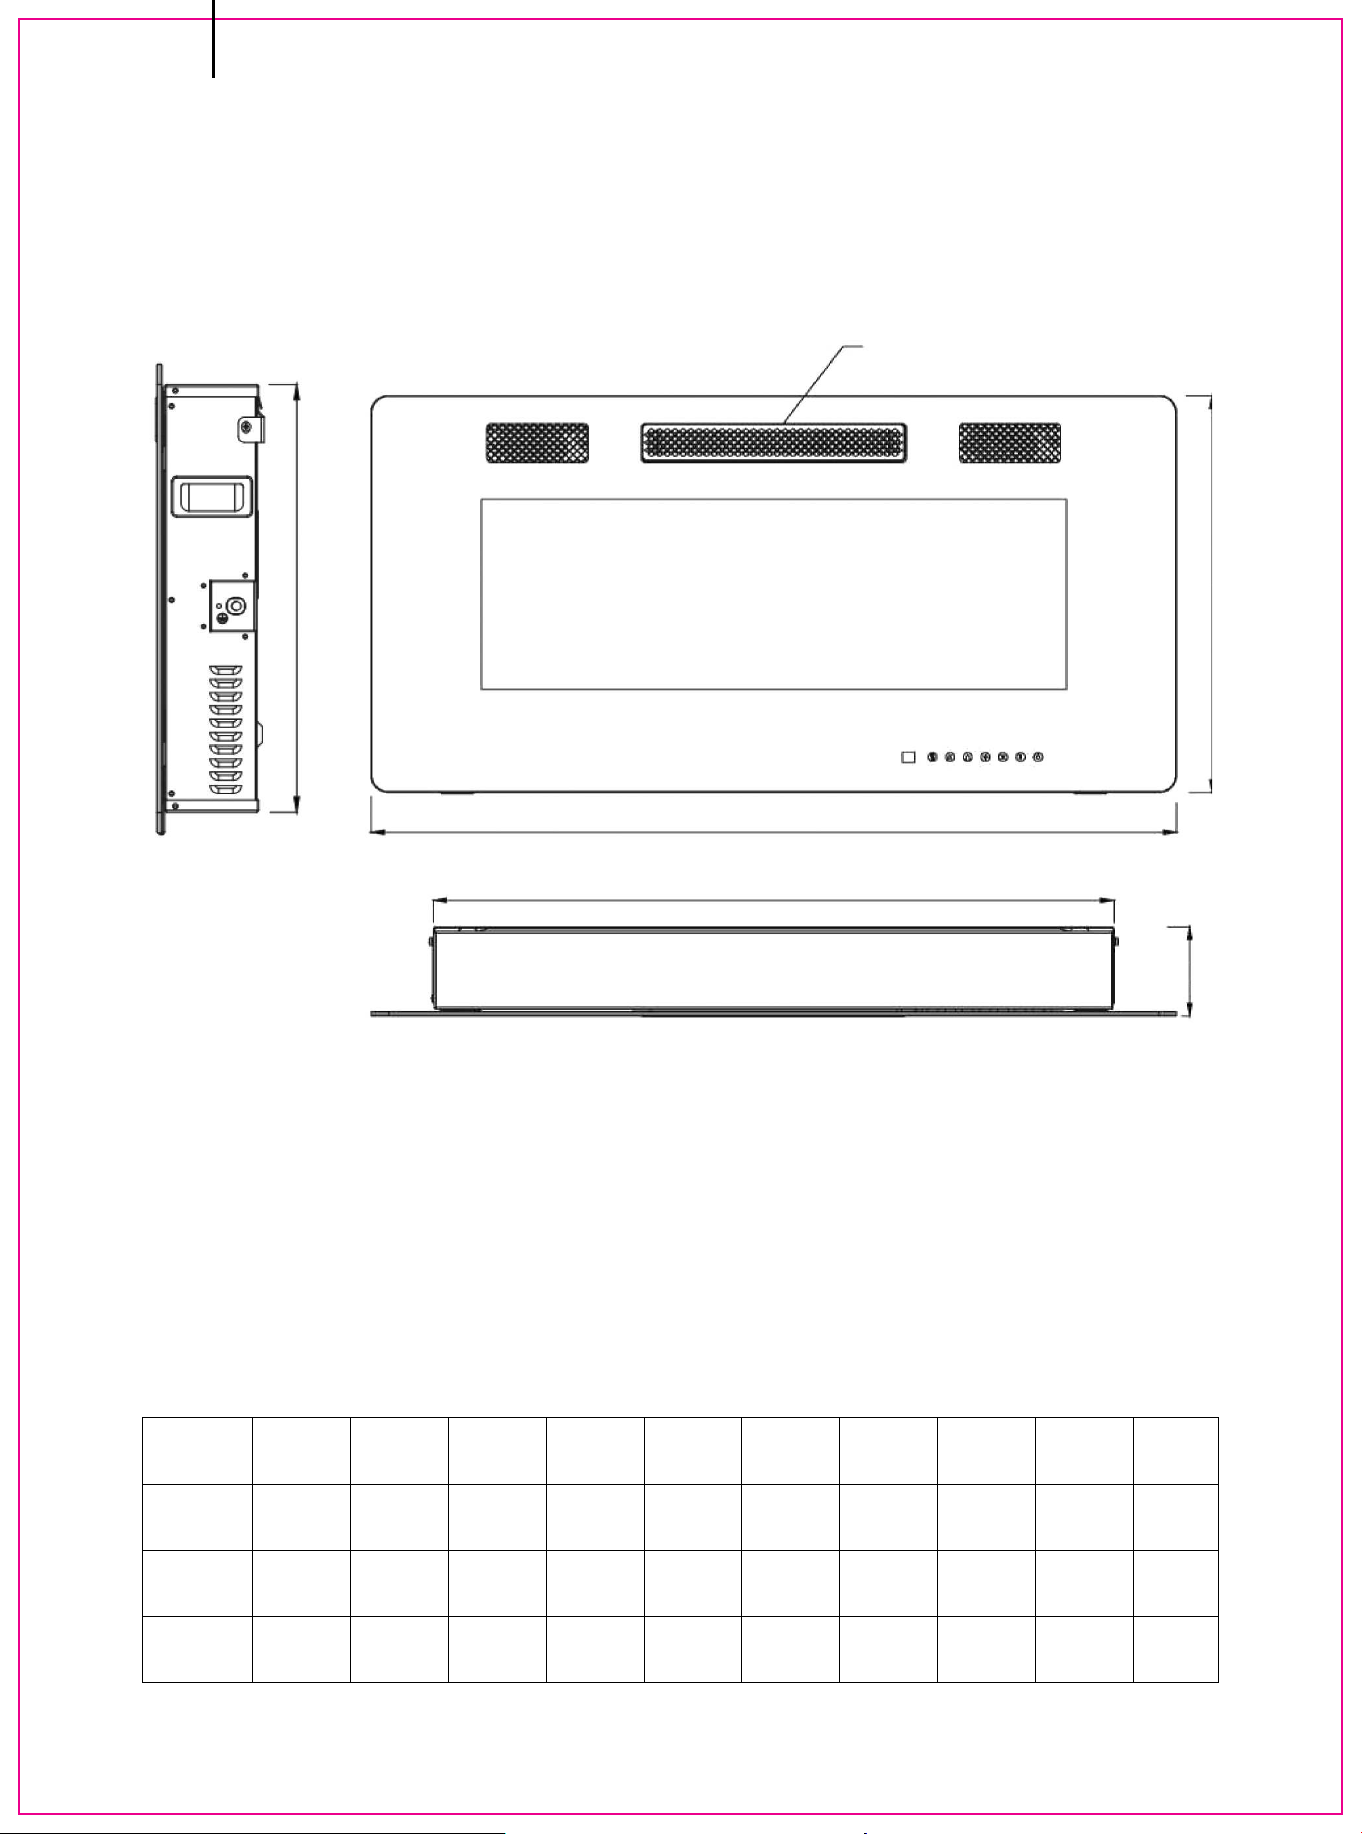
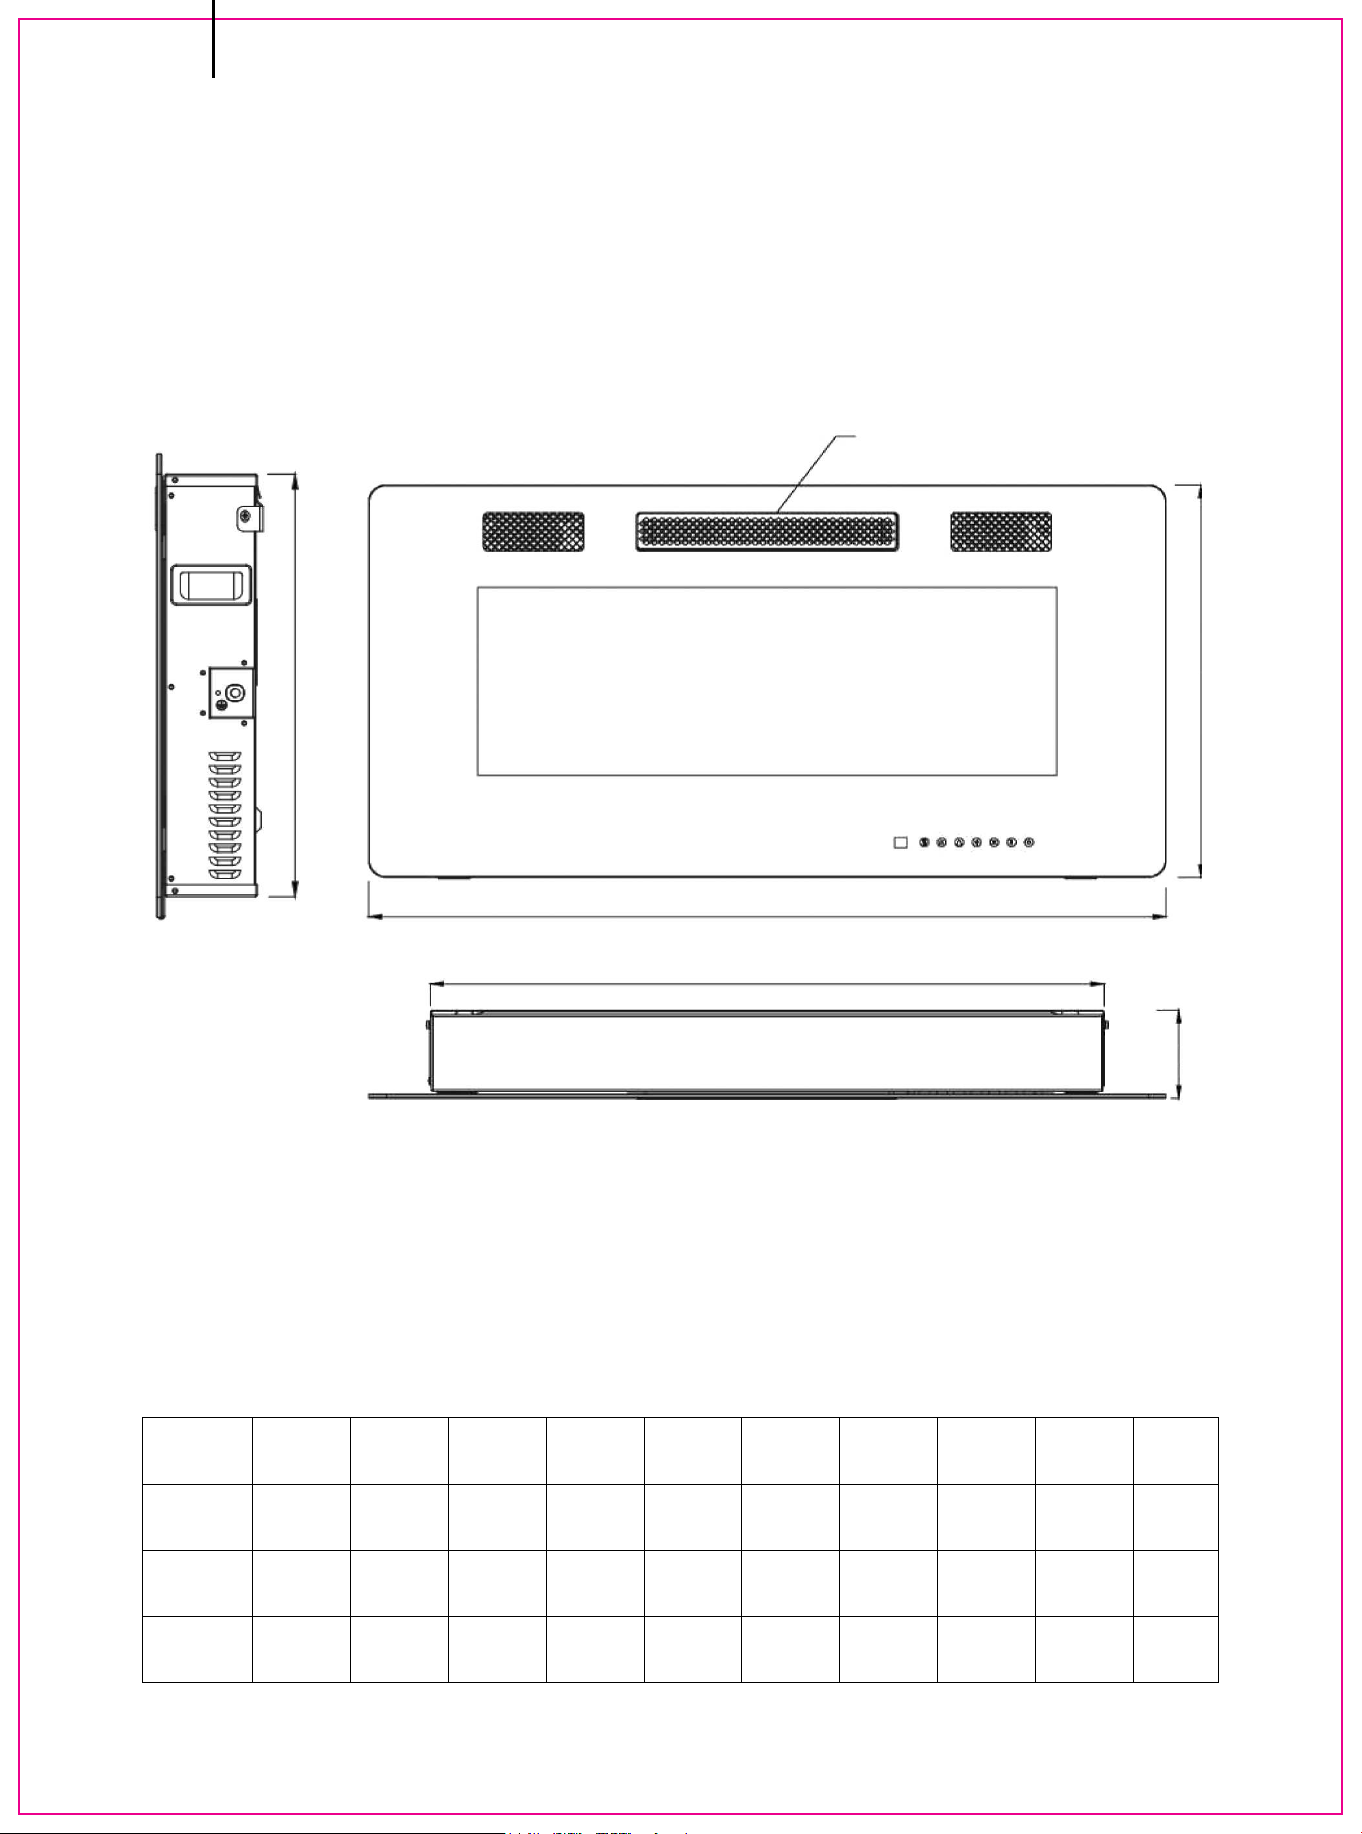
1.1 DIMENSIONS
SIDE
E
B
D
A
C
TOP
HEAT VENTS
(DON'T COVER)
Model
FP10165
FP10166
FP10167
A(mm)
1270
1524
1727
B(mm)
460
460
460
C(mm)
1126
1380
1583
D(mm)
98
98
98
E(mm)
420
420
420
A(in.)
50
60
68
B(in.)
18.11
18.11
18.11
C(in.)
4433
54.33
62.32
D(in.)
3.86
3.86
3.86
E(in.)
16.54
16.54
16.54
EN
08

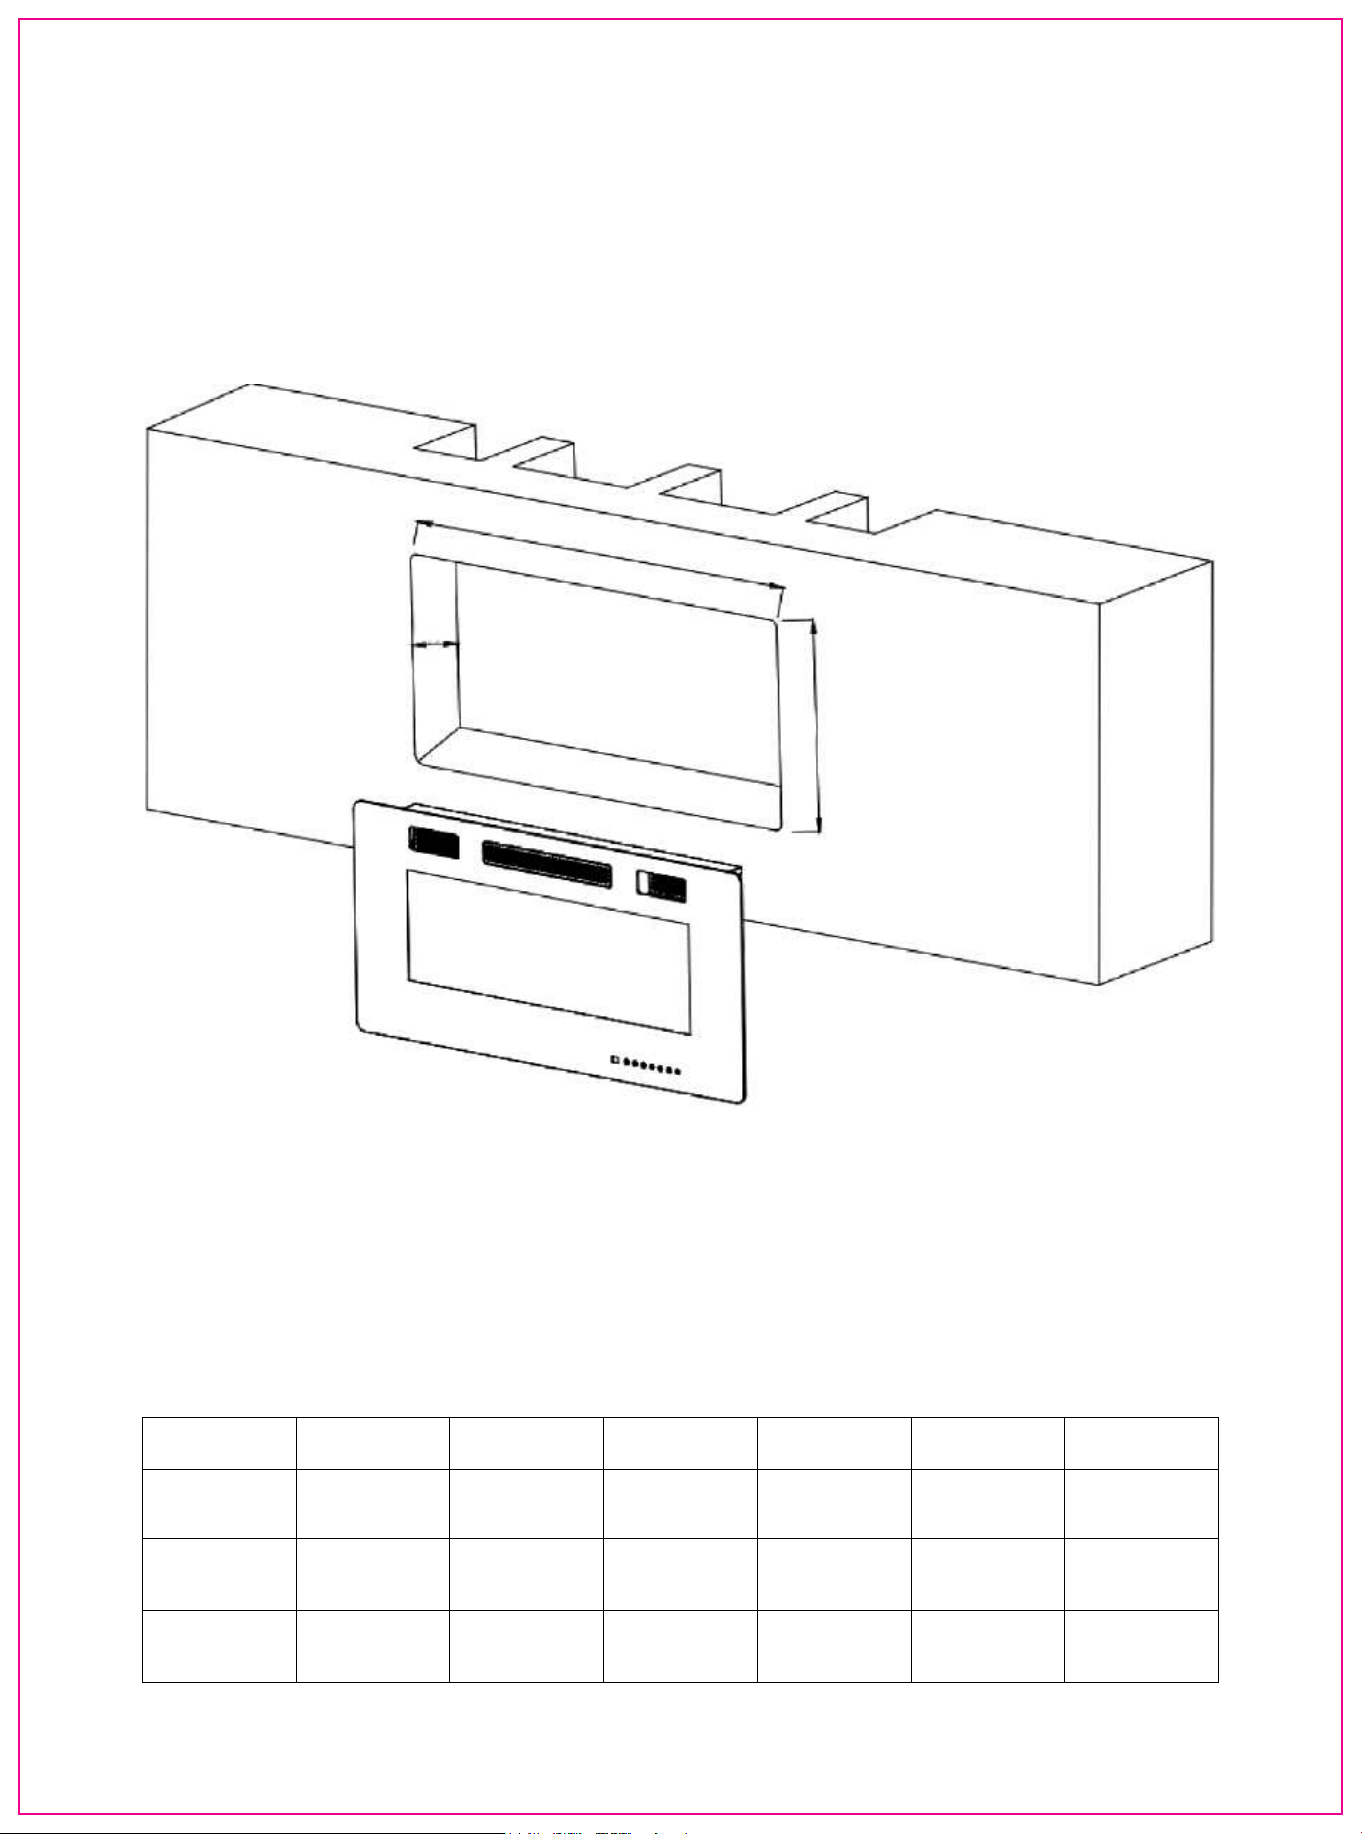
Model
FP10165
FP10166
FP10167
A(mm)
1140-1250
1390-1505
1695-1717
B(mm)
80-90
80-90
80-90
C(mm)
430-450
430-450
430-450
A(in.)
44.9-49.2
54.75-59.2
66.7-67.6
B(in.)
3.15-3.54
3.15-3.54
3.15-3.54
C(in.)
6.93-17.7
6.93-17.7
6.93-17.7
B
A
C
09

This appliance has been tested in accordance with the ETL Standards for
fixed and location-dedicated electric room appliances in the United States
and Canada. If you need assistance during installation, please contact
qualified technician.
A.Prior to plugging your appliance into an electrical outlet, verify that the
house circuit breakers for the outlet are on.
B.The appliance may emit a slight, harmless odor when first used. This odor
is normal and caused by the initial heating of internal appliance elements,
and the odor will not occur again.
C.If your appliance does not emit heat, consult the operation section of this
manual for further information.
D.Use with an ETL or UL certified surge protector.
NOTE: This appliance must be
electrically wired and grounded in
accordance with local or, in the
absence of local, with National
Electric Code ANSI/NFPA 70-latest
edition in the United States or the
Canadian Electric Code and ETL in
Canada.
LISTING APPROVALS
2.0 ELECTRICAL INSTALLATION NOTES
2.1 GENERAL INSTRUCTIONS
Model No.
Description
Voltage
Watts
Amps
BTUs
FP10165/FP10166/FP10167
Wall-mount, recessed
120 VAC
Max 1500W
12.5AMP
5100BTU
NOTE
Please leave enough space to place the power cord on
the right side of the fireplace.
CAUTION - Some parts of this product can become very hot
and cause burns. Particular attention has to be given where
children and vulnerable people are present.
EN
10
ARRANGE THE CORD AWAY FROM HIGH-TRAFFIC AREAS TO AVOID A
TRIPPING HAZARD.
RISK OF FIRE. TO PREVENT A POSSIBLE FIRE, DO NOT BLOCK AIR INTAKE
OR EXHAUST IN ANY MANNER. DO NOT USE IT ON SOFT SURFACES WHERE
OPENINGS MAY BECOME BLOCKED.
RISK OF FIRE. DO NOT BLOW OR PLACE INSULATION AGAINST THE
APPLIANCE.
THIS ELECTRIC APPLIANCE IS TESTED AND LISTED FOR USE ONLY WITH
THE APPROVED OPTIONAL ACCESSORS. USE OPTIONAL ACCESSORIES NOT
SPECIFICALLY TESTED FOR THIS ELECTRIC APPLIANCE COULD RESULT IN A
SAFETY HAZARD.
IF THE INFORMATION IN THESE INSTRUCTIONS IS NOT FOLLOWED
EXACTLY, A FIRE MAY RESULT CAUSING PROPERTY DAMAGE, PERSONAL
INJURY OR DEATH. DO NOT STORE OR USE GASOLINE OR OTHER
FLAMMABLE VAPORS IN THE VICINITY OF THIS OR ANY OTHER APPLIANCE.
THIS APPLIANCE IS HEAVY. IT IS HIGHLY RECOMMENDED THAT TWO
PEOPLE INSTALL THIS APPLIANCE.
HEATER VENTS ON THE ELECTRIC APPLIANCE CANNOT, IN ANY WAY, BE
COVERED. AS IT MAY CREATE A FIRE HAZARD.
1.The heaters should be installed only using the mounting brackets we
provided if you want to mount them.
2.The heater must not be recessed in the ceiling. There must be enough
space around the top of the heater to ensure adequate ventilation.
3. The heater should be at least 60cm/24 inches away from any surrounding
walls.
4.A distance of at least 90cm/36 inches should always be left in front of the
heaters to ensure safety.
5.The heater must be located neither directly below nor in front of a
socket-outlet.
6.The heater must be installed to prevent any control switches from being
touched by anyone who is in the shower or bath.
Follow all National and local electrical codes.
RISK OF FIRE! THE POWER CORD MUST NOT BE PINCHED
AGAINST A SHARP EDGE. SECURE CORD TO AVOID TRIPPING
OR SNAGGING TO REDUCE THE RISK OF FIRE, ELECTRIC
SHOCK OR PERSONAL INJURY.
DO NOT RUN CORD UNDER CARPETING. DO NOT COVER CORD
WITH THROW RUGS, RUNNERS, ETC.
EN
11
3.0 INSTALLATION INSTRUCTIONS
3.1 UNPACKING AND TESTING APPLIANCE WALL
7.Make sure that there is no possibility of inflammable material, combustible
material or curtains coming into contact with the heater, there is a risk of
fire if this happens.
8.DO NOT LEAVE THE HEATER UNATTENDED DURING USE.
Carefully remove the appliance from the box. Prior to installing the
appliance, test to make sure the appliance operates properly by plugging the
power supply cord into a conveniently located 120 Volt grounded outlet.
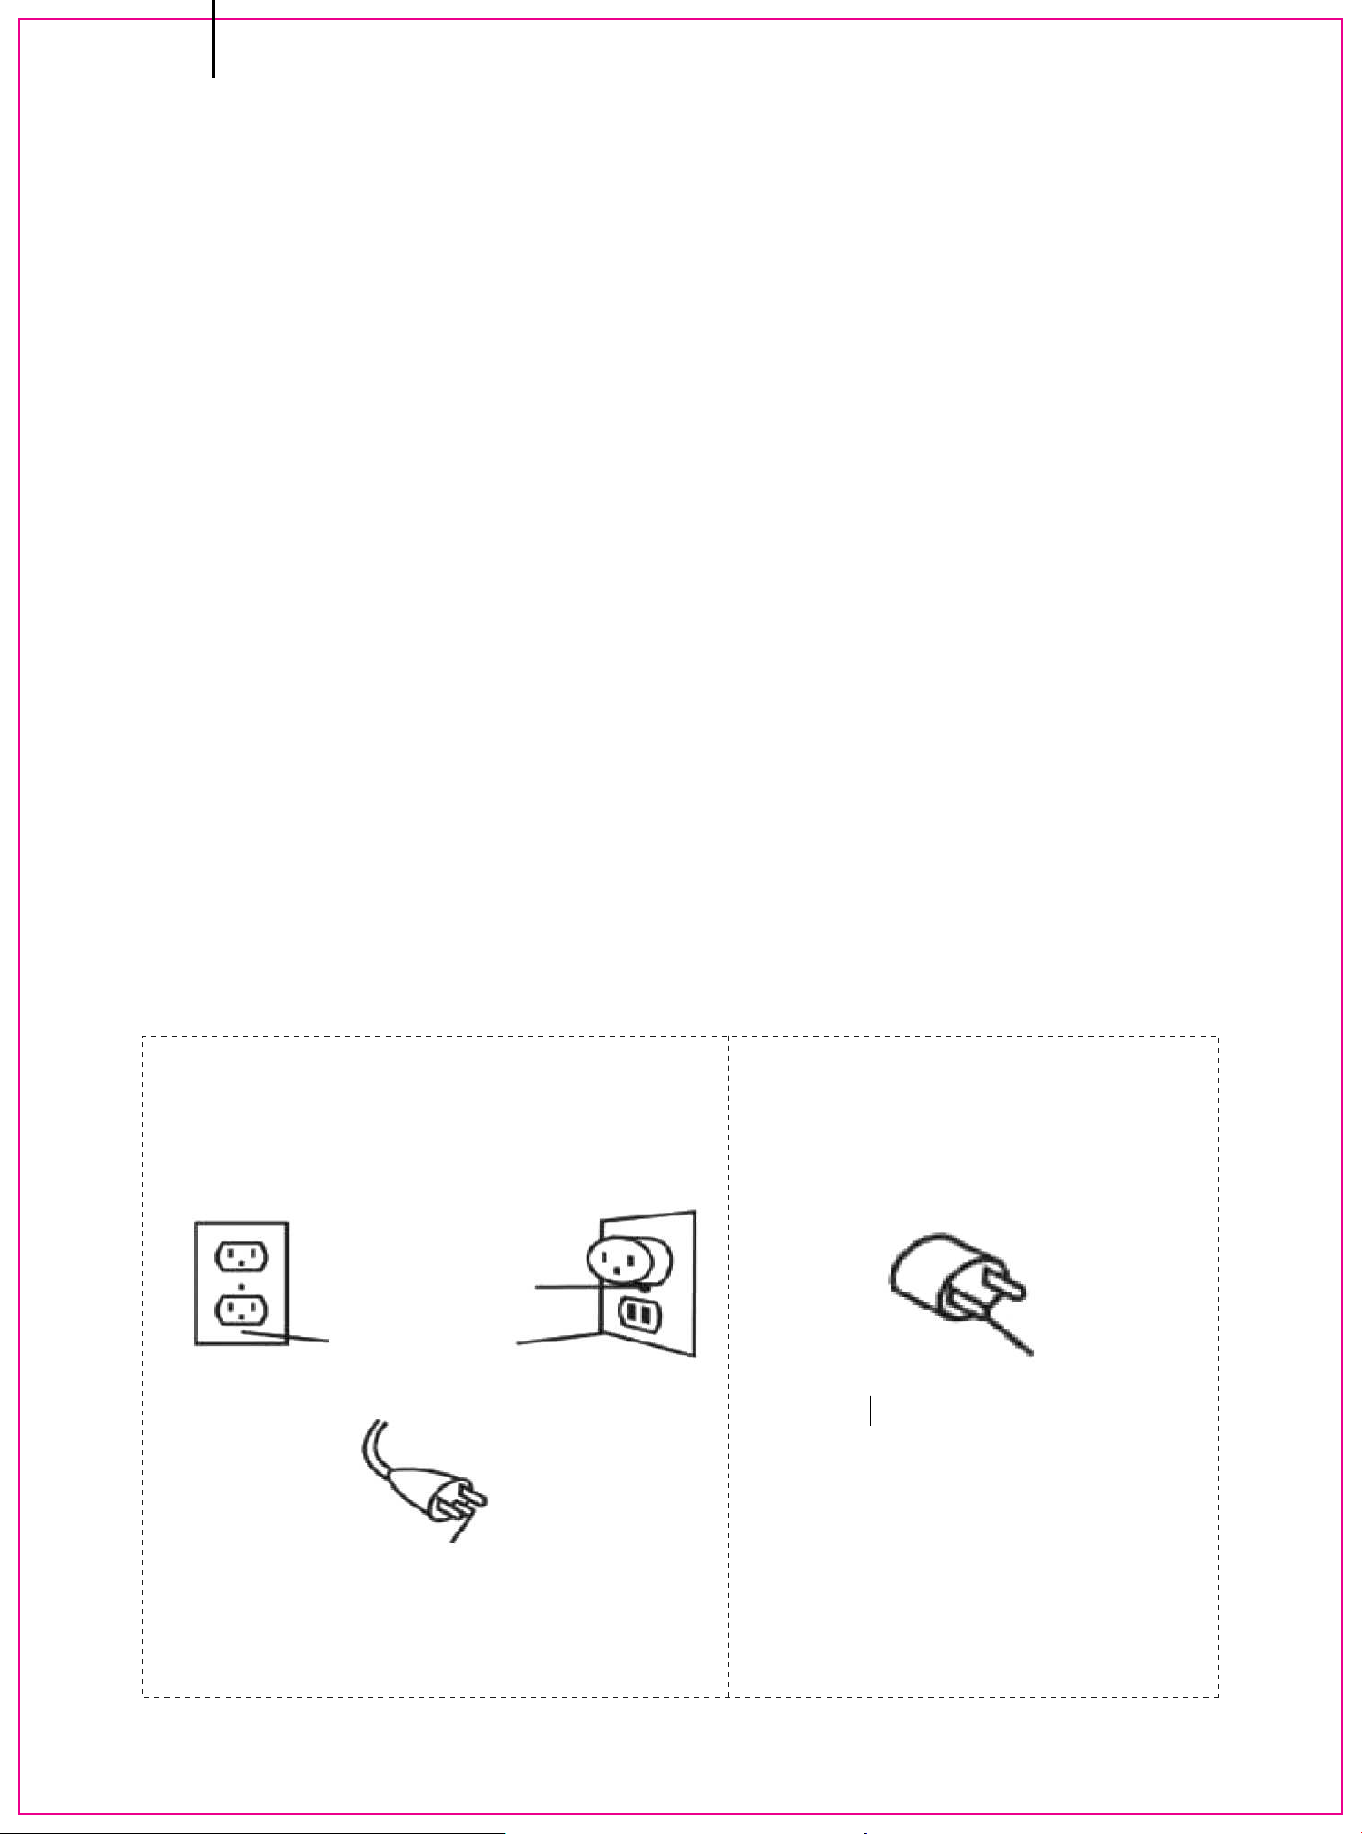
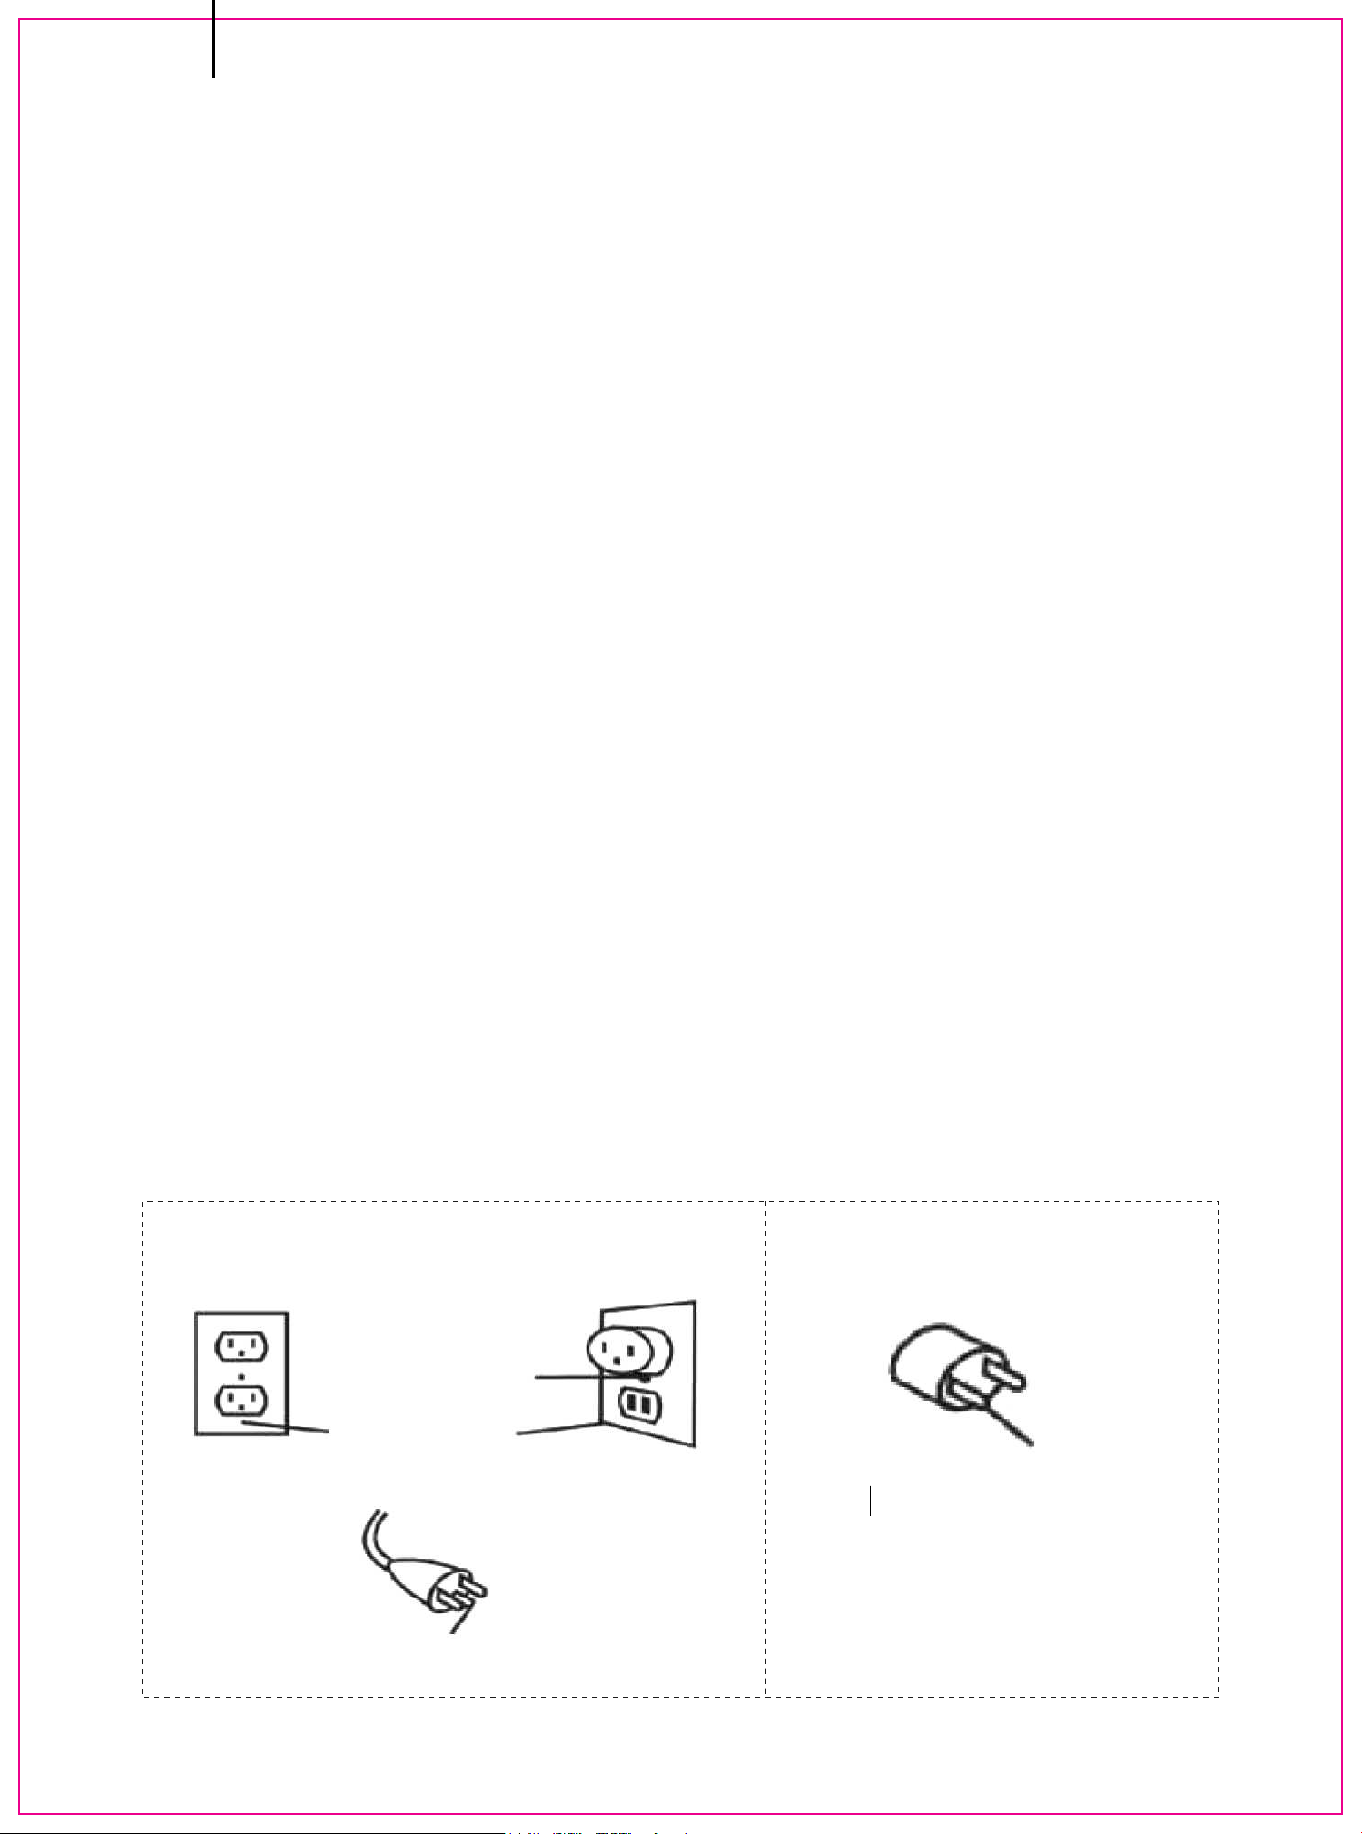
3.2 GROUNDING APPLIANCE
GROUNDING METHODS
ADAPTER
METAL SCREW
NOTALLOWED IN CANADA
(A) (B) (C)
GROUNDING PIN
COVER OF
GROUNDED
OUTLET BOX
GROUNDING
MEANS
This appliance is for use on 120 Volts. The cord has a plug as shown in (A).
An adapter as shown in (C) is available for connecting three-blade grounding
type plugs to two-slot receptacles. The green grounding lug extending from
the adapter must be connected to a permanent ground such as a properly
grounded outlet box. The adapter should not be used if a three-slot
grounded receptacle is available.
To disconnect the appliance, turn off the controls, then remove the plug
from the outlet.
EN
12

Option 1:
Wall Hanging
Option 2:
Built in Construction
3.3 Assembly
The fireplace can be installed with 2 options:
Follow the installation instructions below based on
installation preference.
1.Wall hanging with provided mounting bracket.
2.Built-in construction (in-wall recessed).
EN
13
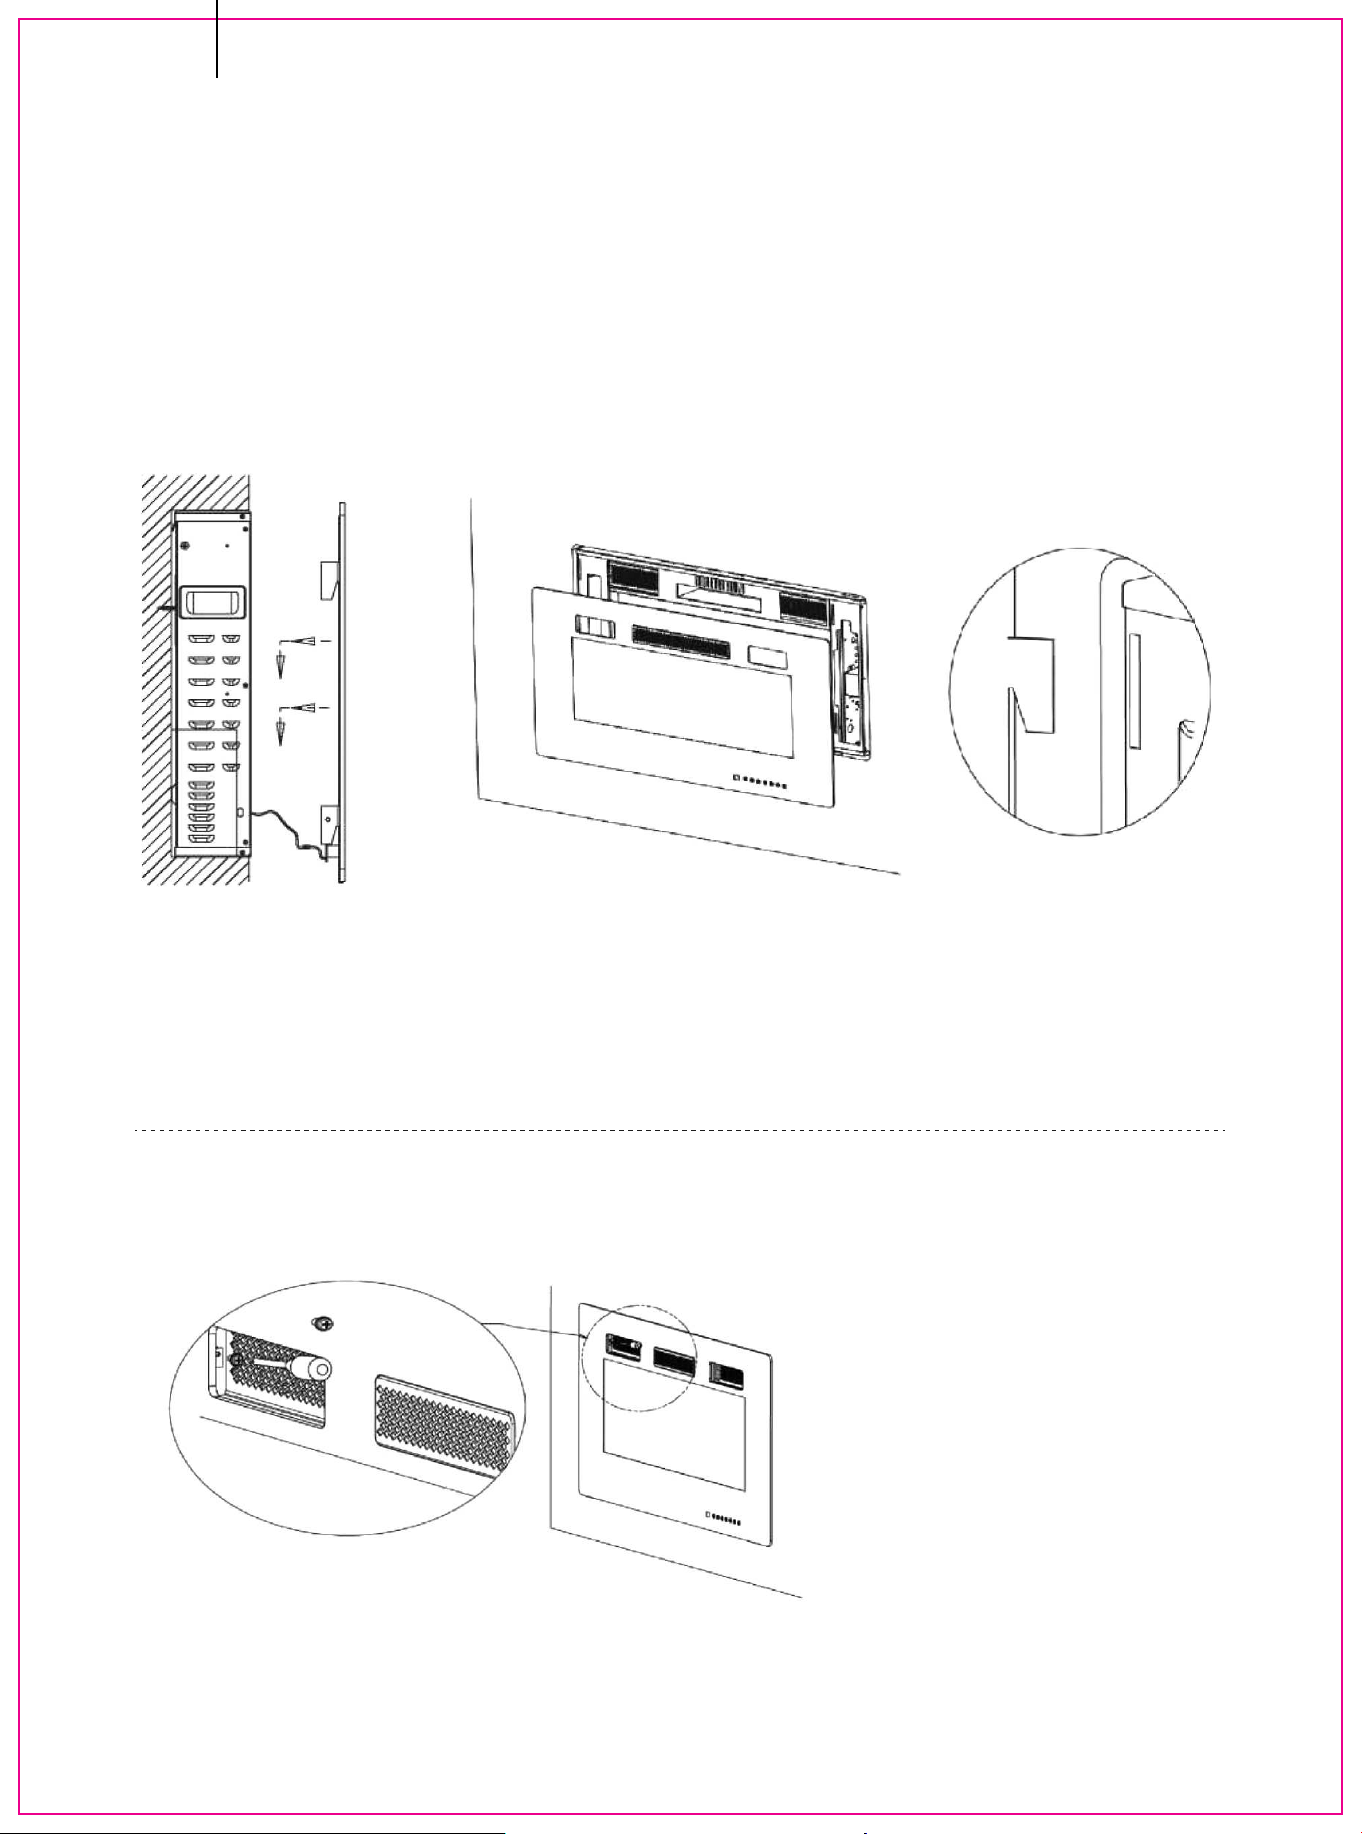
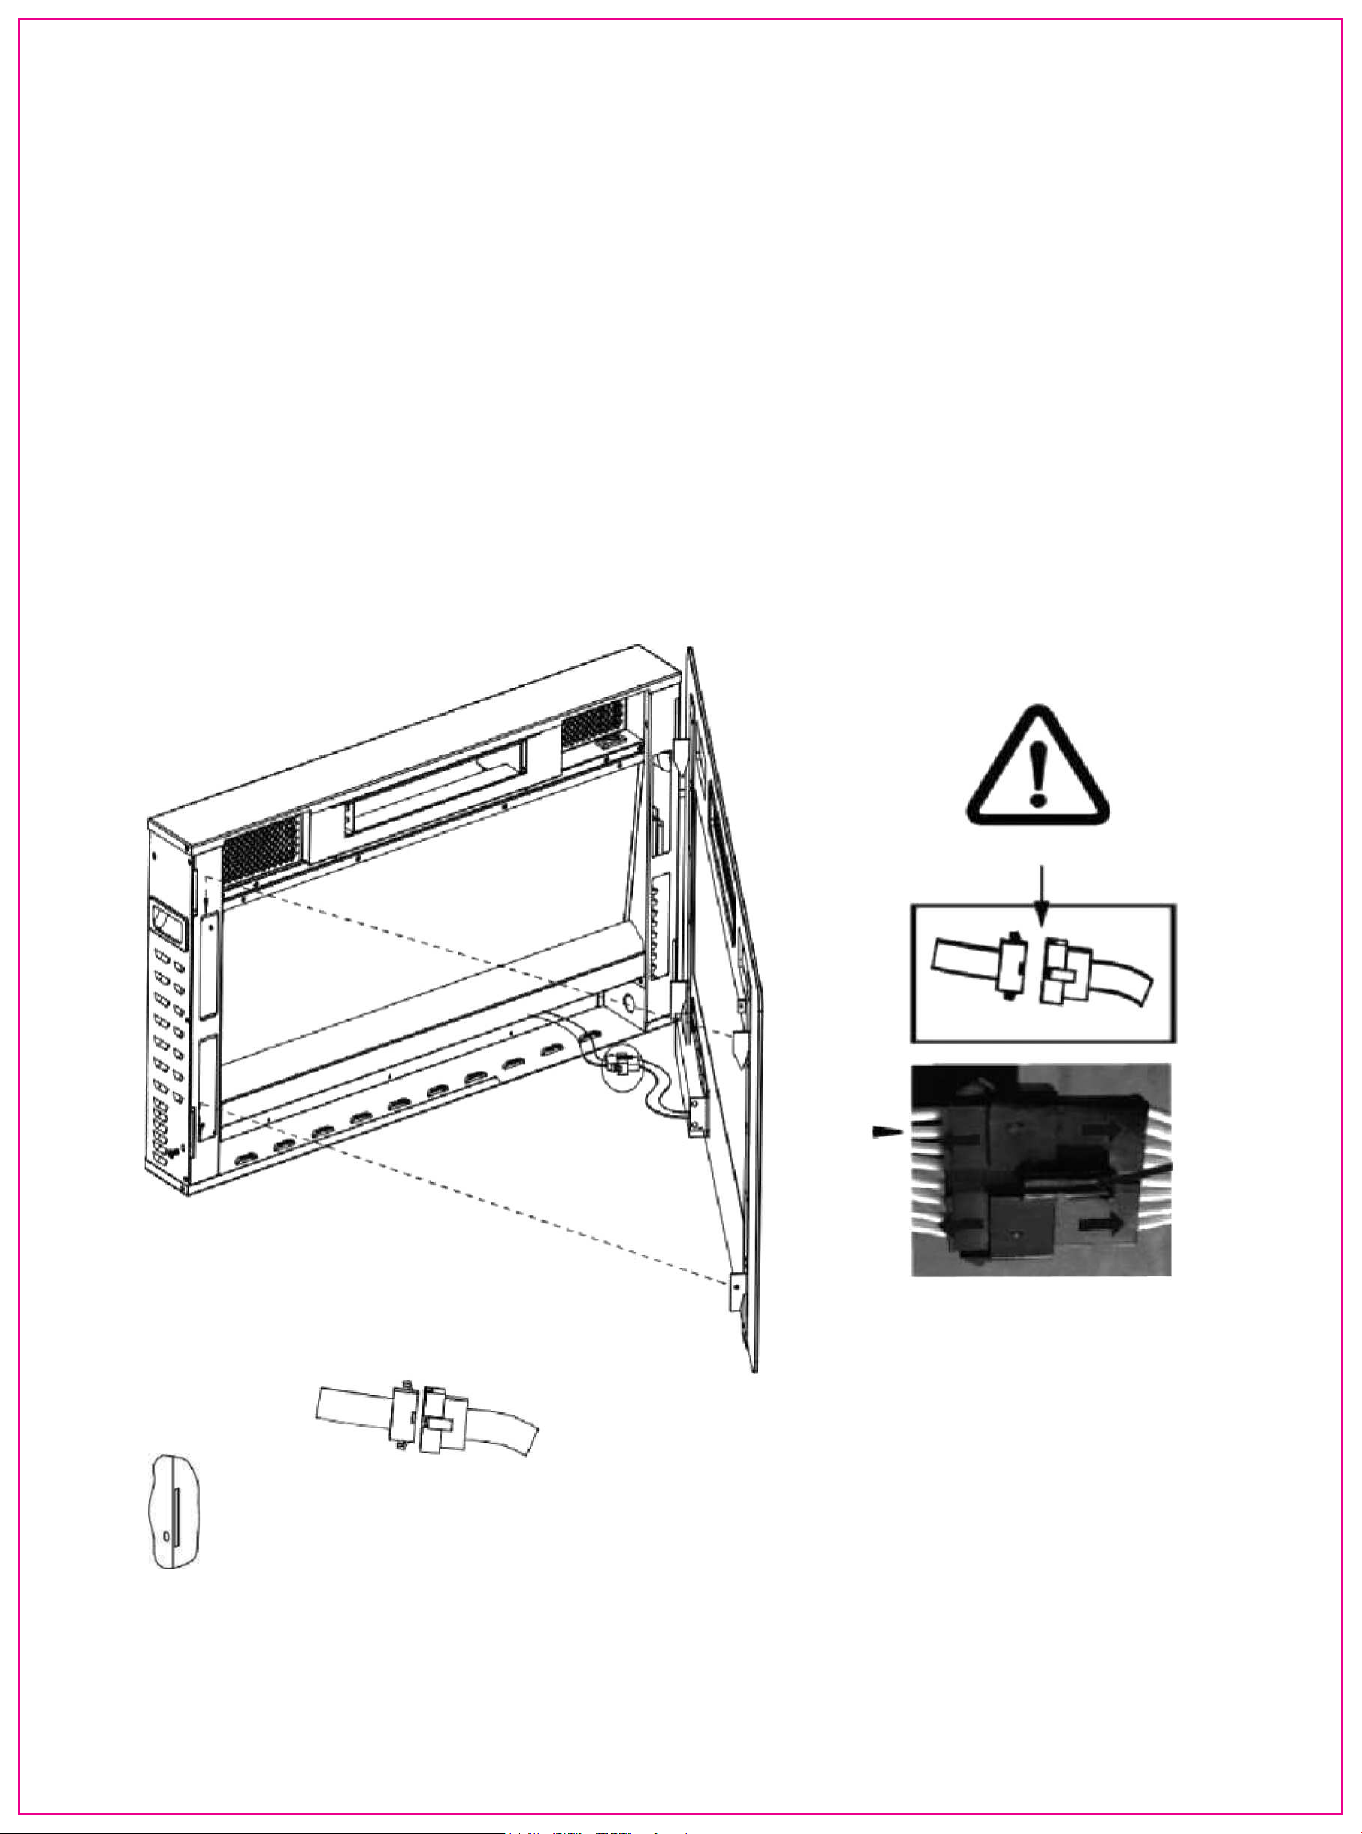
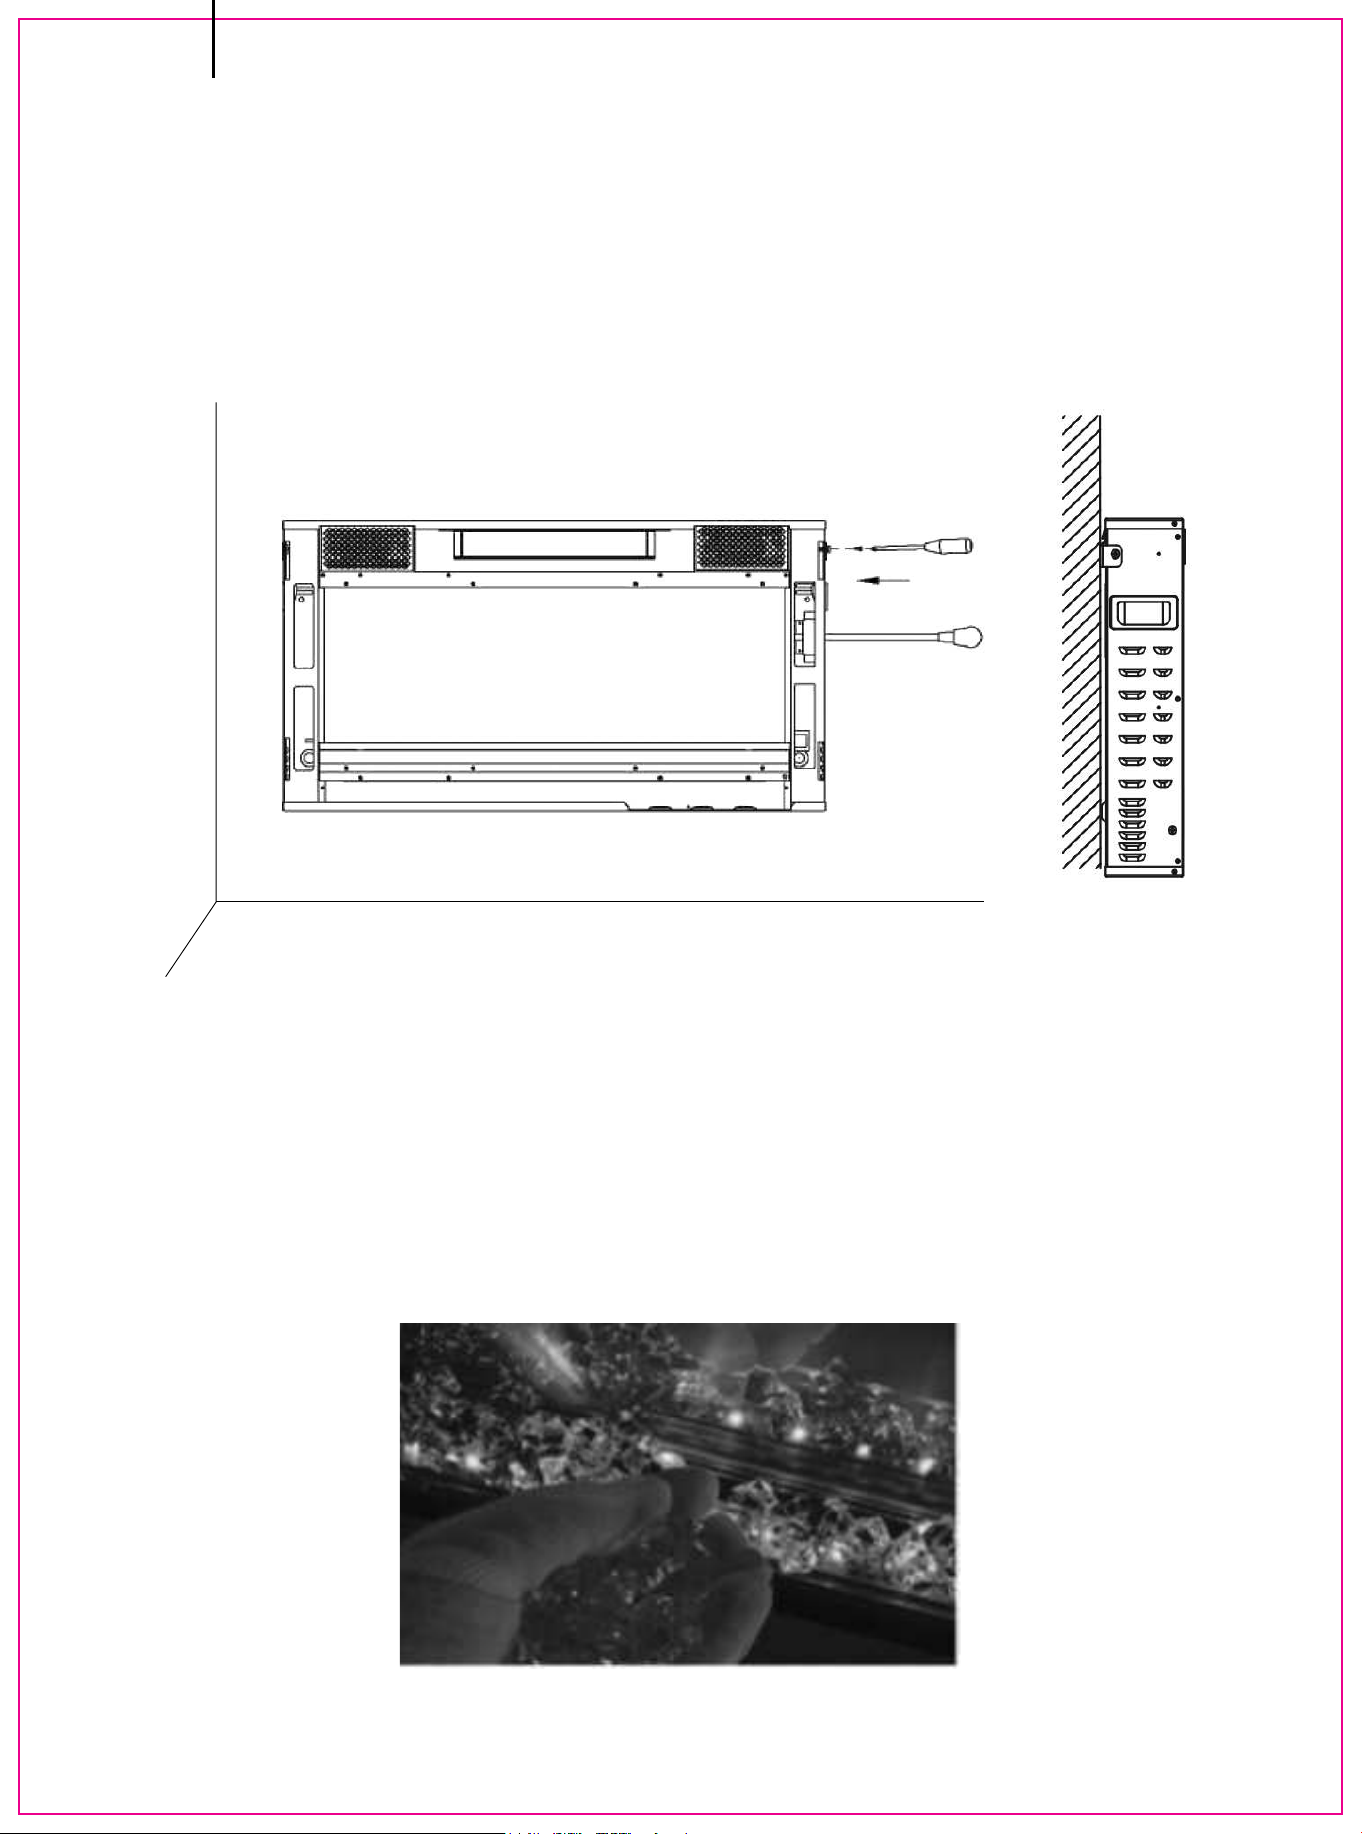
Installation - Wall Hanging
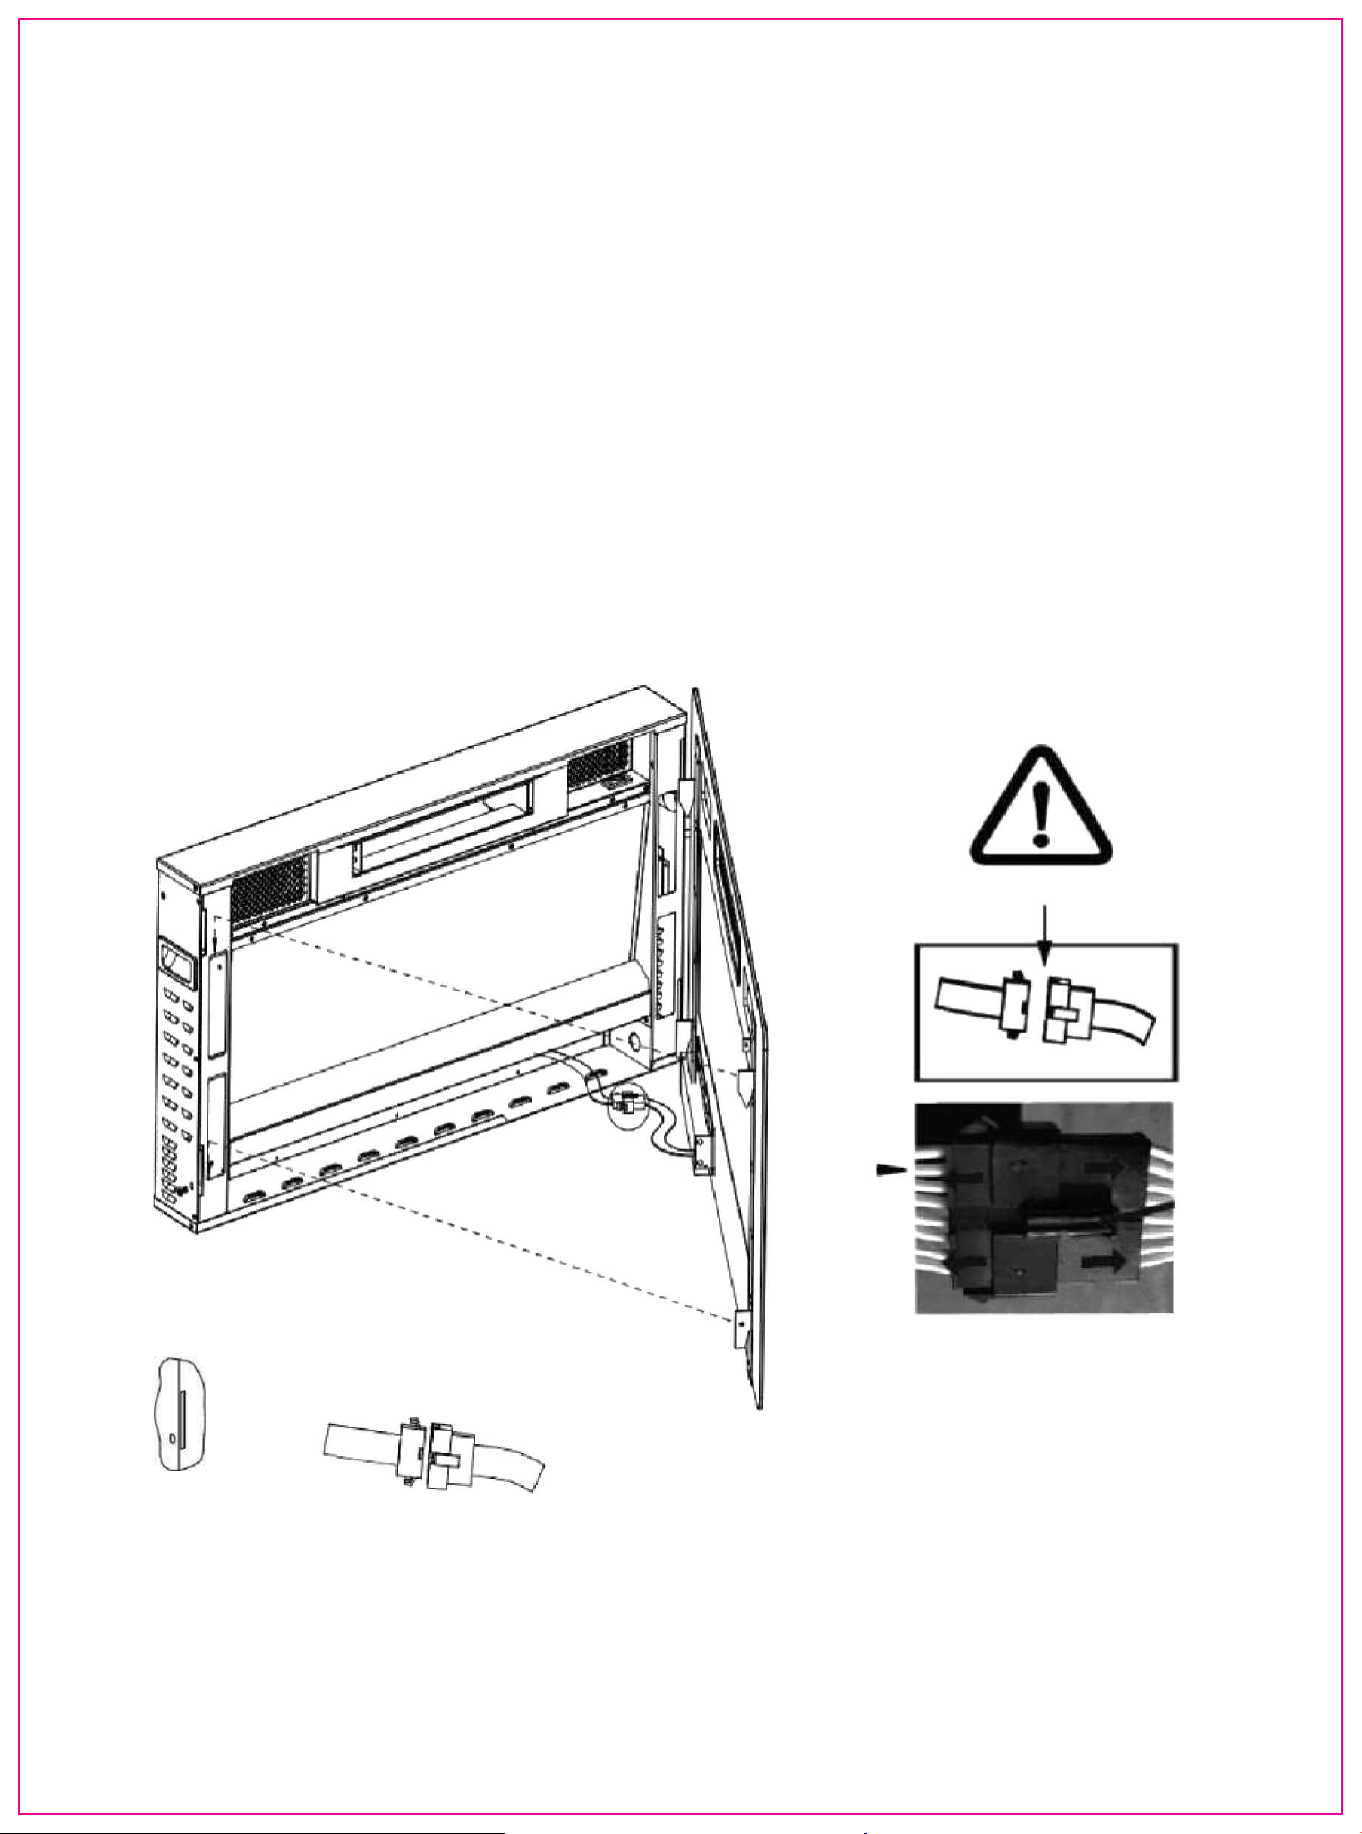
Step 1. Removing the Glass Frame
-Remove the fixed screw in the lower-left corner (Do not discard it)
-Lift the glass frame l-2 cm/0.4-0.8 inches vertically. Then the entire glass
frame can be removed from the front.
-Take the glass frame 0.4-0.8 inches away from the appliance, and pull out
the FFC connector with the help of others or put the glass panel down on the
ground before complete separation.
Do not pull the cable directly
CAUTION
MAXIMUM DISTANCE:50CM/19inches
Press this button and pull
out the FFC connector
14
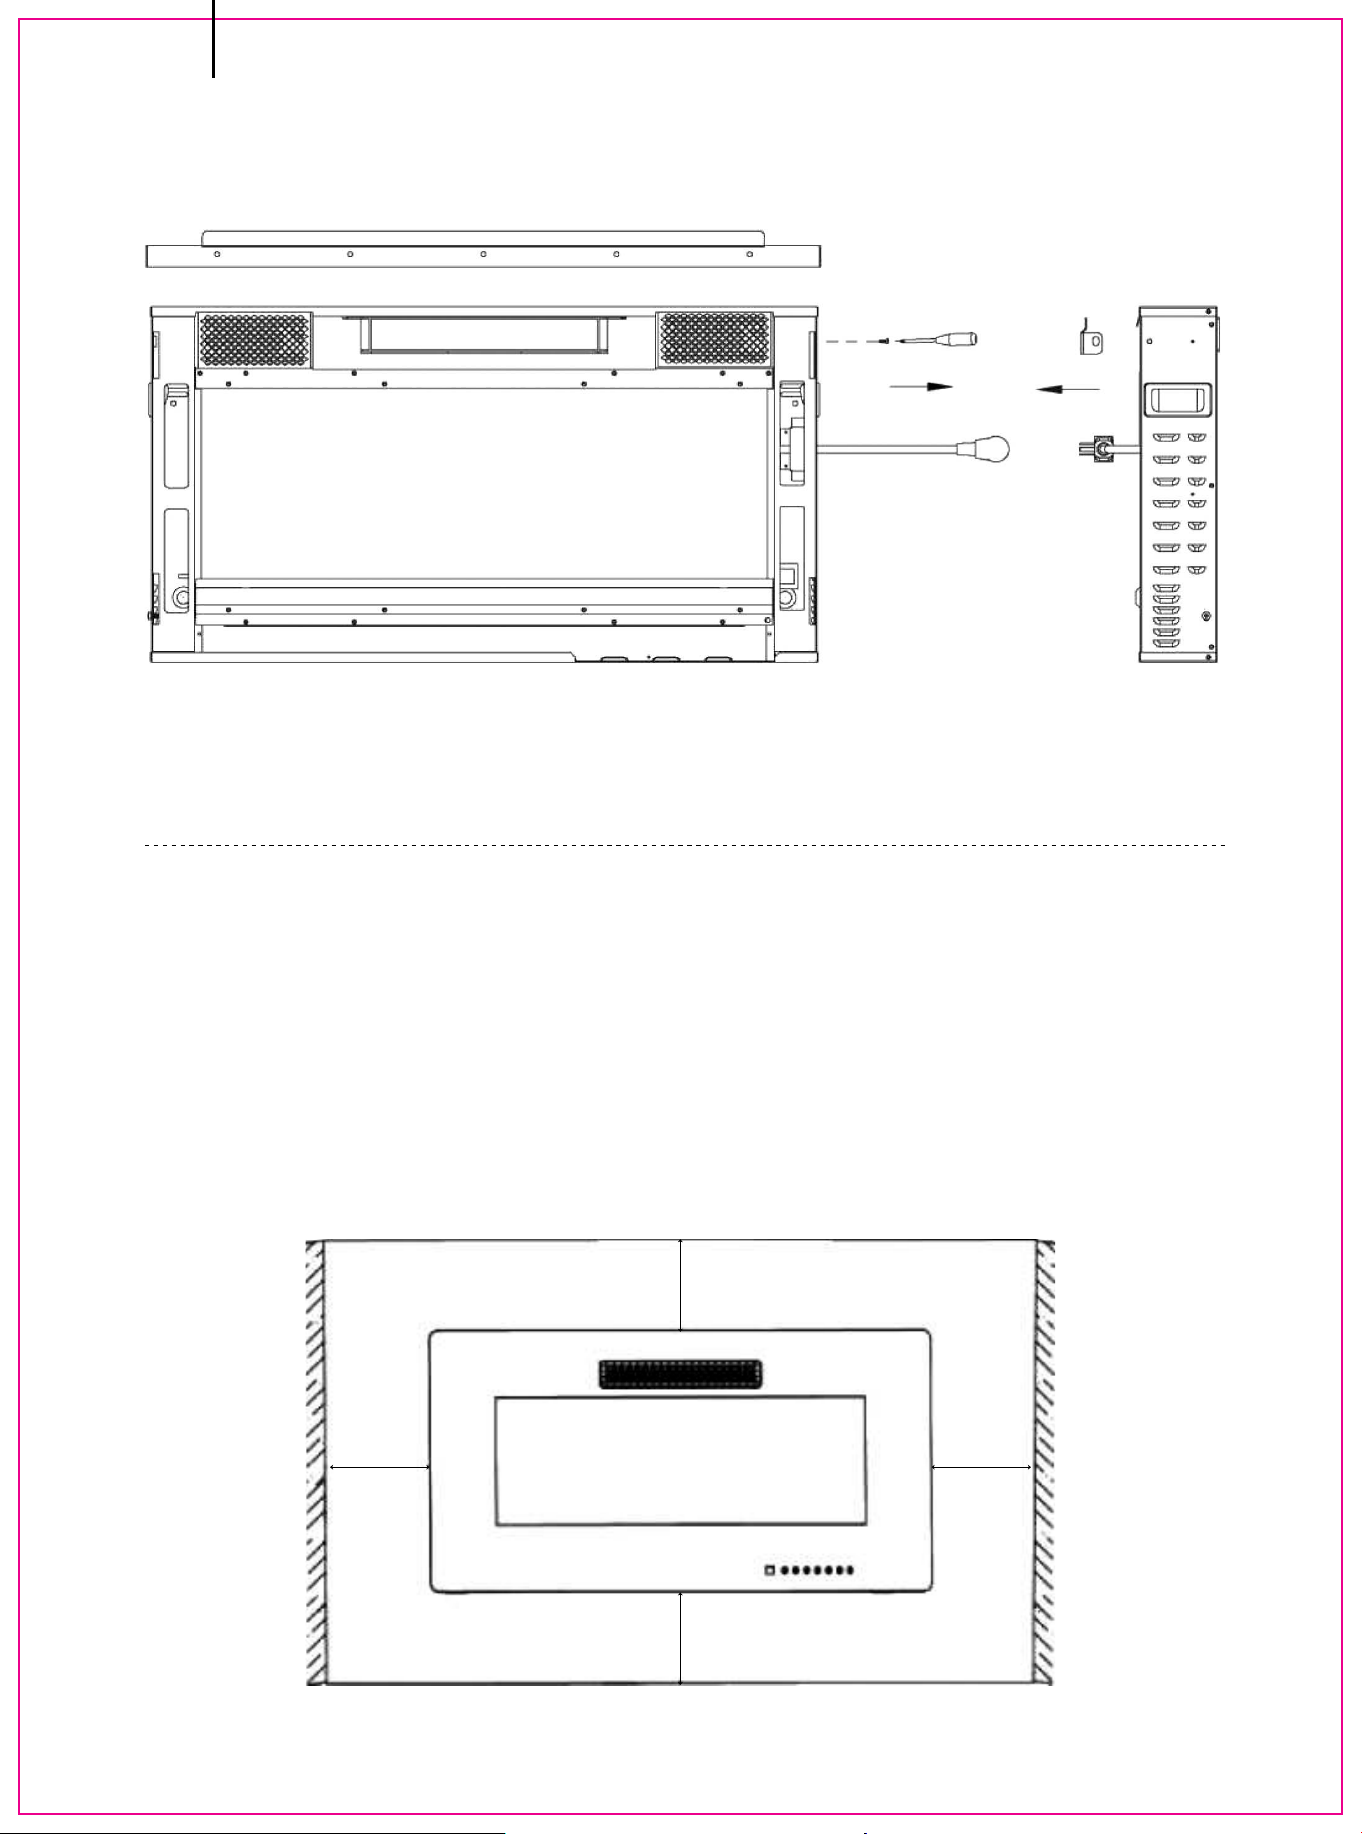
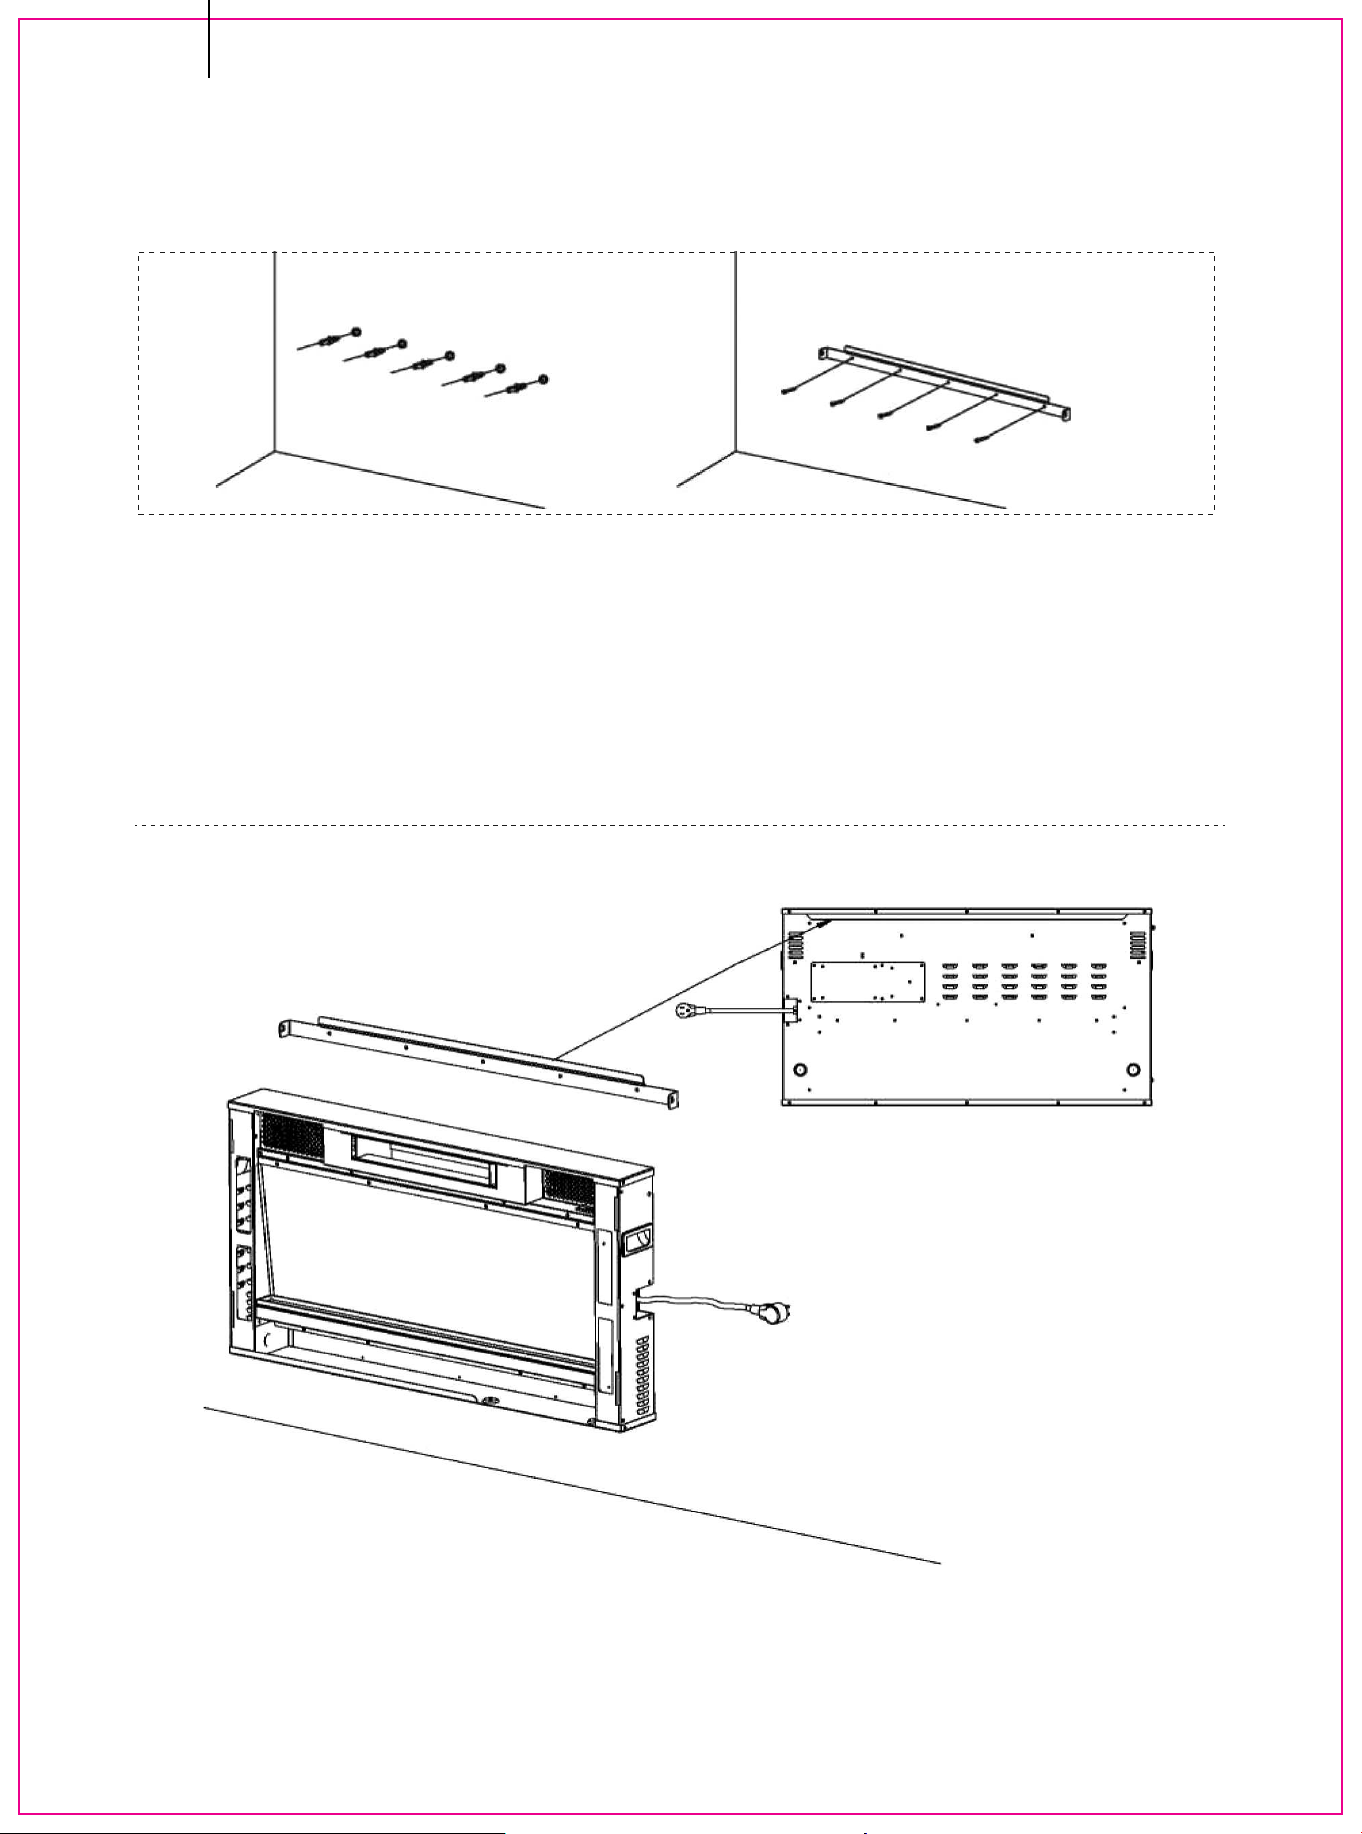
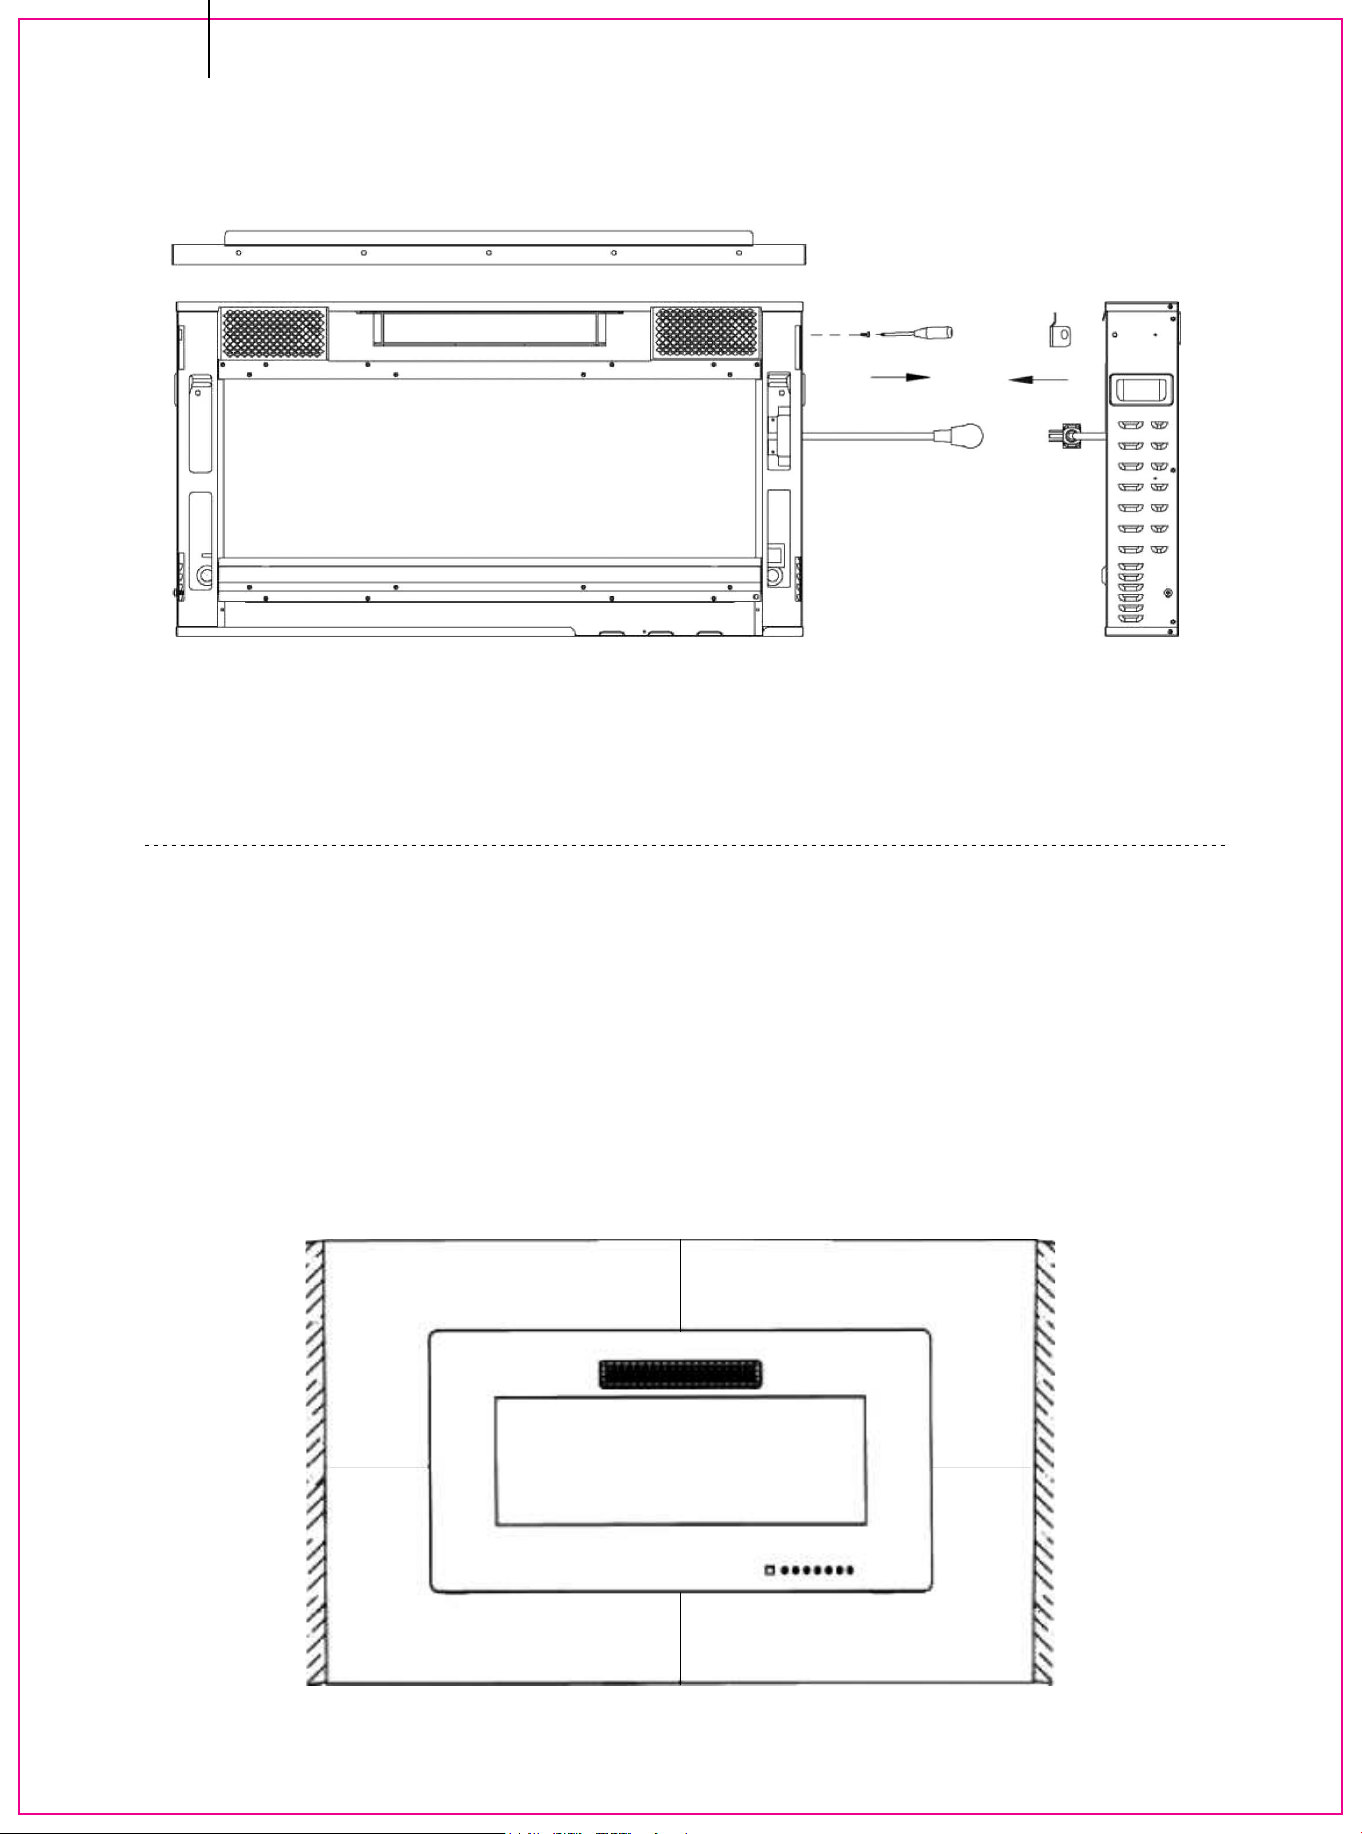
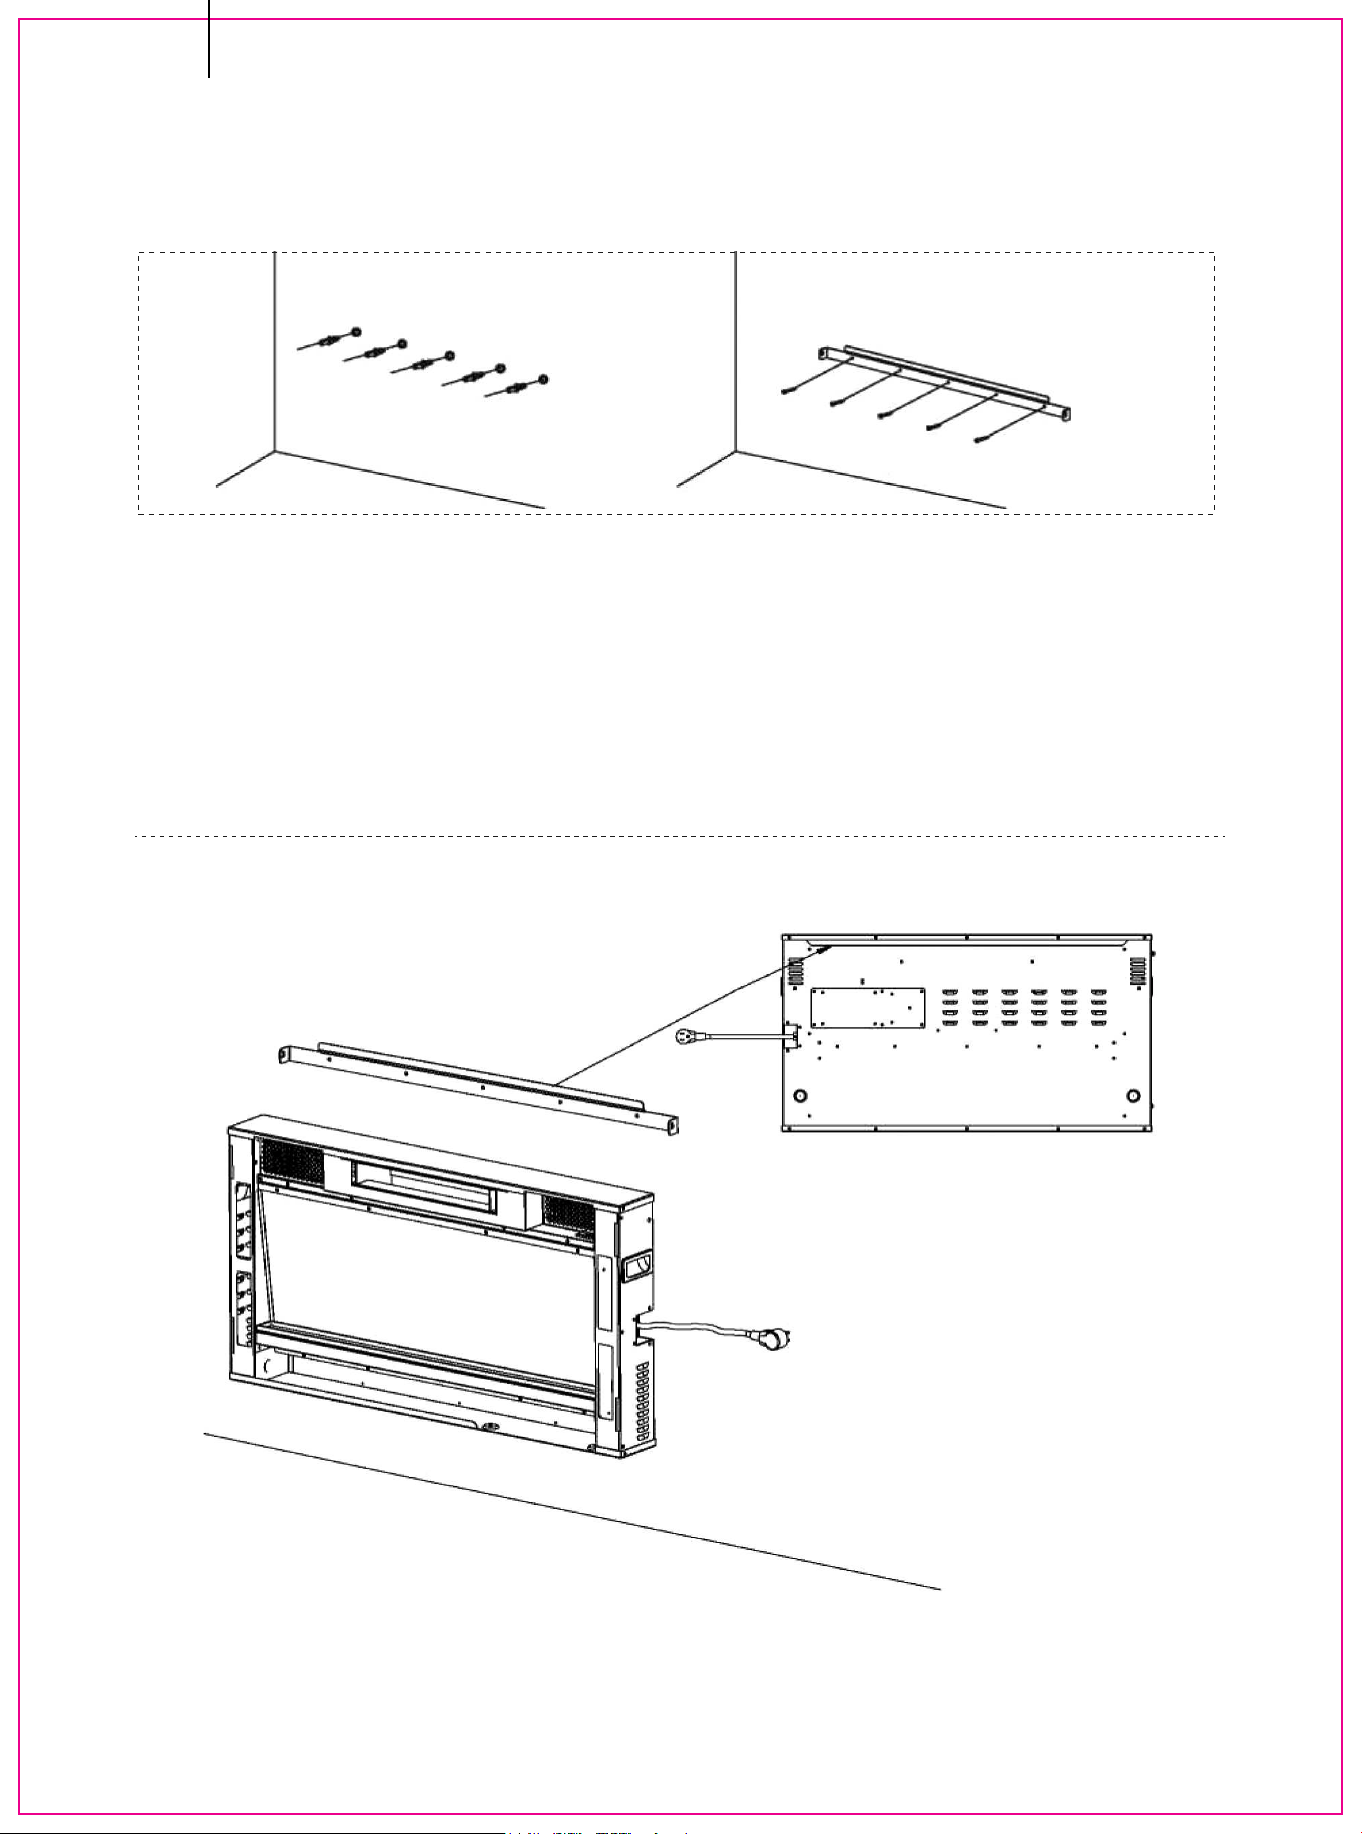
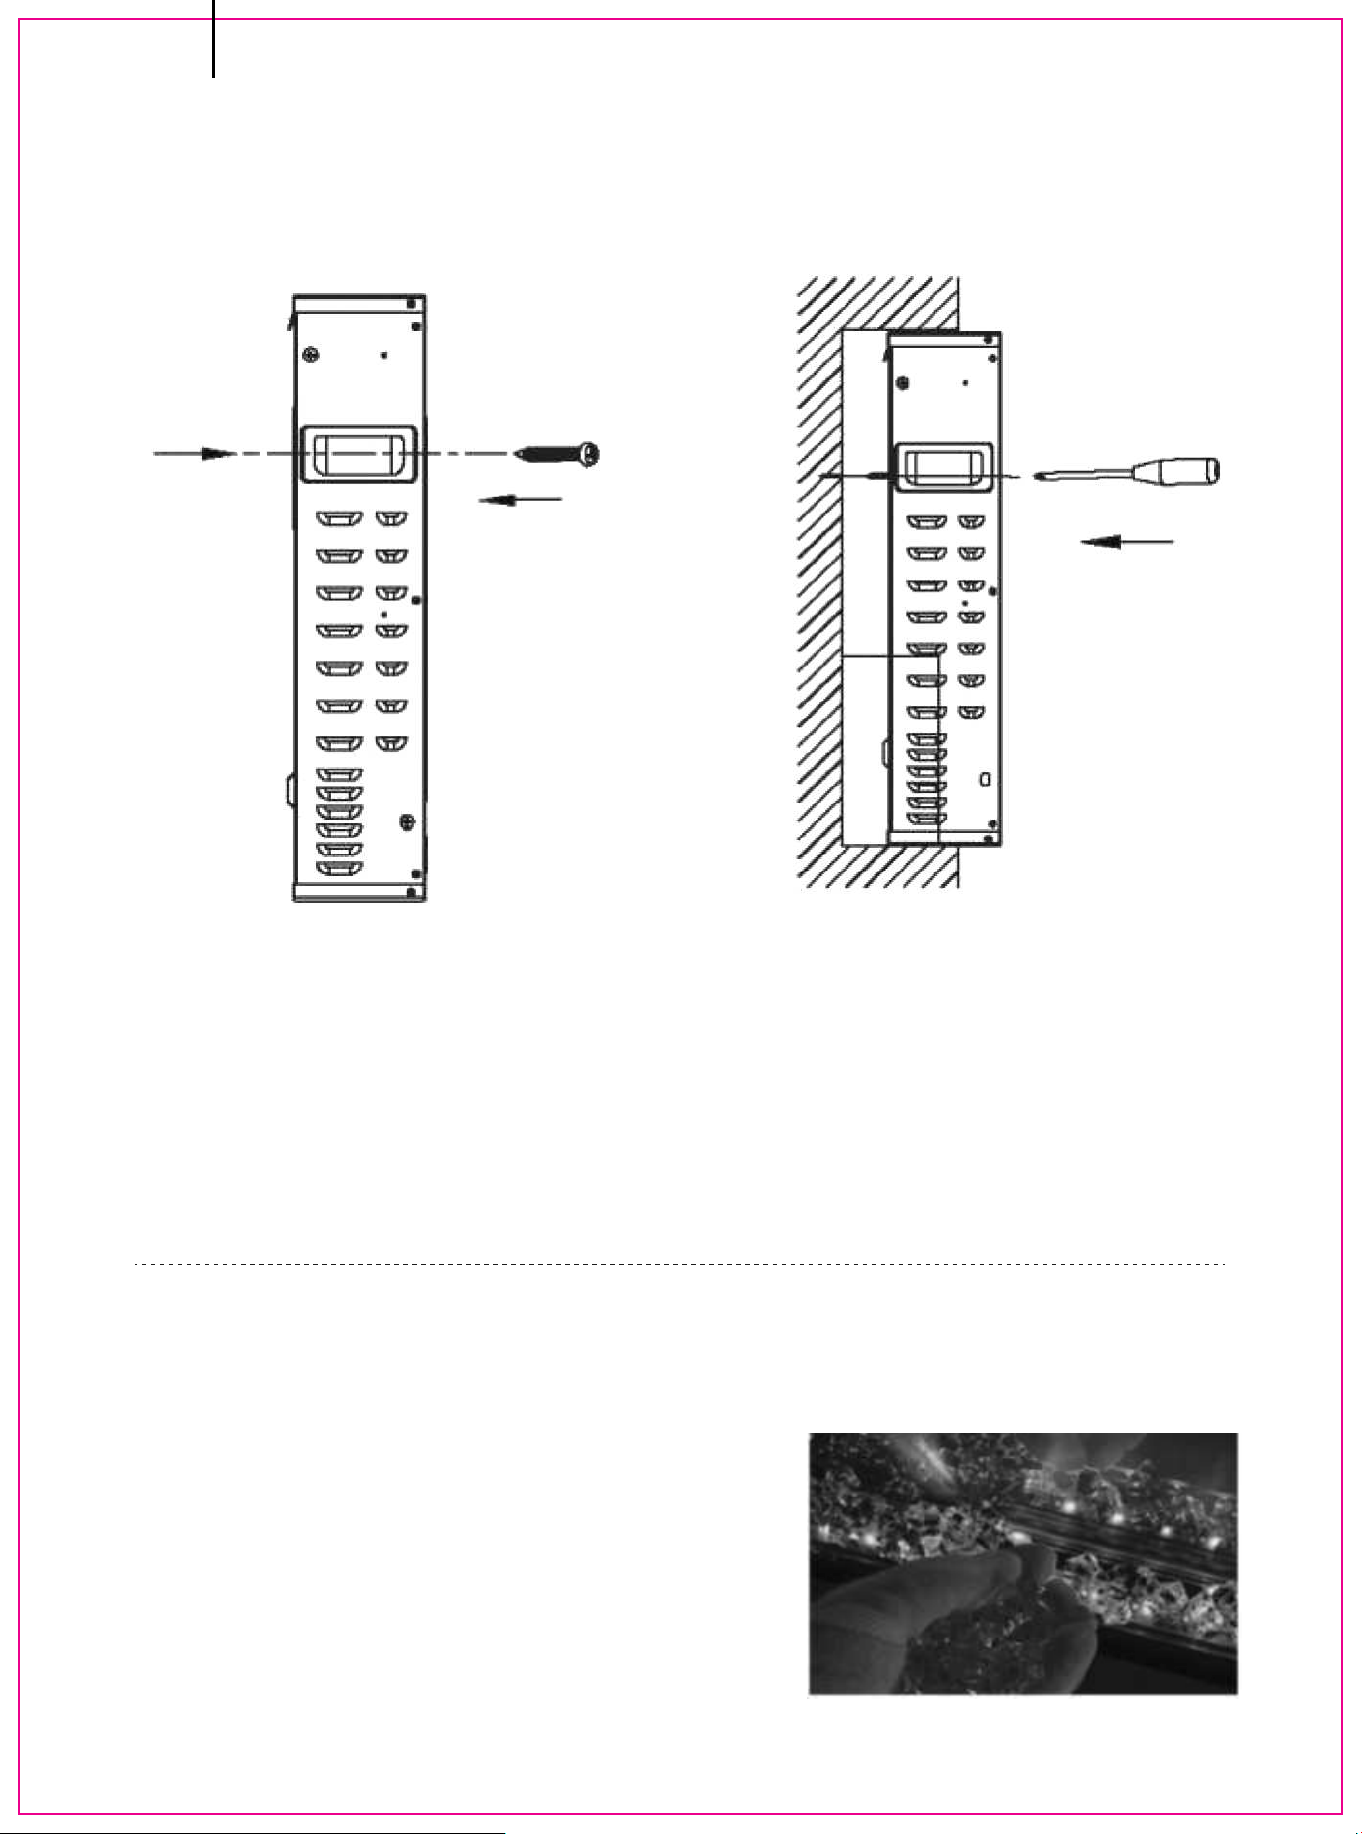
Step 2. Removing the Mounting Bracket
-Unscrew the two screws by Phillips screwdriver from both ends (Do not
discard them), then remove the pre-attached mounting bracket.
M5x12
EN
Step 3. Choosing a Wall Location
-Find a safe location. Minimum clearance between the ceiling and the mantel
must be at least 8 inches (200mm); minimum clearance from the front must
be at least 3 feet (900 mm).
Choose a location near an outlet so an extension cord is not required.
Note: DO NOT position the unit directly below a power outlet. See Safety
Information on pages 2 and 3 for more warnings about placement,
installation, and use of this product.
200mm
200mm
200mm
200mm
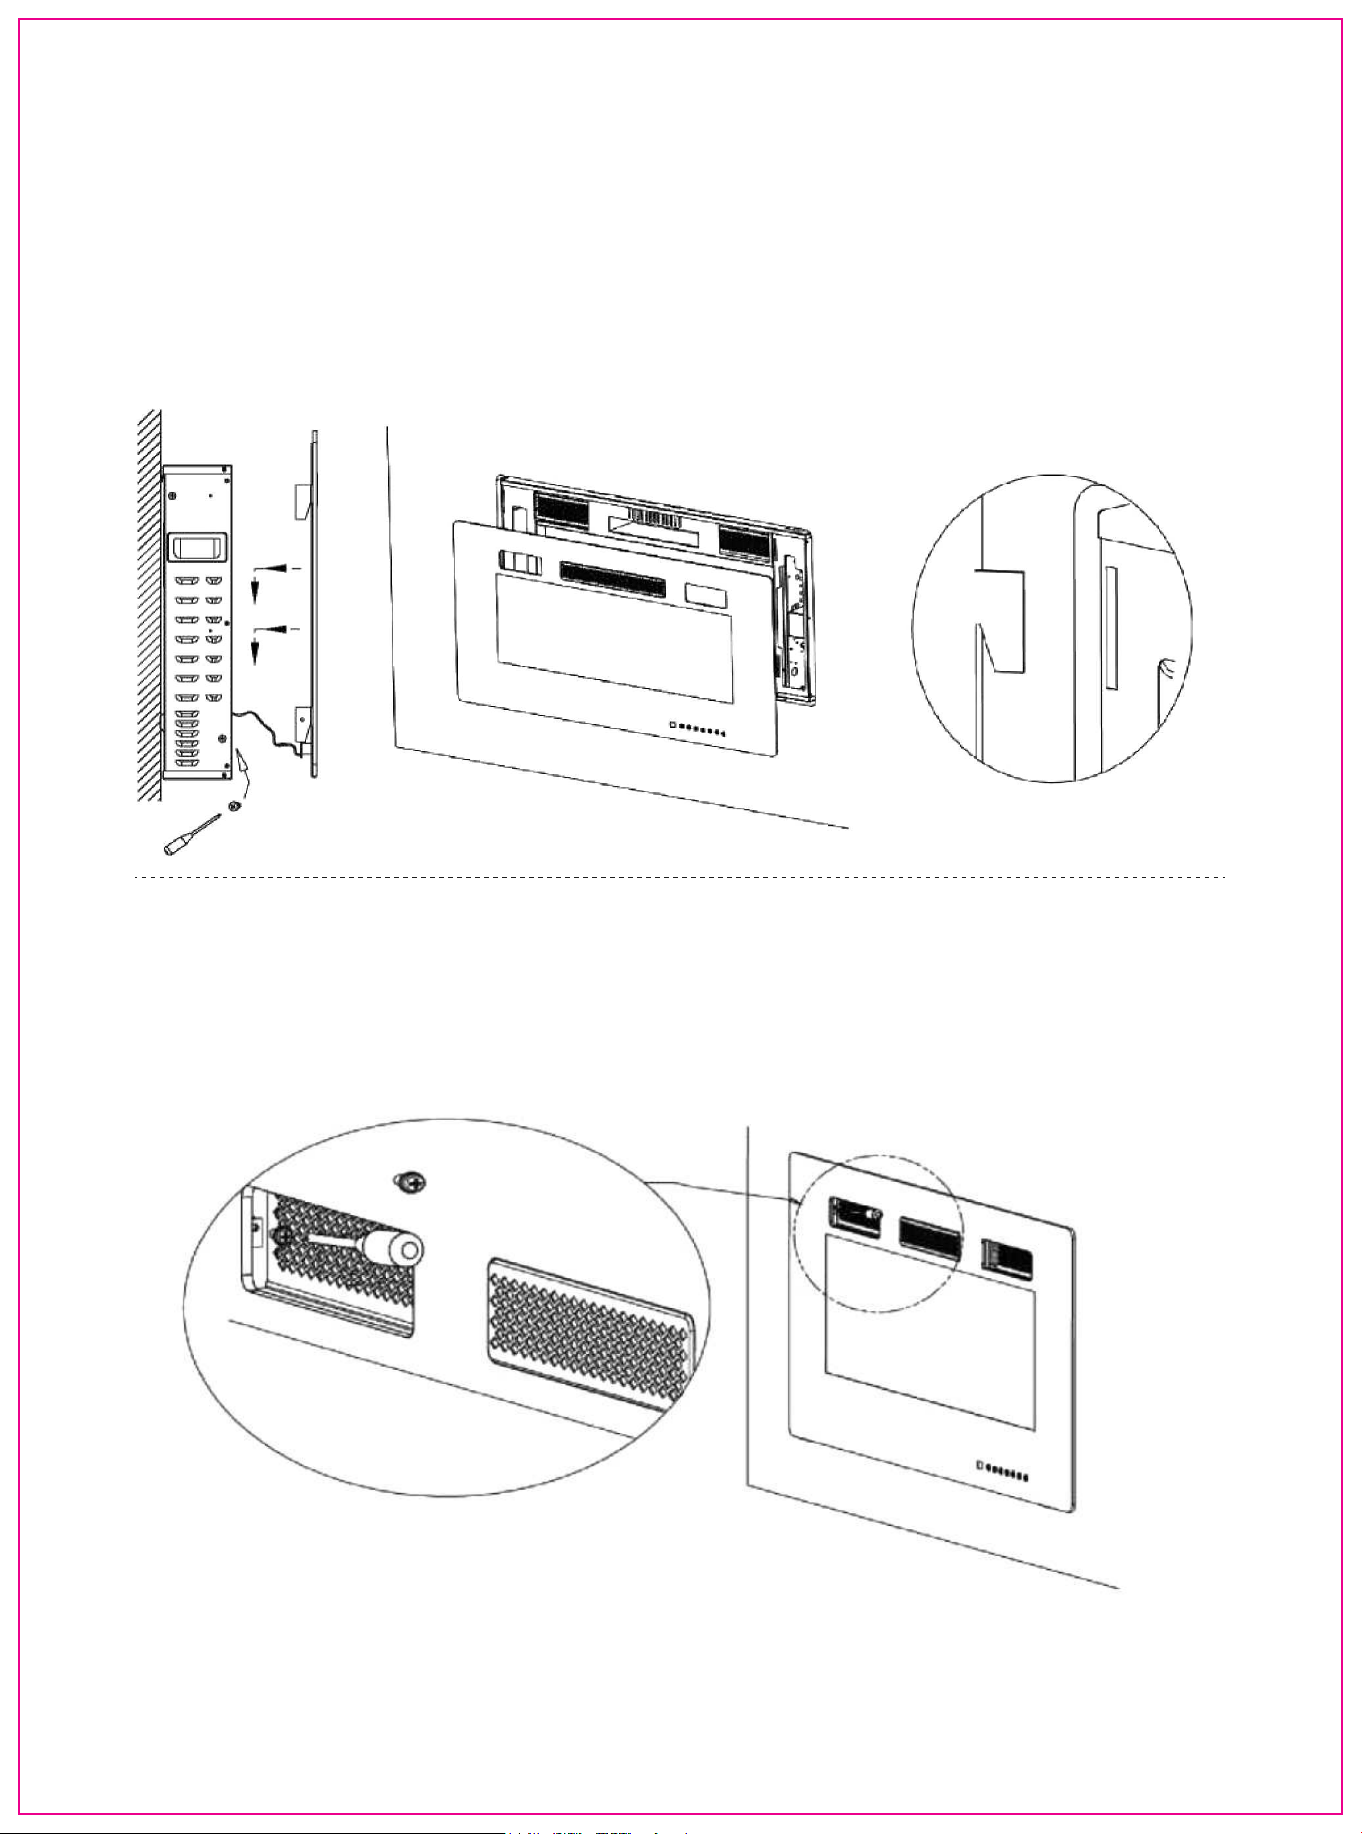
15
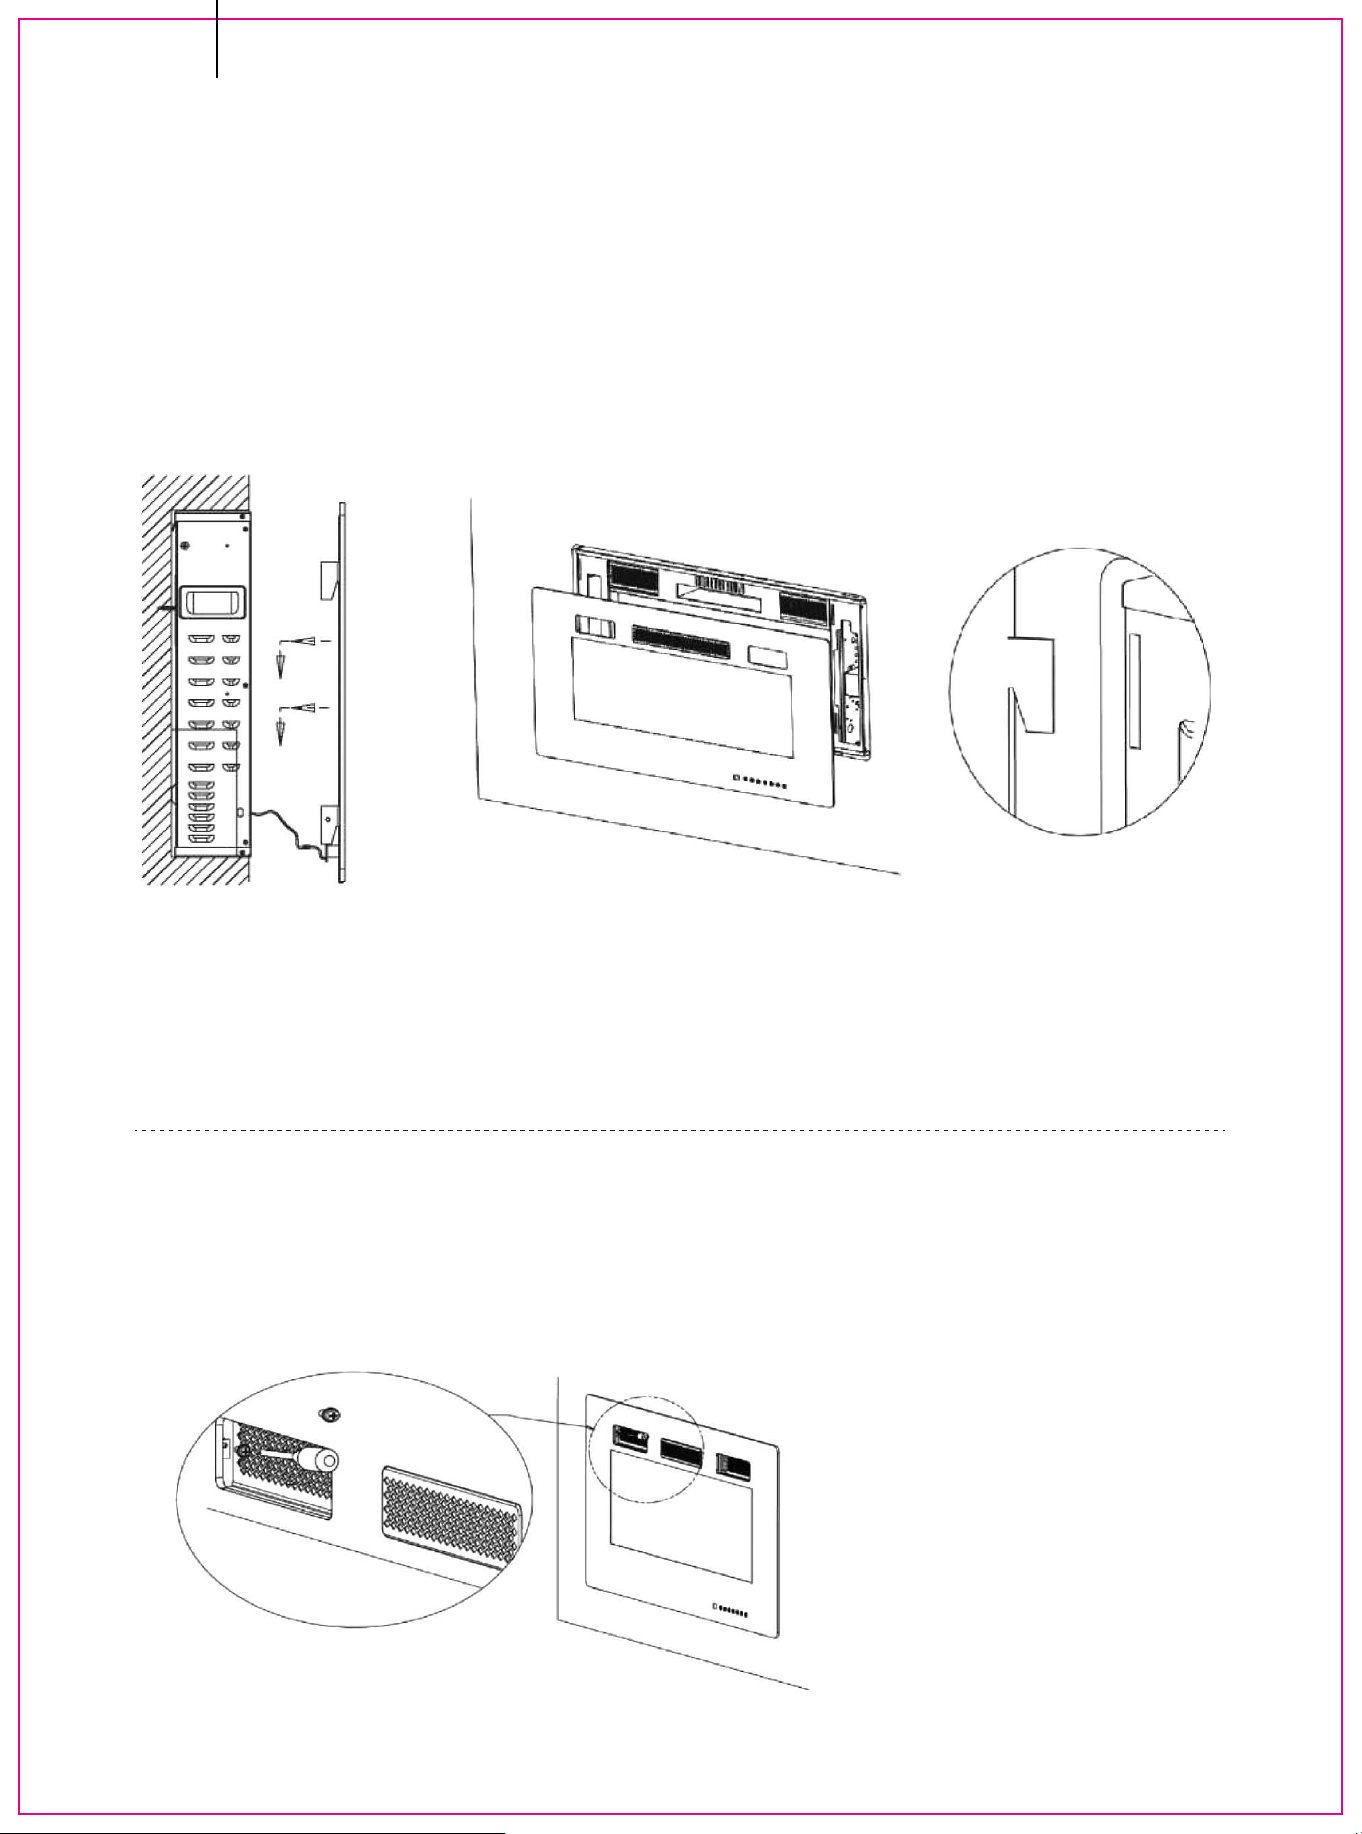
-Hang the slotting behind the appliance on the hooks at the left and right
sides of the bracket.
(Please hold the appliance to avoid dropping down before the installation is
finished)
Step 5. Hanging the Fireplace on the Bracket
EN
Step 4. Drilling the Holes and attaching the
Mounting Bracket
-Use a level to align the bracket and mark the holes which need to be drilled
with a pencil.
-Drill 3-10 (according to the model you have bought) 7/25 in. (7mm) holes
in the wall.
-Insert the wall anchors into the holes by using a hammer.
-Attach the mounting bracket to the wall by fastening the Anchor Screws
(Part A) into the wall anchors (Part B).
16
Step 6. Locking the Fireplace on the Bracket
-Find a safe location. Minimum clearance between the ceiling and the mantel
must be at least 8 inches (200mm); minimum clearance from the front must
be at least 3 feet (900 mm).
Choose a location near an outlet so an extension cord is not required.
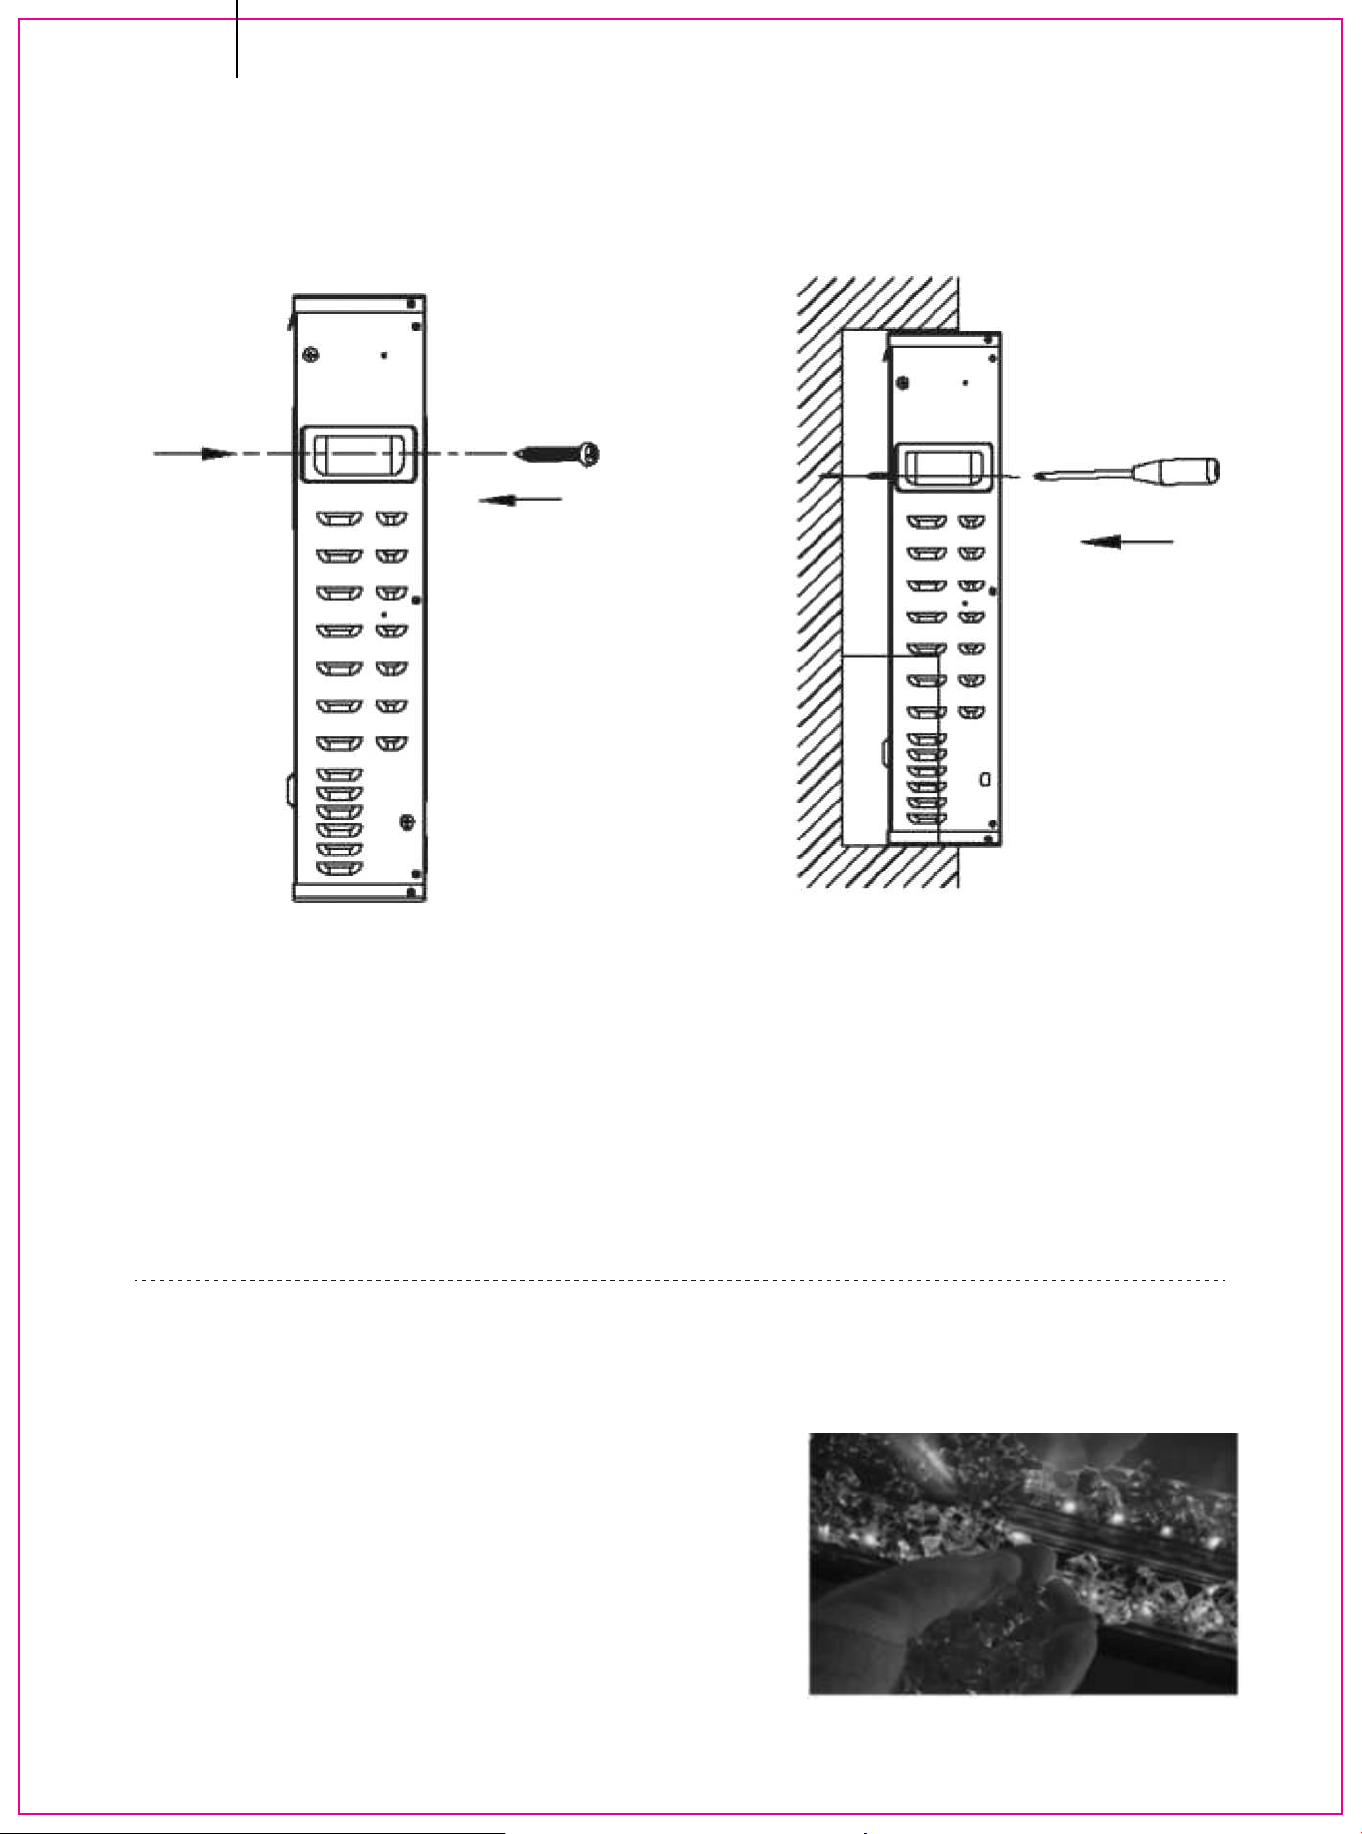
Step 7. Placing the Decorations
-Carefully place crystal (together with the appliance) or logs into the bottom
tray on the front of the appliance as illustrated.
NOTE: Media bed kits may have sharp edges, wear safety glasses
and gloves when handling.
-Lock the bracket at both ends with a screw to ensure a solid combination of
the fireplace and bracket
M5x12
EN
17

Step 8. Hanging the Glass Frame
-Connect the FFC connector before hanging the glass frame on the
appliance.
-Gently place the glass panel by aligning the 4 hooks until it snaps into
position (sinks down 1-2 cm/0.4-0.8 inches).
-Secure the glass panel with the screw removed in Step 1 (or part B).
EN
1PC
M4X12 SCREW
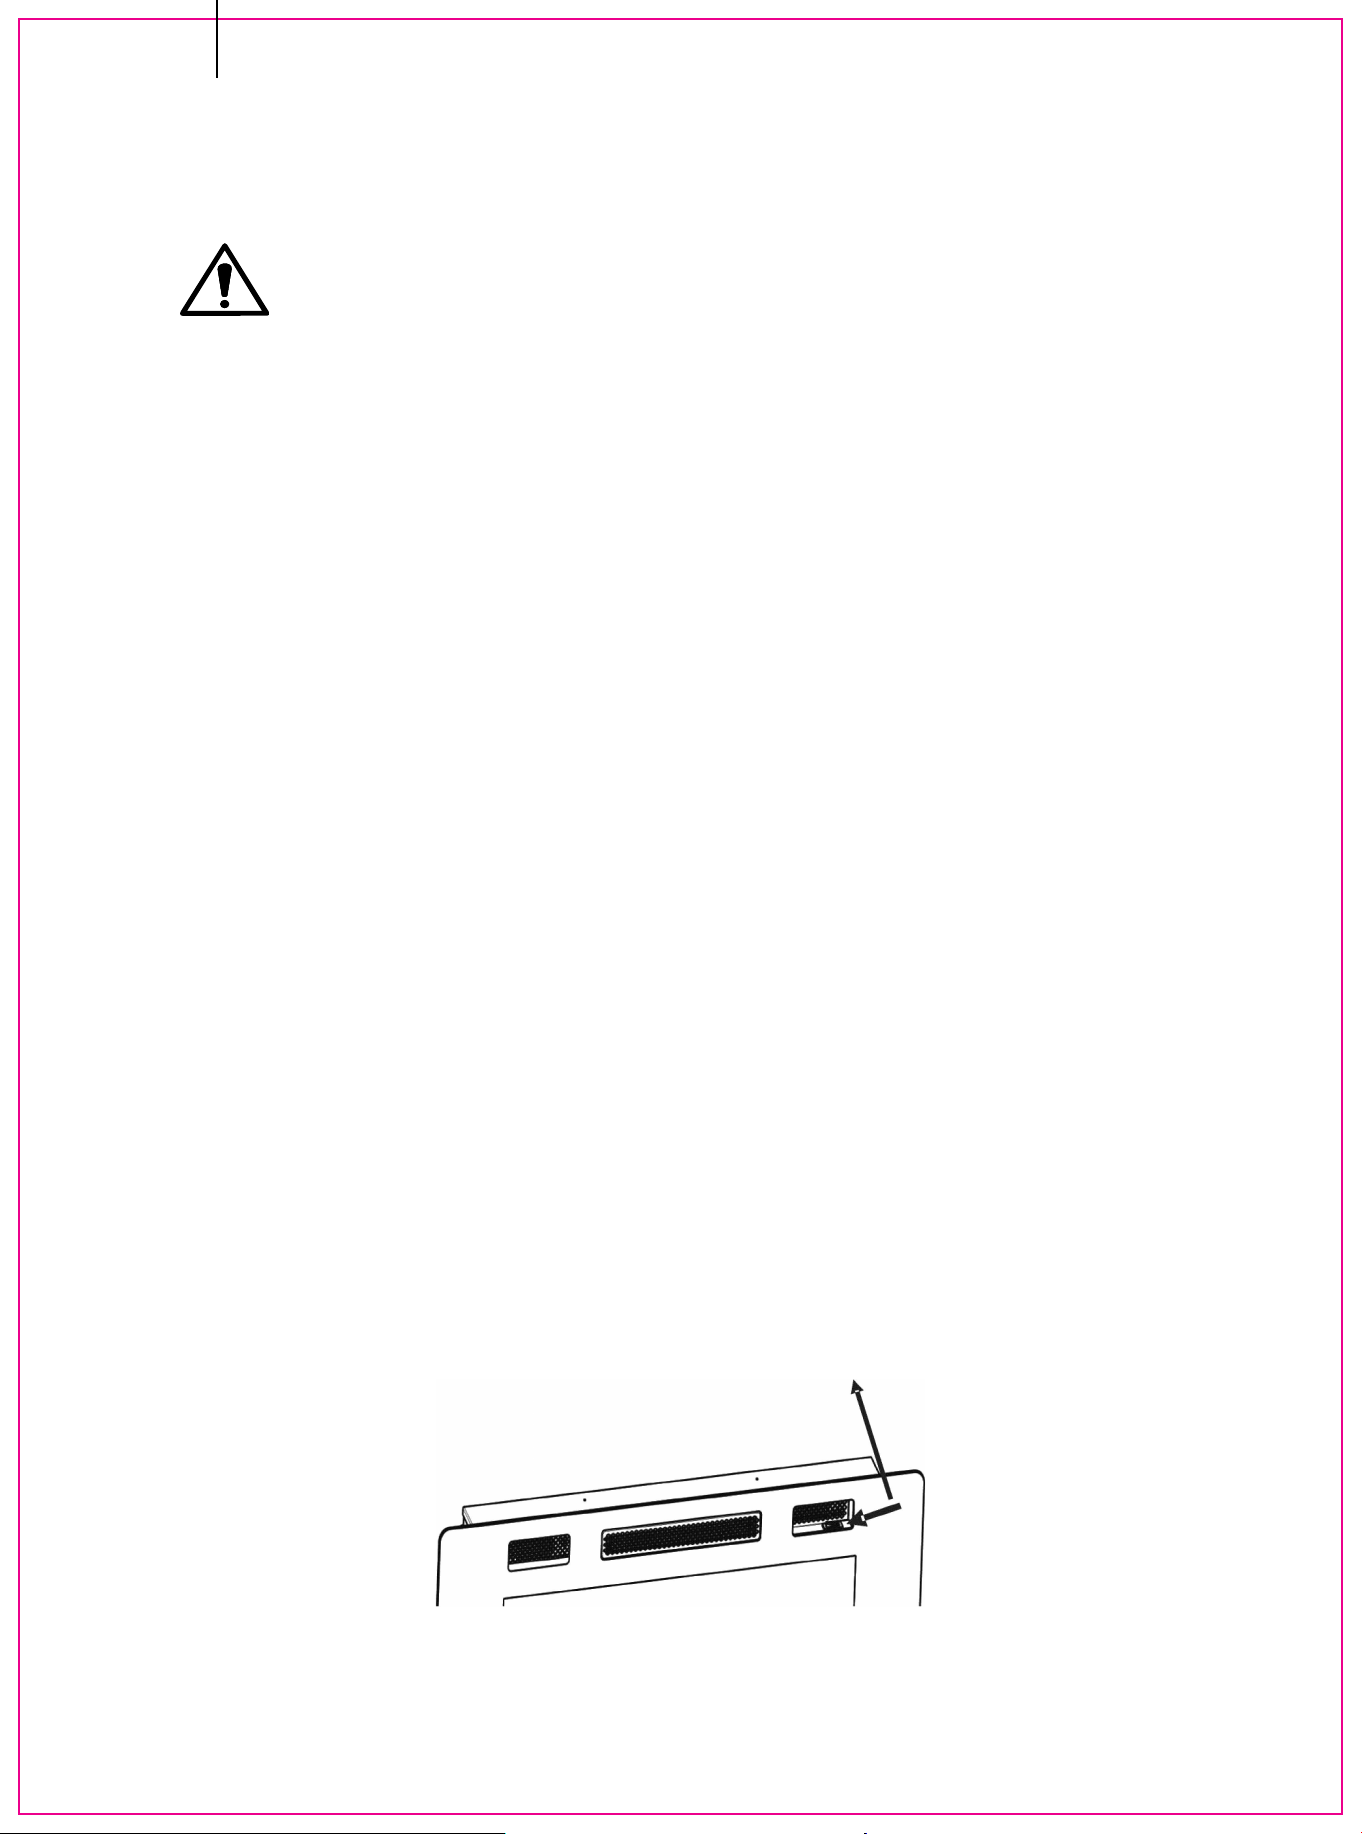
Step 9. Refasten the Glass Frame
- Thread the M4X12 screw into the threaded holes on the glass panel. Check
the alignment of the glass panel and securely tighten the screws.
( Only for all models of style C which has no mesh for the air inlet.)
18
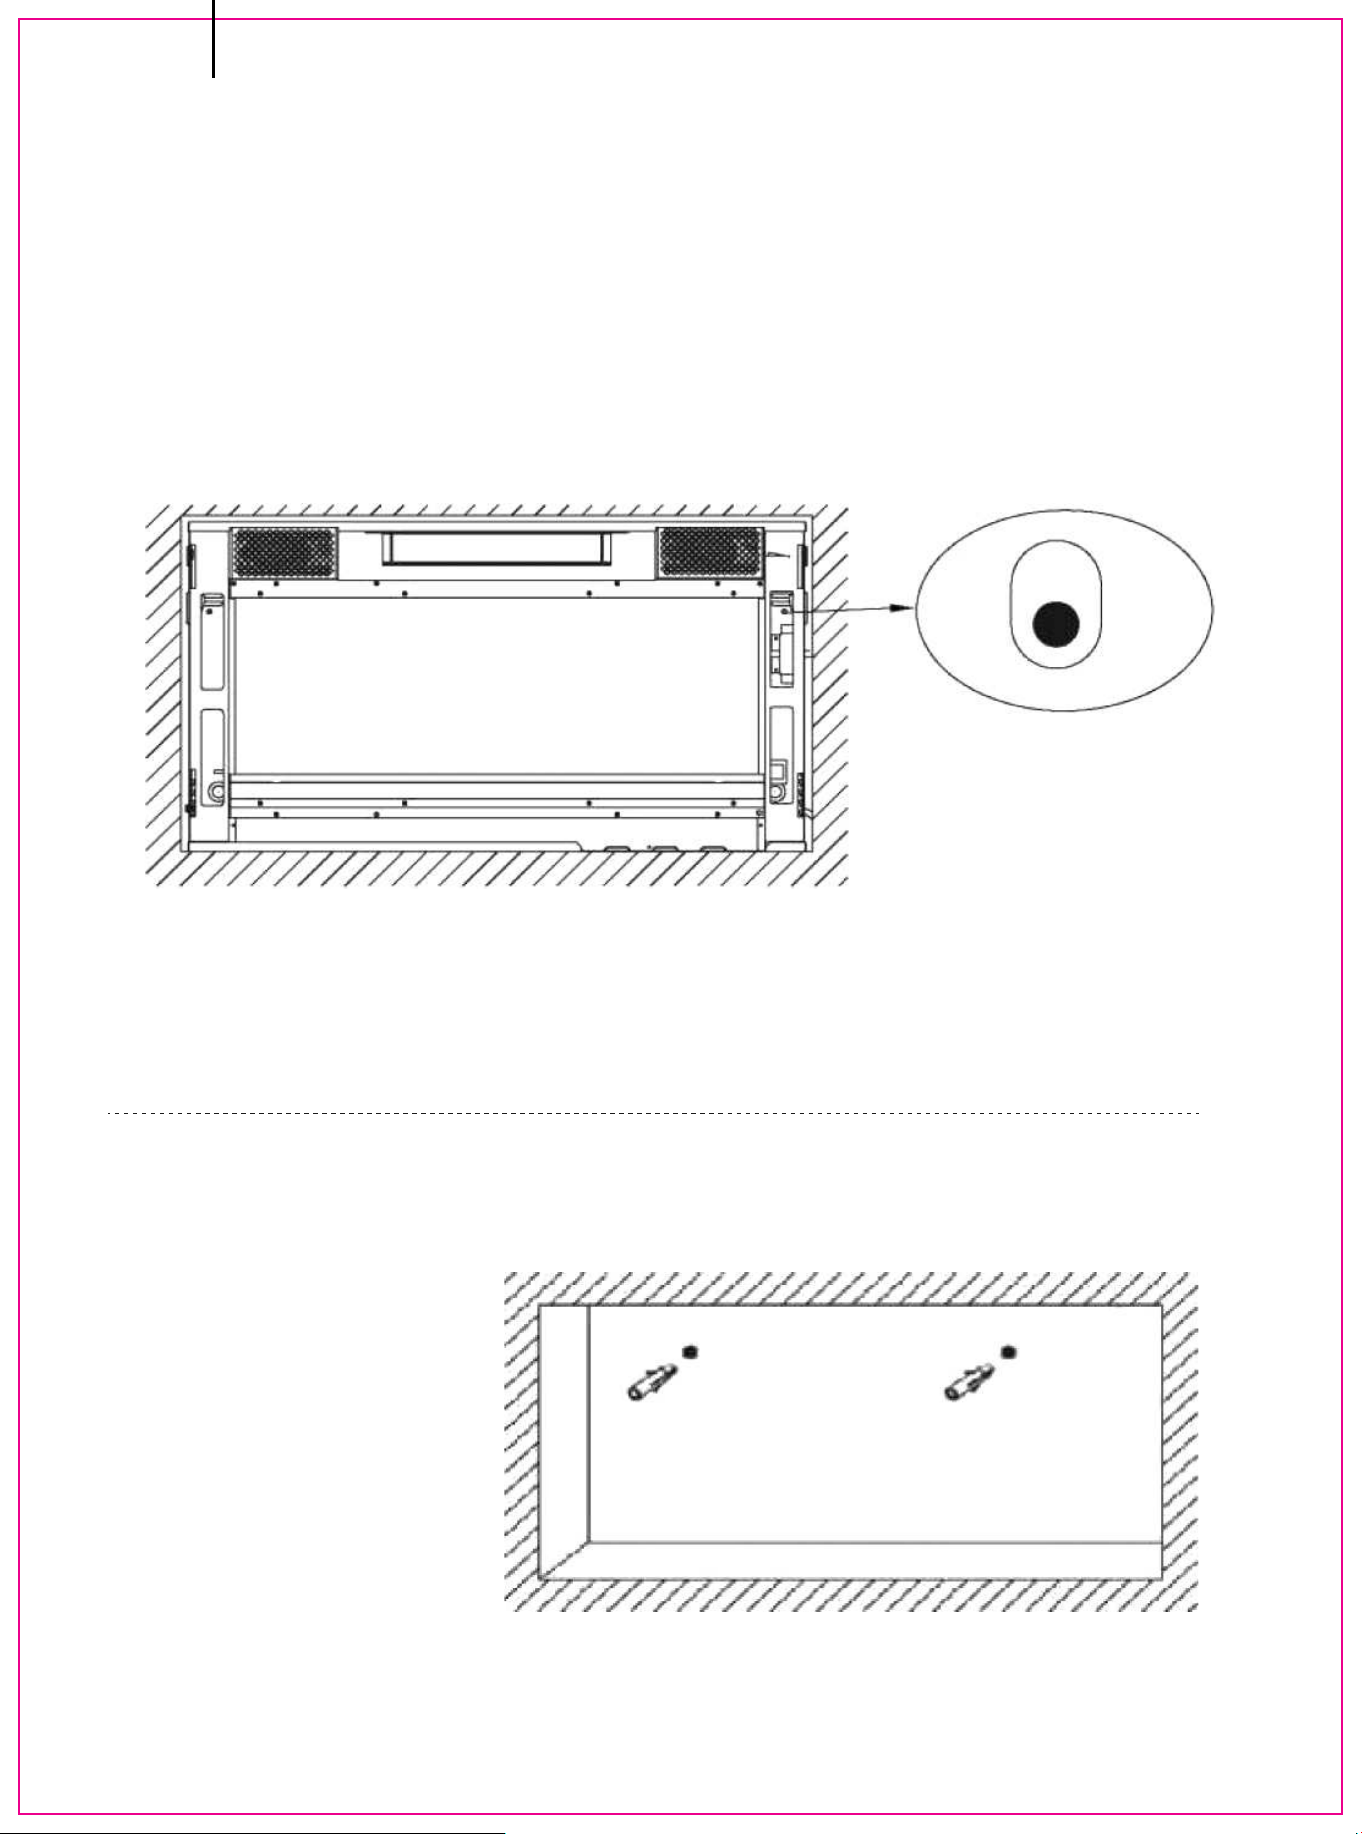
Step 4. Drilling & Installing the Wall Anchors
-Drill the holes 7/25 in.
(7mm) on the prepared
marks.
-Insert the wall anchors
(Part B) into the holes
using a hammer.
-The appropriate cavity (l-2cm/0.4-0.8 inches bigger for each side) needs
to be prepared according to the size of the appliance.
-Put the fireplace in place, mark the holes which need to be drilled with a
pencil. Then take it out of the cavity again.
Installation - Built in Construction
Step 1. Removing the Glass Frame
Step3. Settling the Holes of Screw
Step 2. Removing the Mounting Bracket
(Step 1 and Step 2 please refer Wall Hanging Installation.)
EN
19
Step 6. Placing the Decorations
Step 5. Placing the Pads and Fixing
the Fireplace
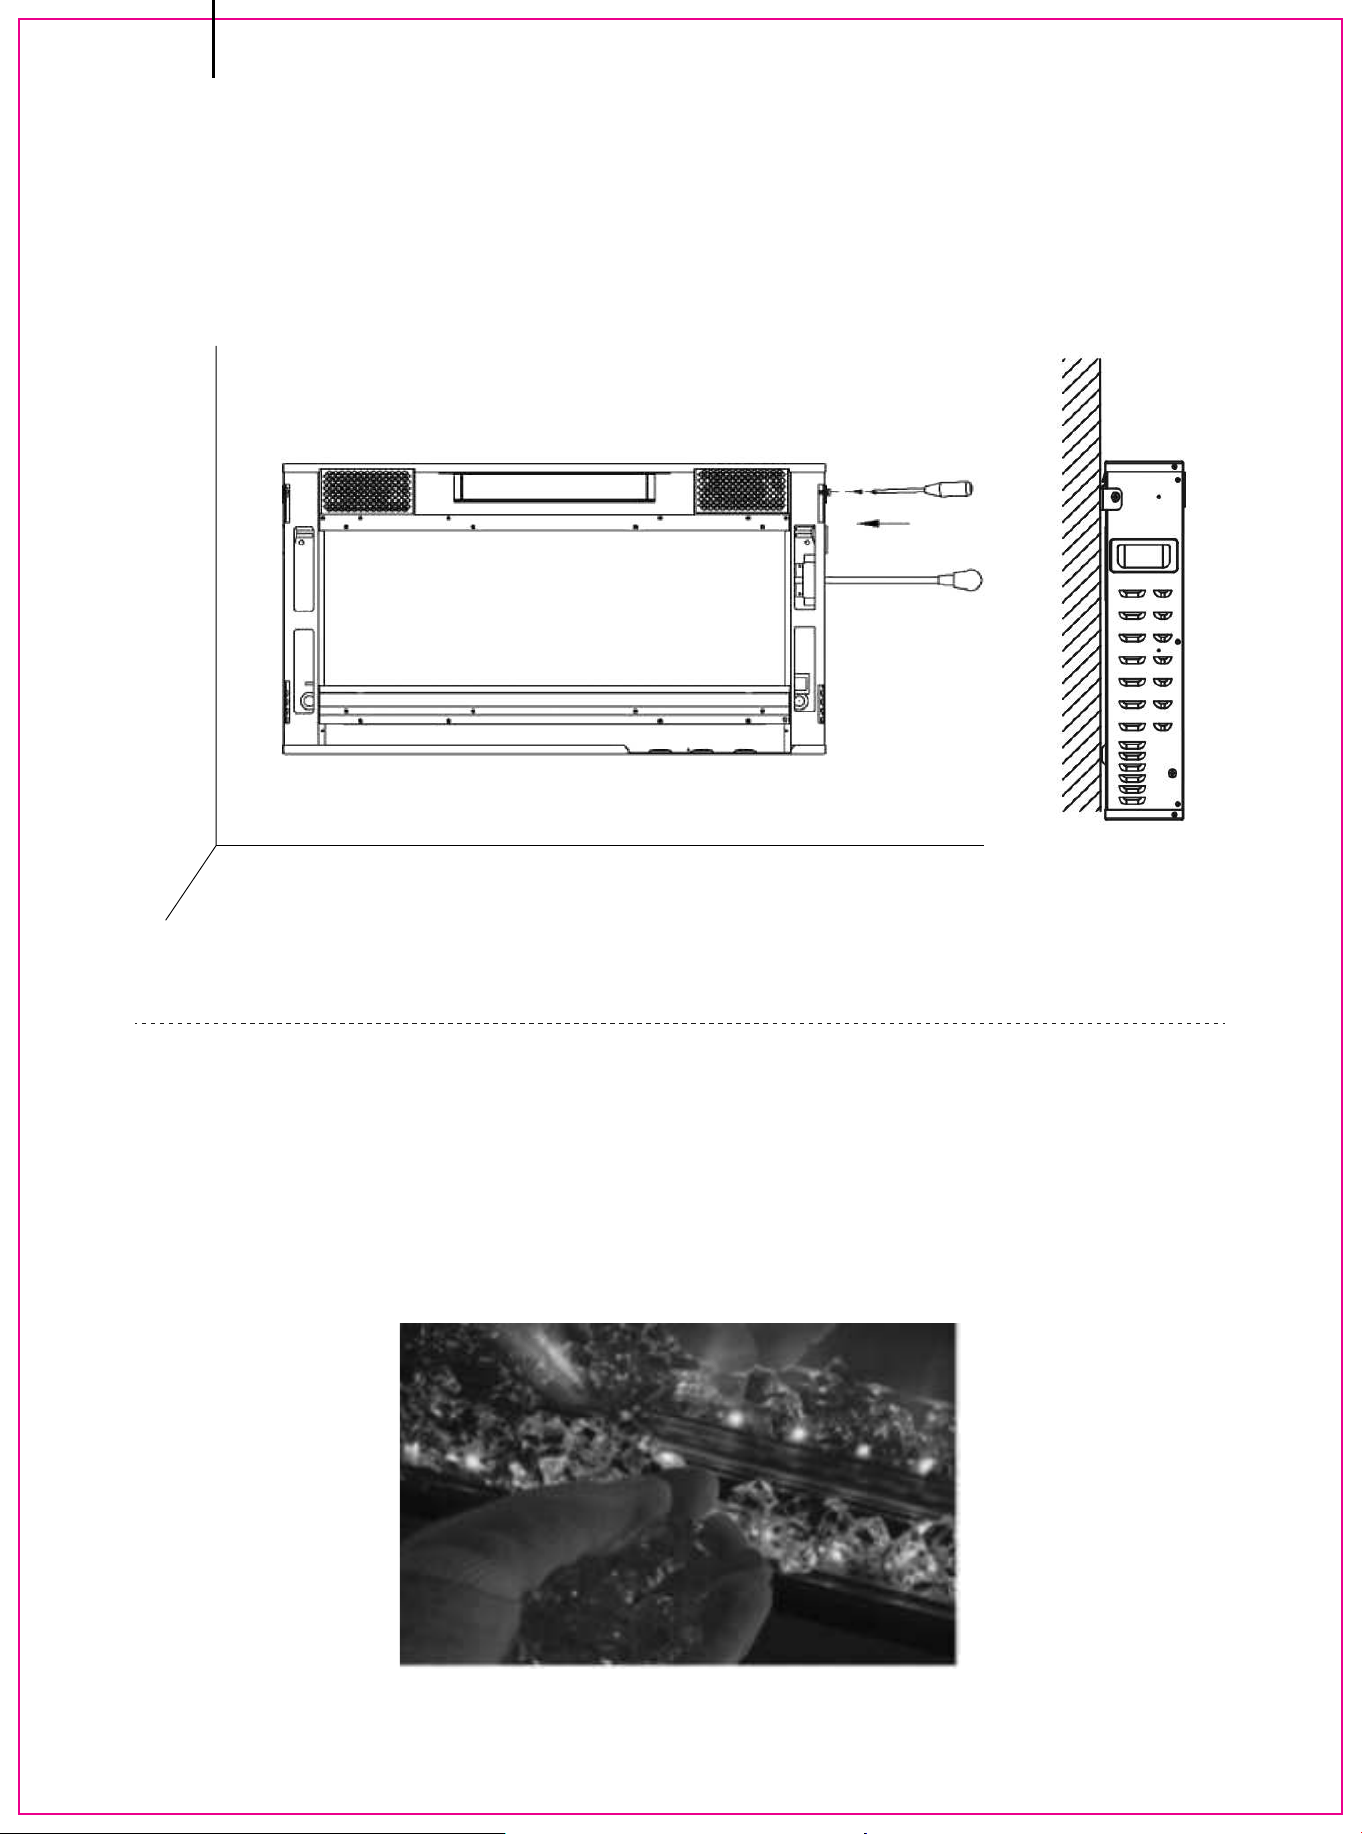
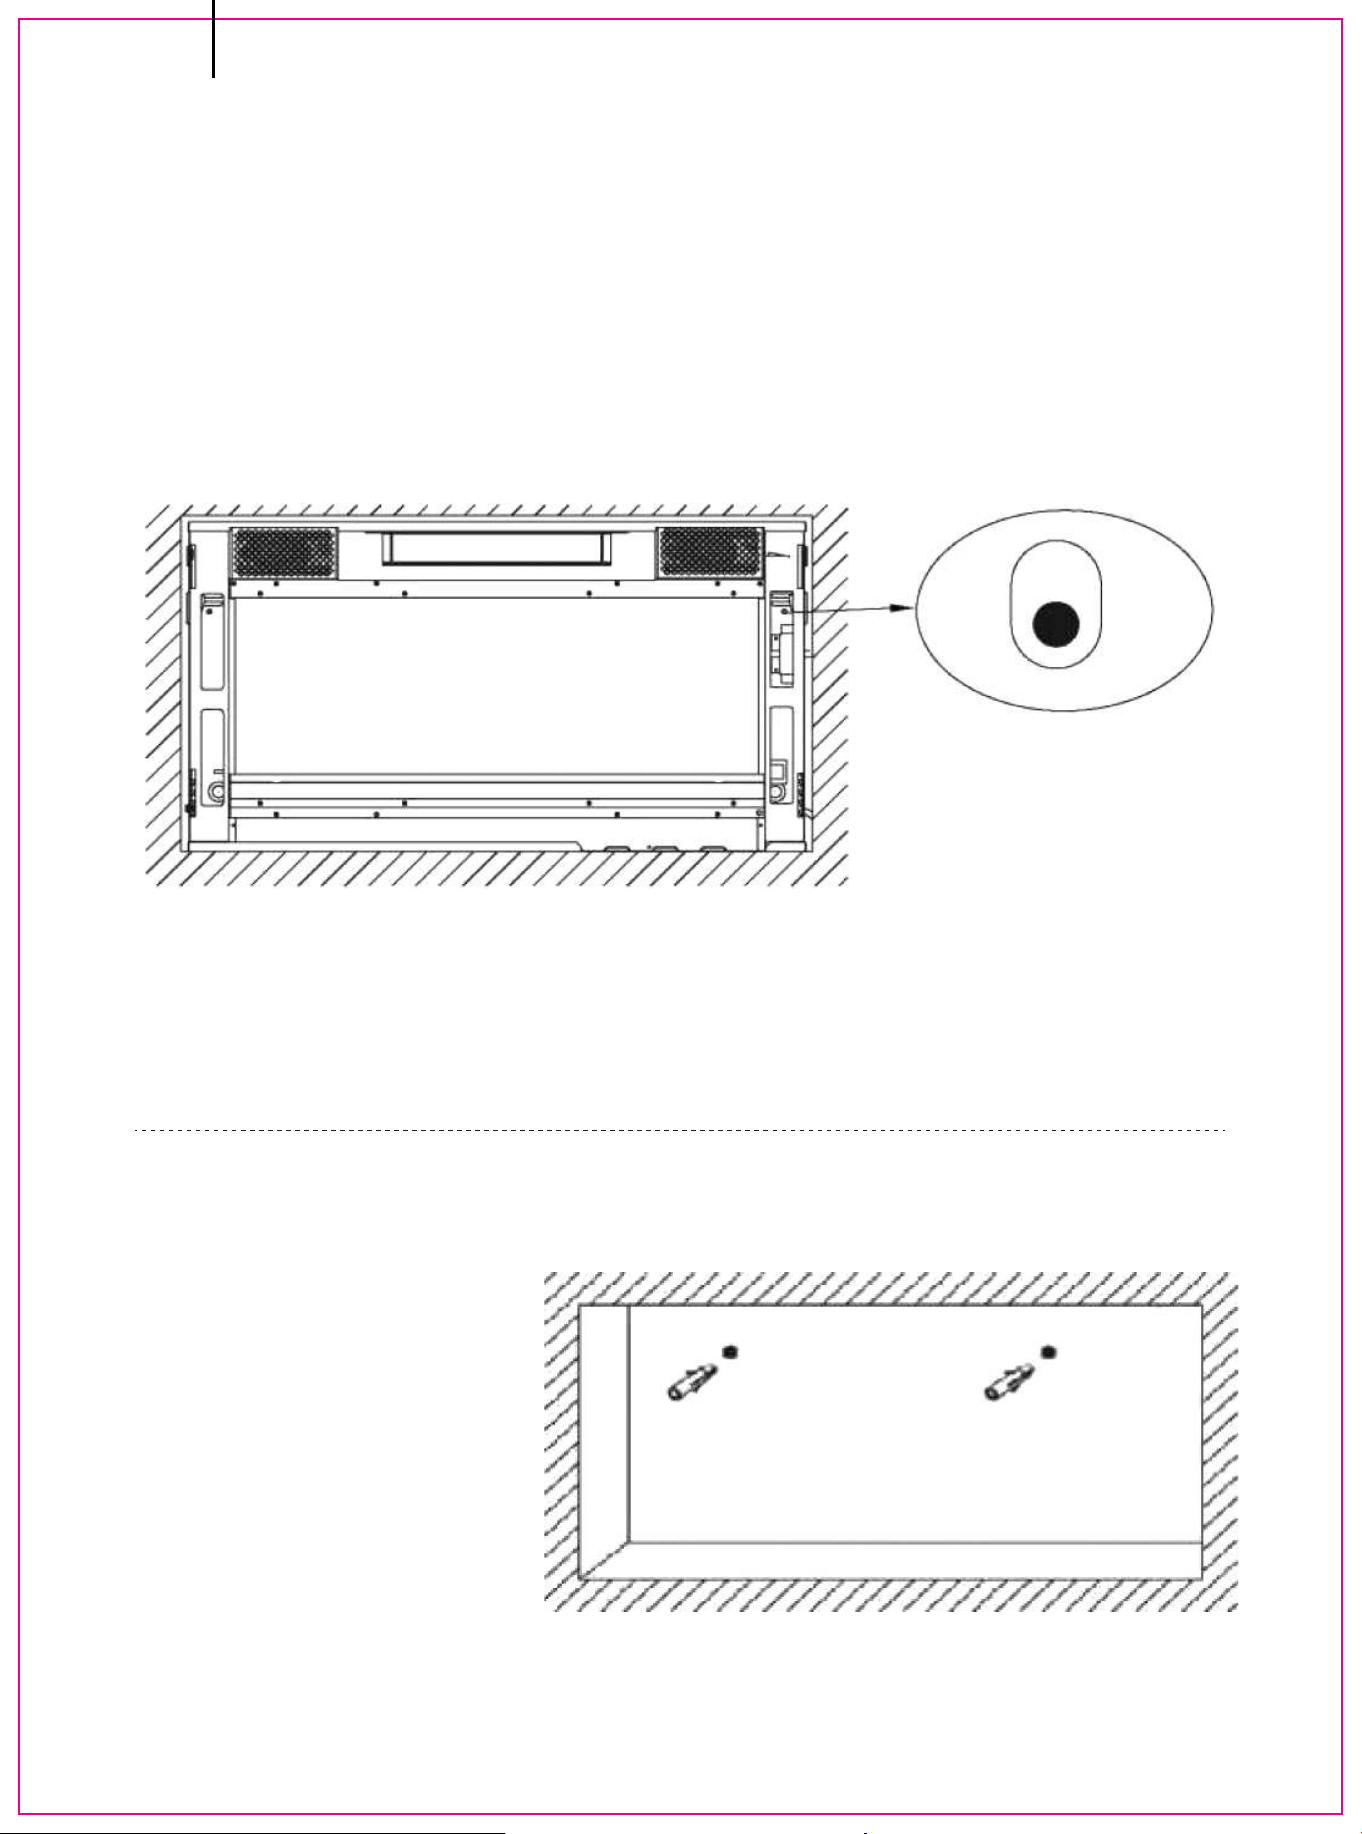
-Screws (Part A) pass through the holes from the front of fireplace with
screwdriver.
-Put the Fireplace into the prepared cavity.
-Fasten the fireplace firmly into the wall by the screws for each side.
(Note: Install carefully and don't let the screws fall into the
fireplace.)
-Carefully place crystal (together with the
appliance) or logs into the bottom tray on
the front of the appliance as illustrated.
NOTE: Media bed kits may have
sharp edges, wear safety glasses and
gloves when handling.
EN
20
WARNING: It's better to reserve some space between the frame and
the wall to enable better air circulation if available.
1PC
M4X12 SCREW
-Connect the FFC connector before attaching the glass frame on the
appliance.
-Gently engage the glass panel by aligning the 4 hooks until the hooks snap
into the corresponding positions (sinks down 1-2 cm/0.4-0.8 inches).
-Secure the glass panel with the screw removed in Step 1 (or part B).
Step 7. Hanging the Glass Frame
-Thread the M4 X 12 screw
into the threaded holes on
the glass panel. Check the
alignment of the glass
panel and
securely tighten the
screws.
Step 8. Refasten the Glass Frame
EN
21
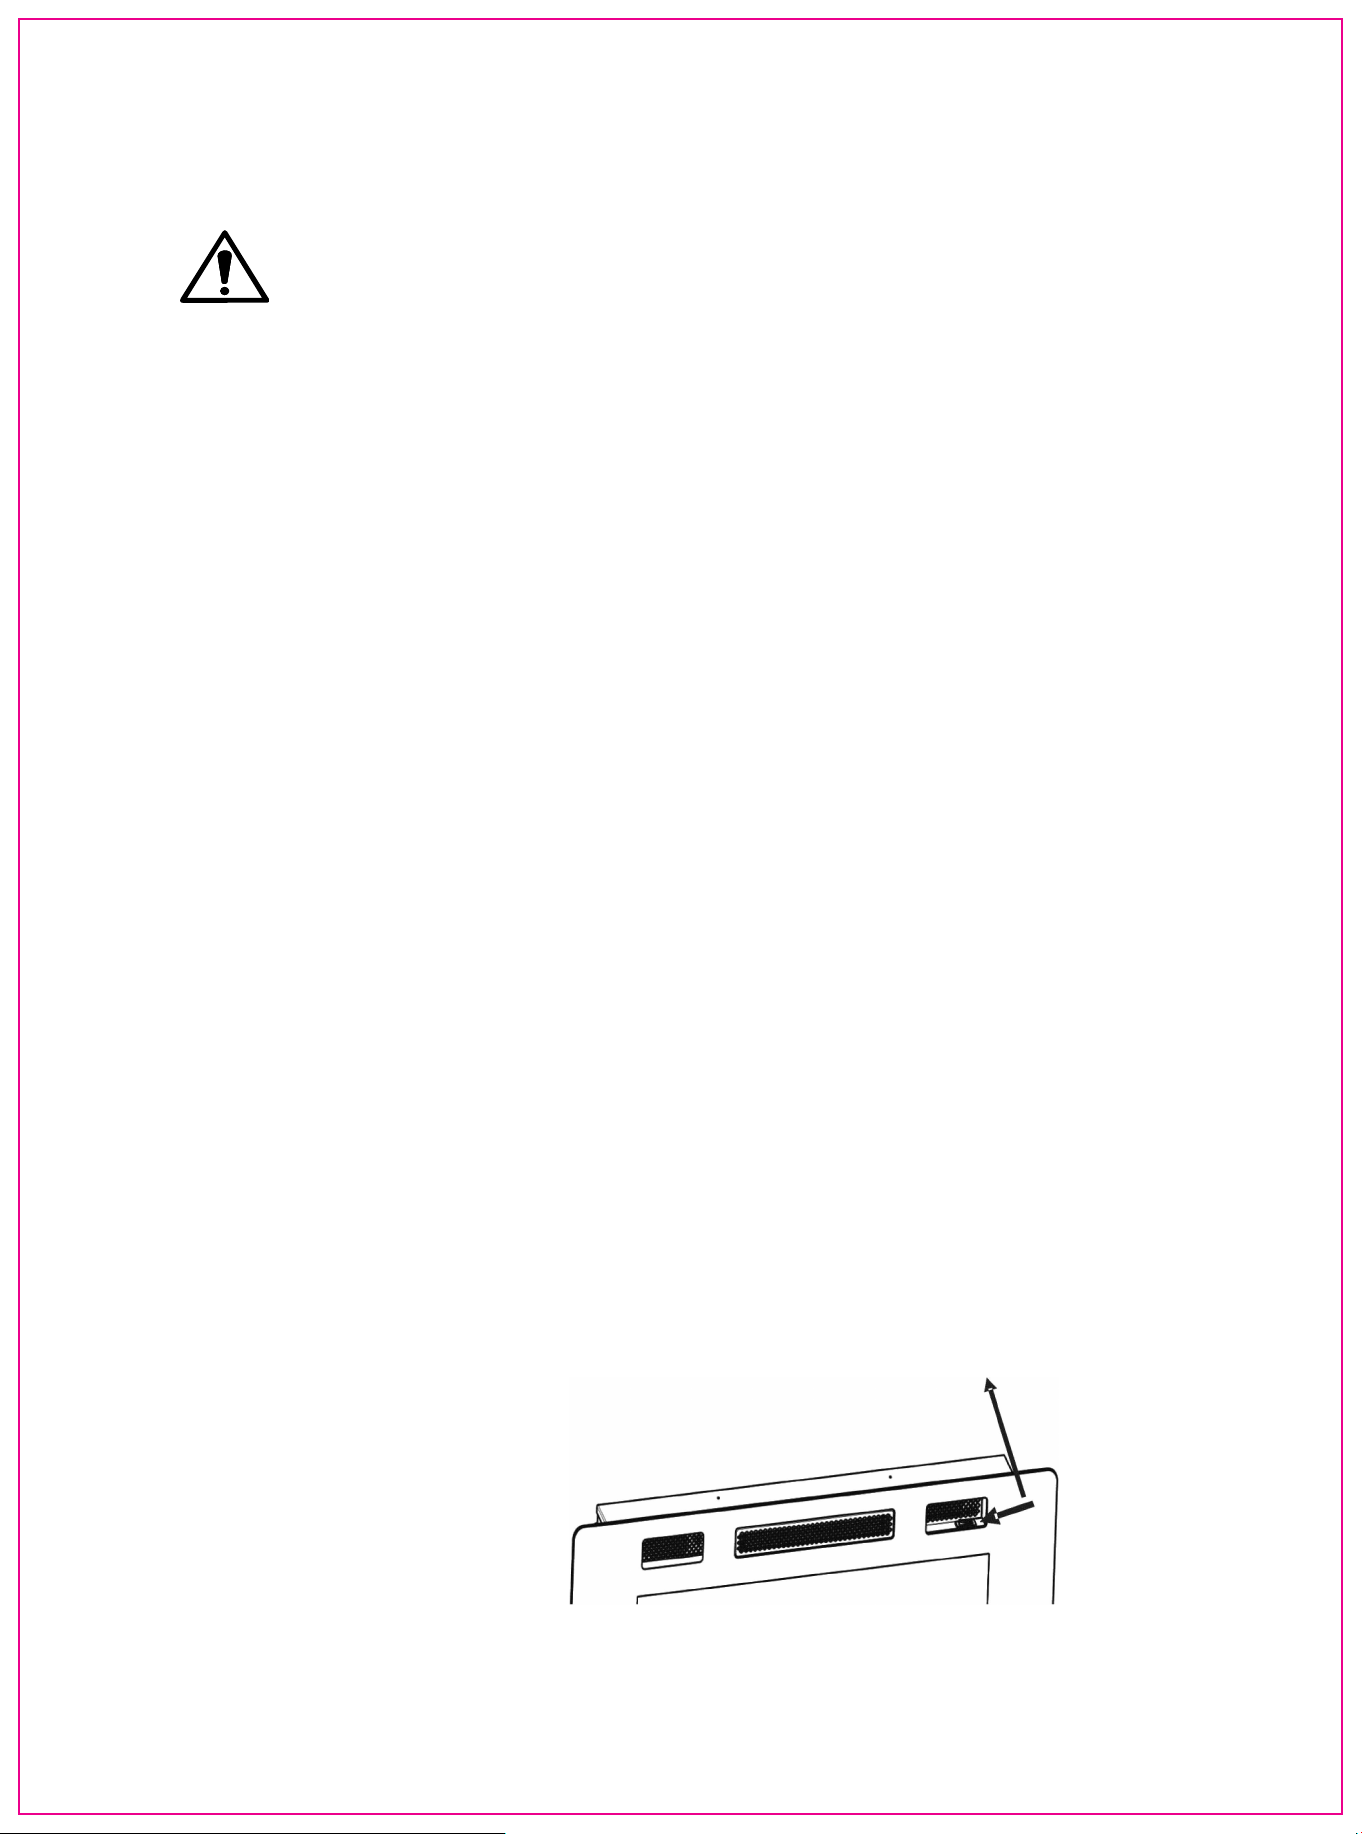
4.0 FINISHING
GRILLE MAY BE HOT, DO NOT TOUCH AIR OUTLET UNTIL COOLED.
THE DOOR HOOKS ARE PART OF A SAFETY SYSTEM AND MUST BE
PROPERLY ENGAGED. DO NOT
OPERATE THE APPLIANCE WITH HOOKS DISENGAGED.
FACING AND/OR FINISHING MATERIALS MUST NOT INTERFERE WITH AIR
FLOW THROUGH AIR OPENINGS,
OPERATION OF OR DOORS OR ACCESS FOR SERVICE. OBSERVE ALL
CLEARANCES WHEN APPLYING COMBUSTIBLE
MATERIALS.
BEFORE DOOR IS REMOVED TURN THE APPLIANCE OFF AND WAIT UNTIL
APPLIANCE IS COOL TO THE TOUCH. DOORS
ARE HEAVY AND FRAGILE SO HANDLE WITH CARE.
NOTE: Glass front must be removed and the appliance must be
finished in its final location before the media bed kits are installed.
Media bed kits may have sharp edges, wear safety glasses and
gloves when handling.
Press the indicator to turn on the appliance, and press the other
side to turn it off.
Note: Make sure the Main Power Switch is turned on before
operating.
MAIN POWER BUTTON
Once the appliance has been plugged into a grounded electrical outlet, it is
ready to operate.
The main power switch for all types is located on the front right of the
fireplace.
5.0 OPERATING INSTRUCTIONS
5.1 MAIN POWER BUTTON
EN
22
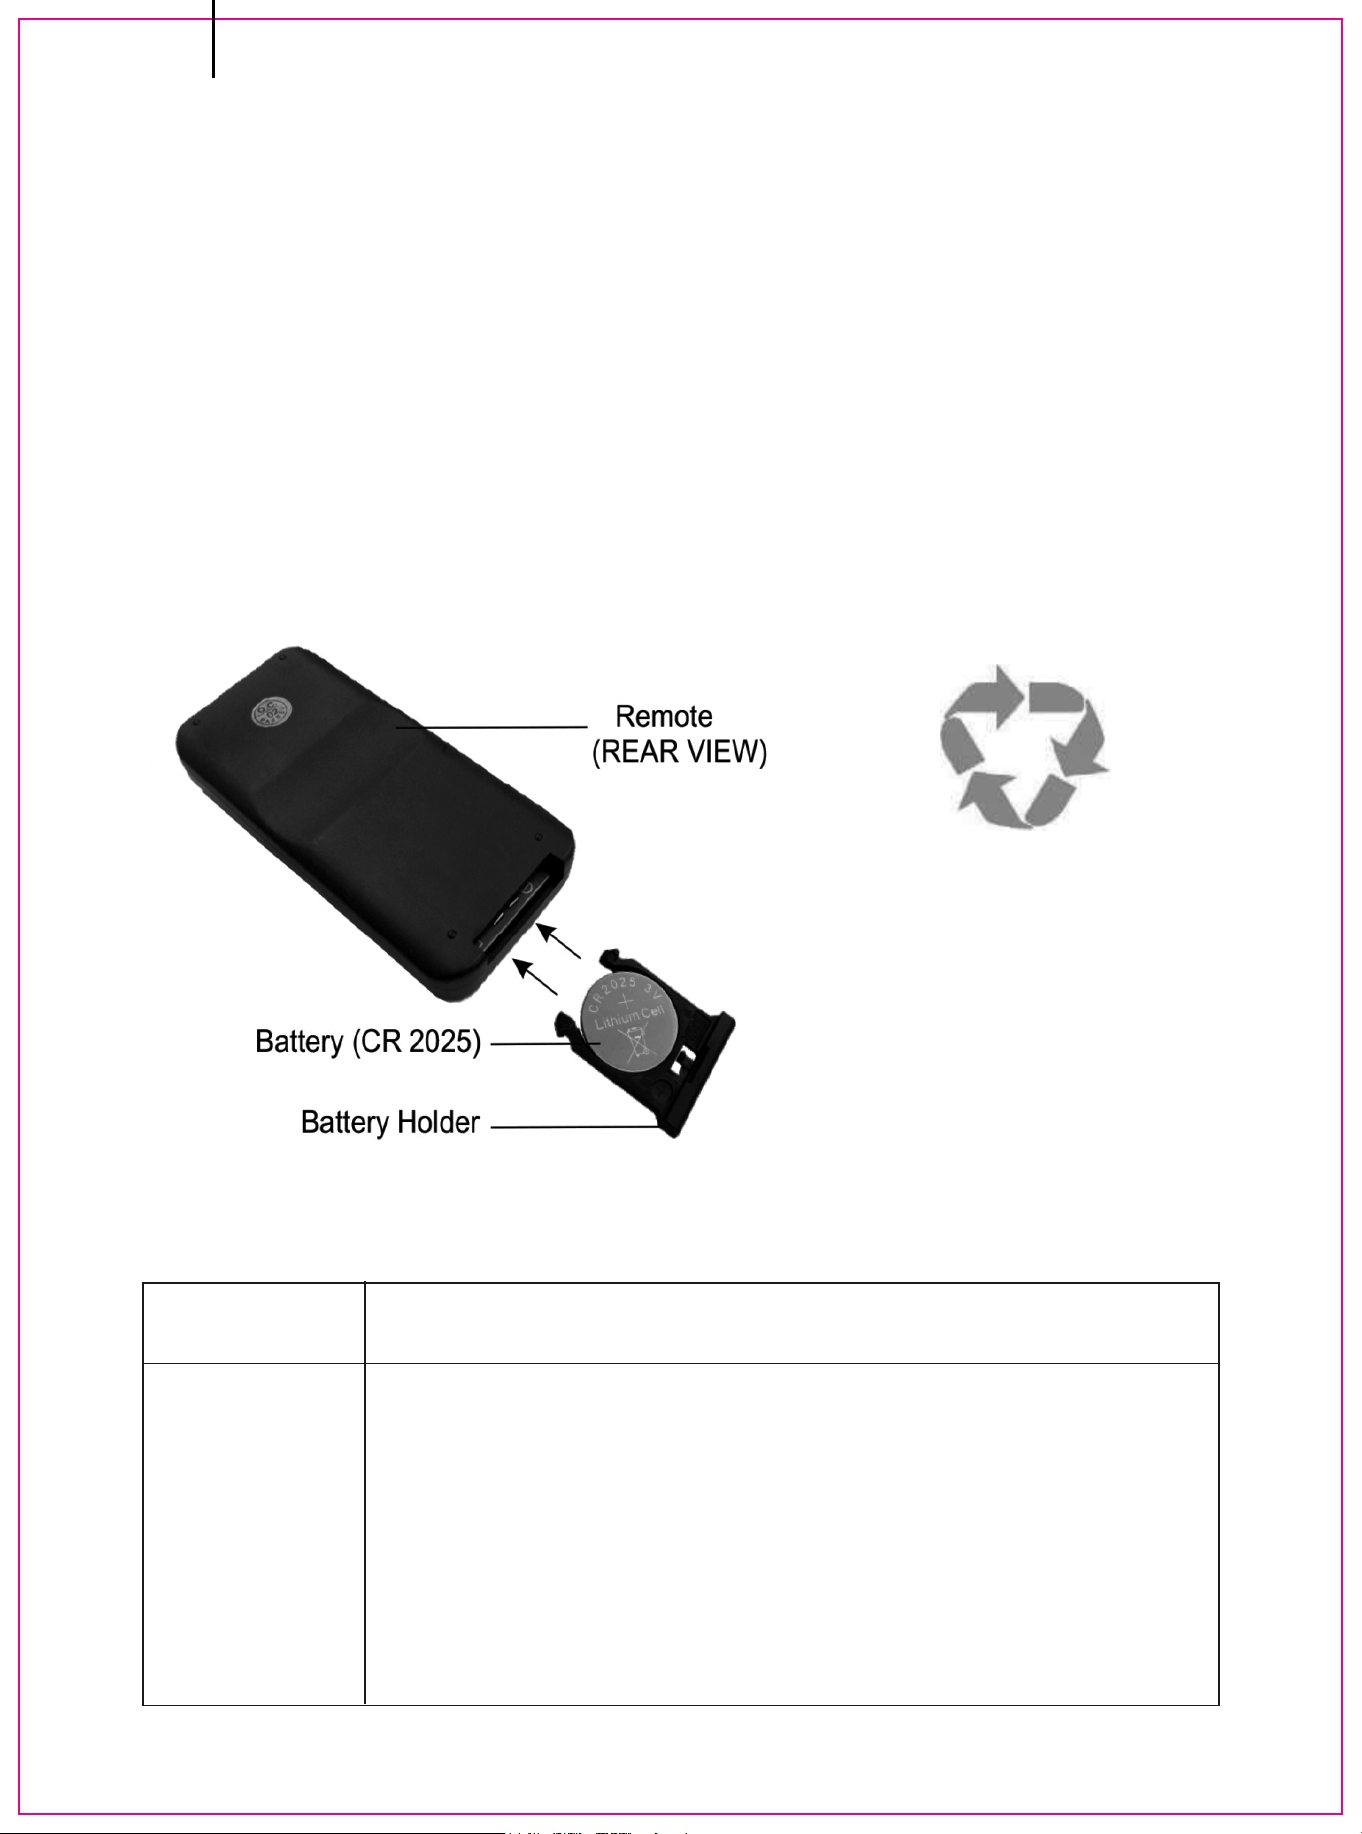
• Move the battery's transparent insulating piece away before using
the remote control.
(Main Power Switch must be turned ON before using the remote control.)
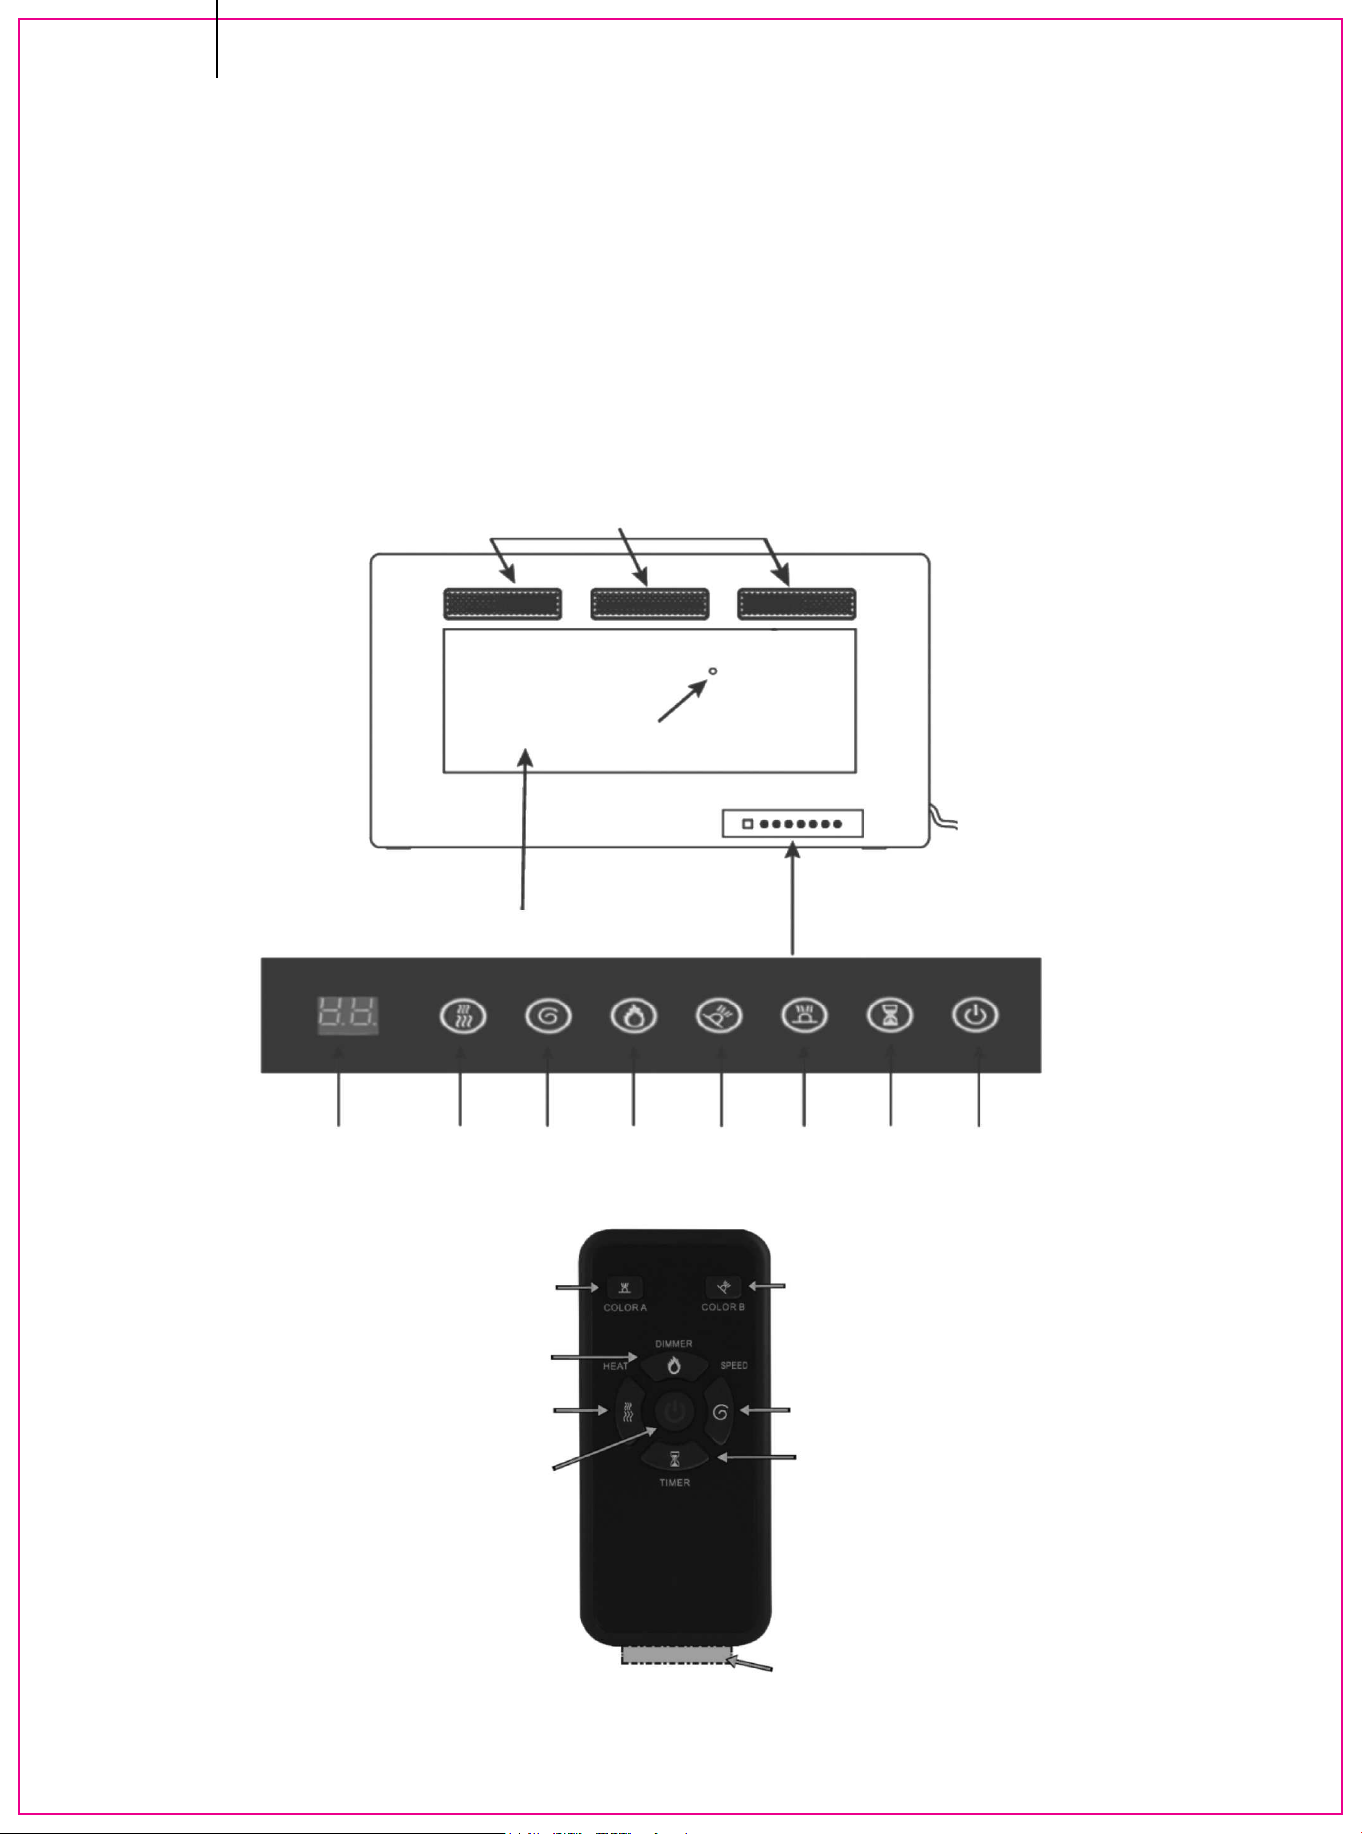
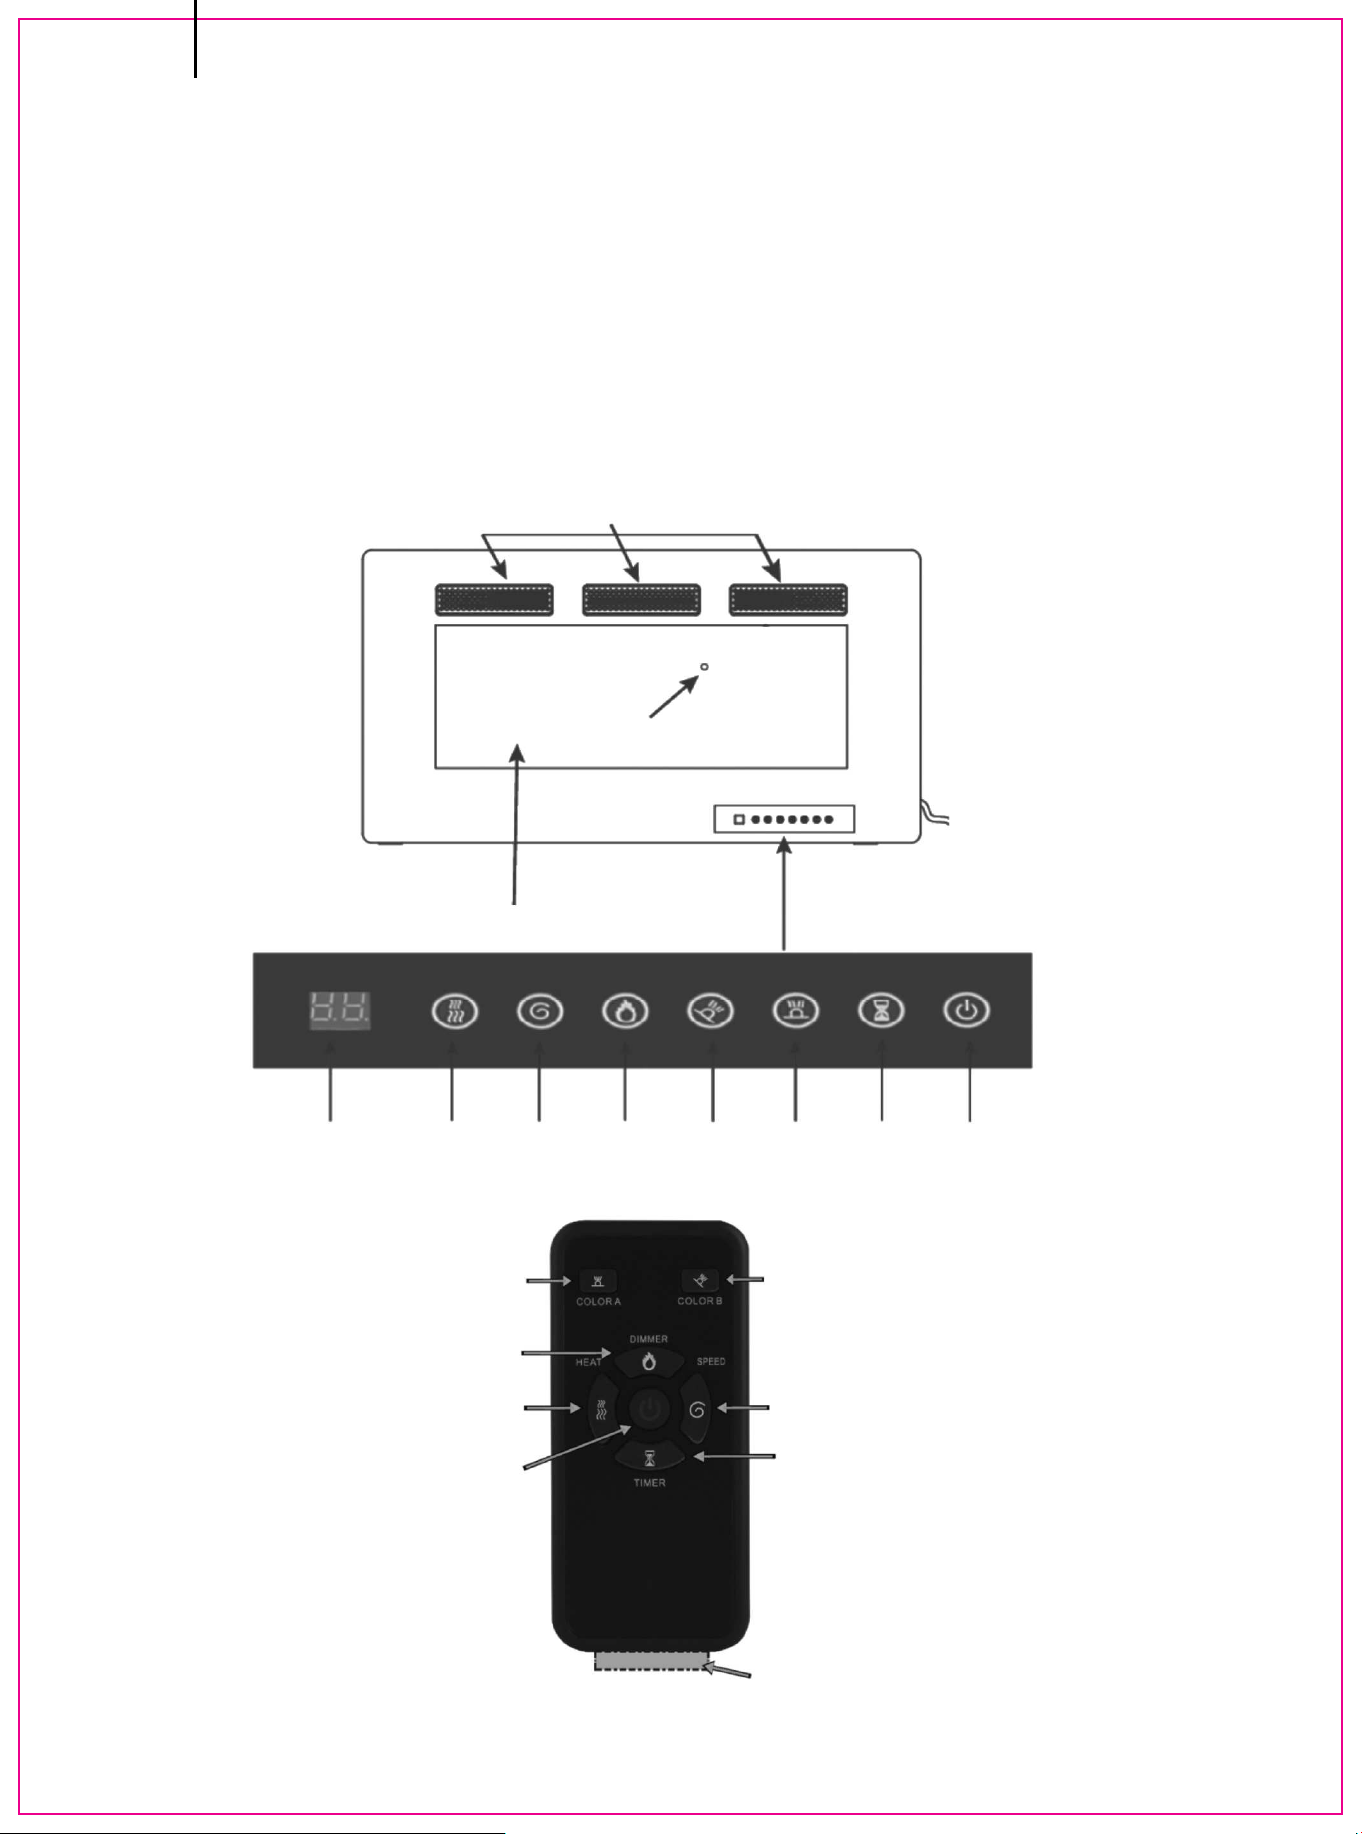
The touch display panel is shown on the bottom right of the front of the
appliance.
5.2 CONTROL PANEL / REMOTE CONTROL
OPERATION
EN
Air Inlet
Heater Vent
Remote Receiver
Flame
Display Heater Flame
Speed
Dimmer Color
B
Color
A
Timer Power
ON/OF
Control Panel
COLOR A
DIMMER
HEAT
POWER
ON/OFF
TIMER
INSULATING PIECE
REMOTE CONTROL
FL AME
SPEED
COLOR B
23
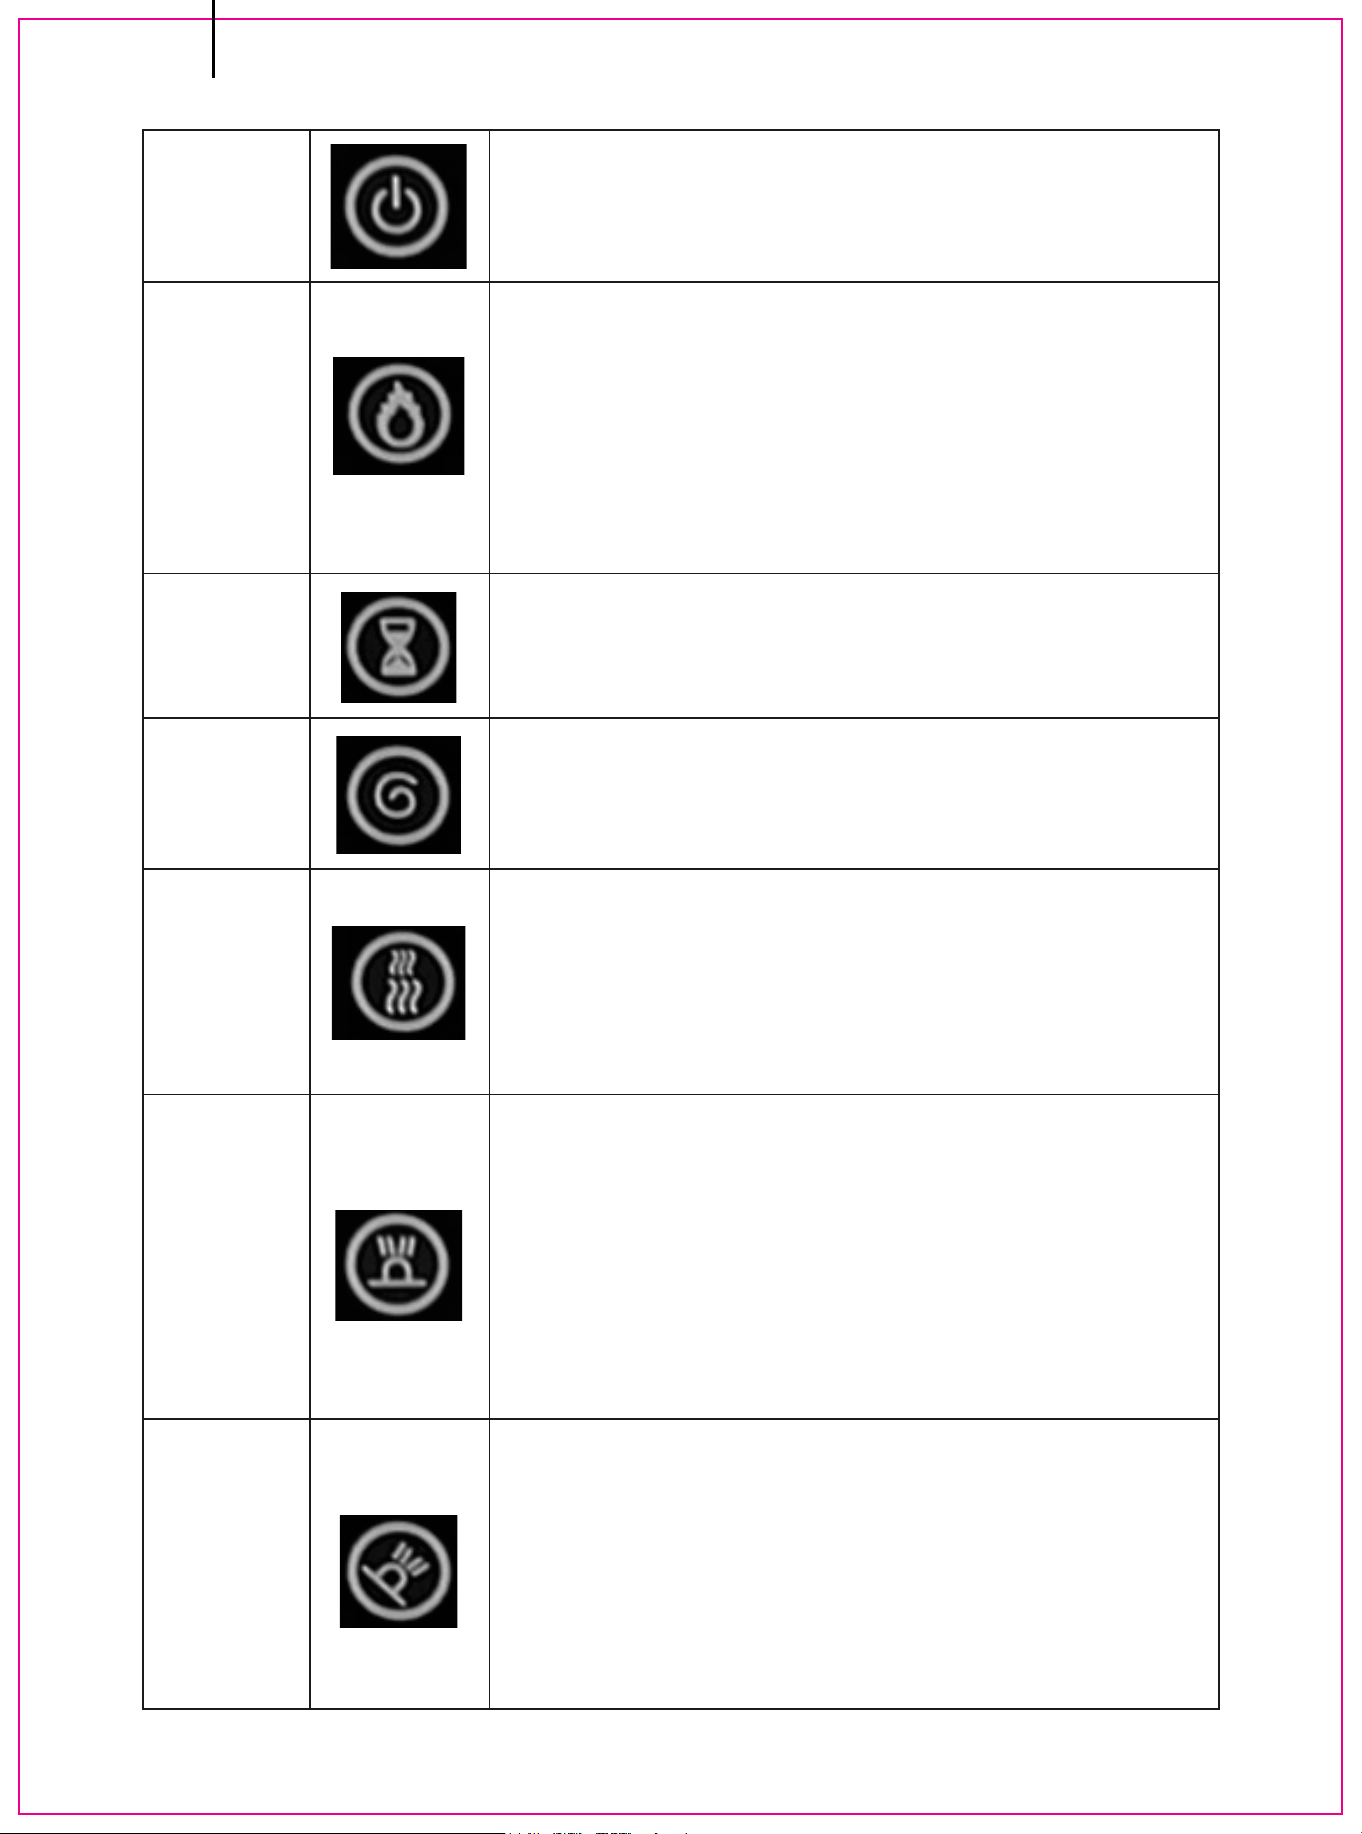
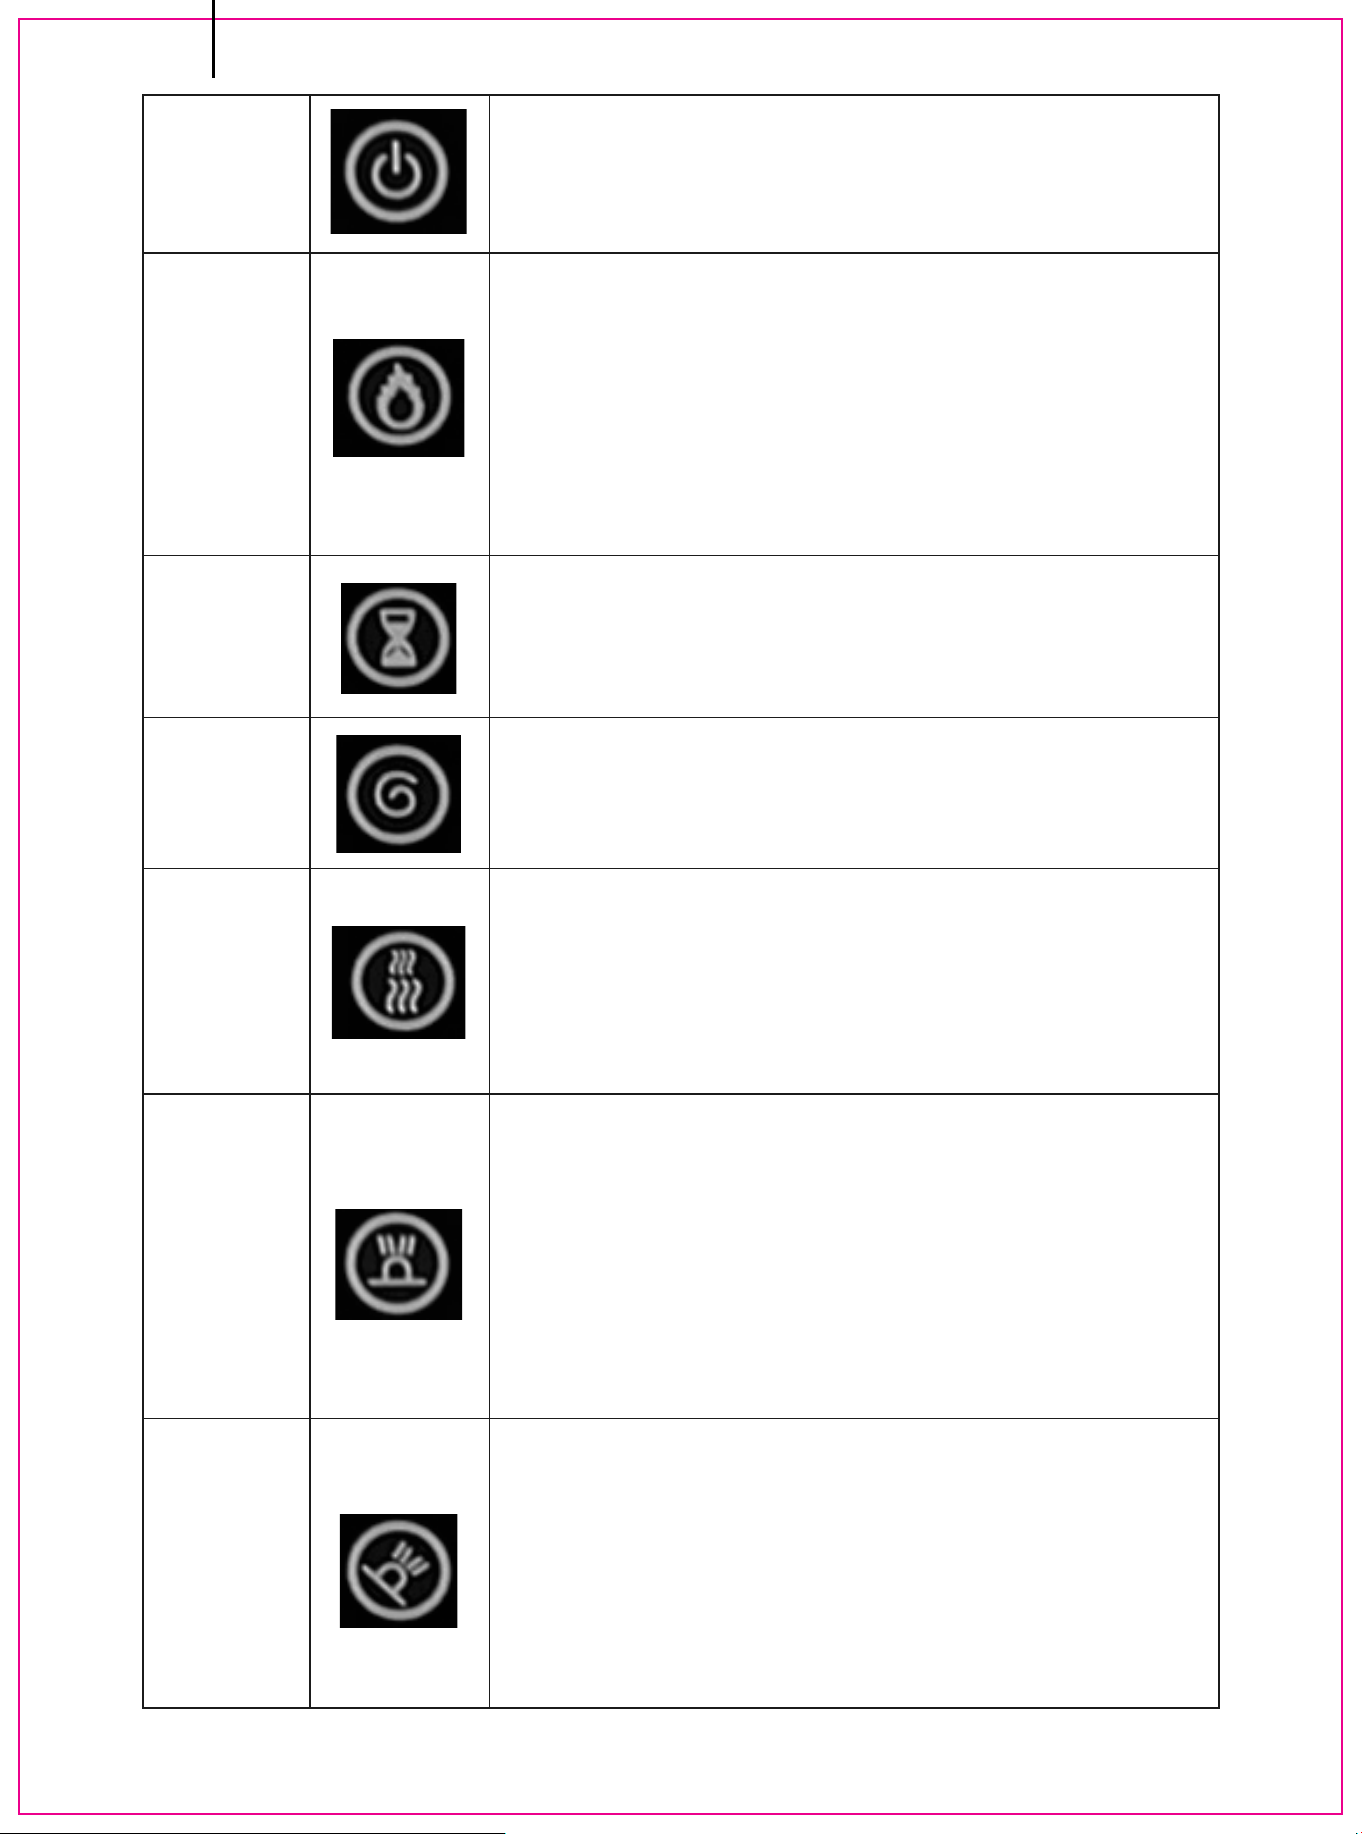
Turn the appliance ON/OFF.
NOTE: Make sure the main switch fireplace is
turned on before operating.
Control Flame brightness.
5 Settings: ( L1-L2-L3-L4-L5 ) Flame dims
from L1 to L5. L5 is the brightest setting.
NOTE: Long press the "DIMMER" button for 6
seconds, and the appliance will go into sleep
mode: all the lights are off, but the heating
function goes on.
Long-press again (>6 sec.) to restore the
appliance to the normal mode.
Control the Timer.
8 Settings: ( 1h, 2h, 3h, 4h, 5h, 6h, 7h, 8h)
Press button until reach desired setting.
Control Flame speed.
5 Settings: ( U1-U2-U3-U4-U5 ) Flame speed
from U1 to U5. U5 is the fastest setting
Control the Heater.
Press the button to initiate the heater.
(OFF) no heater or blower.
(-),heater blows warm air(750W)
(--),heater blows hot air(1500W)
NOTE: Heater functions cycle from (OFF) (-)(--)
Control the flame color.
12 Settings: l.red 2.yellow 3.blue 4.orange
5.red & yellow 6.red & blue7.red & white
8.yellow & blue 9. yellow & white l0.blue &
white 11.red & yellow & blue 12.multi-color
NOTE: When you press the button for 6
seconds, the indicator will show digital "0", and
the flame color and brightness will be changed
automatically.
Control the flame bed color.
12 Settings: 1.red 2.gentian blue 3.green
4.pink 5.yellow 6.cyan 7.purple 8.white
9.saffron 10.sky blue 11.verdant 12.capri blue
NOTE: When you press the button for 6
seconds, the indicator will show digital "0", and
the flame color and brightness will change
automatically.
POWER
DIMMER
TIMER
FLAME
SPEED
HEATER
COLOR A
COLOR B
EN
24
WARNING: Do not move or remove the mesh trim panel, when the appliance
is plugged in and operating. This will cause the remote control and touch
panel to no longer function.
NOTICE: When the heater is turned on for the first time, a slight odor may
be present. This is normal and should not occur again unless the heater is
not used for a long period of time.
NOTICE: To improve the heater's performance, aim the remote control at the
front of the fireplace. DO NOT press the buttons too quickly. Give the unit
enough time to respond to each command.
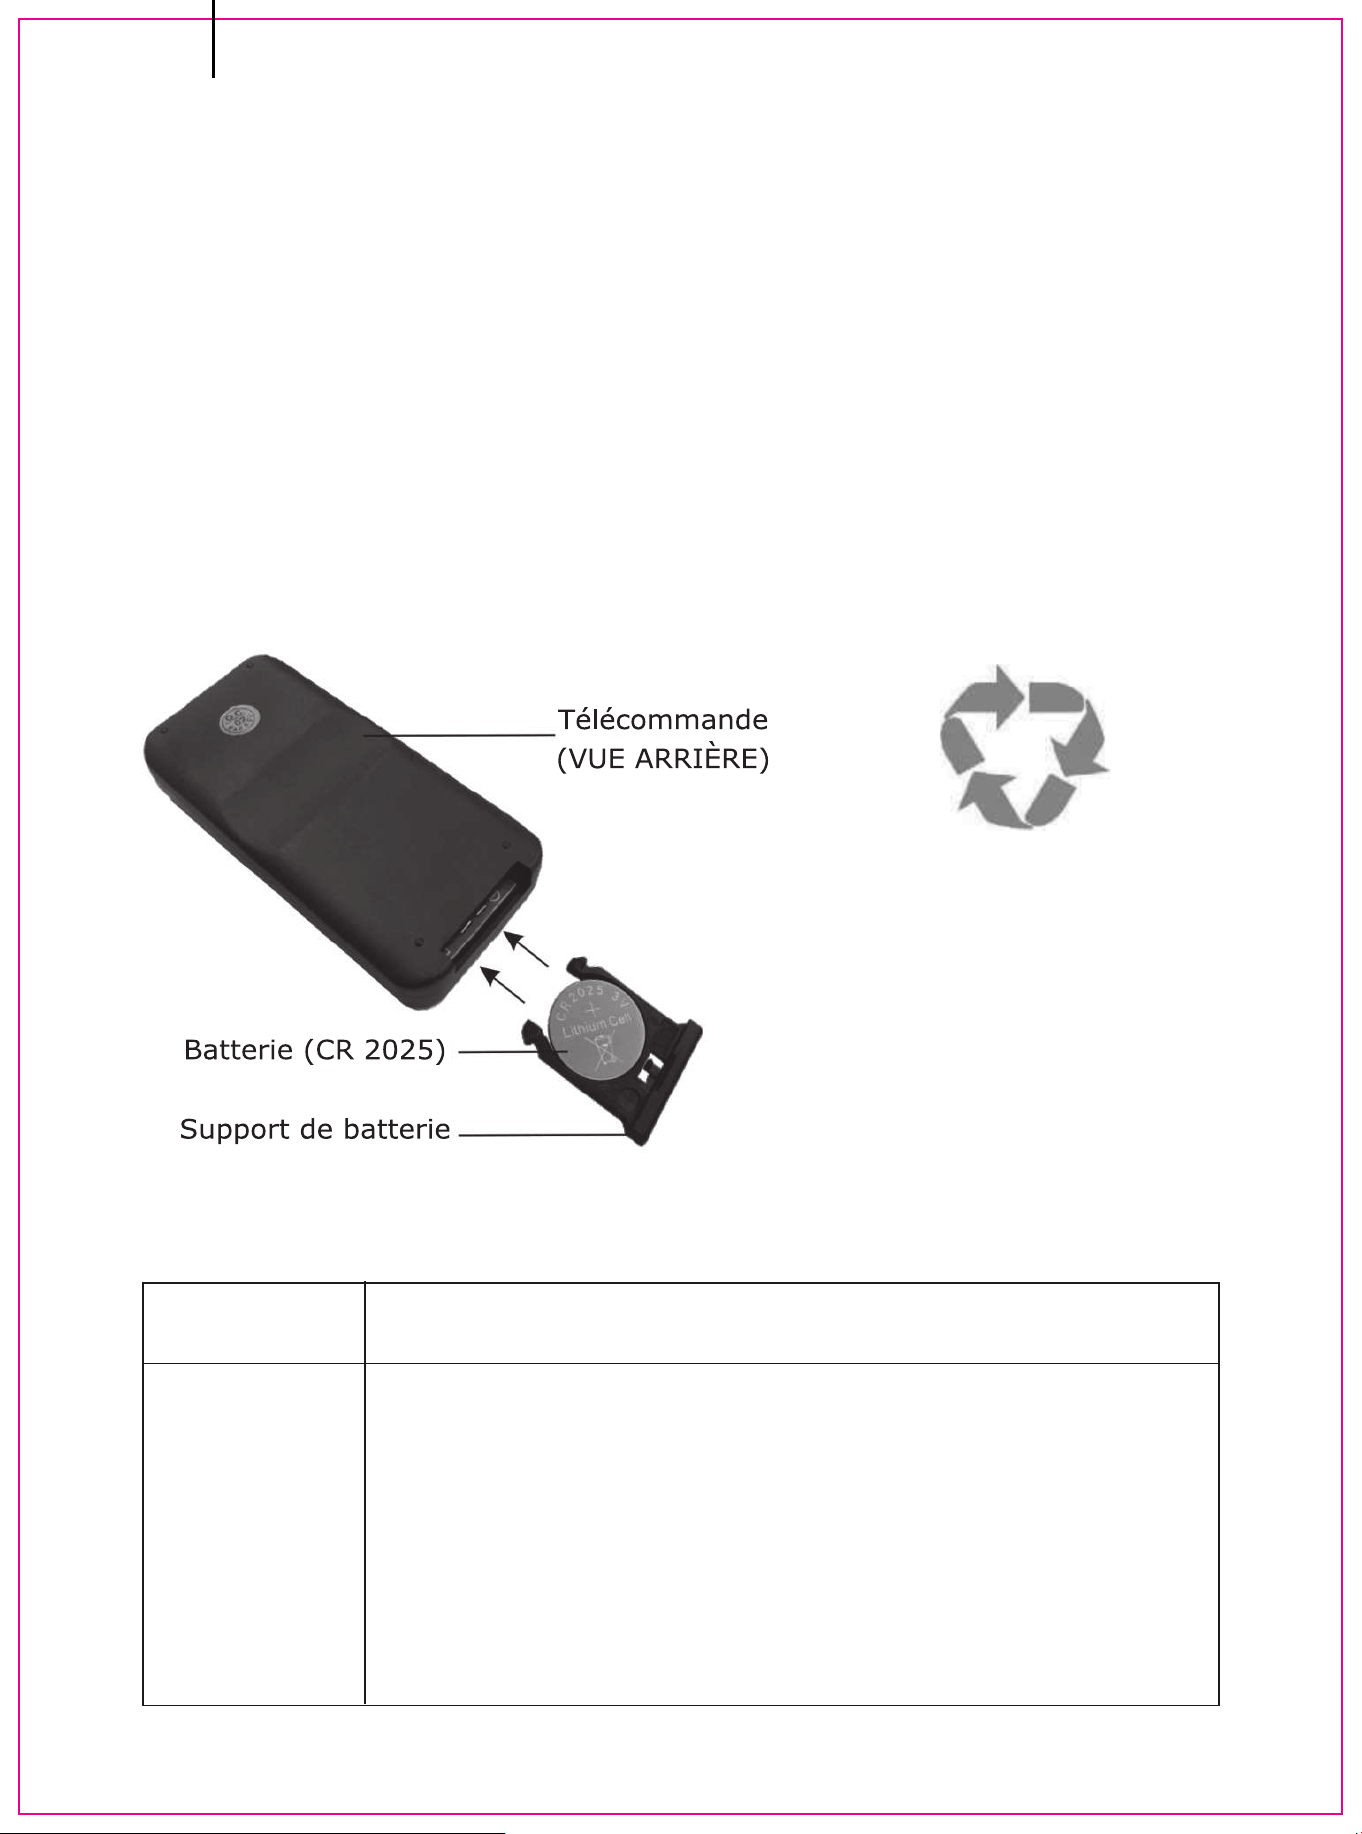
• Move the battery's transparent insulating piece away before using.
5.3 REMOTE CONTROL
6.0 TROUBLE SHOOTING GUIDE
PROBLEM SOLUTION
Battery must be
recycled or disposed
of properly. Check
with your Local
Authority or Retailer
for recycling advice in
your area.
The
mounting
bracket
cannot be
removed
I.The mounting bracket is pre-attached. Unscrew the two
screws at both sides of the fireplace with a Phillips
screwdriver, and then remove the pre-attached mounting
bracket.
2.If the problem is still not solved, please ask qualified
technician for help.
Remote
(REAR VIEW)
Battery (CR 2025)
EN
Battery Holder
25
The control
panel
functions do
not work.
1 .Make sure the Power Switch on the control panel is
turned on before operation.
2.Make sure you have reconnected the data cable which
was pulled out when you removed the glass frame.
3.If the problem is still not solved, please ask qualified
technician for help.
Sudden
power outage
during the
heating
process
1.Don't cover the air outlet.
2.Unplug the unit, and wait for 10 minutes and try to
open it again.
3.If the problem is still not solved, please ask qualified
technician for help.
The appliance
does not blow
hot air when
it turns on
and off.
Heater
doesn't turn
on with the
power switch.
This is normal. The fans blow cool air while the appliance
gradually heat up. The fans blow after the appliance turn
off to cool the appliance and prevent overheating.
1. Main Power
supply switch is
off.
2. Circuit breaker
has been tripped.
3. Heater is
unplugged from
the wall outlet.
4. Power cord or
power plug are
damaged.
5. Power outlet for
power plug prong
is loose.
Contact a qualified electrician to
check all wiring for loose
connections.
Check the power outlet and
replace it with a new one.
Contact a qualified electrician to
replace the power
Make sure the power cord is
plugged into a functioning and
properly grounded 15 Amp 120V
AC electrical outlet.
Too many appliances are on this
circuit. Make sure that the
electrical supply for this unit is an
independent circuit.
Turn the main power supply switch
to “ON" position.
6. Loose wiring.
EN
26
Heater is on.
but no flame
or low flame
intensity.
Flame are
frozen
Excessive
noise in the
lower portion
of the
heater.
Heater
system
doesn't work
1. Heater switches
is on, but Flame is
not on.
2. Flame Adjusting
knob is at low
setting.
Turn the knob to the maximum
setting.
3. Loose wiring.
1. Flame element
is not attached to
the motor.
Contact a qualified electrician to
check all wiring for loose
connections.
Long-press the "DIMMER" button
for 6 seconds, the appliance will go
into sleep mode. All the lights off,
the heating function goes on.
Long-press for 6 seconds again,
the appliance will back to normal
mode.
Ask qualified technician for help.
2. Rotation motor
is defective.
Ask qualified technician for help.
2. Motor is
defective.
Ask qualified technician for help.
1. Flame element
isn't seated
properly
Ask qualified technician for help.
1. Heater power
switch is off.
Turn the heater power switch to
the "ON" position.
3. Loose wiring.
Check all wiring for loose connections.
Contact a qualified electrician.
4. The air inlet or
air outlet is blocked
completely.
Leave adequate space around the
unit. Remove the blockage, on or
in front of the air outlet.
2. Heater system
is overheated.
Maybe the heater is covered or air
inlet or air outlet is blocked;
remove the clothes or the blockage
and turn off the power switch and
unplug it. Wait 10 minutes, and
then turn the heater on again.
EN
27
‘HEAT’ switch
has been
flipped on,
but there is
no airflow.
Fan runs but
no heat is
coming out.
The remote
control does
not work.
1. The heater
system is
overheated.
Temperature Limit
thermostat is
cutoff.
2. Fan motor is
defective.
Ask qualified technician for help.
3. Fan blower is
balanced badly.
4. The "POWER"
and the "HEAT"
switches are not
turned on.
Ask qualified technician for help.
Check the air inlet and outlet. Turn
off the power switch and unplug it.
Wait 10 minutes, and then turn the
heater on again.
Turn these two switches on.
1. The battery is
not properly
installed.
Make sure the battery is properly
installed. Move the battery's
transparent insulating piece away
before using.
1. Loose wiring. Ask qualified technician for help.
2. Bad heating
element.
Ask qualified technician for help.
2. Not pointing to
the right position.
Aim the remote control at the
receiver.
3. There is an
obstacle in front of
the machine.
Remove the obstacles. Items
between the remote control and
the remote-control receiver will
block the signal.
4. Press the
remote control
buttons too
quickly.
Don't press the remote-control
buttons too quickly. Give the unit
enough time to respond to your
commands.
3. Build up of dirt
on the fans
clean all fans
4. Heater fan is
defective.
Ask qualified technician for help.
EN
28
There is an odor
coming from the
heater.
The heater may emit a slight, harmless odor when
first used. This is a normal condition caused by initial
heating of the internal parts and will not occur again.
NOTE: For the most of functional problems, you can unplug the unit wait
for 10 minutes and plug it again, the machine will reset to the initial
status (product originals).
If the problem is still not solved, ask qualified technician for help.
DISCONNECT POWER AND ALLOW HEATER TO COOL BEFORE
ATTEMPTING ANY MAINTENANCE OR CLEANING TO REDUCE THE
RISK OF FIRE, ELECTRIC SHOCK OR DAMAGE TO PERSON.
THE FIREPLACE SHOULD NOT BE OPERATED WITH AN
ACCUMULATION OF DUST OR DIRT ON OR IN THE UNIT, AS THIS
CAN CAUSE A BUILD UP OF HEAT AND SUBSEQUENT EVENTUAL
DAMAGE. FOR THIS REASON THE HEATER MUST BE INSPECTED
REGULARLY, DEPENDING ON CONDITIONS AND AT LEAST AT
YEARLY INTERVALS.
The partially reflective glass is cleaned in the factory during the assembly
operation. During shipment, installation, handling, etc., the partially
reflective glass may collect dust particles; these can be removed by dusting
lightly with a clean dry cloth.
To remove fingerprints or other marks, the partially reflective glass can be
cleaned with a damp cloth. The partially reflective glass should be
completely dried with a lint-free cloth to prevent water spots. To prevent
scratching, do not use abrasive cleaners.
7.0 MAINTENANCE
7.1 PARTIALLY REFLECTIVE GLASS
CLEANING
EN
29
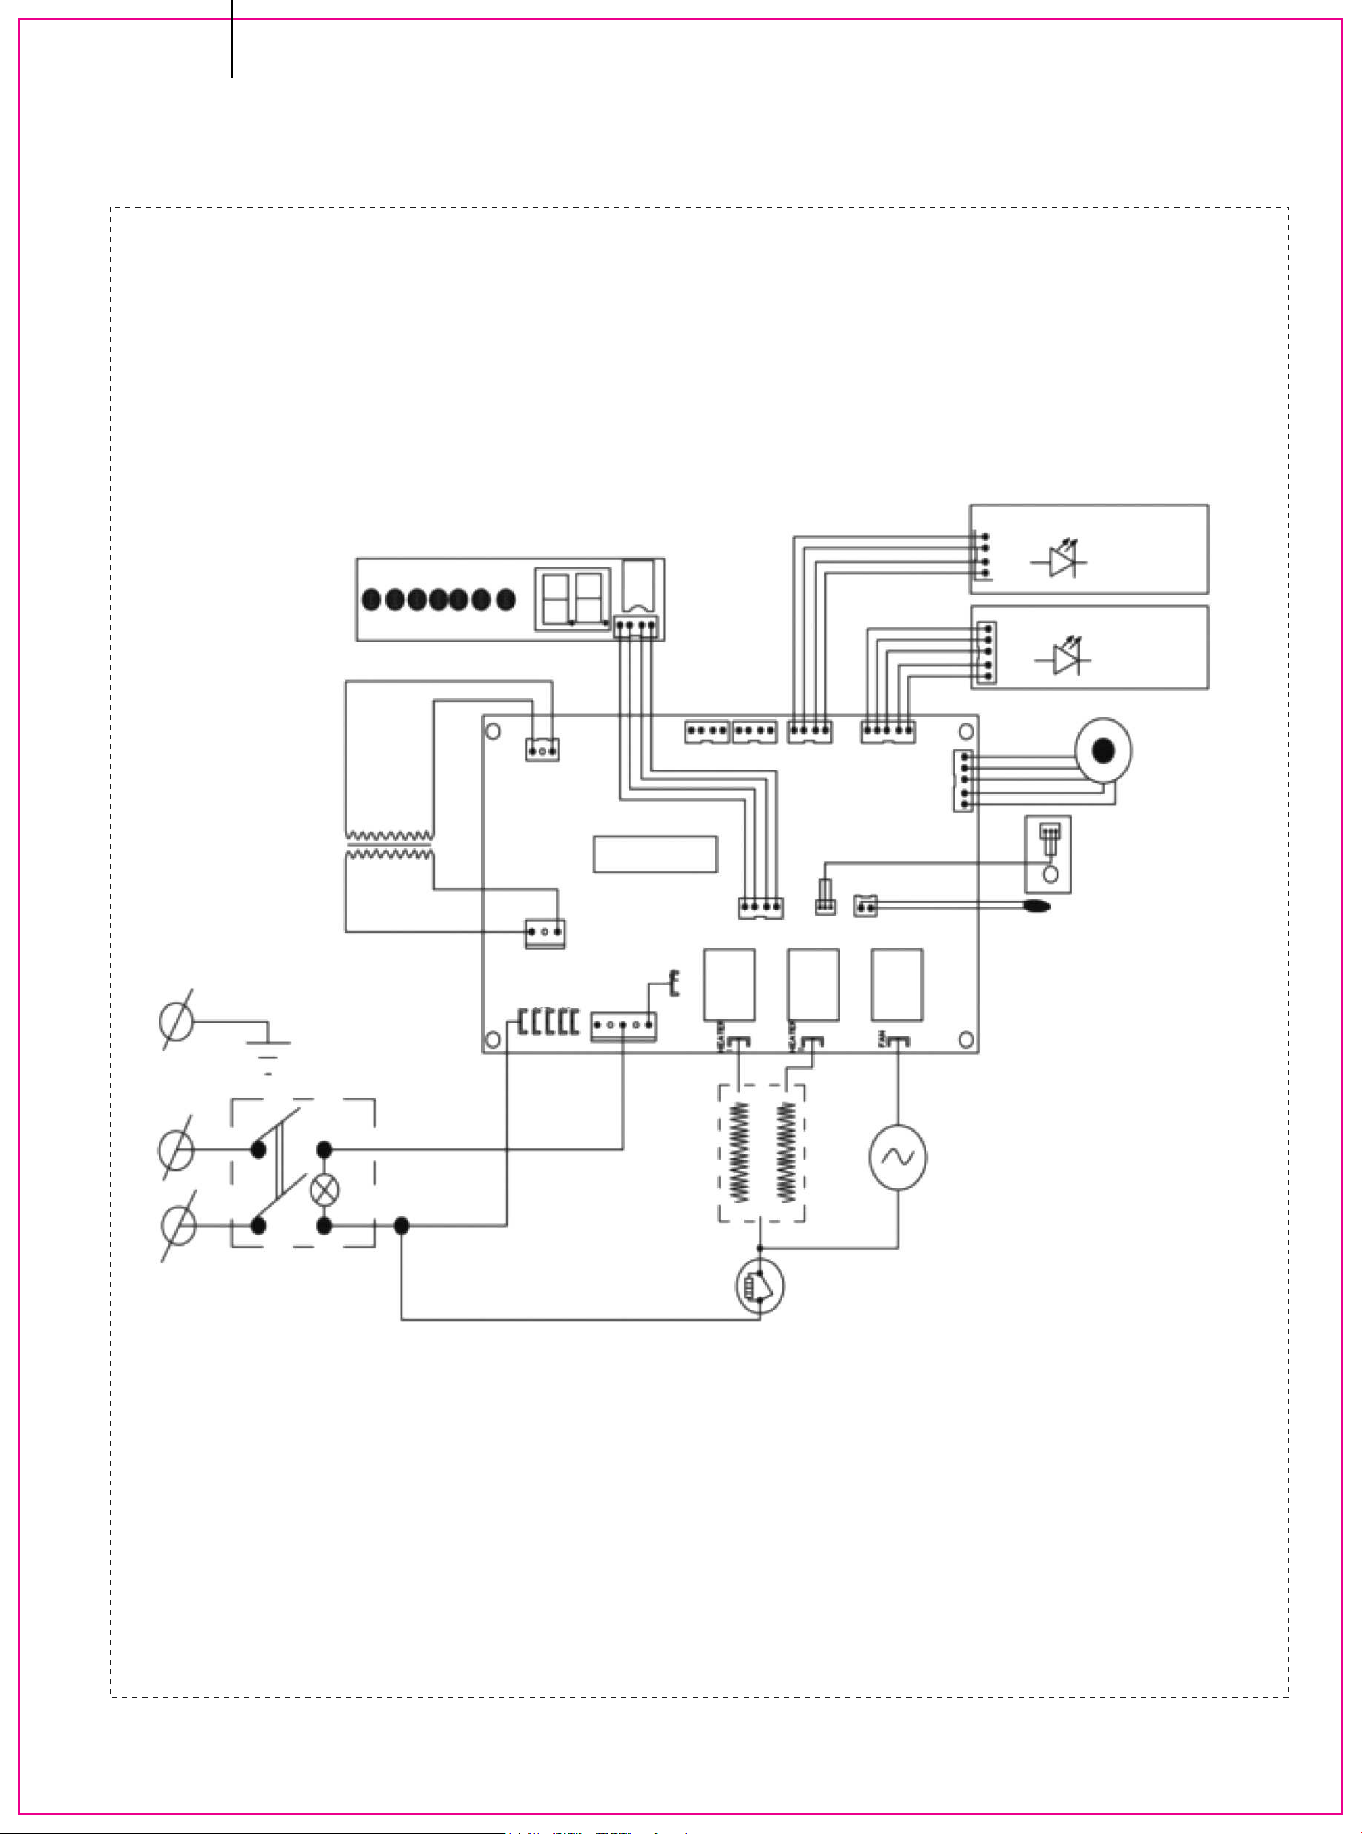
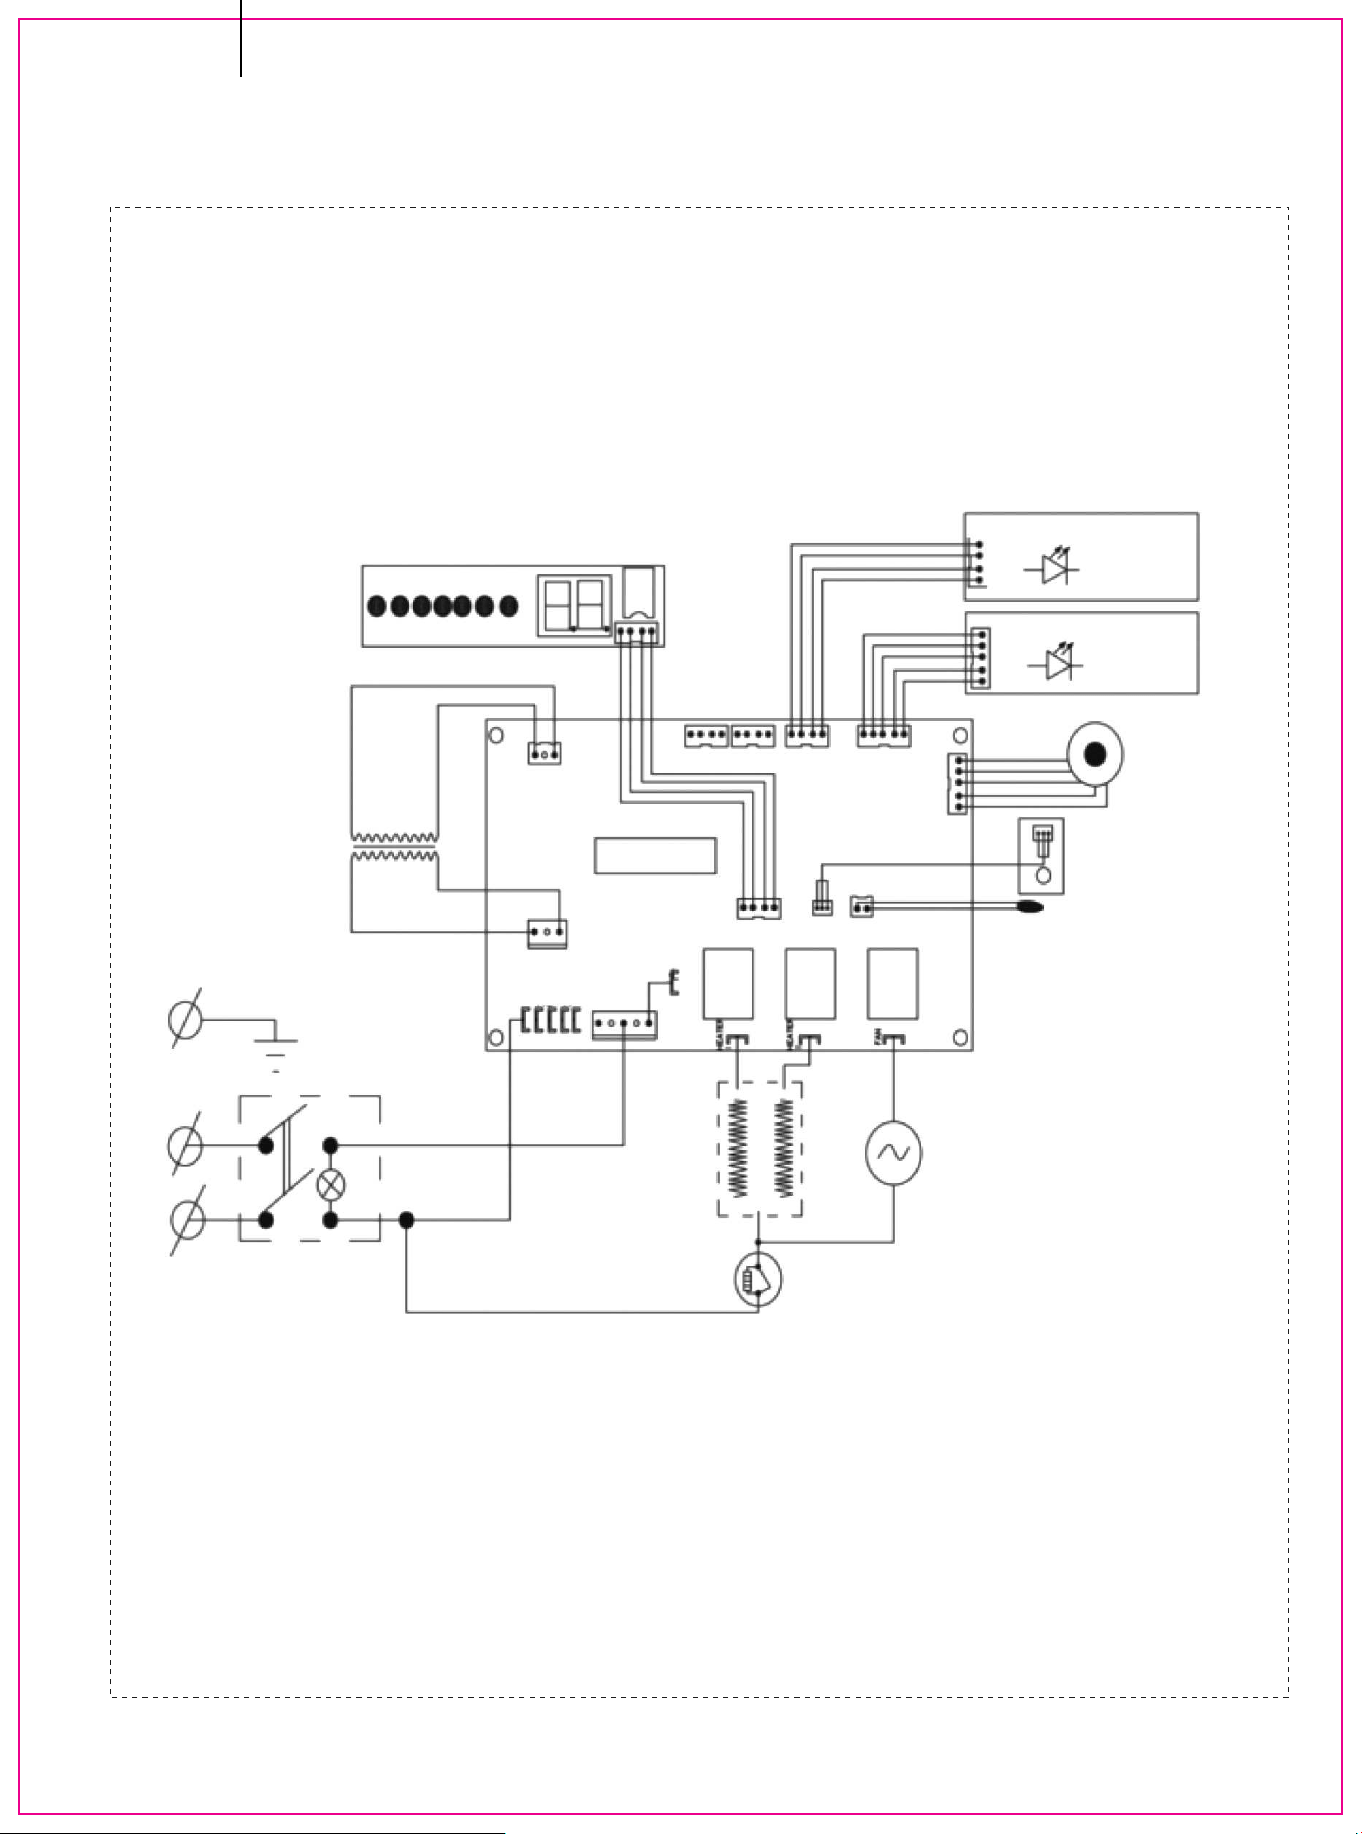
7.2 SCHEMATIC DIAGRAM
LAMP PCB FOR FLAME BED
LAMP PCB FOR FLAME
Power supply
AC-N
AC-C
Key board
Power Switch
G
L
N
STEPPER MOTOE
Receplor PCB for
Remobe Conboler
Transformer
for PCB
Heater Element
Fan-Motor
EUPERATURE
SENSOR
Temperature Umit
Contbrol (PTC Type
Themostat)
EN
30

CERTIFIÉ SELON LES NORMES NATIONALES
CANADIENNES ET AMÉRICAINES : ETL
FR
Contactez-nous !
Contactez d’abord notre service à la clientèle amical pour l’aide.
E-mail
FR : cs.fr@costway.com
Avant de Commencer
• Veuillez lire attentivement toutes les instructions.
• Conservez les instructions pour la référence future.
• Séparez et comptez toutes les pièces et les outils de matériel.
• Lisez attentivement chaque étape et suivez le bon ordre.
• Nous recommandons que, si possible, tous les éléments soient assemblés
à proximité de la zone dans laquelle ils seront utilisés, afin d'éviter de
déplacer inutilement le produit une fois assemblé.
• Placez toujours le produit sur une surface plane, solide et stable.
• Gardez toutes les petites pièces et le matériel d'emballage de ce produit
hors de portée des bébés et des enfants car ils pourraient provoquer un
risque grave d’étouffement.
Ne retournez pas cet article.
AUCUNE VENTILATION REQUISE
ATTENTION
Lisez et comprenez l'intégralité de ce manuel du
propriétaire, y compris toutes les informations de
sécurité avant de brancher ou d'utiliser cet
appareil. Le non-respect de cette consigne peut
entraîner un incendie, un choc électrique ou des
blessures graves.
31

CONSIGNES DE SÉCURITÉ
IMPORTANTES
AVERTISSEMENT
Ces instructions doivent être lues attentivement avant l'installation et
conservées par l'utilisateur. Le livret doivent être conservées et remises aux
nouveaux utilisateurs en cas de besoin. Le Fabricant se réserve le droit de
modifier les caractéristiques du produit sans préavis. Les données
techniques sont données à titre indicatif.
1.Cet appareil est chaud pendant le fonctionnement et peut provoquer de
graves brûlures en cas de contact.
2.N'utilisez pas l'appareil tant que vous n'avez pas lu et compris les
instructions d'utilisation. Le non-respect des consignes d'utilisation de
l'équipement peut entraîner un incendie ou des blessures.
3.Placez les matériaux combustibles tels que les meubles, les oreillers, la
literie, le papier, les vêtements et les rideaux à au moins 3 pieds (0,9 m) de
l'avant de l'appareil et loin des côtés et de l'arrière. AVERTISSEMENT : Afin
d'éviter une surchauffe, ne couvrez pas l'appareil de chauffage. Le
dégagement peut être inadéquat lorsqu'il est installé dans un véhicule
récréatif avec la glissière fermée.
4.Risque de brûlures. L'alimentation de l'appareil doit être coupée et
l'appareil doit pouvoir refroidir avant l'entretien. Pour débrancher l'appareil
de l'alimentation électrique, éteignez les contrôleurs, puis retirez la fiche de
la prise.
5.N'installez pas de composants endommagés, incomplets ou de
remplacement.
6.Les jeunes enfants doivent être surveillés attentivement lorsqu'ils se
trouvent dans la même pièce que l'appareil. Les tout-petits, les jeunes
enfants et les autres personnes peuvent être sensibles aux brûlures par
contact accidentel.
7.Pour éviter toute ingestion accidentelle, les kits doivent être tenus à l'écart
des enfants et des nourrissons.
8.La télécommande contient de petites piles. Tenez-les éloignés des enfants.
En cas d'ingestion, consulter immédiatement un médecin.
9.N'installez pas la batterie à l'envers, ne la chargez pas, ne la mettez pas
au feu ou ne la mélangez pas avec des batteries usagées ou d'autres types
de batterie - cela pourrait exploser ou fuir et causer des blessures.
FR
32

10.Assurez-vous d'avoir mis en place des mesures de sécurité adéquates pour
protéger les nourrissons/tout-petits du contact avec des surfaces chaudes.
11.Les compartiments de commande, le ventilateur de circulation et son
passage dans l'appareil doivent être maintenus propres. L'appareil doit être
inspecté au moins une fois par an par un personnel qualifié avant utilisation.
12.Cet appareil ne doit en aucun cas être modifié.
13.N'utilisez pas cet appareil si l'une de ses pièces a été en contact avec de
l'eau. Appelez immédiatement un technicien de service qualifié pour inspecter
l'appareil et remplacer toute pièce du système de commande qui a été en
contact avec de l'eau.
14.Ne faites pas fonctionner l'appareil si la porte vitrée est enlevée, fissurée ou
cassée. Le remplacement de la vitre doit être effectué par un technicien
qualifié.
15.Ne frappez pas et ne claquez pas la porte vitrée de l'appareil.
16.Gardez le matériel d'emballage hors de portée des enfants et jetez-le en
toute sécurité. Comme tous les sacs en plastique, ce ne sont pas des jouets et
doivent être tenus à l'écart des enfants et des nourrissons.
17.L'entretien doit être effectué uniquement lorsque l'appareil est débranché de
l'alimentation.
18.Débranchez toujours l'appareil lorsqu'il n'est pas utilisé.
19. N'utilisez pas cet appareil avec un cordon ou une fiche endommagé après
que l'appareil a été défectueux, tombé ou endommagé de quelque manière que
ce soit. Retournez l'appareil au centre de service agréé pour examen, réglage
électrique ou mécanique ou réparation.
20.N'utilisez pas l'appareil à l'extérieur.
21.Ne placez jamais l'appareil à un endroit où il pourrait tomber dans une
baignoire ou un autre réservoir d'eau.
22.Ne faites pas passer le cordon sous la moquette. Ne couvrez pas le cordon
avec des carpettes, des tapis de passage, etc. Disposez le cordon à l'écart des
zones à fort trafic pour éviter tout risque de trébuchement.
23.Connectez uniquement à des prises correctement mises à la terre.
24.N'insérez pas ou ne laissez pas d'objets étrangers pénétrer dans les
ouvertures de ventilation ou d'évacuation, car cela pourrait provoquer une
électrocution ou un incendie, ou endommager l'appareil.
25.Pour éviter un éventuel incendie, ne bloquez en aucune manière les prises
d'air ou les sorties d'air. Ne pas utiliser sur des surfaces molles, comme un
tapis, où les ouvertures peuvent se boucher.
26. Branchez toujours les appareils directement dans une prise murale.
N'utilisez jamais de rallonge ou de robinet d'alimentation amovible
(prise/multiprise).
FR
CONSERVEZ CES INSTRUCTIONS
33
1.0 LISTE DES PIECES
Non.
1
2
3
4
5
6
7
Quantité
1 pc
1 pc
1 pc
1 pc
Varie
1 pc
Varie
Description
Cadre avant
Cheminée électrique
Support de montage (pré-attaché)
Manuel
Objets décoratifs (cristal)
Télécommande (Batterie incluse)
Objets décoratifs (bûche)
FR
34
THIS INSTRUCTION BOOKLET CONTAINS IMPORTANT SA FETY INFORMATION. PLEA SE READ AND KEEP FOR FUTURE REFERENCE.
EN FR
USER'S MANUAL/MANUEL DE L'UTILISATEUR
FP10165/FP10166/FP10167
Electric Fireplace / Cheminée Électrique
Pièce
A
B
C
Description
Vis d'ancrage
Ancrage mural
M4 x12 Vis
Quantité
5 PCS
5 PCS
1 PC
LISTE DES ACCESSOIRES
35
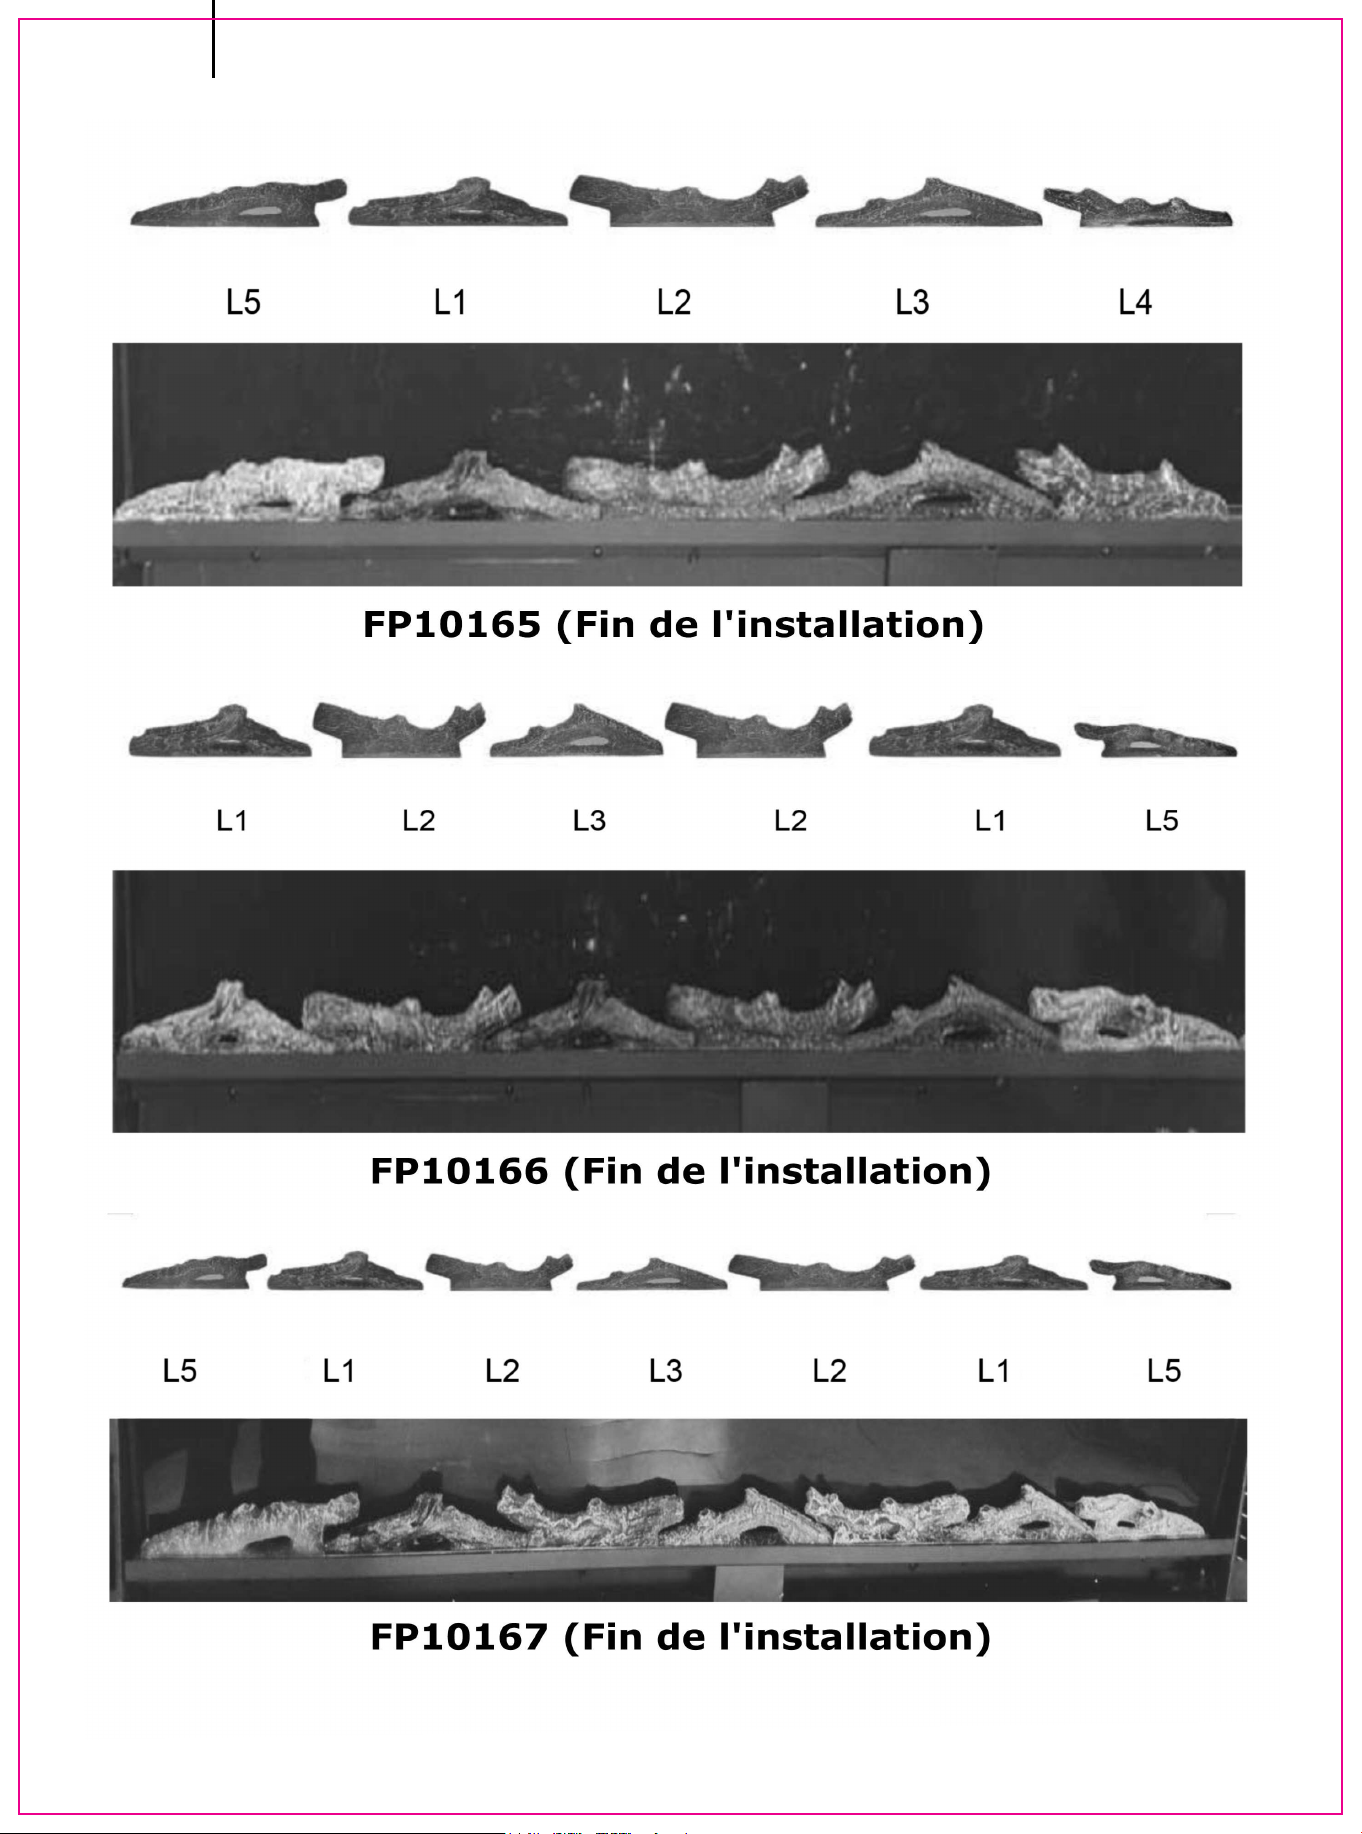
FP10166 (Fin de l'installation)
FP10165 (Fin de l'installation)
FP10167 (Fin de l'installation)
FR
36
1.1DIMENSIONS
CÔTÉ
E
B
D
A
C
HAUT
ÉVENTS DE CHALEUR
(NE PAS COUVRIR)
FR
Modèle
FP10165
FP10166
FP10167
A(mm)
1270
1524
1727
B(mm)
460
460
460
C(mm)
1126
1380
1583
D(mm)
98
98
98
E(mm)
420
420
420
A(in.)
50
60
68
B(in.)
18.11
18.11
18.11
C(in.)
4433
54.33
62.32
D(in.)
3.86
3.86
3.86
E(in.)
16.54
16.54
16.54
37
Modèle
FP10165
FP10166
FP10167
A(mm)
1140-1250
1390-1505
1695-1717
B(mm)
80-90
80-90
80-90
C(mm)
430-450
430-450
430-450
A(in.)
44.9-49.2
54.75-59.2
66.7-67.6
B(in.)
3.15-3.54
3.15-3.54
3.15-3.54
C(in.)
6.93-17.7
6.93-17.7
6.93-17.7
B
A
C
38

Cet appareil a été testé conformément aux normes ETL pour les appareils
électriques fixes et dédiés aux locaux aux États-Unis et au Canada. Si vous
avez besoin d'aide lors de l'installation, veuillez contacter un technicien
qualifié.
A.Avant de brancher votre appareil dans une prise électrique, vérifiez que
les disjoncteurs de la maison pour la prise sont allumés.
B.L'appareil peut émettre une légère odeur inoffensive lors de la première
utilisation. Cette odeur est normale et causée par le chauffage initial des
éléments internes de l'appareil, et l'odeur ne se reproduira plus.
C. Si votre appareil n'émet pas de chaleur, consultez la section de
fonctionnement de ce manuel pour plus d'informations.
D. Utiliser avec un protecteur de surtension certifié ETL ou UL.
REMARQUE : Cet appareil doit être
câblé électriquement et mis à la
terre conformément à la
réglementation locale ou, en
l'absence de réglementation locale,
à la dernière édition du Code
National de l'Électricité ANSI/NFPA
70 aux États-Unis ou au Code
canadien de l'électricité et ETL au
Canada.
APPROBATIONS D'INSCRIPTION
2.0 REMARQUES SUR L'INSTALLATION
ÉLECTRIQUE
2.1INSTRUCTIONS GENERALES
Numéro de modèle
Description
Tension
Watts
Ampères
BTU
FP10165/FP10166/FP10167
Montage mural, encastré
120 VAC
Max 1500W
12.5AMP
5100BTU
REMARQUE
Veuillez laisser suffisamment d'espace pour placer le
cordon d'alimentation sur le côté droit du foyer.
ATTENTION - Certaines parties de ce produit peuvent devenir
très chaudes et provoquer des brûlures. Une attention
particulière doit être accordée là où des enfants et des
personnes vulnérables sont présents.
FR
39
Acheminez les cordons d'alimentation loin des zones à fort trafic pour éviter
les risques de trébuchement.
RISQUE D'INCENDIE. POUR ÉVITER UN INCENDIE POSSIBLE, NE PAS
BLOQUER L'ENTRÉE D'AIR OU L'ÉCHAPPEMENT D'AUCUNE MANIÈRE. NE PAS
L'UTILISER SUR DES SURFACES MOLLES OÙ LES OUVERTURES PEUVENT SE
BLOQUER.
RISQUE D'INCENDIE. NE PAS SOUFFLER OU PLACER L'ISOLANT CONTRE
L'APPAREIL.
CET APPAREIL ÉLECTRIQUE EST TESTÉ ET HOMOLOGUÉ POUR ÊTRE UTILISÉ
UNIQUEMENT AVEC LES ACCESSOIRES EN OPTION APPROUVÉS.
L'UTILISATION D'ACCESSOIRES OPTIONNELS NON SPÉCIFIQUEMENT
TESTÉS POUR CET APPAREIL ÉLECTRIQUE PEUT RÉSULTER EN UN RISQUE
DE SÉCURITÉ.
SI LES INFORMATIONS CONTENUES DANS CES INSTRUCTIONS NE SONT
PAS SUIVIES EXACTEMENT, UN INCENDIE PEUT SE PRODUIRE CAUSANT
DES DOMMAGES MATÉRIELS, DES BLESSURES CORPORELLES OU LA MORT.
NE PAS ENTREPOSER OU UTILISER D'ESSENCE OU D'AUTRES VAPEURS
INFLAMMABLES À PROXIMITÉ DE CET APPAREIL OU DE TOUT AUTRE
APPAREIL.
CET APPAREIL EST LOURD. IL EST FORTEMENT RECOMMANDÉ D'INSTALLER
CET APPAREIL PAR DEUX PERSONNES.
LES ÉVENTS DE CHAUFFAGE SUR L'APPAREIL ÉLECTRIQUE NE PEUVENT EN
AUCUN CAS ÊTRE COUVERTS. CAR IL PEUT CRÉER UN RISQUE D'INCENDIE.
1. Les radiateurs doivent être installés uniquement à l'aide des supports de
montage que nous avons fournis si vous souhaitez les monter.
2. Le radiateur ne doit pas être encastré dans le plafond. Il doit y avoir
suffisamment d'espace autour du haut de l'appareil de chauffage pour
assurer une ventilation adéquate.
3. Le radiateur doit être à au moins 60 cm/24 pouces de tout mur
environnant.
4. Une distance d'au moins 90 cm/36 pouces doit toujours être laissée
devant les radiateurs pour assurer la sécurité.
5. L'appareil de chauffage ne doit être situé ni directement en dessous ni
devant une prise de courant.
Suivez tous les codes électriques nationaux
et locaux.
RISQUE D'INCENDIE ! LE CORDON D'ALIMENTATION NE DOIT
PAS ÊTRE PINCÉ CONTRE UN BORD COUPANT. SÉCURISEZ LE
CORDON POUR ÉVITER DE trébucher ou de s'accrocher AFIN DE
RÉDUIRE LE RISQUE D'INCENDIE, D'ÉLECTROCUTION OU DE
BLESSURE CORPORELLE.
NE PAS PASSER LE CORDON SOUS LA MOQUETTE. NE COUVREZ
PAS LE CORDON AVEC DES TAPIS, DES CHEMINEURS, ETC.
FR
40
6. L'appareil de chauffage doit être installé de manière à empêcher que les
interrupteurs de commande soient touchés par quiconque se trouve sous la
douche ou dans le bain.
7. Assurez-vous qu'il n'y a aucune possibilité que des matériaux
inflammables, des matériaux combustibles ou des rideaux entrent en contact
avec l'appareil de chauffage, il y a un risque d'incendie si cela se produit.
8. NE PAS LAISSER LE CHAUFFAGE SANS SURVEILLANCE PENDANT
L'UTILISATION.
3.0 INSTRUCTIONS D'INSTALLATION
3.1DÉBALLAGE ET TEST DU MUR DE L'APPAREIL
Retirez soigneusement l'appareil de la boîte. Avant d'installer l'appareil,
testez-le pour vous assurer qu'il fonctionne correctement en branchant le
cordon d'alimentation dans une prise de terre de 120 volts bien située.
3.2APPAREIL DE MISE À LA TERRE
MÉTHODES DE MISE À LA TERRE
ADAPTATEUR
VIS MÉTALLIQUE
NON AUTORISÉ
AU CANADA
(A)
(B) (C)
BROCHE DE MISE À LA TERRE
COUVERCLE DE
LA BOÎTE DE SORTIE
MISE À LA TERRE
MOYENS DE MISE
À LA TERRE
Cet appareil est destiné à être utilisé sur 120 volts. Le cordon est muni
d'une fiche comme illustré en (A). Un adaptateur tel qu'illustré en (C) est
disponible pour connecter des fiches de mise à la terre à trois broches à des
prises à deux fentes. La cosse de mise à la terre verte sortant de
l'adaptateur doit être connectée à une terre permanente telle qu'une boîte
de sortie correctement mise à la terre. L'adaptateur ne doit pas être utilisé si
une prise de terre à trois fentes est disponible.
Pour débrancher l'appareil, éteignez les contrôleurs, puis retirez la fiche de
la prise.
FR
41
Option 1:
Montage murale
Option 2:
Construction intégrée
Suivez les instructions d'installation ci-dessous en
fonction de vos préférences d'installation.
3.3 ASSEMBLAGE
Le cheminée peut être installé avec 2 options :
1. Montage murale avec support de montage fourni.
2. Construction intégrée (encastrée dans le mur).
FR
42
Installation - Montage Murale
Étape 1. Retrait du Cadre en Verre
-Retirez la vis fixe dans le coin inférieur gauche (ne la jetez pas)
-Soulevez le cadre en verre l-2 cm/0,4-0,8 pouces verticalement. Ensuite,
l'ensemble du cadre en verre peut être retiré par l'avant.
-Éloignez le cadre en verre de 0,4 à 0,8 pouces de l'appareil et retirez le
connecteur FFC avec l'aide d'autres personnes ou posez le panneau de verre
sur le sol avant la séparation complète.
Ne tirez pas le câble directement
ATTENTION
DISTANCE MAXIMALE : 50 CM/19 pouces
Appuyez sur ce bouton et
retirez le connecteur FFC
43
Étape 2. Retrait du Support de Montage
Dévissez les deux vis avec un tournevis cruciforme des deux extrémités (ne
les jetez pas), puis retirez le support de montage pré-attaché.
M5x12
FR
Étape 3. Choisir un Emplacement de Mur
-Trouvez un endroit sûr. Le dégagement minimum entre le plafond et le
manteau doit être d'au moins 8 pouces (200 mm); le dégagement minimum
par rapport à l'avant doit être d'au moins 3 pieds (900 mm).
Choisissez un emplacement près d'une prise afin qu'une rallonge ne soit pas
nécessaire.
Remarque : NE placez PAS l'appareil directement sous une prise de
courant. Voir les informations de sécurité aux pages 2 et 3 pour plus
d'avertissements sur le placement, l'installation et l'utilisation de ces
produits.
200mm
200mm
200mm
200mm
44
Étape 4. Percer les Trous et Fixer le Support
de Montage
-Utilisez un niveau pour aligner le support et marquez les trous qui doivent
être percés avec un crayon.
-Percez 3 à 10 trous (selon le modèle que vous avez acheté) de 7/25 po (7
mm) dans le mur.
-Insérez les ancrages muraux dans les trous à l'aide d'un marteau.
-Fixez le support de montage au mur en fixant les vis d'ancrage (partie A)
dans les ancrages muraux (partie B).
- Accrochez la fente derrière l'appareil sur les crochets sur les côtés gauche
et droit du support.
(Veuillez tenir l'appareil pour éviter de tomber avant la fin de l'installation)
Étape 5. Accrocher le Cheminée au Support
FR
45
Étape 6. Verrouillage de la Cheminée sur le
Support
-Verrouillez le support aux deux extrémités avec une vis pour assurer une
combinaison solide de la cheminée et du support
Étape 7. Placer les Décorations
-Placez soigneusement le cristal (avec l'appareil) ou les bûches dans le
plateau inférieur à l'avant de l'appareil, comme illustré.
REMARQUE: Les kits de lit de média peuvent avoir des arêtes vives,
portez des lunettes de sécurité et des gants lors de la manipulation.
FR
M5x12
-Trouvez un endroit sûr. Le dégagement minimum entre le plafond et le
manteau doit être d'au moins 8 pouces (200 mm); le dégagement minimum
par rapport à l'avant doit être d'au moins 3 pieds (900 mm).
Choisissez un emplacement près d'une prise afin qu'une rallonge ne soit pas
nécessaire.
46
Étape 8. Accrocher le Cadre en Verre
-Connectez le connecteur FFC avant d'accrocher le cadre de verre sur
l'appareil.
-Placez délicatement le panneau de verre en alignant les 4 crochets jusqu'à
ce qu'il s'enclenche en position (s'enfonce de 1 à 2 cm).
-Fixez le panneau de verre avec la vis retirée à l'étape 1 (ou partie B).
Étape 9. Refixez le Cadre en Verre
- Vissez la vis M4X12 dans les trous filetés du panneau de verre. Vérifiez
l'alignement du panneau de verre et serrez bien les vis.
1PC
M4X12 VIS
(Uniquement pour tous les modèles de style C qui n'ont pas de maille pour
l'entrée d'air.)
47
-La cavité appropriée (l-2cm/0.4-0.8 pouces plus grande pour chaque
côté) doit être préparée selon la taille de l'appareil.
-Mettez la cheminée en place et marquez les trous à percer avec un
crayon. Ensuite, sortez-le à nouveau de la cavité.
Installation - Construction Intégrée
Étape 1. Retrait du Cadre en Verre
Étape 3. Régler les Trous de Vis
Étape 2. Retrait du Support de Montage
(Étape 1 et étape 2, veuillez vous reporter à l'installation de la suspension
murale.)
FR
Étape 4 ・ Percer & Installer les Ancrages Muraux
-Percez les trous de 7/25 po
(7 mm) sur les marques
préparées.
-Insérez les ancrages
muraux (Partie B) dans les
trous à l'aide d'un marteau.
48
Étape 6. Placer les Décorations
Étape 5. Placer les Tampons et Fixer la
Cheminée
-Les vis (Partie A) traversent les trous du devant de la cheminée à l'aide
d'un tournevis.
-Mettez la cheminée dans la cavité préparée.
-Fixez fermement la cheminée au mur à l'aide des vis de chaque côté.
(Remarque : installez soigneusement et ne laissez pas les vis tomber
dans la cheminée.)
-Placez soigneusement le cristal (avec
l'appareil) ou les bûches dans le plateau
inférieur à l'avant de l'appareil, comme illustré.
REMARQUE : Les kits de lit de média
peuvent avoir des arêtes vives, portez
des lunettes de sécurité et des gants
lors de la manipulation.
FR
49
ATTENTION : Il est préférable de réserver un espace entre le cadre
et le mur pour permettre une meilleure circulation de l'air si
disponible.
-Connectez le connecteur FFC avant de fixer le cadre de verre à l'appareil.
-Engagez doucement le panneau de verre en alignant les 4 crochets jusqu'à
ce que les crochets s'enclenchent dans les positions correspondantes
(s'enfoncent de 1 à 2 cm/0,4 à 0,8 pouces).
-Fixez le panneau de verre avec la vis retirée à l'étape 1 (ou partie B).
Étape 7. Accrocher le Cadre en Verre
1PC
M4X12 VIS
- Vissez la vis M4 X 12
dans les trous filetés du
panneau de verre. Vérifiez
l'alignement du panneau
de verre et serrez bien les
vis.
Étape 8. Refixez le Cadre en Verre
FR
50
4.0 FINITION
LA GRILLE PEUT ÊTRE CHAUDE, NE PAS TOUCHER À LA SORTIE
D'AIR AVANT QU'ELLE N'AIT REFROIDIE.
LES CROCHETS DE LA PORTE FONT PARTIE D'UN SYSTÈME DE
SÉCURITÉ ET DOIVENT ÊTRE CORRECTEMENT ENCLENCHÉS. NE
PAS FAIRE FONCTIONNER L'APPAREIL AVEC LES CROCHETS
DÉSENGAGÉS.
LES MATÉRIAUX DE FAÇADE ET/OU DE FINITION NE DOIVENT PAS
INTERFÉRER AVEC LA CIRCULATION DE L'AIR À TRAVERS LES OUVERTURES
D'AIR, LE FONCTIONNEMENT DES PORTES OU L'ACCÈS POUR L'ENTRETIEN.
RESPECTEZ TOUS LES DÉGAGEMENTS LORS DE L'APPLICATION DE
MATÉRIAUX COMBUSTIBLES.
AVANT DE RETIRER LA PORTE, ÉTEINDRE L'APPAREIL ET ATTENDRE QUE
L'APPAREIL SOIT FROID AU TOUCHER. LES PORTES SONT LOURDES ET
FRAGILES, MANIPULEZ-LES AVEC SOIN.
REMARQUE : La façade en verre doit être retirée et l'appareil doit
être terminé à son emplacement final avant l'installation des kits de
lit multimédia. Les kits de lit de média peuvent avoir des arêtes
vives, portez des lunettes de sécurité et des gants lors de la
manipulation.
Appuyez sur le voyant pour allumer l'appareil et appuyez sur l'autre
côté pour l'éteindre.
Remarque : Assurez-vous que l'interrupteur d'alimentation principal
est allumé avant de commencer.
BOUTON D'ALIMENTATION PRINCIPAL
Une fois l'appareil branché sur une prise électrique mise à la terre, il est prêt
à fonctionner.
L'interrupteur d'alimentation principal pour tous les types est situé à l'avant
droit de la cheminée.
5.0 INSTRUCTIONS D'UTILISATION
5.1 BOUTON D'ALIMENTATION PRINCIPAL
51
FR
43
Entrée d'air
Évent de chauffage
Récepteur à distance
Flamme
Affichage Chauffage Vitesse
de
flamme
Variateur Couleur
B
Couleur
A
Minuteur Bouton
marche/Arrêt
Panneau de commande
COULEUR A
VARIATEUR
CHAUFFAGE
BOUTON
MARCHE/ARRÊT
MINUTEUR
PIÈCE ISOLANTE
TÉLÉCOMMANDE
VITESSE DE FLAMME
COULEUR B
• Retirez la pièce isolante transparente de la pile avant d'utiliser la
télécommande.
(L'interrupteur d'alimentation principal doit être allumé avant d'utiliser la
télécommande.) Le panneau d'affichage tactile est affiché en bas à droite à
l'avant de l'appareil.
TÉLÉCOMMANDE
5.2 PANNEAU DE COMMANDE /
FONCTIONNEMENT DE LA
52
Allumer/éteindre l'appareil.
REMARQUE : Assurez-vous que l'interrupteur
principal de la cheminée est allumé avant de l'utiliser.
Contrôlez la luminosité de la flamme.
5 réglages : (L1-L2-L3-L4-L5) La flamme s'atténue
de L1 à L5. L5 est le réglage le plus lumineux.
REMARQUE : Appuyez longuement sur le bouton
DIMMER pendant 6 secondes, et l'appareil passera en
mode sommeil : toutes les lumières sont éteintes,
mais la fonction de chauffage continue.
Appuyez à nouveau longuement (> 6 sec.) pour
remettre l'appareil en mode normal.
Contrôlez la minuterie.
8 réglages : (1h, 2h, 3h, 4h, 5h, 6h, 7h, 8h) Appuyez
sur le bouton jusqu'à atteindre le réglage souhaité.
Contrôlez la vitesse de la flamme.
5 réglages : ( U1-U2-U3-U4-U5 ) Vitesse de flamme
de U1 à U5. U5 est le réglage le plus rapide
Contrôlez le chauffage.
Appuyez sur le bouton pour démarrer le chauffage.
(OFF) pas de chauffage ni de soufflante
(-), le chauffage souffle de l'air chaud (750 W)
(--), le chauffage souffle de l'air chaud (1500W)
REMARQUE : Cycle des fonctions de chauffage à partir
de (OFF) (-)(--)
Contrôlez la couleur de la flamme.
12 Réglages : l.rouge 2.jaune 3.bleu 4.orange
5.rouge et jaune 6.rouge et bleu 7.rouge et blanc
8.jaune et bleu 9. jaune et blanc l0.bleu et blanc
11.rouge et jaune et bleu 12.multicolore
REMARQUE : Lorsque vous appuyez sur le bouton
pendant 6 secondes, l'indicateur affiche « 0 » et la
couleur et la luminosité de la flamme changent
automatiquement.
Contrôlez la couleur du lit de flamme.
12 Réglages : 1.rouge 2.gentiane bleu 3.vert 4.rose
5.jaune 6.cyan 7.violet 8.blanc 9.safran 10.bleu ciel
11.verdoyant 12. bleu capri
REMARQUE : Lorsque vous appuyez sur le bouton
pendant 6 secondes, l'indicateur affiche « 0 » et la
couleur et la luminosité de la flamme changent
automatiquement.
BOUTON
MARCHE/ARRÊT
VARIATEUR
MINUTEUR
VITESSE DE
FLAMME
CHAUFFAGE
COULEUR A
COULEUR B
FR
53
AVERTISSEMENT : Ne déplacez pas et ne retirez pas le panneau de garniture
en treillis lorsque l'appareil est branché et en fonctionnement. Cela
empêchera la télécommande et l'écran tactile de fonctionner.
AVIS : Lorsque le radiateur est allumé pour la première fois, une légère
odeur peut être présente. Ceci est normal et ne devrait pas se reproduire à
moins que le radiateur ne soit pas utilisé pendant une longue période.
AVIS : Pour améliorer les performances de l'appareil de chauffage, dirigez la
télécommande vers l'avant du foyer. N'appuyez PAS sur les boutons trop
rapidement. Donnez à l'unité suffisamment de temps pour répondre à
chaque commande.
• Retirez la pièce isolante transparente de la batterie avant de l'utiliser.
5.3 TÉLÉCOMMANDE
6.0 GUIDE DE DÉPANNAGE
PROBLÈME SOLUTION
La batterie doit être
recyclée ou éliminée
correctement. Vérifiez
auprès de votre autorité
locale ou de votre
détaillant pour obtenir
des conseils de recyclage
dans votre région.
Le support de
montage ne
peut pas être
retiré
I.Le support de montage est pré-attaché. Dévissez les deux vis
des deux côtés du foyer avec un tournevis cruciforme, puis
retirez le support de montage pré-attaché.
2. Si le problème n'est toujours pas résolu, veuillez demander
de l'aide au technicien qualifié.
Télécommande
(VUE ARRIÈRE)
Batterie (CR 2025)
Support de batterie
FR
54

Les fonctions
du panneau de
commande ne
fonctionnent
pas.
1. Assurez-vous que l'interrupteur d'alimentation sur le panneau
de commande est activé avant l'utilisation.
2.Assurez-vous d'avoir reconnecté le câble de données qui a été
retiré lorsque vous avez retiré le cadre en verre.
3. Si le problème n'est toujours pas résolu, veuillez demander
de l'aide à un technicien qualifié.
Coupure de
courant
soudaine
pendant le
processus de
chauffage
1.Ne couvrez pas la sortie d'air.
2.Débranchez l'appareil, attendez 10 minutes et essayez de
l'ouvrir à nouveau.
3. Si le problème n'est toujours pas résolu, veuillez demander
de l'aide à un technicien qualifié.
L'appareil ne
souffle pas
d'air chaud
lorsqu'il
s'allume et
s'éteint.
L'appareil ne
s'allume pas
avec
l'interrupteur
d'alimentation.
C'est normal. Les ventilateurs soufflent de l'air frais pendant
que l'appareil chauffe progressivement. Les ventilateurs
soufflent après l'arrêt de l'appareil pour refroidir l'appareil et
éviter la surchauffe.
1. L'interrupteur
d'alimentation
principal est éteint.
2. Le disjoncteur
s'est déclenché.
3. L'appareil est
débranché de la prise
murale.
4. Le cordon
d'alimentation ou la
fiche d'alimentation
sont endommagés.
5. La prise de
courant pour la
broche de la fiche
d'alimentation est
desserrée.
Contactez un électricien qualifié pour
vérifier tout le câblage pour les
connexions desserrées.
Vérifiez la prise de courant et
remplacez-la par une neuve.
Contactez un électricien qualifié pour
remplacer l'alimentation.
Assurez-vous que le cordon
d'alimentation est branché dans une
prise électrique de 15 A 120 V CA en
bon état de marche et correctement
mise à la terre.
Trop d'appareils sont sur ce circuit.
Assurez-vous que l'alimentation
électrique de cet appareil est un circuit
indépendant.
Mettez l'interrupteur principal
d'alimentation en position « ON ».
6. Câblage desserré.
FR
55
Le radiateur
est allumé
mais pas de
flamme ou à
faible intensité
de flamme.
Les flammes
sont gelées
Bruit excessif
dans la partie
inférieure de
l'appareil de
chauffage.
Le système de
chauffage ne
s'allume pas.
1. Les interrupteurs
de chauffage sont
allumés, mais la
flamme n'est pas
allumée.
2. Le bouton de
réglage de la flamme
est au réglage bas.
Tournez le bouton au réglage
maximum.
3. Câblage desserré.
1. L'élément flamme
n'est pas fixé au
moteur.
Contactez un électricien qualifié pour
vérifier tout le câblage pour les
connexions desserrées.
Appuyez longuement sur le bouton «
DIMMER » pendant 6 secondes,
l'appareil passera en mode veille. Tous
les voyants s'éteignent, la fonction
chauffage se met en marche. Appuyez
à nouveau longuement pendant 6
secondes, l'appareil reviendra en mode
normal.
Demandez de l'aide à un technicien
qualifié.
2. Le moteur de
rotation est
défectueux.
Demandez de l'aide à un technicien
qualifié.
2. Le moteur est
défectueux.
Demandez de l'aide à un technicien
qualifié.
1. L'élément flamme
n'est pas
correctement installé
Demandez de l'aide à un technicien
qualifié.
1. L'interrupteur
d'alimentation du
réchauffeur est éteint.
Tournez l'interrupteur d'alimentation du
radiateur sur la position « ON ».
3. Câblage desserré.
Vérifiez tout le câblage pour les connexions
desserrées. Contactez un électricien qualifié.
4. L'entrée ou la sortie
d'air est
complètement
bloquée.
Laissez suffisamment d'espace autour
de l'appareil. Retirez le blocage, sur ou
devant la sortie d'air.
2. Le système de
chauffage est en
surchauffe.
Peut-être que le radiateur est couvert
ou que l'entrée ou la sortie d'air est
bloquée ; retirez les vêtements ou le
blocage et éteignez l'interrupteur
d'alimentation et débranchez-le.
Attendez 10 minutes, puis rallumez le
radiateur.
FR
56
L'interrupteur
« HEAT » a été
activé, mais il
n'y a pas de
débit d'air.
Le ventilateur
fonctionne
mais aucune
chaleur ne
sort.
La
télécommande
ne fonctionne
pas.
1. Le système de
chauffage est en
surchauffe. Le
thermostat de limite
de température est
coupé.
2. Le moteur du
ventilateur est
défectueux.
Demandez de l'aide à un technicien
qualifié.
3. Le ventilateur du
ventilateur est mal
équilibré.
4. Les interrupteurs
« POWER » et « HEAT »
ne sont pas activés.
Demandez de l'aide à un technicien
qualifié.
Vérifier l'entrée et la sortie d'air.
Éteignez l'interrupteur d'alimentation et
débranchez-le. Attendez 10 minutes,
puis rallumez le radiateur.
Allumez ces deux interrupteurs.
1. La batterie n'est
pas correctement
installée.
Assurez-vous que la batterie est
correctement installée. Retirez la pièce
isolante transparente de la batterie
avant utilisation.
1. Câblage desserré. Demandez de l'aide à un technicien
qualifié.
2. Mauvais élément
chauffant.
Demandez de l'aide à un technicien
qualifié.
2. Ne pas pointer
vers la bonne
position.
Dirigez la télécommande vers le
récepteur.
3. Il y a un obstacle
devant la machine.
Enlevez les obstacles. Les éléments
entre la télécommande et le récepteur
de la télécommande bloqueront le
signal.
4. Appuyez trop
rapidement sur les
boutons de la
télécommande.
N'appuyez pas trop rapidement sur les
boutons de la télécommande. Donnez à
l'appareil suffisamment de temps pour
répondre à vos commandes.
3. Accumulation de
saleté sur les
ventilateurs
Nettoyer tous les ventilateurs
4. Le ventilateur de
chauffage est
défectueux.
Demandez de l'aide à un technicien
qualifié.
FR
57
Il y a une odeur
provenant du
radiateur.
Le radiateur peut émettre une légère odeur inoffensive lors
de la première utilisation. Il s'agit d'une condition normale
causée par l'échauffement initial des pièces internes et ne se
reproduira plus.
REMARQUE : Pour la plupart des problèmes fonctionnels, vous pouvez débrancher
l'appareil, attendre 10 minutes et le rebrancher, la machine se réinitialisera à l'état
initial (originaux du produit).
Si le problème n'est toujours pas résolu, demandez de l'aide à un technicien
qualifié.
COUPER L'ALIMENTATION ET LAISSER LE CHAUFFAGE REFROIDIR
AVANT DE TENTER TOUTE ENTRETIEN OU NETTOYAGE AFIN DE
RÉDUIRE LE RISQUE D'INCENDIE, D'ÉLECTROCUTION OU DE
DOMMAGES CORPORELS.
LA CHEMINÉE NE DOIT PAS ÊTRE UTILISÉ AVEC UNE
ACCUMULATION DE POUSSIÈRE OU DE SALETÉ SUR OU DANS
L'APPAREIL, CAR CELA PEUT PROVOQUER UNE ACCUMULATION DE
CHALEUR ET DES DOMMAGES ÉVENTUELS SUBSÉQUENT. POUR
CETTE RAISON, L'APPAREIL DE CHAUFFAGE DOIT ÊTRE INSPECTÉ
RÉGULIÈREMENT, SELON LES CONDITIONS ET AU MOINS À DES
INTERVALLES ANNUELS.
Le verre partiellement réfléchissant est nettoyé en usine lors de l'opération
de montage. Pendant l'expédition, l'installation, la manutention, etc., le
verre partiellement réfléchissant peut recueillir des particules de poussière ;
ceux-ci peuvent être enlevés en époussetant légèrement avec un chiffon
propre et sec.
Pour enlever les empreintes digitales ou autres marques, le verre
partiellement réfléchissant peut être nettoyé avec un chiffon humide. Le
verre partiellement réfléchissant doit être complètement séché avec un
chiffon non pelucheux pour éviter les taches d'eau. Pour éviter les rayures,
n'utilisez pas de nettoyants abrasifs.
7.0 ENTRETIEN
7.1 NETTOYAGE DES VITRES
PARTIELLEMENT RÉFLÉCHISSANTES
FR
58
7.2 SCHÉMA
LAMPE PCB POUR
LIT DE FLAMME
LAMPE PCB
POUR FLAMME
Source de courant
AC-N
AC-C
Clavier
Interrupteur
G
L
N
MOTEUR
PAS A PAS
PCB Récepteur pour
Télécommande
Transformateur
pour PCB
Heater Element
Moteur de
Ventilateur
CAPTEUR DE
TEMPÉRATURE
Contrôle de limite de
température
(thermostat de type PTC)
FR
59

EN
DE
FR
ES
IT
PL
With your inspiring rating, COSTWAY will be more consistent to offer you EASY
SHOPPING EXPERIENCE, GOOD PRODUCTS and EFFICIENT SERVICE!
Mit Ihrer inspirierenden Bewertung wird COSTWAY konsistenter sein, um Ihnen EIN
SCHÖNES EINKAUFSERLEBNIS, GUTE PRODUKTE und EFFIZIENTEN SERVICE zu
bieten!
Avec votre évaluation inspirante, COSTWAY continuera à fournir une EXPÉRIENCE
D’ACHAT PRATIQUE, des PRODUITS DE QUALITÉ et un SERVICE EFFICACE !
Con su calificación inspiradora, COSTWAY será más consistente para ofrecerle
EXPERIENCIA DE COMPRA FÁCIL, BUENOS PRODUCTOS y SERVICIO EFICIENTE.
Con la tua valutazione incoraggiante, COSTWAY sarà più coerente per offrirti
ESPERIENZA DI ACQUISTO FACILE, BUONI PRODOTTI e SERVIZIO EFFICIENTE!
ziki twojej opinii COSWA bdzie mg oferowa jeszcze WGONESE
AKP, LEPSE PROK i SPRAWNES OBSG KLENA.
US office: Fontana UK office: Ipswich AU office: Truganina
DE office: Hamburg
FR office: Saint Vigor d'Ymonville
PL office Gdask