Safety•Assembly•Operation•Adjustments•Maintenance•Troubleshooting•PartsLists•Warranty
P.O.Box1386,KITCHENER,ONTARION2G4J1
PRINTEDINU.S.A.
IMPORTANT:
READSAFETYRULESAND
INSTRUCTIONSCAREFULLY
BEFOREOPERATION
OPERATOR’SMANUAL
Two-StageSnowThrower
www.troybilt.ca
7/20/2005
772C0769

2
FindingandRecordingModelNumber
Pleasedo
NOT
returntheunittotheretailerfromwhichitwaspurchased,
withoutfirstcontactingCustomerSupport.
TableofContents
BEFOREYOUSTARTASSEMBLING
YOURNEWEQUIPMENT,
pleaselocatethemodelplateontheequipmentandcopythe
themodelnumberandtheserialnumbertothesamplemodel
plateprovidedtotheright.Youcanlocatethemodelplateby
standingattheoperatingpositionandlookingdownatthe
frame.
ThisOperator’sManualisanimportantpartofyournewsnowthrower.Itwillhelpyouassemble,
prepareandmaintaintheunitforbestperformance.Pleasereadandunderstandwhatitsays.
CustomerSupport
Ifyouhavedifficultyassemblingthisproductorhaveanyquestionsregardingthecontrols,operationormaintenanceofthisunit,
youcanseekhelpfromtheexperts.Choosefromtheoptionsbelow:
1.Visitwww.troybilt.caformanyusefulsuggestions,clickonCustomerSupportbutton.
2.CallaCustomerSupportRepresentativeat
1-800-668-1238
3.Theenginemanufacturerisresponsibleforallenigne-relatedissueswithregardstoperformance,power-rating,specifica-
tions,warrantyandservice.Pleaserefertotheenginemanufacturer’sOwner’s/Operator’sManual,packedseparatelywith
yourunit,formoreinformation.
Pleasehaveyourunit’smodelnumberandserialnumberreadywhenyoucall.Seeprevioussectiontolocatethisinformation.
Youwillbeaskedtoentertheserialnumberinordertoprocessyourcall.
SafetyLabels......................................................3
SafeOperationPractices...................................4
SetUp&Adjustment..........................................6
KnowYourSnowThrower..................................8
Operation.............................................................9
Maintenance&Service....................................12
Off-SeasonStorage..........................................14
TroubleShooting..............................................15
IllustratedPartsLists.......................................16
Warranty............................................................20
3
1
Safety
Labels
WARNING
Thissymbolpoints
outimportantsafety
instructionswhich,
ifnotfollowed,could
endangertheper-
sonalsafetyand/or
propertyofyourself
andothers.Readand
followallinstructions
inthismanualbefore
attemptingtooperate
thismachine.Failure
tocomplywiththese
instructionsmay
resultinpersonal
injury.Whenyousee
thissymbol.
HEEDITSWARNING!
YourResponsibility
Restricttheuse
ofthispowermachine
topersonswhoread,
understand
andfollowthewarnings
andinstructions
inthismanual
andonthemachine.
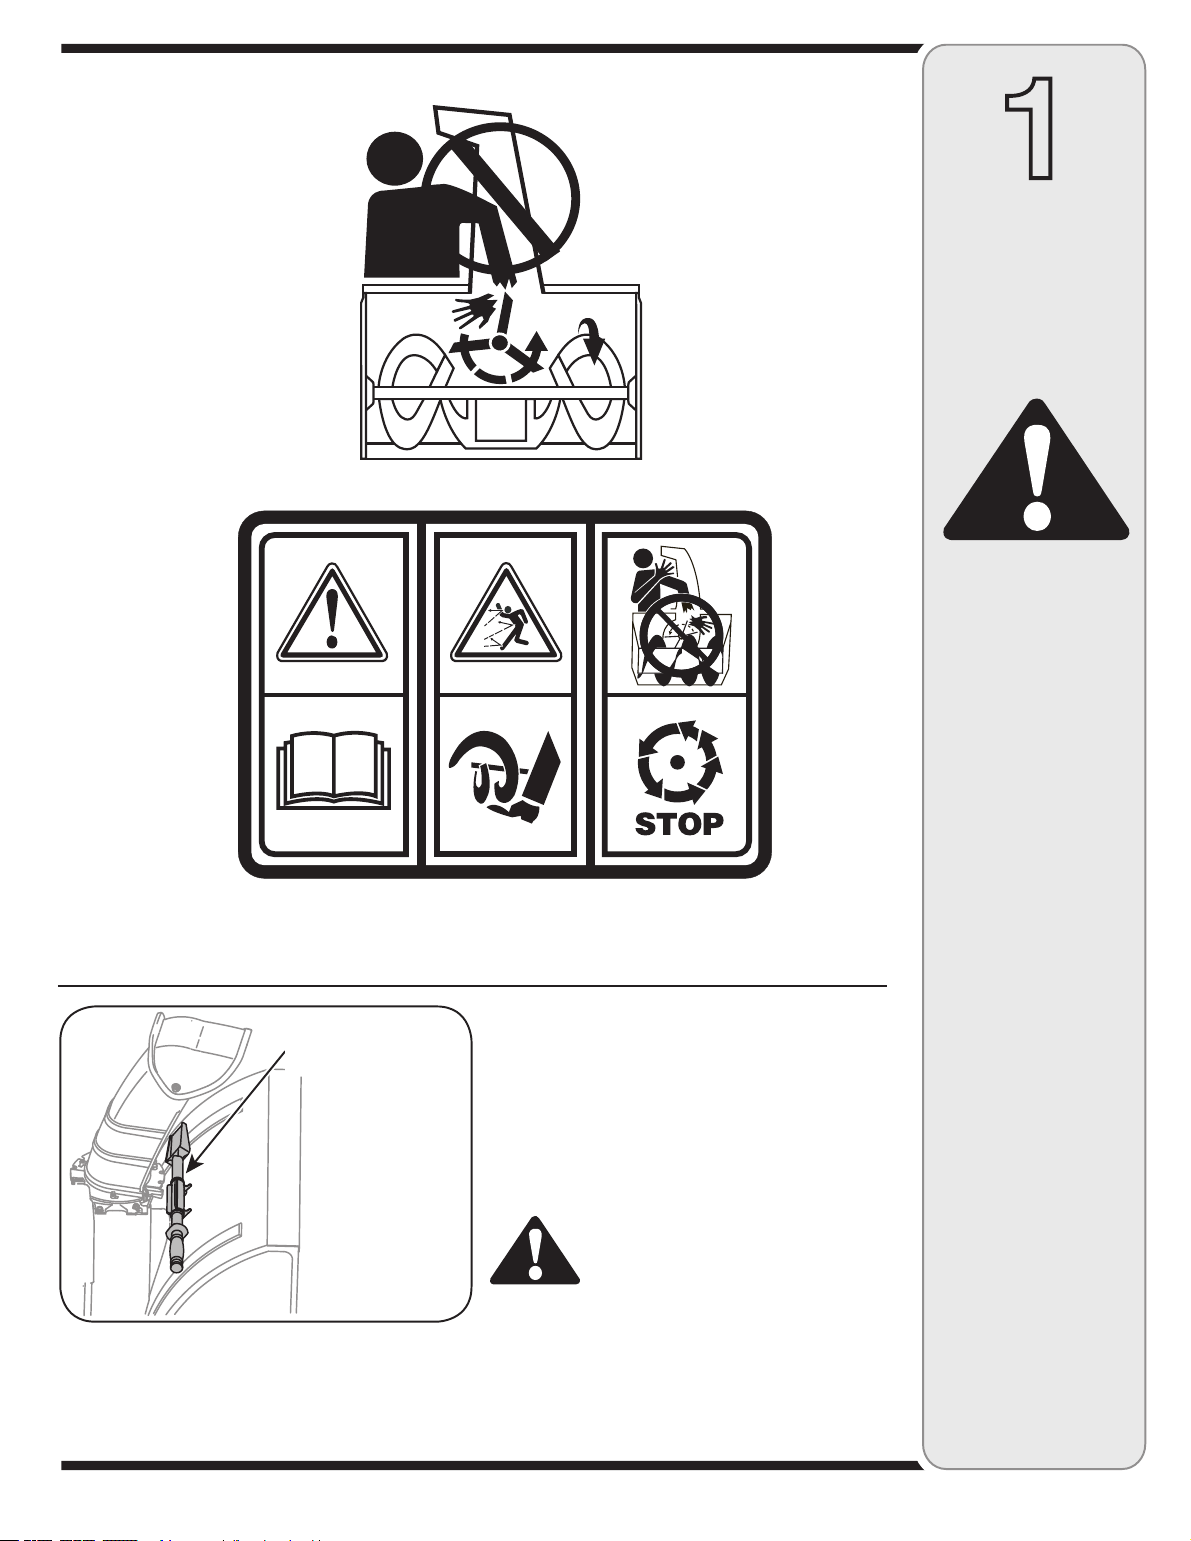
Achuteclean-outtoolisfastenedtothetop
oftheaugerhousingwithamountingclip.The
toolisdesignedtoclearachuteassemblyof
iceandsnow.
Thisitemisfastenedwithacabletieatthe
factory.Cutthecabletiebeforeoperatingthe
snowthrower.
WARNING:Neveruseyour
handstoclearacloggedchute
assembly.Shutoffengineand
remainbehindhandlesuntil
allmovingpartshavestopped
beforeusingtheclean-outtool
toclearthechuteassembly.
ChuteClean-out
Tool
4
2
Safe
Operation
Practices
Training
1.Read,understand,andfollowallinstructionsonthe
machineandinthemanual(s)beforeattemptingto
assembleandoperate.Keepthismanualinasafeplacefor
futureandregularreferenceandfororderingreplacement
parts.
2.Befamiliarwithallcontrolsandtheirproperoperation.
Knowhowtostopthemachineanddisengagethemquickly.
3.Neverallowchildrenunder14yearsoldtooperatethis
machine.Children14yearsoldandovershouldreadand
understandtheoperationinstructionsandsafetyrulesin
thismanualandshouldbetrainedandsupervisedbya
parent.
4.Neverallowadultstooperatethismachinewithoutproper
instruction.
5.Thrownobjectscancauseseriouspersonalinjury.Plan
yoursnow-throwingpatterntoavoiddischargeofmaterial
towardroads,bystandersandthelike.
6.Keepbystanders,helpers,petsandchildrenatleast75feet
fromthemachinewhileitisinoperation.Stopmachineif
anyoneentersthearea.
7.Exercisecautiontoavoidslippingorfalling,especially
whenoperatinginreverse.
Preparation
1. Thoroughlyinspecttheareawheretheequipmentistobe
used.Removealldoormats,newspapers,sleds,boards,
wiresandotherforeignobjects,whichcouldbetrippedover
orthrownbytheauger/impeller.
2.Alwayswearsafetyglassesoreyeshieldsduringoperation
andwhileperforminganadjustmentorrepairtoprotectyour
eyes.Thrownobjectswhichricochetcancauseserious
injurytotheeyes.
3.Donotoperatewithoutwearingadequatewinterouter
garments.Donotwearjewelry,longscarvesorother
looseclothing,whichcouldbecomeentangledinmoving
parts.Wearfootwearwhichwillimprovefootingonslippery
surfaces.
4.Useagroundedthree-wireextensioncordandreceptacle
forallunitswithelectricstartengines.
5.Adjustcollectorhousingheighttocleargravelorcrushed
rocksurfaces.
6.Disengageallcontrolleversbeforestartingtheengine.
7.Neverattempttomakeanyadjustmentswhileengineis
running,exceptwherespecificallyrecommendedinthe
operator’smanual.
8.Letengineandmachineadjusttooutdoortemperature
beforestartingtoclearsnow.
9.Toavoidpersonalinjuryorpropertydamageuseextreme
careinhandlinggasoline.Gasolineisextremelyflammable
andthevaporsareexplosive.Seriouspersonalinjurycan
occurwhengasolineisspilledonyourselforyourclothes,
whichcanignite.Washyourskinandchangeclothes
immediately.
a.Useonlyanapprovedgasolinecontainer.
b.Extinguishallcigarettes,cigars,pipesandothersources
ofignition.
c.Neverfuelmachineindoors.
d.Neverremovegascaporaddfuelwhiletheengineishot
orrunning.
e.Allowenginetocoolatleasttwominutesbeforerefuel
-
ing.
f.Neveroverfillfueltank.Filltanktonomorethan½inch
belowbottomoffillernecktoprovidespaceforfuel
expansion.
g.Replacegasolinecapandtightensecurely.
h.Ifgasolineisspilled,wipeitofftheengineandequip-
ment.Movemachinetoanotherarea.Wait5minutes
beforestartingtheengine.
i. Neverstorethemachineorfuelcontainerinsidewhere
thereisanopenflame,sparkorpilotlight(e.g.furnace,
waterheater,spaceheater,clothesdryeretc.).
j. Allowmachinetocoolatleast5minutesbeforestoring.
WARNING:EngineExhaust,someofitsconstituents,andcertainvehiclecompo-
nentscontainoremitchemicalsknowntoStateofCaliforniatocausecancerand
birthdefectsorotherreproductiveharm.
WARNING
Thissymbolpoints
outimportantsafety
instructionswhich,
ifnotfollowed,could
endangertheper-
sonalsafetyand/or
propertyofyourself
andothers.Readand
followallinstructions
inthismanualbefore
attemptingtooperate
thismachine.Failure
tocomplywiththese
instructionsmay
resultinpersonal
injury.Whenyousee
thissymbol.
HEEDITSWARNING!
YourResponsibility
Restricttheuse
ofthispowermachine
topersonswhoread,
understand
andfollowthewarnings
andinstructions
inthismanual
andonthemachine.
DANGER:Thismachinewasbuilttobeoperatedaccordingtotherulesforsafeoperationinthis
manual.Aswithanytypeofpowerequipment,carelessnessorerroronthepartoftheoperatorcan
resultinseriousinjury.Thismachineiscapableofamputatinghandsandfeetandthrowingobjects.
Failuretoobservethefollowingsafetyinstructionscouldresultinseriousinjuryordeath.
5
Operation
1. Donotputhandsorfeetnearrotatingparts,inthe
auger/impellerhousingorchuteassembly.Contactwiththe
rotatingpartscanamputatehandsandfeet.
2.Theauger/impellercontrolleverisasafetydevice.Never
bypassitsoperation.Doingsomakesthemachineunsafe
andmaycausepersonalinjury.
3.Thecontrolleversmustoperateeasilyinbothdirections
andautomaticallyreturntothedisengagedpositionwhen
released.
4.Neveroperatewithamissingordamagedchuteassembly.
Keepallsafetydevicesinplaceandworking.
5.Neverrunanengineindoorsorinapoorlyventilatedarea.
Engineexhaustcontainscarbonmonoxide,anodorlessand
deadlygas.
6.Donotoperatemachinewhileundertheinfluenceofalcohol
ordrugs.
7.Mufflerandenginebecomehotandcancauseaburn.Do
nottouch.
8.Exerciseextremecautionwhenoperatingonorcrossing
gravelsurfaces.Stayalertforhiddenhazardsortraffic.
9.Exercisecautionwhenchangingdirectionandwhileoperat
-
ingonslopes.
10.Planyoursnow-throwingpatterntoavoiddischargetowards
windows,walls,carsetc.Thus,avoidingpossibleproperty
damageorpersonalinjurycausedbyaricochet.
11.Neverdirectdischargeatchildren,bystandersandpetsor
allowanyoneinfrontofthemachine.
12.Donotoverloadmachinecapacitybyattemptingtoclear
snowattoofastofarate.
13.Neveroperatethismachinewithoutgoodvisibilityorlight.
Alwaysbesureofyourfootingandkeepafirmholdonthe
handles.Walk,neverrun.
14.Disengagepowertotheauger/impellerwhentransportingor
notinuse.
15.Neveroperatemachineathightransportspeedsonslippery
surfaces.Lookdownandbehindandusecarewhen
backingup.
16.Ifthemachineshouldstarttovibrateabnormally,stopthe
engine,disconnectthesparkplugwireandgrounditagainst
theengine.Inspectthoroughlyfordamage.Repairany
damagebeforestartingandoperating.
17.Disengageallcontrolleversandstopenginebeforeyou
leavetheoperatingposition(behindthehandles).Wait
untiltheauger/impellercomestoacompletestopbefore
uncloggingthechuteassembly,makinganyadjustments,or
inspections.
18.Neverputyourhandinthedischargeorcollectoropenings.
Alwaysusetheclean-outtoolprovidedtounclogthedis
-
chargeopening.Donotunclogchuteassemblywhileengine
isrunning.Shutoffengineandremainbehindhandlesuntil
allmovingpartshavestoppedbeforeunclogging.
19.Useonlyattachmentsandaccessoriesapprovedbythe
manufacturer(e.g.wheelweights,tirechains,cabsetc.).
20.Ifsituationsoccurwhicharenotcoveredinthismanual,use
careandgoodjudgment.Callcustomerassistanceforthe
nameofyournearestservicingdealer.
Maintenance&Storage
1. Nevertamperwithsafetydevices.Checktheirproper
operationregularly.
2.Disengageallcontrolleversandstoptheengine.Waituntil
theauger/impellercometoacompletestop.Disconnectthe
sparkplugwireandgroundagainsttheenginetoprevent
unintendedstartingbeforecleaning,repairing,orinspecting.
3.Checkboltsandscrewsforpropertightnessatfrequent
intervalstokeepthemachineinsafeworkingcondition.
Also,visuallyinspectmachineforanydamage.
4.Donotchangetheenginegovernorsettingorover-speed
theengine.Thegovernorcontrolsthemaximumsafe
operatingspeedoftheengine.
5.Snowthrowershaveplatesandskidshoesaresubjectto
wearanddamage.Foryoursafetyprotection,frequently
checkallcomponentsandreplacewithoriginalequipment
manufacturer’s(OEM)partsonly.“Useofpartswhichdo
notmeettheoriginalequipmentspecificationsmayleadto
improperperformanceandcompromisesafety!”
6.Checkcontrolsperiodicallytoverifytheyengageand
disengageproperlyandadjust,ifnecessary.Refertothe
adjustmentsectioninthisoperator’smanualforinstructions.
7.Maintainorreplacesafetyandinstructionlabels,asneces
-
sary.
8.Observeproperdisposallawsandregulationsforgas,oil,
etc.toprotecttheenvironment.
9.Priortostoring,runmachineafewminutestoclearsnow
frommachineandpreventfreezeupofauger/impeller.
10.Neverstorethemachineorfuelcontainerinsidewhere
thereisanopenflame,sparkorpilotlightsuchasawater
heater,furnace,clothesdryeretc.
11.Alwaysrefertotheoperator’smanualforproperinstructions
onoff-seasonstorage.
Donotmodifyengine
Toavoidseriousinjuryordeath,donotmodifyengineinany
way.Tamperingwiththegovernorsettingcanleadtoarunaway
engineandcauseittooperateatunsafespeeds.Nevertamper
withfactorysettingofenginegovernor.
NoticeregardingEmissions
EngineswhicharecertifiedtocomplywithCaliforniaandfederal
EPAemissionregulationsforSORE(SmallOffRoadEquipment)
arecertifiedtooperateonregularunleadedgasoline,andmay
includethefollowingemissioncontrolsystems:EngineModifica-
tion(EM)andThreeWayCatalyst(TWC)ifsoequipped.
2
Safe
Operation
Practices
WARNING
Thissymbolpoints
outimportantsafety
instructions,which
ifnotfollowed,could
endangertheper-
sonalsafetyand/or
propertyofyourself
andothers.Readand
followallinstructions
inthismanualbefore
attemptingtooperate
thismachine.Failure
tocomplywiththese
instructionsmay
resultinpersonal
injury.Whenyousee
thissymbol.
HEEDIT’SWARNING!
YourResponsibility
Restricttheuse
ofthispowermachine
topersonswhoread,
understand
andfollowthewarnings
andinstructions
inthismanual
andonthemachine.
6
3
Alwaysstopengine,
disconnectspark
plug,andground
againstenginebefore
cleaning,lubricating
ordoinganykind
ofmaintenanceor
adjustmentsonyour
machine.
DONOTLIFT
MACHINEWITH
CHUTEHANDLE.
NOTE:Neverreplace
theaugershearpins
withstandardpins.
Anydamagetothe
augergearboxorother
components,asareult
ofdoingso,willNOT
becoveredbyyour
snowthrower’swar-
ranty.
Neveruseyourhands
tocleansnowand
icefromthechute
assemblyorauger
housing..
IMPORTANT:ThisunitisshippedWITHOILand
WITHOUTGASOLINE.Afterassemblyreferto
separateenginemanualforproperfuelandengineoil
recommendations.
NOTE:Referencetorighthandorlefthandsideof
machineareobservedfromtheoperatingposition.
NOTE:ThisOperator’sManualcoversseveralmodels.
Snowthrowerfeaturesvarybymodel.Notallfeatures
discussedinthismanualareapplicabletoallsnow
throwermodels.
BeforeAssembly
WARNING:Disconnectthesparkplug
wireandGrounditagainsttheengine
topreventunintendedstarting.
1.Cutthecabletiethatsecurestheupperhandleto
thechuteassemblyforshippingpurposes.
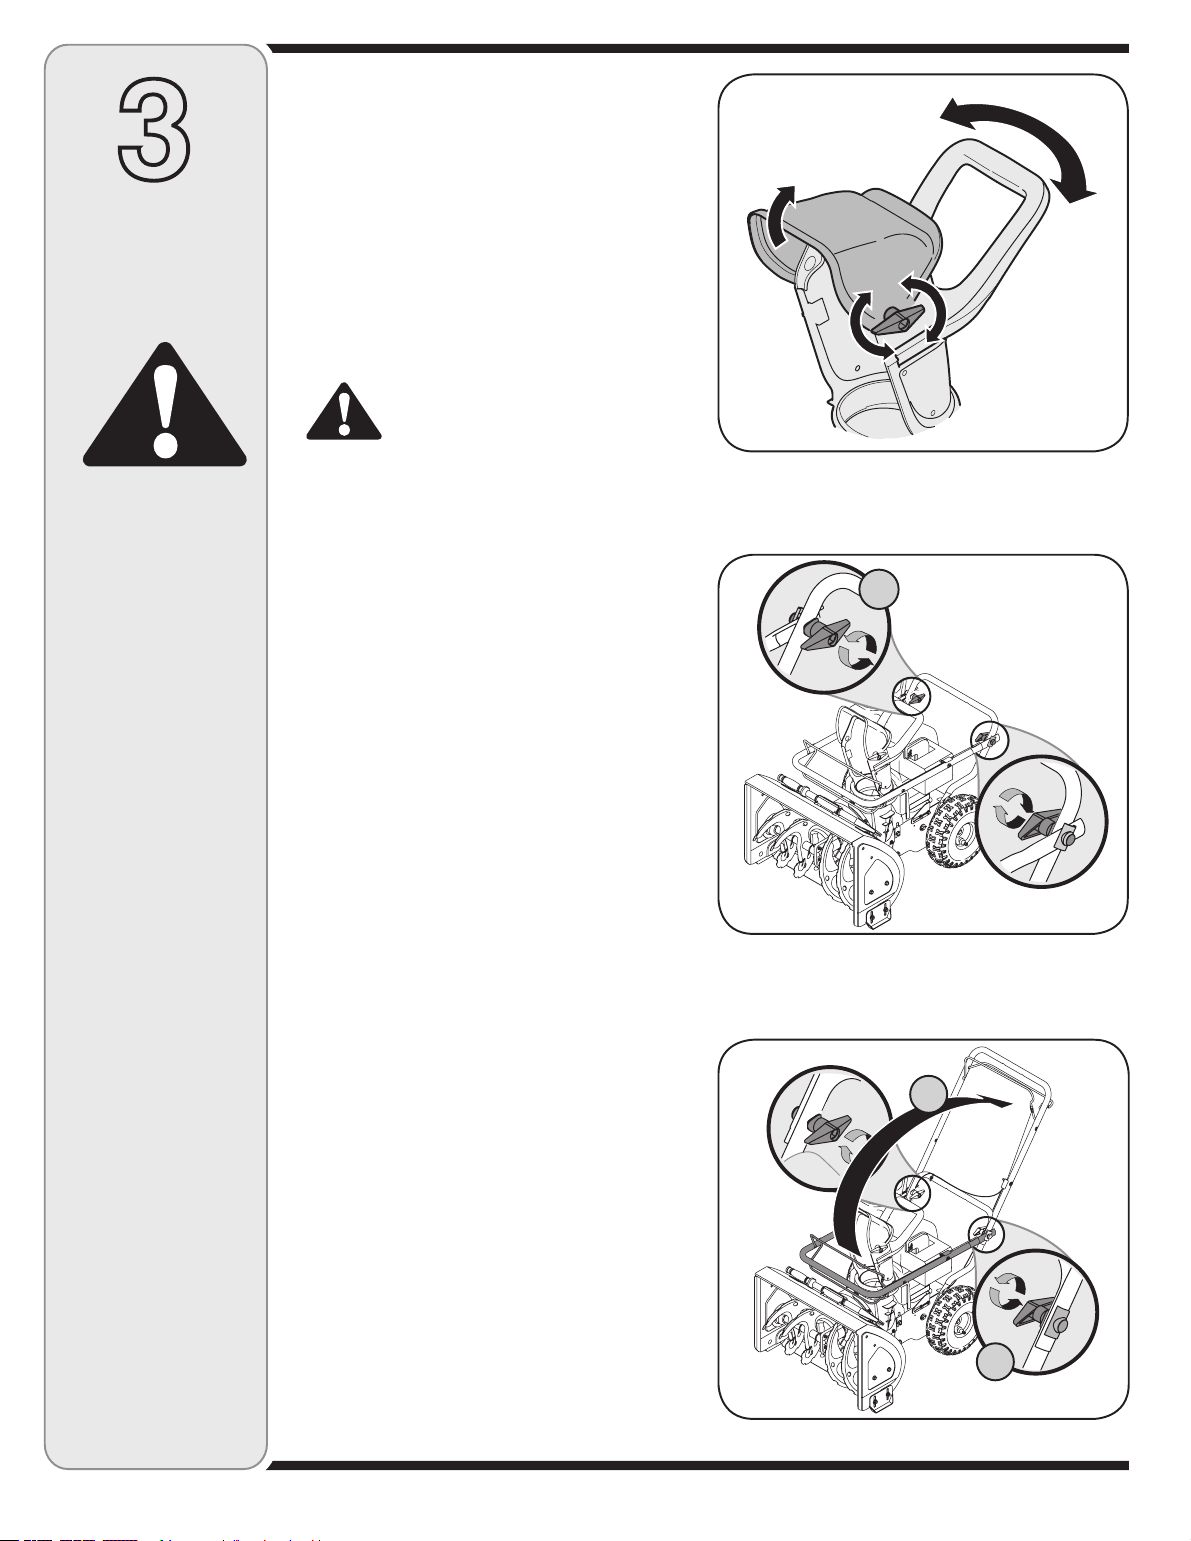
SettingUpTheHandle
1.Loosenthechuteknobontheupperchute(1)and
pivottheupperchuteupwards(2)asfarasitwillgo.
SeeFigure1.
WARNING:Donotliftthesnowthrowerbythechute
handle.
2.Loosenthehandleknob,saddlewasherandhandle
taboneachsideofthehandle.SeeFigure2.
3.Holdbothcontrolsagainstupperhandleandpull
upasshowninFigure3.Makesurethattheupper
handlelocksoverthelowerhandleandhandletabs
alignwiththehandle.Youmayhavetocarefully
maneuvertheupperhandletoclearchuteassembly.
CAUTION:Becarefulnottobendorkinkthecable.
4.Tightenthehandleknobsoneachsideofthe
handle.Refertostep2inFigure3.
5.Adjustupperchuteandrotatechutehandleto
desiredoperatingposition.
6.Tightenthechuteknobontheupperchutemaking
suretheflatwasherandthecarriageboltare
correctlypositioned.RefertoFigure1.
Clean-OutTool
Thistoolandtheelectricextensioncord,ifsoequipped,
maybefastenedwithacabletietotherearoftheauger
housingforshippingpurposes.Inthatcase,cutthe
cabletieandremovetheextensioncordnow.
FinalAdjustments
IMPORTANT:Checktheadjustmentsasinstructedand
makeanyfinaladjustmentsnecessarybeforeoperating
theunit.Checkallnutsandboltsfortightness.Failureto
followtheseinstructionsmaycausedamagetounit.
SetupAnd
Adjustment
Figure1
WARNING
Figure3
Figure2
7
3
SettingUp
YourSnow
Thrower
TirePressure
Tiresareover-inflatedforshippingpurposes.
IMPORTANT:Underanycircumstancedonotexceed
manufacturer’srecommendedpsi.Equaltirepressure
shouldbemaintainedatalltimes.Excessivepressure
whenseatingbeadsmaycausetire/rimassemblyto
burstwithforcesufficienttocauseseriousinjury.Refer
tosidewalloftireforrecommendedpressure.
NOTE:Ifthetirepressureisnotequalinbothtires,the
unitmaynottravelinastraightpathandtheshaveplate
maywearunevenly.
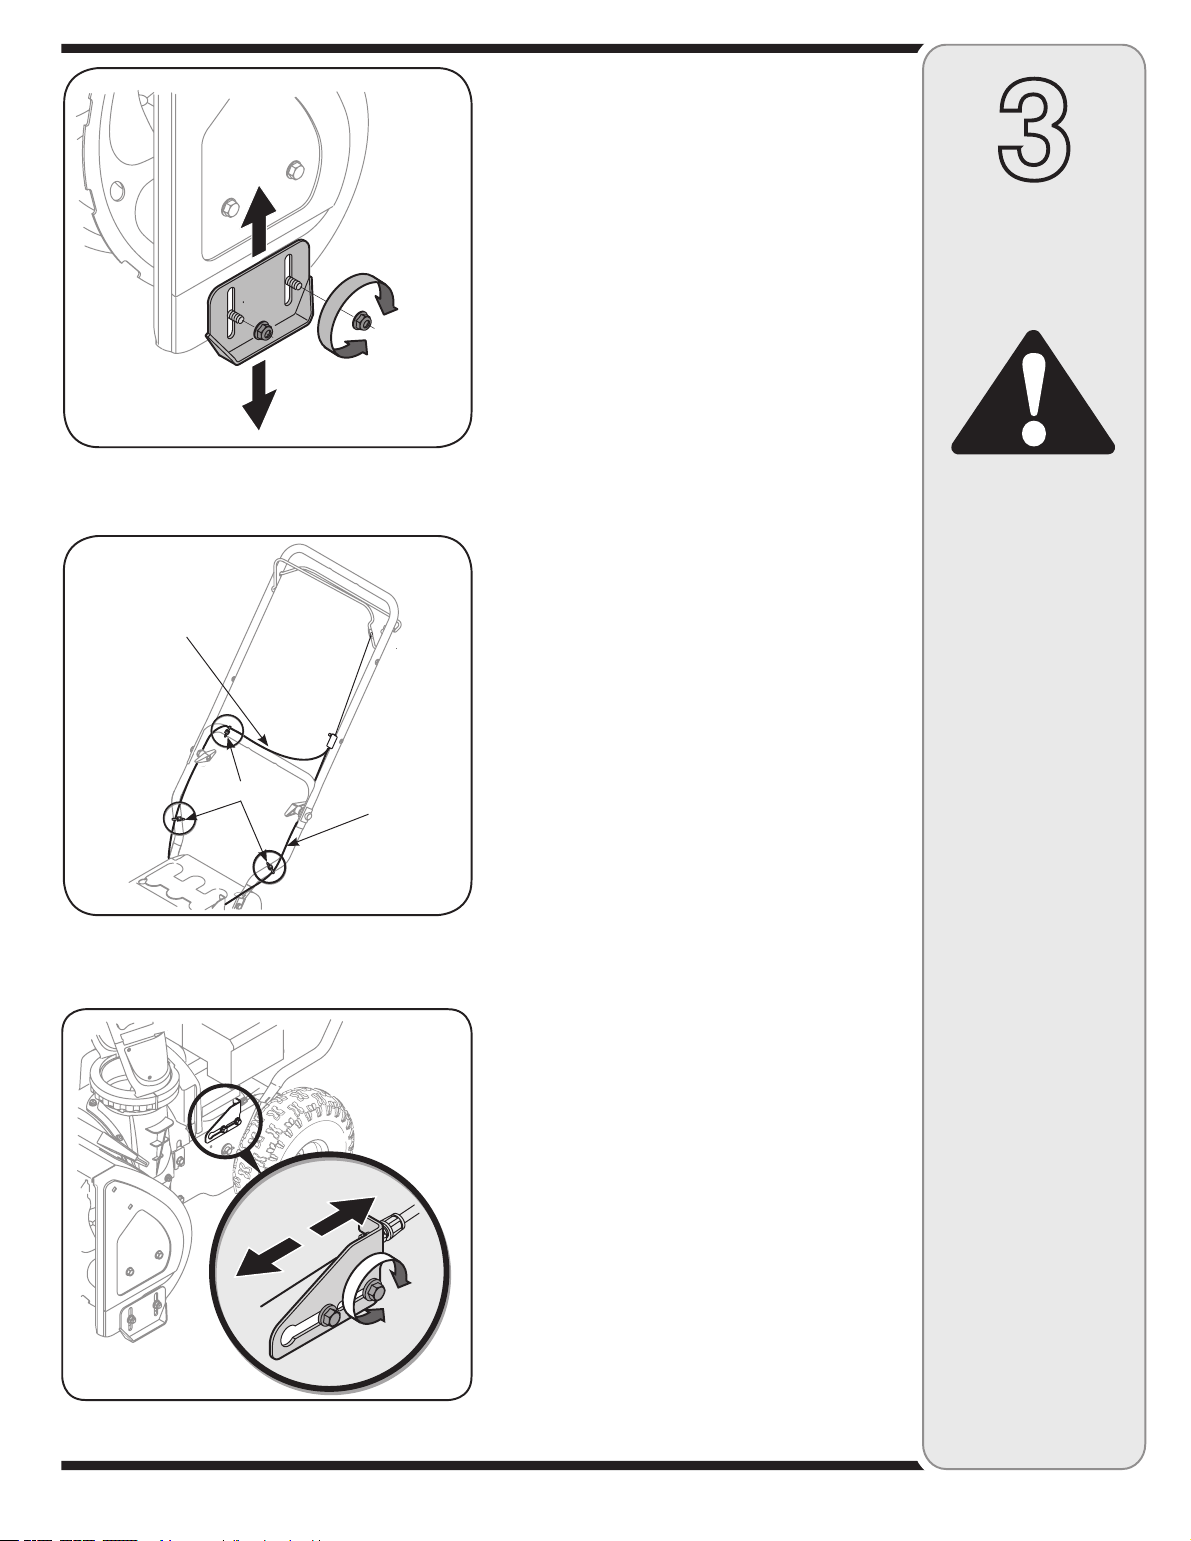
SkidShoe
Thespacebetweentheshaveplateandtheground
canbeadjusted.SeeFigure7.Forclosesnowremoval,
placeskidshoesinthelowposition.Whentheareato
beclearedisuneven,placeskidshoesinthemiddleor
highposition.SeeFigure4.
1.Adjustskidshoesbylooseningtwohexnutsand
carriageboltsoneachskidshoe,andmovingthe
skidshoetothedesiredposition.SeeFigure4.
2.Makecertaintheentirebottomsurfaceofskidshoe
isagainstthegroundtoavoidunevenwearonthe
skidshoes.
3.Tightennutsandboltssecurely.
RoutingTheDriveCable
1.Makesurethatthedrivecableisroutedparallelto
theleftupperhandle,thenacrossthetopofthe
lowerhandleandfinallyparalleltotherightlower
handle.SeeFigure5.
2.Threecabletieshavebeenusedtolooselytiethe
twocontrolcablestothelowerhandle.Twoofthese
cabletiesareoneacharm,andthirdonthetop
crossbarofthelowerhandle.Tightenthesecable
tiestosecurethecabletothelowerhandle.See
Figure5.
AugerCable
Periodicadjustmenttotheaugercontrolcablemaybe
requiredduetonormalstretchandwearonthebelt.
Adjustmentisneedediftheaugersseemtohesitate
whileturning,buttheenginemaintainsspeed,or
continueturningwiththeaugercontroldisengaged.
1. Loosentherearhexboltonthecableadjustment
bracket.SeeFigure6.
2.Slidethecableadjustmentbracketbackwards
takingouttheslackintheaugercable.
3.Retightentherearhexbolt
4.Startengineandverifyaugercontrolengagesand
disengagesproperly.
Figure4
HighPosition
MiddlePosition
LowPosition
Figure5
DriveCable
AugerCable
CableTies
WARNING
Donotover-tighten
thecable.Over-
tighteningmay
preventtheauger
fromdisengaging
andcompromisethe
safetyofthesnow
thrower.
Ifaugercontinues
torotatewiththe
controldisengaged,
shutoffengineand
readjust.
Neverattemptto
cleanchuteormake
anyadjustmentwhile
Figure6
8
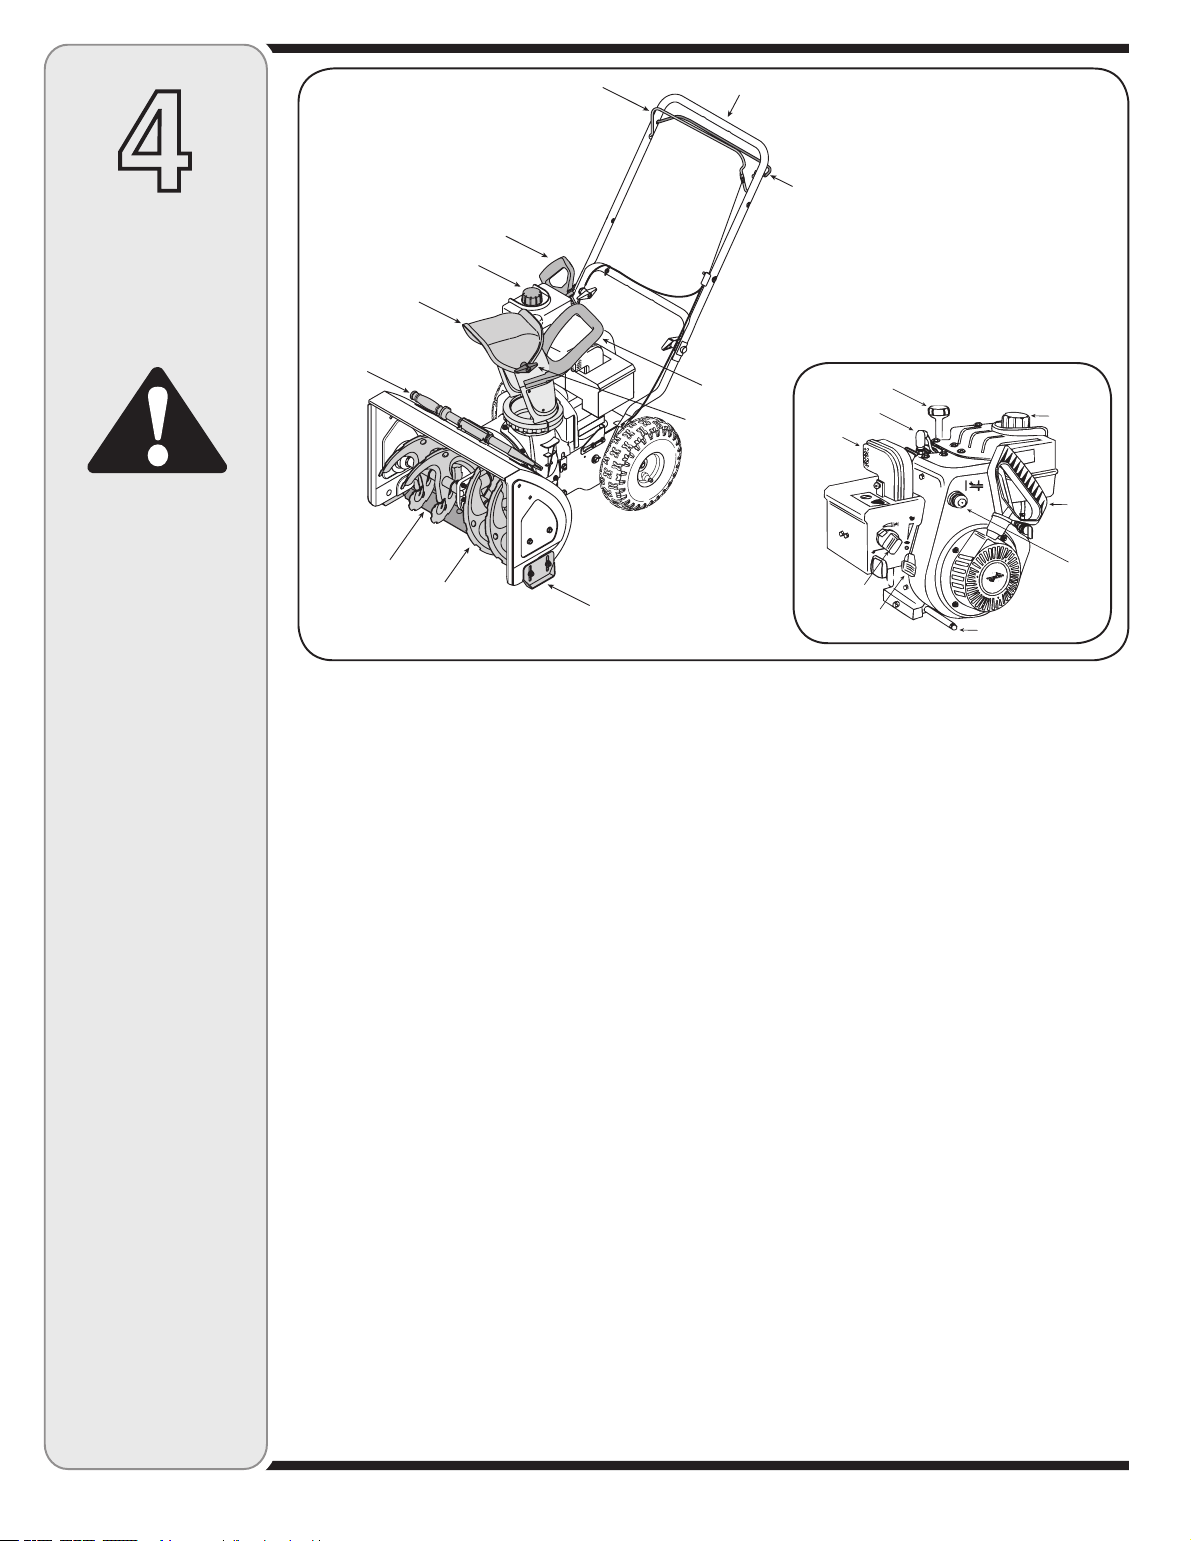
DischargeChute
Clean-outTool
ChuteHandle
WingNut
SkidShoe
Augers
ShavePlate
GasolineCap
ChuteHandle
DriveControl
UpperHandle
AugerControl
4
ThrottleControl
Thethrottlecontrolislocatedontheengine.Itregulates
thespeedoftheengineandalsostopstheengine.
DriveControl
Locatedontheundersideoftheupperhandle,thedrive
controlisusedtoengage/disengagewheels.Pullthe
drivecontrolagainsttheupperhandletoengagethe
wheels;releasetodisengage.
AugerControl
Locatedonthetopsideoftheupperhandle,theauger
controlisusedtoengageanddisengagetheaugers.
Pulltheaugercontrolbackagainsttheupperhandleto
engagetheaugers;releasetodisengage.
IMPORTANT:RefertoAugerControlTestonpage10
priortooperatingyoursnowthrower.Readandfollow
allinstructionscarefullyandperformalladjustments
toverifyyoursnowthrowerisoperatingsafelyand
properly.
DischargeChute
Thedirectionsnowisthrowncanbechangedbyturning
thelowerchutewiththechutehandle.Thedistance
snowisthrowncanbeadjustedbyraisingtheupper
chuteforgreaterdistance,orloweringforlessdistance.
Loosenthewingnutonthesideofthedischargechute
toadjust.Pivotthechutetodesiredposition,and
retightenwingnut.
IgnitionKey
Theignitionkeymustbeinsertedandsnappedinplace
inorderfortheenginetostart.Removetheignitionkeyto
preventunauthorizeduseofequipment.DoNOTattempt
toturnthekey.
ShavePlate
Theshaveplatemaintainscontactwithpavementas
thesnowthrowerispropelled,allowingsnowcloseto
pavement’ssurfacetobedischarged.
SkidShoe
Thespacebetweentheshaveplateandthegroundcan
beadjusted.Forclosesnowremoval,placeskidshoesin
thelowposition.Usemiddleorhighpositionwhenareato
beclearedisunevenorongravelsurfaces.
EngineOperatingControls
Refertotheseparateenginemanualforengineoperat-
ingcontrolsandtheirfunctions.
Figure7
Befamiliarwith
allthecontrolson
thesnowthrower
andtheirproper
operation.Knowhow
tostopthemachine
anddisengagethem
quickly.
Nevermakeadjust-
mentstothechute
assemblyunless
bothcontrolsare
disengagedandthe
operatorisstanding
besidetheunit.
WARNING
OilFill
FuelCap
Starter
Handle
OilDrain
Choke
ThrottleControl
Primer
SparkPlug
Muffler
Know
YourSnow
Thrower
9
BeforeStartingEngine
ATTENTION:YOUMUSTCHECKOIL
LEVELBEFOREOPERATION.LEVEL
MUSTBEATFULLMARKONDIPSTICK
BEFOREENGINEISSTARTED.
NOTE:Failuretofollowthisproceduremayresultin
seriousenginedamagewhichwillnotbecoveredby
warranty.
GasandOilFill-up
•Servicetheenginewithgasolineandoilasinstructed
intheseparateenginemanualpackedwithyour
snowthrower.Readinstructionscarefully.
WARNING:Neverfillfueltankindoors.
Neverfillfueltankwithenginerunning
orwhileengineishot.Donotsmoke
whenfillingfueltank.
•Attachsparkplugwiretosparkplug.Makecertainthe
metalloopontheendofthesparkplugwire(inside
theboot)isfastenedsecurelyoverthemetaltiponthe
sparkplug.
•Makecertaintheaugeranddrivecontrolbailsarein
thedisengaged(released)position.
IMPORTANT:ENGINEWILLNOTSTARTUNLESS
IGNITIONKEYISINSERTEDINTOIGNITIONSLOTIN
CARBURETORCOVER.DONOTTURNIGNITIONKEY.
ToStartEngine
•MovechokelevertoFULLCHOKEposition(cold
enginestart).Ifengineiswarm,placechokeinOFF
positioninsteadofON.
•Pushprimerbuttontwoorthreetimes.Ifunitis
equippedwithanelectricstarter,pushprimerbutton
onetimeonly.Ifengineiswarm,donotprime.
NOTE:Alwayscoverventholeinprimerbuttonwithfinger
whilepushing.Additionalprimingmaybenecessaryfor
thefirststartiftemperatureisbelow15°F(-9°C).
•Makecertaintheaugeranddrivecontrolbailsarein
thedisengaged(released)position.
•MovethrottlecontroluptoFASTposition.Make
certaintheignitionkeyisintheignitionslot.Becertain
itsnapsintoplace.Donotturnkey.
ElectricStarter(Optional)
WARNING:Theoptionalelectricstarter
isequippedwithathree-wirepower
cordandplug,andisdesignedtooper-
ateon120voltACHouseholdcurrent.It
mustbeproperlygroundedatalltimes
toavoidthepossibilityofelectricshock
whichmaybeinjurioustotheoperator.
5
Operation
WARNING
Followallinstructionscarefully.Determinethatyour
housewiringisathreewiregroundedsystem.Aska
licensedelectricianifyouarenotcertain.Ifyourhouse
wiringsystemisnotathree-wiregroundedsystem,do
notusethiselectricstarterunderanyconditions.Ifyour
systemisgroundedandathreeholereceptacleisnot
availableatthepointyourstarterwillnormallybeused,
oneshouldbeinstalledbyalicensedelectrician.
WARNING:Whenconnecting“power
cord”,firstconnectcordto“switch
box”onengine,andthenplugthe
otherendintoathree-wiregrounded
householdreceptacle.Whendiscon-
nectingpowercord,alwaysunplugthe
endinthehouseholdreceptaclefirst.
•Connectpowercordtoswitchboxonengine.
Plugtheotherendofpowercordintoathree-wire,
grounded120voltACreceptacle.
•Pushstarterbuttontoengagestartermotorand
crankengine.(Whenengagingtheelectricstarter,a
slighthesitationofafewsecondsmayoccurbefore
theenginestartstoturn.Thisisnormalandisnot
harmfultotheengine.)
•Whenenginestarts,releasestarterbutton,and
movechokegraduallytoOFF.Ifenginefalters,move
chokeimmediatelytoFULLandthengraduallyto
OFF.
CAUTION:Thiselectricstarterisnotequippedwith
athermalcut-outswitch.Donotcrankenginefor
morethanatotalof20secondswithoutallowing
electricstartertocooldownfor10minutesor
severedamagetoelectricstartercanresult.
NOTE:Ifthestartermotorrunsbuttheenginedoesnot
turnover,thestartergearisapparentlycoveredwithice
andfrozen.Placetheunitinawarmatmosphereuntil
thegearisfreeandthestarterwillengage.
RecoilStarter
•Graspstarterhandle(seeFigureandpullropeout
slowly,untilitpullsslightlyharder.
•Pullstarterhandlerapidly.Donotallowhandleto
snapback.Allowittorewindslowlywhilekeepinga
firmholdonthestarterhandle.Repeatuntilengine
starts.
•Asenginewarmsupandbeginstooperateevenly,
rotatechokeknobslowlytoOFFposition.Ifengine
falters,returntoFULLchoke,thenslowlymoveto
OFFposition.
Read,understand,
andfollowallinstruc-
tionsandwarnings
onthemachineand
inthismanualbefore
operating.
Useextremecare
whenhandling
gasoline.Gasolineis
extremelyflammable
andthevaporsare
explosive.Neverfuel
themachineindoors
orwhiletheengine
ishotorrunning.
Extinguishcigarettes,
cigars,pipesand
othersourcesof
ignition.
Ifyourhome’swir-
ingsystemisnota
three-wiregrounded
system,donotuse
thiselectricstarter
underanyconditions.
Ifyourhome
electricalsystem
isgrounded,buta
three-holereceptacle
isnotavailable,do
notuseyoursnow
thrower’selectric
starter.
10
5
Operation
WARNING
ToStopEngine
•Runengineforafewminutesbeforestoppingtohelp
dryoffanymoistureontheengine.
•Tohelppreventpossiblefreeze-upofstarter,
proceedasfollows.
OptionalElectricStarter:Connectpowercordto
switchboxonengine,thento120voltACreceptacle.
Withtheenginerunning,pushstarterbuttonandspin
thestarterforseveralseconds.Theunusualsound
madebyspinningthestarterwillnotharmengineor
starter.Disconnectthepowercordfromreceptaclefirst,
andthenfromswitchbox.
RecoilStarter:Withenginerunning,pullstarterrope
witharapid,continuousfullarmstrokethreeorfour
times.Pullingthestarterropewillproducealoudclatter-
ingsound,whichisnotharmfultotheengineorstarter.
Tostopengine,removetheignitionkey.Donotturn
key.Disconnectthesparkplugwirefromthespark
plugtopreventunintendedstartingwhileequipmentis
unattended.
NOTE:Donotloseignitionkey.Keepitinasafeplace.
Enginewillnotstartwithouttheignitionkey.
Wipeallsnowandmoisturefromthecarburetorcoverin
theareaofthecontrollevers.Also,movecontrollevers
backandforthseveraltimes.
WARNING:Thetemperatureofmuffler
andthesurroundingareasmay
exceed150ºF.Avoidtheseareas
AugerControlTest
IMPORTANT:Performthefollowingtestbeforeoperat-
ingthesnowthrowerforthefirsttimeandatthestartof
eachseason.
Checktheadjustmentoftheaugercontrolasfollows:
1.Whentheaugercontrolisreleasedandinthe
disengaged“up”position,thecableshouldhavevery
littleslack,butshouldNOTbetight.
WARNING:Donotover-tightenthe
cable.Over-tighteningmayprevent
theaugerfromdisengagingand
compromisethesafetyofthesnow
thrower.
2.Inawell-ventilatedarea,startthesnowthrower
engineasinstructedearlierinthissectionunderthe
headingStartingEngine.Makesurethethrottleis
setintheFASTposition.
3.Whilestandingintheoperator’sposition(behindthe
snowthrower)engagetheauger.
4.Allowtheaugertoremainengagedforapproximately
ten(10)secondsbeforereleasingtheaugercontrol.
Repeatthisseveraltimes.
5.WiththeenginerunningintheFASTpositionandthe
augercontrolinthedisengaged“up”position,walkto
thefrontofthemachine.
6.Confirmthattheaugerhascompletelystopped
rotatingandshowsNOsignsofmotion.
IMPORTANT:IftheaugershowsANYsignsofrotating,
immediatelyreturntotheoperator’spositionandshut
offtheengine.Waitforallmovingpartstostopbefore
readjustingtheaugercontrolcableasshowninthe
“SetupAndAdjustment”sectiononpage7.
OperatingTheSnowthrower
NOTE:Allowtheenginetowarmupforafewminutes
astheenginewillnotdevelopfullpoweruntilitreaches
operatingtemperature.
•Adjustthedischargechuteasdesired.Donotthrow
snowtowardabuildingashiddenobjectscouldbe
dischargedwithenoughforcetocausedamage.
•Starttheengineasinstructedpreviously.
•Makingcertainnobystandersorobstaclesareinfront
oftheunit,squeezetheaugercontrolbailcompletely
againsttheupperhandletofullyengagetheaugers.
Releasetheaugercontrolbailandtheaugerswill
stop.
•Whiletheaugercontrolhandleisengaged,squeeze
thedrivecontrolbailcompletelyagainsttheupper
handletoengagethewheels.Releasethedrive
controlbailandthewheelswillstop.
•Asthesnowthrowerstartstomove,maintainafirm
holdonthehandle,andguidethesnowthroweralong
thepathtobecleared.
•Releasethebailstostopthesnowthrowingactionand
forwardmotion.
NOTE:Yourunitisequippedwithaclutchinthetransmis-
sion.Ifthewheelsstopturningwhiletryingtodischarge
largevolumesofsnow,immediatelydisengagethedrive
controlbailandallowtherotatingaugerstodischarge
snowfromthehousing.Continueoperationreducing
clearingwidth.
Theoperationof
anysnowthrower
canresultinforeign
objectsbeingthrown
intotheeyes,which
candamageyour
eyesseverely.Always
wearsafetyglasses
whileoperatingthe
snowthrower,or
whileperforming
anyadjustmentsor
repairsonit.
Besurenooneother
thantheoperatoris
standingnearthe
snowthrowerwhile
startingengineor
operatingsnow
thrower.Neverrun
engineindoorsorin
enclosed,poorlyven-
tilatedareas.Engine
exhaustcontains
carbonmonoxide,an
odorlessanddeadly
gas.Keephands,
feet,hairandloose
clothingawayfrom
anymovingparts
onengineandsnow
thrower.
11
5
Operation
Neveruseyour
handstoclean
snowandice
fromthechute
assemblyor
augerhousing.
Thetemperatureof
mufflerandthesur-
roundingareasmay
exceed150°F.Avoid
theseareas
WARNING
OperatingTips
•Formostefficientsnowremoval,removesnow
immediatelyafteritfalls.
•Dischargesnowdownwindwheneverpossible.Slightly
overlapeachpreviousswath.
•Settheslideshoes1/4”belowtheshaveplatefor
normalusage.Theslideshoesmaybeadjustedtolow
position,seeFigureforhard-packedsnow.
NOTE:Itisnotrecommendedthatyouoperate
thissnowthrowerongravelasloosegravelcanbe
easilypickedupandthrownbytheaugercausing
personalinjury,propertydamageand/ordamagetoyour
snowthrower.
•Ifforsomereason,youhavetooperatethe
snowthrowerongravel,keeptheslideshoeinthe
highestpositionformaximumclearancebetweenthe
groundandtheshaveplate.
•Becertaintofollowtheprecautionslistedunder“To
StopEngine”topreventpossiblefreeze-up.
•Cleanthesnowthrowerthoroughlyaftereachuse.
Clean-OutTool
WARNING:Neveruseyourhandsto
clearacloggedchuteassembly.Shut
offengineandremainbehindhandles
untilallmovingpartshavestopped
beforeunclogging.
•Releaseboththeaugercontrolandthedrive/auger
controllock.
•Stoptheenginebymovingthethrottletothestop
position.
•Removetheclean-outtoolfromthemountingclip.
•Usetheshovel-shapedendoftheclean-outtoolto
removeanysnowandiceinthechuteassembly.
•Re-fastentheclean-outtooltothemountingclipon
therearoftheaugerhousingandrestartengine.
•Whilestandingintheoperator’sposition(behindthe
snowthrower),engagetheaugercontrolforafew
secondstoclearanyremainingsnoworicefromthe
chuteassemblybeforecontinuingtoclearsnow.

12
Alwaysstopengine,
disconnectspark
plug,andground
againstenginebefore
cleaning,lubricating
ordoinganykind
ofmaintenanceor
adjustmentsonyour
machine.
WARNING
6
Maintenance
&Service
GeneralRecommendations
1.Alwaysobservesafetyruleswhenperformingany
maintenance.
2.Thewarrantyonthissnowthrowerdoesnotcover
itemsthathavebeensubjectedtooperatorabuseor
negligence.Toreceivefullvaluefromthewar-
ranty,operatormustmaintainthesnowthroweras
instructedinthismanual.
3.Periodicallycheckallfastenersandhardwareto
makesurethesearetight.
WARNING:Beforeservicing,repairing,
lubricatingorinspecting,disengageall
controlsandstopengine.Waituntilall
movingpartshavecometoacomplete
stop.Disconnectsparkplugwireand
grounditagainsttheenginetoprevent
unintendedstarting.Alwayswearsafety
glassesduringoperationorwhileper-
forminganyadjustmentsorrepairs.
ShavePlateandSkidShoes
Theshaveplateandskidshoesonthebottomofthe
snowthroweraresubjecttowear.Theyshouldbe
checkedperiodicallyandreplacedwhennecessary.
Toremoveskidshoes:
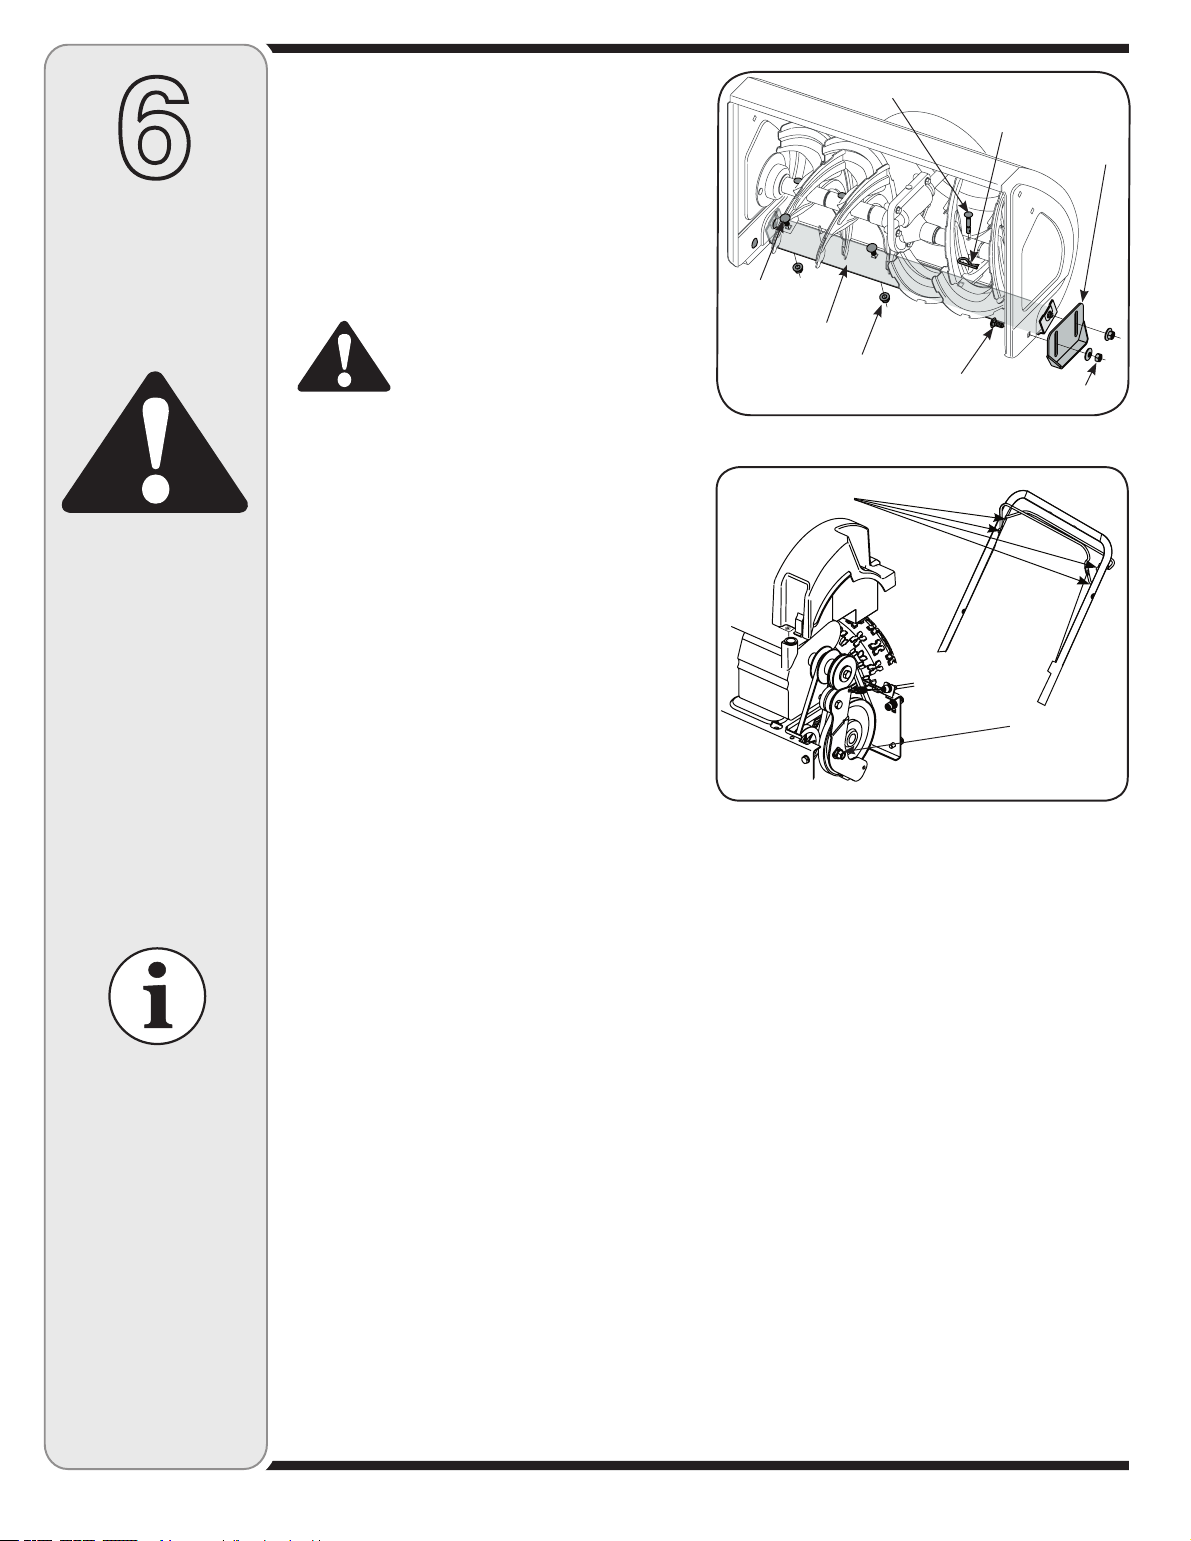
1.Removethefourcarriageboltsandhexflangenuts
whichsecurethemtothesnowthrower.
2.Reassemblenewskidshoeswiththefourcarriage
bolts(twooneachside)andhexflangenuts.Refer
toFigure9.
Toremoveshaveplate:
1.Removethecarriageboltsandhexnutswhichattach
itandtheskidshoestothesnowthrowerhousing.
2.Reassemblenewshaveplate,makingsureheadsof
carriageboltsaretotheinsideofhousing.Tighten
securely.
Augers
•Theaugersaresecuredtothespiralshaftwithtwo
shearpinsandcotterpins.Iftheaugershouldstrike
aforeignobjectoricejam,thesnowthroweris
designedsothatthepinsmayshear.
•Iftheaugerswillnotturn,checktoseeifthepins
havesheared.Onesetofreplacementshearpins
hasbeenprovidedwiththesnowthrower.When
replacingpins,sprayanoillubricantintoshaftbefore
insertingnewpins.
Lubrication
1.Lubricatepivotpointsontheaugercontrolanddrive
controlwithalightengineoilonceaseason.See
Figure10.
2.Lubricatethefaceoftheaugeridlerbracketwitha
lightweightcoldweatherlubricantatleastoncea
season.SeeFigure10.
Engine
Refertotheseparateenginemanualpackedwithyour
unitforallenginemaintenance.
CheckV-Belts
Followinstructionsbelowtocheckconditionofdrivebelts
every50hoursofoperation.
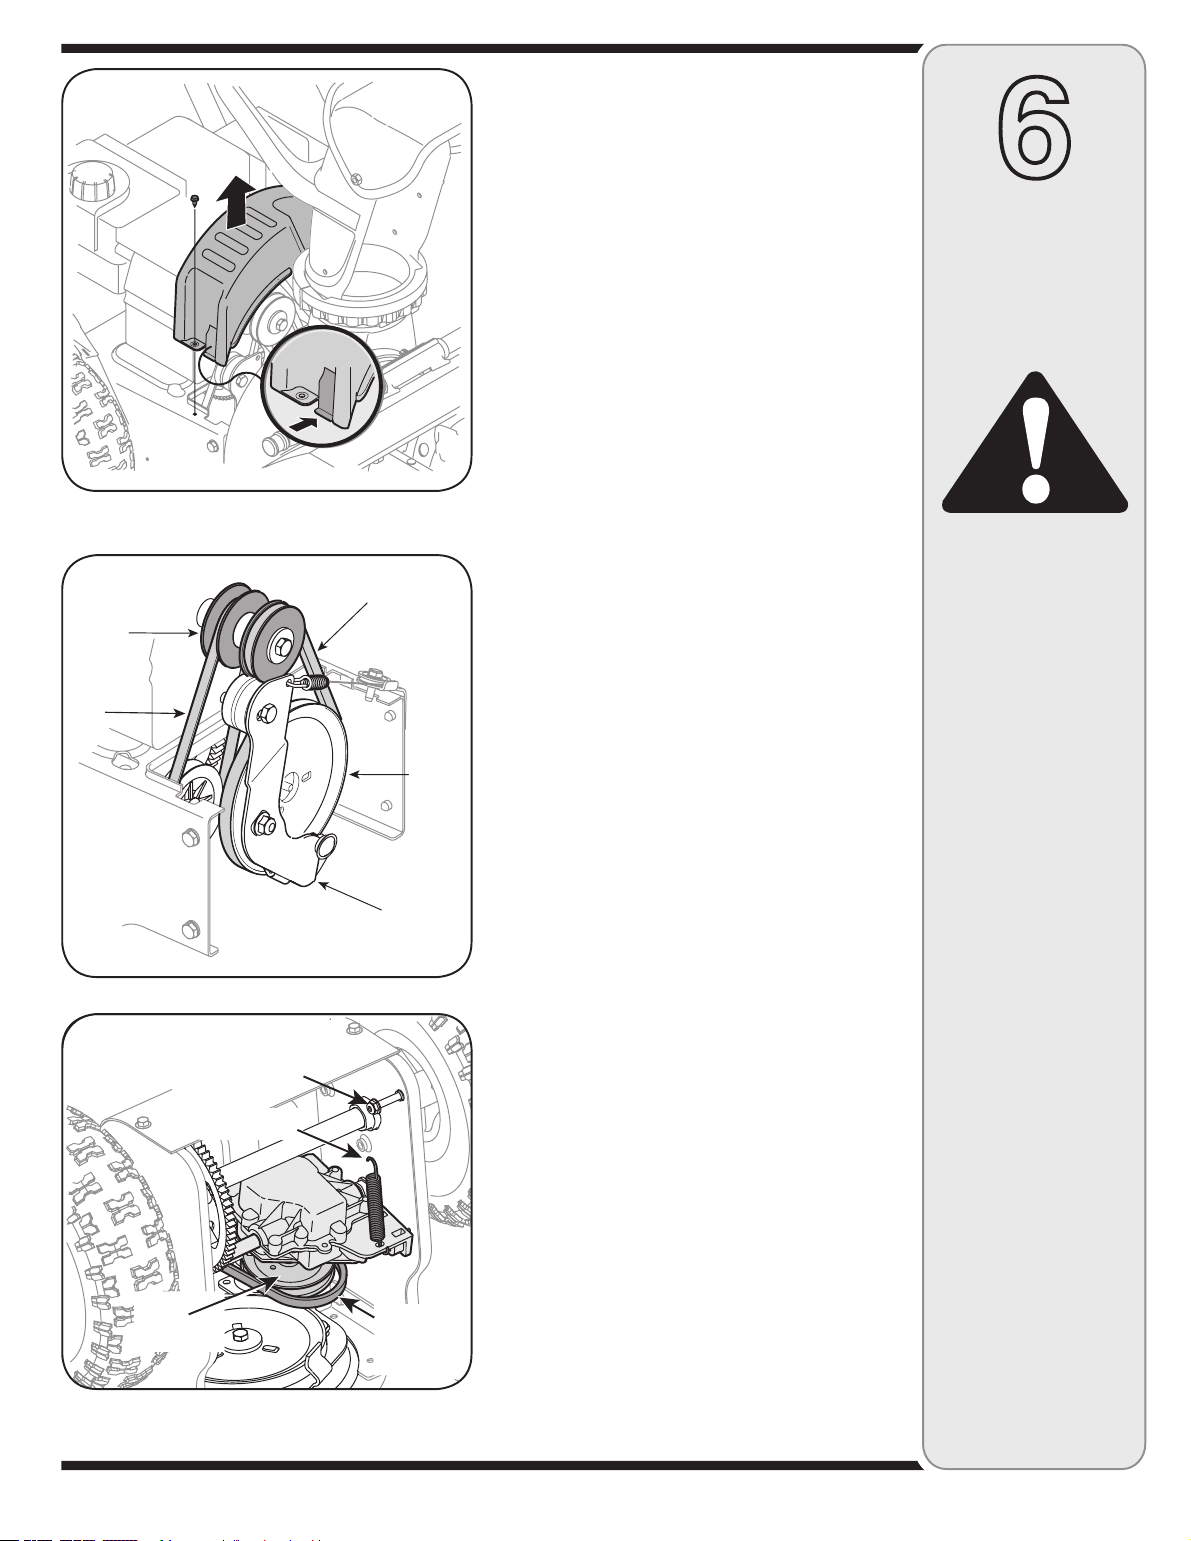
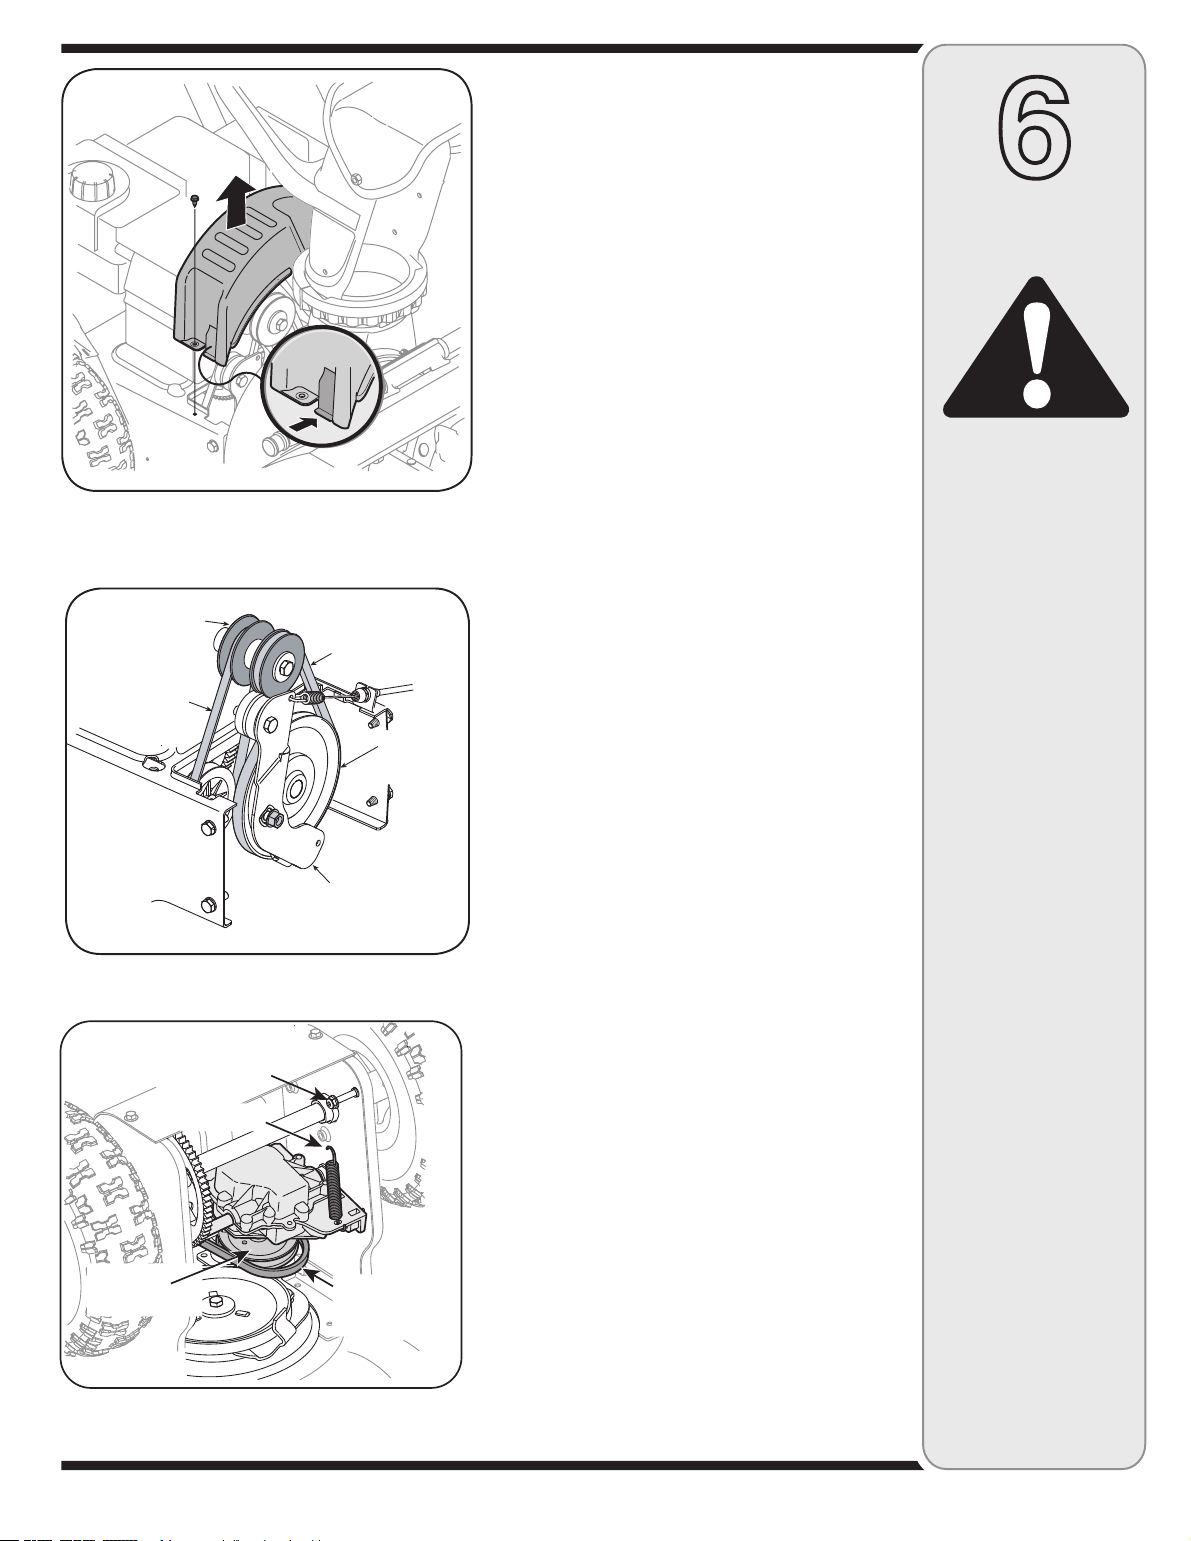
1.Removetheplasticbeltcoveronthefrontofthe
enginebyremovingtheself-tappingscrewandpress-
ingtheplastictabstoreleasethebeltcover.
2.Visuallyinspectforfrayed,cracked,orexcessively
wornoutbelts.Replace,ifnecessary.
ReplacingBelts
NOTE:Therearetwobeltsonthissnowthrower:an
augerbeltanddrivebelt.Itisrecommendedthatboth
beltsbereplacedatthesametime.
1.Removethesparkplugwirefromsparkplugandgroundit
againsttheenginetopreventaccidentalstarting.
2.Draingasolinefromthegastank,orplaceapiece
ofplasticsheetunderneaththegascaptoprevent
gasolineleakage.
Figure10
NOTE:Ifaugercontin-
uestorotatewiththe
controldisengaged,
shutoffengineand
re-adjust.
Lubricate
Lubricate
Figure9
ShearPin
CotterPin
Carriage
Bolt
ShavePlate
HexNut
SkidShoe
Carriage
Bolt
HexNut
NEVERreplacethe
augershearpinswith
standardpinsorfas-
teners.Anydamage
totheaugergearbox
orothercomponents,
asaresultofdoing
so,willNOTbe
coveredbyyoursnow
thrower’swarranty.
13
Spring
FlangeLocknut
Drive
Belt
Drive
Pulley
Alwaysstopengine,
disconnectspark
plug,andground
againstenginebefore
cleaning,lubricating
ordoinganykind
ofmaintenanceor
adjustmentsonyour
machine.
WARNING
6
Maintenance
&Service
3.Removetheselftappingscrewwhichsecuresthe
beltcovertotheframe.Removethebeltcoverby
pushinginonthesidesofthecovertoreleasethe
plastictabs.Pullthebeltcoveroutfromaroundthe
engineandchute.SeeFigure11.
AugerBelt
1.
Slipthefrontaugerbeltoffoftheenginepulleypushing
itforwardandrollinginoffofthepulley.SeeFigure12.
2.Squeezetheaugercontrolhandletoreleasethe
augerbrake,whichisthetabthatholdsthebeltonto
theaugerpulley.Removethebelt.
3.Replacewithnewbeltafterreplacingthedrivebelt.
DriveBelt
NOTE:Replacethedrivebeltbeforereassemblingthe
newaugerbelt.
1.Tipthesnowthrowerupandforwardsothatitrests
ontheaugerhousing.
2.Removethespringthatconnectsthetransmissionto
aboltontheengineframe.SeeFigure13.
NOTE:Itmaybeeasiertofirstremovetheflangelock
nut,thenuseneedle-nosedplierstofirmlygripspring
andremovefrombolt.
3.Pivotthetransmissionforwardtoreleasepressureon
thedrivebelt.Removebeltfromtransmissionpulley.
4.Removethedrivebeltfromaroundtheenginepulley,
andawayfromtheunit.
5.Placethenewdrivebeltintothegrooveonthe
enginepulley.SeeFigure12.
6.Tiltthetransmissionforwardandpositionthedrive
beltontothetransmissionpulley.
7.Reconnectthespringtotheboltontheengineframeand
securethetransmission.Reinstalltheflangelocknut.
8.Installnewaugerbelt.
9.Reassemblethebeltcoveronthesnowthrower
.
Figure12
Figure11
Figure13
Drive
Belt
Engine
Pulley
AugerBelt
Auger
Pulley
Idler
Bracket
14
Observethefollowing,whenpreparingyoursnow
throwerforoff-seasonstorage:
•Drainfuelintoanapprovedcontaineroutdoors,away
fromanyopenflame.Allowenginetocool.Extin-
guishcigarettes,cigars,pipesandothersources
ofignitionpriortodrainingfuel.Fuelleftinengine
duringwarmweatherdeterioratesandwillcause
seriousstartingproblems.
•Ifunitistobestoredover30days,preparefor
storageasinstructedintheseparateenginemanual
packedwithyourunit.
•Runengineuntilfueltankisemptyandenginestops
duetolackoffuel.
•Removegasolinefromcarburetorandfueltankto
preventgumdepositsfromformingontheseparts
andcausingpossiblemalfunctionofengine.
•Draincarburetorbypressingupwardonbowldrain,
locatedbelowthecarburetorcover.
•Fuelstabilizers,suchasSTA-BIL®,areanaccept-
ablealternativeinminimizingtheformationoffuel
gumdepositsduringstorage.Donotdraincarburetor
ifusingafuelstabilizer.
•Wipeequipmentwithanoiledragtopreventrust.
•Removesparkplugandpouroneounceofengine
oilthroughsparkplugholeintocylinder.Coverspark
plugholewithrag.Crankengineseveraltimesto
distributeoil.Replacesparkplug.
•Followthelubricationrecommendationsfoundinthe
MaintenanceSection.
•Alwaysstorethesnowthrowerinaclean,dryarea.
7
Off-Season
Storage
Neverstoresnow
throwerwithfuel
intankindoorsor
inpoorlyventilated
areas,wherefuel
fumesmayreachan
openflame,spark
orpilotlightasona
furnace,waterheater,
clothesdryeror
gasappliance.
Drainfuelintoan
approvedcontainer
outdoors,awayfrom
anyopenflame.Be
certainengineis
cool.Donotsmoke.
Fuelleftinengine
duringwarmweather
deterioratesandwill
causeseriousstart-
ingproblems.
Donotdraincarbure-
torifusingfuel
stabilizer.Neveruse
engineorcarburetor
cleaningproducts
inthefueltankor
permanentdamage
mayoccur.
WARNING
15
NOTE:Thissection
addressesminor
serviceissues.For
furtherdetails,contact
customerassistance.
8
Trouble-
Shooting
CauseProblemRemedy
Enginefailstostart
1.ChokenotinONposition.
2.Sparkplugwiredisconnected.
3.Fueltankemptyorstalefuel.
4.Enginenotprimed.
5.Faultysparkplug.
6.Blockedfuelline.
7.Safetykeynotinignitiononengine.
8.Fuelshut-ffvalveclosed.(IfEquipped)
1.MovechoketoONposition.
2.Connectwiretosparkplug.
3.Filltankwithclean,freshgasoline.
4.Primeengineasinstructedin
“OperatingYourSnowThrower”.
5.Clean,adjustgap,orreplace.
6.Cleanfuelline.
7.Insertkeyfullyintotheswitch.
8.Openfuelshut-offvalve.
Enginerunserratic
1.MovechokelevertoOFFposition.
2.Cleanfuelline;filltankwithclean,
freshgasoline.
3.Drainfueltank.Refillwith
freshfuel.
4.ContactServiceCenter.
1.UnitrunningonCHOKE.
2.Blockedfuellineorstalefuel.
3.Waterordirtinfuelsystem.
4.Carburetoroutofadjustment.
Engineoverheats
1.ContactServiceCenter.1.Carburetornotadjustedproperly.
Lossofpower
1.Connectandtightensparkplug
wire.
2.Removeiceandsnowfromgas
cap.Becertainventholeisclear.
3.ContactServiceCenter.
1.Sparkplugwireloose.
2.Gascapventholeplugged.
3.Exhaustportplugged.
Unitfails
topropelitself
1.Adjustdrivecontrolcable.Referto
“Adjustments”.
2.Replacedrivebelt.
1.Drivecontrolcableinneedofadjust-
ment.
2.Drivebeltlooseordamaged.
Excessive
Vibration
1.Loosepartsordamagedauger.
1.Stopengineimmediatelyand
disconnectsparkplugwire.Tighten
allboltsandnuts.Ifvibration
continues,haveunitservicedbya
ServiceCenter.
Unitfails
todischargesnow
1.Stopengineimmediatelyand
disconnectsparkplugwire.Clean
chuteassemblyandinsideofauger
housingwithclean-outtoolora
stick.
2.Stopengineimmediatelyand
disconnectsparkplugwire.
Removeobjectfromaugerwith
clean-outtoolorastick.
3.Referto“AugerControlTest”.
4.RefertoMaintenancesection.
5.Replacewithnewshearpin(s).
1.Chuteassemblyclogged.
2.Foreignobjectlodgedinauger.
3.Augercontrolcableinneedofadjust-
ment.
4.Augerbeltlooseordamaged.
5.Shearpin(s)sheared.
16
8
Illustrated
Parts/
Pièces
détachés

17
REFPART
NO.NO.
N° DEN° DE
RÉFPIÈCEDE SCRIP TIONDE SCRIP TION
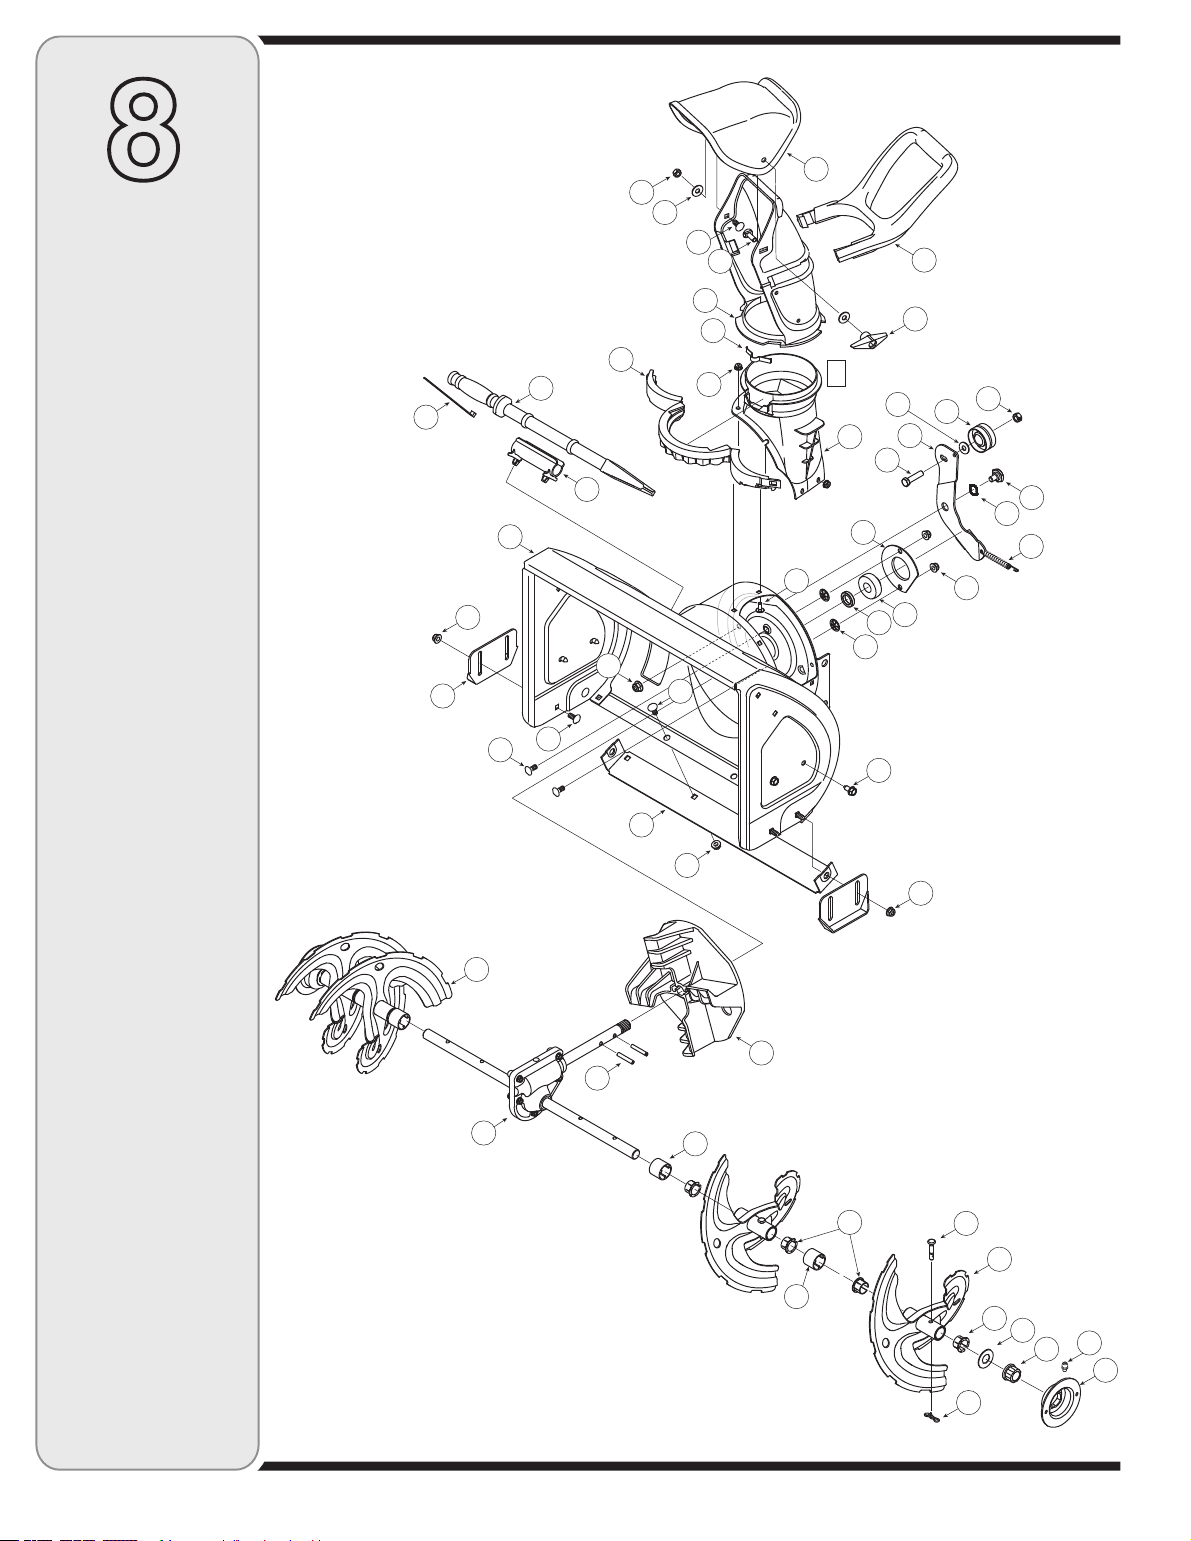
1684-04037Chute As sem blyGoulotte
2710-04071Carriage Screw 5/16-18 x 1.0Vis ordinaire 5/16-18 x 1,0
3710-0451Carriage Bolt 5/16-18 x .75Boulon ordinaire 5/16-18 x 0,75
4712-3068Hex Patch L-Nut 5/16-18Écrou de blocage à six pans 5/16 - fil. 18
5720-0284Han dle Knob As sem bly -BlackBouton - noir
720-04032Han dle Knob As sem bly -Yel lowBouton - jaune
6731-04388AChute Han dlePoignée - goulotte d’éjection
7731-04426AUp per Chute w/Do mes tic La belGoulotte supérieur avec étiquette domestique
8736-0159Flat Washer .349 ID x .879 OD x .063Rondelle plate 0,349 DI x 0,879 DE x 0,063
9731-04127Lower Chute 5" DiaGoulotte d’éjection inférieur dia. 5 po
10731-04353Ring-Lower ChuteBague - goulotte d’éjection inférieur
11731-2636AChute Adapter 5" Dia.Adaptateur de goulotte d’éjection 5 po diam.
12732-04111Chute Ad just ment SpringRessort d’ajustement - goulotte d’éjection
13712-04064Hex L-Flanged Nut 1/4-20 Gr. F Ny lonContre-écrou à embase 1/4-20 Qual. F ny lon
14731-2643Chute Clean-Out ToolOutil de dégagement de la goulotte
15731-2635Mount ing BracketSupport de mon tage
16725-0157Ca ble TieAttache-câble
17710-0134Carriage Bolt 1/4-20 x .62Boulon ordinaire 1/4-20 x 0,62
18710-0520Hex Screw 3/8-16 x 1.50Vis à tête hexagonale 3/8-16 x 1,50
19710-0604ASelf-tapping Screw 5/16-18 x .625Vis autotaraudeuse 5/16-18 x 0,625 po
20712-04063Flange Locknut 5/16-18 Gr. F, Ny lonContre-écrou à embase 5/16-18 Qual. F, ny lon
21712-04065Flange Lock-Nut 3/8-16 Gr. F Ny lonContre-écrou à embase 3/8-16 Qual. F ny lon
22712-0266Hex Jam Nut 3/8-16 Gr. 2Écrou de blocage 3/8-16 Qual. 2
23715-04020Spi ral PinAttache
24726-04012Push NutÉcrou à enfoncer
25731-04218BIm pel lerVentilateur
26732-0611Ex ten sion SpringRessort d’extension
27736-0174Wave Washer .660 ID x .88 OD x .010Rondelle ondulée 0,660 DI x 0,88 DE x 0,010
28738-0281Shoulder Scr .625 Dia. x .170Vis à épaulement dia. 0,625 x 0,170
29741-0245Hex. Flange Bearing.751" IDRoulement à bride à six pans 0,751 DI
30741-0309Self-align ing bear ingRoulement auto-aligneur
31750-04191SpacerEntretoise
32756-04035Flat IdlerTendeur
33784-0434Auger Idler BracketSupport du tendeur
34790-00075Bear ing Hous ingCarter de la roulement
35618-04292Au ger Gear box As sem bly - 22"Boîtier d’engrenage - 22 po
618-04294Au ger Gear box As sem bly - 24"Boîtier d’engrenage - 24 po
36684-04113Au ger As sem bly - LHTarière CG
37684-04114Au ger As sem bly -RHTarière - CD
38684-04166Au ger Hous ing 22"Logement des tarières 22 po
684-04165Au ger Hous ing 24"Logement des tarières 24 po
39714-04040Bow-Tie Cot ter PinGoupille fendue
40731-04870SpacerEntretoise
41736-0351Flat Washer .76 ID x 1.5 OD x .03Rondelle plate 0,76 DI x 1,50 DE x 0,030
42738-04124AShear Pin .25 x 1.50 Gr. 2Goupille 0,25 x 1,50 Qual. 2
43741-0493AFlange Bear ingRoulement à bride
44790-00087AHex Brg. Hous ingCarter de la roulement
790-00138AHex. Brg. Hsg. (w/Grease fit ting hole)Carter de la roulement (trou-raccord de graisse)
45736-0258Flat WasherRondelle plate
46784-5580Slide Shoe (Stan dard)Pat in ordi naire
47790-00117Shave Plate 22"Lame plate 22 po
790-00120Shave Plate 24"Lame plate 24 po
48737-3000Grease Fit tingRaccord graisseur
49731-04870Spacer (24" only)Entretoise (24 po seulement)
31A-3AAD1
7.19.06
18

19
REFPART
NO.NO.
N° DEN° DE
RÉFPIÈCEDE SCRIP TIONDE SCRIP TION
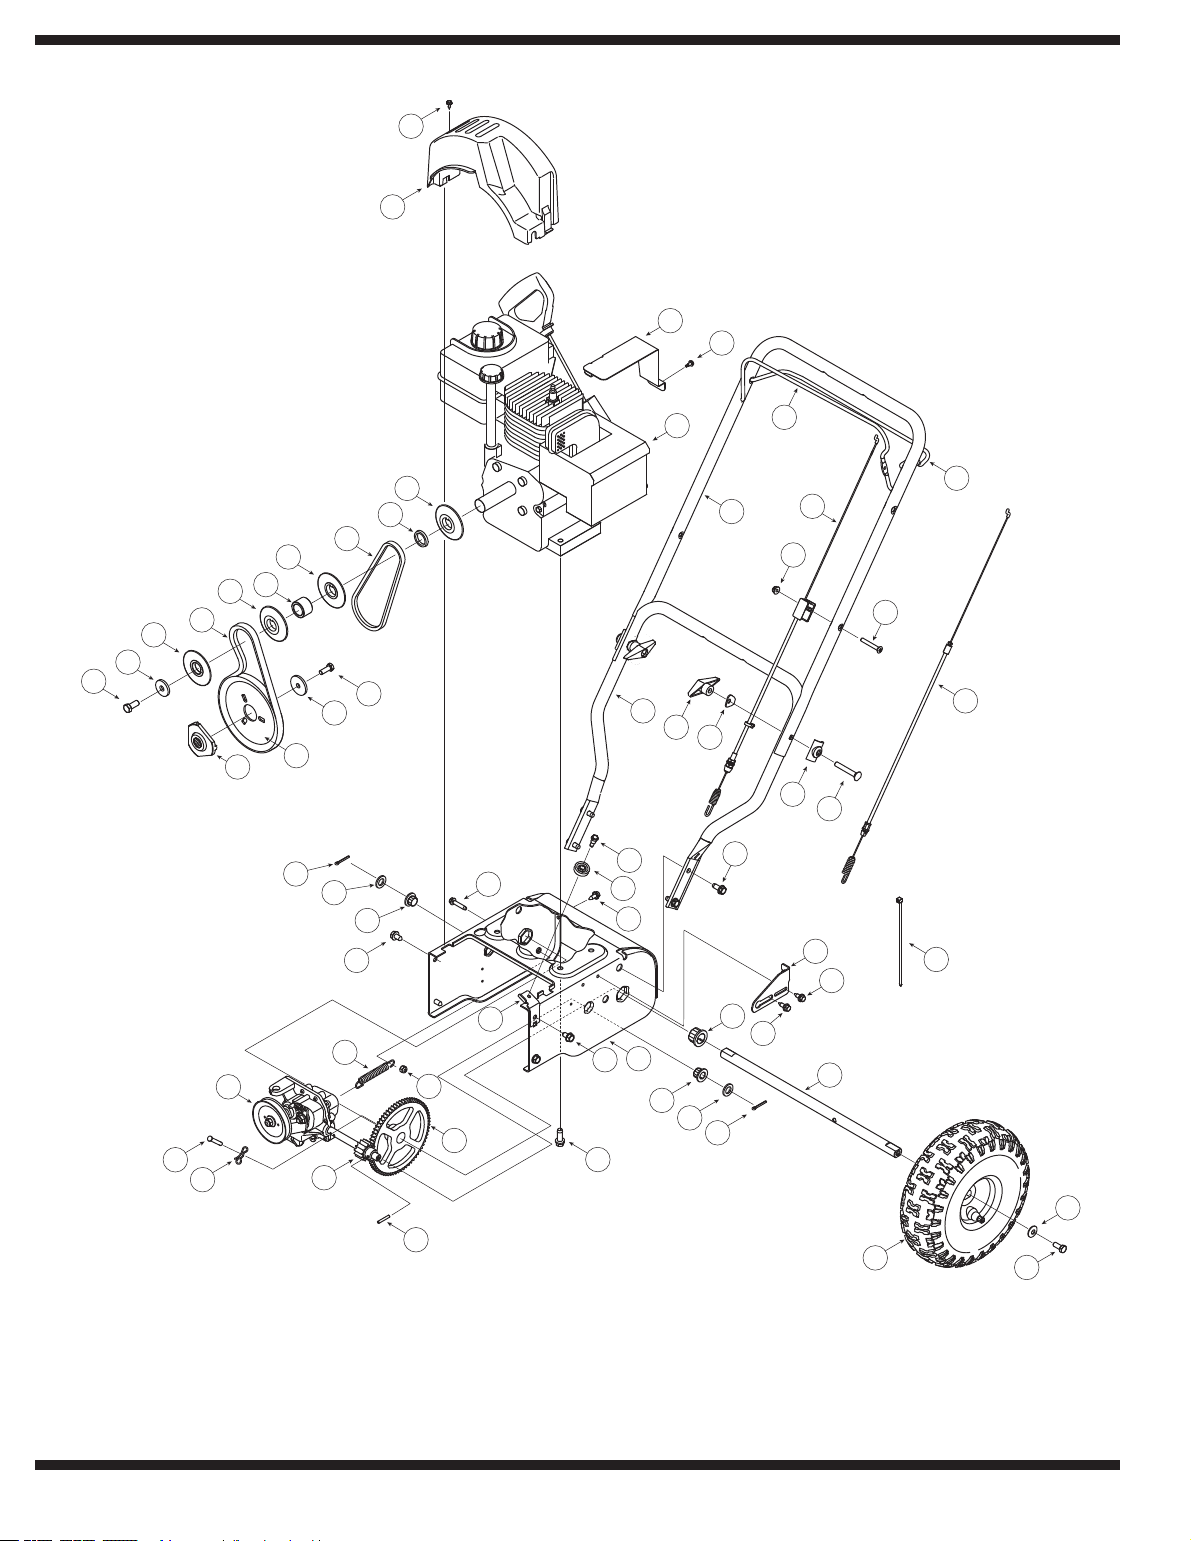
1710-0449Carriage Bolt 5/16-18 x 2.25 Gr. 1Boulon ordinaire 5/16-18 x 2,25 Qual
2710-0605Oval C-Sunk Screw 1/4-20 x 1.825" Lg.Vis à tête noyée 1/4-20 x 1,825 po de lg
3710-01260AHex Wash. Scr. AB 5/16-12 x .75Vis à tête hex. AB 5/16-12 x 0,75
4712-04064Flanged Lock Nut 1/4-20 Gr. F Ny lonÉcrou de blocage 1/4-20 Qual. F
5720-0284Wing Nut Assembly 5/16-18Écrou à oreilles 5/16-18
6725-0157Ca ble TieAttache câble
7746-04256Drive Ca bleCâble d'entraînement
8746-04236Au ger Ca bleCâble de la tarière
9747-1161AAu ger Con trol Han dlePoignée de commande de la tarière
10747-1214Drive Con trol Han dlePoignée de commande d’entraînement
11749-04147Lower Han dleGuidon inférieur
12749-1092AUp per Han dleGuidon supérieur
13790-00053Han dle TabPatte d’attache
14618-04296Trans mis sion As sem blyEssieu
16710-0809Hex Bolt 1/4-20 x 1.25Boulon hex. 1/4-20 x 1,25
17710-1652Screw 1/4-20 x .625Vis 1/4-20 x 0,625
18711-1364Clevis Pin 1/4 x 1.3725Axe de chape 1/4 x 1,3725
19714-0115Cot ter PinGoupille fendue
20714-04040Bow Tie Cot ter PinGoupille fendue
21715-0249Spring Roll Pin 1.12" Lg.Goupille ressort à spirale 1,12 po de lg.
22717-04066Pinion 14T, 12DPPignon 14 dents, 12DP
23717-04073AGear-70 ToothEngrenage - 70 dents
24732-0429ATension Spring .50 OD x 3.97" Lg.Ressort de ten sion 0,50 DE x 3,97 po de lg
25736-0192Flat Washer 0.531 ID x 0.93 OD x .090Rondelle plate 0,531 DI x 0,930 DE x 0,090
26738-04184AShoulder Screw 1/4-20Vis épaulée 1/4-20
27738-0924Carriage Screw 1/4-28Boulon ordinaire 1/4-28
28741-0245Hex Flage Bear ingRoulement
29741-0410BHex. Flange Bearing 0.75" I.D.Roulement à bride hex. de 0,75 po D.I.
30756-0625Ca ble RollerSup port
31784-0419BFrameChâssis
32790-00223Au ger Ca ble BracketSupport - câble de tarière
33790-00224Au ger Ca ble Ad just ment BracketSupport de réglage - câble de tarière
34634-0232BComp. Wheel Ass’y 10 x 4 Snow HogEns.de roue comp 10,0 x 4,0 Snow Hog
734-2047Tire 4.10 x 3.0" Snow HogPneu 4,10 x 3,0 po Snow Hog
734-2627ARim 4.0" x 3.0"Jante 4,0 x 3,0 po
734-0255Air ValveSoupape à air
35710-0627Hex L-Bolt 5/16-24 x 0.75 Gr. 5Boulon hex 5/16-24 x 0,75 Qual. 5
36736-0242Cup. Wash. .340 ID x .872 OD x .060Rondelle creuse 0,340 DI x 0,872 DE x 0,060
37738-1231Axle .75 OD x 17.594 Lg.Essieu 0,75 DE x 17,594 lg.
38710-0224Hex Screw #10-16 x .50Vis no. 10-16 x 0,50
39710-0654AHex Wash HD Tap Scr 3/8-16 x 1.00Vis autotaraudée 3/8-16 x 1,00
40710-0696Hex Scr. 3/8-24 x .875" Lg. Gr. 8Vis à tête hex.3/8-24 x 0,875 po Qual. 8
41710-1245BHex Screw 5/16-24 x .875 Gr. 8Vis à tête hex. 5/16-24 x 0,875 Qual. 8
42731-04162ABelt CoverCouvercle de courroie
43736-0247Flat Washer .406 ID x 1.25 OD x .160Rondelle plate 0,406 DI x 1,25 DE x 0,160
44736-0505Flat Washer .34 ID x 1.50 OD x .150Rondelle plate 0,34 DI x 1,50 DE x 0,150
45748-04067Pulley Adap tor .75 Dia. w/pinsAdaptateur de poulie avec épingles
46750-1355Spacer .8760 ID x 1.25 OD x .190Entretoise 0,8760 DI x 1,25 DE x 0,190
47750-1356Spacer .8760 ID x 1.25 OD x .86Entretoise 0,8760 DI x 1,25 DE x 0,86
48754-04013“V”-Belt 3/8 x 21.108 Lg.Courroie trapézoïdale 3/8 x 21,108 lg.
49754-04014“V”-Belt 3/8 x 26.680 Lg.Courroie trapézoïdale 3/8 x 26,680 lg.
50756-04024Auger Pul ley 6.0 x 3/8Poulie de tarière 6,0 x 3/8
51756-0569V-Pulley Half 3/8 x 2.6Poulie - moitié 3/8 x 2,
6
52710-0456Screw #10-16 x .50Vis no. 10-16 x 0,50
53790-00064Heat ShieldProtecteur
54736-0160Flat Washer .53 ID x .93 OD x .050Rondelle plate 0,53 DI x 0,93 DE x 0,05
31A-3AAD2
7.21.05

20
TWOYEARSUPREMEWARRANTY:
FortwoyearsfromdateofretailpurchasewithinCanada,MTDPRODUCTSLIMITEDwill,atitsoption,
repairorreplace,fortheoriginalpurchaser,freeofcharge,anypartorpartsfoundtobedefectiveinmate-
rialorworkmanship.Thiswarrantycoversunitswhichhavebeenoperatedandmaintainedinaccordance
withtheowner’sinstructionsfurnishedwiththeunit,andwhichhavenotbeensubjecttomisuse,abuse,
commercialuse,neglect,accidentimpropermaintenanceoralteration.Normalwearpartsorcomponents
thereofaresubjecttospecialtermsasnotedbelowintheNOFAULTNinetyDayConsumerWarranty
clause.
Theengine,startermotororcomponentpartsthereofcarryseparatewarrantiesfromtheirmanufacturers.
Pleaserefertotheapplicablemanufacturer’swarrantypolicyfortheseitems.
NOFAULTNinetyDayConsumerWarrantyonNormalWearParts:Allnormalwearpartfailureswillbe
coveredonthisproductforaperiodof90daysregardlessofcause.After90daysbutwithinthetwoyear
warrantyperiod,normalwearpartfailureswillbecoveredifcausedbydefectsinmaterialorworkmanship
ofothercomponentparts.Normalwearpartsaredefinedasbatteries,belts,blades,bladeadaptors,grass
bags,riderdeckwheels,seats,tiresandclutchparts(frictionwheels).
FullNinetyDayWarrantyonBattery:Forninety(90)daysfromthedateofretailpurchase,ifanybattery
includedwiththisunitprovesdefectiveinmaterialorworkmanshipandourtestingdeterminesthebattery
willnotholdacharge,MTDPRODUCTSLIMITEDwillreplacethebatteryatnochargetotheoriginalpur-
chaser.
AdditionalLimitedThirtyDayWarrantyonBattery:Afterninety(90)daysbutwithinonehundred
twenty(120)daysfromthedateofpurchase,MTDPRODUCTSLIMITEDwillreplacethedefectivebattery,
fortheoriginalpurchaser,foracostofone-half(½)ofthecurrentretailpriceofthebatteryineffectatthe
dateofreturn.
HowtoObtainService:Warrantyserviceisavailable,withproofofpurchase,throughyourlocalMTD
AuthorizedServiceDealer.Ifyoudonotknowthedealerinyourarea,pleasewritetotheServiceDepart-
mentofMTDPRODUCTSLIMITED,P.O.BOX1386,KITCHENER,ONTARION2G4J1.Thereturnofa
completeunitwillnotbeacceptedbythefactoryunlesspriorwrittenpermissionhasbeenextendedbyMTD
PRODUCTSLIMITED.
OtherWarranties:Allotherwarranties,expressorimplied,includinganyimpliedwarrantyofmerchant-
abilityislimitedinitsdurationtothatsetforthinthisexpresslimitedwarranty.Theprovisionsassetforthin
thiswarrantyprovidethesoleandexclusiveremedyofMTDPRODUCTSLIMITEDobligationsarisingfrom
thesaleofitsproducts.MTDPRODUCTSLIMITEDwillnotbeliableforincidentalorconsequentiallossor
damage.

16
GARANTIESUPRÈMEDEDEUXANS
MTDPRODUCTSLIMITEDs’engageàréparerouàremplacergratuitement,àsonchoix,àl’acheteurinitial,
laoulespiècesquis’avèrentdéfectueusesenraisond’unvicedematièreoudefabricationdanslesdeuxans
quisuiventladated’achataudétailauCanada.Cettegaranties’appliqueseulementauxmachinesquiont
étéutiliséesetentretenuesconformémentauxinstructionspubliéesdanslanoticed’utilisationaccompagnant
lamachine,quin’ontpasfaitl’objetd’unemploiincorrectouabusif,denégligence,d’unentretieninadéquat
oudemodification,quin’ontpasétéaccidentéesetquin’ontpasétéutiliséesàdesfinscommerciales.Les
piècescourantesfontl’objetdeconditionsspécialesénuméréesci-dessousdanslaclause«Garantiesans
défautdequatre-vingt-dixjoursauconsommateur».
Lemoteur,lemoteurdedémarrageainsiquesescomposantsfontl’objetd’unegarantieséparéedeleurs
fabricantsrespectifs.Veuillezconsulterlesconditionsdegarantiedufabricantencequiconcernecespièces.
«Garantiesansdéfautdequatre-vingt-dixjoursauconsommateur»despiècescourantes:Toutesles
piècescourantessontprotégéespendant90jours,quellequesoitlacausedeleurdéfaillance.Àl’expiration
dudélaide90jours,maisavantlafindelapériodedegarantiededeuxans,lespiècescourantessontproté
-
géessileurdéfaillancerésulteduvicedematièreoudefabricationd’uneautrepièce.Parpiècescourantes,
onentendlesbatteries,lescourroies,leslames,lesadaptateursdelames,lessacsàherbe,lesrouesdes
tondeuses,lessièges,lespneusetlespiècesdel’embrayage(rouesdefrottement).
Garantiecomplètedequatre-vingt-dixjourssurlabatterie:MTDs’engageàremplacergratuitement
àl’acheteurinitialtoutebatteriefournieaveccettemachinequis’avèredéfectueuseenraisond’unvicede
matièreoudefabricationetaprèsquenostestsaientconfirméqu’ellenepeutmaintenirunecharge.
Garantielimitéesupplémentairedetrentejourssurlabatterie:MTDs’engage,àl’expirationdelapéri-
odedequatre-vingt-dix(90)joursetavantlafind’unepériodedecentvingt(120)joursàcompterdeladate
d’achat,àremplacerlabatteriedéfectueuseàl’acheteurinitial,pourlamoitié(1/2)duprixdedétailenvigueur
delabatterieàladateduretourdecelle-ci.
Pourobtenirleservicesousgarantie:Toutconcessionnaire-réparateuragrééparMTDestenmesure
d’assurertoutservicesousgarantiesurprésentationd’unepreuved’achat.Sivousneconnaissezpasle
concessionnaire-réparateurdevotrelocalité,adressez-vousauserviceaprès-vente,MTDPRODUCTSLIM-
ITED,C.P.1386,KITCHENER(ONTARIO)N2G4J1.Unemachinecomplètenepeutêtreretournéeàl’usine
quesielleestaccompagnéed’uneautorisationécritepréalabledeMTDPRODUCTSLIMITED.
Autresgaranties:Touteslesautresgaranties,expriméesoutacites,ycomprislesgarantiestacitesde
qualitémarchande,selimitentàladuréestipuléedanslagarantielimitéeexprimée.Lesconditionsstipulées
danscettegarantiereprésententlesseulesobligationsdeMTDPRODUCTSLIMITEDdécoulantdelavente
desesproduits.MTDPRODUCTSLIMITEDn’estpasresponsabledetoutepertenidetoutdommageindirect
ouaccidentel.
15
REMARQUE:Ce
chapitreconcernedes
problèmesd’entretien
mineurs.Pourplusde
détails,adressez-vous
auserviceaprès-vente.
8
Dépannage
Cause(s)ProblèmeSolution
Lemoteurnedémarrepas
1. Voletdedépartfermé.
2.Fildelabougiedébranché.
3.Réservoirvideouessenceéventée.
4.Boutondel’amorceurn’étantpasemployé
correctement.
5.Bougiedéfectueuse.
6.Canalisationdecarburantbouchée.
7.Laclédecontactdumoteurn’estpasmise.
8.Robinetd’arrivéedecarburantfermé.
1. Ouvrezlevoletdedépart.
2.Branchezlefildelabougie.
3.Faitelepleinavecuneessencepropre
etfraîche.
4.Consultezlechapitre“Utilisationdela
Souffleuse”.
5.Nettoyez,réglezl’écartementou
remplacezlabougie.
6.Lanettoyer.
7.Mettezlaclé.
8.Ouvrezlerobinet.
Fonctionnementirrégulier
1. Ouvrezlevoletdedépart.
2.Nettoyezlacanalisation;faitesleplein
avecuneessencepropre.
3.Débranchezlacanalisationd’essence
aucarburateurpourviderleréservoir
d’essence.Faiteslepleinavecune
essencefraîche.
4.Adressez-vousàunestation
1. Machinefonctionnantaveclevoletde
départfermé.
2.Canalisationdecarburantbouchéeou
essenceéventée.
3.Eauousaletédanslesystèmed’essence.
4.Carburateurestmalréglé.
1.Addressez-vousàunestation
technique.
1.Carbureteurestmalréglé.Moteursurchauffe
Pertedepuissance
1. Branchezetserrezlefildelabougie.
2.Dégagezlaglaceetlaneigedu
chapeau.Assurez-vousdelapropreté
dutroud’aération.
3.Adressez-vousàunestation
technique.
1. Fildelabougiedesserré.
2.Chapeaud’échappementdutrou
d’aérationbouché.
3.Leportdéchappementestbouché.
Lasouffleusen’avance
pas
1. Réglezlecâbled’entraînement.
VoirleRéglages.
2.Remplacezlacourroied’entraînement.
Vibrationexcessives
1.Piècesdesserréesouvissansfin
endommagée.
1. Arrêtezimmédiatementlemoteuret
débranchezlefildelabougie.Serrez
touslesboulonsetécrous.Siles
vibrationspersistent,faitesvérifierla
machineparunestationtechnique
agréée.
Lasouffleusen’évacuepas
laneige
1. Arrêtezimmédiatementlemoteur
etdébranchezlefildelabougie.
Nettoyezlagoulotted’évacuationet
l’intérieurdulogementdelatarière.
2.Arrêterimmédiatementlemoteur
etdébranchezlefildelabougie.
Dégagezlecorpsétrangerdelatarière
avecl’outildedégagementdela
goulotteouunbâton.
3.VoirTestdecommandedelatarière.
4.VoirlaEntretien.
5.Remplacezlagoupilledecisaillement.
1. Goulotted’évacuationbouchée.
2.Présencedecorpsétrangerdansla
tarière.
3.Câbled’entraînementdelatarièremal
réglé.
4.Courroied’entraînementdelatarière
abîméeouayantdujeu.
5.Goupilledecisaillementestcisaillé.
1. Câbled’entraînementmalréglé.
2.Courroied’entraînementabîméeouayant
dujeu.
14
7
Remisage
horssaison
N’entreposezjamaisle
moteuravecducarburant
dansleréservoirà
l’intérieuroudans
desendroitsfermés
silaventilationn’est
pasadéquateetsiles
vapeursdecarburant
peuventvenirencontact
avecuneflammeouune
étincelleouveilleused’un
chauffe-eau,unradiateur,
unfourneau,unsêche-
lingeouautreappareilà
gaz.
Videzlecarburantà
l’extérieurdansun
récipienthomologué,à
distancedetouteflamme
nue.Assurez-vousquele
moteurarefroidi.Nefu-
mezpas.Toutcarburant
restantdansleréservoir
partempschaudse
détérioreraetcausera
degravesproblèmesau
démarrage.
Procédezcommesuitpourpréparerlasouffleuseavant
delaremiser.
•Videzlecarburantàl’extérieurdansunrécipient
homologué,àdistancedetouteflammenue.As-
surez-vousquelemoteurarefroidi.Nefumezpaset
éteigneztoutesourcedechaleurincandescenteavant
deviderlecarburant.Toutcarburantrestantdansle
réservoirpartempschaudsedétérioreraetcausera
degravesproblèmesaudémarrage.
•Silamachinedoitêtreentreposéependantplusde30
jours,préparez-laselonlesinstructionsfourniesdans
lanoticed’utilisationdumoteurquiaccompagnevotre
souffleuse.
•Laisseztournerlemoteurjusqu’àcequ’ils’arrêtepour
causedepanned’essence.
•Videztoutel’essenceducarburateuretduréservoir
pouréviterlaformationdedépôtsdegommequipour-
raientcauserlemauvaisfonctionnementdumoteur.
•Videzlecarburateurenappuyantsurl’évacuationqui
setrouvesouslecouvercleducarburateur.
•Lesagentsdestabilisationducarburant(STA-BIL®
parexemple)offrentunesolutionacceptablepourmi-
nimiserlaformationdedépôtsdegommependantle
remisage.Nevidezpaslecarburateursivousdécidez
d’utiliserunagentdestabilisationducarburant.
•Essuyezlamachineavecunchiffonimbibéd’huile
pourempêcherlaformationderouille.
•Retirezlabougieetversezuneonced’huileàmoteur
dansletroudelabougiedelachemise.Reouvrez
letrouavecunchiffonetfaitestournerlemoteur
plusieursfoispourbienrépartirl’huile.Remettezla
bougieenplace.
•Suivezlesinstructionsconcernantlalubrificationdans
lechapitresurl’entretien.
•Entreposeztoujourslasouffleusedansunendroitsec
etpropre.
Nevidezpaslecarbura-
teursivousutilisezun
stabilisateurdecarbu-
rant.N’utilisezjamaisdes
produitsdenettoyagedu
moteurouducarburateur
pournettoyerleréservoir
decarburantcarvous
pouvezcauserdes
dégâtspermanents.
AVERTISSEMENT
13
6
ReplacingBelts
REMARQUE:Ilestconceilléderemplacerlesdeux
courroiesdetransmissionenmêmetemps.
1.Débranchezlefildelabougieetmettez-leàla
masse.
2.Videzl’essenceduréservoirouplacezunmorceau
deplastiquesouslecapuchonpourempêcherles
fuites.
3.Enlevezlavisauto-taraudeusequimaintientle
couvre-courroiesurlechâssis.Démontezlecouvre-
courroieenpressantdesdeuxcôtéspourlibérerles
pattesenplastique.Dégagezlecouvre-courroiedu
moteuretdelagoulotte.VoirlaFigure11.
Courroiedestarières
1.Dégagezlacourroieavantdestarièresdelapoulie.
2.Pressezlabarredecommandedestarièrespour
débrayerlefreindestarières,soitl’attachequiretient
lacourroiesurlapouliedestarières.
3.Installezlacourroieneuveaprèsavoirremplacéla
courroiedelatransmission.
Courroiedelatransmission
REMARQUE:Remplacezlacourroiedelatransmis-
sionavantd’installerlanouvellecourroiedestarières.
1.Basculezlasouffleusepourlafairereposersur
l’habitacledestarières.
2.Retirezleressortquiretientlatransmissionsurun
boulonsurlechâssisdumoteur.VoirlaFigure13.
REMARQUE:Ilserapeut-êtreplusfacilederetirer
d’abordlecontre-écrouàbride.Puis,avecunepinceà
beceffilé,dégagezleresssortduboulon.
3.Faitespivoterlatransmissionversl’avantpour
détendrelacourroiedelatransmission.Dégagezla
courroiedelapouliedelatransmission.
4.Dégagezlacourroiedelatransmissiondelapoulie
motriceetécartezcelle-cidelasouffleuse.
5.Installezlanouvellecourroiedetransmissiondans
lagorgedelapouliemotrice.VoirlaFigure12.
6.Basculezlatransmissionversl’avantetplacez
lacourroiedelatransmissionsurlapouliedela
transmission.
7.Replacezleressortsurleboulonduchâssisdu
moteuretattachezlatransmission.Remettezle
contre-écrouàbrideenplace.
8.Installezlanouvellecourroiedestarières.
9.Replacezlecouvre-courroiesurlasouffleuse.
Courroiede
latarière
Courrie
d’entraînement
Pouliede
latarière
Supportdela
pouliedetension
Pouliemotrice
Figure12
Figure11
Patte
Figure13
Ressort
Écroudeblocage
Courroie
d’entraînement
Poulie
entraînement
Arrêteztoujourslemoteur,
débranchezlefildebougie
etmettez-leàlaterre
contrelemoteuravantde
nettoyer,delubrifierou
d’effectuertouteopération
d’entretienoutoutréglage
delasouffleuse.
Entretien
AVERTISSEMENT
12
6
Entretien
Recommandationsd’ordregénéral
1.Respecteztoujourslesconsignesdesécuritélorsde
l’entretien.
2.Lagarantiedecettesouffleusenes’applique
pasauxpiècesquiontfaitl’objetd’uneutilisation
abusiveounégligente.Pourbénéficieraumaximum
delagarantie,leconducteurdelasouffleusedoit
l’entretenirconformémentauxinstructionsfournies.
3.Vérifiezrégulièrementquetoutelaboulonnerieest
bienserrée.
AVERTISSEMENT:Porteztoujours
deslunettesdesécuritéenutilisant
lasouffleuseoueneffectuanttout
réglageoutouteréparation.
Lameplateetpatins
Lalameplateetlespatinssontinstalléssousla
souffleuseetilsrisquentdes’user.Vérifiez-lesrégulière-
mentetremplacez-lesaubesoin.
Pourretirerlespatins:
1.Enlevezlesquatreboulonsordinairesetles
contre-écrousàembasequilesmaintiennentsurla
souffleuse.
2.Remontezlesnouveauxpatinsaveclesboulons
ordinaires(deuxsurchaquecôté)etlescontre-
écrousàembase.VoirlesFigures18Aou18B.
Pourdémonterlalameplate:
1.Enlevezlesboulonsordinairesetlecontre-écrousà
embasequilamaintiennentainsiquelespatinssur
lasouffleuse.
2.Installezlalameplateneuveenvérifiantquelatête
desboulonsordinairessetrouveàl’intérieurde
l’habitacle.Serrezàfond.
Tarières
•Deuxgoupillesdecisaillementetdeuxgoupille
fenduemainteiennentlestarièressurl’arbrede
latarière.Lesgoupillessontsensésdepeutêtre
cisaillersilasouffleuseheurteunobjetouunbloc
deglace.
•Silestarièresnetournentpas,vérifiezsilesgoupil-
lessesontcisaillés.Remplacezlesgoupillessi
besoinest.Deuxgoupillesdecisaillementetdeux
goupillefenduesderechangesontfournis.Vapo-
risezunlubrifiantàbased’huilesurl’arbreavant
d’installerlesgoupillesneufs.
IMPORTANT:Neremplacezjamaislesboulonsde
cisaillementavecdesboulonsordinaires.Aucun
dommageàl’ensembledelavissansfinouàd’autres
composantsparutiliserdesboulonsordinairesnesera
couvertparlagarantiedevotresouffleuse..
Lubrication
1.Lubrifiezlespointsdepivotsurlacommandedela
tarrièreetcommanded’entraînementavecunehuile
légèreunefoischaquesaison.VoirlaFigure10.
2.Lubrifiezlafacedelesupportdelapouliedetension
avecunlubrifiantlégerpourtempsfroidaumoinsune
foisparsaison.VoirlaFigure10.
Moteur
Consultezlanoticed’utilisationdumoteurpourtoutcequi
concernel’entretiendumoteur.
Courroiesd’entraînement
Suivezlesinstructionsci-dessouspourvérifierl’état
descourroiesd’entraînementtoutesles50heures
d’utilisation.
•Démontezlecouvre-courroieenplastiquequise
trouvesurl’avantdumoteur.Ilsuffitpourcelade
retirerlestroisvisauto-taraudeuses.
•Vérifiezquelescourroiesnesontpaseffilochées,
fendilléesoutropusées.Remplacezlescourroiesau
besoin.
Figure10
REMARQUE:Siles
tarièrescontinuentà
tournerquandlacom-
mandeestdébrayée,
arrêtezlemoteuret
refaitesleréglage.
Lubrifiez
Lubrifiez
Figure9
Bouloncisaillement
Goupillefendue
Boulon
ordinaire
Lameplate
Écrouàsixpans
Patin
AVERTISSEMENT
Arrêteztoujoursle
moteur,débranchez
lefildebougieet
mettez-leàlaterre
contrelemoteur
avantdenettoyer,
delubrifierou
d’effectuertoute
opérationd’entretien
outoutréglagedela
souffleuse.
Boulon
ordinaire
Écrouàsixpans
11
5
Nedégagezjamais
laneigeoulaglace
prèsdelatarièreou
danslagoulotteàla
main.
Thetemperatureof
Latempératuredu
silencieuxetdes
zonesvoisinespeut
dépasser150°F
(65°C).Évitezdeles
toucher.
Conseilsd’utilisation
•Ledéblaiementseraplusfaciles’ilesteffectuépeude
tempsaprèsunechutedeneige.
•Danslamesuredupossible,projetezlaneigedansle
sensduvent.Chevauchezlégèrementlespassages
successifs.
•Réglezlespatinsà1/4depoendessousdelalame
platepourundéblaiementnormal.Onpeutabaisser
lespatinsencasdeneigetassée.VoirlaFigure3.
REMARQUE:Nousdéconseillonsl’emploidela
souffleusesurdugraviercarilrisqued’êtreramassé
etprojetéparlatarièreetdeprovoquerdesblessures
corporelles,desdégâtsmatérielset/oud’endommagerla
souffleuse.
•Sipouruneraisonquelconque,vousdevezutiliser
lasouffleusesurunesurfacerecouvertedegravier,
réglezlespatinsàleurpositionlaplushautepour
assurerundégagementmaximumentrelesoletla
lameplate.
•Suivezlesmesurespréventivesfigurantdansle
chapitreprécédent«Arrêtdumoteur»pouréviterle
gelpossibledelamachine.
•Nettoyezlasouffleuseaprèschaqueutilisation.
AVERTISSEMENT
Utilisation
dela
souffleuse
Outildedégagementdelagoulotte
AVERTISSEMENT:Arrêtezlemoteur
enretirantlaclédecontactetattendez
queTOUTESlespiècesenmouve-
mentsesoientimmobiliséesavant
d’utiliserl’outildedégagementdela
goulotte.
•Débrayezlesbarresdecommandedel’entraînement
etdelatarière.
•Arrêtezlemoteuretretirezlaclédecontact.
•Détachezl’outildedégagementdelagoulottedesa
positionsurl’arrièredel’habitacledelagoulotte.
•Utilisezl’extrémitéenformedepellepourdélogeret
retirerlaneigeoulaglacequis’estaccumuléedans
lagoulotte.
•Replacezl’outildedégagementsurl’attacheà
l’arrièredel’habitacledelatarière.Remettezlaclé
decontactetfaitesdémarrerlasouffleuse.
•Tenez-vousaupostedeconduite(derrièrela
souffleuse)etembrayezlabarredecommandede
latarièrependantquelquessecondespourdégager
toutrestedeneigeoudeglacedelagoulotte
d’éjection.
10
5
Démarreuràlanceur
•Tirezlentementsurlapoignéedudémarreurjusqu’à
cequevoussentiezunelégèrerésistance.
•Tirezànouveau,maisrapidement.Nelaissezpas
lapoignéeclaquercontrelasouffleuse.Laissezla
cordes’enroulerlentementenretenantlapoignée
dudémarreur.Répétezl’instructionjusqu’àcequele
moteurdémarre.
•Aufuretàmesurequelemoteurchauffeetquand
ilcommenceàtournerrégulièrement,tournez
lentementleboutonduvoletdedépartversla
positionSANSVOLET.Silemoteurhésite,tournez
ànouveauleboutonduvoletdedépartàlaposition
VOLETPLEIN,puisrevenezlentementàlaposition
SANSVOLET.
Pourarrêterlemoteur
•Laisseztournerlemoteurpendantquelquesminutes
pourséchertoutel’humiditéquiauraitpus’y
accumuler.
•Pourempêcherledémarreuràlanceurdegeler,
procédezcommesuit:
Démarreurélectriqueenoption:Branchezlefil
électriquesurlecommutateurdumoteur,puisàune
prisedecourantde120voltsC.A.Quandlemoteur
tourne,appuyezsurleboutondudémarreuretfaites
tournerledémarreurpendantquelquessecondes.Le
bruitparticulierémisparledémarreurnerisquepas
d’endommagerlemoteurniledémarreur.Débranchez
lefilélectriquedelaprisedecourantd’abord,puisdu
commutateur.
Démarreuràlanceur:Quandlemoteurtourne,tirez
rapidementetfermementsurlacordedudémarreur
àtroisouquatrereprises.Vousentendrezunclaque-
mentquinerisquepasd’endommagerlemoteurnile
démarreur.
Pourarrêterlemoteur,enlevezlaclédecontactsans
latourner.Débranchezlefildelabougiepouréviter
toutdémarrageaccidentellorsquelamachinen’estpas
surveillée.
REMARQUE:Neperdezpaslaclédecontact.Rangez-
ladansunendroitsûr.Iln’estpaspossibledefaire
démarrerlemoteursanslaclé.
Enleveztoutelaneigeetl’humiditéducouvercledu
carburateuretprèsdesmanettesdecommande.
Déplacezcelles-ciplusieursfois.
AVERTISSEMENT:Latempérature
dupotd’échappementetdeszones
voisinespeutdépasser150°F(65°C).
Évitezdelestoucher.
Testdelacommandedelatarière
IMPORTANT:Faitescetestavantd’utiliserlasouffleuse
pourlapremièrefoisetaudébutdechaquesaison
d’hiver.
Vérifiezleréglagedecettecommandedelafaçon
suivante:
1.Débrayezlacommandeetplacez-laenposition
«relevée».Lecâbledoitprésentertrèspeudejeu
SANStoutefoisêtretendu.
2.Choisissezunendroitbienaéréetfaitesdémarrerla
souffleuseselonlesinstructionsdansleparagraphe
«pourfairedémarrerlemoteur».Vérifiezque
l’obturateurestrégléàlapositionrapide.
3.Tenez-vousàlapositiondeconduite(derrièrela
souffleuse)etenclenchezlatarière.
4.Attendezenvirondixsecondesavantdedébrayerla
tarière.Répétezcetteopérationplusieursfois.
5.Laisseztournerlemoteuràpleinrégimeetgardez
lamanettedecommandedelatarièreàlaposition
débrayéeet«relevée».Placez-vousdevantla
machine.
6.Vérifiezquelatarièreesttotalementimmobiliséeet
qu’aucunepiècenebouge.
IMPORTANT:Silatarièren’estpascomplètementimmo-
bile,retournezimmédiatementàlapositiondeconduite
etarrêtezlemoteur.AttendezqueTOUTESlespiècesse
soientimmobiliséesavantd’ajusterànouveaulecâblede
latarière,voir“MontageetRéglage”àlapage7.
Utilisationdelasouffleuse
REMARQUE:Laissezlemoteurchaufferpendant
quelquesminutescarilnepeutatteindretoutesapuis-
sanceavantd’êtreàlatempératuredefonctionnement.
•Ajustezlagoulotted’éjectionselonlebesoin.Ne
projetezpaslaneigeversunbâtimentcardesobjets
dissimulésrisquenttoujoursd’êtreprojetésassez
violemmentpourcauserdesdégâts.
•Mettezlemoteurenmarchedelamanièreexpliquée.
•Éloigneztouslesspectateursetobstaclesquise
trouventdevantlasouffleuse,puisappuyezlabarre
decommandedelatarièrecontreleguidonsupérieur
pourembrayerlatarière.Lâchezlabarredecom
-
mandepourarrêterlatarière.
•Quandlabarredecommandedelatatièreest
embrayée,appuyezlabarredel’entraînement
complètementcontreleguidonsupérieurpour
embrayerlesroues.Lâchezlabarredel’entraînement
pourarrêterlesroues.
•Quandlasouffleusecommenceàsedéplacer,tenez
fermementleguidonetguidezlasouffleusedansla
zoneàdéblayer.
•Relâchezlesbarresdecommandepourarrêterlapro
-
jectiondeneigeetledéplacementdelasouffleuse.
REMARQUE:Votremachineestéquipéed’unetransmis-
sionàembrayage.Silesrouesarrêtentdetourneren
essayantdedéblayerunequantitéimportantedeneige,
débrayezimmédiatementlabarredecommandede
l’entraînementetlaissezlestarièresdégagerlaneige
del’habitacle.Continuezàtravaillereneffectuantdes
passagesplusétroits.
Utilisation
dela
souffleuse
AVERTISSEMENT
Toutesouffleuse
encoursde
fonctionnementpeut
projeterunobjetvers
lesyeux,d’oùlerisque
deblessuresgraves.
Porteztoujoursdes
lunettesdesécurité
entravaillantavecune
souffleuseeteneffec-
tuanttouteréparation
outoutajustementsur
lasouffleuse.
Assurez-vousque
personnenesetient
àproximitédela
souffleuselorsdu
démarrageoupendant
sonutilisation.Ne
faitesjamaistourner
lemoteuràl’intérieur
oudansunlocalclos
oumalventilé.Les
gazd’échappementdu
moteurcontiennentdu
monoxydedecarbone,
ungazinodoremortel.
Éloigneztoujoursvos
mains,pieds,cheveux
etvêtementsnon
ajustésdetoutesles
piècesenmouvement
dumoteuretdela
souffleuse.
9
Avantledémarrage
AVERTISSEMENT:VÉRIFIEZLE
NIVEAUD’HUILEAVANTD’UTILISER
LAMACHINE.LENIVEAUDOIT
ATTEINDRELEREPÈRE«PLEIN»SUR
LAJAUGEAVANTDEMETTRELE
MOTEURENMARCHE.
Lenon-respectdecetteprocédurepeutcauserdes
dégâtsgravesaumoteuretceux-cineserontpas
couvertsparlagarantie.
Pleinsd’essenceetd’huile
•Faiteslespleinsd’essenceetd’huileselonles
instructionsfourniesdanslanoticed’utilisationdu
moteurquiaccompagnelasouffleuse.Veuillezlireces
instructionsattentivement.
AVERTISSEMENT:Nefaitesjamaisle
pleind’essenceàl’intérieur,pendant
quelemoteurtourneouquandle
moteurestchaud.Nefumezpasen
faisantlepleind’essence.
•Branchezlefildelabougie.Vérifiezquelaboucle
métallique,auboutdufildelabougie(danslagaine
encaoutchouc),estbienattachéeàl’emboutmétal-
liquedelabougie.
•Assurez-vousquelescommandesdelatarièreetde
l’entraînementsontdébrayées(relâchées).
IMPORTANT:LEMOTEURNEPEUTPASDÉMARRER
SANSLACLÉDECONTACTDANSLAFENTEDU
COUVERCLEDUCARBURATEUR.NEPASTOURNER
CETTECLÉ.
Miseenmarchedumoteur
•Placezlamanetteduvoletdedépartàlaposition
«On»(VOLETPLEIN)(Démarrageàfroid).Sile
moteurestchaud,placezlamanetteduvoletde
départàlaposition«OFF»(SANSVOLET).
•Pressezdeuxoutroisfoissurleboutond’amorçage.
Silasouffleuseestéquipéed’undémarreur
électrique,appuyezuneseulefoissurlebouton
d’amorçage.Silemoteurestchaud,n’appuyezpas
surleboutond’amorçage.
REMARQUE:Couvreztoujoursletroud’aérationdans
leboutond’amorçageavecundoigtquandvousap-
puyez.Ilfaudrapeut-êtreamorcerlemoteurdavantage
lapremièrefoissilatempératureestinférieureà15°F
(-9°C).
•Assurez-vousquelescommandesdelatarièreetde
l’entraînementsontdébrayées(relâchées).
•Placezlamanettedel’obturateuràlaposition
RAPIDE.Enfoncezlaclédanslafente.Assurez-vous
qu’ellesemetbienenposition.Netournezpaslaclé.
5
Démarreurélectrique(enoption)
AVERTISSEMENT:Cedémarreur
estéquipéd’unfiletd’uneprise
électriqueàtroisfilsetilestconçu
pourfonctionnersuruncourantde
120volts,C.A.Ildoittoujoursêtre
reliéàlaterrepouréviterlapossibilité
d’unedéchargeélectriquequipourrait
blesserleconducteur.
Suivezsoigneusementtouteslesinstructionsci-des-
sous.Vérifiezquelecâblagedevotremaisoncomporte
troisfilsreliésàlaterre.Sivousn’êtespascertain,
renseignez-vousauprèsd’unélectricien.Silecâblage
devotremaisonn’estpasunsystèmeàtroisfilsreliésà
laterre,n’utilisezenaucuncascedémarreurélectrique.
Sivotresystèmeestreliéàlaterre,maiss’iln’yapas
depriseàtroistrousàl’endroitoùledémarreurdoit
normalementêtreutilisé,faites-eninstalleruneparun
électricienqualifié.
AVERTISSEMENT:Brancheztoujours
lefilélectriquesurlaprisedu
moteurd’abord,puisbranchezl’autre
extrémitédanslaprisedecourant.
Débrancheztoujourslefilàlaprisede
courantenpremier.
•Branchezlefilélectriquedanslecommutateur,sur
lemoteur.Branchezl’autreextrémitédufildansune
prisedecourantde120voltsC.A.àtroistrous,mise
àlaterre.
•Enfoncezleboutondudémarreurpourengager
lemoteurdudémarreuretfairetournerlemoteur.
(Vousremarquerezpeut-êtreunehésitationde
quelquessecondesavantquelemoteurtourne.
Ceciestnormaletnerisquepasd’endommagerle
moteur.)
•Quandlemoteurdémarre,lâchezleboutondu
démarreurettournezprogressivementlebouton
duvoletdedépartàlapositionSANSVOLET.Sile
moteurhésite,déplacezimmédiatementlebouton
duvoletdedépartàlapositionVOLETPLEIN,
puisrevenezprogressivementàlapositionSANS
VOLET.
ATTENTION:Cedémarreurélectriquenecomporte
pasd’interrupteurthermique.Nefaitespastourner
lemoteurpendantplusde20secondessans
laisserledémarreurélectriquerefroidirpendant10
minutes.Vousrisquezd’endommagersérieusement
ledémarreurélectriquesivousnerespectezpas
cetteconsigne.
REMARQUE:Silemoteurdudémarreurfonctionne,
maissilemoteurdelasouffleusenetournepas,
vérifiezsil’engrenagedudémarreurestcouvertde
glace.Abritezlamachinejusqu’àcequel’engrenageait
dégeléetqueledémarreurs’enclenche.
Lisez,comprenez,
etsuiveztoutesles
instructionsetlescon-
signessurlamachine
etdanscenoticeavant
lefonctionnement.
Faitestrèsattention
enmanipulantde
l’essence.L’essence
estextrêmement
inflammableetles
vapeurssontexplosif.
Nefaitesjamaisle
pleind’essenceà
l’intérieur,pendantque
lemoteurtourneou
quandlemoteurest
chaud.Éteigneztoute
cigarettesoupipe,tout
cigareoutouteautre
sourceincandescente.
Silecâblagedevotre
maisonn’estpas
unsystèmeàtrois
filsreliésàlaterre,
n’utilisezenaucun
cascedémarreur
électrique.
Sivotresystèmeest
reliéàlaterre,mais
s’iln’yapasdeprise
àtroistrousàl’endroit
oùledémarreurdoit
normalementêtre
utilisé,n’utilisezen
aucuncascedémar-
reurélectrique.
AVERTISSEMENT
Utilisation
dela
souffleuse
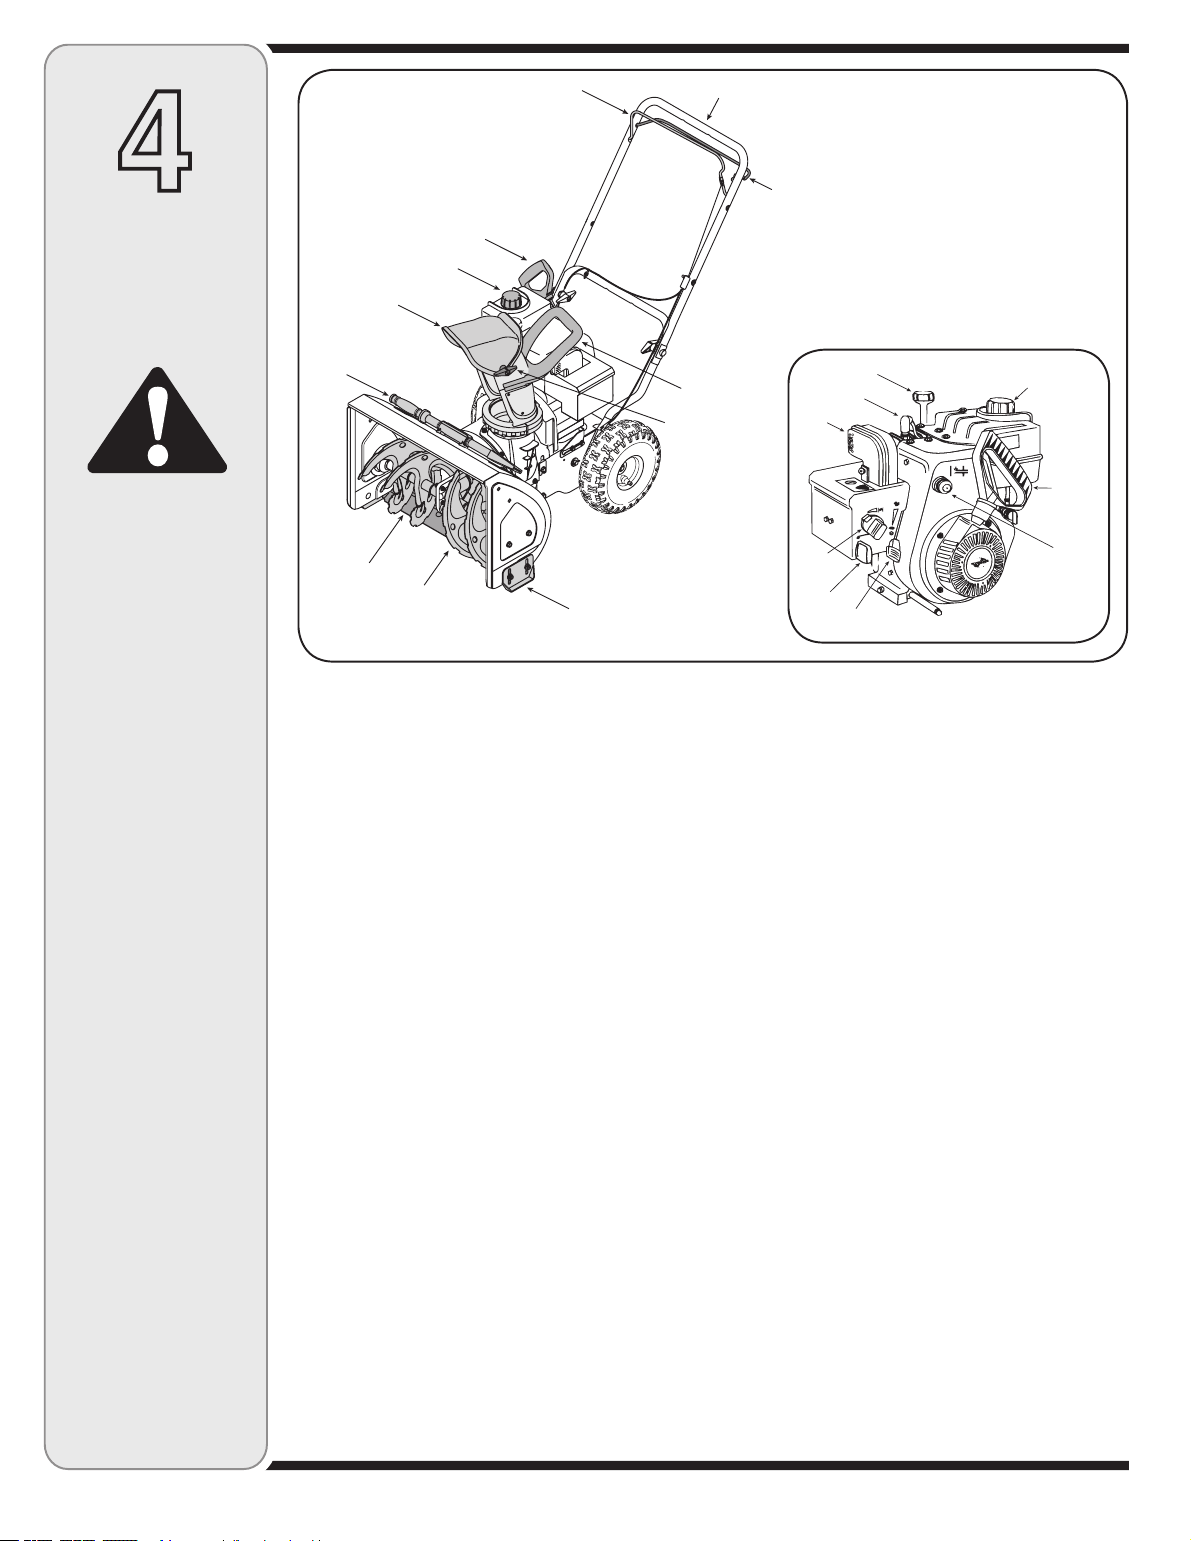
8
4
Commandedel’obturateur
Lacommandedel’obturateursetrouvesurlemoteur.
Ellesertàréglerlerégimedumoteuretàarrêterle
moteur.
Commandedel’entraînement
Ellesetrouveendessousduguidonsupérieuretsertà
embrayeretàdébrayerlesroues.Tirezàfondlabarre
contreleguidonsupérieurpourembrayerlesroues,
lâchez-lapourlesdébrayer.
Commandedelatarière
Ellesetrouvesurleguidonsupérieuretsertàem-
brayeretàdébrayerlatarière.Tirezàfondlabarrede
commandecontreleguidonsupérieurpourembrayerla
tarièreetlâchez-lapourladébrayer.
IMPORTANT:Avantd’utiliservotresouffleuse,référez-
vousà«Testdelacommandedelatarière».Lisezet
suivezsoigneusementlesinstructionseteffectuez
touslesajustementspourvérifierquevotresouffleuse
fonctionnesansrisqueetcorrectement.
Goulotted’éjection
Onpeutchangerladirectiondeprojectiondelaneige
entournantlamanivelledelagoulotte.VoirlaFigure1.
Ladistancedeprojectionpeutêtremodifiéeenrelevant
lagoulottepourprojeterplusloinetenl’abaissantpour
laprojeterplusprès.Desserrezl’écrouàoreillesur
lecôtédelagoulotted’éjectionpourlarégler.Faites
pivoterlagoulotteàlapositionvoulueetresserrez
l’écrouàoreille.
Clédecontact
Laclédecontactestundispositifdesécurité.Elledoit
êtrecomplètementenfoncéepourmettrelemoteuren
marche.Retirezlacléquandlasouffleusen’estpas
utilisée.N’essayezpasdetournerlaclé.Ellepourraitse
briser.
Plaquederaclage
Ellemaintientlecontactaveclesolquandlasouffleuse
avance,cequipermetl’évacuationdelaneigeprochedu
sol.
Patins
L’espaceentrelaplaquederaclageetlesolpeutêtre
ajustéenajustantlespatins.Pourdéblayercomplètement
laneige,placezlespatinsàlapositionplushautesur
l’habitacle.Utilisezlespositionsintermédiaireoubasse
lorsquelasurfaceàdéblayerestirrégulièreourecouverte
degravier.
Manettesdecommandedumoteur
Consultezlanoticed’utilisationdumoteurfournieséparé-
mentpourplusderenseignementssurlescommandes
dumoteuretleursfonctions.
Figure7
Commandes
dela
souffleuse
Lisez,comprenez,
etsuiveztoutesles
instructionsetles
consignessurla
machineetdans
cenoticeavantle
fonctionnement.
N’ajustezjamaisla
goulotted’éjectionsi
lesbarresdecom-
mandedelatarièreet
del’entraînementne
sontpasàlaposition
débrayéeetsile
conducteurnese
trouvepasàcôtéde
lamachine.
AVERTISSEMENT
Goulotte
Outildedégagement
delagoulotte
Écrouàoreilles
Patin
Tarières
Lameplate
Capuchondecarburant
Poignéededémarreur
Poignéede
lagoulotte
Commande
d’entraînement
Guidonsupérieur
Commandedelatarière
Goulotd’huile
Capuchon
decarburant
Poignée
démarreur
Voletde
départ
Commandede
l’obturateur
Amorçeur
Bougie
Silencieux
Cléde
contact
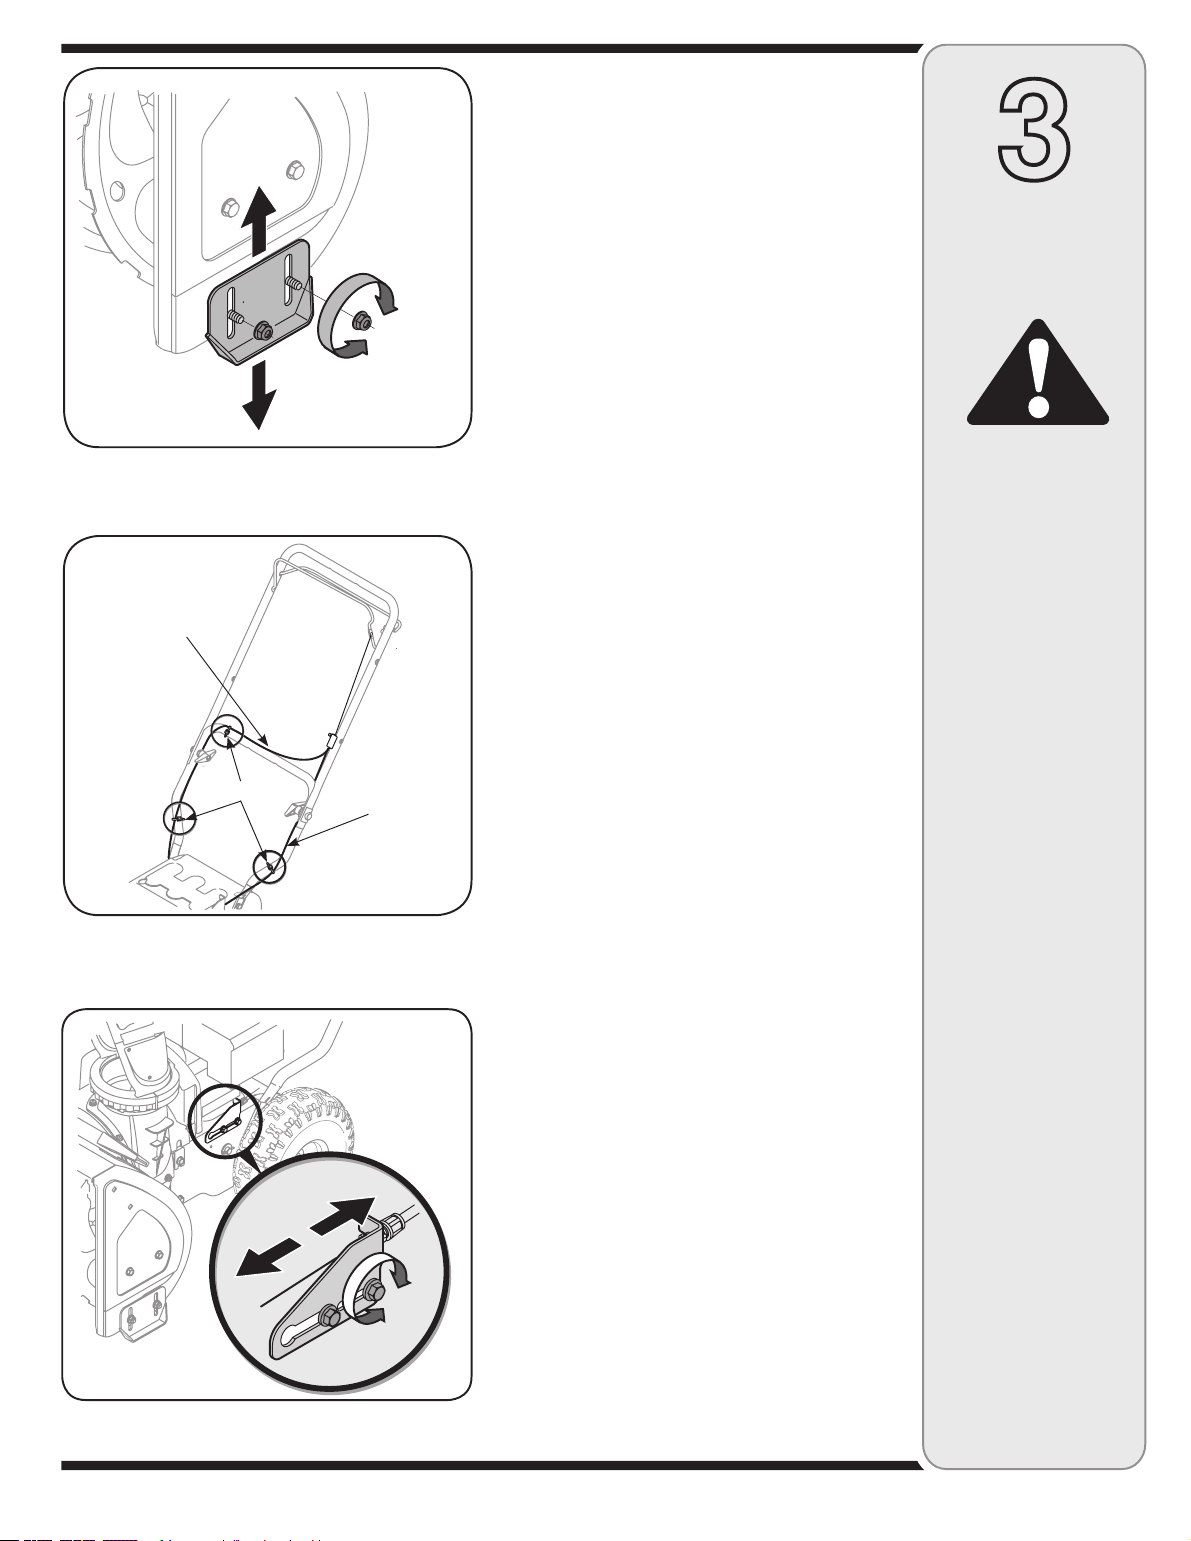
7
3
Figure4
HighPosition
MiddlePosition
LowPosition
Figure5
Câble
d’entraînement
Attaches
Neserrezpastrop
lecâble.Lefait
deserrerexces-
sivementlecâble
risqued’empêcher
ledébrayagedes
tarièresetderéduire
lasécuritédela
souffleuse.
Silestarièrescontinu-
entàtournerquandla
commandeestdébrayée,
arrêtezlemoteuret
refaitesleréglage.
Pressiondespneus
Lespneussontgonflésexcessivementpourl’expédition.
IMPORTANT:Nedépassezjamaislapression
recommandéeparlefabricant.Lapressiondoittoujours
êtreégaledanstouslespneus.Unepressionexcessive
àl’installationdestalonspeutprovoquerl’explosion
del’ensemblepneuetjanteetcauserdesblessures
graves.Lapressionrecommandéeestindiquéesurle
flancdupneu.
REMARQUE:Silapressionn’estpaségaledansles
deuxpneus,lamachinerisquedetirerd’uncôtéplus
quedel’autreetlaplaquederaclagerisquedes’user
defaçoninégale.
Patins
L’espaceentrelalameplateetlesolpeutêtreajustéen
ajustantlespatins.VoirlaFigure7.Pourdéblayercom-
plètementlaneige,placezlespatinsàlapositionplus
hautesurl’habitacle.Utilisezlespositionsintermédiaire
oubaselorsquelasurfaceàdéblayerestirrégulière.
1.Ajustezlespatinsendesserrantlesquatrecontre-
écrousàembase(deuxdechaquecôté)etles
boulonsordinaires.Placezlespatinsàlaposition
voulue.VoirlaFigure4.
2.Vérifiezquetoutelasurfaceinférieuredespatinsest
deniveauetencontactaveclesolpouréviterleur
usureinégale.
3.Serrezlesboulonsetlesécrousàfond.
Installationducâbledela
transmission
1.Vérifiezquelecâbledelatransmissionresteparal-
lèleaucôtégaucheduguidonsupérieur,qu’ilsuitle
dessusduguidoninférieur,etresteensuiteparallèle
aucôtédroitduguidoninférieur.VoirlaFigure5.
2.Troisattachesmaintiennentlesdeuxcâblesdecom-
mandesurleguidoninférieur.Deuxdecesattaches
setrouventsurlesmontantsetlatroisièmese
trouvesurlabarretransversaleduguidoninférieur.
Serrezcesattachespourmaintenirlecâblesurle
guidoninférieur.VoirlaFigure5.
Câbledestarières
1.Desserrezleboulonhex.arrièredusupportde
réglageducâble.VoirlaFigure6.
2.Glissezlesupportderéglageducâblepouréliminer
toutjeudanslecâbledestarières.
3.Resserrezleboulonhex.arrière.
4.Mettezlemoteurenmarcheetvérifiezquela
commandedestarièress’embrayeetsedébraye
correctement.
AVERTISSEMENT
Montageet
Réglage
Câble
delatarière
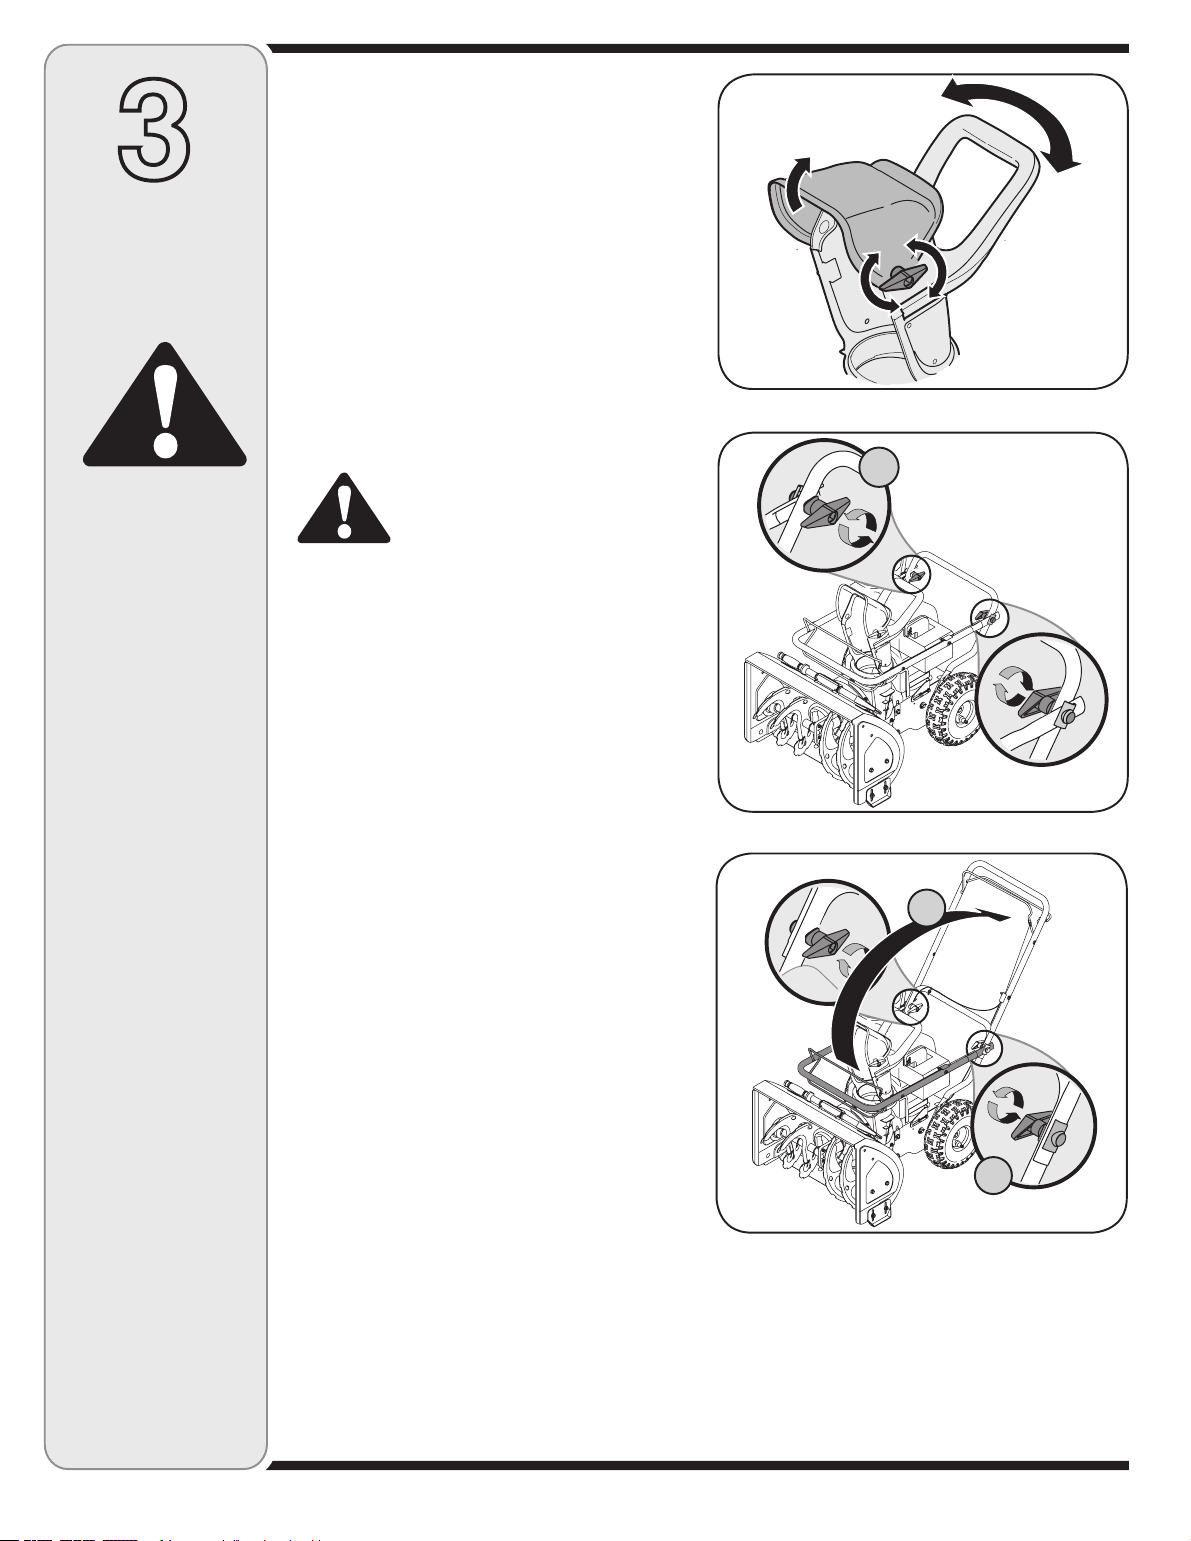
6
3
Arrêteztoujoursle
moteur,débranchezle
fildebougieetmettez-
leàlaterrecontre
lemoteuravantde
nettoyer,delubrifier
oud’effectuertoute
opérationd’entretien
outoutréglagedela
souffleuse.
NESOULEVEZPAS
LAMACHINEPAR
LAPOIGNÉEDELA
GOULOTTE.
NOTE:Neremplacez
jamaislesboulonsde
cisaillementavecdes
boulonsordinaires.
Aucundommageà
l’ensembledelavis
sansfinouàd’autres
composantsparutiliser
desboulonsordinaires
neseracouvertpar
lagarantiedevotre
souffleuse..
Nedégagezjamaisla
neigeoulaglaceprès
delatarièreoudansla
goulotteàlamain.
IMPORTANT:Cettemachineaétéexpédiéeavec
lepleind’huilemaisSANSESSENCE.Après
l’assemblage,veuillezconsulterlanoticed’utilisation
dumoteurquantaucarburantetàl’huileàmoteurà
employer.
REMARQUE:Lescôtésdroitetgauchedelasouffleuse
sontdéterminésdupostedeconduite,derrièrela
souffleuse.
REMARQUE:Cettenoticed’utilisationcouvreplusieurs
modèles,lespanneaux,pharesetlesmanivelles
delagoulottesontquelquesdispositifsquipeuvent
changerparlemodèle.Pastouteslestraitsdiscutées
danscenoticesontapplicablesàtouslesmodèlesde
souffleuse.
AvantAssemblage
AVERTISSEMENT:Débranchezlefil
delabougieetmettez-leàlaterre
contrelemoteurpourempêchertout
démarrageaccidentel.
1.Coupezl’attachequimaintientleguidonsupérieur
surlagoulottepourl’expédition.
Installationduguidon
1.Desserrezleboutondelagoulottesurlapartie
supérieuredelagoulotte(1)etrelevezcelle-ci(2)le
pluspossible.VoirlaFigure1.
AVERTISSEMENT:Nesoulevezpaslasouffleuse
parlapoignéedelagoulotte.
2.Desserrezleboutonduguidon,larondelleet
l’attacheduguidondechaquecôtéduguidon.Voir
laFigure2.
3.Pressezlesdeuxcommandescontreleguidon
supérieuretrelevezlepluspossible,commeàla
Figure3.Vérifiezqueleguidonsupérieurs’emboîte
biensurleguidoninférieuretquelesattachessont
bienalignéesavecleguidon.Ilfaudrafairetrès
attentionendéplaçantleguidonsupérieursans
toucherlagoulotte.
ATTENTION:Faitesattentiondenepasplierou
pincerlecâble.
4.Resserrezlesboutonsdechaquecôtéduguidon.
Voirl’étape2àlaFigure3.
5.Ajustezleguidonsupérieuretplacezlagoulotteàla
positiondésirée.
6.Serrezleboutondelagoulottesurlapartiesupéri-
euredelagoulottedefaçonquelarondelleplateet
leboulonordinairesoientcorrectementplacés.Voir
laFigure1.
Outildedégagementdela
goulotte
Cetoutiletlefilélectrique,lecaséchéant,ontpeut-être
étéattachéssurl’arrièredel’habitacledelatarièrepour
l’expédition.Danscecas,coupezl’attacheetretirezle
filélectrique.
Montageet
Réglage
Figure1
Figure3
Figure2
Derniersréglages
IMPORTANT:Vérifiezlesréglagesselonlesinstructions
eteffectuezlesderniersréglagesnécessairesavant
d’utiliserlamachine.Vérifiezquetouslesécrouset
boulonssontbienserrés.Lenonrespectdecesinstruc-
tionspeutcauserdesdégâtsàlamachine.
AVERTISSEMENT
5
contiennentdumonoxydedecarbone,ungazinodoretrès
dangereux.
6.Nevousservezpasdelamachineaprèsavoirbudes
boissonsalcooliséesouaprèsavoirprisdesmédicaments.
7.Lesilencieuxetlemoteurdeviennenttrèschaudset
peuventcauserdesbrûlures.Nelestouchezpas.
8.Soyezextrêmementprudentàproximitédesroutes,allées
oucheminsengravier.Faitesattentionauxdangersnon
évidentsetàlacirculation.
9.Faitestrèsattentionenchangeantdedirectionetentravail-
lantsurunepente.
10.Prévoyezdetravaillerenévitantdeprojeterlaneigevers
desfenêtres,murs,voitures,etc.carlesdébrispeuvent
ricocheretcauserdesblessuresgravesoudesdégâts
matériels.
11.Nedirigezjamaislaneigeversdesenfants,desspectateurs
etdesanimauxdecompagnieetnepermettezjamaisà
quiconquedesetenirdevantlamachine.
12.Nefatiquezpaslamachineenessayantdedéblayerla
neigetroprapidement.
13.N’utilisezpaslamachinesilavisibilitéestmauvaiseousila
lumièreestinsuffisante.Gardeztoujoursunbonéquilibreet
tenezfermementleguidon.
14.Débrayezlacommandedel’ensembledelatarièreetdela
turbinepourtransporterlamachineetlorsqu’ellen’estpas
utilisée.
15.Nedéplacezjamaisrapidementlasouffleusesurdes
surfacesglissantes.Soyezprudentenreculant.
16.Arrêtezlemoteur,débranchezlefildelabougieetmettez-le
àlaterrecontrelemoteursilamachinecommenceà
vibrerdefaçonanormale.Vérifiezquelamachinen’estpas
endommagée.Répareztoutdégâtéventuelavantdela
remettreenmarche.
17.Débrayeztouteslescommandesetarrêtezlemoteuravant
dequitterlepostedeconduite(derrièrelesguidons).
Attendezquelatarière/turbinesesoitcomplètement
immobiliséeavantdedéboucherlagoulotted’éjection,de
faireunajustementquelconqueoud’examinerlamachine.
18.Neplacezjamaisvotremaindanslagoulotted’éjectionou
prèsdel’admission.Utiliseztoujoursl’outildedégagement
pourdéboucherl’ouverturedelagoulotte.Nedébouchez
paslagoulotted’éjectionpendantquelemoteurtourne.
Arrêtezleguidonjusqu’àcequetouteslespiècesen
mouvementsesoientimmobiliséesavantdedéboucherla
goulotte.
19.N’utilisezquedesaccessoireshomologuésparlefabricant
delamachine.(ex.poidsderoues,chains,cabineetc.)
20.Faitestoujourspreuvedebonsensdansdessituations
quin’ontpasétéabordéesparcettenoticed’utilisation.
Adressez-vousauserviceaprès-ventepourobtenirlenom
duconcessionnaireleplusprochedechezvous.
EntretienetRemisage
1. Nemodifiezjamaislesdispositifsdesécurité.Vérifiez
souventqu’ilsfonctionnentcorrectement.
2.Débrayeztouteslescommandesetarrêtezlemoteuravant
dequitterlepostedeconduite.Attendezquelatarière/tur-
binesesoitcomplètementimmobiliséeavantdedéboucher
lagoulotted’éjection,defaireunajustementquelconqueou
d’examinerlamachine.
3.Vérifiezrégulièrementquelesboulonsetvissontbien
serrésetmaintenezlamachineenbonétatdemarche.
Examinezsoigneusementlamachinepourvousassurer
qu’ellen’estpasendommagée.
4.Nemodifiezpasleréglagedurégulateuretnelaissezpas
lemoteurs’emballer,cequipeutêtredangereux.
5.Lesplaquesderaclageetlespatinsdelasouffleuse
s’usentavecl’usage.Parmesuredesécurité,vérifiez
souventtouslescomposantsetremplacez-lespardes
piècesauthentiquesseulement.L’utilisationdepiècesqui
nesontpasconformesauxspécificationsdel’équipement
d’originepeuventdonnerlieuàdemauvaisesperformances
etcompromettrelasécuritédel’utilisateur.
6.Vérifiezfréquemmentquelescommandesfonctionnentbien
etfaiteslesréglagesnécessaires.Consultezlechapitre
«Réglages»danslanoticed’utilisationdelamachine.
7.Prenezsoindesétiquettesdesécuritéetd’instructionset
remplacez-lesaubesoin.
8.Respectezlesrèglementsconcernantl’éliminationdes
déchetsetliquidesquirisquentdenuireàlanatureetà
l’environnement.
9.Laissezlamachinefonctionnerpendantquelquesminutes
pouréliminerlaneigedelatarièreetéviterquel’ensemble
delatarièreetdelaturbinenegèleavantderemiserla
souffleuse.
10.Neremisezjamaislamachineoulesbidonsd’essenceà
l’intérieurs’ilyauneflamme,uneétincelleouuneveilleuse
(d’unchauffe-eau,unradiateur,unfourneau,unsèche-
lingeouautreappareilàgaz).
11.Consulteztoujourslanoticed’utilisationquantauxinstruc
-
tionsderemisagehors-saison.
Nemodifiezpaslemoteur.
Pourévitertouteblessuregraveoufatale,nemodifiezpasdu
toutlemoteur.Toutemodificationduréglagedurégulateurpeut
provoquerl’emballementdumoteuretentraînersonfonc-
tionnementàdesvitessesdangereuses.Nemodifiezjamaisle
réglagedel’usinedurégulateur.
Avisconcernantlesémissionsdegaz
Lesmoteurscertifiésconformesauxnormesrégulatricesde
laCalifornieetdel’agenceEPAfédéralespourSORE(petit
équipementhorsroute)sontcertifiéspourfonctionneravec
del’essencesansplombordinaireetpeuventêtredotésdes
systèmesdecontrôledesémissionsdegazsuivants:Engine
Modification(EM)etThreeWayCatalyst(TWC)lecaséchéant.
2
Consignes
de
sécurité
AVERTISSEMENT
Cesymboleattire
votreattentionsurdes
consignesdesécurité
importantesqui,sielles
nesontpasrespectées,
peuventmettreen
dangernonseulement
votrepersonneetvos
biens,maisaussiceux
d’autrui.Prièredelire
touteslesinstructions
figurantdanscette
noticed’utilisationavant
d’essayerdevous
servirdecettemachine.
Lenon-respectde
cesinstructionspeut
entraînerdesblessures
corporelles.
RESPECTEZ
L’AVERTISSEMENT
QUIACCOMPAGNE
CESYMBOLE!
Votreresponsabilité
Cettemachinenedoit
êtreutiliséequepardes
personnesquipeuvent
lire,comprendreet
respecterlesavertisse
-
mentsetinstructions
quifigurentdanscette
noticeetsurlamachine.
4
2
Consignes
de
sécurité
Formation
1. Assurez-vousdelireetdebiencomprendretoutesles
instructionsquifigurentsurlamachineetdanslanotice
d’utilisationavantdelamettreenmarche.Conservez
cettenoticed’utilisationàunendroitsûrpourtoute
consultationultérieureetpourcommanderdespiècesde
rechange.
2.Familiarisez-vousaveclescommandesetlabonne
utilisationdecettemachineavantdevousenservir.
Apprenezàarrêterlamachineetàdébrayerrapidement
lescommandes.
3.Nepermettezjamaisàdesenfantsdemoinsde14ans
deseservirdelamachine.Desadolescentsplusâgés
doiventlirelanoticed’utilisation,biencomprendrele
fonctionnementdelamachineetrespecterlesconsignes
desécurité.Ilsdoiventapprendreàutiliserlamachineet
s’enservirsouslasurveillanceétroited’unadulte.
4.Nepermettezjamaisàdesadultesneconnaissantpas
bienlefonctionnementdelamachinedes’enservir.
5.Lesobjetsprojetésparlamachinepeuventcauserdes
blessuresgraves.Prévoyezdetravaillerenévitantde
projeterlaneigeverslaroute,desspectateurs,etc.
6.Gardezlesspectateurs,lesanimauxdecompagnieetles
enfantsàunedistanced’aumoins75piedsdelamachine
quandelleestenmarche.Arrêtezlamachinesiquelqu’un
s’approche.
7.Soyeztoujoursprudentpournepasglisseroutomber,
surtoutenreculant.
Préparation
1. Examinezsoigneusementlazoneàdéblayeretenlevez
touslespaillassons,traîneaux,morceauxdebois,filsde
feretautresobjetssurlesquelsvouspourrieztrébucher
ouquirisquentd’êtreprojetésparlatarière/turbine.
2.Porteztoujoursdeslunettesdesécuritéenutilisantla
machineoueneffectuantunréglageouuneréparation.
Unobjetpeuteneffetêtreprojeté,ricocheretvous
blesserauxyeux.
3.Netravaillezpassansporterdesvêtementsd’hiver
adéquats.Neportezpasdebijoux,d’écharpeslongues
oudevêtementsamplesquirisquentdeseprendredans
lespiècesenmouvement.Portezdeschaussuresqui
améliorentvotrestabilitésurdessurfacesglissantes.
4.Utilisezunerallongeà3filsetuneprisedecourantmises
àlaterreavectouteslesmachineséquipéesd’unmoteur
àdémarreurélectrique.
5.Réglezlahauteurdel’habitaclepourévitertoutcontact
aveclessurfacesengravierouenpierreconcassée.
6.Débrayeztouteslescommandesavantdemettrele
moteurenmarche.
7.N’essayezjamaisderéglerlemoteurpendantqu’iltourne(à
moinsd’indicationscontrairesdelapartdufabricant).
8.Laissezlemoteuretlamachines’habitueràlatempérature
extérieureavantdecommenceràdéblayer.
9.Pouréliminertoutrisquedeblessuregrave,faitestrès
attentionenmanipulantdel’essence.Ils’agitd’un
produitextrêmementinflammableetlesvapeursrisquent
d’exploser.Vouspouvezêtregrièvementblessésides
éclaboussuressurvotrepeauousurvosvêtements
s’enflammaient.Rincezvotrepeauetchangezimmédiate
-
mentdevêtements.
a.Remisezlecarburantdansdesbidonshomologués
seulement.
b.Éteigneztoutecigaretteoupipe,toutcigareoutoute
autresourceincandescente.
c.Nefaitesjamaislepleinàl’intérieur.
d.N’enlevezjamaislecapuchond’essenceetn’ajoutezpas
d’essencependantquelemoteurtourne.
e.Laissezlemoteurrefroidirpendantaumoinsdeux
minutesavantdefaireleplein.
f.Nefaitesjamaisdéborderleréservoir.Laissezun
espaced’undemi-pouceenvironpourpermettre
l’expansionducarburant.
g.Resserrezbienlecapuchond’essence.
h.Encasdedébordement,essuyeztouteéclaboussure
surlemoteuretlamachine.Déplacezlamachineet
attendez5minutesavantdelaremettreenmarche.
i. Neremisezjamaislamachineoulesbidonsd’essence
àl’intérieurs’ilyauneflamme,uneétincelleouune
veilleuse(d’unchauffe-eau,unradiateur,unfourneau,
unsèche-lingeouautreappareilàgaz).
j. Laissezlamachinerefroidirpendantaumoins5minutes
avantdelaremiser.
Utilisation
1. Neplacezjamaisvosmainsouvospiedsprèsd’une
pièceenmouvement,dansl’habitacledelatarièreoude
laturbineoudanslagoulotted’éjection.Lespiècesen
mouvementpeuventamputermainsetpieds.
2.Lamanettedecommandedel’ensembledelatarièreet
delaturbineestundispositifdesécurité.Necontournez
jamaissonrôlecequirendraitdangereuxl’emploidela
machineetpourraitcauserdesblessurescorporelles.
3.Touteslesmanettesdecommandedoiventfonctionner
facilementdanslesdeuxdirectionsetrevenirautomatique-
mentàlapositiondedébrayagelorsqu’ellessontrelâchées.
4.Netravaillezjamaissanslagoulotted’éjectionousielleest
endommagée.Laisseztouslesdispositifsdesécuritéen
placeetassurez-vousqu’ilssontenbonétat.
5.Nefaitesjamaisfonctionnerlamachinedansunlocal
closoumalaérécarlesgazd’échappementdumoteur
AVERTISSEMENT:Lesgazd’échappementdeceproduitcontiennentdes
produitschimiquesreconnusdansl’ÉtatdeCaliforniecommecausantlecancer,
desanomaliescongénitalesoud’autresproblèmesliésàlareproduction.
DANGER:Cettemachinedoitêtreutiliséeconformémentauxconsignesdesécuritéquifigurent
danslanoticed’utilisation.Commeavectoutappareilmotorisé,unenégligenceouuneerreurdela
partdel’utilisateurpeutentraînerdesblessuresgraves.Cettemachinepeutamputermainsetpieds
etprojeterdesdébris.Parconséquent,lenon-respectdecesconsignespeutcauserdesblessures
corporellesgravesetmêmemortelles.
AVERTISSEMENT
Cesymboleattire
votreattentionsurdes
consignesdesécurité
importantesqui,sielles
nesontpasrespectées,
peuventmettreen
dangernonseulement
votrepersonneetvos
biens,maisaussiceux
d’autrui.Prièredelire
touteslesinstructions
figurantdanscette
noticed’utilisationavant
d’essayerdevous
servirdecettemachine.
Lenon-respectde
cesinstructionspeut
entraînerdesblessures
corporelles.
RESPECTEZ
L’AVERTISSEMENT
QUIACCOMPAGNE
CESYMBOLE!
Votreresponsabilité
Cettemachinenedoit
êtreutiliséequepardes
personnesquipeuvent
lire,comprendreet
respecterlesavertisse
-
mentsetinstructions
quifigurentdanscette
noticeetsurlamachine.
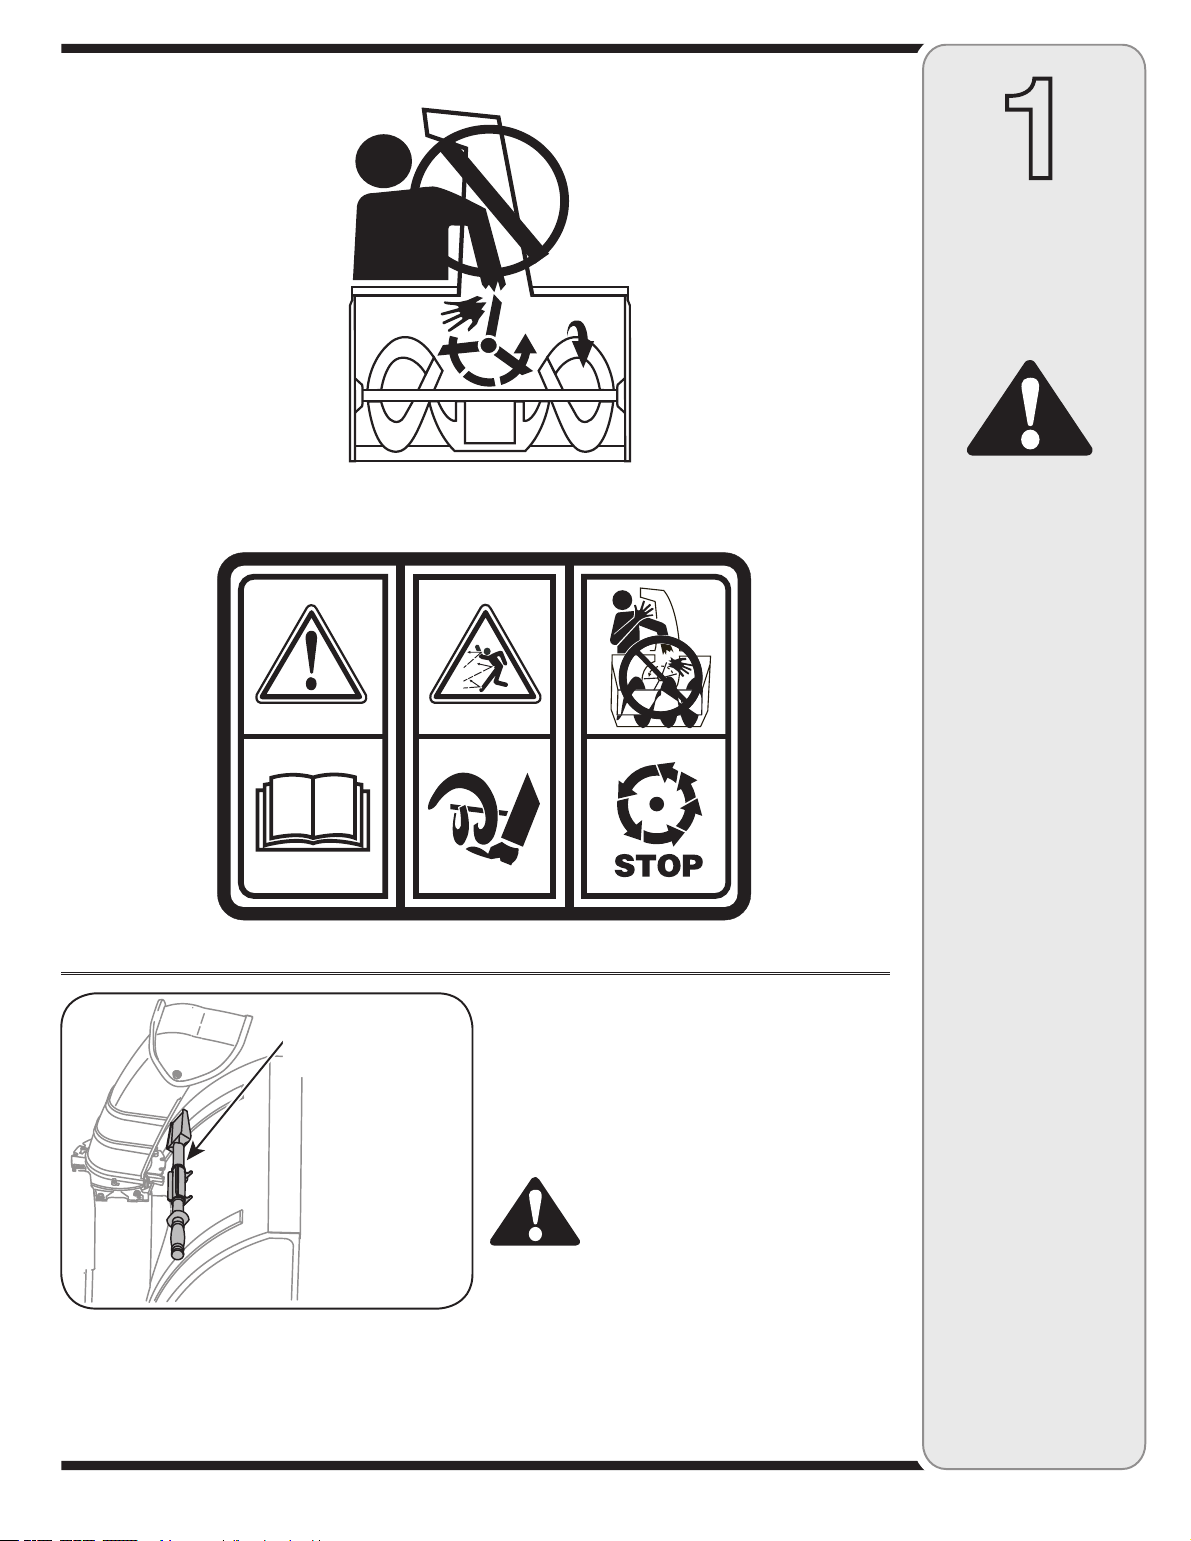
3
1
Étiquettes
de
sécurité
AVERTISSEMENT
Cesymboleattire
votreattentionsurdes
consignesdesécurité
importantesqui,sielles
nesontpasrespectées,
peuventmettreen
dangernonseulement
votrepersonneetvos
biens,maisaussiceux
d’autrui.Prièredelire
touteslesinstructions
figurantdanscette
noticed’utilisationavant
d’essayerdevous
servirdecettemachine.
Lenon-respectde
cesinstructionspeut
entraînerdesblessures
corporelles.
RESPECTEZ
L’AVERTISSEMENT
QUIACCOMPAGNE
CESYMBOLE!
Votreresponsabilité
Cettemachinenedoit
êtreutiliséequepardes
personnesquipeuvent
lire,comprendreet
respecterlesavertisse
-
mentsetinstructions
quifigurentdanscette
noticeetsurlamachine.
Unoutildedégagementdelagoulotteest
maintenusurledessusdel’habitacledelatarière
avecuneattache.Cetoutilsertàdégagerlesac-
cumulationsdeneigeetdeglacedanslagoulotte.
Cetoutilaétéfixéavecunattache-câbleà
l’usine.Coupezl’attache-câbleavantdemettrela
souffleuseenmarche.
AVERTISSEMENT:Nevous
servezjamaisdevosmainspour
dégageruneobstructiondans
lagoulotte.Arrêtezlemoteur
etrestezderrièrelesguidons
jusqu’àcequetouteslespièces
sesoientarrêtéesavantdevous
servirdel’outildedégagement
pournettoyerlagoulotte.
Outilde
dégagement
delagoulotte
2
Pourtrouverlenumérodemodèle
Veuillezretournerlamachineaudétaillantquivousl’avendue,
sansvousadresserd’abordauserviceaprès-vente.
Tabledesmatières
AVANTDEPROCÉDERÀL’ASSEMBLAGEDEVOTRE
NOUVELLESOUFFLEUSE,
localiserlaplaquesignalétiquesurl’équipement,etrecopier
lenumérodemodèleetlenumérodesériesurlemodèle
deplaquesignalétiquefournisurladroite.Pourlocaliserla
plaquesignalétique,placez-vousderrièrelasouffleuseàla
postedeconduiteetregardezàl’arrièreduchâssisdela
souffleuse.
Cettenoticed’utilisationestunepièceimportantedevotrenouveléquipement.Ellevousfournitlesrenseignements
nécessairesàl’assemblage,àlapréparationetàl’entretiendevotremachine.Veuillezdonclalireattentivementet
vousassurerdebiencomprendretouteslesinstructions.
Serviceaprès-vente
Sil’assemblagedecettemachinevousposedesproblèmesoupourtoutequestionconcernantlescommandes,lefonc-
tionnementoul’entretiendelamachine,lesspécialistessontàvotredisposition.Choisissezl’unedesoptionsci-dessous:
1.Visitezlesitewww.troybilt.caoùvoustrouverezdenombreusessuggestionsutiles.CliquezsurleboutonServiceaprès-
vente.
2.Appelezunagentduserviceaprès-venteau1-800-668-1238.
3.Lefabricantdumoteurestresponsabledetouteslesquestionsconcernantlesperformances,lapuissanceindiquée,les
caractéristiquestechniques,lagarantieetleserviceaprès-ventedumoteur.Pourplusderenseignementsàcesujet,veuillez
consulterlanoticed’utilisationdumoteurfournieavecvotremachine.
Préparezvosnumérosdemodèleetdesérieavantdetéléphoner.Veuillezlirelechapitreprécédentpourdéterminer
l’emplacementdecesnuméros.Onvousdemanderad’enregistrerlenumérodesérieavantdepouvoirpoursuivrevotreconsul-
tation.
Étiquettes............................................................3
Importantconsignesdesécurité......................4
MontageetRéglage............................................6
Commandesdelasouffleuse............................8
Utilisationdelasouffleuse................................9
Remisagehorssaison.....................................15
Dépannage........................................................16
Garantie.............................................................17
Piècesdétachées(voirlapage16
delaversionanglaisedecettenotice
d’utilisation
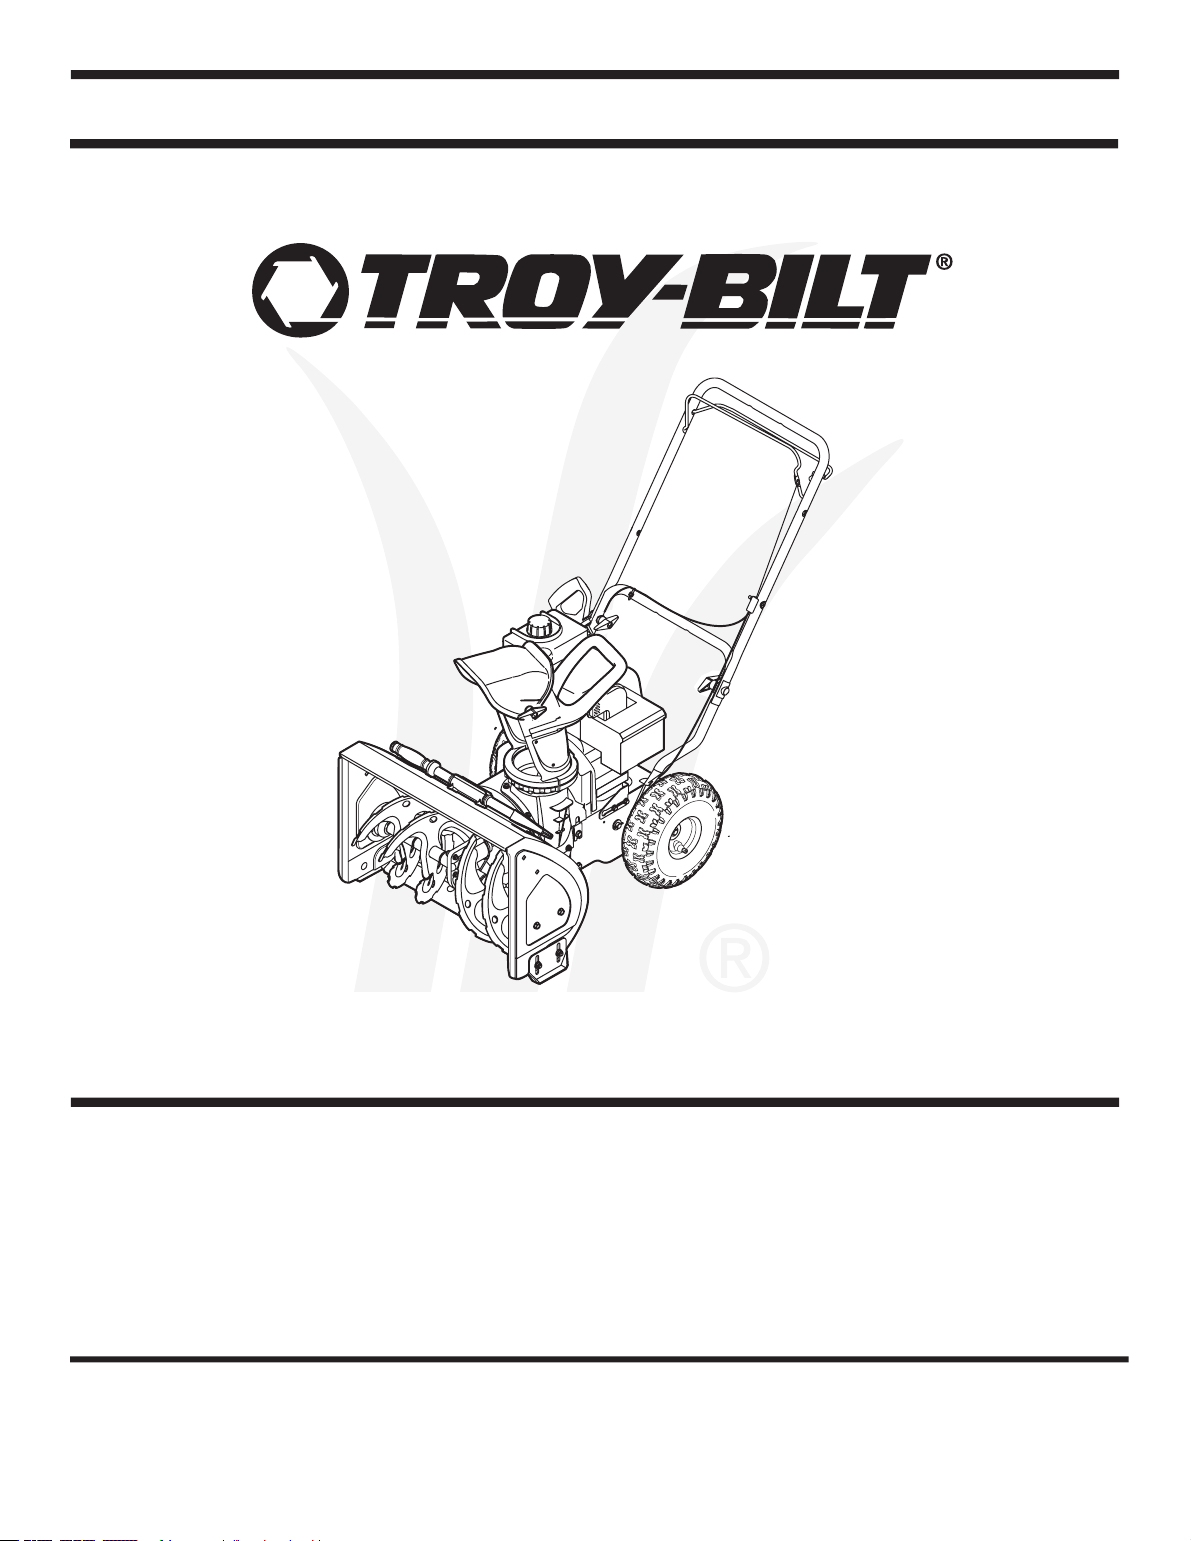
Souffleuseàneigedeuxphases
IMPRIMÉAUXÉTATS-UNIS
7/20/2005
772C0769
Sécurité*Assemblage*Fonctionnement*Réglages*Entretien
Dépannage*Listesdespiècesdétachées*Garantie
NOTICED’UTILISATION
P.O.Box1386,KITCHENER,ONTARION2G4J1
IMPORTANT:
LISEZATTENTIVEMENTLESRÉGLES
DESÉCURITÉETLESININSTRUCTIONS
AVANTDEMETTREENMARCHELA
MACHINE.
www.troybilt.ca
