2024.04v1.0
User Manual
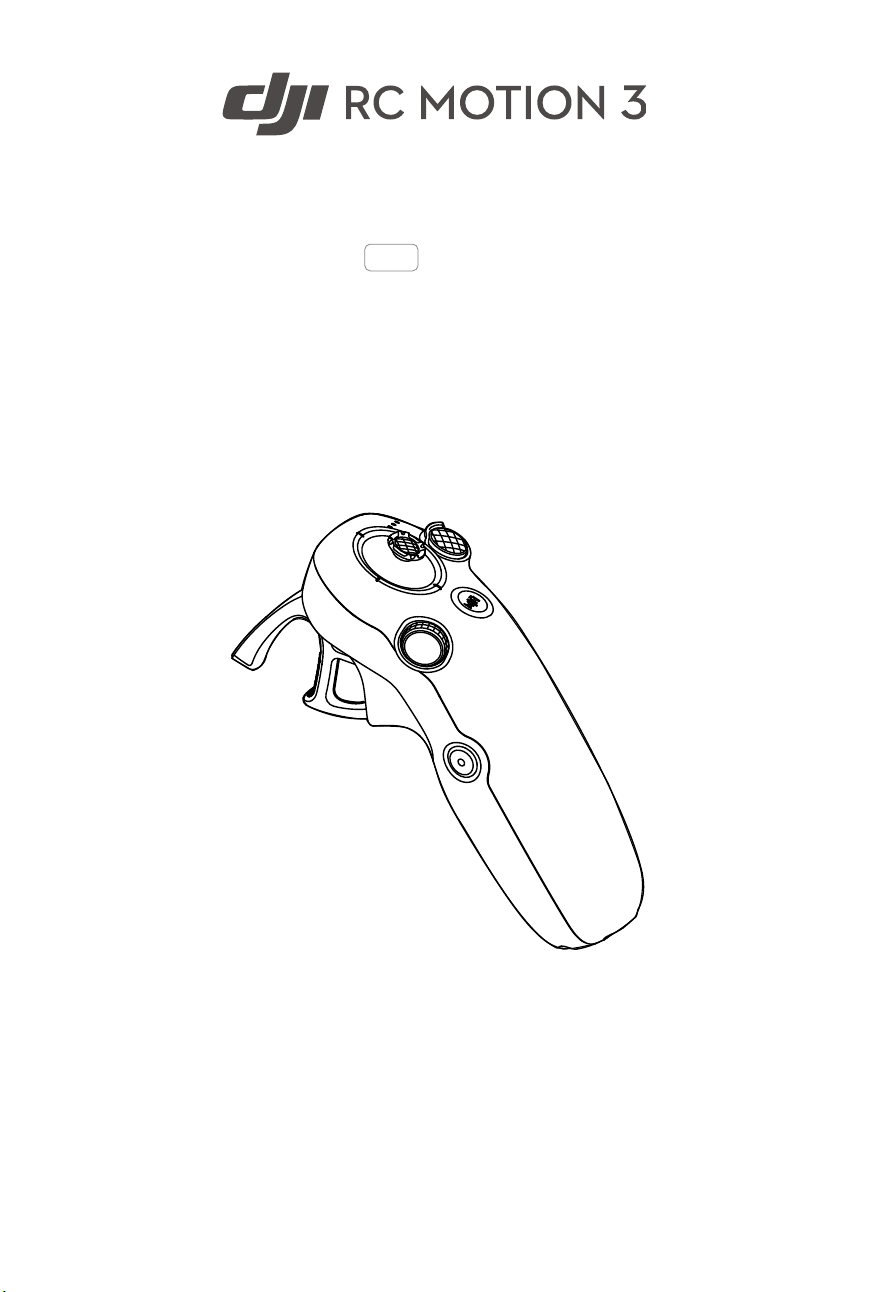
DJI RC Motion 3 User Manual
2
©
2024 DJI All Rights Reserved.
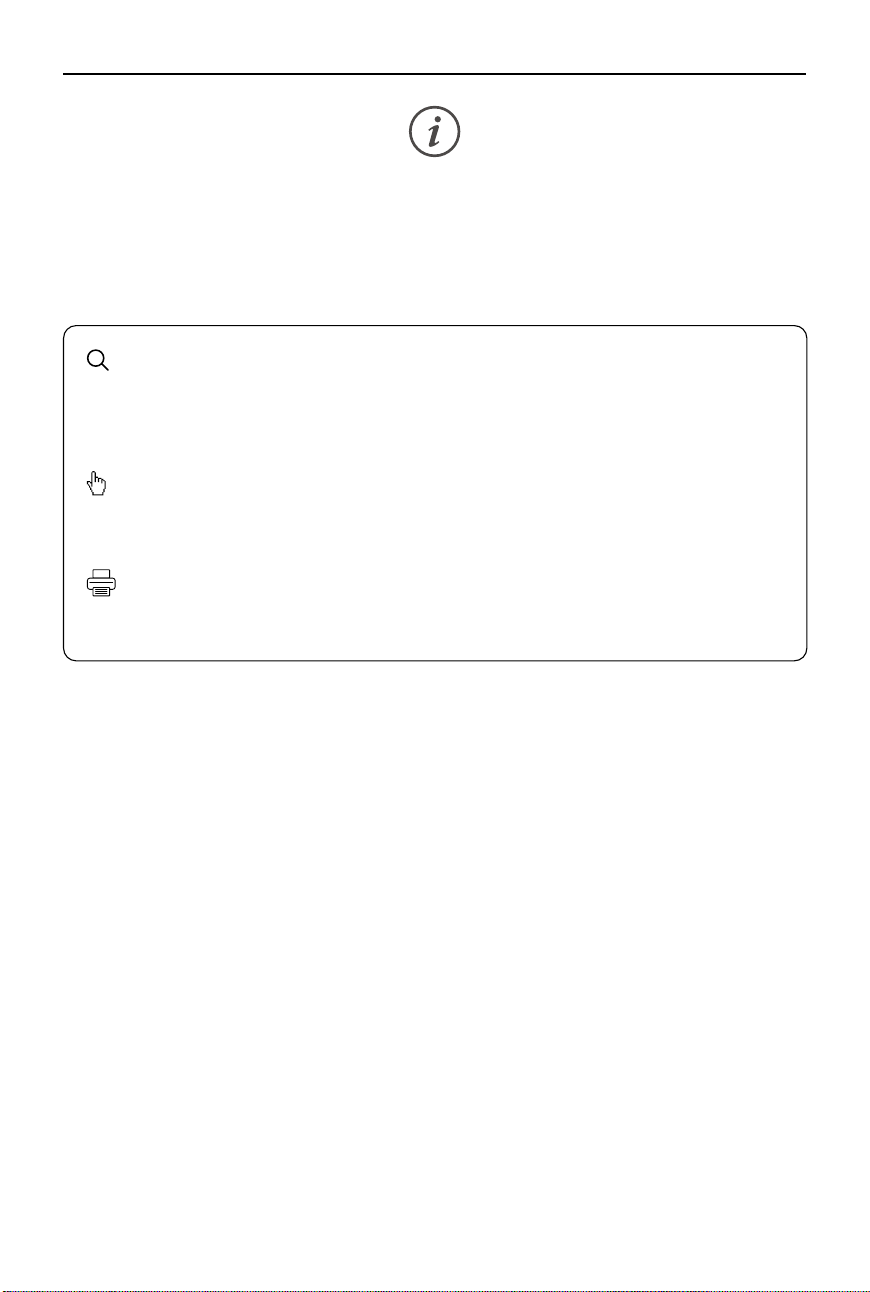
Searching for Keywords
Search for keywords such as “battery” and “install” to nd a topic. If you are using Adobe
Acrobat Reader to read this document, press Ctrl+F on Windows or Command+F on Mac
to begin a search.
Navigating to a Topic
View a complete list of topics in the table of contents. Click on a topic to navigate to that
section.
Printing this Document
This document supports high resolution printing.
This document is copyrighted by DJI with all rights reserved. Unless otherwise authorized by DJI,
you are not eligible to use or allow others to use the document or any part of the document by
reproducing, transferring, or selling the document. Users should only refer to this document
and the content thereof as instructions to operate DJI UAV. The document should not be used
for other purposes.
DJI RC Motion 3 User Manual
©
2024 DJI All Rights Reserved.
3
https://s.dji.com/guide75
Using the Manual
Legend
Important Hints and Tips
Read Before the First Flight
DJI
TM
provides users with tutorial video and the following documents.
1. User Guide
2. User Manual
It is recommended to watch the tutorial video and read the user guide before using for the rst
time. Refer to this user manual for more information.
Video Tutorials
Go to the address below or scan the QR code to watch the tutorial video, which demonstrates
how to use the product safely.
Download the DJI Fly App
Scan the QR code to download the latest version.
• The Android version of DJI Fly is compatible with Android v7.0 and later. The iOS
version of DJI Fly is compatible with iOS v11.0 and later.
• The interface and functions of DJI Fly may vary as the software version is updated.
Actual usage experience is based on the software version used.
Download DJI Assistant 2
Download DJI ASSISTANT
TM
2 (Consumer Drones Series) at:
https://www.dji.com/downloads/softwares/dji-assistant-2-consumer-drones-series

4
©
2024 DJI All Rights Reserved.
Using the Manual 3
Legend 3
Read Before the First Flight 3
Video Tutorials 3
Download the DJI Fly App 3
Download DJI Assistant 2 3
Product Profile 5
Introduction 5
Overview 5
Button Features 6
Preparing DJI RC Motion 3 8
Powering On/Off 8
Charging the Battery 8
Linking 9
Activation 11
Updating Firmware 11
Using the Motion Controller 12
Flight Operations 12
Taking Off, Braking and Landing 12
Flying Forward and Backward 13
Adjusting Aircraft Orientation 14
Making the Aircraft Ascend or Descend at an Angle 14
Controlling the Gimbal and Camera 15
Switching Flight Modes 15
Easy ACRO (Only for Certain Aircraft) 16
AR Cursor 18
Optimal Transmission Zone 22
Motion Controller Alert 22
Motion Controller Calibration 22
Appendix 23
Specifications 23
Compatible Products 23
Updating Firmware 24
Using DJI Fly App 24
Using DJI Assistant 2 (Consumer Drones Series) 24
Aftersales Information 25
Contents
DJI RC Motion 3 User Manual
©
2024 DJI All Rights Reserved.
5
Product Prole
Introduction
DJI RC Motion 3 (hereinafter referred to as motion controller) features a streamlined design
for a comfortable grip. Paired with compatible aircrafts, the function buttons on the body
enable users to easily control the aircraft and remotely change the aircraft settings. The motion
controller supports intuitive body movement control, offering efficiency and ease for your
ights. Paired with DJI Goggles 3 (hereinafter referred to as goggles), the motion controller can
be used to control an AR cursor to navigate the menu on the screen of the goggles.
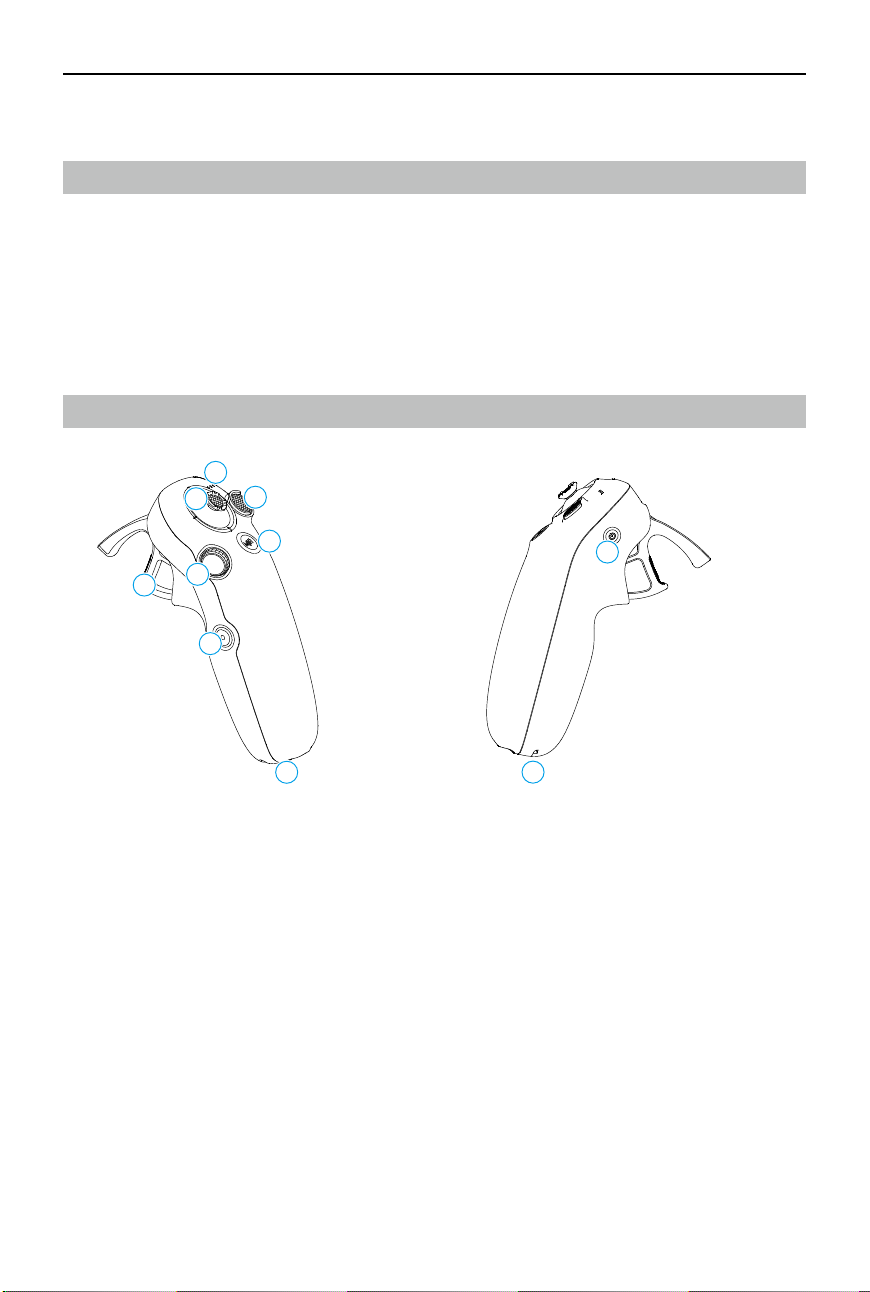
Overview
1
4
3
2
5
6
7
8
9
10
1. Battery Level LEDs
2. Lock Button
3. Joystick
4. Mode Button
5. Shutter/Record Button
6. Accelerator
7. Dial
8. USB-C Port
9. Power Button
10. Lanyard Hole

DJI RC Motion 3 User Manual
6
©
2024 DJI All Rights Reserved.
Button Features
Lock Button
• Takeoff: Press twice to start the aircraft motors, then press and
hold to make the aircraft take off. The aircraft will ascend to
approximately 1.2 m and hover.
• Landing: While the aircraft is hovering, press and hold to land the
aircraft and stop the motors.
• Brake: Press during ight to make the aircraft brake and hover in
place.
Joystick
• Move up or down to make the aircraft ascend or descend.
• Move left or right to make the aircraft move left or right
horizontally.
* For aircraft that support Easy ACRO, move the joystick to perform dierent
Easy ACRO actions when Easy ACRO is enabled.
Mode Button
• Press to switch between Normal and Sport mode.
• Press and hold to initiate RTH. When the aircraft is performing
RTH, press the mode button or lock button once to cancel RTH.
• When the battery level is low and only sucient to y to the Home
Point, a warning prompt will appear in the goggles and RTH will
be triggered following the prompt. Press the mode button once to
cancel the prompt.
Dial
• Press twice to switch between the ight liveview and Real View in
the goggles.
• Scroll up or down to tilt the camera before takeo or during RTH
and landing.
• Scroll the dial to switch between Easy ACRO actions when Easy
ACRO is enabled.
• Press and hold the dial to recenter the cursor on the screen when
using AR Cursor.
Shutter/Record Button
• Press once: Take a photo or start or stop recording.
• Press and hold: Switch between photo and video mode.
DJI RC Motion 3 User Manual
©
2024 DJI All Rights Reserved.
7
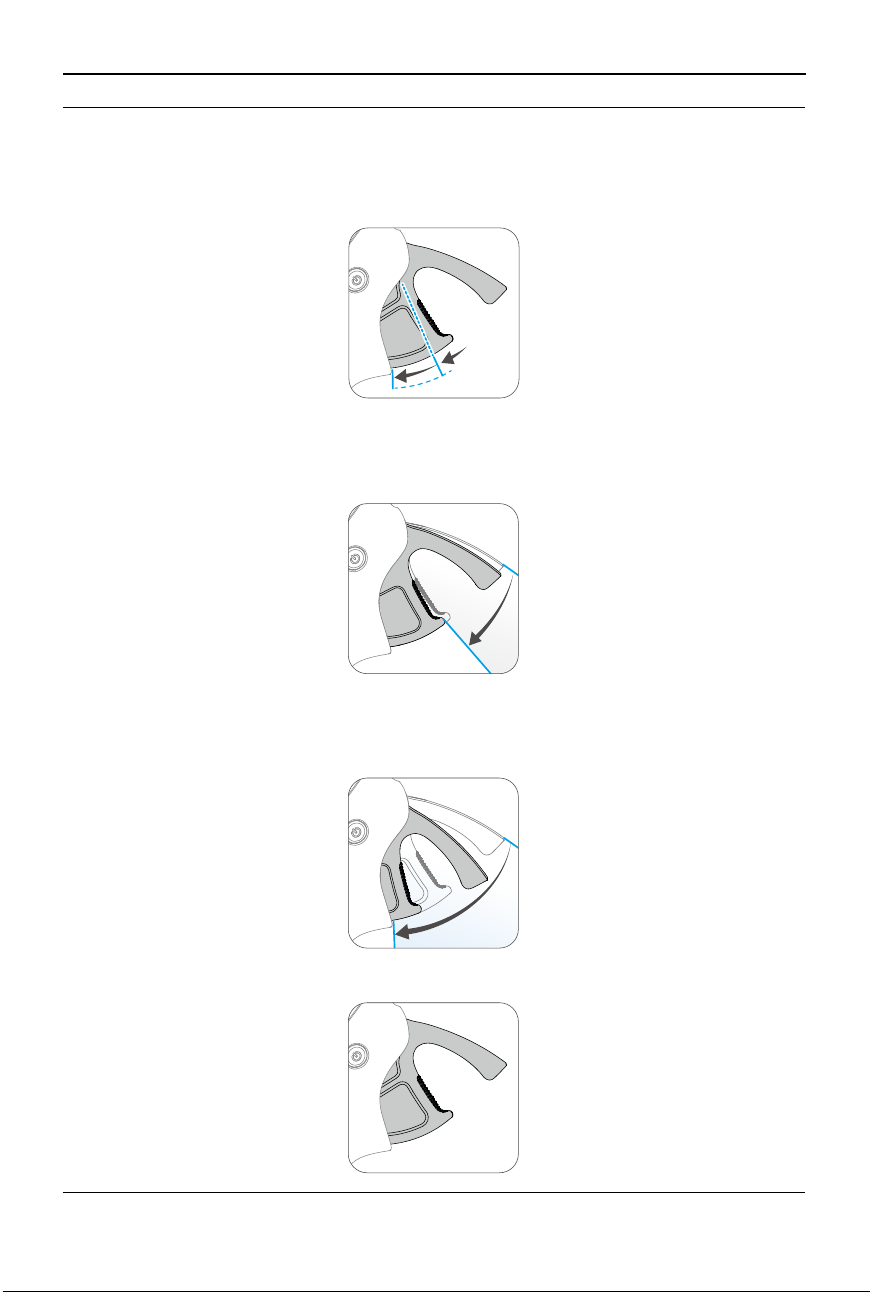
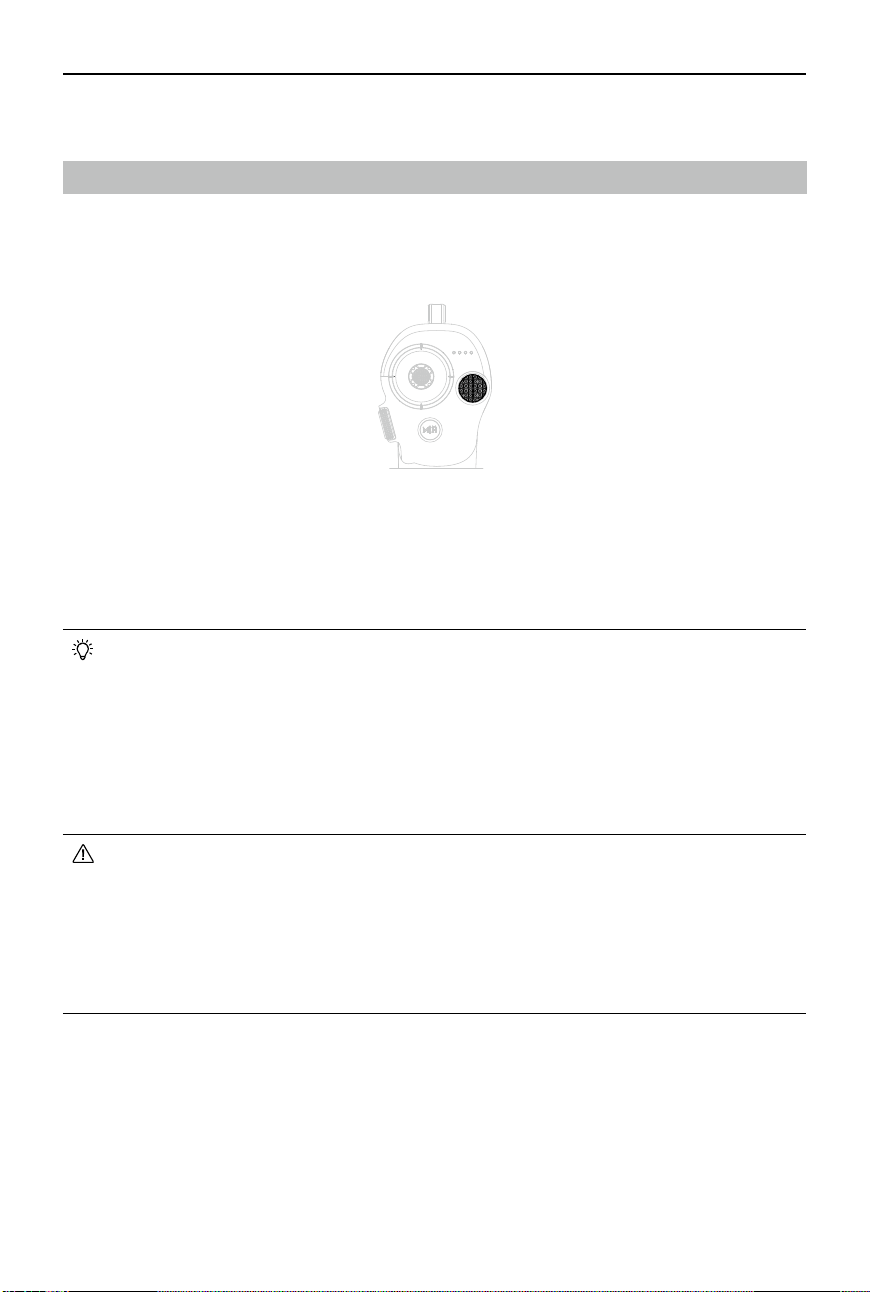
Accelerator
The accelerator is used for controlling aircraft orientation and acceleration. There are two
stops when pressing the accelerator. After gently pressing the accelerator, users will feel
noticeable resistance when the accelerator reaches the rst stop.
1
2
• After gently pressing the accelerator to the rst stop, users can adjust the aircraft orientation
by tilting the top of the motion controller to the left or right. Note that the aircraft will not y
forward at this time.
1
• Press the accelerator past the rst stop to y in the direction of the circle in the goggles.
Push the accelerator forward to fly the aircraft backward. Apply more pressure in either
direction to accelerate.
2
• When the accelerator is not being pressed, the aircraft will hover.
DJI RC Motion 3 User Manual
8
©
2024 DJI All Rights Reserved.
Preparing DJI RC Motion 3
Charging the Battery
Connect the charger to the USB-C port on the motion controller, and charge the motion
controller until at least three LEDs are lit up.
5V, 2A
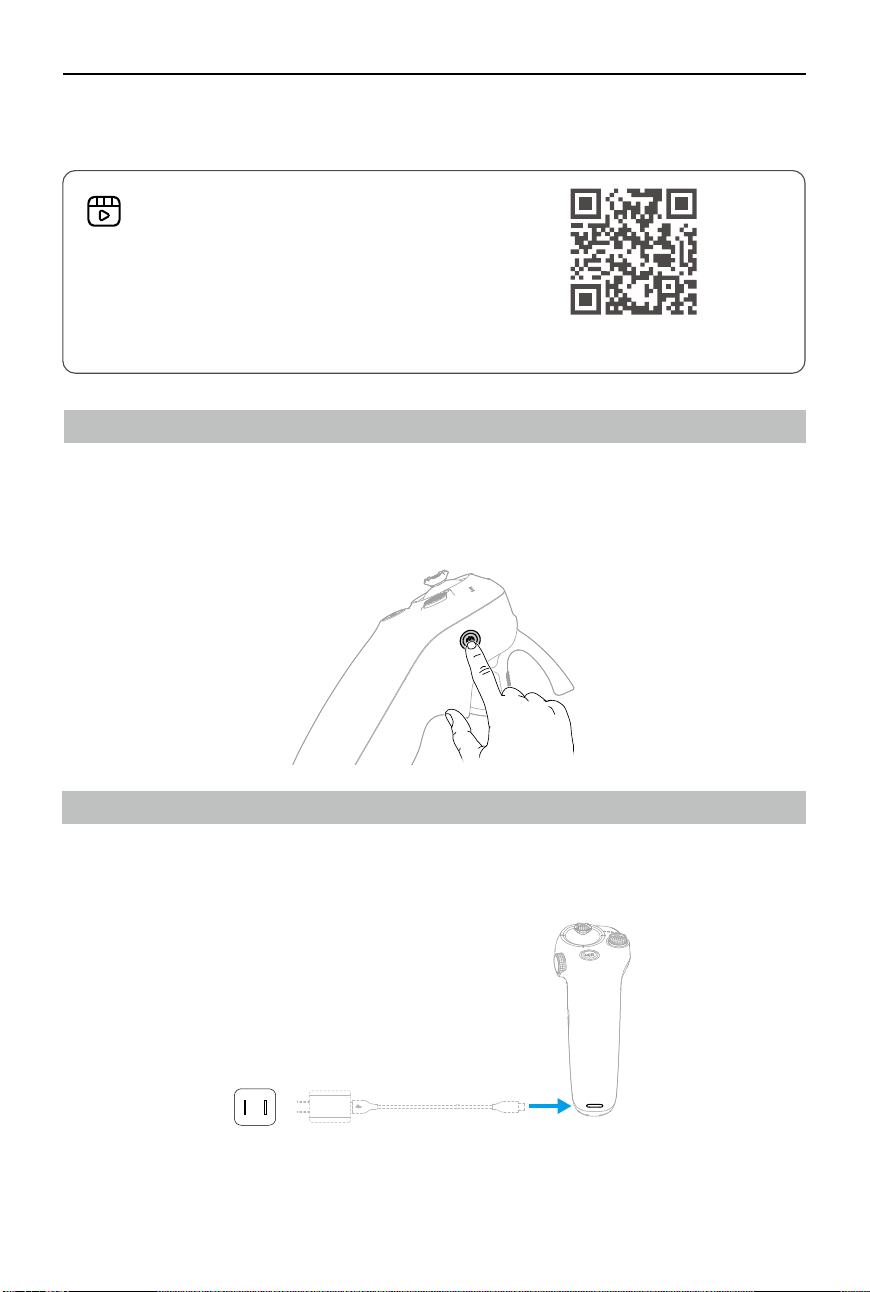
Powering On/O
Press the power button once to check the current battery level. Charge before using if the
battery level is too low.
Press once then press again and hold for two seconds to power the motion controller on or o.
https://www.dji.com/rc-motion-3/video
Go to the address below or scan the QR code to
watch the tutorial video before using for the rst
time.
DJI RC Motion 3 User Manual
©
2024 DJI All Rights Reserved.
9
Linking
Make sure that the devices used with the aircraft have been updated to the latest firmware
version and the devices have been powered on.
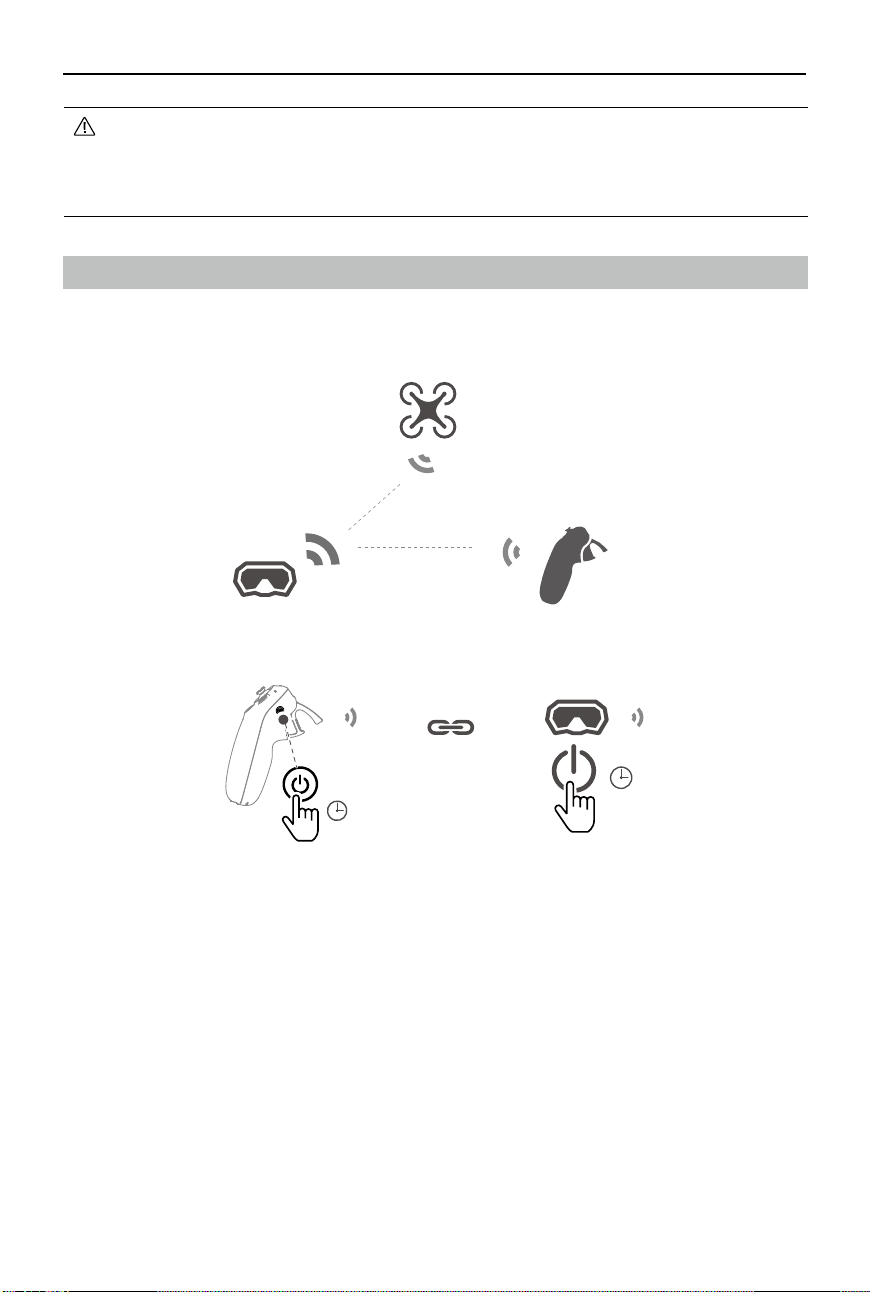
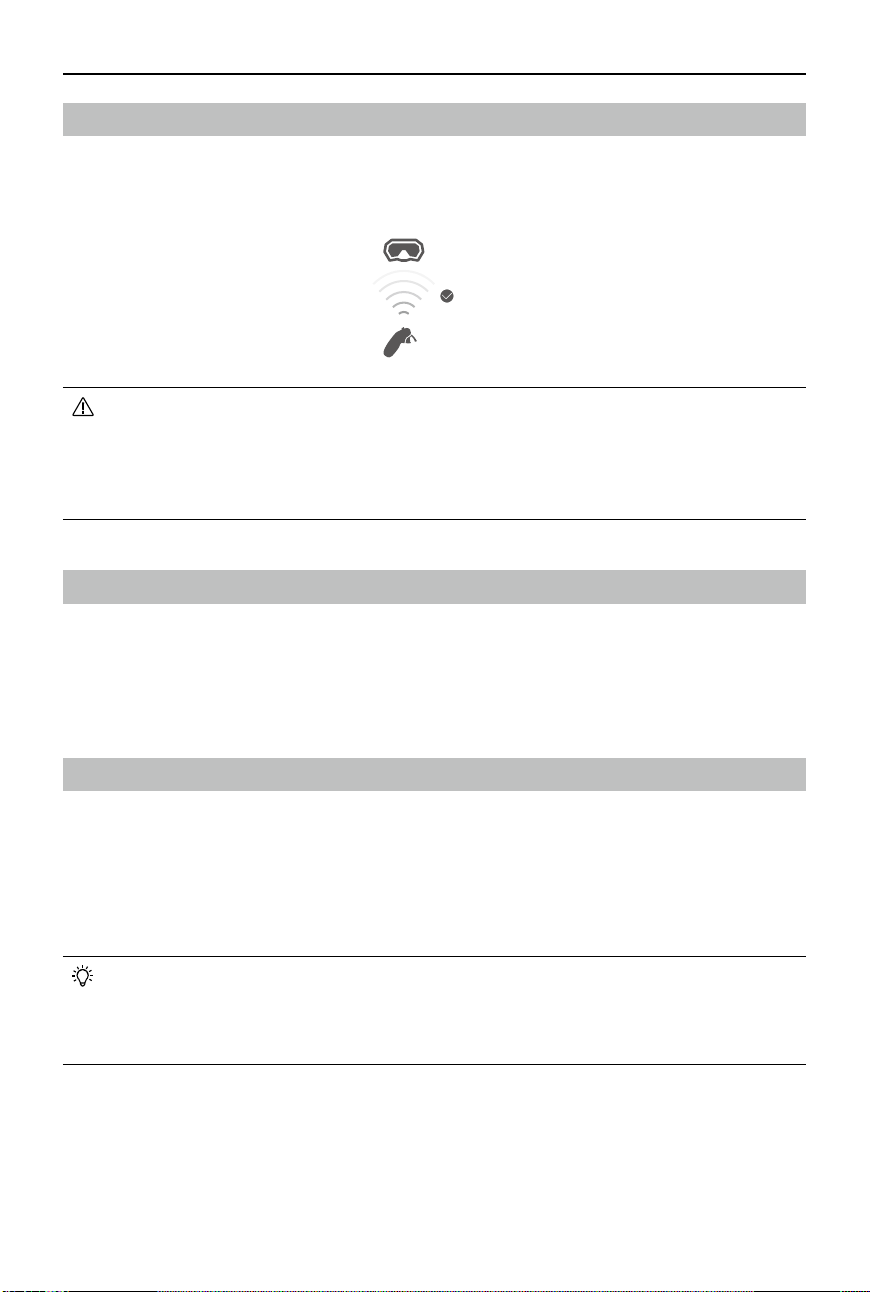
1. Linking the motion controller and the goggles
a. Press and hold the power button on the goggles until it start to beep continuously and
the battery level LEDs start to blink in sequence.
b. Press and hold the power button on the motion controller until it starts to beep
continuously and the battery level LEDs start to blink in sequence.
c. Once linking is successful, the goggles and the motion controller stop beeping and both
the battery level LEDs turn solid and display the battery level.
5s
5s
• Fully charge the remote controller before each ight. The remote controller sounds an
alert when the battery level is low.
• Fully charge the battery at least once every three months to maintain good battery
health.
DJI RC Motion 3 User Manual
10
©
2024 DJI All Rights Reserved.
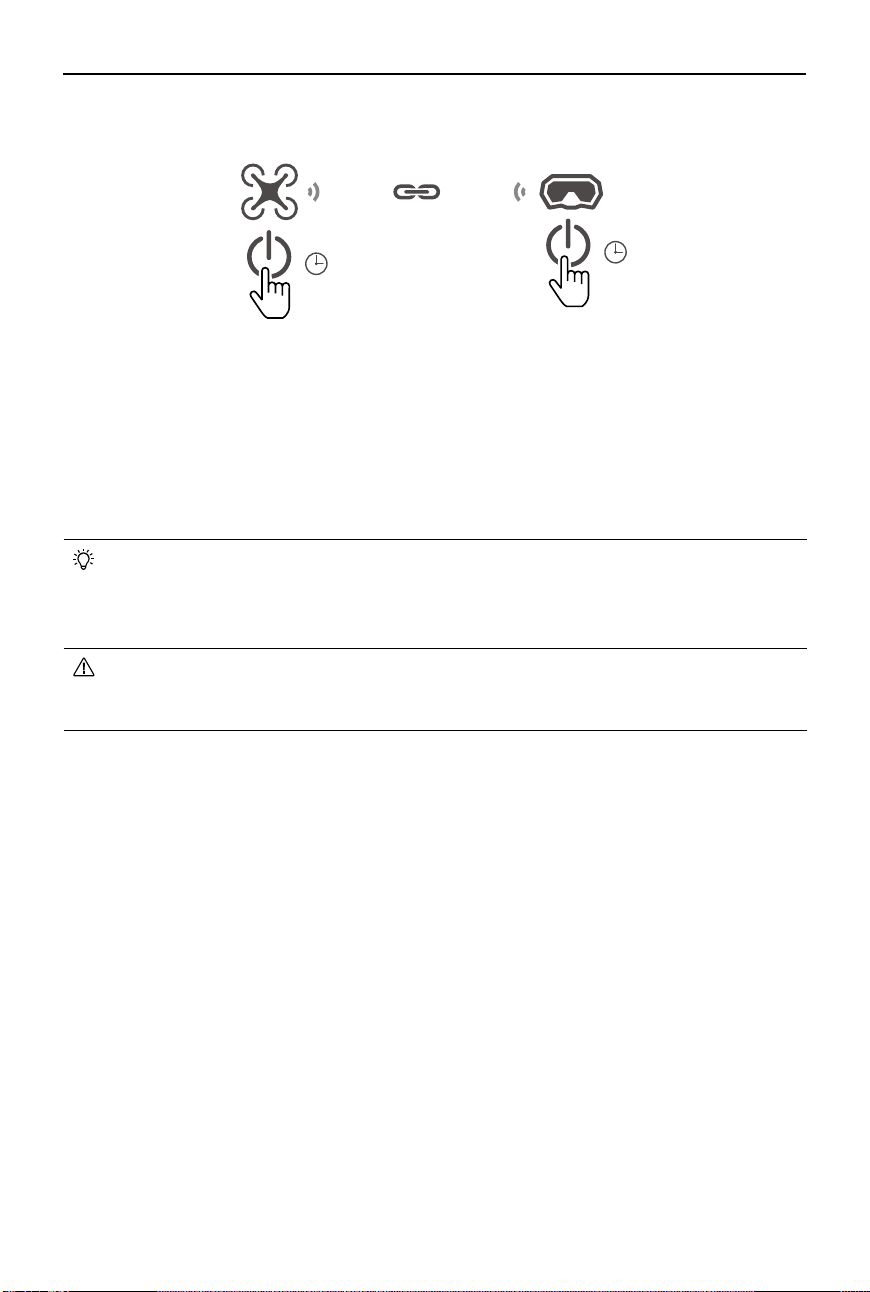
5s
5s
a. Press and hold the power button on the aircraft until it beeps once and the battery level
LEDs start to blink in sequence.
b. Press and hold the power button on the goggles until the goggles start to beep
continuously and the battery level LEDs start to blink in sequence.
c. Once linking is completed, the battery level LEDs of the aircraft turn solid and display
the battery level, the goggles stop beeping, and image transmission can be displayed
normally.
• Make sure the devices are within 0.5 m of each other during linking.
• Restart the devices if the devices fail to link. Connect the goggles to a mobile
device, run the DJI Fly app, select Connection Guide, and then follow the on-screen
instructions to link.
• The aircraft can be controlled with only one remote control device during flight. If
your aircraft has been linked with multiple remote control devices, turn o the other
remote control devices before ight.
2. Linking the aircraft and the goggles
DJI RC Motion 3 User Manual
©
2024 DJI All Rights Reserved.
11
Updating Firmware
A prompt will appear in DJI Fly when new rmware is available. Update the rmware whenever
prompted to ensure optimal user experience. Refer to “Updating Firmware” for more
information.
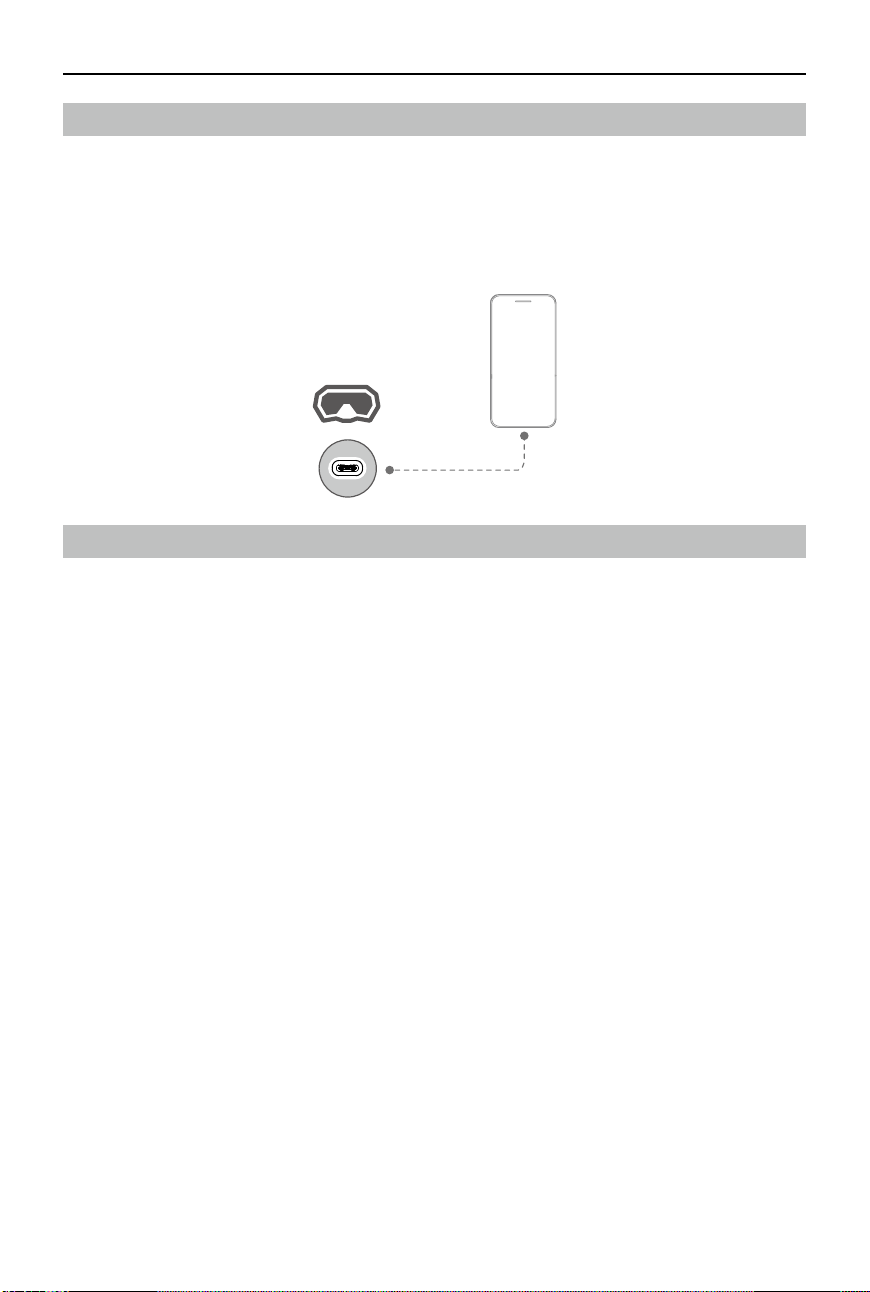
Activation
When all devices are powered on and linked, connect the USB-C port of the goggles to the
mobile device and run the DJI Fly app. The app will automatically identify the motion controller
and activate it in silent mode. Users can also connect the motion controller to DJI Assistant 2
(Consumer Drone Series) to activate. Activate the device as soon as possible after purchase to
avoid aecting the after-sales service.
DJI Fly
App
DJI RC Motion 3 User Manual
12
©
2024 DJI All Rights Reserved.
Using the Motion Controller
Flight Operations
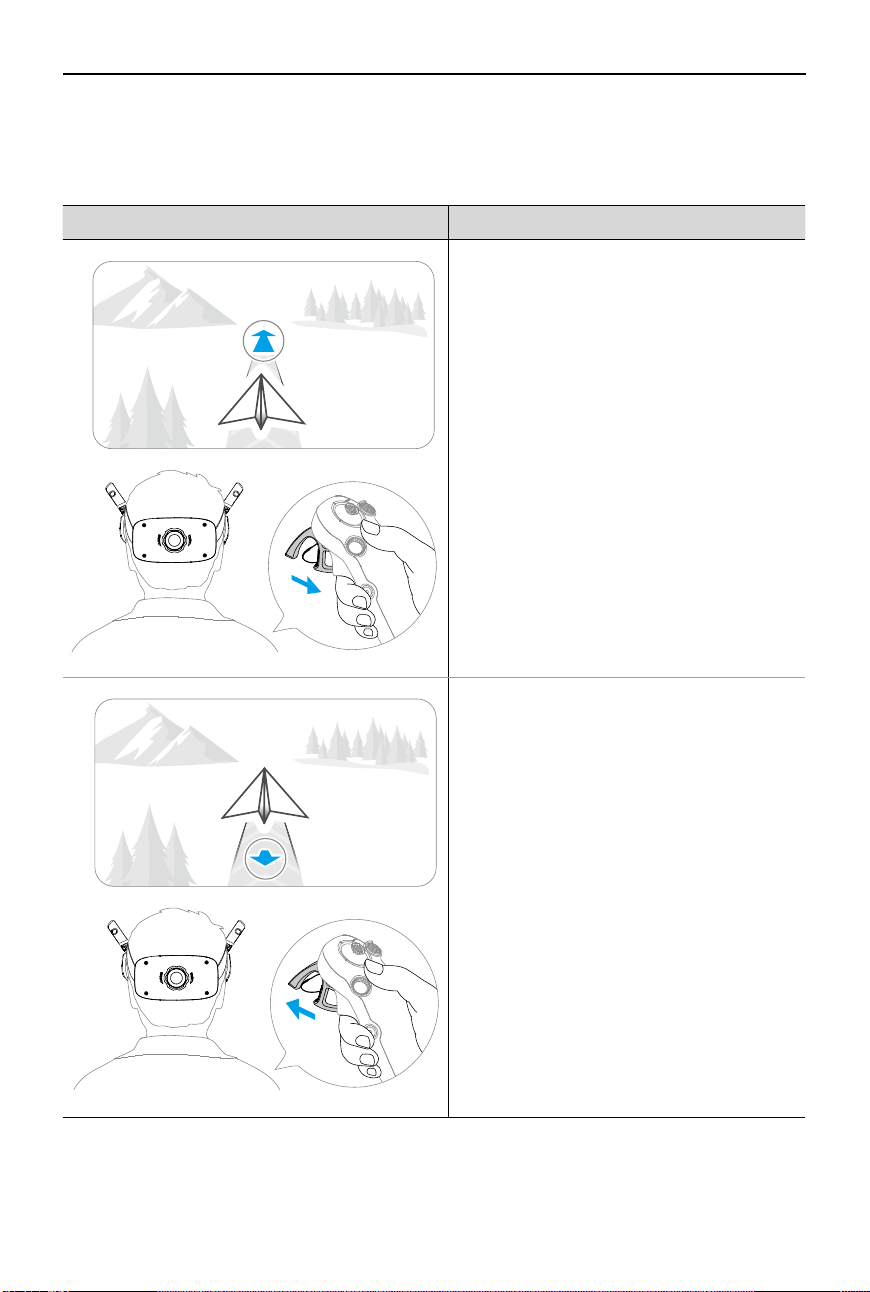
Taking O, Braking and Landing
Use the lock button to control the takeo, landing, and braking of the aircraft.
• It is recommended to watch the tutorial guide in the goggles before the first flight.
Go to Settings > Control > Motion Controller > Flight Control > Motion Controller
Instructions.
• After the aircraft motors have been started by double-pressing the lock button, slowly
push the joystick up to make the aircraft take o.
• When Easy ACRO is disabled, once the aircraft ies to the landing position, gently push
the joystick downwards to land the aircraft. After landing, push the joystick down and
hold in position until the motors stop.
• If an emergency occurs (such as a collision or the aircraft is out of control) during
ight, pressing the lock button four times will trigger Stop Motors Mid-ight, which
will stop the aircraft motors immediately.
The Stop Motors Mid-ight function will
cause the aircraft to crash. Operate with caution.
• To ensure ight safety when using the motion controller, press the lock button once to
brake and hover before operating the goggles. Failure to do so is a safety risk and may
lead to the aircraft losing control or injury.
• Takeo: Press twice to start the aircraft motors, then press and hold to make the aircraft take
o. The aircraft will ascend to approximately 1.2 m and hover.
• Landing: While the aircraft is hovering, press and hold to land the aircraft and stop the
motors.
• Brake: Press during ight to make the aircraft brake and hover in place.
DJI RC Motion 3 User Manual
©
2024 DJI All Rights Reserved.
13
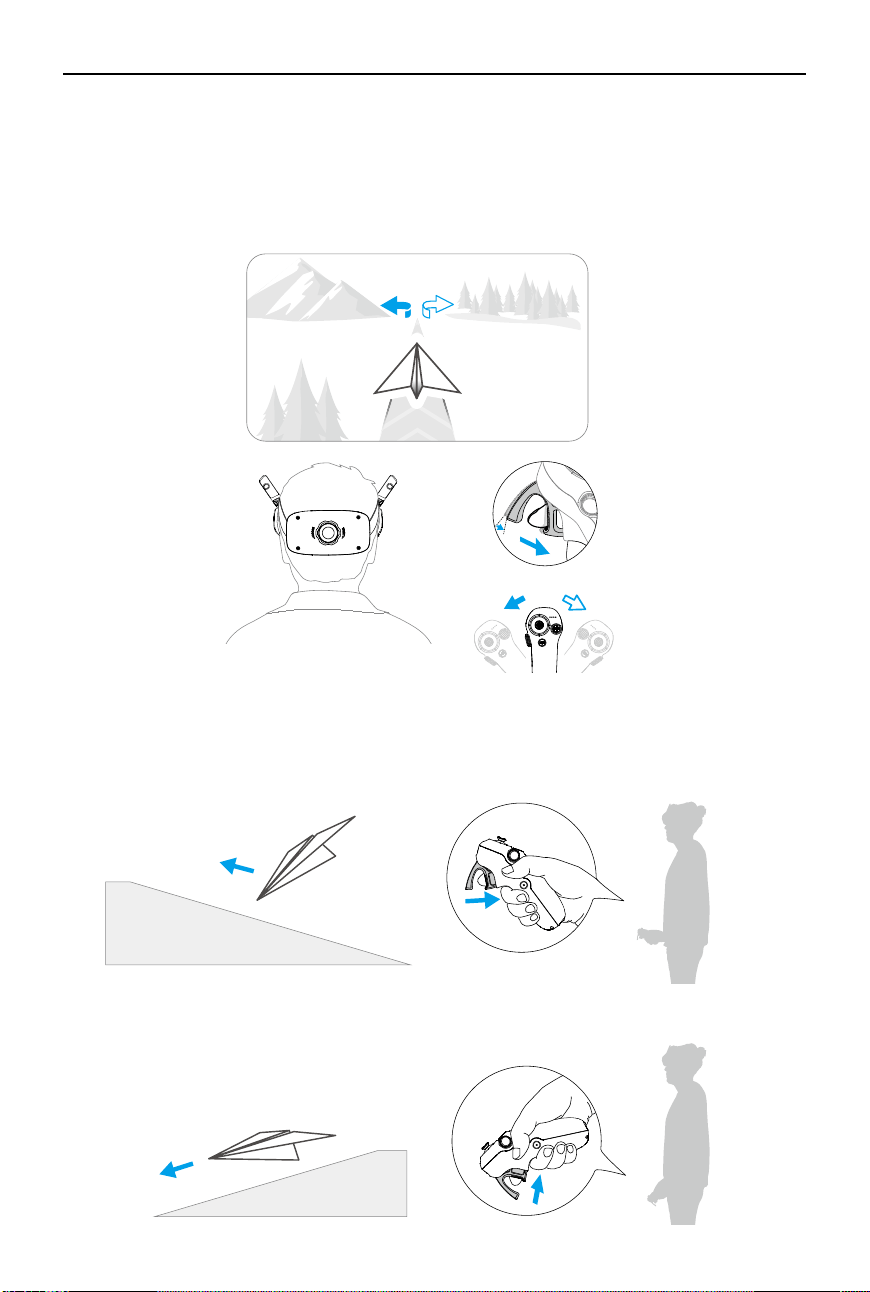
Flight Trajectory Remarks
Press the accelerator past the rst stop to y
in the direction of the circle in the goggles.
Push the accelerator forward to fly the
aircraft backward.
Flying Forward and Backward
Press or push the accelerator of the motion controller to y forward or backward. Apply more
pressure when pressing or pushing to accelerate. Release to stop and hover.
DJI RC Motion 3 User Manual
14
©
2024 DJI All Rights Reserved.
Adjusting Aircraft Orientation
After gently pressing the accelerator to the rst stop, users can adjust the aircraft orientation by
tilting the top of the motion controller to the left or right. The greater the tilt angle of the motion
controller, the faster the aircraft will rotate. The circle in the goggles will move left and right and
the ight liveview will change accordingly.
+
Making the Aircraft Ascend or Descend at an Angle
When the aircraft needs to fly at an upward angle, press the accelerator to the second stop
while simultaneously tilting the motion controller up.
When the aircraft needs to y at an downward angle, press the accelerator to the second stop
while simultaneously tilting the motion controller down.
DJI RC Motion 3 User Manual
©
2024 DJI All Rights Reserved.
15
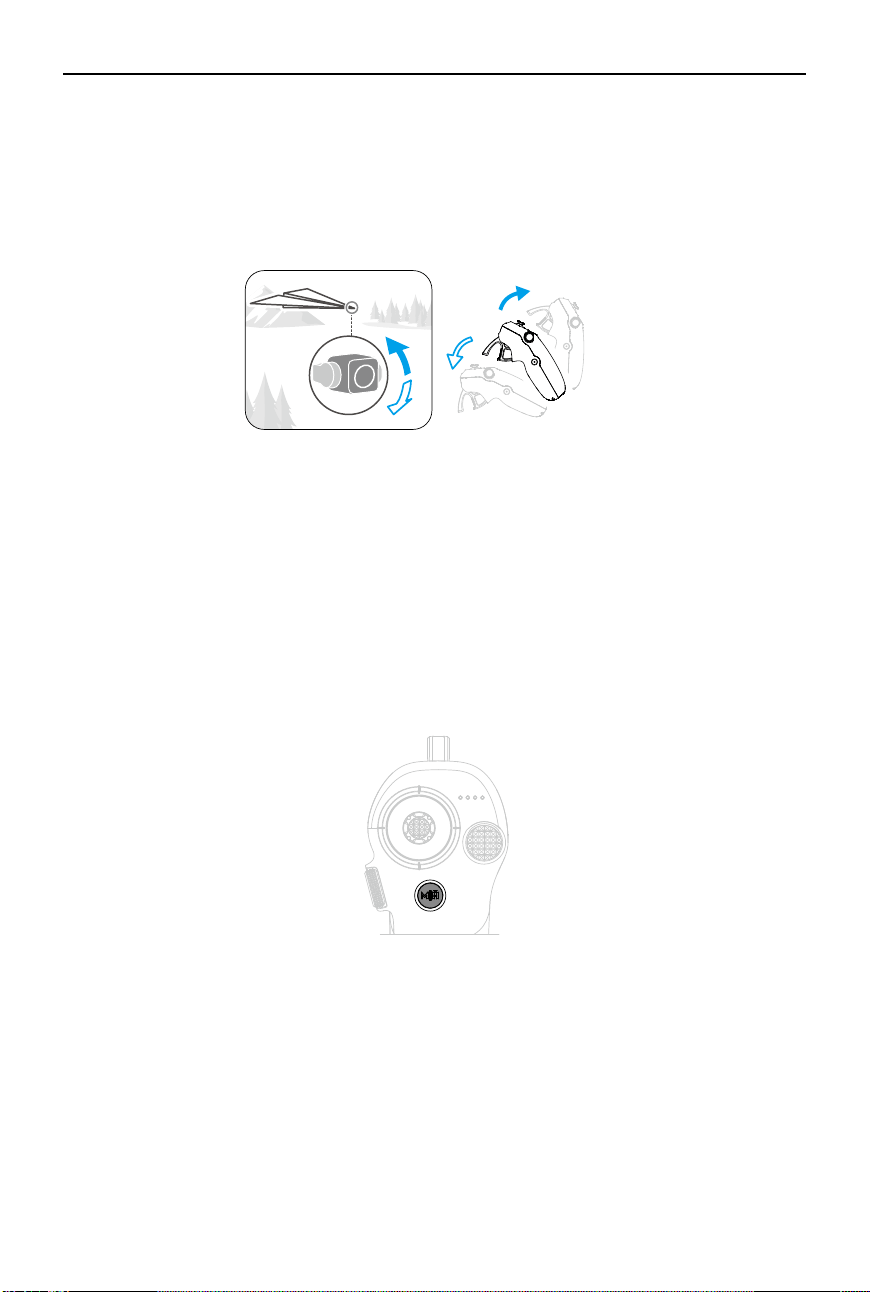
Controlling the Gimbal and Camera
Tilt the motion controller up and down to control the tilt of the gimbal. The tilt of the gimbal
changes with the tilt of the motion controller accordingly and is always consistent with the
orientation of the motion controller. The circle in the goggles will move up and down and the
ight liveview will change accordingly.
Switching Flight Modes
The motion controller has two modes: Normal mode and Sport mode. Normal mode is enabled
by default.
Press the mode button once to switch between Normal mode and Sport mode. While flying
in Sport mode, the ight speed of the aircraft will be faster. The operation logic of the motion
controller remains the same in Sport mode as it is in Normal mode.
Refer to the section "Flight Modes" to know more about the difference between each flight
mode.
DJI RC Motion 3 User Manual
16
©
2024 DJI All Rights Reserved.
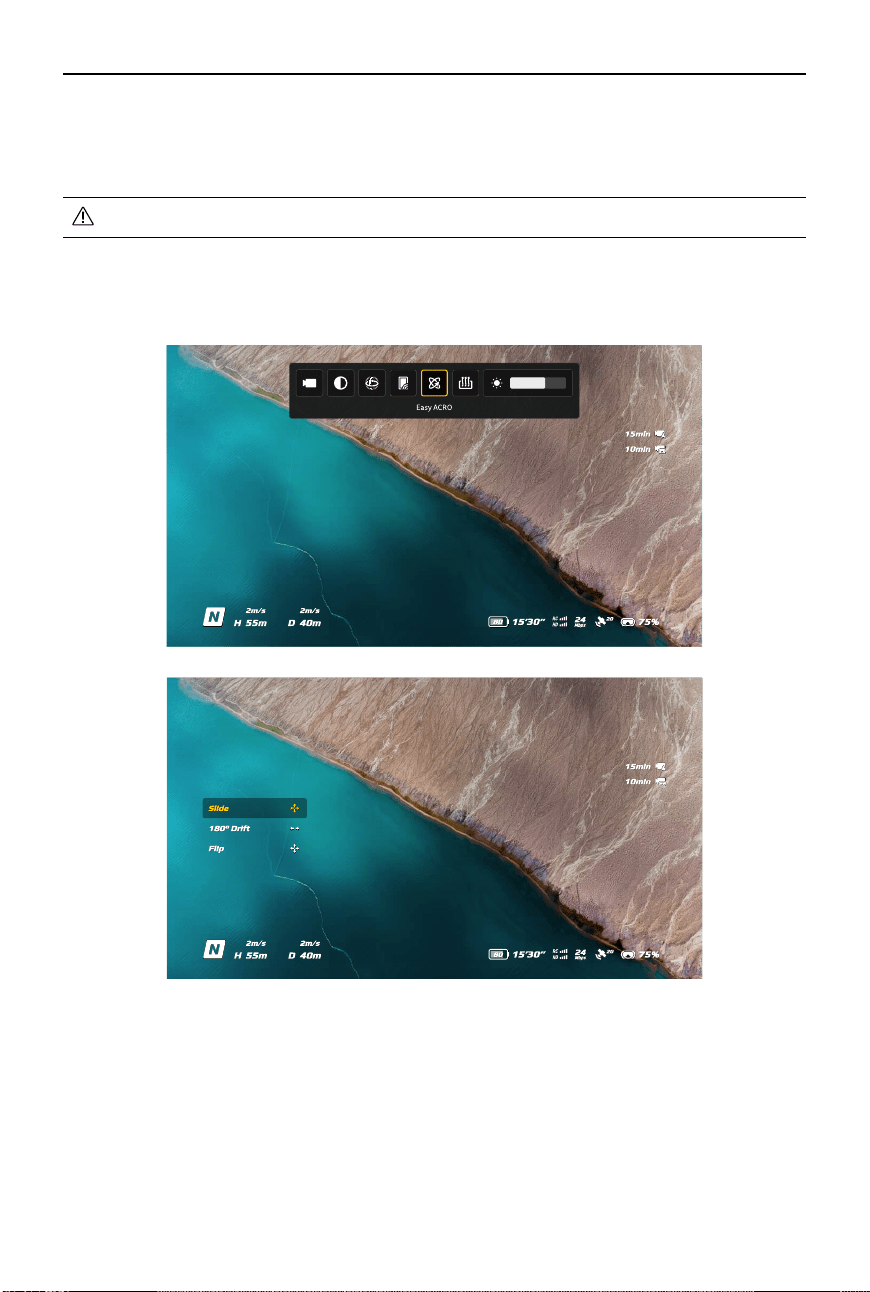
Easy ACRO (Only for Certain Aircraft)
Use the motion controller to perform Easy ACRO actions including front ip, backip, roll, and
180° drift.
• For ight safety, perform Easy ACRO actions in an open environment.
1. Open the shortcut menu and select Easy ACRO. The aircraft will be in Easy ACRO mode. Easy
ACRO includes three actions: Slide, 180° Drift, and Flip. View the selected action on the left
side of liveview in the goggles.
2. Use the dial on the motion controller to switch between Easy ACRO actions.
3. When Easy ACRO is enabled, move the joystick to perform dierent Easy ACRO actions as
shown below.

DJI RC Motion 3 User Manual
©
2024 DJI All Rights Reserved.
17
Slide
Push the joystick up or down to make the aircraft ascend or descend.
Push the joystick left or right to make the aircraft move left or right horizontally.
180° Drift
Push the joystick left or right to make the aircraft 180° drift left or right.
The aircraft will not respond when pushing the joystick up or down in this action mode.
Flip
Push the joystick up or down to make the aircraft perform a front ip or backip.
Push the joystick left or right to make the aircraft do one roll to the left or right.
DJI RC Motion 3 User Manual
18
©
2024 DJI All Rights Reserved.
• Easy ACRO cannot be enabled in the following situations:
a. When recording video;
b. When Head Tracking is enabled;
c. When used with DJI FPV Remote Controller 3.
• Pay attention to surroundings and make sure there are no obstacles nearby before
performing Easy ACRO actions.
• Easy ACRO is unavailable in the following situations:
a. The aircraft is taking o, hovering, landing, or returning to home;
b. The aircraft is in Sport mode;
c. The aircraft battery level is lower than 25%;
d. The altitude of the aircraft is less than 1.5m;
e. Flying in an environment with strong wind (wind speed exceeding 10 m/s);
f. The positioning performance is not good (the GNSS signal is weak);
g. The aircraft is in a buffer zone of a Restricted Zone or an Altitude Zone, or is
approaching the Max Flight Distance.
• As the attitude angle of the aircraft increases (such as when making high-speed turns
or when accelerating or decelerating quickly), the aircraft altitude will also need to be
increased, otherwise Easy ACRO cannot be used.
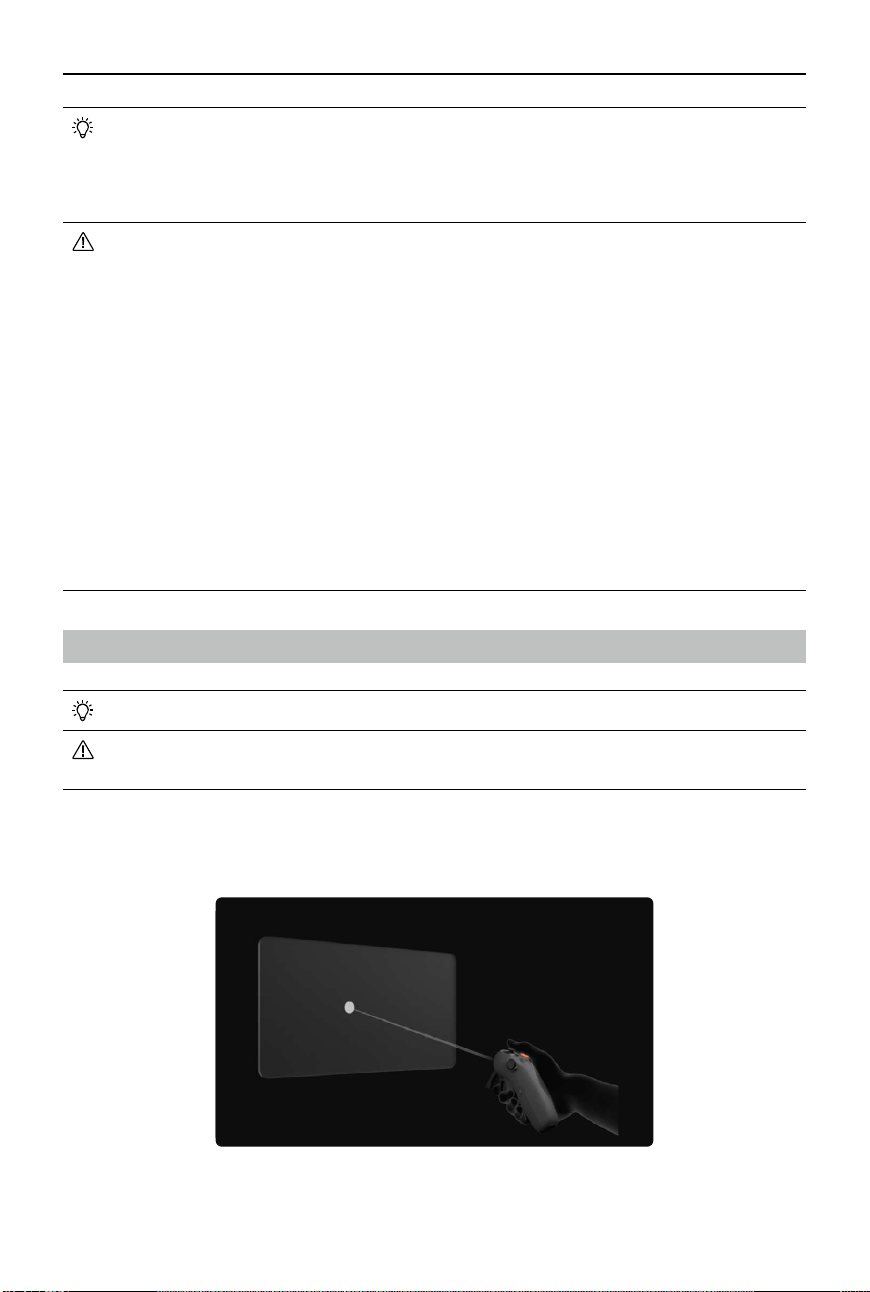
AR Cursor
• AR Cursor is only supported when used with DJI Goggles 3.
• AR Cursor cannot function properly when being used on moving objects, such as
cars and ships.
Before takeo or when using the lock button to trigger the aircraft to hover, users can use the
AR Cursor (the white line with a circle at the end) to interact with the screen of the googles.
DJI RC Motion 3 User Manual
©
2024 DJI All Rights Reserved.
19
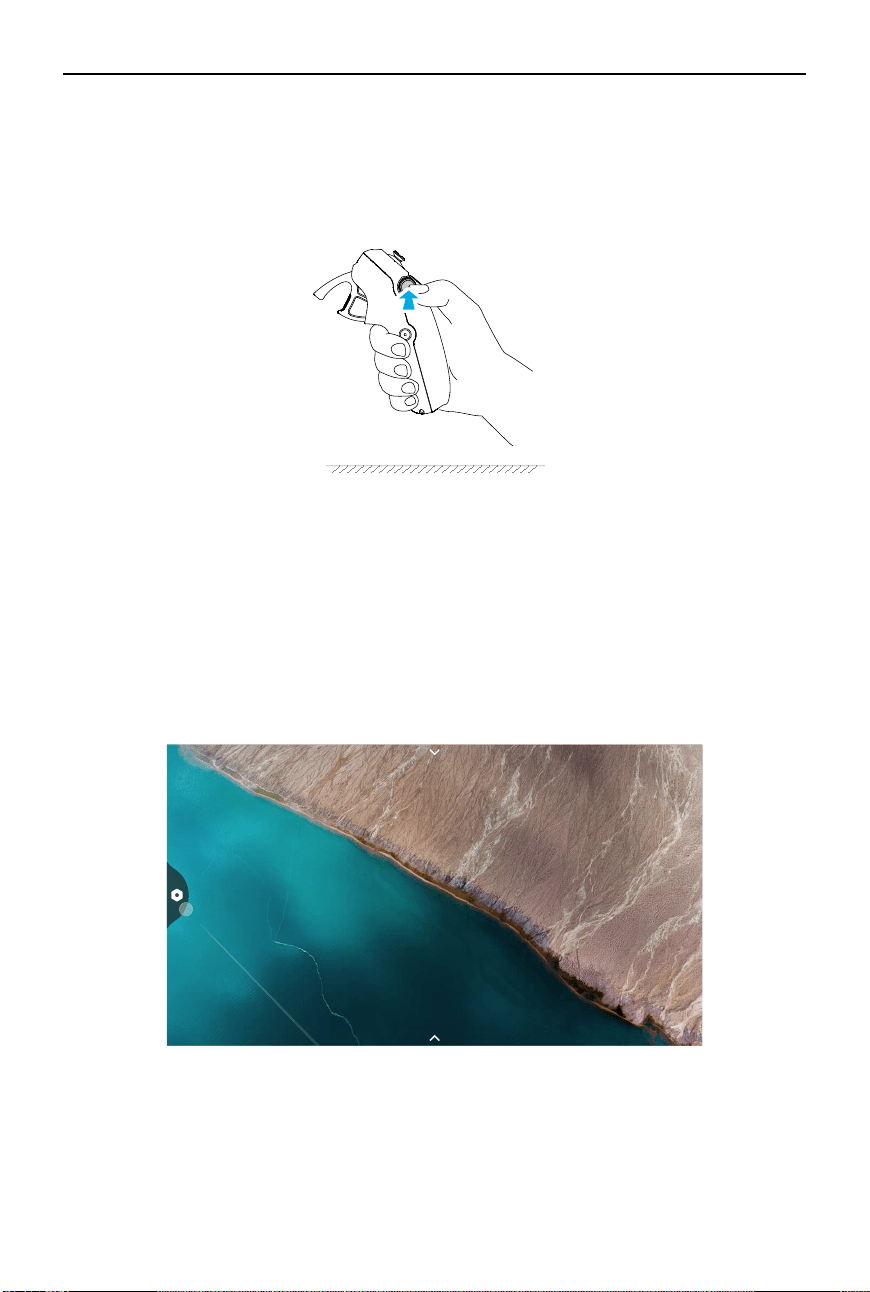
Recenter the Cursor
If the cursor is not displayed on the screen of the goggles, hold the motion controller as shown
below, and then press and hold the dial on the left side of the motion controller to recenter the
cursor.
If the cursor still cannot be found, tilt the motion controller up or down until the cursor appears
on the screen.
Operating the Menu
• Using motion controller movements, move the cursor to the arrow on the left side of the
screen. Gently press the accelerator to the first stop position, then the cursor will become
small and the menu will be opened.
DJI RC Motion 3 User Manual
20
©
2024 DJI All Rights Reserved.
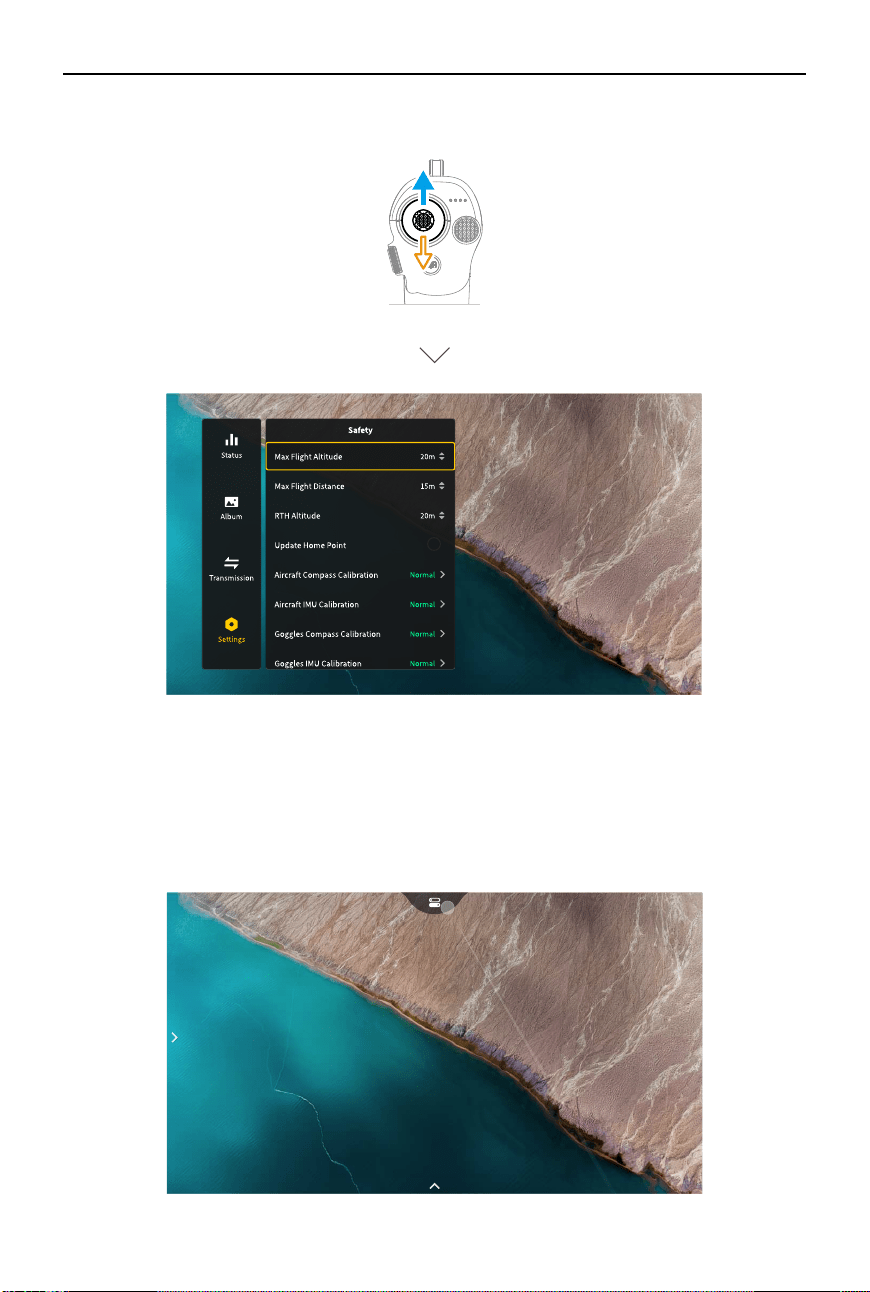
Use the joystick on the motion controller to scroll up or down in the menu.
To exit or return to the previous menu, push the accelerator forward, or gently press the
accelerator when the cursor is on any empty spot on the screen.
• Move the cursor to the arrow on the top of the screen, press the accelerator to enter the
shortcut menu, and congure settings such as Recording or Enhanced Display.
DJI RC Motion 3 User Manual
©
2024 DJI All Rights Reserved.
21
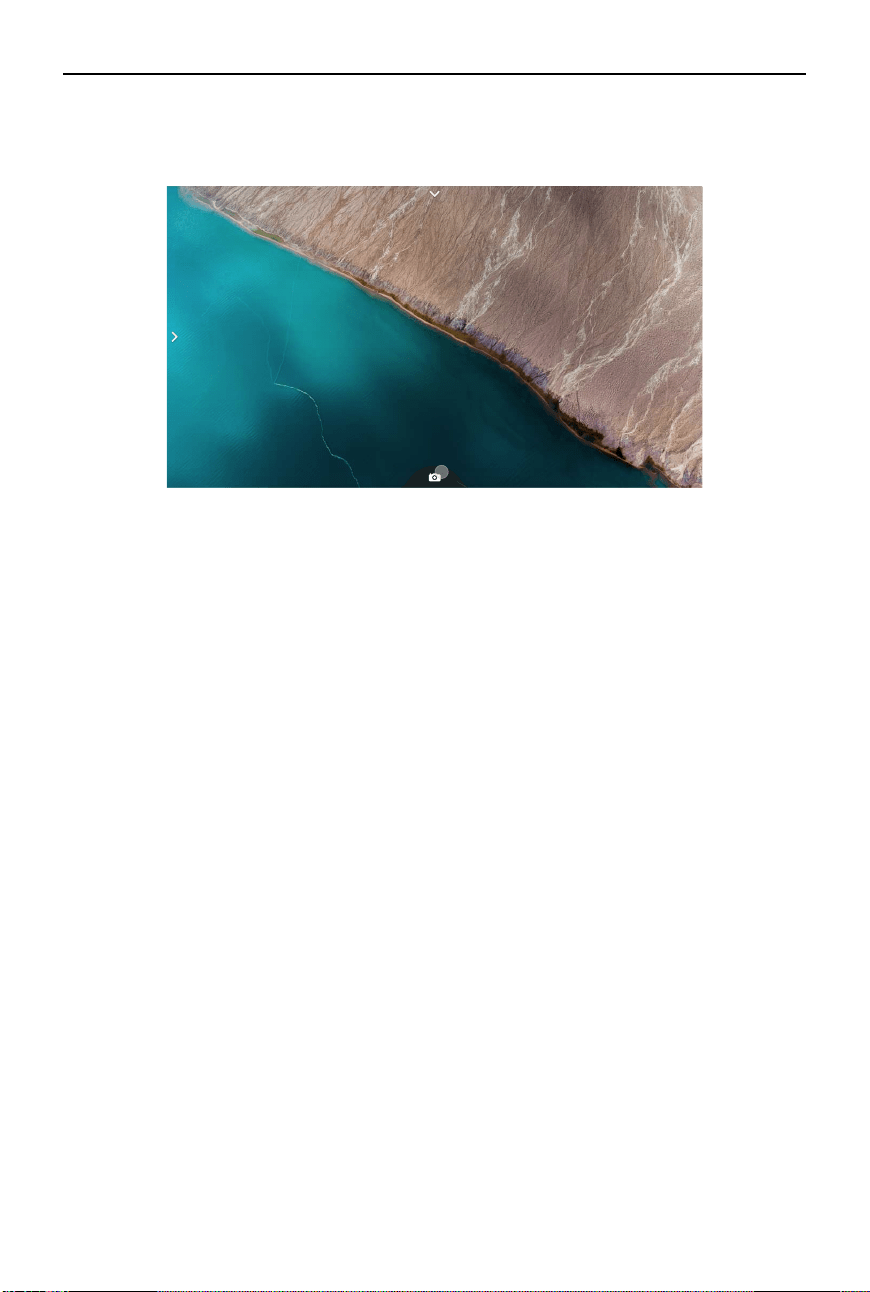
• Move the cursor to the arrow on the bottom of the screen, press the accelerator to enter
camera settings, and congure settings for the parameters of the aircraft camera.
Controlling Video Playback
When previewing photos or videos stored on the microSD card of the goggles, the cursor can be
used to control playback, or complete other operations such as:
• Press the accelerator to pause or continue to play, push the accelerator forward to exit.
• Move the cursor left or right while pressing the accelerator down to adjust the progress bar.
• Move the cursor to the arrow on the top of the screen, press down the accelerator to enter
playback settings and adjust the screen brightness or volume.
DJI RC Motion 3 User Manual
22
©
2024 DJI All Rights Reserved.
• It is recommended to use the device in an open, outdoor environment to avoid having
obstacles between the motion controller and the goggles. Otherwise, the transmission
may be aected.
• In order to avoid interference, DO NOT use other wireless devices on the same
frequency as the motion controller.
Motion Controller Alert
The remote controller sounds an alert when the battery level is between 6% and 10%. A low
battery level alert can be canceled by pressing the power button. A critical battery level alert
will sound when the battery level is less than 5% and cannot be canceled. The remote controller
sounds an alert during RTH, which cannot be canceled.
Motion Controller Calibration
The compass, IMU, and accelerator of the motion controller can be calibrated.
Immediately calibrate any of the modules when prompted to do so:
1. Press down the 5D button in ight liveview to open the menu.
2. Select Settings > Control > Motion Controller > RC Calibration.
3. Select the module and follow the prompts to complete calibration.
• DO NOT calibrate the compass in locations with strong magnetic interference, such
as near magnets, parking lots, or construction sites with underground reinforced
concrete structures.
• DO NOT carry ferromagnetic materials such as mobile phones during calibration.
≤3m
Optimal Transmission Zone
The signal between all the devices is most reliable when the relative distance between the
motion controller and the goggles is less than 3 m.
DJI RC Motion 3 User Manual
©
2024 DJI All Rights Reserved.
23
Appendix
Specications
DJI RC Motion 3
Model
TKMO3
Weight
Approx. 118 g
Operating Frequency
2.4000-2.4835 GHz
Transmitter Power (EIRP)
2.4000-2.4835 GHz: <26 dBm (FCC), <20 dBm (CE/SRRC/MIC)
Max Transmission
Distance (unobstructed,
free of interference)
[1]
With DJI Avata 2 and DJI Goggles 3:
FCC: 13 km
CE/SRRC/MIC: 10 km
Operating Temperature
-10° to 40° C (14° to 104° F)
Operating Time Approx. 10 hours
*
* Measured with an ambient temperature of 25° C (77° F), when connected
to DJI Goggles 3, and in a stationary state.
Battery
Charging Temperature
0° to 50° C (32° to 122° F)
Charging Time
Approx. 2 hours
Charging Type
5 V, 2 A
Battery Capacity
2600 mAh
[1] Measured in an unobstructed outdoor environment free of interference. The above data shows the
farthest communication range for one-way, non-return ights under each standard. Always pay attention
to RTH reminders on the goggles screen during your ight.
Compatible Products
Visit the following link to view compatible products:
https://www.dji.com/rc-motion-3/faq
DJI RC Motion 3 User Manual
24
©
2024 DJI All Rights Reserved.
Updating Firmware
Use one of the following methods to update the rmware.
Using DJI Fly App
When used with DJI Avata 2:
Power on the aircraft, goggles, and motion controller. Make sure all the devices are linked.
Connect the USB-C port of the goggles to the mobile device, run DJI Fly, and follow the prompts
to update the rmware. Make sure the mobile device is connected to the internet during the
rmware update.
When used with other DJI aircraft:
Power o the aircraft. Power on goggles and motion controller Connect the USB-C port of the
goggles to the mobile device, run DJI Fly, and select Prole > Device Management. Locate the
corresponding goggles. Select Firmware Update and follow the on-screen instructions to update
the rmware. An internet connection is required during the rmware update.
Using DJI Assistant 2 (Consumer Drones Series)
1. Power on the device. Connect the USB-C port of the device to the computer using a USB-C
cable.
2. Launch DJI Assistant 2 and log in with a DJI account.
3. Select the device and click Firmware Update on the left side of the screen.
4. Select the rmware version.
5. The rmware will be downloaded and updated automatically.
6. The device will restart automatically after the rmware update is complete.
• Make sure to follow all the steps to update the rmware, otherwise the update may
fail.
• Make sure the computer is connected to the internet during the update.
• Do not unplug the USB-C cable during an update.
• The rmware update will take several minutes. Please wait patiently for the rmware
upgrade to complete.
• Before performing an update, make sure the device is at least 15% charged.
• Note that the update may reset the parameters. Before updating, take note of your
preferred settings and recongure them after the update.
Visit the following link and refer to the Release Notes for rmware update information:
https://www.dji.com/rc-motion-3/downloads

DJI RC Motion 3 User Manual
©
2024 DJI All Rights Reserved.
25
Aftersales Information
Visit https://www.dji.com/support to learn more about aftersales service policies, repair
services, and support.
This content is subject to change.
WE ARE HERE FOR YOU
Contact
DJI SUPPORT
If you have any questions about this document, please
contact DJI by sending a message to [email protected].
DJI and DJI AVATA are trademarks of DJI.
Copyright © 2024 DJI All Rights Reserved.
https://www.dji.com/rc-motion-3/downloads