User Manual
v1.0 2026.01
This document is copyrighted by DJI with all rights reserved. Unless otherwise authorized
by DJI, you are not eligible to use or allow others to use the document or any part of
the document by reproducing, transferring or selling the document. Only refer to this
document and the content thereof as instructions to operate DJI products. The document
should not be used for other purposes.
In the event of divergence among dierent versions, the English version shall prevail.
Searching for Keywords
Search for keywords such as “battery” and “install” to nd a topic. If you are
using Adobe Acrobat Reader to read this document, press Ctrl+F on Windows or
Command+F on Mac to begin a search.
Navigating to a Topic
View a complete list of topics in the table of contents. Click on a topic to navigate to
that section.
Printing this Document
This document supports high resolution printing.
2 © 2026 DJI All Rights Reserved.

Using this Manual
Legend
Important
Hints and Tips
Reference
Read Before Use
DJI
™
provides you with tutorial videos and the following documents:
1. Safety Guidelines
2. Quick Start Guide
3. User Manual
It is recommended to watch all the tutorial videos and read the Safety Guidelines before
using for the rst time. Make sure to review the Quick Start Guide before using for the rst
time and refer to this User Manual for more information.
DJI RS 5 User Manual
© 2026 DJI All Rights Reserved. 3

DJI RS 5 User Manual
4 © 2026 DJI All Rights Reserved.
Contents
Using this Manual 3
Legend 3
Read Before Use 3
1 Overview 6
2 Using for the First Time 7
2.1 Charging 7
2.2 Attaching the Extended Grip/Tripod 7
2.3 Mounting the Camera 8
Supported Cameras and Lenses 8
Preparation 8
Attaching the Upper Quick-Release Plate 9
Horizontal Shooting 9
Vertical Shooting 10
2.4 Balancing 12
Before Balancing 12
Balancing Steps 12
2.5 Activation 12
2.6 Firmware Update 13
2.7 Connecting a Camera 13
2.8 Auto Calibration 14
3 Operation 15
3.1 Buttons 15
3.2 Ports 17
3.3 Touchscreen 18
Home 18
Slide Down - Control Center 19
Slide Up - Gimbal Settings 20
Swipe Left - Create Screen 20
Swipe Right - ActiveTrack 21
3.4 Gimbal Follow Modes 21
3.5 Gimbal Operation Modes 23
3.6 Electronic Briefcase Handle 25
3.7 Ronin App Settings 26
3.8 Enhanced Intelligent Tracking Module 26
Overview 26
Installation 27
ActiveTrack Settings 27

1 Overview
1
3
4
5
15
18
19
17
20
21
16
6
22
23
24
25
26
27
28
12
13
14
7
11
8
2
9
10
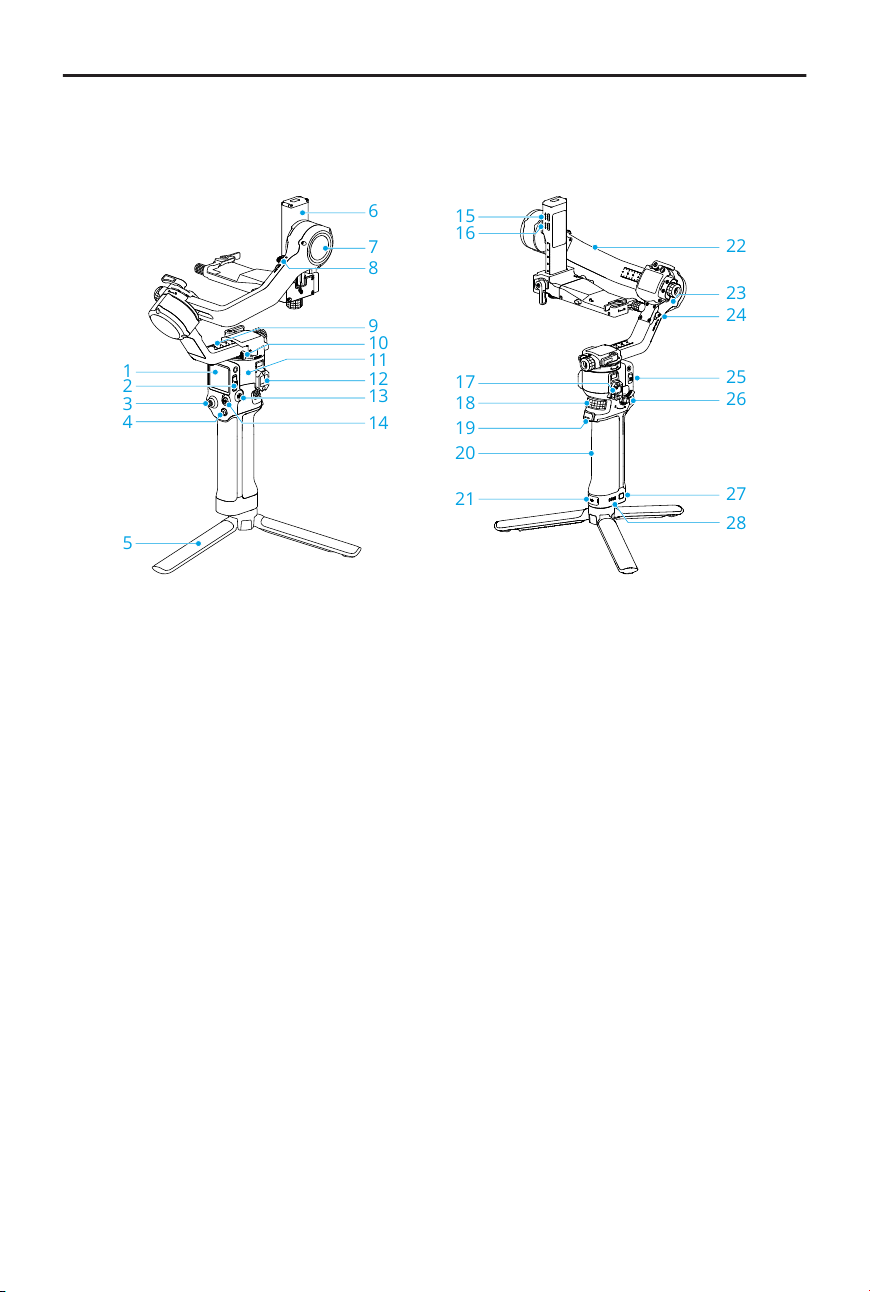
1. Touchscreen
2. Gimbal Mode Switch
3. Joystick
4. Camera Control Button
5. Quick-Open Tripod
6. Tilt Axis
7. Tilt Motor
8. Tilt Lock
9. Pan Axis
10. Pan Lock
11. Pan Motor
12. NATO Port
13. Power Button
14. M Button
15. Multifunctional Port
16. RSS Camera Control Port (USB-C)
17. RSA/NATO Ports
18. Front Dial
19. Trigger
20. Battery grip
21. Charging Port (USB-C)
22. Roll Axis
23. Roll Motor
24. Roll Lock
25. Joystick Mode Switch
26. Grip Lever/Safety Button
27. Battery Level Button
28. Battery Level LEDs
DJI RS 5 User Manual
6 © 2026 DJI All Rights Reserved.

2 Using for the First Time
2.1 Charging
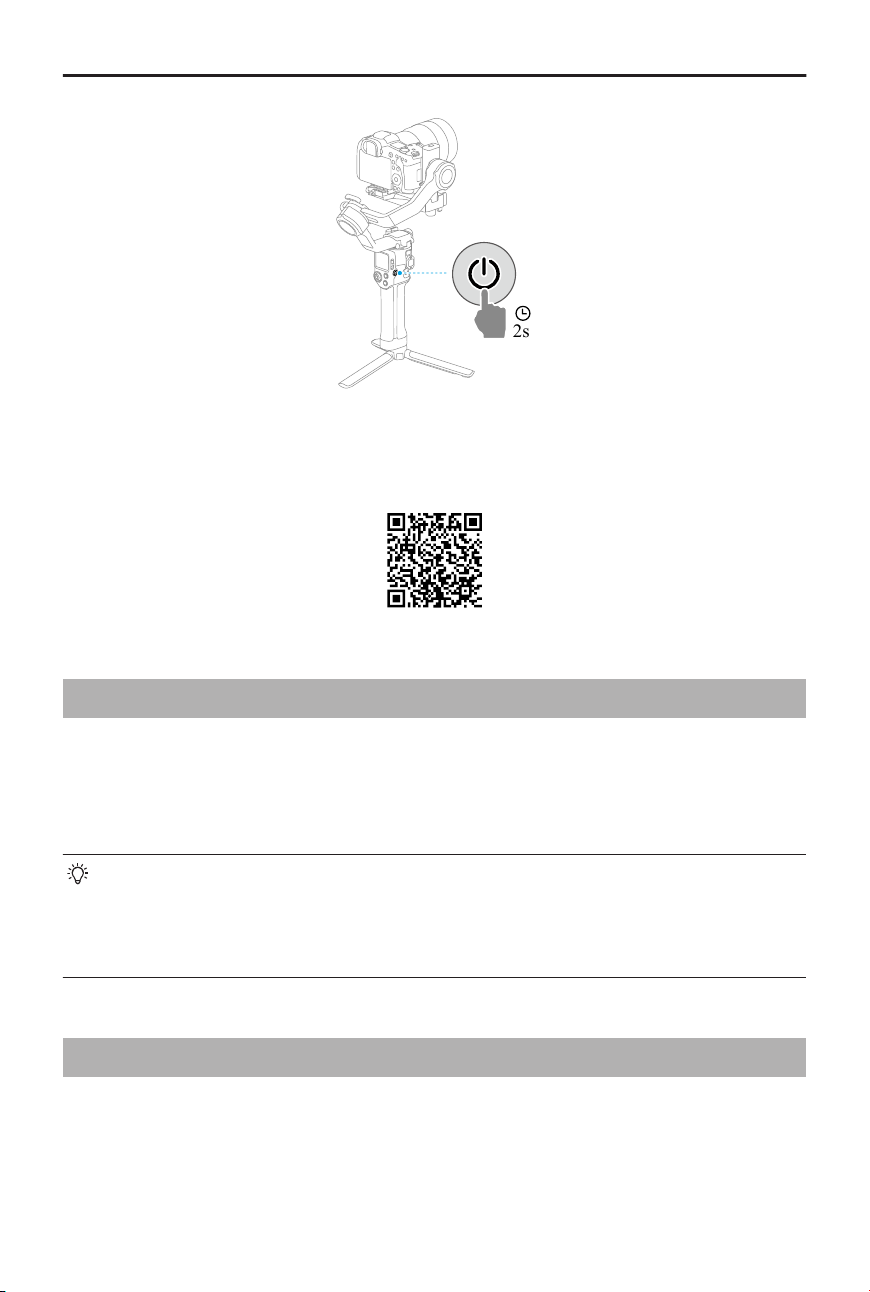
For rst time use, charge the battery grip to activate the battery. Activation is completed
when the battery indicator lights up.
Press the power button to check the current battery level when powered o.
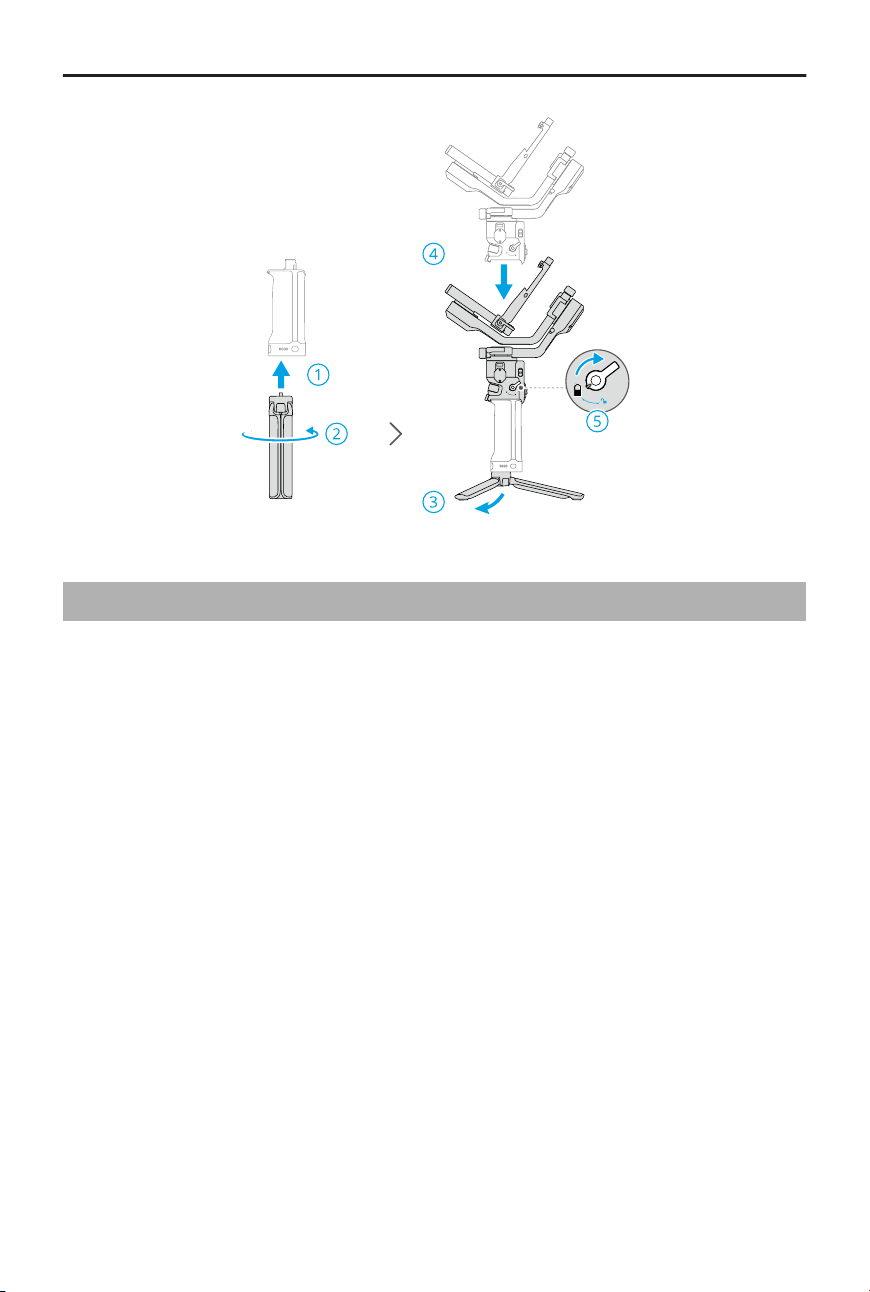
2.2 Attaching the Extended Grip/Tripod
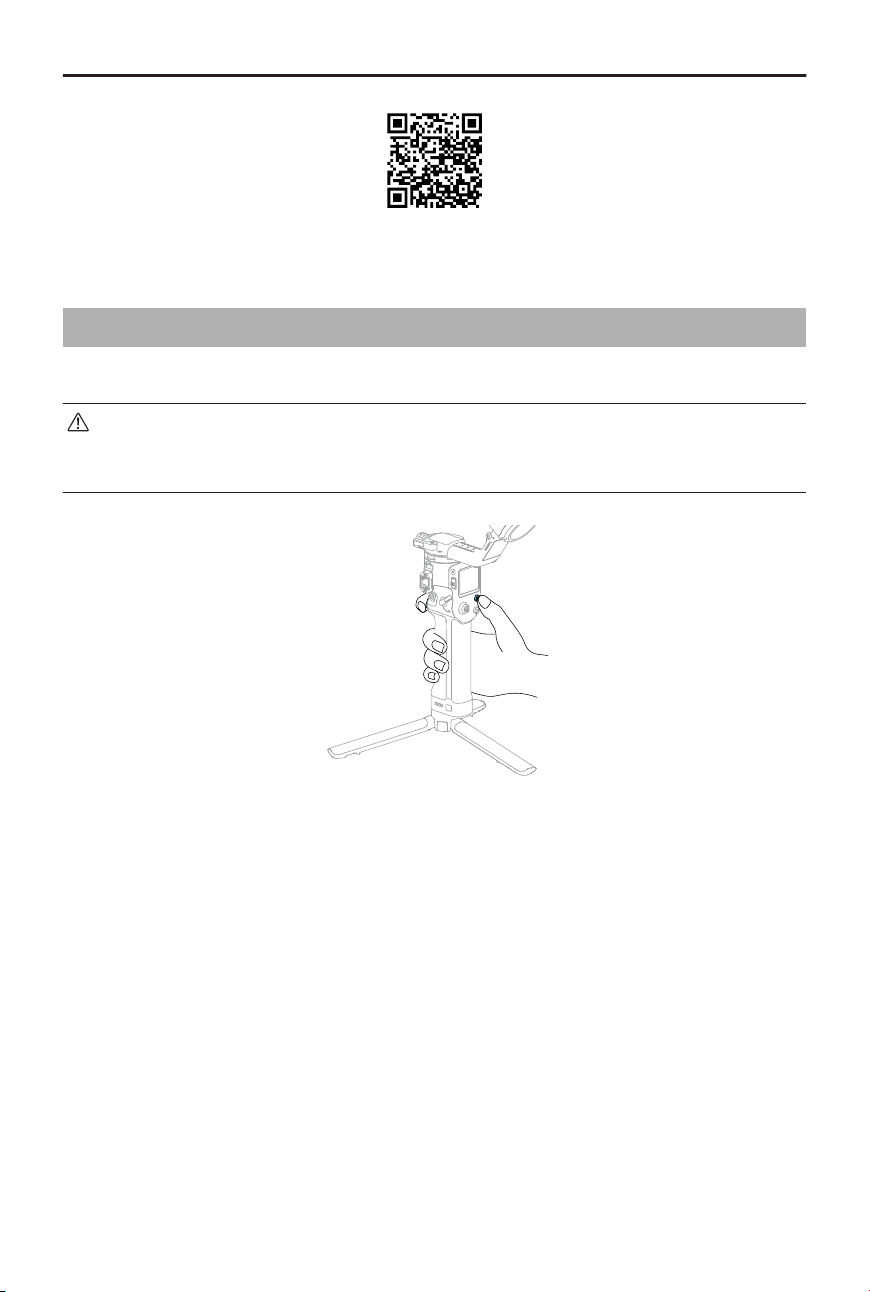
1. Attach the tripod to the battery grip, tighten,and then unfold the tripod.
2. After removing the foam from the axis arms, attach the gimbal to the battery grip.
Tighten the grip lever in the locking direction until you hear a "click" to ensure that the
handle is rmly attached.
Turn the grip lever rmly until no further rotation is possible. The arrow indicates
the direction of locking only and does not represent the fully locked position.
If this fails, it is recommended to move the lever to the unlocked position, hold
down the safety button, and pull the grip away from the gimbal.
DJI RS 5 User Manual
© 2026 DJI All Rights Reserved. 7
2.3 Mounting the Camera
Supported Cameras and Lenses
Visit https://www.dji.com/rs-5/specs for information on specications and make sure the
combined weight of the camera, lens, and other accessories are within the load capacity.
Refer to the Ronin Series Compatibility List for compatible camera lenses and control
features supported.
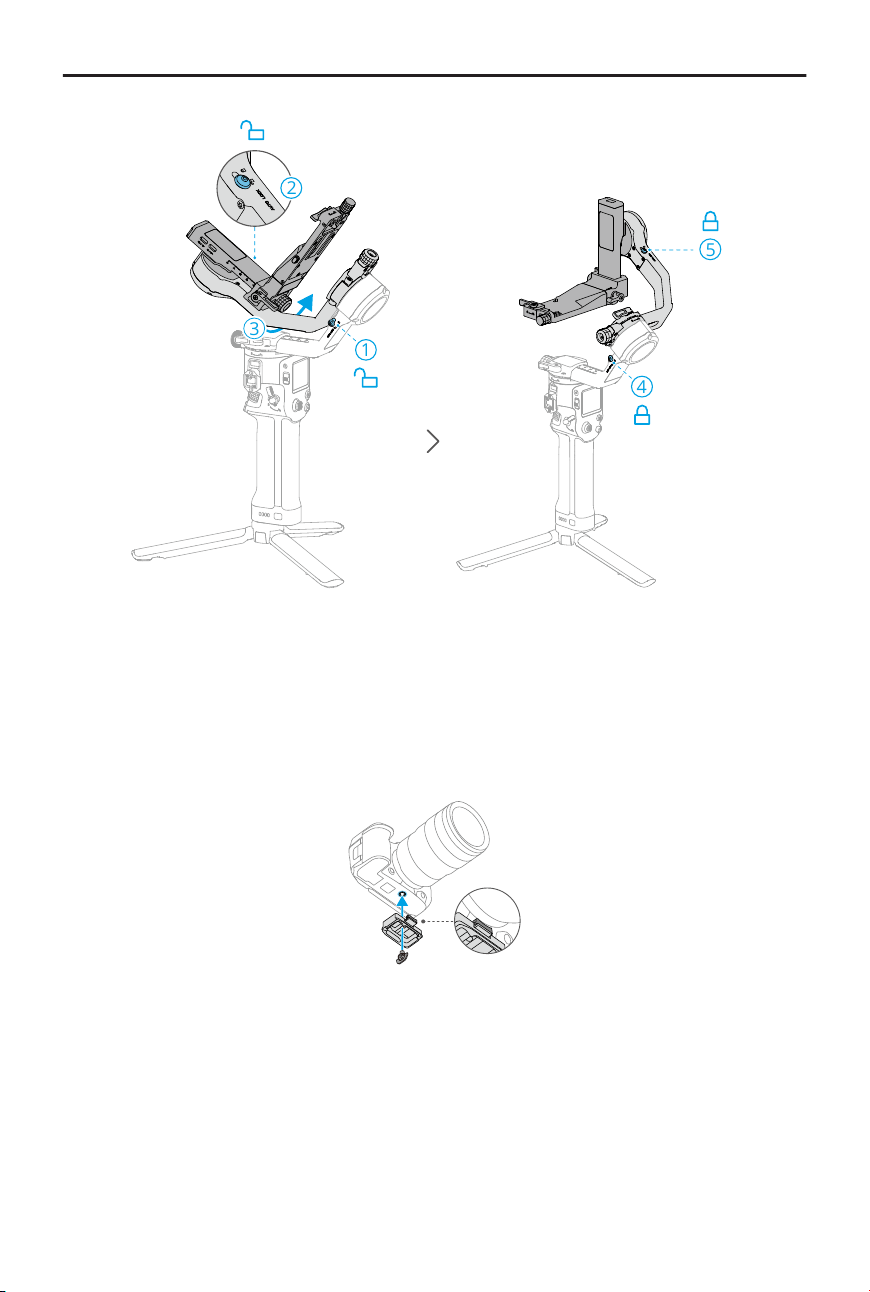
Preparation
1. Remove the lens cap and check that the battery and memory card are inserted in the
camera.
2. Make sure the gimbal is powered o or in sleep mode.
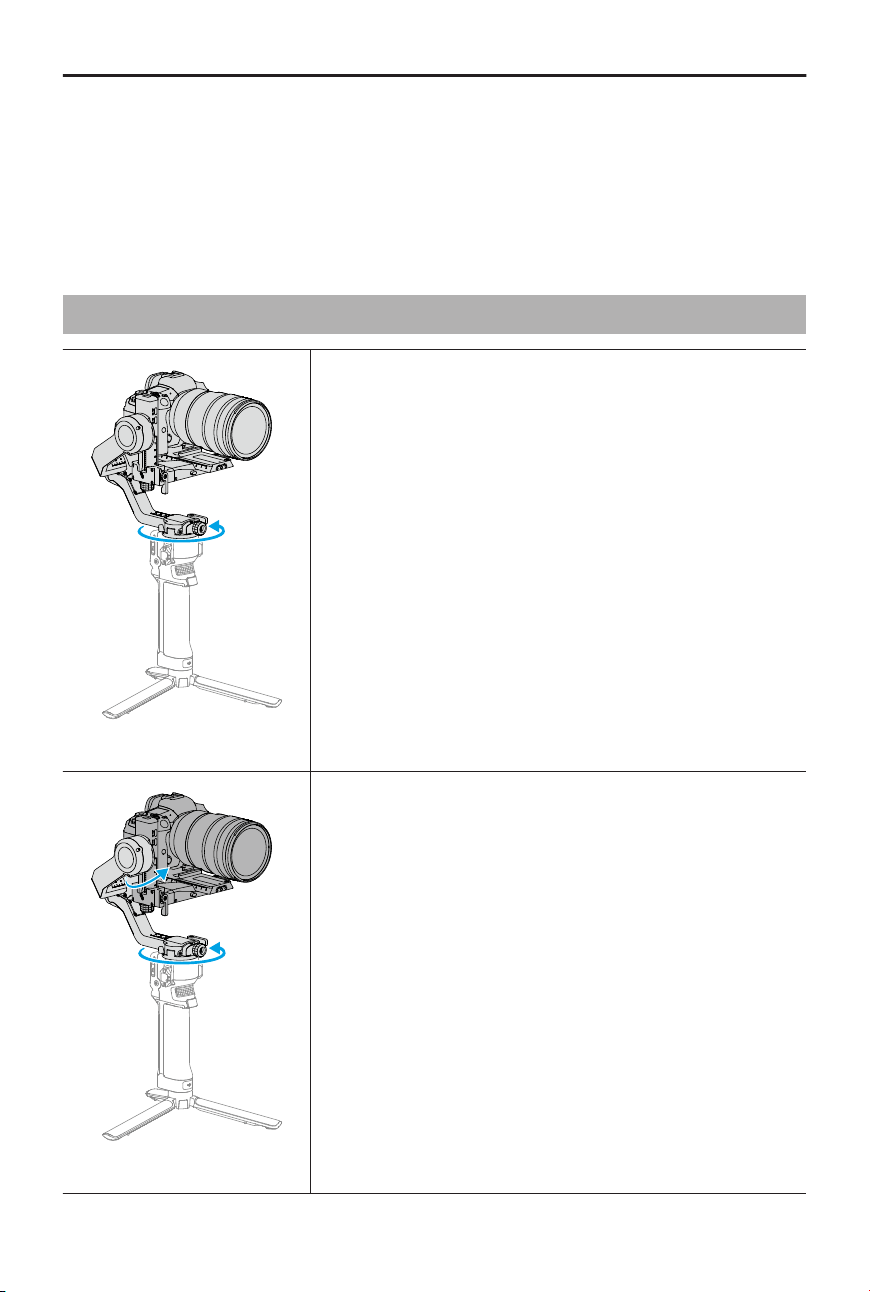
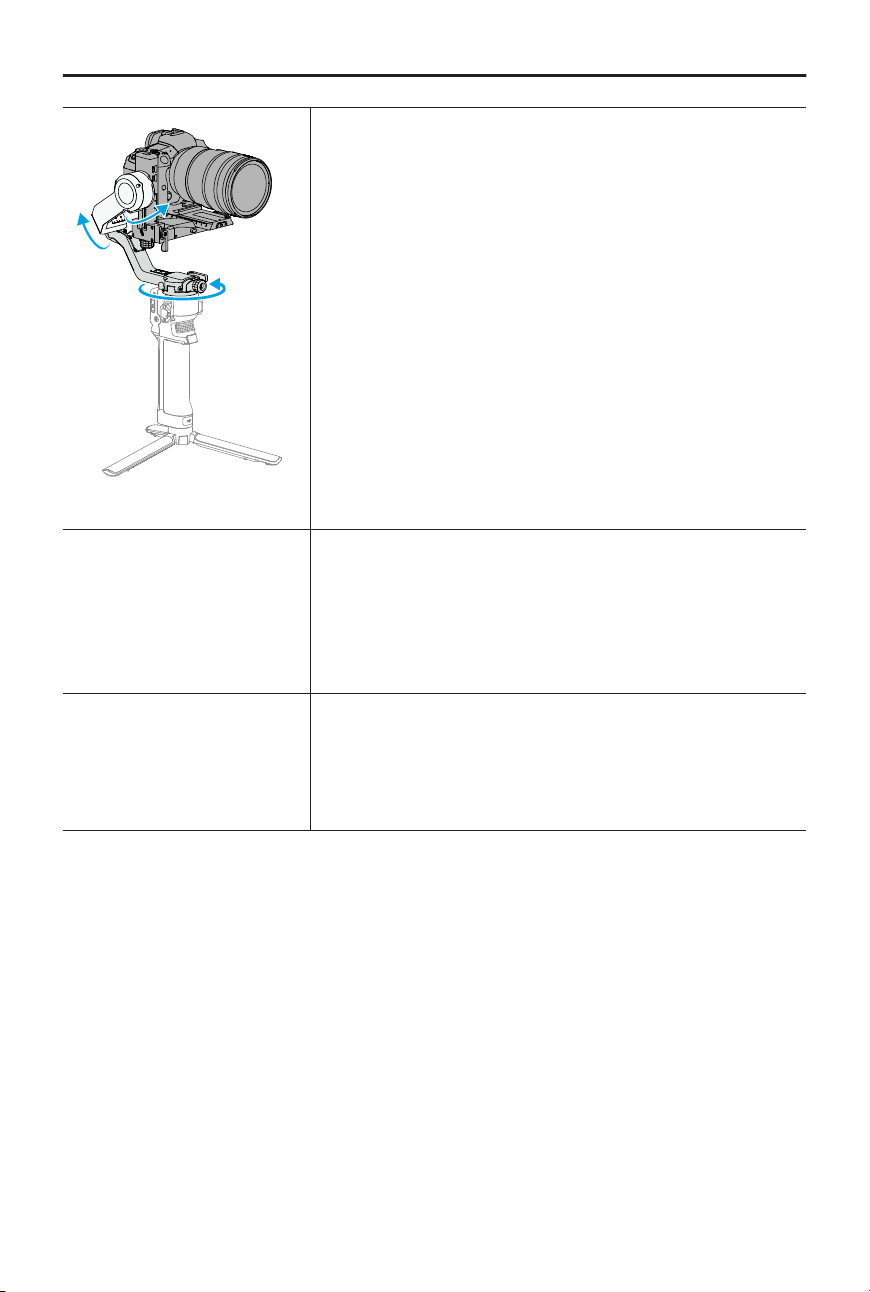
3. Move the tilt and roll locks to the unlocked position respectively and adjust the
position of both axes as shown in the gure, then lock the axes.
DJI RS 5 User Manual
8 © 2026 DJI All Rights Reserved.
1
2
3
4
5
Attaching the Upper Quick-Release Plate
Attach the upper quick-release plate to the bottom of the camera with the 1/4" screw in
the screw kit. Snap the adjustable placement guide onto the camera body before locking
the screw.
Horizontal Shooting
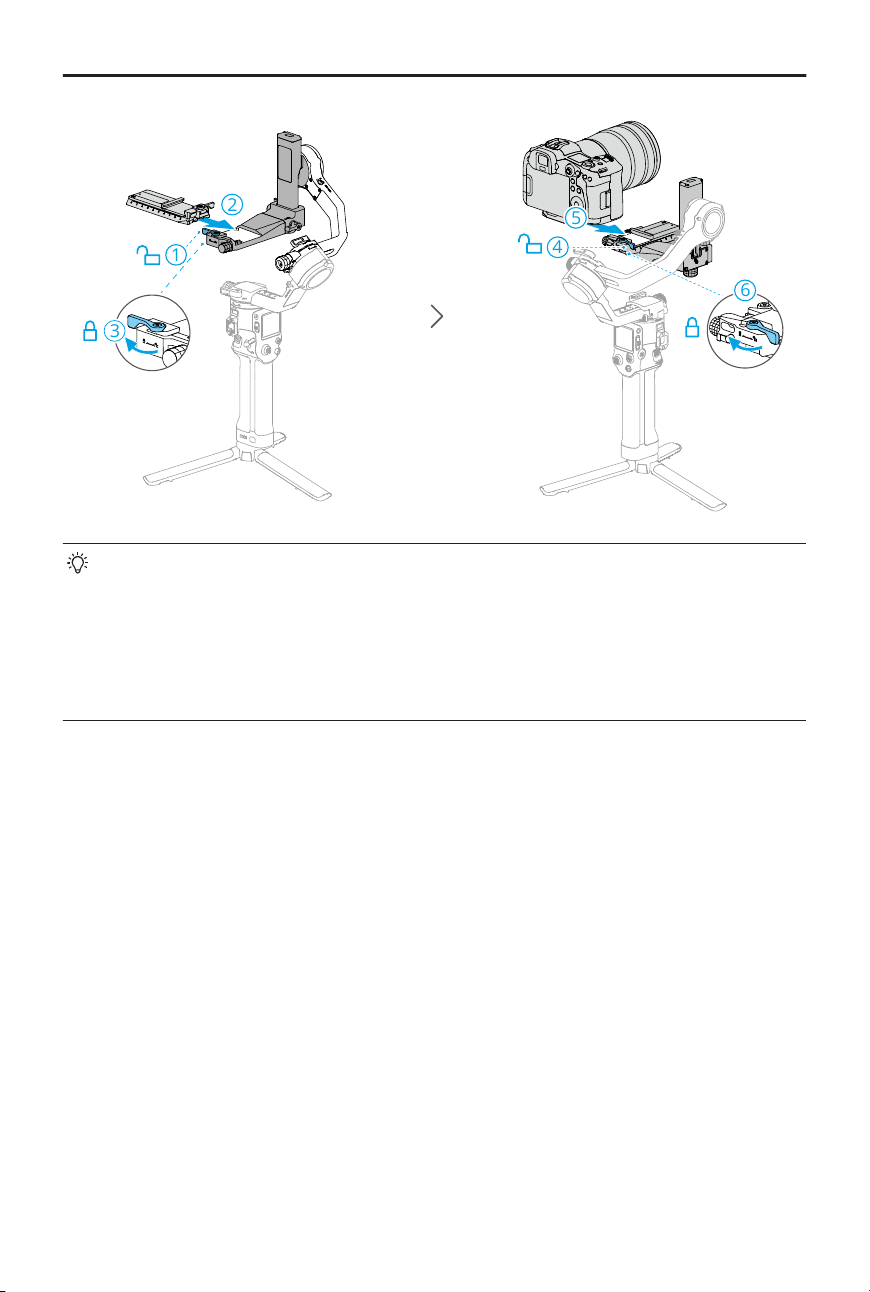
1. Move the lever on the horizontal plate to the unlocked position ①, insert the lower
quick-release plate ② and move the lever to the locked position ③ after it is engaged.
2. Move the lever on the lower quick-release plate to the unlocked position ④, insert the
upper quick-release plate ⑤ and move the lever to the locked position ⑥ after it is
engaged.
DJI RS 5 User Manual
© 2026 DJI All Rights Reserved. 9
1
2
4
5
3
6
• To remove the camera from the lower quick-release plate, move the lever to the
unlocked position and remove the camera while pressing the safety lock beside
the lever.
• To remove the lower quick-release plate, move the lever on the horizontal
plate to the unlocked position and remove the lower quick-release plate while
pressing the safety lock on the horizontal plate.
Vertical Shooting
1. Loosen ① and press the knob ② to remove the horizontal plate ③. Then, install the
plate vertically ④ onto the gimbal and tighten the knob ⑤.
DJI RS 5 User Manual
10 © 2026 DJI All Rights Reserved.
1
2
3
4
5
2. Move the lever on the horizontal plate to the unlocked position ①, insert the lower
quick-release plate ② and move the lever to the locked position ③ after it is engaged.
3. Move the lever on the lower quick-release plate to the unlocked position ④, insert the
upper quick-release plate ⑤, and move the lever to the locked position ⑥ after it is
engaged.
1
2
3
4
6
5
DJI RS 5 User Manual
© 2026 DJI All Rights Reserved. 11
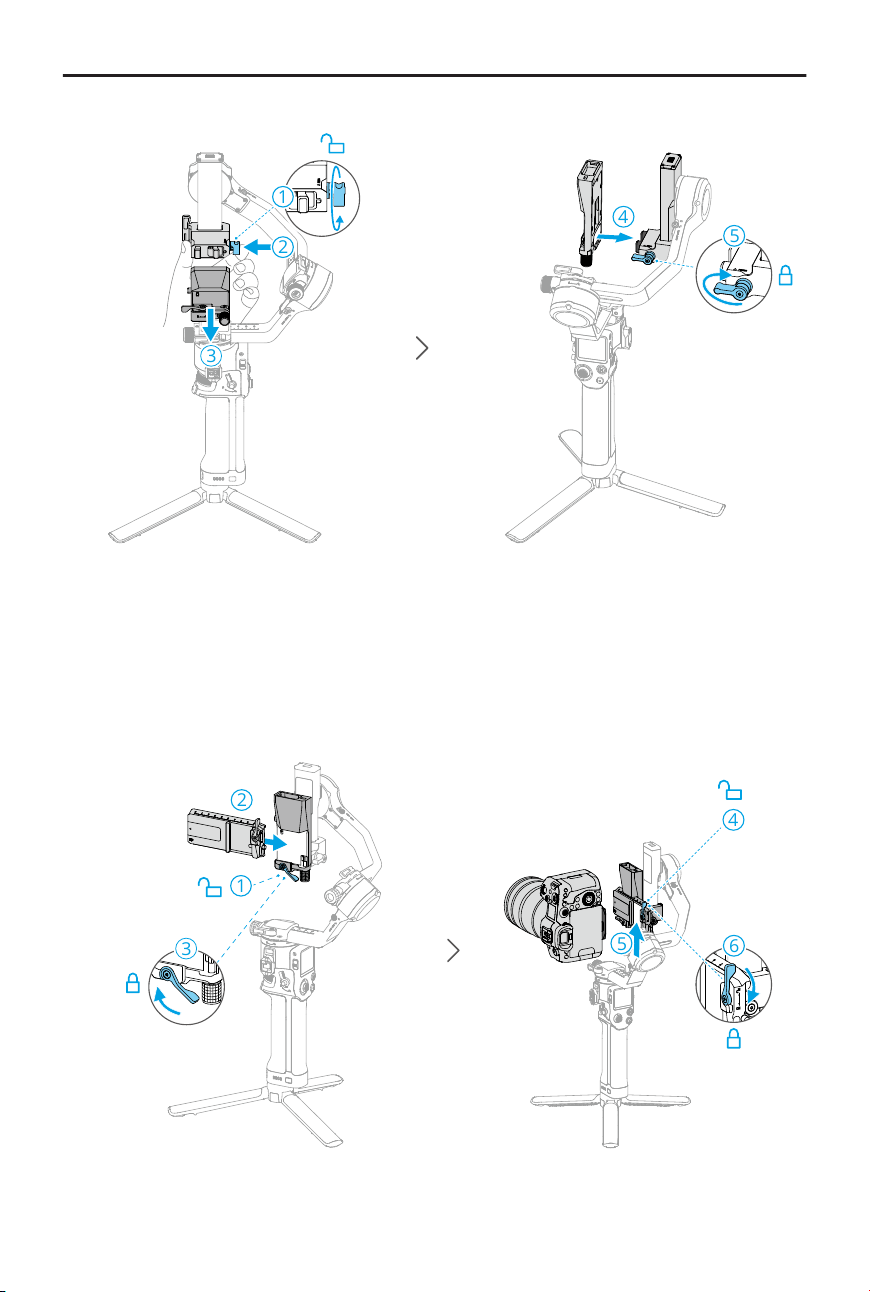
2.4 Balancing
Balance the vertical tilt, the depth for the tilt axis, the roll axis and the pan axis in
sequence according to the shooting requirements before using the gimbal. This ensures
the stability of videos and the full performance of the gimbal.
An unbalanced gimbal may aect the stability of videos and reduce the battery life.
Severe imbalance may cause the device to overheat and go into hibernation.
Before Balancing
1. Before balancing, make sure to power on the camera if using an optical zoom lens
and to select the focal length if using a varifocal lens.
2. Make sure DJI RS 5 is powered o or in sleep mode before balancing.
Balancing Steps
Click the link or scan the QR code to view the tutorial video.
https://s.dji.com/guide122
2.5 Activation
Activation is required for DJI RS 5 through the Ronin app. Follow the steps below to
activate your device:
1. Press and hold the power button to power on your device, and select the language on
the touchscreen.
2. Scan the QR code on the touchscreen to download the Ronin app.
3. Enable Bluetooth on the mobile phone. Launch the Ronin app and log in with a
DJI account. Select the device used, type in the default password 12345678, and
activate the gimbal according to the instructions. An internet connection is required
for activation.
Up to ve uses without activating the gimbal are supported. After that, activation is
required for further use.
DJI RS 5 User Manual
12 © 2026 DJI All Rights Reserved.
2s
If the Ronin app cannot be downloaded after scanning the QR code on the screen of the
device, visit https://www.dji.com/mobile/downloads/djiapp/dji-ronin or scan the QR code
below.
2.6 Firmware Update
If new rmware is available, users will be notied by the Ronin app. Update the rmware
according to the on-screen instructions. DO NOT power o the gimbal or exit the app
during the rmware update. If the update fails, restart the gimbal and Ronin app, and try
again.
• Make sure the gimbal has sucient power and the mobile phone is connected
to the internet when updating.
• It is normal for the gimbal to unlock, lock, and reboot automatically during the
update process.
2.7 Connecting a Camera
DJI RS 5 supports connecting to the camera via Bluetooth or camera control cable.
Click the link or scan the QR code to view the tutorial video.
DJI RS 5 User Manual
© 2026 DJI All Rights Reserved. 13
https://www.dji.com/rs-5/video
2.8 Auto Calibration
Press and hold the M button and trigger to start automatic calibration.
Place the gimbal on a steady at surface. DO NOT move the gimbal during
automatic calibration. It is normal for the gimbal to shake or make sounds during
the calibration.
DJI RS 5 User Manual
14 © 2026 DJI All Rights Reserved.
3 Operation
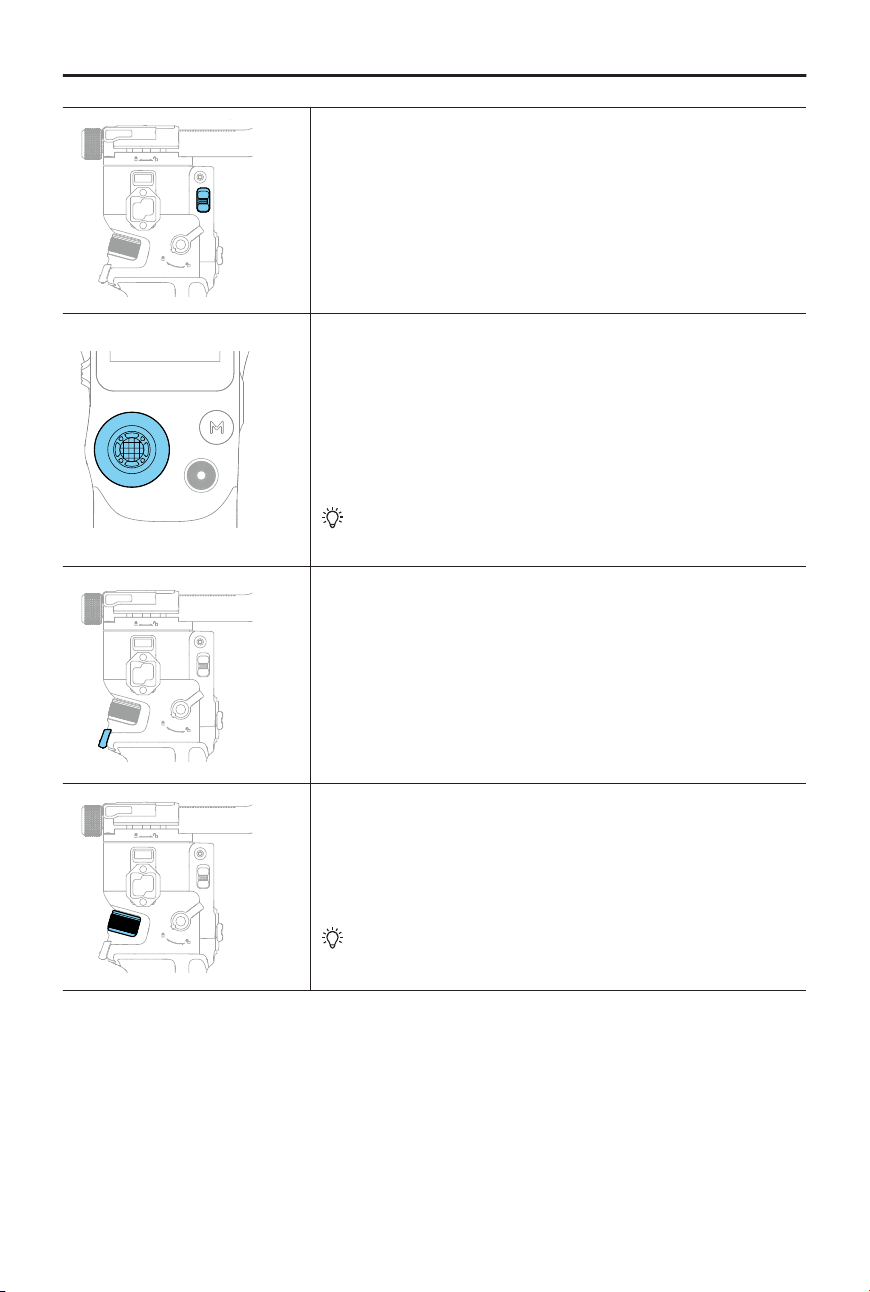
3.1 Buttons
Power Button
Press and hold: Power on/o.
Press once: Enter or exit sleep mode. The three axes will
automatically lock. Press again to wake up the gimbal.
Settings related to the automated axis locks can be
adjusted in the system settings in the touchscreen.
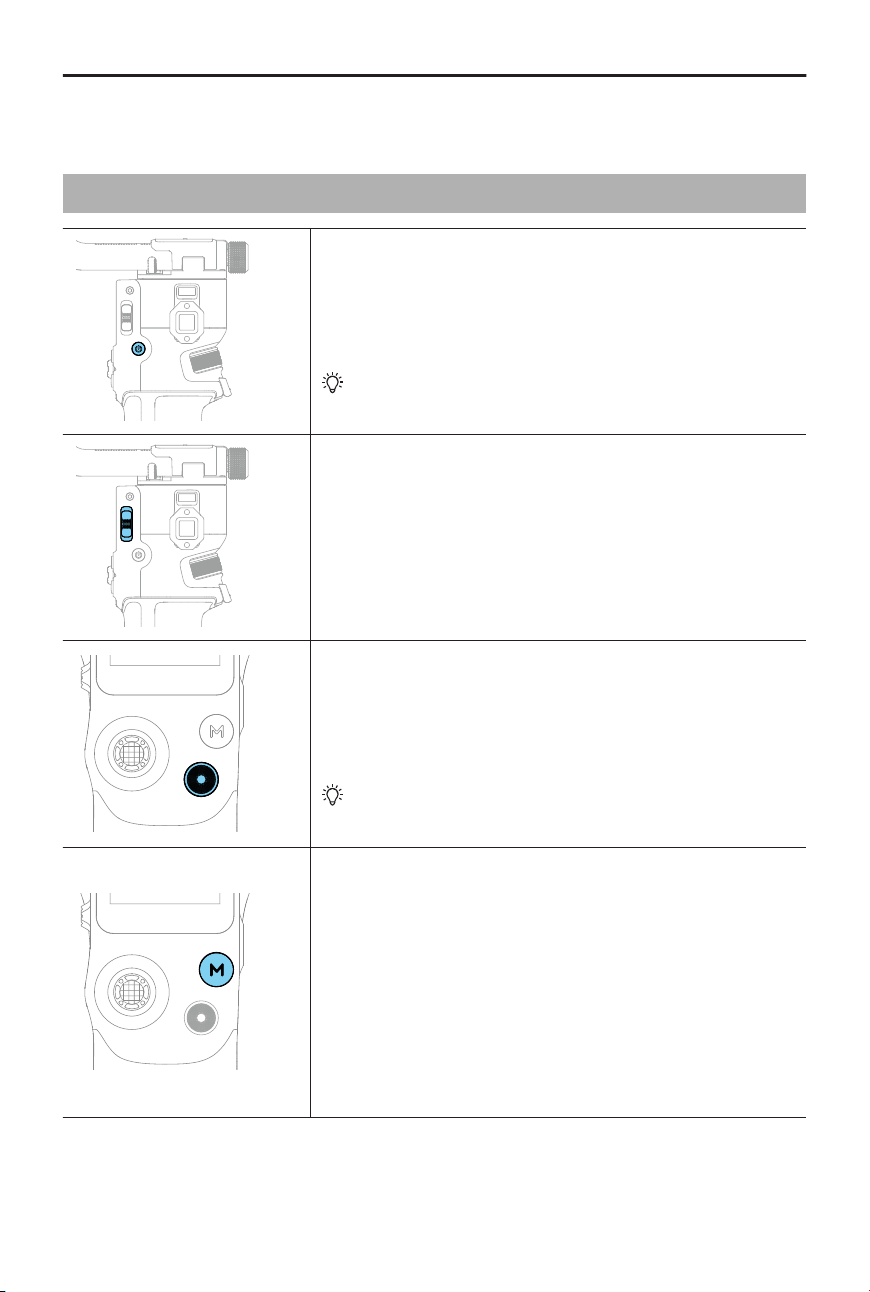
Gimbal Mode Switch
Toggle to switch gimbal mode from PF, PTF, and FPV.
Camera Control Button
After connecting the camera, press halfway for autofocus.
Press once to start or stop recording. Press and hold to
take a photo.
Check the Ronin Series Compatibility List for
detailed information on supported camera
features.
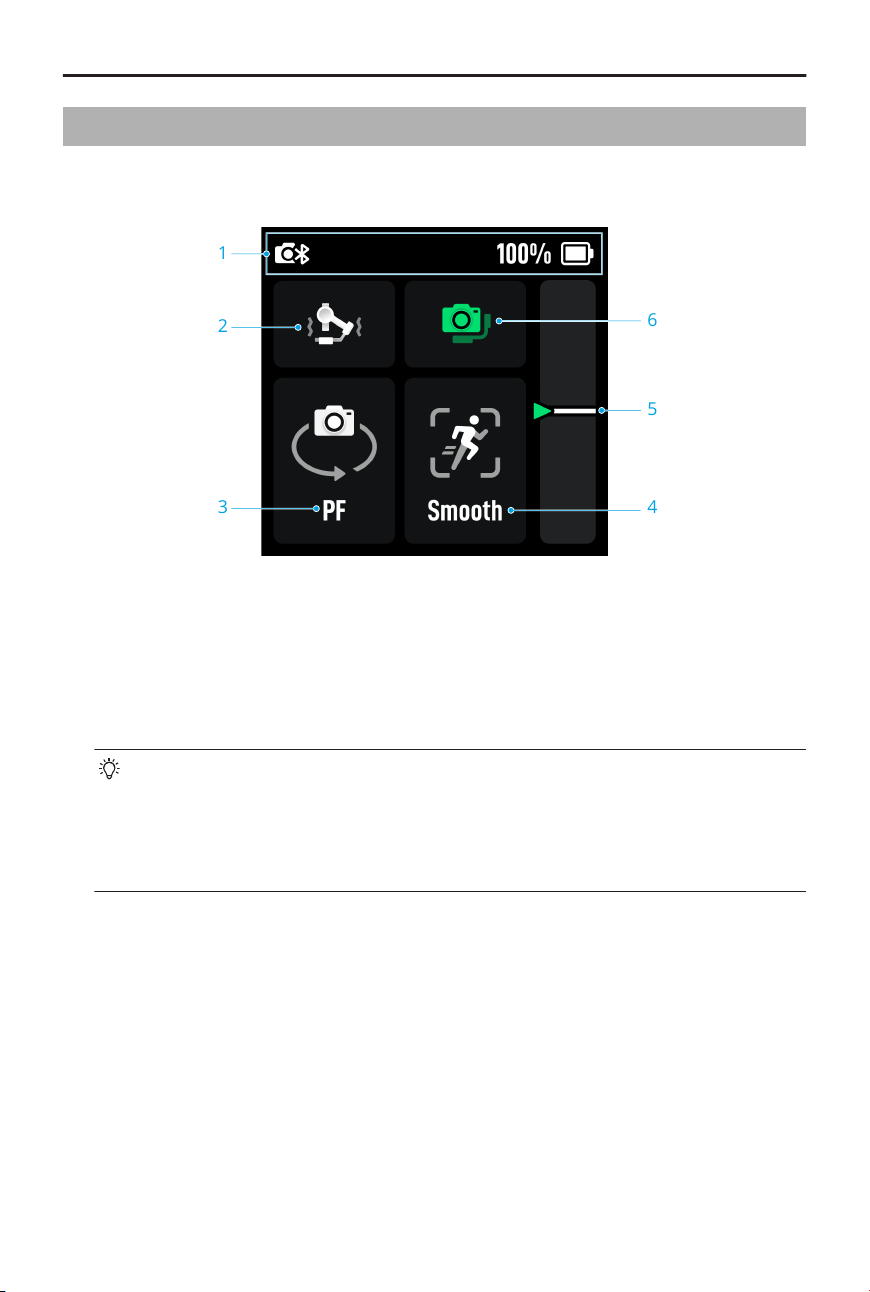
M Button
Press once to take photos by default. The function of the
button can be set on the touchscreen to C1/Fn1 Button
Mapping or Lock/Unlock Screen.
Press and hoId: Enter Sport Mode. In Sport Mode, the
follow speed of the gimbal increases greatly. It is suitable
for shooting in scenarios where subjects move suddenly
and at fast speeds.
Press and hold the M button while pressing the trigger
twice: Enter and remain in Sport Mode. Repeat to exit.
DJI RS 5 User Manual
© 2026 DJI All Rights Reserved. 15
Joystick Mode Switch
Push down: Set the joystick mode to gimbal movement
control.
Push up: Set the joystick mode to zoom control.
Joystick
For gimbal movement control: Move the joystick up and
down to control the tilt of the gimbal and move the joy-
stick left and right to control the pan of the gimbal.
For zoom control: Move the joystick up and down to con-
trol the zoom.
Enable the power zoom on Sony cameras and then
the joystick can control the power zoom of the
camera.
Trigger
Press and hold to enter Lock mode. In Lock mode, the
gimbal will not respond to the movement of the grip. After
setting up on the touchscreen, press and hold the trigger
to enter FPV mode.
Press twice to re-center the gimbal.
Press three times to turn the gimbal 180° so that the
camera faces you (sele mode).
Front Dial
Turn to control the focus by default. The settings can be
changed via the touchscreen. Refer to the Touchscreen
section for more details.
Check the Ronin Series Compatibility List for detailed
information on supported features.
DJI RS 5 User Manual
16 © 2026 DJI All Rights Reserved.

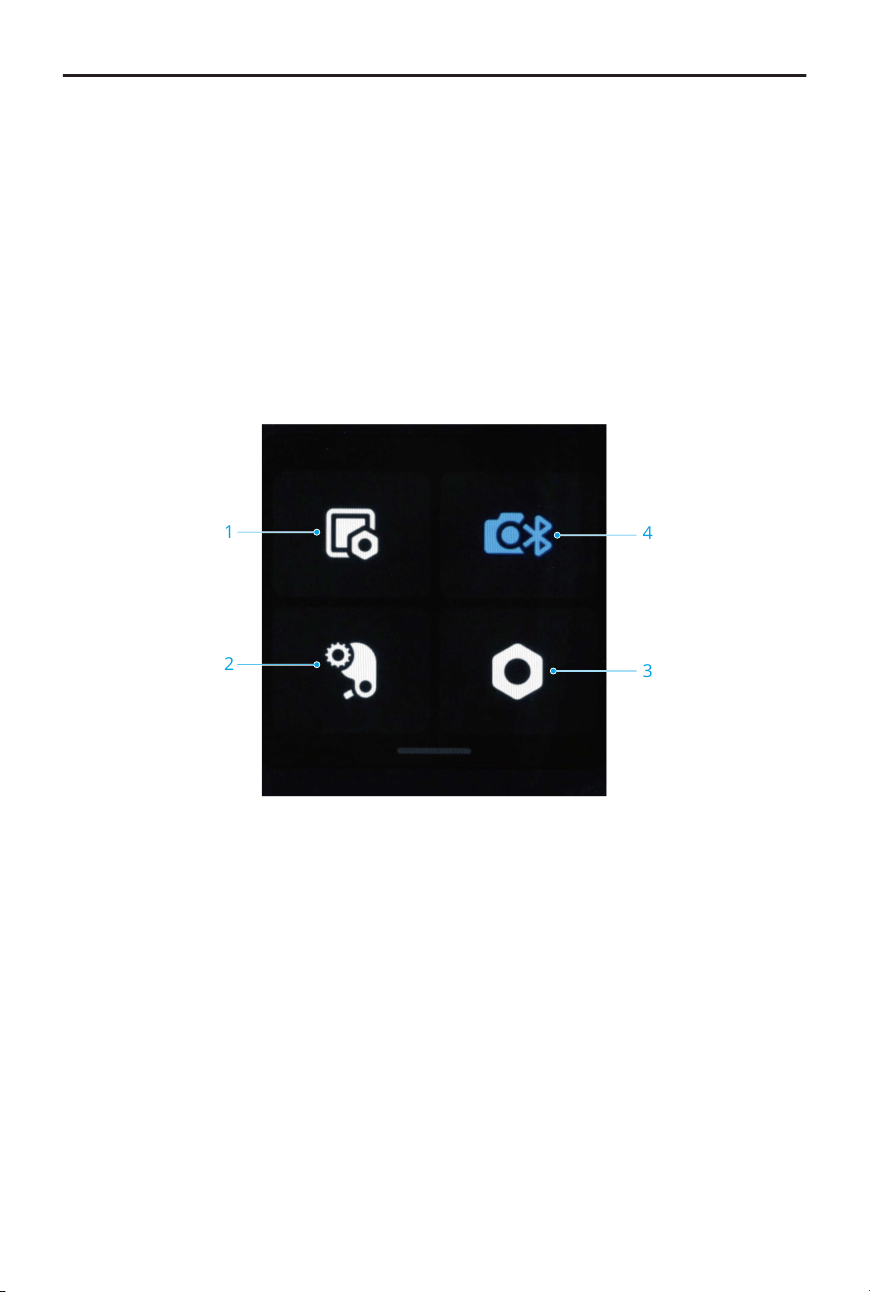
3.2 Ports
Camera Control Port (USB-C)
Can be connected to the corresponding camera port for
camera control and communication.
Multifunctional Port
Can be connected to accessories such as DJI SDR Trans-
mission, DJI Focus Pro Motor, and more.
NATO Port
Compatible with accessories such as the briefcase handle
and monitor. This port does not support charging or com-
munication.
RSA/NATO Ports
This port supports charging and communication. It can
be connected to DJI RS Electronic Briefcase Handle, DJI R
Focus Wheel, and DJI R Twist Grip Dual Handle.
DJI RS 5 User Manual
© 2026 DJI All Rights Reserved. 17
3.3 Touchscreen
Home
2
3
1
6
4
5
1. Status Bar
The status bar at the top of the touchscreen shows the gimbal connection status and
battery level.
2. Auto Calibration
The three values indicate the stiness of the three axes.
After balancing the gimbal, if changing the focal length, changing the lens or the
camera causes the balance status icon to turn red, or if the gimbal shakes for no
reason, it is recommended to perform automatic calibration. It is recommended
to increase the stiness if the gimbal is not stable enough and to lower the
stiness if the gimbal starts to shake.
3. Follow Mode
FPV mode can be switched to 3D Roll 360 mode or Custom mode via the touchscreen.
4. Follow Speed/Sensitivity
Tap the Follow Speed/Sensitivity icon to set Slow, Medium, Fast, or Custom follow
speeds. Dierent sensitivity modes are also provided. The Smooth Mode inherits
the follow sensitivity of the Ronin series stabilizers, ensuring natural transitions and
smooth start and stop movements in your footage. In Responsive mode, the gimbal
responds more quickly to hand movements during start and stop, providing a more
responsive experience.
5. Z-Axis Indicator
DJI RS 5 User Manual
18 © 2026 DJI All Rights Reserved.
Vertical jitter is displayed as a real-time metric.
6. Balance Status
When the status bar shows green or gray, this indicates the gimbal is balanced. To
check the balance status of the gimbal, tilt the gimbal 15° left or right and check the
status bar. If the status bar shows yellow, the gimbal is slightly unbalanced. The status
bar shows red when the gimbal is critically unbalanced. In this case, re-balance the
corresponding axis.
Slide Down - Control Center
1
2
4
3
1. Display
Tap to set auto-lock, brightness while locked, and rotation. Enable rotation and the
on-screen display will ip 180°.
2. Focus Motor Endpoints
Focus motor calibration can be selected.
3. Settings
In the System Settings, you can perform gimbal auto check, auto lock settings, and
parameter restoration. Key features include:
• Z-axis Indicator: Enabled by default, tap to disable.
• Push Mode: Enable to manually control the tilt and pan axis.
• Orbit Follow: When enabled, the gimbal obtains smoother movements after
enabling when shooting arc shots.
DJI RS 5 User Manual
© 2026 DJI All Rights Reserved. 19
• Horiz Calibration: Try horizontal calibration or manual calibration when the gimbal
is unlevel or the axis is drifting.
• Camera Control Port Settings: When enabled, the camera control port (USB-C)
provides camera control functionality.
• Disable Sele: Prevent accidental trigger entry into sele mode.
• Auto O: The gimbal will automatically power o after 10 minutes of being locked
and inactive.
4. Bluetooth
Tap Connect to pair the Bluetooth of the gimbal and camera.
The gimbal can only connect to one camera at a time.
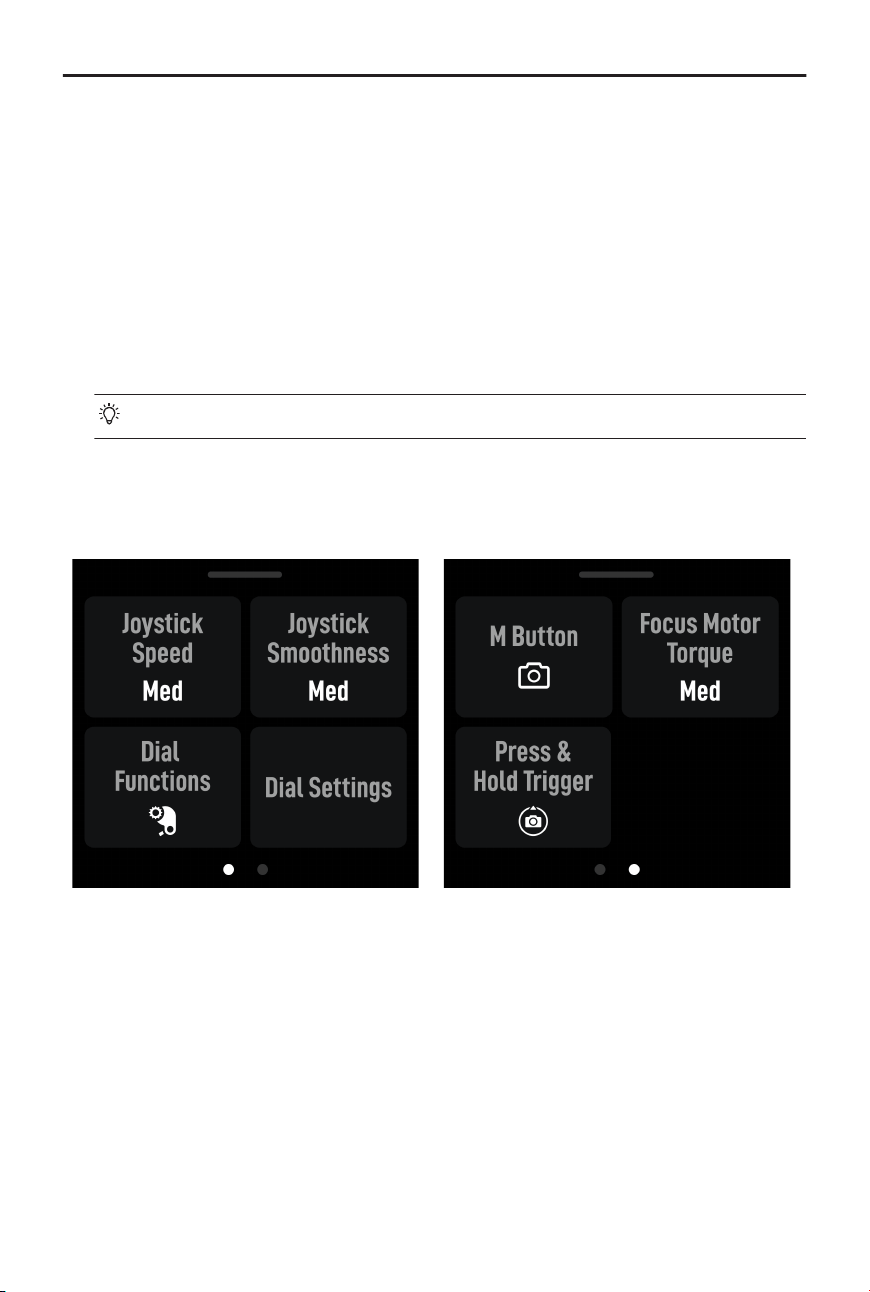
Slide Up - Gimbal Settings
On this interface, you can adjust joystick settings and focus motor torque, and select
functions for pressing the dial and the M button, and for holding the trigger.
M button can be mapped to camera C1 or Fn1. After setup, the M-button can be mapped
to the C1 button on Sony cameras (A7S3, A7M3, ZV-1) or the "Wireless Remote Fn1"
button on Nikon cameras (Z50, Z6II).
Swipe Left - Create Screen
Timelapse, Track and Panorama can be set in this screen.
DJI RS 5 User Manual
20 © 2026 DJI All Rights Reserved.
Swipe Right - ActiveTrack
When the enhanced intelligent tracking module is connected, ActiveTrack view is available
and relevant settings can be adjusted via this interface.
See ActiveTrack Settings for details.
3.4 Gimbal Follow Modes
PF
PF: Pan follow, where only the pan axis follows the move-
ment of the grip.
Suitable for scenarios such as shooting emerging walk-
through and arc shots or moving from left to right.
PTF
PTF: Pan and tilt follow, where both the pan and tilt axes
follow the movement of the grip.
Suitable for scenarios when moving on a slant.
DJI RS 5 User Manual
© 2026 DJI All Rights Reserved. 21
FPV
FPV: Pan, tilt, and roll follow, where all three axes follow
the movement of the grip.
Suitable for scenarios when rotating the camera.
Custom
Custom: Enables or disables any axis follow as required.
Lock mode is enabled when the three axes are disabled.
All the three axes will not follow the movement of the grip
in lock mode.
Suitable for smooth tracking shots and quick reaction
shots.
3D Roll 360
In 3D Roll 360 mode, the tilt axis is rotated 90° upwards
and the camera lens is vertically upwards, at which point
you can use the joystick to control the 360° rotation of the
pan axis.
Suitable for rotating shots.
DJI RS 5 User Manual
22 © 2026 DJI All Rights Reserved.
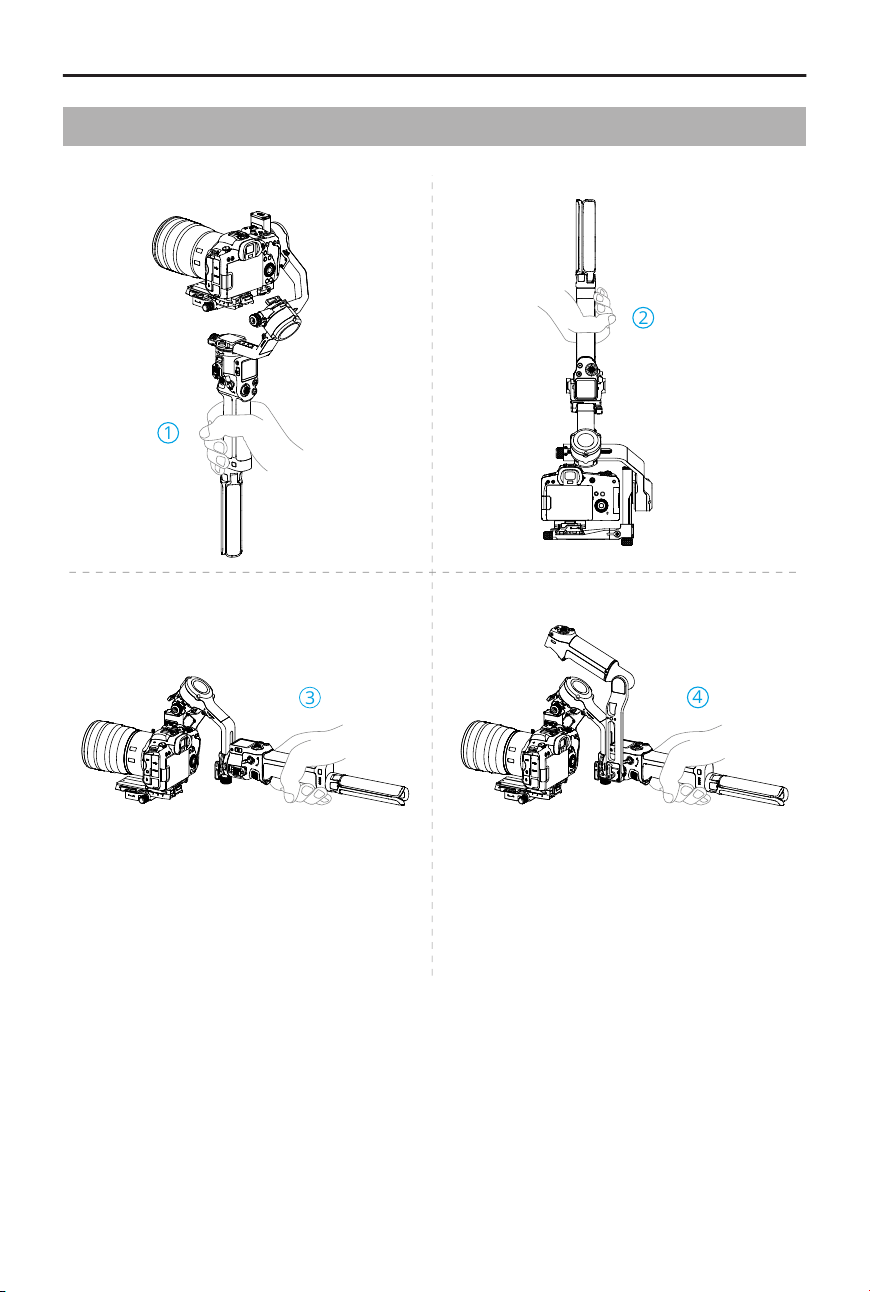
3.5 Gimbal Operation Modes
1
2
3
4
1. Upright Mode
This is is the standard working mode of the gimbal and is suitable for most shooting
scenarios such as walking and running shots.
2. Underslung Mode
The gimbal is ipped and the camera is in a lower position. This mode is suitable for
taking low angle shots, such as tracking objects on the ground.
3. Flashlight Mode
DJI RS 5 User Manual
© 2026 DJI All Rights Reserved. 23

The gimbal is held horizontally like a ashlight. This mode is suitable for shooting in
conned spaces.
4. Briefcase Mode
The briefcase handle needs to be installed in this mode, making low-angle camera
movements more intuitive. The angle of the briefcase handle can be adjusted using
the knob. The cold shoes and 1/4"-20 mounting holes of the gimbal allow for
mounting external monitors to assist in shooting.
DJI RS 5 User Manual
24 © 2026 DJI All Rights Reserved.
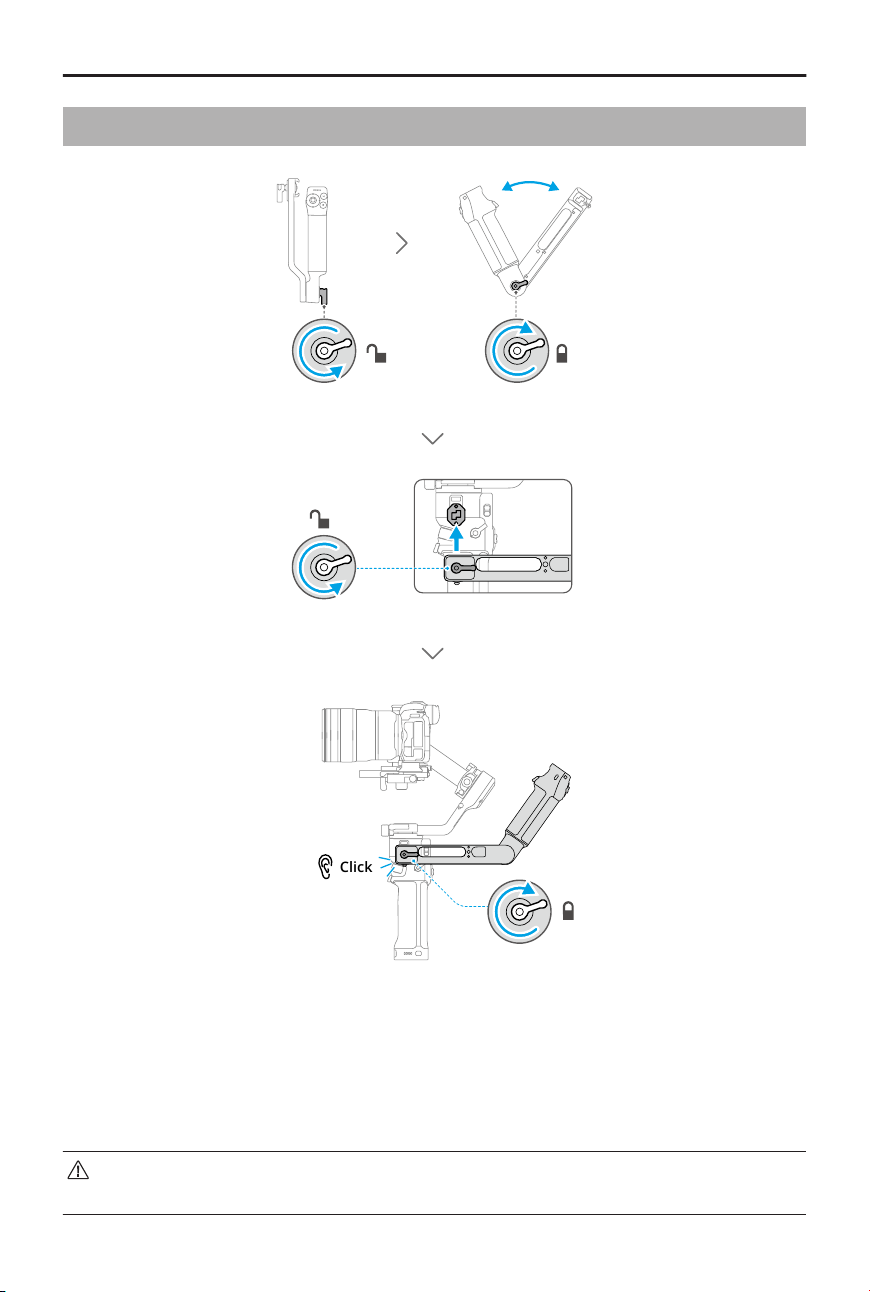
3.6 Electronic Briefcase Handle
Click
You can control the gimbal and camera using the buttons on the handle.
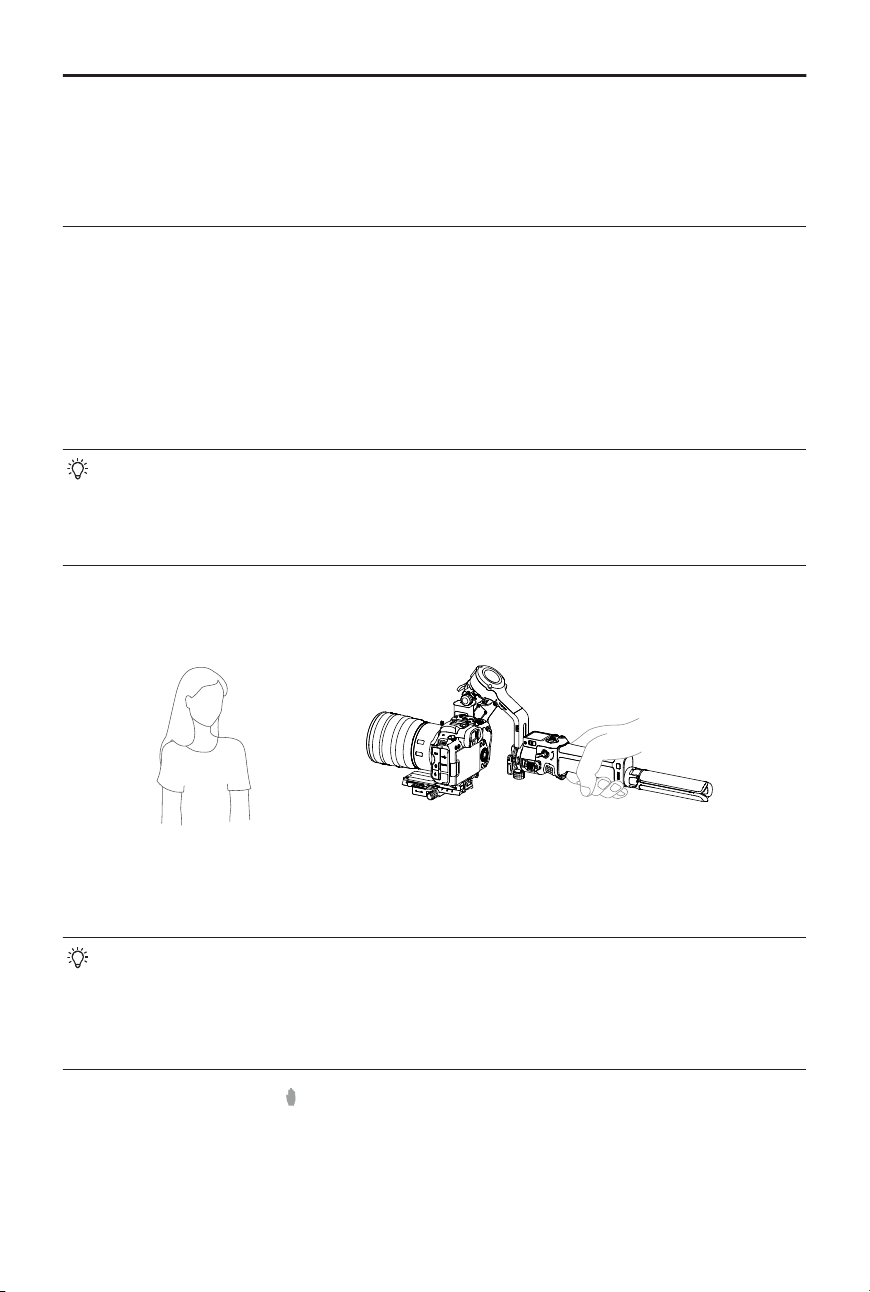
When using a heavier lens, hold the gimbal grip with one hand and the electronic
briefcase handle with the other to distribute weight and enhance stability.
The top of the handle is equipped with a cold shoe mount, a 1/4 threaded hole, and
positioning holes, allowing you to attach additional accessories.
If not properly installed, there is a risk of detachment. A click at the port indicates
that the electronic briefcase handle is properly installed.
DJI RS 5 User Manual
© 2026 DJI All Rights Reserved. 25
Click the link or scan the QR code to watch the tutorial videos.
https://www.dji.com/rs-5/video
3.7 Ronin App Settings
Users can use the Ronin app to activate the gimbal, update the rmware, access
intelligent functions, and congure motor parameters, user settings, and joystick options.
Additionally, system status, user manual, and tutorial videos can be accessed.
3.8 Enhanced Intelligent Tracking Module
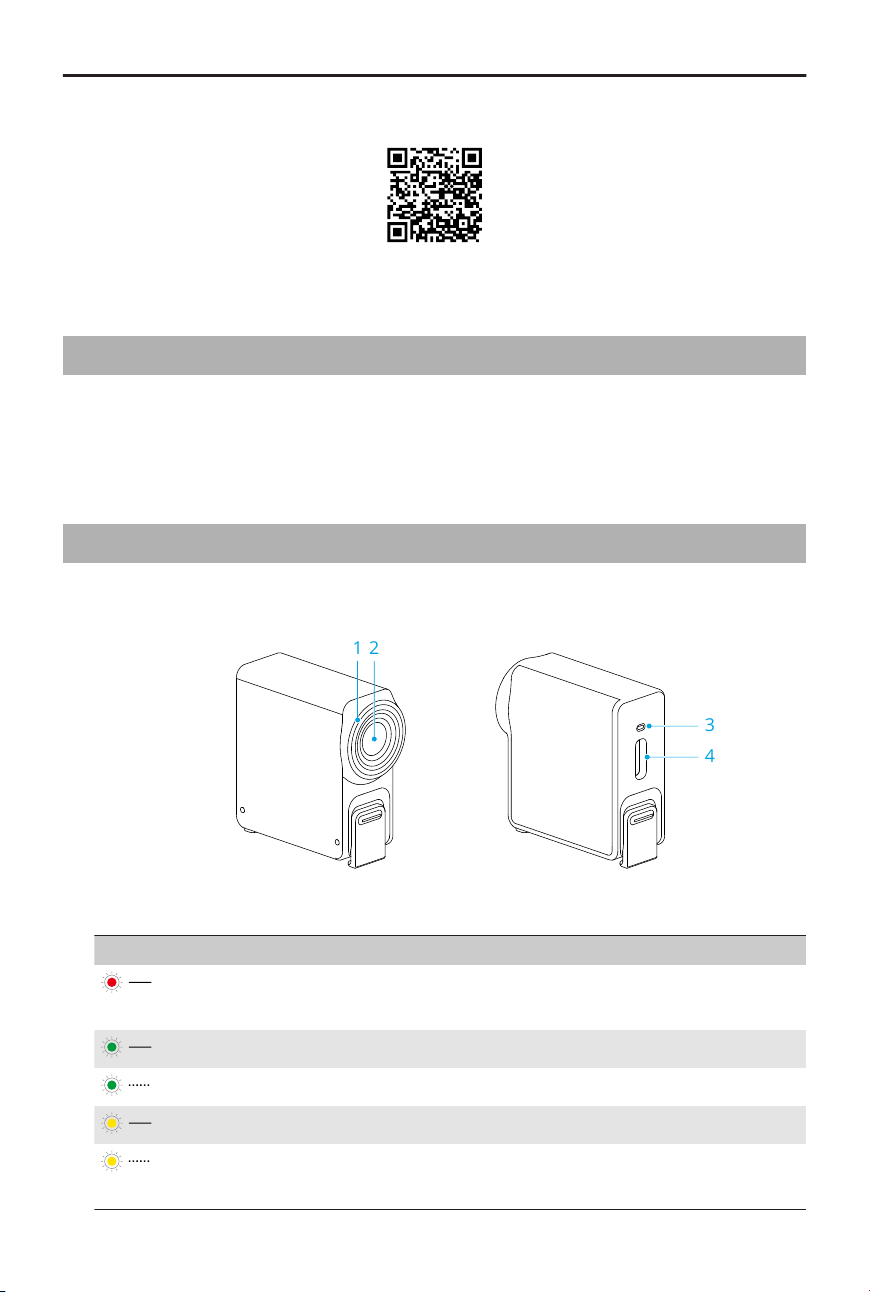
Overview
1
2
3
4
1. Ring Light
Battery Level
Solid red ActiveTrack disabled(in sleep mode) or sub-
ject lost
Solid green ActiveTrack in use
Blinks green Subject lost temporarily
Solid yellow Composition being adjusted
Blinks yellow Countdown for taking a picture or recording
(shutter triggered after 3s of blinking)
DJI RS 5 User Manual
26 © 2026 DJI All Rights Reserved.
2. Tracking Lens
3. Status Indicator
Light signals and meanings are consistent with the ring light.
4. USB-C Data Port
Connect to a computer for rmware updates.
Installation
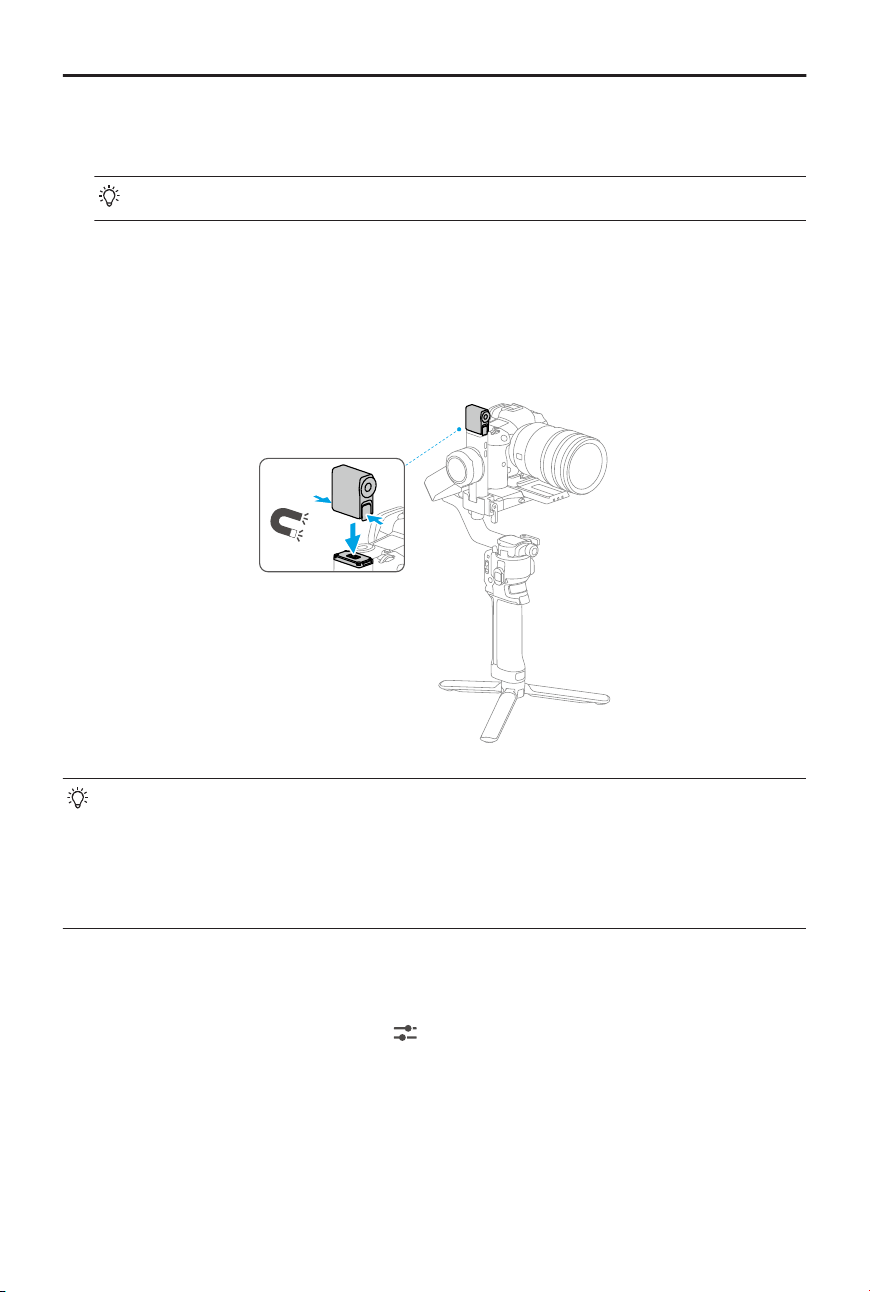
• If the indicator does not turn on after the tracking module is installed, check
whether the tracking module is fully magnetically attached to the gimbal.
• If the tracking module idle for more than ve minutes, it automatically enters
sleep mode and the indicator turns o. Tap the gimbal trigger or swipe right on
the touchscreen to wake up the tracking module.
ActiveTrack Settings
After installing the tracking module, tap to enter the settings interface and congure
related features. Key features include:
Composition
When ActiveTrack is enabled with Keep Current Framing, the gimbal will maintain the
current composition.
DJI RS 5 User Manual
© 2026 DJI All Rights Reserved. 27
When Composition is adjusted to Center Tracking Subject, the subject tracked will be
moved to the center of the ActiveTrack view.
In Center Tracking Subject, due to dierences in camera, lens, and shooting
distance, the actual center of the Active may deviate and cannot always remain
centered. If the composition is not centered, adjust it using the joystick.
ActiveTrack Speed
Slow speed provides smooth tracking, ideal for live streaming.
Medium speed works well for parallel tracking while fast speed is best for close-up circling
shots or high-motion scenes.
Image Calibration
If the center of the ActiveTrack view deviates from the center of the camera view, tap
Image Calibration to adjust the composition.
Toggle the joystick left or right to adjust the composition on the ActiveTrack view so that it
matches the composition of the camera view.
Tracking and Shooting
The tracking module supports tracking people, vehicles, pets (cats and dogs), and
other objects. Dierent subject types oer dierent options for controlling tracking and
capture.
Subject Enable/disable ActiveTrack Adjust Composition
People Via:
Trigger
Gesture
Touchscreen
Via:
Joystick
Gesture
Pets (cats, dogs), Ve-
hicles
Via:
Trigger
Touchscreen
Via:
Joystick
Other Objects Via:
Touchscreen
Via:
Joystick
• It is not recommended to use in backlight or low-light scenarios.
• During tracking, the subject should be followed at a distance between 0.5 m and
10 m. (Measured at a 24 mm focal length.)
• For non‑human subjects, keep the subject occupying at least 10% of the
ActiveTrack view during tracking.
DJI RS 5 User Manual
28 © 2026 DJI All Rights Reserved.
• ActiveTrack for vehicles is designed for scenarios with a single vehicle and is
not intended for tracking vehicles at high speeds. For vehicles, ensure the entire
vehicle remains fully visible in the ActiveTrack view.
• Pet following is only supported when tracking a single pet.
Control via Buttons and Joystick
Press the trigger to enable or disable the ActiveTrack.
Once the subject is being followed and Keep Current Framing is enabled, you can use the
joystick to adjust the composition
Press the trigger twice to disable the ActiveTrack and recenter the gimbal.
During shooting, you can adjust the tracking mode using the mode switch on the
gimbal. In pan follow (PF) mode, only the pan axis follows; in pan and tilt follow
(PTF) mode, both the pan and tilt axes follow; in pan, tilt and roll follow (FPV) mode,
tracking is not supported.
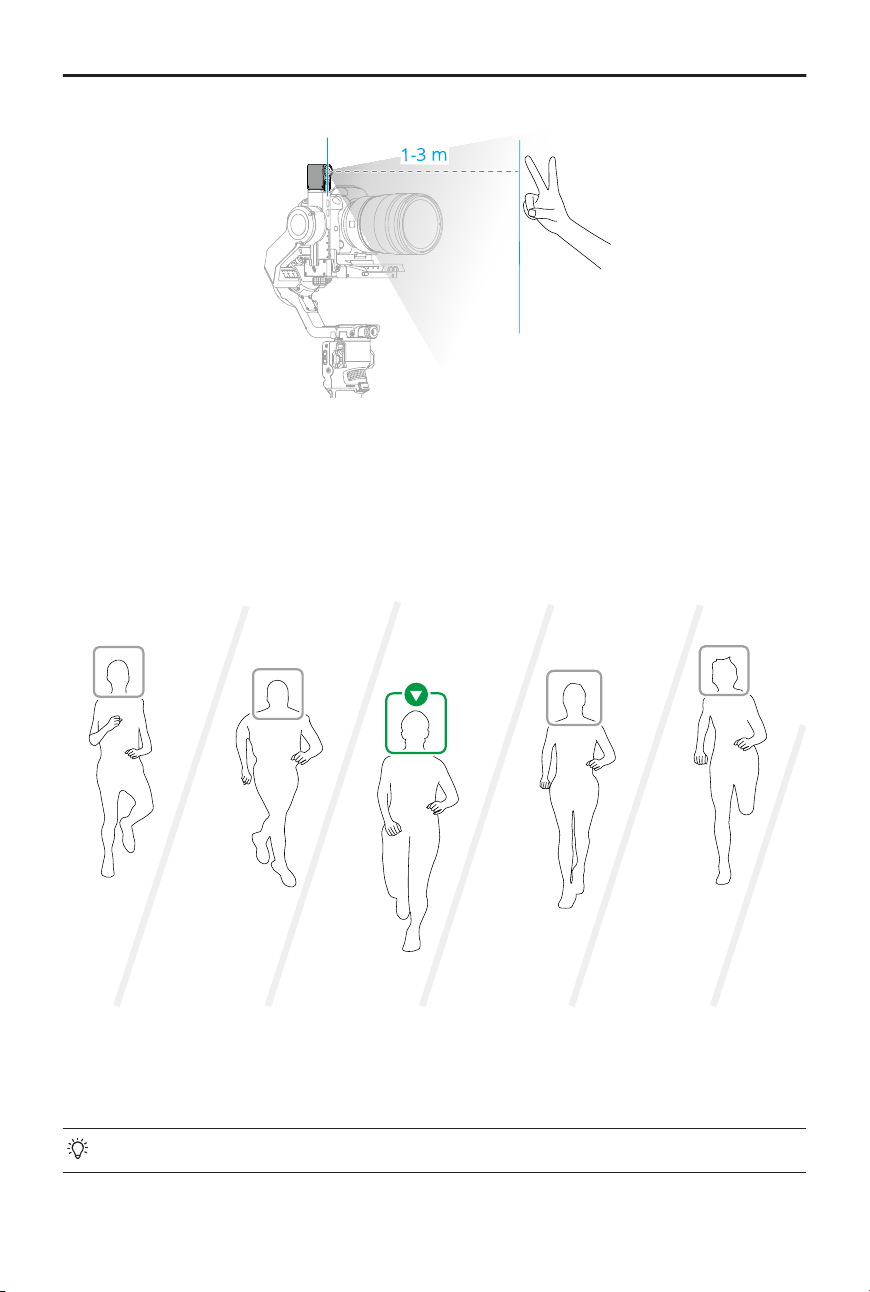
When shooting from a mid-low position, the gimbal handle should point in the direction
of the person being followed.
Control via Gesture
• The tracking module prioritizes those close to the lens and near the center of
the view.
• The subject tracked should be 1 m to 3 m away from the tracking lens.
• Gestures and their functions can be changed in the ActiveTrack Settings.
Enable tracking: Show the gesture to the camera or press the trigger. The indicator
turns solid green.
DJI RS 5 User Manual
© 2026 DJI All Rights Reserved. 29
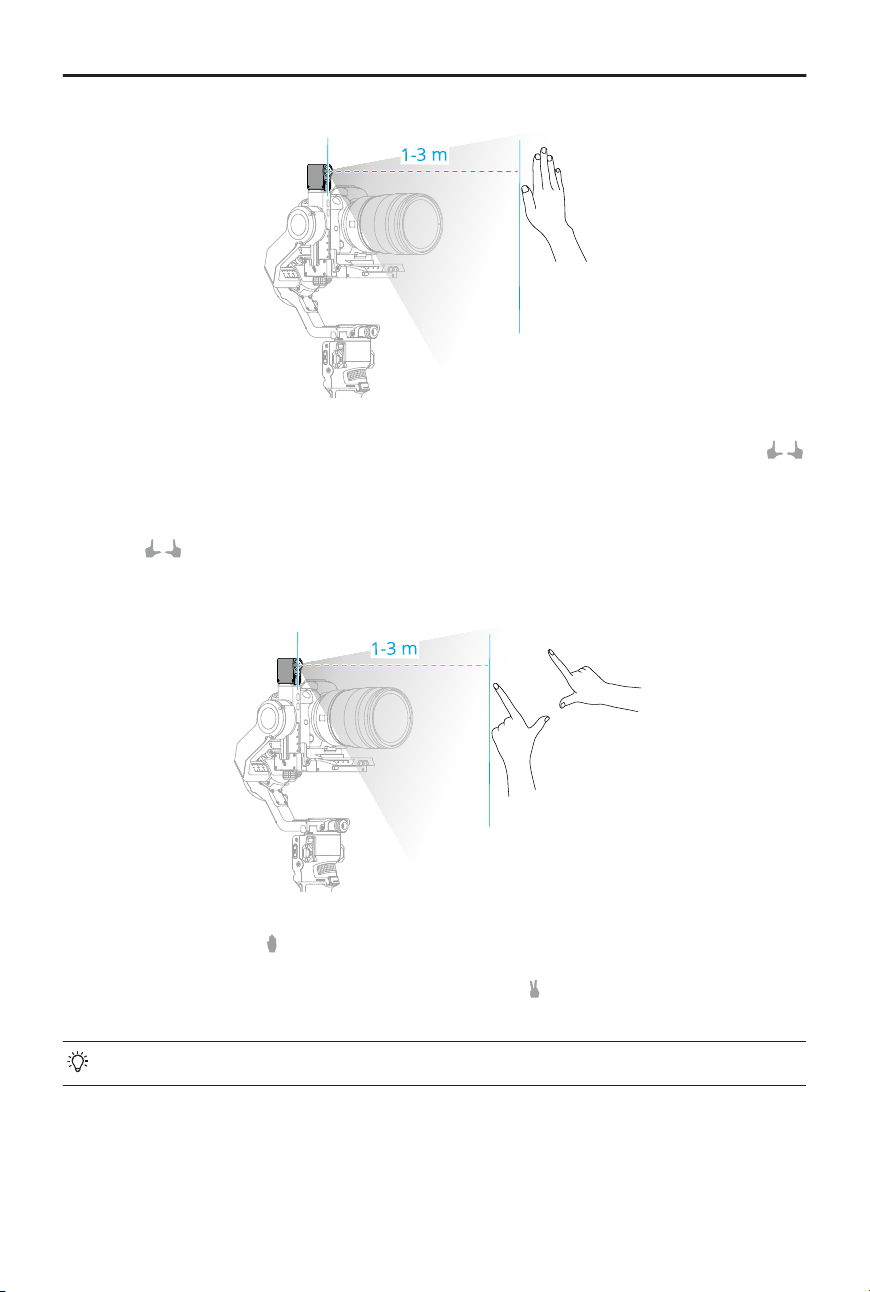
Adjusting composition: Adjust the composition as needed during tracking. Show the
gesture to the camera. The indicator turns solid yellow. The subject can move to the
desired position in the frame.
Show the gesture again to conrm the composition. The indicator turns solid green
and tracking automatically resumes.
Stop tracking: Show the gesture or press the trigger again. The indicator turns solid red.
Shooting: Whether tracking is in use or not, you can use to start a countdown for taking
a photo or starting/stopping recording. The indicator pulses yellow during the countdown.
Make sure the gimbal and camera are connected in advance.
DJI RS 5 User Manual
30 © 2026 DJI All Rights Reserved.
Control via Touchscreen
Detected subjects are shown with gray bounding boxes. Rotate the dial to switch between
dierent subjects. Only available when Dial Functions is set to Focus Motor and no focus
motor is installed.
Tap any bounding box to select a subject and start tracking.
Alternatively, you can drag to draw a box around a subject on the touchscreen to start
tracking.
• Ensure the selected subject has a clear, well‑dened outline.
DJI RS 5 User Manual
© 2026 DJI All Rights Reserved. 31

Firmware Update
The tracking module needs to be connected to a computer for rmware update.
1. Visit https://www.dji.com/rs-5/downloads and download the corresponding rmware
package.
2. Use the included USB-C cable to connect the tracking module to the computer.
3. Place the downloaded rmware package (le ending in .bin) in the root directory of
the tracking module.
4. Once copied, disconnect the USB connection.
5. Reconnect the tracking module to the computer. The tracking module will
automatically start the update process. The status indicator will blink red and green
alternately. DO NOT disconnect the connection during the process.
6. The status indicator remaining solid red indicates that the update is complete.
DJI RS 5 User Manual
32 © 2026 DJI All Rights Reserved.
4 Grip/Built-In Battery
For information about the gimbal battery and gimbal running time, refer to https://
www.dji.com/rs-5/specs
4.1 Safety Guidelines
Read the user manual to become familiar with the features of this product before
operating. Failure to operate the product correctly can result in damage to the
product, personal property, and cause serious injury. This is a sophisticated product.
It must be operated with caution and common sense and requires some basic
mechanical ability. Failure to operate this product in a safe and responsible manner
could result in injury or damage to the product or other property.
This product is not intended for use by children without direct adult supervision.
DO NOT alter this product in any way outside of the documents provided by SZ
DJI TECHNOLOGY CO., LTD. These Safety Guidelines contain instructions for safety,
operation and maintenance. It is essential to read and follow all of the instructions
and warnings in the user manual, prior to assembly, setup or use, in order to operate
the product correctly and avoid damage or serious injury.
Grip Use
1. DO NOT allow the grip to come into contact with any kind of liquid. DO NOT
leave the grip out in the rain or near a source of moisture. DO NOT drop the grip
into water. If the inside of the battery comes into contact with water, chemical
decomposition may occur, potentially resulting in the battery catching on re,
and may even lead to an explosion.
2. If the grip falls into water by accident, put it in a safe and open area
immediately. Maintain a safe distance from the grip until it is completely dry.
DO NOT use the grip again, and dispose of the grip properly as described in the
Grip Disposal section.
3. Put out any re using water, sand, re blanket, or a dry powder re extinguisher.
4. DO NOT use or charge a swollen, leaky, or damaged grip. If the grip is abnormal,
contact DJI or a DJI authorized dealer for further assistance.
DJI RS 5 User Manual
© 2026 DJI All Rights Reserved. 33
5. The grip should be used in temperatures from -20° to 45° C (-4° to 113° F). Use
of the grip in environments above 50° C (122° F) can lead to a re or explosion.
Use of grip below 0° C (32° F) can signicantly reduce operation time.
6. DO NOT use the battery in strong electrostatic or electromagnetic environments
or near high-voltage transmission lines.
7. DO NOT disassemble or pierce the grip in any way or the battery may leak,
ignite, or explode.
8. DO NOT drop or strike batteries. DO NOT place heavy objects on the grip.
9. Electrolytes in the battery are highly corrosive. If any electrolytes make contact
with your skin or eyes, immediately wash the aected area with fresh running
water for at least 15 minutes, and then see a doctor immediately.
10. DO NOT use the grip if dropped.
11. DO NOT heat batteries. DO NOT put the grip in a microwave oven or in a
pressurized container.
12. DO NOT manually short-circuit the grip.
13. Clean grip terminals with a clean, dry cloth.
1. Make sure the grip is fully charged before use.
2. If a low-battery warning appears, charge the grip as soon as possible.
Charging
1. DO NOT leave the grip unattended during charging. DO NOT charge the grip
near ammable materials or on ammable surfaces such as carpet or wood.
2. Charging the grip outside of the temperature range of 5° to 40° C (41° to 104°
F) may lead to leakage, overheating, or battery damage. The ideal charging
temperature is 22° to 28° C (72° to 82° F).
The grip is designed to stop charging when it is full. It is good practice, however, to
monitor the charging progress and disconnect the grip when fully charged.
Storage
1. Keep the batteries out of the reach of children and animals.
2. If the grip will be stored for an extended period, charge the grip until the battery
level reaches between 30% and 50%.
3. DO NOT leave the grip near heat sources such as a furnace or heater. DO NOT
leave the grip inside of a vehicle on hot days. The ideal storage temperature is
22° to 28° C (72° to 82° F).
DJI RS 5 User Manual
34 © 2026 DJI All Rights Reserved.
4. Keep the grip dry.
1. Discharge the grip to 40%-65% if it will not be used for 10 days or more. This can
greatly extend the battery life.
2. If the grip is stored for an extended period and the battery is depleted, the grip
will enter sleep mode. Recharge the grip to exit sleep mode.
3. If the grip is stored for an extended period and the battery is depleted, the grip
will enter sleep mode. Recharge the grip to exit sleep mode.
Maintenance
1. DO NOT use the grip when the temperature is too high or too low.
2. DO NOT store the battery in environments with a temperature higher than 45° C
(113° F) or lower than 0° C (32° F).
1. Battery life may be reduced if not used for an extended period.
2. Discharge and charge the grip completely once every three months to keep it in
good condition.
Travel Notice
1. Before carrying the grip on an airline ight, it must rst be discharged until the
battery level is lower than 30%. Only discharge the grip in a reproof location
and store the grip in a ventilated location.
2. Keep the grip away from metal objects such as glasses, watches, jewelry, and
hairpins.
3. DO NOT transport a damaged grip or a grip with battery level higher than 30%.
Disposal
Dispose of the grip in specic recycling boxes only after a complete discharge. DO
NOT place the grip in regular trash containers. Strictly follow your local regulations
regarding the disposal and recycling of batteries.
1. If the grip is disabled and the battery cannot be fully discharged, contact a
professional battery disposal or recycling agent for further assistance.
2. Dispose of the grip immediately if it cannot be powered on after over-
discharging.
DJI RS 5 User Manual
© 2026 DJI All Rights Reserved. 35

5 Appendix
5.1 Maintenance
The gimbal is not waterproof. Make sure to protect it from dust and water during use.
After use, it is recommended to wipe the gimbal with a soft dry cloth. DO NOT spray any
cleaning liquids onto the gimbal.
5.2 Specications
Visit the following website for specications.
https://www.dji.com/rs-5/specs
DJI RS 5 User Manual
36 © 2026 DJI All Rights Reserved.