1
INSTALLATION AND OPERATING
INSTRUCTIONS
Thank you for purchasing our cylinder
thermostat. It is by listening to your require-
ments we have created and designed our
products to be easy to operate and install.
This thermostat is particularly suitable for
temperature measurements on heating
systems pipes and for domestic hot water
heating.
CTHA IMH FR LH V00 08 01 2016
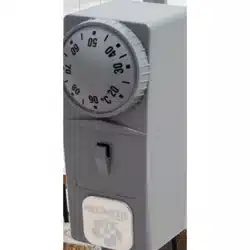
CYLINDER THERMOSTAT
x1
Spring xing for pipe
x1
Hook
x1
Fixing cable for HW
Tank
x1
Cylinder thermostat
x1
Ring
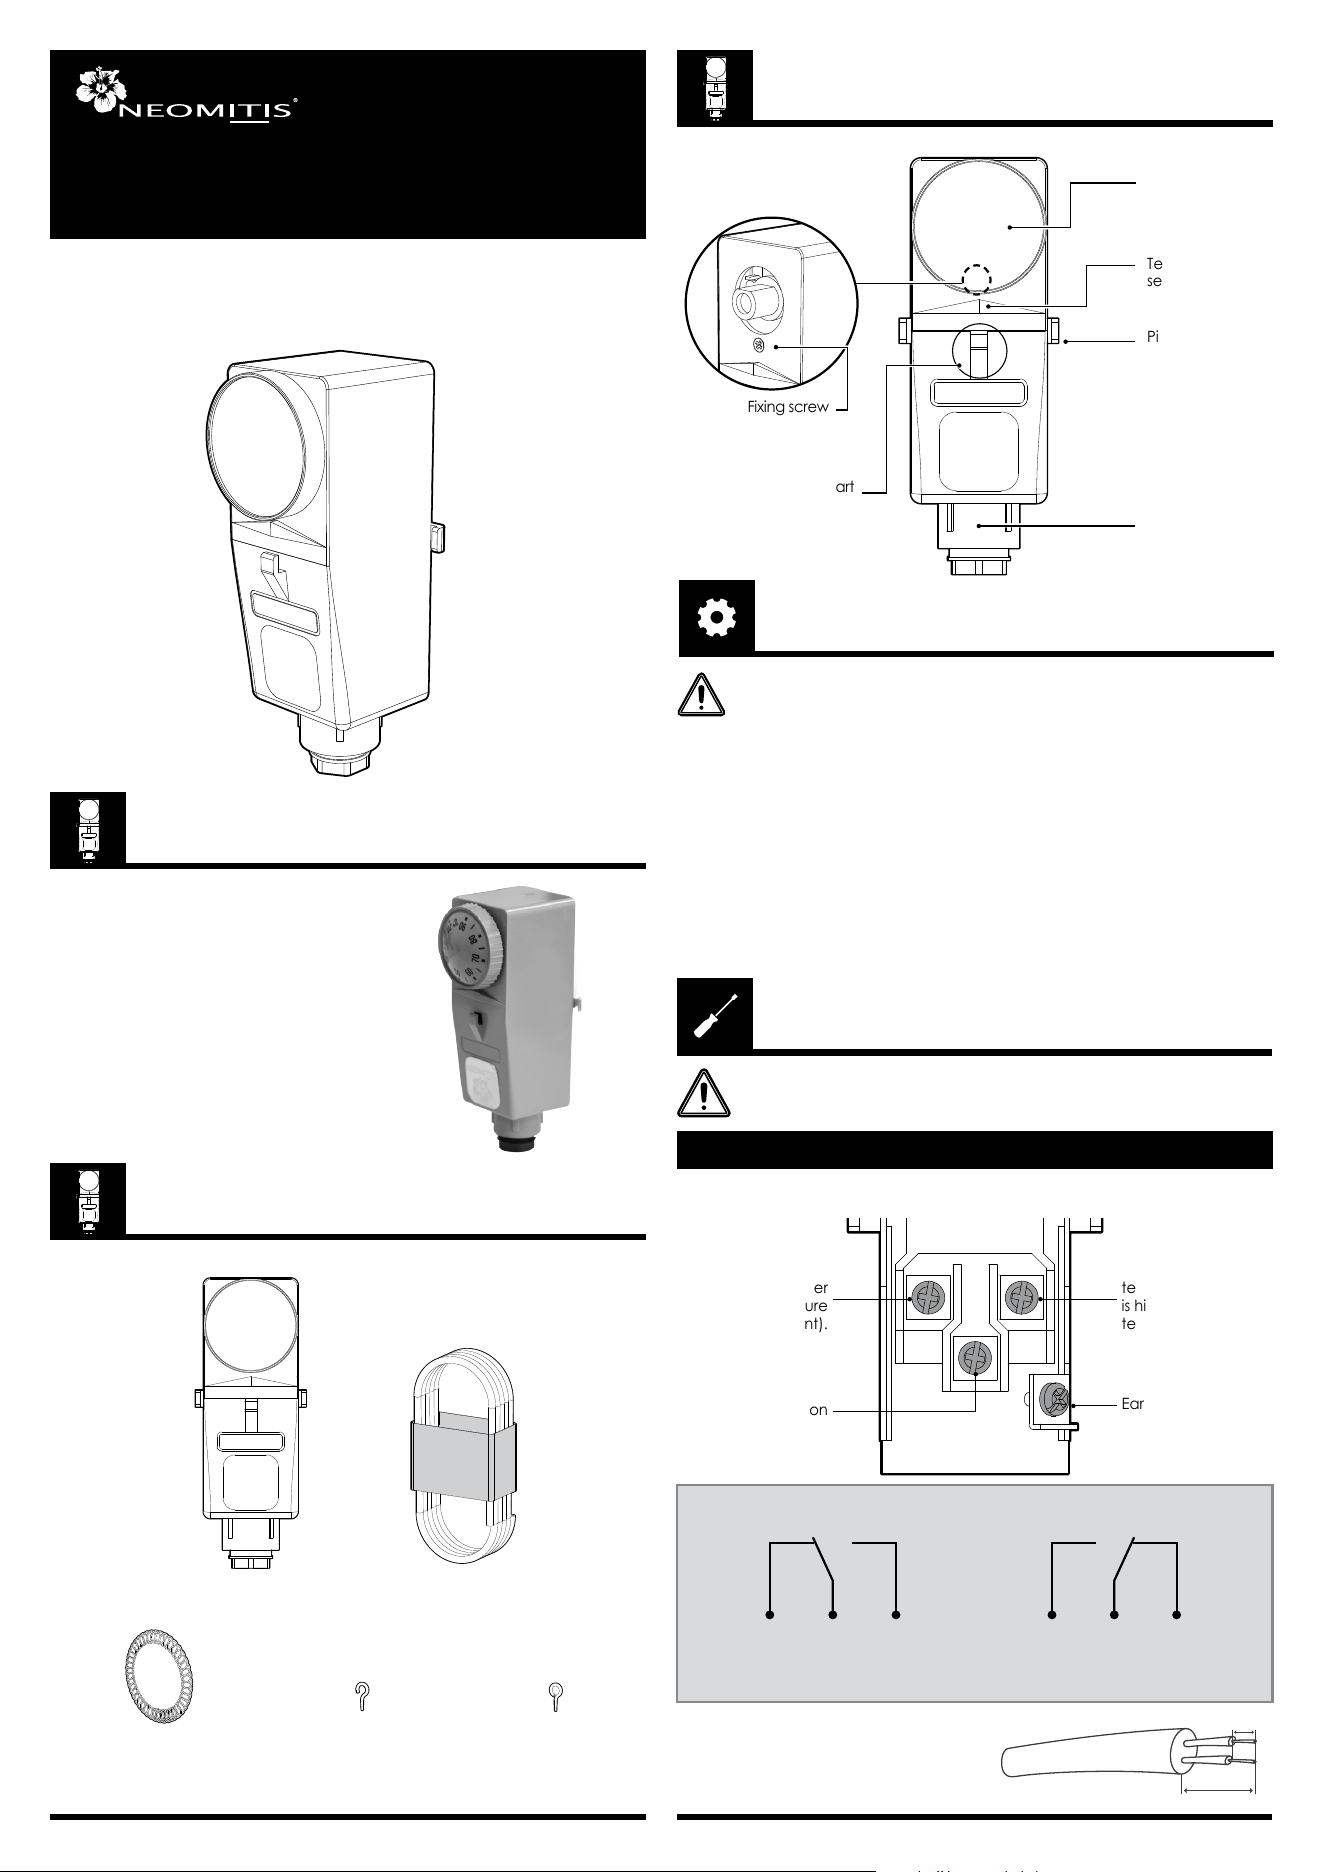
Rotary dial
for setting
temperature
Fixing screw
Cable holding part
Pin for spring xing
Subset: Cable
clamp/grommet
Temperature
setpoint indicator
• Thermostat
Before any work make sure the load you are going to connect
(boiler, circulation pump, air conditioner switch etc) is isolated by
cutting off the power supply.
- All electrical installation work should be carried out by a suitably quali-
ed Electrician or other competent person.
- Check the compatibility between the load and the relay contact ac-
cording to technical information and the product label.
- Disconnect mains supply before removing cover.
- This device must be electrically earthed via the earth terminal provi-
ded.
- This product is for xed wiring only. A switch having contact separation
of at least 3mm in all poles must be incorporated in the xed wiring as a
means of disconnecting the supply.
- All wiring must be in accordance with IEE regulations.
If you are not sure how to install this thermostat consult either
with a qualied electrician or heating Engineer.
Normally closed
contact (Open
when the measured
temperature is lower
than temperature
setpoint).
Common
Normally open
contact (Closed
when the measured
temperature
is higher than
temperature
setpoint).
Earth terminal
1
2 3
WIRING
• Electrical Terminals
MOUNTING OF THERMOSTAT
WARNINGS AND PRECAUTIONS
OVERVIEW
PACK CONTAINS
12 3 12 3
The water temperature is lower
than temperature setpoint
Normally closed contact Normally open contact
The water temperature is higher
than temperature setpoint
6 mm max.
16 mm max.
Note:
Preferably use wires with a cross-sec-
tion area from 1 to 2 mm².
E.g.: H05VV-F2X1 (2 x 1mm²)
Registered trademarks - All rights reserved
NEOMITIS
®
LIMITED - 4th Floor, Lincoln House, 300 High Holborn, London WC1V 7JH
Registered in England and Wales No: 9543404
Tel: +44 (0) 2071 250 236 - Fax: +44 (0) 2071 250 267 - E-mail: [email protected]
Creating innovative solutions for ambient comfort
www.neomitis.com
22
To adjust the temperature setpoint, use the rotary knob to place the
desired temperature in front of the setpoint indicator.
- Temperature setting range:
20°C to 90°C
- Differential: 8+/-3K
- Insulation class: I
- Temperature rate of change:
<1K/min
- Contact rating:
- Terminals "1" and "2":
16(2.5)A/250V~
- Terminals "1" and "3":
2.5A/250V~
- Earth terminal provided
- Switch action: 1B - SPDT
Standards:
LVD
EN60730-1
EN60730-2-9
Environment:
- Storage temperature: -15°C to
60°C
- Protection rating: IP20
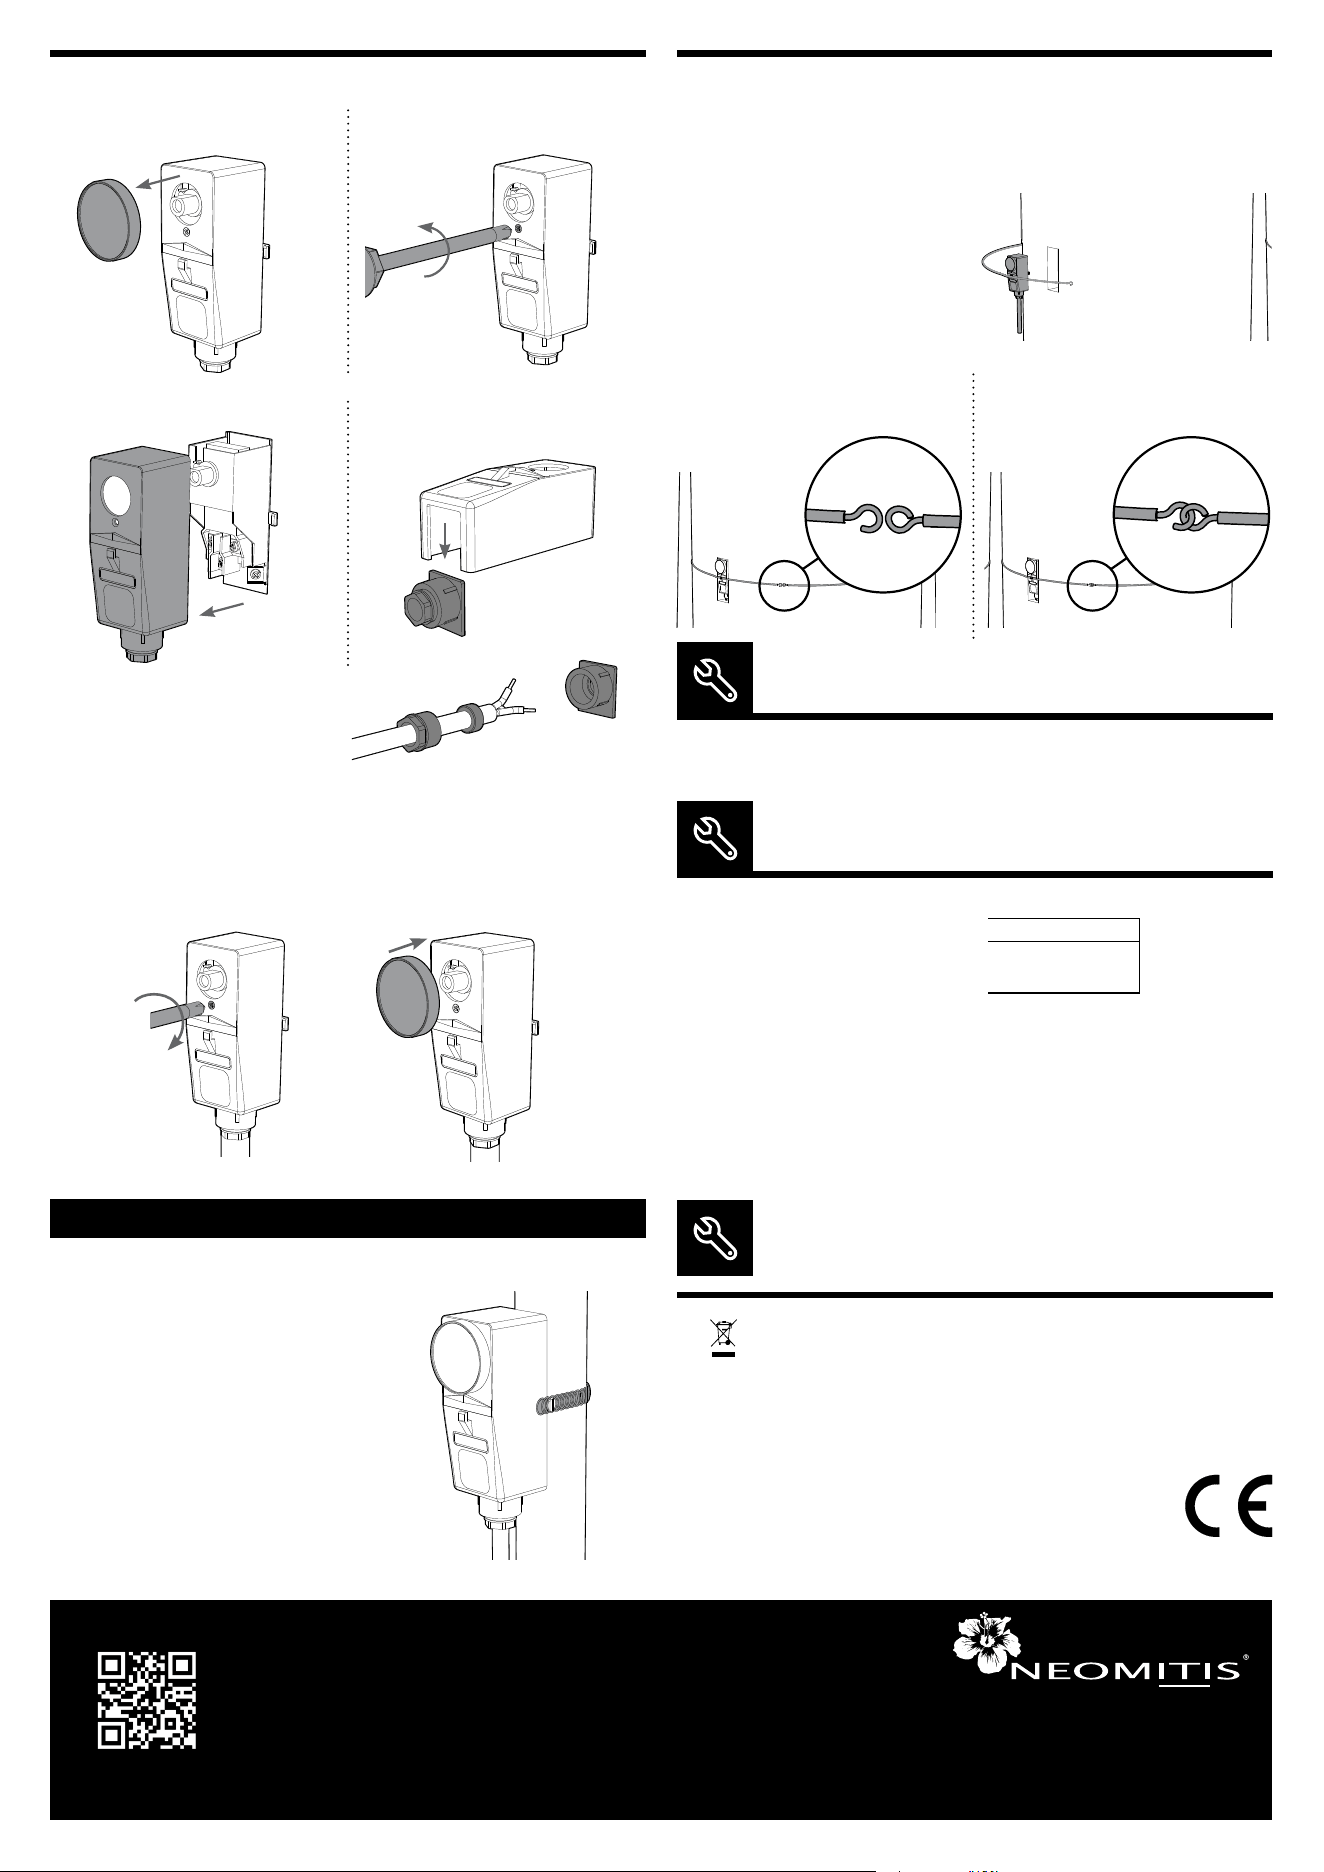
3- Remove the front cover
5- Insert the connecting cable in
the subset removable part.
4- Remove the subset part from
the front cover
6- Wiring connections
7- Replace the front cover, screw the xing screw and replace the rotary
knob.
1- Hold the thermostat on the pipe and
attach the spring to the two pins.
Compliance declaration: we hereby declare under our
sole responsibility that the products described in these ins
-
tructions comply with all the main requirements of the Low
Voltage Directive EMC 2004/108/EC ; LVD 2006/95/EC and
RoHS 2011/65/CE.
The on the product indicates that you must dispose of it at the end of
its useful life at a special recycling point, in accordance with European
Directive WEEE 2012/19/EU. If you are replacing it, you can also return it to
the retailer from which you buy the replacement equipment. Thus, it is not
ordinary household waste. Recycling products enables us to protect the
environment and to use less natural resources.
• On a hot water tank
1- The thermostat should be tted 1/3 of the way up from the bottom of
the cylinder. Remove an area of insulation and ensure good contact
between the thermostat and the hot water tank.
2- Encircle the thermostat and the
water tank using the supplied
cable.Make sure the cable
passes through the cable hol
-
ding part (see diagram page 1).
3- If needed, cut the cable to adjust length.
To attach the cylinder thermostat on hot water tank,proceed as below:
Manufactured by : Co-Intech ([email protected])
There are two ways of mounting:
• On a pipe
To attach the cylinder thermostat on a
pipe, proceed as below:
4- Screw the supplied hook and
ring to each end of the cable.
5- Put the hook into the ring in
order to maintain the cylinder
thermostat against the tank.
MOUNTING OF PRODUCT
SETTING THE TEMPERATURE
TECHNICAL SPECIFICATIONS
RECYCLING AND
COMPLIANCE DECLARATION
1- Remove the rotary knob 2- Unscrew the xing screw.
• Wiring
