
BE A PRO IN YOUR KITCHEN
APPLICABLE MODEL: K24US, K24UPR
UUSER MAN AL
PANEL-READY & UNDER COUNTER
WINE COOLER

P R E S RV
™
B E V E R AG
E
C O O L E R
S I N G L E ZO N E
Contents
Page
Safety Information ................................................................................4-11
Types of Safety Warnings .................................................................... 4
General Safety ................................................................................... 5-7
Save These Instructions ...................................................................... 8
Disposal of Old Appliance ................................................................... 8
Before Using Your Appliance ............................................................... 9
Installation of Your Appliance ........................................................... 9-10
Attention ............................................................................................. 10
Electrical Connection .......................................................................... 11
Introduction ............................................................................................ 12
List of Materials ..................................................................................... 13
Product
........................................................................ 14-18
Product Summary .............................................................................. 14-16
Internal Storage .................................................................................. 14-16
Parts
.............................................................................. 17
Dimensions ........................................................................................ 18-19
Installation Instructions ....................................................................... 20-24
Installation Clearance Requirements .................................................. 20
Carbon Filter ....................................................................................... 21
Installing the Handle ........................................................................... 21
Reversing the Door Swing of Your Appliance ....................................... 22
Installation of external timber doors .................................................... 23
Removing the Wooden Shelves ......................................................... 24
Operating Your Appliance ................................................................... 25-26
Using the Control Panel ...................................................................... 25
Trouble Code ...................................................................................... 26
Defrosting ........................................................................................... 26
Care and Maintenance ....................................................................... 26-27
Norm
al Sounds ................................................................................... 27
Cleaning the Unit ................................................................................ 27
Power Failure ...................................................................................... 28
Moving Your Beverage Cooler ............................................................ 28
Energy Saving Tips ............................................................................ 28
Troubleshooting .................................................................................. 29-30
Safety Information
Your safety and the safety of others are very important. We have provided many important safety messages
i
n this manual for your appliance. Always read and obey all safety messages.
This is the Safety Alert Symbol. This symbol alerts you to potential hazards that can cause severe bodily
i
njury or death. All safety messages will follow the Safety Alert Symbol and either the words “DANGER”
“
WARNING” or “CAUTION”
4
Use, Care, and Installation Guide
DANGER
Danger means that failure to heed this safety
statement may result in severe injury or death.
WARNING
Warning means that failure to heed this safety
statement may result in extensive product damage,
serious personal injury, or death.
CAUTION
Caution means that failure to heed this safety
statement may result in minor or moderate
personal injury, property or equipment damage.
Safety Information
For your safety, read all instructions carefully before operating the appliance.
General Safety
Use this appliance only as described in this manual. Other uses not recommended may cause re,
electric shock or personal injury.
This appliance is not intended for use by been
adequately supervised by a responsible person to ensure that they can use the appliance safely.
Young children should be supervised to ensure that they never play with the appliance.
To protect against the risk of electric shock, NEVER IMMERSE the unit, cord, or plug in water or
spray any other liquid.
Unplug the appliance from the plug socket when not in use, when moving from one location to
another and before cleaning.
Use, Care, and Installation Guide
5
DANGER
When using an electrical appliance, basic precautions should
and
injury to persons.
WARNING
T
o unplug
or disconnect the appliance from the power supply before
servicing.
CAUTION
F
lammable refrigerant used! When handling, moving and use of
the refrigerator, make sure to avoid either damaging the
refrigerant tubing, or increasing the risk of a leak.
Safety Information
For your safety, read all instructions carefully before operating the appliance.
To disconnect the appliance, grip the plug and pull it from the wall outlet. Never pull by the cord.
Never operate the appliance in the presence of explosive and/or ammable fumes.
heating
appliance.
Never operate the appliance with a damaged cord or plug, if the product malfunctions, or if it is
dropped or damaged in any manner.
The use of attachments not recommended by the manufacturer may be hazardous.
Never operate if the housing is removed or damaged.
AC outlet (receptacle) and plug may cause overheating and a distortion of
outlet.
Locate the unit away from direct sunlight and sources of heat (stove, heater, radiator, etc.).
This appliance is CFC and HFC free and contains small quantities of Isobutane (R600a), an
environmentally friendly coolant.
CAUTION – Risk of fire or explosion due to puncture of refrigerant tubing; follow handling
instructions carefully. Flammable refrigerant used.
You must ensure that the cooling circuit is undamaged when installing the appliance. However, if it
which
the appliance is located should be ventilated properly and according to state and local codes.
Never use an appliance with a damaged circuit.
Ensure that the ventilation openings to and from a built-in appliance are never blocked or covered.
No liability will be accepted for any damage caused by misuse of the appliance, or as a result of
claims will apply.
6
Use, Care, and Installation Guide
WARNING
Prop. 65 Warning for California Residents: This product may
contain chemicals known to the State of California to cause
cancer, birth defects, or other reproductive harm.
Safety Information
For your safety, read all instructions carefully before operating the appliance.
Never attempt to repair or replace any part of your appliance unless it is
technician.
DANGER – Risk of fire or explosion. Flammable refrigerant used. To be repaired only by
trained service personnel. Use only manufacturer authorized service parts. Any repair
equipment used must be designed for flammable refrigerants. Follow all manufacturer
repair instructions. Do not puncture refrigerant tubing.
DANGER – Risk of fire or explosion. Flammable refrigerant used. Do not use mechanical
devices to defrost refrigerator. Do not puncture refrigerant tubing.
Replace all access panels before operating.
Use two or more people to move and install the appliance. Failure to do so can result in back or
other injury.
explosion. Never store or use gasoline or other flammable vapors and liquids in the vicinity of this
hazard or explosion.
Never connect or disconnect the electric plug with wet hands.
It is recommended that a separate circuit, serving only your appliance be provided. Use
chain.
Use, Care, and Installation Guide
7
WARNING
Never operate any other electrical appliance inside this
appliance.
WARNING
electric shock or personal injury, unplug
or disconnect the appliance from the power supply before
servicing.
Safety Information
For your safety, read all instructions carefully before operating the appliance.
Save These Instructions
If you are experiencing problems, check the Troubleshooting Guide at the back of this manual. It lists
causes of minor operating problems that you can correct yourself.
Disposal of Old Appliance
Dispose of your appliance packaging properly. Refrigeration equipment must be properly disposed
of in a way which protects the environment. This applies to your old appliance and to your new unit
once it has reached the end
of its service life.
WARNING: Risk of child entrapment. Before you throw away your old refrigerator or freezer,
Take off the doors. Leave the shelves in place so that children may not easily climb inside.
CAUTION – Risk of fire or explosion. Dispose of refrigerator properly in accordance with the
applicable federal or local regulations. Flammable refrigerant used.
The appliance must not be disposed with normal household waste collection.
The coolant circuit, particularly the heat exchange at the back/bottom of the unit, must not be
damaged.
The symbol on the product or its packaging indicates that this product is not to be handled
as normal household waste but is to be taken to a recycling collection point for electrical and
electronic goods. By correctly disposing of this product you are contributing to the protection of
the environment. Improper disposal endangers health and the environment. Further information
about the recycling of the product may be obtained from your town hall or local waste collection
department.
8
Use, Care, and Installation Guide
WARNING
Please ensure that old, worn appliances are rendered unusable
before disposal by removing the plug, cutting the power cable,
and removing or destroying any snap fastenings or bolts. You will
thus prevent children from locking themselves in the appliance
other way.
Safety Information
For your safety, read all instructions carefully before operating the appliance.
Before Using Your Appliance
Remove all exterior and interior packing.
Before connecting the appliance to the power source, let it stand upright for approximately 2
hours. This will reduce the possibility of a malfunction in the cooling system caused by handling
during transportation.
Clean the interior surface with warm water using a soft cloth.
The door on this appliance can be opened from either the left or the right side. The unit is delivered
with the door opening on the left side. Should you wish to open the door from the right, follow the
instructions, “Reversing the Door Swing of your Appliance,” listed below.
Installation of Your Appliance
The appliances are designed for either built-in, or free-standing installation.
To level
your appliance, adjust the 4 legs until level.
Locate the appliance away from direct sunlight and sources of heat (stove, heater, radiator,
etc.).
coating and heat sources may increase electrical
consumption. Extreme cold ambient temperatures may also cause the unit not to perform
properly.
Never place the unit in damp areas.
Plug the appliance into an exclusive, easily accessible electrical socket.
Any questions concerning power and/or electrical connection should be directed towards a
center.
The air vent at the front of the appliance must never be covered or blocked in any way.
Use, Care, and Installation Guide
9
WARNING
Do not store or install the appliance outdoors.

Safety Information
For your safety, read all instructions carefully before operating the appliance.
The appliance must be installed to all electrical connections in accordance with state and local
codes.
Use two or more people to move and install the beverage cooler. Failure to do so can result in back
or other injury.
ow is restricted due to a
fully loaded cabinet.
Install the beverage cooler in a well-ventilated area where the ambient temperature is above 50ºF
and below 90ºF.
Attention
Never overload the cabinet.
Never open the door unless necessary.
Never cover shelves with aluminum foil or any other shelf material which may prevent air
circulation.
Should the appliance be left empty for long periods, it is suggested that the appliance be
unplugged, and, after careful cleaning, leave the door ajar to allow air to circulate inside the
cabinet in order to avoid possible condensation, mold or odors from forming.
10
Use, Care, and Installation Guide
Safety Information
For your safety, read all instructions carefully before operating the appliance.
Electrical Connection
Check that the voltage marked on the product corresponds with your supply voltage.
This appliance should be properly grounded for your safety. The power cord of this appliance is
equipped with a three-pin plug which mates with standard three-pin wall outlets to minimize the
possibility of electrical shock.
Never under any circumstances cut or remove the third ground prong from the power cord supplied
.
For personal safety, this appliance must be properly grounded.
grounded. When a standard two-pin wall outlet is encountered, it is your responsibility and obligation
to have it replaced with a properly grounded three-pin wall outlet.
To prevent accidental injury, the cord should be secured behind the appliance and not left exposed or
dangling.
The appliance should always be plugged into its own individual electrical outlet which has a voltage
rating that matches the rating label on the appliance. This provides the best performance and also
re hazard from overheating. Never unplug
receptacle. Repair or replace immediately all power cords that have become frayed or otherwise
damaged. Never use a cord that shows cracks or abrasion damage along its length or at either end.
When moving the appliance, be careful not to damage the power cord.
Never use your appliance with an extension cord unless this cord has been checked and tested by a
-wire grounding
extension cord that has a grounding plug and outlet and that the electrical rating of the cord is 115
volts and at least 10 amperes.
Use, Care, and Installation Guide
11
WARNING
Improper use of the grounded plug can result in the risk of
electrical shock. If the power cord is damaged, have it replaced
center.
Introduction
Thank you for purchasing your beverage cooler.
This manual contains important information regarding the proper installation, use, and maintenance
of your beverage cooler. Following this manual will ensure that your product will work at its peak
For Your Records
Please write down the model number and serial number below for future reference. Both numbers are
located on the rating label on the back of your unit and are needed to obtain warranty service. You
may also want to staple your receipt to this manual as it is the proof of your purchase and may also
be needed for service under warranty.
Model Number:
Serial Number:
Date of Purchase:
To better serve you, please do the following before contacting customer service:
If you received a damaged product, immediately contac
t the retailer or dealer that sold you the
product.
Read and follow this instruction manual carefully to help you install, use and maintain your
beverage cooler.
Read the troubleshooting section of this manual as it will help you diagnose and solve common
issues.
12
Use, Care, and Installation Guide

List of Materials
Quantity
Part
Door handle
Allen/hex key
Door handle screws M4X18 roundhead
Connection pin
Coupling pin cover
Connecting pin fixing bolts M5×13 flange face
Hinge shims A B
Countersunk head screws for fixing wooden doors ST4x35
ST3.9×16 wood threads
M5×30 roundhead
M5×16 headband cushion
Wooden door connectors
Ecorative cover for wooden door connectors
User manual
Use, Care, and Installation Guide
13

14
Use, Care, and Installation Guide
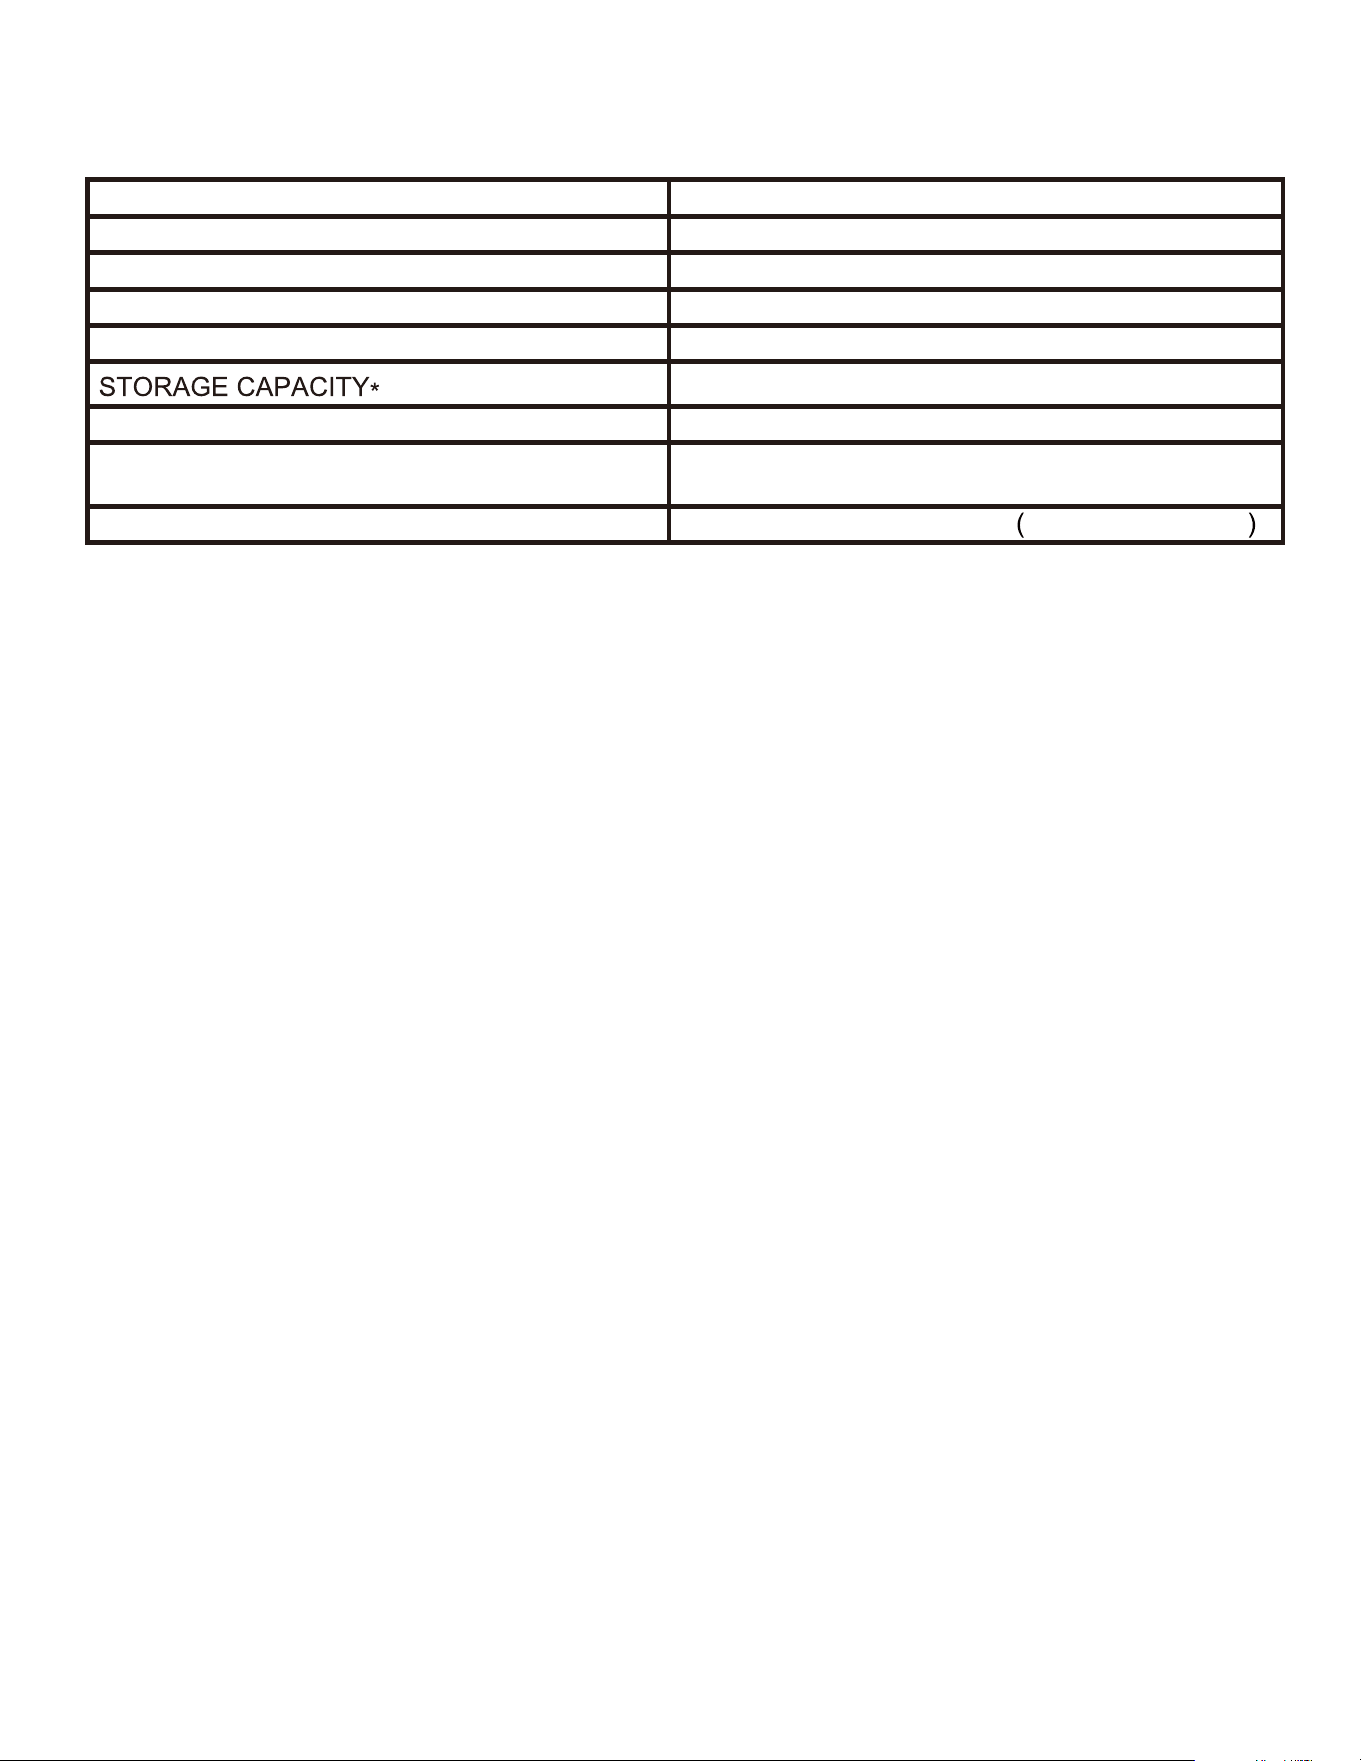
Product Summary
This appliance requires a standard 115/120 Volt AC~60Hz electrical ground outlet.
DESCRIPTION OF PRODUCT
Dual Zone wine cooler
MODEL
K24US
VOLTAGE/FREQUENCY
AC 115/60Hz
AMPERAGE
0.8A
COLOR
Black Cabinet with Stainless Steel Door
52 Bottles (750ml)
REFRIGERANT
R600a
TEMPERATURE RANGE
above zone :
39°F - 50°F
below zone: : 50°F - 68°F
DIMENSIONS (HxWxD)
34-1/16"x23-7/16"x23-1/16" 866x595x586mm
*Storage capacity is based on standard 12 oz. cans and 750 ml. Bordeaux-style wine bottles.
Internal Storage
`
Use, Care, and Installation
15
K24US

Product Summary
This appliance requires a standard 115/120 Volt AC~60Hz electrical ground outlet.
DESCRIPTION OF PRODUCT
Dual Zone wine cooler
MODEL
K24UPR
VOLTAGE/FREQUENCY
AC 115/60Hz
AMPERAGE
0.8A
COLOR
Black Cabinet without Front Panel (Panel Ready)
52 Bottles (750ml)
REFRIGERANT
R600a
TEMPERATURE RANGE
above zone :
39°F - 50°F
below zone: : 50°F - 68°F
DIMENSIONS (HxWxD)
34-1/16"x23-7/16"x23-1/16" 866x595x586mm
*Storage capacity is based on standard 12 oz. cans and 750 ml. Bordeaux-style wine bottles.
Internal Storage
`
16
Use, Care, and
Installation Guide
K24UPR
Use, Care, and Installation
17
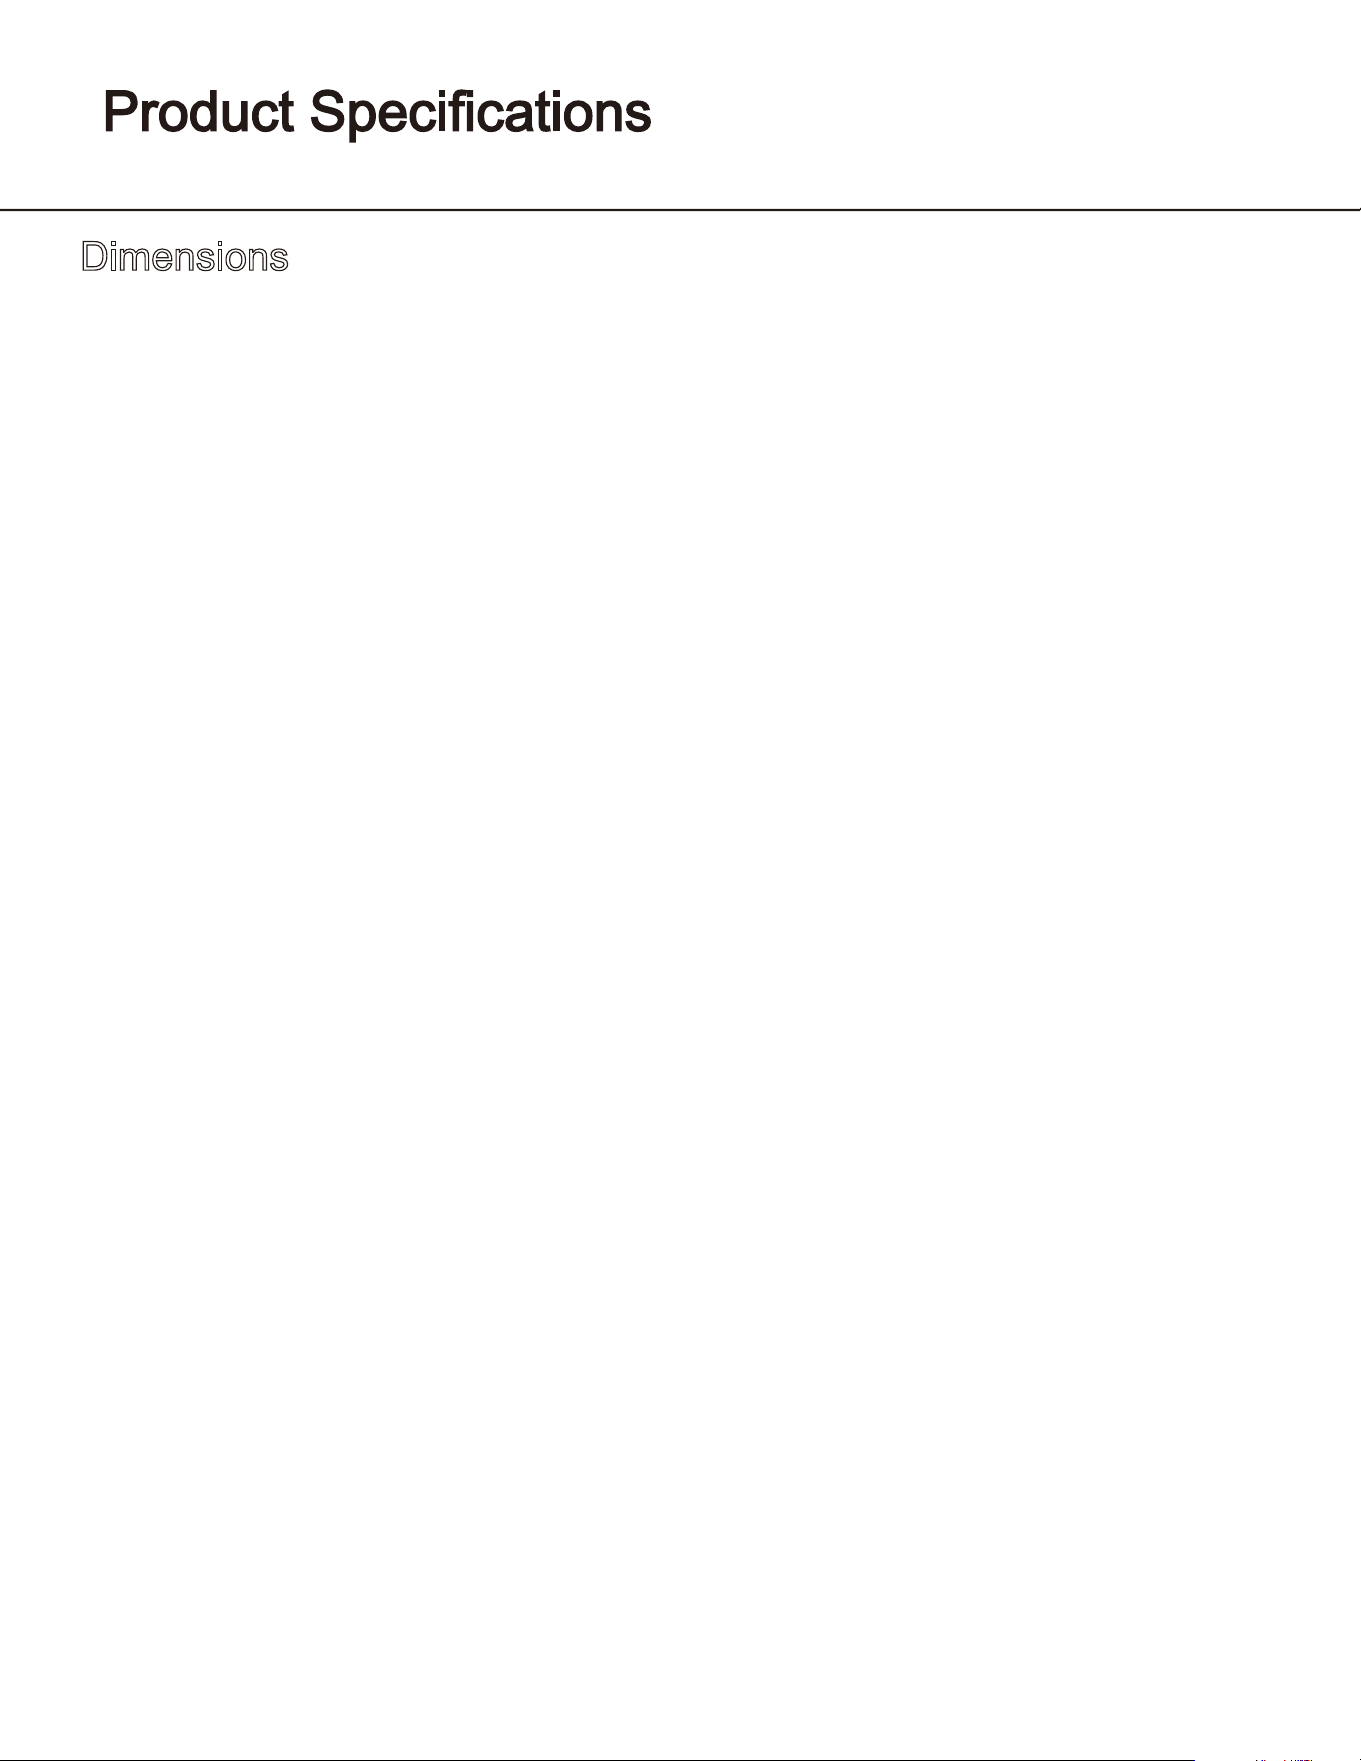
Dimensions
18
Use, Care, and Installation Guide

Dimensions
Use, Care, and Installation
Guide
19
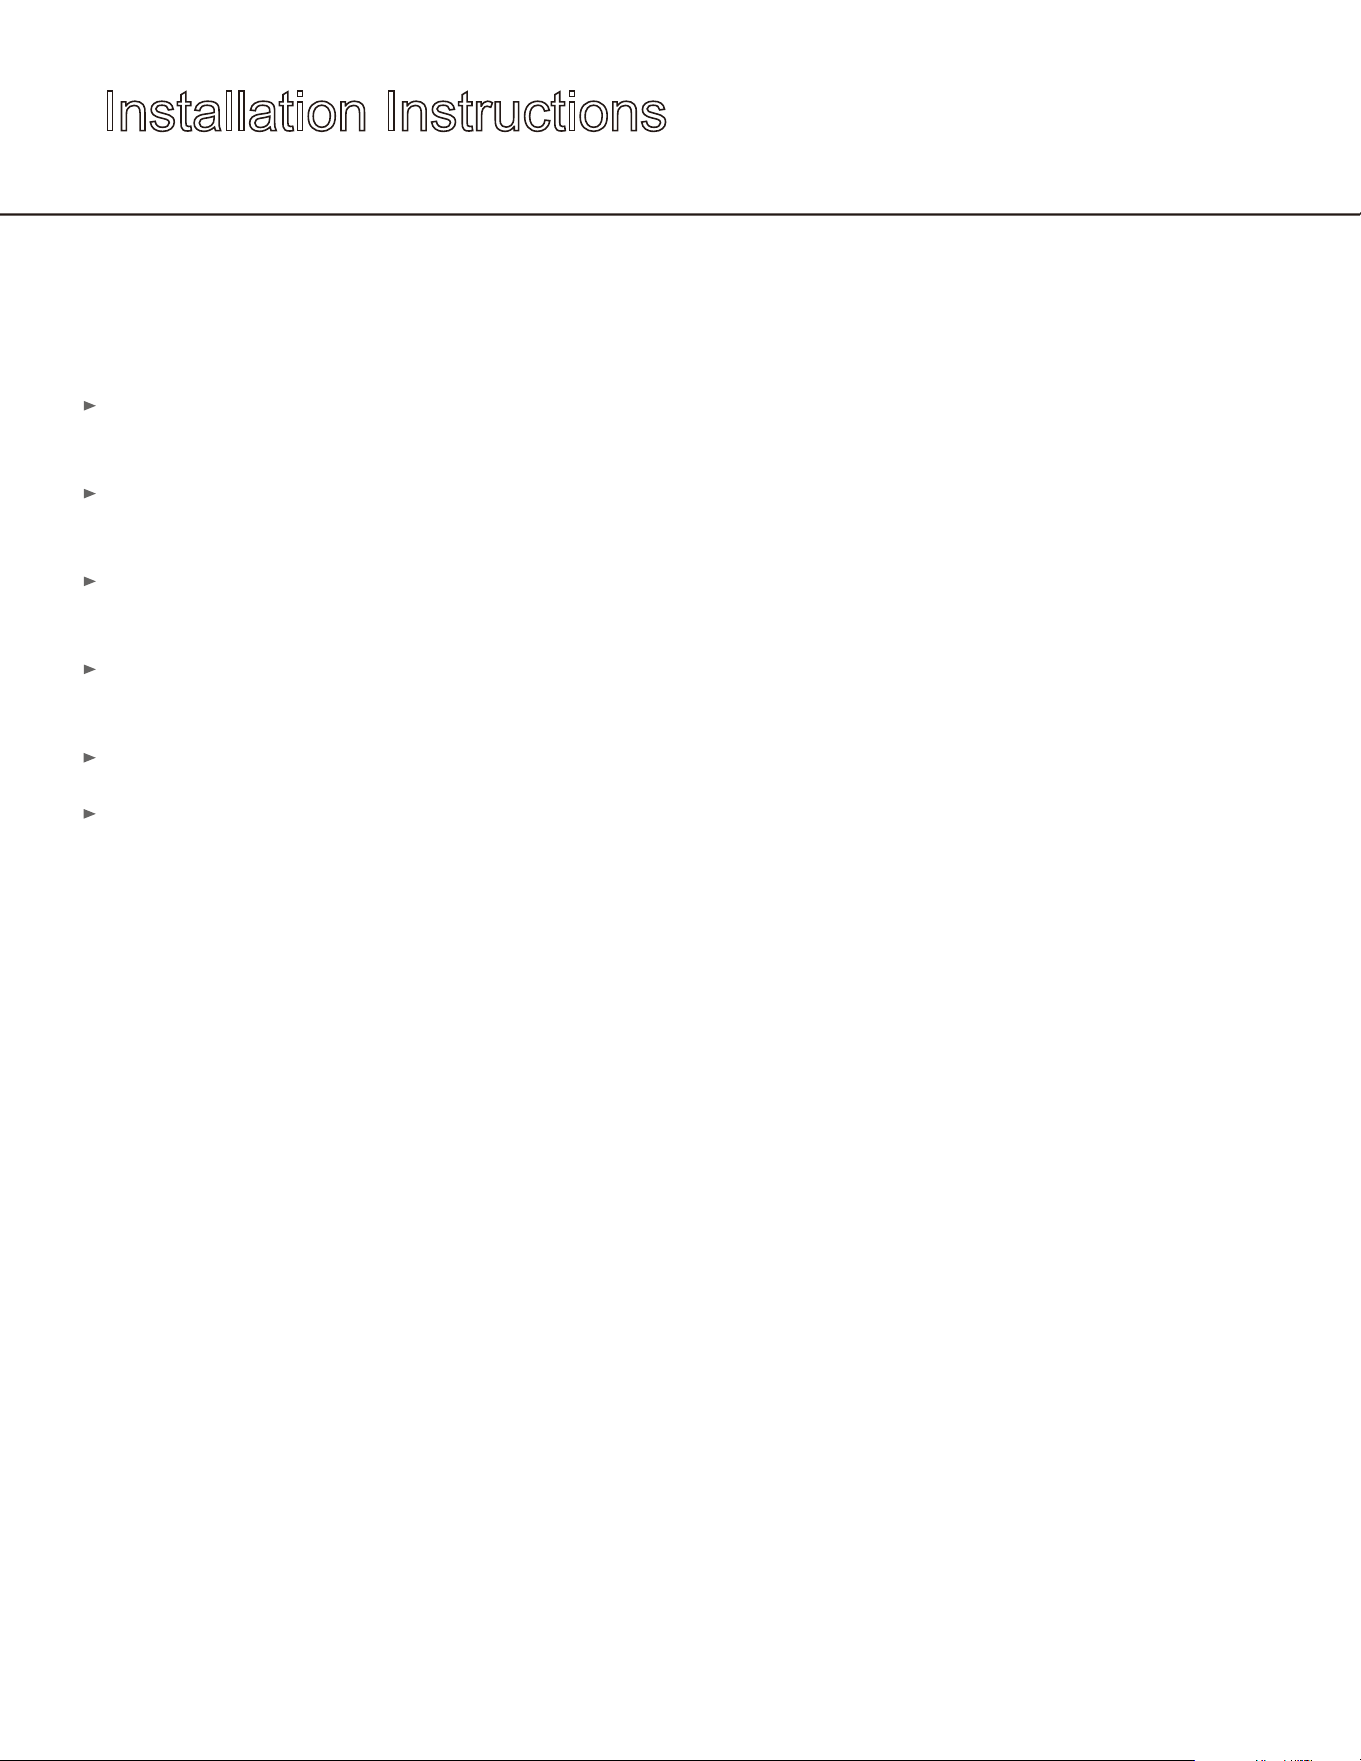
Installation Instructions
Installation Clearance Requirements
When installing the beverage cooler under a counter, follow the recommended spacing dimensions
shown.
For proper clearance of the electrical plug, allow at least 1” of clearance at the back as shown in
the diagram.
An installation next to a wall will require a minimum 2-1/4” door clearance to accommodate the
handle.
The cabinet should allow at least 24” for the width and 34-1/4” for the height to
accommodate the beverage cooler.
The power cable is located on the back right of the unit and has a length of 72” to accommodate
multiple outlet locations.
Once you are ready to install the unit, you must adjust the feet to level the beverage cooler.
The installation should allow the unit to be pulled forward for servicing, if necessary.
Before installation, please prepare the necessary
installation tools as shown below
20
Use, Care, and
Installation Guide
Installation Instructions
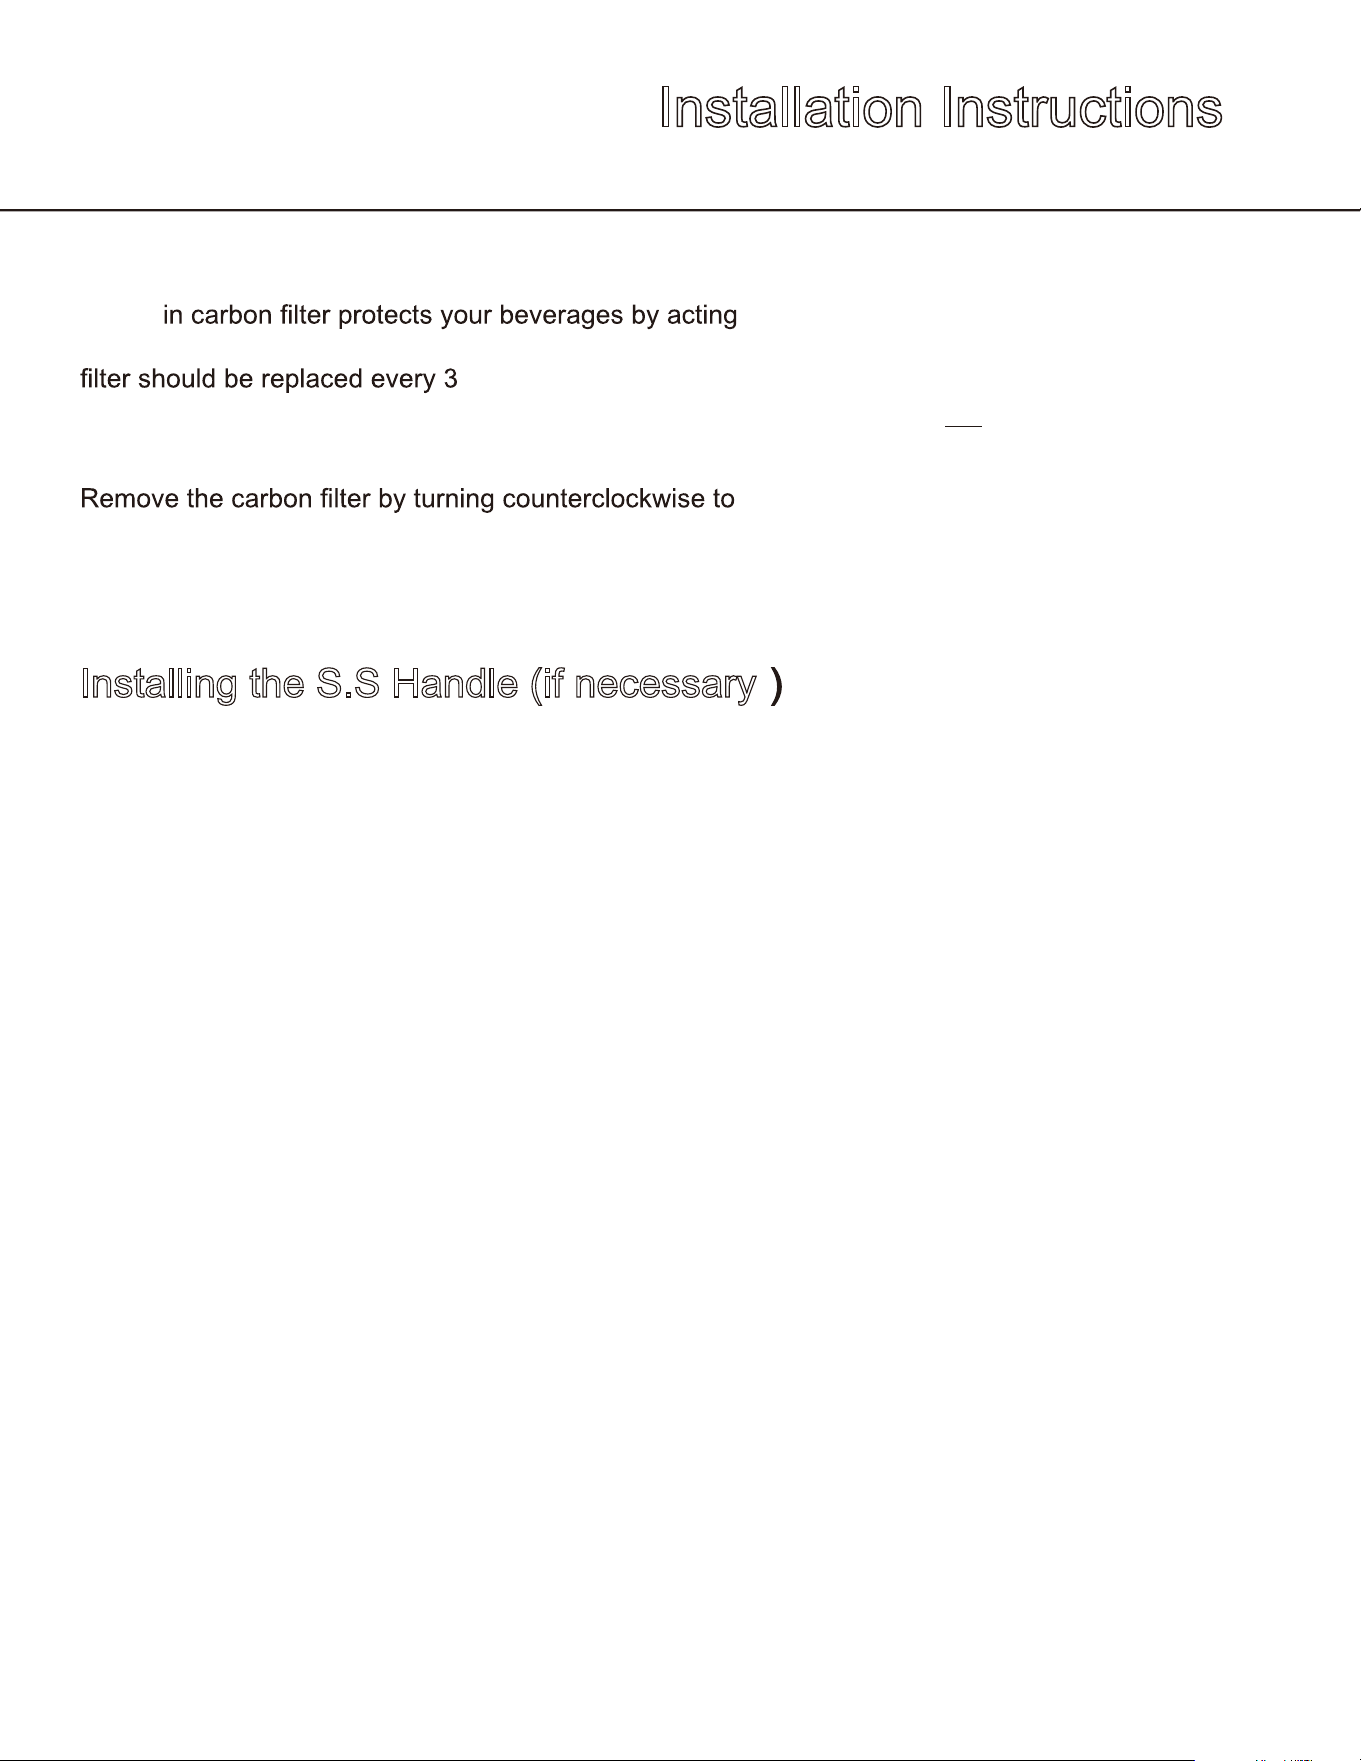
Carbon Filter
A built-
as a natural barrier against harmful odors. The carbon
-6 months depending on
the unit’s exposure level to odor. If the unit is placed in a
kitchen, regular replacement every three months is ideal.
unlock from rear panel.
Installing the S.S Handle (if necessary
1. Assemble the handle with the two side brackets as shown in the diagram. Line up the
handle side bracket with the top handle screw that was inserted. Be sure to note bracket
direction.
2. Tighten the screw part way using the provided Allen/hex wrench. Repeat for the lower
handle bracket/screw. Once both screws are started, go back and tighten the screws to
be snug. Do not over tighten.
Use, Care, and Installation Guide
21
Installation Instructions
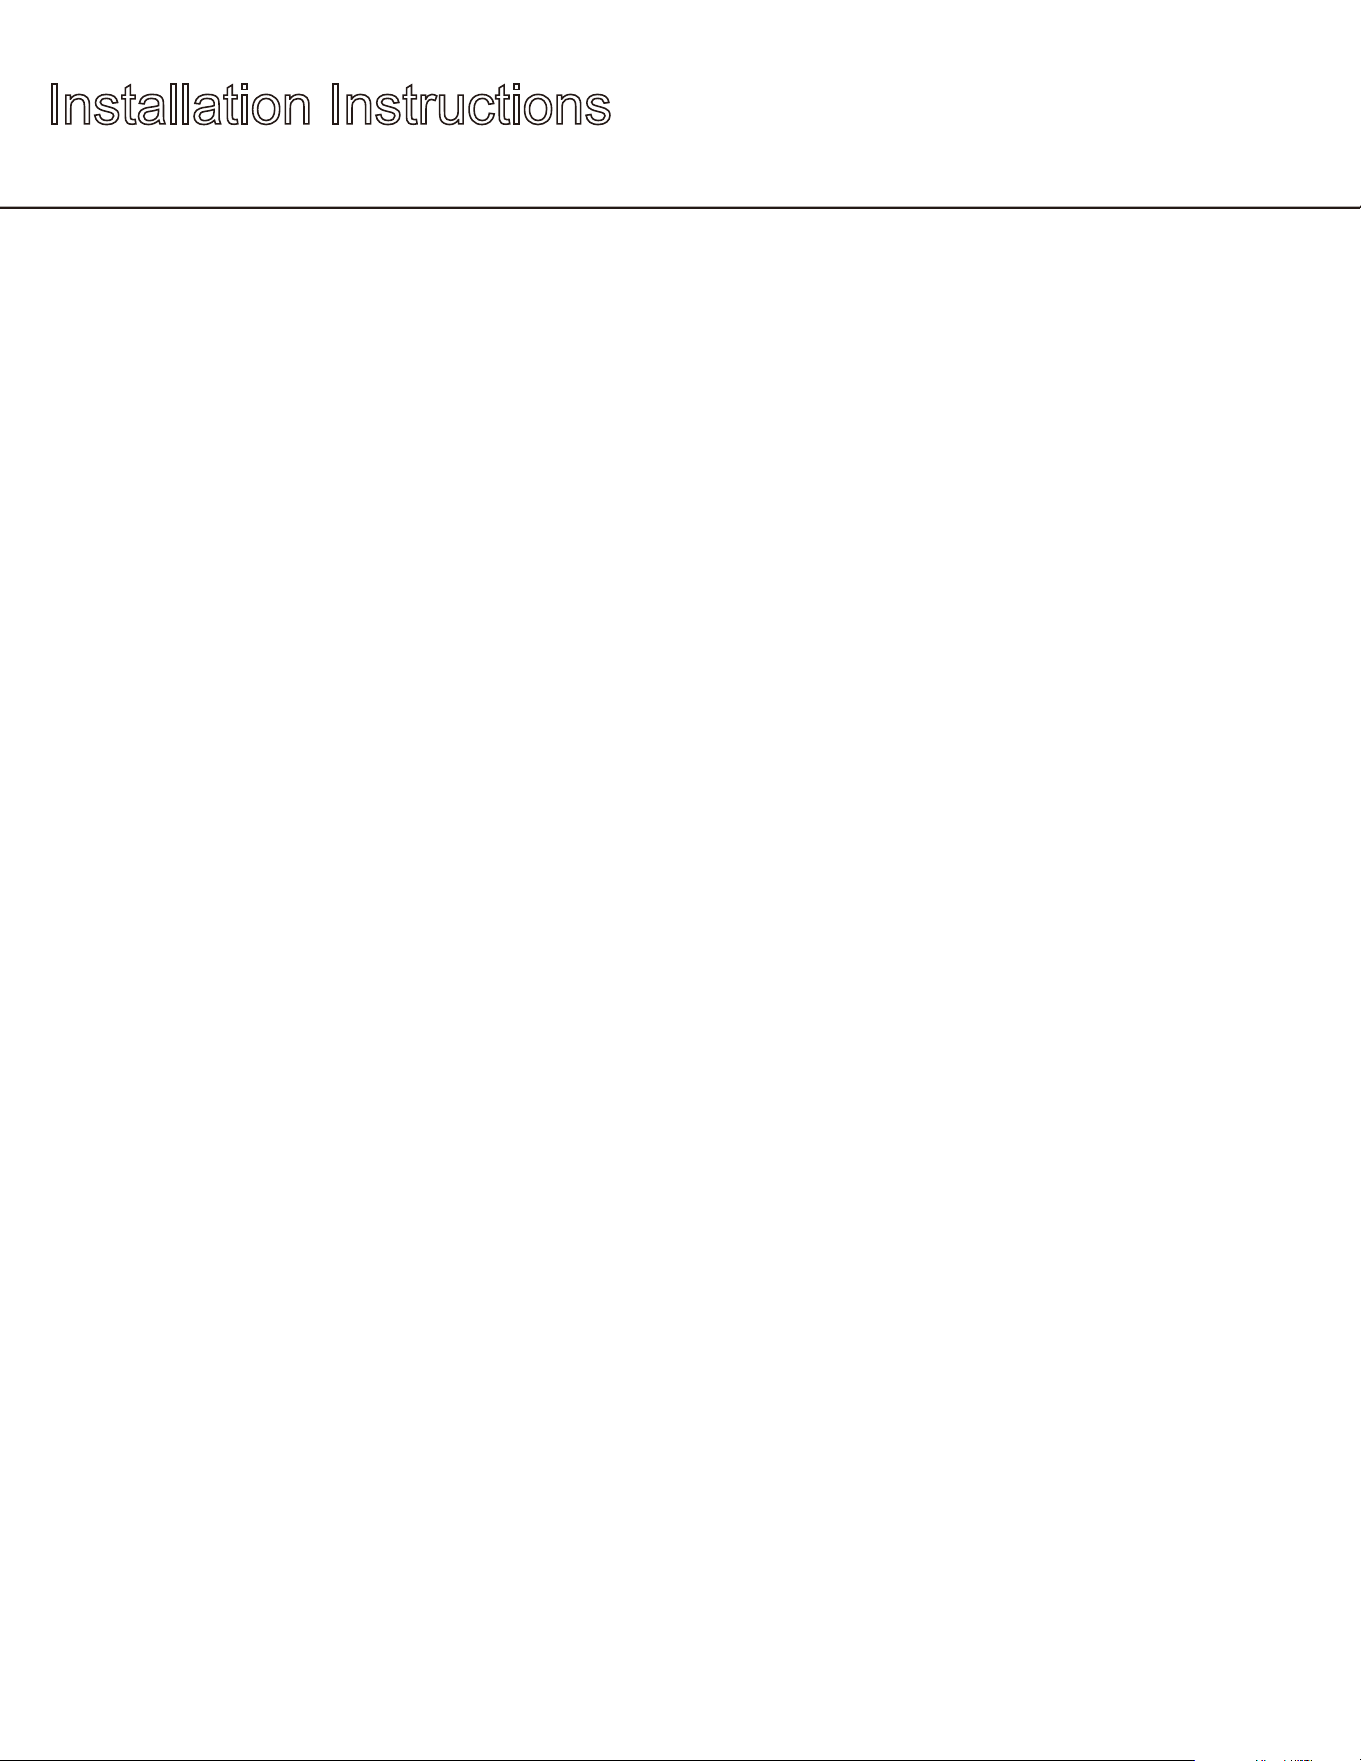
Reversing the Door Swing of Your Appliance
Should you desire to reverse the opening direction of the door, please follow the instructions below.
Safely reversing the door swing of your appliance should require at least two people.
1. Remove the screws holding the hinges from
the box and set the door aside.
2. Remove the induction magnet unit from the
bottom of the door and secure it to the other
end of the door.
3. Flip the door 180 degrees and moun
t it to
the box.
22
Use, Care, and Installation Guide
Installation Instructions
Installation of external timber doors
To install an exterior wood door, review the wood door fabrication requirements dimensions on page
18 of this manual and follow the steps below, which require a minimum of two people.
1. Fix the connecting plate to the corresponding hole
in the wooden door.
Using 3x (ST3.9×16) wood threads
2. Hang the wooden door on the glass door, secure it
with screws and adjust the bolts on the left
and right
sides to bring the wooden door to a satisfactory
relative position to the glass door. Note that the bolt in
the center is different from the specification of the two
Sides.
the specification of the center is 1(M5×16) headband
cushionthe two next to it are 2x(M5×30)roundhead.
3. Remove the glass door seal, then measure
and
adjust the wood door so that it is centered left to
right with the glass door, approximately 1/4 inch
(5.5 mm) above the glass door
4. Use 4 long black screws to drive through
the door from
the
inside of the glass door into the wood door.
Finally, install the wood door trim cover to the top of the door
Screw size: ST4x35 countersunk head black wood threads

Installation Instructions
5. Fixing of the box to the cabinet:
5.1 according to actual cabinet dimensions, if hinge spacers
are required, install them on the side of the hinge.
5.2 Install the connecting pin on the box on the other side of
the hinge. Use M5x13 size bolts
5.3 Adjust the clearance between the box and the cabinet,
and finally fix the hinge + connecting pin with the cabinet
using 3.9x16 wood thread.
To prevent damaging the door or door gasket, make sure the door is open at least 90-degrees
when pulling shelves out of the rail compartment.
The door opens to a maximum of 135 degrees with a door stop on the bottom hinge preventing the
door from opening further.
Removing the Wooden Shelves
1. Open the box door completely.
2. remove all items from the wine rack (if any).
3. pull the wine rack toward you until it is fully extended outward.
4. as shown in the picture below, the wine rack has metal snaps on both sides. Facing the unit, pull
the clips on the wine rack up and out, then carefully pull the clips on the back up and out.
5. pull the wine rack evenly out from the track until it is
completely removed from the liner.
24
Use, Care, and
Installation Guid
Operating Your Appliance
to 5 minutes before restarting the unit. If you attempt
to restart before this time delay, the appliance may not start and will not keep the last set temperature.
Using the Control Panel
The temperature range of the above zone is 39 º F- 50 º F
The temperature range of the below zone is 50 º F- 68 º F
Power Button
Press and hold this
Increase Temperature
Press this button to increase the temperature by one (1) degree increments. 50ºF is the highest
available temperature on this unit.
Decrease Temperature
Press this button to decrease the temperature by one (1) degree increments. 34ºF is the lowest
available temperature on this unit.
Interior Light
Press this button to cycle through the
internal light settings. There are three light
settings: Cloud White, Deep Blue and Amber.
If you want the light always on, you can long press this button straight "ON" blinking,
continue to press the button to select different colors of light. If you want to cancel this
function, press and hold this button repeatedly.
Temperature zone switching button
switch the setting temperature of the above temperature zone or the below temperature
zone by pressing button.
When the sys
tem is powered on for the first time, the system defaults setting is above
temperature zone.
Before temperature adjustment, you must first press the temperature zone switching key
to select the temperature zone to be set.
Use, Care, and Installation Guide
25
Operating Your Appliance
Sabbath pattern
Press and hold the button to turn off the light and display.
For models without this button, long press the temperature “ ”button
ºF/ºC Selector
Hold the Increase and Decrease Temperature buttons at the same time to switch the display
temperature.
NOTE: The beverage cooler is equipped with a temperature memory function. If power is suddenly
lost, the previous set temperature will be saved, and the cooler will return to this setting once
power is restored.
Trouble Code
When a malfunction occurs, contact a service technician for repairs
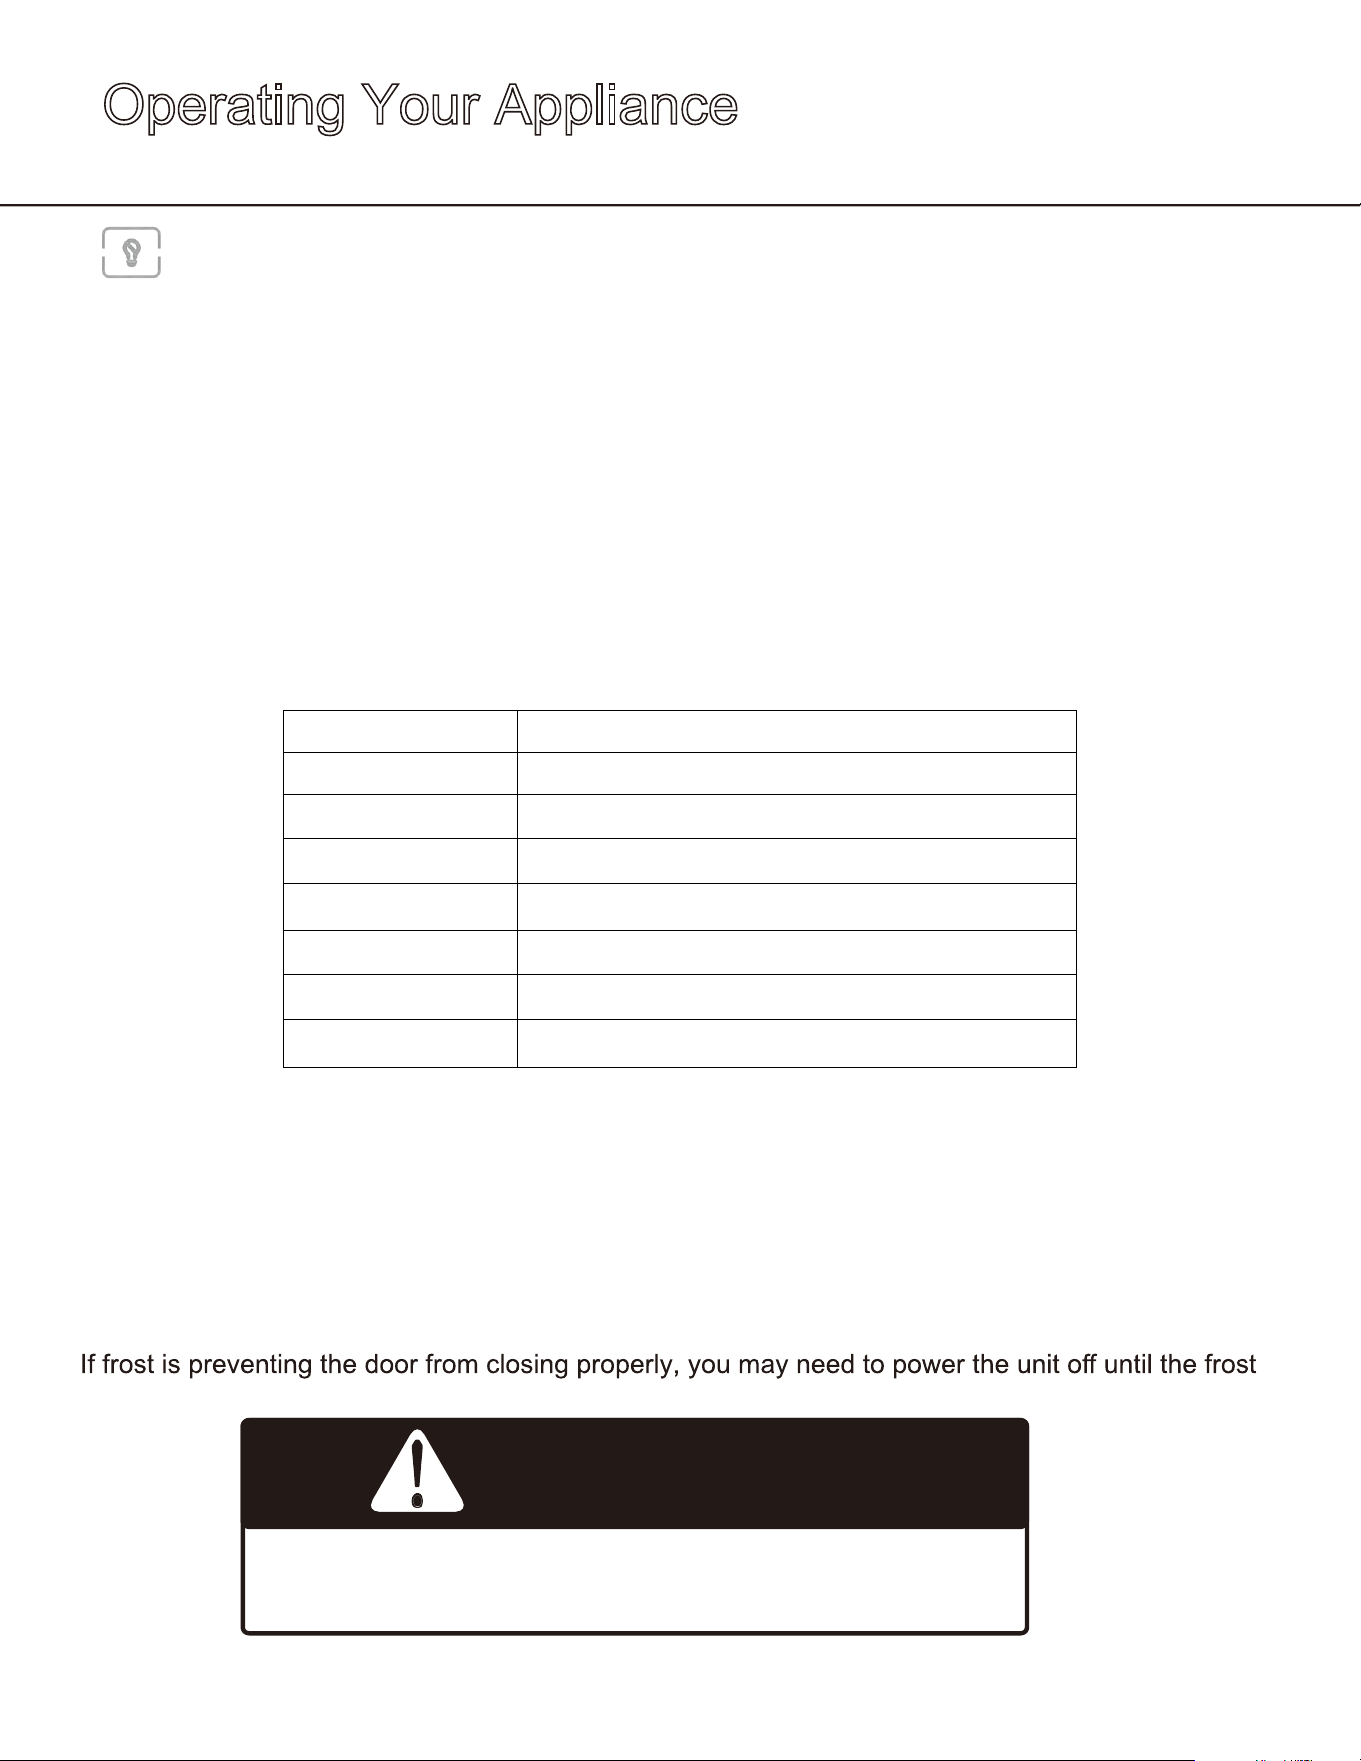
Defrosting
The beverage cooler is designed with an automatic defrost system. However, on colder settings, some
frost may build up. Additionally, the more humid the ambient conditions, the more frost may build up.
Keep the door closed as much as possible and avoid opening the door unnecessarily to minimize frost
build-up.
melts (possibly up to 24 hours). Use a soft absorbent towel to dry the unit.
26
Use, Care, and Installation Guide
Error Explanation Error Explanation
E1 Box temperature sensor failure
E2 Lower Temperature Zone Space sensor failure
E3 Frost sensor failure
E8 malfunction of communications
1E Fan failure
F2 High temperature alarm
F1 Low Temperature Alarm
WARNING
Do not puncture refrigerant tubing

Care and Maintenance
Normal Sounds
Your new beverage cooler may make sounds that are not familiar to you. Most of the new sounds are
normal. Hard surfaces like
make the sounds seem louder than they actually are.
The following describes the kinds of sounds that might be new to you and what may be making them.
Rattling noises may come from the ow of the refrigerant or the water line.
Items stored on top of the beverage cooler can also make noises.
make a pulsating or high-pitched sound.
Water running from the evaporator to the water bin may make a splashing sound.
your
beverage cooler.
You may hear air being forced over the condenser by the condenser fan.
Cleaning the Unit
Interior Cleaning
1.
Disconnect power to the unit.
2.
Open the door and remove the contents and shelves.
3.
With a clean cloth, wipe down the interior of the unit.
4.
Reinsert the shelves and beverages.
5.
Reconnect power to the unit.
Exterior Cleaning
The door and cabinet may be cleaned with a mild detergent and lukewarm water solution such as
two (2) tablespoons of baking soda to one (1) quart of water. Do not use solvent based or abrasive
cleaners. Use a soft sponge and rinse with clean water. Wipe with a soft clean towel to prevent
water spotting. If the door panel is stainless steel, it can discolor when exposed to chlorine gas and
moisture. Clean stainless steel with a cloth dampened with a mild detergent and warm water solution.
Never use an ab
rasive or caustic cleaning agent.
Use, Care, and Installation Guide
27
Care and Maintenance
Power Failure
longer period of time, you need to take the proper steps to protect your contents.
Moving Your Beverage Cooler
Remove all items.
Securely tape down all loose items (shelves) inside your appliance.
Turn the adjustable leg all the way up (clockwise) to the base to avoid damage.
Tape the door shut.
Be sure the appliance stays secure in the upright position during transportation. Also protect
outside of appliance with a blanket, or similar item.
Energy Saving Tips
The appliance should be located in the coolest area of the room, away from heat producing
appliances, and out of the direct sunlight.
Ensure that the unit is adequately ventilated. Never cover air vents.
Only open the door for as long as necessary.
28
Use, Care, and Installation Guide
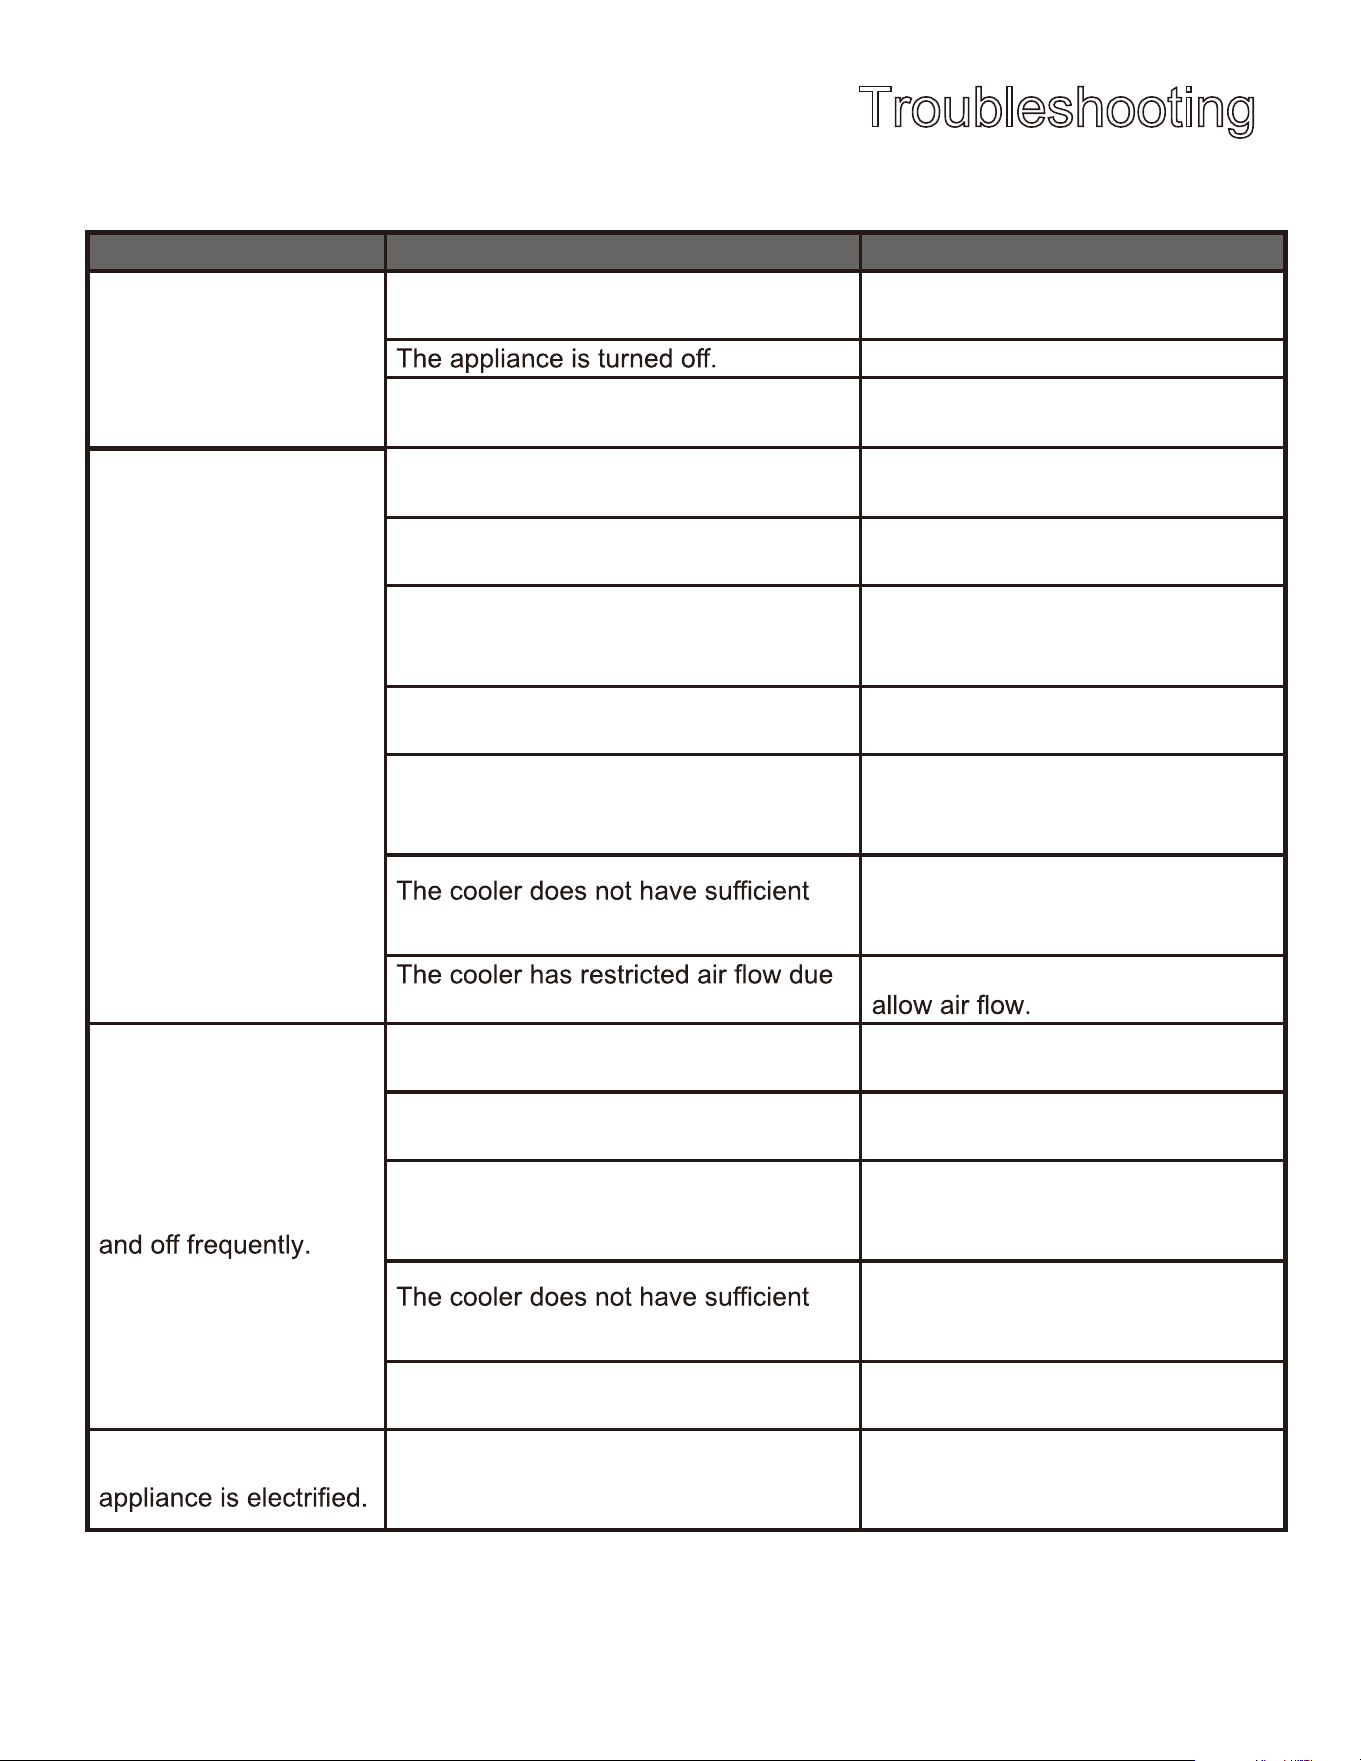
Troubleshooting
Possible Problem
Possible Cause
Solutions
T
he appliance does not
ope
rate.
Not plugged in.
Ensure the appliance is plugged in
and the power outlet has power.
Turn on the appliance.
The circuit breaker tripped or has a
blown fuse.
Replace the broken fuse or reset
the breaker.
The appliance is not
cold enough.
Temperature control setting is too
high.
Adjust the set temperature.
External environment may require a
higher setting.
Keep the appliance away from
sunshine or other heat sources.
The door is opened too frequently or
for long periods of time.
Close the door tightly and do not
open the door too frequently or
for a long period of time.
The door gasket is not sealed properly.
Ensure the door gasket is not
loose.
Demonstration mode may be enabled.
See the Operating Your
Appliance section and verify if
Demonstration mode is disabled.
ventilation.
Read and follow the “Installation
Clearance Requirements” in the
Installation Instructions section.
to too much storage.
Open space in the cabinet to
The appliance turns on
The room temperature is hotter than
normal.
Run the refrigerator at the
appropriate ambient temperature.
The door gasket is not sealed properly.
Ensure the door gasket is not
loose.
The door is opened too frequently or
for long periods of time.
Close the door tightly and do not
open the door too frequently or
for a long period of time.
ventilation.
Read and follow the “Installation
Clearance Requirements” in the
Installation Instructions section.
The door is not closed completely
Make sure the door is completely
closed.
The body of the
The unit is not properly grounded.
Contact your local electrician
to test your electrical grounding
system.
Use, Care, and Installation Guide
29
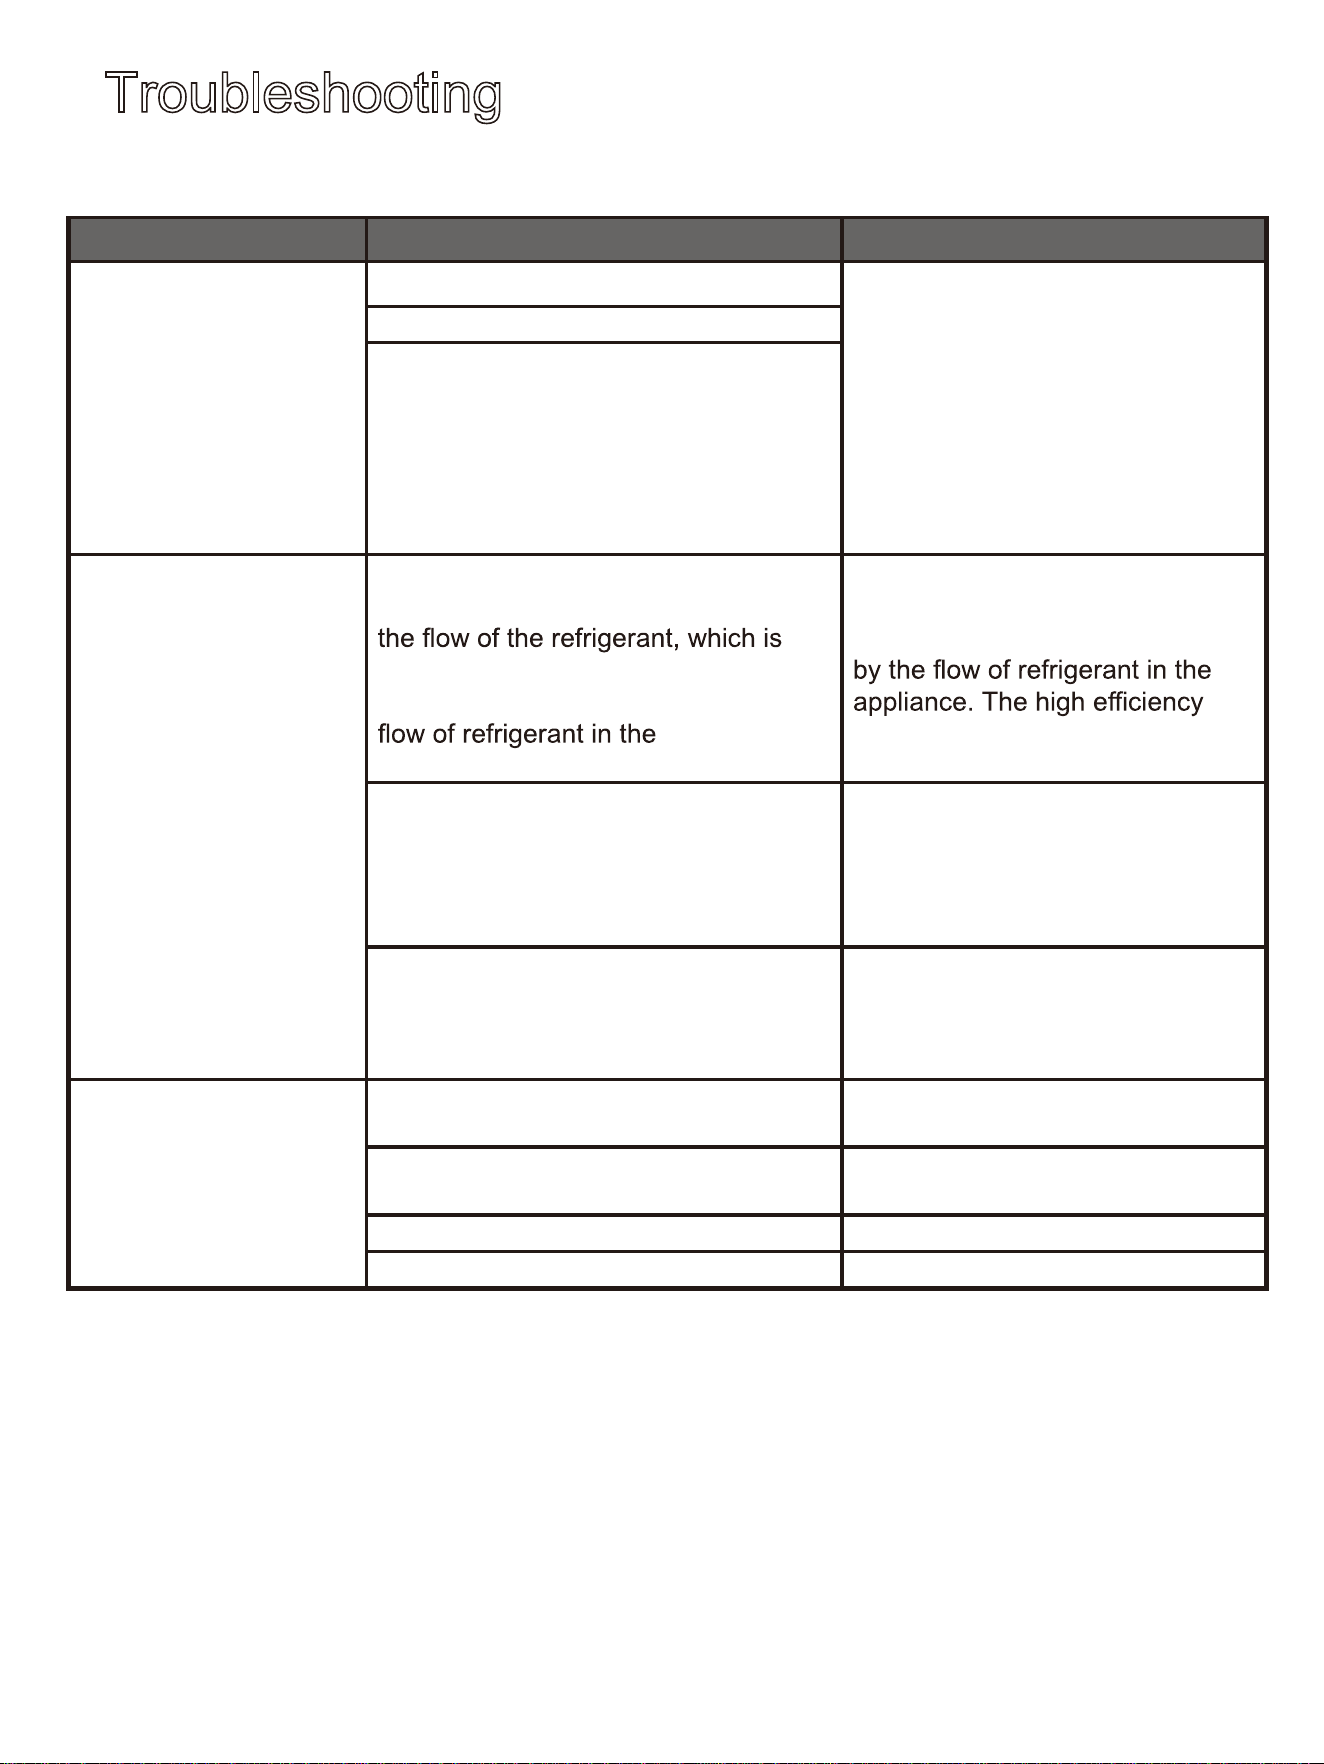
Troubleshooting
Possible Problem
Possible Cause
Solutions
Frost is forming in the
appliance.
The environment is too humid.
The unit uses an ‘auto-defrost’
system, under certain conditions,
manual defrosting may be
required. If frost builds up, you
can try running the refrigerator
on a warmer temperature setting,
minimizing the number of times
you open the door or unplugging
the unit to allow the frost to melt.
The ambient temperature is too low.
The door is being opened too
frequently.
The appliance makes
too much noise.
The rattling noise may come from
normal. As each cycle ends, you may
hear gurgling sounds caused by the
appliance.
It is normal that as each cooling
cycle ends, you may hearing
ratting or gurgling sounds caused
compressor may make a pulsating
or high pitched sound.
Contraction and expansion of the
inside walls may cause popping and
cracking noises.
Some popping or cracking noises
are normal. They are caused by
expansion and contraction of the
inside walls due to temperature
changes.
The unit is not level or is touching
another appliance.
Check to make sure the cooler is
level and that it is non in contact
with another appliance or
furniture.
The door will not close
properly.
The appliance is not level.
Make sure the appliance is on a
level surface.
The door gasket is not installed
correctly.
Make sure the door gasket is
properly installed.
The gasket is dirty.
Clean the door gasket.
The shelves are out of position.
Install the shelves correctly.
30
Use, Care, and Installation Guide


FOR MORE DETAILS AND INFORMATION, PLEASE VISIT OUR WEBSITE WWW.KUCHT.COM
WE TRANSFORM A SIMPLE KITCHEN INTO A PRO ONE.
THIS IS WHY WE CARE ABOUT MAKING VERY HIGH PERFORMANCE
RANGES AND HOODS, TO MAKE YOU FEEL LIKE A PRO AND STYLISH COOKER.
DESIGN: LONDON DC - WWW.LONDON-DC.COM
