Note: * indicates consumer replaceable/ removable parts
There are three ways to turn the toaster oven ON:
Turn Timer knob to “Stay On”.
+ Turn the Toast shade knob past medium shade and then to desired toast shade.
Turn Timer knob past 10 and then to desired time.
To turn OFF turn the Timer and Toast shade knobs to the Oposition.
IMPORTANT SAFEGUARDS.
When using electrical appliances. basic safety precautions should always be lowed. including the following:
Read all instructions before using.
Do not touch hot surfaces. Use handles or knobs.
To protect against electrical shock do not immerse cord. plugs or appliance in water or other liquid.
Close supervision is necessary when any appliance is used by or near children. Unplug from outlet when not in use and before cleaning. Allow to cool before putting on or taking off parts.
Do not operate any appliance with a damaged cord or plug. or after the appliance malfunctions or has been damaged in any manner. Contact consumer support for examination. repair. or electrical or mechanical adjustment. Or. call the appropriate toll-free number listed on the cover.
The use of accessory attachments not recommended by the appliance manufacturer may cause injuries.
Do not use outdoors.
Do not let cord hang over edge of table or counter. or touch hot surfaces.
Do not place on or near a hot gas or electric bumer. or in a heated oven.
Extreme caution must be used when moving an appliance containing hot oil or other hot liquids.
Use extreme caution when removing tray or disposing of hot grease.
To disconnect. turn the Timer and Toast shade knobs to the (OFF) position then remove plug from wall outlet.
Do not use appliance for other than intended use.
Do not clean with metal scouring pads. Pieces can break off the pad and touch electrical parts. creating a risk of electric shock.
Oversized foods or metal utensils must not be inserted in a toaster oven. as they may create a fire or risk of electric shock.
A fire may occur if the toaster oven is covered or touching flammable material including curtains. draperies. walls and the like. when in operation. Do not store any item on top of unit when in operation.
Extreme caution should be exercised when using containers constructed of other than metal or glass.
Do not store any material. other than manufacturer's recommended accessories. in this oven when not in use.
Do not place any of the following materials in the oven: paper. cardboard. plastic. and the like.
Do not cover crumb tray or any part of this oven with metal foil. This will cause overheating of the oven.
To tun OFF turn the Timer and Toast shade knobs to the position.
This appliance is not intended for use by persons (including children) with reduced physical. sensory or mental capabilities. or lack of experience and knowledge. unless they have been given supervision or instruction concerning use of the appliance by a person responsible for their safety.
Children should be supervised to ensure that they do not play with the appliance.
The appliance is not intended to be operated by means of an extemal timer or separate remote-control system.
SAVE THESE INSTRUCTIONS.
This product is for household use only.
GROUNDED PLUG
As a safety feature. this product is equipped with a grounded plug. which will only fit into a three-prong outlet. Do not attempt to defeat this safety feature. Improper connection of the grounding conductor may result in the risk of electric shock. Consult a qualified electrician if you are in doubt as to whether the outlet is properly grounded.
TAMPER-RESISTANT SCREW
Warning: This appliance is equipped with a tamper-resistant screw to prevent removal of the outer cover. To reduce the risk of fire or electric shock. do not attempt to remove the outer cover. There are no user-serviceable parts inside. Repair should be done only by authorized service personnel.
ELECTRICAL CORD
a) A short power-supply cord is provided to reduce the risks resulting from becoming entangled in or tripping over a longer cord.
b) Extension cords are available and may be used if care is exercised in their use.
c) If an extension cord is used:
1) The marked electrical rating of the extension cord should be at least as great as the electrical rating of the appliance; 2) If the appliance is of the grounded type. the extension cord should be a grounding-type 3-wire cord; and 3) The cord should be arranged so that it will not drape over the counter top or tabletop where it can be pulled on by children or tripped over.
Note: If the power cord is damaged. please call our Customer Service line listed in these instructions.
HOW TO USE
Caution: HIS OVEN GETS HOT. WHEN IN USE, ALWAYS USE OVEN MITTS OR POT HOLDERS WHEN TOUCHING ANY OUTER OR INNER SURFACE OF THE OVEN.
Caution: Do not leave oven unattended when in operation. Food ignition may occur. If this happens. unplug unit but DO NOT open door. To reduce the risk of fire. keep oven interior completely clean and free of food residues. oil. grease and any other combustible materials.
Caution: A fire may occur if the toaster oven is covered or touching flammable materials including curtains. draperies. walls and the like when in operation or after. when still hot.
Do not place any of the following materials in the oven. on top of the oven. or in contact with the oven sides or bottom surfaces: paper. cardboard. plastic or the like.
GETTING STARTED
+ Remove all packing material. any stickers. and the plastic band around the power plug. + Please go to www.prodprotect.com/blackanddecker to register your warranty. + Wash all removable parts as instructed in CARE AND CLEANING. + Select a location where this unit is to be used. Allowing enough space from back of the unit and the wall to allow heat to flow without damage to cabinets and walls. + Plug unit into electrical outlet.
IMPORTANT INFORMATION ABOUT YOUR OVEN
This oven gets hot. When in use. always use oven mitts or pot holders when touching any outer or inner surface of the oven.
During first few minutes of use you may notice smoke and a slight odor. This is normal and should cause no concern.
Temperatures in the oven will be lower than your set point. This is due to advanced heating elements used in this oven. Temperature dial settings have been calibrated to provide expected results for most recipes taking into account the advanced heating elements.
You must set the timer or select Stay On for the oven to function.
Be sure food or baking dish does not come within 1/2 inches of the top heating elements.
Food should not extend beyond the edges of the bake pan/drip tray to avoid drippings from falling onto the heating elements.
You can cook your food 3 ways:
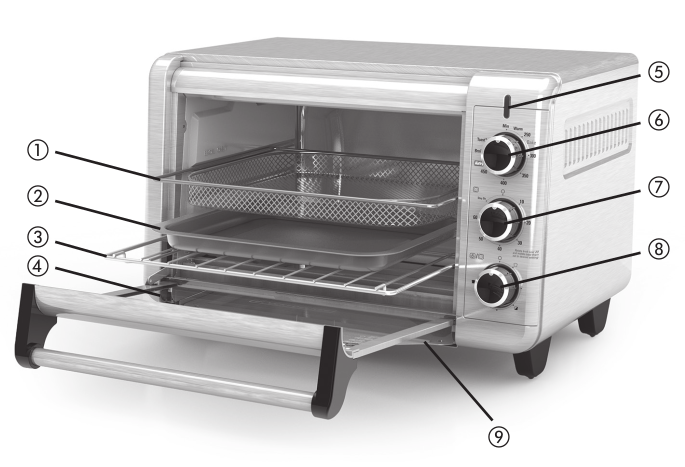
Use the bake pan/drip tray placed on the slide rack.
Place the bake pan/drip tray under the slide rack / broil rack .
Place food on Air Fry mesh rack
TOASTING
It is not necessary to preheat the oven for toasting.
1. Set temperature selector knob to TOAST position. 2. Open oven door and insert slide rack. 3. Place items to be toasted directly on slide rack in the bottom slot and close the door. 4. Turn toast shade selector knob to middle and then turn back to desired toast shade. 5. The power indicator light comes on and remains on until toasting cycle is complete. 6. When toast cycle is complete. there will be an audible signal. The oven and the power indicator light will turn off. 7. Open the oven door. Using oven mitts or pot holders. slide the rack out to remove the toast. 8. Unplug appliance when not in use.
Note: You must set the toast shade selector knob as desired for the oven to begin toasting.
BROILING
When broiling. preheat oven for 10 minutes. For optimal results use top rack position. Be sure food or baking dish does not come within 1 1/2 inches of the top heating element.
1. Set temperature selector knob to BROIL.
2. Set the timer selector knob to 20 then turn back or forward to desired broiling time. Select Stay On to bake longer than 60 minutes or to control cooking time yourself. The power indicator light comes on and remains on during the entire broiling time.
Note: You must set the timer for the oven to function.
3. Once the oven is preheated. open oven door and insert food. Close oven door.
4. Ifusing the oven timer. there will be an audible signal once the broiling cycle is complete. The oven tums off and the power indicator light does out. If not using the oven timer. turn the oven off once the cooking cycle is complete.
5. Open the oven door. Using oven mitts or pot holders. slide the rack out to remove the cooked food.
6. Unplug appliance when not in use.
AIR FRY
It is not necessary to preheat the oven in the air fry function as it may cook slightly faster than recommended cooking times
1. Place food on Air Fry mesh rack
2. Open door and slide Air Fry mesh rack with food into the middle or lower rack position
3. Set Temperature selector knob to AIR FRY position
4. Turn TIMER selector knob to 20 and then turn to desired Air Frying time. Select Stay On to air fry longer than 60 minutes or to control cooking time yourself. The power indicator light comes on and remains on during the entire Air Frying time.
Note: You must choose Stay On or set the timer for the oven to start.
5. If using the oven timer. there will be an audible signal once the Air Fry cycle is complete. The oven turns off and the power indicator light goes out. If not using the oven timer. turn the oven off once the cooking cycle is complete.
6. Open the oven door. Using oven mitts or pot holders. slide the rack out to remove the cooked food.
Note: Clean out the crumb tray frequently when using the air fry setting.
7. Unplug the appliance when notin use.
BAKING
For best results. when baking or cooking. always preheat the oven for at least 10 minutes at the desired temperature setting. For optimal results use middle or lower rack position.
1. Set temperature selector knob to the desired temperature.
2. Turn TIMER selector knob to 20 and then turn to desired baking time. Select Stay On to bake longer than 60 minutes or to control cooking time yourself. The power indicator light comes on and remains on during the entire baking time.
Note: You must set the times for the oven to FUNCTION.
3. Once oven has preheated. open oven door and insert food. Close oven door.
4. If using the oven timer. there will be an audible signal once the baking cycle is complete. The oven turns off and the power indicator light does out. If not using the oven timer. turn the oven off once the cooking cycle is complete.
5. Open the oven door. Using oven mitts or pot holders. slide the rack out to remove the cooked food.
6. Unplug appliance when not in use.
CARE AND CLEANING
This Product contains no user serviceable parts. Refer service to qualified service personnel.
CLEANING
Important: Before cleaning any part. be sure the oven is off. unplugged. and cool.
1. Clean the glass door with a sponge. soft cloth. or nylon pad with dish soap and warm water. Do not use aspray glass cleaner.
2. To remove the slide rack. open the door. pull the rack forward and out. Wash the slide rack with warm water and dish soap or in a dishwasher. To remove stubborn spots. use a polyester or nylon pad.
3. Wash the bake pan with warm water and dish soap. To minimize scratching. use a polyester or nylon pad.
EXTERNAL CRUMB TRAY
External crumb tray is inserted and removed from the exterior of the oven. beneath the oven door.
1. Grasp handle and pull out tray.
2. Dispose of crumbs and wipe tray with a damp cloth; dry thoroughly before placing back in the oven.
EXTERIOR SURFACES
Wipe the top and exterior walls with a damp cloth or sponge. Dry thoroughly.
COOKING CONTAINERS
Metal. ovenproof glass or ceramic bakeware without glass lids can be used in your oven. Follow manufacturer's instructions. Be sure the top edge of the container is at least 112” (3.81 cm) away from the upper heating elements.
NEED HELP / Warranty
Two-Year Limited Warranty
(Applies only in the United States and Canada)
For service. repair or any questions regarding your appliance. call the appropriate 800 number on cover of this book. Please DO NOT return the product to the place of purchase. Also. please DO NOT mail product back to manufacturer. nor bring it to a service center. You may also want to consult the website listed on the cover of this manual.
What does it cover?
Any defect in material or workmanship provided; however. Spectrum Brands. Inc.'s liability will not exceed the purchase price of product.
For how long?
Two years from the date of original purchase with proof of such purchase.
What will we do to help you?
Provide you with a reasonably similar replacement product that is either new or factory refurbished.
How do you get service?
Save your receipt as proof of date of sale.
Visit the online service website at www.prodprotect.com/blackanddecker. or call toll-free 1-800-465-6070. for general warranty service.
If you need parts or accessories. please call 1-800-738-0245.
What does your warranty not cover?
Damage from commercial use
Damage from misuse. abuse or neglect
Products that have been modified in any way
Products used or serviced outside the country of purchase
Glass parts and other accessory items that are packed with the unit
Shipping and handling costs associated with the replacement of the unit
Consequential or incidental damages (Please note. however. that some states do not allow the exclusion or limitation of consequential or incidental damages. so this limitation may not apply to you.)
How does state law relate to this warranty?
This warranty gives you specific legal rights. You may also have other rights that vary from state to state or province to province.
 and then to desired toast shade.
 Oposition.