
USER GUIDE
AA
BUILT-IN OVEN
OB90S9MEPX4, OB90S9MEPB1
USER GUIDE

2
CONTENTS
Safety and warnings 3
Introduction 7
Control panel 8
First use 9
Using Your Oven 10
Oven functions 11
Using the rotisserie 13
Using the timer 15
Automatic cooking 16
Cooking chart 18
User preference settings 19
Sabbath setting 21
Care and cleaning 23
Preparing to use the self clean function 34
Using the self clean function 35
Replace oven light bulb 37
Troubleshooting 38
Alert codes 41
Customer care 43
Registration
To register your product visit our website: fisherpaykel.com/register
3
SAFETY AND WARNINGS
WARNING!
Electric Shock Hazard
Failure to follow this advice may result in
electric shock or death.
• Turn the oven off at the wall before replacing
the oven lamp.
WARNING!
Fire Hazard
Failure to follow this advice may result in
serious burns or death.
• Carefully follow the instructions for starting a
Self Clean cycle.
• Do not place combustible materials (eg wood,
fabric, plastic) in the oven during a Self Clean
cycle.
• Do not place aluminium foil, dishes, trays, water
or ice on the oven floor during cooking, this will
irreversibly damage the enamel. Liningthe oven
with aluminium foil may cause fire.
• Never use your appliance for warming or
heating the room. Personscould be burned or
injured or a fire could start.
• Flammable materials should not be stored in an
oven or near itssurface.
• Failure to follow this advice may result in
overheating, burning, andinjury.
4
Hot Surface Hazard
Failure to follow this advice could result in
burns and scalds.
• To avoid burns and scalds, keep children away
from this appliance.
• Surfaces of the appliance may become hot
enough to cause burns. Examples include the
oven vent, the surface near the oven vent, and
the oven door.
• Do not touch heating elements or interior
surfaces of the oven. Heating elements may be
hot even though they are dark in colour.
• Use protection when handling hot surfaces such
as oven shelves ordishes.
• Use care when opening the oven door. Let
hot air or steam escape before removing or
replacing food.
• During and after use, do not touch, or let
clothing or other flammable materials contact
heating elements or interior surfaces of the oven
until they have had sufficient time to cool.
• Failure to follow this advice could result in burns
and scalds.
WARNING!
Cut Hazard
Failure to use caution could result in injury.
• Take care: some edges are sharp.
SAFETY AND WARNINGS

5
READ AND SAVE THIS GUIDE
WARNING!
z
Do not attempt to operate this oven with the door open. Keep the door closed to
prevent harmful exposure to microwave energy.
z
Do not place any object between the oven front face and the door, or allow food or
cleaner residue to accumulate on sealing surfaces.
z
Do not operate the oven if it is damaged. Ensure the oven door is closed properly
andthere is no damage to the:
z
Door (bent)
z
Hinges and latches (broken or loosened)
z
Door seals and sealing surfaces.
z
Ensure the oven is adjusted or repaired only by a Fisher&Paykel trained and supported
service technician.
z
The door or door seals are damaged, do not operate the oven until it has been repaired
by a Fisher&Paykel trained and supported service technician.
z
Follow the basic precautions to reduce the risk of fire, electric shock, injury to persons
or exposure to excessive microwave oven energy when using your appliance.
z
Installation
z
This appliance is intended to be used for normal personal, family or household use.
z
This is a built-in oven intended to be installed in a cavity only.
z
Ensure that all the packing materials are removed from the inside of the door.
z
DO NOT use the oven outdoors.
z
Check the oven for any damage, such as misaligned or bent door, damaged door seals
and sealing surface, broken or loose door hinges and latches and dents inside the
cavity or on the door. If there is any damage, do not operate the oven and contact a
Fisher&Paykel trained and supported service technician.
z
This microwave oven must be placed on a flat, stable surface to hold its weight and the
heaviest food likely to be cooked in the oven.
z
Do not place the oven where heat, moisture or high humidity are generated or near
combustible materials.
SAFETY AND WARNINGS

6
SAFETY AND WARNINGS
Electrical
z
Never unplug your appliance by pulling on the power cord. Always grip the plug firmly
and pull straight out from the outlet.
z
Do not plug in any other appliance at the same power point as your appliance or use
extension cords or double adapters or ungrounded (two prong) adapters.
z
If the power supply cord is damaged, it must only be replaced by a Fisher&Paykel
trained and supported service technician.
z
All electrical repairs must be carried out by a Fisher&Paykel trained and supported
service technician or qualified electrician in order to avoid a hazard.
z
Ensure that the appliance is switched off before replacing the lamp to avoid the
possibility of electric shock.
z
It is hazardous for anyone other than a Fisher&Paykel trained and supported
service technician or qualified electrician to carry out any service or repair operation
that involves the removal of a cover which gives protection against exposure to
microwaveenergy.
Disposal/Recycling
z
The packaging materials for this appliance are recyclable.
z
Operation
z
Do not use the cavity for storage purposes. Do not leave paper products, cooking
utensils or food in the cavity when not in use.
z
Watch cooking time. Cook for the shortest amount of time indicated and add
more as needed.
z
Do not operate your appliance by means of an external timer or separate remote
control system.
z
Always position the shelves in the desired location while the oven is cool
(beforepreheating). If a shelf must be removed while the oven is hot, do not let
the oven mitts or pot-holder contact hot heating elements in the oven or the
base of the oven.
Food Safety
z
Use only utensils that are suitable for use in ovens.
z
Be fire wise. Switch off or unplug the appliance and keep the door closed if smoke
isobserved in order to stop any flames.
z
Do not heat unopened food containers. They can build up pressure that may cause
thecontainer to burst and result in injury.
z
Food severely overcooked can smoke or ignite.
z
Cover food items while cooking. Covers prevent spattering and help food items
to cook evenly.
Child Safety
z
Keep the appliance and its cord out of reach of children aged less than 8 years.
z
Ensure that children (aged 8 years and above) and persons with reduced physical,
sensory or mental capabilities or lack of experience and knowledge can only use the
appliance if they are supervised or have been given instruction on how to use the
appliance safely and understand the hazards involved.
z
Never allow children to play with the appliance.
7
Congratulations on your new purchase. Your oven has a number of features to make
cooking a great experience for you:
z
Nine oven functions, including Rotisserie (optional and can be purchased
separately as a kit)
z
Intuitive electronic controls and displays
z
Illuminated halos around the dials for visual feedback
z
Preference settings — see ‘User preference settings’ and ‘Sabbath setting’.
Before you start
z
Make sure the installer has completed the ‘Final checklist’ in the Installation instructions.
z
Read this guide, taking special note of the ‘Safety and warnings’ section.
z
Remove all the packaging and check that you have all the accessories listed below.
z
Make sure you follow the instructions under ‘Setting the clock and first use’ before using
your oven for cooking or baking.
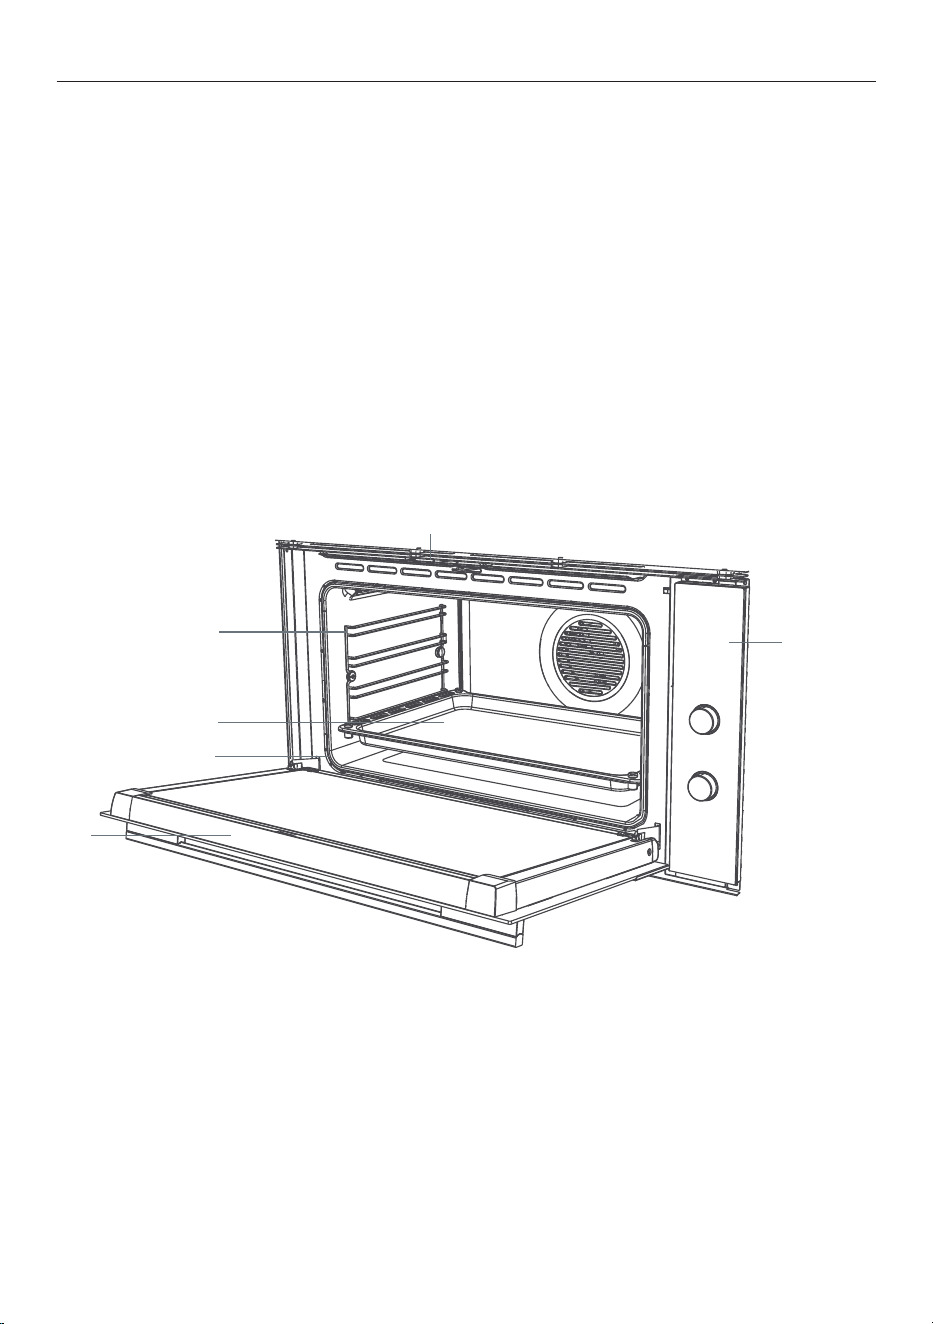
INTRODUCTION
1 Oven vent louvres
2 Control panel
3 Side racks
4 Grill tray and rotisserie
5 Oven seal
6 Oven door and handle
2
4
3
5
6
1
Not illustrated:
z
Baking tray
z
Step-down oven shelf
z
Oven shelf
z
Grill rack
8
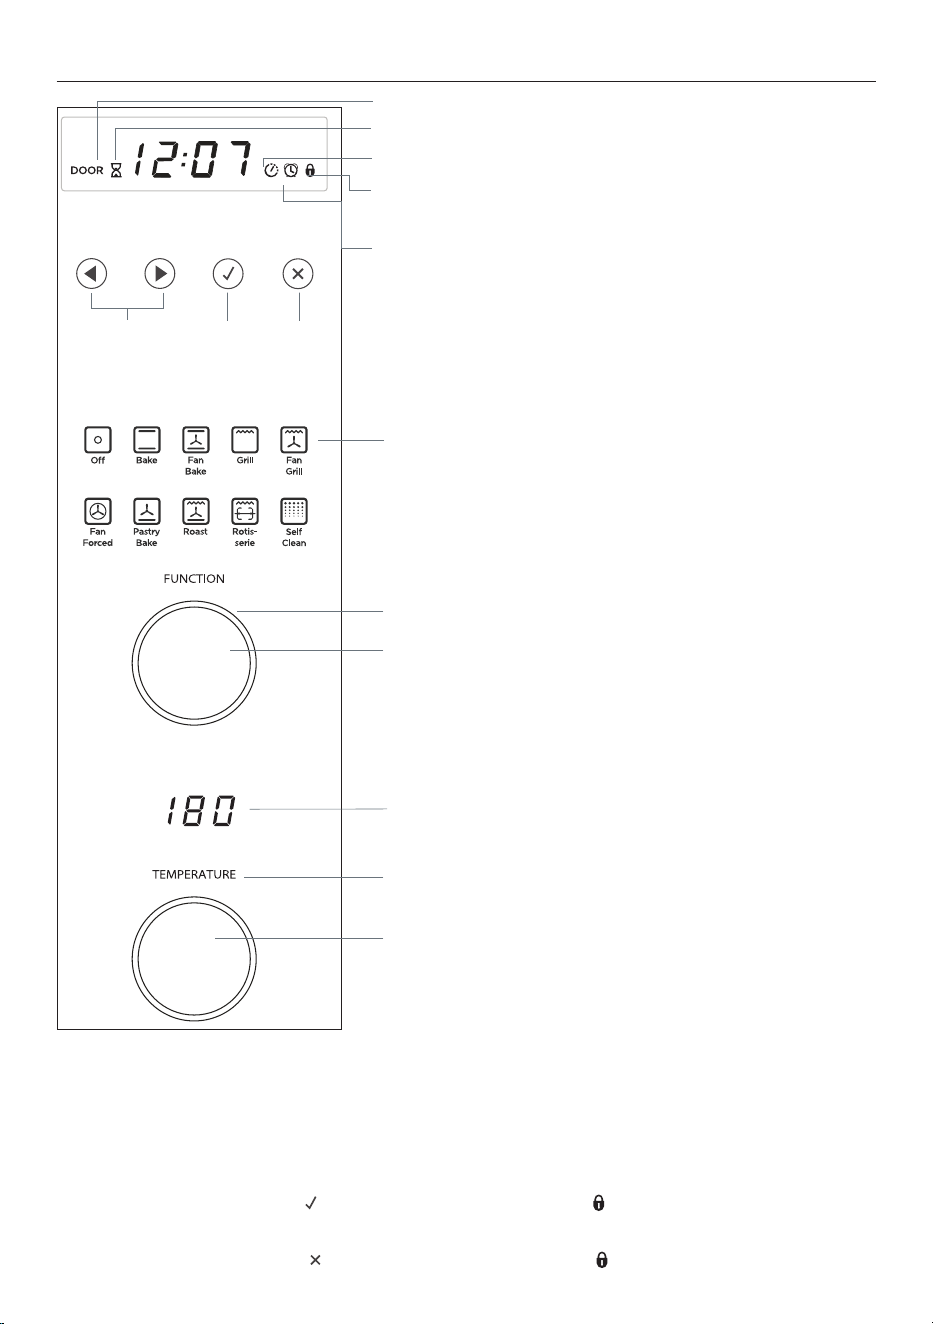
CONTROL PANEL
-
+
Function indicators (see ‘Oven functions’)
Function dial (see ‘Using your oven’)
Function dial halo
Temperature dial halo
Temperature dial (see ‘Using your oven’)
Temperature indicator
Scroll Select Cancel
Locking the control panel
You can lock the control panel to prevent unintended use (e.g. children playing with
theoven). Doing so will disable the dials and all the buttons.
To lock the control panel
1. Make sure the oven is not in use (the function dial is turned to Off) and neither automatic
cooking nor the timer is set (no indicator is lit in the display).
2. Press and hold the select
-
+
-
+
-
+
button until the lock indicator
-
+
comes on.
To unlock the control panel
3. Press and hold the cancel
-
+
-
+
-
+
button until the lock indicator
-
+
flashes and then goes out.
IMPORTANT!
`
Ensure that your oven is regularly cleaned to avoid damage to its surface that can result
in hazards or potential injury.
Cleaning
z
Before starting a Self Clean cycle, remove oven shelves, side racks, and all other
cookware/utensils, and wipe up large food spills or grease deposits.
z
Before starting a Self Clean cycle, make sure you move any pet birds to another, closed
and well ventilated room. Some pet birds are extremely sensitive to the fumes given off
during a Self Clean cycle, and may die if left in the same room as the oven during such
a cycle.
z
During a Self Clean cycle, the oven reaches higher temperatures than it does for
cooking. Under such conditions, the surfaces may get hotter than usual and children
should be kept away.
z
Clean the oven regularly and remove any food deposits. Failure to maintain the oven in
a clean condition could lead to deterioration of the surface that could adversely affect
the life of the appliance and possibly result in a hazardous situation.
z
Do not clean the appliance with a steam cleaner.
z
Always unplug the appliance from the power supply before cleaning.
z
Clean the cavity of the oven after using with a slightly damp cloth.
z
Clean the accessories with soapy water.
z
The door frame, seal and neighbouring parts must be regularly cleaned
with a dampcloth.
z
Do not use harsh abrasive cleaners or sharp metal scrapers to clean the oven door
glass, this may scratch the surface which may result in shattering of the glass.
Cooking time indicator (see ‘Automatic cooking’)
Stop time indicator (see ‘Automatic cooking’)
Control lock indicator (see ‘Locking the control
panel’).
Timer indicator (see ‘Using the timer’)
Door open indicator (See 'Using the Self Clean' function)

9
FIRST USE
Setting the clock
When your oven is first turned on, or after
a power cut, the display will flash. You will
need to set the clock in order to use the
oven.
1. The display will flash 24 Hr.
2. Press the left and right scroll
-
+
-
+
-
+
-
+
-
+
-
+
buttons to set the time. Press the select
ERUTAREPMETNOITCNUF
button to confirm.
3. Press the right scroll
-
+
-
+
-
+
button to scroll
between 24 Hr and 12 Hr. Press the select
ERUTAREPMETNOITCNUF
button to confirm.
Changing the time
Set the clock within the user preference
menu.
4. Press the select
ERUTAREPMETNOITCNUF
button to confirm.
The time set will now be steadily lit.
1. To enter the user preference menu,
press and hold the left and right scroll
-
+
-
+
-
+
-
+
-
+
-
+
buttons together for 3 seconds.
The display will either flash 12 Hr or 24
Hr.
Press the select
ERUTAREPMETNOITCNUF
button to confirm.
The display will flash.
2. Press the right scroll
-
+
-
+
-
+
button to scroll
between 24 Hr, 12 Hr or OFF to turn the
display off (see ‘Setting User preferences’
for more information).
Press the select
ERUTAREPMETNOITCNUF
button to confirm.
3. Press the left and right scroll
-
+
-
+
-
+
-
+
-
+
-
+
buttons to set the time.
Press the select
ERUTAREPMETNOITCNUF
button to confirm.
10
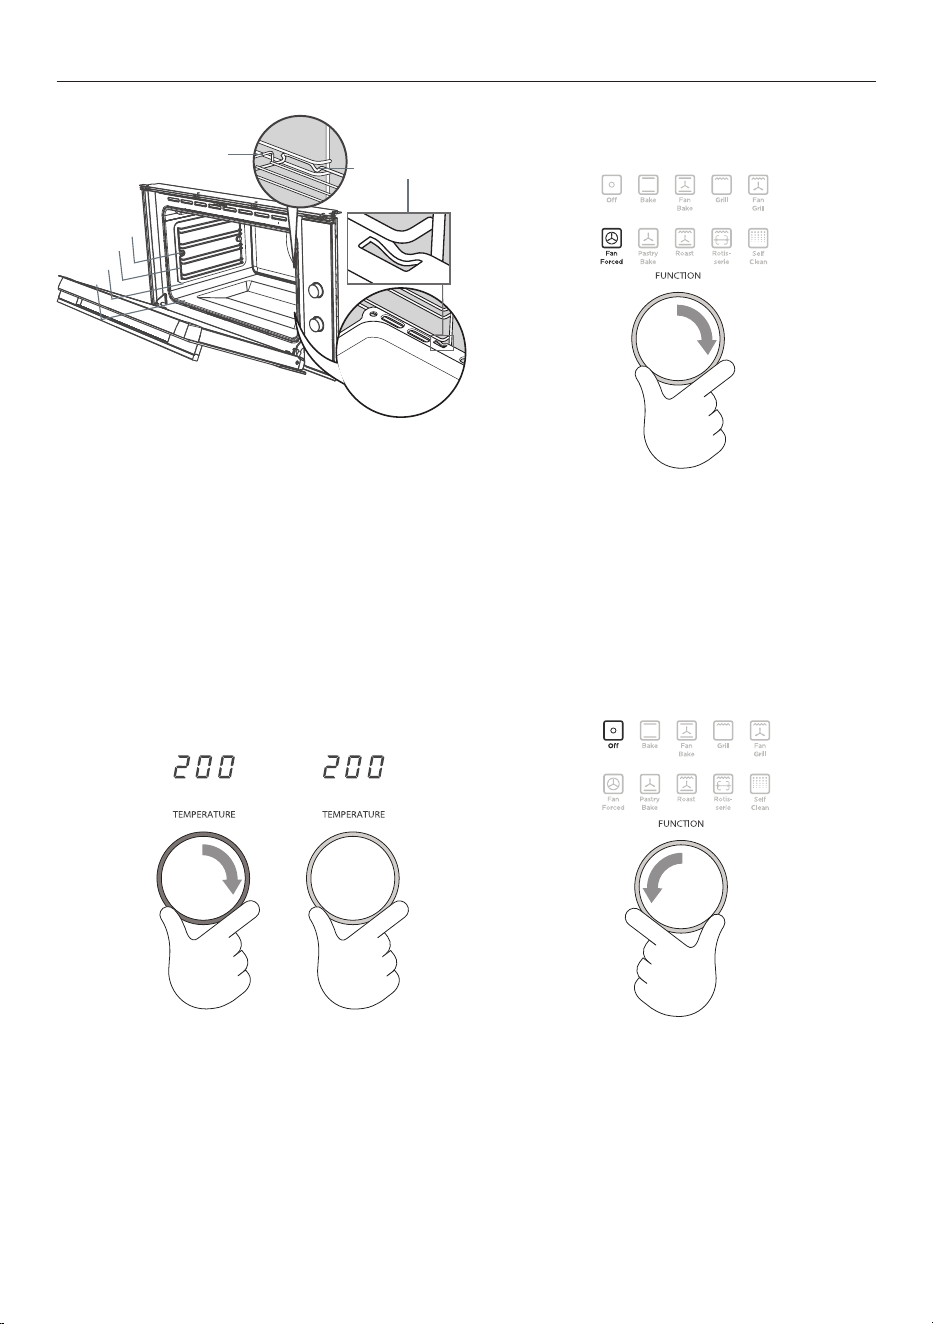
USING YOUR OVEN
-
+
-
+
-
+
-
+
-
+
-
+
4. When you have finished
cooking, turn the function dial
to Off.
-
+
-
+
-
+
1. Insert the shelves that you need.
Ensurethat,
z
they are between two wires of a shelfposition
z
the stop notches point down
z
the guard rail is at the back.
Note: The grill tray should be positioned between
the two wires of a shelf position and orientated as
shown.
Shelf
positions
Guard rail
Stop notch
1
2
3
4
2. Select a function. The halo will
glow white.
3. Set the temperature.
While the oven is heating up, the halo will
glow red and the temperature indicator
will alternately show the actual and
settemperatures.
When the oven has reached set temperature,
a long tone will sound and the halo will turn
white.
Note: Grill provides instant radiant heat, so the
halo will stay red and there will be no tone.

11
OVEN FUNCTIONS
-
+
Off
Selecting this will turn the oven off.
-
+
Bake
This is the traditional method of baking. It is best to bake on only one shelf at a time in this
function. Ideal for large cakes and dishes that bake for several hours.
-
+
Fan Bake
Ideal for dishes like lasagne that need to brown on top and also single trays of small cakes
or biscuits that bake in less than an hour.
-
+
Grill
Grill is the most suitable function for ‘finishing off’ many meals, for example browning the
top of potato gratin and frittata. Use Grill to toast bread or to grill your favourite chicken,
fish and steak. Note: heat levels are from LO (50% power) to HI (100%power), with settings
from 1 to 9 in between. Grill provides instant radiant heat, so the temperature dial halo will
stay red.
-
+
Fan Grill
Ideal for roasting tender cuts of meat and poultry. Use the lower shelf positions for larger
items e.g. a whole chicken.
12
OVEN FUNCTIONS
-
+
Fan Forced
Great for multi-shelf cooking. The consistent temperature ensures baking is well risen.
Cookies baked on Fan Forced are crisp on the outside and chewy in the middle.
-
+
Pastry Bake
Excellent for sweet and savoury pastry foods, for moist breads and brownies and cookies
that you want extra chewy.
-
+
Roast
No pre-heating of the oven required. The meat is seared during an initial 20-minute grilling
stage, then baked at the set temperature for the rest of the time, producing a tender, juicy,
and flavourful roast. Great for roasting vegetables too.
-
+
Rotisserie (optional)
Rotisserie is a delicious way to cook meat and poultry. The slowly rotating food is basted
continuously in its own juices, making it tender on the inside and well browned and full of
flavour on the outside. See ‘Using the rotisserie’.
-
+
Self Clean
The Self Clean cycle takes care of the mess and grime that is traditionally associated
with oven cleaning. See ‘Using the Self Clean function’ for details. Note: this is NOT a
cooking function.
13
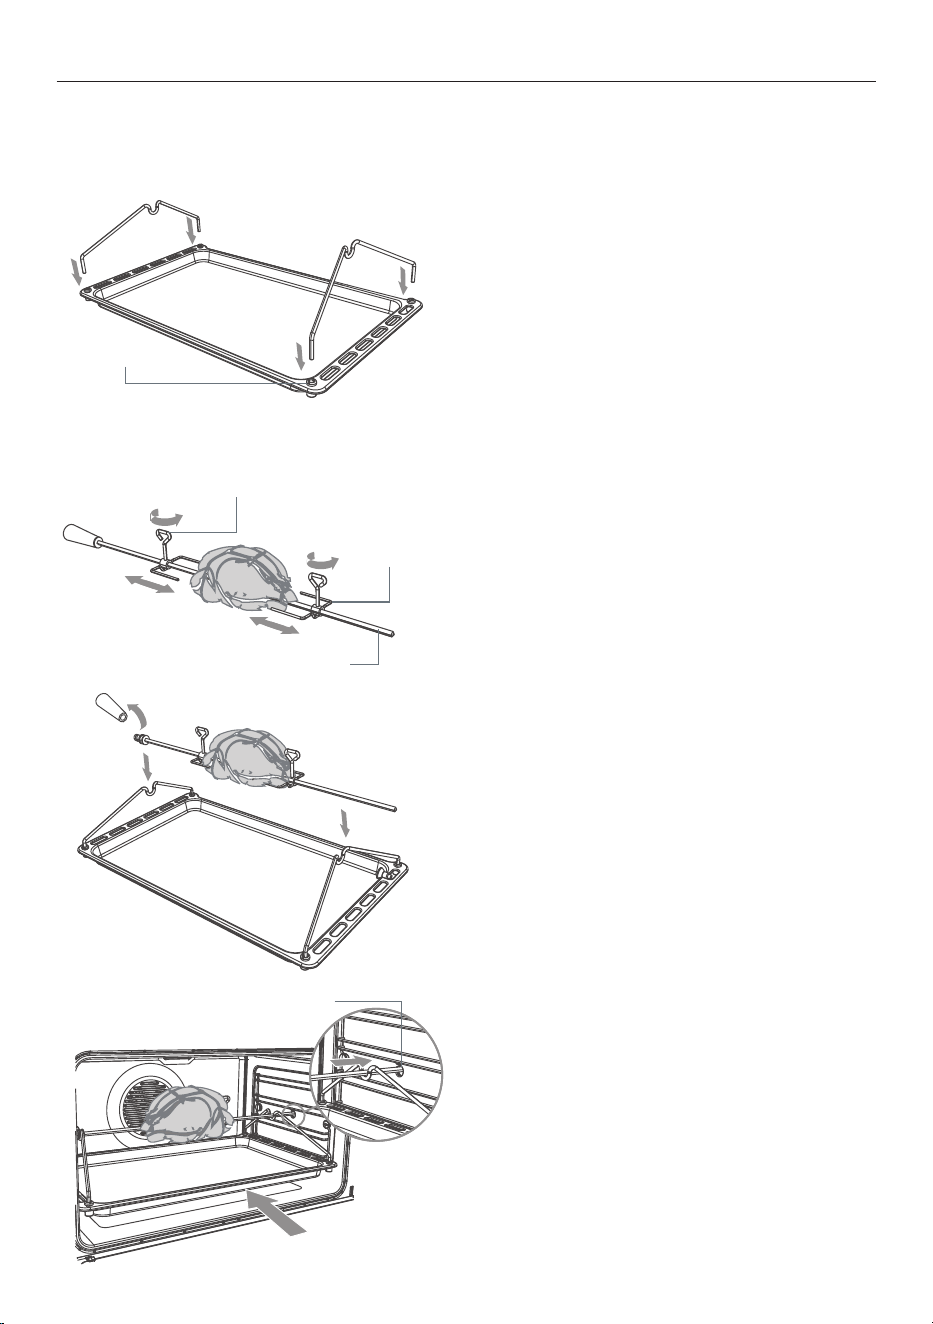
Lock stud
Rotate the fork screws to
loosen and tighten
Fork
Skewer
Rotisserie drive hole
Optional rotisserie kits are available separately for purchase. Contact your dealer for
availability.
1. Prepare the rotisserie supports.
z
Place the grill tray on the bench-top.
z
Insert the supports into the lock studs
making sure the supports faceinwards.
z
Push the supports all the way down to
lock them in firmly
Secure the meat. Slide one fork onto the
skewer first, followed by the meat and the
second fork.
Important!
Take care, the forks are sharp!
2. When securing the meat, ensure that:
z
the skewer goes through the
centre of the meat
z
the forks hold the meat firmly in place
z
the fork screws are tightened
z
there are no loose or projecting parts.
Poultry should be trussed.
Note: the rotisserie can rotate up to 6kg
of meat.
3. Position the skewer on the supports.
z
Place the skewer on the supports, and
check that the meat does not touch
the grill tray.
z
Twist the handle off. It must not be
left in the oven.
4. Place the rotisserie in the oven.
z
Slide the grill tray all the way to the
back on shelf position 1.
z
Push the skewer through the hole
cover on the right-hand wall of the
oven, then insert it fully into the
rotisserie drivehole.
USING THE ROTISSERIE
14
When you have finished using the rotisserie
1. Turn the oven off.
2. Using oven mitts, carefully disengage the right end of the skewer from the rotisseriedrive
hole.
3. Slide out the grill tray and place it on a heat-resistant surface.
4. Twist the handle onto the left end of the skewer.
5. Lift the skewer off the supports by the handle.
6. Loosen the fork screws and slide the meat off the skewer.
Tips for using the rotisserie
z
For food safety reasons, we do not recommend using the rotisserie with stuffed meat.
z
If your meat is too big or heavy (over 6 kg) for the skewer, place it on top of the grill rack
in the grill tray, and use Fan Forced. This function will give a result similar to arotisserie.
z
Use a meat thermometer to ensure that meat is cooked through to a safe temperature.
z
See ‘Care and cleaning’ for advice on cleaning the rotisserie parts.
5. Select the Rotisserie function.
z
The skewer will start rotating.
z
Check that the meat does not touch
the grill tray or the grill element at the
top of the oven.
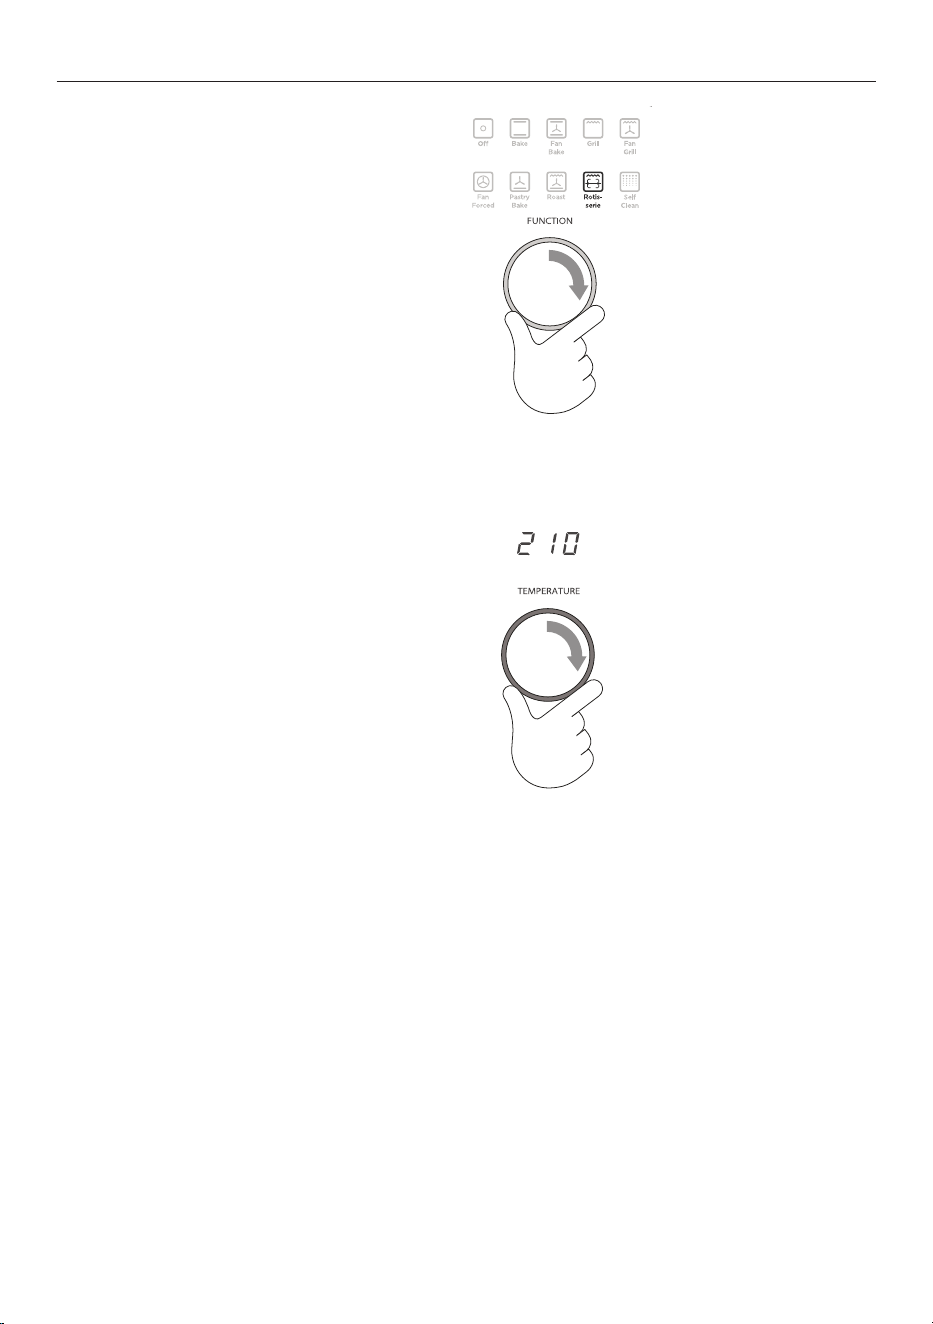
6. Set the temperature.
z
We recommend around 210 °C.
z
Note: The rotisserie will not rotate when
the oven door is open.
-
+
-
+
-
+
-
+
-
+
-
+
USING THE ROTISSERIE
15
z
You can use the timer at any time even if you are not using the oven.
z
If the time is more than an hour, the display will count down in minutes (hr:min).
If it is less than an hour, it will count down in seconds (min:sec).
z
You can set the timer for up to 23 hours 59 minutes.
Important!
The timer does NOT turn the oven off.
1. Select the timer bypressing
the right scroll
-
+
-
+
-
+
button once.
z
The timer
-
+
-
+
-
+
indicator
will appear and the
colon will flash.
2. Press the select
ERUTAREPMETNOITCNUF
button to
confirm.
z
The display will flash
to indicate the timer is
ready to be set.
-
+
-
+
-
+
If you want to check the time
of day, you can toggle between
this and the timer countdown by
pressing the scroll
-
+
-
+
-
+
-
+
-
+
-
+
buttons.
-
+
-
+
-
+
Press the select
ERUTAREPMETNOITCNUF
button to confirm.
z
The timer will then
begin to countdown.
3.
Set the time by pressing
the scroll
-
+
-
+
-
+
-
+
-
+
-
+
buttons.
z
Holding the buttons
down will speed
up thescrolling.
-
+
-
+
-
+
-
+
-
+
-
+
-
+
-
+
-
+
To modify the timer setting
Ensure the display shows the remaining time counting down.
1. Press the select
ERUTAREPMETNOITCNUF
button.
2. Press the scroll
-
+
-
+
-
+
-
+
-
+
-
+
buttons to set a new time.
3. Press the select
ERUTAREPMETNOITCNUF
button to confirm.
To cancel the timer setting
1. Ensure the display shows the remaining time counting down.
2. Press the cancel
ERUTAREPMETNOITCNUF
button until the display shows the time of day and the timer
-
+
-
+
-
+
indicator disappears.
When the set time is up
z
The display will show and a tone will sound every 15 seconds.
z
Press any button to stop the tone sound. The display will revert to showing time of day.
USING THE TIMER
16
z
You can set the oven to automatically turn on later, cook for a pre-set time
(cookingtime), then automatically turn off at a pre-set stop time. See the example and
instructions below (steps 1 to 7).
z
If you start cooking manually and only want the oven to turn off automatically aftera set
cooking time, simply set the cooking time following steps 1 to 3 below.
The oven will automatically turn off when the cooking time is over.
Important!
Remove your food from the oven as soon as possible after cooking or defrosting. This is
to avoid contamination by organisms which may cause food poisoning. Takeparticular
care during warmer weather.
Example: It is 11:05 am. You want your food to cook for 1 hour, and you would like itto be
ready by lunchtime (12:30 pm).
Set the cooking time
Set the stop time
-
+
-
+
-
+
-
+
-
+
-
+
-
+
-
+
-
+
-
+
-
+
-
+
-
+
-
+
-
+
1. Check the clock shows the
correct time of day.
2. Press the right scroll
-
+
-
+
-
+
button twice to scroll to the
cooking time
-
+
-
+
-
+
indicator.
Press the select
ERUTAREPMETNOITCNUF
button to
confirm.
3. Press the right scroll
-
+
-
+
-
+
button to set the
cooking time. Ensureyou
allow for preheat time in
yourcalculation.
Press the select
ERUTAREPMETNOITCNUF
button
to confirm.
AUTOMATIC COOKING
1. Press the right scroll
-
+
-
+
-
+
button once to
scroll to the stop time
-
+
-
+
-
+
indicator.
2. Press the select
ERUTAREPMETNOITCNUF
button to confirm.
3. Press the right scroll
-
+
-
+
-
+
button to set the
time you would like your food to be ready
by (i.e. the stop time).
4. Press the select
ERUTAREPMETNOITCNUF
button to confirm..
17
When automatic cooking is set
z
The oven and the lights will stay off, the halos will be unlit, but your oven is now set
forautomatic cooking. It will automatically turn on at the required time.
z
In a few seconds, the display will show the time of day with the cooking time
-
+
-
+
-
+
andstop time
-
+
-
+
-
+
indicators lit.
z
Note: you can modify the function and temperature while the oven is waiting to
startcooking.
When the stop time is reached
The oven will automatically turn off and a long tone will sound.
To check the set cooking time and stop time
Use the scroll
-
+
-
+
-
+
-
+
-
+
-
+
buttons.
To cancel automatic cooking
Turn the function dial to Off.
To change the cooking or stop time
Use the right scroll
-
+
-
+
-
+
button to scroll to the cooking time
-
+
-
+
-
+
or the stop time
-
+
-
+
-
+
, press to
select the one you want to change and use the scroll
-
+
-
+
-
+
-
+
-
+
-
+
buttons to change the time. Press
the select
ERUTAREPMETNOITCNUF
button to confirm.
To see the current time of day
Press the cancel
ERUTAREPMETNOITCNUF
button.
1. Select a function.
Select function and temperature
-
+
-
+
-
+
-
+
-
+
-
+
AUTOMATIC COOKING
2. Set the temperature.

18
COOKING CHART
Note:
z
The settings in the following chart are guidelines only. Follow the instructions in your
recipe or on food packaging and be prepared to adjust the oven settings and baking
times to achieve the best possible results for you.
z
Shelf positions are counted from the base up (1 is the lowest, 4 the highest).
z
Arrange oven shelves before you turn the oven on, then preheat the oven to the required
temperature. Place items in the oven only when the long tone has sounded andthe
temperature dial halo has turned from red to white.*
z
Single shelf positions below use the flat oven shelf; where a multi shelf arrangement
isrecommended, the higher position uses the step-down shelf.
z
Due to the width of the oven, a single shelf can usually accommodate double the
standard recipe.
FOOD ARRANGEMENT
SHELF
POSITION(S)
BEST
FUNCTION
TEMP
(⁰C)
TIME
Small cakes single shelf 2 Bake 180-190 13-17 mins
multi shelf 1 and 3 Fan Forced 160-170 16-23 mins
Scones single shelf 2 Fan Forced 210-230 8-12 mins
multi shelf 1 and 3 Fan Forced 210-230 8-16 mins
Sponge 2 small pans(20 cm),
on single shelf
2 Bake 170-190 25-35 mins
1 large pan (26 cm) 2 Bake 175 30-40 mins
Light fruit cake 2 pans (21 cm),
onsingle shelf
2 Bake 155-165 1 hr 30 mins
Rich fruit cake exact baking time
will depend on size
2 Bake 130-150 3-6 hrs
Apple pie single shelf 1 Bake 185 35-45 mins
Quiche single shelf 1 Bake 180-200 30-40 mins
Meringues single shelf 1 Bake 100-120 1 hr
Bread rolls single shelf 1 Bake 210-230 15-20 mins
Muffins 2 x 12 muffin trays
on single shelf
3 Fan Forced
or Fan Bake
190-200 10-15 mins
Pastry case
(baked ‘blind’)
1 flan tin (21 cm) 1 or 2 Pastry Bake 200 10 mins with beans,
then 10mins
without
Roast Chicken Rotisserie 1 Rotisserie 210 20-30 mins/
450gms
Roast beef
(boneless)
single shelf 1 or 2 Roast 160-170 35-40 mins/
450gms
Lasagna single shelf 2 Fan Bake 175-180 40-50 mins
* Note: the colour change and tone may occur some time after the set temperature has been reached. Thisis because—
when heating up from cold—your oven is designed to initially heat to a temperature somewhat higher than what you have
set. This is to provide optimal baking conditions right from the start.
19
You can set your oven to:
z
display the temperature in degrees Celsius or Fahrenheit
z
give audio feedback (tones and beeps) or operate quietly
z
display time as 12-hr or 24-hr
z
operate with the display off
z
have its lights on or off during cooking
operate in Sabbath setting (see ‘Sabbath setting’ following).
Note: you cannot change user preference settings when the oven is set for
automaticcooking.
How to change preference settings
1. Check the display shows the time of day
and the function dial is set to OFF.
If you’re unsure, press the cancel
ERUTAREPMETNOITCNUF
button
twice.
2. Press and hold the scroll
-
+
-
+
-
+
-
+
-
+
-
+
buttons
together for 3 seconds to enter the user
preference menu.
-
+
-
+
-
+
-
+
-
+
-
+
-
+
-
+
-
+
USER PREFERENCE SETTINGS
3. Press the right scroll
-
+
-
+
-
+
button
to scroll to the setting you want
to change. Refer to the table
following.
4. Press the select
ERUTAREPMETNOITCNUF
button to select
the particular setting.
The display will flash.
-
+
-
+
-
+
-
+
-
+
-
+
-
+
-
+
-
+
5. Press the right scroll
-
+
-
+
-
+
button to scroll
through the options for that particular
setting. Refer to the table below.
6. Press the select
ERUTAREPMETNOITCNUF
button to save the
new option.
For all options except ‘Display off’ : press
the cancel
ERUTAREPMETNOITCNUF
button to quit the user
preference menu.
20
SETTING DEFAULT OPTION ALTERNATIVE OPTION(S)
TIME SCALE AND
‘DISPLAY OFF’ OPTION
Select between 24-hr or
12-hr clock display or
set ‘Display off’ option if
you only need the basic
functionalities of your oven
24 HR 12 HR DISPLAY OFF **
TEMPERATURE SCALE
Select between degrees
Celsius or Fahrenheit
CELSIUS FAHRENHEIT
AUDIO FEEDBACK
Turn the beeps and tones
on or off*
BEEPS/TONES ON BEEPS/TONES OFF
OVEN LIGHTS
Have the light off during
cooking if you want to
save power or want the
food you cook to be a
surprise for others!
LIGHTS ON
DURING COOKING
LIGHTS OFF
DURING COOKING
SABBATH SETTING SABBATH OFF See ‘Sabbath setting’ forinstructions.
* The timer tone and alert beeps will sound even if you save the BEEPS/TONES OFF option.
** With this option saved, you can still use the oven and timer but the display will be unlit
and the buttons willbe unresponsive. To quit this option and enable the display, press and
hold ‘Cancel’
ERUTAREPMETNOITCNUF
.
USER PREFERENCE SETTINGS
-
+
-
+
-
+
-
+
-
+
-
+
-
+
-
+
-
+
-
+
-
+
-
+
-
+
-
+
-
+
-
+
-
+
-
+
-
+
-
+
-
+
-
+
-
+
-
+
-
+
-
+
-
+
-
+
-
+
-
+
21
SABBATH SETTING
This setting is designed for religious faiths that observe a ‘no work’ requirement on
theSabbath.
While your oven is in Sabbath setting
z
The display, dial halos and indicators will be unlit, the buttons will be unresponsive.
z
No tones or beeps will sound.
z
No alert codes or temperature changes will be displayed.
z
The oven lights will stay on. If you want the oven lights to be off during Sabbath setting,
first select the ‘Lights off’ option as described in ‘User preference settings’, and only then
set Sabbath setting.
z
Bake is the only function available in Sabbath setting.
How to set Sabbath setting
1. Select the Bake function.
Set the desired temperature.
Wait until the oven starts up.
2. Press and hold the scroll
-
+
-
+
-
+
-
+
-
+
-
+
buttons
together for 3 seconds to enter the user
preference menu.
-
+
-
+
-
+
3. Press the right scroll
-
+
-
+
-
+
button to scroll
to the Sabbath setting.
Press the select
-
+
-
+
-
+
button to select the
Sabbath setting. The default option is
‘Sabbath off’.
4. Press the select
-
+
-
+
-
+
button to activate the
option.
z
The display will flash
NOITCNUF
ERUTAREPMET
NOITCNUF
.
NOITCNUF
ERUTAREPMET
NOITCNUF
NOITCNUF
ERUTAREPMET
NOITCNUF
-
+
-
+
-
+

22
SABBATH SETTING
The display, indicators and dial halos will be unlit and unresponsive, but the oven will
bake until you quit Sabbath setting.
To quit Sabbath setting
Press and hold the cancel
-
+
-
+
-
+
button until the time of day appears in the display and
the oven turns off.
5. Press the scroll
-
+
-
+
-
+
-
+
-
+
-
+
buttons to set the
time (hrs). You may set the time up to
99 hours.
6. Press the select
-
+
-
+
-
+
button to activate
the option.
23
DOS DON’TS
z
Before any manual cleaning or maintenance,
first wait for the oven to cool down to a safe
temperature to touch, then disconnect it from
the power supply.
z
Read these cleaning instructions and the
‘Safety and warnings’ section before you start
cleaning your oven.
z
See the following pages for instructions on
removing and refitting different parts of the
oven for cleaning.
z
To prevent soiling from becoming ‘baked on’
and stubborn, we recommend removing any
spills, foodor grease stains from the oven
cavity enamel after each use.
z
Always clean the inner glass pane before
starting a Self Clean cycle (where available).
z
Always remove oven shelves and
sideracks before starting a Self
Clean cycle (where available).
z
Don’t use a steam cleaner.
z
Don’t keep flammable
substances in theoven.
z
Don’t use or any abrasive or harsh
cleaners, cloths, scouring pads or
steel wool. Some nylon scourers
may also scratch. Check the label.
z
Don’t leave alkaline (salty spills)
or acidic substances (such
as lemon juice or vinegar) on
the oven surfaces.
z
Don’t use cleaning products with a
chlorine or acidic base.
WHAT? HOW? IMPORTANT!
Glass surfaces
(oven door
panes, control
panel)
Door comprises a total of 4
glass panes
A
B
C
D
inner
outer
middle
middle
Don’t use oven cleaners or any other
harsh/abrasive cleaners, cloths,
scouring pads, steel wool or sharp
metal scrapers to clean the glass
surfaces. Thesescratch the glass
and may damage its special coating,
which in turn could result in the glass
cracking or shattering.
z
To clean glass pane B-D,
you will first need to remove
the door and the panes. For
instructions, see page 31.
1. Clean with a solution of mild
detergent or baking soda and
hot water, then wipe dry.
2. Wipe with a glass cleaner
and dry with a soft, lint-free
cloth.
Even if you only clean the inner
pane (D), remove the door and
the pane first.
Cleaning the glass with the pane in
the door may result in cleaning liquid
running down the gaps and drying
onto internal components.
Take particular care when cleaning
the control panel glass Only use a
damp cloth with detergent.
Dials Clean with a solution of mild
detergent and hot water, then
wipe dry.
Do not use stainless steel or oven
cleaner, scouring pads, steel wool or
abrasive items on the dials as doing
so may damage theircoating.
CARE AND CLEANING

24
Manual cleaning
WHAT? HOW? IMPORTANT!
Oven cavity To clean light soiling off the
enamelled surfaces:
1. Wipe with a damp cloth and
a solution of hot water and
milddetergent.
2. Wipe dry with a soft cloth.
To clean stubborn, ‘baked on’ soiling
or the whole oven cavity:
Use the Self Clean function. See
‘Using the Self Clean function’ for
instructions.
z
To prevent soiling from
becoming ‘baked on’ and
stubborn, we recommend
removing any easy -to
-reach spills, food or grease
stains from the enamelled
surfaces after each use.
Doing so will reduce the
need for using the Self
Clean function frequently.
Grill tray
Grill rack
Side racks
Oven shelves
Rotisserie parts
Baking tray
Clean with a solution of mild
detergent and hot water.
Pre-soak stubborn burnt-on stains.
Except for the baking tray, these
parts are also dishwasher safe.
You don’t need to remove the
four lock studs from the grill
tray. They can be soaked and
cleaned while fixed to the tray.
z
Never leave any of these
parts in the oven during
a Self Clean cycle. They
will get discoloured or
damaged.
Oven seal Do not clean this part.
Oven vent
louvres
Wipe with a damp cloth. Take care not to let any liquid
run down the louvres of the
oven vent.
CARE AND CLEANING
25
Drop-down grill element
Important!
Turn off the oven at the wall and wait until the element has cooled completely
beforestarting.
z
To lower the grill element: use a flat-head screwdriver or a small coin to loosen the
element fixing screws.
z
When you have finished cleaning the oven ceiling, raise the grill element and screw
the element fixing screws back onto the studs. Make sure that the fixing screws are
tightened and the element is held securely in place.
z
The grill element itself is self-cleaning.
Fixing screw
Stud
CARE AND CLEANING - DROP DOWN GRILL
26
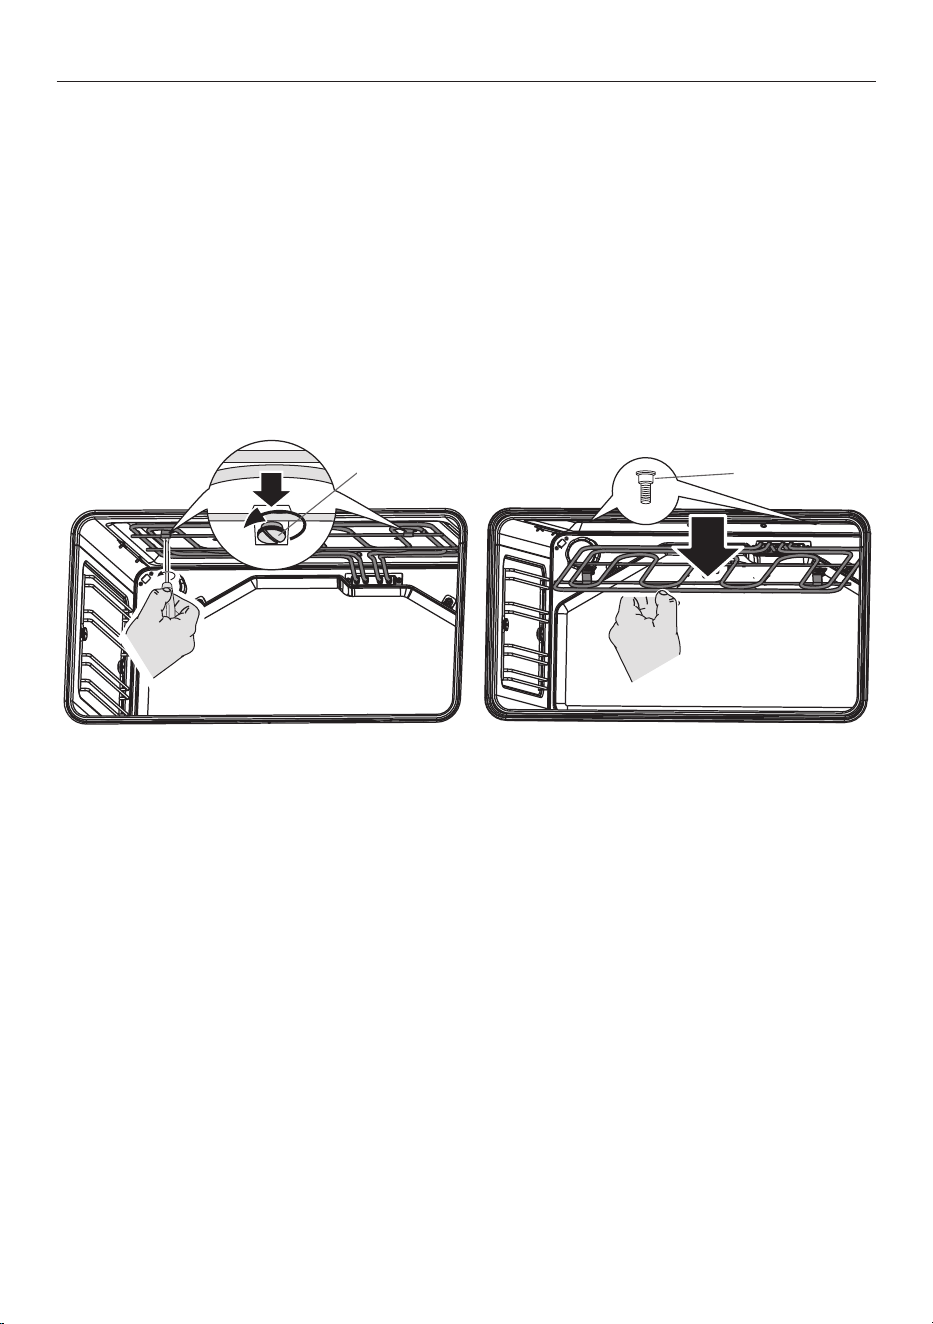
CARE AND CLEANING - REMOVE RACKS
Removing and replacing the side racks
z
Use a flat-head screwdriver or a small coin to loosen the fixing screws.
z
When replacing the side racks, make sure that you tighten the fixing screws.
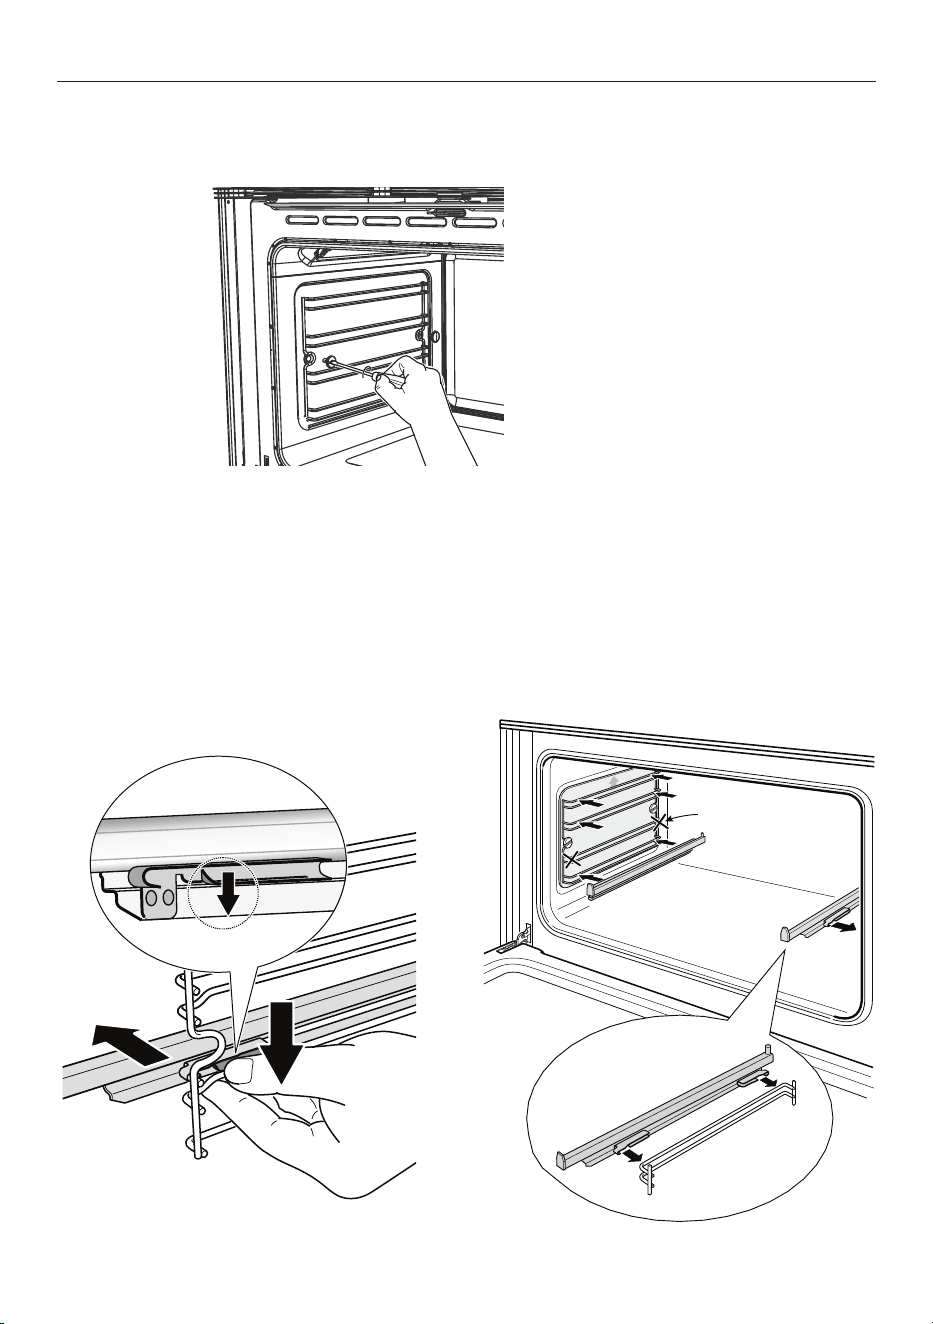
Removing and refitting the sliding shelf supports
IMPORTANT!
z
Remove the side racks first to make removing the sliding shelf supports easier.
z
The sliding shelf supports can only be used on shelf position 1, 3 and 4. They cannot be
used on shelf position 2.
When refitting the sliding shelf supports, make sure that you fit:
z
the side racks first
z
the slides to the top wire of the shelf position
z
both sides of each pair of slides
z
both slides on the same level.
1
2
1
Do not use
that level
Left
Right
Removing the sliding shelf supports Refitting the sliding shelf supports
27
Do not use
that level
Right
Refitting the sliding shelf supports
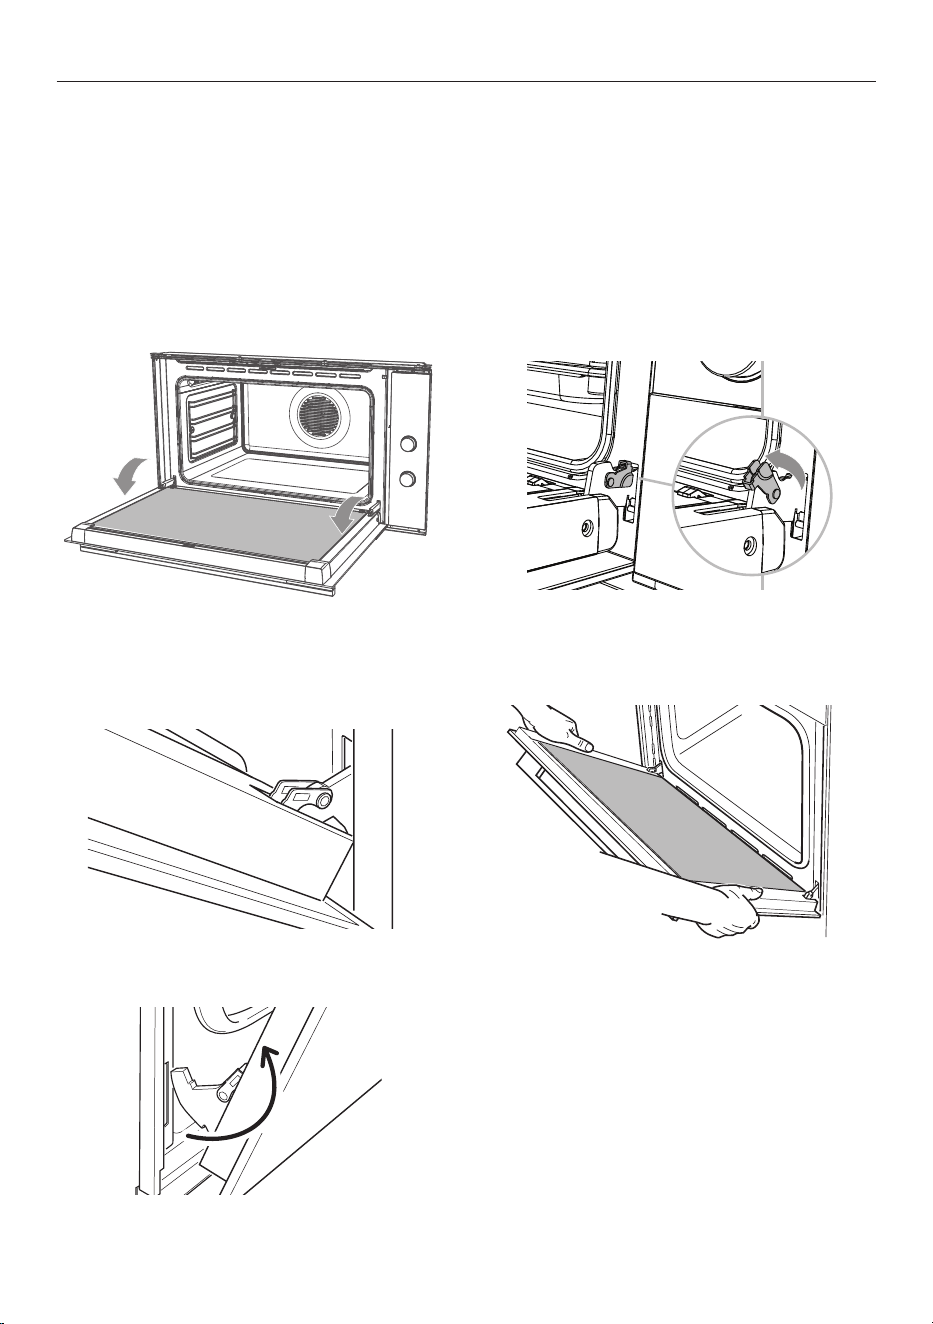
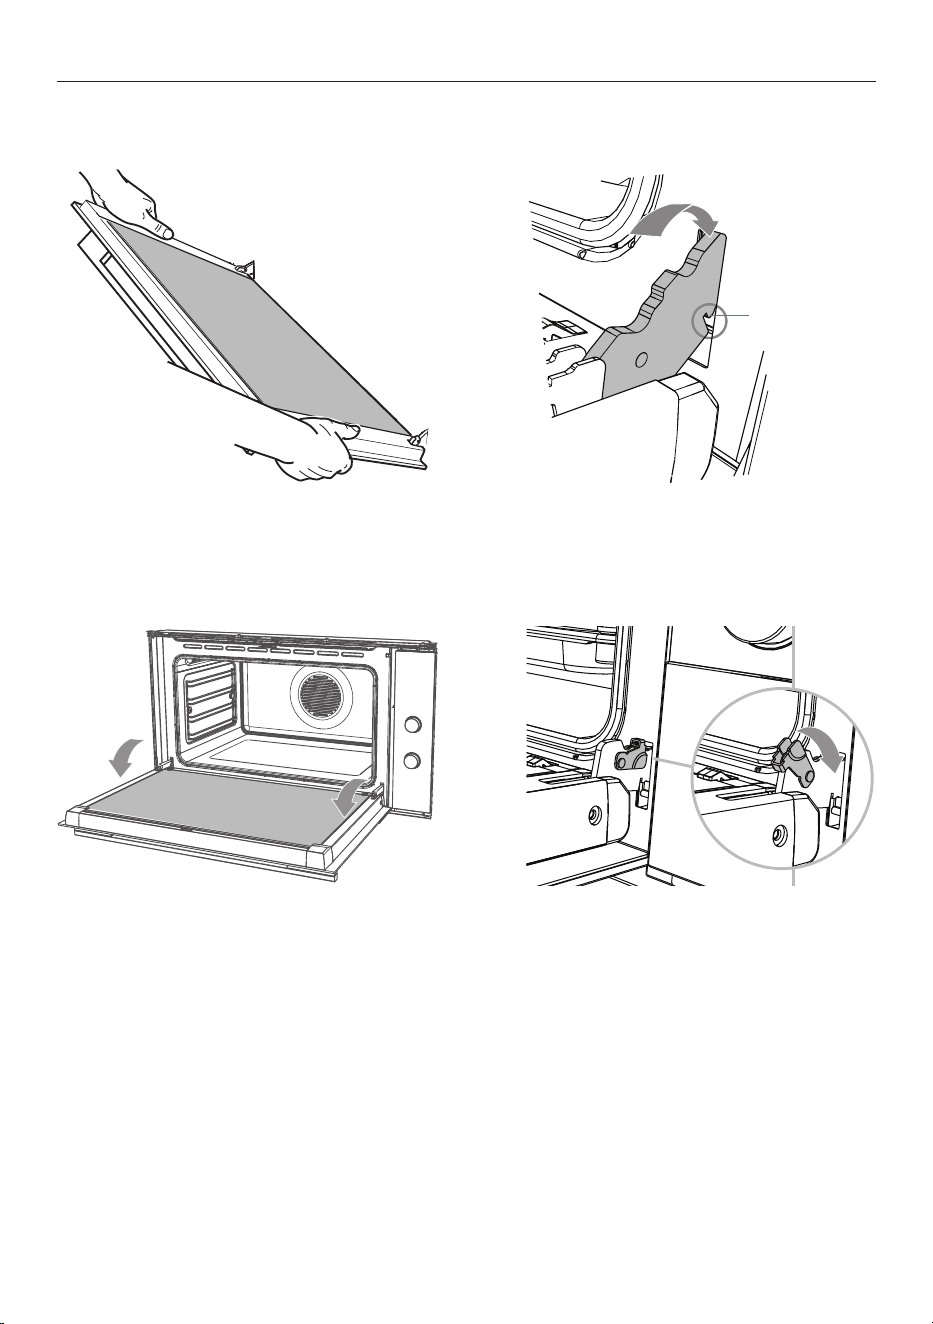
CARE AND CLEANING - REMOVE DOOR
1. Ensure you have prepared enough
space for resting the door and its glass
panes on a clean, flat surface.
2. Open the door to its full extent.
3. Open the levers on the left and right
hinges to their full extent, as shown.
Removing the oven door
We recommend to remove the door to easily clean the interior parts of the oven
or replace the light bulb(s).
Important!
z
Be careful when removing the door. If you are not sure, do not attempt to remove
thedoor.
z
Ensure the oven and all its parts have cooled down. Do not attempt to handle the parts
of a hot oven.
4. Gently close the door until the left and
right hinge levers are hooked to the door.
5. Hold the door firmly, as shown.
C
6. Lift the door and disengage the hinges. Rest
the door on a soft surface.
Ensure you lay it with the handle side down.
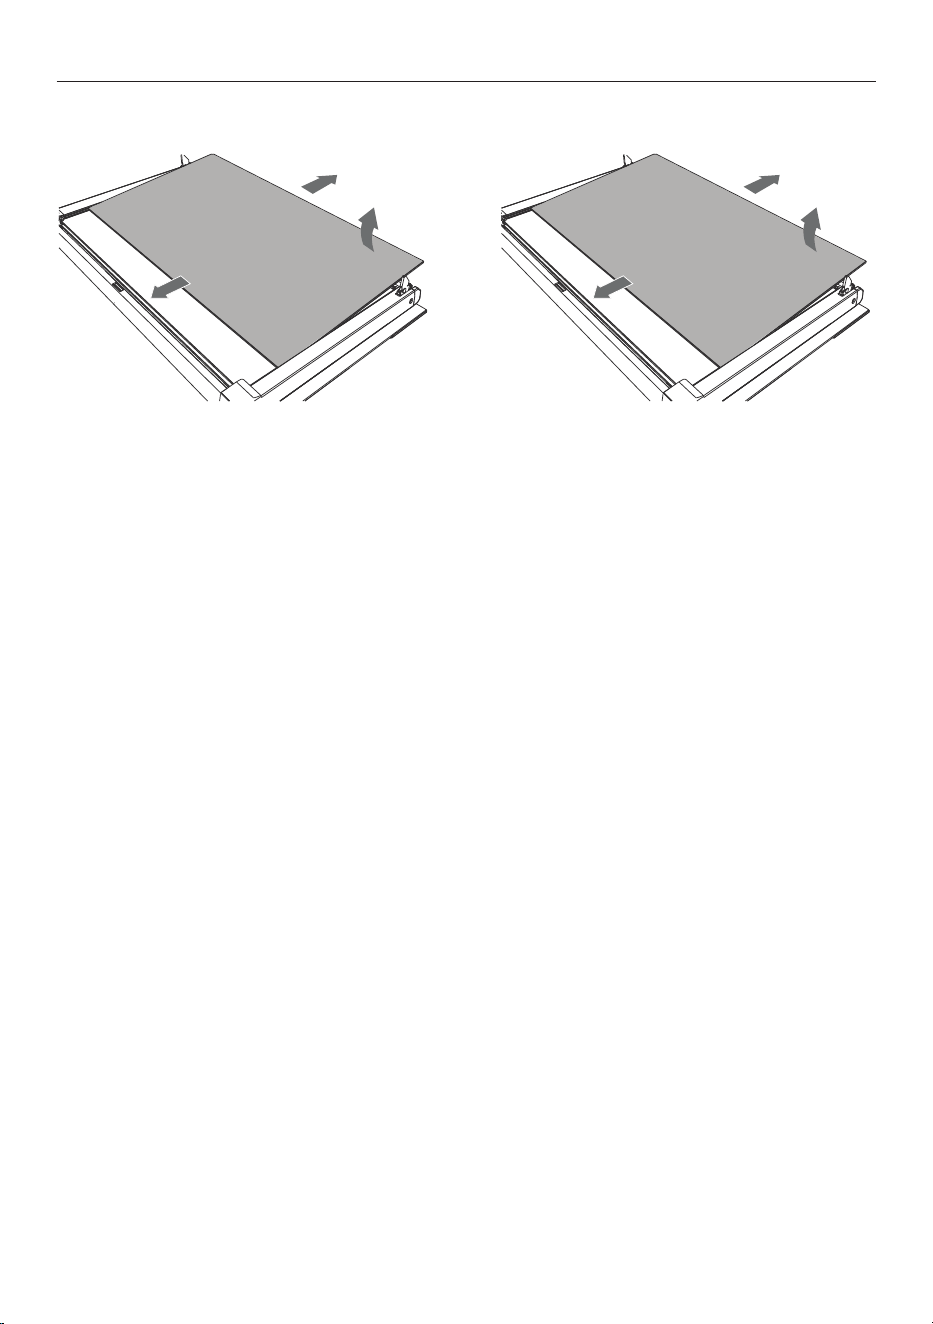
28
Important!
z
the oven door is heavy (14 kg). If you have any doubts, do not attempt to remove the
door.
z
Take extreme care when handling the glass pane. Avoid the edges of the glass
bumping against any surface. This may result in the glass shattering.
z
Don’t use oven cleaners or any other harsh/abrasive cleaners, cloths, scouring pads,
steel wool or sharp metal scrapers to clean the glass surfaces. These scratch the glass
which in turn could result in the glass cracking or shattering.
z
If you notice any sign of damage on any of the glass panes (such as chipping or
cracks), do not use the oven. Call your Authorised Repairer or Customer Care.
z
Ensure you replace the inner glass pane correctly. Do not use the oven without the
inner glass pane correctly in place.
z
If the glass panes feel difficult to remove or replace, do not force it.
Callyour Authorised Repairer or Customer Care for help. Note: service visits
providing assistance with using or maintaining the oven are not covered by your
warranty. Note: service visits providing assistance with using or maintaining the oven
are not covered by your warranty.
CARE AND CLEANING - REMOVE GLASS
To remove the inner glass panes
1. Remove the oven door followingthe
instructions. Lay it on a protected surface
with the handledown.
During the Self Clean Cycle, if soiling is left on
the glass, it will become burnt making it very
difficult to remove.
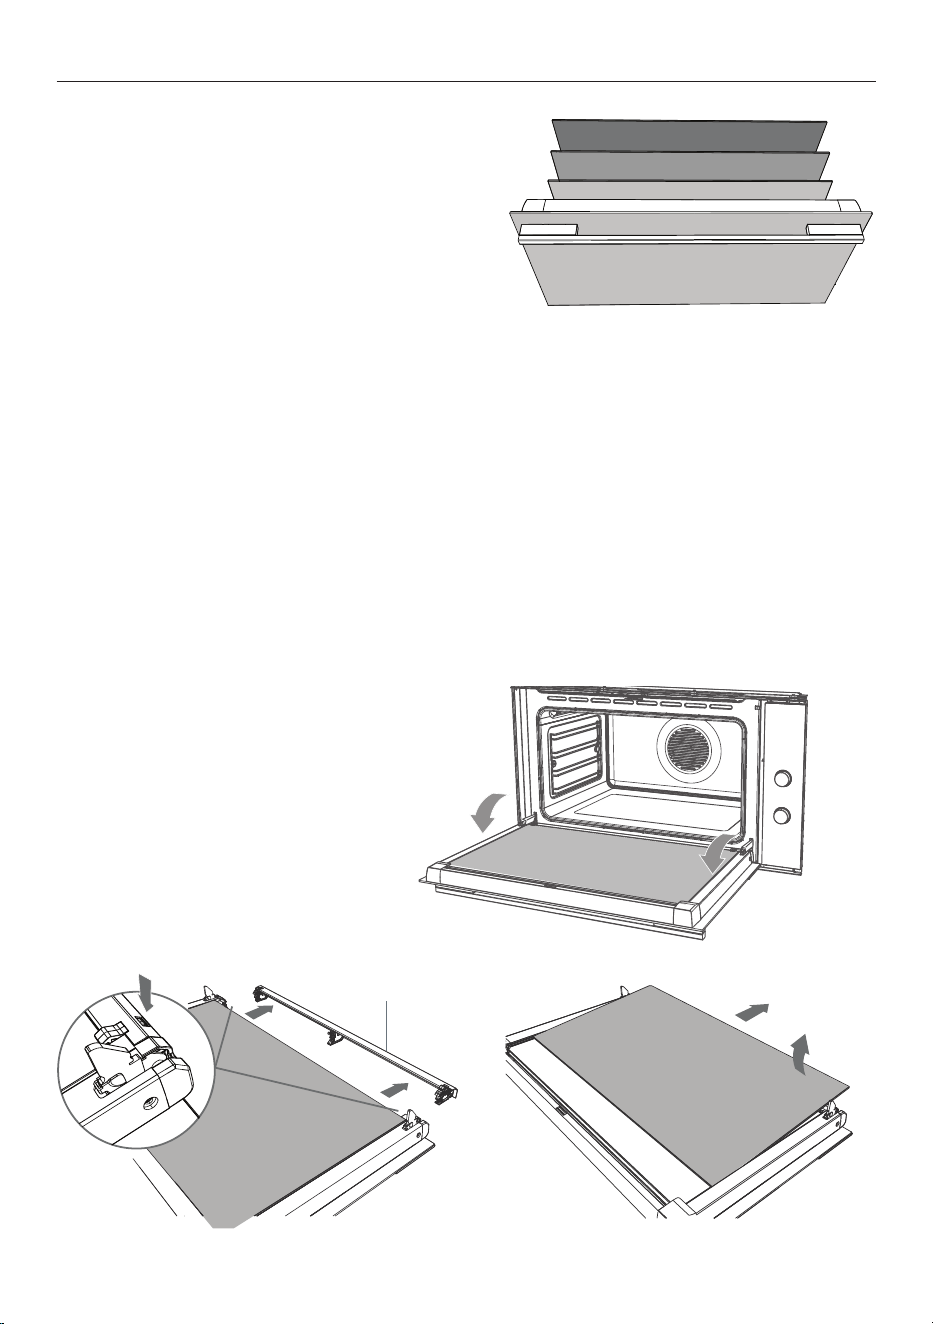
Removing and replacing the door glass panes for
cleaning
The oven door has four panes of glass.
The inner and middle panels can be removed to
make cleaning the glasseasier.
A
B
C
D
inner
outer
middle
middle
Remove the inner and middle glass panes (three in total)
1
2
1
2
Glass Retainer
1. Press down on both tabs (1) to release
the glass retainer (2).
2. Lift the inner pane (D) slightly (1),
then gently slide out (2).
29
2
1
3
2
1
3
3. Slide the first middle pane (C) slightly
towards yourself (1), then lift (2) and slide
out (3).
4. Slide the second middle pane (B)
slightly towards yourself (1), then lift
(2) and slide out (3).
CARE AND CLEANING - REMOVE GLASS
30
After cleaning, replace the glass panes
When replacing the glass panes, make sure that:
z
All three panes are replaced correctly, as shown. Each pane must be in the position
described below in order to fit into the door and to ensure that the oven operates
safely and correctly
z
Extra care is taken not to bump the edges of the glass against any object or surface
z
Panes are not forced into place. If you are experiencing difficulties replacing the panes,
remove them and start the process again from the beginning. If this still does not help,
call Customer Care.
2
1
3
3
CARE AND CLEANING - REFIT GLASS
3
2
1
3
1
2
3
1. Take either one of the middle panes (B or C) and hold it firmly. Insert it in the lowest
pair of grooves (1), push it slightly towards yourself (2) and gently lower into place (3).
Note: the two middle panes (B and C) are identical.
2. Take the other middle pane and hold it firmly. Insert it in the next pair of grooves (1), push
it slightly towards yourself (2) and gently lower into place (3).
31
3
2
1
3
1
2
3
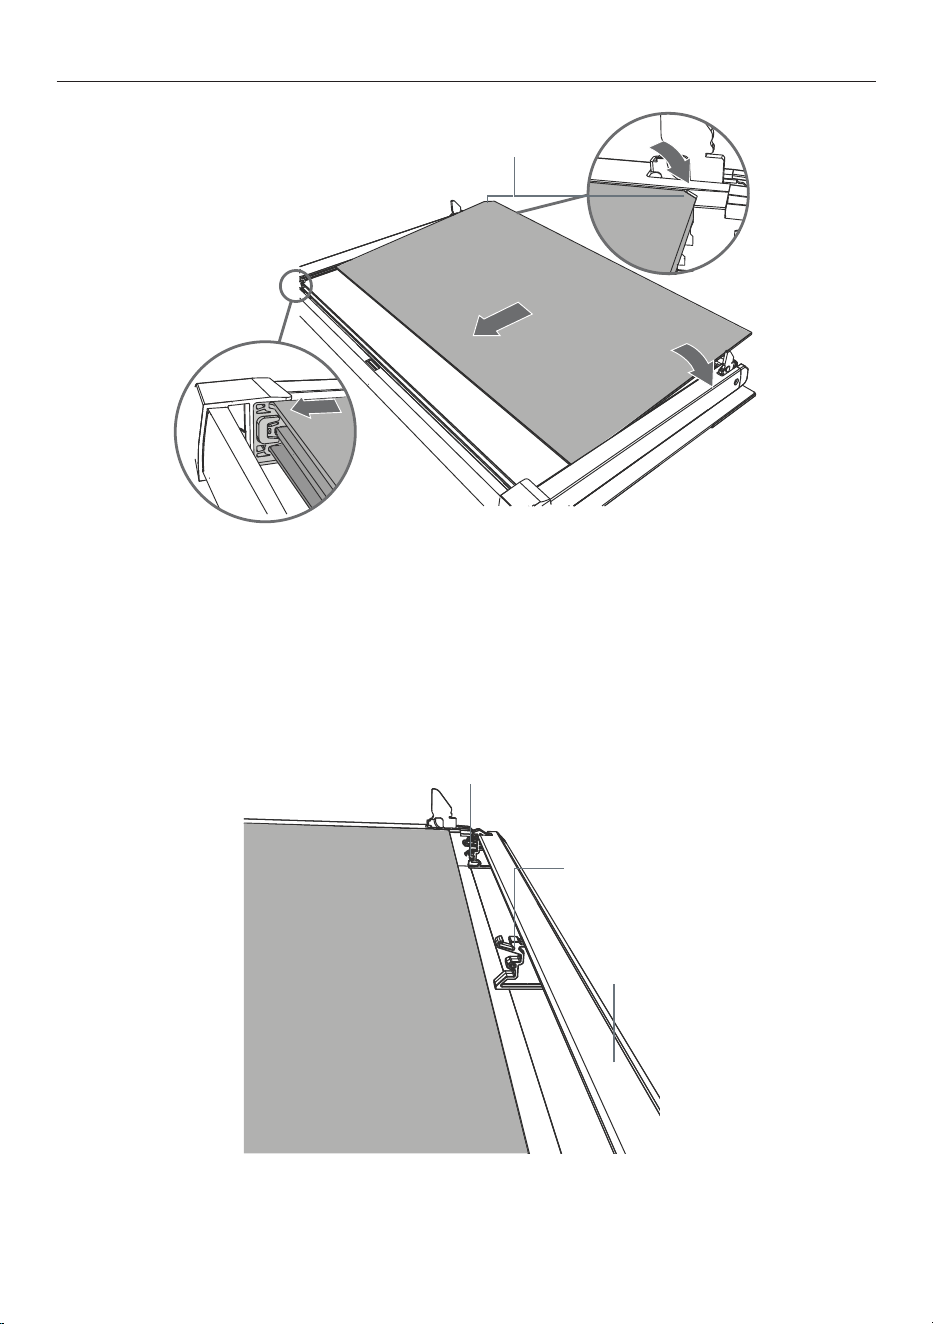
IMPORTANT!
Make sure that the angle-cut corner of the inner pane (D) is at the bottom of the oven
door, on the left-hand side. It has to be in this position for the door to function correctly.
Angle-cut corner
CARE AND CLEANING - REFIT GLASS
35
Clamp
Clamp
Glass Retainer
3. Take the inner pane (D), holding it with the angle-cut corner orientated as shown. Insert
it in the uppermost pair of grooves (1), push it slightly towards yourself (2) and gently
lower into place (3).
4. Position the glass retainer, as shown. It should sit on the bottom edge of the outer
glass (A). Check that the clamps of the glass retainer are not deformed or damaged.
32
35
Glass Retainer
"Click"
5. Gently push the glass retainer back into place. You should be able to hear the tabs
on both sides click as they lock the glass retainer in.
6. Refit the door
IMPORTANT!
Make sure the glass retainer is correctly and firmly in place and that the glass panes
are secure.
CARE AND CLEANING - REFIT GLASS
33
Notch
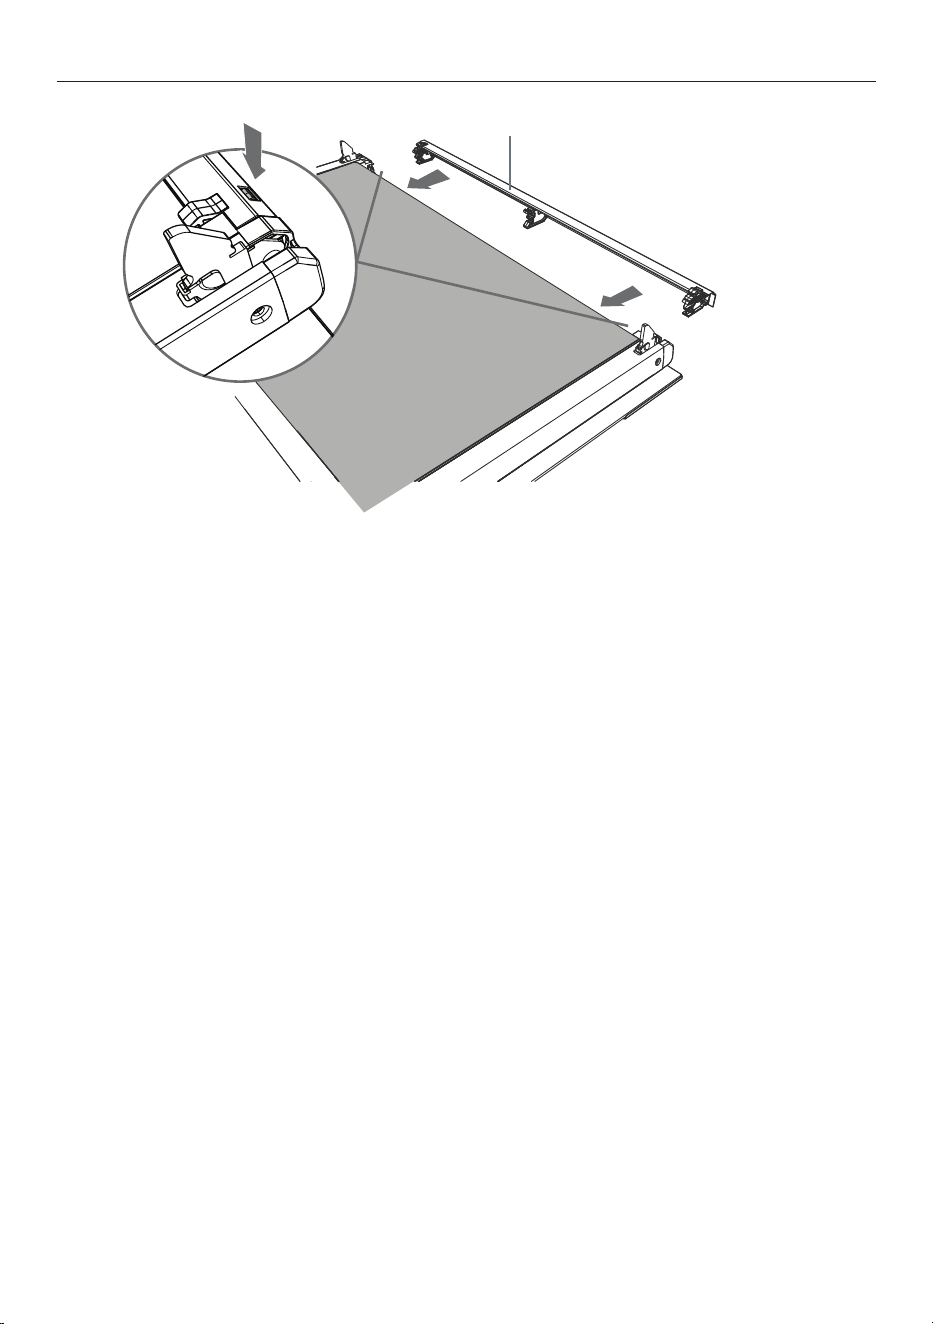
CARE AND CLEANING - REFIT DOOR
Refitting the door
1. Hold the door firmly.
2. Insert the hinge tongues into the slots,
making sure that the notches on both sides
drop into place as shown.
3. Open the door to its full extent.
4. Fully close the levers on the left and right
hinges, as shown.
5. Close the door and check that it is properly
in place: it should sit square to the oven vent
louvres and the control panel.
34
PREPARING TO USE THE SELF CLEAN FUNCTION
z
During the pyrolytic Self Clean cycle the extremely high temperature burns off and
breaks down grime and grease deposits. All that is left is a small amount of grey ash that
you can easily remove.
z
There is a choice of Self Clean cycles:
z
Self Clean (3 hours) (for normal soiling).
z
Light Self Clean (2 hours) (suitable for a light or localised soiling).
IMPORTANT!
z
You must clean the inside glass door panel BEFORE starting a self-clean cycle. Failure
to do this may result in permanent staining or marking of the door glass.
z
Do not use oven cleaners, any degreasing cleaners, or oven liners.
z
Make sure you remove the side racks, oven shelves and trays, rotisserie and all other
bakeware and utensils from the oven before starting a Self Clean cycle. If left in the
oven, they will become permanently discoloured or damaged; items made from
combustible materials (e.g. wood, fabric, plastic) may even catch fire.
z
Do not use your oven to clean miscellaneous parts.
z
Make sure the room is well ventilated.
z
Before starting a Self Clean cycle, make sure you move any pet birds to another, closed
and well-ventilated room. Some pet birds are extremely sensitive to the fumes given off
during a Self Clean cycle, and may die if left in the same room as the oven during such
a cycle.
z
During a Self Clean cycle, the oven reaches higher temperatures than it does for
cooking. Under such conditions, the surfaces may get hotter than usual and children
should be kept away.
z
The oven door will be locked during the Self Clean cycle (approximately 3 hours).
z
If there are cracks or flaws on any of the oven door glass panes, if the oven seal is
damaged or worn, or if the door does not close properly, do not start a Self Clean
cycle. Call your Authorised Repairer or Customer Care.
To start a Self Clean cycle
1. Remove oven shelves, side racks and all other
accessories, bakeware, and utensils.
z
Wipe up any spills. Failure to do so may
discolour the oven surfaces.
z
Check the inner glass pane of the oven door
(D). If it has soiling on it (e.g. stains from
greasy splatter), you will need to clean it
manually before starting a Self Clean cycle.
z
For instructions, see ‘Care and cleaning’.
Important
If soiling is left on the glass, it will become
burnt on during the Self Clean cycle, making it
very difficult to remove.
2. Close the oven door firmly.
35
USING THE SELF CLEAN FUNCTION
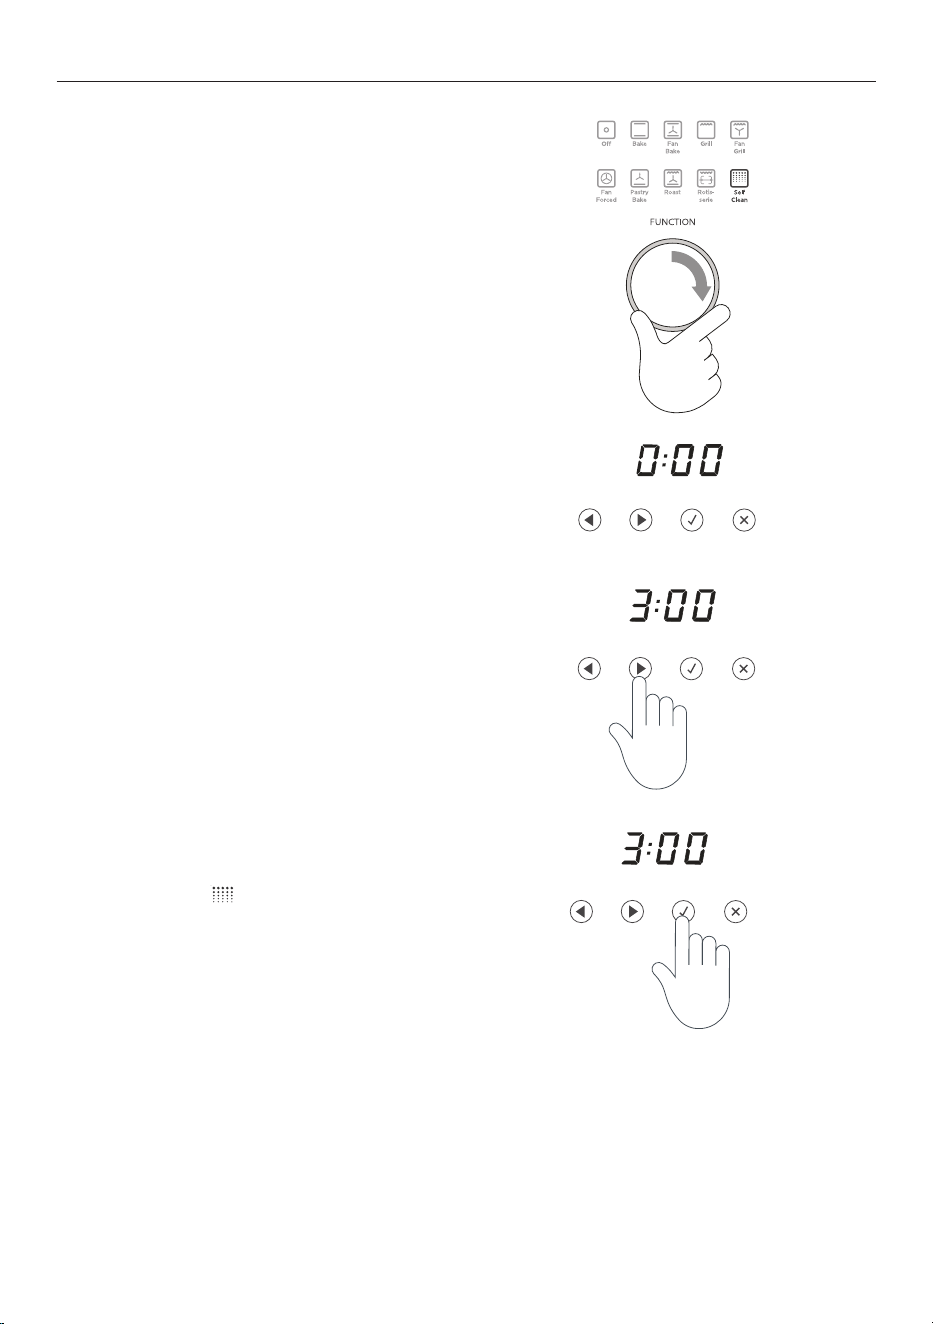
1. Select the Self Clean function. The display
will flash 0:00
2. Press the right scroll button once for the
Self Clean cycle - the display will flash 3:00 (3
hours), or
Press the right scroll button a second time
for the Light Self Clean cycle - the display will
flash 2:00 (2 hours)
The temperature indicator will be blank, as
temperature cannot be adjusted.
3. Press the select button to start the Self
Clean cycle.
z
The time will start counting down.
z
For your safety, the oven door will
automatically lock and remain locked
during the cycle.
z
Note: if the select button is not
pressed within 15 seconds, the oven
will automatically turn off. Start
from step 3 again.
z
The display will show DOOR if the door is
not shut properly. See ‘Troubleshooting’.
z
If the door is not shut properly within 30
seconds, the oven will automatically turn off.
During the Self Clean cycle
z
the temperature and function halos
will remain off.
z
the Self Clean
-
+
function will be lit.
z
the display will countdown the
time remaining.
z
the cancel button will glow red.
-
+
-
+
-
+
-
+
-
+
-
+
-
+
-
+
-
+
-
+
-
+
-
+

36
USING THE SELF CLEAN FUNCTION
When a Self Clean cycle has finished
The oven will:
z
emit a long tone
z
automatically turn off
z
automatically unlock the door.
In a few seconds, the display will show the time of day.
You need to:
1. wait for the oven to cool down completely
2. remove the grey ash with a small brush or damp cloth
3. wipe out the oven with a clean damp cloth
4. dry with a clean lint-free cloth
5. replace the side racks and shelves.
To cancel a Self Clean cycle
IMPORTANT!
z
A Self Clean cycle can be cancelled at any time by pressing the cancel button.
z
The door will not unlock until the oven has cooled to a safe temperature. Do NOT turn
off the mains power supply to the oven (wall switch). Turning off the power while the
oven is too hot may damage the oven and its surrounding cabinetry.
To cancel a Self Clean cycle, press the cancel button.
z
If the oven needs to cool down, the Self Clean function indicator will stay lit, the display
will show the remaining cool-down time, the temperature indicator will show cascading
bars and the door will remain locked.
z
When it has cooled down, the oven will turn off, the door will unlock, a long tone will
sound and the display will show the time of day.
z
We do not recommend cancelling a Self Clean cycle and then immediately
starting one again.
-
+
-
+
-
+
-
+
-
+
-
+
37
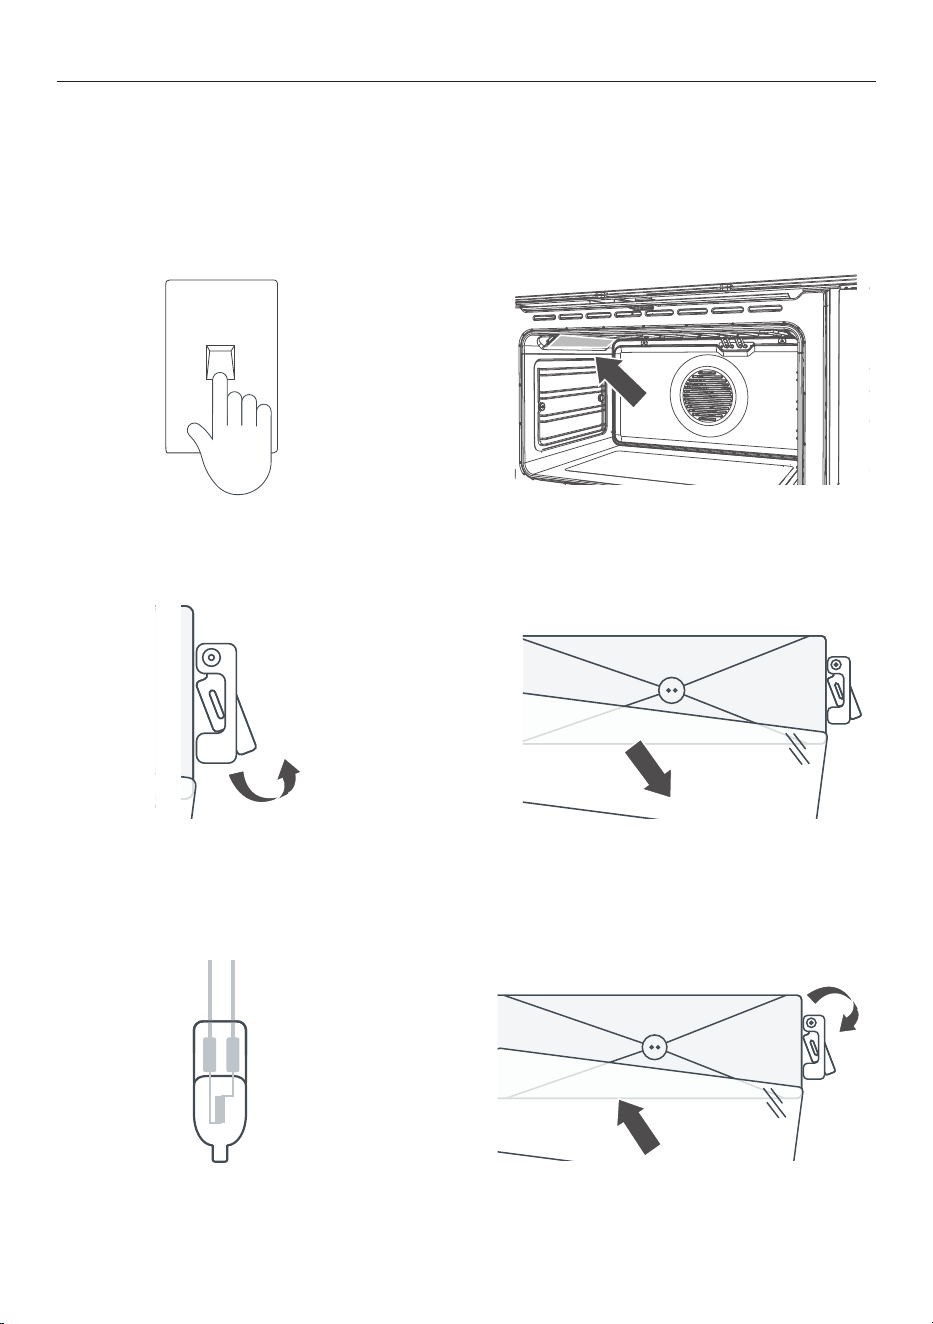
REPLACE OVEN LIGHT BULB
Replacing the oven light bulbs
The oven light bulbs (12V/20 W halogen) have a very long life, but if you should need to
replace one, use only a replacement bulb purchased from your nearest Fisher&Paykel
dealer and follow these steps.
Note: oven bulb replacement is not covered by your warranty.
1. Allow the oven to cool down, then turn
it off at the mains power supply (wall
switch).
OFF
ON
2. Remove any oven shelves that may
get in the way.
OFF
ON
3. Using a flat-head screwdriver, twist and
lift the retainer clip upwards to release the
glass cover. Hold the glass cover to prevent
it falling.
OFF
ON
4. Carefully lift the glass cover out of
the retaining bracket in the back and
pull out the faulty bulb.
OFF
ON
5. Hold the replacement bulb in a soft
cloth or tissue (touching the bulb will
reduce its life span) and insert it into
the socket.
6. Reposition the glass cover and
twist the retainer clip back in place.
Turn the oven back on at the mains
power supply (wall switch).
OFF
ON
OFF
ON

38
Troubleshooting chart
If there is a problem, check the chart below to see if you can fix it. If the problem cannot be
fixed or persists, call your Authorised Repairer or Customer Care.
PROBLEM POSSIBLE CAUSES WHAT TO DO
GENERAL
The oven does
notwork
No power. Check that the mains power supply
(wall switch) is turned on, the fuse
has not tripped and there is no
power outage in your area.
The lights do not
come on when I
openthe oven door
The oven light bulb(s)
have blown.
The door is not correctly
fitted.
The oven is in Sabbath
setting and the ‘Light off’
option has been saved.
Replace the light bulb(s). See ‘Care
and cleaning’ for instructions.
See ‘Care and cleaning’ for instructions
on fitting the door correctly.
To quit Sabbath setting, press and
hold the cancel
-
+
-
+
-
+
button. See ‘User
preference settings’ for instructions
on changing the ‘Light off’ option.
The temperature
indicator shows —
and the dials
and buttons are
unresponsive
The control panel is
locked.
Press and hold the select
-
+
-
+
-
+
or cancel
-
+
-
+
-
+
button to unlock the control panel.
The oven is not
heating
The door is not properly
closed or it is opened too
frequently during cooking.
The heating elements are disabled
while the door is open. Ensurethe door
is properly closed and avoid opening it
frequently during cooking.
A glass pane in
the oven door has
cracked, chipped, or
shattered
Incorrect cleaning or the
edge of the glass hitting
against something.
You must NOT use the oven. Call your
Authorised Repairer or Customer
Care.
TROUBLESHOOTING

39
TROUBLESHOOTING
PROBLEM POSSIBLE CAUSES WHAT TO DO
General
The oven has reached
the set temperature
but the temperature
dial halo is still red
(indicating that the
oven is not ready
touse)
This is normal: when heating
up from cold, your oven is
designed to initially heat to a
temperature somewhat higher
than what you have set. Thisis
to provide optimal baking
conditions right from the start.
Wait until a long tone sounds
and the temperature dial halo
turns white: the oven will then
be ready to use.
The oven is heating
but the display
isdark
The oven is set to ‘Display off’
option.
The oven is in Sabbath setting.
To quit the ‘Display off’
option, press and hold the
cancel
-
+
-
+
-
+
button until the
display shows the time of day.
To quit Sabbath setting, press
and hold the cancel
-
+
-
+
-
+
button
until the display shows the
time of day.
The oven cancels
automatic cooking
when I try to adjust
the clock setting
The oven was set for automatic
cooking when you were trying
to adjust the clocksetting.
You can only adjust the clock
setting while the oven is not
set for automatic cooking.
See section ‘Setting the clock
and first use’ for instructions.
The oven beeps
when I try to turn the
temperature dial OFF
or below a certain
temperature
This is normal: for food safety
reasons, the oven functions
have factory-set minimum
temperature settings.
The temperature dial itself
cannot be ‘turned off’.
Selecting Off with the function
dial will turn the oven off.
The temperature dial
halo never turns
white when I useGrill
This is normal: the halo stays red to indicate that
the grill element provides instant radiant heat.
The rotisserie skewer
will not rotate
The skewer did not fully engage
in the rotisserie drive.
The meat is too heavy.
Ensure the skewer is pushed
fully into the rotisserie
drivehole.
To get a finish similiar to a
rotisserie for pieces of meat or
poultry heavier than 6 kg, use
the grill tray and rack and the
Roast function.
The rotisserie skewer
stops rotating when I
open the door
This is normal: the rotisserie drive is disabled
while the door is open.
40
TROUBLESHOOTING
PROBLEM POSSIBLE CAUSES WHAT TO DO
Self Clean function
During a Self Clean
cycle, the oven is louder
than usual.
During a Self Clean
cycle, the oven is louder
than usual.
The display shows DOOR. The oven door is locked
because the oven is still too
hot
to be used for cooking.
Wait until the Self Clean
cycle has finished. If you
cancelled a Self Clean
cycle
which was already
underway,
the oven still needs to
cool
down before it can be
used. The oven door will
automatically unlock.
At a point during a Self
Clean cycle, the function
dial halo goes out and the
temperature indicator starts
displaying cascading bars
This is normal: the oven is
in the last phase of the Self
Clean cycle, cooling down.
Wait until the Self Clean
cycle has finished. A long
tone will sound and the
oven door will
automatically
unlock when the oven is
ready to use.
The oven beeps when I try
to turn the temperature
dial OFF or below a certain
temperature
This is normal: for food safety
reasons, the oven functions
have factory-set minimum
temperature settings.
The temperature dial itself
cannot be ‘turned off’.
Selecting Off with the
function dial will turn the
oven off.
I have cancelled a Self
Clean cycle but cannot use
the oven:
- the oven door will not
open
- the display is still
counting down
minutes or showing
-
+
-
+
-
+
- the Self Clean function
indicator is still lit
- the temperature
indicator shows
cascading bars
- the dials and buttons are
unresponsive.
This is normal: if the function
dial halo is unlit, you have
successfully cancelled the
Self Clean cycle. However, the
oven is still too hot to be
used for cooking and
needs to cool down.
Wait until the cool-down
phase has finished. A
long tone will sound
and the oven door will
automatically unlock when
the oven is ready to use.
Note: depending on when
the Self Clean cycle was
cancelled, the cool-down
phase may take up to 45
minutes.w
The oven is beeping and
the display shows A2 or A3.
See section ‘Alert codes’ for instructions.

41
If there is a problem, the oven will:
z
automatically suspend all oven functions
z
beep five times
z
display an alert code.
IMPORTANT!
Do not turn off the mains power supply to the oven (wall switch) if you get an
alert code, unless the instructions in the chart following specifically instruct you
to. Thereare cooling fans within the oven which are needed to cool the oven’s
components. Turning off the power while the oven is too hot may damage the oven
and its surrounding cabinetry.
What to do if an alert code is displayed
1. If the beeping hasn’t stopped already, press any button to stop it.
2. Make a note of the alert code displayed. You may need this information.
3. Check the chart following to see if you can fix the problem yourself and follow
theinstructions.
4. If you can fix the problem and the alert code does not reappear, you can keep using your
oven.
OR
If you can’t fix the problem yourself or the alert code reappears and the problem persists:
wait until the cooling fans have stopped and the oven has completely cooled down, then
turn the power to the oven off at the wall and call your Authorised Repairer or Customer
Care with the alert code information.
ALERT CODES

42
ALERT CODE POSSIBLE CAUSES WHAT TO DO
A1 The oven has overheated. 1. Allow the oven to cool down.
2. Once the oven has cooled down and
the door has unlocked, the alert code will
disappear. You can now use the oven again.
A2 Door lock error: the door
cannot be locked after
you have started a Self
Clean cycle.
1. Turn the power to the oven off at the wall
and on again.
2. Wait approximately 10 seconds. This is
to allow the door lock to return to its initial
position.
3. Set the clock. See ‘Setting the clock and
first use’ for instructions.
4. Try starting a Self Clean cycle again,
making sure that you close the door firmly.
See ‘Using the Self Clean function’.
A3 Door lock error: the door
cannot be unlocked after
a Self Clean cycle has
finished.
1. Turn the power to the oven off at the wall
and on again.
2. Try pressing on the oven door to help the
door lock disengage.
3. If this doesn’t help and the alert code
reappears, call your Authorised Repairer or
Customer Care.
F + number Technical fault. 1. Note down the alert code.
2. Wait until the cooling fans have stopped
and the oven has completely cooled down.
3. Turn the power to the oven off at the wall.
4. Call your Authorised Repairer or
Customer Care with the alert code
information.
ALERT CODES

43
Complete and keep for safe reference:
Model
Serial No.
Purchase Date
Purchaser
Dealer
Suburb
Tow n
Country
CUSTOMER CARE

432372A 04.24
FISHERPAYKEL.COM
© Fisher & Paykel Appliances 2024. All rights reserved.
The models shown in this guide may not be available in all markets
and are subject to change at any time.
The product specifications in this guide apply to the specific products and
models described at the date of issue. Under our policy of continuous product
improvement, these specifications may change at any time.
For current details about model and specification availability in your country,
please go to our website or contact your local Fisher&Paykel dealer.
