Quick Start and Troubleshooting Guide
66856
Rev 01
English


Parts in the box ................................................4
Required tools ..................................................5
Installation ...........................................................7
Download the app.........................................17
Reference guide .............................................19
Frequently Asked Questions ...................33
Table of contents
3

Parts in the box
Exterior assembly
Latch
Strike
Battery pack Interior assembly
Interior cover
1
Step
2
Step
actual
size
03809
46780
actual
size
4
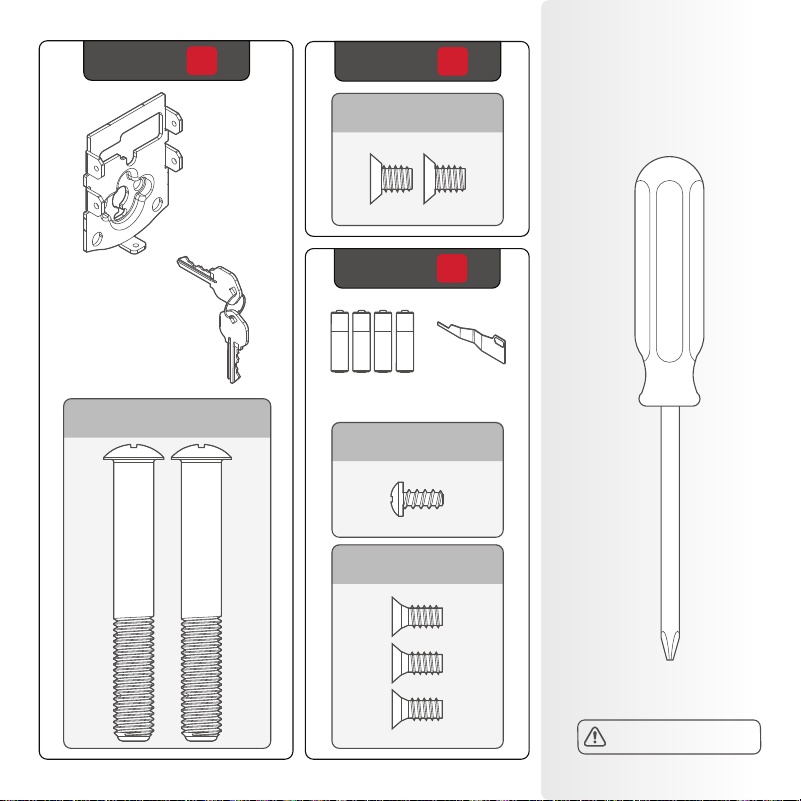
Required
tools
Mounting
plate
Keys
Batteries
SmartKey™
tool
Phillips head
screwdriver
3
Step
4
Step
5
Step
actual
size
actual
size
actual
size
actual
size
64844
49191
64109
68611
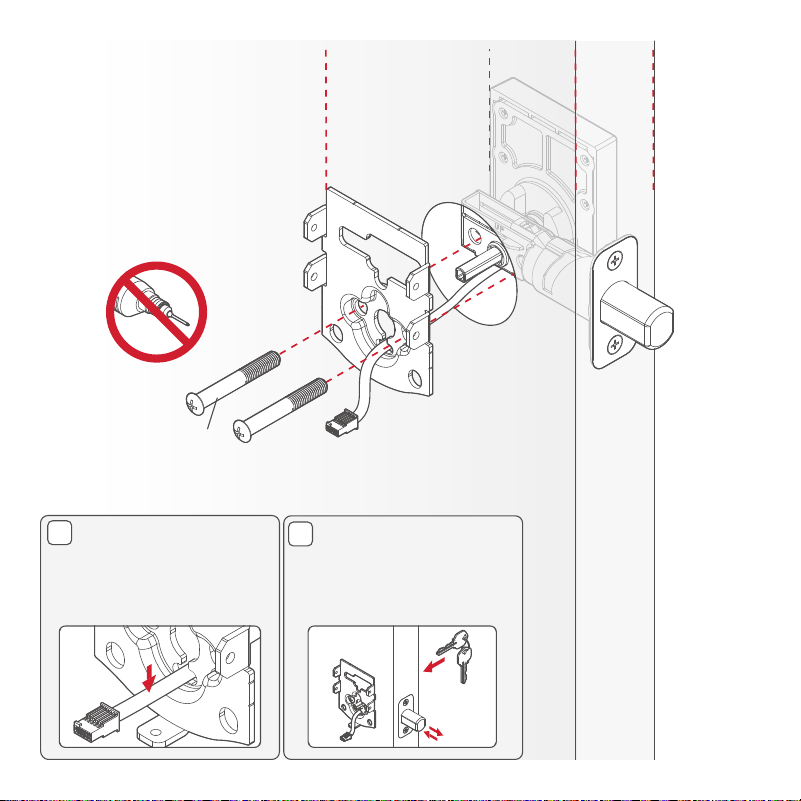
No electric drills
5

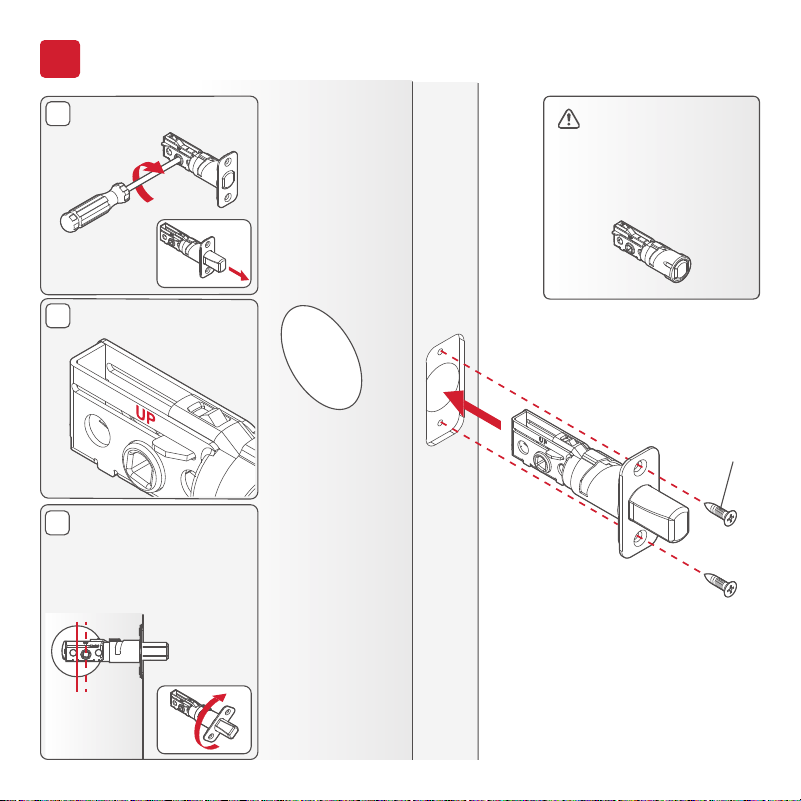
Installation
C
B
A
*Use the longer
screws if the holes
are worn out.
You will have two
extra screws.
Extend the latch bolt.
UP is on top.
If the D-shaped hole
is not centered in the
door hole, rotate the
latch face to extend
the latch.
03809*
(2X)
If your door requires
a drive-in latch,
please contact
Kwikset at
1-800-327-5625.
1
Install the latch
[OUTSIDE]
8

DOOR
JAMB
*Install the longer screws
closest to the door jamb.
1" (25 mm)
hole depth
46780*
(4X)
2
Install the strike
9

A
Install the exterior assembly
3
[OUTSIDE]
Cable goes under the latch.
10
C
B
[INSIDE]
Route the cable
through the center
hole, then push into
the bottom hole.
Insert the key and
test the latch. If the
latch does not extend
or retract smoothly,
adjust the screws.
Tighten the screws evenly.
DO NOT over-tighten.
Keep parallel to
the door edge
64844
(2X)
11
B
A
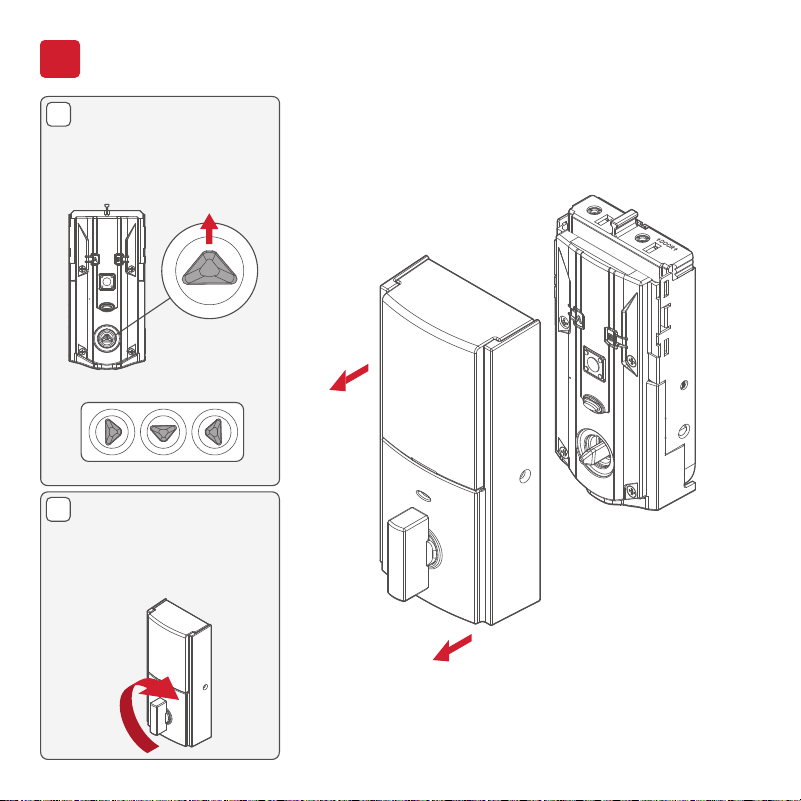
Install the interior assembly
4
Remove the interior
cover from the
interior assembly.
Make sure the turnpiece
shaft is pointing up as
shown below.
Incorrect:
If the turnpiece shaft
is not pointing up, put
the cover back on and
rotate the turnpiece
until you hear a click.
12

E
D
C
align
Secure the interior
assembly onto the
mounting plate.
49191
(2X)
Connect the cable.
Ensure a tight cable
connection.
Lay cable flat inside the
bottom of the interior
housing.
Ensure the spindle
fully engages with the
turnpiece shaft.
[INSIDE]
13
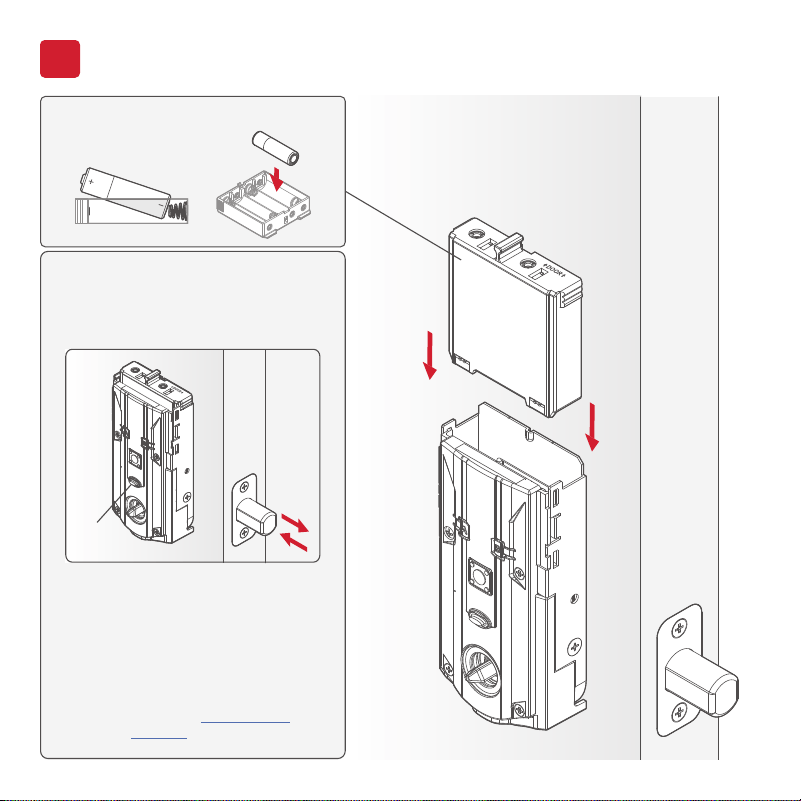
Perform the door handing process
5
With the door open, install
the battery pack to initiate
auto-handing. NOTE: Lock
must be installed on the door
before installing the battery.
Install 4 AA batteries into the
battery pack.
The latch will retract and extend to
learn the orientation of the door.
Then the status LED will indicate
success or failure.
GREEN: Successful. Proceed to the
next step.
RED: Unsuccessful. Make sure the
lock interior and batteries are
correctly installed. Perform
step 5 again. If your second
attempt is still unsuccessful,
follow the Manual Door
Handing instructions.
[INSIDE]
14
Status
LED
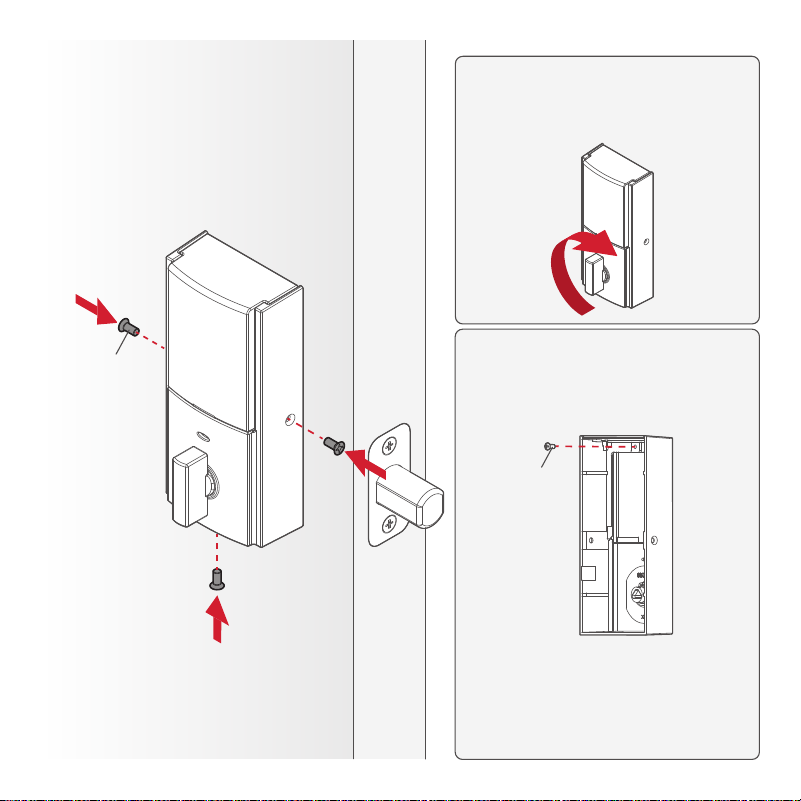
Secure the interior
cover onto the
interior assembly.
You may need to rotate the
turnpiece to align with the
turnpiece shaft.
For additional security, you may
choose to lock the window by
installing the security screw.
When the window is locked, you
will need to remove the entire
cover to access the battery pack
and buttons.
64109
(3X)
68611
(1X)
[INSIDE]
15

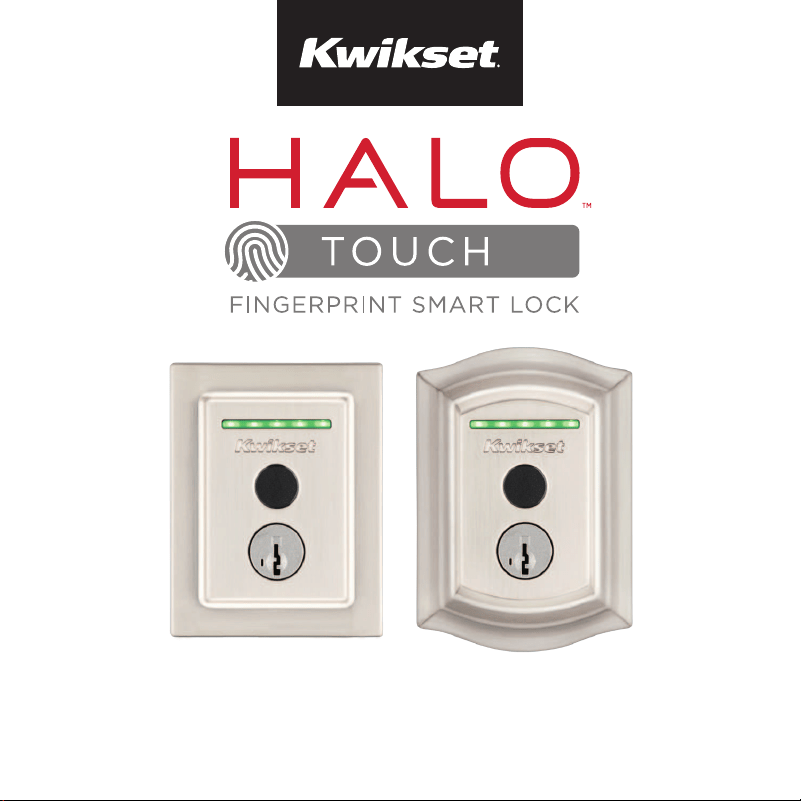
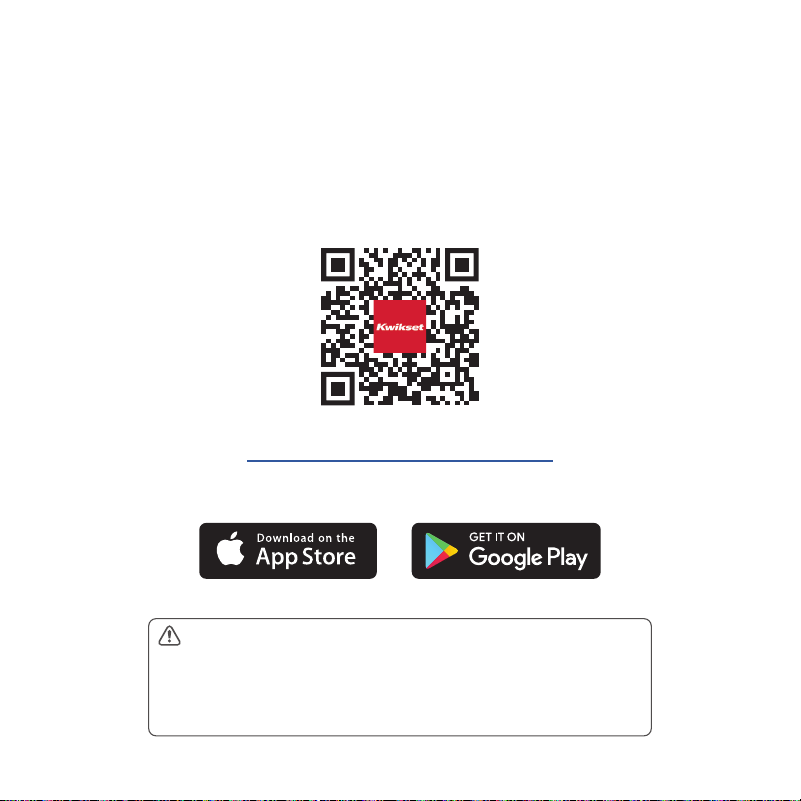
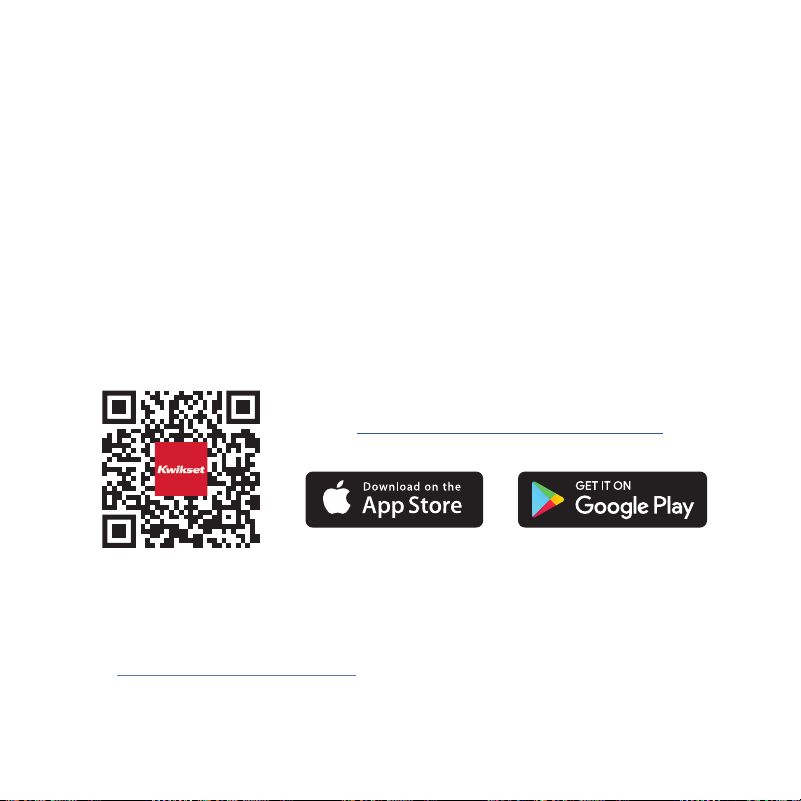
Download the app
& create an account

Reference Guide
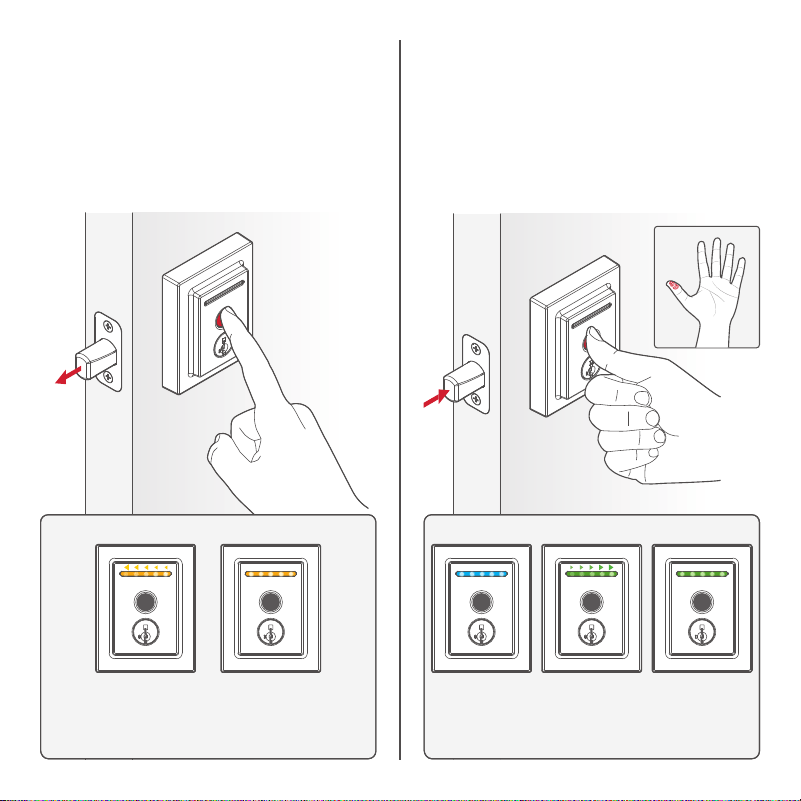
To lock your door, place any finger
on the fingerprint sensor. The
light bar will display the following
animations, beep once, and the
door will lock.
To unlock your door, place your
enrolled finger on the fingerprint
sensor. The light bar will display the
following animations, beep once,
and the door will unlock.
Locking Unlocking
Orange sweep,
moving toward
door edge
All LEDs
blue during
authentication
All LEDs
orange for
2 seconds
Green sweep,
moving away
from door edge.
All LEDs
green for
2 seconds
19


22
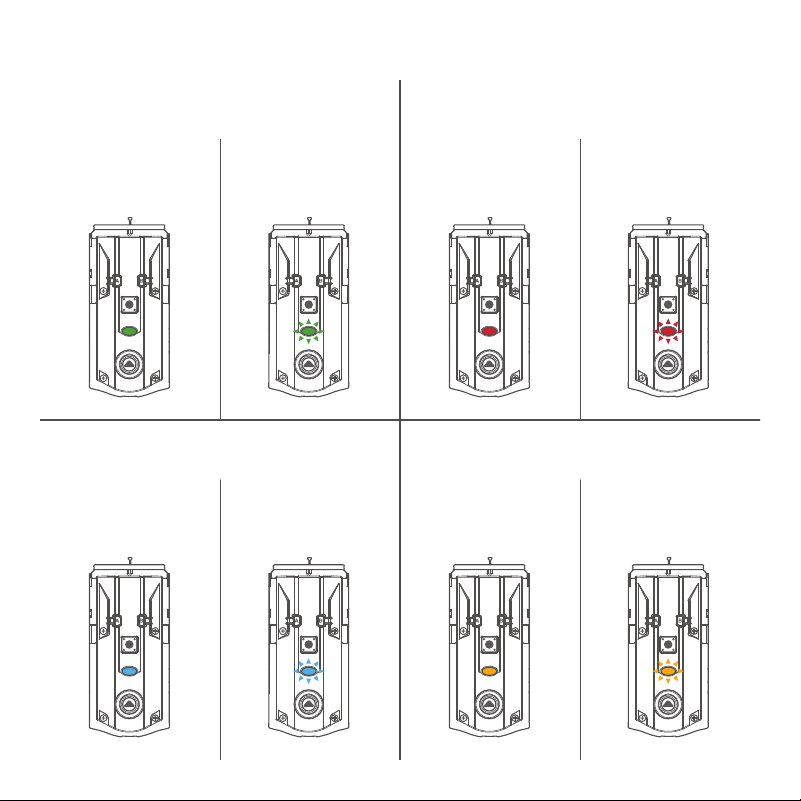
Orange:
Locking
Blue:
Authenticating fingerprint
Red:
Low battery or door jam
Green:
Unlocking
Exterior LED Indicators
23
Green
Blue Orange
Solid:
Action successful
Solid:
Bluetooth pairing
successful
Solid:
Door handing
unsuccessful
Solid:
Entering network
reset mode
Blinking:
Unlocked
Blinking:
Bluetooth pairing
mode
Blinking:
Low battery or
action unsuccessful
Blinking:
Locked or network/
system mode
Red
Interior LED Indicators

24
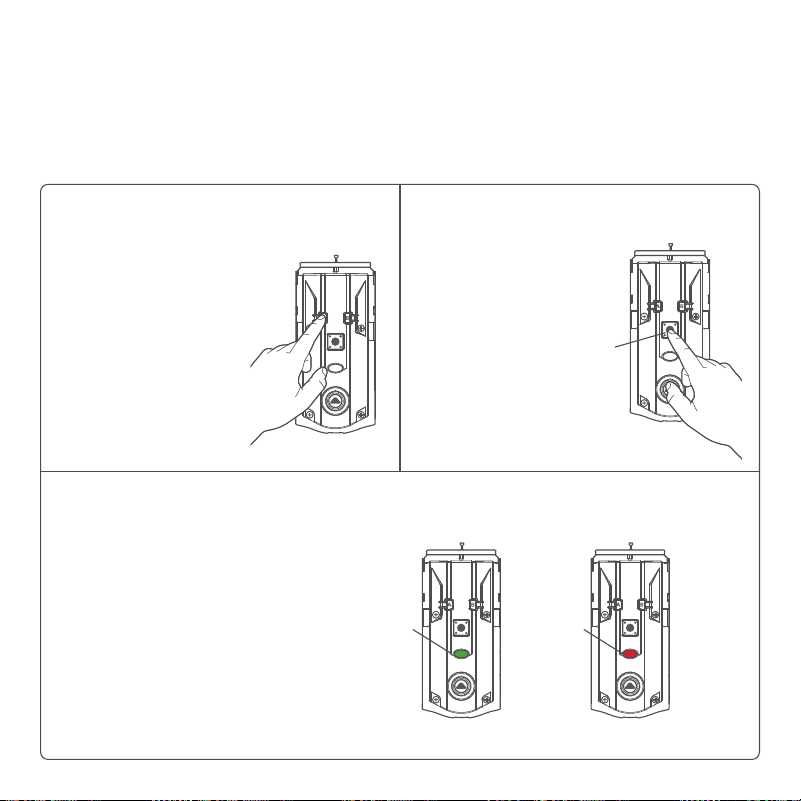
If needed, the door handing process can be initiated manually.
This is useful if the lock is being moved to a dierent door.
1. Remove battery
pack.
3. Press the
Program button
once more.
2. Press and HOLD
the Program
button while
reinserting the
battery pack.
Release the
Program button
after 3 seconds.
The status LED
will flash red
and green.
4. The latch bolt will extend and
retract to learn the orientation
of the door. The LED will flash
green if handing is successful or
red if handing is unsuccessful.
Manual Door Handing
Status
LED

25
1. Press and HOLD “A”
for 10 seconds. You will
hear 1 short beep and
see an amber LED
Note: After 3 seconds,
you will hear 1 short
beep and see a blue
LED. You should
continue to hold
“A” to enter network
reset mode.
3. Press and release
the Program button
to confirm network
reset.
The Program button
must be pressed
within 10 seconds
of releasing “A” or
the function will
time out.
2. Release “A.”
You will see a
blinking amber
LED to indicate
it is in network
reset mode.
4. If successful, you will hear 1 long
beep and see a green LED. If
unsuccessful, you will hear 5 rapid
beeps and see a blinking red LED.
If unsuccessful, repeat from step 1.
Network Reset will delete all Wi-Fi settings, Bluetooth pairings,
user associations, and remove the lock from the account.
Network Reset
Status
LED
10s
Successful: Unsuccessful:
Green
LED
Red
LED
26
System Reset will delete all users, fingerprints, and lock settings
including lock handing.
System Reset
1. Press “A” 10
times. You will
hear 1 short
beep and see a
blinking amber
LED to indicate
it is in system
reset mode.
3. If successful, you will hear 1 long
beep and see a green LED, and
the reset process will begin.
During the reset process, the LED
will blink green/red a few times
and will beep when complete.
If unsuccessful, you will hear 5
rapid beeps and see a blinking
red LED. If unsuccessful, repeat
from step 1.
2. Press and
release the
Program button
to confirm
system reset.
Program
button
Successful:
Unsuccessful:
Green
LED
Red
LED
27
Factory Reset will delete all Wi-Fi/Bluetooth pairings, users,
remove the lock from the account, and reset all lock settings.
Factory Reset
1. Remove battery
pack.
3. Press the
Program button
once more. The
LED will flash
green and red,
and the auto-
handing process
will begin.
2. Press and HOLD
the Program
button while
reinserting the
battery pack.
Keep holding
the button for
30 seconds until
the lock beeps
and the status
LED flashes red.
4. The latch will retract and extend
to learn the orientation of the
door. The LED will flash green if
auto-handing is successful or red
if auto-handing is unsuccessful.
Status
LED

28
iOS 12 and higher
• Apple iPhone 6
• Apple iPhone 6S
• Apple iPhone 7
• Apple iPhone 7S
• Apple iPhone 7 Plus
• Apple iPhone 8
• Apple iPhone 8 Plus
• Apple iPhone X
• Apple iPhone XR
• Apple iPhone XS
• Apple iPhone XS
• Apple iPhone XS Max
• Apple iPhone 11
• Apple iPhone 11 Pro
• Apple iPhone 11 Pro Max
• Apple iPad Air 2
• Apple iPad Pro
Android 8.0 and higher
• LG G7 ThinQ
• Google Pixel 2XL
• Google Pixel 3
• Google Pixel 3a
• Google Pixel 3XL
• Samsung Galaxy S7
• Samsung Galaxy Edge S7
• Samsung Galaxy S8
• Samsung Galaxy S9
• Samsung Galaxy S9 plus
• Samsung M30, OnePlus 6
• Motorola Moto X
• Xiaomi Pocophone F1
Device Compatibility

29
• Router-TP Link (450 Mbps
wireless N Router TL-
WR940N)
• Linksys WRT32X Gaming
Router
• NETGEAR Orbi Whole Home
WIFI System Triband WIFI
• TP Link- AC1750
• Linksys EA6350 Wi-Fi
Wireless Dual-Band+ Router
with Gigabit & USB
• ASUS 3-In-1 Wireless Router
(RT-N12)
• TP-LINK TL-WR702N
• Netgear R6700-100NAS
Nighthawk AC1750 Smart
Dual Band WiFi Router
(R6700)
• Netgear WNR3500 v2
• Netgear WNR3500L
• Mi router 4 Dual Band 2.4
and 5GHZ
• D-Link DIR816 Dual Band 2.4
and 5GHZ
• NetGear WGR614V10
• D-Link DIR 600M- Cloud
router
• D-Link N150
• D-Link N300
• Repeater- Mi Wifi repeater 2
• Repeater - Mi Repeater Pro
300M
• Repeater - TP link wifi
repeater WA850RE
NOTE: Halo Touch implements a standard based Wi-Fi
radio and should work with majority of the routers
available in the market that are Wi-Fi certified.
Router Compatibility
30
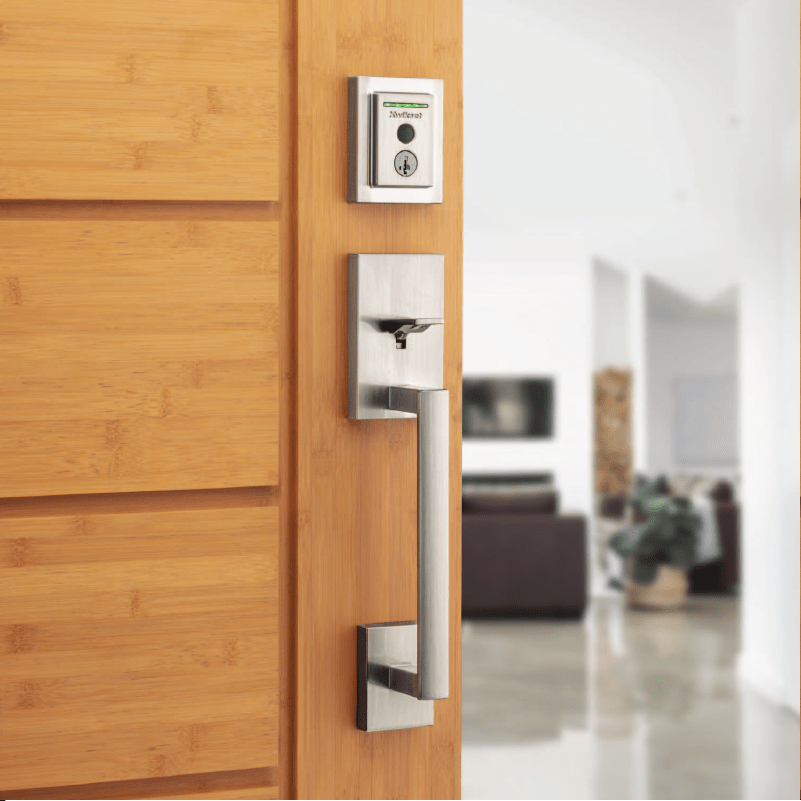
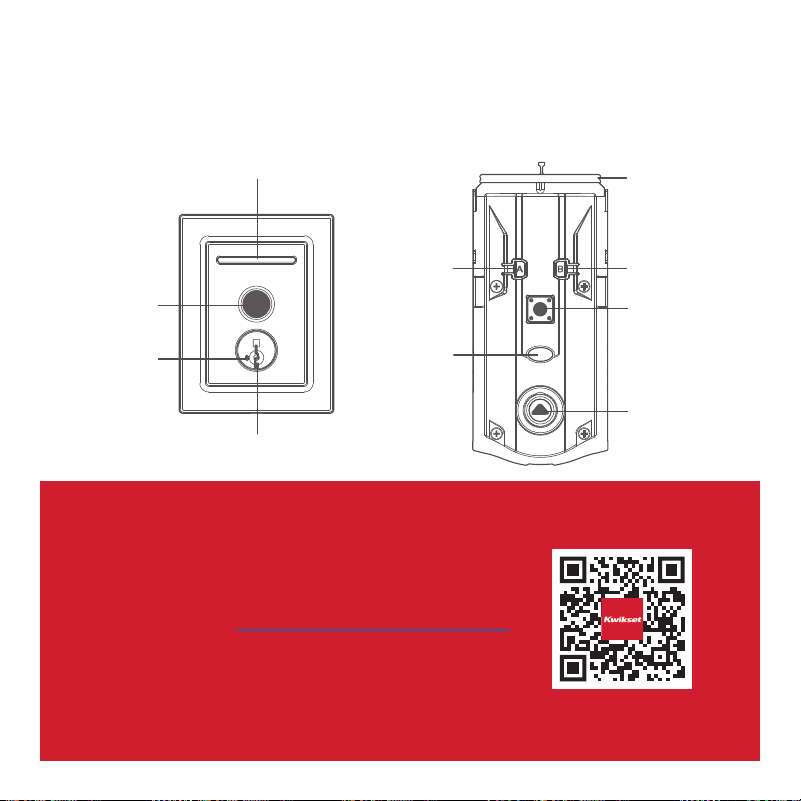
Halo Touch at a Glance
Exterior Interior
(cover removed)
SmartKey™
tool access
Light bar
Fingerprint
sensor
Keyway
Button “A”
Button “B”
Status LED
Program
button
Turnpiece
shaft
Battery
pack
Troubleshooting
If you have any issues, please visit our
support center: kwikset.com/halo-touch
or call us at 1-800-327-5625.

31
Important Safeguards
Regulatory Compliance
1. Read all instructions in their entirety.
2. Familiarize yourself with all warning and
caution statements.
3. Remind all family members of
safety precautions.
4. Always have access to your lock’s
standard key.
5. If using the Auto-Lock features, make sure you
have your smartphone or standard key with you
to prevent locking yourself out.
6. Familiarize yourself with all light bar error
notifications.
7. Replace low batteries immediately.
8. Dispose of used batteries according to local
laws and regulations.
WARNING: This Manufacturer advises that no lock can provide complete security by itself. This lock may be defeated by
forcible or technical means, or evaded by entry elsewhere on the property. No lock can substitute for caution, awareness of
your environment, and common sense. Builder’s hardware is available in multiple performance grades to suit the application. In
order to enhance security and reduce risk, you should consult a qualified locksmith or other security professional.
This product complies with
standards established by the
following regulatory bodies:
• Federal Communications
Commission (FCC)
• Industry Canada
FCC
This device complies with Part
15 of the FCC Rules. Operation
is subject to the following two
conditions: ( 1 ) this device may
not cause harmful interference,
and ( 2 ) this device must accept
any interference received,
including interference that may
cause undesired operation.
This equipment has been tested
and found to comply with the
limits for a Class B digital device,
pursuant to Part 15 of the FCC
Rules. These limits are designed
to provide reasonable protection
against harmful interference in a
residential installation.
This equipment generates, uses,
and can radiate radio frequency
energy and, if not installed
and used in accordance with
the instructions, may cause
harmful interference to radio
communications. However, there
is no guarantee that interference
will not occur in a particular
installation. If this equipment
does cause harmful interference
to radio or television reception,
which can be determined by
turning the equipment o and on,
the user is encouraged to try to
correct the interference by one or
more of the following measures:
• Reorient or relocate the
receiving antenna.
• Increase the separation
between the equipment and
receiver.
• Connect the equipment into
an outlet on a circuit dierent
from that to which the receiver
is connected.
• Consult the dealer or an
experienced radio/TV
technician for help.
IMPORTANT! Changes or
modifications not expressly
approved by the manufacturer
could void the user’s authority to
operate the equipment.
Industry Canada
This device contains licence-
exempt transmitter(s)/
receiver(s) that comply with
Innovation, Science and Economic
Development Canada’s licence-
exempt RSS(s). Operation is
subject to the following two
conditions: ( 1 ) This device may
not cause interference, and
( 2 )This device must accept
any interference, including
interference that may cause
undesired operation of the device.

Frequently
Asked Questions

33
Q: What is the door thickness requirement for Halo Touch?
A: Halo Touch supports 1-3/4” to 2” (44mm - 51mm) door
thickness.
Q: Is there a door thickness kit for Halo Touch to support doors
thicker than 2” (51mm)?
A: Yes, a kit (83033) is available to install Halo Touch on doors
with a thickness between 2” (51mm) and 2-1/4” (57mm). Call our
support center at 1-800-327-5625 to order a thick door kit.
Q: What door hole diameter is required to install Halo Touch?
A: Halo Touch requires 2-1/8” (54mm) door hole for installation.
Q: What do I need to correct a door that is warped or has been
aected by weather?
A: Please refer to the
Warped Door Installation Guide for the
necessary adjustments to properly prepare your door for a smart
lock installation.
Door Preparation

34
Q: How do I install Halo Touch on my door?
A: Refer to the Installation section of this guide or follow the
steps in the Interactive Guide to install the lock.
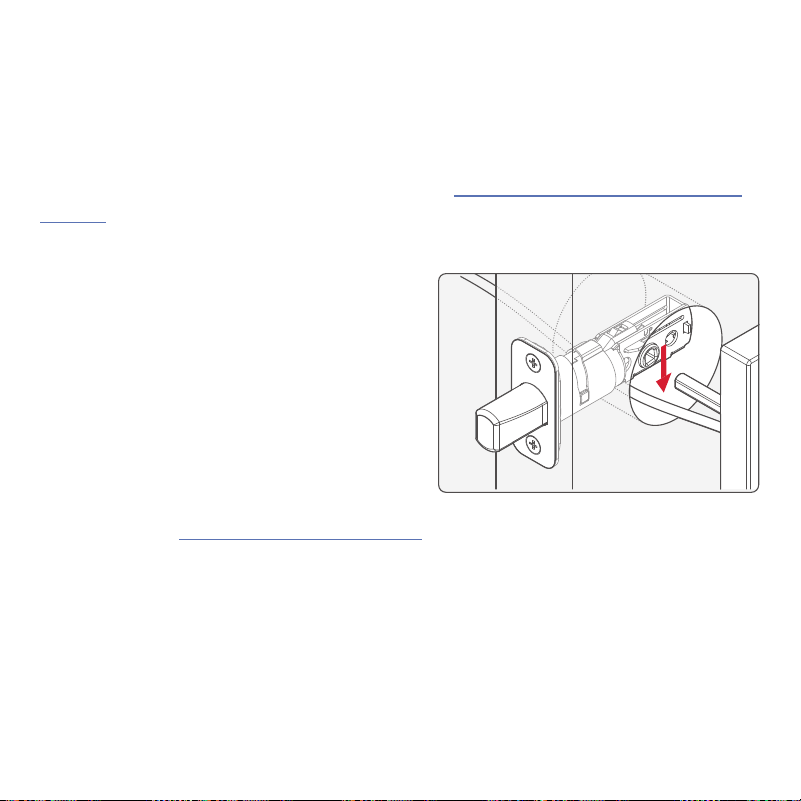
Q: Why is the lock performing the opposite when I’m locking or
unlocking the door using the Kwikset app?
A: Perform the following steps to correct the issue:
1. Remove the cover and interior
assembly from the door.
2. Put the cover back on the interior
and rotate the turnpiece until the
turnpiece shaft is pointing up.
3. Put the interior assembly and
cover back on the door.
Q: What is “handing” or latch calibration?
A: Handing, or latch calibration, is the way that the smart lock
learns the orientation of your door (left- or right-handed).
Installation
Incorrect:
Turnpiece
shaft

35
Q: How do I “hand” or calibrate my lock?
A1: The first time the battery is inserted, the lock will perform
automatic calibration, or “handing.” You will know the handing is
taking place when the latch bolt retracts and extends on its own.
A2: The first time that lock or unlock is performed using the
Kwikset app, pin code, or fingerprint, the lock will automatically
perform latch calibration.
A3: Perform Manual Door Handing steps.
Q: The turnpiece is dicult to turn by hand.
A: Perform Manual Door Handing steps. Upon completion, the
turnpiece will be easier to turn by hand.
Q: What type of Wi-Fi network does Halo Touch require?
A: The home Wi-Fi network needs to be 2.4GHz and password
protected with WPA2 encryption.

36
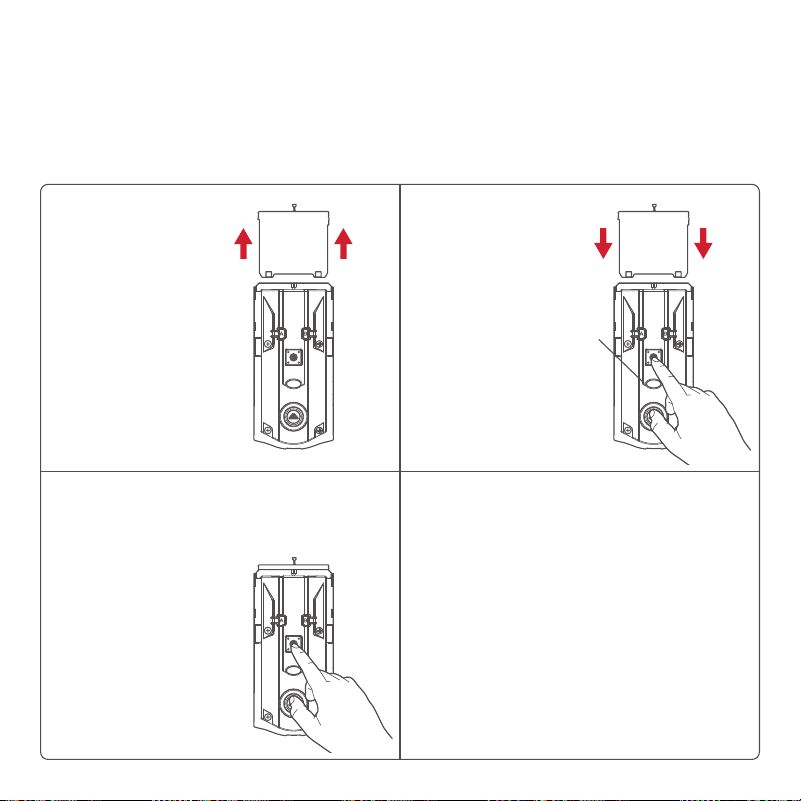
Q: How do I replace the (4) AA batteries?
A: Complete the following steps:
1. Slide interior cover window
up or remove interior cover.
2. Remove the battery pack.
3. Replace the batteries.
Q: How can I tell if the batteries need to be replaced?
A1: The interior status LED will blink
red instead of amber when the
batteries are low.
A2: The exterior LED will flash red
indicating a low battery level in
the deadbolt.
A3: A battery level indicator is also
available in the Kwikset app, along
with a notification when battery
level is low.
Batteries
37
Q: What can I do if I frequently need to replace batteries?
A1: Check that the door is properly aligned. For helpful tips on
getting the door to align, refer to the Warped Door Installation
Guide. Resistance to both locking and unlocking because of door
misalignment will reduce both motor and battery life.
A2: Check that the lock is properly
installed, and the cable is routed
and stored correctly.
A3: Perform Manual Door Handing to make sure that the lock
knows the correct direction for locking and unlocking.
A4: Make sure that the lock has a strong Wi-Fi connection with
the router. For better Wi-Fi coverage within the home, please
investigate using a mesh Wi-Fi network where several endpoints
are deployed to provide the best Wi-Fi coverage.
A5: Call our support center at 1-800-327-5625 for additional help
and product replacement if needed.
38
Q: What app do I use to manage Halo Touch?
A: Kwikset App is used to manage Halo Touch as well as Halo
Touchscreen, Halo Keypad, and Aura.
Q: Where can I download the Kwikset app?
A: The Kwikset App is available for free download from Google
Play or App Store by searching for “Kwikset” and installing the
“Kwikset Smart Lock App.”
Q: Where can I get help with the Kwikset app?
A: The Kwikset App Support page can help answer any
questions you have about the Kwikset app.
Kwikset App
kwikset.com/app

39
Q: How do I create an account to be able to manage Halo Touch
using the Kwikset app?
A: Please refer to the app tutorial for Creating Your Account.
Q: How do I create a “Home” within the Kwikset app?
A: Please refer to the app tutorial for Creating Your First Home.
Q: How do I add a lock within a “Home” in the Kwikset app?
A: Please refer to the app tutorial for Adding Your First Lock.
Q: How do I discover or pair the lock in the Kwikset app?
A: Please refer to the app tutorial for Adding Your First Lock.
Q: How do I connect to a Wi-Fi network with my lock?
A: Please refer to the app tutorial for
Adding Your First Lock.

40
Q: How do I reset my password for my Kwikset account?
A1: If you know your current password, complete the following
steps:
1. Open the Kwikset app.
2. Tap the icon.
3. Select Account Settings.
4. Select Account.
5. Select Change Password.
6. You will be prompted to enter your old password, then
the New Password fields must be filled out.
A2: If you do not remember your password, complete the
following steps:
1. Open the Kwikset app.
2. Tap the
icon.
3. Select Log Out.
4. Select Forgot Password to initiate the recovery process.
Kwikset App (continued)

41
Q: How do I change my security question for my account?
A: Complete the following steps:
1. Go to GoConcourse.com
2. Enter your email and password.
3. Select the icon.
4. Select Change Security Questions.
5. Follow the steps to update your security question and
answer.
NOTE: If prompted, select Kwikset (US) or Weiser (Canada).
Q: How do I disable my account?
A: Complete the following steps:
1. Go to GoConcourse.com
2. Enter your email and password.
3. Select the icon.
4. Select Enable/Disable My Account
5. Tap Disable.

42
Q: How do I enroll the fingerprint of another person that I want
to be able to use the lock?
A: Complete the following steps:
1. Open the Kwikset app.
2. Select the lock.
3. Tap on the icon.
4. Add a user fingerprint by following the instructions.
Q: How do I delete a user account?
A: Complete the following steps:
1. Open the Kwikset app.
2. Select the lock.
3. Tap on the icon.
4. Select the user you would like to delete.
5. Select Delete.
Kwikset App (continued)

43
Q: How do I disable a user account?
A1: Complete the following steps:
1. Open the Kwikset app.
2. Select the lock.
3. Tap on the icon.
4. Select the user you would like to disable.
5. Toggle the option to Disable Fingerprint. This will disable
the user from using their enrolled fingerprint to unlock.
A2: Another option is to enable Secure Mode which disables
all enrolled fingerprints. The only way to unlock is to use the
physical key. Complete the following steps:
1. Open the Kwikset app.
2. Select the lock.
3. Tap on the
icon.
4. Toggle the option on Secure Mode.

44
Q: How do I limit the access times for a user?
A: Complete the following steps:
1. Open the Kwikset app.
2. Select the lock.
3. Tap on the icon.
4. Select the user.
5. Select Schedule Type.
6. Select your desired schedule type and specify the desired
access times.
Kwikset App (continued)