Stinger HEIGH10 Radio Replacement Kit
for 2009-2014 Ford F-150 Trucks
SR-F15009H
© 2021 AAMP Global. All rights reserved. PAC is a Power Brand of AAMP Global. PAC-audio.com
Pacific Accessory Corporation
Page 1
Rev: 1
Date:082123
®
®
Introduction and Features
Important Notes
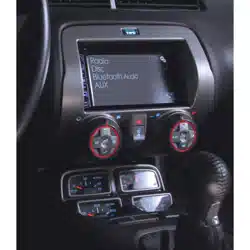
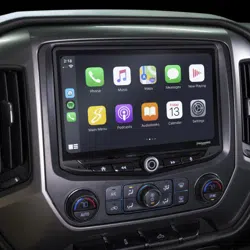
The SR-F15009H is a complete radio replacement kit for the installation of the Stinger HEIGH10
®
modular radio in Ford F-150
trucks equipped with either correct radio types this works with. All modules, cables and adapters are included to retain important
features of the factory system, including: steering wheel-mounted radio controls, factory amplier, AM/FM reception. Plug & Play
wiring harnesses allow for quick and easy installation without the need to cut or splice any wiring. The display mounting panel allows
mounting the 10 inch display without modifying/cutting any part of the vehicle’s sub-dash.
1. Adjustment of the vehicle settings through the original radio’s vehicle settings menu will be disabled after installation of the
new radio. It is advised to make sure all settings are as you desire prior to removal of the original radio.
2. The RP4-FD11 does not retain Rear Seat Entertainment, or Ford Sync.
3. To retain SiriusXM Radio, a SXV300 Tuner is required and sold separately.
4. After installation, if you do not initially hear any audio, you may need to cycle the ignition again to initialize the factory amplier.
5. Factory amplied Systems will not fade as neither the aftermarket radio or the RP interface have the ability to control the
amplier’s fader.
6. The radio select rotary switch on the side of the interface must be adjusted to the proper radio setting before plugging the
interface into the vehicle.
7. The interface comes pre-programmed for all of the vehicles factory SWC functions and does not require programming unless
you wish to re-assign the SWC functions or utilize short press long press dual command functionality. The SWC can always
be restored to default settings by pressing and releasing the program button on the side of the interface once and waiting 7
seconds for the LED to ash 4 times.
8. The LED will ash whenever a SWC button is pressed.
We recommend reading this manual thoroughly to familiarize yourself
with the entire process prior to beginning the installation.
Recommended Tools
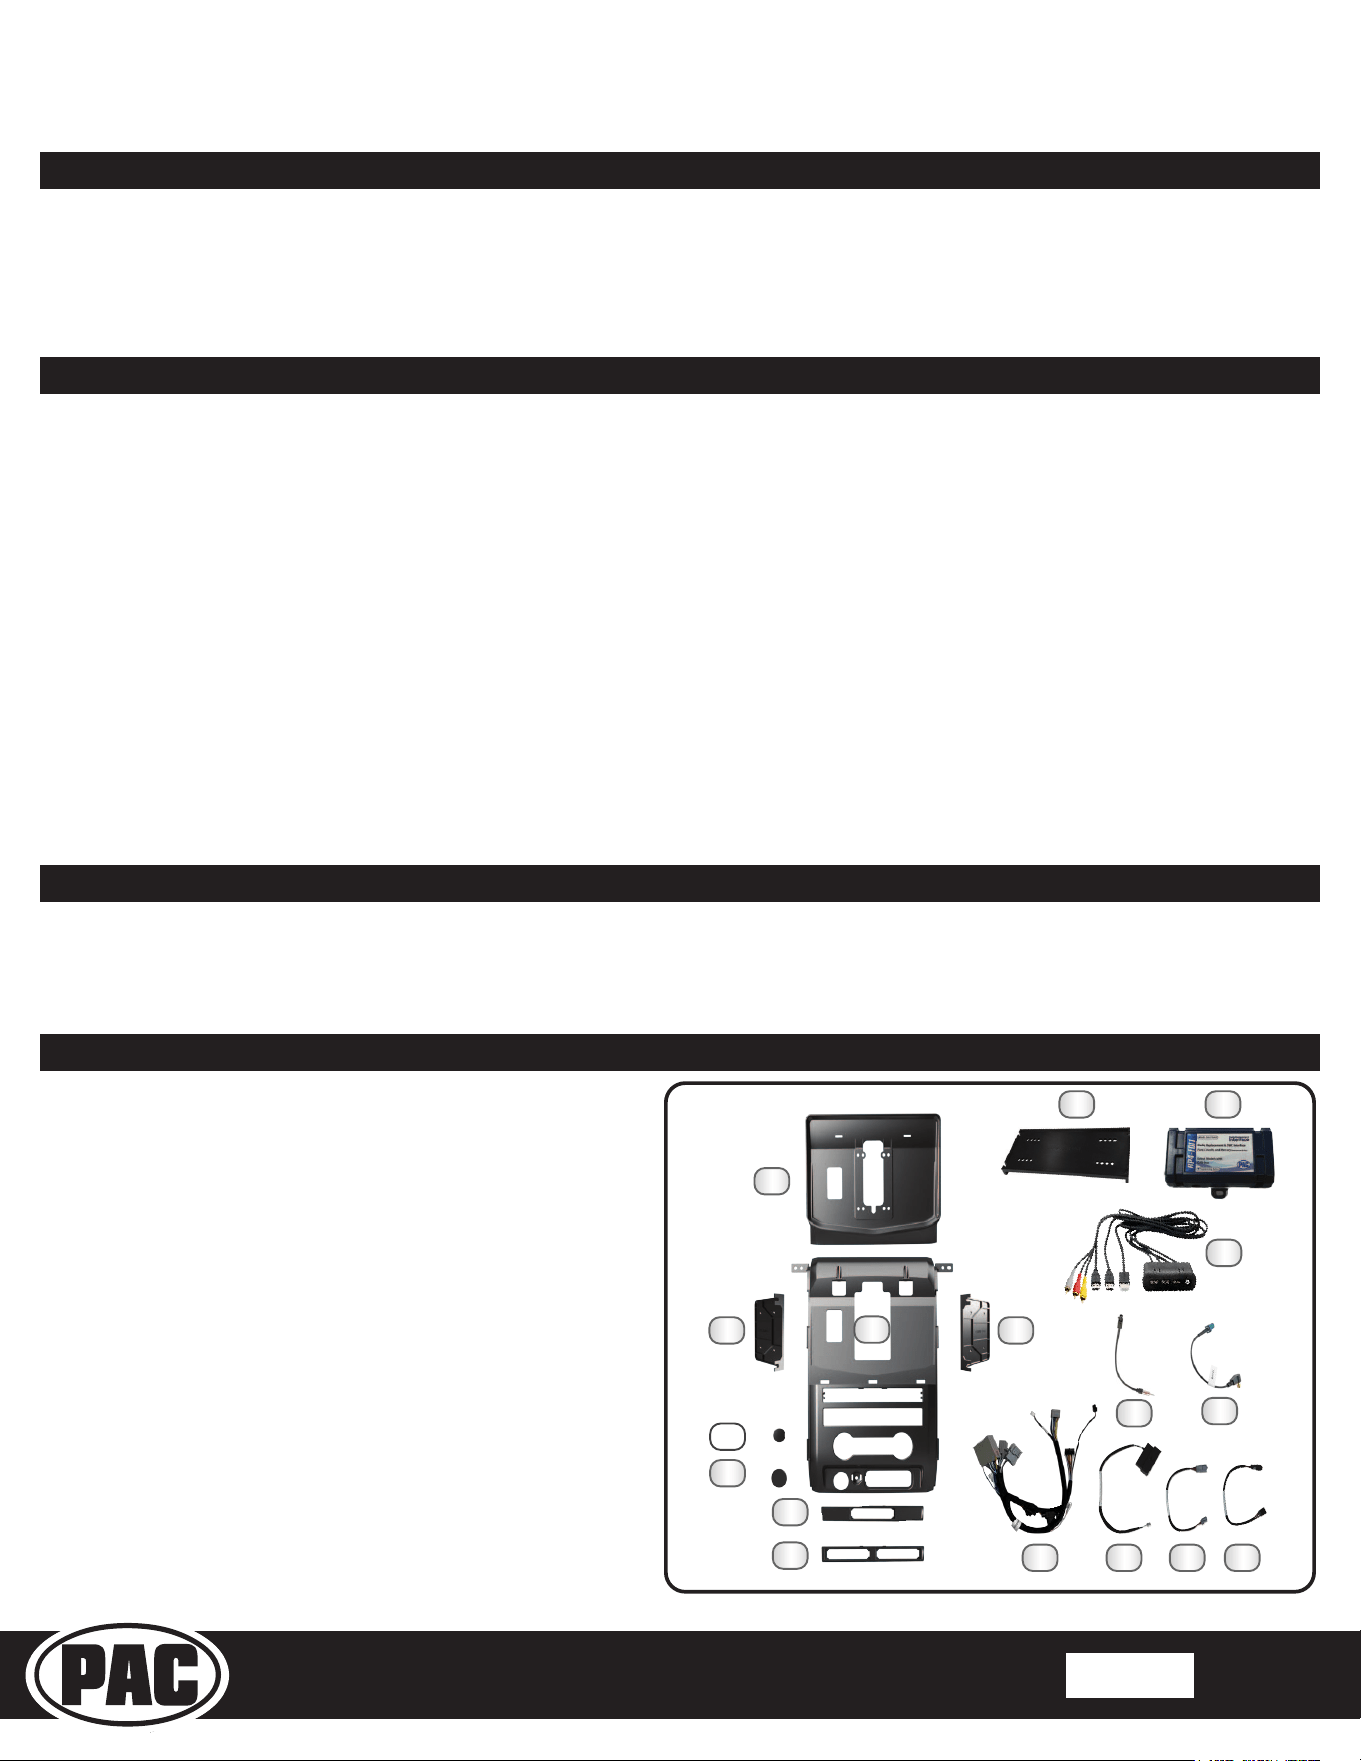
1. HEIGH10 Display Mounting Panel
2. Main Frame
3. Side Bracket Left
4. Side Bracket Right
5. Main Frame Bolt Cover
6. Cig Light Cover
7. Switch Insert 1
8. Switch Insert 2
9. Module Bracket
10. Radio Interface (RP4-FD11)
11. Media HUB (USBHUB-CH1B-RCA-48)
12. AM/FM Antenna Adapter
13. Satellite Radio Antenna Adapter (SAT-01)
14. Main Harness 2019-2021 (SR-F15009H-HAR V1)
15. Sync Harness (SR-F15009H-HAR V1 (SYNC SWC)
16. SR-F15009H-HAR (6P EXT 1)
17. SR-F15009H-HAR (6P EXT 2)
Included Components
1
4
6
10
8
5
2
11
3
7
9
12
13
14 15 16 17
7mm Socket
8mm Socket
Ratchet
Phillips Screwdriver
T-20 Torx
Small Flat Screwdiver
Included, zip ties and M4 x 12 Zinc Screws (6x) not shown.
NOTE: Along with the SR-F15009H components, additional hardware
and wire harnesses from the HEIGH10 (UN1810) kit will also be used in
the installation. Refer to the UN1810 Installation Guide for harness and
hardware descriptions
Flush Cutters
Plastic Pry Tool
Pick Tool
Stinger HEIGH10 Radio Replacement Kit
for 2009-2014 Ford F-150 Trucks
SR-F15009H
© 2021 AAMP Global. All rights reserved. PAC is a Power Brand of AAMP Global. PAC-audio.com
Pacific Accessory Corporation
Page 2
Rev: 1
Date:082123
®
®
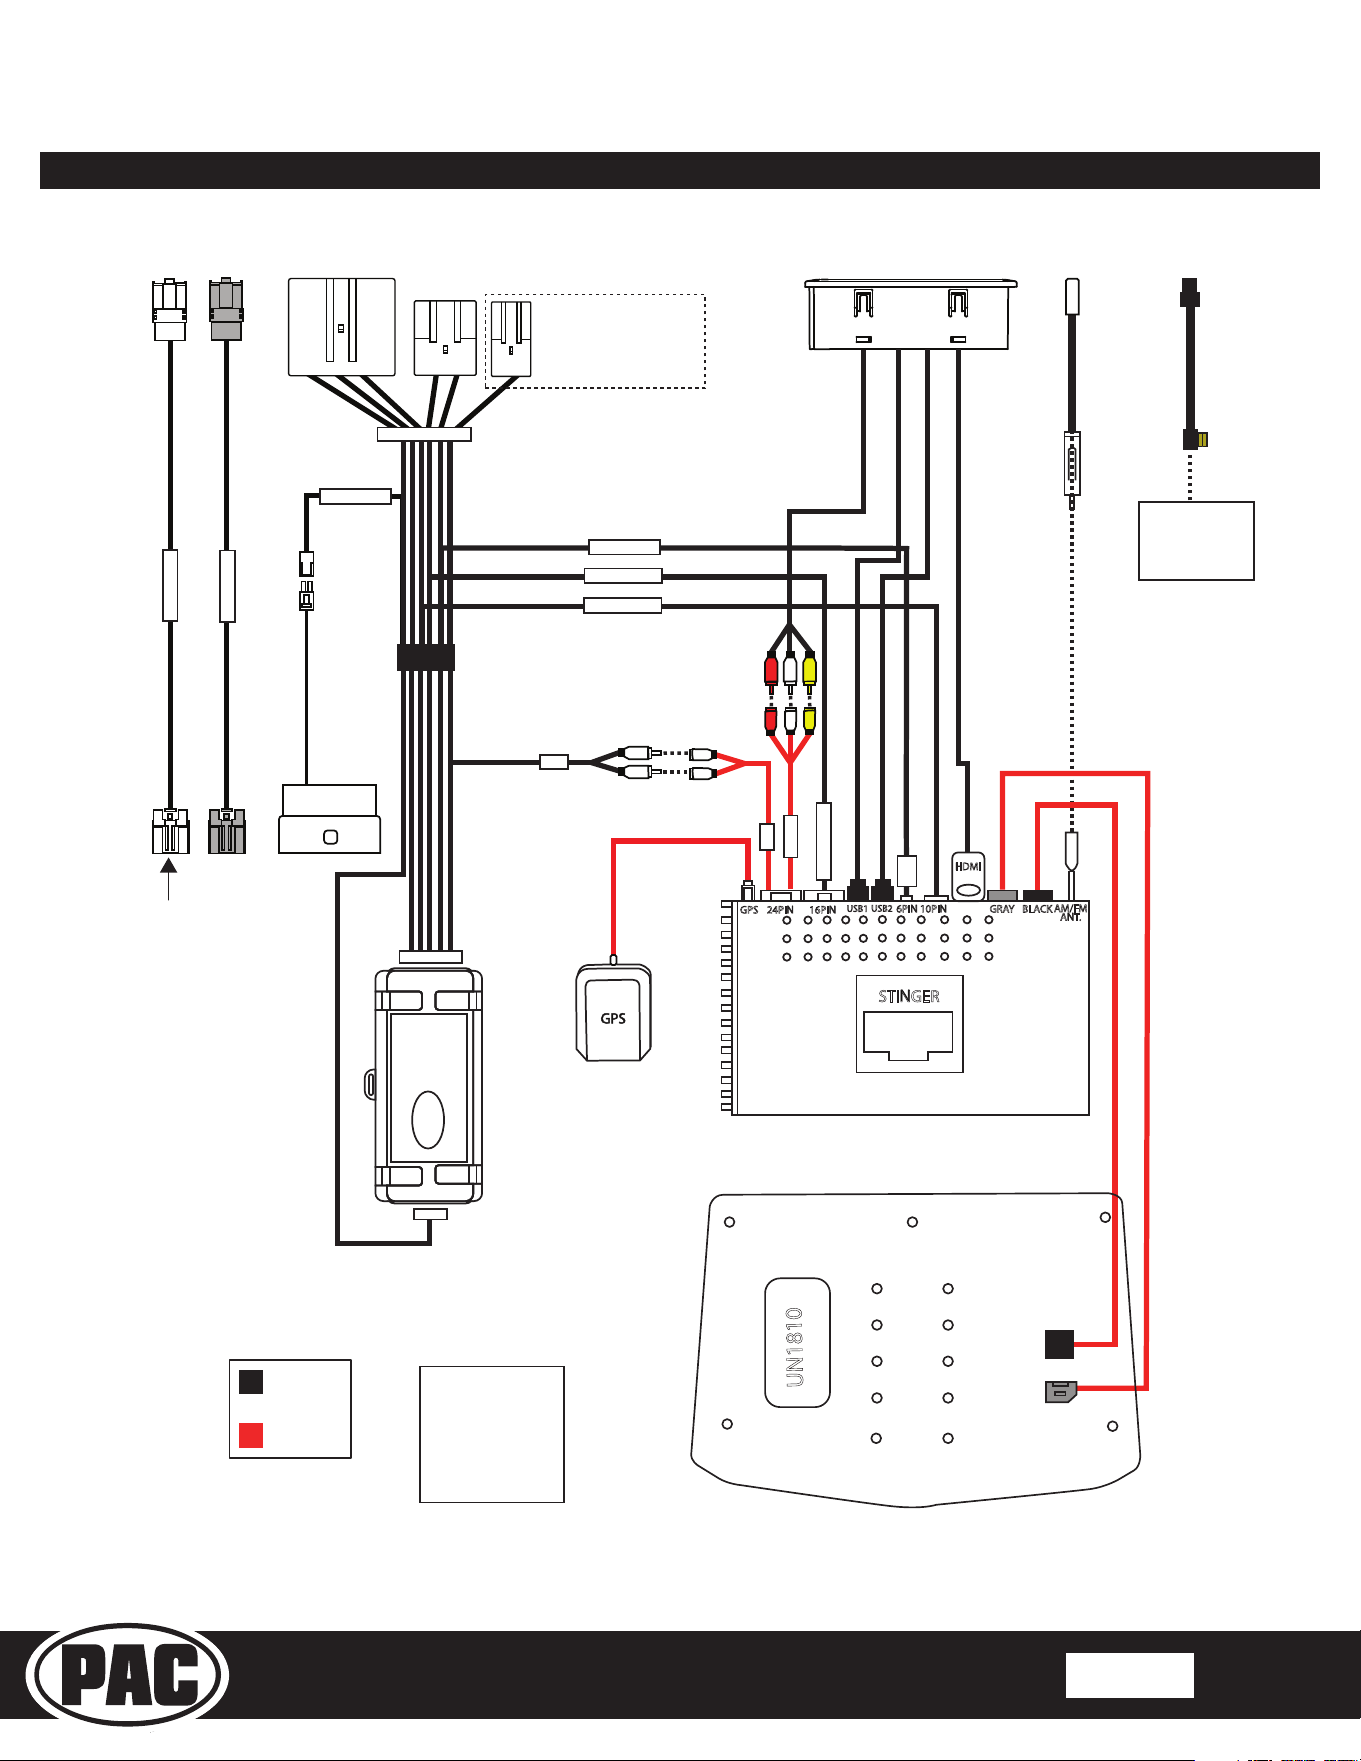
Wiring Overview
USB1
USB2
STINGER
BLACK
GRAY
10PIN
HDMI
6PIN
24PIN 16PINGPS
AM/FM
ANT.
Stinger
Connection
Main Harness
Connection
Connections shown are
all required for full
functionality of the kit
and radio. If adding
additional components,
additional connections
will be needed.
Connects to
SXV300 Satellite
Radio Tuner
(sold separately)
16PIN RADIO
16PIN RADIO
10PIN RADIO
6PIN RADIO
2PIN SYNC
SWI
A/V IN
SUB
SUB
SR-F15009-HAR
*Only used when vehicle
is equipped with a
factory subwoofer
*Only for King Ranch
6PIN EXT 2
6PIN EXT 1
UN1810
SR-F15009H-HAR
VEHICLE CONNECTORS
SR-F15009H-HAR
VEHICLE CONNECTORS
Stinger HEIGH10 Radio Replacement Kit
for 2009-2014 Ford F-150 Trucks
SR-F15009H
© 2021 AAMP Global. All rights reserved. PAC is a Power Brand of AAMP Global. PAC-audio.com
Pacific Accessory Corporation
Page 3
Rev: 1
Date:082123
®
®
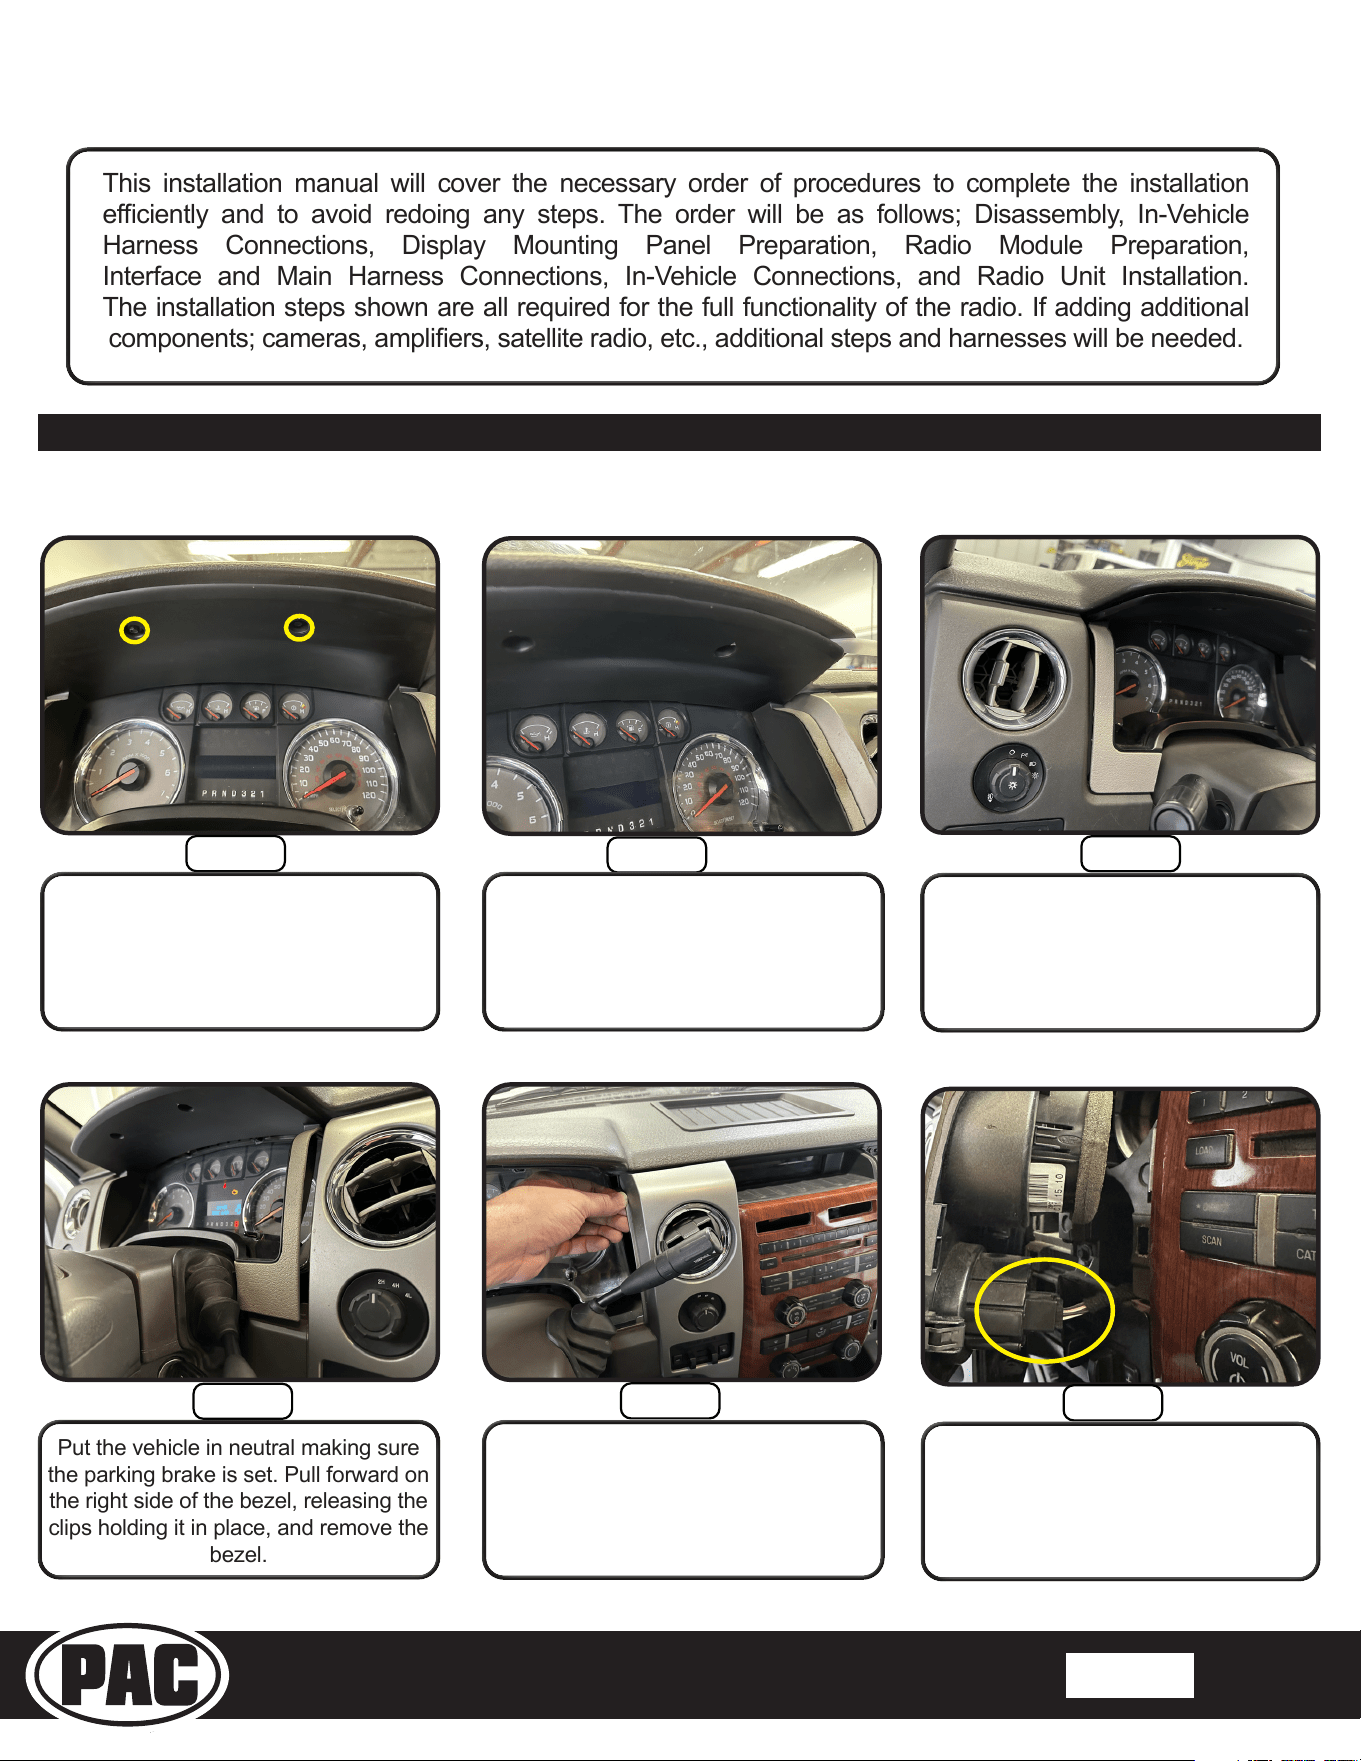
Section 1: Disassembly
This installation manual will cover the necessary order of procedures to complete the installation
eciently and to avoid redoing any steps. The order will be as follows; Disassembly, In-Vehicle
Harness Connections, Display Mounting Panel Preparation, Radio Module Preparation,
Interface and Main Harness Connections, In-Vehicle Connections, and Radio Unit Installation.
The installation steps shown are all required for the full functionality of the radio. If adding additional
components; cameras, ampliers, satellite radio, etc., additional steps and harnesses will be needed.
Before removing the factory radio make sure all vehicle settings are set to the desired settings.
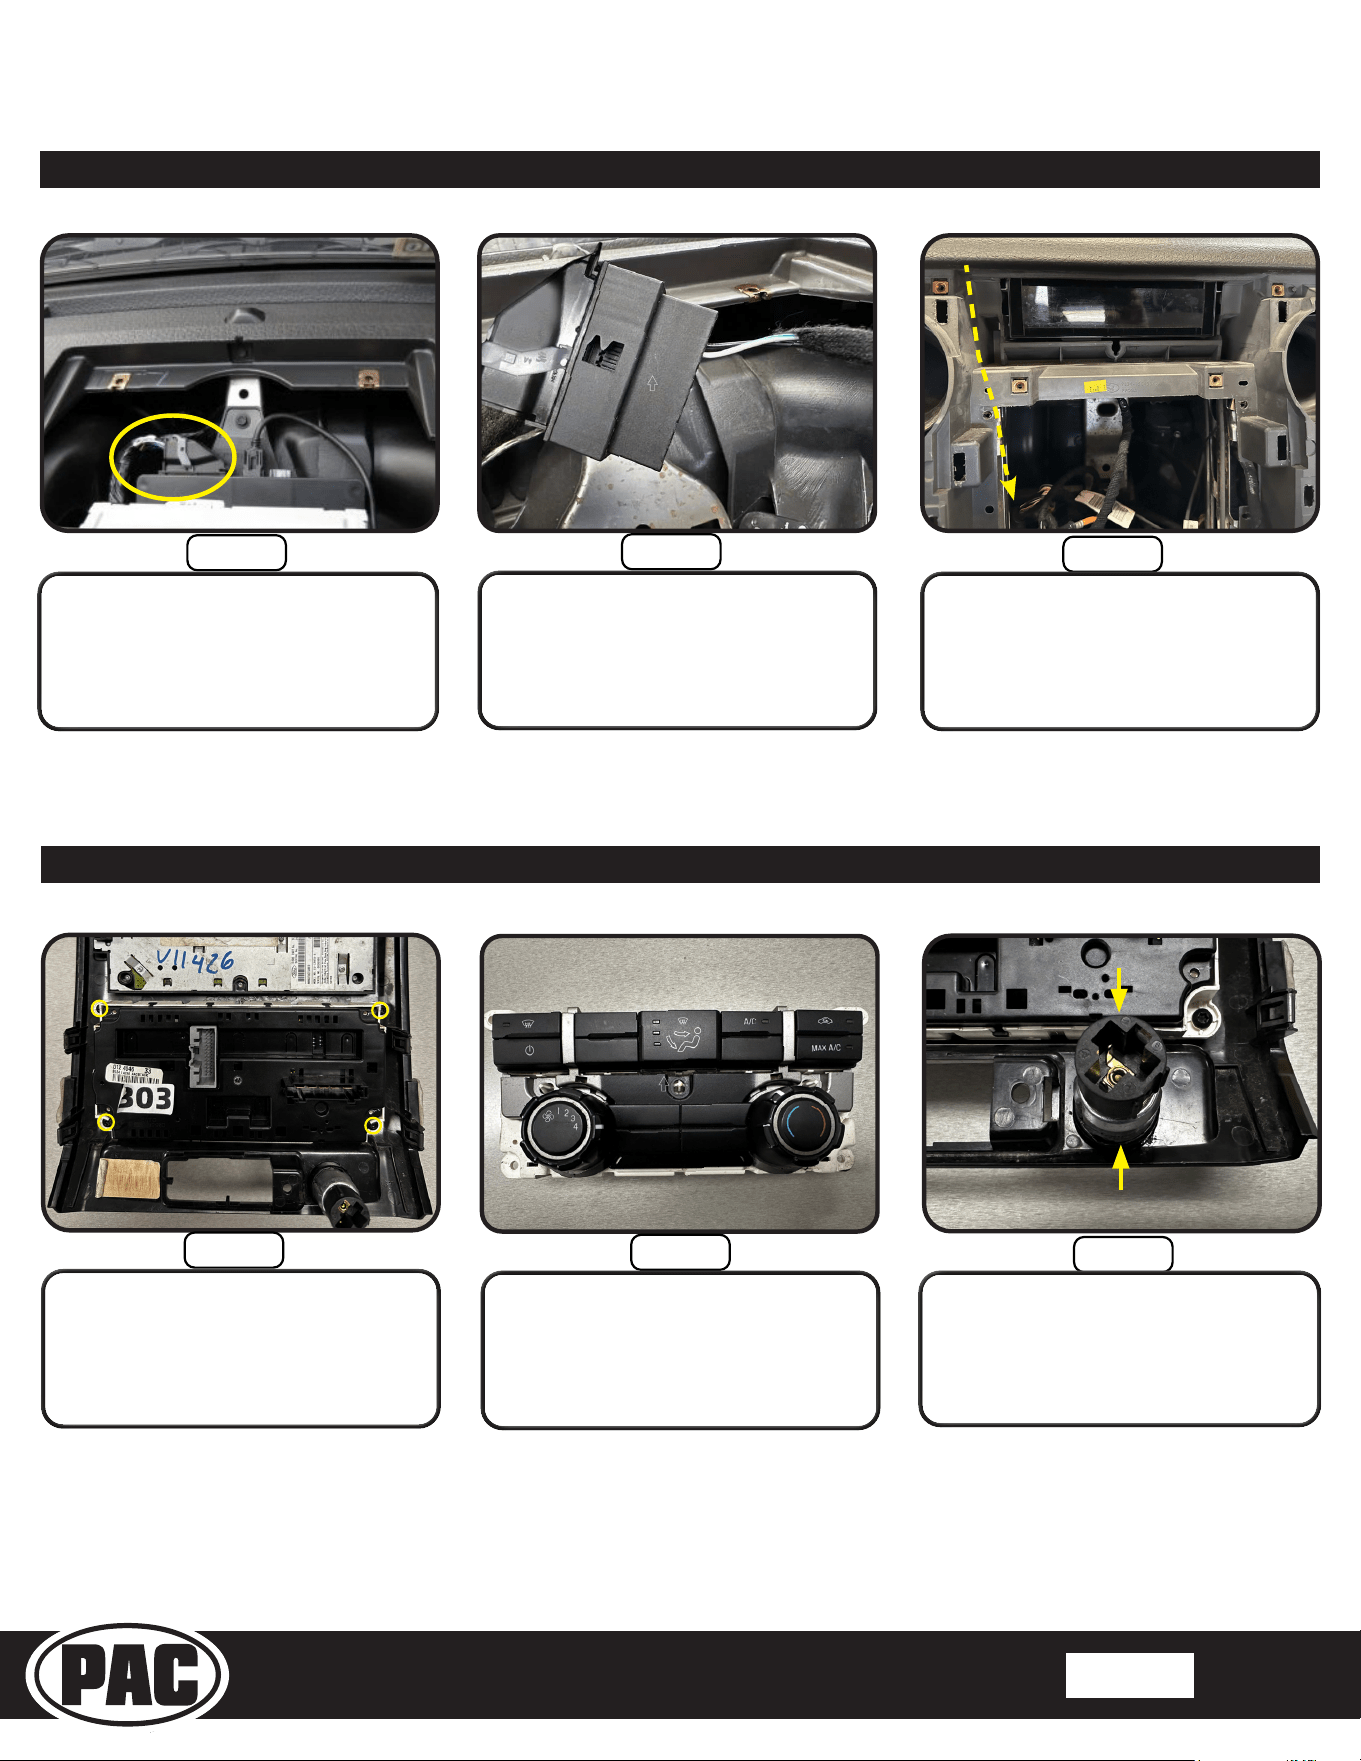
Step 3
Step 2
Step 1
Pull forward on the left side of the
instrument cluster bezel, releasing
the clips holding it in place.
With a plastic pry tool, slide the pry
tool into the right side of the bezel
working towards the left to release the
clips.
Remove the (2) 7mm bolts holding
the instrument cluster bezel.
Step 6
Step 5
Step 4
Once the bezel is loose disconnect the
4-wheel drive switch.
NOTE: The 4 wheel drive switch will not
be present in 2-wheel drive vehicles.
Put the vehicle in neutral making sure
the parking brake is set. Pull forward on
the right side of the bezel, releasing the
clips holding it in place, and remove the
bezel.
Pull forward on the left side bezel,
releasing the clips.
Stinger HEIGH10 Radio Replacement Kit
for 2009-2014 Ford F-150 Trucks
SR-F15009H
© 2021 AAMP Global. All rights reserved. PAC is a Power Brand of AAMP Global. PAC-audio.com
Pacific Accessory Corporation
Page 4
Rev: 1
Date:082123
®
®
Step 8
Once the locking tabs are
pressed in on the glove box, drop
down the glove box.
Step 7
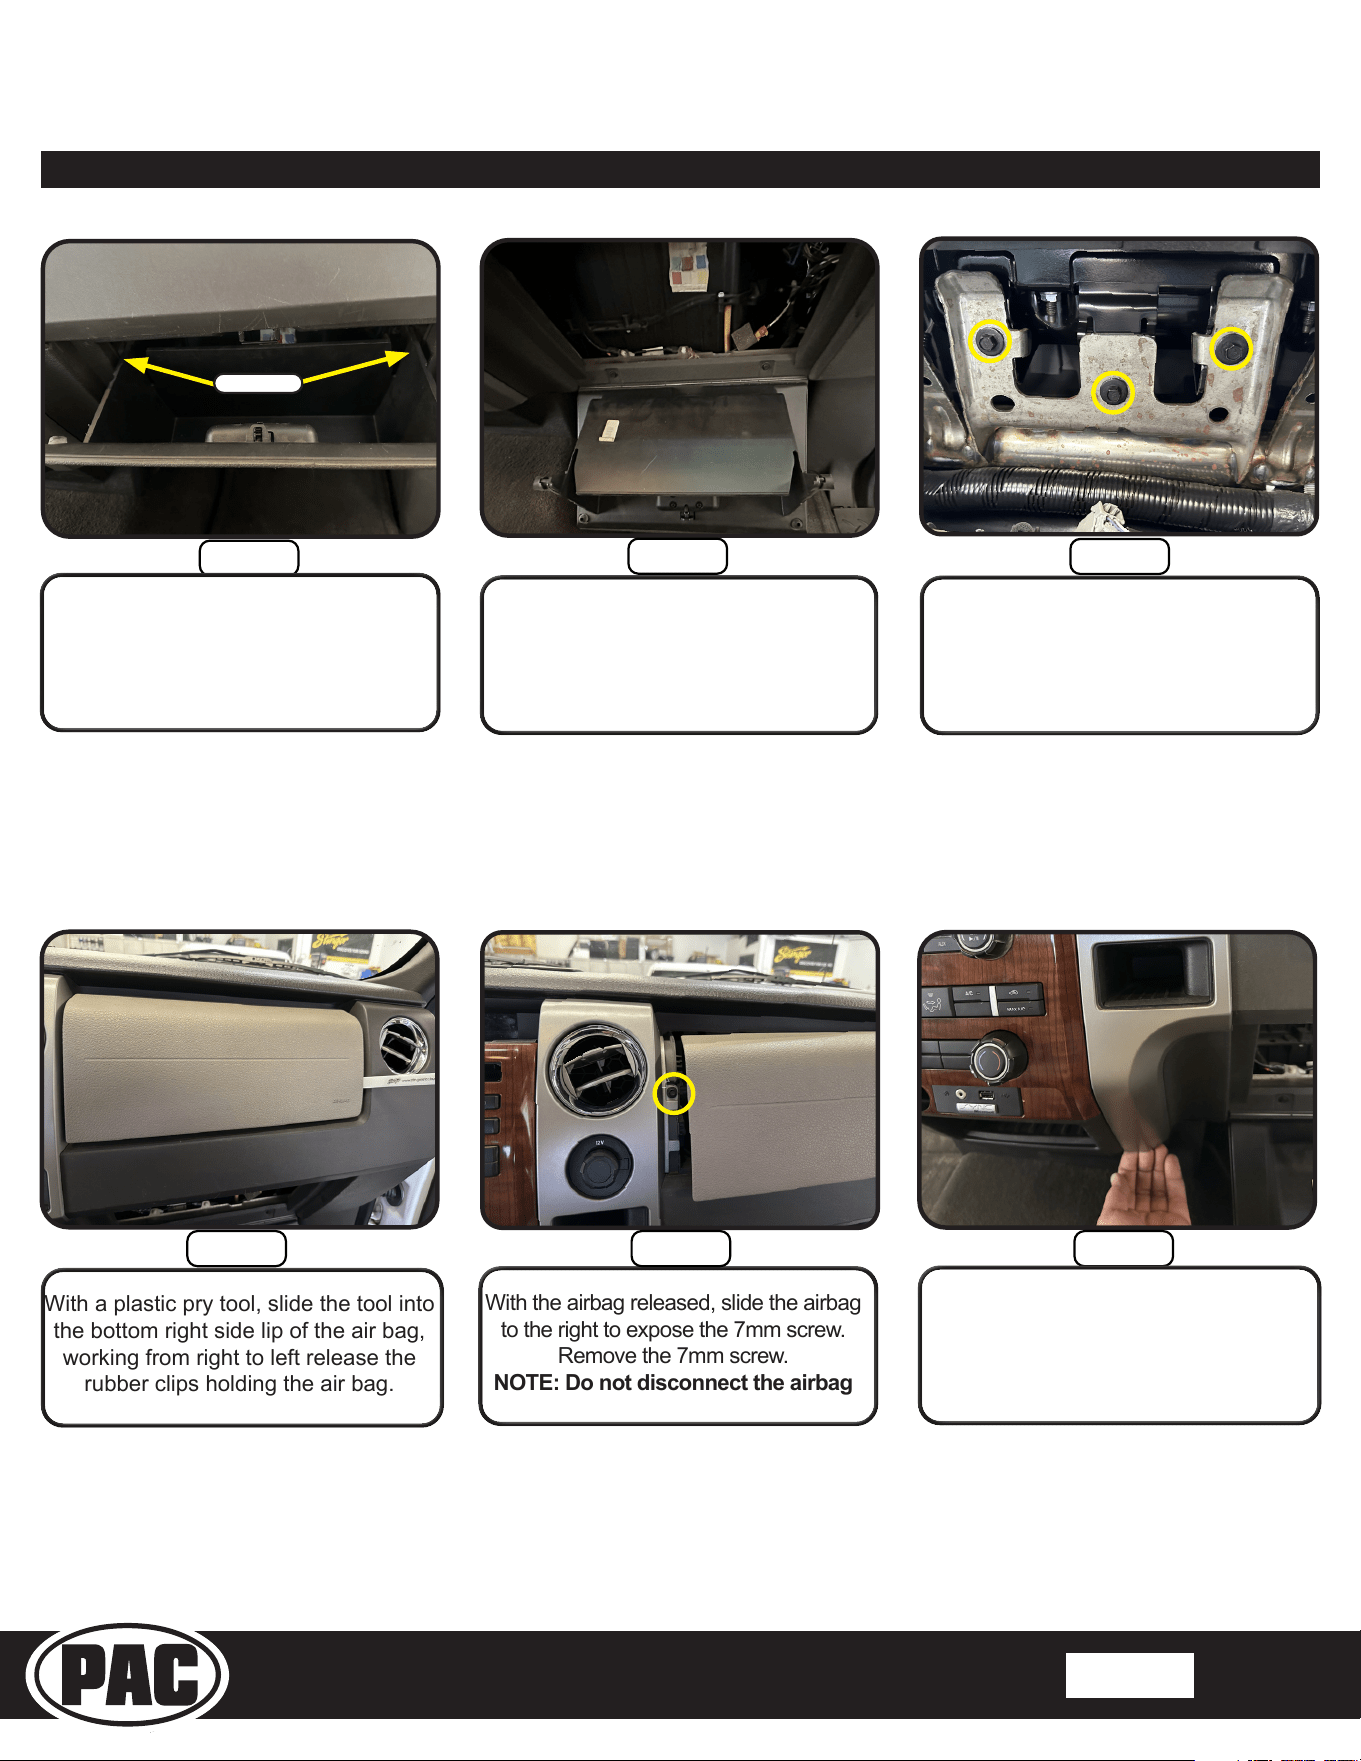
Open the glove box. Press in on
the back left and right of the glove
box to release the locking tabs.
Step 9
Locate the (3) 8mm screws securing
the passenger side airbag inside the
glove box cavity facing upward, and
then remove them.
Section 1: Disassembly cont,
Locking Tabs
With the airbag released, slide the airbag
to the right to expose the 7mm screw.
Remove the 7mm screw.
NOTE: Do not disconnect the airbag
With a plastic pry tool, slide the tool into
the bottom right side lip of the air bag,
working from right to left release the
rubber clips holding the air bag.
Step 11 Step 12Step 10
With your hand, pull forward on the
bottom of the plastic bezel, releasing
the plastic clips.
Stinger HEIGH10 Radio Replacement Kit
for 2009-2014 Ford F-150 Trucks
SR-F15009H
© 2021 AAMP Global. All rights reserved. PAC is a Power Brand of AAMP Global. PAC-audio.com
Pacific Accessory Corporation
Page 5
Rev: 1
Date:082123
®
®
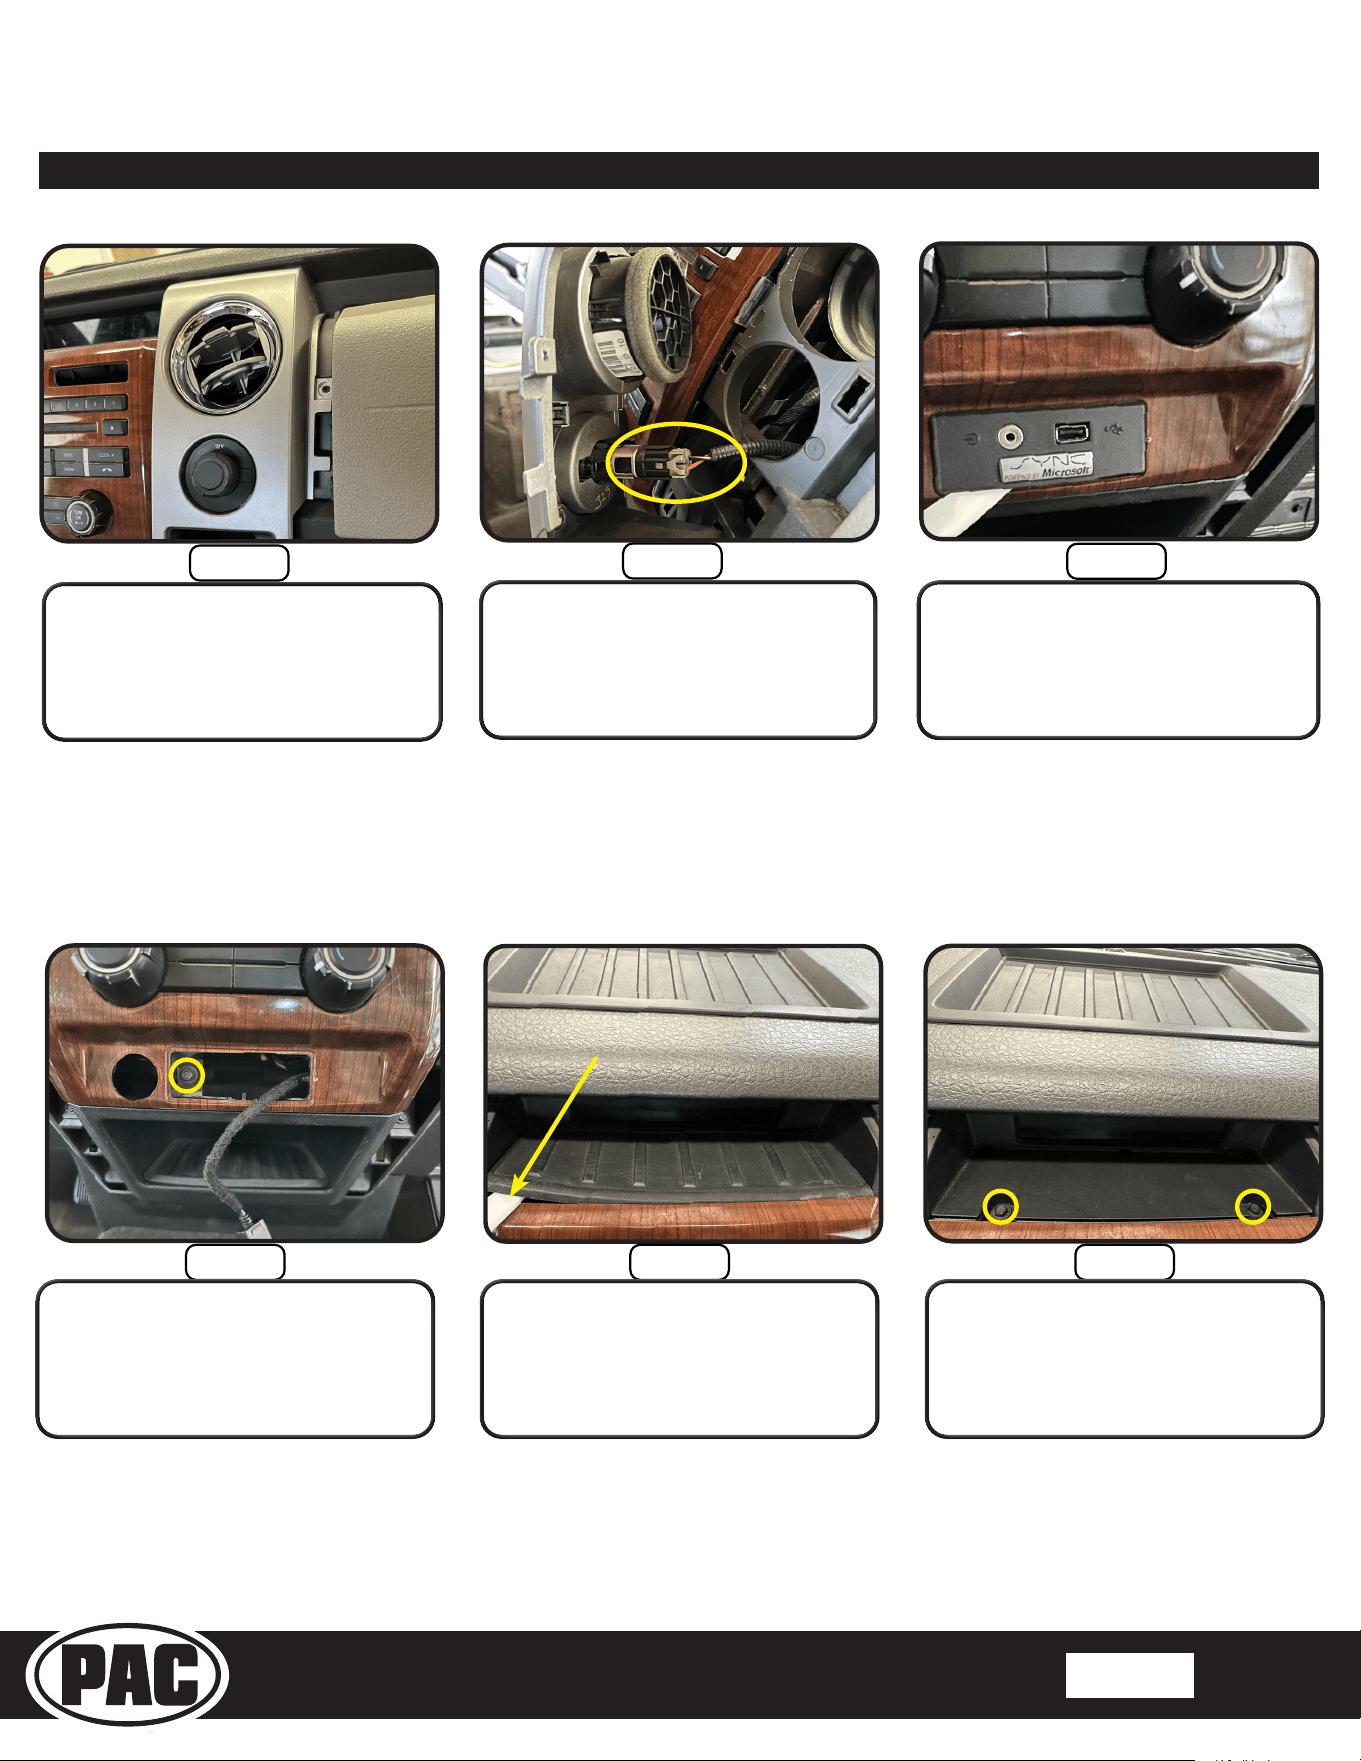
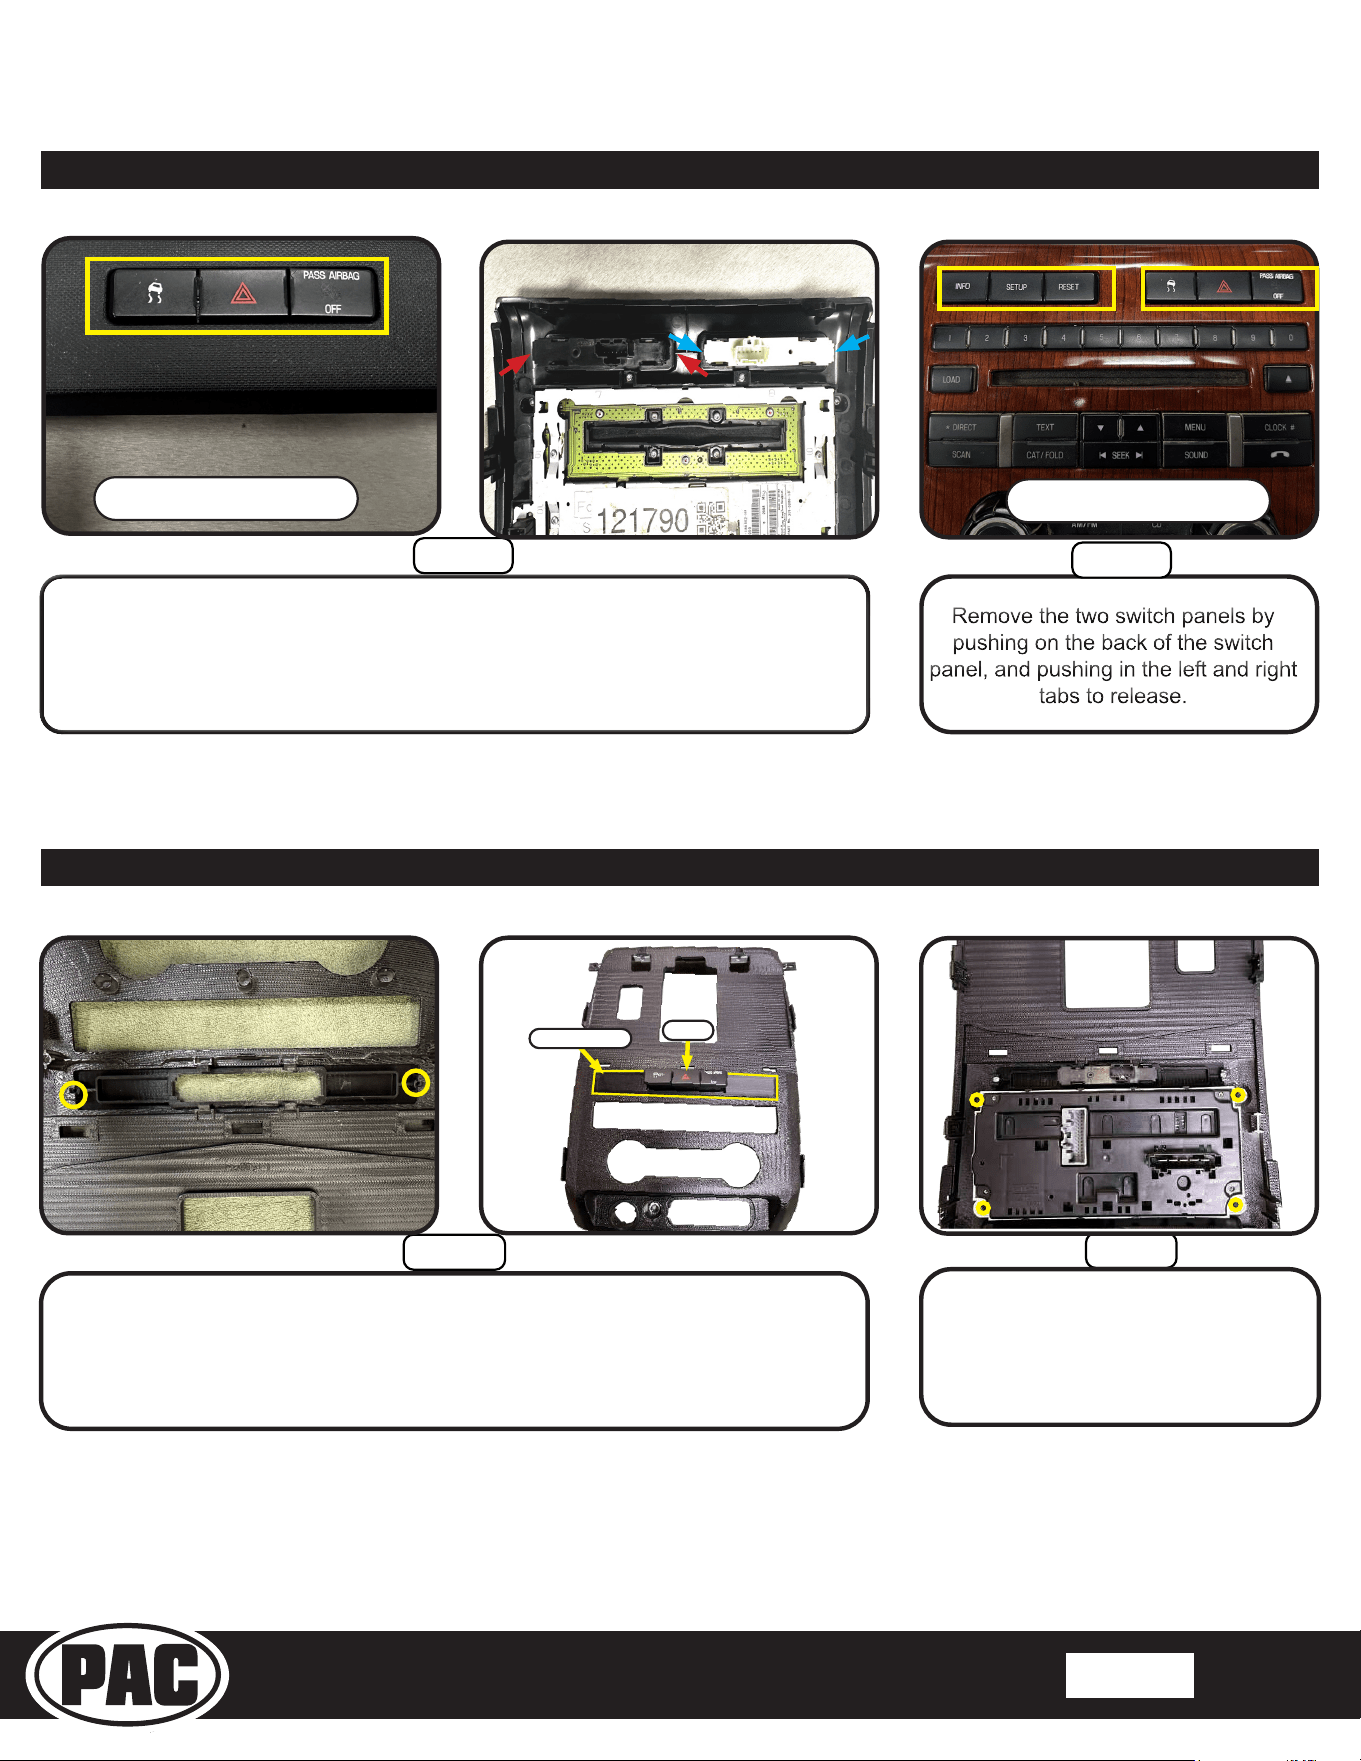
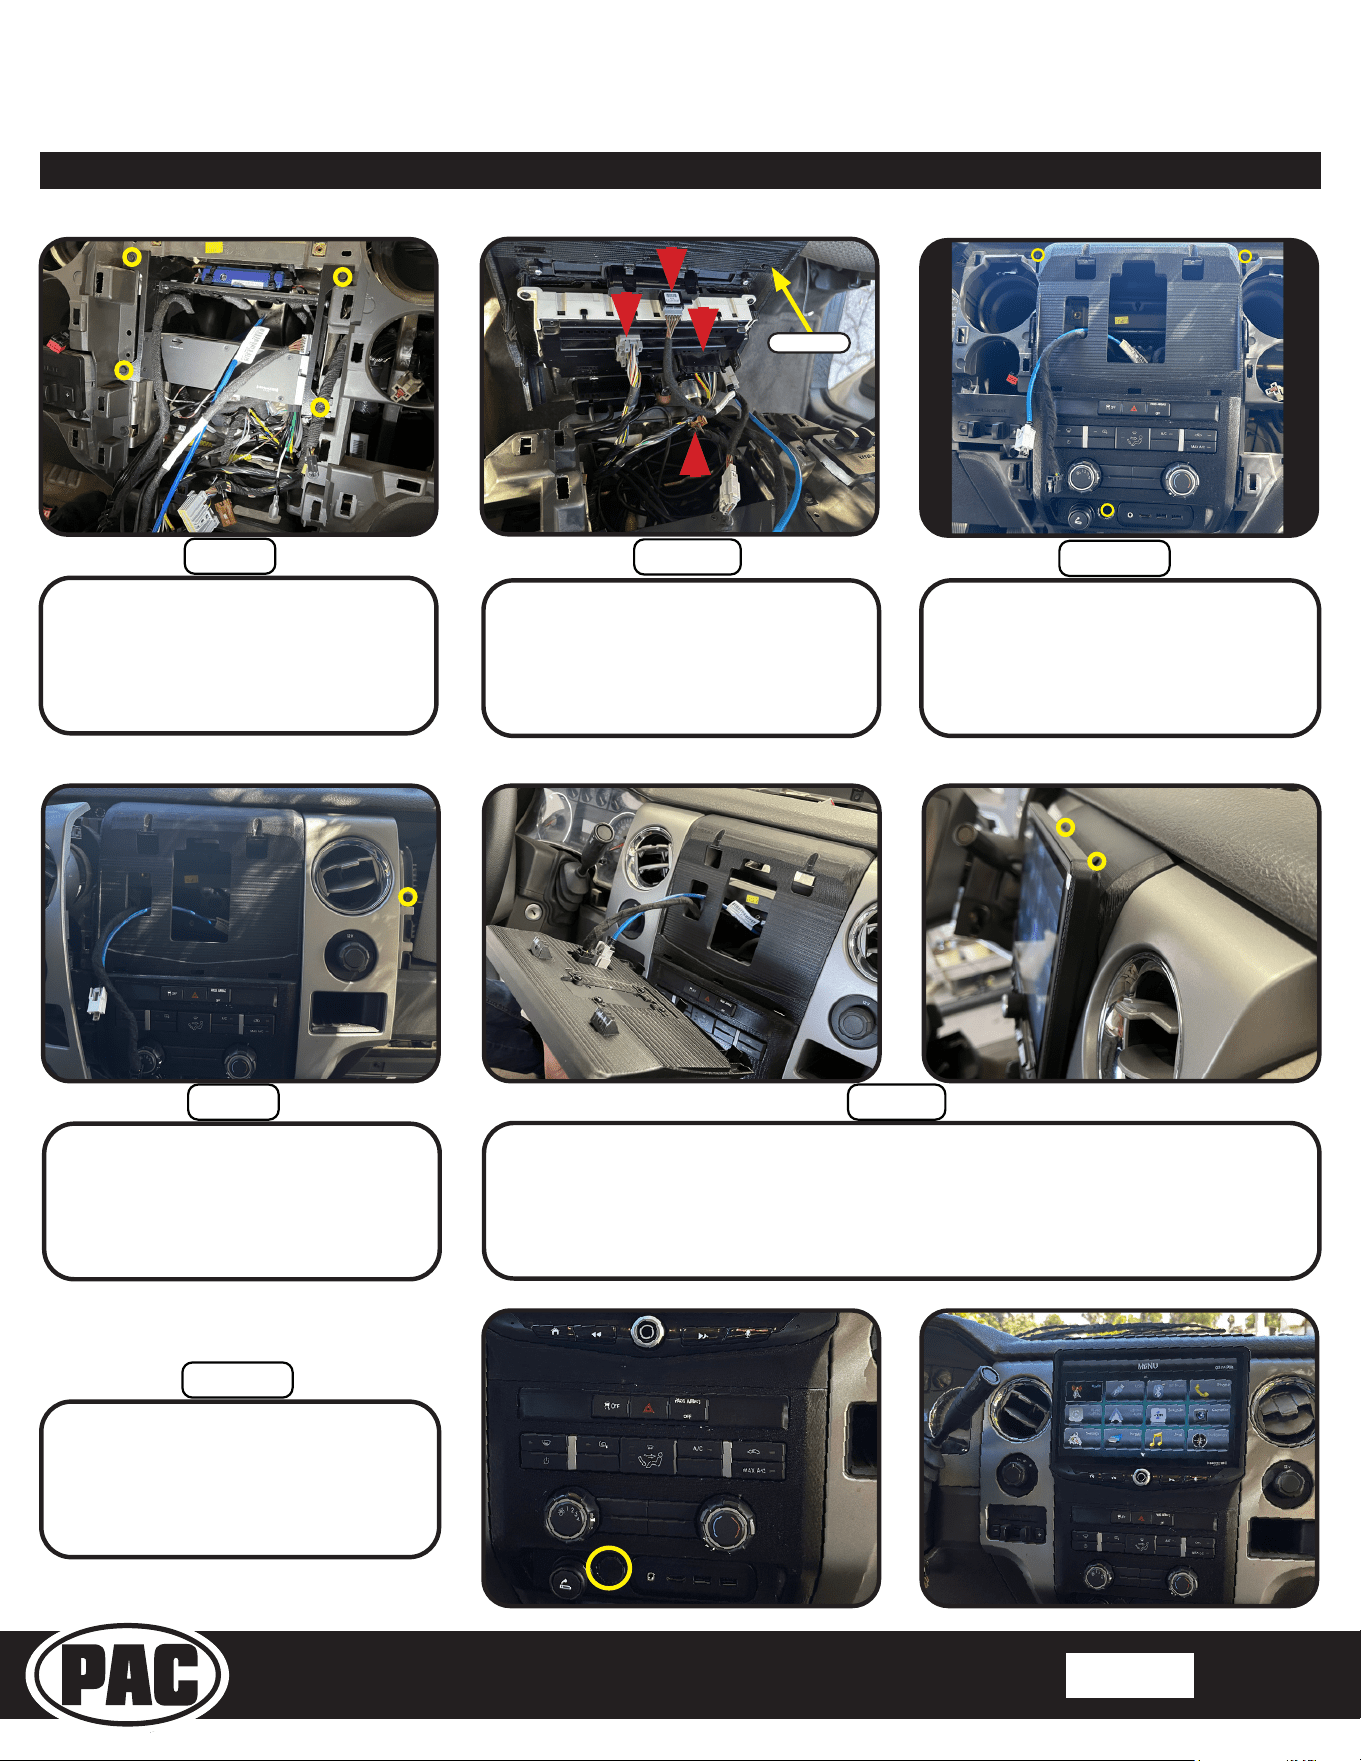
Step 14
Disconnect the 12V power port
connector.
Step 13
Pull forward on the plastic bezel,
releasing the clips holding the bezel in
place.
Step 15
With a plastic pry tool, remove the
Ford Sync USB panel.
Section 1: Disassembly cont,
TAC16H-6
TAC16H-7
Step 17 Step 18Step 16
With a plastic pry tool, remove the rubber
pad located in front of the information
display.
Remove the (2) 7mm screws.
Remove the 7mm screw holding the
radio bezel.
Stinger HEIGH10 Radio Replacement Kit
for 2009-2014 Ford F-150 Trucks
SR-F15009H
© 2021 AAMP Global. All rights reserved. PAC is a Power Brand of AAMP Global. PAC-audio.com
Pacific Accessory Corporation
Page 6
Rev: 1
Date:082123
®
®
Section 1: Disassembly cont,
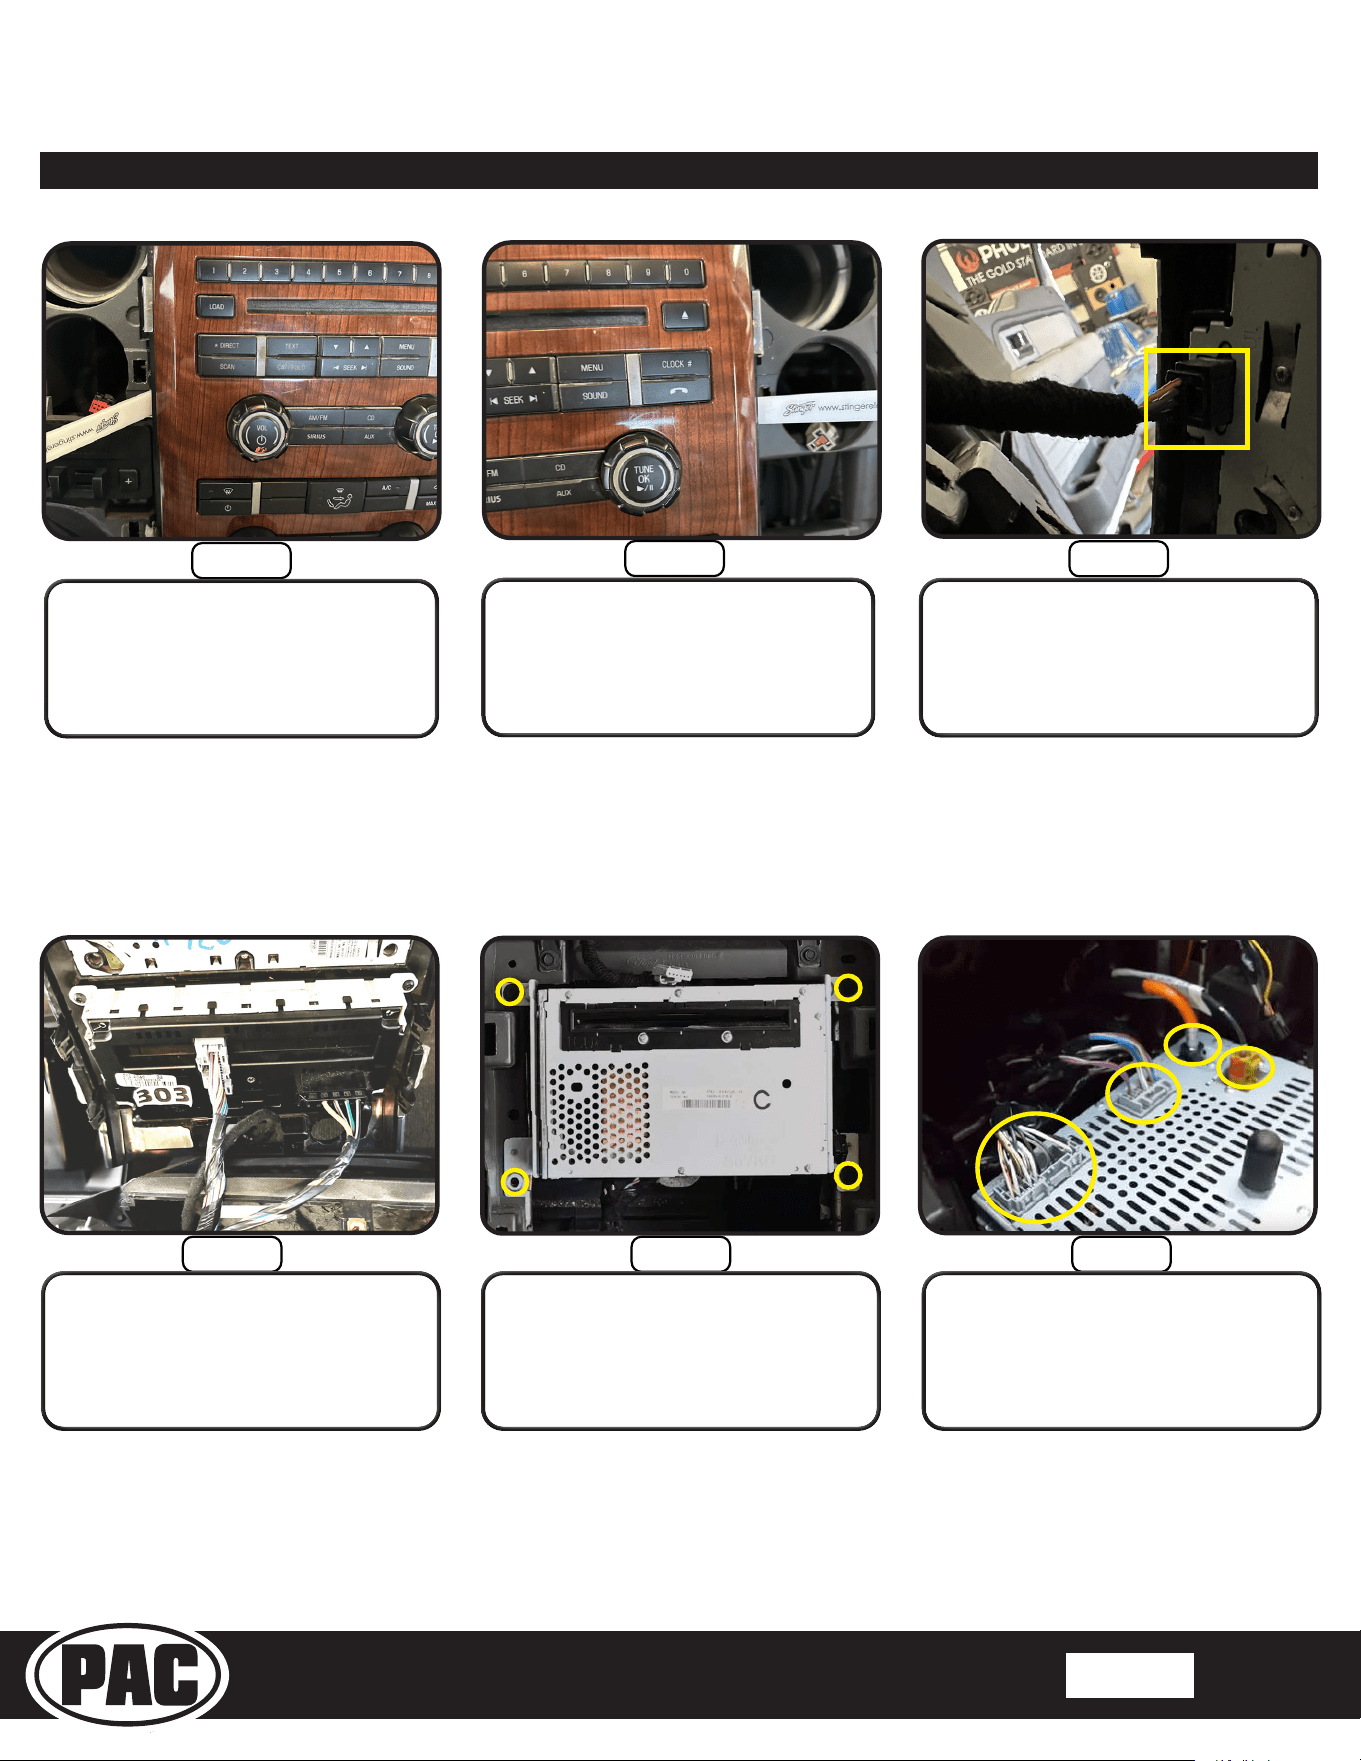
Step 20
With a plastic pry tool, release the clips
on the right of the radio bezel.
Remove the radio bezel.
Step 19
With a plastic pry tool, release the clips
on the left of the radio bezel.
Step 21
With the radio bezel removed
disconnect the small back connector.
TAC16H-6
TAC16H-7
Step 23 Step 24Step 22
Remove the (4) 7mm screws securing the
radio.
Disconnect all the connectors plugged
into the radio, and then remove the
radio.
Disconnect all connectors from the
back of the radio bezel. Set the radio
bezel aside, this will be needed later.
Stinger HEIGH10 Radio Replacement Kit
for 2009-2014 Ford F-150 Trucks
SR-F15009H
© 2021 AAMP Global. All rights reserved. PAC is a Power Brand of AAMP Global. PAC-audio.com
Pacific Accessory Corporation
Page 7
Rev: 1
Date:082123
®
®
Section 1: Disassembly cont,
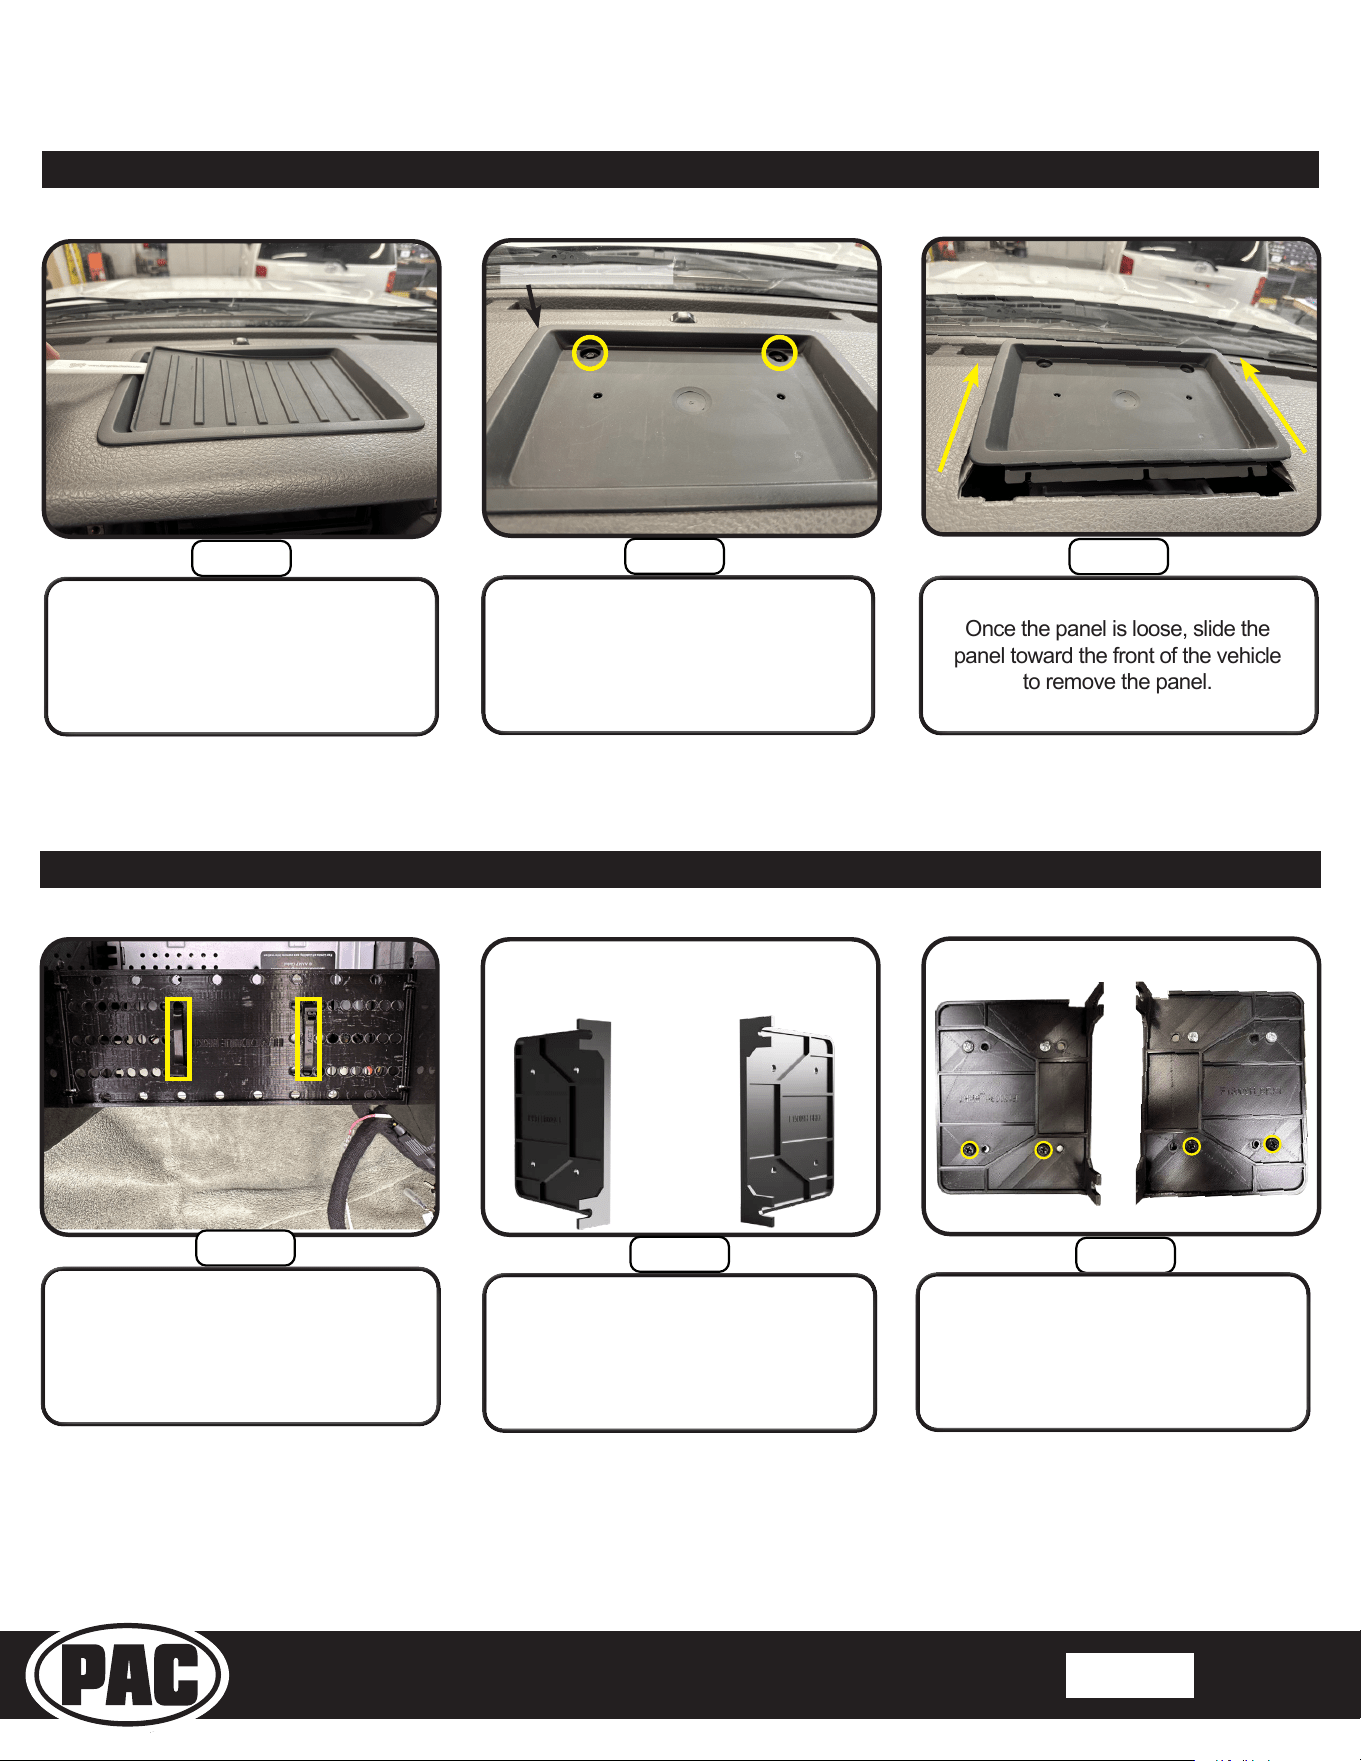
Step 26
Remove the (2) 7mm screws. Slide a
plastic pry tool into the back of the
plastic panel. Pry upwards to release
the clips.
Once the panel is loose, slide the
panel toward the front of the vehicle
to remove the panel.
Step 25
With a plastic pry tool remove the
rubber pad located on the top of the
dash.
Step 27
Insert pry tool here
Section 2: Radio Module Preparation
Step 1
Using the supplied zip ties from the
SR-F15009H kit, mount the RP4-FD11
module to the Module bracket.
Left Bracket Right Bracket
Step 2
Step 3
Locate the left and right side
brackets and (4) M5X10 screws
included with the SR-F15009H kit.
Left Bracket Right Bracket
Align the radio module with the bottom
holes of the brackets. Use (4) M5x10
screws to mount the module.

Stinger HEIGH10 Radio Replacement Kit
for 2009-2014 Ford F-150 Trucks
SR-F15009H
© 2021 AAMP Global. All rights reserved. PAC is a Power Brand of AAMP Global. PAC-audio.com
Pacific Accessory Corporation
Page 8
Rev: 1
Date:082123
®
®
Step 4
Left Bracket Right Bracket
Align the module bracket with the top
holes of the side brackets. Use the (4)
10x3/8 screws to mount the bracket.
Step 5
Note: The HEIGH10 Module should
be ush with the front of both
brackets.
Module Bracket
HEIGH10 Radio Module
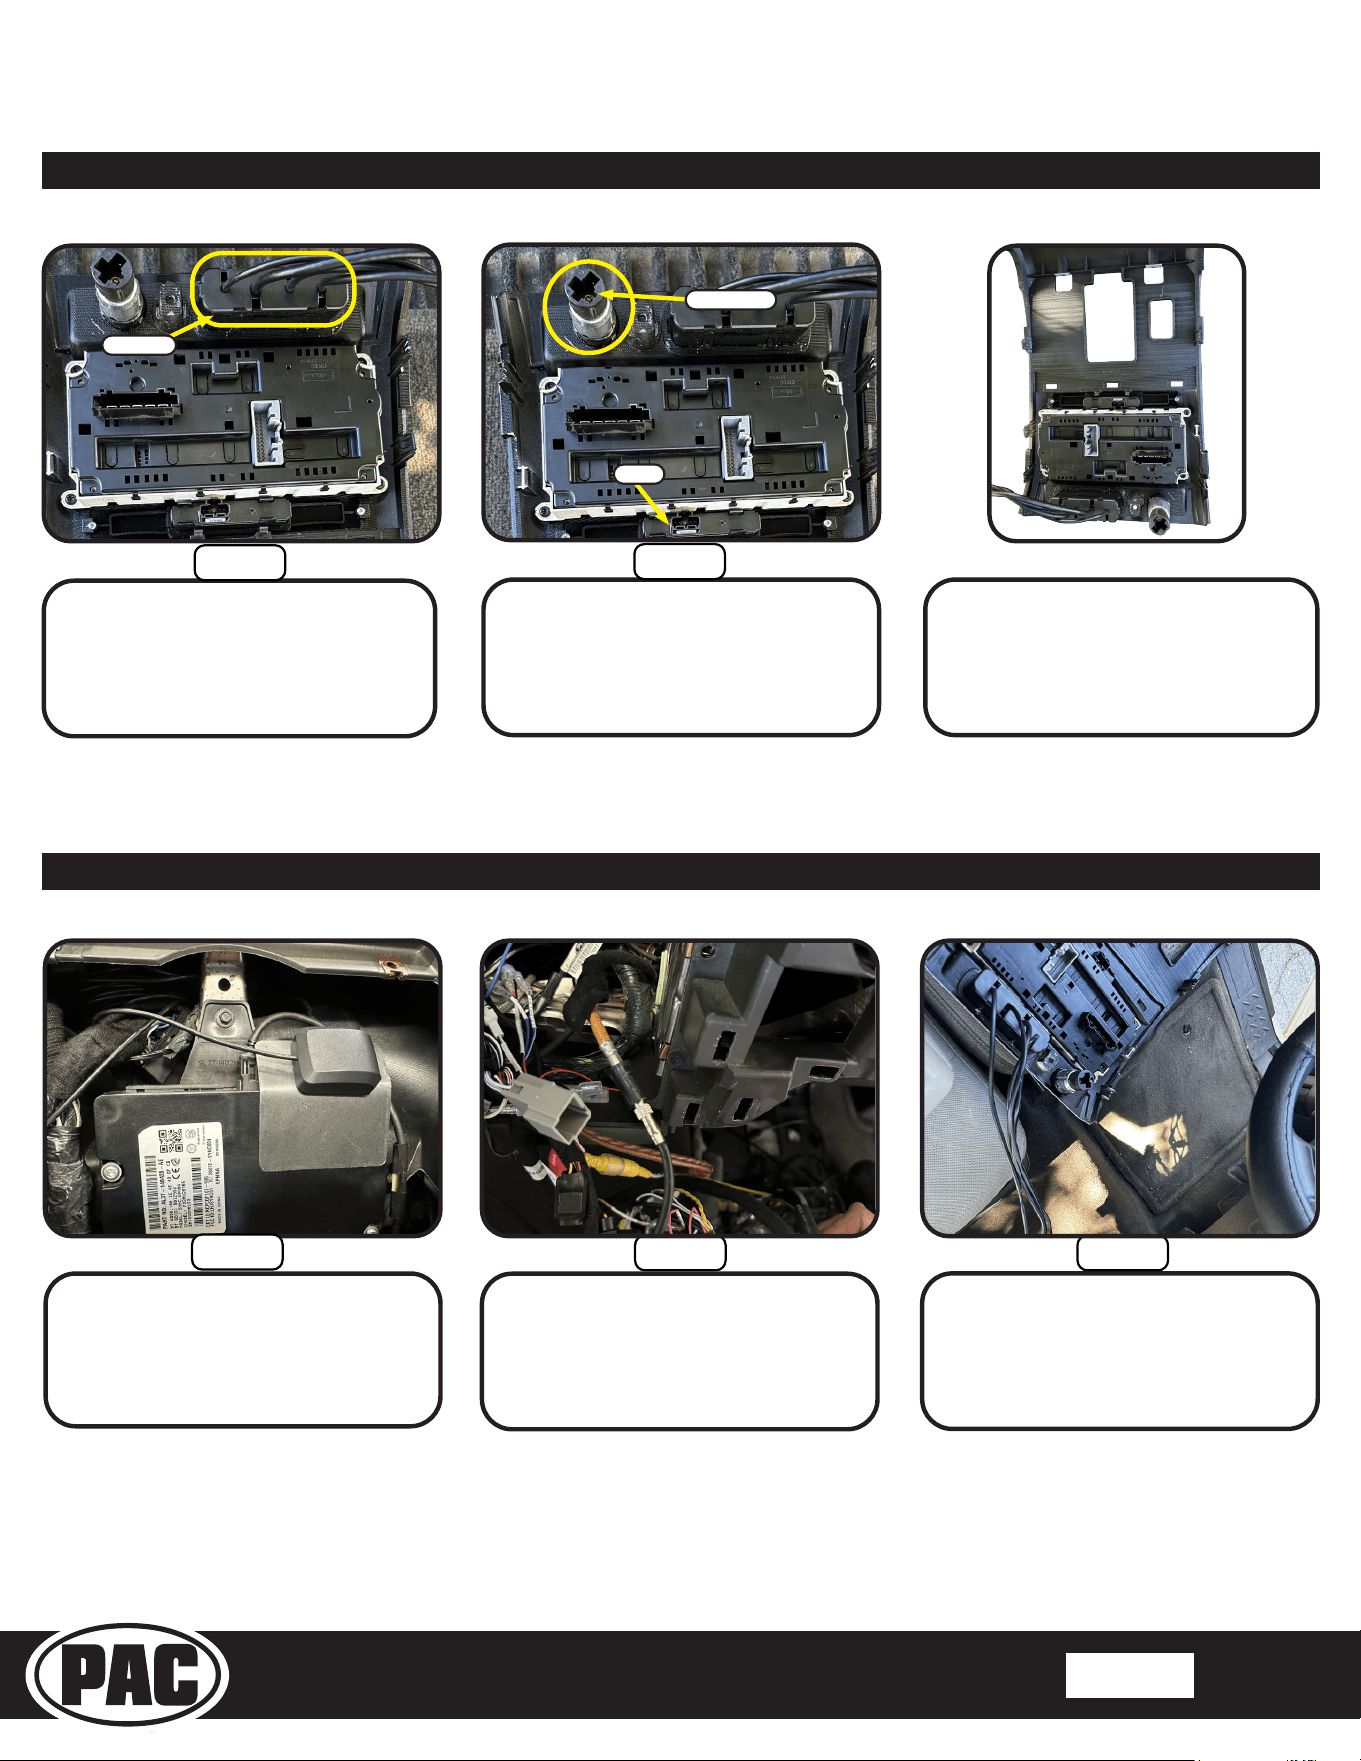
Section 2: Radio Module Preparation
Step 3
Connect the Speed Sen from the
HEIGH10 kit 10-pin connector to the
Speed Sen of the main harness from
the SR kit. Connect the 16-pin and
(SWC) 6-pin connectors on the SR-kit
Main Harness to the radio module.
Plug in the 10-pin harness to the radio
module.
Step 2
Connect the 16-pin and 4-pin
connectors on the SR-F15009H-
HAR V1 Main Harness to the
RP4-FD11 interface module.
Section 3: Interface and Main Harness Connections
Section 3: Interface Connections
Step 4
From the HEIGH10 box, connect the
blue LVDS, 8-pin display cables, and
the 24-pin (Subwoofer/ AUX-IN) RCA
cables to the radio module. Make
sure the LVDS and 8-pin display
cables are routed to the front of the
radio module.
Step 1
Set the dial on the RP4-FD11
interface to number 4.
Remove the warning sticker
covering the 16-pin plug on the
end of the interface.
Speed Sen
Stinger HEIGH10 Radio Replacement Kit
for 2009-2014 Ford F-150 Trucks
SR-F15009H
© 2021 AAMP Global. All rights reserved. PAC is a Power Brand of AAMP Global. PAC-audio.com
Pacific Accessory Corporation
Page 9
Rev: 1
Date:082123
®
®
Step 2
Step 3
Step 1
The climate control panel will need to be
transferred to the Main Frame of the
SR-F15009H kit.
Remove the power outlet by releasing
the two retaining clips with a small pick
tool and then pushing out the front side.
Remove the plastic ring from the bezel.
Remove (4) Torx T-20 screws
securing the climate control panel to
the bezel, and then remove. These
screws will be reused in Main Frame
Assembly.
Section 5: Disassembly of the Radio Bezel
Step 2
Step 3
Step 1
Connect the harness SR-F15009H-HAR
V1 (SYNC SWC) to the 54-pin connector.
Run the 2-pin connector from step 2
behind the display and out the radio
opening.
Unclip then unplug the 54-pin harness
from the Sync module.
Section 4: In-Vehicle Harness Connections and Preparation
Stinger HEIGH10 Radio Replacement Kit
for 2009-2014 Ford F-150 Trucks
SR-F15009H
© 2021 AAMP Global. All rights reserved. PAC is a Power Brand of AAMP Global. PAC-audio.com
Pacific Accessory Corporation
Page 10
Rev: 1
Date:082123
®
®
Attach switch inserts 1 or 2 with the supplied M3x8 screws from the SR hardware kit.
Insert the switch panel from the radio bezel into the switch insert.
NOTE: The image shows Switch Insert 1, follow the same instructions for Switch Insert 2.
Step 1
Step 2
Switch Insert 1
Switch
Section 6: Main Frame Assembly
Secure the climate control panel to the
Main Frame Assembly using (4) T-20
Torx screws removed in disassembly.
Step 5
Step 4
Remove the switch panel by pushing on the back of the panel and pushing in the
left and right tabs to release it.
Dash Bezel with 1 switch
Dash Bezel with 2 switches
Section 5: Disassembly of the Radio Bezel cont;
Stinger HEIGH10 Radio Replacement Kit
for 2009-2014 Ford F-150 Trucks
SR-F15009H
© 2021 AAMP Global. All rights reserved. PAC is a Power Brand of AAMP Global. PAC-audio.com
Pacific Accessory Corporation
Page 11
Rev: 1
Date:082123
®
®
Insert all the cables from the media
hub through the bottom opening of the
main frame. Push in until it locks in.
Using the parts removed from
disassembly, insert the plastic power port
ring, then insert the power port into the
main frame.
Assembled main frame.
Step 3
Step 4
Power Outlet
Switch
Media Hub
Section 7: In-Vehicle Connections and Radio Unit Installation
Attach the GPS antenna and
mounting plate to the Sync module
from the HEIGH10 kit. Bend the metal
so the GPS faces up. Route the GPS
cable out the front of the radio area.
Connect the BAA20 antenna adapter to
the vehicle’s antenna connector.
Bring the assembled main frame into
the vehicle.
Step 1
Step 2 Step 3
Section 6: Main Frame Assembly cont;
Stinger HEIGH10 Radio Replacement Kit
for 2009-2014 Ford F-150 Trucks
SR-F15009H
© 2021 AAMP Global. All rights reserved. PAC is a Power Brand of AAMP Global. PAC-audio.com
Pacific Accessory Corporation
Page 12
Rev: 1
Date:082123
®
®
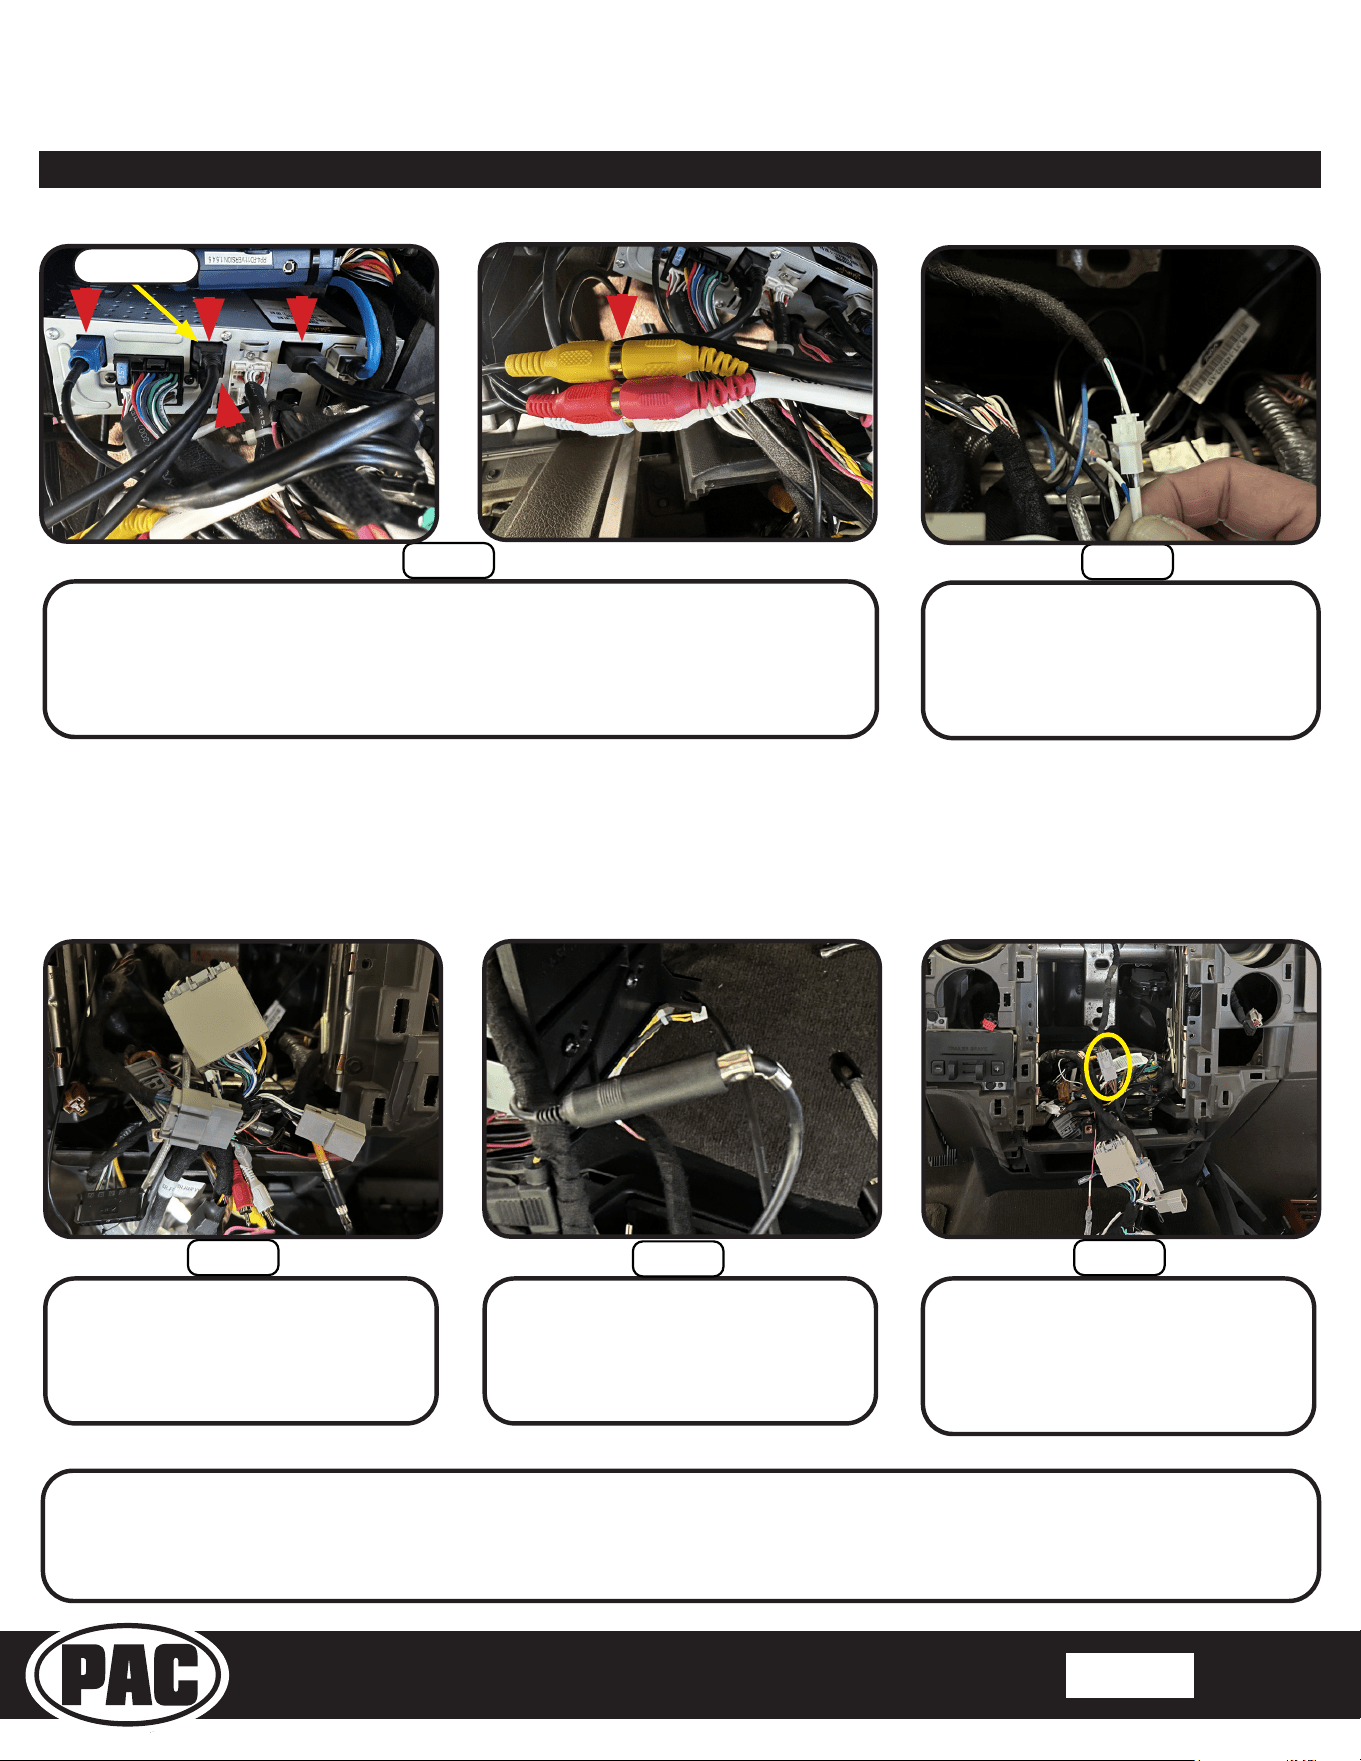
Connect the two or three vehicle side
connectors on the main harness to
the vehicle’s radio plugs.
Connect the antenna male of the
BAA20 to the female antenna of the
radio module.
Connect the 6-pin switch extension to
the switch connection in the vehicle.
NOTE: For vehicles with 2 switches
use both switch extensions.
These are the connections for the basic installation. If adding additional components such as SXM tuner or additional
cameras, those connections should be made at this point, before mounting the radio module.
Step 6
Step 7
Step 8
Section 7: In-Vehicle Connections and Radio Unit Installation cont;
Connect the two-wire connector from
the SR-F15009H-HAR V1 (SYNC
SWC) harness to the main harness of
the SR-F15009H kit.
Bring the assembled radio module into the vehicle.
Plug in the GPS (1), USB 1 (2), USB 2 (3), HDMI (4), and Red, White, and Yellow
RCA’s (5) from the media hub into the HEIGH10 radio module.
Note: The USB 1 cable closest to the driver must be plugged into the USB port
closest to the edge of the radio chassis for Apple CarPlay and Android Auto.
Step 5
Step 4
2
4
5
1
3
CarPlay / Android
USB Port
Stinger HEIGH10 Radio Replacement Kit
for 2009-2014 Ford F-150 Trucks
SR-F15009H
© 2021 AAMP Global. All rights reserved. PAC is a Power Brand of AAMP Global. PAC-audio.com
Pacific Accessory Corporation
Page 13
Rev: 1
Date:082123
®
®
Plug in the 8-pin LVDS display cables into the back of the display. Line up the
bottom of the display with the 3 locator slots on the main frame. Once aligned
press the assembly until it sits at against the main frame. Secure with the
(2) 8x1/2 Phillips screw from the SR-kit.
Step 14
Step 13
Section 7: In-Vehicle Connections and Radio Unit Installation cont;
Install the main bolt cover from the
SR kit onto the main frame next to the
power port.
With the two display cables routed
over the top of the radio assembly,
slide the assembly into position and
re-install the (4) factory 7mm bolts.
Re-install the left and right trim
panels, and the 7mm bolt behind the
airbag. Re-install the airbag, and the
(3) 8mm bolts under the glovebox.
Connect the switch extension to the
switch (1), grey (2), and black (3) plug
for the climate control, and power port
(4) on the main frame.
Install the assembly on the vehicle’s
dash. Snap the panel in place and
Secure with the (3) 7mm bolts.
Step 9
Step 12
Step 10
Step 11
2
4
1
3
Main Frame

Stinger HEIGH10 Radio Replacement Kit
for 2009-2014 Ford F-150 Trucks
SR-F15009H
© 2021 AAMP Global. All rights reserved. PAC is a Power Brand of AAMP Global. PAC-audio.com
Pacific Accessory Corporation
Page 14
Rev: 1
Date:082123
®
®
Testing and Verication
1. Test all features for functionality, including volume, fade, balance, steering wheel controls, reverse camera,
Bluetooth, USB, AUX and HDMI ports, AM/FM reception, Apple CarPlay and Android Auto.
NOTE: Only one of the two USB ports on the media hub will allow Apple CarPlay and Android Auto operation.
2. If the HEIGH10 external microphone was not installed, the default microphone setting of External must be changed to
Internal by accessing the Phone Settings (Main Menu>Phone>Settings>Microphone).
Firmware Updates (Stinger HEIGH10)
To update the Stinger radio rmware, refer to the HEIGH10 product page at:
www.stingerelectronics.com/products/heigh10
Technical Support
Email: support@PAC-audio.com
Phone: 727-592-5991
Chat: PAC-Audio.com