User Manual
2024.01
v1.0

2
©
2024 DJI All Rights Reserved.
Contents
Disclaimer 4
Product Profile 4
Before Using 4
Supported Files 4
Operating Requirements 5
Notes 5
Installation and Configuration 6
Login and Activation 8
Home Screen 10
User Center 10
Language 10
License Manager 11
Log Export 11
Help 11
DJI Product Improvement Project 11
About DJI Modify 12
Logout 12
Layout 12
Sort 13
Search 14
Projects 15
Fast Import from DJI Terra 15
Importing a Project 15
Creating a Project 15
Managing a Project 16
Opening the Local Folder 16
Renaming a Project 16
Deleting a Project 16

©
2024 DJI All Rights Reserved.
3
Model Editing Screen 17
Sidebar 17
Collapsing/Expanding the Sidebar 17
Enabling/Disabling a High-Quality Model 17
Model View 18
Textures 18
Displaying/Hiding a Model Block 18
Wire Frame 19
Rotation Tool 20
Toolbar 20
View 20
Removing Floating Parts 20
Repairing Water Surface 22
Surface Flattening 24
Texture Repair 29
Hole Filling 33
Action Bar 38
Global Shortcuts 38
Undoing/Redoing an Action 38
Version History 38
Rendering and Exporting a Project 39
Saving a Project 39
Sharing a Project 39

4
©
2024 DJI All Rights Reserved.
DJI Modify User Manual
Disclaimer
Read this disclaimer and the terms in DJI MODIFY
TM
(hereinafter referred to as “product”)
carefully before using this product. By using this product, you hereby agree to this disclaimer
and the Terms of Use and signify that you have read it fully. Install and use this product in strict
accordance with the User Manual. SZ DJI TECHNOLOGY CO., LTD and its aliated companies
assume no liability for damages or injuries incurred directly or indirectly from using this product
improperly.
DJI
TM
is a trademark of SZ DJI TECHNOLOGY CO., LTD. (abbreviated as “DJI”) and its affiliated
companies. Names of products, brands, etc., appearing in this document are trademarks
or registered trademarks of their respective owner companies. This product and document
are copyrighted by DJI with all rights reserved. No part of this product or document shall be
reproduced in any form without the prior written consent or authorization from DJI.
This disclaimer is produced in various languages. In the event of any discrepancies among
dierent versions, the simplied Chinese version shall prevail when the product in question is
purchased in China. The English version shall prevail when the product in question is purchased
in any other region.
Product Prole
DJI Modify is DJI’s first intelligent 3D model editing software. It features a streamlined and
intuitive interface that is simple to use to complete 3D model editing eciently. It accurately
identifies floating parts, holes, and vehicles in the models. Mesh can be repaired with a
single click, with true-to-life textures generated quickly, significantly simplifying the model
editing process. Paired with a DJI enterprise drone and DJI TERRA
TM
, it forms a comprehensive
solution from aerial surveying, modeling, and model editing to sharing these models easily
to meet operational needs in surveying and mapping, reghting, emergency response, and
transportation.
Before Using
Supported Files
DJI Modify only supports editing 3D models (visible light) reconstructed using DJI Terra. Users
have the option to convert existing 3D models in DJI Terra into le formats that are compatible
with DJI Modify or start the reconstruction of 3D models from scratch using DJI Terra and import
to DJI Modify.
Only models reconstructed with DJI Terra v4.0.0 or later versions can be imported into DJI
Modify for editing. Otherwise, the core features of DJI Modify, such as removing oating parts
may not function properly. DJI Modify does not support importing models reconstructed using
custom coordinate systems or coordinate systems with seven-parameter transformation, nor
models reconstructed from photos that lack image POS data.
©
2024 DJI All Rights Reserved.
5
DJI Modify
User Manual
When reconstructing 3D models in DJI Terra (v4.0.0 or later versions), make sure to enable Work
with DJI Modify. By enabling this option, historical projects that have already been completed in
DJI Terra can be quickly reconstructed again to generate new models and DMEP les for editing
in DJI Modify without the need to go through the entire reconstruction process again. Users
can nd the DMEP le (DJI Modify editable project le) in the reconstruction output folder of
DJI Terra. For detailed instructions on how to use DJI Terra for 3D reconstruction, refer to the
Reconstruction section in the DJI Terra User Manual.
Operating Requirements
Computers must have a Windows 10 or later (64-bit) operating system installed to run DJI
Modify. In order to ensure a smooth user experience, the computer must also meet the specic
hardware conguration requirements, which are detailed in the table below.
Items Minimum Recommended
GPU
NVIDIA graphics card with a compute
capability of 5.0 or above and a
comprehensive performance not lower
than NVIDIA GeForce GTX 1050Ti.
NVIDIA graphics card with a compute
capability of 7.0 or above and a
comprehensive performance not lower
than NVIDIA GeForce RTX 2070.
VRAM 4 GB or more 8 GB or more
RAM 32 GB or more 64 GB or more
HDD 200GB free space or more SSD plus 200GB free space or more
Compute capability is a key metric of the graphics card performance. For more information
about the compute capabilities of NVIDIA graphics cards, visit: https://developer.nvidia.com/
cuda-gpus#compute.
The graphics cards listed above have been ocially tested and are recommended for optimal
performance. If you are using a graphics card that is not listed above, consult DJI Support before
use. Make sure that the graphics card driver you are using is consistently kept up-to-date.
Notes
1. For authentication purposes, make sure to maintain an internet connection at all times.
2. It is important to ensure that all monitors are connected to the NVIDIA graphics card.
Failure to do so may cause software lag and hinder its ability to function at maximum
performance.
6
©
2024 DJI All Rights Reserved.
DJI Modify User Manual
Installation and Conguration
Visit the DJI official website on a computer and navigate to the DJI Modify product page to
download the software.
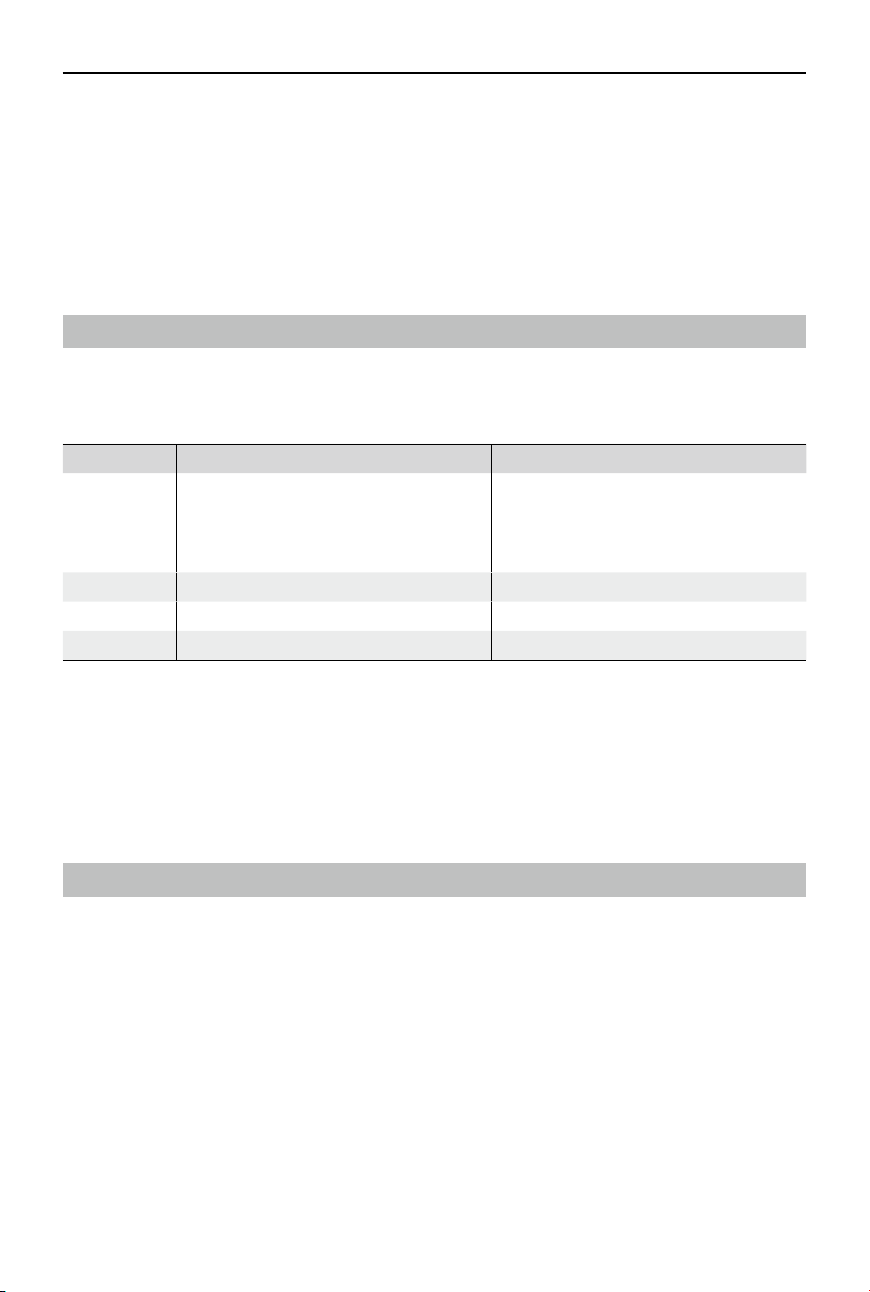
1. Double click to open the software installation package. Wait for a while until the Windows
system prompts for authorization and click Yes. Administrator permissions should be
enabled as DJI Modify needs to write les to the installation drive.
2. Select language preference and the folder in which to install DJI Modify.
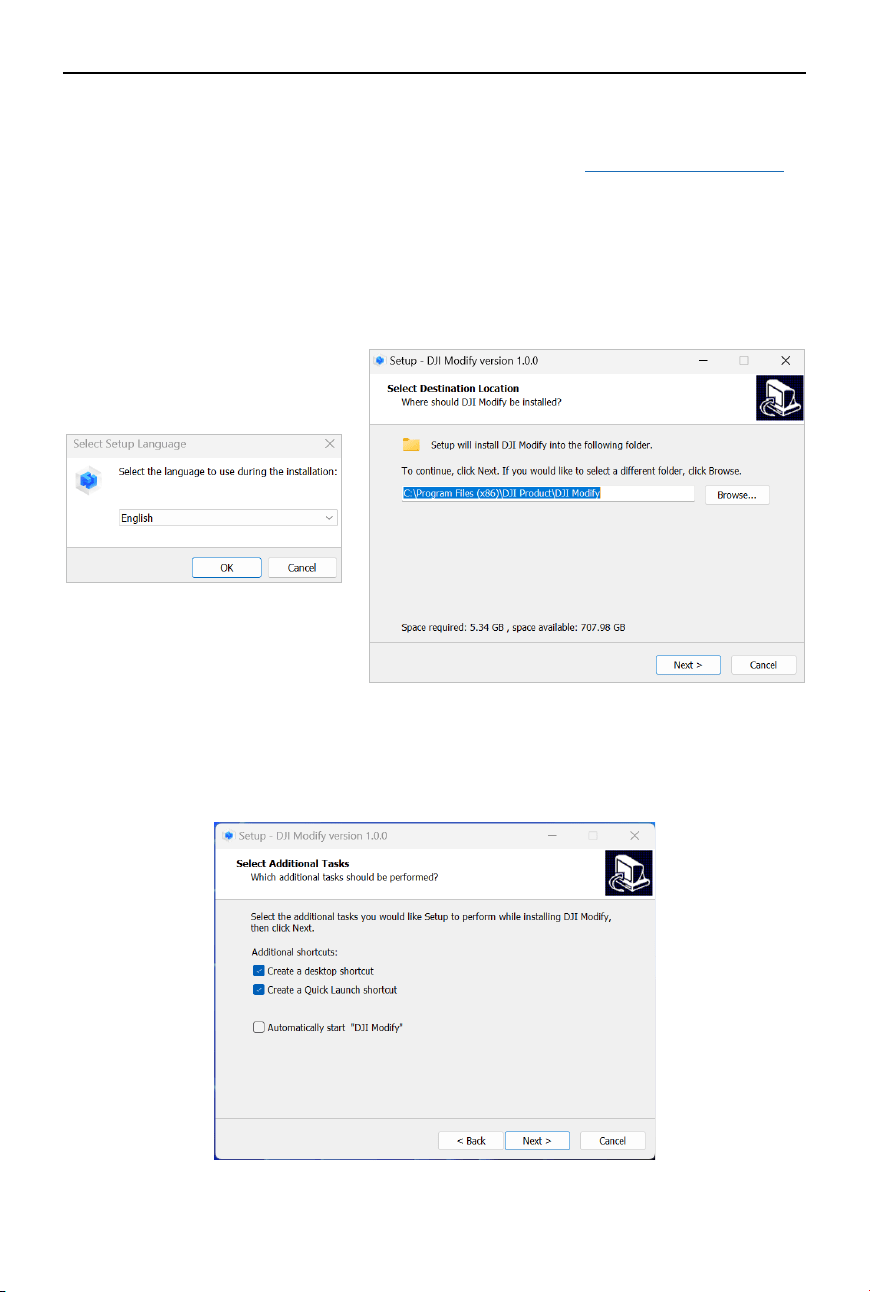
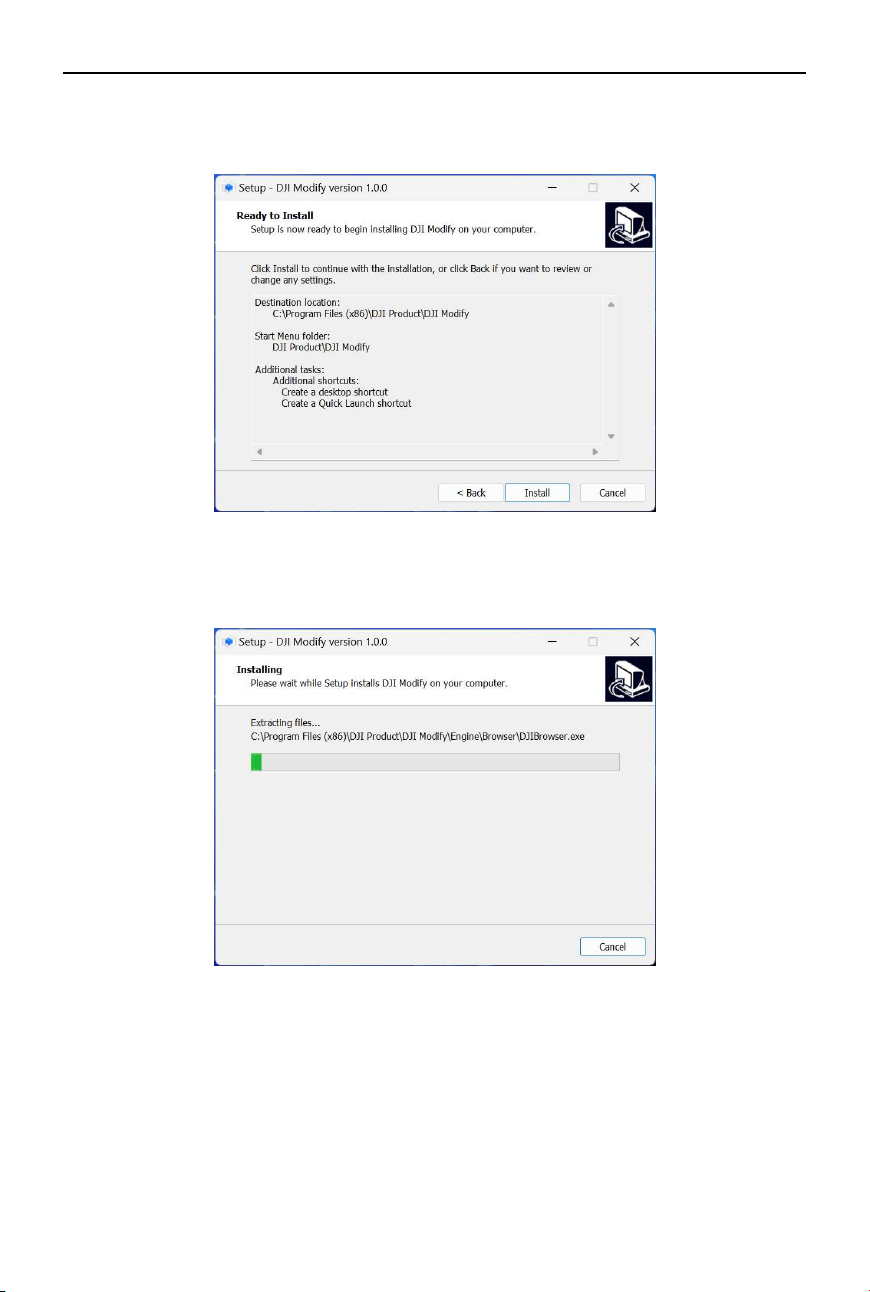
3. Select the additional tasks to perform while installing. Check the boxes according to your
installation preferences.
©
2024 DJI All Rights Reserved.
7
DJI Modify
User Manual
4. Conrm installation settings.
5. Wait for installation to complete.
During the installation process, a Windows command prompt window may appear. This is
a normal occurrence as it installs the drivers.
6. Once the installation is complete, users can either run DJI Modify directly or restart
computer as prompted.
8
©
2024 DJI All Rights Reserved.
DJI Modify User Manual
Login and Activation
A DJI account is required to use the software. Users must log in with an account registered on
the DJI ocial website.
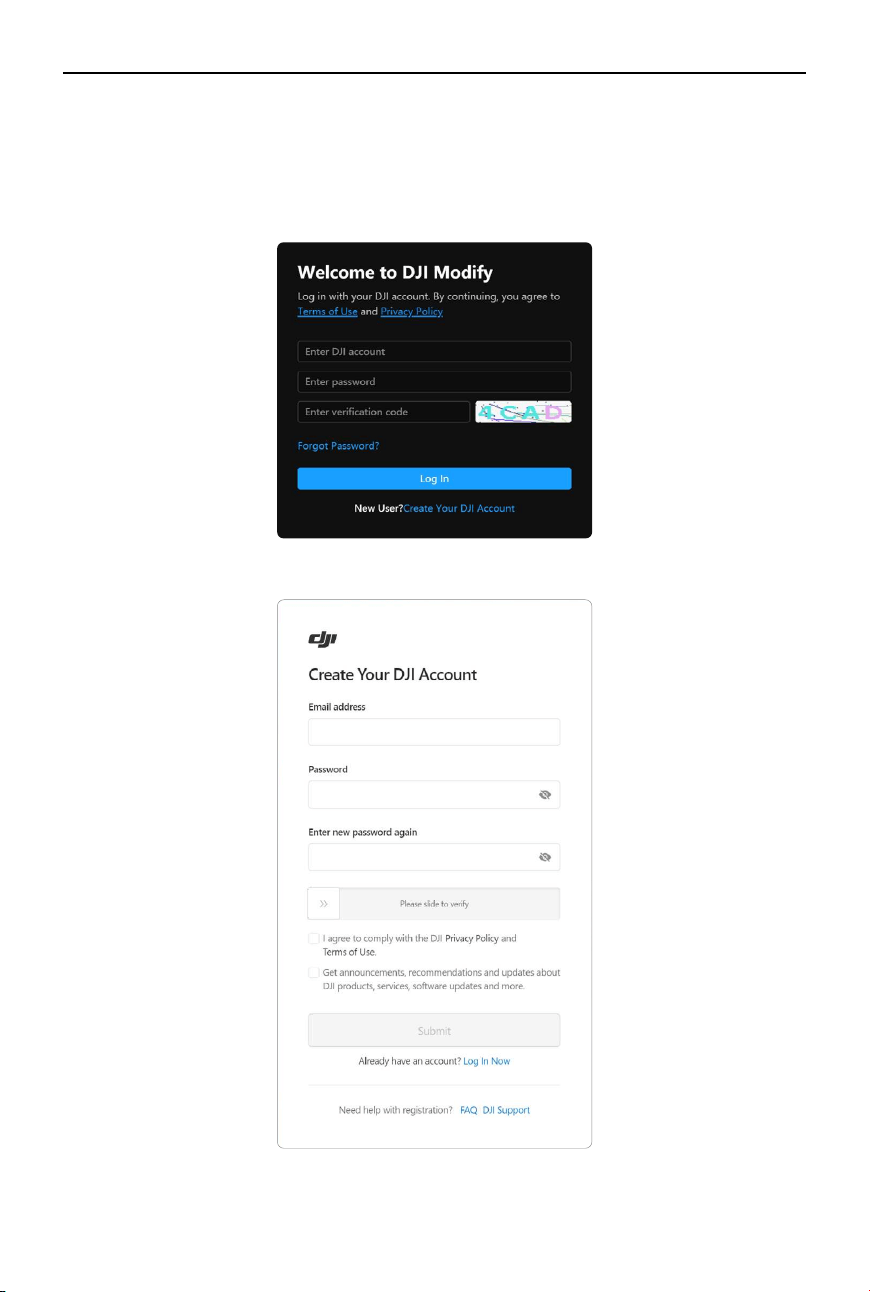
1. Double click to run the software and enter the login screen.
2. Click Create Your DJI Account to register if you do not have a DJI account.
©
2024 DJI All Rights Reserved.
9
DJI Modify
User Manual
3. If you already have a DJI account, enter account, password, and verication code to log in. If
you forgot your password, click Forgot Password to recover your account.
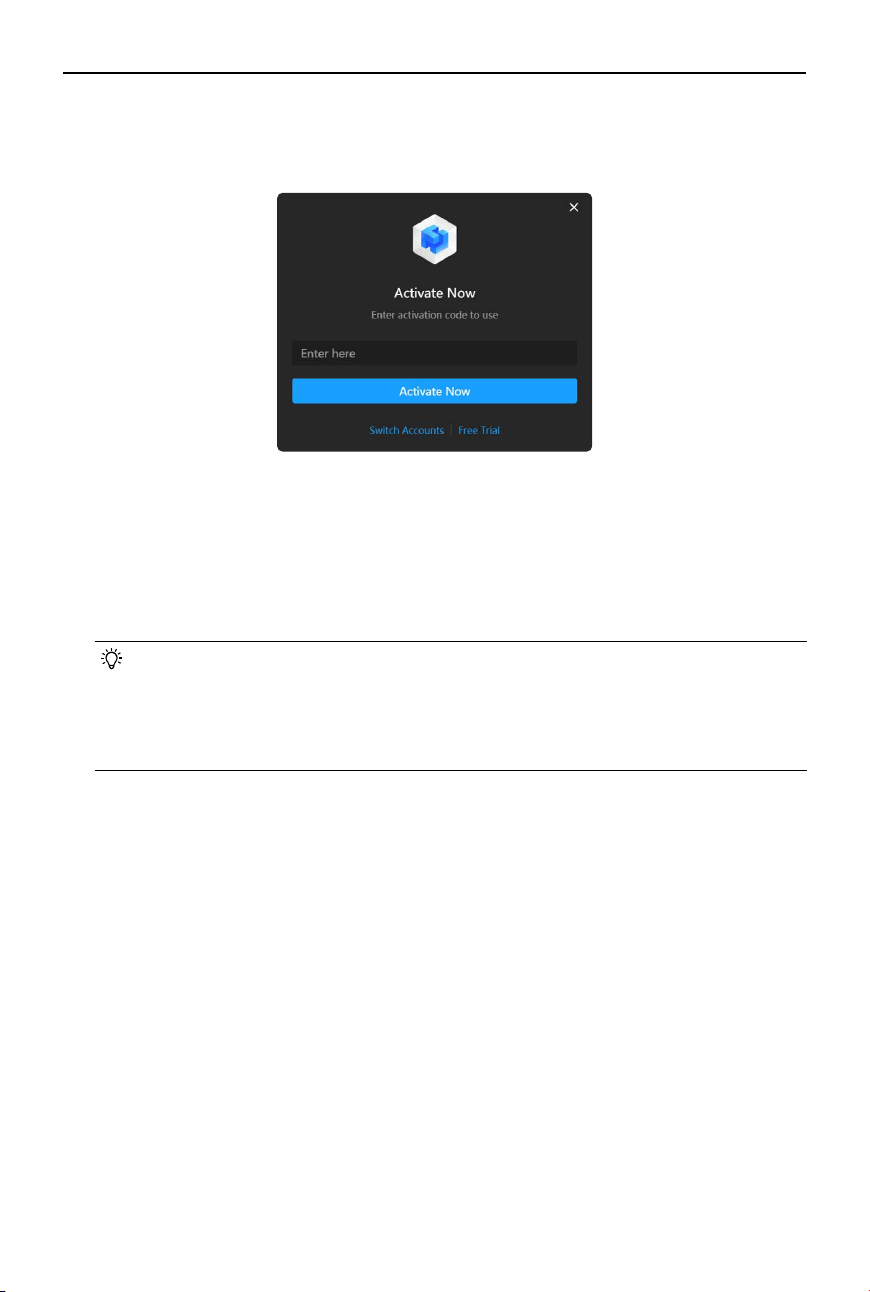
4. Activate the license.
Once logged in, an activation prompt will appear. If you have not obtained a license
activation code yet, click Free Trial to apply for a trial and obtain an activation code. If a
license activation code has already been obtained, directly enter the activation code and
click Activate to activate DJI Modify.
To activate additional licenses, go to User Center > License Manager, and click Activate More
to activate additional licenses in the pop-up window.
• A license that has already been activated in DJI Terra cannot be activated directly in
the above page. Go to User Center > License Manager to nd and bind the license.
• Upon the expiration of the trial period, users will have restricted access and will
only be able to view existing models but unable to perform operations, such as
creating or importing projects.
10
©
2024 DJI All Rights Reserved.
DJI Modify User Manual
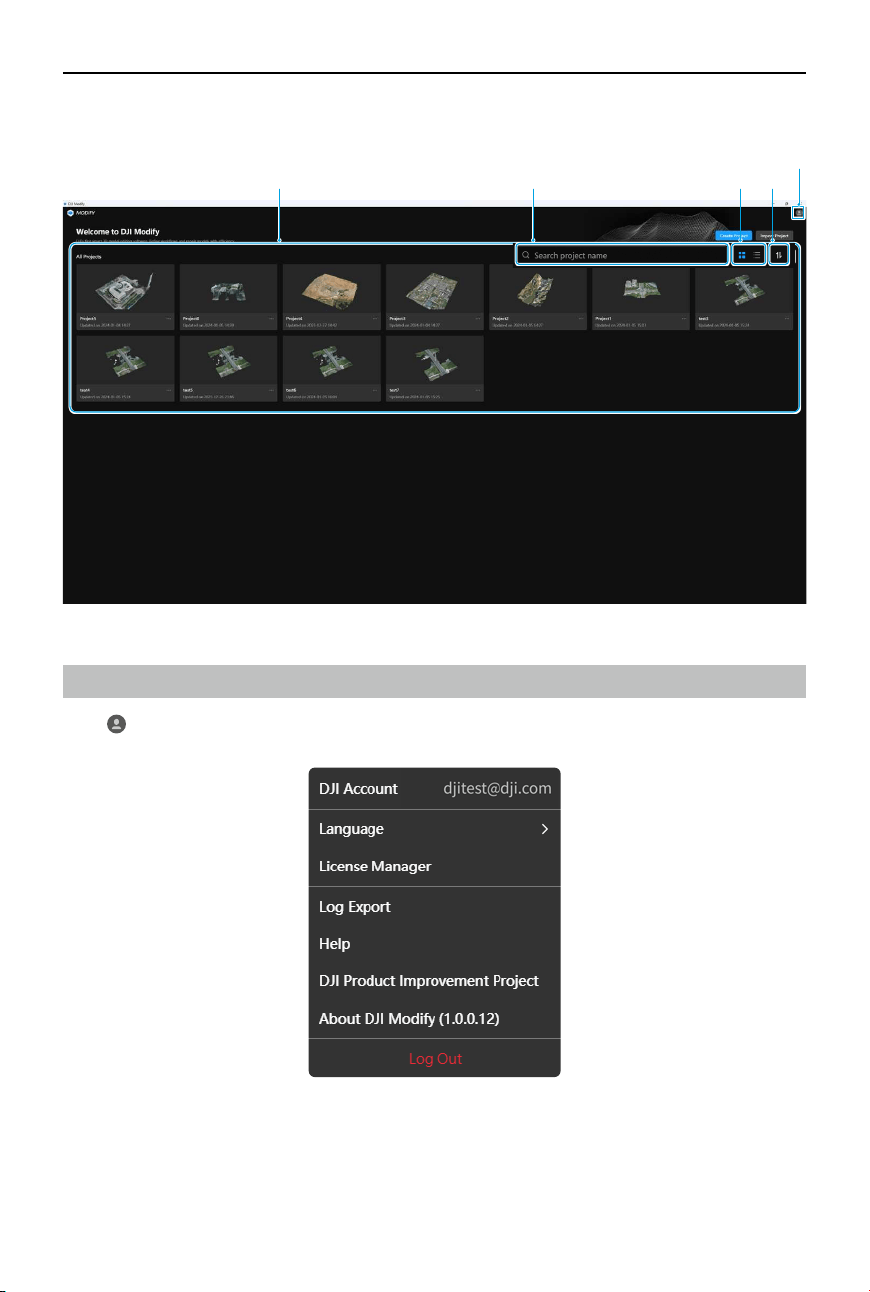
Home Screen
User Center
Click
in the upper right corner of the home screen to access the user center and view
account information.
Language
Click Language to select your preferred language. Currently, DJI Modify only supports Chinese
and English languages.
All Projects Search
User Center
SortLayout
©
2024 DJI All Rights Reserved.
11
DJI Modify
User Manual
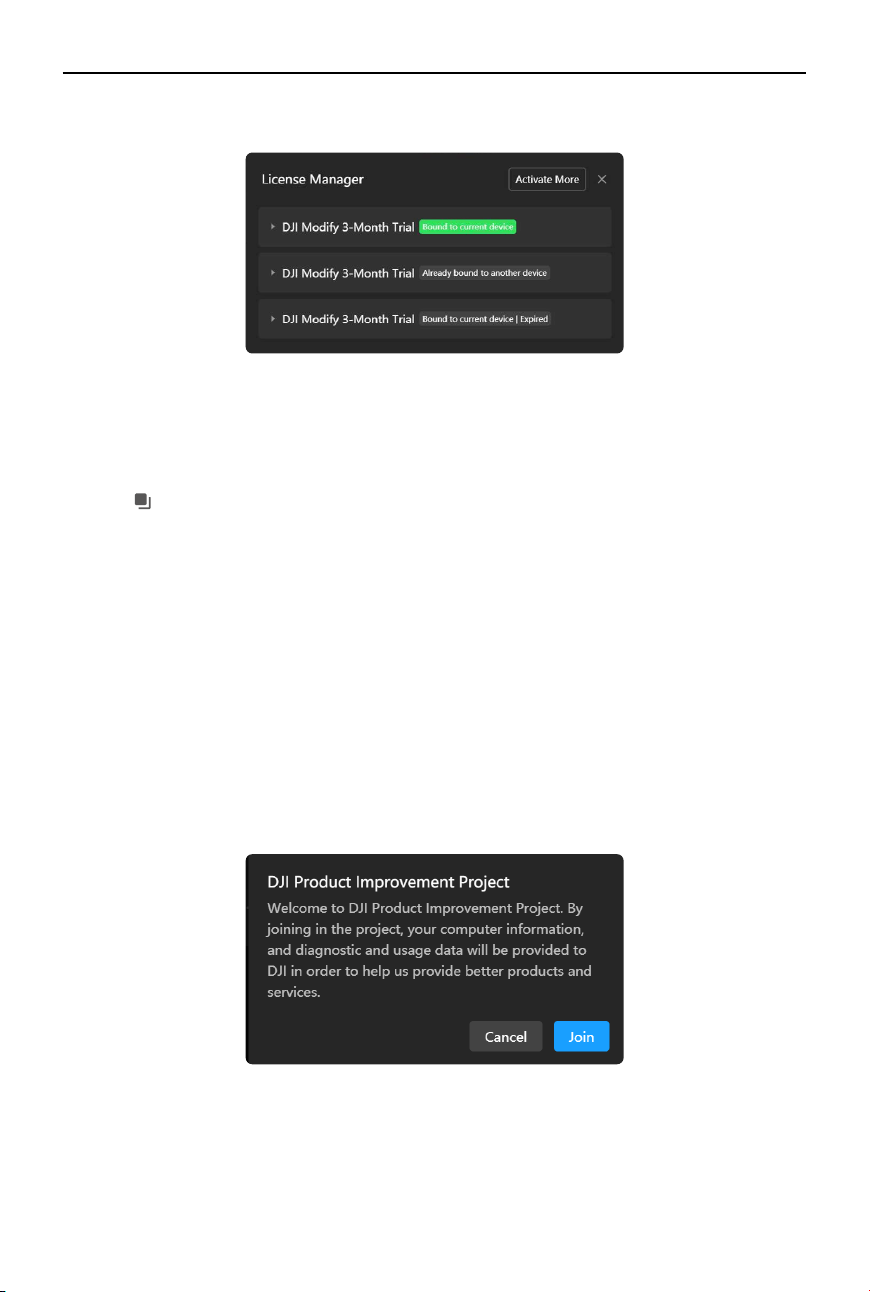
License Manager
1. Click License Manager to view all licenses bound to the current computer.
2. Click Activate More to activate an additional license and bind it to your current computer.
3. Click on an individual license to view detailed information, including the binding status,
activation date, validity period, and license number.
4. Click
to copy the license number.
Log Export
DJI Modify allows users to export product logs and save them locally, facilitating issue diagnosis
and troubleshooting in after-sales. Click Log Export and select a location to save the exported
logs. By default, the time range for log export is set to the past 7 days.
Help
Click Help to quickly navigate to the DJI Modify download page, where users can download the
latest software and view related documentation.
DJI Product Improvement Project
Click DJI Product Improvement Project and then click Join to join the project. By joining in
the project, your computer information and diagnostic and usage data will be provided to
DJI in order to help us provide better products and services. If you do not wish to continue
participating in the project, go to User Center and click Cancel to cancel your participation in
the project at any time. After participation is canceled, your computer information and error
diagnostic data will not be uploaded.
12
©
2024 DJI All Rights Reserved.
DJI Modify User Manual
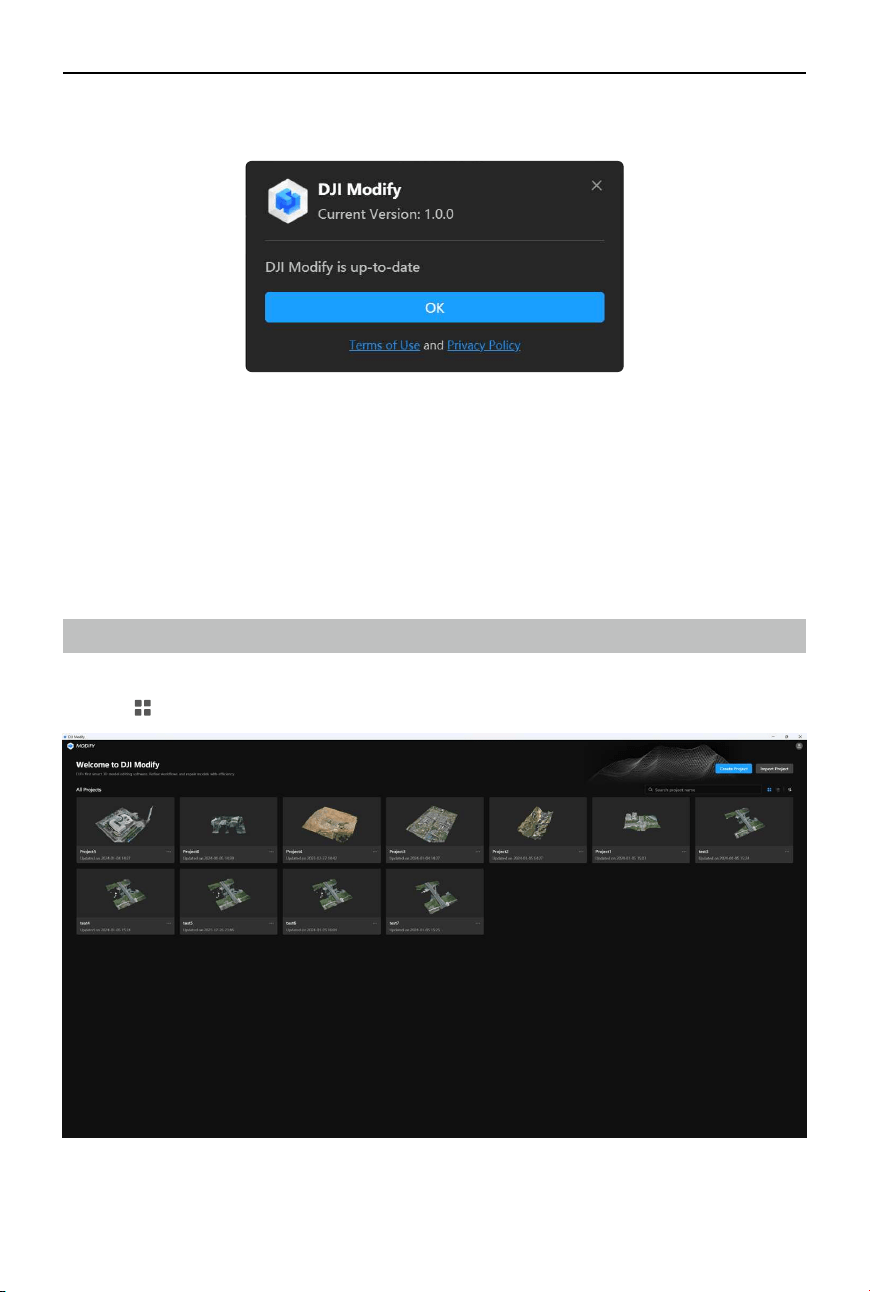
About DJI Modify
Click About DJI Modify to view current software version and check for updates. From here, users
can also view the Terms of Use and Privacy Policy of the product.
Logout
Click Log Out to sign out of the software. If the user clicks Log Out on the model editing screen,
DJI Modify will automatically save the current model before logging out.
Layout
DJI Modify provides two layout options, including Card View and List View.
1. Click
to switch to Card View (default).

©
2024 DJI All Rights Reserved.
13
DJI Modify
User Manual
2. Click to switch to List View.
Sort
Users can use the sorting function to arrange multiple project les in a specic order. DJI Modify
supports to sort les in alphabetical order (A to Z, Z to A), by time created or modied (oldest to
newest, newest to oldest), and by project name.
Click
to select your preferred sorting method. By default, project files are sorted by time
created, from newest to oldest.
14
©
2024 DJI All Rights Reserved.
DJI Modify User Manual
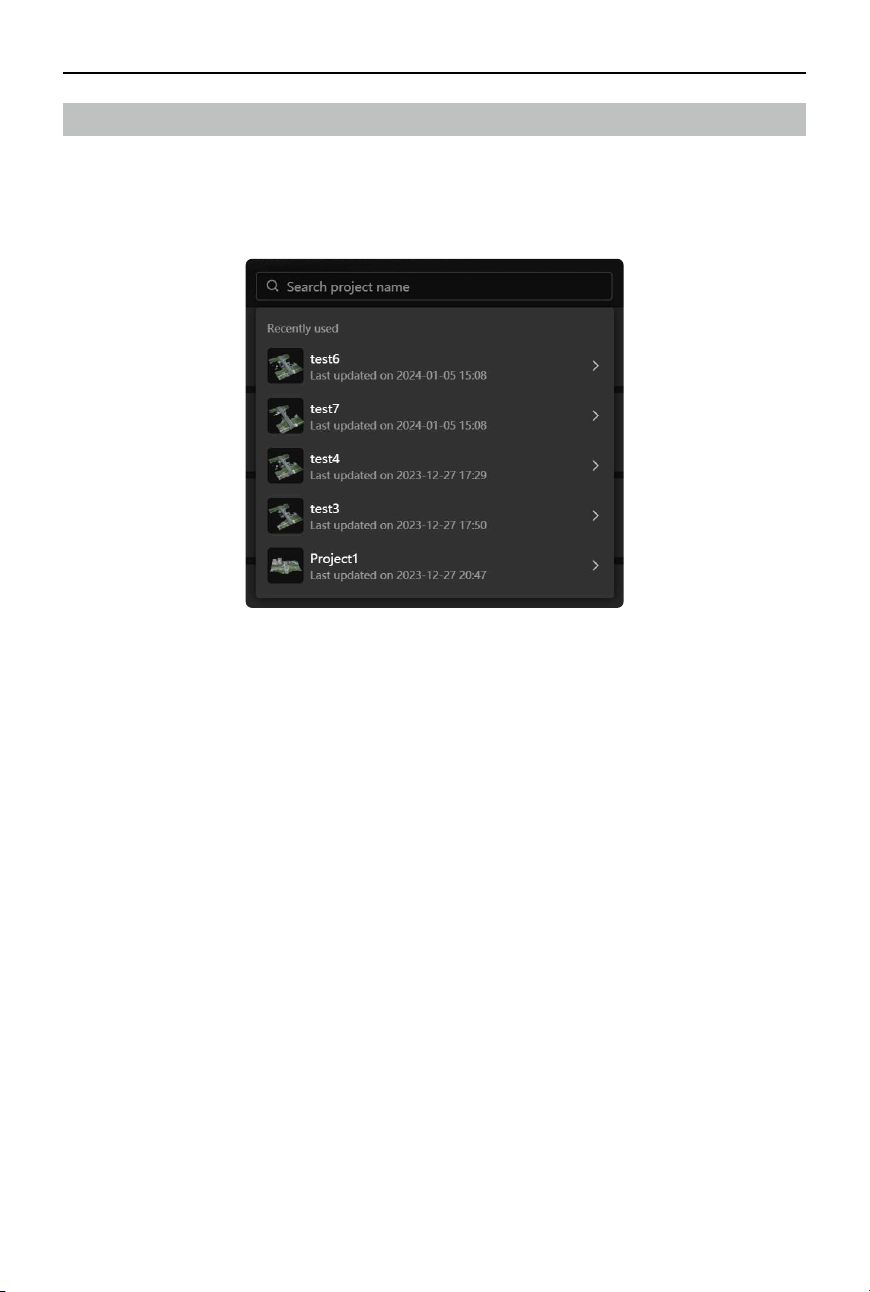
Search
With the search function, users can quickly access recently opened projects or nd a specic
project using keywords.
1. Click on the search box to view all recently accessed project les. Click on a project to open
it.
2. Alternatively, enter keywords to search for a specic project. Click on the project found to
open it.
3. The list of recently accessed projects will be updated when users create, import, edit, or
click on a project, as well as when users drag in or double-click on a project le to open it.

©
2024 DJI All Rights Reserved.
15
DJI Modify
User Manual
Projects
Fast Import from DJI Terra
After completing 3D reconstruction in DJI Terra, users can click on the DJI Modify button in DJI
Terra to open the reconstructed model in DJI Modify with just one click, which allows for fast
project import.
• Be aware that if users open the model in DJI Modify using this method, any further
modications to the project name or reconstruction parameters within DJI Terra will
render the model in DJI Modify unavailable.
Importing a Project
For an existing DJI Modify editable project le (DMEP le), users can directly import and load the
model.
1. Click Import Project.
2. Select the DMEP le to be imported. The le is located in the folder named “modify” under
the DJI Terra project folder.
3. Click Open to open the project and enter the model editing screen. Alternatively, double-
click on the le or drag it directly into the home screen of DJI Modify to start editing.
Creating a Project
Create a new project if the project does not have a DMEP le.
16
©
2024 DJI All Rights Reserved.
DJI Modify User Manual
1. Click Create Project and ll in the project information. Enter the project name, choose the
storage location, and select the location of the project-related folders, including B3DM, PLY,
and AT XML les and undistorted images. Items marked with a red asterisk (*) are required.
2. After all required information is lled in, click OK to enter the model editing screen.
• Undistorted images can project textures onto the holes in the model. Importing
these images can help users achieve improved hole-lling eects. Users can nd the
undistorted images of a project in the reconstruction output folder of DJI Terra (path:
models\pc\0\.temp\ImageCorrection\undistort).
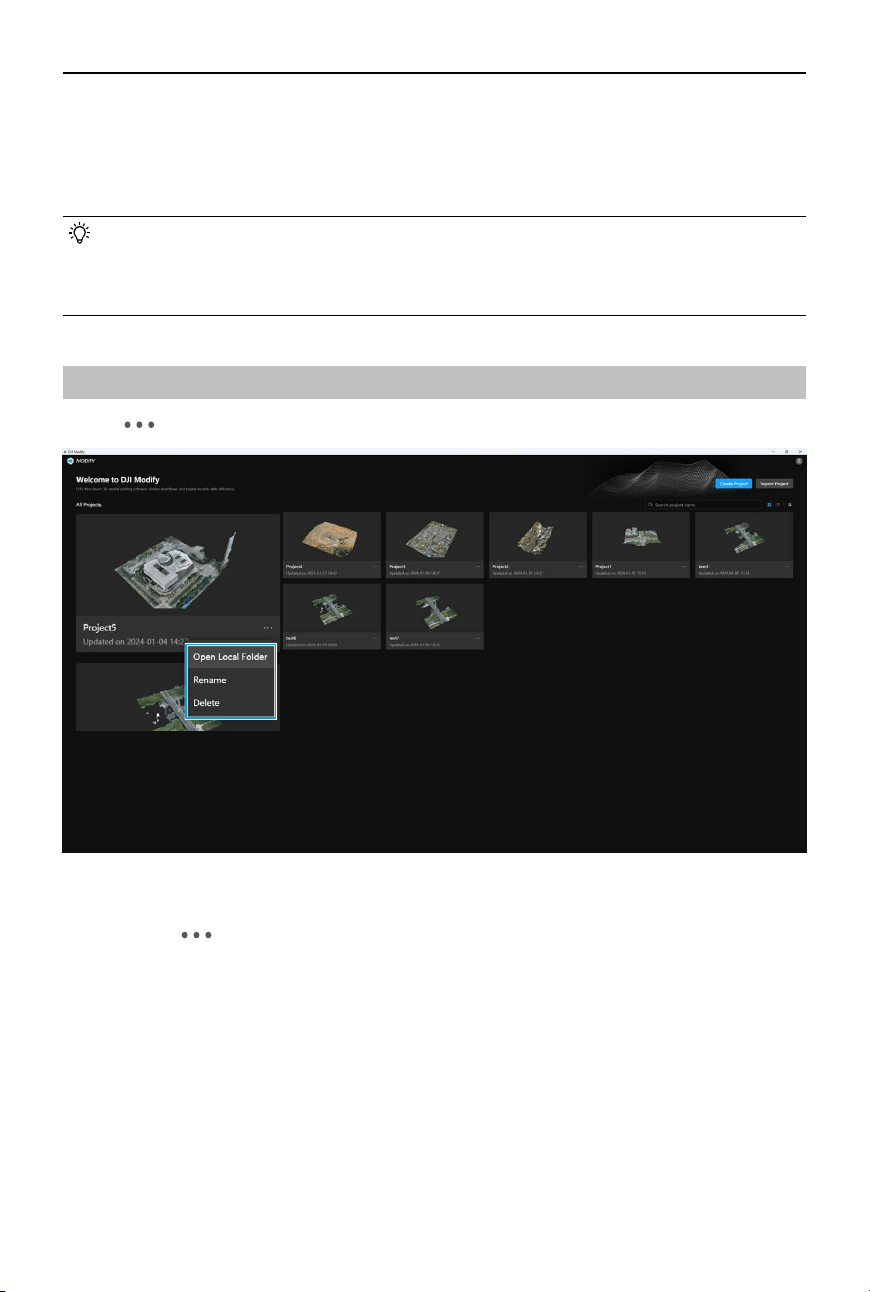
Managing a Project
Click on
at the lower right corner of a project to open local folder, rename, or delete the project.
Opening the Local Folder
Users can click and select Open Local Folder to nd the project les. With this option, users
can precisely identify the path of the project les, enabling them to eciently locate and share
project les.
Renaming a Project
After a project is created or imported, users can still modify the project name by renaming it.
Deleting a Project
DJI Modify supports deleting projects. Deleted projects will be removed from the home screen,
and the folders where the projects are located will also be deleted. The deleted models cannot
be recovered. Exercise caution when deleting.
©
2024 DJI All Rights Reserved.
17
DJI Modify
User Manual
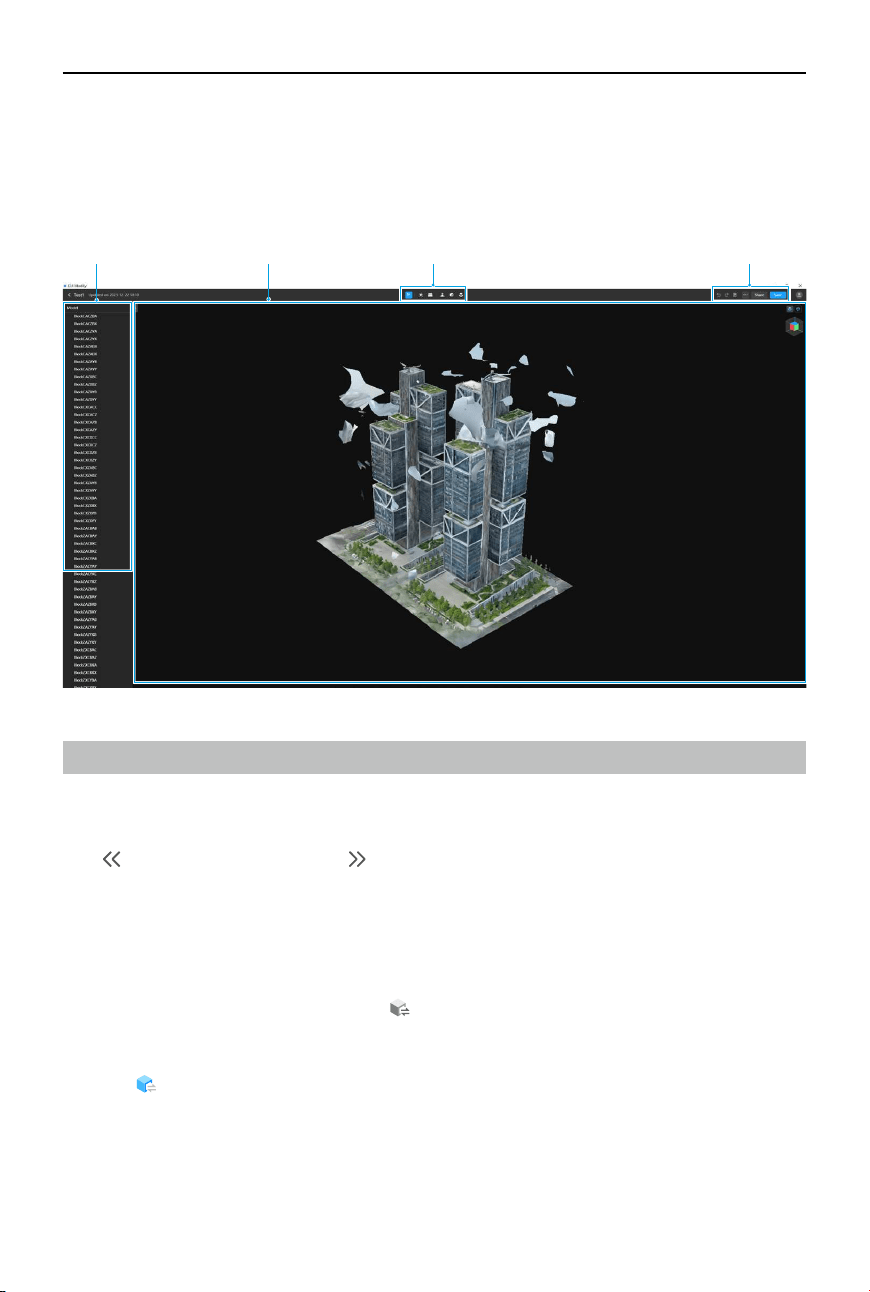
Model Editing Screen
Click on any project in the home screen to enter the model editing screen. Users can also enter
the model editing screen of a project by double-clicking on the DMEP le, dragging the DMEP
le into the home screen, or creating or importing a project.
ToolbarSidebar Action BarModel View
Sidebar
Collapsing/Expanding the Sidebar
After entering the model editing screen, the sidebar will be automatically displayed on the left.
Click to collapse the sidebar. Click to expand the sidebar.
Enabling/Disabling a High-Quality Model
In DJI Modify, high-quality models refer to PLY models, while low-quality models refer to B3DM
models.
1. In the model editing screen, click
to enable the high-quality model for a block.
Alternatively, move the mouse cursor to a model block and right-click to enable the high-
quality model.
2. Click
again to disable the high-quality model. Alternatively, move the mouse cursor to
a model block and right-click to disable the high-quality model. When disabling the high-
quality model, DJI Modify will automatically save any modications made to the high-quality
model.
18
©
2024 DJI All Rights Reserved.
DJI Modify User Manual
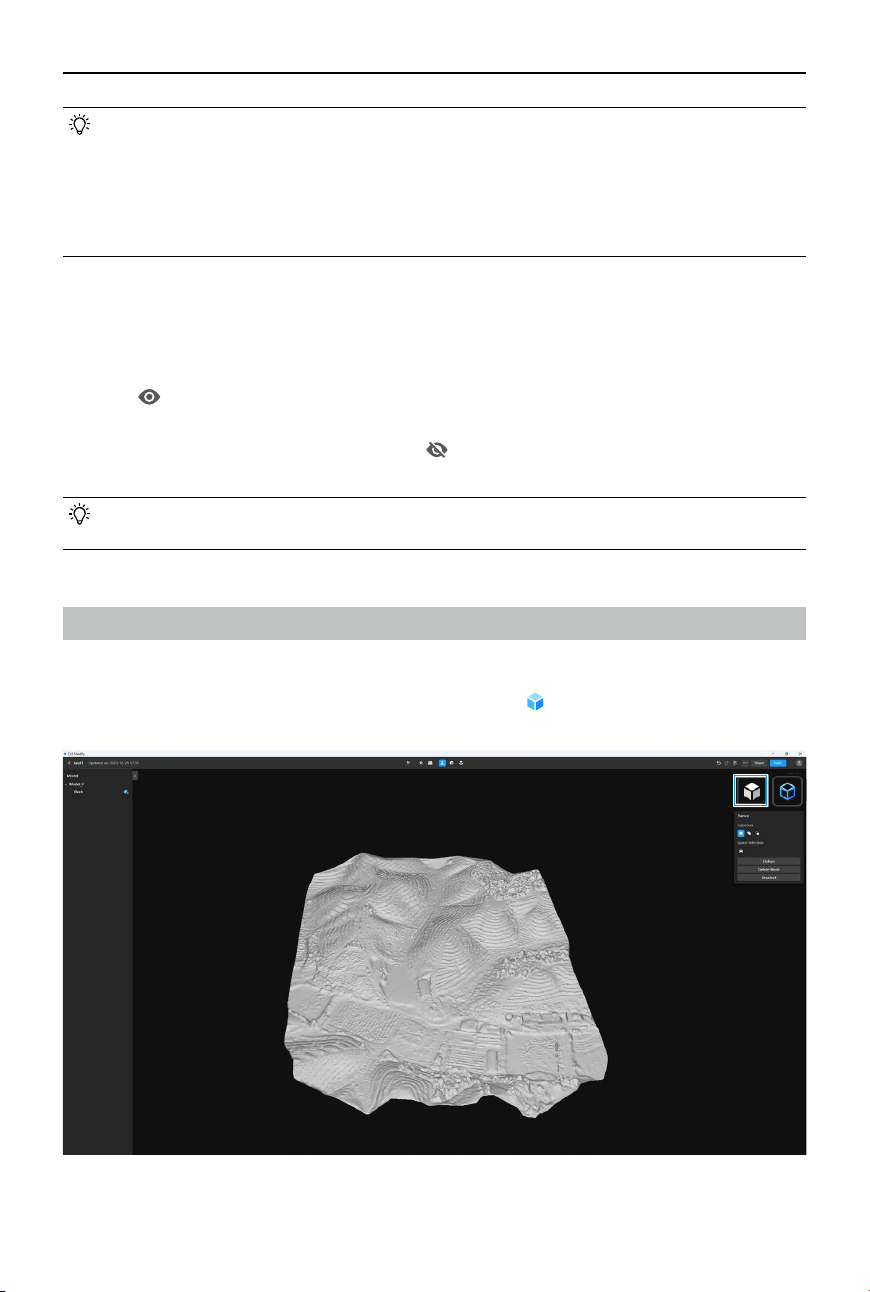
Model View
Textures
1. When high-quality models are enabled, users can click to hide the textures, and a white
model will be displayed.
• High-quality models can only be enabled when using the attening, texture repair, and
hole-lling tools.
• After making modications to a model with a tool where high-quality model needs to
be enabled for editing, if the user changes to another tool without high-quality model
(specifically referring to the switching between B3DM and PLY files), the currently
modied model needs to be rendered rst.
Displaying/Hiding a Model Block
If a single model has too many blocks, users can hide certain model blocks that do not require
editing and only display the necessary ones.
1. Click
on the file list to hide the corresponding model block. Alternatively, move the
mouse cursor to a specic model block and right-click to hide that model block.
2. After the model editing is complete, click
to show the previously hidden model blocks
again.
• Hidden model blocks will not be affected by any editing operations, regardless of
whether a selected area exists, thus enhancing processing eciency to a certain extent.
©
2024 DJI All Rights Reserved.
19
DJI Modify
User Manual
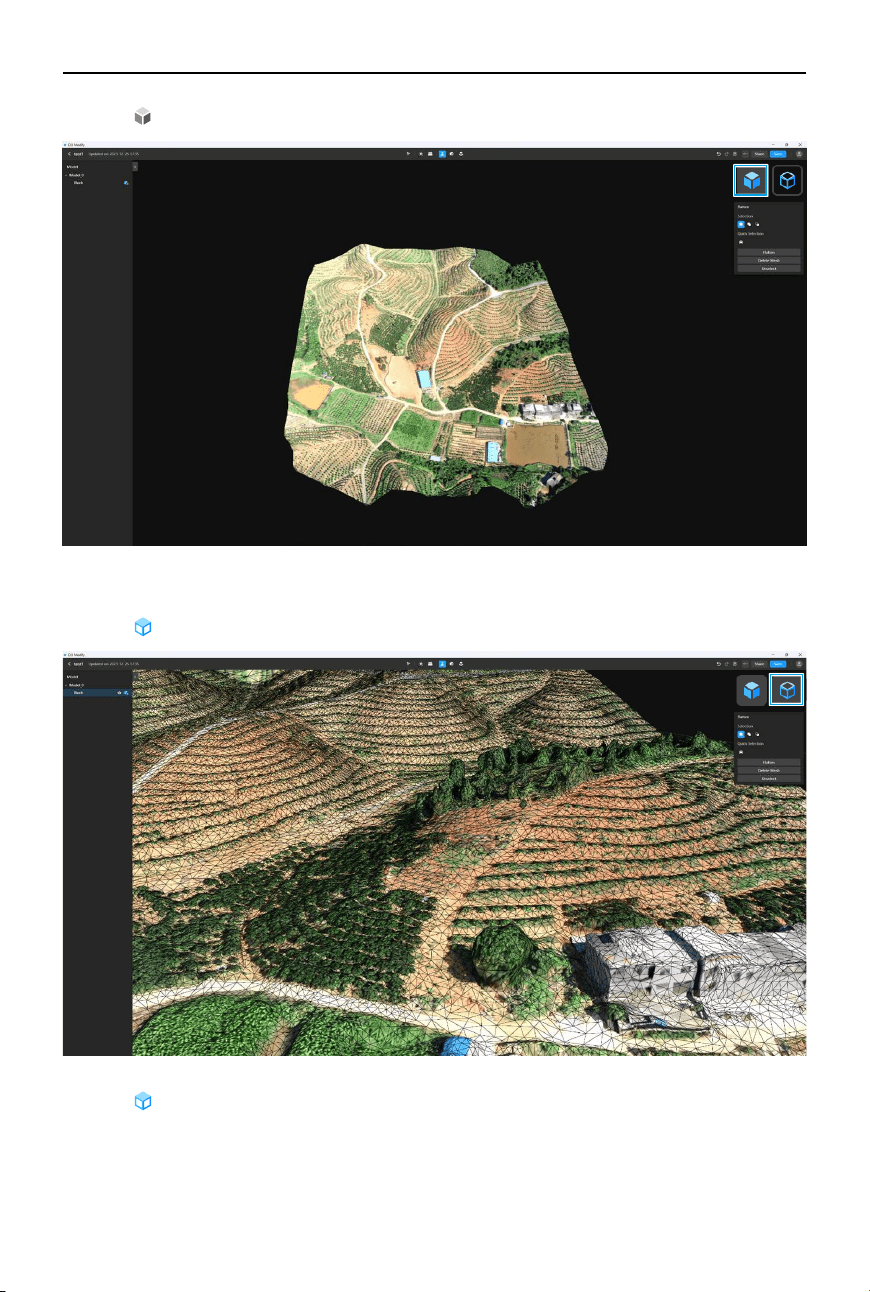
2. Click
again to reload the textures, and exit the white model display.
Wire Frame
1. Click to display the wire frame.
2. Click again to exit the wire frame display.
20
©
2024 DJI All Rights Reserved.
DJI Modify User Manual
Rotation Tool
When entering the model editing screen, the rotation tool will be in the default viewing
state. Red represents the X-axis plane of the model, green represents the Y-axis plane,
and blue represents the Z-axis plane. Clicking on any plane will transition the model
display to the corresponding plane.
Move the mouse cursor to the position of the rotation tool, and the cursor will change into a
small hand icon. In this state, left-click and drag the mouse rotate the rotation tool, and the
model will rotate accordingly. When rotating the rotation tool by dragging it, the initially selected
plane will be highlighted.
Toolbar
The toolbar at the top of the window includes the following tools from left to right.
View
Users can use the view tool in the toolbar to browse or switch views of the model.
1. When entering the model editing screen, it will default to the view tool. Alternatively, users
can click
to enable the view tool.
2. When browsing a model, users can adjust the viewing angle by pressing down on the scroll
wheel and moving the mouse, move the model by clicking the right mouse button and
dragging, and zoom in and out by scrolling the scroll wheel.
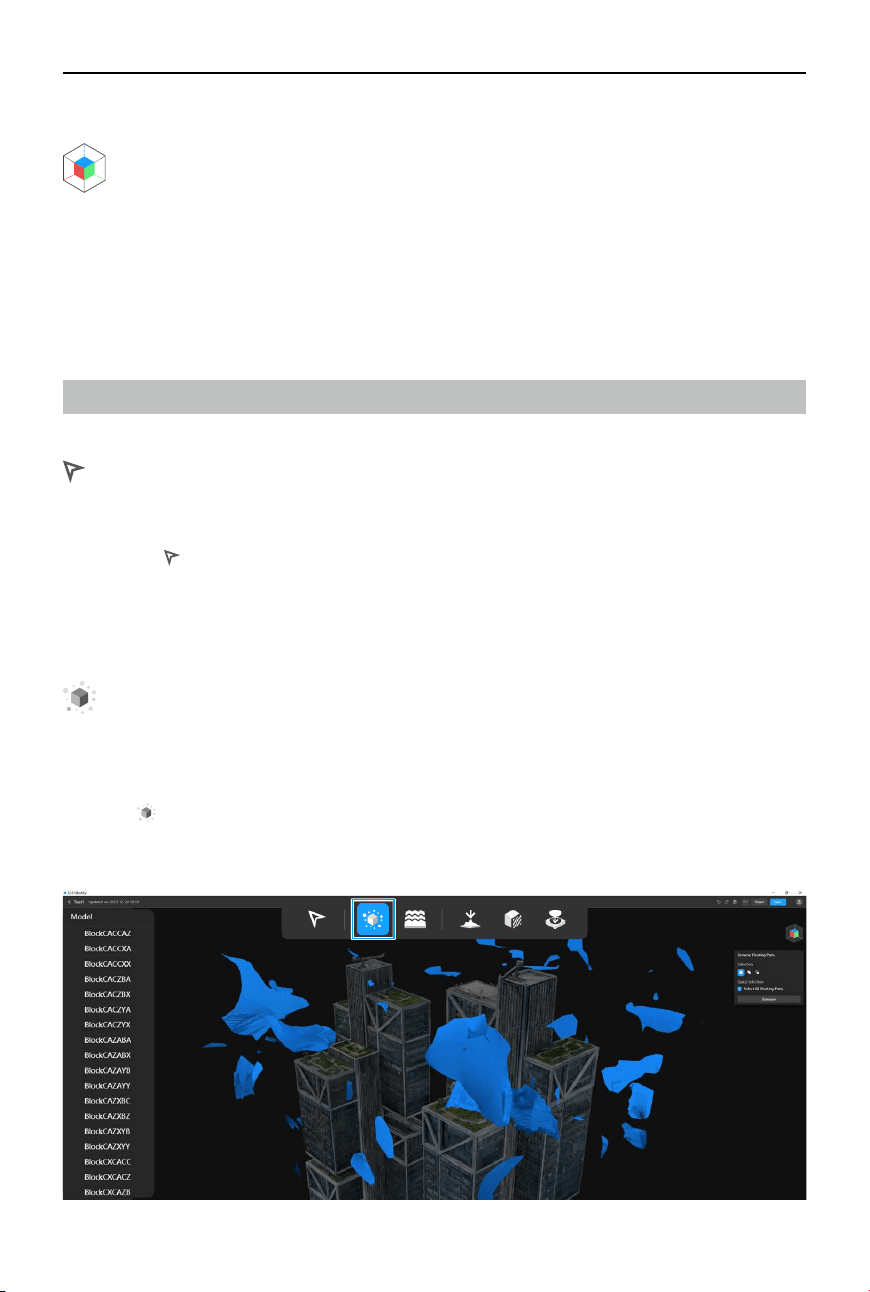
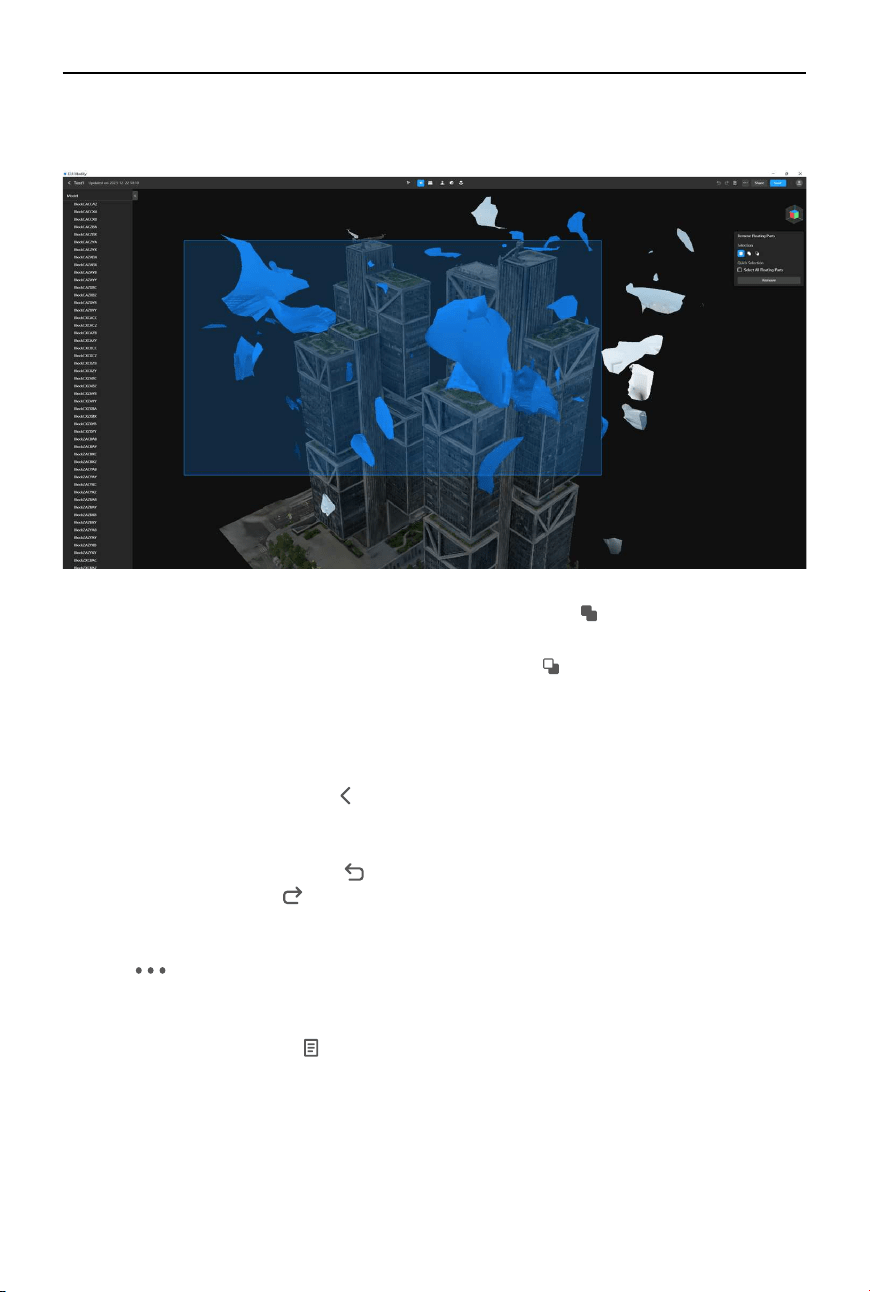
Removing Floating Parts
The removing oating parts tool helps clean up and rene the model by removing fragments or
objects that are not connected or attached to the main body of the model.
1. Open a project and enter the model editing screen.
2. Click
to enable the removing oating parts tool. DJI Modify will automatically select all
recognized oating parts in the model and highlight them in blue, while the non-oating
parts of the model will be displayed in gray.
©
2024 DJI All Rights Reserved.
21
DJI Modify
User Manual
3. Left-click on a recognized oating part to select it. Alternatively, left-click and drag to draw a
selection area and select all oating parts within the area.
4. To add additional oating parts to the current selection, click or press the Shift key and
drag to draw a selection area.
5. To subtract oating parts from the current selection, click
or press the Alt key and drag to
draw a selection area.
6. To delete the currently selected floating parts, click Remove or press the Delete or
Backspace key on the keyboard.
7. Click Save in the top right corner or press Ctrl + S on the keyboard to save the current edits.
Additionally, when users click
in the top left corner to return to the home screen, DJI
Modify will also automatically save the current changes. After saving, the model will show
the updated state with the oating parts removed.
8. To undo a previous action, click
in the action bar or press Ctrl + Z on the keyboard. After
undoing, users can click in the action bar or press Ctrl + Shift + Z on the keyboard to redo
the action if needed.
9. Users need to render the model to synchronize the modications to the high-quality model.
Click
in the top right corner and select Render. DJI Modify will synchronize the edits to
the high-quality model and generate a new B3DM model.
10. Once the model has been rendered, it cannot be undone. Users can start over by restoring
to a previous version. Click
to open the version history, select “Before Rendering” or “Initial
Version” from the list, and restore the selected version. After restoration, users can re-edit
the model.

22
©
2024 DJI All Rights Reserved.
DJI Modify User Manual
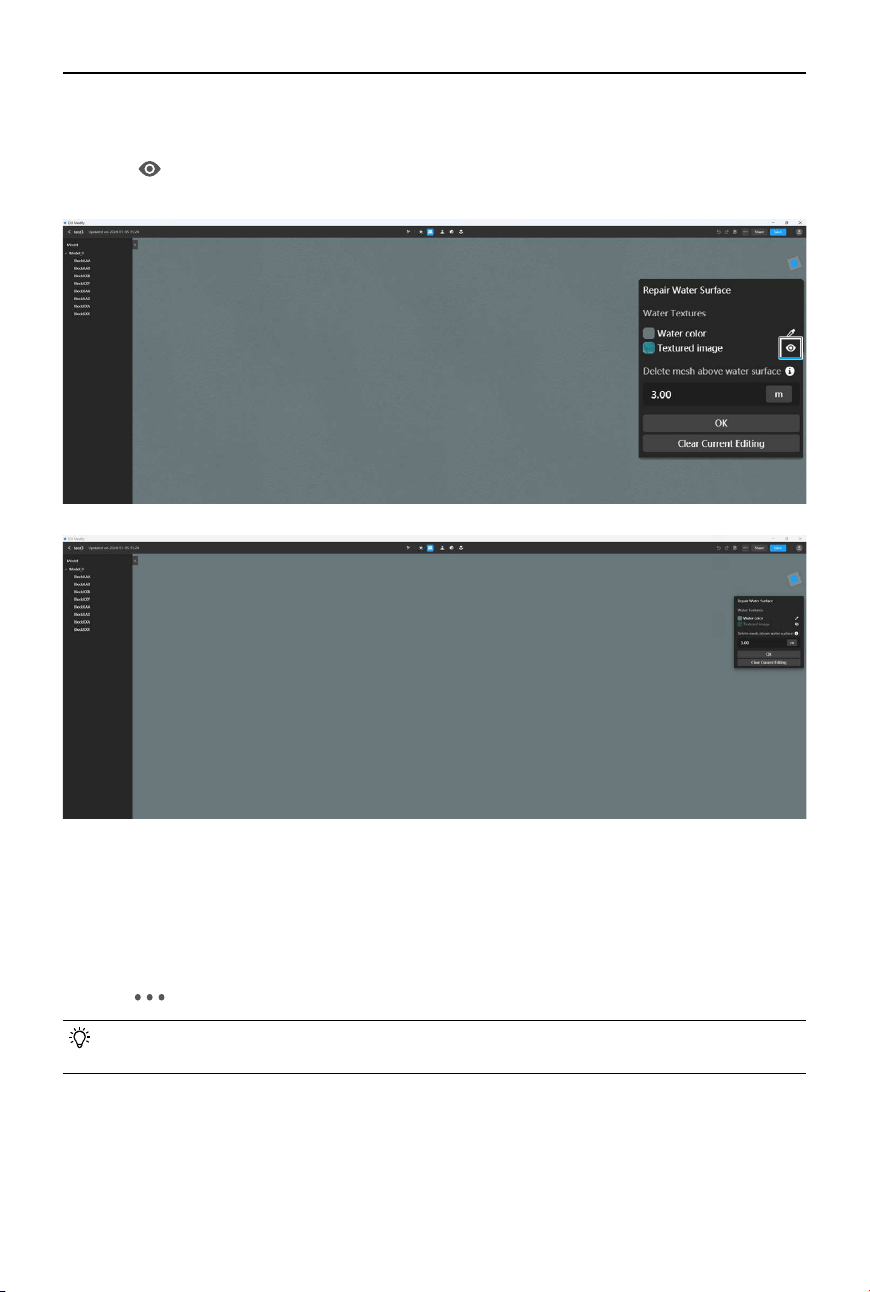
Repairing Water Surface
The repairing water surface tool can be used to address any water-related issues that may arise
during the modeling process, such as missing water surfaces, bulges, and texture distortions.
1. Click
to enable the repairing water surface tool.
2. Click on the right panel to enable the color extraction tool. Move the mouse cursor to
extract a color from the model and click to set it as the preset water surface color.
3. After the color is set, left-click to start drawing the water surface area. When drawing the
polygon, make sure to closely follow the contours of the actual water surface. When editing
the water surface, users can left-click on a vertex and drag it to a new position to modify
the drawn polygon, press the Backspace or Delete key to remove a vertex, and click Clear
Current Editing to quickly clear the drawing and start over again. Once the drawing is
complete, DJI Modify will automatically generate a at water surface.
©
2024 DJI All Rights Reserved.
23
DJI Modify
User Manual
4. After the water surface is generated, left-click and drag the generated water surface to
adjust its position. Move the water surface up or down to adjust its height.
5. Click
on the right panel to display a textured image that simulates a natural water
surface. Click on the icon again to hide it.
6. DJI Modify will automatically remove the model mesh below the water surface (the drawn
polygon). It also supports removing the mesh above the water surface. The supported
range is from 0 to 300 meters. By default, the height is set to 3 meters, which means that it
will remove all the mesh within a height of 3 meters above the water surface. If the height is
set to 0 meters, no mesh above the water surface will be deleted.
7. Click OK to save the current water surface.
8. Click
and select Render to synchronize the modications to the high-quality model.
• The eects of removing the mesh above the water surface cannot be previewed in real
time. Users need to render the model to view the actual eects.
24
©
2024 DJI All Rights Reserved.
DJI Modify User Manual
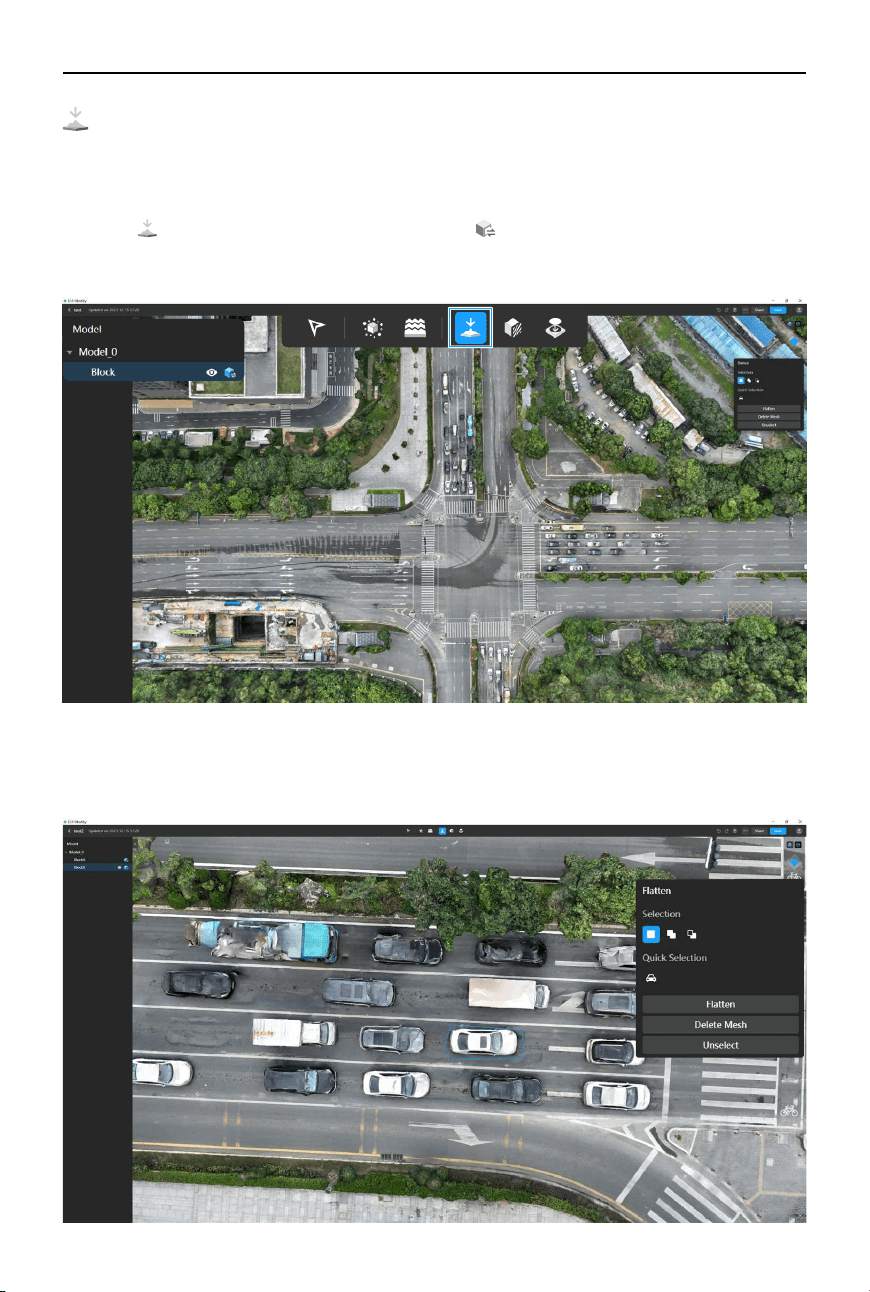
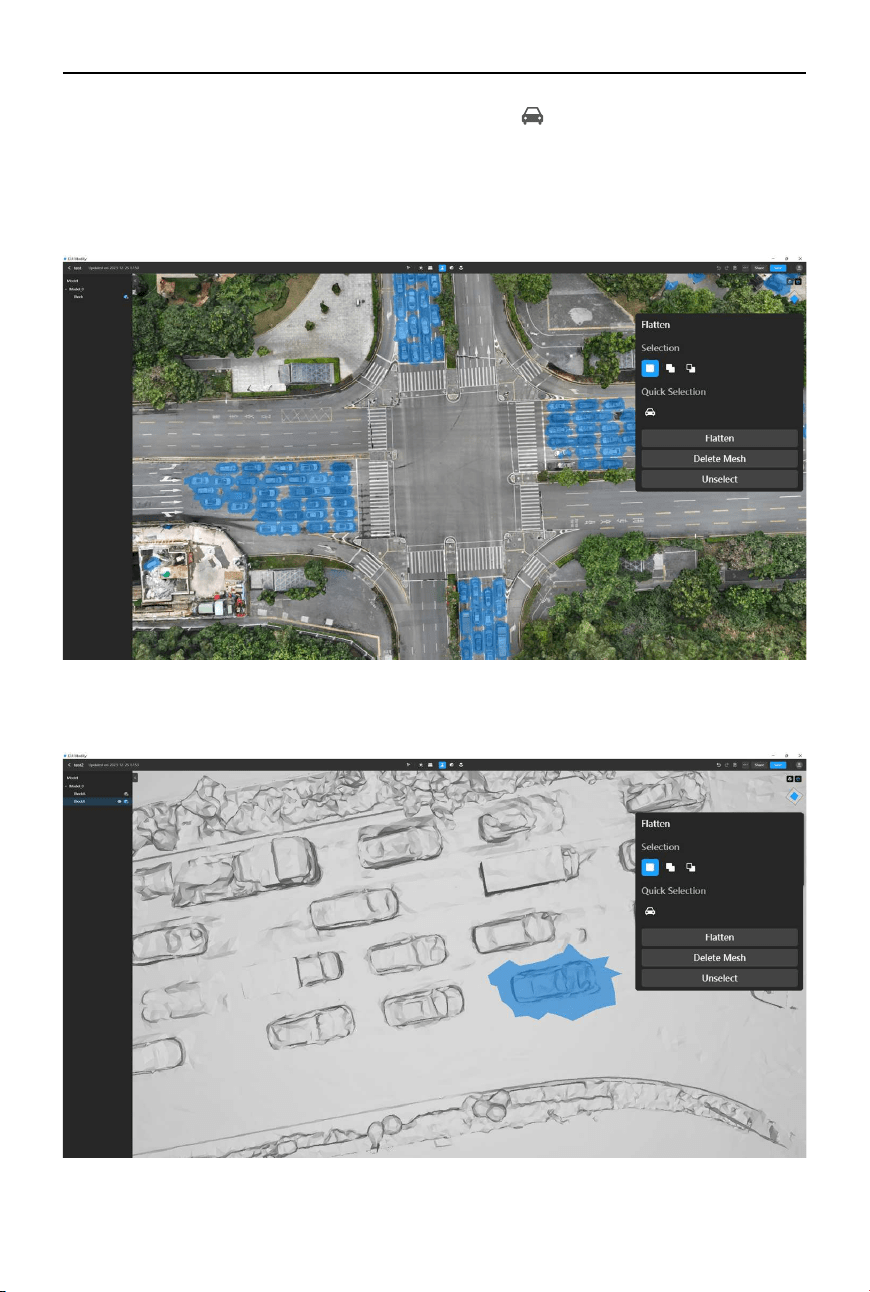
Surface Flattening
The flattening tool can be used to transform curved or irregular surfaces into flat surfaces,
particularly for models with uneven or distorted surfaces. It also supports automatic vehicle
selection, allowing for quick attening and texture repair of vehicles in the model.
1. Click
to enable the flattening tool and click to enable high-quality models for the
corresponding blocks that require editing from the sidebar. At the same time, the drawing
tool will be automatically activated.
2. Left-click to draw a selection area. When drawing the polygon, click again on the starting
point or double-click anywhere to close the polygon, and the model mesh within the
selected area will be highlighted.
©
2024 DJI All Rights Reserved.
25
DJI Modify
User Manual
• Mesh selection only takes effect when the high-quality model is enabled, and the
selected coordinate points should be within the coordinate range of the model.
• The drawing tool is used to select areas on a two-dimensional plane. Once the drawing
is complete, the selection will become three dimensional, and the selected polygonal
area will be projected onto the 3D model.
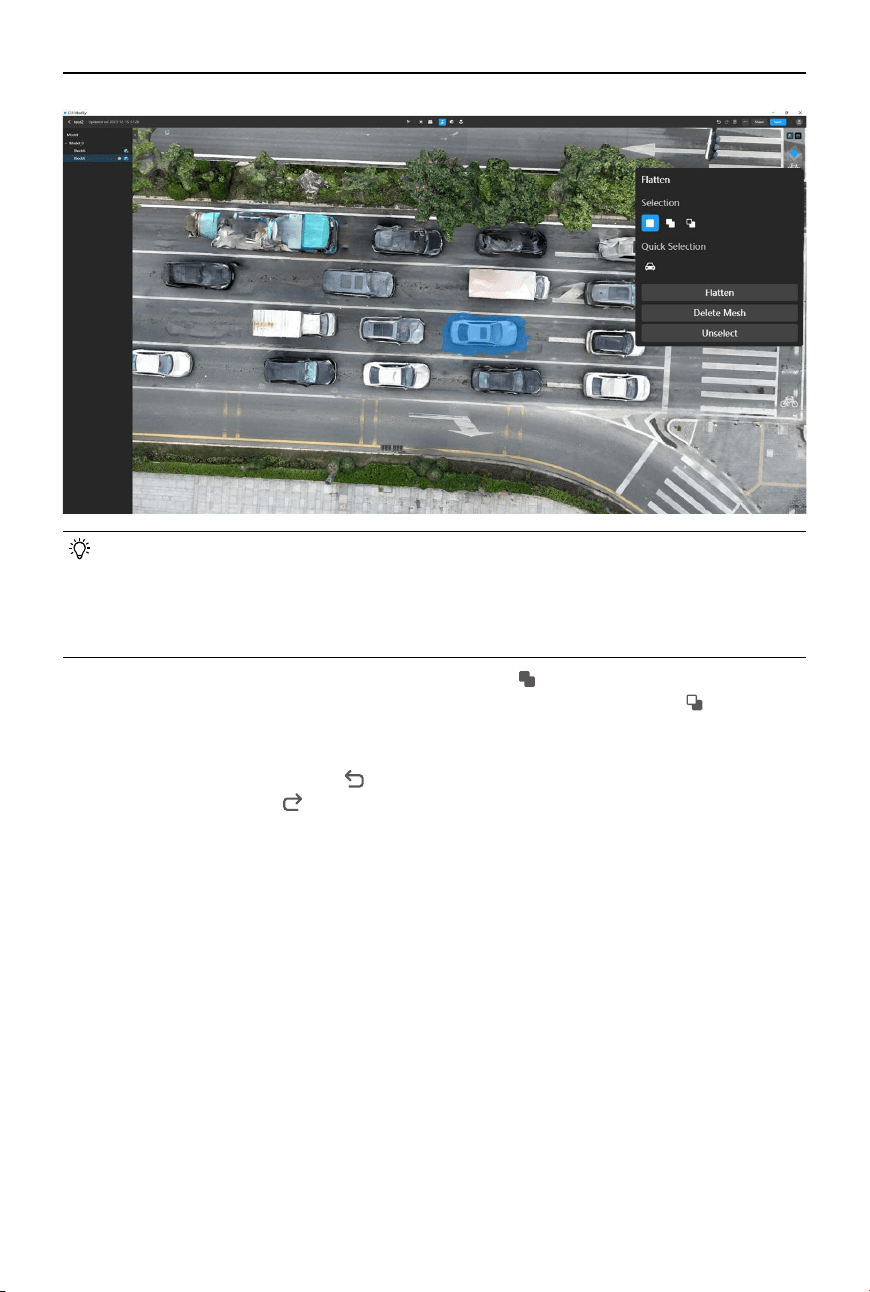
3. To add additional areas to the current selection, click
or press the Shift key and drag to
draw a selection area. To subtract areas from the current selection, click or press the
Alt key and drag to draw a selection area. To clear the current selection, click Unselect to
remove all current selections.
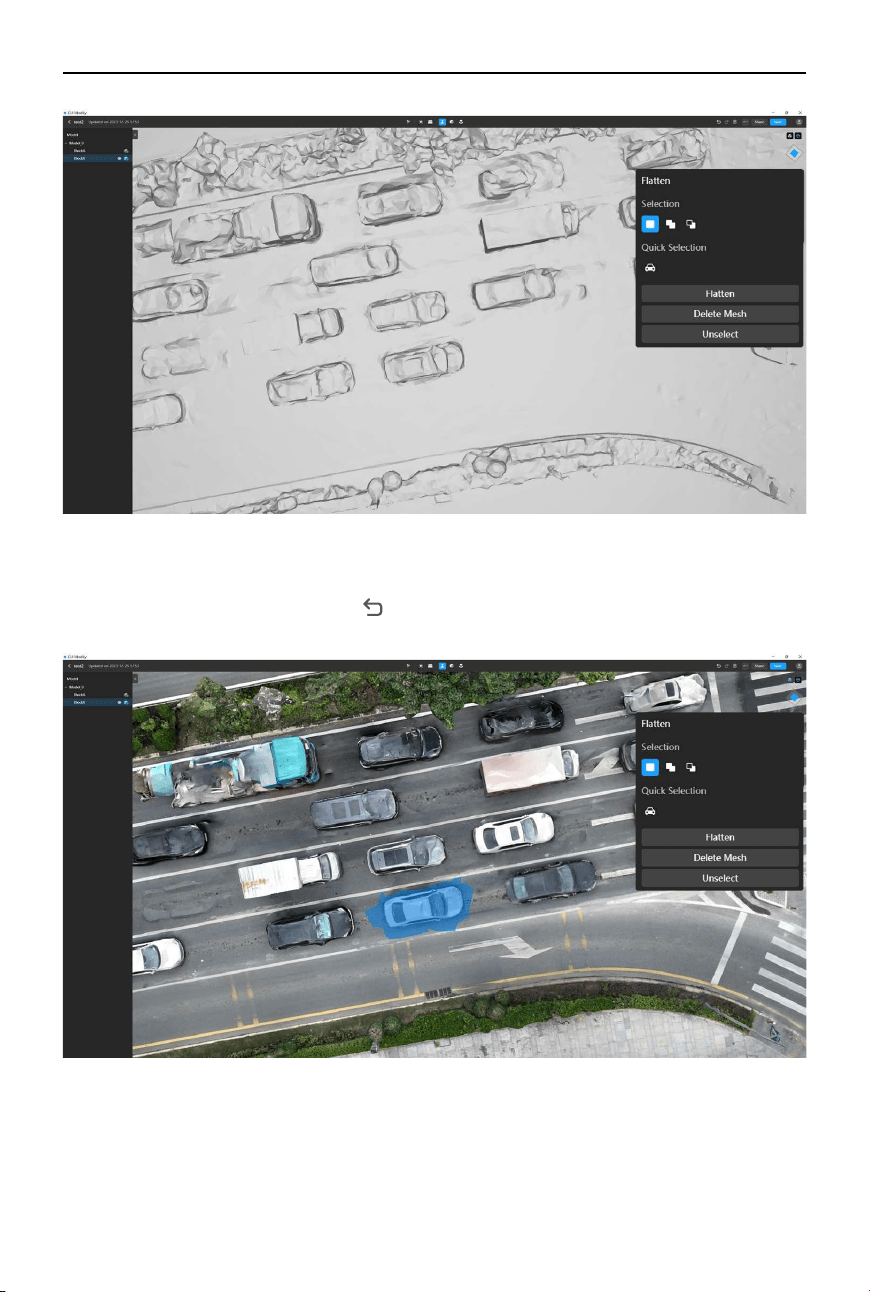
4. To undo a previous action, click
in the action bar or press Ctrl + Z on the keyboard. After
undoing, users can click in the action bar or press Ctrl + Shift + Z on the keyboard to redo
the action if needed.
26
©
2024 DJI All Rights Reserved.
DJI Modify User Manual
5. If there are many vehicles in the model, users can click
to enable vehicle selection, which
allows for quick identification of the vehicles within the model. In order to improve the
accuracy of vehicle recognition, the model needs to be adjusted to a suitable viewing angle,
ensuring that the vehicles are clearly visible. It is recommended to switch to a top-down
perspective, as excessively tilted angles or excessive zooming in on the model can both
aect the recognition accuracy.
6. Once the selection and recognition are complete, click Flatten, and DJI Modify will
automatically atten the surface of the selected model mesh.
©
2024 DJI All Rights Reserved.
27
DJI Modify
User Manual
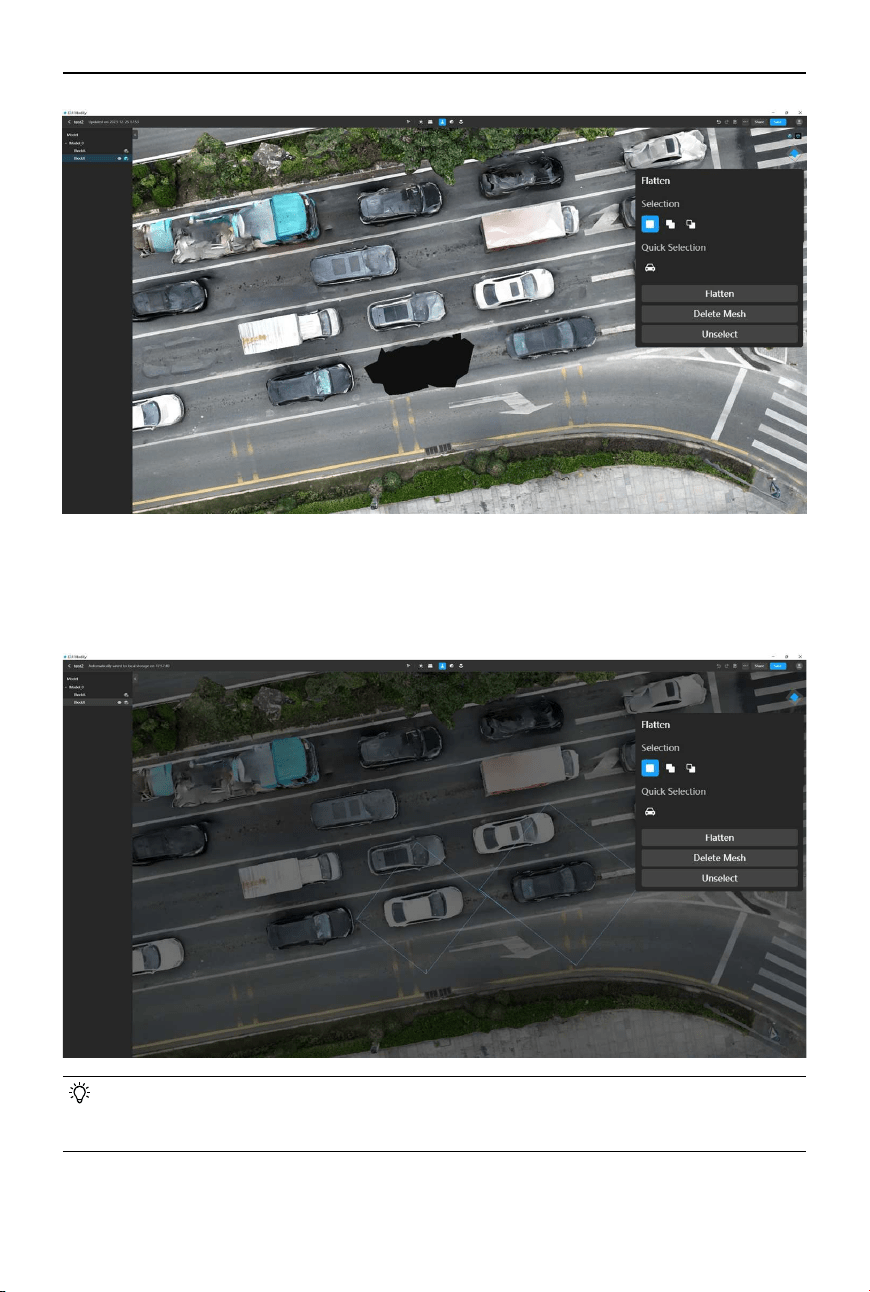
7. DJI Modify also supports deleting mesh in the model. Select the mesh area to be deleted
and click Delete Mesh or press the Delete or Backspace key to delete the selected mesh.
After deletion, users can still click
or press Ctrl + Z on the keyboard to undo a previous
action.
28
©
2024 DJI All Rights Reserved.
DJI Modify User Manual
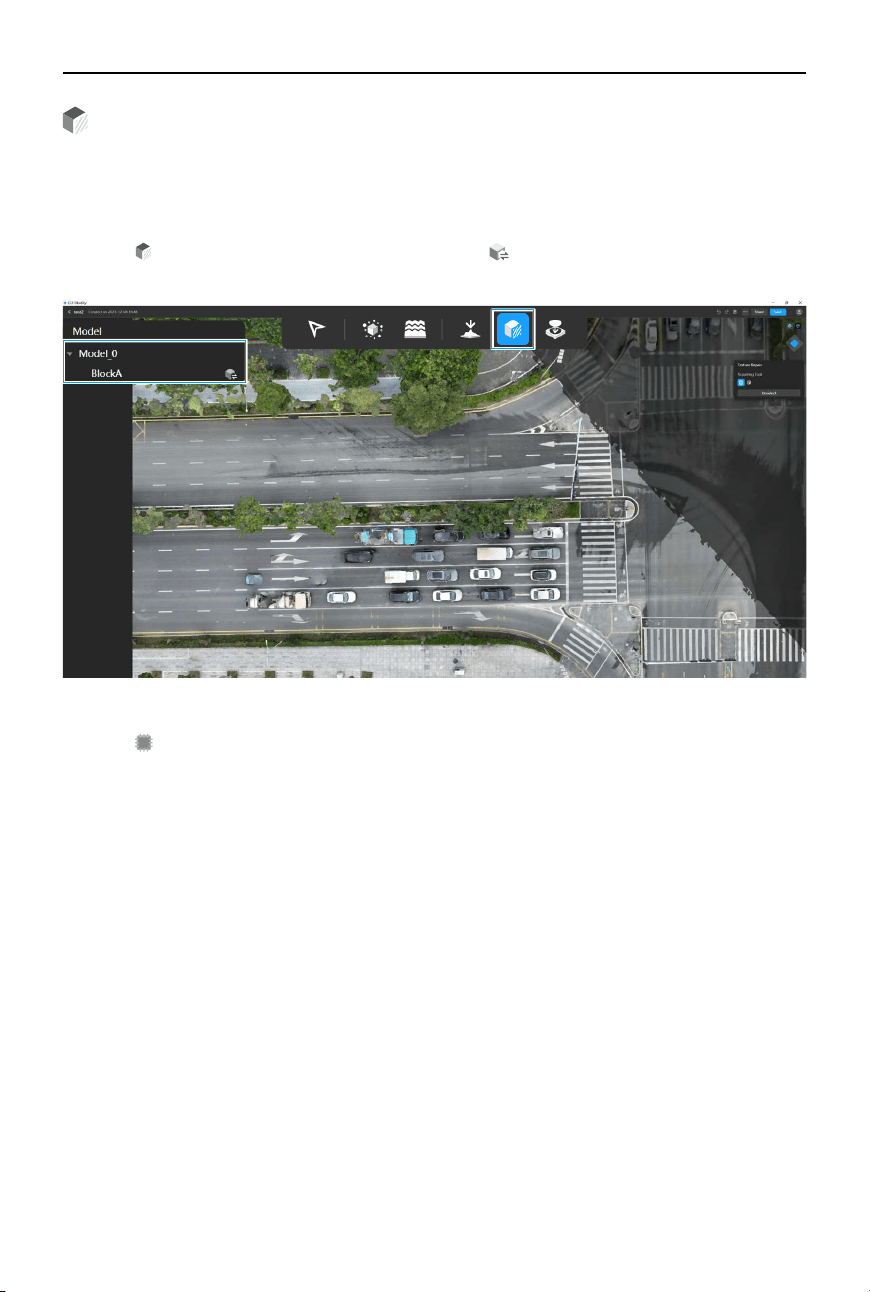
8. Once the model modifications are complete, when users re-enter the project or disable
the high-quality model, DJI Modify will provide a visual indication with a blue box outline,
highlighting the areas where the previous model modications (such as attening or mesh
deletion) were applied.
• When users nish the modications and successfully render the model, the high-quality
model will be automatically disabled, and the modifications will be applied to the
model.
©
2024 DJI All Rights Reserved.
29
DJI Modify
User Manual
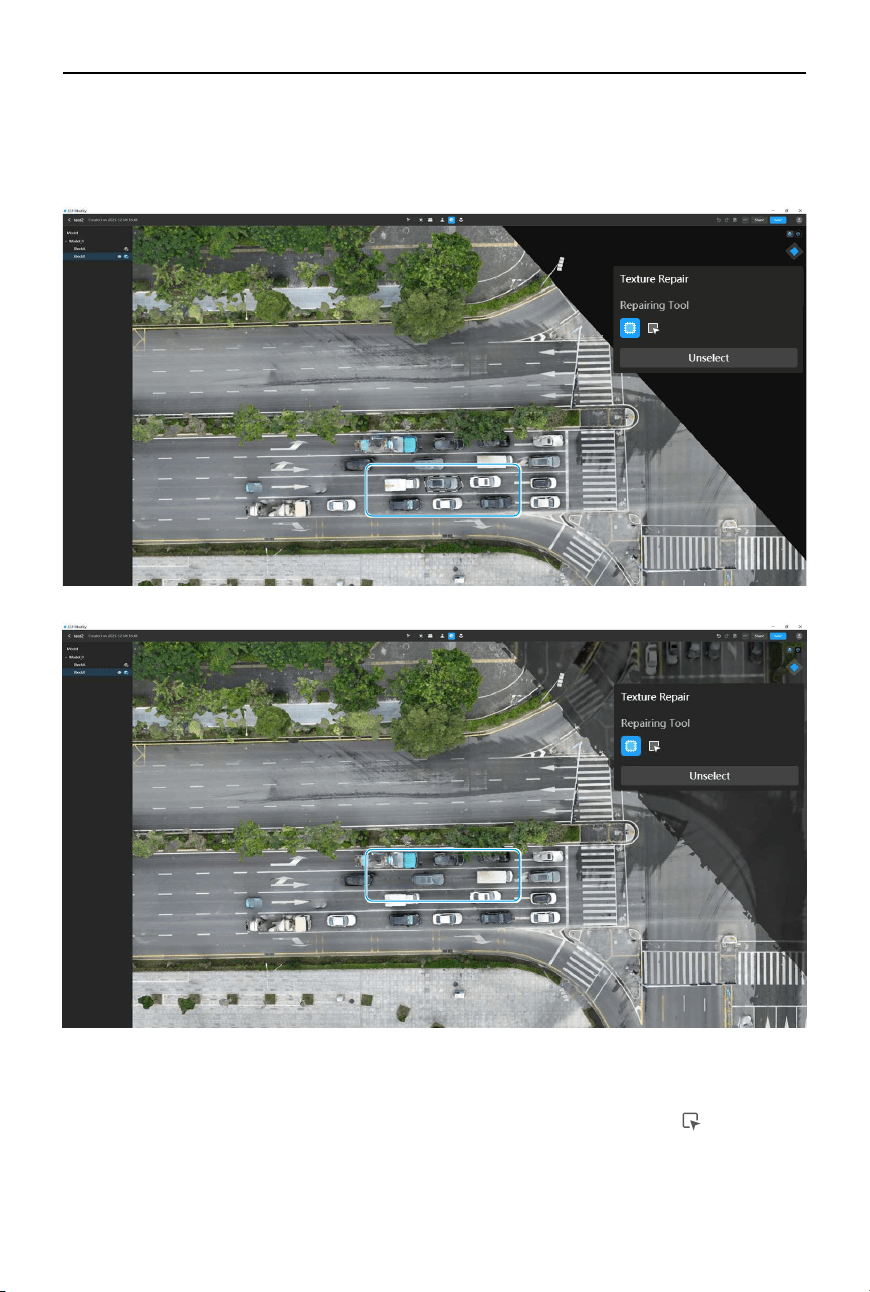
Texture Repair
The texture repair tool can be used to x or correct issues or imperfections in the texture of
a model. This includes eliminating unwanted textures on objects such as vehicles, trees, and
pedestrians, as well as lling in missing or distorted texture details, such as duplicating road
markings. The texture repair tool supports two types of repairs, including erasing and cloning.
1. Click
to enable the texture repair tool and click to enable high-quality models for the
corresponding blocks that require editing from the sidebar.
2. When using the texture repair tool, the Erase tool is selected by default. Users can also
click
to enable the Erase tool. The Erase tool can be used to remove stains, vehicles,
and unwanted patterns on the model. When using this tool for the rst time, it requires
an initialization process that may take a few seconds. The specific time required for
initialization may vary depending on the computer’s performance.
30
©
2024 DJI All Rights Reserved.
DJI Modify User Manual
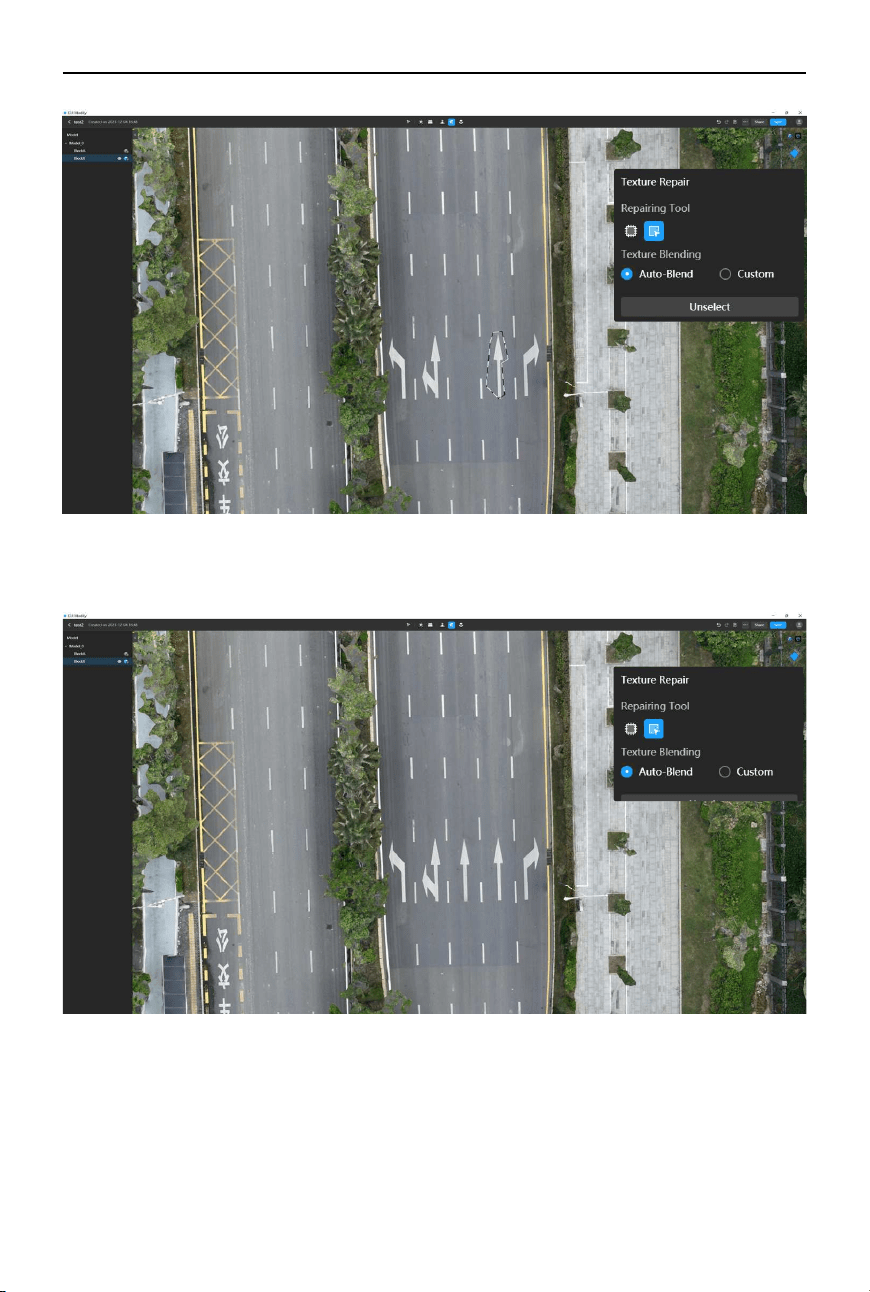
3. Left-click to draw a selection area. When drawing the polygon, click again on the starting
point or double-click anywhere to close the polygon, and the model mesh within the
selected area will be highlighted. After selection, release the mouse button, and DJI Modify
will automatically repair the texture of the selected area.
4. The Clone tool can be used to clone a selected area of the model and apply it to another
part of the model. It essentially copies pixels from one area and pastes them onto another
area, such as copying a particular road sign to a different location. Click
to select the
Clone tool, then draw a selection area on the desired part of the model that requires
cloning. The edges of the selected area will be highlighted.
©
2024 DJI All Rights Reserved.
31
DJI Modify
User Manual
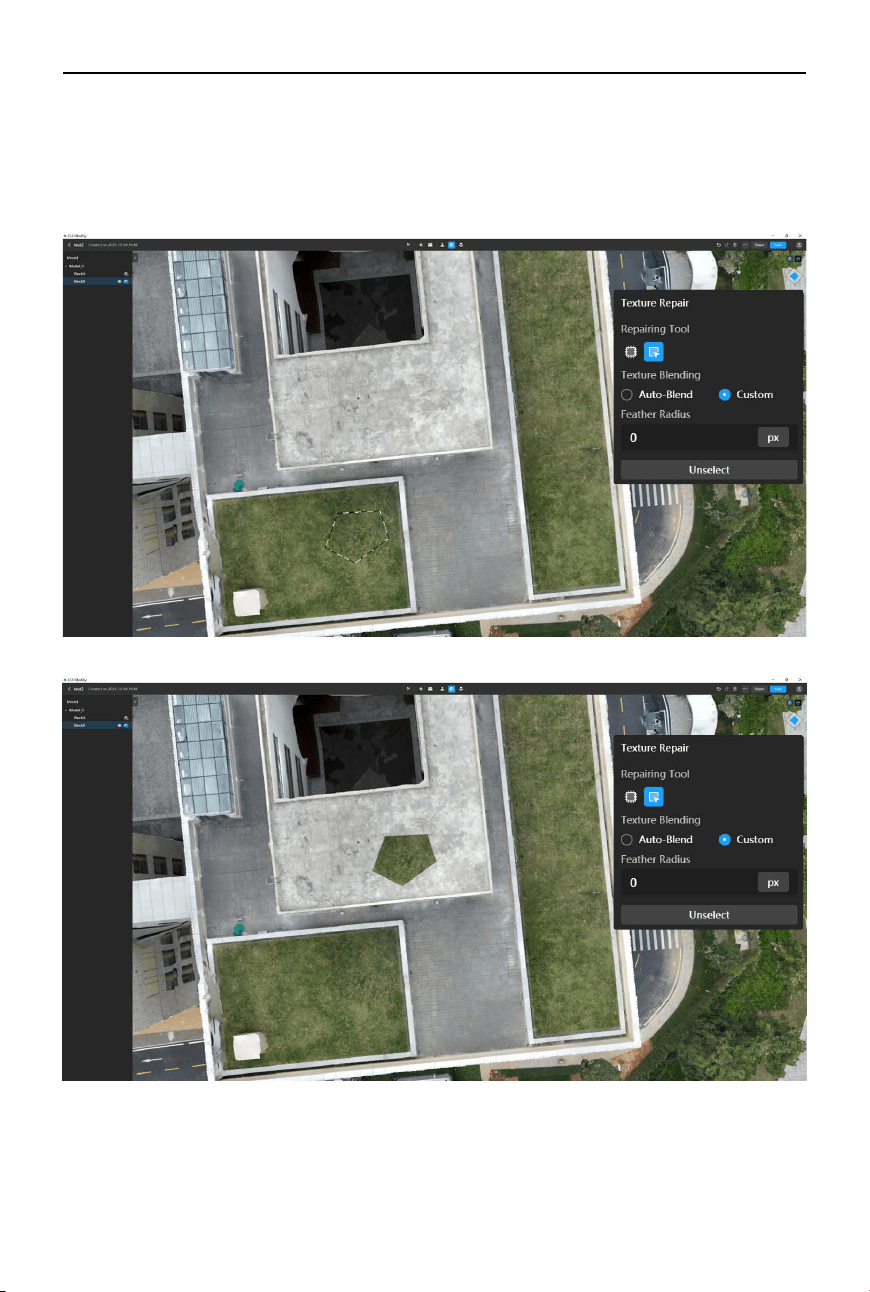
5. Left-click and drag the selected area to the desired position. Then release the mouse
button, and DJI Modify will perform the patch.
32
©
2024 DJI All Rights Reserved.
DJI Modify User Manual
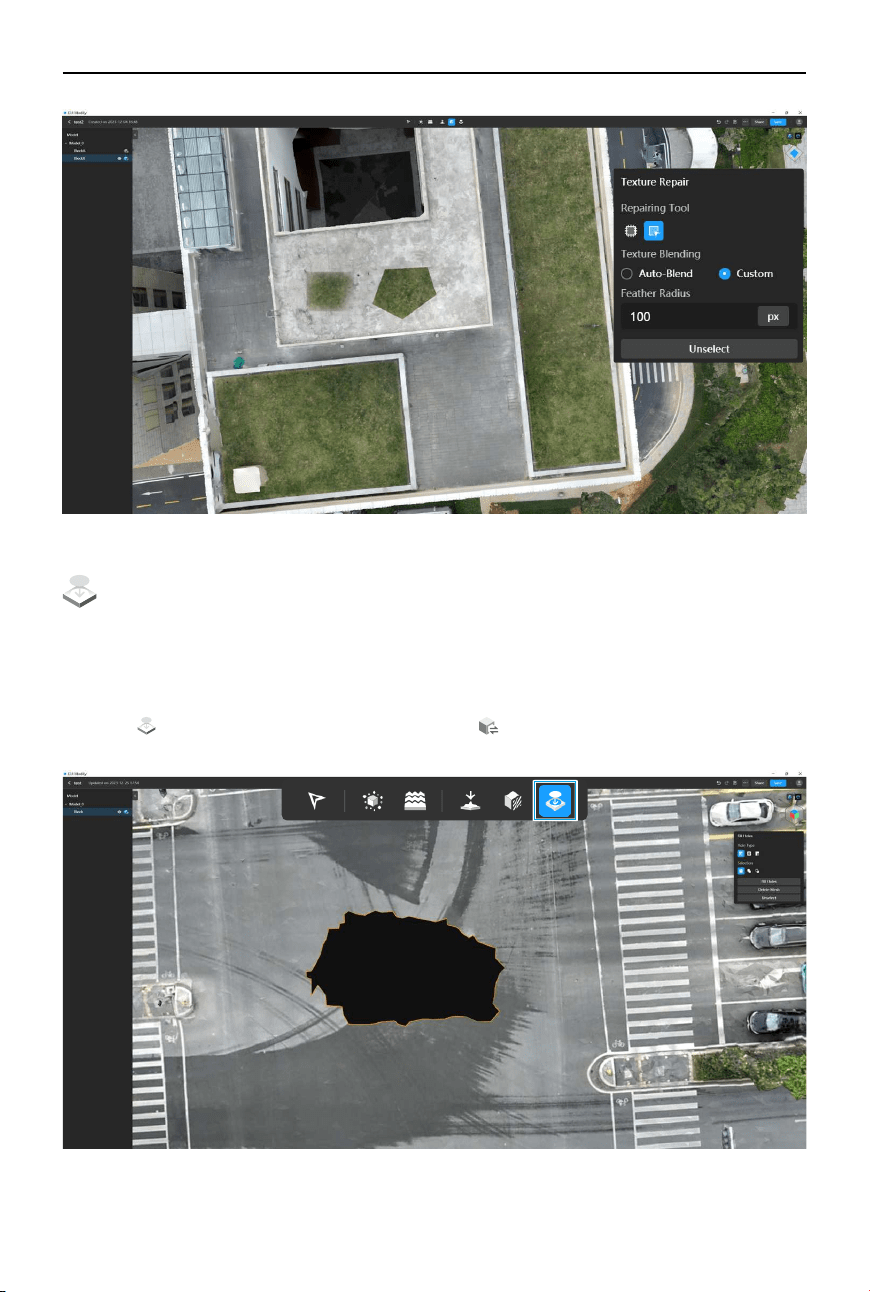
6. In order to better blend the cloned area with surrounding pixels, users can click Custom and
adjust the feather radius (set to 0 pixels by default). Feathering is the process of applying a
softening eect to the edges of the repaired area, creating a smooth color transition. The
greater the feather radius, the more pixels are blended between the cloned area and the
surrounding environment, resulting in a more seamless and natural eect.
©
2024 DJI All Rights Reserved.
33
DJI Modify
User Manual
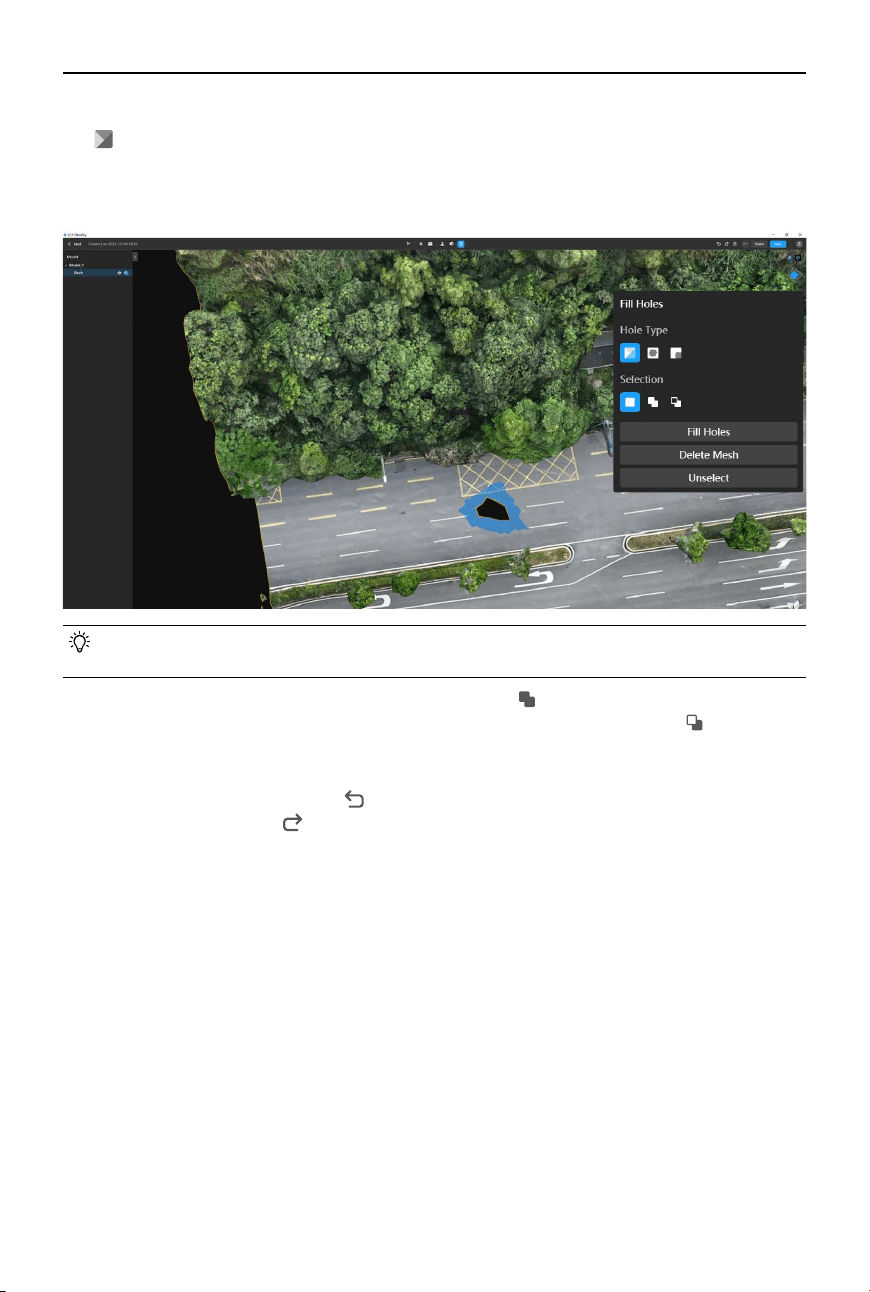
Hole Filling
The hole-lling tool can be used to automatically ll in or repair holes or gaps in the model’s
geometry, such as patching up the holes on a building or a guide board, ensuring a visually
smooth and complete model. The hole-filling tool offers three types of patching, including
custom, entire, and partial hole lling.
1. Click
to enable the hole-filling tool and click to enable high-quality models for the
corresponding blocks that require editing from the sidebar.
34
©
2024 DJI All Rights Reserved.
DJI Modify User Manual
2. When using the hole-lling tool, the Custom tool is selected by default. Users can also click
to enable the Custom tool. By using the custom hole-lling tool, users can select and x
custom hole areas that are of irregular shapes. Left-click to draw a selection area. When
drawing the polygon, click again on the starting point or double-click anywhere to close the
polygon, and the model mesh within the selected area will be highlighted.
• When using the hole-lling tool, make sure to unselect areas that are not intended to
be holes, as the selected polygon will appear in three dimensions on the model.
3. To add additional areas to the current selection, click
or press the Shift key and drag to
draw a selection area. To subtract areas from the current selection, click or press the
Alt key and drag to draw a selection area. To clear the current selection, click Unselect to
remove all current selections.
4. To undo a previous action, click
in the action bar or press Ctrl + Z on the keyboard. After
undoing, users can click in the action bar or press Ctrl + Shift + Z on the keyboard to redo
the action if needed.
©
2024 DJI All Rights Reserved.
35
DJI Modify
User Manual
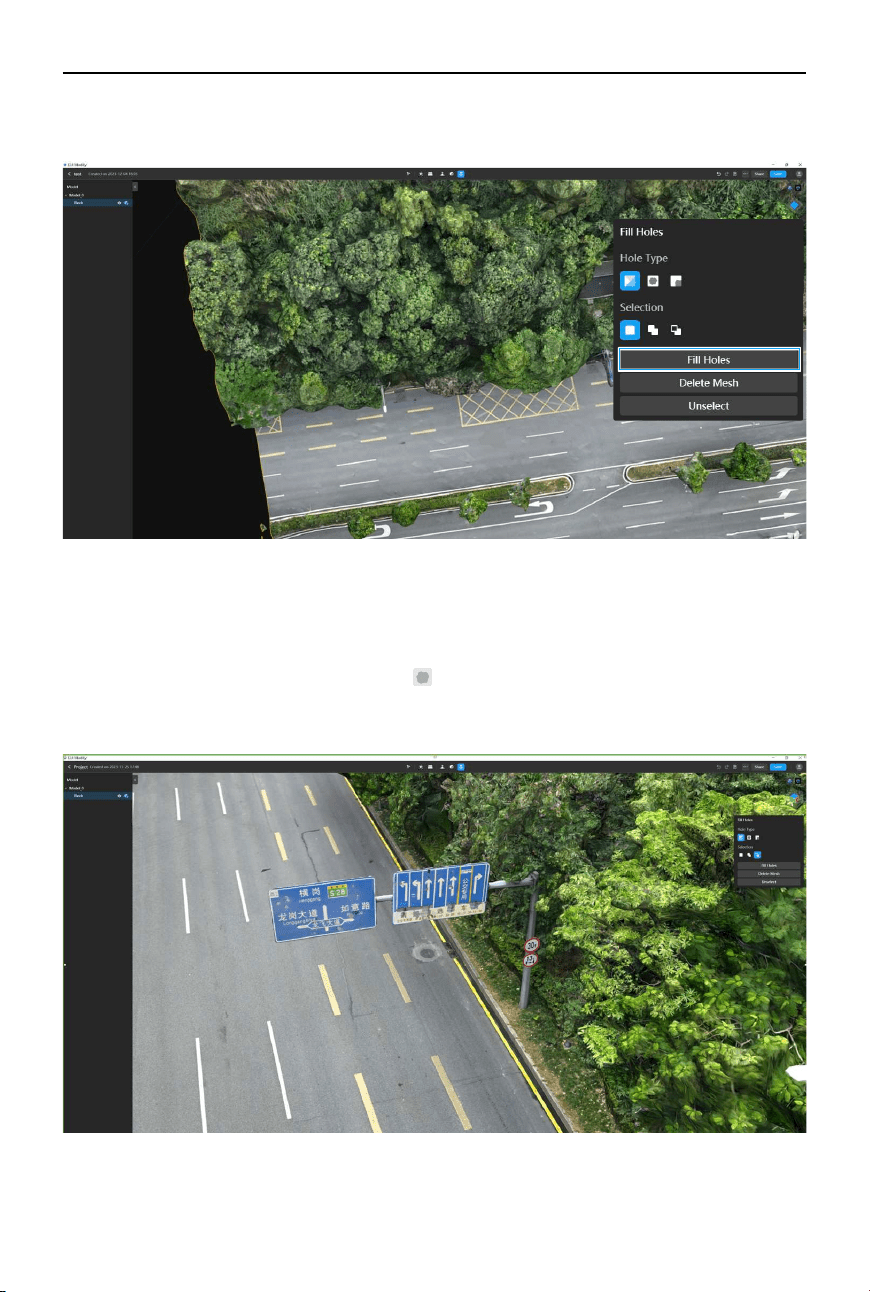
5. After selecting the desired area, click Fill Holes, and DJI Modify will automatically fill and
repair the holes.
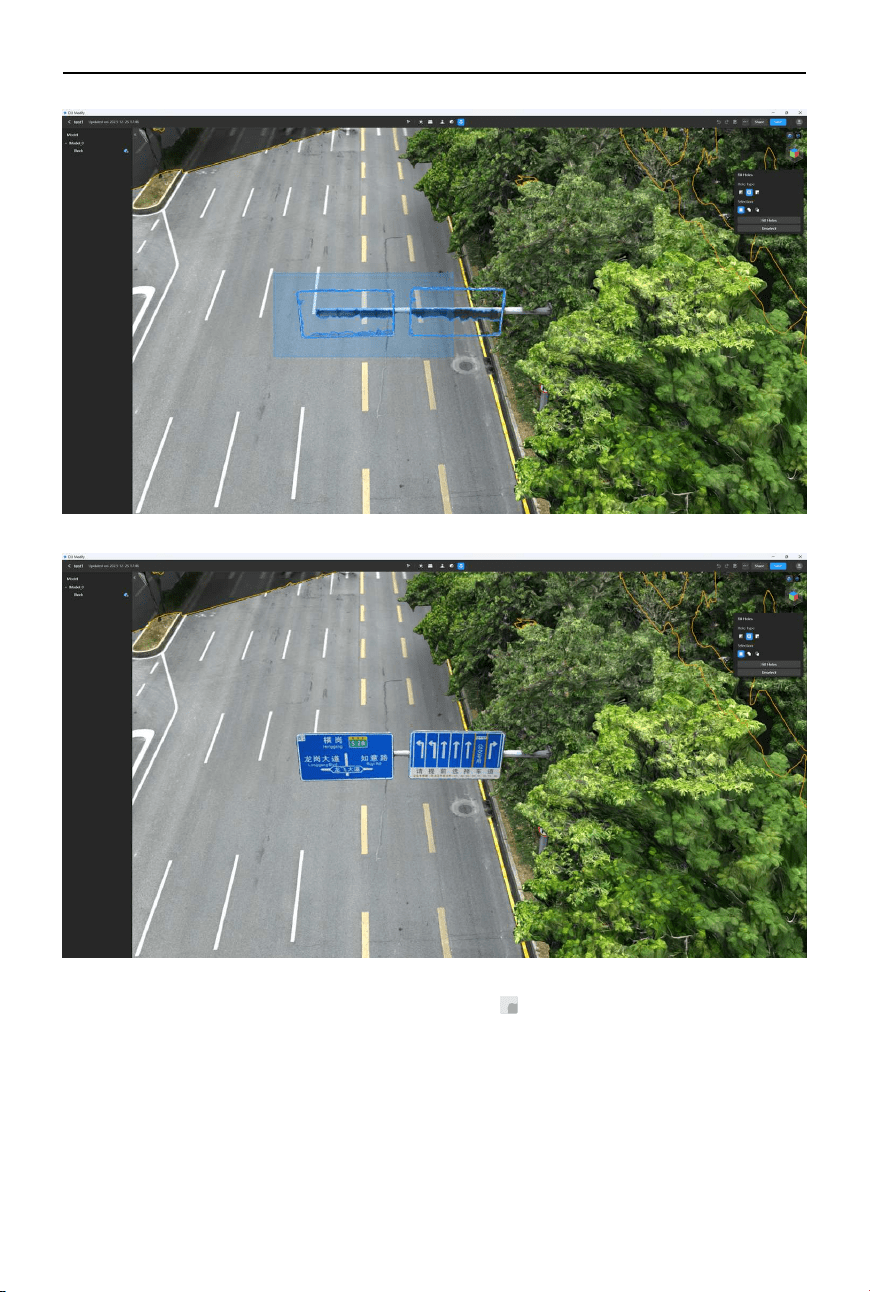
6. For holes recognized by DJI Modify, users can use the entire or partial hole-lling tool to
quickly fill the recognized holes on the model. To enhance the efficiency of hole filling,
users can start by using the custom hole-lling tool to delete the mesh in a selected area
with multiple small holes (the area will be automatically recognized as a hole). If the entire
hole area needs to be patched up, click
to enable the entire hole-lling tool. Then click
on or draw a selection area on the recognized holes, click Fill Holes, and DJI Modify will
automatically ll and repair the holes.
Before Deleting the Mesh
36
©
2024 DJI All Rights Reserved.
DJI Modify User Manual
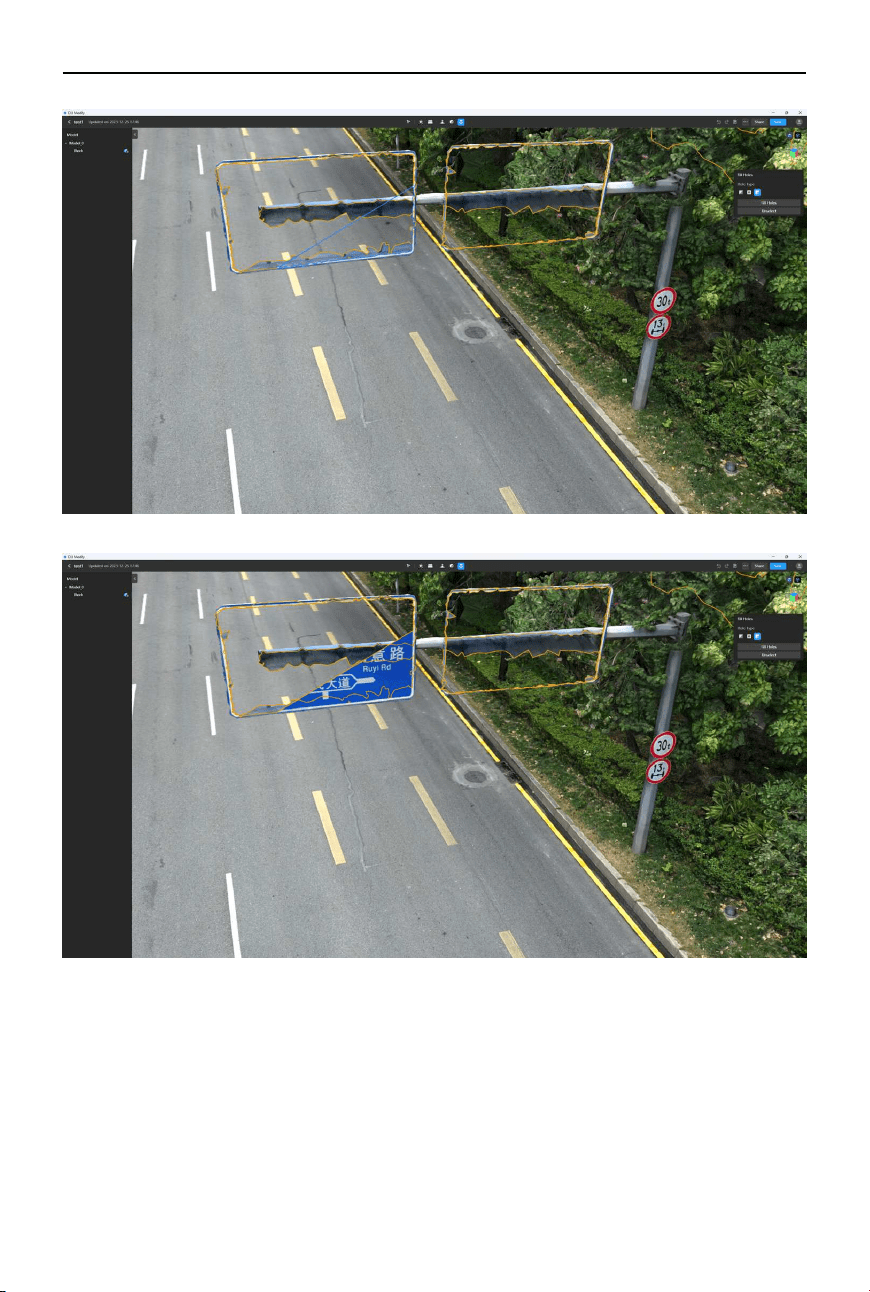
7. If a hole only needs to be partially patched up, click to enable the partial hole-lling tool.
Select a recognized hole that requires editing. Then click on two or more dierent positions
along the highlighted edges to create reference points. These points will dene the part that
needs to be lled. Finally, click Fill Holes, and DJI Modify will automatically ll and repair the
selected area.
©
2024 DJI All Rights Reserved.
37
DJI Modify
User Manual
38
©
2024 DJI All Rights Reserved.
DJI Modify User Manual
Action Bar
Global Shortcuts
The table below lists the commonly used shortcuts and functions in the model editing screen
of DJI Modify, which can help improve model editing efficiency. The shortcuts mentioned in
this section are based on the American keyboard layout (QWERTY). Using a keyboard with a
dierent layout may mean that the combinations are dierent from an American keyboard.
Actions Shortcuts
Rotate model Press and hold scroll wheel + Move mouse
Zoom in/out Scroll the scroll wheel
Drag model Right-click and drag/Space + Move mouse
Add to selection Shift + Click to select/Drag to draw a selection area
Subtract from selection Alt + Click to select/Drag to draw a selection area
Unselect Esc + Click to select/Drag to draw a selection area
Delete Delete/Backspace
Undo Ctrl + Z
Redo Ctrl + Shift + Z
Undoing/Redoing an Action
When using the removing oating parts tool, users can click to undo the previous action, and
it allows undo up to 30 actions.
When using the surface attening, texture repair, and hole lling tools, with high-quality Models
enabled, users can click
to undo the previous action, and these tools only support undo
once. By clicking , users can redo the previous undone action, and it only supports redo once.
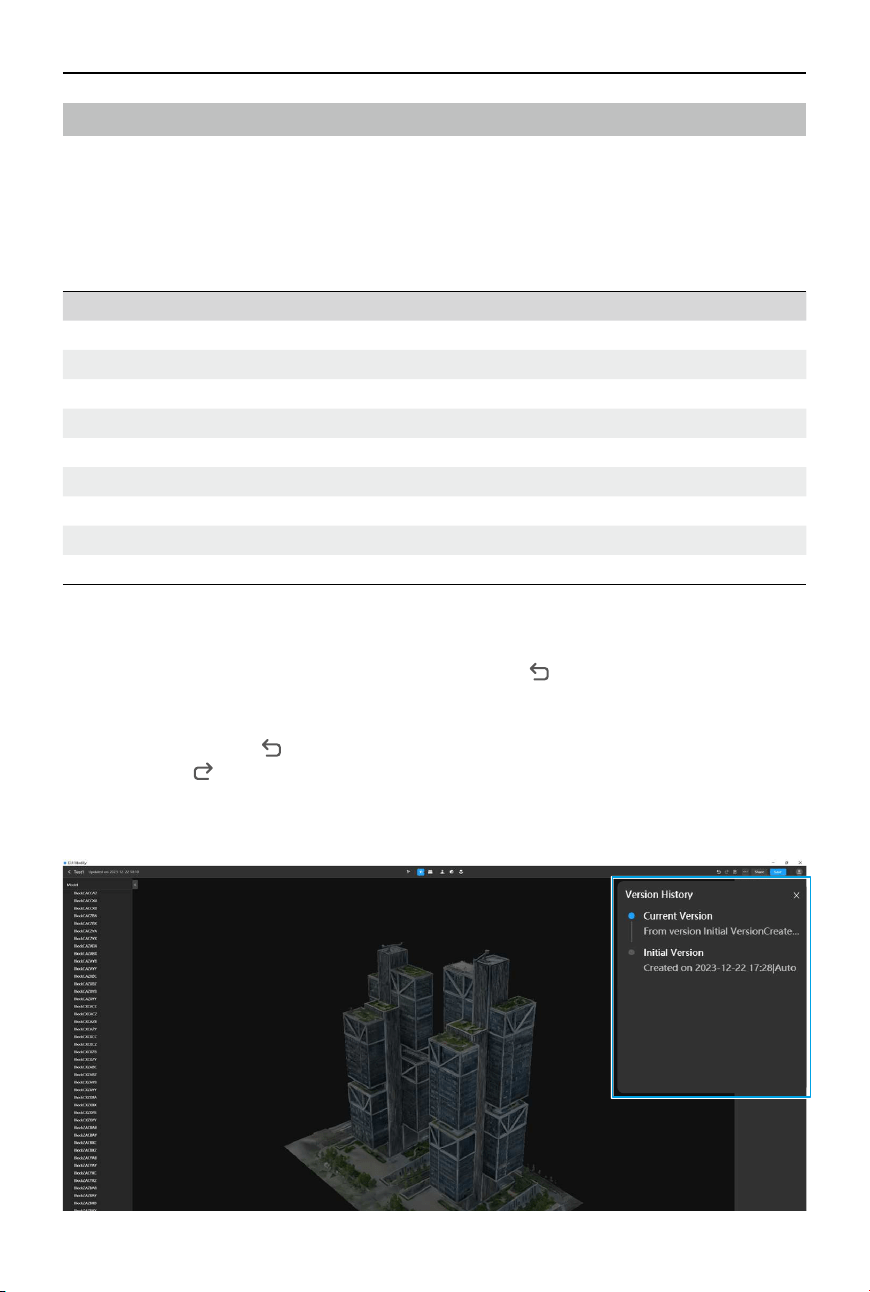
Version History
©
2024 DJI All Rights Reserved.
39
DJI Modify
User Manual
Click
on the top right of the window to view a list of history versions. By default, every project
will automatically save an initial version. Click on the Initial Version and click OK will restore the
current project to its initial state.
If the user wants to create a recoverable backup of the current modied version, click Save a
Copy, name the version, and click OK to save the copy. Once completed, this version will appear
in the history version list. All versions saved in the history version list can be restored at any
time.
Before rendering, DJI Modify will automatically create a backup of the pre-rendering version.
However, the version after rendering will not be automatically backed up.
Rendering and Exporting a Project
Export: Click on the right side of the top toolbar and select Export to export the model le
for the current project. DJI Modify supports exporting models in B3DM, OSGB, PLY, OBJ, S3MB,
and I3S formats. When exporting, the original coordinate system of the model will be preserved.
Rendering: Click
on the right side of the top toolbar and select Render to render the current
model editing results. Rendering means to synchronize modications made on the low-quality
model (B3DM le) to the high-quality model (PLY le).
Saving a Project
Users can click Save to save the edits on the model. DJI Modify also supports auto saving.
During the editing process, DJI Modify will automatically save the changes when users return
to the home screen, when high-quality model is disabled, and before rendering and exporting
the model. However, if the user directly closes or exits DJI Modify, the progress will not be
automatically saved.
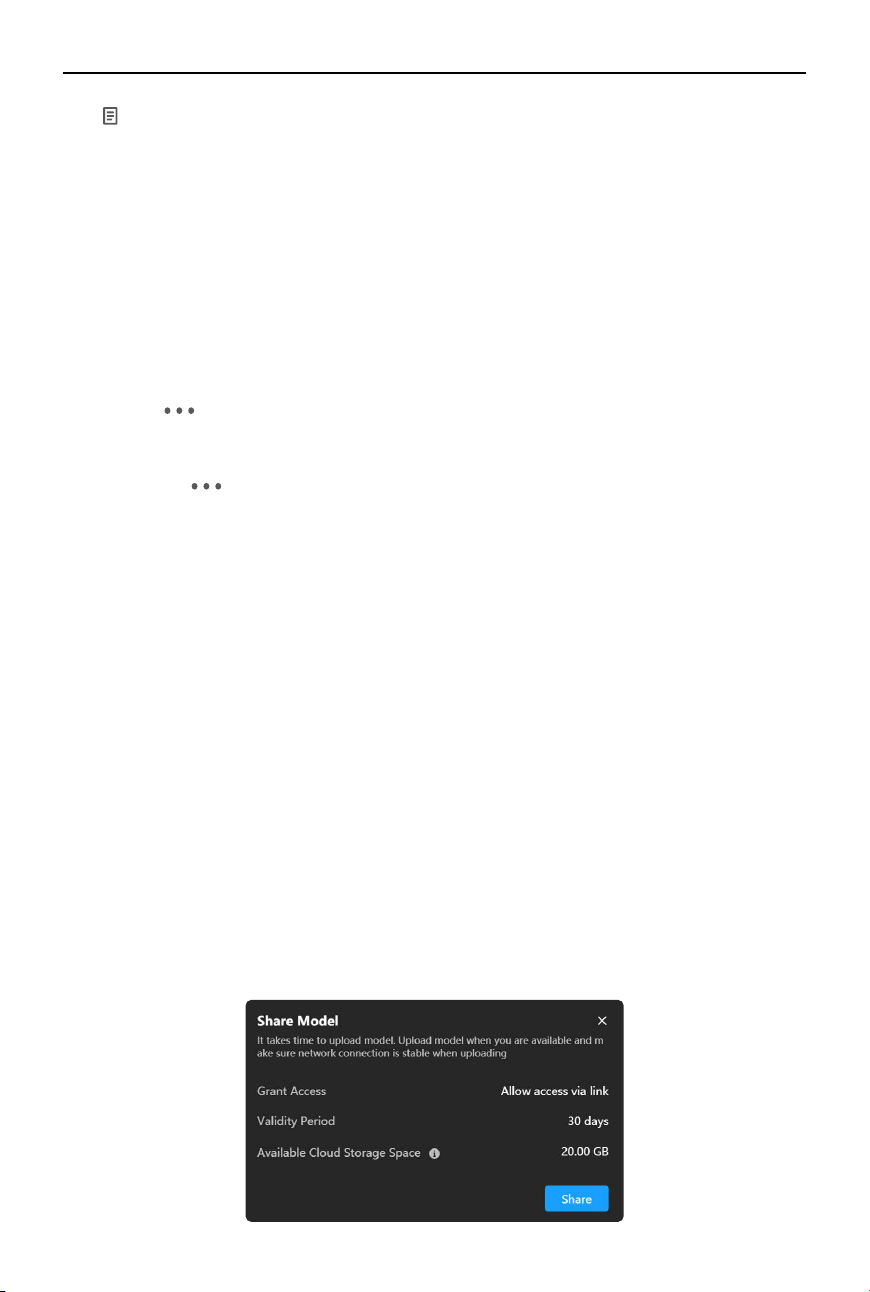
Sharing a Project
Users can securely upload the project les to the cloud and generate sharing links to share the
models eciently. With the link, others can quickly access the model online.
1. After the model editing is complete, click Share in the action bar, and a pop-up window will
appear.
2. Users should conrm the access permissions, valid period for sharing, and available cloud
storage space (20GB cloud storage by default). When the cloud storage space is insucient,
users are unable to upload models to the cloud for sharing.
40
©
2024 DJI All Rights Reserved.
DJI Modify User Manual
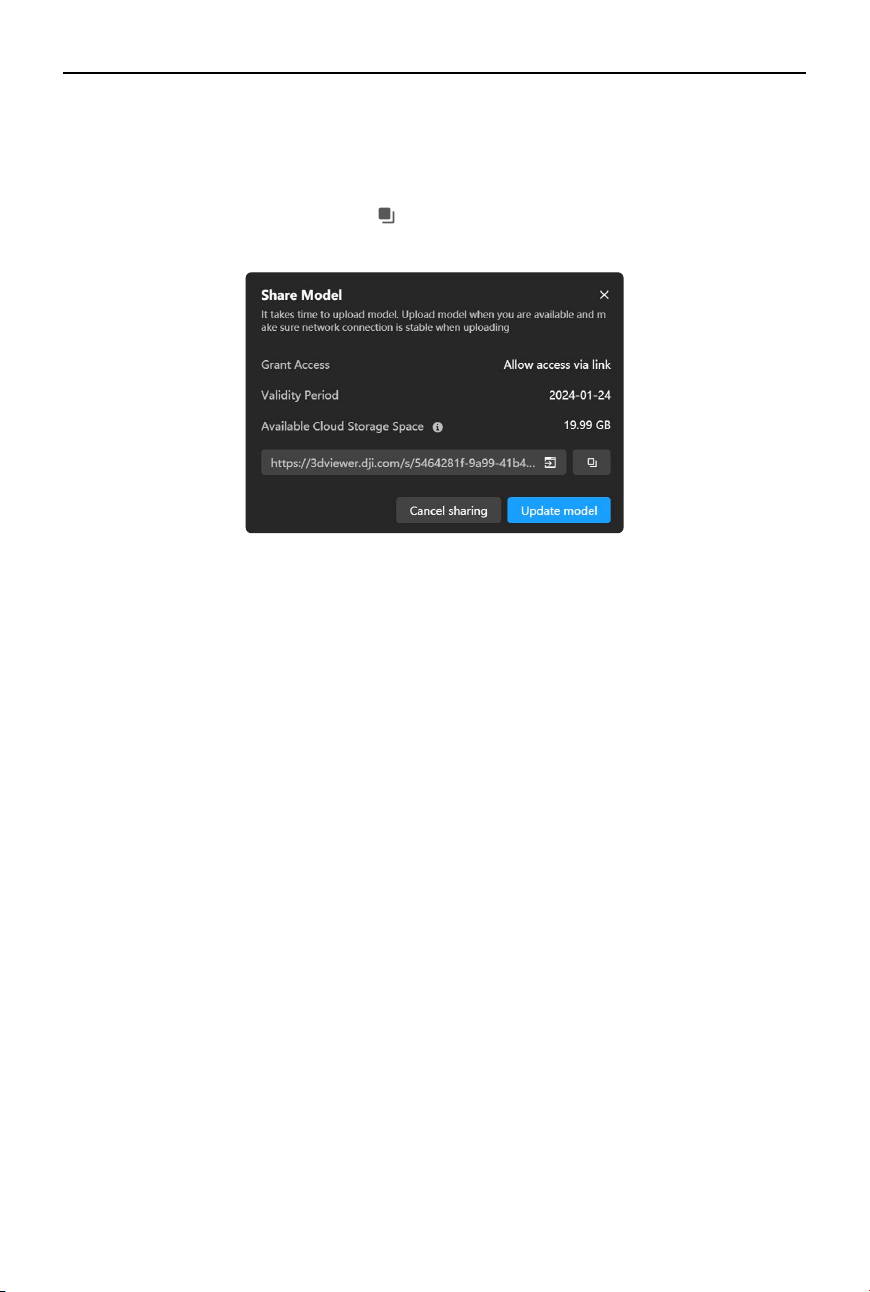
3. Models need to be rendered before they can be uploaded for sharing. If the sharing is
canceled before it completes, both the rendered model and the sharing link will become
invalid, and the user will be redirected back to the sharing window.
4. Click Share in the pop-up window to start sharing and wait for the rendering and uploading
to complete. Once completed, click
to copy the link and paste it into a web browser to
view the model online.
https://enterprise.dji.com/modify/downloads
This content is subject to change without prior notice.
If you have any questions about this document, please contact DJI by
sending a message to: [email protected]
DJI is a trademark of DJI.
Copyright © 2024 DJI All Rights Reserved.
WE ARE HERE FOR YOU
Contact
DJI SUPPORT