Loading ...
Loading ...
Loading ...
AD1000 AD1000
98
MAINTENANCE
MAINTENANCE
Cleaning the Air Monitor
The AirDoctor is designed with an air monitor to track
the quality of your air. Over time the monitor can
become dirty and may require cleaning. The main
symptom of a dirty air monitor is the LED display
remains frozen on one light color. In order to clean
the air monitor you must use a vacuum to clear the
monitor chamber.
1. Power off and unplug unit.
2. Locate and open the air sensor panel door
located on the rear of the unit. (Fig. 1)
3. Use a vacuum cleaner hose to suction any dust
or dirt that may have accumulated inside the
monitor chamber. (Fig. 2)
Cleaning the Pre-lter
Note the pre-filter is attached to the outside of the
UltraHEPA
™
filter and cannot be removed. See below
for cleaning instructions.
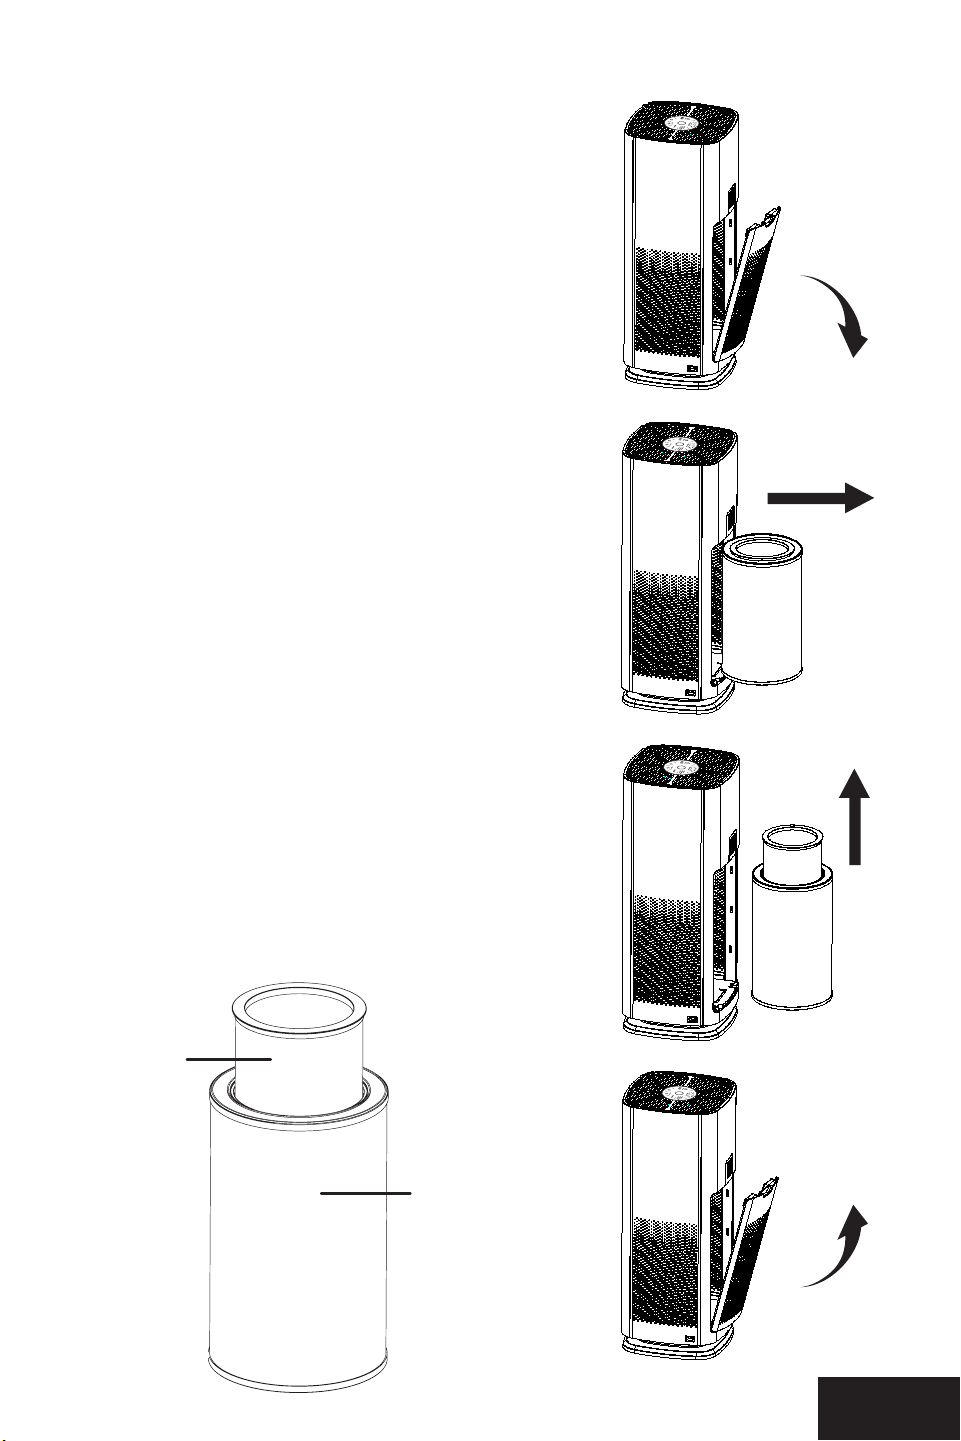
1. Make sure the unit is turned off and unplugged.
With the rear of the unit facing forward, pull the
lid towards you at the upper end as shown and
remove the rear cover.
2. Remove the UltraHEPA
™
and Carbon/VOC filters
by pulling the tabs straight out on the top and
bottom of the filters.
3. Using the crevice tool, vacuum the outside of the
UltraHEPA
™
filter to remove large contaminates
collected on the pre-filter.
4 Install the UltraHEPA
™
filter back into the
AirDoctor AD1000 housing.
5. Install the rear cover by first inserting the bottom
hooks on the cover into the back housing before
pushing the cover into the upright position on the
AirDoctor housing.
The AirDoctor professional air purifier is almost
maintenance free! The high quality Carbon/VOC and
UltraHEPA™ filters last at least 6 months, depending
on use and environment conditions.
Vacuum the outside of the UltraHEPA™ filter every
2 months.
Before replacing the UltraHEPA™ or Carbon/VOC
filter of your AirDoctor professional air purifier, turn
off and unplug the unit from the electrical outlet and
read all safety instructions and important warnings
in this owner’s manual.
REPLACING THE ULTRAHEPA™
& CARBON/VOC FILTERS
1. Make sure the unit is turned off and unplugged.
With the rear of the unit facing forward, pull the
lid towards you at the upper end as shown and
remove the rear cover.
2. Remove the UltraHEPA™ and Carbon/VOC filters
by pulling the tabs straight out on the top and
bottom of the filters.
3 . The Carbon/VOC filter sits inside the HEPA filter.
To remove the filter, simply pull up on the inner
filter to separate it from the HEPA filter. Insert
your new UltraHEPA™ and Carbon/VOC filters
and slide them back into the rear of the unit,
then insert the bottom of the inlet grill first and
then snap the upper part of the rear cover back
into position.
4 . Make sure the bottom hooks are properly in
place before snapping it up to its upright and
locked position.
1.
4.
3.
2.
Figure 1
Figure 2
HEPA /
Pre-lter
Carbon
lter
Loading ...
Loading ...
Loading ...