AD1000 / MNL / US /110220R1
USER MANUAL
AD1000 / AIR PURIFIER
AIRDOCTORPRO.COM
AD1000 / MNL / US /110220R1
USER MANUAL
AD1000 / AIR PURIFIER
AIRDOCTORPRO.COM
AD1000 AD1000
TABLE OF CONTENTS
SAFETY INSTRUCTIONS 2
PRODUCT BENEFITS 3
KNOWING YOUR AIRDOCTOR AIR PURIFIER 4
Main Parts 4
PROPER USAGE 5
OPERATING YOUR AIRDOCTOR AIR PURIFIER 6
Control Panel 6
Air Quality Monitor 6
Control Lock 7
MAINTENANCE 8
Maintaining the AirDoctor Air Purifier 9
TROUBLE-SHOOTING 10
CUSTOMERSERVICECONTACTINFORMATION 11
ONE-YEARLIMITEDWARRANTY 11
ARBITRATIONAGREEMENT 12
THANKYOU
Congratulations on purchasing the
AirDoctor AD1000 professional air
purifier and your commitment to
controlling the quality of your indoor air.
With the AirDoctor AD1000 professional
air purifier, we provide UltraHEPA™
filtration to purify the air and remove
allergens. In addition, AirDoctor AD1000
is equipped with an activated carbon
filter to remove odor and VOCs. Get ready
to experience cleaner air!
PLEASE NOTE: It is crucial that you
read and follow all the instructions
and safety warnings in this manual
for optimal performance of your air
purifier and your health
and safety.

AD1000 AD1000
32
SAFETY INSTRUCTIONS
WARNING: RISK OF ELECTRIC SHOCK
READ AND SAVE THESE INSTRUCTIONS.
Safety precautions should always be used when operating this or any electrical appliance.
Decrease the risk of electrocution, electric shock, injury or re by reading and following all the
warnings below.
Use this product only as described in this AirDoctor professional air purier owner’s guide.
To reduce the risk of electric shock, do not attempt to service the product in any way other than
in the manner described in the “Maintenance” section of this guide.
Read all instructions before operating the AirDoctor professional air purifier.
This product operates at 120V AC, 60Hz only.
Do not run the power cord under carpets or cover with throw rugs.
Do not operate the product in a greasy environment such as in the kitchen. This product is
not intended to filter oil or grease from air.
Do not use the AirDoctor professional air purifier in bathrooms, near sinks or other wet &
humid environments, near fireplaces or in areas where flammable or combustible vapors or
products may exist.
Always unplug the power cord from the electrical outlet when the purifier is not in use, before
cleaning, inserting or removing parts or before moving to another location.
Never run the air purifier unless it is fully assembled.
To reduce the risk of electric shock, this product has a polarized plug (one blade is wider than
the other). This plug will fit into a polarized outlet only one way. If the plug does not fit into
the outlet, contact qualified service personnel to install the proper outlet. Do not alter the
plug in any way.
Always turn off all controls before unplugging the AirDoctor professional air purifier
from outlet.
Attempting to service the AirDoctor professional air purifier in any way not described in this
owner’s guide will void the warranty and could cause serious personal injury to the user and/
or result in considerable damage to the unit.
Do not place the cord near a heated surface.
Never operate the AirDoctor professional air purifier if the plug or cord is damaged or
appears damaged. Only qualified service personnel should replace a damaged power cord.
Never use the power cord to pick up, carry, drag, pull or lift the AirDoctor professional air
purifier. Do not pull the cord against or around sharp corners and edges. This could result in
injury to the user or damage to the cord.
Always remove the plug from its power outlet by holding onto the plug itself and pulling
gently. Never pull on the cord itself to unplug it from its power outlet.
Use care when operating the AirDoctor professional air purifier by keeping all foreign objects,
fingers and other body parts, hair, loose clothing and jewelry away from openings.
Never touch the AirDoctor professional air purifier or its plug when your hands are wet.
The AirDoctor professional air purifier is an electrical appliance. Adult supervision is required
when operating around children.
PRODUCT BENEFITS
THE REVOLUTIONARY AIRDOCTOR PROFESSIONAL AIR PURIFIER
CLEANS AIR WITH ULTRAHEPA™ FILTRATION.
The AirDoctor professional air purier boasts many great features:
UltraHEPA™ filter removes microscopic particles from the air.
High quality Carbon filter removes VOCs (Volatile Organic Compounds) and controls odors.
Effectively removes smoke, pollen, dust, animal dander, dust mites from the air.
Powerful and quiet fan has 4 speed settings so you can select the desired cleaning level.
Air Quality Monitor shows current air quality.
Auto mode automatically adjusts fan speed depending on air quality.
A 24-hour timer to set the time of operation, from 1 hour up to 24 hours.
Built-in ionizer revitalizes air.
Night mode dims the control panel light when you sleep.
Clean filter indicator light.
Low power consumption-energy efficient.
Electrical Ratings
• 120 volt / 60 Hz
• Power consumption / 40 watts
• UltraHEPA™ filter
• Carbon filter
• Model: AD1000
Replacement Filters
• UltraHEPA™ filter / ADF1001
• Carbon filter / ADF1002
To order replacement filters go to airdoctorpro.com or call 800.221.2515.
AD1000 AD1000
54
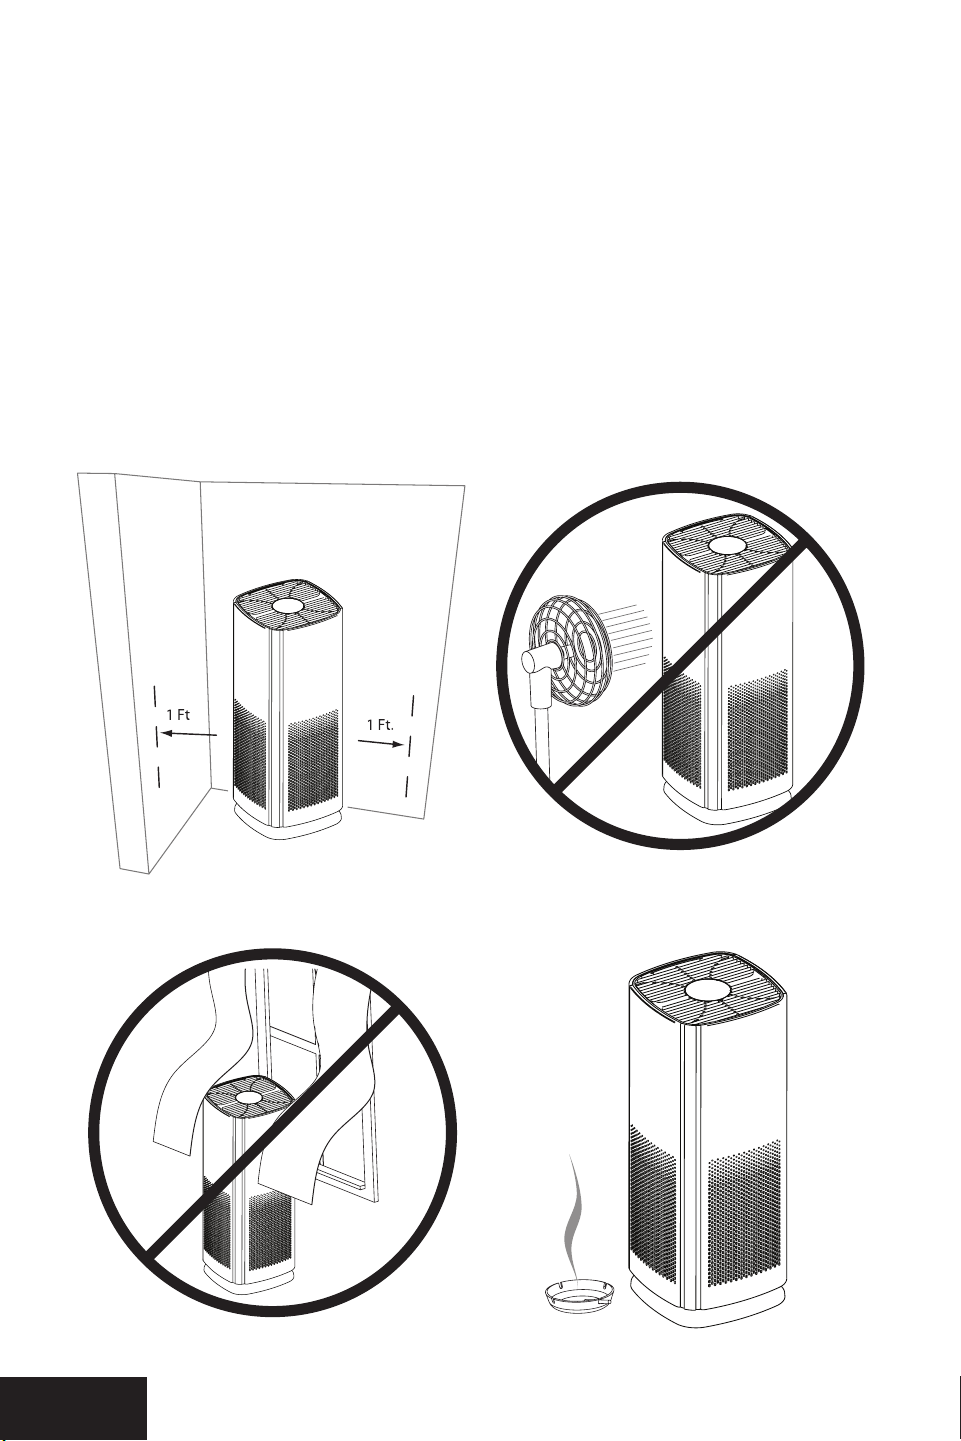
PROPER USAGE
Make sure the UltraHEPA™ & Carbon/VOC filters are properly installed before use.
1. Keep all sides of the unit more than 1 foot away from a wall.
2. Do not blow air from a fan or air conditioner directly into the air purifier.
3. Do not place the unit where the air inlet or outlet grill could come in contact with curtains
or drapery.
4. Place the unit close to the source of air pollution to improve indoor air quality effectively.
KNOWINGTHEAIRDOCTOR
AD1000
AIR PURIFIER
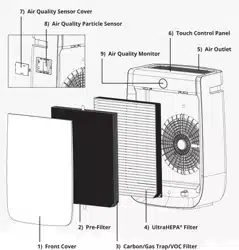
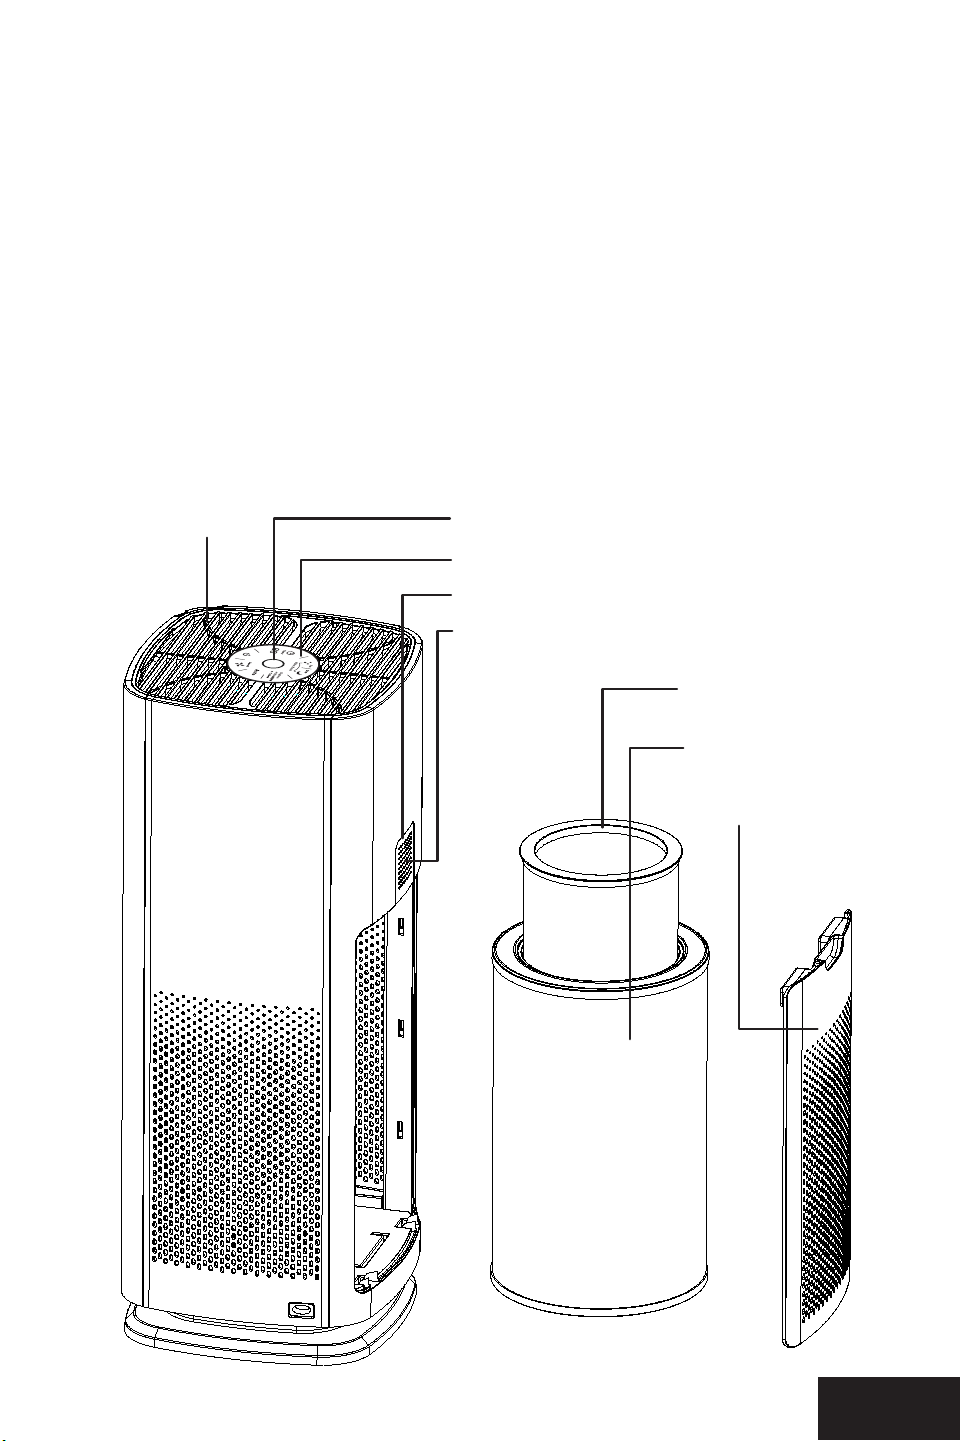
MAIN PARTS
1. Rear Cover
2. Carbon/VOC Filter
3. UltraHEPA™ / Pre-filter
4. Air-Outlet
5. Touch Control Panel
6. Air Quality Sensor Cover
7. Air Quality Sensor
8. Air Quality Monitor: The LED ring display will change color depending on air quality.
3 4
1 2
8. Air Quality Monitor
7. Air Quality Sensor
1. Rear Cover
3. UltraHEPA™/
Pre-lter
6. Air Quality Sensor Cover
5. Touch Control Panel
2. Carbon/VOC Filter
4. Air Outlet
AD1000 AD1000
54
PROPER USAGE
Make sure the UltraHEPA™ & Carbon/VOC filters are properly installed before use.
1. Keep all sides of the unit more than 1 foot away from a wall.
2. Do not blow air from a fan or air conditioner directly into the air purifier.
3. Do not place the unit where the air inlet or outlet grill could come in contact with curtains
or drapery.
4. Place the unit close to the source of air pollution to improve indoor air quality effectively.
KNOWINGTHEAIRDOCTOR
AD1000
AIR PURIFIER
MAIN PARTS
1. Rear Cover
2. Carbon/VOC Filter
3. UltraHEPA™ / Pre-filter
4. Air-Outlet
5. Touch Control Panel
6. Air Quality Sensor Cover
7. Air Quality Sensor
8. Air Quality Monitor: The LED ring display will change color depending on air quality.
3 4
1 2
8. Air Quality Monitor
7. Air Quality Sensor
1. Rear Cover
3. UltraHEPA™/
Pre-lter
6. Air Quality Sensor Cover
5. Touch Control Panel
2. Carbon/VOC Filter
4. Air Outlet
AD1000 AD1000
76
OPERATINGTHEAIRDOCTOR
AD1000
AIR PURIFIER
OPERATINGTHEAIRDOCTOR
AD1000
AIR PURIFIER
Before first use, remove filters and remove plastic bag from filters, then reinstall filters.
Then reinstall front cover.
Plug the unit into an electrical outlet. The unit will be ready to run. Read the following directions
to select desired settings.
AIR QUALITY MONITOR
Air Monitor
The AirDoctor comes with an Air Quality Monitor that continuously monitors the quality of
the air in the room. The LED light located on the front will light up according to the air quality.
The Air Quality Monitor is able to show 3 air quality levels.
BLUE = Good air quality / ORANGE = Fair air quality / RED = Poor air quality
You can choose to set the AirDoctor to “Auto”. This will enable the AirDoctor to adjust the
Fan speed according to the Air Quality. In Auto mode, the fan speed will be adjusted
as follows:
Good Air Quality = Low fan speed
Fair Air Quality = Medium fan speed
Poor Air Quality = High and Boost fan speed
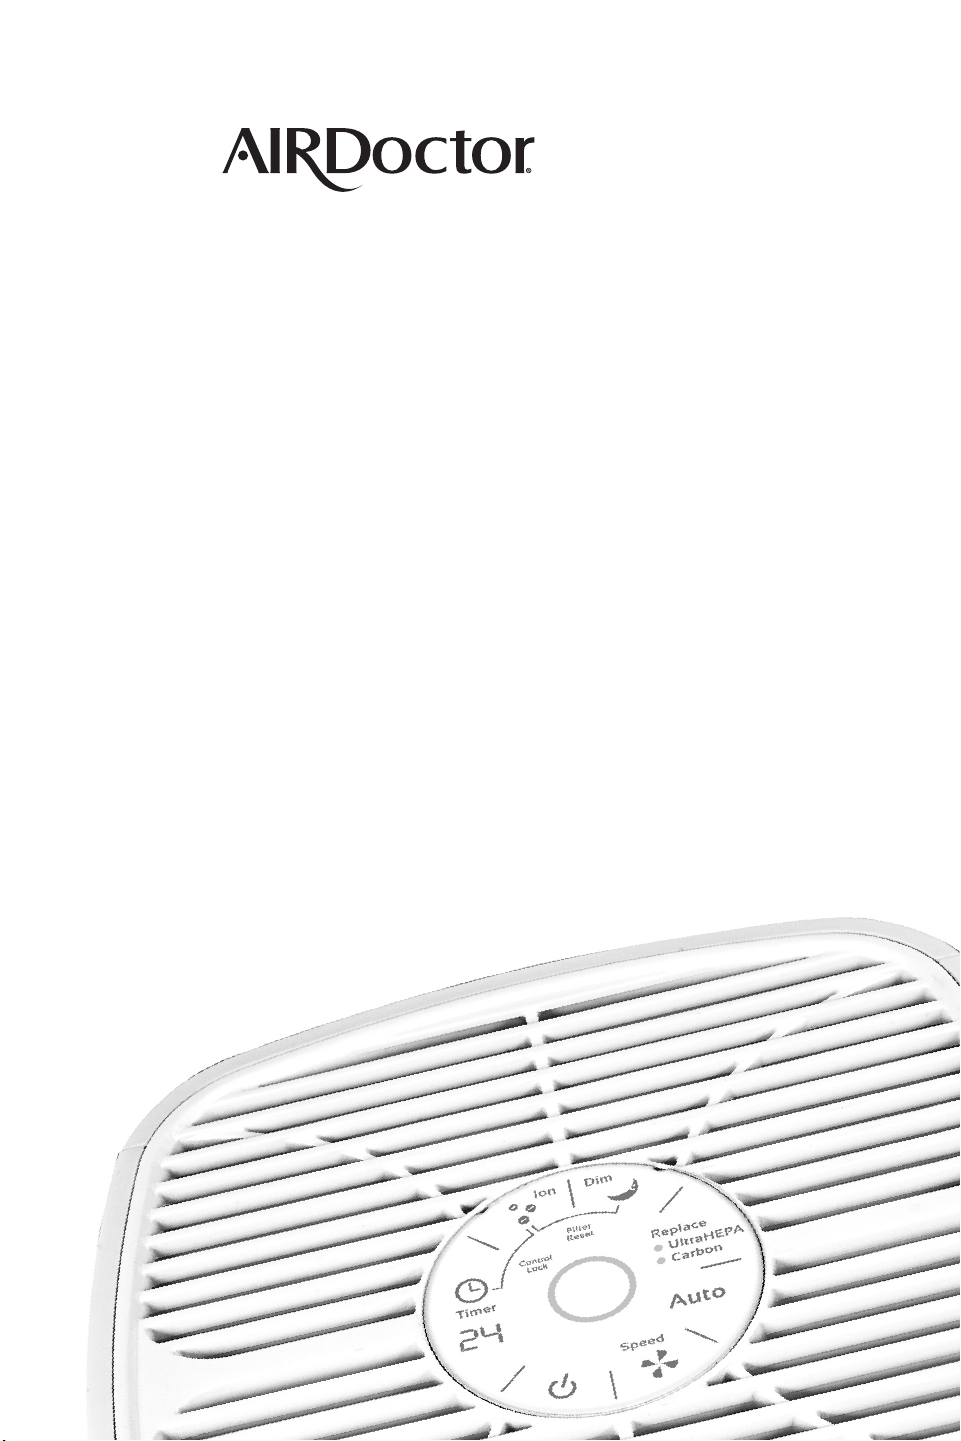
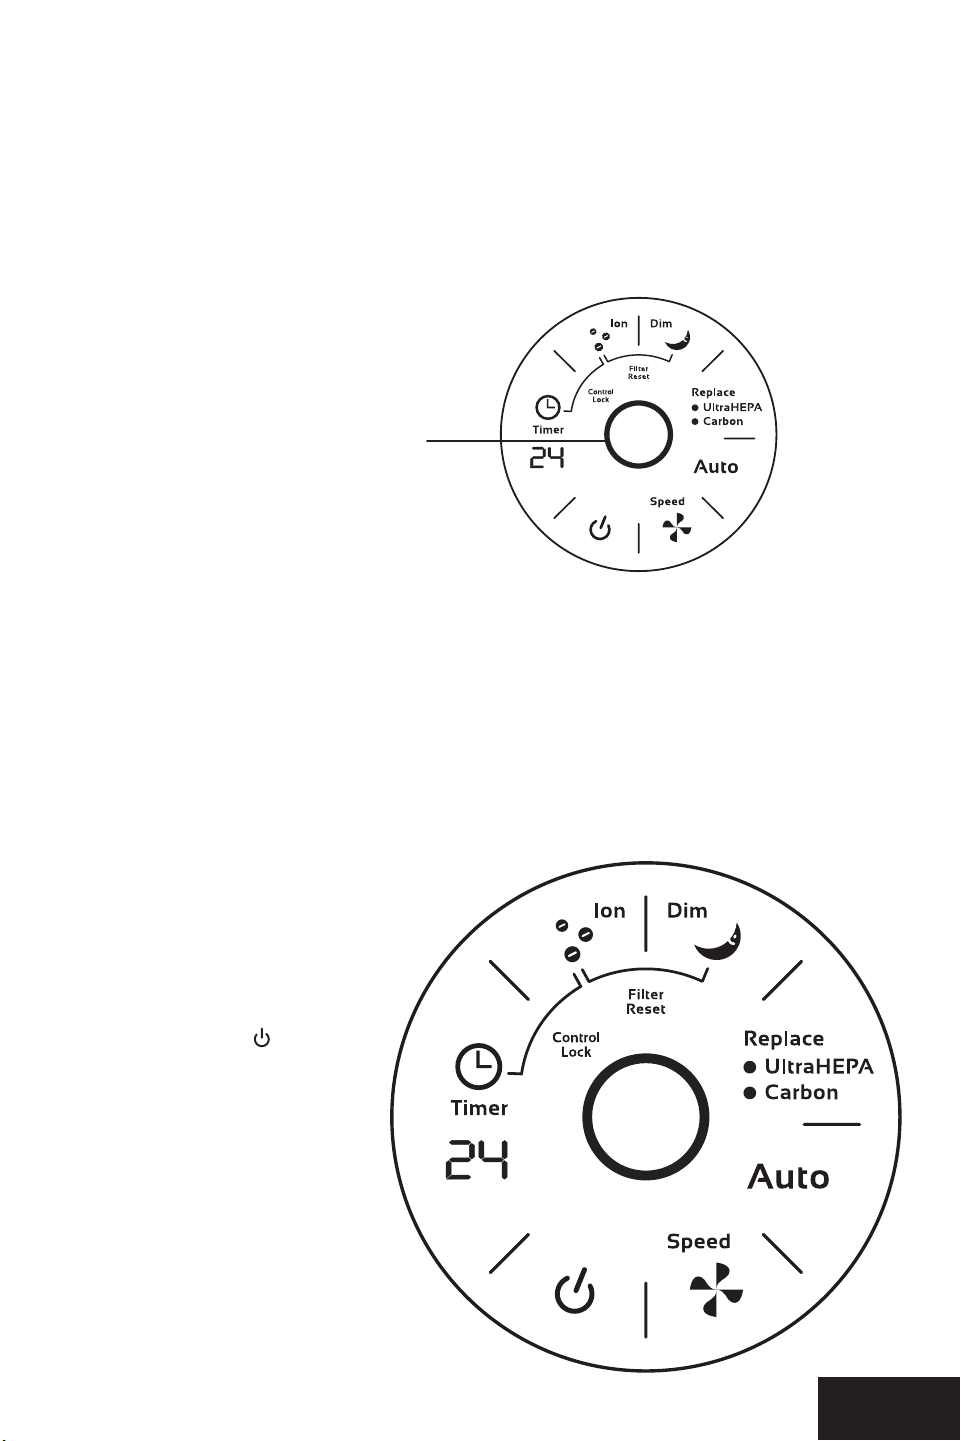
CONTROL PANEL
1. Power Control
As soon as you press
the power button , the
AirDoctor will start in the
Auto mode. As soon as the
auto program has been
activated it will start up in
the high-speed mode, the
sensor will start to detect
the amount of particulate
in the air. As the particles
are detected, the AirDoctor
will select the purification
speed (fan speed) that
is appropriate to the
particulate contamination
in the room.
In most cases we recommend that you leave the AirDoctor in the Auto mode, for other
purication modes, see the next page.
2. Fan Speed Control
The AirDoctor has four different fan speed settings: Low, Medium, High, and Boost. Each
mode has its own indicator light which lights up when the setting is chosen. The speed
selected determines how rapidly you want to clean the air. The “LOW” and “MEDIUM”
settings are great for everyday use. The “HIGH” setting is great for areas with more airborne
contaminants (such as excessive smoke, pet dander, etc), or areas used frequently by allergy-
sufferers. The “BOOST” setting is best used for shorter bursts of time when you
want to rapidly purify the air.
3. Auto Mode
The AirDoctor is equipped with an air sensor to monitor the quality of your air. Simply press
the Auto button to activate the air monitoring system. The monitor will test the air quality
and automatically adjust the fan speed to remove the air contaminants. The top of the
display is equipped with LED lights to notify you of the air quality. RED color is for poor,
ORANGE for fair and BLUE for good quality air.
4. Dim Mode
If the LED lights are too bright, activate the “Dim Mode” to turn off the LED lights and
the lighted display.
5. Timer Control
The AirDoctor air purifier can be programmed to turn off after a preset amount of time. Press
the “TIME” button to program the timer. Each press will add one hour up to a total of 24
hours. Keeping the button pressed will automatically increase to 24 hours, 1 hour at a time.
6. ION Generator
Press the ION button to turn on the IONs. Press it again to turn the IONs off.
7. Clean Filter Indicator Light
The AirDoctor Clean Filter Indicator Light will turn on each time a filter needs to be replaced.
To reset the filter indicator, press the ION and DIM buttons together for 3 seconds. The CLEAN
FILTER light will flash 3 times and then turn off completely, indicating the unit has been reset.
8. 24-Hour Timer Display
Air Quality Monitor
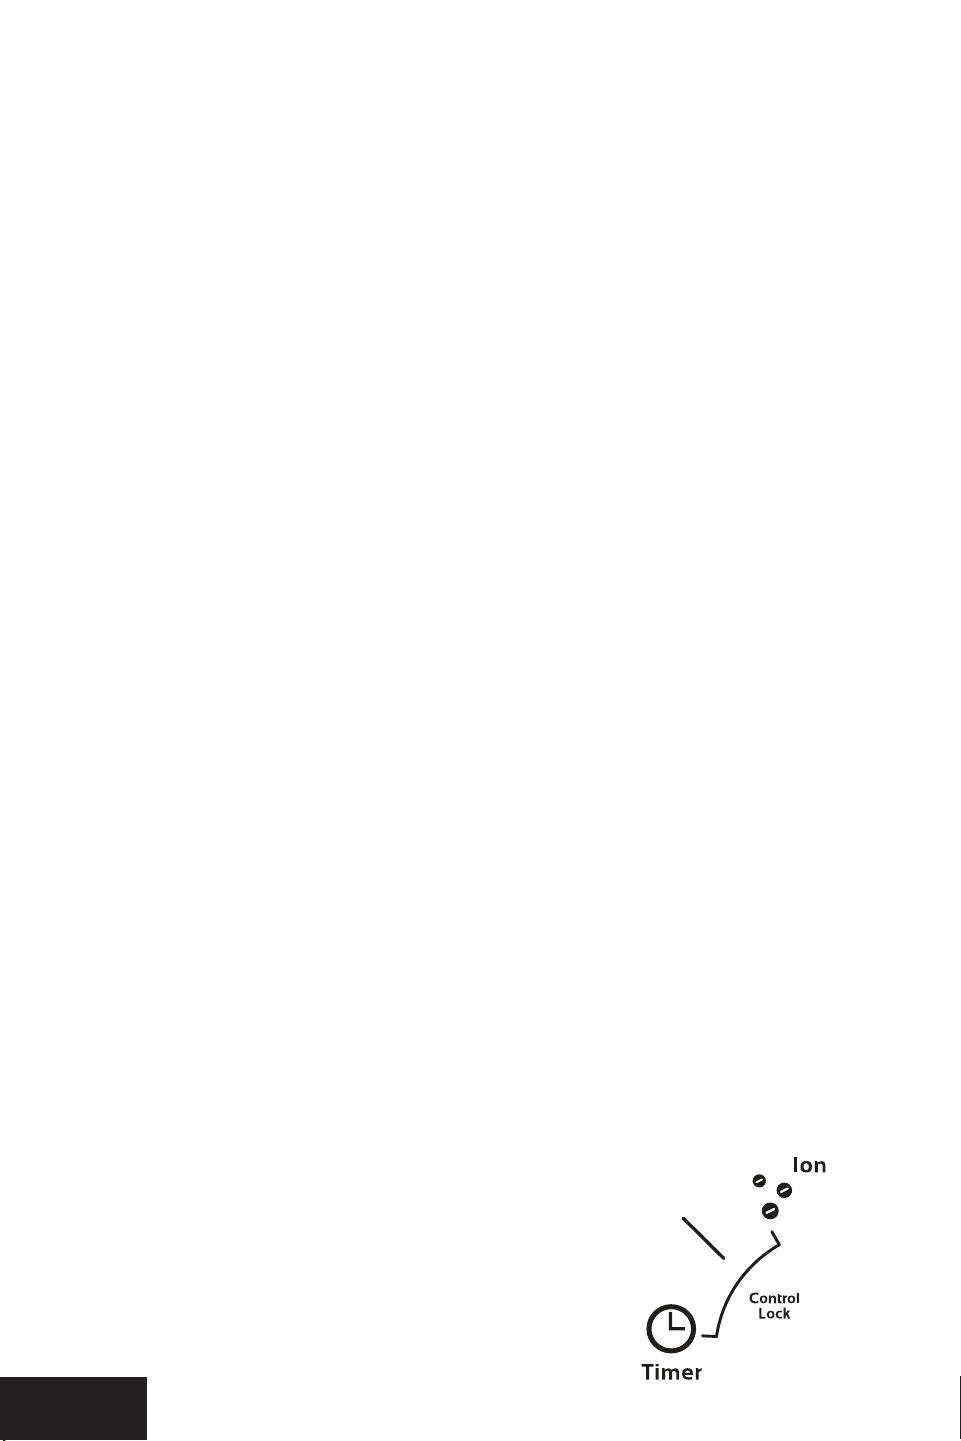
CONTROL LOCK FEATURE
The AirDoctor has a Control Lock feature to prevent a person (child) or a pet from
interrupting the running mode by accident. When the control lock feature has been activated,
none of the buttons on the control panel will work. The only way to change any setting is to
deactivate the control lockout feature or to unplug the AirDoctor.
To activate control lock feature
•
Press “Timer” and “Ion” at the same time for 3 seconds
•
This may be done at anytime while the AirDoctor
is running, including on Dim mode
To deactivate control lock feature
•
“Timer” and “Ion” at the same time for 3 seconds
AD1000 AD1000
76
OPERATINGTHEAIRDOCTOR
AD1000
AIR PURIFIER
OPERATINGTHEAIRDOCTOR
AD1000
AIR PURIFIER
Before first use, remove filters and remove plastic bag from filters, then reinstall filters.
Then reinstall front cover.
Plug the unit into an electrical outlet. The unit will be ready to run. Read the following directions
to select desired settings.
AIR QUALITY MONITOR
Air Monitor
The AirDoctor comes with an Air Quality Monitor that continuously monitors the quality of
the air in the room. The LED light located on the front will light up according to the air quality.
The Air Quality Monitor is able to show 3 air quality levels.
BLUE = Good air quality / ORANGE = Fair air quality / RED = Poor air quality
You can choose to set the AirDoctor to “Auto”. This will enable the AirDoctor to adjust the
Fan speed according to the Air Quality. In Auto mode, the fan speed will be adjusted
as follows:
Good Air Quality = Low fan speed
Fair Air Quality = Medium fan speed
Poor Air Quality = High and Boost fan speed
CONTROL PANEL
1. Power Control
As soon as you press
the power button , the
AirDoctor will start in the
Auto mode. As soon as the
auto program has been
activated it will start up in
the high-speed mode, the
sensor will start to detect
the amount of particulate
in the air. As the particles
are detected, the AirDoctor
will select the purification
speed (fan speed) that
is appropriate to the
particulate contamination
in the room.
In most cases we recommend that you leave the AirDoctor in the Auto mode, for other
purication modes, see the next page.
2. Fan Speed Control
The AirDoctor has four different fan speed settings: Low, Medium, High, and Boost. Each
mode has its own indicator light which lights up when the setting is chosen. The speed
selected determines how rapidly you want to clean the air. The “LOW” and “MEDIUM”
settings are great for everyday use. The “HIGH” setting is great for areas with more airborne
contaminants (such as excessive smoke, pet dander, etc), or areas used frequently by allergy-
sufferers. The “BOOST” setting is best used for shorter bursts of time when you
want to rapidly purify the air.
3. Auto Mode
The AirDoctor is equipped with an air sensor to monitor the quality of your air. Simply press
the Auto button to activate the air monitoring system. The monitor will test the air quality
and automatically adjust the fan speed to remove the air contaminants. The top of the
display is equipped with LED lights to notify you of the air quality. RED color is for poor,
ORANGE for fair and BLUE for good quality air.
4. Dim Mode
If the LED lights are too bright, activate the “Dim Mode” to turn off the LED lights and
the lighted display.
5. Timer Control
The AirDoctor air purifier can be programmed to turn off after a preset amount of time. Press
the “TIME” button to program the timer. Each press will add one hour up to a total of 24
hours. Keeping the button pressed will automatically increase to 24 hours, 1 hour at a time.
6. ION Generator
Press the ION button to turn on the IONs. Press it again to turn the IONs off.
7. Clean Filter Indicator Light
The AirDoctor Clean Filter Indicator Light will turn on each time a filter needs to be replaced.
To reset the filter indicator, press the ION and DIM buttons together for 3 seconds. The CLEAN
FILTER light will flash 3 times and then turn off completely, indicating the unit has been reset.
8. 24-Hour Timer Display
Air Quality Monitor
CONTROL LOCK FEATURE
The AirDoctor has a Control Lock feature to prevent a person (child) or a pet from
interrupting the running mode by accident. When the control lock feature has been activated,
none of the buttons on the control panel will work. The only way to change any setting is to
deactivate the control lockout feature or to unplug the AirDoctor.
To activate control lock feature
•
Press “Timer” and “Ion” at the same time for 3 seconds
•
This may be done at anytime while the AirDoctor
is running, including on Dim mode
To deactivate control lock feature
•
“Timer” and “Ion” at the same time for 3 seconds
AD1000 AD1000
98
MAINTENANCE
MAINTENANCE
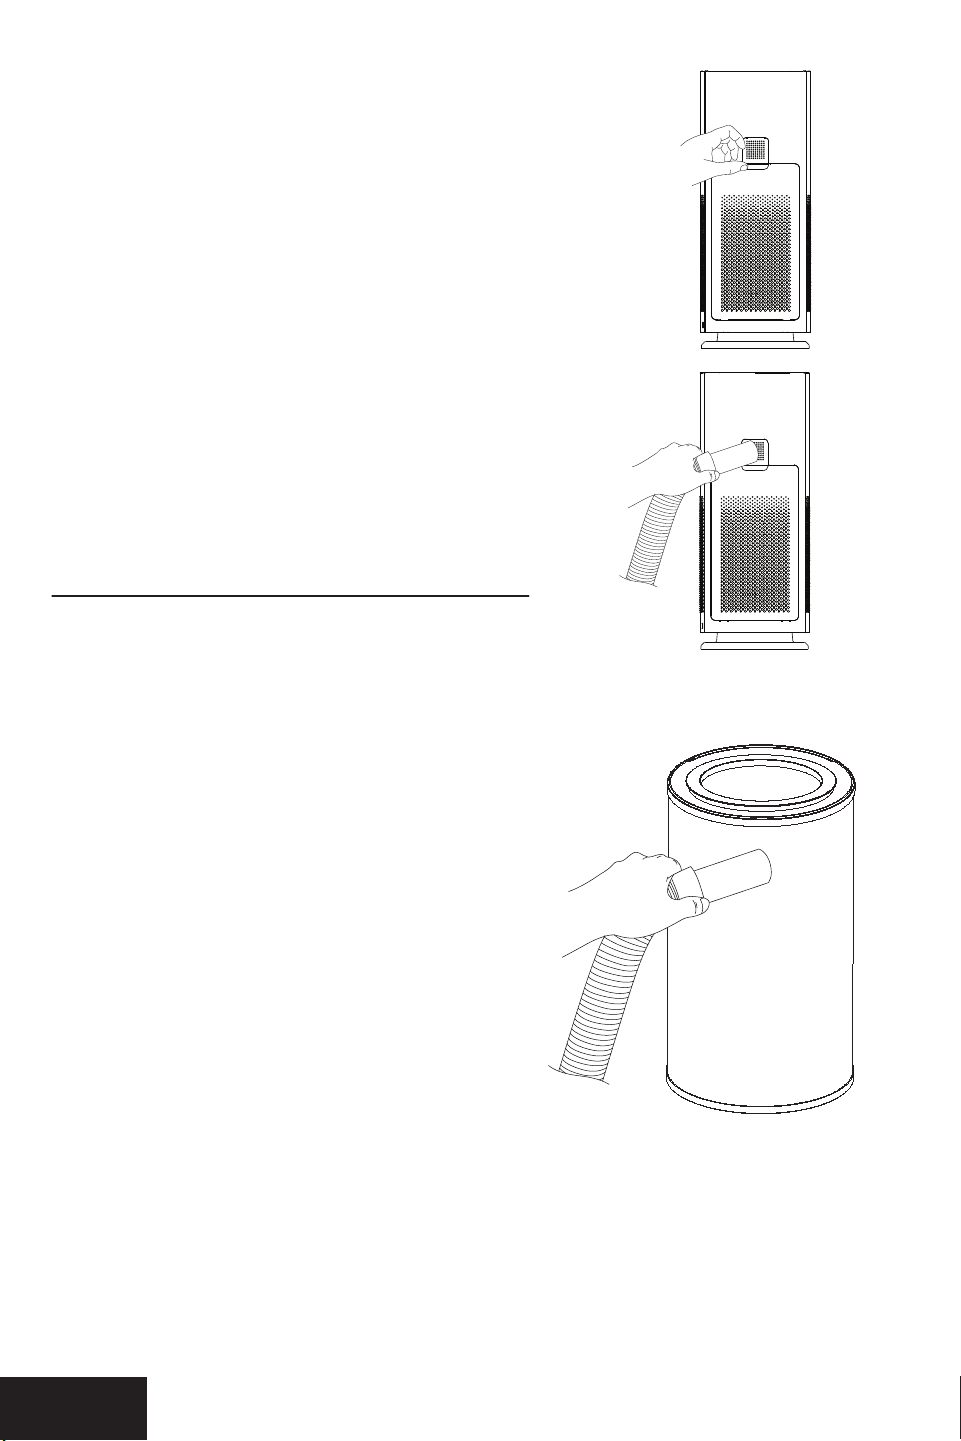
Cleaning the Air Monitor
The AirDoctor is designed with an air monitor to track
the quality of your air. Over time the monitor can
become dirty and may require cleaning. The main
symptom of a dirty air monitor is the LED display
remains frozen on one light color. In order to clean
the air monitor you must use a vacuum to clear the
monitor chamber.
1. Power off and unplug unit.
2. Locate and open the air sensor panel door
located on the rear of the unit. (Fig. 1)
3. Use a vacuum cleaner hose to suction any dust
or dirt that may have accumulated inside the
monitor chamber. (Fig. 2)
Cleaning the Pre-lter
Note the pre-filter is attached to the outside of the
UltraHEPA
™
filter and cannot be removed. See below
for cleaning instructions.
1. Make sure the unit is turned off and unplugged.
With the rear of the unit facing forward, pull the
lid towards you at the upper end as shown and
remove the rear cover.
2. Remove the UltraHEPA
™
and Carbon/VOC filters
by pulling the tabs straight out on the top and
bottom of the filters.
3. Using the crevice tool, vacuum the outside of the
UltraHEPA
™
filter to remove large contaminates
collected on the pre-filter.
4 Install the UltraHEPA
™
filter back into the
AirDoctor AD1000 housing.
5. Install the rear cover by first inserting the bottom
hooks on the cover into the back housing before
pushing the cover into the upright position on the
AirDoctor housing.
The AirDoctor professional air purifier is almost
maintenance free! The high quality Carbon/VOC and
UltraHEPA™ filters last at least 6 months, depending
on use and environment conditions.
Vacuum the outside of the UltraHEPA™ filter every
2 months.
Before replacing the UltraHEPA™ or Carbon/VOC
filter of your AirDoctor professional air purifier, turn
off and unplug the unit from the electrical outlet and
read all safety instructions and important warnings
in this owner’s manual.
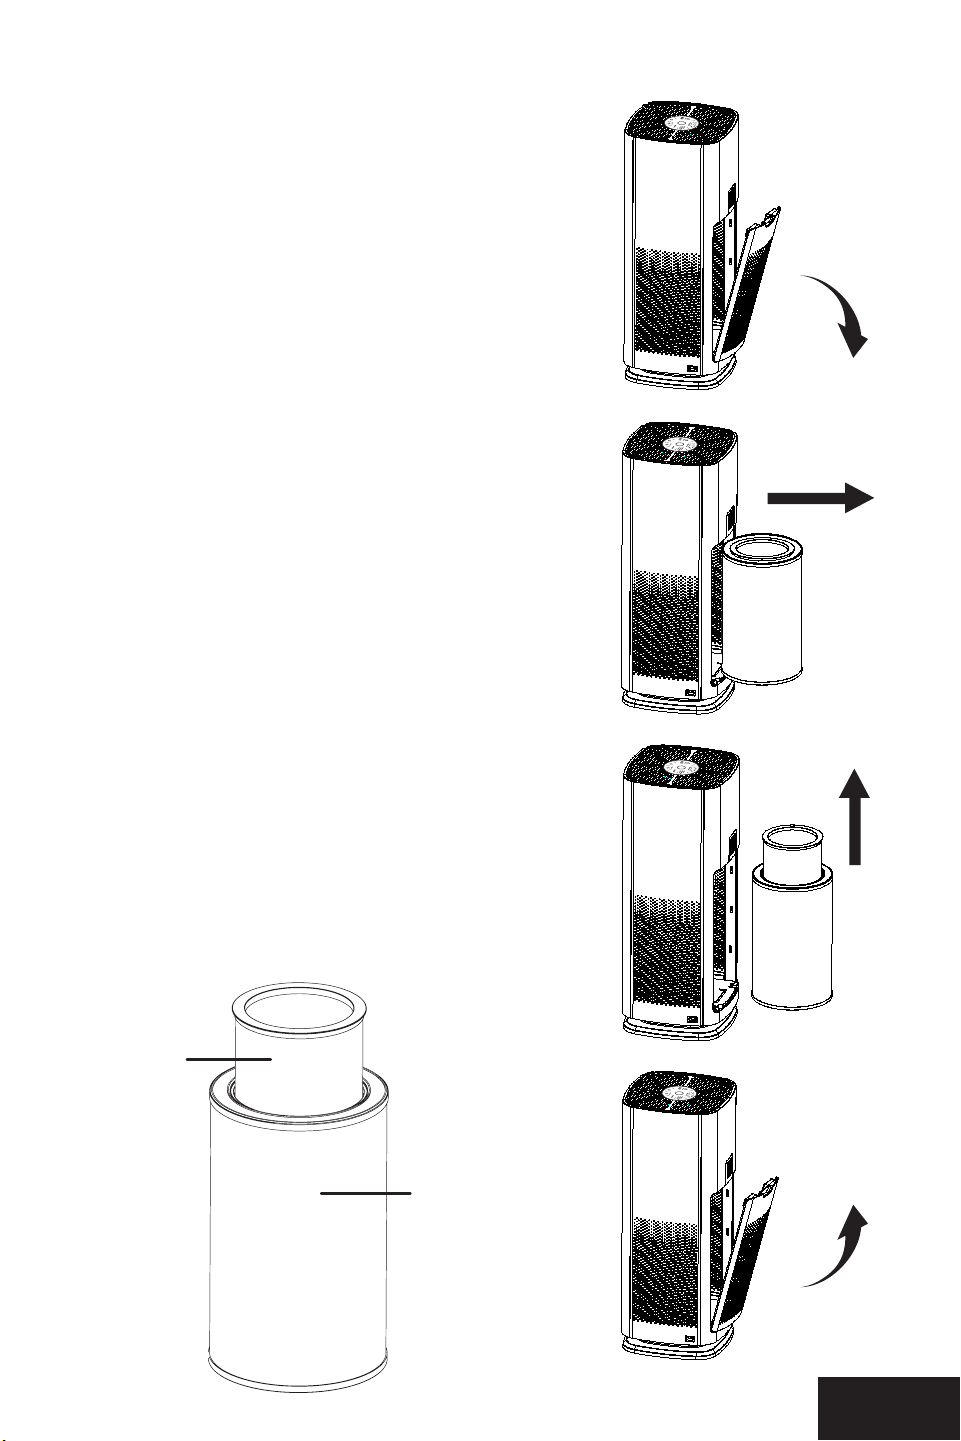
REPLACING THE ULTRAHEPA™
& CARBON/VOC FILTERS
1. Make sure the unit is turned off and unplugged.
With the rear of the unit facing forward, pull the
lid towards you at the upper end as shown and
remove the rear cover.
2. Remove the UltraHEPA™ and Carbon/VOC filters
by pulling the tabs straight out on the top and
bottom of the filters.
3 . The Carbon/VOC filter sits inside the HEPA filter.
To remove the filter, simply pull up on the inner
filter to separate it from the HEPA filter. Insert
your new UltraHEPA™ and Carbon/VOC filters
and slide them back into the rear of the unit,
then insert the bottom of the inlet grill first and
then snap the upper part of the rear cover back
into position.
4 . Make sure the bottom hooks are properly in
place before snapping it up to its upright and
locked position.
1.
4.
3.
2.
Figure 1
Figure 2
HEPA /
Pre-lter
Carbon
lter
AD1000 AD1000
98
MAINTENANCE
MAINTENANCE
Cleaning the Air Monitor
The AirDoctor is designed with an air monitor to track
the quality of your air. Over time the monitor can
become dirty and may require cleaning. The main
symptom of a dirty air monitor is the LED display
remains frozen on one light color. In order to clean
the air monitor you must use a vacuum to clear the
monitor chamber.
1. Power off and unplug unit.
2. Locate and open the air sensor panel door
located on the rear of the unit. (Fig. 1)
3. Use a vacuum cleaner hose to suction any dust
or dirt that may have accumulated inside the
monitor chamber. (Fig. 2)
Cleaning the Pre-lter
Note the pre-filter is attached to the outside of the
UltraHEPA
™
filter and cannot be removed. See below
for cleaning instructions.
1. Make sure the unit is turned off and unplugged.
With the rear of the unit facing forward, pull the
lid towards you at the upper end as shown and
remove the rear cover.
2. Remove the UltraHEPA
™
and Carbon/VOC filters
by pulling the tabs straight out on the top and
bottom of the filters.
3. Using the crevice tool, vacuum the outside of the
UltraHEPA
™
filter to remove large contaminates
collected on the pre-filter.
4 Install the UltraHEPA
™
filter back into the
AirDoctor AD1000 housing.
5. Install the rear cover by first inserting the bottom
hooks on the cover into the back housing before
pushing the cover into the upright position on the
AirDoctor housing.
The AirDoctor professional air purifier is almost
maintenance free! The high quality Carbon/VOC and
UltraHEPA™ filters last at least 6 months, depending
on use and environment conditions.
Vacuum the outside of the UltraHEPA™ filter every
2 months.
Before replacing the UltraHEPA™ or Carbon/VOC
filter of your AirDoctor professional air purifier, turn
off and unplug the unit from the electrical outlet and
read all safety instructions and important warnings
in this owner’s manual.
REPLACING THE ULTRAHEPA™
& CARBON/VOC FILTERS
1. Make sure the unit is turned off and unplugged.
With the rear of the unit facing forward, pull the
lid towards you at the upper end as shown and
remove the rear cover.
2. Remove the UltraHEPA™ and Carbon/VOC filters
by pulling the tabs straight out on the top and
bottom of the filters.
3 . The Carbon/VOC filter sits inside the HEPA filter.
To remove the filter, simply pull up on the inner
filter to separate it from the HEPA filter. Insert
your new UltraHEPA™ and Carbon/VOC filters
and slide them back into the rear of the unit,
then insert the bottom of the inlet grill first and
then snap the upper part of the rear cover back
into position.
4 . Make sure the bottom hooks are properly in
place before snapping it up to its upright and
locked position.
1.
4.
3.
2.
Figure 1
Figure 2
HEPA /
Pre-lter
Carbon
lter

AD1000 AD1000
1110
TROUBLESHOOTING
Before contacting our customer service department, please try the following solutions:
PROBLEM REASON SOLUTION
Unit won’t operate. ON/OFF button hasn’t
been pressed.
Unit is unplugged.
Press ON/OFF button.
Plug in unit.
Reduced air flow or
poor filtering.
The inlet or outlet grill
may be blocked.
The UltraHEPA™ or
Carbon/VOC filter may
be clogged.
Filters may still be in bags.
Ensure nothing is in front of
or on top of the purifier.
Check filters and replace
it if necessary.
(See instructions on pg. 8).
Remove filters from bags.
The air quality
monitor only
illuminates blue.
The air in your room
is clean.
The unit is operating
normally, no action
required.
The air quality
monitor only
illuminates
yellow or red.
Either the air quality
is very poor or the air
monitor sensor has
become dirty.
Clean the air sensor with a
vacuum to restore the
accuracy of the monitor.
(See page 9 for instruction
on how to clean the sensor).
The HEPA or
CARBON filter light
has come on and
won’t turn off.
The AirDoctor is designed
to notify you when it is
time to change each filter.
These lights indicate that
one of the filters needs to
be replaced.
First, remove and replace
the filter that needs to
be changed. Second,
press and hold the
ION and DIM buttons
simultaneously to reset
the filter life tracker and
turn off notification light.
The AUTO mode
is not activating
the ION mode.
The AUTO mode is
designed to adjust the
fan speed depending
on the air quality. Other
modes must be activated
separately.
The unit is operating
normally, no action
required.
ONE-YEARLIMITEDWARRANTY
AIRDOCTOR ONE-YEAR LIMITED WARRANTY
Your AirDoctor air purifier is warranted to be free from defects in materials and workmanship
for one year from the original purchase date. Should the product have a defect in materials or
workmanship, we will repair or replace it without charge to you (a shipping and processing fee
will apply). To obtain service under warranty, simply call our customer service center toll-free at
800.221.2515.
This warranty does not cover damage caused by accident, misuse or any use other than as
intended and described in this product manual, or damage resulting from failure to maintain and
clean this product as specified in this product manual. This warranty applies only to the original
purchaser of the AirDoctor
air purifier. This warranty does not cover the filters.
AIRDOCTOR VOC AND HEPA
LIMITED WARRANTY
Your AirDoctor particle filter (HEPA) and VOC (carbon) is warranted to be free from defects in
material and workmanship for 30 days from the original purchase date. AirDoctor will replace a
defective filter at no charge to you and cover any shipping charges. The limited warranty covers
normal use only.
ALL EXPRESS AND IMPLIED WARRANTIES FOR THIS PRODUCT, INCLUDING IMPLIED WARRANTIES
OF MERCHANTABILITY AND FITNESS FOR A PARTICULAR PURPOSE, ARE LIMITED IN DURATION TO
THE WARRANTY PERIOD, AND NO WARRANTIES, WHETHER EXPRESS OR IMPLIED, WILL APPLY AFTER
THIS PERIOD.
Some states do not allow limitations on the duration of implied warranties, so the above
limitation may not apply to you. While this warranty gives you specific legal rights, you may also
have other rights which may vary from state to state.
CONTACT INFO FOR WARRANTY SERVICE:
AirDoctor
P.O. Box 9159 | Van Nuys, CA | 91409-8291
800.221.2515
|
airdoctorpro.com
©
2020 AirDoctor, LLC. All Rights Reserved.

AD1000 AD1000
1312
ARBITRATION AGREEMENT
PLEASE READ THIS AGREEMENT CAREFULLY. YOU ACCEPT THE TERMS OF THIS AGREEMENT BY
RETAINING THE PRODUCT(S) SHIPPED IN CONNECTION WITH THIS AGREEMENT (THE “PRODUCTS”)
FOR MORE THAN THIRTY (30) DAYS AFTER RECEIPT. IF YOU DO NOT AGREE TO THE TERMS OF THIS
AGREEMENT, YOU MAY RETURN THE PRODUCT TO COMPANY WITHIN THIRTY (30) DAYS OF RECEIPT
FOR A FULL REFUND.
THIS ARBITRATION AGREEMENT (“AGREEMENT”) AFFECTS YOUR LEGAL RIGHTS AND REMEDIES BY
PROVIDING THAT DISPUTES BETWEEN YOU AND THE MANUFACTURER, DISTRIBUTOR AND/OR SELLER
OF THIS PRODUCT (COLLECTIVELY, “COMPANY”), MUST BE RESOLVED THROUGH BINDING ARBITRATION
AND NOT IN COURT. IT ALSO PROVIDES THAT ANY DISPUTE CANNOT BE RESOLVED IN A CLASS ACTION
OR OTHER PROCEEDING WHERE YOU REPRESENT OTHER PERSONS OR OTHER PERSONS REPRESENT
YOU, AND THAT NO CLASS OR REPRESENTATIVE ARBITRATIONS ARE PERMITTED. PLEASE CAREFULLY
READ ALL TERMS IN THIS AGREEMENT.
1. RESOLUTION OF CLAIMS OR DISPUTES. Any claim or dispute between you and Company (or any
of Company’s subsidiaries or affiliates) arising out of or relating in any way to the Product or
this Agreement shall be resolved through final, binding arbitration. This arbitration obligation is
reciprocally binding on both you and the Company and applies regardless of whether the claim
or dispute involves a tort, fraud, misrepresentation, product liability, negligence, violation of a
statute, or any other legal theory. Both you and Company specifically acknowledge and agree that
you waive your right to bring a lawsuit based on such claims or disputes and to have such lawsuit
resolved by a judge or jury.
2. LIMITATION OF LEGAL REMEDIES. All arbitrations under this Agreement shall be conducted on
an individual (and not a class-wide) basis, and an arbitrator shall have no authority to award
class-wide relief. You acknowledge and agree that this Agreement specifically prohibits you and
the Company from commencing arbitration proceedings as a representative of others or joining
in any arbitration proceedings brought by any other person. The parties agree that no class or
representative actions of any type are permitted.
3. ARBITRATION PROCEDURES.
a. Before instituting an arbitration, if you have any dispute, we strongly encourage you to contact the
Company to try to resolve the matter by calling 800-218-3560, although you are not required to do
so.
b. The arbitration of any claim or dispute under this Agreement shall be conducted in accordance
with the expedited procedures set forth in the JAMS Comprehensive Arbitration Rules and
Procedures as those Rules exist on the date you receive the Product, including Rules 16.1 and 16.2
of those Rules. These rules and procedures are available by calling JAMS or by visiting its web
site at www.jamsadr.com. The arbitration of any claim or dispute under this Agreement shall be
conducted by an arbitrator who has at least five years of experience conducting arbitrations.
c. The arbitration of any claim or dispute under this Agreement shall be conducted in the State of
California or the location in which you received this Agreement. For claims of $10,000 or less,
you may choose whether the arbitration proceeds in person, by telephone, or based only on
submissions.
d. The Company shall pay costs for the arbitration of claims, including any JAMS Case Management
Fee and all professional fees for the arbitrator’s services. The Company shall pay the fees and
costs of its own counsel, experts and witnesses and shall not be able to recoup them from you
even if you do not prevail in the arbitration. Unless otherwise provided by law, you acknowledge
and agree that you shall pay the fees and costs of your own counsel, experts and witnesses.
4. CHOICE OF LAW. The arbitration provisions of this Agreement and any arbitration conducted
pursuant to the terms of this Agreement shall be governed by the Federal Arbitration Act (9 U.S.C.
Secs. 1-16). In this respect, the parties acknowledge that this Agreement involves a transaction
conducted in interstate commerce. Otherwise, this Agreement and the rights of the parties
hereunder shall be governed by and construed in accordance with the laws of the State of
California, exclusive of conflict or choice of law rules.
5. SEVER ABILITY. If any provision of this Agreement is declared or found to be unlawful,
unenforceable or void, such provision will be ineffective only to the extent that it is found
unlawful, unenforceable or void, and the remainder of the provision and all other provisions
shall remain fully enforceable.