
If you're having difficulty, our friendly
customer team is always here to help.
THIS INSTRUCTION BOOKLET CONTAINS IMPORTANT SAFETY INFORMATION. PLEASE READ AND KEEP FOR FUTURE REFERENCE.
AUS:cs.au@costway.com
FRA:cs.fr@costway.com
DEU:cs.de@costway.com
ITA :cs.i t @costway.com ESP:cs.es@costway.com
POL:sklep@costway.com
GBR:cs.uk@costway.com
DEU office: FDS GmbH, Neuer Höltigbaum 36, 22143 Hamburg, Deutschland
ITA office: Milano
FRA office: Saint Vigor d'Ymonville
POL office: GdańskGBR office: IpswichAUS office: TruganinaUSA office: Fontana
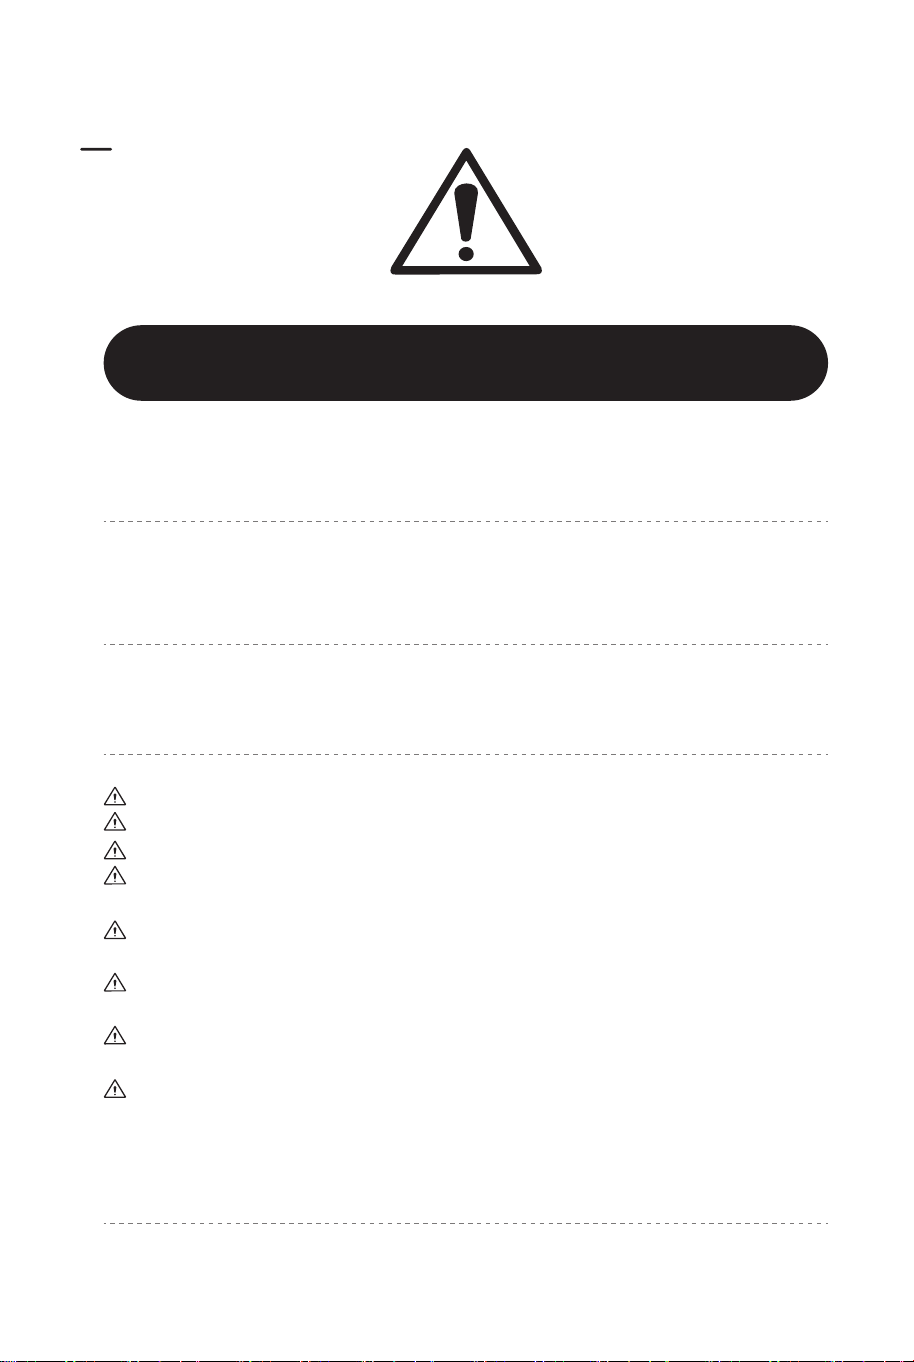
TQ10144
Kids Ride On Bulldozer Truck
Kinder Aufsitz Bulldozer Truck
Tractopelle à Pousser pour Enfants
Buldócer para Niños
Escavatore Cavalcabile per Bambini
Pojazd elektryczny dla dziecka

Der Artikel muss unter der Aufsicht eines Erwachsenen montiert und benutzt
werden.
Lesen Sie jeden Schritt sorgfältig durch und befolgen Sie die richtige
Reihenfolge.
Entfernen Sie alle Verpackungen, separieren und zählen Sie alle Teile und
Hardware vor der Montage oder Verwendung.
Bitte stellen Sie sicher, dass alle Teile richtig montiert sind, eine falsche
Montage kann zu einer Gefahr führen.
Achten Sie bei der Montage auf einen sicheren Untergrund und stellen Sie
den Artikel immer auf eine ebene, feste und stabile Fläche.
Bitte verwenden Sie den Artikel vorsichtig, da es große Geschicklichkeit
erfordert, um Unfälle durch Stürze oder Zusammenstöße des Benutzers oder
anderer zu vermeiden.
Bitte tragen Sie während der Verwendung geeignete Schutzausrüstung, z.B.
Schutzhelm, Handschuhe, Knieschützer, Ellbogenschützer usw.
The product must be installed and used under the supervision of an adult.
Read through each step carefully and follow the proper order.
Remove all packaging, separate and count all parts and hardware.
Please ensure that all parts are correctly installed, incorrect installation can
lead to a danger.
We recommend that, where possible, all items are assembled near the area
in which they will be placed in use, to avoid moving the product
unnecessarily once assembled.
Ensure a secure surface during installation, and place the product always on
a flat, steady and stable surface.
Please use this product with caution. The use of this product requires
superb skills to avoid accidents to the user or others due to a fall or
collision.
Please wear suitable protective equipment during use, e.g. protective
helmet, gloves, knee pads, elbow pads etc.
Attention! Use it with protective equipment.
Attention! Not use it in the traffic.
Attention! Children should use this product under the parental supervision.
Allgemeine Warnhinweise
Before You Start Bevor Sie beginnen
Achtung! Müssen Persönliche Schutzausrüstung tragen .
Achtung! Darf nicht im Straßenverkehr verwenden.
Warnung: Kinder sollten diesen Artikel unter elterlicher Aufsicht benutzen.
Bitte sorgfältig lesen und zum späteren Nachschlagen aufbewahren.
Please read all instructions carefully and keep it for future reference.
EN DE
General Warnings
Warnings Warnung
02 03

Le produit doit être installé et utilisé sous la surveillance d’un adulte.
Lisez attentivement chaque étape et suivez l’ordre correct.
Retirez tous les emballages, séparez et comptez toutes les pièces et le matériel.
Assurez-vous que toutes les pièces sont correctement installées, une installation
incorrecte peut entraîner un danger.
Nous recommandons que, dans la mesure du possible, tous les articles soient
assemblés à proximité de la zone dans laquelle ils seront utilisés, afin d’éviter de
déplacer inutilement le produit une fois assemblé.
Assurez-vous que la surface soit solide pendant l’assemblage et placez toujours le
produit sur une surface plane et stable.
Veuillez utiliser le produit avec précaution, car le produit nécessite une grande habileté,
évitez les accidents de l’utilisateur ou d’autres personnes, par chute ou collision.
Veuillez porter un équipement de protection approprié pendant l’utilisation, par exemple,
le casque de protection, les gants, les genouillères, les coudières, etc.
¡Atención! Utilícelo con equipo de protección.
¡Atención! No lo use en el tráfico.
¡Atención! Los niños deben utilizar este producto bajo la supervisión de sus padres.
Attention ! Utilisez ce produit avec un équipement de protection.
Attention ! Ne l’utilisez pas dans la circulation routière.
Attention ! Les enfants doivent utiliser ce produit sous la surveillance de leurs parents.
Avant de Commencer
Veuillez lire attentivement toutes les instructions et les conserver pour la référence ultérieure.
Antes de Empezar
Lea atentamente todas las instrucciones y consérvelas para futuras consultas.
FR ES
Avertissements Généraux Advertencias Generales
Avertissements Advertencias
El producto debe instalarse y usarse bajo la supervisión de un adulto.
Lea detenidamente cada paso y siga el orden correcto.
Quite todo el embalaje, separe y cuente todas las piezas y los accesorios.
Asegúrese de que todas las piezas estén instaladas correctamente, una
instalación incorrecta puede provocar un peligro.
Recomendamos que, siempre que sea posible, todos los elementos se
monten cerca de la zona en la que se van a utilizar, para evitar mover el
producto innecesariamente una vez montado.
Asegure una superficie segura durante el montaje, y coloque el producto
siempre sobre una superficie plana, firme y estable.
Por favor, utilice este producto con precaución. El uso de este producto
requiere una gran destreza para evitar accidentes al usuario o a otras
personas debido a una caída o colisión.
Por favor, utilice un equipo de protección adecuado durante el uso, por
ejemplo, casco protector, guantes, rodilleras, coderas, etc.
04 05
Produkt musi być zainstalowany i używany pod nadzorem osoby dorosłej.
Przeczytaj uważnie każdy krok i postępuj we właściwej kolejności.
Usuń opakowanie i upewnij się, że zestaw zawiera wszystkie części i elementy
montażowe.
Upewnij się, że wszystkie części są poprawnie połączone, nieprawidłowa instalacja
może prowadzić do wypadku.
Zalecamy, aby w miarę możliwości wszystkie elementy były montowane w pobliżu
miejsca, w którym będą używane, aby uniknąć niepotrzebnego przenoszenia produktu
po złożeniu.
Zapewnij bezpieczną przestrzeń roboczą podczas montażu i upewnij się, że produkt
znajduje się na płaskiej i stabilnej powierzchni.
Używaj produktu ostrożnie. Unikaj upadku lub kolizji.
Podczas użytkowania należy nosić odpowiedni sprzęt ochronny, np. kask ochronny,
rękawiczki, nakolanniki, ochraniacze na łokcie itp.
Il prodotto deve essere installato e utilizzato sotto la supervisione di un adulto.
Leggere attentamente ogni passo e seguire l'ordine corretto.
Rimuovere tutti gli imballaggi, separare e contare tutte le parti e tutti gli accessori.
Si prega di assicurarsi che tutte le parti siano installate correttamente, un'installazione
errata può portare a un pericolo.
Si consiglia, ove possibile, di montare tutti gli articoli vicino alla zona in cui verranno posti
in uso, per evitare di spostare inutilmente il prodotto una volta assemblato.
Garantire una superficie sicura durante il montaggio e posizionare il prodotto sempre su
una superficie piana, stabile.
L'uso di questo prodotto richiede abilità superbe per evitare incidenti all'utente o ad altri
a causa di una caduta o collisione.
Indossare dispositivi di protezione adeguati durante l'uso, come il casco protettivo, i
guanti, le ginocchiere, le gomitiere, ecc.
Attenzione! Utilizzare il prodotto con dispositivi di protezione.
Attenzione! Non usare il prodotto nel traffico.
Attenzione! I bambini devono usare questo prodotto sotto la supervisione dei genitori.
Prima di Iniziare Zanim Zaczniesz
Przeczytaj uważnie wszystkie instrukcje i zachowaj je na przyszłość.Si prega di leggere attentamente tutte le istruzioni e conservarle per riferimento futuro.
PLIT
Avvertenze Generali Ogólne ostrzeżenia
Uwaga! Używaj z ochraniaczami.
Uwaga! Nie używaj go w ruchu ulicznym.
Uwaga! Dzieci moga używać tego produktu jedynie pod nadzorem dorosłych.
Avvertenza Ostrzeżenia
06 07
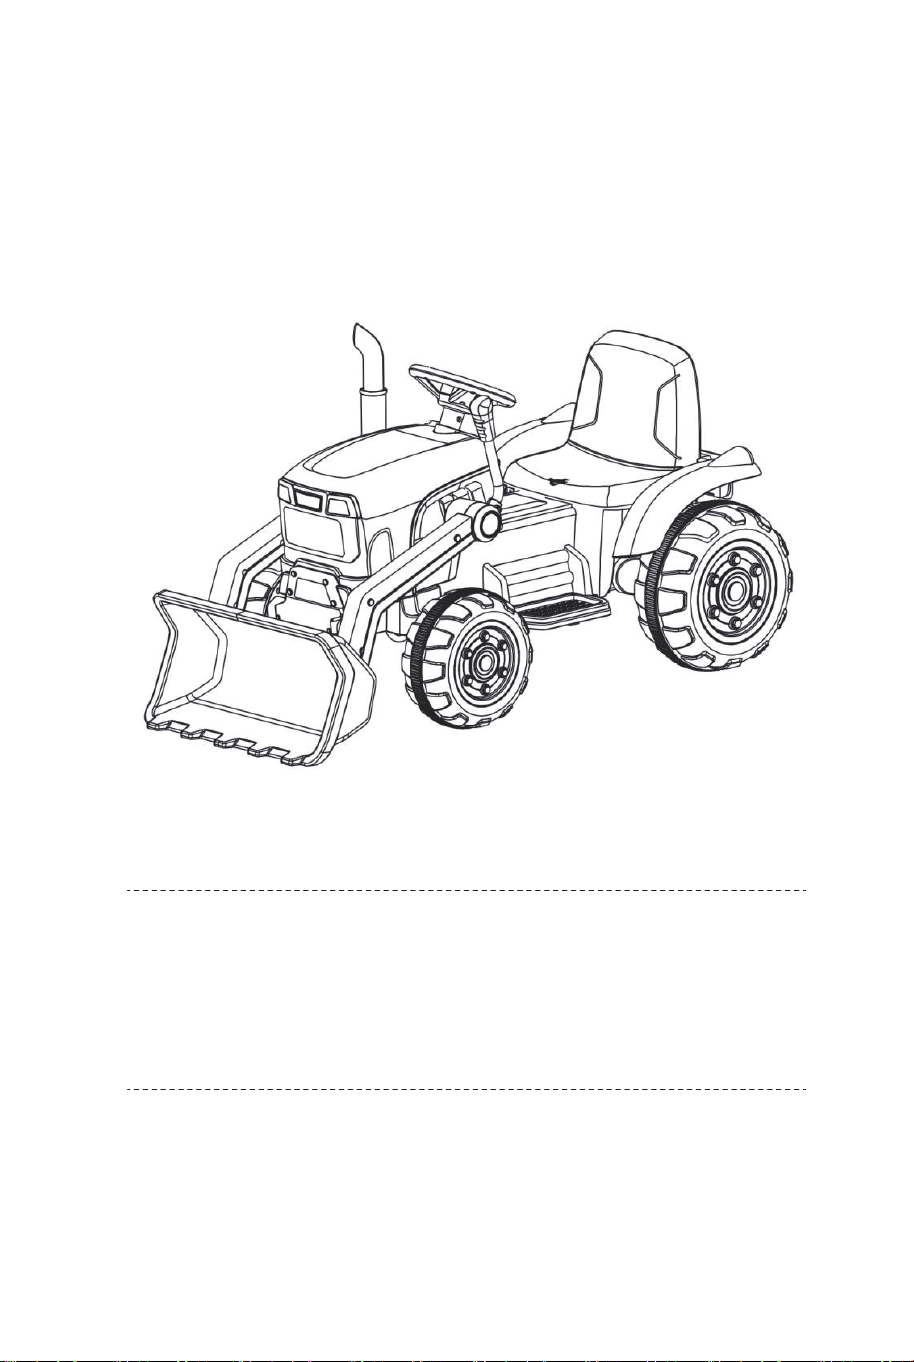
Kids Ride On Bulldozer Truck
Kinder Aufsitz Bulldozer Truck
Tractopelle à Pousser pour Enfants
Buldócer para Niños
Escavatore Cavalcabile per Bambini
Pojazd elektryczny dla dziecka
EN
SAFETY
Please retain these instructions for future reference.
NOTE: For best performance,only use this vehicle on flat and hard surfaces.
AGE RANGE: 3 to 8 years old
WEIGHT CAPACITY: 30KG(66LBS) is the maximum weight for 1 rider
The following safety hazards may result in serious injury or death:
● This product contains small parts.Keep children away during assembly.Make
sure to remove all packaging material and parts from underneath the vehicle
body.
● Never open the battery.Batteries contain lead and lead compounds(acids).
● Limbs,hair,and clothing can get caught in moving parts.Always wear
shoes,keep limbs away from moving parts,and do not wear loose clothing
while operating this vehicle.
● This vehicle does not have brakes or braking capability.Do not leave a child
unattended during operation.DO not use this in a location that may require
braking capability,as this could result in loss of control,which may cause
serious injury or death.
● Use of this vehicle near streets,motor vehicles,steps,bodies of water,sloped
surfaces,hills,wet areas,flammable vapors,in alleys,at night,or in the dark
could result in an unexpected accident.
● Use of this vehicle in unsafe conditions such as snow,rain,loose
dirt,mud,sand,or gravel may result in an unexpected accident such as
tipping over,and could damage the electrical system or battery.
● Do not operate this vehicle in an unsafe manner.Examples include but are
not limited to:
-Pulling the vehicle with another vehicle or similar device
-Pushing the user
-Traveling at an unsafe speed
08 09

The following safety hazards may result in serious injury or death:
● Use of a battery or charger other than the supplied rechargeable battery and
charger may cause a fire or explosion.Only use the supplied battery and
charger.
● Use of the rechargeable battery and charger for any other product may
result in overheating,fire,or explosion.Never use the supplied rechargeable
battery and charger with another product.
● Explosive gases are created during charging.Charge the battery in a
well-ventilated area.Do not charge the battery near heat or flammable
materials.
● Contact between the positive and negative terminals may result in fire or
explosion.Avoid direct contact between the terminals.Picking up the battery
by the wires or charger can cause damage to the battery and may result in a
fire. Always pick up the battery by its case or handles.
● Liquids on the battery may cause fire or electric shock.Always keep all
liquids away from the battery and keep the battery dry.Contact or exposure
to battery leakage(lead acid)may cause serious injury.If contact or exposure
occurs immediately call your physician.If the chemical is on the skin or in the
eyes,flush with cool water for 15 minutes.If the chemical was
swallowed,immediately give the person water or milk.Do not give water or
milk if the patient is vomiting or has a decreased level of alertness.Do not
induce vomiting.
● Battery posts,terminals,and related accessories contain lead and lead
compounds(acid).
● Tampering or modifying the electric circuit system may cause a shock,fire or
explosion and permanently damage the system.Exposed wiring and circuitry
in the charger may cause electric shock.Always keep the charger housing
closed.
The following safety hazards may result in serious injury or death:
● Never leave a child unattended.
● Always sit in the seat when using this vehicle.
● Keep your hands,hair,and clothes away from moving part.
● Always wear shoes when operating this vehicle.
● Children under 3 years of age cannot use the vehicle.
● Only drive on level ground.
● Do not go near swimming pools or other bodies of water,drop-offs,or up and
down steep inclines.
● Do not drive the vehicle into loose dirt,mud,sand,fine gravel,or on wet
surfaces.
● Do not drive the vehicle on streets or near cars.
BATTERY WARNINGS USER WARNINGS
SPECIFICATIONS
Batteries
Motor
Suitable Age
Max Weight
Dimension
Speed
Play Time
Charger
12V
12V
3-8years
30KG (66LBS)
114*58*59cm (45”x23”x23.5”)
2.5~3.5km/h (1.6-2.2Mph)
1-2 hours / recharge time 8-12 hours
Output DC 12V
10 11

The following safety hazards may result in serious injury or death:
● Use of a battery or charger other than the supplied rechargeable battery and
charger may cause a fire or explosion.Only use the supplied battery and
charger.
● Use of the rechargeable battery and charger for any other product may
result in overheating,fire,or explosion.Never use the supplied rechargeable
battery and charger with another product.
● Explosive gases are created during charging.Charge the battery in a
well-ventilated area.Do not charge the battery near heat or flammable
materials.
● Contact between the positive and negative terminals may result in fire or
explosion.Avoid direct contact between the terminals.Picking up the battery
by the wires or charger can cause damage to the battery and may result in a
fire. Always pick up the battery by its case or handles.
● Liquids on the battery may cause fire or electric shock.Always keep all
liquids away from the battery and keep the battery dry.Contact or exposure
to battery leakage(lead acid)may cause serious injury.If contact or exposure
occurs immediately call your physician.If the chemical is on the skin or in the
eyes,flush with cool water for 15 minutes.If the chemical was
swallowed,immediately give the person water or milk.Do not give water or
milk if the patient is vomiting or has a decreased level of alertness.Do not
induce vomiting.
● Battery posts,terminals,and related accessories contain lead and lead
compounds(acid).
● Tampering or modifying the electric circuit system may cause a shock,fire or
explosion and permanently damage the system.Exposed wiring and circuitry
in the charger may cause electric shock.Always keep the charger housing
closed.
The following safety hazards may result in serious injury or death:
● Never leave a child unattended.
● Always sit in the seat when using this vehicle.
● Keep your hands,hair,and clothes away from moving part.
● Always wear shoes when operating this vehicle.
● Children under 3 years of age cannot use the vehicle.
● Only drive on level ground.
● Do not go near swimming pools or other bodies of water,drop-offs,or up and
down steep inclines.
● Do not drive the vehicle into loose dirt,mud,sand,fine gravel,or on wet
surfaces.
● Do not drive the vehicle on streets or near cars.
BATTERY WARNINGS USER WARNINGS
SPECIFICATIONS
Batteries
Motor
Suitable Age
Max Weight
Dimension
Speed
Play Time
Charger
12V
12V
3-8years
30KG (66LBS)
114*58*59cm (45”x23”x23.5”)
2.5~3.5km/h (1.6-2.2Mph)
1-2 hours / recharge time 8-12 hours
Output DC 12V
10 11

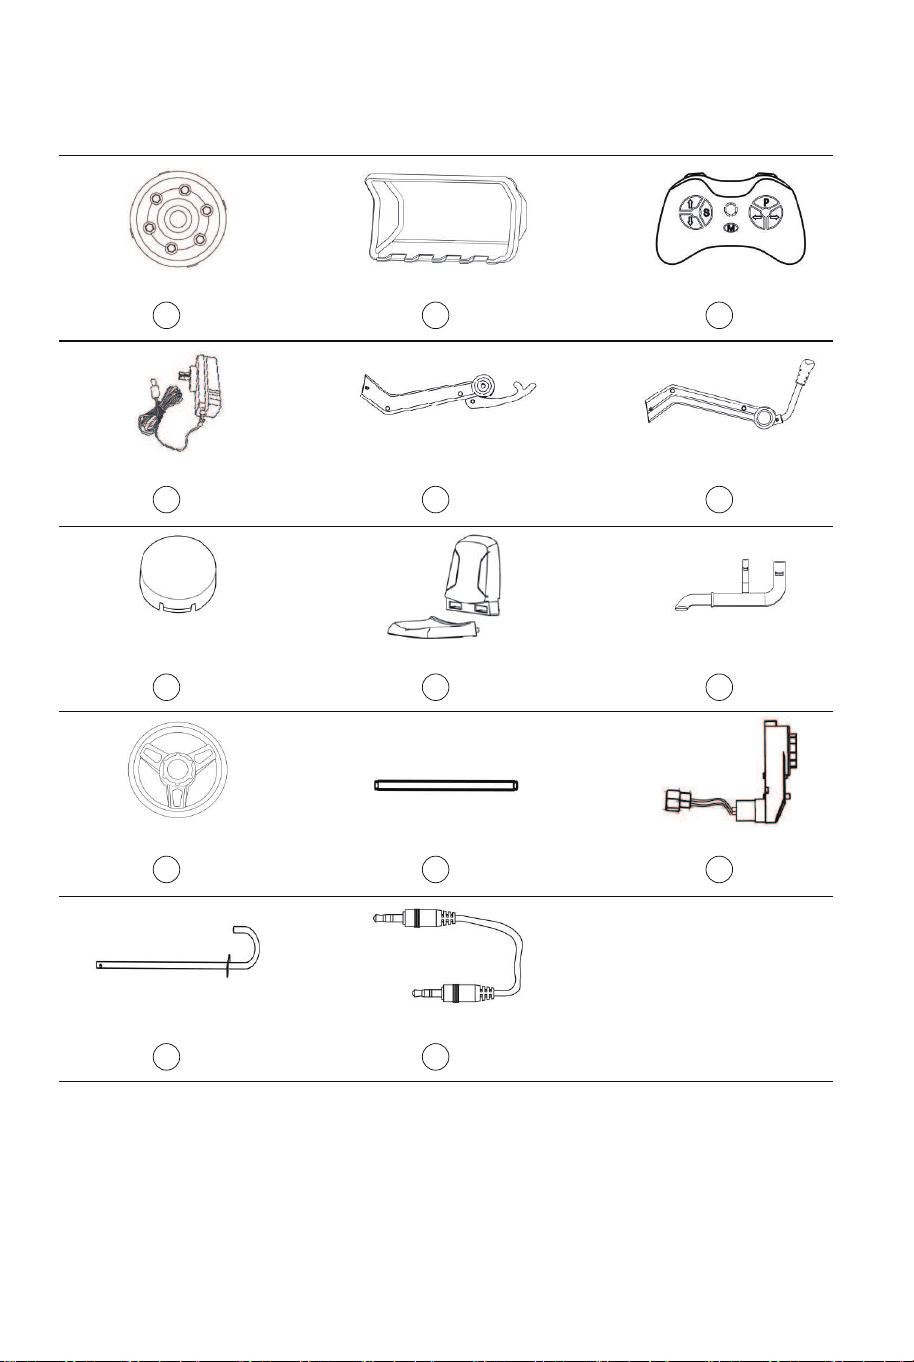
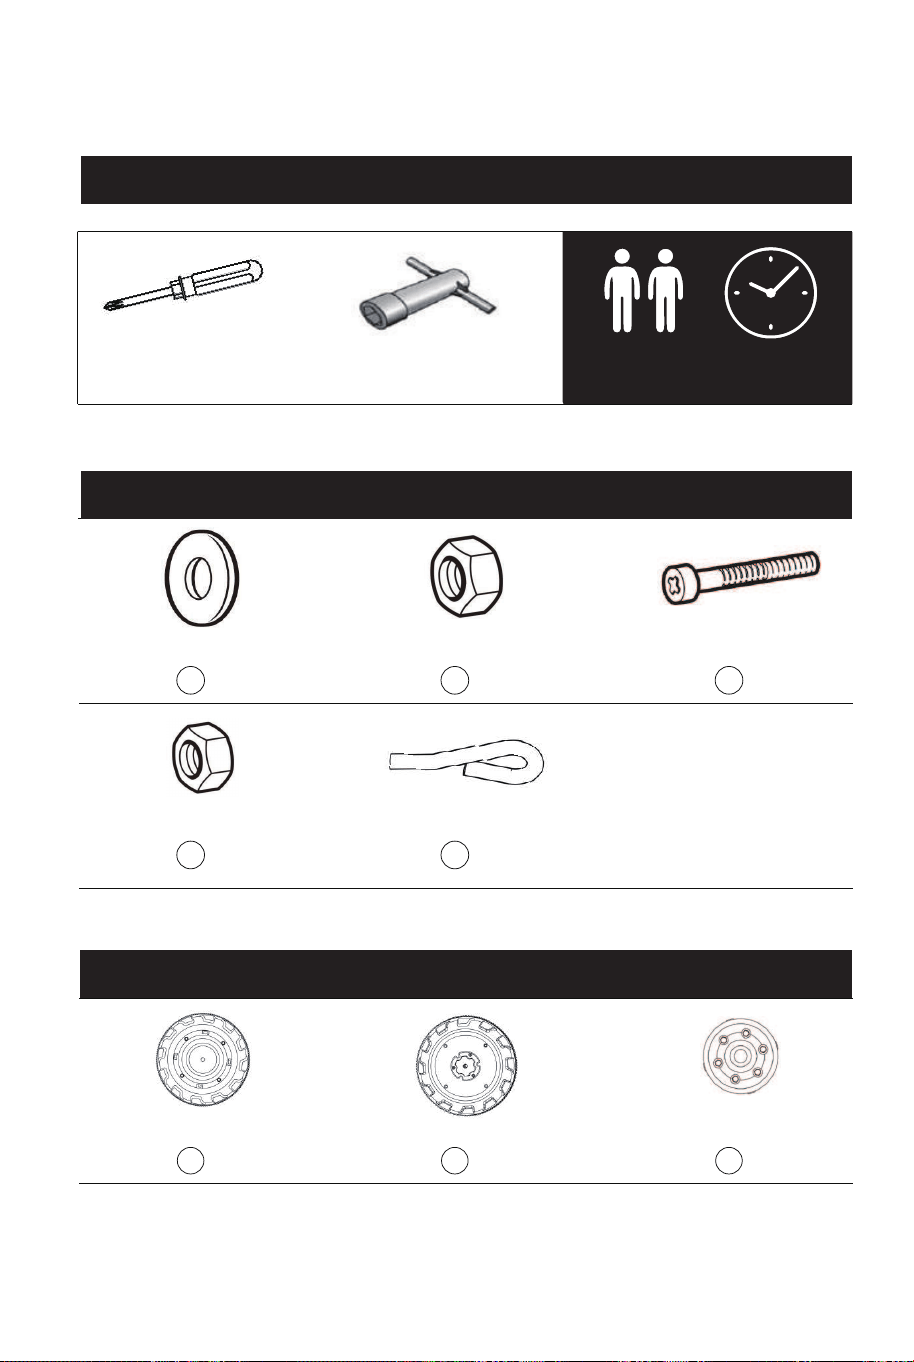
TOOLS REQUIRED
HARDWARE
PARTS
SCREWDRIVER
(BRING YOUR OWN)
M10 WRENCH
(PROVIDED)
2 PERSON
ASSEMBLY
APPROXIMATELY
45 MIN. ASSEMBLY
1 x9
2 x6
3 x2
4 x2
5 x1
A
x2
B x2
C x2
D x2
E x1
F
x1
G x1
H x1
I x1
J x2
K x1
L x1
M x1
N x1
O x2
P x1
Q x1
φ10 GASKETS M10 NUTS
M5 NUTS COTTER PIN
M5*35mm
SCREW
FRONT WHEEL REAR WHEEL
FRONT WHEEL
COVER
REAR WHEEL COVER BUCKET REMOTE CONTROL
CHARGER
BUCKET ARM
(LEFT)
BUCKET ARM
(RIGHT)
BUCKET ARM
COVER
SEAT CHIMNEY
STEERING WHEEL REAR AXLE GEAR BOX (L/R)
STEERING LEVER AUDIO CABLE
12 13
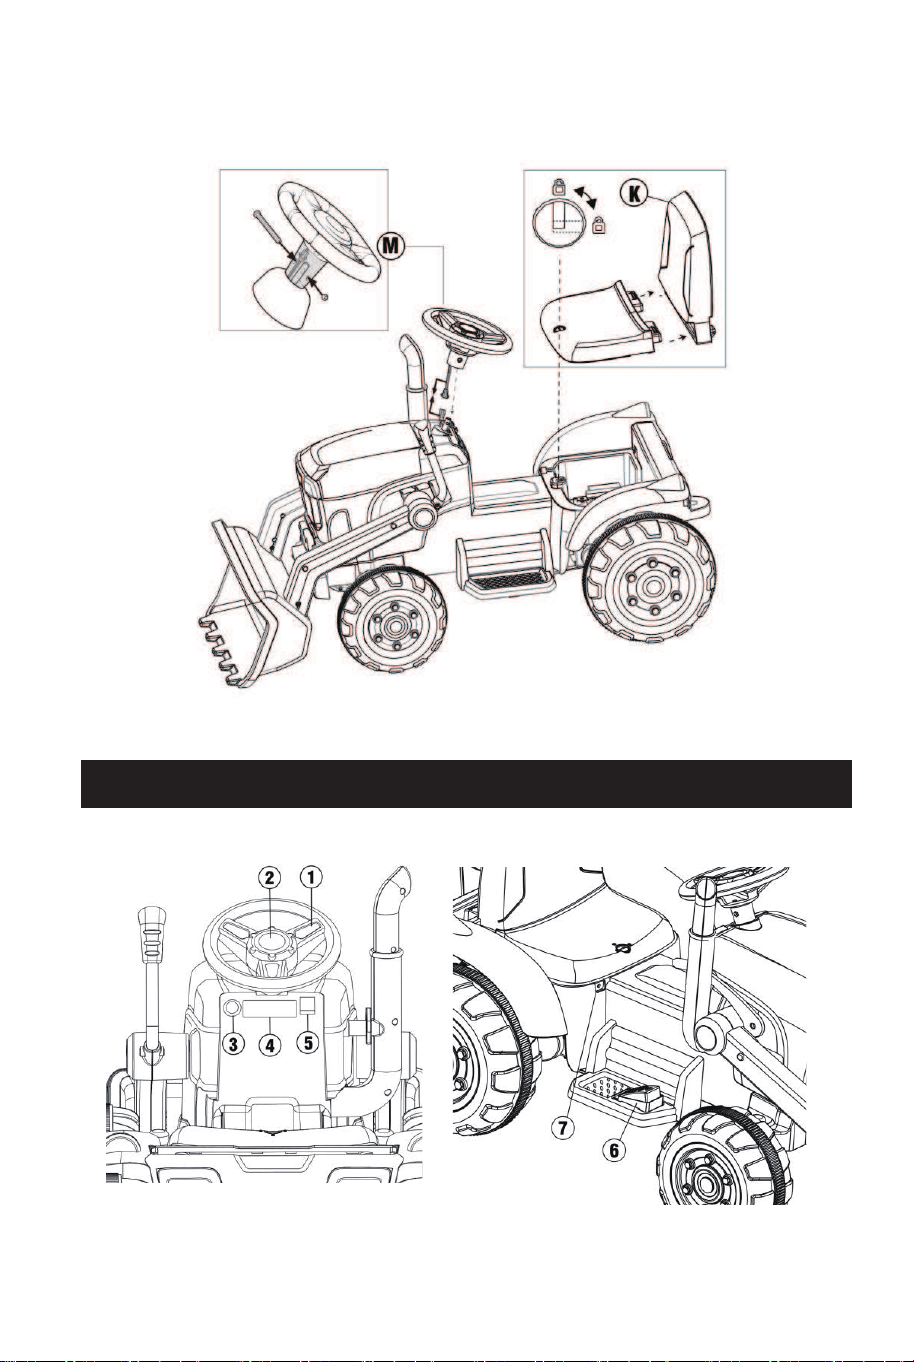
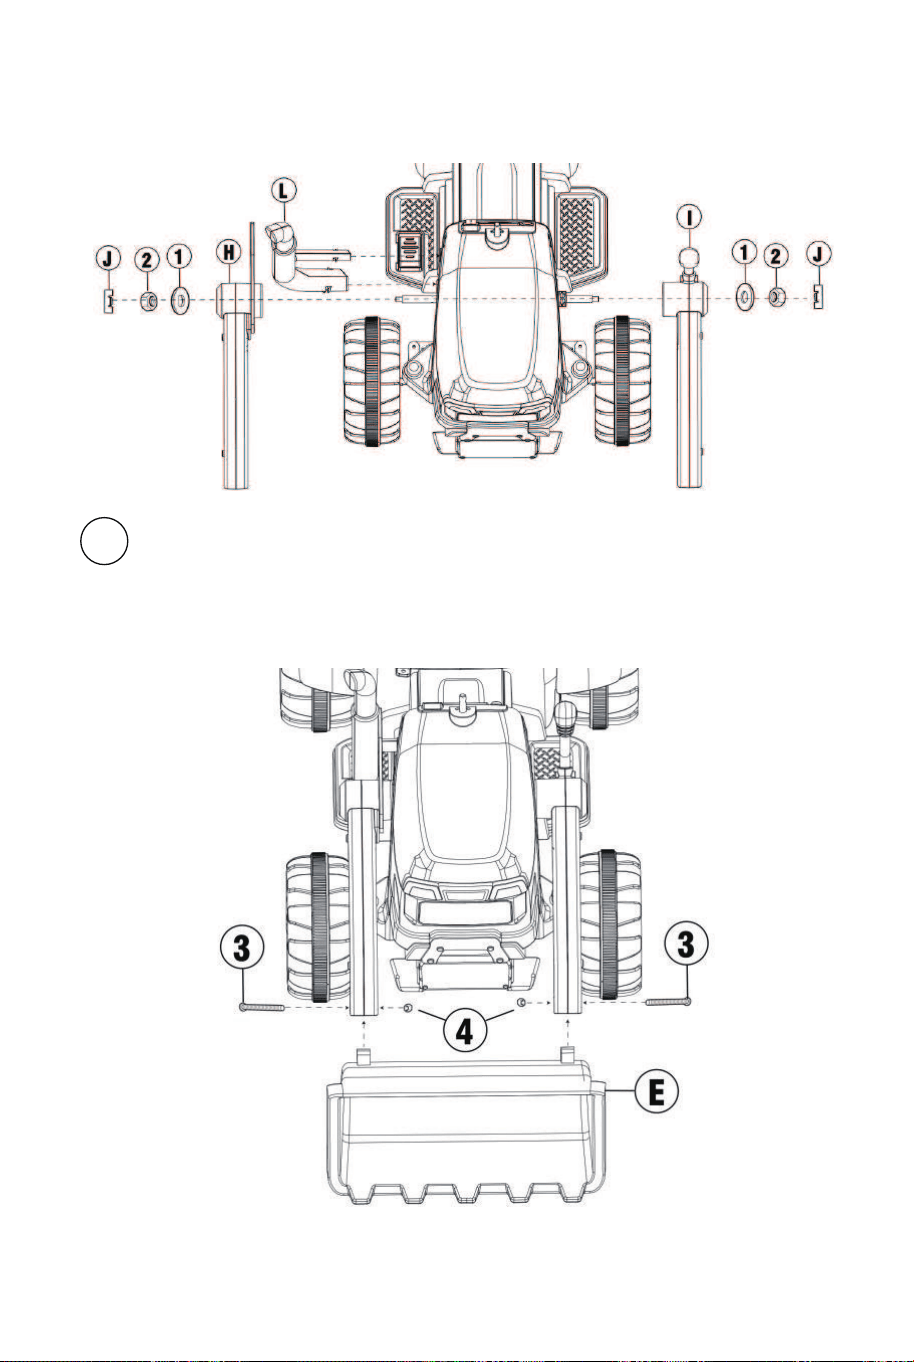
Fix the steering lever.
● Insert the steering lever into the body hole.
● Insert φ10 washer on steering lever.
● After the steering lever is installed in place, insert the cotter pin to
bend and fix it.
Fix the rear axle.
● Insert the rear axle into the car.
Fix the gear box (L/R).
● Put the gear box into the rear axle, and clip the motor and motor wire
into the body slot. (Note: the gear box is distinguished from the left
and right)
PRODUCT ASSEMBLY
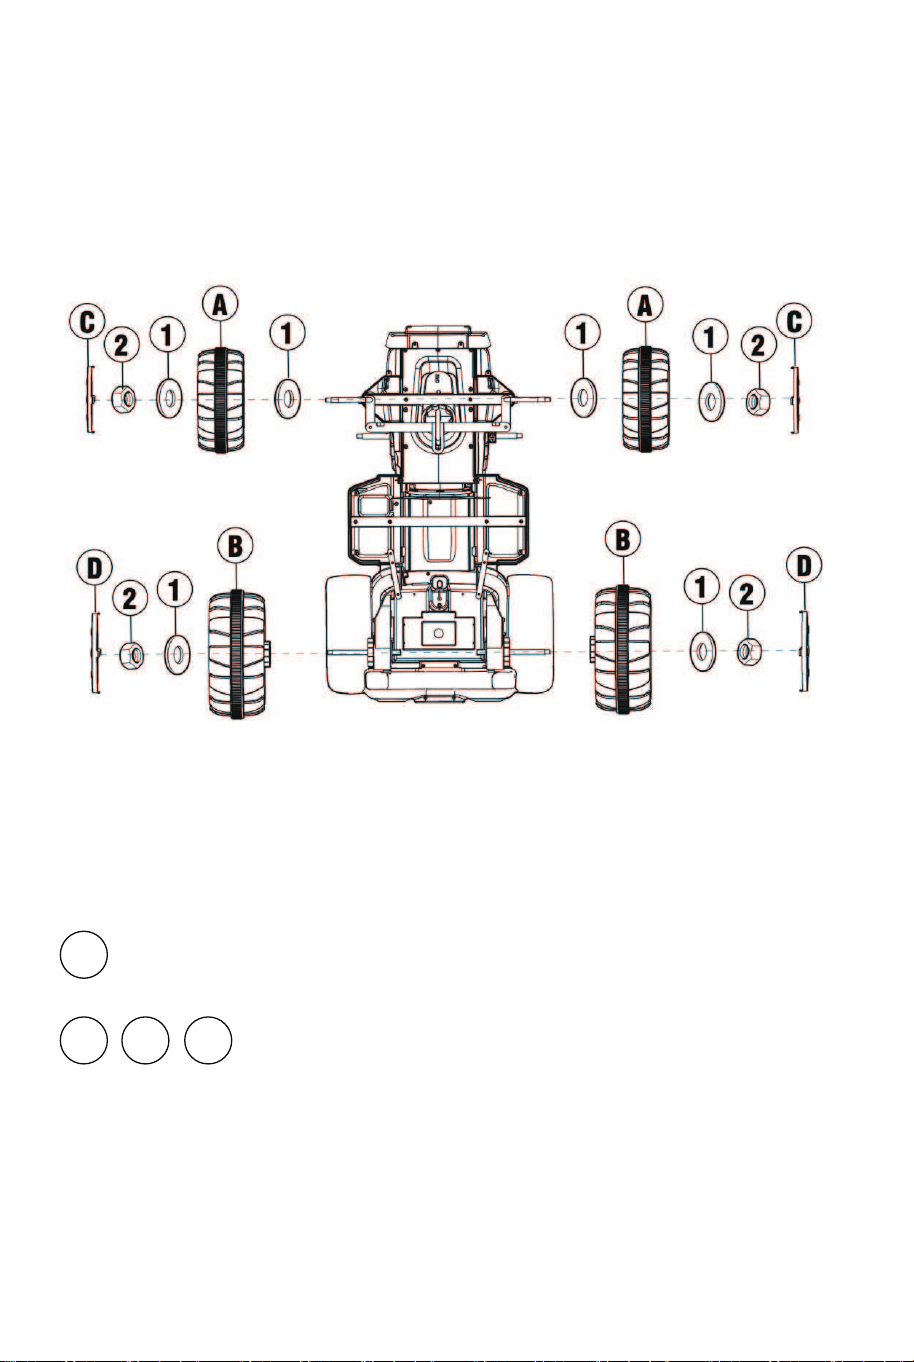
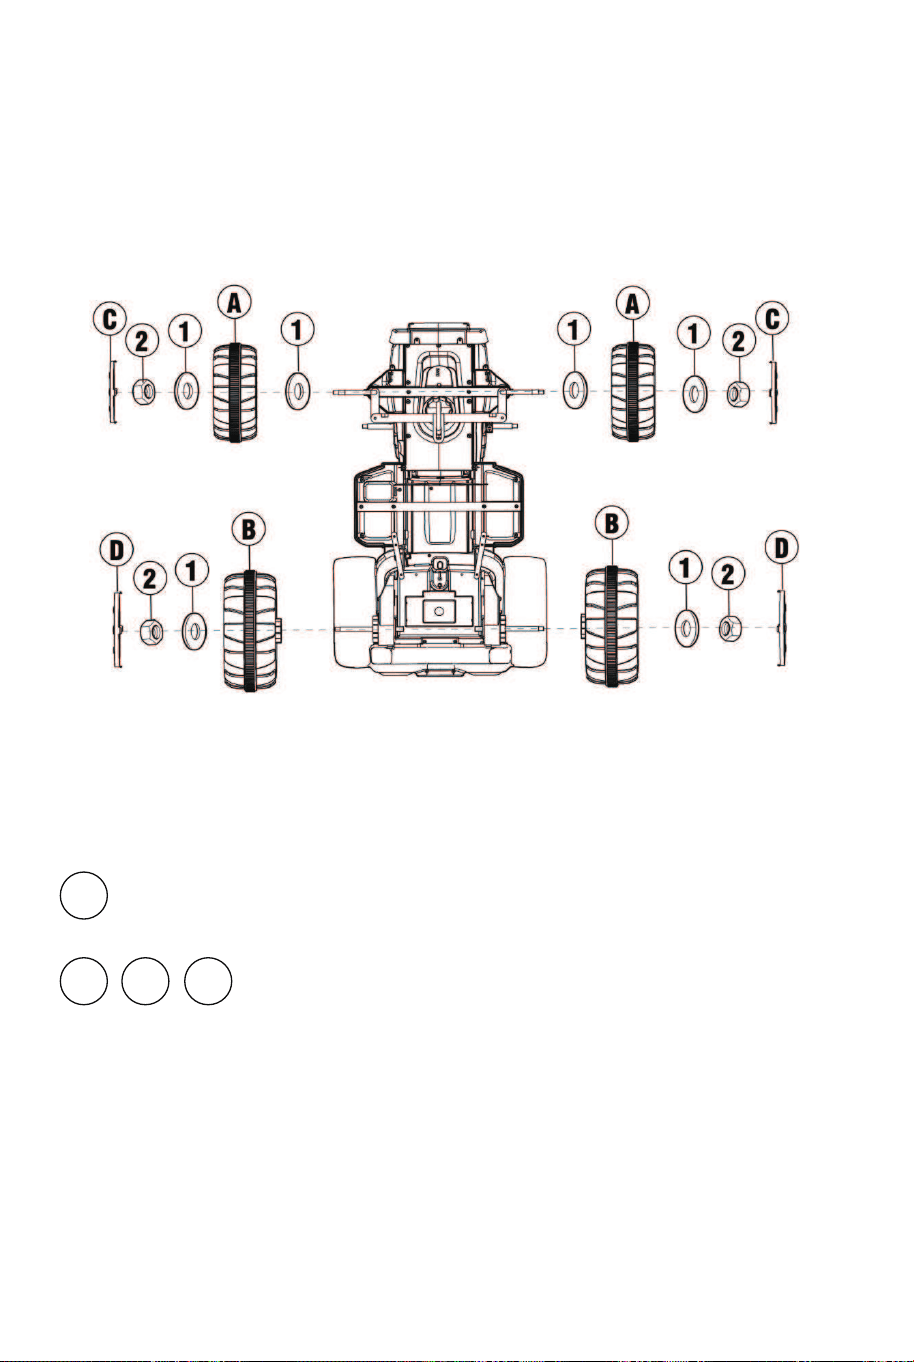
Turn over the body so that its body faces up.
Put the gaskets, front wheel, gaskets and nut into the front axle in turn.
Fix the nut with the M10 wrench and then attach the front wheel cover to the
wheel.
Place the rear wheel,gaskets, and nut on the rear axle in turn.
Fix the nut with the M10 wrench and then attach the rear wheel cover to the
wheel.
P
Fix the chimney.
● Clip chimney into the body slot.
Put the bucket arm, gaskets and nut into the bucket axle in turn.
Fix the nut with the M10 wrench and then attach the bucket arm cover
to the bucket arm. (Note: the bucket arm is divided into left and right, as
shown in the figure)
Note: When installing the front bucket arms, you need to tap them into
place.
L
J H I
N
O
O
N
Turn over the body so that its body faces up.
14 15
1
P
Fix the steering lever.
● Insert the steering lever into the body hole.
● Insert φ10 washer on steering lever.
● After the steering lever is installed in place, insert the cotter pin to
bend and fix it.
Fix the rear axle.
● Insert the rear axle into the car.
Fix the gear box (L/R).
● Put the gear box into the rear axle, and clip the motor and motor wire
into the body slot. (Note: the gear box is distinguished from the left
and right)
PRODUCT ASSEMBLY
Turn over the body so that its body faces up.
Put the gaskets, front wheel, gaskets and nut into the front axle in turn.
Fix the nut with the M10 wrench and then attach the front wheel cover to the
wheel.
Place the rear wheel,gaskets, and nut on the rear axle in turn.
Fix the nut with the M10 wrench and then attach the rear wheel cover to the
wheel.
P
Fix the chimney.
● Clip chimney into the body slot.
Put the bucket arm, gaskets and nut into the bucket axle in turn.
Fix the nut with the M10 wrench and then attach the bucket arm cover
to the bucket arm. (Note: the bucket arm is divided into left and right, as
shown in the figure)
Note: When installing the front bucket arms, you need to tap them into
place.
L
J H I
N
O
O
N
Turn over the body so that its body faces up.
14 15
1
P

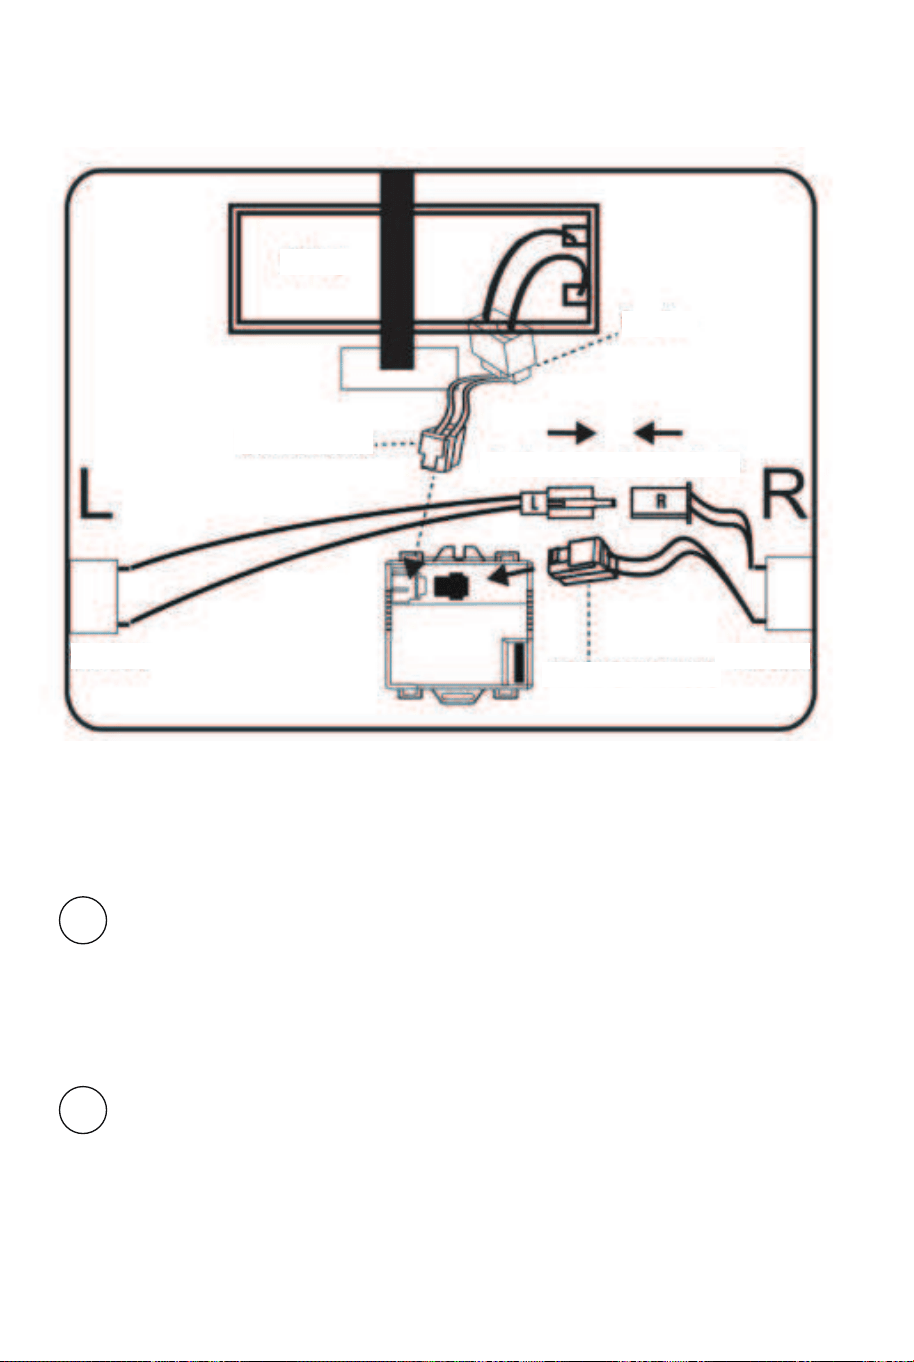
Find out the main power line under the seat, insert the plug-in of the power line
into the corresponding socket of the receiver, connect one end of the right
drive motor line with the left drive motor line, and insert the other plug-in on the
right into the socket of the receiver.
Fix the bucket.
● Clip the bucket into the bucket arm.
● As shown in the figure:And fix it with M5 * 35mm screw and M5 nuts.
E
Fix the steering wheel.
● Remove the nut and bolt from the steering wheel.
● Connect the wires coming from the steering column to the wires on
the steering wheel.
● Insert the steering wheel over the steering and secure with nut and
bolt.
Fix the seat.
● Merge seat.
● Clip the seat into the body.
● Rotate the latch on the seat to secure the seat.
M
K
Battery
Fuse box
Gearbox insert
Gearbox insert
GEAR BOX
Gearbox power supply
GEAR BOX
Power connector
16 17
DASHBOARD DIAGRAM
1. Music Button: press to play music;
2. Horn button: press to play the horn;
3. Power button: can turn the vehicle on or off;
4. Central control panel;
5. Shift Switch: Change the direction of the car, Forward-Backward;
6. Pedal button: Step on the button, the car will move, release the pedal to
stop slowly;
7. Charge socket;
Central control panel:
1. Power display: Clearly see the battery power, in order to charge; the smaller
the number, the lower the voltage. Please charge in time;
2. Last song/Volume decrease: Change songs, and long press will decrease
volume;
3. Play or stop switch;
4. Next song/Volume increase: Change songs, and long press will increase
volume;
5. Mode switch: press to switch mode/music mode/radio mode/Wireless
Technology;
6. MP3: the data cable can be connected to other devices and play music;
7. U: System for connecting external equipment;
18 19

Remote control first. When the remote control is on, foot pedal is not
workable
Operation Manual:
Take out the remote control, Open the battery compartment on the back of the
remote control and add two AAA LRO3 alkaline batteries. Pay attention to the
polarity of the batteries. When the alignment light and speed indicator light up,
it indicates that the battery installed is correct. This product does not provide
dry batteries.
<Button Description >
(1) Long press on the frequency key (M) 2-4 seconds, Low speed LED light
flashing. Turn on the power of the car, Low speed LED light keeps flashing to
long lighting, then frequency bind succeeds. If the frequency bind failed (Low
speed LED light flashing) , remove the battery and repeat steps
P: Press to brake
S: Speed:press to change speed (low, middle and high speed).
△Forward ▽Backward
Turn left Turn right
2)Brake button: Press it to stop moving; press it again to move.
3)Speed selection key and speed indication: used to select speed of the car.
Press the key once to switch the speed once. 3 speeds are cyclically switched,
and the switching sequence is: low-medium-high. The speed indicator is
arranged from top to bottom on the remote control: high-speed lamp,
medium-speed lamp, low-speed lamp; when switching to one speed, the
corresponding indicator lamp will light up. Note: The speed grade changes
only when moving forward
4)Forward/backward keys: used for forward and backward movement control.
When one of the keys is pressed, the moving speed will slowly increase to
reach the set speed level. Therefore, children will not have a sudden impact.
5)Left turn/right turn key: used for left and right direction control.
Note: without operation after 10 seconds, indication light will be off into power
saving mode
WARNING: The remote control is not a toy. It is for the adult use only, and
should not be used by a child. Close adult supervision is always required.
Reception range may change significantly with weather, battery, and other
environmental conditions.
REMOTE CONTROL DIAGRAM
Speed
Forward Backward
Warning
Only used by adults
Long press: Frequency
Turn left
Turn right
Emergency brake
Low speed
Middle speed
High speed
20 21

1. Insert the charger jack into the charging hole of the car.
2. Plug the charger plug into the stable matching AC power supply as shown in
the picture.
● Charge the battery 8 to 12 hours before initial use.
● On average, you will need to charge the battery between 8 and 12 hours.Do
not charge the battery for more than 20 hours.Failure to charge the battery as
directed could cause permanent damage to the battery.
● Damage to the battery may occur if it is allowed to drain completely.Do not
allow the battery to drain completely.
● Check the battery and charger (supply cord,connector) for wear and damage
before charging.DO not charge the battery if damage has occurred.
● nly an adult who has read and understood the safety warnings should
handle,charge and recharge the battery.
● Park the vehicle indoors or cover it with a tarp to protect it from wet weather.
● Do not leave the vehicle in the sun for long periods of time or fading may
occur. Store in shade or cover with tarp.
● Do not wash the vehicle with a hose.
● Do not wash the vehicle with soap.
● Charge battery at least once a month to prolong the life of the battery.
CHARGING INSTRUCTIONS CARING FOR YOUR RIDE-ON
TROUBLESHOOTING
PROBLEM
Vehicle does not
move
Battery does not
recharge
Battery does not last
Low battery
Electrical protection
Switch not in the correct
position
Battery connectors
disconnected
Fully charge the battery
Stop use for several
minutes and restart
Completely press in
switches
Plug in battery connectors
Battery connectors
disconnected
Charge not connected to
socket or outlet
Battery does not have a full
charge
Plug in battery connectors
Completely plug in the
charger
Fully charge the battery
REASON SOLUTION
22 23

WARNING
● The battery on the vehicle is not replaceable.
● Do not mix old and new batteries.
● Do not mix alkaline,standard(carbon-zinc),or rechargeable batteries.
● Non-rechargeable batteries should not be charged.
● Rechargeable batteries should be charged under adult supervision only.
● Exhausted batteries should be removed.
● The supply terminals should not be short-circuited.
● Do not put batteries next to or in a heat source(fire,electronic heating
device,etc.)
● Do not hit batteries against hard objects.
● Do not submerge batteries in water.
● Batteries should be inserted with the correct polarity.
● Only use the battery specified by the manufacturer.
● Only use the charger specified by the manufacturer.
● Protective equipment should be worn.Not to be used in traffic.
● The toy should be used with caution since skill is required to avoid falls or
collisions causing injury to the user or third parties.
● To reduce the risk of injury,adult supervision is required.Never use in
roadways,near motor vehicles,on or near steep inclines or steps,swimming
pools or other bodies of water;always wear shoes,and never allow more than
1 rider.
WARNING: ADULT ASSEMBLY REQUIRED
WARNING: Not to be used in traffic
WARNING: CHOCKING HAZARD-Small parts.
Not for children under 3yrs.
WARNINGS REGARDING BATTERIES
The following batteries or accumulators are contained in this
electronic device
Information on the safe removal of the batteries or accumulators
Battery Type Chemical System
6FM7 Lead(Pb)
● Warning: Make sure the battery is completely drained.
● Open the seat, remove the screws on the iron sheet with a screwdriver, remove the
iron sheet and unplug the two wires from the battery to remove the battery.
● Carefully remove the battery or accumulator.
● The battery or accumulator and the device can now be disposed of separately.
Battery is warm and
makes a
slight noise while
charging
Slow speed
Vehicle shakes while
driving
Difficult shifting
between
forward/reverse
Forward and reverse
switch is
flipped
Normal Normal
Low battery Fully charge the battery
Overloaded vehicle Reduce the weight on the
vehicle
Uneven or sloped road Drive on flat pavement
Loose connection to motor Ensure the motor is
properly connected
to the battery
Attempt to shift while
vehicle is moving
Only shift when the vehicle
is at a stop
Gear boxes are installed
incorrectly
Make sure the L gear box
is on the left
and R gear box is on the
right
24 25

Caution:
This device complies with Part 15 of the FCC Rules. Operation is subject to
the following two conditions: (1) this device may not cause harmful
interference. (2) this device must accept any interference received, including
interference that may cause undesired operation.
Changes or modifications not expressly approved by the party responsible for
compliance are strictly forbidden.
This equipment has been tested and found to comply with the limits for a
Class B digital device, pursuant to part 15 of the FCC Rules. These limits are
designed to provide reasonable protection against harmful interference in a
residential installation. This equipment generates uses and can radiate radio
frequency energy and, if not installed and used in accordance with the
instructions, may cause harmful interference to radio communications.
However, there is no guarantee that interference will not occur in a particular
installation. If this equipment does cause harmful interference to radio or
television reception, which can be determined by turning the equipment off
and on, the user is encouraged to try to correct the interference by one or
more of the following measures:
—Reorient or relocate the receiving antenna.
—Increase the separation between the equipment and receiver.
—Connect the equipment into an outlet on a circuit different from that to which
the receiver is connected.
—Consult the an experienced radio/TV technician for help.
FCC Statement
Carrier Frequency of Channels
Channel
1
2
3
4
5
6
7
8
9
10
11
12
13
14
15
16
17
18
20
21
22
23
24
25
26
27
28
29
30
31
32
33
34
35
36
Frequency
(MHz)
Channel
Frequency
(MHz)
2405
2406
2407
2408
2409
2410
2411
2412
2413
2414
2415
2416
2417
2418
2419
2420
2421
2422 37 2441
19 2423 38 2442
2424
2425
2426
2427
2428
2429
2430
2431
2432
2433
2434
2435
2436
2437
2438
2439
2440
26 27

39
40
41
42
43
44
45
46
47
48
49
50
51
52
53
54
55
56
57
58
59
60
61
62
63
64
65
66
67
68
69
70
71
72
73
74
75
2443
2444
2445
2446
2447
2448
2449
2450
2451
2452
2453
2454
2455
2456
2457
2458
2459
2460
2461
2462
2463
2464
2465
2466
2467
2468
2469
2470
2471
2472
2473
2474
2475
2476
2477
2478
2479
DE
SICHERHEIT
Bitte bewahren Sie diese Anweisungen für zukünftige Referenzen auf.
HINWEIS: Verwenden Sie dieses Fahrzeug nur auf ebenen und harten
Oberflächen, um eine optimale Leistung zu erzielen.
ALTERSGRUPPE: 3 bis 8 Jahre alt
GEWICHTSKAPAZITÄT: 30KG ist das maximale Gewicht für 1 Fahrer
Die folgenden Sicherheitsgefahren können zu schweren Verletzungen oder
zum Tod führen:
● Dieses Produkt enthält Kleinteile.Halten Sie Kinder während der Montage
fern. Achten Sie darauf, alle Verpackungsmaterialien und Teile unter der
Karosserie zu entfernen.
● Öffnen Sie niemals die Batterie.Batterien enthalten Blei und
Bleiverbindungen (Säuren).
● Gliedmaßen, Haare und Kleidung können sich in beweglichen Teilen
verfangen. Tragen Sie immer Schuhe, halten Sie Gliedmaßen von
beweglichen Teilen fern und tragen Sie keine weite Kleidung, wenn Sie
dieses Fahrzeug bedienen.
● Dieses Fahrzeug hat keine Bremsen oder Bremsfähigkeit. Lassen Sie
Kinder während des Betriebs nicht unbeaufsichtigt. Benutzen Sie das
Fahrzeug nicht an Orten, an denen ein Bremsen erforderlich ist, da dies zum
Verlust der Kontrolle führen kann, was zu schweren Verletzungen oder zum
Tod führen kann.
● Die Verwendung dieses Fahrzeugs in der Nähe von Straßen,
Kraftfahrzeugen, Treppen, Gewässern, schrägen Flächen, Hügeln, nassen
Bereichen, entflammbaren Dämpfen, in Gassen, bei Nacht oder in der
Dunkelheit kann zu einem unerwarteten Unfall führen.
● Die Verwendung dieses Fahrzeugs unter unsicheren Bedingungen wie
Schnee, Regen, losem Schmutz, Schlamm, Sand oder Kies kann zu einem
unerwarteten Unfall führen, z. B. zum Umkippen, und kann das elektrische
System oder die Batterie beschädigen.
● Betreiben Sie das Fahrzeug nicht auf unsichere Weise, z. B. durch
-Ziehen des ahrzeugs mit einem anderen Fahrzeug oder einem ähnlichen
Gerät
-Den Benutzer schieben
-Fahren mit einer unsicheren Geschwindigkeit
28 29

Die folgenden Sicherheitsrisiken können zu schweren Verletzungen oder zum
Tod führen:
● Wenn Sie einen anderen Akku oder ein anderes Ladegerät als den
mitgelieferten Akku und das mitgelieferte Ladegerät verwenden, besteht
Brand- und Explosionsgefahr. Verwenden Sie nur den mitgelieferten Akku
und das mitgelieferte Ladegerät.
● Die Verwendung des Akkus und des Ladegeräts für ein anderes Produkt
kann zu Überhitzung, Brand oder Explosion führen. Verwenden Sie den
mitgelieferten Akku und das Ladegerät niemals mit einem anderen Produkt.
● Während des Ladevorgangs entstehen explosive Gase. Laden Sie den Akku
in einem gut belüfteten Bereich auf. Laden Sie den Akku nicht in der Nähe
von Hitze oder brennbaren Materialien auf.
● Ein Kontakt zwischen Plus- und Minuspol kann zu einem Brand oder einer
Explosion führen. Vermeiden Sie den direkten Kontakt zwischen den Polen.
Wenn Sie den Akku an den Kabeln oder am Ladegerät anfassen, kann der
Akku beschädigt werden und es kann zu einem Brand kommen. Fassen Sie
den Akku immer am Gehäuse oder an den Griffen an.
● Flüssigkeiten auf der Batterie können Feuer oder elektrischen Schlag
verursachen. Halten Sie immer alle Flüssigkeiten von der Batterie fern und
halten Sie die Batterie trocken. Kontakt oder Exposition gegenüber
auslaufender Batterie (Bleisäure) kann zu schweren Verletzungen führen.
Wenn Kontakt oder Exposition auftritt, rufen Sie sofort Ihren Arzt. Wenn die
Chemikalie auf der Haut oder in den Augen ist, spülen Sie mit kaltem
Wasser für 15 Minuten. Wenn die Chemikalie verschluckt wurde, geben Sie
der Person sofort Wasser oder Milch. Geben Sie kein Wasser oder Milch,
wenn der Patient erbricht oder einen verminderten Grad der Wachsamkeit
hat. Leiten Sie kein Erbrechen ein.
● Batteriepfosten, Anschlüsse und zugehöriges Zubehör enthalten Blei und
Bleiverbindungen (Säure)
● Manipulationen oder Veränderungen am Stromkreislauf können einen
Stromschlag, einen Brand oder eine Explosion verursachen und das System
dauerhaft beschädigen. Freiliegende Drähte und Schaltkreise im Ladegerät
können einen Stromschlag verursachen. Halten Sie das Gehäuse des
Ladegeräts immer geschlossen.
Die folgenden Sicherheitsgefahren können zu schweren Verletzungen oder
zum Tod führen:
● Lassen Sie ein Kind niemals unbeaufsichtigt.
● Setzen Sie sich bei der Benutzung des Fahrzeugs immer auf den Sitz.
● Halten Sie Ihre Hände, Haare und Kleidung von beweglichen Teilen fern.
● Tragen Sie immer Schuhe, wenn Sie dieses Fahrzeug bedienen.
● Kinder unter 3 Jahren dürfen das Fahrzeug nicht benutzen.
● Fahren Sie nur auf ebenem Gelände.
● Fahren Sie nicht in der Nähe von Schwimmbädern oder anderen
Gewässern, an Steilhängen oder auf steilen Gefällen.
● Fahren Sie das Fahrzeug nicht in losem Schmutz, Schlamm, Sand, feinem
Kies oder auf nassen Oberflächen.
● Fahren Sie das Fahrzeug nicht auf Straßen oder in der Nähe von Autos.
BATTERIEWARNUNGEN BENUTZERWARNUNGEN
TECHNISCHE DATEN
Batterien
Motor
Geeignetes Alter
Maximales Gewicht
Abmessungen
Geschwindigkeit
Spielzeit
Ladegerät
12V
12V
3-8 Jahre
30KG
114*58*59cm
2.5~3.5km/h (1.6-2.2Mph)
1-2 Stunden / Aufladezeit 8-12 Stunden
Output DC 12V
30 31
ERFORDERLICHES WERKZEUG
HARDWARE
TEILE
SCHRAUBENDREHER
(BRINGEN SIE IHR
EIGENES)
M10-BEDIENUNGSSCHLÜSSEL
(MITGELIEFERT)
2 PERSONEN
MONTAGE
CA. 45 MIN
MONTAGE
1 x9
2 x6
3 x2
4 x2
5 x1
A
x2
B x2
C x2
D x2
E x1
F
x1
G x1
H x1
I x1
J x2
K x1
L x1
M x1
N x1
O x2
P x1
Q x1
φ10 DICHTUNGEN M10 MUTTERN
M5 MUTTERN SPLINT
M5*35mm
SCHRAUBE
VORDERRAD HINTERRAD
VORDERRADABDECKUNG
HINTERRADABDECKUNG SCHÜRFKÜBEL FERNBEDIENUNG
LADEGERÄTE
SCHAUFELARM
(LINKS)
SCHAUFELARM
(RECHTS)
ABDECKUNG
DES SCHAUFELARMS
SITZ KAMIN
LENKRAD HINTERACHSE GETRIEBEKASTEN (L/R)
LENKUNGSSCHALTER AUDIO-KABEL
32 33

Befestigen Sie den Lenkhebel.
● Den Lenkhebel in das Karosserieloch einsetzen.
● Setzen Sie eine φ10-Unterlegscheibe auf den Lenkhebel.
● Nachdem der Lenkhebel an seinem Platz installiert ist, setzen
Sie den Splint ein, um ihn zu biegen und zu fixieren.
Befestigen Sie die Hinterachse.
● Setzen Sie die Hinterachse in das Fahrzeug ein.
Befestigen Sie das Getriebegehäuse (L/R).
● Setzen Sie das Getriebe in die Hinterachse ein, und klemmen Sie
den Motor und das Motorkabel in den Karosserieschlitz. (Hinweis:
Das Getriebegehäuse wird von links und rechts unterschieden)
PRODUKTMONTAGE
Drehen Sie die Leiche um, so dass der Körper nach oben zeigt.
Setzen Sie die Dichtungen, das Vorderrad, die Dichtungen und die Mutter
nacheinander in die Vorderachse ein.
Befestigen Sie die Mutter mit dem M10-Schlüssel und bringen Sie dann die
Vorderradabdeckung am Rad an.
Setzen Sie das Hinterrad, die Dichtungen und die Mutter nacheinander auf die
Hinterachse.
Befestigen Sie die Mutter mit dem M10-Schlüssel und bringen Sie dann die
Hinterradabdeckung am Rad an.
P
Befestigen Sie den Schornstein.
● Schornstein in den Schlitz des Gehäuses einhängen.
Schaufelarm, Dichtungen und Mutter nacheinander in die
Schaufelachse einsetzen. Befestigen Sie die Mutter mit dem
M10-Schraubenschlüssel und bringen Sie dann die Abdeckung des
Schaufelarms am Schaufelarm an.(Hinweis: Der Schaufelarm ist,
wie in der Abbildung gezeigt, in einen linken und einen rechten Teil
unterteilt.)
Hinweis: Wenn Sie die vorderen Schaufelarme einbauen, müssen Sie
sie durch Klopfen befestigen.
L
J H I
N
O
O
N
Drehen Sie die Leiche um, so dass der Körper nach oben zeigt.
34 35
1
P
Suchen Sie die Hauptstromleitung unter dem Sitz, stecken Sie den Stecker
der Stromleitung in die entsprechende Buchse des Empfängers, verbinden Sie
ein Ende der rechten Antriebsmotorleitung mit der linken Antriebsmotorleitung
und stecken Sie den anderen Stecker auf der rechten Seite in die Buchse des
Empfängers.
Befestigen Sie die Schaufel.
● Befestigen Sie die Schaufel am Schaufelarm.
● Wie in der Abbildung gezeigt: Und befestigen Sie es mit M5 * 35mm
Schraube und M5 Muttern.
E
Befestigen Sie das Lenkrad.
● Entfernen Sie die Mutter und die Schraube des Lenkrads.
● Verbinden Sie die von der Lenksäule kommenden Drähte mit den
Drähten am Lenkrad.
● Stecken Sie das Lenkrad über die Lenkung und befestigen Sie es mit
Mutter und Schraube.
Befestigen Sie den Sitz.
● Sitz zusammenfügen.
● Befestigen Sie den Sitz an der Karosserie.
● Drehen Sie die Verriegelung am Sitz, um den Sitz zu sichern.
M
K
Batterie
Sicherungskasten
Getriebeeinsatz
Getriebeeinsatz
GETRIEBEGEHÄUSE
Stromversorgung des Getriebes
GETRIEBEGEHÄUSE
Stromanschluss
36 37

ARMATURENBRETT-DIAGRAMM
1. Musiktaste: Drücken Sie sie, um Musik abzuspielen;
2. Hupentaste: Drücken Sie sie, um die Hupe zu spielen;
3. Power-Taste: kann das Fahrzeug ein- oder ausschalten;
4. Zentrales Bedienfeld:
5. Shift Switch: Ändern Sie die Richtung des Autos, vorwärts- rückwärts;
6. Pedal-Taste: Treten Sie auf den Knopf, das Auto wird sich bewegen, lassen
Sie das Pedal los, um langsam anzuhalten;
7. Ladedose;
Zentrales Bedienfeld:
1. Power-Anzeige: Deutlich sehen die Batterieleistung, um zu laden; je kleiner
die Zahl, desto niedriger die Spannung. Bitte rechtzeitig aufladen;
2. Letztes Lied/Lautstärke verringern: Wechseln Sie die Lieder, und drücken
Sie lange, um die Lautstärke zu verringern;
3. Play oder Stop Schalter;
4. Nächster Titel/Lautstärke erhöhen: Wechseln Sie den Titel, und drücken Sie
lange, um die Lautstärke zu erhöhen;
5. Modusschalter: Drücken Sie, um den Modus/Musikmodus/Radiomodus/ die
drahtlose Technologie zu wechseln;
6. MP3: Das Datenkabel kann mit anderen Geräten verbunden werden und
Musik abspielen;
7. U:System für den Anschluss externer Geräte;
38 39

Zuerst die Fernbedienung. Wenn die Fernbedienung eingeschaltet ist,
kann das Fußpedal nicht bedient werden.
Betriebsanleitung:
Nehmen Sie die Fernbedienung heraus, öffnen Sie das Batteriefach auf der
Rückseite der Fernbedienung und legen Sie zwei AAA LRO3 Alkalibatterien
ein. Achten Sie dabei auf die Polarität der Batterien. Wenn die
Ausrichtungsleuchte und die Geschwindigkeitsanzeige aufleuchten, bedeutet
dies, dass die Batterien richtig eingelegt sind. Dieses Produkt ist nicht mit
Trockenbatterien ausgestattet.
<Taste Beschreibung >
(1) Drücken Sie lange auf die Frequenztaste (M) 2-4 Sekunden, die LED-
Anzeige für niedrige Geschwindigkeit blinkt. Schalten Sie das Fahrzeug ein,
die LED-Leuchte für niedrige Geschwindigkeit blinkt weiter und leuchtet lange,
dann ist die Frequenzbindung erfolgreich. Wenn die Frequenzbindung
fehlgeschlagen ist (LED-Leuchte für niedrige Geschwindigkeit blinkt),
entfernen Sie die Batterie und wiederholen Sie die Schritte
P: Bremse drücken
S: Geschwindigkeit:Drücken Sie zum Ändern der Geschwindigkeit (niedrige,
mittlere und hohe Geschwindigkeit).
△Vorwärts ▽ Rückwärts
Links abbiegen Rechts abbiegen
2)Bremstaste: Drücken Sie sie, um die Fahrt anzuhalten; drücken Sie sie
erneut, um weiterzufahren.
3)Geschwindigkeitswahltaste und Geschwindigkeitsanzeige: Dient zur
Auswahl der Geschwindigkeit des Fahrzeugs. Drücken Sie die Taste einmal,
um die Geschwindigkeit einmal umzuschalten. Es werden 3
Geschwindigkeiten zyklisch geschaltet, die Schaltreihenfolge ist:
niedrig-mittel-hoch. Die Geschwindigkeitsanzeige ist auf der Fernbedienung
von oben nach unten angeordnet: Lampe für hohe Geschwindigkeit, Lampe
für mittlere Geschwindigkeit, Lampe für niedrige Geschwindigkeit; beim
Umschalten auf eine Geschwindigkeit leuchtet die entsprechende
Anzeigelampe auf. Hinweis: Die Geschwindigkeitsstufe ändert sich nur beim
Vorwärtsfahren.
4)Vorwärts-/Rückwärtstasten: dienen zur Steuerung der Vorwärts- und
Rückwärtsbewegung. Wenn eine der Tasten gedrückt wird, erhöht sich die
Fahrgeschwindigkeit langsam, bis die eingestellte Geschwindigkeit erreicht ist.
Daher gibt es für Kinder keine plötzlichen Stöße.
5)Linksdrehung/Rechtsdrehungstaste: für die Steuerung der linken und
rechten Richtung.
Hinweis: Wenn die Fernbedienung 10 Sekunden lang nicht benutzt wird,
schaltet die Anzeigeleuchte in den Energiesparmodus.
WARNUNG: Die Fernbedienung ist kein Spielzeug. Sie ist nur für den
Gebrauch durch Erwachsene bestimmt und sollte nicht von Kindern benutzt
werden. Sie muss immer von einem Erwachsenen beaufsichtigt werden. Der
Empfangsbereich kann sich je nach Wetter, Batterie und anderen
Umgebungsbedingungen erheblich ändern.
DIAGRAMM DER FERNSTEUERUNG
Geschwindigkeit
vorwärts rückwärts
Warnung
Nur von Erwachsenen zu benutzen
Langer Druck: Frequenz
links abbiegen rechts abbiegen
Notbremse
niedrige Geschwindigkeit
mittlere Geschwindigkeit
hohe Geschwindigkeit
40 41
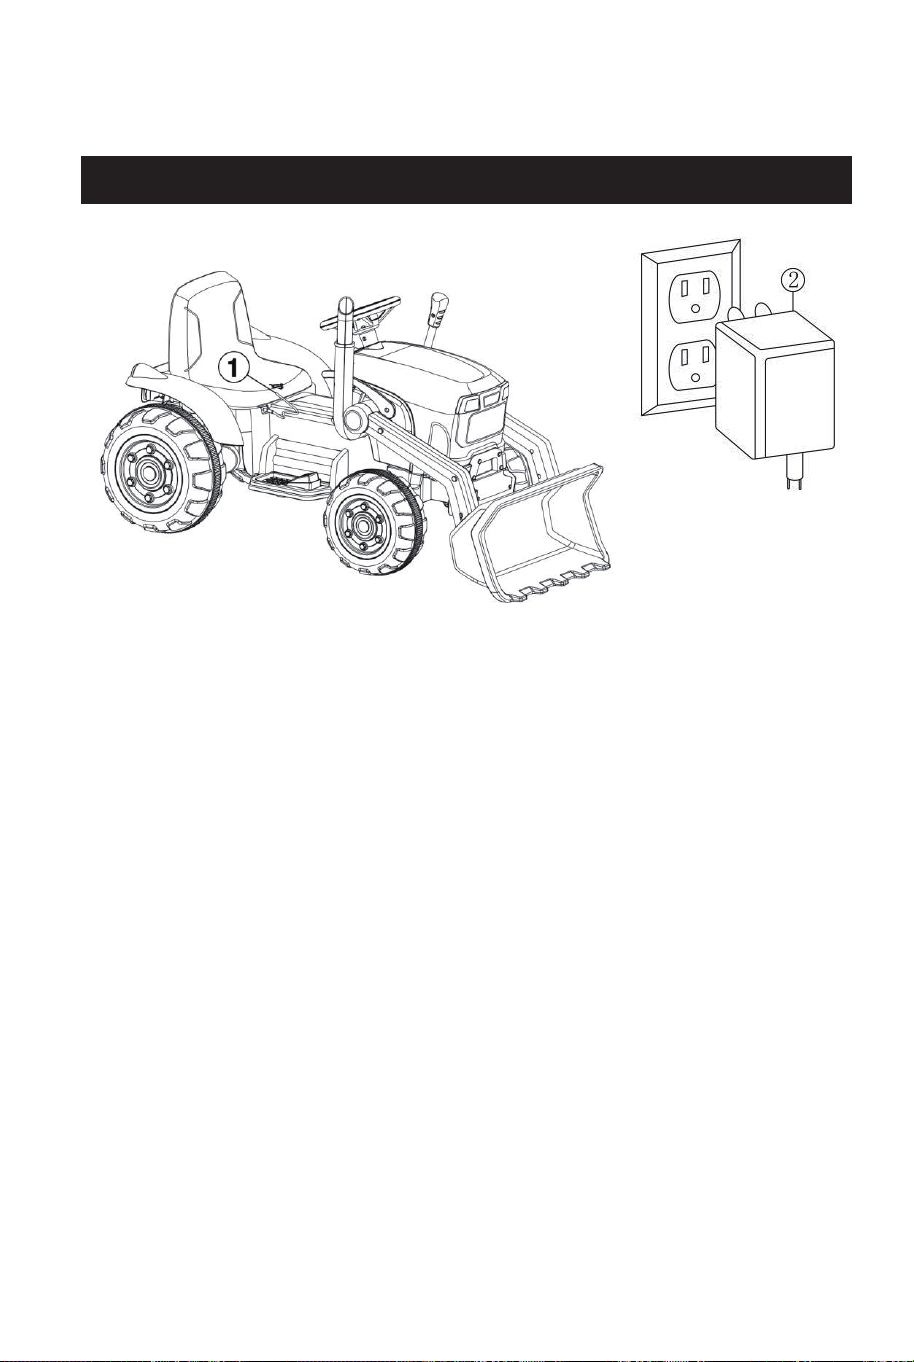
1. Stecken Sie den Stecker des Ladegeräts in die Ladebuchse des Fahrzeugs.
2. Stecken Sie den Stecker des Ladegeräts in das passende, stabile Netzteil,
wie in der Abbildung gezeigt.
● Laden Sie den Akku vor dem ersten Gebrauch 8 bis 12 Stunden auf.
● Im Durchschnitt müssen Sie den Akku zwischen 8 und 12 Stunden aufladen.
Laden Sie den Akku nicht länger als 20 Stunden auf. Wenn der Akku nicht
wie angegeben geladen wird, kann dies zu dauerhaften Schäden an der
Batterie führen.
● Der Akku kann beschädigt werden, wenn er sich vollständig entleert. Lassen
Sie den Akku nicht vollständig entleeren.
● Überprüfen Sie den Akku und das Ladegerät (Netzkabel, Stecker) vor dem
Aufladen auf Abnutzung und Beschädigung. Laden Sie den Akku nicht auf,
wenn er beschädigt ist.
● Nur ein Erwachsener, der die Sicherheitshinweise gelesen und verstanden
hat, sollte den Akku handhaben, aufladen und wieder aufladen.
● Stellen Sie das Fahrzeug in einem geschlossenen Raum ab oder decken Sie
es mit einer Plane ab, um es vor nassem Wetter zu schützen.
● Lassen Sie das Fahrzeug nicht über einen längeren Zeitraum in der Sonne
stehen, da es sonst ausbleichen kann. Lagern Sie es im Schatten oder
decken Sie es mit einer Plane ab.
● Waschen Sie das Fahrzeug nicht mit einem Schlauch.
● Waschen Sie das Fahrzeug nicht mit Seife.
● Laden Sie die Batterie mindestens einmal im Monat auf, um die
Lebensdauer der Batterie zu verlängern.
LADEANLEITUNG PFLEGE IHRES AUFSITZFAHRZEUGS
FEHLERSUCHE
PROBLEM
Das Fahrzeug
bewegt sich nicht
Batterie lässt sich
nicht aufladen
Die Batterie hält nicht
lange
Schwache Batterie
Elektrischer Schutz
Schalter nicht in der
richtigen Position
Batteriestecker
abgeklemmt
Laden Sie den Akku
vollständig auf
Unterbrechen Sie den Betrieb
für einige
Minuten und starten Sie neu
Schalter vollständig
eindrücken
Batteriestecker einstecken
Batteriestecker
abgeklemmt
Ladegerät nicht an
Steckdose angeschlossen
Die Batterie ist nicht voll
geladen
Batteriestecker einstecken
Ladegerät vollständig
einstecken
Die Batterie vollständig
aufladen
URSACHE LÖSUNG
42 43

WARNUNG
● Die Batterie des Fahrzeugs ist nicht austauschbar.
● Mischen Sie nicht alte und neue Batterien.
● Mischen Sie keine Alkali-, Standard- (Kohle-Zink-) oder wiederaufladbaren Batterien.
● Nicht wiederaufladbare Batterien sollten nicht aufgeladen werden.
● Wiederaufladbare Batterien sollten nur unter Aufsicht von Erwachsenen aufgeladen
werden.
● Entladene Batterien sollten entfernt werden.
● Die Versorgungsklemmen dürfen nicht kurzgeschlossen werden.
● Legen Sie die Batterien nicht neben oder in eine Wärmequelle (Feuer, elektronische
Heizgeräte usw.).
● Schlagen Sie die Batterien nicht gegen harte Gegenstände.
● Tauchen Sie die Batterien nicht in Wasser ein.
● Legen Sie die Batterien mit der richtigen Polarität ein.
● Verwenden Sie nur die vom Hersteller angegebene Batterie.
● Verwenden Sie nur das vom Hersteller angegebene Ladegerät.
● Es sollte eine Schutzausrüstung getragen werden und darf nicht im
Straßenverkehr verwendet werden.
● Das Spielzeug sollte mit Vorsicht verwendet werden, da Geschicklichkeit
erforderlich ist, um Stürze oder Zusammenstöße zu vermeiden, die zu
Verletzungen des Benutzers oder Dritter führen können.
● Um das Verletzungsrisiko zu verringern, ist die Aufsicht eines Erwachsenen
erforderlich. Niemals auf Straßen, in der Nähe von Kraftfahrzeugen, an oder
in der Nähe von steilen Hängen oder Treppen, Schwimmbädern oder
anderen Gewässern verwenden. Tragen Sie immer Schuhe und lassen Sie
niemals mehr als 1 Fahrer zu.
WARNUNG: MONTAGE DURCH ERWACHSENE ERFORDERLICH
WARNUNG: Nicht für den Straßenverkehr geeignet
WARNUNG: ERSTICKUNGSGEFAHR-Kleine Teile.
Nicht für Kinder unter 3 Jahren geeignet.
WARNHINWEISE ZU BATTERIEN
Die folgenden Batterien oder Akkus sind in diesem elektronischen
Artikel enthalten.
Informationen zur sicheren Entnahme der Batterien oder Akkumulatoren
Batterietyp Chemisches System
6FM7 Blei (Pb)
● Achtung! Vergewissern Sie sich, dass die Batterie vollständig entladen ist.
● Öffnen Sie den Sitz, entfernen Sie die Schrauben am Blech mit einem
Schraubendreher, nehmen Sie das Blech ab und ziehen Sie die beiden Drähte von der
Batterie ab, um die Batterie zu entfernen.
● Nehmen Sie die Batterie oder den Akku vorsichtig heraus.
● Die Batterie oder der Akku und der Artikel können nun getrennt entsorgt werden.
Die Batterie ist warm
und macht
eim Aufladen ein
leichtes Geräusch
Langsame
Geschwindigkeit
Fahrzeug schüttelt
während der Fahrt
Schwierigkeiten beim
Schalten zwischen
Vorwärts- und
Rückwärtsgang
Vorwärts- und
Rückwärtsschalter ist
umgelegt
Normal Normal
Schwache Batterie Batterie vollständig
aufladen
Überladenes Fahrzeug Reduzieren Sie das
Gewicht des Fahrzeugs
Unebene oder abschüssige
Straße
Fahren Sie auf ebenem
Untergrund
Lose Verbindung zum
Motor
Sicherstellen, dass der Motor
richtig an
die Batterie angeschlossen ist
Versuch zu schalten,
während das
Fahrzeug fährt
Schalten Sie nur, wenn das
Fahrzeug stillsteht
Die Getriebe sind falsch
eingebaut
Sicherstellen, dass sich
das L-Getriebe auf
der linken Seite und das
R-Getriebe auf der
rechten Seite ist
44 45

Achtung:
Dieses Gerät entspricht Teil 15 der FCC-Vorschriften. Der Betrieb unterliegt
den folgenden zwei Bedingungen: (1) Dieses Gerät darf keine schädlichen
Störungen verursachen. (2) Dieses Gerät muss alle empfangenen Störungen
akzeptieren, einschließlich Störungen, die einen unerwünschten Betrieb
verursachen können.
Änderungen oder Modifikationen, die nicht ausdrücklich von der für die
Einhaltung der Vorschriften zuständigen Stelle genehmigt wurden, sind
strengstens untersagt.
Dieses Gerät wurde getestet und entspricht den Grenzwerten für ein digitales
Gerät der Klasse B gemäß Teil 15 der FCC-Vorschriften. Diese Grenzwerte
sind so ausgelegt, dass sie einen angemessenen Schutz gegen schädliche
Störungen bei der Installation in Wohngebieten bieten. Dieses Gerät erzeugt
und verwendet Hochfrequenzenergie und kann diese ausstrahlen. Wenn es
nicht gemäß den Anweisungen installiert und verwendet wird, kann es
schädliche Störungen im Funkverkehr verursachen. Es kann jedoch nicht
garantiert werden, dass bei einer bestimmten Installation keine Störungen
auftreten. Wenn dieses Gerät Störungen des Radio- oder Fernsehempfangs
verursacht, was durch Ein- und Ausschalten des Geräts festgestellt werden
kann, sollte der Benutzer versuchen, die Störungen durch eine oder mehrere
der folgenden Maßnahmen zu beheben:
—Neuausrichtung oder Verlegung der Empfangsantenne.
—Vergrößern Sie den Abstand zwischen dem Gerät und dem Empfänger.
—Anschluss des Geräts an einen anderen Stromkreis als den, an den der
Empfänger angeschlossen ist.
—Ziehen Sie einen erfahrenen Radio-/Fernsehtechniker zu Rate.
FCC-Erklärung
Trägerfrequenz von Kanälen
Kanal
1
2
3
4
5
6
7
8
9
10
11
12
13
14
15
16
17
18
20
21
22
23
24
25
26
27
28
29
30
31
32
33
34
35
36
Frequenz
(MHz)
Kanal
Frequenz
(MHz)
2405
2406
2407
2408
2409
2410
2411
2412
2413
2414
2415
2416
2417
2418
2419
2420
2421
2422 37 2441
19 2423 38 2442
2424
2425
2426
2427
2428
2429
2430
2431
2432
2433
2434
2435
2436
2437
2438
2439
2440
46 47

39
40
41
42
43
44
45
46
47
48
49
50
51
52
53
54
55
56
57
58
59
60
61
62
63
64
65
66
67
68
69
70
71
72
73
74
75
2443
2444
2445
2446
2447
2448
2449
2450
2451
2452
2453
2454
2455
2456
2457
2458
2459
2460
2461
2462
2463
2464
2465
2466
2467
2468
2469
2470
2471
2472
2473
2474
2475
2476
2477
2478
2479
FR
SÉCURITÉ
Veuillez conserver ces instructions pour toute référence ultérieure.
REMARQUE : Pour une performance optimale, n'utilisez ce véhicule que sur
des surfaces plates et dures.
GAMME D'ÂGE : 3 à 8 ans
CAPACITÉ DE POIDS : 30KG (66LBS) est le poids maximum pour un
conducteur.
Les risques de sécurité suivants peuvent entraîner des blessures graves ou la
mort :
● Ce produit contient de petites pièces. Tenez les enfants à l'écart pendant le
montage. Veillez à retirer tous les matériaux d'emballage et les pièces sous
la carrosserie du véhicule.
● N'ouvrez jamais la batterie, car elle contient du plomb et des composés de
plomb (acides).
● Les membres, les cheveux et les vêtements peuvent se prendre dans les
pièces mobiles. Portez toujours des chaussures, tenez vos membres
éloignés des pièces mobiles et ne portez pas de vêtements amples lorsque
vous utilisez ce véhicule.
● Ce véhicule n’a pas de freins ni de capacité de freinage. Ne laissez pas un
enfant sans surveillance pendant l'utilisation. N'utilisez pas ce véhicule dans
un endroit qui pourrait nécessiter une capacité de freinage, car cela pourrait
entraîner une perte de contrôle, ce qui pourrait causer des blessures graves
ou la mort.
● L'utilisation de ce véhicule à proximité de rues, de véhicules à moteur, de
marches, de plans d'eau, de surfaces inclinées, de collines, de zones
humides, de vapeurs inflammables, dans des allées, la nuit ou dans
l'obscurité peut entraîner un accident inattendu.
● L'utilisation de ce véhicule dans des conditions dangereuses telles que la
neige, la pluie, la terre meuble, la boue, le sable ou le gravier peut entraîner
un accident inattendu tel qu'un basculement, et pourrait endommager le
système électrique ou la batterie.
● N'utilisez pas ce véhicule d'une manière dangereuse, par exemple, mais
sans s'y limiter :
- Tirer le véhicule avec un autre véhicule ou un dispositif similaire.
- Pousser l'utilisateur
- Circulation à une vitesse dangereuse
48 49

Les risques suivants pour la sécurité peuvent entraîner des blessures graves
ou la mort :
● L'utilisation d'une batterie ou d'un chargeur autre que la batterie
rechargeable et le chargeur fournis peut provoquer un incendie ou une
explosion. Utilisez uniquement la batterie et le chargeur fournis.
● L'utilisation de la batterie rechargeable et du chargeur pour tout autre
produit peut entraîner une surchauffe, un incendie ou une explosion.
N'utilisez jamais la batterie rechargeable et le chargeur fournis avec un
autre produit.
● Des gaz explosifs sont créés pendant la charge. Chargez la batterie dans
un endroit bien ventilé. Ne chargez pas la batterie à proximité d'une source
de chaleur ou de matériaux inflammables.
● Tout contact entre les bornes positives et négatives peut entraîner un
incendie ou une explosion. Évitez tout contact direct entre les bornes. Le fait
de prendre la batterie par les fils ou le chargeur peut l'endommager et
provoquer un incendie. Prenez toujours la batterie par son boîtier ou ses
poignées.
● Les liquides présents sur la batterie peuvent provoquer un incendie ou un
choc électrique. Tenez toujours tous les liquides éloignés de la batterie et
gardez la batterie sèche. Le contact ou l'exposition à une fuite de batterie
(acide de plomb) peut provoquer des blessures graves. En cas de contact
ou d'exposition, appelez immédiatement votre médecin. Si le produit
chimique est sur la peau ou dans les yeux, rincez à l'eau froide pendant 15
minutes. Si le produit chimique a été avalé, donnez immédiatement de l'eau
ou du lait à la personne. Ne donnez pas d'eau ou de lait si le patient vomit
ou a un niveau de vigilance diminué. Ne provoquez pas de vomissement.
● Les poteaux, bornes et accessoires de la batterie contiennent du plomb et
des composés de plomb (acide).
● L'altération ou la modification du système de circuit électrique peut
provoquer un choc, un incendie ou une explosion et endommager le
système de façon permanente. Le câblage et les circuits exposés dans le
chargeur peuvent provoquer un choc électrique. Gardez toujours le boîtier
du chargeur fermé.
Les risques suivants pour la sécurité peuvent entraîner des blessures graves
ou la mort :
● Ne laissez jamais un enfant sans surveillance.
● Asseyez-vous toujours sur le siège lorsque vous utilisez ce véhicule.
● Gardez vos mains, vos cheveux et vos vêtements éloignés de la partie
mobile.
● Portez toujours des chaussures lorsque vous utilisez ce véhicule.
● Les enfants de moins de 3 ans ne peuvent pas utiliser le véhicule.
● Ne conduisez que sur un terrain plat.
● N'allez pas à proximité de piscines ou d'autres plans d'eau, de
dénivellations ou de montées et descentes de pentes abruptes.
● Ne conduisez pas le véhicule dans de la terre meuble, de la boue, du sable,
du gravier fin ou sur des surfaces humides.
● Ne conduisez pas le véhicule dans les rues ou près des voitures.
AVERTISSEMENTS DE BATTERIE AVERTISSEMENTS DE L'UTILISATEUR
SPÉCIFICATIONS
Batteries
Moteur
Âge approprié
Poids maximum
Dimension
Vitesse
Temps de jeu
Chargeur
12V
12V
3-8 ans
30KG (66LBS)
114*58*59cm (45”x23”x23.5”)
2,5~3,5km/h (1,6-2,2Mph)
1-2 heures / Temps de recharge 8-12 heures
Sortie DC 12V
50 51

Les risques suivants pour la sécurité peuvent entraîner des blessures graves
ou la mort :
● L'utilisation d'une batterie ou d'un chargeur autre que la batterie
rechargeable et le chargeur fournis peut provoquer un incendie ou une
explosion. Utilisez uniquement la batterie et le chargeur fournis.
● L'utilisation de la batterie rechargeable et du chargeur pour tout autre
produit peut entraîner une surchauffe, un incendie ou une explosion.
N'utilisez jamais la batterie rechargeable et le chargeur fournis avec un
autre produit.
● Des gaz explosifs sont créés pendant la charge. Chargez la batterie dans
un endroit bien ventilé. Ne chargez pas la batterie à proximité d'une source
de chaleur ou de matériaux inflammables.
● Tout contact entre les bornes positives et négatives peut entraîner un
incendie ou une explosion. Évitez tout contact direct entre les bornes. Le fait
de prendre la batterie par les fils ou le chargeur peut l'endommager et
provoquer un incendie. Prenez toujours la batterie par son boîtier ou ses
poignées.
● Les liquides présents sur la batterie peuvent provoquer un incendie ou un
choc électrique. Tenez toujours tous les liquides éloignés de la batterie et
gardez la batterie sèche. Le contact ou l'exposition à une fuite de batterie
(acide de plomb) peut provoquer des blessures graves. En cas de contact
ou d'exposition, appelez immédiatement votre médecin. Si le produit
chimique est sur la peau ou dans les yeux, rincez à l'eau froide pendant 15
minutes. Si le produit chimique a été avalé, donnez immédiatement de l'eau
ou du lait à la personne. Ne donnez pas d'eau ou de lait si le patient vomit
ou a un niveau de vigilance diminué. Ne provoquez pas de vomissement.
● Les poteaux, bornes et accessoires de la batterie contiennent du plomb et
des composés de plomb (acide).
● L'altération ou la modification du système de circuit électrique peut
provoquer un choc, un incendie ou une explosion et endommager le
système de façon permanente. Le câblage et les circuits exposés dans le
chargeur peuvent provoquer un choc électrique. Gardez toujours le boîtier
du chargeur fermé.
Les risques suivants pour la sécurité peuvent entraîner des blessures graves
ou la mort :
● Ne laissez jamais un enfant sans surveillance.
● Asseyez-vous toujours sur le siège lorsque vous utilisez ce véhicule.
● Gardez vos mains, vos cheveux et vos vêtements éloignés de la partie
mobile.
● Portez toujours des chaussures lorsque vous utilisez ce véhicule.
● Les enfants de moins de 3 ans ne peuvent pas utiliser le véhicule.
● Ne conduisez que sur un terrain plat.
● N'allez pas à proximité de piscines ou d'autres plans d'eau, de
dénivellations ou de montées et descentes de pentes abruptes.
● Ne conduisez pas le véhicule dans de la terre meuble, de la boue, du sable,
du gravier fin ou sur des surfaces humides.
● Ne conduisez pas le véhicule dans les rues ou près des voitures.
AVERTISSEMENTS DE BATTERIE AVERTISSEMENTS DE L'UTILISATEUR
SPÉCIFICATIONS
Batteries
Moteur
Âge approprié
Poids maximum
Dimension
Vitesse
Temps de jeu
Chargeur
12V
12V
3-8 ans
30KG (66LBS)
114*58*59cm (45”x23”x23.5”)
2,5~3,5km/h (1,6-2,2Mph)
1-2 heures / Temps de recharge 8-12 heures
Sortie DC 12V
50 51
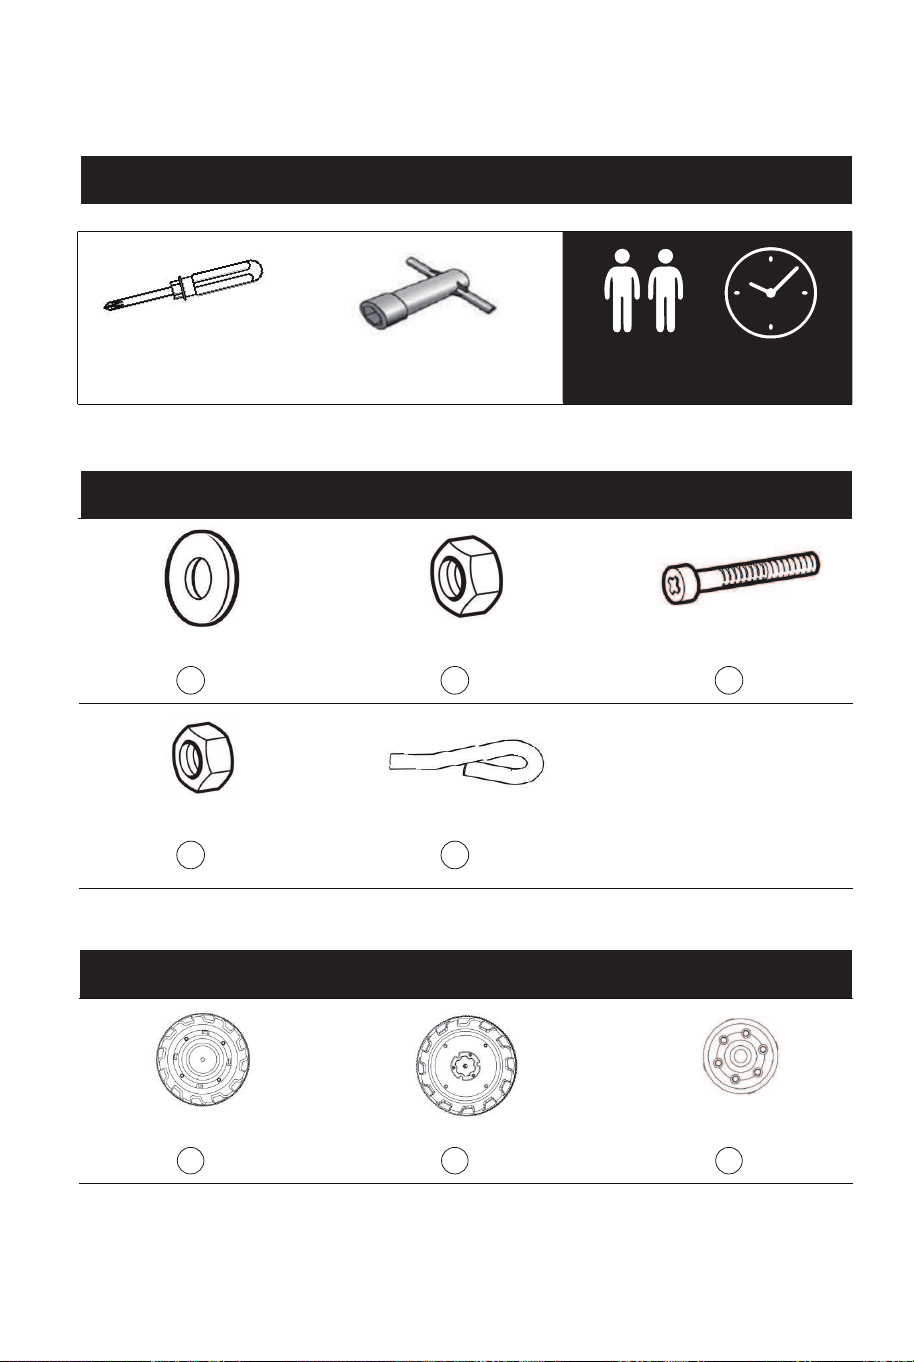
OUTILS NÉCESSAIRES
ACCESSOIRES
PIÈCES
TOURNEVIS
(APPORTEZ LE VÔTRE)
CLÉ M10
(FOURNIE)
ASSEMBLÉE DE 2
PERSONNES
ENVIRON
45 MIN.
ASSEMBLAGE
1 x9
2 x6
3 x2
4 x2
5 x1
A
x2
B x2
C x2
D x2
E x1
F
x1
G x1
H x1
I x1
J x2
K x1
L x1
M x1
N x1
O x2
P x1
Q x1
φ10 RONDELLES M10 ÉCROUS
M5 ÉCROUS GOUPILLE
M5*35mm
VIS
ROUE AVANT ROUE ARRIÈRE
ENJOLIVEUR DE
ROUE AVANT
ENJOLIVEUR DE
ROUE ARRIÈRE
GODET TÉLÉCOMMANDE
CHARGEUR
BRAS DU GODET
(GAUCHE)
BRAS DE GODET
(DROIT)
COUVERCLE DU
BRAS DE GODET
SIÈGE CHEMINÉE
VOLANT ESSIEU ARRIÈRE BOÎTE DE VITESSES (G/D)
LEVIER DE DIRECTION CÂBLE AUDIO
52 53

Fixez le levier de direction.
● Insérez le levier de direction dans l’orifice de la carrosserie.
● Insérez une rondelle φ10 sur le levier de direction.
● Une fois le levier de direction installé en place, insérez la goupille
fendue pour le plier et le fixer.
Fixez l'essieu arrière.
● Insérez l'essieu arrière dans la voiture.
Fixez la boîte de vitesses (G/D).
● Placez la boîte de vitesses dans l'essieu arrière, et fixez le moteur et
le fil du moteur dans la fente de la carrosserie. (Remarque: la boîte
de vitesses se distingue de la gauche et de la droite)
ASSEMBLAGE DU PRODUIT
Retournez la carrosserie de manière à ce qu'elle soit orientée vers le haut.
Placez tour à tour les rondelles, la roue avant, les rondelles et l'écrou dans
l'essieu avant.
Fixez l'écrou avec la clé M10, puis fixez l'enjoliveur de la roue avant à la roue.
Placez tour à tour la roue arrière, les rondelles et l'écrou sur l'essieu arrière.
Fixez l'écrou avec la clé M10, puis fixez l'enjoliveur de roue arrière à la roue.
P
Fixez la cheminée.
● Fixez la cheminée dans la fente de la carrosserie.
Mettez tour à tour le bras de godet, les rondelles et l'écrou dans l'axe
de godet.
Fixez l'écrou avec la clé M10, puis fixer le couvercle du bras de godet
au bras de godet. (Remarque: le bras du godet est divisé en gauche
et droite, comme indiqué sur la figure)
Remarque : Lors de l'installation des bras de godet avant, vous devez
les taper pour les mettre en place.
L
J H I
N
O
O
N
Retournez la carrosserie de manière à ce qu'il soit orienté vers le haut.
54 55
1
P
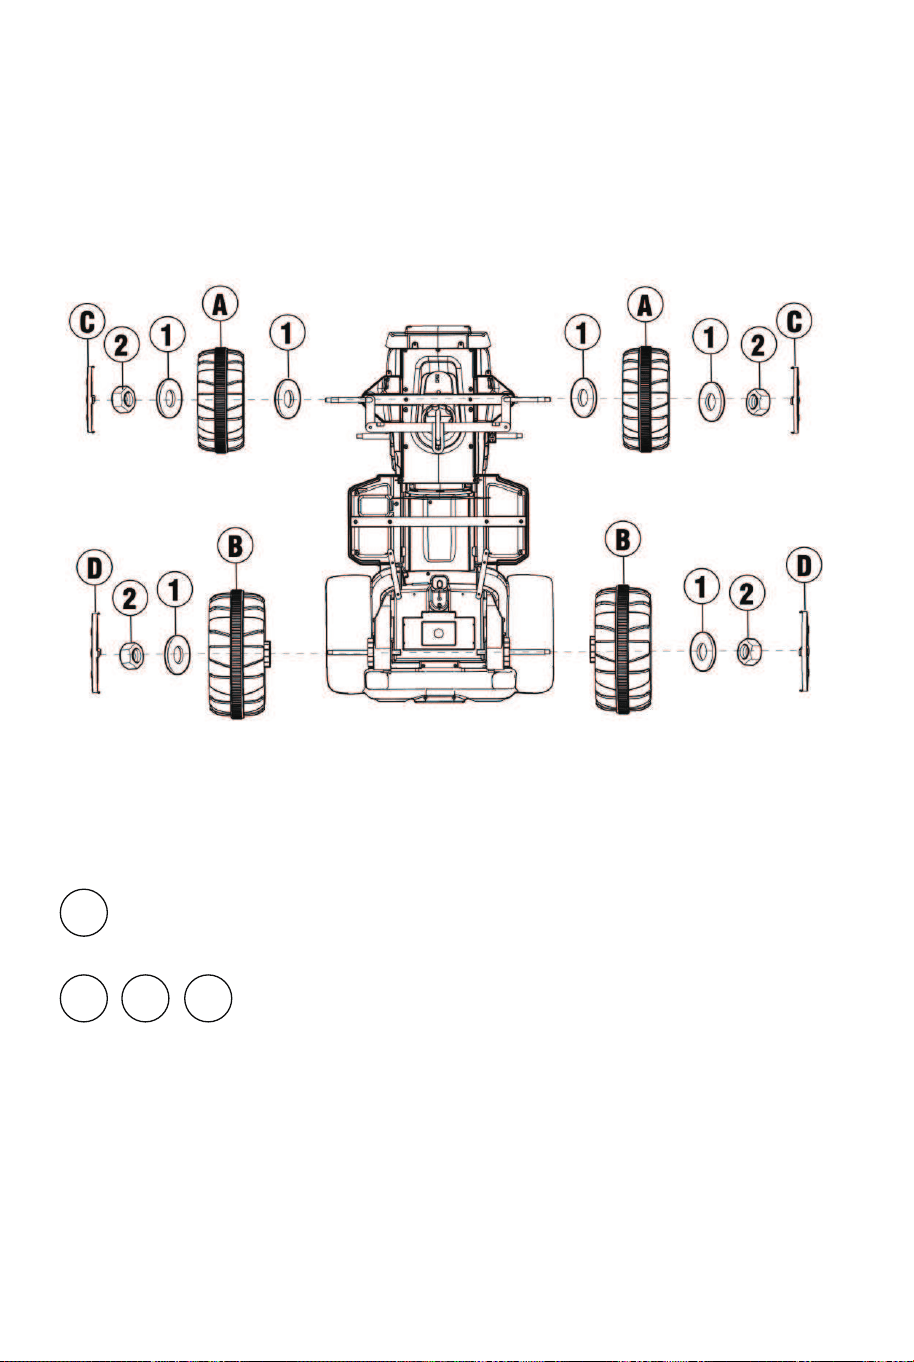

Trouvez la ligne électrique principale sous le siège, insérez la fiche de la ligne
électrique dans la prise correspondante du récepteur, connectez une extrémité
de la ligne du moteur d'entraînement droit avec la ligne du moteur
d'entraînement gauche, et insérez l'autre fiche à droite dans la prise du
récepteur.
Fixez le godet.
● Fixez le godet dans le bras du godet.
● Comme indiqué sur la figure : Et fixez-le avec des vis M5 * 35mm et
des écrous M5.
E
Fixez le volant.
● Retirez l'écrou et le boulon du volant.
● Connectez les fils provenant de la colonne de direction aux fils du
volant.
● Insérez le volant sur la colonne de direction et fixez-le avec l'écrou et
le boulon.
Fixez le siège.
● Fermez le siège.
● Fixez le siège dans la carrosserie.
● Faites tourner le loquet du siège pour le fixer.
M
K
Batterie
Boîte à fusibles
Insert de boîte de vitesses
BOÎTE DE VITESSES
Alimentation de la
boîte de vitesses
BOÎTE DE VITESSES
Connecteur d'alimentation
56 57
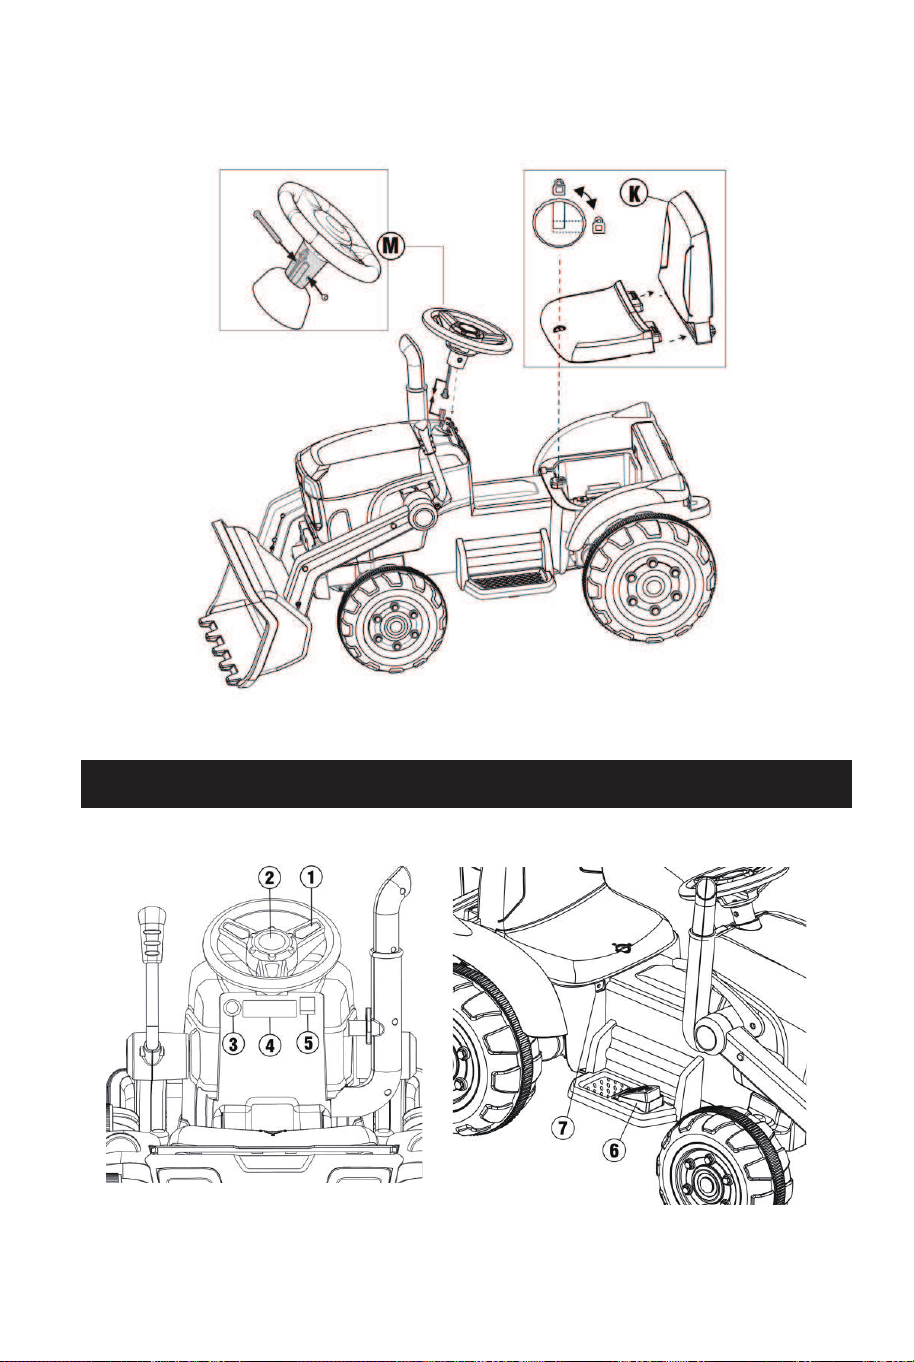
DIAGRAMME DU TABLEAU DE BORD
1. Bouton de Musique : appuyez pour jouer de la musique;
2. Bouton du klaxon : appuyez pour jouer du klaxon ;
3. Bouton d'alimentation : peut allumer ou éteindre le véhicule;
4. Panneau de commande central ;
5. Interrupteur de changement de vitesse : Changer la direction de la voiture,
avant-arrière ;
6. Bouton de pédale : Appuyez sur le bouton, la voiture se déplace, relâchez la
pédale pour vous arrêter lentement ;
7. Prise de charge ;
Panneau de commande central :
1. Affichage de l'alimentation : Permet de voir clairement la puissance de la
batterie, afin de la charger ; plus le chiffre est petit, plus la tension est faible.
Veuillez charger à temps ;
2. Dernière chanson / Diminution du volume : Changez de chanson, et une
pression longue diminuera le volume ;
3. Interrupteur de lecture ou d'arrêt ;
4. Chanson suivante/augmentation du volume : Changez de chanson, et une
pression longue augmentera le volume ;
5. Commutateur de mode : appuyez pour changer de mode/mode
musique/mode radio/technologie sans fil ;
6. MP3 : le câble de données peut être connecté à d'autres appareils et jouer
de la musique;
7. U : Système de connexion d’équipements externes;
58 59

La télécommande d'abord. Quand la télécommande est allumée, la
pédale ne fonctionne pas.
Manuel d’Utilisation :
Sortez la télécommande, ouvrez le compartiment à piles à l'arrière de la
télécommande et ajoutez deux piles alcalines AAA LRO3. Faites attention à la
polarité des piles. Lorsque le voyant d'alignement et l'indicateur de vitesse
s'allument, cela indique que la pile installée est correcte. Ce produit ne fournit
pas de piles sèches.
<Bouton Description>
(1) Appuyez longuement sur la touche de fréquence (M) 2-4 secondes, la
lumière LED de basse vitesse clignote. Allumez l’alimentation de la voiture, la
lumière LED de basse vitesse continue à clignoter jusqu'à l'éclairage long,
alors la liaison de fréquence réussit. Si la liaison de fréquence échoue (le
voyant LED basse vitesse clignote), retirez la batterie et répétez les étapes.
P : Appuyez pour freiner
S : Vitesse : appuyez pour changer de vitesse (basse, moyenne et élevée).
△En avant ▽ En arrière
Tourner à gauche Tourner à droite
2) Bouton de freinage : Appuyez dessus pour arrêter le déplacement ;
appuyez à nouveau pour le déplacer.
3) Touche de sélection de la vitesse et indication de la vitesse : utilisées pour
sélectionner la vitesse de la voiture. Appuyez une fois sur la touche pour
changer de vitesse. Les 3 vitesses sont commutées de manière cyclique, et la
séquence de commutation est la suivante : basse -moyen-élevé. L'indicateur
de vitesse est disposé de haut en bas sur la télécommande : lampe haute
vitesse, lampe moyenne vitesse, lampe basse vitesse ; lors du passage à une
vitesse, la lampe correspondante s'allume. Remarque : le degré de vitesse ne
change que lorsque l'on avance.
4) Touches avant/arrière : utilisées pour contrôler les mouvements avant et
arrière. Lorsque vous appuyez sur l'une des touches, la vitesse de
déplacement augmente lentement pour atteindre le niveau de vitesse défini.
Par conséquent, les enfants ne subiront pas d'impact soudain.
5) Touche de rotation gauche/droite : utilisée pour le contrôle de la direction
gauche et droite.
Remarque : sans fonctionnement après 10 secondes, le voyant sera éteint en
mode d’économie d’énergie
Avertissement : La télécommande n'est pas un jouet. Elle est destinée à
l'usage des adultes uniquement, et ne doit pas être utilisée par un enfant. La
surveillance étroite d'un adulte est toujours requise. La portée de réception
peut changer de manière significative en fonction des conditions
météorologiques, de la batterie et d'autres conditions environnementales.
DIAGRAMME DE LA TÉLÉCOMMANDE
Vitesse
En Avant En Arrière
Avertissement
Utilisé uniquement par les adultes
Appui long : Fréquence
Tourner à gauche Tourner à droite
Frein d’urgence
Vitesse basse
Vitesse moyenne
Vitesse élevée
60 61
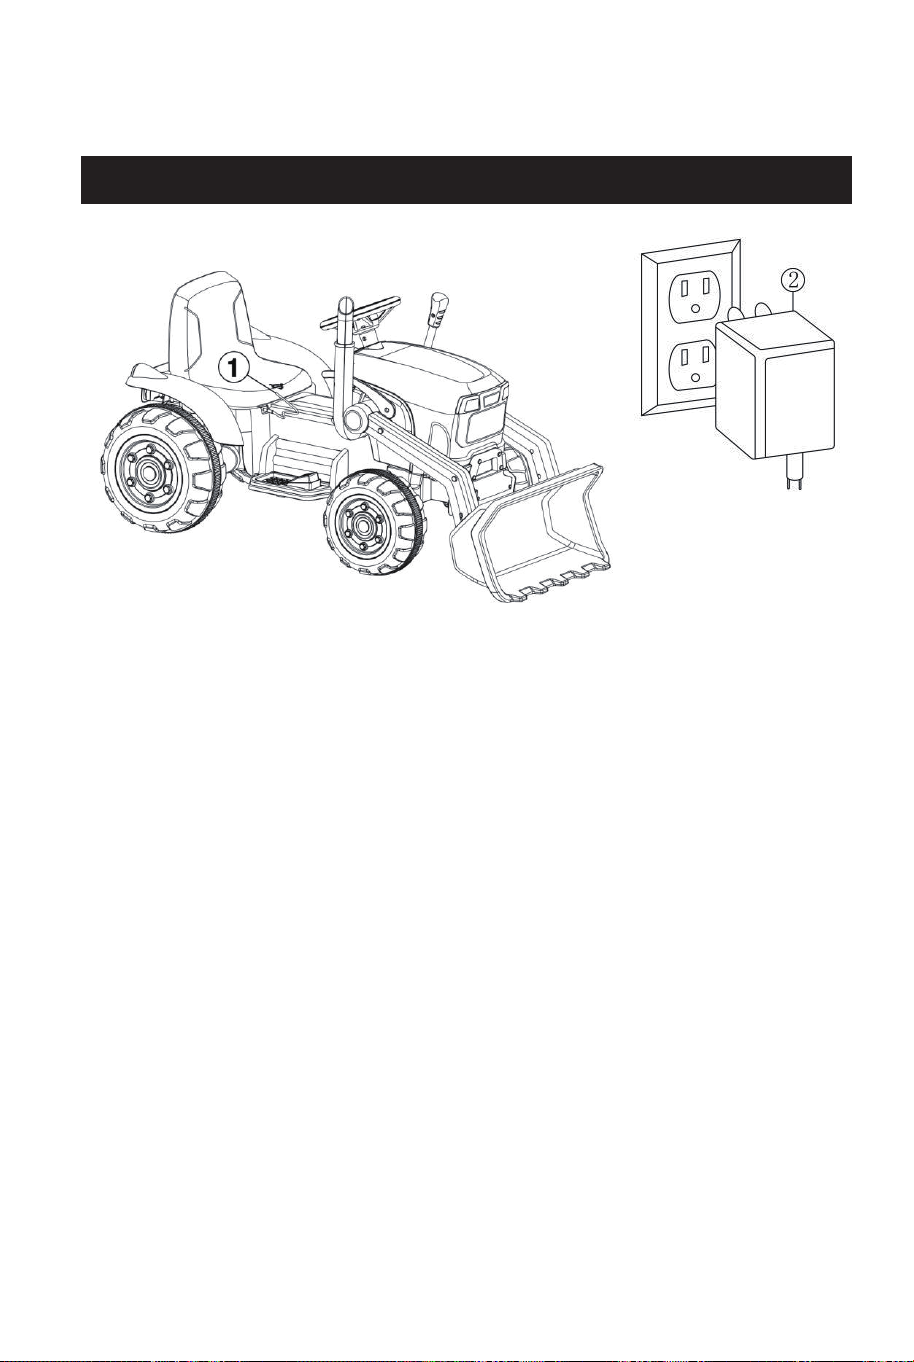
1. Insérez la prise du chargeur dans l'orifice de chargement de la voiture.
2. Branchez la prise du chargeur dans le bloc d'alimentation secteur
correspondant stable, comme indiqué sur l'image.
● Chargez la batterie 8 à 12 heures avant la première utilisation.
● En moyenne, vous devrez charger la batterie entre 8 et 12 heures. Ne
chargez pas la batterie pendant plus de 20 heures. Si vous ne chargez pas
la batterie comme indiqué, vous risquez de l'endommager définitivement.
● La batterie risque d'être endommagée si vous la laissez se vider
complètement. Ne laissez pas la batterie se vider complètement.
● Vérifiez que la batterie et le chargeur (cordon d'alimentation, connecteur) ne
sont pas usés ou endommagés avant de les charger. NE chargez pas la
batterie si elle est endommagée.
● Seul un adulte qui a lu et compris les avertissements de sécurité doit
manipuler, charger et recharger la batterie.
● Garez le véhicule à l'intérieur ou couvrez-le d'une bâche pour le protéger des
intempéries.
● Ne laissez pas le véhicule au soleil pendant de longues périodes, car il
pourrait se décolorer. Rangez-le à l'ombre ou couvrez-le d'une bâche.
● Ne lavez pas le véhicule avec un tuyau d'arrosage.
● Ne lavez pas le véhicule avec du savon.
● Chargez la batterie au moins une fois par mois pour prolonger la durée de
vie de la batterie.
INSTRUCTIONS DE CHARGEMENT ENTRETIEN DE VOTRE VOITURE
DÉPANNAGE
PROBLÈME
Le véhicule ne bouge
pas
La batterie ne se
recharge pas
La batterie ne dure
pas
Batterie faible
Protection électrique
L'interrupteur n'est pas
dans la bonne position
Connecteurs de la batterie
débranchés
Chargez complètement la
batterie
Arrêter l'utilisation pendant
plusieurs minutes et
redémarrer
Appuyez complètement sur
les commutateurs
Branchez les connecteurs
de la batterie
Connecteurs de la batterie
débranchés
La charge n'est pas
connectée à la prise
ou à la sortie
La batterie n'est pas
complètement chargée
Branchez les connecteurs
de la batterie
Branchez complètement le
chargeur
Charger complètement la
batterie
RAISON SOLUTION
62 63

AVERTISSEMENT
● La batterie du véhicule n'est pas remplaçable.
● Ne mélangez pas des piles neuves et usagées.
● Ne mélangez pas des piles alcalines, standard (carbone-zinc) ou rechargeables.
● Les piles non rechargeables ne doivent pas être chargées.
● Les piles rechargeables ne doivent être chargées que sous la surveillance d'un
adulte.
● Les piles épuisées doivent être retirées.
● Les bornes d'alimentation ne doivent pas être court-circuitées.
● Ne placez pas les piles à côté ou dans une source de chaleur (feu, appareil de
chauffage électronique, etc.).
● Ne pas frapper les piles contre des objets durs.
● Ne pas immerger les piles dans l'eau.
● Les piles doivent être insérées en respectant la polarité.
● Utilisez uniquement la batterie spécifiée par le fabricant.
● N'utilisez que le chargeur spécifié par le fabricant.
● Un équipement de protection doit être porté. Ne pas utiliser dans la
circulation.
● Le jouet doit être utilisé avec précaution car il faut savoir éviter les chutes ou
les collisions qui peuvent causer des blessures à l'utilisateur ou à des tiers.
● Pour réduire le risque de blessure, la surveillance d'un adulte est nécessaire.
Ne jamais utiliser sur la chaussée, à proximité de véhicules à moteur, sur ou
près de pentes raides ou de marches, de piscines ou d'autres plans d'eau ;
toujours porter des chaussures, et ne jamais permettre plus d'un cavalier.
AVERTISSEMENT : ASSEMBLAGE PAR UN ADULTE REQUIS
AVERTISSEMENT : Ne doit pas être utilisé dans la circulation
AVERTISSEMENT : RISQUE D’ÉTOUFFEMENT - Petites pièces.
Pas pour les enfants de moins de 3 ans.
AVERTISSEMENTS CONCERNANT LES BATTERIES
Cet appareil électronique contient les piles ou accumulateurs
suivants.
Informations sur le retrait en toute sécurité des piles ou des accumulateurs
Type de Batterie Système Chimique
6FM7 Plomb (Pb)
● Avertissement : Assurez-vous que la batterie est complètement déchargée.
● Ouvrez le siège, retirez les vis de tôle de fer avec un tournevis, retirez la tôle de fer et
débranchez les deux câbles de batterie pour retirer la batterie.
● Retirez avec précaution la pile ou l'accumulateur.
● La pile ou l'accumulateur et l'appareil peuvent maintenant être éliminés séparément.
La batterie est chaude
et fait un léger bruit
pendant la charge
Vitesse lente
Le véhicule tremble
pendant la conduite
Difficulté à passer de
la marche avant à la
marche arrière
L'interrupteur de
marche avant et
arrière est inversé
Normal Normal
Batterie faible Charger complètement la
batterie
Véhicule surchargé Réduire le poids du
véhicule
Route inégale ou en pente Roulez sur une chaussée
plate
Connexion desserrée au
moteur
Assurez-vous que le moteur
est correctement connecté à
la batterie
Tentative de changement
de vitesse pendant que le
véhicule roule
Ne changez de vitesse
que lorsque le véhicule
est à l'arrêt
Les boîtes de vitesses sont
mal installées
Assurez-vous que la boîte
de vitesses L est à gauche
et que la boîte de vitesses
R est à droite.
64 65

Attention :
Cet appareil est conforme à la partie 15 des règles de la FCC. Son
fonctionnement est soumis aux deux conditions suivantes : (1) cet appareil ne
doit pas causer d'interférences nuisibles. (2) cet appareil doit accepter toute
interférence reçue, y compris les interférences susceptibles de provoquer un
fonctionnement indésirable.
Les changements ou modifications non expressément approuvés par la partie
responsable de la conformité sont strictement interdits.
Cet équipement a été testé et déclaré conforme aux limites d'un appareil
numérique de classe B, conformément à la partie 15 des règles de la FCC.
Ces limites sont conçues pour fournir une protection raisonnable contre les
interférences nuisibles dans une installation résidentielle. Cet équipement
génère, utilise et peut émettre de l'énergie de fréquence radio et, s'il n'est pas
installé et utilisé conformément aux instructions, peut causer des interférences
nuisibles aux communications radio. Cependant, il n'y a aucune garantie que
des interférences ne se produiront pas dans une installation particulière. Si cet
équipement provoque des interférences nuisibles à la réception de la radio ou
de la télévision, ce qui peut être déterminé en éteignant et en allumant
l'équipement, l'utilisateur est encouragé à essayer de corriger les
interférences par une ou plusieurs des mesures suivantes :
- Réorienter ou déplacer l'antenne de réception.
- Augmenter la distance entre l'équipement et le récepteur.
- Connecter l'équipement à une prise sur un circuit différent de celui auquel le
récepteur est connecté.
- Consulter un technicien radio/TV expérimenté pour obtenir de l'aide.
Déclaration de la FCC
Fréquence Porteuse des Canaux
Canal
1
2
3
4
5
6
7
8
9
10
11
12
13
14
15
16
17
18
20
21
22
23
24
25
26
27
28
29
30
31
32
33
34
35
36
Fréquence
(MHz)
Canal
Fréquence
(MHz)
2405
2406
2407
2408
2409
2410
2411
2412
2413
2414
2415
2416
2417
2418
2419
2420
2421
2422 37 2441
19 2423 38 2442
2424
2425
2426
2427
2428
2429
2430
2431
2432
2433
2434
2435
2436
2437
2438
2439
2440
66 67

39
40
41
42
43
44
45
46
47
48
49
50
51
52
53
54
55
56
57
58
59
60
61
62
63
64
65
66
67
68
69
70
71
72
73
74
75
2443
2444
2445
2446
2447
2448
2449
2450
2451
2452
2453
2454
2455
2456
2457
2458
2459
2460
2461
2462
2463
2464
2465
2466
2467
2468
2469
2470
2471
2472
2473
2474
2475
2476
2477
2478
2479
ES
SEGURIDAD
Conserve estas instrucciones para futuras consultas.
NOTA: Para un mejor rendimiento, utilice este coche solo en superficies
planas y duras.
Rango de Edad: de 3 a 8 años
Capacidad de Carga: 30 kg es el peso máximo para 1 conductor
Los siguientes riesgos de seguridad pueden provocar lesiones graves o la
muerte:
• Este producto contiene piezas pequeñas. Mantenga a los niños alejados
durante el montaje. Asegúrese de retirar todo el material de embalaje y las
piezas de debajo de la carrocería del vehículo.
• No abra nunca la batería. Las baterías contienen plomo y compuestos de
plomo (ácidos).
• Las extremidades, el pelo y la ropa pueden quedar atrapados en las piezas
móviles. Lleve siempre calzado, mantenga las extremidades alejadas de las
piezas móviles y no lleve ropa suelta mientras maneja este vehículo.
• Este vehículo no tiene frenos ni capacidad de frenado. No deje a un niño sin
vigilancia durante el funcionamiento. No lo utilice en un lugar que pueda
requerir capacidad de frenado, ya que podría provocar la pérdida de control,
lo que podría causar lesiones graves o la muerte.
• El uso de este vehículo cerca de calles, vehículos a motor, escalones,
masas de agua, superficies inclinadas, colinas, zonas húmedas, vapores
inflamables, en callejones, de noche o en la oscuridad podría provocar un
accidente inesperado.
• El uso de este vehículo en condiciones inseguras como nieve, lluvia, tierra
suelta, barro, arena o grava puede provocar un accidente inesperado, como
un vuelco, y podría dañar el sistema eléctrico o la batería.
• No utilice este vehículo de forma insegura. Los ejemplos incluyen, pero no
se limitan a:
- Tirar del vehículo con otro vehículo o dispositivo similar;
- Empujar al usuario;
- Viajar a una velocidad insegura.
68 69

Los siguientes riesgos de seguridad pueden provocar lesiones graves o la
muerte:
• El uso de una batería o un cargador no suministrados puede provocar un
incendio o una explosión. Utilice únicamente la batería y el cargador
suministrados.
• El uso de la batería recargable y el cargador para cualquier otro producto
puede provocar un sobrecalentamiento, un incendio o una explosión. No
utilice nunca la batería recargable y el cargador suministrados con otro
producto.
• Durante la carga se crean gases explosivos. Cargue la batería en un área
bien ventilada. No cargue la batería cerca del calor o de materiales
inflamables.
• El contacto entre los terminales positivo y negativo puede provocar un
incendio o una explosión. Evite el contacto directo entre los terminales. Si
coge la batería por los cables o el cargador, puede dañar la batería y
provocar un incendio. Siempre coja la batería por la carcasa o las asas.
• Los líquidos en la batería pueden provocar un incendio o una descarga
eléctrica. Mantenga siempre todos los líquidos alejados de la batería y
manténgala seca. El contacto o la exposición a las fugas de la batería
(plomo-ácido) puede causar lesiones graves. Si se produce el contacto o la
exposición, llame inmediatamente a su médico. Si el producto químico entra
en contacto con la piel o los ojos, lave con agua fría durante 15 minutos. Si
el producto químico fue ingerido, dé inmediatamente a la persona agua o
leche. No dé agua o leche si el paciente está vomitando o tiene un nivel de
alerta disminuido. No provoque el vómito.
• Los postes, los terminales y los accesorios relacionados de la batería
contienen plomo y compuestos de plomo (ácido).
• La manipulación o modificación del sistema de circuitos eléctricos puede
provocar una descarga eléctrica, un incendio o una explosión y dañar
permanentemente el sistema. El cableado y los circuitos expuestos en el
cargador pueden provocar una descarga eléctrica. Mantenga siempre
cerrada la carcasa del cargador.
Los siguientes riesgos de seguridad pueden provocar lesiones graves o la
muerte:
• Nunca deje al niño sin vigilancia.
• Siéntese siempre en el asiento cuando utilice este vehículo.
• Mantenga las manos, el pelo y la ropa alejados de las piezas móviles.
• Lleve siempre calzado cuando utilice este vehículo.
• Los niños menores de 3 años no pueden utilizar el vehículo.
• Conduzca solo en terreno llano. No se acerque a piscinas u otras masas de
agua, a desniveles o a subidas y bajadas de pendientes pronunciadas.
• No conduzca el vehículo en tierra suelta, barro, arena, grava fina o en
superficies mojadas.
• No conduzca el vehículo en calles o cerca de coches.
ADVERTENCIAS SOBRE BATERÍA ADVERTENCIAS PARA USUARIOS
ESPECIFICACIONES
Batería
Motor
Edad adecuada
Peso máximo
Dimensión
Velocidad
Tiempo de juego
Cargador
12V
12V
3-8 años
30 KG
114*58*59 cm
2,5~3,5 km/h
1-2 horas/tiempo de recarga 8-12 horas
Salida DC12V
70 71
Los siguientes riesgos de seguridad pueden provocar lesiones graves o la
muerte:
• El uso de una batería o un cargador no suministrados puede provocar un
incendio o una explosión. Utilice únicamente la batería y el cargador
suministrados.
• El uso de la batería recargable y el cargador para cualquier otro producto
puede provocar un sobrecalentamiento, un incendio o una explosión. No
utilice nunca la batería recargable y el cargador suministrados con otro
producto.
• Durante la carga se crean gases explosivos. Cargue la batería en un área
bien ventilada. No cargue la batería cerca del calor o de materiales
inflamables.
• El contacto entre los terminales positivo y negativo puede provocar un
incendio o una explosión. Evite el contacto directo entre los terminales. Si
coge la batería por los cables o el cargador, puede dañar la batería y
provocar un incendio. Siempre coja la batería por la carcasa o las asas.
• Los líquidos en la batería pueden provocar un incendio o una descarga
eléctrica. Mantenga siempre todos los líquidos alejados de la batería y
manténgala seca. El contacto o la exposición a las fugas de la batería
(plomo-ácido) puede causar lesiones graves. Si se produce el contacto o la
exposición, llame inmediatamente a su médico. Si el producto químico entra
en contacto con la piel o los ojos, lave con agua fría durante 15 minutos. Si
el producto químico fue ingerido, dé inmediatamente a la persona agua o
leche. No dé agua o leche si el paciente está vomitando o tiene un nivel de
alerta disminuido. No provoque el vómito.
• Los postes, los terminales y los accesorios relacionados de la batería
contienen plomo y compuestos de plomo (ácido).
• La manipulación o modificación del sistema de circuitos eléctricos puede
provocar una descarga eléctrica, un incendio o una explosión y dañar
permanentemente el sistema. El cableado y los circuitos expuestos en el
cargador pueden provocar una descarga eléctrica. Mantenga siempre
cerrada la carcasa del cargador.
Los siguientes riesgos de seguridad pueden provocar lesiones graves o la
muerte:
• Nunca deje al niño sin vigilancia.
• Siéntese siempre en el asiento cuando utilice este vehículo.
• Mantenga las manos, el pelo y la ropa alejados de las piezas móviles.
• Lleve siempre calzado cuando utilice este vehículo.
• Los niños menores de 3 años no pueden utilizar el vehículo.
• Conduzca solo en terreno llano. No se acerque a piscinas u otras masas de
agua, a desniveles o a subidas y bajadas de pendientes pronunciadas.
• No conduzca el vehículo en tierra suelta, barro, arena, grava fina o en
superficies mojadas.
• No conduzca el vehículo en calles o cerca de coches.
ADVERTENCIAS SOBRE BATERÍA ADVERTENCIAS PARA USUARIOS
ESPECIFICACIONES
Batería
Motor
Edad adecuada
Peso máximo
Dimensión
Velocidad
Tiempo de juego
Cargador
12V
12V
3-8 años
30 KG
114*58*59 cm
2,5~3,5 km/h
1-2 horas/tiempo de recarga 8-12 horas
Salida DC12V
70 71

HERRAMIENTAS NECESARIAS
ACCESORIOS
PIEZAS
DESTORNILLADOR
(PROPORCIONADO
POR USTED MISMO)
LLAVE M10
(SUMINISTRADA)
MONTADO POR 2
PERSONAS
MONTAJE DE
APROXIMADAMENTE
25 MINUTOS
1 x9
2 x6
3 x2
4 x2
5 x1
A
x2
B x2
C x2
D x2
E x1
F
x1
G x1
H x1
I x1
J x2
K x1
L x1
M x1
N x1
O x2
P x1
Q x1
ARANDELA φ10 TUERCA M10
TUERCA M5
PASADOR DE
CHAVETA
TORNILLO
M5*35mm
RUEDA DELANTERA RUEDA TRASERA
TAPACUBOS DE LA
RUEDA DELANTERA
TAPACUBOS DE LA
RUEDA TRASERA
PALA MANDO A DISTANCIA
CARGADOR
BRAZO DE PALA
(IZQUIERDO)
BRAZO DE PALA
(DERECHO)
CUBIERTA DEL
BRAZO DE PALA
ASIENTO CHIMENEA
VOLANTE EJE TRASERO CAJA DE CAMBIOS (L/R)
PALANCA DE DIRECCIÓN CABLE DE AUDIO
72 73
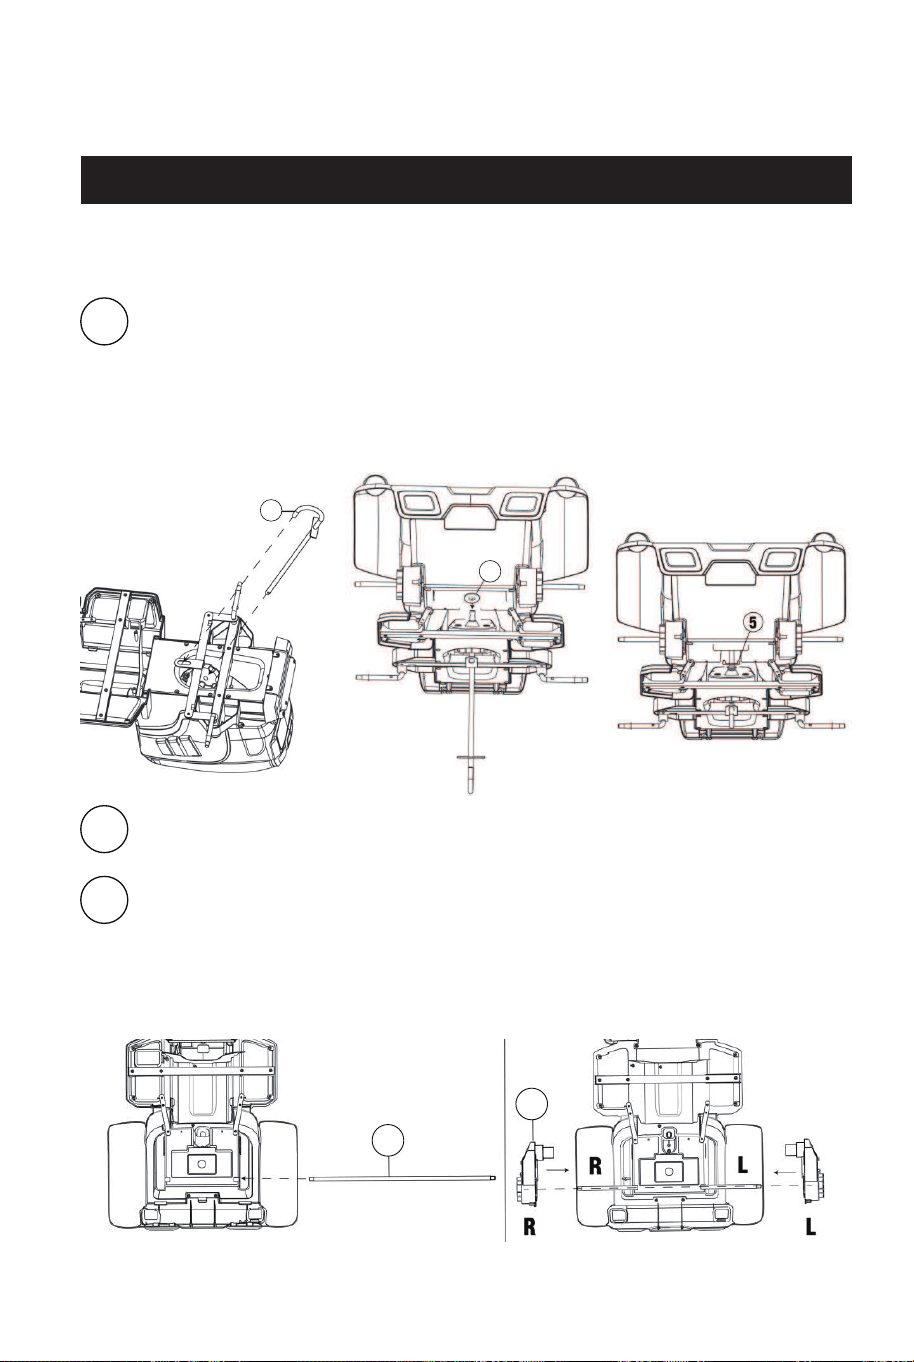
Fijar la palanca de dirección.
● Introduzca la palanca de dirección en el agujero de la carrocería.
● Inserte la arandela φ10 en la palanca de dirección.
● Una vez instalada la palanca de dirección en su lugar, inserte el
pasador de chaveta para doblar y fijar.
Fijar el eje trasero.
● Inserte el eje trasero en el coche.
Fijar la caja de cambios (L/R).
● Coloque la caja de cambios en el eje trasero, y enganche el motor y
el cable del motor en la ranura de la carrocería. (Nota: La caja de
cambios se distingue de la izquierda y de la derecha.)
MONTAJE DEL PRODUCTO
Dé la vuelta a la carrocería del coche de forma que la carrocería esté
orientada hacia arriba.
Coloque sucesivamente la arandela, la rueda delantera, la arandela y la
tuerca en el eje delantero.
Fije la tuerca con la llave M10 y luego fije el tapacubos de la rueda delantera
a la rueda.
Coloque sucesivamente la rueda trasera, la arandela y la tuerca en el eje
trasero.
Fije la tuerca con la llave M10 y luego fije el tapacubos de la rueda trasera
a la rueda.
P
Fijar la chimenea.
● Enganche la chimenea en la ranura de la carrocería.
Coloque sucesivamente el brazo de pala, la arandela y la tuerca en el
eje de pala.
Fije la tuerca con la llave M10 y, a continuación, fije la cubierta del
brazo de pala al brazo de pala. (Nota: El brazo de pala se distingue
de la izquierda y de la derecha, como se muestra en la figura.)
Nota: Cuando instale el brazo delantero de pala, necesita golpearlo
para fijarlo en su lugar.
L
J H I
N
O
O
N
Dé la vuelta a la carrocería.
74 75
1
P

Encuentre la línea de alimentación principal debajo del asiento, inserte el
enchufe de la línea de alimentación en la toma correspondiente del receptor,
conecte un extremo de la línea del motor de accionamiento derecho con la
línea del motor de accionamiento izquierdo, e inserte el otro enchufe de la
derecha en la toma del receptor.
Fijar la pala.
● Enganche la pala en el brazo de pala.
● Como se muestra en la figura: Fije con el tornillo M5*35mm y la
tuerca M5.
E
Fijar el volante.
● Retire la tuerca y el perno del volante.
● Conecte los cables que vienen de la columna de dirección a los
cables del volante.
● Inserte el volante sobre la columna de dirección y fíjelo con la tuerca
y el perno.
Fijar el asiento.
● Junte el asiento.
● Enganche el asiento en la carrocería.
● Gire el pestillo del asiento para fijarlo.
M
K
Batería
Caja de fusibles
Inserto de la caja de cambios
CAJA DE CAMBIOS
Alimentación de la caja
de cambios
CAJA DE CAMBIOS
Conector de alimentación
76 77

DIAGRAMA DEL SALPICADERO
1. Botón de música: Presione para reproducir música.
2. Botón de bocina: Presione para hacer sonar la bocina.
3. Botón de encendido: Puede encender o apagar el vehículo.
4. Panel de control central
5. Interruptor de cambio: Cambia la dirección del coche, adelante-atrás.
6. Botón del pedal: Pise el botón para mover el coche, suelte el pedal para
detenerse lentamente.
7. Enchufe de carga
1. Pantalla de potencia: Puede ver claramente la potencia de la batería, para
cargarla; cuanto más pequeño sea el número, menor será el voltaje. Por favor,
cargue a tiempo.
2. Canción anterior/Disminución de volumen: Cambia de canción, y la
pulsación larga disminuirá el volumen.
3. Interruptor de reproducción o parada
4. Próxima canción/Aumento de volumen: Cambia de canción, y la pulsación
larga aumentará el volumen.
5. Conmutador de modo: Presione para cambiar de modo/modo de
música/modo de radio/tecnología inalámbrica.
6. MP3: El cable de datos se puede conectar a otros dispositivos y reproducir
música.
7. U: Sistema para conectar equipos externos
78 79
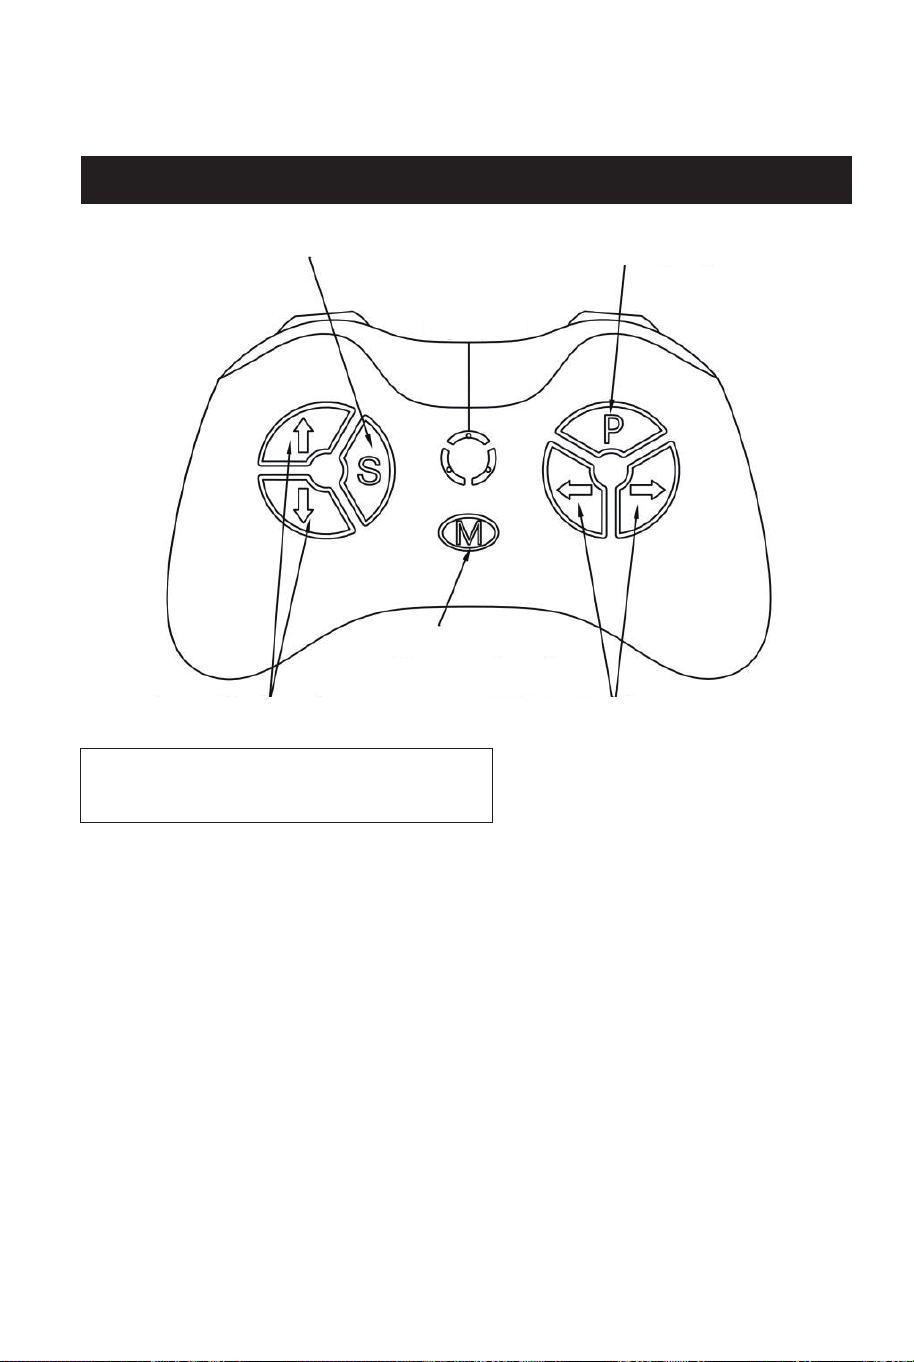
El mando a distancia es el primero. Cuando el mando a distancia está
encendido, el pedal no funciona.
Manual de Operación:
Saque el mando a distancia, abra el compartimento de las pilas en la parte
posterior del mando a distancia y ponga dos pilas alcalinas AAA LRO3. Preste
atención a la polaridad de las pilas. Cuando la luz de alineación y el indicador
de velocidad se encienden, indica que las pilas instaladas son correctas. Este
producto no proporciona pilas secas.
<Descripción de Botones>
(1) Presione prolongadamente la tecla de frecuencia (M) 2-4 segundos, la luz
LED de baja velocidad parpadea. Encienda el coche, la luz LED de baja
velocidad sigue parpadeando hasta que se enciende de forma prolongada,
entonces la vinculación de frecuencia tiene éxito. Si la vinculación de la
frecuencia falla (la luz LED de baja velocidad parpadea), retire las pilas y
repita los pasos.
P: Presione para frenar.
S: Velocidad: Presione para cambiar la velocidad (baja, media y alta).
△ Avance ▽ Retroceso
Giro a la izquierda Giro a la derecha
2) Botón de freno: Presiónelo para detener el movimiento; presiónelo de
nuevo para moverse.
3) Tecla de selección de velocidad e indicación de velocidad: Se utiliza para
seleccionar la velocidad del coche. Presione la tecla una vez para cambiar la
velocidad una vez. Se cambian cíclicamente 3 velocidades, y la secuencia de
cambio es: baja-media-alta. El indicador de velocidad está dispuesto de arriba
a abajo en el mando a distancia: lámpara de velocidad alta, lámpara de
velocidad media, lámpara de velocidad baja; cuando se cambia a una
velocidad, se encenderá la lámpara indicadora correspondiente. Nota: El nivel
de velocidad sólo cambia cuando se avanza.
4) Teclas de avance/retroceso: Se utilizan para controlar el movimiento de
avance y retroceso. Cuando se presiona una de las teclas, la velocidad de
movimiento aumentará lentamente hasta alcanzar el nivel de velocidad
establecido. Por lo tanto, los niños no tendrán un impacto repentino.
5) Teclas de giro a la izquierda/giro a la derecha: Se utilizan para el control de
la dirección izquierda y derecha.
Nota: Si no se utiliza después de 10 segundos, la luz de indicación se
apagará y pasará al modo de ahorro de energía.
ADVERTENCIA: El mando a distancia no es un juguete. Es para uso
exclusivo de los adultos y no debe ser utilizado por los niños. Siempre es
necesaria la supervisión de un adulto. El rango de recepción puede cambiar
significativamente con el clima, la batería y otras condiciones ambientales.
DIAGRAMA DEL MANDO A DISTANCIA
Velocidad
Avance/Retroceso
Advertencia
Solo debe ser utilizado por adultos.
Pulsación larga: Frecuencia
Giro a la izquierda
/Giro a la derecha
Freno de emergencia
Velocidad baja
Velocidad media
Velocidad alta
80 81

1. Inserte el puerto del cargador en el agujero de carga del coche.
2. Conecte el enchufe del cargador en la fuente de alimentación de CA estable
correspondiente, como se muestra en la imagen.
● Cargue la batería de 8 a 12 horas antes del primer uso.
● En promedio, necesitará cargar la batería entre 8 y 12 horas. No cargue la
batería durante más de 20 horas. Si no carga la batería como se indica,
podría causar daños permanentes a la batería.
● La batería puede resultar dañada si se deja que se descargue por completo.
No deje que la batería se descargue por completo.
● Compruebe si la batería y el cargador (cable de alimentación, conector)
están desgastados o dañados antes de cargar. No cargue la batería si está
dañada.
● Solo un adulto que haya leído y comprendido las advertencias de seguridad
debe manipular, cargar y recargar la batería.
● Aparque el coche en el interior o cúbralo con una lona para protegerlo de la
humedad.
● No deje el coche al sol durante largos periodos de tiempo o puede
desvanecerse. Guárdelo a la sombra o cúbralo con una lona.
● No lave el coche con una manguera de agua.
● No lave el coche con jabón.
● Cargue la batería al menos una vez al mes para prolongar su vida útil.
INSTRUCCIONES DE CARGA CUIDADO DE SU COCHE
SOLUCIÓN DE PROBLEMAS
Problema
El coche no se
mueve.
La batería no se
recarga.
La batería no dura.
La batería tiene poca
energía.
Protección eléctrica
El interruptor no está en la
posición correcta
Conectores de la batería
desconectados
Cargue completamente la
batería.
Deje de usarlo durante
varios minutos y vuelva a
encenderlo.
Presione completamente
los interruptores.
Enchufe los conectores de
la batería.
Conectores de la batería
desconectados
El cargador no está
conectado a la toma
de corriente
La batería no tiene una
carga completa.
Enchufe los conectores de
la batería.
Enchufe completamente el
cargador.
Cargue completamente la
batería.
Razón Solución
82 83

ADVERTENCIA:
La batería del coche no es reemplazable.
● No mezcle pilas viejas y nuevas.
No mezcle pilas alcalinas, estándar (carbono-zinc) o recargables.
● Las pilas no recargables no deben cargarse.
● Las baterías recargables deben cargarse únicamente bajo la supervisión de un
adulto.
● Las pilas agotadas deben ser retiradas.
● No se deben cortocircuitar los terminales de alimentación.
● No coloque las pilas cerca o en una fuente de calor (fuego, dispositivo de calefacción
electrónico, etc.).
● No golpee las pilas contra objetos duros.
● No sumerja las pilas en agua.
● Las pilas deben colocarse con la polaridad correcta.
● Utilice únicamente la batería especificada por el fabricante.
● Utilice únicamente el cargador especificado por el fabricante.
● Se debe usar equipo de protección. No debe utilizarse en el tráfico.
● Este juguete debe usarse con precaución ya que se requiere la habilidad
para evitar caídas o colisiones que causen lesiones al usuario o a terceros.
● Para reducir el riesgo de lesiones, se requiere la supervisión de un adulto.
Nunca lo utilice en carreteras, cerca de vehículos de motor, en o cerca de
pendientes o escalones pronunciados, piscinas u otros cuerpos de agua;
lleve siempre calzado y no permita que haya más de un conductor.
ADVERTENCIA: SE REQUIERE EL MONTAJE DE UN ADULTO.
ADVERTENCIA: No debe utilizarse en el tráfico.
ADVERTENCIA: PELIGRO DE ASFIXIA - Piezas pequeñas.
No es adecuado para niños menores de 3 años.
ADVERTENCIAS SOBRE BATERÍA
Este dispositivo eléctrico contiene las siguientes baterías o
acumuladores.
Información sobre la extracción segura de las baterías o acumuladores
Tipo de Batería Sistema Químico
6FM7 Plomo (Pb)
● Advertencia: Asegúrese de que la batería esté completamente agotada.
● Abra el asiento, quite los tornillos de la lámina de hierro con un destornillador, retire la
lámina de hierro y desconecte los dos cables de la batería para quitar la batería.
● Retire con cuidado la batería o el acumulador.
● La batería o el acumulador y el dispositivo ahora se pueden desechar por separado.
La batería está caliente
y hace un ligero ruido
durante la carga.
Velocidad lenta
El coche tiembla
durante la
conducción.
Dificultad para
cambiar de marcha
adelante/atrás.
El interruptor de
marcha adelante y
marcha atrás está
invertido.
Normal Normal
La batería tiene poca
energía.
Cargue completamente la
batería.
El coche está
sobrecargado.
Reduzca el peso en el
coche.
Carretera irregular o
inclinada
Conduzca sobre un
pavimento plano
Conexión floja al motor Asegúrese de que el motor
está bien conectado a la
batería.
Intentar cambiar de marcha
con el coche en
movimiento.
Cambie de marcha sólo
cuando el coche esté
parado.
La caja de cambios está
mal instalada.
Asegúrese de que la caja
de cambios L está a la
izquierda y la R a la
derecha.
84 85

Atención:
Este dispositivo cumple con la Parte 15 de las normas de la FCC. Su
funcionamiento está sujeto a las dos condiciones siguientes: (1) Este
dispositivo no puede causar interferencias perjudiciales, y (2) este dispositivo
debe aceptar cualquier interferencia recibida, incluidas las que puedan causar
un funcionamiento no deseado.
Están estrictamente prohibidos los cambios o modificaciones que no hayan
sido expresamente aprobados por la parte responsable del cumplimiento.
Este equipo ha sido probado y se ha comprobado que cumple con los límites
de un dispositivo digital de Clase B, de acuerdo con la Parte 15 de las normas
de la FCC. Estos límites están diseñados para proporcionar una protección
razonable contra las interferencias perjudiciales en una instalación
residencial. Este equipo genera, utiliza y puede irradiar energía de
radiofrecuencia y, si no se instala y utiliza de acuerdo con las instrucciones,
puede causar interferencias perjudiciales en las comunicaciones de radio. Sin
embargo, no se puede garantizar que no se produzcan interferencias en una
instalación concreta.
Si este equipo causa interferencias perjudiciales en la recepción de radio o
televisión, lo cual puede determinarse apagando y encendiendo el equipo, se
recomienda al usuario que intente corregir las interferencias mediante una o
varias de las siguientes medidas:
• Reorientar o reubicar la antena receptora.
• Aumentar la separación entre el equipo y el receptor.
• Conectar el equipo a una toma de corriente en un circuito diferente al que
está conectado el receptor.
• Consultar a un técnico de radio/TV con experiencia para obtener ayuda.
Declaración de la FCC
Frecuencia Portadora de Canales
Canal
1
2
3
4
5
6
7
8
9
10
11
12
13
14
15
16
17
18
20
21
22
23
24
25
26
27
28
29
30
31
32
33
34
35
36
Frecuencia
(MHz)
Canal
Frecuencia
(MHz)
2405
2406
2407
2408
2409
2410
2411
2412
2413
2414
2415
2416
2417
2418
2419
2420
2421
2422 37 2441
19 2423 38 2442
2424
2425
2426
2427
2428
2429
2430
2431
2432
2433
2434
2435
2436
2437
2438
2439
2440
86 87

39
40
41
42
43
44
45
46
47
48
49
50
51
52
53
54
55
56
57
58
59
60
61
62
63
64
65
66
67
68
69
70
71
72
73
74
75
2443
2444
2445
2446
2447
2448
2449
2450
2451
2452
2453
2454
2455
2456
2457
2458
2459
2460
2461
2462
2463
2464
2465
2466
2467
2468
2469
2470
2471
2472
2473
2474
2475
2476
2477
2478
2479
IT
SICUREZZA
Si prega di conservare queste istruzioni per riferimento futuro.
NOTA: Per ottenere le migliori prestazioni, utilizzare questo veicolo solo su
superfici piane e dure.
GOMMA DI ETÀ: 3 - 8 anni
CAPACITÀ DI PESO: 30KG è il peso massimo per 1 pilota.
I seguenti pericoli per la sicurezza possono causare lesioni gravi o morte:
● Questo prodotto contiene parti di piccole dimensioni. Tenere lontani i
bambini durante il montaggio. Assicurarsi di rimuovere tutto il materiale di
imballaggio e le parti da sotto la carrozzeria del veicolo.
● Non aprire mai la batteria. Le batterie contengono piombo e composti di
piombo (acidi).
● Gli arti, i capelli e gli indumenti possono impigliarsi nelle parti in movimento.
Indossare sempre le scarpe, tenere gli arti lontani dalle parti in movimento e
non indossare indumenti larghi durante l'uso del veicolo.
● Questo veicolo non è dotato di freni o di capacità di frenata. Non lasciare un
bambino incustodito durante il funzionamento. Non utilizzare questo veicolo
in un luogo che potrebbe richiedere la capacità di frenata, in quanto ciò
potrebbe causare la perdita di controllo, con conseguenti lesioni gravi o
morte.
● L'uso di questo veicolo in prossimità di strade, veicoli a motore, gradini,
specchi d'acqua, superfici inclinate, colline, zone umide, vapori infiammabili,
vicoli, di notte o al buio potrebbe causare un incidente imprevisto.
● L'uso di questo veicolo in condizioni non sicure, come neve, pioggia,
sporcizia, fango, sabbia o ghiaia, può provocare un incidente imprevisto,
come il ribaltamento, e può danneggiare l'impianto elettrico o la batteria.
● Non utilizzare il veicolo in condizioni non sicure, ad esempio:
-Tirare il veicolo con un altro veicolo o un dispositivo simile.
-Spingere l'utente.
-Guidare a velocità non sicura.
88 89

I seguenti pericoli per la sicurezza possono causare lesioni gravi o morte:
• L'uso di una batteria o di un caricatore diversi da quelli in dotazione può
provocare incendi o esplosioni. Utilizzare esclusivamente la batteria e il
caricatore in dotazione.
• L'uso della batteria ricaricabile e del caricatore per qualsiasi altro prodotto
può causare surriscaldamento, incendio o esplosione. Non utilizzare mai la
batteria ricaricabile e il caricatore in dotazione con un altro prodotto.
• Durante la carica si formano gas esplosivi. Caricare la batteria in un'area
ben ventilata. Non caricare la batteria in prossimità di fonti di calore o
materiali infiammabili.
• Il contatto tra i terminali positivi e negativi può provocare incendi o
esplosioni. Evitare il contatto diretto tra i terminali. Se si prende la batteria
per i fili o il caricabatterie, si può danneggiare la batteria e provocare un
incendio. Prendere sempre la batteria dalla custodia o dalle maniglie.
• Il contatto o l'esposizione a perdite della batteria (acido di piombo) può
causare gravi lesioni. In caso di contatto o esposizione, chiamare
immediatamente il medico. Se la sostanza chimica è sulla pelle o negli
occhi, sciacquare con acqua fresca per 15 minuti. Se la sostanza chimica è
stata ingerita, somministrare immediatamente acqua o latte alla persona
interessata. Non somministrare acqua o latte se il paziente vomita o ha un
livello di vigilanza ridotto. Non indurre il vomito.
• I poli della batteria, i terminali e i relativi accessori contengono piombo e
composti di piombo (acido).
• La manomissione o la modifica del sistema di circuiti elettrici può provocare
scosse, incendi o esplosioni e danneggiare in modo permanente il sistema. I
cavi e i circuiti esposti nel caricabatterie possono provocare scosse
elettriche.
I seguenti pericoli per la sicurezza possono causare lesioni gravi o morte:
• Non lasciare mai il bambino incustodito.
• Quando si usa questo veicolo, sedersi sempre sul sedile.
• Tenere mani, capelli e vestiti lontani dalle parti in movimento.
• Indossare sempre le scarpe quando si utilizza il veicolo.
• I bambini di età inferiore ai 3 anni non possono utilizzare il veicolo.
• Guidare solo su terreni pianeggianti.
• Non avvicinarsi a piscine o altri specchi d'acqua, a dislivelli o a salite e
discese ripide.
• Non guidare il veicolo su terra battuta, fango, sabbia, ghiaia fine o su
superfici bagnate.
• Non guidare il veicolo su strade o in prossimità di automobili.
AVVERTENZE SULLA BATTERIA AVVERTENZE PER L'UTENTE
SPECIFICAZIONI
Batterie
Motore
Età adatta
Peso massimo
Dimensioni
Velocità
Tempo di gioco
Caricabatterie
12V
12V
3-8 anni
30KG
114*58*59cm
2,5~3,5km/ora
1-2 ore / tempo di ricarica 8-12 ore
Uscita DC 12V
90 91

I seguenti pericoli per la sicurezza possono causare lesioni gravi o morte:
• L'uso di una batteria o di un caricatore diversi da quelli in dotazione può
provocare incendi o esplosioni. Utilizzare esclusivamente la batteria e il
caricatore in dotazione.
• L'uso della batteria ricaricabile e del caricatore per qualsiasi altro prodotto
può causare surriscaldamento, incendio o esplosione. Non utilizzare mai la
batteria ricaricabile e il caricatore in dotazione con un altro prodotto.
• Durante la carica si formano gas esplosivi. Caricare la batteria in un'area
ben ventilata. Non caricare la batteria in prossimità di fonti di calore o
materiali infiammabili.
• Il contatto tra i terminali positivi e negativi può provocare incendi o
esplosioni. Evitare il contatto diretto tra i terminali. Se si prende la batteria
per i fili o il caricabatterie, si può danneggiare la batteria e provocare un
incendio. Prendere sempre la batteria dalla custodia o dalle maniglie.
• Il contatto o l'esposizione a perdite della batteria (acido di piombo) può
causare gravi lesioni. In caso di contatto o esposizione, chiamare
immediatamente il medico. Se la sostanza chimica è sulla pelle o negli
occhi, sciacquare con acqua fresca per 15 minuti. Se la sostanza chimica è
stata ingerita, somministrare immediatamente acqua o latte alla persona
interessata. Non somministrare acqua o latte se il paziente vomita o ha un
livello di vigilanza ridotto. Non indurre il vomito.
• I poli della batteria, i terminali e i relativi accessori contengono piombo e
composti di piombo (acido).
• La manomissione o la modifica del sistema di circuiti elettrici può provocare
scosse, incendi o esplosioni e danneggiare in modo permanente il sistema. I
cavi e i circuiti esposti nel caricabatterie possono provocare scosse
elettriche.
I seguenti pericoli per la sicurezza possono causare lesioni gravi o morte:
• Non lasciare mai il bambino incustodito.
• Quando si usa questo veicolo, sedersi sempre sul sedile.
• Tenere mani, capelli e vestiti lontani dalle parti in movimento.
• Indossare sempre le scarpe quando si utilizza il veicolo.
• I bambini di età inferiore ai 3 anni non possono utilizzare il veicolo.
• Guidare solo su terreni pianeggianti.
• Non avvicinarsi a piscine o altri specchi d'acqua, a dislivelli o a salite e
discese ripide.
• Non guidare il veicolo su terra battuta, fango, sabbia, ghiaia fine o su
superfici bagnate.
• Non guidare il veicolo su strade o in prossimità di automobili.
AVVERTENZE SULLA BATTERIA AVVERTENZE PER L'UTENTE
SPECIFICAZIONI
Batterie
Motore
Età adatta
Peso massimo
Dimensioni
Velocità
Tempo di gioco
Caricabatterie
12V
12V
3-8 anni
30KG
114*58*59cm
2,5~3,5km/ora
1-2 ore / tempo di ricarica 8-12 ore
Uscita DC 12V
90 91
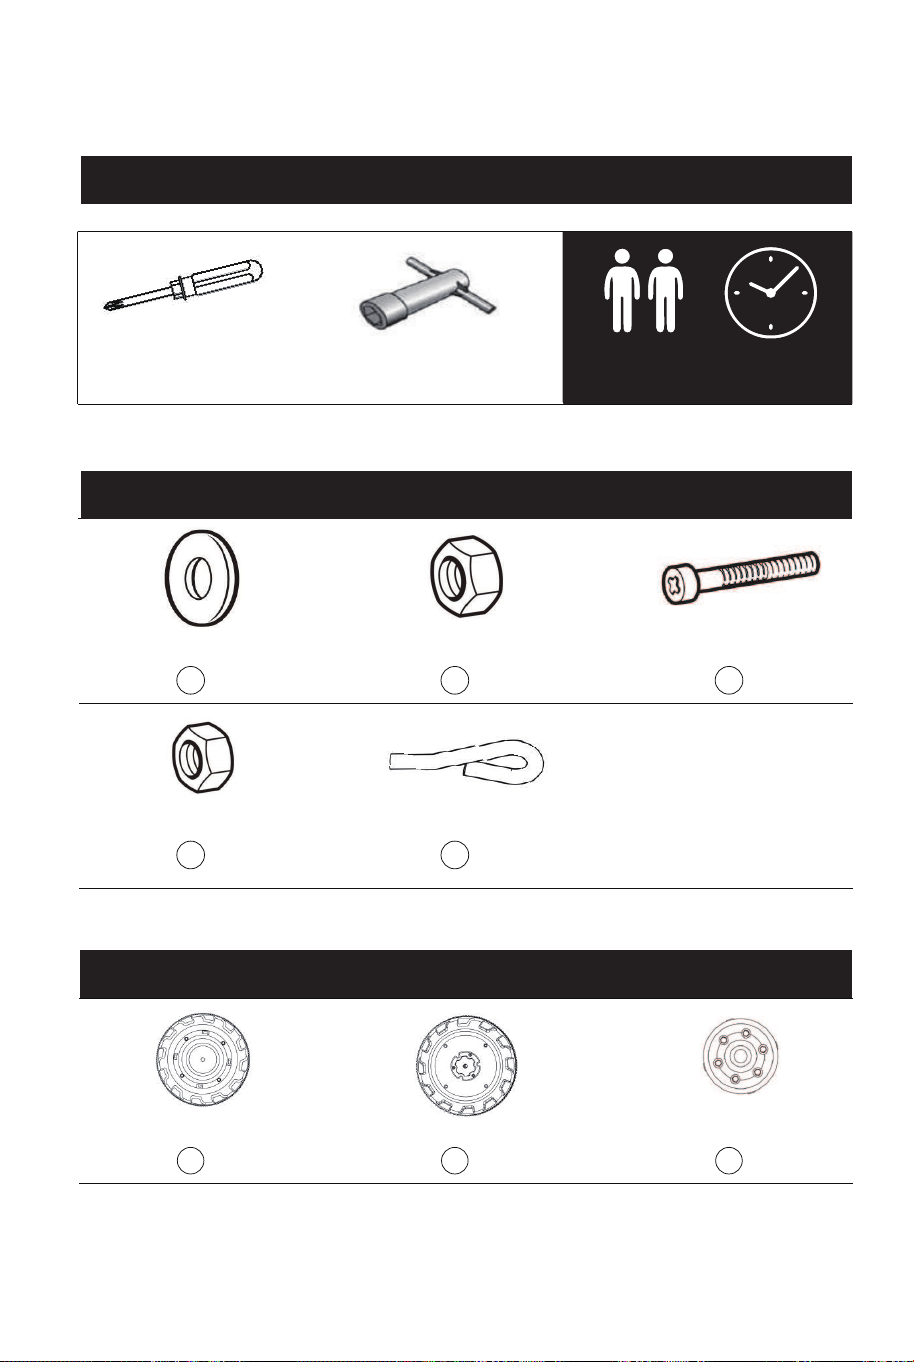
STRUMENTI NECESSARI
HAREWARE
PARTI
CACCIAVITE
(PORTARE IL PROPRIO)
CHIAVE M10
(FORNITO)
MONTAGGIO
DI 2 PERSONE
CIRCA 45
MINUTI DI
MONTAGGIO
1 x9
2 x6
3 x2
4 x2
5 x1
A
x2
B x2
C x2
D x2
E x1
F
x1
G x1
H x1
I x1
J x2
K x1
L x1
M x1
N x1
O x2
P x1
Q x1
φ10 GUARNIZIONI M10 DADI
M5 DADI PERNO PIATTO
M5*35 mm
VITE
RUOTA ANTERIORE RUOTA POSTERIORE
COPRIRUOTA
ANTERIORE
COPRIRUOTA
POSTERIORE
CESTINO TELECOMANDO
CARICATORI
BRACCIO DEL
CESTINO (SINISTRO)
BRACCIO DEL
CESTINO (DESTRO)
COPERTURA DEL
BRACCIO DELLA BENNA
SEDILE CAMINO
VOLANTE
ASSALE
POSTERIORE
SCATOLA INGRANAGGI (S/D)
LEVA DELLO STERZO CAVO AUDIO
92 93

Fissare la leva dello sterzo.
● Inserire la leva dello sterzo nel foro della carrozzeria.
● Inserire la rondella φ10 sulla leva dello sterzo.
● Una volta installata la leva dello sterzo, inserire la coppiglia per
piegarla e fissarla.
Fissare l'assale posteriore.
● Inserire l'assale posteriore nel veicolo.
Fissare la scatola del cambio (S/D).
● Inserire la scatola del cambio nell'assale posteriore e agganciare il
motore e il filo del motore nella fessura della carrozzeria. (Nota: la
scatola del cambio si distingue tra destra e sinistra).
MONTAGGIO DEL PRODOTTO
Girare il corpo in modo che sia rivolto verso l'alto.
Inserire a turno le guarnizioni, la ruota anteriore, le guarnizioni e il dado
nell'assale anteriore.
Fissare il dado con la chiave M10 e poi fissare il copriruota anteriore alla
ruota.
Posizionare a turno la ruota posteriore, le guarnizioni e il dado sull'assale
posteriore.
Fissare il dado con la chiave M10 e poi fissare il copriruota posteriore alla
ruota.
P
Fissare il camino.
● Agganciare la canna fumaria alla scanalatura del corpo.
Inserire a turno il braccio della benna, le guarnizioni e il dado
nell'assale della benna.
Fissare il dado con la chiave M10 e poi fissare il coperchio del braccio
della benna al braccio della benna (Nota: il braccio della benna è
diviso in destro e sinistro, come mostrato nella figura).
Nota: Quando si installano i bracci della benna anteriore, è necessario
batterli in posizione.
L
J H I
N
O
O
N
Girare il corpo in modo che sia rivolto verso l'alto.
94 95
1
P
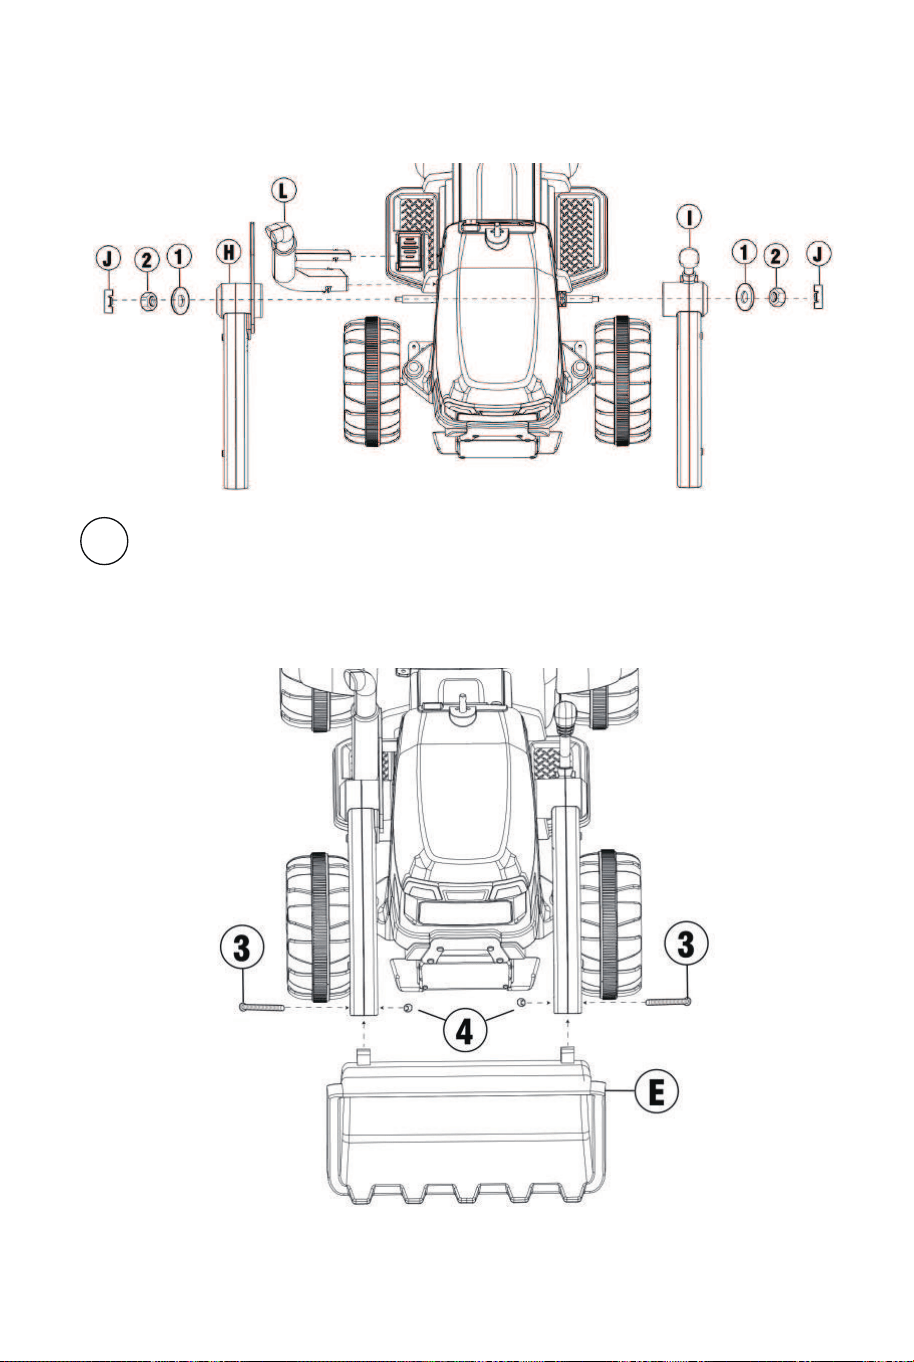
Individuare la linea di alimentazione principale sotto il sedile, inserire il plug-in
della linea di alimentazione nella presa corrispondente del ricevitore, collegare
un'estremità della linea del motore di azionamento destro con la linea del
motore di azionamento sinistro e inserire l'altro plug-in a destra nella presa del
ricevitore.
Fissare la benna.
● Agganciare la benna al braccio della benna.
● Come mostrato nella figura: Fissare con viti M5 * 35 mm e dadi M5.
E
Fissare il volante.
● Rimuovere il dado e il bullone dal volante.
● Collegare i fili provenienti dal piantone dello sterzo ai fili del volante.
● Inserire il volante sullo sterzo e fissarlo con dado e bullone.
Fissare il sedile.
● Unire il sedile.
● Agganciare il sedile alla scocca.
● Ruotare la chiusura del sedile per fissarlo.
M
K
Batteria
Scatola dei fusibili
Inserto scatola ingranaggi
SCATOLA INGRANAGGI
Alimentazione scatola ingranaggi
SCATOLA INGRANAGGI
Connettore di alimentazione
96 97
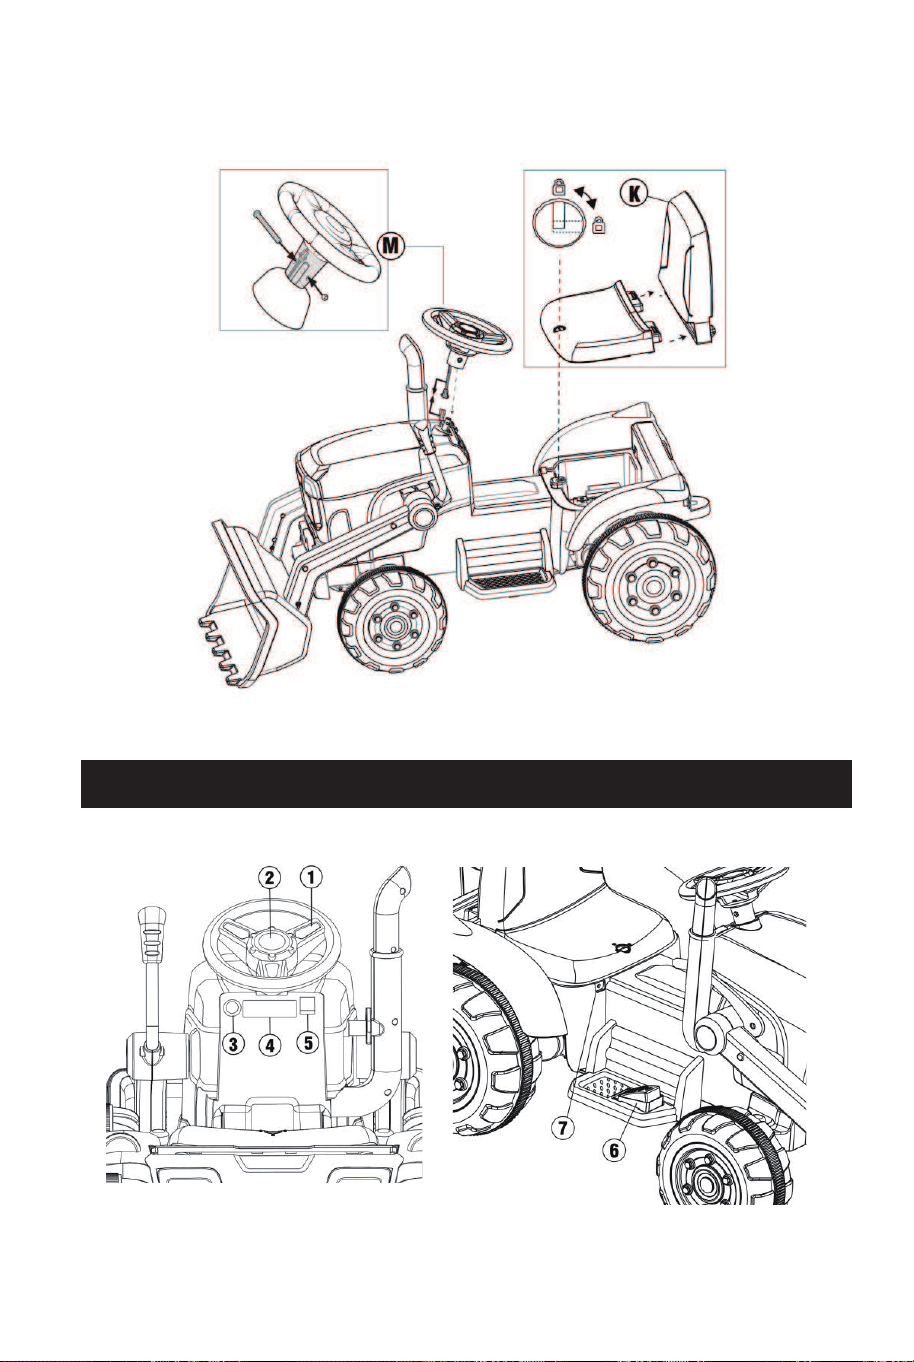
DIAGRAMMA DEL CRUSCOTTO
1. Pulsante musica: Premere per riprodurre la musica;
2. Pulsante del corno: Premere per suonare il corno;
3. Pulsante di accensione: Può accendere o spegnere il veicolo;
4. Pannello di controllo centrale;
5. Interruttore di cambio: Cambia la direzione della vettura, avanti-indietro;
6. Pulsante del pedale: Premendo il pulsante, l'auto si muoverà, rilasciando il
pedale per fermarsi lentamente;
7. Presa di carica;
Pannello di controllo centrale:
1. Display di potenza: Visualizza chiaramente la potenza della batteria, al fine
di caricarla; più piccolo è il numero, più bassa è la tensione. Si prega di
caricare in tempo;
2. Ultima canzone/Diminuzione del volume: Cambiare canzone e premere a
lungo per diminuire il volume; 3. Interruttore di riproduzione o arresto;
4. Canzone successiva/Aumento del volume: Cambia canzone e premendo a
lungo si aumenta il volume;
5. Interruttore di modalità: Premere per cambiare modalità/modalità
musica/modalità radio/tecnologia wireless;
6. MP3: Il cavo dati può essere collegato ad altri dispositivi e riprodurre
musica;
7. U: Sistema per il collegamento di apparecchiature esterne;
98 99

Prima il telecomando. Quando il telecomando è acceso, il pedale non
funziona.
Manuale d'Uso:
Estrarre il telecomando, aprire il vano batterie sul retro del telecomando e
aggiungere due batterie alcaline AAA LRO3. Prestare attenzione alla polarità
delle batterie. Quando la spia di allineamento e l'indicatore di velocità si
accendono, significa che la batteria installata è corretta. Questo prodotto non
è dotato di batterie a secco.
<Descrizione del Pulsante >
(1) Premere a lungo il tasto della frequenza (M) per 2-4 secondi, la luce del
LED a bassa velocità lampeggia. Accendere l'auto, la luce del LED a bassa
velocità continua a lampeggiare fino a un'illuminazione prolungata, quindi il
collegamento della frequenza ha successo. Se il collegamento della frequenza
non è riuscito (la luce del LED a bassa velocità lampeggia), rimuovere la
batteria e ripetere i passi.
P: Premere per frenare
S: Velocità: premere per cambiare la velocità (bassa, media e alta velocità)
△ Avanti ▽ Indietro
Girare a sinistra Girare a destra
2) Pulsante del freno: Premendolo si arresta il movimento; premendolo di
nuovo ci si sposta.
3) Tasto di selezione della velocità e indicazione della velocità: Serve per
selezionare la velocità della vettura. Premendo il tasto una volta, la velocità
viene commutata una volta. Le 3 velocità vengono commutate ciclicamente e
la sequenza di commutazione è: bassa-media-alta. L'indicatore di velocità è
disposto dall'alto verso il basso sul telecomando: spia di alta velocità, spia di
media velocità, spia di bassa velocità; quando si passa a una velocità, la spia
corrispondente si accende. Nota: il grado di velocità cambia solo quando si
procede in avanti.
4) Tasti avanti/indietro: Servono per controllare il movimento in avanti e
indietro. Quando si preme uno dei tasti, la velocità di movimento aumenta
lentamente fino a raggiungere il livello di velocità impostato. Pertanto, i
bambini non subiranno un impatto improvviso.
5) Tasto di girare a sinistra/girare a destra: Utilizzato per controllare la
direzione a sinistra e a destra.
Nota: In caso di mancato funzionamento dopo 10 secondi, la luce di
indicazione si spegne in modalità di risparmio energetico.
AVVERTENZA: Il telecomando non è un giocattolo. È destinato
esclusivamente all'uso da parte di un adulto e non deve essere utilizzato da
un bambino. È sempre necessaria la stretta sorveglianza di un adulto. La
portata della ricezione può variare in modo significativo a seconda delle
condizioni atmosferiche, della batteria e di altre condizioni ambientali.
DIAGRAMMA DEL TELECOMANDO
Velocità
Avanti / Indietro
Avvertenza
Utilizzato solo da adulti
Premere a lungo: frequenza
Girare a sinistra
/ Girare a destra
Interruzione d'emergenza
Velocità bassa
Velocità media
Velocità alta
100 101

1. Inserire l'innesto del caricabatterie nel foro di ricarica dell'auto.
2. Inserire la spina del caricabatterie nell'alimentatore CA stabile e
corrispondente, come mostrato nell'immagine.
● Caricare la batteria per 8 a 12 ore prima dell'uso iniziale.
● Generalmente è necessario caricare la batteria tra le 8 e le 12 ore. Non
caricare la batteria per più di 20 ore. La mancata ricarica della batteria come
indicato potrebbe causare danni permanenti alla batteria.
● Se si lascia che la batteria si scarichi completamente, si possono verificare
danni alla batteria stessa.
● Controllare che la batteria e il caricabatterie (cavo di alimentazione e
connettore) non siano usurati o danneggiati prima di caricarli.
● Solo un adulto che abbia letto e compreso le avvertenze di sicurezza può
maneggiare, caricare e ricaricare la batteria.
● Parcheggiare il veicolo al coperto o coprirlo con un telo per proteggerlo dal
bagnato.
● Non lasciare il veicolo al sole per lunghi periodi di tempo, altrimenti potrebbe
scolorirsi. Conservarlo all'ombra o coprirlo con un telo.
● Non lavare il veicolo con un tubo.
● Non lavare il veicolo con sapone.
● Caricare la batteria almeno una volta al mese per prolungarne la durata.
ISTRUZIONI PER LA RICARICA CURA DEL VEICOLO CAVALCABILE
RISOLUZIONE DEI PROBLEMI
PROBLEMA
Il veicolo non si
muove
La batteria non si
ricarica
La batteria non dura
a lungo
Batteria scarica
Protezione elettrica
Interruttore non in
posizione corretta
Connettori della batteria
scollegati
Caricare completamente la
batteria
Interrompere l'uso per alcuni
minuti e riavviare
Premere completamente gli
interruttori
Inserire i connettori della
batteria
Connettori della batteria
scollegati
La carica non è collegata
alla presa di corrente o alla
presa di corrente
La batteria non è
completamente carica
Inserire i connettori della
batteria
Collegare completamente il
caricabatterie
Caricare completamente la
batteria
CAUSA SOLUZIONE
102 103

AVVERTENZA:
La batteria del veicolo non è sostituibile.
● Non mischiare batterie vecchie e nuove.
● Non mischiare batterie alcaline, standard (carbonio-zinco) o ricaricabili.
● Le batterie non ricaricabili non devono essere caricate.
● Le batterie ricaricabili devono essere caricate solo sotto la supervisione di un adulto.
● Le batterie scariche devono essere rimosse.
● I terminali di alimentazione non devono essere messi in cortocircuito.
● Non mettere le batterie vicino o in prossimità di una fonte di calore (fuoco, dispositivi
elettronici di riscaldamento, ecc.).
● Non urtare le batterie contro oggetti duri.
● Non immergere le batterie in acqua.
● Le batterie devono essere inserite con la polarità corretta.
● Utilizzare solo la batteria specificata dal produttore.
● Utilizzare solo il caricabatterie specificato dal produttore.
● È necessario indossare dispositivi di protezione. Non deve essere utilizzato
nel traffico.
● Il giocattolo deve essere usato con cautela, poiché è necessaria una certa
abilità per evitare cadute o collisioni che possano causare lesioni all'utente o
a terzi.
● Per ridurre il rischio di lesioni, è necessaria la supervisione di un adulto. Non
utilizzare mai in carreggiata, in prossimità di veicoli a motore, su o in
prossimità di pendii o gradini ripidi, piscine o altri specchi d'acqua; indossare
sempre le scarpe e non consentire mai l'utilizzo di più di un pilota.
AVVERENZA: È RICHIESTO IL MONTAGGIO DA PARTE DI UN ADULTO.
AVVERENZA: Non utilizzare nel traffico.
AVVERENZA: PERICOLO DI RAFFREDDAMENTO - Piccole parti.
Non adatto a bambini di età inferiore a 3 anni.
AVVERTENZE RELATIVE ALLE BATTERIE
Le seguenti batterie o accumulatori sono contenuti in questo
dispositivo elettronico.
Informazioni sulla rimozione sicura delle batterie o degli accumulatori
Tipo di Batteria Sistema Chimico
6FM7 Piombo (Pb)
● Avvertenza: Assicurare che la batteria è completamente scarica.
● Aprire il sedile, rimuovere le viti sul foglio di ferro con un cacciavite, rimuovere il foglio di
ferro e staccare i due fili dalla batteria per rimuovere la batteria.
● Rimuovere la batteria o l'accumulatore con cautela.
● La batteria o l'accumulatore e il dispositivo possono essere osmaltiti separatamente ora.
La batteria è calda e fa
un leggero rumore
durante la ricarica
Velocità bassa
Il veicolo trema
durante la guida
Difficile da passare
dalla marcia avanti
alla retromarcia
L'interruttore della
marcia avanti e della
retromarcia è invertito
Normale Normale
Batteria scarica Caricare completamente la
batteria
Veicolo sovraccarico Ridurre il peso sul veicolo
Strada irregolare o in
pendenza
Guidare in piano
Collegamento allentato al
motore
Assicurarsi che il motore sia
collegato correttamente alla
batteria.
Tentativo di cambiare
mentre il veicolo è in
movimento
Cambiare marcia solo
quando il veicolo è fermo
Le scatole del cambio sono
installate in modo errato
Assicurarsi che il cambio L
sia a sinistra e il cambio R
a destra.
104 105
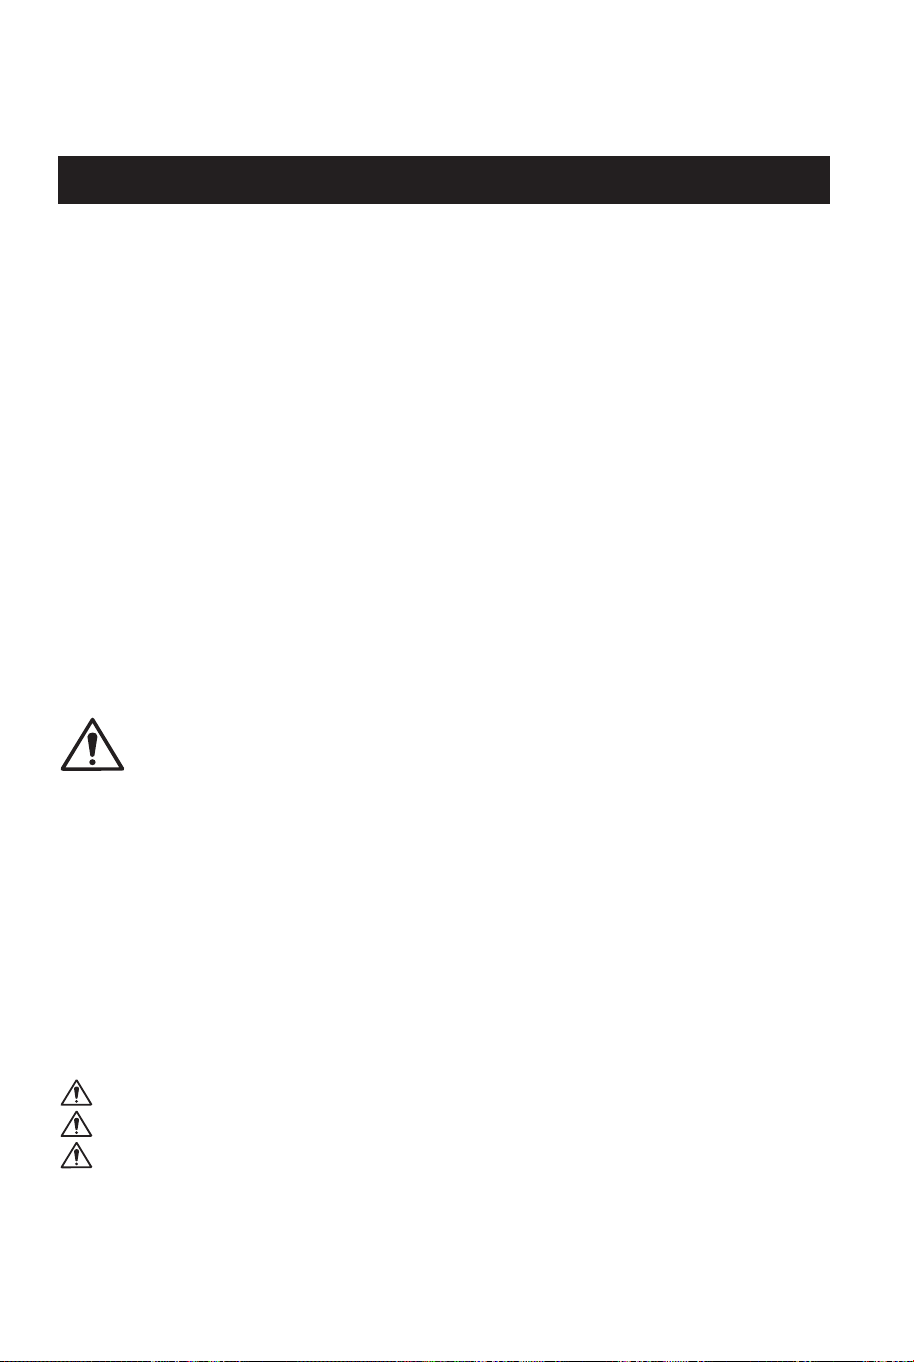

Attenzione:
Questo dispositivo è conforme alla Parte 15 delle norme FCC. Il
funzionamento è soggetto alle due condizioni seguenti: (1) il dispositivo non
deve causare interferenze dannose. (2) il dispositivo deve accettare qualsiasi
interferenza ricevuta, comprese quelle che possono causare un
funzionamento indesiderato.
Cambiamenti o modifiche non espressamente approvati dalla parte
responsabile della conformità possono invalidare l'autorizzazione dell'utente a
utilizzare l'apparecchiatura.
Questa apparecchiatura è stata testata ed è risultata conforme ai limiti previsti
per i dispositivi digitali di Classe B, ai sensi della parte 15 delle norme FCC.
Questi limiti sono concepiti per fornire una protezione ragionevole contro le
interferenze dannose in un'installazione residenziale. Questa apparecchiatura
genera e può irradiare energia in radiofrequenza e, se non viene installata e
utilizzata secondo le istruzioni, può causare interferenze dannose alle
comunicazioni radio. Tuttavia, non è possibile garantire che non si verifichino
interferenze in una particolare installazione. Se questa apparecchiatura causa
interferenze dannose alla ricezione radiotelevisiva, che possono essere
determinate spegnendo e riaccendendo l'apparecchiatura, l'utente è
incoraggiato a cercare di correggere l'interferenza con una o più delle
seguenti misure:
-Riorientare o riposizionare l'antenna ricevente.
-Aumentare la distanza tra l'apparecchiatura e il ricevitore.
-Collegare l'apparecchio a una presa di corrente su un circuito diverso da
quello a cui è collegato il ricevitore.
-Rivolgersi a noi o a un tecnico radiotelevisivo esperto.
Dichiarazione FCC
Frequenza Portante dei Canali
Canale
1
2
3
4
5
6
7
8
9
10
11
12
13
14
15
16
17
18
20
21
22
23
24
25
26
27
28
29
30
31
32
33
34
35
36
Frequenza
(MHz)
Canale
Frequenza
(MHz)
2405
2406
2407
2408
2409
2410
2411
2412
2413
2414
2415
2416
2417
2418
2419
2420
2421
2422 37 2441
19 2423 38 2442
2424
2425
2426
2427
2428
2429
2430
2431
2432
2433
2434
2435
2436
2437
2438
2439
2440
106 107

39
40
41
42
43
44
45
46
47
48
49
50
51
52
53
54
55
56
57
58
59
60
61
62
63
64
65
66
67
68
69
70
71
72
73
74
75
2443
2444
2445
2446
2447
2448
2449
2450
2451
2452
2453
2454
2455
2456
2457
2458
2459
2460
2461
2462
2463
2464
2465
2466
2467
2468
2469
2470
2471
2472
2473
2474
2475
2476
2477
2478
2479
PL
BEZPIECZEŃSTWO
Zachowaj instrukcję do wykorzystania w przyszłości.
UWAGA: Aby uzyskać jak najlepszą wydajność, używaj produktu wyłącznie na
płaskich i twardych nawierzchniach.
DLA DZIECI W WIEKU: 3-8 lat
MAKSYMALNE OBCIĄŻENIE: 30 kg - maksymalna waga 1 użytkownika.
Niezastosowanie się do poniższych ostrzeżeń może prowadzić do powstania
poważnych obrażeń, a nawet śmierci:
● Produkt zawiera małe części. Podczas montażu należy trzymać go z dala od
dzieci. Przed wręczeniem produktu dziecku należy zutylizować wszystkie
materiały opakowaniowe i zamontować wszystkie części.
● Nie należy otwierać obudowy akumulatora. Akumulator zawiera ołów i
związki ołowiu (kwas).
● Należy uważać, aby ręce, nogi, włosy i ubrania nie zakleszczyły ani nie
wplątały się w ruchome części pojazdu. Należy nosić odpowiednie obuwie
sportowe. Nie należy nosić luźnych ubrań, które mogą wplątać się w
ruchome części pojazdu. Należy trzymać ręce i nogi z dala od ruchomych
części pojazdu.
● Pojazd nie ma hamulca ani innego systemu hamowania. Nie należy
zostawiać dziecka bez nadzoru. Nie należy używać pojazdu w miejscach,
które mogą wymagać konieczności użycia hamulca. Utrata kontroli nad
pojazdem może prowadzić do powstania poważnych obrażeń użytkownika,
a nawet śmierci.
● Nie należy używać produktu na lub w pobliżu dróg, w pobliżu pojazdów
silnikowych, na lub w pobliżu stromych zboczy lub schodów, basenów lub
innych zbiorników wodnych, na mokrych nawierzchniach, w nocy lub na
niedostatecznie oświetlonym terenie. Niewłaściwe użytkowanie pojazdu
może prowadzić do wypadku.
● Użytkowanie pojazdu w niebezpiecznych warunkach, takich jak opady
śniegu lub deszczu, w błocie, na piasku lub żwirze może prowadzić do
wypadku, np. przewrócenia się pojazdu, a w konsekwencji także do
uszkodzenia układu elektrycznego lub akumulatora.
● Nie należy używać produktu w niebezpieczny sposób, m.in.:
- Nie należy ciągnąć pojazdu za innym pojazdem lub urządzeniem.
- Nie należy popychać dziecka w celu rozpędzenia pojazdu.
- Nie należy rozpędzać pojazdu do zbyt dużej prędkości.
108 109

Niezastosowanie się do poniższych ostrzeżeń może prowadzić do powstania
poważnych obrażeń, a nawet śmierci:
• Użycie nieoryginalnego akumulatora lub ładowarki może spowodować pożar
lub wybuch. Należy używać wyłącznie oryginalnego akumulatora i ładowarki.
• Używanie akumulatora i ładowarki z jakimkolwiek innym produktem może
spowodować przegrzanie, pożar lub wybuch. Nie należy używać
dołączonego do zestawu akumulatora i ładowarki z innym produktem.
• Podczas ładowania akumulatora powstają gazy wybuchowe. Akumulator
należy ładować w przewiewnym miejscu. Nie należy ładować akumulatora w
pobliżu źródeł ciepła lub materiałów łatwopalnych.
• Zetknięcie się styków akumulatora może spowodować pożar lub wybuch.
Nie należy zwierać styków akumulatora. Podnoszenie akumulatora lub
ładowarki za przewód może spowodować uszkodzenie
akumulatora/ładowarki lub pożar. Akumulator i ładowarkę należy podnosić
trzymając za obudowę/uchwyt.
• Kontakt akumulatora z cieczą może spowodować pożar lub porażenie
prądem. Nie należy wystawiać akumulatora na kontakt z wodą lub inną
cieczą. Wyciek kwasu z akumulatora może być bardzo niebezpieczny i
spowodować poważne obrażenia. W przypadku kontaktu z kwasem należy
natychmiast skontaktować się z lekarzem. W przypadku kontaktu kwasu z
oczami lub skórą należy natychmiast przemyć je czystą i zimną wodą. W
przypadku połknięcia kwasu należy natychmiast wypić szklankę wody lub
mleka. Nie należy spożywać wody ani mleka w przypadku wystąpienia
wymiotów lub złego samopoczucia. Nie należy wywoływać wymiotów.
• Akumulator i jego elementy zawierają kwas.
• Modyfikacja układu elektrycznego przez użytkownika może spowodować
uszkodzenie układu elektrycznego, porażenie prądem, pożar lub wybuch.
Odsłonięte przewody i obwody w ładowarce mogą spowodować porażenie
prądem. Nie należy otwierać obudowy ładowarki, ponieważ może to
spowodować porażenie prądem.
Niezastosowanie się do poniższych ostrzeżeń może prowadzić do powstania
poważnych obrażeń, a nawet śmierci:
• Pod żadnym pozorem nie należy zostawiać dziecka bez nadzoru.
• Podczas użytkowania pojazdu dziecko powinno zawsze siedzieć na
siedzisku.
• Należy trzymać włosy, ręce i ubrania z dala od ruchomych części pojazdu.
• Podczas użytkowania pojazdu dziecko powinno zawsze nosić odpowiednie
obuwie.
• Produkt może być użytkowany wyłącznie przez 1 dziecko w jednym czasie.
• Produkt jest nieodpowiedni dla dzieci poniżej 3 roku życia.
• Produkt jest przeznaczony wyłącznie do użytku na równym podłożu. Nie
należy używać go w pobliżu basenów lub innych zbiorników wodnych,
stromych zboczy i wzniesień.
• Nie należy używać pojazdu w błocie, na piasku, żwirze lub wilgotnej
nawierzchni.
• Nie należy używać pojazdu na drogach lub w pobliżu pojazdów silnikowych.
OSTRZEŻENIA DOTYCZĄCE AKUMULATORA OSTRZEŻENIA
SPECYFIKACJA
Akumulator
Silnik
Dla dzieci w wieku
Maksymalne obciążenie
Wymiary
Prędkość
Czas pracy na 1 ładowaniu
Ładowarka
12V
12V
3-8 lat
30 kg
114 x 58 x 59 cm
2,5-3,5km/h (12V)
1-2 godziny po ładowaniu przez 8-12 godzin
DC 12V
110 111

Niezastosowanie się do poniższych ostrzeżeń może prowadzić do powstania
poważnych obrażeń, a nawet śmierci:
• Użycie nieoryginalnego akumulatora lub ładowarki może spowodować pożar
lub wybuch. Należy używać wyłącznie oryginalnego akumulatora i ładowarki.
• Używanie akumulatora i ładowarki z jakimkolwiek innym produktem może
spowodować przegrzanie, pożar lub wybuch. Nie należy używać
dołączonego do zestawu akumulatora i ładowarki z innym produktem.
• Podczas ładowania akumulatora powstają gazy wybuchowe. Akumulator
należy ładować w przewiewnym miejscu. Nie należy ładować akumulatora w
pobliżu źródeł ciepła lub materiałów łatwopalnych.
• Zetknięcie się styków akumulatora może spowodować pożar lub wybuch.
Nie należy zwierać styków akumulatora. Podnoszenie akumulatora lub
ładowarki za przewód może spowodować uszkodzenie
akumulatora/ładowarki lub pożar. Akumulator i ładowarkę należy podnosić
trzymając za obudowę/uchwyt.
• Kontakt akumulatora z cieczą może spowodować pożar lub porażenie
prądem. Nie należy wystawiać akumulatora na kontakt z wodą lub inną
cieczą. Wyciek kwasu z akumulatora może być bardzo niebezpieczny i
spowodować poważne obrażenia. W przypadku kontaktu z kwasem należy
natychmiast skontaktować się z lekarzem. W przypadku kontaktu kwasu z
oczami lub skórą należy natychmiast przemyć je czystą i zimną wodą. W
przypadku połknięcia kwasu należy natychmiast wypić szklankę wody lub
mleka. Nie należy spożywać wody ani mleka w przypadku wystąpienia
wymiotów lub złego samopoczucia. Nie należy wywoływać wymiotów.
• Akumulator i jego elementy zawierają kwas.
• Modyfikacja układu elektrycznego przez użytkownika może spowodować
uszkodzenie układu elektrycznego, porażenie prądem, pożar lub wybuch.
Odsłonięte przewody i obwody w ładowarce mogą spowodować porażenie
prądem. Nie należy otwierać obudowy ładowarki, ponieważ może to
spowodować porażenie prądem.
Niezastosowanie się do poniższych ostrzeżeń może prowadzić do powstania
poważnych obrażeń, a nawet śmierci:
• Pod żadnym pozorem nie należy zostawiać dziecka bez nadzoru.
• Podczas użytkowania pojazdu dziecko powinno zawsze siedzieć na
siedzisku.
• Należy trzymać włosy, ręce i ubrania z dala od ruchomych części pojazdu.
• Podczas użytkowania pojazdu dziecko powinno zawsze nosić odpowiednie
obuwie.
• Produkt może być użytkowany wyłącznie przez 1 dziecko w jednym czasie.
• Produkt jest nieodpowiedni dla dzieci poniżej 3 roku życia.
• Produkt jest przeznaczony wyłącznie do użytku na równym podłożu. Nie
należy używać go w pobliżu basenów lub innych zbiorników wodnych,
stromych zboczy i wzniesień.
• Nie należy używać pojazdu w błocie, na piasku, żwirze lub wilgotnej
nawierzchni.
• Nie należy używać pojazdu na drogach lub w pobliżu pojazdów silnikowych.
OSTRZEŻENIA DOTYCZĄCE AKUMULATORA OSTRZEŻENIA
SPECYFIKACJA
Akumulator
Silnik
Dla dzieci w wieku
Maksymalne obciążenie
Wymiary
Prędkość
Czas pracy na 1 ładowaniu
Ładowarka
12V
12V
3-8 lat
30 kg
114 x 58 x 59 cm
2,5-3,5km/h (12V)
1-2 godziny po ładowaniu przez 8-12 godzin
DC 12V
110 111

POTRZEBNE NARZĘDZIA
CZĘŚCI MONTAŻOWE
CZĘŚCI
ŚRUBOKRĘT
(BRAK W ZESTAWIE)
KLUCZ
(W ZESTAWIE)
2 OSOBY
DOROSŁE
CZAS MONTAŻU:
OK. 45 MINUT
1 x9
2 x6
3 x2
4 x2
5 x1
A
x2
B x2
C x2
D x2
E x1
F
x1
G x1
H x1
I x1
J x2
K x1
L x1
M x1
N x1
O x2
P x1
Q x1
PODKŁADKA Ø10 NAKRĘTKA M10
NAKRĘTKA M5
ZAWLECZKA
ŚRUBA
M5X35
PRZEDNIE KOŁO TYLNE KOŁO
KOŁPAK
PRZEDNIEGO KOŁA
KOŁPAK
TYLNEGO KOŁA
ŁYŻKA SPYCHARKI
PILOT ZDALNEGO
STEROWANIA
ŁADOWARKA
RAMIĘ ŁYŻKI
(LEWE)
RAMIĘ ŁYŻKI
(PRAWE)
OSŁONA
RAMIENIA ŁYŻKI
SIEDZISKO
RURA
WYDECHOWA
KIEROWNICA
TYLNA OŚ
SILNIK NAPĘDOWY (L/P)
DRĄŻEK KIEROWNICZY KABEL AUDIO
112 113
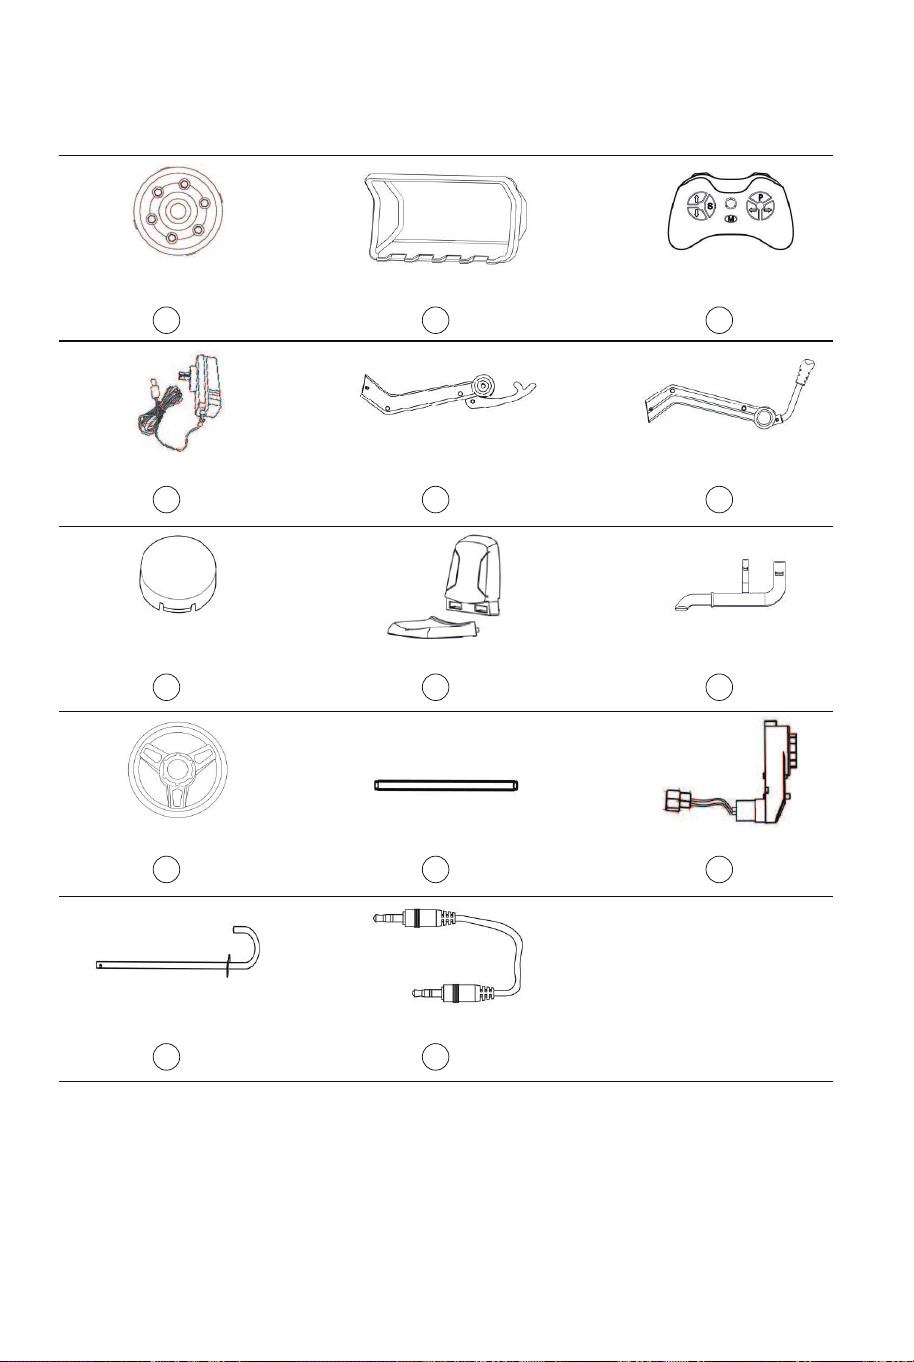

Montaż drążka kierowniczego.
● Przełóż drążek kierowniczy przez otwory w korpusie pojazdu.
● Nasuń podkładkę Ø10 na drążek kierowniczy.
● Po zamocowaniu drążka kierowniczego przełóż i zagnij zawleczkę,
aby ją zamocować.
Montaż tylnej osi.
● Przełóż tylną oś przez otwory w korpusie pojazdu.
Montaż silników napędowych (L/P).
● Nasuń silnik napędowy na tylną oś. Przymocuj silnik do szczeliny w
korpusie pojazdu i podłącz przewód silnika. (Rozróżnij lewy silnik
napędowy od prawego.)
MONTAŻ PRODUKTU
Odwróć karoserię podwoziem do góry.
Zamocuj na przedniej osi kolejno podkładkę, koło, podkładkę i nakrętkę.
Dokręć nakrętkę za pomocą klucza M10. Następnie przymocuj kołpak do
koła.
Zamocuj na tylnej osi kolejno koło, podkładkę i nakrętkę. Dokręć nakrętkę
za pomocą klucza M10. Następnie przymocuj kołpak do koła.
P
Montaż rury wydechowej.
● Przymocuj rurę wydechową w szczelinie w korpusie pojazdu.
Nasuń kolejno ramię łyżki, podkładkę i nakrętkę na oś ramienia.
Dokręć nakrętkę za pomocą klucza M10 i zamocuj osłonę na
ramieniu. (Rozróżnij ramię lewe od ramienia prawego, tak jak
pokazano na rysunku.)
Uwaga: Podczas montażu przednich ramion łyżki należy je dobrze
docisnąć.
L
J H I
N
O
O
N
Postaw pojazd na kołach.
114 115
1
P
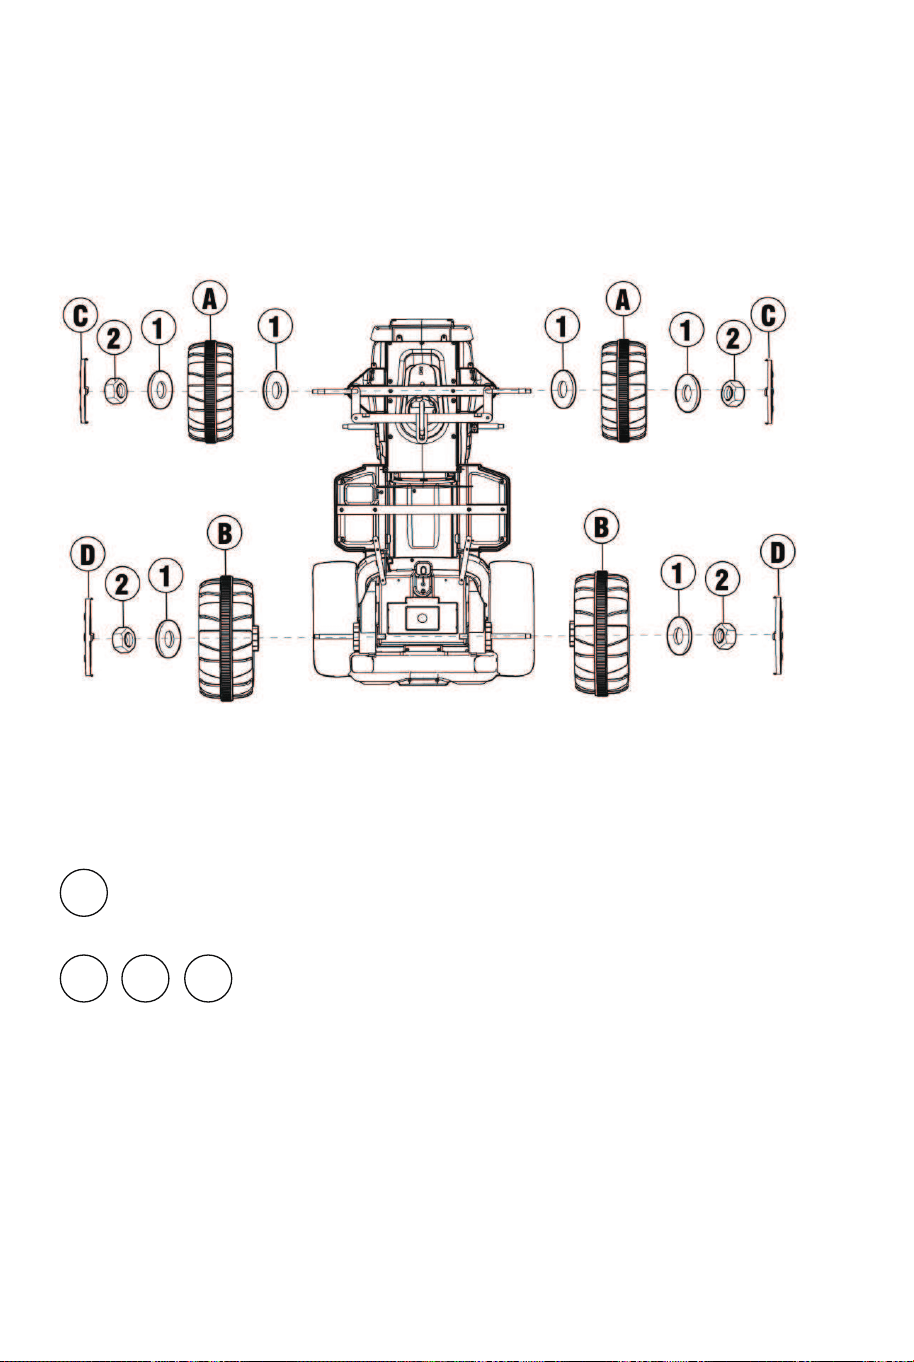

Zlokalizuj główny przewód zasilający pod siedziskiem, a następnie podłącz
wtyczkę przewodu zasilającego do odpowiedniego gniazda odbiornika.
Podłącz złączkę prawego silnika oraz złączkę lewego silnika napędowego.
Podłącz zasilanie prawego silnika napędowego do odbiornika.
Montaż łyżki spycharki.
● Zamocuj łyżkę na ramieniu.
● Zamocuj łyżkę za pomocą śrub M5x35 i nakrętek M5, tak jak
pokazano na rysunku.
E
Montaż kierownicy.
● Zdemontuj śrubę i nakrętkę z kierownicy.
● Podłącz przewody wyprowadzone z kolumny kierowniczej do
przewodów wyprowadzonych z kierownicy.
● Nasuń kierownicę na kolumnę kierownicy, a następnie dokręć śrubę i
nakrętkę.
Montaż siedziska.
● Połącz ze sobą elementy siedziska.
● Zamocuj siedzisko w korpusie pojazdu.
● Obróć blokadę na siedzisku, aby zablokować je na miejscu.
M
K
Akumulator
Skrzynka
bezpiecznika
Złączka silnika napędowego
SILNIK NAPĘDOWY
Zasilanie silnika napędowego
SILNIK NAPĘDOWY
Złącze zasilania
P
116 117
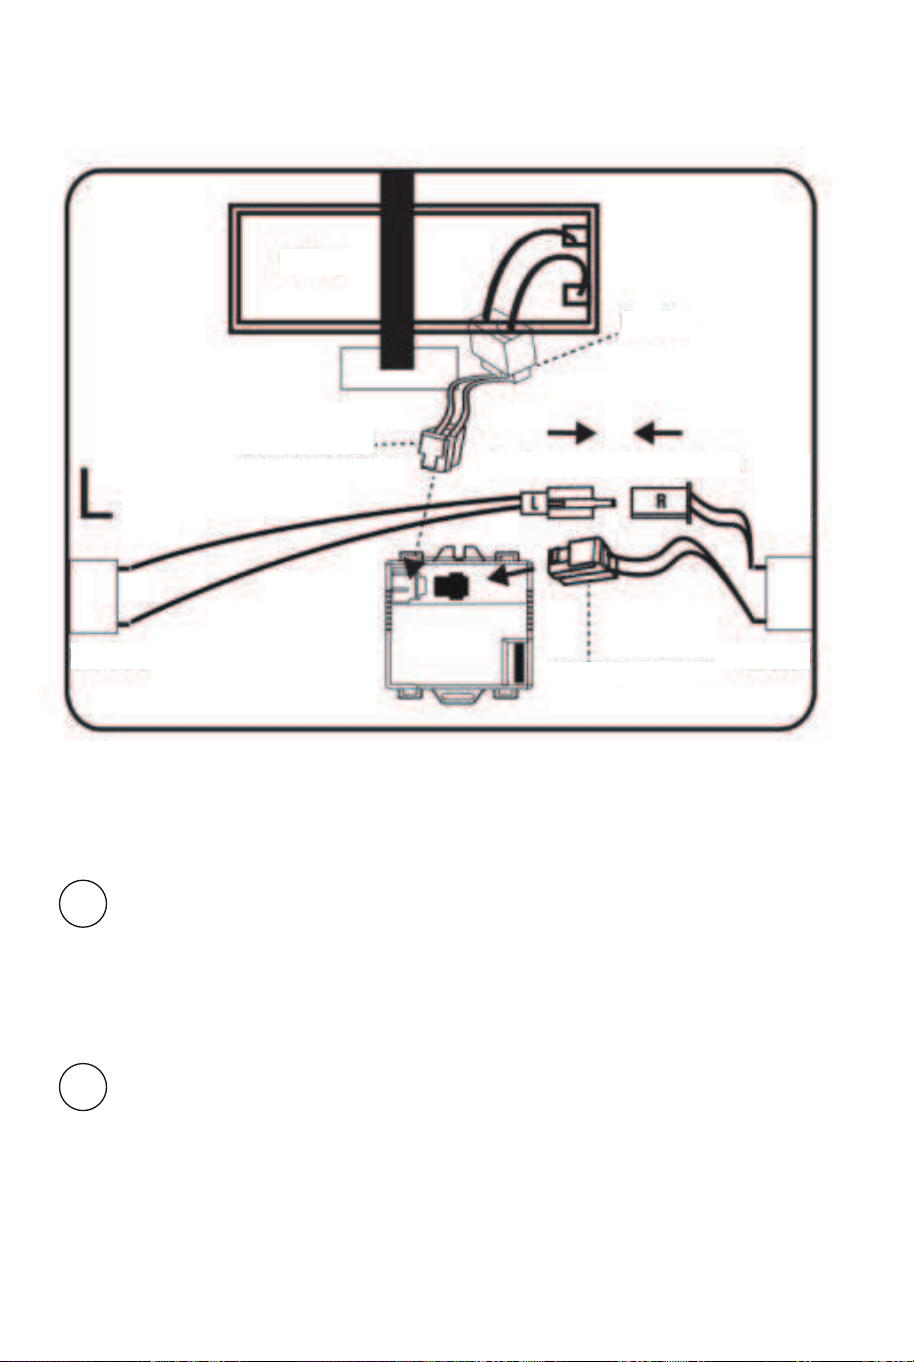

DESKA ROZDZIELCZA
1. Przycisk muzyki: Naciśnij, aby odtwarzać muzykę.
2. Klakson: Naciśnij, aby zatrąbić.
3. Przycisk zasilania: Naciśnij, aby włączyć lub wyłączyć pojazd.
4. Panel sterowania.
5. Przełącznik kierunku jazdy: Zmień kierunek z jazdy w przód na jazdę w tył
lub odwrotnie.
6. Pedał gazu: Naciśnij pedał gazu, aby pojazd ruszył. Zwolnij pedał gazu, aby
pojazd zatrzymał się.
7. Gniazdo ładowania.
Panel sterowania:
1. Wskaźnik naładowania akumulatora: Pokazuje moc akumulatora. Im
mniejsza wartość na wyświetlaczu, tym mniejsze napięcie akumulatora.
Naładuj akumulator zanim ulegnie całkowitemu rozładowaniu.
2. Poprzedni utwór/zmniejszenie głośności: Przełącz utwór na poprzedni.
Długie naciśnięcie przycisku zmniejsza głośność odtwarzanej muzyki.
3. Przełącznik Odtwórz/Stop.
4. Następny utwór/zwiększenie głośności: Przełącz utwór na następny. Długie
naciśnięcie przycisku zwiększa głośność odtwarzanej muzyki.
5. Przełącznik trybu: Naciśnij, aby wybrać tryb/tryb muzyki/tryb radia/łączność
bezprzewodową.
6. MP3: Kabel do transmisji danych można podłączyć do innych urządzeń, aby
odtwarzać muzykę.
7. USB: Możliwość podłączenia urządzeń zewnętrznych.
118 119
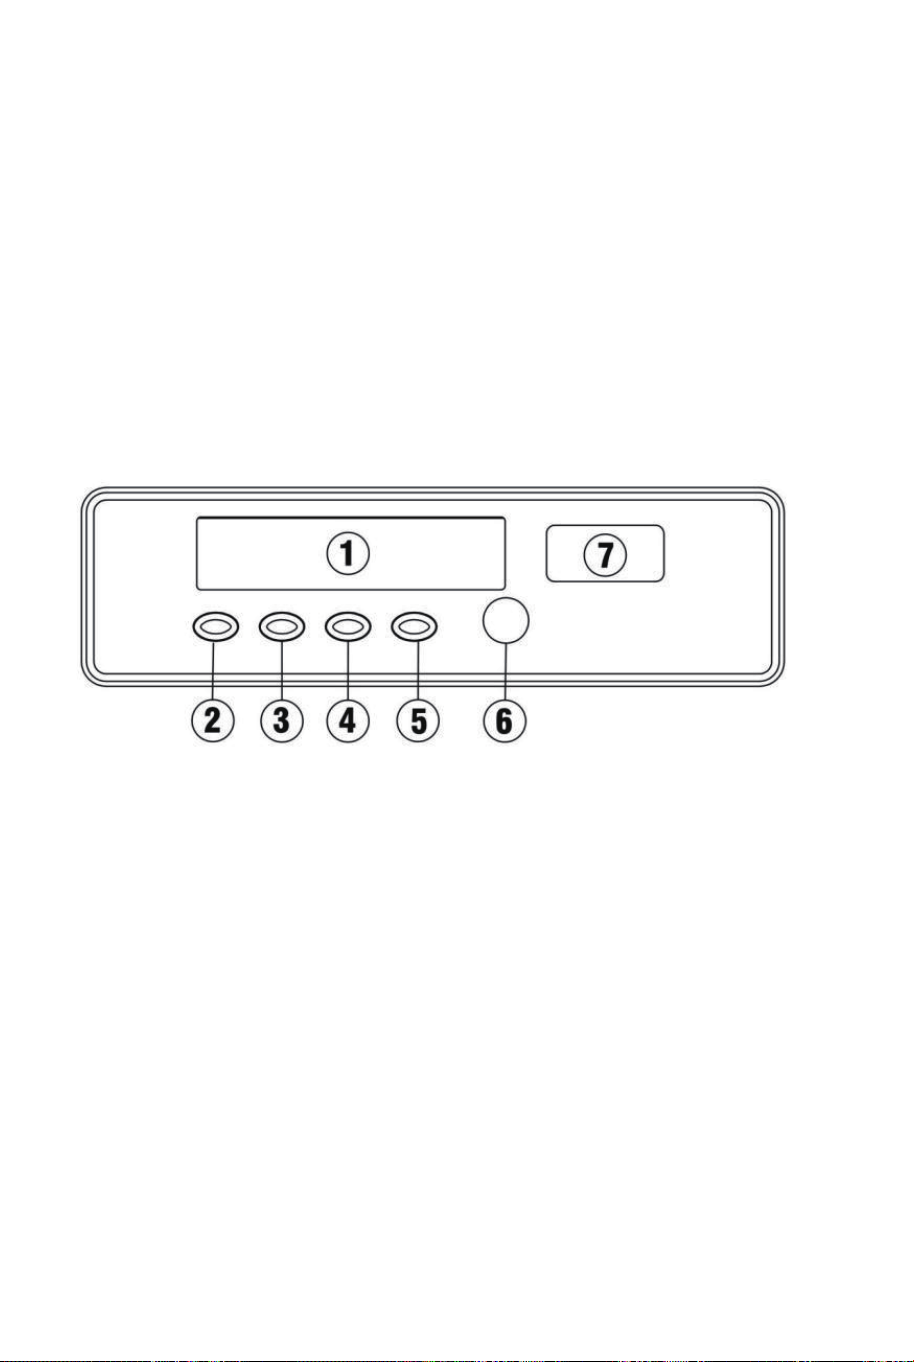
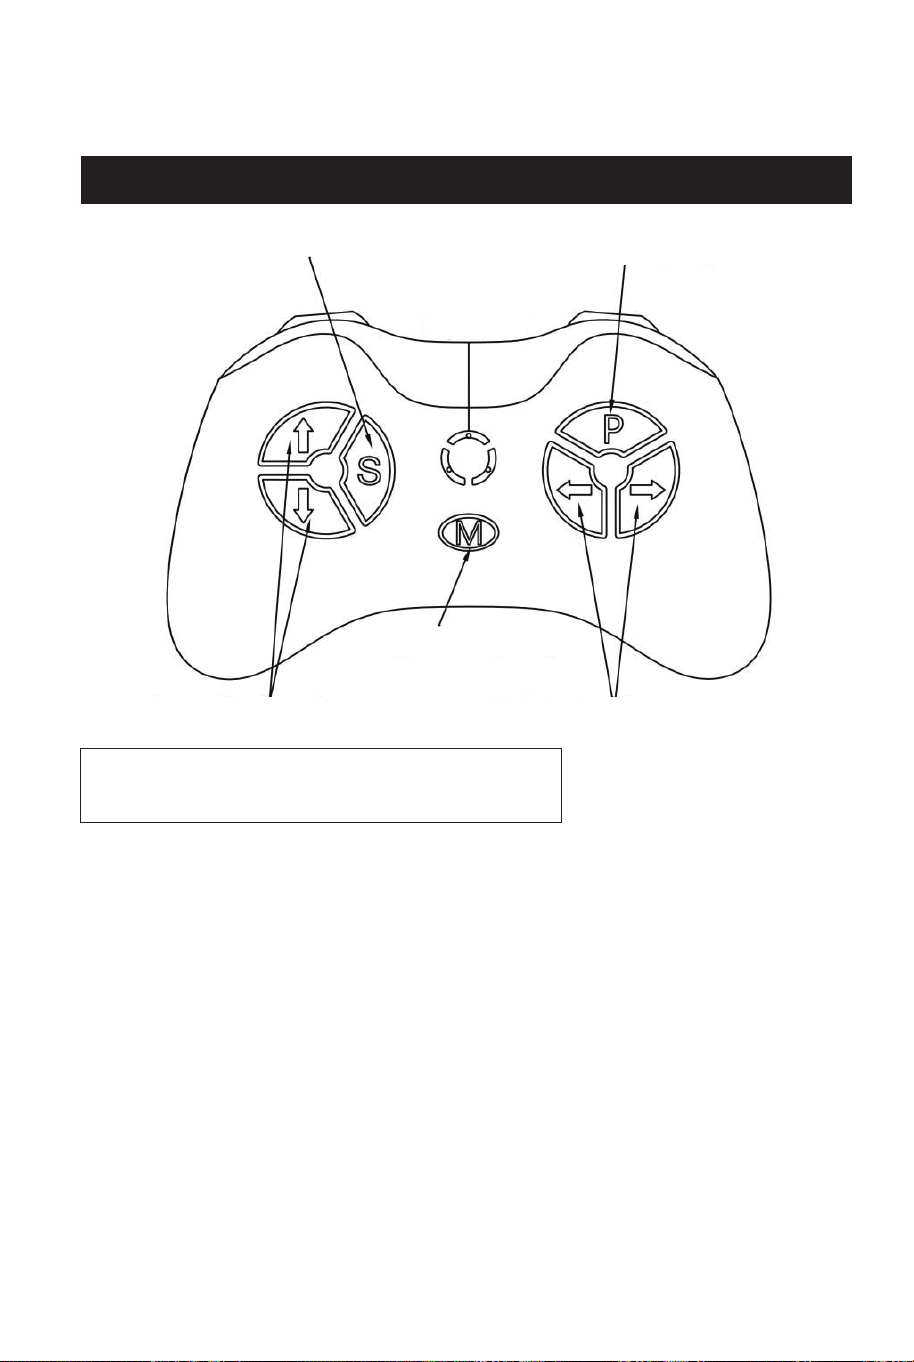
Pilot zdalnego sterowania jest nadrzędny wobec sterowania
manualnego. Gdy pilot jest włączony, pedał nożny nie działa.
Instrukcja użytkowania pilota:
Wyjmij pilot z opakowania, a następnie otwórz pokrywę komory baterii z tyłu
pilota i włóż dwie baterie AAA. Zwróć uwagę na polaryzację baterii. Gdy
kontrolka parowania i kontrolka prędkości zaświecą się, oznacza to, że baterie
zostały włożone prawidłowo. W zestawie nie ma baterii, musisz zakupić je we
własnym zakresie.
<Funkcje przycisków>
(1) Wciśnij i przytrzymaj przycisk parowania (M) przez 2-4 sekundy. Kontrolka
małej prędkości miga. Włącz zasilanie pojazdu. Kontrolka zaczyna świecić
świtałem ciągłym, wskazując, że parowanie powiodło się. Jeśli parowanie nie
powiodło się (kontrolka małej prędkości miga), wyjmij baterię i powtórz proces
parowania.
P: Hamulec: Naciśnij ten przycisk, aby zatrzymać pojazd.
S: Prędkość: Naciśnij ten przycisk, aby zmienić prędkość (prędkość mała,
średnia i duża).
△ Przełącznik jazdy w przód ▽ Przełącznik jazdy w tył
Przycisk skrętu w lewo Przycisk skrętu w prawo
2) Hamulec: Naciśnij przycisk, aby zatrzymać pojazd. Wciśnij ponownie, aby
wprawić pojazd w ruch.
3) Przełącznik prędkości i wskaźnik prędkości: Wciśnij przycisk, aby ustawić
prędkość, z jaką będzie poruszał się pojazd. Naciśnij przycisk raz, aby zmienić
prędkość o jeden poziom. Masz do wyboru kolejno: prędkość małą, średnią i
dużą. Na pilocie znajduje się wskaźnik prędkości w postaci 3 kontrolek. Górna
kontrolka oznacza dużą prędkość, środkowa średnią prędkość, dolna
kontrolka oznacza małą prędkość. Po wybraniu poziomu prędkości zaświeci
się odpowiednia kontrolka.
Uwaga: Zmiana prędkości jest możliwa wyłącznie podczas jazdy w przód.
4) Przełącznik jazdy w przód/tył: Naciśnij przycisk, aby zmienić kierunek jazdy.
Po naciśnięciu przycisku prędkość pojazdu będzie rosła, aż osiągnie
ustawiony poziom prędkości. Dziecko nie rozpędzi się do zbyt dużej prędkości
bez wiedzy rodzica.
5) Przycisk skrętu w lewo/prawo: Naciśnij przycisk, aby pojazd skręcił w lewo
lub prawo.
Uwaga: Po 10 sekundach bezczynności (kiedy nie naciskasz przycisków) pilot
przejdzie w stan oszczędzania energii w trybie gotowości.
OSTRZEŻENIE: Pilot nie jest zabawką. Pilot jest przeznaczony wyłącznie do
użytku przez osoby dorosłe i nie powinien być używany przez dzieci.
Wymagany jest ścisły nadzór osoby dorosłej. Zasięg odbioru może ulec
zmianie w zależności od pogody, stanu baterii i innych warunków
środowiskowych.
PILOT ZDALNEGO STEROWANIA
Przełącznik prędkości
Przełącznik jazdy w przód/tył
Ostrzeżenie
Wyłącznie do użytku przez osobę dorosłą.
Długie naciśnięcie
przycisku: parowanie
Przycisk skrętu w lewo/prawo
Hamulec awaryjny
Mała prędkość
Średnia prędkość
Duża prędkość
120 121
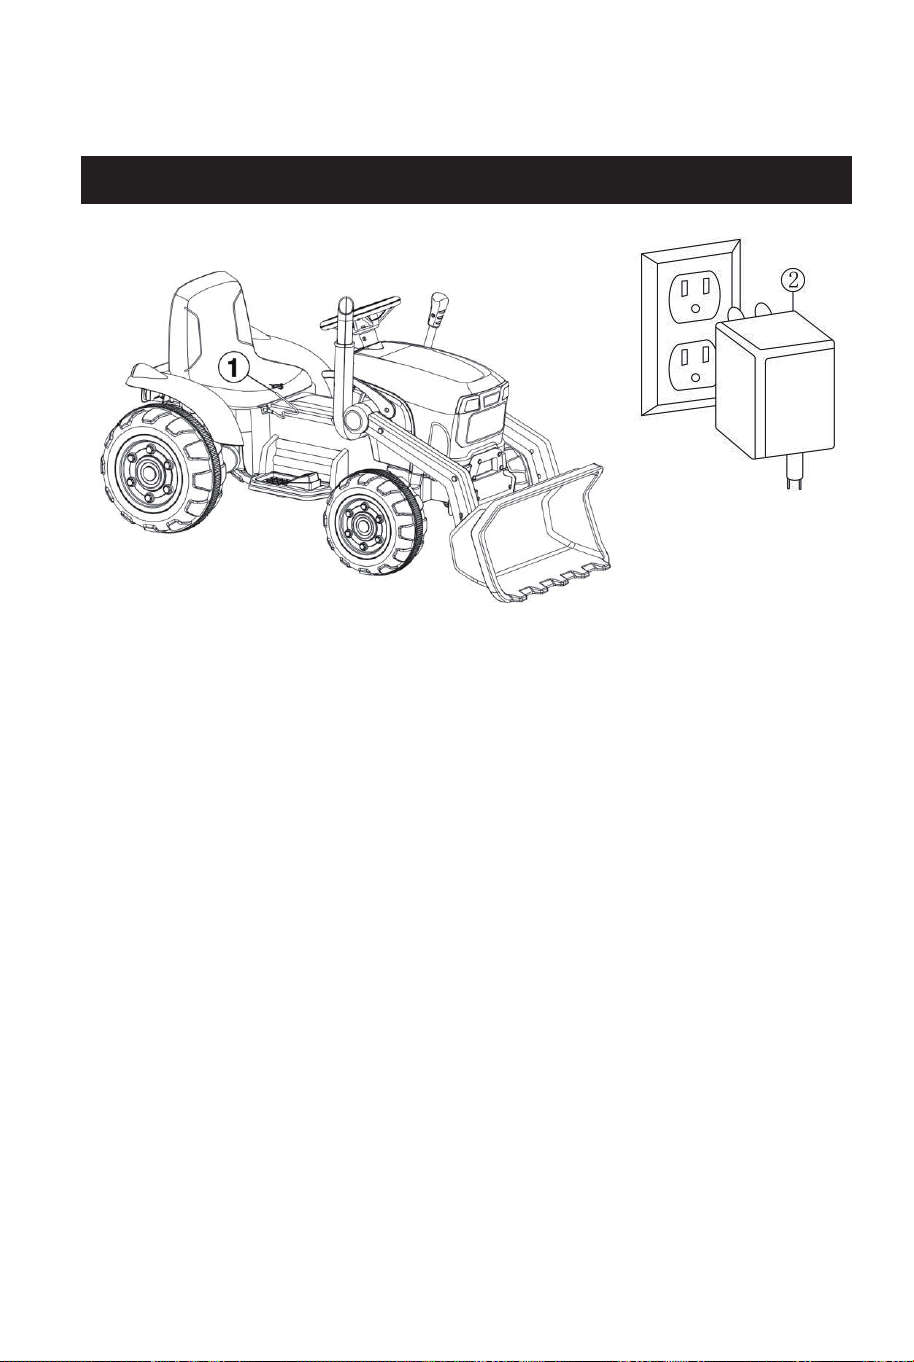
1. Podłącz wtyczkę ładowarki do gniazda ładowania w pojeździe.
2. Podłącz wtyczkę ładowarki do źródła zasilania o napięciu odpowiadającym
specyfikacji produktu.
● Przed pierwszym użyciem ładuj akumulator przez 8-12 godzin.
● Kolejne cykle ładowania akumulatora trwają ok. 8-12 godzin. Nie ładuj
akumulatora przez więcej niż 20 godzin. Niezastosowanie się do zaleceń
dotyczących ładowania może spowodować trwałe uszkodzenie akumulatora.
● Nie dopuszczaj do całkowitego rozładowania akumulatora, które może
prowadzić do jego uszkodzenia.
● Przed przystąpieniem do ładowania sprawdź akumulator i ładowarkę
(przewód zasilający, wtyczkę itd.) pod kątem zużycia i uszkodzenia. Nie ładuj
akumulatora, jeśli jakakolwiek część jest uszkodzona.
● Akumulator może być ładowany i obsługiwany wyłącznie przez osobę
dorosłą, która zapoznała się z niniejszą instrukcją.
● Przechowuj pojazd w pomieszczeniu lub przykryj go plandeką w celu ochrony
przed deszczem.
● Nie wystawiaj pojazdu na długotrwałe działanie promieni słonecznych,
ponieważ części mogą wyblaknąć. Przechowuj pojazd w cieniu lub przykryj go
plandeką.
● Nie myj pojazdu za pomocą węża ogrodowego.
● Nie myj pojazdu mydłem.
● Ładuj akumulator co najmniej raz w miesiącu, aby przedłużyć jego żywotność.
ŁADOWANIE CZYSZCZENIE I KONSERWACJA
ROZWIĄZYWANIE PROBLEMÓW
PROBLEM
Pojazd nie chce
ruszyć.
Akumulator nie ładuje
się.
Akumulator szybko
się rozładowuje.
Niski poziom naładowania
akumulatora.
Zadziałał bezpiecznik.
Przełącznik zasilania nie
znajduje się w pozycji
włączonej.
Naładuj akumulator.
Wyłącz pojazd na kilka
minut, a następnie uruchom
ponownie.
Wciśnij przełącznik
zasilania.
Podłącz złączki akumulatora
w prawidłowy sposób.
Złączki akumulatora nie
zostały podłączone w
prawidłowy sposób.
Złączki akumulatora nie
zostały podłączone w
prawidłowy sposób.
Nieprawidłowo podłączona
ładowarka.
Zbyt krótki czas ładowania.
Podłącz złączki akumulatora
w prawidłowy sposób.
Podłącz ładowarkę w
prawidłowy sposób.
Naładuj akumulator.
PRZYCZYNA ROZWIĄZANIE
122 123

OSTRZEŻENIA:
Akumulator nie podlega wymianie.
● Nie należy mieszać starych i nowych baterii.
● Nie należy mieszać różnych typów baterii (baterie alkaliczne, standardowe i
wielokrotnego użytku).
● Nie należy ładować baterii jednorazowych.
● Baterie wielokrotnego użytku mogą być ładowane wyłącznie przez osobę dorosłą.
● Zużyte baterie należy wyjąć z zabawki.
● Nie należy zwierać styków akumulatora ani komory baterii.
● Nie należy umieszczać baterii ani akumulatora w pobliżu źródeł ciepła (ogień,
elektroniczne urządzenie grzewcze itp.)
● Należy uważać, aby nie uszkodzić baterii i akumulatora.
● Nie należy zanurzać baterii ani akumulatora w wodzie.
● Baterie należy wkładać z zachowaniem właściwej polaryzacji.
● Należy używać wyłącznie akumulatora i baterii określonych przed producenta.
● Należy używać wyłącznie ładowarki określonej przez producenta.
● Dzieci powinny zawsze mieć na sobie sprzęt ochronny. Nie należy używać
pojazdu w ruchu ulicznym.
● Użytkowanie pojazdu wymaga określonych umiejętności, które pozwolą
uniknąć wypadków lub kolizji powodujących obrażenia użytkownika lub osób
trzecich.
● Aby zmniejszyć ryzyko obrażeń, wymagany jest stały nadzór osoby dorosłej.
Nie należy używać produktu na lub w pobliżu dróg, w pobliżu pojazdów
silnikowych, na lub w pobliżu stromych zboczy lub schodów, basenów lub
innych zbiorników wodnych. Należy nosić odpowiednie obuwie sportowe. Nie
należy zezwalać na użytkowanie pojazdu przez więcej niż 2 dzieci.
OSTRZEŻENIE: Wymagany montaż przez osobę dorosłą.
OSTRZEŻENIE: Produkt nie jest przeznaczony do użytku w ruchu ulicznym.
OSTRZEŻENIE: NIEBEZPIECZEŃSTWO ZADŁAWIENIA - małe części!
Produkt nieodpowiedni dla dzieci poniżej 3 roku życia.
OSTRZEŻENIE DOTYCZĄCE BATERII I AKUMULATORA
Produkt zawiera następujące rodzaje baterii/akumulatorów.
Informacje dotyczące właściwej utylizacji baterii/akumulatorów
Typ akumulatora Nomenklatura chemiczna
6FM7 Ołów (Pb)
● Ostrzeżenie: Upewnij się, że bateria jest całkowicie rozładowana.
● Otwórz siedzisko, odkręć z żelaznej blachy śruby (używając śrubokręta), zdejmij blachę
i odłącz dwa przewody od akumulatora, aby go wyjąć.
● Ostrożnie wyjmij baterię lub akumulator.
● Baterię lub akumulator i urządzenie można teraz zutylizować oddzielnie.
Akumulator nagrzewa
się i wytwarza niewielki
hałas podczas
ładowania.
Pojazd porusza się z
małą prędkością.
Pojazd trzęsie się
podczas jazdy.
Trudne przejście z
jazdy w przód na
jazdę w tył lub
odwrotnie.
Przełączniki do jazdy
w przód i tył działają
odwrotnie.
Zjawisko normalne. Zjawisko normalne.
Niski poziom naładowania
akumulatora.
Naładuj akumulator.
Przeciążenie pojazdu. Zmniejsz obciążenie
pojazdu.
Nierówna lub pochyła
nawierzchnia.
Używaj pojazdu wyłącznie
na równych nawierzchniach.
Złączka silnika poluzowała
się.
Podłącz złączkę silnika w
prawidłowy sposób.
Próba zmiany biegu
nastąpiła, gdy pojazd był w
ruchu.
Zatrzymaj pojazd, a
następnie zmień
kierunek jazdy.
Nieprawidłowy montaż
silników napędowych.
Upewnij się, że lewy silnik
napędowy znajduje się po
lewej stronie, a prawy silnik
napędowy po prawej
stronie pojazdu.
124 125

Uwaga:
Urządzenie jest zgodne z Częścią 15 przepisów FCC. Jego działanie podlega
następującym dwóm warunkom: (1) urządzenie nie może powodować
szkodliwych zakłóceń. (2) urządzenie musi odbierać wszelkie zakłócenia, w
tym również takie, które mogą powodować jego nieprawidłowe działanie.
Wszelkie zmiany i modyfikacje urządzenia, nie zatwierdzone przez
odpowiednie organy zarządzania zgodnością, są zabronione. Urządzenie
zostało przetestowane i uznane za zgodne z parametrami dla urządzeń
cyfrowych klasy B, zgodnie z Częścią 15 przepisów FCC. Parametry te mają
na celu zapewnienie podstawowej ochrony przed szkodliwymi zakłóceniami
instalacji domowych. Urządzenie generuje i wykorzystuje do działania fale
radiowe. Jeśli nie jest zainstalowane i użytkowane zgodnie z instrukcją, może
powodować zakłócenia łączności radiowej. Nie ma jednak gwarancji, że w
konkretnej instalacji nie wystąpią zakłócenia. Jeśli urządzenie powoduje
zakłócenia w działaniu radia lub telewizora (co można łatwo stwierdzić
wyłączając i włączając urządzenie), możesz spróbować samodzielnie
wyeliminować problem za pomocą jednego lub kilku poniższych środków
zaradczych:
- Zmień orientację lub położenie anteny odbiorczej.
- Zwiększ odległość między urządzeniem a odbiornikiem.
- Podłącz urządzenie do gniazdka w obwodzie innym niż ten, do którego
podłączony jest odbiornik.
- Skonsultuj się z doświadczonym technikiem w celu uzyskania pomocy.
Stwierdzenie zgodności z przepisami FCC
Tabela częstotliwości kanałów
Kanał
1
2
3
4
5
6
7
8
9
10
11
12
13
14
15
16
17
18
20
21
22
23
24
25
26
27
28
29
30
31
32
33
34
35
36
Częstotliwość
(MHz)
Kanał
Częstotliwość
(MHz)
2405
2406
2407
2408
2409
2410
2411
2412
2413
2414
2415
2416
2417
2418
2419
2420
2421
2422 37 2441
19 2423 38 2442
2424
2425
2426
2427
2428
2429
2430
2431
2432
2433
2434
2435
2436
2437
2438
2439
2440
126 127

39
40
41
42
43
44
45
46
47
48
49
50
51
52
53
54
55
56
57
58
59
60
61
62
63
64
65
66
67
68
69
70
71
72
73
74
75
2443
2444
2445
2446
2447
2448
2449
2450
2451
2452
2453
2454
2455
2456
2457
2458
2459
2460
2461
2462
2463
2464
2465
2466
2467
2468
2469
2470
2471
2472
2473
2474
2475
2476
2477
2478
2479
In case a return is required, the item must be returned in original box. Without this
your return will not be accepted.
DO NOT discard the box / original packaging.
Take a photo of the box markings.
Take a photo of the damaged part (if applicable).
Send us an email with the images requested.
A photo of the markings (text) on the side of the box is required in case a part is
needed for replacement. This helps our staff identify your product number to
ensure you receive the correct parts.
A photo of the damage is always required to file a claim and get your replacement
or refund processed quickly. Please make sure you have the box even if it is
damaged.
Email us directly from marketplace where your item was purchased with the
attached images and a description of your claim.
Falls eine Rücksendung erforderlich ist, muss der Artikel in der
Originalverpackung zurückgeschickt werden. Andernfalls wird Ihre Rücksendung
nicht angenommen.
Werfen Sie den Karton / die Originalverpackung NICHT weg.
Machen Sie ein Foto von der Beschriftung des Kartons.
Machen Sie ein Foto des beschädigten Teils (falls zutreffend).
Schicken Sie uns eine E-Mail mit dem gewünschten Foto.
Für den Fall, dass ein Ersatzteil benötigt wird, benötigen wir ein Foto der
Beschriftung (Text) auf der Seite des Kartons. So können unsere Mitarbeiter Ihre
Artikelnummer identifizieren und sicherstellen, dass Sie die richtigen Teile
erhalten.
Ein Foto des beschädigten Teils ist immer erforderlich, um eine Reklamation
einzureichen und eine schnelle Bearbeitung Ihres Ersatzteils oder Ihrer
Rückerstattung zu gewährleisten. Bitte stellen Sie sicher, dass Sie den Karton
haben, auch wenn er beschädigt ist.
Schicken Sie uns eine E-Mail direkt vom Marktplatz, auf dem Sie den Artikel
gekauft haben, mit den angehängten Fotos und einer Beschreibung Ihrer
Reklamation.
EN
DE
Return / Damage Claim Instructions
Rücksendung / Beschädigung Anweisungen
128 129
Instructions De Retour / Réclamation De Dommages
Dans le cas où un retour est requis, l'article doit être retourné dans sa boîte
d'origine. Sans cela, votre retour ne sera pas accepté.
NE PAS jeter la boîte/l'emballage d'origine.
Prenez une photo des marquages de la boîte.
Prenez une photo des dommages (le cas échéant).
Envoyez-nous un e-mail avec les images demandées.
Une photo des marquages (texte) sur le côté de la boîte est requise au cas où une
pièce serait nécessaire pour le remplacement. Cela aide notre personnel à
identifier votre numéro de produit pour s'assurer que vous recevez les bonnes
pièces.
Une photo des dommages est toujours requise pour déposer une réclamation et
obtenir rapidement votre remplacement ou votre remboursement. Assurez-vous
d'avoir la boîte même si elle est endommagée.
Envoyez-nous un e-mail directement depuis le marché où votre article a été
acheté avec les images ci-jointes et une description de votre réclamation.
Instrucciones de Devolución / Reclamación de Daños
En caso de que se requiera una devolución, el artículo debe ser devuelto en la
caja original. Sin esto su devolución no será aceptada.
NO deseche la caja/embalaje original.
Tome una foto de las marcas de la caja.
Tome una foto de los daños (si procede).
Envíenos un correo electrónico con las imágenes solicitadas.
Se requiere una foto de las marcas (texto) en el lado de la caja en caso de que se
necesite una pieza para reemplazarla. Esto ayuda a nuestro personal a identificar
su número de producto para asegurarse de que recibe las piezas correctas.
Una foto de los daños es siempre necesaria para presentar una reclamación y
conseguir que su reemplazo o reembolso sea procesado rápidamente. Por favor,
asegúrese de tener la caja aunque esté dañada.
Envíenos un correo electrónico directamente desde el mercado donde se compró
su artículo con las imágenes adjuntas y una descripción de su reclamación.
FR
ES
Nel caso in cui sia richiesto un reso, l'articolo deve essere restituito nella scatola
originale. Senza la scatola originale il tuo reso non sarà accettato.
NON scartare la scatola / confezione originale.
Fare una foto dei contrassegni sulla scatola.
Fare una foto di Danno (se è applicabile).
Inviarci una mail con le immagini richieste.
È necessaria una foto dei contrassegni (testo) sul lato della scatola nel caso in
cui la parte debba essere sostituita. Questo aiuta il nostro staff a identificare il
numero del tuo prodotto per assicurarti di ricevere le parti corrette.
Una foto del danno è sempre necessaria per presentare un reclamo e ottenere
rapidamente la sostituzione o il rimborso. Assicurati di avere la scatola anche se
è danneggiata.
Inviarci un’e-mail direttamente dal mercato in cui è stato acquistato il tuo articolo
con le immagini allegate e una descrizione del tuo reclamo.
Jeśli chcesz zwrócić produkt, musi znajdować się on w oryginalnym opakowaniu.
Towar zwrócony w nieoryginalnym opakowaniu nie zostanie przyjęty.
Nie wyrzucaj oryginalnego opakowania.
Zrób zdjęcie oznaczeń na opakowaniu.
Zrób zdjęcie uszkodzonej części (jeśli dotyczy).
Skontaktuj się z nami.
Jeśli jakakolwiek część wymaga wymiany, zrób zdjęcie oznaczeń kodu produktu,
który znajduje się na opakowaniu. Pozwoli nam to zidentyfikować produkt i
dostarczyć ci właściwą część.
Jeśli chcesz złożyć reklamację, zrób zdjęcie uszkodzonej części. Pozwoli nam to
zatwierdzić reklamację i zlecić zwrot środków na twoje konto. Do złożenia
reklamacji potrzebne będzie oryginalne opakowanie.
Skontaktuj się z nami telefonicznie, mailowo lub poprzez formularz kontaktowy.
Załącz zdjęcia produktu i opis roszczenia.
IT
PL
Istruzioni Per La Restituzione / Reclamo Per Danni
Zwroty i reklamacje
130 131

If you're having difficulty, our friendly
customer team is always here to help.
THIS INSTRUCTION BOOKLET CONTAINS IMPORTANT SAFETY INFORMATION. PLEASE READ AND KEEP FOR FUTURE REFERENCE.
AUS:cs[email protected]
FRA:cs.fr@costway.com
DEU:cs.de@costway.com
ITA :cs.i t @costway.com ESP:cs.es@costway.com
POL:sklep@costway.com
GBR:cs.uk@costway.com
DEU office: FDS GmbH, Neuer Höltigbaum 36, 22143 Hamburg, Deutschland
ITA office: Milano
FRA office: Saint Vigor d'Ymonville
POL office: GdańskGBR office: IpswichAUS office: TruganinaUSA office: Fontana
TQ10144
Kids Ride On Bulldozer Truck
Kinder Aufsitz Bulldozer Truck
Tractopelle à Pousser pour Enfants
Buldócer para Niños
Escavatore Cavalcabile per Bambini
Pojazd elektryczny dla dziecka