

1
USER MANUAL
V1.0 | IK511U

2
Contents
1. Meet your TCL LINKPORT IK511 .......................................................... 4
1.1 Product introduction .............................................................................................4
1.2 Product LED, Interface, & Reset Button ................................................................ 4
2. Get started with your TCL LINKPORT IK511 ....................................... 6
2.1 Insert a nano SIM card .........................................................................................6
2.2 Plug the TCL LINKPORT IK511 into your host device ...........................................7
2.3 Plug and Play for host devices .............................................................................. 7
3. Access the Web UI ................................................................................. 8
3.1 Log in to the Web UI ............................................................................................. 8
3.2 Explore Web UI features .......................................................................................9
4. CongureyourTCLLINKPORTIK511 ................................................ 10
4.1 Home ................................................................................................................. 10
4.2 Status .................................................................................................................10
4.3 Services ............................................................................................................. 11
4.4 Settings .............................................................................................................. 12
4.5 System ...............................................................................................................15
Important safety information ...................................................................... 17
Troubleshooting ........................................................................................... 20

3
Pleasereadthisrst
•Thank you for choosing the TCL LINKPORT IK511. In order to maintain your device in
optimal condition, please read this manual and keep it for future reference.
•Before using this document and the device it supports, ensure you read and understand
the “Important safety information” on page 16.
•Illustrationsinthisdocumentmightlookdierentfromyourdevice.
•Instructions in this document may vary depending on your device model and software
version.
•Some apps and features are not available in all countries or regions. App and feature
availability is subject to change.
•Document content is subject to change without notice. We make constant improvements
on the document for your device, including this user manual.
•TCL Communication Ltd. does not assume any liability that may occur due to the use or
applicationoftheproductdescribedherein.Everyeorthasbeenmadeinthepreparation
of this document to ensure accuracy of the contents, but all statements, information and
recommendations in this document do not constitute the warranty of any kind, expressed
or implied.

4
1. Meet your TCL LINKPORT IK511
1.1 Product introduction
TCL LINKPORT IK511 is a 5G capable USB dongle. With its lightweight and compact design,
it can be used to provide one-to-one data access for the connected host device on-the-go,
as well as at home. You can connect your laptops, tablets, desktops, TVs etc. through USB,
and directly access the internet according to the type of OS.
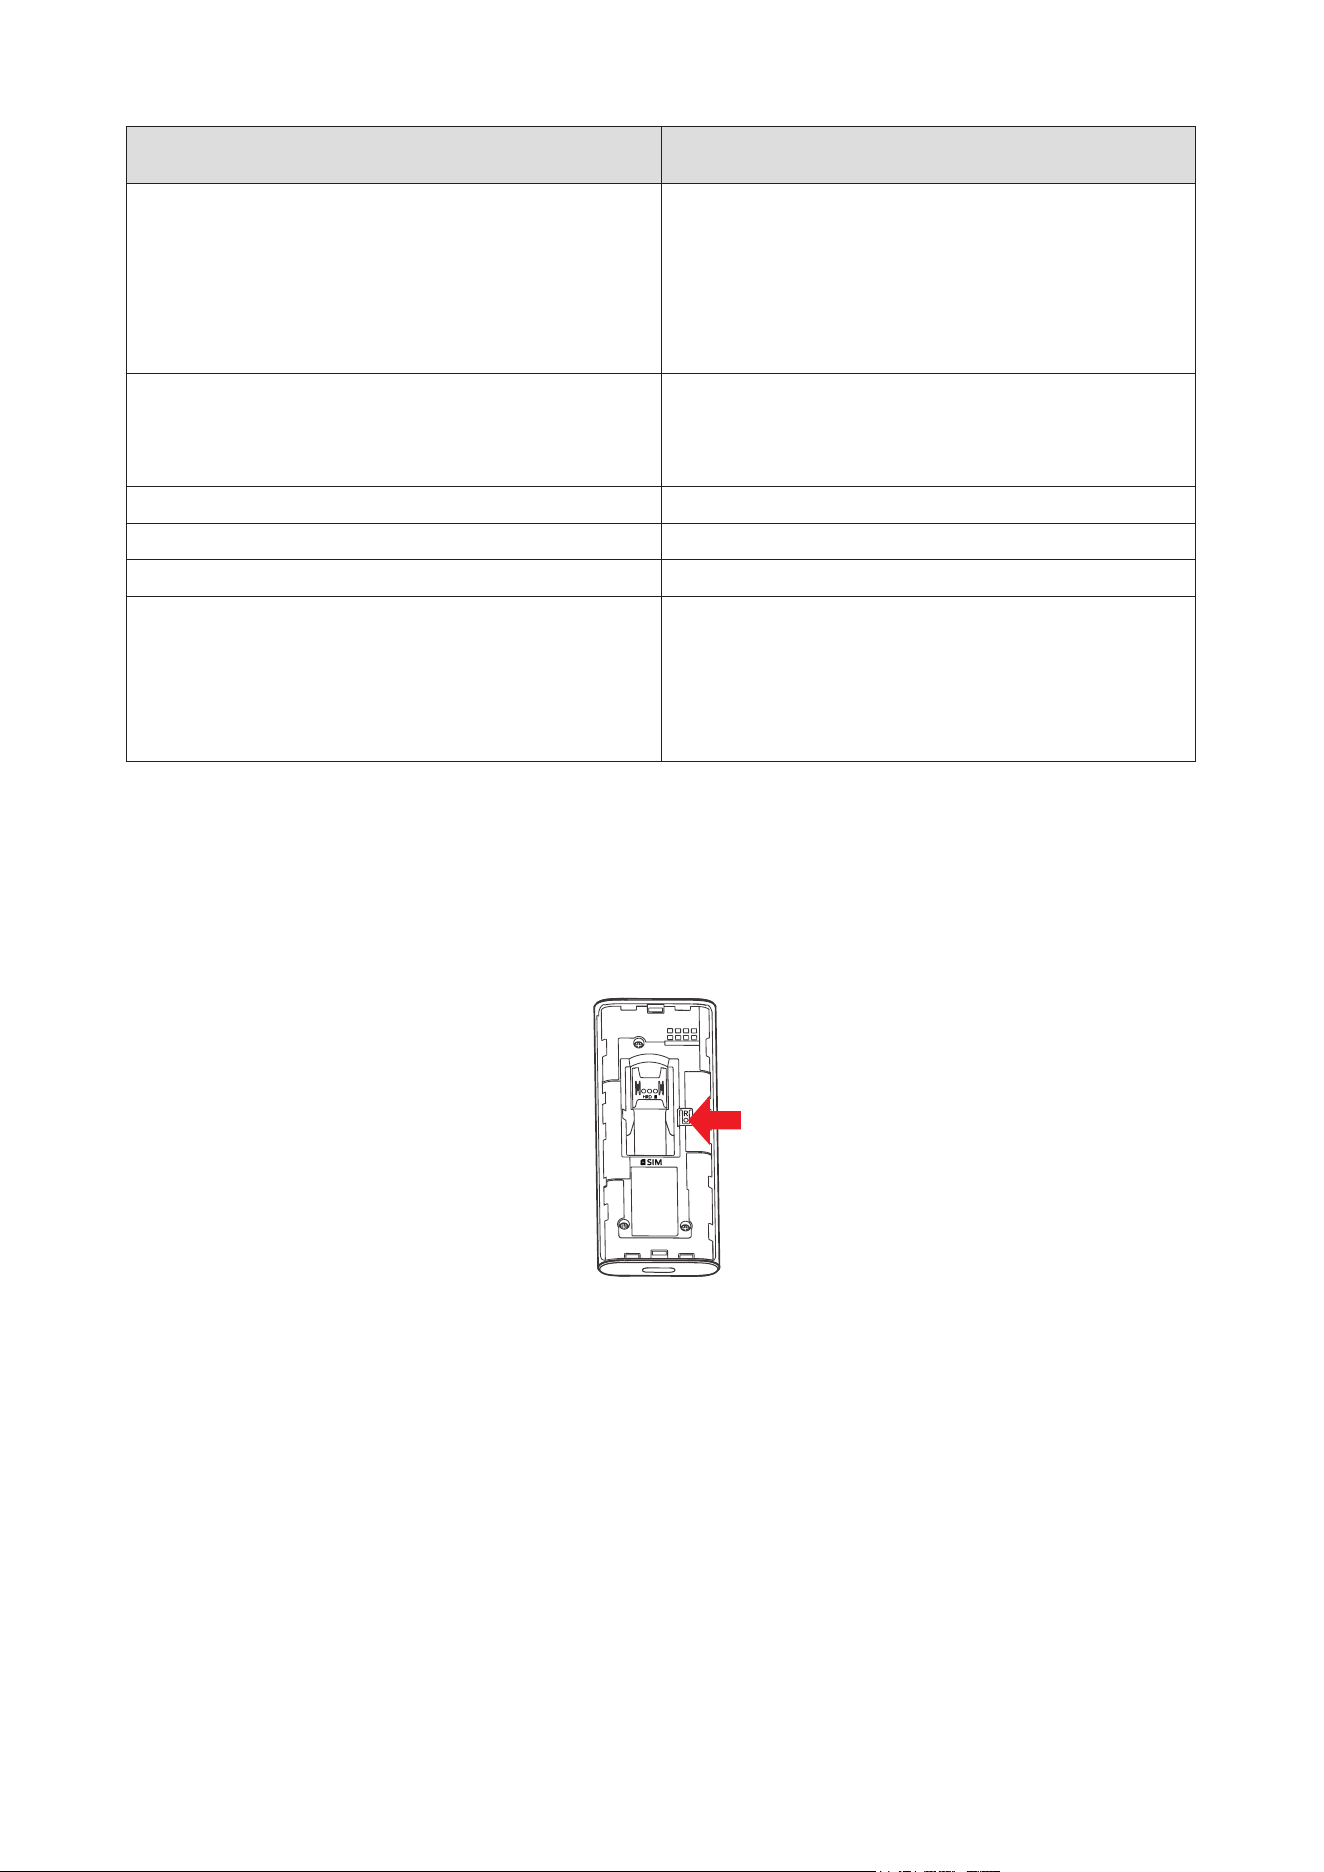
1.2 Product LED, Interface, & Reset Button
1
2
3
4
5
6
1
System LED Indicator
5
SIM Card Slot
2
Signal LED Indicator
6
Reset Button
3
SMS LED Indicator
4
USB-C Port
LED indicator:
Indicator description LED indicator status
Powering up System LED Indicator: Solid yellow
Error (for example, SIM card is not
recognized, or PIN, PUK or SIM lock
protected)
System LED Indicator: Solid red
Network searching System LED Indicator: Solid green
Signal LED Indicator: Blinking blue
Registered on 4G or 5G (but no EPS bearer
established)
System LED Indicator: Solid green
Signal LED Indicator:
•Solid green: Strong signal strength
•Solid yellow: Acceptable signal strength
•Solid red: No signal
5
Indicator description LED indicator status
Connected on 4G or 5G* System LED Indicator: Solid green
Signal LED Indicator:
•Solid green: Strong signal strength
•Solid yellow: Acceptable signal strength
•Solid red: No signal
Firmware upgrading System LED Indicator: Blinking blue
SignalLEDIndicator:O
SMSLEDIndicator:O
Unread SMS SMS LED Indicator: Blinking green
SMS Inbox is full SMS LED Indicator: Solid green
No unread SMS and inbox is not full SMSLEDIndicator:O
Reset When the Reset button is pressed for
3seconds,theSystem&Signal&SMSLEDs
will turn solid green at the same time, and the
device will be restored to factory settings and
then restart.
* 5G requires capable device.
Reset button
Press and hold the reset button for 3 seconds to reset your TCL LINKPORT IK511.
You can also reset the device via the Web UI (See “Restart & reset” on page 15).
6
2. Get started with your TCL LINKPORT IK511
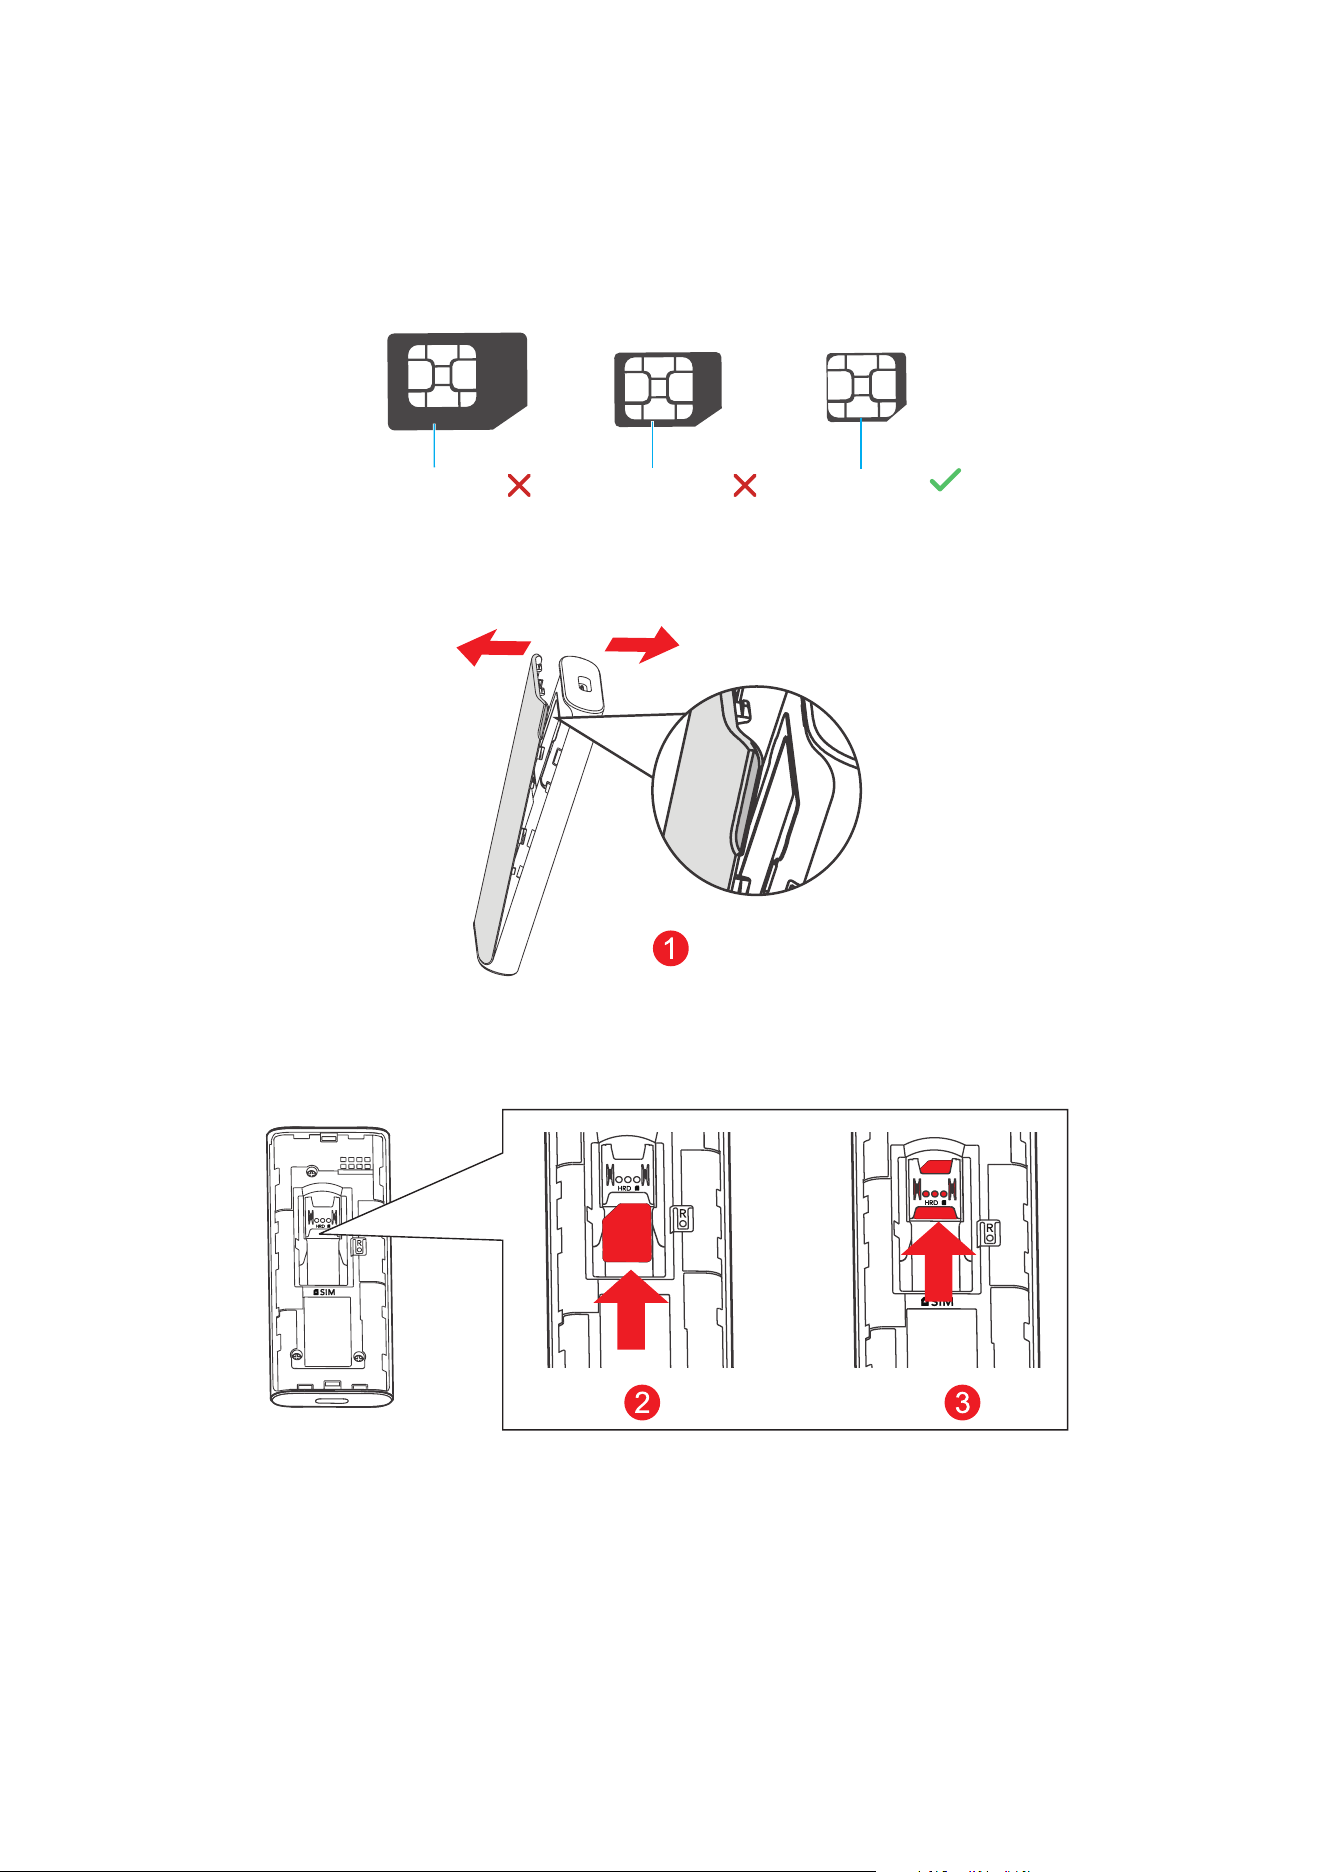
2.1 Insert a nano SIM card
Prerequisite: Select the correct SIM card for your TCL LINKPORT IK511.
Mini-SIM (2FF)
Nano-SIM (4FF)
Micro-SIM (3FF)
1. Remove the back cover.
Hold the TCL LINKPORT IK511 in one hand and pull the back cover outwards from the slot
usingtheindexngerofyourotherhand.
2. Align the SIM card cutout tab as seen in the diagram and gently slide the card into the slot
with the gold metal contacts facing down.
3. Make sure the Nano SIM card clicks into place. Put the back cover on.
Notes:
•Note the orientation of the Nano SIM card. If the Nano SIM card is inserted incorrectly, it
may get jammed.
•Do not remove the Nano SIM card when your TCL LINKPORT IK511 is in use. Otherwise, it
may cause your TCL LINKPORT IK511 to malfunction or data loss of your SIM card.
7
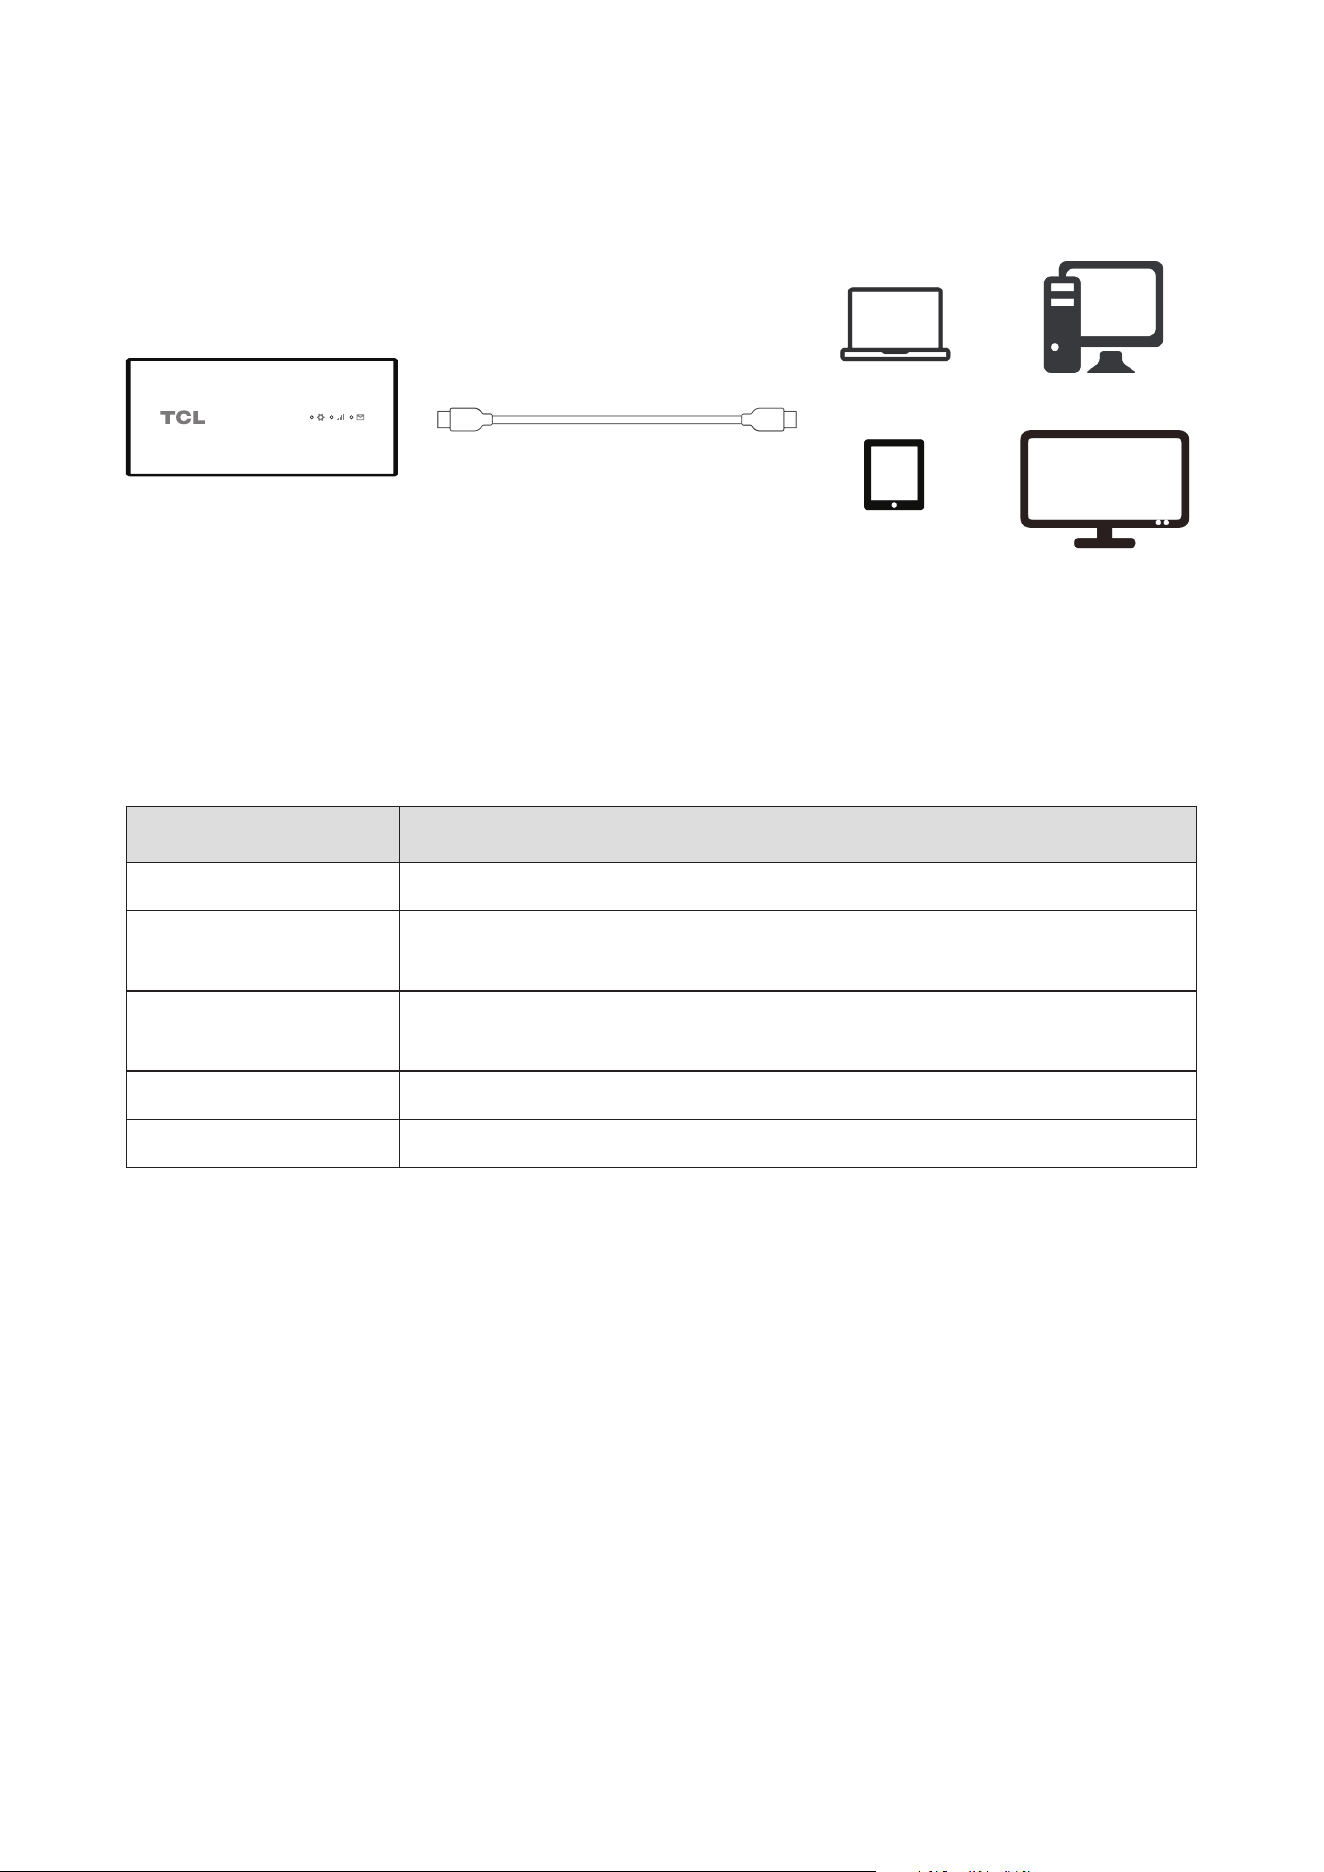
2.2 Plug the TCL LINKPORT IK511 into your host device
TCL LINKPORT IK511 uses a USB-C to USB-C cable to link the dongle to your device.
USB-C to USB-C Cable
(1)
Software will auto-install. Once installation is complete, the network is ready for use.
NOTE: Connecting to the network may take up to 1 minute.
2.3 Plug and Play for host devices
Host Device OS Version
Windows 7, 8, 10, 11
Linux Ubuntu v22.04, Ubuntu 16.04 LTS, Mint 21.1, Fedora 37,
openSUSE Leap 15.4
macOS 10.15.x Catalina, 11.x Big Sur, 12.x Monterey, 13.x Ventura,
14.xSonoma
iPadOS 15, 16, 17 or above
Android 11, 12, 13, 14
NOTE: Some products may not be compatible with your TCL LINKPORT IK511 due to OEM
speciccustomization.
(1) Only use the USB-C cable included with your device. Using the wrong cable may damage the device or
reduce performance.
8
3. Access the Web UI
Youcanaccessthedongle’sWebUIthroughabrowser.Youcanmanageandcongurethe
dongle through the Web UI. The supported browsers and versions are as follows: Microsoft
Edge, Chrome 60 and above, Firefox 58 and above, Safari 12 and above, Opera 50 and
above.
3.1 Log in to the Web UI
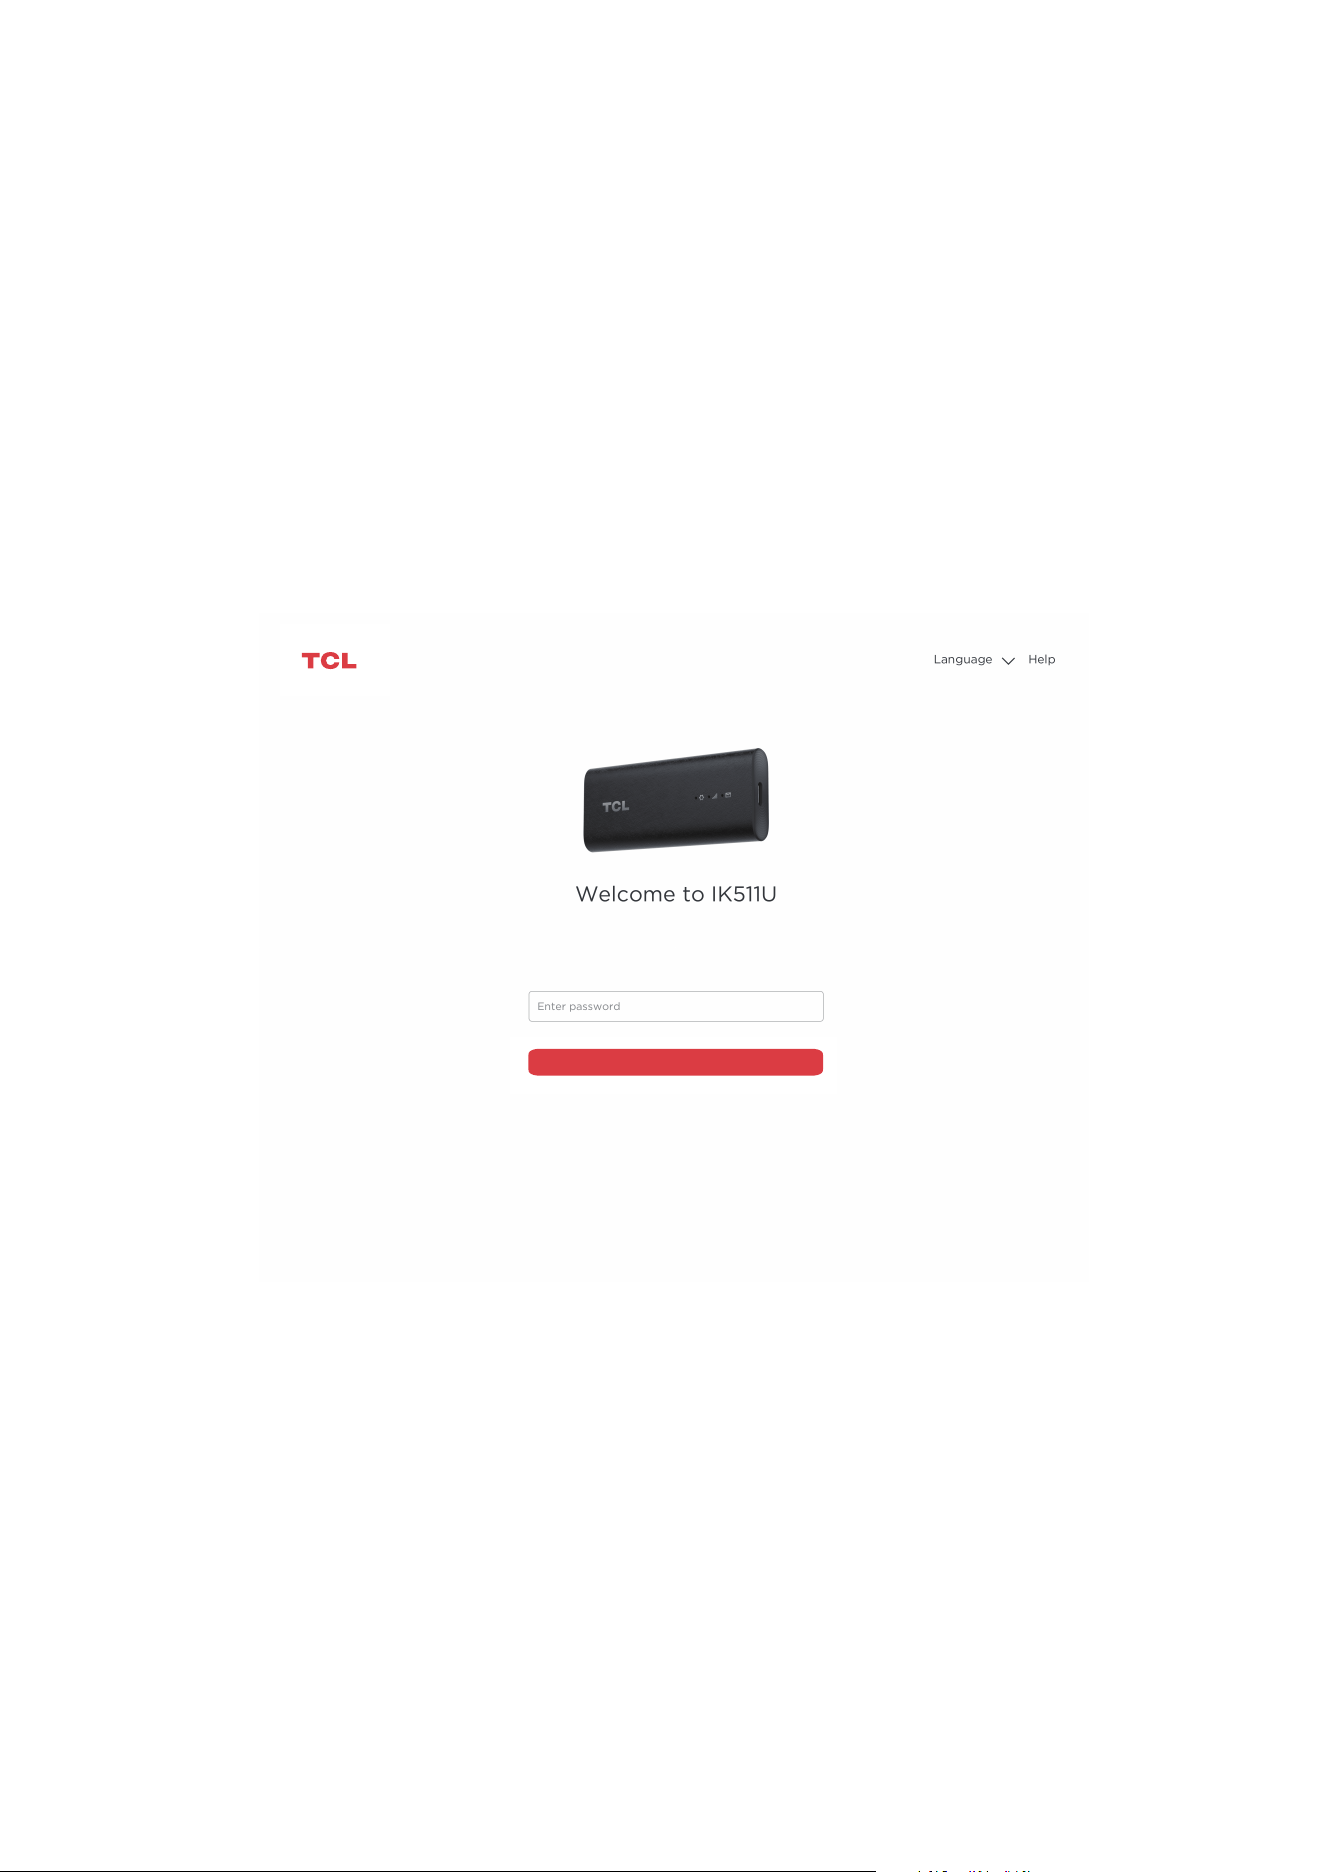
To log in to the Web UI, follow these steps:
1. Open a web browser on the device connected to the TCL LINKPORT IK511 network.
2. Gotohttp://192.168.0.1andfollowtheon-screeninstructionstonishtheloginprocess.
Forthedefaultlogininformation,refertotheImportantInformationLeaetorthelabelon
the inside of the device when you remove the back cover..
Log in
Notes:
•Click Language at the upper right of the screen to change the language setting.
•Click Help at the upper right of the screen to access user manual.
9
3.2 Explore Web UI features
Homepagefeatures
The Web UI is mainly comprised of the following sections: Home, Status, Services, Settings,
and System. Click on each section to display more information about your TCL LINKPORT
IK511.
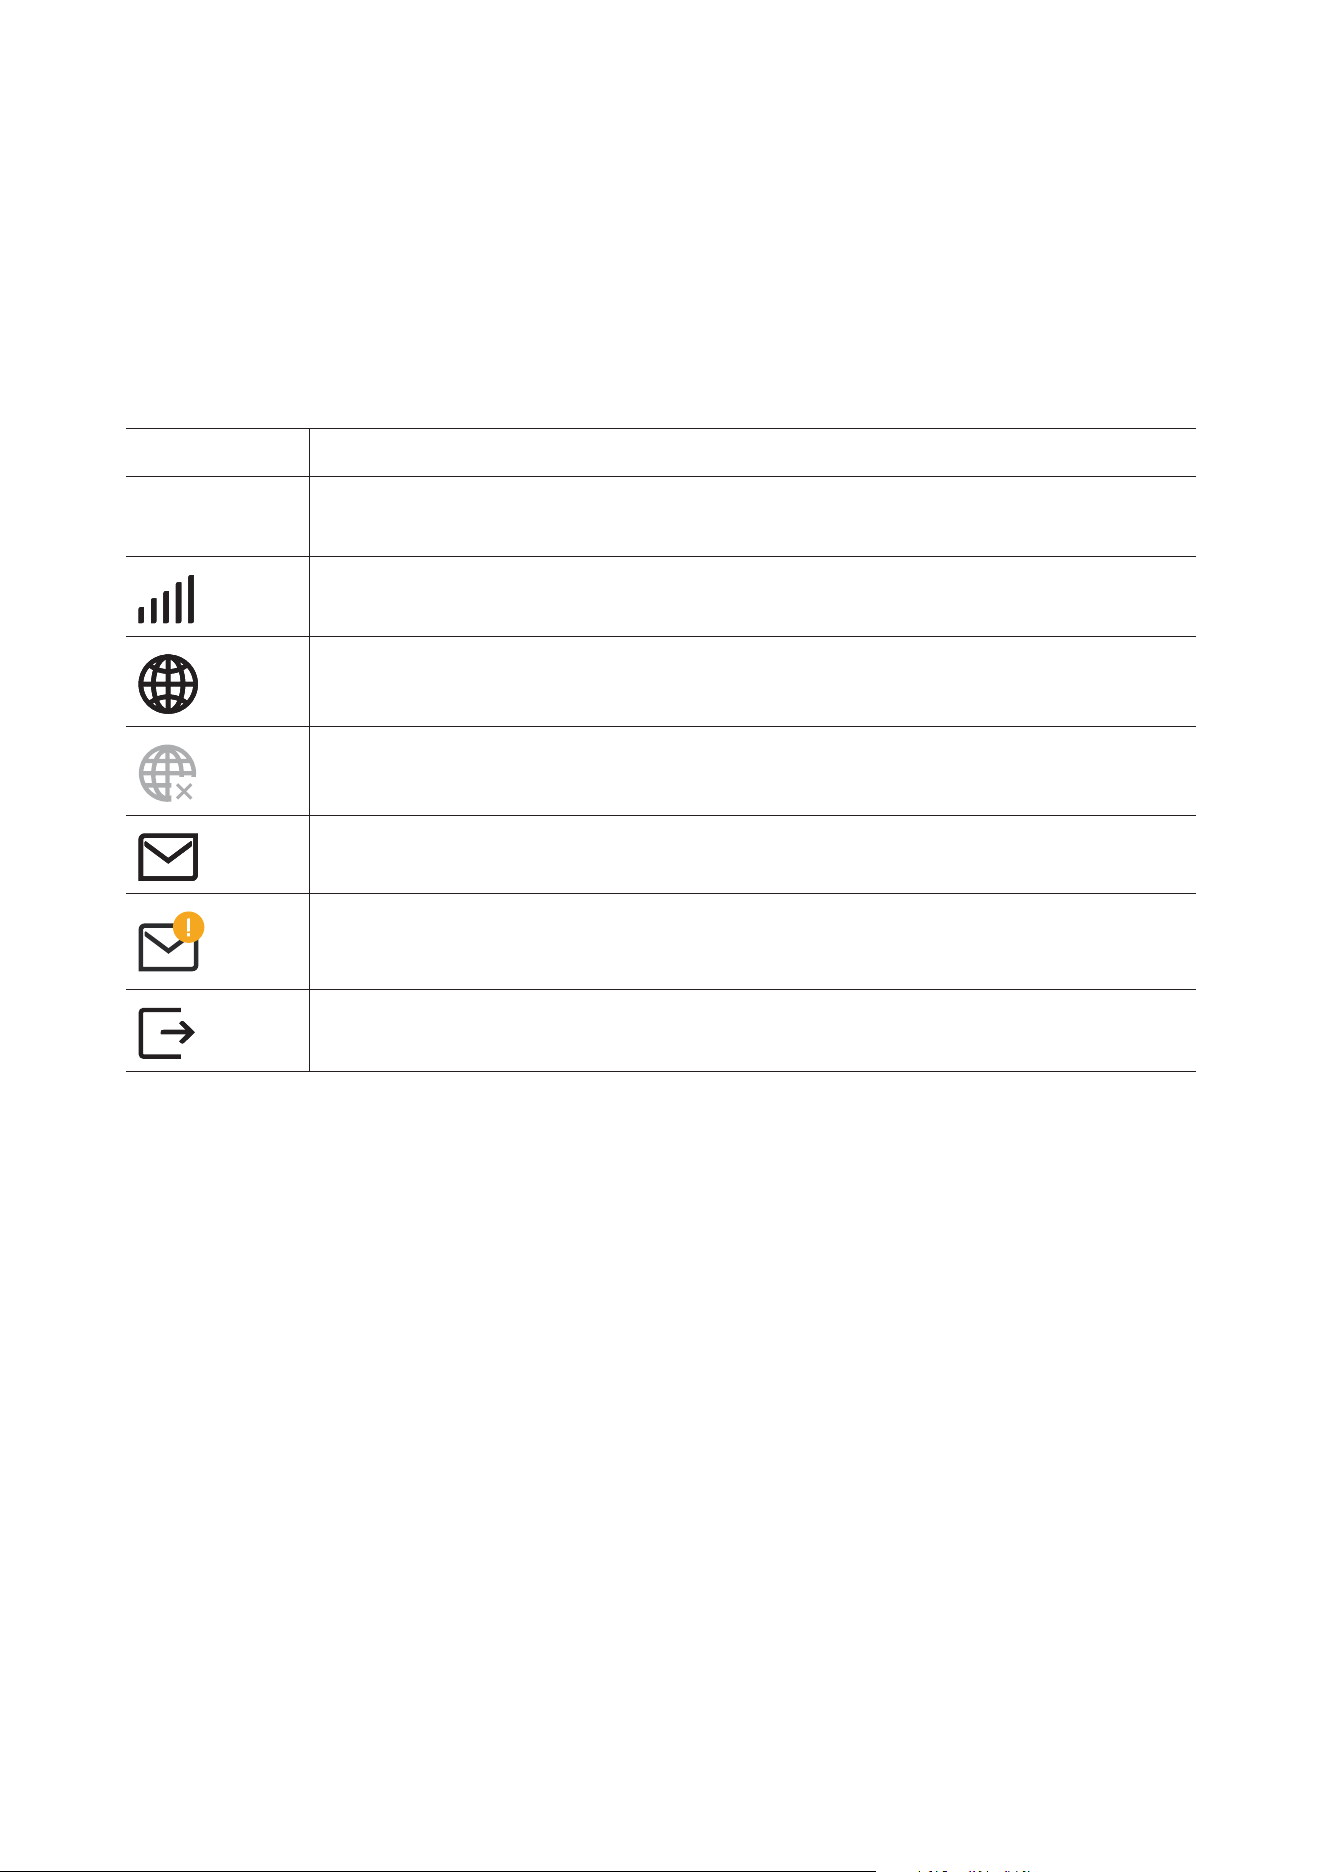
Commonly used status icons are displayed in the Web UI, which give you information about
your TCL LINKPORT IK511.
Status icon What it means
LTE / 5G
It is the network your TCL LINKPORT IK511 connects to. No Service will
be displayed when there is no network available.
The number of the signal bar indicates the signal strength. The more signal
bars it shows, the stronger the signal is.
The TCL LINKPORT IK511 is connected to WAN network.
The TCL LINKPORT IK511 is disconnected from WAN network.
New messages or unread messages.
The SMS inbox is full.
Click to log out of the Web UI.
10
4. CongureyourTCLLINKPORTIK511
In this chapter, we will show you how to get the most out of your TCL LINKPORT IK511
usingtheWebUI,whichallowsyoutocongurenetworksettings,checkmessages,view
connected devices, and more.
4.1 Home
This section allows you to quickly check connection status, network information, device
information, and connected devices.
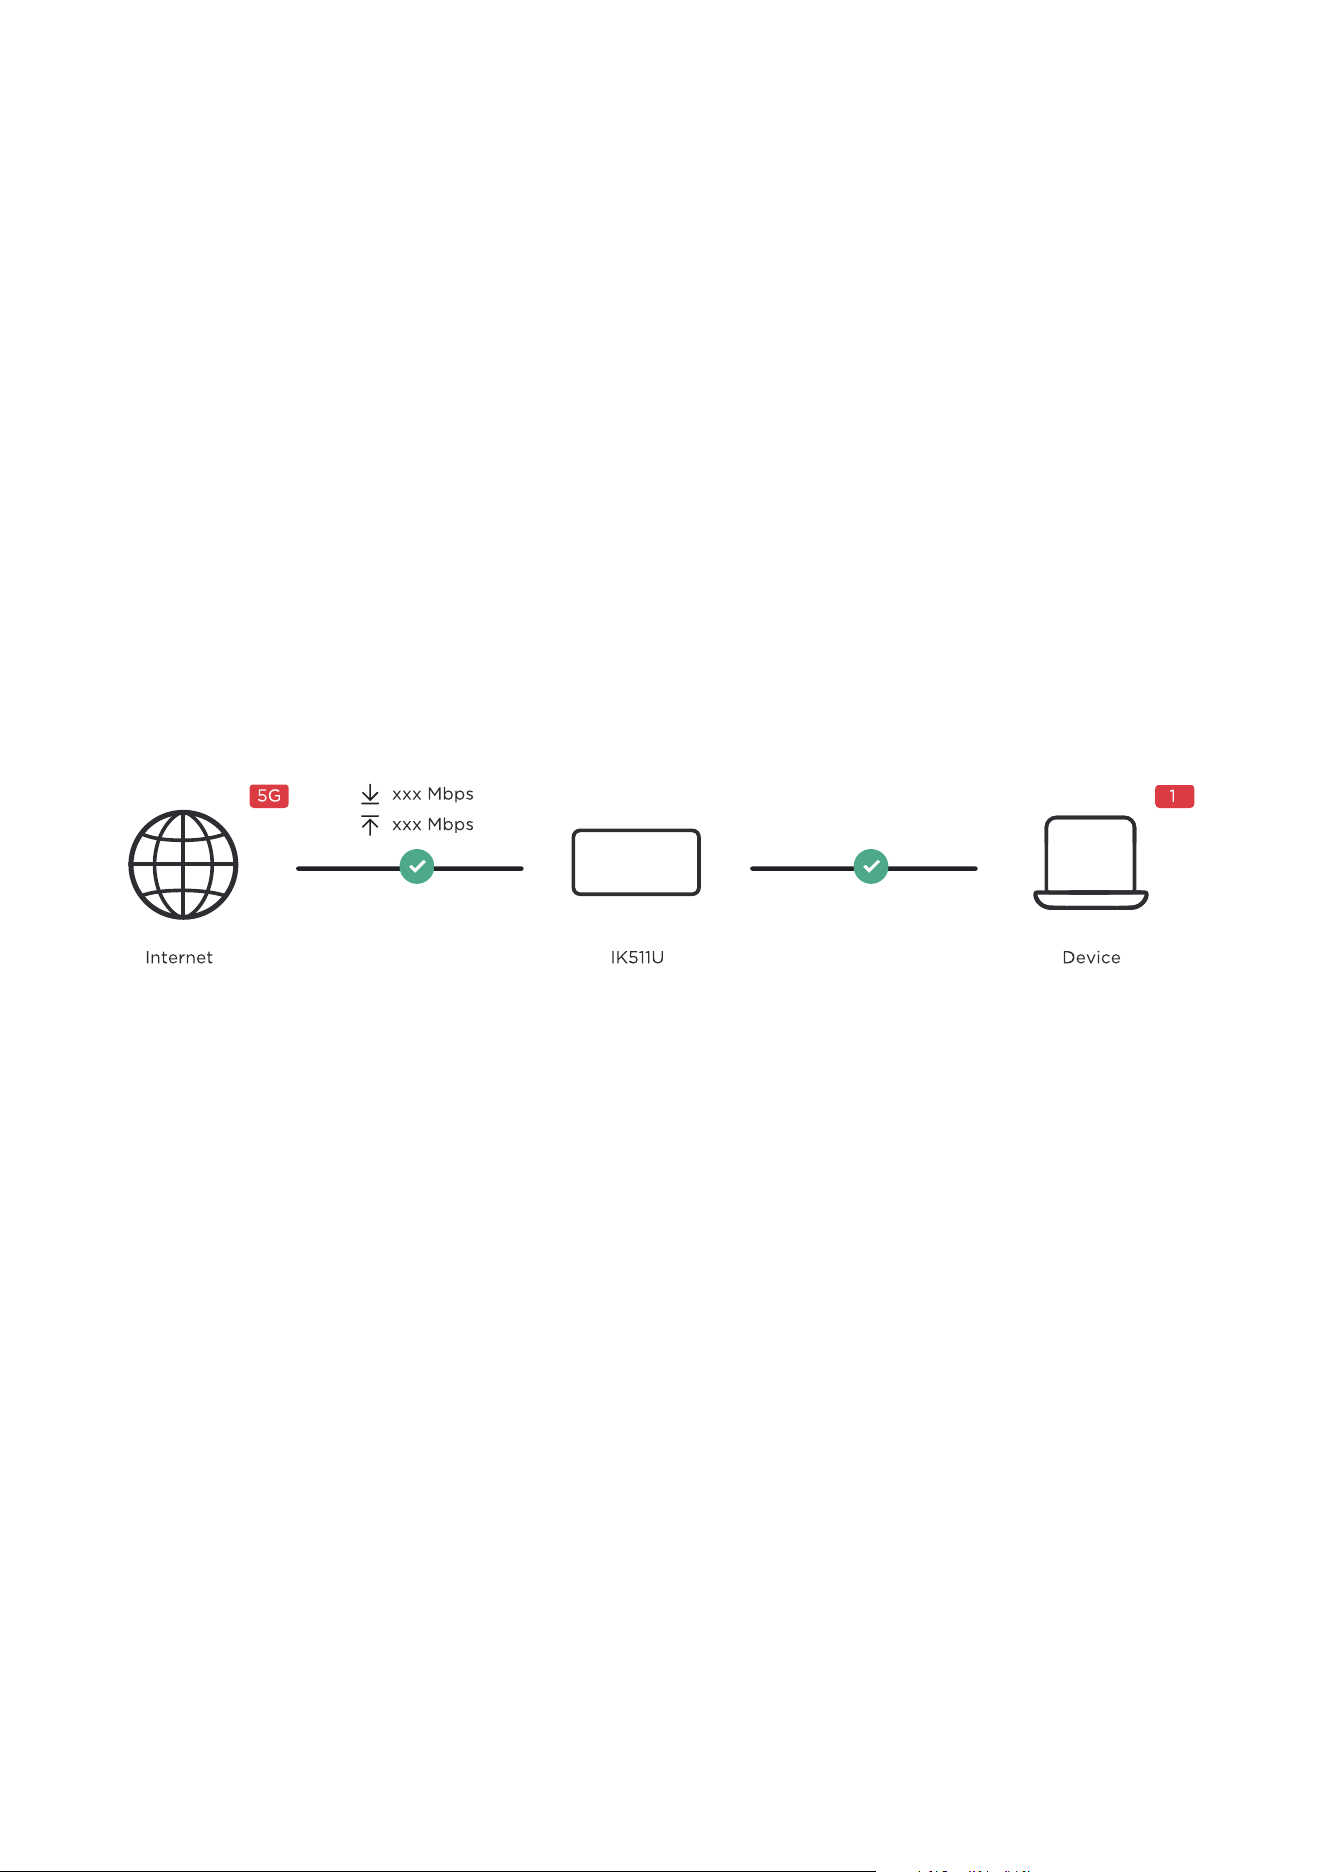
4.1.1 Network overview
The network overview panel shows network connection status, download and upload speed,
and the number of connected devices.
Click Disable mobile data to disconnect your TCL LINKPORT IK511 from the network.
Click Enable mobile data to connect your TCL LINKPORT IK511 to the network.
Network
The Network panel displays network name, network type, and network connection status.
Click Network to access the internet setting page.
Device information
The Device information panel shows device model name, software version, and running time.
Click Device information to get more information on your device.
Diagnostics
You can test network up-and-down and view the band.
4.2 Status
This section allows you to view your network information, connection status, internet
information, and more.

11
4.2.1 Internet
Check your internet information, such as SIM status, Connection status, Network name,
Networktype,Prolename,andIPaddress.
4.2.2 Diagnostics
View the diagnostics data of the network, including Cell ID, RSRP, SINR and Band.
4.3 Services
Navigate to Services, and click the SMS tab to display the information you want or change
SMS settings as desired.
Refer to the following table for the description of each folder under the SMS tab.
Inbox Incoming messages are stored in this folder.
Outbox Outgoing messages are stored in this folder.
Draft Draft messages are stored in this folder.
New message Write a new message in this folder.
SMS settings CongureSMSsettingsinthisfolder.
Refer to the following table for commonly used operations of SMS messages.
Read a message Click the message you want to read.
Send a message
1. Click SMS > New message.
2. Input the recipient’s number and message content.
3. Click Send.
NOTE:Amessagecanbesenttouptoverecipients
simultaneously.
Reply to a message
1. Click the message you want to reply to.
2. Click Reply.
3. Input the message content, then click Send.
Delete a message
1. Locate the message you want to delete in the Inbox or Outbox
folder.
2. Tick the checkbox beside the message you want to delete.
3. Click Delete.
Delete all messages
1. Click at the top of the checkbox column to select all messages.
2. Click Delete.
Forward all
messages
1. Click SMS settings.
2. Enable SMS forwarding to mobile phone.
3. Input the recipient’s number.
4. Click Apply.

12
Enable SMS
delivery reports
Click SMS settings, then enable SMS report.
Disable SMS
delivery reports
Click SMS settings, then disable SMS report.
4.4 Settings
Prioritizethenetworkconnection,router,rewallandadvancedsettings.
4.4.1 Quick setup
Congurenetworkmode,enableordisabledataroamingandinternetprolename.
4.4.2 Mobile network
Network connection
Congureandmanageconnectionmode,enableordisablemobiledata,anddataroaming.
Prolemanagement
SetupanewAPNprole,andeditordeleteexistingproles.
Addanewprole
1. Click New.
2. Inputthecorrectparameters(suchasprolename,APNandIP
type) for your network operator.
3. Click Save.
Editaprole
1. Selecttheprolefromtheprolemanagementlist.
2. Click Edit to set the parameters.
3. Click Save.
Deleteaprole
1. Selecttheprolefromtheprolemanagementlist.
2. Click Delete.
NOTE:Thedefaultprolecannotbedeleted.
Set as default
1. Selecttheprolefromtheprolemanagementlist.
2. Click Set as default.
Mobilenetworksettings
You can set the network search mode to either Auto or Manual. Ensure that you click Apply
after making any changes.
SIMPINmanagement
Enable SIM PIN
1. When the SIM PIN feature is disabled, click
.
2. Set a SIM PIN code.
3. Click Apply.

13
Disable SIM PIN
1. When the SIM PIN feature is enabled, click
.
2. Enter the current SIM PIN code.
3. Click Apply.
Change SIM PIN
1. When the SIM PIN feature is enabled, click Change SIM PIN.
2. Enter the previous and new SIM PIN.
3. Click Apply.
Note: When the SIM PIN code is entered incorrectly 3 times, a PUK code is required. You
can obtain the PUK code from your internet service provider.
4.4.3 Router
DHCP
DynamicHostCongurationProtocol(DHCP)isaclientorserverprotocolthatautomatically
providesyouwithanInternetProtocol(IP)host.TheIPaddressandrelatedconguration
settings such as subnet mask and default gateway address are all automatically assigned.
•DHCP Server: DHCP Server will automatically assign IP addresses to devices on the
network. The default setting is enable.
•Gateway address: It is the router’s IP address on the LAN. The default setting is
“192.168.0.1”.
•Subnet mask: The router’s internal LAN subnet mask. The default setting is
“255.255.255.0”.
•Start IP address: Set the start IP address available to access.
•End IP address: Set the end IP address available to access.
•DHCP Lease Time: Amount of time that a Wi-Fi enabled device can use its assigned IP
address before it is required to renew the lease.
DDNS
WAN IP address is needed when some functions of your TCL LINKPORT IK511 are enabled.
If the WAN IP address of your TCL LINKPORT IK511 changes, these functions may not work
properly. The Dynamic Domain Name Server (DDNS) function allows you to map a dynamic
WAN IP address (public IP address) to a static domain name, helping internet users (WAN
side) access the TCL LINKPORT IK511 network by static domain name.
VPN
Virtual Private Network (VPN) is a dedicated network across the shared or public network
(usually the internet). The VPN technology allows employees at a branch of an enterprise and
employees at the headquarters to exchange resources conveniently without exposing these
resources to other internet users.
VPNpassthrough
A VPN allows you to create a secure link between private networks through the internet.
YoucanchoosethedierentprotocolsthatyoucanusewhensettingupaVPN,suchas
IPSec Passthrough, PPTP Passthrough and L2TP Passthrough.

14
IPpassthrough
IP Passthrough enables a client on the LAN to acquire the router’s IP address assigned from
anISP.WhenIPpassthroughisenabled,therouterbridgesalltractothedeviceconnected
to it.
4.4.4 Firewall
IPlter
By default, any device connected to your TCL LINKPORT IK511 is allowed to access the
internet.
YoucanusetheIPltertoalloworblockspecicdevicesfromaccessingIPaddressesonthe
internet.
Create a Blocklist rule for IP addresses you do not want a device to access. If you enable
it, then only IP addresses that match the rules will be accessible, all other addresses will be
blocked.
A maximum of 32 rules can be created.
Portforwarding
Port forwarding allows external users to connect to services inside the local network (LAN).
Click + to create a new Port forwarding rule, and specify the LAN IP address, LAN ports,
WANportsandProtocoltypefortractobeforwarded.
4.4.5 Advanced settings
AT port
YoucanenteranATcommandtocongureyourTCLLINKPORTIK511.
By default, AT port is disabled, click
to enable, and then click Apply.
The use of AT port requires synchronous installation of driver kits. Please consult the
merchantforspecicdriverkits.
How to send AT Command in Windows PC for TCL LINKPORT IK511?
1. OpentheATCommandtool.Selectthelanguageyouwantandconguretheportviathe
port’s drop-down menu, select the correct port.
2. Send AT Command in the input window, and then click SEND, the result is displayed in the
window of AT Command tool.
M2M
The M2M (Machine to Machine) mode is only applicable for technology professionals. Use
with caution.
Click M2M status to enable M2M mode, and then click Apply. At this time, the Web UI will
be unavailable.
Connect your TCL LINKPORT IK511 to the terminal you want to use it in M2M mode.
*WhenyourTCLLINKPORTIK511isworking,presstheResetbuttonfor3secondsorthroughATcommands
1
to reset your
TCL LINKPORT IK511 back to the Web UI.
¹ATcommands(ATmeaningattention)areinstructionsusedtocontrolamodem.Thecommandsetconsistsofaseriesof
short text strings which can be combined to produce commands for operations such as dialing, managing SMS functions,
and changing the parameters of the connection.

15
4.5 System
4.5.1 Device information
You can view your device information here such as device name, model name, IMEI, SIM
card number, IP address, LAN Domain, software version and hardware version.
4.5.2 Login password
Enteryourcurrentpasswordandconrmanewpassword.Yourchosenpasswordmustbe
between 4-16 characters long.
The default password can be found on the label located on the rear of the TCL LINKPORT
IK511whenyouremovedthebackcoverandalsoontheImportantInformationLeaet
included with your device.
4.5.3 System time
Time zone: Change the local time zone here.
Current date and time: This will show your current time according to the selected time zone.
4.5.4 Backup & restore
HowtobackuptheTCLLINKPORTIK511conguration:
1. Click Backuptosavethecongurationle.
2. On Windows OS and macOS these will be saved in the Downloads folder by default and
thelenamewillbecongure.bin.
Howtorestoretheconguration:
1. ClickBrowsetoselectthepreviouslybackedupcongurationle.
2. Click Restore.
Note:DonotdisconnecttheTCLLINKPORTIK511duringthecongurationrestorationprocess.
4.5.5 Restart & reset
Restart: Click Restart to reboot the TCL LINKPORT IK511. Current settings will be
maintained.
Reset: Click Reset to reset all settings back to factory default settings. Note that any custom
settingsyouhaveappliedwillbereset,sobackupadevicecongurationleasinstructed
above if you want to restore settings later.
You can also reset the device by holding the reset button on the back of the device down for
more than 3 seconds.
Note: Do not disconnect the TCL LINKPORT IK511 during the reset or restart process.
4.5.6 Firmware update
Click Check for updates. Your TCL LINKPORT IK511 will check if there is an update
available.
Ifoneisfound,youmayclickDownload.Oncethelehasdownloadedsuccessfully,the

16
device will update automatically.
Enable Allow automatic updates to automatically update the device when a new update is
available. If this option is disabled, you can still update the device via Check for updates.
Note: Do not disconnect the TCL LINKPORT IK511 during the update process. Your internet
connection may be unavailable during the update process.

17
Important safety information
Read all the safety information before using your product. Failure to follow these safety
instructions could result in injury, damage to your product, or other property.
Important safety instructions
•Observe signs and notices that prohibit or restrict the use of wireless devices.
•Always handle your device with care. It contains sensitive electronic components inside.
The device can be damaged if dropped, burned, punctured, or crushed, or if it comes in
contact with liquid.
•Do not disassemble or attempt to repair your device yourself. Disassembling the device
may damage it, or cause injury to you.
•The device and its accessories may present a choking hazard to small children. Do not let
children use the device and its accessories without supervision.
Operatingtemperature
Your device is designed to work best in ambient temperatures between 0°C and 55°C (32°F
and 131°F), and should be stored between ambient temperatures of –20°C and 70°C (-4°F
and 158°F). Your device may malfunction if operated or stored outside of these temperature
ranges. Avoid exposing the device to dramatic changes in temperature or humidity.
Regulatorycomplianceinformation
Thissectionintroducesregulatoryinformation,certication,andcomplianceinformation
specictoyourproduct.
Electromagneticelds(EMF)
This product complies with all applicable standards and regulations regarding exposure to
electromagneticelds.
Disposalandrecyclinginformation
At TCL, we continually strive to improve our operations and products, in order to minimize our
impact on the environment.
Your product is designed and manufactured with high quality materials
and components, which can be recycled and reused. Please observe the
local regulations regarding the disposal of packaging materials, exhausted
batteries and old equipment.
For recycling information, please visit www.tcl.com.

18
This symbol on your device and/or its accessories indicates that this device
should not be disposed of with household waste. When this device reaches
its end of life, take it to a collection point designated by local authorities.
For more detailed information about device recycling, contact your local
authorities, household waste disposal centers, or retail stores.
The separate collection and recycling of your device and/or its accessories at
the time of disposal will help conserve natural resources and ensure that it is
recycled in a manner that protects human health and the environment.
Radio waves
THIS DEVICE MEETS THE GOVERNMENT’S REQUIREMENTS FOR EXPOSURE TO RADIO
WAVES.
TheexposurestandardfordevicesemploysaunitofmeasurementknownastheSpecic
Absorption Rate, or SAR. The SAR limit set by public authorities such as the Federal
Communications Commission of the US Government (FCC), or by Innovation, Science and
Economic Development Canada (ISEDC), is 1.6 W/kg averaged over 1 gram of body tissue.
Tests for SAR are conducted using standard operating positions with the device transmitting
atitshighestcertiedpowerlevelinalltestedfrequencybands.
This device is complied with SAR for general population /uncontrolled exposure limits in
ANSI/IEEE C95.1-1992 and had been tested in accordance with the measurement methods
andproceduresspeciedinIEEE1528.
The FCC has granted an Equipment Authorization for this model device with all reported SAR
levels evaluated as in compliance with the FCC RF exposure guidelines. SAR information on
thismodeldeviceisonlewiththeFCCandcanbefoundundertheDisplayGrantsectionof
www.fcc.gov/oet/ea/fccid after searching on FCC ID: 2ACCJSCD005
The highest SAR value for this device when tested is 1.19 W/Kg for use close to the body.
WhiletheremaybedierencesbetweentheSARlevelsofvariousdevicesandatvarious
positions, they all meet the government requirement for RF exposure.
For body-worn operation, the device meets FCC RF exposure guidelines provided that it is
used with a non-metallic accessory with the device at least 5 mm from the body.
Use of other accessories may not ensure compliance with FCC RF exposure guidelines.
Additional information on SAR can be found on the Cellular Telecommunications & Internet
Association (CTIA) Web site: http://www.ctia.org/
Note: This equipment has been tested and found to comply with the limits for a Class B
digital device pursuant to part 15 of the FCC Rules. These limits are designed to provide
reasonable protection against harmful interference in a residential installation. This equipment
generates, uses and can radiate radio frequency energy and, if not installed and used in
accordance with the instructions, may cause harmful interference to radio communications.
However, there is no guarantee that interference to radio or television reception, which can be
determinedbyturningtheequipmentoandon,theuserisencouragedtotrytocorrectthe
interference by one or more of the following measures:
•Reorient or relocate the receiving antenna.
•Increase the separation between the equipment and receiver.
•Connecttheequipmentintoanoutletonacircuitdierentfromthattowhichthereceiveris
connected.
•Consult the dealer or an experienced radio/TV technician for help.

19
Changesormodicationsnotexpresslyapprovedbythepartyresponsibleforcompliance
could void the user’s authority to operate the equipment.
For the receiver devices associated with the operation of a licensed radio service (e.g. FM
broadcast), they bear the following statement:
This device complies with Part 15 of the FCC Rules.
Operation is subject to the following two conditions:
•This device may not cause harmful interference.
•This device must accept any interference received, including interference that may cause
undesired operation.
Your device is a transceiver that operates on 5G Frequency Bands n25/66/71, 4G Frequency
Bands B2/4/5/12/25/26/66/71 or 4G Roaming Frequency Bands B7/13/38.

20
Troubleshooting
If you encounter problems while using the product, use the troubleshooting information to
helpdeterminetheproblemandndpossiblesolutions.
General problems
Problem Solution
How do I set a new PIN code for
my SIM card?
1. Log in to the Web UI.
2. Go to Settings > Mobile network > SIM PIN
management.
3. Enable SIM PIN status operation, and enter a
new PIN code.
4. Click Apply.
WherecanIndthedevice’smodel
number and hardware version?
1. Log in to the Web UI.
2. Go to System > Device information.
Web UI problems
Problem Solution
How can I access the Web UI? 1. Open the web browser, and go to
http://192.168.0.1
2. Enter the login information as required. Find the
default login information on the label located on
the rear of the TCL LINKPORT IK511 when you
removed the back cover.
I can’t log in to the Web UI. •Make sure 192.168.0.1 is entered correctly in the
web browser.
•Make sure the TCL LINKPORT IK511 is plugged
into the computer correctly.
•Make sure the system LED indicator is solid green.
How do I change the login
password?
1. Log in to the Web UI.
2. Go to System > Login password.
“No SIM card” or “Invalid SIM card”
is displayed on the Web UI.
•Make sure there is a SIM card in your TCL
LINKPORT IK511.
•Reinstall the SIM card, and log in to the Web UI
again.

21
Connection problems
Problem Solution
I can’t access the internet. •If no SIM card is detected, reinsert the SIM card,
then try again.
•If a PIN code is required, enter the PIN code, and
try again.
•If no network is available, place the TCL
LINKPORT IK511 in an area with better signal (for
example near a window), and try again.
•Reboot your TCL LINKPORT IK511, and try again.
•If the DHCP server is enabled, make sure your
device MAC address is enabled on the DHCP
Reservation list.
“PIN lock” or “PUK lock” is
displayed on the screen of the
device connected to the TCL
LINKPORT IK511 network.
This indicates that the SIM card is locked.
To unlock the SIM card, log in to the Web UI and
enter the PIN code or PUK code. To obtain the PUK
code, contact your internet service provider.
NOTE: If the PIN code is entered incorrectly 3 times,
you will be required to enter the PUK code. If the
PUK code is entered incorrectly 10 times, the SIM
card will be locked permanently.
