USER'S MANUAL
Baby playard
BB0496
1
2
1
2
3
4
3
4
3
4
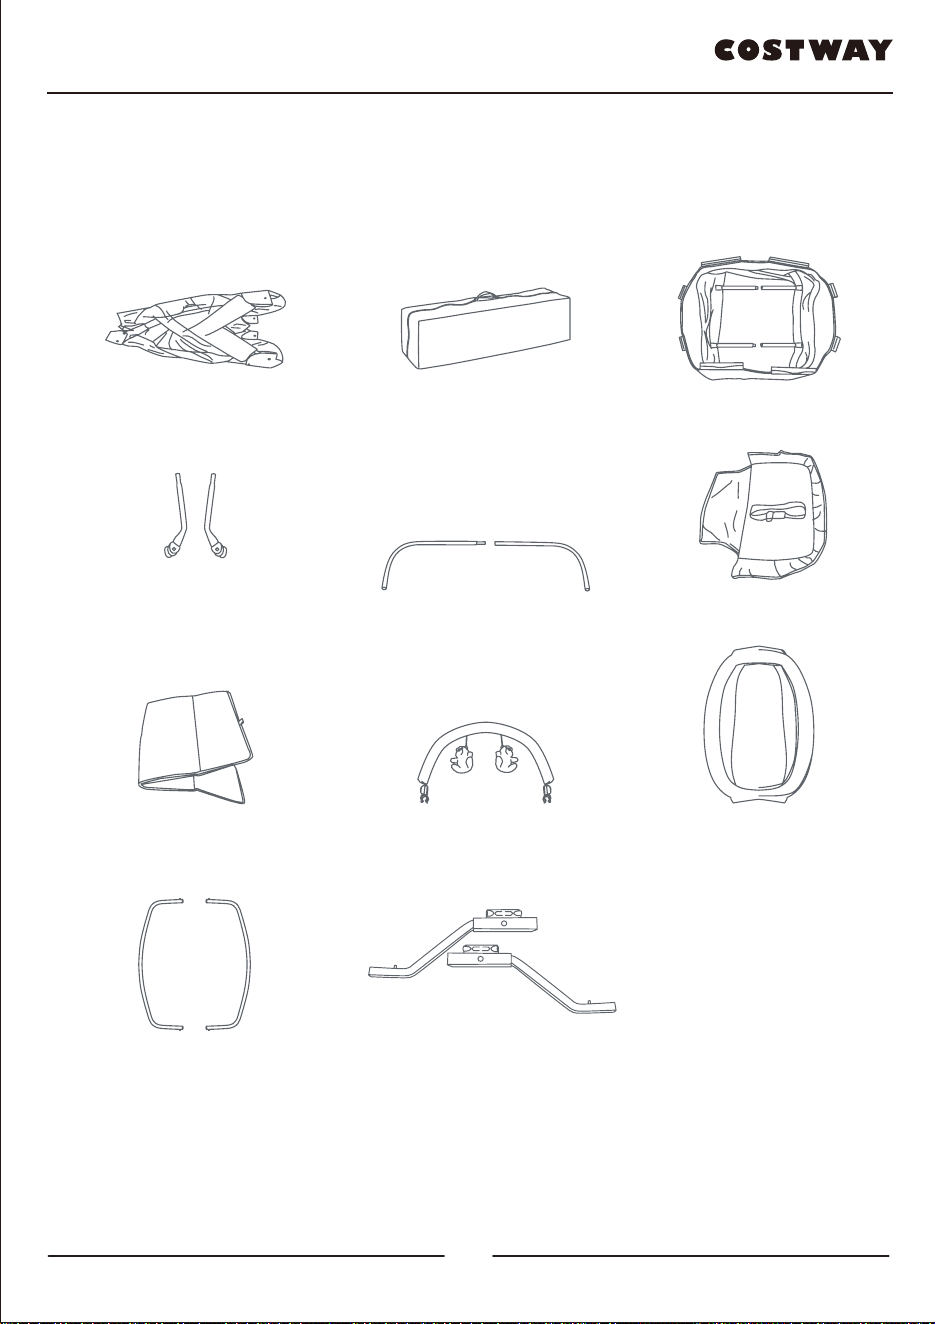
Check the parts list on the back cover to make sure you have all the parts for this
model before assembling the playard.
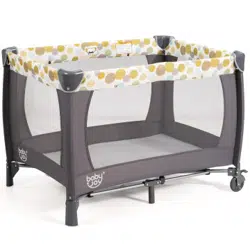
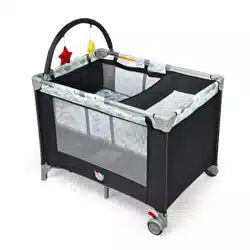
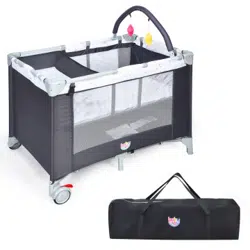
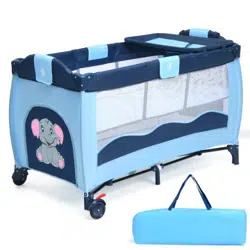
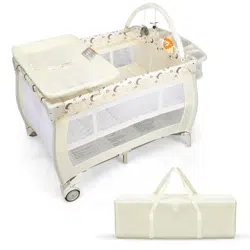
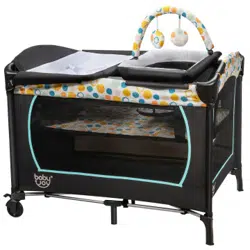
Playard
Travel / Storage Bag
Bassinet with metal support tubes
Short Bar with Connector Knob (2)
Long Curved Bar (2) Changing Table
Mattress
Toy Bar with plush toys** Napper Fabric
Napper Frame Bars (2) Napper Support Tubes (2)
TO ASSEMBLE PLAYARD
Playard
Mattress
ATTENTION: Playard must be fully assembled and securely locked before
installing or using other accessories.
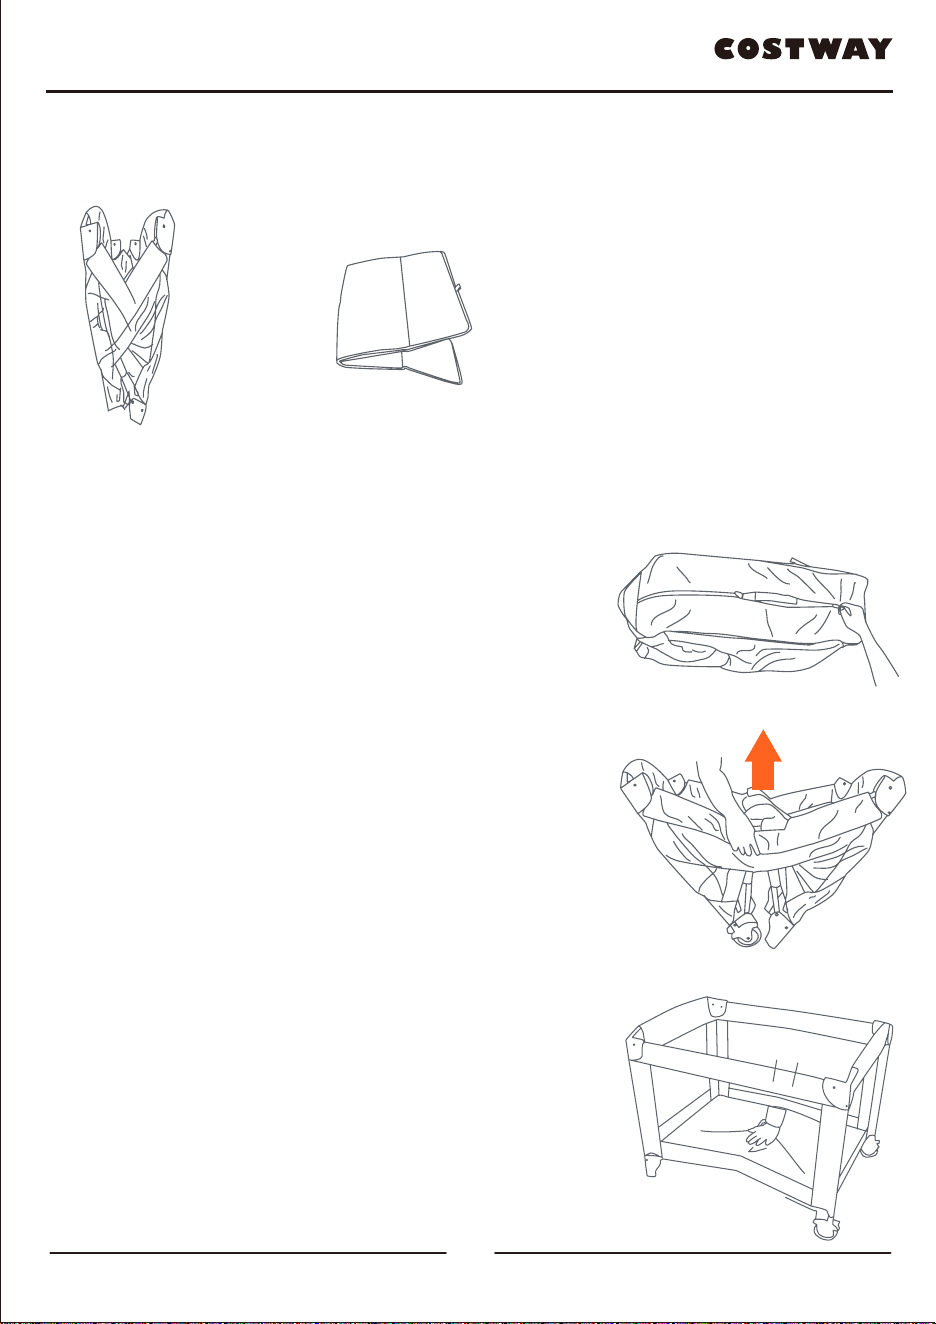
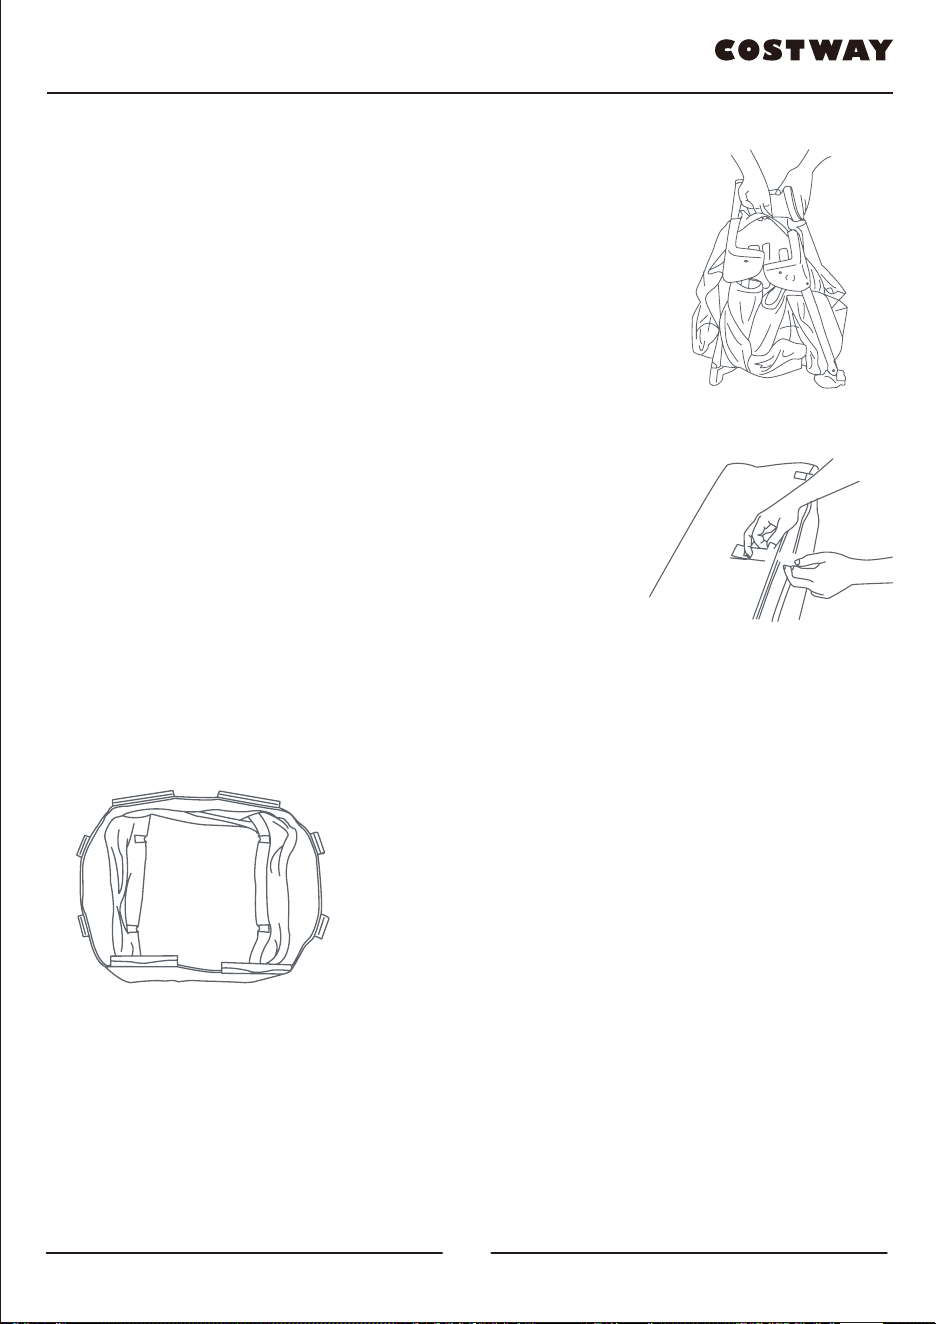
1) • Unzip bag and remove Playard frame (Fig. 1).
Undo the Fasten straps and set the Mattress
aside.
DO NOT push center down yet.
Fig. 1
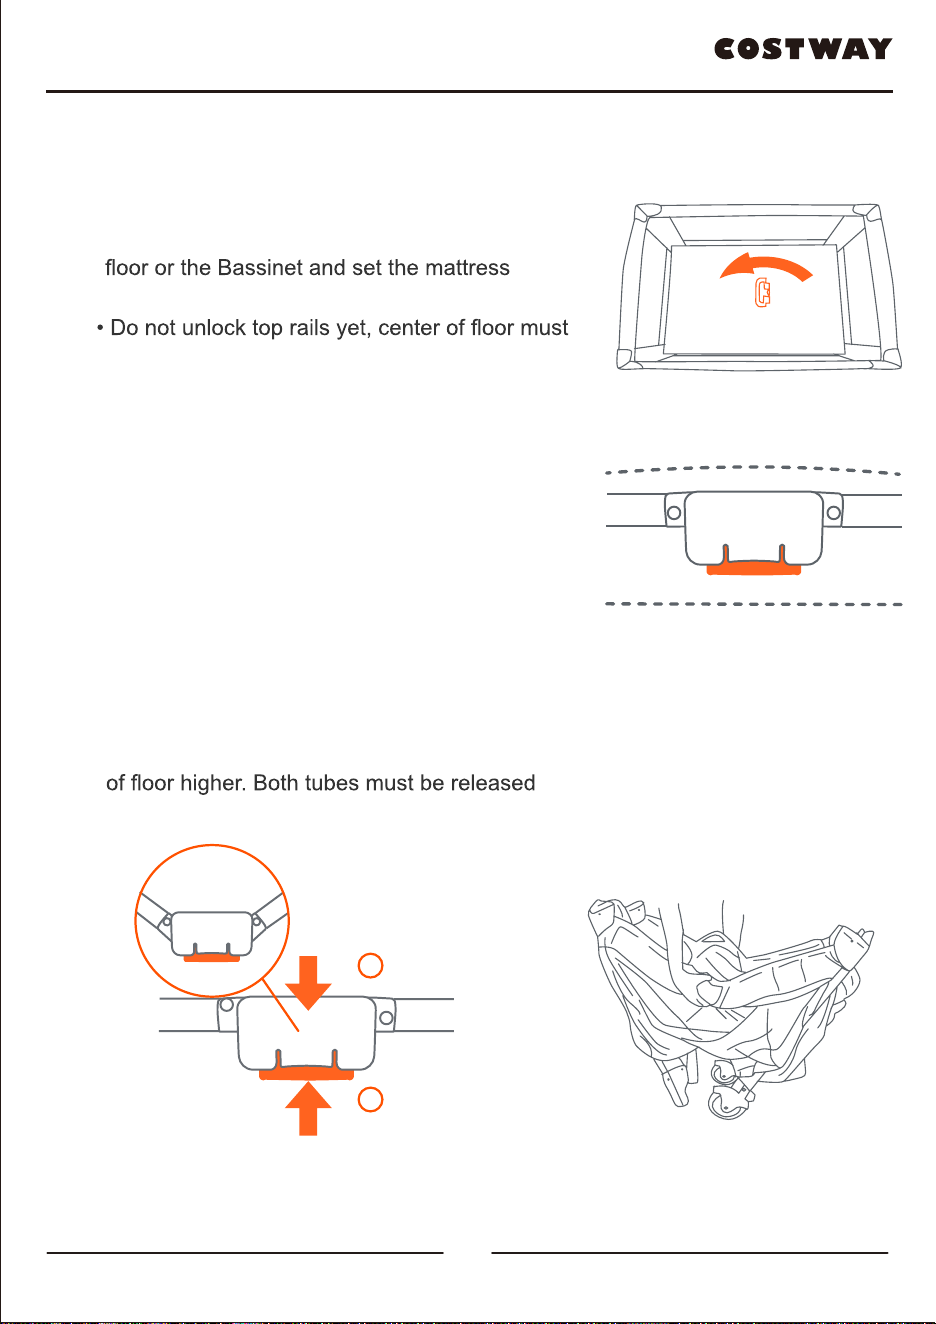
2) •
Top rails must be fully erected before lowering
center. Pull up one rail at a time, hold one hand
on each side of the rail and pull up sharply, do
not pull from the middle where the center latch
release is located, make sure both tubes latch
in place and each rail is rigid (Fig. 2).
IMPORTANT: The center must be raised while
locking the rails. If one rail will lock but the other
side will not then, unlock the rail by squeezing
the release in the center and try again.
Fig. 2
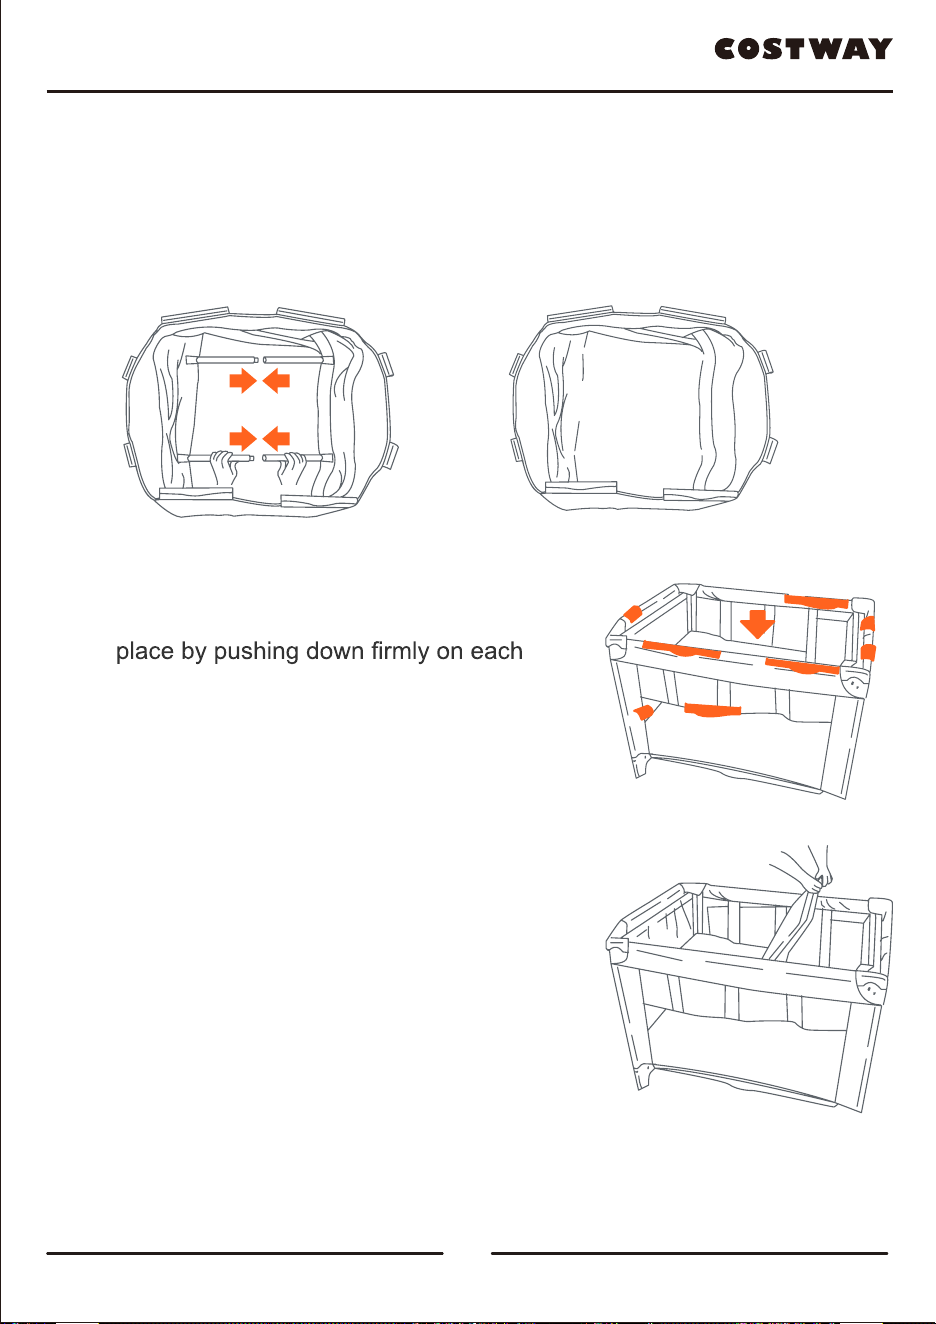
3) • Once all four (4) top rails are locked in place,
push down on the center handle (Fig. 3a). The
center mechanism automatically locks
in place.
Fig. 3a
5
6
3
4
Check the parts list on the back cover to make sure you have all the parts for this
model before assembling the playard.
Playard
Travel / Storage Bag
Bassinet with metal support tubes
Short Bar with Connector Knob (2)
Long Curved Bar (2) Changing Table
Mattress
Toy Bar with plush toys** Napper Fabric
Napper Frame Bars (2) Napper Support Tubes (2)
TO ASSEMBLE PLAYARD
Playard
Mattress
ATTENTION: Playard must be fully assembled and securely locked before
installing or using other accessories.
1) • Unzip bag and remove Playard frame (Fig. 1).
Undo the Fasten straps and set the Mattress
aside.
DO NOT push center down yet.
Fig. 1
2) •
Top rails must be fully erected before lowering
center. Pull up one rail at a time, hold one hand
on each side of the rail and pull up sharply, do
not pull from the middle where the center latch
release is located, make sure both tubes latch
in place and each rail is rigid (Fig. 2).
IMPORTANT: The center must be raised while
locking the rails. If one rail will lock but the other
side will not then, unlock the rail by squeezing
the release in the center and try again.
Fig. 2
3) • Once all four (4) top rails are locked in place,
push down on the center handle (Fig. 3a). The
center mechanism automatically locks
in place.
Fig. 3a
5
6

5
6
IMPORTANT: Test each top rail by pushing
securely in place before use (Fig. 3b).
IMPORTANT: The handle located in the
MUST remain
raised (Approx. 45.7 cm or 18 inches) while
locking the side rails in place. If the center is
not raised the rails will NOT lock.
rail will lock but the other side will not then,
unlock the rail by squeezing the release in the
center and try again.
Fig. 3b
4) •
with the padded side facing up (Fig. 4).
Fig. 4
5)
• Insert the hook & loop fasteners located on
the underside of the Mattress through the
(Fig. 5a). Fasten the hook and loop fasteners
prevent the Mattress from moving (Fig. 5b).
Fig. 5a
Fig. 5b
6) • To operate the brakes on the Wheels, press
downward on the brake levers. To release, lift
upward on the lever (Fig. 6).
Fig. 6
FOLDING PLAYARD
7) • Release the hook and loop fastener holding
the Mattress from underneath the Playard
aside.
be raised before top rails will unlock.
• Rotate the center handle counter-clockwise
90 degrees and raise the center as high as
the top rails (Fig. 7). Gather the Legs and
Wheels together towards the center as close
as possible so that they nearly touch.
Rotate before lifting
Tube
Tube
Latch release
Tube
Tubo
Tube
TOP RAIL
Center latch
8) • Locate the rail latch release in the center and
bottom side of each rail. Squeeze the lever
with two hands until the rail releases the two
tubes (Fig. 8a), then push down (Fig. 8b).
NOTE: If the top rail(s) do not release
completely, DO NOT FORCE! Lift the center
for the top rail to fold.
Fig. 8a
1
2
Push
Raise
Fig. 8b
Fig. 7
7
8
7
8
9) • Gather four (4) corners and center all together
tightly (Fig. 9). Wrap Mattress around Playard
frame with padded side facing inward.
Fig. 9
10) • Secure the hooks and loop fasteners by
feeding them through the loops on the end
of the Mattress and folding them back onto
themselves (Fig. 10).
• Place folded Playard into carry bag so that
the handle comes through the opening
between each side of the zipper.
Fig. 10
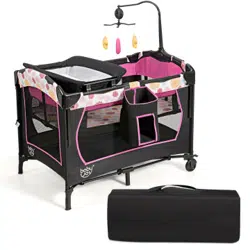
TO ASSEMBLE THE FULL-SIZE BASSINET
Full- Size Bassinet with metal support tubes
ATTENTION: Playard must be fully assembled and securely locked before installing
or using the Full-size bassinet feature. (See To Assemble Playard section). You will
need to remove the mattress from the bottom of the Playard to use inside your Full-
size bassinet.
11) • Connect opposing Mattress Support
Tubes that are attached to the bottom of
the Bassinet (Fig. 11a).
• Before placing the Mattress into the Bassinet, make sure Mattress
Support tubes are connected as seen in Fig. 11b.
Fig. 11a
Fig. 11b
12)
• Position the Bassinet over and down into
the fully assembled Playard. Secure in
plastic support clip until all are snapped
into place (Fig. 12).
Fig. 12
13)
• Place the Mattress into the Bassinet with
the padded side facing upward (Fig. 13).
Fig. 13
TO REMOVE THE FULL-SIZE BASSINET
• Remove Mattress from Bassinet. Remove Canopy. Disconnect
opposing Mattress Support Tubes. Unsnap all clips and lift Bassinet.
9
10
7
8
9) • Gather four (4) corners and center all together
tightly (Fig. 9). Wrap Mattress around Playard
frame with padded side facing inward.
Fig. 9
10) • Secure the hooks and loop fasteners by
feeding them through the loops on the end
of the Mattress and folding them back onto
themselves (Fig. 10).
• Place folded Playard into carry bag so that
the handle comes through the opening
between each side of the zipper.
Fig. 10
TO ASSEMBLE THE FULL-SIZE BASSINET
Full- Size Bassinet with metal support tubes
ATTENTION: Playard must be fully assembled and securely locked before installing
or using the Full-size bassinet feature. (See To Assemble Playard section). You will
need to remove the mattress from the bottom of the Playard to use inside your Full-
size bassinet.
11) • Connect opposing Mattress Support
Tubes that are attached to the bottom of
the Bassinet (Fig. 11a).
• Before placing the Mattress into the Bassinet, make sure Mattress
Support tubes are connected as seen in Fig. 11b.
Fig. 11a
Fig. 11b
12)
• Position the Bassinet over and down into
the fully assembled Playard. Secure in
plastic support clip until all are snapped
into place (Fig. 12).
Fig. 12
13)
• Place the Mattress into the Bassinet with
the padded side facing upward (Fig. 13).
Fig. 13
TO REMOVE THE FULL-SIZE BASSINET
• Remove Mattress from Bassinet. Remove Canopy. Disconnect
opposing Mattress Support Tubes. Unsnap all clips and lift Bassinet.
9
10
9
10
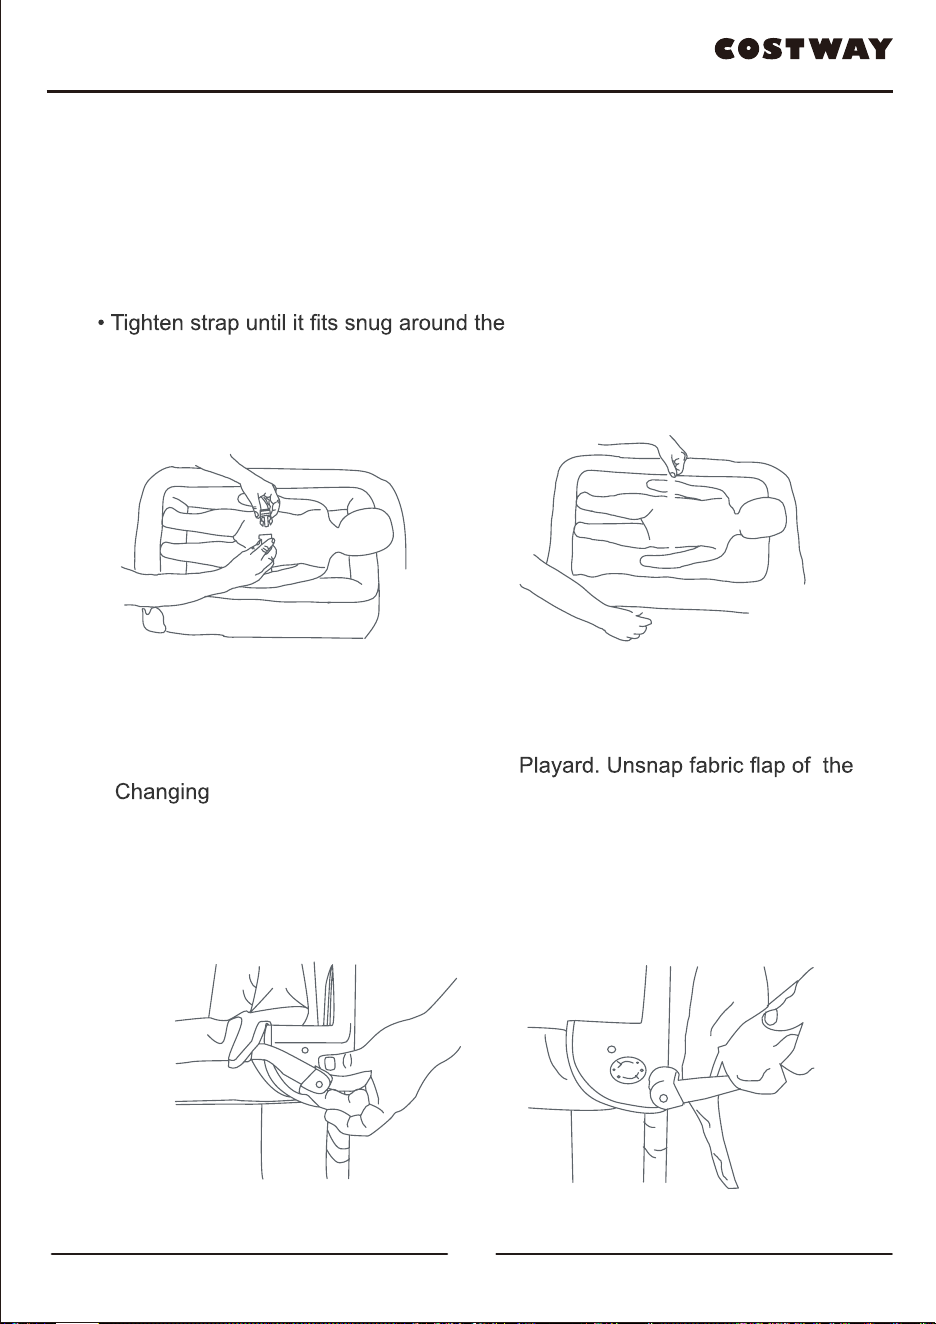
TO ASSEMBLE CHANGING TABLE
2 Long Curved Bars
2 Short Bar with Connector Knobs
1 Changing Table
WARNING-FALLING HAZARD: Children may
suffer serious injuries after falling from changing tables.
Falls can happen quickly.
• STAY within arm’s reach.
• ALWAYS secure this product to the support frame
ATTENTION: Playard and Full-size bassinet must be fully assembled and securely
locked before installing or using the changing table feature
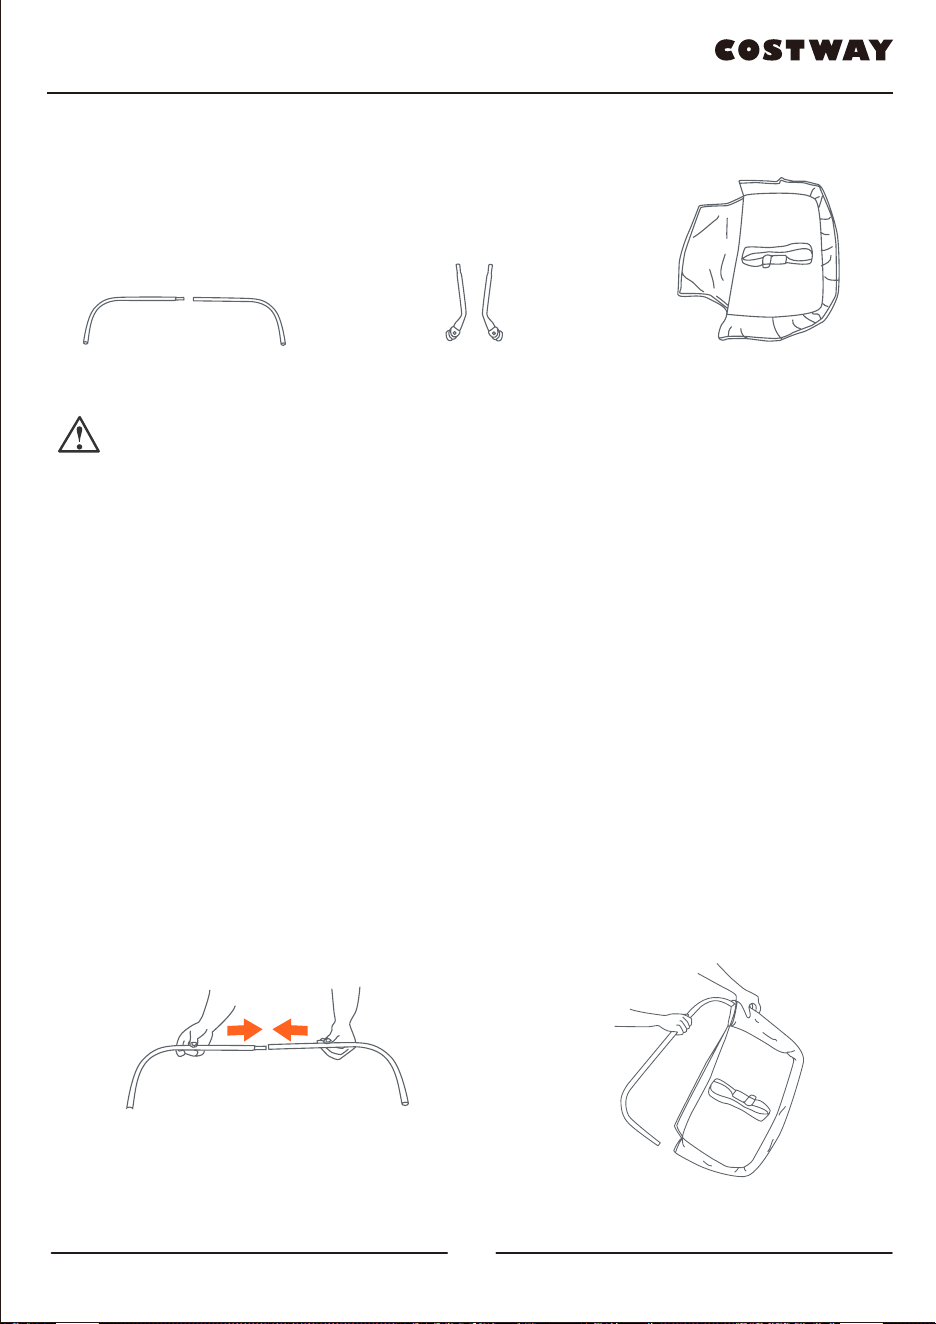
14) • Connect the two (2) Long Curved Bars together (Fig. 14a).
• Insert the assembled curved bars into the Changing Table fabric (Fig. 14b).
Slide the Curved Bars around inside sleeve of the Changing Table.
• Connect the two (2) Short Bars to each end of the Long Curved Bar (Fig.
14c). Make sure that the knobs are both facing down and on the same side
(Fig. 14d).
Fig. 14a
Fig. 14b
Fig. 14dFig. 14c
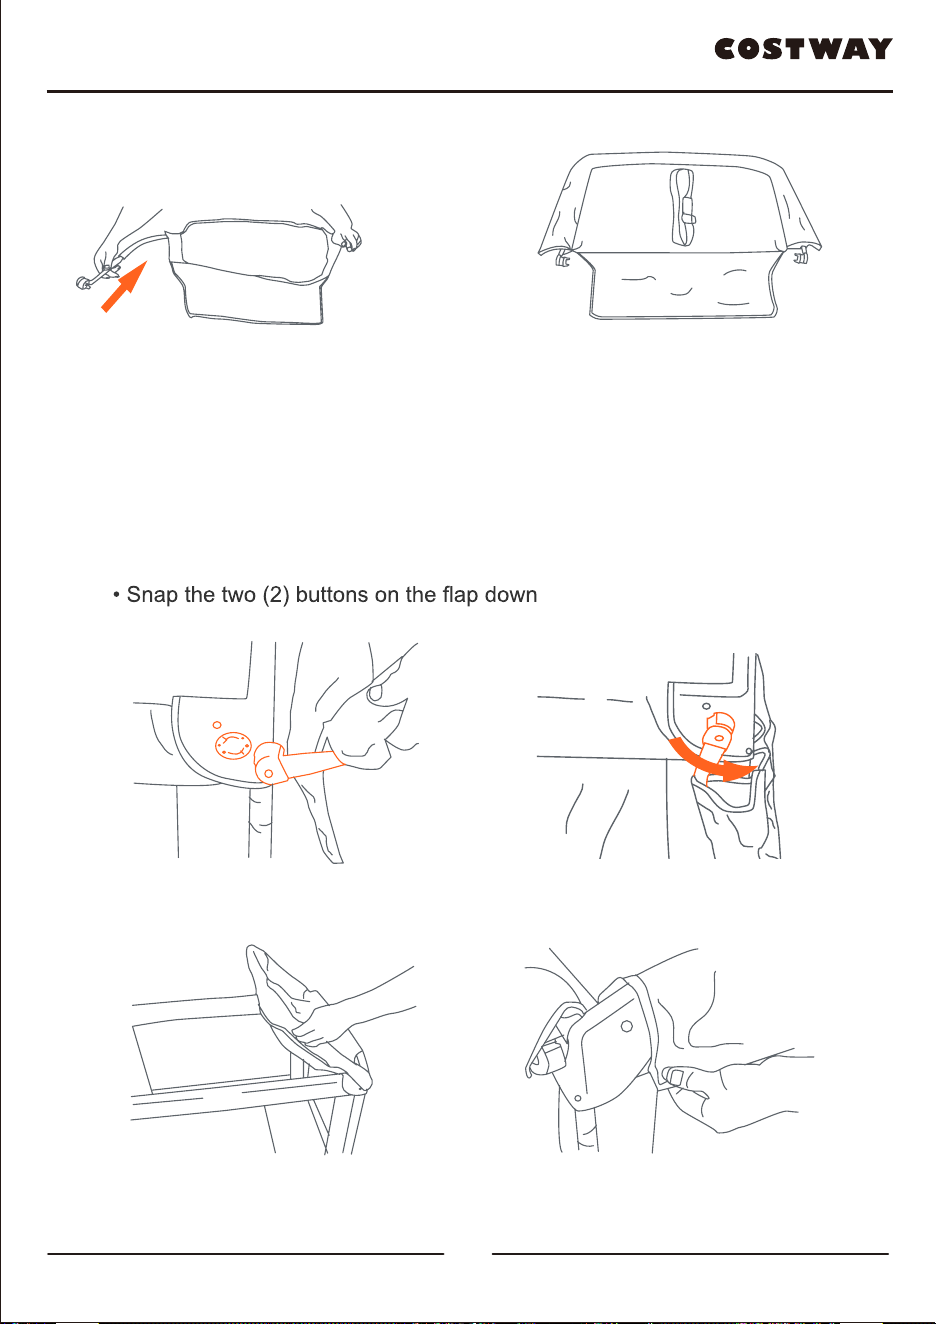
15) • Insert Connector Knob Prongs into holes located on both corners of the
Playard (Fig.15a).
• Turn the Connector Knobs counter clockwise to lock into place (Fig. 15b).
• Flip Changing Table over onto Playard (Fig.
15c).
onto the Playard (Fig. 15d).
Fig. 15a
Fig. 15dFig. 15c
Fig. 15b
12
11
9
10
TO ASSEMBLE CHANGING TABLE
2 Long Curved Bars
2 Short Bar with Connector Knobs
1 Changing Table
WARNING-FALLING HAZARD: Children may
suffer serious injuries after falling from changing tables.
Falls can happen quickly.
• STAY within arm’s reach.
• ALWAYS secure this product to the support frame
ATTENTION: Playard and Full-size bassinet must be fully assembled and securely
locked before installing or using the changing table feature
14) • Connect the two (2) Long Curved Bars together (Fig. 14a).
• Insert the assembled curved bars into the Changing Table fabric (Fig. 14b).
Slide the Curved Bars around inside sleeve of the Changing Table.
• Connect the two (2) Short Bars to each end of the Long Curved Bar (Fig.
14c). Make sure that the knobs are both facing down and on the same side
(Fig. 14d).
Fig. 14a
Fig. 14b
Fig. 14dFig. 14c
15) • Insert Connector Knob Prongs into holes located on both corners of the
Playard (Fig.15a).
• Turn the Connector Knobs counter clockwise to lock into place (Fig. 15b).
• Flip Changing Table over onto Playard (Fig.
15c).
onto the Playard (Fig. 15d).
Fig. 15a
Fig. 15dFig. 15c
Fig. 15b
12
11
11
12
TO SECURE THE CHANGING TABLE TO THE PLAYARD
IMPORTANT!
position the changing table must be secured to the playard frame using the
hook and loop fasteners provided.
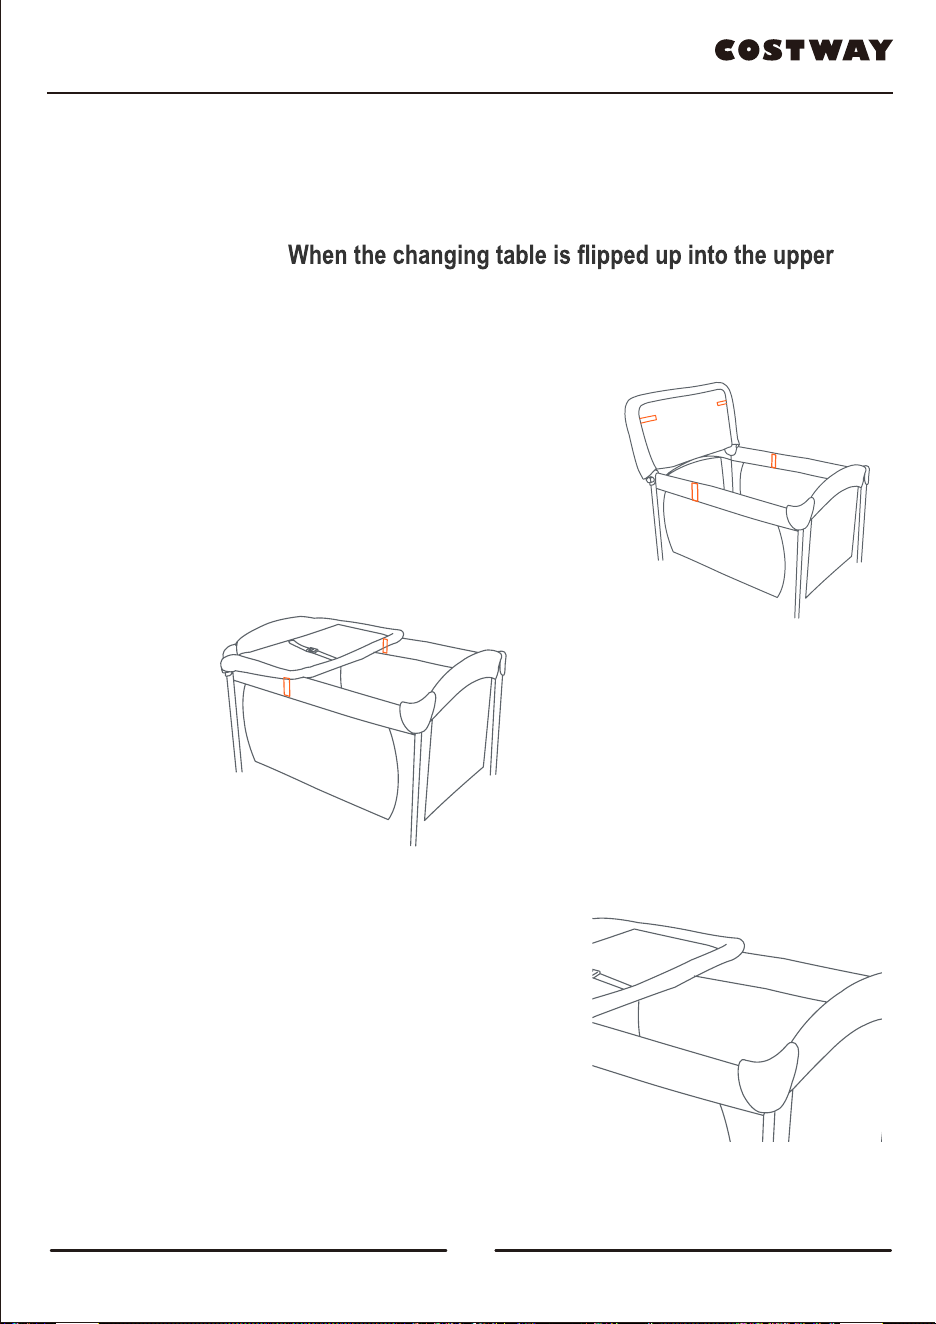
16) • Locate the hook and loop fasteners on the
bottom of the changing table and inside the
side rails of the playard (Fig. 16).
17) • Flip the changing table into its upper position
(Fig. 17).
Fig. 16
Fig. 17
18) • Secure the changing table to the playard
frame by fastening the hook and loop
fasteners on the underside of the changing
table to the side rails of the playard frame
(Fig. 18).
Fig. 18
TO USE THE CHANGING TABLE RESTRAINT SYSTEM
19) • Place child on the changing table, make sure hands and arms are clear of the
restraint.Bring the restraint around the child’s waist and clip the male and female
ends of the buckle together (Fig. 19a).
child’s waist (Fig. 19b).
DO NOT OVER TIGHTEN.
• To remove, unsnap the buckle.
ATTENTION: NEVER use changing table if it is damaged or broken.
Fig. 19a
Fig. 19b
TO REMOVE THE CHANGING TABLE
20) • Flip Changing Table to the outside of the
Table from Playard. Twist Connector Knobs
clockwise to unlock
• Remove Changing Table from the Playard (Fig. 20b) and disconnect the Short
Bars from the Curved Bar by pressing on the snap buttons and pulling apart.
Remove Curved Bar from the Changing Table sleeve.
Fig. 20a Fig. 20b
(Fig. 20a).
13
14
11
12
TO SECURE THE CHANGING TABLE TO THE PLAYARD
IMPORTANT!
position the changing table must be secured to the playard frame using the
hook and loop fasteners provided.
16) • Locate the hook and loop fasteners on the
bottom of the changing table and inside the
side rails of the playard (Fig. 16).
17) • Flip the changing table into its upper position
(Fig. 17).
Fig. 16
Fig. 17
18) • Secure the changing table to the playard
frame by fastening the hook and loop
fasteners on the underside of the changing
table to the side rails of the playard frame
(Fig. 18).
Fig. 18
TO USE THE CHANGING TABLE RESTRAINT SYSTEM
19) • Place child on the changing table, make sure hands and arms are clear of the
restraint.Bring the restraint around the child’s waist and clip the male and female
ends of the buckle together (Fig. 19a).
child’s waist (Fig. 19b).
DO NOT OVER TIGHTEN.
• To remove, unsnap the buckle.
ATTENTION: NEVER use changing table if it is damaged or broken.
Fig. 19a
Fig. 19b
TO REMOVE THE CHANGING TABLE
20) • Flip Changing Table to the outside of the
Table from Playard. Twist Connector Knobs
clockwise to unlock
• Remove Changing Table from the Playard (Fig. 20b) and disconnect the Short
Bars from the Curved Bar by pressing on the snap buttons and pulling apart.
Remove Curved Bar from the Changing Table sleeve.
Fig. 20a Fig. 20b
(Fig. 20a).
13
14
13
14
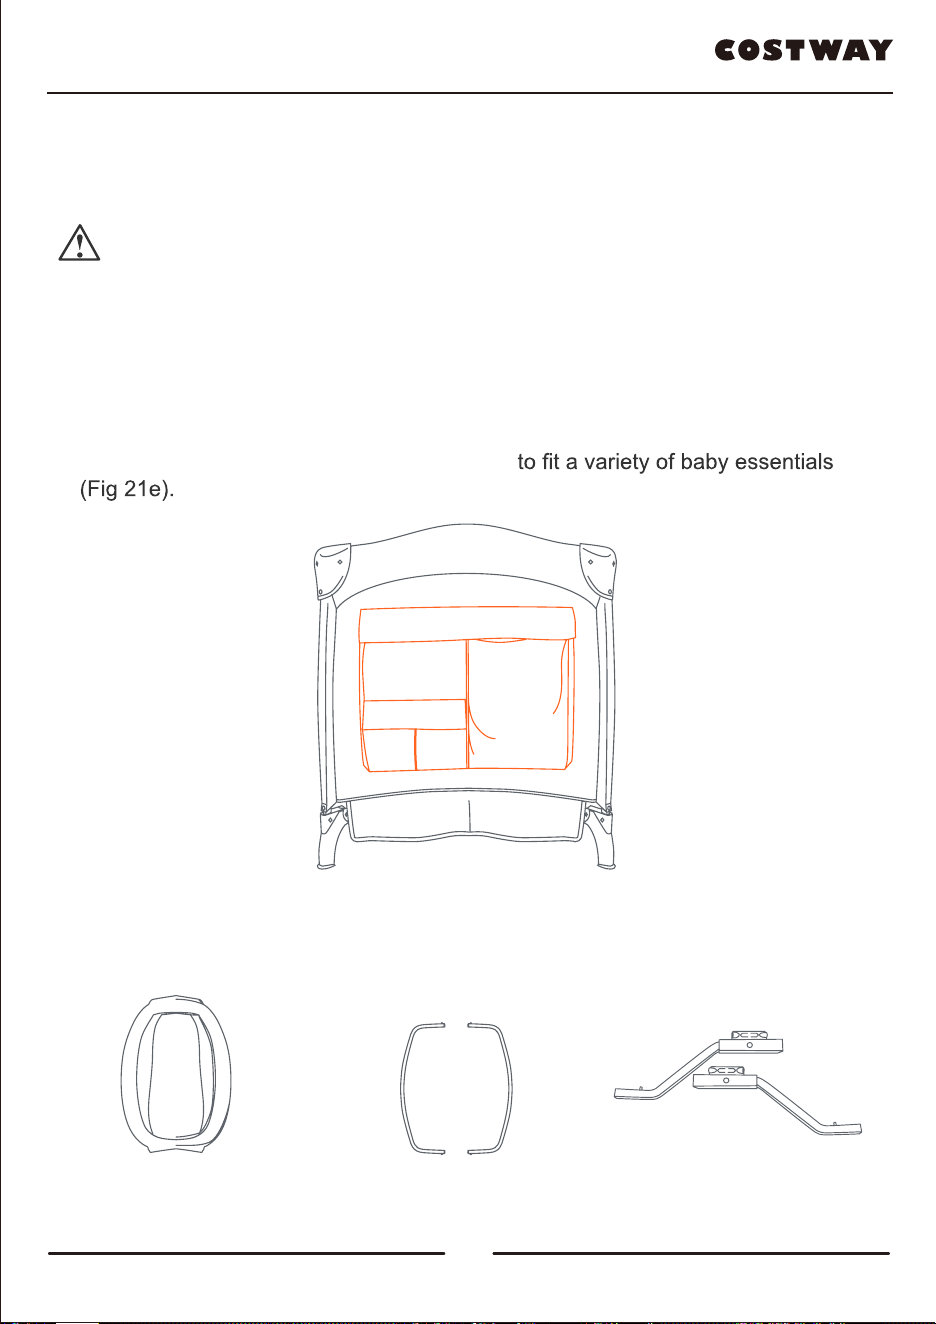
Deluxe Side Pocket Organizer
WARNING:
Do not place hot liquids or more
than 2 pounds in the Deluxe Side Pocket Organizer.
Serious burns or unstable conditions could result.
For safety, do not allow children to hang or play with
side pockets.
• The Deluxe Side Pocket Organizer is conveniently located on the side of your
Playard, it is equipped with multiple pockets
Fig. 21e
TO ASSEMBLE NAPPER
Napper Fabric Napper Frame Bars (2) Napper Support Tubes (2)
WARNING: FALL HAZARD:
• To prevent falls, stop using the product when infant:
Begins to wiggle out of position or turn over in the
product.
•
Head touches the upper edge of the product.
•
Weight more than 22 lb. (10 kg) (approximately 3
months of age) or is more than 22 in (55.88cm).
•
ALWAYS use restraint system,if a restraint system is
provided with the product.
SUFFOCATION HAZARD
INFANTS HAVE SUFFOCATED:
• In gaps between extra padding and side of the bassinet/
cradle, and
• On soft bedding
ONLY use the pad provided by the manufacturer
NEVER add a pillow, comforter, or another mattress for
padding.
• NEVER place extra padding under or beside infant when
trapped between product and adjacent surfaces.
• ONLY use in playard when it is securely attached.
• NEVER use napper in different product.
• ALWAYS place child on back to sleep.
• To reduce the risk of SIDS, pediatricians recommend
healthy infants be placed on their back to sleep, unless
otherwise advised by your physician.
• ALWAYS place child on back to sleep.
• Use napper with only one child at a time
• NEVER place child in bassinet while napper is attached.
• ALWAYS provide the supervision necessary for the
continued safety of your child. NEVER leave children
unattended.
16
15

13
14
Deluxe Side Pocket Organizer
WARNING:
Do not place hot liquids or more
than 2 pounds in the Deluxe Side Pocket Organizer.
Serious burns or unstable conditions could result.
For safety, do not allow children to hang or play with
side pockets.
• The Deluxe Side Pocket Organizer is conveniently located on the side of your
Playard, it is equipped with multiple pockets
Fig. 21e
TO ASSEMBLE NAPPER
Napper Fabric Napper Frame Bars (2) Napper Support Tubes (2)
WARNING: FALL HAZARD:
• To prevent falls, stop using the product when infant:
Begins to wiggle out of position or turn over in the
product.
•
Head touches the upper edge of the product.
•
Weight more than 22 lb. (10 kg) (approximately 3
months of age) or is more than 22 in (55.88cm).
•
ALWAYS use restraint system,if a restraint system is
provided with the product.
SUFFOCATION HAZARD
INFANTS HAVE SUFFOCATED:
• In gaps between extra padding and side of the bassinet/
cradle, and
• On soft bedding
ONLY use the pad provided by the manufacturer
NEVER add a pillow, comforter, or another mattress for
padding.
• NEVER place extra padding under or beside infant when
trapped between product and adjacent surfaces.
• ONLY use in playard when it is securely attached.
• NEVER use napper in different product.
• ALWAYS place child on back to sleep.
• To reduce the risk of SIDS, pediatricians recommend
healthy infants be placed on their back to sleep, unless
otherwise advised by your physician.
• ALWAYS place child on back to sleep.
• Use napper with only one child at a time
• NEVER place child in bassinet while napper is attached.
• ALWAYS provide the supervision necessary for the
continued safety of your child. NEVER leave children
unattended.
16
15
15
16
ATTENTION: Playard and Full-size bassinet must be fully assembled and securely
using the napper and inclined sleeper feature.
21)
of the napper (Fig. 21a).
• Insert and slide the left napper frame bar into the left sleeve of the napper fabric
(Fig. 21b). Make sure the bar is curved upwards (Fig. 21c). Repeat this step for the
right side (Fig. 21d).
NOTE: The curve of the bar must be upward.
Top
Bottom
Fig. 21a Fig. 21b
Fig. 21c
This side up
Fig. 21d
locked before installing or
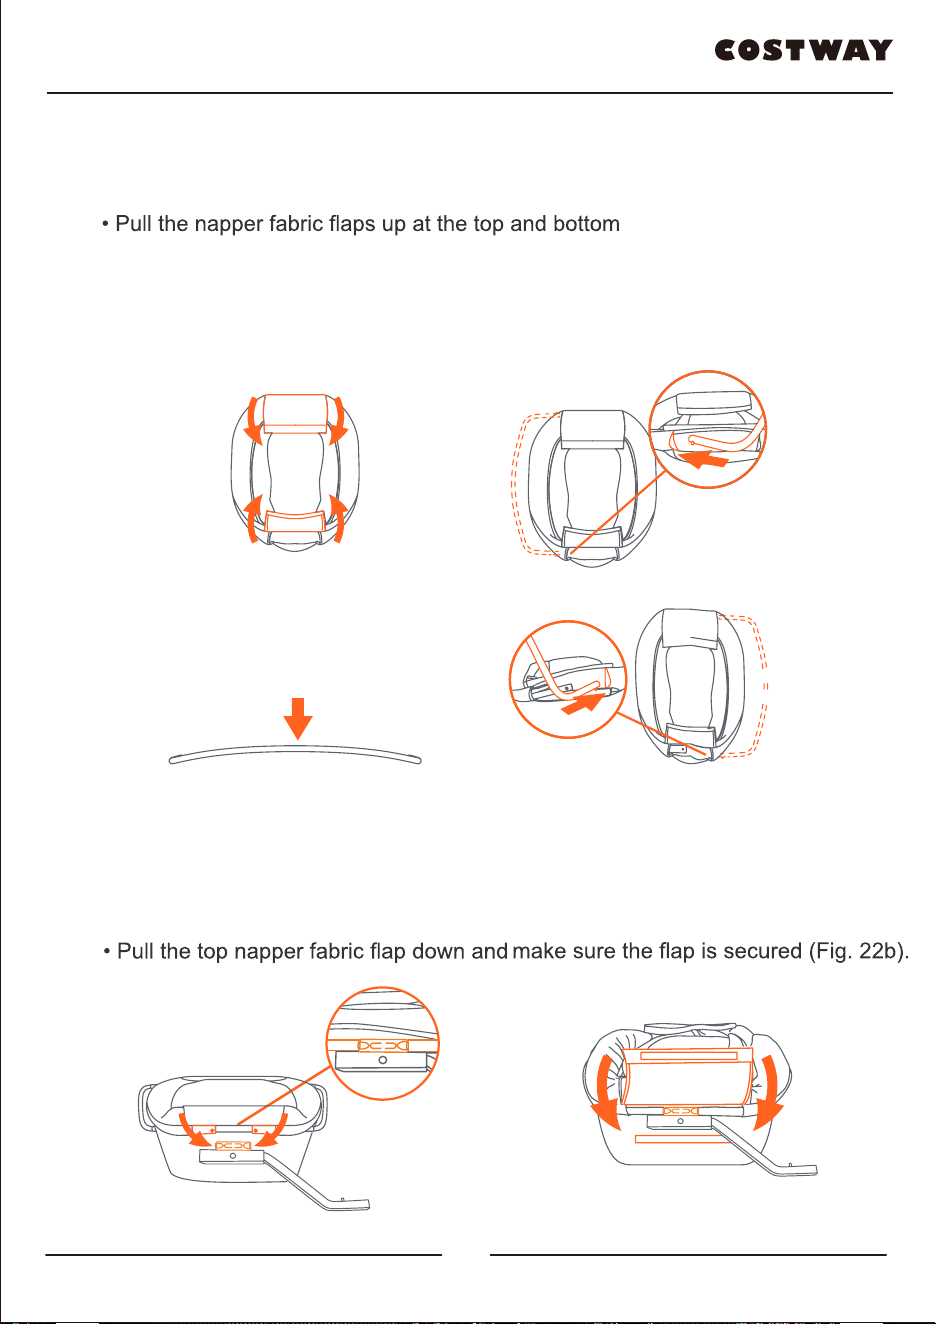
22) • At the Bottom of the napper, insert the left and right frame bars into each of the
right and left end of the napper support tube and slide inward until they lock in
place
(Fig. 22a).
NOTE: Make sure the frame bar supports are seated and locked.
Fig. 22bFig. 22a
23) • At the Top of the napper, insert the left and right frame bar into each of the
right and left end of the napper support tube and slide inward until they lock
in place (Fig. 23a).
NOTE: Make sure the frame bar supports are seated and locked.
Fig. 23bFig. 23a
24) • To attach the napper in the playard, slide the
napper into the bassinet. Push the napper
into the playard until it lock (Fig. 24).
NOTE: DO NOT use napper on playard
without the bassinet and securing
the clips to playard.
Fig. 24
25) • To remove the napper from playard, push
both napper support tubes button and pull
both napper support tubes out (Fig. 25).
Fig. 25
18
17
15
16
ATTENTION: Playard and Full-size bassinet must be fully assembled and securely
using the napper and inclined sleeper feature.
21)
of the napper (Fig. 21a).
• Insert and slide the left napper frame bar into the left sleeve of the napper fabric
(Fig. 21b). Make sure the bar is curved upwards (Fig. 21c). Repeat this step for the
right side (Fig. 21d).
NOTE: The curve of the bar must be upward.
Top
Bottom
Fig. 21a Fig. 21b
Fig. 21c
This side up
Fig. 21d
locked before installing or
22) • At the Bottom of the napper, insert the left and right frame bars into each of the
right and left end of the napper support tube and slide inward until they lock in
place
(Fig. 22a).
NOTE: Make sure the frame bar supports are seated and locked.
Fig. 22bFig. 22a
23) • At the Top of the napper, insert the left and right frame bar into each of the
right and left end of the napper support tube and slide inward until they lock
in place (Fig. 23a).
NOTE: Make sure the frame bar supports are seated and locked.
Fig. 23bFig. 23a
24) • To attach the napper in the playard, slide the
napper into the bassinet. Push the napper
into the playard until it lock (Fig. 24).
NOTE: DO NOT use napper on playard
without the bassinet and securing
the clips to playard.
Fig. 24
25) • To remove the napper from playard, push
both napper support tubes button and pull
both napper support tubes out (Fig. 25).
Fig. 25
18
17
17
18
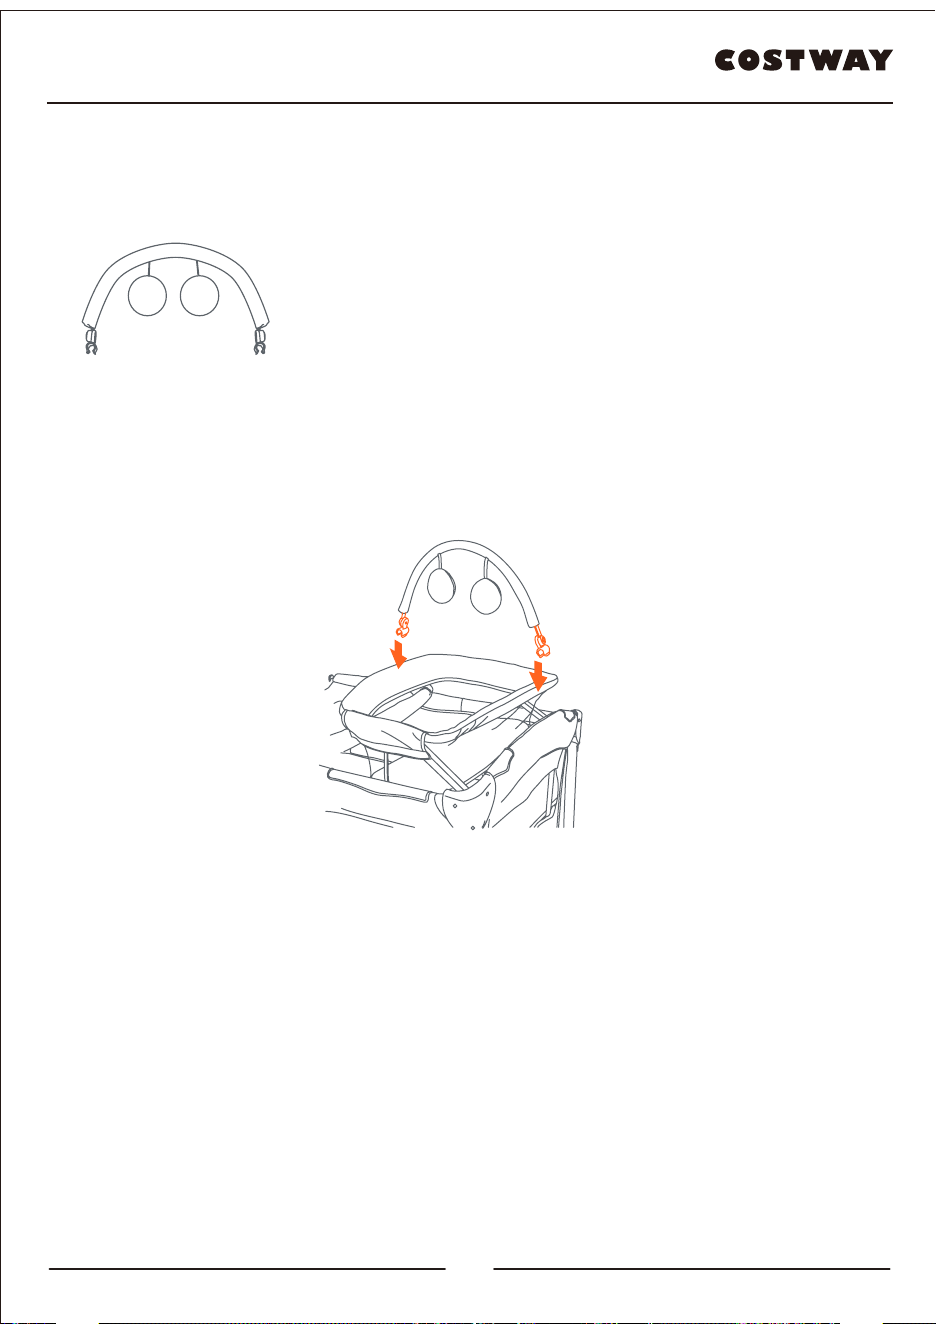
TOY BAR INSTALLATION
Toy Bar with plush toys*
Type may vary
26) • Push down on the ends of the toy bar to secure it onto the top of the frame
Fig. 26
(Fig. 26).
19
20

17
18
TOY BAR INSTALLATION
Toy Bar with plush toys*
Type may vary
26) • Push down on the ends of the toy bar to secure it onto the top of the frame
Fig. 26
(Fig. 26).
19
20

USER'S MANUAL
Baby playard
BB0496