Please give us a chance to make it right and do better !
Contact our friendly customer service department for help first.
Replacements for missing or damaged parts will be shipped ASAP !
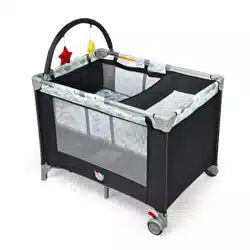
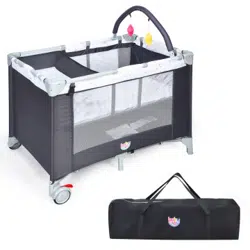
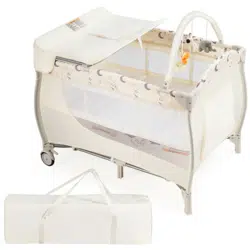
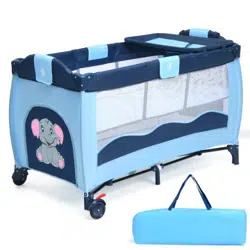
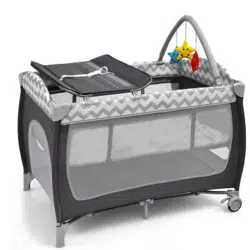
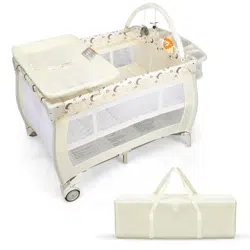
Baby Playpen Crib
BB5591
USER’S MANUAL
THIS INSTRUCTION BOOKLET CONTAINS IMPORTANT SAFETY INFORMATION. PLEASE READ AND KEEP FOR FUTURE REFERENCE.
US office: Fontana UK office: Ipswich AU office: Truganina

Before You Start
General Warnings:
Attention: To prevent possible injury by entanglement, remove this toy when the
child starts trying to get up on its hands and knees in a crawling position.
Danger! Keep all small parts and packaging materials for this product away from
babies and children, otherwise they may pose a choking hazard.
The product must be installed and used under the supervision of an adult.
Read through each step carefully and follow the proper order.
Remove all Packaging, separate and count all parts and hardware before
installation.
Please ensure that all parts are correctly installed, incorrect installation can lead to
a danger.
We recommend that, where possible, all items are assembled near the area in
which they will be placed in use, to avoid moving the product unnecessarily once
assembled.
Ensure a secure surface during installation, and place the product always on a flat,
steady and stable surface.
Please read all instructions carefully and keep it for future reference.
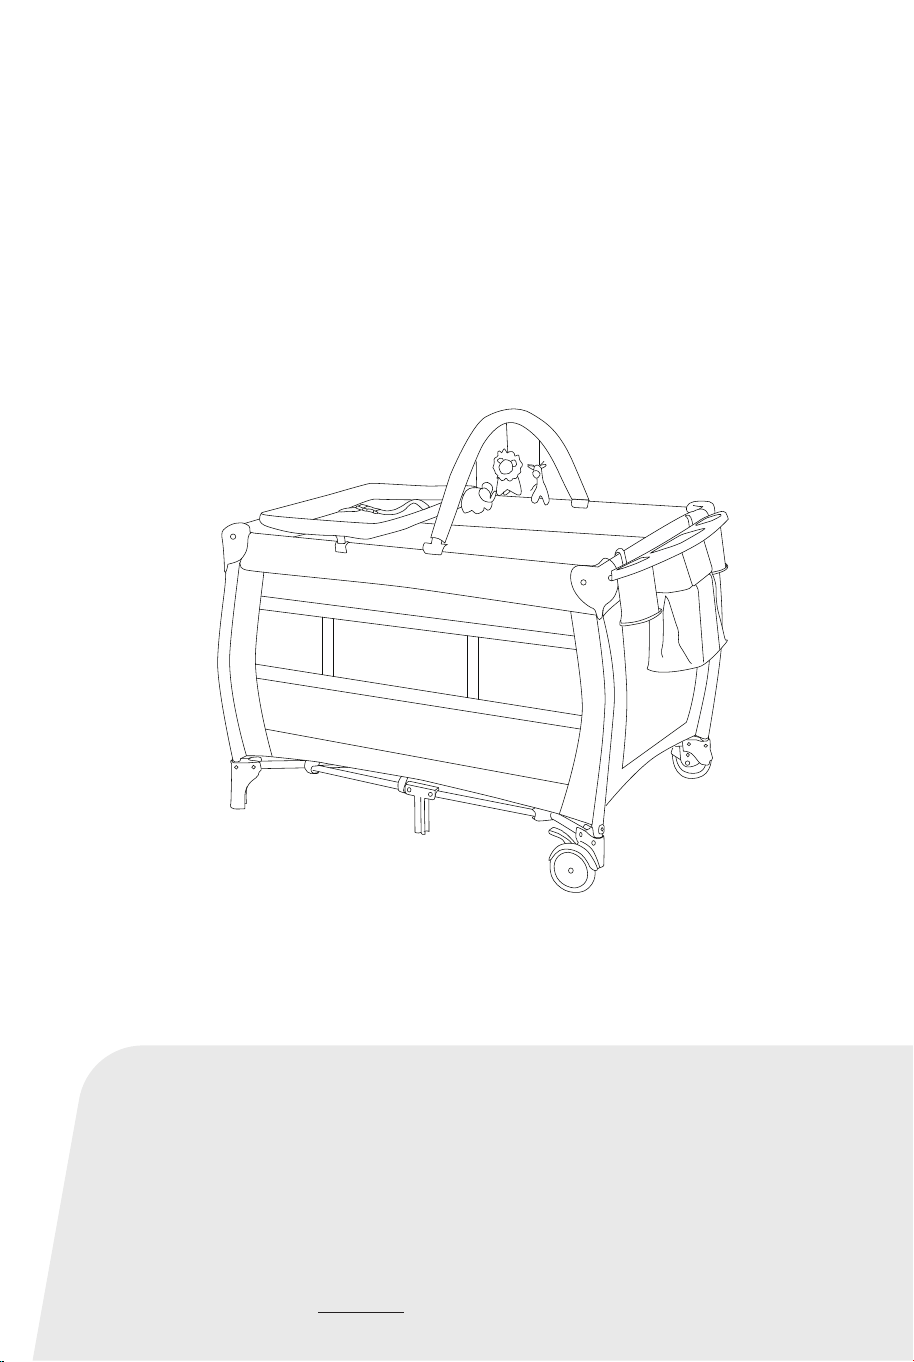
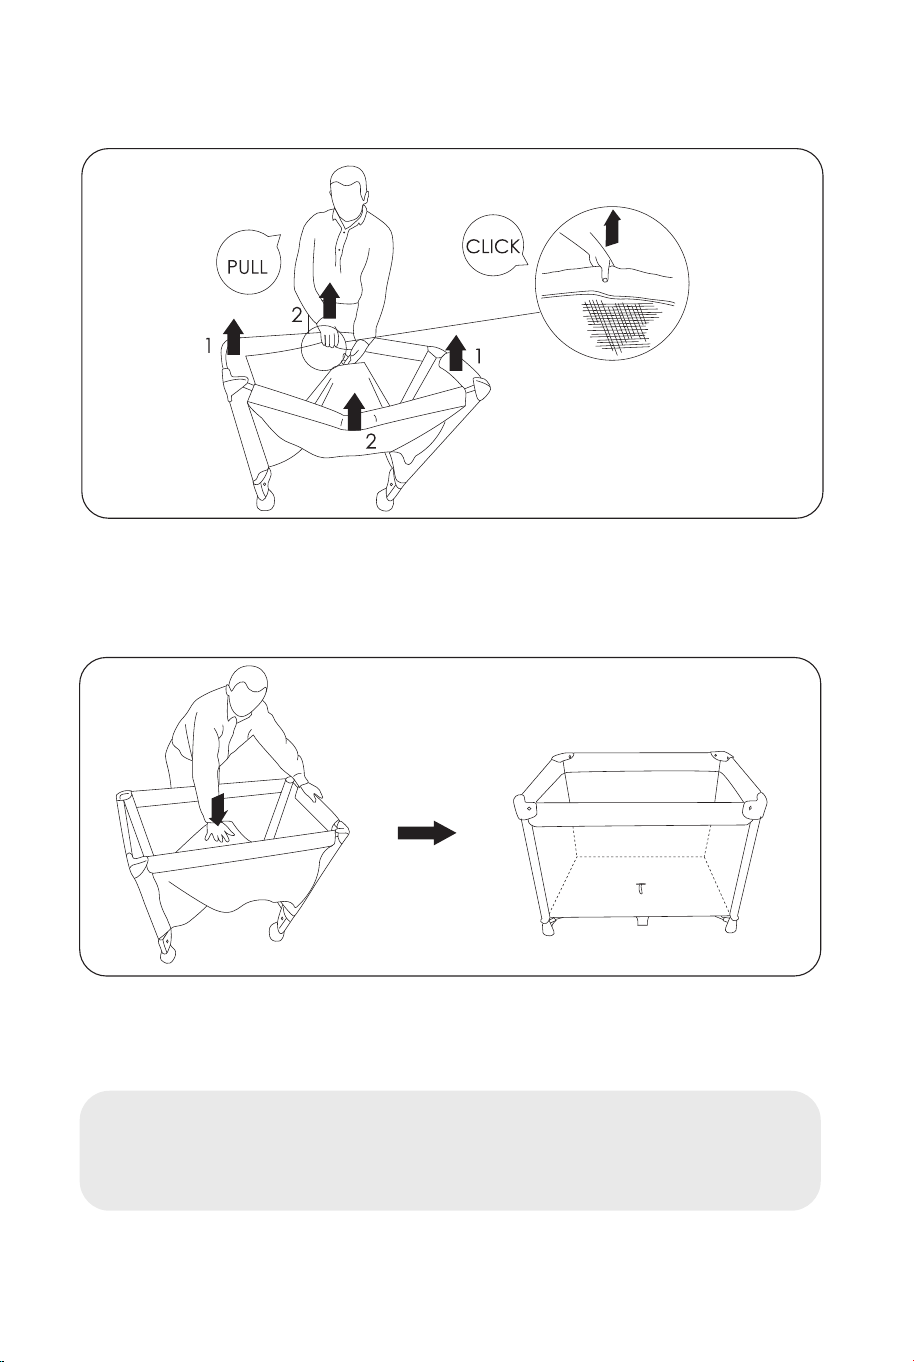
1. Open the bag and take all the
parts out.
2. Unfasten the 3 velcro straps that
are around the mattress.
3. Place the playpen in the vertical
position and open the touch
fasteners to remove the mattress.
4. Grasp the playpen at the
short sides and unfold the playpen.
TO UNFOLD
02 03
Before You Start
General Warnings:
Attention: To prevent possible injury by entanglement, remove this toy when the
child starts trying to get up on its hands and knees in a crawling position.
Danger! Keep all small parts and packaging materials for this product away from
babies and children, otherwise they may pose a choking hazard.
The product must be installed and used under the supervision of an adult.
Read through each step carefully and follow the proper order.
Remove all Packaging, separate and count all parts and hardware before
installation.
Please ensure that all parts are correctly installed, incorrect installation can lead to
a danger.
We recommend that, where possible, all items are assembled near the area in
which they will be placed in use, to avoid moving the product unnecessarily once
assembled.
Ensure a secure surface during installation, and place the product always on a flat,
steady and stable surface.
Please read all instructions carefully and keep it for future reference.
1. Open the bag and take all the
parts out.
2. Unfasten the 3 velcro straps that
are around the mattress.
3. Place the playpen in the vertical
position and open the touch
fasteners to remove the mattress.
4. Grasp the playpen at the
short sides and unfold the playpen.
TO UNFOLD
02 03
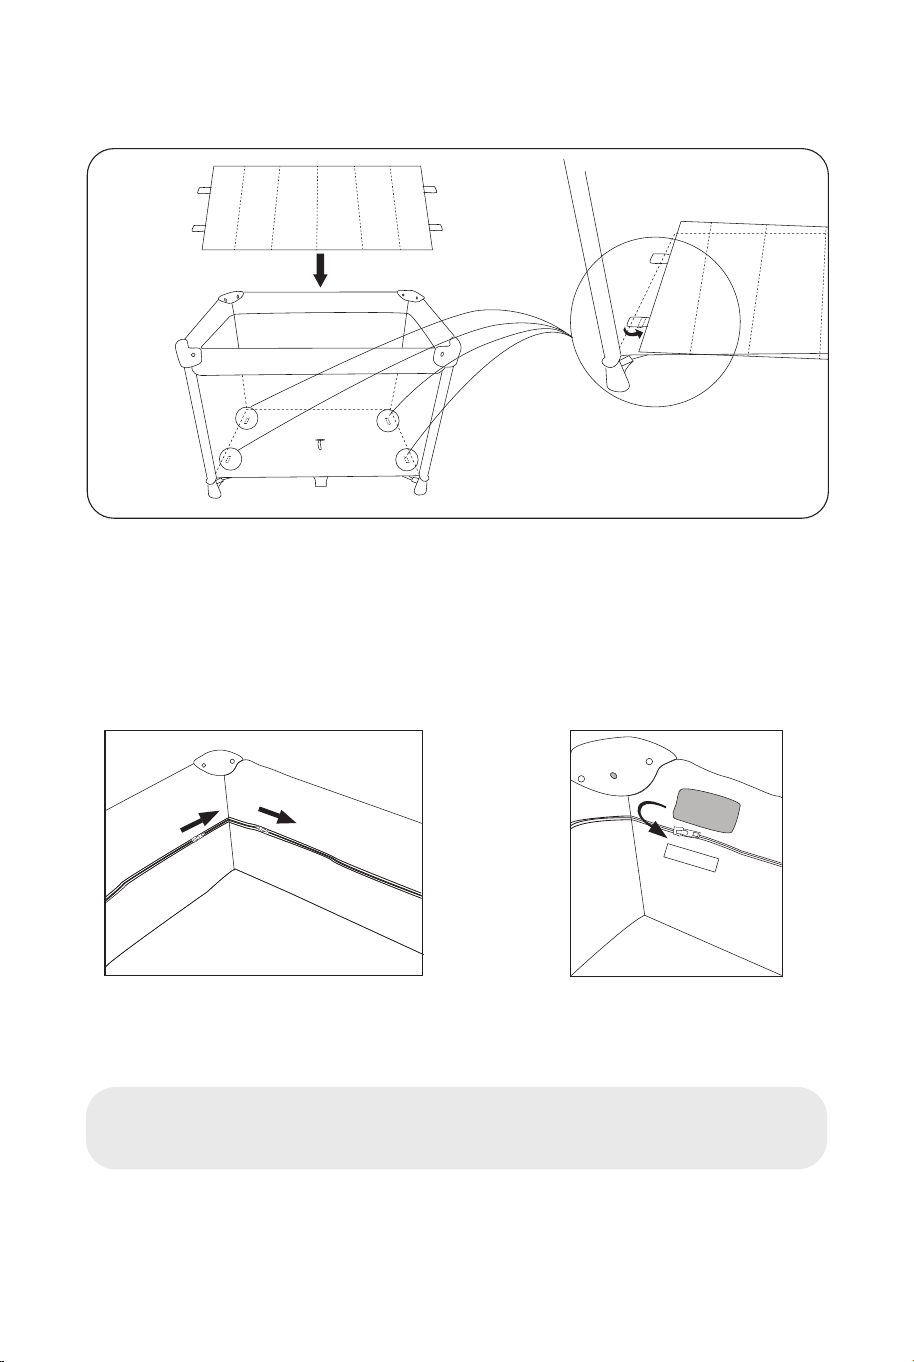
5. Draw upward the four side rails separately, starting with the short
sides frst and lift the middle joint up to completely lock in position.
When completely lock in position you will hear a click sound.
6. Make sure that all 4 sides of the playpen are correctly locked in
position then push down the base pressing the centre.
WARNING! Don’t reverse the above steps. It won’t be possible
to make the 4 rails locked in position if the centre of the base
is down.
7. Place the mattress in the playpen with the padded side up. Insert
the four velcro tabs through the slots in the base of the playpen.
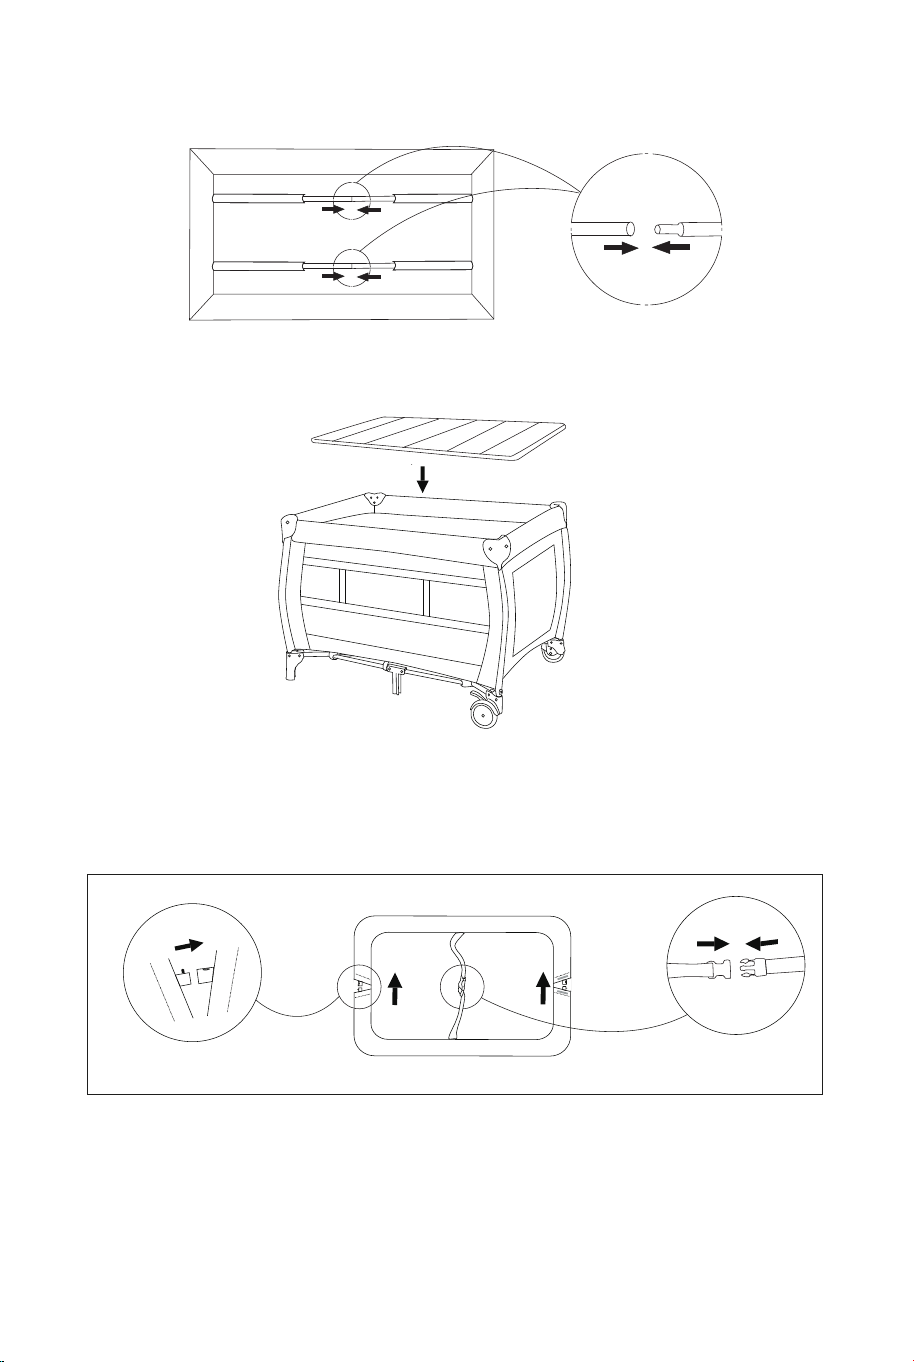
The Usage Of Second Layer
1. Install the Bassinet in the inside of the playpen with all the zippers
and then stick on velcro.
NOTE! Ensure zipper is completely attached all the way around before
each use.
VELCRO
VELCRO
04 05
5. Draw upward the four side rails separately, starting with the short
sides frst and lift the middle joint up to completely lock in position.
When completely lock in position you will hear a click sound.
6. Make sure that all 4 sides of the playpen are correctly locked in
position then push down the base pressing the centre.
WARNING! Don’t reverse the above steps. It won’t be possible
to make the 4 rails locked in position if the centre of the base
is down.
7. Place the mattress in the playpen with the padded side up. Insert
the four velcro tabs through the slots in the base of the playpen.
The Usage Of Second Layer
1. Install the Bassinet in the inside of the playpen with all the zippers
and then stick on velcro.
NOTE! Ensure zipper is completely attached all the way around before
each use.
VELCRO
VELCRO
04 05
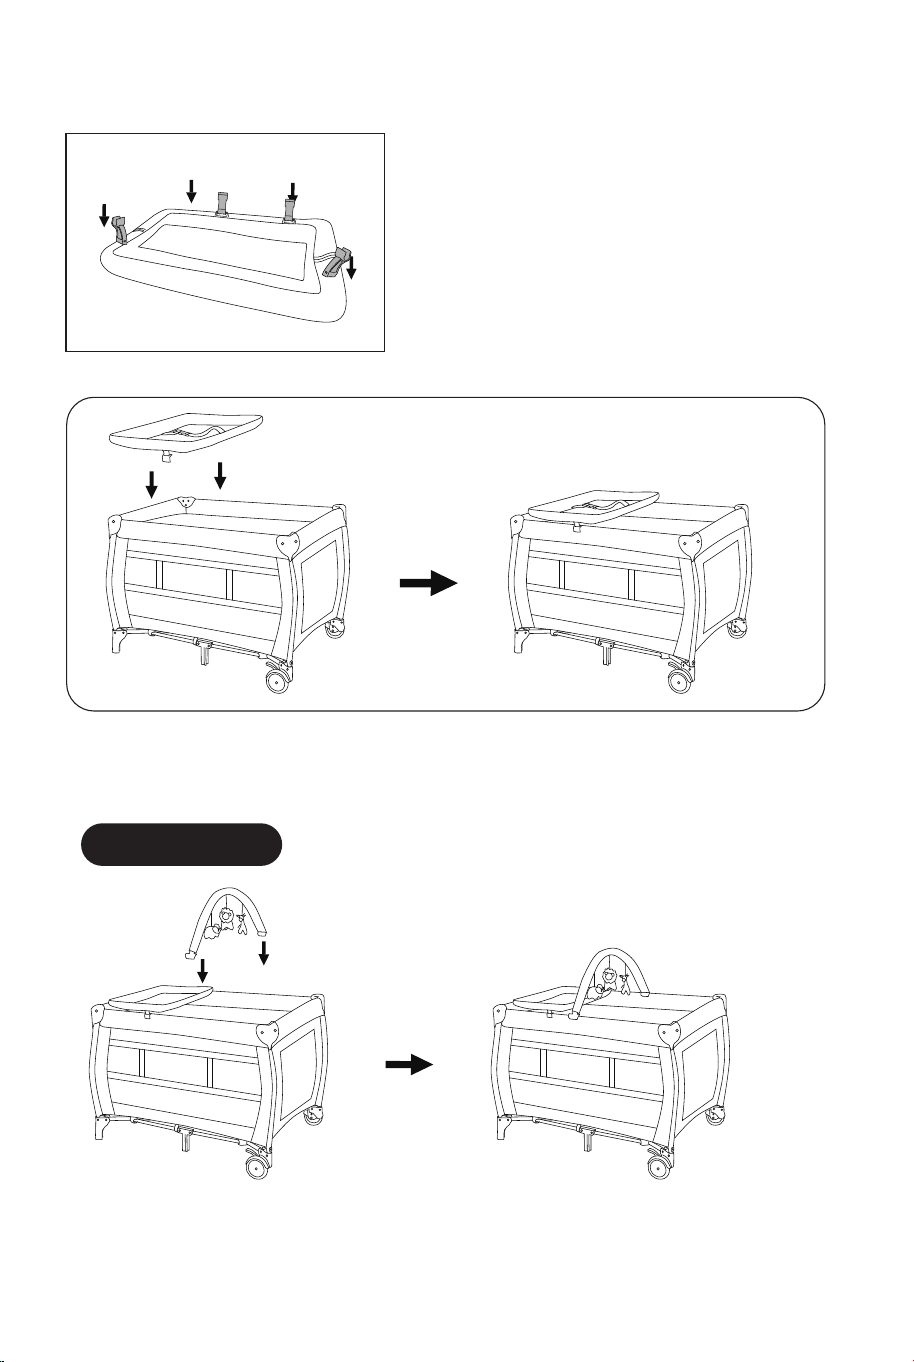
3. Then place the mattress inside the bassinet.
2. Support tubes into the sleeves provided on the bottom of bassinet
and connect them together.
Diaper Changing Table
a. Unfold the changing table and tidy the surface. Open the velcro at
both ends and press the spring key to join the steel tubes.
b. Please make sure that the buckle is installed when the baby is lying
on the changing table.
2. Find the 4 plastic clips, and attach to the
underside of the changing table; Turn the
changing table over and attach to the end
rail of the playpen.
NOTE. Always make sure the plastic clips
under the changing table are securely
fastened to the changing table and playpen.
3. Put the changing table to the top rails and make it correctly locked
in position.
a
b
Toy Bar
4. Attach the plastic clips to either side of the playpen as shown.
06 07
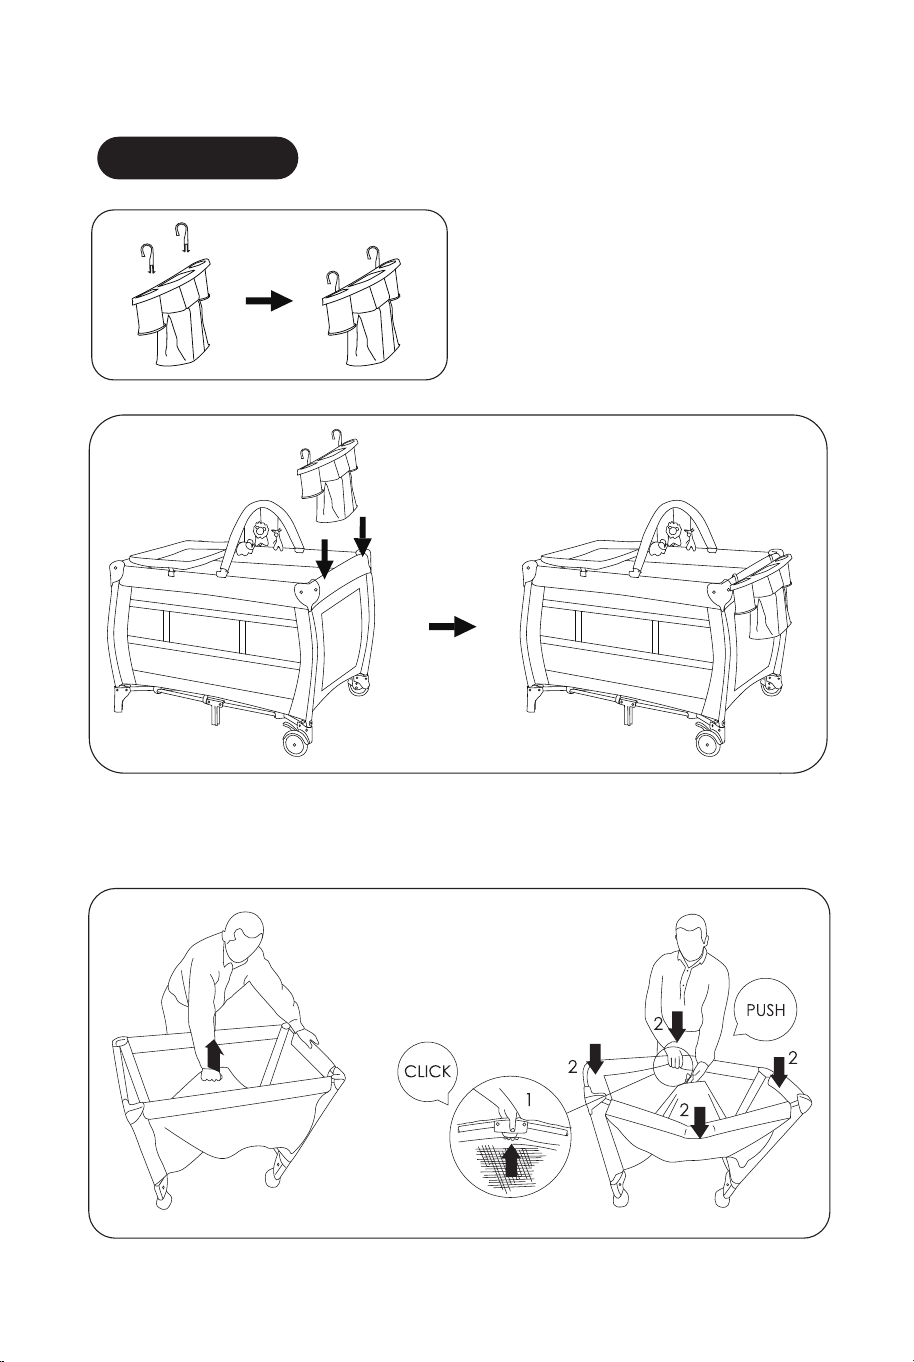
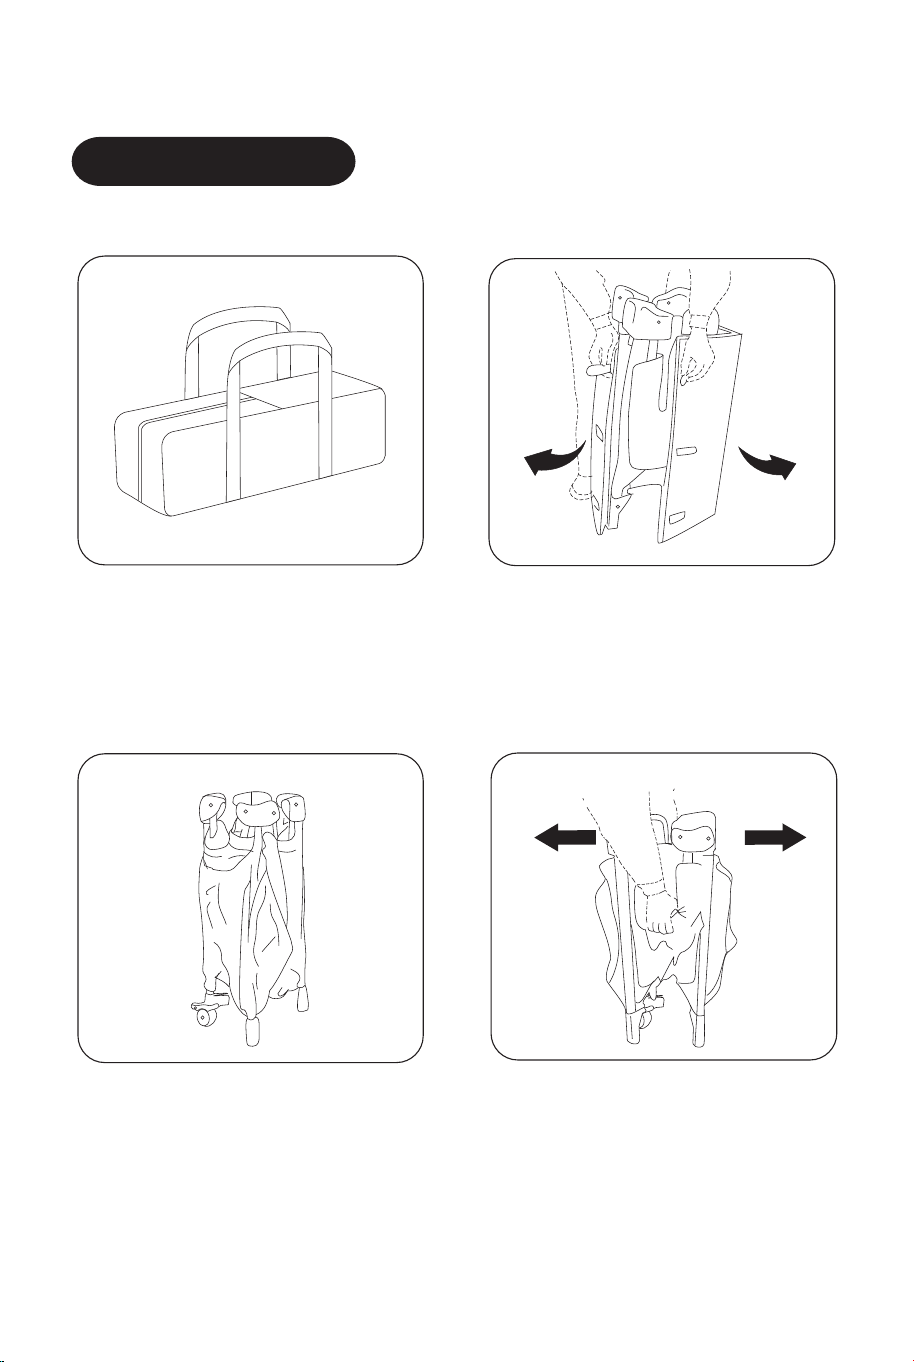
Storage
2. Fix the two plastic hooks of the storage to the handrail of bed.
1. Put the two plastic hooks into
the corresponding holes.
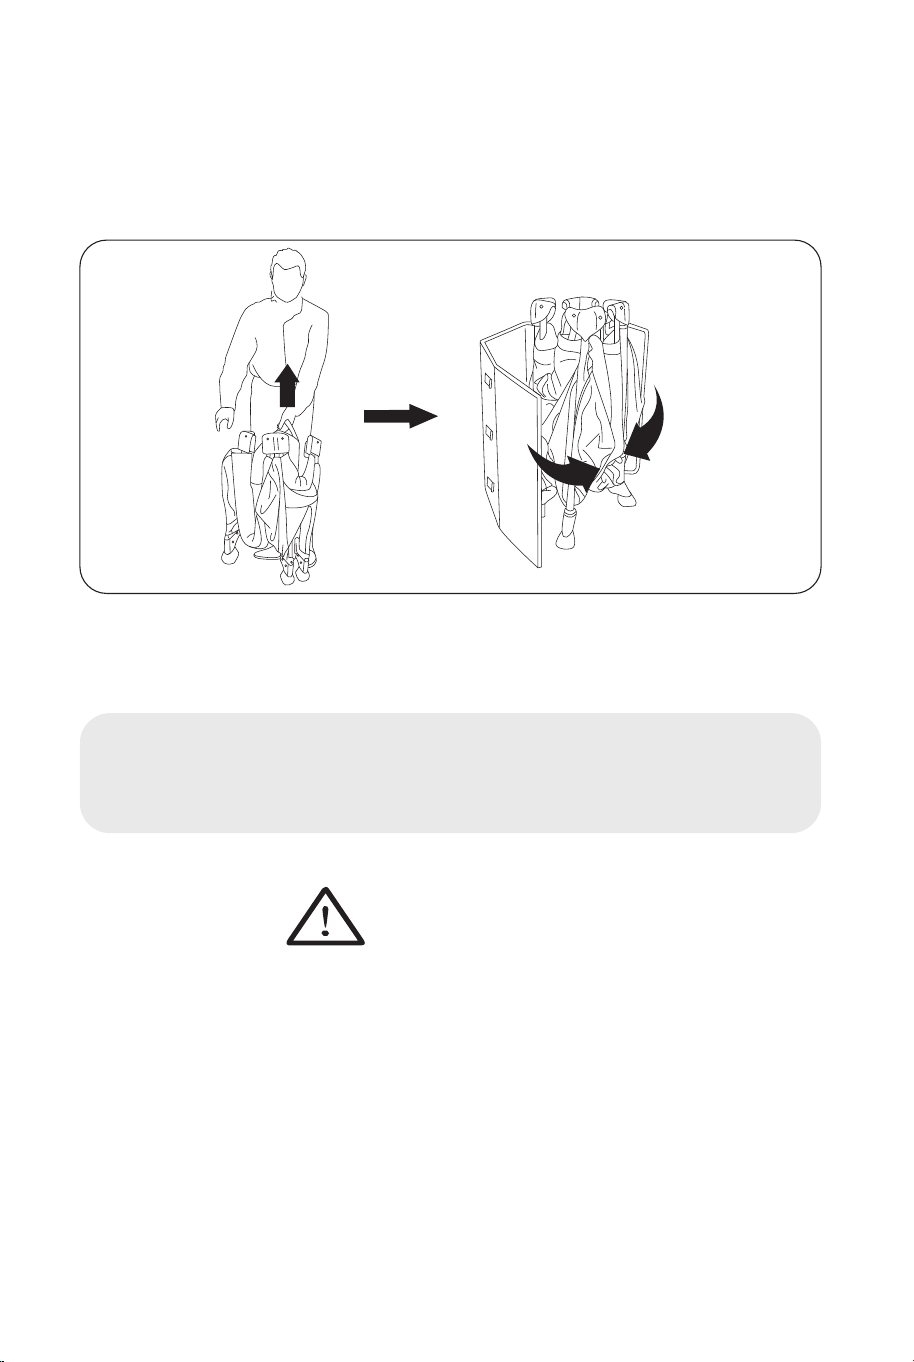
TO FOLD
1. Remove all the accessories ,take the mattress out of the bassinet. Pull the
band in the centre of the base upwards.Then push downward the side rails,
do the same for four sides.
2. Draw toge
ther all four corners of the playpen. Then insert the second layer
inside the playpen and place the other accessories. Fasten the velcro straps
that are around the mattress, and then put it in the travel bag.
WARNING! If the top rails do not release, ensure that the base
is raised fully and lift the rails slightly before pressing the
release button.
WARNING
READ THESE INSTRUCTIONS CAREFULLY BEFORE USE AND KEEP
THEM FOR FUTURE REFERENCE. FAILURE TO FOLLOW THESE
INSTRUCTIONS MAY JEOPARDIZE THE SAFETY OF YOUR CHILD.
YOUR CHILD'S SAFETY IS YOUR RESPONSIBILITY. CAUTION!
NEVER LEAVE THE CHILD UNATTENDED: IT MAY BE DANGEROUS.
PAY UTMOST CARE WHEN USING THE PRODUCT.
08 09
Storage
2. Fix the two plastic hooks of the storage to the handrail of bed.
1. Put the two plastic hooks into
the corresponding holes.
TO FOLD
1. Remove all the accessories ,take the mattress out of the bassinet. Pull the
band in the centre of the base upwards.Then push downward the side rails,
do the same for four sides.
2. Draw toge
ther all four corners of the playpen. Then insert the second layer
inside the playpen and place the other accessories. Fasten the velcro straps
that are around the mattress, and then put it in the travel bag.
WARNING! If the top rails do not release, ensure that the base
is raised fully and lift the rails slightly before pressing the
release button.
WARNING
READ THESE INSTRUCTIONS CAREFULLY BEFORE USE AND KEEP
THEM FOR FUTURE REFERENCE. FAILURE TO FOLLOW THESE
INSTRUCTIONS MAY JEOPARDIZE THE SAFETY OF YOUR CHILD.
YOUR CHILD'S SAFETY IS YOUR RESPONSIBILITY. CAUTION!
NEVER LEAVE THE CHILD UNATTENDED: IT MAY BE DANGEROUS.
PAY UTMOST CARE WHEN USING THE PRODUCT.
08 09
CAUTION
heat radiation such as electric or gas radiators etc. placed in the
vicinity of bed.
• Do not use if any part of the bed is damaged, torn or missing.
Use only original spare parts.
• Be aware of risks related to open fire and other sources of strong
• Never leave inside the bed or close to it, things that may help the
child to get out of the bed or causing the risk of strangulation, such
as curtain or window blind cord etc.
• Do not use the cot without the base.
1. Long-term exposure to direct sunlight may cause fading of fabrics.
2. Products will be constantly updated, subject to the actual product without
notice.
Never leave your child unattended!
Information/Safety/Conditions
1. The bed is ready to use only when the locking mechanisms are put
in operation - always check before you put your child inside that the
security elements are locked.
2. Before putting your child inside, check if there is no possibility to
get out of bed, for instance through an open side part.
3. When you use other mattress than the original one, make sure that
the gap between mattress and bed is smaller than 30mm and that the
mattress thickness leaves a space inside (measured from the upper
surface of the mattress to the bed frame edge) at least 200 mm on
the upper level.
4. We strongly recommend that all assembly fittings should always
be tightened properly and that fittings should be
checked regularly and retightened as necessary.
5. In order to prevent injuries, stop using the bed if your child is
able to climb and get out of the bed.
6. Maximum load of the bed is 15 kg.
7. The product is intended for one child only.
8. Periodically check technical condition of your product.
9. Be careful not to pinch your fingers when folding and opening the
product.
10. The base should always be used in the lowest position as soon
as the baby is old enough to sit up.
11. To use the lowest level of mattress, disassemble the second
level with all support
s.
12. Al
ways remember to lock the wheels!
Cleaning
1. All plastic parts may be cleaned using wet, soft cloth. Do
not use any aggressive cleaning agents.
2. Metal parts shall only be cleaned using dry cloth.
3. Both the upholstery parts and the mattress may be cleaned
using wet, soft cloth using mild washing agents. Do not use
any aggres-sive cleaning agents. Do not whirl and tumble dry!
Dry the mattress completely before using or storing it.
10 11

Please give us a chance to make it right and do better !
Contact our friendly customer service department for help first.
Replacements for missing or damaged parts will be shipped ASAP !
Baby Playpen Crib
BB5591
USER’S MANUAL
THIS INSTRUCTION BOOKLET CONTAINS IMPORTANT SAFETY INFORMATION. PLEASE READ AND KEEP FOR FUTURE REFERENCE.
US office: Fontana UK office: Ipswich AU office: Truganina