
Before using your new product, please read these instructions to prevent any damage.
QUICK SETUP GUIDE
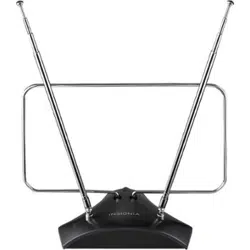
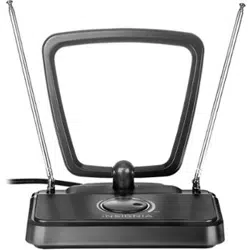
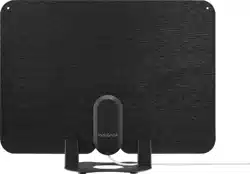
Indoor HDTV Antenna
PACKAGE CONTENTS
• Antenna
• Antenna stand
• Power adapter
• Power inserter
• Fixing pins (2)
• Double-sided tape
• Quick Setup Guide
NS-ANT700HAV2
Double-sided tape
Stand
Fixing pins
FEATURES
• 60-mile range* oers good reception in most locations
• Amplier boosts performance while minimizing noise and interference
for a clear HD picture
• 4K and 1080p capability oers clear, vibrant video**
• Wall-mounted or free-standing design with included tabletop base
supports exible placement options
• Long 10 ft. (3.05 m) coaxial cable is built in for easy routing
• VHF/UHF compatibility helps you receive a wide variety of channels
• Ultra-thin design has two sides, one black and one white, to t your
home décor
* Mile range will vary depending on a wide variety of environmental and
geographic factors
** ATSC 3.0 tuner needed for 4K content
SETTING UP AND USING YOUR ANTENNA
1 Select a location to place your antenna. See “Tips for Better Reception”
for more information.
Notes:
• This is an indoor antenna. Do not place it outside.
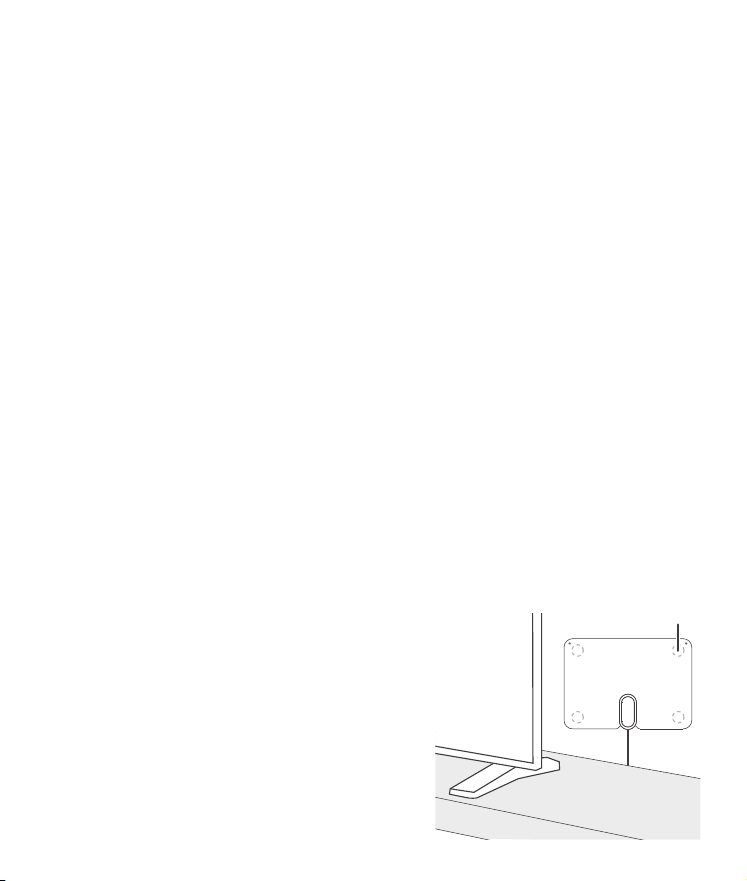
• When placing your antenna in the stand
or on a wall/window, you can orient
your antenna in either direction.
2 Attach double-sided tape to your
antenna’s four corners, then rmly
press your antenna to the wall or
window to secure.
Note: Do not secure your antenna with
the double-sided tape until you’re sure it’s
in the correct location to receive the
channels you want.
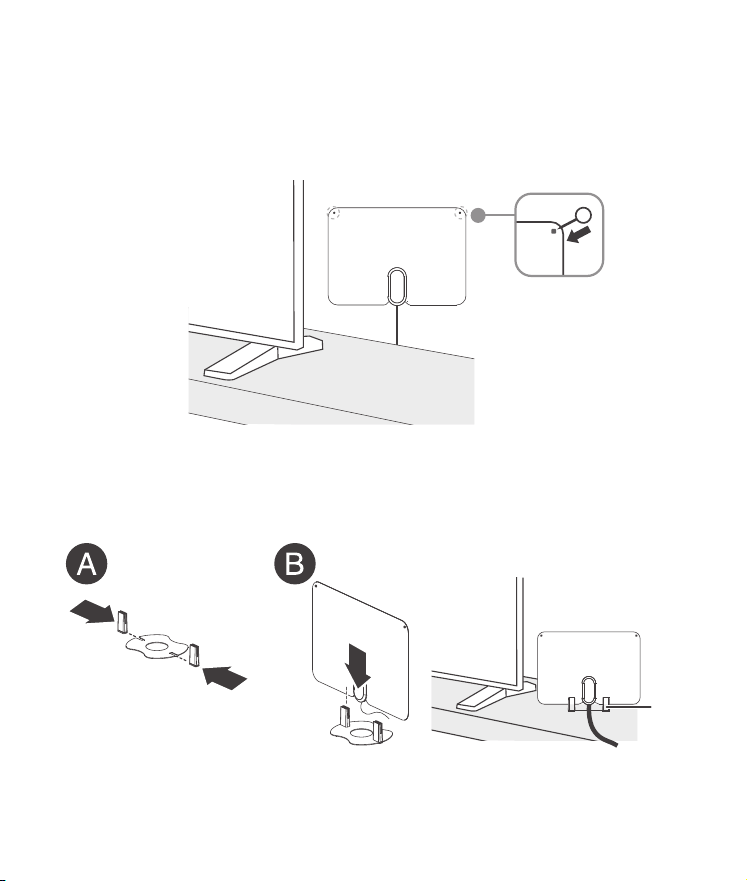
OR
Use the two xing pins (included) to attach your antenna to a wall. Use a
hammer and nail to create two small nail holes, then rmly press the
xing pins through your antenna and into the holes.
Note: The xing pins are suggested for use on a wooden wall or any other softer
wall.
OR
Attach the stand to your antenna by inserting the plastic tabs into the
steel base (A), then pushing your antenna down into the base (B).
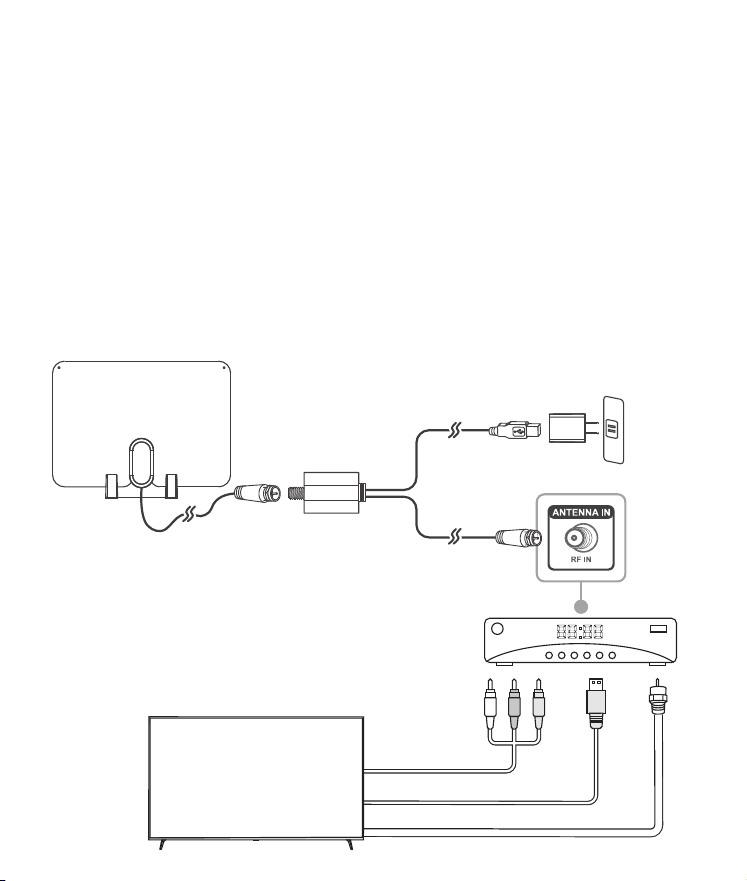
3 Connect your antenna's coaxial cable to the coaxial jack on the power
inserter.
CONNECTING THE ANTENNA TO A DIGITAL
CONVERTER OR SET-TOP BOX
1 Connect the coaxial cable from your antenna to the power inserter.
2 Connect the power inserter’s coaxial cable to your digital converter
box or set-top box.
3 Connect the USB cable from the power inserter to the AC power
adapter (included), then plug the AC power adapter into a wall
outlet.
4 Connect a video/audio cable (such as an HDMI, coaxial, or AV cable)
from your converter box or set-top box to your TV.
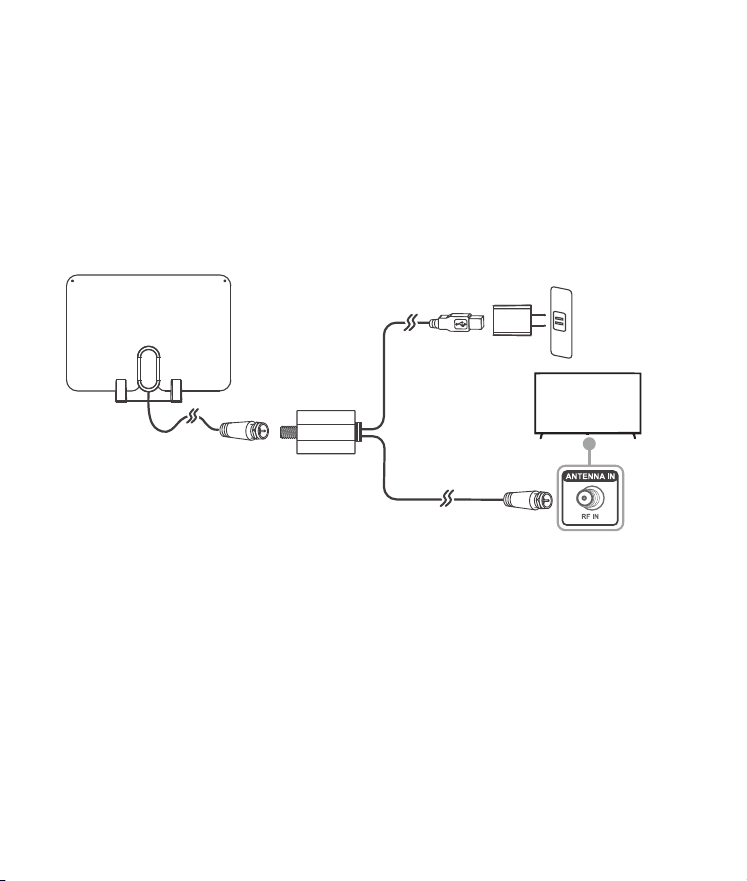
CONNECTING YOUR ANTENNA DIRECTLY TO
YOUR TV
1 Connect the coaxial cable from your antenna to the power inserter.
2 Connect the power inserter’s coaxial cable to the coaxial jack on the
back of your TV.
Note: If you have an HDTV with a digital TV (ATSC) tuner, you can connect
the antenna directly to the HDTV. Older TVs may require a separate digital
TV tuner or digital converter box.
3 Plug the power inserter’s USB cable into the AC power adapter, then
plug the AC power adapter into a wall outlet.
Note: Use only the supplied power adapter.
4 Turn on your TV, then press input or source to select the input your
antenna is connected to.
Note: Turn on your digital converter box or set-top box if your antenna is
connected to either device.
5 Open your TV’s setup menu, then select the “scan” or “channel scan”
option. Your TV automatically searches for available channels in your
area. See your TV’s user guide for detailed instructions.
Note: If you don’t receive channels that you want, try moving your antenna
to another location, then run the channel scan again.
TIPS FOR BETTER RECEPTION
• Install your antenna as high as possible to avoid possible obstacles
between your antenna and the transmission tower.
• If possible, place your antenna near windows.
• Keep your antenna away from sources of interference such as air
conditioners, hair dryers, and microwave ovens.
• Run a channel scan (from your TV’s setup menu) every time you
move your antenna.
• If possible, position your antenna toward the transmission tower.
To determine which channels are available in your area, visit
https://www.fcc.gov/media/engineering/dtvmaps. Type in your zip
code to get help with antenna placement.
• Test your antenna in multiple locations to nd the strongest signal.
• Run a channel scan monthly to make sure that you are receiving all
possible channels.
• Some TVs have a signal strength indicator that can help with
antenna placement. Check your TV manual to see if your TV has
this feature.
• Your antenna works with any TV or device with an ATSC tuner. See
your device’s manual to check compatibility.
TROUBLESHOOTING
I cannot nd any channels.
• Make sure that you have selected the correct input on your TV.
• Make sure that all your connections are correct and secure.
• Move your antenna, then rescan for available channels on your TV or
set-top box.
• Make sure that you are connected to a TV or set-top box with an ATSC
tuner. If you do not have either of those, you will need to purchase a
digital converter box.
The picture quality is good on some channels and poor or no
reception on others.
• Move your antenna, then scan for available channels on your TV or
set-top box.
• Keep your antenna away from sources of interference, such as air
conditioners, hair dryers, and microwave ovens.
• Your antenna may be too far from the broadcast antenna to receive
an adequate signal. The signal may also be aected by obstructions
between the broadcast antenna and your antenna.
• Make sure that the signal strength from your antenna is adequate.
Some TVs have a signal strength indicator. Check your TV manual to
see if your TV has this feature.
I don’t know what digital TV reception I get in my area.
• To determine which channels are available in your area, visit
https://www.fcc.gov/media/engineering/dtvmaps. Type in your zip
code to get help with antenna placement.
Not all channels are available after performing a channel scan.
• Adjust your antenna, then scan for available channels on your TV or
set-top box.
• Make sure that the signal strength from your antenna is adequate.
Some TVs have a signal strength indicator. See your TV manual to see if
your TV has this feature.
I have more than one TV on which I want to view over-the-air TV.
• If the signal is strong enough, you can purchase a coaxial splitter to
allow for one antenna to provide channels to more than one TV.
OR
• You will need to purchase an antenna for each TV that you would like
to view over-the-air TV.
I am not receiving cable and streaming channels after a channel
scan.
• Your antenna is capable of receiving local channels that are dependent
on the broadcasters in your area.
• You can use your antenna alongside cable boxes and streaming
devices, but it will not provide all the same content oered by those
devices.
SPECIFICATIONS
• Dimensions (H×W×D): 11.7 × 8.3 × 0.5 in. (29.8 × 21 × 1.3 cm)
• Range: 60 miles (96 km)
Note: Range will vary depending on a wide range of environmental
and geographic factors
• Frequency range:
o VHF: 174~230MHz
o UHF: 470~608MHz
• Coaxial cable length: 10 ft. (3.05 m)
• Impedance: 75Ω
LEGAL NOTICES
FCC Statement
1.FCC Caution - §15.21:
Changes or modications not expressly approved by the party responsible for compliance could
void the user’s authority to operate the equipment.
2. FCC Statement - §15.105(b):
This equipment has been tested and found to comply with the limits for a Class B digital device,
pursuant to part 15 of the FCC Rules. These limits are designed to provide reasonable protection
against harmful interference in a residential installation. This equipment generates, uses, and can
radiate radio frequency energy and, if not installed and used in accordance with the instructions,
may cause harmful interference to radio communications. However, there is no guarantee that
interference will not occur in a particular installation. If this equipment does cause harmful
interference to radio or television reception, which can be determined by turning the equipment
o and on, the user is encouraged to try to correct the interference by one or more of the
following measures:
• Reorient or relocate the receiving antenna.
• Increase the separation between the equipment and receiver.
• Connect the equipment into an outlet on a circuit dierent from that to which the receiver is
connected.
• Consult the dealer or an experienced radio/TV technician for help.
ONE YEAR LIMITED WARRANTY
Visit www.insigniaproducts.com for details.
CONTACT INSIGNIA:
For customer service, call 1-877-467-4289 (U.S. and Canada)
www.insigniaproducts.com
INSIGNIA is a trademark of Best Buy and its aliated companies.
Distributed by Best Buy Purchasing, LLC
7601 Penn Ave South, Richeld, MN 55423 U.S.A.
©2024 Best Buy. All rights reserved.
Digital converter
or set-top box
HDMI cable
AV cable
OR
Coaxial cable
AC power adapter
USB cable
Antenna
To TV
Coaxial cable
Coaxial cable
Power inserter
OR
TV
AC power adapter
USB cable
Antenna
To TV
Coaxial cable
Coaxial cable
Power inserter
TV
Before using your new product, please read these instructions to prevent any damage.
QUICK SETUP GUIDE
Indoor HDTV Antenna
PACKAGE CONTENTS
• Antenna
• Antenna stand
• Power adapter
• Power inserter
• Fixing pins (2)
• Double-sided tape
• Quick Setup Guide
NS-ANT700HAV2
Double-sided tape
Stand
Fixing pins
FEATURES
• 60-mile range* oers good reception in most locations
• Amplier boosts performance while minimizing noise and interference
for a clear HD picture
• 4K and 1080p capability oers clear, vibrant video**
• Wall-mounted or free-standing design with included tabletop base
supports exible placement options
• Long 10 ft. (3.05 m) coaxial cable is built in for easy routing
• VHF/UHF compatibility helps you receive a wide variety of channels
• Ultra-thin design has two sides, one black and one white, to t your
home décor
* Mile range will vary depending on a wide variety of environmental and
geographic factors
** ATSC 3.0 tuner needed for 4K content
SETTING UP AND USING YOUR ANTENNA
1 Select a location to place your antenna. See “Tips for Better Reception”
for more information.
Notes:
• This is an indoor antenna. Do not place it outside.
• When placing your antenna in the stand
or on a wall/window, you can orient
your antenna in either direction.
2 Attach double-sided tape to your
antenna’s four corners, then rmly
press your antenna to the wall or
window to secure.
Note: Do not secure your antenna with
the double-sided tape until you’re sure it’s
in the correct location to receive the
channels you want.
OR
Use the two xing pins (included) to attach your antenna to a wall. Use a
hammer and nail to create two small nail holes, then rmly press the
xing pins through your antenna and into the holes.
Note: The xing pins are suggested for use on a wooden wall or any other softer
wall.
OR
Attach the stand to your antenna by inserting the plastic tabs into the
steel base (A), then pushing your antenna down into the base (B).
3 Connect your antenna's coaxial cable to the coaxial jack on the power
inserter.
CONNECTING THE ANTENNA TO A DIGITAL
CONVERTER OR SET-TOP BOX
1 Connect the coaxial cable from your antenna to the power inserter.
2 Connect the power inserter’s coaxial cable to your digital converter
box or set-top box.
3 Connect the USB cable from the power inserter to the AC power
adapter (included), then plug the AC power adapter into a wall
outlet.
4 Connect a video/audio cable (such as an HDMI, coaxial, or AV cable)
from your converter box or set-top box to your TV.
CONNECTING YOUR ANTENNA DIRECTLY TO
YOUR TV
1 Connect the coaxial cable from your antenna to the power inserter.
2 Connect the power inserter’s coaxial cable to the coaxial jack on the
back of your TV.
Note: If you have an HDTV with a digital TV (ATSC) tuner, you can connect
the antenna directly to the HDTV. Older TVs may require a separate digital
TV tuner or digital converter box.
3 Plug the power inserter’s USB cable into the AC power adapter, then
plug the AC power adapter into a wall outlet.
Note: Use only the supplied power adapter.
4 Turn on your TV, then press input or source to select the input your
antenna is connected to.
Note: Turn on your digital converter box or set-top box if your antenna is
connected to either device.
5 Open your TV’s setup menu, then select the “scan” or “channel scan”
option. Your TV automatically searches for available channels in your
area. See your TV’s user guide for detailed instructions.
Note: If you don’t receive channels that you want, try moving your antenna
to another location, then run the channel scan again.
TIPS FOR BETTER RECEPTION
• Install your antenna as high as possible to avoid possible obstacles
between your antenna and the transmission tower.
• If possible, place your antenna near windows.
• Keep your antenna away from sources of interference such as air
conditioners, hair dryers, and microwave ovens.
• Run a channel scan (from your TV’s setup menu) every time you
move your antenna.
• If possible, position your antenna toward the transmission tower.
To determine which channels are available in your area, visit
https://www.fcc.gov/media/engineering/dtvmaps. Type in your zip
code to get help with antenna placement.
• Test your antenna in multiple locations to nd the strongest signal.
• Run a channel scan monthly to make sure that you are receiving all
possible channels.
• Some TVs have a signal strength indicator that can help with
antenna placement. Check your TV manual to see if your TV has
this feature.
• Your antenna works with any TV or device with an ATSC tuner. See
your device’s manual to check compatibility.
TROUBLESHOOTING
I cannot nd any channels.
• Make sure that you have selected the correct input on your TV.
• Make sure that all your connections are correct and secure.
• Move your antenna, then rescan for available channels on your TV or
set-top box.
• Make sure that you are connected to a TV or set-top box with an ATSC
tuner. If you do not have either of those, you will need to purchase a
digital converter box.
The picture quality is good on some channels and poor or no
reception on others.
• Move your antenna, then scan for available channels on your TV or
set-top box.
• Keep your antenna away from sources of interference, such as air
conditioners, hair dryers, and microwave ovens.
• Your antenna may be too far from the broadcast antenna to receive
an adequate signal. The signal may also be aected by obstructions
between the broadcast antenna and your antenna.
• Make sure that the signal strength from your antenna is adequate.
Some TVs have a signal strength indicator. Check your TV manual to
see if your TV has this feature.
I don’t know what digital TV reception I get in my area.
• To determine which channels are available in your area, visit
https://www.fcc.gov/media/engineering/dtvmaps. Type in your zip
code to get help with antenna placement.
Not all channels are available after performing a channel scan.
• Adjust your antenna, then scan for available channels on your TV or
set-top box.
• Make sure that the signal strength from your antenna is adequate.
Some TVs have a signal strength indicator. See your TV manual to see if
your TV has this feature.
I have more than one TV on which I want to view over-the-air TV.
• If the signal is strong enough, you can purchase a coaxial splitter to
allow for one antenna to provide channels to more than one TV.
OR
• You will need to purchase an antenna for each TV that you would like
to view over-the-air TV.
I am not receiving cable and streaming channels after a channel
scan.
• Your antenna is capable of receiving local channels that are dependent
on the broadcasters in your area.
• You can use your antenna alongside cable boxes and streaming
devices, but it will not provide all the same content oered by those
devices.
SPECIFICATIONS
• Dimensions (H×W×D): 11.7 × 8.3 × 0.5 in. (29.8 × 21 × 1.3 cm)
• Range: 60 miles (96 km)
Note: Range will vary depending on a wide range of environmental
and geographic factors
• Frequency range:
o VHF: 174~230MHz
o UHF: 470~608MHz
• Coaxial cable length: 10 ft. (3.05 m)
• Impedance: 75Ω
LEGAL NOTICES
FCC Statement
1.FCC Caution - §15.21:
Changes or modications not expressly approved by the party responsible for compliance could
void the user’s authority to operate the equipment.
2. FCC Statement - §15.105(b):
This equipment has been tested and found to comply with the limits for a Class B digital device,
pursuant to part 15 of the FCC Rules. These limits are designed to provide reasonable protection
against harmful interference in a residential installation. This equipment generates, uses, and can
radiate radio frequency energy and, if not installed and used in accordance with the instructions,
may cause harmful interference to radio communications. However, there is no guarantee that
interference will not occur in a particular installation. If this equipment does cause harmful
interference to radio or television reception, which can be determined by turning the equipment
o and on, the user is encouraged to try to correct the interference by one or more of the
following measures:
• Reorient or relocate the receiving antenna.
• Increase the separation between the equipment and receiver.
• Connect the equipment into an outlet on a circuit dierent from that to which the receiver is
connected.
• Consult the dealer or an experienced radio/TV technician for help.
ONE YEAR LIMITED WARRANTY
Visit www.insigniaproducts.com for details.
CONTACT INSIGNIA:
For customer service, call 1-877-467-4289 (U.S. and Canada)
www.insigniaproducts.com
INSIGNIA is a trademark of Best Buy and its aliated companies.
Distributed by Best Buy Purchasing, LLC
7601 Penn Ave South, Richeld, MN 55423 U.S.A.
©2024 Best Buy. All rights reserved.
Digital converter
or set-top box
HDMI cable
AV cable
OR
Coaxial cable
AC power adapter
USB cable
Antenna
To TV
Coaxial cable
Coaxial cable
Power inserter
OR
TV
AC power adapter
USB cable
Antenna
To TV
Coaxial cable
Coaxial cable
Power inserter
TV

PACKAGE CONTENTS
• Antenna
• Antenna stand
• Power adapter
• Power inserter
• Fixing pins (2)
• Double-sided tape
• Quick Setup Guide
FEATURES
• 60-mile range* oers good reception in most locations
• Amplier boosts performance while minimizing noise and interference
for a clear HD picture
• 4K and 1080p capability oers clear, vibrant video**
• Wall-mounted or free-standing design with included tabletop base
supports exible placement options
• Long 10 ft. (3.05 m) coaxial cable is built in for easy routing
• VHF/UHF compatibility helps you receive a wide variety of channels
• Ultra-thin design has two sides, one black and one white, to t your
home décor
* Mile range will vary depending on a wide variety of environmental and
geographic factors
** ATSC 3.0 tuner needed for 4K content
SETTING UP AND USING YOUR ANTENNA
1 Select a location to place your antenna. See “Tips for Better Reception”
for more information.
Notes:
• This is an indoor antenna. Do not place it outside.
• When placing your antenna in the stand
or on a wall/window, you can orient
your antenna in either direction.
2 Attach double-sided tape to your
antenna’s four corners, then rmly
press your antenna to the wall or
window to secure.
Note: Do not secure your antenna with
the double-sided tape until you’re sure it’s
in the correct location to receive the
channels you want.
OR
Use the two xing pins (included) to attach your antenna to a wall. Use a
hammer and nail to create two small nail holes, then rmly press the
xing pins through your antenna and into the holes.
Note: The xing pins are suggested for use on a wooden wall or any other softer
wall.
OR
Attach the stand to your antenna by inserting the plastic tabs into the
steel base (A), then pushing your antenna down into the base (B).
3 Connect your antenna's coaxial cable to the coaxial jack on the power
inserter.
CONNECTING THE ANTENNA TO A DIGITAL
CONVERTER OR SET-TOP BOX
1 Connect the coaxial cable from your antenna to the power inserter.
2 Connect the power inserter’s coaxial cable to your digital converter
box or set-top box.
3 Connect the USB cable from the power inserter to the AC power
adapter (included), then plug the AC power adapter into a wall
outlet.
4 Connect a video/audio cable (such as an HDMI, coaxial, or AV cable)
from your converter box or set-top box to your TV.
CONNECTING YOUR ANTENNA DIRECTLY TO
YOUR TV
1 Connect the coaxial cable from your antenna to the power inserter.
2 Connect the power inserter’s coaxial cable to the coaxial jack on the
back of your TV.
Note: If you have an HDTV with a digital TV (ATSC) tuner, you can connect
the antenna directly to the HDTV. Older TVs may require a separate digital
TV tuner or digital converter box.
3 Plug the power inserter’s USB cable into the AC power adapter, then
plug the AC power adapter into a wall outlet.
Note: Use only the supplied power adapter.
4 Turn on your TV, then press input or source to select the input your
antenna is connected to.
Note: Turn on your digital converter box or set-top box if your antenna is
connected to either device.
5 Open your TV’s setup menu, then select the “scan” or “channel scan”
option. Your TV automatically searches for available channels in your
area. See your TV’s user guide for detailed instructions.
Note: If you don’t receive channels that you want, try moving your antenna
to another location, then run the channel scan again.
TIPS FOR BETTER RECEPTION
• Install your antenna as high as possible to avoid possible obstacles
between your antenna and the transmission tower.
• If possible, place your antenna near windows.
• Keep your antenna away from sources of interference such as air
conditioners, hair dryers, and microwave ovens.
• Run a channel scan (from your TV’s setup menu) every time you
move your antenna.
• If possible, position your antenna toward the transmission tower.
To determine which channels are available in your area, visit
https://www.fcc.gov/media/engineering/dtvmaps. Type in your zip
code to get help with antenna placement.
• Test your antenna in multiple locations to nd the strongest signal.
• Run a channel scan monthly to make sure that you are receiving all
possible channels.
• Some TVs have a signal strength indicator that can help with
antenna placement. Check your TV manual to see if your TV has
this feature.
• Your antenna works with any TV or device with an ATSC tuner. See
your device’s manual to check compatibility.
TROUBLESHOOTING
I cannot nd any channels.
• Make sure that you have selected the correct input on your TV.
• Make sure that all your connections are correct and secure.
• Move your antenna, then rescan for available channels on your TV or
set-top box.
• Make sure that you are connected to a TV or set-top box with an ATSC
tuner. If you do not have either of those, you will need to purchase a
digital converter box.
The picture quality is good on some channels and poor or no
reception on others.
• Move your antenna, then scan for available channels on your TV or
set-top box.
• Keep your antenna away from sources of interference, such as air
conditioners, hair dryers, and microwave ovens.
• Your antenna may be too far from the broadcast antenna to receive
an adequate signal. The signal may also be aected by obstructions
between the broadcast antenna and your antenna.
• Make sure that the signal strength from your antenna is adequate.
Some TVs have a signal strength indicator. Check your TV manual to
see if your TV has this feature.
I don’t know what digital TV reception I get in my area.
• To determine which channels are available in your area, visit
https://www.fcc.gov/media/engineering/dtvmaps. Type in your zip
code to get help with antenna placement.
Not all channels are available after performing a channel scan.
• Adjust your antenna, then scan for available channels on your TV or
set-top box.
• Make sure that the signal strength from your antenna is adequate.
Some TVs have a signal strength indicator. See your TV manual to see if
your TV has this feature.
I have more than one TV on which I want to view over-the-air TV.
• If the signal is strong enough, you can purchase a coaxial splitter to
allow for one antenna to provide channels to more than one TV.
OR
• You will need to purchase an antenna for each TV that you would like
to view over-the-air TV.
I am not receiving cable and streaming channels after a channel
scan.
• Your antenna is capable of receiving local channels that are dependent
on the broadcasters in your area.
• You can use your antenna alongside cable boxes and streaming
devices, but it will not provide all the same content oered by those
devices.
SPECIFICATIONS
• Dimensions (H×W×D): 11.7 × 8.3 × 0.5 in. (29.8 × 21 × 1.3 cm)
• Range: 60 miles (96 km)
Note: Range will vary depending on a wide range of environmental
and geographic factors
• Frequency range:
o VHF: 174~230MHz
o UHF: 470~608MHz
• Coaxial cable length: 10 ft. (3.05 m)
• Impedance: 75Ω
LEGAL NOTICES
FCC Statement
1.FCC Caution - §15.21:
Changes or modications not expressly approved by the party responsible for compliance could
void the user’s authority to operate the equipment.
2. FCC Statement - §15.105(b):
This equipment has been tested and found to comply with the limits for a Class B digital device,
pursuant to part 15 of the FCC Rules. These limits are designed to provide reasonable protection
against harmful interference in a residential installation. This equipment generates, uses, and can
radiate radio frequency energy and, if not installed and used in accordance with the instructions,
may cause harmful interference to radio communications. However, there is no guarantee that
interference will not occur in a particular installation. If this equipment does cause harmful
interference to radio or television reception, which can be determined by turning the equipment
o and on, the user is encouraged to try to correct the interference by one or more of the
following measures:
• Reorient or relocate the receiving antenna.
• Increase the separation between the equipment and receiver.
• Connect the equipment into an outlet on a circuit dierent from that to which the receiver is
connected.
• Consult the dealer or an experienced radio/TV technician for help.
ONE YEAR LIMITED WARRANTY
Visit www.insigniaproducts.com for details.
CONTACT INSIGNIA:
For customer service, call 1-877-467-4289 (U.S. and Canada)
www.insigniaproducts.com
INSIGNIA is a trademark of Best Buy and its aliated companies.
Distributed by Best Buy Purchasing, LLC
7601 Penn Ave South, Richeld, MN 55423 U.S.A.
©2024 Best Buy. All rights reserved.
V1 ENGLISH 24-0227