

Liability
Everycarehasbeentakeninthepreparationofthis
document.PleaseinformyourlocalAxisofceofany
inaccuraciesoromissions.AxisCommunicationsABcannot
beheldresponsibleforanytechnicalortypographicalerrors
andreservestherighttomakechangestotheproductand
manualswithoutpriornotice.AxisCommunicationsAB
makesnowarrantyofanykindwithregardtothematerial
containedwithinthisdocument,including,butnotlimited
to,theimpliedwarrantiesofmerchantabilityandtnessfor
aparticularpurpose.AxisCommunicationsABshallnot
beliablenorresponsibleforincidentalorconsequential
damagesinconnectionwiththefurnishing,performance
oruseofthismaterial.Thisproductisonlytobeusedfor
itsintendedpurpose.
IntellectualPropertyRights
AxisABhasintellectualpropertyrightsrelatingto
technologyembodiedintheproductdescribedinthis
document.Inparticular,andwithoutlimitation,these
intellectualpropertyrightsmayincludeoneormoreof
thepatentslistedatwww.axis.com/patent.htmandoneor
moreadditionalpatentsorpendingpatentapplicationsin
theUSandothercountries.
EquipmentModications
Thisequipmentmustbeinstalledandusedin
strictaccordancewiththeinstructionsgiveninthe
userdocumentation.Thisequipmentcontainsno
user-serviceablecomponents.Unauthorizedequipment
changesormodicationswillinvalidateallapplicable
regulatorycerticationsandapprovals.
TrademarkAcknowledgments
AXISCOMMUNICATIONS,AXIS,ETRAX,ARTPECandVAPIX
areregisteredtrademarksortrademarkapplicationsofAxis
ABinvariousjurisdictions.Allothercompanynamesand
productsaretrademarksorregisteredtrademarksoftheir
respectivecompanies.
Support
LearnMore!
VisitAxislearningcenterwww.axis.com/academy/for
usefultrainings,webinars,tutorialsandguides.
RegulatoryInformation
Europe
ThisproductcomplieswiththeapplicableCEmarking
directivesandharmonizedstandards:
•ElectromagneticCompatibility(EMC)Directive
2014/30/EU.SeeElectromagneticCompatibility(EMC)
onpage2.
•LowVoltage(LVD)Directive2014/35/EU.SeeSafety
onpage2.
•RestrictionsofHazardousSubstances(RoHS)Directive
2011/65/EU.SeeDisposalandRecyclingonpage3.
Acopyoftheoriginaldeclarationofconformitymaybe
obtainedfromAxisCommunicationsAB.SeeContact
Informationonpage3.
ElectromagneticCompatibility(EMC)
Thisequipmenthasbeendesignedandtestedtofulll
applicablestandardsfor:
•Radiofrequencyemissionwheninstalledaccordingto
theinstructionsandusedinitsintendedenvironment.
•Immunitytoelectricalandelectromagneticphenomena
wheninstalledaccordingtotheinstructionsandused
initsintendedenvironment.
USA
Thisequipmenthasbeentestedusingashieldednetwork
cable(STP)andfoundtocomplywiththelimitsfora
ClassBdigitaldevice,pursuanttopart15oftheFCC
Rules.Theselimitsaredesignedtoprovidereasonable
protectionagainstharmfulinterferenceinaresidential
installation.Thisequipmentgenerates,usesandcan
radiateradiofrequencyenergyand,ifnotinstalledand
usedinaccordancewiththeinstructions,maycause
harmfulinterferencetoradiocommunications.However,
thereisnoguaranteethatinterferencewillnotoccurin
aparticularinstallation.Ifthisequipmentdoescause
harmfulinterferencetoradioortelevisionreception,which
canbedeterminedbyturningtheequipmentoffandon,
theuserisencouragedtotrytocorrecttheinterferenceby
oneormoreofthefollowingmeasures:
•Reorientorrelocatethereceivingantenna.
•Increasetheseparationbetweentheequipmentand
receiver.
•Connecttheequipmentintoanoutletonacircuit
differentfromthattowhichthereceiverisconnected.
•Consultthedealeroranexperiencedradio/TV
technicianforhelp.
Theproductshallbeconnectedusingashieldednetwork
cable(STP)thatisproperlygrounded.
Canada
ThisdigitalapparatuscomplieswithCANICES-3(ClassB).
Theproductshallbeconnectedusingashieldednetwork
cable(STP)thatisproperlygrounded.Cetappareil
numériqueestconformeàlanormeCANNMB-3(classeB).
Leproduitdoitêtreconnectéàl'aided'uncâbleréseau
blindé(STP)quiestcorrectementmisàlaterre.
Europe
ThisdigitalequipmentfulllstherequirementsforRF
emissionaccordingtotheClassBlimitofEN55022.The
productshallbeconnectedusingashieldednetworkcable
(STP)thatisproperlygrounded.
Thisproductfulllstherequirementsforimmunity
accordingtoEN61000-6-1residential,commercialand
light-industrialenvironments.
Thisproductfulllstherequirementsforimmunity
accordingtoEN61000-6-2industrialenvironments.
Thisproductfulllstherequirementsforimmunity
accordingtoEN55024ofceandcommercial
environments.
Thisproductfulllstherequirementsforimmunity
accordingtoEN50130-4residential,commercial,
light-industrialandindustrialenvironments.
Australia/NewZealand
ThisdigitalequipmentfulllstherequirementsforRF
emissionaccordingtotheClassBlimitofAS/NZSCISPR22.
Theproductshallbeconnectedusingashieldednetwork
cable(STP)thatisproperlygrounded.
Japan
この装置は、クラスB情報技術装置です。この装置
は、家庭環境で使⽤することを⽬的としています
が、この装置がラジオやテレビジョン受信機に近
接して使⽤されると、受信障害を引き起こすこと
があります。取扱説明書に従って正しい取り扱い
をして下さい。本製品は、シールドネットワーク
ケーブル(STP)を使⽤して接続してください。また
適切に接地してください。
Safety
ThisproductcomplieswithIEC/EN60950-1,Safetyof
InformationTechnologyEquipment.

Ifitsconnectingcablesareroutedoutdoors,theproduct
shallbegroundedeitherthroughashieldednetworkcable
(STP)orotherappropriatemethod.
Thepowersupplyusedwiththisproductshallfulll
therequirementsforSafetyExtraLowVoltage
(SELV)andLimitedPowerSource(LPS)accordingto
IEC/EN/UL62368-1orIEC/EN/UL60950-1.
DisposalandRecycling
Whenthisproducthasreachedtheendofitsusefullife,
disposeofitaccordingtolocallawsandregulations.For
informationaboutyournearestdesignatedcollectionpoint,
contactyourlocalauthorityresponsibleforwastedisposal.
Inaccordancewithlocallegislation,penaltiesmaybe
applicableforincorrectdisposalofthiswaste.
Europe
Thissymbolmeansthattheproductshallnotbe
disposedoftogetherwithhouseholdorcommercialwaste.
Directive2012/19/EUonwasteelectricalandelectronic
equipment(WEEE)isapplicableintheEuropeanUnion
memberstates.Topreventpotentialharmtohumanhealth
andtheenvironment,theproductmustbedisposedofin
anapprovedandenvironmentallysaferecyclingprocess.
Forinformationaboutyournearestdesignatedcollection
point,contactyourlocalauthorityresponsibleforwaste
disposal.Businessesshouldcontacttheproductsupplierfor
informationabouthowtodisposeofthisproductcorrectly.
Thisproductcomplieswiththerequirementsof
Directive2011/65/EUontherestrictionoftheuseof
certainhazardoussubstancesinelectricalandelectronic
equipment(RoHS).
China
Thisproductcomplieswiththerequirementsofthe
legislativeactAdministrationontheControlofPollution
CausedbyElectronicInformationProducts(ACPEIP).
ContactInformation
AxisCommunicationsAB
Emdalavägen14
22369Lund
Sweden
Tel:+46462721800
Fax:+4646136130
www.axis.com


AXISA9188NetworkI/ORelayModule
SafetyInformation
ReadthroughthisInstallationGuidecarefullybeforeinstallingtheproduct.KeeptheInstallation
Guideforfuturereference.
HazardLevels
DANGER
Indicatesahazardoussituationwhich,ifnotavoided,willresultindeathorseriousinjury.
WARNING
Indicatesahazardoussituationwhich,ifnotavoided,couldresultindeathorseriousinjury.
CAUTION
Indicatesahazardoussituationwhich,ifnotavoided,couldresultinminorormoderate
injury.
NO NO
NO
TICE TICE
TICE
Indicatesasituationwhich,ifnotavoided,couldresultindamagetoproperty.
OtherMessageLevels
Important
Indicatessignicantinformationwhichisessentialfortheproducttofunctioncorrectly.
Note
Indicatesusefulinformationwhichhelpsingettingthemostoutoftheproduct.
5

AXISA9188NetworkI/ORelayModule
SafetyInstructions
WARNING
•TheAxisproductshallbeinstalledbyatrainedprofessional.
NO NO
NO
TICE TICE
TICE
•TheAxisproductshallbeusedincompliancewithlocallawsandregulations.
•TousetheAxisproductoutdoors,orinsimilarenvironments,itshallbeinstalledinan
approvedoutdoorhousing.
•StoretheAxisproductinadryandventilatedenvironment.
•AvoidexposingtheAxisproducttoshocksorheavypressure.
•Donotinstalltheproductonunstablebrackets,surfacesorwalls.
•UseonlyapplicabletoolswheninstallingtheAxisproduct.Usingexcessiveforcewith
powertoolscouldcausedamagetotheproduct.
•Donotusechemicals,causticagents,oraerosolcleaners.
•Useonlyaccessoriesthatcomplywiththetechnicalspecicationoftheproduct.These
canbeprovidedbyAxisorathirdparty.
•UseonlysparepartsprovidedbyorrecommendedbyAxis.
•Donotattempttorepairtheproductyourself.ContactAxissupportoryourAxisreseller
forservicematters.
•Thepowersupplyshallbepluggedintoasocketoutletinstalledneartheproductand
shallbeeasilyaccessible.
Transportation
NO NO
NO
TICE TICE
TICE
•WhentransportingtheAxisproduct,usetheoriginalpackagingorequivalenttoprevent
damagetotheproduct.
Battery
Lithiumcoincell3.0Vbatteriescontain1,2-dimethoxyethane;ethyleneglycoldimethylether
(EGDME),CASno.110-71-4.
WARNING
•Riskofexplosionifthebatteryisincorrectlyreplaced.
•ReplaceonlywithanidenticalbatteryorabatterywhichisrecommendedbyAxis.
•Disposeofusedbatteriesaccordingtolocalregulationsorthebatterymanufacturer's
instructions.
6

AXISA9188NetworkI/ORelayModule
InstallationGuide-FullReference
ThisfullreferenceinstallationguideprovidesinstructionsforhowtoinstallAXISA9188Network
I/ORelayModuleonyournetwork.
•Foraquickreferenceguide,seetheprintedAXISA9188InstallationGuide–Quick
Referencethatisincludedinthepackagecontents.Thequickreferenceguideisalso
availableonwww.axis.com
•Forotheraspectsofusingtheproduct,seetheAXISA9188UserManualavailable
onwww.axis.com
InstallationSteps
1.Makesurethepackagecontents,toolsandothermaterialsnecessaryfortheinstallation
areinorder.Seepage7.
2.Studythehardwareoverview.Seepage8.
3.Studythespecications.Seepage18.
4.Installthehardware.Seepage10.
PackageContents
•AXISA9188Module
•2-pinplugconnector(2x)
•3-pinplugconnector(2x)
•4-pinplugconnector(9x)
•7-pinplugconnector(2x)
•Relayjumpers(8x)
•TorxKeyTR20
•Printedmaterials
-AXISA9188InstallationGuide
-Overviewlabel
-Extraserialnumberlabel(2x)
-AVHSAuthenticationkey
-AXISCameraStationlicence
7
AXISA9188NetworkI/ORelayModule
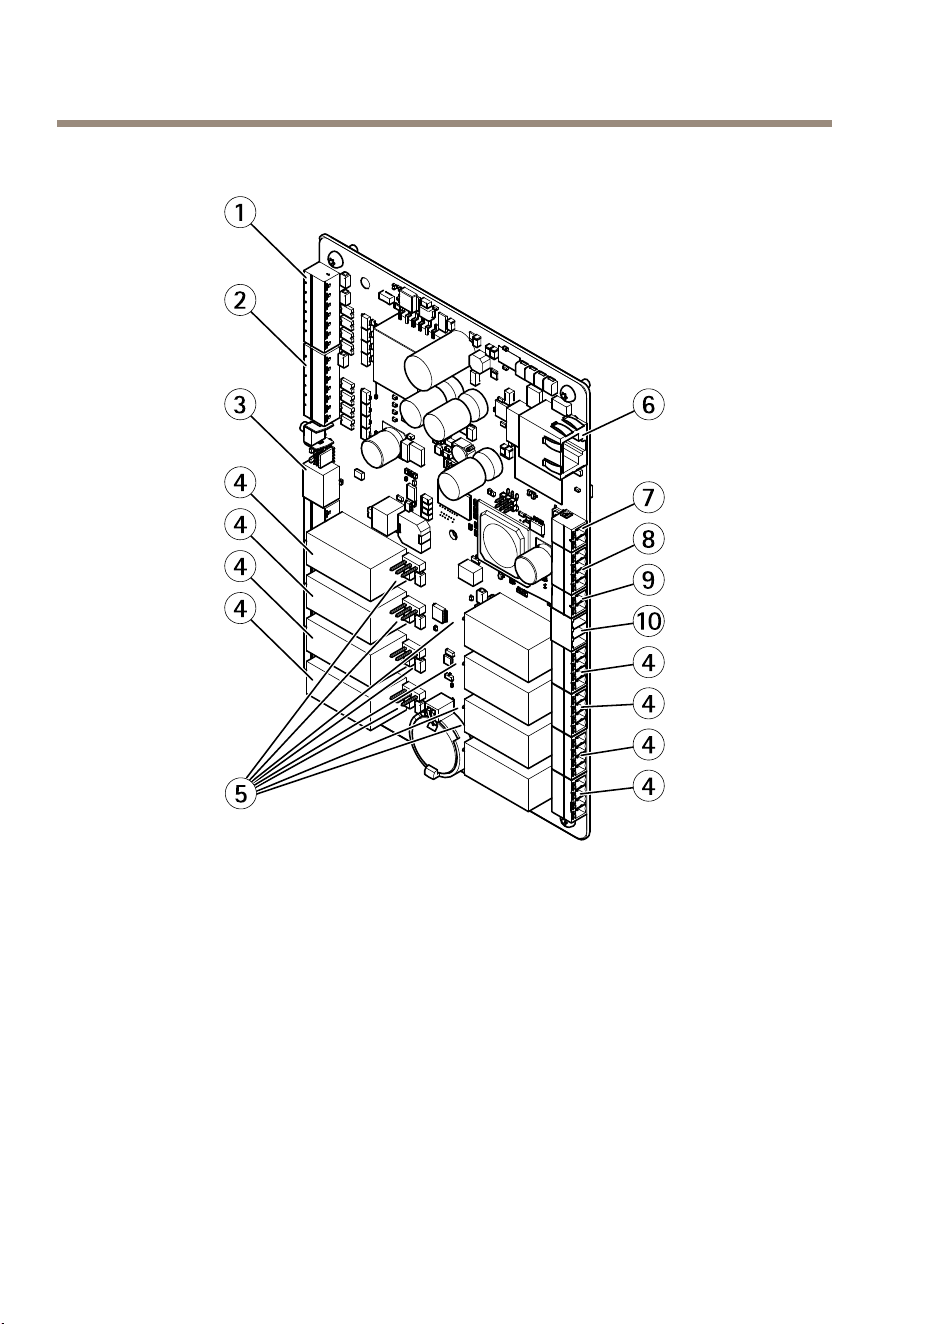
HardwareOverview
1
SupervisedI/Oandpowerconnector(DCOUT)port1–4
2
SupervisedI/Oandpowerconnector(DCOUT)port5–8
3
12/24Vpowerconnector(DCOUT)
4
Relayconnector(8x)
5
Relayjumper(8x)
6
Networkconnector(PoE)
7
Powerconnector(DCIN)
8
RS-485connector(notused)
9
Tamperingalarminput
10
12/24Vpowerconnector(DCOUT)
8
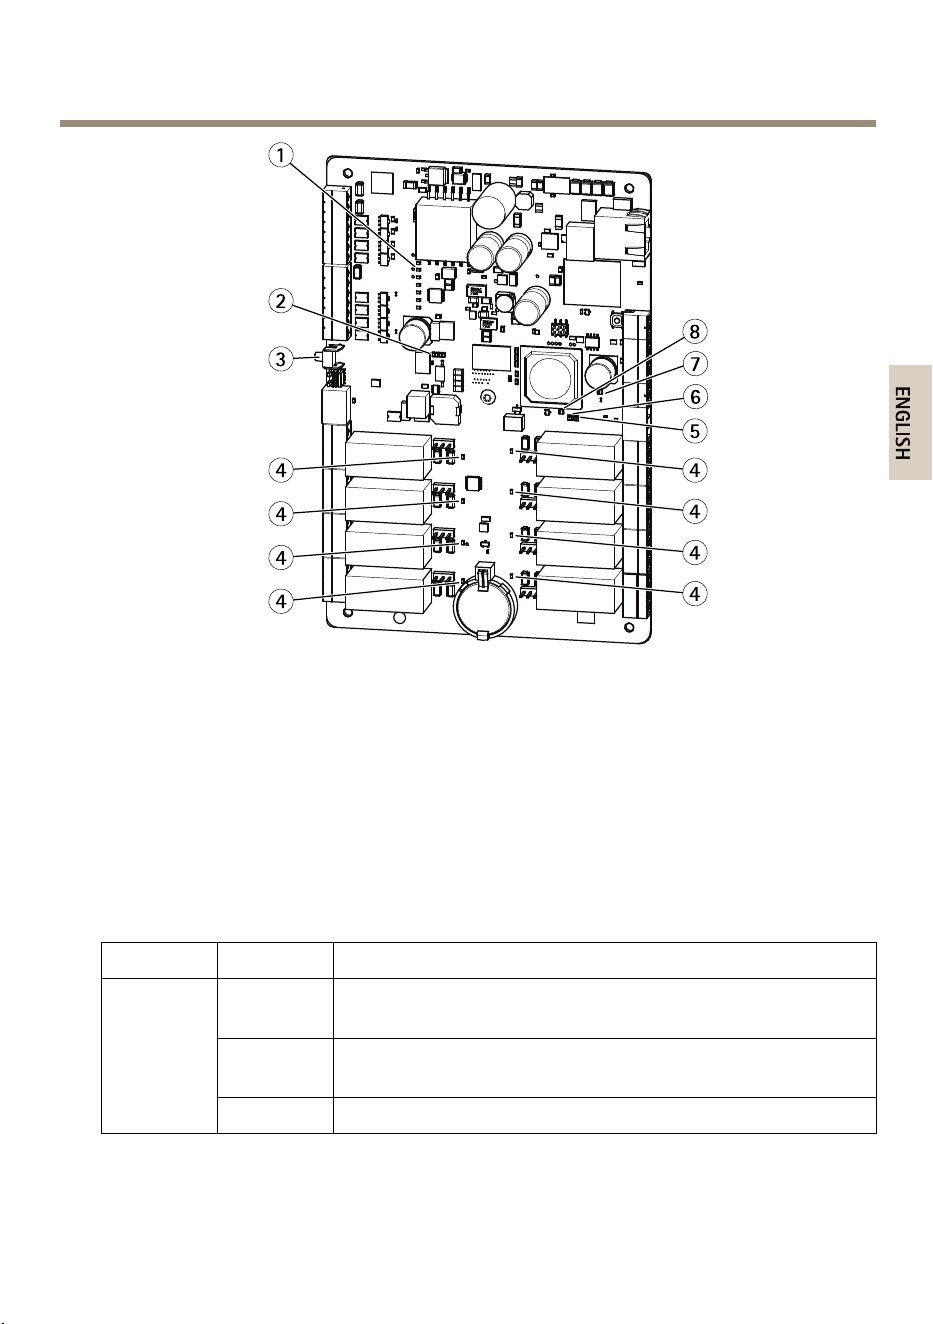
AXISA9188NetworkI/ORelayModule
LEDindicators,buttons
1
I/OLEDindicators(8x)
2
I/OovercurrentLEDindicator
3
Controlbutton
4
RelayLEDindicators(8x)
5
StatusLEDindicator
6
NetworkLEDindicator
7
I/OovercurrentLEDindicator
8
PowerLEDindicator
LEDIndicators
LED
Color
Indication
Green
Steadyforconnectiontoa100MBit/snetwork.Flashesfor
networkactivity.
Amber
Steadyforconnectiontoa10MBit/snetwork.Flashesfornetwork
activity.
Network
UnlitNonetworkconnection.
9
AXISA9188NetworkI/ORelayModule
GreenSteadygreenfornormaloperation.
Amber
Steadyduringstartupandwhenrestoringsettings.
Status
Red
Slowashforfailedupgrade.
Green
Normaloperation. Power
Amber
Flashesgreen/amberduringrmwareupgrade.
Green
Relaycoilisenergized Relay
UnlitRelaycoilisunenergized
Green
I/Oisgrounded I/O
Unlit
I/Oisoating
Red
Overcurrent
RS485(not
used)
UnlitNormalstate
Red
Overcurrent
I/Ovoltage
UnlitNormalstate
InstalltheHardware
SystemConsiderations
TheAxisproductshallbeinstalledwithinasecuredarea.
TheAxisproduct,whetheritisinstalledasasingleelevatorcontrollerorinasystemofcontrollers,
shallnotlimitorweakentheintendeduseofthedevicesconnectedtoit.
TheAxisproductshouldbeinstalledwithaDINrailonawall(preferred)oraceiling,withor
withoutajunctionbox.
Note
•TheAxisproductisconsideredstandalone,anddoesnotrequireconstantconnectiontoa
computerforproperoperation.Theuseofaconnectedcomputerisforlocalprogramming,
downloading,andsupplementalmonitoringpurposesonly.
WallandCeilingMount
1.Ifusingajunctionbox,installthejunctionboxbeforeinstallingtheIORelayModule.
2.FastentheDINrailonthewall.Makesurethatthescrewsandplugsareappropriatefor
thematerial(e.g.wood,metal,sheetrock,stone)
10

AXISA9188NetworkI/ORelayModule
3.MakesurethattheDINclippositiononthemetalplateisoptimal.See
AXISA9188InstallationGuide–QuickReference
4.AttachtheproducttotheDINrail
5.Connectthecables.Seepage11.
ConnecttheCables
CAUTION
DisconnectpowerbeforeconnectinganywirestotheAxisproduct.Nevermakeconnections
whilepowerisappliedtotheproduct.
NO NO
NO
TICE TICE
TICE
•Theproductshallbeconnectedusingashieldednetworkcable(STP).Allcablesconnecting
theproducttothenetworkshallbeintendedfortheirspecicuse.Makesurethatthe
networkdevicesareinstalledinaccordancewiththemanufacturer’sinstructions.For
informationaboutregulatoryrequirements,seeRegulatoryInformationonpage2.
•IfusingPoweroverEthernet,waitwithconnectingthenetworkcabletothenetworkuntil
alltheotherwireshavebeenconnected.
•Toallowforfuturemaintenance,toavoidexcessivestrainonwiresandconnectors,andto
avoiddamagetoconductorinsulation,leaveaserviceloopandmakesureallcablesand
wiresareproperlysupportedandsecured.
•Toprotectthecircuitsagainstelectrostaticdischarge(ESD),useESDprotectionwhen
connectingwirestotheproduct.
1.Stripthecablesandwiresasrequiredusingacablestrippingtool.
2.Userelayjumperstoprovideinternalpowertoauxiliaryequipmentconnectedtothe
relayconnectors.SeeRelayJumperonpage22.
3.ConnectthewiresbetweentheIORelayModuleandtheexternaldevices.Formore
informationabouttheconnectorsandtheirspecications,seeConnectorsonpage19.
NO NO
NO
TICE TICE
TICE
•Makesureallthewiresareconnectedcorrectly.Incorrectwiringcouldcausedamage
totheproduct.
•Makesuretousewiresthatmeettherequirements.Formoreinformation,seeWire
Areaonpage19.
Note
•Forinformationabouthowtoconnectotherwires,suchaspowerwirestolocksandother
devices,seethemanufacturers’instructions.
4.Collectallthewiresneatlyandsecurethem.
5.Labelthecablesforfuturereference.
11

AXISA9188NetworkI/ORelayModule
6.IfusingPoweroverEthernet,connectthenetworkcabletothenetwork.
7.MakesurethattheLEDsindicatethecorrectconditionsandthatnoneoftheovercurrent
LEDsarelit.SeeLEDIndicatorsonpage9.
AccesstheProduct
AccessfromaBrowser
1.Startawebbrowser.
2.EntertheIPaddressorhostnameoftheAxisproductinthebrowser’sLocation/Address
eld.
IfyoudonotknowtheIPaddress,useAXISIPUtilitytolocatetheproductonthenetwork.
ForinformationabouthowtodiscoverandassignanIPaddress,seeAssignanIPAddress.
Thisinformationisalsoavailablefromthesupportpagesatwww.axis.com/techsup
Note
ToshowBonjourasabrowserbookmark,gotoSafari>Preferences.
3.Enteryourusernameandpassword.Ifthisisthersttimetheproductisaccessed,the
rootpasswordmustrstbecongured.Forinstructions,seeSettheRootPasswordon
page16.
4.AXISI/OManageropensinyourbrowser.ThestartpageiscalledtheDashboard.
AccessfromtheInternet
Onceconnected,theAxisproductisaccessibleonyourlocalnetwork(LAN).Toaccesstheproduct
fromtheInternetyoumustcongureyournetworkroutertoallowincomingdatatrafcto
theproduct.Todothis,enabletheNAT-traversalfeature,whichwillattempttoautomatically
conguretheroutertoallowaccesstotheproduct.ThisisenabledfromSetup>AdditionalDevice
Conguration>SystemOptions>Network>TCP/IP>Advanced.
FormoreinformationaboutNATtrasversalforIPv4,seetheproduct’sUserManual.SeealsoAXIS
InternetDynamicDNSServiceatwww.axiscam.net
ForTechnicalnotesonthisandothertopics,visittheAxisSupportwebatwww.axis.com/techsup
AssignanIPAddress
DefaultIPAddress
TheAxisproductisdesignedforuseonanEthernetnetworkandrequiresanIPaddressforaccess.
MostnetworkshaveaDHCPserverthatautomaticallyassignsIPaddressestoconnecteddevices.
IfyournetworkdoesnothaveaDHCPservertheAxisproductwilluse192.168.0.90asthe
defaultIPaddress.
12

AXISA9188NetworkI/ORelayModule
RecommendedMethodsinWindows®
AXISIPUtilityandAXISCameraManagementarerecommendedmethodsforndingAxis
productsonthenetworkandassigningthemIPaddressesinWindows®.Bothapplicationsarefree
andcanbedownloadedfromwww.axis.com/techsup
AXISIPUtility–SmallInstallations
AXISIPUtilityautomaticallydiscoversanddisplaysAxisproductsonyournetwork.Theapplication
canalsobeusedtomanuallyassignastaticIPaddress.
NotethatthecomputerrunningAXISIPUtilitymustbeonthesamenetworksegment(physical
subnet)astheAxisproduct.
AutomaticDiscovery
1.CheckthattheAxisproductisconnectedtothenetworkandhaspoweredup.
2.StartAXISIPUtility.
3.WhentheAxisproductappearsinthewindow,double-clicktoopenitswebpages.
4.Forinformationabouthowtosetthepassword,seepage16.
AssigntheIPAddressManually(optional)
1.AcquireanavailableIPaddressonthesamenetworksegmentasyourcomputer.
2.SelecttheAxisproductinthelist.
3.ClickAssignnewIPaddresstoselecteddevice
andentertheIPaddress.
4.ClickAssignandcontinueaccordingtotheinstructions.
5.WhentheAxisproductappearsinthewindow,double-clicktoopenitswebpages.
6.Forinformationabouthowtosetthepassword,seepage16.
AXISCameraManagement–LargeInstallations
AXISCameraManagementisapowerfulinstallationandmanagementtoolforAxisnetwork
products.Thetoolcanautomaticallysearchthenetworkfordevices,assignIPaddresses,set
passwords,showconnectionstatus,managermwareupgradesandcongureproductparameters.
Itcanperformbatchoperationsonmultipleproductsatonce.
AutomaticDiscovery
1.CheckthattheAxisproductisconnectedtothenetworkandhaspoweredup.
2.StartAXISCameraManagement.
3.Connecttoaserver.
13

AXISA9188NetworkI/ORelayModule
Toconnecttoaserveronthenetwork,selectRemoteserverandselectaserverfromthe
drop-downlistorentertheIPorDNSaddressintheeld.
Toconnecttoaserverrunninglocallyonyourcomputer,selectThiscomputer.
4.ClickLogOntologonasthecurrentcomputeruser,orde-selectLogonascurrentuser
andentertheusernameandpasswordtologonwith.
5.ThersttimeAXISCameraManagementrunsitautomaticallysearchesforAxisproducts
onthenetwork.Tomanuallysearchforproducts,selectConguration>AddDevices.
Thesoftwaredisplaysalistoftheproductsfound.
SelecttheproductstoaddandclickNextandthenclickFinish.
6.Inthelistofdevices,clickontheaddresstoopentheproduct’swebpages.
7.Forinformationabouthowtosetthepassword,seepage16.
AssignIPAddressesinMultipleDevices
AXISCameraManagementspeedsuptheprocessofassigningIPaddressestomultipledevicesby
suggestingIPaddressesfromaspeciedrange.
1.Selectthedevicesyouwishtocongure(differentmodelscanbeselected)andclick
AssignIPaddresstoselecteddevices
.
2.ClickYesintheDeviceMaintenancedialog.
3.SelectAssignthefollowingIPaddressrangeandentertheIPaddressrange,subnet
maskanddefaultrouterthedeviceswilluse.ClickNext.
4.SuggestedIPaddressesarelistedunderNewIPAddressesandcanbeeditedbyselecting
adeviceandclickingEditIP.
5.ClickFinish.
OtherOperatingSystemsandMethods
ThelistbelowshowstheothermethodsavailableforassigningordiscoveringtheIPaddress.All
methodsareenabledbydefault,andallcanbedisabled.
•AVHSServiceConnection(alloperatingsystems).ToconnecttoanAVHSservice,refer
totheserviceprovider’sInstallationguide.Forinformationandhelpinndingalocal
AVHSServiceProvider,gotowww.axis.com/hosting
•AXISCameraStation5(Windows®).Forinformationandhelp,gotowww.axis.com/vms
•UPnP™(Windows®).Whenenabledonyourcomputer,theAxisnetworkproductis
automaticallydetectedandaddedtoNetwork/MyNetworkPlaces.
•Bonjour(MacOSX®10.4orlater).ApplicabletobrowserswithsupportforBonjour.
NavigatetotheBonjourbookmarkinyourbrowser(forexampleSafari)andclickon
thelinktoaccessthewebpages.
14

AXISA9188NetworkI/ORelayModule
•AXISDynamicDNSService(alloperatingsystems).AfreeservicefromAxisthatallows
youtoquicklyandsimplyinstallyourAxisnetworkproduct.RequiresanInternet
connectionwithoutanHTTPproxy.Formoreinformation,seewww.axiscam.net
•ARP/Ping(alloperatingsystems).SeeAssignIPAddressUsingARP/Ping.Thecommand
mustbeissuedwithin2minutesofconnectingpower.
•DHCPserver(alloperatingsystems).ToviewtheadminpagesforthenetworkDHCP
server,seetheserver’suserdocumentation.
AssignIPAddressUsingARP/Ping
Theproduct'sIPaddresscanbeassignedusingARP/Ping.Thecommandmustbeissuedwithin2
minutesofconnectingpower.
1.AcquireafreestaticIPaddressonthesamenetworksegmentasthecomputer.
2.Locatetheserialnumber(S/N)ontheproductlabel.
3.Openacommandpromptandenterthefollowingcommands:
Linux/Unixsyntax
arp-s<IPaddress><serialnumber>temp
ping-s408<IPaddress>
Linux/Unixexample
arp-s192.168.0.12500:40:8c:18:10:00temp
ping-s408192.168.0.125
Windowssyntax(thismayrequirethatyourunthecommandpromptasan
administrator)
arp-s<IPaddress><serialnumber>
ping-l408-t<IPaddress>
Windowsexample(thismayrequirethatyourunthecommandpromptasan
administrator)
arp-s192.168.0.12500-40-8c-18-10-00
ping-l408-t192.168.0.125
4.Checkthatthenetworkcableisconnectedandthenrestarttheproductbydisconnecting
andreconnectingpower.
5.ClosethecommandpromptwhentheproductrespondswithReplyfrom
192.168.0.125:...orsimilar.
6.Openabrowserandtypehttp://<IPaddress>intheLocation/Addresseld.
15

AXISA9188NetworkI/ORelayModule
Note
•ToopenacommandpromptinWindows,opentheStartmenuandtypecmdinthe
Run/Searcheld.
•TousetheARPcommandinWindows8/Windows7/WindowsVista,right-clickthe
commandprompticonandselectRunasadministrator.
•ToopenacommandpromptinMacOSX,opentheTerminalutilityfromApplication>
Utilities.
SettheRootPassword
ToaccesstheAxisproduct,youmustsetthepasswordforthedefaultadministratoruserroot.
ThisisdoneintheCongureRootPassworddialog,whichopenswhentheproductisaccessed
forthersttime.
Topreventnetworkeavesdropping,therootpasswordcanbesetviaanencryptedHTTPSconnection,
whichrequiresanHTTPScerticate.HTTPS(HypertextTransferProtocoloverSSL)isaprotocol
usedtoencrypttrafcbetweenwebbrowsersandservers.TheHTTPScerticateensuresencrypted
exchangeofinformation.
Thedefaultadministratorusernamerootispermanentandcannotbedeleted.Ifthepasswordfor
rootislost,theproductmustberesettothefactorydefaultsettings.Forinformationabouthowto
resettheproducttofactorydefault,seetheproduct’sUserManual.
TosetthepasswordviaastandardHTTPconnection,enteritdirectlyinthedialog.
TosetthepasswordviaanencryptedHTTPSconnection,followthesesteps:
1.ClickUseHTTPS.
Atemporarycerticate(validforoneyear)iscreated,enablingencryptionofalltrafcto
andfromtheproduct,andthepasswordcannowbesetsecurely.
2.Enterapasswordandthenre-enterittoconrmthespelling.
3.ClickOK.Thepasswordhasnowbeencongured.
ResettoFactoryDefaultSettings
Important
Resettofactorydefaultshouldbeusedwithcaution.Aresettofactorydefaultwillreset
allsettings,includingtheIPaddress,tothefactorydefaultvalues.
Note
Theinstallationandmanagementsoftwaretoolsareavailablefromthesupportpages
onwww.axis.com/techsup
16

AXISA9188NetworkI/ORelayModule
Toresettheproducttothefactorydefaultsettings:
1.Disconnectpowerfromtheproduct.
2.Pressandholdthecontrolbuttonandreconnectpower.SeeHardwareOverviewon
page8.
3.Keepthecontrolbuttonpressedfor25secondsuntilthestatusLEDindicatorturns
amberforthesecondtime.
4.Releasethecontrolbutton.TheprocessiscompletewhenthestatusLEDindicatorturns
green.Theproducthasbeenresettothefactorydefaultsettings.IfnoDHCPserveris
availableonthenetwork,thedefaultIPaddressis192.168.0.90
5.Usingtheinstallationandmanagementsoftwaretools,assignanIPaddress,setthe
password,andaccesstheproduct.
Itisalsopossibletoresetparameterstofactorydefaultviathewebinterface.GotoSetup>
AdditionalDeviceConguration>Setup>SystemOptions>MaintenanceandclickDefault.
MaintenanceInstructions
TokeepthenetworkI/Omodulerunningsmoothly,Axisrecommendsregularmaintenanceofthe
networkI/Omoduleandconnecteddevices.
Domaintenanceatleastonceayear.Thesuggestedmaintenanceprocedureincludes,butisnot
limitedto,thefollowingsteps:
•MakesurealltheconnectionsbetweennetworkI/Omoduleandtheexternaldevices
aresecure.
•Verifyallthehardwareconnections.Thisrequiresaccesstotheproduct’swebpages.For
moreinformation,seetheUserManual.
•Verifythatthesystem,includingtheconnectedexternaldevices,functionscorrectly.
-Ifapplicable,swipeacardandtestthereaders,doors,andlocks.
-IfthesystemincludesREXdevices,sensorsorotherdevices,testthemaswell.
-Ifactivated,testthetamperingalarms.
-CheckthatnoneoftheovercurrentLEDsarelit.
Iftheresultsfromanyofthestepsaboveindicatefaultsorunexpectedbehavior:
-Testthesignalsofthewiresusingappropriateequipmentandcheckifthe
wiresorcablesaredamagedinanyway.
-Replacealldamagedorfaultycablesandwires.
-Oncethecablesandwireshavebeenreplaced,verifyallthehardware
connectionsagain.Thisrequiresaccesstotheproduct’swebpages.Formore
information,seetheUserManual.
•Ifapplicable,makesureallaccessschedules,doors,groups,andusersareuptodate.This
requiresaccesstotheproduct’swebpages.Formoreinformation,seetheUserManual.
17

AXISA9188NetworkI/ORelayModule
•IfthenetworkI/Omoduleisnotbehavingasexpected,seetheUsermanualfor
informationabouttroubleshootingandtheproduct’sbuilt-inmaintenancefunctions.
Forinformationaboutmaintenanceofthebattery,seeBatteryonpage6.
Specications
OperatingConditions
TheAxisproductisintendedforindooruse.
Classication
TemperatureHumidity
IEC60721-4-3Class3M3–30°Cto55°C
(–30°Fto131°F)
20–80%RH(non-condensing)
PowerConsumption
NO NO
NO
TICE TICE
TICE
UseaSafetyExtraLowVoltage(SELV)compliantlimitedpowersource(LPS)witheithera
ratedoutputpowerlimitedto≤100Woraratedoutputcurrentlimitedto≤5A.
PowersupplyMaximumloadonoutputs
PoweroverEthernetIEEE802.3afType1Class3/
IEEE802.3atType2Class4,44–57VDC
PoEClass3:3.6W
PoEClass4:12W
8–28VDC,max26W
12W
PowerOutputConversion(WtoA)
ThetotalmaximumoutputloadoftheAxisproductdependsonthepowersource.
ThevoltageontheAxisproduct’spoweroutputsis12VDCor24VDC.Themaximumloadisthe
combinedpowerfrom12Vand24V.Forexampleifyoutake1Afrom12Voutputnopoweris
availablefrom24V.
Ifyourconnecteddevicehasamaximumampereratingofforexample0.3A,thefollowing
conversiongivesthepowerinwatts(W):
Power(W)=Voltage(V)xCurrent(I)
Power=12Vx0.3A=3.6W
18
AXISA9188NetworkI/ORelayModule
Thefollowingtableshowstheavailablepowerafterconnectionofthe0.3Adeviceintheexample.
PowersourceAvailablepower
PoweroverEthernet802.3atType2Class4
12–3.6=8.4W
8–28VDC
12–3.6=8.4W
TheDCoutputonthefollowingconnectorsareconsideredaspoweroutputs:
•DCPowerOutConnector
•SupervisedI/OConnector
Forconnectorspecications,seepage19.
WireArea
NO NO
NO
TICE TICE
TICE
Eachwireshallhaveanconductorcross-sectionalareathatcorrespondstoanconductor
gaugerangeofAWG28–16(CSA)orAWG22–14(cUL/UL).Selectcablesincompliance
withyourlocalregulations.
AWG
Diametermm(in)
Areamm
2
28–16
0.321–1.29(0.0126–0.0508)
0.0810–1.31
22–14
0.644–1.63(0.0253–0.0641)
0.326–2.08
Connectors
Forinformationabouttheconnectors’positions,seeHardwareOverviewonpage8.
Thefollowingsectiondescribestheconnectors’technicalspecications.
NetworkConnector
NO NO
NO
TICE TICE
TICE
Theproductshallbeconnectedusingashieldednetworkcable(STP).Allcablesconnecting
theproducttothenetworkshallbeintendedfortheirspecicuse.Makesurethatthe
networkdevicesareinstalledinaccordancewiththemanufacturer’sinstructions.For
informationaboutregulatoryrequirements,seeElectromagneticCompatibility(EMC)on
page2.
RJ45Ethernetconnector.UseCategory5ecablesorhigher.
19
AXISA9188NetworkI/ORelayModule
Function
Specications
PowerandEthernet
PoweroverEthernetPlus(PoE+)IEEE802.3atType2Class4,
44–57VDC
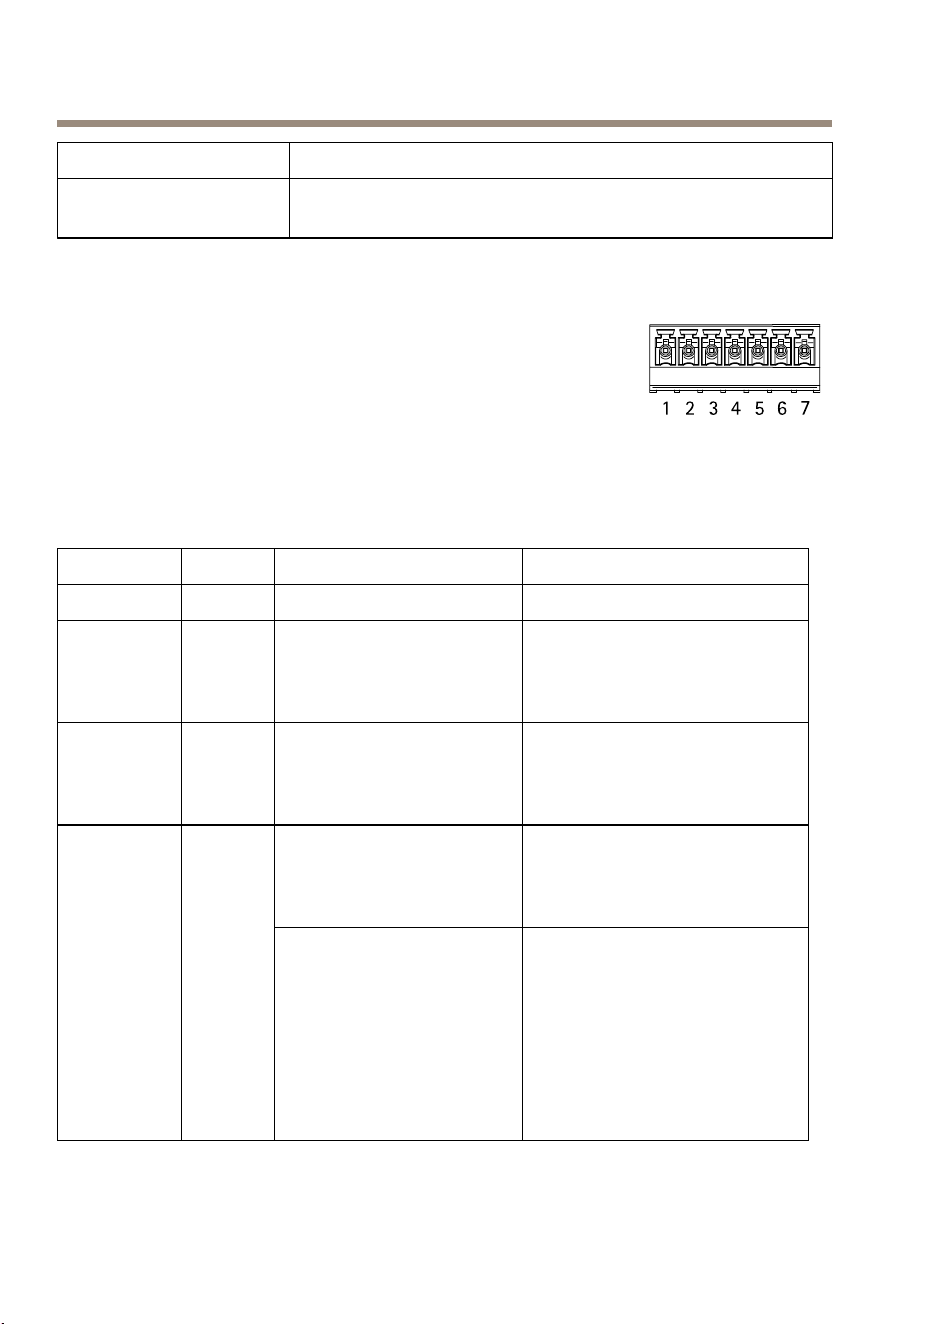
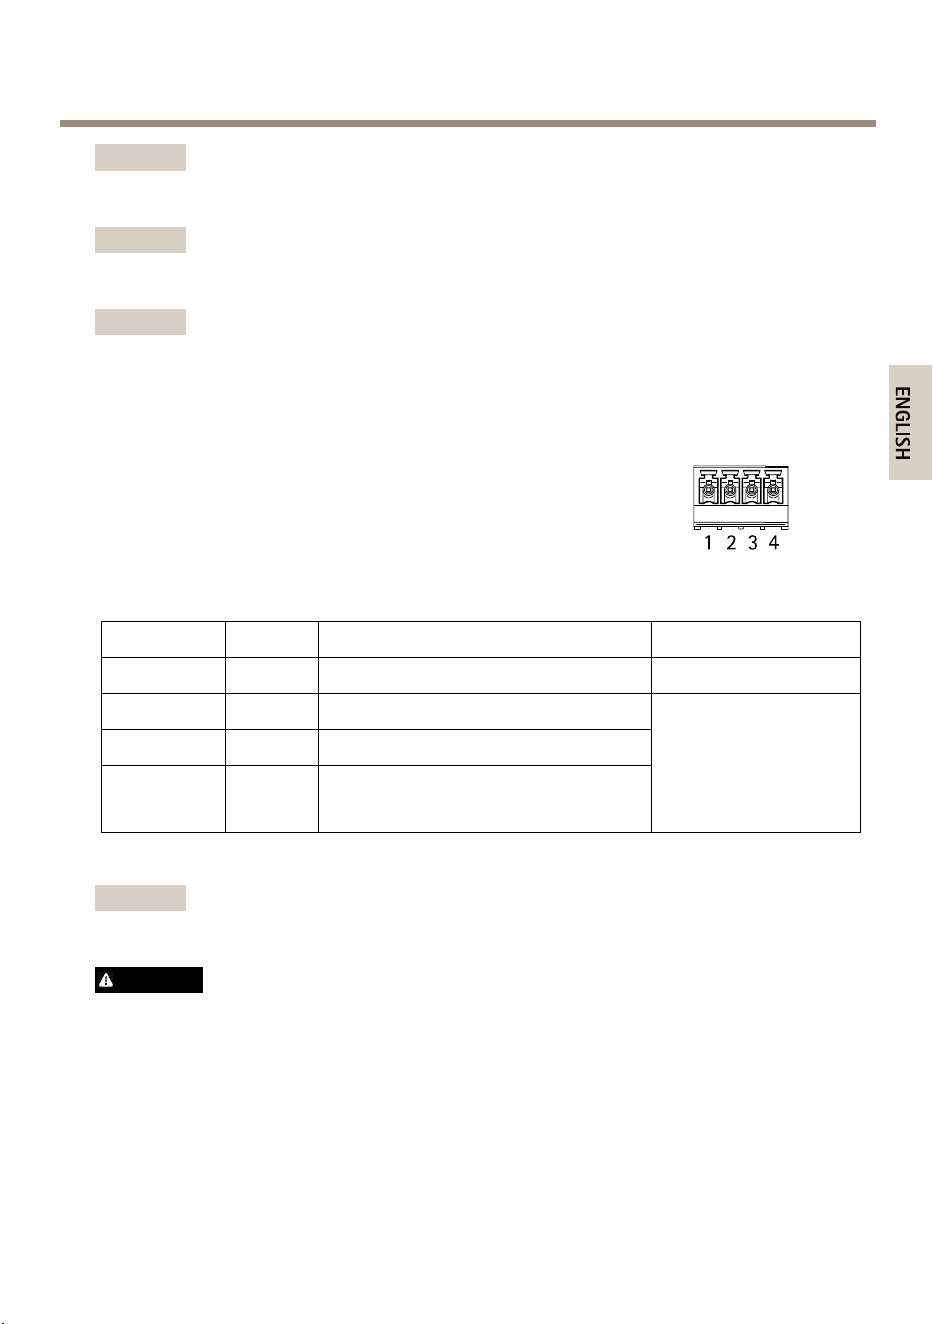
SupervisedI/OandPowerConnector
7-pincongurableI/Oterminalblockfor:
•Auxiliarypower(DCoutput)
•DigitalInput
•DigitalOutput
•Supervisedinput
•0VDC(-)
Foranexampleconnectiondiagram,seeConnectionDiagramsonpage
25.
FunctionPinNotes
Specications
0VREF
1
0VREF
12VDC
output
2
Forpoweringauxiliary
equipment.
Note:Thispincanonlybe
usedaspowerout.
SeePowerConsumptiononpage
18
24VDC
output
3
Forpoweringauxiliary
equipment.
Note:Thispincanonlybe
usedaspowerout.
SeePowerConsumptiononpage
18
Digitalinput—Connectto
pin1toactivate,orleave
oating(unconnected)to
deactivate.
0tomax40VDC
Congurable
(Inputor
Output)
4–7
Digitaloutput—Connectto
pin1toactivate,orleave
oating(unconnected)to
deactivate.Ifusedwithan
inductiveload,e.g.arelay,
adiodemustbeconnected
inparallelwiththeload,for
protectionagainstvoltage
transients.
0tomax40VDC,opendrain,
100mA
20
AXISA9188NetworkI/ORelayModule
Important
Therecommendedmaximumcablelengthis30m(98.4ft).
Important
TheoutputcircuitsinthissectionareClass2powerlimited.
Important
ThetotalpowerfromallDCoutputsare12W(PoEType2Class4)or3.6W(PoEType2
Class3).
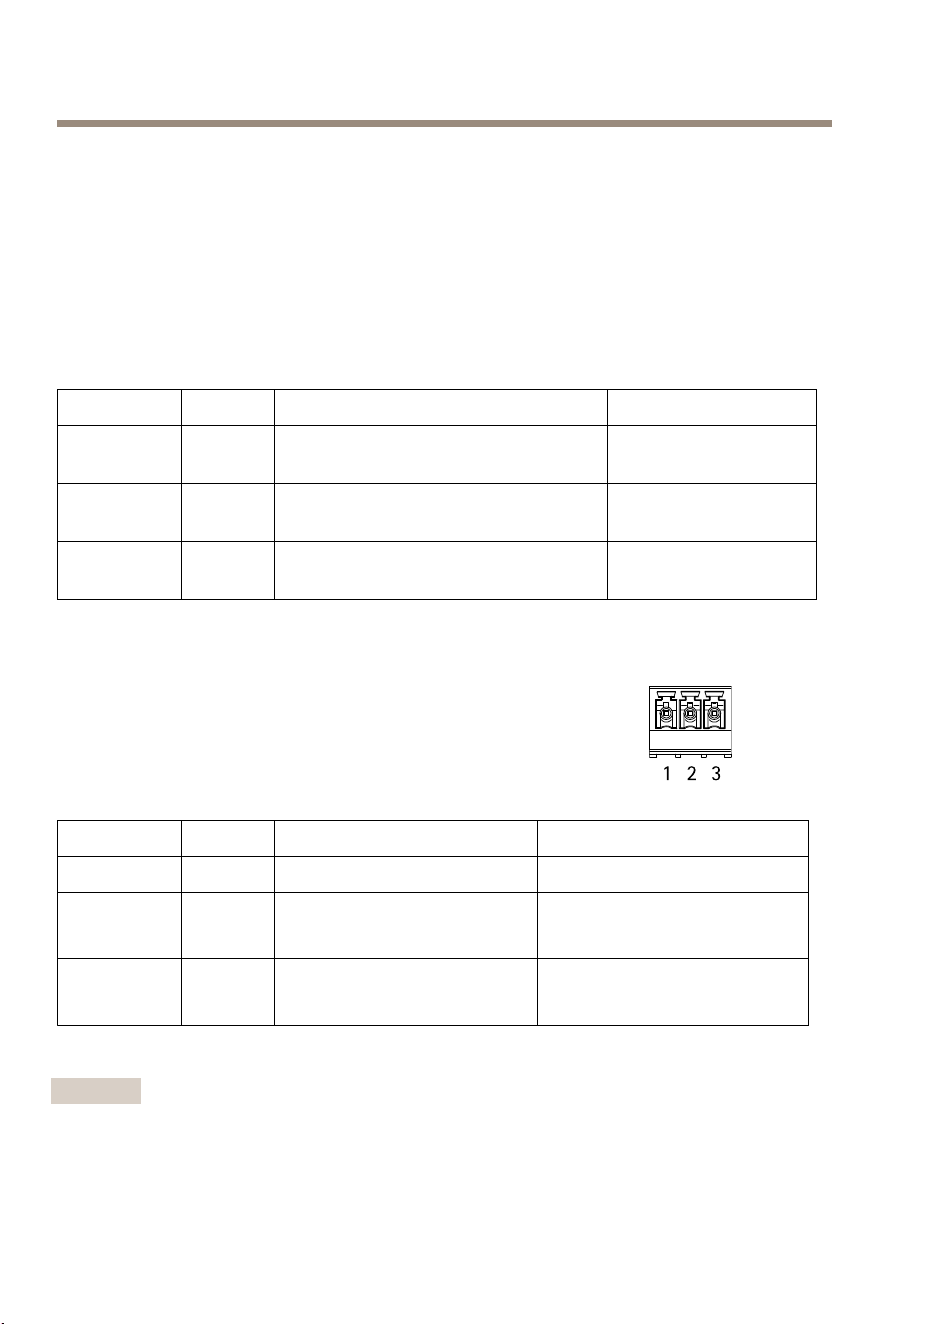
RelayConnector
4-pinrelayterminalblockfor:
•0VREF
•NO
•COM
•NC
FunctionPinNotes
Specications
0VREF
1
0VREF
NO
2
Forconnectingauxiliaryequipment.
COM
3
Forconnectingauxiliaryequipment.
NC
4
Forconnectingauxiliaryequipment.
0tomax48VDC,open
drain,1A
Important
Therecommendedmaximumcablelengthis30m(98.4ft).
WARNING
Maximumconnectedloadontherelayis48VDC,1A
21
AXISA9188NetworkI/ORelayModule
RelayJumper
3-pinrelayjumperforenablingpowertoauxiliaryequipmentviathe
Relayconnector.Insertingthejumperbetween12Vor24VtoCOM
causestheinternalvoltagetobeconnectedtotheCOMterminalof
therelay.
•+12V
•RelayCOM
•+24V
FunctionPinNotes
Specications
+12V+12VUsejumpertoconnectpoweroutto
RelayCOM
+12VDC
RelayCOMCOMOutputpowertoauxiliaryequipment
whenjumperisused
+24V+24VUsejumpertoconnectpoweroutto
RelayCOM
+24VDC
12/24VDCOutPowerConnector
3–pinterminalblockfor:
•0VREF
•12VDCOUT
•24VDCOUT
FunctionPinNotes
Specications
0VREF
1
0VDC
12VDCOUT
2
Forpoweringauxiliary
equipment.
SeePowerConsumptiononpage
18
24VDCOUT
3
Forpoweringauxiliary
equipment.
SeePowerConsumptiononpage
18
Important
Therecommendedmaximumcablelengthis30m(98.4ft).
22
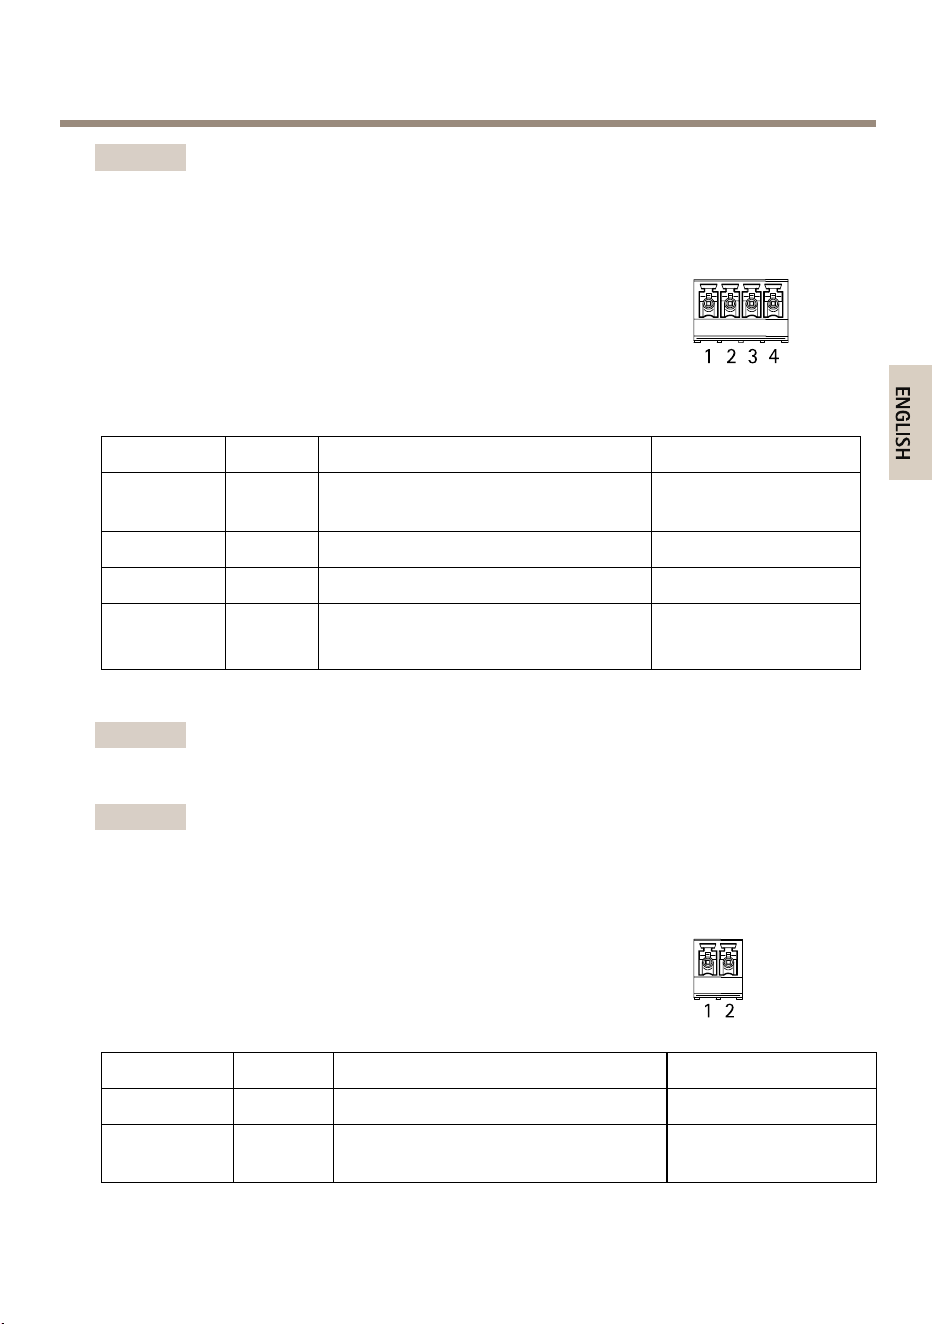
AXISA9188NetworkI/ORelayModule
Important
TheoutputcircuitsinthissectionareClass2powerlimited.
RS–485connector(notused)
4-pinRS-485/RS-422halfduplexserialport:
•+12VDC
•0VREF
•A
•B
FunctionPinNotes
Specications
+12VDC
1
12VDC
Maxload=350mA
0VREF
2
0VDC
A
3
B
4
Important
Therecommendedmaximumcablelengthis30m(98.4ft).
Important
TheoutputcircuitsinthissectionareClass2powerlimited.
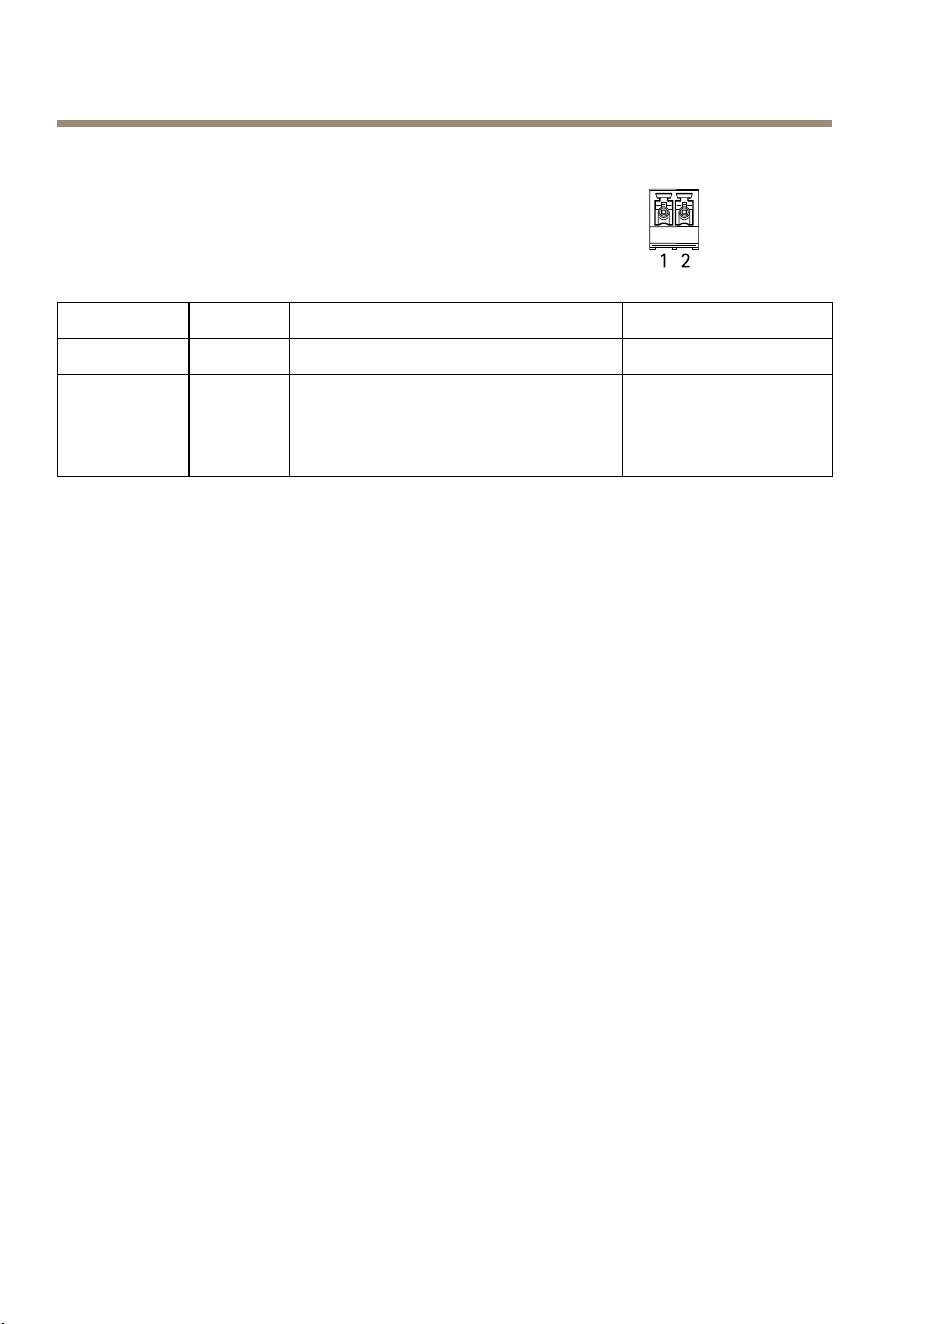
TamperingAlarmInputConnector
2-pinterminalblockfortamperingalarminput.
FunctionPinNotes
Specications
0VREF
1
0VDC
IN
2
Tamperingalarminput.Whenopened
thealarmwilltrigger.
23
AXISA9188NetworkI/ORelayModule
DCInPowerConnector
2-pinterminalblockforDCpowerinput.UseaSafetyExtraLowVoltage
(SELV)compliantlimitedpowersource(LPS)witheitheraratedoutput
powerlimitedto≤100Woraratedoutputcurrentlimitedto≤5A.
FunctionPinNotes
Specications
0VREF
1
0VDC
DCinput
2
Forpoweringcontrollerwhennotusing
PoweroverEthernet.
Note:Thispincanonlybeusedas
powerin.
8–28VDC,max26W
Maxloadonoutputs=
12W
Buttons
Thecontrolbuttonisusedfor:
•Resettingtheproducttofactorydefaultsettings,page16.
•ConnectingtoanAXISVideoHostingSystemserviceorAXISInternetDynamicDNS
Service.Formoreinformationabouttheseservices,seetheUserManual.
•ConnectingtoAXISInternetDynamicDNSService.SeetheUserManual.
24
AXISA9188NetworkI/ORelayModule
ConnectionDiagrams
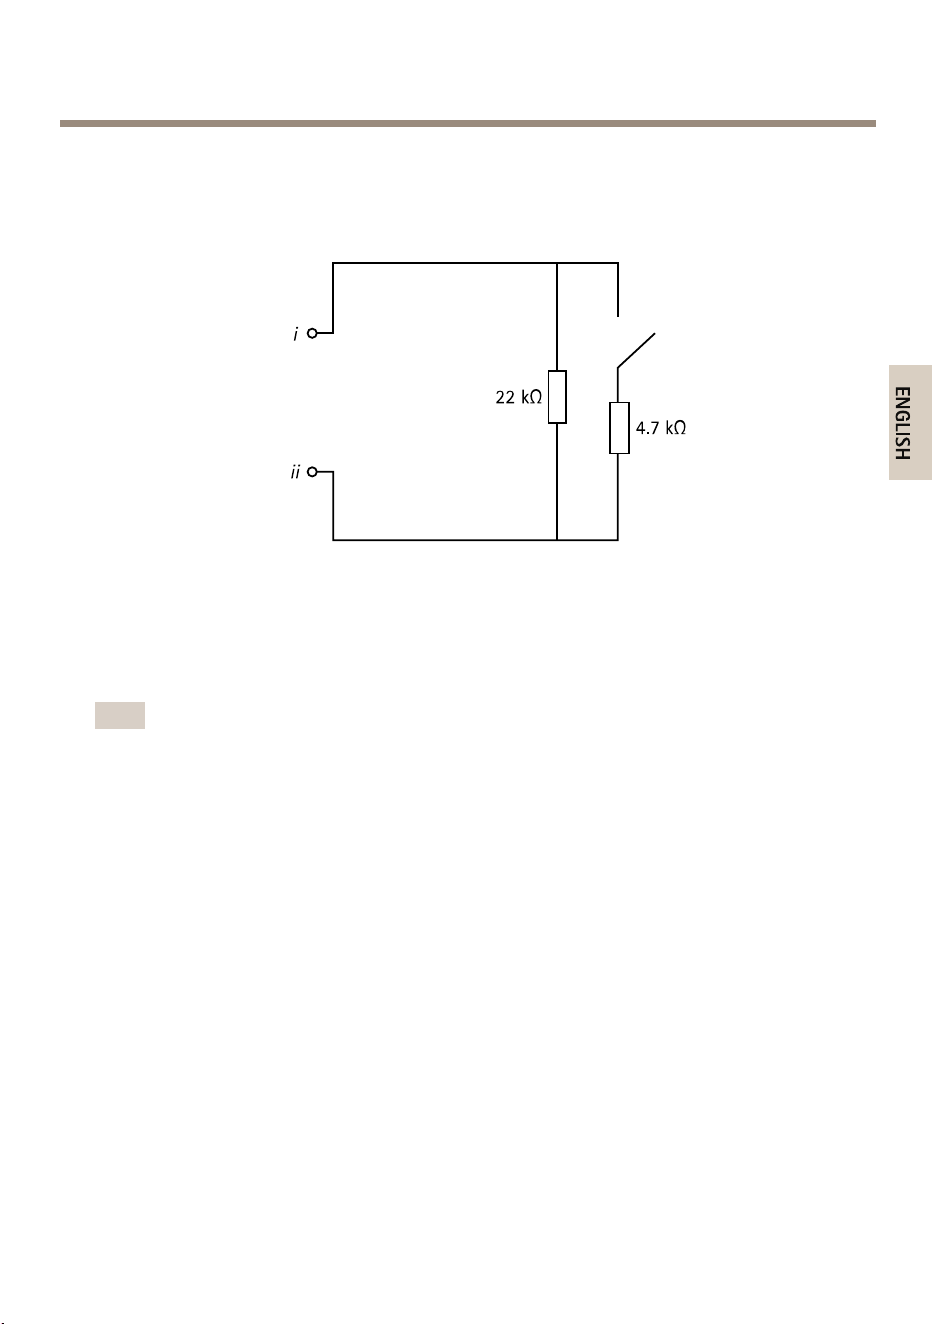
SupervisedInputs
Tousesupervisedinputs,installendoflineresistors.Thisappliestoallsupervisedinputs.For
informationaboutlimitationsandupdates,seetheproduct’sreleasenotes.
iInput
ii
0VDC(-)
Note
Itisrecommendedtousetwistedandshieldedcables.Connectshieldingto0VDC.
Furtherinformation
•Forthelatestversionofthisdocument,seewww.axis.com
•Tocheckifthereisupdatedrmwareavailableforyourproduct,see
www.axis.com/support
•Forusefulonlinetrainingsandwebinars,seewww.axis.com/academy
WarrantyInformation
ForinformationaboutAxis’productwarrantyandtheretorelatedinformation,see
www.axis.com/warranty/
25

InstallationGuide-FullReference
Ver.M1.11
AXISA9188NetworkI/ORelayModule
Date:May2016
©AxisCommunicationsAB,2016
PartNo.1596460