
Monitor
User Manual

I
About this Document
●This Document includes instructions for using and managing the Product. Pictures,
charts, images and all other information hereinafter are for description and explanation
only.
●The information contained in the Document is subject to change, without notice, due to
firmware updates or other reasons. Please find the latest version of the Document at the
Hikvision website (https://www.hikvision.com).
Unless otherwise agreed, Hangzhou Hikvision Digital Technology Co., Ltd. or its affiliates
(hereinafter referred to as "Hikvision") makes no warranties, express or implied.
●Please use the Document with the guidance and assistance of professionals trained in
supporting the Product.
About this Product
This product can only enjoy the after-sales service support in the country or region where
the purchase is made.
Acknowledgment of Intellectual Property Rights
●Hikvision owns the copyrights and/or patents related to the technology embodied in the
Products described in this Document, which may include licenses obtained from third
parties.
●Any part of the Document, including text, pictures, graphics, etc., belongs to Hikvision.
No part of this Document may be excerpted, copied, translated, or modified in whole or in
part by any means without written permission.
● and other Hikvision's trademarks and logos are the properties of Hikvision
in various jurisdictions.
●Other trademarks and logos mentioned are the properties of their respective owners.
● The terms HDMI and HDMI High-Definition Multimedia Interface, and the
HDMI Logo are trademarks or registered trademarks of HDMI Licensing Administrator, Inc.
in the United States and other countries.
Monitor User Manual

II
LEGAL DISCLAIMER
●TO THE MAXIMUM EXTENT PERMITTED BY APPLICABLE LAW, THIS DOCUMENT AND THE
PRODUCT DESCRIBED, WITH ITS HARDWARE, SOFTWARE AND FIRMWARE, ARE PROVIDED
"AS IS" AND "WITH ALL FAULTS AND ERRORS". HIKVISION MAKES NO WARRANTIES, EXPRESS
OR IMPLIED, INCLUDING WITHOUT LIMITATION, MERCHANTABILITY, SATISFACTORY
QUALITY, OR FITNESS FOR A PARTICULAR PURPOSE. THE USE OF THE PRODUCT BY YOU IS AT
YOUR OWN RISK. IN NO EVENT WILL HIKVISION BE LIABLE TO YOU FOR ANY SPECIAL,
CONSEQUENTIAL, INCIDENTAL, OR INDIRECT DAMAGES, INCLUDING, AMONG OTHERS,
DAMAGES FOR LOSS OF BUSINESS PROFITS, BUSINESS INTERRUPTION, OR LOSS OF DATA,
CORRUPTION OF SYSTEMS, OR LOSS OF DOCUMENTATION, WHETHER BASED ON BREACH OF
CONTRACT, TORT (INCLUDING NEGLIGENCE), PRODUCT LIABILITY, OR OTHERWISE, IN
CONNECTION WITH THE USE OF THE PRODUCT, EVEN IF HIKVISION HAS BEEN ADVISED OF
THE POSSIBILITY OF SUCH DAMAGES OR LOSS.
●YOU ACKNOWLEDGE THAT THE NATURE OF THE INTERNET PROVIDES FOR INHERENT
SECURITY RISKS, AND HIKVISION SHALL NOT TAKE ANY RESPONSIBILITIES FOR ABNORMAL
OPERATION, PRIVACY LEAKAGE OR OTHER DAMAGES RESULTING FROM CYBER-ATTACK,
HACKER ATTACK, VIRUS INFECTION, OR OTHER INTERNET SECURITY RISKS; HOWEVER,
HIKVISION WILL PROVIDE TIMELY TECHNICAL SUPPORT IF REQUIRED.
●YOU AGREE TO USE THIS PRODUCT IN COMPLIANCE WITH ALL APPLICABLE LAWS, AND YOU
ARE SOLELY RESPONSIBLE FOR ENSURING THAT YOUR USE CONFORMS TO THE APPLICABLE
LAW. ESPECIALLY, YOU ARE RESPONSIBLE, FOR USING THIS PRODUCT IN A MANNER THAT
DOES NOT INFRINGE ON THE RIGHTS OF THIRD PARTIES, INCLUDING WITHOUT LIMITATION,
RIGHTS OF PUBLICITY, INTELLECTUAL PROPERTY RIGHTS, OR DATA PROTECTION AND OTHER
PRIVACY RIGHTS. YOU SHALL NOT USE THIS PRODUCT FOR ANY PROHIBITED END-USES,
INCLUDING THE DEVELOPMENT OR PRODUCTION OF WEAPONS OF MASS DESTRUCTION,
THE DEVELOPMENT OR PRODUCTION OF CHEMICAL OR BIOLOGICAL WEAPONS, ANY
ACTIVITIES IN THE CONTEXT RELATED TO ANY NUCLEAR EXPLOSIVE OR UNSAFE NUCLEAR
FUEL-CYCLE, OR IN SUPPORT OF HUMAN RIGHTS ABUSES.
●IN THE EVENT OF ANY CONFLICTS BETWEEN THIS DOCUMENT AND THE APPLICABLE LAW,
THE LATTER PREVAILS.
© Hangzhou Hikvision Digital Technology Co., Ltd. All rights reserved.
Monitor User Manual
III
EU Conformity Statement
Regulatory Information
FCC Information
Please take attention that changes or modification not expressly approved by the party responsible for
compliance could void the user’s authority to operate the equipment.
FCC compliance: This equipment has been tested and found to comply with the limits for a Class A
digital device, pursuant to part 15 of the FCC Rules. These limits are designed to provide reasonable
protection against harmful interference when the equipment is operated in a commercial environment.
This equipment generates, uses, and can radiate radio frequency energy and, if not installed and used in
accordance with the instruction manual, may cause harmful interference to radio communications.
Operation of this equipment in a residential area is likely to cause harmful interference in which case
the user will be required to correct the interference at his own expense
FCC Conditions
This device complies with part 15 of the FCC Rules. Operation is subject to the following two conditions:
1. This device may not cause harmful interference.
2. This device must accept any interference received, including interference that may cause
undesired operation.
This product and - if applicable - the supplied accessories too
are marked with"CE"and comply therefore with the applicable
harmonized European standards listed under the EMC Directive
2014/30/EU,the LVD Directive 2014/35/EU,the ROHS Directive
2011/65/EU.
2012/19/EU (WEEE directive): Products marked with this symbol
cannot be disposed of as unsorted municipal waste in the
European Union. For proper recycling, return this product to
your local supplier upon the purchase of equivalent new
equipment, or dispose of it at designated collection points. For
more information see: www.recyclethis.info
2006/66/EC (battery directive): This product contains a battery
that cannot be disposed of as unsorted municipal waste in the
European Union. See the product documentation for specific
battery information. The battery is
marked with this symbol, which may include lettering to indicate cadmium
(Cd), lead (Pb), or mercury (Hg). For proper recycling, return the battery to
your supplier or to a designated collection point. For more information
see: www.recyclethis.info
Industry Canada ICES-003 Compliance
This device meets the CAN ICES-3 (A)/NMB-3(A) standards requirements.
Monitor User Manual
IV
Applicable Models
This manual is applicable to the model: Monitor.
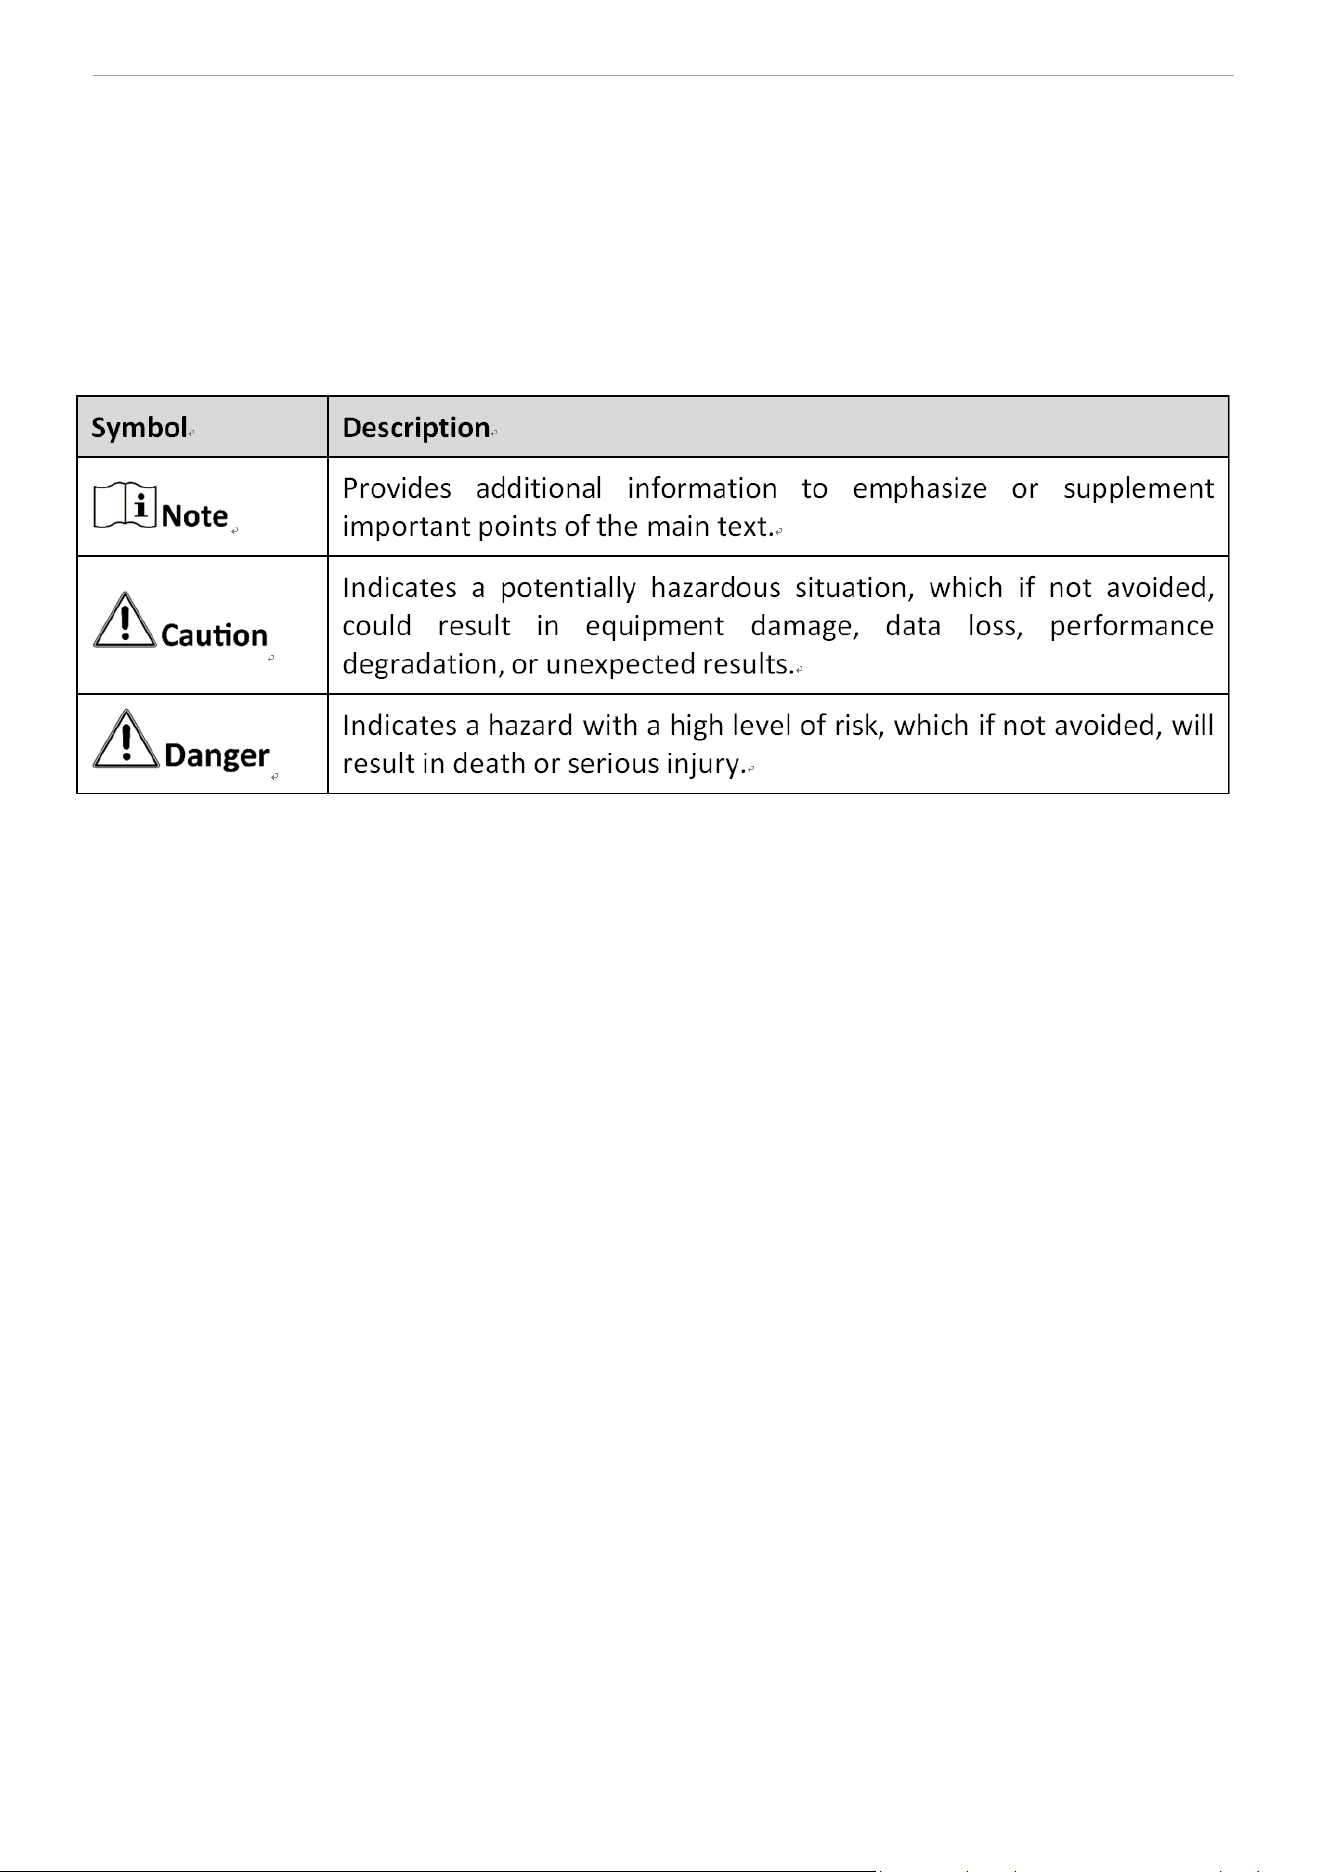
Symbol Conventions
The symbols that may be found in this document are defined as follows.
Note:
Forward tilt of the whole machine is not recommended in use;
if there is a need for forward tilt, it is recommended that the
forward tilt angle should not exceed 5 degrees.
Safety Instructions
• Proper configuration of all passwords and other security settings is the responsibility
of the installer and/or end-user.
• In the use of the product, you must be in strict compliance with the electrical safety
regulations of the nation and region. Please refer to technical specifications for
detailed information.
• Input voltage should meet both the SELV (Safety Extra Low Voltage) and the Limited
Power Source with 100 to 240 VAC or 12 VDC according to the IEC60950-1 standard.
Please refer to technical specifications for detailed information.
• Do not connect several devices to one power adapter as adapter overload may
cause over-heating or a fire hazard.
• Please make sure that the plug is firmly connected to the power socket.
• If smoke, odor or noise rise from the device, turn off the power at once and unplug
the power cable, and then please contact the service center.
• The mains plug of the equipment is used as disconnect devices, the socket-outlet
shall be installed near the equipment and shall be easily accessible;
Monitor User Manual

V
1. Precautions For Operation ............................................................................................................ 1
1.1 Power Cord Usage .............................................................................................................1
1.2 Cleaning and Maintenance............................................................................................... 1
2.Product Function Introduction....................................................................................................... 3
2.1 Function Characteristics ....................................................................................................3
2.2 Packing List ........................................................................................................................ 3
2.3 Power Connection............................................................................................................ 3
3. Device Interface............................................................................................................................ 4
4.Panel Keys....................................................................................................................................... 5
5.Basic Operating Instructions........................................................................................................... 6
5.1 Shortcut Menu .................................................................................................................. 6
5.2 Main Menu........................................................................................................................ 7
TABLE OF CONTENTS
Monitor User Manual

1
1. Precautions For Operation
The display uses LED liquid crystals manufactured with high-precision technology. But
there may be small spots on the screen where the pixels are not bright or have
low brightness. If you view the screen from a tilted sharp angle, you may see uneven
color or brightness. Please note that this is not a malfunction, but a common
phenomenon of LCD screens.
1.1 Power Cord Usage
If the power cord is broken or malfunctioning, do not attempt to repair it. Please ask the
maintenance agency to be responsible for the maintenance. Please check and ensure that
the voltage value on the nameplate on the rear shell matches the main supply voltage value,
and ensure that the AC power line and ground wire are connected.
Do not expose this product to conductive environments such as rain or damp gases. Please
unplug the power cord and antenna plug during thunderstorms and lightning weather.
The display should be installed near an easily pluggable AC power socket, and the ground
wire should be the same as other electronic devices to prevent signal interference.
Please unplug the power plug when there is no one indoors or when not in use for a long
time.
Please perform the operation after two minutes of power outage to ensure that the
discharge ends after the power is cut off.
Do not use power cords that are not configured locally. If you want to replace them, please
purchase the same specification power cord from a legitimate channel.
Please check and ensure that the AC power cord and ground wire are connected.
Do not let the power plug and socket adhere to dust and metal attachments.
It is prohibited to modify the power cord.
Do not press heavy objects onto the power cord.
Keep the power cord away from heat sources.
Keep the power cord away from heat sources.
Monitor User Manual

2
1.2 Cleaning and Maintenance
The rear shell of this product has heat dissipation holes. When cleaning, do not
directly spray, pour liquid, or use a damp cloth to clean the rear shell.
When cleaning is required, please unplug the power plug first.
When cleaning the monitor, please use a flexible, dust-free, and dry cloth to wipe it.
Please contact the service center for internal cleaning of the machine.
Proper maintenance can prevent many early failures.
Do not use industrial chemical reagents to clean this machine, and be careful to
prevent foreign objects from entering the interior of the machine.
Monitor User Manual
3
2.Product Function Introduction
2.1 Function Characteristics
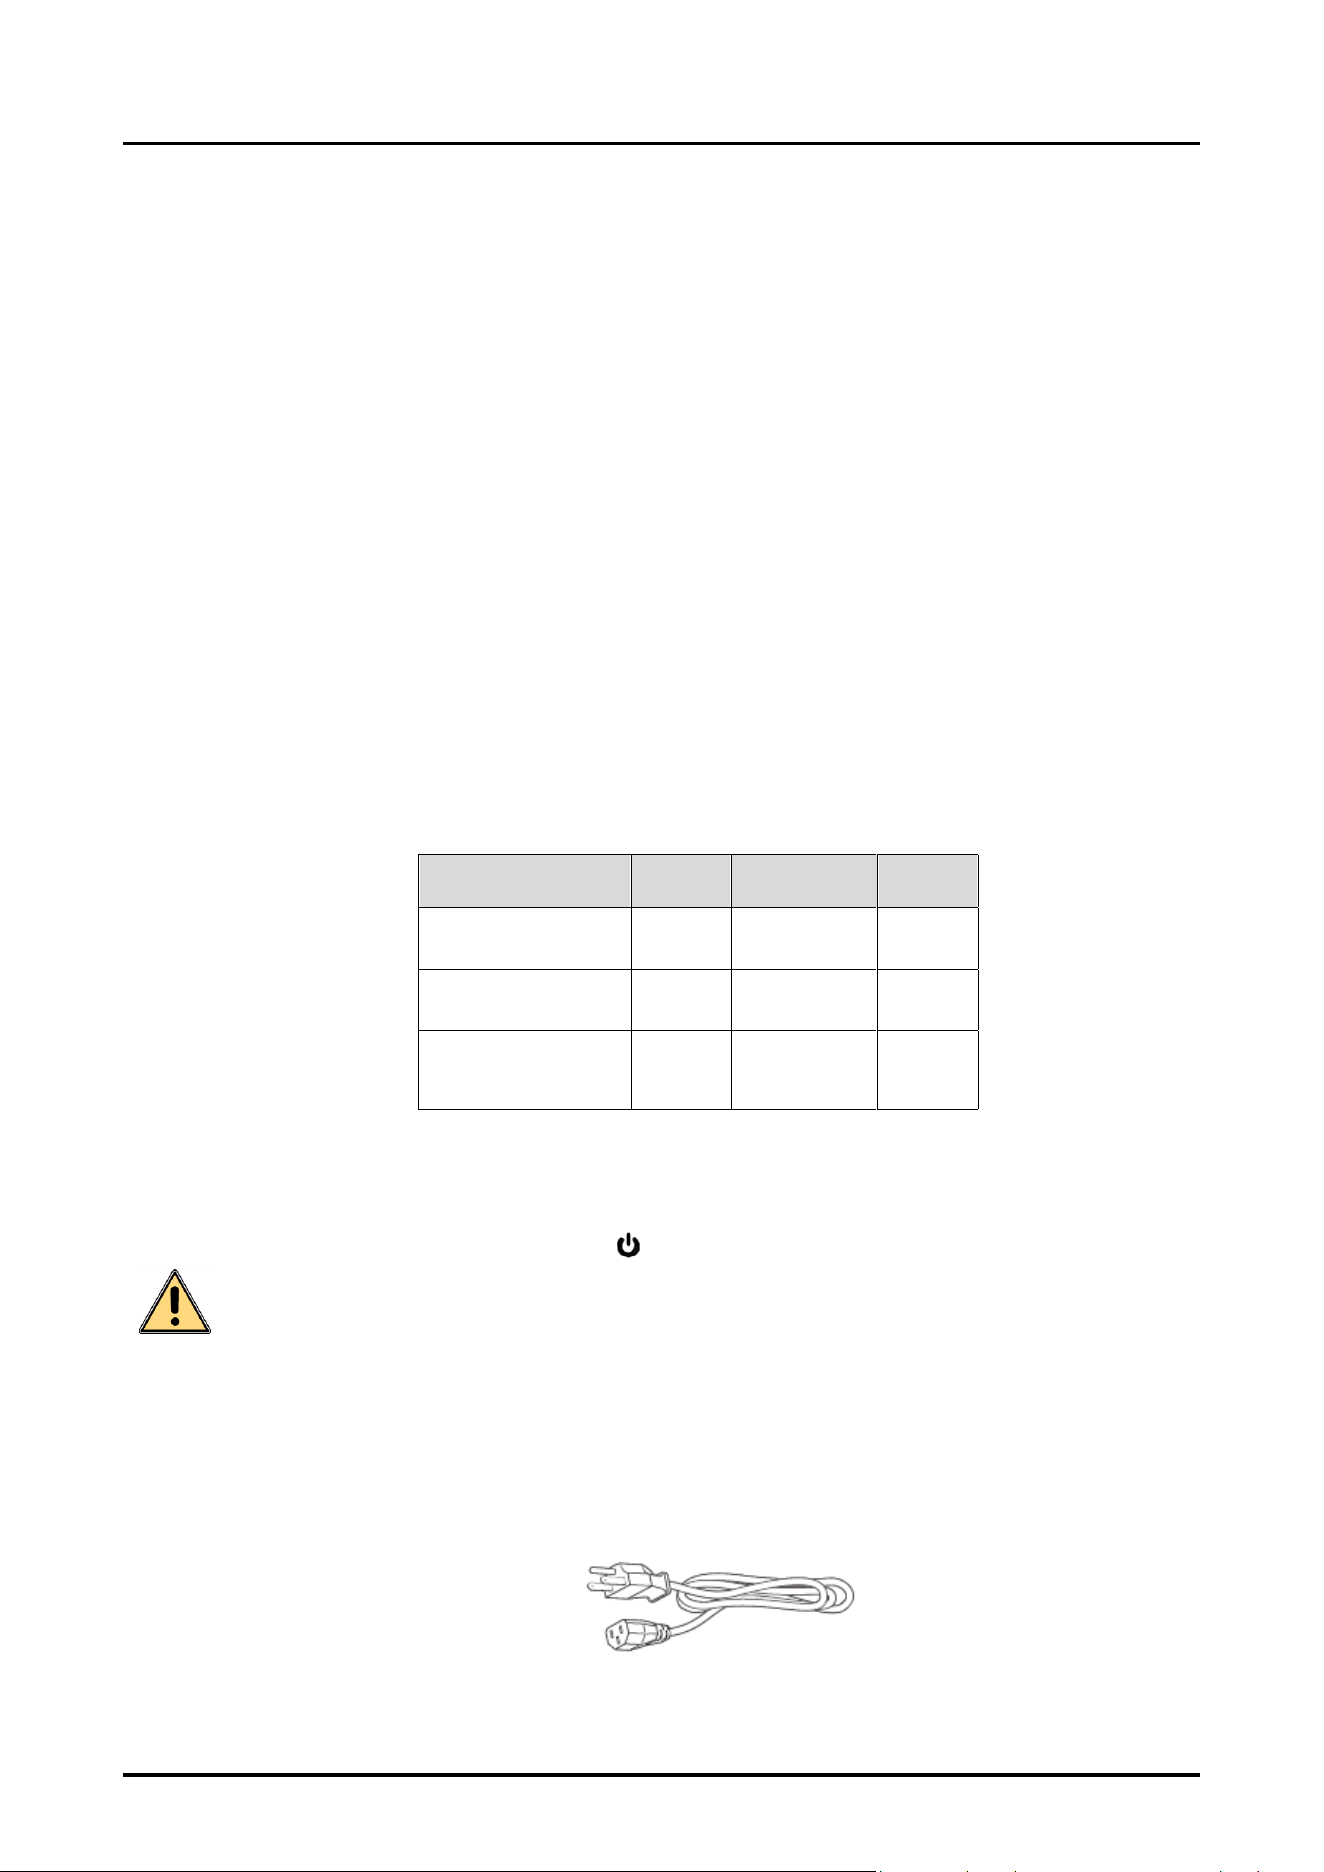
2.3 Power Connection
Plug one end of the power cord (as shown in Figure 2-1) into the monitor and the other end into
a well grounded busbar,Press the key " "to turn on the machine.
The power supply used for this machine: AC 220V~, 50/60 Hz.
If the monitor is not used for a long time, the "POWER" switch of the monitor
should be turned off and the power plug should be unplugged from the
power socket.
Do not connect to a DC power source.
Humanized operation menu;
Multiple image modes are available for different usage scenarios;
16.7 M color;
Perfect factory setting mode;
Supporting software spread spectrum technology can reduce EMI
radiation; Standby power consumption less than 0.5 W;
The visual angle can reach up to 178 ° horizontally and 178 ° vertically.
2.2 Packing List
Article
Number
Monitor
1
Support
1
Operating Manual
1
Base
1
HDMI Cable
1
Power Line
1
Figure 2-1 Power cord diagram
Before installing the monitor, please check your accessories. If there is any damage or missing,
please contact your local supplier.
Table 2-1 Packing List
Article
Number
NOTICE
Monitor User Manual

4
Device Interface
3.Device Interface
Table 3-1 Equipment Interface Description
Figure 3-1 Interface diagram
5
AC power input terminal
HDMI 2.0 signal input terminal
HDMI 2.0 signal input terminal
DP signal input terminal
1
2
3
4
Interface
Illustrate
Audio Out interface
5
Monitor User Manual
5
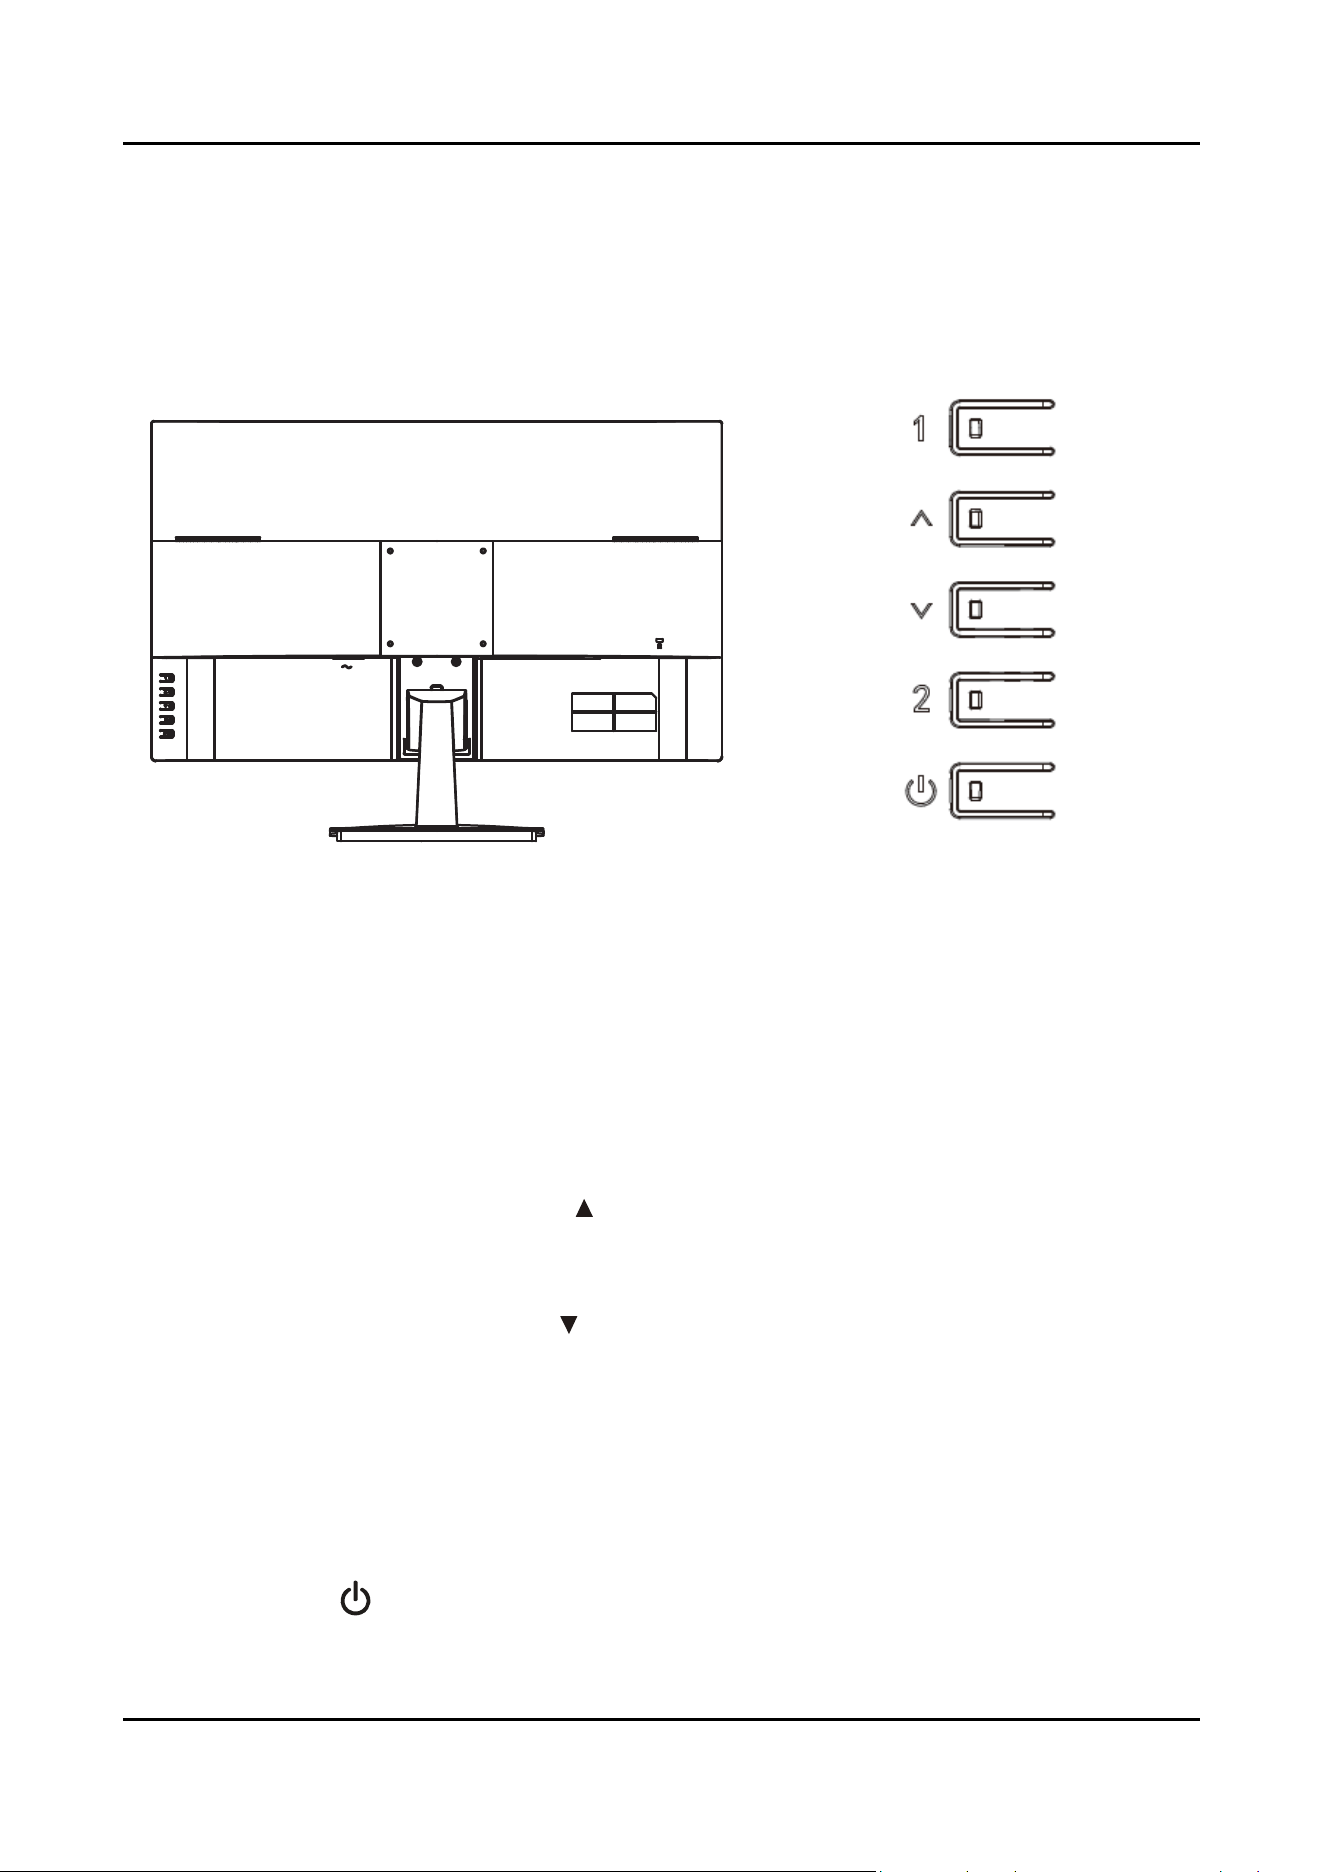
The display panel buttons are shown in Figure 4-1 4-2:
4.Panel Keys
Figure 4-1 Display schematic diagram
Figure 4-2 Key Illustration
Menu/Selection (1):
In the OSD activation state, enter the next submenu or execute the corresponding function, and in
the OSD inactive state, display the OSD main menu.
Adjustment/brightness shortcut key ( ):
Adjust the selection items in the OSD active state, and use the brightness mode shortcut key in the
OSD inactive state.
Adjustment/Contrast shortcut key ( ):
Adjust the selection items in the OSD active state, and use the contrast shortcut key in the OSD
inactive state.
Exit/Starlight shortcut key (2):
When the OSD menu is in a closed state, pressing this button will enter the collimation adjustment
function and have the function of exiting the collimation; In the OSD activation state, return to the
previous level or exit OSD.
Power switch/( ):
Turn on/off the power supply of the monitor.
Monitor User Manual
6
5.1 Shortcut Menu
5.Basic Operating Instructions
1.When there is no active menu, directly press the " " key to pop up a shortcut menu for
brightness adjustment.
2.When there is no active menu, directly press the " " button to pop up a shortcut menu for
contrast adjustment.
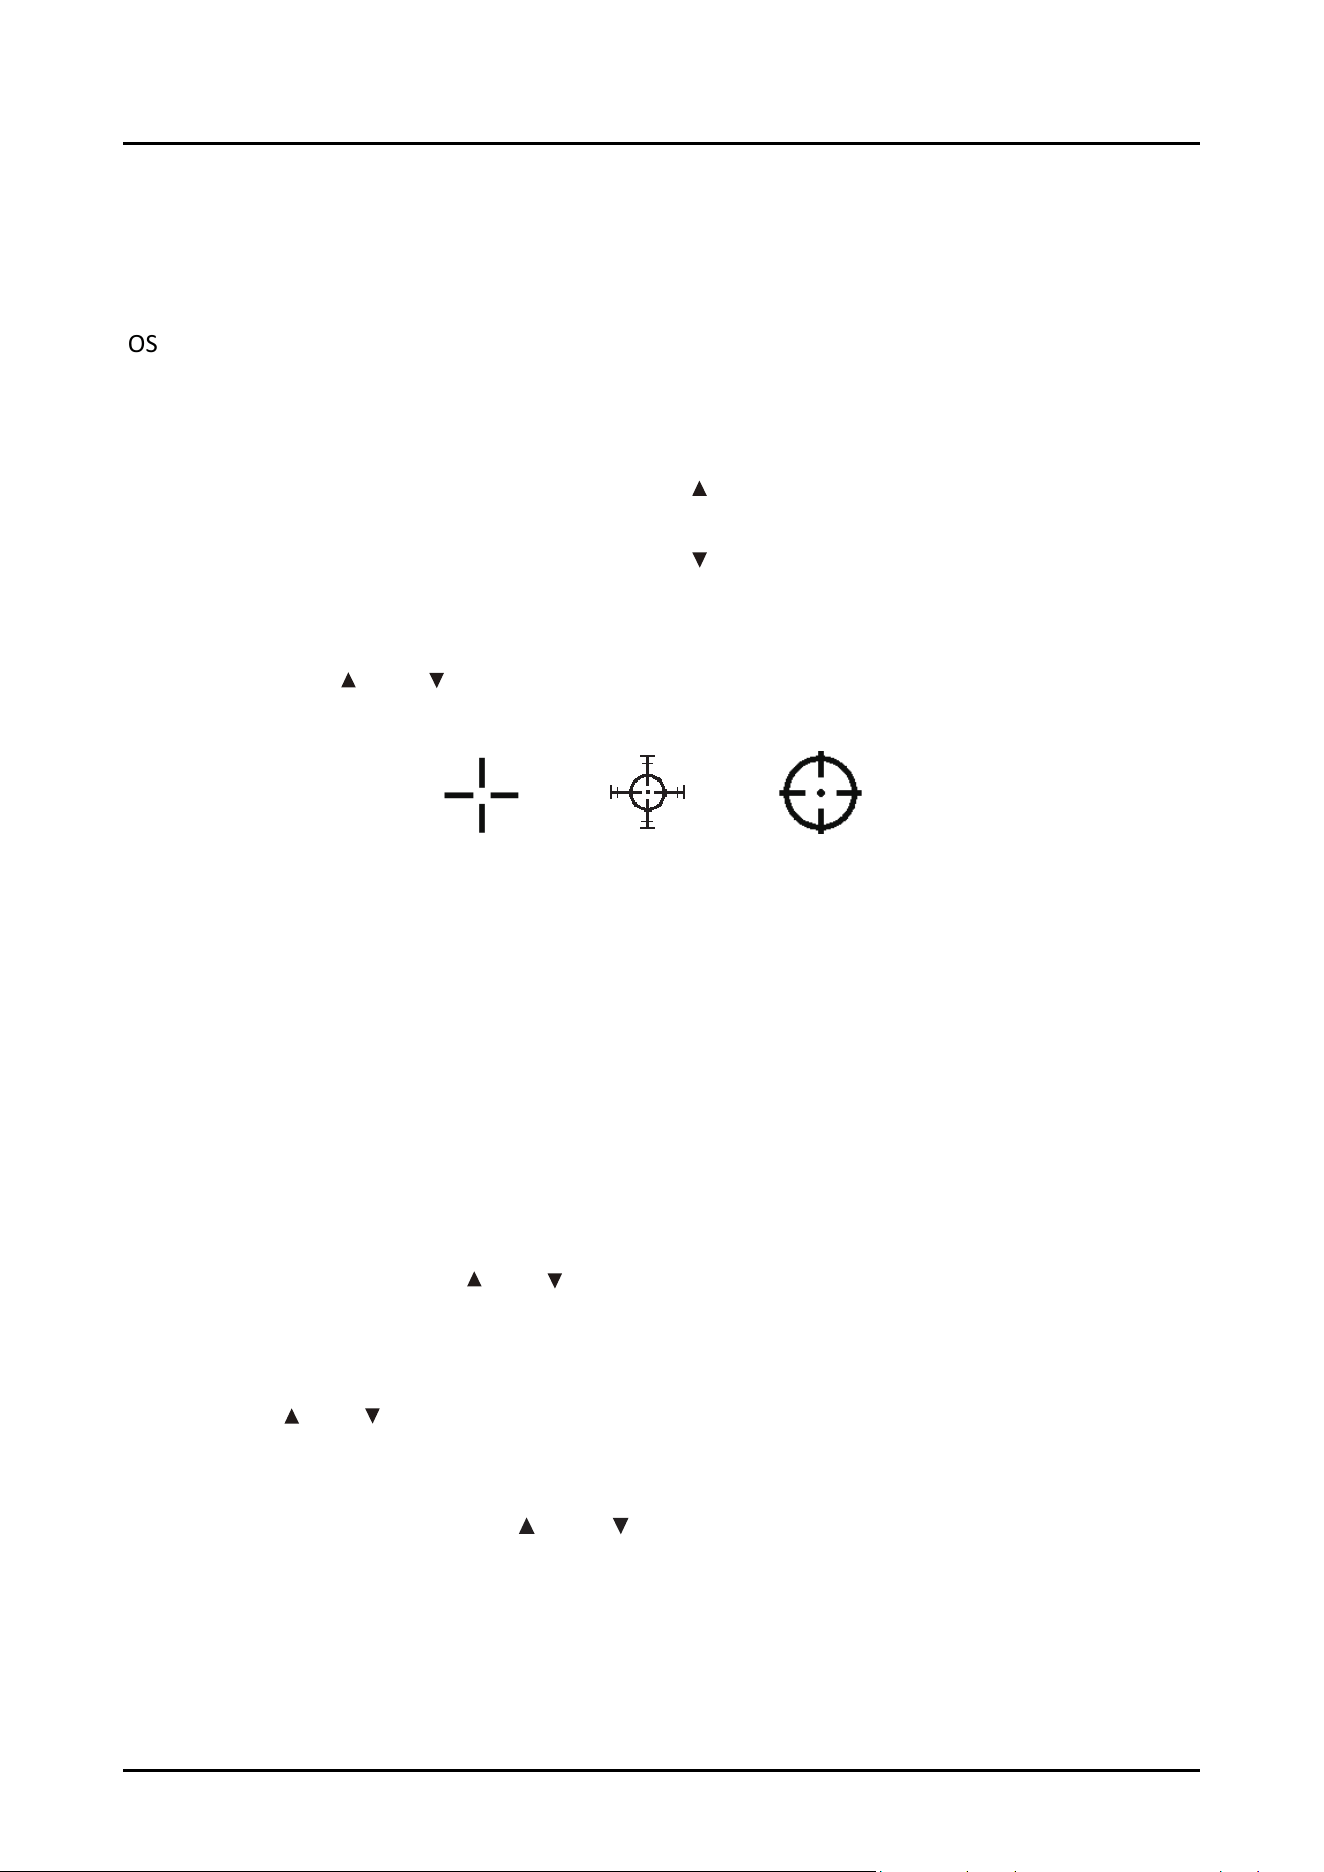
When there is no active menu, directly press the "2" key to enter the collimation adjustment
mode, and press " " or " " to switch the collimation mode.
OSD shortcut keys
This function facilitates users to adjust brightness, contrast, and image
functions.
Note: When the user opens dynamic contrast or selects non-standard mode, the brightness and
contrast shortcut keys are invalid.
On screen menu (OSD) usage guidelines
The following description can help you adjust the display through the operation menu on the
screen. Once you have completed a certain function, please select the (2) key to exit the menu.
Please follow the steps below to adjust using OSD (Screen Menu).
Step 1: Press the main menu (1) key once to activate the OSD menu.
Step 2: Press the selection key " "or" "to select the function icon you want to adjust.
Step 3: Press the (1) key once to activate the function icon you want to adjust.
Step 4: Press " " or " " to adjust the set value and adjust the screen.
Step 5: Press the (1) key again to save the adjusted set value, and then press the (2) key to return
to the previous menu; You can use " " or " " to select other function icons for settings, or
press the (2) key once to exit.
Step 6: Repeat steps 2 to 5 to make adjustments to other functions.
Monitor User Manual
7
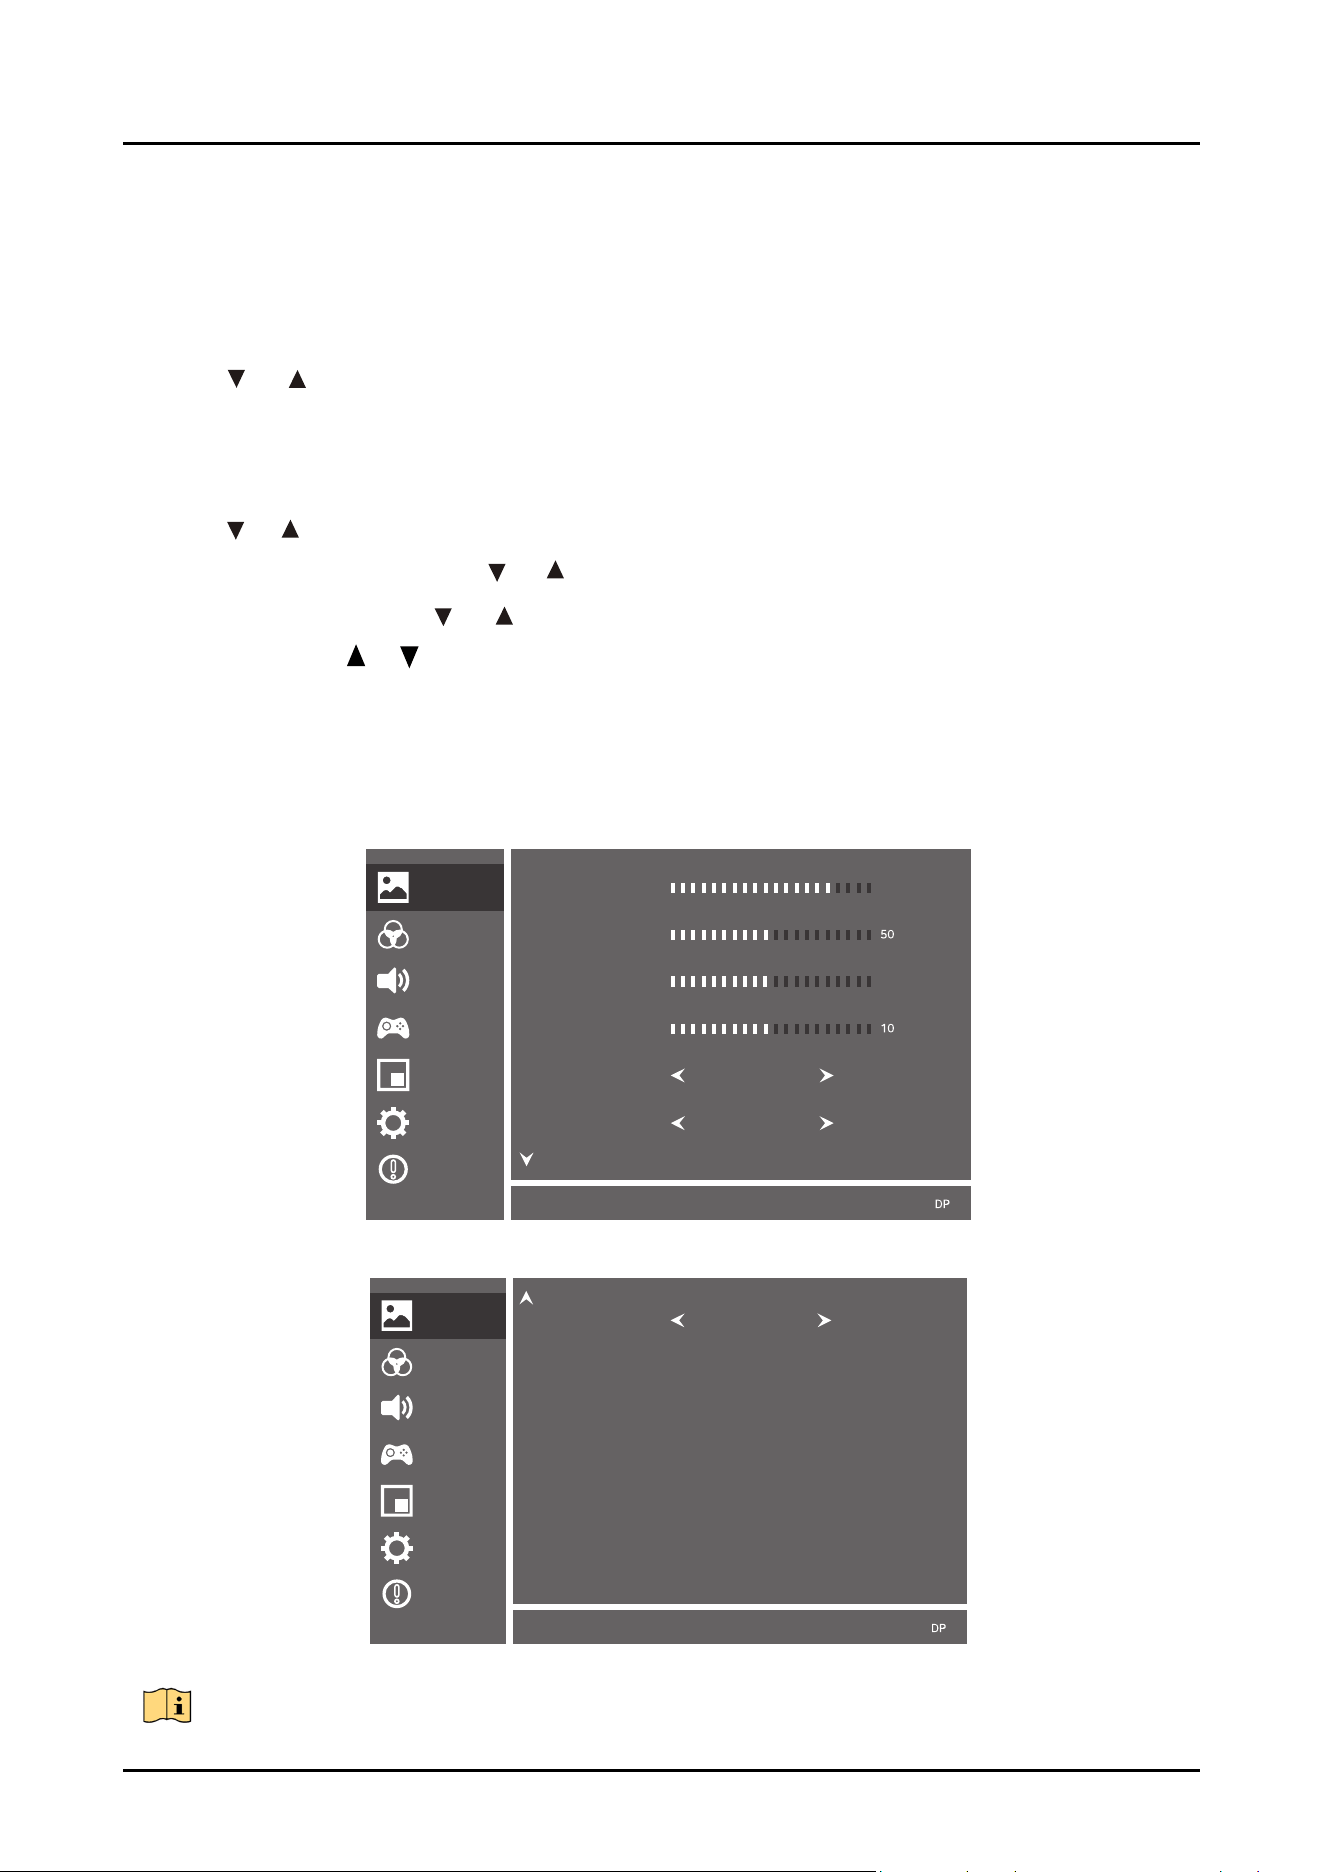
Figure 5-1 Menu diagram
5.2 Main Menu
The steps for adjusting image settings are as follows.
step 1
Press the [1] key to display the main menu page on the screen (as shown in the following
figure).
step 2 Brightness, contrast, dark field adjustment, color saturation: When brightness, contrast, dark field
adjustment, or color saturation is selected (this sentence is omitted below), press the
[ or ] button to adjust its range.
step 3
Dynamic contrast: Press [ or ] to turn it on or off.
step 4
Image mode: Press [ or ] to select the screen mode being displayed.
step 5
HDR: Press [ or ] to select automatic or off.
step 6
After adjusting, press the [2] key to return to the upper menu.
Remarks:
When the user opens dynamic contrast and other non-standard modes, the brightness and
contrast shortcut keys are invalid.
Figure 5-2 Menu diagram
Press the [1] key to enter the right [Brightness]
Adjust the interface. At this point, the word "brightness" is selected and turns blue. Press the
[ or ] button to switch to contrast, dark field adjustment, color saturation, dynamic
contrast, image mode, and HDR.
Illustrate
The illustrations in the manual are for reference only, and everything is subject to the actual product.
Picture
Color
Audio
Gaming
OSD
System
Information
Brightness
Contrast
Black Boost
Saturation
DCR
Picture Mode
Off
User
80
50
Picture
Color
Audio
Gaming
OSD
System
Information
HDR
Off
Monitor User Manual
8
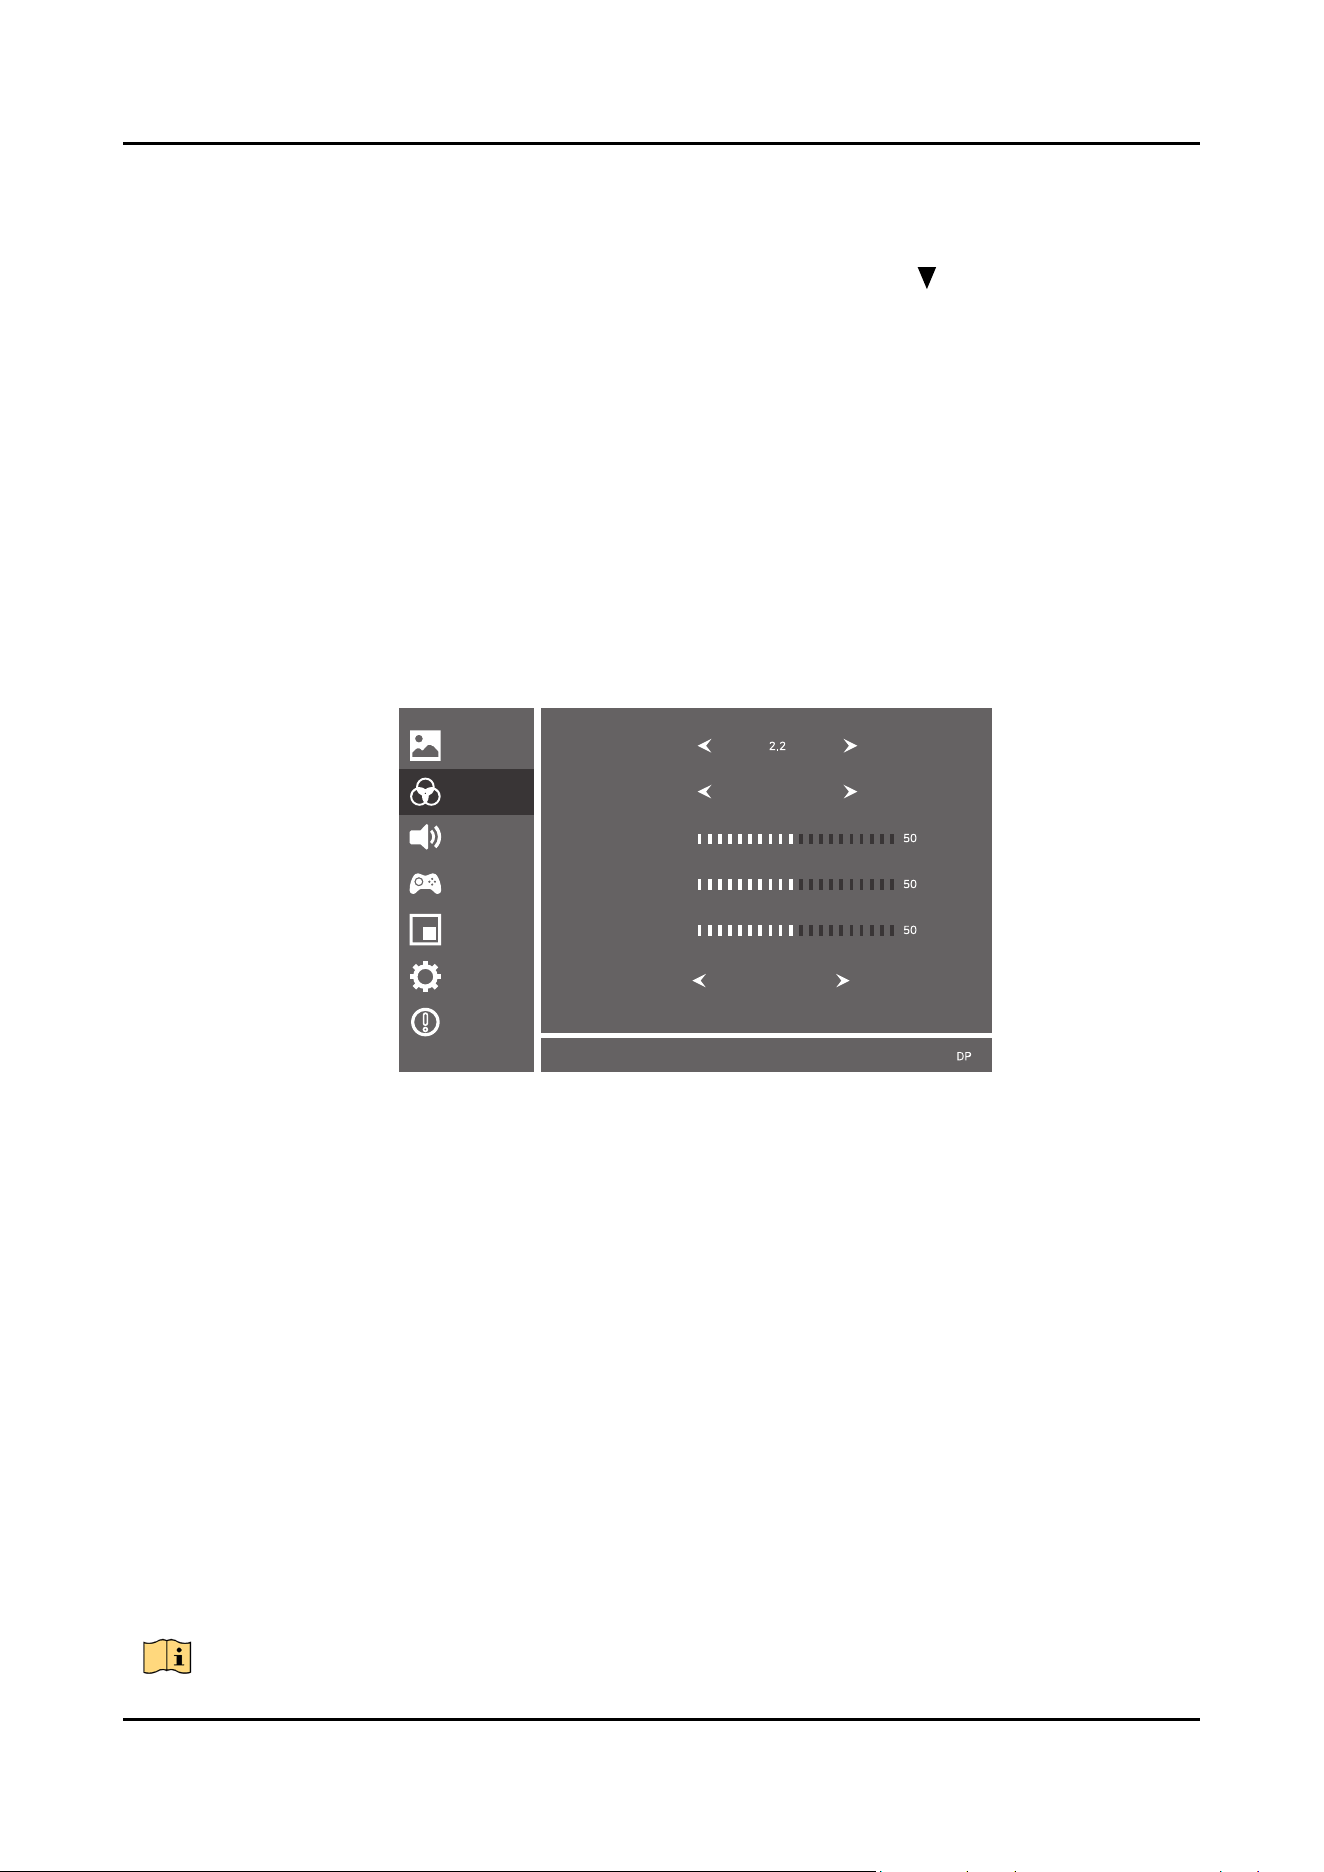
The steps for adjusting color settings are as follows.
Step 1: Press the [1] key to open the menu page, and then press again [ ]to enter the page
shown in the following figure.
Step 2: Press the [1] key in the menu setting interface to enter the secondary menu on the right.
Step 5:
Step 6: After adjusting, press the [2] key to return to the upper menu.
Figure 5-3 Menu diagram
Gamma: Select Gamma 1.8, 2.2, 2.4.
Color temperature: Select cold color temperature, normal, warm color temperature,
and user; When selecting a user, the red, green, and blue values below can be
adjusted, with an adjustable range of 0-100.
Low blue light: anti blue light function
The illustrations in the manual are for reference only, and everything is subject to the actual product.
Illustrate
Step 3:
Audio
Gaming
OSD
System
Information
Picture
Color
Gamma
Color Temp.
R
G
B
Normal
Reduce Blue Light
Off
Step 4:
Monitor User Manual
9
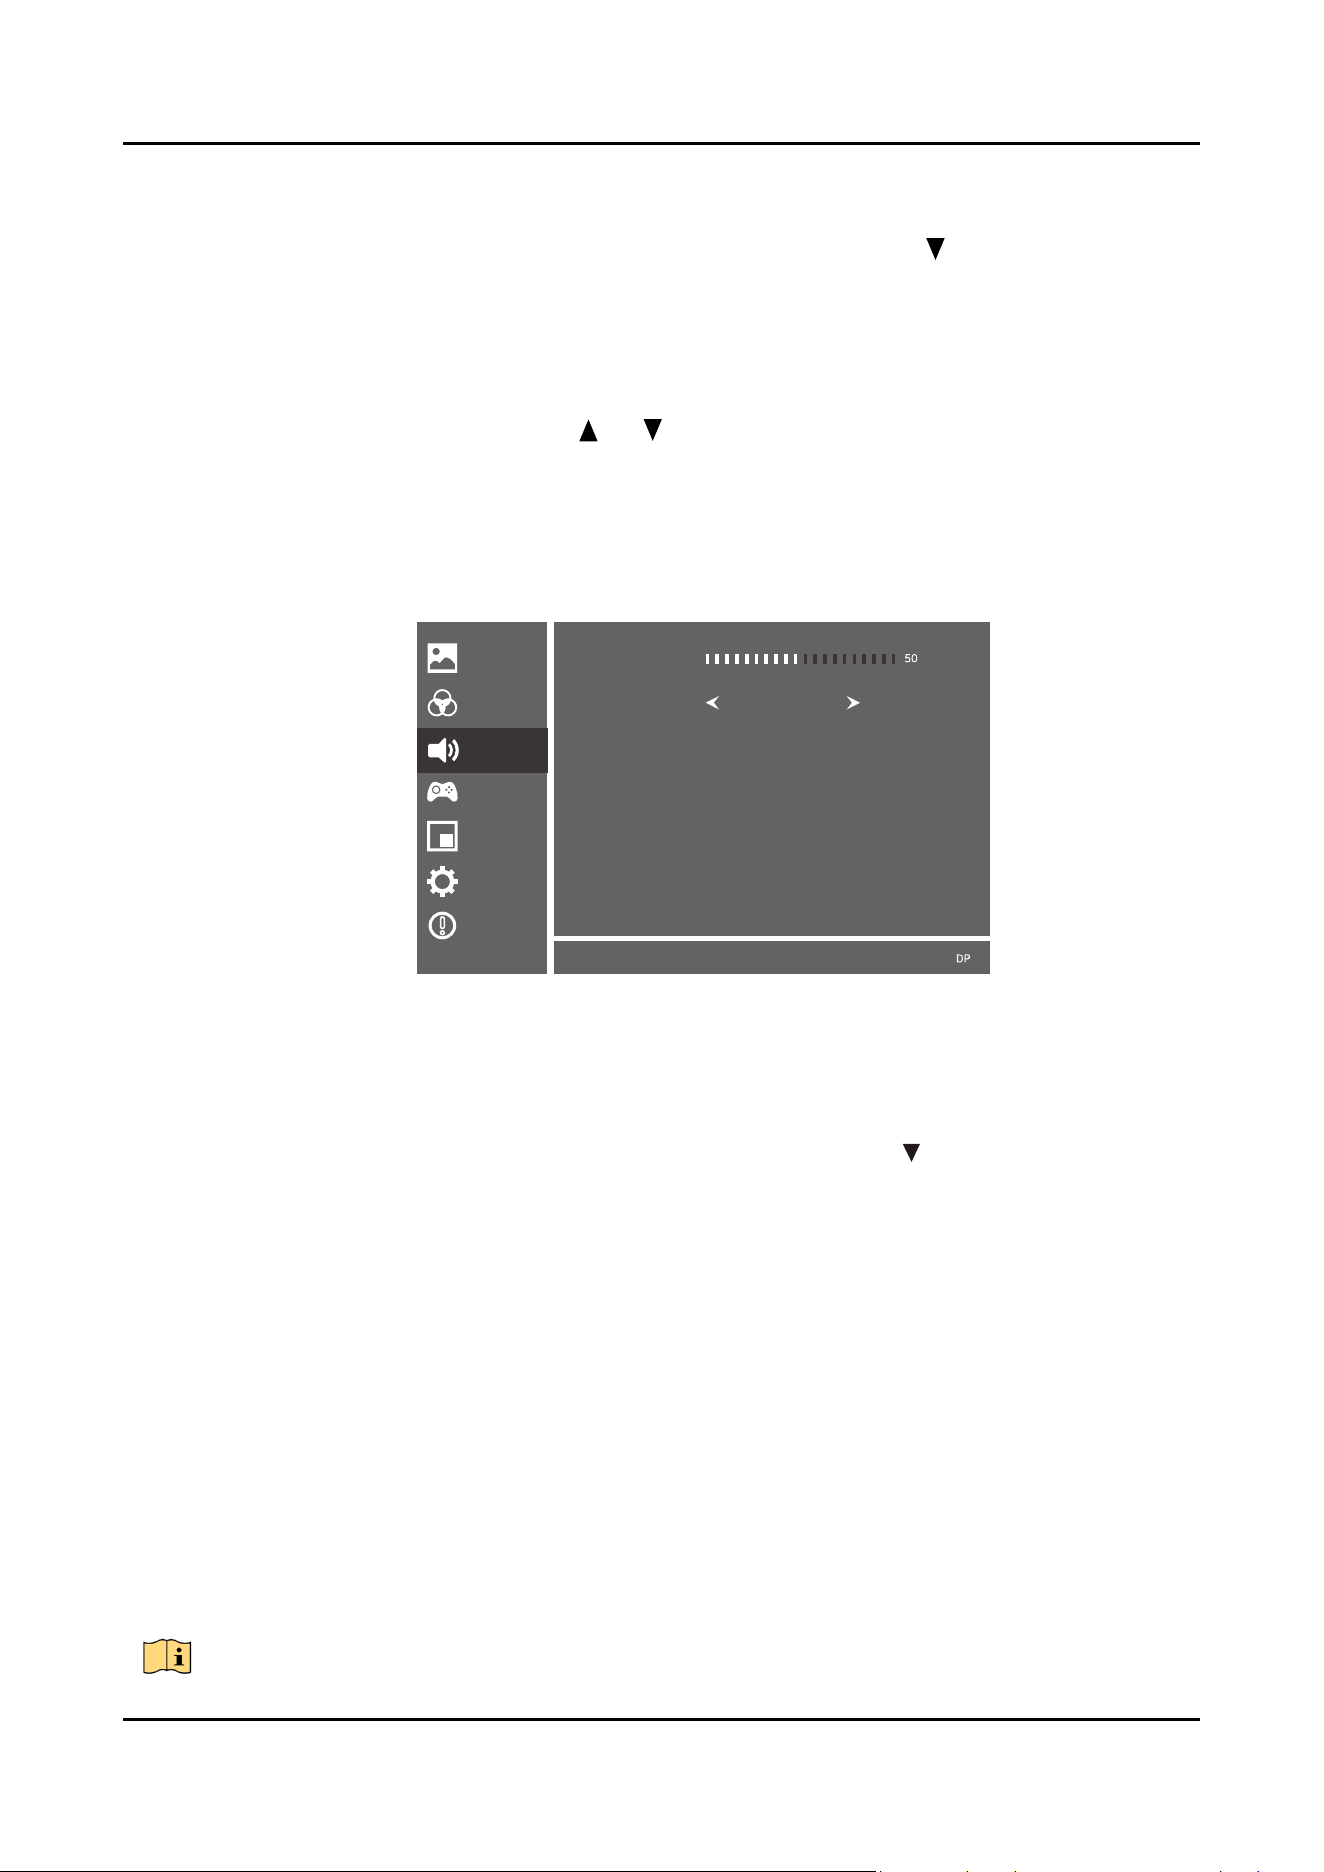
Figure 5-4 Menu diagram
The steps for adjusting the volume setting are as follows.
Press the [1] key to open the menu page, and then press [ ] twice to enter
the page shown in the following figure.
In the menu setting interface, press the [1] key to enter the secondary menu on
the right.
Volume: Press the button [ or ] to adjust the menu value, with an
adjustable range of 0-100.
Mute: Set the monitor sound on or off.
After adjusting, press the [2] key to return to the upper level.
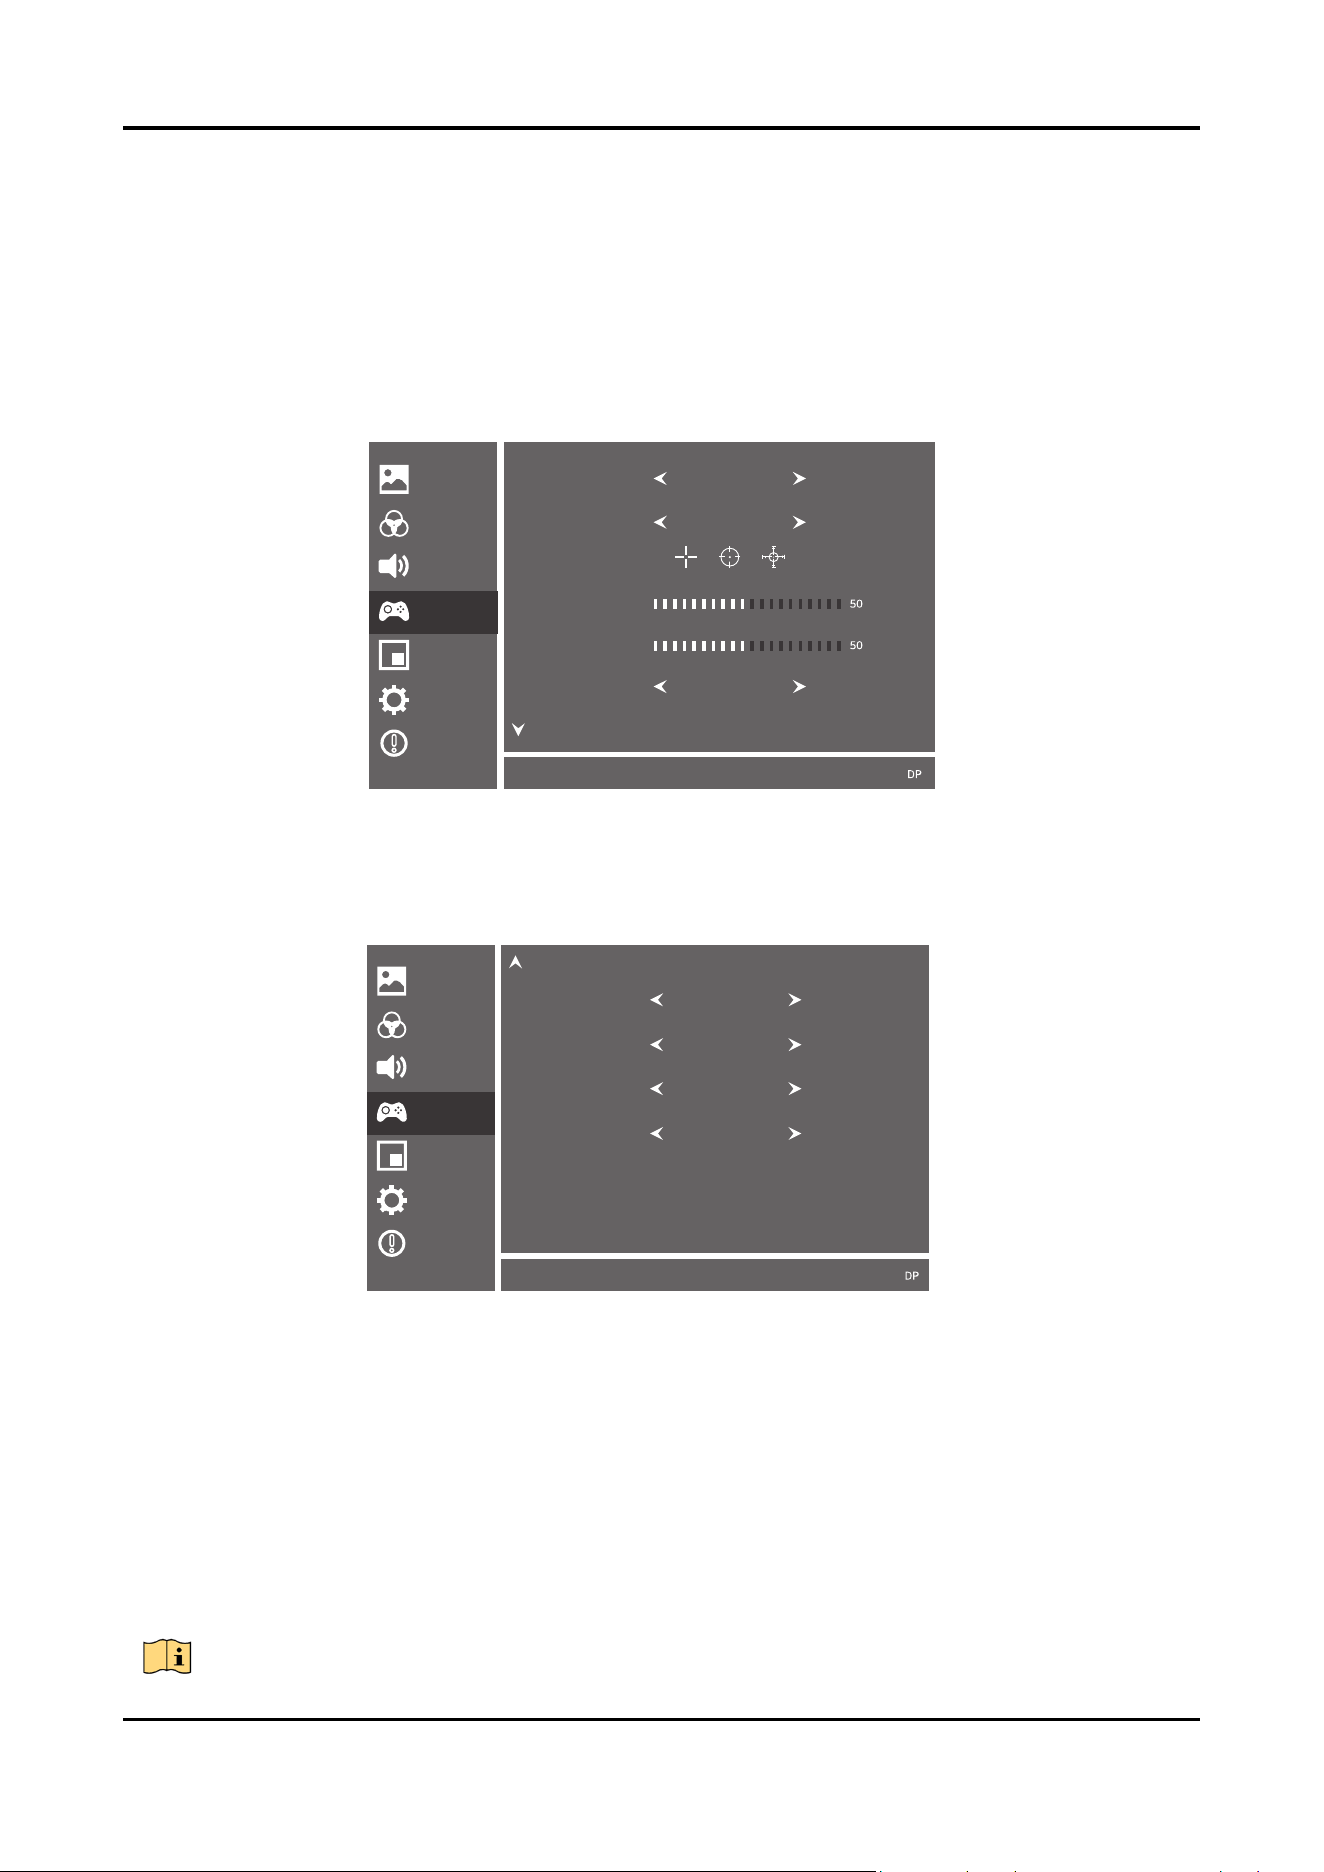
The steps for adjusting game settings are as follows.
Press the [1] key to open the menu page, and then press [ ] three times to enter
the page shown in the following figure.
Press the [1] key in the menu setting interface to enter the secondary menu on the
right.
Game mode: Set the mode of the display screen in the game.
Collider: Select a collimator style.
Horizontal position of the collimator: Adjust the left and right positions of the collimator.
Vertical position of the collimator: Adjust the upper and lower positions of the
collimator.
Color of the collimator: Select the color of the collimator.
The illustrations in the manual are for reference only, and everything is subject to the actual product.
Illustrate
Step 1:
Step 2:
Step 3:
Step 4:
Step 5:
Step 1:
Step 2:
Step 3:
Step 4:
Step 5:
Step 6:
Step 7:
Picture
Color
Gaming
OSD
System
Information
Volume
Mute
Off
Audio
Monitor User Manual
10
Figure 5-5 Menu diagram
Step 8: Low Input Delay: Select Low Input Delay on and off.
Step 9: OD: Select the OD mode.
Step 10: Adaptive Sync: Select Adaptive Sync on and off.
Step 11: Refresh Rate: Select the location to display the refresh rate.
Step 12: After adjusting, press the [2] key to return to the upper level.
Figure 5-6 Menu diagram
The illustrations in the manual are for reference only, and everything is subject to the actual product.
Illustrate
Mode
Aim Point
Aim H.Pos.
Aim V.Pos.
Aim Color
Off
Off
White
Picture
Color
OSD
System
Information
Gaming
Audio
Picture
Color
OSD
System
Information
Gaming
Off
Adaptive-Sync
Audio
Low input Lag
Refresh Rate
Off
Off
Off
OD
Monitor User Manual
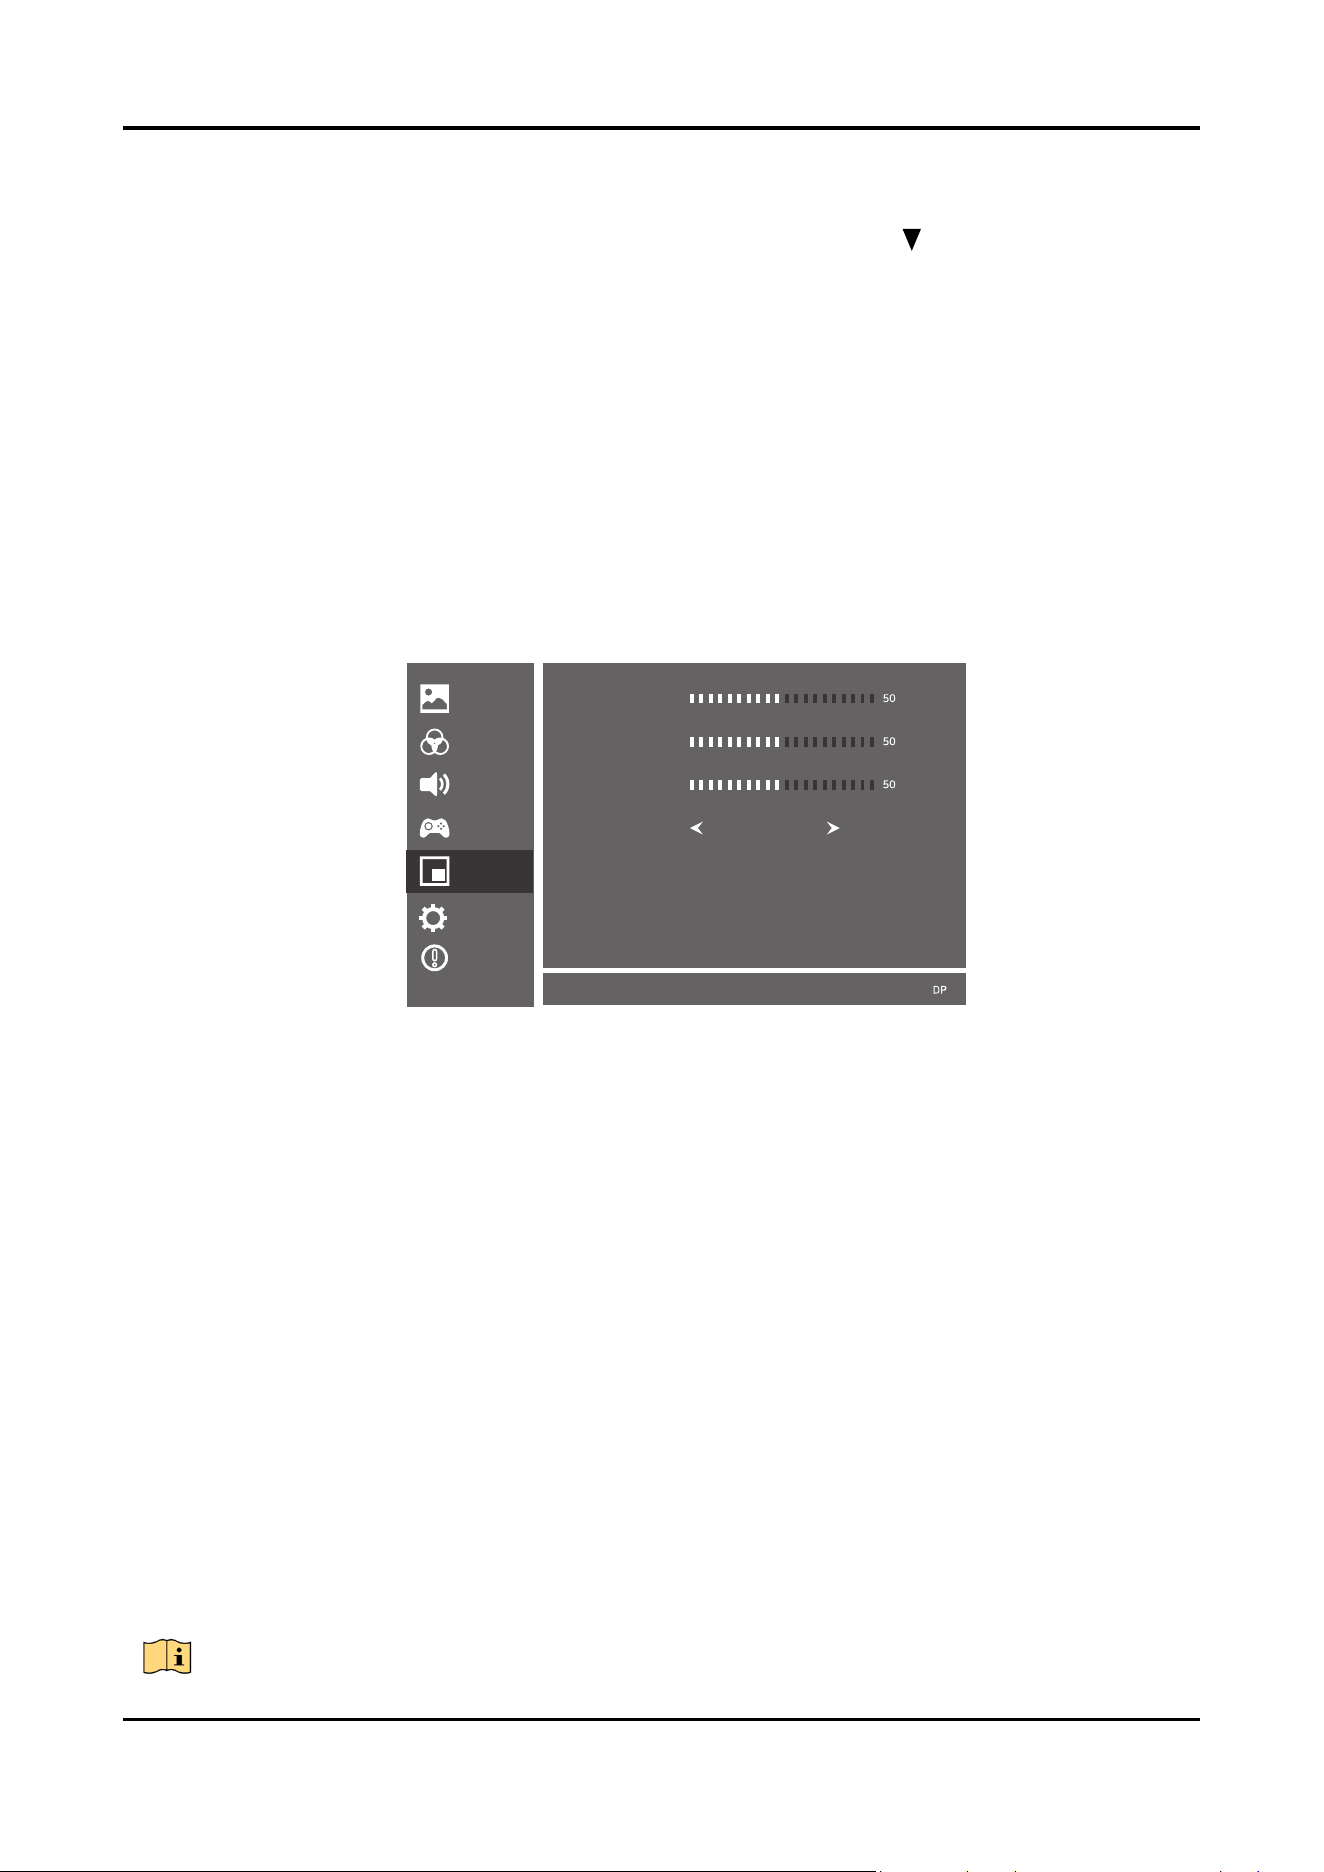
Figure 5-7 Menu diagram
The steps for adjusting OSD settings are as follows.
11
Press the [1] key to open the menu page, and then press [ ] four times to enter
the page shown in the following figure.
Press the [2] key in the menu setting interface to enter the secondary menu on the
right.
Horizontal position: Adjust the left and right positions of the OSD menu.
Vertical position: Adjust the up and down positions of the OSD menu.
OSD time: Adjust the display time of the OSD menu.
Transparency: Adjust the transparency of the OSD menu.
After adjusting, press the [2] key to return to the upper level.
The illustrations in the manual are for reference only, and everything is subject to the actual product.
Illustrate
Step 1:
Step 2:
Step 3:
Step 4:
Step 5:
Step 6:
Step 7:
OSD H.Pos.
OSD V.Pos.
OSD Time
Transparency
Off
Picture
Color
OSD
System
Information
Gaming
Audio
Monitor User Manual

Figure 5-8 Menu diagram
The steps for adjusting system settings are as follows.
12
The illustrations in the manual are for reference only, and everything is subject to the actual product.
Illustrate
Press the [1] key to open the menu page, and then press [ ] five times to
enter the page shown in the following figure.
Press the [1] key in the menu settings interface to enter the secondary menu on
the right.
Input signal: Select the input signal.
Step 1:
Step 2:
Step 3:
Step 4:
Step 5:
Step 6:
Step 7:
Picture
Color
OSD
System
Information
Gaming
Audio
Signal source
DDC/CI
Aspect Ratio
Language
On
Full
English
DP
DDC/CI:Select DDC/CI on and off.
Image Scale: Select the image scale.
Language: Select the OSD language.
After adjusting, press the [2] key to return to the upper menu.
Monitor User Manual
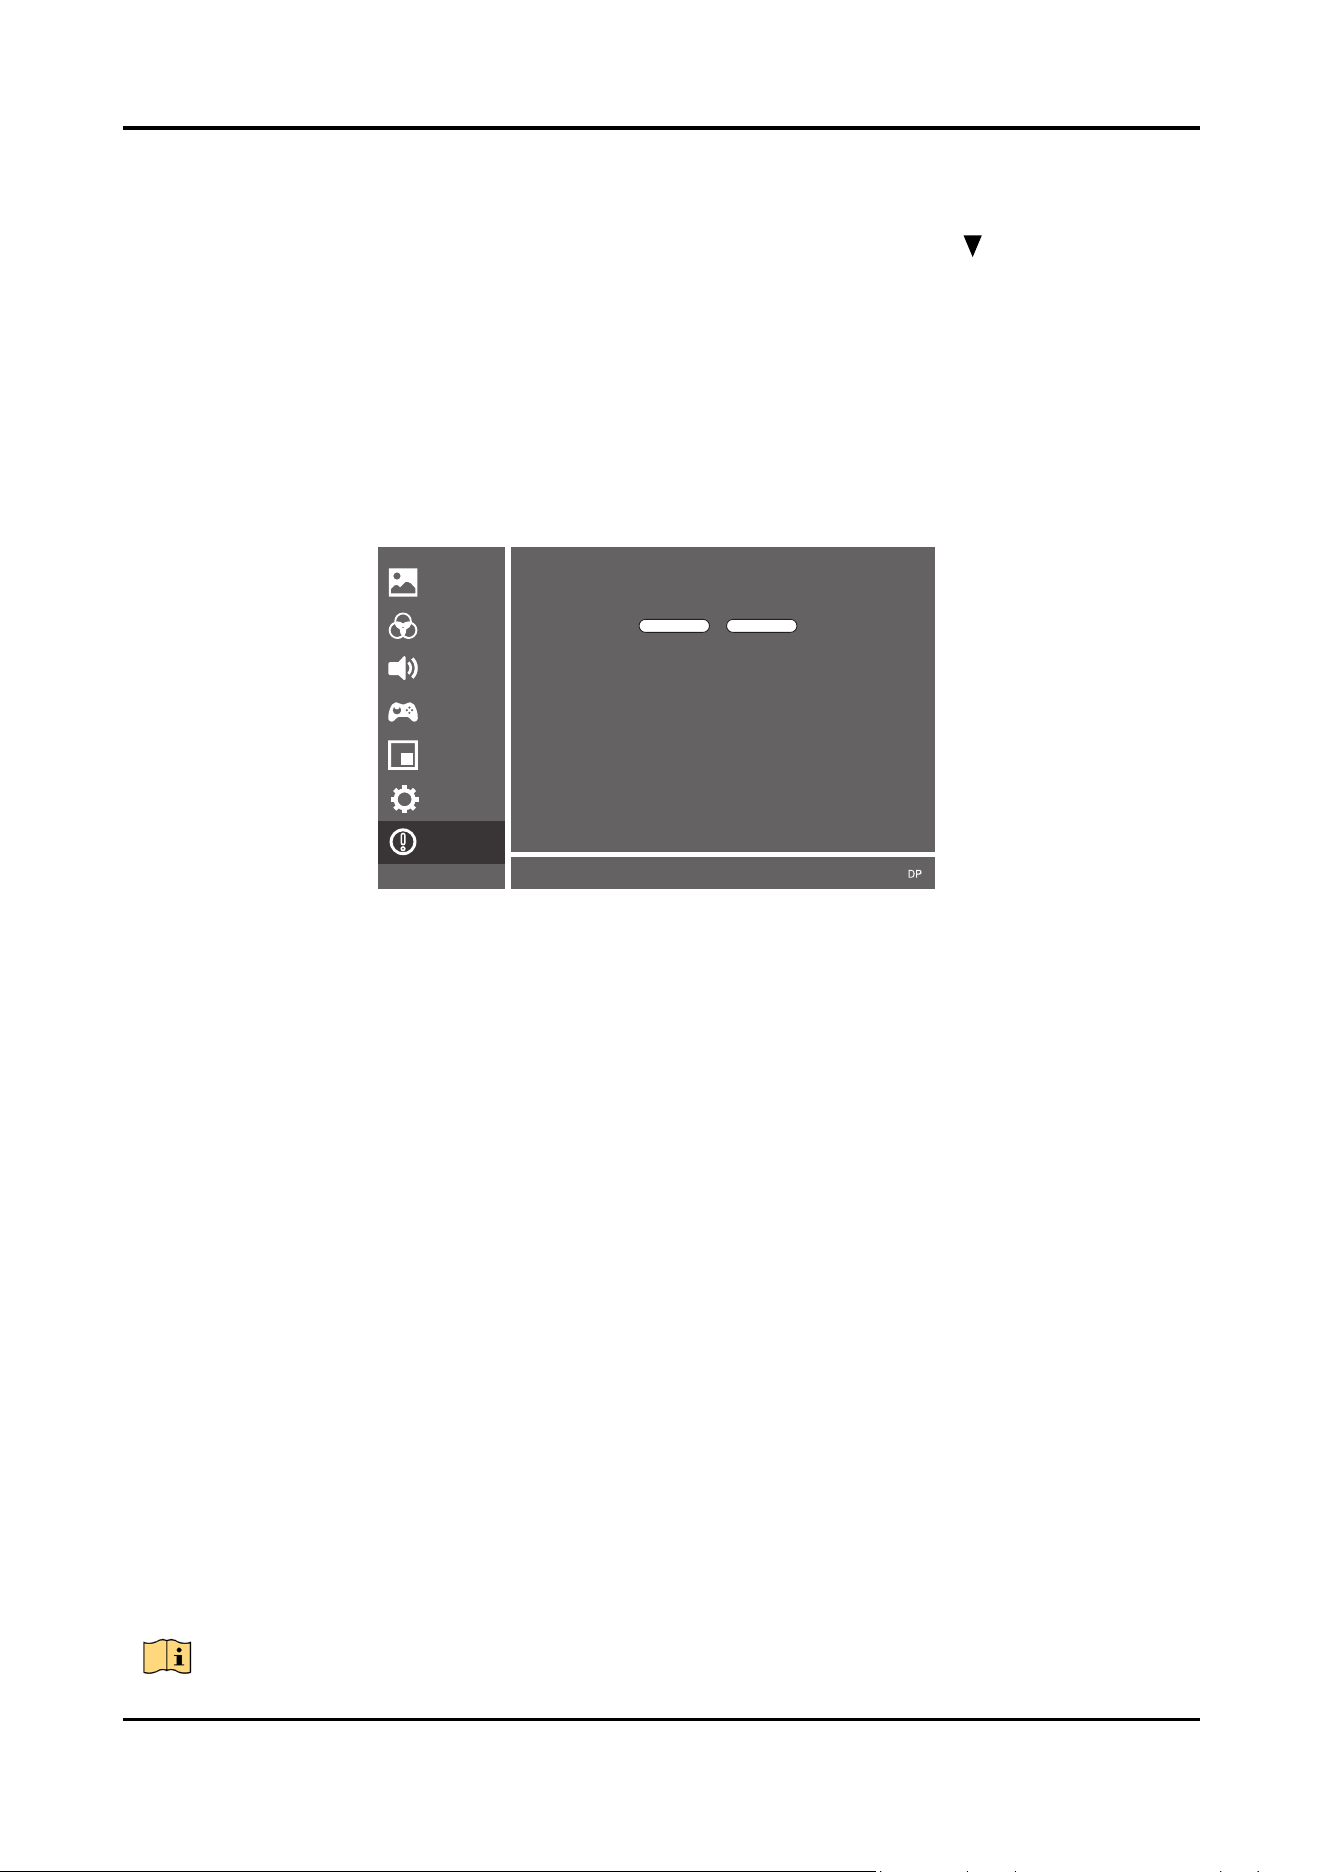
Figure 5-9 Menu diagram
The steps for adjusting information are as follows.
Press the [1] key to open the menu page, and then press [ ] six times to
enter the submenu.
Press the [1] key in the menu setting interface to enter the secondary menu on
the right.
Reset: Restore factory settings
Mode: Display the current display mode
After adjusting, press the [2] key to return to the upper menu.
13
The illustrations in the manual are for reference only, and everything is subject to the actual product.
Illustrate
Step 1:
Step 2:
Step 3:
Step 4:
Step 5:
Picture
Color
OSD
System
Information
Gaming
Audio
3840*2160@60Hz
Reset
Mode
SDR HDR
Monitor User Manual

PN:G6AUM027000177