

www.teccpotools.com
Model no.: TAPS22P
Instruction Manual

English
Français
Español
01~11
12~23
24~35
Contents
www.teccpotools.com
Intended use
This machine is primarily intended for the sawing, longitudinally and transversely, of solid wood,
chipboard, plywood, alum1n1um, tiles and stone held in a fixed position. Please note that the blade
pre-installed in the saw as supplied is intended for use with wood only. Any other use or modification
to the device shall be considered as improper use and could give rise to considerable dangers It is not
suitable for commercial use
Function Description
The numbering of the products features refers to the illustration of the machine on the graphics page.
b)
c)
d)
e)
f)
g)
4)
a)
b)
c)
d)
e)
f)
g)
5)
Have your power tool serviced by a qualified repair person using only identical replacement parts.
This will ensure that the safety of the power tool is maintained.
DANGER: Keep hands away from cutting area and the blade.
a)
b)
●
●
●
WARNING: Some dust created by power sanding, sawing, grinding, drilling, and other construc-
tion activities contains chemicals known in the state of California to cause cancer, birth defects or other
reproductive harm. Some examples of these chemicals are:
●
Your risk from these exposures varies, depending on how often you do this type of work. To reduce
your exposure to these chemicals: work in a well ventilated area, and work with approved safety
equipment, such as those dust masks that are specially designed to filter out microscopic particles.
WARNING: ALWAYS USE SAFETY GLASSES. Everyday eyeglasses are NOT safety glasses.
Also use face or dust mask if cutting
●
WARNING: Cutting plastics, sap coated wood, and other materials may cause melted material
to accumulate on the blade tips and the body of the saw blade, increasing the risk of blade overheat-
ing and binding while cutting.
WARNING: Use of this tool can generate and/or disburse dust, which may cause serious and
permanent respiratory or other injury. Always use NIOSH/OSHA approved respiratory protection
appropriate for the dust exposure. Direct particles away from face and body. Always operate tool in
well-ventilated area and provide for proper dust removal. Use dust collection system wherever
possible.
EN
FR
ES
DEFINITIONS: SAFETY ALERT SYMBOLS AND WORDS
It is important for you to read and understand this manual. The information it contains relates to
protecting YOUR SAFETY and PREVENTING PROBLEMS. The symbols below are used to help you
recognize this information.
NOTICE: Used without the safety alert symbol indicates potentially hazardous situation which, if not
avoided, may result in property damage.
WARNING: Read all safety warnings and all instructions.
Failure to follow the warnings and instructions may result in electric shock, fire and/or serious injury.
SAVE ALL WARNINGS AND INSTRUCTIONS FOR FUTURE REFERENCE
The term “power tool” in the warnings refers to your mains operated (corded) power tool or battery-op-
erated (cordless) power tool.
1)
a)
b)
c)
2)
a)
b)
c)
d)
e)
f)
3)
a)
DANGER: Indicates an imminently hazardous situation which, if not avoided, will result in
death or serious injury.
WARNING: Indicates a potentially hazardous situation which, if not avoided, could result in
death or serious injury.
CAUTION: Indicates a potentially hazardous situation which, if not avoided, may result in minor
or moderate injury.
General Power Tool Safety Warnings
WORK AREA SAFETY
Keep work area clean and well lit. Cluttered or dark areas invite accidents.
Do not operate power tools in explosive atmospheres, such as in the presence of flammable
liquids, gases or dust. Power tools create sparks which may ignite the dust or fumes.
Keep children and bystanders away while operating a power tool. Distractions can cause you to
lose control.
ELECTRICAL SAFETY
Power tool plugs must match the outlet. Never modify the plug in any way. Do not use any adapter
plugs with earthed (grounded) power tools. Unmodified plugs and matching outlets will reduce risk
of electric shock.
Avoid body contact with earthed or grounded surfaces such as pipes, radiators, ranges and
refrigerators. There is an increased risk of electric shock if your body is earthed or grounded.
Do not expose power tools to rain or wet conditions. Water entering a power tool will increase the
risk of electric shock.
Do not abuse the cord. Never use the cord for carrying, pulling or unplugging the power tool. Keep
cord away from heat, oil, sharp edges or moving parts. Damaged or entangled cords increase the
risk of electric shock.
When operating a power tool outdoors, use an extension cord suitable for outdoor use. Use of a
cord suitable for outdoor use reduces the risk of electric shock.
If operating a power tool in a damp location is unavoidable, use a ground fault circuit interrupter
(GFCI) protected supply. Use of a GFCI reduces the risk of electric shock.
PERSONAL SAFETY
Stay alert, watch what you are doing and use common sense when operating a power tool. Do not
use a power tool while you are tired or under the influence of drugs, alcohol or medication. A
moment of inattention while operating power tools may result in serious
personal injury.
Use personal protective equipment.
Always wear eye protection. Protective equipment such as dust mask, nonskid safety shoes, hard
hat, or hearing protection used for appropriate conditions will reduce personal injuries.
Prevent unintentional starting. Ensure the switch is in the off position before connecting to power
source and/ or battery pack, picking up or carrying the tool. Carrying power tools with your finger
on the switch or energizing power tools that have the switch on invites accidents.
Remove any adjusting key or wrench before turning the power tool on. A wrench or a key left
attached to a rotating part of the power tool may result in personal injury.
Do not overreach. Keep proper footing and balance at all times. This enables better control of the
power tool in unexpected situations.
Dress properly. Do not wear loose clothing or jewelry. Keep your hair, clothing and gloves away
from moving parts. Loose clothes, jewelry or long hair can be caught in moving parts.
If devices are provided for the connection of dust extraction and collection facilities, ensure these
are connected and properly used.
Use of dust collection can reduce dust-related hazards.
POWER TOOL USE AND CARE
Do not force the power tool. Use the correct power tool for your application. The correct power tool
will do the job better and safer at the rate for which it was designed.
Do not use the power tool if the switch does not turn it on and off. Any power tool that cannot be
controlled with the switch is dangerous and must be repaired.
Disconnect the plug from the power source and/or the battery pack from the power tool before
making any adjustments, changing accessories, or storing power tools. Such preventive safety
measures reduce the risk of starting the power tool accidentally.
Store idle power tools out of the reach of children and do not allow persons unfamiliar with the
power tool or these instructions to operate the power tool. Power tools are dangerous in the hands
of untrained users.
Maintain power tools. Check for misalignment or binding of moving parts, breakage of parts and
any other condition that may affect the power tool’s operation. If damaged, have the power tool
repaired before use. Many accidents are caused by poorly maintained power tools.
Keep cutting tools sharp and clean. Properly maintained cutting tools with sharp cutting edges are
less likely to bind and are easier to control.
Use the power tool, accessories and tool bits, etc. in accordance with these instructions, taking
into account the working conditions and the work to be performed. Use of the power tool for opera-
tions different from those intended could result in a hazardous situation.
SERVICE
Keep your second hand on auxiliary handle or motor housing. If both hands are holding the saw,
they cannot be cut by the blade.
Do not reach underneath the workpiece. The guard cannot protect you from the blade below the
workpiece.
c)
d)
e)
f)
g)
h)
Causes and Operator Prevention of Kickback:
●
●
●
Kickback is the result of saw misuse and/ or incorrect operating procedures or conditions and can be
avoided by taking proper precautions as given below:
a)
b)
c)
d)
e)
f)
g)
Lower Guard Safety Instructions
a)
Adjust the cutting depth to the thickness of the workpiece. Less than a full tooth of the blade teeth
should be visible below the workpiece.
Never hold piece being cut in your hands or across your leg. Secure the workpiece to a stable
platform. It is important to support the work properly to minimize body exposure, blade binding, or
loss of control.
Hold the power tool by insulated gripping surfaces only, when performing an operation where the
cutting tool may contact hidden wiring or its own cord. Contact with a “live” wire will also make
exposed metal parts of the power tool “live” and could give the operator an electric shock.
When ripping always use a rip fence or straight edge guide. This improves the accuracy of cut and
reduces the chance of blade binding.
Always use blades with correct size and shape (diamond versus round) of arbor holes. Blades that
do not match the mounting hardware of the saw will run eccentrically, causing loss of control.
Never use damaged or incorrect blade washers or bolt. The blade washers and bolt were specially
designed for your saw, for optimum performance and safety of operation
Kickback is a sudden reaction to a pinched, bound or misaligned saw blade, causing an uncon-
trolled saw to lift up and out of the workpiece toward the operator.
When the blade is pinched or bound tightly by the kerf closing down, the blade stalls and the motor
reaction drives the unit rapidly back toward the operator.
If the blade becomes twisted or misaligned in the cut, the teeth at the back edge of the blade can
dig into the top surface of the wood causing the blade to climb out of the kerf and jump back toward
the operator.
Maintain a firm grip with both hands on the saw and position your arms to resist kickback forces.
Position your body to either side of the blade, but not in line with the blade. Kickback could cause
the saw to jump backwards, but kickback forces can be controlled by the operator, if proper
precautions are taken.
When blade is binding, or when interrupting a cut for any reason, release the trigger and hold the
saw motionless in the material until the blade comes to a complete stop. Never attempt to remove
the saw from the work or pull the saw backward while the blade is in motion or kickback may occur.
Investigate and take corrective actions to eliminate the cause of blade binding.
When restarting a saw in the workpiece, center the saw blade in the kerf and check that saw teeth
are not engaged into the material. If saw blade is binding, it may walk up or kickback from the
workpiece as the saw is restarted.
Support large panels to minimize the risk of blade pinching and kickback. Large panels tend to sag
under their own weight. Supports must be placed under the panel on both sides, near the line of
cut and near the edge of the panel.
Do not use dull or damaged blades. Unsharpened or improperly set blades produce narrow kerf
causing excessive friction, blade binding and kickback.
Blade depth and bevel adjusting locking levers must be tight and secure before making cut. If
blade adjustment shifts while cutting, it may cause binding and kickback.
Use extra caution when sawing into existing walls or other blind areas. The protruding blade may
cut objects that can cause kickback.
Check lower guard for proper closing before each use. Do not operate the saw if lower guard does
not move freely and close instantly. Never clamp or tie the lower guard into the open position. If
saw is accidentally dropped, lower guard may be bent. Raise the lower guard with the retracting
b)
c)
d)
Additional Safety Instructions
●
●
●
●
●
●
●
●
●
●
●
●
●
●
●
The smaller the gauge number of the wire, the greater the capacity of the cable, that is 16 gauge has
more capacity than 18 gauge. An undersized cord will cause a drop in line voltage resulting in loss of
power and overheating. When using more than one extension to make up the total length, be sure
each individual extension contains at least the minimum wire size. The following table shows the
correct size to use depending on cord length and nameplate ampere rating. If in doubt, use the next
heavier gauge. The smaller the gauge number, the heavier the cord.
handle and make sure it moves freely and does not touch the blade or any other part, in all angles
and depths of cut.
Check the operation of the lower guard spring. If the guard and the spring are not operating
properly, they must be serviced before use. Lower guard may operate sluggishly due to damaged
parts, gummy deposits, or a buildup of debris.
Lower guard should be retracted manually only for special cuts such as “plunge cuts” and
“compound cuts.” Raise lower guard by retracting handle and as soon as blade enters the materi-
al, the lower guard must be released. For all other sawing, the lower guard should operate
automatically.
Always observe that the lower guard is covering the blade before placing saw down on bench or
floor. An unprotected, coasting blade will cause the saw to walk backwards, cutting whatever is in
its path. Be aware of the time it takes for the blade to stop after switch is released.
Use clamps or another practical way to secure and support the workpiece to a stable platform.
Holding the work by hand or against your body leaves it unstable and may lead to loss of control.
Keep your body positioned to either side of the blade, but not in line with the saw blade.
KICKBACK could cause the saw to jump backwards (see Causes and Operator Prevention of
Kickback and KICKBACK).
Avoid cutting nails. Inspect for and remove all nails from lumber before cutting.
Always make sure nothing interferes with the movement of the lower blade guard.
Accessories must be rated for at least the speed recommended on the tool warning label. Wheels
and other accessories running over rated speed can fly apart and cause injury. Accessory ratings
must always be above tool speed as shown on tool nameplate.
Always make sure the saw is clean before using.
Stop using this saw and have it properly serviced if any unusual noise or abnormal operation
occurs.
Always be sure all components are mounted properly and securely before using tool.
Always handle the saw blade with care when mounting or removing it or when removing the
diamond knockout.
Always wait until the motor has reached full speed before starting a cut.
Always keep handles dry, clean and free of oil and grease. Hold the tool firmly with both hands
when in use.
Always be alert at all times, especially during repetitive, monotonous operations. Always be sure
of position of your hands relative to the blade.
Stay clear of end pieces that may fall after cutting off. They may be hot, sharp and/or heavy.
Serious personal injury may result.
Replace or repair damaged cords. Make sure your extension cord is in good condition. Use only
3-wire extension cords that have 3-prong grounding-type plugs and 3-pole receptacles that accept
the tool’s plug.
An extension cord must have adequate wire size (AWG or American Wire Gauge) for safety.
ANSI Z87.1 eye protection (CAN/CSA Z94.3).
ANSI S12.6 (S3.19) hearing protection.
NIOSH/OSHA respiratory protection.
Lead from lead-based paints, crystalline silica from bricks and cement and other masonry products,
and arsenic and chromium from chemically-treated lumber (CCA).
Avoid prolonged contact with dust from power sanding, sawing, grinding, drilling, and other
construction activities. Wear protective clothing and wash exposed areas with soap and water.
Allowing dust to get into your mouth, eyes, or lay on the skin may promote absorption of harmful
chemicals.
The label on your tool may include the following symbols. The symbols and their definitions are as
follows:
Safety Rules for Laser Lights
The laser light/laser radiation used in the system is Class 2 with maximum 1mW and 650nm
wavelengths. These lasers do not normally present an optical hazard, although staring at the beam
may cause flash blindness.
WARNING : Do not stare directly at the laser beam.
A hazard may exist if you deliberately stare into the beam, please observe all safety rules as follows;
●
●
●
●
●
CAUTION: Use of controls or adjustments or performance of procedures other than those
specified herein may result in hazardous radiation exposure
The laser shall be used and maintained in accordance with the manufacturer’s instructions.
Never aim the beam at any person or an object other than the workpiece.
The laser beam shall not be deliberately aimed at personnel and shall be prevented from being
directed towards the eye of a person for longer than 0.25s.
Always ensure the laser beam is aimed at a sturdy workpiece without reflective surfaces. I.e. wood
or rough coated surfaces are acceptable. Bright shiny reflective sheet steel or the like is not
suitable for laser use as the reflective surface could direct the beam back at the operator.
Do not change the laser light assembly with a different type. Repairs must be carried out by the
laser manufacturer or an authorized agent.
Assembly/Adjustment setup
WARNING: Before any work on the power tool, always remove the plug from the power source.
●
●
●
Adjust the cutting depth,
1.
2.
Note: if possible, recommend to setup the cutting depth approximately 2mm deeper than material
thickness, this should help to ensure you achieve a clean cut.
When mounting the saw blade, wear protective gloves. Danger of injury when touching the saw
blade.
Only use saw blade that correspond with the characteristic data given in the operating instructions.
Do not under any circumstances use grinding discs as the cutting tool.
Attaching and Removing the Blade - FIGURE C-E
• Retract lower guard and assemble blade (8) and clamp washer (17) as shown in figure C.
• Depress the spindle lock (13) while turning the blade bolt (7) with the blade wrench (16) until the
blade lock engages and the blade stops rotating. figure D
NOTE: Blade wrench is stored in polybag together with manual
• Tighten the blade bolt securely with the blade wrench.
NOTE: Bolt has a left-handed thread. To loosen, turn clockwise.
To tighten, turn counterclockwise.figure E
NOTE: Never engage the blade lock while the saw is running, or engage in an effort to stop the tool.
Never turn the tool on while the blade lock is engaged. Serious damage to your saw will result.
As required, move the unlocked knob and let the finger point at the suitable position of depth scale,
Then rotate the knob 180°to lock it,
Switching On and Off
Laser function
CHANGING THE LASER BATTERIES
The batteries that operate the laser will have to be replaced after considerable use of the laser.
1.
2.
3.
4.
DANGER: Never allow the laser beam to shine into a person's eyes, Serious eye damage could
result. Make sure the laser switch is OFF and the laser is NOT pointing toward you while replacing the
laser batteries and when checking the laser function.
Application
The mini plunge saw is a versatile one that allows you to cut many different types of materials. Some
of the materials include
●
●
●
Blade selection
MAINTENANCE
WARNING: Unplug tool before installing or removing accessories, before adjusting, or when
making repairs. Use only mild soap and damp cloth to clean the tool. Never let any liquid get inside
the tool; never immerse any part of the tool into a liquid.
IMPORTANT: To assure product SAFETY and RELIABILITY, repairs, maintenance and adjust-
ment (other than those listed
in this manual) should be performed by authorized service centers or other qualified service organiza-
tions, always using identical replacement parts.
- 01 -
Technology Creates Power

Intended use
This machine is primarily intended for the sawing, longitudinally and transversely, of solid wood,
chipboard, plywood, alum1n1um, tiles and stone held in a fixed position. Please note that the blade
pre-installed in the saw as supplied is intended for use with wood only. Any other use or modification
to the device shall be considered as improper use and could give rise to considerable dangers It is not
suitable for commercial use
Function Description
The numbering of the products features refers to the illustration of the machine on the graphics page.
b)
c)
d)
e)
f)
g)
4)
a)
b)
c)
d)
e)
f)
g)
5)
Have your power tool serviced by a qualified repair person using only identical replacement parts.
This will ensure that the safety of the power tool is maintained.
DANGER: Keep hands away from cutting area and the blade.
a)
b)
●
●
●
WARNING: Some dust created by power sanding, sawing, grinding, drilling, and other construc-
tion activities contains chemicals known in the state of California to cause cancer, birth defects or other
reproductive harm. Some examples of these chemicals are:
●
Your risk from these exposures varies, depending on how often you do this type of work. To reduce
your exposure to these chemicals: work in a well ventilated area, and work with approved safety
equipment, such as those dust masks that are specially designed to filter out microscopic particles.
WARNING: ALWAYS USE SAFETY GLASSES. Everyday eyeglasses are NOT safety glasses.
Also use face or dust mask if cutting
●
WARNING: Cutting plastics, sap coated wood, and other materials may cause melted material
to accumulate on the blade tips and the body of the saw blade, increasing the risk of blade overheat-
ing and binding while cutting.
WARNING: Use of this tool can generate and/or disburse dust, which may cause serious and
permanent respiratory or other injury. Always use NIOSH/OSHA approved respiratory protection
appropriate for the dust exposure. Direct particles away from face and body. Always operate tool in
well-ventilated area and provide for proper dust removal. Use dust collection system wherever
possible.
EN
FR
ES
DEFINITIONS: SAFETY ALERT SYMBOLS AND WORDS
It is important for you to read and understand this manual. The information it contains relates to
protecting YOUR SAFETY and PREVENTING PROBLEMS. The symbols below are used to help you
recognize this information.
NOTICE: Used without the safety alert symbol indicates potentially hazardous situation which, if not
avoided, may result in property damage.
WARNING: Read all safety warnings and all instructions.
Failure to follow the warnings and instructions may result in electric shock, fire and/or serious injury.
SAVE ALL WARNINGS AND INSTRUCTIONS FOR FUTURE REFERENCE
The term “power tool” in the warnings refers to your mains operated (corded) power tool or battery-op-
erated (cordless) power tool.
1)
a)
b)
c)
2)
a)
b)
c)
d)
e)
f)
3)
a)
Safety Instructions for All Saws
WORK AREA SAFETY
Keep work area clean and well lit. Cluttered or dark areas invite accidents.
Do not operate power tools in explosive atmospheres, such as in the presence of flammable
liquids, gases or dust. Power tools create sparks which may ignite the dust or fumes.
Keep children and bystanders away while operating a power tool. Distractions can cause you to
lose control.
ELECTRICAL SAFETY
Power tool plugs must match the outlet. Never modify the plug in any way. Do not use any adapter
plugs with earthed (grounded) power tools. Unmodified plugs and matching outlets will reduce risk
of electric shock.
Avoid body contact with earthed or grounded surfaces such as pipes, radiators, ranges and
refrigerators. There is an increased risk of electric shock if your body is earthed or grounded.
Do not expose power tools to rain or wet conditions. Water entering a power tool will increase the
risk of electric shock.
Do not abuse the cord. Never use the cord for carrying, pulling or unplugging the power tool. Keep
cord away from heat, oil, sharp edges or moving parts. Damaged or entangled cords increase the
risk of electric shock.
When operating a power tool outdoors, use an extension cord suitable for outdoor use. Use of a
cord suitable for outdoor use reduces the risk of electric shock.
If operating a power tool in a damp location is unavoidable, use a ground fault circuit interrupter
(GFCI) protected supply. Use of a GFCI reduces the risk of electric shock.
PERSONAL SAFETY
Stay alert, watch what you are doing and use common sense when operating a power tool. Do not
use a power tool while you are tired or under the influence of drugs, alcohol or medication. A
moment of inattention while operating power tools may result in serious
personal injury.
Use personal protective equipment.
Always wear eye protection. Protective equipment such as dust mask, nonskid safety shoes, hard
hat, or hearing protection used for appropriate conditions will reduce personal injuries.
Prevent unintentional starting. Ensure the switch is in the off position before connecting to power
source and/ or battery pack, picking up or carrying the tool. Carrying power tools with your finger
on the switch or energizing power tools that have the switch on invites accidents.
Remove any adjusting key or wrench before turning the power tool on. A wrench or a key left
attached to a rotating part of the power tool may result in personal injury.
Do not overreach. Keep proper footing and balance at all times. This enables better control of the
power tool in unexpected situations.
Dress properly. Do not wear loose clothing or jewelry. Keep your hair, clothing and gloves away
from moving parts. Loose clothes, jewelry or long hair can be caught in moving parts.
If devices are provided for the connection of dust extraction and collection facilities, ensure these
are connected and properly used.
Use of dust collection can reduce dust-related hazards.
POWER TOOL USE AND CARE
Do not force the power tool. Use the correct power tool for your application. The correct power tool
will do the job better and safer at the rate for which it was designed.
Do not use the power tool if the switch does not turn it on and off. Any power tool that cannot be
controlled with the switch is dangerous and must be repaired.
Disconnect the plug from the power source and/or the battery pack from the power tool before
making any adjustments, changing accessories, or storing power tools. Such preventive safety
measures reduce the risk of starting the power tool accidentally.
Store idle power tools out of the reach of children and do not allow persons unfamiliar with the
power tool or these instructions to operate the power tool. Power tools are dangerous in the hands
of untrained users.
Maintain power tools. Check for misalignment or binding of moving parts, breakage of parts and
any other condition that may affect the power tool’s operation. If damaged, have the power tool
repaired before use. Many accidents are caused by poorly maintained power tools.
Keep cutting tools sharp and clean. Properly maintained cutting tools with sharp cutting edges are
less likely to bind and are easier to control.
Use the power tool, accessories and tool bits, etc. in accordance with these instructions, taking
into account the working conditions and the work to be performed. Use of the power tool for opera-
tions different from those intended could result in a hazardous situation.
SERVICE
Keep your second hand on auxiliary handle or motor housing. If both hands are holding the saw,
they cannot be cut by the blade.
Do not reach underneath the workpiece. The guard cannot protect you from the blade below the
workpiece.
c)
d)
e)
f)
g)
h)
Causes and Operator Prevention of Kickback:
●
●
●
Kickback is the result of saw misuse and/ or incorrect operating procedures or conditions and can be
avoided by taking proper precautions as given below:
a)
b)
c)
d)
e)
f)
g)
Lower Guard Safety Instructions
a)
Adjust the cutting depth to the thickness of the workpiece. Less than a full tooth of the blade teeth
should be visible below the workpiece.
Never hold piece being cut in your hands or across your leg. Secure the workpiece to a stable
platform. It is important to support the work properly to minimize body exposure, blade binding, or
loss of control.
Hold the power tool by insulated gripping surfaces only, when performing an operation where the
cutting tool may contact hidden wiring or its own cord. Contact with a “live” wire will also make
exposed metal parts of the power tool “live” and could give the operator an electric shock.
When ripping always use a rip fence or straight edge guide. This improves the accuracy of cut and
reduces the chance of blade binding.
Always use blades with correct size and shape (diamond versus round) of arbor holes. Blades that
do not match the mounting hardware of the saw will run eccentrically, causing loss of control.
Never use damaged or incorrect blade washers or bolt. The blade washers and bolt were specially
designed for your saw, for optimum performance and safety of operation
Kickback is a sudden reaction to a pinched, bound or misaligned saw blade, causing an uncon-
trolled saw to lift up and out of the workpiece toward the operator.
When the blade is pinched or bound tightly by the kerf closing down, the blade stalls and the motor
reaction drives the unit rapidly back toward the operator.
If the blade becomes twisted or misaligned in the cut, the teeth at the back edge of the blade can
dig into the top surface of the wood causing the blade to climb out of the kerf and jump back toward
the operator.
Maintain a firm grip with both hands on the saw and position your arms to resist kickback forces.
Position your body to either side of the blade, but not in line with the blade. Kickback could cause
the saw to jump backwards, but kickback forces can be controlled by the operator, if proper
precautions are taken.
When blade is binding, or when interrupting a cut for any reason, release the trigger and hold the
saw motionless in the material until the blade comes to a complete stop. Never attempt to remove
the saw from the work or pull the saw backward while the blade is in motion or kickback may occur.
Investigate and take corrective actions to eliminate the cause of blade binding.
When restarting a saw in the workpiece, center the saw blade in the kerf and check that saw teeth
are not engaged into the material. If saw blade is binding, it may walk up or kickback from the
workpiece as the saw is restarted.
Support large panels to minimize the risk of blade pinching and kickback. Large panels tend to sag
under their own weight. Supports must be placed under the panel on both sides, near the line of
cut and near the edge of the panel.
Do not use dull or damaged blades. Unsharpened or improperly set blades produce narrow kerf
causing excessive friction, blade binding and kickback.
Blade depth and bevel adjusting locking levers must be tight and secure before making cut. If
blade adjustment shifts while cutting, it may cause binding and kickback.
Use extra caution when sawing into existing walls or other blind areas. The protruding blade may
cut objects that can cause kickback.
Check lower guard for proper closing before each use. Do not operate the saw if lower guard does
not move freely and close instantly. Never clamp or tie the lower guard into the open position. If
saw is accidentally dropped, lower guard may be bent. Raise the lower guard with the retracting
b)
c)
d)
Additional Safety Instructions
●
●
●
●
●
●
●
●
●
●
●
●
●
●
●
The smaller the gauge number of the wire, the greater the capacity of the cable, that is 16 gauge has
more capacity than 18 gauge. An undersized cord will cause a drop in line voltage resulting in loss of
power and overheating. When using more than one extension to make up the total length, be sure
each individual extension contains at least the minimum wire size. The following table shows the
correct size to use depending on cord length and nameplate ampere rating. If in doubt, use the next
heavier gauge. The smaller the gauge number, the heavier the cord.
handle and make sure it moves freely and does not touch the blade or any other part, in all angles
and depths of cut.
Check the operation of the lower guard spring. If the guard and the spring are not operating
properly, they must be serviced before use. Lower guard may operate sluggishly due to damaged
parts, gummy deposits, or a buildup of debris.
Lower guard should be retracted manually only for special cuts such as “plunge cuts” and
“compound cuts.” Raise lower guard by retracting handle and as soon as blade enters the materi-
al, the lower guard must be released. For all other sawing, the lower guard should operate
automatically.
Always observe that the lower guard is covering the blade before placing saw down on bench or
floor. An unprotected, coasting blade will cause the saw to walk backwards, cutting whatever is in
its path. Be aware of the time it takes for the blade to stop after switch is released.
Use clamps or another practical way to secure and support the workpiece to a stable platform.
Holding the work by hand or against your body leaves it unstable and may lead to loss of control.
Keep your body positioned to either side of the blade, but not in line with the saw blade.
KICKBACK could cause the saw to jump backwards (see Causes and Operator Prevention of
Kickback and KICKBACK).
Avoid cutting nails. Inspect for and remove all nails from lumber before cutting.
Always make sure nothing interferes with the movement of the lower blade guard.
Accessories must be rated for at least the speed recommended on the tool warning label. Wheels
and other accessories running over rated speed can fly apart and cause injury. Accessory ratings
must always be above tool speed as shown on tool nameplate.
Always make sure the saw is clean before using.
Stop using this saw and have it properly serviced if any unusual noise or abnormal operation
occurs.
Always be sure all components are mounted properly and securely before using tool.
Always handle the saw blade with care when mounting or removing it or when removing the
diamond knockout.
Always wait until the motor has reached full speed before starting a cut.
Always keep handles dry, clean and free of oil and grease. Hold the tool firmly with both hands
when in use.
Always be alert at all times, especially during repetitive, monotonous operations. Always be sure
of position of your hands relative to the blade.
Stay clear of end pieces that may fall after cutting off. They may be hot, sharp and/or heavy.
Serious personal injury may result.
Replace or repair damaged cords. Make sure your extension cord is in good condition. Use only
3-wire extension cords that have 3-prong grounding-type plugs and 3-pole receptacles that accept
the tool’s plug.
An extension cord must have adequate wire size (AWG or American Wire Gauge) for safety.
ANSI Z87.1 eye protection (CAN/CSA Z94.3).
ANSI S12.6 (S3.19) hearing protection.
NIOSH/OSHA respiratory protection.
Lead from lead-based paints, crystalline silica from bricks and cement and other masonry products,
and arsenic and chromium from chemically-treated lumber (CCA).
Avoid prolonged contact with dust from power sanding, sawing, grinding, drilling, and other
construction activities. Wear protective clothing and wash exposed areas with soap and water.
Allowing dust to get into your mouth, eyes, or lay on the skin may promote absorption of harmful
chemicals.
The label on your tool may include the following symbols. The symbols and their definitions are as
follows:
Safety Rules for Laser Lights
The laser light/laser radiation used in the system is Class 2 with maximum 1mW and 650nm
wavelengths. These lasers do not normally present an optical hazard, although staring at the beam
may cause flash blindness.
WARNING : Do not stare directly at the laser beam.
A hazard may exist if you deliberately stare into the beam, please observe all safety rules as follows;
●
●
●
●
●
CAUTION: Use of controls or adjustments or performance of procedures other than those
specified herein may result in hazardous radiation exposure
The laser shall be used and maintained in accordance with the manufacturer’s instructions.
Never aim the beam at any person or an object other than the workpiece.
The laser beam shall not be deliberately aimed at personnel and shall be prevented from being
directed towards the eye of a person for longer than 0.25s.
Always ensure the laser beam is aimed at a sturdy workpiece without reflective surfaces. I.e. wood
or rough coated surfaces are acceptable. Bright shiny reflective sheet steel or the like is not
suitable for laser use as the reflective surface could direct the beam back at the operator.
Do not change the laser light assembly with a different type. Repairs must be carried out by the
laser manufacturer or an authorized agent.
Assembly/Adjustment setup
WARNING: Before any work on the power tool, always remove the plug from the power source.
●
●
●
Adjust the cutting depth,
1.
2.
Note: if possible, recommend to setup the cutting depth approximately 2mm deeper than material
thickness, this should help to ensure you achieve a clean cut.
When mounting the saw blade, wear protective gloves. Danger of injury when touching the saw
blade.
Only use saw blade that correspond with the characteristic data given in the operating instructions.
Do not under any circumstances use grinding discs as the cutting tool.
Attaching and Removing the Blade - FIGURE C-E
• Retract lower guard and assemble blade (8) and clamp washer (17) as shown in figure C.
• Depress the spindle lock (13) while turning the blade bolt (7) with the blade wrench (16) until the
blade lock engages and the blade stops rotating. figure D
NOTE: Blade wrench is stored in polybag together with manual
• Tighten the blade bolt securely with the blade wrench.
NOTE: Bolt has a left-handed thread. To loosen, turn clockwise.
To tighten, turn counterclockwise.figure E
NOTE: Never engage the blade lock while the saw is running, or engage in an effort to stop the tool.
Never turn the tool on while the blade lock is engaged. Serious damage to your saw will result.
As required, move the unlocked knob and let the finger point at the suitable position of depth scale,
Then rotate the knob 180°to lock it,
Switching On and Off
Laser function
CHANGING THE LASER BATTERIES
The batteries that operate the laser will have to be replaced after considerable use of the laser.
1.
2.
3.
4.
DANGER: Never allow the laser beam to shine into a person's eyes, Serious eye damage could
result. Make sure the laser switch is OFF and the laser is NOT pointing toward you while replacing the
laser batteries and when checking the laser function.
Application
The mini plunge saw is a versatile one that allows you to cut many different types of materials. Some
of the materials include
●
●
●
Blade selection
MAINTENANCE
WARNING: Unplug tool before installing or removing accessories, before adjusting, or when
making repairs. Use only mild soap and damp cloth to clean the tool. Never let any liquid get inside
the tool; never immerse any part of the tool into a liquid.
IMPORTANT: To assure product SAFETY and RELIABILITY, repairs, maintenance and adjust-
ment (other than those listed
in this manual) should be performed by authorized service centers or other qualified service organiza-
tions, always using identical replacement parts.
- 02 -
Technology Creates Power

Intended use
This machine is primarily intended for the sawing, longitudinally and transversely, of solid wood,
chipboard, plywood, alum1n1um, tiles and stone held in a fixed position. Please note that the blade
pre-installed in the saw as supplied is intended for use with wood only. Any other use or modification
to the device shall be considered as improper use and could give rise to considerable dangers It is not
suitable for commercial use
Function Description
The numbering of the products features refers to the illustration of the machine on the graphics page.
b)
c)
d)
e)
f)
g)
4)
a)
b)
c)
d)
e)
f)
g)
5)
Have your power tool serviced by a qualified repair person using only identical replacement parts.
This will ensure that the safety of the power tool is maintained.
DANGER: Keep hands away from cutting area and the blade.
a)
b)
●
●
●
WARNING: Some dust created by power sanding, sawing, grinding, drilling, and other construc-
tion activities contains chemicals known in the state of California to cause cancer, birth defects or other
reproductive harm. Some examples of these chemicals are:
●
Your risk from these exposures varies, depending on how often you do this type of work. To reduce
your exposure to these chemicals: work in a well ventilated area, and work with approved safety
equipment, such as those dust masks that are specially designed to filter out microscopic particles.
WARNING: ALWAYS USE SAFETY GLASSES. Everyday eyeglasses are NOT safety glasses.
Also use face or dust mask if cutting
●
WARNING: Cutting plastics, sap coated wood, and other materials may cause melted material
to accumulate on the blade tips and the body of the saw blade, increasing the risk of blade overheat-
ing and binding while cutting.
WARNING: Use of this tool can generate and/or disburse dust, which may cause serious and
permanent respiratory or other injury. Always use NIOSH/OSHA approved respiratory protection
appropriate for the dust exposure. Direct particles away from face and body. Always operate tool in
well-ventilated area and provide for proper dust removal. Use dust collection system wherever
possible.
EN
FR
ES
DEFINITIONS: SAFETY ALERT SYMBOLS AND WORDS
It is important for you to read and understand this manual. The information it contains relates to
protecting YOUR SAFETY and PREVENTING PROBLEMS. The symbols below are used to help you
recognize this information.
NOTICE: Used without the safety alert symbol indicates potentially hazardous situation which, if not
avoided, may result in property damage.
WARNING: Read all safety warnings and all instructions.
Failure to follow the warnings and instructions may result in electric shock, fire and/or serious injury.
SAVE ALL WARNINGS AND INSTRUCTIONS FOR FUTURE REFERENCE
The term “power tool” in the warnings refers to your mains operated (corded) power tool or battery-op-
erated (cordless) power tool.
1)
a)
b)
c)
2)
a)
b)
c)
d)
e)
f)
3)
a)
WORK AREA SAFETY
Keep work area clean and well lit. Cluttered or dark areas invite accidents.
Do not operate power tools in explosive atmospheres, such as in the presence of flammable
liquids, gases or dust. Power tools create sparks which may ignite the dust or fumes.
Keep children and bystanders away while operating a power tool. Distractions can cause you to
lose control.
ELECTRICAL SAFETY
Power tool plugs must match the outlet. Never modify the plug in any way. Do not use any adapter
plugs with earthed (grounded) power tools. Unmodified plugs and matching outlets will reduce risk
of electric shock.
Avoid body contact with earthed or grounded surfaces such as pipes, radiators, ranges and
refrigerators. There is an increased risk of electric shock if your body is earthed or grounded.
Do not expose power tools to rain or wet conditions. Water entering a power tool will increase the
risk of electric shock.
Do not abuse the cord. Never use the cord for carrying, pulling or unplugging the power tool. Keep
cord away from heat, oil, sharp edges or moving parts. Damaged or entangled cords increase the
risk of electric shock.
When operating a power tool outdoors, use an extension cord suitable for outdoor use. Use of a
cord suitable for outdoor use reduces the risk of electric shock.
If operating a power tool in a damp location is unavoidable, use a ground fault circuit interrupter
(GFCI) protected supply. Use of a GFCI reduces the risk of electric shock.
PERSONAL SAFETY
Stay alert, watch what you are doing and use common sense when operating a power tool. Do not
use a power tool while you are tired or under the influence of drugs, alcohol or medication. A
moment of inattention while operating power tools may result in serious
personal injury.
Use personal protective equipment.
Always wear eye protection. Protective equipment such as dust mask, nonskid safety shoes, hard
hat, or hearing protection used for appropriate conditions will reduce personal injuries.
Prevent unintentional starting. Ensure the switch is in the off position before connecting to power
source and/ or battery pack, picking up or carrying the tool. Carrying power tools with your finger
on the switch or energizing power tools that have the switch on invites accidents.
Remove any adjusting key or wrench before turning the power tool on. A wrench or a key left
attached to a rotating part of the power tool may result in personal injury.
Do not overreach. Keep proper footing and balance at all times. This enables better control of the
power tool in unexpected situations.
Dress properly. Do not wear loose clothing or jewelry. Keep your hair, clothing and gloves away
from moving parts. Loose clothes, jewelry or long hair can be caught in moving parts.
If devices are provided for the connection of dust extraction and collection facilities, ensure these
are connected and properly used.
Use of dust collection can reduce dust-related hazards.
POWER TOOL USE AND CARE
Do not force the power tool. Use the correct power tool for your application. The correct power tool
will do the job better and safer at the rate for which it was designed.
Do not use the power tool if the switch does not turn it on and off. Any power tool that cannot be
controlled with the switch is dangerous and must be repaired.
Disconnect the plug from the power source and/or the battery pack from the power tool before
making any adjustments, changing accessories, or storing power tools. Such preventive safety
measures reduce the risk of starting the power tool accidentally.
Store idle power tools out of the reach of children and do not allow persons unfamiliar with the
power tool or these instructions to operate the power tool. Power tools are dangerous in the hands
of untrained users.
Maintain power tools. Check for misalignment or binding of moving parts, breakage of parts and
any other condition that may affect the power tool’s operation. If damaged, have the power tool
repaired before use. Many accidents are caused by poorly maintained power tools.
Keep cutting tools sharp and clean. Properly maintained cutting tools with sharp cutting edges are
less likely to bind and are easier to control.
Use the power tool, accessories and tool bits, etc. in accordance with these instructions, taking
into account the working conditions and the work to be performed. Use of the power tool for opera-
tions different from those intended could result in a hazardous situation.
SERVICE
Keep your second hand on auxiliary handle or motor housing. If both hands are holding the saw,
they cannot be cut by the blade.
Do not reach underneath the workpiece. The guard cannot protect you from the blade below the
workpiece.
c)
d)
e)
f)
g)
h)
Causes and Operator Prevention of Kickback:
●
●
●
Kickback is the result of saw misuse and/ or incorrect operating procedures or conditions and can be
avoided by taking proper precautions as given below:
a)
b)
c)
d)
e)
f)
g)
Lower Guard Safety Instructions
a)
Adjust the cutting depth to the thickness of the workpiece. Less than a full tooth of the blade teeth
should be visible below the workpiece.
Never hold piece being cut in your hands or across your leg. Secure the workpiece to a stable
platform. It is important to support the work properly to minimize body exposure, blade binding, or
loss of control.
Hold the power tool by insulated gripping surfaces only, when performing an operation where the
cutting tool may contact hidden wiring or its own cord. Contact with a “live” wire will also make
exposed metal parts of the power tool “live” and could give the operator an electric shock.
When ripping always use a rip fence or straight edge guide. This improves the accuracy of cut and
reduces the chance of blade binding.
Always use blades with correct size and shape (diamond versus round) of arbor holes. Blades that
do not match the mounting hardware of the saw will run eccentrically, causing loss of control.
Never use damaged or incorrect blade washers or bolt. The blade washers and bolt were specially
designed for your saw, for optimum performance and safety of operation
Kickback is a sudden reaction to a pinched, bound or misaligned saw blade, causing an uncon-
trolled saw to lift up and out of the workpiece toward the operator.
When the blade is pinched or bound tightly by the kerf closing down, the blade stalls and the motor
reaction drives the unit rapidly back toward the operator.
If the blade becomes twisted or misaligned in the cut, the teeth at the back edge of the blade can
dig into the top surface of the wood causing the blade to climb out of the kerf and jump back toward
the operator.
Maintain a firm grip with both hands on the saw and position your arms to resist kickback forces.
Position your body to either side of the blade, but not in line with the blade. Kickback could cause
the saw to jump backwards, but kickback forces can be controlled by the operator, if proper
precautions are taken.
When blade is binding, or when interrupting a cut for any reason, release the trigger and hold the
saw motionless in the material until the blade comes to a complete stop. Never attempt to remove
the saw from the work or pull the saw backward while the blade is in motion or kickback may occur.
Investigate and take corrective actions to eliminate the cause of blade binding.
When restarting a saw in the workpiece, center the saw blade in the kerf and check that saw teeth
are not engaged into the material. If saw blade is binding, it may walk up or kickback from the
workpiece as the saw is restarted.
Support large panels to minimize the risk of blade pinching and kickback. Large panels tend to sag
under their own weight. Supports must be placed under the panel on both sides, near the line of
cut and near the edge of the panel.
Do not use dull or damaged blades. Unsharpened or improperly set blades produce narrow kerf
causing excessive friction, blade binding and kickback.
Blade depth and bevel adjusting locking levers must be tight and secure before making cut. If
blade adjustment shifts while cutting, it may cause binding and kickback.
Use extra caution when sawing into existing walls or other blind areas. The protruding blade may
cut objects that can cause kickback.
Check lower guard for proper closing before each use. Do not operate the saw if lower guard does
not move freely and close instantly. Never clamp or tie the lower guard into the open position. If
saw is accidentally dropped, lower guard may be bent. Raise the lower guard with the retracting
b)
c)
d)
Additional Safety Instructions
●
●
●
●
●
●
●
●
●
●
●
●
●
●
●
The smaller the gauge number of the wire, the greater the capacity of the cable, that is 16 gauge has
more capacity than 18 gauge. An undersized cord will cause a drop in line voltage resulting in loss of
power and overheating. When using more than one extension to make up the total length, be sure
each individual extension contains at least the minimum wire size. The following table shows the
correct size to use depending on cord length and nameplate ampere rating. If in doubt, use the next
heavier gauge. The smaller the gauge number, the heavier the cord.
handle and make sure it moves freely and does not touch the blade or any other part, in all angles
and depths of cut.
Check the operation of the lower guard spring. If the guard and the spring are not operating
properly, they must be serviced before use. Lower guard may operate sluggishly due to damaged
parts, gummy deposits, or a buildup of debris.
Lower guard should be retracted manually only for special cuts such as “plunge cuts” and
“compound cuts.” Raise lower guard by retracting handle and as soon as blade enters the materi-
al, the lower guard must be released. For all other sawing, the lower guard should operate
automatically.
Always observe that the lower guard is covering the blade before placing saw down on bench or
floor. An unprotected, coasting blade will cause the saw to walk backwards, cutting whatever is in
its path. Be aware of the time it takes for the blade to stop after switch is released.
Use clamps or another practical way to secure and support the workpiece to a stable platform.
Holding the work by hand or against your body leaves it unstable and may lead to loss of control.
Keep your body positioned to either side of the blade, but not in line with the saw blade.
KICKBACK could cause the saw to jump backwards (see Causes and Operator Prevention of
Kickback and KICKBACK).
Avoid cutting nails. Inspect for and remove all nails from lumber before cutting.
Always make sure nothing interferes with the movement of the lower blade guard.
Accessories must be rated for at least the speed recommended on the tool warning label. Wheels
and other accessories running over rated speed can fly apart and cause injury. Accessory ratings
must always be above tool speed as shown on tool nameplate.
Always make sure the saw is clean before using.
Stop using this saw and have it properly serviced if any unusual noise or abnormal operation
occurs.
Always be sure all components are mounted properly and securely before using tool.
Always handle the saw blade with care when mounting or removing it or when removing the
diamond knockout.
Always wait until the motor has reached full speed before starting a cut.
Always keep handles dry, clean and free of oil and grease. Hold the tool firmly with both hands
when in use.
Always be alert at all times, especially during repetitive, monotonous operations. Always be sure
of position of your hands relative to the blade.
Stay clear of end pieces that may fall after cutting off. They may be hot, sharp and/or heavy.
Serious personal injury may result.
Replace or repair damaged cords. Make sure your extension cord is in good condition. Use only
3-wire extension cords that have 3-prong grounding-type plugs and 3-pole receptacles that accept
the tool’s plug.
An extension cord must have adequate wire size (AWG or American Wire Gauge) for safety.
ANSI Z87.1 eye protection (CAN/CSA Z94.3).
ANSI S12.6 (S3.19) hearing protection.
NIOSH/OSHA respiratory protection.
Lead from lead-based paints, crystalline silica from bricks and cement and other masonry products,
and arsenic and chromium from chemically-treated lumber (CCA).
Avoid prolonged contact with dust from power sanding, sawing, grinding, drilling, and other
construction activities. Wear protective clothing and wash exposed areas with soap and water.
Allowing dust to get into your mouth, eyes, or lay on the skin may promote absorption of harmful
chemicals.
The label on your tool may include the following symbols. The symbols and their definitions are as
follows:
Safety Rules for Laser Lights
The laser light/laser radiation used in the system is Class 2 with maximum 1mW and 650nm
wavelengths. These lasers do not normally present an optical hazard, although staring at the beam
may cause flash blindness.
WARNING : Do not stare directly at the laser beam.
A hazard may exist if you deliberately stare into the beam, please observe all safety rules as follows;
●
●
●
●
●
CAUTION: Use of controls or adjustments or performance of procedures other than those
specified herein may result in hazardous radiation exposure
The laser shall be used and maintained in accordance with the manufacturer’s instructions.
Never aim the beam at any person or an object other than the workpiece.
The laser beam shall not be deliberately aimed at personnel and shall be prevented from being
directed towards the eye of a person for longer than 0.25s.
Always ensure the laser beam is aimed at a sturdy workpiece without reflective surfaces. I.e. wood
or rough coated surfaces are acceptable. Bright shiny reflective sheet steel or the like is not
suitable for laser use as the reflective surface could direct the beam back at the operator.
Do not change the laser light assembly with a different type. Repairs must be carried out by the
laser manufacturer or an authorized agent.
Assembly/Adjustment setup
WARNING: Before any work on the power tool, always remove the plug from the power source.
●
●
●
Adjust the cutting depth,
1.
2.
Note: if possible, recommend to setup the cutting depth approximately 2mm deeper than material
thickness, this should help to ensure you achieve a clean cut.
When mounting the saw blade, wear protective gloves. Danger of injury when touching the saw
blade.
Only use saw blade that correspond with the characteristic data given in the operating instructions.
Do not under any circumstances use grinding discs as the cutting tool.
Attaching and Removing the Blade - FIGURE C-E
• Retract lower guard and assemble blade (8) and clamp washer (17) as shown in figure C.
• Depress the spindle lock (13) while turning the blade bolt (7) with the blade wrench (16) until the
blade lock engages and the blade stops rotating. figure D
NOTE: Blade wrench is stored in polybag together with manual
• Tighten the blade bolt securely with the blade wrench.
NOTE: Bolt has a left-handed thread. To loosen, turn clockwise.
To tighten, turn counterclockwise.figure E
NOTE: Never engage the blade lock while the saw is running, or engage in an effort to stop the tool.
Never turn the tool on while the blade lock is engaged. Serious damage to your saw will result.
As required, move the unlocked knob and let the finger point at the suitable position of depth scale,
Then rotate the knob 180°to lock it,
Switching On and Off
Laser function
CHANGING THE LASER BATTERIES
The batteries that operate the laser will have to be replaced after considerable use of the laser.
1.
2.
3.
4.
DANGER: Never allow the laser beam to shine into a person's eyes, Serious eye damage could
result. Make sure the laser switch is OFF and the laser is NOT pointing toward you while replacing the
laser batteries and when checking the laser function.
Application
The mini plunge saw is a versatile one that allows you to cut many different types of materials. Some
of the materials include
●
●
●
Blade selection
MAINTENANCE
WARNING: Unplug tool before installing or removing accessories, before adjusting, or when
making repairs. Use only mild soap and damp cloth to clean the tool. Never let any liquid get inside
the tool; never immerse any part of the tool into a liquid.
IMPORTANT: To assure product SAFETY and RELIABILITY, repairs, maintenance and adjust-
ment (other than those listed
in this manual) should be performed by authorized service centers or other qualified service organiza-
tions, always using identical replacement parts.
- 03 -
Technology Creates Power

Intended use
This machine is primarily intended for the sawing, longitudinally and transversely, of solid wood,
chipboard, plywood, alum1n1um, tiles and stone held in a fixed position. Please note that the blade
pre-installed in the saw as supplied is intended for use with wood only. Any other use or modification
to the device shall be considered as improper use and could give rise to considerable dangers It is not
suitable for commercial use
Function Description
The numbering of the products features refers to the illustration of the machine on the graphics page.
b)
c)
d)
e)
f)
g)
4)
a)
b)
c)
d)
e)
f)
g)
5)
Have your power tool serviced by a qualified repair person using only identical replacement parts.
This will ensure that the safety of the power tool is maintained.
DANGER: Keep hands away from cutting area and the blade.
a)
b)
●
●
●
WARNING: Some dust created by power sanding, sawing, grinding, drilling, and other construc-
tion activities contains chemicals known in the state of California to cause cancer, birth defects or other
reproductive harm. Some examples of these chemicals are:
●
Your risk from these exposures varies, depending on how often you do this type of work. To reduce
your exposure to these chemicals: work in a well ventilated area, and work with approved safety
equipment, such as those dust masks that are specially designed to filter out microscopic particles.
WARNING: ALWAYS USE SAFETY GLASSES. Everyday eyeglasses are NOT safety glasses.
Also use face or dust mask if cutting
●
WARNING: Cutting plastics, sap coated wood, and other materials may cause melted material
to accumulate on the blade tips and the body of the saw blade, increasing the risk of blade overheat-
ing and binding while cutting.
WARNING: Use of this tool can generate and/or disburse dust, which may cause serious and
permanent respiratory or other injury. Always use NIOSH/OSHA approved respiratory protection
appropriate for the dust exposure. Direct particles away from face and body. Always operate tool in
well-ventilated area and provide for proper dust removal. Use dust collection system wherever
possible.
EN
FR
ES
DEFINITIONS: SAFETY ALERT SYMBOLS AND WORDS
It is important for you to read and understand this manual. The information it contains relates to
protecting YOUR SAFETY and PREVENTING PROBLEMS. The symbols below are used to help you
recognize this information.
NOTICE: Used without the safety alert symbol indicates potentially hazardous situation which, if not
avoided, may result in property damage.
WARNING: Read all safety warnings and all instructions.
Failure to follow the warnings and instructions may result in electric shock, fire and/or serious injury.
SAVE ALL WARNINGS AND INSTRUCTIONS FOR FUTURE REFERENCE
The term “power tool” in the warnings refers to your mains operated (corded) power tool or battery-op-
erated (cordless) power tool.
1)
a)
b)
c)
2)
a)
b)
c)
d)
e)
f)
3)
a)
WORK AREA SAFETY
Keep work area clean and well lit. Cluttered or dark areas invite accidents.
Do not operate power tools in explosive atmospheres, such as in the presence of flammable
liquids, gases or dust. Power tools create sparks which may ignite the dust or fumes.
Keep children and bystanders away while operating a power tool. Distractions can cause you to
lose control.
ELECTRICAL SAFETY
Power tool plugs must match the outlet. Never modify the plug in any way. Do not use any adapter
plugs with earthed (grounded) power tools. Unmodified plugs and matching outlets will reduce risk
of electric shock.
Avoid body contact with earthed or grounded surfaces such as pipes, radiators, ranges and
refrigerators. There is an increased risk of electric shock if your body is earthed or grounded.
Do not expose power tools to rain or wet conditions. Water entering a power tool will increase the
risk of electric shock.
Do not abuse the cord. Never use the cord for carrying, pulling or unplugging the power tool. Keep
cord away from heat, oil, sharp edges or moving parts. Damaged or entangled cords increase the
risk of electric shock.
When operating a power tool outdoors, use an extension cord suitable for outdoor use. Use of a
cord suitable for outdoor use reduces the risk of electric shock.
If operating a power tool in a damp location is unavoidable, use a ground fault circuit interrupter
(GFCI) protected supply. Use of a GFCI reduces the risk of electric shock.
PERSONAL SAFETY
Stay alert, watch what you are doing and use common sense when operating a power tool. Do not
use a power tool while you are tired or under the influence of drugs, alcohol or medication. A
moment of inattention while operating power tools may result in serious
personal injury.
Use personal protective equipment.
Always wear eye protection. Protective equipment such as dust mask, nonskid safety shoes, hard
hat, or hearing protection used for appropriate conditions will reduce personal injuries.
Prevent unintentional starting. Ensure the switch is in the off position before connecting to power
source and/ or battery pack, picking up or carrying the tool. Carrying power tools with your finger
on the switch or energizing power tools that have the switch on invites accidents.
Remove any adjusting key or wrench before turning the power tool on. A wrench or a key left
attached to a rotating part of the power tool may result in personal injury.
Do not overreach. Keep proper footing and balance at all times. This enables better control of the
power tool in unexpected situations.
Dress properly. Do not wear loose clothing or jewelry. Keep your hair, clothing and gloves away
from moving parts. Loose clothes, jewelry or long hair can be caught in moving parts.
If devices are provided for the connection of dust extraction and collection facilities, ensure these
are connected and properly used.
Use of dust collection can reduce dust-related hazards.
POWER TOOL USE AND CARE
Do not force the power tool. Use the correct power tool for your application. The correct power tool
will do the job better and safer at the rate for which it was designed.
Do not use the power tool if the switch does not turn it on and off. Any power tool that cannot be
controlled with the switch is dangerous and must be repaired.
Disconnect the plug from the power source and/or the battery pack from the power tool before
making any adjustments, changing accessories, or storing power tools. Such preventive safety
measures reduce the risk of starting the power tool accidentally.
Store idle power tools out of the reach of children and do not allow persons unfamiliar with the
power tool or these instructions to operate the power tool. Power tools are dangerous in the hands
of untrained users.
Maintain power tools. Check for misalignment or binding of moving parts, breakage of parts and
any other condition that may affect the power tool’s operation. If damaged, have the power tool
repaired before use. Many accidents are caused by poorly maintained power tools.
Keep cutting tools sharp and clean. Properly maintained cutting tools with sharp cutting edges are
less likely to bind and are easier to control.
Use the power tool, accessories and tool bits, etc. in accordance with these instructions, taking
into account the working conditions and the work to be performed. Use of the power tool for opera-
tions different from those intended could result in a hazardous situation.
SERVICE
Keep your second hand on auxiliary handle or motor housing. If both hands are holding the saw,
they cannot be cut by the blade.
Do not reach underneath the workpiece. The guard cannot protect you from the blade below the
workpiece.
c)
d)
e)
f)
g)
h)
Causes and Operator Prevention of Kickback:
●
●
●
Kickback is the result of saw misuse and/ or incorrect operating procedures or conditions and can be
avoided by taking proper precautions as given below:
a)
b)
c)
d)
e)
f)
g)
Lower Guard Safety Instructions
a)
Adjust the cutting depth to the thickness of the workpiece. Less than a full tooth of the blade teeth
should be visible below the workpiece.
Never hold piece being cut in your hands or across your leg. Secure the workpiece to a stable
platform. It is important to support the work properly to minimize body exposure, blade binding, or
loss of control.
Hold the power tool by insulated gripping surfaces only, when performing an operation where the
cutting tool may contact hidden wiring or its own cord. Contact with a “live” wire will also make
exposed metal parts of the power tool “live” and could give the operator an electric shock.
When ripping always use a rip fence or straight edge guide. This improves the accuracy of cut and
reduces the chance of blade binding.
Always use blades with correct size and shape (diamond versus round) of arbor holes. Blades that
do not match the mounting hardware of the saw will run eccentrically, causing loss of control.
Never use damaged or incorrect blade washers or bolt. The blade washers and bolt were specially
designed for your saw, for optimum performance and safety of operation
Kickback is a sudden reaction to a pinched, bound or misaligned saw blade, causing an uncon-
trolled saw to lift up and out of the workpiece toward the operator.
When the blade is pinched or bound tightly by the kerf closing down, the blade stalls and the motor
reaction drives the unit rapidly back toward the operator.
If the blade becomes twisted or misaligned in the cut, the teeth at the back edge of the blade can
dig into the top surface of the wood causing the blade to climb out of the kerf and jump back toward
the operator.
Maintain a firm grip with both hands on the saw and position your arms to resist kickback forces.
Position your body to either side of the blade, but not in line with the blade. Kickback could cause
the saw to jump backwards, but kickback forces can be controlled by the operator, if proper
precautions are taken.
When blade is binding, or when interrupting a cut for any reason, release the trigger and hold the
saw motionless in the material until the blade comes to a complete stop. Never attempt to remove
the saw from the work or pull the saw backward while the blade is in motion or kickback may occur.
Investigate and take corrective actions to eliminate the cause of blade binding.
When restarting a saw in the workpiece, center the saw blade in the kerf and check that saw teeth
are not engaged into the material. If saw blade is binding, it may walk up or kickback from the
workpiece as the saw is restarted.
Support large panels to minimize the risk of blade pinching and kickback. Large panels tend to sag
under their own weight. Supports must be placed under the panel on both sides, near the line of
cut and near the edge of the panel.
Do not use dull or damaged blades. Unsharpened or improperly set blades produce narrow kerf
causing excessive friction, blade binding and kickback.
Blade depth and bevel adjusting locking levers must be tight and secure before making cut. If
blade adjustment shifts while cutting, it may cause binding and kickback.
Use extra caution when sawing into existing walls or other blind areas. The protruding blade may
cut objects that can cause kickback.
Check lower guard for proper closing before each use. Do not operate the saw if lower guard does
not move freely and close instantly. Never clamp or tie the lower guard into the open position. If
saw is accidentally dropped, lower guard may be bent. Raise the lower guard with the retracting
b)
c)
d)
Additional Safety Instructions
●
●
●
●
●
●
●
●
●
●
●
●
●
●
●
The smaller the gauge number of the wire, the greater the capacity of the cable, that is 16 gauge has
more capacity than 18 gauge. An undersized cord will cause a drop in line voltage resulting in loss of
power and overheating. When using more than one extension to make up the total length, be sure
each individual extension contains at least the minimum wire size. The following table shows the
correct size to use depending on cord length and nameplate ampere rating. If in doubt, use the next
heavier gauge. The smaller the gauge number, the heavier the cord.
handle and make sure it moves freely and does not touch the blade or any other part, in all angles
and depths of cut.
Check the operation of the lower guard spring. If the guard and the spring are not operating
properly, they must be serviced before use. Lower guard may operate sluggishly due to damaged
parts, gummy deposits, or a buildup of debris.
Lower guard should be retracted manually only for special cuts such as “plunge cuts” and
“compound cuts.” Raise lower guard by retracting handle and as soon as blade enters the materi-
al, the lower guard must be released. For all other sawing, the lower guard should operate
automatically.
Always observe that the lower guard is covering the blade before placing saw down on bench or
floor. An unprotected, coasting blade will cause the saw to walk backwards, cutting whatever is in
its path. Be aware of the time it takes for the blade to stop after switch is released.
Use clamps or another practical way to secure and support the workpiece to a stable platform.
Holding the work by hand or against your body leaves it unstable and may lead to loss of control.
Keep your body positioned to either side of the blade, but not in line with the saw blade.
KICKBACK could cause the saw to jump backwards (see Causes and Operator Prevention of
Kickback and KICKBACK).
Avoid cutting nails. Inspect for and remove all nails from lumber before cutting.
Always make sure nothing interferes with the movement of the lower blade guard.
Accessories must be rated for at least the speed recommended on the tool warning label. Wheels
and other accessories running over rated speed can fly apart and cause injury. Accessory ratings
must always be above tool speed as shown on tool nameplate.
Always make sure the saw is clean before using.
Stop using this saw and have it properly serviced if any unusual noise or abnormal operation
occurs.
Always be sure all components are mounted properly and securely before using tool.
Always handle the saw blade with care when mounting or removing it or when removing the
diamond knockout.
Always wait until the motor has reached full speed before starting a cut.
Always keep handles dry, clean and free of oil and grease. Hold the tool firmly with both hands
when in use.
Always be alert at all times, especially during repetitive, monotonous operations. Always be sure
of position of your hands relative to the blade.
Stay clear of end pieces that may fall after cutting off. They may be hot, sharp and/or heavy.
Serious personal injury may result.
Replace or repair damaged cords. Make sure your extension cord is in good condition. Use only
3-wire extension cords that have 3-prong grounding-type plugs and 3-pole receptacles that accept
the tool’s plug.
An extension cord must have adequate wire size (AWG or American Wire Gauge) for safety.
ANSI Z87.1 eye protection (CAN/CSA Z94.3).
ANSI S12.6 (S3.19) hearing protection.
NIOSH/OSHA respiratory protection.
Lead from lead-based paints, crystalline silica from bricks and cement and other masonry products,
and arsenic and chromium from chemically-treated lumber (CCA).
Avoid prolonged contact with dust from power sanding, sawing, grinding, drilling, and other
construction activities. Wear protective clothing and wash exposed areas with soap and water.
Allowing dust to get into your mouth, eyes, or lay on the skin may promote absorption of harmful
chemicals.
The label on your tool may include the following symbols. The symbols and their definitions are as
follows:
Safety Rules for Laser Lights
The laser light/laser radiation used in the system is Class 2 with maximum 1mW and 650nm
wavelengths. These lasers do not normally present an optical hazard, although staring at the beam
may cause flash blindness.
WARNING : Do not stare directly at the laser beam.
A hazard may exist if you deliberately stare into the beam, please observe all safety rules as follows;
●
●
●
●
●
CAUTION: Use of controls or adjustments or performance of procedures other than those
specified herein may result in hazardous radiation exposure
The laser shall be used and maintained in accordance with the manufacturer’s instructions.
Never aim the beam at any person or an object other than the workpiece.
The laser beam shall not be deliberately aimed at personnel and shall be prevented from being
directed towards the eye of a person for longer than 0.25s.
Always ensure the laser beam is aimed at a sturdy workpiece without reflective surfaces. I.e. wood
or rough coated surfaces are acceptable. Bright shiny reflective sheet steel or the like is not
suitable for laser use as the reflective surface could direct the beam back at the operator.
Do not change the laser light assembly with a different type. Repairs must be carried out by the
laser manufacturer or an authorized agent.
Assembly/Adjustment setup
WARNING: Before any work on the power tool, always remove the plug from the power source.
●
●
●
Adjust the cutting depth,
1.
2.
Note: if possible, recommend to setup the cutting depth approximately 2mm deeper than material
thickness, this should help to ensure you achieve a clean cut.
When mounting the saw blade, wear protective gloves. Danger of injury when touching the saw
blade.
Only use saw blade that correspond with the characteristic data given in the operating instructions.
Do not under any circumstances use grinding discs as the cutting tool.
Attaching and Removing the Blade - FIGURE C-E
• Retract lower guard and assemble blade (8) and clamp washer (17) as shown in figure C.
• Depress the spindle lock (13) while turning the blade bolt (7) with the blade wrench (16) until the
blade lock engages and the blade stops rotating. figure D
NOTE: Blade wrench is stored in polybag together with manual
• Tighten the blade bolt securely with the blade wrench.
NOTE: Bolt has a left-handed thread. To loosen, turn clockwise.
To tighten, turn counterclockwise.figure E
NOTE: Never engage the blade lock while the saw is running, or engage in an effort to stop the tool.
Never turn the tool on while the blade lock is engaged. Serious damage to your saw will result.
As required, move the unlocked knob and let the finger point at the suitable position of depth scale,
Then rotate the knob 180°to lock it,
Switching On and Off
Laser function
CHANGING THE LASER BATTERIES
The batteries that operate the laser will have to be replaced after considerable use of the laser.
1.
2.
3.
4.
DANGER: Never allow the laser beam to shine into a person's eyes, Serious eye damage could
result. Make sure the laser switch is OFF and the laser is NOT pointing toward you while replacing the
laser batteries and when checking the laser function.
Application
The mini plunge saw is a versatile one that allows you to cut many different types of materials. Some
of the materials include
●
●
●
Blade selection
MAINTENANCE
WARNING: Unplug tool before installing or removing accessories, before adjusting, or when
making repairs. Use only mild soap and damp cloth to clean the tool. Never let any liquid get inside
the tool; never immerse any part of the tool into a liquid.
IMPORTANT: To assure product SAFETY and RELIABILITY, repairs, maintenance and adjust-
ment (other than those listed
in this manual) should be performed by authorized service centers or other qualified service organiza-
tions, always using identical replacement parts.
- 04 -
Technology Creates Power
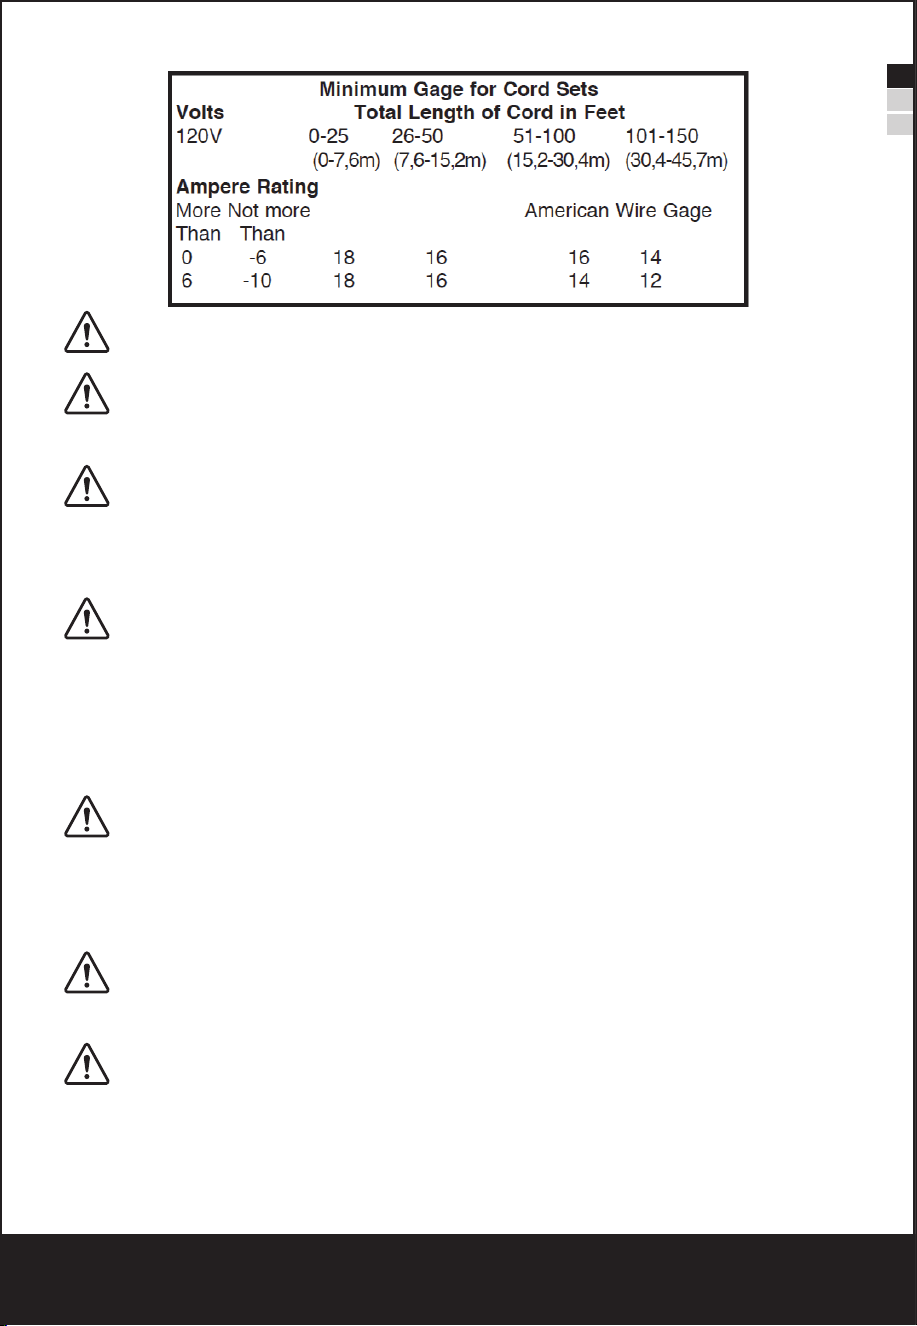
Intended use
This machine is primarily intended for the sawing, longitudinally and transversely, of solid wood,
chipboard, plywood, alum1n1um, tiles and stone held in a fixed position. Please note that the blade
pre-installed in the saw as supplied is intended for use with wood only. Any other use or modification
to the device shall be considered as improper use and could give rise to considerable dangers It is not
suitable for commercial use
Function Description
The numbering of the products features refers to the illustration of the machine on the graphics page.
b)
c)
d)
e)
f)
g)
4)
a)
b)
c)
d)
e)
f)
g)
5)
Have your power tool serviced by a qualified repair person using only identical replacement parts.
This will ensure that the safety of the power tool is maintained.
DANGER: Keep hands away from cutting area and the blade.
a)
b)
●
●
●
WARNING: Some dust created by power sanding, sawing, grinding, drilling, and other construc-
tion activities contains chemicals known in the state of California to cause cancer, birth defects or other
reproductive harm. Some examples of these chemicals are:
●
Your risk from these exposures varies, depending on how often you do this type of work. To reduce
your exposure to these chemicals: work in a well ventilated area, and work with approved safety
equipment, such as those dust masks that are specially designed to filter out microscopic particles.
WARNING: ALWAYS USE SAFETY GLASSES. Everyday eyeglasses are NOT safety glasses.
Also use face or dust mask if cutting
●
WARNING: Cutting plastics, sap coated wood, and other materials may cause melted material
to accumulate on the blade tips and the body of the saw blade, increasing the risk of blade overheat-
ing and binding while cutting.
WARNING: Use of this tool can generate and/or disburse dust, which may cause serious and
permanent respiratory or other injury. Always use NIOSH/OSHA approved respiratory protection
appropriate for the dust exposure. Direct particles away from face and body. Always operate tool in
well-ventilated area and provide for proper dust removal. Use dust collection system wherever
possible.
EN
FR
ES
DEFINITIONS: SAFETY ALERT SYMBOLS AND WORDS
It is important for you to read and understand this manual. The information it contains relates to
protecting YOUR SAFETY and PREVENTING PROBLEMS. The symbols below are used to help you
recognize this information.
NOTICE: Used without the safety alert symbol indicates potentially hazardous situation which, if not
avoided, may result in property damage.
WARNING: Read all safety warnings and all instructions.
Failure to follow the warnings and instructions may result in electric shock, fire and/or serious injury.
SAVE ALL WARNINGS AND INSTRUCTIONS FOR FUTURE REFERENCE
The term “power tool” in the warnings refers to your mains operated (corded) power tool or battery-op-
erated (cordless) power tool.
1)
a)
b)
c)
2)
a)
b)
c)
d)
e)
f)
3)
a)
WORK AREA SAFETY
Keep work area clean and well lit. Cluttered or dark areas invite accidents.
Do not operate power tools in explosive atmospheres, such as in the presence of flammable
liquids, gases or dust. Power tools create sparks which may ignite the dust or fumes.
Keep children and bystanders away while operating a power tool. Distractions can cause you to
lose control.
ELECTRICAL SAFETY
Power tool plugs must match the outlet. Never modify the plug in any way. Do not use any adapter
plugs with earthed (grounded) power tools. Unmodified plugs and matching outlets will reduce risk
of electric shock.
Avoid body contact with earthed or grounded surfaces such as pipes, radiators, ranges and
refrigerators. There is an increased risk of electric shock if your body is earthed or grounded.
Do not expose power tools to rain or wet conditions. Water entering a power tool will increase the
risk of electric shock.
Do not abuse the cord. Never use the cord for carrying, pulling or unplugging the power tool. Keep
cord away from heat, oil, sharp edges or moving parts. Damaged or entangled cords increase the
risk of electric shock.
When operating a power tool outdoors, use an extension cord suitable for outdoor use. Use of a
cord suitable for outdoor use reduces the risk of electric shock.
If operating a power tool in a damp location is unavoidable, use a ground fault circuit interrupter
(GFCI) protected supply. Use of a GFCI reduces the risk of electric shock.
PERSONAL SAFETY
Stay alert, watch what you are doing and use common sense when operating a power tool. Do not
use a power tool while you are tired or under the influence of drugs, alcohol or medication. A
moment of inattention while operating power tools may result in serious
personal injury.
Use personal protective equipment.
Always wear eye protection. Protective equipment such as dust mask, nonskid safety shoes, hard
hat, or hearing protection used for appropriate conditions will reduce personal injuries.
Prevent unintentional starting. Ensure the switch is in the off position before connecting to power
source and/ or battery pack, picking up or carrying the tool. Carrying power tools with your finger
on the switch or energizing power tools that have the switch on invites accidents.
Remove any adjusting key or wrench before turning the power tool on. A wrench or a key left
attached to a rotating part of the power tool may result in personal injury.
Do not overreach. Keep proper footing and balance at all times. This enables better control of the
power tool in unexpected situations.
Dress properly. Do not wear loose clothing or jewelry. Keep your hair, clothing and gloves away
from moving parts. Loose clothes, jewelry or long hair can be caught in moving parts.
If devices are provided for the connection of dust extraction and collection facilities, ensure these
are connected and properly used.
Use of dust collection can reduce dust-related hazards.
POWER TOOL USE AND CARE
Do not force the power tool. Use the correct power tool for your application. The correct power tool
will do the job better and safer at the rate for which it was designed.
Do not use the power tool if the switch does not turn it on and off. Any power tool that cannot be
controlled with the switch is dangerous and must be repaired.
Disconnect the plug from the power source and/or the battery pack from the power tool before
making any adjustments, changing accessories, or storing power tools. Such preventive safety
measures reduce the risk of starting the power tool accidentally.
Store idle power tools out of the reach of children and do not allow persons unfamiliar with the
power tool or these instructions to operate the power tool. Power tools are dangerous in the hands
of untrained users.
Maintain power tools. Check for misalignment or binding of moving parts, breakage of parts and
any other condition that may affect the power tool’s operation. If damaged, have the power tool
repaired before use. Many accidents are caused by poorly maintained power tools.
Keep cutting tools sharp and clean. Properly maintained cutting tools with sharp cutting edges are
less likely to bind and are easier to control.
Use the power tool, accessories and tool bits, etc. in accordance with these instructions, taking
into account the working conditions and the work to be performed. Use of the power tool for opera-
tions different from those intended could result in a hazardous situation.
SERVICE
Keep your second hand on auxiliary handle or motor housing. If both hands are holding the saw,
they cannot be cut by the blade.
Do not reach underneath the workpiece. The guard cannot protect you from the blade below the
workpiece.
c)
d)
e)
f)
g)
h)
Causes and Operator Prevention of Kickback:
●
●
●
Kickback is the result of saw misuse and/ or incorrect operating procedures or conditions and can be
avoided by taking proper precautions as given below:
a)
b)
c)
d)
e)
f)
g)
Lower Guard Safety Instructions
a)
Adjust the cutting depth to the thickness of the workpiece. Less than a full tooth of the blade teeth
should be visible below the workpiece.
Never hold piece being cut in your hands or across your leg. Secure the workpiece to a stable
platform. It is important to support the work properly to minimize body exposure, blade binding, or
loss of control.
Hold the power tool by insulated gripping surfaces only, when performing an operation where the
cutting tool may contact hidden wiring or its own cord. Contact with a “live” wire will also make
exposed metal parts of the power tool “live” and could give the operator an electric shock.
When ripping always use a rip fence or straight edge guide. This improves the accuracy of cut and
reduces the chance of blade binding.
Always use blades with correct size and shape (diamond versus round) of arbor holes. Blades that
do not match the mounting hardware of the saw will run eccentrically, causing loss of control.
Never use damaged or incorrect blade washers or bolt. The blade washers and bolt were specially
designed for your saw, for optimum performance and safety of operation
Kickback is a sudden reaction to a pinched, bound or misaligned saw blade, causing an uncon-
trolled saw to lift up and out of the workpiece toward the operator.
When the blade is pinched or bound tightly by the kerf closing down, the blade stalls and the motor
reaction drives the unit rapidly back toward the operator.
If the blade becomes twisted or misaligned in the cut, the teeth at the back edge of the blade can
dig into the top surface of the wood causing the blade to climb out of the kerf and jump back toward
the operator.
Maintain a firm grip with both hands on the saw and position your arms to resist kickback forces.
Position your body to either side of the blade, but not in line with the blade. Kickback could cause
the saw to jump backwards, but kickback forces can be controlled by the operator, if proper
precautions are taken.
When blade is binding, or when interrupting a cut for any reason, release the trigger and hold the
saw motionless in the material until the blade comes to a complete stop. Never attempt to remove
the saw from the work or pull the saw backward while the blade is in motion or kickback may occur.
Investigate and take corrective actions to eliminate the cause of blade binding.
When restarting a saw in the workpiece, center the saw blade in the kerf and check that saw teeth
are not engaged into the material. If saw blade is binding, it may walk up or kickback from the
workpiece as the saw is restarted.
Support large panels to minimize the risk of blade pinching and kickback. Large panels tend to sag
under their own weight. Supports must be placed under the panel on both sides, near the line of
cut and near the edge of the panel.
Do not use dull or damaged blades. Unsharpened or improperly set blades produce narrow kerf
causing excessive friction, blade binding and kickback.
Blade depth and bevel adjusting locking levers must be tight and secure before making cut. If
blade adjustment shifts while cutting, it may cause binding and kickback.
Use extra caution when sawing into existing walls or other blind areas. The protruding blade may
cut objects that can cause kickback.
Check lower guard for proper closing before each use. Do not operate the saw if lower guard does
not move freely and close instantly. Never clamp or tie the lower guard into the open position. If
saw is accidentally dropped, lower guard may be bent. Raise the lower guard with the retracting
b)
c)
d)
Additional Safety Instructions
●
●
●
●
●
●
●
●
●
●
●
●
●
●
●
The smaller the gauge number of the wire, the greater the capacity of the cable, that is 16 gauge has
more capacity than 18 gauge. An undersized cord will cause a drop in line voltage resulting in loss of
power and overheating. When using more than one extension to make up the total length, be sure
each individual extension contains at least the minimum wire size. The following table shows the
correct size to use depending on cord length and nameplate ampere rating. If in doubt, use the next
heavier gauge. The smaller the gauge number, the heavier the cord.
handle and make sure it moves freely and does not touch the blade or any other part, in all angles
and depths of cut.
Check the operation of the lower guard spring. If the guard and the spring are not operating
properly, they must be serviced before use. Lower guard may operate sluggishly due to damaged
parts, gummy deposits, or a buildup of debris.
Lower guard should be retracted manually only for special cuts such as “plunge cuts” and
“compound cuts.” Raise lower guard by retracting handle and as soon as blade enters the materi-
al, the lower guard must be released. For all other sawing, the lower guard should operate
automatically.
Always observe that the lower guard is covering the blade before placing saw down on bench or
floor. An unprotected, coasting blade will cause the saw to walk backwards, cutting whatever is in
its path. Be aware of the time it takes for the blade to stop after switch is released.
Use clamps or another practical way to secure and support the workpiece to a stable platform.
Holding the work by hand or against your body leaves it unstable and may lead to loss of control.
Keep your body positioned to either side of the blade, but not in line with the saw blade.
KICKBACK could cause the saw to jump backwards (see Causes and Operator Prevention of
Kickback and KICKBACK).
Avoid cutting nails. Inspect for and remove all nails from lumber before cutting.
Always make sure nothing interferes with the movement of the lower blade guard.
Accessories must be rated for at least the speed recommended on the tool warning label. Wheels
and other accessories running over rated speed can fly apart and cause injury. Accessory ratings
must always be above tool speed as shown on tool nameplate.
Always make sure the saw is clean before using.
Stop using this saw and have it properly serviced if any unusual noise or abnormal operation
occurs.
Always be sure all components are mounted properly and securely before using tool.
Always handle the saw blade with care when mounting or removing it or when removing the
diamond knockout.
Always wait until the motor has reached full speed before starting a cut.
Always keep handles dry, clean and free of oil and grease. Hold the tool firmly with both hands
when in use.
Always be alert at all times, especially during repetitive, monotonous operations. Always be sure
of position of your hands relative to the blade.
Stay clear of end pieces that may fall after cutting off. They may be hot, sharp and/or heavy.
Serious personal injury may result.
Replace or repair damaged cords. Make sure your extension cord is in good condition. Use only
3-wire extension cords that have 3-prong grounding-type plugs and 3-pole receptacles that accept
the tool’s plug.
An extension cord must have adequate wire size (AWG or American Wire Gauge) for safety.
WARNING: Blades coast after turn off. Serious personal injury may result.
WARNING: ALWAYS wear proper personal hearing protection that conforms to ANSI S12.6
(S3.19) during use. Under some conditions and duration of use, noise from this product may
contribute to hearing loss.
WARNING: ALWAYS use proper eye protection. All users and bystanders must wear proper
eye protection that conforms to ANSI Z87.1. operation is dusty. ALWAYS wear certified safety
equipment:
ANSI Z87.1 eye protection (CAN/CSA Z94.3).
ANSI S12.6 (S3.19) hearing protection.
NIOSH/OSHA respiratory protection.
Lead from lead-based paints, crystalline silica from bricks and cement and other masonry products,
and arsenic and chromium from chemically-treated lumber (CCA).
Avoid prolonged contact with dust from power sanding, sawing, grinding, drilling, and other
construction activities. Wear protective clothing and wash exposed areas with soap and water.
Allowing dust to get into your mouth, eyes, or lay on the skin may promote absorption of harmful
chemicals.
The label on your tool may include the following symbols. The symbols and their definitions are as
follows:
Safety Rules for Laser Lights
The laser light/laser radiation used in the system is Class 2 with maximum 1mW and 650nm
wavelengths. These lasers do not normally present an optical hazard, although staring at the beam
may cause flash blindness.
WARNING : Do not stare directly at the laser beam.
A hazard may exist if you deliberately stare into the beam, please observe all safety rules as follows;
●
●
●
●
●
CAUTION: Use of controls or adjustments or performance of procedures other than those
specified herein may result in hazardous radiation exposure
The laser shall be used and maintained in accordance with the manufacturer’s instructions.
Never aim the beam at any person or an object other than the workpiece.
The laser beam shall not be deliberately aimed at personnel and shall be prevented from being
directed towards the eye of a person for longer than 0.25s.
Always ensure the laser beam is aimed at a sturdy workpiece without reflective surfaces. I.e. wood
or rough coated surfaces are acceptable. Bright shiny reflective sheet steel or the like is not
suitable for laser use as the reflective surface could direct the beam back at the operator.
Do not change the laser light assembly with a different type. Repairs must be carried out by the
laser manufacturer or an authorized agent.
Assembly/Adjustment setup
WARNING: Before any work on the power tool, always remove the plug from the power source.
●
●
●
Adjust the cutting depth,
1.
2.
Note: if possible, recommend to setup the cutting depth approximately 2mm deeper than material
thickness, this should help to ensure you achieve a clean cut.
When mounting the saw blade, wear protective gloves. Danger of injury when touching the saw
blade.
Only use saw blade that correspond with the characteristic data given in the operating instructions.
Do not under any circumstances use grinding discs as the cutting tool.
Attaching and Removing the Blade - FIGURE C-E
• Retract lower guard and assemble blade (8) and clamp washer (17) as shown in figure C.
• Depress the spindle lock (13) while turning the blade bolt (7) with the blade wrench (16) until the
blade lock engages and the blade stops rotating. figure D
NOTE: Blade wrench is stored in polybag together with manual
• Tighten the blade bolt securely with the blade wrench.
NOTE: Bolt has a left-handed thread. To loosen, turn clockwise.
To tighten, turn counterclockwise.figure E
NOTE: Never engage the blade lock while the saw is running, or engage in an effort to stop the tool.
Never turn the tool on while the blade lock is engaged. Serious damage to your saw will result.
As required, move the unlocked knob and let the finger point at the suitable position of depth scale,
Then rotate the knob 180°to lock it,
Switching On and Off
Laser function
CHANGING THE LASER BATTERIES
The batteries that operate the laser will have to be replaced after considerable use of the laser.
1.
2.
3.
4.
DANGER: Never allow the laser beam to shine into a person's eyes, Serious eye damage could
result. Make sure the laser switch is OFF and the laser is NOT pointing toward you while replacing the
laser batteries and when checking the laser function.
Application
The mini plunge saw is a versatile one that allows you to cut many different types of materials. Some
of the materials include
●
●
●
Blade selection
MAINTENANCE
WARNING: Unplug tool before installing or removing accessories, before adjusting, or when
making repairs. Use only mild soap and damp cloth to clean the tool. Never let any liquid get inside
the tool; never immerse any part of the tool into a liquid.
IMPORTANT: To assure product SAFETY and RELIABILITY, repairs, maintenance and adjust-
ment (other than those listed
in this manual) should be performed by authorized service centers or other qualified service organiza-
tions, always using identical replacement parts.
- 05 -
Technology Creates Power
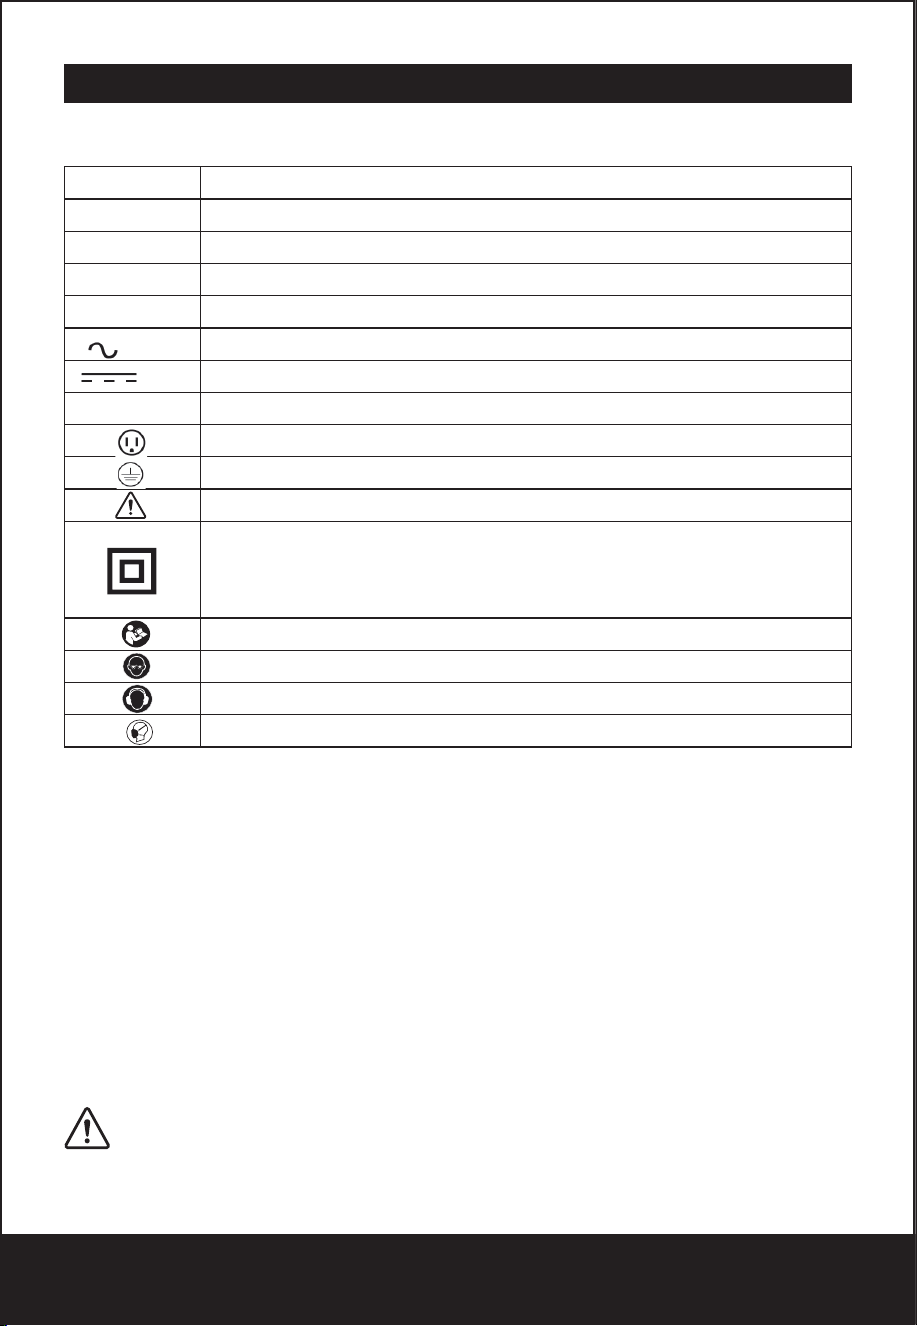
Intended use
This machine is primarily intended for the sawing, longitudinally and transversely, of solid wood,
chipboard, plywood, alum1n1um, tiles and stone held in a fixed position. Please note that the blade
pre-installed in the saw as supplied is intended for use with wood only. Any other use or modification
to the device shall be considered as improper use and could give rise to considerable dangers It is not
suitable for commercial use
Function Description
The numbering of the products features refers to the illustration of the machine on the graphics page.
b)
c)
d)
e)
f)
g)
4)
a)
b)
c)
d)
e)
f)
g)
5)
Have your power tool serviced by a qualified repair person using only identical replacement parts.
This will ensure that the safety of the power tool is maintained.
DANGER: Keep hands away from cutting area and the blade.
a)
b)
●
●
●
WARNING: Some dust created by power sanding, sawing, grinding, drilling, and other construc-
tion activities contains chemicals known in the state of California to cause cancer, birth defects or other
reproductive harm. Some examples of these chemicals are:
●
Your risk from these exposures varies, depending on how often you do this type of work. To reduce
your exposure to these chemicals: work in a well ventilated area, and work with approved safety
equipment, such as those dust masks that are specially designed to filter out microscopic particles.
WARNING: ALWAYS USE SAFETY GLASSES. Everyday eyeglasses are NOT safety glasses.
Also use face or dust mask if cutting
●
WARNING: Cutting plastics, sap coated wood, and other materials may cause melted material
to accumulate on the blade tips and the body of the saw blade, increasing the risk of blade overheat-
ing and binding while cutting.
WARNING: Use of this tool can generate and/or disburse dust, which may cause serious and
permanent respiratory or other injury. Always use NIOSH/OSHA approved respiratory protection
appropriate for the dust exposure. Direct particles away from face and body. Always operate tool in
well-ventilated area and provide for proper dust removal. Use dust collection system wherever
possible.
EN
FR
ES
DEFINITIONS: SAFETY ALERT SYMBOLS AND WORDS
It is important for you to read and understand this manual. The information it contains relates to
protecting YOUR SAFETY and PREVENTING PROBLEMS. The symbols below are used to help you
recognize this information.
NOTICE: Used without the safety alert symbol indicates potentially hazardous situation which, if not
avoided, may result in property damage.
WARNING: Read all safety warnings and all instructions.
Failure to follow the warnings and instructions may result in electric shock, fire and/or serious injury.
SAVE ALL WARNINGS AND INSTRUCTIONS FOR FUTURE REFERENCE
The term “power tool” in the warnings refers to your mains operated (corded) power tool or battery-op-
erated (cordless) power tool.
1)
a)
b)
c)
2)
a)
b)
c)
d)
e)
f)
3)
a)
SAVE THESE INSTRUCTIONS SYMBOLS
WORK AREA SAFETY
Keep work area clean and well lit. Cluttered or dark areas invite accidents.
Do not operate power tools in explosive atmospheres, such as in the presence of flammable
liquids, gases or dust. Power tools create sparks which may ignite the dust or fumes.
Keep children and bystanders away while operating a power tool. Distractions can cause you to
lose control.
ELECTRICAL SAFETY
Power tool plugs must match the outlet. Never modify the plug in any way. Do not use any adapter
plugs with earthed (grounded) power tools. Unmodified plugs and matching outlets will reduce risk
of electric shock.
Avoid body contact with earthed or grounded surfaces such as pipes, radiators, ranges and
refrigerators. There is an increased risk of electric shock if your body is earthed or grounded.
Do not expose power tools to rain or wet conditions. Water entering a power tool will increase the
risk of electric shock.
Do not abuse the cord. Never use the cord for carrying, pulling or unplugging the power tool. Keep
cord away from heat, oil, sharp edges or moving parts. Damaged or entangled cords increase the
risk of electric shock.
When operating a power tool outdoors, use an extension cord suitable for outdoor use. Use of a
cord suitable for outdoor use reduces the risk of electric shock.
If operating a power tool in a damp location is unavoidable, use a ground fault circuit interrupter
(GFCI) protected supply. Use of a GFCI reduces the risk of electric shock.
PERSONAL SAFETY
Stay alert, watch what you are doing and use common sense when operating a power tool. Do not
use a power tool while you are tired or under the influence of drugs, alcohol or medication. A
moment of inattention while operating power tools may result in serious
personal injury.
Use personal protective equipment.
Always wear eye protection. Protective equipment such as dust mask, nonskid safety shoes, hard
hat, or hearing protection used for appropriate conditions will reduce personal injuries.
Prevent unintentional starting. Ensure the switch is in the off position before connecting to power
source and/ or battery pack, picking up or carrying the tool. Carrying power tools with your finger
on the switch or energizing power tools that have the switch on invites accidents.
Remove any adjusting key or wrench before turning the power tool on. A wrench or a key left
attached to a rotating part of the power tool may result in personal injury.
Do not overreach. Keep proper footing and balance at all times. This enables better control of the
power tool in unexpected situations.
Dress properly. Do not wear loose clothing or jewelry. Keep your hair, clothing and gloves away
from moving parts. Loose clothes, jewelry or long hair can be caught in moving parts.
If devices are provided for the connection of dust extraction and collection facilities, ensure these
are connected and properly used.
Use of dust collection can reduce dust-related hazards.
POWER TOOL USE AND CARE
Do not force the power tool. Use the correct power tool for your application. The correct power tool
will do the job better and safer at the rate for which it was designed.
Do not use the power tool if the switch does not turn it on and off. Any power tool that cannot be
controlled with the switch is dangerous and must be repaired.
Disconnect the plug from the power source and/or the battery pack from the power tool before
making any adjustments, changing accessories, or storing power tools. Such preventive safety
measures reduce the risk of starting the power tool accidentally.
Store idle power tools out of the reach of children and do not allow persons unfamiliar with the
power tool or these instructions to operate the power tool. Power tools are dangerous in the hands
of untrained users.
Maintain power tools. Check for misalignment or binding of moving parts, breakage of parts and
any other condition that may affect the power tool’s operation. If damaged, have the power tool
repaired before use. Many accidents are caused by poorly maintained power tools.
Keep cutting tools sharp and clean. Properly maintained cutting tools with sharp cutting edges are
less likely to bind and are easier to control.
Use the power tool, accessories and tool bits, etc. in accordance with these instructions, taking
into account the working conditions and the work to be performed. Use of the power tool for opera-
tions different from those intended could result in a hazardous situation.
SERVICE
Keep your second hand on auxiliary handle or motor housing. If both hands are holding the saw,
they cannot be cut by the blade.
Do not reach underneath the workpiece. The guard cannot protect you from the blade below the
workpiece.
c)
d)
e)
f)
g)
h)
Causes and Operator Prevention of Kickback:
●
●
●
Kickback is the result of saw misuse and/ or incorrect operating procedures or conditions and can be
avoided by taking proper precautions as given below:
a)
b)
c)
d)
e)
f)
g)
Lower Guard Safety Instructions
a)
Adjust the cutting depth to the thickness of the workpiece. Less than a full tooth of the blade teeth
should be visible below the workpiece.
Never hold piece being cut in your hands or across your leg. Secure the workpiece to a stable
platform. It is important to support the work properly to minimize body exposure, blade binding, or
loss of control.
Hold the power tool by insulated gripping surfaces only, when performing an operation where the
cutting tool may contact hidden wiring or its own cord. Contact with a “live” wire will also make
exposed metal parts of the power tool “live” and could give the operator an electric shock.
When ripping always use a rip fence or straight edge guide. This improves the accuracy of cut and
reduces the chance of blade binding.
Always use blades with correct size and shape (diamond versus round) of arbor holes. Blades that
do not match the mounting hardware of the saw will run eccentrically, causing loss of control.
Never use damaged or incorrect blade washers or bolt. The blade washers and bolt were specially
designed for your saw, for optimum performance and safety of operation
Kickback is a sudden reaction to a pinched, bound or misaligned saw blade, causing an uncon-
trolled saw to lift up and out of the workpiece toward the operator.
When the blade is pinched or bound tightly by the kerf closing down, the blade stalls and the motor
reaction drives the unit rapidly back toward the operator.
If the blade becomes twisted or misaligned in the cut, the teeth at the back edge of the blade can
dig into the top surface of the wood causing the blade to climb out of the kerf and jump back toward
the operator.
Maintain a firm grip with both hands on the saw and position your arms to resist kickback forces.
Position your body to either side of the blade, but not in line with the blade. Kickback could cause
the saw to jump backwards, but kickback forces can be controlled by the operator, if proper
precautions are taken.
When blade is binding, or when interrupting a cut for any reason, release the trigger and hold the
saw motionless in the material until the blade comes to a complete stop. Never attempt to remove
the saw from the work or pull the saw backward while the blade is in motion or kickback may occur.
Investigate and take corrective actions to eliminate the cause of blade binding.
When restarting a saw in the workpiece, center the saw blade in the kerf and check that saw teeth
are not engaged into the material. If saw blade is binding, it may walk up or kickback from the
workpiece as the saw is restarted.
Support large panels to minimize the risk of blade pinching and kickback. Large panels tend to sag
under their own weight. Supports must be placed under the panel on both sides, near the line of
cut and near the edge of the panel.
Do not use dull or damaged blades. Unsharpened or improperly set blades produce narrow kerf
causing excessive friction, blade binding and kickback.
Blade depth and bevel adjusting locking levers must be tight and secure before making cut. If
blade adjustment shifts while cutting, it may cause binding and kickback.
Use extra caution when sawing into existing walls or other blind areas. The protruding blade may
cut objects that can cause kickback.
Check lower guard for proper closing before each use. Do not operate the saw if lower guard does
not move freely and close instantly. Never clamp or tie the lower guard into the open position. If
saw is accidentally dropped, lower guard may be bent. Raise the lower guard with the retracting
b)
c)
d)
Additional Safety Instructions
●
●
●
●
●
●
●
●
●
●
●
●
●
●
●
The smaller the gauge number of the wire, the greater the capacity of the cable, that is 16 gauge has
more capacity than 18 gauge. An undersized cord will cause a drop in line voltage resulting in loss of
power and overheating. When using more than one extension to make up the total length, be sure
each individual extension contains at least the minimum wire size. The following table shows the
correct size to use depending on cord length and nameplate ampere rating. If in doubt, use the next
heavier gauge. The smaller the gauge number, the heavier the cord.
handle and make sure it moves freely and does not touch the blade or any other part, in all angles
and depths of cut.
Check the operation of the lower guard spring. If the guard and the spring are not operating
properly, they must be serviced before use. Lower guard may operate sluggishly due to damaged
parts, gummy deposits, or a buildup of debris.
Lower guard should be retracted manually only for special cuts such as “plunge cuts” and
“compound cuts.” Raise lower guard by retracting handle and as soon as blade enters the materi-
al, the lower guard must be released. For all other sawing, the lower guard should operate
automatically.
Always observe that the lower guard is covering the blade before placing saw down on bench or
floor. An unprotected, coasting blade will cause the saw to walk backwards, cutting whatever is in
its path. Be aware of the time it takes for the blade to stop after switch is released.
Use clamps or another practical way to secure and support the workpiece to a stable platform.
Holding the work by hand or against your body leaves it unstable and may lead to loss of control.
Keep your body positioned to either side of the blade, but not in line with the saw blade.
KICKBACK could cause the saw to jump backwards (see Causes and Operator Prevention of
Kickback and KICKBACK).
Avoid cutting nails. Inspect for and remove all nails from lumber before cutting.
Always make sure nothing interferes with the movement of the lower blade guard.
Accessories must be rated for at least the speed recommended on the tool warning label. Wheels
and other accessories running over rated speed can fly apart and cause injury. Accessory ratings
must always be above tool speed as shown on tool nameplate.
Always make sure the saw is clean before using.
Stop using this saw and have it properly serviced if any unusual noise or abnormal operation
occurs.
Always be sure all components are mounted properly and securely before using tool.
Always handle the saw blade with care when mounting or removing it or when removing the
diamond knockout.
Always wait until the motor has reached full speed before starting a cut.
Always keep handles dry, clean and free of oil and grease. Hold the tool firmly with both hands
when in use.
Always be alert at all times, especially during repetitive, monotonous operations. Always be sure
of position of your hands relative to the blade.
Stay clear of end pieces that may fall after cutting off. They may be hot, sharp and/or heavy.
Serious personal injury may result.
Replace or repair damaged cords. Make sure your extension cord is in good condition. Use only
3-wire extension cords that have 3-prong grounding-type plugs and 3-pole receptacles that accept
the tool’s plug.
An extension cord must have adequate wire size (AWG or American Wire Gauge) for safety.
ANSI Z87.1 eye protection (CAN/CSA Z94.3).
ANSI S12.6 (S3.19) hearing protection.
NIOSH/OSHA respiratory protection.
Lead from lead-based paints, crystalline silica from bricks and cement and other masonry products,
and arsenic and chromium from chemically-treated lumber (CCA).
Avoid prolonged contact with dust from power sanding, sawing, grinding, drilling, and other
construction activities. Wear protective clothing and wash exposed areas with soap and water.
Allowing dust to get into your mouth, eyes, or lay on the skin may promote absorption of harmful
chemicals.
The label on your tool may include the following symbols. The symbols and their definitions are as
follows:
Safety Rules for Laser Lights
The laser light/laser radiation used in the system is Class 2 with maximum 1mW and 650nm
wavelengths. These lasers do not normally present an optical hazard, although staring at the beam
may cause flash blindness.
WARNING : Do not stare directly at the laser beam.
A hazard may exist if you deliberately stare into the beam, please observe all safety rules as follows;
●
●
●
●
●
CAUTION: Use of controls or adjustments or performance of procedures other than those
specified herein may result in hazardous radiation exposure
V
A
Hz
W
min
no
volts
amperes
hertz
watts
minutes
Alternating current
Direct current
no load speed
Class I Construction (grounded)
earthing terminal
safety alert symbol
Read instruction manual before use
Use proper eye protection
Use proper hearing protection
Use proper respiratory protection
Class II Construction (double insulated)
/min or rpm revolutions or reciprocation per minute
SPM Strokes per minute
or AC
or DC
The laser shall be used and maintained in accordance with the manufacturer’s instructions.
Never aim the beam at any person or an object other than the workpiece.
The laser beam shall not be deliberately aimed at personnel and shall be prevented from being
directed towards the eye of a person for longer than 0.25s.
Always ensure the laser beam is aimed at a sturdy workpiece without reflective surfaces. I.e. wood
or rough coated surfaces are acceptable. Bright shiny reflective sheet steel or the like is not
suitable for laser use as the reflective surface could direct the beam back at the operator.
Do not change the laser light assembly with a different type. Repairs must be carried out by the
laser manufacturer or an authorized agent.
Assembly/Adjustment setup
WARNING: Before any work on the power tool, always remove the plug from the power source.
●
●
●
Adjust the cutting depth,
1.
2.
Note: if possible, recommend to setup the cutting depth approximately 2mm deeper than material
thickness, this should help to ensure you achieve a clean cut.
When mounting the saw blade, wear protective gloves. Danger of injury when touching the saw
blade.
Only use saw blade that correspond with the characteristic data given in the operating instructions.
Do not under any circumstances use grinding discs as the cutting tool.
Attaching and Removing the Blade - FIGURE C-E
• Retract lower guard and assemble blade (8) and clamp washer (17) as shown in figure C.
• Depress the spindle lock (13) while turning the blade bolt (7) with the blade wrench (16) until the
blade lock engages and the blade stops rotating. figure D
NOTE: Blade wrench is stored in polybag together with manual
• Tighten the blade bolt securely with the blade wrench.
NOTE: Bolt has a left-handed thread. To loosen, turn clockwise.
To tighten, turn counterclockwise.figure E
NOTE: Never engage the blade lock while the saw is running, or engage in an effort to stop the tool.
Never turn the tool on while the blade lock is engaged. Serious damage to your saw will result.
As required, move the unlocked knob and let the finger point at the suitable position of depth scale,
Then rotate the knob 180°to lock it,
Switching On and Off
Laser function
CHANGING THE LASER BATTERIES
The batteries that operate the laser will have to be replaced after considerable use of the laser.
1.
2.
3.
4.
DANGER: Never allow the laser beam to shine into a person's eyes, Serious eye damage could
result. Make sure the laser switch is OFF and the laser is NOT pointing toward you while replacing the
laser batteries and when checking the laser function.
Application
The mini plunge saw is a versatile one that allows you to cut many different types of materials. Some
of the materials include
●
●
●
Blade selection
MAINTENANCE
WARNING: Unplug tool before installing or removing accessories, before adjusting, or when
making repairs. Use only mild soap and damp cloth to clean the tool. Never let any liquid get inside
the tool; never immerse any part of the tool into a liquid.
IMPORTANT: To assure product SAFETY and RELIABILITY, repairs, maintenance and adjust-
ment (other than those listed
in this manual) should be performed by authorized service centers or other qualified service organiza-
tions, always using identical replacement parts.
- 06 -
Technology Creates Power

Intended use
This machine is primarily intended for the sawing, longitudinally and transversely, of solid wood,
chipboard, plywood, alum1n1um, tiles and stone held in a fixed position. Please note that the blade
pre-installed in the saw as supplied is intended for use with wood only. Any other use or modification
to the device shall be considered as improper use and could give rise to considerable dangers It is not
suitable for commercial use
Function Description
The numbering of the products features refers to the illustration of the machine on the graphics page.
b)
c)
d)
e)
f)
g)
4)
a)
b)
c)
d)
e)
f)
g)
5)
Have your power tool serviced by a qualified repair person using only identical replacement parts.
This will ensure that the safety of the power tool is maintained.
DANGER: Keep hands away from cutting area and the blade.
a)
b)
●
●
●
WARNING: Some dust created by power sanding, sawing, grinding, drilling, and other construc-
tion activities contains chemicals known in the state of California to cause cancer, birth defects or other
reproductive harm. Some examples of these chemicals are:
●
Your risk from these exposures varies, depending on how often you do this type of work. To reduce
your exposure to these chemicals: work in a well ventilated area, and work with approved safety
equipment, such as those dust masks that are specially designed to filter out microscopic particles.
WARNING: ALWAYS USE SAFETY GLASSES. Everyday eyeglasses are NOT safety glasses.
Also use face or dust mask if cutting
●
WARNING: Cutting plastics, sap coated wood, and other materials may cause melted material
to accumulate on the blade tips and the body of the saw blade, increasing the risk of blade overheat-
ing and binding while cutting.
WARNING: Use of this tool can generate and/or disburse dust, which may cause serious and
permanent respiratory or other injury. Always use NIOSH/OSHA approved respiratory protection
appropriate for the dust exposure. Direct particles away from face and body. Always operate tool in
well-ventilated area and provide for proper dust removal. Use dust collection system wherever
possible.
EN
FR
ES
DEFINITIONS: SAFETY ALERT SYMBOLS AND WORDS
It is important for you to read and understand this manual. The information it contains relates to
protecting YOUR SAFETY and PREVENTING PROBLEMS. The symbols below are used to help you
recognize this information.
NOTICE: Used without the safety alert symbol indicates potentially hazardous situation which, if not
avoided, may result in property damage.
WARNING: Read all safety warnings and all instructions.
Failure to follow the warnings and instructions may result in electric shock, fire and/or serious injury.
SAVE ALL WARNINGS AND INSTRUCTIONS FOR FUTURE REFERENCE
The term “power tool” in the warnings refers to your mains operated (corded) power tool or battery-op-
erated (cordless) power tool.
1)
a)
b)
c)
2)
a)
b)
c)
d)
e)
f)
3)
a)
Technical Data
WORK AREA SAFETY
Keep work area clean and well lit. Cluttered or dark areas invite accidents.
Do not operate power tools in explosive atmospheres, such as in the presence of flammable
liquids, gases or dust. Power tools create sparks which may ignite the dust or fumes.
Keep children and bystanders away while operating a power tool. Distractions can cause you to
lose control.
ELECTRICAL SAFETY
Power tool plugs must match the outlet. Never modify the plug in any way. Do not use any adapter
plugs with earthed (grounded) power tools. Unmodified plugs and matching outlets will reduce risk
of electric shock.
Avoid body contact with earthed or grounded surfaces such as pipes, radiators, ranges and
refrigerators. There is an increased risk of electric shock if your body is earthed or grounded.
Do not expose power tools to rain or wet conditions. Water entering a power tool will increase the
risk of electric shock.
Do not abuse the cord. Never use the cord for carrying, pulling or unplugging the power tool. Keep
cord away from heat, oil, sharp edges or moving parts. Damaged or entangled cords increase the
risk of electric shock.
When operating a power tool outdoors, use an extension cord suitable for outdoor use. Use of a
cord suitable for outdoor use reduces the risk of electric shock.
If operating a power tool in a damp location is unavoidable, use a ground fault circuit interrupter
(GFCI) protected supply. Use of a GFCI reduces the risk of electric shock.
PERSONAL SAFETY
Stay alert, watch what you are doing and use common sense when operating a power tool. Do not
use a power tool while you are tired or under the influence of drugs, alcohol or medication. A
moment of inattention while operating power tools may result in serious
personal injury.
Use personal protective equipment.
Always wear eye protection. Protective equipment such as dust mask, nonskid safety shoes, hard
hat, or hearing protection used for appropriate conditions will reduce personal injuries.
Prevent unintentional starting. Ensure the switch is in the off position before connecting to power
source and/ or battery pack, picking up or carrying the tool. Carrying power tools with your finger
on the switch or energizing power tools that have the switch on invites accidents.
Remove any adjusting key or wrench before turning the power tool on. A wrench or a key left
attached to a rotating part of the power tool may result in personal injury.
Do not overreach. Keep proper footing and balance at all times. This enables better control of the
power tool in unexpected situations.
Dress properly. Do not wear loose clothing or jewelry. Keep your hair, clothing and gloves away
from moving parts. Loose clothes, jewelry or long hair can be caught in moving parts.
If devices are provided for the connection of dust extraction and collection facilities, ensure these
are connected and properly used.
Use of dust collection can reduce dust-related hazards.
POWER TOOL USE AND CARE
Do not force the power tool. Use the correct power tool for your application. The correct power tool
will do the job better and safer at the rate for which it was designed.
Do not use the power tool if the switch does not turn it on and off. Any power tool that cannot be
controlled with the switch is dangerous and must be repaired.
Disconnect the plug from the power source and/or the battery pack from the power tool before
making any adjustments, changing accessories, or storing power tools. Such preventive safety
measures reduce the risk of starting the power tool accidentally.
Store idle power tools out of the reach of children and do not allow persons unfamiliar with the
power tool or these instructions to operate the power tool. Power tools are dangerous in the hands
of untrained users.
Maintain power tools. Check for misalignment or binding of moving parts, breakage of parts and
any other condition that may affect the power tool’s operation. If damaged, have the power tool
repaired before use. Many accidents are caused by poorly maintained power tools.
Keep cutting tools sharp and clean. Properly maintained cutting tools with sharp cutting edges are
less likely to bind and are easier to control.
Use the power tool, accessories and tool bits, etc. in accordance with these instructions, taking
into account the working conditions and the work to be performed. Use of the power tool for opera-
tions different from those intended could result in a hazardous situation.
SERVICE
Keep your second hand on auxiliary handle or motor housing. If both hands are holding the saw,
they cannot be cut by the blade.
Do not reach underneath the workpiece. The guard cannot protect you from the blade below the
workpiece.
c)
d)
e)
f)
g)
h)
Causes and Operator Prevention of Kickback:
●
●
●
Kickback is the result of saw misuse and/ or incorrect operating procedures or conditions and can be
avoided by taking proper precautions as given below:
a)
b)
c)
d)
e)
f)
g)
Lower Guard Safety Instructions
a)
Adjust the cutting depth to the thickness of the workpiece. Less than a full tooth of the blade teeth
should be visible below the workpiece.
Never hold piece being cut in your hands or across your leg. Secure the workpiece to a stable
platform. It is important to support the work properly to minimize body exposure, blade binding, or
loss of control.
Hold the power tool by insulated gripping surfaces only, when performing an operation where the
cutting tool may contact hidden wiring or its own cord. Contact with a “live” wire will also make
exposed metal parts of the power tool “live” and could give the operator an electric shock.
When ripping always use a rip fence or straight edge guide. This improves the accuracy of cut and
reduces the chance of blade binding.
Always use blades with correct size and shape (diamond versus round) of arbor holes. Blades that
do not match the mounting hardware of the saw will run eccentrically, causing loss of control.
Never use damaged or incorrect blade washers or bolt. The blade washers and bolt were specially
designed for your saw, for optimum performance and safety of operation
Kickback is a sudden reaction to a pinched, bound or misaligned saw blade, causing an uncon-
trolled saw to lift up and out of the workpiece toward the operator.
When the blade is pinched or bound tightly by the kerf closing down, the blade stalls and the motor
reaction drives the unit rapidly back toward the operator.
If the blade becomes twisted or misaligned in the cut, the teeth at the back edge of the blade can
dig into the top surface of the wood causing the blade to climb out of the kerf and jump back toward
the operator.
Maintain a firm grip with both hands on the saw and position your arms to resist kickback forces.
Position your body to either side of the blade, but not in line with the blade. Kickback could cause
the saw to jump backwards, but kickback forces can be controlled by the operator, if proper
precautions are taken.
When blade is binding, or when interrupting a cut for any reason, release the trigger and hold the
saw motionless in the material until the blade comes to a complete stop. Never attempt to remove
the saw from the work or pull the saw backward while the blade is in motion or kickback may occur.
Investigate and take corrective actions to eliminate the cause of blade binding.
When restarting a saw in the workpiece, center the saw blade in the kerf and check that saw teeth
are not engaged into the material. If saw blade is binding, it may walk up or kickback from the
workpiece as the saw is restarted.
Support large panels to minimize the risk of blade pinching and kickback. Large panels tend to sag
under their own weight. Supports must be placed under the panel on both sides, near the line of
cut and near the edge of the panel.
Do not use dull or damaged blades. Unsharpened or improperly set blades produce narrow kerf
causing excessive friction, blade binding and kickback.
Blade depth and bevel adjusting locking levers must be tight and secure before making cut. If
blade adjustment shifts while cutting, it may cause binding and kickback.
Use extra caution when sawing into existing walls or other blind areas. The protruding blade may
cut objects that can cause kickback.
Check lower guard for proper closing before each use. Do not operate the saw if lower guard does
not move freely and close instantly. Never clamp or tie the lower guard into the open position. If
saw is accidentally dropped, lower guard may be bent. Raise the lower guard with the retracting
b)
c)
d)
Additional Safety Instructions
●
●
●
●
●
●
●
●
●
●
●
●
●
●
●
The smaller the gauge number of the wire, the greater the capacity of the cable, that is 16 gauge has
more capacity than 18 gauge. An undersized cord will cause a drop in line voltage resulting in loss of
power and overheating. When using more than one extension to make up the total length, be sure
each individual extension contains at least the minimum wire size. The following table shows the
correct size to use depending on cord length and nameplate ampere rating. If in doubt, use the next
heavier gauge. The smaller the gauge number, the heavier the cord.
handle and make sure it moves freely and does not touch the blade or any other part, in all angles
and depths of cut.
Check the operation of the lower guard spring. If the guard and the spring are not operating
properly, they must be serviced before use. Lower guard may operate sluggishly due to damaged
parts, gummy deposits, or a buildup of debris.
Lower guard should be retracted manually only for special cuts such as “plunge cuts” and
“compound cuts.” Raise lower guard by retracting handle and as soon as blade enters the materi-
al, the lower guard must be released. For all other sawing, the lower guard should operate
automatically.
Always observe that the lower guard is covering the blade before placing saw down on bench or
floor. An unprotected, coasting blade will cause the saw to walk backwards, cutting whatever is in
its path. Be aware of the time it takes for the blade to stop after switch is released.
Use clamps or another practical way to secure and support the workpiece to a stable platform.
Holding the work by hand or against your body leaves it unstable and may lead to loss of control.
Keep your body positioned to either side of the blade, but not in line with the saw blade.
KICKBACK could cause the saw to jump backwards (see Causes and Operator Prevention of
Kickback and KICKBACK).
Avoid cutting nails. Inspect for and remove all nails from lumber before cutting.
Always make sure nothing interferes with the movement of the lower blade guard.
Accessories must be rated for at least the speed recommended on the tool warning label. Wheels
and other accessories running over rated speed can fly apart and cause injury. Accessory ratings
must always be above tool speed as shown on tool nameplate.
Always make sure the saw is clean before using.
Stop using this saw and have it properly serviced if any unusual noise or abnormal operation
occurs.
Always be sure all components are mounted properly and securely before using tool.
Always handle the saw blade with care when mounting or removing it or when removing the
diamond knockout.
Always wait until the motor has reached full speed before starting a cut.
Always keep handles dry, clean and free of oil and grease. Hold the tool firmly with both hands
when in use.
Always be alert at all times, especially during repetitive, monotonous operations. Always be sure
of position of your hands relative to the blade.
Stay clear of end pieces that may fall after cutting off. They may be hot, sharp and/or heavy.
Serious personal injury may result.
Replace or repair damaged cords. Make sure your extension cord is in good condition. Use only
3-wire extension cords that have 3-prong grounding-type plugs and 3-pole receptacles that accept
the tool’s plug.
An extension cord must have adequate wire size (AWG or American Wire Gauge) for safety.
ANSI Z87.1 eye protection (CAN/CSA Z94.3).
ANSI S12.6 (S3.19) hearing protection.
NIOSH/OSHA respiratory protection.
Lead from lead-based paints, crystalline silica from bricks and cement and other masonry products,
and arsenic and chromium from chemically-treated lumber (CCA).
Avoid prolonged contact with dust from power sanding, sawing, grinding, drilling, and other
construction activities. Wear protective clothing and wash exposed areas with soap and water.
Allowing dust to get into your mouth, eyes, or lay on the skin may promote absorption of harmful
chemicals.
The label on your tool may include the following symbols. The symbols and their definitions are as
follows:
Safety Rules for Laser Lights
The laser light/laser radiation used in the system is Class 2 with maximum 1mW and 650nm
wavelengths. These lasers do not normally present an optical hazard, although staring at the beam
may cause flash blindness.
WARNING : Do not stare directly at the laser beam.
A hazard may exist if you deliberately stare into the beam, please observe all safety rules as follows;
●
●
●
●
●
CAUTION: Use of controls or adjustments or performance of procedures other than those
specified herein may result in hazardous radiation exposure
The laser shall be used and maintained in accordance with the manufacturer’s instructions.
Never aim the beam at any person or an object other than the workpiece.
The laser beam shall not be deliberately aimed at personnel and shall be prevented from being
directed towards the eye of a person for longer than 0.25s.
Always ensure the laser beam is aimed at a sturdy workpiece without reflective surfaces. I.e. wood
or rough coated surfaces are acceptable. Bright shiny reflective sheet steel or the like is not
suitable for laser use as the reflective surface could direct the beam back at the operator.
Do not change the laser light assembly with a different type. Repairs must be carried out by the
laser manufacturer or an authorized agent.
1.
2.
3.
4.
5.
6.
7.
8.
9
10
11
12
13
14
15
16
Laser
Switch of Laser
Depth scale
Switch trigger
Lock-off button
Knob
Clamping bolt
Blade
Base plate
Rip fence
Adaptor of Dust extraction
Bracket of base plate
Spindle lock button
Soft grip
Power cord
Allen key
Voltage
Power
No load speed
Blade size
Arbor size
Max cutting depth
Wood:
Tile:
Soft metal:
120VAC
4.8A
3700/min
3-5/16”(85mm)
10mm
1-1/16”
5/16”
1/8”
Assembly/Adjustment setup
WARNING: Before any work on the power tool, always remove the plug from the power source.
●
●
●
Adjust the cutting depth,
1.
2.
Note: if possible, recommend to setup the cutting depth approximately 2mm deeper than material
thickness, this should help to ensure you achieve a clean cut.
When mounting the saw blade, wear protective gloves. Danger of injury when touching the saw
blade.
Only use saw blade that correspond with the characteristic data given in the operating instructions.
Do not under any circumstances use grinding discs as the cutting tool.
Attaching and Removing the Blade - FIGURE C-E
• Retract lower guard and assemble blade (8) and clamp washer (17) as shown in figure C.
• Depress the spindle lock (13) while turning the blade bolt (7) with the blade wrench (16) until the
blade lock engages and the blade stops rotating. figure D
NOTE: Blade wrench is stored in polybag together with manual
• Tighten the blade bolt securely with the blade wrench.
NOTE: Bolt has a left-handed thread. To loosen, turn clockwise.
To tighten, turn counterclockwise.figure E
NOTE: Never engage the blade lock while the saw is running, or engage in an effort to stop the tool.
Never turn the tool on while the blade lock is engaged. Serious damage to your saw will result.
As required, move the unlocked knob and let the finger point at the suitable position of depth scale,
Then rotate the knob 180°to lock it,
Switching On and Off
Laser function
CHANGING THE LASER BATTERIES
The batteries that operate the laser will have to be replaced after considerable use of the laser.
1.
2.
3.
4.
DANGER: Never allow the laser beam to shine into a person's eyes, Serious eye damage could
result. Make sure the laser switch is OFF and the laser is NOT pointing toward you while replacing the
laser batteries and when checking the laser function.
Application
The mini plunge saw is a versatile one that allows you to cut many different types of materials. Some
of the materials include
●
●
●
Blade selection
MAINTENANCE
WARNING: Unplug tool before installing or removing accessories, before adjusting, or when
making repairs. Use only mild soap and damp cloth to clean the tool. Never let any liquid get inside
the tool; never immerse any part of the tool into a liquid.
IMPORTANT: To assure product SAFETY and RELIABILITY, repairs, maintenance and adjust-
ment (other than those listed
in this manual) should be performed by authorized service centers or other qualified service organiza-
tions, always using identical replacement parts.
- 07 -
Technology Creates Power
1 2 311
18
10
8
9
7
17
6
Fig A
4
15
13
12
14
5
Fig B
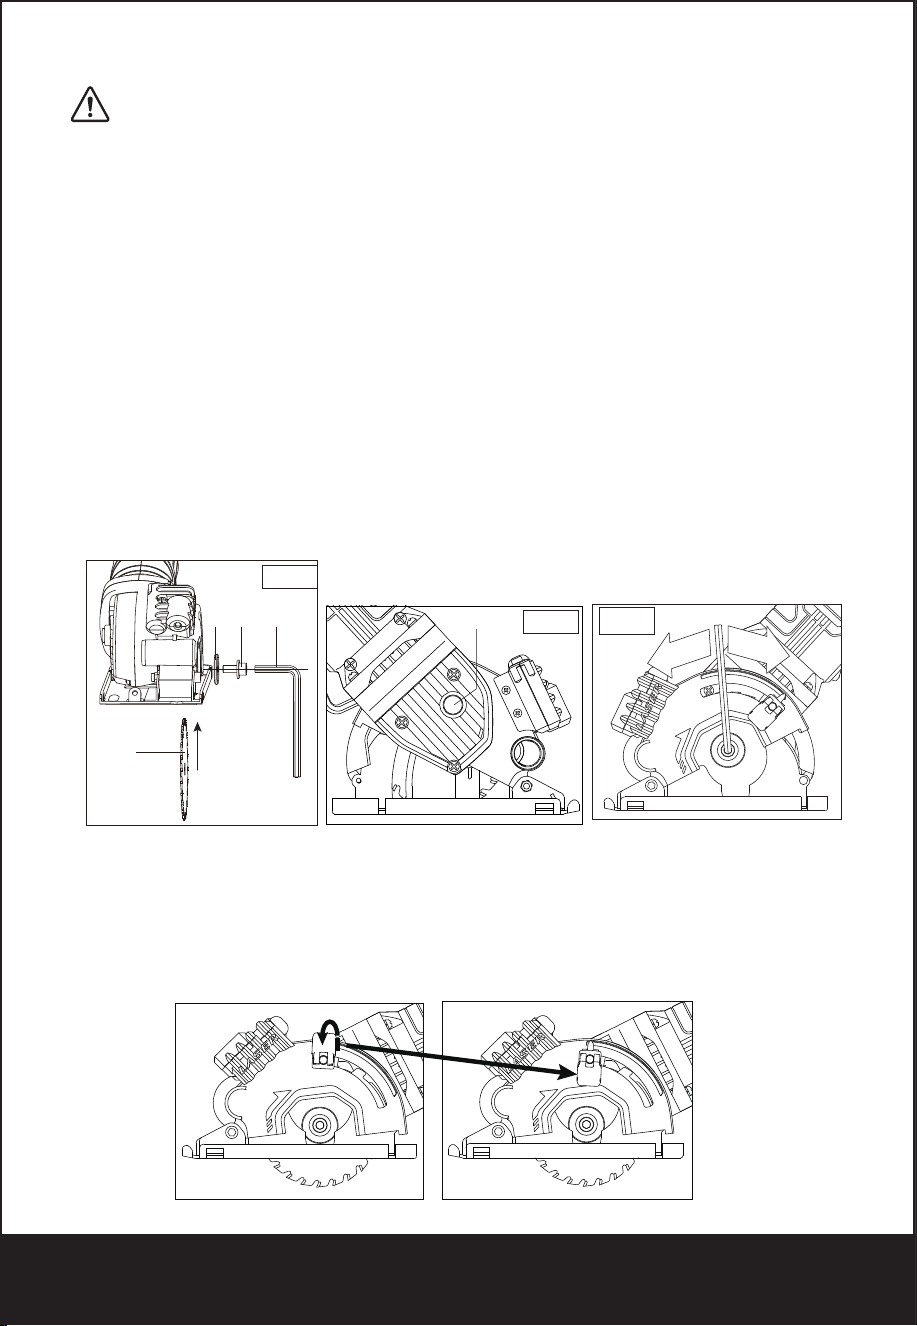
Intended use
This machine is primarily intended for the sawing, longitudinally and transversely, of solid wood,
chipboard, plywood, alum1n1um, tiles and stone held in a fixed position. Please note that the blade
pre-installed in the saw as supplied is intended for use with wood only. Any other use or modification
to the device shall be considered as improper use and could give rise to considerable dangers It is not
suitable for commercial use
Function Description
The numbering of the products features refers to the illustration of the machine on the graphics page.
b)
c)
d)
e)
f)
g)
4)
a)
b)
c)
d)
e)
f)
g)
5)
Have your power tool serviced by a qualified repair person using only identical replacement parts.
This will ensure that the safety of the power tool is maintained.
DANGER: Keep hands away from cutting area and the blade.
a)
b)
●
●
●
WARNING: Some dust created by power sanding, sawing, grinding, drilling, and other construc-
tion activities contains chemicals known in the state of California to cause cancer, birth defects or other
reproductive harm. Some examples of these chemicals are:
●
Your risk from these exposures varies, depending on how often you do this type of work. To reduce
your exposure to these chemicals: work in a well ventilated area, and work with approved safety
equipment, such as those dust masks that are specially designed to filter out microscopic particles.
WARNING: ALWAYS USE SAFETY GLASSES. Everyday eyeglasses are NOT safety glasses.
Also use face or dust mask if cutting
●
WARNING: Cutting plastics, sap coated wood, and other materials may cause melted material
to accumulate on the blade tips and the body of the saw blade, increasing the risk of blade overheat-
ing and binding while cutting.
WARNING: Use of this tool can generate and/or disburse dust, which may cause serious and
permanent respiratory or other injury. Always use NIOSH/OSHA approved respiratory protection
appropriate for the dust exposure. Direct particles away from face and body. Always operate tool in
well-ventilated area and provide for proper dust removal. Use dust collection system wherever
possible.
EN
FR
ES
DEFINITIONS: SAFETY ALERT SYMBOLS AND WORDS
It is important for you to read and understand this manual. The information it contains relates to
protecting YOUR SAFETY and PREVENTING PROBLEMS. The symbols below are used to help you
recognize this information.
NOTICE: Used without the safety alert symbol indicates potentially hazardous situation which, if not
avoided, may result in property damage.
WARNING: Read all safety warnings and all instructions.
Failure to follow the warnings and instructions may result in electric shock, fire and/or serious injury.
SAVE ALL WARNINGS AND INSTRUCTIONS FOR FUTURE REFERENCE
The term “power tool” in the warnings refers to your mains operated (corded) power tool or battery-op-
erated (cordless) power tool.
1)
a)
b)
c)
2)
a)
b)
c)
d)
e)
f)
3)
a)
WORK AREA SAFETY
Keep work area clean and well lit. Cluttered or dark areas invite accidents.
Do not operate power tools in explosive atmospheres, such as in the presence of flammable
liquids, gases or dust. Power tools create sparks which may ignite the dust or fumes.
Keep children and bystanders away while operating a power tool. Distractions can cause you to
lose control.
ELECTRICAL SAFETY
Power tool plugs must match the outlet. Never modify the plug in any way. Do not use any adapter
plugs with earthed (grounded) power tools. Unmodified plugs and matching outlets will reduce risk
of electric shock.
Avoid body contact with earthed or grounded surfaces such as pipes, radiators, ranges and
refrigerators. There is an increased risk of electric shock if your body is earthed or grounded.
Do not expose power tools to rain or wet conditions. Water entering a power tool will increase the
risk of electric shock.
Do not abuse the cord. Never use the cord for carrying, pulling or unplugging the power tool. Keep
cord away from heat, oil, sharp edges or moving parts. Damaged or entangled cords increase the
risk of electric shock.
When operating a power tool outdoors, use an extension cord suitable for outdoor use. Use of a
cord suitable for outdoor use reduces the risk of electric shock.
If operating a power tool in a damp location is unavoidable, use a ground fault circuit interrupter
(GFCI) protected supply. Use of a GFCI reduces the risk of electric shock.
PERSONAL SAFETY
Stay alert, watch what you are doing and use common sense when operating a power tool. Do not
use a power tool while you are tired or under the influence of drugs, alcohol or medication. A
moment of inattention while operating power tools may result in serious
personal injury.
Use personal protective equipment.
Always wear eye protection. Protective equipment such as dust mask, nonskid safety shoes, hard
hat, or hearing protection used for appropriate conditions will reduce personal injuries.
Prevent unintentional starting. Ensure the switch is in the off position before connecting to power
source and/ or battery pack, picking up or carrying the tool. Carrying power tools with your finger
on the switch or energizing power tools that have the switch on invites accidents.
Remove any adjusting key or wrench before turning the power tool on. A wrench or a key left
attached to a rotating part of the power tool may result in personal injury.
Do not overreach. Keep proper footing and balance at all times. This enables better control of the
power tool in unexpected situations.
Dress properly. Do not wear loose clothing or jewelry. Keep your hair, clothing and gloves away
from moving parts. Loose clothes, jewelry or long hair can be caught in moving parts.
If devices are provided for the connection of dust extraction and collection facilities, ensure these
are connected and properly used.
Use of dust collection can reduce dust-related hazards.
POWER TOOL USE AND CARE
Do not force the power tool. Use the correct power tool for your application. The correct power tool
will do the job better and safer at the rate for which it was designed.
Do not use the power tool if the switch does not turn it on and off. Any power tool that cannot be
controlled with the switch is dangerous and must be repaired.
Disconnect the plug from the power source and/or the battery pack from the power tool before
making any adjustments, changing accessories, or storing power tools. Such preventive safety
measures reduce the risk of starting the power tool accidentally.
Store idle power tools out of the reach of children and do not allow persons unfamiliar with the
power tool or these instructions to operate the power tool. Power tools are dangerous in the hands
of untrained users.
Maintain power tools. Check for misalignment or binding of moving parts, breakage of parts and
any other condition that may affect the power tool’s operation. If damaged, have the power tool
repaired before use. Many accidents are caused by poorly maintained power tools.
Keep cutting tools sharp and clean. Properly maintained cutting tools with sharp cutting edges are
less likely to bind and are easier to control.
Use the power tool, accessories and tool bits, etc. in accordance with these instructions, taking
into account the working conditions and the work to be performed. Use of the power tool for opera-
tions different from those intended could result in a hazardous situation.
SERVICE
Keep your second hand on auxiliary handle or motor housing. If both hands are holding the saw,
they cannot be cut by the blade.
Do not reach underneath the workpiece. The guard cannot protect you from the blade below the
workpiece.
c)
d)
e)
f)
g)
h)
Causes and Operator Prevention of Kickback:
●
●
●
Kickback is the result of saw misuse and/ or incorrect operating procedures or conditions and can be
avoided by taking proper precautions as given below:
a)
b)
c)
d)
e)
f)
g)
Lower Guard Safety Instructions
a)
Adjust the cutting depth to the thickness of the workpiece. Less than a full tooth of the blade teeth
should be visible below the workpiece.
Never hold piece being cut in your hands or across your leg. Secure the workpiece to a stable
platform. It is important to support the work properly to minimize body exposure, blade binding, or
loss of control.
Hold the power tool by insulated gripping surfaces only, when performing an operation where the
cutting tool may contact hidden wiring or its own cord. Contact with a “live” wire will also make
exposed metal parts of the power tool “live” and could give the operator an electric shock.
When ripping always use a rip fence or straight edge guide. This improves the accuracy of cut and
reduces the chance of blade binding.
Always use blades with correct size and shape (diamond versus round) of arbor holes. Blades that
do not match the mounting hardware of the saw will run eccentrically, causing loss of control.
Never use damaged or incorrect blade washers or bolt. The blade washers and bolt were specially
designed for your saw, for optimum performance and safety of operation
Kickback is a sudden reaction to a pinched, bound or misaligned saw blade, causing an uncon-
trolled saw to lift up and out of the workpiece toward the operator.
When the blade is pinched or bound tightly by the kerf closing down, the blade stalls and the motor
reaction drives the unit rapidly back toward the operator.
If the blade becomes twisted or misaligned in the cut, the teeth at the back edge of the blade can
dig into the top surface of the wood causing the blade to climb out of the kerf and jump back toward
the operator.
Maintain a firm grip with both hands on the saw and position your arms to resist kickback forces.
Position your body to either side of the blade, but not in line with the blade. Kickback could cause
the saw to jump backwards, but kickback forces can be controlled by the operator, if proper
precautions are taken.
When blade is binding, or when interrupting a cut for any reason, release the trigger and hold the
saw motionless in the material until the blade comes to a complete stop. Never attempt to remove
the saw from the work or pull the saw backward while the blade is in motion or kickback may occur.
Investigate and take corrective actions to eliminate the cause of blade binding.
When restarting a saw in the workpiece, center the saw blade in the kerf and check that saw teeth
are not engaged into the material. If saw blade is binding, it may walk up or kickback from the
workpiece as the saw is restarted.
Support large panels to minimize the risk of blade pinching and kickback. Large panels tend to sag
under their own weight. Supports must be placed under the panel on both sides, near the line of
cut and near the edge of the panel.
Do not use dull or damaged blades. Unsharpened or improperly set blades produce narrow kerf
causing excessive friction, blade binding and kickback.
Blade depth and bevel adjusting locking levers must be tight and secure before making cut. If
blade adjustment shifts while cutting, it may cause binding and kickback.
Use extra caution when sawing into existing walls or other blind areas. The protruding blade may
cut objects that can cause kickback.
Check lower guard for proper closing before each use. Do not operate the saw if lower guard does
not move freely and close instantly. Never clamp or tie the lower guard into the open position. If
saw is accidentally dropped, lower guard may be bent. Raise the lower guard with the retracting
b)
c)
d)
Additional Safety Instructions
●
●
●
●
●
●
●
●
●
●
●
●
●
●
●
The smaller the gauge number of the wire, the greater the capacity of the cable, that is 16 gauge has
more capacity than 18 gauge. An undersized cord will cause a drop in line voltage resulting in loss of
power and overheating. When using more than one extension to make up the total length, be sure
each individual extension contains at least the minimum wire size. The following table shows the
correct size to use depending on cord length and nameplate ampere rating. If in doubt, use the next
heavier gauge. The smaller the gauge number, the heavier the cord.
handle and make sure it moves freely and does not touch the blade or any other part, in all angles
and depths of cut.
Check the operation of the lower guard spring. If the guard and the spring are not operating
properly, they must be serviced before use. Lower guard may operate sluggishly due to damaged
parts, gummy deposits, or a buildup of debris.
Lower guard should be retracted manually only for special cuts such as “plunge cuts” and
“compound cuts.” Raise lower guard by retracting handle and as soon as blade enters the materi-
al, the lower guard must be released. For all other sawing, the lower guard should operate
automatically.
Always observe that the lower guard is covering the blade before placing saw down on bench or
floor. An unprotected, coasting blade will cause the saw to walk backwards, cutting whatever is in
its path. Be aware of the time it takes for the blade to stop after switch is released.
Use clamps or another practical way to secure and support the workpiece to a stable platform.
Holding the work by hand or against your body leaves it unstable and may lead to loss of control.
Keep your body positioned to either side of the blade, but not in line with the saw blade.
KICKBACK could cause the saw to jump backwards (see Causes and Operator Prevention of
Kickback and KICKBACK).
Avoid cutting nails. Inspect for and remove all nails from lumber before cutting.
Always make sure nothing interferes with the movement of the lower blade guard.
Accessories must be rated for at least the speed recommended on the tool warning label. Wheels
and other accessories running over rated speed can fly apart and cause injury. Accessory ratings
must always be above tool speed as shown on tool nameplate.
Always make sure the saw is clean before using.
Stop using this saw and have it properly serviced if any unusual noise or abnormal operation
occurs.
Always be sure all components are mounted properly and securely before using tool.
Always handle the saw blade with care when mounting or removing it or when removing the
diamond knockout.
Always wait until the motor has reached full speed before starting a cut.
Always keep handles dry, clean and free of oil and grease. Hold the tool firmly with both hands
when in use.
Always be alert at all times, especially during repetitive, monotonous operations. Always be sure
of position of your hands relative to the blade.
Stay clear of end pieces that may fall after cutting off. They may be hot, sharp and/or heavy.
Serious personal injury may result.
Replace or repair damaged cords. Make sure your extension cord is in good condition. Use only
3-wire extension cords that have 3-prong grounding-type plugs and 3-pole receptacles that accept
the tool’s plug.
An extension cord must have adequate wire size (AWG or American Wire Gauge) for safety.
ANSI Z87.1 eye protection (CAN/CSA Z94.3).
ANSI S12.6 (S3.19) hearing protection.
NIOSH/OSHA respiratory protection.
Lead from lead-based paints, crystalline silica from bricks and cement and other masonry products,
and arsenic and chromium from chemically-treated lumber (CCA).
Avoid prolonged contact with dust from power sanding, sawing, grinding, drilling, and other
construction activities. Wear protective clothing and wash exposed areas with soap and water.
Allowing dust to get into your mouth, eyes, or lay on the skin may promote absorption of harmful
chemicals.
The label on your tool may include the following symbols. The symbols and their definitions are as
follows:
Safety Rules for Laser Lights
The laser light/laser radiation used in the system is Class 2 with maximum 1mW and 650nm
wavelengths. These lasers do not normally present an optical hazard, although staring at the beam
may cause flash blindness.
WARNING : Do not stare directly at the laser beam.
A hazard may exist if you deliberately stare into the beam, please observe all safety rules as follows;
●
●
●
●
●
CAUTION: Use of controls or adjustments or performance of procedures other than those
specified herein may result in hazardous radiation exposure
The laser shall be used and maintained in accordance with the manufacturer’s instructions.
Never aim the beam at any person or an object other than the workpiece.
The laser beam shall not be deliberately aimed at personnel and shall be prevented from being
directed towards the eye of a person for longer than 0.25s.
Always ensure the laser beam is aimed at a sturdy workpiece without reflective surfaces. I.e. wood
or rough coated surfaces are acceptable. Bright shiny reflective sheet steel or the like is not
suitable for laser use as the reflective surface could direct the beam back at the operator.
Do not change the laser light assembly with a different type. Repairs must be carried out by the
laser manufacturer or an authorized agent.
Assembly/Adjustment setup
WARNING: Before any work on the power tool, always remove the plug from the power source.
●
●
●
Adjust the cutting depth,
1.
2.
Note: if possible, recommend to setup the cutting depth approximately 2mm deeper than material
thickness, this should help to ensure you achieve a clean cut.
When mounting the saw blade, wear protective gloves. Danger of injury when touching the saw
blade.
Only use saw blade that correspond with the characteristic data given in the operating instructions.
Do not under any circumstances use grinding discs as the cutting tool.
Attaching and Removing the Blade - FIGURE C-E
• Retract lower guard and assemble blade (8) and clamp washer (17) as shown in figure C.
• Depress the spindle lock (13) while turning the blade bolt (7) with the blade wrench (16) until the
blade lock engages and the blade stops rotating. figure D
NOTE: Blade wrench is stored in polybag together with manual
• Tighten the blade bolt securely with the blade wrench.
NOTE: Bolt has a left-handed thread. To loosen, turn clockwise.
To tighten, turn counterclockwise.figure E
NOTE: Never engage the blade lock while the saw is running, or engage in an effort to stop the tool.
Never turn the tool on while the blade lock is engaged. Serious damage to your saw will result.
As required, move the unlocked knob and let the finger point at the suitable position of depth scale,
Then rotate the knob 180°to lock it,
Switching On and Off
Laser function
CHANGING THE LASER BATTERIES
The batteries that operate the laser will have to be replaced after considerable use of the laser.
1.
2.
3.
4.
DANGER: Never allow the laser beam to shine into a person's eyes, Serious eye damage could
result. Make sure the laser switch is OFF and the laser is NOT pointing toward you while replacing the
laser batteries and when checking the laser function.
Application
The mini plunge saw is a versatile one that allows you to cut many different types of materials. Some
of the materials include
●
●
●
Blade selection
MAINTENANCE
WARNING: Unplug tool before installing or removing accessories, before adjusting, or when
making repairs. Use only mild soap and damp cloth to clean the tool. Never let any liquid get inside
the tool; never immerse any part of the tool into a liquid.
IMPORTANT: To assure product SAFETY and RELIABILITY, repairs, maintenance and adjust-
ment (other than those listed
in this manual) should be performed by authorized service centers or other qualified service organiza-
tions, always using identical replacement parts.
- 08 -
Technology Creates Power
Fig D
13
FigC
8
17
7
16
Fig F FigG
Fig E
To Tight
To Loose
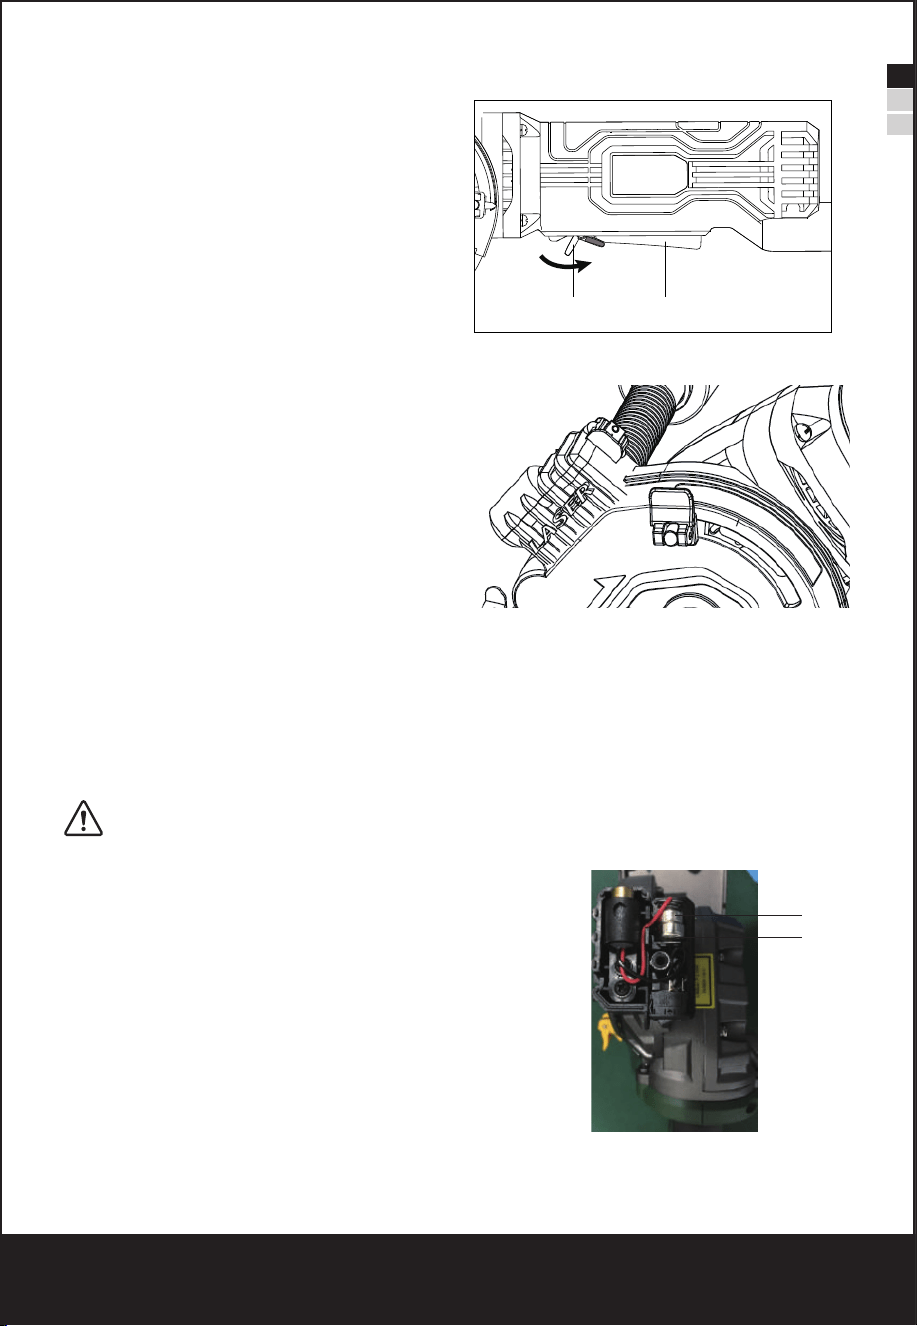
Intended use
This machine is primarily intended for the sawing, longitudinally and transversely, of solid wood,
chipboard, plywood, alum1n1um, tiles and stone held in a fixed position. Please note that the blade
pre-installed in the saw as supplied is intended for use with wood only. Any other use or modification
to the device shall be considered as improper use and could give rise to considerable dangers It is not
suitable for commercial use
Function Description
The numbering of the products features refers to the illustration of the machine on the graphics page.
b)
c)
d)
e)
f)
g)
4)
a)
b)
c)
d)
e)
f)
g)
5)
Have your power tool serviced by a qualified repair person using only identical replacement parts.
This will ensure that the safety of the power tool is maintained.
DANGER: Keep hands away from cutting area and the blade.
a)
b)
●
●
●
WARNING: Some dust created by power sanding, sawing, grinding, drilling, and other construc-
tion activities contains chemicals known in the state of California to cause cancer, birth defects or other
reproductive harm. Some examples of these chemicals are:
●
Your risk from these exposures varies, depending on how often you do this type of work. To reduce
your exposure to these chemicals: work in a well ventilated area, and work with approved safety
equipment, such as those dust masks that are specially designed to filter out microscopic particles.
WARNING: ALWAYS USE SAFETY GLASSES. Everyday eyeglasses are NOT safety glasses.
Also use face or dust mask if cutting
●
WARNING: Cutting plastics, sap coated wood, and other materials may cause melted material
to accumulate on the blade tips and the body of the saw blade, increasing the risk of blade overheat-
ing and binding while cutting.
WARNING: Use of this tool can generate and/or disburse dust, which may cause serious and
permanent respiratory or other injury. Always use NIOSH/OSHA approved respiratory protection
appropriate for the dust exposure. Direct particles away from face and body. Always operate tool in
well-ventilated area and provide for proper dust removal. Use dust collection system wherever
possible.
EN
FR
ES
DEFINITIONS: SAFETY ALERT SYMBOLS AND WORDS
It is important for you to read and understand this manual. The information it contains relates to
protecting YOUR SAFETY and PREVENTING PROBLEMS. The symbols below are used to help you
recognize this information.
NOTICE: Used without the safety alert symbol indicates potentially hazardous situation which, if not
avoided, may result in property damage.
WARNING: Read all safety warnings and all instructions.
Failure to follow the warnings and instructions may result in electric shock, fire and/or serious injury.
SAVE ALL WARNINGS AND INSTRUCTIONS FOR FUTURE REFERENCE
The term “power tool” in the warnings refers to your mains operated (corded) power tool or battery-op-
erated (cordless) power tool.
1)
a)
b)
c)
2)
a)
b)
c)
d)
e)
f)
3)
a)
c)
d)
e)
f)
g)
h)
Causes and Operator Prevention of Kickback:
●
●
●
Kickback is the result of saw misuse and/ or incorrect operating procedures or conditions and can be
avoided by taking proper precautions as given below:
a)
b)
c)
d)
e)
f)
g)
Lower Guard Safety Instructions
a)
b)
c)
d)
Additional Safety Instructions
●
●
●
●
●
●
●
●
●
●
●
●
●
●
●
The smaller the gauge number of the wire, the greater the capacity of the cable, that is 16 gauge has
more capacity than 18 gauge. An undersized cord will cause a drop in line voltage resulting in loss of
power and overheating. When using more than one extension to make up the total length, be sure
each individual extension contains at least the minimum wire size. The following table shows the
correct size to use depending on cord length and nameplate ampere rating. If in doubt, use the next
heavier gauge. The smaller the gauge number, the heavier the cord.
The label on your tool may include the following symbols. The symbols and their definitions are as
follows:
Safety Rules for Laser Lights
The laser light/laser radiation used in the system is Class 2 with maximum 1mW and 650nm
wavelengths. These lasers do not normally present an optical hazard, although staring at the beam
may cause flash blindness.
WARNING : Do not stare directly at the laser beam.
A hazard may exist if you deliberately stare into the beam, please observe all safety rules as follows;
●
●
●
●
●
CAUTION: Use of controls or adjustments or performance of procedures other than those
specified herein may result in hazardous radiation exposure
Assembly/Adjustment setup
WARNING: Before any work on the power tool, always remove the plug from the power source.
●
●
●
Adjust the cutting depth,
1.
2.
Note: if possible, recommend to setup the cutting depth approximately 2mm deeper than material
thickness, this should help to ensure you achieve a clean cut.
Switching On and Off
Laser function
CHANGING THE LASER BATTERIES
The batteries that operate the laser will have to be replaced after considerable use of the laser.
1.
2.
3.
4.
DANGER: Never allow the laser beam to shine into a person's eyes, Serious eye damage could
result. Make sure the laser switch is OFF and the laser is NOT pointing toward you while replacing the
laser batteries and when checking the laser function.
Application
The mini plunge saw is a versatile one that allows you to cut many different types of materials. Some
of the materials include
To start the machine
●First push the lock-off button (5) backward.
●Then press the switch trigger (4) and keep it pressed.
●When cut the wood, put the machine on the
workpiece and push it along the wood.
To switch off the machine
●First take out of the machine from workpiece.
●Then release the switch trigger.
Note: For safety reasons, the On/Off switch
cannot be locked; it must remain pressed during
the entire operation.
Note: Laser light can cause severe eye damage.
Never look directly into the laser beam. Do not
point the laser beam at other people or animals,
either directly or through reflective surfaces.
The laser feature on your saw is powered by two
LR44 1.5V button batteries (installed).
The Laser feature clearly shows you an extend-
ed cut-line, even over debris on the work piece.
●Turn it on with the laser light ON/Off switch right
before cutting.
●Turn it off immediately after use to conserve
battery and laser life.
5.Replace with two new batteries.
NOTES:
a)Use two 1.5V LR 44 batteries
b)install the batteries with the"+" side (19) of the
batteries facing the rear of the tool
6. Re-install the laser cover and fasten it in place
with the laser cover screw.
Turn the laser switch off.
Remove the laser cover screw.
Lift the laser cover off the top of the laser assembly,
Remove the two old batteries (18).
18
19
●
●
●
Blade selection
MAINTENANCE
WARNING: Unplug tool before installing or removing accessories, before adjusting, or when
making repairs. Use only mild soap and damp cloth to clean the tool. Never let any liquid get inside
the tool; never immerse any part of the tool into a liquid.
IMPORTANT: To assure product SAFETY and RELIABILITY, repairs, maintenance and adjust-
ment (other than those listed
in this manual) should be performed by authorized service centers or other qualified service organiza-
tions, always using identical replacement parts.
Wood products such as lumber, hardwood, plywood, composition board and paneling
plastic and soft metal.
tile and backerboard
- 09 -
Technology Creates Power
5 4
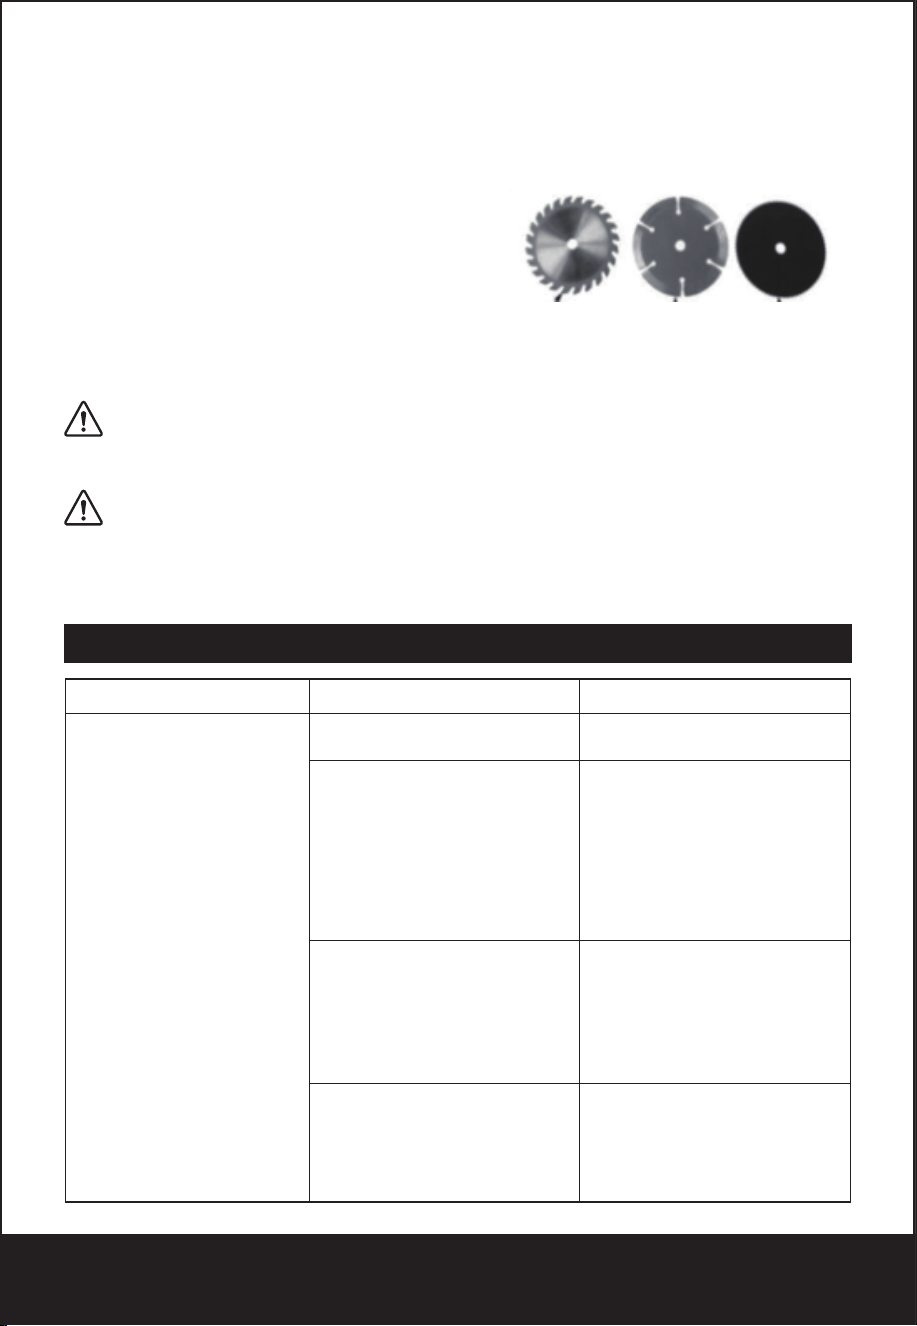
Intended use
This machine is primarily intended for the sawing, longitudinally and transversely, of solid wood,
chipboard, plywood, alum1n1um, tiles and stone held in a fixed position. Please note that the blade
pre-installed in the saw as supplied is intended for use with wood only. Any other use or modification
to the device shall be considered as improper use and could give rise to considerable dangers It is not
suitable for commercial use
Function Description
The numbering of the products features refers to the illustration of the machine on the graphics page.
b)
c)
d)
e)
f)
g)
4)
a)
b)
c)
d)
e)
f)
g)
5)
Have your power tool serviced by a qualified repair person using only identical replacement parts.
This will ensure that the safety of the power tool is maintained.
DANGER: Keep hands away from cutting area and the blade.
a)
b)
●
●
●
WARNING: Some dust created by power sanding, sawing, grinding, drilling, and other construc-
tion activities contains chemicals known in the state of California to cause cancer, birth defects or other
reproductive harm. Some examples of these chemicals are:
●
Your risk from these exposures varies, depending on how often you do this type of work. To reduce
your exposure to these chemicals: work in a well ventilated area, and work with approved safety
equipment, such as those dust masks that are specially designed to filter out microscopic particles.
WARNING: ALWAYS USE SAFETY GLASSES. Everyday eyeglasses are NOT safety glasses.
Also use face or dust mask if cutting
●
WARNING: Cutting plastics, sap coated wood, and other materials may cause melted material
to accumulate on the blade tips and the body of the saw blade, increasing the risk of blade overheat-
ing and binding while cutting.
WARNING: Use of this tool can generate and/or disburse dust, which may cause serious and
permanent respiratory or other injury. Always use NIOSH/OSHA approved respiratory protection
appropriate for the dust exposure. Direct particles away from face and body. Always operate tool in
well-ventilated area and provide for proper dust removal. Use dust collection system wherever
possible.
EN
FR
ES
DEFINITIONS: SAFETY ALERT SYMBOLS AND WORDS
It is important for you to read and understand this manual. The information it contains relates to
protecting YOUR SAFETY and PREVENTING PROBLEMS. The symbols below are used to help you
recognize this information.
NOTICE: Used without the safety alert symbol indicates potentially hazardous situation which, if not
avoided, may result in property damage.
WARNING: Read all safety warnings and all instructions.
Failure to follow the warnings and instructions may result in electric shock, fire and/or serious injury.
SAVE ALL WARNINGS AND INSTRUCTIONS FOR FUTURE REFERENCE
The term “power tool” in the warnings refers to your mains operated (corded) power tool or battery-op-
erated (cordless) power tool.
1)
a)
b)
c)
2)
a)
b)
c)
d)
e)
f)
3)
a)
Troubleshooting
c)
d)
e)
f)
g)
h)
Causes and Operator Prevention of Kickback:
●
●
●
Kickback is the result of saw misuse and/ or incorrect operating procedures or conditions and can be
avoided by taking proper precautions as given below:
a)
b)
c)
d)
e)
f)
g)
Lower Guard Safety Instructions
a)
b)
c)
d)
Additional Safety Instructions
●
●
●
●
●
●
●
●
●
●
●
●
●
●
●
The smaller the gauge number of the wire, the greater the capacity of the cable, that is 16 gauge has
more capacity than 18 gauge. An undersized cord will cause a drop in line voltage resulting in loss of
power and overheating. When using more than one extension to make up the total length, be sure
each individual extension contains at least the minimum wire size. The following table shows the
correct size to use depending on cord length and nameplate ampere rating. If in doubt, use the next
heavier gauge. The smaller the gauge number, the heavier the cord.
The label on your tool may include the following symbols. The symbols and their definitions are as
follows:
Safety Rules for Laser Lights
The laser light/laser radiation used in the system is Class 2 with maximum 1mW and 650nm
wavelengths. These lasers do not normally present an optical hazard, although staring at the beam
may cause flash blindness.
WARNING : Do not stare directly at the laser beam.
A hazard may exist if you deliberately stare into the beam, please observe all safety rules as follows;
●
●
●
●
●
CAUTION: Use of controls or adjustments or performance of procedures other than those
specified herein may result in hazardous radiation exposure
Assembly/Adjustment setup
WARNING: Before any work on the power tool, always remove the plug from the power source.
●
●
●
Adjust the cutting depth,
1.
2.
Note: if possible, recommend to setup the cutting depth approximately 2mm deeper than material
thickness, this should help to ensure you achieve a clean cut.
Switching On and Off
Laser function
CHANGING THE LASER BATTERIES
The batteries that operate the laser will have to be replaced after considerable use of the laser.
1.
2.
3.
4.
DANGER: Never allow the laser beam to shine into a person's eyes, Serious eye damage could
result. Make sure the laser switch is OFF and the laser is NOT pointing toward you while replacing the
laser batteries and when checking the laser function.
Application
The mini plunge saw is a versatile one that allows you to cut many different types of materials. Some
of the materials include
Three blades are available for this saw. Each is for
cutting different materials. Select the correct blade
for your applications.
24 teeth TCT saw blade (a) is for cutting wood,
plastic and other soft materials
44 teeth HSS saw blade (c) is for cutting plastic and
soft metal.
Diamand blade (b) is for cutting tile and backerboard.
Turn the laser switch off.
Remove the laser cover screw.
Lift the laser cover off the top of the laser assembly,
Remove the two old batteries (18).
●
●
●
Blade selection
MAINTENANCE
WARNING: Unplug tool before installing or removing accessories, before adjusting, or when
making repairs. Use only mild soap and damp cloth to clean the tool. Never let any liquid get inside
the tool; never immerse any part of the tool into a liquid.
IMPORTANT: To assure product SAFETY and RELIABILITY, repairs, maintenance and adjust-
ment (other than those listed
in this manual) should be performed by authorized service centers or other qualified service organiza-
tions, always using identical replacement parts.
Wood products such as lumber, hardwood, plywood, composition board and paneling
plastic and soft metal.
tile and backerboard
(a) (b) (c)
Problem
Unit will not start
Cord not plugged in.
Circuit fuse is blown.
Circuit breaker is tripped
Cord or switch is damaged
Plug tool into a
working outlet.
Possible Cause Possible Solution
Replace circuit fuse.(if the
product repeatedly cause the
circuit fuse to blow, discontinue
use immediately and have it
serviced at service center )
Reset circuit breaker.(if the
product repeatedly causes the
circuit breaker to trip, discontin-
ue use immediately and have it
serviced at service center )
Have cord or switch replaced at
service center
- 10 -
Technology Creates Power

EN
FR
ES
Protecting the environment
Separate collection. This product must not be disposed of with normal household waste.
Should you find one day that your TECCPO product needs replacement, or if it is of no
further use to you, do not dispose of it with household waste. Make this product available for
separate collection.
Separate collection of used products and packaging allows materials to be recycled and
used again.
Re-use of recycled materials helps prevent environmental pollution and reduces the
demand for raw materials.
Local regulations may provide for separate collection of electrical products from the house-
hold, at municipal waste sites or by the retailer when you purchase a new product.
- 11 -
Technology Creates Power
This device complies with part 15 of the FCC rules. Operation is subject to the following
two conditions: (1) This device may not cause harmful interference, and (2) this device
must accept any interference received, including interference that may cause undesired
operation.
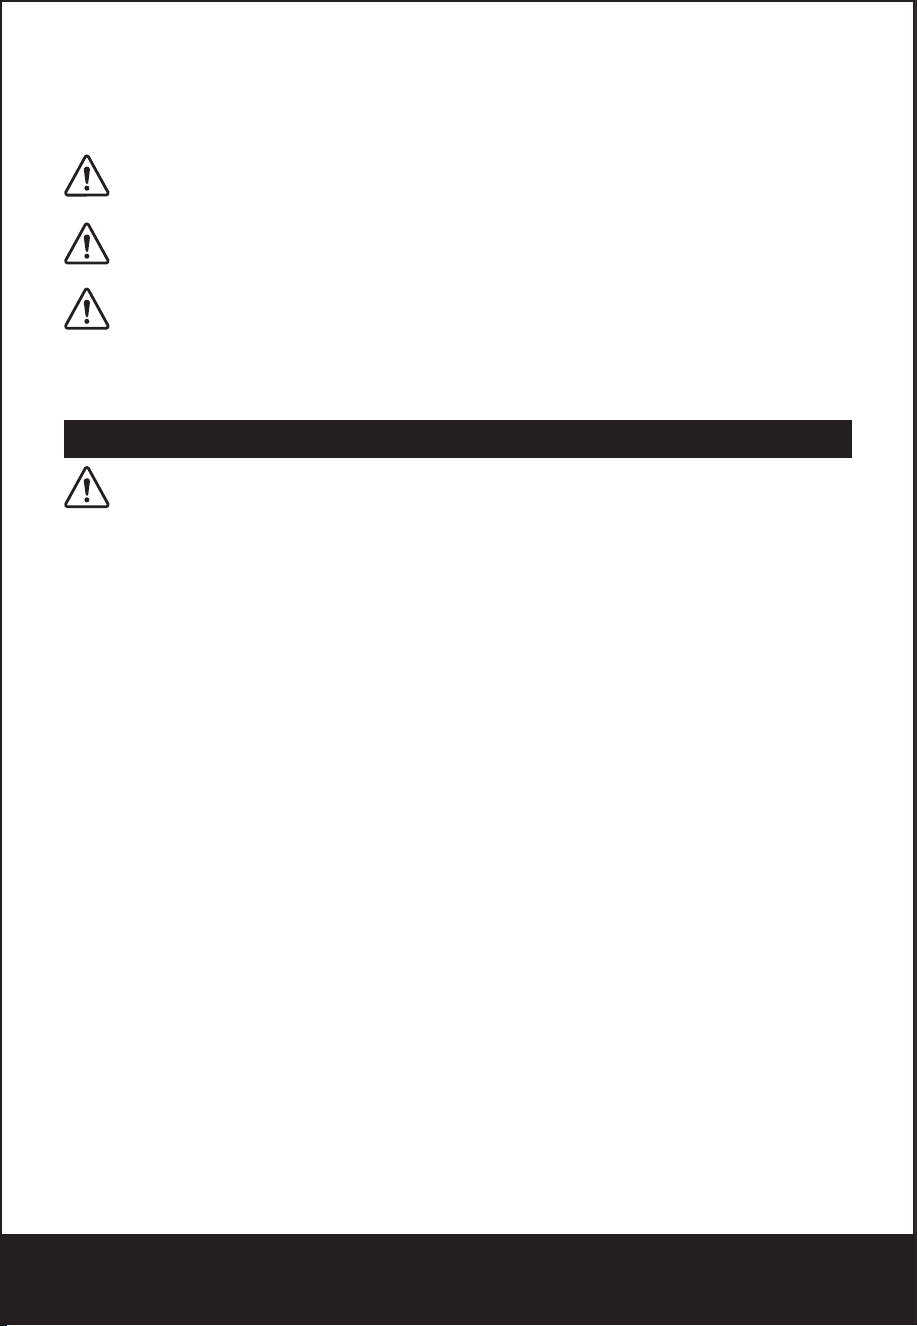
Allumer et éteindre
Remarque: Pour des raisons de sécurité, le commutateur On / Off ne peut pas être verrouillé. il doit
rester appuyé pendant toute l'opération.
Fonction laser
●Allumez-le avec le commutateur ON / OFF de la lumière laser juste avant de couper.
●Éteignez-le immédiatement après l'utilisation pour économiser la batterie et préserver la durée de
vie du laser.
CHANGEMENT DES PILES AU LASER
Les piles qui font fonctionner le laser devront être remplacées après une utilisation considérable du
laser.
1.
2.
3.
4.
DANGER: Ne laissez jamais le rayon laser pénétrer dans les yeux d'une personne, cela pourrait
5)
Faites réparer votre outil électrique par un réparateur qualifié en utilisant uniquement des pièces de
rechange identiques. Cela garantira le maintien de la sécurité de l'outil électrique.
DANGER: Gardez les mains éloignées de la zone de coupe et de la lame.
a)
b)
c)
d)
e)
f)
g)
h)
Causes et prévention du recul par l'opérateur:
●
●
●
Le rebond résulte d'une mauvaise utilisation de la scie et / ou de procédures ou de conditions d'utilisa-
tion incorrectes et peut être évité en prenant les précautions appropriées indiquées ci-dessous:
a)
b)
L'étiquette de votre outil peut inclure les symboles suivants. Les symboles et leurs définitions sont les
suivants:
Règles de sécurité pour les lumières laser
La lumière laser / le rayonnement laser utilisé dans le système est de classe 2 avec des longueurs
d’onde maximales de 1 mW et 650 nm. Ces lasers ne présentent normalement pas de danger
optique, bien que regarder le faisceau puisse provoquer un aveuglement instantané.
ATTENTION : Ne regardez pas directement le rayon laser.
Un danger peut exister si vous regardez délibérément dans le faisceau, respectez toutes les règles
de sécurité ci-dessous.
●
●
●
●
●
f)
3)
a)
b)
c)
d)
e)
f)
g)
4)
a)
b)
c)
d)
e)
f)
g)
●
●
●
●
●
●
●
Plus le numéro de calibre du fil est petit, plus la capacité du câble est grande, c'est-à-dire que le
calibre 16 a une capacité supérieure à 18. Un cordon sous-dimensionné provoquera une chute de
tension entraînant une perte de puissance et une surchauffe. Lorsque vous utilisez plusieurs rallong-
es pour calculer la longueur totale, assurez-vous que chaque rallonge contient au moins la taille
minimale du fil. Le tableau suivant indique la taille à utiliser en fonction de la longueur du cordon et de
l’intensité nominale indiquée sur la plaque signalétique. En cas de doute, utilisez la prochaine jauge
plus lourde. Plus le numéro de calibre est petit, plus le cordon est lourd.
●
●
●
ATTENTION: Certaines poussières générées par le sablage, le sciage, le meulage, le forage et
d'autres activités de construction contiennent des produits chimiques connus dans l'État de Californie
pour provoquer le cancer, des anomalies congénitales ou d'autres troubles de la reproduction. Voici
DÉFINITIONS: SYMBOLES ET MOTS D'ALERTE DE SÉCURITÉ
Il est important que vous lisiez et compreniez ce manuel. Les informations qu’il contient ont trait à la
protection de VOTRE SÉCURITÉ et à la prévention des problèmes. Les symboles ci-dessous sont
utilisés pour vous aider à reconnaître cette information.
NOTICE: Utilisé sans le symbole d'alerte de sécurité, il indique une situation potentiellement
dangereuse qui, si elle n'est pas évitée, peut entraîner des dommages matériels.
ATTENTION: Lire tous les avertissements de sécurité et toutes les instructions
Le non respect des avertissements et des instructions peut entraîner un choc électrique, un incendie
et / ou des blessures graves.
CONSERVEZ TOUS LES AVERTISSEMENTS ET INSTRUCTIONS POUR CONSULTATION
FUTURE
Le terme «outil électrique» dans les avertissements fait référence à votre outil électrique alimenté par
le secteur (avec fil) ou à piles (sans fil).
1)
a)
b)
c)
2)
a)
b)
c)
d)
e)
c)
d)
e)
f)
g)
Consignes de Sécurité Inférieures
a)
b)
c)
d)
Consignes de Sécurité Supplémentaires
●
●
●
●
●
●
●
●
quelques exemples de ces produits chimiques:
●
Les risques liés à ces expositions varient en fonction de la fréquence à laquelle vous effectuez ce type
de travail. Pour réduire votre exposition à ces produits chimiques: travaillez dans un endroit bien
ventilé et utilisez des équipements de sécurité approuvés, tels que les masques antipoussières
spécialement conçus pour filtrer les particules microscopiques.
ATTENTION: TOUJOURS UTILISER DES LUNETTES DE SÉCURITÉ. Les lunettes ordinaires
ne sont PAS des lunettes de sécurité. Utilisez également un masque facial ou antipoussière si vous
coupez
●
ATTENTION: La découpe de plastiques, de bois sablé et d'autres matériaux peut provoquer
l'accumulation de matière fondue sur les pointes de lame et le corps de la lame de scie, augmentant
ainsi le risque de surchauffe et de coincement de la lame lors de la coupe.
ATTENTION: L'utilisation de cet outil peut générer et / ou dissiper de la poussière, ce qui peut
causer des blessures graves et permanentes aux voies respiratoires ou autres. Utilisez toujours une
protection respiratoire approuvée par NIOSH / OSHA appropriée à l'exposition à la poussière. Éloign-
er les particules du visage et du corps. Toujours utiliser l'outil dans une zone bien ventilée et assurer
un dépoussiérage adéquat. Utilisez le système de dépoussiérage autant que possible.
MISE EN GARDE: L'utilisation de commandes ou de réglages ou l'exécution de procédures
autres que celles spécifiées dans le présent document peut entraîner une exposition à des radiations
dangereuses.
Usage prévu
Cette machine est principalement destinée au sciage longitudinal et transversal du bois massif, des
panneaux de particules, du contreplaqué, de l’aluminium, des carreaux et de la pierre maintenus
dans une position fixe. Veuillez noter que la lame pré-installée dans la scie telle que fournie est
destinée à être utilisée avec du bois uniquement. Toute autre utilisation ou modification de l'appareil
doit être considérée comme une utilisation non conforme et peut générer des risques considérables.
Il n'est pas adapté à un usage commercial.
Description de la fonction
La numérotation des caractéristiques des produits fait référence à l'illustration de la machine sur la
page graphique.
Montage / Réglage
ATTENTION: Avant tout travail sur l'outil électrique, retirez toujours la fiche de la source
d'alimentation.
●
●
●
Régler la profondeur de coupe
1.
2.
Remarque: si possible, recommandez une profondeur de coupe d'environ 2 mm plus profonde que
l'épaisseur du matériau. Cela devrait vous aider à obtenir une coupe nette.
entraîner des lésions oculaires graves. Assurez-vous que le commutateur laser est éteint et que le
laser ne pointe pas vers vous lors du remplacement des piles du laser et de la vérification du
fonctionnement du laser.
Application
La mini scie plongeante est polyvalente et vous permet de couper de nombreux types de matériaux.
Certains des matériaux incluent
●
●
●
Sélection de la lame
ENTRETIEN
ATTENTION: Débranchez l'outil avant d'installer ou de retirer des accessoires, avant de
procéder au réglage ou lors de réparations. Utilisez uniquement un savon doux et un chiffon humide
pour nettoyer l'outil. Ne laissez jamais aucun liquide pénétrer à l'intérieur de l'outil. ne jamais immerg-
er une partie de l'outil dans un liquide.
IMPORTANT: Pour assurer la SÉCURITÉ et la FIABILITÉ du produit, les réparations, la mainte-
nance et les réglages (autres que ceux énumérés dans ce manuel) doivent être effectués par des
centres de service agréés ou d'autres centres de service qualifiés, en utilisant toujours des pièces de
rechange identiques.
DANGER:Indique une situation extrêmement dangereuse qui, si elle n'est pas évitée,
entraînera des blessures graves, voire mortelles.
ATTENTION: Indique une situation potentiellement dangereuse qui, si elle n'est pas évitée,
pourrait entraîner la mort ou des blessures graves.
MISE EN GARDE: Indique une situation potentiellement dangereuse qui, si elle n'est pas
évitée, peut entraîner des blessures mineures ou modérées.
Avertissements gÉnÉraux concernant la sÉcuritÉ des outils Électriques
SÉCURITÉ DES ZONES DE TRAVAIL
Gardez la zone de travail propre et bien éclairée. Les zones encombrées ou sombres sont propic-
es aux accidents.
Ne pas utiliser d'outils électriques dans des atmosphères explosives, telles que la présence de
liquides, de gaz ou de poussières inflammables. Les outils électriques créent des étincelles qui
peuvent enflammer la poussière ou les vapeurs.
Tenez les enfants et les passants à distance lorsque vous utilisez un outil électrique. Les distrac-
tions peuvent vous faire perdre le contrôle.
SÉCURITÉ ÉLECTRIQUE
Les fiches des outils électriques doivent correspondre à la prise. Ne modifiez jamais la fiche de
quelque manière que ce soit. N'utilisez pas d'adaptateur avec des outils électriques mis à la terre.
Des fiches non modifiées et des prises de courant adaptées réduiront le risque de choc électrique.
Evitez tout contact du corps avec des surfaces mises à la terre, telles que tuyaux, radiateurs,
cuisinières et réfrigérateurs. Il y a un risque accru de choc électrique si votre corps est mis à la
terre ou mis à la terre.
N'exposez pas les outils électriques à la pluie ou à l'humidité. La pénétration d'eau dans un outil
électrique augmente le risque de choc électrique.
N'abusez pas le cordon. N'utilisez jamais le cordon pour porter, tirer ou débrancher l'outil
électrique. Tenez le cordon à l'écart de la chaleur, de l'huile, des arêtes vives ou des pièces
mobiles. Les cordons endommagés ou emmêlés augmentent le risque de choc électrique.
Lors de l'utilisation d'un outil électrique à l'extérieur, utilisez une rallonge adaptée à une utilisation
en extérieur. L'utilisation d'un cordon adapté à une utilisation en extérieur réduit les risques d'élec-
trocution.
Si l'utilisation d'un outil électrique dans un endroit humide est inévitable, utilisez une alimentation
protégée par un disjoncteur de fuite à la terre (GFCI). L'utilisation d'un GFCI réduit le risque de
choc électrique.
SÉCURITÉ PERSONNELLE
Restez vigilant, regardez ce que vous faites et faites preuve de bon sens lorsque vous utilisez un
outil électrique. N'utilisez pas d'outil électrique lorsque vous êtes fatigué ou sous l'influence de
drogues, d'alcool ou de médicaments. Un moment d'inattention lors de l'utilisation d'outils
électriques peut entraîner des blessures graves.
Utiliser un équipement de protection individuelle. Portez toujours des lunettes de protection. Un
équipement de protection tel qu'un masque anti-poussière, des chaussures de sécurité antidéra-
pantes, un casque de protection ou des protections auditives utilisés dans des conditions appro-
priées réduira les risques de blessures.
Empêcher les démarrages involontaires. Assurez-vous que l'interrupteur est en position d'arrêt
avant de brancher l'appareil à la source d'alimentation et / ou à la batterie, ou de ramasser ou de
porter l'outil. Le fait de transporter des outils avec le doigt sur l'interrupteur ou de les mettre sous
tension lorsque l'interrupteur est en position de marche peut provoquer des accidents.
Retirez toute clé de réglage ou clé avant de mettre l'outil électrique en marche. Une clé ou une clé
laissée sur une pièce rotative de l'outil électrique peut entraîner des blessures.
Ne pas trop atteindre. Gardez une bonne assise et un bon équilibre à tout moment.Cela permet
de mieux contrôler l'outil électroportatif dans des situations imprévues.
Habillez-vous correctement. Ne portez pas de vêtements amples ni de bijoux. Gardez vos
cheveux, vos vêtements et vos gants à l’écart des pièces en mouvement. Les vêtements amples,
les bijoux ou les cheveux longs peuvent être happés par les pièces en mouvement.
Si des dispositifs sont fournis pour la connexion des installations d'extraction et de collecte de
poussière, assurez-vous qu'ils sont connectés et utilisés correctement. L'utilisation d'un dépous-
siéreur peut réduire les risques liés à la poussière.
UTILISATION ET ENTRETIEN DES OUTILS ÉLECTRIQUES
Ne forcez pas l'outil électrique. Utilisez le bon outil pour votre application. Le bon outil électrique
fera le travail mieux et plus sûrement au rythme pour lequel il a été conçu.
N'utilisez pas l'outil si l'interrupteur ne l'allume pas et ne l'éteint pas. Tout outil électrique qui ne
peut pas être contrôlé avec l'interrupteur est dangereux et doit être réparé.
Débranchez la fiche de la source d'alimentation et / ou du bloc-batterie de l'outil électrique avant
d'effectuer tout réglage, de changer d'accessoire ou de ranger les outils électriques. Ces mesures
de sécurité préventives réduisent le risque de démarrage accidentel de l'outil électrique.
Rangez les outils électriques inutilisés hors de la portée des enfants et ne permettez pas à des
personnes inconnues de l'outil électrique ou de ces instructions d'utiliser cet outil. Les outils
électriques sont dangereux entre les mains d'utilisateurs non formés.
Entretenir les outils électriques. Vérifiez le mauvais alignement ou le coincement des pièces
mobiles, la rupture de pièces et toute autre condition pouvant affecter le bon fonctionnement de
l’outil électrique. S'il est endommagé, faites réparer l'outil électrique avant de l'utiliser. De
nombreux accidents sont causés par des outils électriques mal entretenus.
Gardez les outils de coupe tranchants et propres. Les outils de coupe bien entretenus avec des
arêtes tranchantes sont moins susceptibles de se coincer et sont plus faciles à contrôler.
Utilisez l'outil électrique, les accessoires et les mèches, etc. conformément à ces instructions, en
tenant compte des conditions de travail et du travail à effectuer. L'utilisation de l'outil électrique
pour des opérations différentes de celles prévues pourrait entraîner une situation dangereuse.
SERVICE
Gardez votre deuxième main sur la poignée auxiliaire ou le boîtier du moteur. Si les deux mains
tiennent la scie, elles ne peuvent pas être coupées par la lame.
Ne pas atteindre sous la pièce à travailler. Le protecteur ne peut pas vous protéger de la lame
située sous la pièce.
Ajustez la profondeur de coupe à l'épaisseur de la pièce. Moins d'une dent complète de la lame
doit être visible sous la pièce à travailler.
Ne tenez jamais le morceau coupé dans vos mains ou sur votre jambe. Sécurisez la pièce sur une
plate-forme stable. Il est important de bien supporter le travail afin de minimiser l'exposition du
corps, la fixation de la lame ou la perte de contrôle.
Tenez l'outil électroportatif uniquement par des surfaces de préhension isolées lorsque vous
effectuez une opération dans laquelle l'outil de coupe risque d'entrer en contact avec un câblage
caché ou avec son propre cordon. Le contact avec un fil sous tension rendra les parties
métalliques exposées de l'outil électrique «sous tension» et pourrait donner à l'opérateur un choc
électrique
Lors de la déchirure, utilisez toujours un guide de refente ou un guide de bord droit. Cela améliore
la précision de la coupe et réduit les risques de coincement de la lame.
Utilisez toujours des lames de taille et de forme correctes (diamant contre rondes) de trous de
tonnelle. Les lames qui ne correspondent pas au matériel de montage de la scie fonctionneront de
manière excentrique, entraînant une perte de contrôle.
N'utilisez jamais de rondelles ou de boulons de lame endommagés ou incorrects. Les rondelles de
lame et le boulon ont été spécialement conçus pour votre scie, pour des performances optimales
et une sécurité de fonctionnement.
Le rebond est une réaction soudaine à une lame de scie pincée, liée ou mal alignée, provoquant
le soulèvement d'une scie non contrôlée et sa sortie de la pièce à traiter en direction de l'opéra-
teur.
Lorsque la lame est pincée ou liée étroitement par la fermeture du trait de scie, la lame se bloque
et la réaction du moteur ramène rapidement l'unité vers l'opérateur.
Si la lame est tordue ou mal alignée lors de la coupe, les dents situées sur le bord arrière de la
lame peuvent s'enfoncer dans la surface supérieure du bois, faisant ainsi sortir la lame du trait de
scie et la faire remonter vers l'opérateur.
Maintenez fermement la scie des deux mains et positionnez vos bras pour résister aux forces de
choc. Placez votre corps de part et d'autre de la lame, mais pas dans l'alignement de la lame. Un
rebond pourrait faire basculer la scie en arrière, mais les forces de contrecoup peuvent être
contrôlées par l'opérateur si les précautions appropriées sont prises.
Lorsque la lame est coincée ou lorsque vous interrompez une coupe pour quelque raison que ce
soit, relâchez la gâchette et maintenez la scie immobile dans le matériau jusqu’à ce que la lame
s’arrête complètement. N'essayez jamais de retirer la scie de la pièce ou de tirer la scie vers
l'arrière lorsque la lame est en mouvement, sinon un recul pourrait se produire. Recherchez et
prenez des mesures correctives pour éliminer la cause de la reliure de la lame.
Lors du redémarrage d'une scie dans la pièce, centrez la lame de scie dans le trait de scie et
vérifiez que les dents de la scie ne sont pas engagées dans le matériau. Si la lame de scie se
coince, elle risque de remonter ou de rebondir de la pièce à usiner au redémarrage de la scie.
Soutenez les grands panneaux pour minimiser les risques de pincement et de recul de la lame.
Les grands panneaux ont tendance à s'affaisser sous leur propre poids. Les supports doivent être
placés sous le panneau des deux côtés, près de la ligne de coupe et du bord du panneau.
N'utilisez pas de lames émoussées ou endommagées. Les lames mal affûtées ou mal réglées
produisent un trait de scie étroit causant un frottement excessif, un grippage de la lame et un recul.
La profondeur de la lame et les leviers de verrouillage de réglage du biseau doivent être serrés et
sécurisés avant la coupe. Si le réglage de la lame change pendant la coupe, cela peut provoquer
des blocages et des contrecoups.
Soyez particulièrement prudent lorsque vous sciez des murs existants ou d'autres zones
aveugles. La lame en saillie peut couper des objets pouvant causer un recul.
Vérifiez la protection inférieure pour une fermeture correcte avant chaque utilisation. Ne pas
utiliser la scie si la protection inférieure ne bouge pas librement et ne se ferme pas instantané-
ment. Ne jamais serrer ou attacher le protège-lame inférieur en position ouverte. Si la scie tombe
accidentellement, la protection inférieure peut être pliée. Soulevez la protection inférieure avec la
poignée de rétraction et assurez-vous qu'elle se déplace librement et ne touche pas la lame ou
toute autre pièce, sous tous les angles et à toutes les profondeurs de coupe.
Vérifiez le fonctionnement du ressort de protection inférieur. Si la protection et le ressort ne
fonctionnent pas correctement, ils doivent être réparés avant utilisation. Le protège-lame inférieur
peut fonctionner lentement en raison de pièces endommagées, de dépôts de gomme ou d'une
accumulation de débris.
La protection inférieure ne doit être rétractée manuellement que pour les coupes spéciales telles
que les «coupes en plongée» et les «coupes composées». Relevez la protection inférieure en
rétractant la poignée et dès que la lame pénètre dans le matériau, vous devez la relâcher. Pour
tous les autres travaux de sciage, la protection inférieure devrait fonctionner automatiquement.
Veillez toujours à ce que la protection inférieure recouvre la lame avant de poser la scie sur un
établi ou au sol. Une lame de roue libre non protégée fera marcher la scie en arrière, coupant tout
ce qui se trouve sur son passage. Soyez conscient du temps nécessaire pour que la lame s’arrête
après le relâchement du commutateur.
Utilisez des pinces ou un autre moyen pratique pour fixer et maintenir la pièce sur une plate-forme
stable.Tenir le travail à la main ou contre votre corps le laisse instable et peut entraîner une perte
de contrôle.
Gardez votre corps positionné de part et d'autre de la lame, mais pas dans l'alignement de la lame
de scie. KICKBACK pourrait faire basculer la scie en arrière(voir Causes et prévention de
Kickback et KICKBACK par l'opérateur).
Évitez de couper les ongles. Inspectez et enlevez tous les clous du bois avant de couper.
Assurez-vous toujours que rien ne gêne le mouvement du protège-lame inférieur.
Les accessoires doivent avoir au moins la vitesse recommandée sur l'étiquette d'avertissement de
l'outil. Les roues et autres accessoires fonctionnant à une vitesse supérieure à la vitesse nominale
peuvent voler en éclats et causer des blessures. Les valeurs nominales des accessoires doivent
toujours être supérieures à la vitesse de l'outil, comme indiqué sur la plaque signalétique de l'outil.
Assurez-vous toujours que la scie est propre avant de l'utiliser.
Arrêtez d’utiliser cette scie et faites-la réparer si des bruits inhabituels ou un fonctionnement
anormal se produisent.
Assurez-vous toujours que tous les composants sont montés correctement et fermement avant
d'utiliser l'outil.
Manipulez toujours la lame de scie avec précaution lors du montage, du retrait ou du retrait de la
découpe au diamant.
Attendez toujours que le moteur ait atteint sa vitesse maximale avant de commencer une coupe.
Gardez toujours les poignées sèches, propres et exemptes d’huile et de graisse. Tenez l'outil
fermement à deux mains lors de son utilisation.
Soyez toujours vigilant à tout moment, surtout lors d'opérations répétitives et monotones.
Assurez-vous toujours de la position de vos mains par rapport à la lame.
Éloignez-vous des pièces d'extrémité qui pourraient tomber après la coupe. Ils peuvent être
chauds, coupants et / ou lourds. Des blessures graves peuvent en résulter.
Remplacez ou réparez les cordons endommagés. Assurez-vous que votre rallonge est en bon état.
Utilisez uniquement des rallonges à 3 fils munies de fiches à trois broches avec mise à la terre et
de prises à 3 pôles acceptant la fiche de l’outil.
Une rallonge doit avoir une taille de fil adéquate (AWG ou American Wire Gauge) pour des raisons
de sécurité.
Protection oculaire ANSI Z87.1 (CAN / CSA Z94.3).
Protection auditive ANSI S12.6 (S3.19).
Protection respiratoire NIOSH / OSHA.
Plomb provenant de peintures à base de plomb, de silice cristalline issue de briques, de ciment et
d'autres produits de maçonnerie, ainsi que d'arsenic et de chrome provenant de bois d'œuvre traité
chimiquement.
Évitez tout contact prolongé avec la poussière provenant du ponçage, du sciage, du meulage, du
perçage et autres travaux de construction. Porter des vêtements de protection et laver les zones
exposées à l'eau et au savon. Le fait de laisser la poussière pénétrer dans la bouche, les yeux ou
sur la peau peut favoriser l'absorption de produits chimiques nocifs.
Le laser doit être utilisé et entretenu conformément aux instructions du fabricant.
Ne dirigez jamais le faisceau sur une personne ou un objet autre que la pièce.
Le faisceau laser ne doit pas être délibérément dirigé vers le personnel et il ne doit pas pouvoir être
dirigé vers les yeux d'une personne plus de 0,25 s.
Assurez-vous toujours que le faisceau laser est dirigé sur une pièce solide sans surfaces réfléchis-
santes. C'est à dire. le bois ou les surfaces rugueuses sont acceptables. Les tôles d'acier réfléchis-
santes brillantes brillantes ou similaires ne conviennent pas à une utilisation au laser, car la surface
réfléchissante pourrait diriger le faisceau vers l'opérateur.
Ne changez pas le faisceau laser avec un type différent. Les réparations doivent être effectuées
par le fabricant du laser ou un agent agréé.
Portez des gants de protection lors du montage de la lame de scie. Risque de blessure en touchant
la lame de scie.
Utilisez uniquement des lames de scie correspondant aux caractéristiques indiquées dans le mode
d'emploi.
N'utilisez en aucun cas des disques de meulage comme outil de coupe.
FIXATION ET RETRAIT DE LA LAME - FIGURE C-E
• Rétracter la protection inférieure et assembler la lame (8) et la rondelle de serrage (17) comme
indiqué sur la figure C.
• Appuyez sur le verrou de la broche (13) tout en tournant le boulon de lame (7) avec la clé pour
lame (16) jusqu'à ce que le verrou de la lame s'enclenche et que la lame s'arrête de tourner. figure
D
REMARQUE: la clé à lame est stockée dans un sac en polyéthylène avec le manuel
• Serrez fermement le boulon de lame avec la clé à lame.
REMARQUE: le boulon a un filetage à gauche. Pour desserrer, tournez dans le sens des aiguilles
d'une montre. Pour serrer, tournez dans le sens antihoraire. figure E
REMARQUE: N'engagez jamais le verrouillage de la lame pendant que la scie est en marche et ne
tentez jamais d'arrêter l'outil. N'allumez jamais l'outil lorsque le verrouillage de la lame est engagé.
Il en résultera de graves dommages à votre scie.
Au besoin, déplacez le bouton déverrouillé et laissez le doigt pointé sur la position appropriée de
l’échelle de profondeur.
Tournez ensuite le bouton à 180°pour le verrouiller,
- 12 -
Technology Creates Power

Allumer et éteindre
Remarque: Pour des raisons de sécurité, le commutateur On / Off ne peut pas être verrouillé. il doit
rester appuyé pendant toute l'opération.
Fonction laser
●Allumez-le avec le commutateur ON / OFF de la lumière laser juste avant de couper.
●Éteignez-le immédiatement après l'utilisation pour économiser la batterie et préserver la durée de
vie du laser.
CHANGEMENT DES PILES AU LASER
Les piles qui font fonctionner le laser devront être remplacées après une utilisation considérable du
laser.
1.
2.
3.
4.
DANGER: Ne laissez jamais le rayon laser pénétrer dans les yeux d'une personne, cela pourrait
5)
Faites réparer votre outil électrique par un réparateur qualifié en utilisant uniquement des pièces de
rechange identiques. Cela garantira le maintien de la sécurité de l'outil électrique.
DANGER: Gardez les mains éloignées de la zone de coupe et de la lame.
a)
b)
c)
d)
e)
f)
g)
h)
Causes et prévention du recul par l'opérateur:
●
●
●
Le rebond résulte d'une mauvaise utilisation de la scie et / ou de procédures ou de conditions d'utilisa-
tion incorrectes et peut être évité en prenant les précautions appropriées indiquées ci-dessous:
a)
b)
L'étiquette de votre outil peut inclure les symboles suivants. Les symboles et leurs définitions sont les
suivants:
Règles de sécurité pour les lumières laser
La lumière laser / le rayonnement laser utilisé dans le système est de classe 2 avec des longueurs
d’onde maximales de 1 mW et 650 nm. Ces lasers ne présentent normalement pas de danger
optique, bien que regarder le faisceau puisse provoquer un aveuglement instantané.
ATTENTION : Ne regardez pas directement le rayon laser.
Un danger peut exister si vous regardez délibérément dans le faisceau, respectez toutes les règles
de sécurité ci-dessous.
●
●
●
●
●
f)
3)
a)
b)
c)
d)
e)
f)
g)
4)
a)
b)
c)
d)
e)
f)
g)
●
●
●
●
●
●
●
Plus le numéro de calibre du fil est petit, plus la capacité du câble est grande, c'est-à-dire que le
calibre 16 a une capacité supérieure à 18. Un cordon sous-dimensionné provoquera une chute de
tension entraînant une perte de puissance et une surchauffe. Lorsque vous utilisez plusieurs rallong-
es pour calculer la longueur totale, assurez-vous que chaque rallonge contient au moins la taille
minimale du fil. Le tableau suivant indique la taille à utiliser en fonction de la longueur du cordon et de
l’intensité nominale indiquée sur la plaque signalétique. En cas de doute, utilisez la prochaine jauge
plus lourde. Plus le numéro de calibre est petit, plus le cordon est lourd.
●
●
●
ATTENTION: Certaines poussières générées par le sablage, le sciage, le meulage, le forage et
d'autres activités de construction contiennent des produits chimiques connus dans l'État de Californie
pour provoquer le cancer, des anomalies congénitales ou d'autres troubles de la reproduction. Voici
DÉFINITIONS: SYMBOLES ET MOTS D'ALERTE DE SÉCURITÉ
Il est important que vous lisiez et compreniez ce manuel. Les informations qu’il contient ont trait à la
protection de VOTRE SÉCURITÉ et à la prévention des problèmes. Les symboles ci-dessous sont
utilisés pour vous aider à reconnaître cette information.
NOTICE: Utilisé sans le symbole d'alerte de sécurité, il indique une situation potentiellement
dangereuse qui, si elle n'est pas évitée, peut entraîner des dommages matériels.
ATTENTION: Lire tous les avertissements de sécurité et toutes les instructions
Le non respect des avertissements et des instructions peut entraîner un choc électrique, un incendie
et / ou des blessures graves.
CONSERVEZ TOUS LES AVERTISSEMENTS ET INSTRUCTIONS POUR CONSULTATION
FUTURE
Le terme «outil électrique» dans les avertissements fait référence à votre outil électrique alimenté par
le secteur (avec fil) ou à piles (sans fil).
1)
a)
b)
c)
2)
a)
b)
c)
d)
e)
c)
d)
e)
f)
g)
Consignes de Sécurité Inférieures
a)
b)
c)
d)
Consignes de Sécurité Supplémentaires
●
●
●
●
●
●
●
●
quelques exemples de ces produits chimiques:
●
Les risques liés à ces expositions varient en fonction de la fréquence à laquelle vous effectuez ce type
de travail. Pour réduire votre exposition à ces produits chimiques: travaillez dans un endroit bien
ventilé et utilisez des équipements de sécurité approuvés, tels que les masques antipoussières
spécialement conçus pour filtrer les particules microscopiques.
ATTENTION: TOUJOURS UTILISER DES LUNETTES DE SÉCURITÉ. Les lunettes ordinaires
ne sont PAS des lunettes de sécurité. Utilisez également un masque facial ou antipoussière si vous
coupez
●
ATTENTION: La découpe de plastiques, de bois sablé et d'autres matériaux peut provoquer
l'accumulation de matière fondue sur les pointes de lame et le corps de la lame de scie, augmentant
ainsi le risque de surchauffe et de coincement de la lame lors de la coupe.
ATTENTION: L'utilisation de cet outil peut générer et / ou dissiper de la poussière, ce qui peut
causer des blessures graves et permanentes aux voies respiratoires ou autres. Utilisez toujours une
protection respiratoire approuvée par NIOSH / OSHA appropriée à l'exposition à la poussière. Éloign-
er les particules du visage et du corps. Toujours utiliser l'outil dans une zone bien ventilée et assurer
un dépoussiérage adéquat. Utilisez le système de dépoussiérage autant que possible.
MISE EN GARDE: L'utilisation de commandes ou de réglages ou l'exécution de procédures
autres que celles spécifiées dans le présent document peut entraîner une exposition à des radiations
dangereuses.
Usage prévu
Cette machine est principalement destinée au sciage longitudinal et transversal du bois massif, des
panneaux de particules, du contreplaqué, de l’aluminium, des carreaux et de la pierre maintenus
dans une position fixe. Veuillez noter que la lame pré-installée dans la scie telle que fournie est
destinée à être utilisée avec du bois uniquement. Toute autre utilisation ou modification de l'appareil
doit être considérée comme une utilisation non conforme et peut générer des risques considérables.
Il n'est pas adapté à un usage commercial.
Description de la fonction
La numérotation des caractéristiques des produits fait référence à l'illustration de la machine sur la
page graphique.
Montage / Réglage
ATTENTION: Avant tout travail sur l'outil électrique, retirez toujours la fiche de la source
d'alimentation.
●
●
●
Régler la profondeur de coupe
1.
2.
Remarque: si possible, recommandez une profondeur de coupe d'environ 2 mm plus profonde que
l'épaisseur du matériau. Cela devrait vous aider à obtenir une coupe nette.
entraîner des lésions oculaires graves. Assurez-vous que le commutateur laser est éteint et que le
laser ne pointe pas vers vous lors du remplacement des piles du laser et de la vérification du
fonctionnement du laser.
Application
La mini scie plongeante est polyvalente et vous permet de couper de nombreux types de matériaux.
Certains des matériaux incluent
●
●
●
Sélection de la lame
ENTRETIEN
ATTENTION: Débranchez l'outil avant d'installer ou de retirer des accessoires, avant de
procéder au réglage ou lors de réparations. Utilisez uniquement un savon doux et un chiffon humide
pour nettoyer l'outil. Ne laissez jamais aucun liquide pénétrer à l'intérieur de l'outil. ne jamais immerg-
er une partie de l'outil dans un liquide.
IMPORTANT: Pour assurer la SÉCURITÉ et la FIABILITÉ du produit, les réparations, la mainte-
nance et les réglages (autres que ceux énumérés dans ce manuel) doivent être effectués par des
centres de service agréés ou d'autres centres de service qualifiés, en utilisant toujours des pièces de
rechange identiques.
EN
FR
ES
SÉCURITÉ DES ZONES DE TRAVAIL
Gardez la zone de travail propre et bien éclairée. Les zones encombrées ou sombres sont propic-
es aux accidents.
Ne pas utiliser d'outils électriques dans des atmosphères explosives, telles que la présence de
liquides, de gaz ou de poussières inflammables. Les outils électriques créent des étincelles qui
peuvent enflammer la poussière ou les vapeurs.
Tenez les enfants et les passants à distance lorsque vous utilisez un outil électrique. Les distrac-
tions peuvent vous faire perdre le contrôle.
SÉCURITÉ ÉLECTRIQUE
Les fiches des outils électriques doivent correspondre à la prise. Ne modifiez jamais la fiche de
quelque manière que ce soit. N'utilisez pas d'adaptateur avec des outils électriques mis à la terre.
Des fiches non modifiées et des prises de courant adaptées réduiront le risque de choc électrique.
Evitez tout contact du corps avec des surfaces mises à la terre, telles que tuyaux, radiateurs,
cuisinières et réfrigérateurs. Il y a un risque accru de choc électrique si votre corps est mis à la
terre ou mis à la terre.
N'exposez pas les outils électriques à la pluie ou à l'humidité. La pénétration d'eau dans un outil
électrique augmente le risque de choc électrique.
N'abusez pas le cordon. N'utilisez jamais le cordon pour porter, tirer ou débrancher l'outil
électrique. Tenez le cordon à l'écart de la chaleur, de l'huile, des arêtes vives ou des pièces
mobiles. Les cordons endommagés ou emmêlés augmentent le risque de choc électrique.
Lors de l'utilisation d'un outil électrique à l'extérieur, utilisez une rallonge adaptée à une utilisation
en extérieur. L'utilisation d'un cordon adapté à une utilisation en extérieur réduit les risques d'élec-
trocution.
Si l'utilisation d'un outil électrique dans un endroit humide est inévitable, utilisez une alimentation
protégée par un disjoncteur de fuite à la terre (GFCI). L'utilisation d'un GFCI réduit le risque de
choc électrique.
SÉCURITÉ PERSONNELLE
Restez vigilant, regardez ce que vous faites et faites preuve de bon sens lorsque vous utilisez un
outil électrique. N'utilisez pas d'outil électrique lorsque vous êtes fatigué ou sous l'influence de
drogues, d'alcool ou de médicaments. Un moment d'inattention lors de l'utilisation d'outils
électriques peut entraîner des blessures graves.
Utiliser un équipement de protection individuelle. Portez toujours des lunettes de protection. Un
équipement de protection tel qu'un masque anti-poussière, des chaussures de sécurité antidéra-
pantes, un casque de protection ou des protections auditives utilisés dans des conditions appro-
priées réduira les risques de blessures.
Empêcher les démarrages involontaires. Assurez-vous que l'interrupteur est en position d'arrêt
avant de brancher l'appareil à la source d'alimentation et / ou à la batterie, ou de ramasser ou de
porter l'outil. Le fait de transporter des outils avec le doigt sur l'interrupteur ou de les mettre sous
tension lorsque l'interrupteur est en position de marche peut provoquer des accidents.
Retirez toute clé de réglage ou clé avant de mettre l'outil électrique en marche. Une clé ou une clé
laissée sur une pièce rotative de l'outil électrique peut entraîner des blessures.
Ne pas trop atteindre. Gardez une bonne assise et un bon équilibre à tout moment.Cela permet
de mieux contrôler l'outil électroportatif dans des situations imprévues.
Habillez-vous correctement. Ne portez pas de vêtements amples ni de bijoux. Gardez vos
cheveux, vos vêtements et vos gants à l’écart des pièces en mouvement. Les vêtements amples,
les bijoux ou les cheveux longs peuvent être happés par les pièces en mouvement.
Si des dispositifs sont fournis pour la connexion des installations d'extraction et de collecte de
poussière, assurez-vous qu'ils sont connectés et utilisés correctement. L'utilisation d'un dépous-
siéreur peut réduire les risques liés à la poussière.
UTILISATION ET ENTRETIEN DES OUTILS ÉLECTRIQUES
Ne forcez pas l'outil électrique. Utilisez le bon outil pour votre application. Le bon outil électrique
fera le travail mieux et plus sûrement au rythme pour lequel il a été conçu.
N'utilisez pas l'outil si l'interrupteur ne l'allume pas et ne l'éteint pas. Tout outil électrique qui ne
peut pas être contrôlé avec l'interrupteur est dangereux et doit être réparé.
Débranchez la fiche de la source d'alimentation et / ou du bloc-batterie de l'outil électrique avant
d'effectuer tout réglage, de changer d'accessoire ou de ranger les outils électriques. Ces mesures
de sécurité préventives réduisent le risque de démarrage accidentel de l'outil électrique.
Rangez les outils électriques inutilisés hors de la portée des enfants et ne permettez pas à des
personnes inconnues de l'outil électrique ou de ces instructions d'utiliser cet outil. Les outils
électriques sont dangereux entre les mains d'utilisateurs non formés.
Entretenir les outils électriques. Vérifiez le mauvais alignement ou le coincement des pièces
mobiles, la rupture de pièces et toute autre condition pouvant affecter le bon fonctionnement de
l’outil électrique. S'il est endommagé, faites réparer l'outil électrique avant de l'utiliser. De
nombreux accidents sont causés par des outils électriques mal entretenus.
Gardez les outils de coupe tranchants et propres. Les outils de coupe bien entretenus avec des
arêtes tranchantes sont moins susceptibles de se coincer et sont plus faciles à contrôler.
Utilisez l'outil électrique, les accessoires et les mèches, etc. conformément à ces instructions, en
tenant compte des conditions de travail et du travail à effectuer. L'utilisation de l'outil électrique
pour des opérations différentes de celles prévues pourrait entraîner une situation dangereuse.
SERVICE
Gardez votre deuxième main sur la poignée auxiliaire ou le boîtier du moteur. Si les deux mains
tiennent la scie, elles ne peuvent pas être coupées par la lame.
Ne pas atteindre sous la pièce à travailler. Le protecteur ne peut pas vous protéger de la lame
située sous la pièce.
Ajustez la profondeur de coupe à l'épaisseur de la pièce. Moins d'une dent complète de la lame
doit être visible sous la pièce à travailler.
Ne tenez jamais le morceau coupé dans vos mains ou sur votre jambe. Sécurisez la pièce sur une
plate-forme stable. Il est important de bien supporter le travail afin de minimiser l'exposition du
corps, la fixation de la lame ou la perte de contrôle.
Tenez l'outil électroportatif uniquement par des surfaces de préhension isolées lorsque vous
effectuez une opération dans laquelle l'outil de coupe risque d'entrer en contact avec un câblage
caché ou avec son propre cordon. Le contact avec un fil sous tension rendra les parties
métalliques exposées de l'outil électrique «sous tension» et pourrait donner à l'opérateur un choc
électrique
Lors de la déchirure, utilisez toujours un guide de refente ou un guide de bord droit. Cela améliore
la précision de la coupe et réduit les risques de coincement de la lame.
Utilisez toujours des lames de taille et de forme correctes (diamant contre rondes) de trous de
tonnelle. Les lames qui ne correspondent pas au matériel de montage de la scie fonctionneront de
manière excentrique, entraînant une perte de contrôle.
N'utilisez jamais de rondelles ou de boulons de lame endommagés ou incorrects. Les rondelles de
lame et le boulon ont été spécialement conçus pour votre scie, pour des performances optimales
et une sécurité de fonctionnement.
Le rebond est une réaction soudaine à une lame de scie pincée, liée ou mal alignée, provoquant
le soulèvement d'une scie non contrôlée et sa sortie de la pièce à traiter en direction de l'opéra-
teur.
Lorsque la lame est pincée ou liée étroitement par la fermeture du trait de scie, la lame se bloque
et la réaction du moteur ramène rapidement l'unité vers l'opérateur.
Si la lame est tordue ou mal alignée lors de la coupe, les dents situées sur le bord arrière de la
lame peuvent s'enfoncer dans la surface supérieure du bois, faisant ainsi sortir la lame du trait de
scie et la faire remonter vers l'opérateur.
Maintenez fermement la scie des deux mains et positionnez vos bras pour résister aux forces de
choc. Placez votre corps de part et d'autre de la lame, mais pas dans l'alignement de la lame. Un
rebond pourrait faire basculer la scie en arrière, mais les forces de contrecoup peuvent être
contrôlées par l'opérateur si les précautions appropriées sont prises.
Lorsque la lame est coincée ou lorsque vous interrompez une coupe pour quelque raison que ce
soit, relâchez la gâchette et maintenez la scie immobile dans le matériau jusqu’à ce que la lame
s’arrête complètement. N'essayez jamais de retirer la scie de la pièce ou de tirer la scie vers
l'arrière lorsque la lame est en mouvement, sinon un recul pourrait se produire. Recherchez et
prenez des mesures correctives pour éliminer la cause de la reliure de la lame.
Lors du redémarrage d'une scie dans la pièce, centrez la lame de scie dans le trait de scie et
vérifiez que les dents de la scie ne sont pas engagées dans le matériau. Si la lame de scie se
coince, elle risque de remonter ou de rebondir de la pièce à usiner au redémarrage de la scie.
Soutenez les grands panneaux pour minimiser les risques de pincement et de recul de la lame.
Les grands panneaux ont tendance à s'affaisser sous leur propre poids. Les supports doivent être
placés sous le panneau des deux côtés, près de la ligne de coupe et du bord du panneau.
N'utilisez pas de lames émoussées ou endommagées. Les lames mal affûtées ou mal réglées
produisent un trait de scie étroit causant un frottement excessif, un grippage de la lame et un recul.
La profondeur de la lame et les leviers de verrouillage de réglage du biseau doivent être serrés et
sécurisés avant la coupe. Si le réglage de la lame change pendant la coupe, cela peut provoquer
des blocages et des contrecoups.
Soyez particulièrement prudent lorsque vous sciez des murs existants ou d'autres zones
aveugles. La lame en saillie peut couper des objets pouvant causer un recul.
Vérifiez la protection inférieure pour une fermeture correcte avant chaque utilisation. Ne pas
utiliser la scie si la protection inférieure ne bouge pas librement et ne se ferme pas instantané-
ment. Ne jamais serrer ou attacher le protège-lame inférieur en position ouverte. Si la scie tombe
accidentellement, la protection inférieure peut être pliée. Soulevez la protection inférieure avec la
poignée de rétraction et assurez-vous qu'elle se déplace librement et ne touche pas la lame ou
toute autre pièce, sous tous les angles et à toutes les profondeurs de coupe.
Vérifiez le fonctionnement du ressort de protection inférieur. Si la protection et le ressort ne
fonctionnent pas correctement, ils doivent être réparés avant utilisation. Le protège-lame inférieur
peut fonctionner lentement en raison de pièces endommagées, de dépôts de gomme ou d'une
accumulation de débris.
La protection inférieure ne doit être rétractée manuellement que pour les coupes spéciales telles
que les «coupes en plongée» et les «coupes composées». Relevez la protection inférieure en
rétractant la poignée et dès que la lame pénètre dans le matériau, vous devez la relâcher. Pour
tous les autres travaux de sciage, la protection inférieure devrait fonctionner automatiquement.
Veillez toujours à ce que la protection inférieure recouvre la lame avant de poser la scie sur un
établi ou au sol. Une lame de roue libre non protégée fera marcher la scie en arrière, coupant tout
ce qui se trouve sur son passage. Soyez conscient du temps nécessaire pour que la lame s’arrête
après le relâchement du commutateur.
Utilisez des pinces ou un autre moyen pratique pour fixer et maintenir la pièce sur une plate-forme
stable.Tenir le travail à la main ou contre votre corps le laisse instable et peut entraîner une perte
de contrôle.
Gardez votre corps positionné de part et d'autre de la lame, mais pas dans l'alignement de la lame
de scie. KICKBACK pourrait faire basculer la scie en arrière(voir Causes et prévention de
Kickback et KICKBACK par l'opérateur).
Évitez de couper les ongles. Inspectez et enlevez tous les clous du bois avant de couper.
Assurez-vous toujours que rien ne gêne le mouvement du protège-lame inférieur.
Les accessoires doivent avoir au moins la vitesse recommandée sur l'étiquette d'avertissement de
l'outil. Les roues et autres accessoires fonctionnant à une vitesse supérieure à la vitesse nominale
peuvent voler en éclats et causer des blessures. Les valeurs nominales des accessoires doivent
toujours être supérieures à la vitesse de l'outil, comme indiqué sur la plaque signalétique de l'outil.
Assurez-vous toujours que la scie est propre avant de l'utiliser.
Arrêtez d’utiliser cette scie et faites-la réparer si des bruits inhabituels ou un fonctionnement
anormal se produisent.
Assurez-vous toujours que tous les composants sont montés correctement et fermement avant
d'utiliser l'outil.
Manipulez toujours la lame de scie avec précaution lors du montage, du retrait ou du retrait de la
découpe au diamant.
Attendez toujours que le moteur ait atteint sa vitesse maximale avant de commencer une coupe.
Gardez toujours les poignées sèches, propres et exemptes d’huile et de graisse. Tenez l'outil
fermement à deux mains lors de son utilisation.
Soyez toujours vigilant à tout moment, surtout lors d'opérations répétitives et monotones.
Assurez-vous toujours de la position de vos mains par rapport à la lame.
Éloignez-vous des pièces d'extrémité qui pourraient tomber après la coupe. Ils peuvent être
chauds, coupants et / ou lourds. Des blessures graves peuvent en résulter.
Remplacez ou réparez les cordons endommagés. Assurez-vous que votre rallonge est en bon état.
Utilisez uniquement des rallonges à 3 fils munies de fiches à trois broches avec mise à la terre et
de prises à 3 pôles acceptant la fiche de l’outil.
Une rallonge doit avoir une taille de fil adéquate (AWG ou American Wire Gauge) pour des raisons
de sécurité.
Protection oculaire ANSI Z87.1 (CAN / CSA Z94.3).
Protection auditive ANSI S12.6 (S3.19).
Protection respiratoire NIOSH / OSHA.
Plomb provenant de peintures à base de plomb, de silice cristalline issue de briques, de ciment et
d'autres produits de maçonnerie, ainsi que d'arsenic et de chrome provenant de bois d'œuvre traité
chimiquement.
Évitez tout contact prolongé avec la poussière provenant du ponçage, du sciage, du meulage, du
perçage et autres travaux de construction. Porter des vêtements de protection et laver les zones
exposées à l'eau et au savon. Le fait de laisser la poussière pénétrer dans la bouche, les yeux ou
sur la peau peut favoriser l'absorption de produits chimiques nocifs.
Le laser doit être utilisé et entretenu conformément aux instructions du fabricant.
Ne dirigez jamais le faisceau sur une personne ou un objet autre que la pièce.
Le faisceau laser ne doit pas être délibérément dirigé vers le personnel et il ne doit pas pouvoir être
dirigé vers les yeux d'une personne plus de 0,25 s.
Assurez-vous toujours que le faisceau laser est dirigé sur une pièce solide sans surfaces réfléchis-
santes. C'est à dire. le bois ou les surfaces rugueuses sont acceptables. Les tôles d'acier réfléchis-
santes brillantes brillantes ou similaires ne conviennent pas à une utilisation au laser, car la surface
réfléchissante pourrait diriger le faisceau vers l'opérateur.
Ne changez pas le faisceau laser avec un type différent. Les réparations doivent être effectuées
par le fabricant du laser ou un agent agréé.
Portez des gants de protection lors du montage de la lame de scie. Risque de blessure en touchant
la lame de scie.
Utilisez uniquement des lames de scie correspondant aux caractéristiques indiquées dans le mode
d'emploi.
N'utilisez en aucun cas des disques de meulage comme outil de coupe.
FIXATION ET RETRAIT DE LA LAME - FIGURE C-E
• Rétracter la protection inférieure et assembler la lame (8) et la rondelle de serrage (17) comme
indiqué sur la figure C.
• Appuyez sur le verrou de la broche (13) tout en tournant le boulon de lame (7) avec la clé pour
lame (16) jusqu'à ce que le verrou de la lame s'enclenche et que la lame s'arrête de tourner. figure
D
REMARQUE: la clé à lame est stockée dans un sac en polyéthylène avec le manuel
• Serrez fermement le boulon de lame avec la clé à lame.
REMARQUE: le boulon a un filetage à gauche. Pour desserrer, tournez dans le sens des aiguilles
d'une montre. Pour serrer, tournez dans le sens antihoraire. figure E
REMARQUE: N'engagez jamais le verrouillage de la lame pendant que la scie est en marche et ne
tentez jamais d'arrêter l'outil. N'allumez jamais l'outil lorsque le verrouillage de la lame est engagé.
Il en résultera de graves dommages à votre scie.
Au besoin, déplacez le bouton déverrouillé et laissez le doigt pointé sur la position appropriée de
l’échelle de profondeur.
Tournez ensuite le bouton à 180°pour le verrouiller,
- 13 -
Technology Creates Power

Allumer et éteindre
Remarque: Pour des raisons de sécurité, le commutateur On / Off ne peut pas être verrouillé. il doit
rester appuyé pendant toute l'opération.
Fonction laser
●Allumez-le avec le commutateur ON / OFF de la lumière laser juste avant de couper.
●Éteignez-le immédiatement après l'utilisation pour économiser la batterie et préserver la durée de
vie du laser.
CHANGEMENT DES PILES AU LASER
Les piles qui font fonctionner le laser devront être remplacées après une utilisation considérable du
laser.
1.
2.
3.
4.
DANGER: Ne laissez jamais le rayon laser pénétrer dans les yeux d'une personne, cela pourrait
5)
Faites réparer votre outil électrique par un réparateur qualifié en utilisant uniquement des pièces de
rechange identiques. Cela garantira le maintien de la sécurité de l'outil électrique.
DANGER: Gardez les mains éloignées de la zone de coupe et de la lame.
a)
b)
c)
d)
e)
f)
g)
h)
Causes et prévention du recul par l'opérateur:
●
●
●
Le rebond résulte d'une mauvaise utilisation de la scie et / ou de procédures ou de conditions d'utilisa-
tion incorrectes et peut être évité en prenant les précautions appropriées indiquées ci-dessous:
a)
b)
L'étiquette de votre outil peut inclure les symboles suivants. Les symboles et leurs définitions sont les
suivants:
Règles de sécurité pour les lumières laser
La lumière laser / le rayonnement laser utilisé dans le système est de classe 2 avec des longueurs
d’onde maximales de 1 mW et 650 nm. Ces lasers ne présentent normalement pas de danger
optique, bien que regarder le faisceau puisse provoquer un aveuglement instantané.
ATTENTION : Ne regardez pas directement le rayon laser.
Un danger peut exister si vous regardez délibérément dans le faisceau, respectez toutes les règles
de sécurité ci-dessous.
●
●
●
●
●
f)
3)
a)
b)
c)
d)
e)
f)
g)
4)
a)
b)
c)
d)
e)
f)
g)
●
●
●
●
●
●
●
Plus le numéro de calibre du fil est petit, plus la capacité du câble est grande, c'est-à-dire que le
calibre 16 a une capacité supérieure à 18. Un cordon sous-dimensionné provoquera une chute de
tension entraînant une perte de puissance et une surchauffe. Lorsque vous utilisez plusieurs rallong-
es pour calculer la longueur totale, assurez-vous que chaque rallonge contient au moins la taille
minimale du fil. Le tableau suivant indique la taille à utiliser en fonction de la longueur du cordon et de
l’intensité nominale indiquée sur la plaque signalétique. En cas de doute, utilisez la prochaine jauge
plus lourde. Plus le numéro de calibre est petit, plus le cordon est lourd.
●
●
●
ATTENTION: Certaines poussières générées par le sablage, le sciage, le meulage, le forage et
d'autres activités de construction contiennent des produits chimiques connus dans l'État de Californie
pour provoquer le cancer, des anomalies congénitales ou d'autres troubles de la reproduction. Voici
DÉFINITIONS: SYMBOLES ET MOTS D'ALERTE DE SÉCURITÉ
Il est important que vous lisiez et compreniez ce manuel. Les informations qu’il contient ont trait à la
protection de VOTRE SÉCURITÉ et à la prévention des problèmes. Les symboles ci-dessous sont
utilisés pour vous aider à reconnaître cette information.
NOTICE: Utilisé sans le symbole d'alerte de sécurité, il indique une situation potentiellement
dangereuse qui, si elle n'est pas évitée, peut entraîner des dommages matériels.
ATTENTION: Lire tous les avertissements de sécurité et toutes les instructions
Le non respect des avertissements et des instructions peut entraîner un choc électrique, un incendie
et / ou des blessures graves.
CONSERVEZ TOUS LES AVERTISSEMENTS ET INSTRUCTIONS POUR CONSULTATION
FUTURE
Le terme «outil électrique» dans les avertissements fait référence à votre outil électrique alimenté par
le secteur (avec fil) ou à piles (sans fil).
1)
a)
b)
c)
2)
a)
b)
c)
d)
e)
c)
d)
e)
f)
g)
Consignes de Sécurité Inférieures
a)
b)
c)
d)
Consignes de Sécurité Supplémentaires
●
●
●
●
●
●
●
●
quelques exemples de ces produits chimiques:
●
Les risques liés à ces expositions varient en fonction de la fréquence à laquelle vous effectuez ce type
de travail. Pour réduire votre exposition à ces produits chimiques: travaillez dans un endroit bien
ventilé et utilisez des équipements de sécurité approuvés, tels que les masques antipoussières
spécialement conçus pour filtrer les particules microscopiques.
ATTENTION: TOUJOURS UTILISER DES LUNETTES DE SÉCURITÉ. Les lunettes ordinaires
ne sont PAS des lunettes de sécurité. Utilisez également un masque facial ou antipoussière si vous
coupez
●
ATTENTION: La découpe de plastiques, de bois sablé et d'autres matériaux peut provoquer
l'accumulation de matière fondue sur les pointes de lame et le corps de la lame de scie, augmentant
ainsi le risque de surchauffe et de coincement de la lame lors de la coupe.
ATTENTION: L'utilisation de cet outil peut générer et / ou dissiper de la poussière, ce qui peut
causer des blessures graves et permanentes aux voies respiratoires ou autres. Utilisez toujours une
protection respiratoire approuvée par NIOSH / OSHA appropriée à l'exposition à la poussière. Éloign-
er les particules du visage et du corps. Toujours utiliser l'outil dans une zone bien ventilée et assurer
un dépoussiérage adéquat. Utilisez le système de dépoussiérage autant que possible.
MISE EN GARDE: L'utilisation de commandes ou de réglages ou l'exécution de procédures
autres que celles spécifiées dans le présent document peut entraîner une exposition à des radiations
dangereuses.
Usage prévu
Cette machine est principalement destinée au sciage longitudinal et transversal du bois massif, des
panneaux de particules, du contreplaqué, de l’aluminium, des carreaux et de la pierre maintenus
dans une position fixe. Veuillez noter que la lame pré-installée dans la scie telle que fournie est
destinée à être utilisée avec du bois uniquement. Toute autre utilisation ou modification de l'appareil
doit être considérée comme une utilisation non conforme et peut générer des risques considérables.
Il n'est pas adapté à un usage commercial.
Description de la fonction
La numérotation des caractéristiques des produits fait référence à l'illustration de la machine sur la
page graphique.
Montage / Réglage
ATTENTION: Avant tout travail sur l'outil électrique, retirez toujours la fiche de la source
d'alimentation.
●
●
●
Régler la profondeur de coupe
1.
2.
Remarque: si possible, recommandez une profondeur de coupe d'environ 2 mm plus profonde que
l'épaisseur du matériau. Cela devrait vous aider à obtenir une coupe nette.
entraîner des lésions oculaires graves. Assurez-vous que le commutateur laser est éteint et que le
laser ne pointe pas vers vous lors du remplacement des piles du laser et de la vérification du
fonctionnement du laser.
Application
La mini scie plongeante est polyvalente et vous permet de couper de nombreux types de matériaux.
Certains des matériaux incluent
●
●
●
Sélection de la lame
ENTRETIEN
ATTENTION: Débranchez l'outil avant d'installer ou de retirer des accessoires, avant de
procéder au réglage ou lors de réparations. Utilisez uniquement un savon doux et un chiffon humide
pour nettoyer l'outil. Ne laissez jamais aucun liquide pénétrer à l'intérieur de l'outil. ne jamais immerg-
er une partie de l'outil dans un liquide.
IMPORTANT: Pour assurer la SÉCURITÉ et la FIABILITÉ du produit, les réparations, la mainte-
nance et les réglages (autres que ceux énumérés dans ce manuel) doivent être effectués par des
centres de service agréés ou d'autres centres de service qualifiés, en utilisant toujours des pièces de
rechange identiques.
EN
FR
ES
Consignes de sécurité pour Toutes les Scies
SÉCURITÉ DES ZONES DE TRAVAIL
Gardez la zone de travail propre et bien éclairée. Les zones encombrées ou sombres sont propic-
es aux accidents.
Ne pas utiliser d'outils électriques dans des atmosphères explosives, telles que la présence de
liquides, de gaz ou de poussières inflammables. Les outils électriques créent des étincelles qui
peuvent enflammer la poussière ou les vapeurs.
Tenez les enfants et les passants à distance lorsque vous utilisez un outil électrique. Les distrac-
tions peuvent vous faire perdre le contrôle.
SÉCURITÉ ÉLECTRIQUE
Les fiches des outils électriques doivent correspondre à la prise. Ne modifiez jamais la fiche de
quelque manière que ce soit. N'utilisez pas d'adaptateur avec des outils électriques mis à la terre.
Des fiches non modifiées et des prises de courant adaptées réduiront le risque de choc électrique.
Evitez tout contact du corps avec des surfaces mises à la terre, telles que tuyaux, radiateurs,
cuisinières et réfrigérateurs. Il y a un risque accru de choc électrique si votre corps est mis à la
terre ou mis à la terre.
N'exposez pas les outils électriques à la pluie ou à l'humidité. La pénétration d'eau dans un outil
électrique augmente le risque de choc électrique.
N'abusez pas le cordon. N'utilisez jamais le cordon pour porter, tirer ou débrancher l'outil
électrique. Tenez le cordon à l'écart de la chaleur, de l'huile, des arêtes vives ou des pièces
mobiles. Les cordons endommagés ou emmêlés augmentent le risque de choc électrique.
Lors de l'utilisation d'un outil électrique à l'extérieur, utilisez une rallonge adaptée à une utilisation
en extérieur. L'utilisation d'un cordon adapté à une utilisation en extérieur réduit les risques d'élec-
trocution.
Si l'utilisation d'un outil électrique dans un endroit humide est inévitable, utilisez une alimentation
protégée par un disjoncteur de fuite à la terre (GFCI). L'utilisation d'un GFCI réduit le risque de
choc électrique.
SÉCURITÉ PERSONNELLE
Restez vigilant, regardez ce que vous faites et faites preuve de bon sens lorsque vous utilisez un
outil électrique. N'utilisez pas d'outil électrique lorsque vous êtes fatigué ou sous l'influence de
drogues, d'alcool ou de médicaments. Un moment d'inattention lors de l'utilisation d'outils
électriques peut entraîner des blessures graves.
Utiliser un équipement de protection individuelle. Portez toujours des lunettes de protection. Un
équipement de protection tel qu'un masque anti-poussière, des chaussures de sécurité antidéra-
pantes, un casque de protection ou des protections auditives utilisés dans des conditions appro-
priées réduira les risques de blessures.
Empêcher les démarrages involontaires. Assurez-vous que l'interrupteur est en position d'arrêt
avant de brancher l'appareil à la source d'alimentation et / ou à la batterie, ou de ramasser ou de
porter l'outil. Le fait de transporter des outils avec le doigt sur l'interrupteur ou de les mettre sous
tension lorsque l'interrupteur est en position de marche peut provoquer des accidents.
Retirez toute clé de réglage ou clé avant de mettre l'outil électrique en marche. Une clé ou une clé
laissée sur une pièce rotative de l'outil électrique peut entraîner des blessures.
Ne pas trop atteindre. Gardez une bonne assise et un bon équilibre à tout moment.Cela permet
de mieux contrôler l'outil électroportatif dans des situations imprévues.
Habillez-vous correctement. Ne portez pas de vêtements amples ni de bijoux. Gardez vos
cheveux, vos vêtements et vos gants à l’écart des pièces en mouvement. Les vêtements amples,
les bijoux ou les cheveux longs peuvent être happés par les pièces en mouvement.
Si des dispositifs sont fournis pour la connexion des installations d'extraction et de collecte de
poussière, assurez-vous qu'ils sont connectés et utilisés correctement. L'utilisation d'un dépous-
siéreur peut réduire les risques liés à la poussière.
UTILISATION ET ENTRETIEN DES OUTILS ÉLECTRIQUES
Ne forcez pas l'outil électrique. Utilisez le bon outil pour votre application. Le bon outil électrique
fera le travail mieux et plus sûrement au rythme pour lequel il a été conçu.
N'utilisez pas l'outil si l'interrupteur ne l'allume pas et ne l'éteint pas. Tout outil électrique qui ne
peut pas être contrôlé avec l'interrupteur est dangereux et doit être réparé.
Débranchez la fiche de la source d'alimentation et / ou du bloc-batterie de l'outil électrique avant
d'effectuer tout réglage, de changer d'accessoire ou de ranger les outils électriques. Ces mesures
de sécurité préventives réduisent le risque de démarrage accidentel de l'outil électrique.
Rangez les outils électriques inutilisés hors de la portée des enfants et ne permettez pas à des
personnes inconnues de l'outil électrique ou de ces instructions d'utiliser cet outil. Les outils
électriques sont dangereux entre les mains d'utilisateurs non formés.
Entretenir les outils électriques. Vérifiez le mauvais alignement ou le coincement des pièces
mobiles, la rupture de pièces et toute autre condition pouvant affecter le bon fonctionnement de
l’outil électrique. S'il est endommagé, faites réparer l'outil électrique avant de l'utiliser. De
nombreux accidents sont causés par des outils électriques mal entretenus.
Gardez les outils de coupe tranchants et propres. Les outils de coupe bien entretenus avec des
arêtes tranchantes sont moins susceptibles de se coincer et sont plus faciles à contrôler.
Utilisez l'outil électrique, les accessoires et les mèches, etc. conformément à ces instructions, en
tenant compte des conditions de travail et du travail à effectuer. L'utilisation de l'outil électrique
pour des opérations différentes de celles prévues pourrait entraîner une situation dangereuse.
SERVICE
Gardez votre deuxième main sur la poignée auxiliaire ou le boîtier du moteur. Si les deux mains
tiennent la scie, elles ne peuvent pas être coupées par la lame.
Ne pas atteindre sous la pièce à travailler. Le protecteur ne peut pas vous protéger de la lame
située sous la pièce.
Ajustez la profondeur de coupe à l'épaisseur de la pièce. Moins d'une dent complète de la lame
doit être visible sous la pièce à travailler.
Ne tenez jamais le morceau coupé dans vos mains ou sur votre jambe. Sécurisez la pièce sur une
plate-forme stable. Il est important de bien supporter le travail afin de minimiser l'exposition du
corps, la fixation de la lame ou la perte de contrôle.
Tenez l'outil électroportatif uniquement par des surfaces de préhension isolées lorsque vous
effectuez une opération dans laquelle l'outil de coupe risque d'entrer en contact avec un câblage
caché ou avec son propre cordon. Le contact avec un fil sous tension rendra les parties
métalliques exposées de l'outil électrique «sous tension» et pourrait donner à l'opérateur un choc
électrique
Lors de la déchirure, utilisez toujours un guide de refente ou un guide de bord droit. Cela améliore
la précision de la coupe et réduit les risques de coincement de la lame.
Utilisez toujours des lames de taille et de forme correctes (diamant contre rondes) de trous de
tonnelle. Les lames qui ne correspondent pas au matériel de montage de la scie fonctionneront de
manière excentrique, entraînant une perte de contrôle.
N'utilisez jamais de rondelles ou de boulons de lame endommagés ou incorrects. Les rondelles de
lame et le boulon ont été spécialement conçus pour votre scie, pour des performances optimales
et une sécurité de fonctionnement.
Le rebond est une réaction soudaine à une lame de scie pincée, liée ou mal alignée, provoquant
le soulèvement d'une scie non contrôlée et sa sortie de la pièce à traiter en direction de l'opéra-
teur.
Lorsque la lame est pincée ou liée étroitement par la fermeture du trait de scie, la lame se bloque
et la réaction du moteur ramène rapidement l'unité vers l'opérateur.
Si la lame est tordue ou mal alignée lors de la coupe, les dents situées sur le bord arrière de la
lame peuvent s'enfoncer dans la surface supérieure du bois, faisant ainsi sortir la lame du trait de
scie et la faire remonter vers l'opérateur.
Maintenez fermement la scie des deux mains et positionnez vos bras pour résister aux forces de
choc. Placez votre corps de part et d'autre de la lame, mais pas dans l'alignement de la lame. Un
rebond pourrait faire basculer la scie en arrière, mais les forces de contrecoup peuvent être
contrôlées par l'opérateur si les précautions appropriées sont prises.
Lorsque la lame est coincée ou lorsque vous interrompez une coupe pour quelque raison que ce
soit, relâchez la gâchette et maintenez la scie immobile dans le matériau jusqu’à ce que la lame
s’arrête complètement. N'essayez jamais de retirer la scie de la pièce ou de tirer la scie vers
l'arrière lorsque la lame est en mouvement, sinon un recul pourrait se produire. Recherchez et
prenez des mesures correctives pour éliminer la cause de la reliure de la lame.
Lors du redémarrage d'une scie dans la pièce, centrez la lame de scie dans le trait de scie et
vérifiez que les dents de la scie ne sont pas engagées dans le matériau. Si la lame de scie se
coince, elle risque de remonter ou de rebondir de la pièce à usiner au redémarrage de la scie.
Soutenez les grands panneaux pour minimiser les risques de pincement et de recul de la lame.
Les grands panneaux ont tendance à s'affaisser sous leur propre poids. Les supports doivent être
placés sous le panneau des deux côtés, près de la ligne de coupe et du bord du panneau.
N'utilisez pas de lames émoussées ou endommagées. Les lames mal affûtées ou mal réglées
produisent un trait de scie étroit causant un frottement excessif, un grippage de la lame et un recul.
La profondeur de la lame et les leviers de verrouillage de réglage du biseau doivent être serrés et
sécurisés avant la coupe. Si le réglage de la lame change pendant la coupe, cela peut provoquer
des blocages et des contrecoups.
Soyez particulièrement prudent lorsque vous sciez des murs existants ou d'autres zones
aveugles. La lame en saillie peut couper des objets pouvant causer un recul.
Vérifiez la protection inférieure pour une fermeture correcte avant chaque utilisation. Ne pas
utiliser la scie si la protection inférieure ne bouge pas librement et ne se ferme pas instantané-
ment. Ne jamais serrer ou attacher le protège-lame inférieur en position ouverte. Si la scie tombe
accidentellement, la protection inférieure peut être pliée. Soulevez la protection inférieure avec la
poignée de rétraction et assurez-vous qu'elle se déplace librement et ne touche pas la lame ou
toute autre pièce, sous tous les angles et à toutes les profondeurs de coupe.
Vérifiez le fonctionnement du ressort de protection inférieur. Si la protection et le ressort ne
fonctionnent pas correctement, ils doivent être réparés avant utilisation. Le protège-lame inférieur
peut fonctionner lentement en raison de pièces endommagées, de dépôts de gomme ou d'une
accumulation de débris.
La protection inférieure ne doit être rétractée manuellement que pour les coupes spéciales telles
que les «coupes en plongée» et les «coupes composées». Relevez la protection inférieure en
rétractant la poignée et dès que la lame pénètre dans le matériau, vous devez la relâcher. Pour
tous les autres travaux de sciage, la protection inférieure devrait fonctionner automatiquement.
Veillez toujours à ce que la protection inférieure recouvre la lame avant de poser la scie sur un
établi ou au sol. Une lame de roue libre non protégée fera marcher la scie en arrière, coupant tout
ce qui se trouve sur son passage. Soyez conscient du temps nécessaire pour que la lame s’arrête
après le relâchement du commutateur.
Utilisez des pinces ou un autre moyen pratique pour fixer et maintenir la pièce sur une plate-forme
stable.Tenir le travail à la main ou contre votre corps le laisse instable et peut entraîner une perte
de contrôle.
Gardez votre corps positionné de part et d'autre de la lame, mais pas dans l'alignement de la lame
de scie. KICKBACK pourrait faire basculer la scie en arrière(voir Causes et prévention de
Kickback et KICKBACK par l'opérateur).
Évitez de couper les ongles. Inspectez et enlevez tous les clous du bois avant de couper.
Assurez-vous toujours que rien ne gêne le mouvement du protège-lame inférieur.
Les accessoires doivent avoir au moins la vitesse recommandée sur l'étiquette d'avertissement de
l'outil. Les roues et autres accessoires fonctionnant à une vitesse supérieure à la vitesse nominale
peuvent voler en éclats et causer des blessures. Les valeurs nominales des accessoires doivent
toujours être supérieures à la vitesse de l'outil, comme indiqué sur la plaque signalétique de l'outil.
Assurez-vous toujours que la scie est propre avant de l'utiliser.
Arrêtez d’utiliser cette scie et faites-la réparer si des bruits inhabituels ou un fonctionnement
anormal se produisent.
Assurez-vous toujours que tous les composants sont montés correctement et fermement avant
d'utiliser l'outil.
Manipulez toujours la lame de scie avec précaution lors du montage, du retrait ou du retrait de la
découpe au diamant.
Attendez toujours que le moteur ait atteint sa vitesse maximale avant de commencer une coupe.
Gardez toujours les poignées sèches, propres et exemptes d’huile et de graisse. Tenez l'outil
fermement à deux mains lors de son utilisation.
Soyez toujours vigilant à tout moment, surtout lors d'opérations répétitives et monotones.
Assurez-vous toujours de la position de vos mains par rapport à la lame.
Éloignez-vous des pièces d'extrémité qui pourraient tomber après la coupe. Ils peuvent être
chauds, coupants et / ou lourds. Des blessures graves peuvent en résulter.
Remplacez ou réparez les cordons endommagés. Assurez-vous que votre rallonge est en bon état.
Utilisez uniquement des rallonges à 3 fils munies de fiches à trois broches avec mise à la terre et
de prises à 3 pôles acceptant la fiche de l’outil.
Une rallonge doit avoir une taille de fil adéquate (AWG ou American Wire Gauge) pour des raisons
de sécurité.
Protection oculaire ANSI Z87.1 (CAN / CSA Z94.3).
Protection auditive ANSI S12.6 (S3.19).
Protection respiratoire NIOSH / OSHA.
Plomb provenant de peintures à base de plomb, de silice cristalline issue de briques, de ciment et
d'autres produits de maçonnerie, ainsi que d'arsenic et de chrome provenant de bois d'œuvre traité
chimiquement.
Évitez tout contact prolongé avec la poussière provenant du ponçage, du sciage, du meulage, du
perçage et autres travaux de construction. Porter des vêtements de protection et laver les zones
exposées à l'eau et au savon. Le fait de laisser la poussière pénétrer dans la bouche, les yeux ou
sur la peau peut favoriser l'absorption de produits chimiques nocifs.
Le laser doit être utilisé et entretenu conformément aux instructions du fabricant.
Ne dirigez jamais le faisceau sur une personne ou un objet autre que la pièce.
Le faisceau laser ne doit pas être délibérément dirigé vers le personnel et il ne doit pas pouvoir être
dirigé vers les yeux d'une personne plus de 0,25 s.
Assurez-vous toujours que le faisceau laser est dirigé sur une pièce solide sans surfaces réfléchis-
santes. C'est à dire. le bois ou les surfaces rugueuses sont acceptables. Les tôles d'acier réfléchis-
santes brillantes brillantes ou similaires ne conviennent pas à une utilisation au laser, car la surface
réfléchissante pourrait diriger le faisceau vers l'opérateur.
Ne changez pas le faisceau laser avec un type différent. Les réparations doivent être effectuées
par le fabricant du laser ou un agent agréé.
Portez des gants de protection lors du montage de la lame de scie. Risque de blessure en touchant
la lame de scie.
Utilisez uniquement des lames de scie correspondant aux caractéristiques indiquées dans le mode
d'emploi.
N'utilisez en aucun cas des disques de meulage comme outil de coupe.
FIXATION ET RETRAIT DE LA LAME - FIGURE C-E
• Rétracter la protection inférieure et assembler la lame (8) et la rondelle de serrage (17) comme
indiqué sur la figure C.
• Appuyez sur le verrou de la broche (13) tout en tournant le boulon de lame (7) avec la clé pour
lame (16) jusqu'à ce que le verrou de la lame s'enclenche et que la lame s'arrête de tourner. figure
D
REMARQUE: la clé à lame est stockée dans un sac en polyéthylène avec le manuel
• Serrez fermement le boulon de lame avec la clé à lame.
REMARQUE: le boulon a un filetage à gauche. Pour desserrer, tournez dans le sens des aiguilles
d'une montre. Pour serrer, tournez dans le sens antihoraire. figure E
REMARQUE: N'engagez jamais le verrouillage de la lame pendant que la scie est en marche et ne
tentez jamais d'arrêter l'outil. N'allumez jamais l'outil lorsque le verrouillage de la lame est engagé.
Il en résultera de graves dommages à votre scie.
Au besoin, déplacez le bouton déverrouillé et laissez le doigt pointé sur la position appropriée de
l’échelle de profondeur.
Tournez ensuite le bouton à 180°pour le verrouiller,
- 14 -
Technology Creates Power

Allumer et éteindre
Remarque: Pour des raisons de sécurité, le commutateur On / Off ne peut pas être verrouillé. il doit
rester appuyé pendant toute l'opération.
Fonction laser
●Allumez-le avec le commutateur ON / OFF de la lumière laser juste avant de couper.
●Éteignez-le immédiatement après l'utilisation pour économiser la batterie et préserver la durée de
vie du laser.
CHANGEMENT DES PILES AU LASER
Les piles qui font fonctionner le laser devront être remplacées après une utilisation considérable du
laser.
1.
2.
3.
4.
DANGER: Ne laissez jamais le rayon laser pénétrer dans les yeux d'une personne, cela pourrait
5)
Faites réparer votre outil électrique par un réparateur qualifié en utilisant uniquement des pièces de
rechange identiques. Cela garantira le maintien de la sécurité de l'outil électrique.
DANGER: Gardez les mains éloignées de la zone de coupe et de la lame.
a)
b)
c)
d)
e)
f)
g)
h)
Causes et prévention du recul par l'opérateur:
●
●
●
Le rebond résulte d'une mauvaise utilisation de la scie et / ou de procédures ou de conditions d'utilisa-
tion incorrectes et peut être évité en prenant les précautions appropriées indiquées ci-dessous:
a)
b)
L'étiquette de votre outil peut inclure les symboles suivants. Les symboles et leurs définitions sont les
suivants:
Règles de sécurité pour les lumières laser
La lumière laser / le rayonnement laser utilisé dans le système est de classe 2 avec des longueurs
d’onde maximales de 1 mW et 650 nm. Ces lasers ne présentent normalement pas de danger
optique, bien que regarder le faisceau puisse provoquer un aveuglement instantané.
ATTENTION : Ne regardez pas directement le rayon laser.
Un danger peut exister si vous regardez délibérément dans le faisceau, respectez toutes les règles
de sécurité ci-dessous.
●
●
●
●
●
f)
3)
a)
b)
c)
d)
e)
f)
g)
4)
a)
b)
c)
d)
e)
f)
g)
●
●
●
●
●
●
●
Plus le numéro de calibre du fil est petit, plus la capacité du câble est grande, c'est-à-dire que le
calibre 16 a une capacité supérieure à 18. Un cordon sous-dimensionné provoquera une chute de
tension entraînant une perte de puissance et une surchauffe. Lorsque vous utilisez plusieurs rallong-
es pour calculer la longueur totale, assurez-vous que chaque rallonge contient au moins la taille
minimale du fil. Le tableau suivant indique la taille à utiliser en fonction de la longueur du cordon et de
l’intensité nominale indiquée sur la plaque signalétique. En cas de doute, utilisez la prochaine jauge
plus lourde. Plus le numéro de calibre est petit, plus le cordon est lourd.
●
●
●
ATTENTION: Certaines poussières générées par le sablage, le sciage, le meulage, le forage et
d'autres activités de construction contiennent des produits chimiques connus dans l'État de Californie
pour provoquer le cancer, des anomalies congénitales ou d'autres troubles de la reproduction. Voici
DÉFINITIONS: SYMBOLES ET MOTS D'ALERTE DE SÉCURITÉ
Il est important que vous lisiez et compreniez ce manuel. Les informations qu’il contient ont trait à la
protection de VOTRE SÉCURITÉ et à la prévention des problèmes. Les symboles ci-dessous sont
utilisés pour vous aider à reconnaître cette information.
NOTICE: Utilisé sans le symbole d'alerte de sécurité, il indique une situation potentiellement
dangereuse qui, si elle n'est pas évitée, peut entraîner des dommages matériels.
ATTENTION: Lire tous les avertissements de sécurité et toutes les instructions
Le non respect des avertissements et des instructions peut entraîner un choc électrique, un incendie
et / ou des blessures graves.
CONSERVEZ TOUS LES AVERTISSEMENTS ET INSTRUCTIONS POUR CONSULTATION
FUTURE
Le terme «outil électrique» dans les avertissements fait référence à votre outil électrique alimenté par
le secteur (avec fil) ou à piles (sans fil).
1)
a)
b)
c)
2)
a)
b)
c)
d)
e)
c)
d)
e)
f)
g)
Consignes de Sécurité Inférieures
a)
b)
c)
d)
Consignes de Sécurité Supplémentaires
●
●
●
●
●
●
●
●
quelques exemples de ces produits chimiques:
●
Les risques liés à ces expositions varient en fonction de la fréquence à laquelle vous effectuez ce type
de travail. Pour réduire votre exposition à ces produits chimiques: travaillez dans un endroit bien
ventilé et utilisez des équipements de sécurité approuvés, tels que les masques antipoussières
spécialement conçus pour filtrer les particules microscopiques.
ATTENTION: TOUJOURS UTILISER DES LUNETTES DE SÉCURITÉ. Les lunettes ordinaires
ne sont PAS des lunettes de sécurité. Utilisez également un masque facial ou antipoussière si vous
coupez
●
ATTENTION: La découpe de plastiques, de bois sablé et d'autres matériaux peut provoquer
l'accumulation de matière fondue sur les pointes de lame et le corps de la lame de scie, augmentant
ainsi le risque de surchauffe et de coincement de la lame lors de la coupe.
ATTENTION: L'utilisation de cet outil peut générer et / ou dissiper de la poussière, ce qui peut
causer des blessures graves et permanentes aux voies respiratoires ou autres. Utilisez toujours une
protection respiratoire approuvée par NIOSH / OSHA appropriée à l'exposition à la poussière. Éloign-
er les particules du visage et du corps. Toujours utiliser l'outil dans une zone bien ventilée et assurer
un dépoussiérage adéquat. Utilisez le système de dépoussiérage autant que possible.
MISE EN GARDE: L'utilisation de commandes ou de réglages ou l'exécution de procédures
autres que celles spécifiées dans le présent document peut entraîner une exposition à des radiations
dangereuses.
Usage prévu
Cette machine est principalement destinée au sciage longitudinal et transversal du bois massif, des
panneaux de particules, du contreplaqué, de l’aluminium, des carreaux et de la pierre maintenus
dans une position fixe. Veuillez noter que la lame pré-installée dans la scie telle que fournie est
destinée à être utilisée avec du bois uniquement. Toute autre utilisation ou modification de l'appareil
doit être considérée comme une utilisation non conforme et peut générer des risques considérables.
Il n'est pas adapté à un usage commercial.
Description de la fonction
La numérotation des caractéristiques des produits fait référence à l'illustration de la machine sur la
page graphique.
Montage / Réglage
ATTENTION: Avant tout travail sur l'outil électrique, retirez toujours la fiche de la source
d'alimentation.
●
●
●
Régler la profondeur de coupe
1.
2.
Remarque: si possible, recommandez une profondeur de coupe d'environ 2 mm plus profonde que
l'épaisseur du matériau. Cela devrait vous aider à obtenir une coupe nette.
entraîner des lésions oculaires graves. Assurez-vous que le commutateur laser est éteint et que le
laser ne pointe pas vers vous lors du remplacement des piles du laser et de la vérification du
fonctionnement du laser.
Application
La mini scie plongeante est polyvalente et vous permet de couper de nombreux types de matériaux.
Certains des matériaux incluent
●
●
●
Sélection de la lame
ENTRETIEN
ATTENTION: Débranchez l'outil avant d'installer ou de retirer des accessoires, avant de
procéder au réglage ou lors de réparations. Utilisez uniquement un savon doux et un chiffon humide
pour nettoyer l'outil. Ne laissez jamais aucun liquide pénétrer à l'intérieur de l'outil. ne jamais immerg-
er une partie de l'outil dans un liquide.
IMPORTANT: Pour assurer la SÉCURITÉ et la FIABILITÉ du produit, les réparations, la mainte-
nance et les réglages (autres que ceux énumérés dans ce manuel) doivent être effectués par des
centres de service agréés ou d'autres centres de service qualifiés, en utilisant toujours des pièces de
rechange identiques.
EN
FR
ES
SÉCURITÉ DES ZONES DE TRAVAIL
Gardez la zone de travail propre et bien éclairée. Les zones encombrées ou sombres sont propic-
es aux accidents.
Ne pas utiliser d'outils électriques dans des atmosphères explosives, telles que la présence de
liquides, de gaz ou de poussières inflammables. Les outils électriques créent des étincelles qui
peuvent enflammer la poussière ou les vapeurs.
Tenez les enfants et les passants à distance lorsque vous utilisez un outil électrique. Les distrac-
tions peuvent vous faire perdre le contrôle.
SÉCURITÉ ÉLECTRIQUE
Les fiches des outils électriques doivent correspondre à la prise. Ne modifiez jamais la fiche de
quelque manière que ce soit. N'utilisez pas d'adaptateur avec des outils électriques mis à la terre.
Des fiches non modifiées et des prises de courant adaptées réduiront le risque de choc électrique.
Evitez tout contact du corps avec des surfaces mises à la terre, telles que tuyaux, radiateurs,
cuisinières et réfrigérateurs. Il y a un risque accru de choc électrique si votre corps est mis à la
terre ou mis à la terre.
N'exposez pas les outils électriques à la pluie ou à l'humidité. La pénétration d'eau dans un outil
électrique augmente le risque de choc électrique.
N'abusez pas le cordon. N'utilisez jamais le cordon pour porter, tirer ou débrancher l'outil
électrique. Tenez le cordon à l'écart de la chaleur, de l'huile, des arêtes vives ou des pièces
mobiles. Les cordons endommagés ou emmêlés augmentent le risque de choc électrique.
Lors de l'utilisation d'un outil électrique à l'extérieur, utilisez une rallonge adaptée à une utilisation
en extérieur. L'utilisation d'un cordon adapté à une utilisation en extérieur réduit les risques d'élec-
trocution.
Si l'utilisation d'un outil électrique dans un endroit humide est inévitable, utilisez une alimentation
protégée par un disjoncteur de fuite à la terre (GFCI). L'utilisation d'un GFCI réduit le risque de
choc électrique.
SÉCURITÉ PERSONNELLE
Restez vigilant, regardez ce que vous faites et faites preuve de bon sens lorsque vous utilisez un
outil électrique. N'utilisez pas d'outil électrique lorsque vous êtes fatigué ou sous l'influence de
drogues, d'alcool ou de médicaments. Un moment d'inattention lors de l'utilisation d'outils
électriques peut entraîner des blessures graves.
Utiliser un équipement de protection individuelle. Portez toujours des lunettes de protection. Un
équipement de protection tel qu'un masque anti-poussière, des chaussures de sécurité antidéra-
pantes, un casque de protection ou des protections auditives utilisés dans des conditions appro-
priées réduira les risques de blessures.
Empêcher les démarrages involontaires. Assurez-vous que l'interrupteur est en position d'arrêt
avant de brancher l'appareil à la source d'alimentation et / ou à la batterie, ou de ramasser ou de
porter l'outil. Le fait de transporter des outils avec le doigt sur l'interrupteur ou de les mettre sous
tension lorsque l'interrupteur est en position de marche peut provoquer des accidents.
Retirez toute clé de réglage ou clé avant de mettre l'outil électrique en marche. Une clé ou une clé
laissée sur une pièce rotative de l'outil électrique peut entraîner des blessures.
Ne pas trop atteindre. Gardez une bonne assise et un bon équilibre à tout moment.Cela permet
de mieux contrôler l'outil électroportatif dans des situations imprévues.
Habillez-vous correctement. Ne portez pas de vêtements amples ni de bijoux. Gardez vos
cheveux, vos vêtements et vos gants à l’écart des pièces en mouvement. Les vêtements amples,
les bijoux ou les cheveux longs peuvent être happés par les pièces en mouvement.
Si des dispositifs sont fournis pour la connexion des installations d'extraction et de collecte de
poussière, assurez-vous qu'ils sont connectés et utilisés correctement. L'utilisation d'un dépous-
siéreur peut réduire les risques liés à la poussière.
UTILISATION ET ENTRETIEN DES OUTILS ÉLECTRIQUES
Ne forcez pas l'outil électrique. Utilisez le bon outil pour votre application. Le bon outil électrique
fera le travail mieux et plus sûrement au rythme pour lequel il a été conçu.
N'utilisez pas l'outil si l'interrupteur ne l'allume pas et ne l'éteint pas. Tout outil électrique qui ne
peut pas être contrôlé avec l'interrupteur est dangereux et doit être réparé.
Débranchez la fiche de la source d'alimentation et / ou du bloc-batterie de l'outil électrique avant
d'effectuer tout réglage, de changer d'accessoire ou de ranger les outils électriques. Ces mesures
de sécurité préventives réduisent le risque de démarrage accidentel de l'outil électrique.
Rangez les outils électriques inutilisés hors de la portée des enfants et ne permettez pas à des
personnes inconnues de l'outil électrique ou de ces instructions d'utiliser cet outil. Les outils
électriques sont dangereux entre les mains d'utilisateurs non formés.
Entretenir les outils électriques. Vérifiez le mauvais alignement ou le coincement des pièces
mobiles, la rupture de pièces et toute autre condition pouvant affecter le bon fonctionnement de
l’outil électrique. S'il est endommagé, faites réparer l'outil électrique avant de l'utiliser. De
nombreux accidents sont causés par des outils électriques mal entretenus.
Gardez les outils de coupe tranchants et propres. Les outils de coupe bien entretenus avec des
arêtes tranchantes sont moins susceptibles de se coincer et sont plus faciles à contrôler.
Utilisez l'outil électrique, les accessoires et les mèches, etc. conformément à ces instructions, en
tenant compte des conditions de travail et du travail à effectuer. L'utilisation de l'outil électrique
pour des opérations différentes de celles prévues pourrait entraîner une situation dangereuse.
SERVICE
Gardez votre deuxième main sur la poignée auxiliaire ou le boîtier du moteur. Si les deux mains
tiennent la scie, elles ne peuvent pas être coupées par la lame.
Ne pas atteindre sous la pièce à travailler. Le protecteur ne peut pas vous protéger de la lame
située sous la pièce.
Ajustez la profondeur de coupe à l'épaisseur de la pièce. Moins d'une dent complète de la lame
doit être visible sous la pièce à travailler.
Ne tenez jamais le morceau coupé dans vos mains ou sur votre jambe. Sécurisez la pièce sur une
plate-forme stable. Il est important de bien supporter le travail afin de minimiser l'exposition du
corps, la fixation de la lame ou la perte de contrôle.
Tenez l'outil électroportatif uniquement par des surfaces de préhension isolées lorsque vous
effectuez une opération dans laquelle l'outil de coupe risque d'entrer en contact avec un câblage
caché ou avec son propre cordon. Le contact avec un fil sous tension rendra les parties
métalliques exposées de l'outil électrique «sous tension» et pourrait donner à l'opérateur un choc
électrique
Lors de la déchirure, utilisez toujours un guide de refente ou un guide de bord droit. Cela améliore
la précision de la coupe et réduit les risques de coincement de la lame.
Utilisez toujours des lames de taille et de forme correctes (diamant contre rondes) de trous de
tonnelle. Les lames qui ne correspondent pas au matériel de montage de la scie fonctionneront de
manière excentrique, entraînant une perte de contrôle.
N'utilisez jamais de rondelles ou de boulons de lame endommagés ou incorrects. Les rondelles de
lame et le boulon ont été spécialement conçus pour votre scie, pour des performances optimales
et une sécurité de fonctionnement.
Le rebond est une réaction soudaine à une lame de scie pincée, liée ou mal alignée, provoquant
le soulèvement d'une scie non contrôlée et sa sortie de la pièce à traiter en direction de l'opéra-
teur.
Lorsque la lame est pincée ou liée étroitement par la fermeture du trait de scie, la lame se bloque
et la réaction du moteur ramène rapidement l'unité vers l'opérateur.
Si la lame est tordue ou mal alignée lors de la coupe, les dents situées sur le bord arrière de la
lame peuvent s'enfoncer dans la surface supérieure du bois, faisant ainsi sortir la lame du trait de
scie et la faire remonter vers l'opérateur.
Maintenez fermement la scie des deux mains et positionnez vos bras pour résister aux forces de
choc. Placez votre corps de part et d'autre de la lame, mais pas dans l'alignement de la lame. Un
rebond pourrait faire basculer la scie en arrière, mais les forces de contrecoup peuvent être
contrôlées par l'opérateur si les précautions appropriées sont prises.
Lorsque la lame est coincée ou lorsque vous interrompez une coupe pour quelque raison que ce
soit, relâchez la gâchette et maintenez la scie immobile dans le matériau jusqu’à ce que la lame
s’arrête complètement. N'essayez jamais de retirer la scie de la pièce ou de tirer la scie vers
l'arrière lorsque la lame est en mouvement, sinon un recul pourrait se produire. Recherchez et
prenez des mesures correctives pour éliminer la cause de la reliure de la lame.
Lors du redémarrage d'une scie dans la pièce, centrez la lame de scie dans le trait de scie et
vérifiez que les dents de la scie ne sont pas engagées dans le matériau. Si la lame de scie se
coince, elle risque de remonter ou de rebondir de la pièce à usiner au redémarrage de la scie.
Soutenez les grands panneaux pour minimiser les risques de pincement et de recul de la lame.
Les grands panneaux ont tendance à s'affaisser sous leur propre poids. Les supports doivent être
placés sous le panneau des deux côtés, près de la ligne de coupe et du bord du panneau.
N'utilisez pas de lames émoussées ou endommagées. Les lames mal affûtées ou mal réglées
produisent un trait de scie étroit causant un frottement excessif, un grippage de la lame et un recul.
La profondeur de la lame et les leviers de verrouillage de réglage du biseau doivent être serrés et
sécurisés avant la coupe. Si le réglage de la lame change pendant la coupe, cela peut provoquer
des blocages et des contrecoups.
Soyez particulièrement prudent lorsque vous sciez des murs existants ou d'autres zones
aveugles. La lame en saillie peut couper des objets pouvant causer un recul.
Vérifiez la protection inférieure pour une fermeture correcte avant chaque utilisation. Ne pas
utiliser la scie si la protection inférieure ne bouge pas librement et ne se ferme pas instantané-
ment. Ne jamais serrer ou attacher le protège-lame inférieur en position ouverte. Si la scie tombe
accidentellement, la protection inférieure peut être pliée. Soulevez la protection inférieure avec la
poignée de rétraction et assurez-vous qu'elle se déplace librement et ne touche pas la lame ou
toute autre pièce, sous tous les angles et à toutes les profondeurs de coupe.
Vérifiez le fonctionnement du ressort de protection inférieur. Si la protection et le ressort ne
fonctionnent pas correctement, ils doivent être réparés avant utilisation. Le protège-lame inférieur
peut fonctionner lentement en raison de pièces endommagées, de dépôts de gomme ou d'une
accumulation de débris.
La protection inférieure ne doit être rétractée manuellement que pour les coupes spéciales telles
que les «coupes en plongée» et les «coupes composées». Relevez la protection inférieure en
rétractant la poignée et dès que la lame pénètre dans le matériau, vous devez la relâcher. Pour
tous les autres travaux de sciage, la protection inférieure devrait fonctionner automatiquement.
Veillez toujours à ce que la protection inférieure recouvre la lame avant de poser la scie sur un
établi ou au sol. Une lame de roue libre non protégée fera marcher la scie en arrière, coupant tout
ce qui se trouve sur son passage. Soyez conscient du temps nécessaire pour que la lame s’arrête
après le relâchement du commutateur.
Utilisez des pinces ou un autre moyen pratique pour fixer et maintenir la pièce sur une plate-forme
stable.Tenir le travail à la main ou contre votre corps le laisse instable et peut entraîner une perte
de contrôle.
Gardez votre corps positionné de part et d'autre de la lame, mais pas dans l'alignement de la lame
de scie. KICKBACK pourrait faire basculer la scie en arrière(voir Causes et prévention de
Kickback et KICKBACK par l'opérateur).
Évitez de couper les ongles. Inspectez et enlevez tous les clous du bois avant de couper.
Assurez-vous toujours que rien ne gêne le mouvement du protège-lame inférieur.
Les accessoires doivent avoir au moins la vitesse recommandée sur l'étiquette d'avertissement de
l'outil. Les roues et autres accessoires fonctionnant à une vitesse supérieure à la vitesse nominale
peuvent voler en éclats et causer des blessures. Les valeurs nominales des accessoires doivent
toujours être supérieures à la vitesse de l'outil, comme indiqué sur la plaque signalétique de l'outil.
Assurez-vous toujours que la scie est propre avant de l'utiliser.
Arrêtez d’utiliser cette scie et faites-la réparer si des bruits inhabituels ou un fonctionnement
anormal se produisent.
Assurez-vous toujours que tous les composants sont montés correctement et fermement avant
d'utiliser l'outil.
Manipulez toujours la lame de scie avec précaution lors du montage, du retrait ou du retrait de la
découpe au diamant.
Attendez toujours que le moteur ait atteint sa vitesse maximale avant de commencer une coupe.
Gardez toujours les poignées sèches, propres et exemptes d’huile et de graisse. Tenez l'outil
fermement à deux mains lors de son utilisation.
Soyez toujours vigilant à tout moment, surtout lors d'opérations répétitives et monotones.
Assurez-vous toujours de la position de vos mains par rapport à la lame.
Éloignez-vous des pièces d'extrémité qui pourraient tomber après la coupe. Ils peuvent être
chauds, coupants et / ou lourds. Des blessures graves peuvent en résulter.
Remplacez ou réparez les cordons endommagés. Assurez-vous que votre rallonge est en bon état.
Utilisez uniquement des rallonges à 3 fils munies de fiches à trois broches avec mise à la terre et
de prises à 3 pôles acceptant la fiche de l’outil.
Une rallonge doit avoir une taille de fil adéquate (AWG ou American Wire Gauge) pour des raisons
de sécurité.
Protection oculaire ANSI Z87.1 (CAN / CSA Z94.3).
Protection auditive ANSI S12.6 (S3.19).
Protection respiratoire NIOSH / OSHA.
Plomb provenant de peintures à base de plomb, de silice cristalline issue de briques, de ciment et
d'autres produits de maçonnerie, ainsi que d'arsenic et de chrome provenant de bois d'œuvre traité
chimiquement.
Évitez tout contact prolongé avec la poussière provenant du ponçage, du sciage, du meulage, du
perçage et autres travaux de construction. Porter des vêtements de protection et laver les zones
exposées à l'eau et au savon. Le fait de laisser la poussière pénétrer dans la bouche, les yeux ou
sur la peau peut favoriser l'absorption de produits chimiques nocifs.
Le laser doit être utilisé et entretenu conformément aux instructions du fabricant.
Ne dirigez jamais le faisceau sur une personne ou un objet autre que la pièce.
Le faisceau laser ne doit pas être délibérément dirigé vers le personnel et il ne doit pas pouvoir être
dirigé vers les yeux d'une personne plus de 0,25 s.
Assurez-vous toujours que le faisceau laser est dirigé sur une pièce solide sans surfaces réfléchis-
santes. C'est à dire. le bois ou les surfaces rugueuses sont acceptables. Les tôles d'acier réfléchis-
santes brillantes brillantes ou similaires ne conviennent pas à une utilisation au laser, car la surface
réfléchissante pourrait diriger le faisceau vers l'opérateur.
Ne changez pas le faisceau laser avec un type différent. Les réparations doivent être effectuées
par le fabricant du laser ou un agent agréé.
Portez des gants de protection lors du montage de la lame de scie. Risque de blessure en touchant
la lame de scie.
Utilisez uniquement des lames de scie correspondant aux caractéristiques indiquées dans le mode
d'emploi.
N'utilisez en aucun cas des disques de meulage comme outil de coupe.
FIXATION ET RETRAIT DE LA LAME - FIGURE C-E
• Rétracter la protection inférieure et assembler la lame (8) et la rondelle de serrage (17) comme
indiqué sur la figure C.
• Appuyez sur le verrou de la broche (13) tout en tournant le boulon de lame (7) avec la clé pour
lame (16) jusqu'à ce que le verrou de la lame s'enclenche et que la lame s'arrête de tourner. figure
D
REMARQUE: la clé à lame est stockée dans un sac en polyéthylène avec le manuel
• Serrez fermement le boulon de lame avec la clé à lame.
REMARQUE: le boulon a un filetage à gauche. Pour desserrer, tournez dans le sens des aiguilles
d'une montre. Pour serrer, tournez dans le sens antihoraire. figure E
REMARQUE: N'engagez jamais le verrouillage de la lame pendant que la scie est en marche et ne
tentez jamais d'arrêter l'outil. N'allumez jamais l'outil lorsque le verrouillage de la lame est engagé.
Il en résultera de graves dommages à votre scie.
Au besoin, déplacez le bouton déverrouillé et laissez le doigt pointé sur la position appropriée de
l’échelle de profondeur.
Tournez ensuite le bouton à 180°pour le verrouiller,
- 15 -
Technology Creates Power
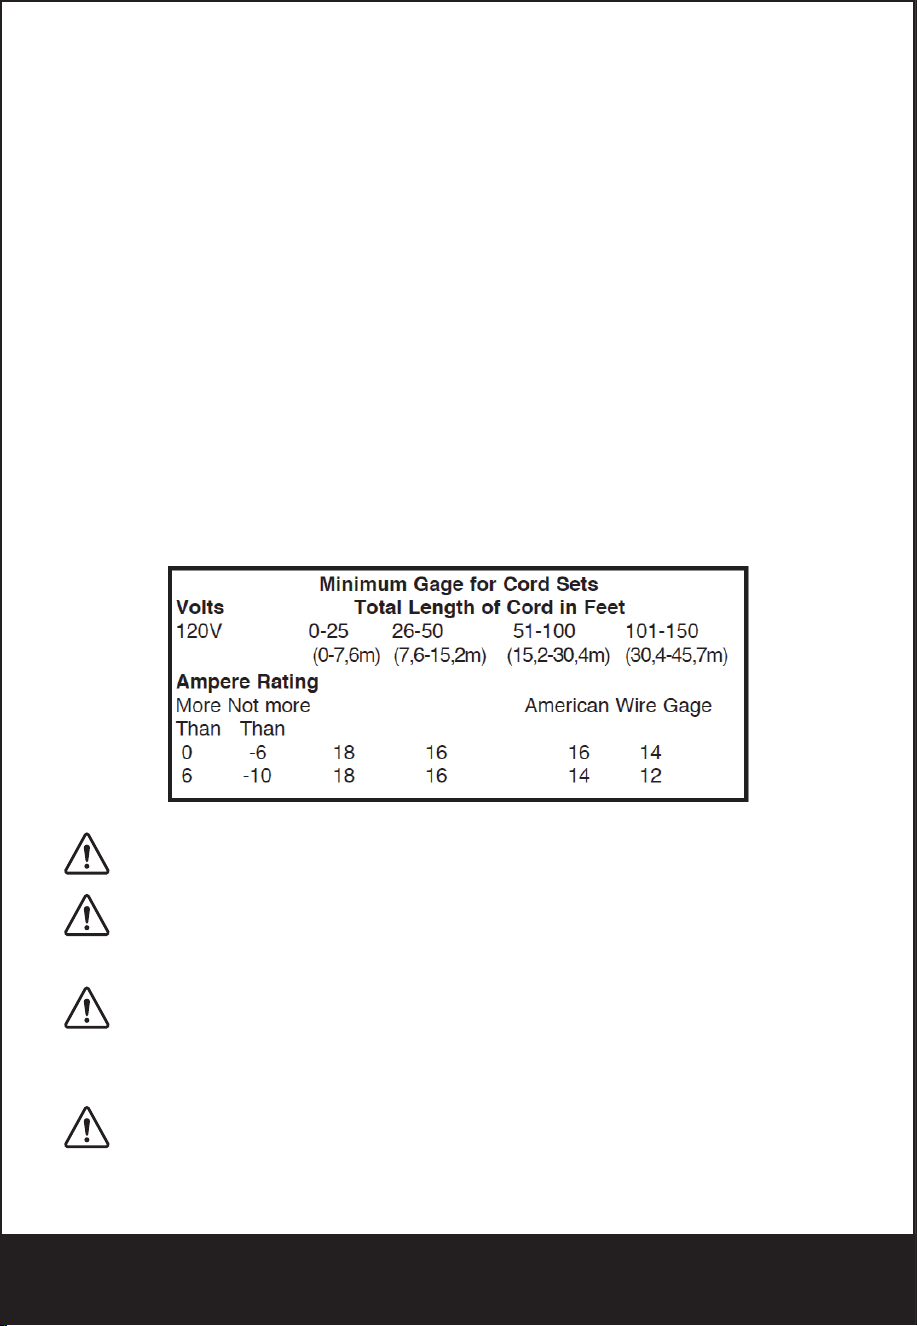
Allumer et éteindre
Remarque: Pour des raisons de sécurité, le commutateur On / Off ne peut pas être verrouillé. il doit
rester appuyé pendant toute l'opération.
Fonction laser
●Allumez-le avec le commutateur ON / OFF de la lumière laser juste avant de couper.
●Éteignez-le immédiatement après l'utilisation pour économiser la batterie et préserver la durée de
vie du laser.
CHANGEMENT DES PILES AU LASER
Les piles qui font fonctionner le laser devront être remplacées après une utilisation considérable du
laser.
1.
2.
3.
4.
DANGER: Ne laissez jamais le rayon laser pénétrer dans les yeux d'une personne, cela pourrait
5)
Faites réparer votre outil électrique par un réparateur qualifié en utilisant uniquement des pièces de
rechange identiques. Cela garantira le maintien de la sécurité de l'outil électrique.
DANGER: Gardez les mains éloignées de la zone de coupe et de la lame.
a)
b)
c)
d)
e)
f)
g)
h)
Causes et prévention du recul par l'opérateur:
●
●
●
Le rebond résulte d'une mauvaise utilisation de la scie et / ou de procédures ou de conditions d'utilisa-
tion incorrectes et peut être évité en prenant les précautions appropriées indiquées ci-dessous:
a)
b)
L'étiquette de votre outil peut inclure les symboles suivants. Les symboles et leurs définitions sont les
suivants:
Règles de sécurité pour les lumières laser
La lumière laser / le rayonnement laser utilisé dans le système est de classe 2 avec des longueurs
d’onde maximales de 1 mW et 650 nm. Ces lasers ne présentent normalement pas de danger
optique, bien que regarder le faisceau puisse provoquer un aveuglement instantané.
ATTENTION : Ne regardez pas directement le rayon laser.
Un danger peut exister si vous regardez délibérément dans le faisceau, respectez toutes les règles
de sécurité ci-dessous.
●
●
●
●
●
f)
3)
a)
b)
c)
d)
e)
f)
g)
4)
a)
b)
c)
d)
e)
f)
g)
●
●
●
●
●
●
●
Plus le numéro de calibre du fil est petit, plus la capacité du câble est grande, c'est-à-dire que le
calibre 16 a une capacité supérieure à 18. Un cordon sous-dimensionné provoquera une chute de
tension entraînant une perte de puissance et une surchauffe. Lorsque vous utilisez plusieurs rallong-
es pour calculer la longueur totale, assurez-vous que chaque rallonge contient au moins la taille
minimale du fil. Le tableau suivant indique la taille à utiliser en fonction de la longueur du cordon et de
l’intensité nominale indiquée sur la plaque signalétique. En cas de doute, utilisez la prochaine jauge
plus lourde. Plus le numéro de calibre est petit, plus le cordon est lourd.
●
●
●
ATTENTION: Certaines poussières générées par le sablage, le sciage, le meulage, le forage et
d'autres activités de construction contiennent des produits chimiques connus dans l'État de Californie
pour provoquer le cancer, des anomalies congénitales ou d'autres troubles de la reproduction. Voici
DÉFINITIONS: SYMBOLES ET MOTS D'ALERTE DE SÉCURITÉ
Il est important que vous lisiez et compreniez ce manuel. Les informations qu’il contient ont trait à la
protection de VOTRE SÉCURITÉ et à la prévention des problèmes. Les symboles ci-dessous sont
utilisés pour vous aider à reconnaître cette information.
NOTICE: Utilisé sans le symbole d'alerte de sécurité, il indique une situation potentiellement
dangereuse qui, si elle n'est pas évitée, peut entraîner des dommages matériels.
ATTENTION: Lire tous les avertissements de sécurité et toutes les instructions
Le non respect des avertissements et des instructions peut entraîner un choc électrique, un incendie
et / ou des blessures graves.
CONSERVEZ TOUS LES AVERTISSEMENTS ET INSTRUCTIONS POUR CONSULTATION
FUTURE
Le terme «outil électrique» dans les avertissements fait référence à votre outil électrique alimenté par
le secteur (avec fil) ou à piles (sans fil).
1)
a)
b)
c)
2)
a)
b)
c)
d)
e)
c)
d)
e)
f)
g)
Consignes de Sécurité Inférieures
a)
b)
c)
d)
Consignes de Sécurité Supplémentaires
●
●
●
●
●
●
●
●
quelques exemples de ces produits chimiques:
●
Les risques liés à ces expositions varient en fonction de la fréquence à laquelle vous effectuez ce type
de travail. Pour réduire votre exposition à ces produits chimiques: travaillez dans un endroit bien
ventilé et utilisez des équipements de sécurité approuvés, tels que les masques antipoussières
spécialement conçus pour filtrer les particules microscopiques.
ATTENTION: TOUJOURS UTILISER DES LUNETTES DE SÉCURITÉ. Les lunettes ordinaires
ne sont PAS des lunettes de sécurité. Utilisez également un masque facial ou antipoussière si vous
coupez
●
ATTENTION: La découpe de plastiques, de bois sablé et d'autres matériaux peut provoquer
l'accumulation de matière fondue sur les pointes de lame et le corps de la lame de scie, augmentant
ainsi le risque de surchauffe et de coincement de la lame lors de la coupe.
ATTENTION: L'utilisation de cet outil peut générer et / ou dissiper de la poussière, ce qui peut
causer des blessures graves et permanentes aux voies respiratoires ou autres. Utilisez toujours une
protection respiratoire approuvée par NIOSH / OSHA appropriée à l'exposition à la poussière. Éloign-
er les particules du visage et du corps. Toujours utiliser l'outil dans une zone bien ventilée et assurer
un dépoussiérage adéquat. Utilisez le système de dépoussiérage autant que possible.
MISE EN GARDE: L'utilisation de commandes ou de réglages ou l'exécution de procédures
autres que celles spécifiées dans le présent document peut entraîner une exposition à des radiations
dangereuses.
Usage prévu
Cette machine est principalement destinée au sciage longitudinal et transversal du bois massif, des
panneaux de particules, du contreplaqué, de l’aluminium, des carreaux et de la pierre maintenus
dans une position fixe. Veuillez noter que la lame pré-installée dans la scie telle que fournie est
destinée à être utilisée avec du bois uniquement. Toute autre utilisation ou modification de l'appareil
doit être considérée comme une utilisation non conforme et peut générer des risques considérables.
Il n'est pas adapté à un usage commercial.
Description de la fonction
La numérotation des caractéristiques des produits fait référence à l'illustration de la machine sur la
page graphique.
Montage / Réglage
ATTENTION: Avant tout travail sur l'outil électrique, retirez toujours la fiche de la source
d'alimentation.
●
●
●
Régler la profondeur de coupe
1.
2.
Remarque: si possible, recommandez une profondeur de coupe d'environ 2 mm plus profonde que
l'épaisseur du matériau. Cela devrait vous aider à obtenir une coupe nette.
entraîner des lésions oculaires graves. Assurez-vous que le commutateur laser est éteint et que le
laser ne pointe pas vers vous lors du remplacement des piles du laser et de la vérification du
fonctionnement du laser.
Application
La mini scie plongeante est polyvalente et vous permet de couper de nombreux types de matériaux.
Certains des matériaux incluent
●
●
●
Sélection de la lame
ENTRETIEN
ATTENTION: Débranchez l'outil avant d'installer ou de retirer des accessoires, avant de
procéder au réglage ou lors de réparations. Utilisez uniquement un savon doux et un chiffon humide
pour nettoyer l'outil. Ne laissez jamais aucun liquide pénétrer à l'intérieur de l'outil. ne jamais immerg-
er une partie de l'outil dans un liquide.
IMPORTANT: Pour assurer la SÉCURITÉ et la FIABILITÉ du produit, les réparations, la mainte-
nance et les réglages (autres que ceux énumérés dans ce manuel) doivent être effectués par des
centres de service agréés ou d'autres centres de service qualifiés, en utilisant toujours des pièces de
rechange identiques.
EN
FR
ES
SÉCURITÉ DES ZONES DE TRAVAIL
Gardez la zone de travail propre et bien éclairée. Les zones encombrées ou sombres sont propic-
es aux accidents.
Ne pas utiliser d'outils électriques dans des atmosphères explosives, telles que la présence de
liquides, de gaz ou de poussières inflammables. Les outils électriques créent des étincelles qui
peuvent enflammer la poussière ou les vapeurs.
Tenez les enfants et les passants à distance lorsque vous utilisez un outil électrique. Les distrac-
tions peuvent vous faire perdre le contrôle.
SÉCURITÉ ÉLECTRIQUE
Les fiches des outils électriques doivent correspondre à la prise. Ne modifiez jamais la fiche de
quelque manière que ce soit. N'utilisez pas d'adaptateur avec des outils électriques mis à la terre.
Des fiches non modifiées et des prises de courant adaptées réduiront le risque de choc électrique.
Evitez tout contact du corps avec des surfaces mises à la terre, telles que tuyaux, radiateurs,
cuisinières et réfrigérateurs. Il y a un risque accru de choc électrique si votre corps est mis à la
terre ou mis à la terre.
N'exposez pas les outils électriques à la pluie ou à l'humidité. La pénétration d'eau dans un outil
électrique augmente le risque de choc électrique.
N'abusez pas le cordon. N'utilisez jamais le cordon pour porter, tirer ou débrancher l'outil
électrique. Tenez le cordon à l'écart de la chaleur, de l'huile, des arêtes vives ou des pièces
mobiles. Les cordons endommagés ou emmêlés augmentent le risque de choc électrique.
Lors de l'utilisation d'un outil électrique à l'extérieur, utilisez une rallonge adaptée à une utilisation
en extérieur. L'utilisation d'un cordon adapté à une utilisation en extérieur réduit les risques d'élec-
trocution.
Si l'utilisation d'un outil électrique dans un endroit humide est inévitable, utilisez une alimentation
protégée par un disjoncteur de fuite à la terre (GFCI). L'utilisation d'un GFCI réduit le risque de
choc électrique.
SÉCURITÉ PERSONNELLE
Restez vigilant, regardez ce que vous faites et faites preuve de bon sens lorsque vous utilisez un
outil électrique. N'utilisez pas d'outil électrique lorsque vous êtes fatigué ou sous l'influence de
drogues, d'alcool ou de médicaments. Un moment d'inattention lors de l'utilisation d'outils
électriques peut entraîner des blessures graves.
Utiliser un équipement de protection individuelle. Portez toujours des lunettes de protection. Un
équipement de protection tel qu'un masque anti-poussière, des chaussures de sécurité antidéra-
pantes, un casque de protection ou des protections auditives utilisés dans des conditions appro-
priées réduira les risques de blessures.
Empêcher les démarrages involontaires. Assurez-vous que l'interrupteur est en position d'arrêt
avant de brancher l'appareil à la source d'alimentation et / ou à la batterie, ou de ramasser ou de
porter l'outil. Le fait de transporter des outils avec le doigt sur l'interrupteur ou de les mettre sous
tension lorsque l'interrupteur est en position de marche peut provoquer des accidents.
Retirez toute clé de réglage ou clé avant de mettre l'outil électrique en marche. Une clé ou une clé
laissée sur une pièce rotative de l'outil électrique peut entraîner des blessures.
Ne pas trop atteindre. Gardez une bonne assise et un bon équilibre à tout moment.Cela permet
de mieux contrôler l'outil électroportatif dans des situations imprévues.
Habillez-vous correctement. Ne portez pas de vêtements amples ni de bijoux. Gardez vos
cheveux, vos vêtements et vos gants à l’écart des pièces en mouvement. Les vêtements amples,
les bijoux ou les cheveux longs peuvent être happés par les pièces en mouvement.
Si des dispositifs sont fournis pour la connexion des installations d'extraction et de collecte de
poussière, assurez-vous qu'ils sont connectés et utilisés correctement. L'utilisation d'un dépous-
siéreur peut réduire les risques liés à la poussière.
UTILISATION ET ENTRETIEN DES OUTILS ÉLECTRIQUES
Ne forcez pas l'outil électrique. Utilisez le bon outil pour votre application. Le bon outil électrique
fera le travail mieux et plus sûrement au rythme pour lequel il a été conçu.
N'utilisez pas l'outil si l'interrupteur ne l'allume pas et ne l'éteint pas. Tout outil électrique qui ne
peut pas être contrôlé avec l'interrupteur est dangereux et doit être réparé.
Débranchez la fiche de la source d'alimentation et / ou du bloc-batterie de l'outil électrique avant
d'effectuer tout réglage, de changer d'accessoire ou de ranger les outils électriques. Ces mesures
de sécurité préventives réduisent le risque de démarrage accidentel de l'outil électrique.
Rangez les outils électriques inutilisés hors de la portée des enfants et ne permettez pas à des
personnes inconnues de l'outil électrique ou de ces instructions d'utiliser cet outil. Les outils
électriques sont dangereux entre les mains d'utilisateurs non formés.
Entretenir les outils électriques. Vérifiez le mauvais alignement ou le coincement des pièces
mobiles, la rupture de pièces et toute autre condition pouvant affecter le bon fonctionnement de
l’outil électrique. S'il est endommagé, faites réparer l'outil électrique avant de l'utiliser. De
nombreux accidents sont causés par des outils électriques mal entretenus.
Gardez les outils de coupe tranchants et propres. Les outils de coupe bien entretenus avec des
arêtes tranchantes sont moins susceptibles de se coincer et sont plus faciles à contrôler.
Utilisez l'outil électrique, les accessoires et les mèches, etc. conformément à ces instructions, en
tenant compte des conditions de travail et du travail à effectuer. L'utilisation de l'outil électrique
pour des opérations différentes de celles prévues pourrait entraîner une situation dangereuse.
SERVICE
Gardez votre deuxième main sur la poignée auxiliaire ou le boîtier du moteur. Si les deux mains
tiennent la scie, elles ne peuvent pas être coupées par la lame.
Ne pas atteindre sous la pièce à travailler. Le protecteur ne peut pas vous protéger de la lame
située sous la pièce.
Ajustez la profondeur de coupe à l'épaisseur de la pièce. Moins d'une dent complète de la lame
doit être visible sous la pièce à travailler.
Ne tenez jamais le morceau coupé dans vos mains ou sur votre jambe. Sécurisez la pièce sur une
plate-forme stable. Il est important de bien supporter le travail afin de minimiser l'exposition du
corps, la fixation de la lame ou la perte de contrôle.
Tenez l'outil électroportatif uniquement par des surfaces de préhension isolées lorsque vous
effectuez une opération dans laquelle l'outil de coupe risque d'entrer en contact avec un câblage
caché ou avec son propre cordon. Le contact avec un fil sous tension rendra les parties
métalliques exposées de l'outil électrique «sous tension» et pourrait donner à l'opérateur un choc
électrique
Lors de la déchirure, utilisez toujours un guide de refente ou un guide de bord droit. Cela améliore
la précision de la coupe et réduit les risques de coincement de la lame.
Utilisez toujours des lames de taille et de forme correctes (diamant contre rondes) de trous de
tonnelle. Les lames qui ne correspondent pas au matériel de montage de la scie fonctionneront de
manière excentrique, entraînant une perte de contrôle.
N'utilisez jamais de rondelles ou de boulons de lame endommagés ou incorrects. Les rondelles de
lame et le boulon ont été spécialement conçus pour votre scie, pour des performances optimales
et une sécurité de fonctionnement.
Le rebond est une réaction soudaine à une lame de scie pincée, liée ou mal alignée, provoquant
le soulèvement d'une scie non contrôlée et sa sortie de la pièce à traiter en direction de l'opéra-
teur.
Lorsque la lame est pincée ou liée étroitement par la fermeture du trait de scie, la lame se bloque
et la réaction du moteur ramène rapidement l'unité vers l'opérateur.
Si la lame est tordue ou mal alignée lors de la coupe, les dents situées sur le bord arrière de la
lame peuvent s'enfoncer dans la surface supérieure du bois, faisant ainsi sortir la lame du trait de
scie et la faire remonter vers l'opérateur.
Maintenez fermement la scie des deux mains et positionnez vos bras pour résister aux forces de
choc. Placez votre corps de part et d'autre de la lame, mais pas dans l'alignement de la lame. Un
rebond pourrait faire basculer la scie en arrière, mais les forces de contrecoup peuvent être
contrôlées par l'opérateur si les précautions appropriées sont prises.
Lorsque la lame est coincée ou lorsque vous interrompez une coupe pour quelque raison que ce
soit, relâchez la gâchette et maintenez la scie immobile dans le matériau jusqu’à ce que la lame
s’arrête complètement. N'essayez jamais de retirer la scie de la pièce ou de tirer la scie vers
l'arrière lorsque la lame est en mouvement, sinon un recul pourrait se produire. Recherchez et
prenez des mesures correctives pour éliminer la cause de la reliure de la lame.
Lors du redémarrage d'une scie dans la pièce, centrez la lame de scie dans le trait de scie et
vérifiez que les dents de la scie ne sont pas engagées dans le matériau. Si la lame de scie se
coince, elle risque de remonter ou de rebondir de la pièce à usiner au redémarrage de la scie.
Soutenez les grands panneaux pour minimiser les risques de pincement et de recul de la lame.
Les grands panneaux ont tendance à s'affaisser sous leur propre poids. Les supports doivent être
placés sous le panneau des deux côtés, près de la ligne de coupe et du bord du panneau.
N'utilisez pas de lames émoussées ou endommagées. Les lames mal affûtées ou mal réglées
produisent un trait de scie étroit causant un frottement excessif, un grippage de la lame et un recul.
La profondeur de la lame et les leviers de verrouillage de réglage du biseau doivent être serrés et
sécurisés avant la coupe. Si le réglage de la lame change pendant la coupe, cela peut provoquer
des blocages et des contrecoups.
Soyez particulièrement prudent lorsque vous sciez des murs existants ou d'autres zones
aveugles. La lame en saillie peut couper des objets pouvant causer un recul.
Vérifiez la protection inférieure pour une fermeture correcte avant chaque utilisation. Ne pas
utiliser la scie si la protection inférieure ne bouge pas librement et ne se ferme pas instantané-
ment. Ne jamais serrer ou attacher le protège-lame inférieur en position ouverte. Si la scie tombe
accidentellement, la protection inférieure peut être pliée. Soulevez la protection inférieure avec la
poignée de rétraction et assurez-vous qu'elle se déplace librement et ne touche pas la lame ou
toute autre pièce, sous tous les angles et à toutes les profondeurs de coupe.
Vérifiez le fonctionnement du ressort de protection inférieur. Si la protection et le ressort ne
fonctionnent pas correctement, ils doivent être réparés avant utilisation. Le protège-lame inférieur
peut fonctionner lentement en raison de pièces endommagées, de dépôts de gomme ou d'une
accumulation de débris.
La protection inférieure ne doit être rétractée manuellement que pour les coupes spéciales telles
que les «coupes en plongée» et les «coupes composées». Relevez la protection inférieure en
rétractant la poignée et dès que la lame pénètre dans le matériau, vous devez la relâcher. Pour
tous les autres travaux de sciage, la protection inférieure devrait fonctionner automatiquement.
Veillez toujours à ce que la protection inférieure recouvre la lame avant de poser la scie sur un
établi ou au sol. Une lame de roue libre non protégée fera marcher la scie en arrière, coupant tout
ce qui se trouve sur son passage. Soyez conscient du temps nécessaire pour que la lame s’arrête
après le relâchement du commutateur.
Utilisez des pinces ou un autre moyen pratique pour fixer et maintenir la pièce sur une plate-forme
stable.Tenir le travail à la main ou contre votre corps le laisse instable et peut entraîner une perte
de contrôle.
Gardez votre corps positionné de part et d'autre de la lame, mais pas dans l'alignement de la lame
de scie. KICKBACK pourrait faire basculer la scie en arrière(voir Causes et prévention de
Kickback et KICKBACK par l'opérateur).
Évitez de couper les ongles. Inspectez et enlevez tous les clous du bois avant de couper.
Assurez-vous toujours que rien ne gêne le mouvement du protège-lame inférieur.
Les accessoires doivent avoir au moins la vitesse recommandée sur l'étiquette d'avertissement de
l'outil. Les roues et autres accessoires fonctionnant à une vitesse supérieure à la vitesse nominale
peuvent voler en éclats et causer des blessures. Les valeurs nominales des accessoires doivent
toujours être supérieures à la vitesse de l'outil, comme indiqué sur la plaque signalétique de l'outil.
Assurez-vous toujours que la scie est propre avant de l'utiliser.
Arrêtez d’utiliser cette scie et faites-la réparer si des bruits inhabituels ou un fonctionnement
anormal se produisent.
Assurez-vous toujours que tous les composants sont montés correctement et fermement avant
ATTENTION: Lames côte après éteindre. Des blessures graves peuvent en résulter.
ATTENTION: TOUJOURS porter une protection auditive personnelle conforme à la norme
ANSI S12.6 (S3.19) lors de son utilisation. Dans certaines conditions et selon la durée d'utilisa-
tion, le bruit de ce produit peut contribuer à la perte d'audition.
ATTENTION: TOUJOURS utiliser une protection oculaire appropriée. Tous les utilisateurs et
spectateurs doivent porter une protection oculaire conforme à la norme ANSI Z87.1. l'opération
est poussiéreuse. TOUJOURS porter un équipement de sécurité certifié:
d'utiliser l'outil.
Manipulez toujours la lame de scie avec précaution lors du montage, du retrait ou du retrait de la
découpe au diamant.
Attendez toujours que le moteur ait atteint sa vitesse maximale avant de commencer une coupe.
Gardez toujours les poignées sèches, propres et exemptes d’huile et de graisse. Tenez l'outil
fermement à deux mains lors de son utilisation.
Soyez toujours vigilant à tout moment, surtout lors d'opérations répétitives et monotones.
Assurez-vous toujours de la position de vos mains par rapport à la lame.
Éloignez-vous des pièces d'extrémité qui pourraient tomber après la coupe. Ils peuvent être
chauds, coupants et / ou lourds. Des blessures graves peuvent en résulter.
Remplacez ou réparez les cordons endommagés. Assurez-vous que votre rallonge est en bon état.
Utilisez uniquement des rallonges à 3 fils munies de fiches à trois broches avec mise à la terre et
de prises à 3 pôles acceptant la fiche de l’outil.
Une rallonge doit avoir une taille de fil adéquate (AWG ou American Wire Gauge) pour des raisons
de sécurité.
Protection oculaire ANSI Z87.1 (CAN / CSA Z94.3).
Protection auditive ANSI S12.6 (S3.19).
Protection respiratoire NIOSH / OSHA.
Plomb provenant de peintures à base de plomb, de silice cristalline issue de briques, de ciment et
d'autres produits de maçonnerie, ainsi que d'arsenic et de chrome provenant de bois d'œuvre traité
chimiquement.
Évitez tout contact prolongé avec la poussière provenant du ponçage, du sciage, du meulage, du
perçage et autres travaux de construction. Porter des vêtements de protection et laver les zones
exposées à l'eau et au savon. Le fait de laisser la poussière pénétrer dans la bouche, les yeux ou
sur la peau peut favoriser l'absorption de produits chimiques nocifs.
Le laser doit être utilisé et entretenu conformément aux instructions du fabricant.
Ne dirigez jamais le faisceau sur une personne ou un objet autre que la pièce.
Le faisceau laser ne doit pas être délibérément dirigé vers le personnel et il ne doit pas pouvoir être
dirigé vers les yeux d'une personne plus de 0,25 s.
Assurez-vous toujours que le faisceau laser est dirigé sur une pièce solide sans surfaces réfléchis-
santes. C'est à dire. le bois ou les surfaces rugueuses sont acceptables. Les tôles d'acier réfléchis-
santes brillantes brillantes ou similaires ne conviennent pas à une utilisation au laser, car la surface
réfléchissante pourrait diriger le faisceau vers l'opérateur.
Ne changez pas le faisceau laser avec un type différent. Les réparations doivent être effectuées
par le fabricant du laser ou un agent agréé.
Portez des gants de protection lors du montage de la lame de scie. Risque de blessure en touchant
la lame de scie.
Utilisez uniquement des lames de scie correspondant aux caractéristiques indiquées dans le mode
d'emploi.
N'utilisez en aucun cas des disques de meulage comme outil de coupe.
FIXATION ET RETRAIT DE LA LAME - FIGURE C-E
• Rétracter la protection inférieure et assembler la lame (8) et la rondelle de serrage (17) comme
indiqué sur la figure C.
• Appuyez sur le verrou de la broche (13) tout en tournant le boulon de lame (7) avec la clé pour
lame (16) jusqu'à ce que le verrou de la lame s'enclenche et que la lame s'arrête de tourner. figure
D
REMARQUE: la clé à lame est stockée dans un sac en polyéthylène avec le manuel
• Serrez fermement le boulon de lame avec la clé à lame.
REMARQUE: le boulon a un filetage à gauche. Pour desserrer, tournez dans le sens des aiguilles
d'une montre. Pour serrer, tournez dans le sens antihoraire. figure E
REMARQUE: N'engagez jamais le verrouillage de la lame pendant que la scie est en marche et ne
tentez jamais d'arrêter l'outil. N'allumez jamais l'outil lorsque le verrouillage de la lame est engagé.
Il en résultera de graves dommages à votre scie.
Au besoin, déplacez le bouton déverrouillé et laissez le doigt pointé sur la position appropriée de
l’échelle de profondeur.
Tournez ensuite le bouton à 180°pour le verrouiller,
- 16 -
Technology Creates Power
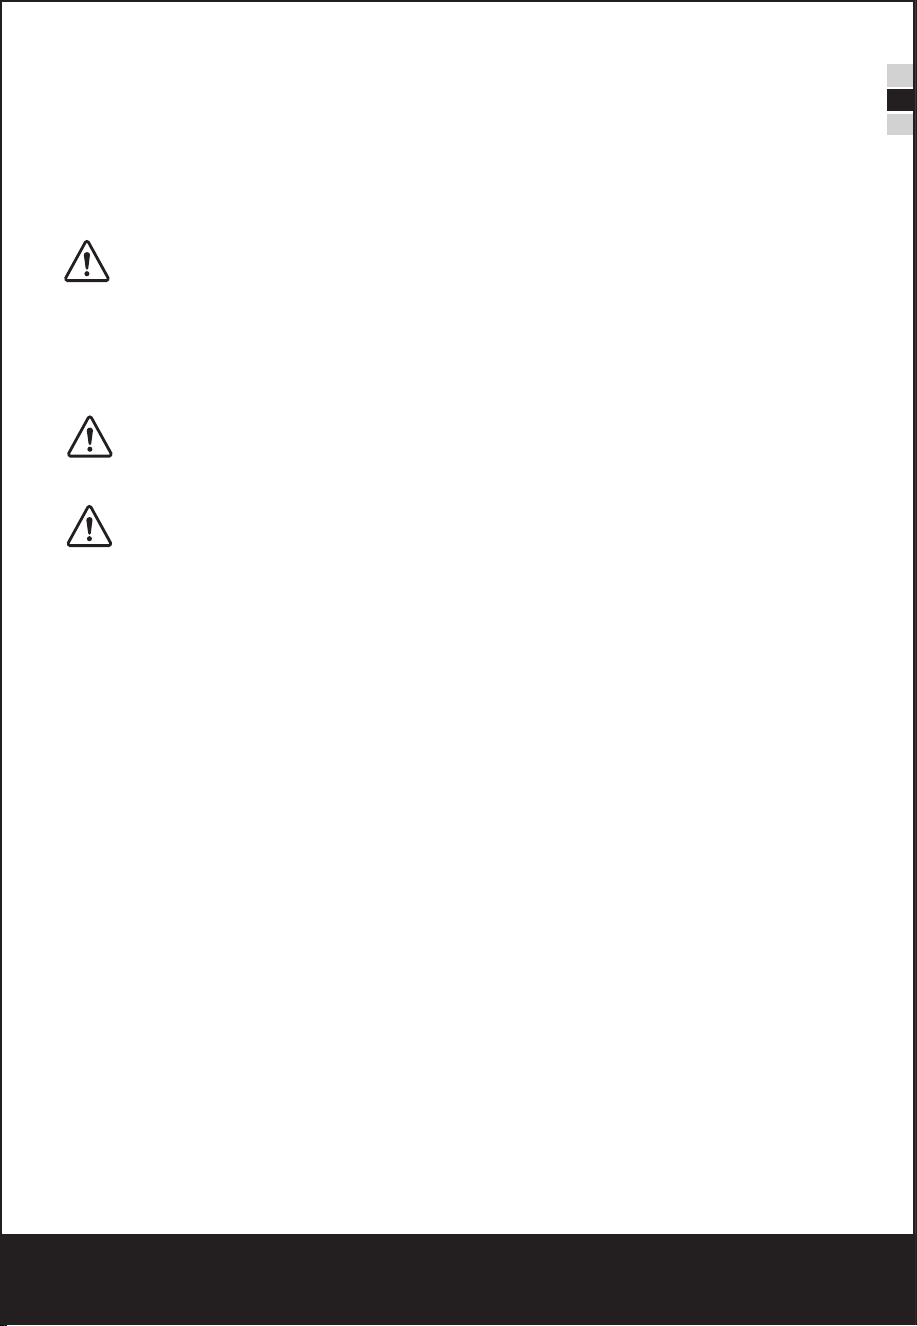
Allumer et éteindre
Remarque: Pour des raisons de sécurité, le commutateur On / Off ne peut pas être verrouillé. il doit
rester appuyé pendant toute l'opération.
Fonction laser
●Allumez-le avec le commutateur ON / OFF de la lumière laser juste avant de couper.
●Éteignez-le immédiatement après l'utilisation pour économiser la batterie et préserver la durée de
vie du laser.
CHANGEMENT DES PILES AU LASER
Les piles qui font fonctionner le laser devront être remplacées après une utilisation considérable du
laser.
1.
2.
3.
4.
DANGER: Ne laissez jamais le rayon laser pénétrer dans les yeux d'une personne, cela pourrait
5)
Faites réparer votre outil électrique par un réparateur qualifié en utilisant uniquement des pièces de
rechange identiques. Cela garantira le maintien de la sécurité de l'outil électrique.
DANGER: Gardez les mains éloignées de la zone de coupe et de la lame.
a)
b)
c)
d)
e)
f)
g)
h)
Causes et prévention du recul par l'opérateur:
●
●
●
Le rebond résulte d'une mauvaise utilisation de la scie et / ou de procédures ou de conditions d'utilisa-
tion incorrectes et peut être évité en prenant les précautions appropriées indiquées ci-dessous:
a)
b)
L'étiquette de votre outil peut inclure les symboles suivants. Les symboles et leurs définitions sont les
suivants:
Règles de sécurité pour les lumières laser
La lumière laser / le rayonnement laser utilisé dans le système est de classe 2 avec des longueurs
d’onde maximales de 1 mW et 650 nm. Ces lasers ne présentent normalement pas de danger
optique, bien que regarder le faisceau puisse provoquer un aveuglement instantané.
ATTENTION : Ne regardez pas directement le rayon laser.
Un danger peut exister si vous regardez délibérément dans le faisceau, respectez toutes les règles
de sécurité ci-dessous.
●
●
●
●
●
f)
3)
a)
b)
c)
d)
e)
f)
g)
4)
a)
b)
c)
d)
e)
f)
g)
●
●
●
●
●
●
●
Plus le numéro de calibre du fil est petit, plus la capacité du câble est grande, c'est-à-dire que le
calibre 16 a une capacité supérieure à 18. Un cordon sous-dimensionné provoquera une chute de
tension entraînant une perte de puissance et une surchauffe. Lorsque vous utilisez plusieurs rallong-
es pour calculer la longueur totale, assurez-vous que chaque rallonge contient au moins la taille
minimale du fil. Le tableau suivant indique la taille à utiliser en fonction de la longueur du cordon et de
l’intensité nominale indiquée sur la plaque signalétique. En cas de doute, utilisez la prochaine jauge
plus lourde. Plus le numéro de calibre est petit, plus le cordon est lourd.
●
●
●
ATTENTION: Certaines poussières générées par le sablage, le sciage, le meulage, le forage et
d'autres activités de construction contiennent des produits chimiques connus dans l'État de Californie
pour provoquer le cancer, des anomalies congénitales ou d'autres troubles de la reproduction. Voici
DÉFINITIONS: SYMBOLES ET MOTS D'ALERTE DE SÉCURITÉ
Il est important que vous lisiez et compreniez ce manuel. Les informations qu’il contient ont trait à la
protection de VOTRE SÉCURITÉ et à la prévention des problèmes. Les symboles ci-dessous sont
utilisés pour vous aider à reconnaître cette information.
NOTICE: Utilisé sans le symbole d'alerte de sécurité, il indique une situation potentiellement
dangereuse qui, si elle n'est pas évitée, peut entraîner des dommages matériels.
ATTENTION: Lire tous les avertissements de sécurité et toutes les instructions
Le non respect des avertissements et des instructions peut entraîner un choc électrique, un incendie
et / ou des blessures graves.
CONSERVEZ TOUS LES AVERTISSEMENTS ET INSTRUCTIONS POUR CONSULTATION
FUTURE
Le terme «outil électrique» dans les avertissements fait référence à votre outil électrique alimenté par
le secteur (avec fil) ou à piles (sans fil).
1)
a)
b)
c)
2)
a)
b)
c)
d)
e)
c)
d)
e)
f)
g)
Consignes de Sécurité Inférieures
a)
b)
c)
d)
Consignes de Sécurité Supplémentaires
●
●
●
●
●
●
●
●
quelques exemples de ces produits chimiques:
●
Les risques liés à ces expositions varient en fonction de la fréquence à laquelle vous effectuez ce type
de travail. Pour réduire votre exposition à ces produits chimiques: travaillez dans un endroit bien
ventilé et utilisez des équipements de sécurité approuvés, tels que les masques antipoussières
spécialement conçus pour filtrer les particules microscopiques.
ATTENTION: TOUJOURS UTILISER DES LUNETTES DE SÉCURITÉ. Les lunettes ordinaires
ne sont PAS des lunettes de sécurité. Utilisez également un masque facial ou antipoussière si vous
coupez
●
ATTENTION: La découpe de plastiques, de bois sablé et d'autres matériaux peut provoquer
l'accumulation de matière fondue sur les pointes de lame et le corps de la lame de scie, augmentant
ainsi le risque de surchauffe et de coincement de la lame lors de la coupe.
ATTENTION: L'utilisation de cet outil peut générer et / ou dissiper de la poussière, ce qui peut
causer des blessures graves et permanentes aux voies respiratoires ou autres. Utilisez toujours une
protection respiratoire approuvée par NIOSH / OSHA appropriée à l'exposition à la poussière. Éloign-
er les particules du visage et du corps. Toujours utiliser l'outil dans une zone bien ventilée et assurer
un dépoussiérage adéquat. Utilisez le système de dépoussiérage autant que possible.
MISE EN GARDE: L'utilisation de commandes ou de réglages ou l'exécution de procédures
autres que celles spécifiées dans le présent document peut entraîner une exposition à des radiations
dangereuses.
Usage prévu
Cette machine est principalement destinée au sciage longitudinal et transversal du bois massif, des
panneaux de particules, du contreplaqué, de l’aluminium, des carreaux et de la pierre maintenus
dans une position fixe. Veuillez noter que la lame pré-installée dans la scie telle que fournie est
destinée à être utilisée avec du bois uniquement. Toute autre utilisation ou modification de l'appareil
doit être considérée comme une utilisation non conforme et peut générer des risques considérables.
Il n'est pas adapté à un usage commercial.
Description de la fonction
La numérotation des caractéristiques des produits fait référence à l'illustration de la machine sur la
page graphique.
Montage / Réglage
ATTENTION: Avant tout travail sur l'outil électrique, retirez toujours la fiche de la source
d'alimentation.
●
●
●
Régler la profondeur de coupe
1.
2.
Remarque: si possible, recommandez une profondeur de coupe d'environ 2 mm plus profonde que
l'épaisseur du matériau. Cela devrait vous aider à obtenir une coupe nette.
entraîner des lésions oculaires graves. Assurez-vous que le commutateur laser est éteint et que le
laser ne pointe pas vers vous lors du remplacement des piles du laser et de la vérification du
fonctionnement du laser.
Application
La mini scie plongeante est polyvalente et vous permet de couper de nombreux types de matériaux.
Certains des matériaux incluent
●
●
●
Sélection de la lame
ENTRETIEN
ATTENTION: Débranchez l'outil avant d'installer ou de retirer des accessoires, avant de
procéder au réglage ou lors de réparations. Utilisez uniquement un savon doux et un chiffon humide
pour nettoyer l'outil. Ne laissez jamais aucun liquide pénétrer à l'intérieur de l'outil. ne jamais immerg-
er une partie de l'outil dans un liquide.
IMPORTANT: Pour assurer la SÉCURITÉ et la FIABILITÉ du produit, les réparations, la mainte-
nance et les réglages (autres que ceux énumérés dans ce manuel) doivent être effectués par des
centres de service agréés ou d'autres centres de service qualifiés, en utilisant toujours des pièces de
rechange identiques.
EN
FR
ES
SÉCURITÉ DES ZONES DE TRAVAIL
Gardez la zone de travail propre et bien éclairée. Les zones encombrées ou sombres sont propic-
es aux accidents.
Ne pas utiliser d'outils électriques dans des atmosphères explosives, telles que la présence de
liquides, de gaz ou de poussières inflammables. Les outils électriques créent des étincelles qui
peuvent enflammer la poussière ou les vapeurs.
Tenez les enfants et les passants à distance lorsque vous utilisez un outil électrique. Les distrac-
tions peuvent vous faire perdre le contrôle.
SÉCURITÉ ÉLECTRIQUE
Les fiches des outils électriques doivent correspondre à la prise. Ne modifiez jamais la fiche de
quelque manière que ce soit. N'utilisez pas d'adaptateur avec des outils électriques mis à la terre.
Des fiches non modifiées et des prises de courant adaptées réduiront le risque de choc électrique.
Evitez tout contact du corps avec des surfaces mises à la terre, telles que tuyaux, radiateurs,
cuisinières et réfrigérateurs. Il y a un risque accru de choc électrique si votre corps est mis à la
terre ou mis à la terre.
N'exposez pas les outils électriques à la pluie ou à l'humidité. La pénétration d'eau dans un outil
électrique augmente le risque de choc électrique.
N'abusez pas le cordon. N'utilisez jamais le cordon pour porter, tirer ou débrancher l'outil
électrique. Tenez le cordon à l'écart de la chaleur, de l'huile, des arêtes vives ou des pièces
mobiles. Les cordons endommagés ou emmêlés augmentent le risque de choc électrique.
Lors de l'utilisation d'un outil électrique à l'extérieur, utilisez une rallonge adaptée à une utilisation
en extérieur. L'utilisation d'un cordon adapté à une utilisation en extérieur réduit les risques d'élec-
trocution.
Si l'utilisation d'un outil électrique dans un endroit humide est inévitable, utilisez une alimentation
protégée par un disjoncteur de fuite à la terre (GFCI). L'utilisation d'un GFCI réduit le risque de
choc électrique.
SÉCURITÉ PERSONNELLE
Restez vigilant, regardez ce que vous faites et faites preuve de bon sens lorsque vous utilisez un
outil électrique. N'utilisez pas d'outil électrique lorsque vous êtes fatigué ou sous l'influence de
drogues, d'alcool ou de médicaments. Un moment d'inattention lors de l'utilisation d'outils
électriques peut entraîner des blessures graves.
Utiliser un équipement de protection individuelle. Portez toujours des lunettes de protection. Un
équipement de protection tel qu'un masque anti-poussière, des chaussures de sécurité antidéra-
pantes, un casque de protection ou des protections auditives utilisés dans des conditions appro-
priées réduira les risques de blessures.
Empêcher les démarrages involontaires. Assurez-vous que l'interrupteur est en position d'arrêt
avant de brancher l'appareil à la source d'alimentation et / ou à la batterie, ou de ramasser ou de
porter l'outil. Le fait de transporter des outils avec le doigt sur l'interrupteur ou de les mettre sous
tension lorsque l'interrupteur est en position de marche peut provoquer des accidents.
Retirez toute clé de réglage ou clé avant de mettre l'outil électrique en marche. Une clé ou une clé
laissée sur une pièce rotative de l'outil électrique peut entraîner des blessures.
Ne pas trop atteindre. Gardez une bonne assise et un bon équilibre à tout moment.Cela permet
de mieux contrôler l'outil électroportatif dans des situations imprévues.
Habillez-vous correctement. Ne portez pas de vêtements amples ni de bijoux. Gardez vos
cheveux, vos vêtements et vos gants à l’écart des pièces en mouvement. Les vêtements amples,
les bijoux ou les cheveux longs peuvent être happés par les pièces en mouvement.
Si des dispositifs sont fournis pour la connexion des installations d'extraction et de collecte de
poussière, assurez-vous qu'ils sont connectés et utilisés correctement. L'utilisation d'un dépous-
siéreur peut réduire les risques liés à la poussière.
UTILISATION ET ENTRETIEN DES OUTILS ÉLECTRIQUES
Ne forcez pas l'outil électrique. Utilisez le bon outil pour votre application. Le bon outil électrique
fera le travail mieux et plus sûrement au rythme pour lequel il a été conçu.
N'utilisez pas l'outil si l'interrupteur ne l'allume pas et ne l'éteint pas. Tout outil électrique qui ne
peut pas être contrôlé avec l'interrupteur est dangereux et doit être réparé.
Débranchez la fiche de la source d'alimentation et / ou du bloc-batterie de l'outil électrique avant
d'effectuer tout réglage, de changer d'accessoire ou de ranger les outils électriques. Ces mesures
de sécurité préventives réduisent le risque de démarrage accidentel de l'outil électrique.
Rangez les outils électriques inutilisés hors de la portée des enfants et ne permettez pas à des
personnes inconnues de l'outil électrique ou de ces instructions d'utiliser cet outil. Les outils
électriques sont dangereux entre les mains d'utilisateurs non formés.
Entretenir les outils électriques. Vérifiez le mauvais alignement ou le coincement des pièces
mobiles, la rupture de pièces et toute autre condition pouvant affecter le bon fonctionnement de
l’outil électrique. S'il est endommagé, faites réparer l'outil électrique avant de l'utiliser. De
nombreux accidents sont causés par des outils électriques mal entretenus.
Gardez les outils de coupe tranchants et propres. Les outils de coupe bien entretenus avec des
arêtes tranchantes sont moins susceptibles de se coincer et sont plus faciles à contrôler.
Utilisez l'outil électrique, les accessoires et les mèches, etc. conformément à ces instructions, en
tenant compte des conditions de travail et du travail à effectuer. L'utilisation de l'outil électrique
pour des opérations différentes de celles prévues pourrait entraîner une situation dangereuse.
SERVICE
Gardez votre deuxième main sur la poignée auxiliaire ou le boîtier du moteur. Si les deux mains
tiennent la scie, elles ne peuvent pas être coupées par la lame.
Ne pas atteindre sous la pièce à travailler. Le protecteur ne peut pas vous protéger de la lame
située sous la pièce.
Ajustez la profondeur de coupe à l'épaisseur de la pièce. Moins d'une dent complète de la lame
doit être visible sous la pièce à travailler.
Ne tenez jamais le morceau coupé dans vos mains ou sur votre jambe. Sécurisez la pièce sur une
plate-forme stable. Il est important de bien supporter le travail afin de minimiser l'exposition du
corps, la fixation de la lame ou la perte de contrôle.
Tenez l'outil électroportatif uniquement par des surfaces de préhension isolées lorsque vous
effectuez une opération dans laquelle l'outil de coupe risque d'entrer en contact avec un câblage
caché ou avec son propre cordon. Le contact avec un fil sous tension rendra les parties
métalliques exposées de l'outil électrique «sous tension» et pourrait donner à l'opérateur un choc
électrique
Lors de la déchirure, utilisez toujours un guide de refente ou un guide de bord droit. Cela améliore
la précision de la coupe et réduit les risques de coincement de la lame.
Utilisez toujours des lames de taille et de forme correctes (diamant contre rondes) de trous de
tonnelle. Les lames qui ne correspondent pas au matériel de montage de la scie fonctionneront de
manière excentrique, entraînant une perte de contrôle.
N'utilisez jamais de rondelles ou de boulons de lame endommagés ou incorrects. Les rondelles de
lame et le boulon ont été spécialement conçus pour votre scie, pour des performances optimales
et une sécurité de fonctionnement.
Le rebond est une réaction soudaine à une lame de scie pincée, liée ou mal alignée, provoquant
le soulèvement d'une scie non contrôlée et sa sortie de la pièce à traiter en direction de l'opéra-
teur.
Lorsque la lame est pincée ou liée étroitement par la fermeture du trait de scie, la lame se bloque
et la réaction du moteur ramène rapidement l'unité vers l'opérateur.
Si la lame est tordue ou mal alignée lors de la coupe, les dents situées sur le bord arrière de la
lame peuvent s'enfoncer dans la surface supérieure du bois, faisant ainsi sortir la lame du trait de
scie et la faire remonter vers l'opérateur.
Maintenez fermement la scie des deux mains et positionnez vos bras pour résister aux forces de
choc. Placez votre corps de part et d'autre de la lame, mais pas dans l'alignement de la lame. Un
rebond pourrait faire basculer la scie en arrière, mais les forces de contrecoup peuvent être
contrôlées par l'opérateur si les précautions appropriées sont prises.
Lorsque la lame est coincée ou lorsque vous interrompez une coupe pour quelque raison que ce
soit, relâchez la gâchette et maintenez la scie immobile dans le matériau jusqu’à ce que la lame
s’arrête complètement. N'essayez jamais de retirer la scie de la pièce ou de tirer la scie vers
l'arrière lorsque la lame est en mouvement, sinon un recul pourrait se produire. Recherchez et
prenez des mesures correctives pour éliminer la cause de la reliure de la lame.
Lors du redémarrage d'une scie dans la pièce, centrez la lame de scie dans le trait de scie et
vérifiez que les dents de la scie ne sont pas engagées dans le matériau. Si la lame de scie se
coince, elle risque de remonter ou de rebondir de la pièce à usiner au redémarrage de la scie.
Soutenez les grands panneaux pour minimiser les risques de pincement et de recul de la lame.
Les grands panneaux ont tendance à s'affaisser sous leur propre poids. Les supports doivent être
placés sous le panneau des deux côtés, près de la ligne de coupe et du bord du panneau.
N'utilisez pas de lames émoussées ou endommagées. Les lames mal affûtées ou mal réglées
produisent un trait de scie étroit causant un frottement excessif, un grippage de la lame et un recul.
La profondeur de la lame et les leviers de verrouillage de réglage du biseau doivent être serrés et
sécurisés avant la coupe. Si le réglage de la lame change pendant la coupe, cela peut provoquer
des blocages et des contrecoups.
Soyez particulièrement prudent lorsque vous sciez des murs existants ou d'autres zones
aveugles. La lame en saillie peut couper des objets pouvant causer un recul.
Vérifiez la protection inférieure pour une fermeture correcte avant chaque utilisation. Ne pas
utiliser la scie si la protection inférieure ne bouge pas librement et ne se ferme pas instantané-
ment. Ne jamais serrer ou attacher le protège-lame inférieur en position ouverte. Si la scie tombe
accidentellement, la protection inférieure peut être pliée. Soulevez la protection inférieure avec la
poignée de rétraction et assurez-vous qu'elle se déplace librement et ne touche pas la lame ou
toute autre pièce, sous tous les angles et à toutes les profondeurs de coupe.
Vérifiez le fonctionnement du ressort de protection inférieur. Si la protection et le ressort ne
fonctionnent pas correctement, ils doivent être réparés avant utilisation. Le protège-lame inférieur
peut fonctionner lentement en raison de pièces endommagées, de dépôts de gomme ou d'une
accumulation de débris.
La protection inférieure ne doit être rétractée manuellement que pour les coupes spéciales telles
que les «coupes en plongée» et les «coupes composées». Relevez la protection inférieure en
rétractant la poignée et dès que la lame pénètre dans le matériau, vous devez la relâcher. Pour
tous les autres travaux de sciage, la protection inférieure devrait fonctionner automatiquement.
Veillez toujours à ce que la protection inférieure recouvre la lame avant de poser la scie sur un
établi ou au sol. Une lame de roue libre non protégée fera marcher la scie en arrière, coupant tout
ce qui se trouve sur son passage. Soyez conscient du temps nécessaire pour que la lame s’arrête
après le relâchement du commutateur.
Utilisez des pinces ou un autre moyen pratique pour fixer et maintenir la pièce sur une plate-forme
stable.Tenir le travail à la main ou contre votre corps le laisse instable et peut entraîner une perte
de contrôle.
Gardez votre corps positionné de part et d'autre de la lame, mais pas dans l'alignement de la lame
de scie. KICKBACK pourrait faire basculer la scie en arrière(voir Causes et prévention de
Kickback et KICKBACK par l'opérateur).
Évitez de couper les ongles. Inspectez et enlevez tous les clous du bois avant de couper.
Assurez-vous toujours que rien ne gêne le mouvement du protège-lame inférieur.
Les accessoires doivent avoir au moins la vitesse recommandée sur l'étiquette d'avertissement de
l'outil. Les roues et autres accessoires fonctionnant à une vitesse supérieure à la vitesse nominale
peuvent voler en éclats et causer des blessures. Les valeurs nominales des accessoires doivent
toujours être supérieures à la vitesse de l'outil, comme indiqué sur la plaque signalétique de l'outil.
Assurez-vous toujours que la scie est propre avant de l'utiliser.
Arrêtez d’utiliser cette scie et faites-la réparer si des bruits inhabituels ou un fonctionnement
anormal se produisent.
Assurez-vous toujours que tous les composants sont montés correctement et fermement avant
d'utiliser l'outil.
Manipulez toujours la lame de scie avec précaution lors du montage, du retrait ou du retrait de la
découpe au diamant.
Attendez toujours que le moteur ait atteint sa vitesse maximale avant de commencer une coupe.
Gardez toujours les poignées sèches, propres et exemptes d’huile et de graisse. Tenez l'outil
fermement à deux mains lors de son utilisation.
Soyez toujours vigilant à tout moment, surtout lors d'opérations répétitives et monotones.
Assurez-vous toujours de la position de vos mains par rapport à la lame.
Éloignez-vous des pièces d'extrémité qui pourraient tomber après la coupe. Ils peuvent être
chauds, coupants et / ou lourds. Des blessures graves peuvent en résulter.
Remplacez ou réparez les cordons endommagés. Assurez-vous que votre rallonge est en bon état.
Utilisez uniquement des rallonges à 3 fils munies de fiches à trois broches avec mise à la terre et
de prises à 3 pôles acceptant la fiche de l’outil.
Une rallonge doit avoir une taille de fil adéquate (AWG ou American Wire Gauge) pour des raisons
de sécurité.
Protection oculaire ANSI Z87.1 (CAN / CSA Z94.3).
Protection auditive ANSI S12.6 (S3.19).
Protection respiratoire NIOSH / OSHA.
Plomb provenant de peintures à base de plomb, de silice cristalline issue de briques, de ciment et
d'autres produits de maçonnerie, ainsi que d'arsenic et de chrome provenant de bois d'œuvre traité
chimiquement.
Évitez tout contact prolongé avec la poussière provenant du ponçage, du sciage, du meulage, du
perçage et autres travaux de construction. Porter des vêtements de protection et laver les zones
exposées à l'eau et au savon. Le fait de laisser la poussière pénétrer dans la bouche, les yeux ou
sur la peau peut favoriser l'absorption de produits chimiques nocifs.
Le laser doit être utilisé et entretenu conformément aux instructions du fabricant.
Ne dirigez jamais le faisceau sur une personne ou un objet autre que la pièce.
Le faisceau laser ne doit pas être délibérément dirigé vers le personnel et il ne doit pas pouvoir être
dirigé vers les yeux d'une personne plus de 0,25 s.
Assurez-vous toujours que le faisceau laser est dirigé sur une pièce solide sans surfaces réfléchis-
santes. C'est à dire. le bois ou les surfaces rugueuses sont acceptables. Les tôles d'acier réfléchis-
santes brillantes brillantes ou similaires ne conviennent pas à une utilisation au laser, car la surface
réfléchissante pourrait diriger le faisceau vers l'opérateur.
Ne changez pas le faisceau laser avec un type différent. Les réparations doivent être effectuées
par le fabricant du laser ou un agent agréé.
Portez des gants de protection lors du montage de la lame de scie. Risque de blessure en touchant
la lame de scie.
Utilisez uniquement des lames de scie correspondant aux caractéristiques indiquées dans le mode
d'emploi.
N'utilisez en aucun cas des disques de meulage comme outil de coupe.
FIXATION ET RETRAIT DE LA LAME - FIGURE C-E
• Rétracter la protection inférieure et assembler la lame (8) et la rondelle de serrage (17) comme
indiqué sur la figure C.
• Appuyez sur le verrou de la broche (13) tout en tournant le boulon de lame (7) avec la clé pour
lame (16) jusqu'à ce que le verrou de la lame s'enclenche et que la lame s'arrête de tourner. figure
D
REMARQUE: la clé à lame est stockée dans un sac en polyéthylène avec le manuel
• Serrez fermement le boulon de lame avec la clé à lame.
REMARQUE: le boulon a un filetage à gauche. Pour desserrer, tournez dans le sens des aiguilles
d'une montre. Pour serrer, tournez dans le sens antihoraire. figure E
REMARQUE: N'engagez jamais le verrouillage de la lame pendant que la scie est en marche et ne
tentez jamais d'arrêter l'outil. N'allumez jamais l'outil lorsque le verrouillage de la lame est engagé.
Il en résultera de graves dommages à votre scie.
Au besoin, déplacez le bouton déverrouillé et laissez le doigt pointé sur la position appropriée de
l’échelle de profondeur.
Tournez ensuite le bouton à 180°pour le verrouiller,
- 17 -
Technology Creates Power
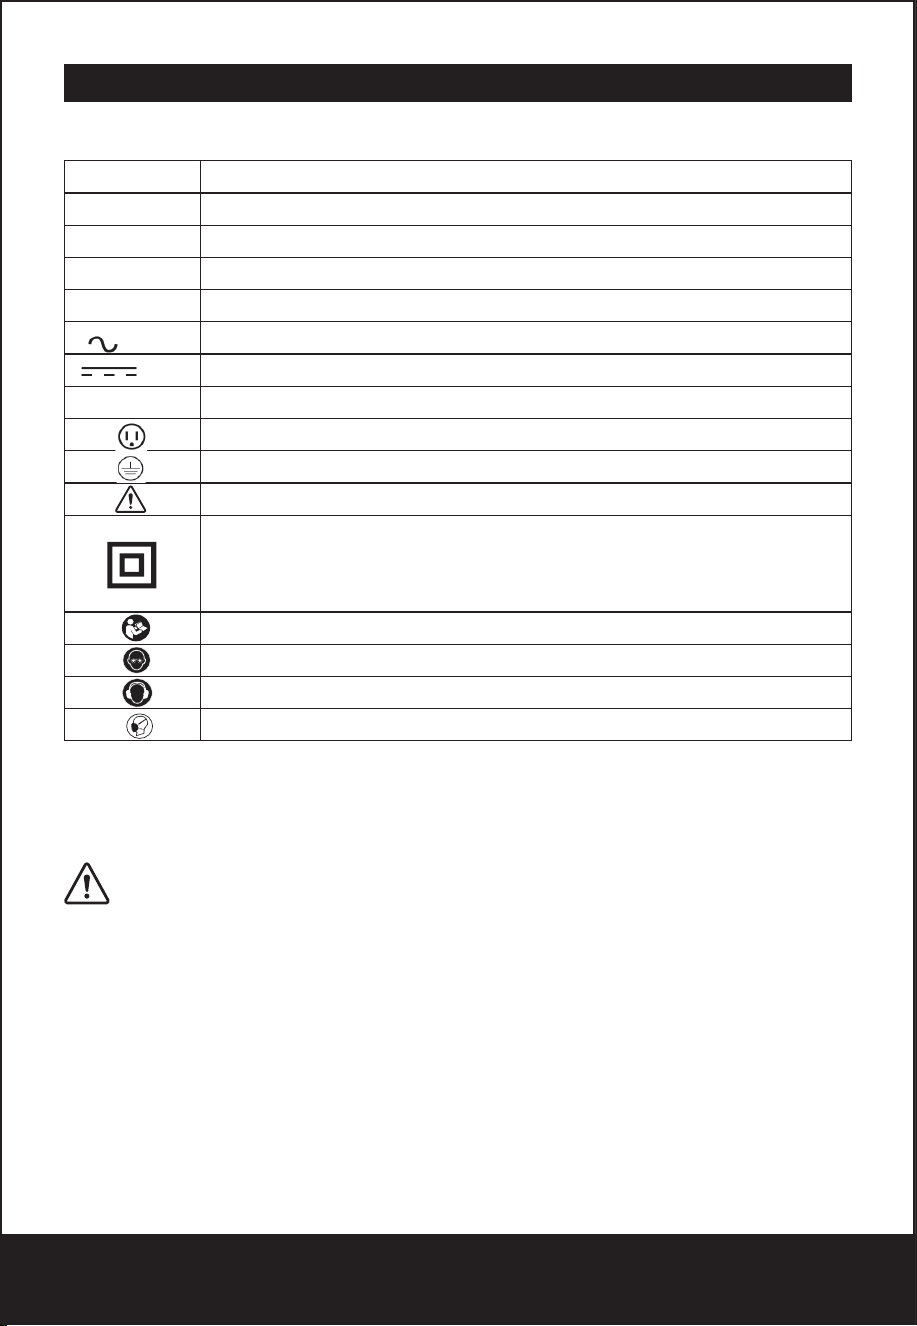
Allumer et éteindre
Remarque: Pour des raisons de sécurité, le commutateur On / Off ne peut pas être verrouillé. il doit
rester appuyé pendant toute l'opération.
Fonction laser
●Allumez-le avec le commutateur ON / OFF de la lumière laser juste avant de couper.
●Éteignez-le immédiatement après l'utilisation pour économiser la batterie et préserver la durée de
vie du laser.
CHANGEMENT DES PILES AU LASER
Les piles qui font fonctionner le laser devront être remplacées après une utilisation considérable du
laser.
1.
2.
3.
4.
DANGER: Ne laissez jamais le rayon laser pénétrer dans les yeux d'une personne, cela pourrait
5)
Faites réparer votre outil électrique par un réparateur qualifié en utilisant uniquement des pièces de
rechange identiques. Cela garantira le maintien de la sécurité de l'outil électrique.
DANGER: Gardez les mains éloignées de la zone de coupe et de la lame.
a)
b)
c)
d)
e)
f)
g)
h)
Causes et prévention du recul par l'opérateur:
●
●
●
Le rebond résulte d'une mauvaise utilisation de la scie et / ou de procédures ou de conditions d'utilisa-
tion incorrectes et peut être évité en prenant les précautions appropriées indiquées ci-dessous:
a)
b)
L'étiquette de votre outil peut inclure les symboles suivants. Les symboles et leurs définitions sont les
suivants:
Règles de sécurité pour les lumières laser
La lumière laser / le rayonnement laser utilisé dans le système est de classe 2 avec des longueurs
d’onde maximales de 1 mW et 650 nm. Ces lasers ne présentent normalement pas de danger
optique, bien que regarder le faisceau puisse provoquer un aveuglement instantané.
ATTENTION : Ne regardez pas directement le rayon laser.
Un danger peut exister si vous regardez délibérément dans le faisceau, respectez toutes les règles
de sécurité ci-dessous.
●
●
●
●
●
f)
3)
a)
b)
c)
d)
e)
f)
g)
4)
a)
b)
c)
d)
e)
f)
g)
●
●
●
●
●
●
●
Plus le numéro de calibre du fil est petit, plus la capacité du câble est grande, c'est-à-dire que le
calibre 16 a une capacité supérieure à 18. Un cordon sous-dimensionné provoquera une chute de
tension entraînant une perte de puissance et une surchauffe. Lorsque vous utilisez plusieurs rallong-
es pour calculer la longueur totale, assurez-vous que chaque rallonge contient au moins la taille
minimale du fil. Le tableau suivant indique la taille à utiliser en fonction de la longueur du cordon et de
l’intensité nominale indiquée sur la plaque signalétique. En cas de doute, utilisez la prochaine jauge
plus lourde. Plus le numéro de calibre est petit, plus le cordon est lourd.
●
●
●
ATTENTION: Certaines poussières générées par le sablage, le sciage, le meulage, le forage et
d'autres activités de construction contiennent des produits chimiques connus dans l'État de Californie
pour provoquer le cancer, des anomalies congénitales ou d'autres troubles de la reproduction. Voici
DÉFINITIONS: SYMBOLES ET MOTS D'ALERTE DE SÉCURITÉ
Il est important que vous lisiez et compreniez ce manuel. Les informations qu’il contient ont trait à la
protection de VOTRE SÉCURITÉ et à la prévention des problèmes. Les symboles ci-dessous sont
utilisés pour vous aider à reconnaître cette information.
NOTICE: Utilisé sans le symbole d'alerte de sécurité, il indique une situation potentiellement
dangereuse qui, si elle n'est pas évitée, peut entraîner des dommages matériels.
ATTENTION: Lire tous les avertissements de sécurité et toutes les instructions
Le non respect des avertissements et des instructions peut entraîner un choc électrique, un incendie
et / ou des blessures graves.
CONSERVEZ TOUS LES AVERTISSEMENTS ET INSTRUCTIONS POUR CONSULTATION
FUTURE
Le terme «outil électrique» dans les avertissements fait référence à votre outil électrique alimenté par
le secteur (avec fil) ou à piles (sans fil).
1)
a)
b)
c)
2)
a)
b)
c)
d)
e)
c)
d)
e)
f)
g)
Consignes de Sécurité Inférieures
a)
b)
c)
d)
Consignes de Sécurité Supplémentaires
●
●
●
●
●
●
●
●
quelques exemples de ces produits chimiques:
●
Les risques liés à ces expositions varient en fonction de la fréquence à laquelle vous effectuez ce type
de travail. Pour réduire votre exposition à ces produits chimiques: travaillez dans un endroit bien
ventilé et utilisez des équipements de sécurité approuvés, tels que les masques antipoussières
spécialement conçus pour filtrer les particules microscopiques.
ATTENTION: TOUJOURS UTILISER DES LUNETTES DE SÉCURITÉ. Les lunettes ordinaires
ne sont PAS des lunettes de sécurité. Utilisez également un masque facial ou antipoussière si vous
coupez
●
ATTENTION: La découpe de plastiques, de bois sablé et d'autres matériaux peut provoquer
l'accumulation de matière fondue sur les pointes de lame et le corps de la lame de scie, augmentant
ainsi le risque de surchauffe et de coincement de la lame lors de la coupe.
ATTENTION: L'utilisation de cet outil peut générer et / ou dissiper de la poussière, ce qui peut
causer des blessures graves et permanentes aux voies respiratoires ou autres. Utilisez toujours une
protection respiratoire approuvée par NIOSH / OSHA appropriée à l'exposition à la poussière. Éloign-
er les particules du visage et du corps. Toujours utiliser l'outil dans une zone bien ventilée et assurer
un dépoussiérage adéquat. Utilisez le système de dépoussiérage autant que possible.
MISE EN GARDE: L'utilisation de commandes ou de réglages ou l'exécution de procédures
autres que celles spécifiées dans le présent document peut entraîner une exposition à des radiations
dangereuses.
Usage prévu
Cette machine est principalement destinée au sciage longitudinal et transversal du bois massif, des
panneaux de particules, du contreplaqué, de l’aluminium, des carreaux et de la pierre maintenus
dans une position fixe. Veuillez noter que la lame pré-installée dans la scie telle que fournie est
destinée à être utilisée avec du bois uniquement. Toute autre utilisation ou modification de l'appareil
doit être considérée comme une utilisation non conforme et peut générer des risques considérables.
Il n'est pas adapté à un usage commercial.
Description de la fonction
La numérotation des caractéristiques des produits fait référence à l'illustration de la machine sur la
page graphique.
Montage / Réglage
ATTENTION: Avant tout travail sur l'outil électrique, retirez toujours la fiche de la source
d'alimentation.
●
●
●
Régler la profondeur de coupe
1.
2.
Remarque: si possible, recommandez une profondeur de coupe d'environ 2 mm plus profonde que
l'épaisseur du matériau. Cela devrait vous aider à obtenir une coupe nette.
entraîner des lésions oculaires graves. Assurez-vous que le commutateur laser est éteint et que le
laser ne pointe pas vers vous lors du remplacement des piles du laser et de la vérification du
fonctionnement du laser.
Application
La mini scie plongeante est polyvalente et vous permet de couper de nombreux types de matériaux.
Certains des matériaux incluent
●
●
●
Sélection de la lame
ENTRETIEN
ATTENTION: Débranchez l'outil avant d'installer ou de retirer des accessoires, avant de
procéder au réglage ou lors de réparations. Utilisez uniquement un savon doux et un chiffon humide
pour nettoyer l'outil. Ne laissez jamais aucun liquide pénétrer à l'intérieur de l'outil. ne jamais immerg-
er une partie de l'outil dans un liquide.
IMPORTANT: Pour assurer la SÉCURITÉ et la FIABILITÉ du produit, les réparations, la mainte-
nance et les réglages (autres que ceux énumérés dans ce manuel) doivent être effectués par des
centres de service agréés ou d'autres centres de service qualifiés, en utilisant toujours des pièces de
rechange identiques.
EN
FR
ES
CONSERVEZ CES INSTRUCTIONS SYMBOLES
SÉCURITÉ DES ZONES DE TRAVAIL
Gardez la zone de travail propre et bien éclairée. Les zones encombrées ou sombres sont propic-
es aux accidents.
Ne pas utiliser d'outils électriques dans des atmosphères explosives, telles que la présence de
liquides, de gaz ou de poussières inflammables. Les outils électriques créent des étincelles qui
peuvent enflammer la poussière ou les vapeurs.
Tenez les enfants et les passants à distance lorsque vous utilisez un outil électrique. Les distrac-
tions peuvent vous faire perdre le contrôle.
SÉCURITÉ ÉLECTRIQUE
Les fiches des outils électriques doivent correspondre à la prise. Ne modifiez jamais la fiche de
quelque manière que ce soit. N'utilisez pas d'adaptateur avec des outils électriques mis à la terre.
Des fiches non modifiées et des prises de courant adaptées réduiront le risque de choc électrique.
Evitez tout contact du corps avec des surfaces mises à la terre, telles que tuyaux, radiateurs,
cuisinières et réfrigérateurs. Il y a un risque accru de choc électrique si votre corps est mis à la
terre ou mis à la terre.
N'exposez pas les outils électriques à la pluie ou à l'humidité. La pénétration d'eau dans un outil
électrique augmente le risque de choc électrique.
N'abusez pas le cordon. N'utilisez jamais le cordon pour porter, tirer ou débrancher l'outil
électrique. Tenez le cordon à l'écart de la chaleur, de l'huile, des arêtes vives ou des pièces
mobiles. Les cordons endommagés ou emmêlés augmentent le risque de choc électrique.
Lors de l'utilisation d'un outil électrique à l'extérieur, utilisez une rallonge adaptée à une utilisation
en extérieur. L'utilisation d'un cordon adapté à une utilisation en extérieur réduit les risques d'élec-
trocution.
Si l'utilisation d'un outil électrique dans un endroit humide est inévitable, utilisez une alimentation
protégée par un disjoncteur de fuite à la terre (GFCI). L'utilisation d'un GFCI réduit le risque de
choc électrique.
SÉCURITÉ PERSONNELLE
Restez vigilant, regardez ce que vous faites et faites preuve de bon sens lorsque vous utilisez un
outil électrique. N'utilisez pas d'outil électrique lorsque vous êtes fatigué ou sous l'influence de
drogues, d'alcool ou de médicaments. Un moment d'inattention lors de l'utilisation d'outils
électriques peut entraîner des blessures graves.
Utiliser un équipement de protection individuelle. Portez toujours des lunettes de protection. Un
équipement de protection tel qu'un masque anti-poussière, des chaussures de sécurité antidéra-
pantes, un casque de protection ou des protections auditives utilisés dans des conditions appro-
priées réduira les risques de blessures.
Empêcher les démarrages involontaires. Assurez-vous que l'interrupteur est en position d'arrêt
avant de brancher l'appareil à la source d'alimentation et / ou à la batterie, ou de ramasser ou de
porter l'outil. Le fait de transporter des outils avec le doigt sur l'interrupteur ou de les mettre sous
tension lorsque l'interrupteur est en position de marche peut provoquer des accidents.
Retirez toute clé de réglage ou clé avant de mettre l'outil électrique en marche. Une clé ou une clé
laissée sur une pièce rotative de l'outil électrique peut entraîner des blessures.
Ne pas trop atteindre. Gardez une bonne assise et un bon équilibre à tout moment.Cela permet
de mieux contrôler l'outil électroportatif dans des situations imprévues.
Habillez-vous correctement. Ne portez pas de vêtements amples ni de bijoux. Gardez vos
cheveux, vos vêtements et vos gants à l’écart des pièces en mouvement. Les vêtements amples,
les bijoux ou les cheveux longs peuvent être happés par les pièces en mouvement.
Si des dispositifs sont fournis pour la connexion des installations d'extraction et de collecte de
poussière, assurez-vous qu'ils sont connectés et utilisés correctement. L'utilisation d'un dépous-
siéreur peut réduire les risques liés à la poussière.
UTILISATION ET ENTRETIEN DES OUTILS ÉLECTRIQUES
Ne forcez pas l'outil électrique. Utilisez le bon outil pour votre application. Le bon outil électrique
fera le travail mieux et plus sûrement au rythme pour lequel il a été conçu.
N'utilisez pas l'outil si l'interrupteur ne l'allume pas et ne l'éteint pas. Tout outil électrique qui ne
peut pas être contrôlé avec l'interrupteur est dangereux et doit être réparé.
Débranchez la fiche de la source d'alimentation et / ou du bloc-batterie de l'outil électrique avant
d'effectuer tout réglage, de changer d'accessoire ou de ranger les outils électriques. Ces mesures
de sécurité préventives réduisent le risque de démarrage accidentel de l'outil électrique.
Rangez les outils électriques inutilisés hors de la portée des enfants et ne permettez pas à des
personnes inconnues de l'outil électrique ou de ces instructions d'utiliser cet outil. Les outils
électriques sont dangereux entre les mains d'utilisateurs non formés.
Entretenir les outils électriques. Vérifiez le mauvais alignement ou le coincement des pièces
mobiles, la rupture de pièces et toute autre condition pouvant affecter le bon fonctionnement de
l’outil électrique. S'il est endommagé, faites réparer l'outil électrique avant de l'utiliser. De
nombreux accidents sont causés par des outils électriques mal entretenus.
Gardez les outils de coupe tranchants et propres. Les outils de coupe bien entretenus avec des
arêtes tranchantes sont moins susceptibles de se coincer et sont plus faciles à contrôler.
Utilisez l'outil électrique, les accessoires et les mèches, etc. conformément à ces instructions, en
tenant compte des conditions de travail et du travail à effectuer. L'utilisation de l'outil électrique
pour des opérations différentes de celles prévues pourrait entraîner une situation dangereuse.
SERVICE
Gardez votre deuxième main sur la poignée auxiliaire ou le boîtier du moteur. Si les deux mains
tiennent la scie, elles ne peuvent pas être coupées par la lame.
Ne pas atteindre sous la pièce à travailler. Le protecteur ne peut pas vous protéger de la lame
située sous la pièce.
Ajustez la profondeur de coupe à l'épaisseur de la pièce. Moins d'une dent complète de la lame
doit être visible sous la pièce à travailler.
Ne tenez jamais le morceau coupé dans vos mains ou sur votre jambe. Sécurisez la pièce sur une
plate-forme stable. Il est important de bien supporter le travail afin de minimiser l'exposition du
corps, la fixation de la lame ou la perte de contrôle.
Tenez l'outil électroportatif uniquement par des surfaces de préhension isolées lorsque vous
effectuez une opération dans laquelle l'outil de coupe risque d'entrer en contact avec un câblage
caché ou avec son propre cordon. Le contact avec un fil sous tension rendra les parties
métalliques exposées de l'outil électrique «sous tension» et pourrait donner à l'opérateur un choc
électrique
Lors de la déchirure, utilisez toujours un guide de refente ou un guide de bord droit. Cela améliore
la précision de la coupe et réduit les risques de coincement de la lame.
Utilisez toujours des lames de taille et de forme correctes (diamant contre rondes) de trous de
tonnelle. Les lames qui ne correspondent pas au matériel de montage de la scie fonctionneront de
manière excentrique, entraînant une perte de contrôle.
N'utilisez jamais de rondelles ou de boulons de lame endommagés ou incorrects. Les rondelles de
lame et le boulon ont été spécialement conçus pour votre scie, pour des performances optimales
et une sécurité de fonctionnement.
Le rebond est une réaction soudaine à une lame de scie pincée, liée ou mal alignée, provoquant
le soulèvement d'une scie non contrôlée et sa sortie de la pièce à traiter en direction de l'opéra-
teur.
Lorsque la lame est pincée ou liée étroitement par la fermeture du trait de scie, la lame se bloque
et la réaction du moteur ramène rapidement l'unité vers l'opérateur.
Si la lame est tordue ou mal alignée lors de la coupe, les dents situées sur le bord arrière de la
lame peuvent s'enfoncer dans la surface supérieure du bois, faisant ainsi sortir la lame du trait de
scie et la faire remonter vers l'opérateur.
Maintenez fermement la scie des deux mains et positionnez vos bras pour résister aux forces de
choc. Placez votre corps de part et d'autre de la lame, mais pas dans l'alignement de la lame. Un
rebond pourrait faire basculer la scie en arrière, mais les forces de contrecoup peuvent être
contrôlées par l'opérateur si les précautions appropriées sont prises.
Lorsque la lame est coincée ou lorsque vous interrompez une coupe pour quelque raison que ce
soit, relâchez la gâchette et maintenez la scie immobile dans le matériau jusqu’à ce que la lame
s’arrête complètement. N'essayez jamais de retirer la scie de la pièce ou de tirer la scie vers
l'arrière lorsque la lame est en mouvement, sinon un recul pourrait se produire. Recherchez et
prenez des mesures correctives pour éliminer la cause de la reliure de la lame.
Lors du redémarrage d'une scie dans la pièce, centrez la lame de scie dans le trait de scie et
vérifiez que les dents de la scie ne sont pas engagées dans le matériau. Si la lame de scie se
coince, elle risque de remonter ou de rebondir de la pièce à usiner au redémarrage de la scie.
Soutenez les grands panneaux pour minimiser les risques de pincement et de recul de la lame.
Les grands panneaux ont tendance à s'affaisser sous leur propre poids. Les supports doivent être
placés sous le panneau des deux côtés, près de la ligne de coupe et du bord du panneau.
N'utilisez pas de lames émoussées ou endommagées. Les lames mal affûtées ou mal réglées
produisent un trait de scie étroit causant un frottement excessif, un grippage de la lame et un recul.
La profondeur de la lame et les leviers de verrouillage de réglage du biseau doivent être serrés et
sécurisés avant la coupe. Si le réglage de la lame change pendant la coupe, cela peut provoquer
des blocages et des contrecoups.
Soyez particulièrement prudent lorsque vous sciez des murs existants ou d'autres zones
aveugles. La lame en saillie peut couper des objets pouvant causer un recul.
Vérifiez la protection inférieure pour une fermeture correcte avant chaque utilisation. Ne pas
utiliser la scie si la protection inférieure ne bouge pas librement et ne se ferme pas instantané-
ment. Ne jamais serrer ou attacher le protège-lame inférieur en position ouverte. Si la scie tombe
accidentellement, la protection inférieure peut être pliée. Soulevez la protection inférieure avec la
poignée de rétraction et assurez-vous qu'elle se déplace librement et ne touche pas la lame ou
toute autre pièce, sous tous les angles et à toutes les profondeurs de coupe.
Vérifiez le fonctionnement du ressort de protection inférieur. Si la protection et le ressort ne
fonctionnent pas correctement, ils doivent être réparés avant utilisation. Le protège-lame inférieur
peut fonctionner lentement en raison de pièces endommagées, de dépôts de gomme ou d'une
accumulation de débris.
La protection inférieure ne doit être rétractée manuellement que pour les coupes spéciales telles
que les «coupes en plongée» et les «coupes composées». Relevez la protection inférieure en
rétractant la poignée et dès que la lame pénètre dans le matériau, vous devez la relâcher. Pour
tous les autres travaux de sciage, la protection inférieure devrait fonctionner automatiquement.
Veillez toujours à ce que la protection inférieure recouvre la lame avant de poser la scie sur un
établi ou au sol. Une lame de roue libre non protégée fera marcher la scie en arrière, coupant tout
ce qui se trouve sur son passage. Soyez conscient du temps nécessaire pour que la lame s’arrête
après le relâchement du commutateur.
Utilisez des pinces ou un autre moyen pratique pour fixer et maintenir la pièce sur une plate-forme
stable.Tenir le travail à la main ou contre votre corps le laisse instable et peut entraîner une perte
de contrôle.
Gardez votre corps positionné de part et d'autre de la lame, mais pas dans l'alignement de la lame
de scie. KICKBACK pourrait faire basculer la scie en arrière(voir Causes et prévention de
Kickback et KICKBACK par l'opérateur).
Évitez de couper les ongles. Inspectez et enlevez tous les clous du bois avant de couper.
Assurez-vous toujours que rien ne gêne le mouvement du protège-lame inférieur.
Les accessoires doivent avoir au moins la vitesse recommandée sur l'étiquette d'avertissement de
l'outil. Les roues et autres accessoires fonctionnant à une vitesse supérieure à la vitesse nominale
peuvent voler en éclats et causer des blessures. Les valeurs nominales des accessoires doivent
toujours être supérieures à la vitesse de l'outil, comme indiqué sur la plaque signalétique de l'outil.
Assurez-vous toujours que la scie est propre avant de l'utiliser.
Arrêtez d’utiliser cette scie et faites-la réparer si des bruits inhabituels ou un fonctionnement
anormal se produisent.
Assurez-vous toujours que tous les composants sont montés correctement et fermement avant
d'utiliser l'outil.
Manipulez toujours la lame de scie avec précaution lors du montage, du retrait ou du retrait de la
découpe au diamant.
Attendez toujours que le moteur ait atteint sa vitesse maximale avant de commencer une coupe.
Gardez toujours les poignées sèches, propres et exemptes d’huile et de graisse. Tenez l'outil
fermement à deux mains lors de son utilisation.
Soyez toujours vigilant à tout moment, surtout lors d'opérations répétitives et monotones.
Assurez-vous toujours de la position de vos mains par rapport à la lame.
Éloignez-vous des pièces d'extrémité qui pourraient tomber après la coupe. Ils peuvent être
chauds, coupants et / ou lourds. Des blessures graves peuvent en résulter.
Remplacez ou réparez les cordons endommagés. Assurez-vous que votre rallonge est en bon état.
Utilisez uniquement des rallonges à 3 fils munies de fiches à trois broches avec mise à la terre et
de prises à 3 pôles acceptant la fiche de l’outil.
Une rallonge doit avoir une taille de fil adéquate (AWG ou American Wire Gauge) pour des raisons
de sécurité.
Protection oculaire ANSI Z87.1 (CAN / CSA Z94.3).
Protection auditive ANSI S12.6 (S3.19).
Protection respiratoire NIOSH / OSHA.
V
A
Hz
W
min
no
volts
ampères
hertz
watts
minutes
courant alternatif
direct courant
pas de vitesse de chargement
Classe I Construction (mise à la terre)
borne de terre
symbole d'alerte de sécurité
Lire le manuel d'instructions avant utilisation
Utilisez une protection oculaire appropriée
Utilisez une protection auditive appropriée
Utiliser une protection respiratoire appropriée
Classe II Construction (double isolation) /min ou rpm
tours ou alternance par minute
SPM Coups par minute
or AC
or DC
Plomb provenant de peintures à base de plomb, de silice cristalline issue de briques, de ciment et
d'autres produits de maçonnerie, ainsi que d'arsenic et de chrome provenant de bois d'œuvre traité
chimiquement.
Évitez tout contact prolongé avec la poussière provenant du ponçage, du sciage, du meulage, du
perçage et autres travaux de construction. Porter des vêtements de protection et laver les zones
exposées à l'eau et au savon. Le fait de laisser la poussière pénétrer dans la bouche, les yeux ou
sur la peau peut favoriser l'absorption de produits chimiques nocifs.
Le laser doit être utilisé et entretenu conformément aux instructions du fabricant.
Ne dirigez jamais le faisceau sur une personne ou un objet autre que la pièce.
Le faisceau laser ne doit pas être délibérément dirigé vers le personnel et il ne doit pas pouvoir être
dirigé vers les yeux d'une personne plus de 0,25 s.
Assurez-vous toujours que le faisceau laser est dirigé sur une pièce solide sans surfaces réfléchis-
santes. C'est à dire. le bois ou les surfaces rugueuses sont acceptables. Les tôles d'acier réfléchis-
santes brillantes brillantes ou similaires ne conviennent pas à une utilisation au laser, car la surface
réfléchissante pourrait diriger le faisceau vers l'opérateur.
Ne changez pas le faisceau laser avec un type différent. Les réparations doivent être effectuées
par le fabricant du laser ou un agent agréé.
Portez des gants de protection lors du montage de la lame de scie. Risque de blessure en touchant
la lame de scie.
Utilisez uniquement des lames de scie correspondant aux caractéristiques indiquées dans le mode
d'emploi.
N'utilisez en aucun cas des disques de meulage comme outil de coupe.
FIXATION ET RETRAIT DE LA LAME - FIGURE C-E
• Rétracter la protection inférieure et assembler la lame (8) et la rondelle de serrage (17) comme
indiqué sur la figure C.
• Appuyez sur le verrou de la broche (13) tout en tournant le boulon de lame (7) avec la clé pour
lame (16) jusqu'à ce que le verrou de la lame s'enclenche et que la lame s'arrête de tourner. figure
D
REMARQUE: la clé à lame est stockée dans un sac en polyéthylène avec le manuel
• Serrez fermement le boulon de lame avec la clé à lame.
REMARQUE: le boulon a un filetage à gauche. Pour desserrer, tournez dans le sens des aiguilles
d'une montre. Pour serrer, tournez dans le sens antihoraire. figure E
REMARQUE: N'engagez jamais le verrouillage de la lame pendant que la scie est en marche et ne
tentez jamais d'arrêter l'outil. N'allumez jamais l'outil lorsque le verrouillage de la lame est engagé.
Il en résultera de graves dommages à votre scie.
Au besoin, déplacez le bouton déverrouillé et laissez le doigt pointé sur la position appropriée de
l’échelle de profondeur.
Tournez ensuite le bouton à 180°pour le verrouiller,
- 18 -
Technology Creates Power

Allumer et éteindre
Remarque: Pour des raisons de sécurité, le commutateur On / Off ne peut pas être verrouillé. il doit
rester appuyé pendant toute l'opération.
Fonction laser
●Allumez-le avec le commutateur ON / OFF de la lumière laser juste avant de couper.
●Éteignez-le immédiatement après l'utilisation pour économiser la batterie et préserver la durée de
vie du laser.
CHANGEMENT DES PILES AU LASER
Les piles qui font fonctionner le laser devront être remplacées après une utilisation considérable du
laser.
1.
2.
3.
4.
DANGER: Ne laissez jamais le rayon laser pénétrer dans les yeux d'une personne, cela pourrait
5)
Faites réparer votre outil électrique par un réparateur qualifié en utilisant uniquement des pièces de
rechange identiques. Cela garantira le maintien de la sécurité de l'outil électrique.
DANGER: Gardez les mains éloignées de la zone de coupe et de la lame.
a)
b)
c)
d)
e)
f)
g)
h)
Causes et prévention du recul par l'opérateur:
●
●
●
Le rebond résulte d'une mauvaise utilisation de la scie et / ou de procédures ou de conditions d'utilisa-
tion incorrectes et peut être évité en prenant les précautions appropriées indiquées ci-dessous:
a)
b)
L'étiquette de votre outil peut inclure les symboles suivants. Les symboles et leurs définitions sont les
suivants:
Règles de sécurité pour les lumières laser
La lumière laser / le rayonnement laser utilisé dans le système est de classe 2 avec des longueurs
d’onde maximales de 1 mW et 650 nm. Ces lasers ne présentent normalement pas de danger
optique, bien que regarder le faisceau puisse provoquer un aveuglement instantané.
ATTENTION : Ne regardez pas directement le rayon laser.
Un danger peut exister si vous regardez délibérément dans le faisceau, respectez toutes les règles
de sécurité ci-dessous.
●
●
●
●
●
f)
3)
a)
b)
c)
d)
e)
f)
g)
4)
a)
b)
c)
d)
e)
f)
g)
●
●
●
●
●
●
●
Plus le numéro de calibre du fil est petit, plus la capacité du câble est grande, c'est-à-dire que le
calibre 16 a une capacité supérieure à 18. Un cordon sous-dimensionné provoquera une chute de
tension entraînant une perte de puissance et une surchauffe. Lorsque vous utilisez plusieurs rallong-
es pour calculer la longueur totale, assurez-vous que chaque rallonge contient au moins la taille
minimale du fil. Le tableau suivant indique la taille à utiliser en fonction de la longueur du cordon et de
l’intensité nominale indiquée sur la plaque signalétique. En cas de doute, utilisez la prochaine jauge
plus lourde. Plus le numéro de calibre est petit, plus le cordon est lourd.
●
●
●
ATTENTION: Certaines poussières générées par le sablage, le sciage, le meulage, le forage et
d'autres activités de construction contiennent des produits chimiques connus dans l'État de Californie
pour provoquer le cancer, des anomalies congénitales ou d'autres troubles de la reproduction. Voici
DÉFINITIONS: SYMBOLES ET MOTS D'ALERTE DE SÉCURITÉ
Il est important que vous lisiez et compreniez ce manuel. Les informations qu’il contient ont trait à la
protection de VOTRE SÉCURITÉ et à la prévention des problèmes. Les symboles ci-dessous sont
utilisés pour vous aider à reconnaître cette information.
NOTICE: Utilisé sans le symbole d'alerte de sécurité, il indique une situation potentiellement
dangereuse qui, si elle n'est pas évitée, peut entraîner des dommages matériels.
ATTENTION: Lire tous les avertissements de sécurité et toutes les instructions
Le non respect des avertissements et des instructions peut entraîner un choc électrique, un incendie
et / ou des blessures graves.
CONSERVEZ TOUS LES AVERTISSEMENTS ET INSTRUCTIONS POUR CONSULTATION
FUTURE
Le terme «outil électrique» dans les avertissements fait référence à votre outil électrique alimenté par
le secteur (avec fil) ou à piles (sans fil).
1)
a)
b)
c)
2)
a)
b)
c)
d)
e)
c)
d)
e)
f)
g)
Consignes de Sécurité Inférieures
a)
b)
c)
d)
Consignes de Sécurité Supplémentaires
●
●
●
●
●
●
●
●
quelques exemples de ces produits chimiques:
●
Les risques liés à ces expositions varient en fonction de la fréquence à laquelle vous effectuez ce type
de travail. Pour réduire votre exposition à ces produits chimiques: travaillez dans un endroit bien
ventilé et utilisez des équipements de sécurité approuvés, tels que les masques antipoussières
spécialement conçus pour filtrer les particules microscopiques.
ATTENTION: TOUJOURS UTILISER DES LUNETTES DE SÉCURITÉ. Les lunettes ordinaires
ne sont PAS des lunettes de sécurité. Utilisez également un masque facial ou antipoussière si vous
coupez
●
ATTENTION: La découpe de plastiques, de bois sablé et d'autres matériaux peut provoquer
l'accumulation de matière fondue sur les pointes de lame et le corps de la lame de scie, augmentant
ainsi le risque de surchauffe et de coincement de la lame lors de la coupe.
ATTENTION: L'utilisation de cet outil peut générer et / ou dissiper de la poussière, ce qui peut
causer des blessures graves et permanentes aux voies respiratoires ou autres. Utilisez toujours une
protection respiratoire approuvée par NIOSH / OSHA appropriée à l'exposition à la poussière. Éloign-
er les particules du visage et du corps. Toujours utiliser l'outil dans une zone bien ventilée et assurer
un dépoussiérage adéquat. Utilisez le système de dépoussiérage autant que possible.
MISE EN GARDE: L'utilisation de commandes ou de réglages ou l'exécution de procédures
autres que celles spécifiées dans le présent document peut entraîner une exposition à des radiations
dangereuses.
Usage prévu
Cette machine est principalement destinée au sciage longitudinal et transversal du bois massif, des
panneaux de particules, du contreplaqué, de l’aluminium, des carreaux et de la pierre maintenus
dans une position fixe. Veuillez noter que la lame pré-installée dans la scie telle que fournie est
destinée à être utilisée avec du bois uniquement. Toute autre utilisation ou modification de l'appareil
doit être considérée comme une utilisation non conforme et peut générer des risques considérables.
Il n'est pas adapté à un usage commercial.
Description de la fonction
La numérotation des caractéristiques des produits fait référence à l'illustration de la machine sur la
page graphique.
Montage / Réglage
ATTENTION: Avant tout travail sur l'outil électrique, retirez toujours la fiche de la source
d'alimentation.
●
●
●
Régler la profondeur de coupe
1.
2.
Remarque: si possible, recommandez une profondeur de coupe d'environ 2 mm plus profonde que
l'épaisseur du matériau. Cela devrait vous aider à obtenir une coupe nette.
entraîner des lésions oculaires graves. Assurez-vous que le commutateur laser est éteint et que le
laser ne pointe pas vers vous lors du remplacement des piles du laser et de la vérification du
fonctionnement du laser.
Application
La mini scie plongeante est polyvalente et vous permet de couper de nombreux types de matériaux.
Certains des matériaux incluent
●
●
●
Sélection de la lame
ENTRETIEN
ATTENTION: Débranchez l'outil avant d'installer ou de retirer des accessoires, avant de
procéder au réglage ou lors de réparations. Utilisez uniquement un savon doux et un chiffon humide
pour nettoyer l'outil. Ne laissez jamais aucun liquide pénétrer à l'intérieur de l'outil. ne jamais immerg-
er une partie de l'outil dans un liquide.
IMPORTANT: Pour assurer la SÉCURITÉ et la FIABILITÉ du produit, les réparations, la mainte-
nance et les réglages (autres que ceux énumérés dans ce manuel) doivent être effectués par des
centres de service agréés ou d'autres centres de service qualifiés, en utilisant toujours des pièces de
rechange identiques.
EN
FR
ES
Données Techniques
SÉCURITÉ DES ZONES DE TRAVAIL
Gardez la zone de travail propre et bien éclairée. Les zones encombrées ou sombres sont propic-
es aux accidents.
Ne pas utiliser d'outils électriques dans des atmosphères explosives, telles que la présence de
liquides, de gaz ou de poussières inflammables. Les outils électriques créent des étincelles qui
peuvent enflammer la poussière ou les vapeurs.
Tenez les enfants et les passants à distance lorsque vous utilisez un outil électrique. Les distrac-
tions peuvent vous faire perdre le contrôle.
SÉCURITÉ ÉLECTRIQUE
Les fiches des outils électriques doivent correspondre à la prise. Ne modifiez jamais la fiche de
quelque manière que ce soit. N'utilisez pas d'adaptateur avec des outils électriques mis à la terre.
Des fiches non modifiées et des prises de courant adaptées réduiront le risque de choc électrique.
Evitez tout contact du corps avec des surfaces mises à la terre, telles que tuyaux, radiateurs,
cuisinières et réfrigérateurs. Il y a un risque accru de choc électrique si votre corps est mis à la
terre ou mis à la terre.
N'exposez pas les outils électriques à la pluie ou à l'humidité. La pénétration d'eau dans un outil
électrique augmente le risque de choc électrique.
N'abusez pas le cordon. N'utilisez jamais le cordon pour porter, tirer ou débrancher l'outil
électrique. Tenez le cordon à l'écart de la chaleur, de l'huile, des arêtes vives ou des pièces
mobiles. Les cordons endommagés ou emmêlés augmentent le risque de choc électrique.
Lors de l'utilisation d'un outil électrique à l'extérieur, utilisez une rallonge adaptée à une utilisation
en extérieur. L'utilisation d'un cordon adapté à une utilisation en extérieur réduit les risques d'élec-
trocution.
Si l'utilisation d'un outil électrique dans un endroit humide est inévitable, utilisez une alimentation
protégée par un disjoncteur de fuite à la terre (GFCI). L'utilisation d'un GFCI réduit le risque de
choc électrique.
SÉCURITÉ PERSONNELLE
Restez vigilant, regardez ce que vous faites et faites preuve de bon sens lorsque vous utilisez un
outil électrique. N'utilisez pas d'outil électrique lorsque vous êtes fatigué ou sous l'influence de
drogues, d'alcool ou de médicaments. Un moment d'inattention lors de l'utilisation d'outils
électriques peut entraîner des blessures graves.
Utiliser un équipement de protection individuelle. Portez toujours des lunettes de protection. Un
équipement de protection tel qu'un masque anti-poussière, des chaussures de sécurité antidéra-
pantes, un casque de protection ou des protections auditives utilisés dans des conditions appro-
priées réduira les risques de blessures.
Empêcher les démarrages involontaires. Assurez-vous que l'interrupteur est en position d'arrêt
avant de brancher l'appareil à la source d'alimentation et / ou à la batterie, ou de ramasser ou de
porter l'outil. Le fait de transporter des outils avec le doigt sur l'interrupteur ou de les mettre sous
tension lorsque l'interrupteur est en position de marche peut provoquer des accidents.
Retirez toute clé de réglage ou clé avant de mettre l'outil électrique en marche. Une clé ou une clé
laissée sur une pièce rotative de l'outil électrique peut entraîner des blessures.
Ne pas trop atteindre. Gardez une bonne assise et un bon équilibre à tout moment.Cela permet
de mieux contrôler l'outil électroportatif dans des situations imprévues.
Habillez-vous correctement. Ne portez pas de vêtements amples ni de bijoux. Gardez vos
cheveux, vos vêtements et vos gants à l’écart des pièces en mouvement. Les vêtements amples,
les bijoux ou les cheveux longs peuvent être happés par les pièces en mouvement.
Si des dispositifs sont fournis pour la connexion des installations d'extraction et de collecte de
poussière, assurez-vous qu'ils sont connectés et utilisés correctement. L'utilisation d'un dépous-
siéreur peut réduire les risques liés à la poussière.
UTILISATION ET ENTRETIEN DES OUTILS ÉLECTRIQUES
Ne forcez pas l'outil électrique. Utilisez le bon outil pour votre application. Le bon outil électrique
fera le travail mieux et plus sûrement au rythme pour lequel il a été conçu.
N'utilisez pas l'outil si l'interrupteur ne l'allume pas et ne l'éteint pas. Tout outil électrique qui ne
peut pas être contrôlé avec l'interrupteur est dangereux et doit être réparé.
Débranchez la fiche de la source d'alimentation et / ou du bloc-batterie de l'outil électrique avant
d'effectuer tout réglage, de changer d'accessoire ou de ranger les outils électriques. Ces mesures
de sécurité préventives réduisent le risque de démarrage accidentel de l'outil électrique.
Rangez les outils électriques inutilisés hors de la portée des enfants et ne permettez pas à des
personnes inconnues de l'outil électrique ou de ces instructions d'utiliser cet outil. Les outils
électriques sont dangereux entre les mains d'utilisateurs non formés.
Entretenir les outils électriques. Vérifiez le mauvais alignement ou le coincement des pièces
mobiles, la rupture de pièces et toute autre condition pouvant affecter le bon fonctionnement de
l’outil électrique. S'il est endommagé, faites réparer l'outil électrique avant de l'utiliser. De
nombreux accidents sont causés par des outils électriques mal entretenus.
Gardez les outils de coupe tranchants et propres. Les outils de coupe bien entretenus avec des
arêtes tranchantes sont moins susceptibles de se coincer et sont plus faciles à contrôler.
Utilisez l'outil électrique, les accessoires et les mèches, etc. conformément à ces instructions, en
tenant compte des conditions de travail et du travail à effectuer. L'utilisation de l'outil électrique
pour des opérations différentes de celles prévues pourrait entraîner une situation dangereuse.
SERVICE
Gardez votre deuxième main sur la poignée auxiliaire ou le boîtier du moteur. Si les deux mains
tiennent la scie, elles ne peuvent pas être coupées par la lame.
Ne pas atteindre sous la pièce à travailler. Le protecteur ne peut pas vous protéger de la lame
située sous la pièce.
Ajustez la profondeur de coupe à l'épaisseur de la pièce. Moins d'une dent complète de la lame
doit être visible sous la pièce à travailler.
Ne tenez jamais le morceau coupé dans vos mains ou sur votre jambe. Sécurisez la pièce sur une
plate-forme stable. Il est important de bien supporter le travail afin de minimiser l'exposition du
corps, la fixation de la lame ou la perte de contrôle.
Tenez l'outil électroportatif uniquement par des surfaces de préhension isolées lorsque vous
effectuez une opération dans laquelle l'outil de coupe risque d'entrer en contact avec un câblage
caché ou avec son propre cordon. Le contact avec un fil sous tension rendra les parties
métalliques exposées de l'outil électrique «sous tension» et pourrait donner à l'opérateur un choc
électrique
Lors de la déchirure, utilisez toujours un guide de refente ou un guide de bord droit. Cela améliore
la précision de la coupe et réduit les risques de coincement de la lame.
Utilisez toujours des lames de taille et de forme correctes (diamant contre rondes) de trous de
tonnelle. Les lames qui ne correspondent pas au matériel de montage de la scie fonctionneront de
manière excentrique, entraînant une perte de contrôle.
N'utilisez jamais de rondelles ou de boulons de lame endommagés ou incorrects. Les rondelles de
lame et le boulon ont été spécialement conçus pour votre scie, pour des performances optimales
et une sécurité de fonctionnement.
Le rebond est une réaction soudaine à une lame de scie pincée, liée ou mal alignée, provoquant
le soulèvement d'une scie non contrôlée et sa sortie de la pièce à traiter en direction de l'opéra-
teur.
Lorsque la lame est pincée ou liée étroitement par la fermeture du trait de scie, la lame se bloque
et la réaction du moteur ramène rapidement l'unité vers l'opérateur.
Si la lame est tordue ou mal alignée lors de la coupe, les dents situées sur le bord arrière de la
lame peuvent s'enfoncer dans la surface supérieure du bois, faisant ainsi sortir la lame du trait de
scie et la faire remonter vers l'opérateur.
Maintenez fermement la scie des deux mains et positionnez vos bras pour résister aux forces de
choc. Placez votre corps de part et d'autre de la lame, mais pas dans l'alignement de la lame. Un
rebond pourrait faire basculer la scie en arrière, mais les forces de contrecoup peuvent être
contrôlées par l'opérateur si les précautions appropriées sont prises.
Lorsque la lame est coincée ou lorsque vous interrompez une coupe pour quelque raison que ce
soit, relâchez la gâchette et maintenez la scie immobile dans le matériau jusqu’à ce que la lame
s’arrête complètement. N'essayez jamais de retirer la scie de la pièce ou de tirer la scie vers
l'arrière lorsque la lame est en mouvement, sinon un recul pourrait se produire. Recherchez et
prenez des mesures correctives pour éliminer la cause de la reliure de la lame.
Lors du redémarrage d'une scie dans la pièce, centrez la lame de scie dans le trait de scie et
vérifiez que les dents de la scie ne sont pas engagées dans le matériau. Si la lame de scie se
coince, elle risque de remonter ou de rebondir de la pièce à usiner au redémarrage de la scie.
Soutenez les grands panneaux pour minimiser les risques de pincement et de recul de la lame.
Les grands panneaux ont tendance à s'affaisser sous leur propre poids. Les supports doivent être
placés sous le panneau des deux côtés, près de la ligne de coupe et du bord du panneau.
N'utilisez pas de lames émoussées ou endommagées. Les lames mal affûtées ou mal réglées
produisent un trait de scie étroit causant un frottement excessif, un grippage de la lame et un recul.
La profondeur de la lame et les leviers de verrouillage de réglage du biseau doivent être serrés et
sécurisés avant la coupe. Si le réglage de la lame change pendant la coupe, cela peut provoquer
des blocages et des contrecoups.
Soyez particulièrement prudent lorsque vous sciez des murs existants ou d'autres zones
aveugles. La lame en saillie peut couper des objets pouvant causer un recul.
Vérifiez la protection inférieure pour une fermeture correcte avant chaque utilisation. Ne pas
utiliser la scie si la protection inférieure ne bouge pas librement et ne se ferme pas instantané-
ment. Ne jamais serrer ou attacher le protège-lame inférieur en position ouverte. Si la scie tombe
accidentellement, la protection inférieure peut être pliée. Soulevez la protection inférieure avec la
poignée de rétraction et assurez-vous qu'elle se déplace librement et ne touche pas la lame ou
toute autre pièce, sous tous les angles et à toutes les profondeurs de coupe.
Vérifiez le fonctionnement du ressort de protection inférieur. Si la protection et le ressort ne
fonctionnent pas correctement, ils doivent être réparés avant utilisation. Le protège-lame inférieur
peut fonctionner lentement en raison de pièces endommagées, de dépôts de gomme ou d'une
accumulation de débris.
La protection inférieure ne doit être rétractée manuellement que pour les coupes spéciales telles
que les «coupes en plongée» et les «coupes composées». Relevez la protection inférieure en
rétractant la poignée et dès que la lame pénètre dans le matériau, vous devez la relâcher. Pour
tous les autres travaux de sciage, la protection inférieure devrait fonctionner automatiquement.
Veillez toujours à ce que la protection inférieure recouvre la lame avant de poser la scie sur un
établi ou au sol. Une lame de roue libre non protégée fera marcher la scie en arrière, coupant tout
ce qui se trouve sur son passage. Soyez conscient du temps nécessaire pour que la lame s’arrête
après le relâchement du commutateur.
Utilisez des pinces ou un autre moyen pratique pour fixer et maintenir la pièce sur une plate-forme
stable.Tenir le travail à la main ou contre votre corps le laisse instable et peut entraîner une perte
de contrôle.
Gardez votre corps positionné de part et d'autre de la lame, mais pas dans l'alignement de la lame
de scie. KICKBACK pourrait faire basculer la scie en arrière(voir Causes et prévention de
Kickback et KICKBACK par l'opérateur).
Évitez de couper les ongles. Inspectez et enlevez tous les clous du bois avant de couper.
Assurez-vous toujours que rien ne gêne le mouvement du protège-lame inférieur.
Les accessoires doivent avoir au moins la vitesse recommandée sur l'étiquette d'avertissement de
l'outil. Les roues et autres accessoires fonctionnant à une vitesse supérieure à la vitesse nominale
peuvent voler en éclats et causer des blessures. Les valeurs nominales des accessoires doivent
toujours être supérieures à la vitesse de l'outil, comme indiqué sur la plaque signalétique de l'outil.
Assurez-vous toujours que la scie est propre avant de l'utiliser.
Arrêtez d’utiliser cette scie et faites-la réparer si des bruits inhabituels ou un fonctionnement
anormal se produisent.
Assurez-vous toujours que tous les composants sont montés correctement et fermement avant
d'utiliser l'outil.
Manipulez toujours la lame de scie avec précaution lors du montage, du retrait ou du retrait de la
découpe au diamant.
Attendez toujours que le moteur ait atteint sa vitesse maximale avant de commencer une coupe.
Gardez toujours les poignées sèches, propres et exemptes d’huile et de graisse. Tenez l'outil
fermement à deux mains lors de son utilisation.
Soyez toujours vigilant à tout moment, surtout lors d'opérations répétitives et monotones.
Assurez-vous toujours de la position de vos mains par rapport à la lame.
Éloignez-vous des pièces d'extrémité qui pourraient tomber après la coupe. Ils peuvent être
chauds, coupants et / ou lourds. Des blessures graves peuvent en résulter.
Remplacez ou réparez les cordons endommagés. Assurez-vous que votre rallonge est en bon état.
Utilisez uniquement des rallonges à 3 fils munies de fiches à trois broches avec mise à la terre et
de prises à 3 pôles acceptant la fiche de l’outil.
Une rallonge doit avoir une taille de fil adéquate (AWG ou American Wire Gauge) pour des raisons
de sécurité.
Protection oculaire ANSI Z87.1 (CAN / CSA Z94.3).
Protection auditive ANSI S12.6 (S3.19).
Protection respiratoire NIOSH / OSHA.
Plomb provenant de peintures à base de plomb, de silice cristalline issue de briques, de ciment et
d'autres produits de maçonnerie, ainsi que d'arsenic et de chrome provenant de bois d'œuvre traité
chimiquement.
Évitez tout contact prolongé avec la poussière provenant du ponçage, du sciage, du meulage, du
perçage et autres travaux de construction. Porter des vêtements de protection et laver les zones
exposées à l'eau et au savon. Le fait de laisser la poussière pénétrer dans la bouche, les yeux ou
sur la peau peut favoriser l'absorption de produits chimiques nocifs.
1.
2.
3.
4.
5.
6.
7.
8.
9
10
11
12
13
14
15
16
Laser
Commutateur de laser
Échelle de profondeur
Commutateur de déclenchement
Bouton de verrouillage
Bouton
Boulon de serrage
Lame
Plaque de base
Clôture
Adaptateur d'extraction de poussière
Support de plaque de base
Bouton de verrouillage de la broche
Prise souple
Cordon d'alimentation
Clé Allen
Tension
Puissance
Pas de vitesse de chargement
Taille de la lame
Taille de l'arbre
Profondeur de coupe max
Bois:
Tuile:
Métal mou:
120VAC
4.8A
3700/min
3-5/16”(85mm)
10mm
1-1/16”
5/16”
1/8”
Le laser doit être utilisé et entretenu conformément aux instructions du fabricant.
Ne dirigez jamais le faisceau sur une personne ou un objet autre que la pièce.
Le faisceau laser ne doit pas être délibérément dirigé vers le personnel et il ne doit pas pouvoir être
dirigé vers les yeux d'une personne plus de 0,25 s.
Assurez-vous toujours que le faisceau laser est dirigé sur une pièce solide sans surfaces réfléchis-
santes. C'est à dire. le bois ou les surfaces rugueuses sont acceptables. Les tôles d'acier réfléchis-
santes brillantes brillantes ou similaires ne conviennent pas à une utilisation au laser, car la surface
réfléchissante pourrait diriger le faisceau vers l'opérateur.
Ne changez pas le faisceau laser avec un type différent. Les réparations doivent être effectuées
par le fabricant du laser ou un agent agréé.
Portez des gants de protection lors du montage de la lame de scie. Risque de blessure en touchant
la lame de scie.
Utilisez uniquement des lames de scie correspondant aux caractéristiques indiquées dans le mode
d'emploi.
N'utilisez en aucun cas des disques de meulage comme outil de coupe.
FIXATION ET RETRAIT DE LA LAME - FIGURE C-E
• Rétracter la protection inférieure et assembler la lame (8) et la rondelle de serrage (17) comme
indiqué sur la figure C.
• Appuyez sur le verrou de la broche (13) tout en tournant le boulon de lame (7) avec la clé pour
lame (16) jusqu'à ce que le verrou de la lame s'enclenche et que la lame s'arrête de tourner. figure
D
REMARQUE: la clé à lame est stockée dans un sac en polyéthylène avec le manuel
• Serrez fermement le boulon de lame avec la clé à lame.
REMARQUE: le boulon a un filetage à gauche. Pour desserrer, tournez dans le sens des aiguilles
d'une montre. Pour serrer, tournez dans le sens antihoraire. figure E
REMARQUE: N'engagez jamais le verrouillage de la lame pendant que la scie est en marche et ne
tentez jamais d'arrêter l'outil. N'allumez jamais l'outil lorsque le verrouillage de la lame est engagé.
Il en résultera de graves dommages à votre scie.
Au besoin, déplacez le bouton déverrouillé et laissez le doigt pointé sur la position appropriée de
l’échelle de profondeur.
Tournez ensuite le bouton à 180°pour le verrouiller,
- 19 -
Technology Creates Power
1 2 311
18
10
8
9
7
17
6
Fig A
4
15
13
12
14
5
Fig B
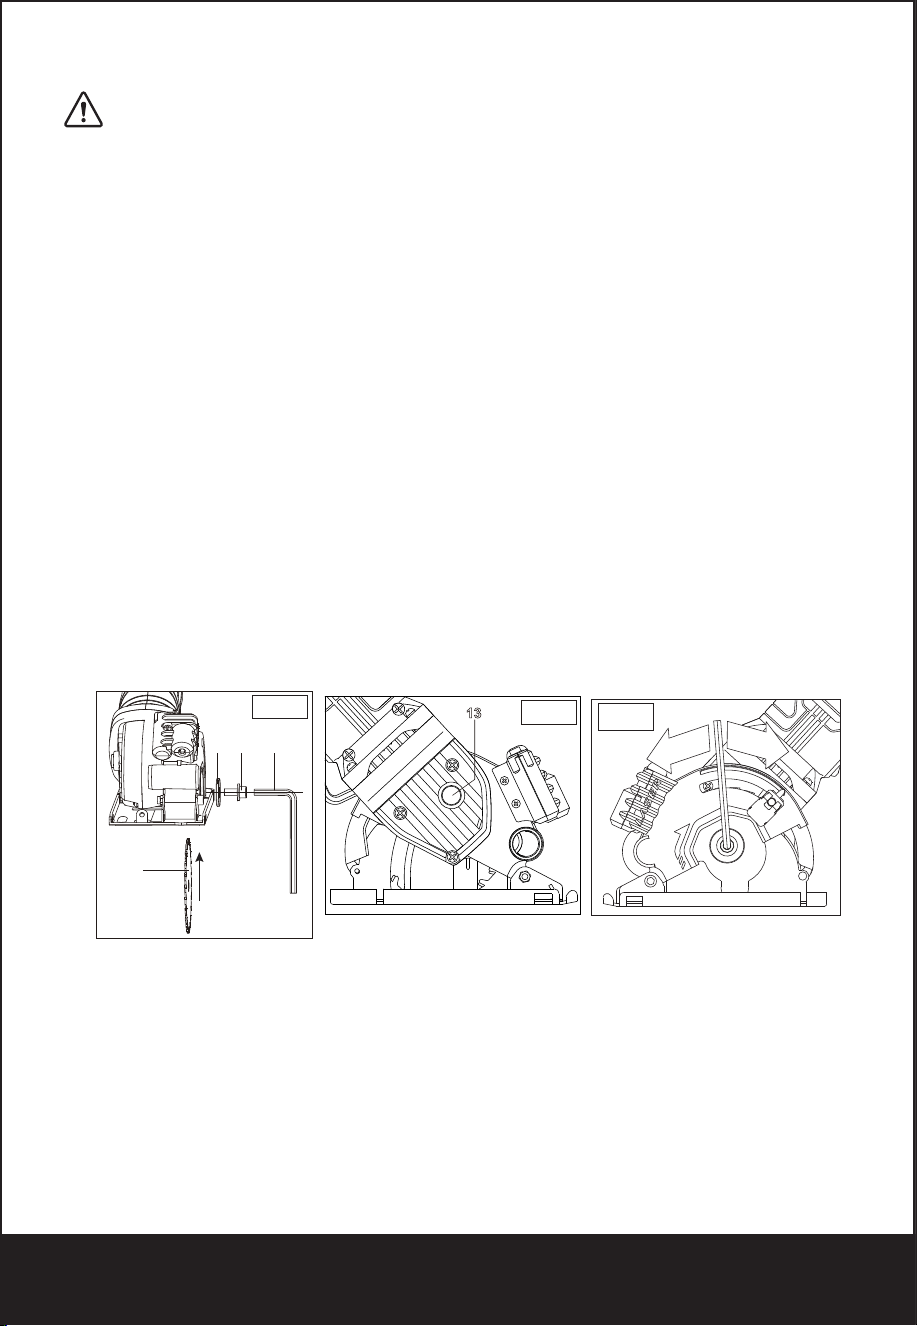
Allumer et éteindre
Remarque: Pour des raisons de sécurité, le commutateur On / Off ne peut pas être verrouillé. il doit
rester appuyé pendant toute l'opération.
Fonction laser
●Allumez-le avec le commutateur ON / OFF de la lumière laser juste avant de couper.
●Éteignez-le immédiatement après l'utilisation pour économiser la batterie et préserver la durée de
vie du laser.
CHANGEMENT DES PILES AU LASER
Les piles qui font fonctionner le laser devront être remplacées après une utilisation considérable du
laser.
1.
2.
3.
4.
DANGER: Ne laissez jamais le rayon laser pénétrer dans les yeux d'une personne, cela pourrait
5)
Faites réparer votre outil électrique par un réparateur qualifié en utilisant uniquement des pièces de
rechange identiques. Cela garantira le maintien de la sécurité de l'outil électrique.
DANGER: Gardez les mains éloignées de la zone de coupe et de la lame.
a)
b)
c)
d)
e)
f)
g)
h)
Causes et prévention du recul par l'opérateur:
●
●
●
Le rebond résulte d'une mauvaise utilisation de la scie et / ou de procédures ou de conditions d'utilisa-
tion incorrectes et peut être évité en prenant les précautions appropriées indiquées ci-dessous:
a)
b)
L'étiquette de votre outil peut inclure les symboles suivants. Les symboles et leurs définitions sont les
suivants:
Règles de sécurité pour les lumières laser
La lumière laser / le rayonnement laser utilisé dans le système est de classe 2 avec des longueurs
d’onde maximales de 1 mW et 650 nm. Ces lasers ne présentent normalement pas de danger
optique, bien que regarder le faisceau puisse provoquer un aveuglement instantané.
ATTENTION : Ne regardez pas directement le rayon laser.
Un danger peut exister si vous regardez délibérément dans le faisceau, respectez toutes les règles
de sécurité ci-dessous.
●
●
●
●
●
f)
3)
a)
b)
c)
d)
e)
f)
g)
4)
a)
b)
c)
d)
e)
f)
g)
●
●
●
●
●
●
●
Plus le numéro de calibre du fil est petit, plus la capacité du câble est grande, c'est-à-dire que le
calibre 16 a une capacité supérieure à 18. Un cordon sous-dimensionné provoquera une chute de
tension entraînant une perte de puissance et une surchauffe. Lorsque vous utilisez plusieurs rallong-
es pour calculer la longueur totale, assurez-vous que chaque rallonge contient au moins la taille
minimale du fil. Le tableau suivant indique la taille à utiliser en fonction de la longueur du cordon et de
l’intensité nominale indiquée sur la plaque signalétique. En cas de doute, utilisez la prochaine jauge
plus lourde. Plus le numéro de calibre est petit, plus le cordon est lourd.
●
●
●
ATTENTION: Certaines poussières générées par le sablage, le sciage, le meulage, le forage et
d'autres activités de construction contiennent des produits chimiques connus dans l'État de Californie
pour provoquer le cancer, des anomalies congénitales ou d'autres troubles de la reproduction. Voici
DÉFINITIONS: SYMBOLES ET MOTS D'ALERTE DE SÉCURITÉ
Il est important que vous lisiez et compreniez ce manuel. Les informations qu’il contient ont trait à la
protection de VOTRE SÉCURITÉ et à la prévention des problèmes. Les symboles ci-dessous sont
utilisés pour vous aider à reconnaître cette information.
NOTICE: Utilisé sans le symbole d'alerte de sécurité, il indique une situation potentiellement
dangereuse qui, si elle n'est pas évitée, peut entraîner des dommages matériels.
ATTENTION: Lire tous les avertissements de sécurité et toutes les instructions
Le non respect des avertissements et des instructions peut entraîner un choc électrique, un incendie
et / ou des blessures graves.
CONSERVEZ TOUS LES AVERTISSEMENTS ET INSTRUCTIONS POUR CONSULTATION
FUTURE
Le terme «outil électrique» dans les avertissements fait référence à votre outil électrique alimenté par
le secteur (avec fil) ou à piles (sans fil).
1)
a)
b)
c)
2)
a)
b)
c)
d)
e)
c)
d)
e)
f)
g)
Consignes de Sécurité Inférieures
a)
b)
c)
d)
Consignes de Sécurité Supplémentaires
●
●
●
●
●
●
●
●
quelques exemples de ces produits chimiques:
●
Les risques liés à ces expositions varient en fonction de la fréquence à laquelle vous effectuez ce type
de travail. Pour réduire votre exposition à ces produits chimiques: travaillez dans un endroit bien
ventilé et utilisez des équipements de sécurité approuvés, tels que les masques antipoussières
spécialement conçus pour filtrer les particules microscopiques.
ATTENTION: TOUJOURS UTILISER DES LUNETTES DE SÉCURITÉ. Les lunettes ordinaires
ne sont PAS des lunettes de sécurité. Utilisez également un masque facial ou antipoussière si vous
coupez
●
ATTENTION: La découpe de plastiques, de bois sablé et d'autres matériaux peut provoquer
l'accumulation de matière fondue sur les pointes de lame et le corps de la lame de scie, augmentant
ainsi le risque de surchauffe et de coincement de la lame lors de la coupe.
ATTENTION: L'utilisation de cet outil peut générer et / ou dissiper de la poussière, ce qui peut
causer des blessures graves et permanentes aux voies respiratoires ou autres. Utilisez toujours une
protection respiratoire approuvée par NIOSH / OSHA appropriée à l'exposition à la poussière. Éloign-
er les particules du visage et du corps. Toujours utiliser l'outil dans une zone bien ventilée et assurer
un dépoussiérage adéquat. Utilisez le système de dépoussiérage autant que possible.
MISE EN GARDE: L'utilisation de commandes ou de réglages ou l'exécution de procédures
autres que celles spécifiées dans le présent document peut entraîner une exposition à des radiations
dangereuses.
Usage prévu
Cette machine est principalement destinée au sciage longitudinal et transversal du bois massif, des
panneaux de particules, du contreplaqué, de l’aluminium, des carreaux et de la pierre maintenus
dans une position fixe. Veuillez noter que la lame pré-installée dans la scie telle que fournie est
destinée à être utilisée avec du bois uniquement. Toute autre utilisation ou modification de l'appareil
doit être considérée comme une utilisation non conforme et peut générer des risques considérables.
Il n'est pas adapté à un usage commercial.
Description de la fonction
La numérotation des caractéristiques des produits fait référence à l'illustration de la machine sur la
page graphique.
Montage / Réglage
ATTENTION: Avant tout travail sur l'outil électrique, retirez toujours la fiche de la source
d'alimentation.
●
●
●
Régler la profondeur de coupe
1.
2.
Remarque: si possible, recommandez une profondeur de coupe d'environ 2 mm plus profonde que
l'épaisseur du matériau. Cela devrait vous aider à obtenir une coupe nette.
entraîner des lésions oculaires graves. Assurez-vous que le commutateur laser est éteint et que le
laser ne pointe pas vers vous lors du remplacement des piles du laser et de la vérification du
fonctionnement du laser.
Application
La mini scie plongeante est polyvalente et vous permet de couper de nombreux types de matériaux.
Certains des matériaux incluent
●
●
●
Sélection de la lame
ENTRETIEN
ATTENTION: Débranchez l'outil avant d'installer ou de retirer des accessoires, avant de
procéder au réglage ou lors de réparations. Utilisez uniquement un savon doux et un chiffon humide
pour nettoyer l'outil. Ne laissez jamais aucun liquide pénétrer à l'intérieur de l'outil. ne jamais immerg-
er une partie de l'outil dans un liquide.
IMPORTANT: Pour assurer la SÉCURITÉ et la FIABILITÉ du produit, les réparations, la mainte-
nance et les réglages (autres que ceux énumérés dans ce manuel) doivent être effectués par des
centres de service agréés ou d'autres centres de service qualifiés, en utilisant toujours des pièces de
rechange identiques.
EN
FR
ES
SÉCURITÉ DES ZONES DE TRAVAIL
Gardez la zone de travail propre et bien éclairée. Les zones encombrées ou sombres sont propic-
es aux accidents.
Ne pas utiliser d'outils électriques dans des atmosphères explosives, telles que la présence de
liquides, de gaz ou de poussières inflammables. Les outils électriques créent des étincelles qui
peuvent enflammer la poussière ou les vapeurs.
Tenez les enfants et les passants à distance lorsque vous utilisez un outil électrique. Les distrac-
tions peuvent vous faire perdre le contrôle.
SÉCURITÉ ÉLECTRIQUE
Les fiches des outils électriques doivent correspondre à la prise. Ne modifiez jamais la fiche de
quelque manière que ce soit. N'utilisez pas d'adaptateur avec des outils électriques mis à la terre.
Des fiches non modifiées et des prises de courant adaptées réduiront le risque de choc électrique.
Evitez tout contact du corps avec des surfaces mises à la terre, telles que tuyaux, radiateurs,
cuisinières et réfrigérateurs. Il y a un risque accru de choc électrique si votre corps est mis à la
terre ou mis à la terre.
N'exposez pas les outils électriques à la pluie ou à l'humidité. La pénétration d'eau dans un outil
électrique augmente le risque de choc électrique.
N'abusez pas le cordon. N'utilisez jamais le cordon pour porter, tirer ou débrancher l'outil
électrique. Tenez le cordon à l'écart de la chaleur, de l'huile, des arêtes vives ou des pièces
mobiles. Les cordons endommagés ou emmêlés augmentent le risque de choc électrique.
Lors de l'utilisation d'un outil électrique à l'extérieur, utilisez une rallonge adaptée à une utilisation
en extérieur. L'utilisation d'un cordon adapté à une utilisation en extérieur réduit les risques d'élec-
trocution.
Si l'utilisation d'un outil électrique dans un endroit humide est inévitable, utilisez une alimentation
protégée par un disjoncteur de fuite à la terre (GFCI). L'utilisation d'un GFCI réduit le risque de
choc électrique.
SÉCURITÉ PERSONNELLE
Restez vigilant, regardez ce que vous faites et faites preuve de bon sens lorsque vous utilisez un
outil électrique. N'utilisez pas d'outil électrique lorsque vous êtes fatigué ou sous l'influence de
drogues, d'alcool ou de médicaments. Un moment d'inattention lors de l'utilisation d'outils
électriques peut entraîner des blessures graves.
Utiliser un équipement de protection individuelle. Portez toujours des lunettes de protection. Un
équipement de protection tel qu'un masque anti-poussière, des chaussures de sécurité antidéra-
pantes, un casque de protection ou des protections auditives utilisés dans des conditions appro-
priées réduira les risques de blessures.
Empêcher les démarrages involontaires. Assurez-vous que l'interrupteur est en position d'arrêt
avant de brancher l'appareil à la source d'alimentation et / ou à la batterie, ou de ramasser ou de
porter l'outil. Le fait de transporter des outils avec le doigt sur l'interrupteur ou de les mettre sous
tension lorsque l'interrupteur est en position de marche peut provoquer des accidents.
Retirez toute clé de réglage ou clé avant de mettre l'outil électrique en marche. Une clé ou une clé
laissée sur une pièce rotative de l'outil électrique peut entraîner des blessures.
Ne pas trop atteindre. Gardez une bonne assise et un bon équilibre à tout moment.Cela permet
de mieux contrôler l'outil électroportatif dans des situations imprévues.
Habillez-vous correctement. Ne portez pas de vêtements amples ni de bijoux. Gardez vos
cheveux, vos vêtements et vos gants à l’écart des pièces en mouvement. Les vêtements amples,
les bijoux ou les cheveux longs peuvent être happés par les pièces en mouvement.
Si des dispositifs sont fournis pour la connexion des installations d'extraction et de collecte de
poussière, assurez-vous qu'ils sont connectés et utilisés correctement. L'utilisation d'un dépous-
siéreur peut réduire les risques liés à la poussière.
UTILISATION ET ENTRETIEN DES OUTILS ÉLECTRIQUES
Ne forcez pas l'outil électrique. Utilisez le bon outil pour votre application. Le bon outil électrique
fera le travail mieux et plus sûrement au rythme pour lequel il a été conçu.
N'utilisez pas l'outil si l'interrupteur ne l'allume pas et ne l'éteint pas. Tout outil électrique qui ne
peut pas être contrôlé avec l'interrupteur est dangereux et doit être réparé.
Débranchez la fiche de la source d'alimentation et / ou du bloc-batterie de l'outil électrique avant
d'effectuer tout réglage, de changer d'accessoire ou de ranger les outils électriques. Ces mesures
de sécurité préventives réduisent le risque de démarrage accidentel de l'outil électrique.
Rangez les outils électriques inutilisés hors de la portée des enfants et ne permettez pas à des
personnes inconnues de l'outil électrique ou de ces instructions d'utiliser cet outil. Les outils
électriques sont dangereux entre les mains d'utilisateurs non formés.
Entretenir les outils électriques. Vérifiez le mauvais alignement ou le coincement des pièces
mobiles, la rupture de pièces et toute autre condition pouvant affecter le bon fonctionnement de
l’outil électrique. S'il est endommagé, faites réparer l'outil électrique avant de l'utiliser. De
nombreux accidents sont causés par des outils électriques mal entretenus.
Gardez les outils de coupe tranchants et propres. Les outils de coupe bien entretenus avec des
arêtes tranchantes sont moins susceptibles de se coincer et sont plus faciles à contrôler.
Utilisez l'outil électrique, les accessoires et les mèches, etc. conformément à ces instructions, en
tenant compte des conditions de travail et du travail à effectuer. L'utilisation de l'outil électrique
pour des opérations différentes de celles prévues pourrait entraîner une situation dangereuse.
SERVICE
Gardez votre deuxième main sur la poignée auxiliaire ou le boîtier du moteur. Si les deux mains
tiennent la scie, elles ne peuvent pas être coupées par la lame.
Ne pas atteindre sous la pièce à travailler. Le protecteur ne peut pas vous protéger de la lame
située sous la pièce.
Ajustez la profondeur de coupe à l'épaisseur de la pièce. Moins d'une dent complète de la lame
doit être visible sous la pièce à travailler.
Ne tenez jamais le morceau coupé dans vos mains ou sur votre jambe. Sécurisez la pièce sur une
plate-forme stable. Il est important de bien supporter le travail afin de minimiser l'exposition du
corps, la fixation de la lame ou la perte de contrôle.
Tenez l'outil électroportatif uniquement par des surfaces de préhension isolées lorsque vous
effectuez une opération dans laquelle l'outil de coupe risque d'entrer en contact avec un câblage
caché ou avec son propre cordon. Le contact avec un fil sous tension rendra les parties
métalliques exposées de l'outil électrique «sous tension» et pourrait donner à l'opérateur un choc
électrique
Lors de la déchirure, utilisez toujours un guide de refente ou un guide de bord droit. Cela améliore
la précision de la coupe et réduit les risques de coincement de la lame.
Utilisez toujours des lames de taille et de forme correctes (diamant contre rondes) de trous de
tonnelle. Les lames qui ne correspondent pas au matériel de montage de la scie fonctionneront de
manière excentrique, entraînant une perte de contrôle.
N'utilisez jamais de rondelles ou de boulons de lame endommagés ou incorrects. Les rondelles de
lame et le boulon ont été spécialement conçus pour votre scie, pour des performances optimales
et une sécurité de fonctionnement.
Le rebond est une réaction soudaine à une lame de scie pincée, liée ou mal alignée, provoquant
le soulèvement d'une scie non contrôlée et sa sortie de la pièce à traiter en direction de l'opéra-
teur.
Lorsque la lame est pincée ou liée étroitement par la fermeture du trait de scie, la lame se bloque
et la réaction du moteur ramène rapidement l'unité vers l'opérateur.
Si la lame est tordue ou mal alignée lors de la coupe, les dents situées sur le bord arrière de la
lame peuvent s'enfoncer dans la surface supérieure du bois, faisant ainsi sortir la lame du trait de
scie et la faire remonter vers l'opérateur.
Maintenez fermement la scie des deux mains et positionnez vos bras pour résister aux forces de
choc. Placez votre corps de part et d'autre de la lame, mais pas dans l'alignement de la lame. Un
rebond pourrait faire basculer la scie en arrière, mais les forces de contrecoup peuvent être
contrôlées par l'opérateur si les précautions appropriées sont prises.
Lorsque la lame est coincée ou lorsque vous interrompez une coupe pour quelque raison que ce
soit, relâchez la gâchette et maintenez la scie immobile dans le matériau jusqu’à ce que la lame
s’arrête complètement. N'essayez jamais de retirer la scie de la pièce ou de tirer la scie vers
l'arrière lorsque la lame est en mouvement, sinon un recul pourrait se produire. Recherchez et
prenez des mesures correctives pour éliminer la cause de la reliure de la lame.
Lors du redémarrage d'une scie dans la pièce, centrez la lame de scie dans le trait de scie et
vérifiez que les dents de la scie ne sont pas engagées dans le matériau. Si la lame de scie se
coince, elle risque de remonter ou de rebondir de la pièce à usiner au redémarrage de la scie.
Soutenez les grands panneaux pour minimiser les risques de pincement et de recul de la lame.
Les grands panneaux ont tendance à s'affaisser sous leur propre poids. Les supports doivent être
placés sous le panneau des deux côtés, près de la ligne de coupe et du bord du panneau.
N'utilisez pas de lames émoussées ou endommagées. Les lames mal affûtées ou mal réglées
produisent un trait de scie étroit causant un frottement excessif, un grippage de la lame et un recul.
La profondeur de la lame et les leviers de verrouillage de réglage du biseau doivent être serrés et
sécurisés avant la coupe. Si le réglage de la lame change pendant la coupe, cela peut provoquer
des blocages et des contrecoups.
Soyez particulièrement prudent lorsque vous sciez des murs existants ou d'autres zones
aveugles. La lame en saillie peut couper des objets pouvant causer un recul.
Vérifiez la protection inférieure pour une fermeture correcte avant chaque utilisation. Ne pas
utiliser la scie si la protection inférieure ne bouge pas librement et ne se ferme pas instantané-
ment. Ne jamais serrer ou attacher le protège-lame inférieur en position ouverte. Si la scie tombe
accidentellement, la protection inférieure peut être pliée. Soulevez la protection inférieure avec la
poignée de rétraction et assurez-vous qu'elle se déplace librement et ne touche pas la lame ou
toute autre pièce, sous tous les angles et à toutes les profondeurs de coupe.
Vérifiez le fonctionnement du ressort de protection inférieur. Si la protection et le ressort ne
fonctionnent pas correctement, ils doivent être réparés avant utilisation. Le protège-lame inférieur
peut fonctionner lentement en raison de pièces endommagées, de dépôts de gomme ou d'une
accumulation de débris.
La protection inférieure ne doit être rétractée manuellement que pour les coupes spéciales telles
que les «coupes en plongée» et les «coupes composées». Relevez la protection inférieure en
rétractant la poignée et dès que la lame pénètre dans le matériau, vous devez la relâcher. Pour
tous les autres travaux de sciage, la protection inférieure devrait fonctionner automatiquement.
Veillez toujours à ce que la protection inférieure recouvre la lame avant de poser la scie sur un
établi ou au sol. Une lame de roue libre non protégée fera marcher la scie en arrière, coupant tout
ce qui se trouve sur son passage. Soyez conscient du temps nécessaire pour que la lame s’arrête
après le relâchement du commutateur.
Utilisez des pinces ou un autre moyen pratique pour fixer et maintenir la pièce sur une plate-forme
stable.Tenir le travail à la main ou contre votre corps le laisse instable et peut entraîner une perte
de contrôle.
Gardez votre corps positionné de part et d'autre de la lame, mais pas dans l'alignement de la lame
de scie. KICKBACK pourrait faire basculer la scie en arrière(voir Causes et prévention de
Kickback et KICKBACK par l'opérateur).
Évitez de couper les ongles. Inspectez et enlevez tous les clous du bois avant de couper.
Assurez-vous toujours que rien ne gêne le mouvement du protège-lame inférieur.
Les accessoires doivent avoir au moins la vitesse recommandée sur l'étiquette d'avertissement de
l'outil. Les roues et autres accessoires fonctionnant à une vitesse supérieure à la vitesse nominale
peuvent voler en éclats et causer des blessures. Les valeurs nominales des accessoires doivent
toujours être supérieures à la vitesse de l'outil, comme indiqué sur la plaque signalétique de l'outil.
Assurez-vous toujours que la scie est propre avant de l'utiliser.
Arrêtez d’utiliser cette scie et faites-la réparer si des bruits inhabituels ou un fonctionnement
anormal se produisent.
Assurez-vous toujours que tous les composants sont montés correctement et fermement avant
d'utiliser l'outil.
Manipulez toujours la lame de scie avec précaution lors du montage, du retrait ou du retrait de la
découpe au diamant.
Attendez toujours que le moteur ait atteint sa vitesse maximale avant de commencer une coupe.
Gardez toujours les poignées sèches, propres et exemptes d’huile et de graisse. Tenez l'outil
fermement à deux mains lors de son utilisation.
Soyez toujours vigilant à tout moment, surtout lors d'opérations répétitives et monotones.
Assurez-vous toujours de la position de vos mains par rapport à la lame.
Éloignez-vous des pièces d'extrémité qui pourraient tomber après la coupe. Ils peuvent être
chauds, coupants et / ou lourds. Des blessures graves peuvent en résulter.
Remplacez ou réparez les cordons endommagés. Assurez-vous que votre rallonge est en bon état.
Utilisez uniquement des rallonges à 3 fils munies de fiches à trois broches avec mise à la terre et
de prises à 3 pôles acceptant la fiche de l’outil.
Une rallonge doit avoir une taille de fil adéquate (AWG ou American Wire Gauge) pour des raisons
de sécurité.
Protection oculaire ANSI Z87.1 (CAN / CSA Z94.3).
Protection auditive ANSI S12.6 (S3.19).
Protection respiratoire NIOSH / OSHA.
Plomb provenant de peintures à base de plomb, de silice cristalline issue de briques, de ciment et
d'autres produits de maçonnerie, ainsi que d'arsenic et de chrome provenant de bois d'œuvre traité
chimiquement.
Évitez tout contact prolongé avec la poussière provenant du ponçage, du sciage, du meulage, du
perçage et autres travaux de construction. Porter des vêtements de protection et laver les zones
exposées à l'eau et au savon. Le fait de laisser la poussière pénétrer dans la bouche, les yeux ou
sur la peau peut favoriser l'absorption de produits chimiques nocifs.
Le laser doit être utilisé et entretenu conformément aux instructions du fabricant.
Ne dirigez jamais le faisceau sur une personne ou un objet autre que la pièce.
Le faisceau laser ne doit pas être délibérément dirigé vers le personnel et il ne doit pas pouvoir être
dirigé vers les yeux d'une personne plus de 0,25 s.
Assurez-vous toujours que le faisceau laser est dirigé sur une pièce solide sans surfaces réfléchis-
santes. C'est à dire. le bois ou les surfaces rugueuses sont acceptables. Les tôles d'acier réfléchis-
santes brillantes brillantes ou similaires ne conviennent pas à une utilisation au laser, car la surface
réfléchissante pourrait diriger le faisceau vers l'opérateur.
Ne changez pas le faisceau laser avec un type différent. Les réparations doivent être effectuées
par le fabricant du laser ou un agent agréé.
Portez des gants de protection lors du montage de la lame de scie. Risque de blessure en touchant
la lame de scie.
Utilisez uniquement des lames de scie correspondant aux caractéristiques indiquées dans le mode
d'emploi.
N'utilisez en aucun cas des disques de meulage comme outil de coupe.
FIXATION ET RETRAIT DE LA LAME - FIGURE C-E
• Rétracter la protection inférieure et assembler la lame (8) et la rondelle de serrage (17) comme
indiqué sur la figure C.
• Appuyez sur le verrou de la broche (13) tout en tournant le boulon de lame (7) avec la clé pour
lame (16) jusqu'à ce que le verrou de la lame s'enclenche et que la lame s'arrête de tourner. figure
D
REMARQUE: la clé à lame est stockée dans un sac en polyéthylène avec le manuel
• Serrez fermement le boulon de lame avec la clé à lame.
REMARQUE: le boulon a un filetage à gauche. Pour desserrer, tournez dans le sens des aiguilles
d'une montre. Pour serrer, tournez dans le sens antihoraire. figure E
REMARQUE: N'engagez jamais le verrouillage de la lame pendant que la scie est en marche et ne
tentez jamais d'arrêter l'outil. N'allumez jamais l'outil lorsque le verrouillage de la lame est engagé.
Il en résultera de graves dommages à votre scie.
Au besoin, déplacez le bouton déverrouillé et laissez le doigt pointé sur la position appropriée de
l’échelle de profondeur.
Tournez ensuite le bouton à 180°pour le verrouiller,
- 20 -
Technology Creates Power
Fig D
13
FigC
8
17
7
16
Fig E
To Tight
To Loose
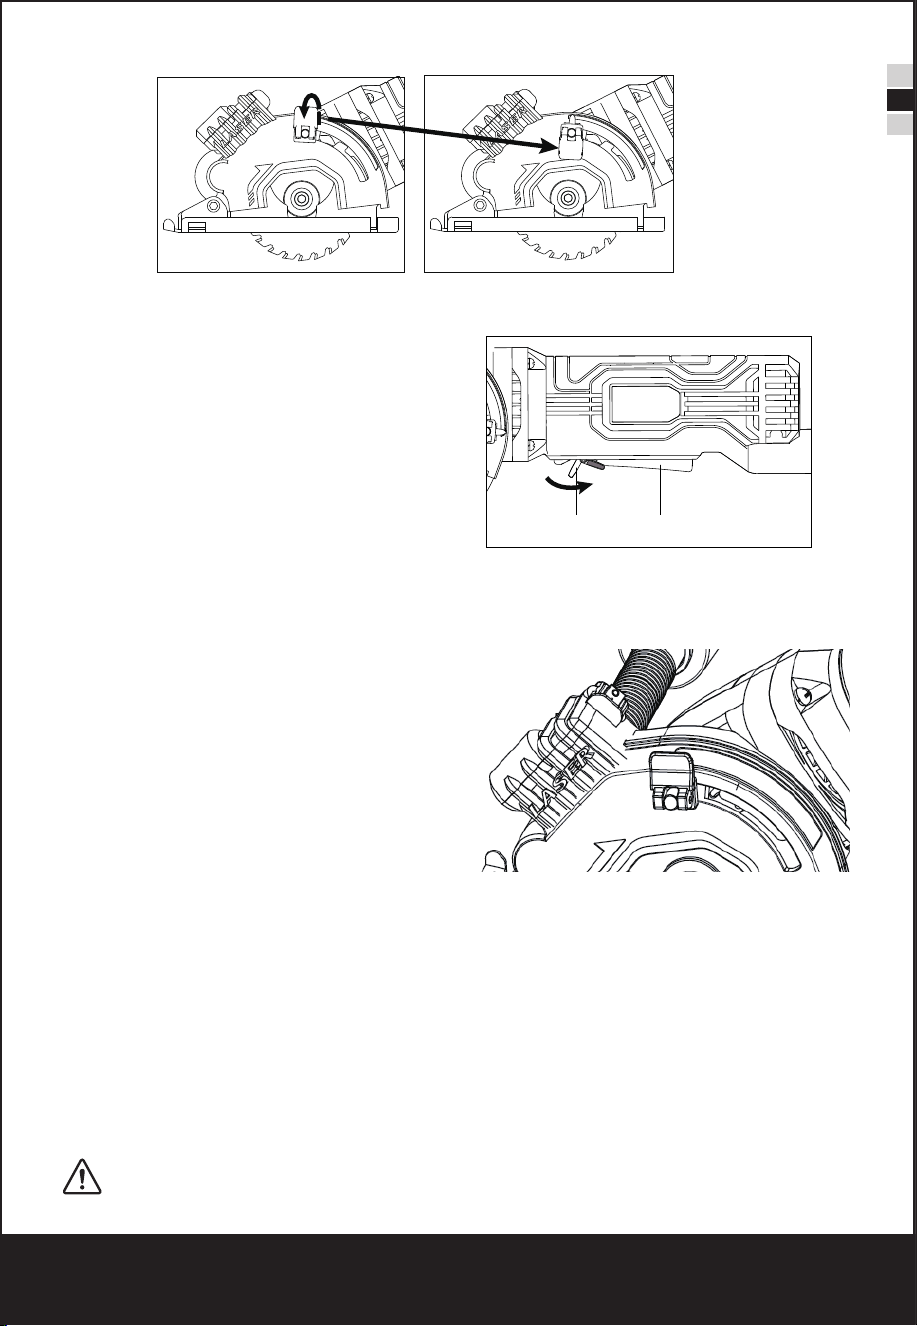
Allumer et éteindre
Remarque: Pour des raisons de sécurité, le commutateur On / Off ne peut pas être verrouillé. il doit
rester appuyé pendant toute l'opération.
Fonction laser
●Allumez-le avec le commutateur ON / OFF de la lumière laser juste avant de couper.
●Éteignez-le immédiatement après l'utilisation pour économiser la batterie et préserver la durée de
vie du laser.
CHANGEMENT DES PILES AU LASER
Les piles qui font fonctionner le laser devront être remplacées après une utilisation considérable du
laser.
1.
2.
3.
4.
DANGER: Ne laissez jamais le rayon laser pénétrer dans les yeux d'une personne, cela pourrait
5)
Faites réparer votre outil électrique par un réparateur qualifié en utilisant uniquement des pièces de
rechange identiques. Cela garantira le maintien de la sécurité de l'outil électrique.
DANGER: Gardez les mains éloignées de la zone de coupe et de la lame.
a)
b)
c)
d)
e)
f)
g)
h)
Causes et prévention du recul par l'opérateur:
●
●
●
Le rebond résulte d'une mauvaise utilisation de la scie et / ou de procédures ou de conditions d'utilisa-
tion incorrectes et peut être évité en prenant les précautions appropriées indiquées ci-dessous:
a)
b)
L'étiquette de votre outil peut inclure les symboles suivants. Les symboles et leurs définitions sont les
suivants:
Règles de sécurité pour les lumières laser
La lumière laser / le rayonnement laser utilisé dans le système est de classe 2 avec des longueurs
d’onde maximales de 1 mW et 650 nm. Ces lasers ne présentent normalement pas de danger
optique, bien que regarder le faisceau puisse provoquer un aveuglement instantané.
ATTENTION : Ne regardez pas directement le rayon laser.
Un danger peut exister si vous regardez délibérément dans le faisceau, respectez toutes les règles
de sécurité ci-dessous.
●
●
●
●
●
f)
3)
a)
b)
c)
d)
e)
f)
g)
4)
a)
b)
c)
d)
e)
f)
g)
●
●
●
●
●
●
●
Plus le numéro de calibre du fil est petit, plus la capacité du câble est grande, c'est-à-dire que le
calibre 16 a une capacité supérieure à 18. Un cordon sous-dimensionné provoquera une chute de
tension entraînant une perte de puissance et une surchauffe. Lorsque vous utilisez plusieurs rallong-
es pour calculer la longueur totale, assurez-vous que chaque rallonge contient au moins la taille
minimale du fil. Le tableau suivant indique la taille à utiliser en fonction de la longueur du cordon et de
l’intensité nominale indiquée sur la plaque signalétique. En cas de doute, utilisez la prochaine jauge
plus lourde. Plus le numéro de calibre est petit, plus le cordon est lourd.
●
●
●
ATTENTION: Certaines poussières générées par le sablage, le sciage, le meulage, le forage et
d'autres activités de construction contiennent des produits chimiques connus dans l'État de Californie
pour provoquer le cancer, des anomalies congénitales ou d'autres troubles de la reproduction. Voici
DÉFINITIONS: SYMBOLES ET MOTS D'ALERTE DE SÉCURITÉ
Il est important que vous lisiez et compreniez ce manuel. Les informations qu’il contient ont trait à la
protection de VOTRE SÉCURITÉ et à la prévention des problèmes. Les symboles ci-dessous sont
utilisés pour vous aider à reconnaître cette information.
NOTICE: Utilisé sans le symbole d'alerte de sécurité, il indique une situation potentiellement
dangereuse qui, si elle n'est pas évitée, peut entraîner des dommages matériels.
ATTENTION: Lire tous les avertissements de sécurité et toutes les instructions
Le non respect des avertissements et des instructions peut entraîner un choc électrique, un incendie
et / ou des blessures graves.
CONSERVEZ TOUS LES AVERTISSEMENTS ET INSTRUCTIONS POUR CONSULTATION
FUTURE
Le terme «outil électrique» dans les avertissements fait référence à votre outil électrique alimenté par
le secteur (avec fil) ou à piles (sans fil).
1)
a)
b)
c)
2)
a)
b)
c)
d)
e)
c)
d)
e)
f)
g)
Consignes de Sécurité Inférieures
a)
b)
c)
d)
Consignes de Sécurité Supplémentaires
●
●
●
●
●
●
●
●
quelques exemples de ces produits chimiques:
●
Les risques liés à ces expositions varient en fonction de la fréquence à laquelle vous effectuez ce type
de travail. Pour réduire votre exposition à ces produits chimiques: travaillez dans un endroit bien
ventilé et utilisez des équipements de sécurité approuvés, tels que les masques antipoussières
spécialement conçus pour filtrer les particules microscopiques.
ATTENTION: TOUJOURS UTILISER DES LUNETTES DE SÉCURITÉ. Les lunettes ordinaires
ne sont PAS des lunettes de sécurité. Utilisez également un masque facial ou antipoussière si vous
coupez
●
ATTENTION: La découpe de plastiques, de bois sablé et d'autres matériaux peut provoquer
l'accumulation de matière fondue sur les pointes de lame et le corps de la lame de scie, augmentant
ainsi le risque de surchauffe et de coincement de la lame lors de la coupe.
ATTENTION: L'utilisation de cet outil peut générer et / ou dissiper de la poussière, ce qui peut
causer des blessures graves et permanentes aux voies respiratoires ou autres. Utilisez toujours une
protection respiratoire approuvée par NIOSH / OSHA appropriée à l'exposition à la poussière. Éloign-
er les particules du visage et du corps. Toujours utiliser l'outil dans une zone bien ventilée et assurer
un dépoussiérage adéquat. Utilisez le système de dépoussiérage autant que possible.
MISE EN GARDE: L'utilisation de commandes ou de réglages ou l'exécution de procédures
autres que celles spécifiées dans le présent document peut entraîner une exposition à des radiations
dangereuses.
Usage prévu
Cette machine est principalement destinée au sciage longitudinal et transversal du bois massif, des
panneaux de particules, du contreplaqué, de l’aluminium, des carreaux et de la pierre maintenus
dans une position fixe. Veuillez noter que la lame pré-installée dans la scie telle que fournie est
destinée à être utilisée avec du bois uniquement. Toute autre utilisation ou modification de l'appareil
doit être considérée comme une utilisation non conforme et peut générer des risques considérables.
Il n'est pas adapté à un usage commercial.
Description de la fonction
La numérotation des caractéristiques des produits fait référence à l'illustration de la machine sur la
page graphique.
Montage / Réglage
ATTENTION: Avant tout travail sur l'outil électrique, retirez toujours la fiche de la source
d'alimentation.
●
●
●
Régler la profondeur de coupe
1.
2.
Remarque: si possible, recommandez une profondeur de coupe d'environ 2 mm plus profonde que
l'épaisseur du matériau. Cela devrait vous aider à obtenir une coupe nette.
entraîner des lésions oculaires graves. Assurez-vous que le commutateur laser est éteint et que le
laser ne pointe pas vers vous lors du remplacement des piles du laser et de la vérification du
fonctionnement du laser.
Application
La mini scie plongeante est polyvalente et vous permet de couper de nombreux types de matériaux.
Certains des matériaux incluent
●
●
●
Sélection de la lame
ENTRETIEN
ATTENTION: Débranchez l'outil avant d'installer ou de retirer des accessoires, avant de
procéder au réglage ou lors de réparations. Utilisez uniquement un savon doux et un chiffon humide
pour nettoyer l'outil. Ne laissez jamais aucun liquide pénétrer à l'intérieur de l'outil. ne jamais immerg-
er une partie de l'outil dans un liquide.
IMPORTANT: Pour assurer la SÉCURITÉ et la FIABILITÉ du produit, les réparations, la mainte-
nance et les réglages (autres que ceux énumérés dans ce manuel) doivent être effectués par des
centres de service agréés ou d'autres centres de service qualifiés, en utilisant toujours des pièces de
rechange identiques.
EN
FR
ES
TPour démarrer la machine
●Commencez par pousser le bouton de verrouil-
lage (5) vers l'arrière.
●Appuyez ensuite sur la gâchette (4) et
maintenez-la enfoncée.
●Lorsque vous coupez le bois, placez la
machine sur la pièce à travailler et poussez-la
contre le bois. Pour éteindre la machine
●Première sortie de la machine de la pièce.
●Then release the switch trigger.Relâchez
ensuite la gâchette.
Remarque: La lumière laser peut causer de
graves dommages aux yeux. Ne regardez jamais
directement dans le faisceau laser. Ne dirigez
pas le faisceau laser vers des personnes ou des
animaux, ni directement, ni à travers des surfac-
es réfléchissantes.
La fonction laser de votre scie est alimentée par
deux piles bouton LR44 1,5 V (installées).
La fonction laser vous montre clairement une
ligne de coupe étendue, même sur les débris de
la pièce.
Éteignez le laser.
Retirez la vis du capot du laser.
Soulevez le capot du laser pour le retirer du haut de l’ensemble laser.
Retirez les deux piles usagées (18).
Produits du bois tels que bois d'oeuvre, bois dur, contreplaqué, panneaux de composition et
lambris
plastique et métal mou.
carrelage et backerboard
- 21 -
Technology Creates Power
5 4
Fig F FigG
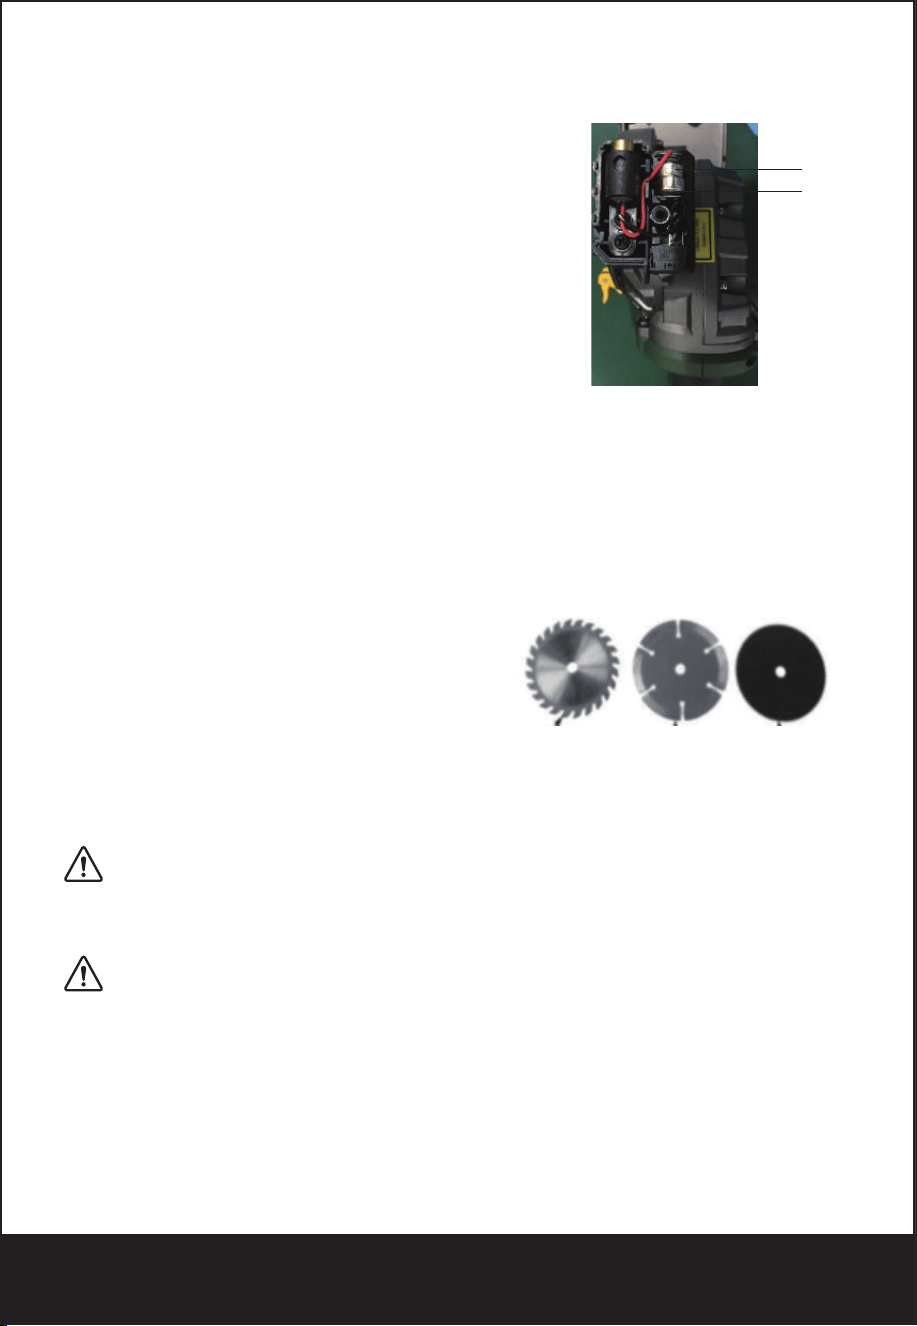
Allumer et éteindre
Remarque: Pour des raisons de sécurité, le commutateur On / Off ne peut pas être verrouillé. il doit
rester appuyé pendant toute l'opération.
Fonction laser
●Allumez-le avec le commutateur ON / OFF de la lumière laser juste avant de couper.
●Éteignez-le immédiatement après l'utilisation pour économiser la batterie et préserver la durée de
vie du laser.
CHANGEMENT DES PILES AU LASER
Les piles qui font fonctionner le laser devront être remplacées après une utilisation considérable du
laser.
1.
2.
3.
4.
DANGER: Ne laissez jamais le rayon laser pénétrer dans les yeux d'une personne, cela pourrait
5)
Faites réparer votre outil électrique par un réparateur qualifié en utilisant uniquement des pièces de
rechange identiques. Cela garantira le maintien de la sécurité de l'outil électrique.
DANGER: Gardez les mains éloignées de la zone de coupe et de la lame.
a)
b)
c)
d)
e)
f)
g)
h)
Causes et prévention du recul par l'opérateur:
●
●
●
Le rebond résulte d'une mauvaise utilisation de la scie et / ou de procédures ou de conditions d'utilisa-
tion incorrectes et peut être évité en prenant les précautions appropriées indiquées ci-dessous:
a)
b)
L'étiquette de votre outil peut inclure les symboles suivants. Les symboles et leurs définitions sont les
suivants:
Règles de sécurité pour les lumières laser
La lumière laser / le rayonnement laser utilisé dans le système est de classe 2 avec des longueurs
d’onde maximales de 1 mW et 650 nm. Ces lasers ne présentent normalement pas de danger
optique, bien que regarder le faisceau puisse provoquer un aveuglement instantané.
ATTENTION : Ne regardez pas directement le rayon laser.
Un danger peut exister si vous regardez délibérément dans le faisceau, respectez toutes les règles
de sécurité ci-dessous.
●
●
●
●
●
f)
3)
a)
b)
c)
d)
e)
f)
g)
4)
a)
b)
c)
d)
e)
f)
g)
●
●
●
●
●
●
●
Plus le numéro de calibre du fil est petit, plus la capacité du câble est grande, c'est-à-dire que le
calibre 16 a une capacité supérieure à 18. Un cordon sous-dimensionné provoquera une chute de
tension entraînant une perte de puissance et une surchauffe. Lorsque vous utilisez plusieurs rallong-
es pour calculer la longueur totale, assurez-vous que chaque rallonge contient au moins la taille
minimale du fil. Le tableau suivant indique la taille à utiliser en fonction de la longueur du cordon et de
l’intensité nominale indiquée sur la plaque signalétique. En cas de doute, utilisez la prochaine jauge
plus lourde. Plus le numéro de calibre est petit, plus le cordon est lourd.
●
●
●
ATTENTION: Certaines poussières générées par le sablage, le sciage, le meulage, le forage et
d'autres activités de construction contiennent des produits chimiques connus dans l'État de Californie
pour provoquer le cancer, des anomalies congénitales ou d'autres troubles de la reproduction. Voici
DÉFINITIONS: SYMBOLES ET MOTS D'ALERTE DE SÉCURITÉ
Il est important que vous lisiez et compreniez ce manuel. Les informations qu’il contient ont trait à la
protection de VOTRE SÉCURITÉ et à la prévention des problèmes. Les symboles ci-dessous sont
utilisés pour vous aider à reconnaître cette information.
NOTICE: Utilisé sans le symbole d'alerte de sécurité, il indique une situation potentiellement
dangereuse qui, si elle n'est pas évitée, peut entraîner des dommages matériels.
ATTENTION: Lire tous les avertissements de sécurité et toutes les instructions
Le non respect des avertissements et des instructions peut entraîner un choc électrique, un incendie
et / ou des blessures graves.
CONSERVEZ TOUS LES AVERTISSEMENTS ET INSTRUCTIONS POUR CONSULTATION
FUTURE
Le terme «outil électrique» dans les avertissements fait référence à votre outil électrique alimenté par
le secteur (avec fil) ou à piles (sans fil).
1)
a)
b)
c)
2)
a)
b)
c)
d)
e)
c)
d)
e)
f)
g)
Consignes de Sécurité Inférieures
a)
b)
c)
d)
Consignes de Sécurité Supplémentaires
●
●
●
●
●
●
●
●
quelques exemples de ces produits chimiques:
●
Les risques liés à ces expositions varient en fonction de la fréquence à laquelle vous effectuez ce type
de travail. Pour réduire votre exposition à ces produits chimiques: travaillez dans un endroit bien
ventilé et utilisez des équipements de sécurité approuvés, tels que les masques antipoussières
spécialement conçus pour filtrer les particules microscopiques.
ATTENTION: TOUJOURS UTILISER DES LUNETTES DE SÉCURITÉ. Les lunettes ordinaires
ne sont PAS des lunettes de sécurité. Utilisez également un masque facial ou antipoussière si vous
coupez
●
ATTENTION: La découpe de plastiques, de bois sablé et d'autres matériaux peut provoquer
l'accumulation de matière fondue sur les pointes de lame et le corps de la lame de scie, augmentant
ainsi le risque de surchauffe et de coincement de la lame lors de la coupe.
ATTENTION: L'utilisation de cet outil peut générer et / ou dissiper de la poussière, ce qui peut
causer des blessures graves et permanentes aux voies respiratoires ou autres. Utilisez toujours une
protection respiratoire approuvée par NIOSH / OSHA appropriée à l'exposition à la poussière. Éloign-
er les particules du visage et du corps. Toujours utiliser l'outil dans une zone bien ventilée et assurer
un dépoussiérage adéquat. Utilisez le système de dépoussiérage autant que possible.
MISE EN GARDE: L'utilisation de commandes ou de réglages ou l'exécution de procédures
autres que celles spécifiées dans le présent document peut entraîner une exposition à des radiations
dangereuses.
Usage prévu
Cette machine est principalement destinée au sciage longitudinal et transversal du bois massif, des
panneaux de particules, du contreplaqué, de l’aluminium, des carreaux et de la pierre maintenus
dans une position fixe. Veuillez noter que la lame pré-installée dans la scie telle que fournie est
destinée à être utilisée avec du bois uniquement. Toute autre utilisation ou modification de l'appareil
doit être considérée comme une utilisation non conforme et peut générer des risques considérables.
Il n'est pas adapté à un usage commercial.
Description de la fonction
La numérotation des caractéristiques des produits fait référence à l'illustration de la machine sur la
page graphique.
Montage / Réglage
ATTENTION: Avant tout travail sur l'outil électrique, retirez toujours la fiche de la source
d'alimentation.
●
●
●
Régler la profondeur de coupe
1.
2.
Remarque: si possible, recommandez une profondeur de coupe d'environ 2 mm plus profonde que
l'épaisseur du matériau. Cela devrait vous aider à obtenir une coupe nette.
entraîner des lésions oculaires graves. Assurez-vous que le commutateur laser est éteint et que le
laser ne pointe pas vers vous lors du remplacement des piles du laser et de la vérification du
fonctionnement du laser.
Application
La mini scie plongeante est polyvalente et vous permet de couper de nombreux types de matériaux.
Certains des matériaux incluent
●
●
●
Sélection de la lame
ENTRETIEN
ATTENTION: Débranchez l'outil avant d'installer ou de retirer des accessoires, avant de
procéder au réglage ou lors de réparations. Utilisez uniquement un savon doux et un chiffon humide
pour nettoyer l'outil. Ne laissez jamais aucun liquide pénétrer à l'intérieur de l'outil. ne jamais immerg-
er une partie de l'outil dans un liquide.
IMPORTANT: Pour assurer la SÉCURITÉ et la FIABILITÉ du produit, les réparations, la mainte-
nance et les réglages (autres que ceux énumérés dans ce manuel) doivent être effectués par des
centres de service agréés ou d'autres centres de service qualifiés, en utilisant toujours des pièces de
rechange identiques.
EN
FR
ES
Trois lames sont disponibles pour cette scie. Chacun est
pour couper différents matériaux. Sélectionnez la lame
appropriée pour vos applications.
Lame de scie TCT 24 dents (a) pour la coupe du bois,
du plastique et d'autres matériaux tendres
La lame de scie HSS à 44 dents (c) sert à couper le
plastique et le métal tendre.
La lame diamantée (b) sert à couper les carreaux et le
panneau de support.
5.Remplacez par deux piles neuves.
REMARQUES:
a)Utilisez deux piles 1,5 V LR 44
b)installer les piles avec le côté "+" (19) des piles
orienté vers l'arrière de l'outil
6. Réinstallez le capot du laser et fixez-le à l'aide
de la vis du capot du laser.
Éteignez le laser.
Retirez la vis du capot du laser.
Soulevez le capot du laser pour le retirer du haut de l’ensemble laser.
Retirez les deux piles usagées (18).
18
19
Produits du bois tels que bois d'oeuvre, bois dur, contreplaqué, panneaux de composition et
lambris
plastique et métal mou.
carrelage et backerboard
(a) (b) (c)
- 22 -
Technology Creates Power
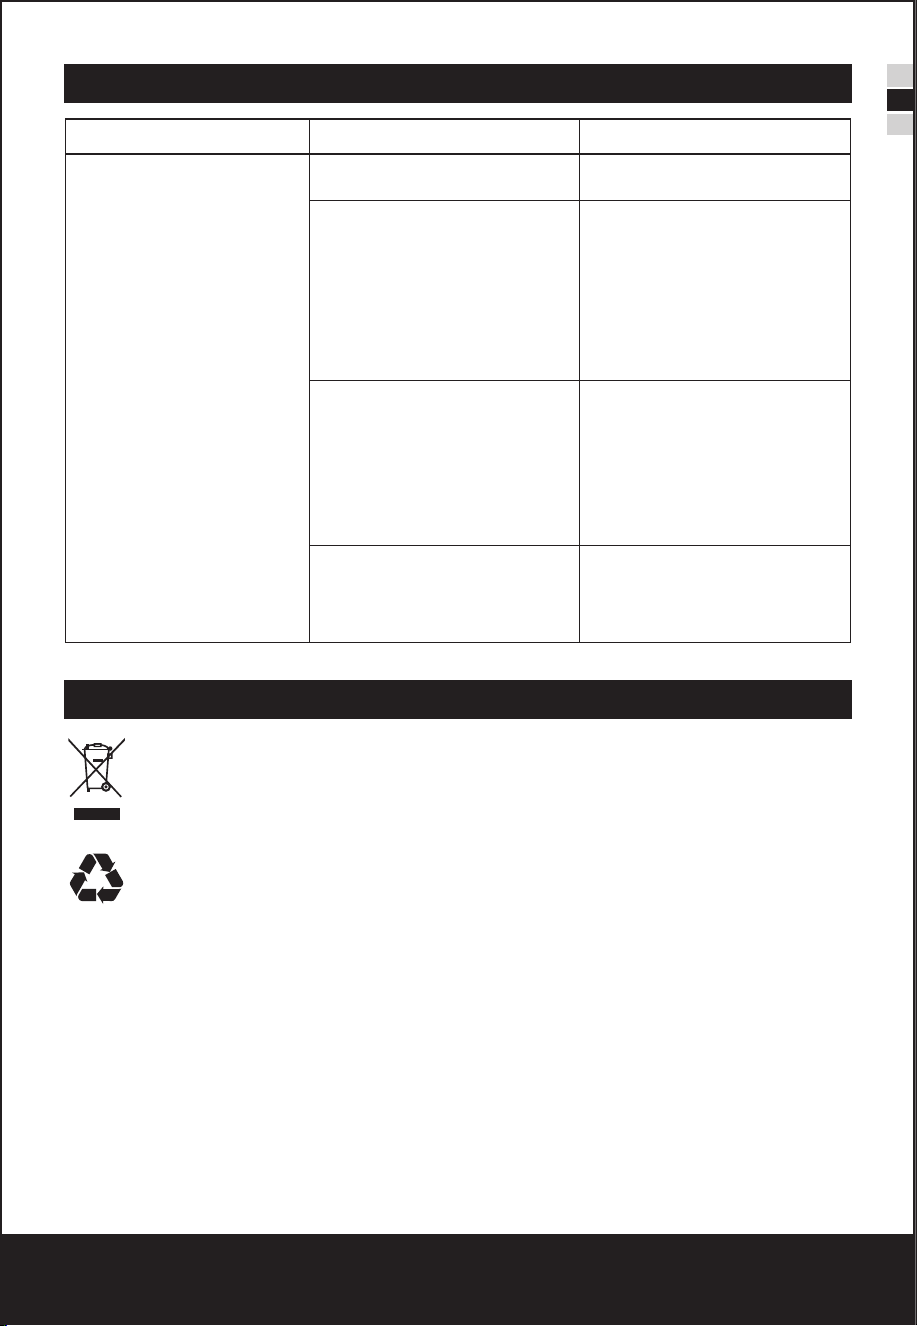
EN
FR
ES
Dépannage
Problème
L'unité ne démarrera pas
Cord non branché.
Le fusible du circuit est grillé.
Le disjoncteur est déclenché
Le cordon ou l'interrupteur
est endommagé
Branchez l'outil dans
une prise de travail.
Cause possible Solution possible
Remplacez le fusible du circuit
(si le produit provoque la rupture
du fusible à plusieurs reprises,
cessez immédiatement de
l'utiliser et faites-le réparer par
un centre de service)
Réinitialisez le disjoncteur (si le
produit provoque à plusieurs
reprises le déclenchement du
disjoncteur, arrêtez immédiate-
ment de l'utiliser et faites-le
réparer par un centre de
service.)
Faire remplacer le cordon ou
l'interrupteur au centre de
service
La protection de l'environnement
Collection séparée. Ce produit ne doit pas être jeté avec les ordures ménagères.
.Si vous trouvez un jour que votre produit TECCPO a besoin d'être remplacé, ou s'il ne vous
est plus d'aucune utilité, ne le jetez pas avec les ordures ménagères. Rendez ce produit
disponible pour une collecte séparée.
La collecte séparée des produits usagés et des emballages permet aux matériaux d'être
recyclés et réutilisés.
La réutilisation de matériaux recyclés aide à prévenir la pollution de l’environnement et à
réduire la demande de matières premières..
Les réglementations locales peuvent prévoir la collecte séparée des produits électriques
auprès du ménage, dans les décharges municipales ou chez le détaillant lorsque vous
achetez un nouveau produit.
- 23 -
Technology Creates Power
Cet appareil est conforme à la partie 15 des règles FCC. Son fonctionnement est soumis
aux deux conditions suivantes: (1) Cet appareil ne doit pas causer d'interférences nuisibles,
et (2) cet appareil doit accepter toute interférence reçue, y compris les interférences peut
provoquer un fonctionnement indésirable.

Encendido y apagado
Nota: Por razones de seguridad, el interruptor de encendido / apagado no se puede bloquear; debe
permanecer presionado durante toda la operación.
Función Láser
●Enciéndalo con el interruptor de encendido / apagado de la luz láser justo antes de cortar.
●Apáguelo inmediatamente después del uso para conservar la vida útil de la batería y el láser.
CAMBIO DE LAS BATERÍAS LÁSER
Las baterías que operan el láser deberán reemplazarse después de un uso considerable del láser.
1.
2.
3.
4.
PELIGRO: Nunca permita que el rayo láser brille en los ojos de una persona, podría provocar
daños oculares graves. Asegúrese de que el interruptor del láser esté apagado y que el láser NO esté
apuntando hacia usted mientras reemplaza las baterías del láser y cuando verifica la función del
láser.
5)
Haga que un técnico calificado repare su herramienta eléctrica utilizando solo piezas de repuesto
idénticas. Esto asegurará que se mantenga la seguridad de la herramienta eléctrica.
PELIGRO: Mantenga las manos alejadas del área de corte y la cuchilla.
a)
b)
c)
d)
e)
f)
g)
h)
Causas y prevención del contragolpe del operador:
●
●
●
El contragolpe es el resultado del mal uso de la sierra y / o procedimientos o condiciones de
operación incorrectas y puede evitarse tomando las precauciones adecuadas como se indica a
continuación:
a)
b)
La etiqueta de su herramienta puede incluir los siguientes símbolos. Los símbolos y sus definiciones
son los siguientes:
Reglas de seguridad para luces láser
La luz láser / radiación láser utilizada en el sistema es de Clase 2 con longitudes de onda máximas
de 1 mW y 650 nm. Estos láseres normalmente no presentan un riesgo óptico, aunque mirar el rayo
puede causar ceguera instantánea.
ADVERTENCIA : No mire directamente al rayo láser.
Puede existir un peligro si observa deliberadamente la viga, observe todas las reglas de seguridad
de la siguiente manera;
●
●
●
●
●
f)
3)
a)
b)
c)
d)
e)
f)
g)
4)
a)
b)
c)
d)
e)
f)
g)
●
●
●
●
●
●
●
●
Cuanto menor es el número de calibre del cable, mayor es la capacidad del cable, es decir, el calibre
16 tiene más capacidad que el calibre 18. Un cable de menor tamaño provocará una caída en el
voltaje de la línea, lo que provocará pérdida de potencia y sobrecalentamiento. Cuando use más de
una extensión para completar la longitud total, asegúrese de que cada extensión individual contenga
al menos el tamaño mínimo de cable. La siguiente tabla muestra el tamaño correcto a utilizar según
la longitud del cable y la clasificación de amperaje de la placa de identificación. En caso de duda, use
el siguiente medidor más pesado. Cuanto más pequeño es el número de calibre, más pesado es el
cable.
DEFINICIONES: SÍMBOLOS Y PALABRAS DE ALERTA DE SEGURIDAD
Es importante que lea y comprenda este manual. La información que contiene se relaciona con la
protección de SU SEGURIDAD y la PREVENCIÓN DE PROBLEMAS. Los siguientes símbolos se
usan para ayudarlo a reconocer esta información.
AVISO: El uso sin el símbolo de alerta de seguridad indica una situación potencialmente peligrosa
que, si no se evita, puede provocar daños a la propiedad.
ADVERTENCIA: lea todas las advertencias de seguridad y todas las instrucciones.
El incumplimiento de las advertencias e instrucciones puede provocar descargas eléctricas, incendi-
os y / o lesiones graves.
GUARDE TODAS LAS ADVERTENCIAS E INSTRUCCIONES PARA FUTURAS REFERENCIAS
El término "herramienta eléctrica" en las advertencias se refiere a la herramienta eléctrica que funcio-
na con la red eléctrica (con cable) o la herramienta eléctrica que funciona con batería (sin cable).
1)
a)
b)
c)
2)
a)
b)
c)
d)
e)
c)
d)
e)
f)
g)
Instrucciones de seguridad de la protección inferior
a)
b)
c)
d)
Instrucciones de seguridad adicionales
●
●
●
●
●
●
●
●
●
●
ADVERTENCIA: Parte del polvo creado por el lijado eléctrico, el aserrado, el rectificado, la
perforación y otras actividades de construcción contienen productos químicos que en el estado de
California se sabe que causan cáncer, defectos de nacimiento u otros daños reproductivos. Algunos
ejemplos de estos químicos son:
●
El riesgo de estas exposiciones varía, según la frecuencia con la que realice este tipo de trabajo.
Para reducir su exposición a estos productos químicos: trabaje en un área bien ventilada y trabaje
con equipos de seguridad aprobados, como las máscaras antipolvo que están especialmente diseña-
das para filtrar partículas microscópicas.
ADVERTENCIA: SIEMPRE USE GAFAS DE SEGURIDAD. Los anteojos de uso diario NO
son lentes de seguridad. También use mascarilla facial o antipolvo si corta
●
ADVERTENCIA: Cortar plásticos, madera recubierta de savia y otros materiales puede hacer
que el material derretido se acumule en las puntas de la hoja y en el cuerpo de la hoja de sierra, lo
que aumenta el riesgo de sobrecalentamiento y atascamiento de la hoja durante el corte.
ADVERTENCIA: El uso de esta herramienta puede generar y / o desechar polvo, lo que puede
causar lesiones respiratorias u otras lesiones graves y permanentes. Siempre use protección respira-
toria aprobada por NIOSH / OSHA apropiada para la exposición al polvo. Dirija las partículas lejos de
la cara y el cuerpo. Siempre opere la herramienta en un área bien ventilada y permita la eliminación
adecuada del polvo. Utilice el sistema de recolección de polvo siempre que sea posible.
PRECAUCIÓN: El uso de controles o ajustes o la realización de procedimientos distintos a los
especificados en este documento pueden provocar una exposición peligrosa a la radiación
Uso previsto
Esta máquina está destinada principalmente al aserrado, longitudinal y transversalmente, de madera
maciza, aglomerado, madera contrachapada, aluminio, azulejos y piedra en una posición fija. Tenga
en cuenta que la hoja preinstalada en la sierra, tal como se suministra, está diseñada para usarse
solo con madera. Cualquier otro uso o modificación del dispositivo se considerará como un uso
inadecuado y podría generar peligros considerables. No es adecuado para uso comercial
Función descriptiva
La numeración de las características de los productos se refiere a la ilustración de la máquina en la
página de gráficos.
Montaje / configuración de ajuste
ADVERTENCIA: Antes de trabajar en la herramienta eléctrica, retire siempre el enchufe de la
fuente de alimentación.
●
●
●
Ajustar la profundidad de corte,
1.
2.
Nota: si es posible, recomiende configurar la profundidad de corte aproximadamente 2 mm más
profundo que el grosor del material, esto debería ayudar a asegurar que logre un corte limpio.
Solicitud
La mini sierra de inmersión es versátil y le permite cortar muchos tipos diferentes de materiales.
Algunos de los materiales incluyen
●
●
●
Selección de cuchilla
MANTENIMIENTO
ADVERTENCIA: Desenchufe la herramienta antes de instalar o quitar accesorios, antes de
ajustar o al hacer reparaciones. Use solo jabón suave y un paño húmedo para limpiar la herramienta.
Nunca permita que ningún líquido ingrese a la herramienta; nunca sumerja ninguna parte de la
herramienta en un líquido.
IMPORTANTE: Para garantizar la SEGURIDAD y CONFIABILIDAD del producto, reparaciones,
mantenimiento y ajuste (que no sean los enumerados
en este manual) debe ser realizado por centros de servicio autorizados u otras organizaciones de
servicio calificadas, utilizando siempre piezas de repuesto idénticas.
PELIGRO: Indica una situación inminentemente peligrosa que, si no se evita, provocará la
muerte o lesiones graves.
ADVERTENCIA: Indica una situación potencialmente peligrosa que, si no se evita, podría
provocar la muerte o lesiones graves.
PRECAUCIÓN: Indica una situación potencialmente peligrosa que, si no se evita, puede
provocar lesiones leves o moderadas.
Advertencias generales de seguridad de herramientas eléctricas
SEGURIDAD EN EL ÁREA DE TRABAJO
Mantenga el área de trabajo limpia y bien iluminada. Las áreas desordenadas u oscuras provocan
accidentes.
No opere herramientas eléctricas en atmósferas explosivas, como en presencia de líquidos,
gases o polvo inflamables. Las herramientas eléctricas crean chispas que pueden encender el
polvo o los humos.
Mantenga alejados a los niños y transeúntes mientras utiliza una herramienta eléctrica. Las
distracciones pueden hacer que pierdas el control.
SEGURIDAD ELECTRICA
Los enchufes de la herramienta eléctrica deben coincidir con la toma de corriente. Nunca
modifique el enchufe de ninguna manera. No utilice enchufes adaptadores con herramientas
eléctricas conectadas a tierra. Los enchufes no modificados y las tomas correspondientes
reducirán el riesgo de descarga eléctrica.
Evite el contacto del cuerpo con superficies conectadas a tierra, como tuberías, radiadores,
cocinas y refrigeradores. Existe un mayor riesgo de electricidad
choque si su cuerpo está conectado a tierra.
No exponga las herramientas eléctricas a la lluvia o la humedad. El agua que ingresa a una
herramienta eléctrica aumentará el riesgo de descarga eléctrica.
No maltrate el cable. Nunca use el cable para transportar, tirar o desenchufar la herramienta
eléctrica. Mantenga el cable alejado del calor, aceite, bordes afilados o piezas móviles. Los cables
dañados o enredados aumentan el riesgo de descarga eléctrica.
Cuando utilice una herramienta eléctrica en exteriores, use un cable de extensión adecuado para
uso en exteriores. El uso de un cable adecuado para uso en exteriores reduce el riesgo de descar-
ga eléctrica.
Si es inevitable utilizar una herramienta eléctrica en una ubicación húmeda, utilice un suministro
protegido por un interruptor de circuito de falla a tierra (GFCI). El uso de un GFCI reduce el riesgo
de descarga eléctrica.
SEGURIDAD PERSONAL
Manténgase alerta, observe lo que está haciendo y use el sentido común al operar una
herramienta eléctrica. No use una herramienta eléctrica mientras
Está cansado o bajo la influencia de drogas, alcohol o medicamentos. Un momento de falta de
atención al utilizar herramientas eléctricas puede provocar lesiones personales graves.
Use equipo de protección personal.
Siempre use protección para los ojos. El equipo de protección como máscara antipolvo, zapatos
de seguridad antideslizantes, casco o protección auditiva para condiciones apropiadas reducirá
las lesiones personales.
Prevenir arranques involuntarios. Asegúrese de que el interruptor esté en la posición de apagado
antes de conectarlo a la fuente de alimentación y / o al paquete de baterías, levantar o transportar
la herramienta. Llevar herramientas eléctricas con el dedo en el interruptor o activar herramientas
eléctricas que tienen el interruptor encendido invita a accidentes.
Retire cualquier llave de ajuste o llave inglesa antes de encender la herramienta eléctrica. Una
llave inglesa o una llave dejada unida a una parte giratoria de la herramienta eléctrica puede
provocar lesiones personales.
No te excedas. Mantenga la postura y el equilibrio en todo momento. Esto permite un mejor
control de la herramienta eléctrica en situaciones inesperadas.
Vístete apropiadamente. No use ropa suelta o joyas. Mantenga su cabello, ropa y guantes lejos
de las partes móviles. Ropa suelta, joyas o cabello largo pueden quedar atrapados en las partes
móviles.
Si se proporcionan dispositivos para la conexión de instalaciones de extracción y recolección de
polvo, asegúrese de que estén conectados y se usen adecuadamente.
El uso de la recolección de polvo puede reducir los riesgos relacionados con el polvo.
USO Y CUIDADO DE LA HERRAMIENTA ELÉCTRICA
No fuerce la herramienta eléctrica. Use la herramienta eléctrica correcta para su aplicación. La
herramienta eléctrica correcta hará el trabajo mejor y más seguro a la velocidad para la que fue
diseñada.
No use la herramienta eléctrica si el interruptor no enciende y apaga. Cualquier herramienta
eléctrica que no pueda controlarse con el interruptor es peligrosa y debe repararse.
Desconecte el enchufe de la fuente de alimentación y / o la batería de la herramienta eléctrica
antes de hacer cualquier ajuste, cambiar accesorios o almacenar herramientas eléctricas. Dichas
medidas de seguridad preventivas reducen el riesgo de arrancar la herramienta eléctrica acciden-
talmente.
Guarde las herramientas eléctricas inactivas fuera del alcance de los niños y no permita que
personas que no estén familiarizadas con la herramienta eléctrica o estas instrucciones operen la
herramienta. Las herramientas eléctricas son peligrosas en manos de usuarios no capacitados.
Mantener herramientas eléctricas. Verifique la desalineación o el atascamiento de las piezas
móviles, la rotura de las piezas y cualquier otra condición que pueda afectar el funcionamiento de
la herramienta eléctrica. Si está dañado, repare la herramienta eléctrica antes de usar. Muchos
accidentes son causados por herramientas eléctricas mal mantenidas.
Mantenga las herramientas de corte afiladas y limpias. Es menos probable que las herramientas de
corte mantenidas adecuadamente con bordes de corte afilados se unan y son más fáciles de controlar.
Utilice la herramienta eléctrica, los accesorios y las brocas de herramientas, etc. de acuerdo con
estas instrucciones, teniendo en cuenta las condiciones de trabajo y el trabajo a realizar. El uso
de la herramienta eléctrica para operaciones diferentes de las previstas podría provocar una
situación peligrosa.
SERVICIO
Mantenga su segunda mano en la manija auxiliar o en la carcasa del motor. Si ambas manos
sostienen la sierra, la hoja no puede cortarlas.
No meta debajo de la pieza de trabajo. El protector no puede protegerlo de la cuchilla debajo de
la pieza de trabajo.
Ajuste la profundidad de corte al grosor de la pieza de trabajo. Debe verse menos de un diente
completo de los dientes de la cuchilla debajo de la pieza de trabajo.
Nunca sostenga la pieza que está cortando en sus manos o en su pierna. Asegure la pieza de
trabajo a una plataforma estable. Es importante apoyar el trabajo adecuadamente para minimizar
la exposición del cuerpo, la fijación de la cuchilla o la pérdida de control.
Sujete la herramienta eléctrica solo por las superficies de agarre aisladas, cuando realice una
operación donde la herramienta de corte pueda entrar en contacto con cables ocultos o su propio
cable. El contacto con un cable "vivo" también hará que las partes metálicas expuestas de la
herramienta eléctrica "vivan" y podría dar al operador una descarga eléctrica.
Cuando rasgue siempre use una guía de corte o una guía de borde recto. Esto mejora la precisión
del corte y reduce la posibilidad de que la cuchilla se atasque.
Utilice siempre cuchillas con el tamaño y la forma correctos (diamante versus redondo) de los
agujeros del eje. Las hojas que no coinciden con el hardware de montaje de la sierra funcionarán
excéntricamente, causando pérdida de control.
Nunca use arandelas o pernos dañados o incorrectos. Las arandelas y el perno de la hoja fueron
diseñados especialmente para su sierra, para un rendimiento óptimo y seguridad de operación
El retroceso es una reacción repentina a una hoja de sierra apretada, atada o desalineada, que
hace que una sierra no controlada se levante y salga de la pieza de trabajo hacia el operador.
Cuando la cuchilla se pellizca o ata fuertemente por la ranura que se cierra, la cuchilla se detiene
y la reacción del motor impulsa la unidad rápidamente hacia el operador.
Si la cuchilla se tuerce o se desalinea en el corte, los dientes en el borde posterior de la cuchilla
pueden cavar en la superficie superior de la madera haciendo que la cuchilla salga de la ranura y
salte hacia el operador.
Mantenga un agarre firme con ambas manos en la sierra y coloque los brazos para resistir las
fuerzas de contragolpe. Coloque su cuerpo a ambos lados de la cuchilla, pero no en línea con la
cuchilla. El retroceso puede hacer que la sierra salte hacia atrás, pero el operador puede controlar
las fuerzas de retroceso si se toman las precauciones adecuadas.
Cuando la cuchilla está atascada, o cuando se interrumpe un corte por cualquier motivo, suelte el
gatillo y mantenga la sierra inmóvil en el material hasta que la cuchilla se detenga por completo.
Nunca intente retirar la sierra del trabajo ni tirar de la sierra hacia atrás mientras la hoja está en
movimiento o puede producirse un contragolpe. Investigue y tome medidas correctivas para
eliminar la causa del atascamiento de la cuchilla.
Cuando reinicie una sierra en la pieza de trabajo, centre la hoja de la sierra en la ranura y verifique
que los dientes de la sierra no estén enganchados en el material. Si la hoja de la sierra está
atascada, puede subir o retroceder desde la pieza de trabajo a medida que se reinicia la sierra.
Admite paneles grandes para minimizar el riesgo de pellizcos y contragolpes de la cuchilla. Los
paneles grandes tienden a ceder bajo su propio peso. Los soportes deben colocarse debajo del
panel en ambos lados, cerca de la línea de corte y cerca del borde del panel.
No use cuchillas desafiladas o dañadas. Las cuchillas sin afilar o mal ajustadas producen una
ranura estrecha que causa fricción excesiva, atascamiento de la cuchilla y retroceso.
Las palancas de bloqueo de ajuste de la profundidad de la cuchilla y el bisel deben estar apreta-
das y seguras antes de hacer el corte. Si el ajuste de la cuchilla cambia durante el corte, puede
causar atascamiento y retroceso.
Tenga especial cuidado al cortar en paredes existentes u otras áreas ciegas. La cuchilla sobresali-
ente puede cortar objetos que pueden causar retroceso.
Verifique que el protector inferior esté bien cerrado antes de cada uso. No opere la sierra si la
protección inferior no se mueve libremente y se cierra instantáneamente. Nunca sujete ni ate la
protección inferior en la posición abierta. Si la sierra se cae accidentalmente, la protección inferior
puede doblarse. Levante la protección inferior con el mango retráctil y asegúrese de que se
mueva libremente y no toque la cuchilla ni ninguna otra parte, en todos los ángulos y profundi-
dades de corte.
Compruebe el funcionamiento del muelle protector inferior. Si el protector y el resorte no funcio-
nan correctamente, deben ser reparados antes de su uso. La protección inferior puede funcionar
lentamente debido a piezas dañadas, depósitos gomosos o acumulación de escombros.
La protección inferior debe retraerse manualmente solo para cortes especiales como "cortes por
inmersión" y "cortes compuestos". Eleve la protección inferior retrayendo la manija y tan pronto
como la cuchilla ingrese al material, la protección inferior debe liberarse. Para todas las demás
sierras, la protección inferior debe funcionar automáticamente.
Observe siempre que el protector inferior esté cubriendo la hoja antes de colocar la sierra en el
banco o el piso. Una cuchilla sin protección y en inercia hará que la sierra camine hacia atrás,
cortando todo lo que se encuentre en su camino. Tenga en cuenta el tiempo que tarda la cuchilla
en detenerse después de soltar el interruptor.
Use abrazaderas u otra forma práctica para asegurar y apoyar la pieza de trabajo en una platafor-
ma estable. Sostener el trabajo con la mano o contra su cuerpo lo deja inestable y puede conducir
a la pérdida de control.
Mantenga su cuerpo colocado a ambos lados de la hoja, pero no en línea con la hoja de sierra.
RETROCESO podría hacer que la sierra salte hacia atrás (ver Causas y Prevención del operador
de contragolpe y retroceso).
Evita cortar las uñas. Inspeccione y quite todas las uñas de la madera antes de cortar.
Asegúrese siempre de que nada interfiera con el movimiento del protector inferior de la cuchilla.
Los accesorios deben estar clasificados para al menos la velocidad recomendada en la etiqueta
de advertencia de la herramienta. Las ruedas y otros accesorios que corren por encima de la
velocidad nominal pueden separarse y causar lesiones. Las clasificaciones de accesorios
siempre deben estar por encima de la velocidad de la herramienta como se muestra en la placa
de identificación de la herramienta.
Siempre asegúrese de que la sierra esté limpia antes de usar.
Deje de usar esta sierra y hágalo reparar adecuadamente si se produce algún ruido inusual u
operación anormal.
Siempre asegúrese de que todos los componentes estén montados de manera adecuada y segura
antes de usar la herramienta.
Siempre maneje la hoja de sierra con cuidado cuando la monte o la quite, o cuando quite el troquel
de diamante.
Siempre espere hasta que el motor haya alcanzado la velocidad máxima antes de comenzar un
corte.
Mantenga siempre los mangos secos, limpios y libres de aceite y grasa. Sostenga la herramienta
firmemente con
ambas manos cuando está en uso.
Esté siempre alerta en todo momento, especialmente durante operaciones repetitivas y
monótonas. Asegúrese siempre de la posición de sus manos en relación con la cuchilla.
Manténgase alejado de las piezas finales que pueden caerse después de cortar. Pueden estar
calientes, afilados y / o pesados. Se pueden producir lesiones personales graves.
Reemplace o repare los cables dañados. Asegúrese de que su cable de extensión esté en buenas
condiciones. Use solo cables de extensión de 3 cables que tengan enchufes de conexión a tierra
de 3 clavijas y receptáculos de 3 polos que acepten el enchufe de la herramienta.
Un cable de extensión debe tener un tamaño de cable adecuado (AWG o American Wire Gauge)
por seguridad.
Protección para los ojos ANSI Z87.1 (CAN / CSA Z94.3).
Protección auditiva ANSI S12.6 (S3.19).
Protección respiratoria NIOSH / OSHA.
Plomo de pinturas a base de plomo, sílice cristalina de ladrillos y cemento y otros productos de
albañilería, y arsénico y cromo de madera tratada químicamente (CCA).
Evite el contacto prolongado con el polvo del lijado eléctrico, aserrado, rectificado, taladrado y
otras construcciones.
ocupaciones. Use ropa protectora y lave las áreas expuestas con agua y jabón. Permitir que el
polvo penetre en la boca, los ojos o se ponga sobre la piel puede promover la absorción de produc-
tos químicos nocivos.
El láser se debe usar y mantener de acuerdo con las instrucciones del fabricante.
Nunca apunte el rayo a ninguna persona u objeto que no sea la pieza de trabajo.
El rayo láser no debe dirigirse deliberadamente al personal y se debe evitar que se dirija hacia el
ojo de una persona durante más de 0.25 segundos.
Asegúrese siempre de que el rayo láser esté dirigido a una pieza de trabajo resistente sin superfi-
cies reflectantes. Es decir. Se aceptan superficies revestidas de madera o rugosas. La lámina de
acero reflectante brillante o similar no es adecuada para el uso con láser, ya que la superficie
reflectante podría dirigir el rayo hacia el operador.
No cambie el conjunto de luz láser con un tipo diferente. Las reparaciones deben ser realizadas
por el fabricante del láser o un agente autorizado.
Al montar la hoja de sierra, use guantes protectores. Peligro de lesiones al tocar la hoja de sierra.
Utilice únicamente hojas de sierra que correspondan con los datos característicos que figuran en
las instrucciones de funcionamiento.
No utilice bajo ninguna circunstancia discos abrasivos como herramienta de corte.
COLOCACIÓN Y EXTRACCIÓN DE LA HOJA - FIGURA C-E
• Retraiga la protección inferior y ensamble la cuchilla (8) y la arandela de sujeción (17) como se
muestra en la figura C.
• Oprima el bloqueo del eje (13) mientras gira el perno de la hoja (7) con la llave de la hoja (16)
hasta que el bloqueo de la hoja se enganche y la hoja deje de girar. figura D
NOTA: La llave de la hoja se guarda en una bolsa de polietileno junto con el manual.
• Apriete firmemente el perno de la hoja con la llave de la hoja.
NOTA: El perno tiene una rosca a la izquierda. Para aflojar, gire en sentido horario. Para apretar,
gire en sentido antihorario. figura E
NOTA: Nunca enganche el bloqueo de la hoja mientras la sierra esté en funcionamiento, ni haga
un esfuerzo para detener la herramienta. Nunca encienda la herramienta mientras el bloqueo de
la hoja esté activado. Se producirán daños graves en su sierra.
Según sea necesario, mueva la perilla desbloqueada y deje que el dedo apunte a la posición
adecuada de la escala de profundidad,
Luego gire la perilla 180 ° para bloquearla,
- 24 -
Technology Creates Power

EN
FR
ES
Encendido y apagado
Nota: Por razones de seguridad, el interruptor de encendido / apagado no se puede bloquear; debe
permanecer presionado durante toda la operación.
Función Láser
●Enciéndalo con el interruptor de encendido / apagado de la luz láser justo antes de cortar.
●Apáguelo inmediatamente después del uso para conservar la vida útil de la batería y el láser.
CAMBIO DE LAS BATERÍAS LÁSER
Las baterías que operan el láser deberán reemplazarse después de un uso considerable del láser.
1.
2.
3.
4.
PELIGRO: Nunca permita que el rayo láser brille en los ojos de una persona, podría provocar
daños oculares graves. Asegúrese de que el interruptor del láser esté apagado y que el láser NO esté
apuntando hacia usted mientras reemplaza las baterías del láser y cuando verifica la función del
láser.
5)
Haga que un técnico calificado repare su herramienta eléctrica utilizando solo piezas de repuesto
idénticas. Esto asegurará que se mantenga la seguridad de la herramienta eléctrica.
PELIGRO: Mantenga las manos alejadas del área de corte y la cuchilla.
a)
b)
c)
d)
e)
f)
g)
h)
Causas y prevención del contragolpe del operador:
●
●
●
El contragolpe es el resultado del mal uso de la sierra y / o procedimientos o condiciones de
operación incorrectas y puede evitarse tomando las precauciones adecuadas como se indica a
continuación:
a)
b)
La etiqueta de su herramienta puede incluir los siguientes símbolos. Los símbolos y sus definiciones
son los siguientes:
Reglas de seguridad para luces láser
La luz láser / radiación láser utilizada en el sistema es de Clase 2 con longitudes de onda máximas
de 1 mW y 650 nm. Estos láseres normalmente no presentan un riesgo óptico, aunque mirar el rayo
puede causar ceguera instantánea.
ADVERTENCIA : No mire directamente al rayo láser.
Puede existir un peligro si observa deliberadamente la viga, observe todas las reglas de seguridad
de la siguiente manera;
●
●
●
●
●
f)
3)
a)
b)
c)
d)
e)
f)
g)
4)
a)
b)
c)
d)
e)
f)
g)
●
●
●
●
●
●
●
●
Cuanto menor es el número de calibre del cable, mayor es la capacidad del cable, es decir, el calibre
16 tiene más capacidad que el calibre 18. Un cable de menor tamaño provocará una caída en el
voltaje de la línea, lo que provocará pérdida de potencia y sobrecalentamiento. Cuando use más de
una extensión para completar la longitud total, asegúrese de que cada extensión individual contenga
al menos el tamaño mínimo de cable. La siguiente tabla muestra el tamaño correcto a utilizar según
la longitud del cable y la clasificación de amperaje de la placa de identificación. En caso de duda, use
el siguiente medidor más pesado. Cuanto más pequeño es el número de calibre, más pesado es el
cable.
DEFINICIONES: SÍMBOLOS Y PALABRAS DE ALERTA DE SEGURIDAD
Es importante que lea y comprenda este manual. La información que contiene se relaciona con la
protección de SU SEGURIDAD y la PREVENCIÓN DE PROBLEMAS. Los siguientes símbolos se
usan para ayudarlo a reconocer esta información.
AVISO: El uso sin el símbolo de alerta de seguridad indica una situación potencialmente peligrosa
que, si no se evita, puede provocar daños a la propiedad.
ADVERTENCIA: lea todas las advertencias de seguridad y todas las instrucciones.
El incumplimiento de las advertencias e instrucciones puede provocar descargas eléctricas, incendi-
os y / o lesiones graves.
GUARDE TODAS LAS ADVERTENCIAS E INSTRUCCIONES PARA FUTURAS REFERENCIAS
El término "herramienta eléctrica" en las advertencias se refiere a la herramienta eléctrica que funcio-
na con la red eléctrica (con cable) o la herramienta eléctrica que funciona con batería (sin cable).
1)
a)
b)
c)
2)
a)
b)
c)
d)
e)
c)
d)
e)
f)
g)
Instrucciones de seguridad de la protección inferior
a)
b)
c)
d)
Instrucciones de seguridad adicionales
●
●
●
●
●
●
●
●
●
●
ADVERTENCIA: Parte del polvo creado por el lijado eléctrico, el aserrado, el rectificado, la
perforación y otras actividades de construcción contienen productos químicos que en el estado de
California se sabe que causan cáncer, defectos de nacimiento u otros daños reproductivos. Algunos
ejemplos de estos químicos son:
●
El riesgo de estas exposiciones varía, según la frecuencia con la que realice este tipo de trabajo.
Para reducir su exposición a estos productos químicos: trabaje en un área bien ventilada y trabaje
con equipos de seguridad aprobados, como las máscaras antipolvo que están especialmente diseña-
das para filtrar partículas microscópicas.
ADVERTENCIA: SIEMPRE USE GAFAS DE SEGURIDAD. Los anteojos de uso diario NO
son lentes de seguridad. También use mascarilla facial o antipolvo si corta
●
ADVERTENCIA: Cortar plásticos, madera recubierta de savia y otros materiales puede hacer
que el material derretido se acumule en las puntas de la hoja y en el cuerpo de la hoja de sierra, lo
que aumenta el riesgo de sobrecalentamiento y atascamiento de la hoja durante el corte.
ADVERTENCIA: El uso de esta herramienta puede generar y / o desechar polvo, lo que puede
causar lesiones respiratorias u otras lesiones graves y permanentes. Siempre use protección respira-
toria aprobada por NIOSH / OSHA apropiada para la exposición al polvo. Dirija las partículas lejos de
la cara y el cuerpo. Siempre opere la herramienta en un área bien ventilada y permita la eliminación
adecuada del polvo. Utilice el sistema de recolección de polvo siempre que sea posible.
PRECAUCIÓN: El uso de controles o ajustes o la realización de procedimientos distintos a los
especificados en este documento pueden provocar una exposición peligrosa a la radiación
Uso previsto
Esta máquina está destinada principalmente al aserrado, longitudinal y transversalmente, de madera
maciza, aglomerado, madera contrachapada, aluminio, azulejos y piedra en una posición fija. Tenga
en cuenta que la hoja preinstalada en la sierra, tal como se suministra, está diseñada para usarse
solo con madera. Cualquier otro uso o modificación del dispositivo se considerará como un uso
inadecuado y podría generar peligros considerables. No es adecuado para uso comercial
Función descriptiva
La numeración de las características de los productos se refiere a la ilustración de la máquina en la
página de gráficos.
Montaje / configuración de ajuste
ADVERTENCIA: Antes de trabajar en la herramienta eléctrica, retire siempre el enchufe de la
fuente de alimentación.
●
●
●
Ajustar la profundidad de corte,
1.
2.
Nota: si es posible, recomiende configurar la profundidad de corte aproximadamente 2 mm más
profundo que el grosor del material, esto debería ayudar a asegurar que logre un corte limpio.
Solicitud
La mini sierra de inmersión es versátil y le permite cortar muchos tipos diferentes de materiales.
Algunos de los materiales incluyen
●
●
●
Selección de cuchilla
MANTENIMIENTO
ADVERTENCIA: Desenchufe la herramienta antes de instalar o quitar accesorios, antes de
ajustar o al hacer reparaciones. Use solo jabón suave y un paño húmedo para limpiar la herramienta.
Nunca permita que ningún líquido ingrese a la herramienta; nunca sumerja ninguna parte de la
herramienta en un líquido.
IMPORTANTE: Para garantizar la SEGURIDAD y CONFIABILIDAD del producto, reparaciones,
mantenimiento y ajuste (que no sean los enumerados
en este manual) debe ser realizado por centros de servicio autorizados u otras organizaciones de
servicio calificadas, utilizando siempre piezas de repuesto idénticas.
SEGURIDAD EN EL ÁREA DE TRABAJO
Mantenga el área de trabajo limpia y bien iluminada. Las áreas desordenadas u oscuras provocan
accidentes.
No opere herramientas eléctricas en atmósferas explosivas, como en presencia de líquidos,
gases o polvo inflamables. Las herramientas eléctricas crean chispas que pueden encender el
polvo o los humos.
Mantenga alejados a los niños y transeúntes mientras utiliza una herramienta eléctrica. Las
distracciones pueden hacer que pierdas el control.
SEGURIDAD ELECTRICA
Los enchufes de la herramienta eléctrica deben coincidir con la toma de corriente. Nunca
modifique el enchufe de ninguna manera. No utilice enchufes adaptadores con herramientas
eléctricas conectadas a tierra. Los enchufes no modificados y las tomas correspondientes
reducirán el riesgo de descarga eléctrica.
Evite el contacto del cuerpo con superficies conectadas a tierra, como tuberías, radiadores,
cocinas y refrigeradores. Existe un mayor riesgo de electricidad
choque si su cuerpo está conectado a tierra.
No exponga las herramientas eléctricas a la lluvia o la humedad. El agua que ingresa a una
herramienta eléctrica aumentará el riesgo de descarga eléctrica.
No maltrate el cable. Nunca use el cable para transportar, tirar o desenchufar la herramienta
eléctrica. Mantenga el cable alejado del calor, aceite, bordes afilados o piezas móviles. Los cables
dañados o enredados aumentan el riesgo de descarga eléctrica.
Cuando utilice una herramienta eléctrica en exteriores, use un cable de extensión adecuado para
uso en exteriores. El uso de un cable adecuado para uso en exteriores reduce el riesgo de descar-
ga eléctrica.
Si es inevitable utilizar una herramienta eléctrica en una ubicación húmeda, utilice un suministro
protegido por un interruptor de circuito de falla a tierra (GFCI). El uso de un GFCI reduce el riesgo
de descarga eléctrica.
SEGURIDAD PERSONAL
Manténgase alerta, observe lo que está haciendo y use el sentido común al operar una
herramienta eléctrica. No use una herramienta eléctrica mientras
Está cansado o bajo la influencia de drogas, alcohol o medicamentos. Un momento de falta de
atención al utilizar herramientas eléctricas puede provocar lesiones personales graves.
Use equipo de protección personal.
Siempre use protección para los ojos. El equipo de protección como máscara antipolvo, zapatos
de seguridad antideslizantes, casco o protección auditiva para condiciones apropiadas reducirá
las lesiones personales.
Prevenir arranques involuntarios. Asegúrese de que el interruptor esté en la posición de apagado
antes de conectarlo a la fuente de alimentación y / o al paquete de baterías, levantar o transportar
la herramienta. Llevar herramientas eléctricas con el dedo en el interruptor o activar herramientas
eléctricas que tienen el interruptor encendido invita a accidentes.
Retire cualquier llave de ajuste o llave inglesa antes de encender la herramienta eléctrica. Una
llave inglesa o una llave dejada unida a una parte giratoria de la herramienta eléctrica puede
provocar lesiones personales.
No te excedas. Mantenga la postura y el equilibrio en todo momento. Esto permite un mejor
control de la herramienta eléctrica en situaciones inesperadas.
Vístete apropiadamente. No use ropa suelta o joyas. Mantenga su cabello, ropa y guantes lejos
de las partes móviles. Ropa suelta, joyas o cabello largo pueden quedar atrapados en las partes
móviles.
Si se proporcionan dispositivos para la conexión de instalaciones de extracción y recolección de
polvo, asegúrese de que estén conectados y se usen adecuadamente.
El uso de la recolección de polvo puede reducir los riesgos relacionados con el polvo.
USO Y CUIDADO DE LA HERRAMIENTA ELÉCTRICA
No fuerce la herramienta eléctrica. Use la herramienta eléctrica correcta para su aplicación. La
herramienta eléctrica correcta hará el trabajo mejor y más seguro a la velocidad para la que fue
diseñada.
No use la herramienta eléctrica si el interruptor no enciende y apaga. Cualquier herramienta
eléctrica que no pueda controlarse con el interruptor es peligrosa y debe repararse.
Desconecte el enchufe de la fuente de alimentación y / o la batería de la herramienta eléctrica
antes de hacer cualquier ajuste, cambiar accesorios o almacenar herramientas eléctricas. Dichas
medidas de seguridad preventivas reducen el riesgo de arrancar la herramienta eléctrica acciden-
talmente.
Guarde las herramientas eléctricas inactivas fuera del alcance de los niños y no permita que
personas que no estén familiarizadas con la herramienta eléctrica o estas instrucciones operen la
herramienta. Las herramientas eléctricas son peligrosas en manos de usuarios no capacitados.
Mantener herramientas eléctricas. Verifique la desalineación o el atascamiento de las piezas
móviles, la rotura de las piezas y cualquier otra condición que pueda afectar el funcionamiento de
la herramienta eléctrica. Si está dañado, repare la herramienta eléctrica antes de usar. Muchos
accidentes son causados por herramientas eléctricas mal mantenidas.
Mantenga las herramientas de corte afiladas y limpias. Es menos probable que las herramientas de
corte mantenidas adecuadamente con bordes de corte afilados se unan y son más fáciles de controlar.
Utilice la herramienta eléctrica, los accesorios y las brocas de herramientas, etc. de acuerdo con
estas instrucciones, teniendo en cuenta las condiciones de trabajo y el trabajo a realizar. El uso
de la herramienta eléctrica para operaciones diferentes de las previstas podría provocar una
situación peligrosa.
SERVICIO
Mantenga su segunda mano en la manija auxiliar o en la carcasa del motor. Si ambas manos
sostienen la sierra, la hoja no puede cortarlas.
No meta debajo de la pieza de trabajo. El protector no puede protegerlo de la cuchilla debajo de
la pieza de trabajo.
Ajuste la profundidad de corte al grosor de la pieza de trabajo. Debe verse menos de un diente
completo de los dientes de la cuchilla debajo de la pieza de trabajo.
Nunca sostenga la pieza que está cortando en sus manos o en su pierna. Asegure la pieza de
trabajo a una plataforma estable. Es importante apoyar el trabajo adecuadamente para minimizar
la exposición del cuerpo, la fijación de la cuchilla o la pérdida de control.
Sujete la herramienta eléctrica solo por las superficies de agarre aisladas, cuando realice una
operación donde la herramienta de corte pueda entrar en contacto con cables ocultos o su propio
cable. El contacto con un cable "vivo" también hará que las partes metálicas expuestas de la
herramienta eléctrica "vivan" y podría dar al operador una descarga eléctrica.
Cuando rasgue siempre use una guía de corte o una guía de borde recto. Esto mejora la precisión
del corte y reduce la posibilidad de que la cuchilla se atasque.
Utilice siempre cuchillas con el tamaño y la forma correctos (diamante versus redondo) de los
agujeros del eje. Las hojas que no coinciden con el hardware de montaje de la sierra funcionarán
excéntricamente, causando pérdida de control.
Nunca use arandelas o pernos dañados o incorrectos. Las arandelas y el perno de la hoja fueron
diseñados especialmente para su sierra, para un rendimiento óptimo y seguridad de operación
El retroceso es una reacción repentina a una hoja de sierra apretada, atada o desalineada, que
hace que una sierra no controlada se levante y salga de la pieza de trabajo hacia el operador.
Cuando la cuchilla se pellizca o ata fuertemente por la ranura que se cierra, la cuchilla se detiene
y la reacción del motor impulsa la unidad rápidamente hacia el operador.
Si la cuchilla se tuerce o se desalinea en el corte, los dientes en el borde posterior de la cuchilla
pueden cavar en la superficie superior de la madera haciendo que la cuchilla salga de la ranura y
salte hacia el operador.
Mantenga un agarre firme con ambas manos en la sierra y coloque los brazos para resistir las
fuerzas de contragolpe. Coloque su cuerpo a ambos lados de la cuchilla, pero no en línea con la
cuchilla. El retroceso puede hacer que la sierra salte hacia atrás, pero el operador puede controlar
las fuerzas de retroceso si se toman las precauciones adecuadas.
Cuando la cuchilla está atascada, o cuando se interrumpe un corte por cualquier motivo, suelte el
gatillo y mantenga la sierra inmóvil en el material hasta que la cuchilla se detenga por completo.
Nunca intente retirar la sierra del trabajo ni tirar de la sierra hacia atrás mientras la hoja está en
movimiento o puede producirse un contragolpe. Investigue y tome medidas correctivas para
eliminar la causa del atascamiento de la cuchilla.
Cuando reinicie una sierra en la pieza de trabajo, centre la hoja de la sierra en la ranura y verifique
que los dientes de la sierra no estén enganchados en el material. Si la hoja de la sierra está
atascada, puede subir o retroceder desde la pieza de trabajo a medida que se reinicia la sierra.
Admite paneles grandes para minimizar el riesgo de pellizcos y contragolpes de la cuchilla. Los
paneles grandes tienden a ceder bajo su propio peso. Los soportes deben colocarse debajo del
panel en ambos lados, cerca de la línea de corte y cerca del borde del panel.
No use cuchillas desafiladas o dañadas. Las cuchillas sin afilar o mal ajustadas producen una
ranura estrecha que causa fricción excesiva, atascamiento de la cuchilla y retroceso.
Las palancas de bloqueo de ajuste de la profundidad de la cuchilla y el bisel deben estar apreta-
das y seguras antes de hacer el corte. Si el ajuste de la cuchilla cambia durante el corte, puede
causar atascamiento y retroceso.
Tenga especial cuidado al cortar en paredes existentes u otras áreas ciegas. La cuchilla sobresali-
ente puede cortar objetos que pueden causar retroceso.
Verifique que el protector inferior esté bien cerrado antes de cada uso. No opere la sierra si la
protección inferior no se mueve libremente y se cierra instantáneamente. Nunca sujete ni ate la
protección inferior en la posición abierta. Si la sierra se cae accidentalmente, la protección inferior
puede doblarse. Levante la protección inferior con el mango retráctil y asegúrese de que se
mueva libremente y no toque la cuchilla ni ninguna otra parte, en todos los ángulos y profundi-
dades de corte.
Compruebe el funcionamiento del muelle protector inferior. Si el protector y el resorte no funcio-
nan correctamente, deben ser reparados antes de su uso. La protección inferior puede funcionar
lentamente debido a piezas dañadas, depósitos gomosos o acumulación de escombros.
La protección inferior debe retraerse manualmente solo para cortes especiales como "cortes por
inmersión" y "cortes compuestos". Eleve la protección inferior retrayendo la manija y tan pronto
como la cuchilla ingrese al material, la protección inferior debe liberarse. Para todas las demás
sierras, la protección inferior debe funcionar automáticamente.
Observe siempre que el protector inferior esté cubriendo la hoja antes de colocar la sierra en el
banco o el piso. Una cuchilla sin protección y en inercia hará que la sierra camine hacia atrás,
cortando todo lo que se encuentre en su camino. Tenga en cuenta el tiempo que tarda la cuchilla
en detenerse después de soltar el interruptor.
Use abrazaderas u otra forma práctica para asegurar y apoyar la pieza de trabajo en una platafor-
ma estable. Sostener el trabajo con la mano o contra su cuerpo lo deja inestable y puede conducir
a la pérdida de control.
Mantenga su cuerpo colocado a ambos lados de la hoja, pero no en línea con la hoja de sierra.
RETROCESO podría hacer que la sierra salte hacia atrás (ver Causas y Prevención del operador
de contragolpe y retroceso).
Evita cortar las uñas. Inspeccione y quite todas las uñas de la madera antes de cortar.
Asegúrese siempre de que nada interfiera con el movimiento del protector inferior de la cuchilla.
Los accesorios deben estar clasificados para al menos la velocidad recomendada en la etiqueta
de advertencia de la herramienta. Las ruedas y otros accesorios que corren por encima de la
velocidad nominal pueden separarse y causar lesiones. Las clasificaciones de accesorios
siempre deben estar por encima de la velocidad de la herramienta como se muestra en la placa
de identificación de la herramienta.
Siempre asegúrese de que la sierra esté limpia antes de usar.
Deje de usar esta sierra y hágalo reparar adecuadamente si se produce algún ruido inusual u
operación anormal.
Siempre asegúrese de que todos los componentes estén montados de manera adecuada y segura
antes de usar la herramienta.
Siempre maneje la hoja de sierra con cuidado cuando la monte o la quite, o cuando quite el troquel
de diamante.
Siempre espere hasta que el motor haya alcanzado la velocidad máxima antes de comenzar un
corte.
Mantenga siempre los mangos secos, limpios y libres de aceite y grasa. Sostenga la herramienta
firmemente con
ambas manos cuando está en uso.
Esté siempre alerta en todo momento, especialmente durante operaciones repetitivas y
monótonas. Asegúrese siempre de la posición de sus manos en relación con la cuchilla.
Manténgase alejado de las piezas finales que pueden caerse después de cortar. Pueden estar
calientes, afilados y / o pesados. Se pueden producir lesiones personales graves.
Reemplace o repare los cables dañados. Asegúrese de que su cable de extensión esté en buenas
condiciones. Use solo cables de extensión de 3 cables que tengan enchufes de conexión a tierra
de 3 clavijas y receptáculos de 3 polos que acepten el enchufe de la herramienta.
Un cable de extensión debe tener un tamaño de cable adecuado (AWG o American Wire Gauge)
por seguridad.
Protección para los ojos ANSI Z87.1 (CAN / CSA Z94.3).
Protección auditiva ANSI S12.6 (S3.19).
Protección respiratoria NIOSH / OSHA.
Plomo de pinturas a base de plomo, sílice cristalina de ladrillos y cemento y otros productos de
albañilería, y arsénico y cromo de madera tratada químicamente (CCA).
Evite el contacto prolongado con el polvo del lijado eléctrico, aserrado, rectificado, taladrado y
otras construcciones.
ocupaciones. Use ropa protectora y lave las áreas expuestas con agua y jabón. Permitir que el
polvo penetre en la boca, los ojos o se ponga sobre la piel puede promover la absorción de produc-
tos químicos nocivos.
El láser se debe usar y mantener de acuerdo con las instrucciones del fabricante.
Nunca apunte el rayo a ninguna persona u objeto que no sea la pieza de trabajo.
El rayo láser no debe dirigirse deliberadamente al personal y se debe evitar que se dirija hacia el
ojo de una persona durante más de 0.25 segundos.
Asegúrese siempre de que el rayo láser esté dirigido a una pieza de trabajo resistente sin superfi-
cies reflectantes. Es decir. Se aceptan superficies revestidas de madera o rugosas. La lámina de
acero reflectante brillante o similar no es adecuada para el uso con láser, ya que la superficie
reflectante podría dirigir el rayo hacia el operador.
No cambie el conjunto de luz láser con un tipo diferente. Las reparaciones deben ser realizadas
por el fabricante del láser o un agente autorizado.
Al montar la hoja de sierra, use guantes protectores. Peligro de lesiones al tocar la hoja de sierra.
Utilice únicamente hojas de sierra que correspondan con los datos característicos que figuran en
las instrucciones de funcionamiento.
No utilice bajo ninguna circunstancia discos abrasivos como herramienta de corte.
COLOCACIÓN Y EXTRACCIÓN DE LA HOJA - FIGURA C-E
• Retraiga la protección inferior y ensamble la cuchilla (8) y la arandela de sujeción (17) como se
muestra en la figura C.
• Oprima el bloqueo del eje (13) mientras gira el perno de la hoja (7) con la llave de la hoja (16)
hasta que el bloqueo de la hoja se enganche y la hoja deje de girar. figura D
NOTA: La llave de la hoja se guarda en una bolsa de polietileno junto con el manual.
• Apriete firmemente el perno de la hoja con la llave de la hoja.
NOTA: El perno tiene una rosca a la izquierda. Para aflojar, gire en sentido horario. Para apretar,
gire en sentido antihorario. figura E
NOTA: Nunca enganche el bloqueo de la hoja mientras la sierra esté en funcionamiento, ni haga
un esfuerzo para detener la herramienta. Nunca encienda la herramienta mientras el bloqueo de
la hoja esté activado. Se producirán daños graves en su sierra.
Según sea necesario, mueva la perilla desbloqueada y deje que el dedo apunte a la posición
adecuada de la escala de profundidad,
Luego gire la perilla 180 ° para bloquearla,
- 25 -
Technology Creates Power

EN
FR
ES
Encendido y apagado
Nota: Por razones de seguridad, el interruptor de encendido / apagado no se puede bloquear; debe
permanecer presionado durante toda la operación.
Función Láser
●Enciéndalo con el interruptor de encendido / apagado de la luz láser justo antes de cortar.
●Apáguelo inmediatamente después del uso para conservar la vida útil de la batería y el láser.
CAMBIO DE LAS BATERÍAS LÁSER
Las baterías que operan el láser deberán reemplazarse después de un uso considerable del láser.
1.
2.
3.
4.
PELIGRO: Nunca permita que el rayo láser brille en los ojos de una persona, podría provocar
daños oculares graves. Asegúrese de que el interruptor del láser esté apagado y que el láser NO esté
apuntando hacia usted mientras reemplaza las baterías del láser y cuando verifica la función del
láser.
5)
Haga que un técnico calificado repare su herramienta eléctrica utilizando solo piezas de repuesto
idénticas. Esto asegurará que se mantenga la seguridad de la herramienta eléctrica.
PELIGRO: Mantenga las manos alejadas del área de corte y la cuchilla.
a)
b)
c)
d)
e)
f)
g)
h)
Causas y prevención del contragolpe del operador:
●
●
●
El contragolpe es el resultado del mal uso de la sierra y / o procedimientos o condiciones de
operación incorrectas y puede evitarse tomando las precauciones adecuadas como se indica a
continuación:
a)
b)
La etiqueta de su herramienta puede incluir los siguientes símbolos. Los símbolos y sus definiciones
son los siguientes:
Reglas de seguridad para luces láser
La luz láser / radiación láser utilizada en el sistema es de Clase 2 con longitudes de onda máximas
de 1 mW y 650 nm. Estos láseres normalmente no presentan un riesgo óptico, aunque mirar el rayo
puede causar ceguera instantánea.
ADVERTENCIA : No mire directamente al rayo láser.
Puede existir un peligro si observa deliberadamente la viga, observe todas las reglas de seguridad
de la siguiente manera;
●
●
●
●
●
f)
3)
a)
b)
c)
d)
e)
f)
g)
4)
a)
b)
c)
d)
e)
f)
g)
●
●
●
●
●
●
●
●
Cuanto menor es el número de calibre del cable, mayor es la capacidad del cable, es decir, el calibre
16 tiene más capacidad que el calibre 18. Un cable de menor tamaño provocará una caída en el
voltaje de la línea, lo que provocará pérdida de potencia y sobrecalentamiento. Cuando use más de
una extensión para completar la longitud total, asegúrese de que cada extensión individual contenga
al menos el tamaño mínimo de cable. La siguiente tabla muestra el tamaño correcto a utilizar según
la longitud del cable y la clasificación de amperaje de la placa de identificación. En caso de duda, use
el siguiente medidor más pesado. Cuanto más pequeño es el número de calibre, más pesado es el
cable.
DEFINICIONES: SÍMBOLOS Y PALABRAS DE ALERTA DE SEGURIDAD
Es importante que lea y comprenda este manual. La información que contiene se relaciona con la
protección de SU SEGURIDAD y la PREVENCIÓN DE PROBLEMAS. Los siguientes símbolos se
usan para ayudarlo a reconocer esta información.
AVISO: El uso sin el símbolo de alerta de seguridad indica una situación potencialmente peligrosa
que, si no se evita, puede provocar daños a la propiedad.
ADVERTENCIA: lea todas las advertencias de seguridad y todas las instrucciones.
El incumplimiento de las advertencias e instrucciones puede provocar descargas eléctricas, incendi-
os y / o lesiones graves.
GUARDE TODAS LAS ADVERTENCIAS E INSTRUCCIONES PARA FUTURAS REFERENCIAS
El término "herramienta eléctrica" en las advertencias se refiere a la herramienta eléctrica que funcio-
na con la red eléctrica (con cable) o la herramienta eléctrica que funciona con batería (sin cable).
1)
a)
b)
c)
2)
a)
b)
c)
d)
e)
c)
d)
e)
f)
g)
Instrucciones de seguridad de la protección inferior
a)
b)
c)
d)
Instrucciones de seguridad adicionales
●
●
●
●
●
●
●
●
●
●
ADVERTENCIA: Parte del polvo creado por el lijado eléctrico, el aserrado, el rectificado, la
perforación y otras actividades de construcción contienen productos químicos que en el estado de
California se sabe que causan cáncer, defectos de nacimiento u otros daños reproductivos. Algunos
ejemplos de estos químicos son:
●
El riesgo de estas exposiciones varía, según la frecuencia con la que realice este tipo de trabajo.
Para reducir su exposición a estos productos químicos: trabaje en un área bien ventilada y trabaje
con equipos de seguridad aprobados, como las máscaras antipolvo que están especialmente diseña-
das para filtrar partículas microscópicas.
ADVERTENCIA: SIEMPRE USE GAFAS DE SEGURIDAD. Los anteojos de uso diario NO
son lentes de seguridad. También use mascarilla facial o antipolvo si corta
●
ADVERTENCIA: Cortar plásticos, madera recubierta de savia y otros materiales puede hacer
que el material derretido se acumule en las puntas de la hoja y en el cuerpo de la hoja de sierra, lo
que aumenta el riesgo de sobrecalentamiento y atascamiento de la hoja durante el corte.
ADVERTENCIA: El uso de esta herramienta puede generar y / o desechar polvo, lo que puede
causar lesiones respiratorias u otras lesiones graves y permanentes. Siempre use protección respira-
toria aprobada por NIOSH / OSHA apropiada para la exposición al polvo. Dirija las partículas lejos de
la cara y el cuerpo. Siempre opere la herramienta en un área bien ventilada y permita la eliminación
adecuada del polvo. Utilice el sistema de recolección de polvo siempre que sea posible.
PRECAUCIÓN: El uso de controles o ajustes o la realización de procedimientos distintos a los
especificados en este documento pueden provocar una exposición peligrosa a la radiación
Uso previsto
Esta máquina está destinada principalmente al aserrado, longitudinal y transversalmente, de madera
maciza, aglomerado, madera contrachapada, aluminio, azulejos y piedra en una posición fija. Tenga
en cuenta que la hoja preinstalada en la sierra, tal como se suministra, está diseñada para usarse
solo con madera. Cualquier otro uso o modificación del dispositivo se considerará como un uso
inadecuado y podría generar peligros considerables. No es adecuado para uso comercial
Función descriptiva
La numeración de las características de los productos se refiere a la ilustración de la máquina en la
página de gráficos.
Montaje / configuración de ajuste
ADVERTENCIA: Antes de trabajar en la herramienta eléctrica, retire siempre el enchufe de la
fuente de alimentación.
●
●
●
Ajustar la profundidad de corte,
1.
2.
Nota: si es posible, recomiende configurar la profundidad de corte aproximadamente 2 mm más
profundo que el grosor del material, esto debería ayudar a asegurar que logre un corte limpio.
Solicitud
La mini sierra de inmersión es versátil y le permite cortar muchos tipos diferentes de materiales.
Algunos de los materiales incluyen
●
●
●
Selección de cuchilla
MANTENIMIENTO
ADVERTENCIA: Desenchufe la herramienta antes de instalar o quitar accesorios, antes de
ajustar o al hacer reparaciones. Use solo jabón suave y un paño húmedo para limpiar la herramienta.
Nunca permita que ningún líquido ingrese a la herramienta; nunca sumerja ninguna parte de la
herramienta en un líquido.
IMPORTANTE: Para garantizar la SEGURIDAD y CONFIABILIDAD del producto, reparaciones,
mantenimiento y ajuste (que no sean los enumerados
en este manual) debe ser realizado por centros de servicio autorizados u otras organizaciones de
servicio calificadas, utilizando siempre piezas de repuesto idénticas.
Instrucciones de seguridad para todas las sierras
SEGURIDAD EN EL ÁREA DE TRABAJO
Mantenga el área de trabajo limpia y bien iluminada. Las áreas desordenadas u oscuras provocan
accidentes.
No opere herramientas eléctricas en atmósferas explosivas, como en presencia de líquidos,
gases o polvo inflamables. Las herramientas eléctricas crean chispas que pueden encender el
polvo o los humos.
Mantenga alejados a los niños y transeúntes mientras utiliza una herramienta eléctrica. Las
distracciones pueden hacer que pierdas el control.
SEGURIDAD ELECTRICA
Los enchufes de la herramienta eléctrica deben coincidir con la toma de corriente. Nunca
modifique el enchufe de ninguna manera. No utilice enchufes adaptadores con herramientas
eléctricas conectadas a tierra. Los enchufes no modificados y las tomas correspondientes
reducirán el riesgo de descarga eléctrica.
Evite el contacto del cuerpo con superficies conectadas a tierra, como tuberías, radiadores,
cocinas y refrigeradores. Existe un mayor riesgo de electricidad
choque si su cuerpo está conectado a tierra.
No exponga las herramientas eléctricas a la lluvia o la humedad. El agua que ingresa a una
herramienta eléctrica aumentará el riesgo de descarga eléctrica.
No maltrate el cable. Nunca use el cable para transportar, tirar o desenchufar la herramienta
eléctrica. Mantenga el cable alejado del calor, aceite, bordes afilados o piezas móviles. Los cables
dañados o enredados aumentan el riesgo de descarga eléctrica.
Cuando utilice una herramienta eléctrica en exteriores, use un cable de extensión adecuado para
uso en exteriores. El uso de un cable adecuado para uso en exteriores reduce el riesgo de descar-
ga eléctrica.
Si es inevitable utilizar una herramienta eléctrica en una ubicación húmeda, utilice un suministro
protegido por un interruptor de circuito de falla a tierra (GFCI). El uso de un GFCI reduce el riesgo
de descarga eléctrica.
SEGURIDAD PERSONAL
Manténgase alerta, observe lo que está haciendo y use el sentido común al operar una
herramienta eléctrica. No use una herramienta eléctrica mientras
Está cansado o bajo la influencia de drogas, alcohol o medicamentos. Un momento de falta de
atención al utilizar herramientas eléctricas puede provocar lesiones personales graves.
Use equipo de protección personal.
Siempre use protección para los ojos. El equipo de protección como máscara antipolvo, zapatos
de seguridad antideslizantes, casco o protección auditiva para condiciones apropiadas reducirá
las lesiones personales.
Prevenir arranques involuntarios. Asegúrese de que el interruptor esté en la posición de apagado
antes de conectarlo a la fuente de alimentación y / o al paquete de baterías, levantar o transportar
la herramienta. Llevar herramientas eléctricas con el dedo en el interruptor o activar herramientas
eléctricas que tienen el interruptor encendido invita a accidentes.
Retire cualquier llave de ajuste o llave inglesa antes de encender la herramienta eléctrica. Una
llave inglesa o una llave dejada unida a una parte giratoria de la herramienta eléctrica puede
provocar lesiones personales.
No te excedas. Mantenga la postura y el equilibrio en todo momento. Esto permite un mejor
control de la herramienta eléctrica en situaciones inesperadas.
Vístete apropiadamente. No use ropa suelta o joyas. Mantenga su cabello, ropa y guantes lejos
de las partes móviles. Ropa suelta, joyas o cabello largo pueden quedar atrapados en las partes
móviles.
Si se proporcionan dispositivos para la conexión de instalaciones de extracción y recolección de
polvo, asegúrese de que estén conectados y se usen adecuadamente.
El uso de la recolección de polvo puede reducir los riesgos relacionados con el polvo.
USO Y CUIDADO DE LA HERRAMIENTA ELÉCTRICA
No fuerce la herramienta eléctrica. Use la herramienta eléctrica correcta para su aplicación. La
herramienta eléctrica correcta hará el trabajo mejor y más seguro a la velocidad para la que fue
diseñada.
No use la herramienta eléctrica si el interruptor no enciende y apaga. Cualquier herramienta
eléctrica que no pueda controlarse con el interruptor es peligrosa y debe repararse.
Desconecte el enchufe de la fuente de alimentación y / o la batería de la herramienta eléctrica
antes de hacer cualquier ajuste, cambiar accesorios o almacenar herramientas eléctricas. Dichas
medidas de seguridad preventivas reducen el riesgo de arrancar la herramienta eléctrica acciden-
talmente.
Guarde las herramientas eléctricas inactivas fuera del alcance de los niños y no permita que
personas que no estén familiarizadas con la herramienta eléctrica o estas instrucciones operen la
herramienta. Las herramientas eléctricas son peligrosas en manos de usuarios no capacitados.
Mantener herramientas eléctricas. Verifique la desalineación o el atascamiento de las piezas
móviles, la rotura de las piezas y cualquier otra condición que pueda afectar el funcionamiento de
la herramienta eléctrica. Si está dañado, repare la herramienta eléctrica antes de usar. Muchos
accidentes son causados por herramientas eléctricas mal mantenidas.
Mantenga las herramientas de corte afiladas y limpias. Es menos probable que las herramientas de
corte mantenidas adecuadamente con bordes de corte afilados se unan y son más fáciles de controlar.
Utilice la herramienta eléctrica, los accesorios y las brocas de herramientas, etc. de acuerdo con
estas instrucciones, teniendo en cuenta las condiciones de trabajo y el trabajo a realizar. El uso
de la herramienta eléctrica para operaciones diferentes de las previstas podría provocar una
situación peligrosa.
SERVICIO
Mantenga su segunda mano en la manija auxiliar o en la carcasa del motor. Si ambas manos
sostienen la sierra, la hoja no puede cortarlas.
No meta debajo de la pieza de trabajo. El protector no puede protegerlo de la cuchilla debajo de
la pieza de trabajo.
Ajuste la profundidad de corte al grosor de la pieza de trabajo. Debe verse menos de un diente
completo de los dientes de la cuchilla debajo de la pieza de trabajo.
Nunca sostenga la pieza que está cortando en sus manos o en su pierna. Asegure la pieza de
trabajo a una plataforma estable. Es importante apoyar el trabajo adecuadamente para minimizar
la exposición del cuerpo, la fijación de la cuchilla o la pérdida de control.
Sujete la herramienta eléctrica solo por las superficies de agarre aisladas, cuando realice una
operación donde la herramienta de corte pueda entrar en contacto con cables ocultos o su propio
cable. El contacto con un cable "vivo" también hará que las partes metálicas expuestas de la
herramienta eléctrica "vivan" y podría dar al operador una descarga eléctrica.
Cuando rasgue siempre use una guía de corte o una guía de borde recto. Esto mejora la precisión
del corte y reduce la posibilidad de que la cuchilla se atasque.
Utilice siempre cuchillas con el tamaño y la forma correctos (diamante versus redondo) de los
agujeros del eje. Las hojas que no coinciden con el hardware de montaje de la sierra funcionarán
excéntricamente, causando pérdida de control.
Nunca use arandelas o pernos dañados o incorrectos. Las arandelas y el perno de la hoja fueron
diseñados especialmente para su sierra, para un rendimiento óptimo y seguridad de operación
El retroceso es una reacción repentina a una hoja de sierra apretada, atada o desalineada, que
hace que una sierra no controlada se levante y salga de la pieza de trabajo hacia el operador.
Cuando la cuchilla se pellizca o ata fuertemente por la ranura que se cierra, la cuchilla se detiene
y la reacción del motor impulsa la unidad rápidamente hacia el operador.
Si la cuchilla se tuerce o se desalinea en el corte, los dientes en el borde posterior de la cuchilla
pueden cavar en la superficie superior de la madera haciendo que la cuchilla salga de la ranura y
salte hacia el operador.
Mantenga un agarre firme con ambas manos en la sierra y coloque los brazos para resistir las
fuerzas de contragolpe. Coloque su cuerpo a ambos lados de la cuchilla, pero no en línea con la
cuchilla. El retroceso puede hacer que la sierra salte hacia atrás, pero el operador puede controlar
las fuerzas de retroceso si se toman las precauciones adecuadas.
Cuando la cuchilla está atascada, o cuando se interrumpe un corte por cualquier motivo, suelte el
gatillo y mantenga la sierra inmóvil en el material hasta que la cuchilla se detenga por completo.
Nunca intente retirar la sierra del trabajo ni tirar de la sierra hacia atrás mientras la hoja está en
movimiento o puede producirse un contragolpe. Investigue y tome medidas correctivas para
eliminar la causa del atascamiento de la cuchilla.
Cuando reinicie una sierra en la pieza de trabajo, centre la hoja de la sierra en la ranura y verifique
que los dientes de la sierra no estén enganchados en el material. Si la hoja de la sierra está
atascada, puede subir o retroceder desde la pieza de trabajo a medida que se reinicia la sierra.
Admite paneles grandes para minimizar el riesgo de pellizcos y contragolpes de la cuchilla. Los
paneles grandes tienden a ceder bajo su propio peso. Los soportes deben colocarse debajo del
panel en ambos lados, cerca de la línea de corte y cerca del borde del panel.
No use cuchillas desafiladas o dañadas. Las cuchillas sin afilar o mal ajustadas producen una
ranura estrecha que causa fricción excesiva, atascamiento de la cuchilla y retroceso.
Las palancas de bloqueo de ajuste de la profundidad de la cuchilla y el bisel deben estar apreta-
das y seguras antes de hacer el corte. Si el ajuste de la cuchilla cambia durante el corte, puede
causar atascamiento y retroceso.
Tenga especial cuidado al cortar en paredes existentes u otras áreas ciegas. La cuchilla sobresali-
ente puede cortar objetos que pueden causar retroceso.
Verifique que el protector inferior esté bien cerrado antes de cada uso. No opere la sierra si la
protección inferior no se mueve libremente y se cierra instantáneamente. Nunca sujete ni ate la
protección inferior en la posición abierta. Si la sierra se cae accidentalmente, la protección inferior
puede doblarse. Levante la protección inferior con el mango retráctil y asegúrese de que se
mueva libremente y no toque la cuchilla ni ninguna otra parte, en todos los ángulos y profundi-
dades de corte.
Compruebe el funcionamiento del muelle protector inferior. Si el protector y el resorte no funcio-
nan correctamente, deben ser reparados antes de su uso. La protección inferior puede funcionar
lentamente debido a piezas dañadas, depósitos gomosos o acumulación de escombros.
La protección inferior debe retraerse manualmente solo para cortes especiales como "cortes por
inmersión" y "cortes compuestos". Eleve la protección inferior retrayendo la manija y tan pronto
como la cuchilla ingrese al material, la protección inferior debe liberarse. Para todas las demás
sierras, la protección inferior debe funcionar automáticamente.
Observe siempre que el protector inferior esté cubriendo la hoja antes de colocar la sierra en el
banco o el piso. Una cuchilla sin protección y en inercia hará que la sierra camine hacia atrás,
cortando todo lo que se encuentre en su camino. Tenga en cuenta el tiempo que tarda la cuchilla
en detenerse después de soltar el interruptor.
Use abrazaderas u otra forma práctica para asegurar y apoyar la pieza de trabajo en una platafor-
ma estable. Sostener el trabajo con la mano o contra su cuerpo lo deja inestable y puede conducir
a la pérdida de control.
Mantenga su cuerpo colocado a ambos lados de la hoja, pero no en línea con la hoja de sierra.
RETROCESO podría hacer que la sierra salte hacia atrás (ver Causas y Prevención del operador
de contragolpe y retroceso).
Evita cortar las uñas. Inspeccione y quite todas las uñas de la madera antes de cortar.
Asegúrese siempre de que nada interfiera con el movimiento del protector inferior de la cuchilla.
Los accesorios deben estar clasificados para al menos la velocidad recomendada en la etiqueta
de advertencia de la herramienta. Las ruedas y otros accesorios que corren por encima de la
velocidad nominal pueden separarse y causar lesiones. Las clasificaciones de accesorios
siempre deben estar por encima de la velocidad de la herramienta como se muestra en la placa
de identificación de la herramienta.
Siempre asegúrese de que la sierra esté limpia antes de usar.
Deje de usar esta sierra y hágalo reparar adecuadamente si se produce algún ruido inusual u
operación anormal.
Siempre asegúrese de que todos los componentes estén montados de manera adecuada y segura
antes de usar la herramienta.
Siempre maneje la hoja de sierra con cuidado cuando la monte o la quite, o cuando quite el troquel
de diamante.
Siempre espere hasta que el motor haya alcanzado la velocidad máxima antes de comenzar un
corte.
Mantenga siempre los mangos secos, limpios y libres de aceite y grasa. Sostenga la herramienta
firmemente con
ambas manos cuando está en uso.
Esté siempre alerta en todo momento, especialmente durante operaciones repetitivas y
monótonas. Asegúrese siempre de la posición de sus manos en relación con la cuchilla.
Manténgase alejado de las piezas finales que pueden caerse después de cortar. Pueden estar
calientes, afilados y / o pesados. Se pueden producir lesiones personales graves.
Reemplace o repare los cables dañados. Asegúrese de que su cable de extensión esté en buenas
condiciones. Use solo cables de extensión de 3 cables que tengan enchufes de conexión a tierra
de 3 clavijas y receptáculos de 3 polos que acepten el enchufe de la herramienta.
Un cable de extensión debe tener un tamaño de cable adecuado (AWG o American Wire Gauge)
por seguridad.
Protección para los ojos ANSI Z87.1 (CAN / CSA Z94.3).
Protección auditiva ANSI S12.6 (S3.19).
Protección respiratoria NIOSH / OSHA.
Plomo de pinturas a base de plomo, sílice cristalina de ladrillos y cemento y otros productos de
albañilería, y arsénico y cromo de madera tratada químicamente (CCA).
Evite el contacto prolongado con el polvo del lijado eléctrico, aserrado, rectificado, taladrado y
otras construcciones.
ocupaciones. Use ropa protectora y lave las áreas expuestas con agua y jabón. Permitir que el
polvo penetre en la boca, los ojos o se ponga sobre la piel puede promover la absorción de produc-
tos químicos nocivos.
El láser se debe usar y mantener de acuerdo con las instrucciones del fabricante.
Nunca apunte el rayo a ninguna persona u objeto que no sea la pieza de trabajo.
El rayo láser no debe dirigirse deliberadamente al personal y se debe evitar que se dirija hacia el
ojo de una persona durante más de 0.25 segundos.
Asegúrese siempre de que el rayo láser esté dirigido a una pieza de trabajo resistente sin superfi-
cies reflectantes. Es decir. Se aceptan superficies revestidas de madera o rugosas. La lámina de
acero reflectante brillante o similar no es adecuada para el uso con láser, ya que la superficie
reflectante podría dirigir el rayo hacia el operador.
No cambie el conjunto de luz láser con un tipo diferente. Las reparaciones deben ser realizadas
por el fabricante del láser o un agente autorizado.
Al montar la hoja de sierra, use guantes protectores. Peligro de lesiones al tocar la hoja de sierra.
Utilice únicamente hojas de sierra que correspondan con los datos característicos que figuran en
las instrucciones de funcionamiento.
No utilice bajo ninguna circunstancia discos abrasivos como herramienta de corte.
COLOCACIÓN Y EXTRACCIÓN DE LA HOJA - FIGURA C-E
• Retraiga la protección inferior y ensamble la cuchilla (8) y la arandela de sujeción (17) como se
muestra en la figura C.
• Oprima el bloqueo del eje (13) mientras gira el perno de la hoja (7) con la llave de la hoja (16)
hasta que el bloqueo de la hoja se enganche y la hoja deje de girar. figura D
NOTA: La llave de la hoja se guarda en una bolsa de polietileno junto con el manual.
• Apriete firmemente el perno de la hoja con la llave de la hoja.
NOTA: El perno tiene una rosca a la izquierda. Para aflojar, gire en sentido horario. Para apretar,
gire en sentido antihorario. figura E
NOTA: Nunca enganche el bloqueo de la hoja mientras la sierra esté en funcionamiento, ni haga
un esfuerzo para detener la herramienta. Nunca encienda la herramienta mientras el bloqueo de
la hoja esté activado. Se producirán daños graves en su sierra.
Según sea necesario, mueva la perilla desbloqueada y deje que el dedo apunte a la posición
adecuada de la escala de profundidad,
Luego gire la perilla 180 ° para bloquearla,
- 26 -
Technology Creates Power

EN
FR
ES
Encendido y apagado
Nota: Por razones de seguridad, el interruptor de encendido / apagado no se puede bloquear; debe
permanecer presionado durante toda la operación.
Función Láser
●Enciéndalo con el interruptor de encendido / apagado de la luz láser justo antes de cortar.
●Apáguelo inmediatamente después del uso para conservar la vida útil de la batería y el láser.
CAMBIO DE LAS BATERÍAS LÁSER
Las baterías que operan el láser deberán reemplazarse después de un uso considerable del láser.
1.
2.
3.
4.
PELIGRO: Nunca permita que el rayo láser brille en los ojos de una persona, podría provocar
daños oculares graves. Asegúrese de que el interruptor del láser esté apagado y que el láser NO esté
apuntando hacia usted mientras reemplaza las baterías del láser y cuando verifica la función del
láser.
5)
Haga que un técnico calificado repare su herramienta eléctrica utilizando solo piezas de repuesto
idénticas. Esto asegurará que se mantenga la seguridad de la herramienta eléctrica.
PELIGRO: Mantenga las manos alejadas del área de corte y la cuchilla.
a)
b)
c)
d)
e)
f)
g)
h)
Causas y prevención del contragolpe del operador:
●
●
●
El contragolpe es el resultado del mal uso de la sierra y / o procedimientos o condiciones de
operación incorrectas y puede evitarse tomando las precauciones adecuadas como se indica a
continuación:
a)
b)
La etiqueta de su herramienta puede incluir los siguientes símbolos. Los símbolos y sus definiciones
son los siguientes:
Reglas de seguridad para luces láser
La luz láser / radiación láser utilizada en el sistema es de Clase 2 con longitudes de onda máximas
de 1 mW y 650 nm. Estos láseres normalmente no presentan un riesgo óptico, aunque mirar el rayo
puede causar ceguera instantánea.
ADVERTENCIA : No mire directamente al rayo láser.
Puede existir un peligro si observa deliberadamente la viga, observe todas las reglas de seguridad
de la siguiente manera;
●
●
●
●
●
f)
3)
a)
b)
c)
d)
e)
f)
g)
4)
a)
b)
c)
d)
e)
f)
g)
●
●
●
●
●
●
●
●
Cuanto menor es el número de calibre del cable, mayor es la capacidad del cable, es decir, el calibre
16 tiene más capacidad que el calibre 18. Un cable de menor tamaño provocará una caída en el
voltaje de la línea, lo que provocará pérdida de potencia y sobrecalentamiento. Cuando use más de
una extensión para completar la longitud total, asegúrese de que cada extensión individual contenga
al menos el tamaño mínimo de cable. La siguiente tabla muestra el tamaño correcto a utilizar según
la longitud del cable y la clasificación de amperaje de la placa de identificación. En caso de duda, use
el siguiente medidor más pesado. Cuanto más pequeño es el número de calibre, más pesado es el
cable.
DEFINICIONES: SÍMBOLOS Y PALABRAS DE ALERTA DE SEGURIDAD
Es importante que lea y comprenda este manual. La información que contiene se relaciona con la
protección de SU SEGURIDAD y la PREVENCIÓN DE PROBLEMAS. Los siguientes símbolos se
usan para ayudarlo a reconocer esta información.
AVISO: El uso sin el símbolo de alerta de seguridad indica una situación potencialmente peligrosa
que, si no se evita, puede provocar daños a la propiedad.
ADVERTENCIA: lea todas las advertencias de seguridad y todas las instrucciones.
El incumplimiento de las advertencias e instrucciones puede provocar descargas eléctricas, incendi-
os y / o lesiones graves.
GUARDE TODAS LAS ADVERTENCIAS E INSTRUCCIONES PARA FUTURAS REFERENCIAS
El término "herramienta eléctrica" en las advertencias se refiere a la herramienta eléctrica que funcio-
na con la red eléctrica (con cable) o la herramienta eléctrica que funciona con batería (sin cable).
1)
a)
b)
c)
2)
a)
b)
c)
d)
e)
c)
d)
e)
f)
g)
Instrucciones de seguridad de la protección inferior
a)
b)
c)
d)
Instrucciones de seguridad adicionales
●
●
●
●
●
●
●
●
●
●
ADVERTENCIA: Parte del polvo creado por el lijado eléctrico, el aserrado, el rectificado, la
perforación y otras actividades de construcción contienen productos químicos que en el estado de
California se sabe que causan cáncer, defectos de nacimiento u otros daños reproductivos. Algunos
ejemplos de estos químicos son:
●
El riesgo de estas exposiciones varía, según la frecuencia con la que realice este tipo de trabajo.
Para reducir su exposición a estos productos químicos: trabaje en un área bien ventilada y trabaje
con equipos de seguridad aprobados, como las máscaras antipolvo que están especialmente diseña-
das para filtrar partículas microscópicas.
ADVERTENCIA: SIEMPRE USE GAFAS DE SEGURIDAD. Los anteojos de uso diario NO
son lentes de seguridad. También use mascarilla facial o antipolvo si corta
●
ADVERTENCIA: Cortar plásticos, madera recubierta de savia y otros materiales puede hacer
que el material derretido se acumule en las puntas de la hoja y en el cuerpo de la hoja de sierra, lo
que aumenta el riesgo de sobrecalentamiento y atascamiento de la hoja durante el corte.
ADVERTENCIA: El uso de esta herramienta puede generar y / o desechar polvo, lo que puede
causar lesiones respiratorias u otras lesiones graves y permanentes. Siempre use protección respira-
toria aprobada por NIOSH / OSHA apropiada para la exposición al polvo. Dirija las partículas lejos de
la cara y el cuerpo. Siempre opere la herramienta en un área bien ventilada y permita la eliminación
adecuada del polvo. Utilice el sistema de recolección de polvo siempre que sea posible.
PRECAUCIÓN: El uso de controles o ajustes o la realización de procedimientos distintos a los
especificados en este documento pueden provocar una exposición peligrosa a la radiación
Uso previsto
Esta máquina está destinada principalmente al aserrado, longitudinal y transversalmente, de madera
maciza, aglomerado, madera contrachapada, aluminio, azulejos y piedra en una posición fija. Tenga
en cuenta que la hoja preinstalada en la sierra, tal como se suministra, está diseñada para usarse
solo con madera. Cualquier otro uso o modificación del dispositivo se considerará como un uso
inadecuado y podría generar peligros considerables. No es adecuado para uso comercial
Función descriptiva
La numeración de las características de los productos se refiere a la ilustración de la máquina en la
página de gráficos.
Montaje / configuración de ajuste
ADVERTENCIA: Antes de trabajar en la herramienta eléctrica, retire siempre el enchufe de la
fuente de alimentación.
●
●
●
Ajustar la profundidad de corte,
1.
2.
Nota: si es posible, recomiende configurar la profundidad de corte aproximadamente 2 mm más
profundo que el grosor del material, esto debería ayudar a asegurar que logre un corte limpio.
Solicitud
La mini sierra de inmersión es versátil y le permite cortar muchos tipos diferentes de materiales.
Algunos de los materiales incluyen
●
●
●
Selección de cuchilla
MANTENIMIENTO
ADVERTENCIA: Desenchufe la herramienta antes de instalar o quitar accesorios, antes de
ajustar o al hacer reparaciones. Use solo jabón suave y un paño húmedo para limpiar la herramienta.
Nunca permita que ningún líquido ingrese a la herramienta; nunca sumerja ninguna parte de la
herramienta en un líquido.
IMPORTANTE: Para garantizar la SEGURIDAD y CONFIABILIDAD del producto, reparaciones,
mantenimiento y ajuste (que no sean los enumerados
en este manual) debe ser realizado por centros de servicio autorizados u otras organizaciones de
servicio calificadas, utilizando siempre piezas de repuesto idénticas.
SEGURIDAD EN EL ÁREA DE TRABAJO
Mantenga el área de trabajo limpia y bien iluminada. Las áreas desordenadas u oscuras provocan
accidentes.
No opere herramientas eléctricas en atmósferas explosivas, como en presencia de líquidos,
gases o polvo inflamables. Las herramientas eléctricas crean chispas que pueden encender el
polvo o los humos.
Mantenga alejados a los niños y transeúntes mientras utiliza una herramienta eléctrica. Las
distracciones pueden hacer que pierdas el control.
SEGURIDAD ELECTRICA
Los enchufes de la herramienta eléctrica deben coincidir con la toma de corriente. Nunca
modifique el enchufe de ninguna manera. No utilice enchufes adaptadores con herramientas
eléctricas conectadas a tierra. Los enchufes no modificados y las tomas correspondientes
reducirán el riesgo de descarga eléctrica.
Evite el contacto del cuerpo con superficies conectadas a tierra, como tuberías, radiadores,
cocinas y refrigeradores. Existe un mayor riesgo de electricidad
choque si su cuerpo está conectado a tierra.
No exponga las herramientas eléctricas a la lluvia o la humedad. El agua que ingresa a una
herramienta eléctrica aumentará el riesgo de descarga eléctrica.
No maltrate el cable. Nunca use el cable para transportar, tirar o desenchufar la herramienta
eléctrica. Mantenga el cable alejado del calor, aceite, bordes afilados o piezas móviles. Los cables
dañados o enredados aumentan el riesgo de descarga eléctrica.
Cuando utilice una herramienta eléctrica en exteriores, use un cable de extensión adecuado para
uso en exteriores. El uso de un cable adecuado para uso en exteriores reduce el riesgo de descar-
ga eléctrica.
Si es inevitable utilizar una herramienta eléctrica en una ubicación húmeda, utilice un suministro
protegido por un interruptor de circuito de falla a tierra (GFCI). El uso de un GFCI reduce el riesgo
de descarga eléctrica.
SEGURIDAD PERSONAL
Manténgase alerta, observe lo que está haciendo y use el sentido común al operar una
herramienta eléctrica. No use una herramienta eléctrica mientras
Está cansado o bajo la influencia de drogas, alcohol o medicamentos. Un momento de falta de
atención al utilizar herramientas eléctricas puede provocar lesiones personales graves.
Use equipo de protección personal.
Siempre use protección para los ojos. El equipo de protección como máscara antipolvo, zapatos
de seguridad antideslizantes, casco o protección auditiva para condiciones apropiadas reducirá
las lesiones personales.
Prevenir arranques involuntarios. Asegúrese de que el interruptor esté en la posición de apagado
antes de conectarlo a la fuente de alimentación y / o al paquete de baterías, levantar o transportar
la herramienta. Llevar herramientas eléctricas con el dedo en el interruptor o activar herramientas
eléctricas que tienen el interruptor encendido invita a accidentes.
Retire cualquier llave de ajuste o llave inglesa antes de encender la herramienta eléctrica. Una
llave inglesa o una llave dejada unida a una parte giratoria de la herramienta eléctrica puede
provocar lesiones personales.
No te excedas. Mantenga la postura y el equilibrio en todo momento. Esto permite un mejor
control de la herramienta eléctrica en situaciones inesperadas.
Vístete apropiadamente. No use ropa suelta o joyas. Mantenga su cabello, ropa y guantes lejos
de las partes móviles. Ropa suelta, joyas o cabello largo pueden quedar atrapados en las partes
móviles.
Si se proporcionan dispositivos para la conexión de instalaciones de extracción y recolección de
polvo, asegúrese de que estén conectados y se usen adecuadamente.
El uso de la recolección de polvo puede reducir los riesgos relacionados con el polvo.
USO Y CUIDADO DE LA HERRAMIENTA ELÉCTRICA
No fuerce la herramienta eléctrica. Use la herramienta eléctrica correcta para su aplicación. La
herramienta eléctrica correcta hará el trabajo mejor y más seguro a la velocidad para la que fue
diseñada.
No use la herramienta eléctrica si el interruptor no enciende y apaga. Cualquier herramienta
eléctrica que no pueda controlarse con el interruptor es peligrosa y debe repararse.
Desconecte el enchufe de la fuente de alimentación y / o la batería de la herramienta eléctrica
antes de hacer cualquier ajuste, cambiar accesorios o almacenar herramientas eléctricas. Dichas
medidas de seguridad preventivas reducen el riesgo de arrancar la herramienta eléctrica acciden-
talmente.
Guarde las herramientas eléctricas inactivas fuera del alcance de los niños y no permita que
personas que no estén familiarizadas con la herramienta eléctrica o estas instrucciones operen la
herramienta. Las herramientas eléctricas son peligrosas en manos de usuarios no capacitados.
Mantener herramientas eléctricas. Verifique la desalineación o el atascamiento de las piezas
móviles, la rotura de las piezas y cualquier otra condición que pueda afectar el funcionamiento de
la herramienta eléctrica. Si está dañado, repare la herramienta eléctrica antes de usar. Muchos
accidentes son causados por herramientas eléctricas mal mantenidas.
Mantenga las herramientas de corte afiladas y limpias. Es menos probable que las herramientas de
corte mantenidas adecuadamente con bordes de corte afilados se unan y son más fáciles de controlar.
Utilice la herramienta eléctrica, los accesorios y las brocas de herramientas, etc. de acuerdo con
estas instrucciones, teniendo en cuenta las condiciones de trabajo y el trabajo a realizar. El uso
de la herramienta eléctrica para operaciones diferentes de las previstas podría provocar una
situación peligrosa.
SERVICIO
Mantenga su segunda mano en la manija auxiliar o en la carcasa del motor. Si ambas manos
sostienen la sierra, la hoja no puede cortarlas.
No meta debajo de la pieza de trabajo. El protector no puede protegerlo de la cuchilla debajo de
la pieza de trabajo.
Ajuste la profundidad de corte al grosor de la pieza de trabajo. Debe verse menos de un diente
completo de los dientes de la cuchilla debajo de la pieza de trabajo.
Nunca sostenga la pieza que está cortando en sus manos o en su pierna. Asegure la pieza de
trabajo a una plataforma estable. Es importante apoyar el trabajo adecuadamente para minimizar
la exposición del cuerpo, la fijación de la cuchilla o la pérdida de control.
Sujete la herramienta eléctrica solo por las superficies de agarre aisladas, cuando realice una
operación donde la herramienta de corte pueda entrar en contacto con cables ocultos o su propio
cable. El contacto con un cable "vivo" también hará que las partes metálicas expuestas de la
herramienta eléctrica "vivan" y podría dar al operador una descarga eléctrica.
Cuando rasgue siempre use una guía de corte o una guía de borde recto. Esto mejora la precisión
del corte y reduce la posibilidad de que la cuchilla se atasque.
Utilice siempre cuchillas con el tamaño y la forma correctos (diamante versus redondo) de los
agujeros del eje. Las hojas que no coinciden con el hardware de montaje de la sierra funcionarán
excéntricamente, causando pérdida de control.
Nunca use arandelas o pernos dañados o incorrectos. Las arandelas y el perno de la hoja fueron
diseñados especialmente para su sierra, para un rendimiento óptimo y seguridad de operación
El retroceso es una reacción repentina a una hoja de sierra apretada, atada o desalineada, que
hace que una sierra no controlada se levante y salga de la pieza de trabajo hacia el operador.
Cuando la cuchilla se pellizca o ata fuertemente por la ranura que se cierra, la cuchilla se detiene
y la reacción del motor impulsa la unidad rápidamente hacia el operador.
Si la cuchilla se tuerce o se desalinea en el corte, los dientes en el borde posterior de la cuchilla
pueden cavar en la superficie superior de la madera haciendo que la cuchilla salga de la ranura y
salte hacia el operador.
Mantenga un agarre firme con ambas manos en la sierra y coloque los brazos para resistir las
fuerzas de contragolpe. Coloque su cuerpo a ambos lados de la cuchilla, pero no en línea con la
cuchilla. El retroceso puede hacer que la sierra salte hacia atrás, pero el operador puede controlar
las fuerzas de retroceso si se toman las precauciones adecuadas.
Cuando la cuchilla está atascada, o cuando se interrumpe un corte por cualquier motivo, suelte el
gatillo y mantenga la sierra inmóvil en el material hasta que la cuchilla se detenga por completo.
Nunca intente retirar la sierra del trabajo ni tirar de la sierra hacia atrás mientras la hoja está en
movimiento o puede producirse un contragolpe. Investigue y tome medidas correctivas para
eliminar la causa del atascamiento de la cuchilla.
Cuando reinicie una sierra en la pieza de trabajo, centre la hoja de la sierra en la ranura y verifique
que los dientes de la sierra no estén enganchados en el material. Si la hoja de la sierra está
atascada, puede subir o retroceder desde la pieza de trabajo a medida que se reinicia la sierra.
Admite paneles grandes para minimizar el riesgo de pellizcos y contragolpes de la cuchilla. Los
paneles grandes tienden a ceder bajo su propio peso. Los soportes deben colocarse debajo del
panel en ambos lados, cerca de la línea de corte y cerca del borde del panel.
No use cuchillas desafiladas o dañadas. Las cuchillas sin afilar o mal ajustadas producen una
ranura estrecha que causa fricción excesiva, atascamiento de la cuchilla y retroceso.
Las palancas de bloqueo de ajuste de la profundidad de la cuchilla y el bisel deben estar apreta-
das y seguras antes de hacer el corte. Si el ajuste de la cuchilla cambia durante el corte, puede
causar atascamiento y retroceso.
Tenga especial cuidado al cortar en paredes existentes u otras áreas ciegas. La cuchilla sobresali-
ente puede cortar objetos que pueden causar retroceso.
Verifique que el protector inferior esté bien cerrado antes de cada uso. No opere la sierra si la
protección inferior no se mueve libremente y se cierra instantáneamente. Nunca sujete ni ate la
protección inferior en la posición abierta. Si la sierra se cae accidentalmente, la protección inferior
puede doblarse. Levante la protección inferior con el mango retráctil y asegúrese de que se
mueva libremente y no toque la cuchilla ni ninguna otra parte, en todos los ángulos y profundi-
dades de corte.
Compruebe el funcionamiento del muelle protector inferior. Si el protector y el resorte no funcio-
nan correctamente, deben ser reparados antes de su uso. La protección inferior puede funcionar
lentamente debido a piezas dañadas, depósitos gomosos o acumulación de escombros.
La protección inferior debe retraerse manualmente solo para cortes especiales como "cortes por
inmersión" y "cortes compuestos". Eleve la protección inferior retrayendo la manija y tan pronto
como la cuchilla ingrese al material, la protección inferior debe liberarse. Para todas las demás
sierras, la protección inferior debe funcionar automáticamente.
Observe siempre que el protector inferior esté cubriendo la hoja antes de colocar la sierra en el
banco o el piso. Una cuchilla sin protección y en inercia hará que la sierra camine hacia atrás,
cortando todo lo que se encuentre en su camino. Tenga en cuenta el tiempo que tarda la cuchilla
en detenerse después de soltar el interruptor.
Use abrazaderas u otra forma práctica para asegurar y apoyar la pieza de trabajo en una platafor-
ma estable. Sostener el trabajo con la mano o contra su cuerpo lo deja inestable y puede conducir
a la pérdida de control.
Mantenga su cuerpo colocado a ambos lados de la hoja, pero no en línea con la hoja de sierra.
RETROCESO podría hacer que la sierra salte hacia atrás (ver Causas y Prevención del operador
de contragolpe y retroceso).
Evita cortar las uñas. Inspeccione y quite todas las uñas de la madera antes de cortar.
Asegúrese siempre de que nada interfiera con el movimiento del protector inferior de la cuchilla.
Los accesorios deben estar clasificados para al menos la velocidad recomendada en la etiqueta
de advertencia de la herramienta. Las ruedas y otros accesorios que corren por encima de la
velocidad nominal pueden separarse y causar lesiones. Las clasificaciones de accesorios
siempre deben estar por encima de la velocidad de la herramienta como se muestra en la placa
de identificación de la herramienta.
Siempre asegúrese de que la sierra esté limpia antes de usar.
Deje de usar esta sierra y hágalo reparar adecuadamente si se produce algún ruido inusual u
operación anormal.
Siempre asegúrese de que todos los componentes estén montados de manera adecuada y segura
antes de usar la herramienta.
Siempre maneje la hoja de sierra con cuidado cuando la monte o la quite, o cuando quite el troquel
de diamante.
Siempre espere hasta que el motor haya alcanzado la velocidad máxima antes de comenzar un
corte.
Mantenga siempre los mangos secos, limpios y libres de aceite y grasa. Sostenga la herramienta
firmemente con
ambas manos cuando está en uso.
Esté siempre alerta en todo momento, especialmente durante operaciones repetitivas y
monótonas. Asegúrese siempre de la posición de sus manos en relación con la cuchilla.
Manténgase alejado de las piezas finales que pueden caerse después de cortar. Pueden estar
calientes, afilados y / o pesados. Se pueden producir lesiones personales graves.
Reemplace o repare los cables dañados. Asegúrese de que su cable de extensión esté en buenas
condiciones. Use solo cables de extensión de 3 cables que tengan enchufes de conexión a tierra
de 3 clavijas y receptáculos de 3 polos que acepten el enchufe de la herramienta.
Un cable de extensión debe tener un tamaño de cable adecuado (AWG o American Wire Gauge)
por seguridad.
Protección para los ojos ANSI Z87.1 (CAN / CSA Z94.3).
Protección auditiva ANSI S12.6 (S3.19).
Protección respiratoria NIOSH / OSHA.
Plomo de pinturas a base de plomo, sílice cristalina de ladrillos y cemento y otros productos de
albañilería, y arsénico y cromo de madera tratada químicamente (CCA).
Evite el contacto prolongado con el polvo del lijado eléctrico, aserrado, rectificado, taladrado y
otras construcciones.
ocupaciones. Use ropa protectora y lave las áreas expuestas con agua y jabón. Permitir que el
polvo penetre en la boca, los ojos o se ponga sobre la piel puede promover la absorción de produc-
tos químicos nocivos.
El láser se debe usar y mantener de acuerdo con las instrucciones del fabricante.
Nunca apunte el rayo a ninguna persona u objeto que no sea la pieza de trabajo.
El rayo láser no debe dirigirse deliberadamente al personal y se debe evitar que se dirija hacia el
ojo de una persona durante más de 0.25 segundos.
Asegúrese siempre de que el rayo láser esté dirigido a una pieza de trabajo resistente sin superfi-
cies reflectantes. Es decir. Se aceptan superficies revestidas de madera o rugosas. La lámina de
acero reflectante brillante o similar no es adecuada para el uso con láser, ya que la superficie
reflectante podría dirigir el rayo hacia el operador.
No cambie el conjunto de luz láser con un tipo diferente. Las reparaciones deben ser realizadas
por el fabricante del láser o un agente autorizado.
Al montar la hoja de sierra, use guantes protectores. Peligro de lesiones al tocar la hoja de sierra.
Utilice únicamente hojas de sierra que correspondan con los datos característicos que figuran en
las instrucciones de funcionamiento.
No utilice bajo ninguna circunstancia discos abrasivos como herramienta de corte.
COLOCACIÓN Y EXTRACCIÓN DE LA HOJA - FIGURA C-E
• Retraiga la protección inferior y ensamble la cuchilla (8) y la arandela de sujeción (17) como se
muestra en la figura C.
• Oprima el bloqueo del eje (13) mientras gira el perno de la hoja (7) con la llave de la hoja (16)
hasta que el bloqueo de la hoja se enganche y la hoja deje de girar. figura D
NOTA: La llave de la hoja se guarda en una bolsa de polietileno junto con el manual.
• Apriete firmemente el perno de la hoja con la llave de la hoja.
NOTA: El perno tiene una rosca a la izquierda. Para aflojar, gire en sentido horario. Para apretar,
gire en sentido antihorario. figura E
NOTA: Nunca enganche el bloqueo de la hoja mientras la sierra esté en funcionamiento, ni haga
un esfuerzo para detener la herramienta. Nunca encienda la herramienta mientras el bloqueo de
la hoja esté activado. Se producirán daños graves en su sierra.
Según sea necesario, mueva la perilla desbloqueada y deje que el dedo apunte a la posición
adecuada de la escala de profundidad,
Luego gire la perilla 180 ° para bloquearla,
- 27 -
Technology Creates Power
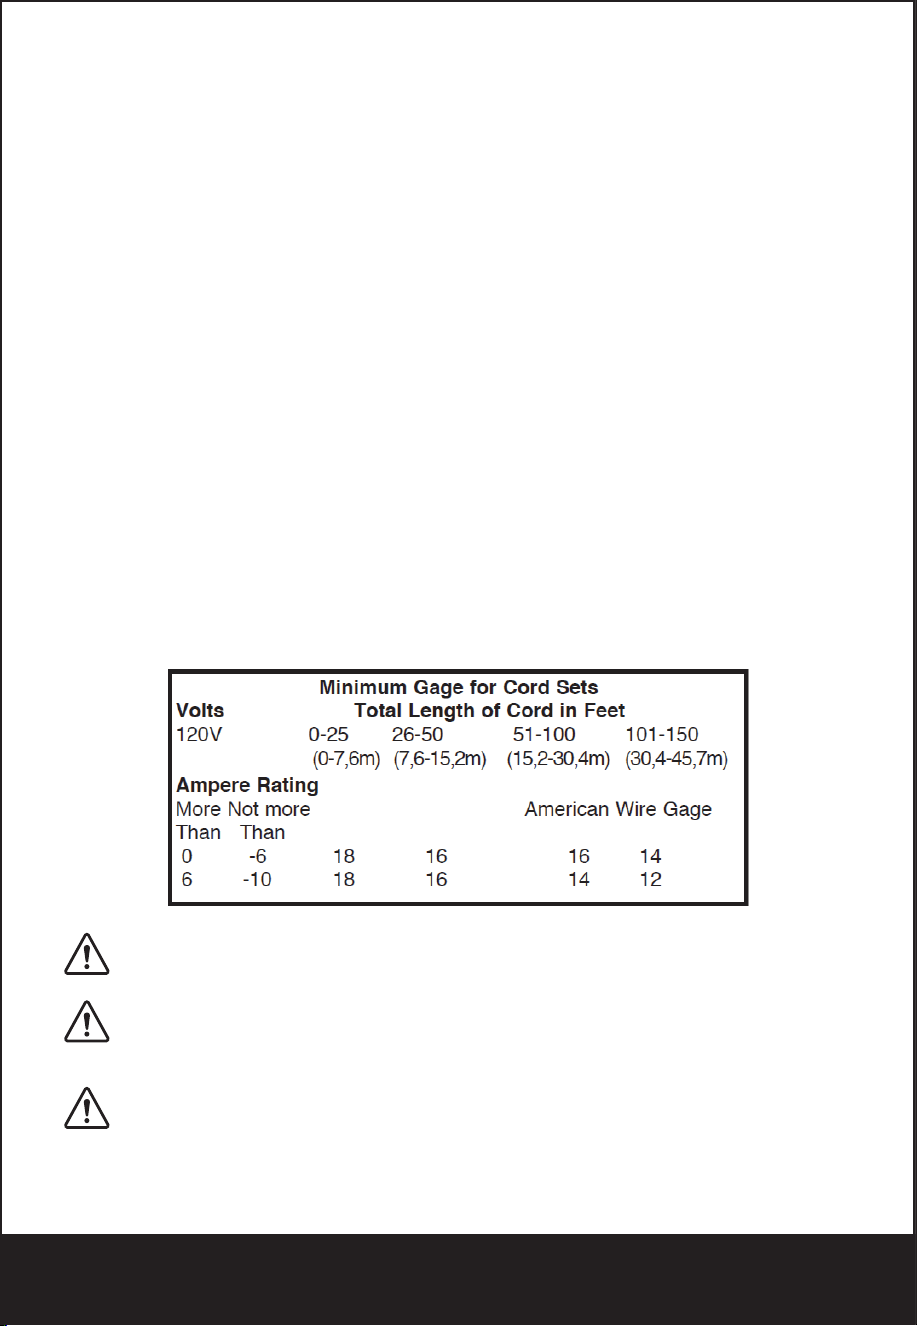
EN
FR
ES
Encendido y apagado
Nota: Por razones de seguridad, el interruptor de encendido / apagado no se puede bloquear; debe
permanecer presionado durante toda la operación.
Función Láser
●Enciéndalo con el interruptor de encendido / apagado de la luz láser justo antes de cortar.
●Apáguelo inmediatamente después del uso para conservar la vida útil de la batería y el láser.
CAMBIO DE LAS BATERÍAS LÁSER
Las baterías que operan el láser deberán reemplazarse después de un uso considerable del láser.
1.
2.
3.
4.
PELIGRO: Nunca permita que el rayo láser brille en los ojos de una persona, podría provocar
daños oculares graves. Asegúrese de que el interruptor del láser esté apagado y que el láser NO esté
apuntando hacia usted mientras reemplaza las baterías del láser y cuando verifica la función del
láser.
5)
Haga que un técnico calificado repare su herramienta eléctrica utilizando solo piezas de repuesto
idénticas. Esto asegurará que se mantenga la seguridad de la herramienta eléctrica.
PELIGRO: Mantenga las manos alejadas del área de corte y la cuchilla.
a)
b)
c)
d)
e)
f)
g)
h)
Causas y prevención del contragolpe del operador:
●
●
●
El contragolpe es el resultado del mal uso de la sierra y / o procedimientos o condiciones de
operación incorrectas y puede evitarse tomando las precauciones adecuadas como se indica a
continuación:
a)
b)
La etiqueta de su herramienta puede incluir los siguientes símbolos. Los símbolos y sus definiciones
son los siguientes:
Reglas de seguridad para luces láser
La luz láser / radiación láser utilizada en el sistema es de Clase 2 con longitudes de onda máximas
de 1 mW y 650 nm. Estos láseres normalmente no presentan un riesgo óptico, aunque mirar el rayo
puede causar ceguera instantánea.
ADVERTENCIA : No mire directamente al rayo láser.
Puede existir un peligro si observa deliberadamente la viga, observe todas las reglas de seguridad
de la siguiente manera;
●
●
●
●
●
f)
3)
a)
b)
c)
d)
e)
f)
g)
4)
a)
b)
c)
d)
e)
f)
g)
●
●
●
●
●
●
●
●
Cuanto menor es el número de calibre del cable, mayor es la capacidad del cable, es decir, el calibre
16 tiene más capacidad que el calibre 18. Un cable de menor tamaño provocará una caída en el
voltaje de la línea, lo que provocará pérdida de potencia y sobrecalentamiento. Cuando use más de
una extensión para completar la longitud total, asegúrese de que cada extensión individual contenga
al menos el tamaño mínimo de cable. La siguiente tabla muestra el tamaño correcto a utilizar según
la longitud del cable y la clasificación de amperaje de la placa de identificación. En caso de duda, use
el siguiente medidor más pesado. Cuanto más pequeño es el número de calibre, más pesado es el
cable.
DEFINICIONES: SÍMBOLOS Y PALABRAS DE ALERTA DE SEGURIDAD
Es importante que lea y comprenda este manual. La información que contiene se relaciona con la
protección de SU SEGURIDAD y la PREVENCIÓN DE PROBLEMAS. Los siguientes símbolos se
usan para ayudarlo a reconocer esta información.
AVISO: El uso sin el símbolo de alerta de seguridad indica una situación potencialmente peligrosa
que, si no se evita, puede provocar daños a la propiedad.
ADVERTENCIA: lea todas las advertencias de seguridad y todas las instrucciones.
El incumplimiento de las advertencias e instrucciones puede provocar descargas eléctricas, incendi-
os y / o lesiones graves.
GUARDE TODAS LAS ADVERTENCIAS E INSTRUCCIONES PARA FUTURAS REFERENCIAS
El término "herramienta eléctrica" en las advertencias se refiere a la herramienta eléctrica que funcio-
na con la red eléctrica (con cable) o la herramienta eléctrica que funciona con batería (sin cable).
1)
a)
b)
c)
2)
a)
b)
c)
d)
e)
c)
d)
e)
f)
g)
Instrucciones de seguridad de la protección inferior
a)
b)
c)
d)
Instrucciones de seguridad adicionales
●
●
●
●
●
●
●
●
●
●
ADVERTENCIA: Parte del polvo creado por el lijado eléctrico, el aserrado, el rectificado, la
perforación y otras actividades de construcción contienen productos químicos que en el estado de
California se sabe que causan cáncer, defectos de nacimiento u otros daños reproductivos. Algunos
ejemplos de estos químicos son:
●
El riesgo de estas exposiciones varía, según la frecuencia con la que realice este tipo de trabajo.
Para reducir su exposición a estos productos químicos: trabaje en un área bien ventilada y trabaje
con equipos de seguridad aprobados, como las máscaras antipolvo que están especialmente diseña-
das para filtrar partículas microscópicas.
ADVERTENCIA: SIEMPRE USE GAFAS DE SEGURIDAD. Los anteojos de uso diario NO
son lentes de seguridad. También use mascarilla facial o antipolvo si corta
●
ADVERTENCIA: Cortar plásticos, madera recubierta de savia y otros materiales puede hacer
que el material derretido se acumule en las puntas de la hoja y en el cuerpo de la hoja de sierra, lo
que aumenta el riesgo de sobrecalentamiento y atascamiento de la hoja durante el corte.
ADVERTENCIA: El uso de esta herramienta puede generar y / o desechar polvo, lo que puede
causar lesiones respiratorias u otras lesiones graves y permanentes. Siempre use protección respira-
toria aprobada por NIOSH / OSHA apropiada para la exposición al polvo. Dirija las partículas lejos de
la cara y el cuerpo. Siempre opere la herramienta en un área bien ventilada y permita la eliminación
adecuada del polvo. Utilice el sistema de recolección de polvo siempre que sea posible.
PRECAUCIÓN: El uso de controles o ajustes o la realización de procedimientos distintos a los
especificados en este documento pueden provocar una exposición peligrosa a la radiación
Uso previsto
Esta máquina está destinada principalmente al aserrado, longitudinal y transversalmente, de madera
maciza, aglomerado, madera contrachapada, aluminio, azulejos y piedra en una posición fija. Tenga
en cuenta que la hoja preinstalada en la sierra, tal como se suministra, está diseñada para usarse
solo con madera. Cualquier otro uso o modificación del dispositivo se considerará como un uso
inadecuado y podría generar peligros considerables. No es adecuado para uso comercial
Función descriptiva
La numeración de las características de los productos se refiere a la ilustración de la máquina en la
página de gráficos.
Montaje / configuración de ajuste
ADVERTENCIA: Antes de trabajar en la herramienta eléctrica, retire siempre el enchufe de la
fuente de alimentación.
●
●
●
Ajustar la profundidad de corte,
1.
2.
Nota: si es posible, recomiende configurar la profundidad de corte aproximadamente 2 mm más
profundo que el grosor del material, esto debería ayudar a asegurar que logre un corte limpio.
Solicitud
La mini sierra de inmersión es versátil y le permite cortar muchos tipos diferentes de materiales.
Algunos de los materiales incluyen
●
●
●
Selección de cuchilla
MANTENIMIENTO
ADVERTENCIA: Desenchufe la herramienta antes de instalar o quitar accesorios, antes de
ajustar o al hacer reparaciones. Use solo jabón suave y un paño húmedo para limpiar la herramienta.
Nunca permita que ningún líquido ingrese a la herramienta; nunca sumerja ninguna parte de la
herramienta en un líquido.
IMPORTANTE: Para garantizar la SEGURIDAD y CONFIABILIDAD del producto, reparaciones,
mantenimiento y ajuste (que no sean los enumerados
en este manual) debe ser realizado por centros de servicio autorizados u otras organizaciones de
servicio calificadas, utilizando siempre piezas de repuesto idénticas.
SEGURIDAD EN EL ÁREA DE TRABAJO
Mantenga el área de trabajo limpia y bien iluminada. Las áreas desordenadas u oscuras provocan
accidentes.
No opere herramientas eléctricas en atmósferas explosivas, como en presencia de líquidos,
gases o polvo inflamables. Las herramientas eléctricas crean chispas que pueden encender el
polvo o los humos.
Mantenga alejados a los niños y transeúntes mientras utiliza una herramienta eléctrica. Las
distracciones pueden hacer que pierdas el control.
SEGURIDAD ELECTRICA
Los enchufes de la herramienta eléctrica deben coincidir con la toma de corriente. Nunca
modifique el enchufe de ninguna manera. No utilice enchufes adaptadores con herramientas
eléctricas conectadas a tierra. Los enchufes no modificados y las tomas correspondientes
reducirán el riesgo de descarga eléctrica.
Evite el contacto del cuerpo con superficies conectadas a tierra, como tuberías, radiadores,
cocinas y refrigeradores. Existe un mayor riesgo de electricidad
choque si su cuerpo está conectado a tierra.
No exponga las herramientas eléctricas a la lluvia o la humedad. El agua que ingresa a una
herramienta eléctrica aumentará el riesgo de descarga eléctrica.
No maltrate el cable. Nunca use el cable para transportar, tirar o desenchufar la herramienta
eléctrica. Mantenga el cable alejado del calor, aceite, bordes afilados o piezas móviles. Los cables
dañados o enredados aumentan el riesgo de descarga eléctrica.
Cuando utilice una herramienta eléctrica en exteriores, use un cable de extensión adecuado para
uso en exteriores. El uso de un cable adecuado para uso en exteriores reduce el riesgo de descar-
ga eléctrica.
Si es inevitable utilizar una herramienta eléctrica en una ubicación húmeda, utilice un suministro
protegido por un interruptor de circuito de falla a tierra (GFCI). El uso de un GFCI reduce el riesgo
de descarga eléctrica.
SEGURIDAD PERSONAL
Manténgase alerta, observe lo que está haciendo y use el sentido común al operar una
herramienta eléctrica. No use una herramienta eléctrica mientras
Está cansado o bajo la influencia de drogas, alcohol o medicamentos. Un momento de falta de
atención al utilizar herramientas eléctricas puede provocar lesiones personales graves.
Use equipo de protección personal.
Siempre use protección para los ojos. El equipo de protección como máscara antipolvo, zapatos
de seguridad antideslizantes, casco o protección auditiva para condiciones apropiadas reducirá
las lesiones personales.
Prevenir arranques involuntarios. Asegúrese de que el interruptor esté en la posición de apagado
antes de conectarlo a la fuente de alimentación y / o al paquete de baterías, levantar o transportar
la herramienta. Llevar herramientas eléctricas con el dedo en el interruptor o activar herramientas
eléctricas que tienen el interruptor encendido invita a accidentes.
Retire cualquier llave de ajuste o llave inglesa antes de encender la herramienta eléctrica. Una
llave inglesa o una llave dejada unida a una parte giratoria de la herramienta eléctrica puede
provocar lesiones personales.
No te excedas. Mantenga la postura y el equilibrio en todo momento. Esto permite un mejor
control de la herramienta eléctrica en situaciones inesperadas.
Vístete apropiadamente. No use ropa suelta o joyas. Mantenga su cabello, ropa y guantes lejos
de las partes móviles. Ropa suelta, joyas o cabello largo pueden quedar atrapados en las partes
móviles.
Si se proporcionan dispositivos para la conexión de instalaciones de extracción y recolección de
polvo, asegúrese de que estén conectados y se usen adecuadamente.
El uso de la recolección de polvo puede reducir los riesgos relacionados con el polvo.
USO Y CUIDADO DE LA HERRAMIENTA ELÉCTRICA
No fuerce la herramienta eléctrica. Use la herramienta eléctrica correcta para su aplicación. La
herramienta eléctrica correcta hará el trabajo mejor y más seguro a la velocidad para la que fue
diseñada.
No use la herramienta eléctrica si el interruptor no enciende y apaga. Cualquier herramienta
eléctrica que no pueda controlarse con el interruptor es peligrosa y debe repararse.
Desconecte el enchufe de la fuente de alimentación y / o la batería de la herramienta eléctrica
antes de hacer cualquier ajuste, cambiar accesorios o almacenar herramientas eléctricas. Dichas
medidas de seguridad preventivas reducen el riesgo de arrancar la herramienta eléctrica acciden-
talmente.
Guarde las herramientas eléctricas inactivas fuera del alcance de los niños y no permita que
personas que no estén familiarizadas con la herramienta eléctrica o estas instrucciones operen la
herramienta. Las herramientas eléctricas son peligrosas en manos de usuarios no capacitados.
Mantener herramientas eléctricas. Verifique la desalineación o el atascamiento de las piezas
móviles, la rotura de las piezas y cualquier otra condición que pueda afectar el funcionamiento de
la herramienta eléctrica. Si está dañado, repare la herramienta eléctrica antes de usar. Muchos
accidentes son causados por herramientas eléctricas mal mantenidas.
Mantenga las herramientas de corte afiladas y limpias. Es menos probable que las herramientas de
corte mantenidas adecuadamente con bordes de corte afilados se unan y son más fáciles de controlar.
Utilice la herramienta eléctrica, los accesorios y las brocas de herramientas, etc. de acuerdo con
estas instrucciones, teniendo en cuenta las condiciones de trabajo y el trabajo a realizar. El uso
de la herramienta eléctrica para operaciones diferentes de las previstas podría provocar una
situación peligrosa.
SERVICIO
Mantenga su segunda mano en la manija auxiliar o en la carcasa del motor. Si ambas manos
sostienen la sierra, la hoja no puede cortarlas.
No meta debajo de la pieza de trabajo. El protector no puede protegerlo de la cuchilla debajo de
la pieza de trabajo.
Ajuste la profundidad de corte al grosor de la pieza de trabajo. Debe verse menos de un diente
completo de los dientes de la cuchilla debajo de la pieza de trabajo.
Nunca sostenga la pieza que está cortando en sus manos o en su pierna. Asegure la pieza de
trabajo a una plataforma estable. Es importante apoyar el trabajo adecuadamente para minimizar
la exposición del cuerpo, la fijación de la cuchilla o la pérdida de control.
Sujete la herramienta eléctrica solo por las superficies de agarre aisladas, cuando realice una
operación donde la herramienta de corte pueda entrar en contacto con cables ocultos o su propio
cable. El contacto con un cable "vivo" también hará que las partes metálicas expuestas de la
herramienta eléctrica "vivan" y podría dar al operador una descarga eléctrica.
Cuando rasgue siempre use una guía de corte o una guía de borde recto. Esto mejora la precisión
del corte y reduce la posibilidad de que la cuchilla se atasque.
Utilice siempre cuchillas con el tamaño y la forma correctos (diamante versus redondo) de los
agujeros del eje. Las hojas que no coinciden con el hardware de montaje de la sierra funcionarán
excéntricamente, causando pérdida de control.
Nunca use arandelas o pernos dañados o incorrectos. Las arandelas y el perno de la hoja fueron
diseñados especialmente para su sierra, para un rendimiento óptimo y seguridad de operación
El retroceso es una reacción repentina a una hoja de sierra apretada, atada o desalineada, que
hace que una sierra no controlada se levante y salga de la pieza de trabajo hacia el operador.
Cuando la cuchilla se pellizca o ata fuertemente por la ranura que se cierra, la cuchilla se detiene
y la reacción del motor impulsa la unidad rápidamente hacia el operador.
Si la cuchilla se tuerce o se desalinea en el corte, los dientes en el borde posterior de la cuchilla
pueden cavar en la superficie superior de la madera haciendo que la cuchilla salga de la ranura y
salte hacia el operador.
Mantenga un agarre firme con ambas manos en la sierra y coloque los brazos para resistir las
fuerzas de contragolpe. Coloque su cuerpo a ambos lados de la cuchilla, pero no en línea con la
cuchilla. El retroceso puede hacer que la sierra salte hacia atrás, pero el operador puede controlar
las fuerzas de retroceso si se toman las precauciones adecuadas.
Cuando la cuchilla está atascada, o cuando se interrumpe un corte por cualquier motivo, suelte el
gatillo y mantenga la sierra inmóvil en el material hasta que la cuchilla se detenga por completo.
Nunca intente retirar la sierra del trabajo ni tirar de la sierra hacia atrás mientras la hoja está en
movimiento o puede producirse un contragolpe. Investigue y tome medidas correctivas para
eliminar la causa del atascamiento de la cuchilla.
Cuando reinicie una sierra en la pieza de trabajo, centre la hoja de la sierra en la ranura y verifique
que los dientes de la sierra no estén enganchados en el material. Si la hoja de la sierra está
atascada, puede subir o retroceder desde la pieza de trabajo a medida que se reinicia la sierra.
Admite paneles grandes para minimizar el riesgo de pellizcos y contragolpes de la cuchilla. Los
paneles grandes tienden a ceder bajo su propio peso. Los soportes deben colocarse debajo del
panel en ambos lados, cerca de la línea de corte y cerca del borde del panel.
No use cuchillas desafiladas o dañadas. Las cuchillas sin afilar o mal ajustadas producen una
ranura estrecha que causa fricción excesiva, atascamiento de la cuchilla y retroceso.
Las palancas de bloqueo de ajuste de la profundidad de la cuchilla y el bisel deben estar apreta-
das y seguras antes de hacer el corte. Si el ajuste de la cuchilla cambia durante el corte, puede
causar atascamiento y retroceso.
Tenga especial cuidado al cortar en paredes existentes u otras áreas ciegas. La cuchilla sobresali-
ente puede cortar objetos que pueden causar retroceso.
Verifique que el protector inferior esté bien cerrado antes de cada uso. No opere la sierra si la
protección inferior no se mueve libremente y se cierra instantáneamente. Nunca sujete ni ate la
protección inferior en la posición abierta. Si la sierra se cae accidentalmente, la protección inferior
puede doblarse. Levante la protección inferior con el mango retráctil y asegúrese de que se
mueva libremente y no toque la cuchilla ni ninguna otra parte, en todos los ángulos y profundi-
dades de corte.
Compruebe el funcionamiento del muelle protector inferior. Si el protector y el resorte no funcio-
nan correctamente, deben ser reparados antes de su uso. La protección inferior puede funcionar
lentamente debido a piezas dañadas, depósitos gomosos o acumulación de escombros.
La protección inferior debe retraerse manualmente solo para cortes especiales como "cortes por
inmersión" y "cortes compuestos". Eleve la protección inferior retrayendo la manija y tan pronto
como la cuchilla ingrese al material, la protección inferior debe liberarse. Para todas las demás
sierras, la protección inferior debe funcionar automáticamente.
Observe siempre que el protector inferior esté cubriendo la hoja antes de colocar la sierra en el
banco o el piso. Una cuchilla sin protección y en inercia hará que la sierra camine hacia atrás,
cortando todo lo que se encuentre en su camino. Tenga en cuenta el tiempo que tarda la cuchilla
en detenerse después de soltar el interruptor.
Use abrazaderas u otra forma práctica para asegurar y apoyar la pieza de trabajo en una platafor-
ma estable. Sostener el trabajo con la mano o contra su cuerpo lo deja inestable y puede conducir
a la pérdida de control.
Mantenga su cuerpo colocado a ambos lados de la hoja, pero no en línea con la hoja de sierra.
RETROCESO podría hacer que la sierra salte hacia atrás (ver Causas y Prevención del operador
de contragolpe y retroceso).
Evita cortar las uñas. Inspeccione y quite todas las uñas de la madera antes de cortar.
Asegúrese siempre de que nada interfiera con el movimiento del protector inferior de la cuchilla.
Los accesorios deben estar clasificados para al menos la velocidad recomendada en la etiqueta
de advertencia de la herramienta. Las ruedas y otros accesorios que corren por encima de la
velocidad nominal pueden separarse y causar lesiones. Las clasificaciones de accesorios
siempre deben estar por encima de la velocidad de la herramienta como se muestra en la placa
de identificación de la herramienta.
Siempre asegúrese de que la sierra esté limpia antes de usar.
Deje de usar esta sierra y hágalo reparar adecuadamente si se produce algún ruido inusual u
ADVERTENCIA: Las cuchillas se apagan después de apagar. Se pueden producir lesiones
personales graves.
ADVERTENCIA: SIEMPRE use protección auditiva personal adecuada que cumpla con ANSI
S12.6 (S3.19) durante el uso. Bajo ciertas condiciones y duración de uso, el ruido de este
producto puede contribuir a la pérdida auditiva.
ADVERTENCIA: SIEMPRE use protección ocular adecuada. Todos los usuarios y espectado-
res deben usar protección ocular adecuada que cumpla con ANSI Z87.1. La operación es
polvorienta. SIEMPRE use equipo de seguridad certificado:
operación anormal.
Siempre asegúrese de que todos los componentes estén montados de manera adecuada y segura
antes de usar la herramienta.
Siempre maneje la hoja de sierra con cuidado cuando la monte o la quite, o cuando quite el troquel
de diamante.
Siempre espere hasta que el motor haya alcanzado la velocidad máxima antes de comenzar un
corte.
Mantenga siempre los mangos secos, limpios y libres de aceite y grasa. Sostenga la herramienta
firmemente con
ambas manos cuando está en uso.
Esté siempre alerta en todo momento, especialmente durante operaciones repetitivas y
monótonas. Asegúrese siempre de la posición de sus manos en relación con la cuchilla.
Manténgase alejado de las piezas finales que pueden caerse después de cortar. Pueden estar
calientes, afilados y / o pesados. Se pueden producir lesiones personales graves.
Reemplace o repare los cables dañados. Asegúrese de que su cable de extensión esté en buenas
condiciones. Use solo cables de extensión de 3 cables que tengan enchufes de conexión a tierra
de 3 clavijas y receptáculos de 3 polos que acepten el enchufe de la herramienta.
Un cable de extensión debe tener un tamaño de cable adecuado (AWG o American Wire Gauge)
por seguridad.
Protección para los ojos ANSI Z87.1 (CAN / CSA Z94.3).
Protección auditiva ANSI S12.6 (S3.19).
Protección respiratoria NIOSH / OSHA.
Plomo de pinturas a base de plomo, sílice cristalina de ladrillos y cemento y otros productos de
albañilería, y arsénico y cromo de madera tratada químicamente (CCA).
Evite el contacto prolongado con el polvo del lijado eléctrico, aserrado, rectificado, taladrado y
otras construcciones.
ocupaciones. Use ropa protectora y lave las áreas expuestas con agua y jabón. Permitir que el
polvo penetre en la boca, los ojos o se ponga sobre la piel puede promover la absorción de produc-
tos químicos nocivos.
El láser se debe usar y mantener de acuerdo con las instrucciones del fabricante.
Nunca apunte el rayo a ninguna persona u objeto que no sea la pieza de trabajo.
El rayo láser no debe dirigirse deliberadamente al personal y se debe evitar que se dirija hacia el
ojo de una persona durante más de 0.25 segundos.
Asegúrese siempre de que el rayo láser esté dirigido a una pieza de trabajo resistente sin superfi-
cies reflectantes. Es decir. Se aceptan superficies revestidas de madera o rugosas. La lámina de
acero reflectante brillante o similar no es adecuada para el uso con láser, ya que la superficie
reflectante podría dirigir el rayo hacia el operador.
No cambie el conjunto de luz láser con un tipo diferente. Las reparaciones deben ser realizadas
por el fabricante del láser o un agente autorizado.
Al montar la hoja de sierra, use guantes protectores. Peligro de lesiones al tocar la hoja de sierra.
Utilice únicamente hojas de sierra que correspondan con los datos característicos que figuran en
las instrucciones de funcionamiento.
No utilice bajo ninguna circunstancia discos abrasivos como herramienta de corte.
COLOCACIÓN Y EXTRACCIÓN DE LA HOJA - FIGURA C-E
• Retraiga la protección inferior y ensamble la cuchilla (8) y la arandela de sujeción (17) como se
muestra en la figura C.
• Oprima el bloqueo del eje (13) mientras gira el perno de la hoja (7) con la llave de la hoja (16)
hasta que el bloqueo de la hoja se enganche y la hoja deje de girar. figura D
NOTA: La llave de la hoja se guarda en una bolsa de polietileno junto con el manual.
• Apriete firmemente el perno de la hoja con la llave de la hoja.
NOTA: El perno tiene una rosca a la izquierda. Para aflojar, gire en sentido horario. Para apretar,
gire en sentido antihorario. figura E
NOTA: Nunca enganche el bloqueo de la hoja mientras la sierra esté en funcionamiento, ni haga
un esfuerzo para detener la herramienta. Nunca encienda la herramienta mientras el bloqueo de
la hoja esté activado. Se producirán daños graves en su sierra.
Según sea necesario, mueva la perilla desbloqueada y deje que el dedo apunte a la posición
adecuada de la escala de profundidad,
Luego gire la perilla 180 ° para bloquearla,
- 28 -
Technology Creates Power
EN
FR
ES
Encendido y apagado
Nota: Por razones de seguridad, el interruptor de encendido / apagado no se puede bloquear; debe
permanecer presionado durante toda la operación.
Función Láser
●Enciéndalo con el interruptor de encendido / apagado de la luz láser justo antes de cortar.
●Apáguelo inmediatamente después del uso para conservar la vida útil de la batería y el láser.
CAMBIO DE LAS BATERÍAS LÁSER
Las baterías que operan el láser deberán reemplazarse después de un uso considerable del láser.
1.
2.
3.
4.
PELIGRO: Nunca permita que el rayo láser brille en los ojos de una persona, podría provocar
daños oculares graves. Asegúrese de que el interruptor del láser esté apagado y que el láser NO esté
apuntando hacia usted mientras reemplaza las baterías del láser y cuando verifica la función del
láser.
5)
Haga que un técnico calificado repare su herramienta eléctrica utilizando solo piezas de repuesto
idénticas. Esto asegurará que se mantenga la seguridad de la herramienta eléctrica.
PELIGRO: Mantenga las manos alejadas del área de corte y la cuchilla.
a)
b)
c)
d)
e)
f)
g)
h)
Causas y prevención del contragolpe del operador:
●
●
●
El contragolpe es el resultado del mal uso de la sierra y / o procedimientos o condiciones de
operación incorrectas y puede evitarse tomando las precauciones adecuadas como se indica a
continuación:
a)
b)
La etiqueta de su herramienta puede incluir los siguientes símbolos. Los símbolos y sus definiciones
son los siguientes:
Reglas de seguridad para luces láser
La luz láser / radiación láser utilizada en el sistema es de Clase 2 con longitudes de onda máximas
de 1 mW y 650 nm. Estos láseres normalmente no presentan un riesgo óptico, aunque mirar el rayo
puede causar ceguera instantánea.
ADVERTENCIA : No mire directamente al rayo láser.
Puede existir un peligro si observa deliberadamente la viga, observe todas las reglas de seguridad
de la siguiente manera;
●
●
●
●
●
f)
3)
a)
b)
c)
d)
e)
f)
g)
4)
a)
b)
c)
d)
e)
f)
g)
●
●
●
●
●
●
●
●
Cuanto menor es el número de calibre del cable, mayor es la capacidad del cable, es decir, el calibre
16 tiene más capacidad que el calibre 18. Un cable de menor tamaño provocará una caída en el
voltaje de la línea, lo que provocará pérdida de potencia y sobrecalentamiento. Cuando use más de
una extensión para completar la longitud total, asegúrese de que cada extensión individual contenga
al menos el tamaño mínimo de cable. La siguiente tabla muestra el tamaño correcto a utilizar según
la longitud del cable y la clasificación de amperaje de la placa de identificación. En caso de duda, use
el siguiente medidor más pesado. Cuanto más pequeño es el número de calibre, más pesado es el
cable.
DEFINICIONES: SÍMBOLOS Y PALABRAS DE ALERTA DE SEGURIDAD
Es importante que lea y comprenda este manual. La información que contiene se relaciona con la
protección de SU SEGURIDAD y la PREVENCIÓN DE PROBLEMAS. Los siguientes símbolos se
usan para ayudarlo a reconocer esta información.
AVISO: El uso sin el símbolo de alerta de seguridad indica una situación potencialmente peligrosa
que, si no se evita, puede provocar daños a la propiedad.
ADVERTENCIA: lea todas las advertencias de seguridad y todas las instrucciones.
El incumplimiento de las advertencias e instrucciones puede provocar descargas eléctricas, incendi-
os y / o lesiones graves.
GUARDE TODAS LAS ADVERTENCIAS E INSTRUCCIONES PARA FUTURAS REFERENCIAS
El término "herramienta eléctrica" en las advertencias se refiere a la herramienta eléctrica que funcio-
na con la red eléctrica (con cable) o la herramienta eléctrica que funciona con batería (sin cable).
1)
a)
b)
c)
2)
a)
b)
c)
d)
e)
c)
d)
e)
f)
g)
Instrucciones de seguridad de la protección inferior
a)
b)
c)
d)
Instrucciones de seguridad adicionales
●
●
●
●
●
●
●
●
●
●
ADVERTENCIA: Parte del polvo creado por el lijado eléctrico, el aserrado, el rectificado, la
perforación y otras actividades de construcción contienen productos químicos que en el estado de
California se sabe que causan cáncer, defectos de nacimiento u otros daños reproductivos. Algunos
ejemplos de estos químicos son:
●
El riesgo de estas exposiciones varía, según la frecuencia con la que realice este tipo de trabajo.
Para reducir su exposición a estos productos químicos: trabaje en un área bien ventilada y trabaje
con equipos de seguridad aprobados, como las máscaras antipolvo que están especialmente diseña-
das para filtrar partículas microscópicas.
ADVERTENCIA: SIEMPRE USE GAFAS DE SEGURIDAD. Los anteojos de uso diario NO
son lentes de seguridad. También use mascarilla facial o antipolvo si corta
●
ADVERTENCIA: Cortar plásticos, madera recubierta de savia y otros materiales puede hacer
que el material derretido se acumule en las puntas de la hoja y en el cuerpo de la hoja de sierra, lo
que aumenta el riesgo de sobrecalentamiento y atascamiento de la hoja durante el corte.
ADVERTENCIA: El uso de esta herramienta puede generar y / o desechar polvo, lo que puede
causar lesiones respiratorias u otras lesiones graves y permanentes. Siempre use protección respira-
toria aprobada por NIOSH / OSHA apropiada para la exposición al polvo. Dirija las partículas lejos de
la cara y el cuerpo. Siempre opere la herramienta en un área bien ventilada y permita la eliminación
adecuada del polvo. Utilice el sistema de recolección de polvo siempre que sea posible.
PRECAUCIÓN: El uso de controles o ajustes o la realización de procedimientos distintos a los
especificados en este documento pueden provocar una exposición peligrosa a la radiación
Uso previsto
Esta máquina está destinada principalmente al aserrado, longitudinal y transversalmente, de madera
maciza, aglomerado, madera contrachapada, aluminio, azulejos y piedra en una posición fija. Tenga
en cuenta que la hoja preinstalada en la sierra, tal como se suministra, está diseñada para usarse
solo con madera. Cualquier otro uso o modificación del dispositivo se considerará como un uso
inadecuado y podría generar peligros considerables. No es adecuado para uso comercial
Función descriptiva
La numeración de las características de los productos se refiere a la ilustración de la máquina en la
página de gráficos.
Montaje / configuración de ajuste
ADVERTENCIA: Antes de trabajar en la herramienta eléctrica, retire siempre el enchufe de la
fuente de alimentación.
●
●
●
Ajustar la profundidad de corte,
1.
2.
Nota: si es posible, recomiende configurar la profundidad de corte aproximadamente 2 mm más
profundo que el grosor del material, esto debería ayudar a asegurar que logre un corte limpio.
Solicitud
La mini sierra de inmersión es versátil y le permite cortar muchos tipos diferentes de materiales.
Algunos de los materiales incluyen
●
●
●
Selección de cuchilla
MANTENIMIENTO
ADVERTENCIA: Desenchufe la herramienta antes de instalar o quitar accesorios, antes de
ajustar o al hacer reparaciones. Use solo jabón suave y un paño húmedo para limpiar la herramienta.
Nunca permita que ningún líquido ingrese a la herramienta; nunca sumerja ninguna parte de la
herramienta en un líquido.
IMPORTANTE: Para garantizar la SEGURIDAD y CONFIABILIDAD del producto, reparaciones,
mantenimiento y ajuste (que no sean los enumerados
en este manual) debe ser realizado por centros de servicio autorizados u otras organizaciones de
servicio calificadas, utilizando siempre piezas de repuesto idénticas.
SEGURIDAD EN EL ÁREA DE TRABAJO
Mantenga el área de trabajo limpia y bien iluminada. Las áreas desordenadas u oscuras provocan
accidentes.
No opere herramientas eléctricas en atmósferas explosivas, como en presencia de líquidos,
gases o polvo inflamables. Las herramientas eléctricas crean chispas que pueden encender el
polvo o los humos.
Mantenga alejados a los niños y transeúntes mientras utiliza una herramienta eléctrica. Las
distracciones pueden hacer que pierdas el control.
SEGURIDAD ELECTRICA
Los enchufes de la herramienta eléctrica deben coincidir con la toma de corriente. Nunca
modifique el enchufe de ninguna manera. No utilice enchufes adaptadores con herramientas
eléctricas conectadas a tierra. Los enchufes no modificados y las tomas correspondientes
reducirán el riesgo de descarga eléctrica.
Evite el contacto del cuerpo con superficies conectadas a tierra, como tuberías, radiadores,
cocinas y refrigeradores. Existe un mayor riesgo de electricidad
choque si su cuerpo está conectado a tierra.
No exponga las herramientas eléctricas a la lluvia o la humedad. El agua que ingresa a una
herramienta eléctrica aumentará el riesgo de descarga eléctrica.
No maltrate el cable. Nunca use el cable para transportar, tirar o desenchufar la herramienta
eléctrica. Mantenga el cable alejado del calor, aceite, bordes afilados o piezas móviles. Los cables
dañados o enredados aumentan el riesgo de descarga eléctrica.
Cuando utilice una herramienta eléctrica en exteriores, use un cable de extensión adecuado para
uso en exteriores. El uso de un cable adecuado para uso en exteriores reduce el riesgo de descar-
ga eléctrica.
Si es inevitable utilizar una herramienta eléctrica en una ubicación húmeda, utilice un suministro
protegido por un interruptor de circuito de falla a tierra (GFCI). El uso de un GFCI reduce el riesgo
de descarga eléctrica.
SEGURIDAD PERSONAL
Manténgase alerta, observe lo que está haciendo y use el sentido común al operar una
herramienta eléctrica. No use una herramienta eléctrica mientras
Está cansado o bajo la influencia de drogas, alcohol o medicamentos. Un momento de falta de
atención al utilizar herramientas eléctricas puede provocar lesiones personales graves.
Use equipo de protección personal.
Siempre use protección para los ojos. El equipo de protección como máscara antipolvo, zapatos
de seguridad antideslizantes, casco o protección auditiva para condiciones apropiadas reducirá
las lesiones personales.
Prevenir arranques involuntarios. Asegúrese de que el interruptor esté en la posición de apagado
antes de conectarlo a la fuente de alimentación y / o al paquete de baterías, levantar o transportar
la herramienta. Llevar herramientas eléctricas con el dedo en el interruptor o activar herramientas
eléctricas que tienen el interruptor encendido invita a accidentes.
Retire cualquier llave de ajuste o llave inglesa antes de encender la herramienta eléctrica. Una
llave inglesa o una llave dejada unida a una parte giratoria de la herramienta eléctrica puede
provocar lesiones personales.
No te excedas. Mantenga la postura y el equilibrio en todo momento. Esto permite un mejor
control de la herramienta eléctrica en situaciones inesperadas.
Vístete apropiadamente. No use ropa suelta o joyas. Mantenga su cabello, ropa y guantes lejos
de las partes móviles. Ropa suelta, joyas o cabello largo pueden quedar atrapados en las partes
móviles.
Si se proporcionan dispositivos para la conexión de instalaciones de extracción y recolección de
polvo, asegúrese de que estén conectados y se usen adecuadamente.
El uso de la recolección de polvo puede reducir los riesgos relacionados con el polvo.
USO Y CUIDADO DE LA HERRAMIENTA ELÉCTRICA
No fuerce la herramienta eléctrica. Use la herramienta eléctrica correcta para su aplicación. La
herramienta eléctrica correcta hará el trabajo mejor y más seguro a la velocidad para la que fue
diseñada.
No use la herramienta eléctrica si el interruptor no enciende y apaga. Cualquier herramienta
eléctrica que no pueda controlarse con el interruptor es peligrosa y debe repararse.
Desconecte el enchufe de la fuente de alimentación y / o la batería de la herramienta eléctrica
antes de hacer cualquier ajuste, cambiar accesorios o almacenar herramientas eléctricas. Dichas
medidas de seguridad preventivas reducen el riesgo de arrancar la herramienta eléctrica acciden-
talmente.
Guarde las herramientas eléctricas inactivas fuera del alcance de los niños y no permita que
personas que no estén familiarizadas con la herramienta eléctrica o estas instrucciones operen la
herramienta. Las herramientas eléctricas son peligrosas en manos de usuarios no capacitados.
Mantener herramientas eléctricas. Verifique la desalineación o el atascamiento de las piezas
móviles, la rotura de las piezas y cualquier otra condición que pueda afectar el funcionamiento de
la herramienta eléctrica. Si está dañado, repare la herramienta eléctrica antes de usar. Muchos
accidentes son causados por herramientas eléctricas mal mantenidas.
Mantenga las herramientas de corte afiladas y limpias. Es menos probable que las herramientas de
corte mantenidas adecuadamente con bordes de corte afilados se unan y son más fáciles de controlar.
Utilice la herramienta eléctrica, los accesorios y las brocas de herramientas, etc. de acuerdo con
estas instrucciones, teniendo en cuenta las condiciones de trabajo y el trabajo a realizar. El uso
de la herramienta eléctrica para operaciones diferentes de las previstas podría provocar una
situación peligrosa.
SERVICIO
Mantenga su segunda mano en la manija auxiliar o en la carcasa del motor. Si ambas manos
sostienen la sierra, la hoja no puede cortarlas.
No meta debajo de la pieza de trabajo. El protector no puede protegerlo de la cuchilla debajo de
la pieza de trabajo.
Ajuste la profundidad de corte al grosor de la pieza de trabajo. Debe verse menos de un diente
completo de los dientes de la cuchilla debajo de la pieza de trabajo.
Nunca sostenga la pieza que está cortando en sus manos o en su pierna. Asegure la pieza de
trabajo a una plataforma estable. Es importante apoyar el trabajo adecuadamente para minimizar
la exposición del cuerpo, la fijación de la cuchilla o la pérdida de control.
Sujete la herramienta eléctrica solo por las superficies de agarre aisladas, cuando realice una
operación donde la herramienta de corte pueda entrar en contacto con cables ocultos o su propio
cable. El contacto con un cable "vivo" también hará que las partes metálicas expuestas de la
herramienta eléctrica "vivan" y podría dar al operador una descarga eléctrica.
Cuando rasgue siempre use una guía de corte o una guía de borde recto. Esto mejora la precisión
del corte y reduce la posibilidad de que la cuchilla se atasque.
Utilice siempre cuchillas con el tamaño y la forma correctos (diamante versus redondo) de los
agujeros del eje. Las hojas que no coinciden con el hardware de montaje de la sierra funcionarán
excéntricamente, causando pérdida de control.
Nunca use arandelas o pernos dañados o incorrectos. Las arandelas y el perno de la hoja fueron
diseñados especialmente para su sierra, para un rendimiento óptimo y seguridad de operación
El retroceso es una reacción repentina a una hoja de sierra apretada, atada o desalineada, que
hace que una sierra no controlada se levante y salga de la pieza de trabajo hacia el operador.
Cuando la cuchilla se pellizca o ata fuertemente por la ranura que se cierra, la cuchilla se detiene
y la reacción del motor impulsa la unidad rápidamente hacia el operador.
Si la cuchilla se tuerce o se desalinea en el corte, los dientes en el borde posterior de la cuchilla
pueden cavar en la superficie superior de la madera haciendo que la cuchilla salga de la ranura y
salte hacia el operador.
Mantenga un agarre firme con ambas manos en la sierra y coloque los brazos para resistir las
fuerzas de contragolpe. Coloque su cuerpo a ambos lados de la cuchilla, pero no en línea con la
cuchilla. El retroceso puede hacer que la sierra salte hacia atrás, pero el operador puede controlar
las fuerzas de retroceso si se toman las precauciones adecuadas.
Cuando la cuchilla está atascada, o cuando se interrumpe un corte por cualquier motivo, suelte el
gatillo y mantenga la sierra inmóvil en el material hasta que la cuchilla se detenga por completo.
Nunca intente retirar la sierra del trabajo ni tirar de la sierra hacia atrás mientras la hoja está en
movimiento o puede producirse un contragolpe. Investigue y tome medidas correctivas para
eliminar la causa del atascamiento de la cuchilla.
Cuando reinicie una sierra en la pieza de trabajo, centre la hoja de la sierra en la ranura y verifique
que los dientes de la sierra no estén enganchados en el material. Si la hoja de la sierra está
atascada, puede subir o retroceder desde la pieza de trabajo a medida que se reinicia la sierra.
Admite paneles grandes para minimizar el riesgo de pellizcos y contragolpes de la cuchilla. Los
paneles grandes tienden a ceder bajo su propio peso. Los soportes deben colocarse debajo del
panel en ambos lados, cerca de la línea de corte y cerca del borde del panel.
No use cuchillas desafiladas o dañadas. Las cuchillas sin afilar o mal ajustadas producen una
ranura estrecha que causa fricción excesiva, atascamiento de la cuchilla y retroceso.
Las palancas de bloqueo de ajuste de la profundidad de la cuchilla y el bisel deben estar apreta-
das y seguras antes de hacer el corte. Si el ajuste de la cuchilla cambia durante el corte, puede
causar atascamiento y retroceso.
Tenga especial cuidado al cortar en paredes existentes u otras áreas ciegas. La cuchilla sobresali-
ente puede cortar objetos que pueden causar retroceso.
Verifique que el protector inferior esté bien cerrado antes de cada uso. No opere la sierra si la
protección inferior no se mueve libremente y se cierra instantáneamente. Nunca sujete ni ate la
protección inferior en la posición abierta. Si la sierra se cae accidentalmente, la protección inferior
puede doblarse. Levante la protección inferior con el mango retráctil y asegúrese de que se
mueva libremente y no toque la cuchilla ni ninguna otra parte, en todos los ángulos y profundi-
dades de corte.
Compruebe el funcionamiento del muelle protector inferior. Si el protector y el resorte no funcio-
nan correctamente, deben ser reparados antes de su uso. La protección inferior puede funcionar
lentamente debido a piezas dañadas, depósitos gomosos o acumulación de escombros.
La protección inferior debe retraerse manualmente solo para cortes especiales como "cortes por
inmersión" y "cortes compuestos". Eleve la protección inferior retrayendo la manija y tan pronto
como la cuchilla ingrese al material, la protección inferior debe liberarse. Para todas las demás
sierras, la protección inferior debe funcionar automáticamente.
Observe siempre que el protector inferior esté cubriendo la hoja antes de colocar la sierra en el
banco o el piso. Una cuchilla sin protección y en inercia hará que la sierra camine hacia atrás,
cortando todo lo que se encuentre en su camino. Tenga en cuenta el tiempo que tarda la cuchilla
en detenerse después de soltar el interruptor.
Use abrazaderas u otra forma práctica para asegurar y apoyar la pieza de trabajo en una platafor-
ma estable. Sostener el trabajo con la mano o contra su cuerpo lo deja inestable y puede conducir
a la pérdida de control.
Mantenga su cuerpo colocado a ambos lados de la hoja, pero no en línea con la hoja de sierra.
RETROCESO podría hacer que la sierra salte hacia atrás (ver Causas y Prevención del operador
de contragolpe y retroceso).
Evita cortar las uñas. Inspeccione y quite todas las uñas de la madera antes de cortar.
Asegúrese siempre de que nada interfiera con el movimiento del protector inferior de la cuchilla.
Los accesorios deben estar clasificados para al menos la velocidad recomendada en la etiqueta
de advertencia de la herramienta. Las ruedas y otros accesorios que corren por encima de la
velocidad nominal pueden separarse y causar lesiones. Las clasificaciones de accesorios
siempre deben estar por encima de la velocidad de la herramienta como se muestra en la placa
de identificación de la herramienta.
Siempre asegúrese de que la sierra esté limpia antes de usar.
Deje de usar esta sierra y hágalo reparar adecuadamente si se produce algún ruido inusual u
operación anormal.
Siempre asegúrese de que todos los componentes estén montados de manera adecuada y segura
antes de usar la herramienta.
Siempre maneje la hoja de sierra con cuidado cuando la monte o la quite, o cuando quite el troquel
de diamante.
Siempre espere hasta que el motor haya alcanzado la velocidad máxima antes de comenzar un
corte.
Mantenga siempre los mangos secos, limpios y libres de aceite y grasa. Sostenga la herramienta
firmemente con
ambas manos cuando está en uso.
Esté siempre alerta en todo momento, especialmente durante operaciones repetitivas y
monótonas. Asegúrese siempre de la posición de sus manos en relación con la cuchilla.
Manténgase alejado de las piezas finales que pueden caerse después de cortar. Pueden estar
calientes, afilados y / o pesados. Se pueden producir lesiones personales graves.
Reemplace o repare los cables dañados. Asegúrese de que su cable de extensión esté en buenas
condiciones. Use solo cables de extensión de 3 cables que tengan enchufes de conexión a tierra
de 3 clavijas y receptáculos de 3 polos que acepten el enchufe de la herramienta.
Un cable de extensión debe tener un tamaño de cable adecuado (AWG o American Wire Gauge)
por seguridad.
Protección para los ojos ANSI Z87.1 (CAN / CSA Z94.3).
Protección auditiva ANSI S12.6 (S3.19).
Protección respiratoria NIOSH / OSHA.
Plomo de pinturas a base de plomo, sílice cristalina de ladrillos y cemento y otros productos de
albañilería, y arsénico y cromo de madera tratada químicamente (CCA).
Evite el contacto prolongado con el polvo del lijado eléctrico, aserrado, rectificado, taladrado y
otras construcciones.
ocupaciones. Use ropa protectora y lave las áreas expuestas con agua y jabón. Permitir que el
polvo penetre en la boca, los ojos o se ponga sobre la piel puede promover la absorción de produc-
tos químicos nocivos.
El láser se debe usar y mantener de acuerdo con las instrucciones del fabricante.
Nunca apunte el rayo a ninguna persona u objeto que no sea la pieza de trabajo.
El rayo láser no debe dirigirse deliberadamente al personal y se debe evitar que se dirija hacia el
ojo de una persona durante más de 0.25 segundos.
Asegúrese siempre de que el rayo láser esté dirigido a una pieza de trabajo resistente sin superfi-
cies reflectantes. Es decir. Se aceptan superficies revestidas de madera o rugosas. La lámina de
acero reflectante brillante o similar no es adecuada para el uso con láser, ya que la superficie
reflectante podría dirigir el rayo hacia el operador.
No cambie el conjunto de luz láser con un tipo diferente. Las reparaciones deben ser realizadas
por el fabricante del láser o un agente autorizado.
Al montar la hoja de sierra, use guantes protectores. Peligro de lesiones al tocar la hoja de sierra.
Utilice únicamente hojas de sierra que correspondan con los datos característicos que figuran en
las instrucciones de funcionamiento.
No utilice bajo ninguna circunstancia discos abrasivos como herramienta de corte.
COLOCACIÓN Y EXTRACCIÓN DE LA HOJA - FIGURA C-E
• Retraiga la protección inferior y ensamble la cuchilla (8) y la arandela de sujeción (17) como se
muestra en la figura C.
• Oprima el bloqueo del eje (13) mientras gira el perno de la hoja (7) con la llave de la hoja (16)
hasta que el bloqueo de la hoja se enganche y la hoja deje de girar. figura D
NOTA: La llave de la hoja se guarda en una bolsa de polietileno junto con el manual.
• Apriete firmemente el perno de la hoja con la llave de la hoja.
NOTA: El perno tiene una rosca a la izquierda. Para aflojar, gire en sentido horario. Para apretar,
gire en sentido antihorario. figura E
NOTA: Nunca enganche el bloqueo de la hoja mientras la sierra esté en funcionamiento, ni haga
un esfuerzo para detener la herramienta. Nunca encienda la herramienta mientras el bloqueo de
la hoja esté activado. Se producirán daños graves en su sierra.
Según sea necesario, mueva la perilla desbloqueada y deje que el dedo apunte a la posición
adecuada de la escala de profundidad,
Luego gire la perilla 180 ° para bloquearla,
- 29 -
Technology Creates Power

EN
FR
ES
Encendido y apagado
Nota: Por razones de seguridad, el interruptor de encendido / apagado no se puede bloquear; debe
permanecer presionado durante toda la operación.
Función Láser
●Enciéndalo con el interruptor de encendido / apagado de la luz láser justo antes de cortar.
●Apáguelo inmediatamente después del uso para conservar la vida útil de la batería y el láser.
CAMBIO DE LAS BATERÍAS LÁSER
Las baterías que operan el láser deberán reemplazarse después de un uso considerable del láser.
1.
2.
3.
4.
PELIGRO: Nunca permita que el rayo láser brille en los ojos de una persona, podría provocar
daños oculares graves. Asegúrese de que el interruptor del láser esté apagado y que el láser NO esté
apuntando hacia usted mientras reemplaza las baterías del láser y cuando verifica la función del
láser.
5)
Haga que un técnico calificado repare su herramienta eléctrica utilizando solo piezas de repuesto
idénticas. Esto asegurará que se mantenga la seguridad de la herramienta eléctrica.
PELIGRO: Mantenga las manos alejadas del área de corte y la cuchilla.
a)
b)
c)
d)
e)
f)
g)
h)
Causas y prevención del contragolpe del operador:
●
●
●
El contragolpe es el resultado del mal uso de la sierra y / o procedimientos o condiciones de
operación incorrectas y puede evitarse tomando las precauciones adecuadas como se indica a
continuación:
a)
b)
La etiqueta de su herramienta puede incluir los siguientes símbolos. Los símbolos y sus definiciones
son los siguientes:
Reglas de seguridad para luces láser
La luz láser / radiación láser utilizada en el sistema es de Clase 2 con longitudes de onda máximas
de 1 mW y 650 nm. Estos láseres normalmente no presentan un riesgo óptico, aunque mirar el rayo
puede causar ceguera instantánea.
ADVERTENCIA : No mire directamente al rayo láser.
Puede existir un peligro si observa deliberadamente la viga, observe todas las reglas de seguridad
de la siguiente manera;
●
●
●
●
●
f)
3)
a)
b)
c)
d)
e)
f)
g)
4)
a)
b)
c)
d)
e)
f)
g)
●
●
●
●
●
●
●
●
Cuanto menor es el número de calibre del cable, mayor es la capacidad del cable, es decir, el calibre
16 tiene más capacidad que el calibre 18. Un cable de menor tamaño provocará una caída en el
voltaje de la línea, lo que provocará pérdida de potencia y sobrecalentamiento. Cuando use más de
una extensión para completar la longitud total, asegúrese de que cada extensión individual contenga
al menos el tamaño mínimo de cable. La siguiente tabla muestra el tamaño correcto a utilizar según
la longitud del cable y la clasificación de amperaje de la placa de identificación. En caso de duda, use
el siguiente medidor más pesado. Cuanto más pequeño es el número de calibre, más pesado es el
cable.
DEFINICIONES: SÍMBOLOS Y PALABRAS DE ALERTA DE SEGURIDAD
Es importante que lea y comprenda este manual. La información que contiene se relaciona con la
protección de SU SEGURIDAD y la PREVENCIÓN DE PROBLEMAS. Los siguientes símbolos se
usan para ayudarlo a reconocer esta información.
AVISO: El uso sin el símbolo de alerta de seguridad indica una situación potencialmente peligrosa
que, si no se evita, puede provocar daños a la propiedad.
ADVERTENCIA: lea todas las advertencias de seguridad y todas las instrucciones.
El incumplimiento de las advertencias e instrucciones puede provocar descargas eléctricas, incendi-
os y / o lesiones graves.
GUARDE TODAS LAS ADVERTENCIAS E INSTRUCCIONES PARA FUTURAS REFERENCIAS
El término "herramienta eléctrica" en las advertencias se refiere a la herramienta eléctrica que funcio-
na con la red eléctrica (con cable) o la herramienta eléctrica que funciona con batería (sin cable).
1)
a)
b)
c)
2)
a)
b)
c)
d)
e)
c)
d)
e)
f)
g)
Instrucciones de seguridad de la protección inferior
a)
b)
c)
d)
Instrucciones de seguridad adicionales
●
●
●
●
●
●
●
●
●
●
ADVERTENCIA: Parte del polvo creado por el lijado eléctrico, el aserrado, el rectificado, la
perforación y otras actividades de construcción contienen productos químicos que en el estado de
California se sabe que causan cáncer, defectos de nacimiento u otros daños reproductivos. Algunos
ejemplos de estos químicos son:
●
El riesgo de estas exposiciones varía, según la frecuencia con la que realice este tipo de trabajo.
Para reducir su exposición a estos productos químicos: trabaje en un área bien ventilada y trabaje
con equipos de seguridad aprobados, como las máscaras antipolvo que están especialmente diseña-
das para filtrar partículas microscópicas.
ADVERTENCIA: SIEMPRE USE GAFAS DE SEGURIDAD. Los anteojos de uso diario NO
son lentes de seguridad. También use mascarilla facial o antipolvo si corta
●
ADVERTENCIA: Cortar plásticos, madera recubierta de savia y otros materiales puede hacer
que el material derretido se acumule en las puntas de la hoja y en el cuerpo de la hoja de sierra, lo
que aumenta el riesgo de sobrecalentamiento y atascamiento de la hoja durante el corte.
ADVERTENCIA: El uso de esta herramienta puede generar y / o desechar polvo, lo que puede
causar lesiones respiratorias u otras lesiones graves y permanentes. Siempre use protección respira-
toria aprobada por NIOSH / OSHA apropiada para la exposición al polvo. Dirija las partículas lejos de
la cara y el cuerpo. Siempre opere la herramienta en un área bien ventilada y permita la eliminación
adecuada del polvo. Utilice el sistema de recolección de polvo siempre que sea posible.
PRECAUCIÓN: El uso de controles o ajustes o la realización de procedimientos distintos a los
especificados en este documento pueden provocar una exposición peligrosa a la radiación
Uso previsto
Esta máquina está destinada principalmente al aserrado, longitudinal y transversalmente, de madera
maciza, aglomerado, madera contrachapada, aluminio, azulejos y piedra en una posición fija. Tenga
en cuenta que la hoja preinstalada en la sierra, tal como se suministra, está diseñada para usarse
solo con madera. Cualquier otro uso o modificación del dispositivo se considerará como un uso
inadecuado y podría generar peligros considerables. No es adecuado para uso comercial
Función descriptiva
La numeración de las características de los productos se refiere a la ilustración de la máquina en la
página de gráficos.
Montaje / configuración de ajuste
ADVERTENCIA: Antes de trabajar en la herramienta eléctrica, retire siempre el enchufe de la
fuente de alimentación.
●
●
●
Ajustar la profundidad de corte,
1.
2.
Nota: si es posible, recomiende configurar la profundidad de corte aproximadamente 2 mm más
profundo que el grosor del material, esto debería ayudar a asegurar que logre un corte limpio.
Solicitud
La mini sierra de inmersión es versátil y le permite cortar muchos tipos diferentes de materiales.
Algunos de los materiales incluyen
●
●
●
Selección de cuchilla
MANTENIMIENTO
ADVERTENCIA: Desenchufe la herramienta antes de instalar o quitar accesorios, antes de
ajustar o al hacer reparaciones. Use solo jabón suave y un paño húmedo para limpiar la herramienta.
Nunca permita que ningún líquido ingrese a la herramienta; nunca sumerja ninguna parte de la
herramienta en un líquido.
IMPORTANTE: Para garantizar la SEGURIDAD y CONFIABILIDAD del producto, reparaciones,
mantenimiento y ajuste (que no sean los enumerados
en este manual) debe ser realizado por centros de servicio autorizados u otras organizaciones de
servicio calificadas, utilizando siempre piezas de repuesto idénticas.
GUARDE ESTOS SÍMBOLOS DE INSTRUCCIONES
SEGURIDAD EN EL ÁREA DE TRABAJO
Mantenga el área de trabajo limpia y bien iluminada. Las áreas desordenadas u oscuras provocan
accidentes.
No opere herramientas eléctricas en atmósferas explosivas, como en presencia de líquidos,
gases o polvo inflamables. Las herramientas eléctricas crean chispas que pueden encender el
polvo o los humos.
Mantenga alejados a los niños y transeúntes mientras utiliza una herramienta eléctrica. Las
distracciones pueden hacer que pierdas el control.
SEGURIDAD ELECTRICA
Los enchufes de la herramienta eléctrica deben coincidir con la toma de corriente. Nunca
modifique el enchufe de ninguna manera. No utilice enchufes adaptadores con herramientas
eléctricas conectadas a tierra. Los enchufes no modificados y las tomas correspondientes
reducirán el riesgo de descarga eléctrica.
Evite el contacto del cuerpo con superficies conectadas a tierra, como tuberías, radiadores,
cocinas y refrigeradores. Existe un mayor riesgo de electricidad
choque si su cuerpo está conectado a tierra.
No exponga las herramientas eléctricas a la lluvia o la humedad. El agua que ingresa a una
herramienta eléctrica aumentará el riesgo de descarga eléctrica.
No maltrate el cable. Nunca use el cable para transportar, tirar o desenchufar la herramienta
eléctrica. Mantenga el cable alejado del calor, aceite, bordes afilados o piezas móviles. Los cables
dañados o enredados aumentan el riesgo de descarga eléctrica.
Cuando utilice una herramienta eléctrica en exteriores, use un cable de extensión adecuado para
uso en exteriores. El uso de un cable adecuado para uso en exteriores reduce el riesgo de descar-
ga eléctrica.
Si es inevitable utilizar una herramienta eléctrica en una ubicación húmeda, utilice un suministro
protegido por un interruptor de circuito de falla a tierra (GFCI). El uso de un GFCI reduce el riesgo
de descarga eléctrica.
SEGURIDAD PERSONAL
Manténgase alerta, observe lo que está haciendo y use el sentido común al operar una
herramienta eléctrica. No use una herramienta eléctrica mientras
Está cansado o bajo la influencia de drogas, alcohol o medicamentos. Un momento de falta de
atención al utilizar herramientas eléctricas puede provocar lesiones personales graves.
Use equipo de protección personal.
Siempre use protección para los ojos. El equipo de protección como máscara antipolvo, zapatos
de seguridad antideslizantes, casco o protección auditiva para condiciones apropiadas reducirá
las lesiones personales.
Prevenir arranques involuntarios. Asegúrese de que el interruptor esté en la posición de apagado
antes de conectarlo a la fuente de alimentación y / o al paquete de baterías, levantar o transportar
la herramienta. Llevar herramientas eléctricas con el dedo en el interruptor o activar herramientas
eléctricas que tienen el interruptor encendido invita a accidentes.
Retire cualquier llave de ajuste o llave inglesa antes de encender la herramienta eléctrica. Una
llave inglesa o una llave dejada unida a una parte giratoria de la herramienta eléctrica puede
provocar lesiones personales.
No te excedas. Mantenga la postura y el equilibrio en todo momento. Esto permite un mejor
control de la herramienta eléctrica en situaciones inesperadas.
Vístete apropiadamente. No use ropa suelta o joyas. Mantenga su cabello, ropa y guantes lejos
de las partes móviles. Ropa suelta, joyas o cabello largo pueden quedar atrapados en las partes
móviles.
Si se proporcionan dispositivos para la conexión de instalaciones de extracción y recolección de
polvo, asegúrese de que estén conectados y se usen adecuadamente.
El uso de la recolección de polvo puede reducir los riesgos relacionados con el polvo.
USO Y CUIDADO DE LA HERRAMIENTA ELÉCTRICA
No fuerce la herramienta eléctrica. Use la herramienta eléctrica correcta para su aplicación. La
herramienta eléctrica correcta hará el trabajo mejor y más seguro a la velocidad para la que fue
diseñada.
No use la herramienta eléctrica si el interruptor no enciende y apaga. Cualquier herramienta
eléctrica que no pueda controlarse con el interruptor es peligrosa y debe repararse.
Desconecte el enchufe de la fuente de alimentación y / o la batería de la herramienta eléctrica
antes de hacer cualquier ajuste, cambiar accesorios o almacenar herramientas eléctricas. Dichas
medidas de seguridad preventivas reducen el riesgo de arrancar la herramienta eléctrica acciden-
talmente.
Guarde las herramientas eléctricas inactivas fuera del alcance de los niños y no permita que
personas que no estén familiarizadas con la herramienta eléctrica o estas instrucciones operen la
herramienta. Las herramientas eléctricas son peligrosas en manos de usuarios no capacitados.
Mantener herramientas eléctricas. Verifique la desalineación o el atascamiento de las piezas
móviles, la rotura de las piezas y cualquier otra condición que pueda afectar el funcionamiento de
la herramienta eléctrica. Si está dañado, repare la herramienta eléctrica antes de usar. Muchos
accidentes son causados por herramientas eléctricas mal mantenidas.
Mantenga las herramientas de corte afiladas y limpias. Es menos probable que las herramientas de
corte mantenidas adecuadamente con bordes de corte afilados se unan y son más fáciles de controlar.
Utilice la herramienta eléctrica, los accesorios y las brocas de herramientas, etc. de acuerdo con
estas instrucciones, teniendo en cuenta las condiciones de trabajo y el trabajo a realizar. El uso
de la herramienta eléctrica para operaciones diferentes de las previstas podría provocar una
situación peligrosa.
SERVICIO
Mantenga su segunda mano en la manija auxiliar o en la carcasa del motor. Si ambas manos
sostienen la sierra, la hoja no puede cortarlas.
No meta debajo de la pieza de trabajo. El protector no puede protegerlo de la cuchilla debajo de
la pieza de trabajo.
Ajuste la profundidad de corte al grosor de la pieza de trabajo. Debe verse menos de un diente
completo de los dientes de la cuchilla debajo de la pieza de trabajo.
Nunca sostenga la pieza que está cortando en sus manos o en su pierna. Asegure la pieza de
trabajo a una plataforma estable. Es importante apoyar el trabajo adecuadamente para minimizar
la exposición del cuerpo, la fijación de la cuchilla o la pérdida de control.
Sujete la herramienta eléctrica solo por las superficies de agarre aisladas, cuando realice una
operación donde la herramienta de corte pueda entrar en contacto con cables ocultos o su propio
cable. El contacto con un cable "vivo" también hará que las partes metálicas expuestas de la
herramienta eléctrica "vivan" y podría dar al operador una descarga eléctrica.
Cuando rasgue siempre use una guía de corte o una guía de borde recto. Esto mejora la precisión
del corte y reduce la posibilidad de que la cuchilla se atasque.
Utilice siempre cuchillas con el tamaño y la forma correctos (diamante versus redondo) de los
agujeros del eje. Las hojas que no coinciden con el hardware de montaje de la sierra funcionarán
excéntricamente, causando pérdida de control.
Nunca use arandelas o pernos dañados o incorrectos. Las arandelas y el perno de la hoja fueron
diseñados especialmente para su sierra, para un rendimiento óptimo y seguridad de operación
El retroceso es una reacción repentina a una hoja de sierra apretada, atada o desalineada, que
hace que una sierra no controlada se levante y salga de la pieza de trabajo hacia el operador.
Cuando la cuchilla se pellizca o ata fuertemente por la ranura que se cierra, la cuchilla se detiene
y la reacción del motor impulsa la unidad rápidamente hacia el operador.
Si la cuchilla se tuerce o se desalinea en el corte, los dientes en el borde posterior de la cuchilla
pueden cavar en la superficie superior de la madera haciendo que la cuchilla salga de la ranura y
salte hacia el operador.
Mantenga un agarre firme con ambas manos en la sierra y coloque los brazos para resistir las
fuerzas de contragolpe. Coloque su cuerpo a ambos lados de la cuchilla, pero no en línea con la
cuchilla. El retroceso puede hacer que la sierra salte hacia atrás, pero el operador puede controlar
las fuerzas de retroceso si se toman las precauciones adecuadas.
Cuando la cuchilla está atascada, o cuando se interrumpe un corte por cualquier motivo, suelte el
gatillo y mantenga la sierra inmóvil en el material hasta que la cuchilla se detenga por completo.
Nunca intente retirar la sierra del trabajo ni tirar de la sierra hacia atrás mientras la hoja está en
movimiento o puede producirse un contragolpe. Investigue y tome medidas correctivas para
eliminar la causa del atascamiento de la cuchilla.
Cuando reinicie una sierra en la pieza de trabajo, centre la hoja de la sierra en la ranura y verifique
que los dientes de la sierra no estén enganchados en el material. Si la hoja de la sierra está
atascada, puede subir o retroceder desde la pieza de trabajo a medida que se reinicia la sierra.
Admite paneles grandes para minimizar el riesgo de pellizcos y contragolpes de la cuchilla. Los
paneles grandes tienden a ceder bajo su propio peso. Los soportes deben colocarse debajo del
panel en ambos lados, cerca de la línea de corte y cerca del borde del panel.
No use cuchillas desafiladas o dañadas. Las cuchillas sin afilar o mal ajustadas producen una
ranura estrecha que causa fricción excesiva, atascamiento de la cuchilla y retroceso.
Las palancas de bloqueo de ajuste de la profundidad de la cuchilla y el bisel deben estar apreta-
das y seguras antes de hacer el corte. Si el ajuste de la cuchilla cambia durante el corte, puede
causar atascamiento y retroceso.
Tenga especial cuidado al cortar en paredes existentes u otras áreas ciegas. La cuchilla sobresali-
ente puede cortar objetos que pueden causar retroceso.
Verifique que el protector inferior esté bien cerrado antes de cada uso. No opere la sierra si la
protección inferior no se mueve libremente y se cierra instantáneamente. Nunca sujete ni ate la
protección inferior en la posición abierta. Si la sierra se cae accidentalmente, la protección inferior
puede doblarse. Levante la protección inferior con el mango retráctil y asegúrese de que se
mueva libremente y no toque la cuchilla ni ninguna otra parte, en todos los ángulos y profundi-
dades de corte.
Compruebe el funcionamiento del muelle protector inferior. Si el protector y el resorte no funcio-
nan correctamente, deben ser reparados antes de su uso. La protección inferior puede funcionar
lentamente debido a piezas dañadas, depósitos gomosos o acumulación de escombros.
La protección inferior debe retraerse manualmente solo para cortes especiales como "cortes por
inmersión" y "cortes compuestos". Eleve la protección inferior retrayendo la manija y tan pronto
como la cuchilla ingrese al material, la protección inferior debe liberarse. Para todas las demás
sierras, la protección inferior debe funcionar automáticamente.
Observe siempre que el protector inferior esté cubriendo la hoja antes de colocar la sierra en el
banco o el piso. Una cuchilla sin protección y en inercia hará que la sierra camine hacia atrás,
cortando todo lo que se encuentre en su camino. Tenga en cuenta el tiempo que tarda la cuchilla
en detenerse después de soltar el interruptor.
Use abrazaderas u otra forma práctica para asegurar y apoyar la pieza de trabajo en una platafor-
ma estable. Sostener el trabajo con la mano o contra su cuerpo lo deja inestable y puede conducir
a la pérdida de control.
Mantenga su cuerpo colocado a ambos lados de la hoja, pero no en línea con la hoja de sierra.
RETROCESO podría hacer que la sierra salte hacia atrás (ver Causas y Prevención del operador
de contragolpe y retroceso).
Evita cortar las uñas. Inspeccione y quite todas las uñas de la madera antes de cortar.
Asegúrese siempre de que nada interfiera con el movimiento del protector inferior de la cuchilla.
Los accesorios deben estar clasificados para al menos la velocidad recomendada en la etiqueta
de advertencia de la herramienta. Las ruedas y otros accesorios que corren por encima de la
velocidad nominal pueden separarse y causar lesiones. Las clasificaciones de accesorios
siempre deben estar por encima de la velocidad de la herramienta como se muestra en la placa
de identificación de la herramienta.
Siempre asegúrese de que la sierra esté limpia antes de usar.
Deje de usar esta sierra y hágalo reparar adecuadamente si se produce algún ruido inusual u
operación anormal.
Siempre asegúrese de que todos los componentes estén montados de manera adecuada y segura
antes de usar la herramienta.
Siempre maneje la hoja de sierra con cuidado cuando la monte o la quite, o cuando quite el troquel
de diamante.
Siempre espere hasta que el motor haya alcanzado la velocidad máxima antes de comenzar un
corte.
Mantenga siempre los mangos secos, limpios y libres de aceite y grasa. Sostenga la herramienta
firmemente con
ambas manos cuando está en uso.
Esté siempre alerta en todo momento, especialmente durante operaciones repetitivas y
monótonas. Asegúrese siempre de la posición de sus manos en relación con la cuchilla.
Manténgase alejado de las piezas finales que pueden caerse después de cortar. Pueden estar
calientes, afilados y / o pesados. Se pueden producir lesiones personales graves.
Reemplace o repare los cables dañados. Asegúrese de que su cable de extensión esté en buenas
condiciones. Use solo cables de extensión de 3 cables que tengan enchufes de conexión a tierra
de 3 clavijas y receptáculos de 3 polos que acepten el enchufe de la herramienta.
Un cable de extensión debe tener un tamaño de cable adecuado (AWG o American Wire Gauge)
por seguridad.
V
A
Hz
W
min
no
voltios
amperios
hertz
vatios
minutos
corriente alterna
corriente continua
sin velocidad de carga
Construcción de clase I (puesta a tierra)
terminal de tierra
símbolo de alerta de seguridad
Lea el manual de instrucciones antes de usar
Use protección ocular adecuada
Use protección auditiva adecuada
Use protección respiratoria adecuada
Construcción de clase II (doble aislamiento) /min or
rpm revoluciones o reciprocidad por minuto
SPM Golpes por minuto
or AC
or DC
Protección para los ojos ANSI Z87.1 (CAN / CSA Z94.3).
Protección auditiva ANSI S12.6 (S3.19).
Protección respiratoria NIOSH / OSHA.
Plomo de pinturas a base de plomo, sílice cristalina de ladrillos y cemento y otros productos de
albañilería, y arsénico y cromo de madera tratada químicamente (CCA).
Evite el contacto prolongado con el polvo del lijado eléctrico, aserrado, rectificado, taladrado y
otras construcciones.
ocupaciones. Use ropa protectora y lave las áreas expuestas con agua y jabón. Permitir que el
polvo penetre en la boca, los ojos o se ponga sobre la piel puede promover la absorción de produc-
tos químicos nocivos.
El láser se debe usar y mantener de acuerdo con las instrucciones del fabricante.
Nunca apunte el rayo a ninguna persona u objeto que no sea la pieza de trabajo.
El rayo láser no debe dirigirse deliberadamente al personal y se debe evitar que se dirija hacia el
ojo de una persona durante más de 0.25 segundos.
Asegúrese siempre de que el rayo láser esté dirigido a una pieza de trabajo resistente sin superfi-
cies reflectantes. Es decir. Se aceptan superficies revestidas de madera o rugosas. La lámina de
acero reflectante brillante o similar no es adecuada para el uso con láser, ya que la superficie
reflectante podría dirigir el rayo hacia el operador.
No cambie el conjunto de luz láser con un tipo diferente. Las reparaciones deben ser realizadas
por el fabricante del láser o un agente autorizado.
Al montar la hoja de sierra, use guantes protectores. Peligro de lesiones al tocar la hoja de sierra.
Utilice únicamente hojas de sierra que correspondan con los datos característicos que figuran en
las instrucciones de funcionamiento.
No utilice bajo ninguna circunstancia discos abrasivos como herramienta de corte.
COLOCACIÓN Y EXTRACCIÓN DE LA HOJA - FIGURA C-E
• Retraiga la protección inferior y ensamble la cuchilla (8) y la arandela de sujeción (17) como se
muestra en la figura C.
• Oprima el bloqueo del eje (13) mientras gira el perno de la hoja (7) con la llave de la hoja (16)
hasta que el bloqueo de la hoja se enganche y la hoja deje de girar. figura D
NOTA: La llave de la hoja se guarda en una bolsa de polietileno junto con el manual.
• Apriete firmemente el perno de la hoja con la llave de la hoja.
NOTA: El perno tiene una rosca a la izquierda. Para aflojar, gire en sentido horario. Para apretar,
gire en sentido antihorario. figura E
NOTA: Nunca enganche el bloqueo de la hoja mientras la sierra esté en funcionamiento, ni haga
un esfuerzo para detener la herramienta. Nunca encienda la herramienta mientras el bloqueo de
la hoja esté activado. Se producirán daños graves en su sierra.
Según sea necesario, mueva la perilla desbloqueada y deje que el dedo apunte a la posición
adecuada de la escala de profundidad,
Luego gire la perilla 180 ° para bloquearla,
- 30 -
Technology Creates Power
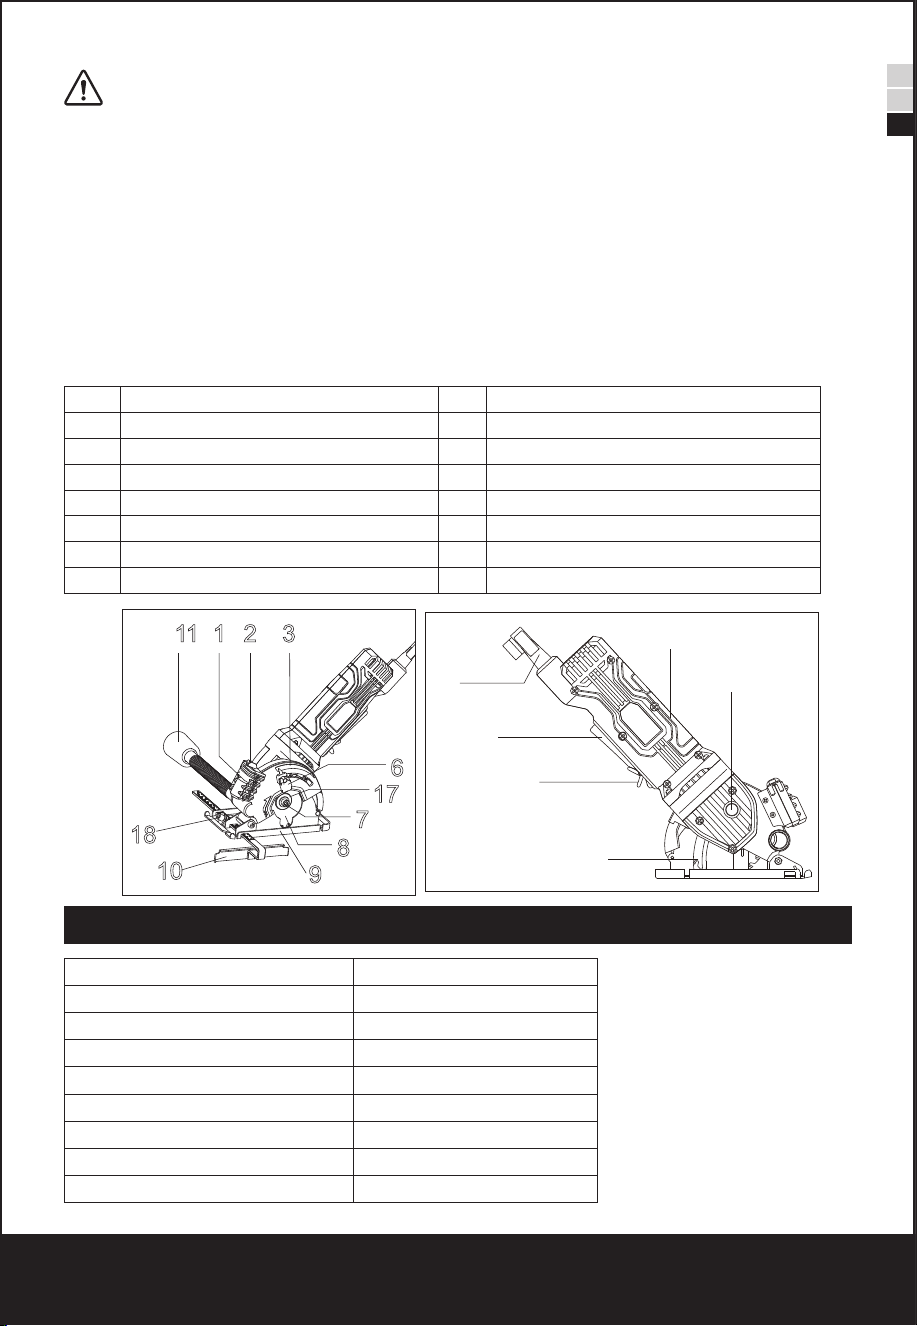
EN
FR
ES
Encendido y apagado
Nota: Por razones de seguridad, el interruptor de encendido / apagado no se puede bloquear; debe
permanecer presionado durante toda la operación.
Función Láser
●Enciéndalo con el interruptor de encendido / apagado de la luz láser justo antes de cortar.
●Apáguelo inmediatamente después del uso para conservar la vida útil de la batería y el láser.
CAMBIO DE LAS BATERÍAS LÁSER
Las baterías que operan el láser deberán reemplazarse después de un uso considerable del láser.
1.
2.
3.
4.
PELIGRO: Nunca permita que el rayo láser brille en los ojos de una persona, podría provocar
daños oculares graves. Asegúrese de que el interruptor del láser esté apagado y que el láser NO esté
apuntando hacia usted mientras reemplaza las baterías del láser y cuando verifica la función del
láser.
5)
Haga que un técnico calificado repare su herramienta eléctrica utilizando solo piezas de repuesto
idénticas. Esto asegurará que se mantenga la seguridad de la herramienta eléctrica.
PELIGRO: Mantenga las manos alejadas del área de corte y la cuchilla.
a)
b)
c)
d)
e)
f)
g)
h)
Causas y prevención del contragolpe del operador:
●
●
●
El contragolpe es el resultado del mal uso de la sierra y / o procedimientos o condiciones de
operación incorrectas y puede evitarse tomando las precauciones adecuadas como se indica a
continuación:
a)
b)
La etiqueta de su herramienta puede incluir los siguientes símbolos. Los símbolos y sus definiciones
son los siguientes:
Reglas de seguridad para luces láser
La luz láser / radiación láser utilizada en el sistema es de Clase 2 con longitudes de onda máximas
de 1 mW y 650 nm. Estos láseres normalmente no presentan un riesgo óptico, aunque mirar el rayo
puede causar ceguera instantánea.
ADVERTENCIA : No mire directamente al rayo láser.
Puede existir un peligro si observa deliberadamente la viga, observe todas las reglas de seguridad
de la siguiente manera;
●
●
●
●
●
f)
3)
a)
b)
c)
d)
e)
f)
g)
4)
a)
b)
c)
d)
e)
f)
g)
●
●
●
●
●
●
●
●
Cuanto menor es el número de calibre del cable, mayor es la capacidad del cable, es decir, el calibre
16 tiene más capacidad que el calibre 18. Un cable de menor tamaño provocará una caída en el
voltaje de la línea, lo que provocará pérdida de potencia y sobrecalentamiento. Cuando use más de
una extensión para completar la longitud total, asegúrese de que cada extensión individual contenga
al menos el tamaño mínimo de cable. La siguiente tabla muestra el tamaño correcto a utilizar según
la longitud del cable y la clasificación de amperaje de la placa de identificación. En caso de duda, use
el siguiente medidor más pesado. Cuanto más pequeño es el número de calibre, más pesado es el
cable.
DEFINICIONES: SÍMBOLOS Y PALABRAS DE ALERTA DE SEGURIDAD
Es importante que lea y comprenda este manual. La información que contiene se relaciona con la
protección de SU SEGURIDAD y la PREVENCIÓN DE PROBLEMAS. Los siguientes símbolos se
usan para ayudarlo a reconocer esta información.
AVISO: El uso sin el símbolo de alerta de seguridad indica una situación potencialmente peligrosa
que, si no se evita, puede provocar daños a la propiedad.
ADVERTENCIA: lea todas las advertencias de seguridad y todas las instrucciones.
El incumplimiento de las advertencias e instrucciones puede provocar descargas eléctricas, incendi-
os y / o lesiones graves.
GUARDE TODAS LAS ADVERTENCIAS E INSTRUCCIONES PARA FUTURAS REFERENCIAS
El término "herramienta eléctrica" en las advertencias se refiere a la herramienta eléctrica que funcio-
na con la red eléctrica (con cable) o la herramienta eléctrica que funciona con batería (sin cable).
1)
a)
b)
c)
2)
a)
b)
c)
d)
e)
c)
d)
e)
f)
g)
Instrucciones de seguridad de la protección inferior
a)
b)
c)
d)
Instrucciones de seguridad adicionales
●
●
●
●
●
●
●
●
●
●
ADVERTENCIA: Parte del polvo creado por el lijado eléctrico, el aserrado, el rectificado, la
perforación y otras actividades de construcción contienen productos químicos que en el estado de
California se sabe que causan cáncer, defectos de nacimiento u otros daños reproductivos. Algunos
ejemplos de estos químicos son:
●
El riesgo de estas exposiciones varía, según la frecuencia con la que realice este tipo de trabajo.
Para reducir su exposición a estos productos químicos: trabaje en un área bien ventilada y trabaje
con equipos de seguridad aprobados, como las máscaras antipolvo que están especialmente diseña-
das para filtrar partículas microscópicas.
ADVERTENCIA: SIEMPRE USE GAFAS DE SEGURIDAD. Los anteojos de uso diario NO
son lentes de seguridad. También use mascarilla facial o antipolvo si corta
●
ADVERTENCIA: Cortar plásticos, madera recubierta de savia y otros materiales puede hacer
que el material derretido se acumule en las puntas de la hoja y en el cuerpo de la hoja de sierra, lo
que aumenta el riesgo de sobrecalentamiento y atascamiento de la hoja durante el corte.
ADVERTENCIA: El uso de esta herramienta puede generar y / o desechar polvo, lo que puede
causar lesiones respiratorias u otras lesiones graves y permanentes. Siempre use protección respira-
toria aprobada por NIOSH / OSHA apropiada para la exposición al polvo. Dirija las partículas lejos de
la cara y el cuerpo. Siempre opere la herramienta en un área bien ventilada y permita la eliminación
adecuada del polvo. Utilice el sistema de recolección de polvo siempre que sea posible.
PRECAUCIÓN: El uso de controles o ajustes o la realización de procedimientos distintos a los
especificados en este documento pueden provocar una exposición peligrosa a la radiación
Uso previsto
Esta máquina está destinada principalmente al aserrado, longitudinal y transversalmente, de madera
maciza, aglomerado, madera contrachapada, aluminio, azulejos y piedra en una posición fija. Tenga
en cuenta que la hoja preinstalada en la sierra, tal como se suministra, está diseñada para usarse
solo con madera. Cualquier otro uso o modificación del dispositivo se considerará como un uso
inadecuado y podría generar peligros considerables. No es adecuado para uso comercial
Función descriptiva
La numeración de las características de los productos se refiere a la ilustración de la máquina en la
página de gráficos.
Montaje / configuración de ajuste
ADVERTENCIA: Antes de trabajar en la herramienta eléctrica, retire siempre el enchufe de la
fuente de alimentación.
●
●
●
Ajustar la profundidad de corte,
1.
2.
Nota: si es posible, recomiende configurar la profundidad de corte aproximadamente 2 mm más
profundo que el grosor del material, esto debería ayudar a asegurar que logre un corte limpio.
Solicitud
La mini sierra de inmersión es versátil y le permite cortar muchos tipos diferentes de materiales.
Algunos de los materiales incluyen
●
●
●
Selección de cuchilla
MANTENIMIENTO
ADVERTENCIA: Desenchufe la herramienta antes de instalar o quitar accesorios, antes de
ajustar o al hacer reparaciones. Use solo jabón suave y un paño húmedo para limpiar la herramienta.
Nunca permita que ningún líquido ingrese a la herramienta; nunca sumerja ninguna parte de la
herramienta en un líquido.
IMPORTANTE: Para garantizar la SEGURIDAD y CONFIABILIDAD del producto, reparaciones,
mantenimiento y ajuste (que no sean los enumerados
en este manual) debe ser realizado por centros de servicio autorizados u otras organizaciones de
servicio calificadas, utilizando siempre piezas de repuesto idénticas.
Datos técnicos
SEGURIDAD EN EL ÁREA DE TRABAJO
Mantenga el área de trabajo limpia y bien iluminada. Las áreas desordenadas u oscuras provocan
accidentes.
No opere herramientas eléctricas en atmósferas explosivas, como en presencia de líquidos,
gases o polvo inflamables. Las herramientas eléctricas crean chispas que pueden encender el
polvo o los humos.
Mantenga alejados a los niños y transeúntes mientras utiliza una herramienta eléctrica. Las
distracciones pueden hacer que pierdas el control.
SEGURIDAD ELECTRICA
Los enchufes de la herramienta eléctrica deben coincidir con la toma de corriente. Nunca
modifique el enchufe de ninguna manera. No utilice enchufes adaptadores con herramientas
eléctricas conectadas a tierra. Los enchufes no modificados y las tomas correspondientes
reducirán el riesgo de descarga eléctrica.
Evite el contacto del cuerpo con superficies conectadas a tierra, como tuberías, radiadores,
cocinas y refrigeradores. Existe un mayor riesgo de electricidad
choque si su cuerpo está conectado a tierra.
No exponga las herramientas eléctricas a la lluvia o la humedad. El agua que ingresa a una
herramienta eléctrica aumentará el riesgo de descarga eléctrica.
No maltrate el cable. Nunca use el cable para transportar, tirar o desenchufar la herramienta
eléctrica. Mantenga el cable alejado del calor, aceite, bordes afilados o piezas móviles. Los cables
dañados o enredados aumentan el riesgo de descarga eléctrica.
Cuando utilice una herramienta eléctrica en exteriores, use un cable de extensión adecuado para
uso en exteriores. El uso de un cable adecuado para uso en exteriores reduce el riesgo de descar-
ga eléctrica.
Si es inevitable utilizar una herramienta eléctrica en una ubicación húmeda, utilice un suministro
protegido por un interruptor de circuito de falla a tierra (GFCI). El uso de un GFCI reduce el riesgo
de descarga eléctrica.
SEGURIDAD PERSONAL
Manténgase alerta, observe lo que está haciendo y use el sentido común al operar una
herramienta eléctrica. No use una herramienta eléctrica mientras
Está cansado o bajo la influencia de drogas, alcohol o medicamentos. Un momento de falta de
atención al utilizar herramientas eléctricas puede provocar lesiones personales graves.
Use equipo de protección personal.
Siempre use protección para los ojos. El equipo de protección como máscara antipolvo, zapatos
de seguridad antideslizantes, casco o protección auditiva para condiciones apropiadas reducirá
las lesiones personales.
Prevenir arranques involuntarios. Asegúrese de que el interruptor esté en la posición de apagado
antes de conectarlo a la fuente de alimentación y / o al paquete de baterías, levantar o transportar
la herramienta. Llevar herramientas eléctricas con el dedo en el interruptor o activar herramientas
eléctricas que tienen el interruptor encendido invita a accidentes.
Retire cualquier llave de ajuste o llave inglesa antes de encender la herramienta eléctrica. Una
llave inglesa o una llave dejada unida a una parte giratoria de la herramienta eléctrica puede
provocar lesiones personales.
No te excedas. Mantenga la postura y el equilibrio en todo momento. Esto permite un mejor
control de la herramienta eléctrica en situaciones inesperadas.
Vístete apropiadamente. No use ropa suelta o joyas. Mantenga su cabello, ropa y guantes lejos
de las partes móviles. Ropa suelta, joyas o cabello largo pueden quedar atrapados en las partes
móviles.
Si se proporcionan dispositivos para la conexión de instalaciones de extracción y recolección de
polvo, asegúrese de que estén conectados y se usen adecuadamente.
El uso de la recolección de polvo puede reducir los riesgos relacionados con el polvo.
USO Y CUIDADO DE LA HERRAMIENTA ELÉCTRICA
No fuerce la herramienta eléctrica. Use la herramienta eléctrica correcta para su aplicación. La
herramienta eléctrica correcta hará el trabajo mejor y más seguro a la velocidad para la que fue
diseñada.
No use la herramienta eléctrica si el interruptor no enciende y apaga. Cualquier herramienta
eléctrica que no pueda controlarse con el interruptor es peligrosa y debe repararse.
Desconecte el enchufe de la fuente de alimentación y / o la batería de la herramienta eléctrica
antes de hacer cualquier ajuste, cambiar accesorios o almacenar herramientas eléctricas. Dichas
medidas de seguridad preventivas reducen el riesgo de arrancar la herramienta eléctrica acciden-
talmente.
Guarde las herramientas eléctricas inactivas fuera del alcance de los niños y no permita que
personas que no estén familiarizadas con la herramienta eléctrica o estas instrucciones operen la
herramienta. Las herramientas eléctricas son peligrosas en manos de usuarios no capacitados.
Mantener herramientas eléctricas. Verifique la desalineación o el atascamiento de las piezas
móviles, la rotura de las piezas y cualquier otra condición que pueda afectar el funcionamiento de
la herramienta eléctrica. Si está dañado, repare la herramienta eléctrica antes de usar. Muchos
accidentes son causados por herramientas eléctricas mal mantenidas.
Mantenga las herramientas de corte afiladas y limpias. Es menos probable que las herramientas de
corte mantenidas adecuadamente con bordes de corte afilados se unan y son más fáciles de controlar.
Utilice la herramienta eléctrica, los accesorios y las brocas de herramientas, etc. de acuerdo con
estas instrucciones, teniendo en cuenta las condiciones de trabajo y el trabajo a realizar. El uso
de la herramienta eléctrica para operaciones diferentes de las previstas podría provocar una
situación peligrosa.
SERVICIO
Mantenga su segunda mano en la manija auxiliar o en la carcasa del motor. Si ambas manos
sostienen la sierra, la hoja no puede cortarlas.
No meta debajo de la pieza de trabajo. El protector no puede protegerlo de la cuchilla debajo de
la pieza de trabajo.
Ajuste la profundidad de corte al grosor de la pieza de trabajo. Debe verse menos de un diente
completo de los dientes de la cuchilla debajo de la pieza de trabajo.
Nunca sostenga la pieza que está cortando en sus manos o en su pierna. Asegure la pieza de
trabajo a una plataforma estable. Es importante apoyar el trabajo adecuadamente para minimizar
la exposición del cuerpo, la fijación de la cuchilla o la pérdida de control.
Sujete la herramienta eléctrica solo por las superficies de agarre aisladas, cuando realice una
operación donde la herramienta de corte pueda entrar en contacto con cables ocultos o su propio
cable. El contacto con un cable "vivo" también hará que las partes metálicas expuestas de la
herramienta eléctrica "vivan" y podría dar al operador una descarga eléctrica.
Cuando rasgue siempre use una guía de corte o una guía de borde recto. Esto mejora la precisión
del corte y reduce la posibilidad de que la cuchilla se atasque.
Utilice siempre cuchillas con el tamaño y la forma correctos (diamante versus redondo) de los
agujeros del eje. Las hojas que no coinciden con el hardware de montaje de la sierra funcionarán
excéntricamente, causando pérdida de control.
Nunca use arandelas o pernos dañados o incorrectos. Las arandelas y el perno de la hoja fueron
diseñados especialmente para su sierra, para un rendimiento óptimo y seguridad de operación
El retroceso es una reacción repentina a una hoja de sierra apretada, atada o desalineada, que
hace que una sierra no controlada se levante y salga de la pieza de trabajo hacia el operador.
Cuando la cuchilla se pellizca o ata fuertemente por la ranura que se cierra, la cuchilla se detiene
y la reacción del motor impulsa la unidad rápidamente hacia el operador.
Si la cuchilla se tuerce o se desalinea en el corte, los dientes en el borde posterior de la cuchilla
pueden cavar en la superficie superior de la madera haciendo que la cuchilla salga de la ranura y
salte hacia el operador.
Mantenga un agarre firme con ambas manos en la sierra y coloque los brazos para resistir las
fuerzas de contragolpe. Coloque su cuerpo a ambos lados de la cuchilla, pero no en línea con la
cuchilla. El retroceso puede hacer que la sierra salte hacia atrás, pero el operador puede controlar
las fuerzas de retroceso si se toman las precauciones adecuadas.
Cuando la cuchilla está atascada, o cuando se interrumpe un corte por cualquier motivo, suelte el
gatillo y mantenga la sierra inmóvil en el material hasta que la cuchilla se detenga por completo.
Nunca intente retirar la sierra del trabajo ni tirar de la sierra hacia atrás mientras la hoja está en
movimiento o puede producirse un contragolpe. Investigue y tome medidas correctivas para
eliminar la causa del atascamiento de la cuchilla.
Cuando reinicie una sierra en la pieza de trabajo, centre la hoja de la sierra en la ranura y verifique
que los dientes de la sierra no estén enganchados en el material. Si la hoja de la sierra está
atascada, puede subir o retroceder desde la pieza de trabajo a medida que se reinicia la sierra.
Admite paneles grandes para minimizar el riesgo de pellizcos y contragolpes de la cuchilla. Los
paneles grandes tienden a ceder bajo su propio peso. Los soportes deben colocarse debajo del
panel en ambos lados, cerca de la línea de corte y cerca del borde del panel.
No use cuchillas desafiladas o dañadas. Las cuchillas sin afilar o mal ajustadas producen una
ranura estrecha que causa fricción excesiva, atascamiento de la cuchilla y retroceso.
Las palancas de bloqueo de ajuste de la profundidad de la cuchilla y el bisel deben estar apreta-
das y seguras antes de hacer el corte. Si el ajuste de la cuchilla cambia durante el corte, puede
causar atascamiento y retroceso.
Tenga especial cuidado al cortar en paredes existentes u otras áreas ciegas. La cuchilla sobresali-
ente puede cortar objetos que pueden causar retroceso.
Verifique que el protector inferior esté bien cerrado antes de cada uso. No opere la sierra si la
protección inferior no se mueve libremente y se cierra instantáneamente. Nunca sujete ni ate la
protección inferior en la posición abierta. Si la sierra se cae accidentalmente, la protección inferior
puede doblarse. Levante la protección inferior con el mango retráctil y asegúrese de que se
mueva libremente y no toque la cuchilla ni ninguna otra parte, en todos los ángulos y profundi-
dades de corte.
Compruebe el funcionamiento del muelle protector inferior. Si el protector y el resorte no funcio-
nan correctamente, deben ser reparados antes de su uso. La protección inferior puede funcionar
lentamente debido a piezas dañadas, depósitos gomosos o acumulación de escombros.
La protección inferior debe retraerse manualmente solo para cortes especiales como "cortes por
inmersión" y "cortes compuestos". Eleve la protección inferior retrayendo la manija y tan pronto
como la cuchilla ingrese al material, la protección inferior debe liberarse. Para todas las demás
sierras, la protección inferior debe funcionar automáticamente.
Observe siempre que el protector inferior esté cubriendo la hoja antes de colocar la sierra en el
banco o el piso. Una cuchilla sin protección y en inercia hará que la sierra camine hacia atrás,
cortando todo lo que se encuentre en su camino. Tenga en cuenta el tiempo que tarda la cuchilla
en detenerse después de soltar el interruptor.
Use abrazaderas u otra forma práctica para asegurar y apoyar la pieza de trabajo en una platafor-
ma estable. Sostener el trabajo con la mano o contra su cuerpo lo deja inestable y puede conducir
a la pérdida de control.
Mantenga su cuerpo colocado a ambos lados de la hoja, pero no en línea con la hoja de sierra.
RETROCESO podría hacer que la sierra salte hacia atrás (ver Causas y Prevención del operador
de contragolpe y retroceso).
Evita cortar las uñas. Inspeccione y quite todas las uñas de la madera antes de cortar.
Asegúrese siempre de que nada interfiera con el movimiento del protector inferior de la cuchilla.
Los accesorios deben estar clasificados para al menos la velocidad recomendada en la etiqueta
de advertencia de la herramienta. Las ruedas y otros accesorios que corren por encima de la
velocidad nominal pueden separarse y causar lesiones. Las clasificaciones de accesorios
siempre deben estar por encima de la velocidad de la herramienta como se muestra en la placa
de identificación de la herramienta.
Siempre asegúrese de que la sierra esté limpia antes de usar.
Deje de usar esta sierra y hágalo reparar adecuadamente si se produce algún ruido inusual u
operación anormal.
Siempre asegúrese de que todos los componentes estén montados de manera adecuada y segura
antes de usar la herramienta.
Siempre maneje la hoja de sierra con cuidado cuando la monte o la quite, o cuando quite el troquel
de diamante.
Siempre espere hasta que el motor haya alcanzado la velocidad máxima antes de comenzar un
corte.
Mantenga siempre los mangos secos, limpios y libres de aceite y grasa. Sostenga la herramienta
firmemente con
ambas manos cuando está en uso.
Esté siempre alerta en todo momento, especialmente durante operaciones repetitivas y
monótonas. Asegúrese siempre de la posición de sus manos en relación con la cuchilla.
Manténgase alejado de las piezas finales que pueden caerse después de cortar. Pueden estar
calientes, afilados y / o pesados. Se pueden producir lesiones personales graves.
Reemplace o repare los cables dañados. Asegúrese de que su cable de extensión esté en buenas
condiciones. Use solo cables de extensión de 3 cables que tengan enchufes de conexión a tierra
de 3 clavijas y receptáculos de 3 polos que acepten el enchufe de la herramienta.
Un cable de extensión debe tener un tamaño de cable adecuado (AWG o American Wire Gauge)
por seguridad.
Protección para los ojos ANSI Z87.1 (CAN / CSA Z94.3).
Protección auditiva ANSI S12.6 (S3.19).
Protección respiratoria NIOSH / OSHA.
Plomo de pinturas a base de plomo, sílice cristalina de ladrillos y cemento y otros productos de
albañilería, y arsénico y cromo de madera tratada químicamente (CCA).
Evite el contacto prolongado con el polvo del lijado eléctrico, aserrado, rectificado, taladrado y
otras construcciones.
ocupaciones. Use ropa protectora y lave las áreas expuestas con agua y jabón. Permitir que el
polvo penetre en la boca, los ojos o se ponga sobre la piel puede promover la absorción de produc-
tos químicos nocivos.
1.
2.
3.
4.
5.
6.
7.
8.
9
10
11
12
13
14
15
16
Láser
Interruptor de láser
Escala de profundidad
Interruptor de disparo
Botón de bloqueo
Mando
Tornillo de sujeción
Espada
Plato base
Cerca de corte
Adaptador de extracción de polvo
Soporte de placa base
Botón de bloqueo del husillo
Agarre suave
Cable de alimentación
Llave Allen
voltaje
Poder
Sin velocidad de carga
Tamaño de la hoja
Tamaño del cenador
Profundidad máxima de corte
Madera:
Loseta:
Metal blando:
120VAC
4.8A
3700/min
3-5/16”(85mm)
10mm
1-1/16”
5/16”
1/8”
El láser se debe usar y mantener de acuerdo con las instrucciones del fabricante.
Nunca apunte el rayo a ninguna persona u objeto que no sea la pieza de trabajo.
El rayo láser no debe dirigirse deliberadamente al personal y se debe evitar que se dirija hacia el
ojo de una persona durante más de 0.25 segundos.
Asegúrese siempre de que el rayo láser esté dirigido a una pieza de trabajo resistente sin superfi-
cies reflectantes. Es decir. Se aceptan superficies revestidas de madera o rugosas. La lámina de
acero reflectante brillante o similar no es adecuada para el uso con láser, ya que la superficie
reflectante podría dirigir el rayo hacia el operador.
No cambie el conjunto de luz láser con un tipo diferente. Las reparaciones deben ser realizadas
por el fabricante del láser o un agente autorizado.
Al montar la hoja de sierra, use guantes protectores. Peligro de lesiones al tocar la hoja de sierra.
Utilice únicamente hojas de sierra que correspondan con los datos característicos que figuran en
las instrucciones de funcionamiento.
No utilice bajo ninguna circunstancia discos abrasivos como herramienta de corte.
COLOCACIÓN Y EXTRACCIÓN DE LA HOJA - FIGURA C-E
• Retraiga la protección inferior y ensamble la cuchilla (8) y la arandela de sujeción (17) como se
muestra en la figura C.
• Oprima el bloqueo del eje (13) mientras gira el perno de la hoja (7) con la llave de la hoja (16)
hasta que el bloqueo de la hoja se enganche y la hoja deje de girar. figura D
NOTA: La llave de la hoja se guarda en una bolsa de polietileno junto con el manual.
• Apriete firmemente el perno de la hoja con la llave de la hoja.
NOTA: El perno tiene una rosca a la izquierda. Para aflojar, gire en sentido horario. Para apretar,
gire en sentido antihorario. figura E
NOTA: Nunca enganche el bloqueo de la hoja mientras la sierra esté en funcionamiento, ni haga
un esfuerzo para detener la herramienta. Nunca encienda la herramienta mientras el bloqueo de
la hoja esté activado. Se producirán daños graves en su sierra.
Según sea necesario, mueva la perilla desbloqueada y deje que el dedo apunte a la posición
adecuada de la escala de profundidad,
Luego gire la perilla 180 ° para bloquearla,
- 31 -
Technology Creates Power
1 2 311
18
10
8
9
7
17
6
Fig A
4
15
13
12
14
5
Fig B
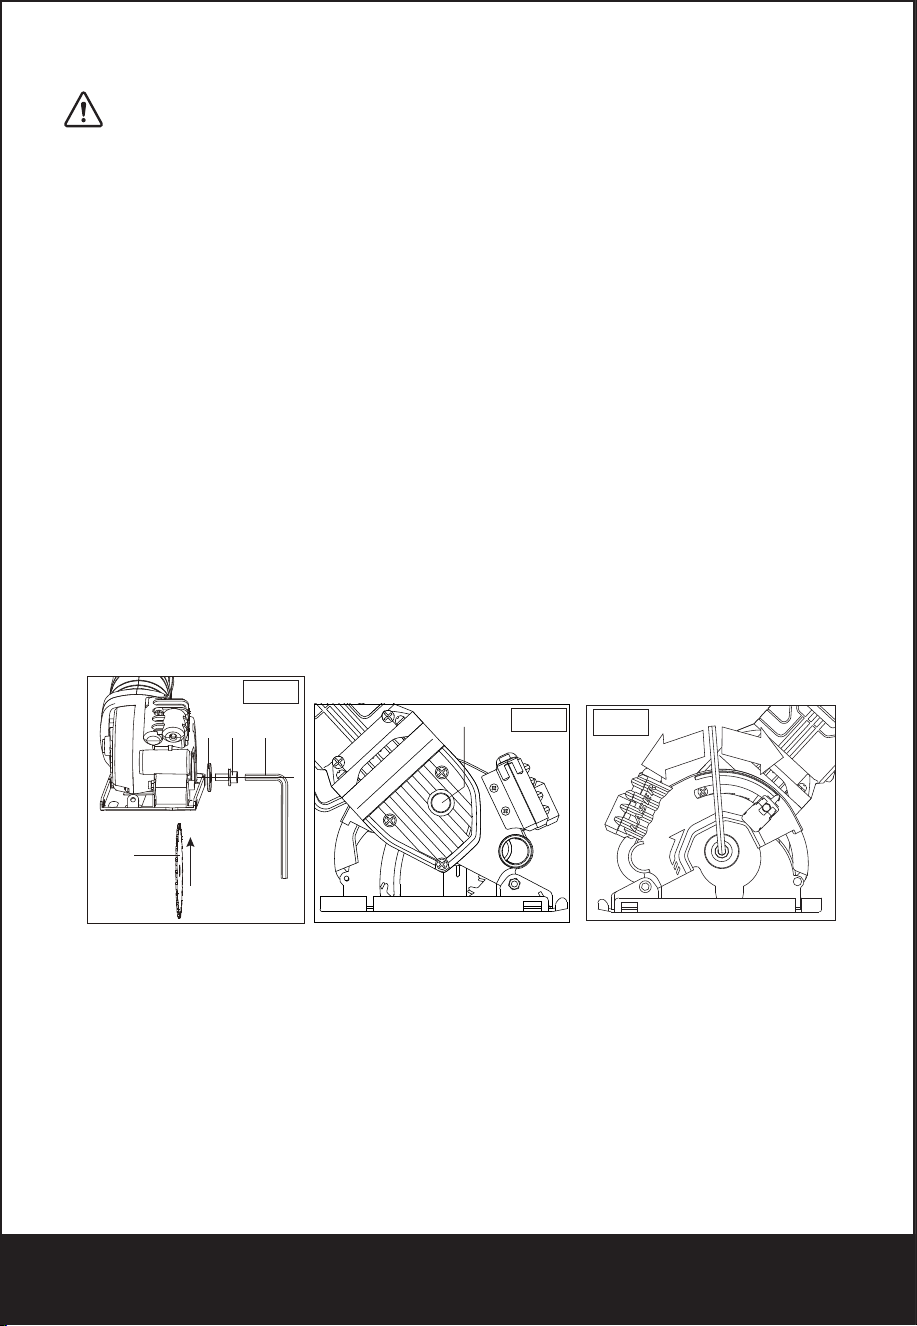
EN
FR
ES
Encendido y apagado
Nota: Por razones de seguridad, el interruptor de encendido / apagado no se puede bloquear; debe
permanecer presionado durante toda la operación.
Función Láser
●Enciéndalo con el interruptor de encendido / apagado de la luz láser justo antes de cortar.
●Apáguelo inmediatamente después del uso para conservar la vida útil de la batería y el láser.
CAMBIO DE LAS BATERÍAS LÁSER
Las baterías que operan el láser deberán reemplazarse después de un uso considerable del láser.
1.
2.
3.
4.
PELIGRO: Nunca permita que el rayo láser brille en los ojos de una persona, podría provocar
daños oculares graves. Asegúrese de que el interruptor del láser esté apagado y que el láser NO esté
apuntando hacia usted mientras reemplaza las baterías del láser y cuando verifica la función del
láser.
5)
Haga que un técnico calificado repare su herramienta eléctrica utilizando solo piezas de repuesto
idénticas. Esto asegurará que se mantenga la seguridad de la herramienta eléctrica.
PELIGRO: Mantenga las manos alejadas del área de corte y la cuchilla.
a)
b)
c)
d)
e)
f)
g)
h)
Causas y prevención del contragolpe del operador:
●
●
●
El contragolpe es el resultado del mal uso de la sierra y / o procedimientos o condiciones de
operación incorrectas y puede evitarse tomando las precauciones adecuadas como se indica a
continuación:
a)
b)
La etiqueta de su herramienta puede incluir los siguientes símbolos. Los símbolos y sus definiciones
son los siguientes:
Reglas de seguridad para luces láser
La luz láser / radiación láser utilizada en el sistema es de Clase 2 con longitudes de onda máximas
de 1 mW y 650 nm. Estos láseres normalmente no presentan un riesgo óptico, aunque mirar el rayo
puede causar ceguera instantánea.
ADVERTENCIA : No mire directamente al rayo láser.
Puede existir un peligro si observa deliberadamente la viga, observe todas las reglas de seguridad
de la siguiente manera;
●
●
●
●
●
f)
3)
a)
b)
c)
d)
e)
f)
g)
4)
a)
b)
c)
d)
e)
f)
g)
●
●
●
●
●
●
●
●
Cuanto menor es el número de calibre del cable, mayor es la capacidad del cable, es decir, el calibre
16 tiene más capacidad que el calibre 18. Un cable de menor tamaño provocará una caída en el
voltaje de la línea, lo que provocará pérdida de potencia y sobrecalentamiento. Cuando use más de
una extensión para completar la longitud total, asegúrese de que cada extensión individual contenga
al menos el tamaño mínimo de cable. La siguiente tabla muestra el tamaño correcto a utilizar según
la longitud del cable y la clasificación de amperaje de la placa de identificación. En caso de duda, use
el siguiente medidor más pesado. Cuanto más pequeño es el número de calibre, más pesado es el
cable.
DEFINICIONES: SÍMBOLOS Y PALABRAS DE ALERTA DE SEGURIDAD
Es importante que lea y comprenda este manual. La información que contiene se relaciona con la
protección de SU SEGURIDAD y la PREVENCIÓN DE PROBLEMAS. Los siguientes símbolos se
usan para ayudarlo a reconocer esta información.
AVISO: El uso sin el símbolo de alerta de seguridad indica una situación potencialmente peligrosa
que, si no se evita, puede provocar daños a la propiedad.
ADVERTENCIA: lea todas las advertencias de seguridad y todas las instrucciones.
El incumplimiento de las advertencias e instrucciones puede provocar descargas eléctricas, incendi-
os y / o lesiones graves.
GUARDE TODAS LAS ADVERTENCIAS E INSTRUCCIONES PARA FUTURAS REFERENCIAS
El término "herramienta eléctrica" en las advertencias se refiere a la herramienta eléctrica que funcio-
na con la red eléctrica (con cable) o la herramienta eléctrica que funciona con batería (sin cable).
1)
a)
b)
c)
2)
a)
b)
c)
d)
e)
c)
d)
e)
f)
g)
Instrucciones de seguridad de la protección inferior
a)
b)
c)
d)
Instrucciones de seguridad adicionales
●
●
●
●
●
●
●
●
●
●
ADVERTENCIA: Parte del polvo creado por el lijado eléctrico, el aserrado, el rectificado, la
perforación y otras actividades de construcción contienen productos químicos que en el estado de
California se sabe que causan cáncer, defectos de nacimiento u otros daños reproductivos. Algunos
ejemplos de estos químicos son:
●
El riesgo de estas exposiciones varía, según la frecuencia con la que realice este tipo de trabajo.
Para reducir su exposición a estos productos químicos: trabaje en un área bien ventilada y trabaje
con equipos de seguridad aprobados, como las máscaras antipolvo que están especialmente diseña-
das para filtrar partículas microscópicas.
ADVERTENCIA: SIEMPRE USE GAFAS DE SEGURIDAD. Los anteojos de uso diario NO
son lentes de seguridad. También use mascarilla facial o antipolvo si corta
●
ADVERTENCIA: Cortar plásticos, madera recubierta de savia y otros materiales puede hacer
que el material derretido se acumule en las puntas de la hoja y en el cuerpo de la hoja de sierra, lo
que aumenta el riesgo de sobrecalentamiento y atascamiento de la hoja durante el corte.
ADVERTENCIA: El uso de esta herramienta puede generar y / o desechar polvo, lo que puede
causar lesiones respiratorias u otras lesiones graves y permanentes. Siempre use protección respira-
toria aprobada por NIOSH / OSHA apropiada para la exposición al polvo. Dirija las partículas lejos de
la cara y el cuerpo. Siempre opere la herramienta en un área bien ventilada y permita la eliminación
adecuada del polvo. Utilice el sistema de recolección de polvo siempre que sea posible.
PRECAUCIÓN: El uso de controles o ajustes o la realización de procedimientos distintos a los
especificados en este documento pueden provocar una exposición peligrosa a la radiación
Uso previsto
Esta máquina está destinada principalmente al aserrado, longitudinal y transversalmente, de madera
maciza, aglomerado, madera contrachapada, aluminio, azulejos y piedra en una posición fija. Tenga
en cuenta que la hoja preinstalada en la sierra, tal como se suministra, está diseñada para usarse
solo con madera. Cualquier otro uso o modificación del dispositivo se considerará como un uso
inadecuado y podría generar peligros considerables. No es adecuado para uso comercial
Función descriptiva
La numeración de las características de los productos se refiere a la ilustración de la máquina en la
página de gráficos.
Montaje / configuración de ajuste
ADVERTENCIA: Antes de trabajar en la herramienta eléctrica, retire siempre el enchufe de la
fuente de alimentación.
●
●
●
Ajustar la profundidad de corte,
1.
2.
Nota: si es posible, recomiende configurar la profundidad de corte aproximadamente 2 mm más
profundo que el grosor del material, esto debería ayudar a asegurar que logre un corte limpio.
Solicitud
La mini sierra de inmersión es versátil y le permite cortar muchos tipos diferentes de materiales.
Algunos de los materiales incluyen
●
●
●
Selección de cuchilla
MANTENIMIENTO
ADVERTENCIA: Desenchufe la herramienta antes de instalar o quitar accesorios, antes de
ajustar o al hacer reparaciones. Use solo jabón suave y un paño húmedo para limpiar la herramienta.
Nunca permita que ningún líquido ingrese a la herramienta; nunca sumerja ninguna parte de la
herramienta en un líquido.
IMPORTANTE: Para garantizar la SEGURIDAD y CONFIABILIDAD del producto, reparaciones,
mantenimiento y ajuste (que no sean los enumerados
en este manual) debe ser realizado por centros de servicio autorizados u otras organizaciones de
servicio calificadas, utilizando siempre piezas de repuesto idénticas.
SEGURIDAD EN EL ÁREA DE TRABAJO
Mantenga el área de trabajo limpia y bien iluminada. Las áreas desordenadas u oscuras provocan
accidentes.
No opere herramientas eléctricas en atmósferas explosivas, como en presencia de líquidos,
gases o polvo inflamables. Las herramientas eléctricas crean chispas que pueden encender el
polvo o los humos.
Mantenga alejados a los niños y transeúntes mientras utiliza una herramienta eléctrica. Las
distracciones pueden hacer que pierdas el control.
SEGURIDAD ELECTRICA
Los enchufes de la herramienta eléctrica deben coincidir con la toma de corriente. Nunca
modifique el enchufe de ninguna manera. No utilice enchufes adaptadores con herramientas
eléctricas conectadas a tierra. Los enchufes no modificados y las tomas correspondientes
reducirán el riesgo de descarga eléctrica.
Evite el contacto del cuerpo con superficies conectadas a tierra, como tuberías, radiadores,
cocinas y refrigeradores. Existe un mayor riesgo de electricidad
choque si su cuerpo está conectado a tierra.
No exponga las herramientas eléctricas a la lluvia o la humedad. El agua que ingresa a una
herramienta eléctrica aumentará el riesgo de descarga eléctrica.
No maltrate el cable. Nunca use el cable para transportar, tirar o desenchufar la herramienta
eléctrica. Mantenga el cable alejado del calor, aceite, bordes afilados o piezas móviles. Los cables
dañados o enredados aumentan el riesgo de descarga eléctrica.
Cuando utilice una herramienta eléctrica en exteriores, use un cable de extensión adecuado para
uso en exteriores. El uso de un cable adecuado para uso en exteriores reduce el riesgo de descar-
ga eléctrica.
Si es inevitable utilizar una herramienta eléctrica en una ubicación húmeda, utilice un suministro
protegido por un interruptor de circuito de falla a tierra (GFCI). El uso de un GFCI reduce el riesgo
de descarga eléctrica.
SEGURIDAD PERSONAL
Manténgase alerta, observe lo que está haciendo y use el sentido común al operar una
herramienta eléctrica. No use una herramienta eléctrica mientras
Está cansado o bajo la influencia de drogas, alcohol o medicamentos. Un momento de falta de
atención al utilizar herramientas eléctricas puede provocar lesiones personales graves.
Use equipo de protección personal.
Siempre use protección para los ojos. El equipo de protección como máscara antipolvo, zapatos
de seguridad antideslizantes, casco o protección auditiva para condiciones apropiadas reducirá
las lesiones personales.
Prevenir arranques involuntarios. Asegúrese de que el interruptor esté en la posición de apagado
antes de conectarlo a la fuente de alimentación y / o al paquete de baterías, levantar o transportar
la herramienta. Llevar herramientas eléctricas con el dedo en el interruptor o activar herramientas
eléctricas que tienen el interruptor encendido invita a accidentes.
Retire cualquier llave de ajuste o llave inglesa antes de encender la herramienta eléctrica. Una
llave inglesa o una llave dejada unida a una parte giratoria de la herramienta eléctrica puede
provocar lesiones personales.
No te excedas. Mantenga la postura y el equilibrio en todo momento. Esto permite un mejor
control de la herramienta eléctrica en situaciones inesperadas.
Vístete apropiadamente. No use ropa suelta o joyas. Mantenga su cabello, ropa y guantes lejos
de las partes móviles. Ropa suelta, joyas o cabello largo pueden quedar atrapados en las partes
móviles.
Si se proporcionan dispositivos para la conexión de instalaciones de extracción y recolección de
polvo, asegúrese de que estén conectados y se usen adecuadamente.
El uso de la recolección de polvo puede reducir los riesgos relacionados con el polvo.
USO Y CUIDADO DE LA HERRAMIENTA ELÉCTRICA
No fuerce la herramienta eléctrica. Use la herramienta eléctrica correcta para su aplicación. La
herramienta eléctrica correcta hará el trabajo mejor y más seguro a la velocidad para la que fue
diseñada.
No use la herramienta eléctrica si el interruptor no enciende y apaga. Cualquier herramienta
eléctrica que no pueda controlarse con el interruptor es peligrosa y debe repararse.
Desconecte el enchufe de la fuente de alimentación y / o la batería de la herramienta eléctrica
antes de hacer cualquier ajuste, cambiar accesorios o almacenar herramientas eléctricas. Dichas
medidas de seguridad preventivas reducen el riesgo de arrancar la herramienta eléctrica acciden-
talmente.
Guarde las herramientas eléctricas inactivas fuera del alcance de los niños y no permita que
personas que no estén familiarizadas con la herramienta eléctrica o estas instrucciones operen la
herramienta. Las herramientas eléctricas son peligrosas en manos de usuarios no capacitados.
Mantener herramientas eléctricas. Verifique la desalineación o el atascamiento de las piezas
móviles, la rotura de las piezas y cualquier otra condición que pueda afectar el funcionamiento de
la herramienta eléctrica. Si está dañado, repare la herramienta eléctrica antes de usar. Muchos
accidentes son causados por herramientas eléctricas mal mantenidas.
Mantenga las herramientas de corte afiladas y limpias. Es menos probable que las herramientas de
corte mantenidas adecuadamente con bordes de corte afilados se unan y son más fáciles de controlar.
Utilice la herramienta eléctrica, los accesorios y las brocas de herramientas, etc. de acuerdo con
estas instrucciones, teniendo en cuenta las condiciones de trabajo y el trabajo a realizar. El uso
de la herramienta eléctrica para operaciones diferentes de las previstas podría provocar una
situación peligrosa.
SERVICIO
Mantenga su segunda mano en la manija auxiliar o en la carcasa del motor. Si ambas manos
sostienen la sierra, la hoja no puede cortarlas.
No meta debajo de la pieza de trabajo. El protector no puede protegerlo de la cuchilla debajo de
la pieza de trabajo.
Ajuste la profundidad de corte al grosor de la pieza de trabajo. Debe verse menos de un diente
completo de los dientes de la cuchilla debajo de la pieza de trabajo.
Nunca sostenga la pieza que está cortando en sus manos o en su pierna. Asegure la pieza de
trabajo a una plataforma estable. Es importante apoyar el trabajo adecuadamente para minimizar
la exposición del cuerpo, la fijación de la cuchilla o la pérdida de control.
Sujete la herramienta eléctrica solo por las superficies de agarre aisladas, cuando realice una
operación donde la herramienta de corte pueda entrar en contacto con cables ocultos o su propio
cable. El contacto con un cable "vivo" también hará que las partes metálicas expuestas de la
herramienta eléctrica "vivan" y podría dar al operador una descarga eléctrica.
Cuando rasgue siempre use una guía de corte o una guía de borde recto. Esto mejora la precisión
del corte y reduce la posibilidad de que la cuchilla se atasque.
Utilice siempre cuchillas con el tamaño y la forma correctos (diamante versus redondo) de los
agujeros del eje. Las hojas que no coinciden con el hardware de montaje de la sierra funcionarán
excéntricamente, causando pérdida de control.
Nunca use arandelas o pernos dañados o incorrectos. Las arandelas y el perno de la hoja fueron
diseñados especialmente para su sierra, para un rendimiento óptimo y seguridad de operación
El retroceso es una reacción repentina a una hoja de sierra apretada, atada o desalineada, que
hace que una sierra no controlada se levante y salga de la pieza de trabajo hacia el operador.
Cuando la cuchilla se pellizca o ata fuertemente por la ranura que se cierra, la cuchilla se detiene
y la reacción del motor impulsa la unidad rápidamente hacia el operador.
Si la cuchilla se tuerce o se desalinea en el corte, los dientes en el borde posterior de la cuchilla
pueden cavar en la superficie superior de la madera haciendo que la cuchilla salga de la ranura y
salte hacia el operador.
Mantenga un agarre firme con ambas manos en la sierra y coloque los brazos para resistir las
fuerzas de contragolpe. Coloque su cuerpo a ambos lados de la cuchilla, pero no en línea con la
cuchilla. El retroceso puede hacer que la sierra salte hacia atrás, pero el operador puede controlar
las fuerzas de retroceso si se toman las precauciones adecuadas.
Cuando la cuchilla está atascada, o cuando se interrumpe un corte por cualquier motivo, suelte el
gatillo y mantenga la sierra inmóvil en el material hasta que la cuchilla se detenga por completo.
Nunca intente retirar la sierra del trabajo ni tirar de la sierra hacia atrás mientras la hoja está en
movimiento o puede producirse un contragolpe. Investigue y tome medidas correctivas para
eliminar la causa del atascamiento de la cuchilla.
Cuando reinicie una sierra en la pieza de trabajo, centre la hoja de la sierra en la ranura y verifique
que los dientes de la sierra no estén enganchados en el material. Si la hoja de la sierra está
atascada, puede subir o retroceder desde la pieza de trabajo a medida que se reinicia la sierra.
Admite paneles grandes para minimizar el riesgo de pellizcos y contragolpes de la cuchilla. Los
paneles grandes tienden a ceder bajo su propio peso. Los soportes deben colocarse debajo del
panel en ambos lados, cerca de la línea de corte y cerca del borde del panel.
No use cuchillas desafiladas o dañadas. Las cuchillas sin afilar o mal ajustadas producen una
ranura estrecha que causa fricción excesiva, atascamiento de la cuchilla y retroceso.
Las palancas de bloqueo de ajuste de la profundidad de la cuchilla y el bisel deben estar apreta-
das y seguras antes de hacer el corte. Si el ajuste de la cuchilla cambia durante el corte, puede
causar atascamiento y retroceso.
Tenga especial cuidado al cortar en paredes existentes u otras áreas ciegas. La cuchilla sobresali-
ente puede cortar objetos que pueden causar retroceso.
Verifique que el protector inferior esté bien cerrado antes de cada uso. No opere la sierra si la
protección inferior no se mueve libremente y se cierra instantáneamente. Nunca sujete ni ate la
protección inferior en la posición abierta. Si la sierra se cae accidentalmente, la protección inferior
puede doblarse. Levante la protección inferior con el mango retráctil y asegúrese de que se
mueva libremente y no toque la cuchilla ni ninguna otra parte, en todos los ángulos y profundi-
dades de corte.
Compruebe el funcionamiento del muelle protector inferior. Si el protector y el resorte no funcio-
nan correctamente, deben ser reparados antes de su uso. La protección inferior puede funcionar
lentamente debido a piezas dañadas, depósitos gomosos o acumulación de escombros.
La protección inferior debe retraerse manualmente solo para cortes especiales como "cortes por
inmersión" y "cortes compuestos". Eleve la protección inferior retrayendo la manija y tan pronto
como la cuchilla ingrese al material, la protección inferior debe liberarse. Para todas las demás
sierras, la protección inferior debe funcionar automáticamente.
Observe siempre que el protector inferior esté cubriendo la hoja antes de colocar la sierra en el
banco o el piso. Una cuchilla sin protección y en inercia hará que la sierra camine hacia atrás,
cortando todo lo que se encuentre en su camino. Tenga en cuenta el tiempo que tarda la cuchilla
en detenerse después de soltar el interruptor.
Use abrazaderas u otra forma práctica para asegurar y apoyar la pieza de trabajo en una platafor-
ma estable. Sostener el trabajo con la mano o contra su cuerpo lo deja inestable y puede conducir
a la pérdida de control.
Mantenga su cuerpo colocado a ambos lados de la hoja, pero no en línea con la hoja de sierra.
RETROCESO podría hacer que la sierra salte hacia atrás (ver Causas y Prevención del operador
de contragolpe y retroceso).
Evita cortar las uñas. Inspeccione y quite todas las uñas de la madera antes de cortar.
Asegúrese siempre de que nada interfiera con el movimiento del protector inferior de la cuchilla.
Los accesorios deben estar clasificados para al menos la velocidad recomendada en la etiqueta
de advertencia de la herramienta. Las ruedas y otros accesorios que corren por encima de la
velocidad nominal pueden separarse y causar lesiones. Las clasificaciones de accesorios
siempre deben estar por encima de la velocidad de la herramienta como se muestra en la placa
de identificación de la herramienta.
Siempre asegúrese de que la sierra esté limpia antes de usar.
Deje de usar esta sierra y hágalo reparar adecuadamente si se produce algún ruido inusual u
operación anormal.
Siempre asegúrese de que todos los componentes estén montados de manera adecuada y segura
antes de usar la herramienta.
Siempre maneje la hoja de sierra con cuidado cuando la monte o la quite, o cuando quite el troquel
de diamante.
Siempre espere hasta que el motor haya alcanzado la velocidad máxima antes de comenzar un
corte.
Mantenga siempre los mangos secos, limpios y libres de aceite y grasa. Sostenga la herramienta
firmemente con
ambas manos cuando está en uso.
Esté siempre alerta en todo momento, especialmente durante operaciones repetitivas y
monótonas. Asegúrese siempre de la posición de sus manos en relación con la cuchilla.
Manténgase alejado de las piezas finales que pueden caerse después de cortar. Pueden estar
calientes, afilados y / o pesados. Se pueden producir lesiones personales graves.
Reemplace o repare los cables dañados. Asegúrese de que su cable de extensión esté en buenas
condiciones. Use solo cables de extensión de 3 cables que tengan enchufes de conexión a tierra
de 3 clavijas y receptáculos de 3 polos que acepten el enchufe de la herramienta.
Un cable de extensión debe tener un tamaño de cable adecuado (AWG o American Wire Gauge)
por seguridad.
Protección para los ojos ANSI Z87.1 (CAN / CSA Z94.3).
Protección auditiva ANSI S12.6 (S3.19).
Protección respiratoria NIOSH / OSHA.
Plomo de pinturas a base de plomo, sílice cristalina de ladrillos y cemento y otros productos de
albañilería, y arsénico y cromo de madera tratada químicamente (CCA).
Evite el contacto prolongado con el polvo del lijado eléctrico, aserrado, rectificado, taladrado y
otras construcciones.
ocupaciones. Use ropa protectora y lave las áreas expuestas con agua y jabón. Permitir que el
polvo penetre en la boca, los ojos o se ponga sobre la piel puede promover la absorción de produc-
tos químicos nocivos.
El láser se debe usar y mantener de acuerdo con las instrucciones del fabricante.
Nunca apunte el rayo a ninguna persona u objeto que no sea la pieza de trabajo.
El rayo láser no debe dirigirse deliberadamente al personal y se debe evitar que se dirija hacia el
ojo de una persona durante más de 0.25 segundos.
Asegúrese siempre de que el rayo láser esté dirigido a una pieza de trabajo resistente sin superfi-
cies reflectantes. Es decir. Se aceptan superficies revestidas de madera o rugosas. La lámina de
acero reflectante brillante o similar no es adecuada para el uso con láser, ya que la superficie
reflectante podría dirigir el rayo hacia el operador.
No cambie el conjunto de luz láser con un tipo diferente. Las reparaciones deben ser realizadas
por el fabricante del láser o un agente autorizado.
Al montar la hoja de sierra, use guantes protectores. Peligro de lesiones al tocar la hoja de sierra.
Utilice únicamente hojas de sierra que correspondan con los datos característicos que figuran en
las instrucciones de funcionamiento.
No utilice bajo ninguna circunstancia discos abrasivos como herramienta de corte.
COLOCACIÓN Y EXTRACCIÓN DE LA HOJA - FIGURA C-E
• Retraiga la protección inferior y ensamble la cuchilla (8) y la arandela de sujeción (17) como se
muestra en la figura C.
• Oprima el bloqueo del eje (13) mientras gira el perno de la hoja (7) con la llave de la hoja (16)
hasta que el bloqueo de la hoja se enganche y la hoja deje de girar. figura D
NOTA: La llave de la hoja se guarda en una bolsa de polietileno junto con el manual.
• Apriete firmemente el perno de la hoja con la llave de la hoja.
NOTA: El perno tiene una rosca a la izquierda. Para aflojar, gire en sentido horario. Para apretar,
gire en sentido antihorario. figura E
NOTA: Nunca enganche el bloqueo de la hoja mientras la sierra esté en funcionamiento, ni haga
un esfuerzo para detener la herramienta. Nunca encienda la herramienta mientras el bloqueo de
la hoja esté activado. Se producirán daños graves en su sierra.
Según sea necesario, mueva la perilla desbloqueada y deje que el dedo apunte a la posición
adecuada de la escala de profundidad,
Luego gire la perilla 180 ° para bloquearla,
- 32 -
Technology Creates Power
Fig D
13
FigC
8
17
7
16
Fig E
To Tight
To Loose
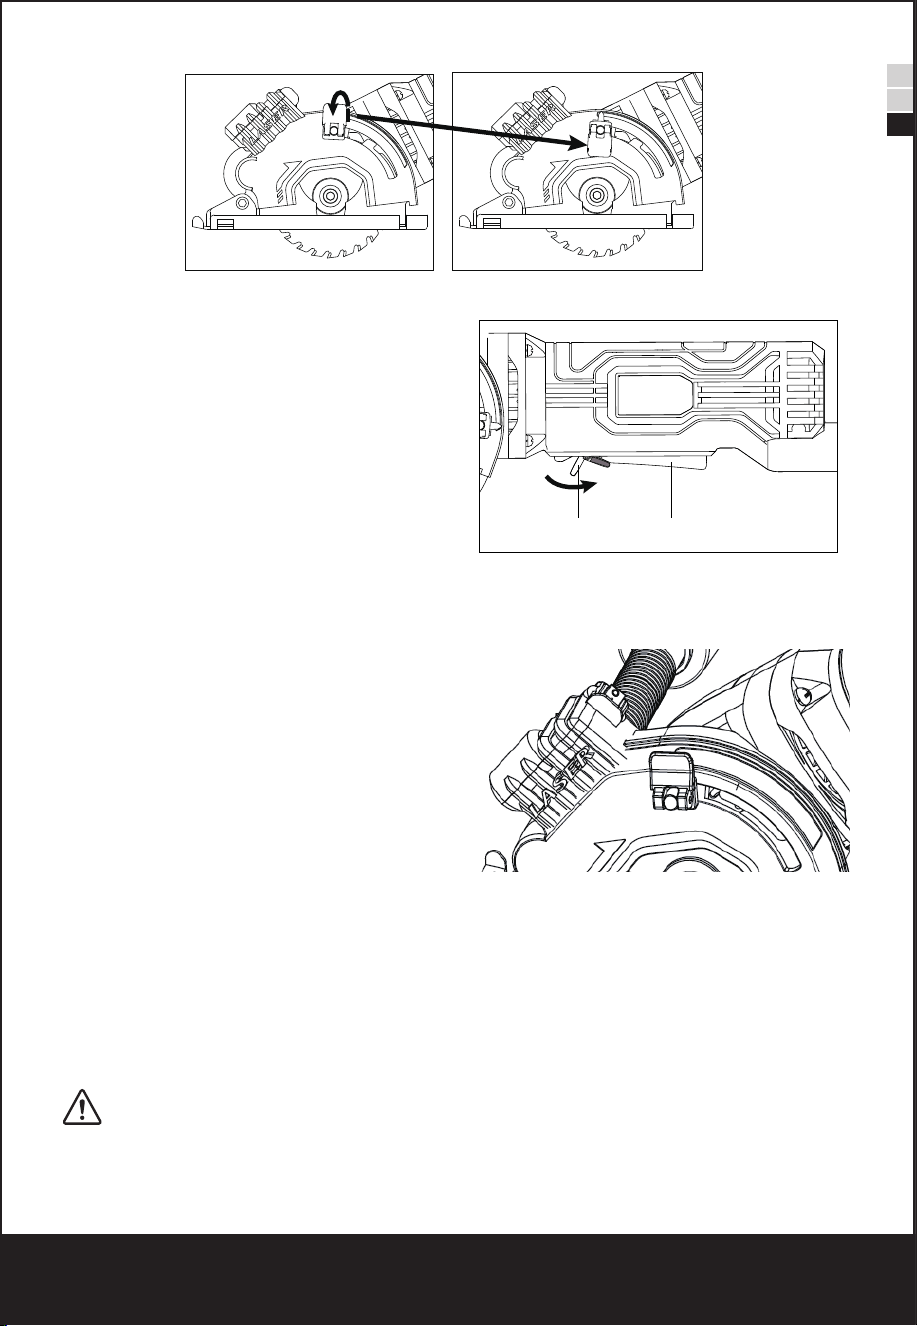
EN
FR
ES
Encendido y apagado
Nota: Por razones de seguridad, el interruptor de encendido / apagado no se puede bloquear; debe
permanecer presionado durante toda la operación.
Función Láser
●Enciéndalo con el interruptor de encendido / apagado de la luz láser justo antes de cortar.
●Apáguelo inmediatamente después del uso para conservar la vida útil de la batería y el láser.
CAMBIO DE LAS BATERÍAS LÁSER
Las baterías que operan el láser deberán reemplazarse después de un uso considerable del láser.
1.
2.
3.
4.
PELIGRO: Nunca permita que el rayo láser brille en los ojos de una persona, podría provocar
daños oculares graves. Asegúrese de que el interruptor del láser esté apagado y que el láser NO esté
apuntando hacia usted mientras reemplaza las baterías del láser y cuando verifica la función del
láser.
5)
Haga que un técnico calificado repare su herramienta eléctrica utilizando solo piezas de repuesto
idénticas. Esto asegurará que se mantenga la seguridad de la herramienta eléctrica.
PELIGRO: Mantenga las manos alejadas del área de corte y la cuchilla.
a)
b)
c)
d)
e)
f)
g)
h)
Causas y prevención del contragolpe del operador:
●
●
●
El contragolpe es el resultado del mal uso de la sierra y / o procedimientos o condiciones de
operación incorrectas y puede evitarse tomando las precauciones adecuadas como se indica a
continuación:
a)
b)
La etiqueta de su herramienta puede incluir los siguientes símbolos. Los símbolos y sus definiciones
son los siguientes:
Reglas de seguridad para luces láser
La luz láser / radiación láser utilizada en el sistema es de Clase 2 con longitudes de onda máximas
de 1 mW y 650 nm. Estos láseres normalmente no presentan un riesgo óptico, aunque mirar el rayo
puede causar ceguera instantánea.
ADVERTENCIA : No mire directamente al rayo láser.
Puede existir un peligro si observa deliberadamente la viga, observe todas las reglas de seguridad
de la siguiente manera;
●
●
●
●
●
f)
3)
a)
b)
c)
d)
e)
f)
g)
4)
a)
b)
c)
d)
e)
f)
g)
●
●
●
●
●
●
●
●
Cuanto menor es el número de calibre del cable, mayor es la capacidad del cable, es decir, el calibre
16 tiene más capacidad que el calibre 18. Un cable de menor tamaño provocará una caída en el
voltaje de la línea, lo que provocará pérdida de potencia y sobrecalentamiento. Cuando use más de
una extensión para completar la longitud total, asegúrese de que cada extensión individual contenga
al menos el tamaño mínimo de cable. La siguiente tabla muestra el tamaño correcto a utilizar según
la longitud del cable y la clasificación de amperaje de la placa de identificación. En caso de duda, use
el siguiente medidor más pesado. Cuanto más pequeño es el número de calibre, más pesado es el
cable.
DEFINICIONES: SÍMBOLOS Y PALABRAS DE ALERTA DE SEGURIDAD
Es importante que lea y comprenda este manual. La información que contiene se relaciona con la
protección de SU SEGURIDAD y la PREVENCIÓN DE PROBLEMAS. Los siguientes símbolos se
usan para ayudarlo a reconocer esta información.
AVISO: El uso sin el símbolo de alerta de seguridad indica una situación potencialmente peligrosa
que, si no se evita, puede provocar daños a la propiedad.
ADVERTENCIA: lea todas las advertencias de seguridad y todas las instrucciones.
El incumplimiento de las advertencias e instrucciones puede provocar descargas eléctricas, incendi-
os y / o lesiones graves.
GUARDE TODAS LAS ADVERTENCIAS E INSTRUCCIONES PARA FUTURAS REFERENCIAS
El término "herramienta eléctrica" en las advertencias se refiere a la herramienta eléctrica que funcio-
na con la red eléctrica (con cable) o la herramienta eléctrica que funciona con batería (sin cable).
1)
a)
b)
c)
2)
a)
b)
c)
d)
e)
c)
d)
e)
f)
g)
Instrucciones de seguridad de la protección inferior
a)
b)
c)
d)
Instrucciones de seguridad adicionales
●
●
●
●
●
●
●
●
●
●
ADVERTENCIA: Parte del polvo creado por el lijado eléctrico, el aserrado, el rectificado, la
perforación y otras actividades de construcción contienen productos químicos que en el estado de
California se sabe que causan cáncer, defectos de nacimiento u otros daños reproductivos. Algunos
ejemplos de estos químicos son:
●
El riesgo de estas exposiciones varía, según la frecuencia con la que realice este tipo de trabajo.
Para reducir su exposición a estos productos químicos: trabaje en un área bien ventilada y trabaje
con equipos de seguridad aprobados, como las máscaras antipolvo que están especialmente diseña-
das para filtrar partículas microscópicas.
ADVERTENCIA: SIEMPRE USE GAFAS DE SEGURIDAD. Los anteojos de uso diario NO
son lentes de seguridad. También use mascarilla facial o antipolvo si corta
●
ADVERTENCIA: Cortar plásticos, madera recubierta de savia y otros materiales puede hacer
que el material derretido se acumule en las puntas de la hoja y en el cuerpo de la hoja de sierra, lo
que aumenta el riesgo de sobrecalentamiento y atascamiento de la hoja durante el corte.
ADVERTENCIA: El uso de esta herramienta puede generar y / o desechar polvo, lo que puede
causar lesiones respiratorias u otras lesiones graves y permanentes. Siempre use protección respira-
toria aprobada por NIOSH / OSHA apropiada para la exposición al polvo. Dirija las partículas lejos de
la cara y el cuerpo. Siempre opere la herramienta en un área bien ventilada y permita la eliminación
adecuada del polvo. Utilice el sistema de recolección de polvo siempre que sea posible.
PRECAUCIÓN: El uso de controles o ajustes o la realización de procedimientos distintos a los
especificados en este documento pueden provocar una exposición peligrosa a la radiación
Uso previsto
Esta máquina está destinada principalmente al aserrado, longitudinal y transversalmente, de madera
maciza, aglomerado, madera contrachapada, aluminio, azulejos y piedra en una posición fija. Tenga
en cuenta que la hoja preinstalada en la sierra, tal como se suministra, está diseñada para usarse
solo con madera. Cualquier otro uso o modificación del dispositivo se considerará como un uso
inadecuado y podría generar peligros considerables. No es adecuado para uso comercial
Función descriptiva
La numeración de las características de los productos se refiere a la ilustración de la máquina en la
página de gráficos.
Montaje / configuración de ajuste
ADVERTENCIA: Antes de trabajar en la herramienta eléctrica, retire siempre el enchufe de la
fuente de alimentación.
●
●
●
Ajustar la profundidad de corte,
1.
2.
Nota: si es posible, recomiende configurar la profundidad de corte aproximadamente 2 mm más
profundo que el grosor del material, esto debería ayudar a asegurar que logre un corte limpio.
Solicitud
La mini sierra de inmersión es versátil y le permite cortar muchos tipos diferentes de materiales.
Algunos de los materiales incluyen
●
●
●
Selección de cuchilla
MANTENIMIENTO
ADVERTENCIA: Desenchufe la herramienta antes de instalar o quitar accesorios, antes de
ajustar o al hacer reparaciones. Use solo jabón suave y un paño húmedo para limpiar la herramienta.
Nunca permita que ningún líquido ingrese a la herramienta; nunca sumerja ninguna parte de la
herramienta en un líquido.
IMPORTANTE: Para garantizar la SEGURIDAD y CONFIABILIDAD del producto, reparaciones,
mantenimiento y ajuste (que no sean los enumerados
en este manual) debe ser realizado por centros de servicio autorizados u otras organizaciones de
servicio calificadas, utilizando siempre piezas de repuesto idénticas.
Para iniciar la máquina
●Primero presione el botón de bloqueo (5) hacia atrás.
●
Luego presione el gatillo interruptor (4) y
manténgalo presionado.
●
Cuando corte la madera, coloque la máquina
sobre la pieza de trabajo y empújela a lo largo de
la madera.
Para apagar la maquina
●
Primero saque la máquina de la pieza de
trabajo.
●
Luego suelte el gatillo interruptor.
Nota: La luz láser puede causar daños oculares
graves. Nunca mire directamente al rayo láser.
No apunte el rayo láser a otras personas o
animales, ya sea directamente o a través de
superficies reflectantes.
La función láser de su sierra funciona con dos
baterías de botón LR44 de 1.5V (instaladas).
La función láser le muestra claramente una línea
de corte extendida, incluso sobre los escombros
en la pieza de trabajo.
Apague el interruptor láser.
Retire el tornillo de la cubierta del láser.
Levante la cubierta del láser de la parte superior del conjunto del láser,
Retire las dos baterías viejas (18).
Productos de madera como madera, madera dura, madera contrachapada, tableros de
composición y paneles.
plástico y metal blando.
azulejo y tablero
- 33 -
Technology Creates Power
5 4
Fig F FigG
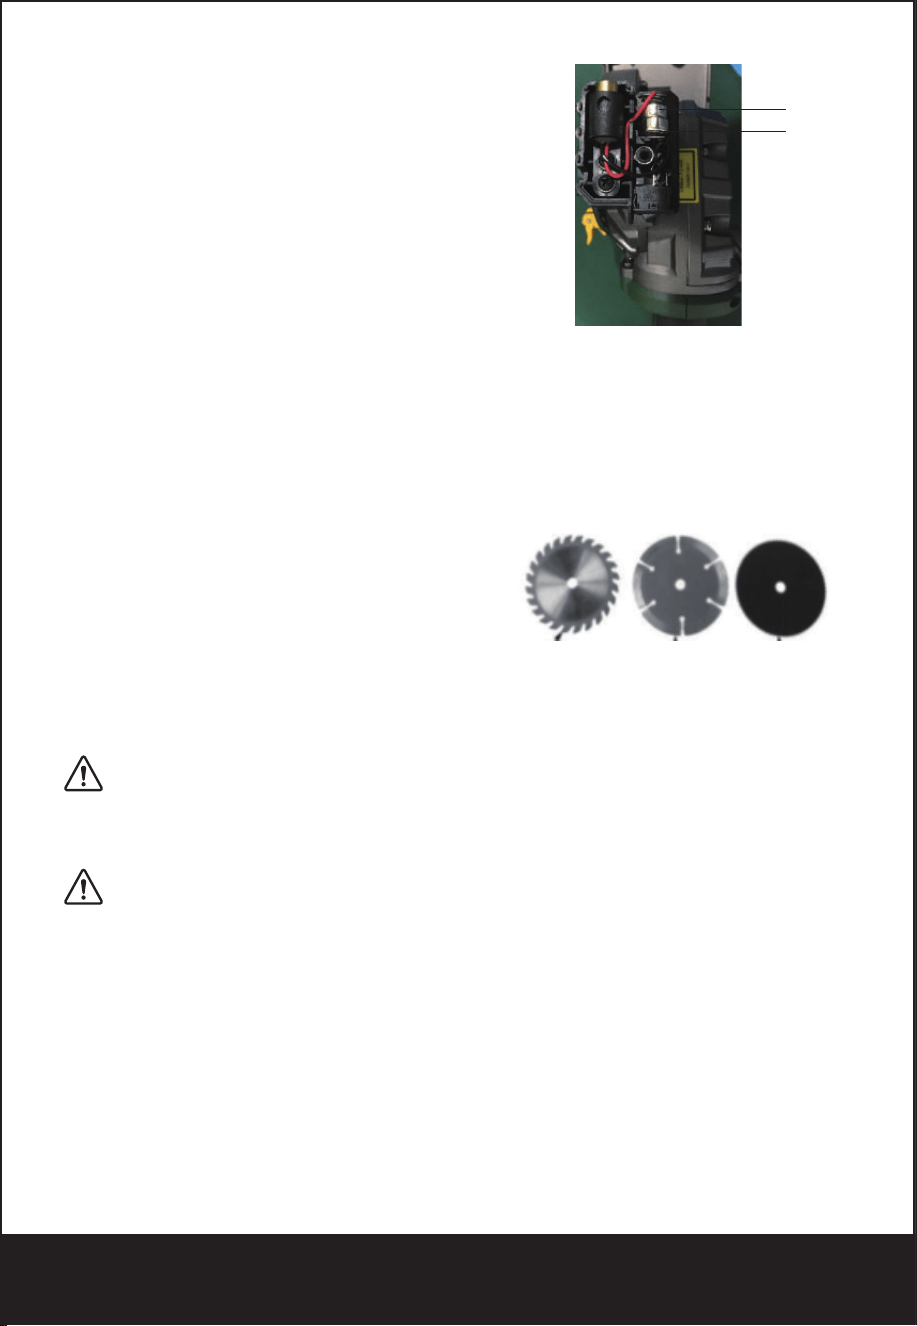
EN
FR
ES
Encendido y apagado
Nota: Por razones de seguridad, el interruptor de encendido / apagado no se puede bloquear; debe
permanecer presionado durante toda la operación.
Función Láser
●Enciéndalo con el interruptor de encendido / apagado de la luz láser justo antes de cortar.
●Apáguelo inmediatamente después del uso para conservar la vida útil de la batería y el láser.
CAMBIO DE LAS BATERÍAS LÁSER
Las baterías que operan el láser deberán reemplazarse después de un uso considerable del láser.
1.
2.
3.
4.
PELIGRO: Nunca permita que el rayo láser brille en los ojos de una persona, podría provocar
daños oculares graves. Asegúrese de que el interruptor del láser esté apagado y que el láser NO esté
apuntando hacia usted mientras reemplaza las baterías del láser y cuando verifica la función del
láser.
5)
Haga que un técnico calificado repare su herramienta eléctrica utilizando solo piezas de repuesto
idénticas. Esto asegurará que se mantenga la seguridad de la herramienta eléctrica.
PELIGRO: Mantenga las manos alejadas del área de corte y la cuchilla.
a)
b)
c)
d)
e)
f)
g)
h)
Causas y prevención del contragolpe del operador:
●
●
●
El contragolpe es el resultado del mal uso de la sierra y / o procedimientos o condiciones de
operación incorrectas y puede evitarse tomando las precauciones adecuadas como se indica a
continuación:
a)
b)
La etiqueta de su herramienta puede incluir los siguientes símbolos. Los símbolos y sus definiciones
son los siguientes:
Reglas de seguridad para luces láser
La luz láser / radiación láser utilizada en el sistema es de Clase 2 con longitudes de onda máximas
de 1 mW y 650 nm. Estos láseres normalmente no presentan un riesgo óptico, aunque mirar el rayo
puede causar ceguera instantánea.
ADVERTENCIA : No mire directamente al rayo láser.
Puede existir un peligro si observa deliberadamente la viga, observe todas las reglas de seguridad
de la siguiente manera;
●
●
●
●
●
f)
3)
a)
b)
c)
d)
e)
f)
g)
4)
a)
b)
c)
d)
e)
f)
g)
●
●
●
●
●
●
●
●
Cuanto menor es el número de calibre del cable, mayor es la capacidad del cable, es decir, el calibre
16 tiene más capacidad que el calibre 18. Un cable de menor tamaño provocará una caída en el
voltaje de la línea, lo que provocará pérdida de potencia y sobrecalentamiento. Cuando use más de
una extensión para completar la longitud total, asegúrese de que cada extensión individual contenga
al menos el tamaño mínimo de cable. La siguiente tabla muestra el tamaño correcto a utilizar según
la longitud del cable y la clasificación de amperaje de la placa de identificación. En caso de duda, use
el siguiente medidor más pesado. Cuanto más pequeño es el número de calibre, más pesado es el
cable.
DEFINICIONES: SÍMBOLOS Y PALABRAS DE ALERTA DE SEGURIDAD
Es importante que lea y comprenda este manual. La información que contiene se relaciona con la
protección de SU SEGURIDAD y la PREVENCIÓN DE PROBLEMAS. Los siguientes símbolos se
usan para ayudarlo a reconocer esta información.
AVISO: El uso sin el símbolo de alerta de seguridad indica una situación potencialmente peligrosa
que, si no se evita, puede provocar daños a la propiedad.
ADVERTENCIA: lea todas las advertencias de seguridad y todas las instrucciones.
El incumplimiento de las advertencias e instrucciones puede provocar descargas eléctricas, incendi-
os y / o lesiones graves.
GUARDE TODAS LAS ADVERTENCIAS E INSTRUCCIONES PARA FUTURAS REFERENCIAS
El término "herramienta eléctrica" en las advertencias se refiere a la herramienta eléctrica que funcio-
na con la red eléctrica (con cable) o la herramienta eléctrica que funciona con batería (sin cable).
1)
a)
b)
c)
2)
a)
b)
c)
d)
e)
c)
d)
e)
f)
g)
Instrucciones de seguridad de la protección inferior
a)
b)
c)
d)
Instrucciones de seguridad adicionales
●
●
●
●
●
●
●
●
●
●
ADVERTENCIA: Parte del polvo creado por el lijado eléctrico, el aserrado, el rectificado, la
perforación y otras actividades de construcción contienen productos químicos que en el estado de
California se sabe que causan cáncer, defectos de nacimiento u otros daños reproductivos. Algunos
ejemplos de estos químicos son:
●
El riesgo de estas exposiciones varía, según la frecuencia con la que realice este tipo de trabajo.
Para reducir su exposición a estos productos químicos: trabaje en un área bien ventilada y trabaje
con equipos de seguridad aprobados, como las máscaras antipolvo que están especialmente diseña-
das para filtrar partículas microscópicas.
ADVERTENCIA: SIEMPRE USE GAFAS DE SEGURIDAD. Los anteojos de uso diario NO
son lentes de seguridad. También use mascarilla facial o antipolvo si corta
●
ADVERTENCIA: Cortar plásticos, madera recubierta de savia y otros materiales puede hacer
que el material derretido se acumule en las puntas de la hoja y en el cuerpo de la hoja de sierra, lo
que aumenta el riesgo de sobrecalentamiento y atascamiento de la hoja durante el corte.
ADVERTENCIA: El uso de esta herramienta puede generar y / o desechar polvo, lo que puede
causar lesiones respiratorias u otras lesiones graves y permanentes. Siempre use protección respira-
toria aprobada por NIOSH / OSHA apropiada para la exposición al polvo. Dirija las partículas lejos de
la cara y el cuerpo. Siempre opere la herramienta en un área bien ventilada y permita la eliminación
adecuada del polvo. Utilice el sistema de recolección de polvo siempre que sea posible.
PRECAUCIÓN: El uso de controles o ajustes o la realización de procedimientos distintos a los
especificados en este documento pueden provocar una exposición peligrosa a la radiación
Uso previsto
Esta máquina está destinada principalmente al aserrado, longitudinal y transversalmente, de madera
maciza, aglomerado, madera contrachapada, aluminio, azulejos y piedra en una posición fija. Tenga
en cuenta que la hoja preinstalada en la sierra, tal como se suministra, está diseñada para usarse
solo con madera. Cualquier otro uso o modificación del dispositivo se considerará como un uso
inadecuado y podría generar peligros considerables. No es adecuado para uso comercial
Función descriptiva
La numeración de las características de los productos se refiere a la ilustración de la máquina en la
página de gráficos.
Montaje / configuración de ajuste
ADVERTENCIA: Antes de trabajar en la herramienta eléctrica, retire siempre el enchufe de la
fuente de alimentación.
●
●
●
Ajustar la profundidad de corte,
1.
2.
Nota: si es posible, recomiende configurar la profundidad de corte aproximadamente 2 mm más
profundo que el grosor del material, esto debería ayudar a asegurar que logre un corte limpio.
Solicitud
La mini sierra de inmersión es versátil y le permite cortar muchos tipos diferentes de materiales.
Algunos de los materiales incluyen
●
●
●
Selección de cuchilla
MANTENIMIENTO
ADVERTENCIA: Desenchufe la herramienta antes de instalar o quitar accesorios, antes de
ajustar o al hacer reparaciones. Use solo jabón suave y un paño húmedo para limpiar la herramienta.
Nunca permita que ningún líquido ingrese a la herramienta; nunca sumerja ninguna parte de la
herramienta en un líquido.
IMPORTANTE: Para garantizar la SEGURIDAD y CONFIABILIDAD del producto, reparaciones,
mantenimiento y ajuste (que no sean los enumerados
en este manual) debe ser realizado por centros de servicio autorizados u otras organizaciones de
servicio calificadas, utilizando siempre piezas de repuesto idénticas.
Hay tres hojas disponibles para esta sierra. Cada uno
es para cortar diferentes materiales. Seleccione la
cuchilla correcta para sus aplicaciones.
La hoja de sierra TCT de 24 dientes (a) es para cortar
madera, plástico y otros materiales blandos
La hoja de sierra HSS de 44 dientes (c) es para cortar
plástico y metal blando.
La cuchilla Diamand (b) es para cortar azulejos y
tableros.
5. Reemplace con dos baterías nuevas.
NOTAS
a) Use dos baterías de 1.5V LR 44
b) instale las baterías con el lado "+" (19) de las baterías
mirando hacia la parte posterior de la herramienta
6. Vuelva a instalar la cubierta del láser y fíjela con el
tornillo de la cubierta del láser.
Apague el interruptor láser.
Retire el tornillo de la cubierta del láser.
Levante la cubierta del láser de la parte superior del conjunto del láser,
Retire las dos baterías viejas (18).
18
19
Productos de madera como madera, madera dura, madera contrachapada, tableros de
composición y paneles.
plástico y metal blando.
azulejo y tablero
(a) (b) (c)
- 34 -
Technology Creates Power
EN
FR
ES
Solución de Problemas
Problema
L'unité ne démarrera pas
Cord no enchufado.
El fusible del circuito
está quemado.
Disyuntor se disparó
El cable o el interruptor
están dañados
Enchufe la herramienta en un
tomacorriente que funcione.
Causa posible Solución posible
Reemplace el fusible del circuito
(si el producto hace que el
fusible del circuito se queme
repetidamente, interrumpa el
uso inmediatamente y haga que
lo reparen en el centro de
servicio)
Reinicie el disyuntor (si el
producto hace que el disyuntor
se dispare repetidamente,
interrumpa el uso inmediata-
mente y haga que lo reparen en
el centro de servicio)
Haga reemplazar el cable o el
interruptor en el centro de
servicio
Protegiendo al medio ambiente
Colección separada. Este producto no debe desecharse con la basura doméstica normal.
Si algún día encuentra que su producto TECCPO necesita ser reemplazado, o si no le sirve
de nada, no lo deseche con la basura doméstica. Haga que este producto esté disponible
para una colección separada.
La recogida selectiva de productos y embalajes usados permite que los materiales sean
reciclados y utilizados nuevamente.
La reutilización de materiales reciclados ayuda a prevenir la contaminación ambiental y
reduce la demanda de materias primas.
Las regulaciones locales pueden prever la recolección por separado de productos eléctri-
cos del hogar, en los sitios de desechos municipales o por el minorista cuando compra un
producto nuevo.
- 35 -
Technology Creates Power
Este dispositivo cumple con la parte 15 de las normas de la FCC. El funcionamiento está
sujeto a las dos condiciones siguientes: (1) este dispositivo no puede causar interferencias
perjudiciales y (2) este dispositivo debe aceptar cualquier interferencia recibida, incluidas
las interferencias que puede causar una operación no deseada.

Warranty
Your Warranty Includes
30 Days Money Back Guaranty
30 Days to 3 Months(6 Months)
3 Months to 24 Months
Please be noted that accesories are free, not included.
How to Return Your TECCPO Products
Return Products Details
With in first 30days of your purchase, you are allowed to return your product for a full refund.
We will replace the defective unit due to manufacture fault with a new one.
(You will receive extra 3 months if you register on our website.)
To get your returns processed as quickly as possible, please fill this form and
include it in your return package.
–
If your product is purchased from Amazon Fulfilled channel, please contact
Amazon for return within 30 days of purchase.
Within 24 months, we will provide timely and effective online after-sales
service after your purchase.
–
–
–
Contact [email protected] with your order number.
We will issue you RMA# and return address for your return.
Please fill out RMA info, tear off this page and leave it inside your return pack-
age.We will issue replace/return after receiving your return.
Purchase Name
Order Number
Date of Purchase
Your Email Address
Where did you buy it
Technology Creates Power

www.teccpotools.com
Shenzhen Allsight E-business Co., Ltd
www.teccpotools.com
fb.me/teccpotools
INS: @teccpotools
ADD: Room 104, Building P09, South China City Electronic
Trading Center, Longgang District, Shenzhen, CHINA
Made in China