www.teccpotools.com
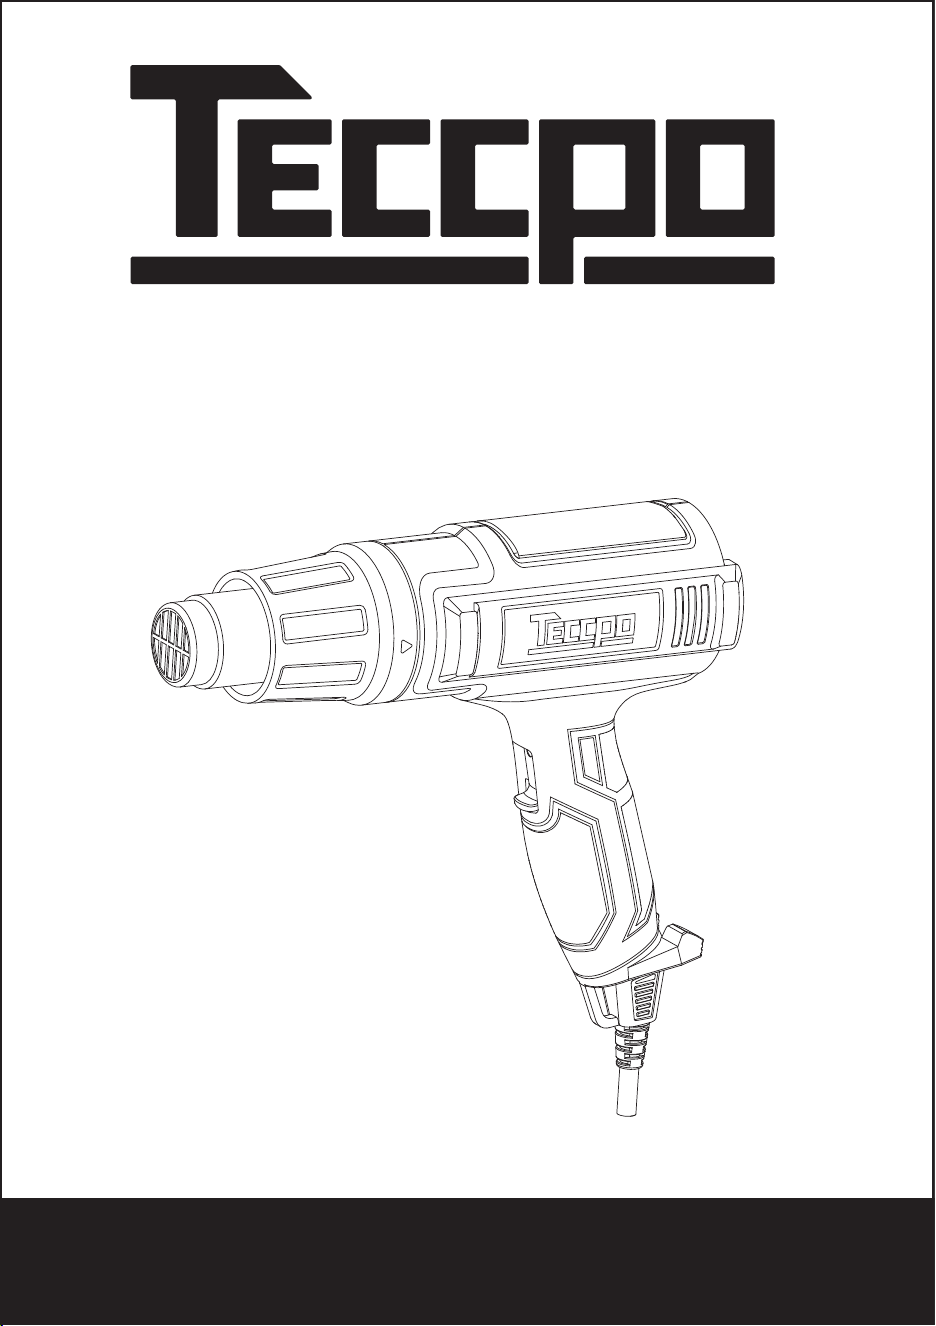
Heat Gun
TAHG07P
Technology Creates Power
TROUBLESHOOTING
Your Warranty Includes
30 Days Money Back Guaranty
30 Days to 3 Months(6 Months)
3 Months to 24 Months
Please be noted that accesories are free, not included.
How to Return Your TECCPO Products
Return Products Details
With in first 30days of your purchase, you are allowed to return your product for a full refund.
We will replace the defective unit due to manufacture fault with a new one.
(You will receive extra 3 months if you register on our website.)
To get your returns processed as quickly as possible, please fill this form and
include it in your return package.
– If your product is purchased from Amazon Fulfilled channel, please contact
Amazon for return within 30 days of purchase.
Within 24 months, we will provide timely and effective online after-sales service
after your purchase.
–
–
–
Contact [email protected] with your order number.
We will issue you RMA# and return address for your return.
Please fill out RMA info, tear off this page and leave it inside your return package.
We will issue replace/return after receiving your return.
Purchase Name
Order Number
Date of Purchase
Your Email Address
Where did you buy it

READ THESE INSTRUCTIONS
WARNING:Extreme care should be taken when stripping paint. The
peelings, residue and vapors of paint may contain lead, which is
poisonous. Any pre-1977 paint may contain lead and paint applied to
homes prior to 1950 is likely to contain lead. Once deposited on
surfaces, hand to mouth contact can result in the ingestion of lead.
Exposure to even low levels of lead can cause irreversible brain and
nervous system damage; young and unborn children are particularly
vulnerable.
Before beginning any paint removal process you should determine
whether the paint you are removing contains lead. This can be done
by your local health department or by a professional who uses a paint
analyzer to check the lead content of the paint to be removed. Lead
-based paint should only be removed by a professional and should
not be removed by using a heat gun.
Persons removing paint should follow these guidelines:
IMPORTANT SAFETY INSTRUCTIONS
Technology Creates Power
1
Indoors, keep the work area well ventilated. Open the windows
and put an exhaust fan in one of them. Be sure the fan is moving
the air from inside to outside.
Remove or cover any carpets, rugs, furniture, clothing, cooking
utensils and air ducts.
Place drop cloth in the work area to catch any paint chips or peel-
ings. Wear protective clothing such as extra work shirts, overalls
and hats.
Work in one room at a time. Furnishings should be removed or
placed in the center of the room and covered. Work areas should
be sealed off from the rest of the dwelling by sealing doorways
with drop cloths.
Children, pregnant or potentially pregnant women and nursing
mothers should not be present in the work area until the work is
done and all clean up is complete.
Wear a dust respirator mask or a dual filter (dust and fume) respi-
rator mask which has been approved by the Occupational Safety
1.
2.
3.
4.
5.
6.

A fire may result if the appliance is not used with care, therefore
If the supply cord is damaged, it must be replaced by manufacturer,
its service agent or similarity qualified persons in order to avoid a
Technology Creates Power
2
Be careful when using the appliance in places where there are
combustible materials;
Do not apply to the same place for long time;
Do not use in presence of an explosive atmosphere;
Be aware that heat may be conducted to combustible materials
that are out of sight;
Do not leave the appliance unattended when it is switched on.
-
-
-
-
-
7.
8.
9.
10.
11.
and Health Administration (OSHA), the National Institute of Safety
and Health (NIOSH), or the United States Bureau of Mines.
These masks and replaceable filters are readily available at major
hardware stores. Be sure the mask fits. Beards and facial hair
may keep masks from sealing properly. Change filters often.
DISPOSABLE PAPER MASKS ARE NOT ADEQUATE.
Use caution when operating the heat gun. Keep the heat gun
moving as excessive heat will generate fumes which can be
inhaled by the operator.
Keep food and drink out of the work area. Wash hands, arms and
face and rinse mouth before eating or drinking. Do not smoke or
chew gum or tobacco in the work area.
Clean up all removed paint and dust by wet mopping the floors.
Use a wet cloth to clean all walls, sills and any other surface
where paint or dust is clinging. DO NOT SWEEP, DRY DUST OR
VACUUM. Use a high phosphate detergent or trisodium phos-
phate (TSP) to wash and mop areas.
At the end of each work session put the paint chips and debris in
a double plastic bag, close it with tape or twist ties, and dispose of
properly.
Remove protective clothing and work shoes in the work area to
avoid carrying dust into the rest of the dwelling. Wash work
clothes separately. Wipe shoes off with a wet rag that is then
washed with the work clothes. Wash hair and body thoroughly
with soap and water.
hazard.
This appliance can be used by children aged from 8 years and above
and persons with reduced physical, sensory or mental capabilities or
lack of experience and knowledge if they have been given supervi-
sion or instruction concerning use of the appliance in a safe way and
understand the hazards involved.
Children shall not play with the appliance.
Cleaning and user maintenance shall not be made by children with-
out supervision.
Safety Rules
SAVE THESE INSTRUCTIONS
Technology Creates Power
3
WARNING: Non-observance of the safety rules while working
with the hot air tool can lead to fire, explosion, electric shock or
burns. Read the operating instructions before using the tool and
always observe the safely rules. Save these instructions and give
them to persons that have not been instructed before they use
the tool.
WARNING: A damaged casing or an opened unit can lead to a
hazardous electric shock. Do not open the unit and do not put a
damaged unit into operation. Do not drill into the casing, e.g. to
attach a company label. Before any work on the unit, pull the
mains plug.
WARNING: A damaged power cord can lead to a hazardous
electric shock. Check the power cord regularly. Do not operate
the unit when the power cord is damaged. Always have a dam-
aged cord replaced through a specialist. Do not wrap the cord
around the unit and protect it from oil, heat and sharp edges. Do
not carry the unit by the cord and do not use the cord to pull the
plug from the outlet.
WARNING: Do not work in rain or in a moist or wet environment.
This can lead to a hazardous electric shock. Keep the unit dry.
Store the unit in a dry location when not in use. Consider the
weather conditions. Do not work in wet sanitary facilities Avoid
body contact with grounded cables or surfaces, such as pipes,
Technology Creates Power
4
radiators, ranges and refrigerators.
WARNING: Connect power tools that are used in the open via a
residual current circuit breaker (RCCB).
WARNING: Danger of explosion! The hot air tool can explosively
ignite combustible fluids and gases. Do not work in a potentially
explosive environment. Check the surrounding before starting to
work. Do not work on fuels or gas containers or in their vicinity,
even when they are empty.
WARNING: Danger of fire! Heat can reach combustible materials
that are hidden behind coverings, in ceilings, floors or cavities,
and ignite them. Inspect the work area before starting to work
and in case of doubt, abstain from using the hot air tool. Do not
point the unit at the same spot for extended periods
WARNING: Danger of fire! An unsupervised operating hot air tool
can set fire to objects that are close by. The unit must be super-
vised at all limes during operation. When allowing the switched
off unit to cool down, always place it down vertical and standing.
Allow the unit to cool down completely.
WARNING: Danger of fire! When working plastics varnish or sim-
ilar materials, gases develop that are easily inflammable and can
lead to explosions. Be prepared for flames to develop and keep
suitable fire-extinguishing means at hand.
WARNING:Danger of intoxication! When working plastics,
varnish or similar materials, gases develop that can be aggres-
sive or toxic. Avoid breathing in vapours, even when they appear
to be harmless. Always provide for good ventilation of the work
area or wear a respirator.
WARNING:Danger of injury! The hot air jet can injure persons or
animals. Touching the hot tube of the heating element or the
nozzle leads to skin burns. Keep children and other persons away
from the unit. Do not touch the tube of the heating element or the
nozzle when they are hot. Do not use the unit as a hair dryer. It
develops much more heat than a hair dryer. Do not use the unit to
heat up fluids or to dry objects or materials that are destroyed
through the influence of hot air.
Technical Data
Technology Creates Power
5
WARNING:Unintentional starting or unexpected switching on of
the heating element after actuation of the thermal relay can lead to
injuries. Make sure that the switch is set to OFF when connecting
the unit to the mains supply. Switch the unit OFF when the thermal
relay has actuated
WARNING:Danger of injury! Using an air flow reflection nozzle
that is not suitable for your unit can lead to burns. Use only original
accessories for your model that are listed in these operating
instructions.
WARNING:Danger of injury and fire. The hot air tool is dangerous
for children. Keep the hot air tool out of the reach of children.
DANGER:Danger of lead overheating! Incorrect handing can lead
to an accumulation of heat and thus damage the unit. Do not oper-
ate the unit when it is placed down horizontally or when pointed
downward. The air –intake opening and the nozzle must not be
covered. Use only nozzles that are suitable for your unit.
Model
Voltage
Frequency
Power
Switch position
Temperature
Air flow
Protection class
(V)
(Hz)
(W)
℃
℉
L/min
TAHG07P
120V
60Hz
1500W
Ⅰ
50℃(Cool Down)
122℉
250L/min
Ⅱ
480℃
896℉
250L/min
Ⅲ
600℃
1112℉
500L/min
Ⅱ/ Double insulated
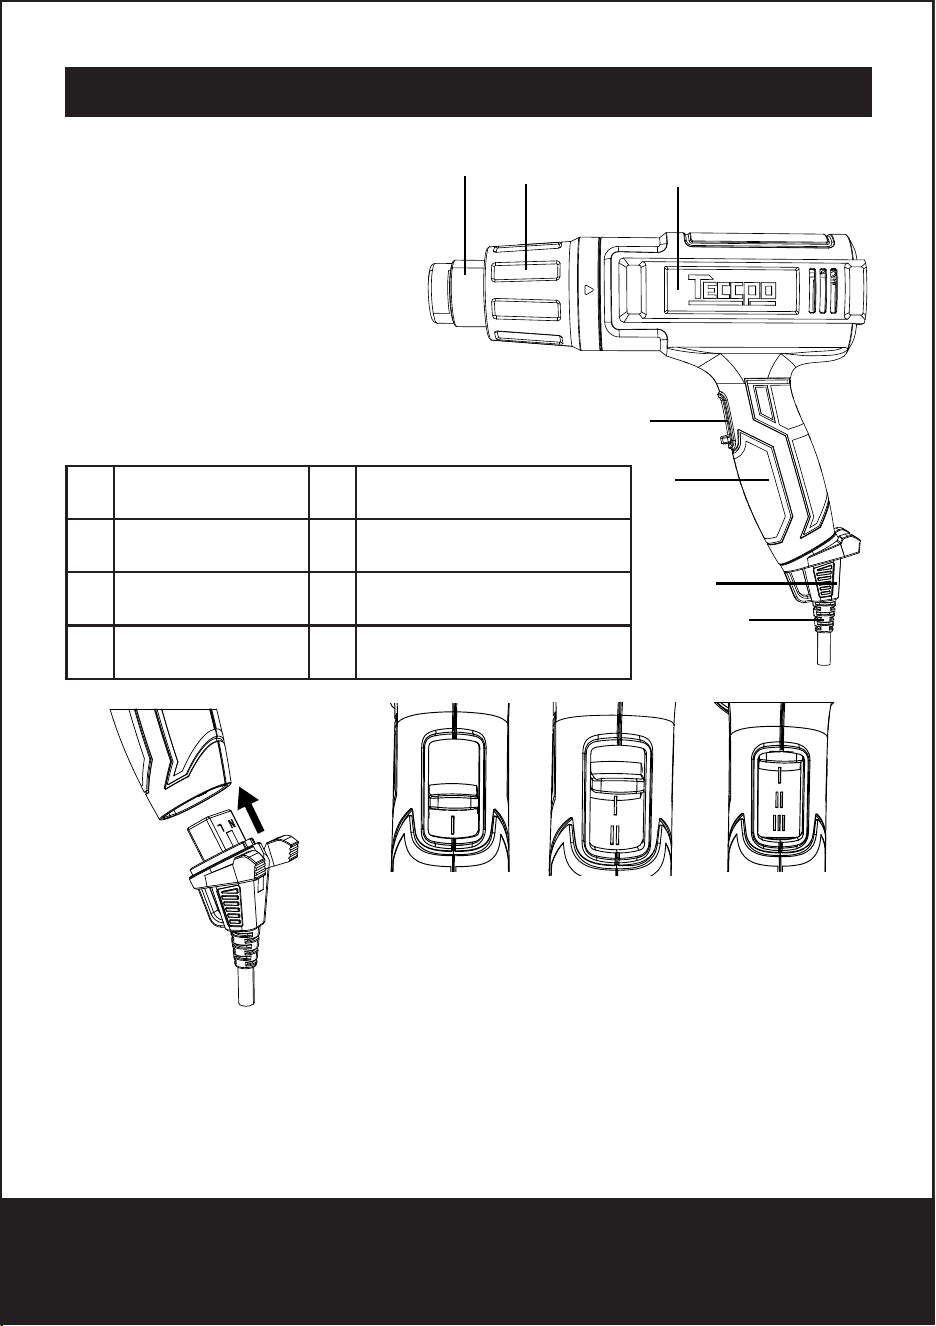
Fully insert the cord plug into heat gun handle.
NOTE: The power cord is not detachable, once insert do not try to detach it.
Note: Smoke may appear during the initial start up due to the burning of manufac-
turing oils. The smoke should disappear in less than a minute.
Component Description
Technology Creates Power
6
Mode selector switch
0 ( Power OFF)
Ⅰ (Cool Down 50℃ / 122℉)
Ⅱ (Low 480℃ / 896℉)
Ⅲ (High 600℃ / 1100℉)
1)
a)
b)
c)
d)
Rear stabilizer fins (stand)
2)
1
2
3
4
5
6
7
Barrel
Barrel cover
Housing
Switch ( 0 -I-II-III )
Handle
Plug clip
Coupler
1
2
3
4
5
6
7
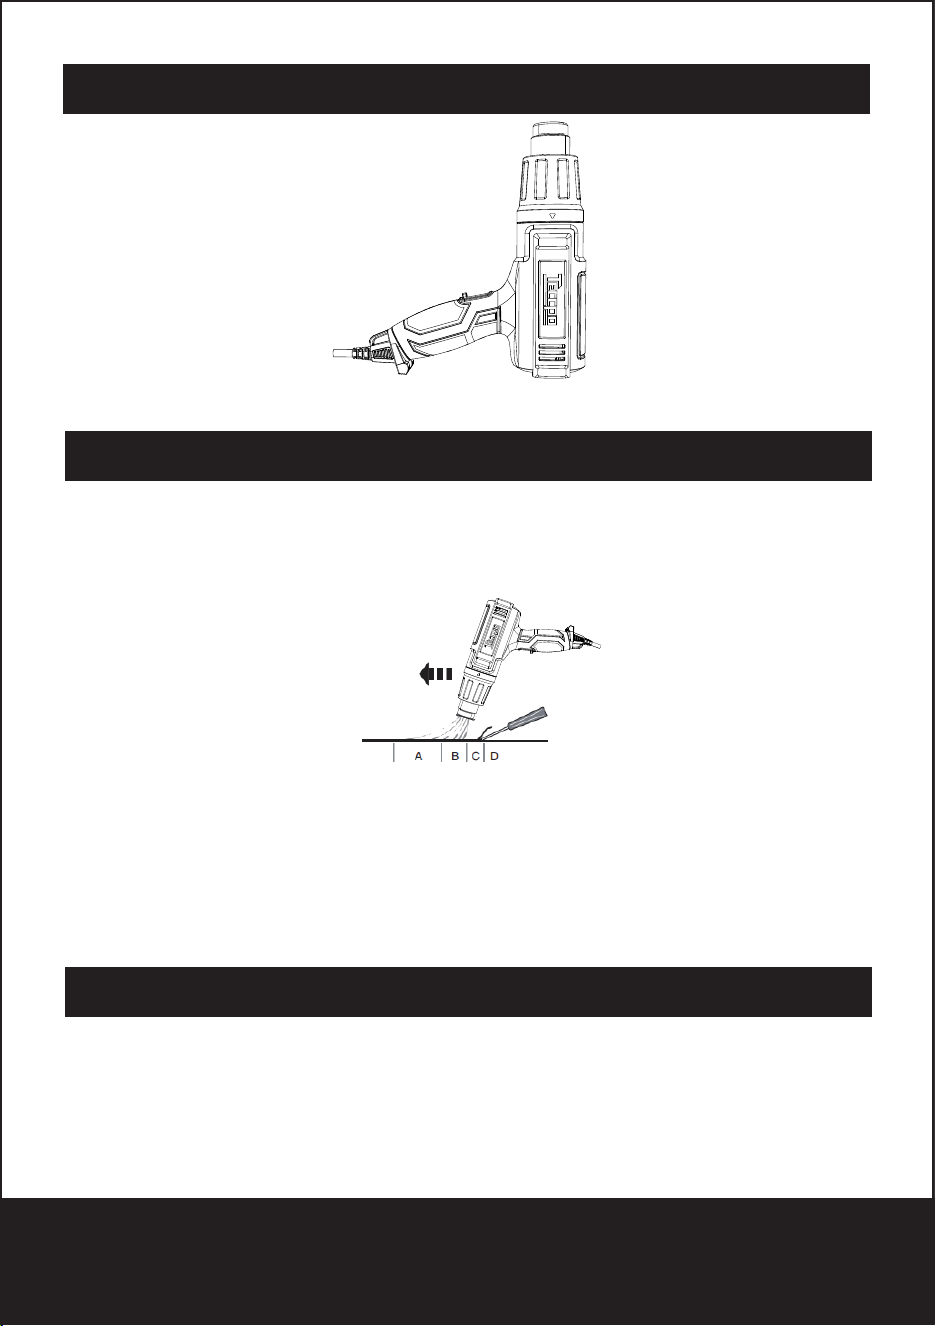
The Heat Gun has an integrated stand for bench top applications and cooling
down.
Move the Heat Gun slowly and steadily forward at an angle to the surface, pointing
the nozzle in the direction of motion. This allows you to scrape safely outside the
hot air stream and keeps the scraper and the scraped surface cooler.
The following accessories may come with the Heat Gun or be purchased.
Hands-free operation
The best method of paint removal
Accessories
Technology Creates Power
7
Warm air preheats the surface.
Paint is softened by hot air.
A + B. Deep penetration of heat over total area.
Paint can be easily scraped off as soon as it is softened and the gun is moved
forward.
Stripped surface allowed to cool.
A.
B.
C.
D.
TECCPO Heat Gun is one of the most versatile tools you can own. It can be used
for a great variety of projects, from big DIY to small Art & Crafts jobs.
Heating Guidelines
Technology Creates Power
8
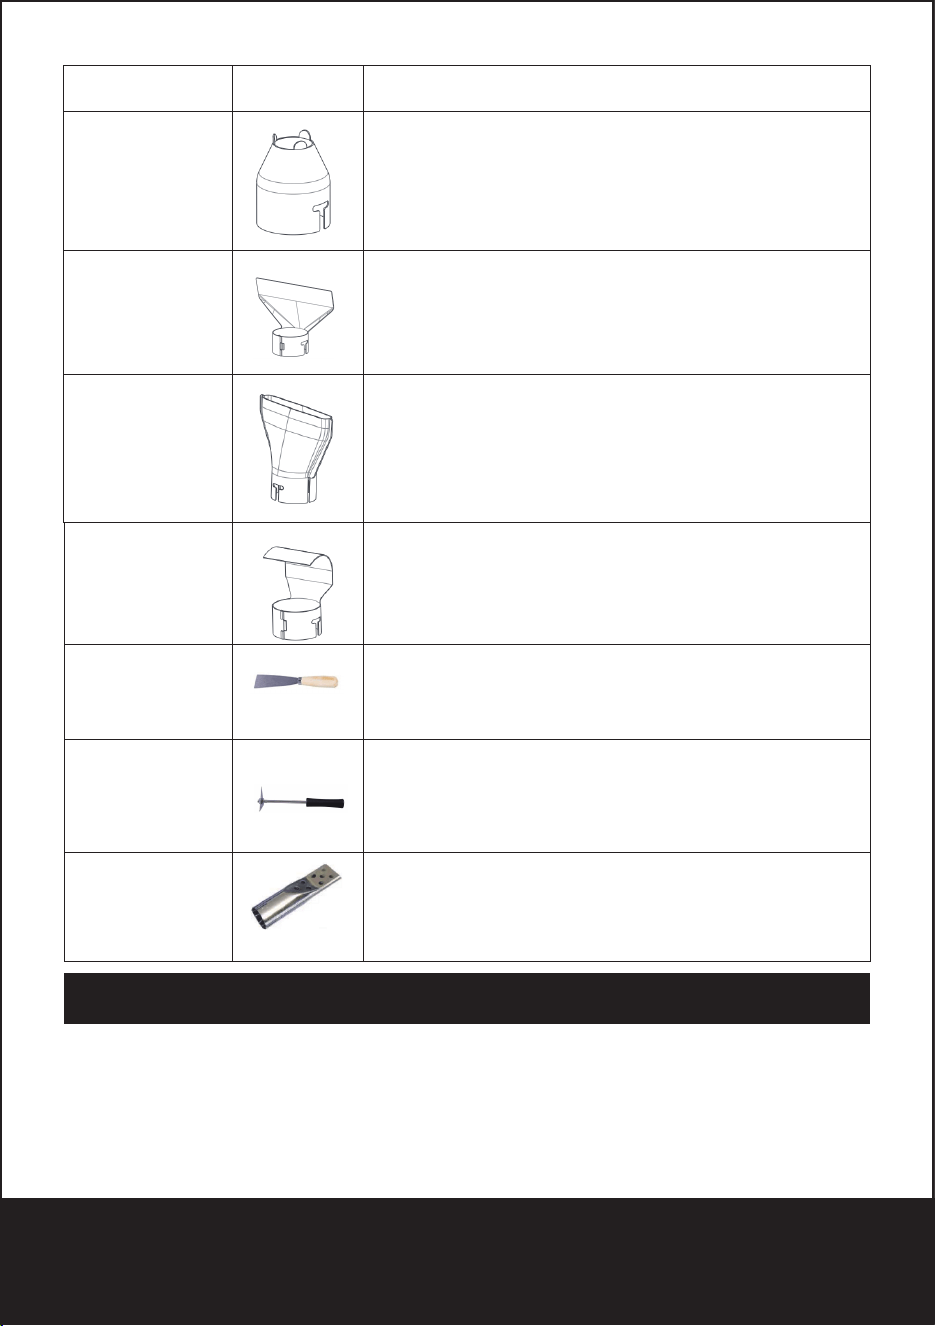
Description Photo Applications
Concentrator
Nozzle
Directs a concentrated heat flow to the work
surface. Ideal for removing paint in awkward
corners, crevices, mouldings, beading or archi-
traves.
Deflects the heat away from glass or other fragile
areas. Ideal for window sills, ledges, frames and
skirting boards.
Directs a long, narrow heat pattern to the work
surface. Ideal for removing paint or varnish from
large, flat surfaces such as skirting boards, doors,
stairs, etc. It should be used in conjunction with a
flat scraper.
Glass Protec-
tion Nozzle
Wide Concen-
trator Nozzle
Reflect o r
Nozzle
Disperses the heat flow evenly around the whole
work surface. Ideal for thawing frozen pipes,solder
pipe work, bending plastics or heat shrinking
electrical insulating tubing.
Stripping paint,varnish and removing vinyl tiles
Stripping paint and varnish from window sills.
Dry or lighting charcoal for BBQ and fireplace.
Scraper
Detailed scrap-
er
BBQ Nozzle

Technology Creates Power
9
Application Switch Setting Nozzle Tip Options
DIY
Stripping paint
Wall repair
Drying paint
Soften adhesives to
remove floor tiles
Bend plastic, plexi glass,
formica
Removing formica and
linoleum
Soften paint, caulking and putty
for easier removal (use heat
deflector)
Shrink plastic film for wrap-
ping or Weatherproofing
HIGH
LOW
LOW
LOW
LOW/HIGH
LOW
HIGH
LOW
Concentrator / Wide
Concentrator
Open
Open
Wide Concentrator
Reflector
Wide Concentrator
Concentrator /
Wide Concentrator
Wide concentrator
Autom-
otive
Electro-
nics
LOW
HIGH
HIGH
LOW
HIGH
LOW
LOW
Open
Open
Concentrator/Wide Con-
centrator
Open
Open
Concentrator
Concentrator
Removing dents
Removing paint
Applying and removing
window tint
Restoring bumpers
Smart phone & tablet
repair
PlayStation and Xbox
repair
Removing stickers,
emblems and decals

Technology Creates Power
10
Art &
Crafts
Small jobs
(including
repair)
LOW
LOW
LOW
LOW/HIGH
HIGH
LOW
HIGH
LOW
Open
Open
Open
Open
Open
Wide concentrator
Concentrator
Open
Making soap
Shrink wrapping presents
Forming foam
Cookie decoration
Loosen rusted nuts,
bolts and fittings
Repairing jeans
Burning weeds
Removing adhesives
Waxing skis/snowboard
Glass fibre work
Unfreezing pipes and
locks
Lighting a BBQ grill
Heat concrete prior to
patching
Defrosting refrigerator /
freezer
LOW
HIGH
LOW
HIGH
LOW/HIGH
LOW
Wide concentrator
Concentrator or
Wide Concentrator
Open
Concentrator /
BBQ Nozzle
Concentrator
Open
Do not dispose of electrical appliances as unsorted municipal waste, use
separate collection facilities.
Contact you local government for information regarding the collection systems
available.
If electrical appliances are disposed of in landfills or dumps, hazardous substances
can leak into the groundwater and get into the food chain, damaging your health
and well-being.
When replacing old appliances with new ones, the retailer is legally obligated to
take back your old appliance for disposals at least free of charge.
Advisable temperature setting and application
Meaning of crossed –out wheeled dustbin:
Technology Creates Power
11
Removing varnish/ softening adhesives
Shaping plastic tubing
HDPE
PVC
PP
LDPE
ABS
Note: Temperature can be varied according the shape.
Shrinking
Defrosting water pipes
Metal
PVC(hard)
IMPORTANT: Before heating pipes, check to make sure that it is actually a water pipe.
450 / 842
300 / 572
300 / 572
260 / 500
250 / 482
350 / 662
300 / 572
550 / 1022
300 / 572
Applications Temperature setting℃/℉

Shenzhen Allsight E-business Co., Ltd
Website: www.teccpotools.com
E-mail: [email protected]
ADD: Room 104, Building P09, South China City Electronic
Trading Center, Longgang District, Shenzhen, CHINA
Made in China
www.teccpotools.com