1. Overview
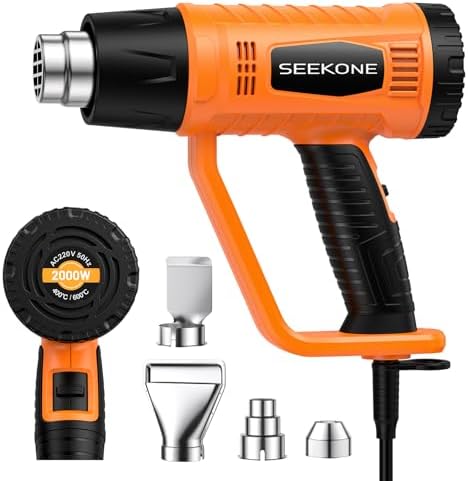
The SEEKONE 2000W Heat Gun is a professional-grade hot air tool designed for a variety of applications including paint stripping, shrinking PVC and heat shrink tubing, loosening adhesives, and craft projects. It features dual-temperature settings and includes four specialized nozzles.

Included in the Kit:
- 1 x 2000W Heat Gun
- 4 x Nozzles (Deflector, Large Concentrator, Small Concentrator, Reflector)
- 1 x User Manual
2. Product Features & Components
2.1 Main Unit
- Body Material: ABS engineering plastic. Hard, impact-resistant, heat-resistant, scratch-resistant, moisture-resistant, and corrosion-resistant.
- Motor: 2000W full copper motor for high efficiency and low noise operation.
- Heating Element: Ceramic heating element with a service life of up to 500 hours. Provides high heating efficiency and good stability.
- Power Source: AC, 220V.
- Cable: Features an anti-break rubber cable sleeve for increased durability.
2.2 Temperature Control & Airflow
- Dual-Temperature Switch: Located on the back of the handle.
- Mode I (Low): 400°C, 250L/min airflow.
- Mode II (High): 600°C, 500L/min airflow.
2.3 Safety & Ergonomics
- Flame Retardant Protective Cover: A black ring around the front muzzle protects the user from high temperatures during prolonged use.
- Ring Handle: Helps prevent splashes from contacting the user's hand.
- Main Handle: Wrapped with TPE rubber for a non-slip, comfortable, and labor-saving grip. The material is non-toxic.
- Overload Protection: Built-in circuit protection helps prevent short circuits.
2.4 Nozzles
Each nozzle directs heat for specific tasks. Attach by sliding onto the front of the gun until it clicks securely.
- Deflector Nozzle: Directs a narrow heat pattern to the work surface.
- Concentrator Nozzles (Large & Small): Direct a concentrated heat flow to a small area.
- Reflector Nozzle: Evenly disperses heat flow around the entire work surface.

3. Safety Instructions
- Read all instructions before use.
- Use only with a 220V AC power supply.
- Ensure the work area is clean, dry, and free from flammable materials, liquids, or gases.
- Always wear appropriate personal protective equipment (PPE): heat-resistant gloves and safety glasses.
- Never leave the tool unattended while it is plugged in or hot.
- Keep the air intake and exhaust vents unobstructed.
- Allow the gun to cool completely before handling or storing.
- Do not use the tool in wet or damp conditions.
- Do not touch the metal nozzle or front section during or immediately after use.
- This tool is not a hair dryer. Do not use on people, animals, or hair.
- Keep the tool out of reach of children.
4. Use Guide
4.1 Initial Setup
- Unpack all components and inspect for damage.
- Select the appropriate nozzle for your task and attach it to the front of the heat gun.
- Ensure the temperature switch on the handle is in the "0" (off) position.
- Plug the power cord into a suitable 220V outlet.
4.2 Basic Operation
- Hold the tool firmly by the insulated handle.
- Point the nozzle away from yourself, other people, and any flammable objects.
- Flip the temperature switch to the desired setting:
- I (Low): For delicate tasks like shrinking thin tubing, crafts, or working with electronics.
- II (High): For heavy-duty tasks like stripping paint, loosening bolts, or shrinking thick PVC.
- The tool will begin to heat up and blow hot air within seconds.
- Keep the nozzle moving continuously over the work surface to avoid concentrating heat in one spot, which can cause damage or fire.
- After use, flip the switch back to "0". Unplug the tool and place it on a heat-resistant surface to cool.

4.3 Common Applications
- Shrinking Heat Shrink Tubing: Use low heat (Mode I). Keep the nozzle moving 2-3 inches from the tubing until it shrinks uniformly.
- Stripping Paint/Varnish: Use high heat (Mode II). Soften the paint, then scrape it away with a putty knife. Ensure proper ventilation.
- Loosening Adhesives/Rusty Bolts: Apply concentrated heat (using a concentrator nozzle) to the adhesive or bolt to soften or expand the material.
- Shaping PVC/Plastic: Apply even heat (using the reflector nozzle) to make the material pliable for bending or shaping.
- Craft Projects (e.g., Vinyl Wrapping, Embossing): Use low heat (Mode I) and keep the tool moving to avoid burning the material.
5. Care & Maintenance
- Always allow the tool to cool completely before cleaning or storing.
- Wipe the exterior with a dry, soft cloth. Do not use water or solvents.
- Ensure the air intake vents at the rear of the gun are free from dust and debris. Use compressed air to clean if necessary.
- Check the power cord regularly for damage. Do not use if the cord is frayed or damaged.
- Store the tool and all accessories in a dry, cool place out of direct sunlight.
6. Troubleshooting
- Tool does not turn on: Check that the power outlet is working. Ensure the cord is fully plugged in. Check for tripped circuit breakers.
- No heat/low heat output: Ensure the temperature switch is fully engaged in position I or II. Check that the air vents are not blocked.
- Overheating or unusual smell: Turn off and unplug immediately. Allow to cool. Check for blockages in the air intake or exhaust. Do not use if the problem persists.
- Motor noise is excessive: This may indicate a blockage or a failing motor. Discontinue use and inspect air vents.
7. Technical Specifications
- Model: HG886 / Part Number: SDL-899
- Power: 2000W
- Voltage: 220V AC
- Temperature Settings: Dual-mode: 400°C (Mode I), 600°C (Mode II)
- Airflow: 250 L/min (Mode I), 500 L/min (Mode II)
- Body Material: ABS Engineering Plastic & Stainless Steel components
- Heating Element: Ceramic
- Cable: With anti-break rubber sleeve
- Net Weight: 575 g
- Package Dimensions: 23 x 21.8 x 7.7 cm
8. Warranty & Support
The manufacturer provides ongoing technical support for the life of the device. For specific warranty terms, contact information, or to report an issue, please refer to the documentation provided with your purchase or the seller's website.
Note: This manual is based on the product information available at the time of writing. Specifications are subject to change without notice.