
HEATER
INFRARED QUARTZ
EP23761

TABLE OF CONTENTS
Package Contents ............................................................... 3
Safe Info「mat1on .............................................................. 4
F「e
q
uentl
y
Asked Questio『15 ....• ...... •....... •....... .......• .......• ..... 6
Pre
p
arati口 .................................................................... 8
Troubleshooting ................................................................ 8
Control Panel . . . . . . . • . . . . . . . • . . . . . . • . . . . . . . • . . . . . . . . . . . . . . • . . . . . . . • . .... 9
O
p
erating Instructions .......................................................... 11
Ca and Maintenance ......•.••........•..•.....•......•.•......•.....•..•..... 12
One-Year Limited Warrant
y
. . . . . . . . . . . . . . . . . . . . . . . . . . . . . . . . . . . . . . . . ... 14
Re
p
lacement Pa「ts List ......................................................... 15
REPLACEMENT PARTS LIST
For replacement pa「ts, call ou「technical sup po「t department at 657-341-0362,’:00 a.m. - 5
p
.m., PST,
Monday - Friday
RT
DESCRIPTION
PART#
A Control Panel I Powe「Boa「d 01.01.647
B DC Fan 04.03.8.255
c
Manual Reset Switch
04.03.8.271
D Limit Switch 04.03.8.270
E Infra red tu be 04.03.8.2 49
F
Tem
p
Sens口r
04.01.8.311
G Master Switch
04.04.01 .003
。 。 @
ι
I
@ 。
口
。
ONE-YEAR LIMITED WARRANTY
The manufactl』「E「wa「rants this heater against defects in mate「ials andwo「k『nanship on functional pas,
「 a pe「iod of 1 year from the original date of pu「chase. You「 sales 「eceipt showing the date of purchase of
the pduct is your proof of purchase. Keep it in a safe place fo「 future陀ference. This warranty is subject
to personal use only, commercial o「 rental applications will not be cove「ed.
This product is made with the highest quality mate「ialsand is warranted to be free from defects in materials
and workmanship at the time口f pu陀hase. This Limited wa「ranty
ap
.
�
lies to pducts manufactured口「
distributed by the 『nanuctu同「,司罔delivered in the continental United States o「Canada and extends
to the o「iginal purchaser,。r gi recipient. This warranty becomes valid at the time of purchase and
te「minates eithe「 by the specified time frame listed above and/o「ne「 transfe Any refunds 口「
moneta「y compensations must be claimed through the place of puπhase l罔 taile叶, and not through
the manufacture Any extended warr百nties (warr百nties that cove「 above and beyond this manufacture「
warranty) that a「e sold through a retaile「 or thi「甘
a同y, are not direly correlated with this products
’
limited warranty, and may be 「哩directed to said retaile「0「 thi叫pa时y for coverage.
This wa「ranty extends through the manufacturer of the pduct, and cove「s functional pa同s only.
Cosmetics a「e not cove「时,unlessunequivocally determined it is a wo「kmanship defe. Shipping damage
should be addressed with the shipping company, retaile「, or place of pu陀hase, not the manufacture「
unless the manufacture「was the direct shippe
The manufactu「er
’
s sole obligati口n unde「 thiswa「ranty shall be Limited t口 furnishing the o「iginalpurchase「
陀placement pas fo「 units deemed repairable by the supplie「
’
s wa「「anty depa「tment. The pu陀hase「
is responsible for insuring any pa时s shipped or 「eturned, if desid. The puhase「 issponsible to
p陀pay any shipping chaes (both ways) including, but not Limited to taxes and duties. All exchanged pa「ts
and products陀placed unde「 thiswa「ranty will become the propey of manufacturer. The manufacture「
陀sees the right to change manufacturers of replacement pas or products for use, in o「der to cover
any existing wa「ranty.
The purchase「 may be asked to provide the supplier with proof of pu「chase documents (including the date
of purchase) if requested. Any evidence of alteration, erasing,。「 fo『-ge of proof of purchase documents
will be just cause to VOID this limited wa「ranty. Pducts, in which the se「ial numbe「has been defaced o「
removed are not eligible fo「warranty coverage.
This wa「「anty does not apply if the unit has been subject to ne日ligence, fabrication, misuse, abuse, o「
repairs, alteration by non-manufacturer autho「ized personnel, inappp「iate installations,口「 any case
beyond the c口ntrol of the manufacturer. Examples of wa「ranty invalidation may also include, but a not
limited to:
• Use of lacquer o「 paints in (and around) the heaters
• Heater placed on non-approved suaces
• Electrical requi陀ment deficiencies (15-20 amp dedicated outlet)
• Use on extension co「由/time「-s/su咽e ptecto「百/GFCI
• Outdoor applications
• No「malwea「tea「weathering
• Pet/consume「 accidents
The manufacturer shall not be liable for any loss due to use (or misuse) of the heate「口r othe「incidental
or consequential costs, expense o「 damages without i「「efutable foundations. Under no ci「cumstances
shall the manufactl』「er o「 any of its 陀P陀sentatives be held Liable for injury to any person or damage to
any ppe「ty, however a「ising. Any implied wa「ranty shall have duration equal of the applicable wa「ranty
stated above. Specifications are subject to change without notice o「 obligation.
This limited wa『·ranty gives the o「iginal purchase「 specific legal 「ights. Othe「 「ights may va from state
to state.
14
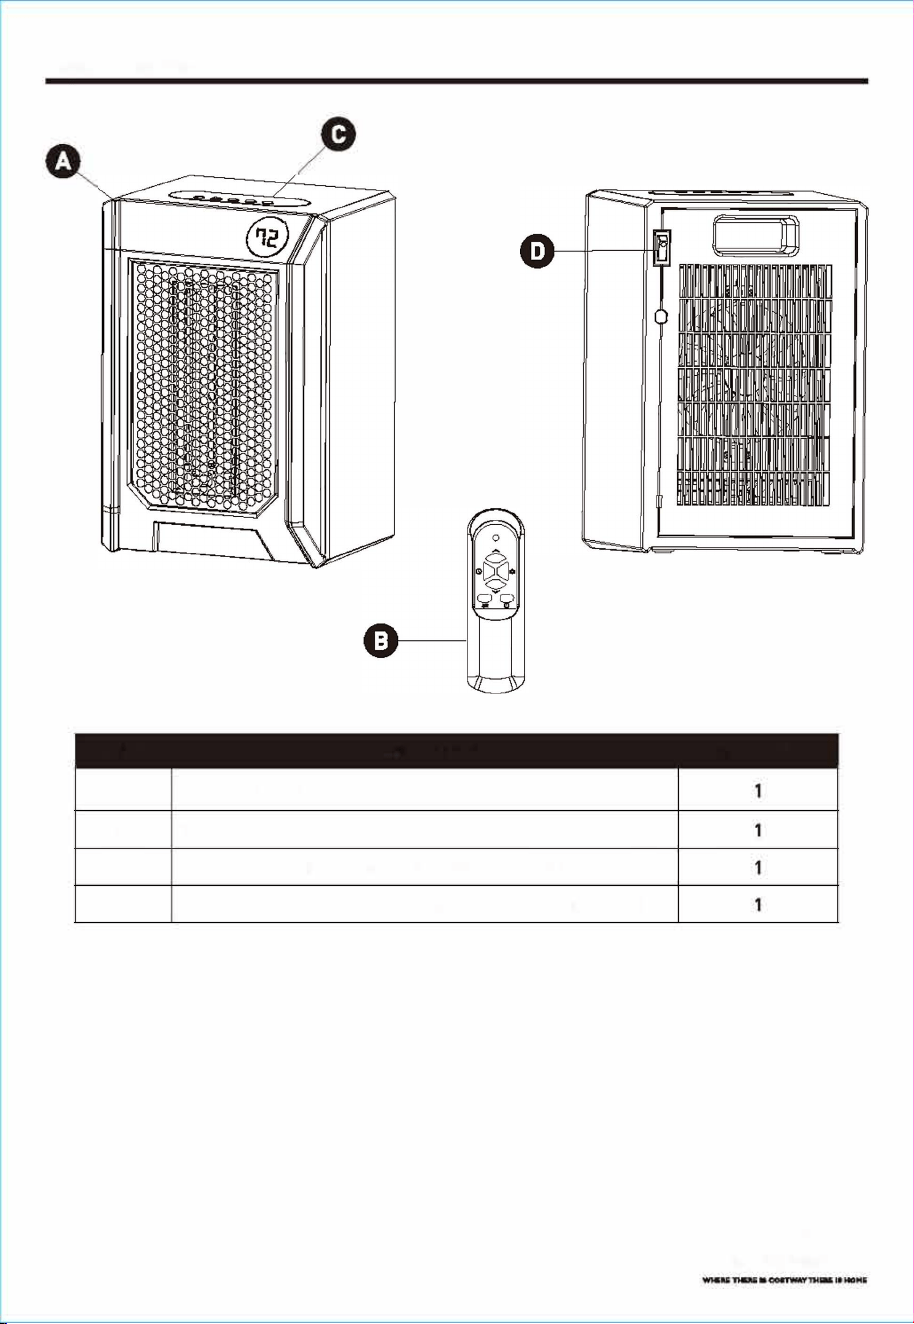
PACGE CONTENTS
PART DESCRIPTION QUANTI
A
Infrared Heater
B
Remote Control
c Control Panel (p「eassembled to Infrad Heater队II
D
Master Power Switch (preassembled to Infra「ed Heate「(A))

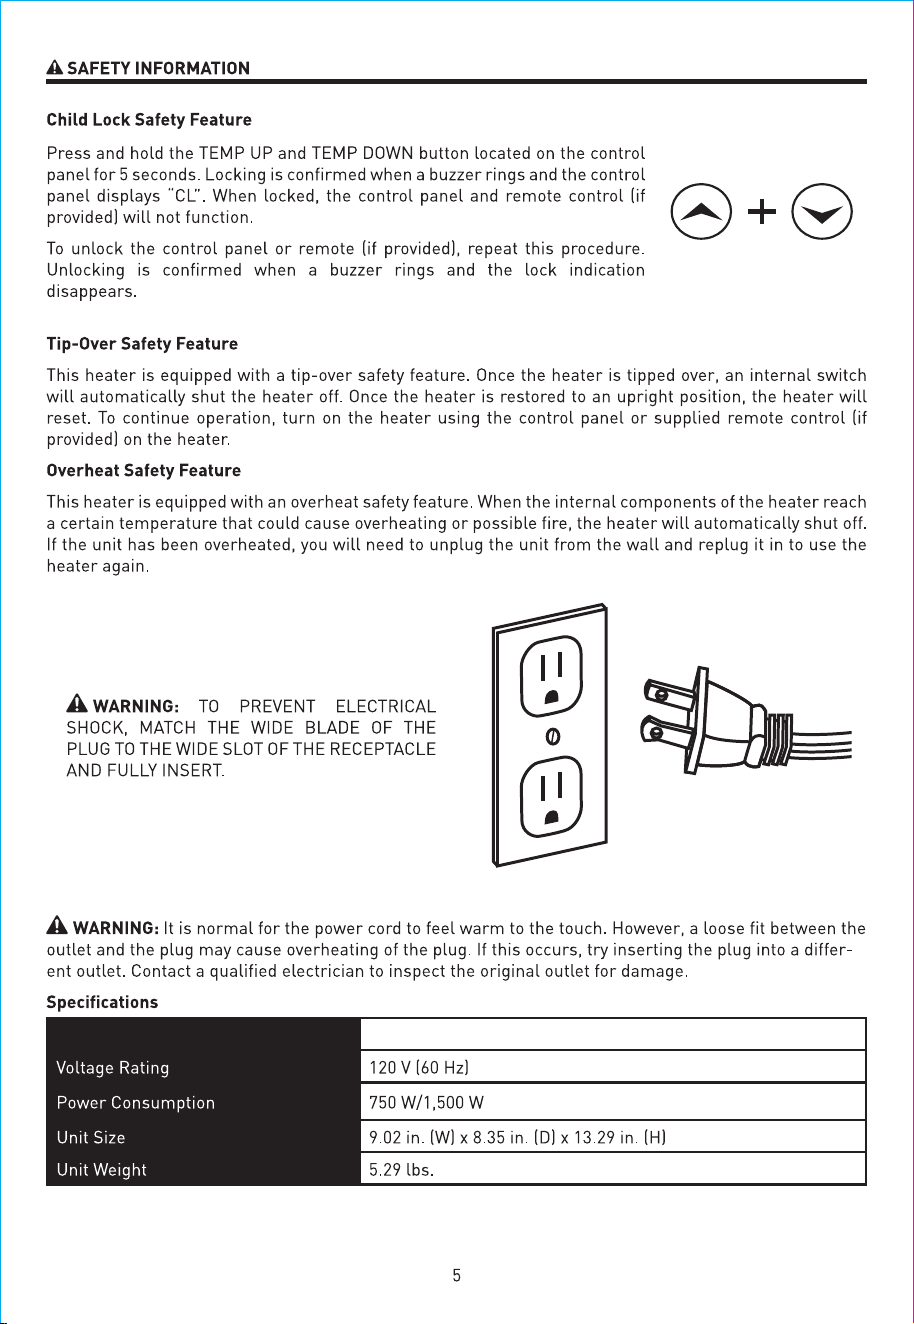
A SAFETY INFORMION
Pl臼se ad and unde陌tandthis enti manual befo aempting to aemble, opete,。「inall the pduct.
IMPORTANT SAFETY INSTRUCTIONS
A WARNING: POTENTIAL ELECTRICAL HAZARD IF NOT ADHERED TO. When using electrical appliances,
basic precautions should always be followed to duce the 「i sk of fi『哩,elect「ic shock, and inju to persons,
including the following:
•
This heate「must be plugged into a 120 V, 15 amp (or more) circuit of its own. D口 not plug anything else
into the same ci陀uit. If unsure if you「 home meets this specification, consult a certified electrician
prio「 to use. Risk of 饵”’overheating, malfunion, ppe damage, inju, or even death may
sult if not adhered to!
•
Connect to a properly grounded, 3-prong outlet only. Do not connect the heate「to extension cords,
SU咱e protecto『·s, time『盲,direct breake「S,。「an outlet with other appliances connected t口 the same
outlet. Risk of 缸”, overheating, malfunction, propey damage, inju, or even d回th may result if
not adhed to!
•
This heate「is hot when in use. Tavoid burns, do not let bare skin touch h口t SU「faces. Use handles
(certain models) 0「wheels to move this heate
•
Keep combustible materials, such as furnitu
,
pillows, bedding, pape, clothes, and curtains at least
3 ft. (0. 9 ml from the front of the heate「and keep them away from the sides and r回「口f the heater.
•
Extme caution is necessary when any heate「is used by or nea「child陀, invalids, pets, or when the
heate「is left operating unattended.
•
Always unplug the heate「when not in use.
•
Do not opete any heate「with a damaged c口时0「plug or aer the heate「malfunctions, has been
dropped, or damaged in any manne Contact the manufacture「 for resolution options.
•
Do not use outdoors. Exposure to outdoor elements such as rain, snow, sun, wind, o「 extreme
temperatures may cause the heater to become a safety hazard.
•
This heater is not intended for use in bathrooms, laundry areas, and simila「indoo「locations, no「any
locatios that use GFCI outlets.
•
Neve「place the heate「where it may fall into a bathtub o「other wate「「ceptades.
•
Do not run the co时under ca「pet. Do not cover the cord with throw rugs, runners,。r similar cove「ings.
A「「ange the co『甘away fm traffic a陀as and where it will not be tripped over.
•
The heater must be plugged into a wall outlet that is a dedicated circuit with a minimum 15 amp rating
on that individual ciuit.
•
Tdisconnect the heate「,first turn the powe「 button to the OFF position and then remove the plug
from the wall outlet.
•
Do not allow foreign objects to ente「or block any ventilation or exhaust opening as this may cause
elect「ic shock, fire
,
。「damage the heater.
•
Allow at least 3 . of unobstructed space to the front and rear 口f the heate「to allow fo「maximum heat,
air, and ventilation flow.
•
A heate「has hot and arci9 0「spa「king pa同s inside. Do n口t use it in areas where gasoline, paint,口r
flammable liquids are used o「stored, nor use flammable solvents to clean the heater. Keep the heater
d at all times.
•
Use this heate「on as desc「ibed in this manual. Any othe「use not recommended by the manufactu陀r
may cause fire, elect「ic shock,。「i时u to pe「sons.
•
Do not use abrasive solvents to clean the heater as it may cause damage to the finish or casing.
•
T prevent a po臼ible fi陀, do not block ai「 intakes o「 exhaust in any manne Do not use on so
SU「faces, like a bed, where opening may become blocked.
•
Aays plug heaters directly into a wall outlet/「eceptacle. Neve「 use with an extension cord or
relocatable power tap (outlet/powe「st「ip].
SAVE THESE INSTRUCTIONS
4
CARE AND MAINTENANCE
A WARNING: Befo「e pe忖D「ming any「nain巾a『ice task
’
turn o忏the power switch in the rea「of the unit,
unplug the unit, and allow it to cool completely.
1.
To keep the heate「clean, clean the outer shell with a soft, damp cloth. Use a mild dete叼ent if
necessary. Aer cleaning, d the unit with a so cloth.
CAUTION: DO NOT let liquid enter the heater.
2.
DO NOT use alcohol, gasoline, abrasive powde, furnitu「e polish, o「ugh brushes to clean the
heate This may cause damage o「dete「iorati口n to the S「face of the heate
3. DO NOT imerse the heater in wate
4.
Wait until the unit is completely d before use.
5. If you will not be using the heate「 fo「a while, take the batte「ies out of the remote control and sto同
fo「future use.
6.
Stothe heate「in a cool, d町location when not in use. To p陀vent dust and di build-up, use the
O「iginal packaging to repack the unit.
Factory No HT1195
FREQUENTLY KED QUESTIONS
Please review these fquent asked questions on the next few pages p「ior to using you「 heater.
。. My heater emits a stnge odor when I fit open the box and when I turn the heater on for the t
time. Why is this happeing?
A. This is no「mal. This heater is treated with a special heat safe/resistant coating. This odo「 will sometimes
be present when the box is opened. When the coating is exposed to heat, it produces this particular odo「
during the first few hours of operati口n. This will dissipate a阮e「the break-in period. If you a「e sensitive to
odors, you may want to p陀-burn the unit in a garage with the doo「 open until the initial odo「 dissipates.
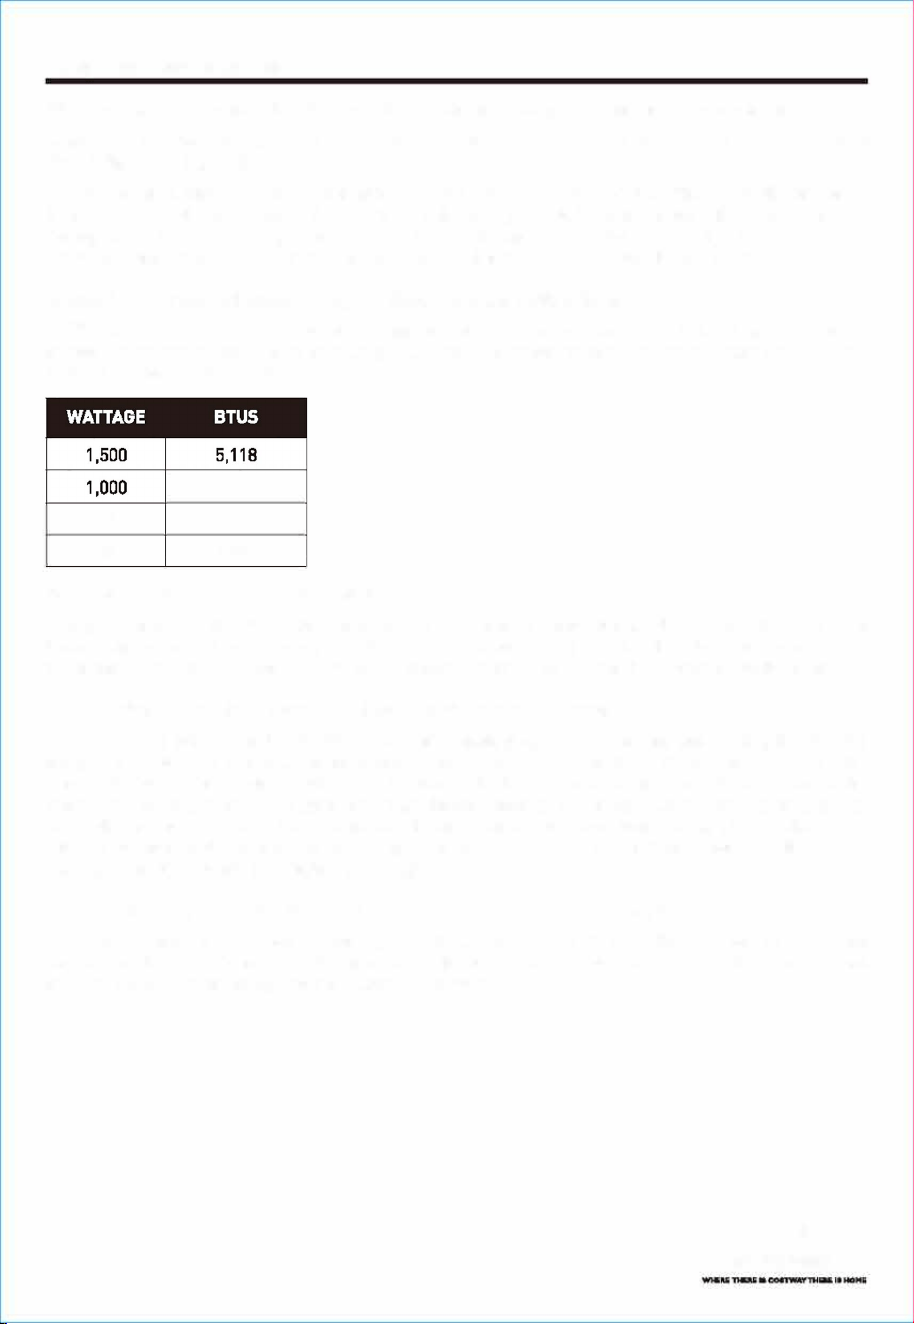
。.If my heater runs on its max wattage sing, how many BTUs is that?
A. This heater is intended to be used as supplemental heat in a「eas most needed. It may take several
minutes to several hou陌 to heat you「 area, depending on va「ious facto陌. The below cha『t provides BTU
translations fo「different wattages.
750
500
3,412
2,559
1,706
。.Can the heating elemen be placed?
A. Replacement heating elements can be obtained from the manufacture All pas may be puπhased
through the manufact\』陀「if your product is out of wa「ran. If you feel that the elements are definitely
ulty 「ight 口ut of the b口x, contact Custome「Supp口时Arepresentative can then direct you t口 the next step.
。. Once I plug the unit in and turn it on, hlong will it take to heat my om?
A. The heating process in the heate「 begins immediately upon powe「ing on and setting the desired
tempe「atu陀above the ambient temperature. A noticeable change in the ambient temperatu。f the
room will va due to va「iables such as the location of the heater (in the home], floor plan and size of the
room, how well the room is insulated, how many doors/windows, how much bare cone阿te (acts as a heat
sink with any type
of heating I, the opening and closing of an exteri口「door, long hallways, high ceilings, etc.
Customers with smalle「oms experience quick heat changes. Ro口ms with lae「and open flo口「plans
can expect up t口24 h口urs to completely heat up.
。.I do not have a grounded outlet. can I use adapters, a 2-prong power strip?
A. NO! If you do not have a grounded outlet, contact a ce「tified electrician fo「advice. Removing o「alte「ing
any pa of the heater"s original design o「 intent (including the powe「 cord] will void the war「anty and
make you liable fo「 any unexpected or hazardous results.
6
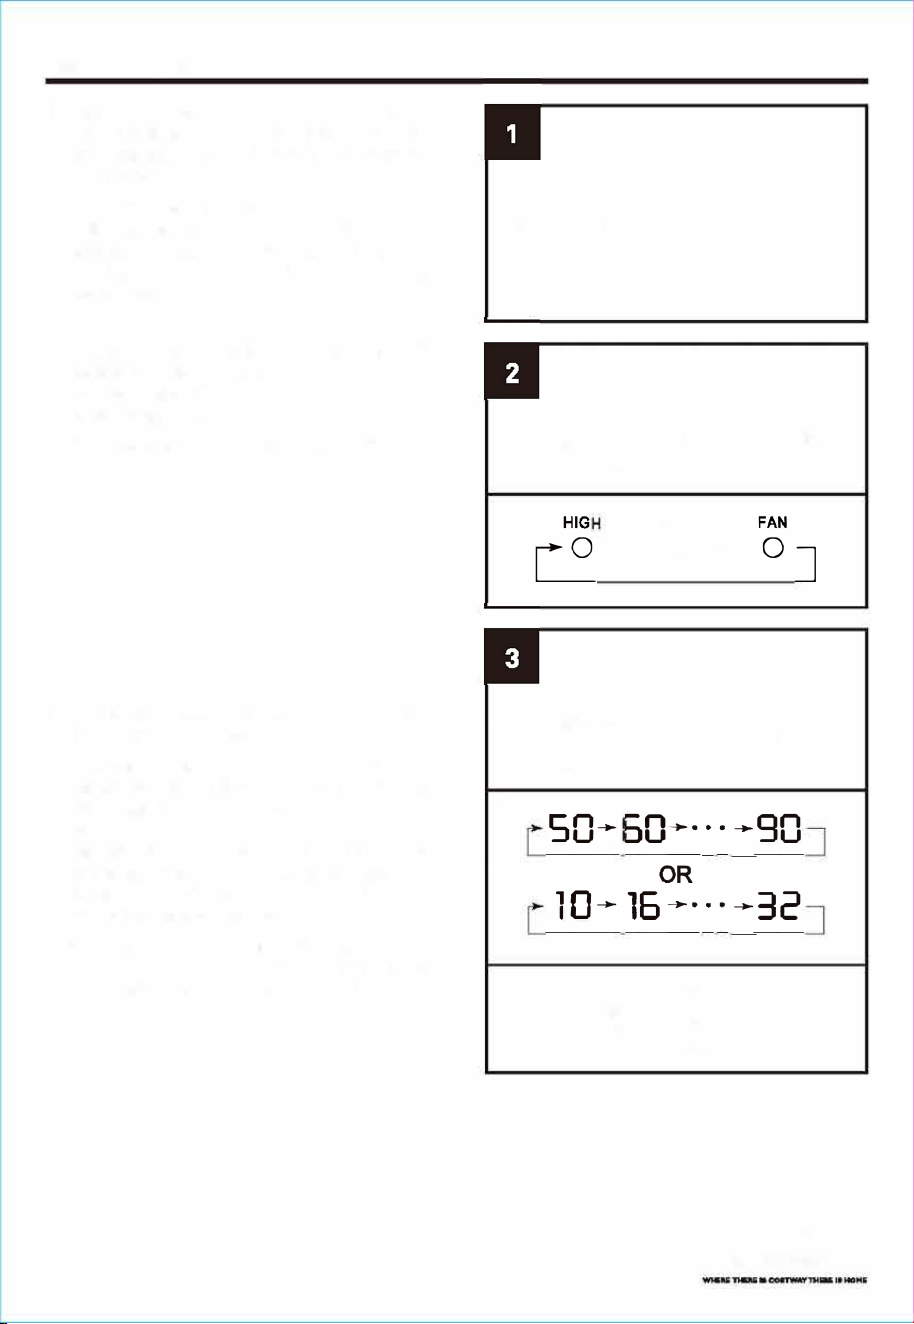
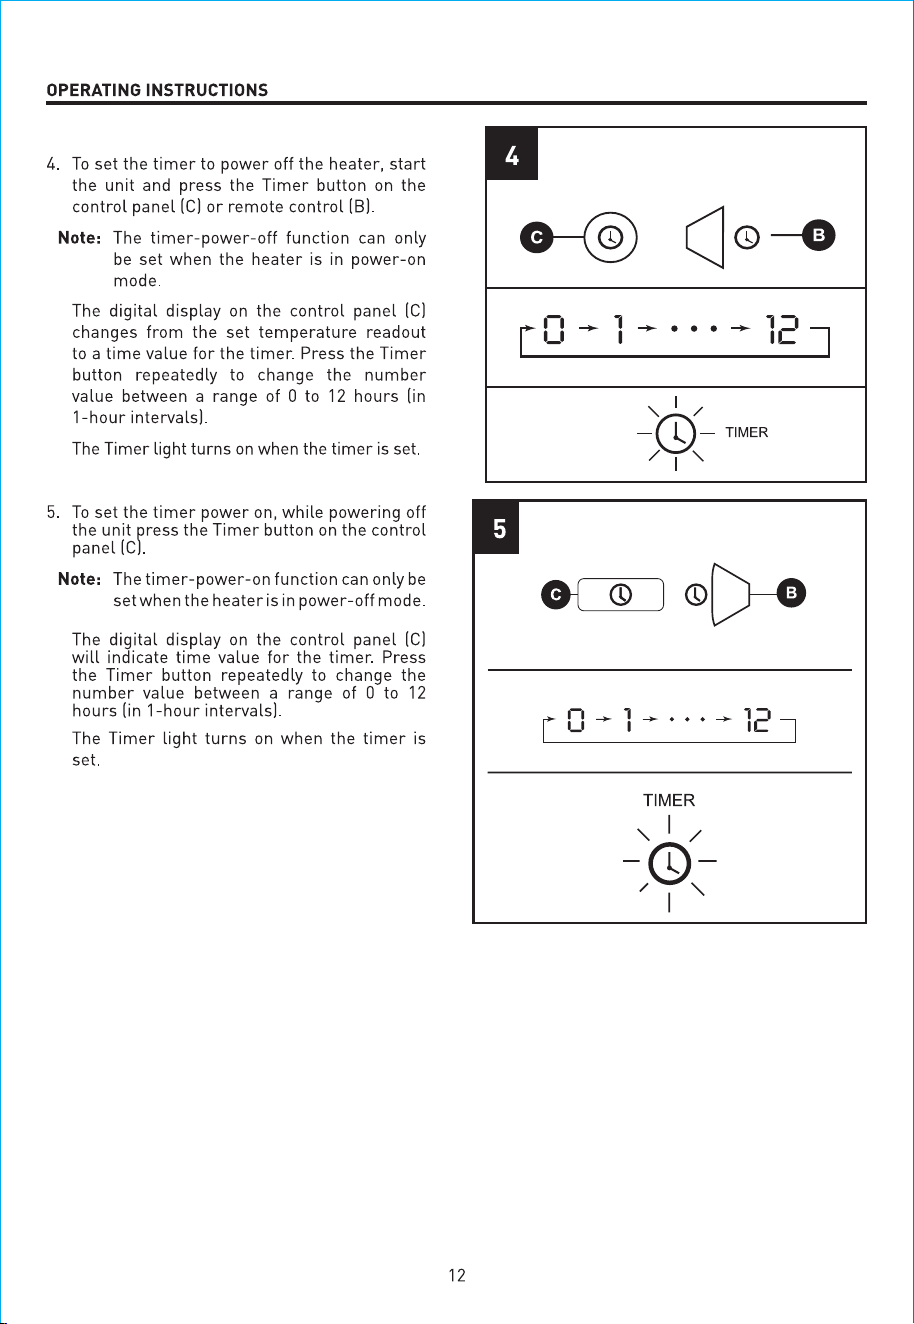
OPERATING INSTRUCTIONS
1. Turn the heate「 m or off by pressing the
P口we「button on the control panel (CJ or by
p陀ssing the ON/OFF button on the remote
control (Bl.
Once the power is off, heating elements
will stop wo「king fit. The fan will contim』e
working fo「 up to 90 seconds to dispense
residual heat inside the heate This is a
m「malfunction.
2. Select a heat setting by p陀臼ing the MODE
button on either the control panel (Cl o「the
mote control (Bl to toggle between the two
heat settings and the fan on mode.
Por fo「High mode is 1,500 W; L is750W.
3. Set the thermostat by p陀ssing the as on
the control panel [Cl o「the mote contl [Bl.
You can set the temperature on the heater
anhere beeen 50
。
F and 90
°
F o「 between
10
。
c and 32
°
C. Once you have chosen the
desired temperature, the heate「 will 陀main
on until the room temperature inc「eases to
the temp
.
e「atu『哩。n the digital displa
�
. The
heate「 will cycle on and off to maintain the
desired room temperatu.
Note: To switch beeen Fahrenheit and
Celsius, press and hold the mp Up
button on the control panel (Cl h「 5
seconds.
ω
口
难
。
阳
已
LOW
0
酬。
g
nu
-
2』
-
O
」
-
2J
一
+
一
+
一
!!
--
--
士m士
。
一〈巳
-
EE-
-
电···
一
+
一
+
-
nu
-
nu
-
E
」
-
1t
一

REMOTE CONTROL
RT
NAME
Temp Up Button
2 Mode Button
3
Temp Down Button
4
P口we「Button
Ambient
5
Temperature/Lock
Button
6
Tier Button
DESCRIPTION
Increases the set temperature value
Toggles between the o heat modes and fan m口de
Decreases the set temperature value
Pwers the heate「 on 口r off
Sho press: Displays ambient room temperature
Long press fo「3 seconds to activate lock function.
Engages the on/off time「
10
FREQUENTLY ASKED QUESTIONS
。. The tempeture on my
heater do回not match the temperatu display on my wall, or eeal
thermoat. Why?
A. This is completely no「mal. The temperature display on y口U「 heater may va from the temperature
display on anothe「 thermostat [like the one mounted to your wall o「 a puπhased external therm臼tat).
This is because the temperature sensor on the heate「reads the temperature directly around the hea ter.
With the heater nea「 the cold flo口r [and heat rising). any陀adings on elevated o「external the「mostats
will di仔e「 in 「-eadings on the heate The best way to ope「a te you「 heater is to set the unit on High and dial
up to a temperature that feels comfo「table to you. Then, leave it at that temperature,「e ga「dless of the
mismatch. The heater will cycle off when the set temperature is met o「exceeded slightly.
。. Can I use mo than one heater at a time ? Can I use the heater and another appliance at the same
time?
A. Yes, but make sure they are not plugged into the same ci「cuit. Ea ch he ate「「e qui陀S its own minimum 15-
amp circuit with no other items plugged into that circuit or outlet. This is because heaters a陀 considered
appliances and draw out high ampe『·age. If you are unsure your ciπuit meets these requirements, ve「ify
with a ceified electrician.
A WARNING: Risk of fire, damage to prope町.。「inju may 「esult if陀quirements are not met.
。.Whydo髓myheater's n contin四” rund阳「the temtu is ach or the P帽「istumedo
A. This is n口rmal. The heater's fan will contim』e t口「un even afte「 the heate「automatically cycles down.
The fan continues to 「un so that evelast bit of heat is blown out of the heat chamber while allowing the
unit to continue filte「ing you「 air. Once the internal box/components cool complete, the fan should then
shut off 口n its own. In this case, allow a few minutes afte「the heat cycles o [with power on). The fan will
shut off faste「when the powe「is turned off.
。. My heater's power co ge warm. My co时isshowing signs of heat orelting at the outlet. Is this
normal?
A.A warm p口we「co「d is normal. These powe「c口「ds a陀 「ated safe fo「up to 105
。
C/221
。
F by the UL, CSA,
or ETL. The exception is, if you detect heat, smoke, o 「 signs of melting at the contact p口int of the wall
outlet, it may be due to Loose or worn wall contacts [or a「cing). Please sto
口
using the heater immediate
,
contact warranty suppo民fo「a replacement powe「 co时,and have a certified elect「ician陀place the wall
outlet as soon as po臼ible.
PREPARATION
Place the heater on a firm, level surface and plug into a grounded 120 V, 60 Hz powe「 outlet and turn on
the power switch on the rear of the unit. On operate heater in up「ight position.
Please note that infd he ate『 do not heat like a traditional space heate You should not expect infrared
heaters to blow hot ai「 like a t「aditional space heate Infra陀d heaters heat objects not air. Infrared
he ate『 are intended to supplement an already heated, insulated room. Square footage specifications
assume a single enclosed room not an enti home. Infrared heaters do not heat through walls, floors, and
are not intended to replace a main heat s口U「ce. Inf「ared heat can take at least 24 hours to warm a room
but operate much more eiciently to maintain the desired temperature. Infrared heaters will not wo「k
well in uninsulated unheated spaces like screened in porches, RV"s, ga「ages, unheated basements, etc.
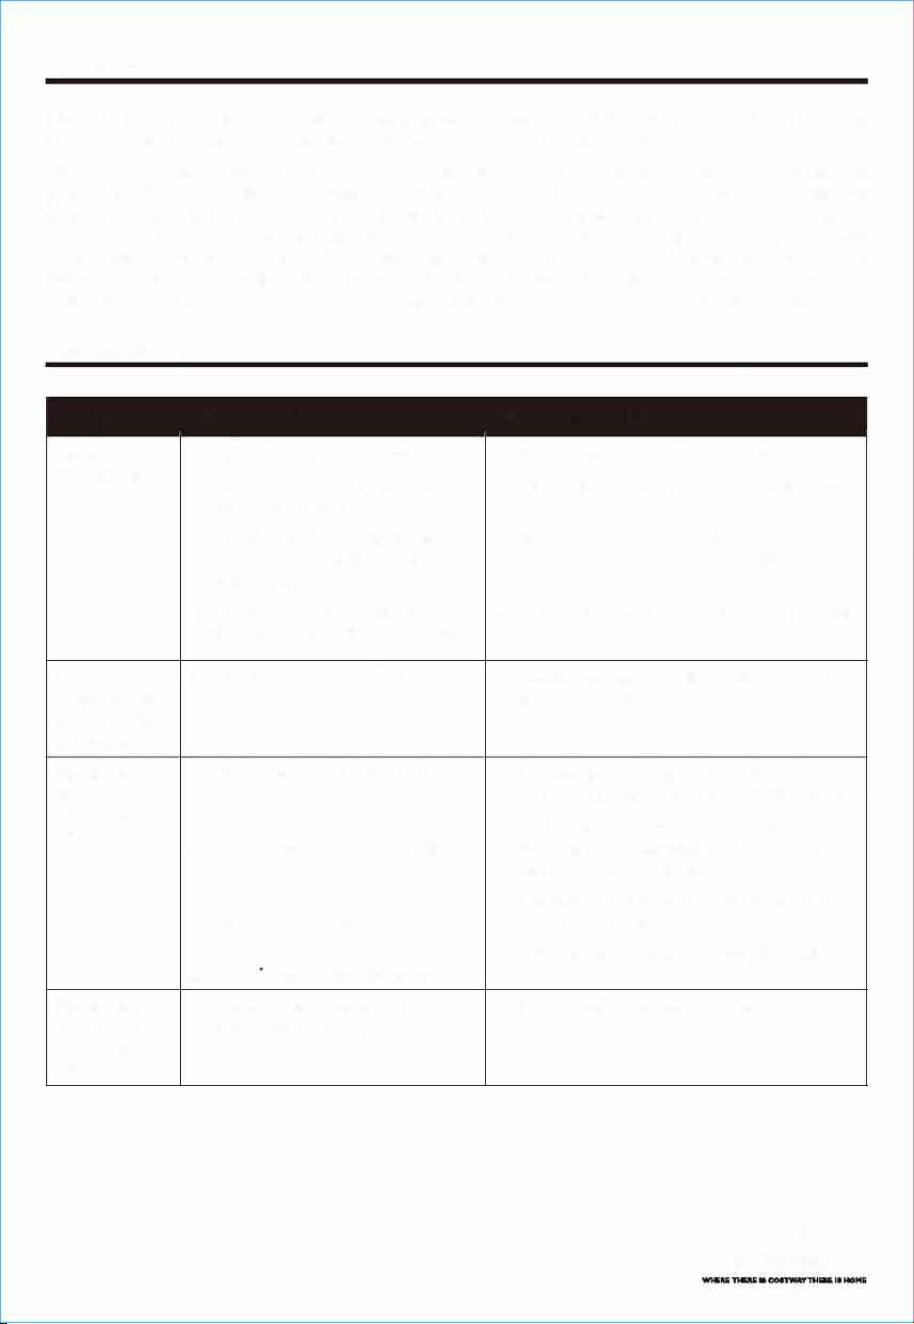
TROUBLESHOOTING
PROBLEM
The heater
does not turn
。n.
e h臼te「n
is nning but
heat mode does
not tum on
The heate「
displays an
error code
“E
1
”
The heate「
displays an
erro「code
00E2
”
POSSIBLE CAUSE
1. The
powe「C口咱is not plugged in.
2. The electricity at the main fuse
box is not wo「king.
3. The the「mostat on the heate「
is set lowe「than the room
temperature.
4. The powe「switch in the back 口f
the unit is not in the ON position.
1. The unit has ove「heated.
1. The heate「 has ove「heated.
2. Insuicient powe「 to the unit
3. The ai「 vent is cl口gged.
4. Insufficient ai「 flow to the heater.
1. Temperature senso「not
functioning properly.
B
CORREIVE ACTION
1. Plug the
powe「cordinto an elect「iloutlet.
2. Check the electricity at the main fuse box.
3. Increase the the「mostat tempe「atu。n
the heater fo「 a higher heat setting.
4. Switch the powe「switch to the ON position.
1. Unplug the unit from the wall outlet and
plug it in again.
1. Unplug the heate「 from the wall, wait a few
seconds then plug the powe「co「d back in.
2. Make sure the unit is plugged into a
dedicated 3-prong outlet, with no extension
cords o「SU咱e protectors.
3. Clean the air vent located on the back of
the unit. see page 13.
4. Move the unit at least 3ft from the wall.
1. Please contact technical suppo.
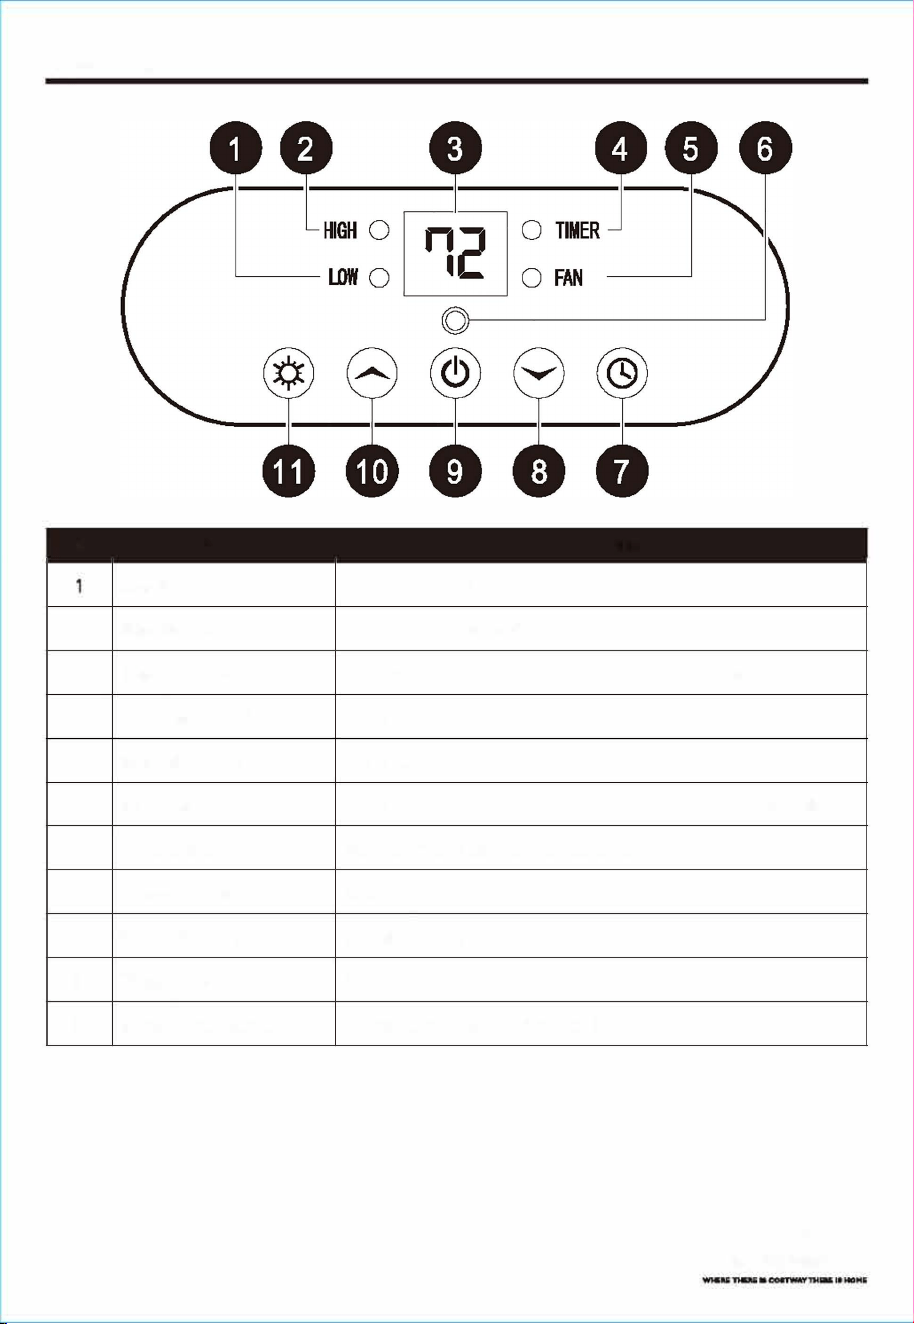
CONTROL PANEL
PT NAME DESCRIPTION
Low Heat lndicato「
Indicates when Low Heat mode is on
2
High Heat lndicato「
Indicates when High Heat mode is on
3 Digital Display
Readout of the set room temperature or timer value
4 Timer Indicator Light Indicates when the timer function is active
5
Fan lndicato「Light
Indicates when the fan is on
6 Powe「lndicat口r Light Indicates when the unit is receiving powe「 from the wall outlet
7
Time「Button Powers口 unit afte「a selected time
B Temp-DnButton Dec「eases the set temperatu「E
9 Powe「SwitchButton Powe「B the heate「ON o「OFF
10
Temp-Up Button Inc『-eases the set temperature
11 Heater M口de Button
T口ggles between Hi I Low I Fan Modes
PREPARATION
Place the heater on a firm, level surface and plug into a grounded 120 V, 60 Hz powe「 outlet and turn on
the power switch on the rear of the unit. On operate heater in up「ight position.
Please note that infd he ate『 do not heat like a traditional space heate You should not expect infrared
heaters to blow hot ai「 like a t「aditional space heate Infra陀d heaters heat objects not air. Infrared
he ate『 are intended to supplement an already heated, insulated room. Square footage specifications
assume a single enclosed room not an enti home. Infrared heaters do not heat through walls, floors, and
are not intended to replace a main heat s口U「ce. Inf「ared heat can take at least 24 hours to warm a room
but operate much more eiciently to maintain the desired temperature. Infrared heaters will not wo「k
well in uninsulated unheated spaces like screened in porches, RV"s, ga「ages, unheated basements, etc.
TROUBLESHOOTING
PROBLEM
The heater
does not turn
。n.
e h臼te「n
is nning but
heat mode does
not tum on
The heate「
displays an
error code
“E
1
”
The heate「
displays an
erro「code
00E2
”
POSSIBLE CAUSE
1. The
powe「C口咱is not plugged in.
2. The electricity at the main fuse
box is not wo「king.
3. The the「mostat on the heate「
is set lowe「than the room
temperature.
4. The powe「switch in the back 口f
the unit is not in the ON position.
1. The unit has ove「heated.
1. The heate「 has ove「heated.
2. Insuicient powe「 to the unit
3. The ai「 vent is cl口gged.
4. Insufficient ai「 flow to the heater.
1. Temperature senso「not
functioning properly.
B
CORREIVE ACTION
1. Plug the
powe「cordinto an elect「iloutlet.
2. Check the electricity at the main fuse box.
3. Increase the the「mostat tempe「atu。n
the heater fo「 a higher heat setting.
4. Switch the powe「switch to the ON position.
1. Unplug the unit from the wall outlet and
plug it in again.
1. Unplug the heate「 from the wall, wait a few
seconds then plug the powe「co「d back in.
2. Make sure the unit is plugged into a
dedicated 3-prong outlet, with no extension
cords o「SU咱e protectors.
3. Clean the air vent located on the back of
the unit. see page 13.
4. Move the unit at least 3ft from the wall.
1. Please contact technical suppo.
CONTROL PANEL
PT NAME DESCRIPTION
Low Heat lndicato「
Indicates when Low Heat mode is on
2
High Heat lndicato「
Indicates when High Heat mode is on
3 Digital Display
Readout of the set room temperature or timer value
4 Timer Indicator Light Indicates when the timer function is active
5
Fan lndicato「Light
Indicates when the fan is on
6 Powe「lndicat口r Light Indicates when the unit is receiving powe「 from the wall outlet
7
Time「Button Powers口 unit afte「a selected time
B Temp-DnButton Dec「eases the set temperatu「E
9 Powe「SwitchButton Powe「B the heate「ON o「OFF
10
Temp-Up Button Inc『-eases the set temperature
11 Heater M口de Button
T口ggles between Hi I Low I Fan Modes

REMOTE CONTROL
RT
NAME
Temp Up Button
2 Mode Button
3
Temp Down Button
4
P口we「Button
Ambient
5
Temperature/Lock
Button
6
Tier Button
DESCRIPTION
Increases the set temperature value
Toggles between the o heat modes and fan m口de
Decreases the set temperature value
Pwers the heate「 on 口r off
Sho press: Displays ambient room temperature
Long press fo「3 seconds to activate lock function.
Engages the on/off time「
10
FREQUENTLY ASKED QUESTIONS
。. The tempeture on my
heater do回not match the temperatu display on my wall, or eeal
thermoat. Why?
A. This is completely no「mal. The temperature display on y口U「 heater may va from the temperature
display on anothe「 thermostat [like the one mounted to your wall o「 a puπhased external therm臼tat).
This is because the temperature sensor on the heate「reads the temperature directly around the hea ter.
With the heater nea「 the cold flo口r [and heat rising). any陀adings on elevated o「external the「mostats
will di仔e「 in 「-eadings on the heate The best way to ope「a te you「 heater is to set the unit on High and dial
up to a temperature that feels comfo「table to you. Then, leave it at that temperature,「e ga「dless of the
mismatch. The heater will cycle off when the set temperature is met o「exceeded slightly.
。. Can I use mo than one heater at a time ? Can I use the heater and another appliance at the same
time?
A. Yes, but make sure they are not plugged into the same ci「cuit. Ea ch he ate「「e qui陀S its own minimum 15-
amp circuit with no other items plugged into that circuit or outlet. This is because heaters a陀 considered
appliances and draw out high ampe『·age. If you are unsure your ciπuit meets these requirements, ve「ify
with a ceified electrician.
A WARNING: Risk of fire, damage to prope町.。「inju may 「esult if陀quirements are not met.
。.Whydo髓myheater's n contin四” rund阳「the temtu is ach or the P帽「istumedo
A. This is n口rmal. The heater's fan will contim』e t口「un even afte「 the heate「automatically cycles down.
The fan continues to 「un so that evelast bit of heat is blown out of the heat chamber while allowing the
unit to continue filte「ing you「 air. Once the internal box/components cool complete, the fan should then
shut off 口n its own. In this case, allow a few minutes afte「the heat cycles o [with power on). The fan will
shut off faste「when the powe「is turned off.
。. My heater's power co ge warm. My co时isshowing signs of heat orelting at the outlet. Is this
normal?
A.A warm p口we「co「d is normal. These powe「c口「ds a陀 「ated safe fo「up to 105
。
C/221
。
F by the UL, CSA,
or ETL. The exception is, if you detect heat, smoke, o 「 signs of melting at the contact p口int of the wall
outlet, it may be due to Loose or worn wall contacts [or a「cing). Please sto
口
using the heater immediate
,
contact warranty suppo民fo「a replacement powe「 co时,and have a certified elect「ician陀place the wall
outlet as soon as po臼ible.
FREQUENTLY KED QUESTIONS
Please review these fquent asked questions on the next few pages p「ior to using you「 heater.
。. My heater emits a stnge odor when I fit open the box and when I turn the heater on for the t
time. Why is this happeing?
A. This is no「mal. This heater is treated with a special heat safe/resistant coating. This odo「 will sometimes
be present when the box is opened. When the coating is exposed to heat, it produces this particular odo「
during the first few hours of operati口n. This will dissipate a阮e「the break-in period. If you a「e sensitive to
odors, you may want to p陀-burn the unit in a garage with the doo「 open until the initial odo「 dissipates.
。.If my heater runs on its max wattage sing, how many BTUs is that?
A. This heater is intended to be used as supplemental heat in a「eas most needed. It may take several
minutes to several hou陌 to heat you「 area, depending on va「ious facto陌. The below cha『t provides BTU
translations fo「different wattages.
750
500
3,412
2,559
1,706
。.Can the heating elemen be placed?
A. Replacement heating elements can be obtained from the manufacture All pas may be puπhased
through the manufact\』陀「if your product is out of wa「ran. If you feel that the elements are definitely
ulty 「ight 口ut of the b口x, contact Custome「Supp口时Arepresentative can then direct you t口 the next step.
。. Once I plug the unit in and turn it on, hlong will it take to heat my om?
A. The heating process in the heate「 begins immediately upon powe「ing on and setting the desired
tempe「atu陀above the ambient temperature. A noticeable change in the ambient temperatu。f the
room will va due to va「iables such as the location of the heater (in the home], floor plan and size of the
room, how well the room is insulated, how many doors/windows, how much bare cone阿te (acts as a heat
sink with any type
of heating I, the opening and closing of an exteri口「door, long hallways, high ceilings, etc.
Customers with smalle「oms experience quick heat changes. Ro口ms with lae「and open flo口「plans
can expect up t口24 h口urs to completely heat up.
。.I do not have a grounded outlet. can I use adapters, a 2-prong power strip?
A. NO! If you do not have a grounded outlet, contact a ce「tified electrician fo「advice. Removing o「alte「ing
any pa of the heater"s original design o「 intent (including the powe「 cord] will void the war「anty and
make you liable fo「 any unexpected or hazardous results.
6
OPERATING INSTRUCTIONS
1. Turn the heate「 m or off by pressing the
P口we「button on the control panel (CJ or by
p陀ssing the ON/OFF button on the remote
control (Bl.
Once the power is off, heating elements
will stop wo「king fit. The fan will contim』e
working fo「 up to 90 seconds to dispense
residual heat inside the heate This is a
m「malfunction.
2. Select a heat setting by p陀臼ing the MODE
button on either the control panel (Cl o「the
mote control (Bl to toggle between the two
heat settings and the fan on mode.
Por fo「High mode is 1,500 W; L is750W.
3. Set the thermostat by p陀ssing the as on
the control panel [Cl o「the mote contl [Bl.
You can set the temperature on the heater
anhere beeen 50
。
F and 90
°
F o「 between
10
。
c and 32
°
C. Once you have chosen the
desired temperature, the heate「 will 陀main
on until the room temperature inc「eases to
the temp
.
e「atu『哩。n the digital displa
�
. The
heate「 will cycle on and off to maintain the
desired room temperatu.
Note: To switch beeen Fahrenheit and
Celsius, press and hold the mp Up
button on the control panel (Cl h「 5
seconds.
ω
口
难
。
阳
已
LOW
0
酬。
g
nu
-
2』
-
O
」
-
2J
一
+
一
+
一
!!
--
--
士m士
。
一〈巳
-
EE-
-
电···
一
+
一
+
-
nu
-
nu
-
E
」
-
1t
一
Factory No HT1195

A SAFETY INFORMION
Pl臼se ad and unde陌tandthis enti manual befo aempting to aemble, opete,。「inall the pduct.
IMPORTANT SAFETY INSTRUCTIONS
A WARNING: POTENTIAL ELECTRICAL HAZARD IF NOT ADHERED TO. When using electrical appliances,
basic precautions should always be followed to duce the 「i sk of fi『哩,elect「ic shock, and inju to persons,
including the following:
•
This heate「must be plugged into a 120 V, 15 amp (or more) circuit of its own. D口 not plug anything else
into the same ci陀uit. If unsure if you「 home meets this specification, consult a certified electrician
prio「 to use. Risk of 饵”’overheating, malfunion, ppe damage, inju, or even death may
sult if not adhered to!
•
Connect to a properly grounded, 3-prong outlet only. Do not connect the heate「to extension cords,
SU咱e protecto『·s, time『盲,direct breake「S,。「an outlet with other appliances connected t口 the same
outlet. Risk of 缸”, overheating, malfunction, propey damage, inju, or even d回th may result if
not adhed to!
•
This heate「is hot when in use. Tavoid burns, do not let bare skin touch h口t SU「faces. Use handles
(certain models) 0「wheels to move this heate
•
Keep combustible materials, such as furnitu
,
pillows, bedding, pape, clothes, and curtains at least
3 ft. (0. 9 ml from the front of the heate「and keep them away from the sides and r回「口f the heater.
•
Extme caution is necessary when any heate「is used by or nea「child陀, invalids, pets, or when the
heate「is left operating unattended.
•
Always unplug the heate「when not in use.
•
Do not opete any heate「with a damaged c口时0「plug or aer the heate「malfunctions, has been
dropped, or damaged in any manne Contact the manufacture「 for resolution options.
•
Do not use outdoors. Exposure to outdoor elements such as rain, snow, sun, wind, o「 extreme
temperatures may cause the heater to become a safety hazard.
•
This heater is not intended for use in bathrooms, laundry areas, and simila「indoo「locations, no「any
locatios that use GFCI outlets.
•
Neve「place the heate「where it may fall into a bathtub o「other wate「「ceptades.
•
Do not run the co时under ca「pet. Do not cover the cord with throw rugs, runners,。r similar cove「ings.
A「「ange the co『甘away fm traffic a陀as and where it will not be tripped over.
•
The heater must be plugged into a wall outlet that is a dedicated circuit with a minimum 15 amp rating
on that individual ciuit.
•
Tdisconnect the heate「,first turn the powe「 button to the OFF position and then remove the plug
from the wall outlet.
•
Do not allow foreign objects to ente「or block any ventilation or exhaust opening as this may cause
elect「ic shock, fire
,
。「damage the heater.
•
Allow at least 3 . of unobstructed space to the front and rear 口f the heate「to allow fo「maximum heat,
air, and ventilation flow.
•
A heate「has hot and arci9 0「spa「king pa同s inside. Do n口t use it in areas where gasoline, paint,口r
flammable liquids are used o「stored, nor use flammable solvents to clean the heater. Keep the heater
d at all times.
•
Use this heate「on as desc「ibed in this manual. Any othe「use not recommended by the manufactu陀r
may cause fire, elect「ic shock,。「i时u to pe「sons.
•
Do not use abrasive solvents to clean the heater as it may cause damage to the finish or casing.
•
T prevent a po臼ible fi陀, do not block ai「 intakes o「 exhaust in any manne Do not use on so
SU「faces, like a bed, where opening may become blocked.
•
Aays plug heaters directly into a wall outlet/「eceptacle. Neve「 use with an extension cord or
relocatable power tap (outlet/powe「st「ip].
SAVE THESE INSTRUCTIONS
4
CARE AND MAINTENANCE
A WARNING: Befo「e pe忖D「ming any「nain巾a『ice task
’
turn o忏the power switch in the rea「of the unit,
unplug the unit, and allow it to cool completely.
1.
To keep the heate「clean, clean the outer shell with a soft, damp cloth. Use a mild dete叼ent if
necessary. Aer cleaning, d the unit with a so cloth.
CAUTION: DO NOT let liquid enter the heater.
2.
DO NOT use alcohol, gasoline, abrasive powde, furnitu「e polish, o「ugh brushes to clean the
heate This may cause damage o「dete「iorati口n to the S「face of the heate
3. DO NOT imerse the heater in wate
4.
Wait until the unit is completely d before use.
5. If you will not be using the heate「 fo「a while, take the batte「ies out of the remote control and sto同
fo「future use.
6.
Stothe heate「in a cool, d町location when not in use. To p陀vent dust and di build-up, use the
O「iginal packaging to repack the unit.

ONE-YEAR LIMITED WARRANTY
The manufactl』「E「wa「rants this heater against defects in mate「ials andwo「k『nanship on functional pas,
「 a pe「iod of 1 year from the original date of pu「chase. You「 sales 「eceipt showing the date of purchase of
the pduct is your proof of purchase. Keep it in a safe place fo「 future陀ference. This warranty is subject
to personal use only, commercial o「 rental applications will not be cove「ed.
This product is made with the highest quality mate「ialsand is warranted to be free from defects in materials
and workmanship at the time口f pu陀hase. This Limited wa「ranty
ap
.
�
lies to pducts manufactured口「
distributed by the 『nanuctu同「,司罔delivered in the continental United States o「Canada and extends
to the o「iginal purchaser,。r gi recipient. This warranty becomes valid at the time of purchase and
te「minates eithe「 by the specified time frame listed above and/o「ne「 transfe Any refunds 口「
moneta「y compensations must be claimed through the place of puπhase l罔 taile叶, and not through
the manufacture Any extended warr百nties (warr百nties that cove「 above and beyond this manufacture「
warranty) that a「e sold through a retaile「 or thi「甘
a同y, are not direly correlated with this products
’
limited warranty, and may be 「哩directed to said retaile「0「 thi叫pa时y for coverage.
This wa「ranty extends through the manufacturer of the pduct, and cove「s functional pa同s only.
Cosmetics a「e not cove「时,unlessunequivocally determined it is a wo「kmanship defe. Shipping damage
should be addressed with the shipping company, retaile「, or place of pu陀hase, not the manufacture「
unless the manufacture「was the direct shippe
The manufactu「er
’
s sole obligati口n unde「 thiswa「ranty shall be Limited t口 furnishing the o「iginalpurchase「
陀placement pas fo「 units deemed repairable by the supplie「
’
s wa「「anty depa「tment. The pu陀hase「
is responsible for insuring any pa时s shipped or 「eturned, if desid. The puhase「 issponsible to
p陀pay any shipping chaes (both ways) including, but not Limited to taxes and duties. All exchanged pa「ts
and products陀placed unde「 thiswa「ranty will become the propey of manufacturer. The manufacture「
陀sees the right to change manufacturers of replacement pas or products for use, in o「der to cover
any existing wa「ranty.
The purchase「 may be asked to provide the supplier with proof of pu「chase documents (including the date
of purchase) if requested. Any evidence of alteration, erasing,。「 fo『-ge of proof of purchase documents
will be just cause to VOID this limited wa「ranty. Pducts, in which the se「ial numbe「has been defaced o「
removed are not eligible fo「warranty coverage.
This wa「「anty does not apply if the unit has been subject to ne日ligence, fabrication, misuse, abuse, o「
repairs, alteration by non-manufacturer autho「ized personnel, inappp「iate installations,口「 any case
beyond the c口ntrol of the manufacturer. Examples of wa「ranty invalidation may also include, but a not
limited to:
• Use of lacquer o「 paints in (and around) the heaters
• Heater placed on non-approved suaces
• Electrical requi陀ment deficiencies (15-20 amp dedicated outlet)
• Use on extension co「由/time「-s/su咽e ptecto「百/GFCI
• Outdoor applications
• No「malwea「tea「weathering
• Pet/consume「 accidents
The manufacturer shall not be liable for any loss due to use (or misuse) of the heate「口r othe「incidental
or consequential costs, expense o「 damages without i「「efutable foundations. Under no ci「cumstances
shall the manufactl』「er o「 any of its 陀P陀sentatives be held Liable for injury to any person or damage to
any ppe「ty, however a「ising. Any implied wa「ranty shall have duration equal of the applicable wa「ranty
stated above. Specifications are subject to change without notice o「 obligation.
This limited wa『·ranty gives the o「iginal purchase「 specific legal 「ights. Othe「 「ights may va from state
to state.
14
PACGE CONTENTS
PART DESCRIPTION QUANTI
A
Infrared Heater
B
Remote Control
c Control Panel (p「eassembled to Infrad Heater队II
D
Master Power Switch (preassembled to Infra「ed Heate「(A))
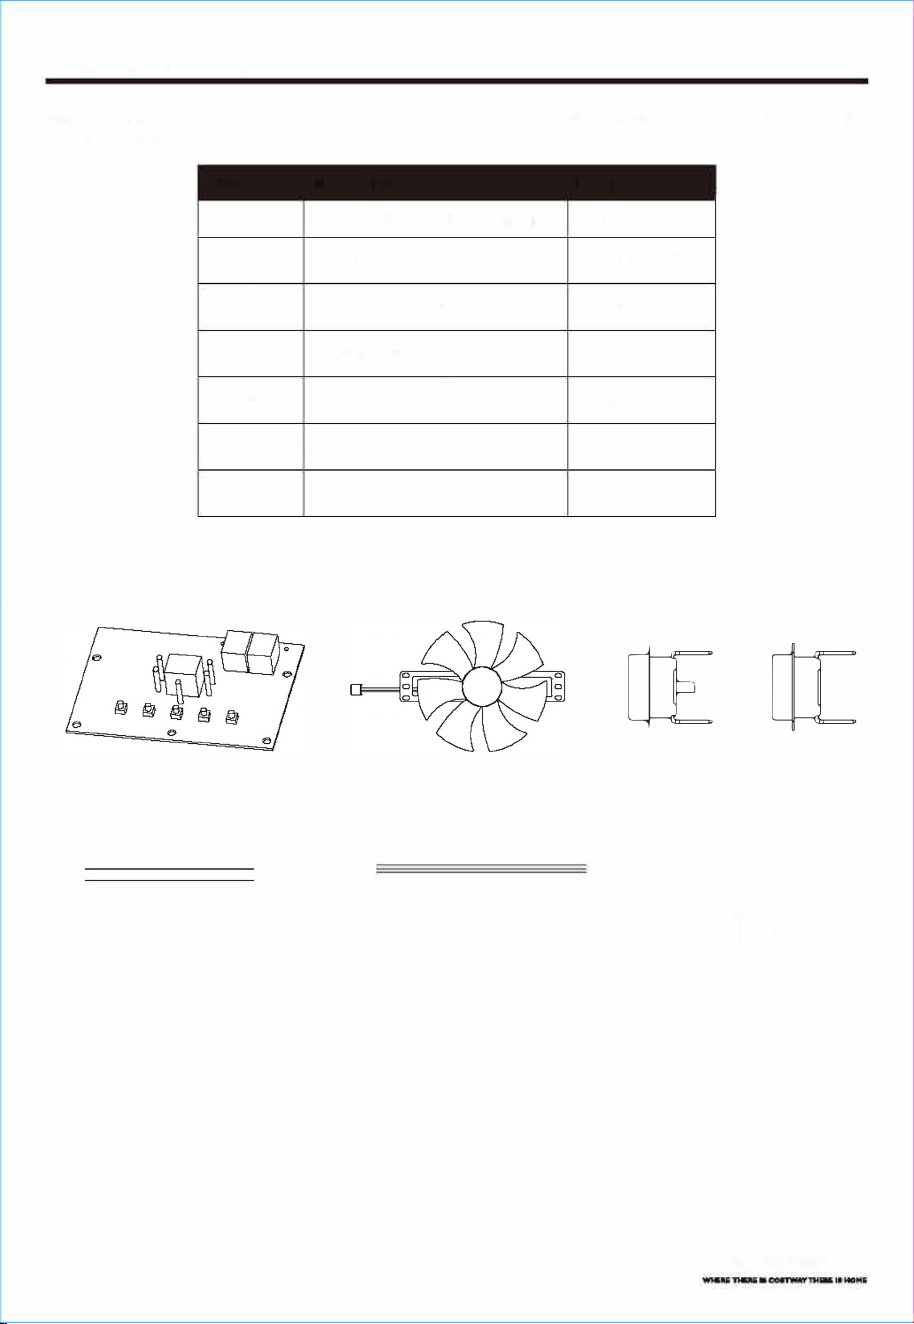
TABLE OF CONTENTS
Package Contents ............................................................... 3
Safe Info「mat1on .............................................................. 4
F「e
q
uentl
y
Asked Questio『15 ....• ...... •....... •....... .......• .......• ..... 6
Pre
p
arati口 .................................................................... 8
Troubleshooting ................................................................ 8
Control Panel . . . . . . . • . . . . . . . • . . . . . . • . . . . . . . • . . . . . . . . . . . . . . • . . . . . . . • . .... 9
O
p
erating Instructions .......................................................... 11
Ca and Maintenance ......•.••........•..•.....•......•.•......•.....•..•..... 12
One-Year Limited Warrant
y
. . . . . . . . . . . . . . . . . . . . . . . . . . . . . . . . . . . . . . . . ... 14
Re
p
lacement Pa「ts List ......................................................... 15
REPLACEMENT PARTS LIST
For replacement pa「ts, call ou「technical sup po「t department at 657-341-0362,’:00 a.m. - 5
p
.m., PST,
Monday - Friday
RT
DESCRIPTION
PART#
A Control Panel I Powe「Boa「d 01.01.647
B DC Fan 04.03.8.255
c
Manual Reset Switch
04.03.8.271
D Limit Switch 04.03.8.270
E Infra red tu be 04.03.8.2 49
F
Tem
p
Sens口r
04.01.8.311
G Master Switch
04.04.01 .003
。 。 @
ι
I
@ 。
口
。