
Model: R3130
51005001495 V04
User Manual
ROAV Jump Starter Pro 1000A

Model: R3130
51005001495 V04
User Manual
ROAV Jump Starter Pro 1000A

English 01
Deutsch 19
Español
35
Français 51
Italiano 57
日本語
83

English 01
Deutsch 19
Español
35
Français 51
Italiano 57
日本語
83

01 English English 02
• DO NOT operate this product if it has received a sharp
blow, been dropped, or otherwise damaged in any
way; take it to a qualified service person.
• DO NOT disassemble this product; take it to a
qualified service person when service or repair is
required. Incorrect reassembly may result in electric
shock or fire risk.
• To reduce risk of electric shock, unplug this product
before attempting any maintenance or cleaning.
Turning o controls will not reduce this risk.
• Avoid long exposure to direct sunlight which may
cause damage to the device.
• Exposing this product to open flames may cause it to
explode.
• If the battery is swollen, leaking fluid, or smells bad,
discard it immediately.
• Make sure the battery connector is clean, and battery
clamp and cables are kept intact before using the
product.
• Ensure the battery clamps are fully plugged in or they may
aect functionality and cause damage to the product.
• To preserve battery lifespan, recharge the device at
least once every 6 months.
Important Safety
Instructions
SAVE THESE INSTRUCTIONS – This manual contains
important safety and operating instructions for the
ROAV Jump Starter 1000A (Model R3130).
Please read and understand all instructions before using
this product. If damage is caused by failure to follow the
instructions, the warranty does not apply.
• This product is suitable for petrol engines up to 6L
and diesel engines up to 4L. To avoid damage to
the product and potential injury to persons, do not
attempt to start an engine exceeding this capacity.
• Clear your car battery of dust and debris before jump
starting your car.
• Keep the product in a place free from exposure to any
liquid or corrosive materials.
• Use of an attachment not recommended or sold by
the manufacturer may result in a risk of fire, electric
shock, or injury to persons.

03 English English 04
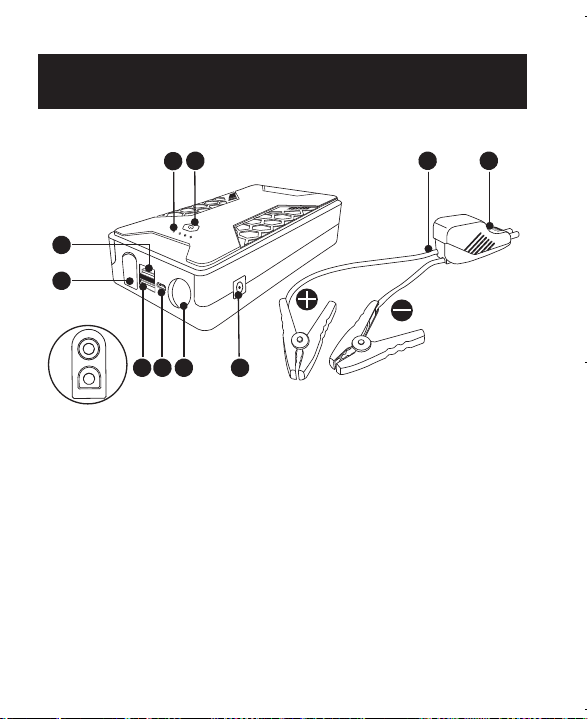
At a Glance
10
9
1 2
3
4
5
678
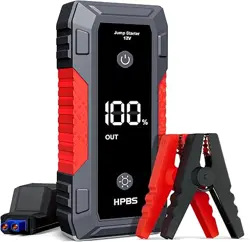
① Power level indicators
② Function button
• Press to turn on power level
indicators
• Press and hold for 2 seconds to
turn on / o the flashlight
③ Jumper cables
④ LED display
⑤ 12V DC output (φ
5.5 mm)
⑥ Flashlight
⑦ USB-C input & output
⑧ USB 1 output
⑨ USB 2 output
⑩ Jumping port
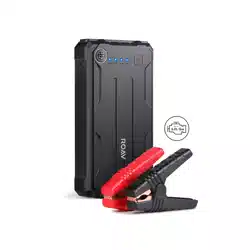
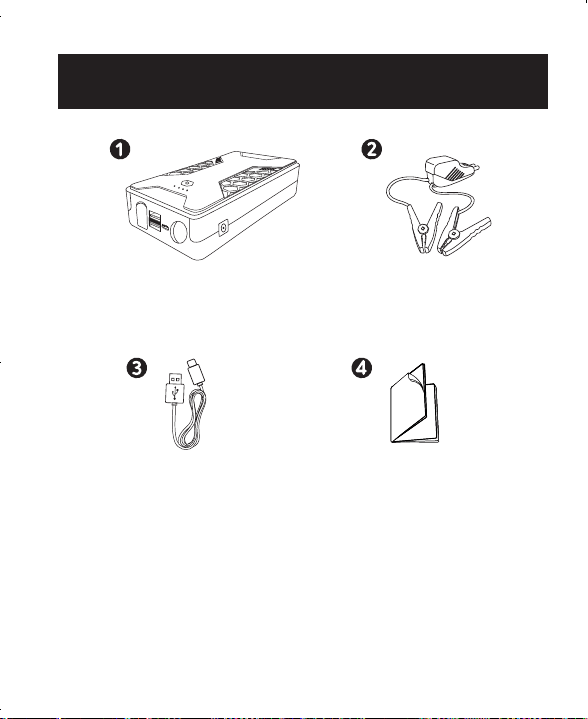
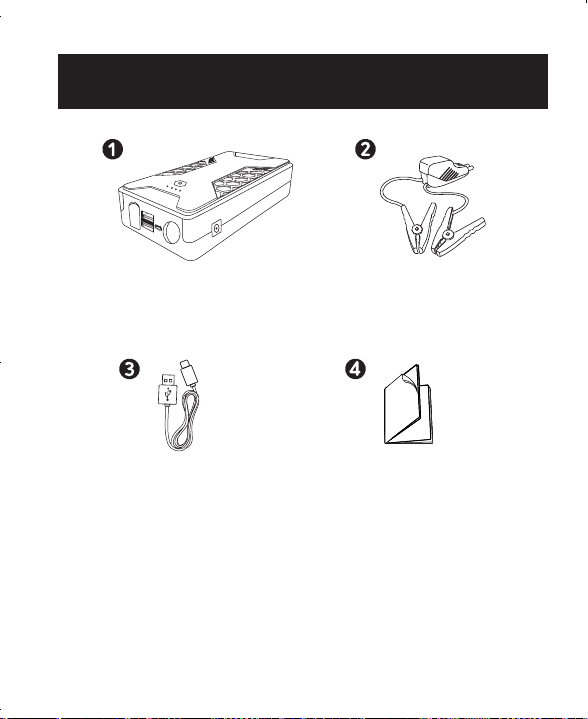
What’s Included
ROAV Jump Starter
1000A
Jumper cables
USB cable Manual
Features
• Convenient jump starting
• Two USB 3.0 ports
• USB-C input port
• Emergency LED flashlight
• User-friendly design

03 English English 04
At a Glance
10
9
1 2
3
4
5
678
① Power level indicators
② Function button
• Press to turn on power level
indicators
• Press and hold for 2 seconds to
turn on / o the flashlight
③ Jumper cables
④ LED display
⑤ 12V DC output (φ
5.5 mm)
⑥ Flashlight
⑦ USB-C input & output
⑧ USB 1 output
⑨ USB 2 output
⑩ Jumping port
What’s Included
ROAV Jump Starter
1000A
Jumper cables
USB cable Manual
Features
• Convenient jump starting
• Two USB 3.0 ports
• USB-C input port
• Emergency LED flashlight
• User-friendly design
05 English English 06
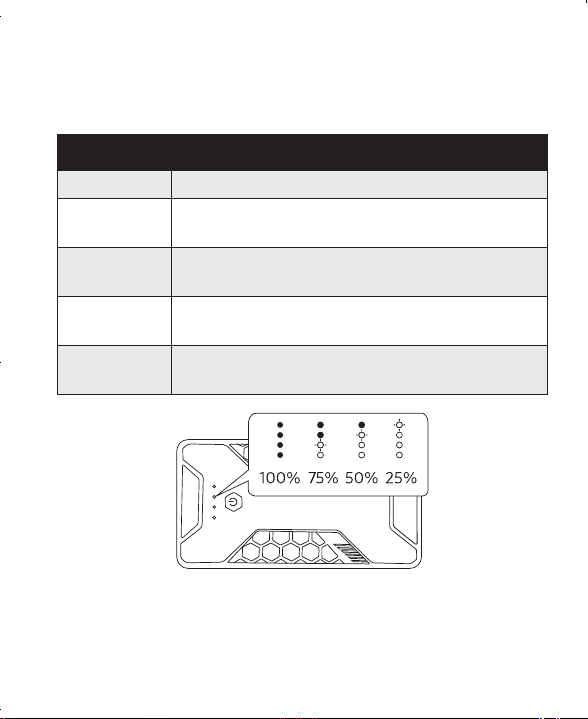
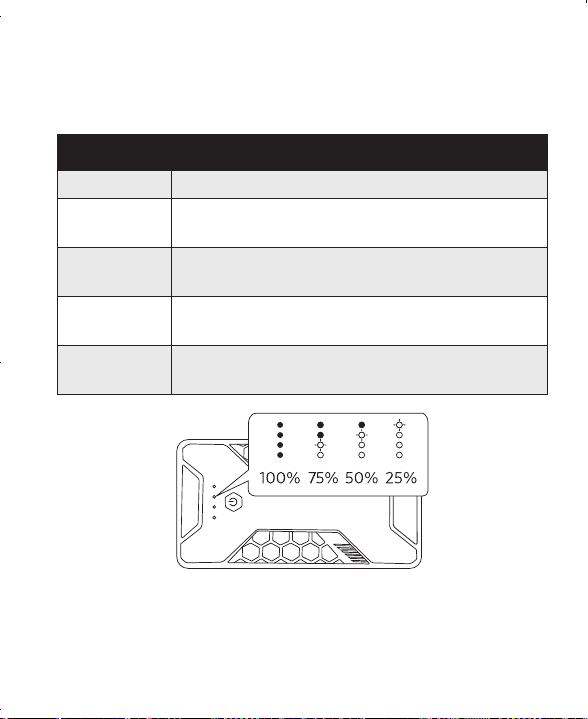
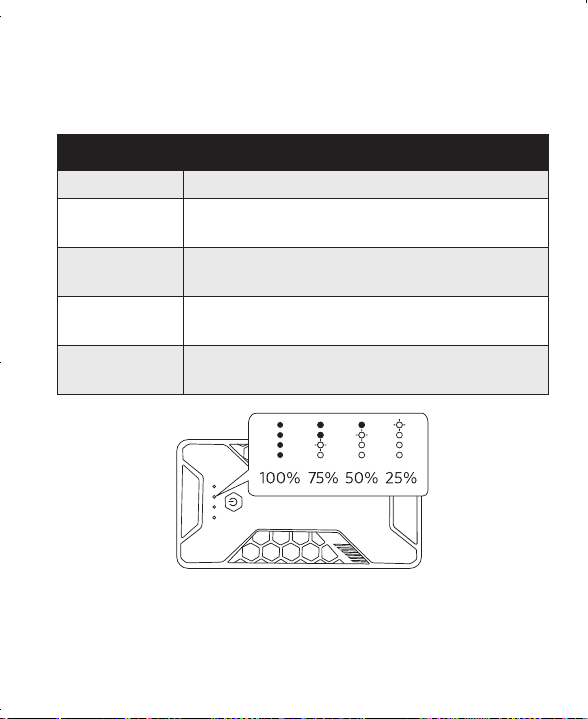
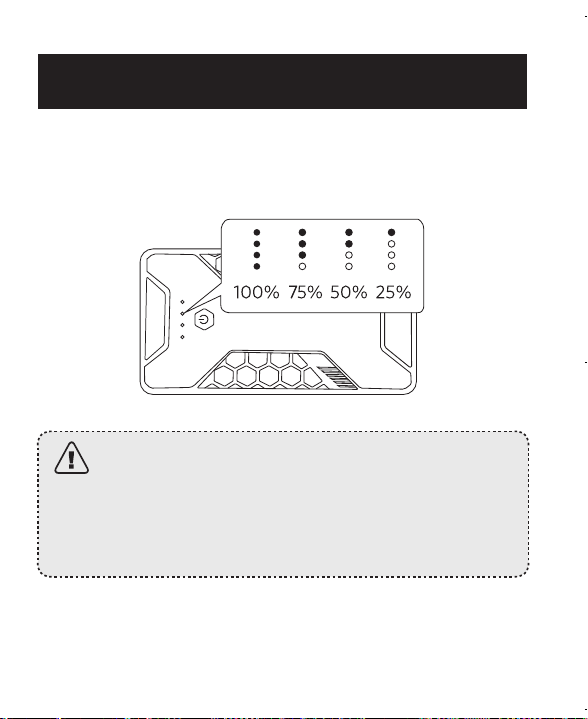
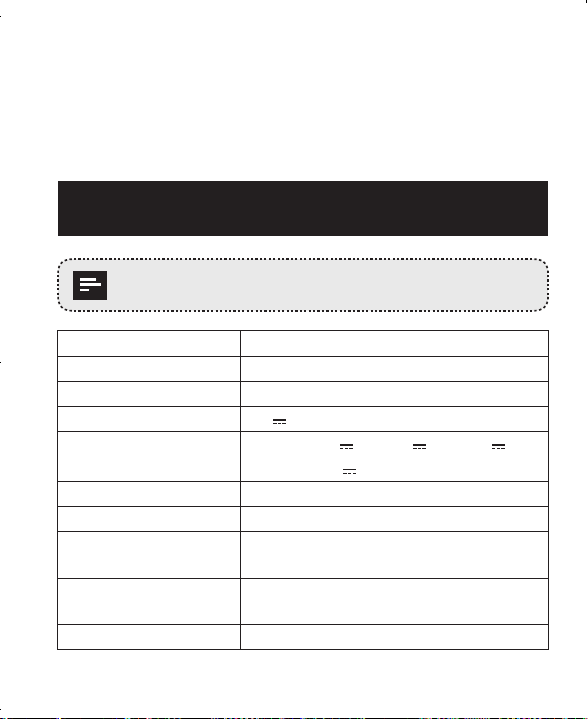
Status LED
While charging Roav Jump Starter 1000A, LED indicators show as
below:
Power level LED indicator status
0%~24% One LED indicator flashes
25%~49% One LED indicator stays steady blue, and one
flashes
50%~74% Two LED indicators stay steady blue, and one
flashes
75%~99% Three LED indicators stay steady blue, and one
flashes
100% All the four LED indicators stay steady blue, and
will turn o after 10 seconds
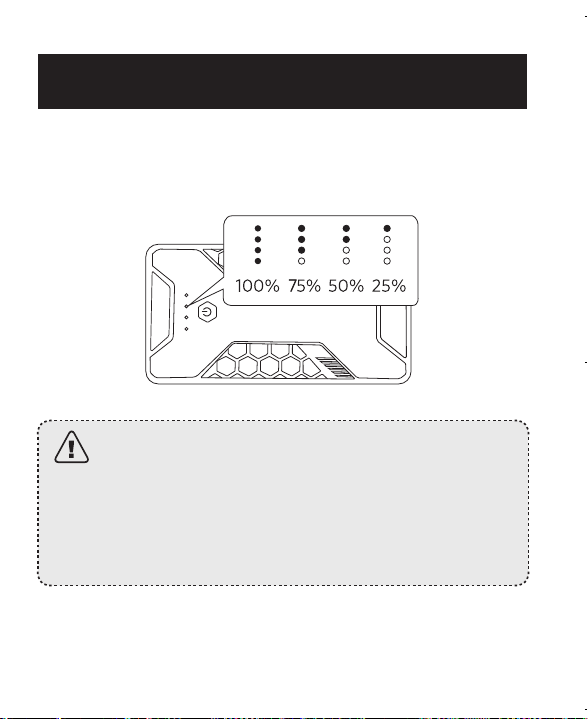
Note: When four LED indicators keep flashing, it means the jump
starter exceeds the temperature limit. Let the jump starter cool
down before using again.
Jump Starting Your Car
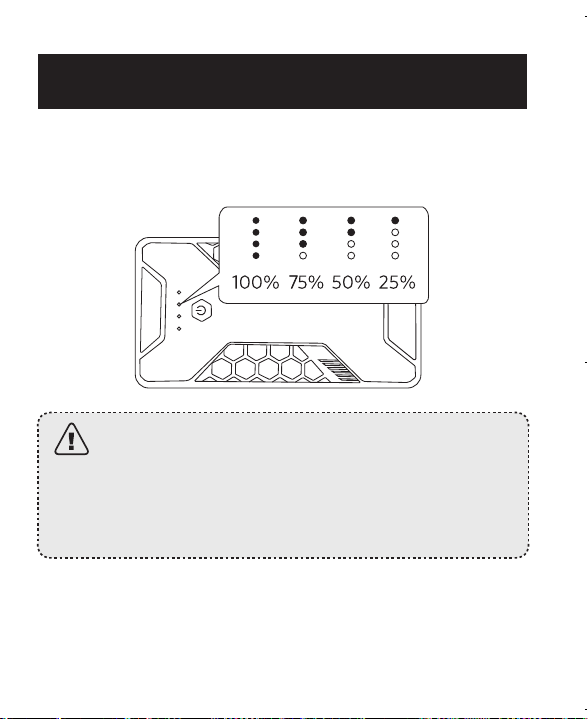
1. Turn on your ROAV Jump Starter 1000A and make sure it is over
50% charged.
• If the battery level is lower than 5%, one LED indicator
will flash continuously.
• If the jump starter is less than 50% charged, it may
not be able to start your engine. We recommend fully
charging the battery before you use the jump starter
for the first time.

05 English English 06
Status LED
While charging Roav Jump Starter 1000A, LED indicators show as
below:
Power level LED indicator status
0%~24% One LED indicator flashes
25%~49% One LED indicator stays steady blue, and one
flashes
50%~74% Two LED indicators stay steady blue, and one
flashes
75%~99% Three LED indicators stay steady blue, and one
flashes
100% All the four LED indicators stay steady blue, and
will turn o after 10 seconds
Note: When four LED indicators keep flashing, it means the jump
starter exceeds the temperature limit. Let the jump starter cool
down before using again.
Jump Starting Your Car
1. Turn on your ROAV Jump Starter 1000A and make sure it is over
50% charged.
• If the battery level is lower than 5%, one LED indicator
will flash continuously.
• If the jump starter is less than 50% charged, it may
not be able to start your engine. We recommend fully
charging the battery before you use the jump starter
for the first time.
07 English English 08
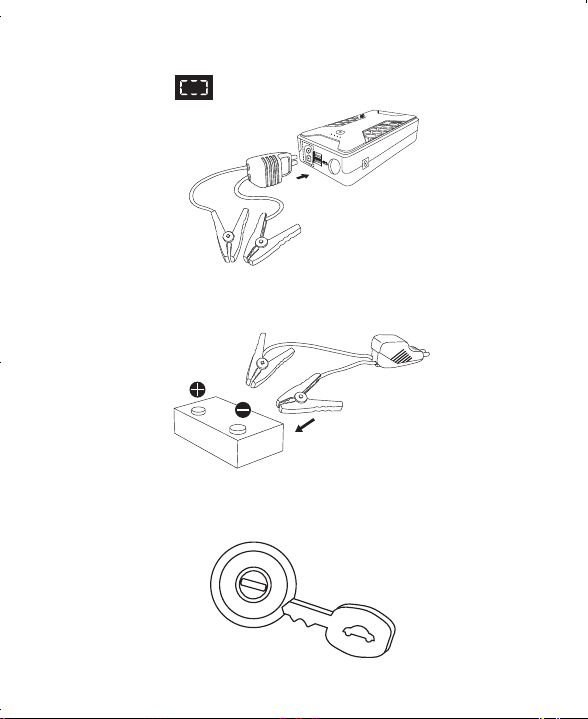
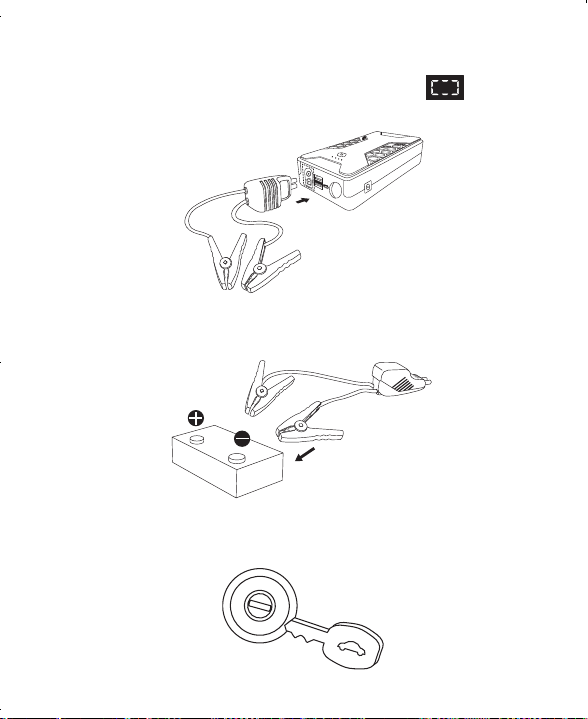
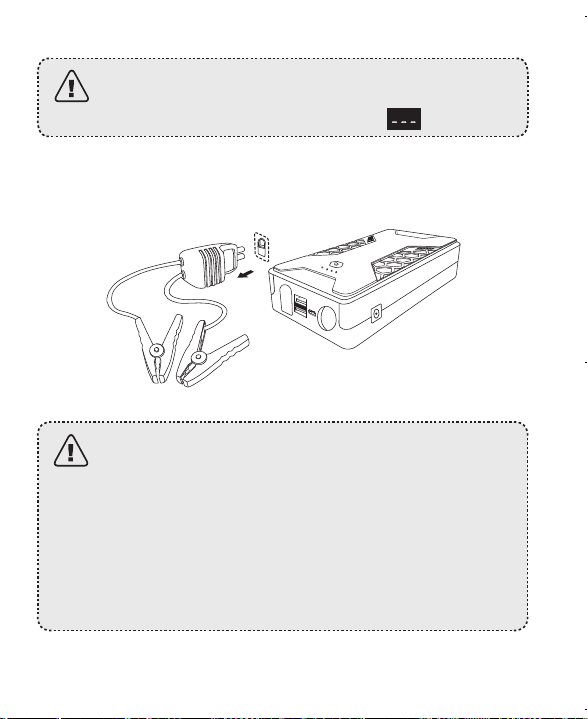
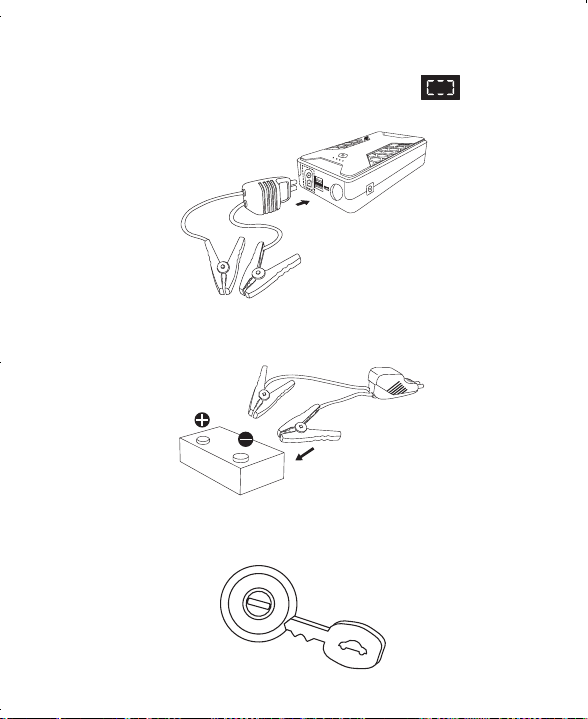
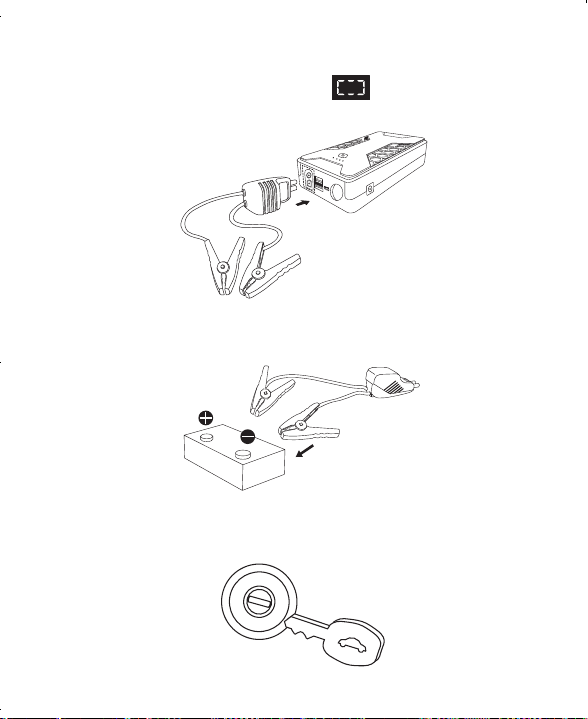
2. Plug in the jumper cables. The LED display on the jump cables
should show circulating clockwise.
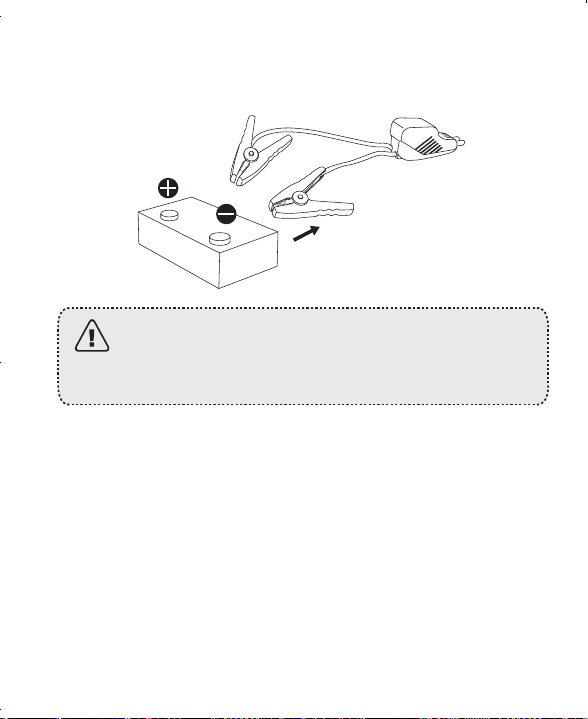
3. Connect the red clamp to the positive terminal (+) and the black
clamp to the negative terminal (-) of your car battery.
4.
Start your engine. The cables’ LED display should show the current
voltage of the jump starter battery.
The jump starter will halt power output after eight
consecutive attempts to jump start the car engine, and
will flash on the LED display.
5. After successfully jump starting your car, unplug the jumper
cables within 30 seconds.
• After every successful jump start, the jump starter will reset
automatically. If it fails to jump start your car, remove and
reconnect the clamps after two minutes. After the LED
display shows the voltage, start the car engine.
• DO NOT charge the device immediately after jump starting
your car. Wait at least 30 minutes before charging the
device after a jump start.
• DO NOT crank the engine for more than 3 seconds. Allow
the jump starter to cool down for at least 1 minute after
each attempt.
• If it is extremely hot or cold, wait for several minutes until
the battery works properly (0-60°C).
07 English English 08
2. Plug in the jumper cables. The LED display on the jump cables
should show circulating clockwise.
3. Connect the red clamp to the positive terminal (+) and the black
clamp to the negative terminal (-) of your car battery.
4.
Start your engine. The cables’ LED display should show the current
voltage of the jump starter battery.
The jump starter will halt power output after eight
consecutive attempts to jump start the car engine, and
will flash on the LED display.
5. After successfully jump starting your car, unplug the jumper
cables within 30 seconds.
• After every successful jump start, the jump starter will reset
automatically. If it fails to jump start your car, remove and
reconnect the clamps after two minutes. After the LED
display shows the voltage, start the car engine.
• DO NOT charge the device immediately after jump starting
your car. Wait at least 30 minutes before charging the
device after a jump start.
• DO NOT crank the engine for more than 3 seconds. Allow
the jump starter to cool down for at least 1 minute after
each attempt.
• If it is extremely hot or cold, wait for several minutes until
the battery works properly (0-60°C).
09 English English 10
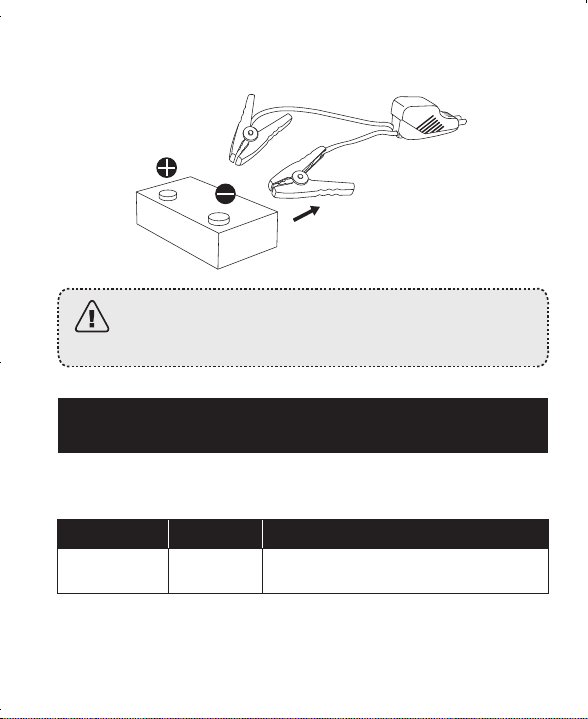
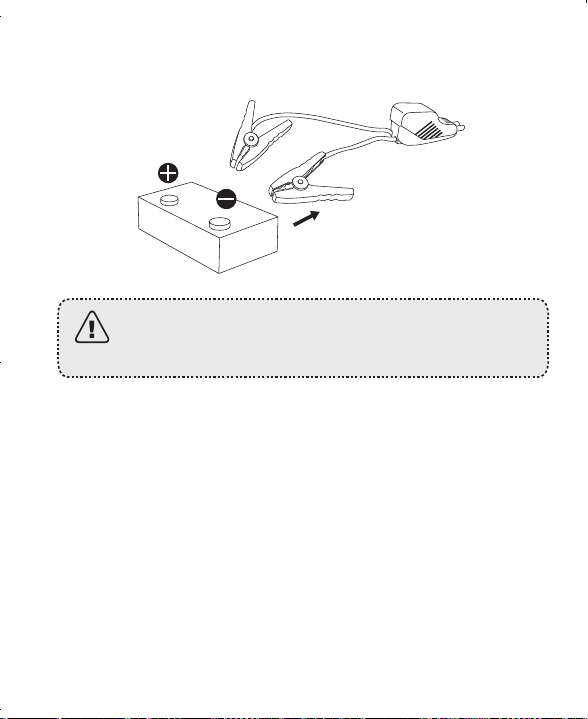
6. Promptly remove clamps from the car battery and put away.
To avoid serious injury to a person or damage to the
jump starter, never attempt to connect the two clamps
together when plugged into the jump starter.
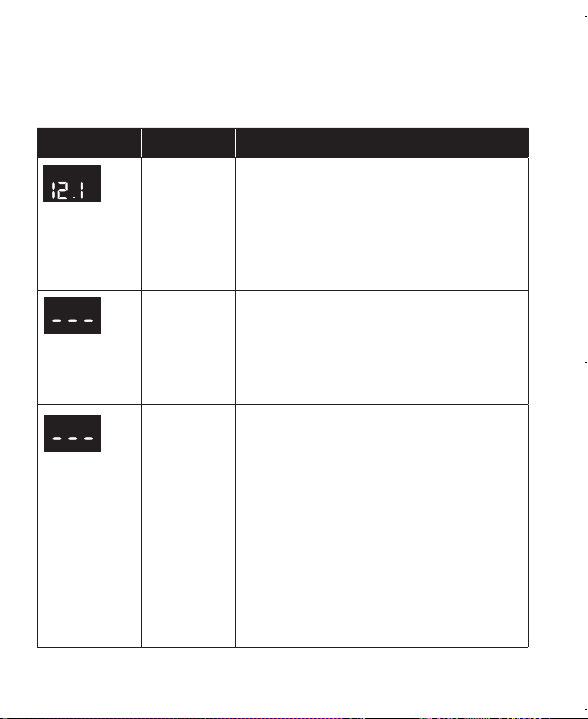
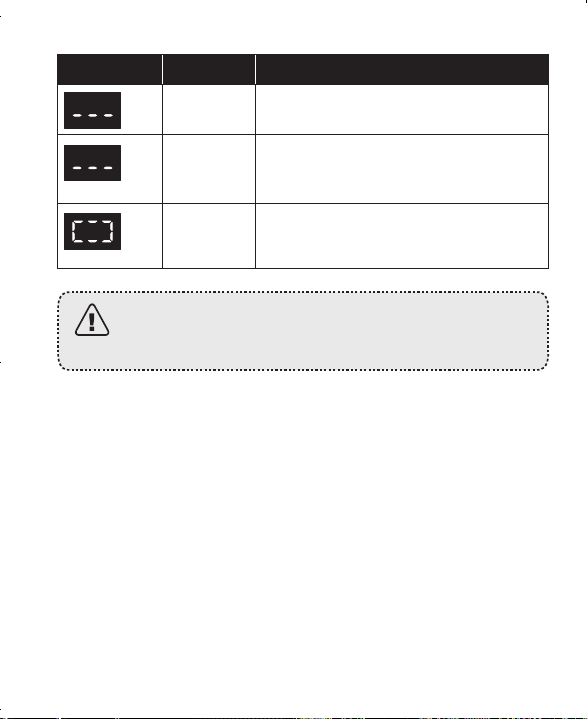
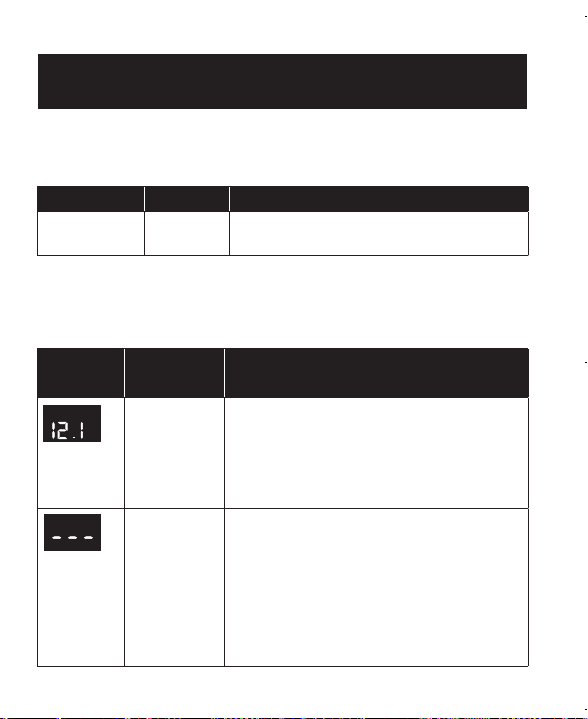
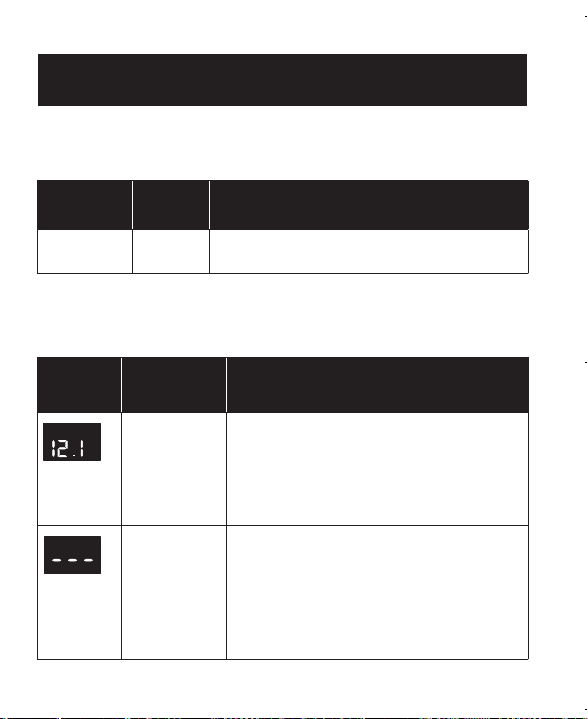
Jumper Cable’s LED Display Guide
1. The table below indicates the jump starter is working properly.
LED Display Buzzer Description
The current
voltage
/
The clamps are connected correctly.
Ready to start the car engine.
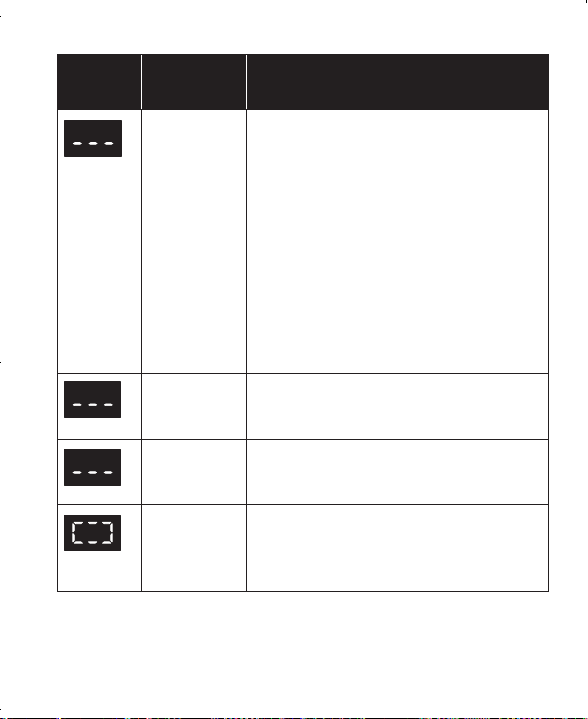
2. The table below indicates the reasons why the jump starter is not
working correctly. DO NOT force the jump starter to jump the car
engine when the LED display shows any of the messages below.
LED Display
Buzzer Description
RC
v
/ • The clamps are connected to the car
battery (not connected to the jump
starter).
• Make sure the clamps are connected
to the jump starter before starting
your engine.
R SC
Beeps once
per second
• The clamps are connected to the
incorrect terminals.
• The clamps are connected together
(this may damage the jump starter).
• The battery has short circuited.
/
• You’ve attempted to jump start the
car engine eight times consecutively
after the clamps have been
connected to the car battery.
• We recommend disconnecting the
jump starter and letting the battery
cool down. Then start your car
engine.
• The peak current of 1000A is not
high enough to jump-start the car
engine successfully.
09 English English 10
6. Promptly remove clamps from the car battery and put away.
To avoid serious injury to a person or damage to the
jump starter, never attempt to connect the two clamps
together when plugged into the jump starter.
Jumper Cable’s LED Display Guide
1. The table below indicates the jump starter is working properly.
LED Display Buzzer Description
The current
voltage
/
The clamps are connected correctly.
Ready to start the car engine.
2. The table below indicates the reasons why the jump starter is not
working correctly. DO NOT force the jump starter to jump the car
engine when the LED display shows any of the messages below.
LED Display
Buzzer Description
RC
v
/ • The clamps are connected to the car
battery (not connected to the jump
starter).
• Make sure the clamps are connected
to the jump starter before starting
your engine.
R SC
Beeps once
per second
• The clamps are connected to the
incorrect terminals.
• The clamps are connected together
(this may damage the jump starter).
• The battery has short circuited.
/
• You’ve attempted to jump start the
car engine eight times consecutively
after the clamps have been
connected to the car battery.
• We recommend disconnecting the
jump starter and letting the battery
cool down. Then start your car
engine.
• The peak current of 1000A is not
high enough to jump-start the car
engine successfully.
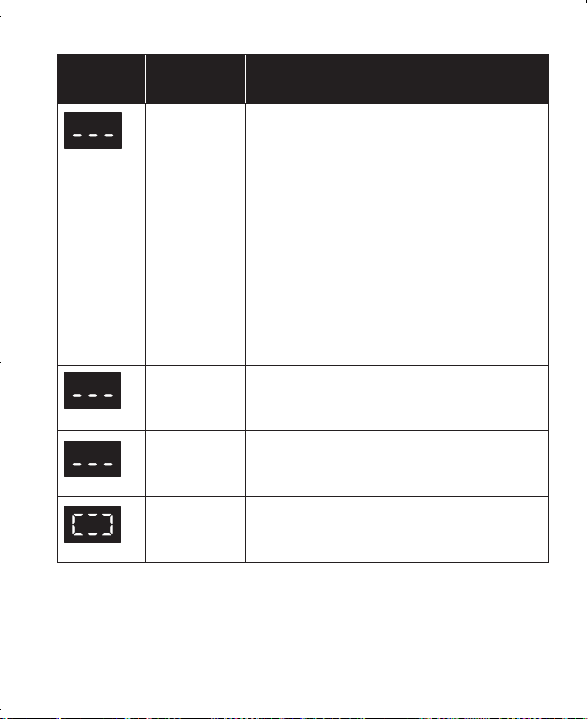
11 English English 12
LED Display
Buzzer Description
HT
Beeps once
per second
• Temperature limit exceeded. Let the
jump starter and cables cool down.
LV
Beeps once
per second
• The jump starter's voltage is low.
• We recommend charging the jump
starter before proceeding.
/
• The clamps are connected to the
jump starter and are ready to be
connected to the car battery.
If one of the situations listed in the table above occurs,
unplug and plug the jumper cable until the current
battery voltage shows on the jump starter's LED display.
Charging and Recharging
Charge Your Phone or Tablet
① Connect your phone or tablet to the jump starter using a USB-A
cable
② Press the function button
1
2
USB-A
USB-A
13 English English 14
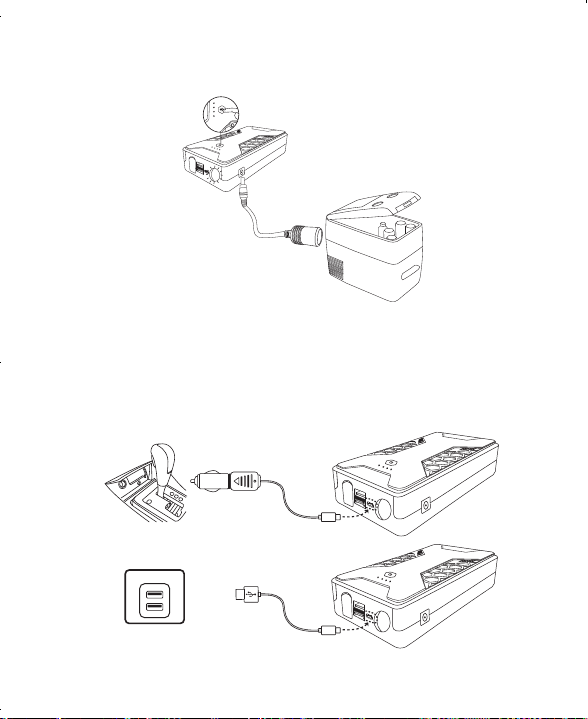
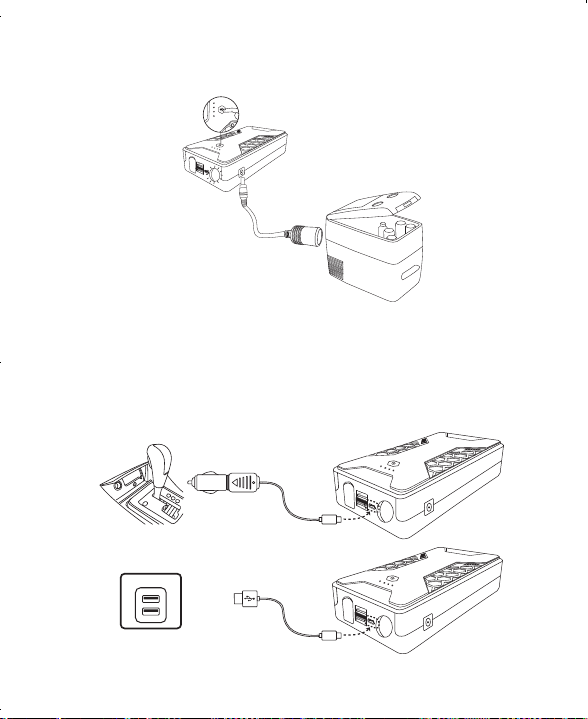
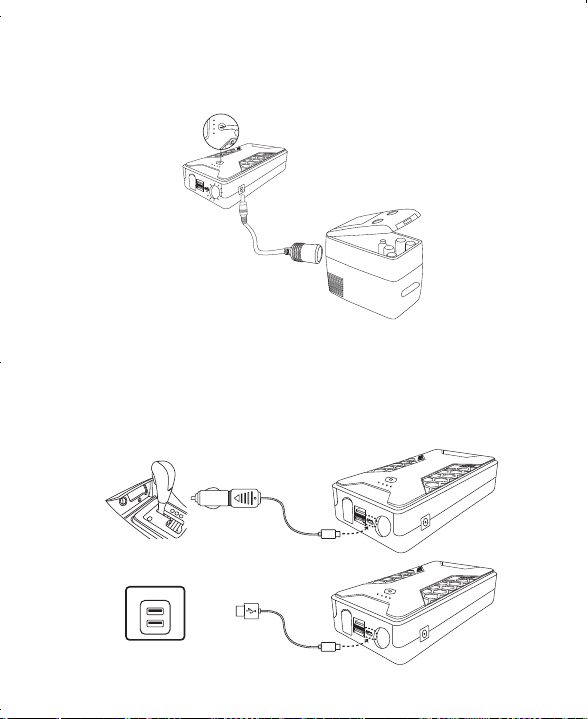
Charge Devices that Connect to a Car Cigarette Socket
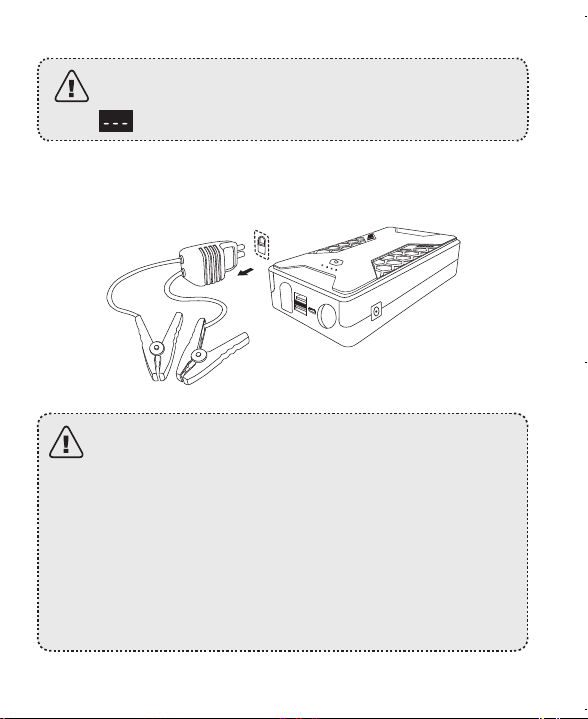
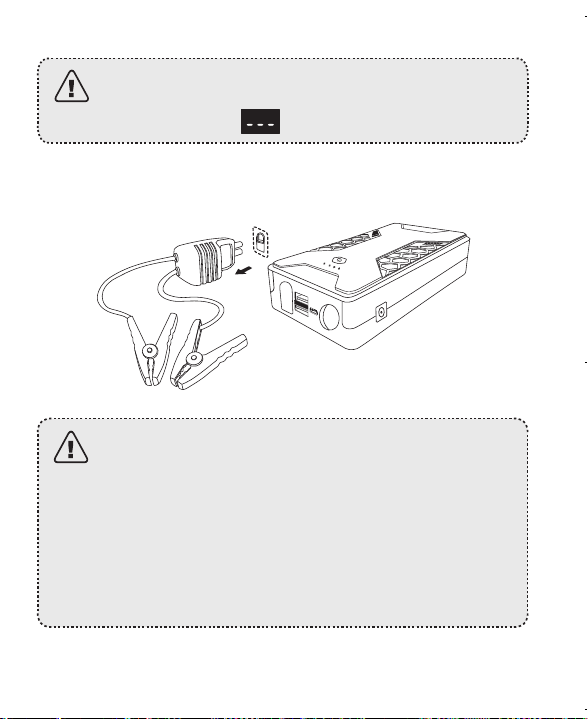
Recharging Your Roav Jump Starter 1000A
Recharge your Roav Jump Starter 1000A when the battery level is
low.
USB-C
USB-C
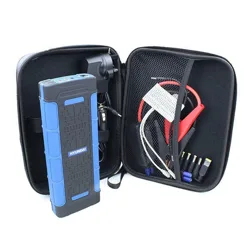
• While recharging and storing your jump starter, make
sure you keep it in the protection bag provided.
• The power adapter is not provided.
• Simultaneous charging and recharging is not
supported.
• DO NOT start the car engine while charging the jump
starter.
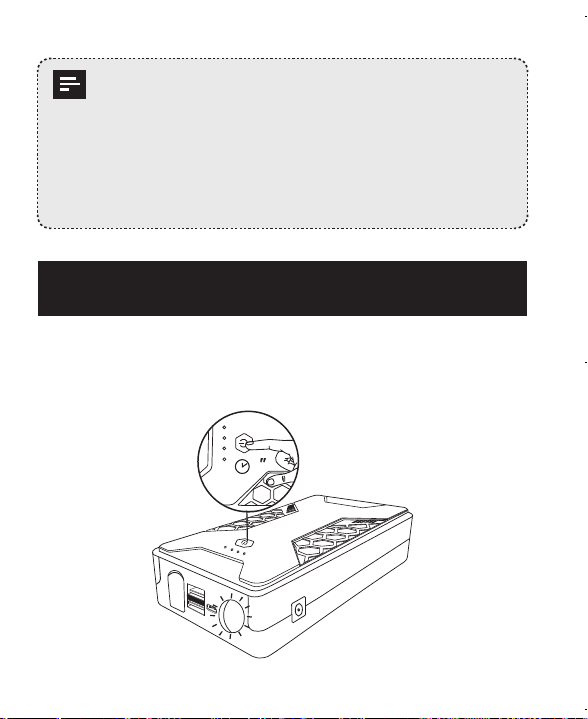
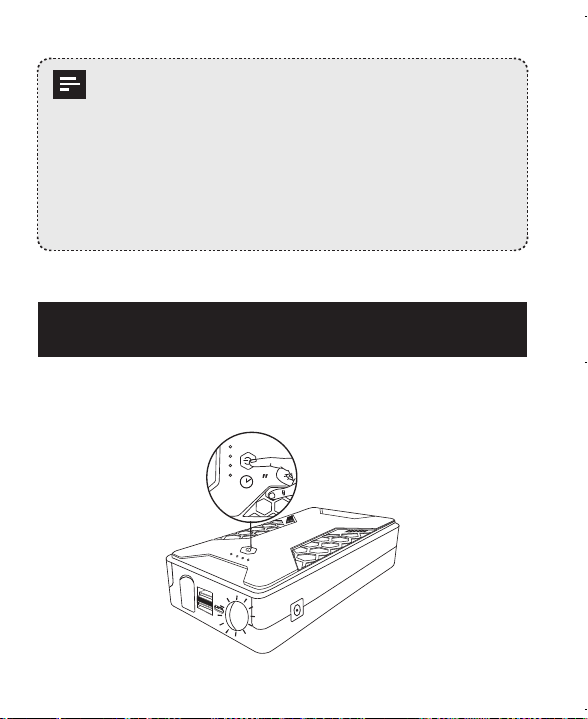
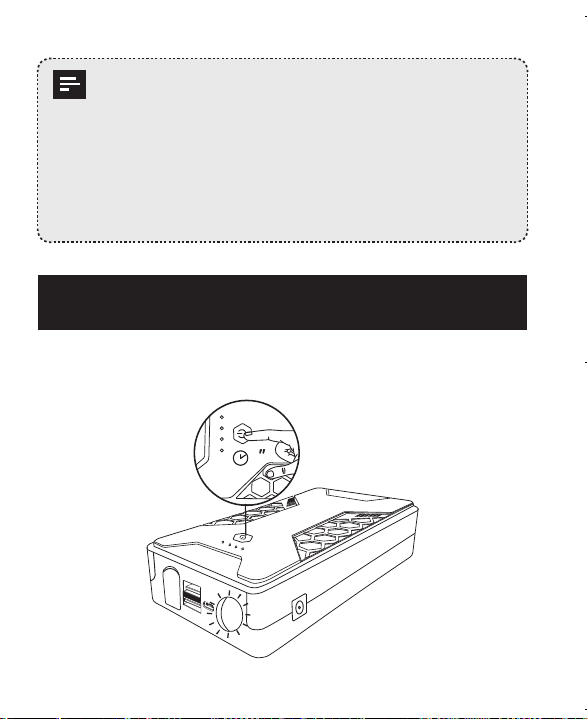
Using the Flashlight
Press and hold to Turn On / O
2
13 English English 14
Charge Devices that Connect to a Car Cigarette Socket
Recharging Your Roav Jump Starter 1000A
Recharge your Roav Jump Starter 1000A when the battery level is
low.
USB-C
USB-C
• While recharging and storing your jump starter, make
sure you keep it in the protection bag provided.
• The power adapter is not provided.
• Simultaneous charging and recharging is not
supported.
• DO NOT start the car engine while charging the jump
starter.
Using the Flashlight
Press and hold to Turn On / O
2
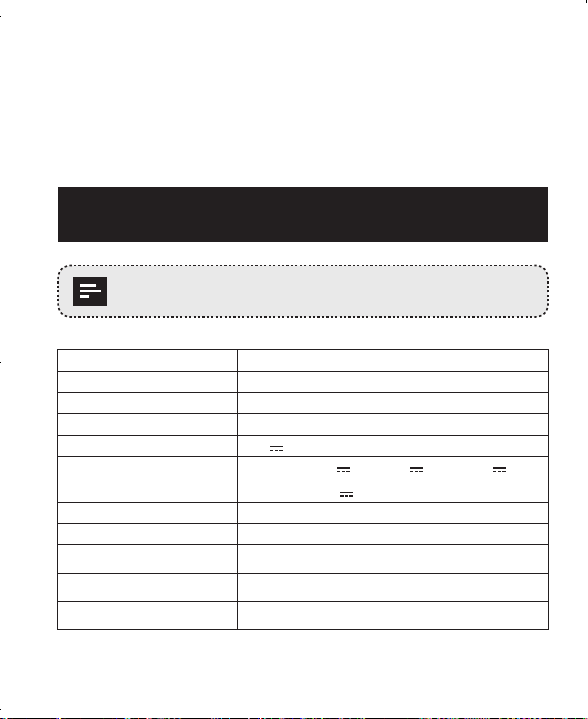
15 English English 16
Press to toggle flash modes
• Always on (illumination)
• Slowly flashing (Alarm)
• Fast flashing (SOS)
Specifications
Specifications are subject to change without notice.
Product Name Roav Jump Starter 1000A
Capacity 12,800 mAh / 47.36Wh
Weight 575g / 20.28 oz
Size 170 x 88 x 39mm / 6.7 x 3.3 x 1.3 in
Input 5 V 3 A
USB output
Output 1: 5V 3A, 9V 2A, 12V 1.5A
Output 2: 5V 2.4A
Starting current 500A
Peak current 1000A
Operating Temperature 14°F - 140°F / -10°C - 60°C
Storage Temperature -4°F - 140°F / -20°C - 60°C
Charging Temperature 14°F - 95°F / -10°C - 35°C
FAQ
1. How long will the jump starter hold its charge?
• The jump starter can hold one charge for six months.
• Make sure your jump starter is more than 50% charged before
use.
2. What does it indicate when all four LED indicators flash
simultaneously?
• It indicates that the temperature of the jump starter exceeds the
limit (140°F / 60°C).
• Let the jump starter cool down until the battery works correctly
and then try again.
3. How do I charge the jump starter?
You need a USB charger or car charger in order to recharge the jump
starter.
• If you have a USB charger with 5V output (5V 3A preferred),
plug one end of a USB-C cable into your device and the other end
into the charger.
• If you have a car charger with 5V USB output (5V 3A
preferred), plug one end of a USB-C cable into your device and the
other into the car charger.
4. What is the purpose of the protection bag?
The protection bag is intended to be used while recharging and
storing the jump starter. Make sure you always keep the jump
starter inside your protection bag while recharging and storing the
jump starter.
17 English English 18
Notice
This product complies with the radio interference
requirements of the European Community.This product can
be used across EU member states.
This product is designed and manufactured with high quality
materials and components, which can be recycled and
reused.
This symbol means the product must not be discarded as
household waste, and should be delivered to an appropriate
collection facility for recycling. Proper disposal and recycling
helps protect natural resources, human health and the
environment. For more information on disposal and recycling
of this product, contact your local municipality, disposal
service, or the shop where you bought this product.
FCC Statement
This device complies with Part 15 of the FCC Rules. Operation
is subject to the following two conditions: (1) This device may
not cause harmful interference, and (2) this device must accept
any interference received, including interference that may cause
undesired operation.
Warning: Changes or modifications not expressly approved by the
party responsible for compliance could void the user's authority to
operate the equipment.
Note: This equipment has been tested and found to comply with
the limits for a Class B digital device, pursuant to Part 15 of the FCC
Rules. These limits are designed to provide reasonable protection
against harmful interference in a residential installation.
This equipment generates, uses, and can radiate radio
frequency energy and, if not installed and used in accordance
with the instructions, may cause harmful interference to radio
communications. However, there is no guarantee that interference
will not occur in a particular installation. If this equipment does
cause harmful interference to radio or television reception, which
can be determined by turning the equipment o and on, the user is
encouraged to try to correct the interference by one or more of the
following measures:
(1) Reorient or relocate the receiving antenna.
(2) Increase the separation between the equipment and receiver.
(3) Connect the equipment into an outlet on a circuit dierent from
that to which the receiver is connected.
(4) Consult the dealer or an experienced radio / TV technician for
help.
The following importer is the responsible party.
Company Name: Fantasia Trading LLC
Address: 9155 Archibald Avenue, Suite 202, Rancho Cucamonga,
CA, 91730, US
Telephone: +1 (909) 484 1530

19 Deutsch Deutsch 20
Wichtige
Sicherheitsinformationen
DIESE INFORMATIONEN AUFBEWAHREN – Dieses Handbuch
enthält wichtige Informationen zur Sicherheit und zum
Betrieb der Kfz-Starthilfe Modell R3130.
Lesen Sie alle Anweisungen sorgfältig durch, bevor Sie
dieses Produkt verwenden. Die Garantie greift nicht,
wenn Schäden auf eine Missachtung der Anweisungen
zurückzuführen sind.
• Bewahren Sie das Produkt an einem Ort auf, der frei von
Flüssigkeiten oder ätzenden Stoen ist.
• Die Verwendung eines nicht vom Hersteller empfohlenen
oder vertriebenen Peripheriegeräts kann zu Brandgefahr,
Stromschlägen oder Personenschäden führen.
• Verwenden Sie dieses Produkt nicht, wenn es einem
harten Schlag ausgesetzt war, fallen gelassen oder
anderweitig beschädigt wurde. Bringen Sie es zu einem
qualifizierten Servicetechniker.
• Nehmen Sie dieses Produkt nicht auseinander; bringen
Sie es zu einem qualifizierten Servicetechniker, wenn eine
Reparatur oder Wartung erforderlich ist. Der inkorrekte
Zusammenbau kann einen Stromschlag oder Brandgefahr
verursachen.
• Um das Risiko eines Stromschlags zu reduzieren,
müssen Sie das Produkt ausstecken, bevor Sie es zu
reinigen oder zu warten versuchen. Das Ausschalten der
Bedienelemente reduziert das Stromschlagrisiko nicht.
• Längere direkte Sonneneinstrahlung vermeiden, da sie
Schäden am Gerät verursachen kann.
• Wenn das Produkt oenen Flammen ausgesetzt wird,
besteht Explosionsgefahr.
• Wenn der Akku aufgebläht ist, Flüssigkeit aus ihm austritt
oder er übel riecht, entsorgen Sie ihn sofort.
• Stellen Sie sicher, dass der Akkuanschluss sauber ist und
die Batterieklemme und die Kabel intakt sind, bevor Sie
das Produkt verwenden.
• Stellen Sie sicher, dass die Batterieklemme vollständig
eingesteckt ist, da anderenfalls die Funktionen
beeinträchtigt werden und Schäden am Gerät entstehen
können.

21 Deutsch Deutsch 22
Was ist im Lieferumfang enthalten
ROAV Jump Starter
1000A
Überbrückungskabel
USB-Kabel Handbuch
Funktionen
• Praktische Starthilfe
• Zwei USB 3.0-Anschlüsse
• USB-C-Eingang
• Notfall-LED-Taschenlampe
• Benutzerfreundliches Design
Auf einen Blick
10
9
1 2
3
4
5
678
① Leistungsanzeige
② Funktionstaste
• Drücken Sie diese Taste, um die
Leistungsanzeige einzuschalten.
• Halten Sie die Taste 2 Sekunden lang
gedrückt, um die Taschenlampe ein-
und auszuschalten
③ Überbrückungskabel
④ LED-Display
⑤ 12V-DC-Ausgang (φ
5,5 mm)
⑥ Taschenlampe
⑦ USB-C- Eingang und
Ausgang
⑧ Ausgang USB 1
⑨ Ausgang USB 2
⑩ Überbrückungskabel-
Anschluss
23 Deutsch Deutsch 24
Status-LED
Während des Ladevorgangs des Roav Jump Starter 1000A leuchten
die LED-Anzeigen wie folgt:
Ladestand LED-Anzeigenstatus
0% bis 24% Eine LED-Anzeige blinkt
25% bis 49% Eine LED-Anzeige leuchtet konstant blau, und eine
blinkt.
50% bis 74% Zwei LED-Anzeigen leuchten konstant blau, und
eine blinkt.
75% bis 99% Drei LED-Anzeigen leuchten konstant blau, und
eine blinkt.
100 % Alle vier LED-Anzeigen leuchten konstant blau
und verlöschen nach 10 Sekunden.
Hinweis: Wenn vier LED-Anzeigen weiter blinken, bedeutet dies, dass
das Startehilfegerät die Temperaturgrenze überschritten hat. Lassen
Sie das Startehilfegerät abkühlen, bevor Sie es wieder verwenden.
Ihr Auto starten
1. Schalten Sie Ihre Roav Kfz-Starthilfe ein und stellen Sie sicher,
dass sie über 50% geladen ist.
• Wenn der Batteriestand unter 5% liegt, blinkt eine
LED-Anzeige kontinuierlich.
• Falls die Ladung weniger als 50% beträgt, ist die
Starthilfe unter Umständen nicht in der Lage, Ihren
Motor zu starten. Wir empfehlen Ihnen, den Akku
vollständig aufzuladen, bevor Sie die Starthilfe
erstmals verwenden.
25 Deutsch Deutsch 26
2. Schließen Sie die Überbrückungskabel an. Auf dem LED-Display
der Überbrückungskabel sollte sich das Symbol im
Uhrzeigersinn drehen.
3. Verbinden Sie die rote Klemme mit dem Pluspol ( + ) und die
schwarze Klemme mit dem Minuspol ( - ) Ihrer Fahrzeugbatterie.
4.
Starten Sie den Motor. Auf dem LED-Display der Kabel sollte die
aktuelle Spannung der Starthilfebatterie zu sehen sein.
Das Startehilfegerät stoppt die Leistungsabgabe nach acht
aufeinanderfolgenden Versuchen, den Fahrzeugmotor zu
starten, und auf der LED-Anzeige blinkt
.
5. Wenn der Motor erfolgreich gestartet wurde, entfernen Sie die
Überbrückungskabel bitte innerhalb von 30 Sekunden.
1. Nach jedem erfolgreichen Motorstart wird die
Starthilfe automatisch zurückgesetzt. Kann der Motor
nicht gestartet werden, entfernen Sie die Klemmen
und schließen Sie sie nach zwei Minuten wieder an.
Sobald auf dem LED-Display die Spannung zu sehen
ist, starten Sie den Motor.
2. Starten Sie den Motor nicht mehr als dreimal
hintereinander, da dies eine Überhitzung oder Schäden
am Produkt verursachen kann.
27 Deutsch Deutsch 28
6. Entfernen Sie die Klemmen rasch von der Fahrzeugbatterie und
räumen Sie diese weg.
Verbinden Sie niemals die beiden Klemmen wenn diese
am Anlasser eingesteckt sind, um schwerwiegende
Verletzungen oder eine Beschädigung Ihres Anlassers zu
vermeiden.
Übersicht der Jumperkabel-LED-Anzeigen
1. Die nachfolgende Tabelle zeigt, was beim ordnungsgemäßen
Funktionieren der Starthilfe auf dem Display zu sehen ist.
LED-Display
Signalton Beschreibung
Aktuelle
Spannung
/
Die Klemmen sind korrekt angeschlossen.
Der Motor kann gestartet werden.
2. Die nachfolgende Tabelle zeigt den Fehlerstatus. Aktivieren
Sie die Starthilfe nicht, wenn folgende Symbole auf dem LED-
Display zu sehen sind.
LED-
Display
Signalton Beschreibung
RC
v
/ • Die Klemmen sind mit den falschen
Polen verbunden.
• Die Klemmen sind miteinander
verbunden (dies kann die Starthilfe
beschädigen).
R SC
Ein Piepton
pro Sekunde
• Die Klemmen sind mit den falschen
Polen verbunden.
• Die Klemmen sind miteinander
verbunden. (Dies kann den Anlasser
beschädigen.)
• Es tritt ein Kurzschluss an der
Autobatterie auf.
29 Deutsch Deutsch 30
LED-
Display
Signalton Beschreibung
/
• Sie haben acht Mal hintereinander
versucht, den Fahrzeugmotor
anspringen zu lassen, nachdem
die Klemmen an der Autobatterie
angeschlossen wurden.
• Wir empfehlen, die Starthilfe zu
trennen und den Motor abkühlen zu
lassen. Starten Sie anschließend den
Motor.
• Der Motor konnte nicht gestartet
werden, weil der Spitzenstrom
(1000 A) nicht hoch genug ist.
HT
Ein Piepton
pro Sekunde
• Temperaturlimit überschritten,
lassen Sie die Starthilfe und die Kabel
abkühlen.
LV
Ein Piepton
pro Sekunde
• Niedrige Spannung auf der Starthilfe.
Wir empfehlen Ihnen, die Starthilfe
zunächst aufzuladen.
/ • Die Klemmen sind mit der Starthilfe
verbunden und können an die
Autobatterie angeschlossen werden.
Laden und wieder aufladen
Laden Sie Ihr Smartphone oder Tablet
① Verbinden Sie Ihr Telefon oder Tablet mit dem Starthilfegerät
über ein USB-A-Kabel
② Drücken Sie die Funktionstaste
1
2
USB-A
USB-A
31 Deutsch Deutsch 32
Laden von Geräten durch die Zigarettenanzünderbuchse
Aufladen Ihres Roav Jump Starter 1000A
Laden Sie Ihren Roav Jump Starter 1000A auf, wenn der
Batteriestand niedrig ist.
USB-C
USB-C
• Achten Sie beim Aufladen und Aufbewahren Ihres
Starthilfegeräts darauf, dass Sie es in der mitgelieferten
Schutztasche aufbewahren.
• Das Netzteil ist nicht im Lieferumfang enthalten.
• Das gleichzeitige Laden und Wiederaufladen wird
nicht unterstützt.
• Starten Sie den Motor NICHT, während Sie die
Starthilfe laden.
Die Taschenlampe verwenden
Gedrückt halten, um einzuschalten / auszuschalten
2

33 Deutsch Deutsch 34
Drücken Sie diese Taste, um die Taschenlampen-
Betriebsarten umzuschalten.
• Leuchtet dauerhaft (Beleuchtung)
• Blinkt langsam (Alarm)
• Blinkt schnell (SOS)
Spezifikationen
Änderungen der technischen Daten ohne
Vorankündigung vorbehalten.
Kapazität 12800mAh / 47,36Wh
Gewicht 575 g
Größe 170 x 88 x 39mm
Input 5 V 3 A
USB-Output
Output 1: 5V 3A, 9V 2A, 12V 1,5A
Output 2: 5V 2.4A
Startstrom 500A
Spitzenstrom 1000A
Betriebstemperatur -10°C - 60°C
Lagertemperatur -20°C - 60°C
Ladetemperatur -10°C - 35°C
FAQ
1. Wie lange hält die Starthilfe die Ladung?
• Die Starthilfe kann eine Ladung sechs Monate lang halten.
• Stellen Sie sicher, dass Ihre Starthilfe vor der Verwendung zu 50 %
aufgeladen ist.
2. Was bedeutet es, wenn alle vier LED-Anzeigen gleichzeitig blinken?
• Die Anzeige zeigt an, dass die Temperatur des Starthilfegeräts den
Grenzwert überschreitet (140°F / 60°C).
• Lassen Sie das Startehilfegerät abkühlen, bis die Batterie richtig
funktioniert, und versuchen Sie es dann erneut.
3. Wie wird die Starthilfe aufgeladen?
Sie müssen ein USB-Ladegerät oder ein Kfz-Ladegerät kaufen, um
die Starthilfe wieder aufladen zu können.
• Wenn Sie über ein USB-Ladegerät mit 5 V Ausgangsleistung
(5 V 3 A bevorzugt) verfügen, stecken Sie ein Ende eines USB-
C-Kabels in Ihr Gerät und das andere Ende in Ihr Ladegerät.
• Wenn Sie über ein Kfz-Ladegerät mit einem 5-V-USB-Ausgang
(5 V 3 A bevorzugt) verfügen, stecken Sie ein Ende eines USB-
C-Kabels in Ihr Gerät und das andere Ende in das Kfz-Ladegerät.
4. Wder Zweck der Schutztasche?
Die Schutztasche ist zur Verwendung beim Aufladen und
Aufbewahren des Starthilfegeräts vorgesehen. Achten Sie darauf,
dass Sie das Starthilfegerät beim Aufladen und Aufbewahren immer
in Ihrer Schutztasche lassen.

35 Español Español 36
Instrucciones de
seguridad importantes
CONSERVE ESTAS INSTRUCCIONES
: este manual contiene
instrucciones de seguridad y funcionamiento
importantes para el arrancador de baterías (modelo
R3130).
Lea y comprenda todas las instrucciones antes de utilizar
este producto. Si los daños son consecuencia de no
seguir las instrucciones, no se aplicará la garantía.
• Mantenga el producto en un lugar que no esté
expuesto a líquidos o materiales corrosivos.
• El uso de un accesorio no recomendado o vendido por
el fabricante puede suponer un riesgo de incendio,
descarga eléctrica o lesiones.
• No utilice este producto si ha recibido un golpe
fuerte, ha sufrido una caída o ha resultado dañado de
cualquier otra forma. En ese caso, llévelo a un técnico
de servicio cualificado.
• No desmonte este producto; llévelo a un técnico de
servicio cualificado si necesita mantenimiento o una
reparación. Si se vuelve a montar de forma incorrecta,
puede existir riesgo de descarga eléctrica o incendio.
• Para reducir el riesgo de descarga eléctrica,
desenchufe el producto antes de intentar realizar
cualquier tipo de mantenimiento o limpieza. Apagar
los controles no reduce este riesgo.
• Evite la exposición prolongada a la luz solar directa,
que puede provocar daños en el dispositivo.
• La exposición de este producto a llamas vivas puede
hacer que explote.
• Si la batería está hinchada, tiene fugas de líquido o
desprende mal olor, deséchela de inmediato.
• Asegúrese de que el conector de la batería está
limpio y de que las pinzas de batería y los cables se
conservan intactos antes de utilizar el producto.
• Asegúrese de que las pinzas de la batería están
correctamente conectadas; de lo contrario, el
funcionamiento podría verse afectado y el producto
podría dañarse.
37 Español Español 38
Contenido
ROAV Jump Starter
Pro 1000A
Cables de arranque
de baterías
cable USB Manual
Características
• Arranque de baterías cómodo
• Dos puertos USB 3.0
• Puerto de entrada USB-C
• Luz LED de emergencia
• Diseño intuitivo
Síntesis
10
9
1 2
3
4
5
678
① Indicadores de nivel de batería
② Botón de función
• Pulsar para encender los
indicadores de nivel de batería
• Mantener pulsado durante 2
segundos para encender o apagar
la linterna
③ Cables de arranque
④ Pantalla LED
⑤ Salida de 12 V CC (φ
5,5 mm)
⑥ Linterna
⑦ Entrada y salida
USB-C
⑧ Salida USB 1
⑨ Salida USB 2
⑩ Puerto de arranque
39 Español Español 40
Led de estado
Al cargar el arrancador de baterías Roav 1000A, los indicadores
LED se iluminan de la siguiente forma:
Nivel de batería
Estado del indicador LED
0 %-24 % Un indicador LED parpadea
25 %-49 % Un indicador LED se ilumina en color azul fijo y
otro parpadea
50 %-74 % Dos indicadores LED se iluminan en color azul
fijo y otro parpadea
75 %-99 % Tres indicadores LED se iluminan en color azul
fijo y otro parpadea
100 % Los cuatro indicadores LED se iluminan en color
azul fijo y se apagarán después de 10 segundos
Nota: Si los cuatro indicadores LED parpadean, esto indica que la
temperatura del arrancador de baterías es superior al límite. Permita
que el arrancador de baterías se enfríe antes de volver a utilizarlo.
Puentear tu coche
1. Encender Roav Jump Starter y asegurarse de que tenga al menos
50% de carga.
• Si en nivel de batería es inferior al 5 %, un indicador
LED se iluminará de forma continua.
• Si la carga es menor de 50%, quizás no logre puentear
el motor.Se recomienda cargar por completo la batería
antes de utilizar el arrancador de baterías por primera
vez.
41 Español Español 42
2. Conecte los cables de arranque de baterías. La pantalla LED de
los cables de arranque debe mostrar la imagen pasando
hacia la derecha.
3. Conecta la pinza roja al polo positivo (+) de la batería del coche
y la negra al negativo (-).
4.
Arranque el motor. La pantalla LED de los cables debe mostrar la
tensión actual de la batería del arrancador.
Tras ocho intentos consecutivos de arrancar el motor del
automóvil, el arrancador de baterías detendrá la salida de
potencia y el icono parpadeará en la pantalla LED.
5. Tras realizar el arranque de la batería, desconecte los cables en
30 segundos.
1. Cada vez que se efectúe el arranque de la batería, el
arrancador se restablecerá automáticamente. Si el
arranque de la batería no se realiza correctamente,
desconecte y vuelva a conectar las pinzas
transcurridos dos minutos. Cuando la pantalla LED
muestre la tensión, arranque el motor.
2. NO arranque el motor del coche más de tres veces
seguidas, ya que el producto puede sobrecalentarse o
dañarse.
43 Español Español 44
6. Quitar pinzas de la batería del coche y guardar.
Para evitar provocar lesiones graves a una persona o
daños en el arrancador, nunca intente conectar las dos
abrazaderas juntas cuando enchufe el arrancador.
Guía sobre la pantalla LED del cable de arranque
1. La siguiente tabla indica que el arrancador de baterías funciona
correctamente.
Pantalla
LED
Señal
acústica
Descripción
Tensión
actual
/
Las pinzas están conectadas correctamente.
Listo para arrancar el motor del coche.
2. La siguiente tabla indica un estado de error. No intente nunca
forzar el arranque del motor del coche si la pantalla LED muestra
lo siguiente.
Pantalla
LED
Señal
acústica
Descripción
RC
v
/ • Las pinzas están conectadas a los
terminales incorrectos.
• Las pinzas están conectadas entre sí
(esto puede dañar el dispositivo de
arranque).
R SC
Emite un
pitido por
segundo
• Pinzas conectadas a terminales
incorrectos
• Pinzas conectadas una a otra (puede
causar daños)
• Se ha producido un cortocircuito en la
batería del coche.
45 Español Español 46
Pantalla
LED
Señal
acústica
Descripción
/
• Ha intentado usar el dispositivo
de arranque del motor del coche
ocho veces consecutivas una vez
conectadas las pinzas a la batería del
coche.
• Le recomendamos que desconecte el
dispositivo de arranque y deje que la
batería se enfríe. Luego inicie el motor.
• No se ha podido arrancar el coche
porque la corriente de pico (1000 A)
no es lo suficientemente alta como para
que el motor arranque.
HT
Emite un
pitido por
segundo
• Límite de temperatura excedido, dejar
enfriar los cables del jump starter
LV
Emite un
pitido por
segundo
• La tensión del arrancador de baterías es
baja. Se recomienda cargar el arrancador
de baterías primero.
/ • Las pinzas están conectadas al
arrancador de baterías y están listas
para conectarlas a la batería del
coche.
Cargar y recargar
Cargar tu móvil o tableta
① Conecte el teléfono o tableta al arrancador de baterías mediante
un cable USB-A
② Pulse el botón de función
1
2
USB-A
USB-A
47 Español Español 48
Cargar dispositivos que conectan a un puerto de carga
de carro para encendedor de cigarrillos
Carga del arrancador de baterías Roav 1000A
Cuando el nivel de batería del arrancador de baterías Roav 1000A
sea bajo, cargue la batería.
USB-C
USB-C
• Asegúrese de mantener el arrancador de baterías en
la funda protectora suministrada durante la carga y el
almacenamiento.
• El adaptador de alimentación no está incluido.
• No es posible cargar la batería y el arrancador de
baterías simultáneamente.
• NO arranque el motor del coche mientras el
arrancador de baterías se carga.
Usar la linterna
Mantener presionado para encender / apagar
2
49 Español Español 50
Pulsar para alternar entre los distintos modos de linterna
• Encendido permanente (iluminación)
• Intermitente lento (alarma)
• Intermitente rápido (señal de auxilio)
Especificaciones
Las especificaciones están sujetas a cambios sin previo
aviso.
Capacidad 12800mAh / 47.36Wh
Peso 575g / 20.28 oz
Medidas 170 x 88 x 39mm / 6.7 x 3.3 x 1.3 in
Entrada 5 V 3 A
Salida USB
Output 1: 5V 3A, 9V 2A, 12V 1.5A
Output 2: 5V 2.4A
Corriente inicial 500A
Corriente pico 1000A
Temperatura de
funcionamiento
-10 °C a 60 °C (14 °F a 140 °F)
Temperatura de
almacenamiento
-20 °C a 60 °C (-4 °F a 140 °F)
Temperatura de carga -10°C a 35°C (14°F a 95°F)
FAQ
1. ¿Cuánto tiempo aguanta la carga el dispositivo de arranque?
• El dispositivo de arranque conserva una carga para seis meses.
• Asegúrese de que el dispositivo de arranque tiene más de un 50
% de carga antes de su uso.
2. ¿Qué significa cuando los cuatro indicadores LED parpadean
simultáneamente?
• Esto indica que la temperatura del arrancador de batería ha
superado el límite (60 °C o 140 °F).
• Permita que el arrancador de baterías se enfríe hasta que la batería
funcione correctamente y, a continuación, inténtelo de nuevo.
3. ¿Cómo puedo cargar el dispositivo de arranque?
Tiene que comprar un cargador USB o un cargador de coche para
poder recargar el dispositivo de arranque.
• Si ya tiene un cargador USB con salida de 5 V (preferiblemente
5 V 3 A), enchufe un extremo del cable USB-C a su dispositivo
y el otro al cargador.
• Si tiene un cargador de coche con una salida USB de 5 V
(preferiblemente 5 V 3 A), enchufe un extremo del cable USB-C
a su dispositivo y el otro al cargador de coche.
4. ¿Para qué se utiliza la funda protectora?
La funda protectora se debe utilizar durante la carga y el
almacenamiento del arrancador de baterías. Asegúrese de mantener
siempre el arrancador de baterías dentro de la funda protectora
durante la carga y el almacenamiento.

51 Français Français 52
Tout remontage incorrect pourrait entraîner un risque
d'électrocution ou d'incendie.
• Pour réduire le risque d'électrocution, débranchez
ce produit avant de procéder à tout entretien ou
nettoyage. La désactivation des commandes ne réduit
pas ce risque.
• Évitez une longue exposition à la lumière directe du
soleil, qui peut causer des dommages.
• L’exposition de ce produit à des flammes peut causer
une explosion.
• Si la batterie est gonflée, fuit ou sent mauvais, mettez-
la au rebut immédiatement.
• Avant d'utiliser le produit, assurez-vous que le
connecteur de batterie est propre et que la pince et les
câbles de batterie sont intacts.
• Assurez-vous que la pince de batterie est bien
branchée. Dans le cas contraire, cela pourrait aecter
les fonctions et endommager le produit.
Consignes importantes
de sécurité
CONSERVEZ CES INSTRUCTIONS
- Ce manuel contient
d'importantes consignes de sécurité et d'utilisation pour
cette aide au démarrage (modèle R3130.
Veuillez lire et comprendre toutes les instructions avant
d'utiliser ce produit. Si des dommages sont causés par le
non-respect des instructions, La garantie ne s’appliquera pas
.
• Conservez le produit dans un endroit à l'abri de
l'exposition à un liquide ou des matières corrosives.
• L'utilisation d'un accessoire non recommandé ou
non vendu par le fabricant peut entraîner un risque
d'incendie, d'électrocution ou de blessure.
• N'utilisez pas ce produit s'il a reçu un choc violent, s'il
est tombé ou s'il a été endommagé ; confiez-le à un
technicien de maintenance qualifié.
• Ne démontez pas ce produit ; confiez-le à un
technicien qualifié en cas d'entretien ou de réparation.
53 Français Français 54
Ce qui est inclus
ROAV Jump Starter
1000A
Câbles de démarrage
câble USB Manuel
Fonctionnalités
• Pour un démarrage pratique
• 2 ports USB 3.0
• Port d'entrée USB-C
• Lampe torche d'urgence
• Conception conviviale
Aperçu
10
9
1 2
3
4
5
678
① Indicateurs du niveau d'alimentation
② Bouton de fonction
• Appuyez pour allumer
les indicateurs de niveau
d'alimentation.
• Maintenir appuyé pendant deux
secondes pour allumer/éteindre la
lampe de poche
③ Câbles de démarrage
④ Achage LED
⑤ Sortie 12 V CC (φ 5,5
mm)
⑥ Lampe de poche
⑦ Entrée et sortie USB C
⑧ Sortie USB 1
⑨ Sortie USB 2
⑩ Port de démarrage

55 Français Français 56
LED d'état
Pendant le chargement du Roav Jump Starter 1000A, les
indicateurs LED s’achent comme suit :
Niveau
d'alimentation
État de l'indicateur LED
0 %~24 % Un indicateur LED clignote.
25%~49% Un indicateur LED est allumé en bleu et un autre
clignote.
50%~74% Deux indicateurs LED sont allumés en bleu et un
autre clignote.
75%~99% Trois indicateurs LED sont allumés en bleu et un
autre clignote.
100 % Les quatre indicateurs LED sont allumés en bleu
et s'éteignent après 10 secondes.
Remarque : Lorsque les quatre indicateurs LED continuent de
clignoter, cela signifie que la température du démarreur de secours
dépasse la limite maximale. Laissez le démarreur de secours
refroidir avant de le réutiliser.
Démarrer votre voiture
1. Allumez votre Roav Jump Starter et assurez-vous qu’il a bien
plus de 50% de batterie.
• Si le niveau de la batterie est inférieur à 5 %, un
indicateur LED clignotera en continu.
• S’il a moins de 25% de batterie, il pourrait ne pas
être capable de démarrer votre véhicule.Nous vous
recommandons de recharger complètement la batterie
avant d'utiliser l'aide au démarrage la première fois.
57 Français Français 58
2. Branchez les câbles de démarrage. L'achage LED sur les câbles
de démarrage devrait montrer que circule dans le sens
horaire.
3. Branchez la pince rouge à la borne positive (+) et la pince noire à
la borne négative (-) de la batterie de votre véhicule.
4.
Démarrez votre moteur. L'achage LED des câbles doit indiquer la
tension actuelle de la batterie de l'aide au démarrage.
Le démarreur de sauts arrêtera la puissance après huit
tentatives consécutives de redémarrage du moteur de la
voiture et clignotera sur l’achage LED.
5. Une fois le démarrage eectué, débranchez les câbles de
démarrage dans les 30 secondes.
1.
Après chaque démarrage réussi, l'aide au démarrage
se réinitialise automatiquement. Si votre voiture ne
démarre pas rapidement, débranchez et rebranchez les
pinces après deux minutes. Une fois que l'achage LED
indique la tension, démarrez le moteur de votre véhicule.
2. N'utilisez PAS l'aide au démarrage plus de trois
successivement. Cela pourrait faire surchauer ou
endommager le produit.
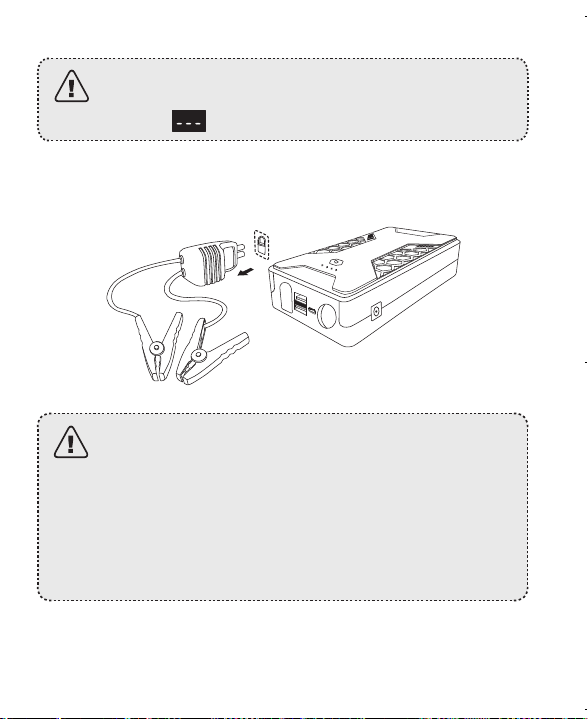
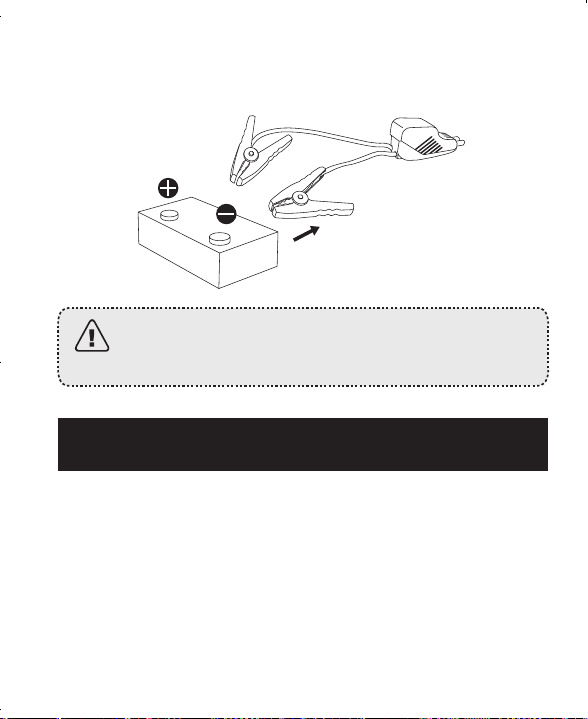
59 Français Français 60
6. Débranchez immédiatement les pinces de la batterie de la voiture
et rangez-les.
Pour éviter toute blessure ou dommage sur le Jump
Starter, ne jamais connecter les 2 pinces ensemble
lorsqu’elles sont branchées sur celui-ci.
Guide d'affichage LED du câble de démarrage
1. Le tableau ci-dessous indique que l'aide au démarrage
fonctionne correctement.
Achage LED Sonnerie Description
Tension actuelle /
Les pinces sont branchées
correctement. Prêt à démarrer le
moteur du véhicule.
2. Le tableau ci-dessous montre l'état d'erreur. N'essayez jamais
de forcer le démarrage de votre véhicule lorsque l'achage LED
montre ceci :
Achage
LED
Sonnerie Description
RC
v
/ • Les pinces ne sont pas connectées
au bons terminaux.
• Les pinces sont connectées l’une
à l’autre (cela peut endommager
l’appareil d’aide au démarrage).
R SC
Retentit
une fois par
seconde
• Pinces connectées aux mauvais
terminaux
• Pinces connectées l’une à l’autre
(risque d’endommager le Jump
Starter)
• Des courts-circuits ont lieu au sein
de la batterie du véhicule.
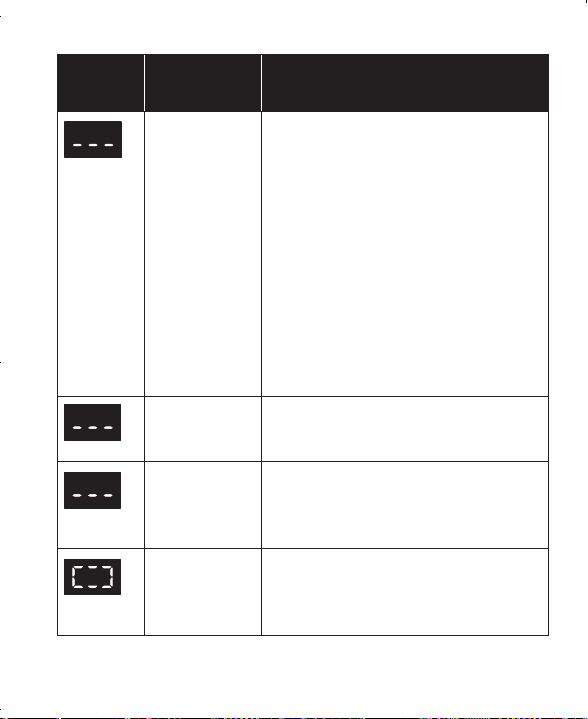
61 Français Français 62
Achage
LED
Sonnerie Description
/
• Vous avez essayé de lancer le
moteur du véhicule huit fois
consécutivement après la connexion
des pinces à la batterie.
• Nous recommandons de
déconnecter l’appareil d’aide au
démarrage et de laisser la batterie
refroidir. Puis, démarrez votre
moteur.
• Impossible de démarrer le moteur
d'un véhicule car la tension de crête
(1000 A) n'est pas susamment
élevée.
HT
Retentit
une fois par
seconde
• Température trop élevée, laisser le
booster et les câbles refroidir
LV
Retentit
une fois par
seconde
• La tension de l'aide au
démarrage est faible. Nous vous
recommandons de charger d'abord
l'aide au démarrage.
/ • Les pinces sont branchées sur
l'aide au démarrage et sont prêtes
à être branchées sur une batterie
de voiture.
Charge et recharge
Charger votre téléphone ou tablette
① Branchez votre téléphone ou tablette au démarreur de secours à
l'aide d'un câble USB A
② Appuyez sur le bouton de fonction
1
2
USB-A
USB-A
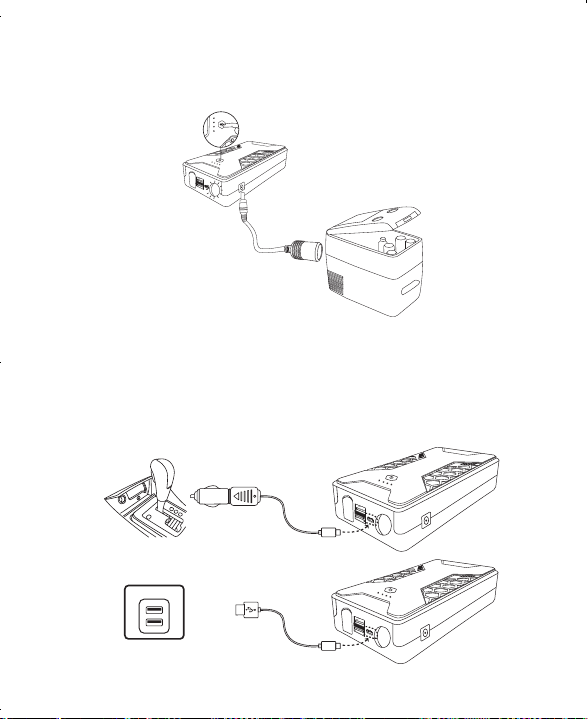
63 Français Français 64
Dispositifs de charge qui se connectent à un allume
cigare de voiture
Recharge de votre Roav Jump Starter 1000A
Rechargez votre Roav Jump Starter 1000A lorsque le niveau de la
batterie est faible.
USB-C
USB-C
• Lors de la recharge et du rangement de votre
démarreur de secours, veillez à conserver celui-ci dans
le sac de protection fourni.
• L'adaptateur secteur n'est pas fourni.
• La charge et la recharge simultanées ne sont pas prises
en charge.
• Ne démarrez PAS le moteur de votre véhicule lorsque
l'aide au démarrage est en charge.
Utilisation de la Lampe Torche
Maintenez appuyé pour allumer/ éteindre
2

65 Français Français 66
Appuyez pour passer d'un mode flash à l'autre
• Fixe (Illumination)
• Clignotement lent (Alarme)
• Clignotement rapide (SOS)
Spécifications
Les spécifications sont susceptibles d'être modifiées
sans préavis.
Capacité 12800mAh / 47.36Wh
Poids 575g / 20.28 oz
Dimensions 170 x 88 x 39mm / 6.7 x 3.3 x 1.3 in
Entrée 5 V 3 A
Sortie USB
Output 1: 5V 3A, 9V 2A, 12V 1.5A
Output 2: 5V 2.4A
Courant à l’allumage 500A
Courant de crête 1000A
Température de
fonctionnement
14 °F - 140 °F / -10 °C - 60 °C
Température de stockage -4 °F - 140 °F / -20 °C - 60 °C
Température de charge 14 °F - 95 °F / -10 °C - 35 °C
FAQ
1. Quelle est l’autonomie de l’appareil d’aide au démarrage ?
• L’appareil d’aide au démarrage a une autonomie de six mois.
• Assurez-vous qu’il est chargé à plus de 50 % avant l’utilisation.
2. Qu'est-ce que cela indique lorsque les quatre indicateurs LED
clignotent simultanément ?
• Cela indique que la température du démarreur de secours dépasse
la limite (140 °F / 60 °C).
• Laissez le démarreur de secours refroidir jusqu'à ce que la batterie
fonctionne correctement, puis réessayez.
3. Comment recharger l’appareil d’aide au démarrage ?
Vous devez acquérir un chargeur USB ou un chargeur de voiture
pour recharger votre appareil d’aide au démarrage.
• Si vous avez un chargeur USB avec une sortie de 5 V (5 V 3
A de préférence), branchez une extrémité du câble USB-C dans
votre appareil et l’autre dans le chargeur.
• Si vous avez un chargeur de voiture avec une sortie USB de 5 V
(5 V 3 A de préférence), branchez une extrémité du câble
USB-C dans votre appareil et l’autre dans le véhicule.
4. À quoi sert le sac de protection ?
Le sac de protection est destiné à être utilisé lors de la recharge et
du rangement du démarreur de secours. Assurez-vous de toujours
conserver le démarreur de secours dans votre sac de protection lors
de la recharge et du rangement.

67 Italiano Italiano 68
Istruzioni importanti
sulla sicurezza
CONSERVARE QUESTE ISTRUZIONI
- Questo manuale contiene istruzioni importanti per
la sicurezza e per l'utilizzo dell'avviatore di emergenza
(Modello R3130).
Leggere e comprendere tutte le istruzioni prima di
utilizzare il prodotto. La garanzia non si applica in caso di
danni causati dal mancato rispetto delle istruzioni.
• Conservare il prodotto in un'area non esposta a liquidi
o materiali corrosivi.
• L'uso di accessori non consigliati o non venduti dal
produttore può comportare il rischio di incendi, scosse
elettriche o lesioni alle persone.
• Non azionare il prodotto se ha subito un urto violento,
è caduto o risulta comunque danneggiato. Richiedere
assistenza a un tecnico qualificato.
• Non smontare il prodotto. Qualora sia necessario un
intervento di manutenzione o riparazione, rivolgersi a
un tecnico qualificato. Il riassemblaggio non corretto
può determinare un rischio di scosse elettriche o
incendio.
• Per ridurre il rischio di scosse elettriche, scollegare il
prodotto prima di eettuare qualsiasi operazione di
manutenzione o pulizia. Disattivare tutti i comandi non
consente di ridurre questo rischio.
• Evitare di esporre il dispositivo alla luce diretta del
sole, poiché potrebbe subire danni.
• Il prodotto può esplodere se esposto a fiamme libere.
• Se la batteria appare gonfia, perde liquido o emana
cattivi odori, smaltirla immediatamente.
• Prima di utilizzare il prodotto, assicurarsi che il
connettore della batteria sia pulito e verificare che i
morsetti e i cavi della batteria siano intatti.
• Assicurarsi che il morsetto della batteria sia
completamente inserito, per non rischiare di
compromettere il funzionamento e danneggiare il
prodotto.

69 Italiano Italiano 70
Contenuto della confezione
ROAV Jump Starter
1000A
Cavi con ponticelli
cavo USB Manuale
Funzioni
• Pratico avvio di emergenza
• Due porte USB 3.0
• Porta di ingresso USB-C
• Torcia a LED di emergenza
• Design intuitivo
Sintesi
10
9
1 2
3
4
5
678
① Indicatori del livello di alimentazione
② Pulsante funzione
• Premere per attivare gli indicatori
del livello di alimentazione
• Tenere premuto per 2 secondi per
accendere/spegnere la torcia
③ Cavi di connessione
④ Display a LED
⑤ Uscita 12 V CC
(φ 5,5 mm)
⑥ Torcia
⑦ Porta di ingresso e
uscita USB-C
⑧ Uscita USB 1
⑨ Uscita USB 2
⑩ Porta di connessione
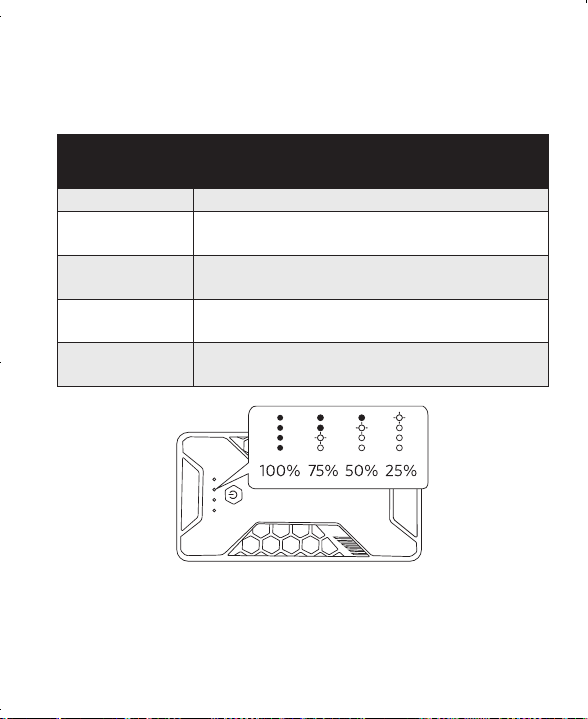
71 Italiano Italiano 72
LED di stato
Durante la ricarica del dispositivo di avviamento Roav 1000A, gli
indicatori LED mostrano quanto segue:
Livello di
alimentazione
Stato indicatore LED
0%~24% Un indicatore LED lampeggia
25%~49% Un indicatore LED rimane blu fisso e uno
lampeggia
50%~74% Due indicatori LED rimangono blu fisso e uno
lampeggia
75%~99% Tre indicatori LED rimangono blu fisso e uno
lampeggia
100% Tutti e quattro gli indicatori LED rimangono blu
fisso e si spengono dopo 10 secondi
Nota: quando quattro indicatori LED continuano a lampeggiare,
significa che il dispositivo di avviamento supera il limite di temperatura.
Lasciar rareddare il dispositivo di avviamento prima di riutilizzarlo.
Avviare la vostra auto
1. Accendere Roav Jump Starter e assicurarsi che la batteria non
sia inferiore al 50%.
• Se il livello della batteria è inferiore al 5%, un
indicatore LED lampeggerà continuamente. `
• Se la batteria è inferiore al 50%, Roav Jump Starter
potrebbe non riuscire ad avviare il motore. È
consigliabile caricare completamente la batteria prima
di iniziare a utilizzare l'avviatore di emergenza.
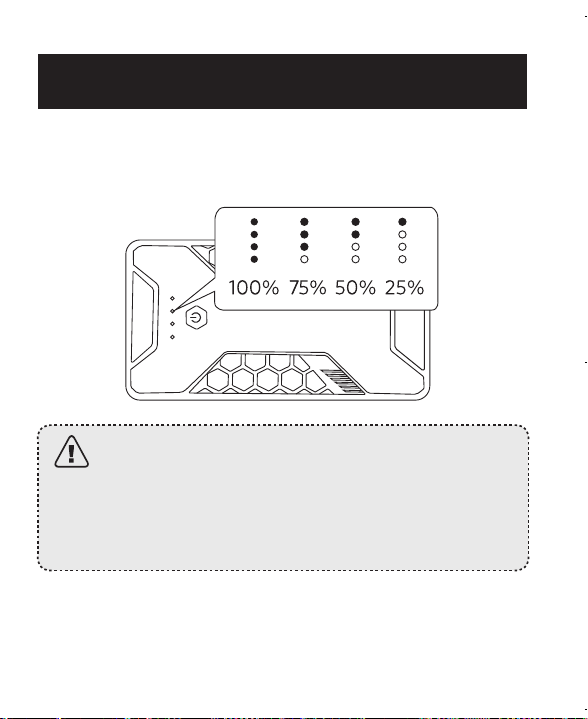
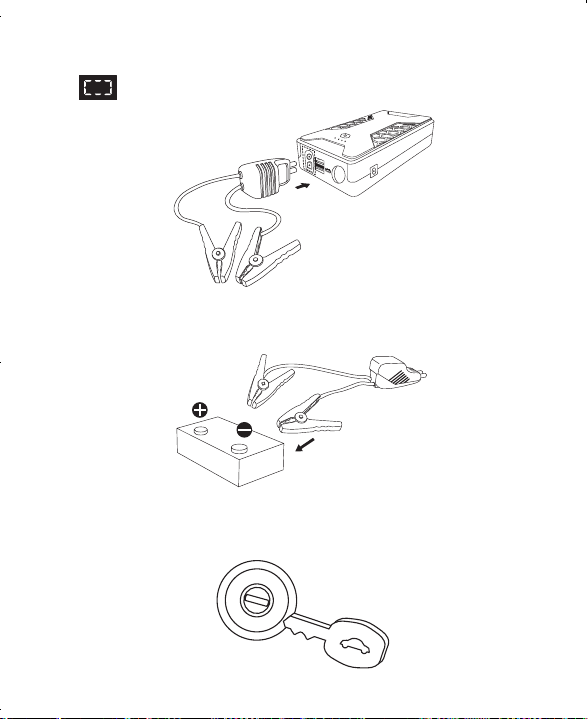
73 Italiano Italiano 74
2. Collegare i cavi con ponticelli. L'icona sul display LED dei cavi
dovrebbe ruotare in senso orario.
3. Agganciare la pinza rossa con il polo positivo (+) e la pinza nera
con il polo negativo (-) della batteria dell’auto.
4.
Avviare il motore. Il display a LED dei cavi dovrebbe mostrare la
tensione attuale della batteria dell'avviatore di emergenza.
il dispositivo di avviamento interromperà l’uscita di
alimentazione dopo otto tentativi consecutivi di avviamento
del motore dell’auto e lampeggerà sul display a LED.
5. Se l'avvio di emergenza viene eseguito correttamente, scollegare
i cavi con ponticelli entro 30 secondi.
1.
Dopo ogni avvio di emergenza riuscito, l'avviatore di
emergenza viene reimpostato automaticamente. Se
l'avvio di emergenza dell'auto non riesce, rimuovere i
morsetti e ricollegarli dopo due minuti. Quando il display
a LED mostra la tensione, avviare il motore dell'auto.
2. NON tentare l'avvio di emergenza per più di tre volte
di seguito, perché il prodotto potrebbe surriscaldarsi o
danneggiarsi.
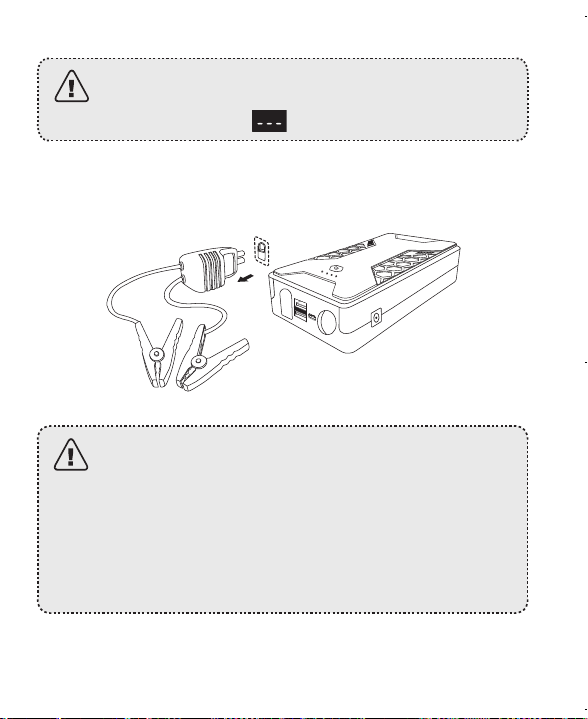
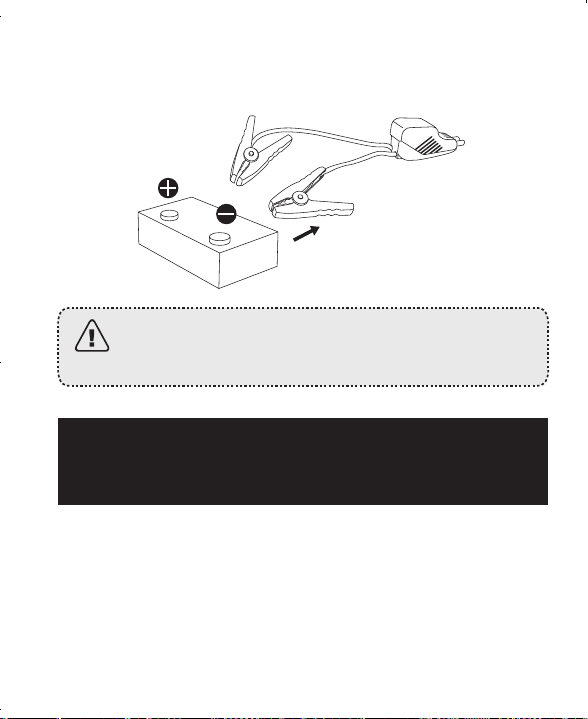
75 Italiano Italiano 76
6. Rimuovere tempestivamente le pinze dalla batteria e riponerle
con cura.
Per evitare danni a persone o alla batteria non provare
mai a connettere tra loro le pinze quando già connesse
alla batteria.
Guida relativa al display LED
del cavo di connessione
1. La tabella che segue indica che l'avviatore di emergenza funziona
correttamente.
Display a LED Cicalino Descrizione
Tensione
elettrica
/ I morsetti sono collegati
correttamente. Dispositivo pronto
per l'avvio del motore dell'auto
2. La tabella che segue mostra lo stato di errore. Non tentare mai di
forzare un avvio di emergenza del motore dell'auto se sul display
a LED viene mostrato quanto segue.
Display
a LED
Cicalino Descrizione
RC
v
/ • I morsetti sono collegati ai
terminali errati.
• I morsetti sono collegati tra
loro (ciò potrebbe danneggiare
l’avviatore di emergenza).
R SC
Viene emesso un
segnale acustico
al secondo
• Pinze agganciate ai poli incorretti
• Pinze agganciate insieme
(potrebbero danneggiare il jump
starter)
• Si verifica un corto circuito nella
batteria dell’auto.
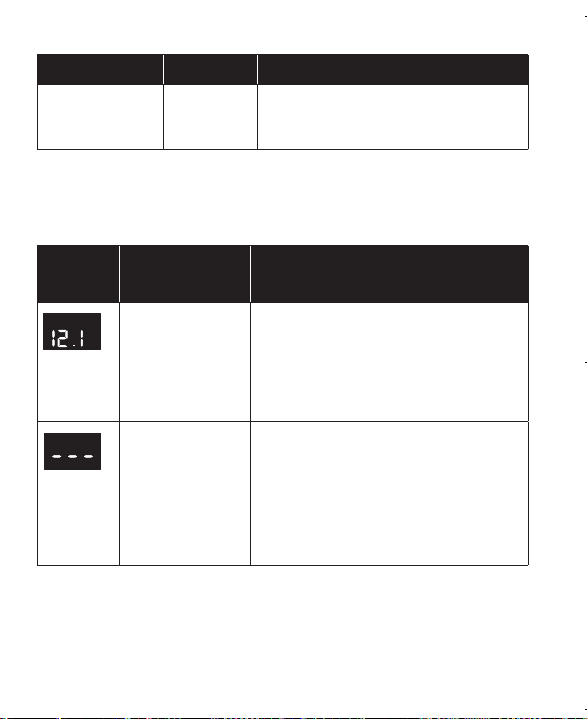
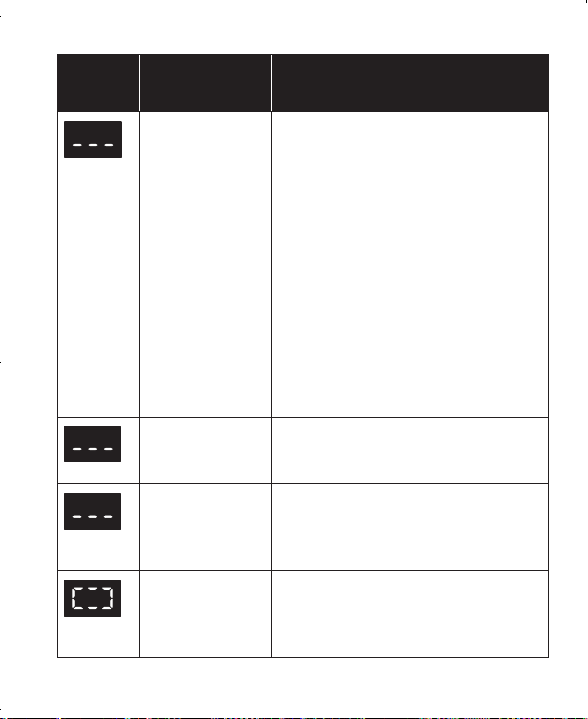
77 Italiano Italiano 78
Display
a LED
Cicalino Descrizione
/
• Si è tentato di avviare il motore
dell’auto in emergenza per otto
volte consecutive dopo aver
collegato i morsetti alla batteria
dell’auto.
• Si consiglia di scollegare
l’avviatore di emergenza e di
lasciar rareddare la batteria.
Successivamente, avviare il
motore.
• Non è possibile eseguire l'avvio
di emergenza dell'auto perché la
corrente di picco (1000 A) non è
suciente per avviare il motore.
HT
Viene emesso un
segnale acustico
al secondo
• Oltrepassato il limite di
temperatura, lasciar rareddare il
jump starter e i cavi
LV
Viene emesso un
segnale acustico
al secondo
• La tensione dell'avviatore di
emergenza è bassa. È consigliabile
caricare prima l'avviatore di
emergenza.
/ • I morsetti sono collegati
all'avviatore di emergenza e sono
pronti per il collegamento alla
batteria dell'auto.
Carica e ricarica
Caricare il vostro telefono o tablet
① Collegare il telefono o tablet al dispositivo di avviamento
utilizzando un cavo USB-A.
② Premere il pulsante funzione.
1
2
USB-A
USB-A
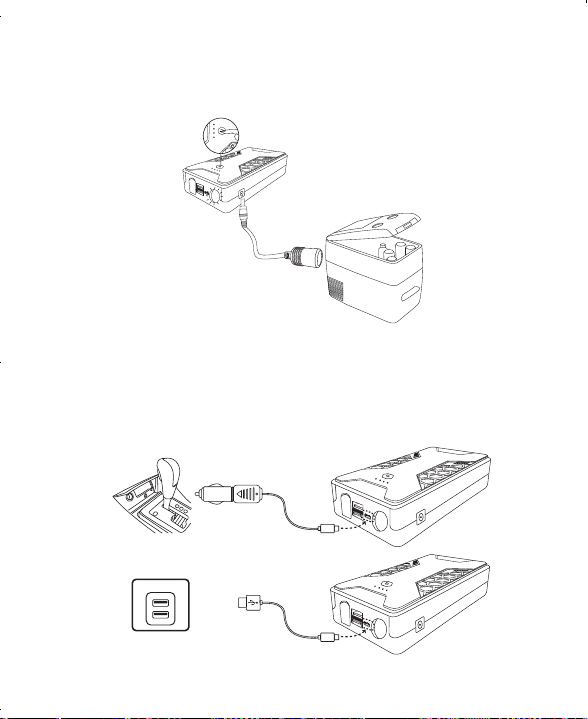
79 Italiano Italiano 80
Carica i dispositivi che si collegano ad una presa
accendisigari
Ricaricare il dispositivo di avviamento Roav 1000A
Ricaricare il dispositivo di avviamento Roav 1000A quando il livello
della batteria è basso.
USB-C
USB-C
• Durante la ricarica e la conservazione del dispositivo
di avviamento, assicurarsi di tenerlo nella custodia
protettiva fornita.
• L’adattatore di alimentazione non è incluso.
• La carica/ricarica simultanea non è supportata.
• NON avviare il motore dell'auto durante la ricarica
dell'avviatore di emergenza.
Utilizzare la torcia
Mantenere premuto per accendere / spegnere
2
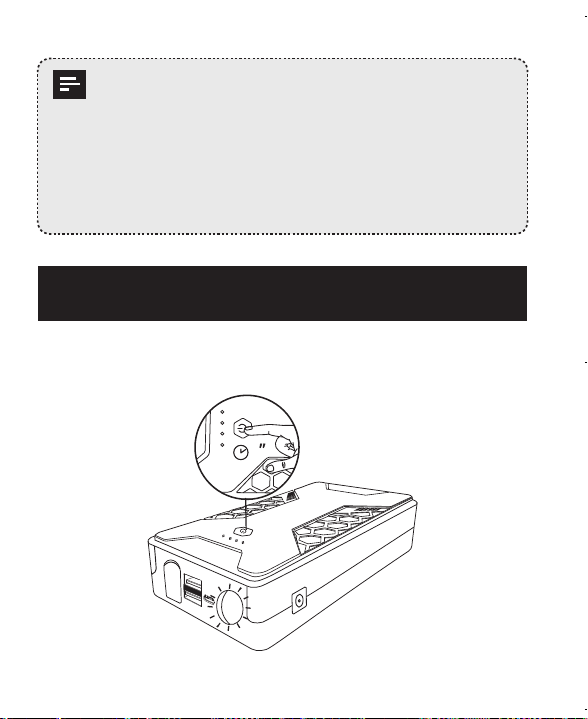
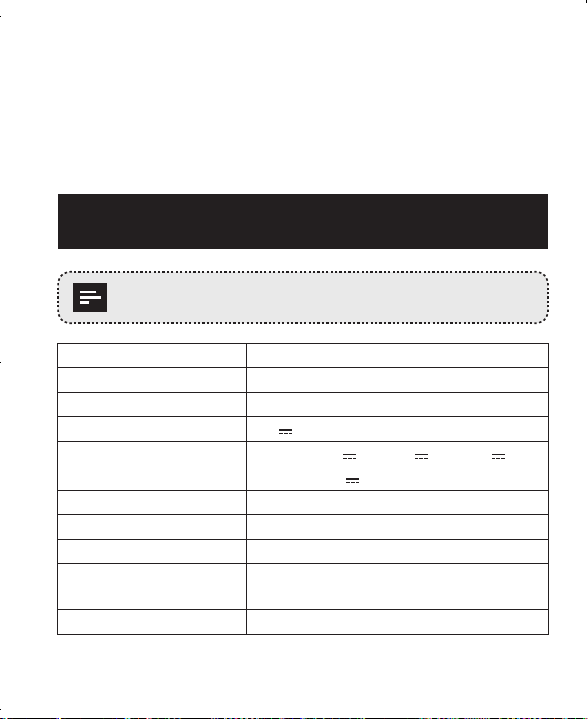
81 Italiano Italiano 82
Premere per attivare/disattivare le modalità flash
• Acceso fisso (illuminazione)
• Bianco lampeggiante lento (allarme)
• Lampeggiamento rapido (SOS)
Specifiche
Le specifiche sono soggette a modifiche senza preavviso.
Capacità 12800mAh / 47.36Wh
Peso 575g
Dimensioni 170 x 88 x 39mm
Entrata 5 V 3 A
Uscita USB
Output 1: 5V 3A, 9V 2A, 12V 1.5A
Output 2: 5V 2.4A
Corrente di spunto 500A
Corrente di picco 1000A
Temperatura di esercizio Da -10 °C a 60 °C
Temperatura di
conservazione
Da -20 °C a 60 °C
Temperatura di ricarica Da -10 °C a 35 °C
FAQ
1. Per quanto tempo l’avviatore di emergenza manterrà la sua carica?
• L’avviatore di emergenza può contenere una carica per sei mesi.
• Accertarsi che l’avviatore di emergenza sia carico per oltre il 50%
prima dell’uso.
2. Cosa indica quando tutti e quattro gli indicatori LED lampeggiano
contemporaneamente?
• Indica che la temperatura del dispositivo di avviamento supera il
limite (60 °C).
• Lasciar rareddare il dispositivo di avviamento fino a quando la
batteria funziona correttamente, quindi riprovare.
3. Come ricaricare l’avviatore di emergenza?
È necessario acquistare un caricabatterie USB o un caricabatterie
per auto per ricaricare l’avviatore di emergenza.
• Se si dispone di un caricabatterie USB con uscita a 5 V
(preferibilmente 5 V 3 A), collegare un’estremità di un cavo
USB-C al dispositivo e l’altra estremità al caricabatterie.
• Se si dispone di un caricabatterie per auto con uscita USB 5 V
(preferibilmente 5 V 3 A), collegare un’estremità di un cavo
USB-C al dispositivo e l’altra al caricabatterie per auto.
4. Qual è la funzione della custodia protettiva?
La custodia protettiva deve essere utilizzata durante la ricarica e la
conservazione del dispositivo di avviamento. Assicurarsi di tenere
sempre il dispositivo di avviamento all’interno della custodia protettiva
durante la ricarica e la conservazione del dispositivo di avviamento.

83 日本語 日本語 84
• 本製品を分解しないでください。サービスや修理が
必要な場合は、販売元にお問い合わせください。間
違った方法で分解すると、感電や火災につながるお
それがあります。
• 感電のリスクを軽減するため、メンテナンスおよび
清掃を行う際は、必ず本製品を電源から外してくだ
さい。
• 本製品が損傷するおそれがあるため、直射日光に長
時間さらされないようにしてください。
• 本製品を火の近くに置くと、爆発するおそれがあり
ます。
• バッテリーの膨張、液漏れ、または異臭が発生した
場合は、自治体のルールにしたがってすみやかに廃
棄してください。
• 本製品を使用する前に、バッテリーコネクターに汚
れがなく、バッテリークランプとケーブルが傷つい
ていないことを確認してください。
• バッテリークランプが完全に接続されていることを
確認します。完全に接続されていないと、機能に影
響したり製品が損傷したりするおそれがあります。
安全にご利用いただ
くために
本マニュアルには、本製品(モデルR3130)に関する安全
上および操作上の重要な指示が記載されています。お
読みになった後も、必ず保管してください。
本製品を使用する前に、すべての記載事項を確認して
ください。記載されている指示に従わなかったことが
原因で破損が発生しても、保証の対象になりません。
• 本製品は、液体や腐食性物質のない場所に保管して
ください。
• 製造元から販売されていないアクセサリー製品、も
しくは推奨されていない製品を使用すると、火災、
感電、または身体への傷害につながるおそれがあり
ます。
• 本製品が強い衝撃を受けたり、落下したり、または
何らかの原因で破損したりした場合は、使用しない
でください
。

85 日本語 日本語 86
パッケージ内容
ROAV Jump Starter Pro
1000A
クランプ付きジャン
パーケーブル
USBケーブル 取扱説明書
機能
• ジャンプスタート
• USB 3.0ポート×2
• USB-Cポート
• 緊急用LEDフラッシュライト
• 使いやすいデザイン
外観
10
9
1 2
3
4
5
678
① バッテリー残量表示
② 機能ボタン
• このボタンを押すと、バッテリー
残量表示がオンになります
• 2秒間押し続けると、フラッシュ
ライトのオン/オフを切り替える
ことができます
③ クランプ付きジャンパーケーブル
④ LEDディスプレイ
⑤ 12V DC出力 (直径5.5
mm)
⑥ フラッシュライト
⑦ USB-C入力/出力
⑧ USB 1出力
⑨ USB 2出力
⑩ ジャンピングポート
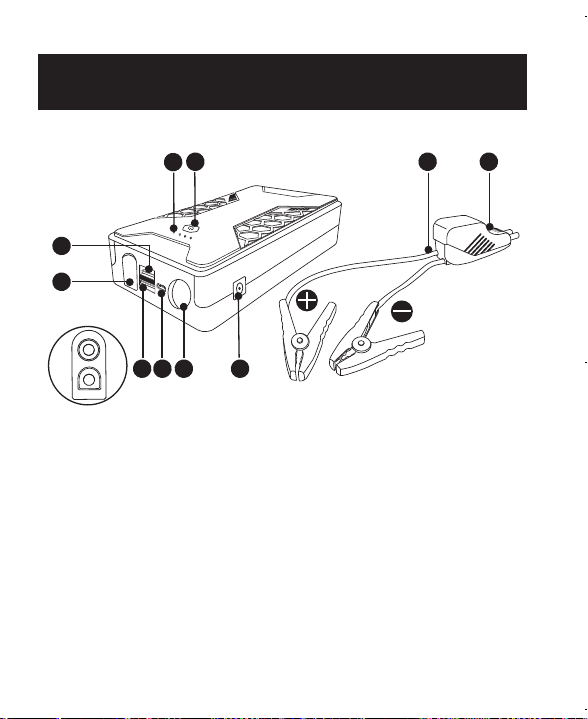
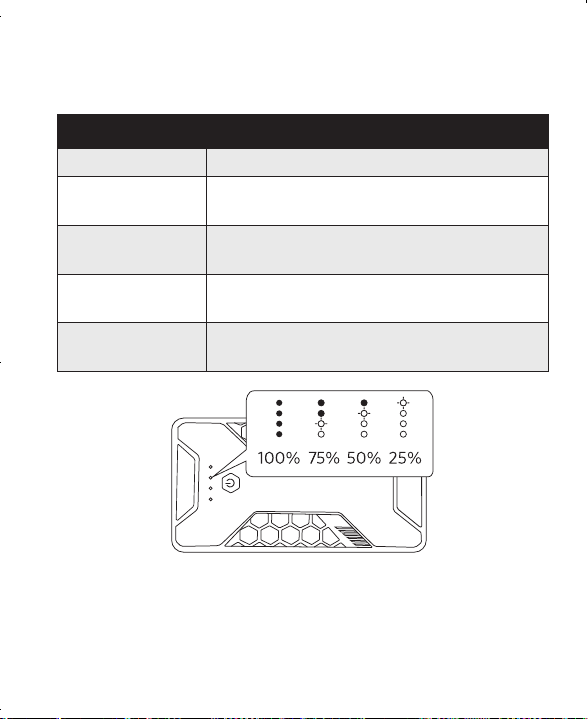
87 日本語 日本語 88
LED表示
本製品の充電中、LED表示は次のように表示されます。
バッテリー残量 LED表示
0%~24% 1つのLED表示が点滅します
25%~49% 1つのLED表示が青く点灯し、1つが点滅
します
50%~74% 2つのLED表示が青く点灯し、 1つが点滅
します
75%~99% 3つのLED表示が青く点灯し、1つが点滅
します
100% 4つすべてのLED表示が青く点灯し、10秒後
に消灯します
注意:4つのLED表示が点滅し続ける場合は、ジャンプスター
ターの温度上限を超えていることを意味します。ジャンプス
ターターの温度が下がるまで待ってから、再度使用してくだ
さい。
車のジャンプスタート方法
1. 電池残量が50%以上であることを確認し、本製品を起動し
ます。
• バッテリー残量が5%未満の場合、1つのLED表示
が継続して点滅します。
• 充電残量が50%以下の場合、エンジンをジャンプ
スタートできない場合があります。ジャンプスタ
ーターを初めて使用するときは、使用前にバッテ
リーを満充電することをお勧めします。
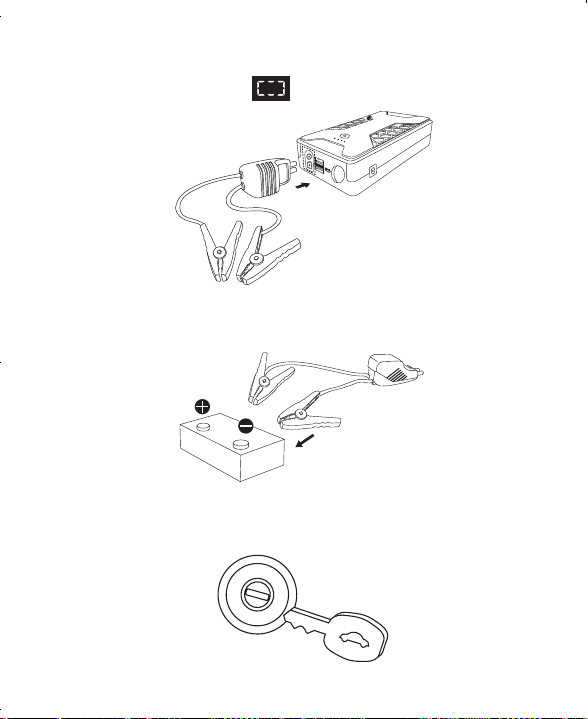
89 日本語 日本語 90
2. ジャンパーケーブルを接続します。ジャンパーケーブルの
LEDディスプレイに、 が表示されます(時計回り)。
3. 赤のクランプをプラス(+)、黒のクランプをマイナス(-)に
接続します。
4.
エンジンを始動します。ケーブルのLEDディスプレイに、ジャ
ンプスターターのバッテリーの現在の電圧が表示されます。
ジャンプスターターでは、車両エンジンのジャンプスター
トを8回連続で試行すると、電源出力を一時停止します。ま
た、LEDディスプレイで が点滅します。
5. 正常にジャンプスタートしたら、30秒以内にジャンパーケーブ
ルを取り外します。
1. すべて正常にジャンプスタートすると、ジャンプスター
ターが自動的にリセットされます。車のジャンプスター
トに失敗したら、クランプを取り外し、2分経ってから
再度接続します。LEDディスプレイに電圧が表示された
ら、車のエンジンを始動します。
2. ジャンプスタート直後に機器を充電しないでください。
少なくとも30分間ほどジャンプスタートから時間をおい
て充電を開始してください。
3. キーを回してエンジンが始動しない場合は、長時間(3秒
以上)キーを回し続けないでください。少なくとも1分以
上間をあけジャンプスターターを十分に冷やしてから、
ジャンプスタートを再開してください。
4. 極端な温度下では、数分間ほど時間をおきバッテリーが
正常に動作していることを確認してください(0-60℃)。
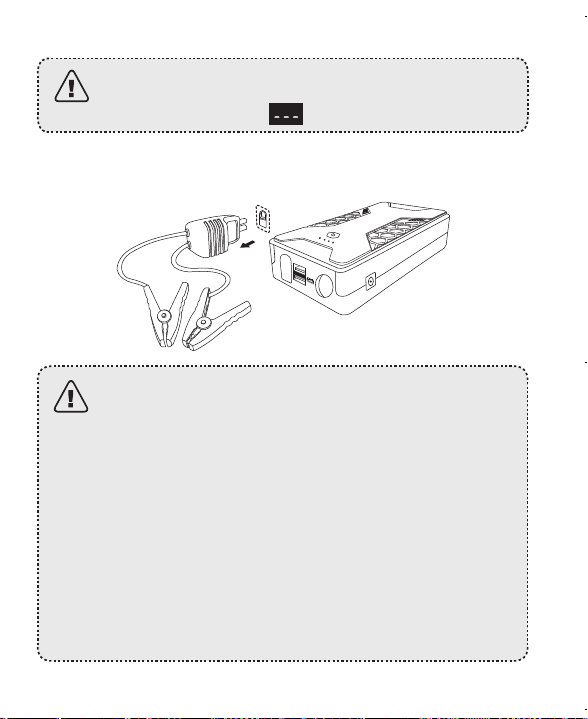

91 日本語 日本語 92
6. クランプを車のバッテリーから速やかに取り除き、収納し
ます。
ケガや本製品へのダメージを防ぐために、ジャンプ
スターターに接続している時は、絶対にクランプ同
士を接続しないでください。
ジャンパーケーブルのLEDディスプ
レイガイド
1. 次の表は、ジャンプスターターが正常に動作していること
を示しています。
LEDディス
プレイ
ブザー 説明
現在の電圧 なし
クランプが正しく接続されていま
す。エンジンを始動する準備ができ
ています。
2. 次の表は、エラーの状況を示しています。LEDディスプレ
イに以下の内容が表示されている場合は、車のエンジンを
無理にジャンプスタートさせないでください。
LEDディス
プレイ
ブザー 説明
RC
v
なし • クランプが車のバッテリーに接続
されています(ジャンプスタータ
ーに接続されていません)。
• エンジンを始動する前に、クラ
ンプがジャンプスターターに接
続されていることを確認してく
ださい。
R SC
1秒ごとに
ビープ音が
1回
• クランプが誤った端子(+/-)に接続
されています
• クランプ同士が接続されています
(ジャンプスターターを傷つける
恐れがあります)
• 自動車用バッテリーで短絡が発生
します。
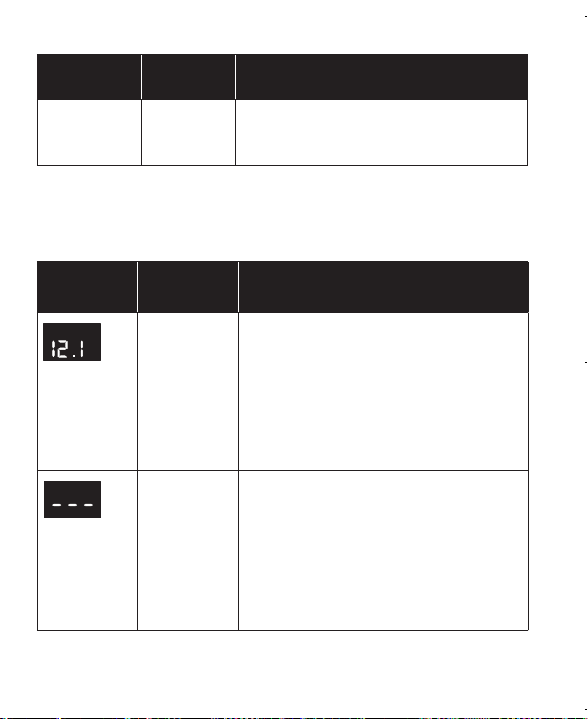
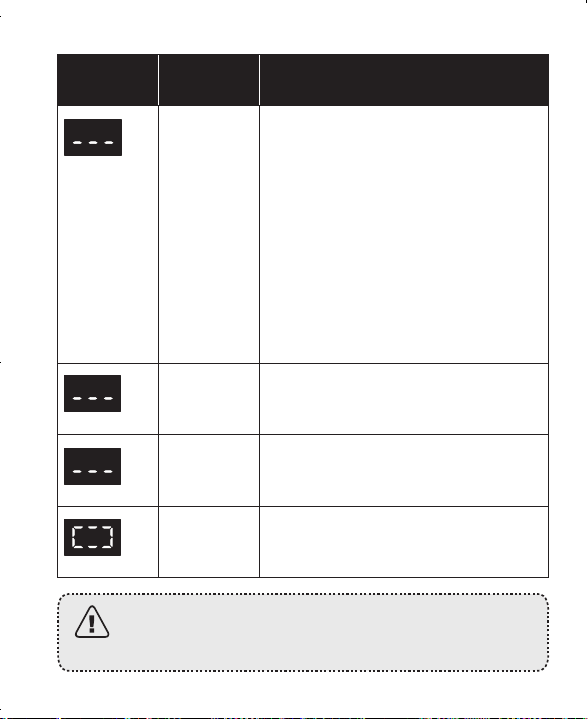
93 日本語 日本語 94
LEDディス
プレイ
ブザー 説明
なし
• クランプを自動車用バッテリーに
接続した後、エンジンのジャン
プスタートが8回連続で試行され
ました。
• ジャンプスターターを取り外し、
バッテリーの温度が下がるのをお
待ちください。その後、エンジン
をかけてください。
• 本製品のピーク電流(1000 A)では
車のエンジンの始動に不十分のた
め、ジャンプスタートできません
でした。
HT
1秒ごとにビ
ープ音が1回
• 温度制限を越えているので、ジャ
ンプスターターとケーブルを冷や
してください。
LV
1秒ごとに
ビープ音が
1回
• ジャンプスターターの電圧が低下
しています。ジャンプスターター
を充電してください。
なし • クランプがジャンプスターターに
接続されており、車のバッテリー
に接続できます。
上記に記載されている事象が何か一つでも起こった場
合は、現在の電圧がLEDディスプレイに表示されるま
で、ジャンパーケーブルを抜き差ししてください。
接続機器とジャンプスターター本体の
充電方法
携帯電話やタブレット端末の充電方法
① USB-Aケーブルを使用して、スマートフォンまたはタブレ
ット端末をジャンプスターターに接続します。
② 機能ボタンを押します。
1
2
USB-A
USB-A
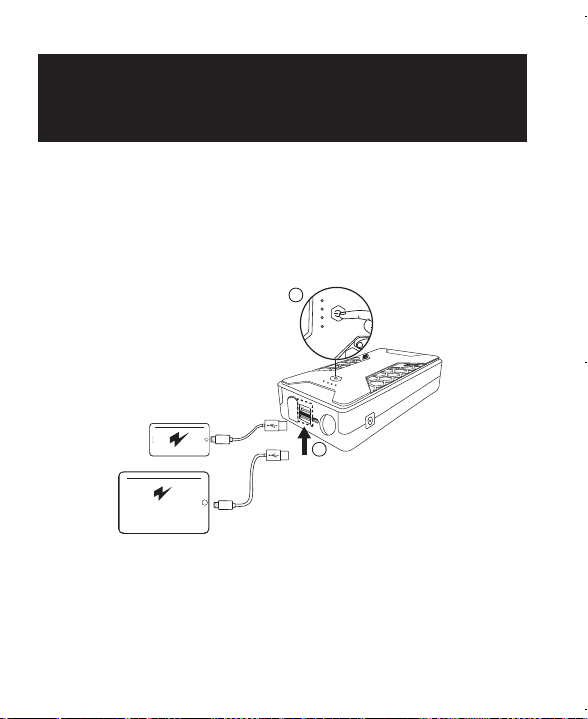
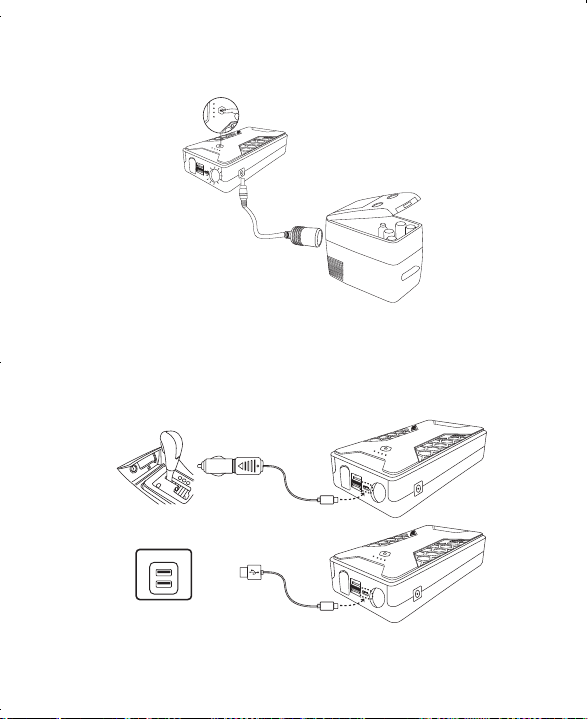
95 日本語 日本語 96
シガーソケットに接続する機器の充電方法
本製品の充電
バッテリー残量が少なくなったら、本製品を充電してくださ
い。
USB-C
USB-C
• ジャンプスターターの充電中や保管中には必ず、
付属の保護バッグに入れてください。
• 電源アダプターは付属していません。
• 充電と本体充電を同時に行うことはできません。
• ジャンプスターターの充電中は、エンジンを始動
させないでください。
フラッシュライトの使用方法
長押しすると点灯 / 消灯します
2
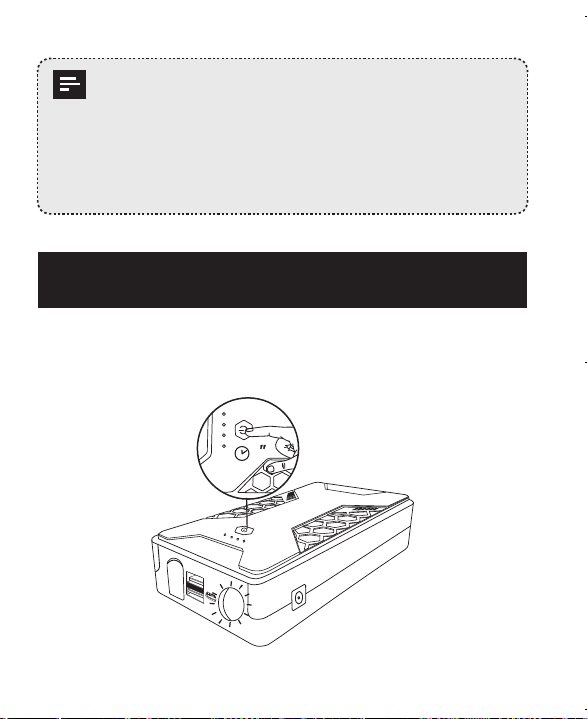
95 日本語 日本語 96
シガーソケットに接続する機器の充電方法
本製品の充電
バッテリー残量が少なくなったら、本製品を充電してくださ
い。
USB-C
USB-C
• ジャンプスターターの充電中や保管中には必ず、
付属の保護バッグに入れてください。
• 電源アダプターは付属していません。
• 充電と本体充電を同時に行うことはできません。
• ジャンプスターターの充電中は、エンジンを始動
させないでください。
フラッシュライトの使用方法
長押しすると点灯 / 消灯します
2
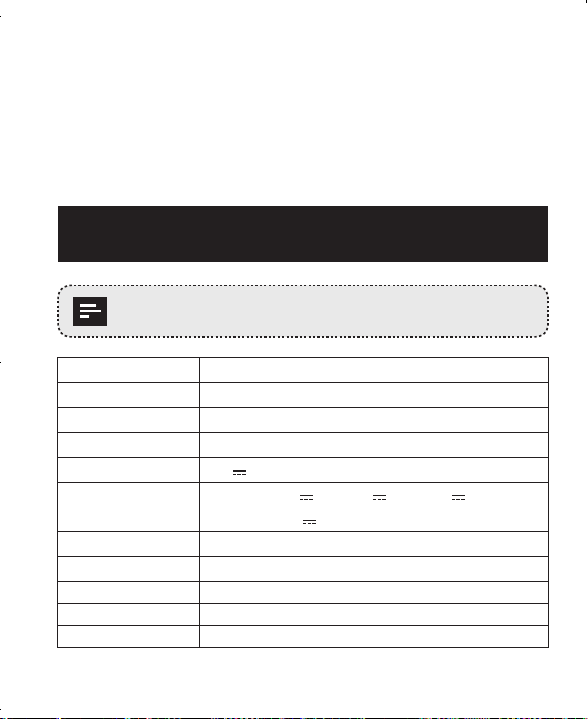
97 日本語 日本語 98
このボタンを押すと、ライトモードが切り替わ
ります
• 点灯 (照明)
• ゆっくり点滅 (アラーム)
• 速く点滅 (SOS)
製品の仕様
仕様は予告なく変更されることがあります。
製品名 Roav Jump Starter 1000A
容量
12800mAh / 47.36Wh
重さ
575 g / 20.28 oz
サイズ
170 x 88 x 39mm / 6.7 x 3.3 x 1.3 in
入力
5 V 3 A
USB出力
Output 1: 5V 3A, 9V 2A, 12V 1.5A
Output 2: 5V 2.4A
始動時の電流
500A
ピーク時の電流
1000A
動作温度 -10°C~60°C
保管温度 -20°C~60°C
充電温度範囲 -10°C~35°C
FAQ
1. ジャンプスターターはどのくらいの間、バッテリーが持続します
か?
• ジャンプスターターは1回の充電で6ヶ月バッテリーが持続し
ます。
• ご使用前に必ず、ジャンプスターターを50%以上充電してくだ
さい。
2. 4つのLED表示がすべて同時に点滅している場合は、何を意味しま
すか?
• これは、ジャンプスターターの温度が上限 (60°C) を超えている
ことを示します。
• バッテリーが正常に動作するように、ジャンプスターターの温
度が下がるまで待ってから、再度お試しください。
3. ジャンプスターターはどのように充電しますか?
ジャンプスターターを充電するには、USB充電器またはカーチャ
ージャーを使用してください。
• 5Vの出力 (5V 3Aを推奨) のUSB充電器の場合は、USB-Cケー
ブルの片側をジャンプスターターに、もう片方を充電器に接続
します。
• 5VのUSB出力 (5V 3Aを推奨) のカーチャージャーの場合
は、USB-Cケーブルの片側をジャンプスターターに、もう片方
をカーチャージャーに接続します。
4. 保護バッグを使用する理由は何ですか?
保護バッグは、ジャンプスターターの充電中および保管中に使用
します。ジャンプスターターの充電中および保管中は常に、保護
バッグに入れてください。

Customer Service
Kundenservice | Servicio de atención al cliente
Service client | Servizio clienti | カスタマーサポート
12-month limited warranty
12 Monate eingeschränkte Garantie | Garantía limitada de 12 meses
Garantie limitée de 12 mois | Garanzia limitata di 12 mesi
18ヶ月保証(*日本のみ18ヶ月保証となります)
Lifetime technical support
Technischer Support für die Produktlebensdauer
Asistencia técnica de por vida | Assistance technique à vie
Supporto tecnico per l'intero ciclo di vita
テクニカルサポート
support@goroav.com
+1 (800) 988 7973 (US) Mon-Fri 9:00am - 5:00pm (PT)
+44 (0) 1604 936200 (UK) Mon-Fri 6:00 - 11:00 (GMT)
+49 (0) 69 9579 7960 (DE) Mo-Fr 6:00 - 11:00
+81 03 4455 7823 (日本) 月-金 9:00 - 17:00
+86 400 0550 036 (中国) 周一至周五 9:00 - 17:30
Live Chat on Roav app and website
Anker Innovations Limited
Room 1318-19, Hollywood Plaza, 610 Nathan Road, Mongkok, Kowloon,
Hong Kong