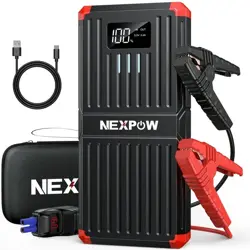
User Manual for Jump Starter Pro
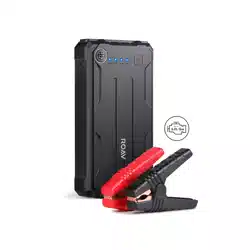
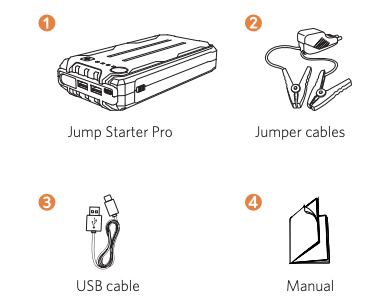
What is included
Features
- Convenient jump starting
- Two USB 3.0 ports
- USB-C input port
- Emergency LED flashlight
- User-friendly design
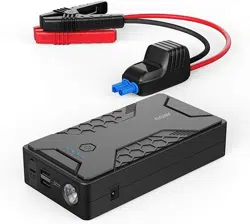
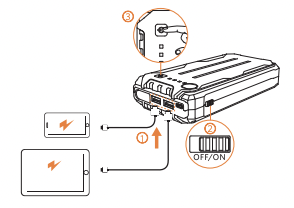
At a Glance
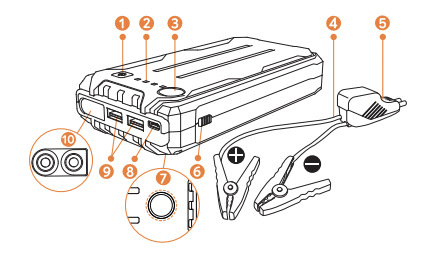
① Function button
② LED indicators
③ Compass
④ Jumper cables
⑤ LED display
⑥ Power switch
⑦ Flashlight
⑧ USB-C input port
⑨ USB output ports
⑩ Jumping port
Jump Starting Your Car
1. Turn on your Roav Jump Starter Pro and make sure it is over 50% charged.

 If it is less than 50% charged, it may not be able to start your engine. We recommend fully charging the battery before you use the jump starter for the first time.
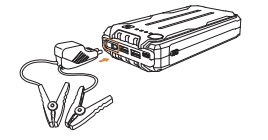
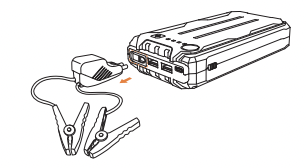
2. Plug in the jumper cables. The LED display on the jump cables should show circulating clockwise.
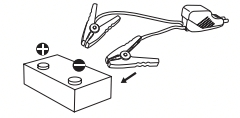
3. Connect the red clamp to the positive terminal ( + ) and black clamp to the negative terminal ( - ) of your car battery.
4. Start your engine. The cables’ LED display should show the current voltage of the jump starter battery.
The jump starter will stop power output after 20 seconds, and  will flash on the LED display.
5. After successfully jump starting, unplug the jumper cables within 30 seconds.
1. After every successful jump start, the jump starter will reset automatically. If it fails to jump start your car, remove and reconnect the clamps after two minutes. After the LED display shows the voltage, start the car engine.
2. Do NOT jump the car engine more than three times continuously as it may overheat or damage the product.
6. Promptly remove clamps from the car battery and put away

To avoid serious injury to a person or damage to the jump starter, never try to connect the two clamps together when plugged into the jump starter.
LED Indicator Guide
1. The table below indicates the jump starter is working properly
| LED Display |
Buzzer |
Description |
| The current voltage |
/ |
The clamps are connected correctly. Ready to start the car engine. |
2. The table below shows the error status. Never try to force jump the car engine when the LED display shows as below.
Charging and Recharging
Charge your phone or tablet
Recharge your Roav Jump Starter Pro
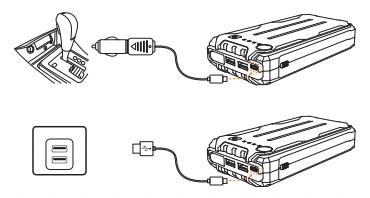

- The power adapter is not provided.
- Simultaneous charging and recharging is not supported.
- DO NOT start the car engine while charging the jump starter.
- When using two USB ports for simultaneous charging, it outputs 3.5A in total.
Using the Flashlight
Hold to turn on / off

Press to toggle flash modes
- Steady on
- Slowly flashing
- Fast flashing
Notice
This product complies with the radio interference requirements of the European Community.This product can be used across EU member states.
This product is designed and manufactured with high quality materials and components, which can be recycled and reused.
This symbol means the product must not be discarded as household waste, and should be delivered to an appropriate collection facility for recycling. Proper disposal and recycling helps protect natural resources, human health and the environment. For more information on disposal and recycling of this product, contact your local municipality, disposal service, or the shop where you bought this product.
FCC Statement
This device complies with Part 15 of the FCC Rules. Operation is subject to the following two conditions: (1) This device may not cause harmful interference, and (2) this device must accept any interference received, including interference that may cause undesired operation.
Warning: Changes or modifications not expressly approved by the party responsible for compliance could void the user's authority to operate the equipment.
Important Safety Instructions
SAVE THESE INSTRUCTIONS – This manual contains important safety and operating instructions for the jump starter (Model R3120).
Please read and understand all instructions before using this product. If damage is caused by failure to follow the instructions, the warranty does not apply.
- Keep the product in a place free from exposure to any liquid or corrosive materials.
- Use of an attachment not recommended or sold by the manufacturer may result in a risk of fire, electric shock, or injury to persons.
- Do not operate this product if it has received a sharp blow, been dropped, or otherwise damaged in any way; take it to a qualified service person.
- Do not disassemble this product; take it to a qualified service person when service or repair is required. Incorrect reassembly may result in electric shock or fire risk.
- To reduce risk of electric shock, unplug this product before attempting any maintenance or cleaning. Turning off controls will not reduce this risk.
- Avoid long exposure to direct sunlight which may cause damage to the device.
- Exposing this product to open flames may cause it to explode.
- If the battery is swollen, leaking liquid or smells bad, discard it immediately.
- Make sure the battery connector is clean, and battery clamp and cables are kept intact before using the product.
- Make sure the battery clamp is fully plugged in, or it may affect functions and cause damage to the product.