READ AND SAVE THESE INSTRUCTIONS
OWNER’S MANUAL
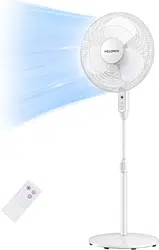
16'' DC STAND FAN
MODEL: FS40-19PRD
ITEM: 1158598
1
Read Rules for Safe Operation and Instructions carefully.
CAUTION
1. Never insert fingers, pencils, or any other object through the grille when fan is
running.
2. Disconnect fan when moving from one location to another.
3. Be sure fan is on a stable surface when operating to avoid overturning.
4. Do not use fan in window. Rain may create electrical hazard.
5. Household use only.
The rules for safe cord and plug operations are as follows:
1. Do not leave the fan running unattended.
2. Keep electrical appliances out of reach from Children or infirm persons. Do not let
them use the appliances without supervision.
3. If the supply cord is damaged, it must be replaced by manufacturer or its
serviceagent or a similarly qualified person in order to avoid a hazard.
4. This appliance is not intended for use by persons (including children) with reduced
physical, sensory or mental capabilities, or lack of experience and knowledge,
unless they have been given supervision or instruction concerning use of the
appliance by a person responsible for their safety Young children should be
supervised to ensure that they do not play with the appliance.
5. When the fan was assembled, the rotor blade guard shall not be taken off anymore
- Prior cleaning unplug the fan.
- The rotor guard shall not be dissembled/opened to clean the rotor blades.
- Wipe the fan enclosure and rotor blade guard with a slightly damp cloth.
6. This product employs overload protection (fuse). A blown fuse indicates an
overload or short-circuit situation. If the fuse blows, unplug the product from the
outlet. Replace the fuse as per the user servicing instructions (follow product
marking for proper fuse rating) and check the products. If the replacement fuse
blows, a short-circuit may be present and the product should be discarded or
returned to an authorized service facility for examination and/or repair.
7. Do not operate any fan with a damaged cord or plug. Discard fan or return to an
authorized service facility for examination and/or repair.
8. Do not run cord under carpeting. Do not cover cord with throw rugs, runners, or
similar coverings. Do not route cord under furniture or appliances. Arrange cord
away from traffic area and where it will not be tripped over.
RULES FOR SAFE OPERATION
1. This appliance has a polarized plug (one blade is wider than the other). To reduce
the risk of electric shock, this plug is intended to fit in a polarized outlet only one
way. If plug does not fit fully in the outlet, reverse the plug. If it still does not fit,
contact a qualified electrician. Do not attempt to defeat this safely feature.
2. To reduce the risk of fire or electric shock, do not use this fan with any solid state
speed control device.
WARNING
IMPORTANT SAFETY INSTRUCTIONS
READ AND SAVE THESE INSTRUCTIONS
2
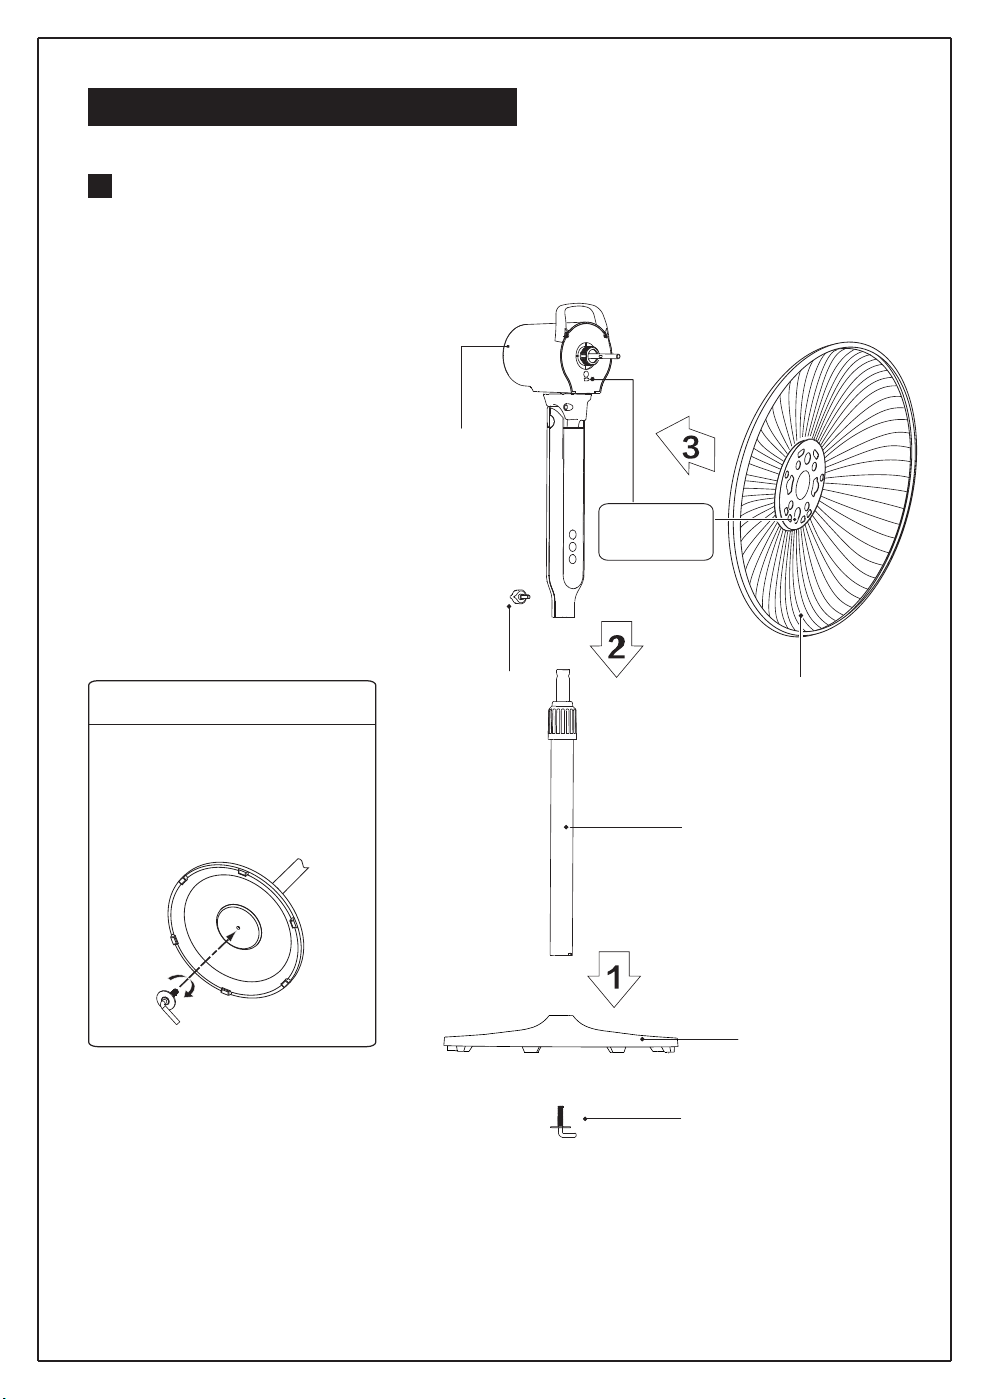
INSTALLATION INSTRUCTIONS
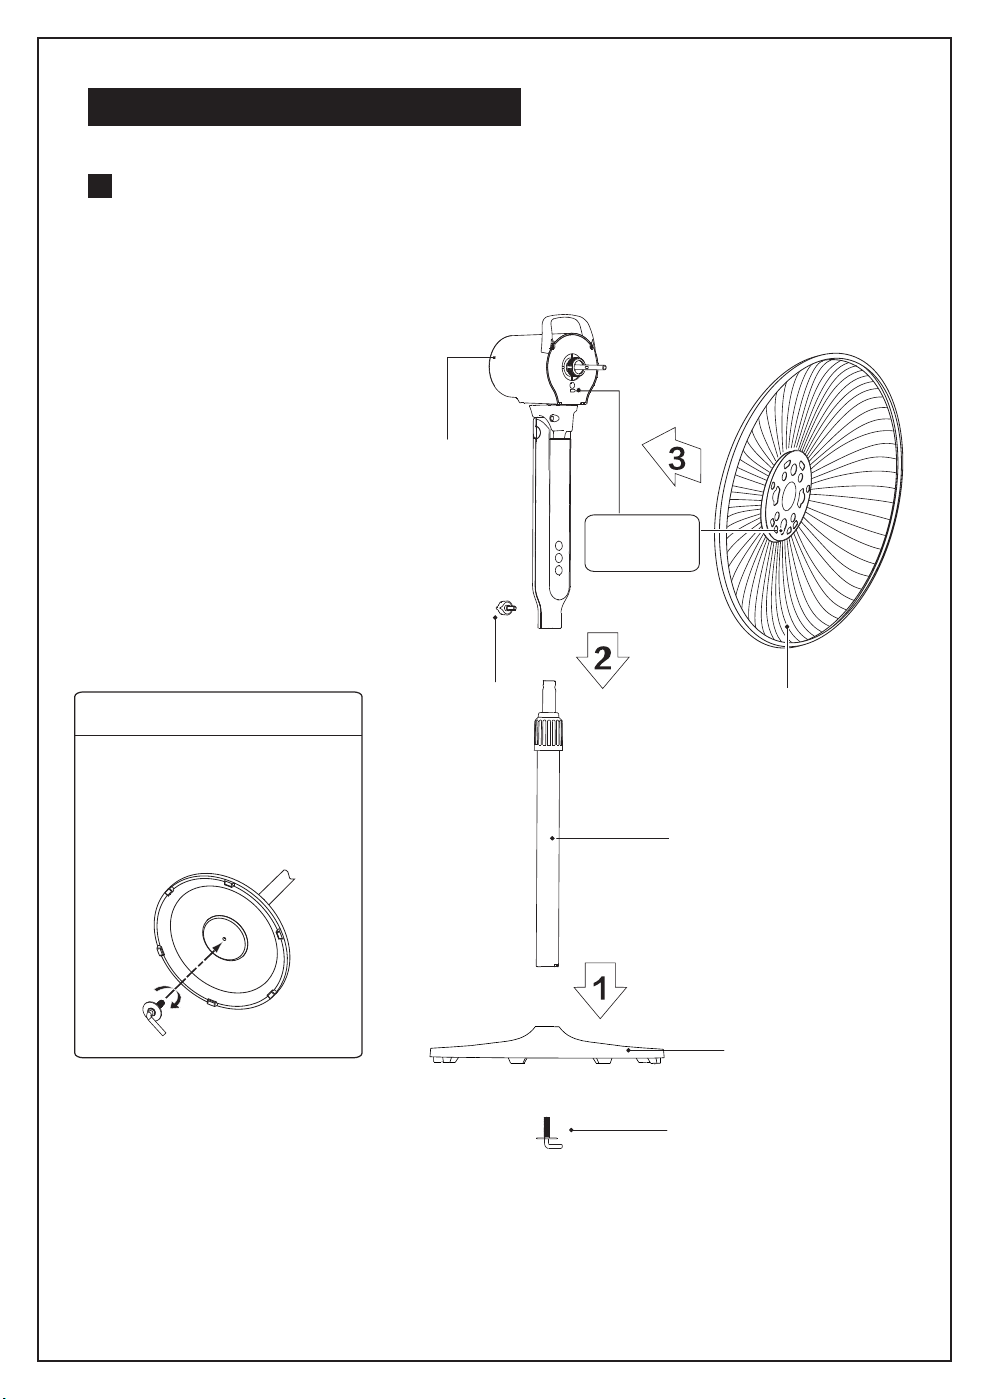
Name of components
Pole
Motor
Rear grill
Tighten
knob
Install by
aligning
Base
Right-angle bolt
Considerate Hint:
Remove parts from the
component before performing
installation.
Base Installation
Align the column with the
groove on the base and
fix them together using a
right-angle bolt.
INSTALLATION INSTRUCTIONS
3
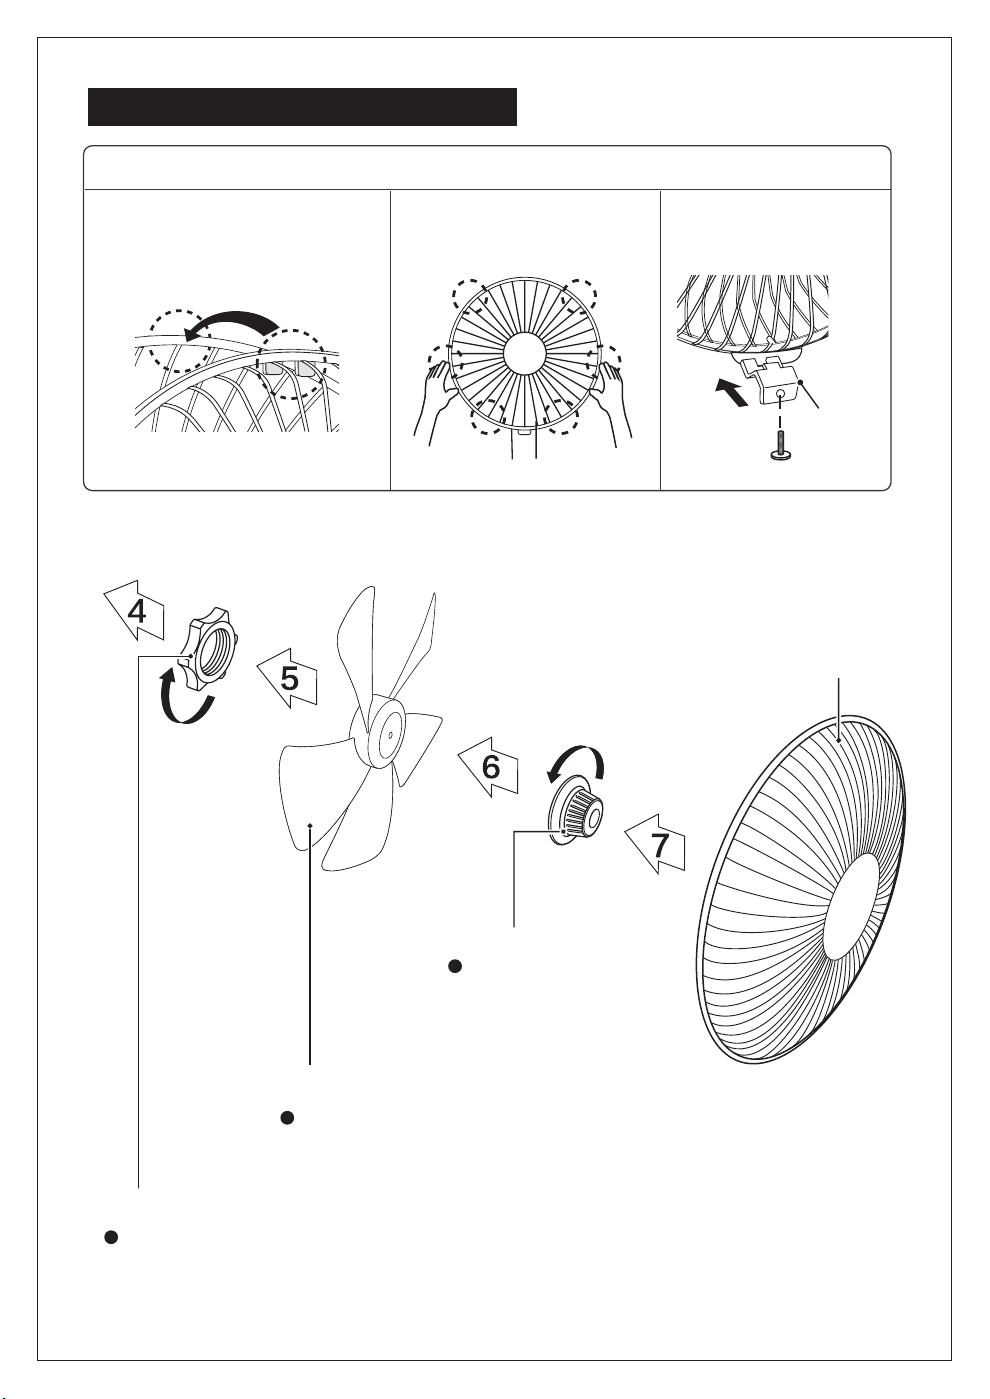
INSTALLATION INSTRUCTIONS
Lock nut of grill
Lock nut of blade
Blade
Screw the lock nut of grill clockwise,
and in the meantime, fix the rear grill.
Lock nut of blade
anticlockwise,
and then install the
front fan cover.
Pull the blade to rotate after installing,
so as to ensure that the blade can be
normally rotated.
Front grill
Guard
Catch
1
2
3
1
2
3
Align Catch of the Front Guard
with the illustrated position of
the Rear Guard.
Press guards sequentially
with both hands.
Self-Catch Installation.
Front and Rear Guard Installation
4
INSTRUCTIONS FOR USE
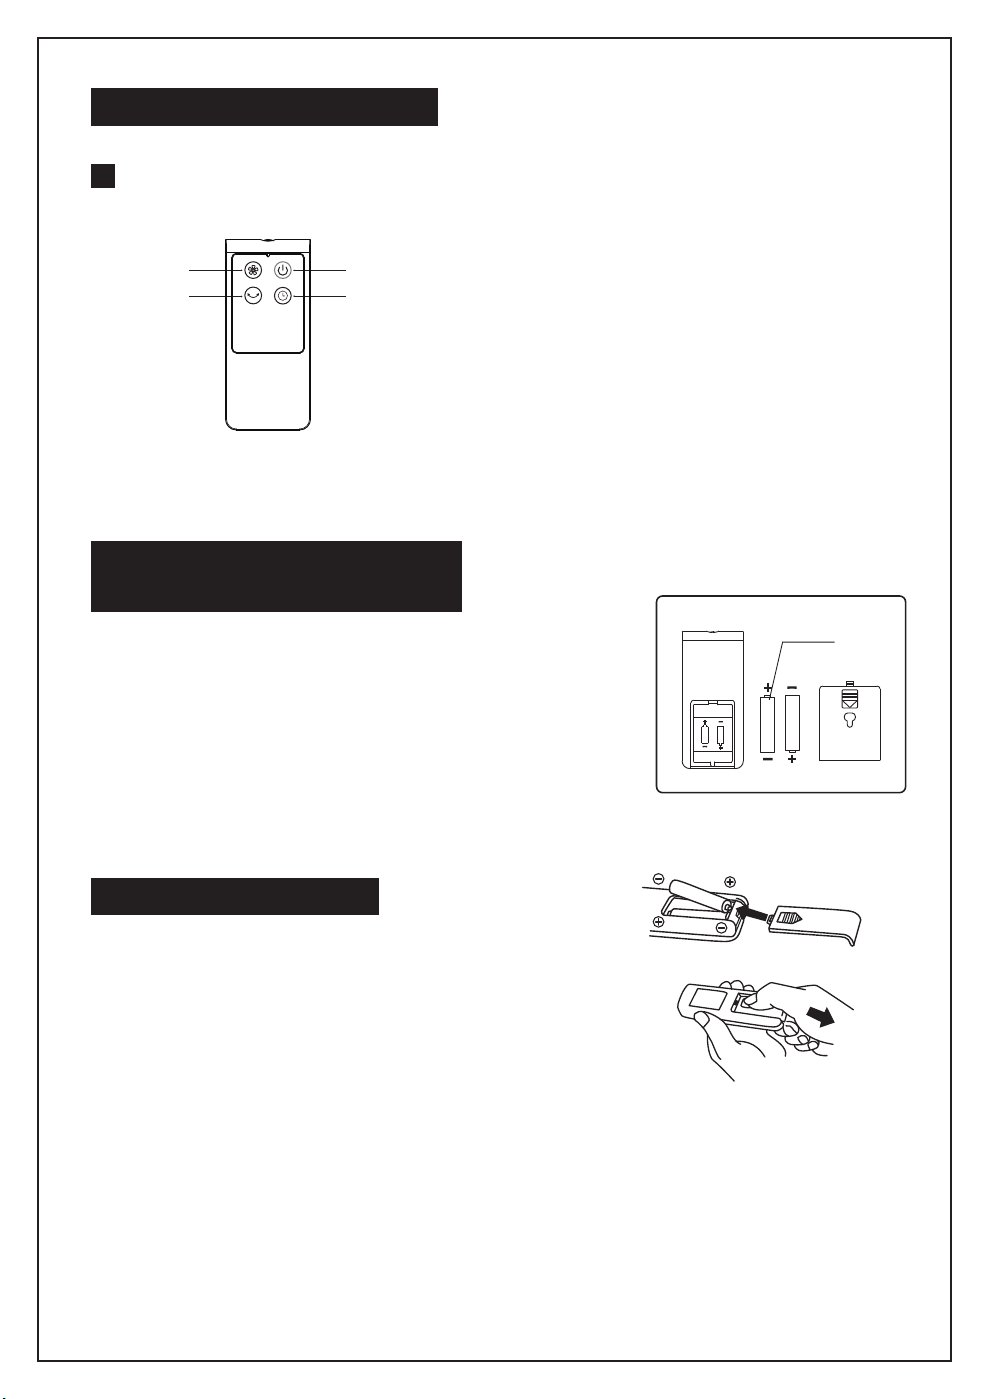
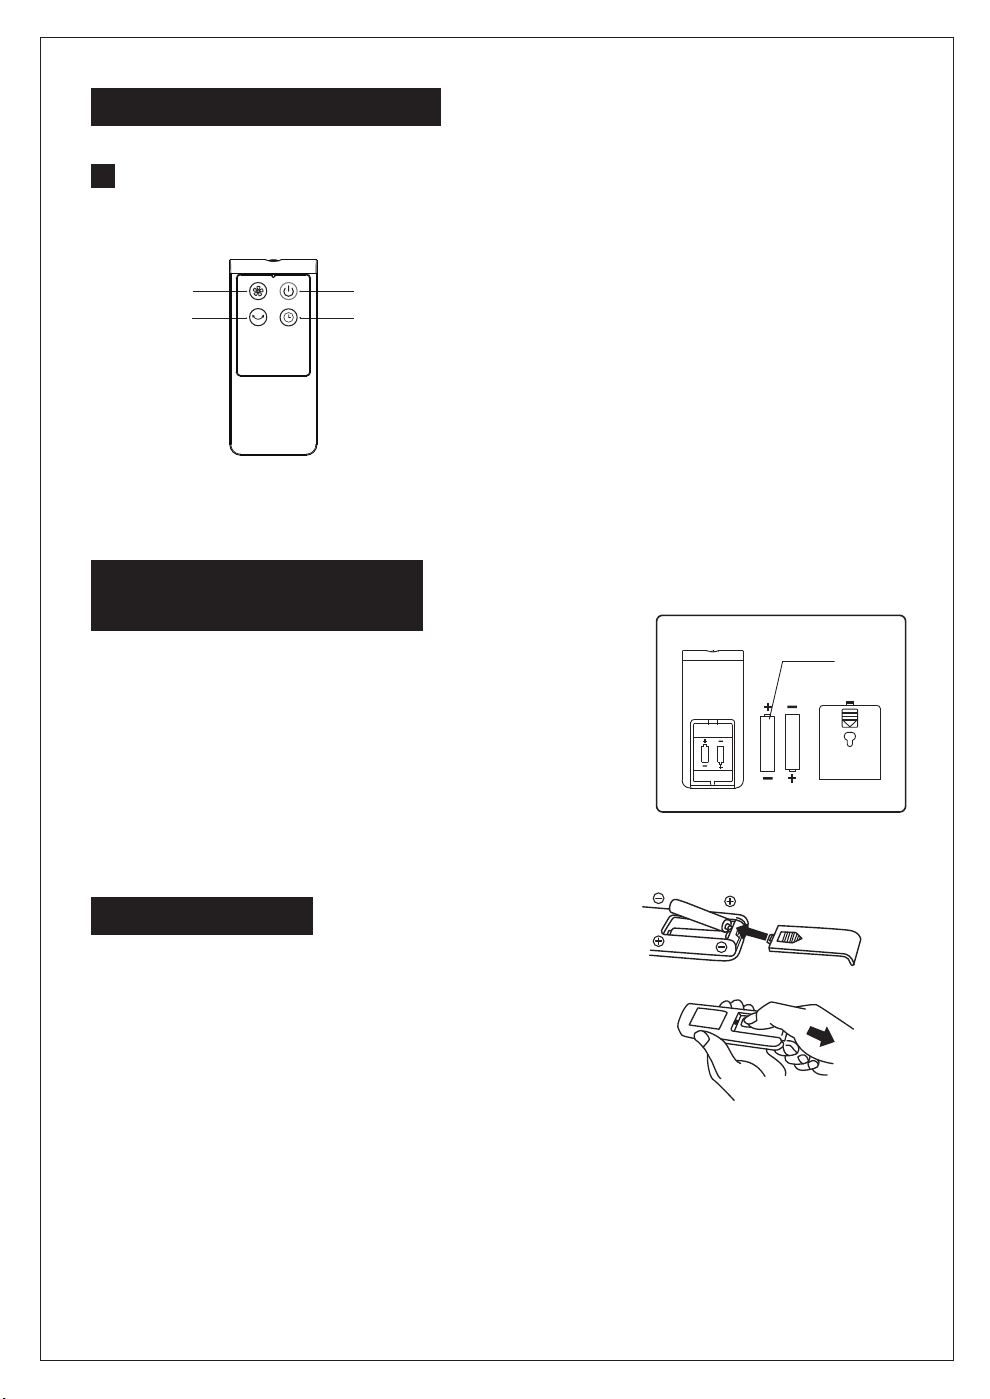
Instructions for key of remote controller
“ON/OFF” key
“TIMER”key
“Speed” key
“Osc” key
Battery
1. Press down on the battery compartment cover
and slide it out.
2. Use 2 "AAA" batteries (Not Included)
3. Insert the batteries, making sure that the positive
terminals are facing the proper way.
4. Replace the cover.
BATTERIES INSTRUCTIONS
(not included)
1. Do not dispose of batteries in fire, batteries may
explode or leak.
2. Do not mix old and new batteries.
3. Do not mix alkaline, standard (carbon-zinc) or
rechargeable (nickel-cadmium) batteries.
4. Non-rechargeable batteries are not to be recharged.
5. Batteries are to be inserted with the correct polarity.
6. Exhausted batteries are to be removed from the product.
7. The batteries must be removed from the remote controller before it is scrapped
and that they are disposed of safely.
BATTERY WARNING
Considerate Hint:
Effective Range of Remote Control: within 16.40 feets
distance and 30-degree deflection in front of Product.
INSTRUCTIONS FOR USE
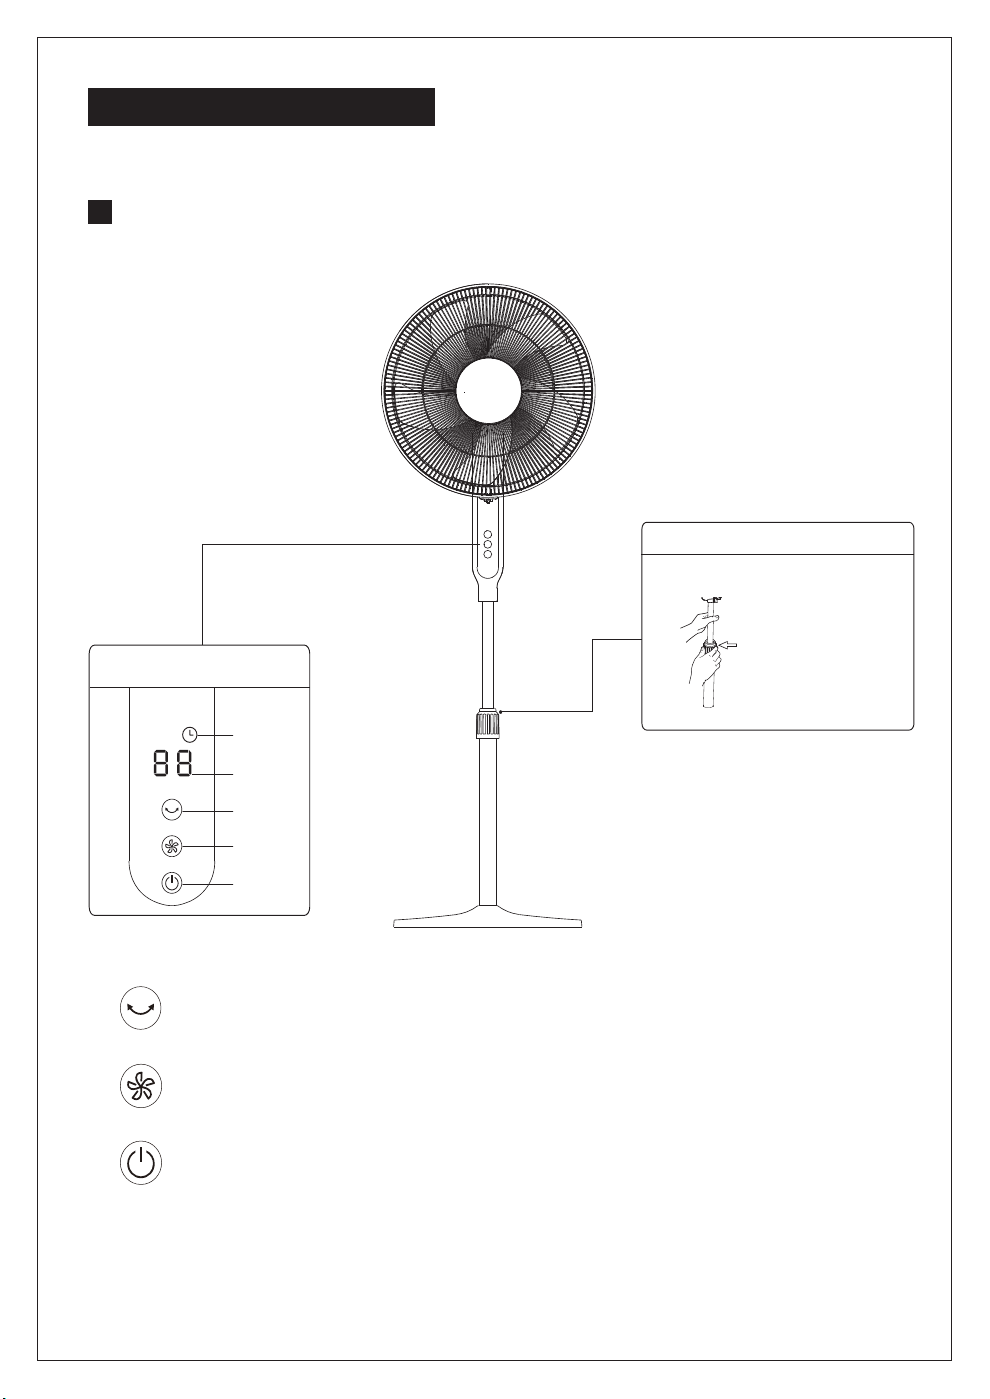
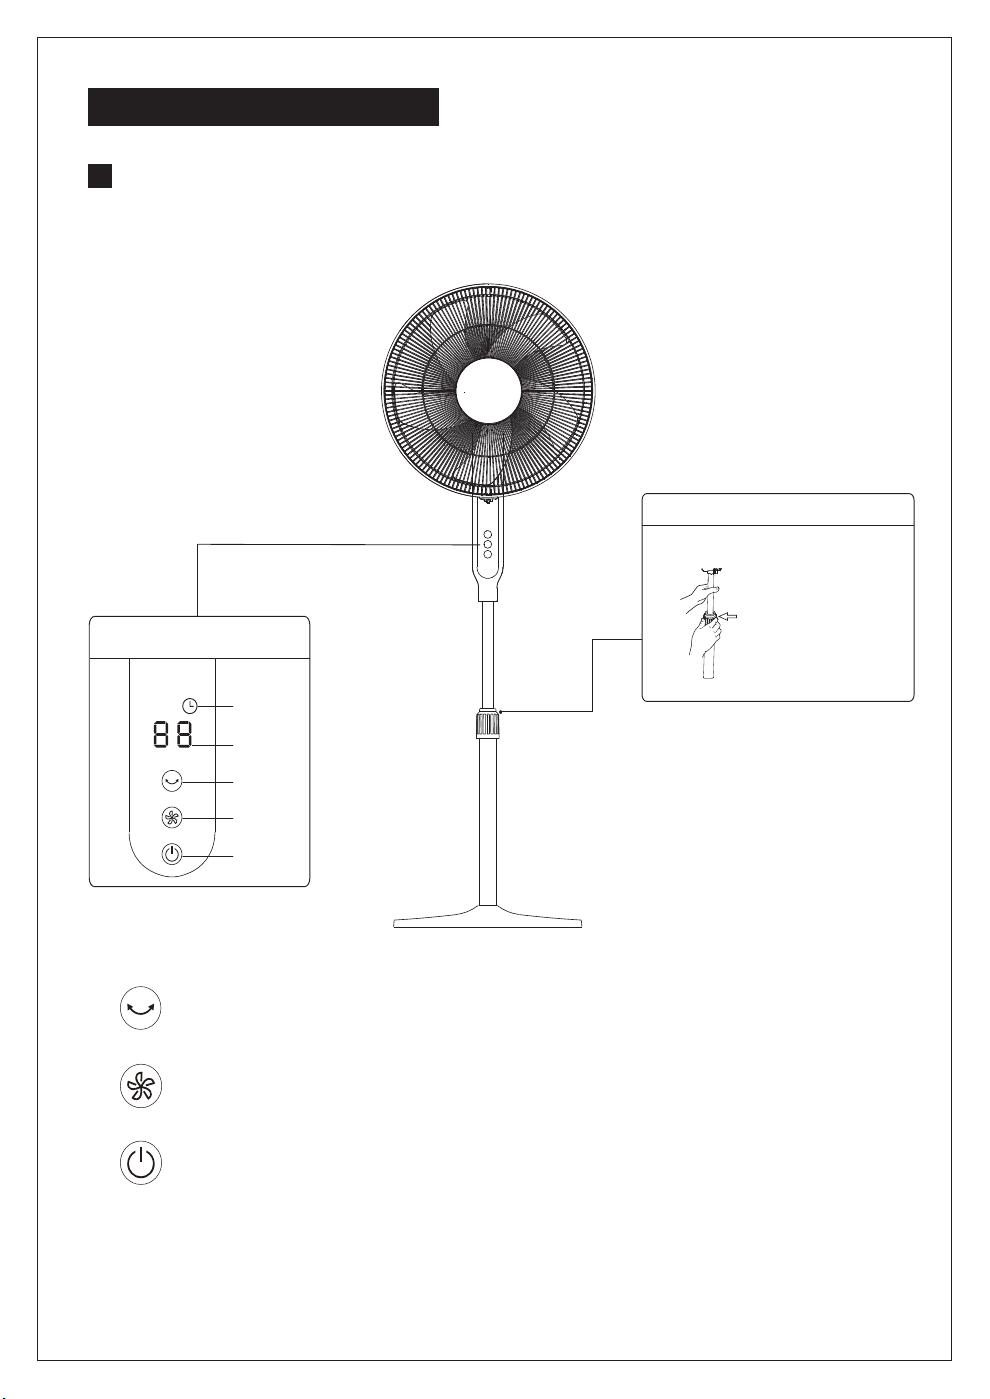
Instructions for operation of body
Body Control
Turn counterclockwise and loosen for
performing height adjustment.
Height Adjustment
Height Adjustment Key
Oscillating button: Short press the oscillating button to start or close the oscillating function;
press the oscillating button for 2s for time setting, and then short press the oscillating button
for time adjustment.
Wind speed button: Short press the wind speed button, and wind speed will change
according to: shifts of 1-2-3-4-...-12 successively; press the wind speed button for a long
time to realize quick adjustment of wind speed
On/off button: Switch operation or stop.
Timing Display
Wind Speed Display
Oscillating Button
Wind Speed Button
On/Off Button
5
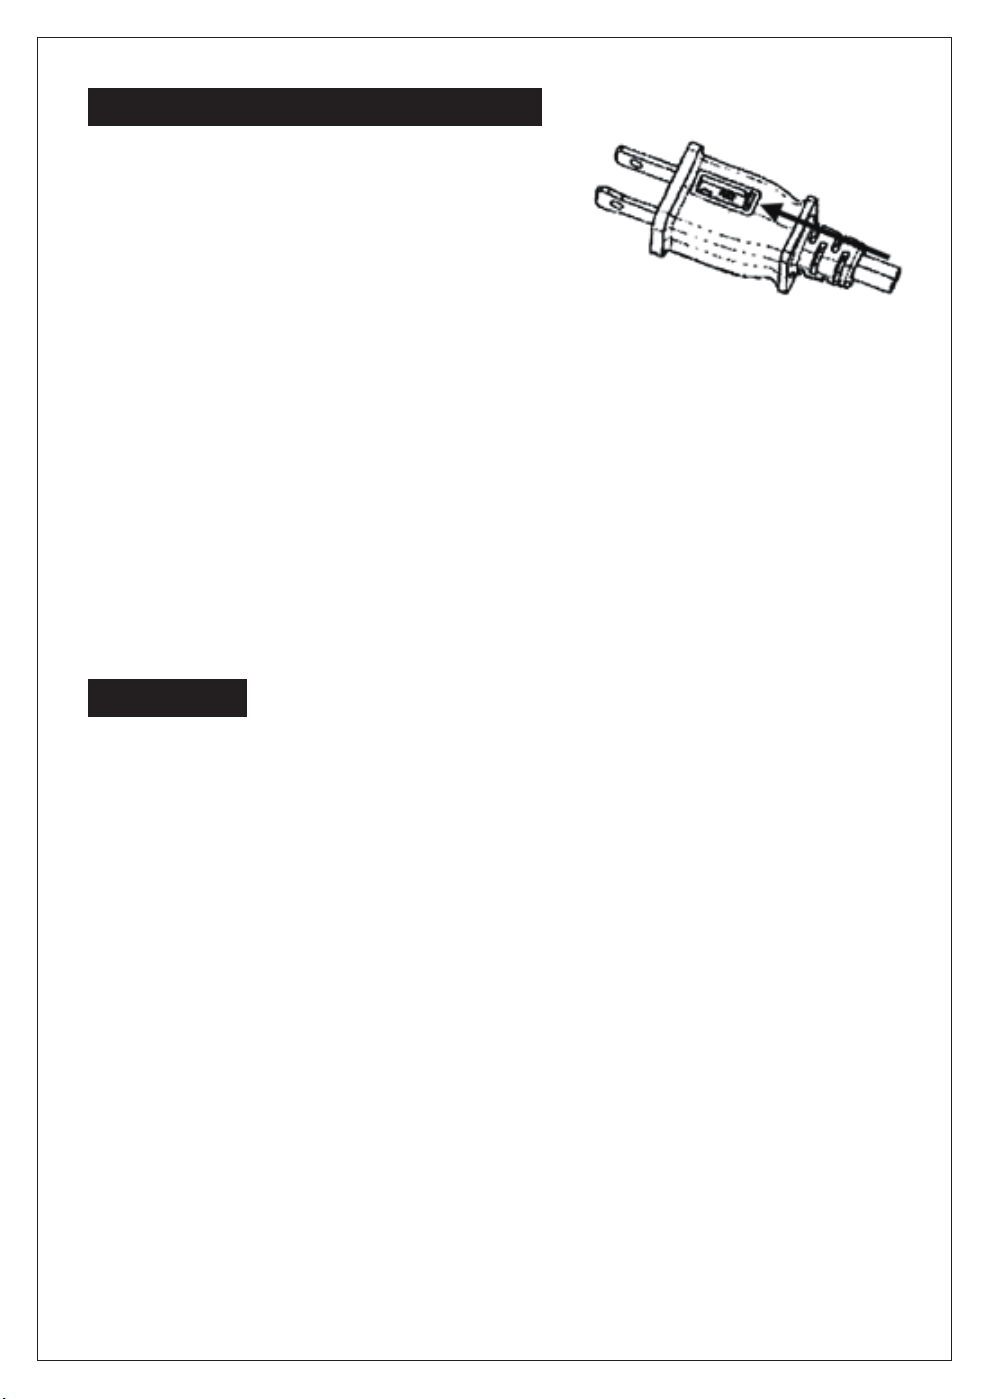
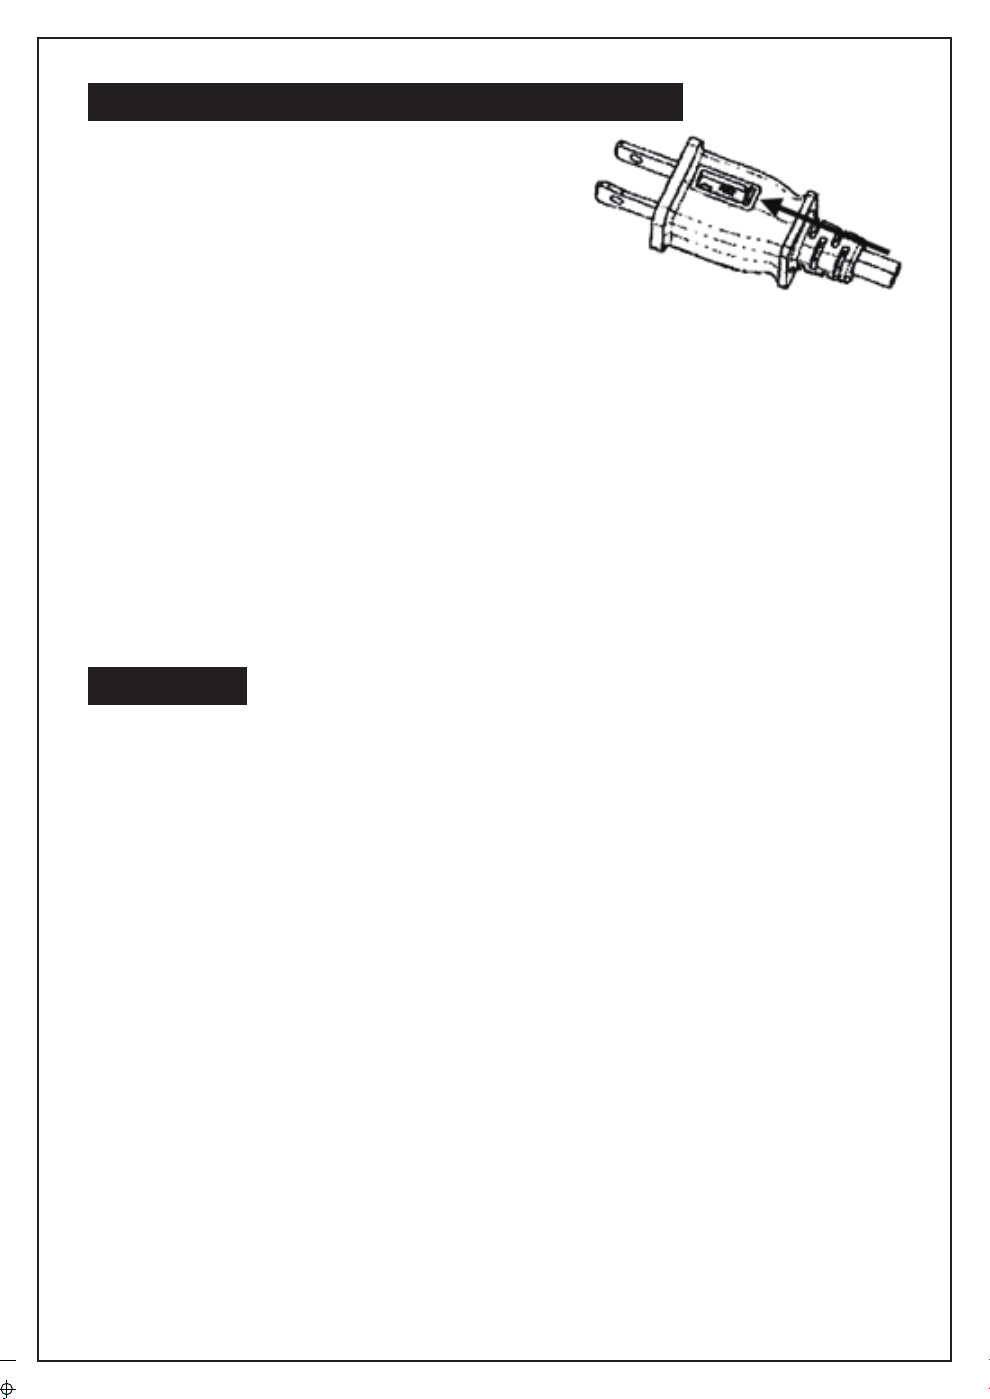
a) Grasp plug and remove from the receptacle or
other outlet device. Do not unplug by pulling
on cord.
b) Open fuse cover. Slide open fuse access
cover on top of attachment plug towards blades.
c) Remove fuse carefully. Insert the tip of your tool
into fuse slot (close with the terminal), then prize
the fuse gradually and slowly, but not overexert. If you feel tight, you can try it at
several times and prize the fuse little by little. When one side of the fuse has
been prized, then you can get the fuse out entirely.
d) Risk of fire. Replace fuse only with 2.5 Amp, 125 Volt fuse.
e) Close fuse cover. Slide closed the fuse access cover on top of attachment plug.
f) Risk of fire. Do not replace attachment plug. Contains a safety device (fuse) that
should not be removed. Discard product if the attachment plug is damaged.
Notice:
1. When you replace the fuse, please don’t operate suddenly or overexert, or else
the product will be damage or cause accident.
2. When you feel it hard to be operated, please make sure you have got the right
way.
USER SERVICING INSTRUCTIONS
CLEANING
1. Be sure to unplug from the electrical supply source before cleaning.
2. Plastic parts should be cleaned with mild soap and a damp cloth or sponge.
Thoroughly to remove soap film with clean water.
3. Be sure not to make water or other liquid enter inside of motor.
6
7
For questions or comments,please write to:
Midea America Corporation
Customer Care Center
Email us at: [email protected]
1-866-646-4332
fan
11411 NW 107th Street,
Suite 12 Miami, FL 33178
8
ONE (1) YEAR LIMITED WARRANTY
Please read all instructions before attempting to use this product.
In the event of malfunctions or failure of your Fan, simply deliver or send the Fan,
postage prepaid along with PROOF OF PURCHASE, within the warranty period of one (1)
year, to Midea America Corporation. Midea America Corporation reserves the right to
inspect the claimed defective part or parts to determine if the defect or malfunction
complaint is covered by this warranty. Midea America Corporation shall, within sixty(60)days
after receipt of the product, at its option, repair and/or replace the defective part or parts free
of charge. This warranty shall only cover defect arising from normal usage. Midea America
Corporation assumes no responsibility whatsoever if the Fan should fail during the warranty
period by reason of:
Misuse, negligence, physical damage or accidents.
Lack of maintenance (see instructions for proper maintenance).
Repair by any unauthorized party during the warranty period.
Damage caused by connection to an improper input voltage (see specification
label on your Fan).
Midea America Corporation makes no further warranties or representations, express or
implied except those contained herein. No representative or dealer is authorized to assume
any other liability regarding the Fan. The duration of the implied warranty granted under
State law, including warranties of merchantability and fitness for particular purpose are
limited in duration should the duration of the express warranty grant it hereunder. Midea
America Corporation shall in no event be liable for direct, indirect, special or consequential
damages.
Some states do not allow limitations on how long an implied warranty lasts, and/or the above
limitations or exclusion may not apply to you. This warranty gives you specific legal rights
and you may have other rights which vary from state to state.
Midea America Corporation warrants as limited herein to the original purchaser of retail
thateach new Fan, shall be free of defects in material and workmanship for aperiod of
one (1) year from the date of original purchase. This one (1) year warranty is limited to
the Motor and Electric Element.
LEA Y GUARDE ESTAS INSTRUCCIONES
MANUAL DEL USUARIO
VENTILADOR DE PIE DE DC
DE 16"(40,6cm)
MODELO: FS40-19PRD
ARTÍCULO: 1158598
Lea las normas de seguridad y las instrucciones atentamente.
PRECAUCIÓN
1. No introduzca los dedos, lápices, u cualquier otro objeto a través de las rejillas mientras el
ventilador esté en funcionamiento.
2. Desconectar si va a desplazarlo.
3. Asegúrese de que el ventilador esté colocado sobre una superficie estable, para evitar que
se vuelque.
4. No utilizar en una ventana. La lluvia representa un peligro eléctrico.
5.
Sólo para uso del hogar.
NORMAS DE SEGURIDAD
INSTRUCCIONES DE SEGURIDAD IMPORTANTES
LEA Y GUARDE ESTAS INSTRUCCIONES
9
1. Este aparato tiene un enchufe polarizado (una pata es más ancha que la otra). Para reducir
el riesgo de descarga eléctrica, el enchufe está diseñado para encajar en un tomacorriente
polarizado de una sola manera. Si el enchufe no encaja por completo en el tomacorriente,
inviértalo. Si aún así no encaja, llame a un electricista calificado. No trate de violar esta
medida de seguridad.
2. Para reducir el riesgo de incendio o descarga eléctrica, no utilice este ventilador con un
dispositivo de control de velocidad sólido.
ADVERTENCIA
Las normas para operar el cable y el enchufe son las siguientes:
1. No deje el ventilador en funcionamiento sin vigilancia.
2. Mantenga los aparatos eléctricos fuera del alcance de los niños o personas vulnerables. No deje
que utilicen los aparatos sin supervisión.
3. Si el cable de alimentación está dañado, debe ser reemplazado por el fabricante o su agente de
servicio, u otra persona calificada, con el fin de evitar peligros.
4. Este aparato no está diseñado para su uso por personas (incluyendo niños) con capacidades
físicas, sensoriales o mentales reducidas, o falta de experiencia y conocimiento, a menos que se
les haya dado la supervisión o instrucciones relativas al uso del aparato por una persona
responsable de su seguridad. Los niños pequeños deben ser supervisados para asegurarse que
no utilicen el producto como un juguete.
5. Una vez montado el ventilador, la rejilla de las aspas no debe quitarse más.
- Desconectar antes de limpiar.
- La rejilla de las aspas no debe quitarse/abrirse para limpiarlas.
- Limpie la carcasa del ventilador y la rejilla con un paño ligeramente húmedo.
6. Este producto emplea protección contra sobrecargas (fusible). Un fusible fundido indica una
sobrecarga o cortocircuito. Si el fusible se funde, desenchufe el producto de la toma. Reemplace
la fusible según las instrucciones de mantenimiento del usuario (siga la identificación de
productos para conocer la calificación de fusible adecuada) y verificar. Si el fusible de reemplazo
sopla, puede existir un cortocircuito y el producto debe ser desechado o devuelto a un centro de
servicio autorizado para su examen y/o reparación.
7. No haga funcionar ningún ventilador con un cable o enchufe dañado. Descártelo, o llévelo a un
centro de servicio autorizado para su revisión y/o reparación.
8. No pase el cable por debajo de la alfombra. No cubra el cable con tapetes, alfombras, o cubiertas
similares. No coloque el cable debajo de muebles o electrodomésticos. Coloque el cable lejos
del área de tráfico y donde no pueda causar tropiezos.
10
INSTRUCCIONES DE INSTALACIÓN
Nombre de los componentes
Tubo
Motor
Rejilla trasera
Ajustar
el pomo
Instalar
alineando
Base
perno de ángulo
recto
Sugerencia:
Separar las piezas de la
componente antes de realizar
la instalación.
Instalación de la base
Alinear la columna con la
ranura en la base, y unirlos
utilizando el perno de
ángulo recto.

11
INSTRUCCIONES DE INSTALACIÓN
Tuerca de seguridad de la rejilla
Tuerca de bloqueo de la hoja
Espada
Atornillar la tuerca de seguridad hacia la derecha,
y al mismo tiempo, fijar la rejilla trasera.
Girar la de las aspas
en sentido contrario a
las agujas del reloj, e
instalar la rejilla frontal.
Tire de las aspas y hágalas girar después de la instalación,
a fin de asegurar de que pueden girar con facilidad.
Rejilla
delantera
Captura de
las rejillas
1
2
3
1
2
3
Alinear las aletas de la rejilla
delantera con la posición de
la rejilla trasera como se
muestra en la imagen.
Prensar las rejillas
secuencialmente con
ambas manos.
Instalación de auto-
captura.
Instalación delantera y trasera de la Guardia
12
INSTRUCCIONES DE USO
Encender/Apagar
Temporizador
Velocidad
Oscilador
PILAS (no incluidas)
1. Presione la tapa del compartimento de pilas
2. Utilice 2 pilas "AAA" (no incluidas).
3. Inserte las pilas asegurándose de que los extremos
positivos estén hacia el lado correcto.
4. Vuelva a colocar la tapa.
INSTRUCCIONES PARA
1. No deseche las pilas en fuego, ya que pueden
explotar o tener fugas.
2. No combine pilas viejas y nuevas.
3. No combine pilas alcalinas y estándar (línea de
carbono) y pilas recargables (níquel-cadmio).
4. No intente recargar pilas no recargables.
5. Inserte las pilas con la polaridad correcta.
6. Las pilas agotadas deben ser removidas del producto.
7. Quitar las pilas del control remoto antes de desecharlo
y asegúrese de eliminarlas de forma segura.
ADVERTENCIA
Battery
Instrucciones del control remoto
Nota:
El rango del control remoto es de 16.40 pies de distancia
y 30 grados de desviación de la parte frontal del aparato.
13
INSTRUCCIONES DE USO
Instrucciones de uso del cuerpo del ventilador
Body Control
Gire hacia la izquierda y aflojar para
realizar el ajuste de altura.
Ajuste de altura
Perno de ajuste de altura
Visualización del
temporizador
Visualización de
la velocidad de las
aspas
Botón de
oscilación
Botón de velocidad
Botón de encendido/
apagado
Botones de oscilación: Pulsos de oscilación corta, iniciando o apagando funciones
de oscilación; 2 segundos para la clave de oscilación, fijando el tiempo y ajustando
el tiempo con la clave de oscilación.
Botón de velocidad
: El viento se basa en la velocidad del viento :1-2-3-4... -12 años
consecutivos; Presione la velocidad del viento para ajustar la velocidad del viento.
Botón de encendido/apagado
: Interruptores o paradas.
14
a) Desconectar de la toma de corriente sujetando el
enchufe. No tire del cable.
b) Abrir la tapa del fusible. Deslice la cubierta de
acceso al fusible en la parte superior del enchufe
accesorio para abrirla.
c) Retirar el fusible con cuidado. Desatornillar con
mucho cuidado y sin ejercer fuerza. Retire el fusible
poco a poco. Cuando un lado esté suelto, podrá sacar el fusible
completamente.
d) Riesgo de incendio. Reemplazar solamente con un fusible de 2,5 Amp y 125 Volt.
e) Cerrar la tapa. Deslice la cubierta para cerrarla.
f) Riesgo de incendio. No reemplace el enchufe accesorio. Contiene un dispositivo
de seguridad (fusible) que no debe ser quitado. Deseche el producto si el enchufe
accesorio está dañado.
Nota:
1. Al reemplazar el fusible, no aplique fuerza sobre él, o de lo contrario puede
dañarlo o causar un accidente.
2. Si encuentra que es difícil de operar, verifique que esté haciéndolo según las
instrucciones.
INSTRUCCIONES DE SERVICIO DE USUARIO
LIMPIEZA
1. Desconectar de la fuente de alimentación antes de limpiar.
2. Las partes de plástico deben lavarse con jabón suave y un paño húmedo o
esponja.
Enjuagar con agua para eliminar todo el jabón.
3. Tenga cuidado de que no entre agua ni ningún otro líquido en el motor.
15
SERVICIO Y SOPORTE
En caso de reclamos de garantía o si se necesita servicio para este ventilador, por favor,
póngase en contacto con nosotros a los siguientes números:
Gratis: 1-866-646-4332
Envíenos un mensaje de correo electrónico a:
Para preguntas o comentarios, por favor escriba a:
Midea America Corporation
Customer Care Center
Para su registro, engrape su recibo de compra a este manual y registre lo siguiente:
FECHA DE COMPRA: ________________________________
_
______________
_
LUGAR DE COMPRA: ________________________________
_
______________
_
(ENGRAPE EL RECIBO DE VENTA AQUÍ)
NOTA: SE REQUIERE UNA PRUEBA DE
COMPRA PARA TODOS LOS RECLAMOS
DE GARANTÍA
IMPRESO EN CHINA
11411 NW 107th Street,
Suite 12 Miami, FL 33178

16
GARANTÍA LIMITADA DE UN (1) AÑOS
Por favor lea todas las instrucciones antes de intentar utilizar este producto.
Mal uso, negligencia, daño físico o accidentes.
Falta de mantenimiento (vea las instrucciones de mantenimiento adecuado).
Reparación por alguna parte no autorizada durante el período de garantía.
Daños causados por conexión a un voltaje inapropiado (vea la etiqueta de
especificación en su Ventilador).
Midea America Corporation no ot orga más garantías o representaciones, expresas o implícitas
excepto las que se mencionan aquí. Ningún representante o vendedor está autorizado a asumir
cualquier otra responsabilidad relacionada con el Calefactor con ventilador. La duración de la
garantía implícita otorgada bajo las leyes del Estado, incluyendo garantías de comercialización y
aptitud para un propósito en particular están limitadas en duración si l
a duración de la garantía
expresa lo otorgara a continuación.Midea America Corporation no será en ningún caso responsable
por daños directos, indirectos, especiales o consecuenciales.
Algunos estados no permiten limitaciones sobre la duración de una garantía implícita, y/o las
limitaciones o exclusiones anteriores pueden no aplicarse a usted. Esta garantía le ofrece
derechos legales específicos y usted puede tener otros derechos, que varían de estado a
estado.
●
●
●
●
●
Midea America Corporation ntiza de forma limitada, como se explicita aquí, al comprador original
que cada Ventilador nuevo estará libre de defectos de materiales o mano de obra por el período
de un (1) años desde la fecha de la compra original. Esta garantía de un (1) años está limitada a
los motor,y elementos de calefacción.
En caso de mal funcionamiento o avería de su Ventilador simplemente lleve o envíe el
valentador, con un envío prepago junto con una PRUEBA DE COMPRA, dentro del período de la
garantía de un (1) años, a Midea America Corporation. Midea America Corporation se reserva el
derecho de inspeccionar la parte o partes supuestamente defectuosas para determinar si el
reclamo por defecto o mal funcionamiento está cubierto por esta garantía. Dentro de los sesenta
(60) días de recibido el producto, Midea America Corporation , a su elección, reparará y/o
reemplazará la parte o partes defectuosas sin cargo alguno. Esta garantía sólo cubrirá defectos que
surjan de una utilización normal. Midea America Corporation no asume ninguna responsabilidad si el
Calefacotr con Ventilador se averiara durante el período de la garantía debido a: