PEDESTAL FAN
PFS40M2ABB
pelonis.com
USER MANUAL
en
PFS40M2ABB
Warning Notice: Before using
this product, please read this
manual carefully and keep it for
future reference. For additional
support, please call customer
service at 866-646-4332.
The design and specifications are
subject to change without prior
notice for product improvement.
Consult with your dealer or
the manufacturer for details.
Rated voltage: 120V
Rated power: 32W
Frequency: 60Hz

Read This Manual
Inside you’ll find many helpful hints on how to use and maintain your appliance
properly. Just a little preventive care on your part can save you a great deal of time
and money over the life of your appliance. You’ll find many answers to common
problems in the troubleshooting tips - you should be able to fix most of them quickly
before calling service. These instructions may not cover every possible condition of
use, so common sense and attention to safety is required when installing, operating
and maintaining this product.
• For support, please call the Service Center at 1-866-646-4332.
• This appliance is not intended for use by people (including children) with reduced
physical, sensory, or mental capabilities or lack of experience and knowledge,
unless they have been given supervision or instruction concerning use of the
appliance by a person responsible for their safety.
• Children should be supervised to ensure that they do not play with the appliance.
• The appliance should be installed in accordance with national wiring regulations.
CAUTION
SAFETY PRECAUTIONS ............................................................................ 3
IMPORTANT INSTRUCTIONS ................................................................... 3
RULES FOR SAFE OPERATION .............................................................. 4
PART NAMES ...............................................................................................
.......................................
........................................
5
ASSEMBLY OF STAND & EXTENSION POLE 6
FRONT AND REAR GRILLE INSTALLATION 7
...................................................................OPERATING INSTRUCTIONS 7
.........................................................USER SERVICING INSTRUCTIONS 8
....................................................................................................CLEANING 8
..........................................................................SERVICE AND SUPPORT 9
..................................................................1 YEAR LIMITED WARRANTY 10
Owner’s Manual
Page 2
SAFETY PRECAUTIONS
IMPORTANT INSTRUCTIONS
To prevent injury to the user or other people and property damage, the instructions
shown here must be followed. Incorrect operation due to ignoring of instructions may
cause harm or damage. The level of risk is shown by the following indications.
WARNING
This symbol indicates a hazardous situation which, if not
avoided, could result in death or serious injury.
CAUTION
This symbol indicates a hazardous situation, which, if not
avoided, could result in minor or moderate injury.
NOTICE
This symbol addresses practices not related to physical
injury.
WARNING
CAUTION
1. This appliance has a polarized plug (one blade is wider than the
other). To reduce the risk of electric shock, this plug is intended to
fit in a polarized outlet only one way. If the plug does not fit fully in
the outlet, reverse the plug. If it still does not fit, contact a qualified
electrician. Do not attempt to defeat this safety feature.
2. WARNING—To reduce the risk of fire or electric shock, do not use
this fan with any solid-state speed control device.
3. This product employs overload protection (fuse). A blown fuse
indicates an overload or short-circuit situation. If the fuse blows,
unplug the product from the outlet. Replace the fuse as per the
user servicing instructions (follow product marking for proper fuse
rating) and check the product. If the replacement fuse blows, a
short-circuit may be present and the product should be discarded
or returned to an authorized service facility for examination and/or
repair.
4. Do not operate any fan with a damaged cord or plug. Discard fan
or return to an authorized service facility for examination and/or
repair.
Page 3
Read Rules for Safe Operation and Instructions Carefully.

WARNING
5. Do not run cord under carpeting. Do not cover cord with throw
rugs, runners, or similar coverings. Do not route cord under furniture
or appliances. Arrange cord away from traffic area and where it will
not be tripped over.
6. Do not leave the fan running unattended.
7. Keep electrical appliances out of reach from children or infirm
persons. Do not let them use the appliances without supervision.
8. If the supply cord is damaged, it must be replaced by manufacturer
or its service agent or a similarly qualified person in order to avoid a
hazard.
9. This appliance is not intended for use by persons (including
children) with reduced physical, sensory or mental capabilities, or
lack of experience and knowledge, unless they have been given
supervision or instruction concerning use of the appliance by a
person responsible for their safety. Children should be supervised to
ensure that they do not play with the appliance.
10. Once the fan is assembled, the rotor blade guard shall not be taken
off anymore.
- Prior to cleaning, unplug the fan.
- The rotor guard shall not be dissembled/opened to clean the rotor
blades.
- Wipe the fan enclosure and rotor blade guard with a slightly damp
cloth.
SAVE THESE INSTRUCTIONS
Page 4
RULES FOR SAFE OPERATION
1. Never insert fingers, pencils, or any other object through the grille
when fan is running.
2. Disconnect fan when moving from one location to another.
3. Be sure fan is on a stable surface when operating to avoid
overturning.
4. DO NOT use fan in window, rain may create electrical hazard.
5. Household use only.
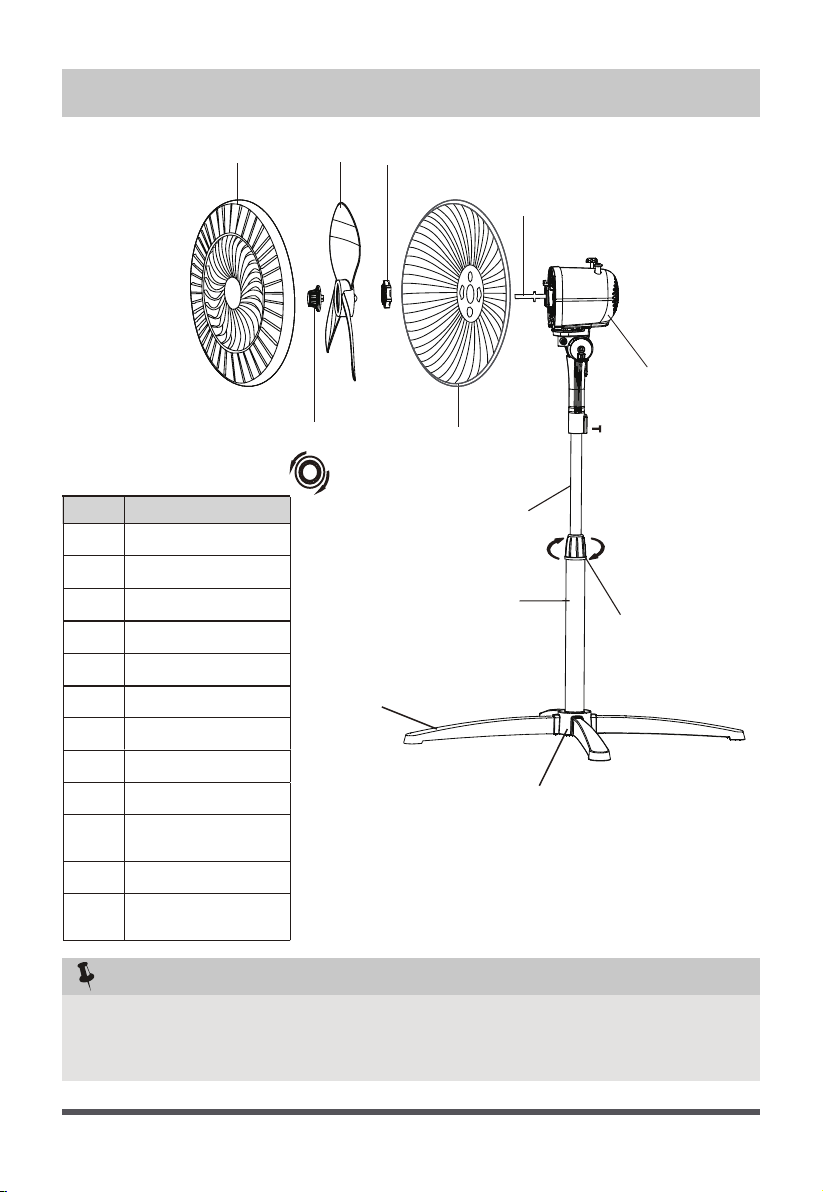
PART NAMES
Page 5
NO. Description
1 Front grille
2 Fan blade
3 Plastic nut
4 Rear grille
5 Motor shaft
6 Motor housing
7 Spinner
8 Internal Pole
9 Extension Pole
10
Height adjustment
ring
11 Stand
12
Cross base
connector
1 2 3
Tighten
Loosen
47
Fasten
5
6
8
9
10
11
12
NOTICE:
All the pictures in this manual are for explanation purpose only. Any
discrepancy between the real object and the illustration in the drawing
shall be subject to the real subject.
Page 6
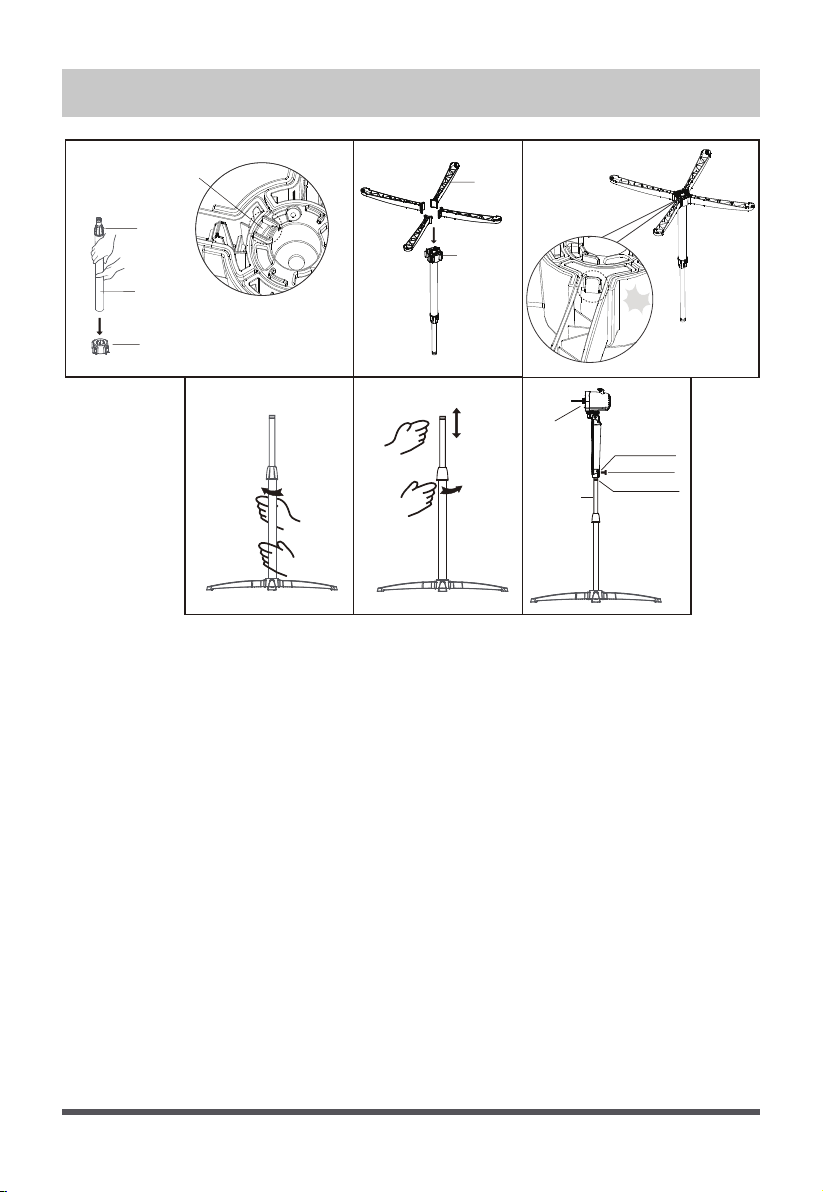
ASSEMBLY OF STAND & EXTENSION POLE
Thumb screw
Cross base
connector
Stand
Pa!
Fig.6
Height
adjustment
ring
Pole assembly
Cross base connector
Observation hole
Screw installation hole
Mounting hole
Fig.1 Fig.2 Fig.3
Fig.4 Fig.5
1. Insert the pole assembly into the cross base connector from top to
bottom, ensure it is installed in place (use the observation hole to
determine if the pole assembly is fully inserted into the cross base
connector).(Fig.1)
2. Insert 4 stands into the cross base connector. Ensure the stands are
well fixed into the cross base connector.(Fig.2,3)
3. From the extension pole, loosen the height adjustment ring and
adjust the internal pole to the desired height. (Note: If you can’t find
the internal pole, it slides inside the extension pole. You can pull it
out from the extension pole.) Fasten the height adjustment
ring.(Fig.4,5)
4. To attach the head unit to the internal pole, loosen the thumb screw
(separate screw driver needed) on the bottom of the head unit.
Place the head unit on the internal pole and tighten the thumb screw
in alignment with the groove and mounting hole on the internal pole.
(Fig.6)
Tighten
Loosen
Head unit
Internal pole

Page 7
1. Align the front grille buckle with the top line of the rear grille from
top to bottom, after aligning, the grilles should look like the
corresponding schematic.(Fig.7)
2. Press the grilles with both hands in sequence, and while the grilles
are being connected, you will hear several clicks.(Fig.8)
3. For self-locking installation, tighten the screw (separate screw driver
needed) on the lower grille buckle of the front grille.(Fig.9)
1. Speed is controlled by the rotary knob located on top of the motor
housing:
0---Off 1---Low 2---Medium 3---High
2. To start/stop the fan head oscillation, push down/pull up the clutch
knob that is located on the top of the motor housing.
3. To adjust the air flow upward or downward, push the grilles lightly
to the desired direction.
4. The height of the fan can be adjusted by loosening the height
adjustment ring, carefully carefully raising or lowering the fan and
firmly re-tightening the height adjustment ring.
FRONT AND REAR GRILLE INSTALLATION
OPERATING INSTRUCTIONS
Grill line
Buckle
Grill line
Buckle
Fig.7
1 1
2 2
3 3
Pa!
Fig.8
Grill buckle
Fig.9

USER SERVICING INSTRUCTIONS
CLEANING
Page 8
1. Grasp plug and remove from the
receptacle or other outlet device.
Do not unplug by pulling on cord.
2. Open fuse cover. Slide open fuse
access cover ,that is on top of the plug,
towards blades.
3. Remove fuse carefully. Insert the tip of your tool
into fuse slot (close with the terminal), then pry
the fuse gradually and slowly, but not overexert. If it feels tight,
you can try to pry the fuse little by little. When one side of the
fuse has been pried, then you can get the fuse out entirely.
4. Risk of fire. Replace fuse only with 2.5 Amp, 125 Volt fuse.
5. Close fuse cover. Slide the fuse access cover back to the closed
position.
6. Risk of fire. Do not replace attachment plug. Contains a safety
device (fuse) that should not be removed. Discard product if the
attachment plug is damaged.
NOTICE:
1. When you replace the fuse, please operate cautiously to avoid
accidental damage.
2. If it is hard to place the new fuse, ensure that the fuse is in the
correct orientation.
1. Be sure to unplug from the electrical supply source before cleaning.
2. Plastic parts should be cleaned with mild soap and a damp cloth or
sponge. Thoroughly remove soap film with clean water on a cloth
or sponge.
3. Ensure that water or other liquid does not enter inside of the motor.

Page 9
SERVICE AND SUPPORT
In the event of a warranty claim or if service is required for this
product, please contact us at the following:
Toll Free: 1-866-646-4332
Email us at: customerservice@supportuscenter.com
Midea America Corp.
Parsippany, NJ 07054
For your records, staple your sales receipt to this manual and record
the following:
DATE OF PURCHASE: _______________________________________
PLACE OF PURCHASE: ______________________________________
(STAPLE SALES RECEIPT HERE)
NOTE: PROOF OF PURCHASE IS REQUIRED FOR ALL
WARRANTY CLAIMS
PRINTED IN CHINA

Page 10t u
This is the only express warranty for this product and is in lieu of any
other warranty or condition.
This product is warranted to be free from defects in material and
workmanship for a period of one (1) year from the date of original
purchase. During this period, your exclusive remedy is repair or
replacement of this product or any component found to be defective, at
our option; however, you are responsible for all costs associated with
returning the product to us and our returning the product or component
under this warranty to you. If the product or component is no longer
available, we will replace with a similar one of equal or greater value.
This warranty does not cover wear from normal use, and operation doesn't
conformity with the instruction manuals, or damages to the product
resulting from accident, alteration, abuse, or misuse. This warranty extends
only to the original consumer purchaser or gift recipient. Keep the original
sales receipt, as proof of purchase is required to make a warranty claim.
This warranty is void if products is used for other than single-family
household use or subjected to any voltage and waveform other than as
specified on the label.
We exclude all claims for special, incidental, and consequential damages
by breach of express or implied warranty. All liability is limited to amount
of the purchase price. Every implied warranty, including any statutory
warranty or condition of merchant-ability or fitness for particular purpose,
is disclaimed except to the extent prohibited by law, in which case such
warranty or condition is limited to the duration of this written warranty.
This warranty gives you specific legal rights. You ma
y have other legal
rights that vary depending on where you live. Some states or provinces do
not allow limitations on implied warranties or special, incidental
consequential damages, so the foregoing limitations may not apply to you.
Please note that failure to complete and submit this form does not
diminish your warranty rights.
Customer Service:
Midea America Corp.
Parsippany, NJ 07054
1 YEAR LIMITED WARRANTY