2024.06v1.0
User Manual

Searching for Keywords
Search for keywords such as “battery” and “install” to nd a topic. If you are using Adobe
Acrobat Reader to read this document, press Ctrl+F on Windows or Command+F on Mac
to begin a search.
Navigating to a Topic
View a complete list of topics in the table of contents. Click on a topic to navigate to that
section.
Printing this Document
This document supports high resolution printing.
This document is copyrighted by DJI with all rights reserved. Unless otherwise authorized by
DJI, you are not eligible to use or allow others to use the document or any part of the document
by reproducing, transferring or selling the document. Users should only refer to this document
and the content thereof as instructions to operate DJI UAV. The document should not be used
for other purposes.

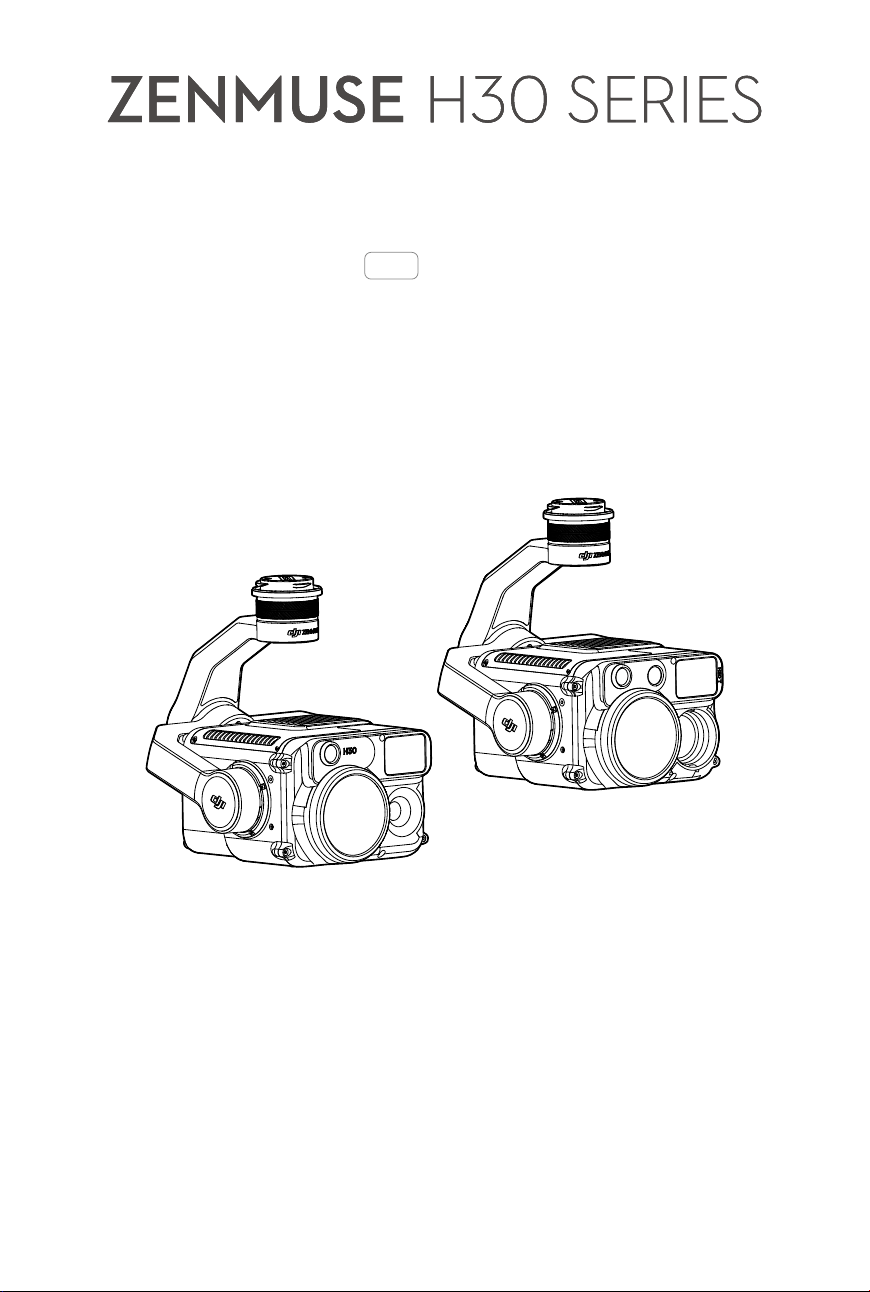
ZENMUSE H30 SERIES
User Manual
©
2024 DJI All Rights Reserved.
1
Using This Manual
Legends
Important Hints and Tips
Video Tutorials
Go to the official website to watch the tutorial videos, which demonstrate how to use the
product safely.
Warnings
1. When not in use, store the ZENMUSE
TM
H30 series in the storage case and replace the
desiccant packet as necessary to prevent fogging on the lenses due to excessive ambient
humidity. If the lenses fog up, the water vapor will usually dissipate after powering on the
device for a while. It is recommended to store the product in an environment with a relative
humidity of less than 40% and temperature of 20±5° C.
2. DO NOT expose the infrared camera lens to a strong energy source such as the sun, lava, or
laser beams. The temperature of the observed subjects should not exceed 800° C (1472° F)
(or not exceed 1600° C (2912° F) with an Infrared Density Filter installed). Otherwise, it will
burn the infrared sensor and cause irreversible damage.
3. DO NOT place the product under direct sunlight, in areas with poor ventilation, or near a
heat source such as a heater.
4. DO NOT repeatedly power the product on or off. After powering off, wait at least 30
seconds before powering back on. Otherwise, the product life will be aected.
5. Under controlled laboratory conditions, the product achieves an IP54 protection rating
by IEC60529 standards. The protection rating is not permanent and may reduce over an
extended period.
6. Make sure there is no liquid on the surface or in the port of the gimbal before installation.
7. Make sure the gimbal is securely installed on the aircraft and the microSD card slot cover is
closed properly.
8. Make sure the surface of the gimbal is dry before opening the microSD card slot cover.
9. DO NOT insert or remove the microSD card during use.
10. DO NOT touch the surface of the lenses with your hand. Be careful to avoid scratching the
surface of the lenses with sharp objects. Otherwise, the quality of images may be aected.
11. Clean the surface of the camera lenses with a soft, dry, clean cloth. DO NOT use alkaline
detergents.
12. DO NOT drop the product and handle with care. Otherwise, it may not function properly.
13. The image quality of the infrared thermal camera may be aected with an infrared density
filter installed, including decreased image clarity and contrast, increased noise, and
horizontal stripes on the edge of the view.

2
©
2024 DJI All Rights Reserved.
Contents
Using This Manual 1
Legends 1
Video Tutorials 1
Warnings 1
Product Profile 3
Introduction 3
Overview 3
Installation 4
Activation 5
Basic Operations 5
Remote Controller Controls 5
DJI Pilot 2 App 6
Zoom Camera 6
Wide-Angle Camera 9
Infrared Thermal Camera* 10
Using the Camera 12
Setting the Shooting Mode 12
Camera Functions 13
Visible Light Camera 13
Infrared Thermal Camera 14
General Settings 15
Maintenance 16
Log Export 16
Firmware Update 16
Using DJI Pilot 2 16
Using microSD Card 16
Update Status Alarm 17
Appendix 18
Specifications 18
Infrared Parameters 22
Palettes 22
Emissivity 23
ZENMUSE H30 SERIES
User Manual
©
2024 DJI All Rights Reserved.
3
Product Prole
Introduction
Both Zenmuse H30 and 30T have integrated zoom and wide-angle cameras, which enables users
to quickly switch to a highly magnied zoom view for detailed observation after recognizing an
object in the wide-angle camera view. The observation performance at night and in low-light
environments is improved with the NIR auxiliary light, and the equipped laser rangender can
provide the distance and location information of the subject. H30T also features a long-wave
infrared thermal camera, which can capture thermal images.
With a 3-axis stabilized gimbal, the H30 series can be used with compatible DJI aircraft and
stream live video to the DJI PILOT
TM
2 App. The upgraded Night Scene mode and Smart Capture
mode allow a wider range of usage scenarios.
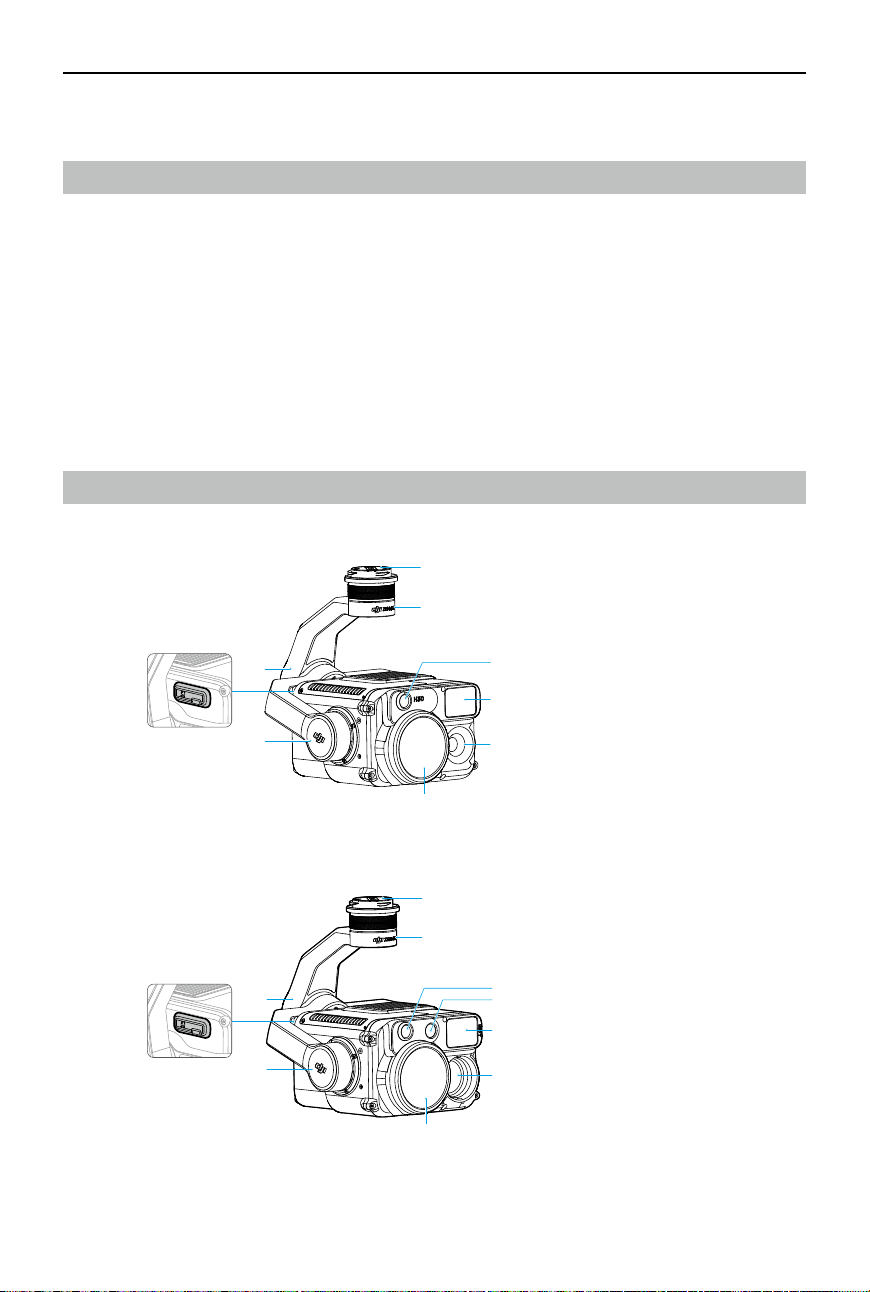
Overview
H30
H30T
1. Gimbal Connector
2. Pan Motor
3. Roll Motor
4. microSD Card Slot
5. Tilt Motor
6. Zoom Camera
7. NIR Auxiliary Light
8. Laser Range Finder
9. Wide-Angle Camera
10. Infrared Thermal Camera
1
2
8
9
6
7
3
5
4
1
2
8
10
6
7
9
3
5
4
ZENMUSE H30 SERIES
User Manual
4
©
2024 DJI All Rights Reserved.
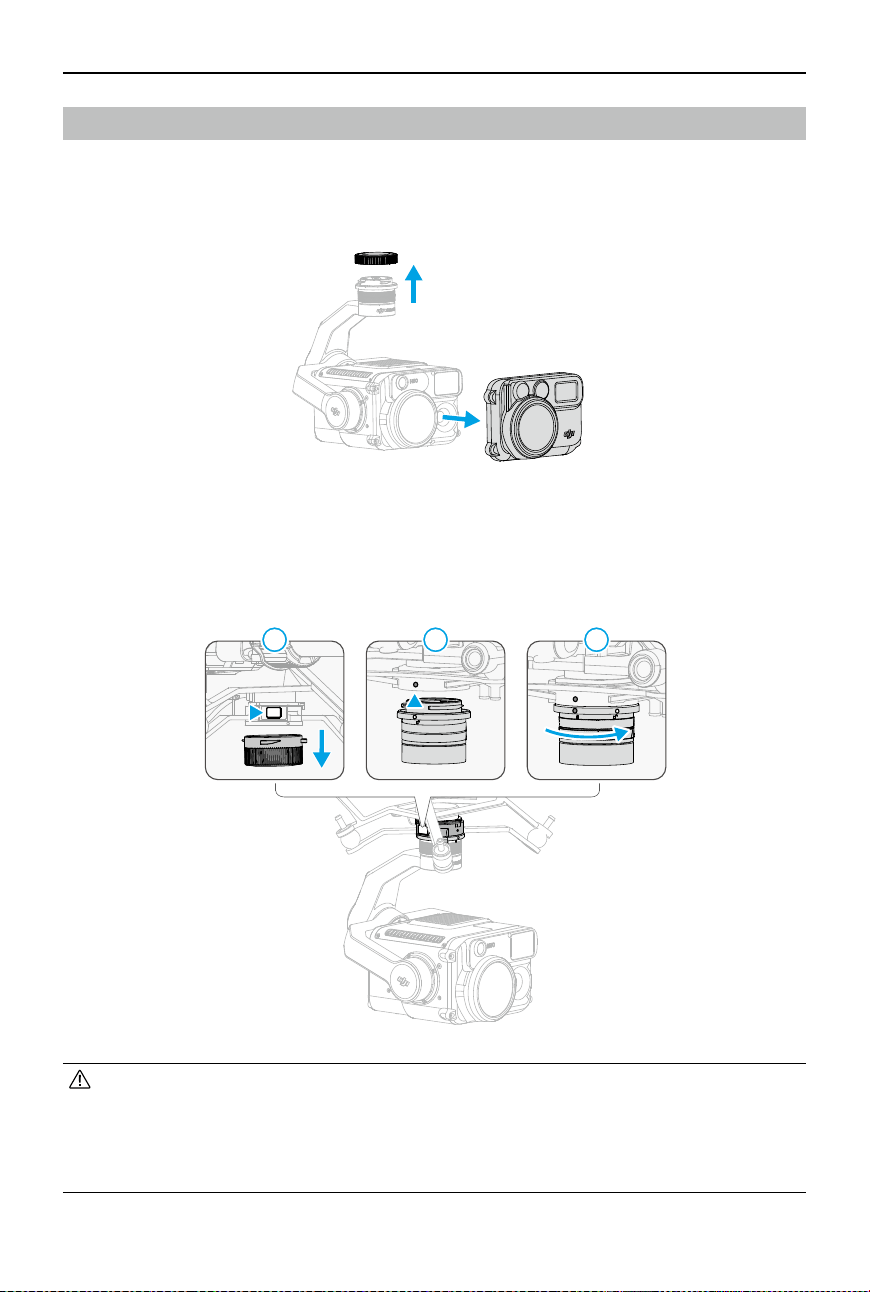
Installation
H30 series can be mounted to MATRICE
TM
350 RTK and Matrice 300 RTK aircraft (requires DJI RC
Plus). In the example below, the H30 is being mounted on a Matrice 350 RTK aircraft.
1. Remove the gimbal cap and lens protector.
2. Press and hold the button on the aircraft used for detaching the gimbal and camera. Rotate
and remove the gimbal cap on the aircraft.
3. Align the white dot on the gimbal with the red dot on the aircraft and insert the gimbal.
4. Rotate the gimbal connector to the locked position by aligning the red dots.
2 3
11
• It is necessary to perform Gimbal Auto Calibration to ensure image quality when the
payload is mounted onto dierent gimbal connectors.
• Make sure the gimbal connector on the aircraft is positioned correctly when mounting.
Otherwise, the payload cannot be mounted.
• Only remove the payload after powering o the aircraft.
ZENMUSE H30 SERIES
User Manual
©
2024 DJI All Rights Reserved.
5
• Remove the payload by pressing the button on the aircraft and rotating the payload.
• Make sure the microSD card slot cover is rmly in place to prevent dust or moisture
entering during usage or transportation.
• Detach the gimbal from the aircraft during transportation or storage. Otherwise, the
service life of the damper balls may be shortened or they may even be damaged.
Activation
The Zenmuse H30 series requires activation via DJI Pilot 2 before first use. Mount it on the
aircraft, then power on the aircraft and remote controller and follow the on-screen instructions
to activate using the DJI Pilot 2 app. An internet connection is required for activation.
Basic Operations
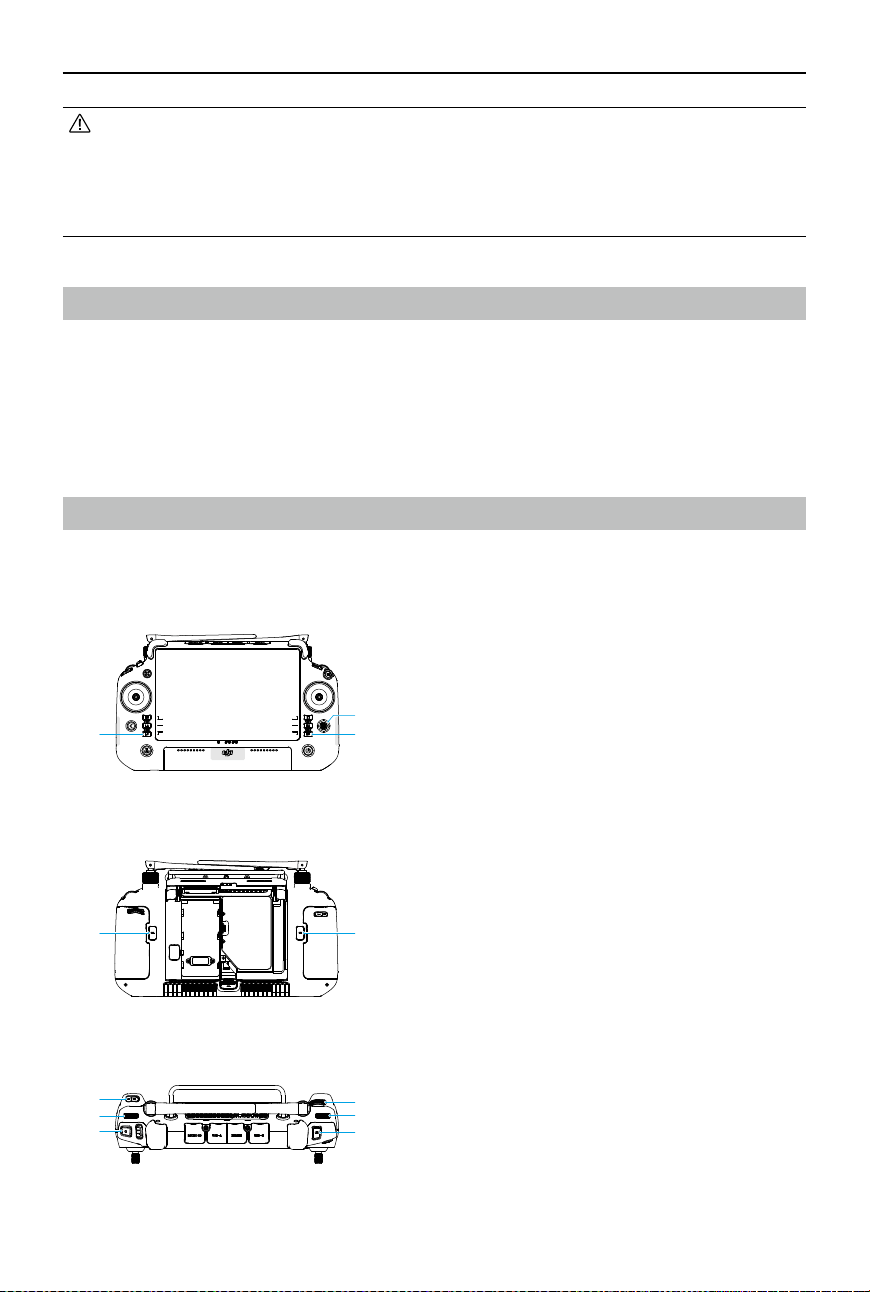
Remote Controller Controls
With the buttons on the DJI RC Plus remote controller, users can switch between different
camera views, adjust the camera zoom, and control the gimbal and camera.
1. L1/L2/L3/R1/R2/R3 Buttons: Go to Camera
View in DJI Pilot 2 to view the specic
functions of these buttons. Refer to the DJI
Pilot 2 App section for details.
2. 5D Button*
3. Customizable C1/C2/C3 Buttons*
4. Left Dial: Adjusts the tilt of the gimbal.
5. Record Button: Press once to start or stop
recording.
6. Focus/Shutter Button: Press the button
halfway down to autofocus and all the way
down to take a photo.
7. Right Dial: Adjusts the pan of the gimbal.
8. Scroll Wheel: Adjusts the zoom
magnication level.
* The function of these buttons can be customized in
the DJI Pilot 2 app.
11
2
33
8
3
7
4
6
5
ZENMUSE H30 SERIES
User Manual
6
©
2024 DJI All Rights Reserved.
DJI Pilot 2 App
The DJI Pilot 2 app provides professional photography configurations. The visual cameras
support advanced functions such as Smart Capture mode and Night Scene mode. The infrared
thermal camera provides high-res review and users can set the environment parameters to
improve the temperature measurement accuracy.
• Features marked with * are only available on Zenmuse H30T.
• The following image is for reference only. The actual interface varies according to the
app version.
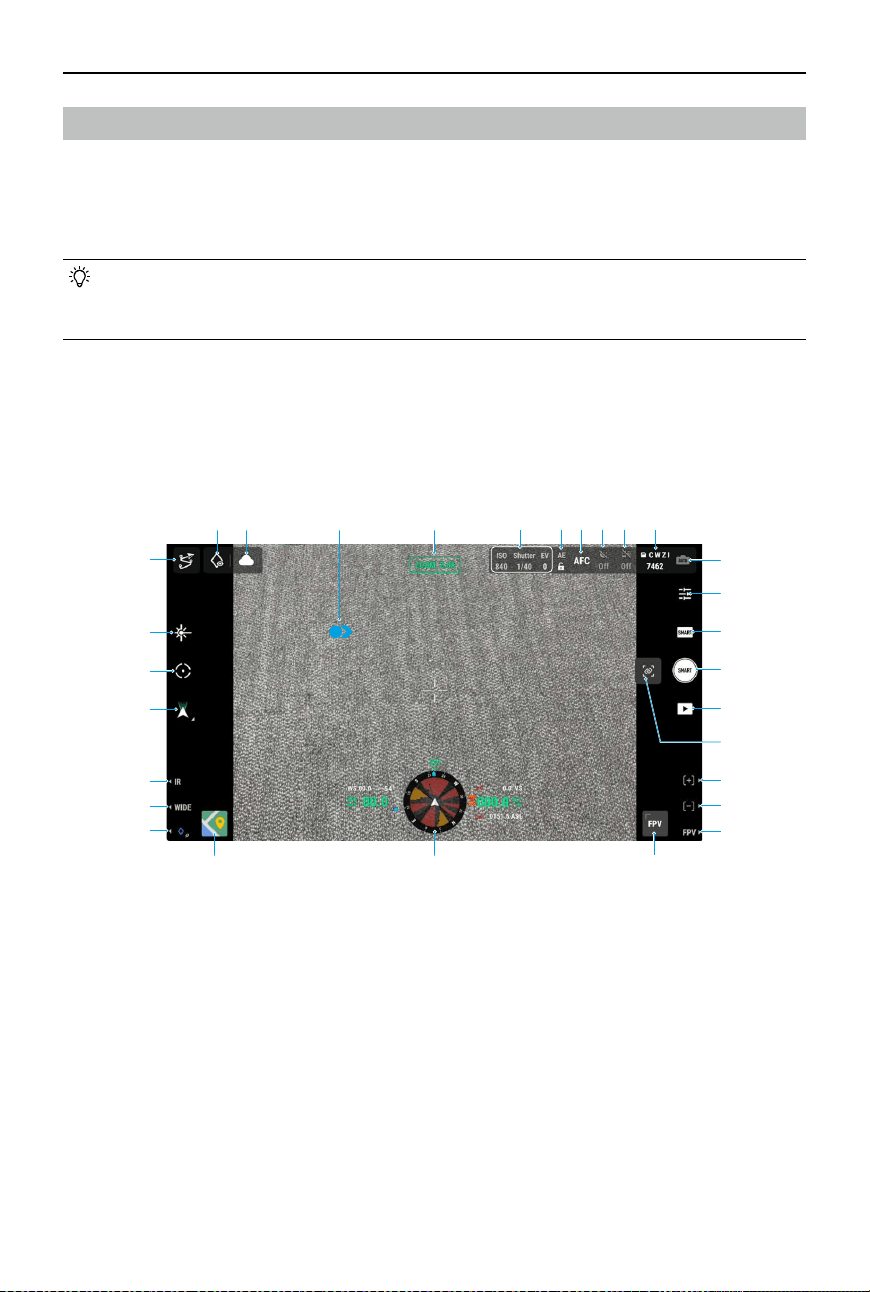
Zoom Camera
After tapping Enter Camera View on the home screen of DJI Pilot 2 and completing the Preight
Check, users will be directed to the camera view. Below is an illustration using the zoom camera
as the main view on the remote controller.
2 3 4 75 6
8
9
10
11
12
13
14
15
16
17
18
19
20
21
22
23
24
25
26
127 28 29
1. Camera and Zoom
Displays the camera for the current liveview and its zoom ratio.
2. Camera Settings
Displays the current camera parameters.
3. Auto Exposure Lock
Tap to lock the current exposure value.
4. Focus Mode
Tap to switch between MF (manual focus), AFC (continuous autofocus), and AFS (single
autofocus).

ZENMUSE H30 SERIES
User Manual
©
2024 DJI All Rights Reserved.
7
5. Night Scene
Tap to enable or disable Night Scene mode. Night Scene Level, IR Cut Filter, and NIR Illumination
are available when Night Scene mode is enabled. Refer to the
Using the Camera section for
details.
6. Electronic Dehazing
Tap to enable or disable Electronic Dehazing. Refer to the
Using the Camera section for
details.
7. Storage Info and Storage File Type Selection
Displays the remaining number of photos or the duration of video for the microSD card.
Tap to select the storage le type: current camera view, wide-angle, IR, or zoom.
8. Exposure Settings
The H30 series supports Auto and M exposure modes. Only Auto mode is available when
using Smart Capture mode.
9. Camera Settings
Tap to enter the camera setting menu. The settings may vary depending on the camera
type and shooting mode. Switch to dierent camera types and shooting modes to view the
settings. Refer to the
Using the Camera section for details.
10. Photo/Video Mode
Tap to select dierent shooting modes. Refer to the
Using the Camera section for details.
11. Shutter/Record Button
Tap to take photos or start or stop recording.
12. Playback
Tap to view and download photos or videos stored on the aircraft microSD card.
13. Link Zoom*
Tap to enable or disable Link Zoom. Once enabled, adjusting the zoom ratio of the zoom
camera will change the zoom of the infrared thermal cameras simultaneously. The
maximum zoom ratio of infrared thermal camera is 32x. When the zoom ratio of the zoom
camera is adjusted to 32x or above, the infrared thermal camera will remain at 32x and no
longer increase.
14. Press the R1 button on the remote controller, and the camera lens will zoom in. The
maximum ratio is 400x.
15. Press the R2 button on the remote controller, and the camera lens will zoom out.
Press the R3 button on the remote controller to switch to FPV camera view.
17. FPV Camera View
Tap to display the FPV camera view on the screen. Users can maximize or minimize the
view.
18. Navigation Display
In Camera View, the horizontal speed, wind speed, gimbal pitch angle and pitch scale, and
the inclination of the gimbal relative to the ground are shown on the left of Navigation
Display. The right shows the absolute altitude, relative altitude, vertical obstacle sensing
information, and vertical speed bar.

ZENMUSE H30 SERIES
User Manual
8
©
2024 DJI All Rights Reserved.
19. Map View
Tap to display the map view on the screen. Users can maximize or minimize the view.
20. Laser PinPoint
Press the L3 button on the remote controller to add a PinPoint in the center of the screen.
Tap to select a PinPoint on the map to view the distance between the subject and the
aircraft, the absolute and relative altitude, latitude and longitude of the subject. The laser
points can be projected onto the live view.
21. Press the L2 button on the remote controller to switch between the wide-angle camera view
and the zoom camera view.
22. Press the L1 button on the remote controller to switch between the visible light camera
view (wide-angle camera or zoom camera) and the infrared camera view.*
23. Gimbal Mode
Displays the current gimbal status as follow mode. Tap to select an action such as gimbal
recenter, gimbal pan recenter, gimbal tilt down, or gimbal down, or switch to gimbal free
mode.
24. Smart Track
Tap to enable Smart Track and use the H30 series to track subjects such as people, vehicles,
or boats. After recognizing and locking the subjects, it will automatically rotate the gimbal
to situate the subject in the center of the screen, and adjust the camera focal length to an
appropriate focus rate to track and view the subject.
• Enabling Night Scene mode may reduce the camera frame rate, which will affect
tracking eects.
25. Laser Rangending (RNG)
Tap to enable RNG. The crosshair in the center of the liveview will turn red, which means the
laser rangender is pointing at the subject and measuring the distance between the subject
and the aircraft, as well as the absolute altitude, latitude, and longitude of the target.
RNG positioning may be aected in the following conditions:
• The measuring range may decrease and the rangending result may be unstable when
used in low-visibility environments such as rainy or foggy weather.
• The rangefinding result may be unstable when pointed at subjects with reflective
surfaces.
• If there are multiple subjects in the view or the subjects are small or blocked, the object
in the center of the screen may not be the measured subject, so the rangending result
may be unstable.
26. Flight Route
Tap to enter the ight route library. Users can create and view all ight tasks and more.
ZENMUSE H30 SERIES
User Manual
©
2024 DJI All Rights Reserved.
9
27. Look At
After selecting a PinPoint, users can tap the Look At icon, and the camera will face the
PinPoint.
28. Status of Photo/Video Upload to Cloud
Displays the file upload status from DJI Pilot 2 to DJI FlightHub 2 or the live stream
connection status. Tap to view the details. If the DJI FlightHub 2 cloud service is enabled,
users can quickly congure the media le upload settings.
29. Screen Gestures
Double-tap anywhere on the main screen, and the gimbal will automatically rotate to place
the tapped point in the center of the screen.
Tap and hold the screen with one finger until the cursor appears, and then swipe your
nger to adjust the gimbal angle.
Swipe down with three ngers to hide the settings on the screen.
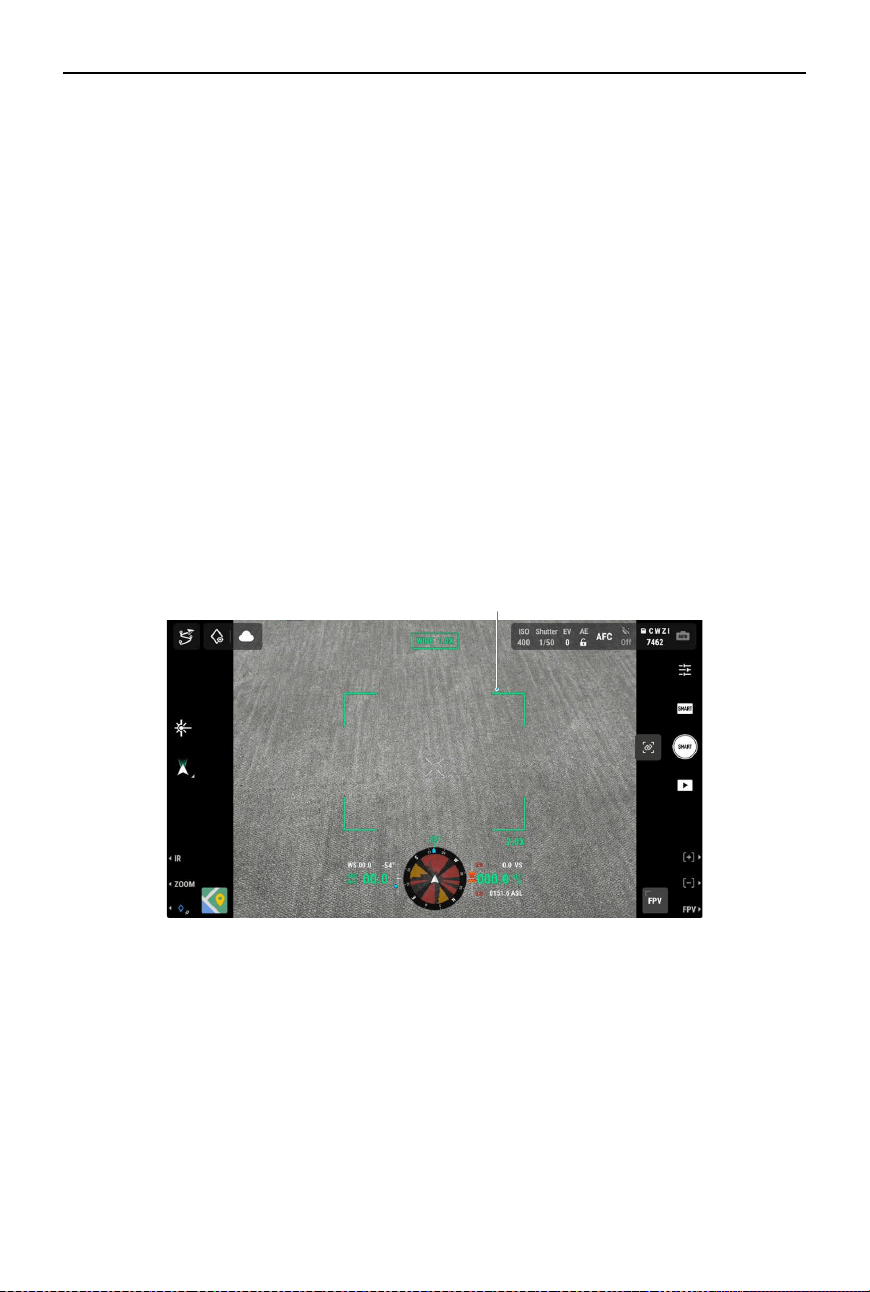
Wide-Angle Camera
This section mainly sets out the dierences with the zoom camera. Refer to the Zoom Camera
section for more details.
30. Zoom Frame: After switching to the wide-angle camera as the main view, the zoom frame
will display the eld of view and camera zoom ratio.
30
ZENMUSE H30 SERIES
User Manual
10
©
2024 DJI All Rights Reserved.
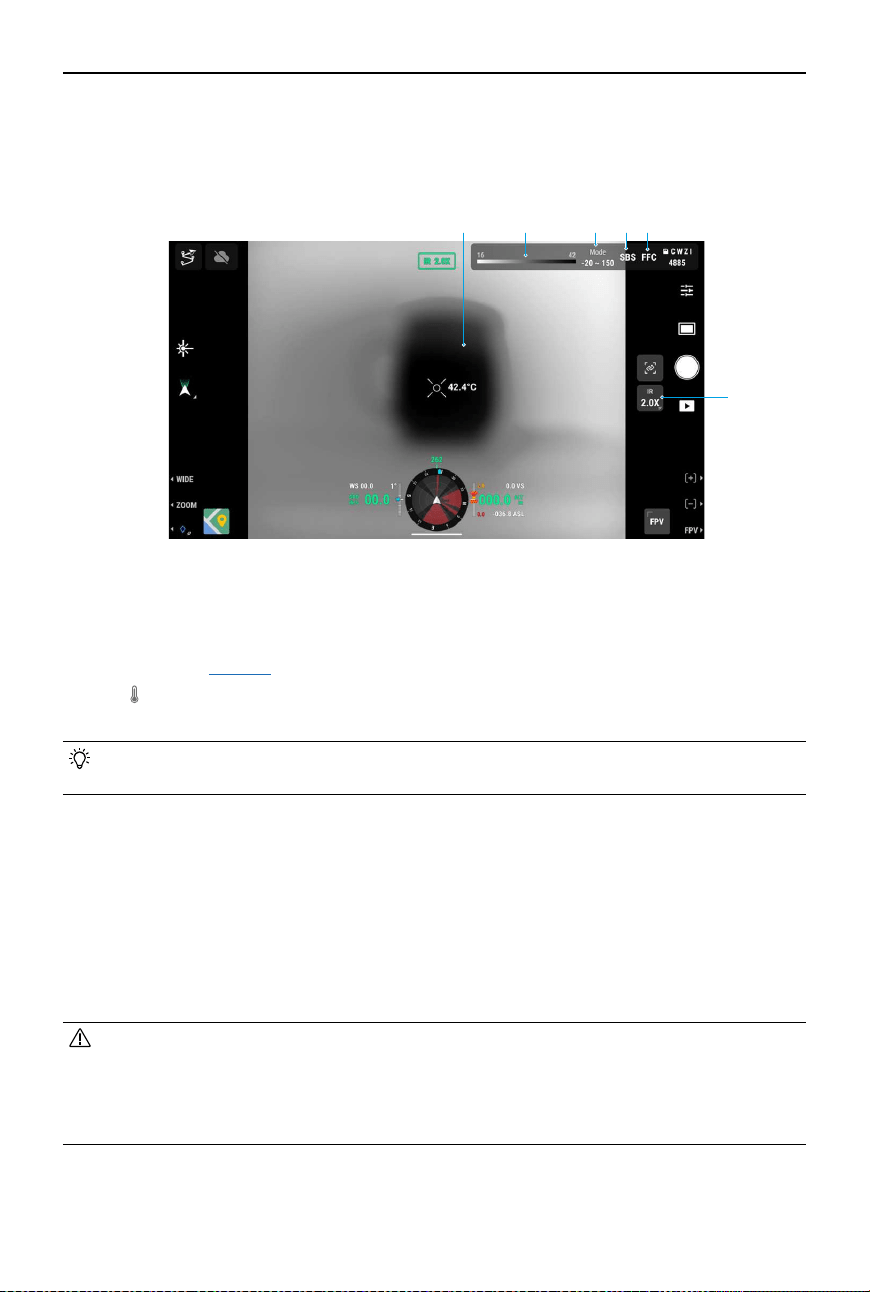
Infrared Thermal Camera*
This section mainly sets out the dierences with the zoom camera. Refer to the Zoom Camera
section for more details.
3136 32 3334
35
31. Palette/Isotherm
The numbers in the two ends of the chroma bar display the highest and lowest temperature
measurement values. Tap the chroma bar to select different infrared temperature
measurement
palettes.
Tap
to enable Isotherm and set temperature measurement intervals, so that subjects
within the designated temperature range will be more easily visible.
• The setting will not take effect if the measured area exceeds the maximum or
minimum temperature measurement values of the current view.
32. Gain Modes
Tap to select dierent gain modes and adjust the temperature measurement range:
• The High Gain mode oers more precise temperature measurement capabilities, with a
measurement range of -20° to 150° C (-4° to 302° F).
• The Low Gain mode provides a broader temperature measurement range, from 0° to
600° C (32° to 1112° F).
• The High-Res mode is designed for observing objects with small temperature
dierences. Temperature measurement is not supported in this mode.
• The camera view may exhibit uneven dark or bright areas if the High-Res mode is
enabled immediately after powering on. The image will return to normal after using it
for a while. Performing FFC calibration once can reduce the unevenness of the view.
It is not recommended to continuously perform FFC calibration, which may cause the
shutter to overheat and aect quality of the image.
ZENMUSE H30 SERIES
User Manual
©
2024 DJI All Rights Reserved.
11
33. Single/Side-By-Side View Toggle
Tap to enable or disable side-by-side view. When enabled, both the infrared and zoom view
will be displayed side by side.
34. FFC Calibration
Tap to perform FFC calibration. FFC calibration is a function of the infrared thermal camera
that optimizes image quality for easy observation of temperature changes.
During calibration, the app view will pause for approximately one second and the camera
will make a clicking sound.
35. Zoom (Infrared Thermal Camera)
Tap to adjust the digital zoom of the infrared thermal camera, which has a maximum zoom
capability of 32x. Tap and hold to zoom directly to 2x. Once Link Zoom is enabled, this icon
will disappear automatically.
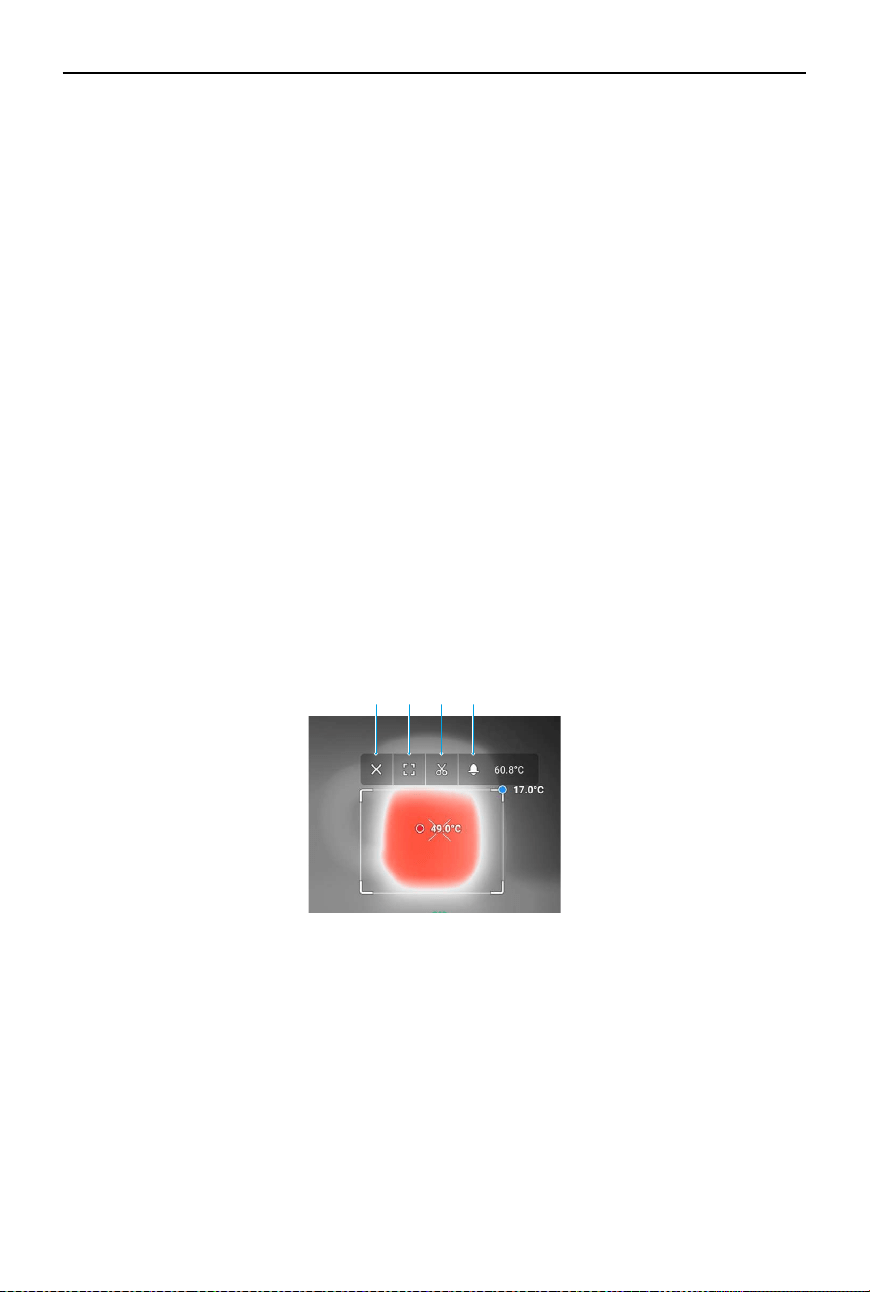
36. Temperature Measurement
Spot Measurement: Tap on any spot in the infrared thermal camera view to display the
temperature of that spot.
Center Point Temperature Measurement: Tap on the center point in the infrared thermal
camera view to display the temperature at that point for higher precision measurements.
Tapping outside the center point exits the Center Point Temperature Measurement mode.
Area Measurement: Frame to select any area in the infrared thermal camera view to
display the highest temperature and lowest temperature within that area, along with their
locations. Tap the icons to perform these functions:
a. Exit the area measurement.
b. Maximize the selected area.
c. Take a screenshot of the measurement result.
d. Enable/disable Temperature Alert and set alert temperature. Once the highest
temperature exceeds the set alert temperature, the remote controller will issue a
warning sound.
a b c d

ZENMUSE H30 SERIES
User Manual
12
©
2024 DJI All Rights Reserved.
Using the Camera
Setting the Shooting Mode
Tap the Photo/Video Mode button to select dierent shooting modes.
Smart Capture
Smart Capture mode allows the camera to automatically adjust parameters based on dierent
scenes and lighting conditions to achieve higher-quality photo results. However, the shooting
speed may be slower compared to Single Shot mode.
Single Shot
Tap the shutter button to take a single photo.
Interval
In this mode, the camera will automatically take photos at the setting intervals
(0.7/1/2/3/5/7/10/15/20/30/60 s) after tapping the shutter button.
Panorama
Panorama is available after takeo. When enabled, the current view will switch to wide-angle
camera view. Users cannot adjust the zoom ratio or switch the camera view in this mode. The
gimbal moves automatically and the wide-angle camera takes a series of photos at the current
zoom ratio, and then combines them into a panoramic photo.
• Toggle the flight mode switch on the remote controller to N mode before taking a
panorama.
High-Res Grid Photo
The live view will switch to the wide-angle camera view. Drag to select an area and set the target
shooting area by re-sizing or moving the white grid on the screen, and zooming in or out as
needed.
Tap the shutter button to take a series of photos of the selected area at the current zoom ratio
with the zoom camera and one photo with the wide-angle camera.
Video
Dierent resolution options are available when taking videos. The zoom camera and wide-angle
camera support recording at 3840×2160 and 1920×1080 (Night Scene mode o).
Pre-Recording is available when taking videos. Tap
to enable Pre-Recording and select
duration. The recorded video will include the image of the set duration before tapping the
shooting button.

ZENMUSE H30 SERIES
User Manual
©
2024 DJI All Rights Reserved.
13
Camera Functions
Visible Light Camera
The functions below are available when the camera view is the zoom or the wide-angle camera
view.
Night Scene
Night Scene mode can optimize imaging in low-light environments. The setting applies to both
the zoom camera and the wide-angle camera.
When selecting Auto, Night Scene mode will be enabled automatically in low-light environments.
When manually enabled, users can set the following settings:
Night Scene Level: Further decrease the recording frame rate to achieve better image quality.
IR Cut Filter: When enabled, the live view turns to a grayscale image by removing the IR lter.
NIR Illumination: When enabled, the NIR auxiliary light will turn on after takeoff to provide
additional illumination to the center of the view. IR Cut Filter will also start simultaneously. NIR
auxiliary light will turn o automatically after landing.
IR Cut Filter and NIR Illumination are only available when using the zoom camera.
• It is recommended to enable NIR illumination in no-light conditions (less than 0.1 lux,
such as starlight or black-light conditions) and only enable Night Scene in non-black-
light environments (more than 0.1 lux, such as urban nightscapes or full moon).
• The illumination eect may be negatively aected when used in weather conditions
like rain, fog, haze, or snow.
• The auxiliary light beam cannot cover the whole eld of view when the zoom ratio is
below 10x, so the illumination eect will be aected.
Electronic Dehazing
The function is only available when using the zoom camera, improving the imaging clarity in
environments with fog, haze, or high atmospheric humidity.
It will automatically turn on to optimize the imaging clarity when Auto has been selected. If
manually enabled, the dehazing level can be set as Low or High.
• Night Scene mode and Electronic Dehazing cannot be used at the same time.
Electronic Dehazing will not take eect with Night Scene mode enabled.

ZENMUSE H30 SERIES
User Manual
14
©
2024 DJI All Rights Reserved.
Infrared Thermal Camera
When the main screen shows the infrared thermal camera view, tap to enter camera settings
to enable the functions below.
Region of interest (ROI)
Users can select the ROI according to the scene and their requirements.
Full Screen: Select to evenly distribute the color spectrum across the entire image.
Sky Excluded: Select to ignore areas of the sky so that most of the spectrum can be allocated to
the remaining areas.
Therefore, if there is a large patch of sky in the image, you can select Sky Excluded and the
areas except the sky will have higher contrast, enhancing observation.
Scenes
Users can select a scene from Manual, Default, and Inspection according to the actual situation.
After selecting Manual, users can set and save custom parameters. When selecting Default
or Inspection, the camera will automatically apply the following properties to obtain the best
result.
DDE (Digital Detail Enhancement): Enhance image details and/or suppresses fixed pattern
noise.
Contrast: The ratio of black and white in the image. Colors will be richer and have more contrast
when the value is high.
Brightness: The brightness of the image.
Auto FFC
Once enabled, the infrared thermal camera will automatically calibrate at regular intervals.
Auto UHR Infrared Image
When enabled, UHR (Ultra-High Resolution) Infrared Image mode will automatically activate
when the infrared thermal camera is at 5x zoom or higher, providing clear infrared images.
• UHR Infrared Image is unavailable when Night Scene mode is enabled.
Sun Burn Protection
When enabled, the infrared shutter automatically closes in strong sunlight.
Infrared Thermometry Parameters
[1]
Temperature measurement accuracy is aected by various factors. It is recommended to set
the environment parameters to improve the accuracy.
Emissivity of objects: The emissivity of the object will affect temperature measurement
accuracy. Generally, accuracy increases proportionally to emissivity. Refer to
Infrared
Parameters section for emissivity of common objects.
Temperature measurement distance: The distance can be set from 1 to 300 m. The real-time
RNG value is for your reference when the Laser Rangefinding or Center Point Temperature
Measurement is enabled.

ZENMUSE H30 SERIES
User Manual
©
2024 DJI All Rights Reserved.
15
Air humidity: Temperature and humidity resistance has been calibrated before delivery, but
extreme humidity levels will affect measurement accuracy. So you can set the humidity of
current environment to improve the accuracy.
Temperature: When selecting Auto, the temperature value detected by the sensor will be used.
You can also set the temperature manually.
[1] When measuring a blackbody 13 m away at 25° C in a windless indoor environment without the infrared
density lter, the infrared thermal camera provides an accuracy of ±2° C or ±2% (whichever is the larger
value) when using the High Gain mode, and an accuracy of ±5° C or ±3% (whichever is the larger value)
when using the Low Gain mode. Since the emissivity of dierent blackbodies varies, this measurement
result only represents the accuracy of tested blackbodies and is for reference only. It is recommended to
set the correct thermometry parameters to improve the accuracy.
General Settings
Create Folder Create a folder manually on the microSD card of the gimbal and camera
to store photos and videos, with customizable folder names.
LEDs O While
Shooting
Once enabled, Frame Arm LEDs will turn o automatically during shooting
and recording.
Timestamp Customized timestamp can be created when enabled, including
information such as payload model and SN, coordinates, altitudes, date
and time. Timestamp location can also be customized.
Grid Enable or disable the gridlines or diagonal lines.
Laser Module Enhanced Mode: In this mode, functions including Smart Track, PinPoint,
RNG, and Center Point Temperature Measurement are able to work
normally. It will be reset to Enhanced after the camera is restarted.
On-Demand Mode: In this mode, the laser module will only be enabled
when required. Laser Assisted AF is disabled and the camera focus
performance is decreased.
Reset Camera
Settings
Tap to reset the camera to the default settings.
Format Memory
Card
Tap to format and remove all content from the microSD card. Operate
with caution.
Lens Defog Tap the button and then the gimbal camera will continuously warm itself
up to dissipate the moisture on the lens.
Video Caption Video Caption can be enabled when the shooting mode is video. The
caption le will be created when videos are saved.

ZENMUSE H30 SERIES
User Manual
16
©
2024 DJI All Rights Reserved.
Maintenance
Log Export
Run DJI Pilot 2, tap HMS, then Manage Logs, and select H30 or H30T to export the log to the
microSD card of the payload.
Firmware Update
Using DJI Pilot 2
Online Updating
1. Make sure that the payload is correctly installed on the aircraft and the aircraft, remote
controller, and other DJI devices are powered on. Make sure all the devices are connected.
2. Run DJI Pilot 2, tap HMS, Firmware Update, and then Update All to update the rmware.
Oine Updating
An offline firmware package can be downloaded from the DJI official website to an external
storage device such as a microSD card or USB thumb drive. Run DJI Pilot 2, tap HMS, and then
Firmware Update. Tap Oine Update to select the rmware package from the external storage
device and tap Update All to update.
Using microSD Card
1. Make sure that the payload is mounted onto the aircraft and the aircraft is powered
o. Check that there is enough free space on the microSD card and the Intelligent Flight
Batteries are fully charged.
2. Visit the Zenmuse H30 series product page on the DJI ocial website and go to Downloads.
3. Download the latest rmware.
4. Once downloaded, copy the rmware le to the root directory of the microSD card.
5. Insert the microSD card into the microSD card slot of the payload.
6. Power on the aircraft. The payload will perform an auto-check and start to update
automatically. The payload will beep to indicate the status of the rmware update.
7. Restart the device after the rmware update is complete.

ZENMUSE H30 SERIES
User Manual
©
2024 DJI All Rights Reserved.
17
Update Status Alarm
Alarm Description
1 short beep Firmware update detected. Preparing to update.
4 short beeps Updating rmware. Do not stop update.
1 long beep followed by 2
short beeps
Firmware update successful.
Continuous long beep
Firmware update failed. Try again. Contact DJI support if the
problem persists.
• Make sure that there is only one rmware update le on the microSD card.
• DO NOT power o the aircraft or detach the gimbal and camera while updating the
rmware. It is recommended to delete the rmware update le on the microSD card
once the rmware is updated.

ZENMUSE H30 SERIES
User Manual
18
©
2024 DJI All Rights Reserved.
Appendix
Specications
General
Dimensions 170×145×165 mm
Weight 920±5 g
Power H30: 26 W
H30T: 28 W
IP Rating IP54
Supported Aircraft Matrice 350 RTK
Matrice 300 RTK (requires DJI RC Plus)
Operating
Temperature
-20° to 50° C (-4° to 122° F)
Storage Temperature -20° to 60° C (-4° to 122° F)
Maximum Ground
Speed
[1]
20 m/s
Gimbal
Stabilization System 3-axis (tilt, roll, pan)
Angular Vibration
Range
Hover: ±0.002°
Flight: ±0.004°
Mounting Detachable DJI SKYPORT
Mechanical Range Tilt: -132.5° to +73°
Roll: ±60°
Pan: ±328° (structural limit, not controllable range)
Controllable Range Tilt: -120°to +60°; Pan: ±320° (downward gimbal)
Tilt: -60°to +120°; Pan: ±320° (upward gimbal)
Operation Mode Follow/Free/Re-center
Zoom Camera (H30/H30T)
Image Sensor Eective Pixels: 40M, 1/1.8” CMOS
Lens Focal length: 7.1-172mm (equivalent: 33.4-809.3mm)
Aperture: f/1.6-f/5.2
DFOV: 66.7°-2.9°
Focus Mode MF/AFC/AFS
Exposure Mode Manual, Auto
Exposure
Compensation
±3.0 (1/3 increments)
Metering Mode Spot Metering, Average Metering

ZENMUSE H30 SERIES
User Manual
©
2024 DJI All Rights Reserved.
19
AE Lock Supported
Electronic Shutter
Speed
1/8000-2 s
ISO Range Single Shot: 100-25600
Night Scene: 100-819200
Video Resolution Single Shot: 3840×2160@30fps, 1920×1080@30fps
Night Scene: 1920×1080@25fps, 1920×1080@15fps,
1920×1080@5fps
Video Format MP4
Video Caption Supported
Video Codec and Bit
Rate Strategy
H.264, H.265
CBR, VBR
Max Photo Size 7328×5496, 3664×2748
Photo Format JPG
Wide Camera (H30/H30T)
Image Sensor Eective Pixels: 48M, 1/1.3”CMOS
Lens Focal length: 6.72mm (equivalent: 24mm)
Aperture: f/1.7
DFOV: 82.1°
Focus Mode MF/AFC/AFS
Exposure Mode Manual, Auto
Exposure
Compensation
±3.0 (1/3 increments)
Metering Mode Spot Metering, Average Metering
AE Lock Supported
Electronic Shutter
Speed
1/8000-2 s
ISO Range Single Shot: 100-25600
Night Scene: 100-409600
Video Resolution Single Shot: 3840×2160@30fps, 1920×1080@30fps
Night Scene: 1920×1080@25fps, 1920×1080@15fps,
1920×1080@5fps
Video Format MP4
Video Caption Supported
Video Codec and Bit
Rate Strategy
H.264, H.265
CBR, VBR
Max Photo Size 8064×6048, 4032×3024
Photo Format JPG

ZENMUSE H30 SERIES
User Manual
20
©
2024 DJI All Rights Reserved.
Infrared Thermal Camera (H30T only)
Thermal Imager Uncooled VOx Microbolometer
Lens Focal length: 24mm (equivalent: 52mm)
Aperture: f/0.95
DFOV: 45.2°
Digital Zoom
Equivalent
32×
Video Resolution 1280×1024@30fps
Video Format MP4
Video Caption Supported
Video Codec and Bit
Rate Strategy
H264, H265
CBR, VBR
Photo Resolution 1280×1024
Photo Format R-JPEG
Pixel Pitch 12 μm
Spectral Band 8-14 μm
Noise Equivalent
Temperature
Dierence (NETD)
≤ 50 [email protected]
Temperature
Measurement Method
Spot Measurement, Area Measurement, Center Point Temperature
Measurement
Temperature
Measurement Range
High Gain: -20° to 150° C (-4° to 302° F), -20° to 450° C (-4° to 842° F)
(With Infrared Density Filter)
Low Gain: 0° to 600° C (32° to 1112° F), 0° to 1600° C (32° to 2912° F)
(With Infrared Density Filter)
Temperature Alert Supported
Sun Burn Protection Supported
FFC Auto/Manual
Palette White Hot, Black Hot, Tint, Iron Red, Rainbow 1, Rainbow 2, Medical,
Arctic, Fulgurite, Hot Iron
Laser Rangender (H30/H30T)
Wavelength 905 nm
Measurement Range
[2]
3-3000 m
Range for common objects: Grassland 2000 m, woodland 1900 m,
road surface 1700 m
[3]
Measurement Accuracy ≤ 500 m: ±(0.2 m + measurement distance×0.15%)
> 500 m: ±1.0 m
Laser Spot Size @100 m: Approx. 50×450 mm
@1000 m: Approx. 450×4500 mm

ZENMUSE H30 SERIES
User Manual
©
2024 DJI All Rights Reserved.
21
Safety Regulation Level Class 1
Accessible Emission
Limit (AEL)
260 nJ
Reference Aperture 18 mm
Max Laser Pulse
Emission Power Within
5 Nanoseconds
52 W
NIR Auxiliary Light (H30/H30T)
Wavelength 850 nm
FOV 4.6±0.6° (Round)
Safety Regulation Level Class 1
Illumination Range @100 m: Approx. 8m diameter circle
Data Storage
[5]
Supported microSD
Cards
U3/Class10/V30 or above is required, or use a memory card from the
recommended list.
Supported File System exFAT
Recommended
microSD Cards
Lexar 1066x V30 A2 64GB/128GB/256GB/512GB microSDXC
Kingston CANVAS GO! Plus V30 A2 64GB/128GB/256GB/512GB
microSDXC
Processing Data
Mapping Software DJI Terra, DJI FlightHub 2
Infrared Analysis
Software
DJI Thermal Analysis Tool 3
[1] The gimbal may vibrate if exceeding the maximum ground speed. Image quality may be aected.
[2] The rangefinding data may vary based on the material and shape of the tested object as well as the
impact of gimbal angle, environmental light, and weather conditions such as rain or fog. If a laser pulse
hits multiple targets, its energy is dispersed, which may reduce the measurable distance.
[3] For a at surface subject (when the subject size exceeded the laser beam diameter), with an atmospheric
visibility of 23 km (the laser has a shorter range in clear conditions compared with overcast conditions),
the laser impinges at an oblique angle (with an angle of incidence of approx. 0.2 radians).
[4] Zenmuse H30 series supports the Security Code function. Go to Data and Privacy in DJI Pilot 2 and set the
code to encrypt the microSD card installed on the camera. Download DJI Decrypt Tool from the DJI ocial
website to decrypt the microSD card on a Windows computer and access the card content.
ZENMUSE H30 SERIES
User Manual
22
©
2024 DJI All Rights Reserved.
Infrared Parameters
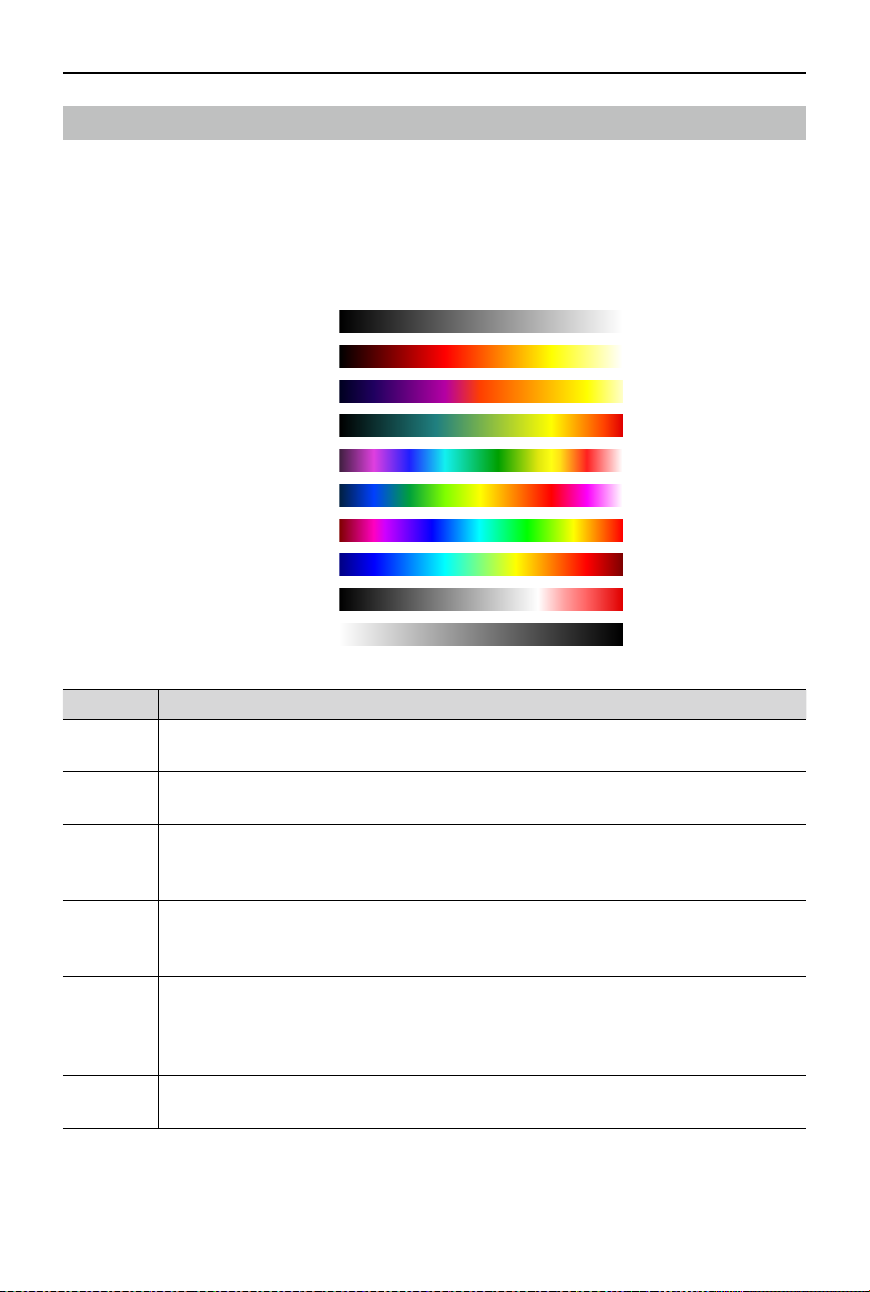
Palettes
Distinct colors are used to show temperature dierences in the thermal image using grayscale
intensity. The temperature range of the image is mapped to 256 colors and displayed in the 8-bit
JPEG or MP4 format. The infrared thermal camera oers a variety of palette options, the table
shows all palette options.
White Hot
Fulgurite
Iron Red
Hot Iron
Medical
Arctic
Rainbow 1
Rainbow 2
Tint
Black Hot
Palette Description
White Hot
The mostly commonly used pseudo color, using white for high temperatures and
black for low temperatures, which is a natural association for people.
Fulgurite
Dark red represents low temperatures and white represents high temperatures. The
warm tone of this palette aligns with peoples' association with hot temperatures.
Iron Red
This palette displays nuanced differences in heat signatures, quickly displaying
anomalies and human bodies. Hotter objects appear as light warm colors and
colder objects appear as dark cool colors.
Hot Iron
Red represents high temperatures, and cool colors represent low temperatures.
Users are able to identify hot target quickly, while showing the details of cool
targets.
Medical
This palette shows nuanced dierences in temperatures, and is therefore ideal
for scenarios with small temperature changes. In environments with low contrast,
it is still able to detect objects and slight temperature changes. It is mainly used in
the medical eld for human body temperatures.
Arctic
Uses the same palette as Medical, except switching the purple for a cool blue to
better reect temperature changes.

ZENMUSE H30 SERIES
User Manual
©
2024 DJI All Rights Reserved.
23
Rainbow 1
Similar to Medical, it reduces the warm color ratio and increases the cold color
ratio for high temperature targets to better show the details of cool targets.
Rainbow 2
The color transition is reduced and the warm and cold colors are moderately
proportioned, which helps show the details of high and low temperature targets
at the same time.
Tint
Uses black and white for low temperatures and bright red for high temperatures,
allowing users to detect high temperature objects quickly. Mainly used for
high-contrast environments, ideal for quickly and accurately identifying high
temperature objects.
Black Hot
The opposite to White Hot, using black for warmer objects and white for cooler
objects. The heat distribution of high temperature objects can be better observed
when outdoors.
Emissivity
Emissivity is the ability of the object to emit infrared radiation, which is aected by factors such
as the material, the roughness or degree of oxidation of the object's surface. The table below
shows the emissivity of common objects for reference.
Material Emissivity
Glass 0.85
Ceramics 0.95
Concrete 0.95
Plastic (opaque) 0.95
Paper 0.95
Soil 0.92 (dry); 0.95 (wet)
Aluminum 0.3
Brass 0.5
Iron 0.7
Lead 0.5
Steel 0.8
Water 0.93
Oil 0.94

WE ARE HERE FOR YOU
Contact
DJI SUPPORT
This content is subject to change.
https://enterprise.dji.com/zenmuse-h30-series/downloads
If you have any questions about this document, please
contact DJI by sending a message to [email protected].
DJI and ZENMUSE are trademarks of DJI.
Copyright © 2024 DJI All Rights Reserved.