Loading ...
Loading ...
Loading ...
17
8. Electrical work
8.4. Function settings
8.4.1. Function setting on the unit (Selecting the unit functions)
1) For wired remote controller [Fig. 8-4-1] (P.8)
1. Changing the external static pressure setting.
• Be sure to change the external static pressure setting depending on the duct and the
grill used.
1
2
3
4
5
2. Other functions
1Select unit number 00 for the settings. (Settings for all indoor units)
Refer to Function table 1.
2Select unit number 01 to 04 or AL for the settings. (Settings for each indoor unit)
To set the indoor unit in the individual system, select unit number 01.
To set each indoor unit of two, three or four indoor units, which are connected when
these units are simultaneously in operation, select unit number 01 to 04.
To set all indoor units of two, three or four indoor units which are connected when
these units are simultaneously in operation, select AL.
Refer to Function table 2.
2) For IR wireless remote controller
[Fig. 8-4-2] (P.8)
1. Changing the external static pressure setting.
• Be sure to change the external static pressure setting depending on the duct and the
grill used.
1Go to the function select mode
Press the CHECK button F twice continuously.
(Start this operation from the status of remote controller display turned off.)
is lighted and “00” blinks.
Press the TEMP button C once to set “50”. Direct the wireless remote controller
toward the receiver of the indoor unit and press the Hour button A.
2Setting the unit number
Press the TEMP buttons C and D to set the unit number to 01-04 or AL. Direct the
wireless remote controller toward the receiver of the indoor unit and press the
Minute button B.
3Selecting a mode
Enter 08 to change the external static pressure setting using the C and D buttons.
Direct the wireless remote controller toward the receiver of the indoor unit and
press the Hour button A.
Current setting number: 1 = 1 beep (one second)
2 = 2 beeps (one second each)
3 = 3 beeps (one second each)
4Selecting the setting number
Use the C and D buttons to change the external static pressure setting to be used.
Direct the wireless remote controller toward the sensor of the indoor unit and press
the Hour button A.
5To set the external static pressure
Repeat steps 3 and 4 to set the mode number to 10.
6Complete function selection
Direct the wireless remote controller toward the sensor of the indoor unit and press
the ON/OFF button E.
Note:
• Whenever changes are made to the function settings after installation or
maintenance, be sure to record the changes with a mark in the “Check”
column of the Function table.
3) Changing the power voltage setting (Function table 1)
• Be sure to change the power voltage setting depending on the voltage used.
• Select “Service” from the Main menu, and press the [SELECT] button.
• Select “Function settings” with the [F1] or [F2] button, and press the [SELECT]
button.
• Set the indoor unit refrigerant addresses and unit numbers with the [F1] through
[F4] buttons, and then press the [SELECT] button to confirm the current setting.
<Checking the Indoor unit No.>
When the [SELECT] button is pressed, the target indoor unit will start fan
operation. If the unit is common or when running all units, all indoor units for the
selected refrigerant address will start fan operation.
• When data collection from the indoor units is completed, the current settings
appear highlighted. Non-highlighted items indicate that no function settings are
made. Screen appearance varies depending on the “Unit No.” setting.
• Use the [F1] or [F2] button to move the cursor to select the mode number, and
change the setting number with the [F3] or [F4] button to switch the setting
number in response to the external static pressure to be used.
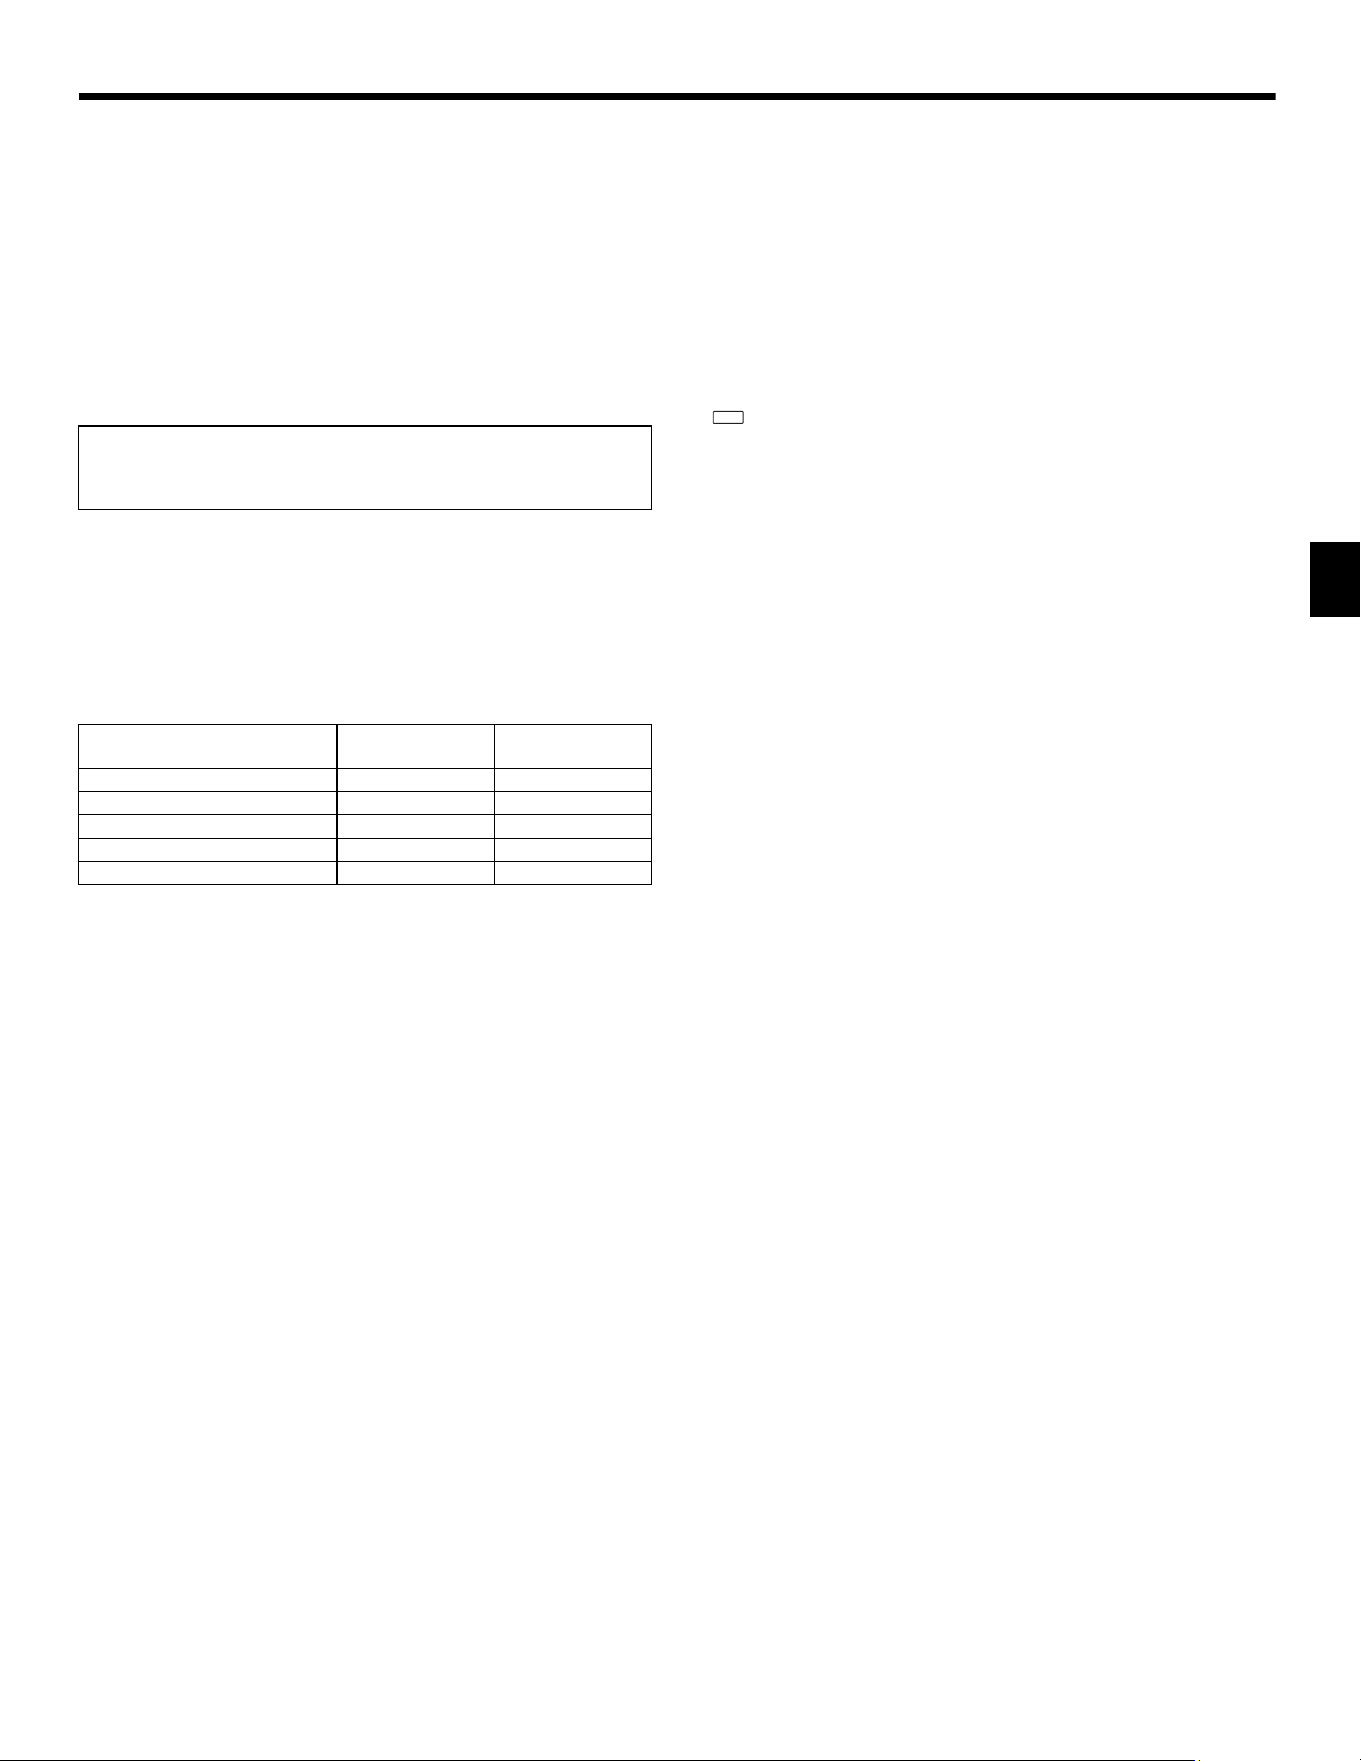
External static pressure
Setting no. of mode
no. 08
Setting no. of mode
no. 10
35 Pa [0.14 in. WG] 2 1
50 Pa [0.20 in. WG] (before shipment)
31
70 Pa [0.28 in. WG] 1 2
100 Pa [0.40 in. WG] 2 2
150 Pa [0.60 in. WG] 3 2
• When the settings are completed, press the [SELECT] button to send the
setting data from the remote controller to the indoor units.
• When the transmission is successfully completed, the screen will return to the
Function setting screen.
A Hour button
B Minute button
C TEMP button
D TEMP button
E ON/OFF button
F CHECK button
CHECK
KJ79P806H01.book 17 ページ 2021年12月13日 月曜日 午後2時15分
Loading ...
Loading ...
Loading ...