Loading ...
Loading ...
Loading ...

HD Street Glide 98 – 13
HD Road Glide 98 – 13
With the front faring removed. Using the Type(4) bracket, align bracket on the bottom side of the mounting
plate using the bracket type indicators. On the top edge, you will screw in the two threaded pins into the
mounting plate. These are used to align the mounting plate with the rubber bushings on top of the
factory radio.
Step 1 - Mounting Plate and Bracket Mounting
9
10
Step 2 - Mounting Plate and Bracket Mounting
Using the Type(1) and Type(4) brackets, align bracket on the bottom side of the mounting plate using
the bracket type indicators. On the top edge, you will screw in the two threaded pins into the mounting
plate. These are used to align the mounting plate with the rubber bushings on top of the factory radio.
Step 2 - Mounting Plate and Bracket Mounting
Using the Type(2),Type(3) and Type(4) brackets, align bracket on the bottom side of the mounting
plate using the bracket type indicators. After you have the bracket attached to the mounting plate,
remove the clutch side fairing bulkhead nuts. Place the bracket over the studs pushing the bracket
upwards while tightening down using the factory hardware.
Step 3 - Amplifier Mounting
Mount amplifier upside down with the supplied screws to the mounting plate. Align the amplifier
to the appropriate holes on the plate.
Aluminum
Heat Sink
Double sides
tape
Screws
Nylon Spacers
Aluminum
Heat Sink
Screws
Bracket
(Type 5)
2014 & Up - Street Glide
2015 & Up - Road Glide
1998 & 2013 - Road Glide
Aluminum
Heat Sink
Brackets
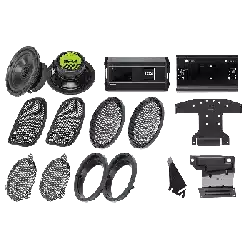
BHD3F
Harley Davidson Front System
BHD3F
Harley Davidson Front System
Aluminum
Heat Sink
Threaded Rod
Bracket
Screws
1998 & 2013 - Street Glide
Screws
Loading ...
Loading ...
Loading ...