
© 2024 Samsung Electronics Co., Ltd. All rights reserved.
User Guide
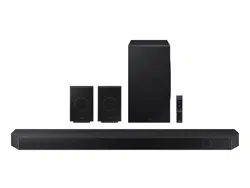
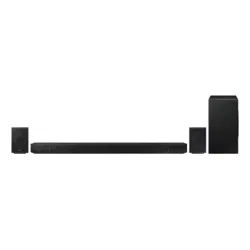
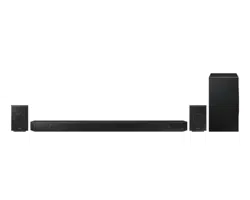
HW-Q990D
To receive more complete service, please register your product at
www.samsung.com/register
Figures and illustrations in this User Manual are provided for reference
only and may differ from actual product appearance.

ENG - 2
CONTENTS
01 Checking the Components 3
02 Product Overview 4
Top Panel of the Soundbar. . . . . . . . . . . . . . . . . . . . . . . . . . . . . . . . . . 4
Bottom Panel of the Soundbar. . . . . . . . . . . . . . . . . . . . . . . . . . . . . . 4
03 Using the Soundbar Remote Control 5
Inserting Batteries before using the Remote Control (AAA
batteries X 2). . . . . . . . . . . . . . . . . . . . . . . . . . . . . . . . . . . . . . . . . . . . . . 5
How to Use the Remote Control. . . . . . . . . . . . . . . . . . . . . . . . . . . . . 5
Setting the
(Sound Control). . . . . . . . . . . . . . . . . . . . . . . . . . . . . 6
Using the Hidden Buttons (Buttons with more than one
function). . . . . . . . . . . . . . . . . . . . . . . . . . . . . . . . . . . . . . . . . . . . . . . . . . 7
Output specications for the different sound effect modes. . . . 7
Adjusting the Soundbar volume with a TV remote control . . . . . 8
04 Connecting the Soundbar 9
Connecting the power and units . . . . . . . . . . . . . . . . . . . . . . . . . . . . 9
‒ Recommended Speaker Layout . . . . . . . . . . . . . . . . . . . . . . . . . 10
‒ Surround speaker mode. . . . . . . . . . . . . . . . . . . . . . . . . . . . . . . . 10
‒ Manually connecting the Subwoofer or Surround Speakers 11
‒ LED Indicator Lights on the Rear of Subwoofer and Surround
Speakers . . . . . . . . . . . . . . . . . . . . . . . . . . . . . . . . . . . . . . . . . . . . . 12
05 Connecting to a TV 13
Connecting the TV that supports HDMI ARC (Audio Return
Channel) . . . . . . . . . . . . . . . . . . . . . . . . . . . . . . . . . . . . . . . . . . . . . . . . . 13
Connecting using an Optical Cable . . . . . . . . . . . . . . . . . . . . . . . . . 14
Connecting via Bluetooth . . . . . . . . . . . . . . . . . . . . . . . . . . . . . . . . . 15
Connecting via Wi-Fi . . . . . . . . . . . . . . . . . . . . . . . . . . . . . . . . . . . . . . 16
Using the Q-Symphony Function . . . . . . . . . . . . . . . . . . . . . . . . . . . 17
Using the SpaceFit Sound . . . . . . . . . . . . . . . . . . . . . . . . . . . . . . . . . 18
06 Connecting an External Device 19
Method 1. Connecting using an HDMI Cable (Capable of Dolby
Atmos / DTS:X decoding and playback) . . . . . . . . . . . . . . . . . . . . . 19
Method 2. Connecting using an Optical Cable . . . . . . . . . . . . . . .20
07 Connecting a Mobile Device 21
Method 1. Connecting via Bluetooth . . . . . . . . . . . . . . . . . . . . . . . . 21
Method 2. Connecting via Wi-Fi (Wireless Network). . . . . . . . . .23
Using Group Play . . . . . . . . . . . . . . . . . . . . . . . . . . . . . . . . . . . . . . . . .23
Using the SmartThings Hub . . . . . . . . . . . . . . . . . . . . . . . . . . . . . . . 24
Connecting via Apple AirPlay . . . . . . . . . . . . . . . . . . . . . . . . . . . . . .24
Using the Tap Sound . . . . . . . . . . . . . . . . . . . . . . . . . . . . . . . . . . . . . .25
08 Installing the Wall Mount 26
Installation Precautions . . . . . . . . . . . . . . . . . . . . . . . . . . . . . . . . . . .26
Wallmount Components . . . . . . . . . . . . . . . . . . . . . . . . . . . . . . . . . .26
Installing the Surround Speakers on a Wall . . . . . . . . . . . . . . . . . 27
09 Installing the Soundbar in front of TV 27
Component . . . . . . . . . . . . . . . . . . . . . . . . . . . . . . . . . . . . . . . . . . . . . . 27
10 Software Update 28
Auto Update . . . . . . . . . . . . . . . . . . . . . . . . . . . . . . . . . . . . . . . . . . . . .28
USB Update . . . . . . . . . . . . . . . . . . . . . . . . . . . . . . . . . . . . . . . . . . . . . .28
Security updates information . . . . . . . . . . . . . . . . . . . . . . . . . . . . . .28
Initialization . . . . . . . . . . . . . . . . . . . . . . . . . . . . . . . . . . . . . . . . . . . . .29
11 Troubleshooting 29
12 Licence 31
ENG - 3
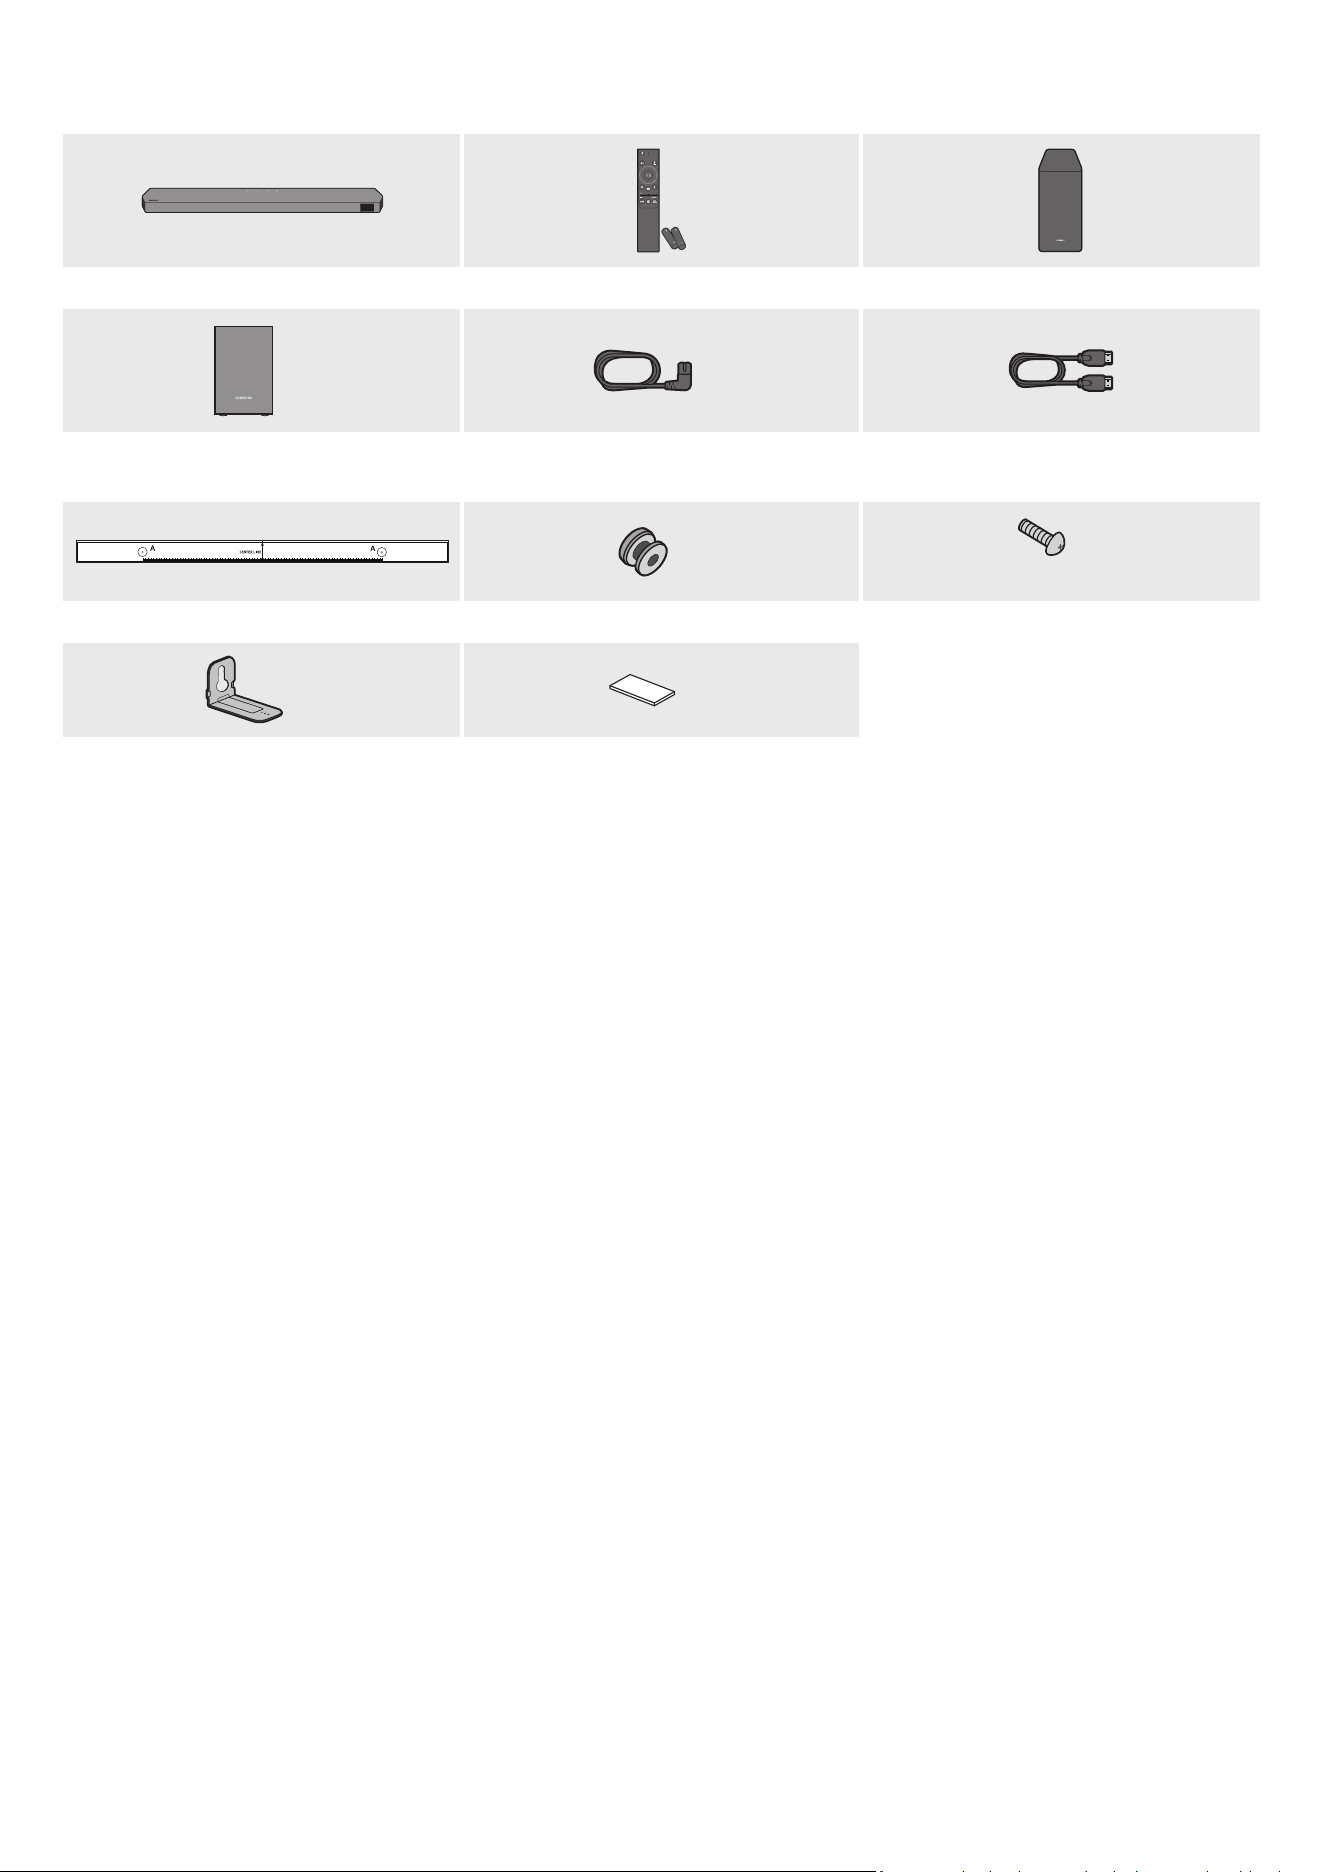
01 CHECKING THE COMPONENTS
SOUNDBAR
Soundbar Main Unit Soundbar Remote Control / Batteries Subwoofer
x 2
x 4
Surround Speaker
(Left / Right)
Power Cord
(Soundbar, Subwoofer, Surround speaker)
HDMI Cable
A TYPE : 450mm
x 2
x 2
(M4 x L10)
Wall Mount Guide Holder-Screw Screw
x 2
x 4
Bracket-Wall Mount Rubber-Foot
• For more information about the power supply and power consumption, refer to the label attached to the product. (Label: Rear of the Soundbar
Main Unit)
• To purchase additional components or optional cables, contact a Samsung Service Center or Samsung Customer Care.
• For more information about the wallmount or rubber-foot, see pages 26~28.
• Design, specications, and App screen are subject to change without prior notice.
• The appearance of the accessories may differ slightly from the illustrations above.
• Samsung Electronics Co., Ltd reserves the right to change the specications without notice.
• Weight and dimensions are approximate.
ENG - 4
02 PRODUCT OVERVIEW
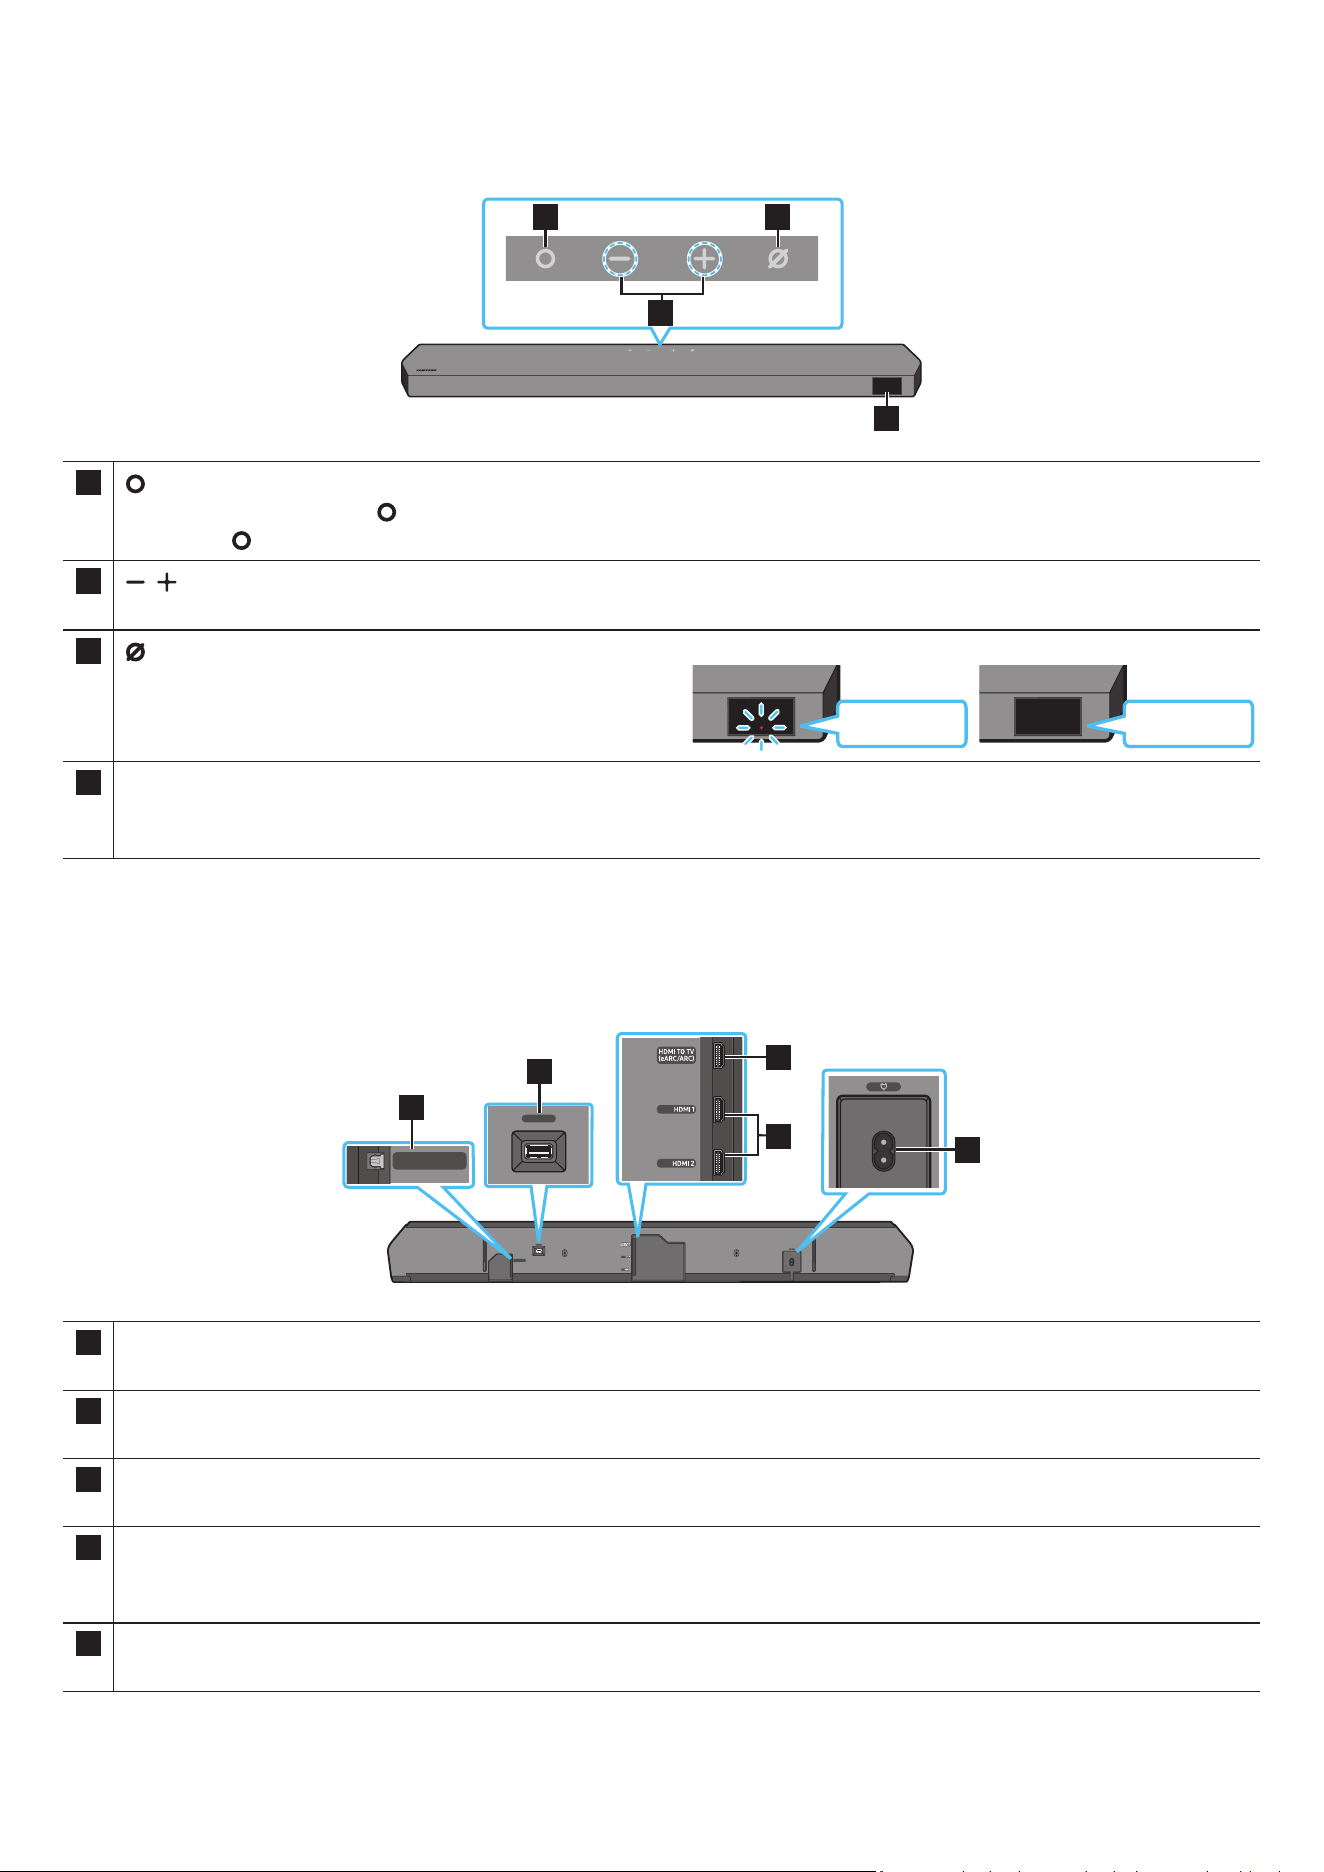
Top Panel of the Soundbar
2
1 3
4
1
(Multi Function) Button
• In standby mode, press the (Multi Function) button to turn on the Soundbar.
• Press the (Multi Function) button to change the input source.
2
(Volume) Button
Adjusts the volume.
3
(Mic On/Off) Button
Press the button to turn the microphone on or off.
When the microphone is off, the LED indicator will glow red.
Red On
Mic Off
Red Off
Mic On
4 Display
Displays the product’s status and current mode.
TV ARC or eARC → HDMI 1 → HDMI 2 → Wi-Fi → BT → D.IN
• When you plug in the power cord, the power button will begin working in 4 to 6 seconds.
• When you turn on this unit, there will be a 4 to 5 second delay before it produces sound.
• If you hear sounds from both the TV and Soundbar, go to the Settings menu for the TV audio and change the TV speaker to External Speaker.
Bottom Panel of the Soundbar
DIGITAL AUDIO IN
(OPTICAL)
SERVICE
5
SERVICE
DIGITAL AUDIO IN
(OPTICAL)
2
1
4
3
1 DIGITAL AUDIO IN (OPTICAL)
Connect to the digital (optical) output of an external device. (See page 20)
2 SERVICE
Connect a USB storage device to upgrade the product’s software.
3 HDMI TO TV (eARC/ARC)
Connect to the HDMI jack on a TV. (See page 13)
4 HDMI 1 / HDMI 2
Inputs digital video and audio signals simultaneously using an HDMI cable.
Connect to the HDMI output of an external device. (See page 19)
5 POWER
Connect the Soundbar’s power cord. (See page 9)
• When disconnecting the power cord from a wall outlet, pull the plug. Do not pull the cable.
• Do not connect this unit or other components to an AC outlet until all connections between components are complete.
ENG - 5
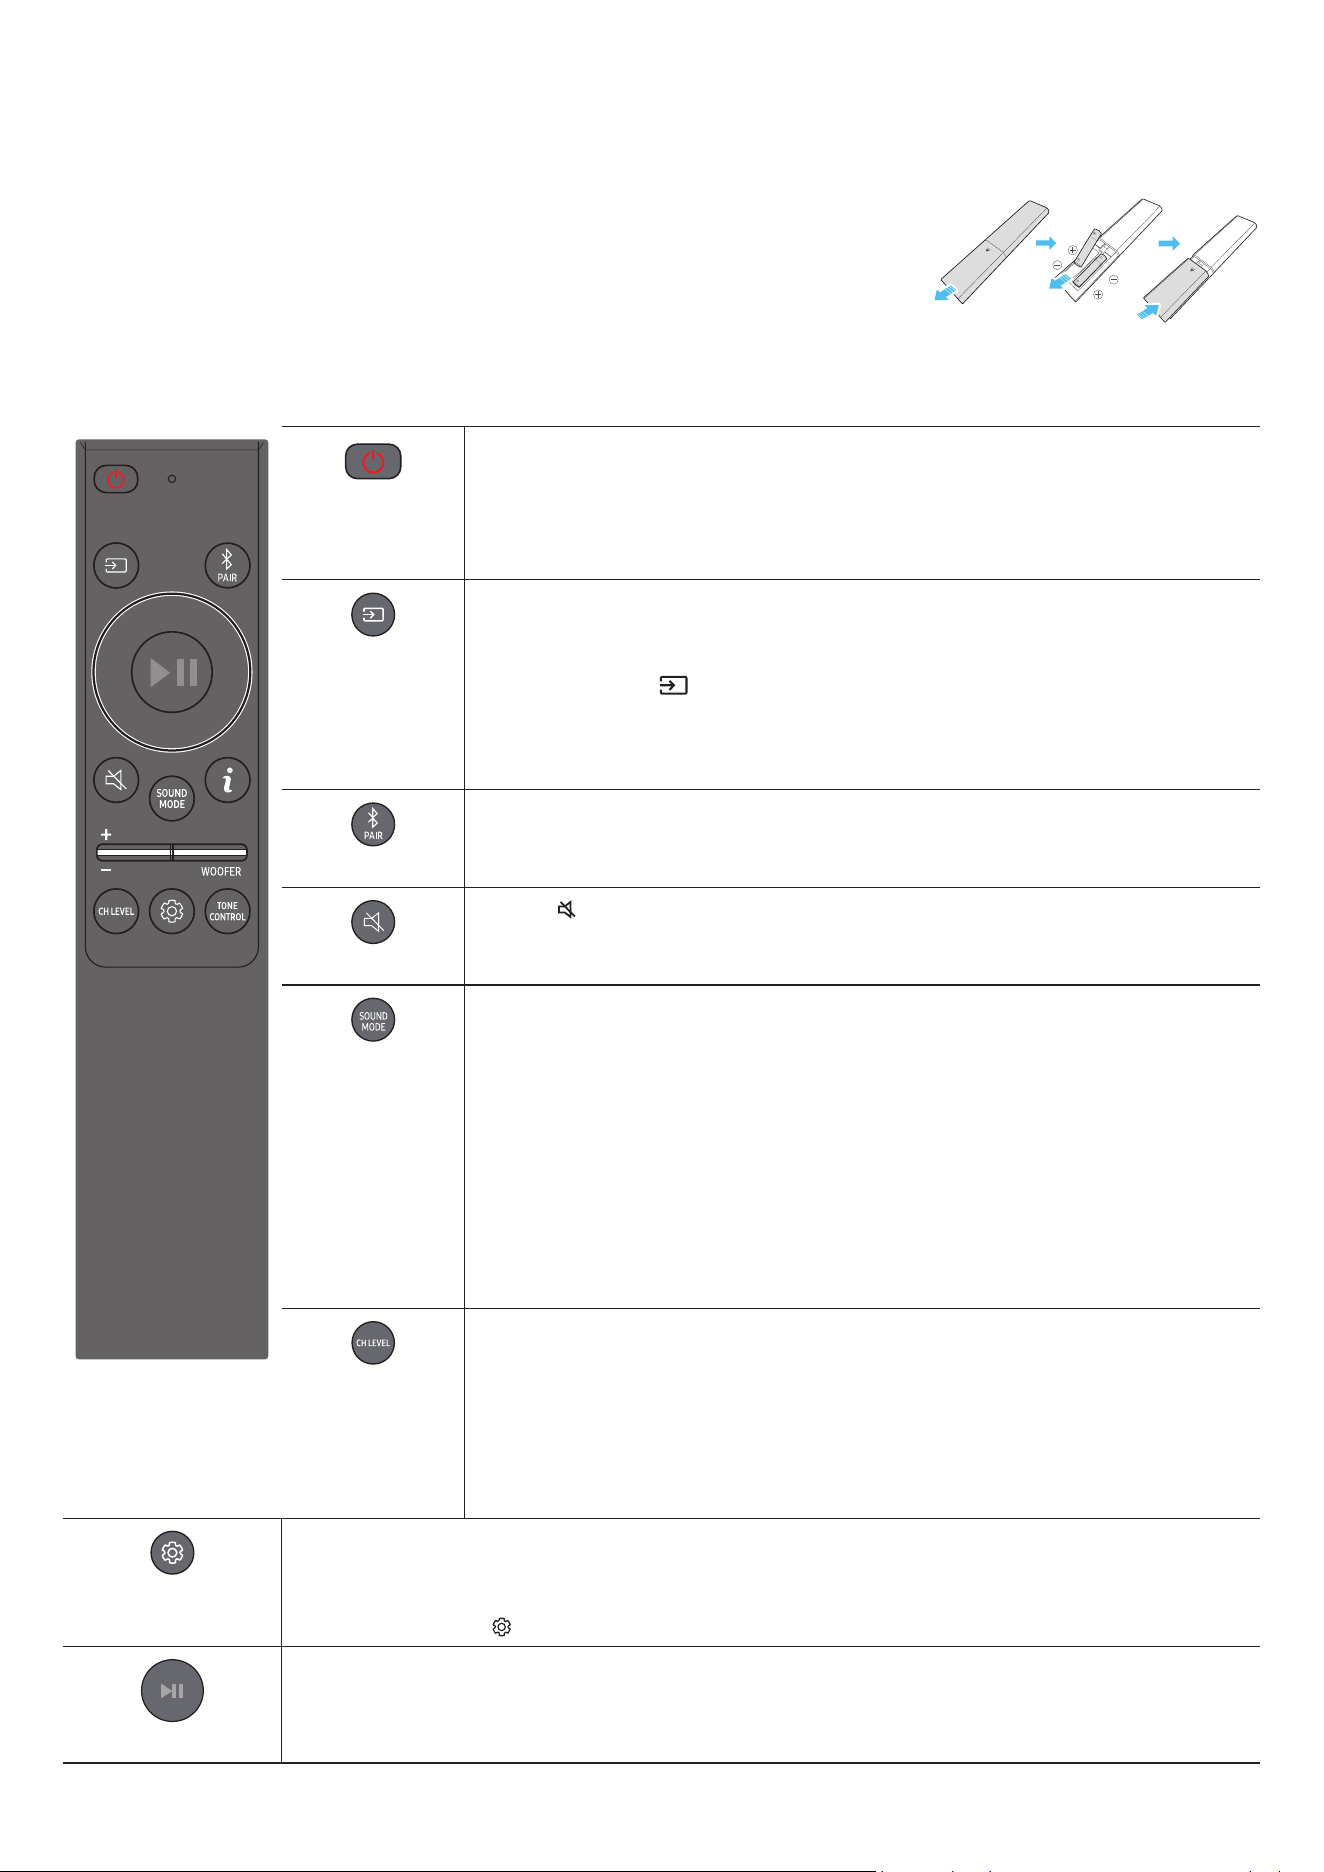
03 USING THE SOUNDBAR REMOTE CONTROL
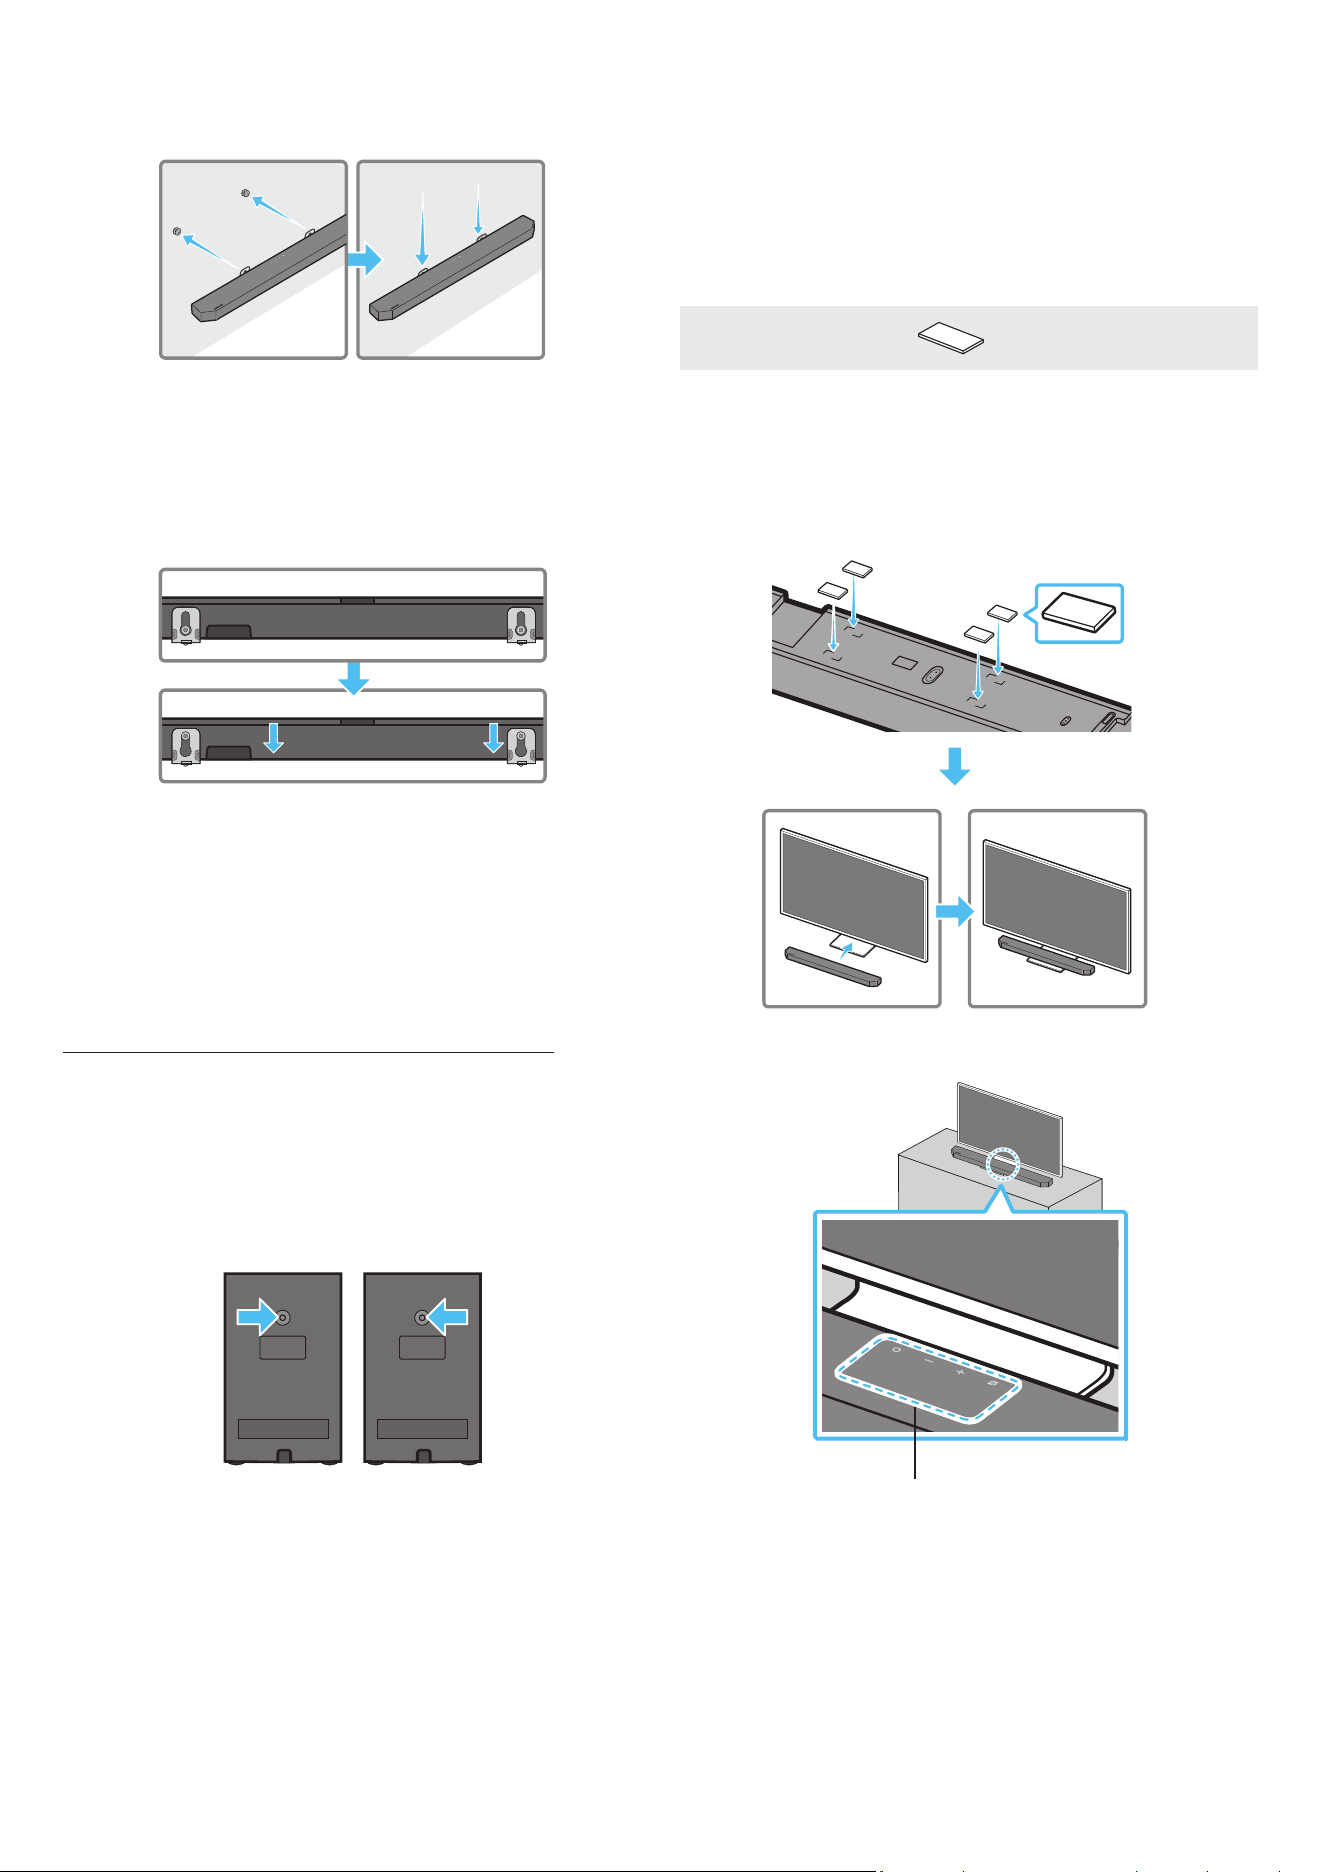
Inserting Batteries before using the Remote Control (AAA batteries X 2)
Slide the back cover in the direction of the arrow until it is completely removed. Insert 2 AAA batteries
(1.5V) oriented so that their polarity is correct. Slide the battery cover back into position.
• The illustration differs with the respective Remote Control model.
How to Use the Remote Control
SOUNDBAR
Power
Turns the Soundbar on and off.
• Auto Power Down Function
The unit turns off automatically in the following situations:
• In TV ARC or eARC / HDMI 1 / HDMI 2 / Wi-Fi / BT / D.IN mode if there is no audio signal
for 18 minutes.
Source
Press to select a source connected to the Soundbar.
• Voice Feedback On/Off
You can turn on or off the Voice Feedback.
Press and hold the
(Source) button on the remote control for 5 seconds while the
Soundbar is off (Standby mode).
Each time you change the Voice Feedback setting, the display will show “AUI OFF”
(Default) or “AUI ON”.
Bluetooth PAIR
Switch the Soundbar to Bluetooth pairing mode. Press the button and wait for the “BT
PAIRING” screen to connect to a new Bluetooth device.
Mute
Press the
(Mute) button to mute the sound.
Press it again to unmute the sound.
SOUND MODE
By pressing the button, you can select the desired audio mode such as Surround, Game Pro,
Standard, Adaptive Sound.
• Standard
Outputs the original sound.
• Surround
Provides a wider sound eld than standard.
• Game Pro
Provides stereoscopic sound to immerse you in the action while gaming.
• Adaptive Sound
Analyzes the content in real time and automatically provides the optimal sound eld
based on the characteristics of the content.
CH LEVEL
By pressing the button, you can adjust the volume of the each speaker such as Center level,
Side level, Wide level, Front Top level, Rear level, Rear top level, and Rear side level.
• To control the volume of the each speaker select Center level, Side level, Wide level, or
Front Top level in Sound Settings, and then adjust the volume between -6~+6 by using the
Up/Down buttons.
• If Surround Speakers are connected, select Rear level, Rear top level, or Rear side level
and then use the Up/Down buttons to adjust the volume within a -6 to +6 range.
Sound Control
By pressing the button, you can set the audio functions such as SpaceFit Sound, AVA, Voice enhance mode, Night
mode, Sync, Surround speaker mode, Virtual, Private Rear Sound, and Sound Grouping. The desired item can be
adjusted using the Up/Down buttons.
• Refer to “Setting the
(Sound Control)” on page 6.
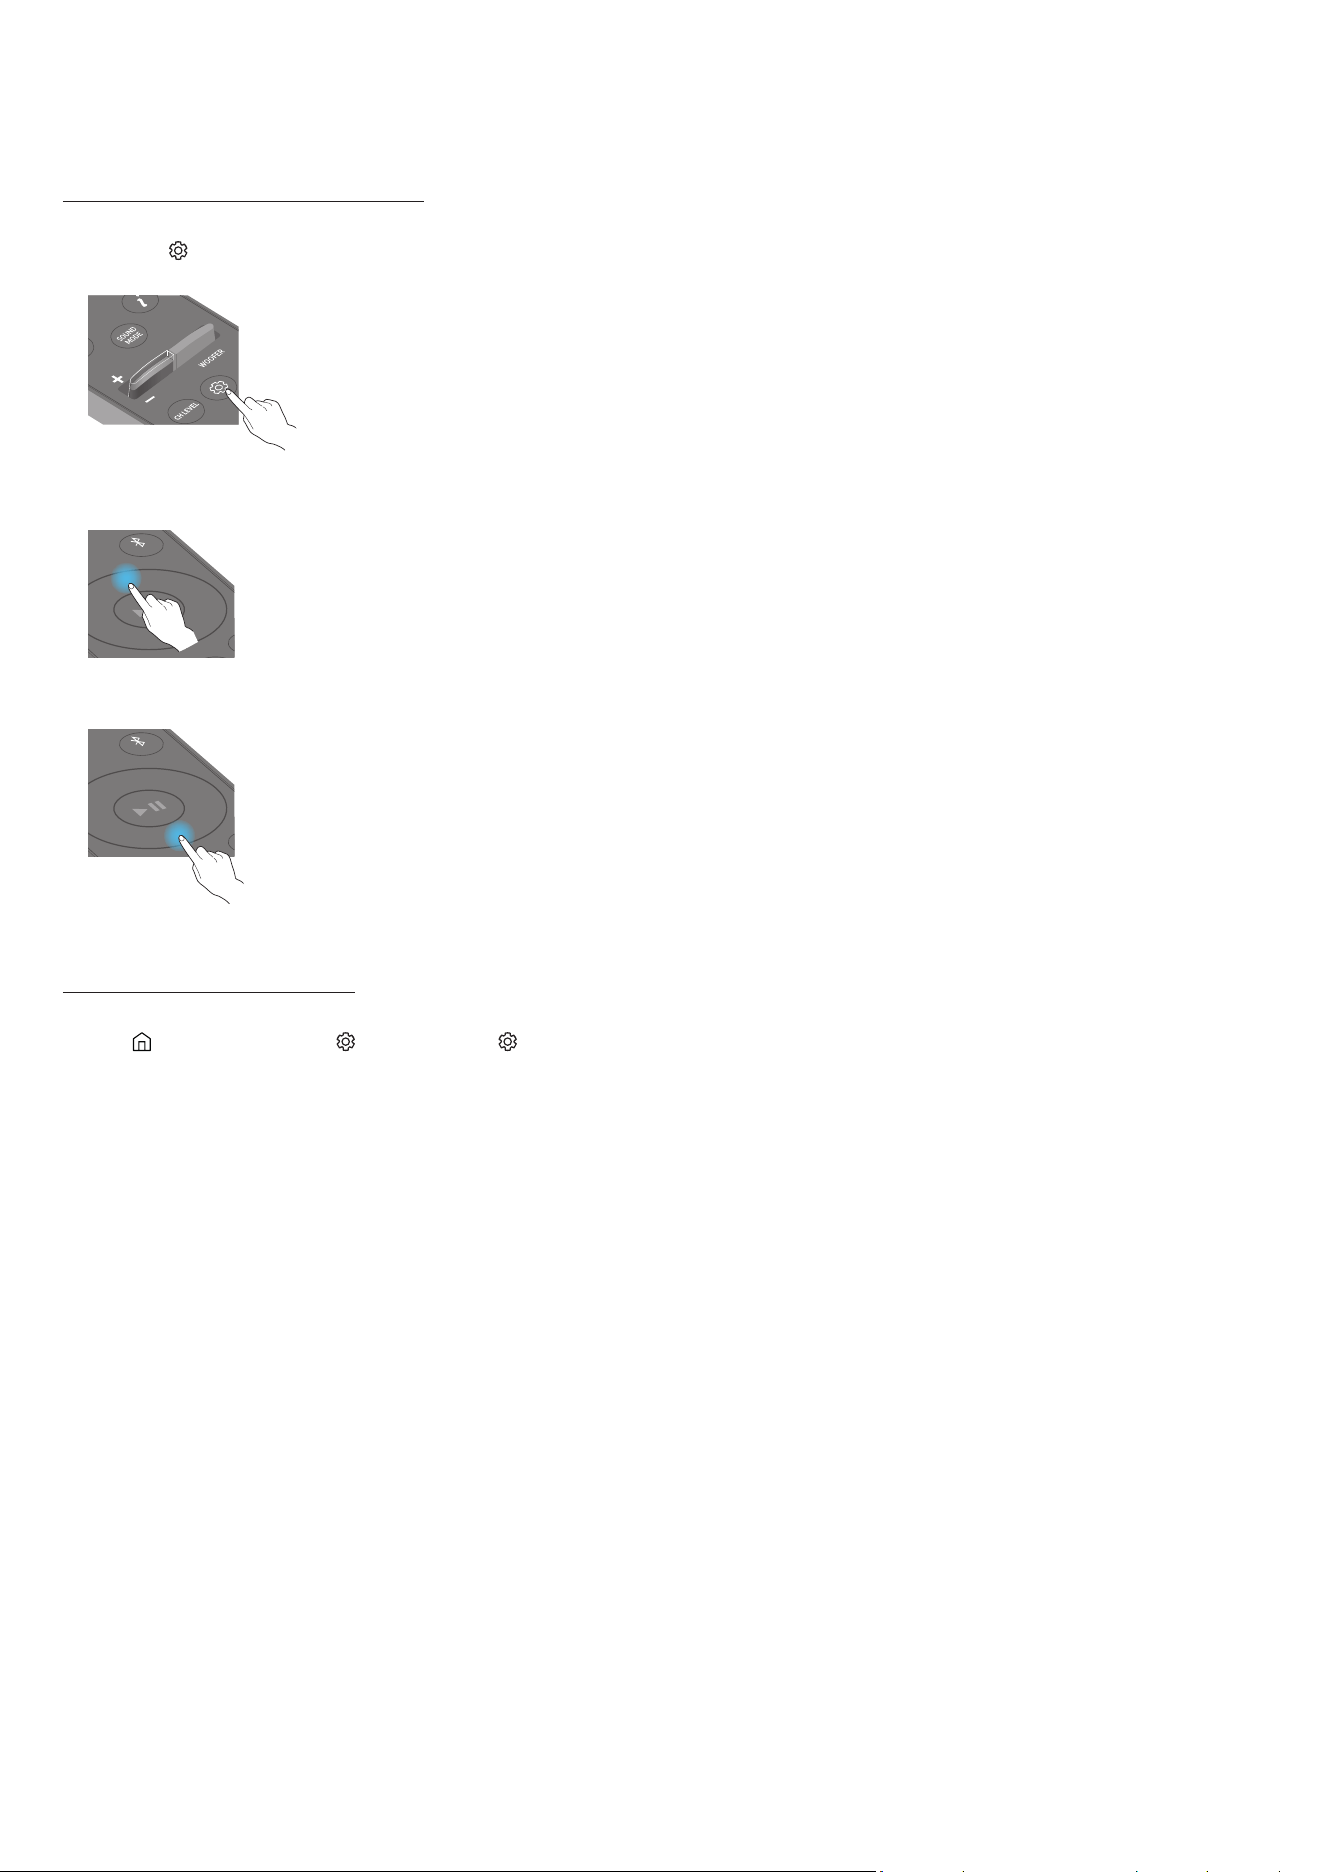
Play / Pause
You can also play or pause music by pressing the button.
ENG - 6
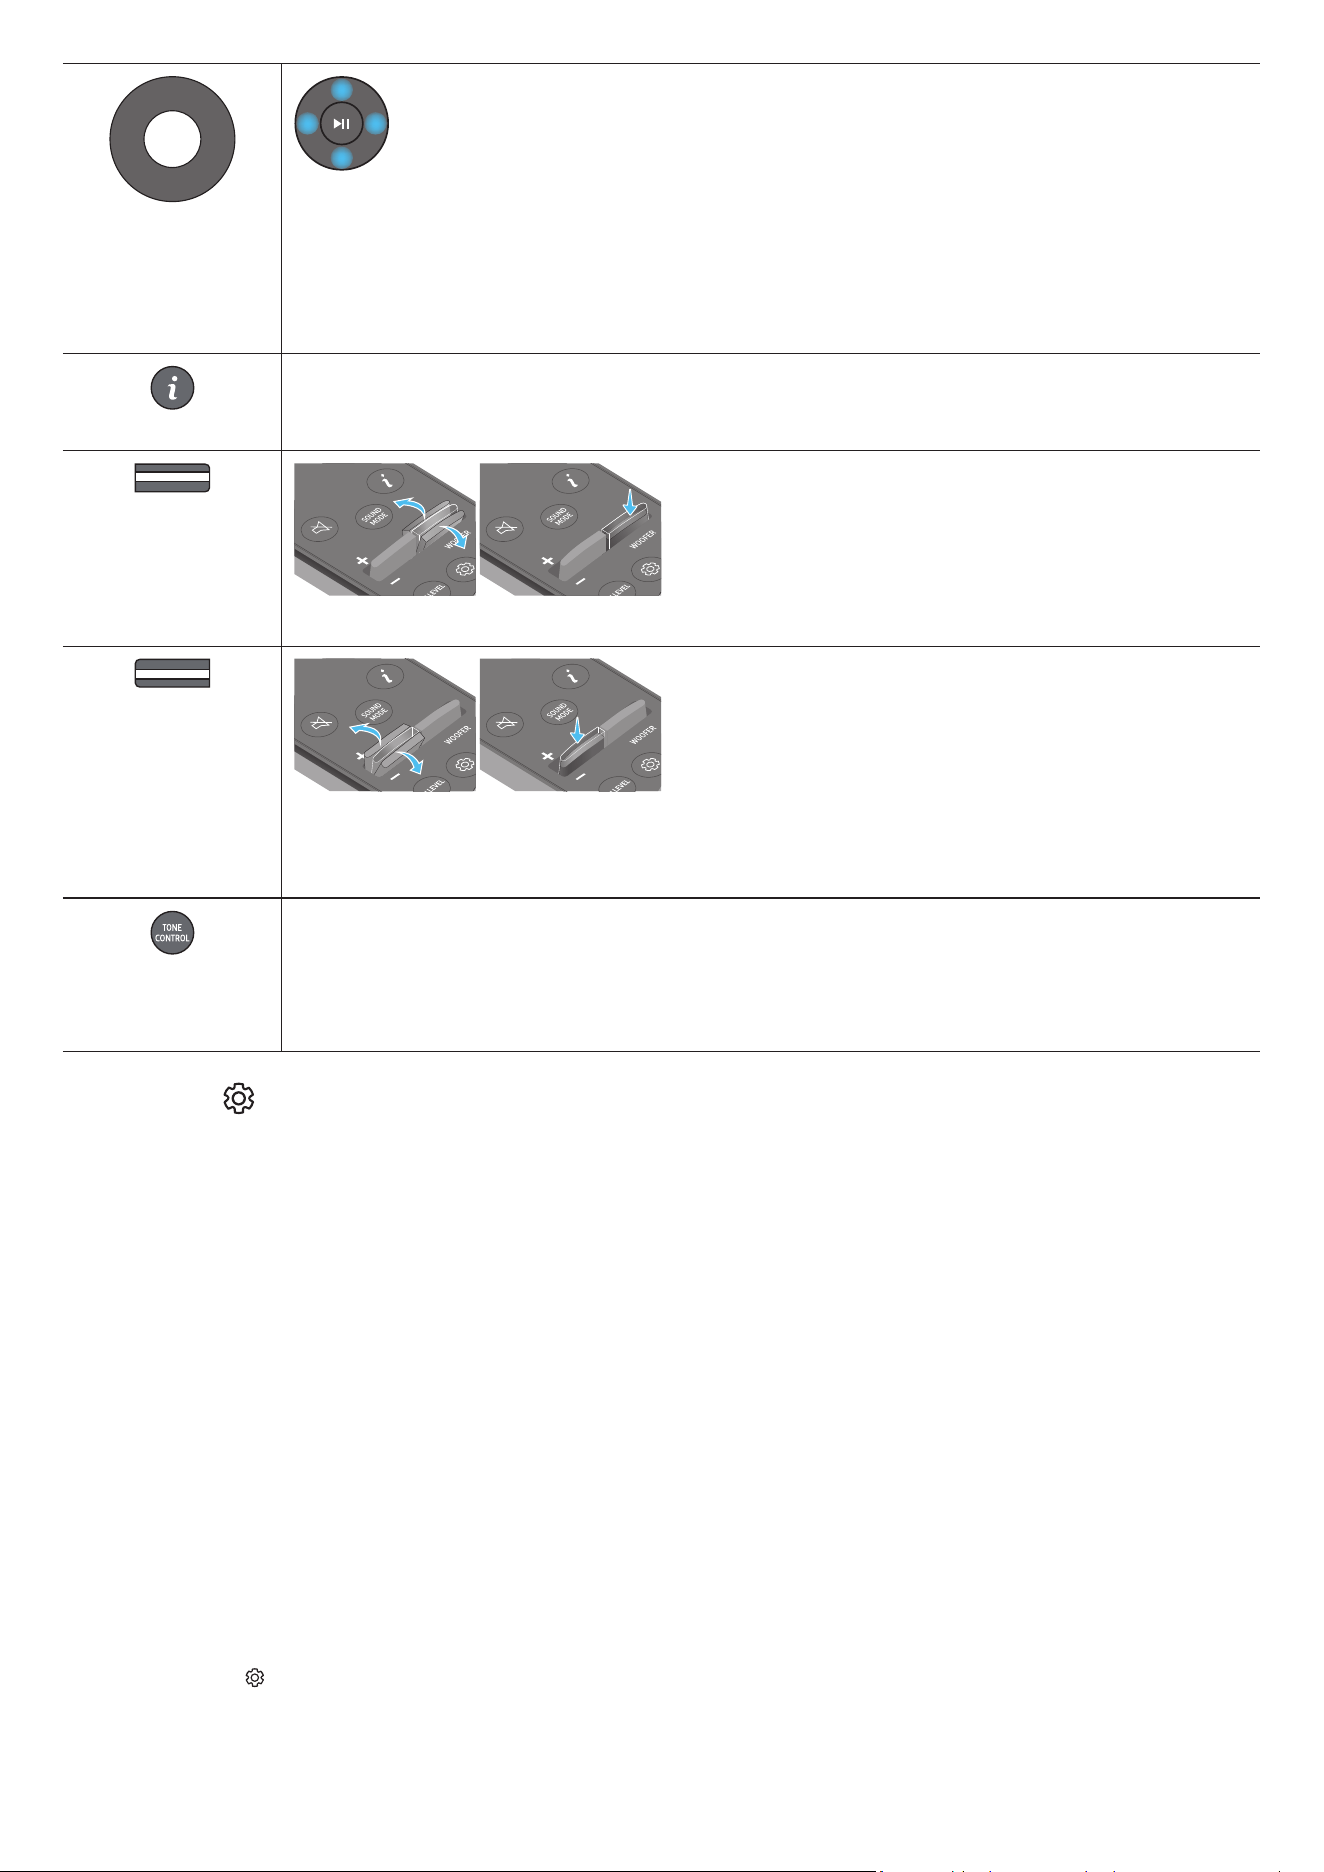
Up/Down/Left/Right
Press the indicated areas to select Up/Down/Left/Right.
Press Up/Down/Left/Right on the button to select or set functions.
• Music Skip
Press the Right button to select the next music le. Press the Left button to select the previous music le.
• ID SET
Use this option when the Subwoofer or Surround Speakers are not connected or need reconnection.
While powered off, press and hold the Up button for 5 seconds to perform ID SET. (See page 11.)
Info
Press to display information about the active function or the codec available.
In BT mode, it displays the connected device (when pairing is complete) or “BT ready” (when pairing is required).
WOOFER LEVEL
Push the button up or down to adjust the level of the woofer (bass).
VOLUME
Push the button up or down to adjust the volume.
• Mute
Press the VOL button to mute the sound. Press it again to unmute the sound.
TONE CONTROL
By pressing the button, you can adjust the volume of the treble or bass sound. The dered item can be adjusted
using the Up/Down buttons. This function is enabled in Sound mode excluding in Standard mode.
• To control the volume of the treble or bass sound, select TREBLE or BASS in Sound Settings, and then adjust the
volume between -6~+6 by using the Up/Down buttons.
• Once the bass level is changed, the woofer level will be also adjusted accordingly.
Setting the
(Sound Control)
• Active Voice Amplier (AVA) : Analyzes external noise in real time while soundbar is playing, so that voice audio can always be heard clearly.
No data is saved during the analysis.
• Voice enhance mode enhances spoken dialog in movies and TV to make it easier to hear.
• Night mode is optimized for night time viewing with the settings adjusted to bring the volume down but keep the dialog clear.
• Sound Grouping : The Soundbar main unit and the Surround Speakers play the entire sound instead of surround sound, making it ideal for
large groups of people listening to music in a large space.
‒ This menu is initially activated when the Surround Speakers are connected, and then the menu remains activated regardless of the
connection of the Surround Speakers.
‒ If you enable the Sound Grouping, there are no differences in sounds between the Sound modes.
‒ Sound does not come out from all speaker units of the Soundbar main unit and the Surround speakers, but only from certain
predetermined units, which vary by model.
• Private Rear Sound : This mode sets the sound to come out from the Surround Speakers only, allowing you to listen without being disturbed
by others.
‒ If you enable this mode, sound does not come out from the Soundbar main unit and the Subwoofer. Sound only comes out from the front
channel of the Surround Speakers.
‒ If you enable the Private Rear Sound, there are no differences in sounds between the Sound modes.
‒ The function turns off when the power turns off or the Surround Speakers connection is lost.
‒ The menu is activated only when the Surround Speakers are connected.
‒ This mode is automatically turned off and becomes unavailable when the Q-symphony function turns on.
• Press and hold the (Sound Control) button for about 5 seconds to adjust the sound for each frequency band. 150Hz, 300Hz, 600Hz, 1.2kHz,
2.5kHz, 5kHz, and 10kHz are selectable using the Left/Right buttons and each can be adjusted to a setting between -6 to +6 using the Up/
Down buttons.
(Make sure the Sound mode is set to “Standard”.)
ENG - 7
• If the video on the TV and audio from the Soundbar are not synchronized, select Sync in Sound Control, and then set the audio delay between
0~300 milliseconds by using the Up/Down buttons.
• Sync is only supported for some functions.
• Available Surround speaker mode settings may vary depending on the specication of the compatible (with the Soundbar) surround speaker.
• The Virtual Speaker function can be turned ON/OFF by using the Up/Down buttons.
Using the Hidden Buttons (Buttons with more than one function)
Hidden Button
Reference page
Remote Control Button Function
WOOFER (Up) TV remote control On/Off (Standby) page 8
Up ID SET page 11
(Sound Control)
7 Band EQ page 6
(Source)
Voice Feedback On/Off (Standby) page 5
Output specications for the different sound effect modes
Effect Input
Output
With Subwoofer & Surround Speaker
Standard
2.0 ch 2.1 ch
5.1 ch 5.1 ch / 7.1 ch (DTS)
7.1 ch 7.1 ch
Dolby Atmos®, DTS:X 7.1.4 ch
Surround
2.0 ch 11.1.4 ch
5.1 ch 11.1.4 ch
7.1 ch 11.1.4 ch
Dolby Atmos®, DTS:X 11.1.4 ch
Game Pro
2.0 ch 11.1.4 ch
5.1 ch 11.1.4 ch
7.1 ch 11.1.4 ch
Dolby Atmos®, DTS:X 11.1.4 ch
Adaptive Sound
2.0 ch 11.1.4 ch
5.1 ch 11.1.4 ch
7.1 ch 11.1.4 ch
Dolby Atmos®, DTS:X 11.1.4 ch
The Surround Speakers will not produce sounds for 2 channel output while Standard mode is in use. To enable sound for the Surround
Speakers, change the effect mode to Surround.

ENG - 8
Adjusting the Soundbar volume with a TV remote control
Adjust the Soundbar volume using the TV’s remote control.
• This function can be used with IR remote controls only. Bluetooth remote controls (remote controls that require pairing) are not
supported.
• Set the TV speaker to External Speaker to use this function.
• Manufacturers supporting this function:
Samsung, VIZIO, LG, Sony, Sharp, PHILIPS, PANASONIC, TOSHIBA, Hisense, RCA
1. Turn Off the Soundbar.
2. Push up and hold the WOOFER button for 5 seconds.
Each time you push the WOOFER button up and hold it for 5 seconds, the mode switches in the following order: “OFF-TV REMOTE” (Default
mode), “SAMSUNG-TV REMOTE”, “ALL-TV REMOTE”.
Remote Control Button Display Status
(Default mode)
OFF-TV REMOTE
Disable the TV remote control.
SAMSUNG-TV REMOTE
Enable a Samsung TV’s IR remote control.
ALL-TV REMOTE
Enable a third-party TV’s IR remote control.

ENG - 9
04 CONNECTING THE SOUNDBAR
Connecting the power and units
Use the Power cord to connect the Subwoofer, Surround Speakers, and Soundbar to an electrical outlet in the following order:
• For more information about the required electrical power and power consumption, refer to the label attached to the product. (Label: Rear of
the Soundbar Main Unit)
1. Connect the Power cord to the Subwoofer.
Rear of Subwoofer
Power Cord
2. Connect the power cord to the Left and Right Surround Speakers.
Bottoms of the Left and
Right Surround Speakers
Power Cord
3. Connect the Power cord to the Soundbar.
Bottom of the Soundbar
Main Unit
Power Cord
4. Connect power to the Soundbar, Subwoofer and Surround Speakers. The Subwoofer and Surround Speakers are automatically connected when
the Soundbar is turned on.
LINK LED - Blue is On
NOTE
• Connect the Subwoofer and Surround Speakers power before connecting to the Soundbar. The Subwoofer and Surround Speakers will be
automatically connected when turning on the Soundbar.
• If you unplug and reconnect the power cord when the product is turned on, the Soundbar turns on automatically.
ENG - 10
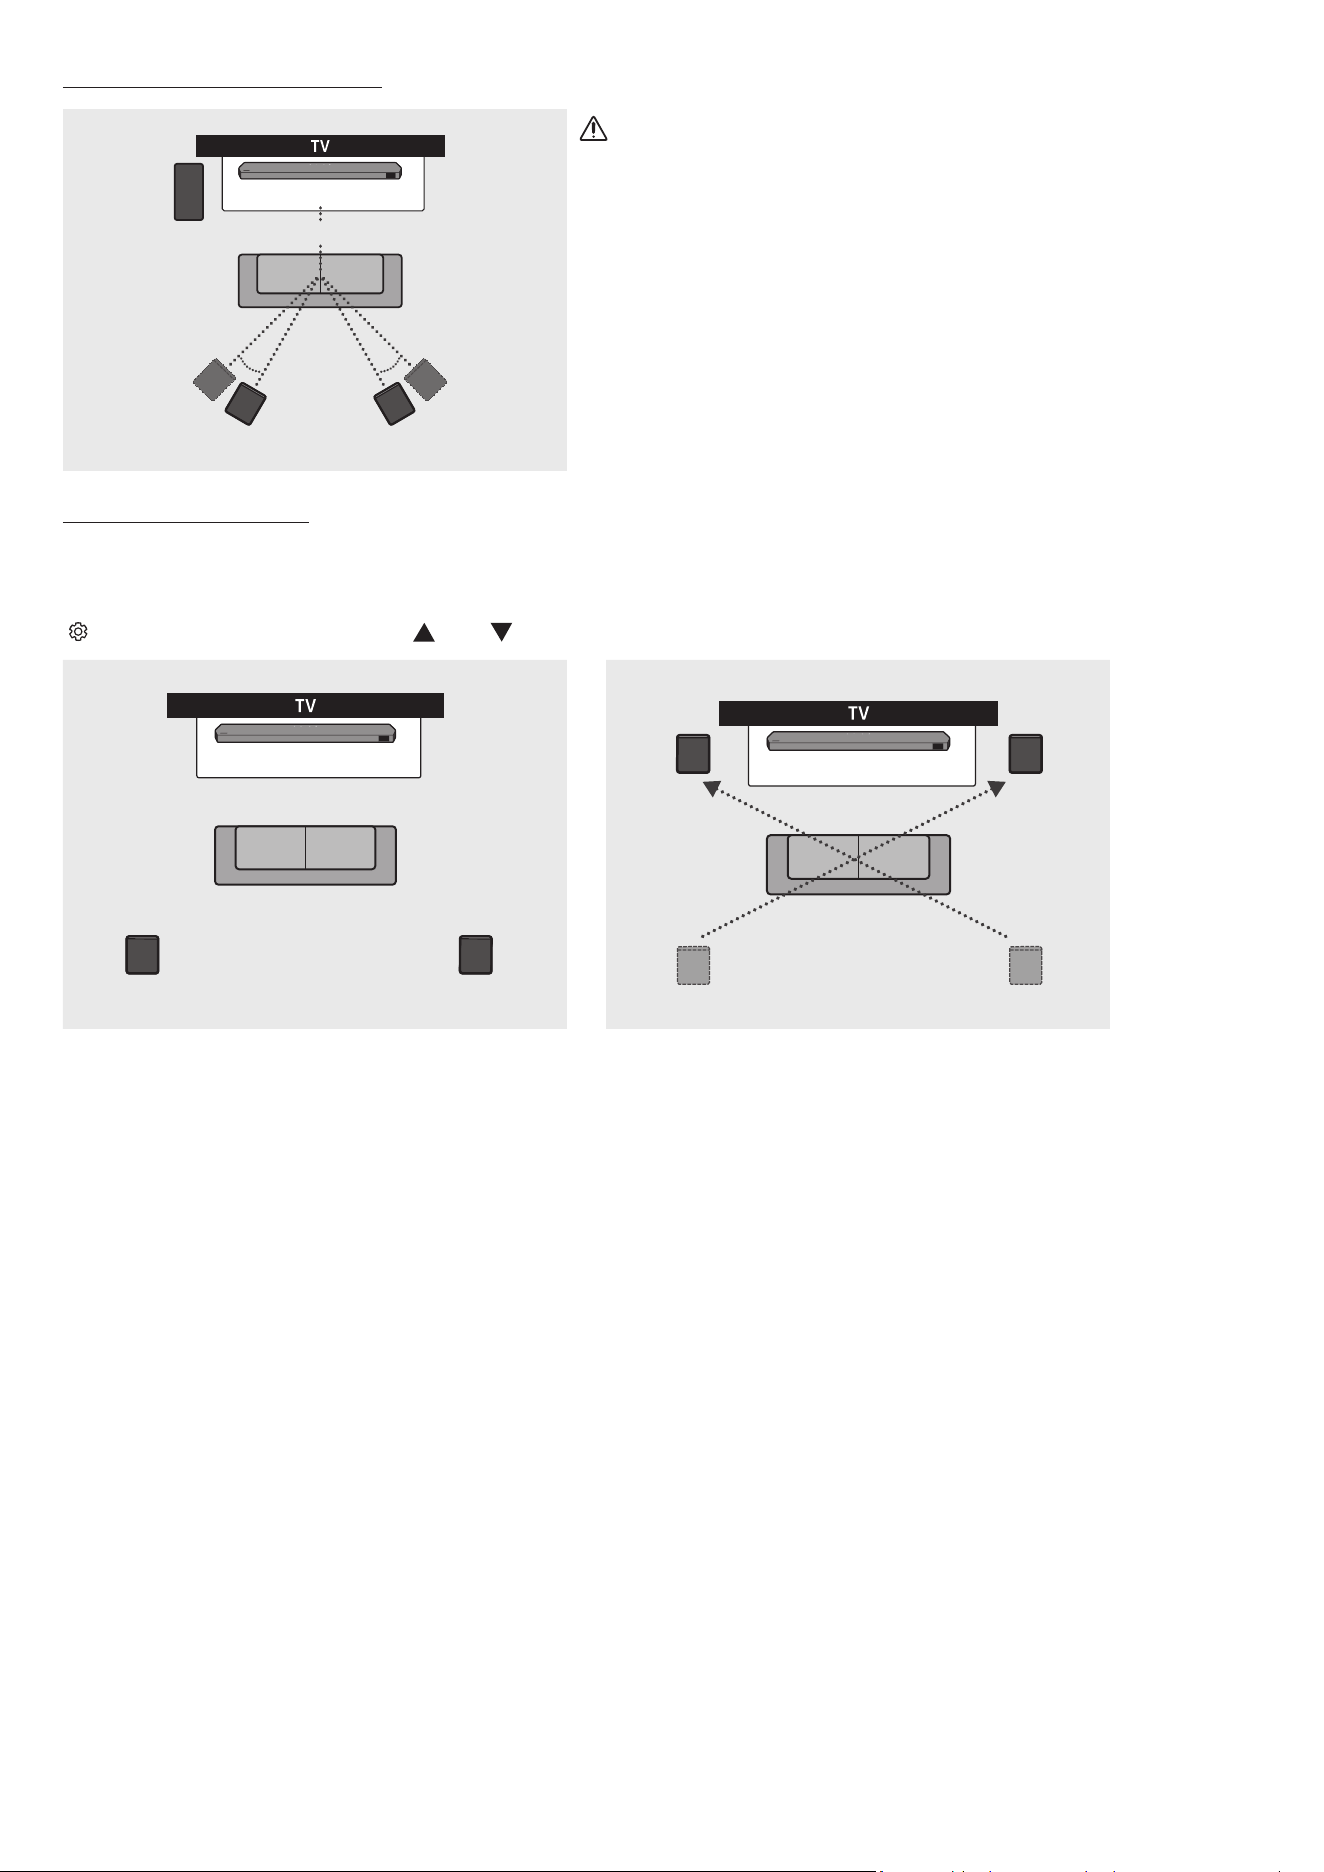
Recommended Speaker Layout
150° 150°
135° 135°
0°
Subwoofer
Soundbar
Surround Speaker L Surround Speaker R
CAUTION
• Wireless receiving antennas are built into the Subwoofer and surround
speakers. Keep the units away from water and moisture.
• For optimal listening performance, make sure that the areas around the
Subwoofer and surround speakers locations are clear of any obstructions.
Surround speaker mode
An optimal surround sound may be delivered depending on the position of the surround speaker. See the illustration below for speaker
positioning.
To activate this mode, select the Surround Speaker mode using the remote control of the Soundbar.
(
(Sound Control) → Surround speaker → (Up) / (Down) → Front / Rear)
Soundbar
Surround Speaker L Surround Speaker R
Soundbar
Surround Speaker R
Surround Speaker L
Rear positioning Front positioning
NOTE
• This mode is available only with Soundbar models including a specic surround speaker.
• In Front speaker mode, position the front speakers toward you.
• The surround speaker mode is enabled by default as rear position.
ENG - 11
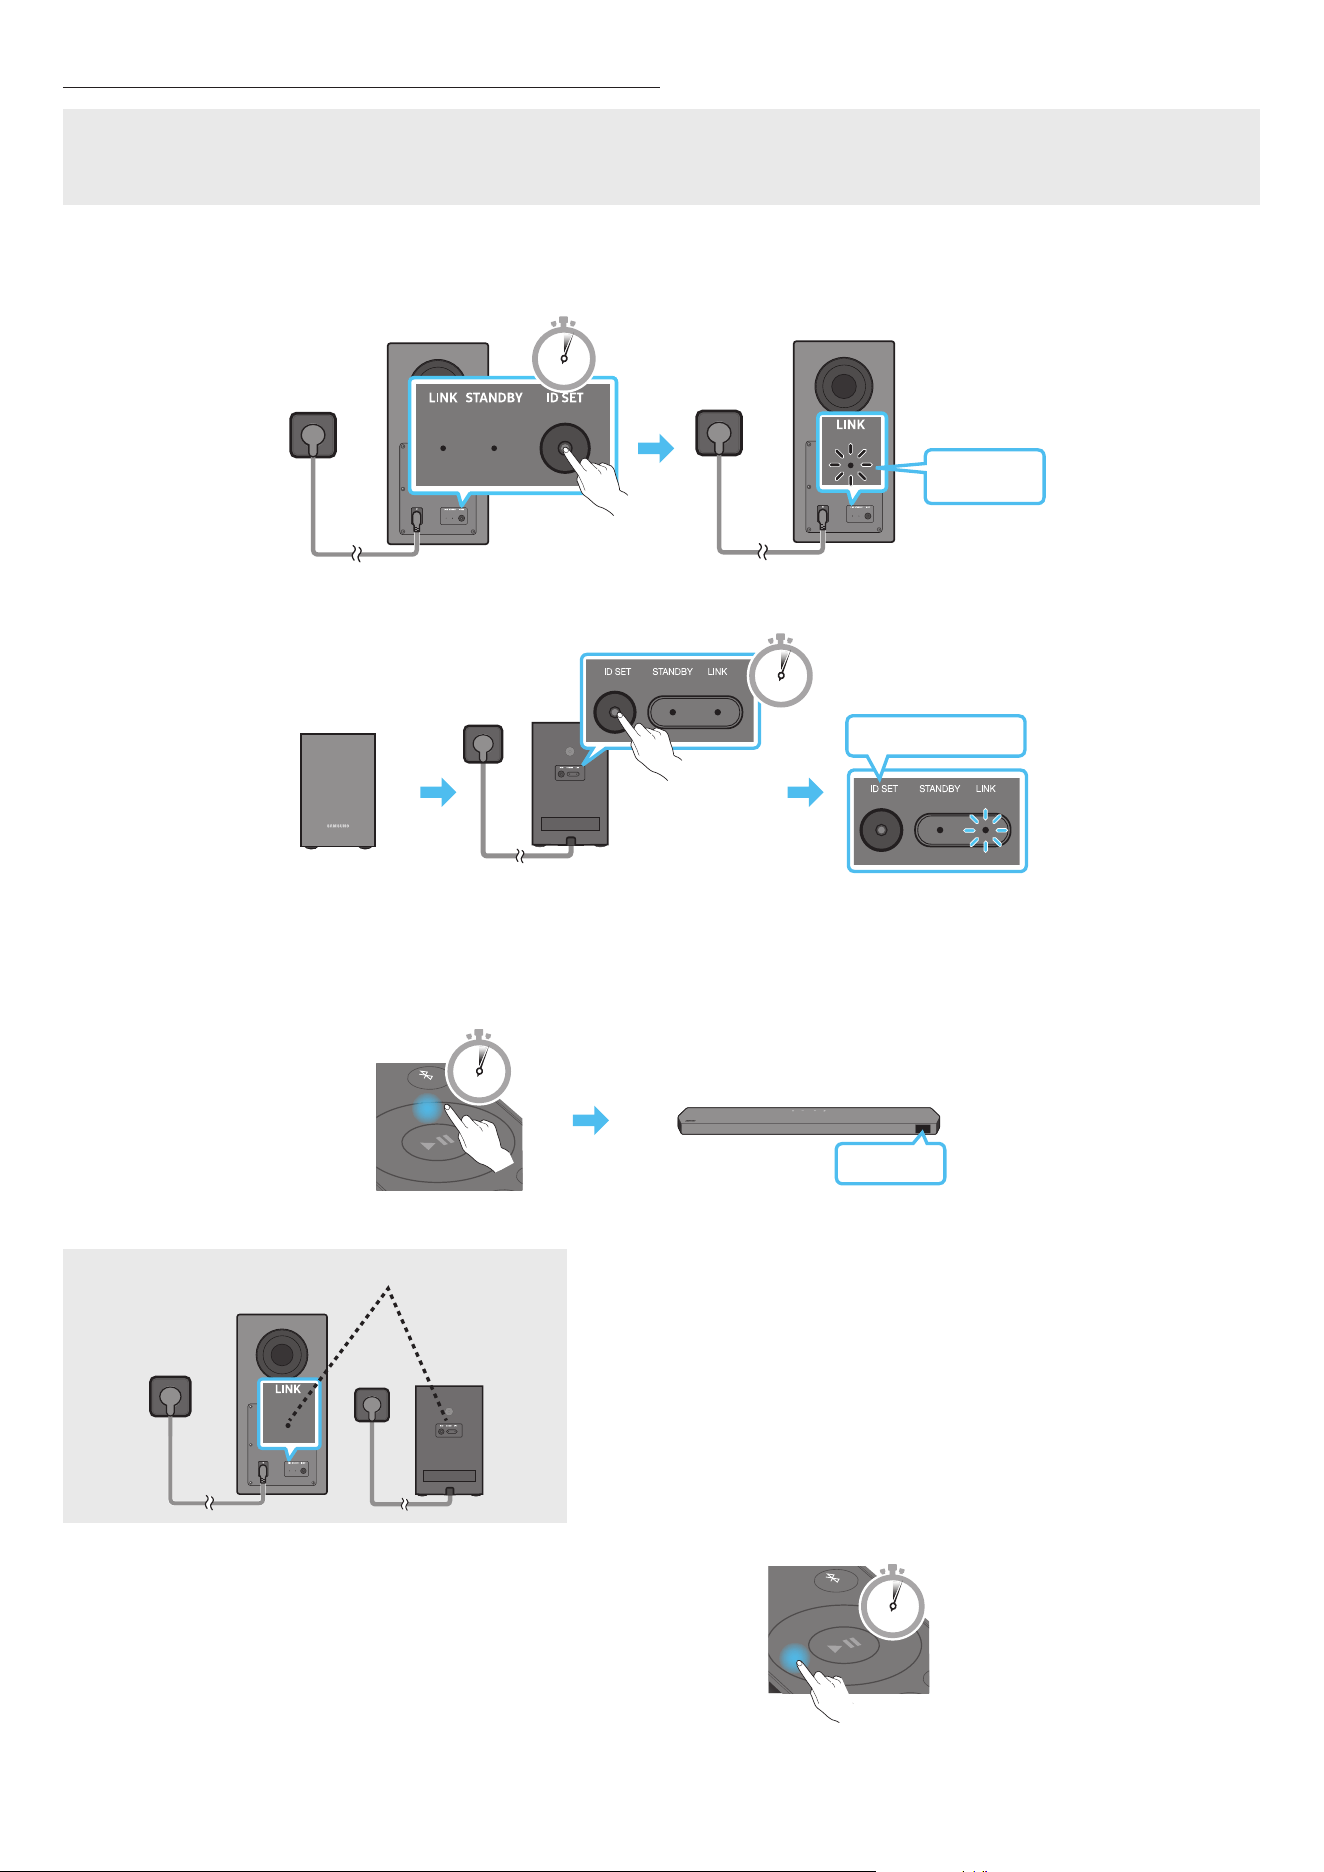
Manually connecting the Subwoofer or Surround Speakers
Before performing the manual connection procedure below:
• Check whether the power cables for the Soundbar and Subwoofer or Surround Speakers are connected properly.
• Make sure that the Soundbar is turned off.
1. Turn off the Soundbar main.
2. Press and hold ID SET on the rear of the Subwoofer and surround speakers for at least 5 seconds.
• The red indicator at the rear of each speaker turns off and the blue indicator blinks.
5 Sec
Blinking
blue fast
Rear of Subwoofer Rear of Subwoofer
Blinking blue fast
x 2
Rear of the Left and Right Surround Speakers
5 Sec
3. Press the Up button on the remote control for 5 seconds.
• The ID SET message appears on the display of the Soundbar for a moment, and then it disappears.
• The Soundbar will automatically power on when ID SET is complete.
PAIR
5 Sec
ID SET
4. Check if the LINK LED is solid blue (connection complete).
LINK LED - Blue is On The LINK LED indicator stops blinking and glows a solid blue when a connection
is established between the Soundbar and the Subwoofer, surround speakers.
NOTE
• How to Tx Module Reset
1. Turn off the soundbar.
2. Press the Left button on the remote control for 5 seconds
3. Follow the “Manually connecting the Subwoofer or Surround Speakers”.
PAIR
5 Sec
ENG - 12
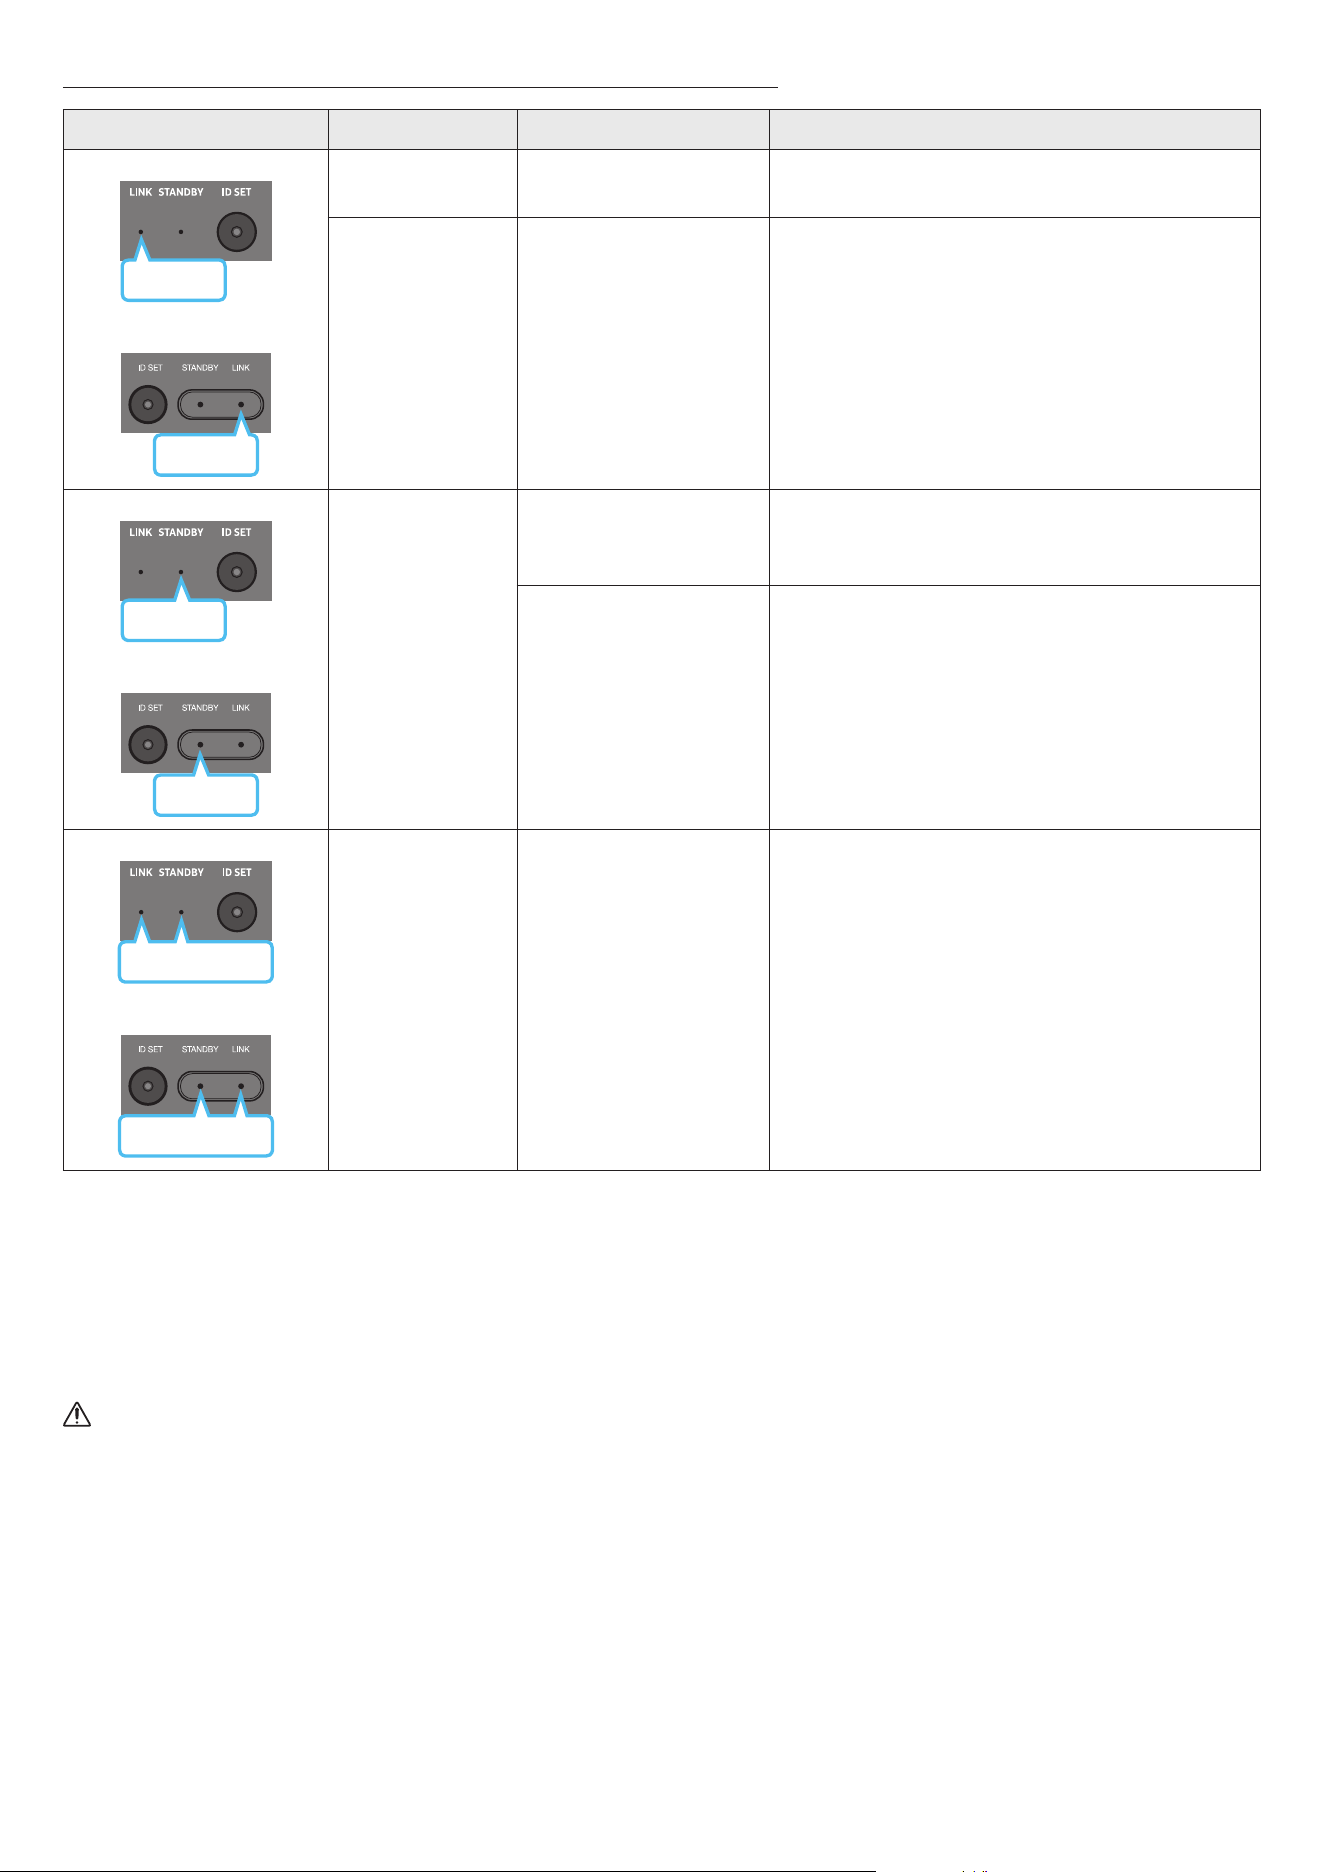
LED Indicator Lights on the Rear of Subwoofer and Surround Speakers
LED Status Description Resolution
Blue
Subwoofer
Surround Speakers
Blue
On
Successfully connected
(normal operation)
-
Blinking Recovering the connection
Check if the power cable attached to the main Soundbar
unit is connected properly or wait about 5 minutes.
If blinking persists, try manually connecting the
Subwoofer and Surround Speakers. See page 11.
Red
Subwoofer
Surround Speakers
Red
On
Standby (with the
Soundbar main unit turned
off)
Check if the power cable attached to the main Soundbar
unit is connected properly.
Connection failed
Connect again. See the instructions for manual
connection on page 11.
Subwoofer
Red and blue
Surround Speakers
Red and blue
Blinking Malfunction
See the contact information for the Samsung Service
Center in this manual.
NOTE
• If the main unit is powered off, the Subwoofer will go into stand-by mode and the STANDBY LED on the rear of the sub-woofer will turn red
after blinking in blue several times.
• If you use a device that uses the same frequency as the Soundbar near the Soundbar, interference may cause some sound interruption.
• The maximum transmission distance of the main unit’s wireless signal is about 32.8 ft (10 m), but may vary depending on your operating
environment. If a steel-concrete or metallic wall is between the main unit and the Subwoofer, the system may not operate at all because the
wireless signal cannot penetrate metal.
CAUTION
• Wireless receiving antennas are built into the Subwoofer and Surround Speakers. Keep the unit away from water and moisture.
• For optimal listening performance, make sure that the area around the Subwoofer and the Surround Speakers are clear of any obstructions.
• Do not insert any part of your body or foreign objects into the Subwoofer’s duct (hole).
• Do not use the Subwoofer’s duct (hole) to hang it on the wall.
ENG - 13
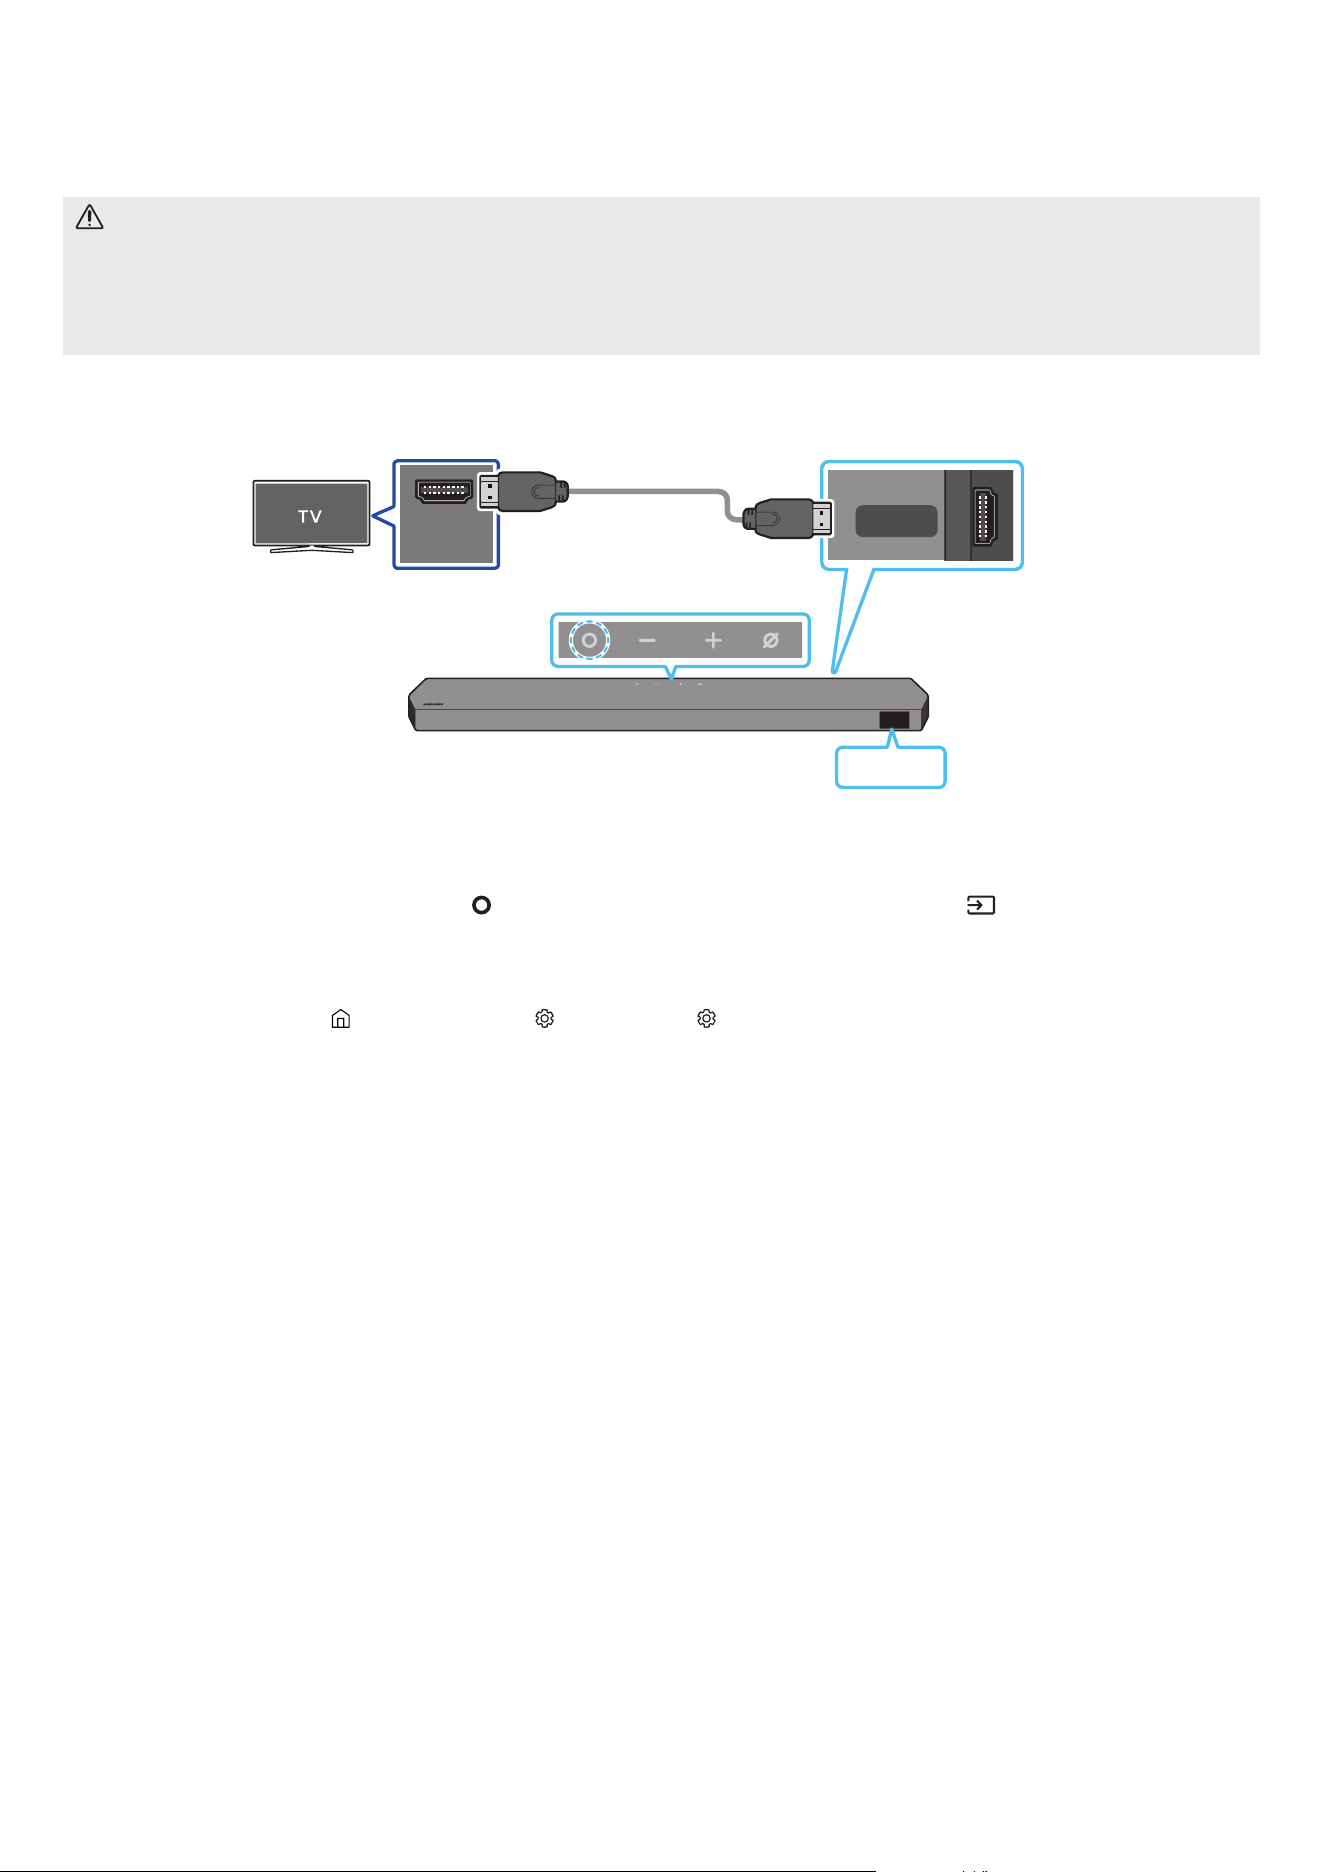
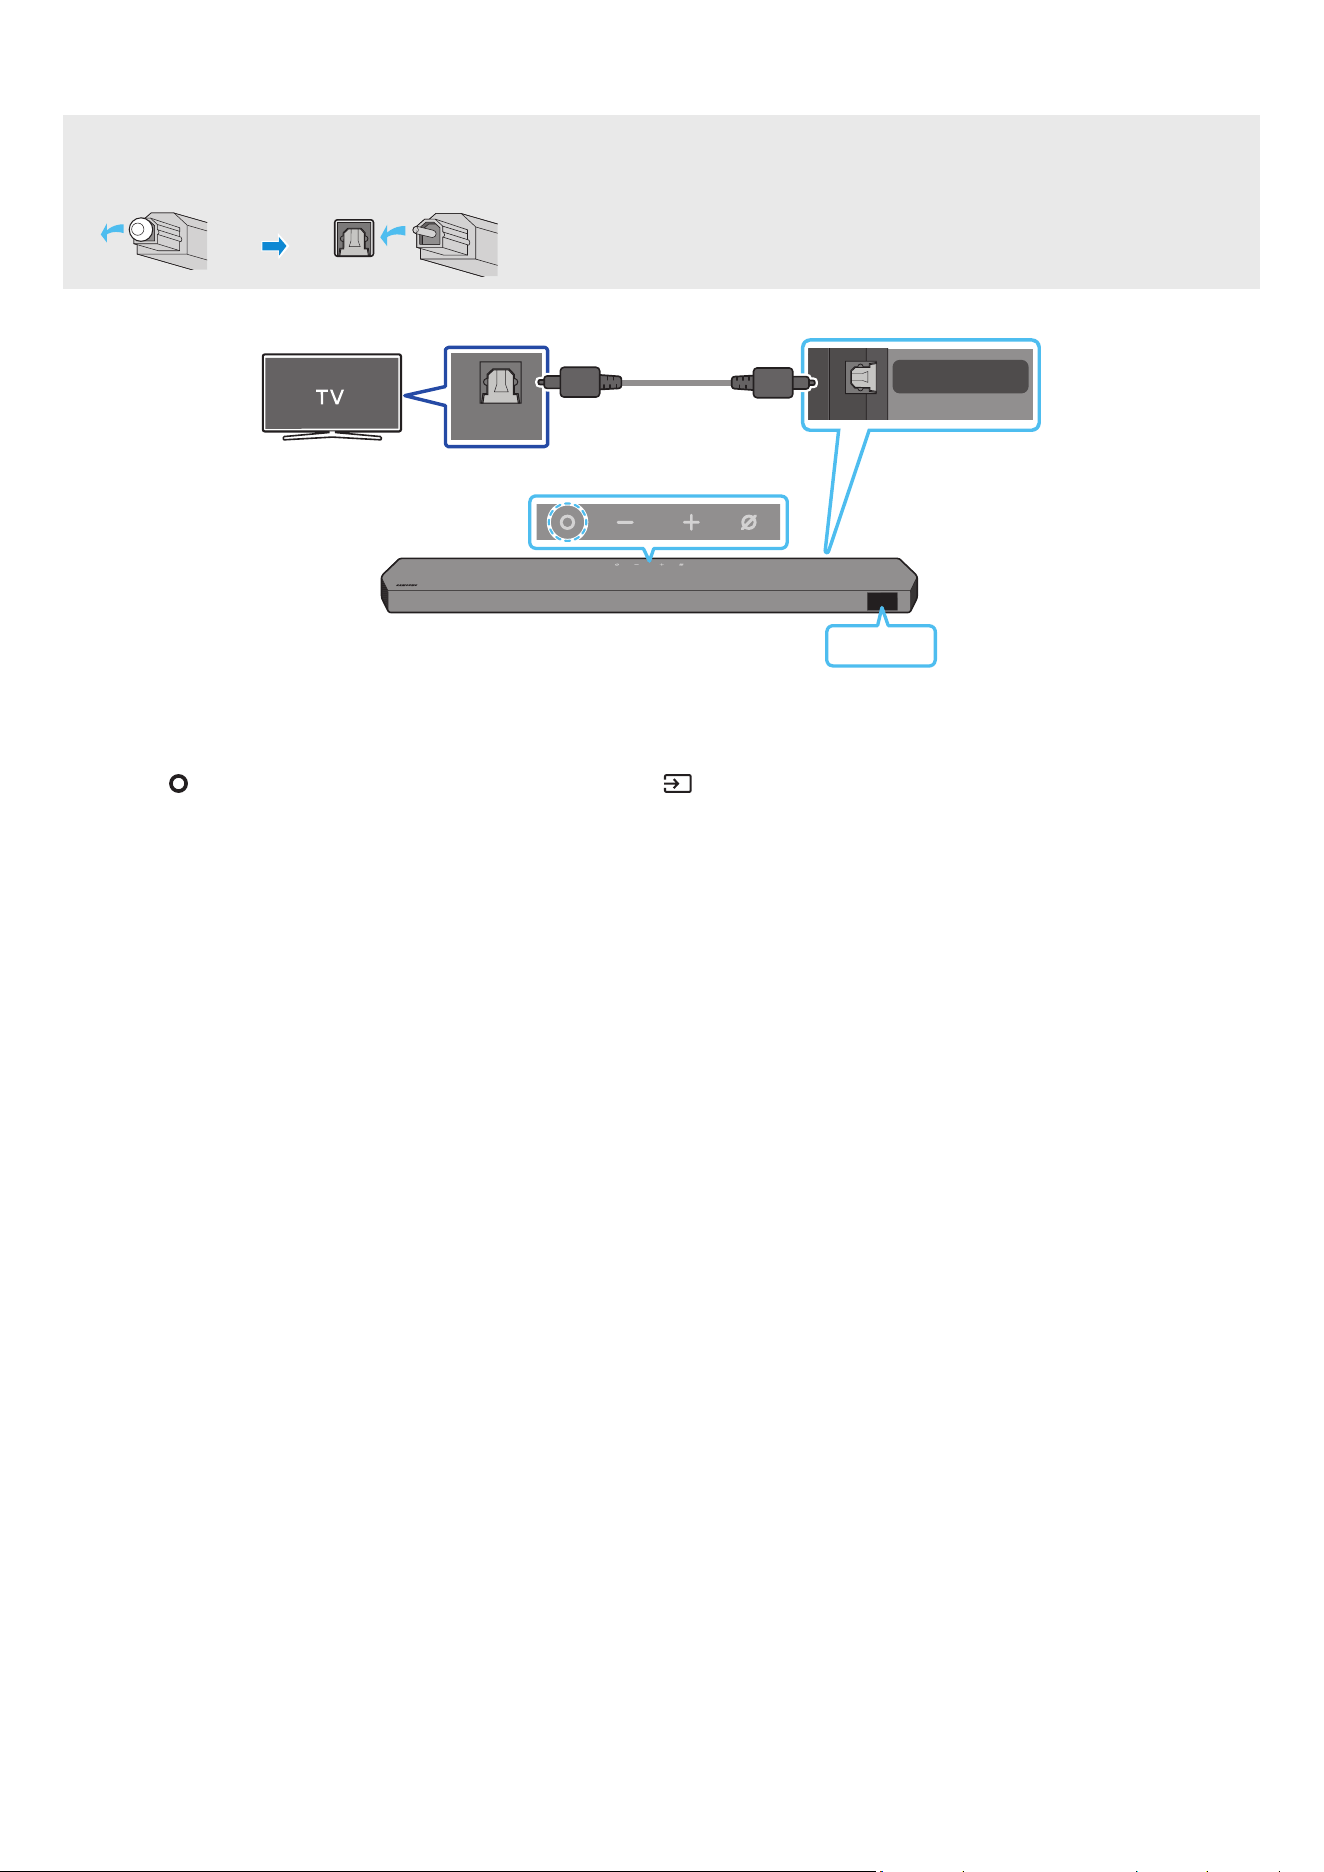
05 CONNECTING TO A TV
Connecting the TV that supports HDMI ARC (Audio Return Channel)
CAUTION
• When both the HDMI cable and optical cable are connected, the HDMI signal is received rst.
• To connect the HDMI cable between the TV and Soundbar, be sure to connect the terminals marked ARC. Otherwise, the TV sound may not
be output.
• The recommended cable is an HDMI cable certied by HDMI.org.
HDMI IN
(ARC)
HDMI TO TV
(eARC/ARC)
Connect to the HDMI IN
(ARC/eARC) port of your TV.
Connect to the HDMI TO
TV (eARC/ARC) port of the
Soundbar main unit.
HDMI Cable
(supplied)
Top of the Soundbar
Bottom of the Soundbar
TV ARC
1. With the Soundbar and TV turned off, connect the HDMI cable as shown in the gure.
2. Turn on the Soundbar and TV.
3. “TV ARC” appears in the display window of the Soundbar main unit and the Soundbar plays TV sound.
• When the TV sound is not output, press the
(Multi Function) button at the top of the Soundbar or the (Source) button on the remote
control to select the “TV ARC” mode. The screen display “TV ARC”, and TV sound is played.
• When connecting a TV that supports the eARC function, “TV eARC” appears on the display and the sound is heard.
• To connect with eARC, the eARC function in the TV menu should be set to On. Refer to the TV user manual for details on setting.
(e.g. Samsung TV : Home ( ) → Menu → Settings ( ) → All Settings ( ) → Sound → Expert Settings → HDMI-eARC Mode (Auto))
• If “TV ARC” does not appear in the display window of the Soundbar main unit, conrm that the HDMI cable is connected to the correct port.
• Use the volume buttons on the TV’s remote control to change the volume on the Soundbar.
NOTE
• When you connect the TV that supports the HDMI ARC (Audio Return Channel) to the Soundbar with an HDMI cable, you can transmit the
digital video and audio data without connecting a separate optical cable.
• We recommend you use a coreless HDMI cable if possible. If you use a cored HDMI cable, use one whose diameter is less than 0.55 inches (14
mm).
• This function is not available if the HDMI cable does not support ARC.
• When the audio in a broadcast is encoded in Dolby Digital and the “Digital Output Audio Format” on your TV is set to PCM, we recommend that
you change the setting to Dolby Digital. When the setting on the TV is changed, you will experience better sound quality. (The TV menu may
use different words for Dolby Digital and PCM depending on the TV manufacturer.)
• The ARC/eARC protocols support Dolby Atmos.
• Make sure that the content supports Dolby Atmos®.
ENG - 14
Connecting using an Optical Cable
Pre-connection Checklist
• When both the HDMI cable and optical cable are connected, the HDMI signal is received rst.
• When you use an optical cable and the terminals have covers, be sure to remove the covers.
OPTICAL OUT
DIGITAL AUDIO IN
(OPTICAL)
Optical Cable (not supplied)
Bottom of the Soundbar
D.IN
Top of the Soundbar
1. With the TV and Soundbar turned off, connect the DIGITAL AUDIO IN (OPTICAL) port on the Soundbar and the OPTICAL output port on the TV
with an optical cable (not supplied), as shown in the gure.
2. Turn on the Soundbar and TV.
3. Press the
(Multi Function) button at the top of the Soundbar or the (Source) button on the remote control to select the “D.IN” mode.
4. The TV sound is output from the Soundbar.
ENG - 15
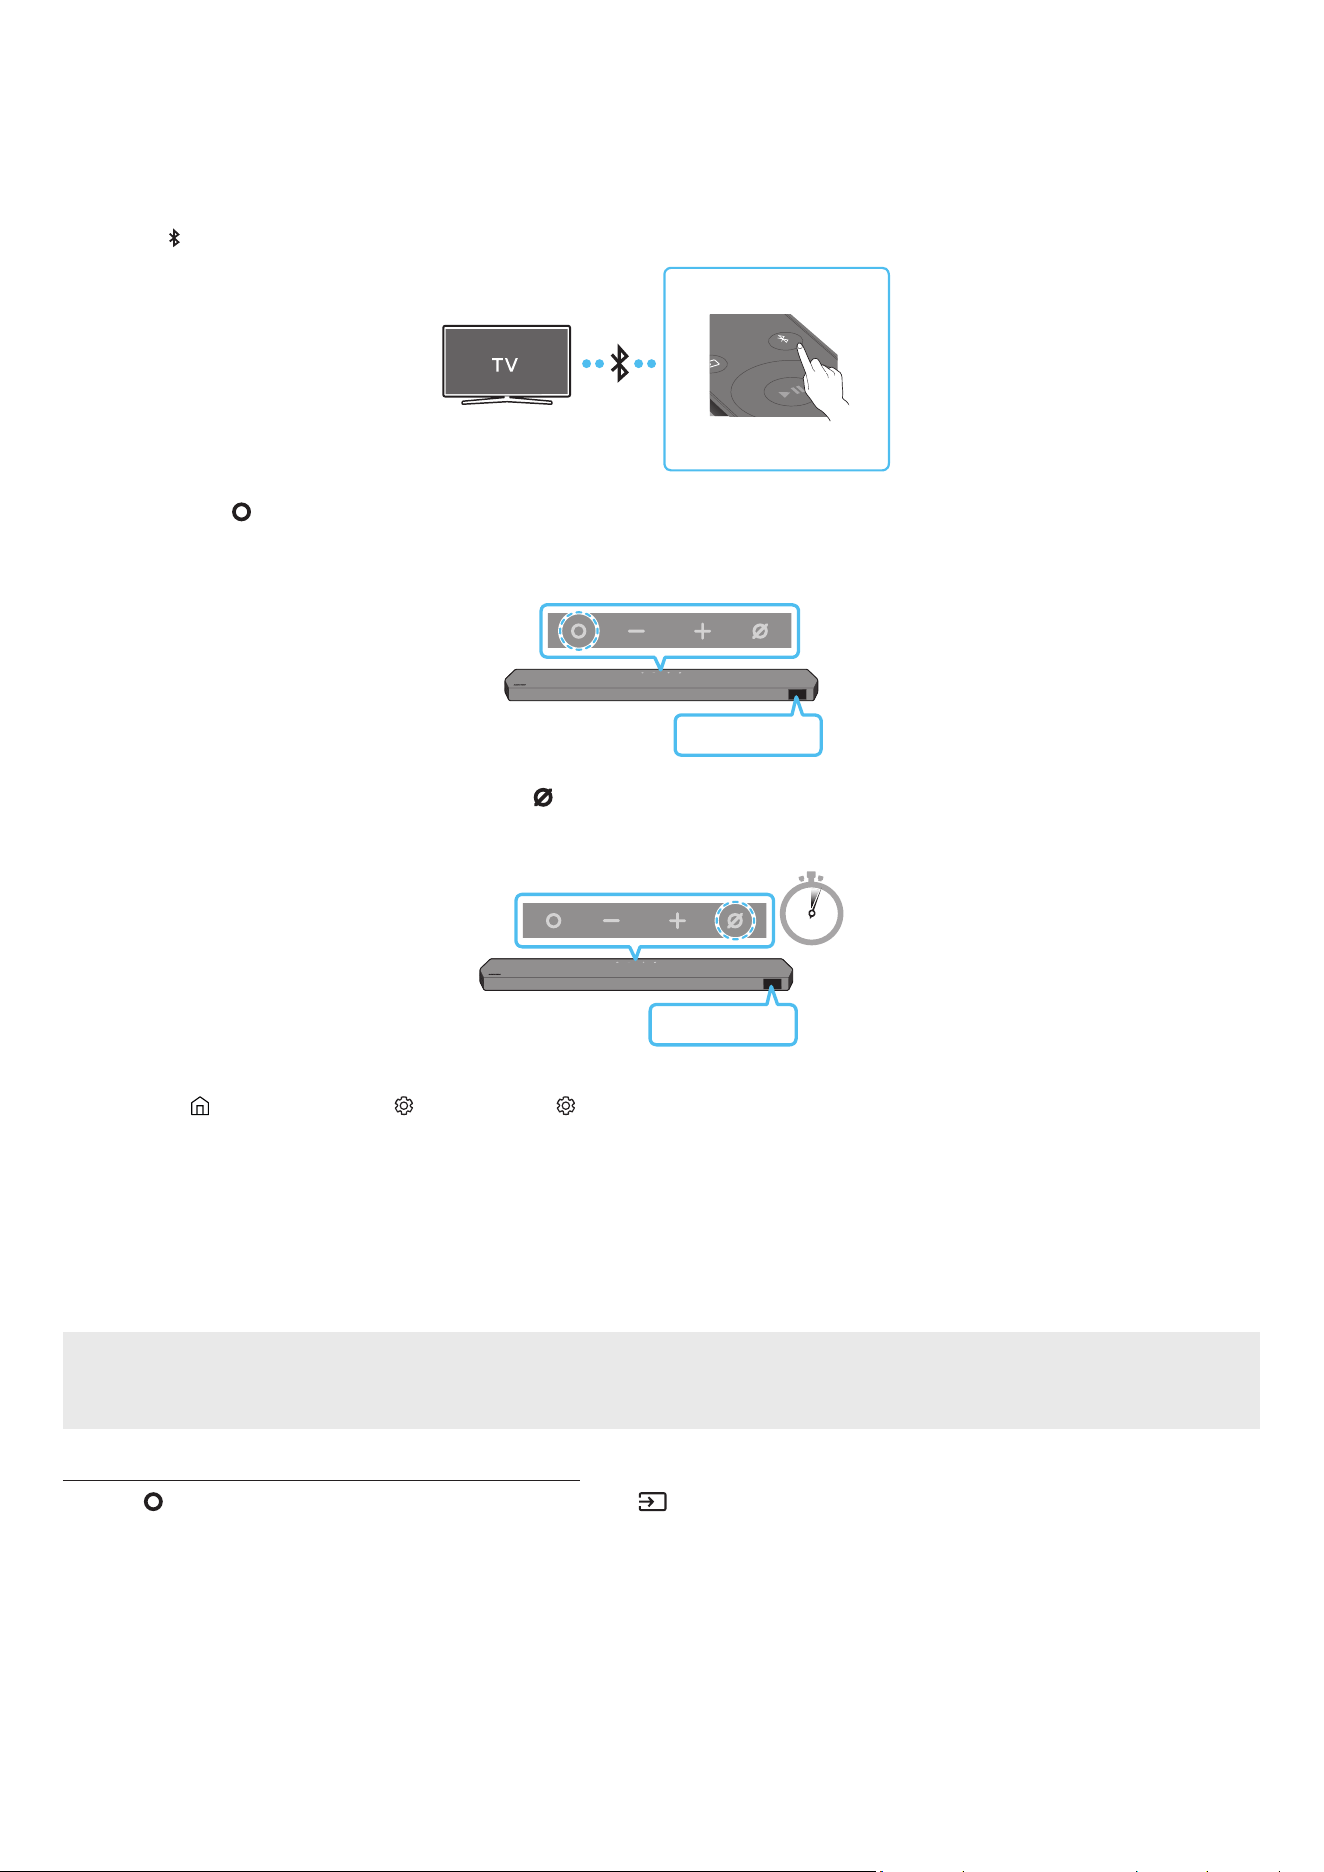
Connecting via Bluetooth
When a Samsung TV is connected using Bluetooth, you can hear stereo sound without the hassle of cabling.
• Only one Samsung TV can be connected at a time.
• Samsung TV that supports Bluetooth can be connected. Check the specications of your TV.
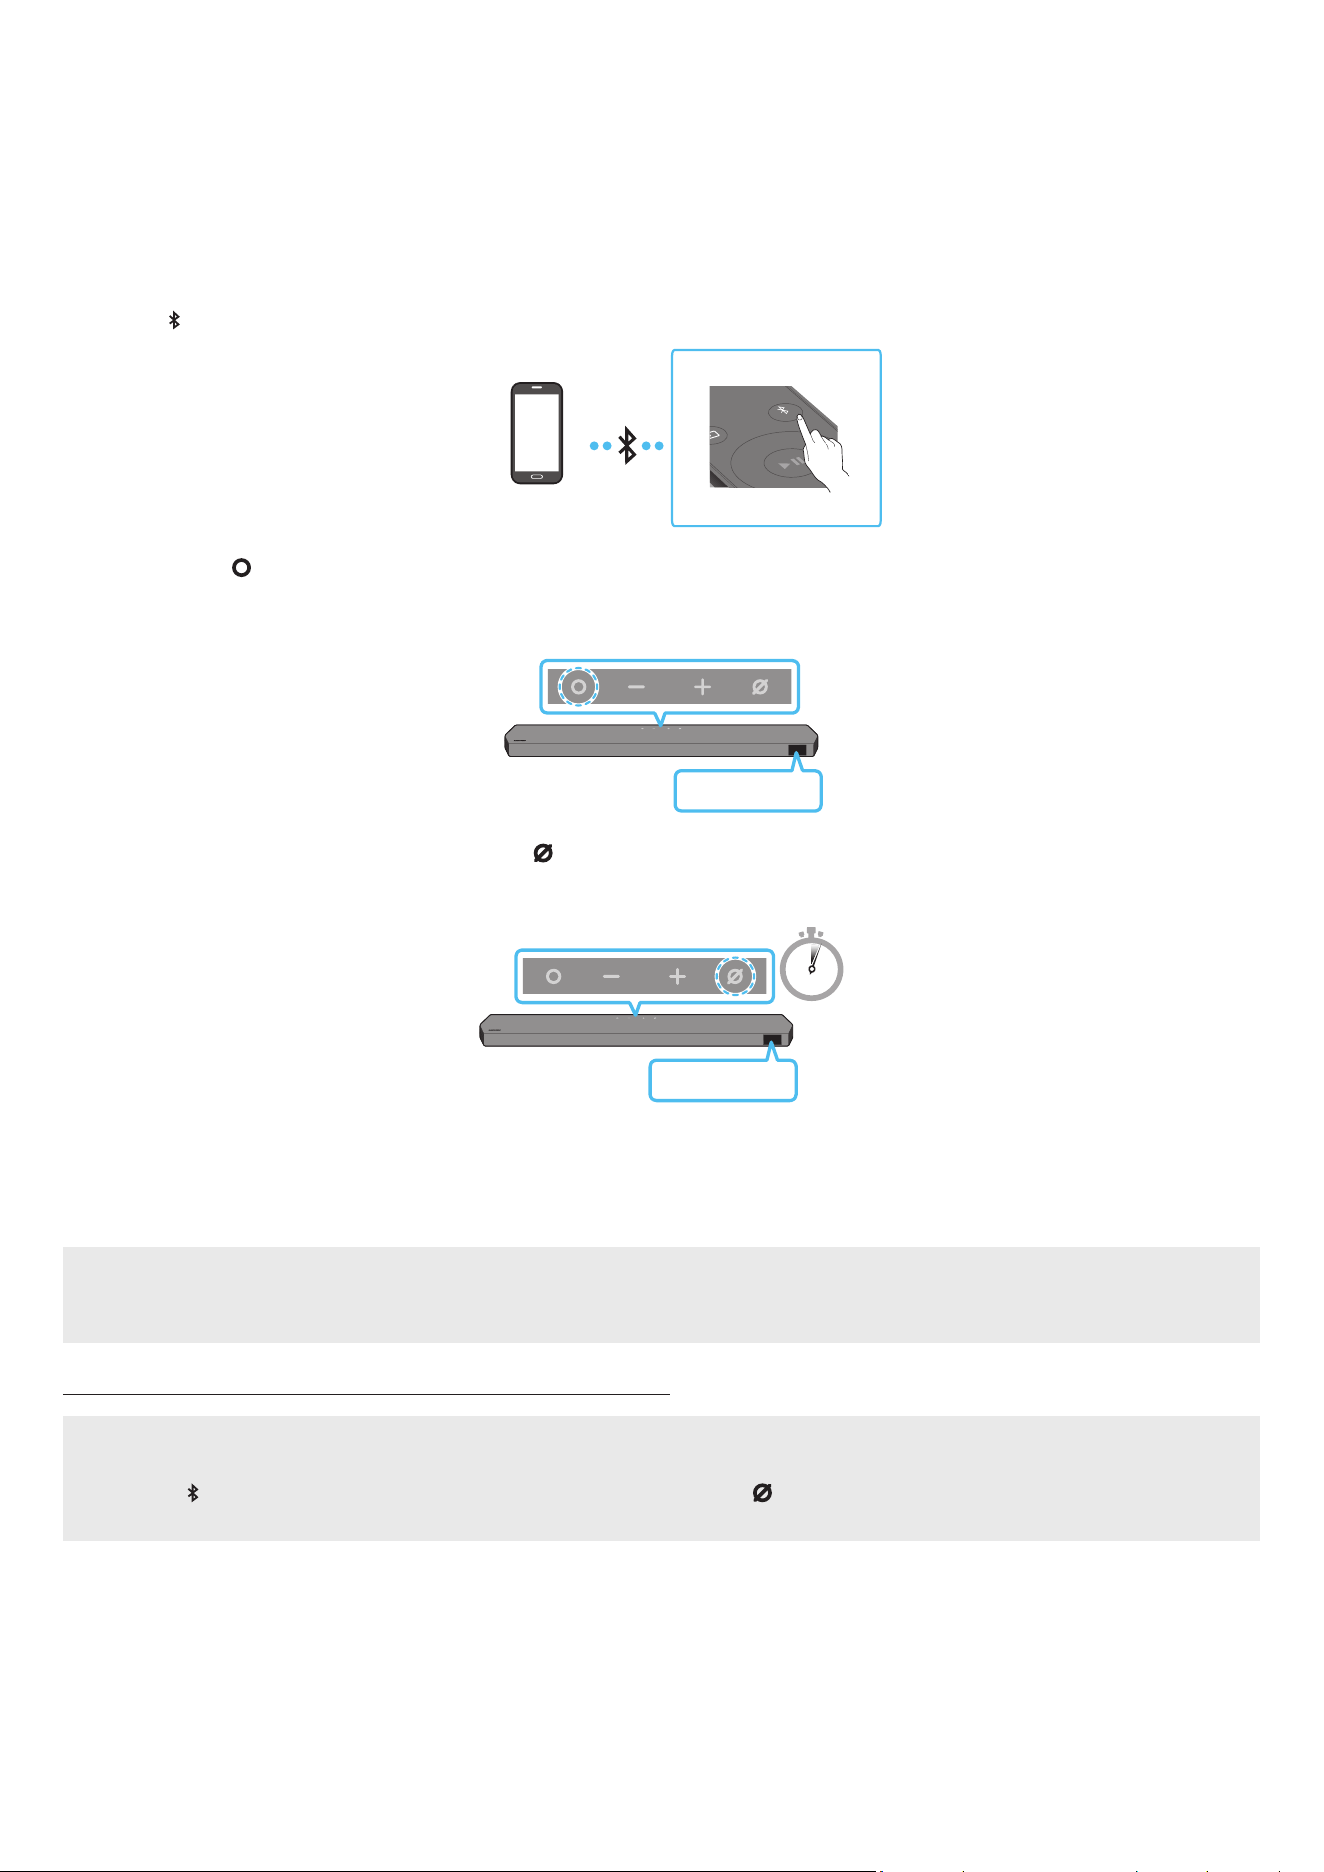
The initial connection
1. Press the
PAIR button on the Soundbar remote control to enter the “BT PAIRING” mode.
PAIR
(OR)
a. Press the
(Multi Function) button on the top panel and then select “BT”.
“BT” changes to “BT PAIRING” in a few seconds automatically or changes to “BT READY” if there is a connect record.
Top of the Soundbar
BT READY
b. When “BT READY” appears, press and hold the
(Mic On/Off) button on the top panel of the Soundbar for more than 5 seconds to
display “BT PAIRING”.
5 Sec
Top of the Soundbar
BT PAIRING
2. Select Bluetooth mode on the Samsung TV.
(e.g. Home ( ) → Menu → Settings ( ) → All Settings ( ) → Sound → Sound Output → Bluetooth Speaker List → Soundbar Q-Series
(Bluetooth))
3. Select “Soundbar Q-Series” from the list on TV’s screen.
An available Soundbar is indicated with “Need Pairing” or “Paired” on the TV’s Bluetooth device list. To connect the Samsung TV to the
Soundbar, select the message, and then establish a connection.
• When the Samsung TV is connected, [TV Name] → “BT” appears on the Soundbar’s front display.
4. You can now hear Samsung TV sound from the Soundbar.
• After you have connected the Soundbar to your Samsung TV the rst time, use the “BT READY” mode to reconnect.
If the device fails to connect
• If you have an existing Soundbar (e.g., Soundbar Q-Series) on the list of speakers on the Samsung TV, delete it.
• Then repeat steps 1 through 3.
Disconnecting the Soundbar from the Samsung TV
Press the
(Multi Function) button at the top of the Soundbar or the (Source) button on the remote control to select the mode other than
“BT”.
• Disconnecting takes time because the Samsung TV must receive a response from the Soundbar.
(The time required may differ, depending on the Samsung TV model.)

ENG - 16
What is the difference between BT READY and BT PAIRING?
• BT READY : In this mode, you can reconnect any Samsung TV or mobile device that was connected before.
• BT PAIRING : In this mode, you can connect a new device to the Soundbar.
(Press the PAIR button on the Soundbar remote control or press and hold the (Mic On/Off) button on the top of the Soundbar for more
than 5 seconds while the Soundbar is in “BT” mode.)
Notes on Bluetooth connection
• Locate a new device within 3.28 ft (1 m) to connect via Bluetooth communication.
• If asked for a PIN code when connecting a Bluetooth device, enter <0000>.
• The Soundbar automatically turns off after 18 minutes in the Ready state.
• The Soundbar may not perform Bluetooth search or connection correctly under the following circumstances:
‒ If there is a strong electrical eld around the Soundbar.
‒ If several Bluetooth devices are simultaneously paired with the Soundbar.
‒ If the Bluetooth device is turned off, not in place, or malfunctions.
• Electronic devices may cause radio interference. Devices that generate electromagnetic waves must be kept away from the Soundbar main
unit - e.g., microwaves, wireless LAN devices, etc.
• To activate/deactivate Bluetooth connection
Press the TONE CONTROL button on the remote control of the Soundbar for 30 seconds to turn Bluetooth On / Off.
Connecting via Wi-Fi
Pre-connection Checklist
• Wi-Fi connection is available only on Samsung TV.
• Check whether the wireless router (Wi-Fi) is turned on and the TV is connected to the router.
• The TV and Soundbar must be connected to the same wireless network (Wi-Fi).
• If your wireless router (Wi-Fi) uses a DFS channel, you will not be able to establish a Wi-Fi connection between the TV and Soundbar.
Contact your Internet service provider for details.
• Because the menus may differ depending on the year of manufacture, refer to your TV manual.
• To connect the TV to the Soundbar via Wi-Fi, connect the Soundbar to the wireless router rst. See page 23, for details on how to establish a
Wi-Fi connection.
1. For more information about Wi-Fi connection to the Soundbar, see page 23, “Method 2. Connecting via Wi-Fi (Wireless Network)”.
2. Change the input source of the TV by using the Audio menu to Soundbar.
• Samsung TVs released in 2017 or later
Home (
) → Menu → Settings ( ) → All Settings ( ) → Sound → Sound Output → Soundbar Q-Series (Wi-Fi)
NOTE
• The Wi-Fi Dolby Atmos connection is available in some Samsung TVs and some Soundbar models.
• Precaution : The Soundbar will restart automatically if you turn on/turn off Wi-Fi.
• To activate/deactivate Wi-Fi connection
Press the CH LEVEL button on the remote control of the Soundbar for 30 seconds to turn Wi-Fi On / Off.
ENG - 17
Using the Q-Symphony Function
• When the Soundbar connects to a Samsung TV that supports the Q-Symphony function you can play the sound simultaneously through the
Soundbar and the TV. If you use the Q-Symphony function, the surround sound played on the TV allows you to enjoy a richer, more three-
dimensional surround sound effect.
• When the Soundbar is connected “Q-Symphony” menu appears on the TV.
Settings (
) → All Settings ( ) → Sound → Sound Output
• TV menu example: Q-Symphony
TV menu
HDMI Cable
TV ARC/eARC
TV menu
Optical Cable (not supplied)
D.IN
TV menu
Wi-Fi
Wi-Fi
NOTE
• It can operate according to the Codec supported by TV.
• This function is supported only when the HDMI Cable or Optical Cable (not supplied) or Wi-Fi is connected.
• The message displayed may differ with the TV model.
• Ensure that your TV and Soundbar are connected to the same wireless router/frequency.
• This function is available in some Samsung TVs and some Soundbar models.
ENG - 18
Using the SpaceFit Sound
This function analyzes the user’s listening space with the Soundbar’s microphone and provide optimal sound for the space. Sound optimization
proceeds automatically.
Method 1. Connecting via Soundbar
To enable this function, turn on the SpaceFit Sound mode with the remote control of the Soundbar.
1. Press the
(Sound Control) button to turn on the SpaceFit Sound mode.
“SPACEFIT SOUND OFF” appears on the display.
2. Press the Up button on the remote control to turn on the SpaceFit Sound.
“ON” appears on the display.
PAIR
3. Press the Down button on the remote control to turn off the SpaceFit Sound.
“OFF” appears on the display.
PAIR
• This is available in all Sound modes.
Method 2. Connecting via TV
To enable this function, turn on the Adaptive Sound+ mode on your Samsung TV menu.
(Home (
) → Menu → Settings ( ) → All Settings ( ) → General → Intelligent Mode Settings → Adaptive Sound+)
• The sound mode on your Soundbar will automatically change to Adaptive Sound+ if you enable the Adaptive Sound+ mode on your TV.
NOTE
This function works when the Soundbar connects to some of the Samsung TVs.
ENG - 19
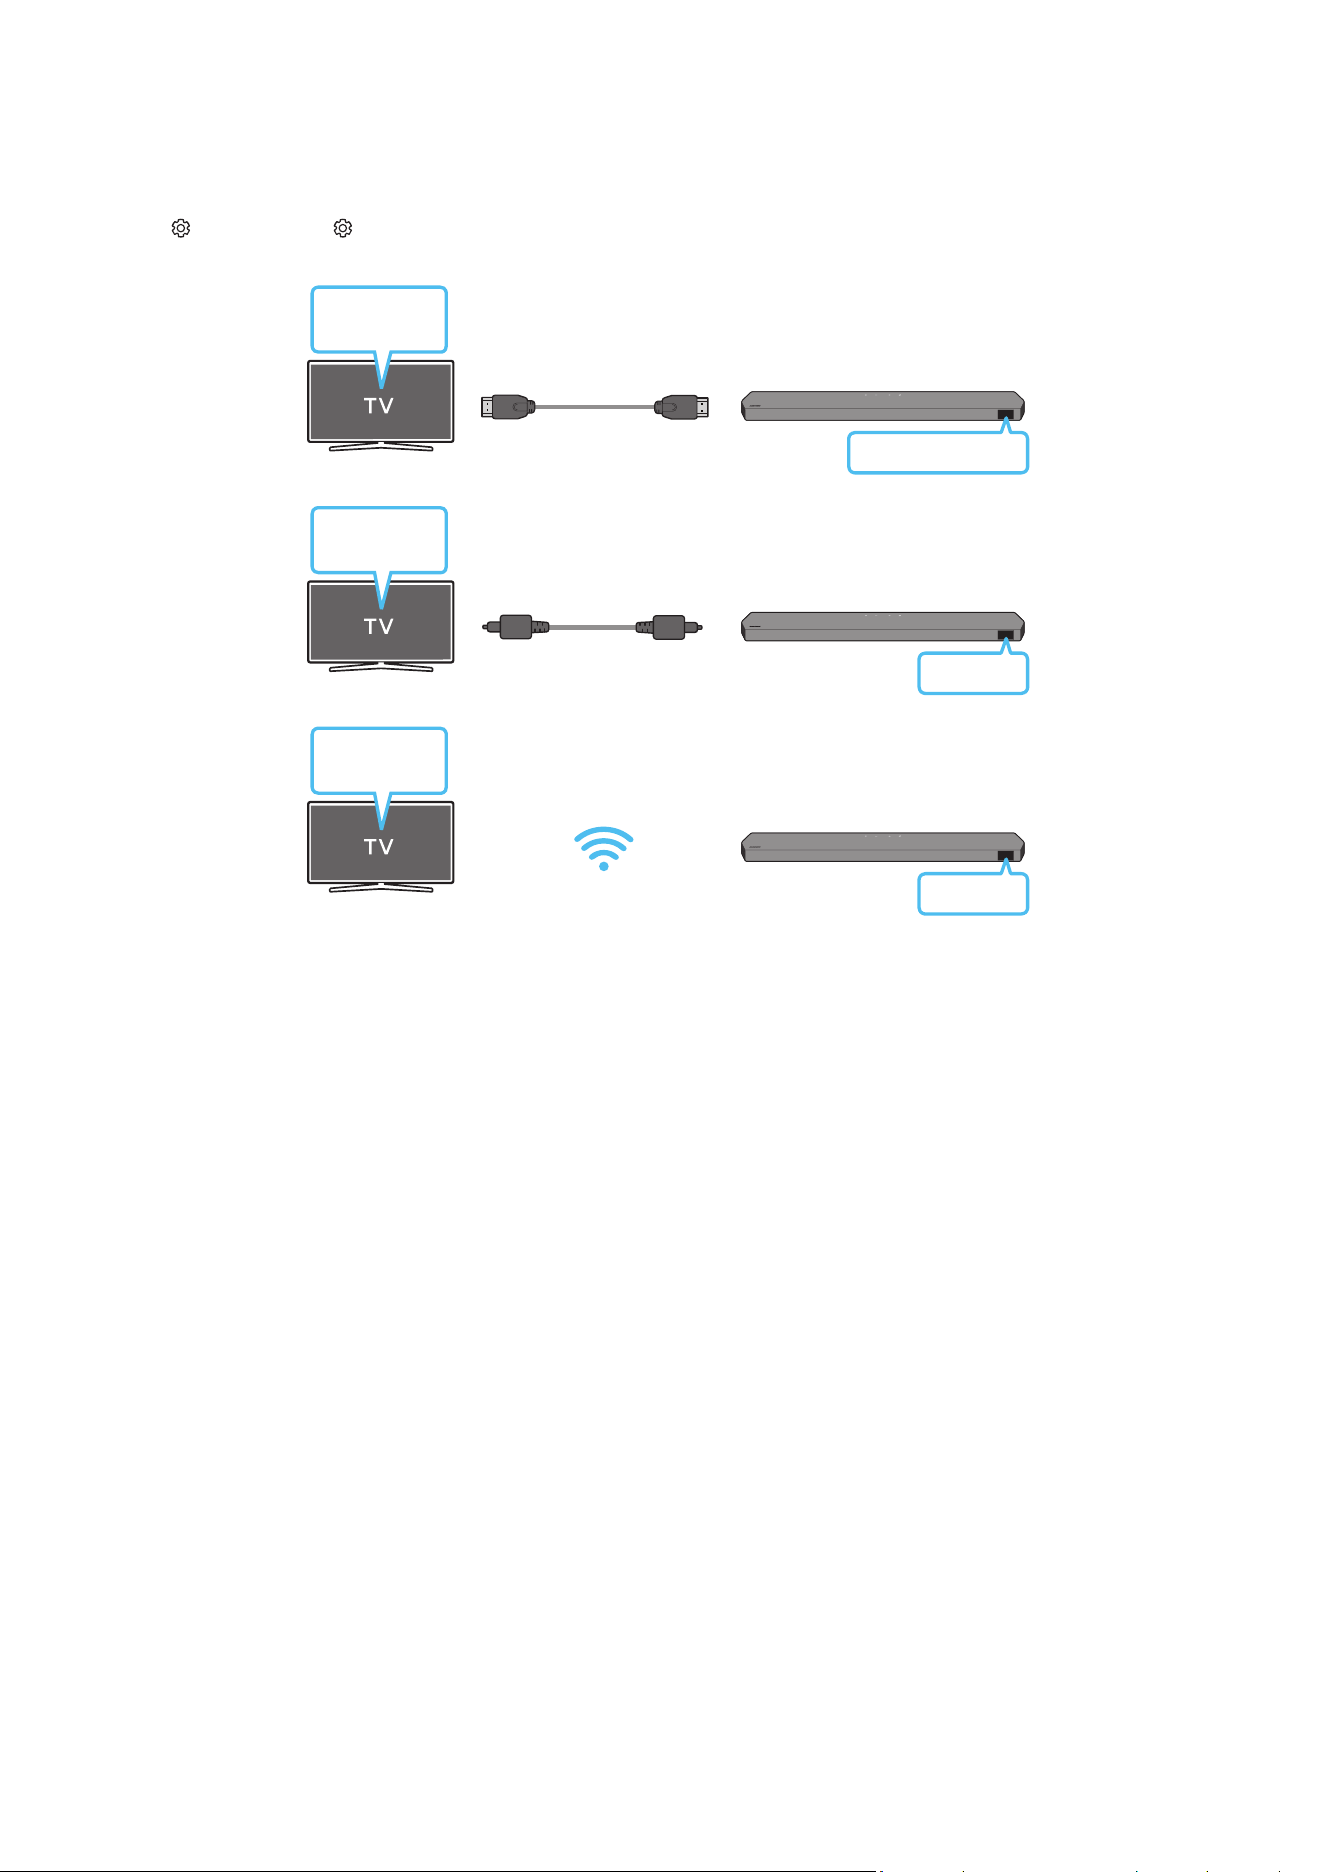
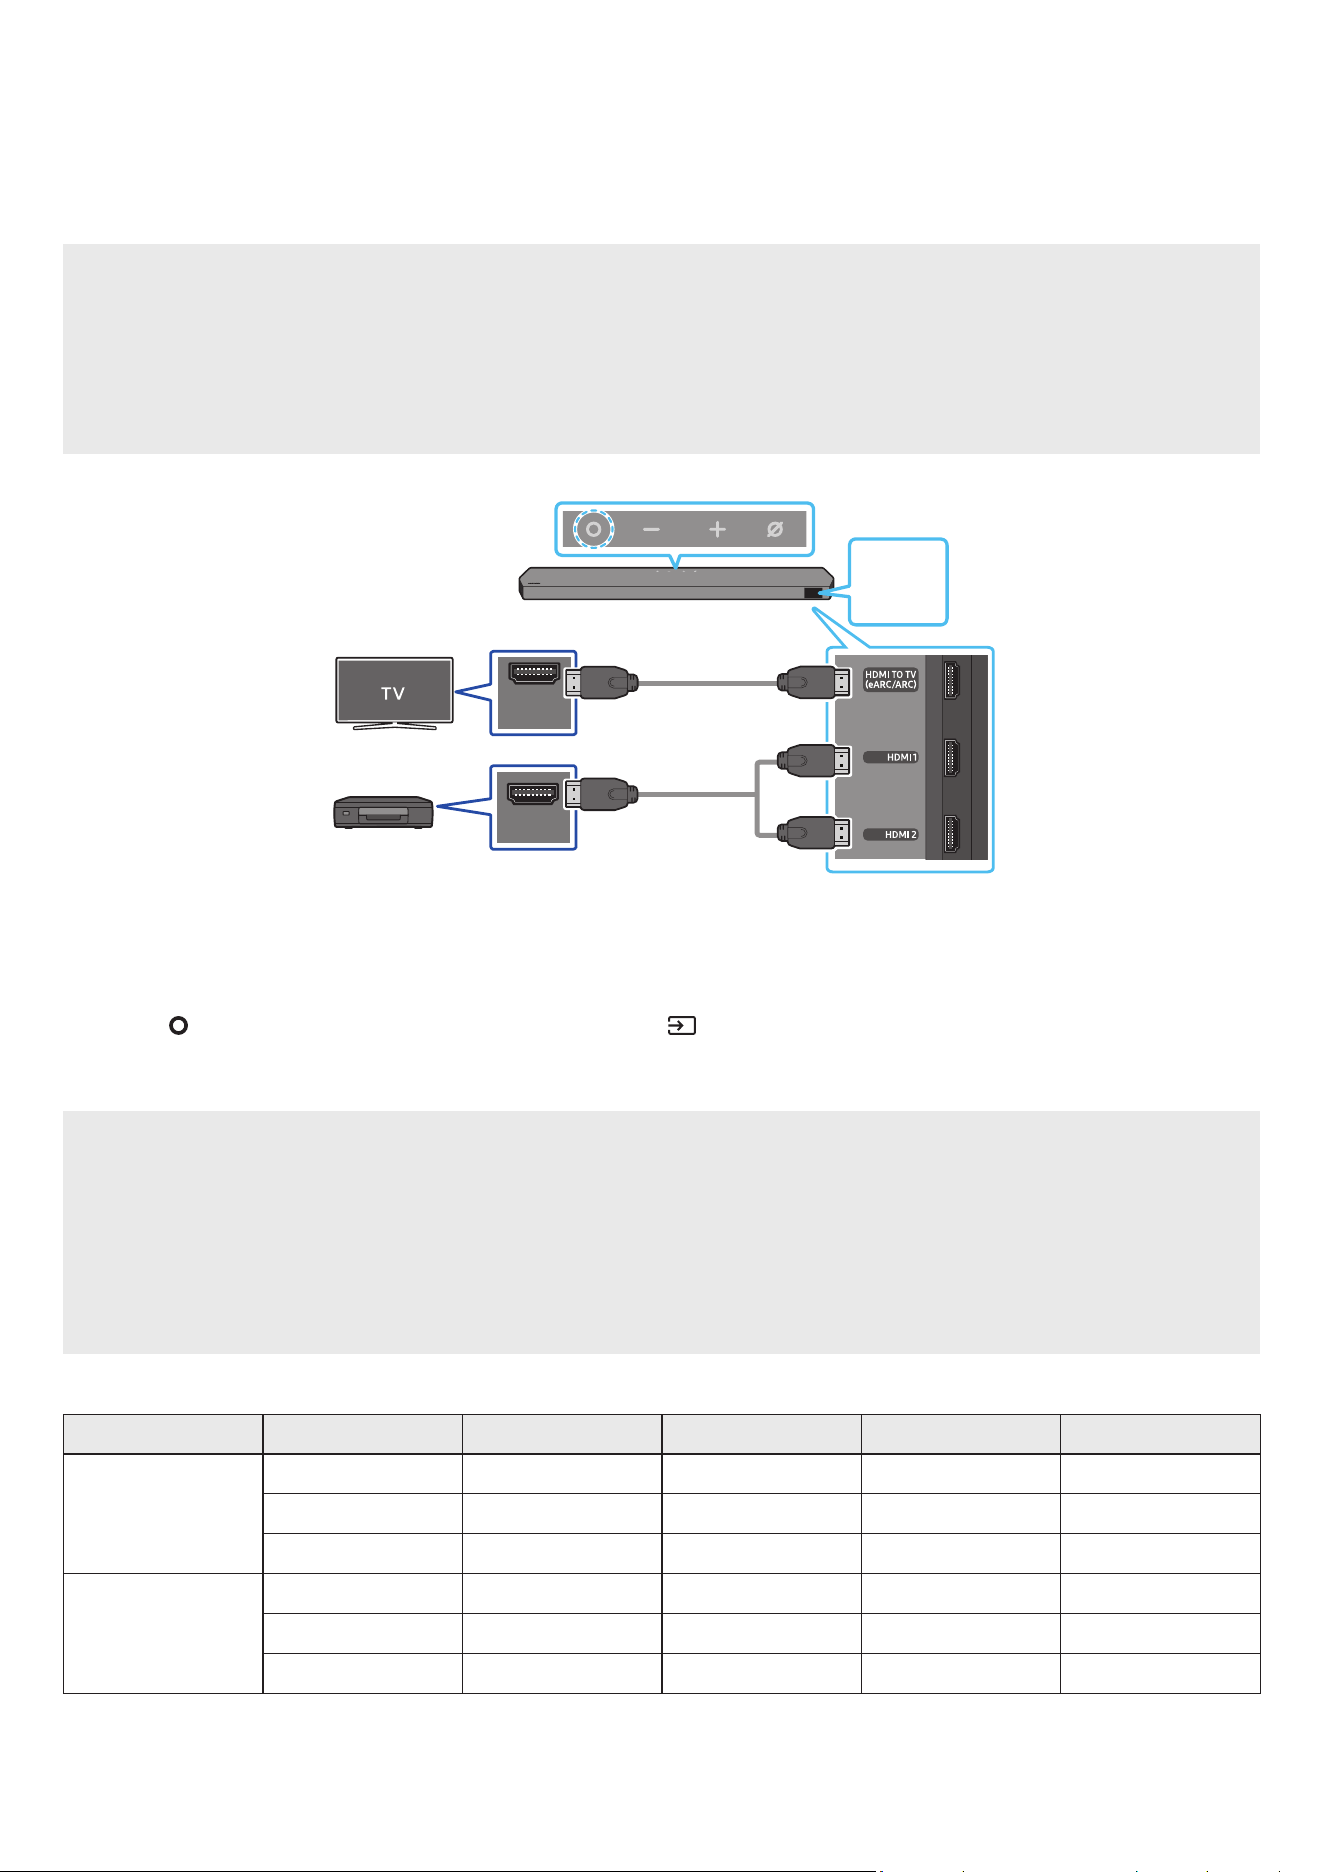
06 CONNECTING AN EXTERNAL DEVICE
Method 1. Connecting using an HDMI Cable (Capable of Dolby Atmos / DTS:X decoding
and playback)
Pre-connection Checklist
• If the Audio Output options include Secondary Audio, make sure Secondary Audio is set to Off.
• Make sure that the content supports Dolby Atmos® / DTS:X.
• Only use an HDMI cable that satises relevant I/O requirements.
• To receive the UHD signal properly, a certied Ultra High Speed HDMI cable is required.
• For proper reception of the UHD signal, check out the video I/O specication and local settings of the TV or the external device beforehand.
• For more information, refer to the TV user manual or the external device.
HDMI IN
(ARC)
HDMI OUT
Bottom of the Soundbar
HDMI 1
OR
HDMI 2
External Device
HDMI Cable
(supplied)
HDMI Cable
OR
Top of the Soundbar
1. Use an HDMI cable to connect the HDMI OUT port on the external device and the HDMI port on the bottom of the Soundbar.
2. Use an HDMI cable (supplied) to connect the HDMI IN port of the TV and the HDMI TO TV (eARC/ARC) port on the bottom of the Soundbar.
3. Turn on the Soundbar, TV, and the external device.
4. Press the
(Multi Function) button on the top of the Soundbar or the (Source) button on the remote control to select “HDMI 1” or “HDMI
2” mode.
5. The Soundbar display indicates that “HDMI 1” or “HDMI 2” mode is currently selected and the Soundbar will start playing sounds.
NOTE
• When you use Dolby Atmos® / DTS:X: If the input source is Dolby Atmos® / DTS:X, refer to “Output specications for the different sound
effect modes” on page 7
• When Dolby Atmos® is activated, “DOLBY ATMOS” appears in the front display.
• When DTS:X is activated, “DTS:X” appear in the front display.
• Conguring Dolby Atmos® / DTS:X on your BD player or other device
Open the audio output options on the settings menu of your BD player or other device and make sure that “No Encoding” is selected for
Bitstream. For example, on a Samsung BD Player, go to Home Menu → Sound → Digital Output and then select Bitstream (unprocessed).
Supported UHD Signals Specication (3840 x 2160p)
Frame rate (fps) Color depth RGB 4:4:4 YCbCr 4:4:4 YCbCr 4:2:2 YCbCr 4:2:0
< 60
8 bit O O O O
10 bit O O O O
12 bit O O O O
120
8 bit O O O O
10 bit O O O O
12 bit - - O O
• Supported specication may vary depending on the connected external device or usage conditions.

ENG - 20
Method 2. Connecting using an Optical Cable
DIGITAL AUDIO IN
(OPTICAL)
OPTICAL OUT
BD / DVD player / Set-
top box / Game console
Top of the Soundbar
D.IN
Optical Cable
(not supplied)
Bottom of the Soundbar
1. Use an optical cable (not supplied) to connect the DIGITAL AUDIO IN (OPTICAL) on the Soundbar main and the OPTICAL OUT port on the
external device.
2. Turn on the Soundbar and external device.
3. To select “D.IN” mode, press the (Multi Function) button on the top of the Soundbar or the (Source) button on the remote control.
4. Your Soundbar will play sounds from the external device.
ENG - 21
07 CONNECTING A MOBILE DEVICE
Method 1. Connecting via Bluetooth
When a mobile device is connected using Bluetooth, you can hear stereo sound without the hassle of cabling.
• When you connect a paired Bluetooth device with the Soundbar off, the Soundbar automatically turns on.
The initial connection
• When connecting to a new Bluetooth device, make sure the device is within 3.28 ft (1 m) distance.
1. Press the
PAIR button on the Soundbar remote control to enter the “BT PAIRING” mode.
PAIR
Mobile device
(OR)
a. Press the
(Multi Function) button on the top panel and then select “BT”.
“BT” changes to “BT PAIRING” in a few seconds automatically or changes to “BT READY” if there is a connect record.
Top of the Soundbar
BT READY
b. When “BT READY” appears, press and hold the
(Mic On/Off) button on the top panel of the Soundbar for more than 5 seconds to
display “BT PAIRING”.
5 Sec
Top of the Soundbar
BT PAIRING
2. On your device, select “Soundbar Q-Series” from the list that appears.
• When the Soundbar is connected to the Mobile device, [Mobile Device Name] → “BT” appears in the front display.
3. Play music les from the device connected via Bluetooth through the Soundbar.
• After you have connected the Soundbar to your mobile device the rst time, use the “BT READY” mode to reconnect.
If the device fails to connect
• If you have an existing Soundbar (e.g., “Soundbar Q-Series”) in the list of speakers on the Mobile device, delete it.
• Repeat steps 1 and 2.
What is the difference between BT READY and BT PAIRING?
• BT READY : In this mode, you can reconnect any Samsung TV or mobile device that was connected before.
• BT PAIRING : In this mode, you can connect a new device to the Soundbar.
(Press the PAIR button on the Soundbar remote control or press and hold the (Mic On/Off) button on the top of the Soundbar for more
than 5 seconds while the Soundbar is in “BT” mode.)

ENG - 22
Notes on Bluetooth connection
• Locate a new device within 3.28 ft (1 m) to connect via Bluetooth communication.
• If asked for a PIN code when connecting a Bluetooth device, enter <0000>.
• The Soundbar automatically turns off after 18 minutes in the Ready state.
• The Soundbar may not perform Bluetooth search or connection correctly under the following circumstances:
‒ If there is a strong electrical eld around the Soundbar.
‒ If several Bluetooth devices are simultaneously paired with the Soundbar.
‒ If the Bluetooth device is turned off, not in place, or malfunctions.
• Electronic devices may cause radio interference. Devices that generate electromagnetic waves must be kept away from the Soundbar main
unit - e.g., microwaves, wireless LAN devices, etc.
• The Soundbar supports SBC data (44.1kHz, 48kHz).
• Connect only to a Bluetooth device that supports the A2DP (AV) function.
• When connecting the Soundbar to a Bluetooth device, place them as close to each other as possible.
• The farther the Soundbar and Bluetooth device are from each other, the lower the sound quality will become.
The Bluetooth connection may break when the devices are out of the effective range.
• The Bluetooth connection may not function as intended in areas with poor reception.
• A Bluetooth device may experience noise or malfunction under in the following conditions:
‒ When the body is in contact with the signal transceiver on the Bluetooth device or Soundbar
‒ In corners or when there is an obstacle in proximity, such as a wall or partition, where electrical changes may occur.
‒ When exposed to radio interferences by other products operating on the same frequency ranges, such as medical equipment, microwave
ovens, and wireless LAN devices.
‒ Obstacles such as doors and walls may still impact the sound quality even when the devices are within the effective range.
• Note that your Soundbar cannot be paired with other Bluetooth devices while using the Bluetooth option.
• This wireless device may cause electrical interference during operation.
Disconnecting the Bluetooth device from a Soundbar
You can disconnect a Bluetooth device from the Soundbar. For instructions, see the Bluetooth device’s user manual.
• The Soundbar will be disconnected.
• When the Soundbar is disconnected from the Bluetooth device, the Soundbar will display “BT DISCONNECTED” on the front display.
Disconnecting the Soundbar from the Bluetooth device
Press the (Multi Function) button on the top of the Soundbar or the (Source) button on the remote control to switch the mode from “BT”.
• Disconnecting takes time because the Bluetooth device must receive a response from the Soundbar. (Disconnection time may differ,
depending on the Bluetooth device)
• When the Soundbar is disconnected from the Bluetooth device, the Soundbar will display “BT DISCONNECTED” on the front display.

ENG - 23
Method 2. Connecting via Wi-Fi (Wireless Network)
To connect a Soundbar to a mobile device via a wireless network (Wi-Fi), the SmartThings app is required.
The initial connection
1. Install and launch the SmartThings app from your mobile device (smartphone or tablet).
2. On the app, follow the screen instructions to add the Soundbar.
• The automatic pop-up (the second screenshot below) may not show on some devices.
If the pop-up window does not appear, press “
” on the Home screen. The Soundbar is added to the app.
• The illustration below may differ according to the app version.
Launch App Auto pop-up Add device
SmartThings
App
To change your Wi-Fi connection
1. Launch the SmartThings app from your mobile device (smartphone or tablet).
2. Tap the Soundbar’s card and tap the ( ) icon.
3. Go to Device Settings > Network Status > Change Wi-Fi network, and follow the onscreen instructions.
Using Group Play
• To benet from this feature, add your Soundbar to the SmartThings app.
• To enable this, connect at least two audio devices to the same Wi-Fi network at 5 GHz.
• This is available on Samsung Sound devices that support Wi-Fi released year 2024 or later.
• This feature does not support TV sound.
Conguring Group Play
1. Run the SmartThings app on your mobile device.
2. Add the Soundbar in the SmartThings app according to the instructions in the “Method 2. Connecting via Wi-Fi (Wireless Network)” section.
3. Tap the Soundbar’s card.
4. On your mobile device, tap Create Group under the audio device icon.
• Create Group button appears only when Soundbar is in Wi-Fi mode.
• If the Soundbar is playing the TV sound, the connection to the TV is disconnected when creating a group.
5. Enable Group Play.
6. Select a desired device in the list, and tap Apply.
• You can add a maximum of 4 devices.
• With Group Play, the audio will be output through the host device alone.
• When a device connected to the host device switches to a different source, the device will be deleted from the group automatically.
• When the host device is connected to a TV, the generated group will be deleted automatically.
Disabling Group Play
1. Tap the audio device’s card.
2. On your mobile device, tap Edit Group under the audio device icon.
3. Disable Group Play.
• To disable an individual device, uncheck the device from the list and tap Apply.

ENG - 24
Using the SmartThings Hub
• You can use the Soundbar’s SmartThings Hub function to connect the IoT devices (bulbs, plugs, sensors etc.) that require SmartThings Hub.
• To use the SmartThings Hub function, you must register the Soundbar in the SmartThings app.
Registering an IoT device on the SmartThings app
1. Add the Soundbar in the SmartThings app according to the instructions in the “Method 2. Connecting via Wi-Fi (Wireless Network) > The
initial connection” section.
2. Tap the Soundbar device card.
3. Tap SmartThings Hub at the bottom of the screen.
4. Tap Using SmartThings Hub, and then tap Set up to activate the SmartThings Hub function.
• When the SmartThings Hub function activates, unset changes to using.
• SmartThings Hub device card will appear next to the Soundbar device card.
5. On the Home screen, tap “
” to add an IoT device.
• An IoT device card appears on the app when you successfully add an IoT device.
• If you unplug the Soundbar, devices connected through the SmartThings Hub may be disconnected. You must reconnect the devices once
they get disconnected.
Deleting SmartThings Hub from the SmartThings app
1. On the devices screen , tap the Soundbar device card.
2. Tap SmartThings Hub at the bottom of the screen.
3. Tap Removing SmartThings Hub to deactivate the SmartThings Hub function.
• When the SmartThings Hub function deactivates, using changes to unset.
Connecting via Apple AirPlay
• This feature may not be available in some countries.
• This Samsung Soundbar supports AirPlay® and recommends that the user use the latest version of iOS, iPadOS, or macOS.
• To enable AirPlay in your Soundbar, you must rst register the device with the Samsung Smart Things app by agreeing with the app’s terms
and conditions.
• Make sure the Soundbar is powered on and connected to the same Wi-Fi network as your Apple® device.
With AirPlay, you can enjoy music, podcasts, and other audio on the Samsung Soundbar right from your Apple devices.
• Select
from an AirPlay-supported app or Control Center on your iPhone®, iPad®, or Mac®.
• Select the Soundbar from the list of available devices to play the current audio to.
ENG - 25
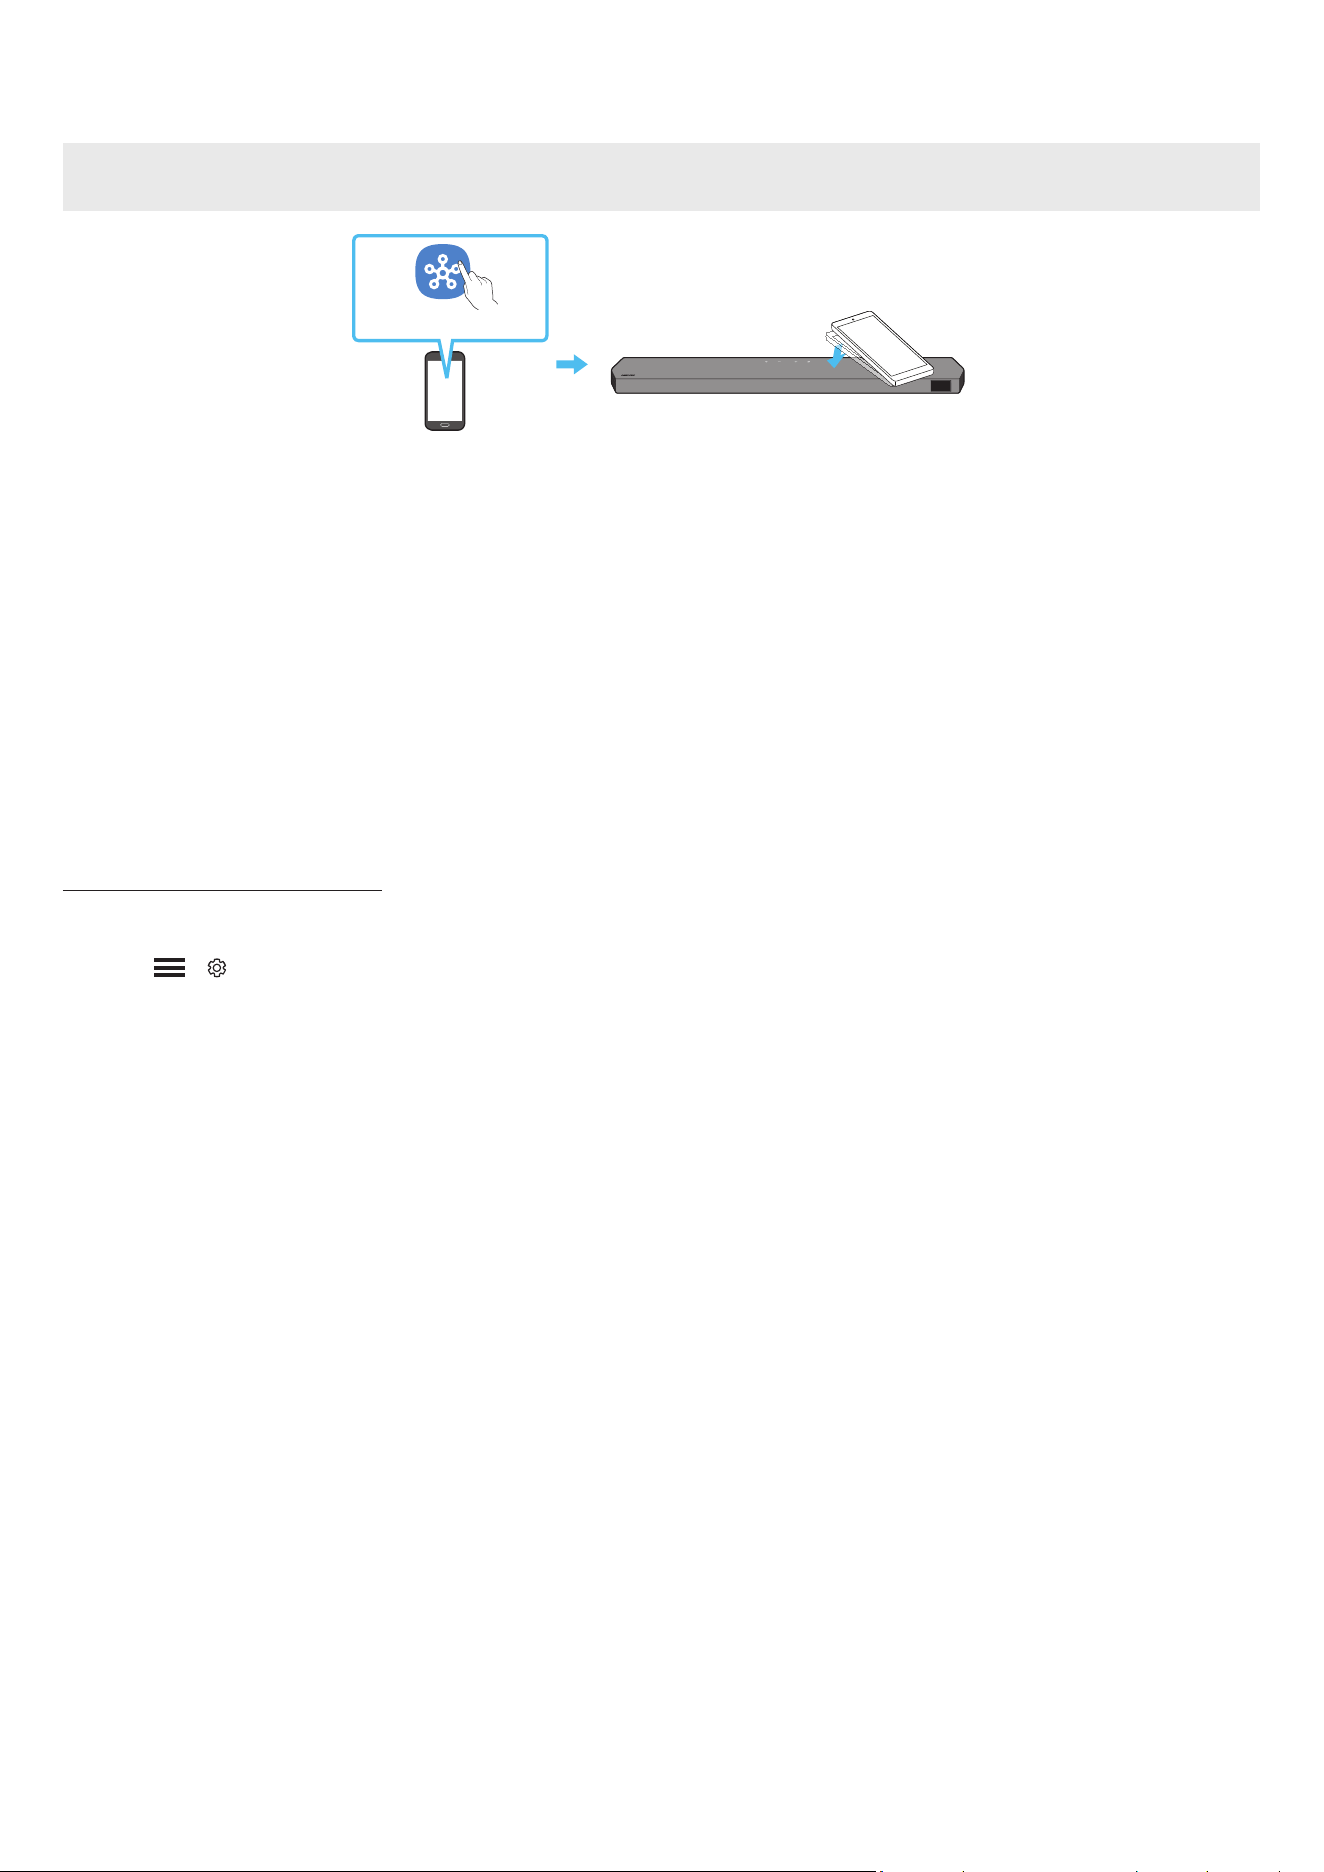
Using the Tap Sound
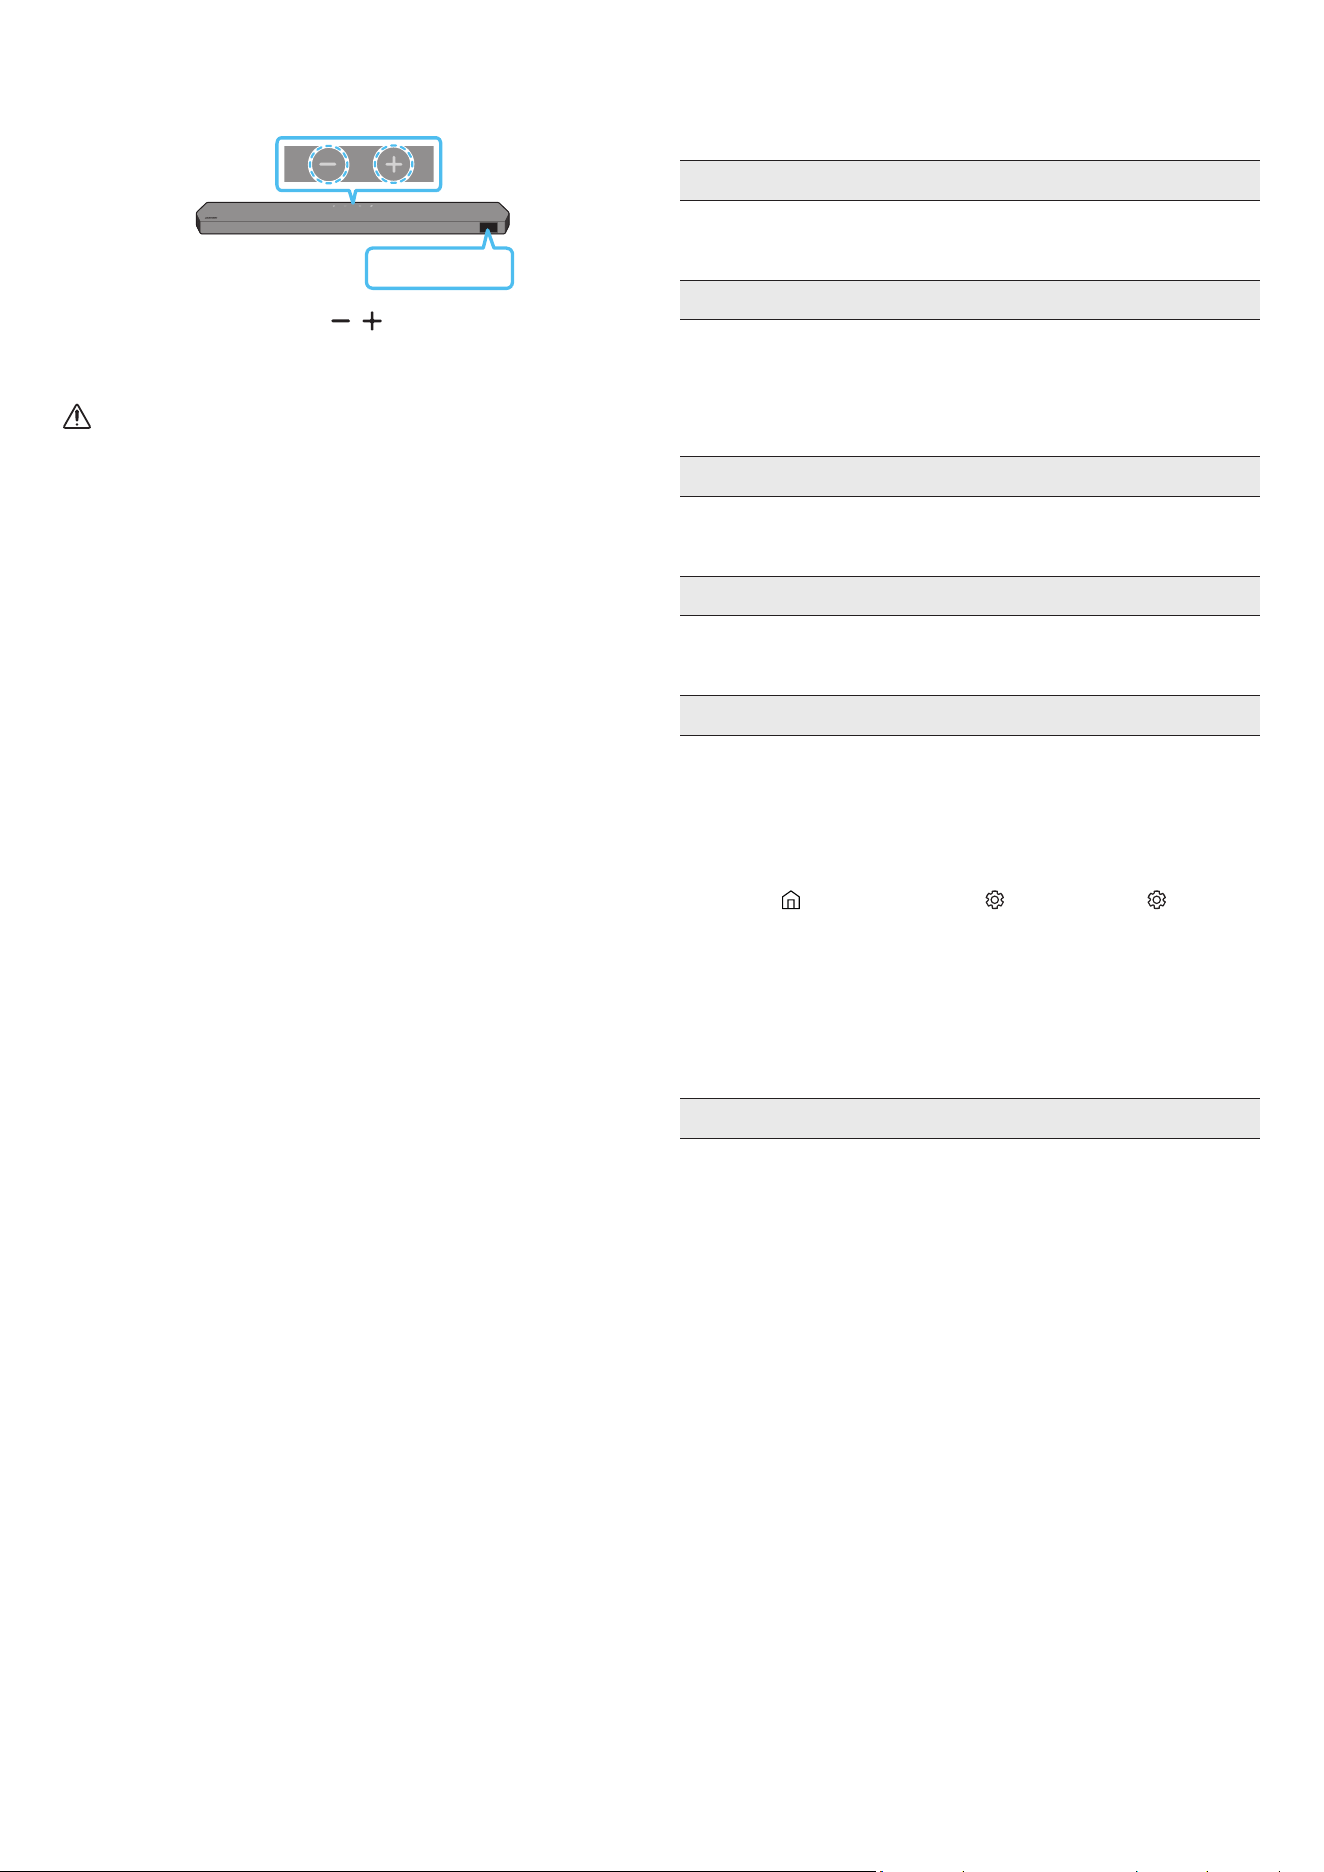
Tap the Soundbar with your mobile device to play the sound of content on the mobile device through the Soundbar.
• This function may not be supported, depending on the mobile device.
• This function is only compatible with Samsung mobile devices with Android 8.1 or later.
Top of the Soundbar
Mobile device
SmartThings App
1. Turn on the Tap Sound function on your mobile device.
• For details on how to turn on the function, refer to “Setting the Tap Sound function” below.
2. Tap the Soundbar with the mobile device. Select “Start now” in the displayed message window.
A connection is established between the mobile device and Soundbar via Bluetooth.
3. Play the sound of content on the mobile device through the Soundbar.
• This function connects a mobile device to the Soundbar via Bluetooth by detecting vibration that occurs when the device touches the
Soundbar.
• Make sure the mobile device does not tap a sharp corner of the Soundbar. The Soundbar or mobile device may become scratched or
damaged.
• It is recommended that the mobile device be covered with a case. Lightly tap the wide area in the upper portion of the Soundbar, without
using excessive force.
• To use this function, update the SmartThings app to the latest version.
The function may not be supported, depending on the app version.
Setting the Tap Sound function
Use the SmartThings app to turn on the Tap View, Tap Sound function.
1. On the mobile device, run the SmartThings app.
2. Select (
→ ) in the SmartThings app screen displayed on the mobile device.
3. Set “Tap View, Tap Sound” to On to allow the function to work when a mobile device moves close to the Soundbar. The function is turned on.
NOTE
• When the mobile device is in power-saving mode, the Tap Sound function does not work.
• The Tap Sound function may not work if there are devices near the Soundbar that cause radio interference such as electric devices. Make sure
devices that may cause radio interference are placed at a sufcient distance away from the Soundbar.
ENG - 26
08 INSTALLING THE WALL
MOUNT
Installation Precautions
• Install on a vertical wall only.
• Do not install in a place with high temperature or humidity.
• Verify whether the wall is strong enough to support the product’s
weight. If not, reinforce the wall or choose another installation
point.
• Purchase and use the xing screws or anchors appropriate for
the kind of wall you have (plaster board, iron board, wood, etc.). If
possible, x the support screws into wall studs.
• Purchase wall mounting screws according to the type and
thickness of the wall you want to mount the Soundbar on.
‒ Diameter: M5
‒ Length: 1 3/8 inches (35 mm) or longer recommended.
• Connect cables from the unit to external devices before you install
the Soundbar on the wall.
• Make sure the unit is turned off and unplugged before you install
it. Otherwise, it may cause an electric shock.
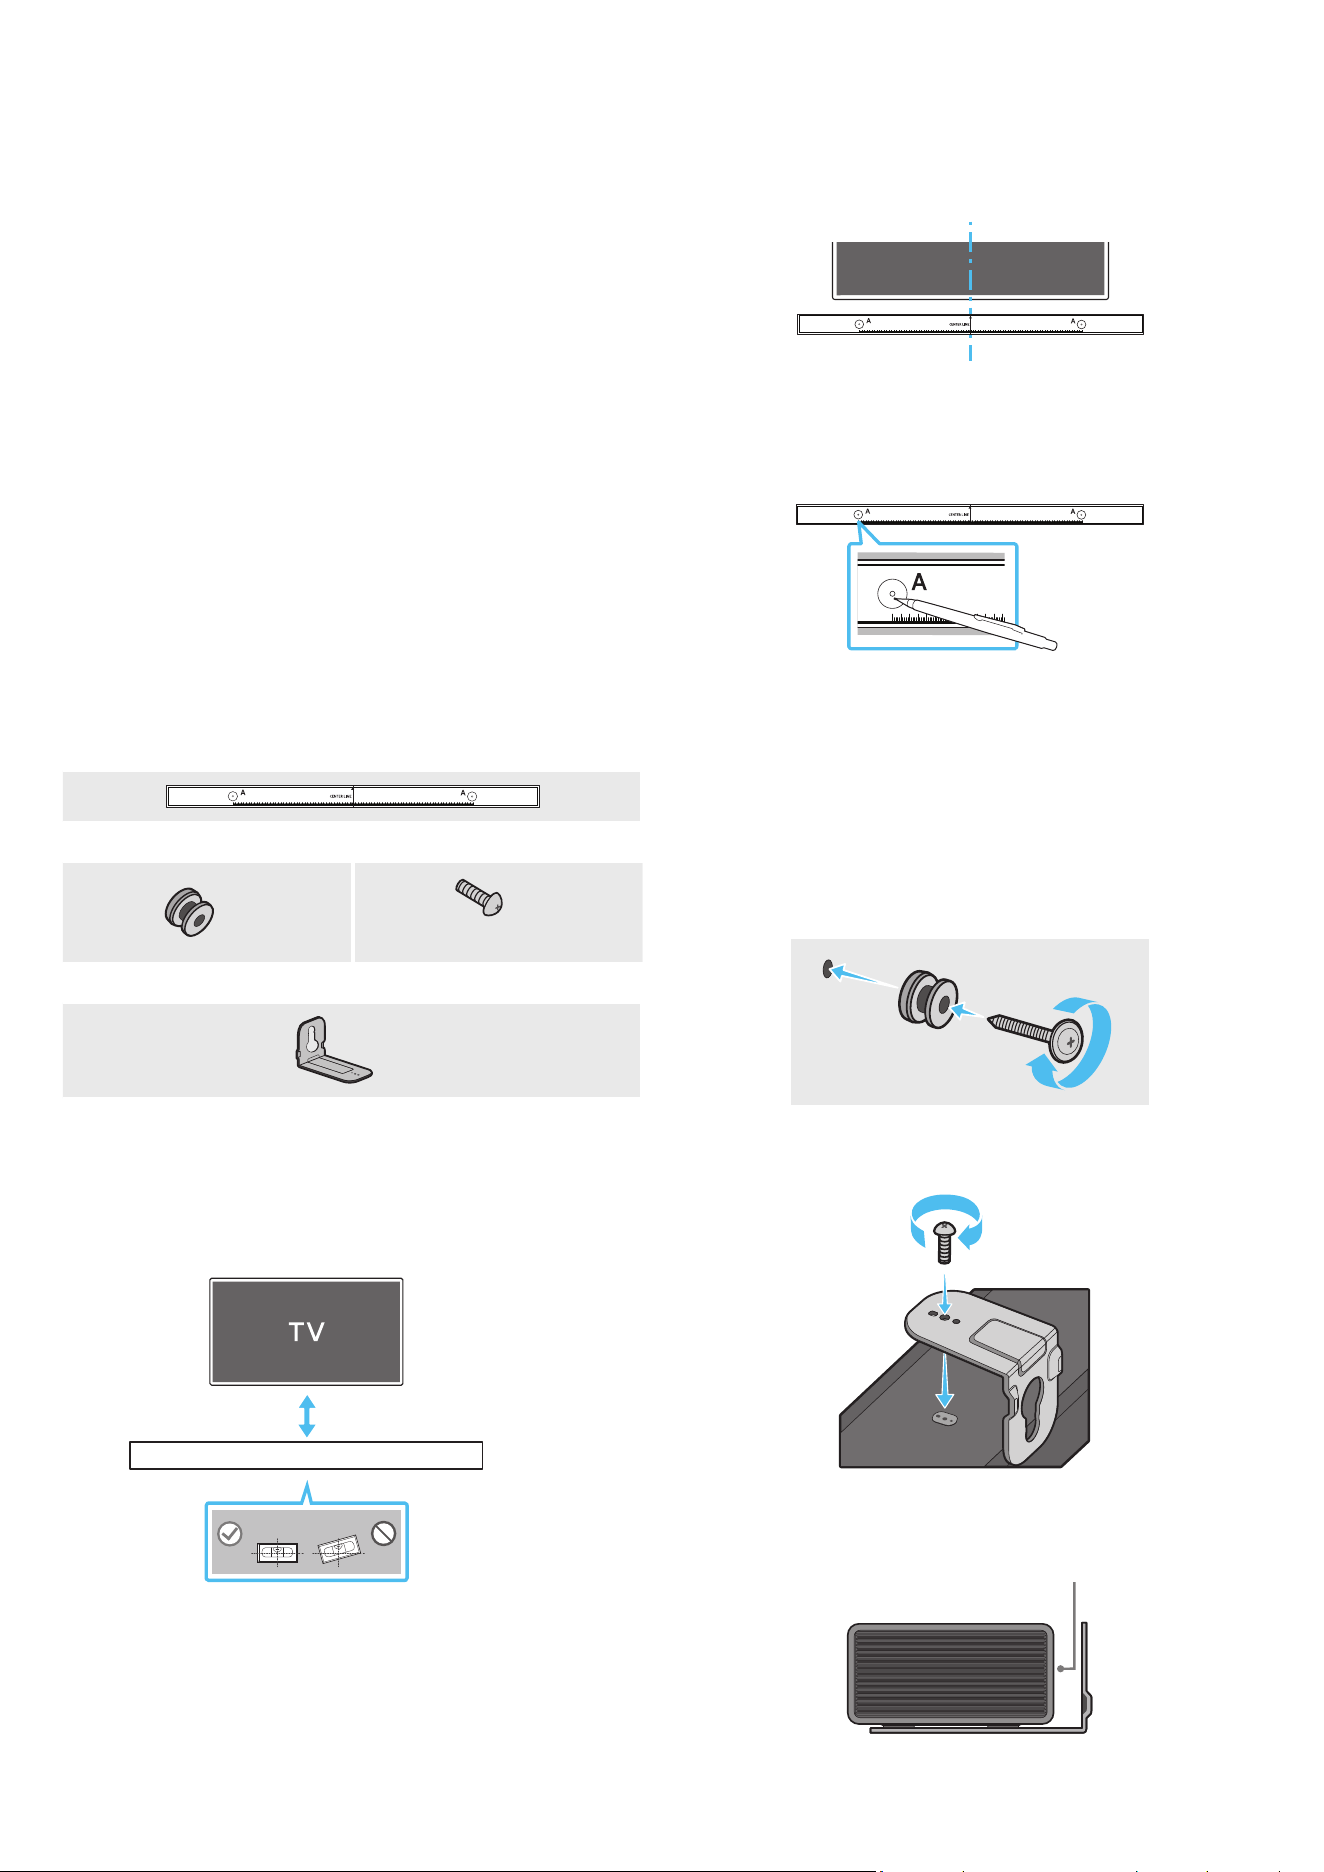
Wallmount Components
A TYPE : 450mm
Wall Mount Guide
x 2
x 2
(M4 x L10)
Holder-Screw Screw
x 2
Bracket-Wall Mount
1. Place the Wall Mount Guide against the wall surface.
• The Wall mount guide must be leveled.
• If your TV is mounted on the wall, install the Soundbar at least 2
inches (5 cm) below the TV.
2 inches (5 cm) or more
2. Align the Wall Mount Guide’s Center Line with the center of your
TV (if you are mounting the Soundbar below your TV), and then x
the Wall Mount Guide to the wall using tape.
• If you are not mounting below a TV, place the Center Line in the
center of the installation area.
A TYPE : 450mm
Center Line
3. Push a pen tip or sharpened pencil tip through the center of the
A-TYPE images on each end of the Guide to mark the holes for the
supporting screws, and then remove the Wall Mount Guide.
A TYPE : 450mm
4. Using an appropriately sized drill bit, drill a hole in the wall at each
marking.
• If the markings do not correspond to the positions of studs,
make sure you insert appropriate anchors or mollies into the
holes before you insert the support screws. If you use anchors
or mollies, make sure the holes you drill are large enough for
the anchors or mollies you use.
5. Push a screw (not supplied) through each Holder-Screw, and then
screw each screw rmly into a support screw hole.
6. Install the 2 Bracket-Wall Mounts in the correct orientation on the
bottom of the Soundbar using 2 Screws.
• When assembling, make sure the hanger part of the Bracket-
Wall Mounts are located behind the rear of the Soundbar.
Rear of Soundbar
Right end of Soundbar
ENG - 27
7. Install the Soundbar with the attached Bracket-Wall Mounts by
hanging the Bracket-Wall Mounts on the Holder-Screws on the
wall.
8. Slide the Soundbar down as shown below so that the Bracket-Wall
Mounts rest securely on the Holder-Screws.
• Insert the Holder-Screws into the wide (bottom) part of the
Bracket-Wall Mounts, and then slide the Bracket-Wall Mounts
down so that the Bracket-Wall Mounts rest securely on the
Holder-Screws.
Installing the Surround Speakers on a
Wall
You can purchase wall mounts separately to install the surround
speakers on a wall.
Wall mounts aren’t sold by Samsung Electronics.
Notes for Wall Mounting the Surround Speakers
• Surround Speaker wall mounts must be able to support more than
17.6 lbs (8.0 kg).
• Hole size : 1/4 - 20 UNC threaded insert
‒ Standard Screw : 6.35 mm (0.25 Inch) ø,
1.27mm (0.05 Inch) Pitch
‒ Length : 18 mm (0.70 Inch) long
‒ Quantity : Left 1 EA / Right 1 EA
L R
• Check the strength of the wall before you install the Wall Mount
Brackets. If the strength is insufcient, make sure to reinforce the
wall before installing the Wall Mount Brackets and the speakers
on the wall.
• Samsung Electronics is not liable for any damage to the product
due to the product being installed inappropriately.
• Take care not to install the speakers sideways or upside down.
09 INSTALLING THE
SOUNDBAR IN FRONT OF
TV
Component
x 4
Rubber-Foot
To install, attach the Rubber-Feet to the bottom of the Soundbar
before placing it in position above the TV stand. Make sure you attach
the Rubber-Feet so they do not lie outside the edges of the TV stand.
Refer to the gure below.
Rubber-Foot
Place the Soundbar on a TV stand.
Microphones
ENG - 28
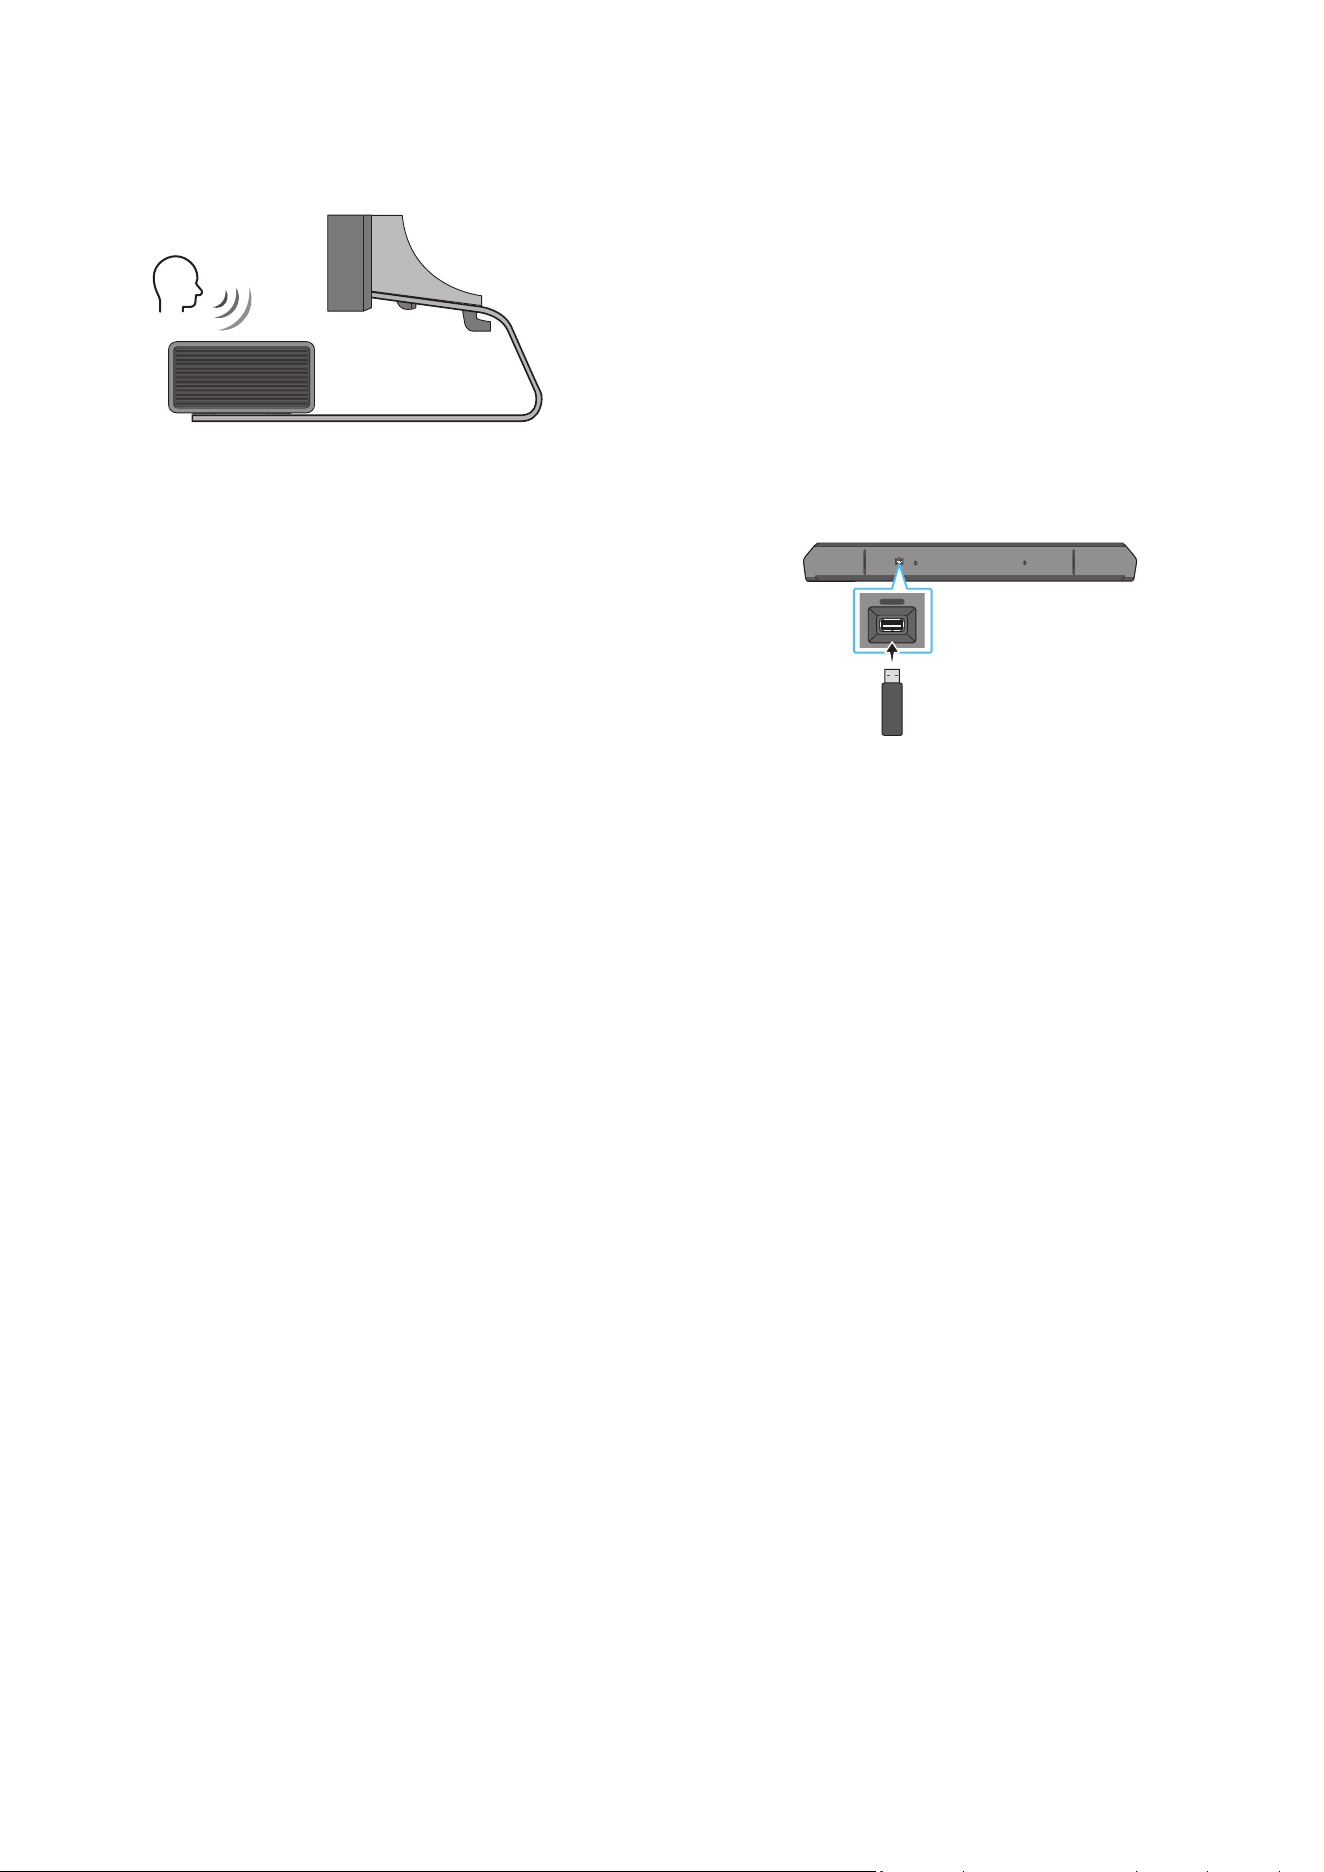
As illustrated in the image, align the center of the Soundbar with the
center of the TV, carefully place the Soundbar onto the TV stand.
At this time, place the microphones at the front of the stand not to
interfere with voice recognition.
Right end of Soundbar
TV
NOTE
• Make sure the Soundbar is placed on a at and solid surface.
• Insufcient gap from the TV may cause voice recognition and
acoustic problems.
• The illustration above differs from the respective model.
• For the best performance of the microphones, keep the Soundbar
at least 2 cm away from the TV’s panel.
10 SOFTWARE UPDATE
Auto Update
When the Soundbar is connected to the Internet, software updates
automatically occur even when the Soundbar is turned off.
• To use the Auto Update function, the Soundbar must be connected
to the Internet.
The Wi-Fi connection to the Soundbar will be terminated if
the Soundbar’s power cord is disconnected or the power is cut
off. If the power is cut off, when the power comes back on or
you reconnect the power cord, turn on the Soundbar, and then
reconnect it to the Internet.
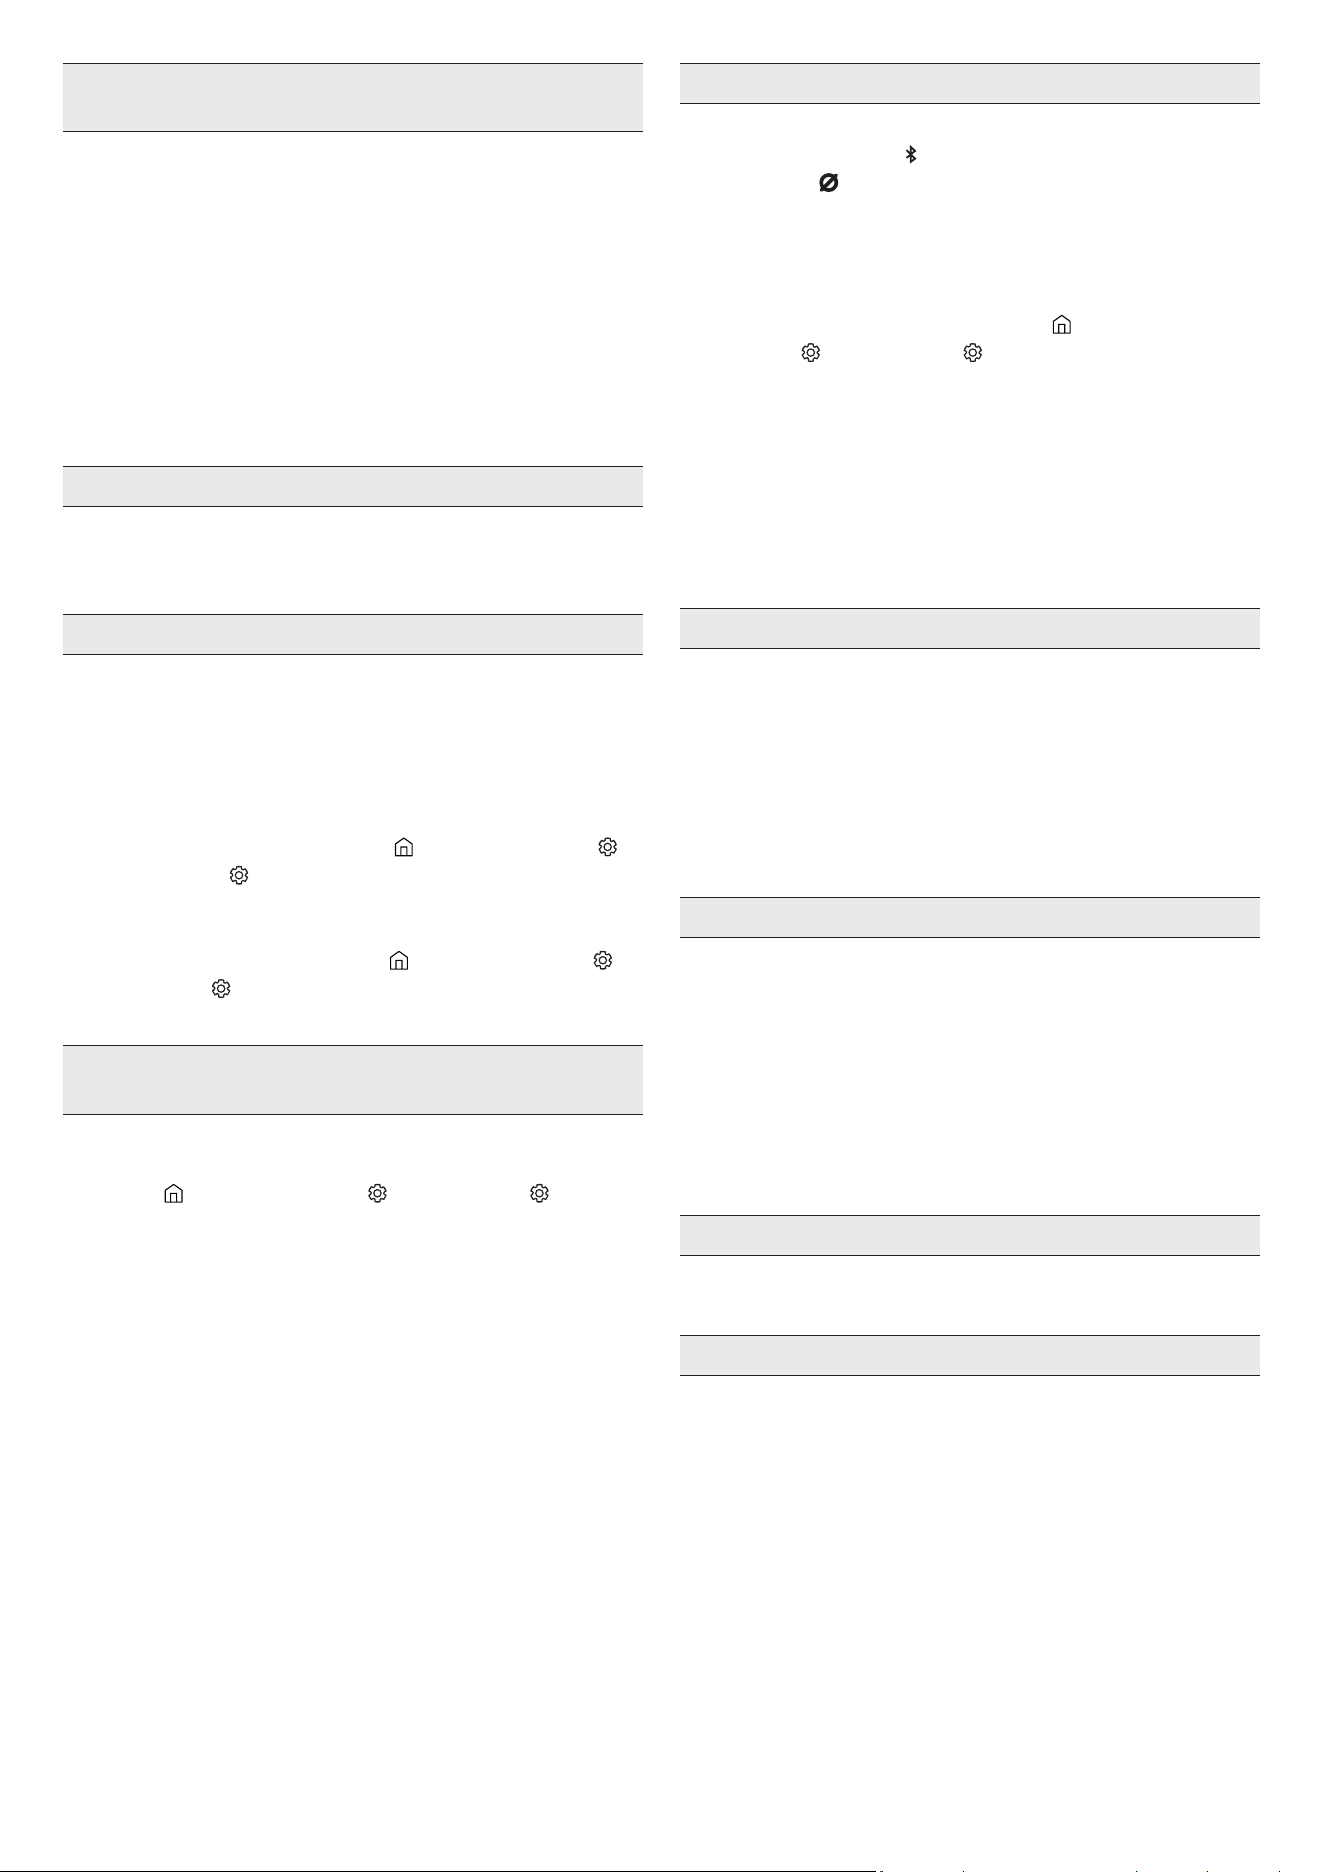
USB Update
Bottom of the Soundbar
SERVICE
REAR)
SERVICE
Samsung may offer updates for the Soundbar’s system rmware in
the future.
When an update is available, you can update the Soundbar by
connecting the USB drive that contains the update rmware to the
SERVICE port of the Soundbar.
1. Go to the Samsung Electronics website (www.samsung.com) →
search for the model name from the customer support menu
option.
• For more information about update, refer to Upgrade Guide.
2. Download the upgrade le (USB type).
3. Unzip the le to create a folder with the le name.
4. Store the created folder in a USB and then connect it to the
Soundbar.
5. Turn on the Soundbar. Then the product is updated within 3
minutes with displaying the message, “UPDATE”.
• During update, do not turn it off or remove the USB.
• If “UPDATE” does not appear on the display window, remove the
power cord from the Soundbar and then reconnect it.
• When the latest version is installed, no update is performed.
• Depending on the USB type, update may not be supported.
Security updates information
Security updates are provided to strengthen the security of your
device and protect your personal information. For more information
on security updates, visit https://security.samsungtv.com.
• The website supports only some languages.
ENG - 29
Initialization
Top of the Soundbar
INIT
With the Soundbar on, press the (Volume) buttons on the body
at the same time for at least 5 seconds. “INIT” appears on the display
and then the Soundbar is initialized.
CAUTION
• All the settings of the Soundbar are initialized. Be sure to
perform this only when initialization is required.
11 TROUBLESHOOTING
Before seeking assistance, check the following.
Soundbar does not turn on.
• Check whether the power cord of the Soundbar is correctly
inserted into the outlet.
Soundbar works erratically.
• After removing the power cord, insert it again.
• Power cycle the external device and try again.
• If there is no signal, the Soundbar automatically turns off after a
certain period of time. Turn on the power. (See page 5.)
Remote control does not work
• Point the remote directly at the soundbar.
• Replace the batteries with new ones.
The Soundbar indicator turns solid red.
• The microphone is turned off.
Turn on the microphone. (See page 4.)
Sound is not output from the soundbar.
• The volume of the Soundbar is too low or muted. Adjust the
volume.
• When any external device (STB, Bluetooth device, mobile device,
etc.) is connected, adjust the volume of the external device.
• For sound output of the TV, select Soundbar. (Samsung TV:
Home (
) → Menu → Settings ( ) → All Settings ( ) → Sound
→ Sound Output → Select Soundbar)
• The cable connection to the Soundbar may not be loose. Remove
the cable and connect again.
• Remove the power cord completely, reconnect, and turn the
power on.
• Initialize the product and try again. (See page 29.)
Sound is not output from the Subwoofer or the surround speakers.
• Check whether the LED indicator on the rear of the Subwoofer
and Surround Speakers are on in blue. Reconnect the Soundbar
and Subwoofer and Surround Speakers if the indicator is blinking
in blue or turned red. (See page 11.)
• You may experience an issue if there is an obstacle between the
Soundbar and Subwoofer. Move devices to an area away from
obstacles.
• Other devices sending radio frequency signals in proximity may
interrupt the connection.
Keep your speaker away from such devices.
• Remove and reconnect the power plug.
ENG - 30
In case there is sound jitter, delays, or noise from the Subwoofer
and Surround Speaker
• If there are any objects between the Soundbar and Subwoofer
speaker, this could cause a problem. Please reposition these to a
place without such an object.
• There may be sound jitter or delays when the Subwoofer and
Surround Speaker are far from the Soundbar. Please place them
near the Soundbar.
• There may be sound jitter or delays when the Soundbar is near an
instrument or electrical device that can cause radio interference.
Place the Soundbar far from such devices that can cause radio
interference. (E.g., wireless router)
• Change the TV network connection status from wireless to wired.
The Subwoofer volume is too low
• The original volume of the content you are playing may be low.
Try adjusting the Subwoofer level. (See page 6.)
• Bring the Subwoofer speaker closer to you.
If the TV is not connected via HDMI TO TV (eARC/ARC)
• Check whether the HDMI cable is connected properly to the ARC
terminal. (See page 13.)
• Connection may not be possible due to the connected external
device (set-top box, game machine, etc.). Directly connect the
Soundbar.
• HDMI-CEC may not be activated on the TV. Turn on the CEC on
the TV menu. (Samsung TV: Home (
) → Menu → Settings ( )
→ All Settings ( ) → Connection → External Device Manager →
Anynet+ (HDMI-CEC) ON)
• To connect with eARC, the eARC function in the TV menu should
be set to On. (Samsung TV: Home ( ) → Menu → Settings ( ) →
All Settings ( ) → Sound → Expert Settings → HDMI-eARC Mode
(Auto))
There is no sound in when connecting to the TV in HDMI TO TV
(eARC/ARC) mode
• Your device is unable to play the input signal. Change the
TV’s audio output to PCM or Dolby Digital. (For a Samsung TV:
Home (
) → Menu → Settings ( ) → All Settings ( ) → Sound
→ Expert Settings → Digital Output Audio Format)
Soundbar will not connect via Bluetooth.
• When connecting a new device, switch to “BT PAIRING” for
connection. (Press the
PAIR button on the remote control
or press the (Mic On/Off) button on the body for at least 5
seconds.)
• If the Soundbar is connected to another device, disconnect that
device rst to switch the device.
• Reconnect it after removing the Bluetooth speaker list on the
device to connect. (Samsung TV: Home ( ) → Menu →
Settings ( ) → All Settings ( ) → Sound → Sound Output →
Bluetooth Speaker List)
• The automatic TV connection may be disabled. While the
Soundbar is in “BT READY”, press and hold the Left button on
the Soundbar remote control for 5 seconds to select ON-TV
CONNECT. If you see OFF-TV CONNECT, press and hold Left
button again for 5 seconds to switch the selection.
• Remove and reconnect the power plug, then try again.
• Initialize the product and try again. (See page 29.)
Sound drops out when connected via Bluetooth.
• Some devices can cause radio interference if they are located too
close to the Soundbar. e. g. microwaves, wireless routers, etc.
• If your device that is connected via Bluetooth moves too far away
from the soundbar, it may cause the sound to drop out. Move the
device closer to the soundbar.
• If a part of your body is in contact with the Bluetooth transceiver
or the product is installed on metal furniture, the sound may drop
out. Check the installation environment and conditions for use.
Soundbar will not connect to Wi-Fi.
• Check whether your wireless router is on.
• Turn off the router, turn it back on, and then try again.
• The soundbar will not connect if the wireless signal is too weak.
Try moving the router closer to the soundbar, or eliminating
any obstacles that are between the soundbar and the router, if
possible.
• If your wireless router is new, you will need to recongure the
speaker’s network settings. (See page 23.)
• Soundbar does not support Wi-Fi 6.
The soundbar does not turn on automatically with the TV.
• When you turn off the Soundbar while watching TV, power
synchronization with the TV is disabled. First turn off the TV.
The AVA function is not available in the following cases.
• The AVA function will not be available when the microphone is
turned off.
ENG - 31
After connecting the TV to the Soundbar, I switched the Soundbar
mode. Then no sound is output from the TV.
• If you connect your Soundbar to a mobile device while the
Soundbar is connected to the TV, the Soundbar outputs sound
from the mobile device while keeping the TV connection. So the
TV sound will not be delivered anywhere.
• Disconnect the mobile device, and the TV sound will be output
from the Soundbar again.
The Soundbar does not appear in AirPlay
• To enable AirPlay in your Soundbar, you must rst register the
device with the Samsung Smart Things app by agreeing with the
app’s terms and conditions. (See page 24.)
• AirPlay does not operate if you delete the Soundbar from the
Samsung Smart Things app.
• Make sure that the Soundbar and the Apple device are connected
to the same Wi-Fi network.
• The Soundbar is compatible with AirPlay installed on iOS 13.4 or
later.
No UHD input signal is displayed on my TV.
• An additional change in settings may be required for your TV or
the input source. For more information, refer to the user manual
of the TV or the external device.
• Make sure you are using an Ultra High Speed HDMI Cable
certied by HDMI.org.
Group Play is not enabled
• Check if the audio devices are newer models released year 2024
or later.
• Check if the host device is connected to a Wi-Fi network as
source.
• Make sure that all audio devices are connected to the same Wi-Fi
network (at 5 GHz).
12 LICENCE
Dolby, Dolby Atmos, and the double-D symbol are registered
trademarks of Dolby Laboratories Licensing Corporation.
Manufactured under license from Dolby Laboratories. Condential
unpublished works.
Copyright © 2012-2021 Dolby Laboratories. All rights reserved.
For DTS patents, see http://patents.dts.com. Manufactured under
license from DTS, Inc. or DTS Licensing Limited. DTS, DTS:X, and the
DTS:X logo are registered trademarks or trademarks of DTS, Inc. in
the United States and other countries.
© 2021 DTS, Inc. ALL RIGHTS RESERVED.
The terms HDMI, HDMI High-Denition Multimedia Interface, HDMI
Trade dress and the HDMI Logos are trademarks or registered
trademarks of HDMI Licensing Administrator, Inc.
Apple, AirPlay, iPad, iPhone, and Mac are trademarks of Apple Inc.,
registered in the U.S. and other countries and regions.
• Use your phone, tablet or computer as a remote control for
Spotify. Go to spotify.com/connect to learn how
• The Spotify Software is subject to third party licenses found here:
https://www.spotify.com/connect/third-party-licenses.
Being Roon Tested means that Samsung and Roon have collaborated
to ensure you have the best experience using Roon software and
Samsung equipment together, so you can just enjoy the music.
Open Source License Notice
Open Source used in this product can be found on the following
webpage (
http://opensource.samsung.com).

© 2024 Samsung Electronics Co., Ltd. Tous droits réservés.
Guide d’utilisation
HW-Q990D
Pour bénécier d’un service plus complet, veuillez inscrire votre produit sur le
site www.samsung.com/register
Les chiffres et les illustrations contenus dans ce Guide d’utilisation sont fournis
à titre de référence uniquement et pourraient ne pas représenter exactement le
produit.

FRC - 2
CONTENU
01 Vérication des composants 3
02 Présentation du produit 4
Panneau supérieur du Soundbar . . . . . . . . . . . . . . . . . . . . . . . . . . . . . . . . . . . . .4
Panneau inférieur du Soundbar . . . . . . . . . . . . . . . . . . . . . . . . . . . . . . . . . . . . . .4
03 Utilisation de la télécommande du Soundbar 5
Insertion des piles avant d’utiliser la télécommande (2 piles AAA) . . . . . 5
Comment utiliser la télécommande. . . . . . . . . . . . . . . . . . . . . . . . . . . . . . . . . . 5
Réglage de
(Commande du son). . . . . . . . . . . . . . . . . . . . . . . . . . . . . . . . . 6
Utilisation des boutons masqués (boutons ayant plusieurs fonctions) . . 7
Spécications de sortie pour les différents modes d’effets sonores . . . . . 7
Réglage du volume du Soundbar avec la télécommande du téléviseur. . 8
04 Connexion du Soundbar 9
Connexion de l’alimentation et des unités . . . . . . . . . . . . . . . . . . . . . . . . . . . .9
‒ Disposition recommandée pour les haut-parleurs . . . . . . . . . . . . . . . . 10
‒ Mode Haut-parleurs ambiophoniques . . . . . . . . . . . . . . . . . . . . . . . . . . . 10
‒ Connexion manuelle du caisson de basses ou des haut-parleurs
ambiophoniques . . . . . . . . . . . . . . . . . . . . . . . . . . . . . . . . . . . . . . . . . . . . . . . .11
‒ Voyants à DEL à l’arrière du caisson de basses et des haut-parleurs
ambiophoniques . . . . . . . . . . . . . . . . . . . . . . . . . . . . . . . . . . . . . . . . . . . . . . 12
05 Connexion à un téléviseur 13
Connexion du téléviseur prenant en charge HDMI ARC (canal de retour
audio) . . . . . . . . . . . . . . . . . . . . . . . . . . . . . . . . . . . . . . . . . . . . . . . . . . . . . . . . . . . . 13
Connexion à l’aide d’un câble optique . . . . . . . . . . . . . . . . . . . . . . . . . . . . . . . 14
Connexion par Bluetooth. . . . . . . . . . . . . . . . . . . . . . . . . . . . . . . . . . . . . . . . . . . 15
Connexion en Wi-Fi . . . . . . . . . . . . . . . . . . . . . . . . . . . . . . . . . . . . . . . . . . . . . . . . 16
Utilisation de la fonction Q-Symphony . . . . . . . . . . . . . . . . . . . . . . . . . . . . . . 17
Utilisation du SpaceFit Sound . . . . . . . . . . . . . . . . . . . . . . . . . . . . . . . . . . . . . .18
06 Connexion d’un appareil externe 19
Méthode 1. Connexion à l’aide d’un câble HDMI (décodage et lecture
Dolby Atmos / DTS:X possible). . . . . . . . . . . . . . . . . . . . . . . . . . . . . . . . . . . . . . 19
Méthode 2. Connexion à l’aide d’un câble optique . . . . . . . . . . . . . . . . . . . .20
07 Connexion d’un appareil mobile 21
Méthode 1. Connexion par Bluetooth. . . . . . . . . . . . . . . . . . . . . . . . . . . . . . . . 21
Méthode 2. Connexion par Wi-Fi (réseau sans l). . . . . . . . . . . . . . . . . . . . .23
Utilisation de Group Play. . . . . . . . . . . . . . . . . . . . . . . . . . . . . . . . . . . . . . . . . . .23
Utilisation de SmartThings Hub . . . . . . . . . . . . . . . . . . . . . . . . . . . . . . . . . . . .24
Connexion par Apple AirPlay . . . . . . . . . . . . . . . . . . . . . . . . . . . . . . . . . . . . . . .24
Utilisation de la fonction Tap Sound. . . . . . . . . . . . . . . . . . . . . . . . . . . . . . . . .25
08 Installation du support mural 26
Précautions d’installation . . . . . . . . . . . . . . . . . . . . . . . . . . . . . . . . . . . . . . . . . .26
Composants de montage mural . . . . . . . . . . . . . . . . . . . . . . . . . . . . . . . . . . . .26
Installation des haut-parleurs ambiophoniques au mur . . . . . . . . . . . . . . 27
09 Installation du Soundbar devant le téléviseur 27
Composant . . . . . . . . . . . . . . . . . . . . . . . . . . . . . . . . . . . . . . . . . . . . . . . . . . . . . . . 27
10 Mise à jour du logiciel 28
Mise à jour automatique . . . . . . . . . . . . . . . . . . . . . . . . . . . . . . . . . . . . . . . . . . .28
Mise à jour USB. . . . . . . . . . . . . . . . . . . . . . . . . . . . . . . . . . . . . . . . . . . . . . . . . . . .28
Information concernant les mises à jour sur la sécurité . . . . . . . . . . . . . . .28
Initialisation . . . . . . . . . . . . . . . . . . . . . . . . . . . . . . . . . . . . . . . . . . . . . . . . . . . . . .29
11 Dépannage 29
12 Licence 31
FRC - 3
01 VÉRIFICATION DES COMPOSANTS
SOUNDBAR
Unité principale du Soundbar Télécommande du Soundbar / Piles Caisson de basses
x 2
x 4
Haut-parleur ambiophonique
(Gauche/Droite)
Cordon d’alimentation
(Soundbar, Caisson de basse,
Haut-parleur ambiophonique)
Câble HDMI
A TYPE : 450mm
x 2
x 2
(M4 x L10)
Guide de montage mural Vis de xation Vis
x 2
x 4
Support de montage mural Pied en caoutchouc
• Pour plus d’informations sur l’alimentation et la consommation électriques, reportez-vous à l’étiquette apposée sur le produit (Étiquette : Arrière de l’unité
principale du Soundbar
• Pour acheter des composants supplémentaires ou des câbles en option, contactez un centre de service Samsung ou le service clientèle Samsung.
• Pour plus d’informations sur le support mural ou le pied en caoutchouc, voir les pages 26 à 28.
• La conception, les spécications et l’écran de l’application peuvent faire l’objet d’une modication sans préavis.
• L’apparence des accessoires peut différer légèrement des illustrations ci-dessus.
• Samsung Electronics Co., Ltd se réserve le droit de modier les spécications sans préavis.
• Le poids et les dimensions sont approximatifs.
FRC - 4
02 PRÉSENTATION DU PRODUIT
Panneau supérieur du Soundbar
2
1 3
4
1
Bouton
(Multifonction)
• En mode veille, appuyez sur le bouton (Multifonction) pour allumer le Soundbar.
• Appuyez sur le bouton (Multifonction) pour changer la source d’entrée.
2
Bouton
(Volume)
Permet de régler le volume.
3
Bouton
(Marche/Arrêt microphone)
Appuyez sur le bouton pour activer ou désactiver le microphone.
Lorsque le microphone est éteint, le voyant DEL s’allume en rouge.
Voyant rouge
allumé
Arrêt microphone
Voyant rouge
éteint
Marche microphone
4 Écran
Afche l’état du produit et le mode actuel.
TV ARC ou eARC → HDMI 1 → HDMI 2 → Wi-Fi → BT → D.IN
• Lorsque vous branchez le câble d’alimentation, le bouton d’alimentation se met à fonctionner dans 4 à 6 secondes.
• Lorsque vous allumez cet appareil, vous devrez patienter 4 à 5 secondes avant qu’il ne produise du son.
• Si le son provient à la fois du téléviseur et du Soundbar, accédez au menu Paramètres correspondant au son du téléviseur et réglez le haut-parleur du téléviseur à
Haut-parleur externe.
Panneau inférieur du Soundbar
DIGITAL AUDIO IN
(OPTICAL)
SERVICE
5
SERVICE
DIGITAL AUDIO IN
(OPTICAL)
2
1
4
3
1 DIGITAL AUDIO IN (OPTICAL)
Permet de connecter la sortie numérique (optique) d’un appareil externe. (Voir la page 20)
2 SERVICE
Connectez un dispositif de stockage USB pour mettre à niveau le logiciel du produit.
3 HDMI TO TV (eARC/ARC)
Permet de connecter la prise HDMI d’un téléviseur. (Voir la page 13)
4 HDMI 1 / HDMI 2
Entrées simultanées de signaux vidéo et audio numériques à l’aide d’un câble HDMI.
Permet de connecter la sortie HDMI d’un appareil externe. (Voir la page 19)
5 POWER
Branchez le cordon d’alimentation du Soundbar. (Voir la page 9)
• Pour débrancher le cordon d’alimentation d’une prise murale, tirez la prise. Ne tirez pas sur le câble.
• Ne connectez pas cet appareil ou d’autres composants à une prise CA tant que toutes les connexions entre les composants ne sont pas établies.
FRC - 5
03 UTILISATION DE LA TÉLÉCOMMANDE DU SOUNDBAR
Insertion des piles avant d’utiliser la télécommande (2 piles AAA)
Faites glisser le couvercle arrière dans le sens de la èche jusqu’à ce qu’il soit complètement retiré. Insérez 2 piles
AAA (1,5 V) orientées de sorte que leur polarité soit correcte. Refaites glisser le couvercle des piles à sa position
initiale.
• L’illustration diffère selon le modèle de télécommande respectif.
Comment utiliser la télécommande
SOUNDBAR
Alimentation
Permet d’allumer et d’éteindre le Soundbar.
• Fonction de mise hors tension automatique
L’appareil s’éteint automatiquement dans les situations suivantes :
• En mode TV ARC ou eARC / HDMI 1 / HDMI 2 / Wi-Fi / BT / D.IN en l’absence de signal audio pendant
18 minutes.
Source
Appuyez sur ce bouton pour sélectionner une source connectée au Soundbar.
• Activation/désactivation du retour vocal
Vous pouvez activer ou désactiver le retour vocal.
Appuyez sur le bouton
(Source) de la télécommande pendant 5 secondes lorsque le Soundbar est
éteint (mode veille).
Chaque fois que vous modiez le paramètre de retour vocal, l’écran afche AUI OFF (par défaut) ou AUI ON.
Bluetooth PAIR
Basculez le Soundbar en mode association Bluetooth. Appuyez sur ce bouton et attendez que l’écran « BT
PAIRING » se connecte à un nouvel appareil Bluetooth.
Silence
Appuyez sur le bouton
(Silence) pour couper le son.
Appuyez de nouveau sur ce bouton pour activer le son.
SOUND MODE
En appuyant sur le bouton, vous pouvez sélectionner le mode de son : Surround, Game Pro, Standard ou
Adaptive Sound.
• Standard
Émet le son d’origine.
• Surround
Fournit un champ sonore plus étendu que la norme.
• Game Pro
Émet un son stéréoscopique an de vous plonger dans le feu de l’action lorsque vous jouez.
• Adaptive Sound
Analyse le contenu en temps réel et fournit automatiquement le champ sonore optimal en fonction
des caractéristiques du contenu.
CH LEVEL
En appuyant sur le bouton, vous pouvez ajuster le volume de chaque haut-parleur, comme Center level,
Side level, Wide level, Front Top level, Rear level, Rear top level et Rear side level.
• Pour contrôler le volume de chaque haut-parleur, sélectionnez Center level, Side level, Wide level ou
Front Top level dans les réglages sonores, puis réglez le volume entre -6 et +6 à l’aide des boutons
Haut/Bas.
• Si des haut-parleurs ambiophoniques sont connectés, sélectionnez Rear Level, Rear top level ou Rear
side level et utilisez les boutons Haut/Bas pour régler le volume sur la plage de réglage allant de -6 à
+6.
Commande du son
En appuyant sur le bouton, vous pouvez régler les fonctions audio, comme SpaceFit Sound, AVA, le Voice enhance mode, Night
mode, Sync, le Surround speaker mode, Virtual, Private Rear Sound et Sound Grouping. L’élément souhaité peut être ajusté à l’aide
des boutons Haut/Bas.
• Reportez-vous à la section Réglage de
(Commande du son) à la page 6.
Lecture / Pause
Vous pouvez également lire ou mettre en pause la musique en appuyant sur ce bouton.
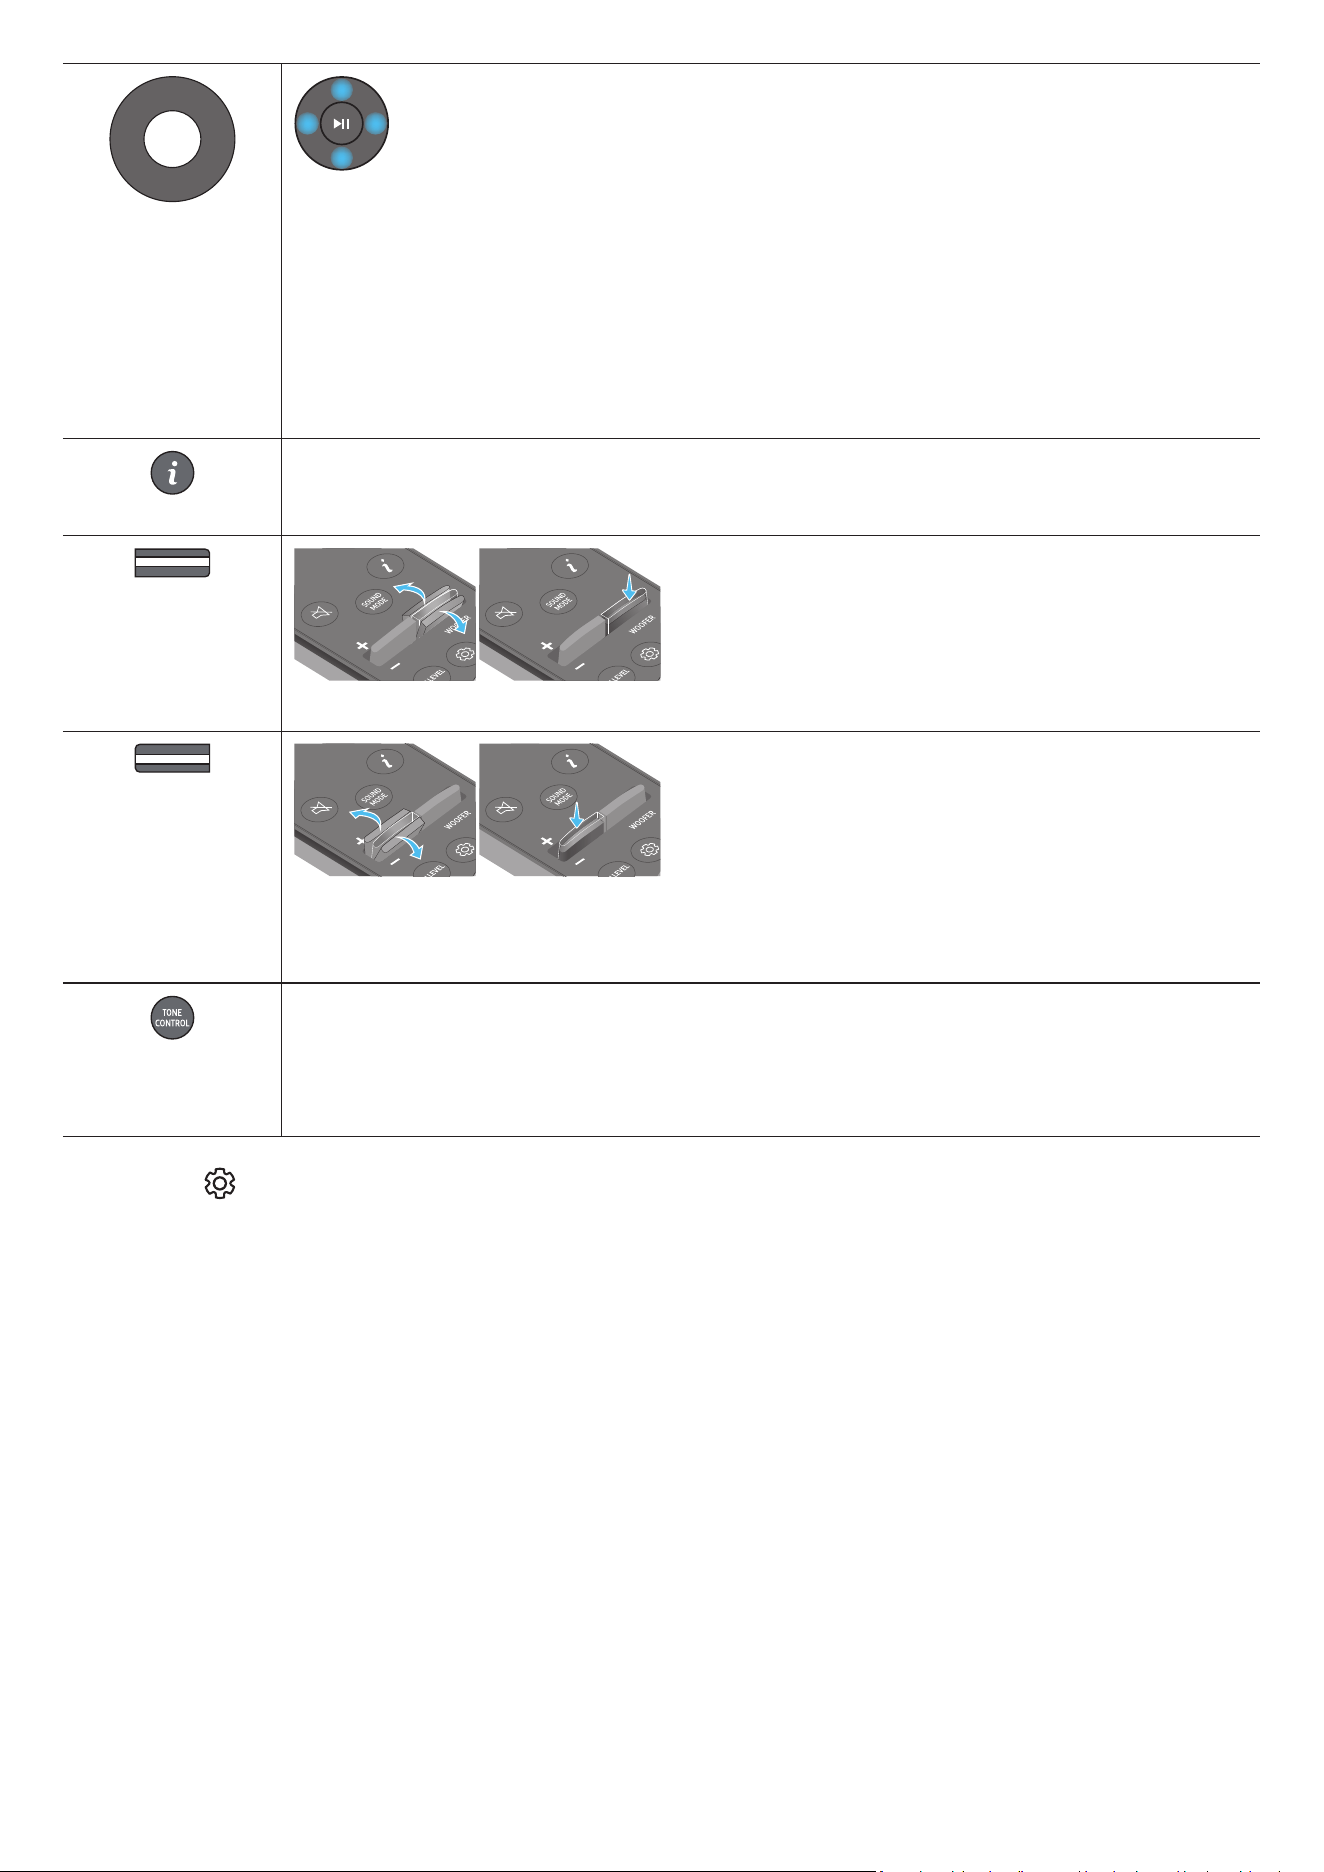
FRC - 6
Haut/Bas/Gauche/Droite
Appuyez aux endroits indiqués pour sélectionner haut/bas/gauche/droite.
Appuyez en haut, en bas, à gauche et à droite du bouton pour sélectionner ou dénir des fonctions.
• Saut de musique
Appuyez sur le bouton de Droite pour passer au chier de musique suivant. Appuyez sur le bouton de Gauche pour passer au
chier de musique précédent.
• ID SET
Utilisez cette option lorsque le caisson de basses ou les haut-parleurs ambiophoniques ne sont pas connectés ou doivent être
reconnectés.
Pendant que l’appareil est hors tension, appuyez sur le bouton Haut et maintenez-le enfoncé pendant 5 secondes pour exécuter
un ID SET. (Voir la page 11.)
Info
Appuyez sur le bouton pour afcher l'information sur la fonction active ou sur le codec disponible.
En mode BT, il afche l'appareil connecté (lorsque l'association est terminée) ou la mention « BT ready » (lorsqu'une association
est nécessaire).
WOOFER LEVEL
Appuyez sur le bouton haut ou bas pour régler le niveau du caisson de basses.
VOLUME
Appuyez sur ce bouton vers le haut ou vers le bas pour régler le volume.
• Silence
Appuyez sur le bouton VOL pour mettre le son en sourdine. Appuyez de nouveau sur ce bouton pour activer le son.
TONE CONTROL
En appuyant sur le bouton, vous pouvez ajuster le volume des aigus ou des basses. L’élément souhaité peut être ajusté à l’aide des
boutons Haut/Bas. Cette fonction est activée en mode Son, sauf en mode Standard.
• Pour contrôler le volume du son des aigus ou des basses, sélectionnez TREBLE ou BASS dans les réglages sonores, puis réglez
le volume entre -6 et + 6 à l’aide des boutons Haut/Bas.
• Une fois le niveau des basses modié, le niveau du caisson de basses est ajusté en conséquence.
Réglage de
(Commande du son)
• Active Voice Amplier (AVA) : Analyse le bruit externe en temps réel pendant que le Soundbar est actif, de sorte que la voix puisse toujours être entendue
clairement. Aucune donnée n’est enregistrée pendant l’analyse.
• Voice enhance mode améliore les dialogues dans les lms et à la télévision et permet de mieux les entendre.
• Night mode est optimisé pour un visionnement nocturne lorsque les paramètres sont réglés de façon à baisser le volume tout en préservant la clarté des
dialogues.
• Sound Grouping : L’unité principale du Soundbar et les haut-parleurs ambiophoniques émettent l’ensemble des sons, pas seulement le son ambiophonique, ce
qui est idéal pour les grands groupes de personnes écoutant de la musique dans un grand espace.
‒ Ce menu est activé initialement lorsque les haut-parleurs ambiophoniques sont connectés, puis il le reste que ces haut-parleurs soient toujours connectés ou
non.
‒ Si vous activez Sound Grouping, les modes audio ne produisent aucune différence dans le rendu sonore.
‒ Le son n’est pas émis de tous les haut-parleurs de l’unité principale du Soundbar et des haut-parleurs ambiophoniques, mais seulement de certaines unités
prédénies, qui varient selon le modèle.
• Private Rear Sound : Avec ce mode, le son est émis uniquement des haut-parleurs ambiophoniques, ce qui vous offre une écoute sans être dérangé par les autres.
‒ Si vous activez ce mode, le son n’est émis ni par l’unité principale du Soundbar, ni par le caisson de basse. Le son n’est émis que via le canal avant des haut-
parleurs ambiophoniques.
‒ Si vous activez Private Rear Sound, les modes audio ne produisent aucune différence dans le rendu sonore.
‒ La fonction se désactive si l’alimentation est coupée ou si la connexion des haut-parleurs ambiophoniques est perdue.
‒ Le menu est activé uniquement si les haut-parleurs ambiophoniques sont connectés.
‒ Ce mode est automatiquement désactivé et n’est plus disponible si la fonction Q-Symphony est activée.
FRC - 7
• Maintenez le bouton
(Commande du son) enfoncé pendant environ 5 secondes pour régler le son pour chaque bande de fréquences. Vous pouvez utiliser les
boutons Gauche/Droite pour sélectionner les fréquences suivantes : 150 Hz, 300 Hz, 600 Hz, 1,2 kHz, 2,5 kHz, 5 kHz et 10 kHz. Vous pouvez également dénir
chaque fréquence sur une valeur allant de -6 à +6 à l’aide des boutons Haut/Bas.
(Veillez à ce que le mode son soit réglé à « Standard ».)
• Si la vidéo du téléviseur et le son du Soundbar ne sont pas synchronisés, sélectionnez Sync dans les réglages sonores, puis réglez le retard de l’audio entre 0 et
300 millisecondes à l’aide des boutons Haut/Bas.
• L’option Sync n’est prise en charge que pour certaines fonctions.
• Les paramètres du Surround speaker mode disponibles peuvent varier en fonction des caractéristiques du haut-parleur ambiophonique compatible (avec le
Soundbar).
• La fonction de haut-parleur Virtual peut être réglée à ON/OFF à l’aide des boutons Haut/Bas.
Utilisation des boutons masqués (boutons ayant plusieurs fonctions)
Bouton masqué
Page de référence
Bouton de la télécommande Fonction
WOOFER (Haut)
Marche/Arrêt de la télécommande du téléviseur
(Veille)
page 8
Haut ID SET page 11
(Commande du son)
Égaliseur 7 bandes page 6
(Source)
Activation/Désactivation du retour vocal (veille) page 5
Spécications de sortie pour les différents modes d’effets sonores
Effet Entrée
Sortie
Avec caisson de basse et haut-parleur ambiophonique
Standard
2,0 canaux 2,1 canaux
5,1 canaux 5,1 canaux / 7,1 canaux (DTS)
7,1 canaux 7,1 canaux
Dolby Atmos®, DTS:X 7,1,4 canaux
Surround
2,0 canaux 11,1,4 canaux
5,1 canaux 11,1,4 canaux
7,1 canaux 11,1,4 canaux
Dolby Atmos®, DTS:X 11,1,4 canaux
Game Pro
2,0 canaux 11,1,4 canaux
5,1 canaux 11,1,4 canaux
7,1 canaux 11,1,4 canaux
Dolby Atmos®, DTS:X 11,1,4 canaux
Adaptive Sound
2,0 canaux 11,1,4 canaux
5,1 canaux 11,1,4 canaux
7,1 canaux 11,1,4 canaux
Dolby Atmos®, DTS:X 11,1,4 canaux
Les haut-parleurs ambiophoniques ne produisent aucun son par la sortie du canal 2 lorsque le mode Standard est utilisé. Pour activer le son des haut-parleurs
ambiophoniques, réglez le mode d’effet à Surround.

FRC - 8
Réglage du volume du Soundbar avec la télécommande du téléviseur
Contrôlez le volume du Soundbar à l’aide de la télécommande du téléviseur.
• Cette fonction ne peut être utilisée qu’avec des télécommandes infrarouges. Les télécommandes Bluetooth (télécommandes qui nécessitent un appairage)
ne sont pas prises en charge.
• Réglez le haut-parleur du téléviseur à Haut-parleur externe pour utiliser cette fonction.
• Fabricants qui utilisent cette fonction :
Samsung, VIZIO, LG, Sony, Sharp, PHILIPS, PANASONIC, TOSHIBA, Hisense, RCA
1. Éteignez le Soundbar.
2. Appuyez vers le haut sur le bouton WOOFER et maintenez-le enfoncé pendant 5 secondes.
Chaque fois que vous appuyez sur le bouton WOOFER vers le haut et le maintenez enfoncé pendant 5 secondes, le mode change, dans l’ordre suivant : « OFF-TV
REMOTE » (mode par défaut), « SAMSUNG-TV REMOTE », « ALL-TV REMOTE ».
Bouton de la télécommande Écran État
(Mode par défaut)
OFF-TV REMOTE
Télécommande du téléviseur désactivée.
SAMSUNG-TV REMOTE
Télécommande infrarouge du téléviseur Samsung activée.
ALL-TV REMOTE
Télécommande infrarouge du téléviseur tiers activée.
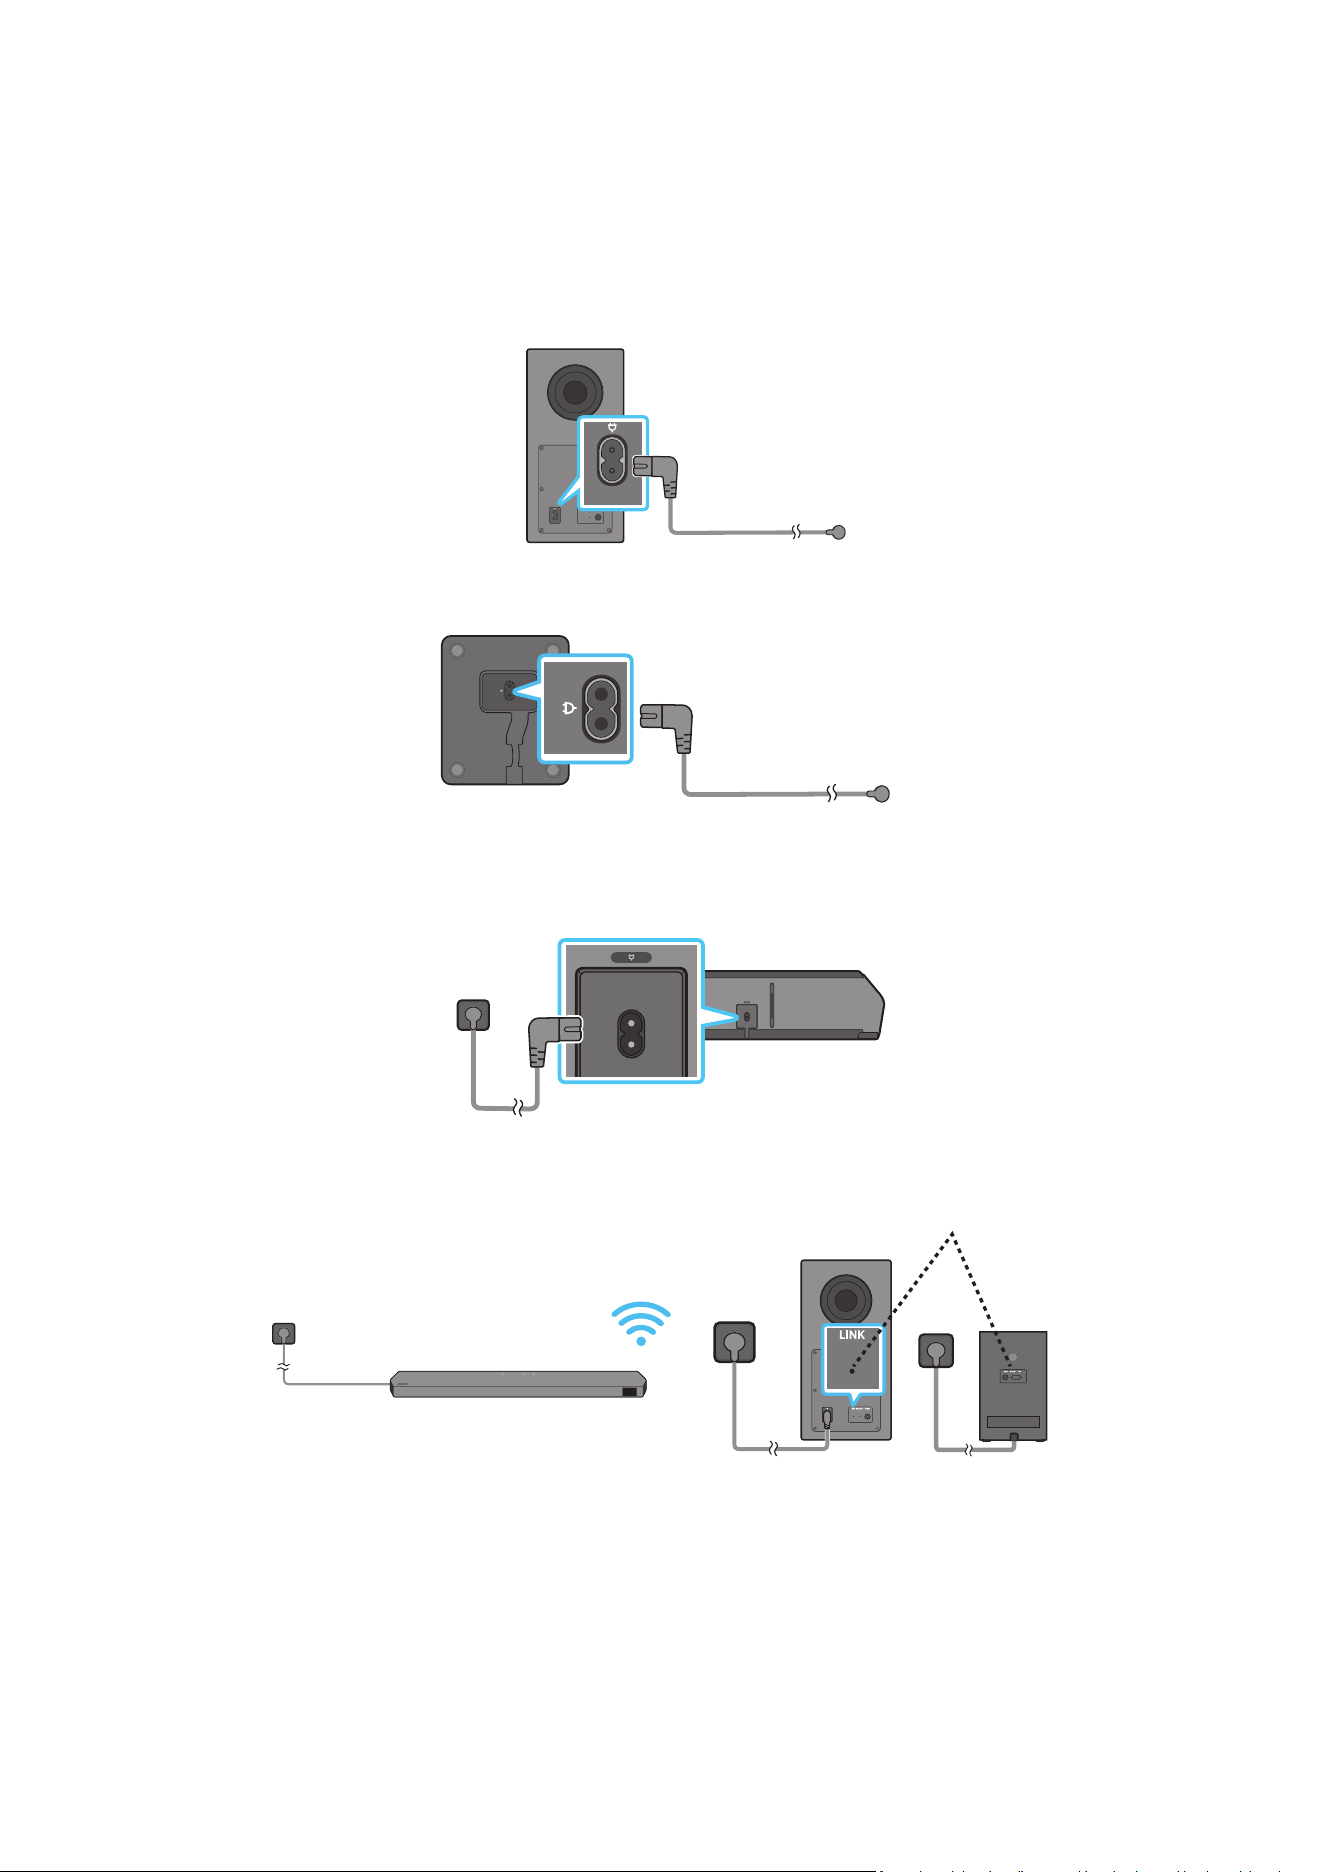
FRC - 9
04 CONNEXION DU SOUNDBAR
Connexion de l’alimentation et des unités
Utilisez le cordon d’alimentation pour brancher le caisson de basse, les haut-parleurs ambiophoniques et la Soundbar dans une prise électrique en respectant la
séquence suivante :
• Pour plus d’informations sur les exigences en matière d’alimentation électrique et de consommation d’énergie, reportez-vous à l’étiquette apposée sur le produit.
(Étiquette : Arrière de l’unité principale du Soundbar
1. Raccordez le cordon d’alimentation au caisson de basses.
Arrière du caisson de basses
Cordon d’alimentation
2. Branchez le cordon d’alimentation aux haut-parleurs ambiophoniques gauche et droit.
Bas des haut-parleurs
ambiophoniques gauche et
droit.
Cordon d’alimentation
3. Branchez le cordon d’alimentation à la Soundbar.
Dessous de l’unité principale
du Soundbar
Cordon d’alimentation
4. Branchez l’alimentation à la Soundbar, au caisson de basse et aux haut-parleurs ambiophoniques. Le caisson de basse et les haut-parleurs ambiophoniques se
connectent automatiquement lorsque la Soundbar est allumée.
DEL LINK - Le bleu est allumé
REMARQUE
• Branchez l’alimentation de la caisse de basse et des haut-parleurs ambiophoniques avant la connexion à la Soundbar. Le caisson de basse et les haut-parleurs
ambiophoniques se connecteront automatiquement lorsque la Soundbar sera allumée.
• Si vous débranchez et rebranchez le cordon d’alimentation lorsque le produit est sous tension, le Soundbar s’allume automatiquement.
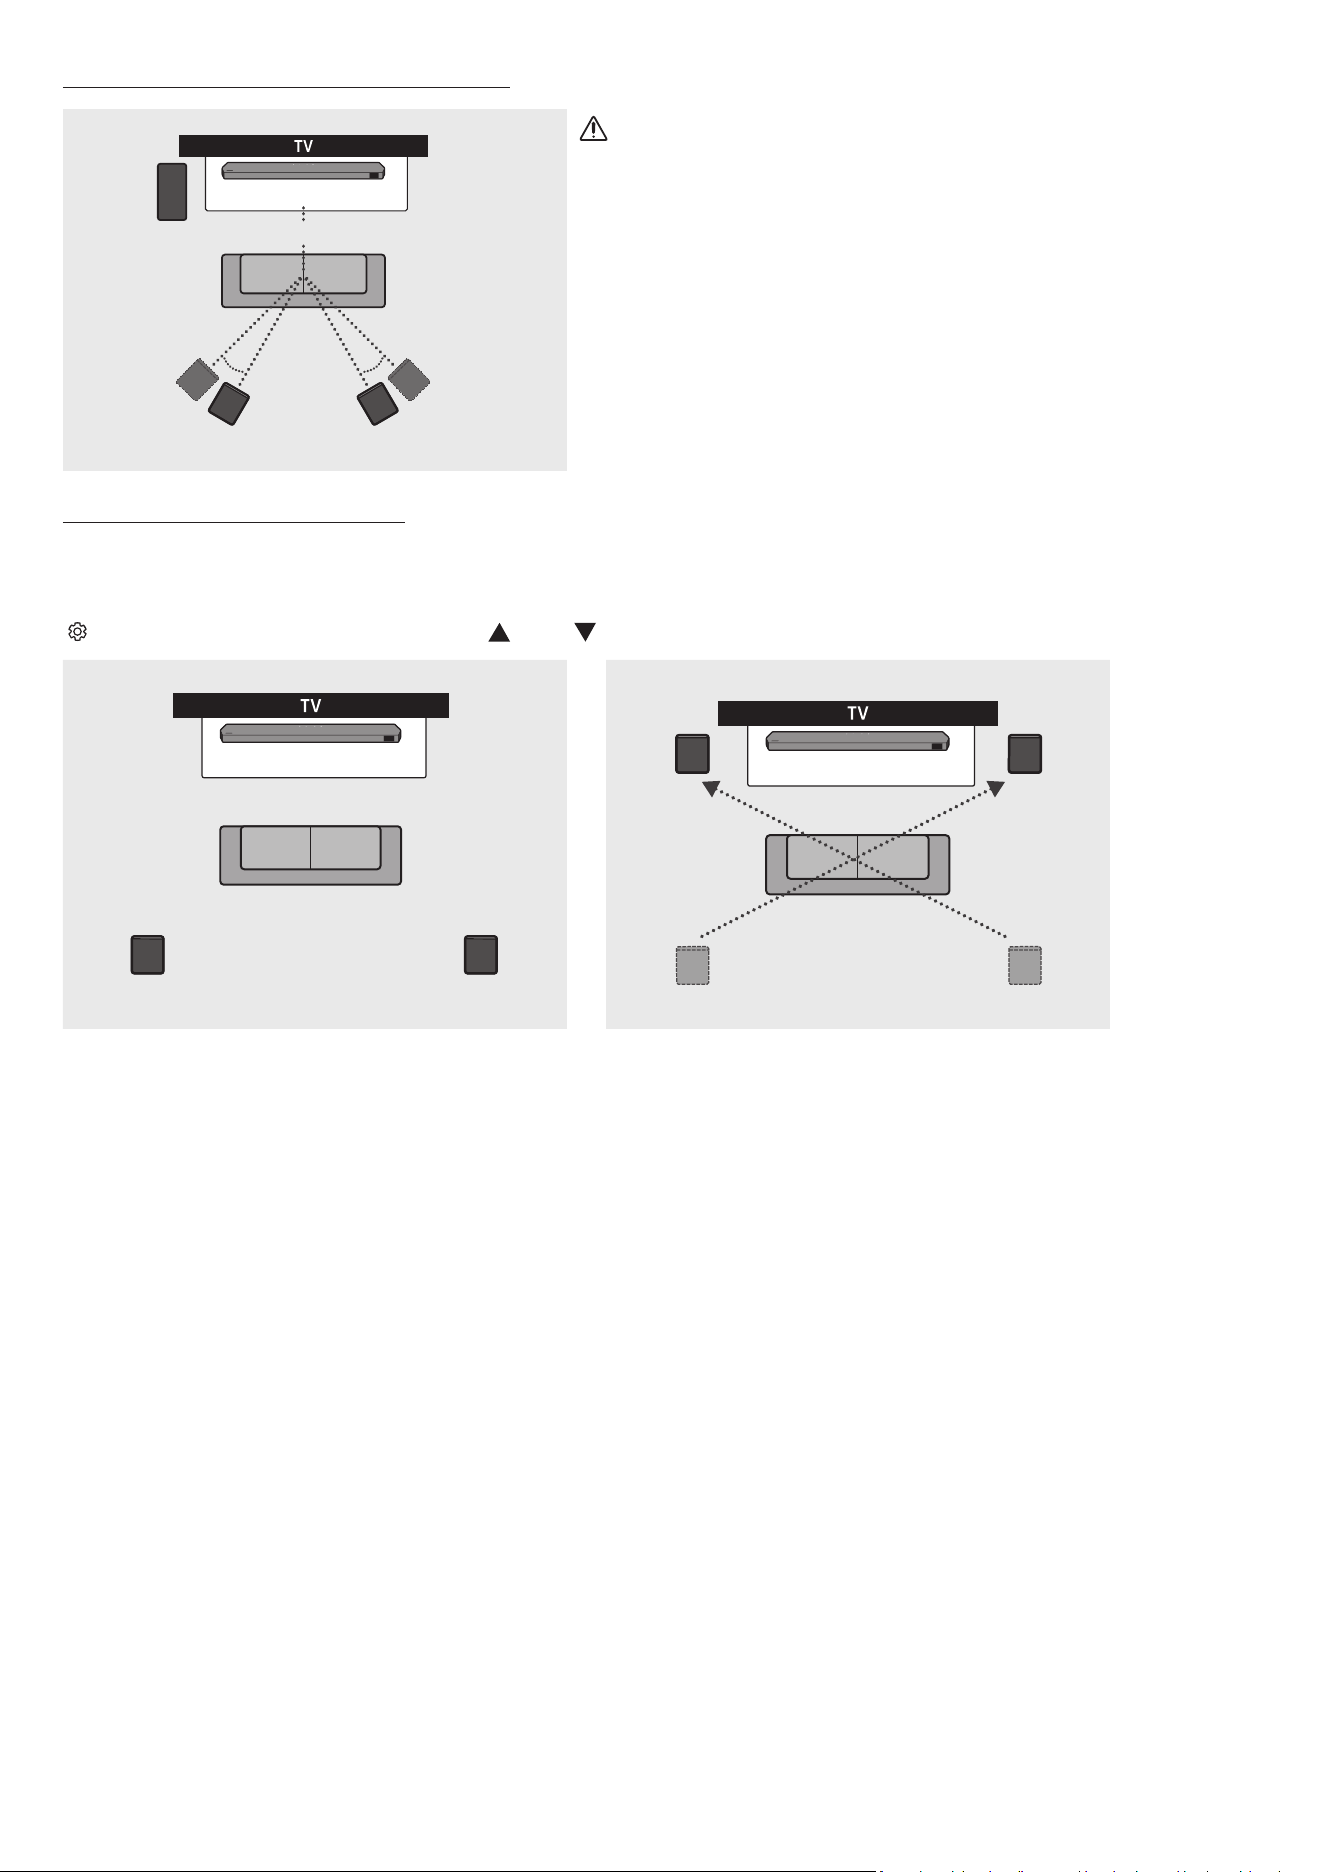
FRC - 10
Disposition recommandée pour les haut-parleurs
150° 150°
135° 135°
0°
Caisson de
basses
Soundbar
Haut-parleur ambiophonique G Haut-parleur ambiophonique D
MISE EN GARDE
• Des antennes de réception sans l sont intégrées dans le caisson de basse et les haut-
parleurs ambiophoniques. Protégez ces derniers de l’eau et de l’humidité.
• Pour une écoute optimale, veillez à dégager l’espace autour du caisson de basse et des
haut-parleurs ambiophoniques.
Mode Haut-parleurs ambiophoniques
Un son ambiophonique optimal peut être obtenu, selon la position du haut-parleur ambiophonique. Voir l’illustration ci-dessous pour le positionnement des haut-
parleurs.
Pour activer ce mode, sélectionnez le mode Haut-parleurs ambiophoniques au moyen de la télécommande du Soundbar.
(
(Commande du son) → Haut-parleur ambiophonique → (Haut) / (Bas) → Avant / Arrière)
Soundbar
Haut-parleur ambiophonique G Haut-parleur ambiophonique D
Soundbar
Haut-parleur ambiophonique D
Haut-parleur ambiophonique G
Positionnement arrière Positionnement avant
REMARQUE
• Ce mode n'est offert que sur les modèles de Soundbar qui comprennent un certain haut-parleur ambiophonique.
• En mode Haut-parleurs avant, positionnez haut-parleurs avant vers vous.
• Le mode Haut-parleurs ambiophoniques est activé par défaut en positionnement arrière.
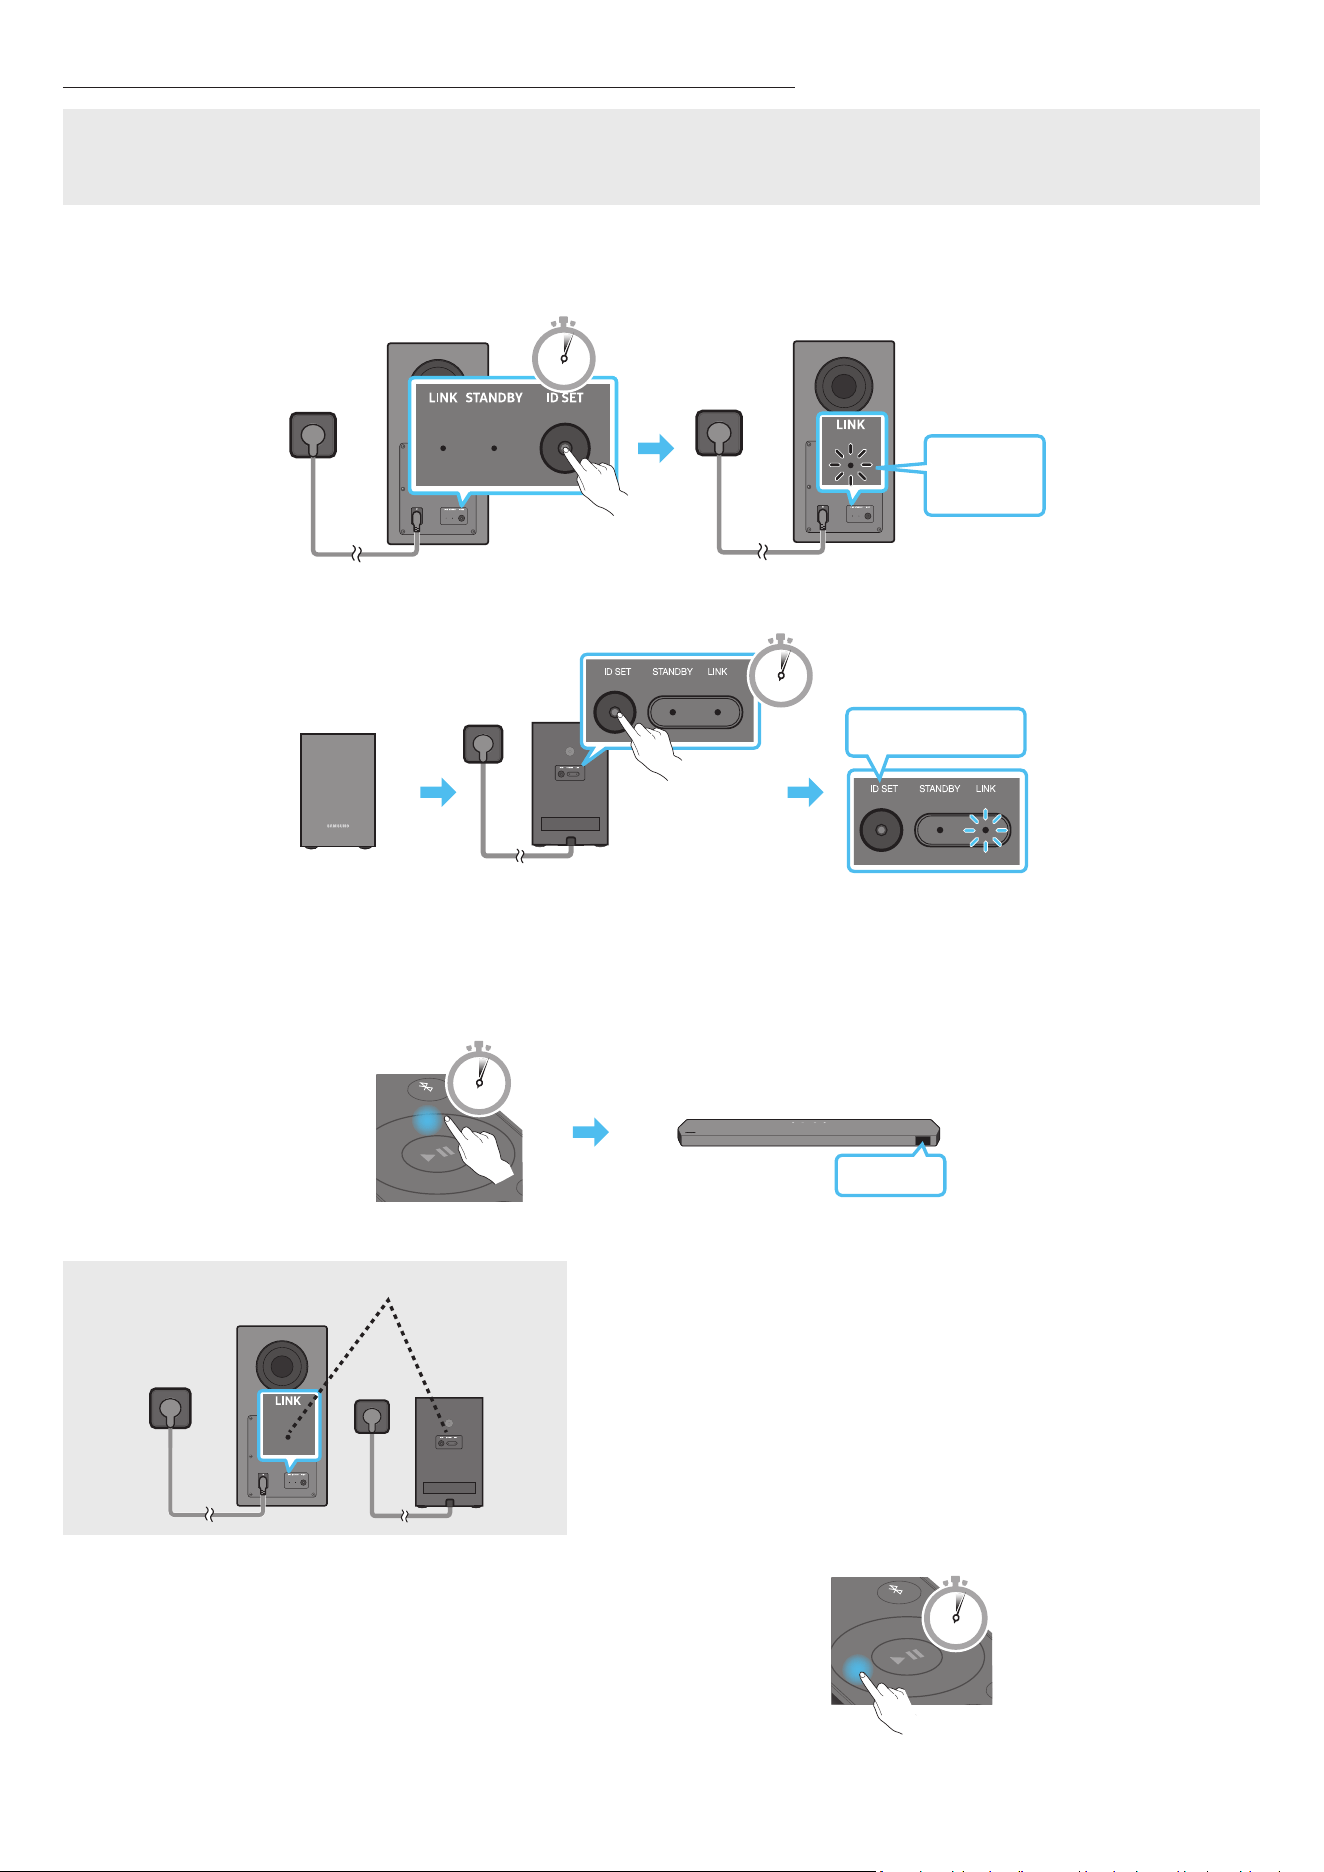
FRC - 11
Connexion manuelle du caisson de basses ou des haut-parleurs ambiophoniques
Avant d’effectuer la procédure de branchement manuel ci-dessous :
• Vériez si les câbles d’alimentation du Soundbar et du caisson de basse ou des haut-parleurs ambiophoniques sont bien branchés.
• Assurez-vous que le Soundbar est éteint.
1. Éteignez le Soundbar.
2. Maintenez appuyé le bouton ID SET à l’arrière du caisson de basse et des haut-parleurs ambiophoniques pendant au moins 5 secondes.
• Le voyant rouge situé à l’arrière de chaque haut-parleur s’éteint et le voyant bleu clignote.
5 Sec
Voyant bleu
clignotant
rapidement
Arrière du caisson de basses Arrière du caisson de basses
Voyant bleu clignotant
rapidement
x 2
Arrière des haut-parleurs
ambiophoniques gauche et droit
5 Sec
3. Appuyez sur le bouton Haut de la télécommande et maintenez-le enfoncé pendant 5 secondes.
• Le message ID SET apparaît sur l’écran du Soundbar pendant un moment, puis disparaît.
• Le Soundbar se met automatiquement sous tension lorsque l’étape ID SET est terminée.
PAIR
5 Sec
ID SET
4. Vériez que le voyant LINK est bleu xe (connexion établie).
DEL LINK - Le bleu est allumé Le voyant DEL LINK arrête de clignoter et reste allumé en bleu lorsque la connexion est
établie entre le Soundbar et le caisson de basse ou les haut-parleurs ambiophoniques.
REMARQUE
• Instructions pour réinitialiser le module Tx
1. Éteignez le Soundbar.
2. Appuyez sur le bouton Gauche de la télécommande et maintenez-le enfoncé pendant 5 secondes.
3. Suivez les consignes de la section « Connexion manuelle du caisson de basses ou des haut-
parleurs ambiophoniques ».
PAIR
5 Sec
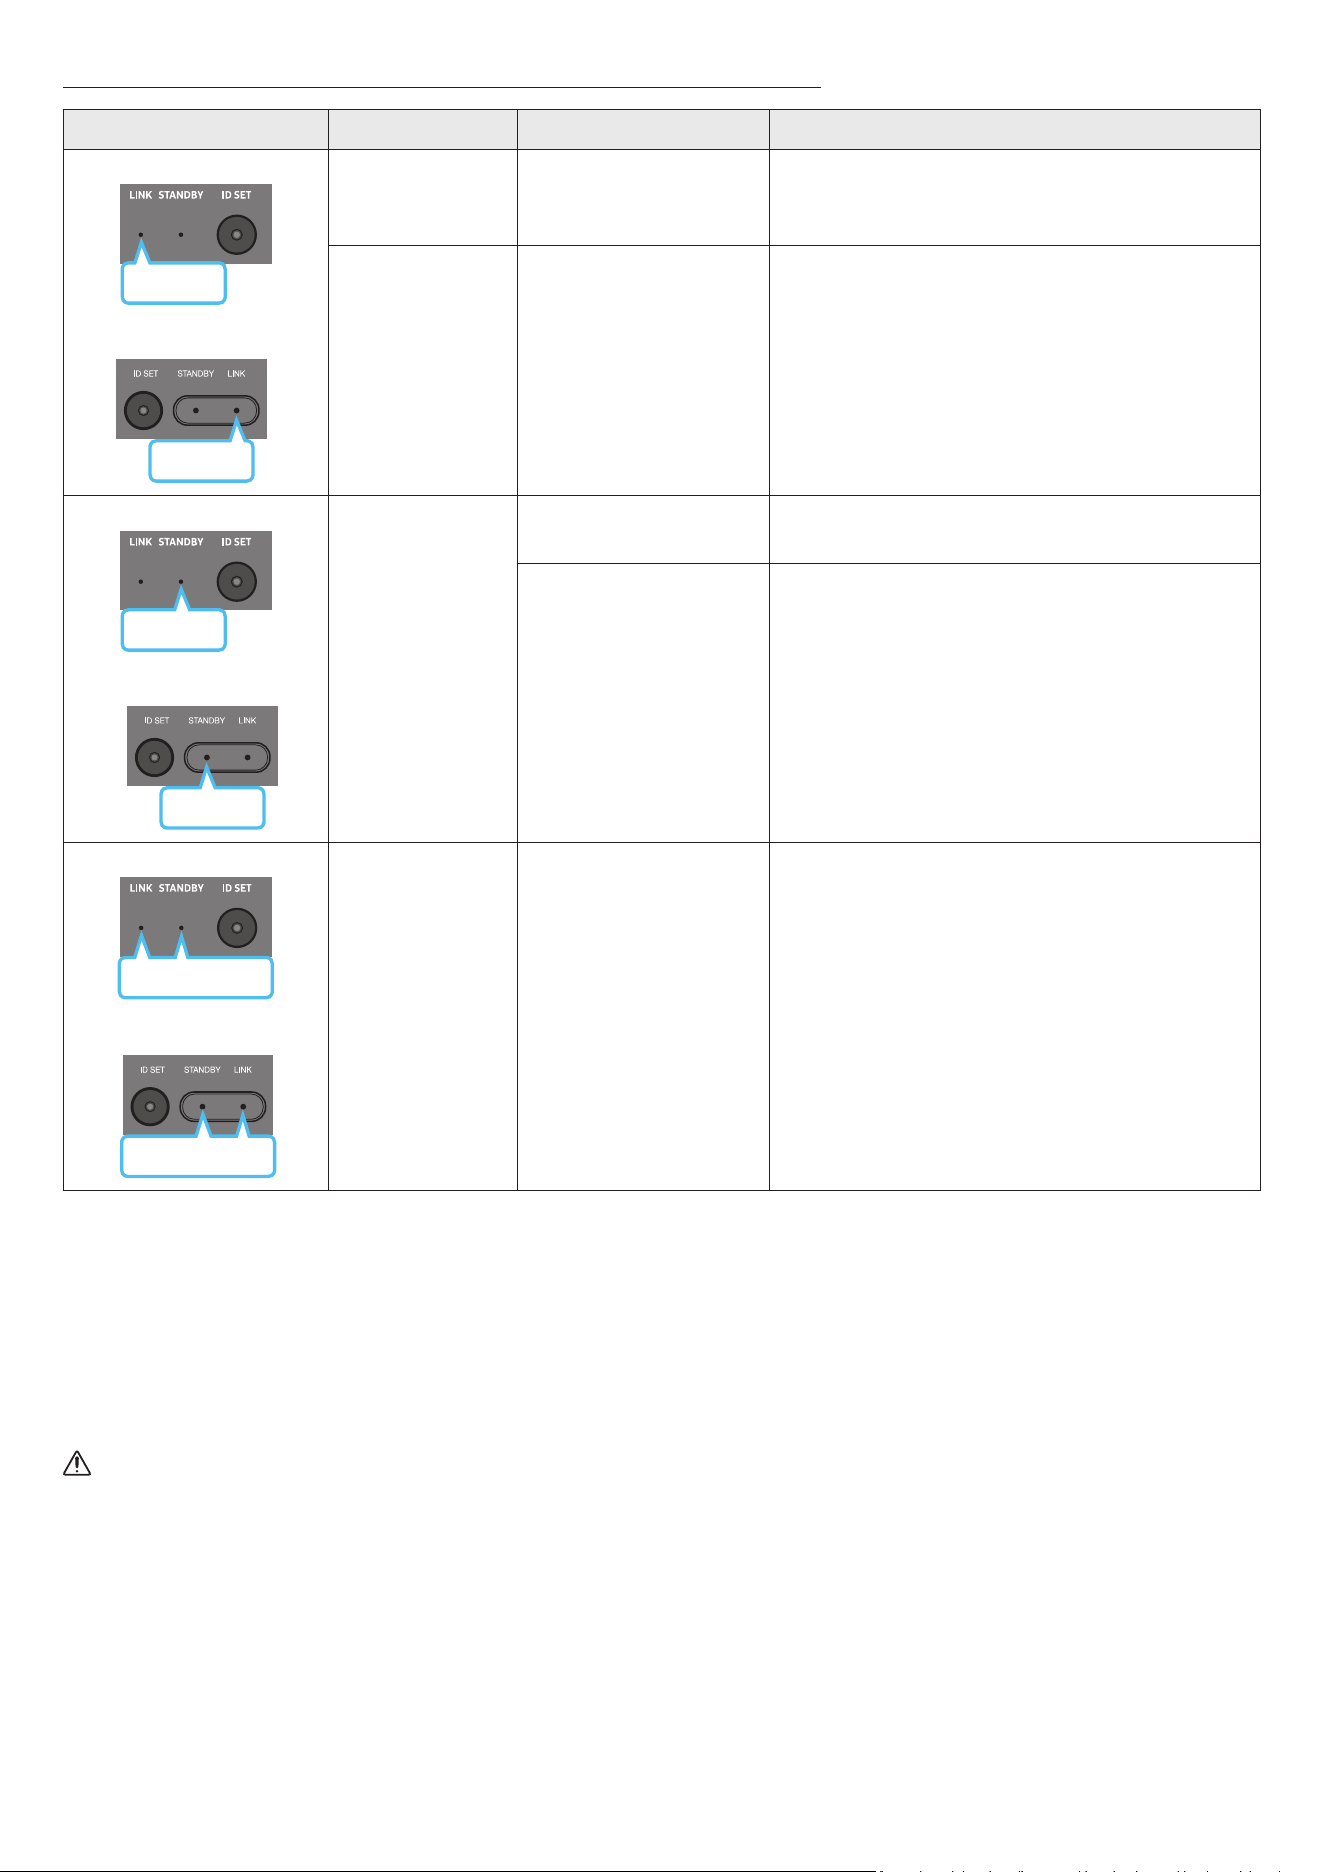
FRC - 12
Voyants à DEL à l’arrière du caisson de basses et des haut-parleurs ambiophoniques
Voyant État Description Résolution
Bleu
Caisson de basses
Haut-parleurs ambiophoniques
Bleu
Allumé
Connexion réussie
(fonctionnement normal)
-
Clignotant Récupération de la connexion
Vériez si le câble d’alimentation raccordé à l’unité principale
du Soundbar est correctement connecté ou attendez environ
cinq minutes. Si le voyant à DEL continue à clignoter, essayez
de connecter manuellement le caisson de basse et les haut-
parleurs ambiophoniques. Voir la page 11.
Rouge
Caisson de basses
Haut-parleurs ambiophoniques
Rouge
Allumé
Veille (avec l’unité principale
Soundbar éteinte)
Vériez si le câble d’alimentation raccordé à l’unité principale
du Soundbar est correctement connecté.
Échec de la connexion
Connectez-vous à nouveau. Voir les instructions de connexion
manuelle à la page 11.
Caisson de basses
Rouge et bleu
Haut-parleurs ambiophoniques
Rouge et bleu
Clignotant Dysfonctionnement
Consultez les coordonnées du centre de service Samsung dans
ce manuel.
REMARQUE
• Si l’unité principale est éteinte, le caisson de basse passe en mode veille et la DEL STANDBY située à l’arrière du caisson devient rouge après avoir clignoté en
bleu.
• Si vous utilisez un appareil qui utilise la même fréquence que le Soundbar à proximité du Soundbar, des interférences peuvent donner lieu à des interruptions du
son.
• La distance maximale de transmission du signal sans l à partir de l’unité principale est d’environ 10 m (32,8 pieds), mais cela peut varier en fonction de votre
environnement d’utilisation. Si un mur métallique ou en béton armé se trouve entre l’unité principale et le caisson de basse, il est possible que le système ne
fonctionne pas, car le signal sans l ne peut pas traverser le métal.
MISE EN GARDE
• Des antennes de réception sans l sont intégrées dans le caisson de basse et les haut-parleurs ambiophoniques. N’exposez pas l’appareil à la pluie ni à
l’humidité.
• Pour une écoute optimale, veillez à dégager l’espace autour du caisson de basse et des haut-parleurs ambiophoniques.
• N’introduisez aucune partie de votre corps ni de corps étrangers dans le conduit (trou) du caisson de basse.
• N’utilisez pas le conduit (trou) du caisson de basse pour le suspendre au mur.
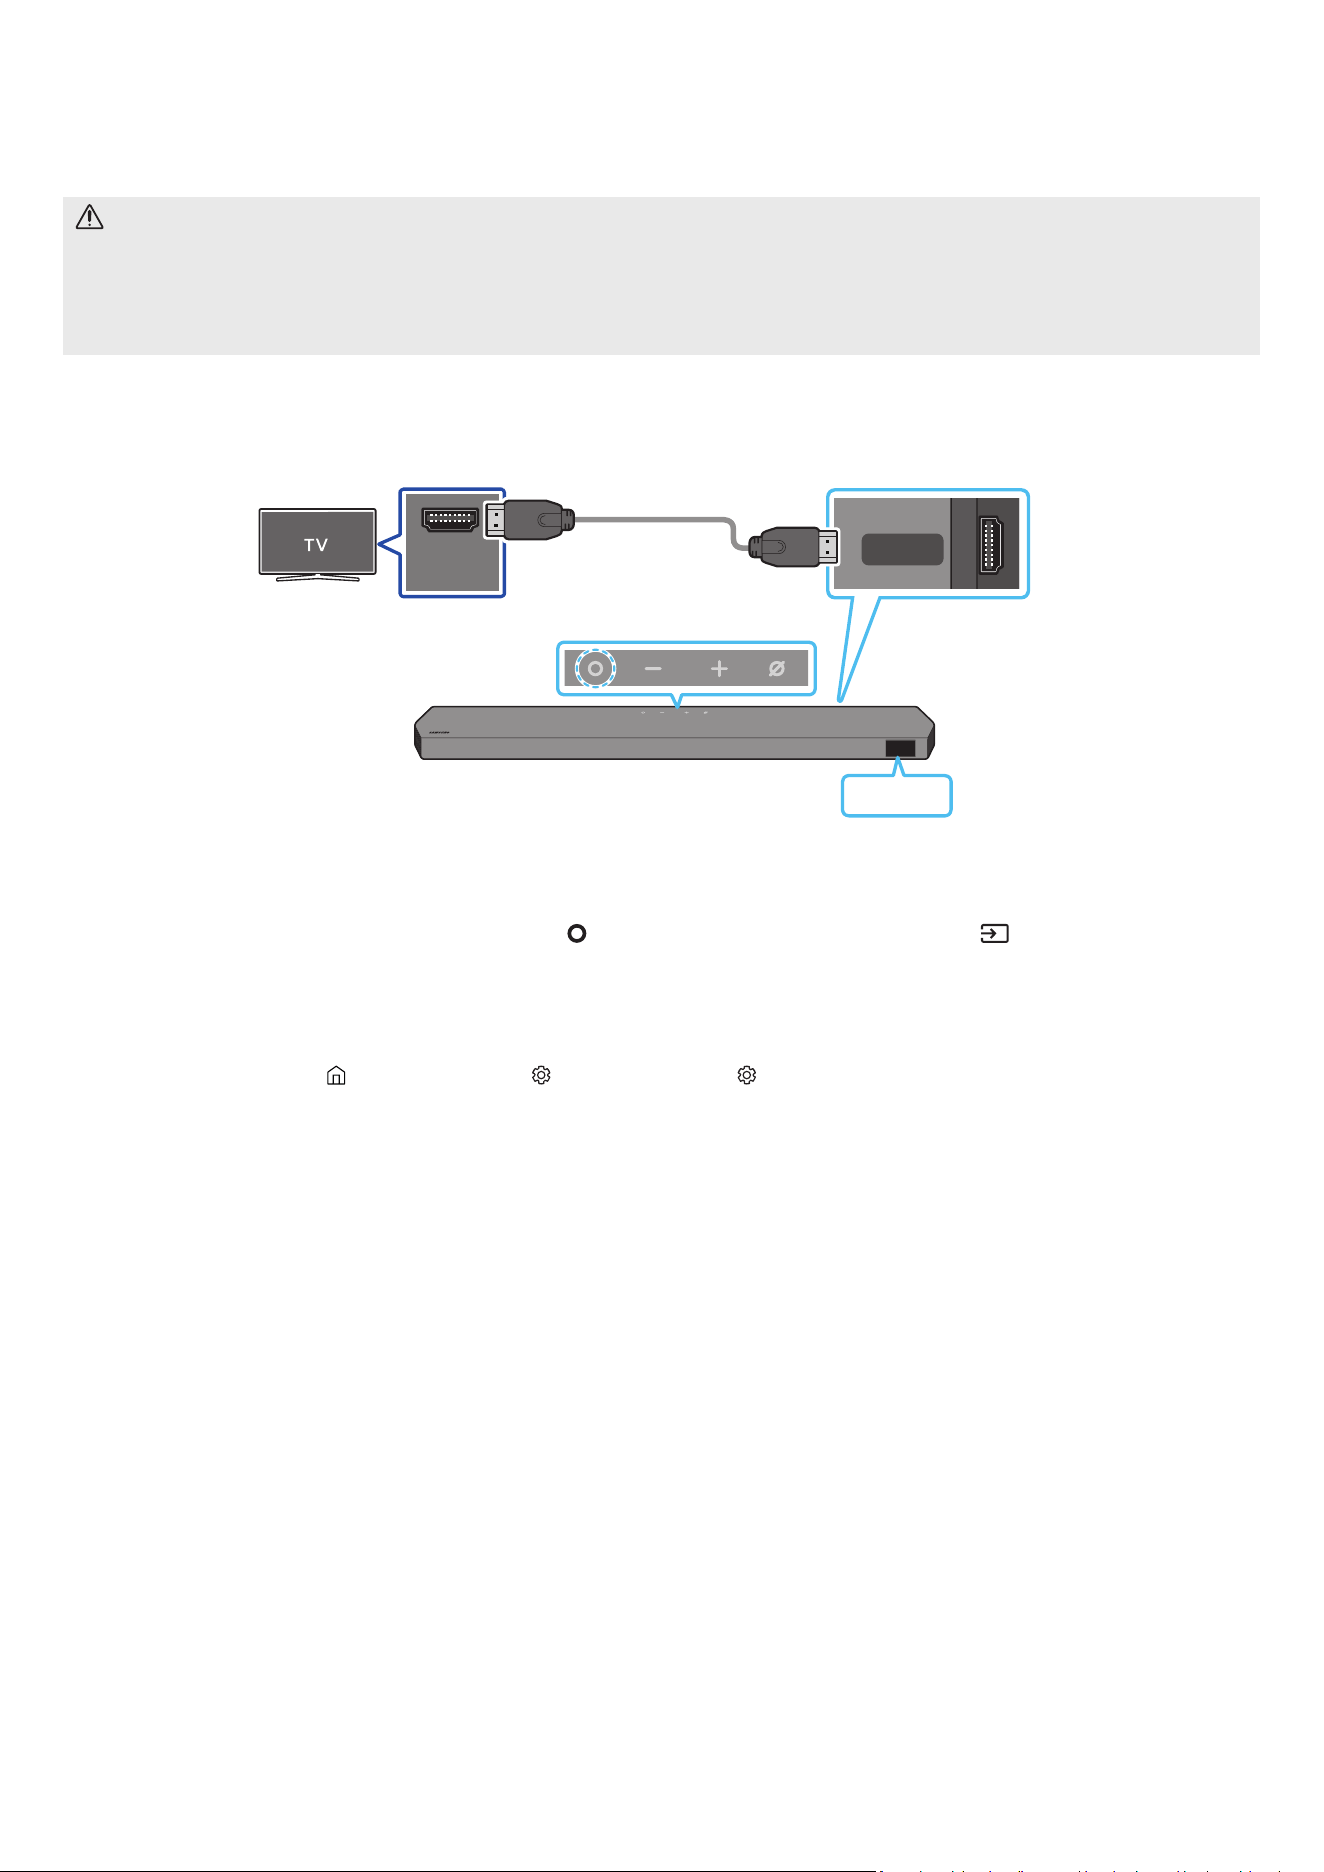
FRC - 13
05 CONNEXION À UN TÉLÉVISEUR
Connexion du téléviseur prenant en charge HDMI ARC (canal de retour audio)
MISE EN GARDE
• Lorsque le câble HDMI et le câble optique sont tous les deux connectés, le signal HDMI est reçu en premier.
• Pour connecter le câble HDMI entre le téléviseur et le Soundbar, assurez-vous de connecter les bornes marquées ARC. Sinon, le son du téléviseur risque de ne
pas être émis.
• Le câble recommandé est un câble HDMI certié par HDMI.org.
HDMI IN
(ARC)
HDMI TO TV
(eARC/ARC)
Connectez le câble au port HDMI
IN (ARC/eARC) de votre téléviseur.
Connectez le câble au port
HDMI TO TV (eARC/ARC) de
l’unité principale du Soundbar.
Câble HDMI
(fourni)
Dessus du Soundbar
Dessous du Soundbar
TV ARC
1. Connectez le câble HDMI comme indiqué sur la gure en vous assurant que le Soundbar et le téléviseur sont éteints.
2. Allumez le Soundbar et le téléviseur.
3. « TV ARC » apparaît sur l’écran d’afchage de l’unité principale du Soundbar qui diffuse le son du téléviseur.
• Si le son du téléviseur n’est pas audible, appuyez sur le bouton
(Multifonction) en haut du Soundbar ou sur le bouton (Source) de la télécommande
pour sélectionner le mode « TV ARC ». L’écran afche « TV ARC » et le son du téléviseur est émis.
• Lors de la connexion d’un téléviseur prenant en charge la fonction eARC, « TV eARC » apparaît sur l’afchage et le son est audible.
• Pour la connexion à eARC, la fonction eARC dans le menu du téléviseur devrait être activée. Reportez-vous au manuel de l’utilisateur du téléviseur pour de
plus amples renseignements sur ce réglage.
(p. ex, Samsung TV : Accueil ( ) → Menu → Paramètres ( ) → Tous les paramètres ( ) → Son → Réglages expert → Mode HDMI-eARC (Auto))
• Si l’option « TV ARC » ne s’afche pas sur l’écran de l’unité principale du Soundbar, vériez que le câble HDMI est connecté au bon port.
• Utilisez les boutons de volume de la télécommande du téléviseur pour modier le volume du Soundbar.
REMARQUE
• Lorsque vous connectez le téléviseur prenant en charge HDMI ARC (Audio Return Channel) au Soundbar avec un câble HDMI, vous pouvez transmettre les
données vidéo et audio numériques sans connecter de câble optique séparé.
• Nous vous recommandons d’utiliser si possible un câble HDMI sans noyau. Si vous utilisez un câble HDMI à noyau, utilisez-en un dont le diamètre est inférieur à
14 mm (0,55 po).
• Cette fonction n’est pas disponible si le câble HDMI ne prend pas en charge ARC.
• Lorsque le son d’une diffusion est encodé en Dolby Digital et que le paramètre « Digital Output Audio Format » est déni sur PCM sur votre téléviseur, nous
recommandons de changer ce paramètre en le dénissant sur Dolby Digital. Une fois que vous aurez modié ce paramètre sur le téléviseur, vous pourrez proter
d’une meilleure qualité sonore. (Le menu du téléviseur peut utiliser des mots différents pour Dolby Digital et PCM selon le fabricant du téléviseur.)
• Les protocoles ARC/eARC prennent Dolby Atmos en charge.
• Vériez que le contenu prend en charge Dolby Atmos®.
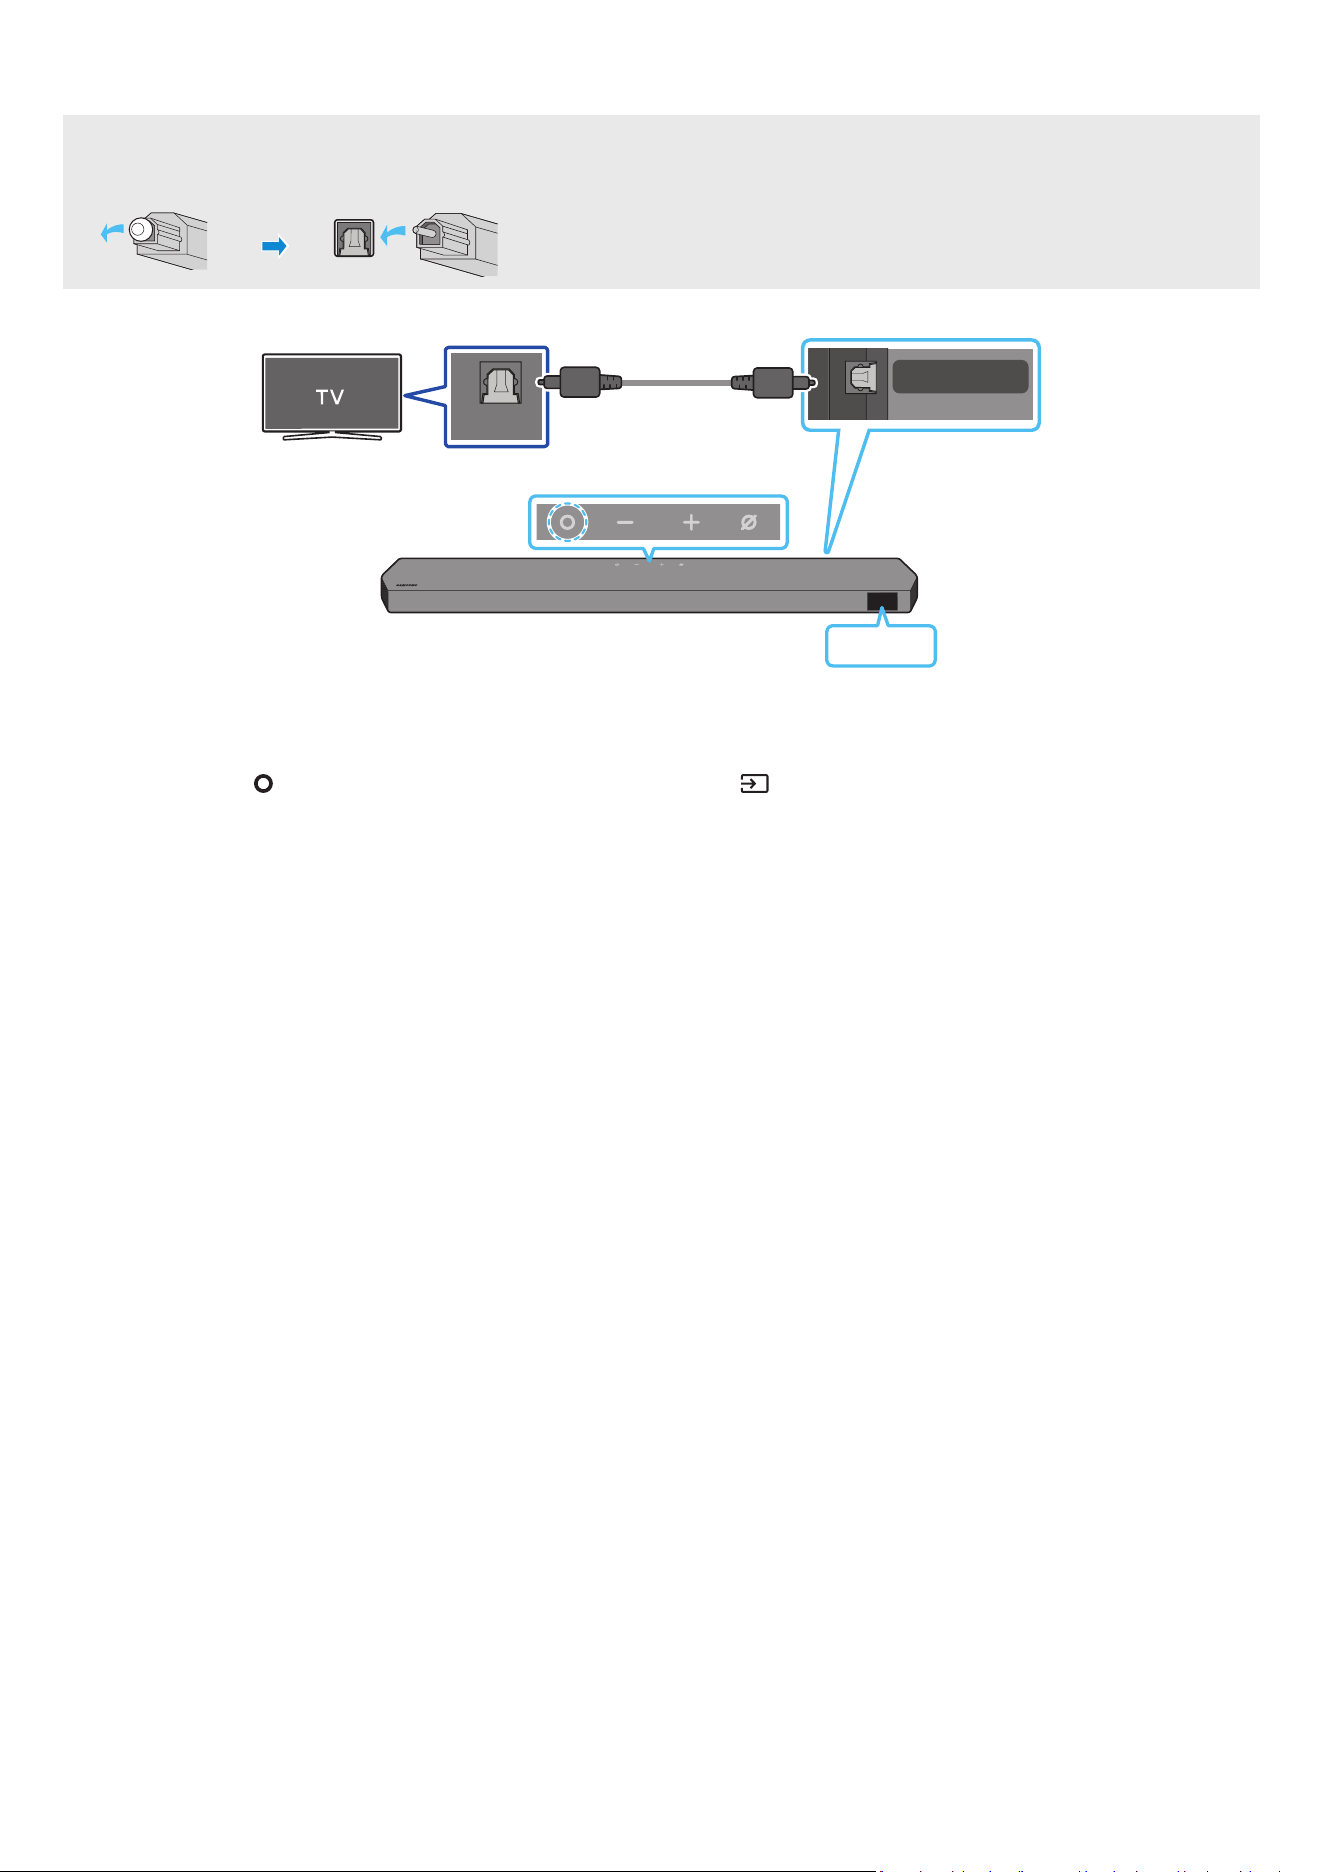
FRC - 14
Connexion à l’aide d’un câble optique
Liste de contrôle de pré-connexion
• Lorsque le câble HDMI et le câble optique sont tous les deux connectés, le signal HDMI est reçu en premier.
• Lorsque vous utilisez un câble optique et que les bornes sont munies de caches, assurez-vous de retirer les caches.
OPTICAL OUT
DIGITAL AUDIO IN
(OPTICAL)
Câble optique (non fourni)
Dessous du Soundbar
D.IN
Dessus du Soundbar
1. Le téléviseur et le Soundbar étant éteints, connectez le port DIGITAL AUDIO IN (OPTICAL) du Soundbar et le port de sortie OPTICAL du téléviseur à l’aide d’un
câble optique (non fourni), comme indiqué sur la gure.
2. Allumez le Soundbar et le téléviseur.
3. Appuyez sur le bouton
(Multifonction) situé dans le haut du Soundbar ou sur le bouton (Source) de la télécommande pour sélectionner le mode « D.IN ».
4. Le son du téléviseur est émis par le Soundbar.
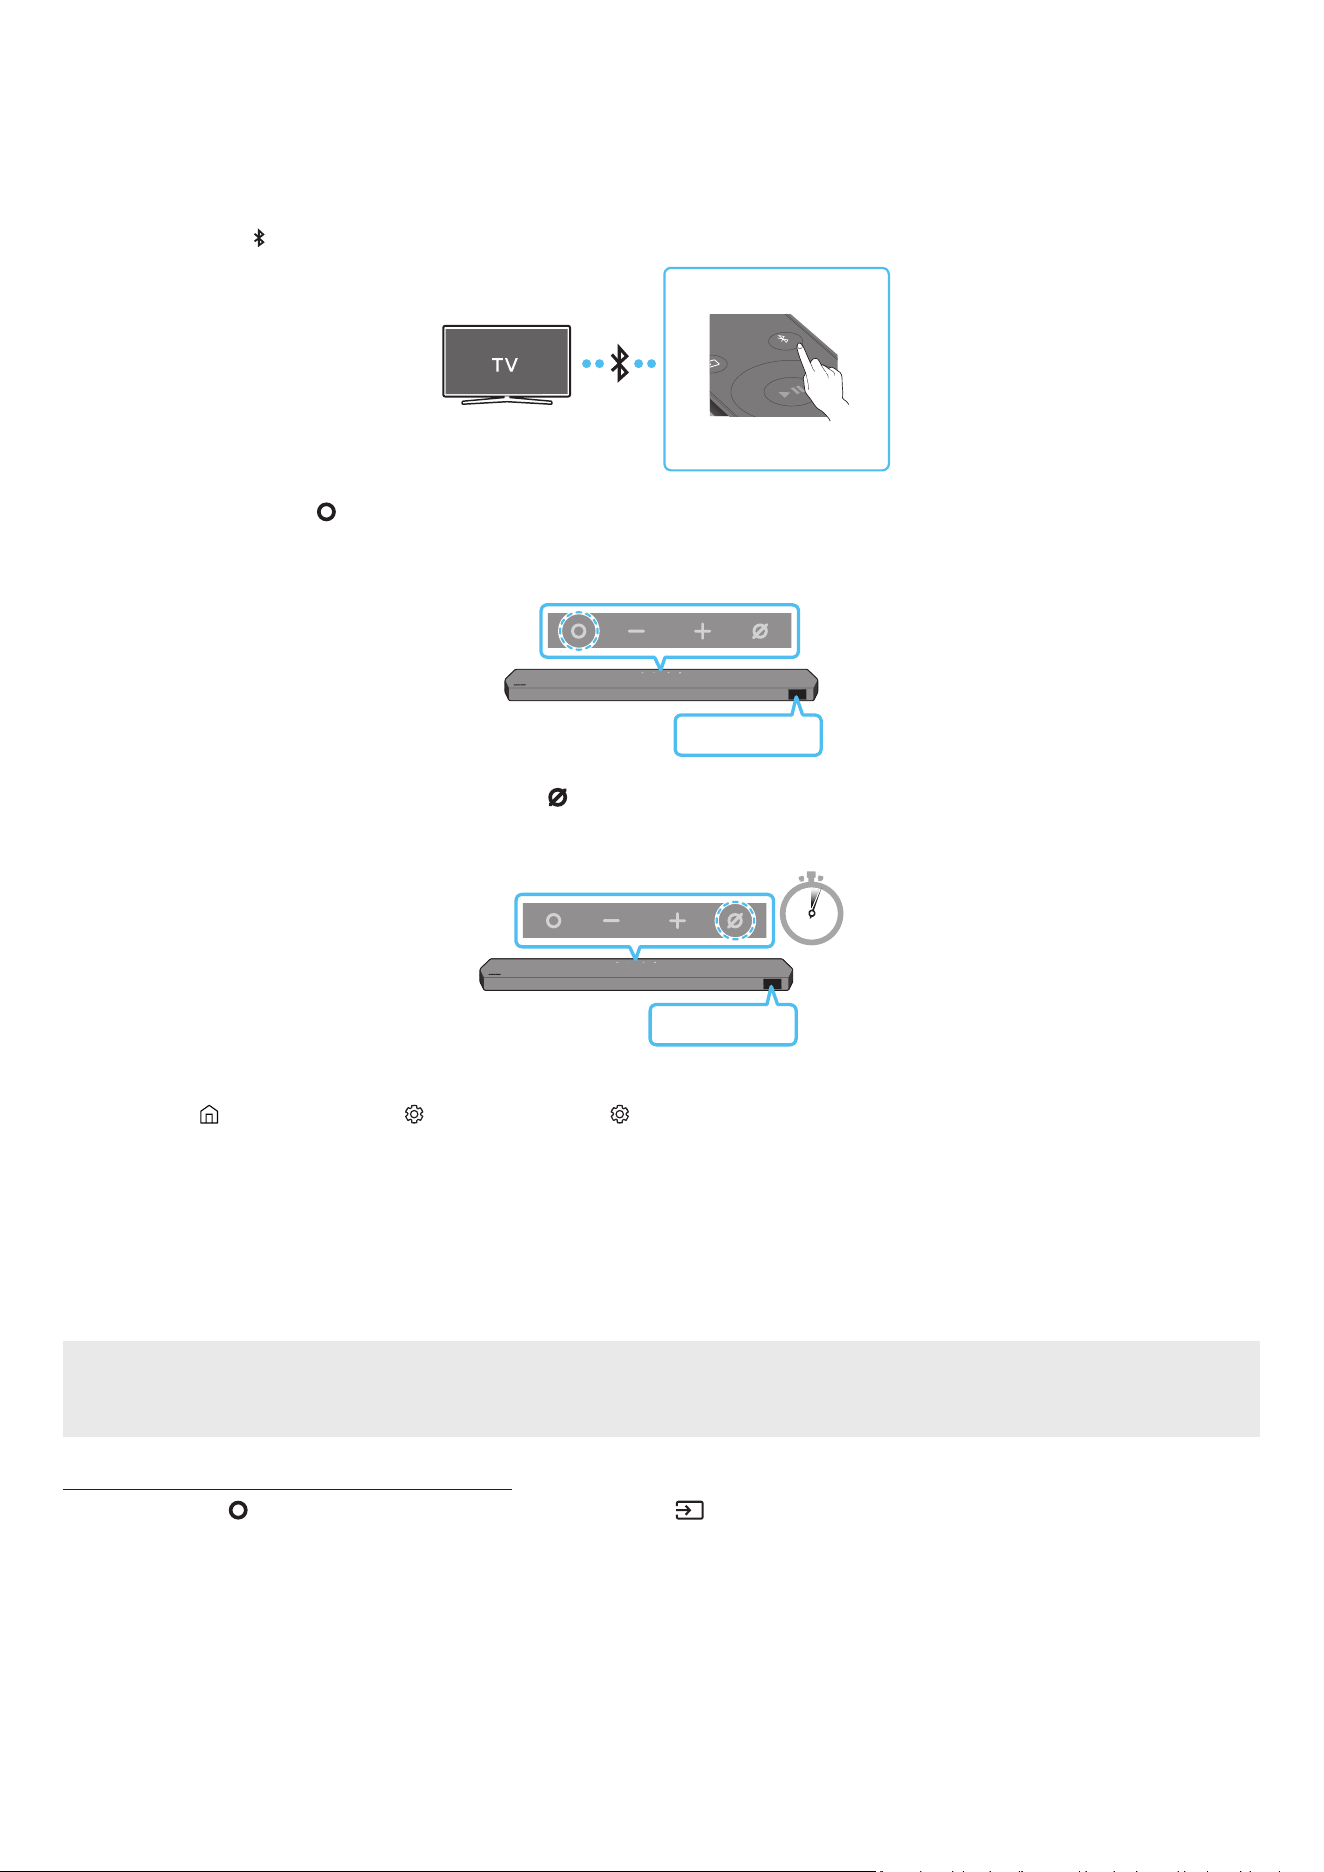
FRC - 15
Connexion par Bluetooth
Lorsqu’un téléviseur Samsung est connecté via Bluetooth, vous pouvez entendre le son stéréo sans les tracas du câblage.
• Un seul téléviseur Samsung peut être connecté à la fois.
• Un téléviseur Samsung prenant en charge Bluetooth peut être connecté. Vériez les spécications de votre téléviseur.
La connexion initiale
1. Appuyez sur le bouton
PAIR de la télécommande du Soundbar pour accéder au mode « BT PAIRING ».
PAIR
(OU)
a. Appuyez sur le bouton
(Multifonction) du panneau supérieur, puis sélectionnez « BT ».
« BT » passe automatiquement à « BT PAIRING » en quelques secondes ou à « BT READY » s’il existe un enregistrement de connexion.
Dessus du Soundbar
BT READY
b. Lorsque « BT READY » apparaît, appuyez sur le bouton
(Marche/Arrêt microphone) du panneau supérieur du Soundbar et maintenez-le enfoncé
pendant plus de 5 secondes jusqu’à ce que « BT PAIRING » apparaisse.
5 Sec
Dessus du Soundbar
BT PAIRING
2. Sélectionnez le mode Bluetooth sur le téléviseur Samsung.
(p. ex. Accueil ( ) → Menu → Paramètres ( ) → Tous les paramètres ( ) → Son → Sortie audio → Liste des haut-parleurs Bluetooth → Soundbar Q-Series
(Bluetooth))
3. Sélectionnez « Soundbar Q-Series » dans la liste sur l’écran du téléviseur.
Un Soundbar disponible est indiqué par « Association requise » ou « Associé » sur la liste des appareils Bluetooth du téléviseur. Pour connecter le téléviseur
Samsung au Soundbar, sélectionnez le message, puis établissez une connexion.
• Lorsque le téléviseur Samsung est connecté, [Nom du téléviseur] → « BT » apparaît sur l'écran avant du Soundbar.
4. Vous pouvez maintenant entendre le son du téléviseur Samsung à partir du Soundbar.
• Une fois que vous avez connecté le Soundbar à votre téléviseur la première fois, utilisez le mode « BT READY » pour la reconnexion.
En cas d’échec de la connexion de l’équipement
• Si vous avez un Soundbar existant (par exemple, Soundbar Q-Series) dans la liste des haut-parleurs du téléviseur Samsung, supprimez-le.
• Répétez ensuite les étapes 1 à 3.
Déconnexion du Soundbar du téléviseur Samsung
Appuyez sur le bouton
(Multifonction) dans le haut du Soundbar ou sur le bouton (Source) de la télécommande pour sélectionner un mode autre que « BT ».
• La déconnexion prend du temps car le téléviseur Samsung doit recevoir une réponse du Soundbar.
(Le temps requis peut varier en fonction du modèle de téléviseur Samsung.)

FRC - 16
Quelle est la différence entre BT READY et BT PAIRING ?
• BT READY : dans ce mode, vous pouvez reconnecter n’importe quel téléviseur ou appareil mobile Samsung connecté auparavant.
• BT PAIRING : dans ce mode, vous pouvez connecter un nouvel appareil au Soundbar.
(Appuyez sur le bouton PAIR de la télécommande du Soundbar ou appuyez sur le bouton (Marche/Arrêt microphone) situé sur le dessus du Soundbar et
maintenez-le enfoncé pendant plus de 5 secondes pendant que le Soundbar est en mode « BT ».)
Remarques sur la connexion Bluetooth
• Placez un nouvel appareil à moins de 1 m (3,28 pi) pour vous connecter par Bluetooth.
• Si un code PIN vous est demandé lors de la connexion d’un appareil Bluetooth, entrez <0000>.
• Le Soundbar s’éteint automatiquement au bout de 18 minutes à l’état Ready (Prêt).
• Le Soundbar peut ne pas effectuer correctement la recherche ou la connexion Bluetooth dans les circonstances suivantes :
‒ S’il y a un fort champ électrique autour du Soundbar.
‒ Si plusieurs appareils Bluetooth sont associés simultanément au Soundbar.
‒ Si l’appareil Bluetooth est éteint, pas en place ou fonctionne mal.
• Les appareils électroniques peuvent créer des interférences radio. Les appareils produisant des ondes électromagnétiques doivent être gardés à distance de
l’unité principale du Soundbar, par exemple les micro-ondes, les appareils de réseau sans l, etc.
• Pour activer/désactiver la connexion Bluetooth
Appuyez sur le bouton TONE CONTROL de la télécommande du Soundbar pendant 30 secondes pour activer/désactiver le Wi-Bluetooth.
Connexion en Wi-Fi
Liste de contrôle de pré-connexion
• La connexion Wi-Fi est disponible uniquement sur les téléviseurs Samsung.
• Vériez que le routeur sans l (Wi-Fi) est activé et que le téléviseur est connecté au routeur.
• Le téléviseur et le Soundbar doivent être connectés au même réseau sans l (Wi-Fi).
• Si votre routeur sans l (Wi-Fi) utilise un canal DFS, vous ne pourrez pas établir de connexion Wi-Fi entre le téléviseur et le Soundbar. Communiquez avec
votre fournisseur de service Internet pour plus de détails.
• Étant donné que les menus peuvent varier selon l’année de fabrication, consultez le manuel de votre téléviseur.
• Pour brancher le téléviseur au Soundbar par Wi-Fi, branchez d’abord le Soundbar au routeur sans l. Reportez-vous à la page 23 pour savoir comment établir
une connexion Wi-Fi.
1. Pour plus de détails sur la connexion Wi-Fi du Soundbar, reportez-vous à la page 23, « Méthode 2. Connexion par Wi-Fi (réseau sans l) ».
2. Modiez la source d’entrée du téléviseur en utilisant le menu Audio sur le Soundbar.
• Téléviseurs Samsung mis en marché en 2017 ou après
Accueil (
) → Menu → Paramètres ( ) → Tous les paramètres ( ) → Son → Sortie audio → Soundbar Q-Series (Wi-Fi)
REMARQUE
• La connexion Wi-Fi Dolby Atmos est disponible sur certains téléviseurs Samsung et sur certains modèles de Soundbar.
• Précautions : Le Soundbar redémarrera automatiquement si vous activez/désactivez le Wi-Fi.
• Pour activer/désactiver la connexion Wi-Fi
Appuyez sur le bouton CH LEVEL de la télécommande du Soundbar pendant 30 secondes pour activer/désactiver le Wi-Fi.

FRC - 17
Utilisation de la fonction Q-Symphony
• Lorsque le Soundbar se connecte à un téléviseur Samsung prenant en charge la fonction Q-Symphony, vous pouvez lire le son simultanément via le Soundbar
et le téléviseur. Si vous utilisez la fonction Q-Symphony, le son ambiophonique émis par le téléviseur vous permet de proter d’un effet de son tridimensionnel
ambiophonique plus puissant et plus riche.
• Lorsque le Soundbar est connecté, le menu « Q-Symphony » s’afche sur le téléviseur.
Paramètres (
) → Tous les paramètres ( ) → Son → Sortie audio
• Exemple de menu du téléviseur : Q-Symphony
Menu du
téléviseur
Câble HDMI
TV ARC/eARC
Menu du
téléviseur
Câble optique (non fourni)
D.IN
Menu du
téléviseur
Wi-Fi
Wi-Fi
REMARQUE
• Le fonctionnement dépend du codec pris en charge par le téléviseur.
• Cette fonction est prise en charge uniquement lorsque le câble HDMI ou le câble optique (non fourni) ou le Wi-Fi est connecté.
• Le message qui s'afche peut varier selon le modèle de TV.
• Assurez-vous que votre téléviseur et le Soundbar sont connectés au même routeur sans l et à la même fréquence.
• Cette fonction est disponible sur certains téléviseurs Samsung et sur certains modèles de Soundbar.

FRC - 18
Utilisation du SpaceFit Sound
Cette fonction analyse l’espace d’écoute de l’utilisateur avec le microphone du Soundbar et offre le son optimal pour cet espace. L’optimisation du son se fait
automatiquement.
Méthode 1. Connexion par le Soundbar
Pour activer cette fonction, activez le mode SpaceFit Sound à l’aide de la télécommande du Soundbar.
1. Appuyez sur le bouton
(Commande du son) pour activer le mode SpaceFit Sound.
« SPACEFIT SOUND OFF » apparaît sur l’écran.
2. Appuyez sur le bouton Haut sur la télécommande pour activer le SpaceFit Sound.
« ON » apparaît à l’écran.
PAIR
3. Appuyez sur le bouton Bas sur la télécommande pour désactiver le SpaceFit Sound.
« OFF » apparaît à l’écran.
PAIR
• Cette fonction est offerte par tous les modes audio.
Méthode 2. Connexion par un téléviseur
Pour activer cette fonction, activez le mode Adaptive Sound+ sur le menu de votre téléviseur Samsung.
(Accueil (
) → Menu → Paramètres ( ) → Tous les paramètres ( ) → Général → Paramètres de mode intelligent→ Adaptive Sound+)
• Le mode son de votre Soundbar passera automatiquement à Adaptive Sound+ si vous activez le mode Adaptive Sound+ sur votre téléviseur.
REMARQUE
Cette fonction est active lorsque le Soundbar se connecte à certains téléviseurs Samsung.
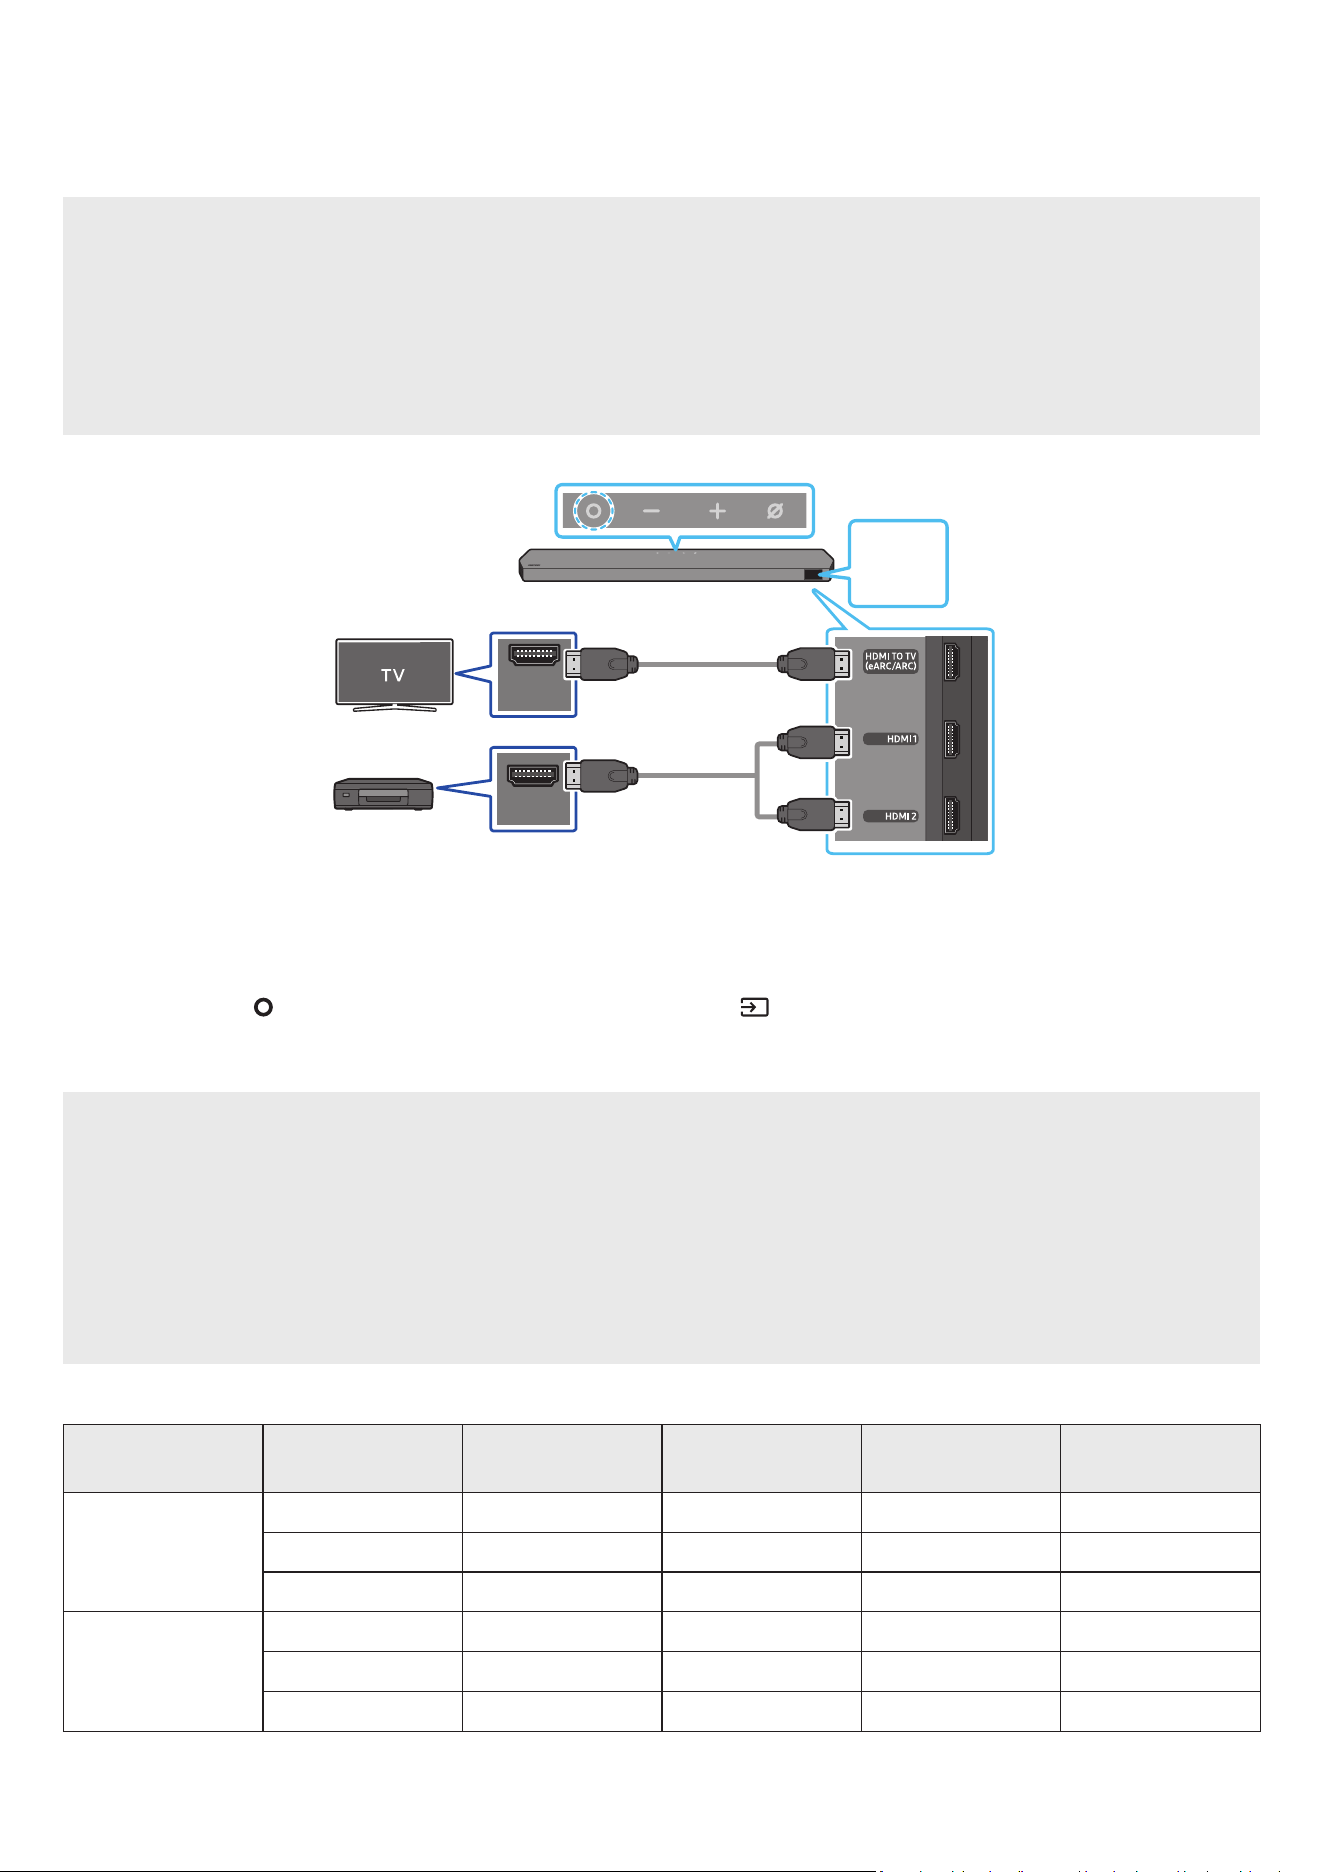
FRC - 19
06 CONNEXION D’UN APPAREIL EXTERNE
Méthode 1. Connexion à l’aide d’un câble HDMI (décodage et lecture Dolby Atmos / DTS:X possible)
Liste de contrôle de pré-connexion
• Si les options de sortie audio incluent une sortie audio secondaire, vériez qu’elle est désactivée.
• Vériez que le contenu prend en charge Dolby Atmos® / DTS:X.
• Utilisez uniquement un câble HDMI respectant les exigences d’E/S pertinentes.
• An de recevoir correctement le signal UHD, un câble HDMI ultra haute vitesse est requis.
• Pour une bonne réception du signal UHD, vériez au préalable les caractéristiques techniques d’E/S vidéo et les paramètres locaux du téléviseur ou de
l’appareil externe.
• Pour en savoir plus, consultez le manuel utilisateur du téléviseur ou de l’appareil externe.
HDMI IN
(ARC)
HDMI OUT
Dessous du Soundbar
HDMI 1
OU
HDMI 2
Appareil externe
Câble HDMI
(fourni)
Câble HDMI
OU
Dessus du Soundbar
1. Utilisez un câble HDMI pour connecter le port HDMI OUT de l’appareil externe au port HDMI qui se trouve au bas du Soundbar.
2. Utilisez un câble HDMI (fourni) pour connecter le port HDMI IN du téléviseur au port HDMI TO TV (eARC/ARC) qui se trouve au bas du Soundbar.
3. Allumez le Soundbar, le téléviseur et l’appareil externe.
4. Appuyez sur le bouton
(Multifonction) situé dans le haut du Soundbar ou sur le bouton (Source) de la télécommande pour sélectionner le mode « HDMI 1 »
ou « HDMI 2 ».
5. L’écran du Soundbar indique que le mode « HDMI 1 » ou « HDMI 2 » est actuellement sélectionné, et le Soundbar commence à émettre des sons.
REMARQUE
• Lorsque vous utilisez Dolby Atmos® / DTS:X : Si la source d’entrée est Dolby Atmos® / DTS:X, consultez « Spécications de sortie pour les différents modes
d’effets sonores » à la page 7.
• Lorsque Dolby Atmos® est activé, « DOLBY ATMOS » apparaît sur l’écran avant.
• Lorsque DTS:X est activé, « DTS:X » s’afche sur l’écran avant.
• Conguration de Dolby Atmos® / DTS:X sur votre lecteur Blu-ray ou un autre appareil
Ouvrez les options de sortie audio dans le menu des paramètres de votre lecteur Blu-ray ou d’un autre appareil et assurez-vous que « Pas d’encodage » est
sélectionné pour Bitstream. Par exemple, sur un lecteur Blu-ray Samsung, accédez à Menu principal → Son → Sortie numérique, puis sélectionnez Bitstream
(non traité).
Spécication des signaux UHD pris en charge (3840 x 2160p)
Fréquence d’images
(image/sec)
Profondeur de couleur RGB 4:4:4 YCbCr 4:4:4 YCbCr 4:2:2 YCbCr 4:2:0
< 60
8 bits O O O O
10 bits O O O O
12 bits O O O O
120
8 bits O O O O
10 bits O O O O
12 bits - - O O
• La spécication prise en charge peut varier en fonction de l’appareil externe connecté et des conditions d’utilisation.
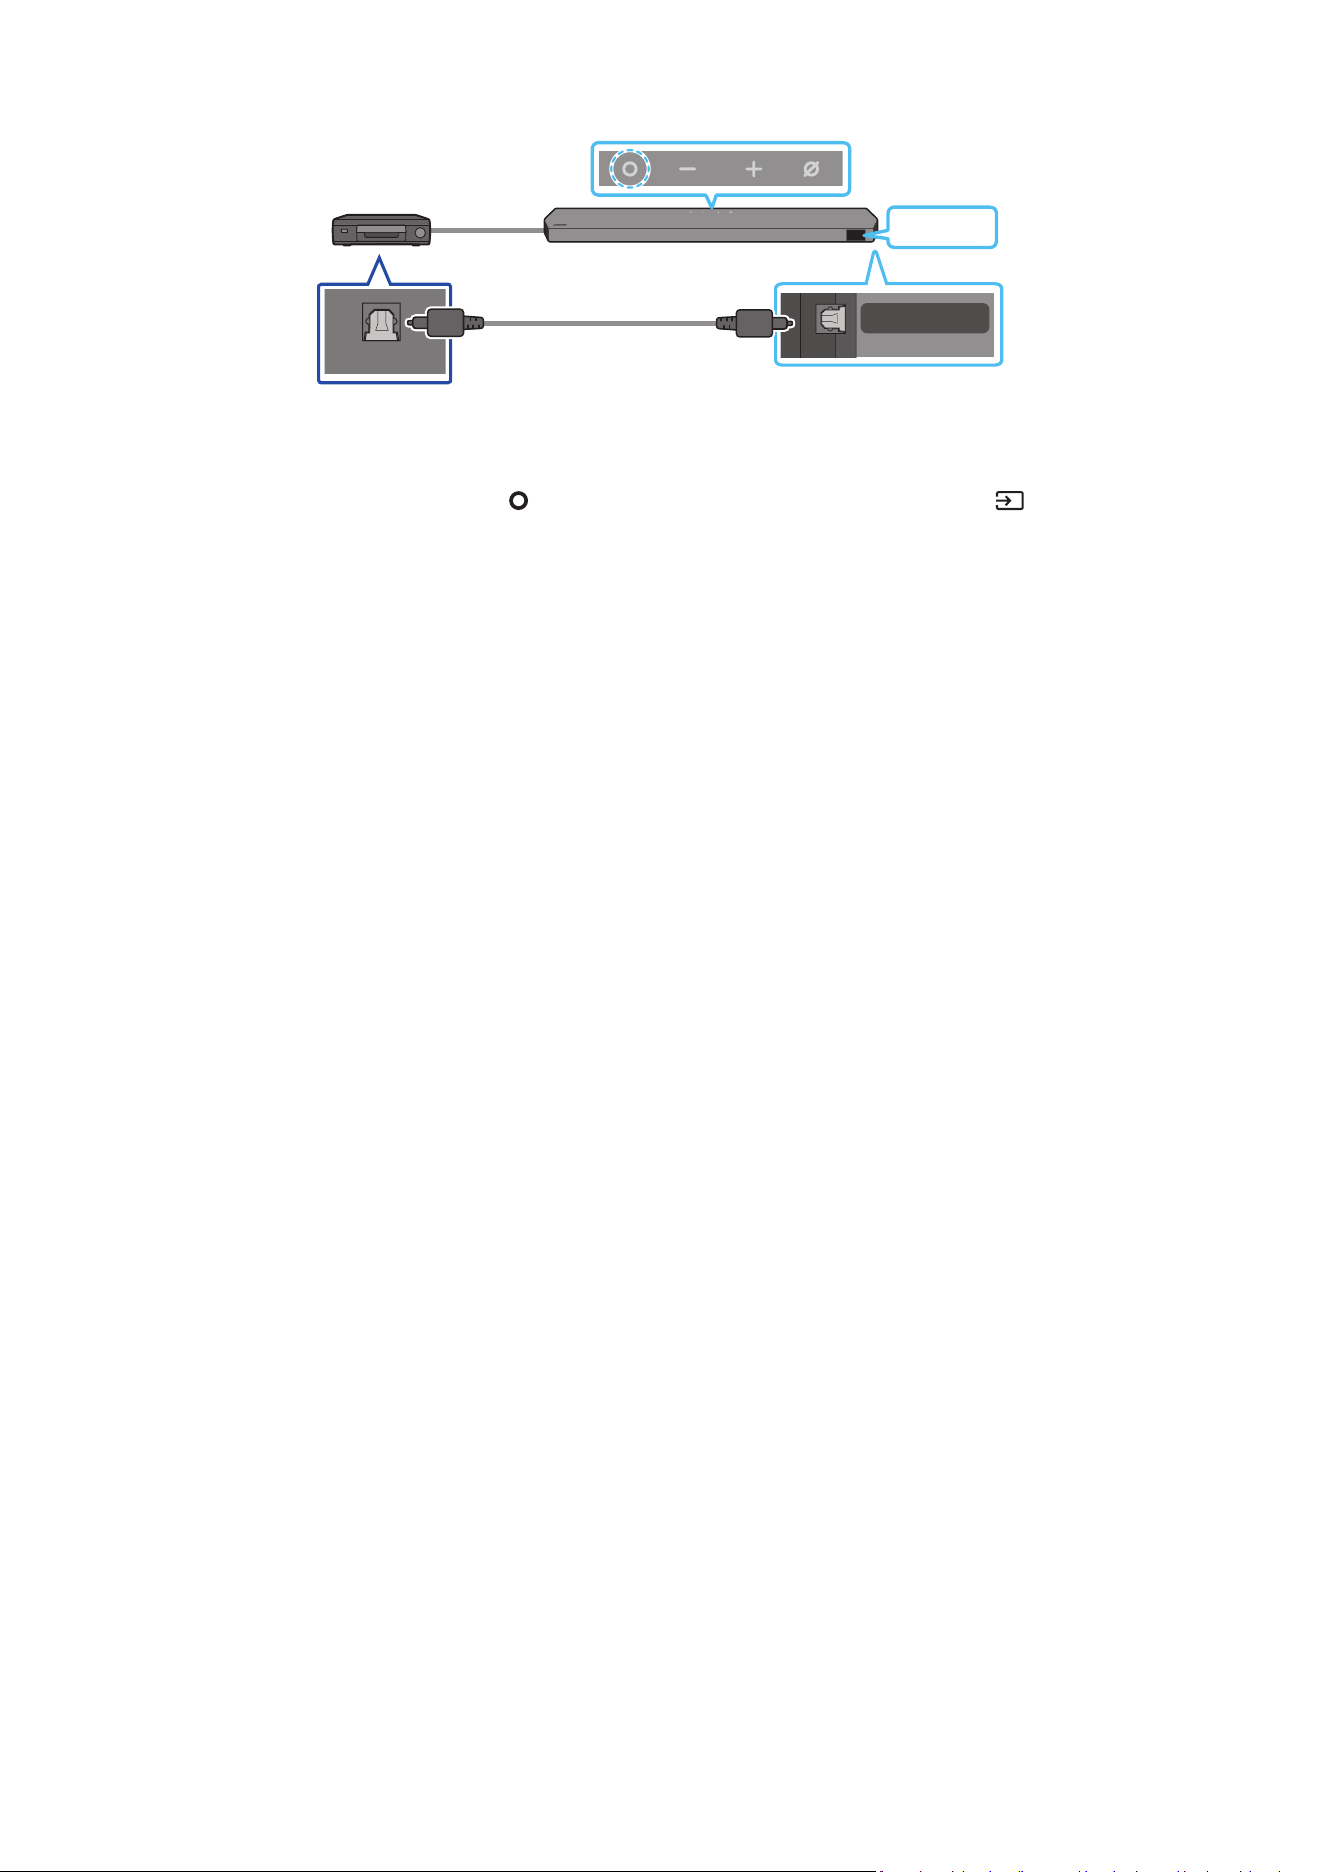
FRC - 20
Méthode 2. Connexion à l’aide d’un câble optique
DIGITAL AUDIO IN
(OPTICAL)
OPTICAL OUT
Lecteur BD/DVD/Décodeur/
Console de jeu
Dessus du Soundbar
D.IN
Câble optique
(non fourni)
Dessous du Soundbar
1. Utilisez un câble optique (non fourni) pour connecter le port DIGITAL AUDIO IN (OPTICAL) au Soundbar principal et le port OPTICAL OUT à l’appareil externe.
2. Allumez le Soundbar et l’appareil externe.
3. Pour sélectionner le mode « D.IN », appuyez sur le bouton (Multifonction) situé dans le haut du Soundbar ou sur le bouton (Source) de la télécommande.
4. Votre Soundbar lit les sons de l’appareil externe.
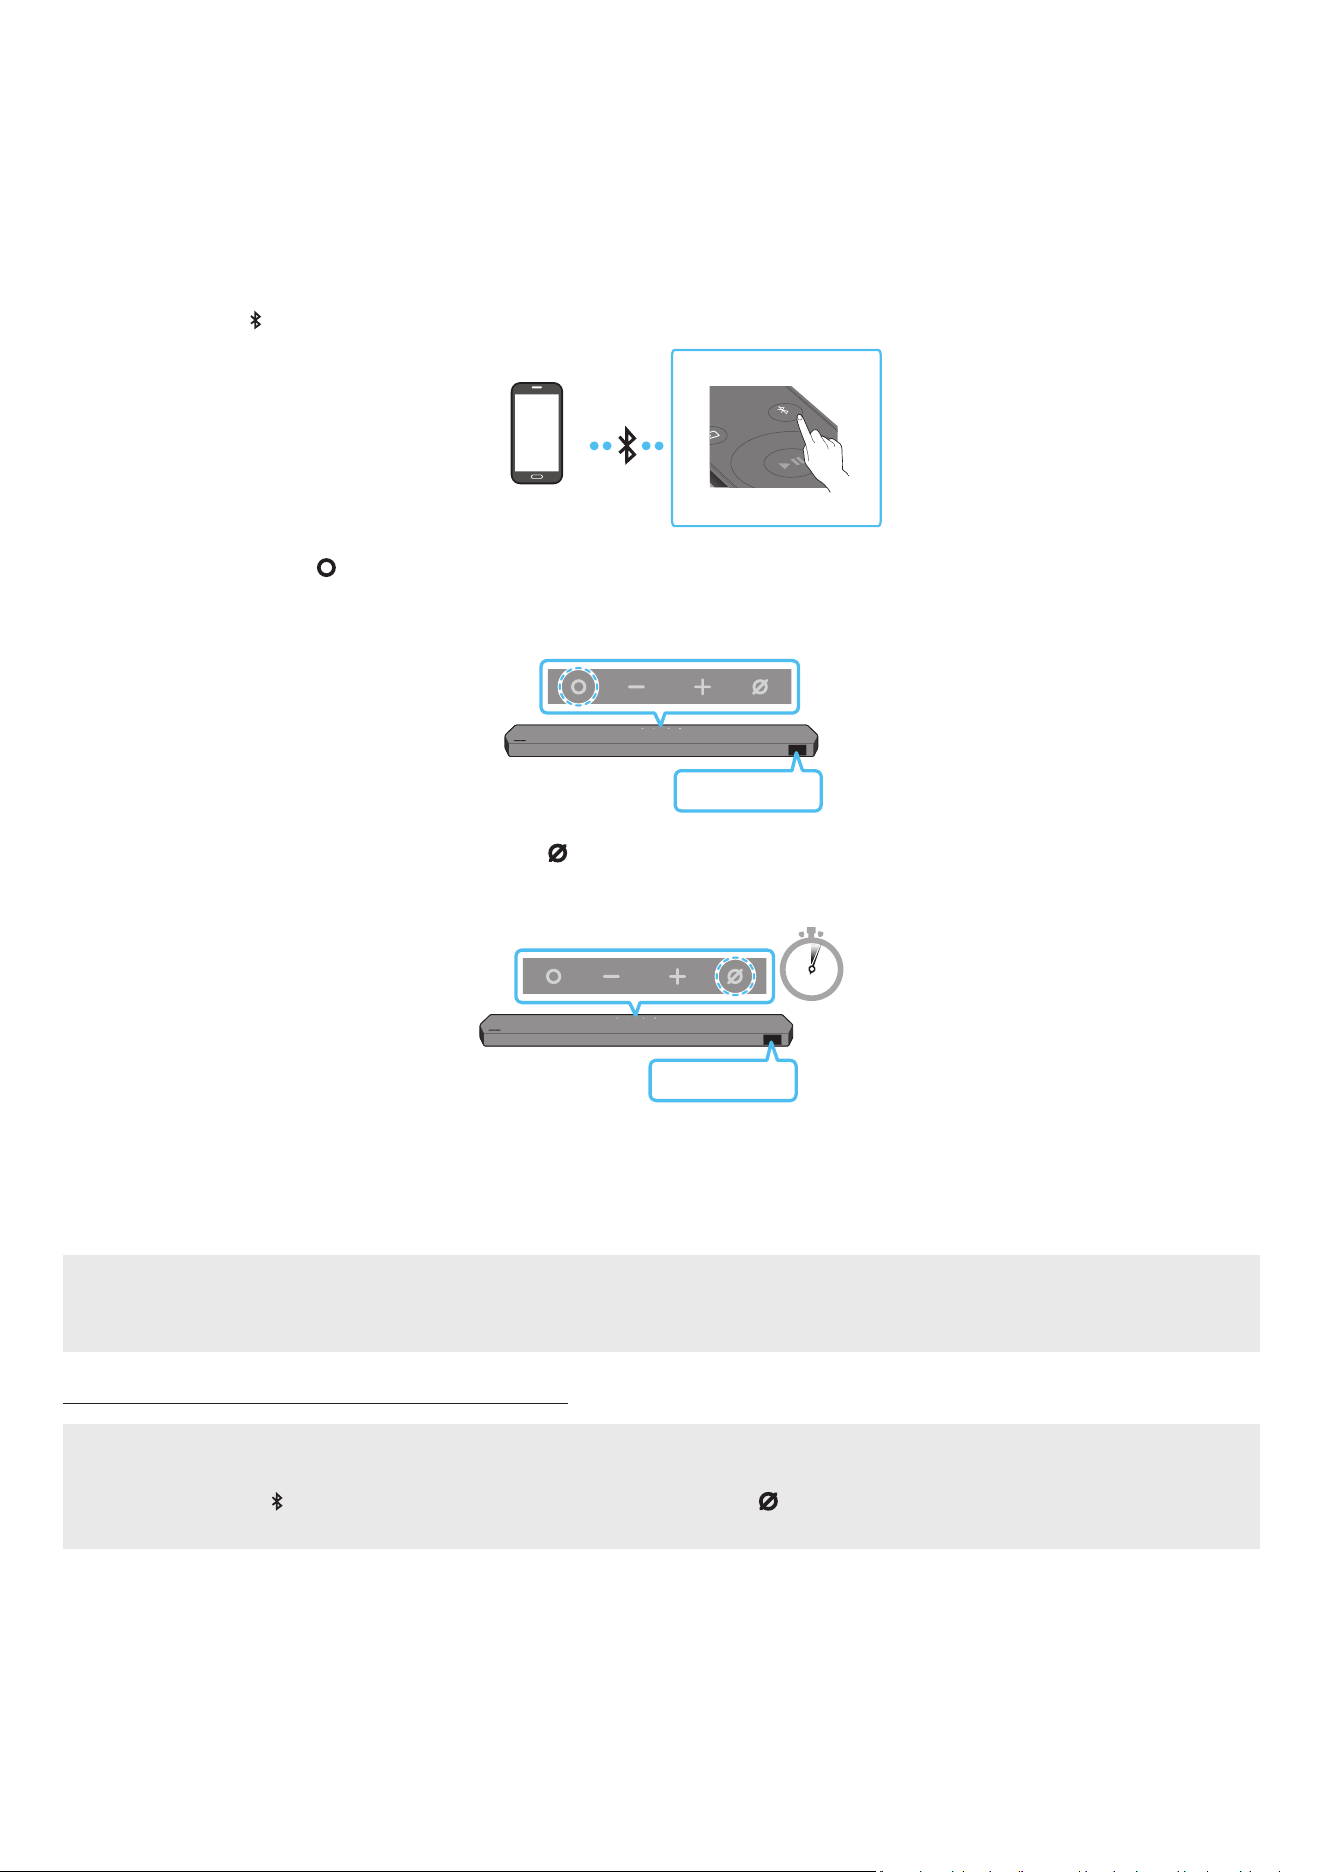
FRC - 21
07 CONNEXION D’UN APPAREIL MOBILE
Méthode 1. Connexion par Bluetooth
Lorsqu’un appareil mobile est connecté par Bluetooth, vous pouvez entendre le son stéréo sans les tracas du câblage.
• Lorsque vous connectez un appareil Bluetooth associé alors que le Soundbar est éteint, le Soundbar s’allume automatiquement.
La connexion initiale
• Lors de la connexion à un nouvel appareil Bluetooth, assurez-vous que l’appareil est à moins de 1 m (3,28 pi) de distance.
1. Appuyez sur le bouton
PAIR de la télécommande du Soundbar pour accéder au mode « BT PAIRING ».
PAIR
Appareil mobile
(OU)
a. Appuyez sur le bouton
(Multifonction) du panneau supérieur, puis sélectionnez « BT ».
« BT » passe automatiquement à « BT PAIRING » en quelques secondes ou à « BT READY » s’il existe un enregistrement de connexion.
Dessus du Soundbar
BT READY
b. Lorsque « BT READY » apparaît, appuyez sur le bouton
(Marche/Arrêt microphone) du panneau supérieur du Soundbar et maintenez-le enfoncé
pendant plus de 5 secondes jusqu’à ce que « BT PAIRING » apparaisse.
5 Sec
Dessus du Soundbar
BT PAIRING
2. Sur votre appareil, sélectionnez « Soundbar Q-Series » dans la liste qui apparaît.
• Lorsque le Soundbar est connecté à l'appareil mobile, [Nom de l'appareil mobile] → « BT » apparaît sur l'écran avant.
3. Lisez les chiers musicaux de l’appareil connecté par Bluetooth via le Soundbar.
• Après avoir connecté le Soundbar à votre appareil mobile pour la première fois, utilisez le mode « BT READY » pour la reconnexion.
En cas d’échec de la connexion de l’équipement
• Si vous avez un Soundbar existant (par exemple, « Soundbar Q-Series ») dans la liste des haut-parleurs de l’appareil mobile, supprimez-le.
• Répétez les étapes 1 et 2.
Quelle est la différence entre BT READY et BT PAIRING ?
• BT READY : dans ce mode, vous pouvez reconnecter n’importe quel téléviseur ou appareil mobile Samsung connecté auparavant.
• BT PAIRING : dans ce mode, vous pouvez connecter un nouvel appareil au Soundbar
(Appuyez sur le bouton PAIR de la télécommande du Soundbar ou appuyez sur le bouton (Marche/Arrêt microphone) situé sur le dessus du Soundbar et
maintenez-le enfoncé pendant plus de 5 secondes pendant que le Soundbar est en mode « BT ».)

FRC - 22
Remarques sur la connexion Bluetooth
• Placez un nouvel appareil à moins de 1 m (3,28 pi) pour vous connecter par Bluetooth.
• Si un code PIN vous est demandé lors de la connexion d’un appareil Bluetooth, entrez <0000>.
• Le Soundbar s’éteint automatiquement au bout de 18 minutes à l’état Ready (Prêt).
• Le Soundbar peut ne pas effectuer correctement la recherche ou la connexion Bluetooth dans les circonstances suivantes :
‒ S’il y a un fort champ électrique autour du Soundbar.
‒ Si plusieurs appareils Bluetooth sont associés simultanément au Soundbar.
‒ Si l’appareil Bluetooth est éteint, pas en place ou fonctionne mal.
• Les appareils électroniques peuvent créer des interférences radio. Les appareils produisant des ondes électromagnétiques doivent être gardés à distance de
l’unité principale du Soundbar, par exemple les micro-ondes, les appareils de réseau sans l, etc.
• Le Soundbar prend en charge les données SBC (44,1 kHz, 48 kHz).
• Connectez-vous uniquement à un appareil Bluetooth prenant en charge la fonction A2DP (AV).
• Lorsque vous connectez le Soundbar à un appareil Bluetooth, placez-les aussi près que possible l’un de l’autre.
• Plus le Soundbar et l’appareil Bluetooth sont éloignés l’un de l’autre, plus la qualité sonore diminue.
La connexion Bluetooth peut se rompre lorsque les appareils sont hors de portée effective.
• La connexion Bluetooth peut ne pas fonctionner comme prévu dans les zones où la réception est mauvaise.
• Un appareil Bluetooth peut émettre du bruit ou devenir défaillant dans les conditions suivantes :
‒ Lorsque le corps est en contact avec l’émetteur-récepteur de signal sur l’appareil Bluetooth ou le Soundbar
‒ Dans les coins ou lorsqu’il y a un obstacle à proximité, tel qu’un mur ou une cloison, où des changements électriques peuvent se produire.
‒ Lorsqu’il est exposé à des interférences radio par d’autres produits fonctionnant sur les mêmes gammes de fréquences, comme des équipements médicaux,
des fours à micro-ondes et des appareils LAN sans l.
‒ Les obstacles tels que les portes et les murs peuvent avoir un impact sur la qualité sonore, même lorsque les appareils sont dans le champ de portée
effective.
• Notez que votre Soundbar ne peut pas être appairé avec d’autres appareils Bluetooth lorsque vous utilisez l’option Bluetooth.
• Cet appareil sans l peut provoquer des interférences électriques lorsqu’il est en marche.
Déconnexion de l’appareil Bluetooth d’un Soundbar
Vous pouvez déconnecter un appareil Bluetooth du Soundbar. Pour plus de détails, consultez le manuel d’utilisation de l’appareil Bluetooth.
• Le Soundbar sera déconnecté.
• Lorsque le Soundbar est débranché de l’appareil Bluetooth, son afchage avant indique « BT DISCONNECTED ».
Déconnexion du Soundbar de l’appareil Bluetooth
Appuyez sur le bouton (Multifonction) situé dans le haut du Soundbar ou sur le bouton (Source) de la télécommande pour quitter le mode « BT ».
• La déconnexion prend du temps car l’appareil Bluetooth doit recevoir une réponse du Soundbar. (Le temps de déconnexion peut varier selon l’appareil Bluetooth)
• Lorsque le Soundbar est débranché de l’appareil Bluetooth, son afchage avant indique « BT DISCONNECTED ».
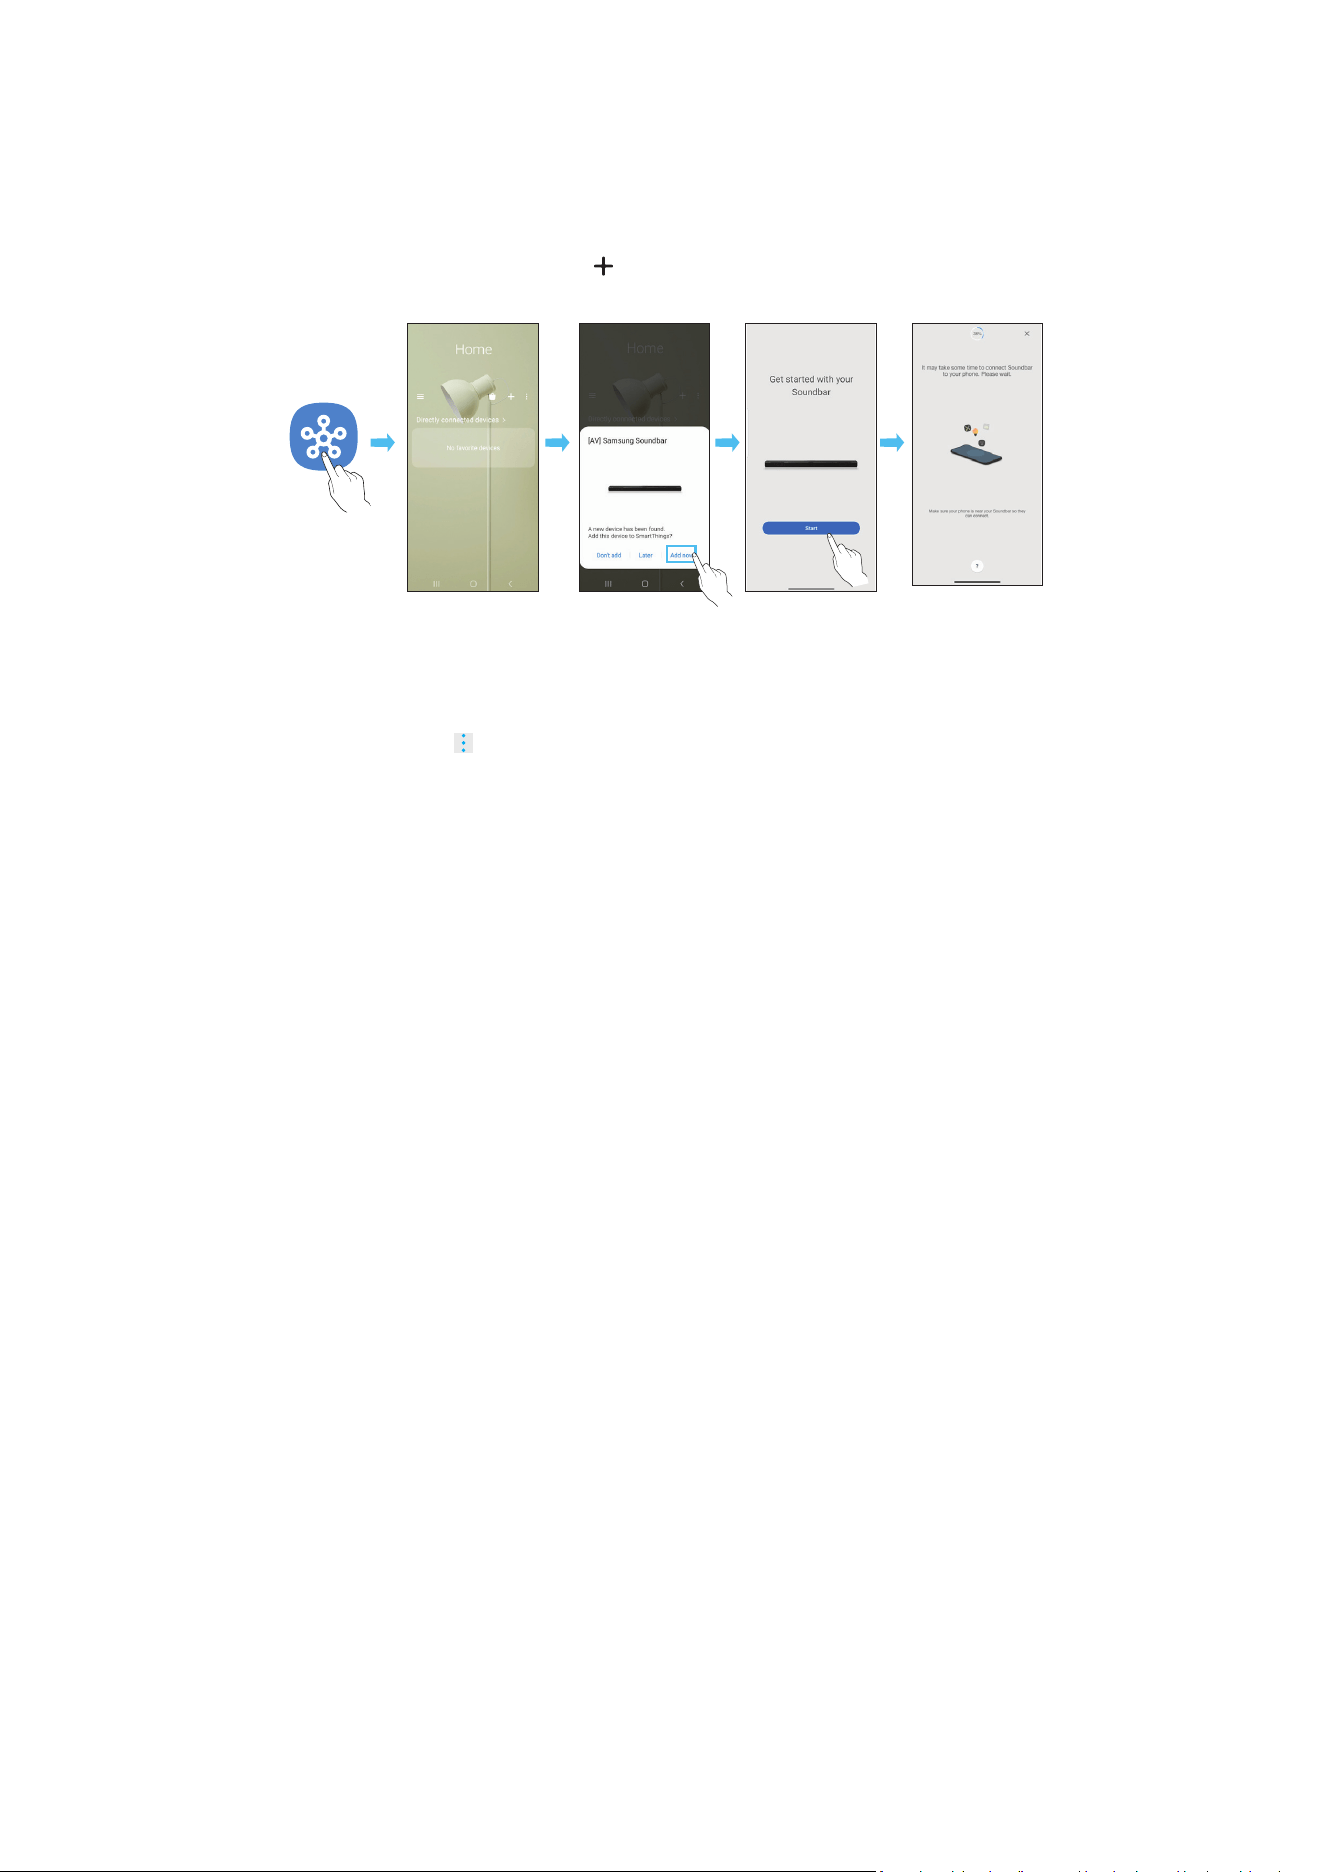
FRC - 23
Méthode 2. Connexion par Wi-Fi (réseau sans l)
Pour connecter un Soundbar à un appareil mobile via un réseau sans l (Wi-Fi), l’application SmartThings est requise.
La connexion initiale
1. Installez et lancez l’application SmartThings sur votre appareil mobile (téléphone intelligent ou tablette).
2. Dans l’application, suivez les instructions à l’écran pour ajouter le Soundbar.
• La fenêtre contextuelle automatique (deuxième illustration ci-dessous) peut ne pas s’afcher sur certains appareils.
Si la fenêtre contextuelle ne s’afche pas, appuyez sur le bouton «
» sur l’écran Accueil. Le Soundbar a été ajouté à l’application.
• L'illustration ci-dessous peut varier selon la version de l'application.
Lancez
l’application
Notication
automatique
Ajouter un
appareil
Application
SmartThings
Pour changer votre connexion Wi-Fi
1. Lancez l’application SmartThings sur votre appareil mobile (téléphone intelligent ou tablette).
2. Appuyez sur la carte du Soundbar, puis sur l’icône ( ).
3. Accédez à Paramètres de l’appareil > État du réseau > Changer le réseau Wi-Fi, et suivez les instructions afchées à l’écran.
Utilisation de Group Play
• Pour bénécier de cette fonctionnalité, ajoutez votre Soundbar à l’application SmartThings.
• Pour l’activer, connectez au moins deux appareils audio au même réseau Wi-Fi à 5 GHz.
• Cette fonction est disponible sur les appareils de son Samsung prenant en charge le Wi-Fi commercialisés à partir de 2024.
• Cette fonctionnalité ne prend pas en charge le son du téléviseur.
Conguration de Group Play
1. Lancez l’application SmartThings sur votre appareil mobile.
2. Ajoutez le Soundbar dans l’application SmartThings en suivant les instructions de la section « Méthode 2. Connexion par Wi-Fi (réseau sans l) ».
3. Appuyez sur la carte du Soundbar.
4. Sur votre appareil mobile, appuyez sur Créer un groupe sous l’icône d'appareil audio.
• Le bouton Créer un groupe s’afche uniquement lorsque le Soundbar est en mode Wi-Fi.
• Si le Soundbar diffuse le son du téléviseur, la connexion au téléviseur est débranchée lors de la création d’un groupe.
5. Activez Group Play.
6. Sélectionnez l’appareil de votre choix dans la liste et appuyez sur Appliquer.
• Vous pouvez ajouter jusqu’à 4 appareils.
• Avec Group Play, l’audio sera diffusé au moyen de l’appareil hôte seulement.
• Lorsqu’un appareil connecté à l’appareil hôte passe sur une source différente, l’appareil sera supprimé automatiquement du groupe.
• Lorsque l’appareil hôte est connecté à un téléviseur, le groupe généré sera supprimé automatiquement.
Désactivation de Group Play
1. Appuyez sur la carte de l’appareil audio.
2. Sur votre appareil mobile, appuyez sur Modier le groupe sous l’icône d'appareil audio.
3. Désactivez Group Play.
• Pour désactiver un appareil individuel, décochez la case de l’appareil de la liste et appuyez sur Appliquer.

FRC - 24
Utilisation de SmartThings Hub
• Vous pouvez utiliser la fonction SmartThings Hub du Soundbar pour connecter les appareils IdO (ampoules, prises, capteurs, etc.) qui nécessitent
SmartThings Hub.
• Pour utiliser la fonction SmartThings Hub, vous devez enregistrer le Soundbar dans l’application SmartThings.
Enregistrement d’un appareil IdO dans l’application SmartThings
1. Ajoutez le Soundbar dans l’application SmartThings en suivant les instructions de la section « Méthode 2. Connexion par Wi-Fi (réseau sans l) > La connexion
initiale ».
2. Appuyez sur la carte de l’appareil Soundbar.
3. Appuyez sur SmartThings Hub en bas de l’écran.
4. Appuyez sur Utilisation de SmartThings Hub, puis sur Conguration pour activer la fonction SmartThings Hub.
• Lorsque la fonction SmartThings Hub est activée, non conguré change vers utilisation.
• La carte d’appareil SmartThings Hub apparaît près de la carte d’appareil du Soundbar.
5. Sur l’écran Accueil, appuyez sur «
» pour ajouter un appareil IdO.
• Une carte d’appareil IdO apparaît sur l’application lorsque vous ajoutez un appareil IdO avec succès.
• Si vous débranchez le Soundbar, les appareils connectés par le biais de SmartThings Hub peuvent être déconnectés. Si des appareils ont été déconnectés,
vous devez les reconnecter.
Suppression de SmartThings Hub de l’application SmartThings
1. Sur l’écran de l’appareil, appuyez sur la carte d’appareil du Soundbar.
2. Appuyez sur SmartThings Hub en bas de l’écran.
3. Appuyez sur Supprimer SmartThings Hub pour désactiver la fonction SmartThings Hub.
• Lorsque la fonction SmartThings Hub est désactivée, utilisation change vers non conguré.
Connexion par Apple AirPlay
• Cette fonction pourrait ne pas être disponible dans certains pays.
• Ce Samsung Soundbar prend en charge AirPlay® et recommande d’utiliser la dernière version d’iOS, d’iPadOS et de macOS.
• Pour activer AirPlay dans votre Soundbar, vous devez d’abord enregistrer l’appareil avec l’application Samsung SmartThings en acceptant les conditions
générales de l’application.
• Assurez-vous que le Soundbar est sous tension et qu’il est connecté au même réseau Wi-Fi que votre appareil Apple®.
Avec AirPlay vous pouvez proter de la musique, de balados et d’autres sons sur le Samsung Soundbar à partir de vos appareils Apple.
• Sélectionnez
à partir d’une application prise en charge par AirPlay ou du centre de contrôle sur votre iPhone®, iPad® ou Mac®.
• Dans la liste d’appareils disponibles, sélectionnez le Soundbar sur lequel jouer le son actuel.

FRC - 25
Utilisation de la fonction Tap Sound
Appuyez sur le Soundbar avec votre appareil mobile pour lire le son du contenu de l’appareil mobile via le Soundbar.
• Cette fonction peut ne pas être prise en charge en fonction de l’appareil mobile.
• Cette fonction n’est compatible qu’avec les appareils mobiles Samsung fonctionnant sous Android 8.1 ou une version ultérieure.
Dessus du Soundbar
Appareil mobile
Application SmartThings
1. Activez la fonction Tap Sound sur votre appareil mobile.
• Pour plus de détails sur l’activation de la fonction, reportez-vous à « Réglage de la fonction Tap Sound » ci-dessous.
2. Appuyez sur le Soundbar avec l’appareil mobile. Sélectionnez « Start now » dans la boîte de dialogue afchée.
La connexion est établie entre l’appareil mobile et le Soundbar via Bluetooth.
3. Lisez le son du contenu de l’appareil mobile via le Soundbar.
• Cette fonction connecte un appareil mobile au Soundbar via Bluetooth en détectant les vibrations produites lorsque l’appareil touche le Soundbar.
• Veillez à ne pas appuyer l’appareil mobile sur un coin pointu du Soundbar. Cela pourrait rayer ou endommager le Soundbar ou l’appareil mobile.
• Il est recommandé de placer l’appareil mobile dans un étui. Appuyez légèrement sur la zone large de la partie supérieure du Soundbar, sans exercer de force
excessive.
• Pour utiliser cette fonction, mettez à jour l’application SmartThings vers la dernière version.
Cette fonction peut ne pas être prise en charge en fonction de la version de l’application.
Réglage de la fonction Tap Sound
Utilisez l’application SmartThings pour activer la fonction Tap View, Tap Sound.
1. Sur l’appareil mobile, lancez l’application SmartThings.
2. Sélectionnez (
→ ) sur l’écran de l’application SmartThings qui apparaît sur l’appareil mobile.
3. Dénissez « Tap View, Tap Sound » sur Activé pour permettre à la fonction de se lancer lorsqu’un appareil mobile se rapproche du Soundbar. La fonction est
activée.
REMARQUE
• Lorsque l’appareil mobile est en mode d’économie d’énergie, la fonction Tap Sound ne fonctionne pas.
• La fonction Tap Sound peut ne pas fonctionner si des appareils à proximité du Soundbar, par exemple des appareils électriques, provoquent des interférences
radio. Assurez-vous que les appareils susceptibles de provoquer des interférences radio sont placés à une distance sufsante du Soundbar.

FRC - 26
08 INSTALLATION DU SUPPORT
MURAL
Précautions d’installation
• Effectuez l’installation sur un mur vertical uniquement.
• N’installez pas le produit dans un endroit où la température ou le taux
d’humidité est élevé.
• Vériez que le mur est sufsamment solide pour supporter le poids du
produit. Sinon, renforcez le mur ou choisissez un autre point d’installation.
• Achetez et utilisez les vis de xation ou les chevilles adaptées au type
de mur que vous possédez (plaque de plâtre, plaque de fer, bois, etc.). Si
possible, xez les vis de support dans les poteaux muraux.
• Achetez des vis de montage mural en fonction du type et de l’épaisseur du
mur sur lequel vous souhaitez installer le Soundbar.
‒ Diamètre : M5
‒ Longueur : 35 mm (1 3/8 po) ou plus recommandé.
• Connectez les câbles de l’unité aux appareils externes avant d’installer le
Soundbar sur le mur.
• Assurez-vous que l’unité est éteinte et débranchée avant de l’installer.
Sinon, cela pourrait provoquer un choc électrique.
Composants de montage mural
A TYPE : 450mm
Guide de montage mural
x 2
x 2
(M4 x L10)
Vis de xation Vis
x 2
Support de montage mural
1. Placez le guide de montage mural contre la surface du mur.
• Le guide de montage mural doit être horizontal.
• Si votre téléviseur est xé au mur, installez le Soundbar à au moins 5 cm
(2 po) sous le téléviseur.
5 cm (2 po) ou plus
2. Alignez la ligne centrale du guide de montage mural du gabarit papier sur
le centre de votre téléviseur (si vous montez le Soundbar sous ce dernier),
puis xez le guide de montage mural au mur avec du ruban adhésif.
• Si vous ne faites pas l’installation sous un téléviseur, placez la ligne
centrale au centre de la zone d’installation.
A TYPE : 450mm
Ligne centrale
3. Poussez une pointe de stylo ou une pointe de crayon bien taillé au centre
des images de type A à chaque extrémité du guide pour marquer les trous
des vis de support, puis retirez le guide de montage mural.
A TYPE : 450mm
4. À l’aide d’un foret de taille appropriée, percez un trou dans le mur à chaque
marque.
• Si les marques ne correspondent pas à la position des montants de
la cloison, veillez à insérer des ancrages ou des chevilles à expansion
appropriés dans les trous avant d’insérer les vis de support. Si vous
utilisez des ancrages ou des chevilles à expansion, assurez-vous que les
trous que vous percez sont assez grands pour recevoir celles-ci.
5. Poussez une vis (non fournie) dans chaque vis de support, puis vissez
fermement chaque vis dans un trou de vis de support.
6. Installez les 2 supports muraux dans le bon sens en dessous du Soundbar à
l’aide de 2 vis.
• Lors du montage, assurez-vous que la pièce de suspension des supports
muraux est située derrière le dos du Soundbar.
Arrière du Soundbar
Extrémité droite du Soundbar
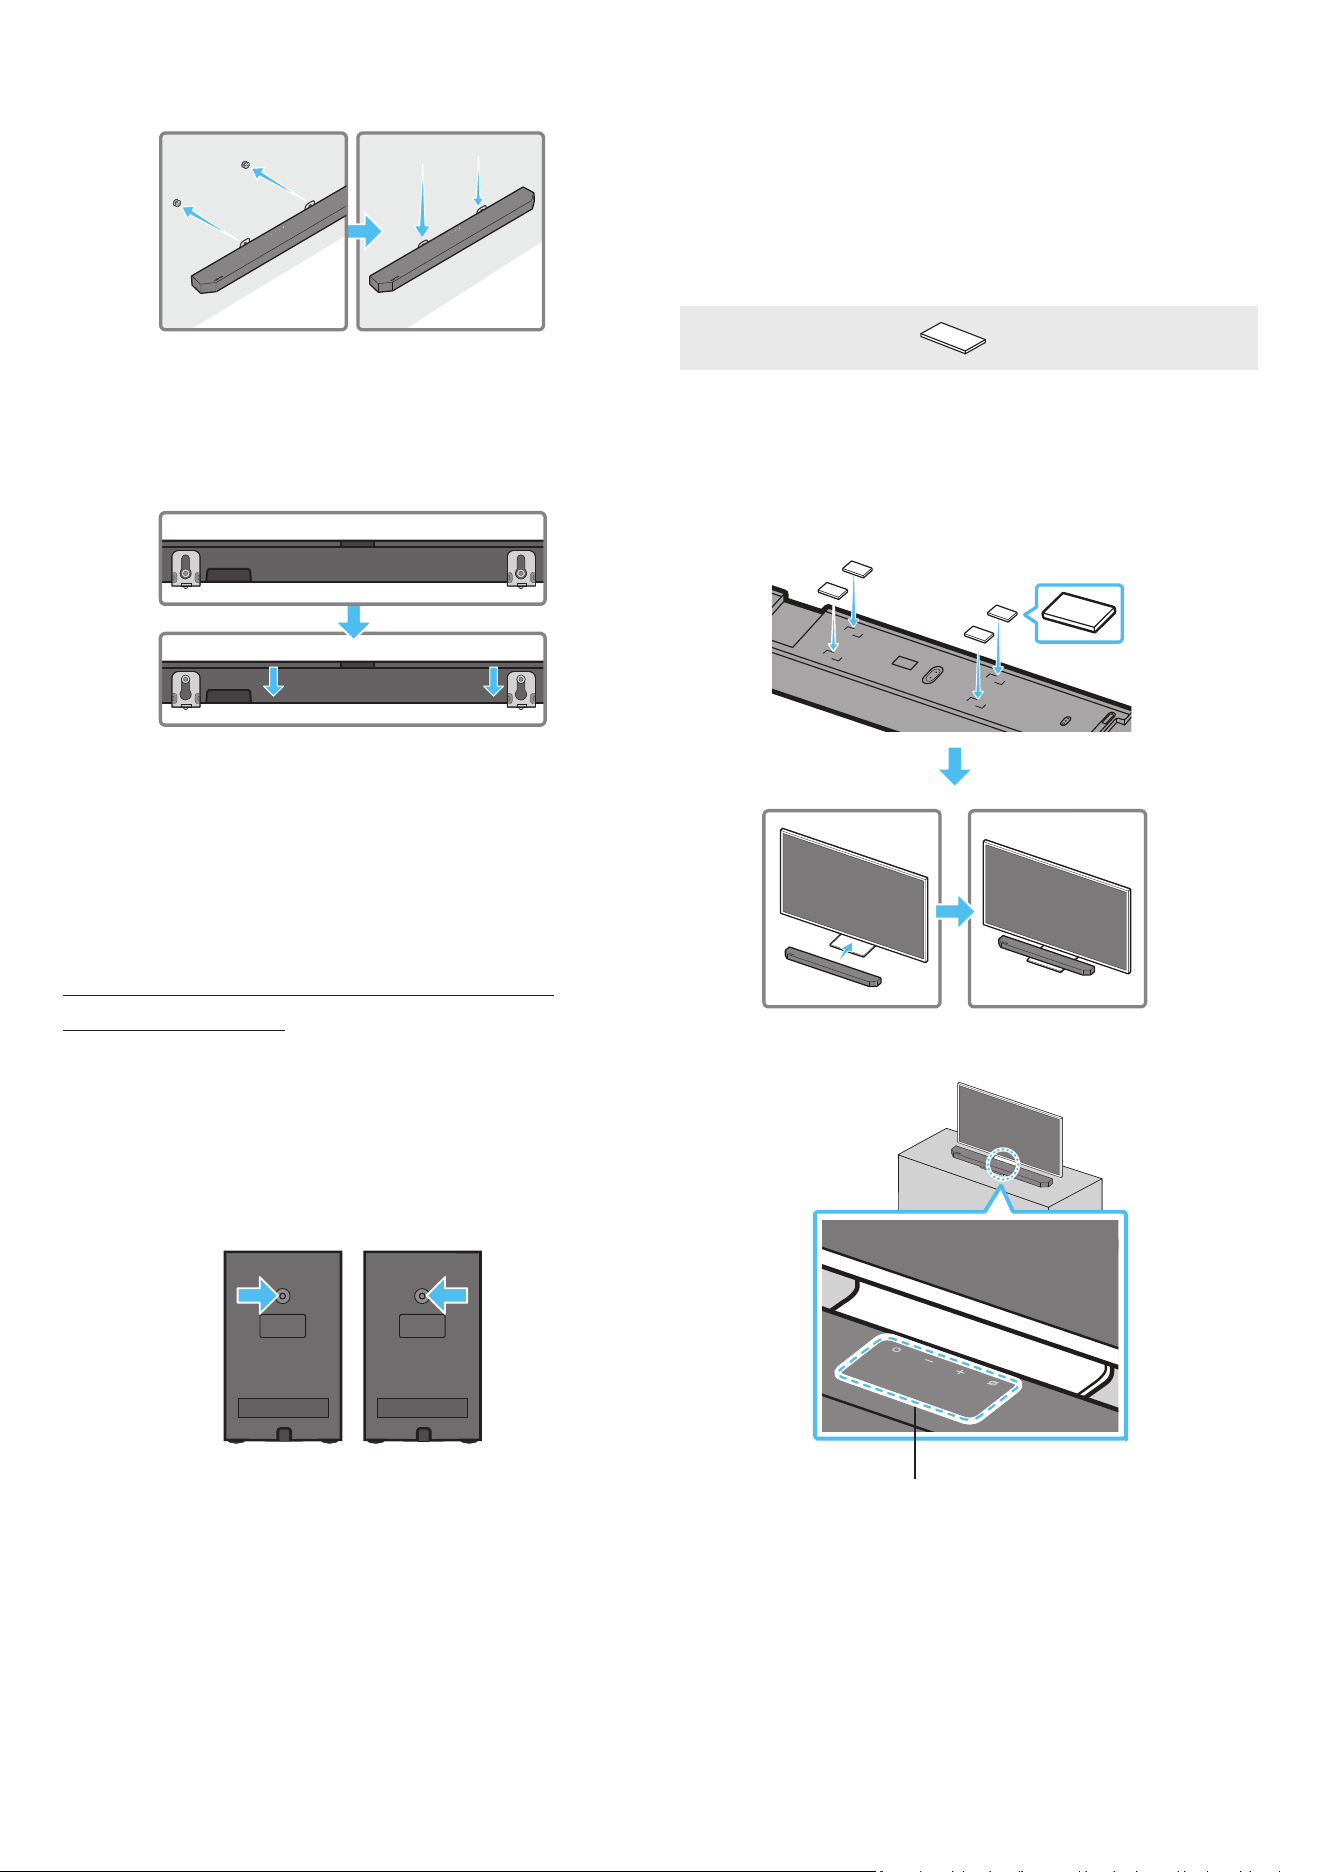
FRC - 27
7. Installez le Soundbar à l’aide des supports muraux en accrochant les
supports muraux sur les vis de maintien sur le mur.
8. Faites glisser le Soundbar vers le bas, comme illustré ci-dessous, de sorte
que les supports muraux reposent fermement sur les vis de maintien.
• Insérez les vis de maintien dans la partie large (inférieure) des supports
muraux, puis faites glisser les supports muraux vers le bas de sorte que
les supports muraux reposent solidement sur les vis de maintien.
Installation des haut-parleurs ambiophoniques
au mur
Vous pouvez acheter des supports muraux pour installer les haut-parleurs
ambiophoniques au mur.
Samsung Electronics ne vend pas de supports muraux.
Remarques concernant le montage des haut-parleurs
ambiophoniques au mur
• La capacité de charge des supports muraux pour haut-parleurs
ambiophoniques doit être supérieure à 8 kg (17,6 lb).
• Diamètre du trou : douille taraudée de 1/4-20 UNC
‒ Vis standard : diamètre de 6,35 mm (0,25 po),
pas de 1,27 mm (0,05 po)
‒ Longueur : 18 mm (0,70 po)
‒ Quantité : gauche 1 / droite 1
Gauche Droit
• Vériez la résistance du mur avant d’installer les supports muraux. Si elle
est insufsante, renforcez le mur avant d’y installer les supports muraux et
les haut-parleurs.
• Samsung Electronics n’est pas responsable des dommages causés au
produit suite à une installation défectueuse du produit.
• Veillez à ne pas installer les haut-parleurs sur le côté ou à l’envers.
09 INSTALLATION DU
SOUNDBAR DEVANT LE
TÉLÉVISEUR
Composant
x 4
Pied en caoutchouc
Pour procéder à cette installation, xez les pieds en caoutchouc en dessous du
Soundbar avant de placer ce dernier au-dessus du support du téléviseur. Veillez
à xer les pieds en caoutchouc de manière à ce qu’ils ne dépassent pas des
bords extérieurs du support du téléviseur. Reportez-vous à la gure ci-dessous.
Pied en caoutchouc
Placez le Soundbar sur un support de téléviseur.
Microphones
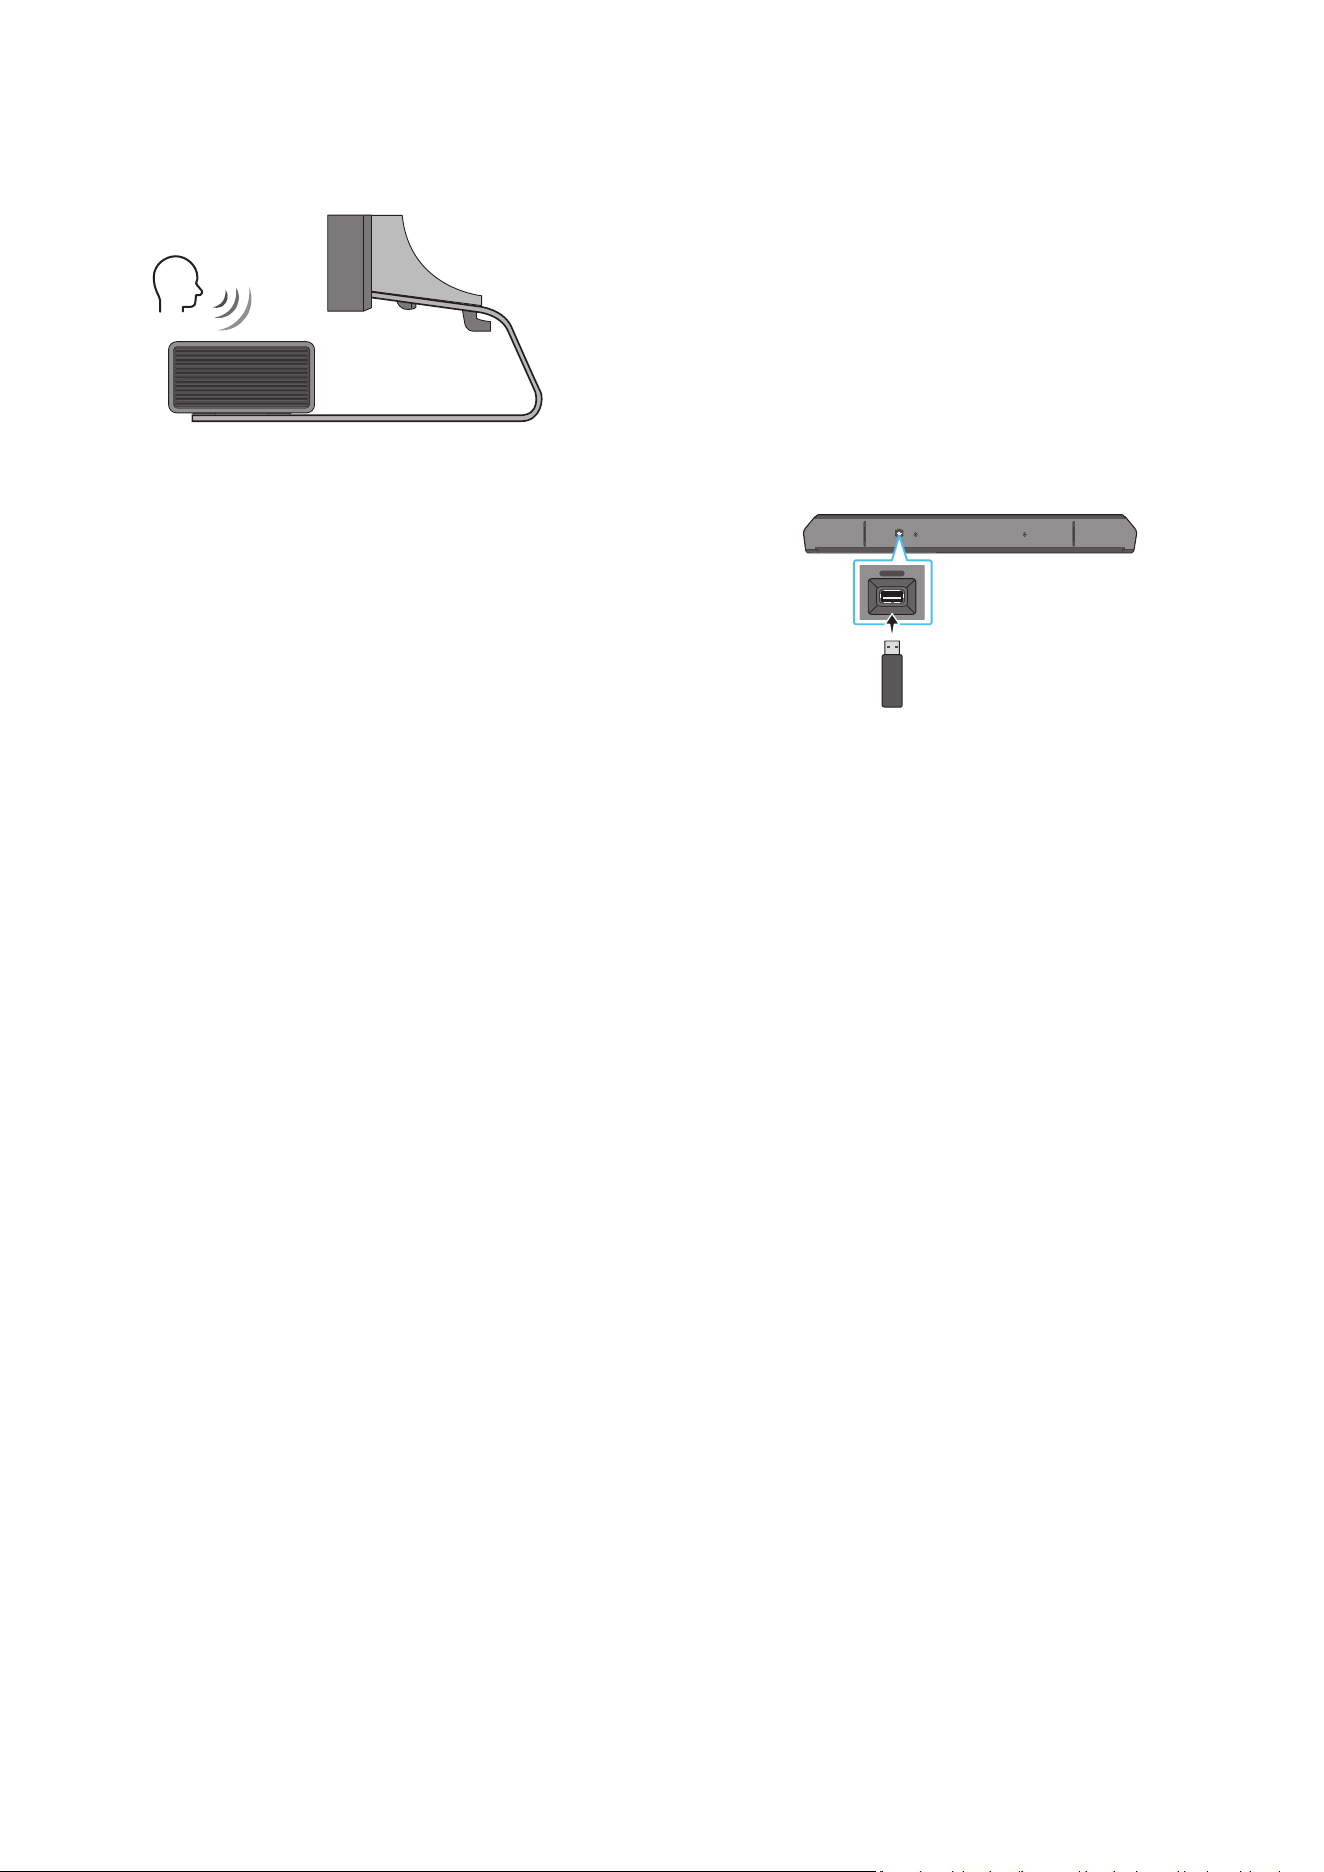
FRC - 28
Comme illustré sur l'image, alignez le centre du Soundbar avec le centre du
téléviseur, puis placez soigneusement le Soundbar sur le support du téléviseur.
À ce stade, placez les microphones à l’avant du support pour ne pas nuire à la
reconnaissance vocale.
Extrémité droite du Soundbar
TV
REMARQUE
• Assurez-vous que le Soundbar est placé sur une surface plane et solide.
• Un espace insufsant par rapport au téléviseur peut entraîner des
problèmes acoustiques et de reconnaissance vocale.
• L’illustration ci-dessous diffère du modèle respectif.
• Pour des performances optimales des microphones, gardez le Soundbar à
une distance minimale de 2 cm de l’écran du téléviseur.
10 MISE À JOUR DU LOGICIEL
Mise à jour automatique
Lorsque le Soundbar est connecté à Internet, les mises à jour logicielles
s’installent automatiquement, même lorsque le Soundbar est éteint.
• Pour utiliser la fonction de mise à jour automatique, le Soundbar doit être
connecté à Internet.
La connexion Wi-Fi au Soundbar sera interrompue si le cordon
d’alimentation du Soundbar est débranché ou si l’alimentation est coupée.
En cas de coupure, à la remise sous tension ou lorsque vous rebranchez le
cordon d’alimentation, allumez le Soundbar, puis reconnectez-le à Internet.
Mise à jour USB
Dessous du Soundbar
SERVICE
REAR)
SERVICE
Il se peut que Samsung propose des mises à jour du micrologiciel du système
Soundbar à l’avenir.
Lorsqu’une mise à jour est disponible, vous pouvez mettre à jour le Soundbar en
connectant le lecteur USB qui contient le micrologiciel de mise à jour au port
SERVICE du Soundbar.
1. Accédez au site Web de Samsung Electronics (www.samsung.com) →
recherchez le nom du modèle à partir de l'option de menu de l'assistance à
la clientèle.
• Pour plus d’informations sur la mise à jour, reportez-vous au Guide de
mise à niveau.
2. Téléchargez le chier de mise à niveau (type USB).
3. Décompressez le chier pour créer un dossier avec le nom du chier.
4. Stockez le dossier créé sur une clé USB, puis connectez-le au Soundbar.
5. Allumez le Soundbar. Ensuite, le produit est mis à jour dans les 3 minutes
qui suivent. Le message « UPDATE » s’afche à l’écran.
• Pendant la mise à jour, n’éteignez pas le produit et ne retirez pas le câble
USB.
• Si « UPDATE » n’apparaît pas sur la fenêtre d’afchage, retirez le cordon
d’alimentation du Soundbar, puis rebranchez-le.
• Si la dernière version est installée, aucune mise à jour n’est effectuée.
• Selon le type d’USB, la mise à jour peut ne pas être prise en charge.
Information concernant les mises à jour sur la
sécurité
Des mises à jour sur la sécurité sont fournies pour renforcer la sécurité de votre
appareil et protéger vos données personnelles. Pour en savoir plus sur les mises
à jour sur la sécurité, visitez la page https://security.samsungtv.com.
• Le site Web ne prend en charge que certaines langues.
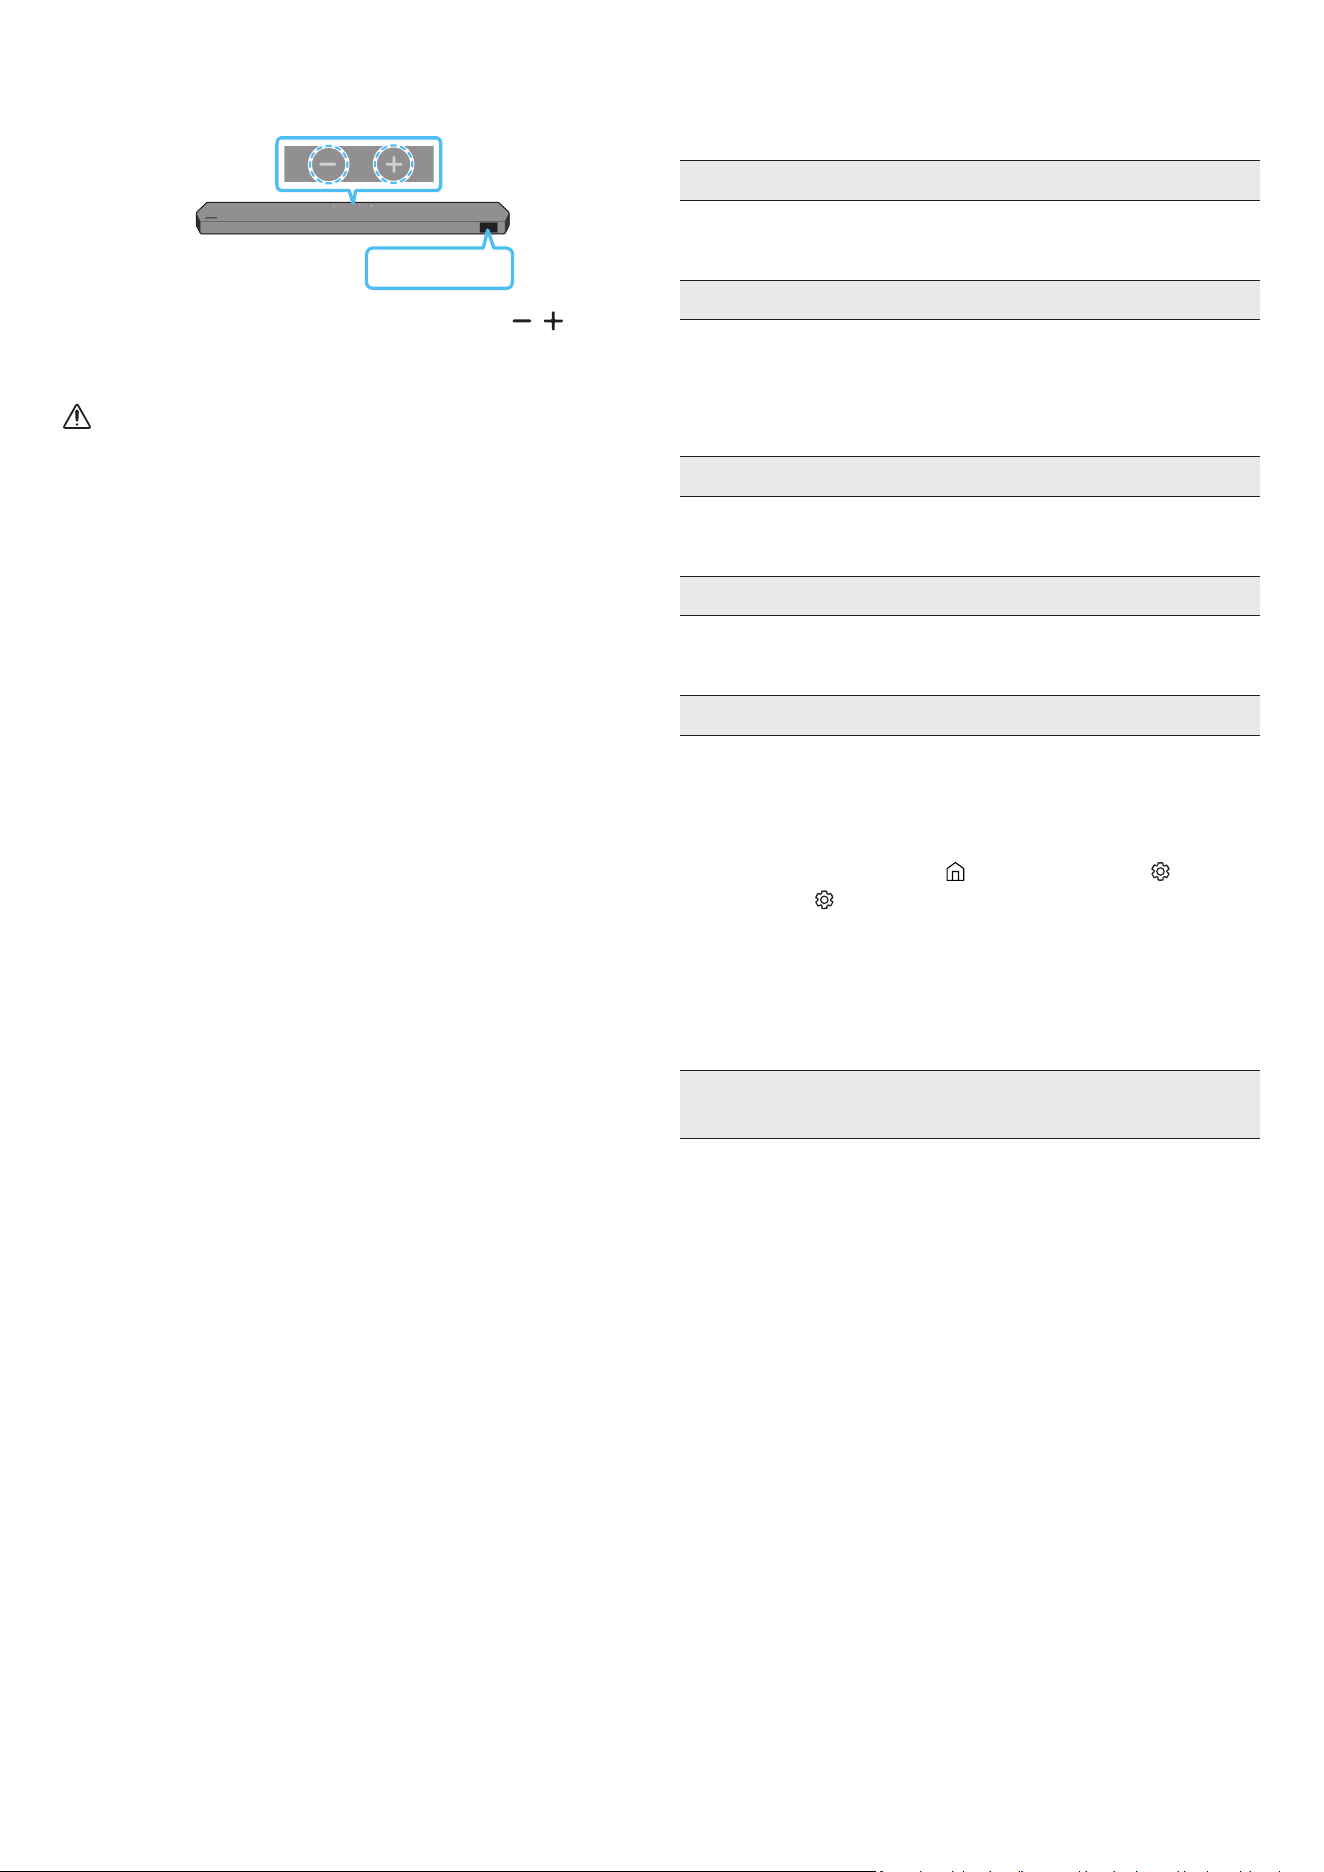
FRC - 29
Initialisation
Dessus du Soundbar
INIT
Pendant que le Soundbar est allumé, appuyez sur les boutons (Volume)
de l’unité pendant au moins 5 secondes. Le message « INIT » apparaît sur
l'écran et le Soundbar s'initialise.
MISE EN GARDE
• Tous les paramètres du Soundbar sont initialisés. Veillez à effectuer
cette opération uniquement lorsque l'initialisation est requise.
11 DÉPANNAGE
Avant de communiquer avec l’assistance, effectuez les vérications suivantes.
Le Soundbar ne s’allume pas.
• Vériez si le cordon d’alimentation du Soundbar est correctement inséré
dans la prise.
Le Soundbar fonctionne par intermittence.
• Après avoir retiré le cordon d’alimentation, réinsérez-le.
• Mettez l’appareil externe sous tension et réessayez.
• S’il n’y a pas de signal, le Soundbar s’éteint automatiquement après un
certain temps. Allumez le produit. (Voir la page 5.)
La télécommande ne fonctionne pas
• Pointez la télécommande directement sur le Soundbar.
• Remplacez les piles.
Le voyant du Soundbar s’allume en rouge xe.
• Le microphone est éteint.
Allumez le microphone. (Voir la page 4.)
Le Soundbar n’émet pas de son.
• Le volume du Soundbar est trop faible ou coupé. Réglez le volume.
• Lorsqu’un appareil externe (STB, appareil Bluetooth, appareil mobile, etc.)
est connecté, réglez le volume de l’appareil externe.
• Pour la sortie audio du téléviseur, sélectionnez Soundbar.
(Téléviseur Samsung : Accueil (
) → Menu → Paramètres ( ) → Tous les
paramètres ( ) → Son → Sortie audio → Sélectionnez Soundbar)
• La connexion du câble au Soundbar ne doit pas être lâche. Débranchez le
câble et rebranchez-le.
• Retirez complètement le cordon d’alimentation, rebranchez-le et mettez
l’appareil sous tension.
• Initialisez le produit et réessayez. (Voir la page 29.)
Aucun son n’est émis par le caisson de basse ou les haut-parleurs
ambiophoniques.
• Vériez si le voyant à DEL bleu à l’arrière du caisson de basse et des haut-
parleurs ambiophoniques est allumé. Reconnectez la Soundbar, le caisson
de basse et les haut-parleurs ambiophoniques si le voyant bleu clignote
ou si le rouge est allumé. (Voir la page 11.)
• Vous pouvez rencontrer un problème s’il y a un obstacle entre le Soundbar
et le caisson de basses. Déplacez les appareils dans une zone éloignée des
obstacles.
• D’autres appareils envoyant des signaux radioélectriques à proximité
peuvent interrompre la connexion.
Éloignez votre haut-parleur de tels appareils.
• Retirez et rebranchez la che d’alimentation.
FRC - 30
En cas d’instabilité du son, de retards ou de bruit provenant du caisson de
basses et du haut-parleur ambiophonique
• S’il y a des objets entre le Soundbar et le caisson de basses, cela peut causer
un problème. Veuillez les déplacer à un autre endroit.
• Le son pourrait être instable ou retardé lorsque le caisson de basses et
le haut-parleur ambiophonique sont éloignés du Soundbar. Veuillez les
rapprocher du Soundbar.
• Le son pourrait être instable ou retardé lorsque le Soundbar est proche d’un
instrument ou d’un appareil électrique pouvant provoquer des interférences
radio. Placez le Soundbar loin des appareils susceptibles de provoquer des
interférences radio. (P. ex. routeur sans l)
• Modiez l’état de la connexion au réseau TV de sans l à laire.
Le volume du caisson de basses est trop faible
• Le volume d’origine du contenu que vous lisez peut être faible. Essayez de
régler le niveau du caisson des basses. (Voir la page 6.)
• Placez le haut-parleur du caisson de basses plus près de vous.
Si le téléviseur n’est pas connecté via HDMI TO TV (eARC/ARC)
• Vériez que le câble HDMI est correctement connecté à la borne ARC.
(Voir la page 13.)
• La connexion peut ne pas être possible en raison de l’appareil externe
connecté (décodeur, machine de jeux, etc.). Connectez directement le
Soundbar.
• HDMI-CEC peut ne pas être activé sur le téléviseur. Activez le CEC dans
le menu du téléviseur. (Téléviseur Samsung : Accueil (
) → Menu →
Paramètres ( ) → Tous les paramètres ( ) → Connexion → Gestionnaire
d’appareils externes → Anynet+ (HDMI-CEC) ACTIVÉ)
• Pour la connexion à eARC, la fonction eARC dans le menu du téléviseur
devrait être activée. (Téléviseur Samsung : Accueil ( ) → Menu →
Paramètres ( ) → Tous les paramètres ( ) → Son → Réglages expert →
Mode HDMI-eARC (Auto))
Aucun son n’est émis lors de la connexion au téléviseur en mode HDMI TO
TV (eARC/ARC)
• Votre appareil ne peut pas lire le signal d’entrée. Changez la sortie
audio du téléviseur et réglez-la sur PCM ou sur Dolby Digital. (Pour un
téléviseur Samsung : Accueil (
) → Menu → Paramètres ( ) → Tous les
paramètres ( ) → Son → Réglages expert → Format audio de la sortie
numérique)
Le Soundbar ne se connecte pas par Bluetooth.
• Lors de la connexion d’un nouvel appareil, passez à « BT PAIRING » pour
la connexion. (Appuyez sur le bouton
PAIR de la télécommande ou sur
le bouton (Marche/Arrêt microphone) de l’unité pendant au moins
5 secondes.)
• Si le Soundbar est connecté à un autre appareil, débranchez d’abord cet
appareil pour commuter l’appareil.
• Reconnectez l’appareil après avoir supprimé la liste des haut-parleurs
Bluetooth sur l’appareil à connecter. (Téléviseur Samsung : Accueil ( )
→ Menu → Paramètres ( ) → Tous les paramètres ( ) → Son → Sortie
audio→ Liste des haut-parleurs Bluetooth)
• La connexion automatique au téléviseur peut être désactivée. Pendant
que le Soundbar est en mode « BT READY », appuyez sur la touche Gauche
de la télécommande du Soundbar et maintenez-la enfoncée pendant
5 secondes pour sélectionner ON-TV CONNECT. Si OFF-TV CONNECT
s’afche, appuyez à nouveau sur la touche Gauche et maintenez-la
enfoncée pendant 5 secondes pour changer de sélection.
• Retirez et rebranchez la che d’alimentation, puis réessayez.
• Initialisez le produit et réessayez. (Voir la page 29.)
Le son se coupe lors d’une connexion par Bluetooth.
• Certains appareils peuvent créer des interférences radio s’ils sont trop
proches du Soundbar (p. ex. fours à micro-ondes, routeurs sans l, etc.).
• Si votre appareil connecté par Bluetooth est trop éloigné du Soundbar, il
est possible que le son soit coupé. Rapprochez l’appareil du Soundbar.
• Si une partie de l’unité est en contact avec l’émetteur-récepteur Bluetooth
ou si le produit est installé sur un meuble en métal, une coupure du son
peut se produire. Vériez l’environnement d’installation et les conditions
d’utilisation.
Le Soundbar ne se connecte pas par Wi-Fi.
• Vériez si votre routeur sans l est allumé.
• Éteignez le routeur, rallumez-le, puis réessayez.
• Le Soundbar ne peut pas se connecter si le signal sans l est trop faible.
Placez le routeur plus près du Soundbar ou éliminez tout obstacle entre le
Soundbar et le routeur, dans la mesure du possible.
• Si votre routeur sans l est nouveau, vous devrez recongurer les
paramètres réseau du haut-parleur. (Voir la page 23.)
• Le Soundbar ne prend pas en charge le Wi-Fi 6.
Le Soundbar ne s’allume pas automatiquement avec le téléviseur.
• Lorsque vous éteignez le Soundbar tout en regardant la télévision, la
synchronisation de l’alimentation avec le téléviseur est désactivée.
Éteignez d’abord le téléviseur.
La fonction AVA n’est pas disponible dans les cas suivants.
• La fonction AVA n’est pas disponible lorsque le microphone est éteint.
FRC - 31
Après avoir connecté le téléviseur au Soundbar, j’ai modié le mode du
Soundbar. Aucun son n’est émis du téléviseur.
• Si vous connectez votre Soundbar à un appareil mobile pendant que le
Soundbar est connecté au téléviseur, le Soundbar diffuse du son à partir de
l’appareil mobile tout en préservant la connexion au téléviseur. Le son du
téléviseur ne sera donc pas diffusé à nulle part.
• Déconnectez l’appareil mobile, et le son du téléviseur sera de nouveau
diffusé à partir du Soundbar.
Le Soundbar n’apparaît pas dans AirPlay
• Pour activer AirPlay dans votre Soundbar, vous devez d’abord enregistrer
l’appareil avec l’application Samsung SmartThings en acceptant les
conditions générales de l’application. (Voir la page 24.)
• AirPlay ne fonctionne pas si vous supprimez le Soundbar de l’application
Samsung SmartThings.
• Vériez que le Soundbar et l’appareil Apple sont connectés au même
réseau Wi-Fi.
• Le Soundbar est compatible avec AirPlay installé sur iOS 13.4 ou version
ultérieure.
Aucun signal d’entrée UHD n’est afché sur mon téléviseur.
• Il est possible que d’autres modications des paramètres soient requises
pour votre téléviseur ou la source d’entrée. Pour en savoir plus, consultez
le manuel utilisateur du téléviseur ou de l’appareil externe.
• Assurez-vous d’utiliser un câble HDMI ultra haut vitesse certié par HDMI.
org.
Group Play n’est pas activé
• Vériez si les appareils audio sont des modèles plus récents
commercialisés à partir de 2024.
• Vériez si l’appareil hôte est connecté à un réseau Wi-Fi en tant que
source.
• Assurez-vous que tous les appareils audio sont connectés au même
réseau Wi-Fi (à 5 GHz).
12 LICENCE
Dolby, Dolby Atmos, and the double-D symbol are registered trademarks of
Dolby Laboratories Licensing Corporation. Manufactured under license from
Dolby Laboratories. Condential unpublished works.
Copyright © 2012-2021 Dolby Laboratories. All rights reserved.
For DTS patents, see http://patents.dts.com. Manufactured under license
from DTS, Inc. or DTS Licensing Limited. DTS, DTS:X, and the DTS:X logo are
registered trademarks or trademarks of DTS, Inc. in the United States and
other countries.
© 2021 DTS, Inc. ALL RIGHTS RESERVED.
The terms HDMI, HDMI High-Denition Multimedia Interface, HDMI Trade
dress and the HDMI Logos are trademarks or registered trademarks of HDMI
Licensing Administrator, Inc.
Apple, AirPlay, iPad, iPhone et Mac sont des marques commerciales d’Apple
Inc. enregistrées aux États-Unis et dans d’autres pays et régions.
• Utilisez votre téléphone, tablette ou ordinateur comme une
télécommande pour Spotify. Accédez à spotify.com/connect pour savoir
comment faire
• Le logiciel Spotify est soumis à des licences tierces disponibles ici :
https://www.spotify.com/connect/third-party-licenses.
Being Roon Tested means that Samsung and Roon have collaborated to
ensure you have the best experience using Roon software and Samsung
equipment together, so you can just enjoy the music.
Avis concernant les licences libres
Les sources libres utilisées dans ce produit sont disponibles sur la page Web
suivante (
http://opensource.samsung.com).