THIS INSTRUCTION BOOKLET CONTAINS IMPORTANT SAFETY INFORMATION. PLEASE READ AND KEEP FOR FUTURE REFERENCE.
USER'S MANUAL
SP35778
Golf Push Cart/Golfwagen
EN
DE
FR
ES
IT
PL
With your inspiring rating, COSTWAY will be more consistent to offer you EASY
SHOPPING EXPERIENCE, GOOD PRODUCTS and EFFICIENT SERVICE!
Mit Ihrer inspirierenden Bewertung wird COSTWAY konsistenter sein, um Ihnen EIN
SCHÖNES EINKAUFSERLEBNIS, GUTE PRODUKTE und EFFIZIENTEN SERVICE zu
bieten!
Avec votre évaluation inspirante, COSTWAY continuera à fournir une EXPÉRIENCE
D’ACHAT PRATIQUE, des PRODUITS DE QUALITÉ et un SERVICE EFFICACE !
Con su calificación inspiradora, COSTWAY será más consistente para ofrecerle
EXPERIENCIA DE COMPRA FÁCIL, BUENOS PRODUCTOS y SERVICIO EFICIENTE.
Con la tua valutazione incoraggiante, COSTWAY sarà più coerente per offrirti ESPE-
RIENZA DI ACQUISTO FACILE, BUONI PRODOTTI e SERVIZIO EFFICIENTE!
Dzięki twojej opinii COSTWAY będzie mógł oferować jeszcze WYGODNIEJSZE
ZAKUPY, LEPSZE PRODUKTY i SPRAWNIEJSZĄ OBSŁUGĘ KLIENTA.
US office: Fontana UK office: Ipswich
DE office: FDS GmbH, Neuer Höltigbaum 36, 22143 Hamburg, Deutschland
FR office: Saint Vigor d'Ymonville
PL office: Gdańsk
02 03
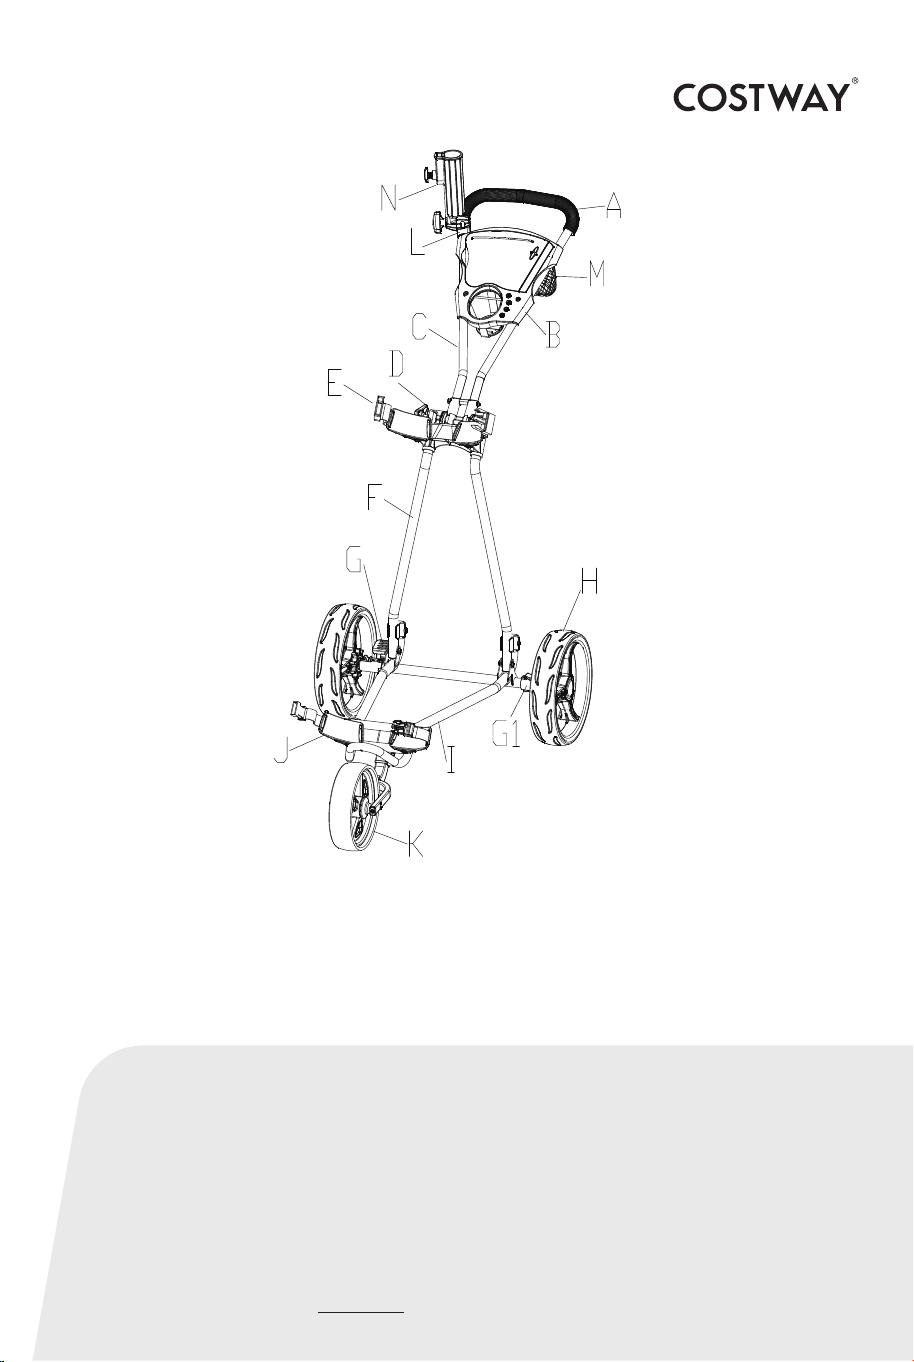
A Foam Handle
B Scorecard Holder
C Handle Tube
D Adjustable Handle Mechanism
E Upper Bracket
F Upper Frame Set
G Left Wheel Lock Mechanism
G1 Right Wheel Lock Mechanism
H Rear Wheel Set
I Lower Frame Set
J Lower Bracket Set
K Front Wheel Set
L Umbrella Holder Base
M Storage Net
N Umbrella Holder
To clean, wipe cart with a soft, dry cloth. Car polish may be used to
maintain finish. Lubricate moving parts every 6 months.
PART LIST
MAINTENANCE
For your own safety, please read and understand these warnings and keep
this user guide for future reference.
Always make sure the cart is fully extended and locked before use.
Always make sure the cart is folded and locked properly before lifting or
transporting.
Do not run while using this product.
Do not use accessories other than those designed for use with your carts.
Keep all packing materials away from children and recycle where possible
or where required by law.
Keep hands and fingers away from moving or sliding parts!
Warning
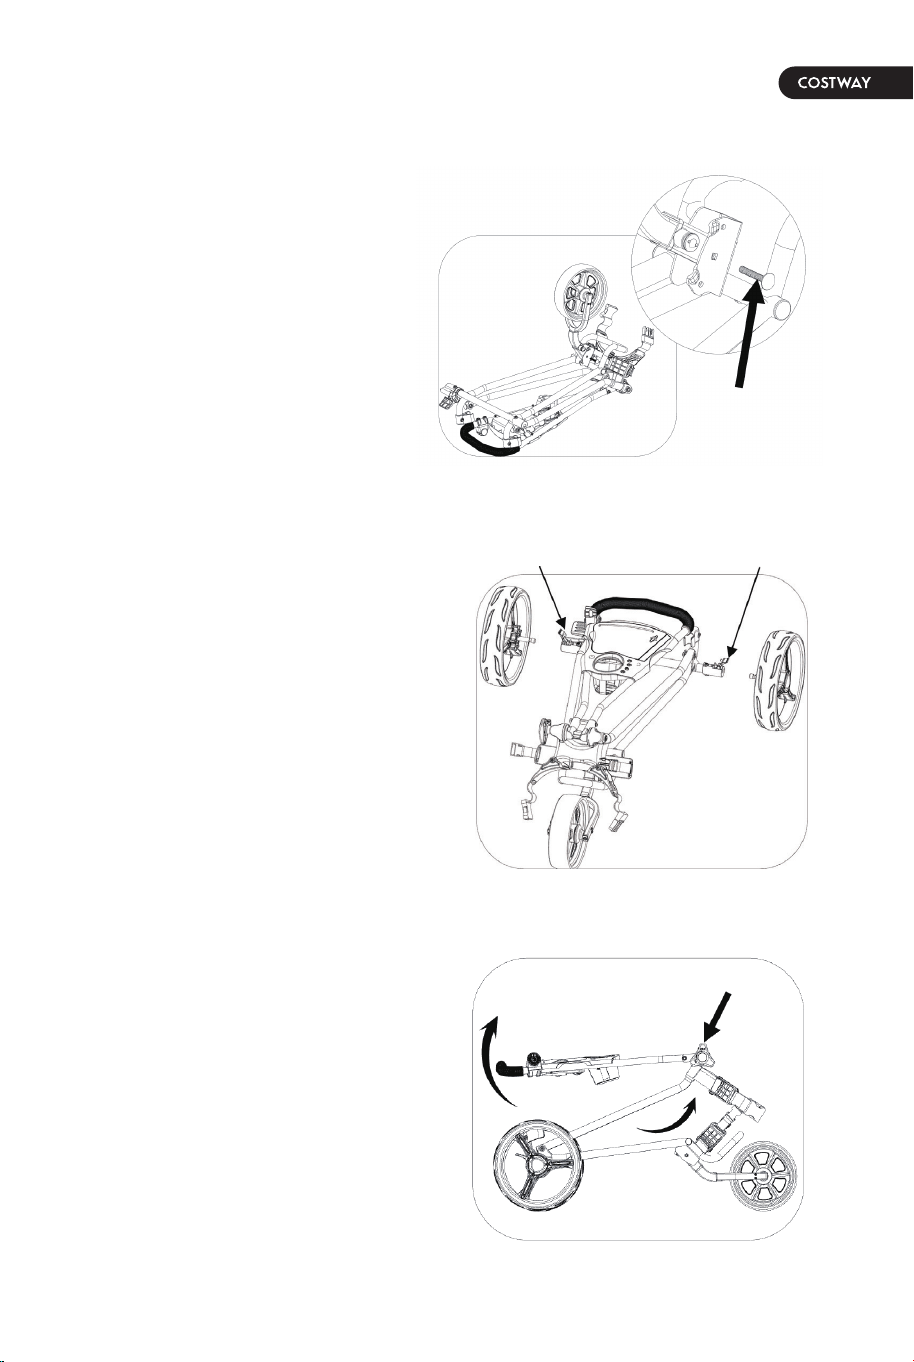
Assembly instructions
Install the front wheel set into the
lower frame with the M6 * 40mm
screw and nut as shown in Fig.1
Unfold the upper frame and the
handle tube, then lock the red
buckle as shown in Fig.3
Install and insert the rear wheel
sets into the wheel holes, then
press the button towards down as
shown in Fig.2
M6*40mm
screw
Fig.1
buckle
Fig.3
button button
Fig.2
02 03
A Foam Handle
B Scorecard Holder
C Handle Tube
D Adjustable Handle Mechanism
E Upper Bracket
F Upper Frame Set
G Left Wheel Lock Mechanism
G1 Right Wheel Lock Mechanism
H Rear Wheel Set
I Lower Frame Set
J Lower Bracket Set
K Front Wheel Set
L Umbrella Holder Base
M Storage Net
N Umbrella Holder
To clean, wipe cart with a soft, dry cloth. Car polish may be used to
maintain finish. Lubricate moving parts every 6 months.
PART LIST
MAINTENANCE
For your own safety, please read and understand these warnings and keep
this user guide for future reference.
Always make sure the cart is fully extended and locked before use.
Always make sure the cart is folded and locked properly before lifting or
transporting.
Do not run while using this product.
Do not use accessories other than those designed for use with your carts.
Keep all packing materials away from children and recycle where possible
or where required by law.
Keep hands and fingers away from moving or sliding parts!
Warning
Assembly instructions
Install the front wheel set into the
lower frame with the M6 * 40mm
screw and nut as shown in Fig.1
Unfold the upper frame and the
handle tube, then lock the red
buckle as shown in Fig.3
Install and insert the rear wheel
sets into the wheel holes, then
press the button towards down as
shown in Fig.2
M6*40mm
screw
Fig.1
buckle
Fig.3
button button
Fig.2
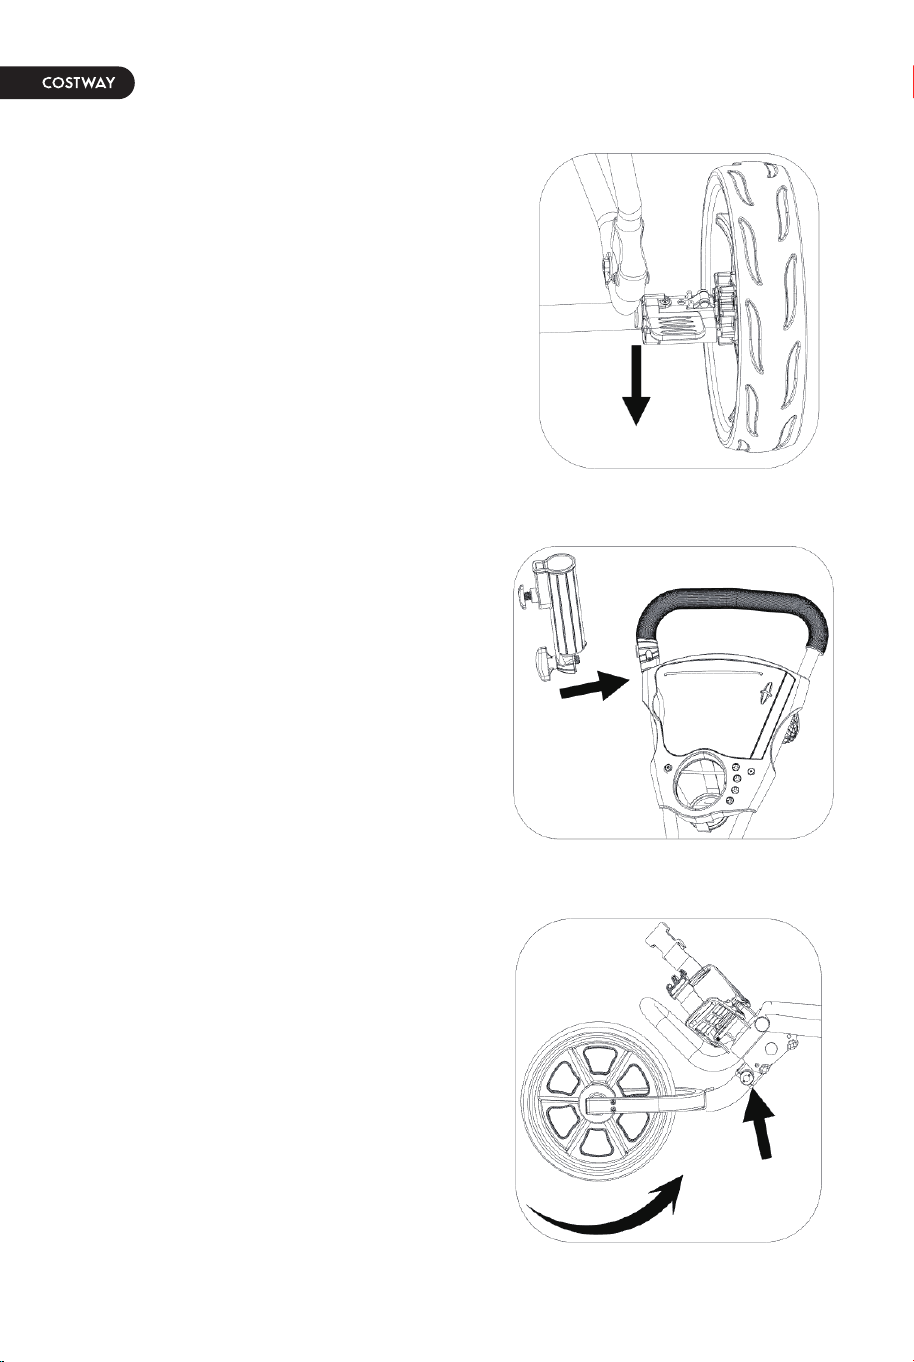
Fig.8
buckle
hole
Fig.7
Release the red buckle, then fold the
upper frame and the handle as
shown in Fig.8
Use the brake
Fig.4
Push down the red brake pedal to
stop the rear wheel and raise up to
release the rear wheel as shown in
Fig.4
Umbrella holder
Fig.5
To put in use :
Simply attach the umbrella holder
onto the cart as shown in Fig.5
Fig.6
button
Fold the cart
Press the red button to release the
front wheel, then fold until the pin is
inserted into the hole as shown in
Fig.6 and Fig.7
04 05
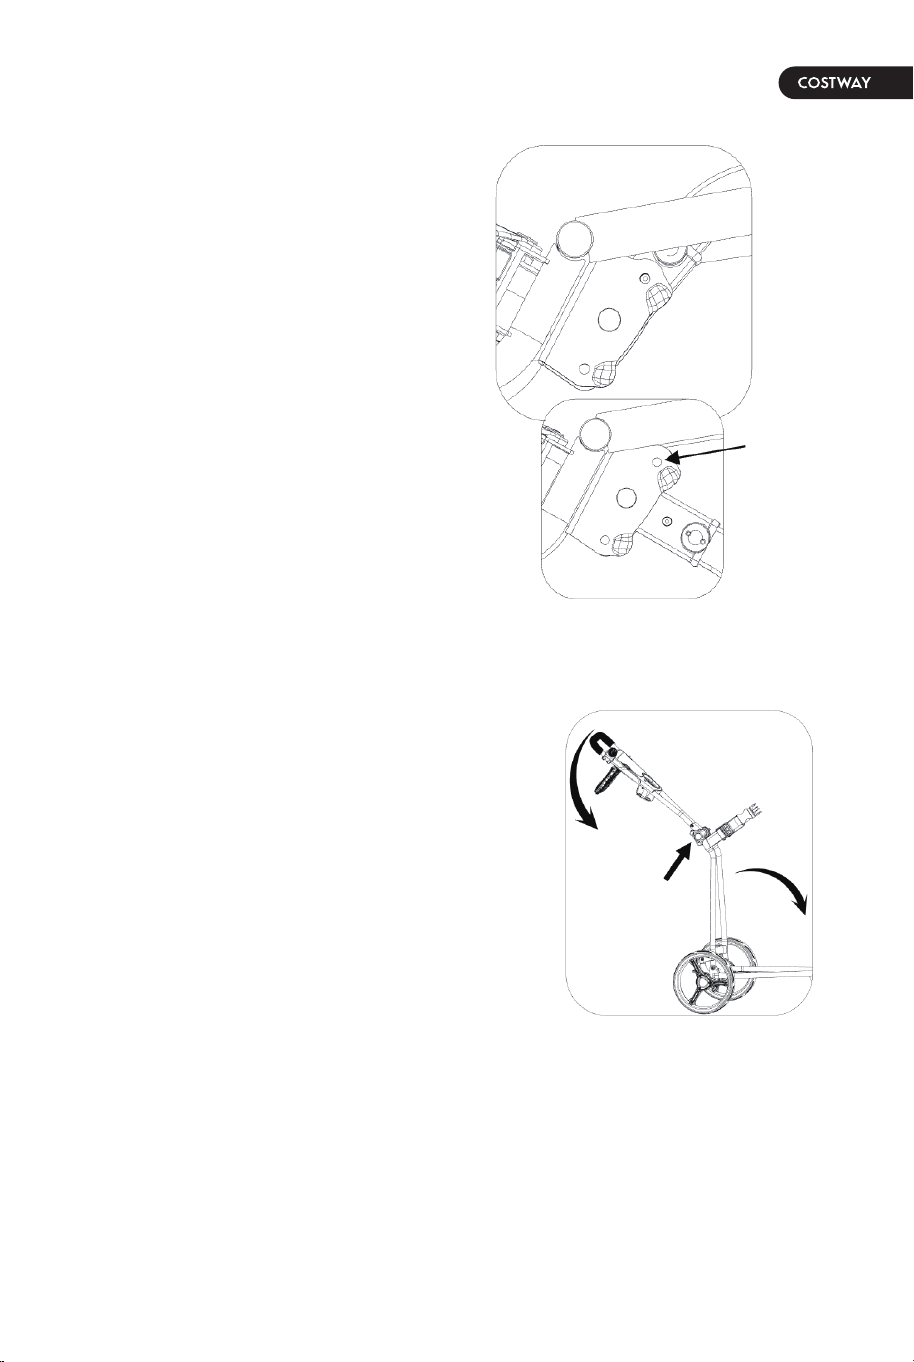
06
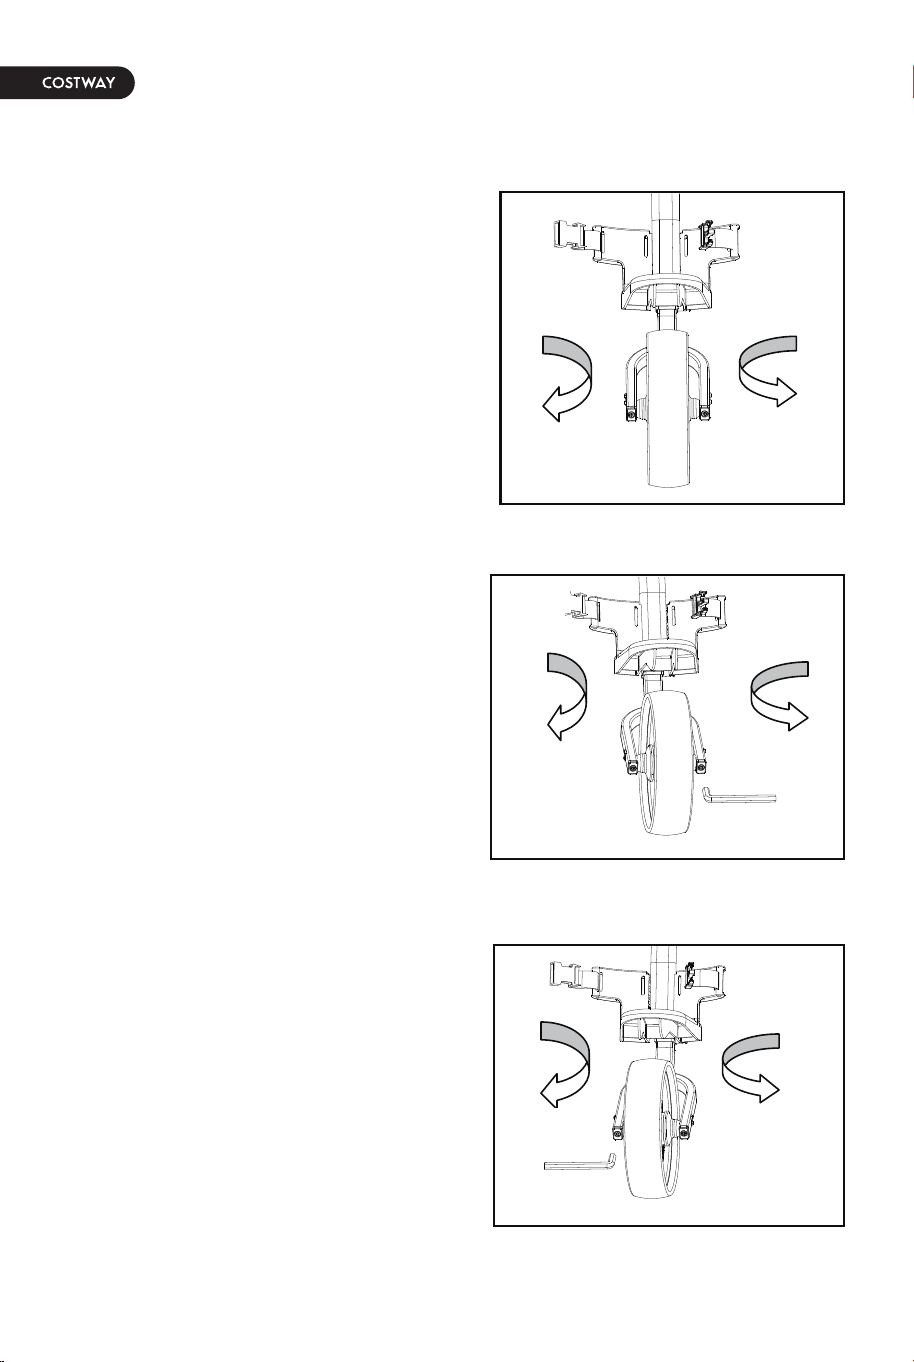
Front Wheel Adjustment Mechanism
1. If you find that the cart veers to
the left or right during use, please
refer to the following instructions to
correct the problem. (Fig 1)
2.If the cart veers to the left, face
the front wheel of the cart and use
the Allen wrench provided to screw
the right bolt counterclockwise or the
left bolt clockwise until the front
wheel is centered between the front
fork.(Fig.2)
3.If the cart veers to the right, face
the front wheel of the cart and use
the Allen wrench provided to screw
the left bolt counterclockwise or the
right bolt clockwise until the front
wheel is centered between the front
fork.(Fig.3)
Left Right
Left Right
Left Right
Fig.1
Fig.2
Fig.3

06
Front Wheel Adjustment Mechanism
1. If you find that the cart veers to
the left or right during use, please
refer to the following instructions to
correct the problem. (Fig 1)
2.If the cart veers to the left, face
the front wheel of the cart and use
the Allen wrench provided to screw
the right bolt counterclockwise or the
left bolt clockwise until the front
wheel is centered between the front
fork.(Fig.2)
3.If the cart veers to the right, face
the front wheel of the cart and use
the Allen wrench provided to screw
the left bolt counterclockwise or the
right bolt clockwise until the front
wheel is centered between the front
fork.(Fig.3)
Left Right
Left Right
Left Right
Fig.1
Fig.2
Fig.3

THIS INSTRUCTION BOOKLET CONTAINS IMPORTANT SAFETY INFORMATION. PLEASE READ AND KEEP FOR FUTURE REFERENCE.
USER'S MANUAL
SP35778
Golf Push Cart/Golfwagen
EN
DE
FR
ES
IT
PL
With your inspiring rating, COSTWAY will be more consistent to offer you EASY
SHOPPING EXPERIENCE, GOOD PRODUCTS and EFFICIENT SERVICE!
Mit Ihrer inspirierenden Bewertung wird COSTWAY konsistenter sein, um Ihnen EIN
SCHÖNES EINKAUFSERLEBNIS, GUTE PRODUKTE und EFFIZIENTEN SERVICE zu
bieten!
Avec votre évaluation inspirante, COSTWAY continuera à fournir une EXPÉRIENCE
D’ACHAT PRATIQUE, des PRODUITS DE QUALITÉ et un SERVICE EFFICACE !
Con su calificación inspiradora, COSTWAY será más consistente para ofrecerle
EXPERIENCIA DE COMPRA FÁCIL, BUENOS PRODUCTOS y SERVICIO EFICIENTE.
Con la tua valutazione incoraggiante, COSTWAY sarà più coerente per offrirti ESPE-
RIENZA DI ACQUISTO FACILE, BUONI PRODOTTI e SERVIZIO EFFICIENTE!
Dzięki twojej opinii COSTWAY będzie mógł oferować jeszcze WYGODNIEJSZE
ZAKUPY, LEPSZE PRODUKTY i SPRAWNIEJSZĄ OBSŁUGĘ KLIENTA.
US office: Fontana UK office: Ipswich
DE office: FDS GmbH, Neuer Höltigbaum 36, 22143 Hamburg, Deutschland
FR office: Saint Vigor d'Ymonville
PL office: Gdańsk