SCD730, SCD731
SCD733, SCD734
SCD735
User manual

Table of Contents
Important safety information ����������������������������������������������������������������������������������3
IMPORTANT ��������������������������������������������������������������������������������������������������������������������� 3
Introduction �����������������������������������������������������������������������������������������������������������������6
Display of the parent unit (Fig� 1) ���������������������������������������������������������������������������� 6
Preparing for use ���������������������������������������������������������������������������������������������������������7
Baby unit��������������������������������������������������������������������������������������������������������������������������� 7
Parent unit ����������������������������������������������������������������������������������������������������������������������� 7
Using the baby monitor ��������������������������������������������������������������������������������������������� 7
Positioning the baby monitor ������������������������������������������������������������������������������������� 7
Linking parent unit and baby unit ����������������������������������������������������������������������������� 8
Functions and feedback on the baby unit ������������������������������������������������������������9
Nightlight ������������������������������������������������������������������������������������������������������������������������� 9
Lullaby function �������������������������������������������������������������������������������������������������������������� 9
Projector �������������������������������������������������������������������������������������������������������������������������10
Paging the parent unit ������������������������������������������������������������������������������������������������10
Battery status light ������������������������������������������������������������������������������������������������������� 10
Functions and feedback on the parent unit ������������������������������������������������������ 11
Soothing menu �������������������������������������������������������������������������������������������������������������11
Volume ���������������������������������������������������������������������������������������������������������������������������� 13
Talk function ������������������������������������������������������������������������������������������������������������������14
Night dim mode �����������������������������������������������������������������������������������������������������������14
Baby unit battery low alert ����������������������������������������������������������������������������������������14
Battery status indications ������������������������������������������������������������������������������������������� 14
Menu of the parent unit ����������������������������������������������������������������������������������������� 15
Navigating the menu ��������������������������������������������������������������������������������������������������15
Sensitivity �����������������������������������������������������������������������������������������������������������������������15
Eco Max mode ��������������������������������������������������������������������������������������������������������������16
Feed timer ����������������������������������������������������������������������������������������������������������������������17
Room temperature ������������������������������������������������������������������������������������������������������18
Cry alert ���������������������������������������������������������������������������������������������������������������������������19
Clock ��������������������������������������������������������������������������������������������������������������������������������19
Language �����������������������������������������������������������������������������������������������������������������������19
Key lock ���������������������������������������������������������������������������������������������������������������������������20
Environmental information ����������������������������������������������������������������������������������� 20
Recycling ��������������������������������������������������������������������������������������������������������������������� 20
Support ����������������������������������������������������������������������������������������������������������������������� 20

- 3 -
Important safety information
Read this important information carefully before you use the appliance,
and save it for future reference�
IMPORTANT
This baby monitor is intended as an aid� It is not a substitute for
responsible and proper adult supervision and should not be used as
such�
Never leave your baby alone in your home� Always make sure there is
someone present to look after the baby and take care of its needs�
Disclaimer
Please note that you use this baby monitor at your own risk� Koninklijke
Philips N�V� and its subsidiary companies are not responsible for the
operation of this baby monitor or your use of it and therefore do not
accept any liability in connection with your use of this baby monitor�
Danger
- Never immerse any part of the baby monitor in water or any other
liquid� Do not place the appliance where water or any other liquid can
drip or splash onto it� Never use the baby monitor in moist places or
close to water�
- Never put any object on top of the baby monitor and do not cover
it� Do not block any ventilation openings� Install according to the
manufacturer’s instructions�
Warning
- Long cable� Strangulation hazard!
- Check if the voltage indicated on the adapter corresponds to the local
mains voltage before you connect the appliance�
- Only use the adapter supplied�
- Model: S005Bxy0600050
- xy=NV(EU plug) or xy=NB(UK plug)
- Rating: Input 100-240V~ 50/60Hz, 0.15 A
Output: 6�0 V 0�5 A, 3 W
- Average active eciency: 74.38%
- No-load power consumption (W): 0�1 W LEVEL VI
- Do not modify or cut o any part of the adapter and its cord, as this
causes a hazardous situation�
- If the adapter is damaged, always have it replaced with one of the
original type in order to avoid a hazard�
- This appliance can be used by children aged from 8years and above
and persons with reduced physical, sensory or mental capabilities or
lack of experience and knowledge if they have been given supervision
or instruction concerning use of the appliance in a safe way and
understand the hazards involved� Children shall not play with the
appliance� Cleaning and user maintenance shall not be made by
children without supervision�

- 4 -
- Protect the mains cord from being walked on or pinched particularly
at plugs, and the point where they exit from the appliance�
- Make sure that you place the baby monitor in such a way that its cord
does not obstruct a doorway or passage� If you place the baby monitor
on a table or low cabinet, do not let the mains cord hang over the
edge of the table or cabinet� Make sure the cord does not lie on the
oor where it presents a tripping hazard.
- Keep the packaging materials (plastic bags, cardboard buers, etc.)
out of the reach of children, as they are not a toy�
- To prevent electric shock, do not open the housing of the baby unit or
parent unit�
Battery safety instructions
- Only use the product for its intended purpose� Read this information
carefully before you use the product and its batteries and accessories,
and save it for future reference� Misuse can lead to hazards or serious
injuries. Accessories supplied may vary for dierent products.
- Charge, use and store the product at a temperature between 0 °C and
40 °C�
- Make sure to use the following batteries:
- Baby Unit: 1�5 V R6 AA alkaline nonrechargeable batteries or
charged 1.2 V AA HR6 rechargeable batteries. Recharge the
rechargeable batteries in a separate battery charger�
- Parent Unit: Philips 130AAHC 1.2 V, 1300 mAh (SCD730/ SCD731/
SCD733); GP 180AAHC 1.2V, 1800mAh ( SCD733/SCD734/
SCD735)�
- Only use the rechargeable battery provided with the parent unit�
- Do not recharge non-rechargeable batteries in the parent unit�
- Keep product and batteries away from re and do not expose them to
direct sunlight or high temperatures�
- Always keep coin/button cell batteries out of reach of children.
Swallowing these batteries can result in serious injury or death�
- If the product becomes abnormally hot or smelly, changes colour or if
charging takes longer than usual, stop using and charging the product
and contact Philips�
- Do not place products and their batteries in microwave ovens or on
induction cookers�
- Do not open, modify, pierce, damage or dismantle the product or
battery to prevent batteries from heating up or releasing toxic or
hazardous substances� Do not short-circuit, overcharge or reverse
charge batteries�
- If batteries are damaged or leaking, avoid contact with the skin or eye�
If this occurs, immediately rinse well with water and seek medical care�
- When you handle batteries, make sure that your hands, the product
and the batteries are dry�
- Insert batteries with the + and - poles pointing in the direction
indicated in the battery compartment or holder�
- Do not mix dierent brands and types of batteries, do not mix new
and used batteries and do not use batteries with dierent date codes.

- 5 -
- Remove batteries from the product if you are not going to use it for
some time�
- To avoid accidental short-circuiting of batteries after removal, do not
let battery terminals come into contact with metal objects (e�g� coins,
hairpins, rings)� Do not wrap batteries in aluminium foil� Tape battery
terminals or put batteries in a plastic bag before you discard them�
- Do not leave empty disposable batteries inside the product�
- Rechargeable batteries have a limited number of charge cycles� Battery
life and number of charge cycles vary by use and settings�
- Replace the rechargeable battery when the battery capacity declines
signicantly.
Caution
- Do not install the appliance near any heat sources such as radiators,
heat registers, stoves or other apparatus (including ampliers) that
produce heat�
- Make sure that your hands are dry when you handle adapters, plugs
and the mains cord�
- All required markings on the baby unit, parent unitand power adapter
are located on the bottom of the baby unit, parent unit and power
adapter�
Declaration of conformity
Hereby, Philips Consumer Lifestyle B.V. declares that this product is in
compliance with the essential requirements and other relevant provisions
of Directive 2014/53/EU. Acopy of the EC Declaration of Conformity
(DoC) is available online at www�philips�com/support�
Compliance with EMF
This product complies with all applicable standards and regulations
regarding exposure to electromagnetic elds.
- 6 -
1
9 10 11 12 13
7
8
14
2 3 4 5 6
1
Introduction
Go to www�philips�com/welcome to register your product and to read
the detailed user manual�
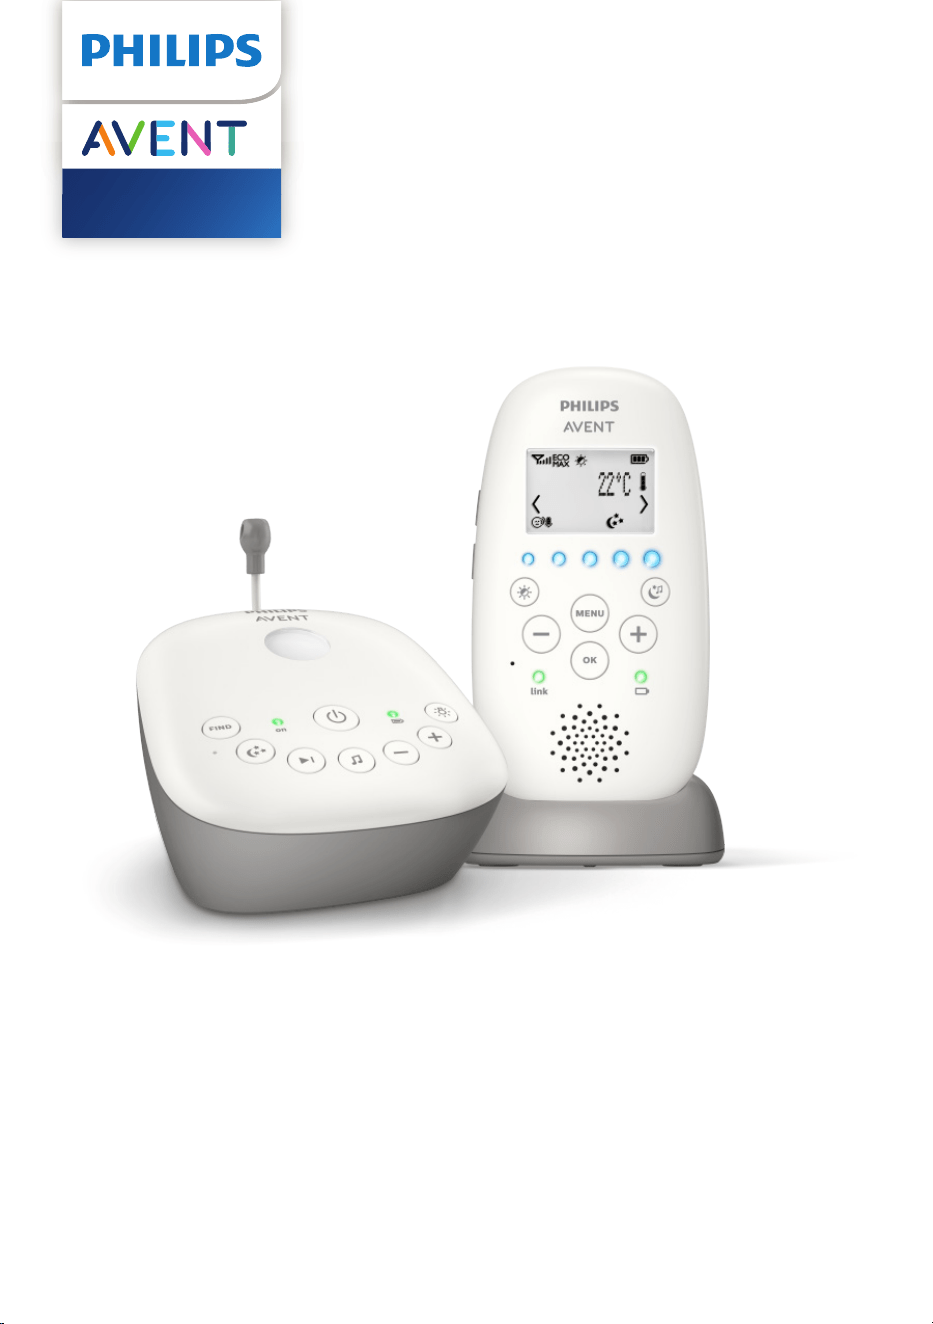
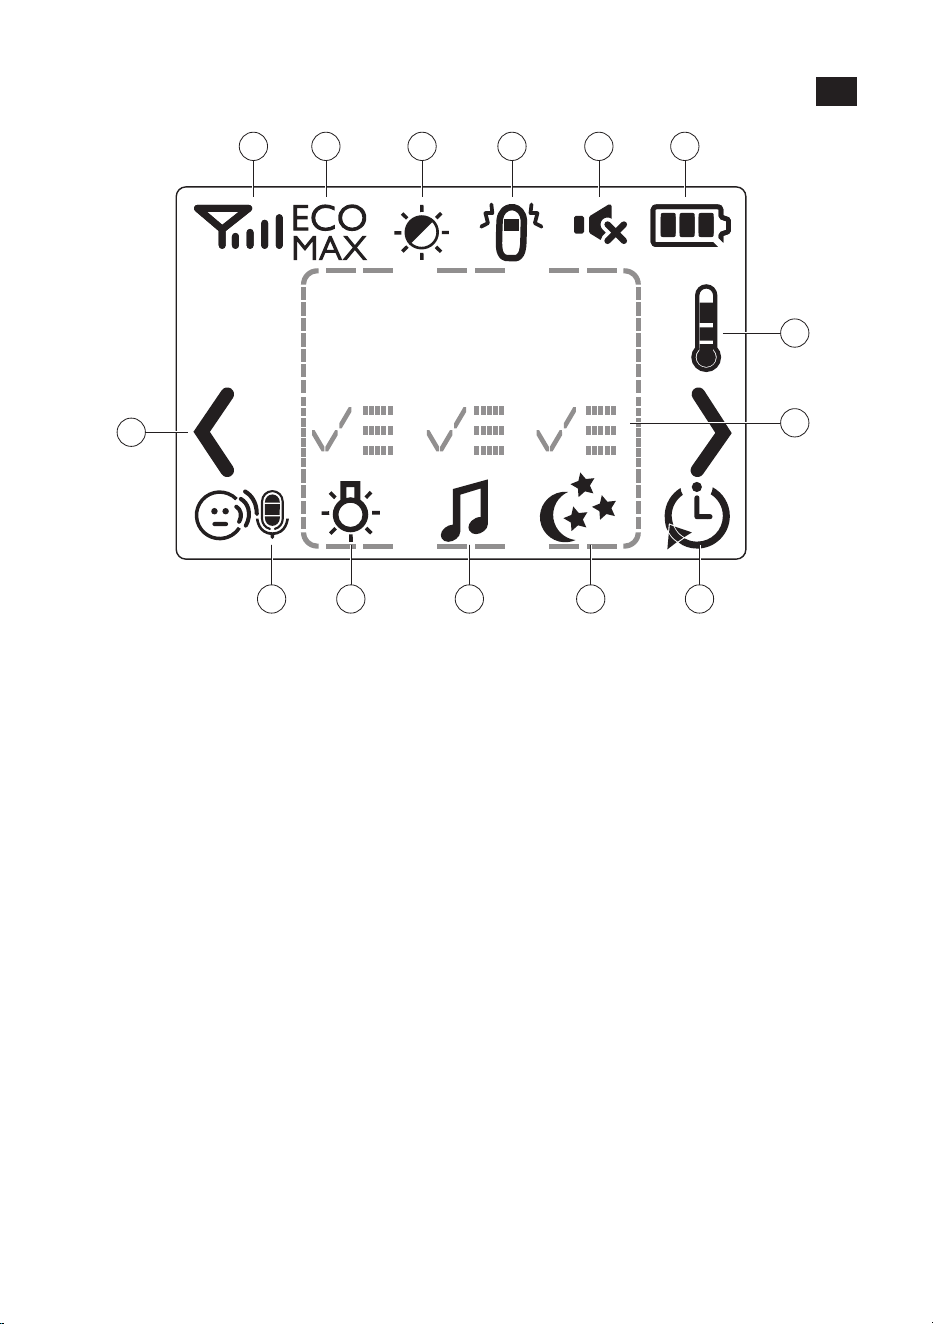
Display of the parent unit (Fig. 1)
1 Signal strength indicator
2 Eco Max indicator
3 Night dim mode symbol
4 Cry alert indicator
5 Mute symbol
6 Battery status indicator
7 Navigation arrow
8 Temperature symbol
9 Microphone sensitivity indicator
10 Nightlight symbol
11 Lullaby symbol
12 Projector symbol
13 Timer or timer repeat symbol
14 Soothing menu screen

- 7 -
Preparing for use
IMPORTANT: Read the important safety information carefully before
you use the baby monitor and keep them for future reference.
Baby unit
We advise you to use the baby unit connected to the mains� To guarantee
automatic power backup in case of mains failure, you can insert four
1.5VAA alkaline batteries (not included).
Recharge the rechargeable batteries in a separate battery charger� The
baby unit does not have a charging function and rechargeable batteries
discharge slowly when they are not in use�
Parent unit
The parent unit runs on two rechargeable batteries that are supplied with
the baby monitor. Charge the parent unit before you use it for the rst
time and when the batteries are low�
Please note that for the SCD730 / SCD731/ SCD733/xx, you
have to charge the parent unit for the full 10 hours to have a
cordless operating time of 18 hours. For the SCD734 / SCD735 and
SCD733/26: the charging time is 14 hours and the operating time is
25 hours.
Note: When you start using the baby monitor, it takes 4 charge and
discharge cycles before the rechargeable batteries reach their full
capacity�
Using the baby monitor
Positioning the baby monitor
Keep the baby unit out of the reach of the baby. Never place
the baby unit inside the baby’s bed or playpen.
- Because the cord of the baby unit presents a potential strangulation
hazard, make sure that the baby unit and its cord are at least
1metre/3.5 feet away from your baby.
- To prevent a high-pitched sound from one or both units, make sure
that the parent unit is at least 1 metre/3.5 feet away from the baby
unit�

- 8 -
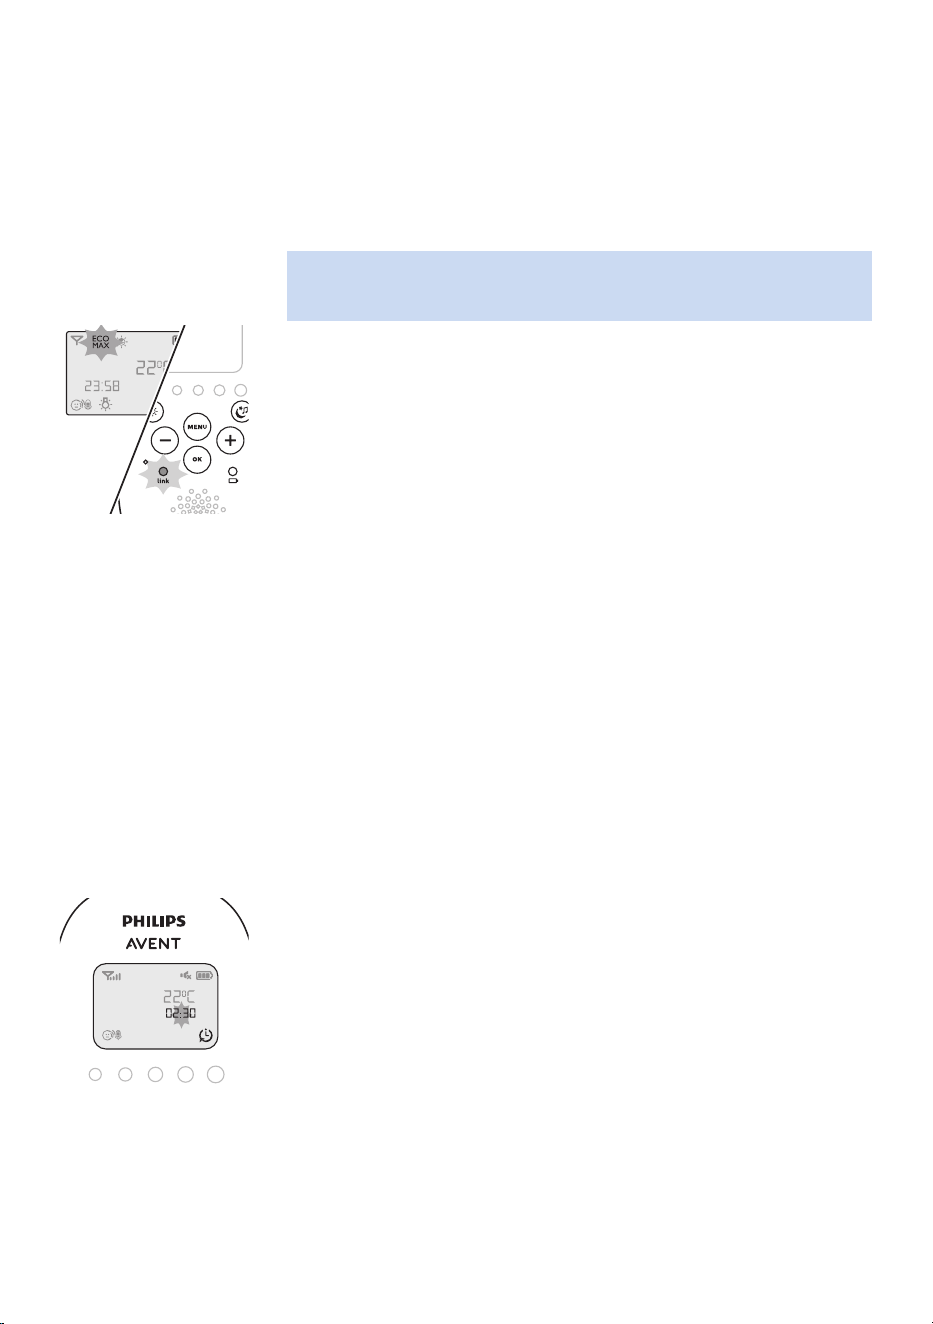
Linking parent unit and baby unit
1 Press and hold the button on the baby unit for 2 seconds until the
power-on light goes on�
2 Press and hold the button on the parent unit for 2 seconds until the
display lights up. The ‚link‘ light on the parent unit starts ashing red
and the message ‚I AM LINKING‘ appears on the display�
When the parent unit and baby unit are linked, the ‚link‘ light turns
solid green� The signal strength indicator and the message ‚LINKED‘
appear on the display�
If no connection is established, the message ‚NOT LINKED‘ is displayed
and the parent unit starts and the parent unit starts to beep�
What to do if no link is established
- If the parent unit is out of range, place it closer to the baby unit, but
not closer than 1 metre/3.5 feet.
- If the baby or parent unit is too close, <2 m/6.5 ft away from another
DECT appliance (e.g. a cordless phone), switch o this appliance or
move the unit away from this appliance�
- If the baby unit is switched o, switch it on.
Operating range
- The operating range is 330 metres/1000 feet outdoors and up to
50metres/150 feet indoors.
- The operating range of the baby monitor varies depending on the
surroundings and factors that cause interference� Wet and moist
materials cause so much interference that the range loss is up to
100%. For interference from dry materials, see the table below.
Dry materials Material thickness Loss of range
Wood, plaster, cardboard, glass
(without metal, wires or lead)
< 30 cm (12 in) 0-10 %
Brick, plywood < 30 cm (12 in) 5-35 %
Reinforced concrete < 30 cm (12 in) 30-100 %
Metal grilles or bars < 1 cm (0�4 in) 90-100 %
Metal or aluminium sheets < 1 cm (0�4 in) 100 %
- 9 -
Functions and feedback on the baby unit
Nightlight
The nightlight produces a soft glow that comforts your baby�
1 Press the button on the baby unit to switch the nightlight on or o.
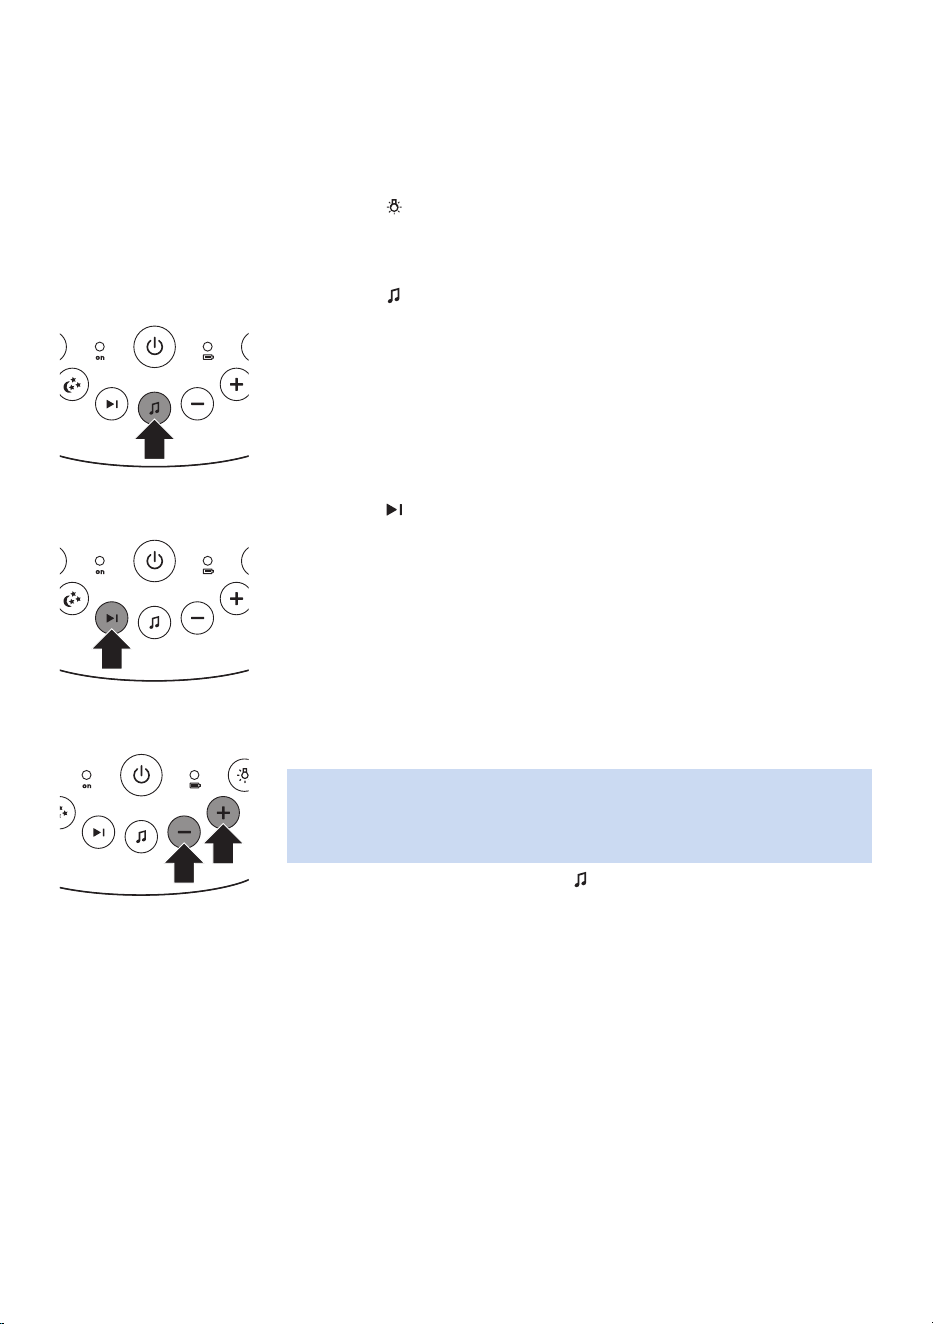
Lullaby function
1 Press the button on the baby unit to play the last selected lullaby�
The selected lullaby repeats for the set time�
2 Press the button to select another lullaby from the list�
3 To adjust the sound level of the lullaby, press the volume + or the
volume – button the baby unit�
Note: You can only set the loudspeaker volume on the baby unit when
a lullaby is playing� If you set the volume for the lullaby higher, the
sound will also be louder when you use the talk function on the parent
unit�
4 To stop lullaby playing, press the button on the baby unit�
- 10 -
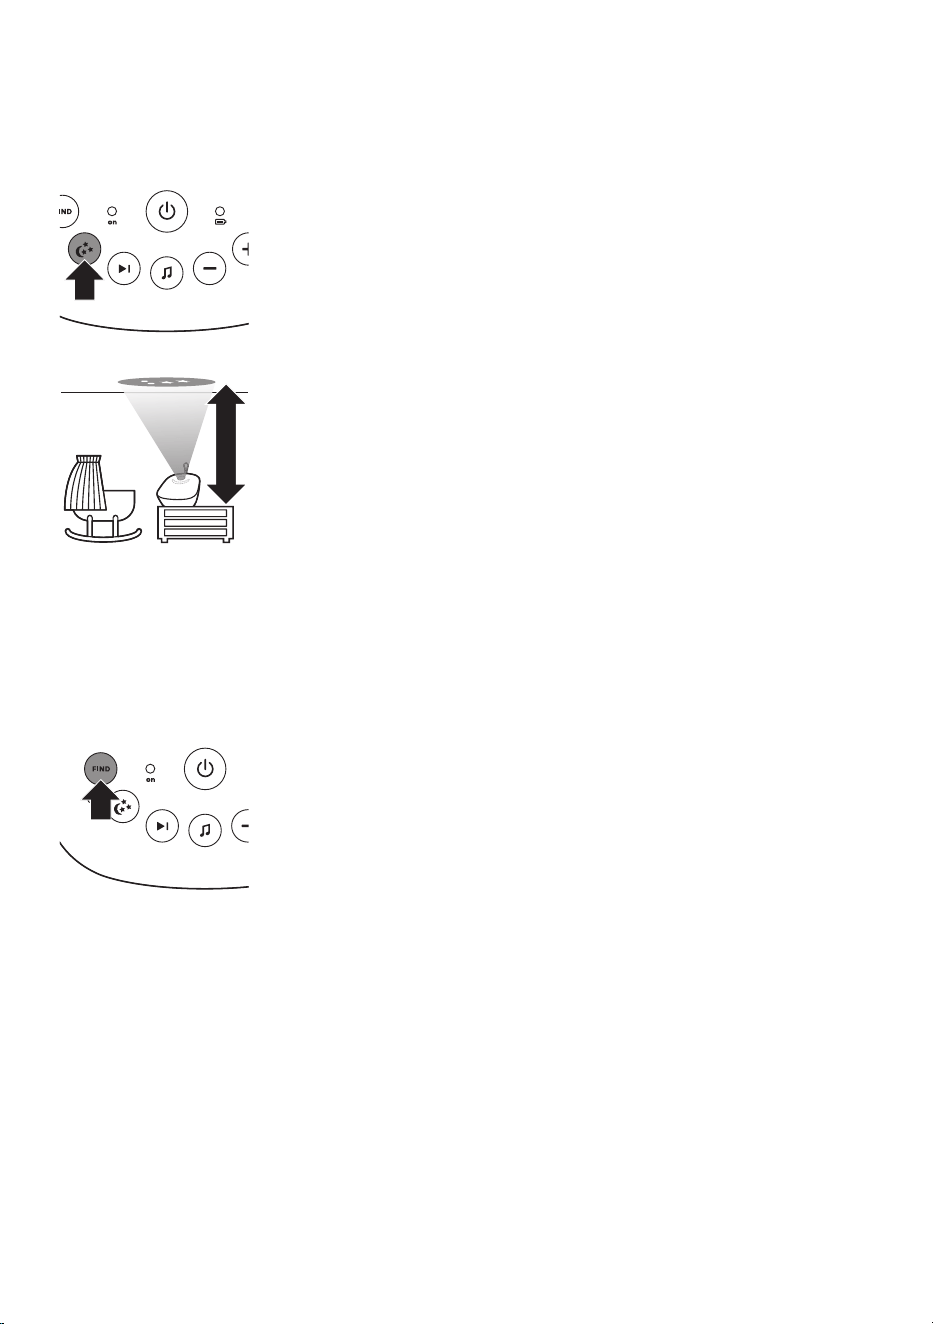
Projector
You can soothe your baby with coloured light patterns projected on the
ceiling by switching on the projector�
1 Press the projector on/o button to switch on the projector. The
projector symbol appears on the display of the parent unit�
>2.5m/8.2ft
2 There are six dierent patterns. The rst pattern fades in to full
intensity in 2 seconds� It is projected for 8 seconds and then fades out
for 2 seconds while the next pattern fades in� Each pattern is projected
for 10 seconds� The patterns are repeated for the set time�
3 To switch o the projector, press the projector on/o button again.
Paging the parent unit
If you have lost the parent unit, you can use the FIND button on the baby
unit to locate the parent unit� This function only works when the parent
unit is switched on�
1 Press FIND on the baby unit� The parent unit produces a paging alert
tone�
2 To stop the paging alert tone, press FIND on the baby unit again or
press any button on the parent unit� The paging alert tone stops
automatically after 2 minutes�
Battery status light
1 The battery status light is solid green when the baby unit is operating
on battery power and the batteries contain enough energy�
2 The battery status light ashes red quickly when the batteries run
low while the baby unit is operating on battery power� Replace the
batteries when they run low�
- 11 -
Functions and feedback on the parent unit
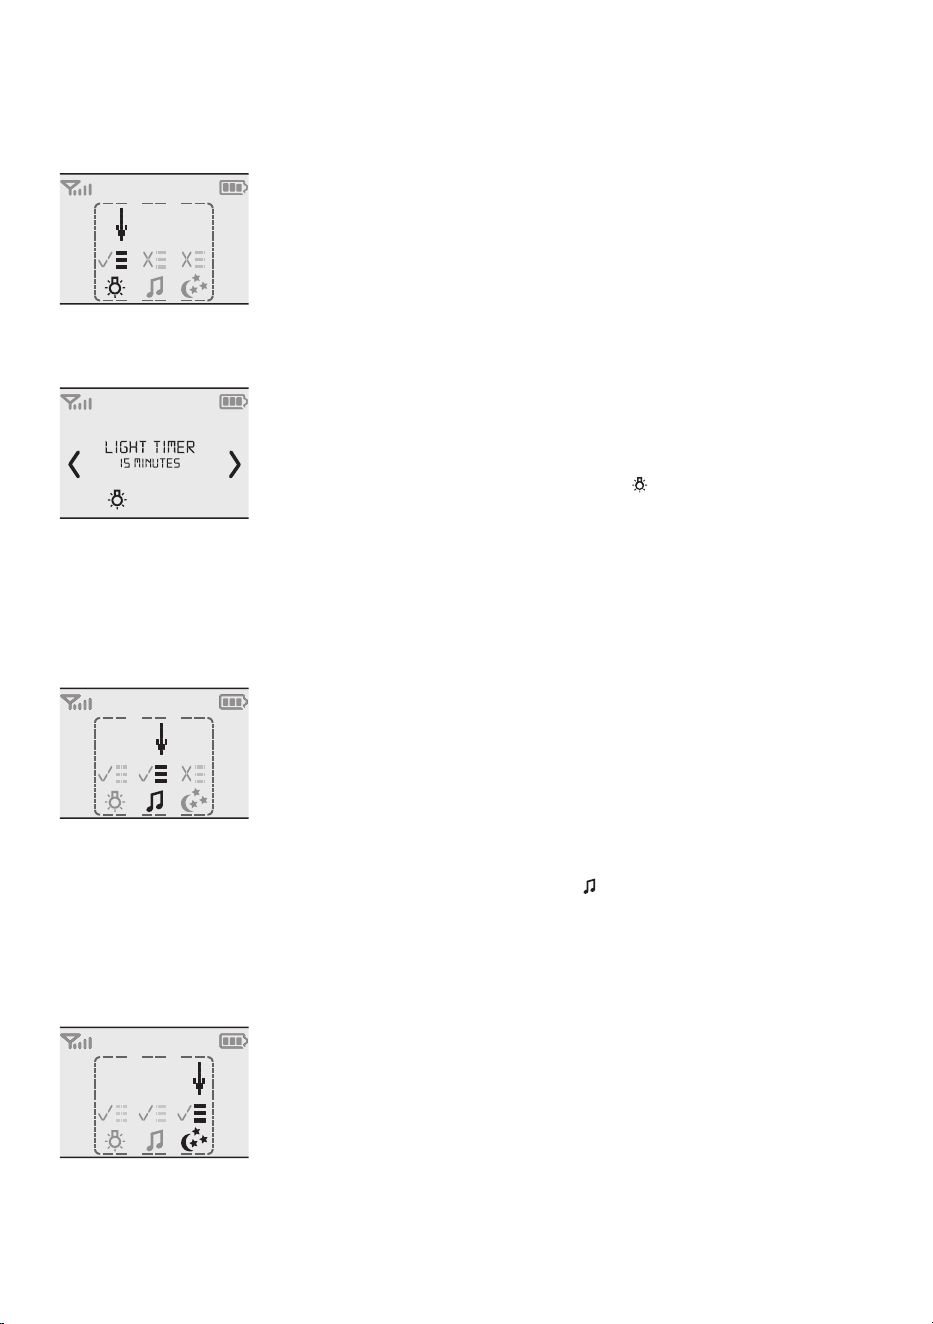
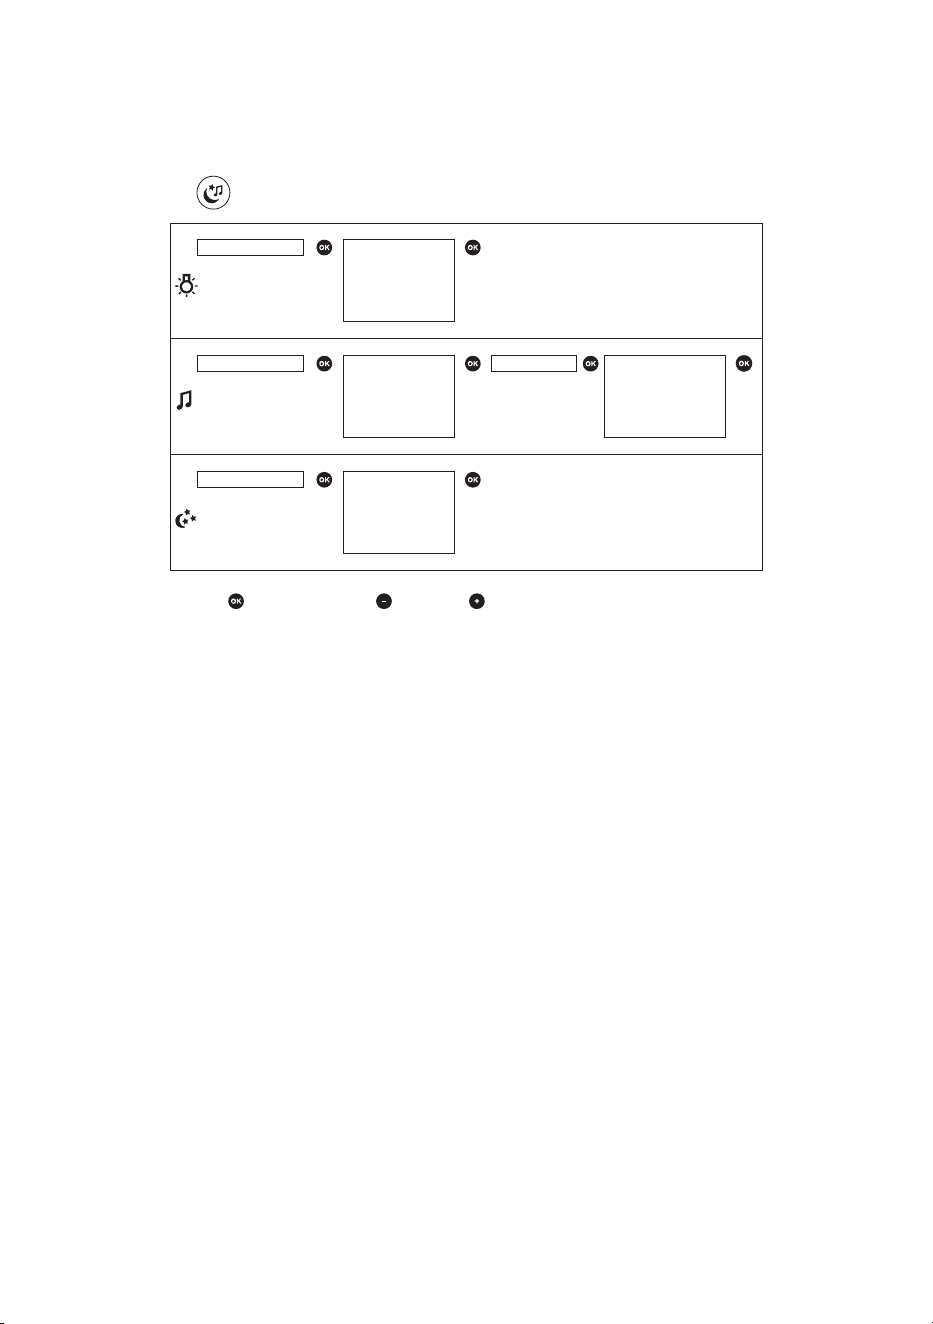
Soothing menu
The parent unit has a separate soothing menu for all soothing features:
nightlight, lullaby and projector� To open the soothing menu, press the
soothing button� This screen allows you to operate the nightlight, the
lullabies and the projector on the baby unit remotely�
1 To open the soothing menu, press the soothing button�
2 Use the + and - buttons to point the arrow to a soothing feature�
3 To switch on a soothing feature when it is o or to switch it o when
it is on, press OK� When the feature is on, there is a tick above the
symbol of the feature. When the feature is o, there is a cross above
the symbol of the feature�
4 To open the menu with options for the feature, move the arrow over
the options eld and press OK. Use the - and + buttons to select items
in the options eld.
5 To leave the soothing menu, press the soothing button�
- 12 -
Nightlight
This soothing feature allows you to switch the nightlight on or o and to
set the nightlight timer�
1 Select the nightlight feature and open the menu with nightlight
options�
2 You can set the nightlight timer for 5 to 20 minutes or you can switch
on the nightlight continuously. Press OK to conrm. The nightlight
symbol appears on the display�
If you set the nightlight timer, the nightlight switches o
automatically. If you switch on the nightlight continuously, switch it o
in the soothing menu or by pressing the button on the baby unit�
Lullaby
This soothing feature allows you to select the lullaby playing options and
set the lullaby timer�
1 Select the lullaby feature and open the menu with lullaby options�
2 In the lullaby options menu, you can select a lullaby from the list of
pre-stored lullabies� You can also select ‚Play all‘ to play all pre-stored
lullabies�
3 You can set the lullaby timer for 5 to 20 minutes or you can choose to
play lullabies continuously. Press OK to conrm the timer setting. The
lullaby symbol and the lullaby played are shown on the display�
If you set the timer, the lullaby function switches o after the time set.
If you choose play continuously, switch o the lullaby function in the
soothing menu or by pressing the button on the baby unit�
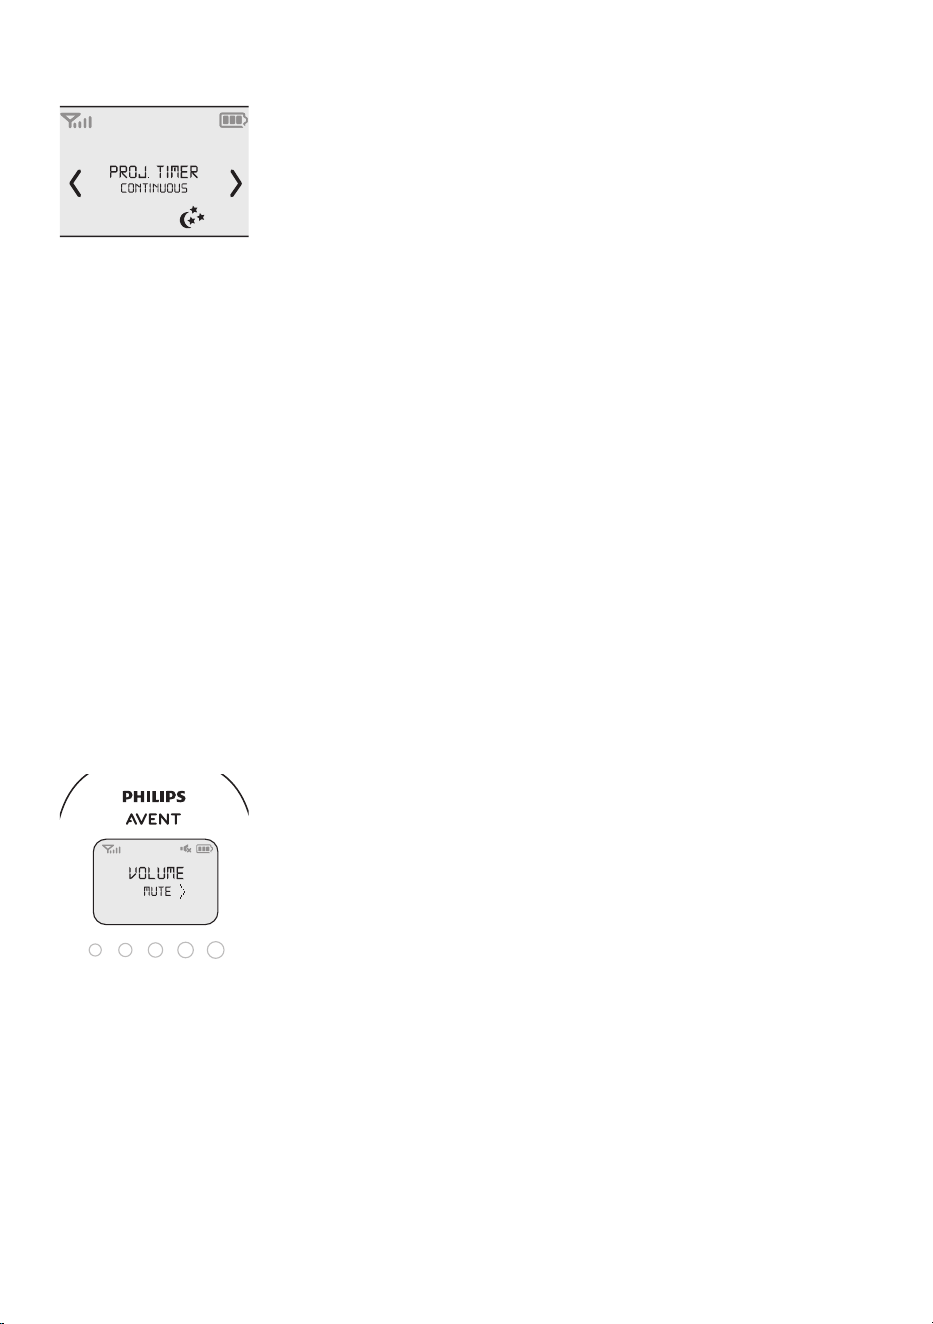
Projector
This soothing feature allows you to switch on the projector on the baby
unit and to program the duration of projection�
1 Select the projector feature and open the menu with projector
options�
2 To access the projector options, point the arrow at the options eld
and press OK�
- 13 -
3 You can set the projector timer for 5 to 20 minutes or you can switch
on the projector continuously. Press OK to conrm. The projector
symbol appears on the display�
If you set the projector timer, the projector switches o automatically.
If you switch on the projector continuously, switch o the projector in
the soothing menu or by pressing the projector button on the baby
unit�
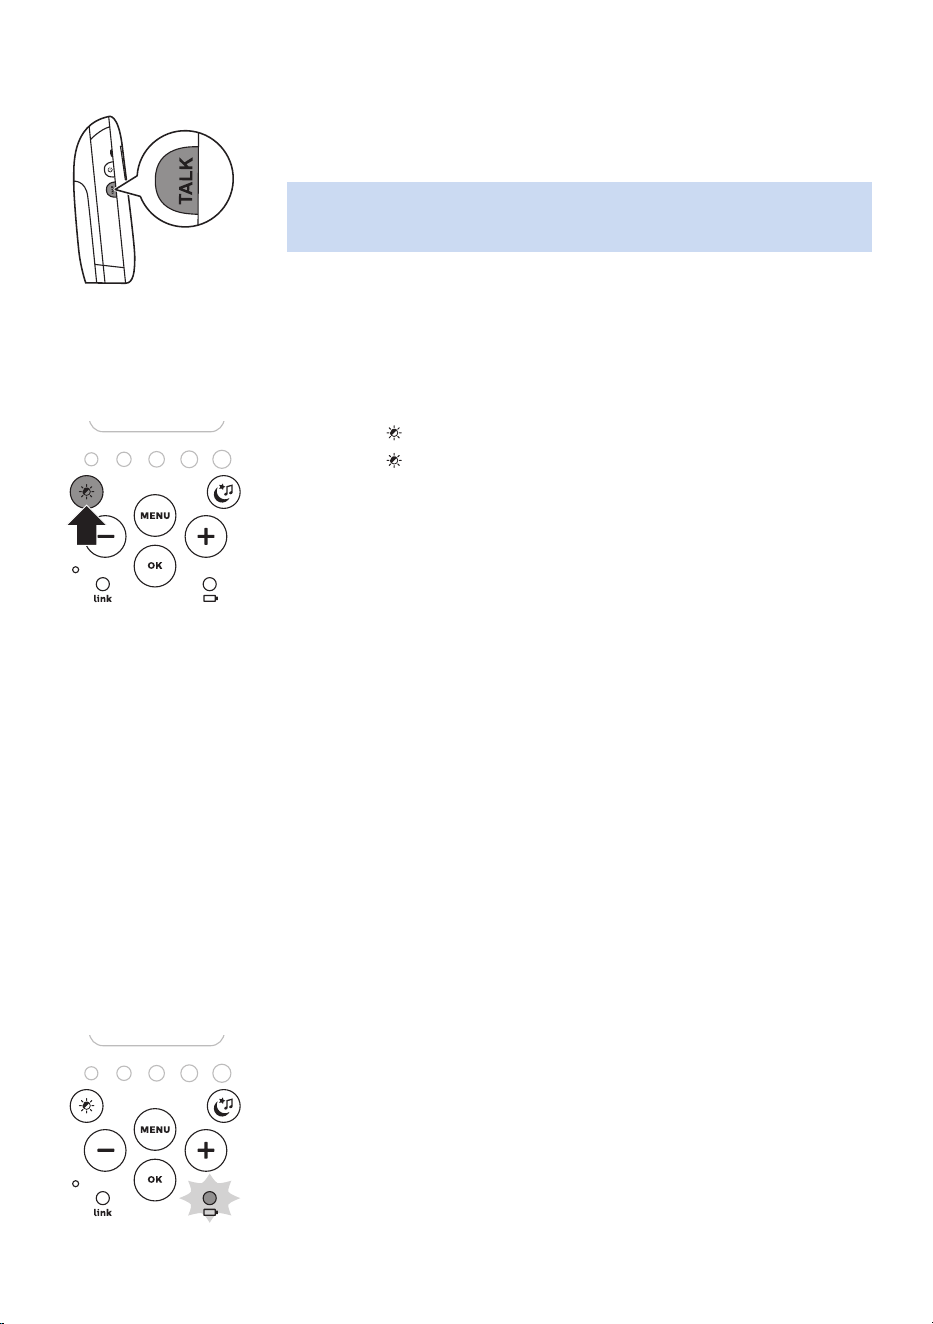
Volume
The volume can be set if the menu is not active� There are seven volume
levels and a ‚volume o‘ setting.
Setting the volume level
1 Press the + button or the - button once�
The current volume level appears on the display�
2 Press the + button to increase the volume or press the - button to
decrease the volume�
If no button is pressed for more than 2 seconds, the volume level
indication disappears from the display and the volume setting is saved�
Volume o
Below the lowest volume setting, there is a ‚volume o‘ setting.
1 Press the + button or the - button once�
The current volume level appears on the display�
2 Press and hold the - button for more than 2 seconds to set the volume
to o.
The message ‚MUTE‘ and the mute symbol appear on the display� Only
the sound level lights show that the baby produces sounds�
- 14 -
Talk function
1 If you want to comfort your baby, press TALK on the parent unit and
talk clearly into the microphone on the front from a distance of 15-
30cm (0.5-1ft).
Note: If you have set the volume of the lullaby higher on the baby unit,
the sound will also be louder when you use the talk function on the
parent unit�
2 Release TALK when you have nished talking.
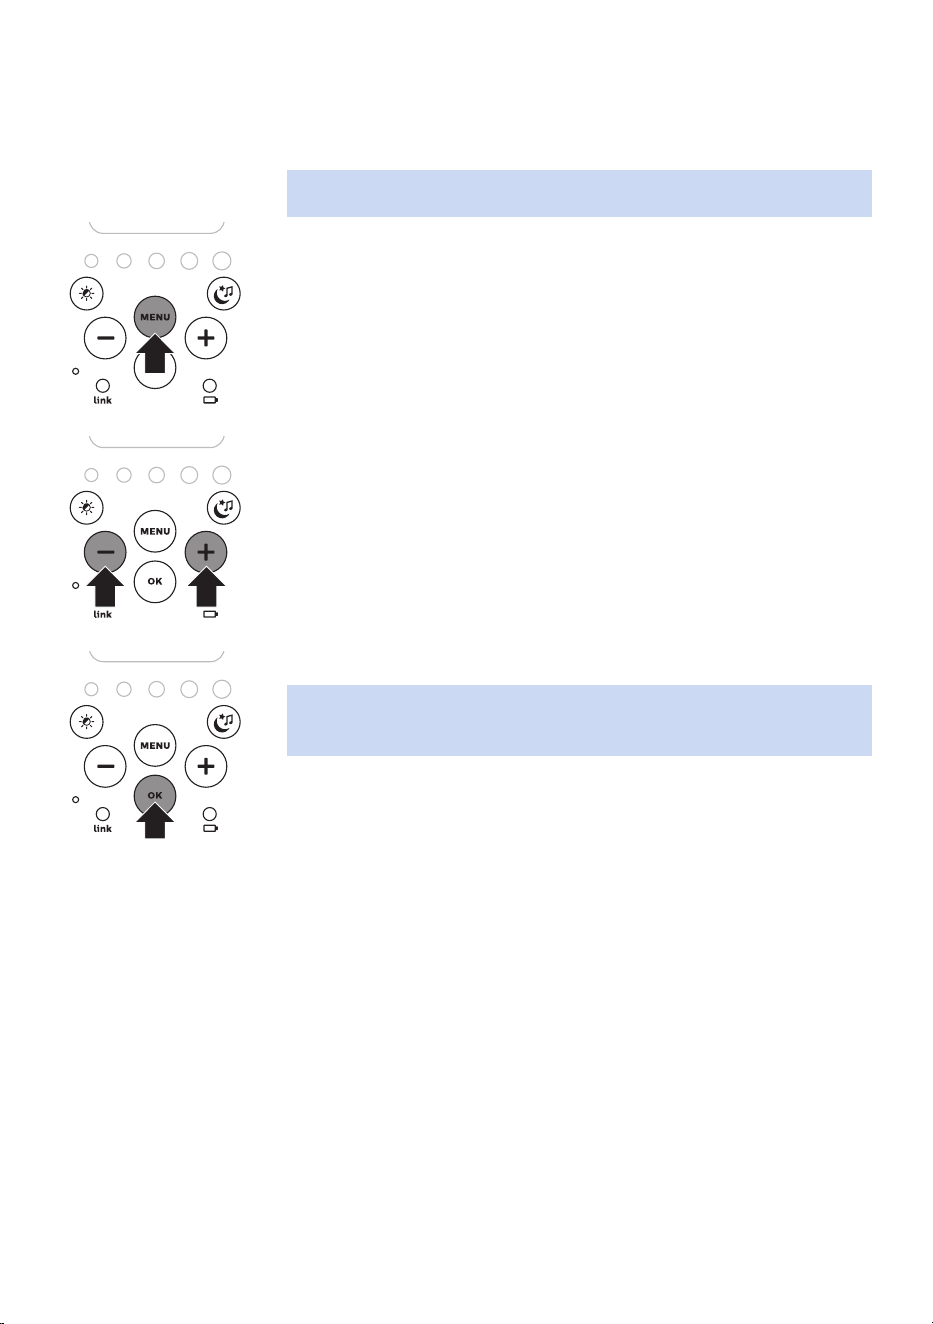
Night dim mode
In night dim mode, the light intensity of the lights and the display is
reduced and the volume of alert sounds is decreased�
1 Press the button to switch on the night dim mode�
2 Press the button again to switch back to normal operating mode�
Baby unit battery low alert
1 When the baby unit runs on battery power and its batteries are low,
the parent unit beeps and the text ‚BABY UNIT CHANGE BATTERIES‘
appears on the display�
2 If you do not replace the batteries in time, the link with the baby unit
will be lost�
Battery status indications
Battery low
When the rechargeable batteries are low, ‚BATTERY LOW‘ appears on
the display, the status indicator is empty and ashes, and the parent unit
beeps� The remaining operating time is at least 30 minutes�
Battery empty
1 If the rechargeable batteries are almost empty, the battery status light
ashes red quickly.
2 If you do not connect the parent unit to the mains, it switches o.
- 15 -
Menu of the parent unit
Navigating the menu
Note: Some menu functions only work when the baby unit and the parent
unit are linked�
1 Press the MENU button to open the menu and to make the rst menu
option appear�
2 Use the + button to go to the next option or the - button to go to the
previous option� The arrow on the display indicates in which direction
you can navigate�
3 Press OK to conrm your selection.
Note: Press the MENU button if you want to leave the menu without
making any changes� If there is no input in the menu for more than
20seconds, the menu closes automatically.
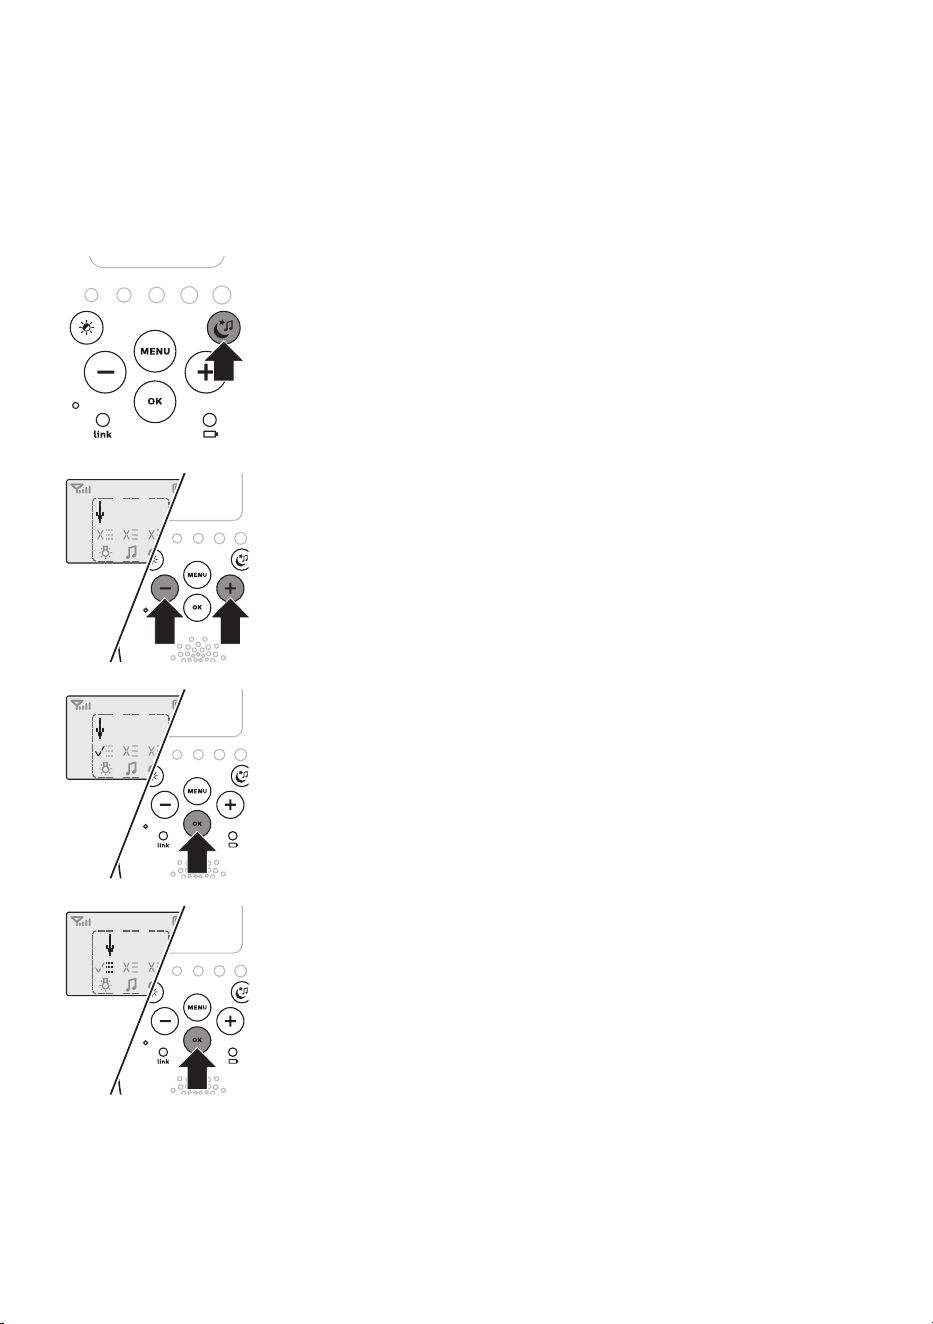
Sensitivity
This option in the parent unit menu allows you to set the microphone
sensitivity of the baby unit�
The microphone sensitivity determines what noise level the baby unit
picks up, e�g� you will want to hear when your baby cries, but you may be
less interested in its babbling�
1 Select ‘Sensitivity’ in the menu with the + and - buttons and press OK
to conrm.
2 Use the + and - buttons to increase or decrease the microphone
sensitivity. The number of lled segments shows the sensitivity level
selected. Press OK to conrm the setting.
- 16 -
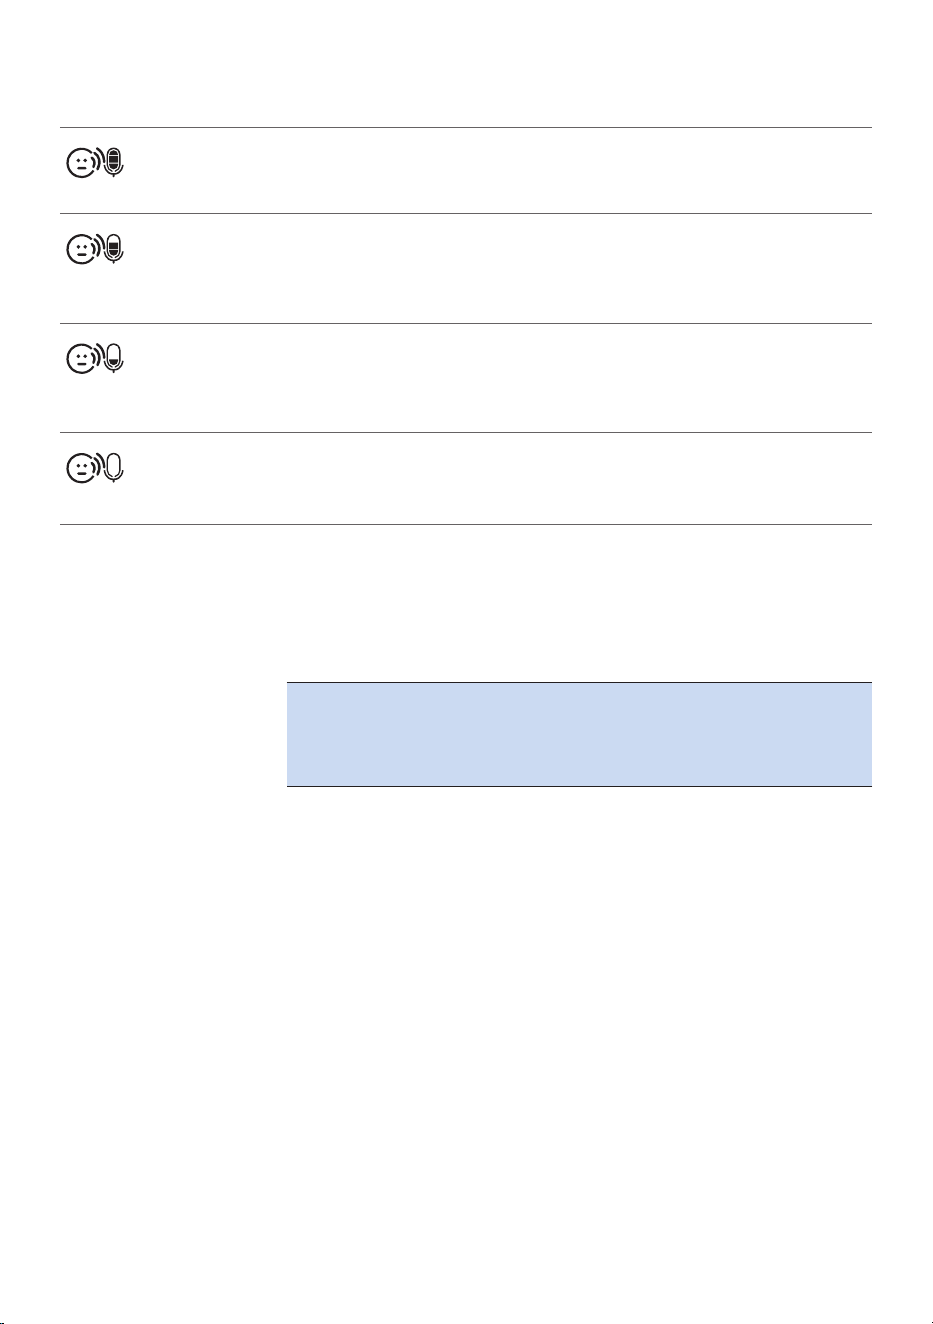
Sensitivity levels and indications
Icon Sensitivity Description
highest Hear everything from your baby.
The speaker of the parent unit is
continuously on�
high Hear all sounds from soft babbling and
louder� If your baby does not make any
sound, the speaker of the parent unit
is o.
medium Hear sounds from soft cries and louder.
If your baby makes softer sounds, the
speaker of the parent unit does not go
on�
low The speaker of the parent unit only goes
on if the baby makes loud sounds, for
instance because it is crying�
Eco Max mode
Smart Eco is a standard feature on this baby monitor� It automatically
reduces the DECT signal from the baby unit to save energy� To save even
more energy, activate the Eco Max mode� In this mode, the DECT signal of
the baby unit is switched o as long as the baby does not make a sound.
Caution: In Eco Max mode, the parent unit receives feedback
from the baby unit with a delay. When your baby makes a
sound, the baby unit rst has to reactivate radio transmission
before it can send feedback to the parent unit.
Please note the following:
- In Eco Max mode you do not receive feedback when the parent unit is
out of range of the baby unit� You can check the link by pressing any
button on the parent unit�
- The Eco Max mode cannot be activated if the microphone sensitivity is
set to the highest level�
- 17 -
Activating Eco Max mode
1 Select ‚Eco Max‘ in the menu with the + and - buttons and press OK to
conrm.
2 When the display shows ‚Turn On‘, press OK to switch on the Eco Max
mode�
3 The warning message ‚!No alert if out of range, OK?‘ appears on the
display. Press OK to conrm.
Note: The warning message scrolls across the display twice� If you do
not press OK, the parent unit leaves the menu and the Eco Max mode
remains o.
4 The Eco Max indication ashes on the display. The ‚link‘ light ashes
green slowly when the baby unit does not transmit any signals to the
parent unit�
5 When the parent unit receives a signal from the baby unit because
radio transmission has been reactivated, the ‚link‘ light turns solid
green�
Deactivating Eco Max mode
1 Press the MENU button�
2 Use the + and - buttons to select ‘Eco Max’ and press OK to conrm.
3 When the display shows ‘Turn O’, press OK to conrm.
Feed timer
You can set the feed timer to alert you that it is time to feed your baby�
The timer can be set from 1 minute to 23 hours and 59 minutes�
1 To open the feed timer submenu, select 'Feed Timer' in the menu�
Press OK to conrm.
2 Select ‚Set Timer‘ in the feed timer submenu� Press OK to start setting
the timer�
3 Set the hour and the minutes and press OK to conrm.
4 To start the feed timer, select ‚xx:xx Start‘ in the feed timer submenu�
Press OK to conrm. The timer symbol appears on the display and the
timer starts counting down�

- 18 -
5 When the timer has reached 00:00, the feed timer alert goes o, the
timer symbol starts ashing on the display and the message ‚TIMER
END‘ scrolls across the display�
6 To stop the timer, select ‚Stop & Reset‘ in the feed timer submenu and
press OK to conrm.
Setting the feed timer repeat
1 To make the feed timer go o after the same set time, select ‘Timer
repeat’ in the feed timer submenu after you have set the timer� Press
OK to conrm.
2 Choose ‘Repeat ON’ or ‘Repeat OFF’ and press OK to conrm. The
timer repeat symbol appears on the display�
3 If ‘Repeat ON’ is set, the feed timer starts counting down again after
you stop the alert�
Setting a feed timer alert
1 To set an alert, select ‚Timer Alert‘ in the feed timer submenu� Press OK
to conrm.
2 Choose one of the alert options� The options available are sound only,
sound and vibration and vibration only�
3 Press any key to stop the alert or the alert stops automatically after
2minutes.
4 To stop the timer, select ‚Stop & Reset‘ in the feed timer submenu and
press OK to conrm.
Room temperature
A baby sleeps comfortably at a temperature between 16°C/61°F and
20°C/68°F. You can set a minimum and a maximum temperature range
and an alert�
1 To open the temperature submenu, select ‚Temperature‘ in the menu�
Press OK to conrm.
2 Select ‚Temp Range‘ in the temperature submenu and press OK to
conrm.
3 Use the + and - buttons to set the minimum temperature range
between 10°C/50°F and 19°C/66°F and the maximum temperature
range between 22°C/72°F and 37°C/99°F. Press OK to conrm.
4 Select ‚Alert‘ in the temperature submenu. Press OK to conrm.
5 Choose one of the alert options� The options available are sound
only, sound and vibration,vibration only and display only� Press OK to
conrm. The temperature alert symbol appears on the display.
6 Select ‚Temp Scale‘ in the temperature submenu. Press OK to conrm.
- 19 -
7 Select ‚Celsius‘ or ‚Fahrenheit‘ and press OK to conrm. The
temperature in the set scale appears on the display�
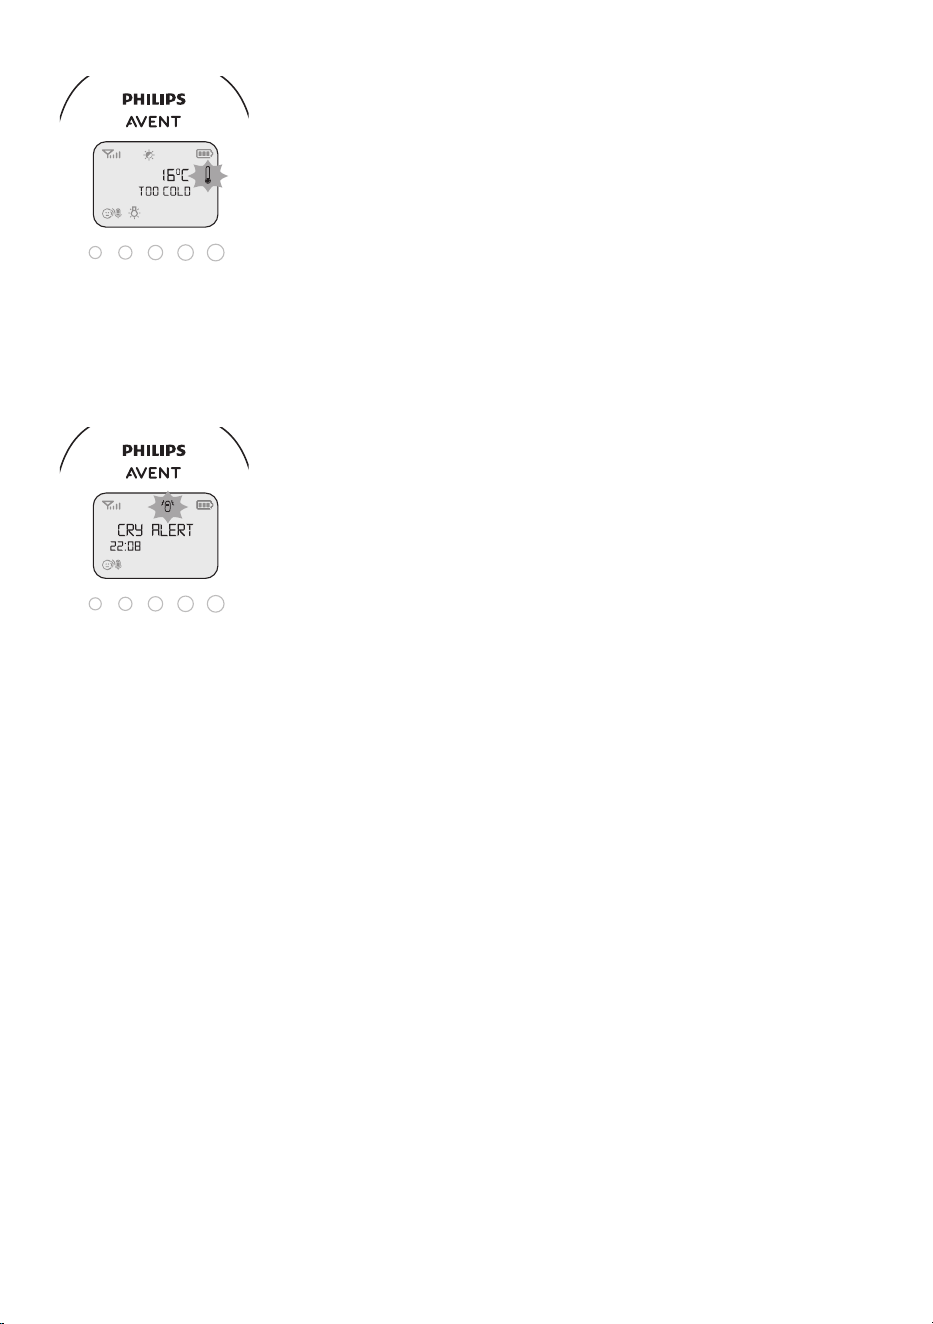
If the temperature is within the set range, the temperature alert
symbol has two segments�
If the temperature is below or above the set range, the temperature
alert symbol on the display has only one segment and ashes. The
message ‚TOO COLD‘ or ‚TOO HOT‘ appears on the display.
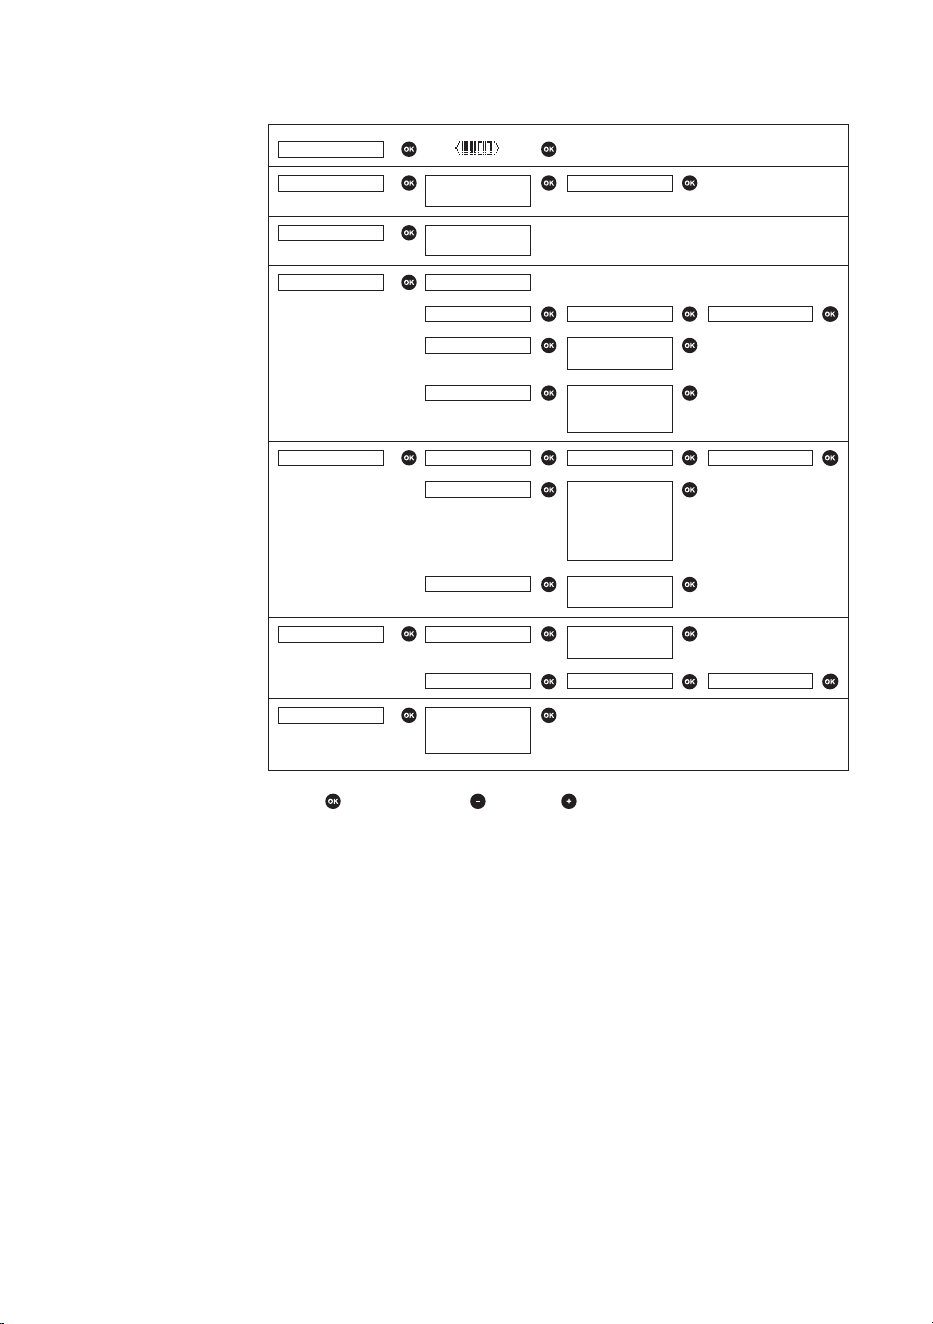
Cry alert
You can set a cry alert to warn you that the baby is crying�
1 Select ‚Cry alert‘ in the menu with the + and - buttons� Press OK to
conrm.
2 When the display shows ‚Vibration ON‘, press OK to conrm. The cry
alert indicator appears on the display�
The cry alert goes o when the sound in the baby room is loud enough
to make the fourth sound level light go on� The parent unit vibrates
and the message ‚Cry alert‘ appears on the display for 4 seconds� The
cry alert repeats every 8 seconds until the sound becomes less loud or
you deactivate the cry alert�
3 To deactivate the cry alert, select ‚Cry alert‘ in the menu� When the
display shows ‚Vibration OFF‘, press OK to conrm.
Clock
The default setting for the clock is hidden� You can choose to show the
clock and set the clock time in the menu of the parent unit�
1 Select ‚Set clock‘ in the menu with the + and - buttons� Press OK to
conrm.
2 Select ‚Show Time‘ and press OK to conrm.
3 Select ‚Set the time‘ and press OK to conrm.
4 Set the hour and the minutes and press OK to conrm.
The clock time alternates with other indications in the message eld of
the display�
Language
You can use this menu option to change the language setting�
1 Select ‘Set language’ in the menu with the + and - buttons� Press OK to
conrm.
2 Use the + and - buttons to select your language and press OK to
conrm.

- 20 -
Key lock
You can activate the key lock to prevent the buttons from being pressed
accidentally while you carry the parent unit around�
1 To activate the key lock, press OK�
2 Press the + button within 2 seconds�
Note: If you do not press the + button within 2 seconds, the instruction
remains on the display�
3 After you have pressed the + button, the message ‚Keys locked‘
appears on the display�
4 To deactivate the key lock, press OK� When the display shows the
instruction message, press the + button within 2 seconds�
Notes:
- When you press a button other than OK while the key lock is active,
the display goes on and the second line on the display tells you how to
deactivate the key lock�
- When you press OK while the key lock is active, the second line on the
display tells you what second step is necessary to unlock the buttons�
Environmental information
All unnecessary packaging has been omitted� We have tried to make
the packaging easy to separate into two materials: cardboard box and
polyethylene (bags, protective foam sheet)�
Recycling
This symbol means that electrical products and batteries shall not be
disposed of with normal household waste�
Follow your country’s rules for the separate collection of electrical
products and batteries�
Support
For all product support such as frequently asked questions, please visit
www�philips�com/support�
- 21 -
< >
< >
< >
< >
>
<
>
< >
<
< >
>
< >
< >
< >
<
>
<
< > >
<
<
Sensitivity
Eco Max
Cry Alert
Feed Timer
Te mperature
Set Clock
Set Language >
Press OK =
< =
Timer Alert
Turn On?
Turn O?
Vibrate On?
Vibrate O?
xx:yy Start?
Set Timer
Timer Repeat
Temp Range
Temp Alert
Temp Scale
Show/Hide
Set The Time
English
...
Русский
<
<
<
<
<
<
<
<
<
>
>
>
>
>
>
>
>
>
>
>
>
Minimum XXºC
!No alert if…
Hr 00:00
Hr 00:00
Repeat ON
Repeat OFF
Sound only
Sound & Vibe
Vibrate only
Sound only
Sound & Vibe
Vibrate only
Screen only
O
Celsius
Fahrenheit
Hide Clock
Show Clock
Maximum YYºC
00:30 Min
00:00 Min
SCD730/SCD731/SCD733/SCD734/SCD735
(
EN
)
> =
- 22 -
Light Timer
Lullaby
Proj. timer
5 minutes
10 minutes
15 minutes
20 minutes
Continuous
Play no.1
Play no.12
.................
Play all
5 minutes
10 minutes
15 minutes
20 minutes
Continuous
Song Timer5 minutes
10 minutes
15 minutes
20 minutes
Continuous
<
<
<
<
<
<
<
<
<
<
<
>
>
>
>
>
>
>
>
>
>
>
>
<
<
<
<
>
>
>
>
Press OK =
< =
> =

© 2023 Koninklijke Philips N�V�
All rights reserved�
23/10/2023