
0
Smart Conference Camera
User Manual

Smart Conference Camera • User Manual
I
Legal Information
Regulatory Compliance and Safety Information
Read all information and instructions in this document carefully before using the device and keep
it for further reference.
For more device information and instructions, please visit our website at
https://www.hikvision.com. You can also refer to other documents (if any) accompanying the
device or scan the QR code (if any) on the packaging to get more information.
About this Document
The document includes instructions for using and managing the product. Pictures, charts, images
and all other information hereinafter are for description and explanation only. The information
contained in the document is subject to change, without notice, due to firmware updates or other
reasons. Please find the latest version in the company website (https://www.hikvision.com).
Please use this document under the guidance of professionals.
© 2022 Hangzhou Hikvision Digital Technology Co., Ltd. All rights reserved.
Trademarks
and other Hikvision's trademarks and logos are the properties of Hikvision in various
jurisdictions.
Other trademarks and logos mentioned are the properties of their respective owners.
The terms HDMI and HDMI High-Definition Multimedia Interface, and the HDMI Logo are
trademarks or registered trademarks of HDMI Licensing Administrator, Inc. in the United States
and other countries.
Disclaimer
TO THE MAXIMUM EXTENT PERMITTED BY APPLICABLE LAW, THIS MANUAL AND THE PRODUCT
DESCRIBED, WITH ITS HARDWARE, SOFTWARE AND FIRMWARE, ARE PROVIDED “AS IS” AND “WITH
ALL FAULTS AND ERRORS”. HIKVISION MAKES NO WARRANTIES, EXPRESS OR IMPLIED, INCLUDING
WITHOUT LIMITATION, MERCHANTABILITY, SATISFACTORY QUALITY, OR FITNESS FOR A
PARTICULAR PURPOSE. THE USE OF THE PRODUCT BY YOU IS AT YOUR OWN RISK. IN NO EVENT
WILL HIKVISION BE LIABLE TO YOU FOR ANY SPECIAL, CONSEQUENTIAL, INCIDENTAL, OR INDIRECT
DAMAGES, INCLUDING, AMONG OTHERS, DAMAGES FOR LOSS OF BUSINESS PROFITS, BUSINESS
INTERRUPTION, OR LOSS OF DATA, CORRUPTION OF SYSTEMS, OR LOSS OF DOCUMENTATION,
WHETHER BASED ON BREACH OF CONTRACT, TORT (INCLUDING NEGLIGENCE), PRODUCT LIABILITY,
OR OTHERWISE, IN CONNECTION WITH THE USE OF THE PRODUCT, EVEN IF HIKVISION HAS BEEN
ADVISED OF THE POSSIBILITY OF SUCH DAMAGES OR LOSS.
YOU ACKNOWLEDGE THAT THE NATURE OF THE INTERNET PROVIDES FOR INHERENT SECURITY
RISKS, AND HIKVISION SHALL NOT TAKE ANY RESPONSIBILITIES FOR ABNORMAL OPERATION,
PRIVACY LEAKAGE OR OTHER DAMAGES RESULTING FROM CYBER-ATTACK, HACKER ATTACK, VIRUS
INFECTION, OR OTHER INTERNET SECURITY RISKS; HOWEVER, HIKVISION WILL PROVIDE TIMELY
TECHNICAL SUPPORT IF REQUIRED.
YOU AGREE TO USE THIS PRODUCT IN COMPLIANCE WITH ALL APPLICABLE LAWS, AND YOU ARE
SOLELY RESPONSIBLE FOR ENSURING THAT YOUR USE CONFORMS TO THE APPLICABLE LAW.
ESPECIALLY, YOU ARE RESPONSIBLE, FOR USING THIS PRODUCT IN A MANNER THAT DOES NOT

Smart Conference Camera • User Manual
II
INFRINGE ON THE RIGHTS OF THIRD PARTIES, INCLUDING WITHOUT LIMITATION, RIGHTS OF
PUBLICITY, INTELLECTUAL PROPERTY RIGHTS, OR DATA PROTECTION AND OTHER PRIVACY RIGHTS.
YOU SHALL NOT USE THIS PRODUCT FOR ANY PROHIBITED END-USES, INCLUDING THE
DEVELOPMENT OR PRODUCTION OF WEAPONS OF MASS DESTRUCTION, THE DEVELOPMENT OR
PRODUCTION OF CHEMICAL OR BIOLOGICAL WEAPONS, ANY ACTIVITIES IN THE CONTEXT RELATED
TO ANY NUCLEAR EXPLOSIVE OR UNSAFE NUCLEAR FUEL-CYCLE, OR IN SUPPORT OF HUMAN RIGHTS
ABUSES.
IN THE EVENT OF ANY CONFLICTS BETWEEN THIS MANUAL AND THE APPLICABLE LAW, THE LATTER
PREVAILS.
These clauses apply only to the products bearing the corresponding mark or information.

Smart Conference Camera • User Manual
I
Regulatory Information
FCC Compliance Statement
Please take attention that changes or modification not expressly approved by the party responsible
for compliance could void the user’s authority to operate the equipment.
This device complies with part 15 of the FCC Rules. Operation is subject to the following two
conditions:
(1) this device may not cause harmful interference, and
(2) this device must accept any interference received, including interference that may cause
undesired operation.
This equipment complies with FCC radiation exposure limits set forth for an uncontrolled
environment. This equipment should be installed and operated with minimum distance 20cm
between the radiator & your body.
Note: This product has been tested and found to comply with the limits for a Class B digital device,
pursuant to part 15 of the FCC Rules. These limits are designed to provide reasonable protection
against harmful interference in a residential installation. This product generates, uses, and can
radiate radio frequency energy and, if not installed and used in accordance with the instructions,
may cause harmful interference to radio communications. However, there is no guarantee that
interference will not occur in a particular installation. If this product does cause harmful interference
to radio or television reception, which can be determined by turning the equipment off and on, the
user is encouraged to try to correct the interference by one or more of the following measures:
—Reorient or relocate the receiving antenna.
—Increase the separation between the equipment and receiver.
—Connect the equipment into an outlet on a circuit different from that to which the receiver is
connected.
—Consult the dealer or an experienced radio/TV technician for help.
EU/UK Compliance Statement
This product and - if applicable - the supplied accessories too are marked with "CE" and
comply therefore with the applicable harmonized European standards listed under the
Directive 2014/30/EU (EMCD), Directive 2014/35/EU (LVD), Directive 2011/65/EU
(RoHS).
This product and - if applicable - the supplied accessories too are marked with "UKCA"
and comply therefore with the following directives: Radio Equipment Regulations 2017,
Electromagnetic Compatibility Regulations 2016, Electrical Equipment (Safety)
Regulations 2016, the Restriction of the Use of Certain Hazardous Substances in Electrical
and Electronic Equipment Regulations 2012.
Hereby, Hikvision declares that this device (refer to the label) is in compliance with Directive
2014/53/EU.
The full text of the EU declaration of conformity is available at the following internet address:
https://www.hikvision.com.
Frequency Bands and Power (for CE/UKCA)
The frequency bands and transmitting power (radiated and/or conducted) nominal limits applicable
to the following radio equipment are as follows:

Smart Conference Camera • User Manual
II
Equipment Model
Frequency Bands and Power
(i)DS-UVC-***
2.4GHz(2400-2483.5MHz) EIRP ≤ 20dBm
NFC:13.56MHz
Use the power adapter provided by a qualified manufacturer. Refer to the product specification for
detailed power requirements.
Use the battery provided by a qualified manufacturer. Refer to the product specification for detailed
battery requirements.
Directive 2012/19/EU (WEEE Directive): Products marked with this symbol cannot be
disposed of as unsorted municipal waste in the European Union. For proper recycling,
return this product to your local supplier upon the purchase of equivalent new equipment,
or dispose of it at designated collection points. For more information see: www.recyclethis.info.
According to the Waste Electrical and Electronic Equipment Regulations 2013: Products marked with
this symbol cannot be disposed of as unsorted municipal waste in the United Kingdom. For proper
recycling, return this product to your local supplier upon the purchase of equivalent new equipment,
or dispose of it at designated collection points. For more information see: www.recyclethis.info.
Directive 2006/66/EC and its amendment 2013/56/EU (Battery Directive): This product
contains a battery that cannot be disposed of as unsorted municipal waste in the European
Union. See the product documentation for specific battery information. The battery is
marked with this symbol, which may include lettering to indicate cadmium (Cd), lead (Pb), or
mercury (Hg). For proper recycling, return the battery to your supplier or to a designated collection
point. For more information see:www.recyclethis.info.
According to the Batteries and Accumulators (Placing on the Market) Regulations 2008 and the
Waste Batteries and Accumulators Regulations 2009: This product contains a battery that cannot be
disposed of as unsorted municipal waste in the United Kingdom. See the product documentation
for specific battery information. The battery is marked with this symbol, which may include lettering
to indicate cadmium (Cd), lead (Pb), or mercury (Hg). For proper recycling, return the battery to your
supplier or to a designated collection point. For more information see: www.recyclethis.info.
Industry Canada ICES-003 Compliance
This device meets the CAN ICES-003 (B) / NMB-003 (B) standards requirements.
This device complies with Industry Canada licence-exempt RSS standard(s). Operation is subject to
the following two conditions:
(1) this device may not cause interference, and
(2) this device must accept any interference, including interference that may cause undesired
operation of the device.
Le présent appareil est conforme aux CNR d'Industrie Canada applicables aux appareils
radioexempts de licence. L'exploitation est autorisée aux deux conditions suivantes :
(1) l'appareil ne doit pas produire de brouillage, et
(2) l'utilisateur de l'appareil doit accepter tout brouillage radioélectrique subi, même si le brouillage
est susceptible d'en compromettre le fonctionnement.

Smart Conference Camera • User Manual
III
This equipment complies with IC RSS-102 radiation exposure limits set forth for an uncontrolled
environment. This equipment should be installed and operated with minimum distance 20cm
between the radiator & your body.
ce matériel est conforme aux limites de dose d'exposition aux rayonnements, CNR-102 énoncée
dans un autre environnement.cette eqipment devrait être installé et exploité avec distance
minimale de 20 entre le radiateur et votre corps.
KC
B 급 기기: 이 기기는 가정용(B 급) 전자파적합기기로써 주로 가정에서 사용하는 것을
목적으로 하며, 모든 지역에서 사용할 수 있습니다.

Smart Conference Camera • User Manual
IV
Applicable Models
This manual is applicable to the Smart Conference Camera.
Symbol Conventions
The symbols that may be found in this document are defined as follows.
Safety Instructions
This device can only be safely used in the region below 2,000 meters above the sea level.
No naked flame sources, such as lighted candles, should be placed on the equipment.
The ventilation should not be impeded by covering the ventilation openings with items, such
as newspapers, table-cloths, curtains, etc. The openings shall never be blocked by placing the
equipment on a bed, sofa, rug or other similar surface.
Keep a minimum 10 cm distance around the equipment for sufficient ventilation.
The USB port of the equipment is used for connecting to a mouse, a keyboard, or a USB flash
drive only.
The serial port of the equipment is used for debugging only.
Install the equipment according to the instructions in this manual. To prevent injury, this
equipment must be securely attached to the floor/wall in accordance with the installation
instructions.
CAUTION: This bracket is intended for use only with Smart Conference Camera. Use with other
equipment may result in instability causing injury.
CAUTION: This equipment is for use only with Smart Conference Camera and bracket. Use with
other (carts, stands, or carriers) may result in instability causing injury.
Symbol
Description
Provides additional information to emphasize or supplement
important points of the main text.
Indicates a potentially hazardous situation, which if not avoided,
could result in equipment damage, data loss, performance
degradation, or unexpected results.
Indicates a hazard with a high level of risk, which if not avoided, will
result in death or serious injury.

Smart Conference Camera • User Manual
V
In the use of the product, you must be in strict compliance with the electrical safety
regulations of the nation and region.
The socket-outlet shall be installed near the equipment and shall be easily accessible.
This equipment is not suitable for use in locations where children are likely to be present.
The additional force shall be equal to three times the weight of the equipment but not less
than 50N. The equipment and its associated mounting means shall remain secure during the
installation. After the installation, the equipment, including any associated mounting plate,
shall not be damaged.
Keep body parts away from motors. Disconnect the power source during servicing.
To prevent possible hearing damage, do not listen at high volume levels for long periods.
Smart Conference Camera • User Manual
VI
TABLE OF CONTENTS
Chapter 1 Introduction ............................................................................................................... 1
Packing List............................................................................................................................................................ 1
Appearance ........................................................................................................................................................... 1
Interface Description ............................................................................................................................................ 2
Remote Control Description ................................................................................................................................. 4
1.4.1 Indicator Status Description....................................................................................................................... 5
1.4.2 Remote Control .......................................................................................................................................... 5
Chapter 2 Installation ................................................................................................................. 7
Desk Mounting ...................................................................................................................................................... 7
Wall Mounting ...................................................................................................................................................... 7
Chapter 3 Set Control Mode ..................................................................................................... 11
Chapter 4 PTZ Control .............................................................................................................. 12
4.1.1 Set Preset Point ........................................................................................................................................ 12
4.1.2 Call Preset Point ....................................................................................................................................... 12
Chapter 5 Menu Function ......................................................................................................... 13
Set System Mode ................................................................................................................................................ 13
Set Backlight Mode ............................................................................................................................................. 13
Set Tracking Sensitivity ....................................................................................................................................... 14
Reboot Device ..................................................................................................................................................... 14
Restore Device .................................................................................................................................................... 14
View Basic Device Information ........................................................................................................................... 14
Smart Conference Camera • User Manual
1
Chapter 1 Introduction
Based on audio and video processing technology, the smart conference camera (referred to as
"camera") is an easy-to-use, efficient, smooth and safe video conference camera. It has functions
of quick meeting joining, multi-party conference, etc.
The camera can work with Hikvision MCU products and video conference terminals to meet
various scene applications such as users' daily meetings, remote training, telemedicine,
collaborative office, command and dispatch, etc.
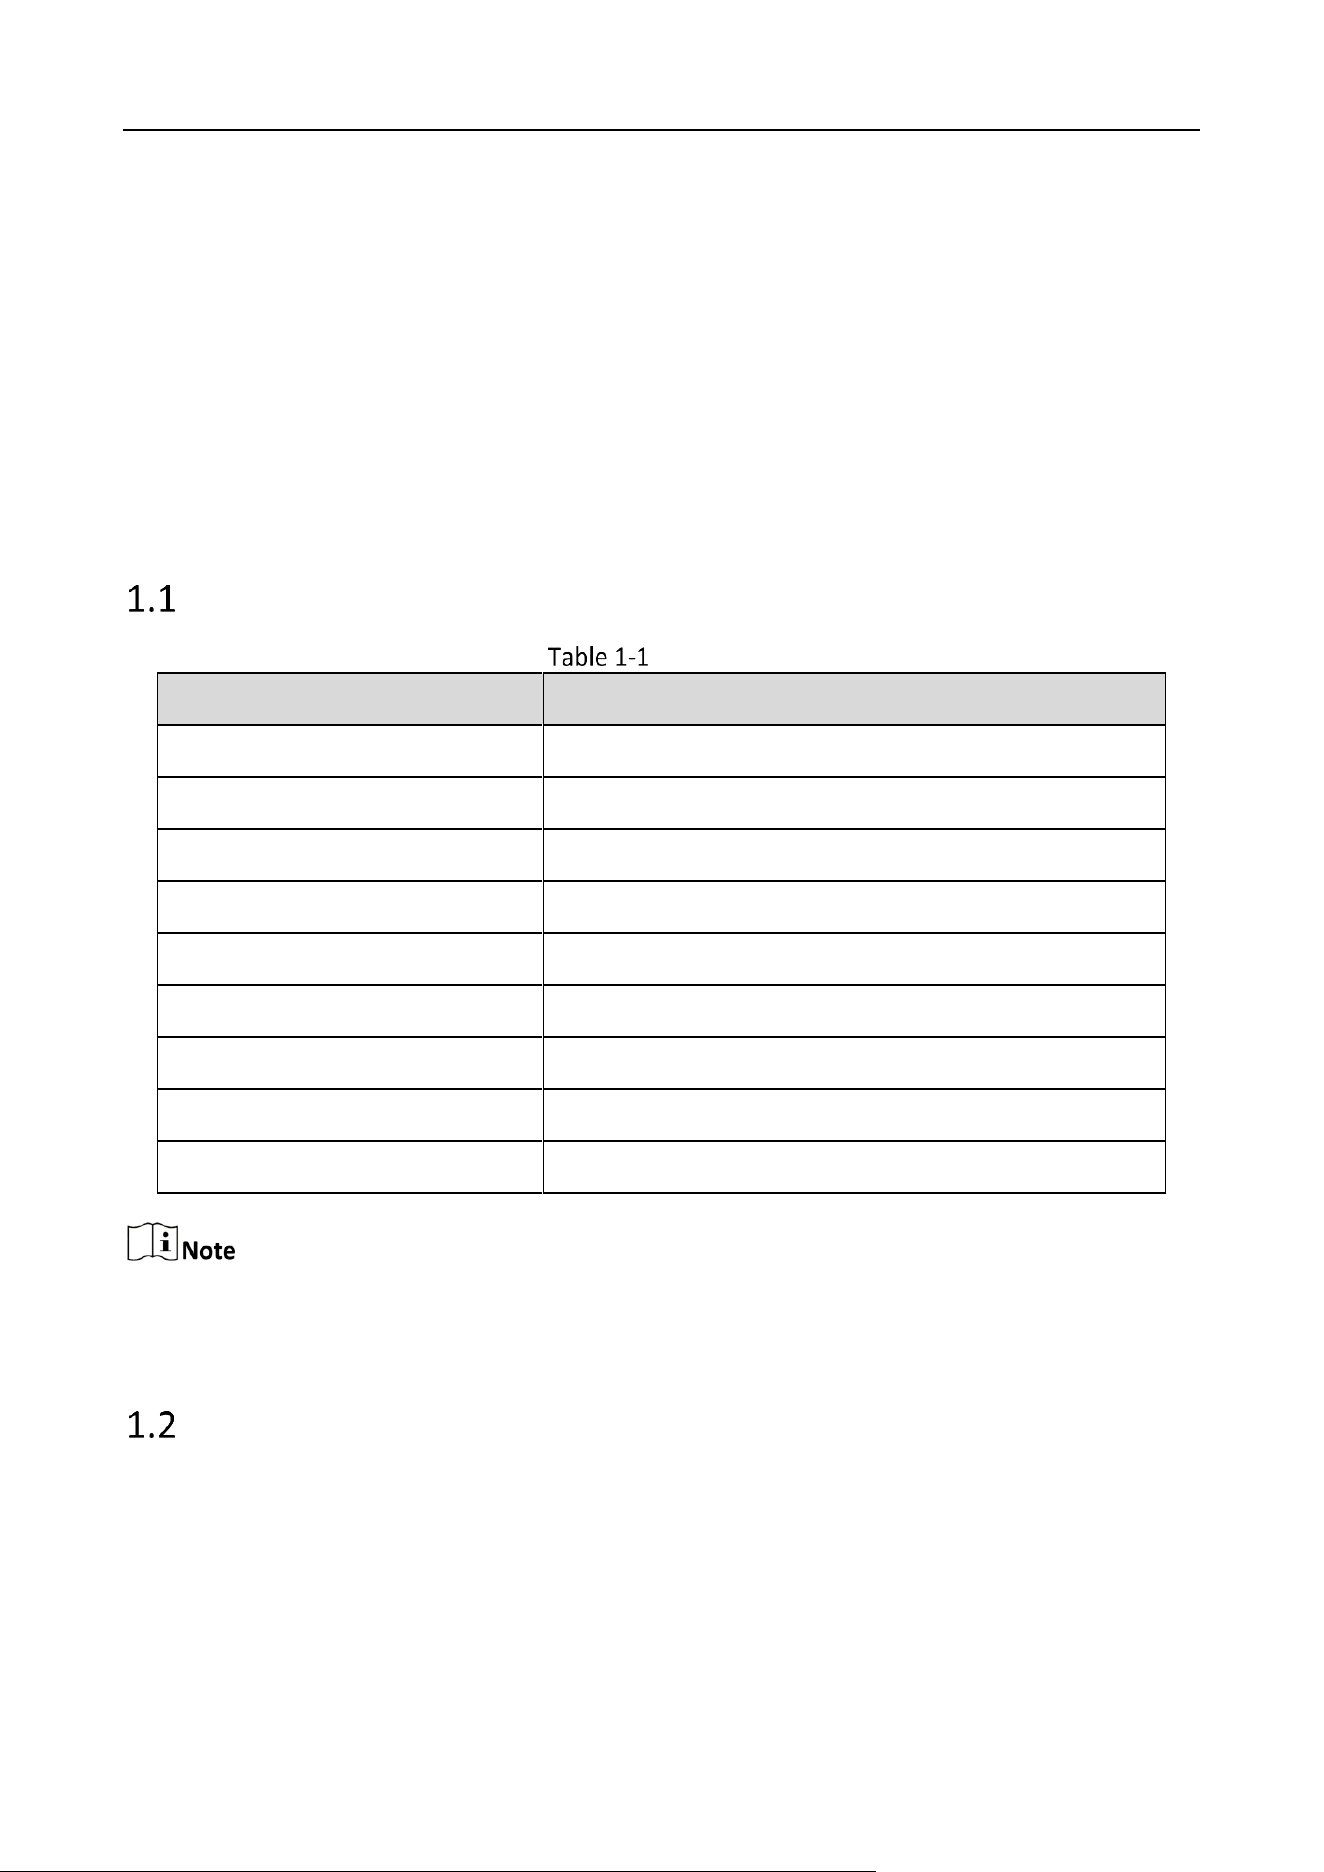
Packing List
Packing List
Accessories
Number
Smart Conference Camera
1
Power Adapter
1
Remote Control
1
AAA Battery
2
5m USB Type-C Cable
1
NFC Stickers
1
Desk Mounting Bracket
1
Screw Pack
1
User Manual
1
The NFC sticker can be pasted on the desk. The mobile phone can be paired via NFC and connected
to Bluetooth to realize the voice access of mobile phone calls.
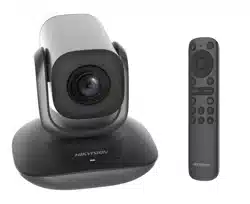
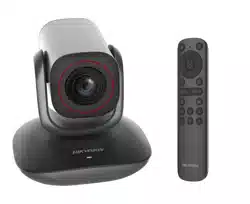
Appearance
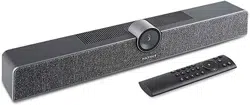
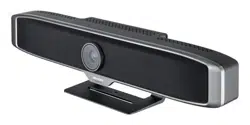
The front and rear views of the camera are shown as follows.

Smart Conference Camera • User Manual
2
Front View
Rear View
Interface Description
The interface on the side of the camera rear view is shown as follows.
Front View
The camera interface is described as follows.

Smart Conference Camera • User Manual
3
Interface Description
Name
Description
MIC USB
Type-A port, used for connecting an external
microphone. When an external microphone is
connected, the build-in microphone will be
unavailable.
Network Interface
The network interface 10 m / 100 m / 1000 m is
self-adaptive and used for network interaction
with downlink devices.
The device can also be debugged through the
network port.
HDMI OUT Interface
HDMI output interface, used for connecting an
external display.
USB Interface
Type-C interface, used for connecting devices with
PC system.
Power Interface
DC 12 V power input interface, used for connecting
the matching power adapter.

Smart Conference Camera • User Manual
4
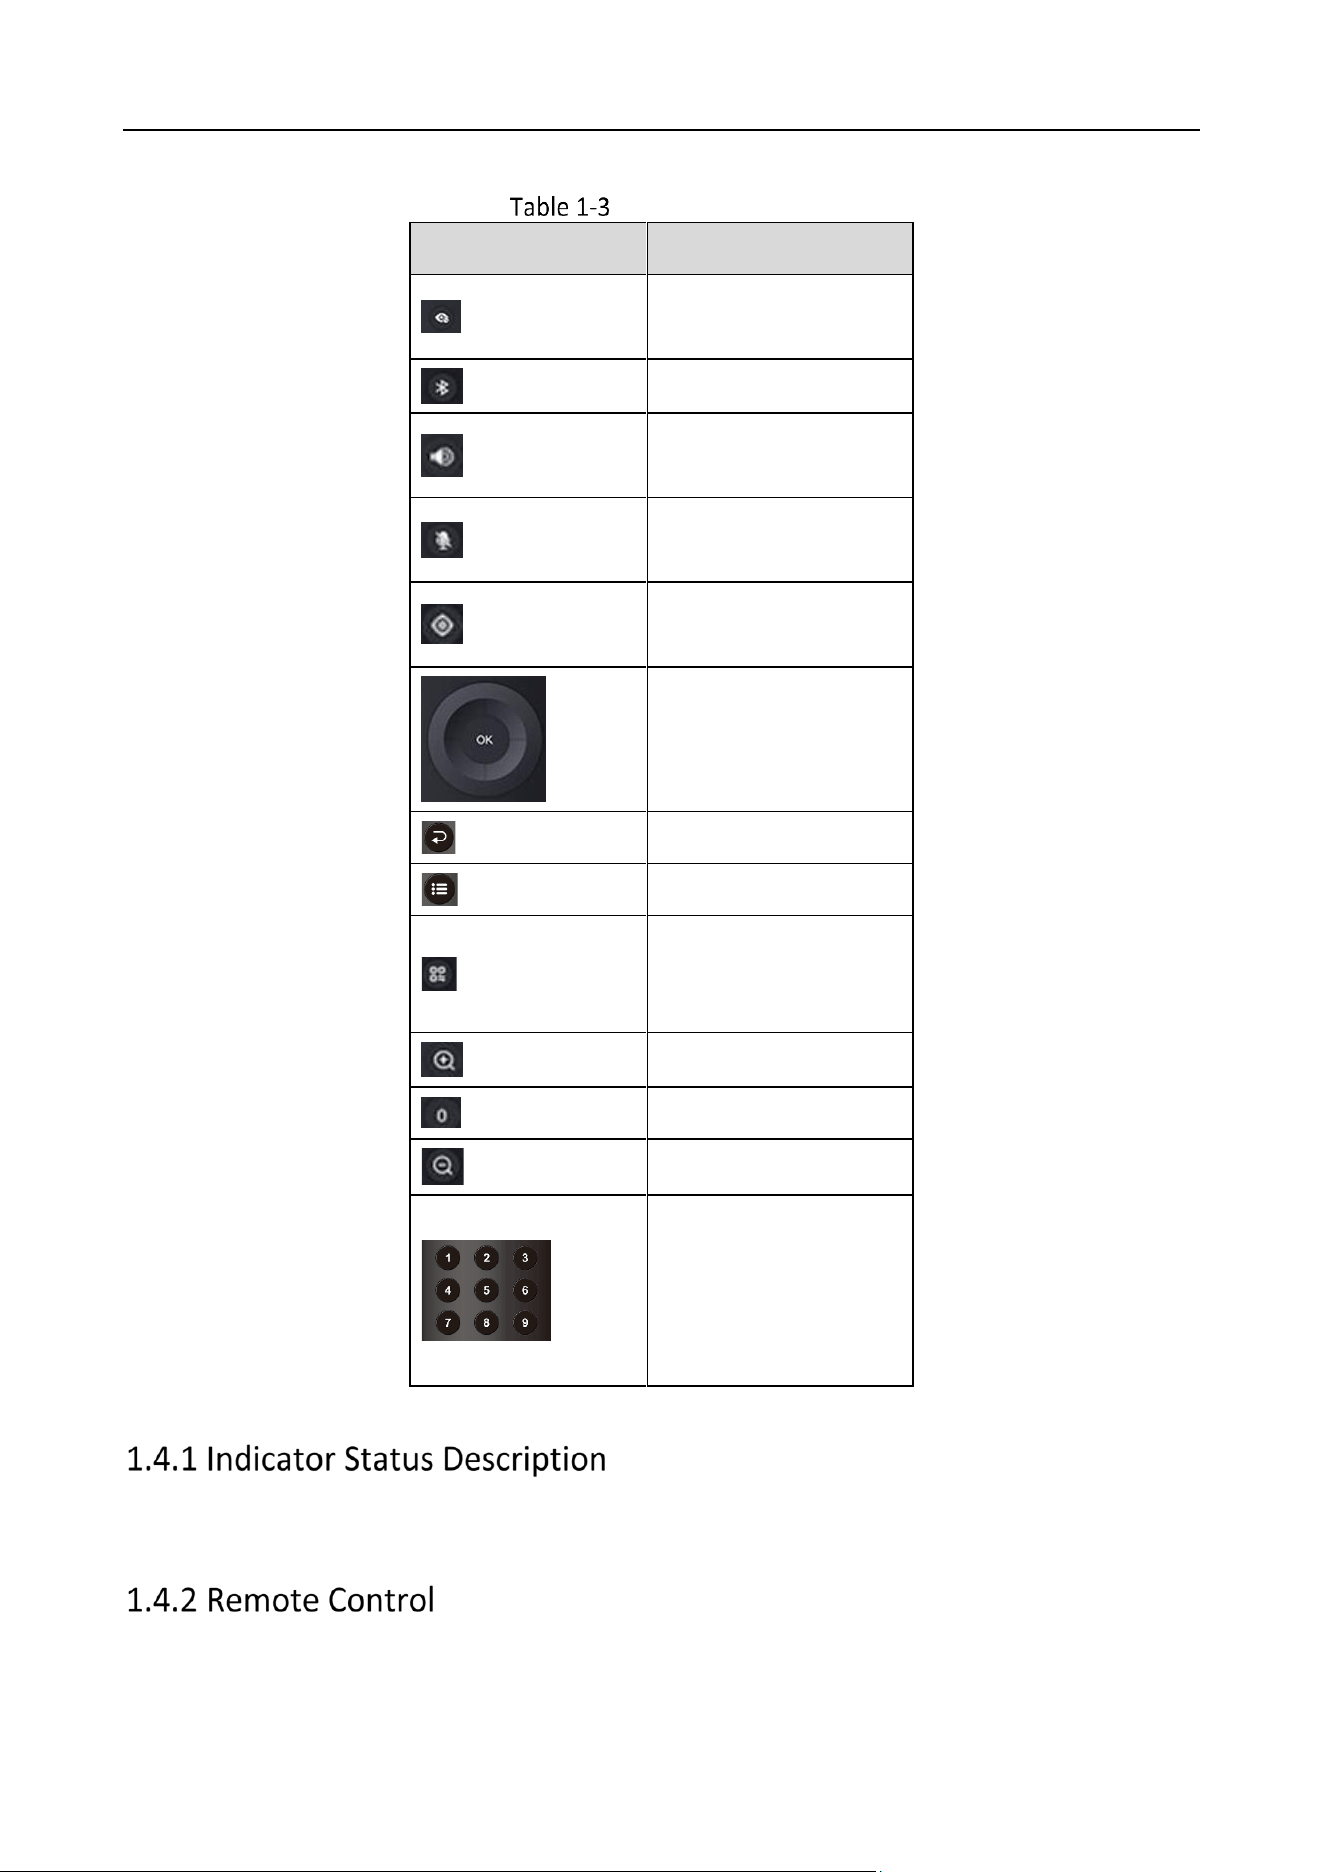
Remote Control Description
Remote Control
The Bluetooth remote control buttons are described as follows.
Smart Conference Camera • User Manual
5
Button Description
Icon
Button Description
Turn on/off privacy
cover
Turn on/off Bluetooth
Shortcut key for
volume interface
Mute/Unmute
microphone
Switch HDMI OUT
resolution
Dome Camera Quick
Control
Return
Menu
Switch Mode
(Speaker Tacking, AF,
etc.)
Zoom In
Reset preset point
Zoom Out
Number
Press and hold 1 ~ 5
to call the
corresponding preset
point.
Steady red: indicates that the camera is in standby; Steady white: indicates that the camera is
working normally.

Smart Conference Camera • User Manual
6
The remote control is used with the camera and cannot be mixed with other devices.
The distance between the remote control and the camera is 5 m. The camera cannot be
controlled beyond this distance.
Please use a 1.5 V battery. Batteries of other specifications may fail to pair due to insufficient
battery power.
The remote control has been paired at the factory. You need to pair it again when it is
disconnected. The specific operations are as follows:
Press and hold and at the same time. When the indicator light flashes at high
frequency, release the keys and the remote control and the camera are pairing. When pairing,
the indicator light changes from high-frequency flashing to constant on and finally goes out.
The camera prompts "beep-beep-beep", indicating that the remote control and camera are
paired successfully. Press any button on the remote control to control the camera.
When the remote control and the camera are paired successfully, restart the camera and then
press any button on the remote control to control the camera.
If the pairing of the remote control and the camera fails, you can press any button on the remote
control to solve the problem according to the information displayed by the indicator light.
When the indicator light flashes several times, it is recommended to restart the camera and
pair it again.
When the indicator flashes once, the remote control may be connected to other devices.
Find the connected device, cancel the connection, and then pair the camera again. If the
pairing still fails, it is recommended to restart the camera to pair again.

Smart Conference Camera • User Manual
7
Chapter 2 Installation
The camera supports desk and wall mounting.
Desk Mounting
Place the camera on a smooth horizontal table, and adjust the camera base as required.
Please keep the desk stable, pay attention to anti-skid, and make sure there is no obstruction in
front of the camera.
Desk Mounting
Wall Mounting
The camera can be mounted on a designated wall with the wall mounting bracket.
The wall mounting bracket is optional. The applicable model is DS-65VTA-wall mounting bracket
assembly.
The camera is installed in the conference room. The recommended installation height is 1.2 m ~
1.6 m, at which the whole conference room can be viewed.
The accessories need to be replaced during wall mounting. The precautions are as follows.
Before replacing accessories, make sure that the worktable is clean and tidy to avoid external or
structural damage to the camera caused by dirt or sharp objects.
Before replacing accessories, please unplug all external cables of the camera. Please protect the
lens from impact or falling to prevent damage to the camera.
Please keep the replaced accessories properly to avoid loss.
Remove the camera desk-mounting base.

Smart Conference Camera • User Manual
8
1) Loosen the 2 decorative cover screws on the camera desk-mounting base and remove
the decorative cover.
2) Remove the 8 rotating shaft screws.
3) Remove the desk-mounting base.
Remove Desk-Mounting Base
Loosen the hand screws on both sides of the wall mounting bracket, and split the wall
mounting bracket into the wall mounting bracket base and the wall mounting bracket
assembly.
Remove Wall-Mounting Bracket
Install the wall mounting bracket assembly onto the camera, fix it with 8 shaft screws. Install
the decorative cover, and tighten the decorative cover screws to fix it.

Smart Conference Camera • User Manual
9
Install Wall-Mounting Bracket Assembly
Select the appropriate installation wall to open a hole and embed the expansion pipe into
the hole (size of the expansion pipe bottom hole in the wall:φ5.5 mm, depth ≥ 25 mm).
Open A Hole And Embed the Expansion Pipe
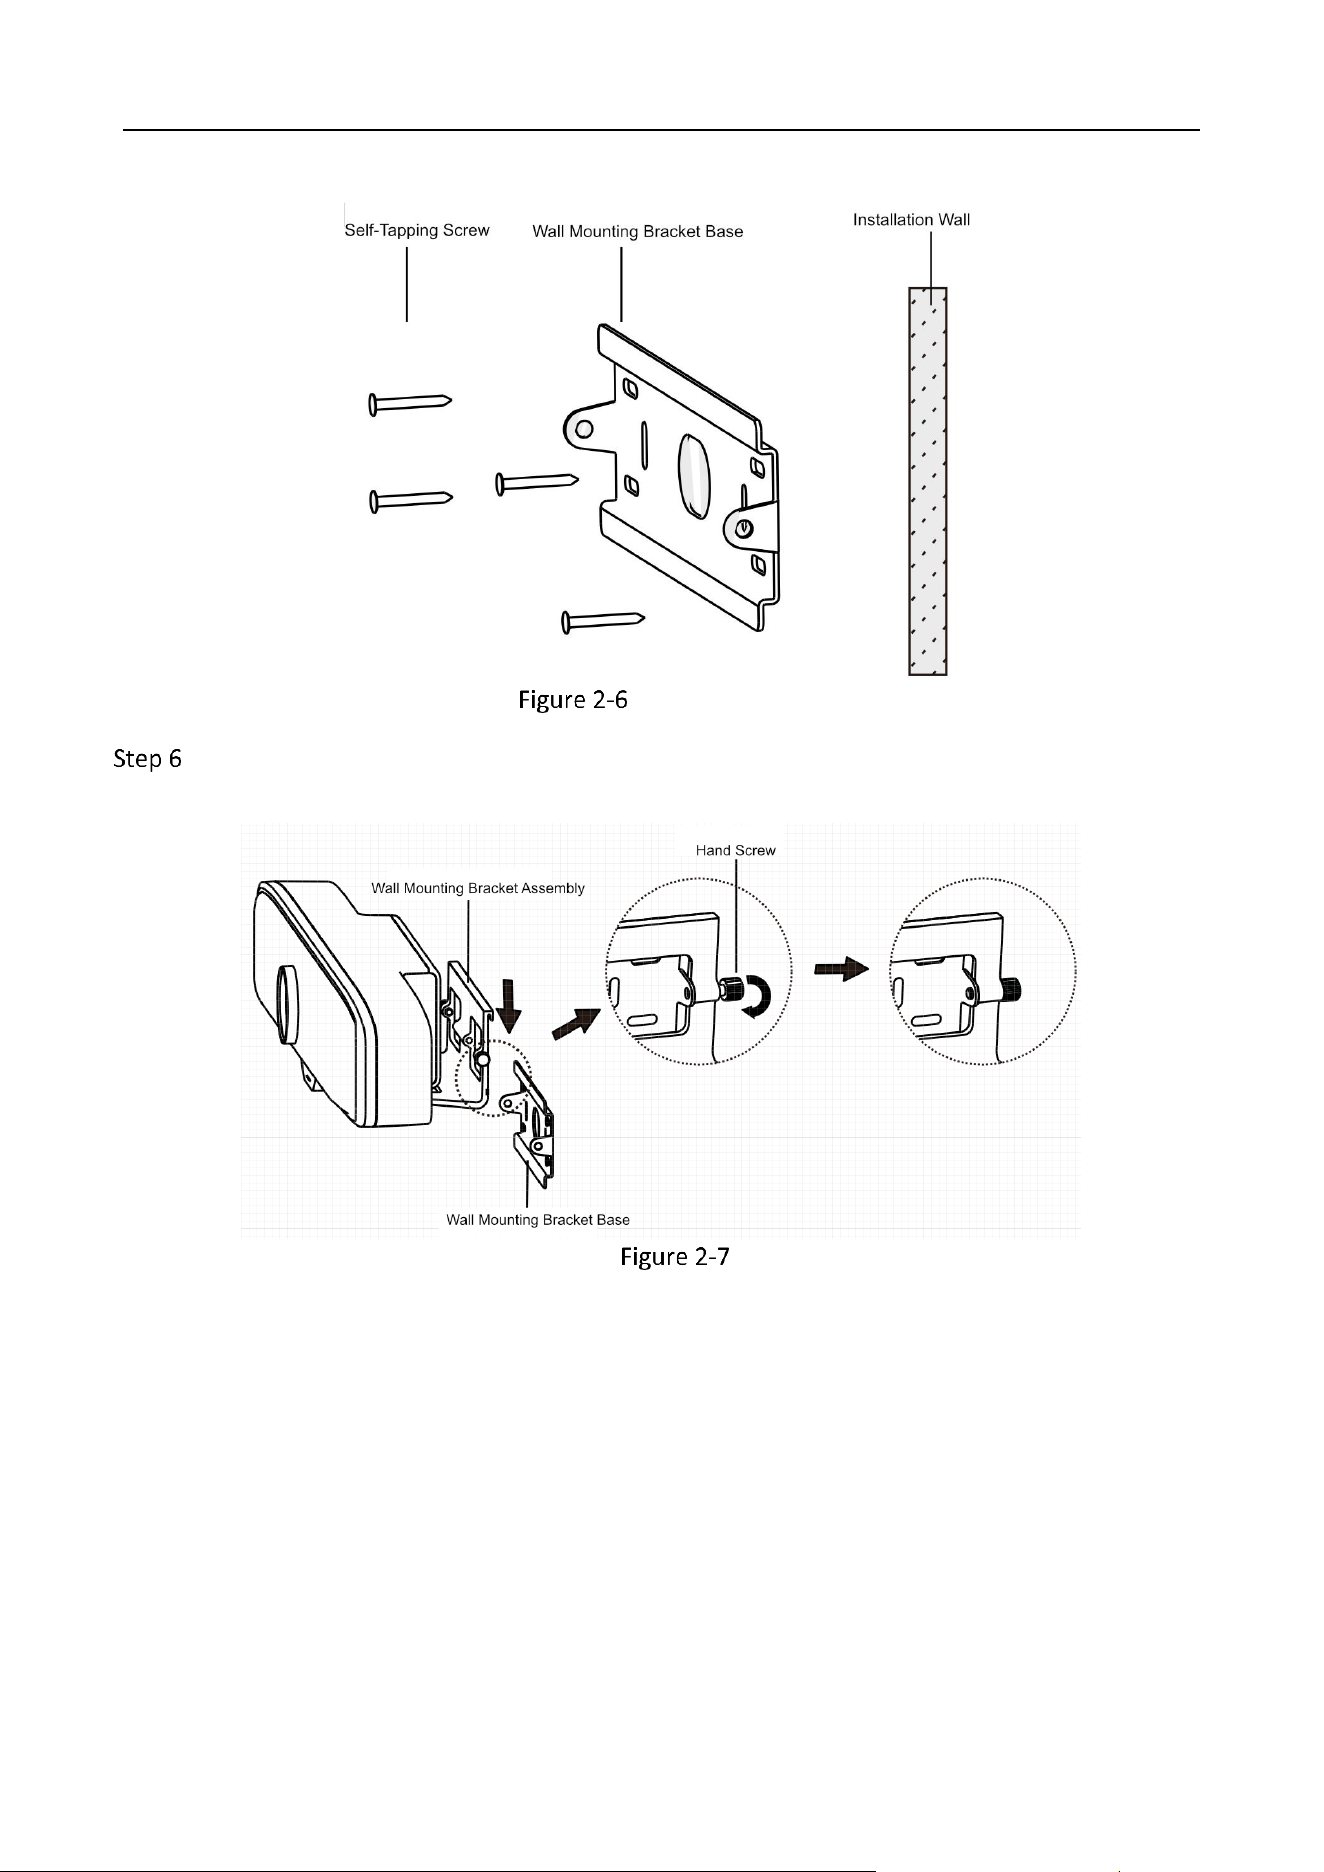
Align the mounting holes of the wall mounting bracket base with the openings on the wall,
and use self-tapping screws to fix the wall mounting bracket base to the wall.
Smart Conference Camera • User Manual
10
Install Wall Mounting Bracket Base
Place the wall mounting bracket assembly on the wall mounting bracket base, and tighten
the hand screws on both sides until they are fixed.
Fix the Camera

Smart Conference Camera • User Manual
11
Chapter 3 Set Control Mode
Set camera control mode. Press to switch control modes:
Manual: You need to adjust the camera tracking speakers in the conference manually.
Speaker Tracking: The camera can automatically track the speaker in the conference, focusing
on the speaker area.
Auto Frame: The camera can automatically adjust parameters according to the number of
participants in the conference room and display the image of all the participants.
− Once a participant moves in the conference room, the optimal angle will be automatically
adjusted after all participants stop moving.
When a participant moves in the conference, the camera will automatically select all the persons
that the panoramic camera can capture in the conference area within 5 seconds. Make sure all
persons' shoulders are in the picture.
When the number of participants in the conference room increases, the camera will adjust
automatically to cover all participants in the panoramic view.
When someone leaves the conference, the camera will adjust to place the remaining
participants in the center of the picture.
Speaker Tracking Description
Presentation Status
Frame Mode
No one is speaking.
Best Perspective
Single-Sole Speaking
Close-up of Speaker
Multi-Person Discussion
Best Perspective

Smart Conference Camera • User Manual
12
Chapter 4 PTZ Control
In manual mode, the PTZ can be controlled via remote control.
Press to zoom in and to zoom out.
Press / / / to enable the camera to turn up, down, left, and right.
PTZ control is not supported in Speaker Tracking or Auto Frame mode.
The preset point refers to the preset camera frame.
Press or , and press / / / to check the frame.
Press and hold the number key for several seconds to set the preset point.
(Optional) Repeat the steps above to set multiple presets.
Setting preset point is only supported by number keys 1 to 5.
The preset point cannot be cleared. Press and hold the same number key repeatedly to
overwrite the preset point.
You can quickly switch to the preset frame by calling the preset point.
If the camera turns to other frames in manual mode, you can short press the number key to call
the corresponding preset point.
Please set preset points first.

Smart Conference Camera • User Manual
13
Chapter 5 Menu Function
Set System Mode
Short press to enter the menu, move the cursor to System Mode, press / to select
Normal Mode or Upgrade Mode, and press to confirm and return.
Normal Mode:
The camera is in current operation mode.
Upgrade Mode
Select this mode when the camera requires upgrading.
The camera needs to be connected to PC.
Ensure you have obtained the correct updating pack and that the pack has been stored in
the computer.
Do not power off the camera during upgrade.
Press to enter the menu and move the cursor to System Mode.
Press / to select upgrade mode, and press .
Move the cursor to Reboot Device and press to restart the camera.
The camera will be recognized as a USB flash drive.
Copy the upgrade pack to the root directory of the USB flash drive, and restart the camera
again.
The camera will be upgraded automatically.
After the camera is upgraded, switch it to Normal Mode and press again.
Set Backlight Mode
When backlight compensation is enabled, the camera can compensate for the darkness of the
camera's main body when recording in the reverse light environment. Press to call out the
Smart Conference Camera • User Manual
14
menu, move the cursor to Backlight Compensation, press / , select to turn on or off, and
press .
Set Tracking Sensitivity
Tracking sensitivity means the duration of the speaker's continuous speaking time. Press and
move the cursor to Tracking Sensitivity, press / , adjust sensitivity parameter, and press .
Reboot Device
Move the cursor to Reboot Device and press to restart the camera.
Restore Device
Restore camera parameters to factory defaults. Use with caution.
Move the cursor to Restore Device and press to restore the camera to the factory defaults.
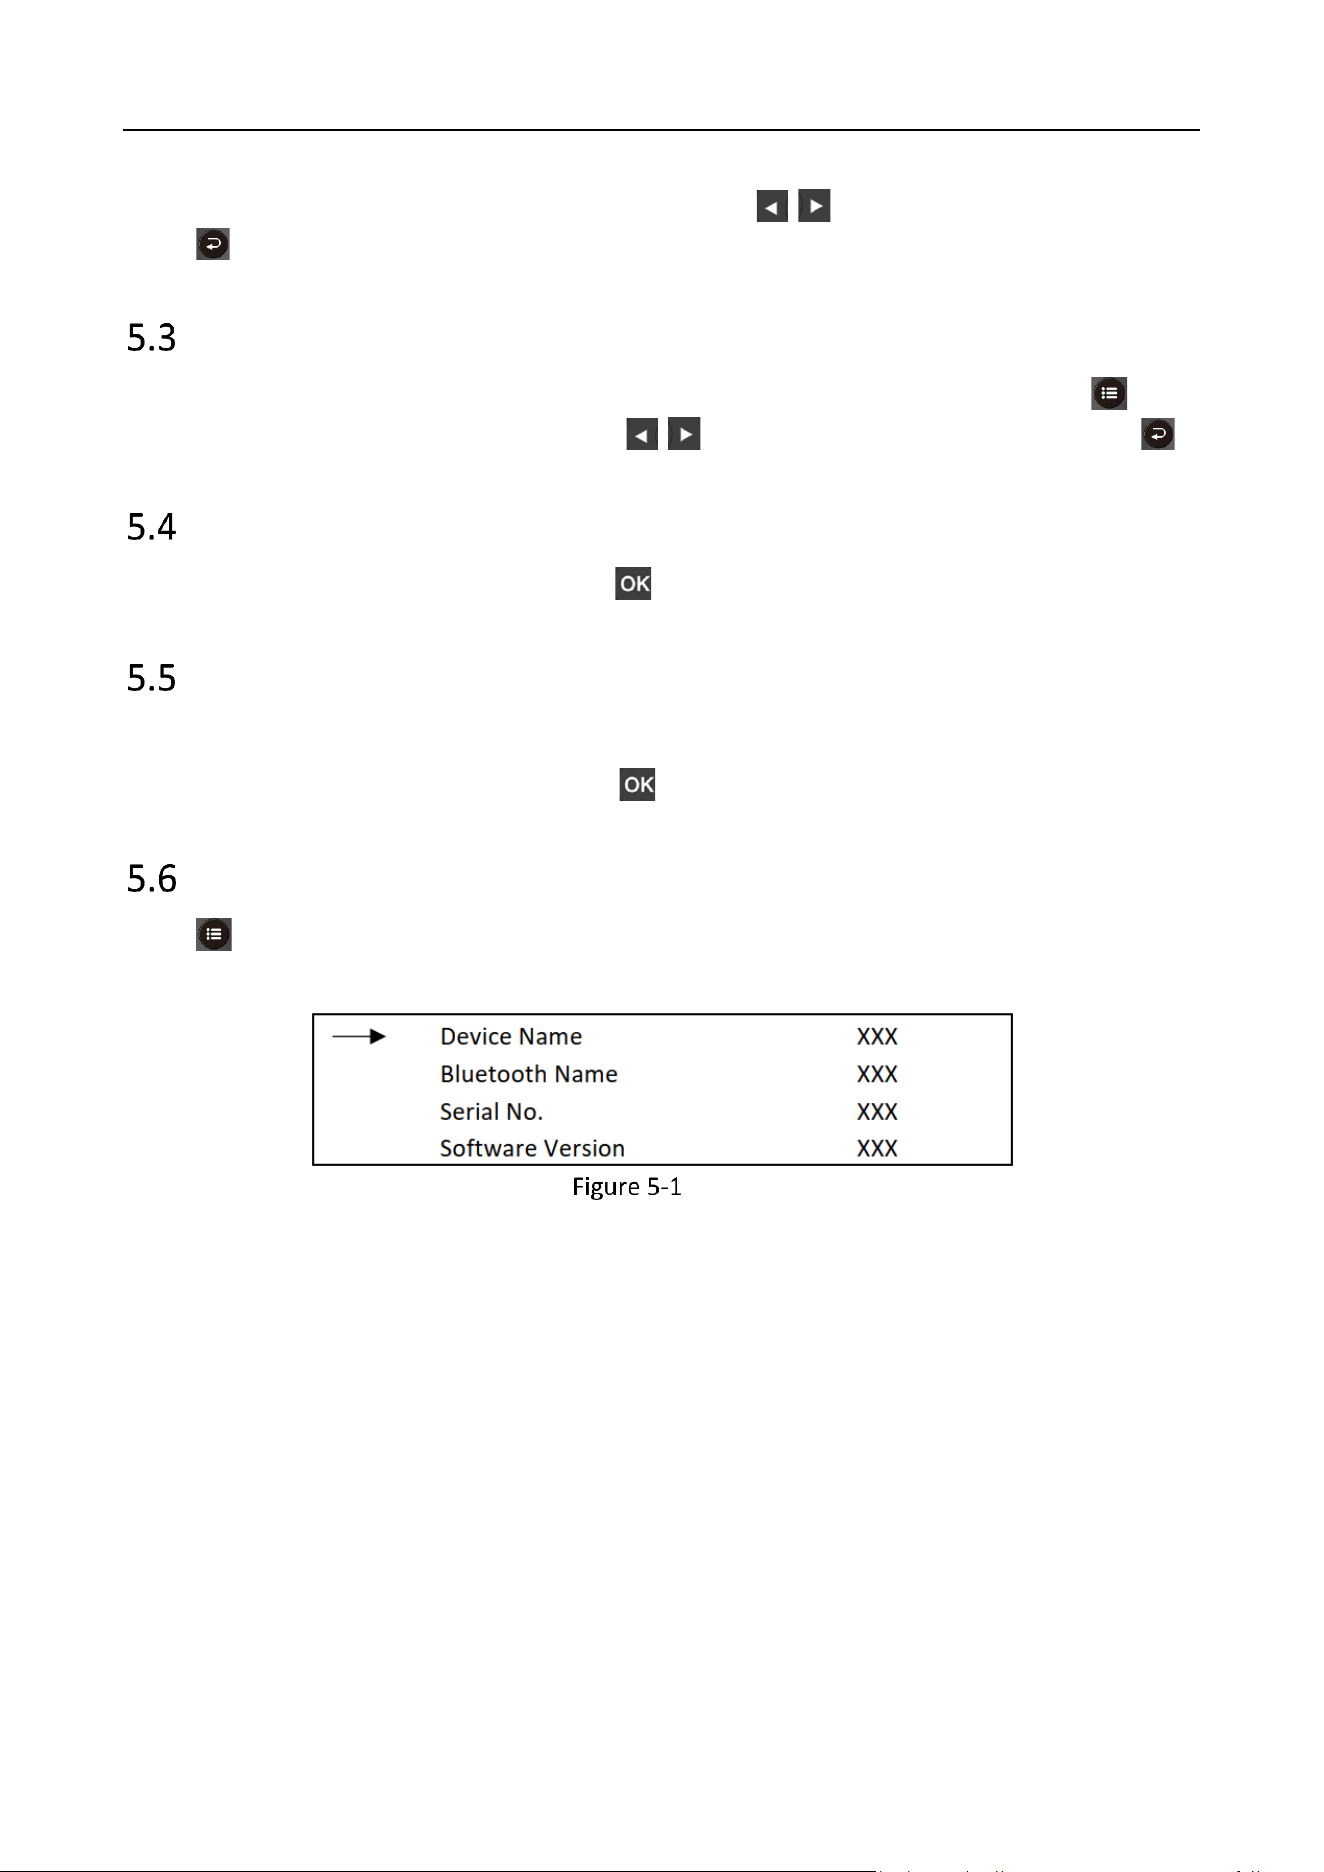
View Basic Device Information
Press to enter the menu. You can check the device name, Bluetooth name, serial number, and
software version.
Menu

0
UD28890B