092118-BR www.akiascreens.com
1
FIXED FRAME
Projection Screen Series
User’s Guide
Thank you for choosing the Akia™ Fixed Frame projection screen! Congratulations on your new Akia Fixed Frame purchase! Please
read through this user guide before utilizing the screen. Correct usage and maintenance will ensure a long product life.
Care & Use Instructions
Dust, dirt and scratches on the projection surface will affect the picture quality, please take note of the points below to prevent that
from occurring:
1. Do not touch the projection surface with your hands
2. Do not write or draw on the projection surface
3. Do not use fingers or sharp objects to point on the projection surface; this will damage the screen material.
4. Use a soft-damp cloth to clean the projection surface; do not use chemical cleaning agents or alcohol.
5. Use clean water when dampening the cleaning cloth and do not rub against the material to clean it.
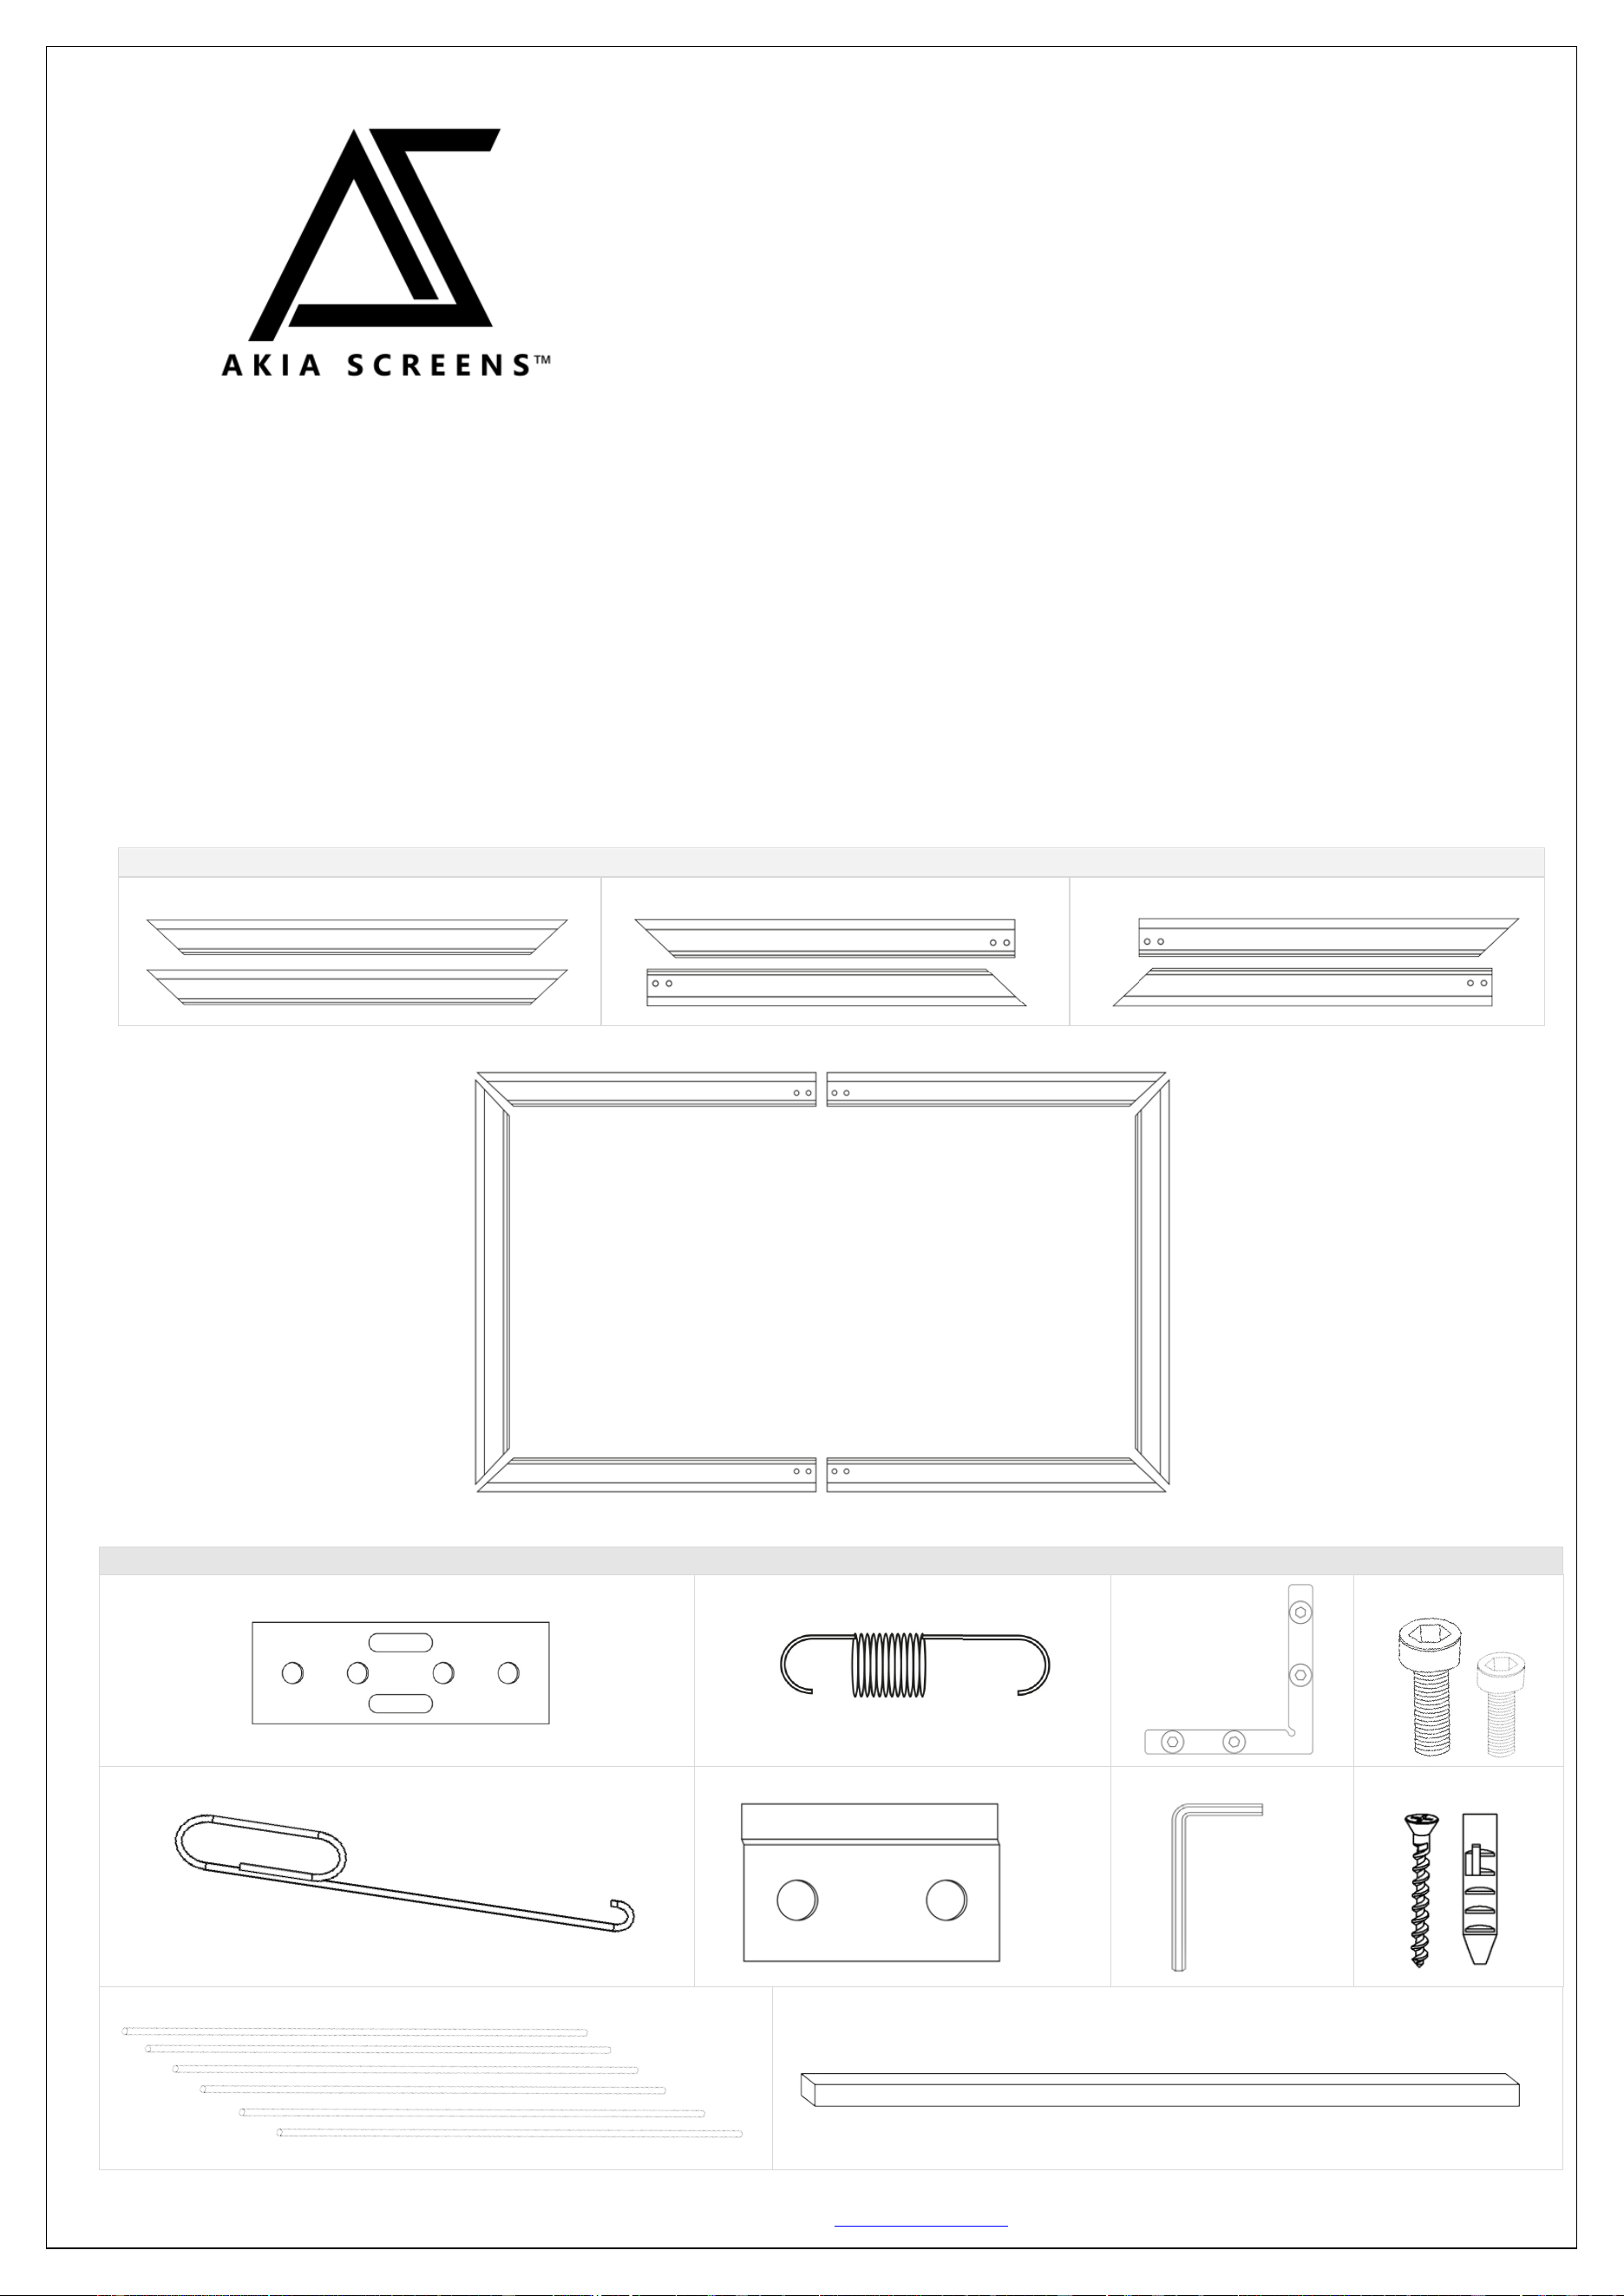
Frame Parts List
A. Vertical Frame x 2pcs
B. ½ Horizontal Frame x 4 pcs
C. ½ Horizontal Frame x 2pcs
Hardware Parts List
A.
B.
C.
D.
E.
F.
G.
H.
I.
J.
A
C+B
B+C
A
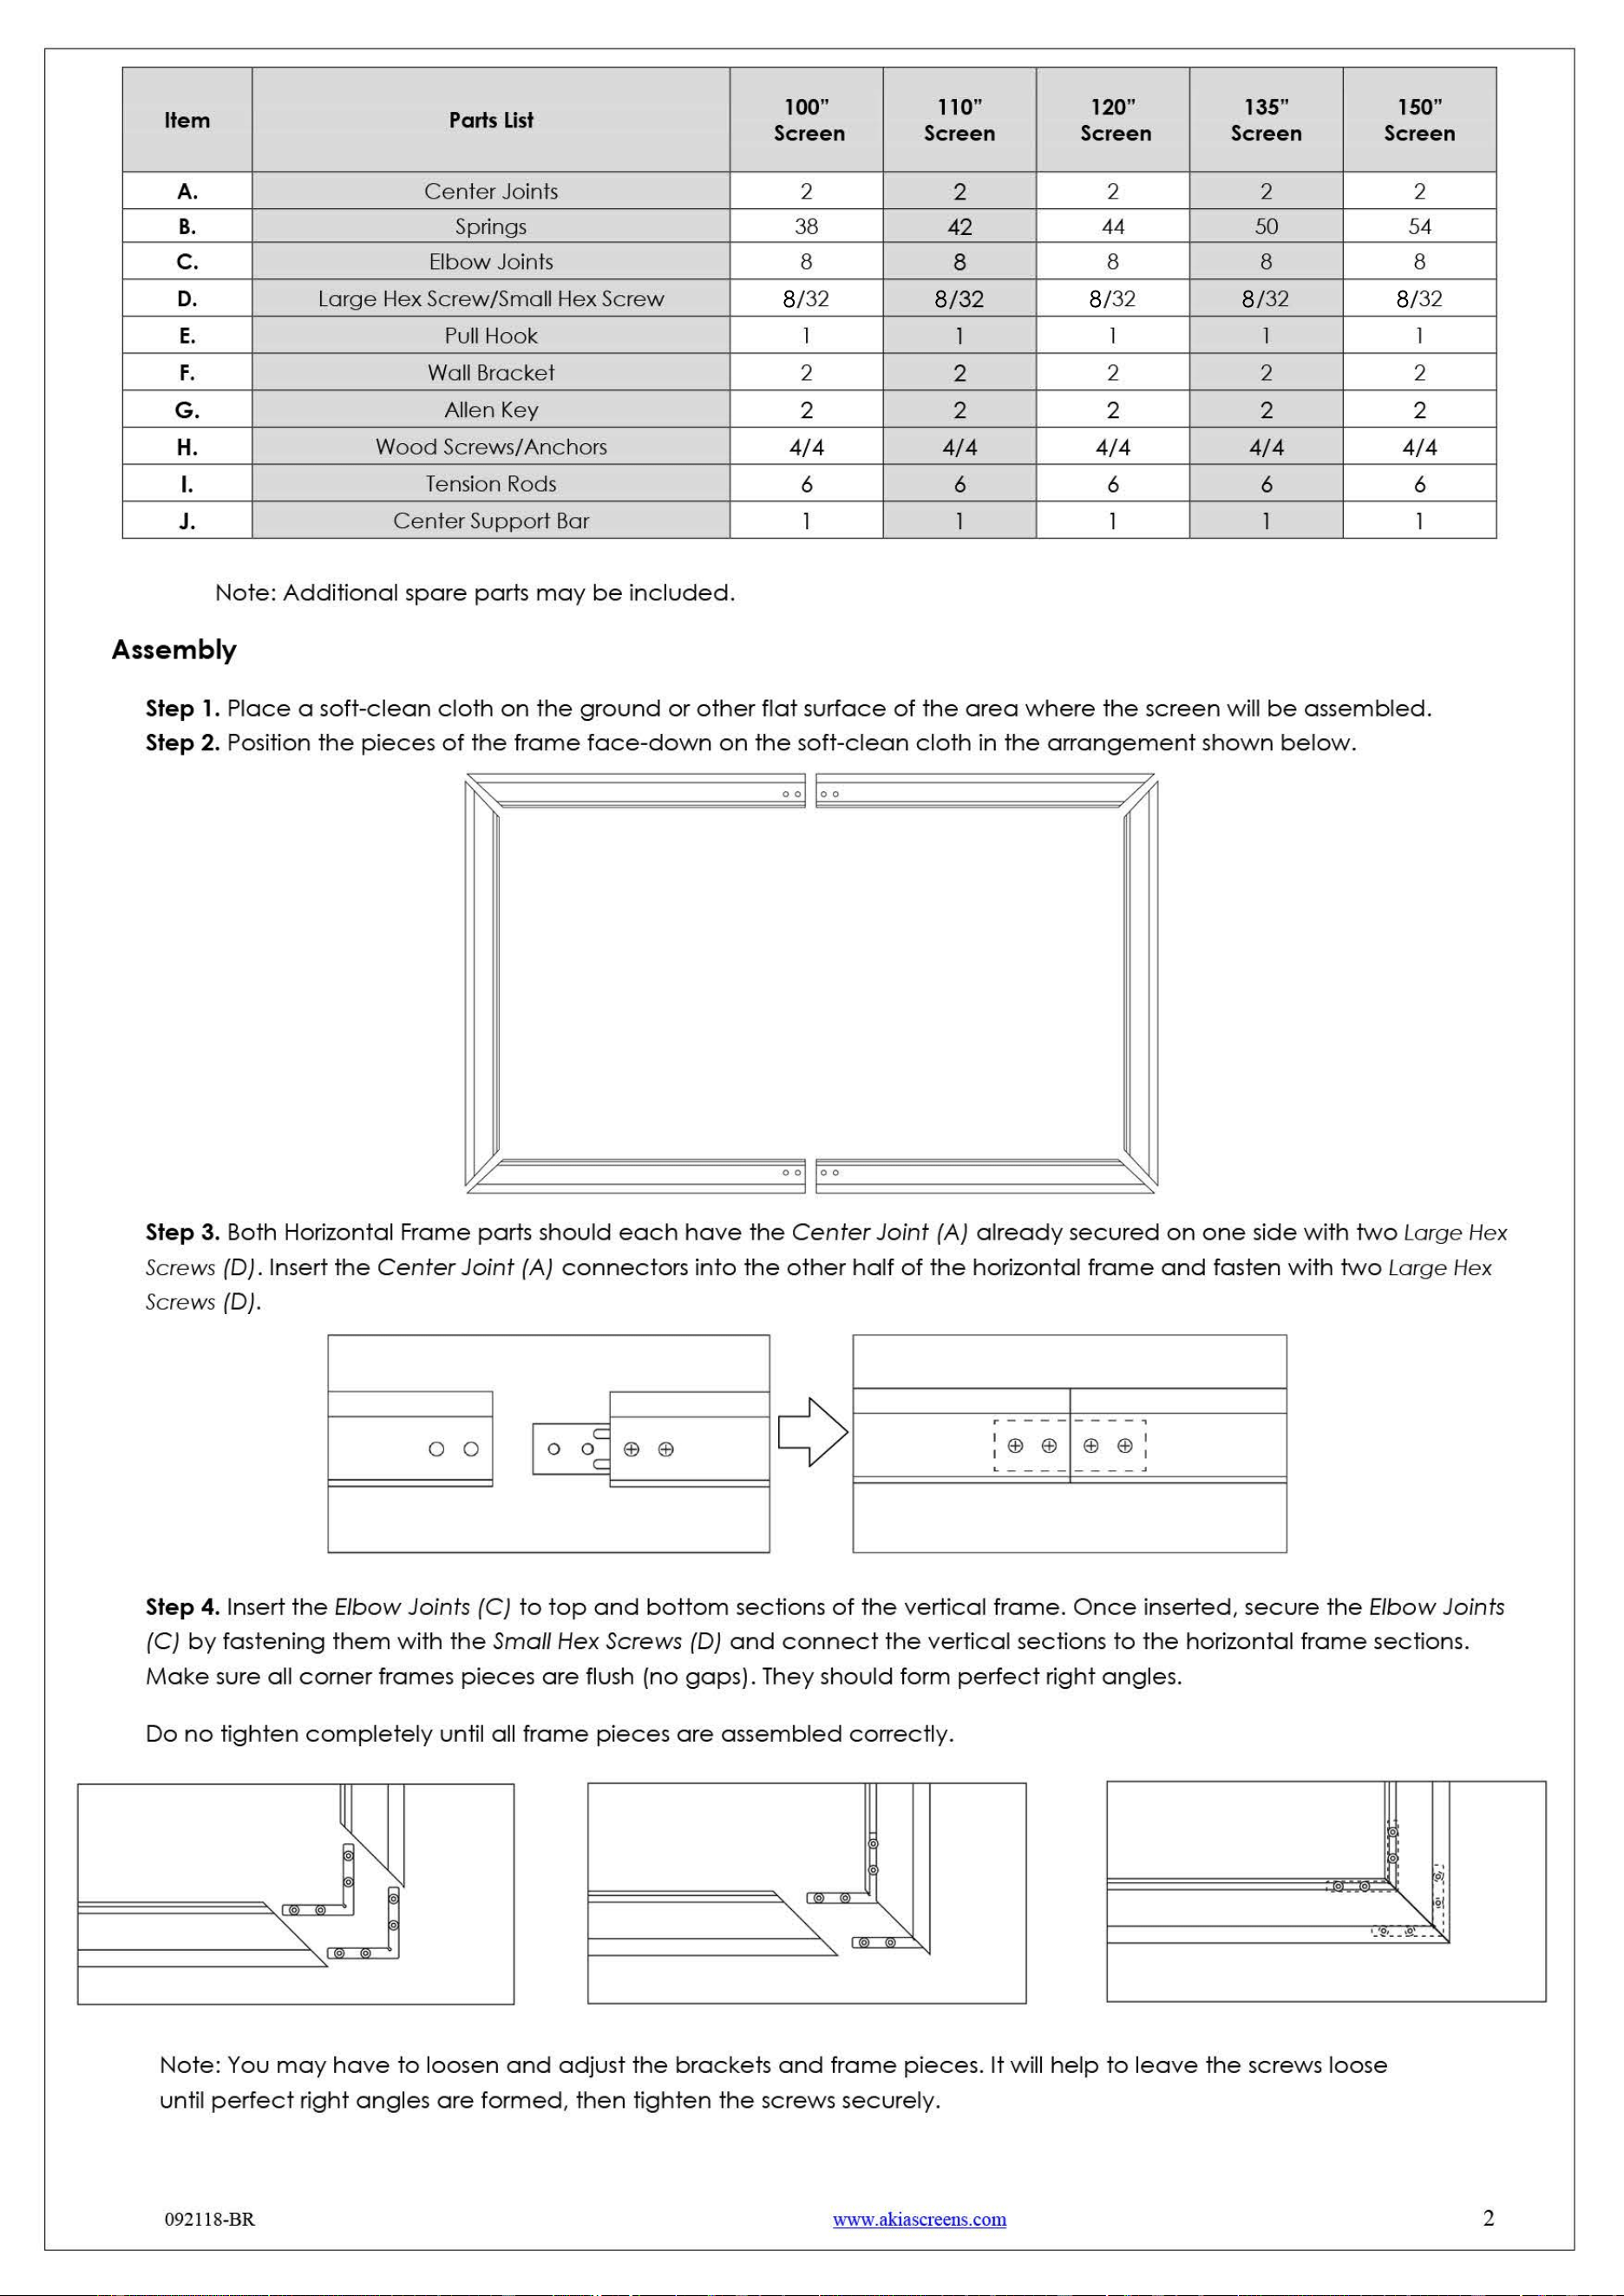
8 8 8 8 8
092118-BR www.akiascreens.com
3
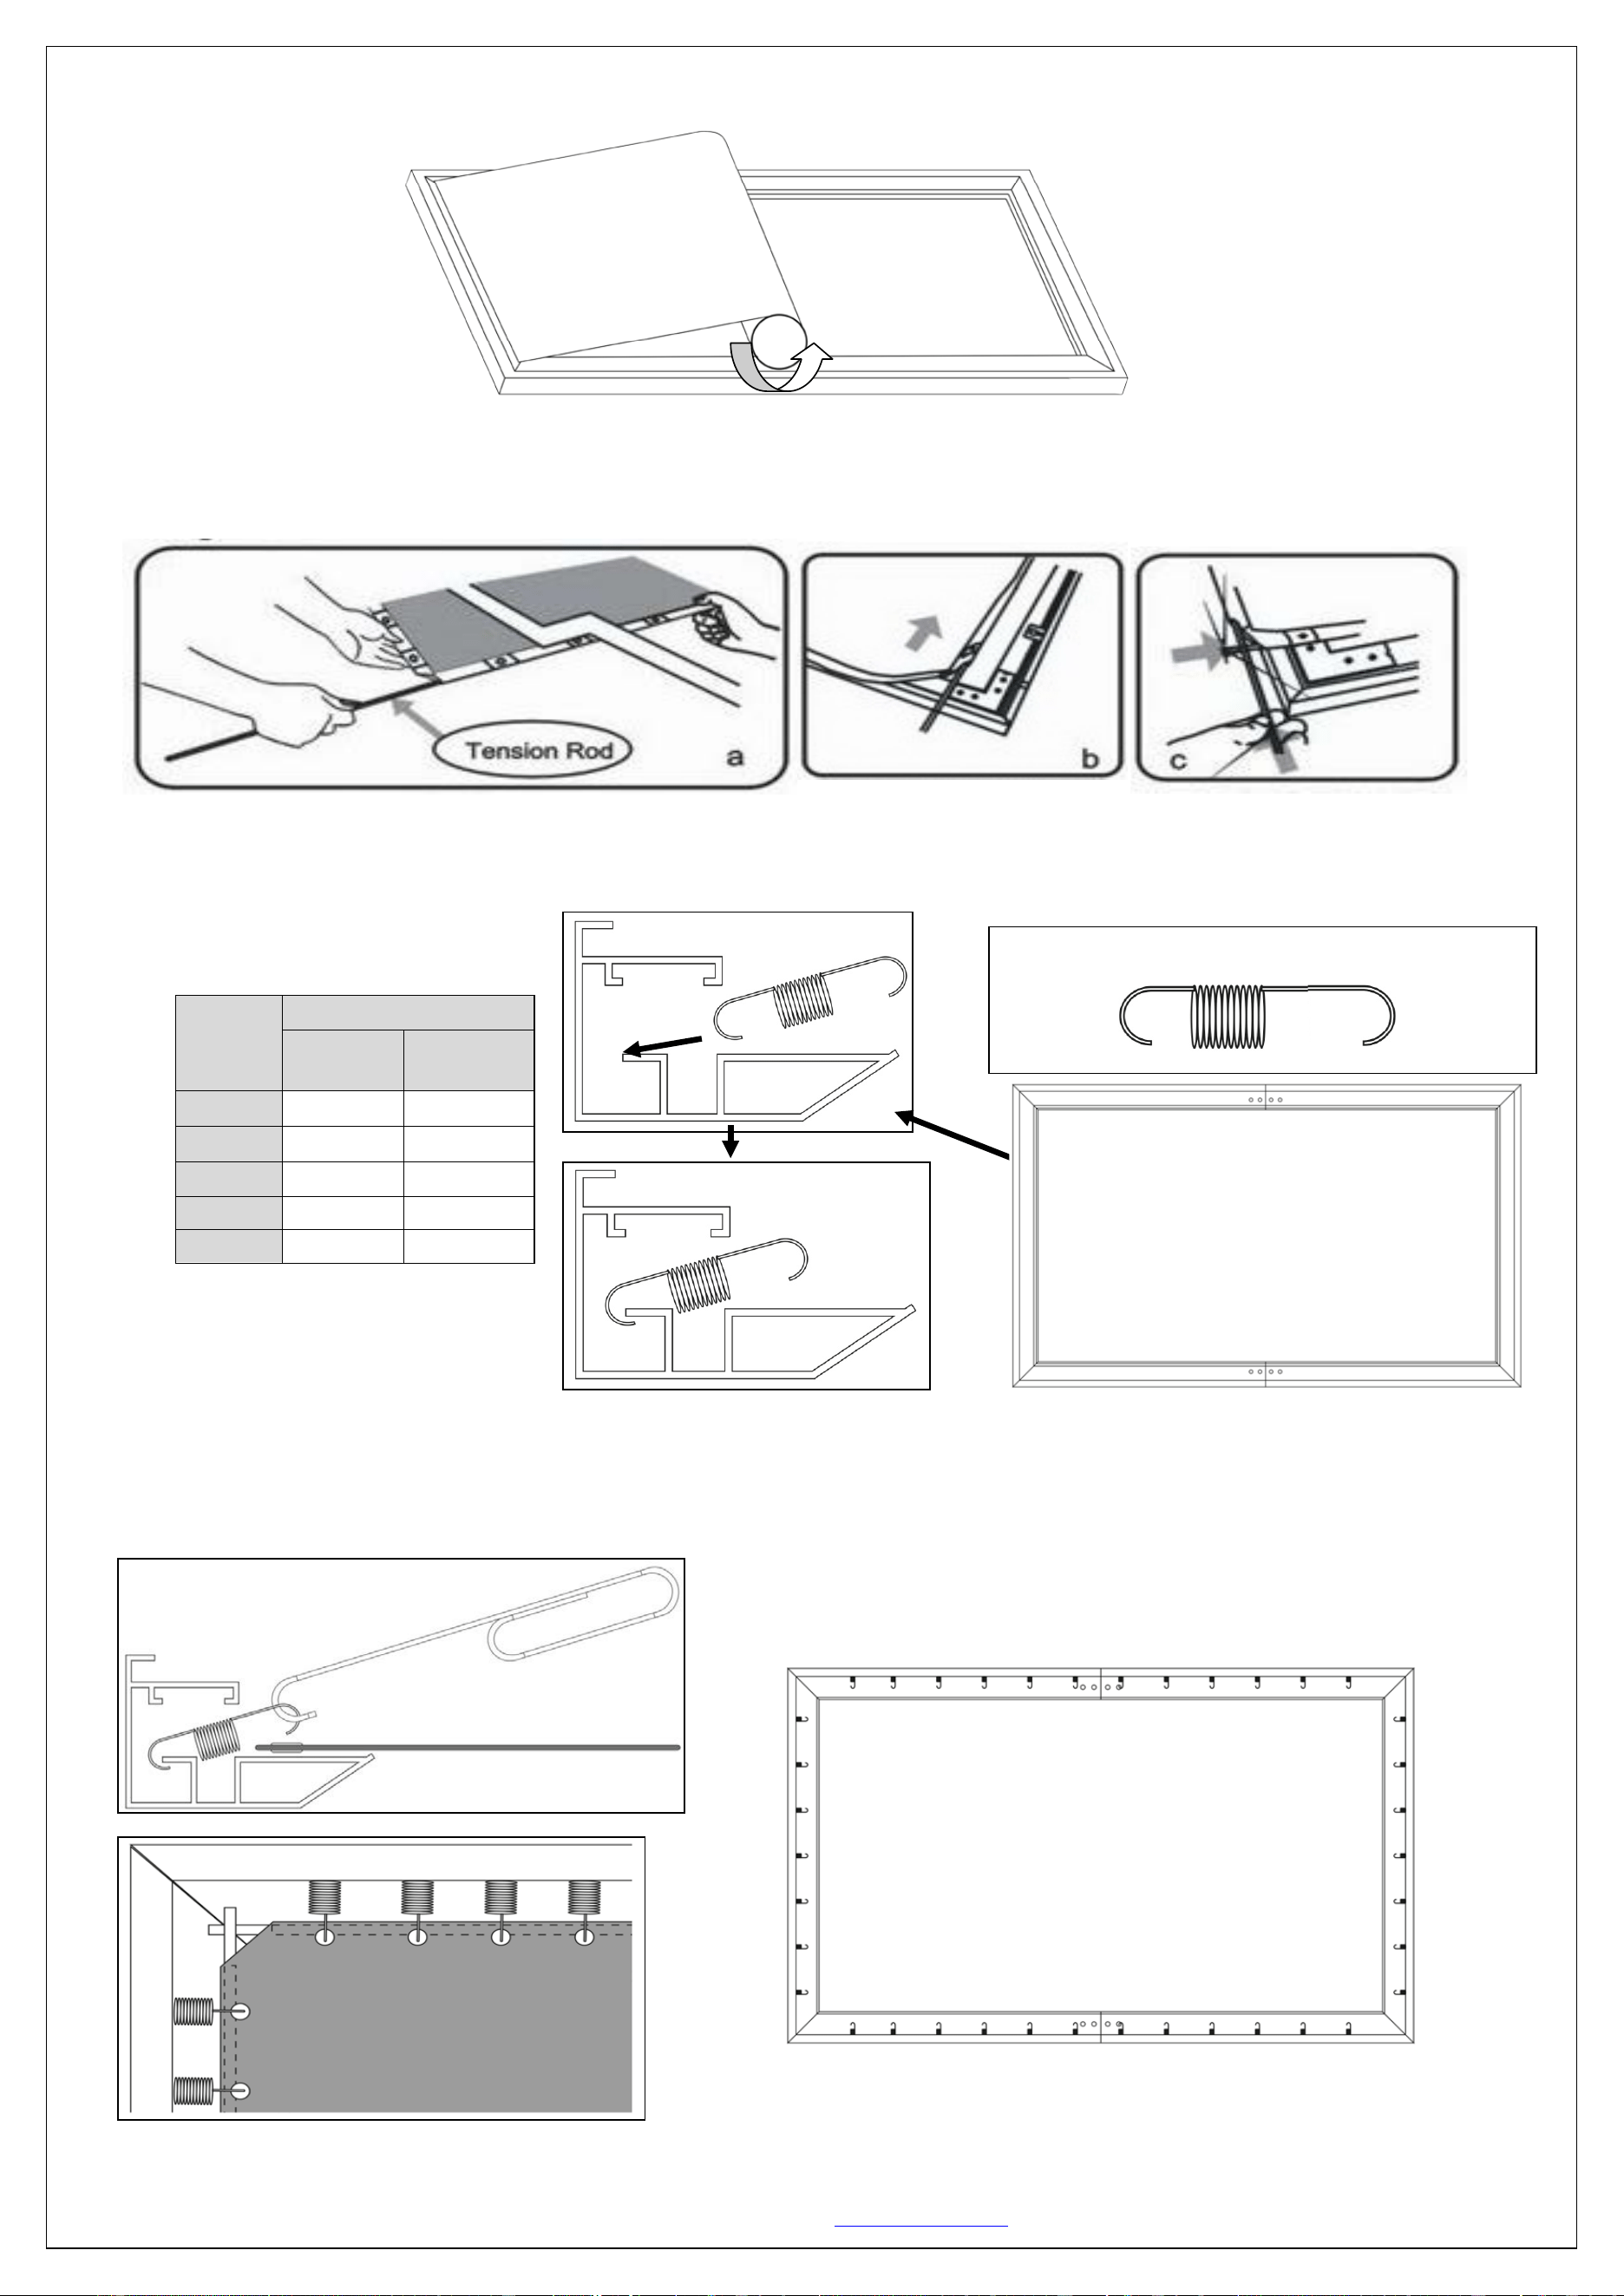
To prevent permanent damage to the screen material, be sure your hands are clean for the next step.
Step 5. Carefully unroll the screen material face-down on, top of the assembled frame, from one side of the frame to the
other side as shown below.
Step 6. Insert the four horizontal and two vertical Tension Rods (I) into the corresponding sides of the screen material, while
keeping the material laying flat. Careful not to snag on the holes at the edge of the material during this process; forcing
the rods may damage the screen material.
Step 7. Insert the Springs (B) into the grooves of the frame. Line them up with the corresponding holes in the materials
edge. Be sure the shorter hook on each spring is placed in the frame's groove, while the longer hook attaches to the
material. For the correct amount of springs to place into the frame, please refer to the table listed below.
Step 8. With one end of the spring placed inside the groove of the frame, hook the Spring (B) through the hole located on
the screen material’s outer edge. Be sure to hook the Springs (B) onto the Tension Rod (I) to avoid damage to the screen
material. Use the Pull Hook (E) when necessary. Attach the four corners and center horizontal sections of the material (1).
Screen
Size
Qty
Horizontal
Spring
Vertical
Spring
100”
24 14
110”
26
16
120”
28
16
135”
32
18
150”
34
20
1
1
1
1
Short side
hooks to
frame.
Long side
hooks to
material.
1
1
Back Side
092118-BR www.akiascreens.com
4
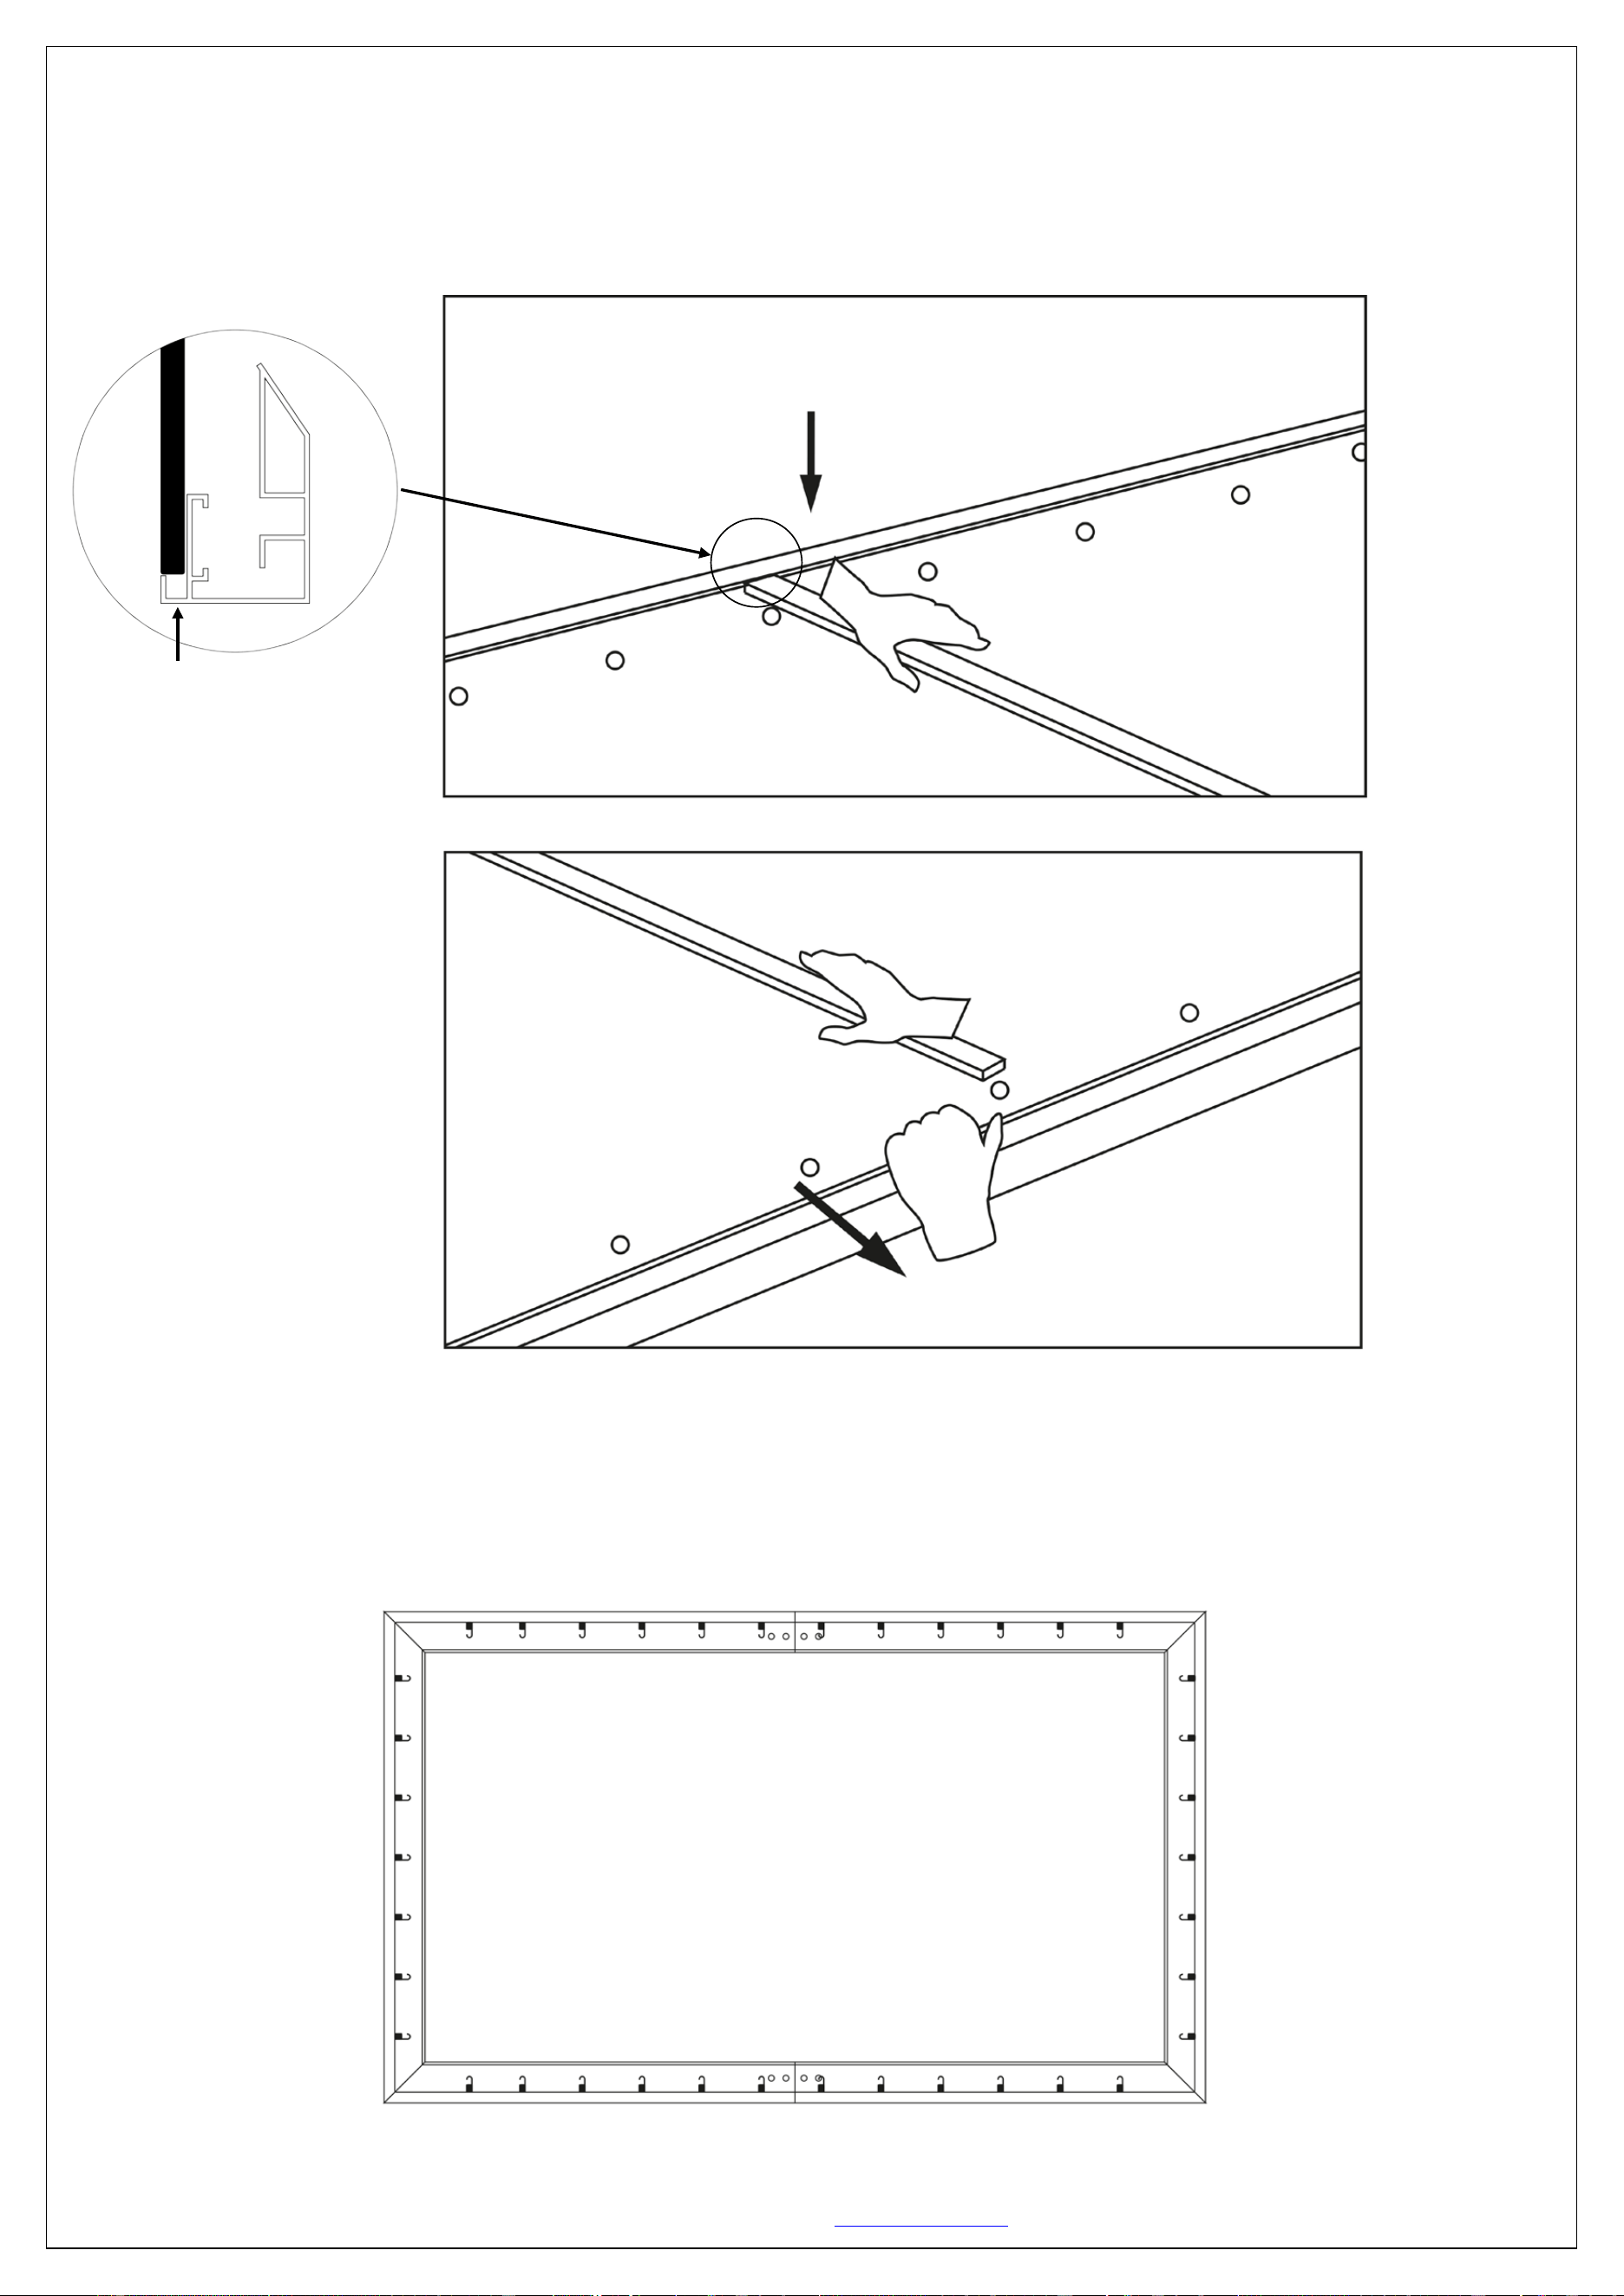
Step 9. Two people are suggested for this step. Place the Center Support Bar (J) into the top groove on the back of the
frame (not the one where the spring inserts) at the approximate center point of the frame. Carefully pull the bottom
horizontal frame outward and place the Center Support Bar (J) at the approximate center point of the frame. Carefully
release the frame once the bar is centered. (See illustrations below for details.)
Step 10. After the Center Support Bar (J) secure, connect the center of the vertical portions of the material (2). Be sure to
hook the Springs (B) onto the Tension Rod (I) to avoid damage to the screen material. Next, return to the vertical sides,
securing the remainder of the springs (3). Lastly, secure the remaining springs of the horizontal sides of the screen (4).
(Top of backside of frame)
(Bottom of backside of frame)
Top groove
1
1
1
1
1
2
2
1
4
4
3
3

092118-BR www.akiascreens.com
5
Installation
Step 11
. Measure the overall length and height of the frame and drill holes for the Brackets (F). Line up the wall brackets
with the drilled holes on the installation location and screw them in using a Phillips screwdriver. If not installing into a
structural wood stud, use a hollow wall Anchor (H), then screw in the M5x50 Screws (H) with a screwdriver. Make sure the
brackets are leveled.
Step 12. Position the fixed frame screen onto the wall Brackets (F) as shown below and push down at the center of the top
of the frame to secure.
CAUTION
Please follow these instructions carefully to ensure proper maintenance and safety of your Fixed Frame Screen
1. When hanging the screen up, please make sure that no other objects such as power switches, outlets, furniture,
ladders, windows, etc. occupy the space designated for your Fixed-Frame screen.
2. Regardless if the screen is hung on or installed into the wall, make sure that the proper mounting anchors are used
and that the weight is supported appropriately by a strong and structurally sound surface just as any large and
heavy picture frame should.
3. (Please consult a home improvement specialist for the best advice on installation)
4. Frame parts are made of high quality velour-surfaced aluminum and should be handled with care.
5. When not in use, cover over the screen with a furniture sheet to protect it from dirt, grime, paint or any other
impurities.
6. Spare Parts should be placed out of reach of small children in accordance with household safety guidelines.
Need Assistance? Please Contact our Amazon Dedicated Support Team:
1-877-511-1211 ext 262/ 239/ 263
We are always happy to help.
Our office hours are Monday-Friday from 7:30am to 4:00pm PST.
www.akiascreens.com