Models
Modelos
Modèles
❍
ICR500
❍
ICR505
❍
ICR510
❍
ICR515
❍
ICR517
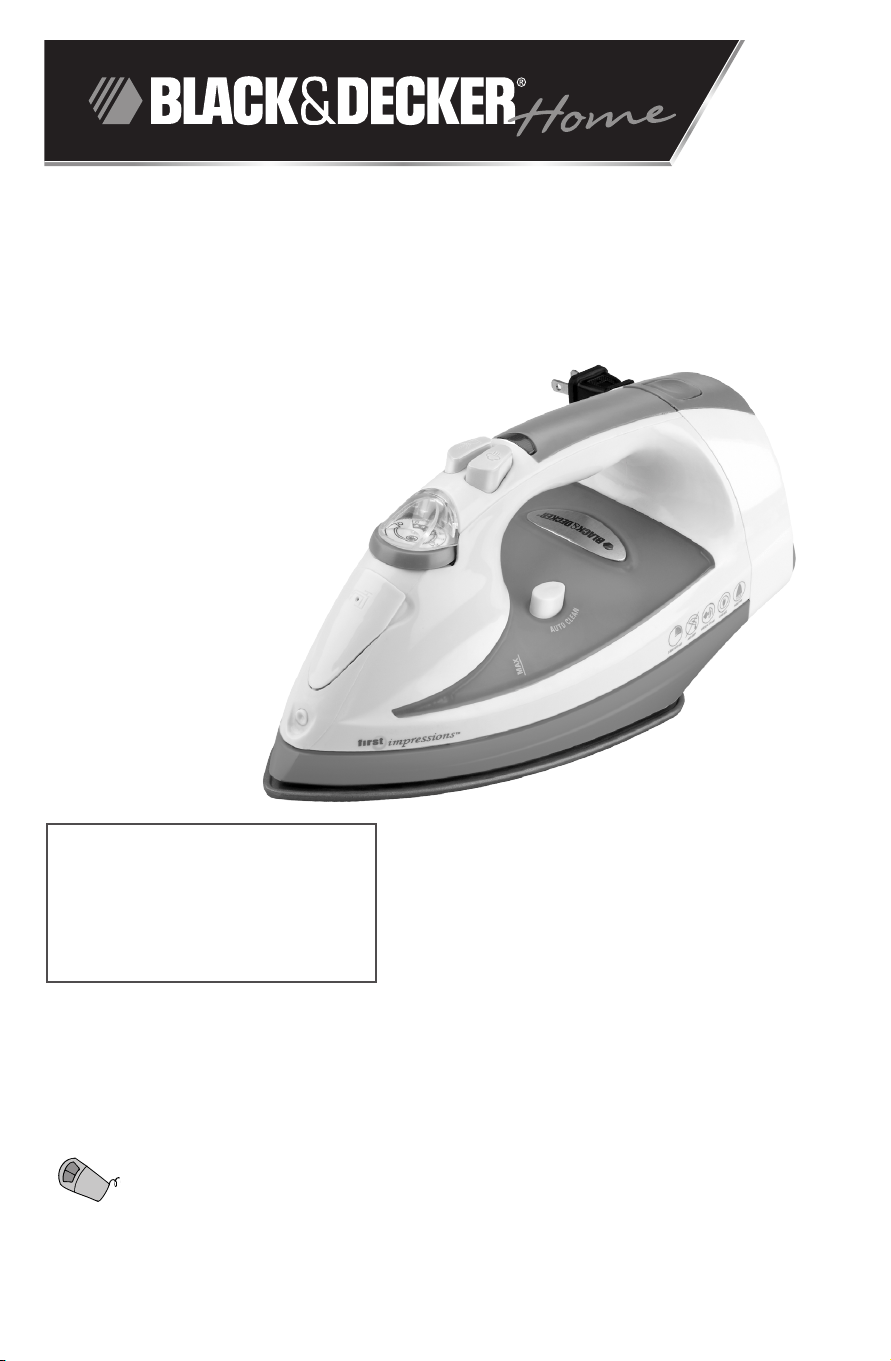
First Impressions
®
Cord Reel Iron
Plancha con cable rectractable
Fer avec enrouleur de cordon
Register your product online at
www.prodprotect.com/applica, for
a chance to WIN $100,000!
For US residents only
Accessories/Parts
(USA/Canada)
1-800-738-0245
?
USA/Canada 1-800-231-9786
Mexico 01-800-714-2503
www.prodprotect.com/applica.

Please Read and Save this Use and Care Book
IMPORTANT SAFEGUARDS
Whenusingyouriron,basicsafetyprecautionsshouldalwaysbefollowed,
includingthefollowing:
❍Readallinstructionsbeforeusing.
❍Useirononlyforitsintendeduse.
❍Toprotectagainstariskofelectricshock,donotimmersetheironin
waterorotherliquid.
❍Theironshouldalwaysbeturnedoff[0](refertoHoWToUsesection)
beforepluggingintoorunpluggingfromanoutlet.Neveryankcordto
disconnectfromoutlet;insteadgraspplugandpulltodisconnect.
❍Donotallowcordtotouchhotsurfaces.Letironcoolcompletelybefore
puttingaway.Loopcordlooselyaroundironwhenstoring.
❍Alwaysdisconnectironfromelectricaloutletwhenfillingwithoremptying
ofwaterandwhennotinuse.
❍Donotoperateironwithadamagedcordoriftheironhasbeendropped
ordamaged.Toavoidtheriskofelectricshock,donotdisassemblethe
iron,takeittoaqualifiedservicemanforexaminationandrepair.Incorrect
reassemblycancauseariskofelectricshockwhentheironisused.
❍Closesupervisionisnecessaryforanyappliancebeingusedbyornear
children.Donotleaveironunattendedwhileconnectedoronanironing
board.
❍Burnscanoccurfromtouchinghotmetalparts,hotwater,orsteam.
Usecautionwhenyouturnasteamironupsidedownorusethesurge
ofsteam—theremaybehotwaterinthewatertank.Avoidrapid
movementofirontominimizehotwaterspillage.
SPECIAL INSTRUCTIONS
❍Toavoidacircuitoverload,donotoperateanotherhigh-wattageappliance
onthesamecircuit.
❍Ifanextensioncordisabsolutelynecessary,a5-ampereand0-volt,
or7-ampereand0-voltcordshouldbeused.Cordsratedforless
amperagemayoverheat.Careshouldbetakentoarrangethecord
sothatitcannotbepulledortrippedover.
SAVE THESE INSTRUCTIONS.
This product is for household use only.
ENGLISH
POLARIZED PLUG
Thisappliancehasapolarizedplug(onebladeiswiderthantheother).
Toreducetheriskofelectricshock,thisplugisintendedtofitintoa
polarizedoutletonlyoneway.Iftheplugdoesnotfitfullyintotheoutlet,
reversetheplug.Ifitstilldoesnotfit,contactaqualifiedelectrician.Do
notattempttomodifythepluginanyway.
TAMPER-RESISTANT SCREW
Warning : This appliance is equipped with a tamper-resistant screw
to prevent removal of the outer cover. To reduce the risk of fire or
electric shock, do not attempt to remove the outer cover. There are
no user-serviceable parts inside. Repair should be done only by
authorized service personnel.
Note: Ifthepowersupplycordisdamaged,itshouldbereplacedby
qualifiedpersonnel;inLatinAmerica,byanauthorizedservicecenter.
5
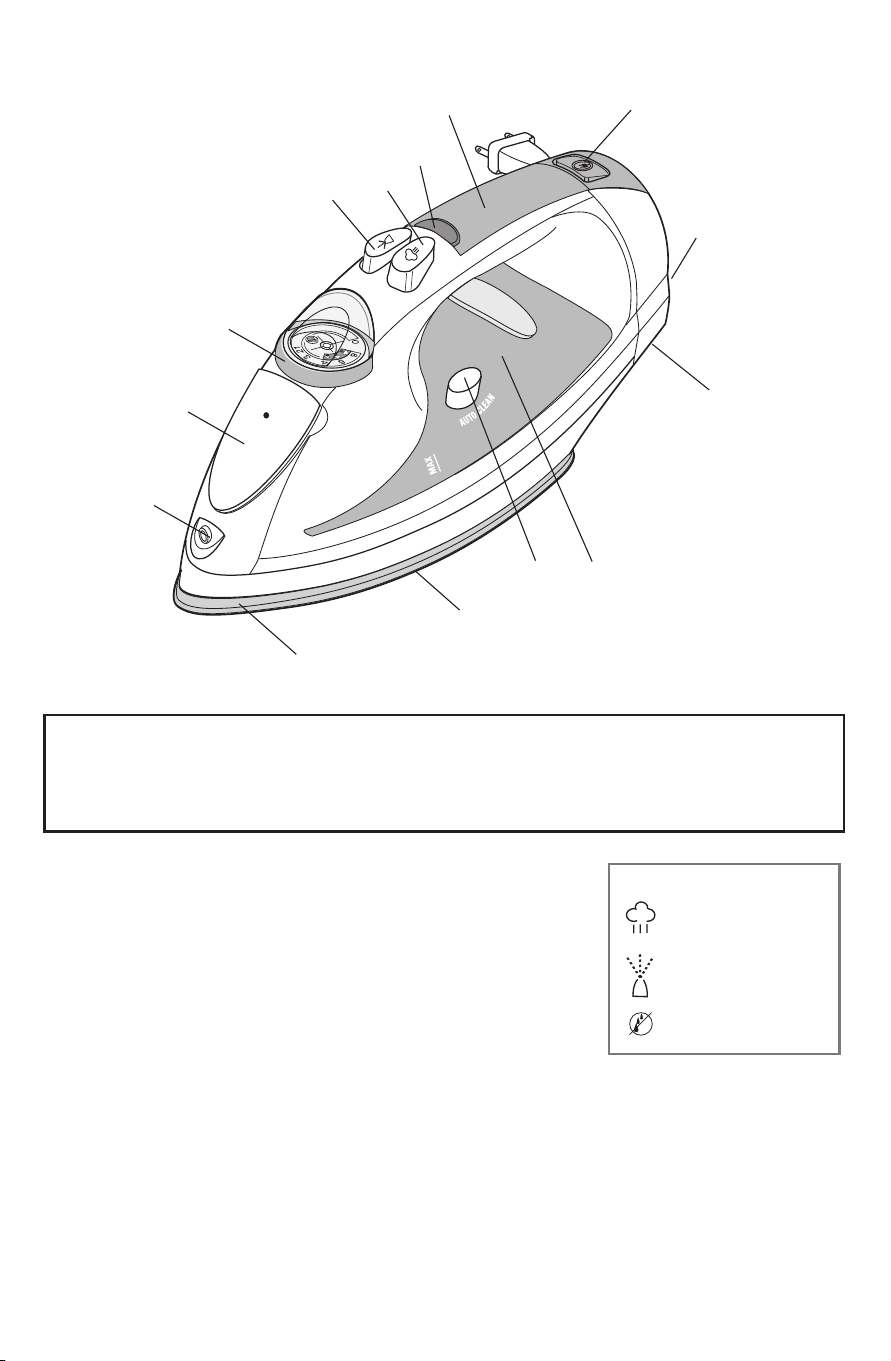
How to Use
Thisapplianceisintendedforhouseholduseonly.
GETTING STARTED
•
Removeanylabels,stickersortagsattachedtothebodyorsoleplateoftheiron.
• Pleasegotowww.prodprotect.com/applicatoregisteryourwarranty.
Note:Useordinarytapwaterforironing.Donotusewaterprocessedthroughahome
softeningsystem.
Important: For optimum performance, let the iron stand for 90 seconds before
beginning to iron.
Tip:Ifunsureofagarment'sfiber,testasmallarea(onaninsideseamorhem)before
ironing.
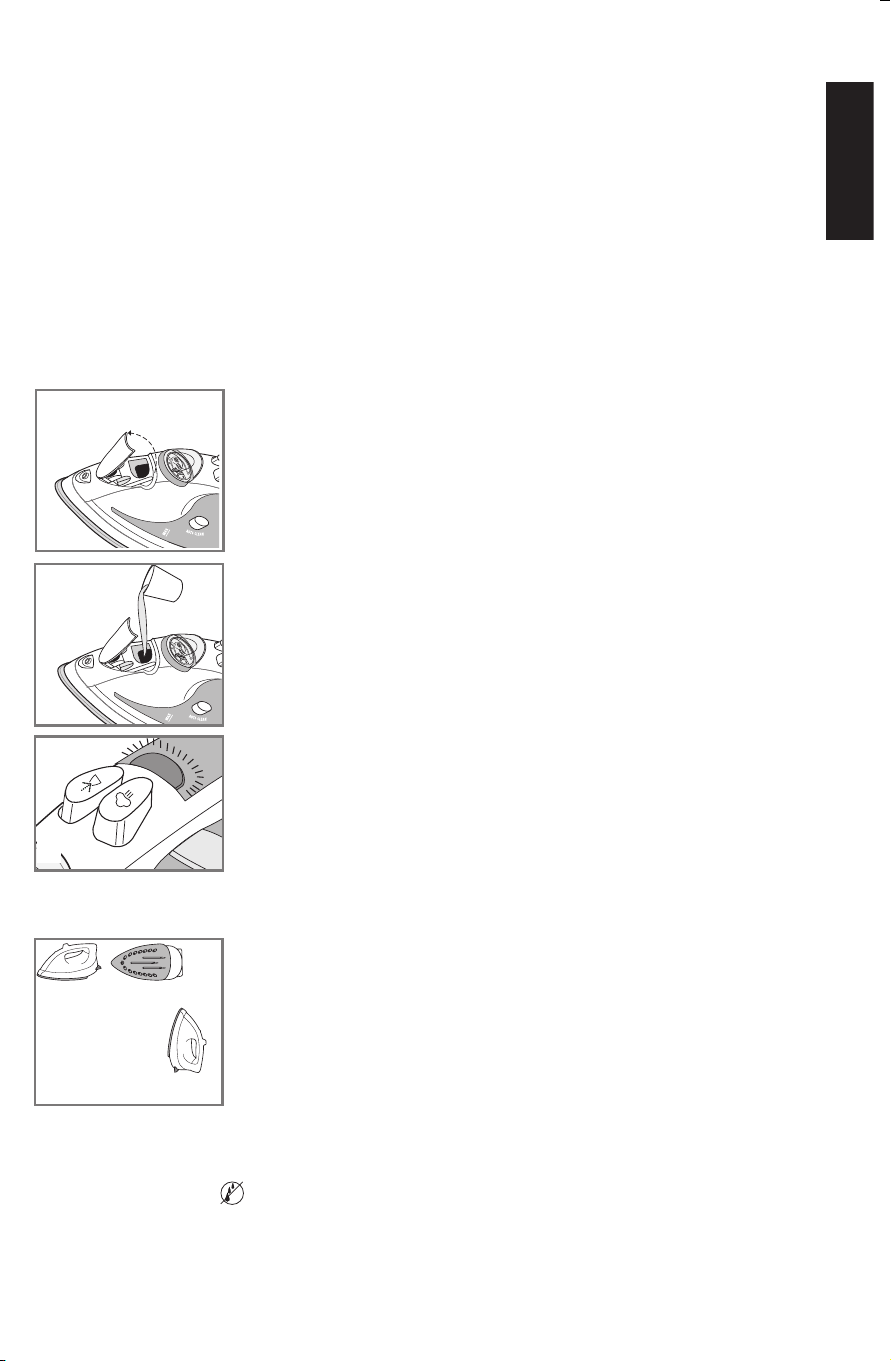
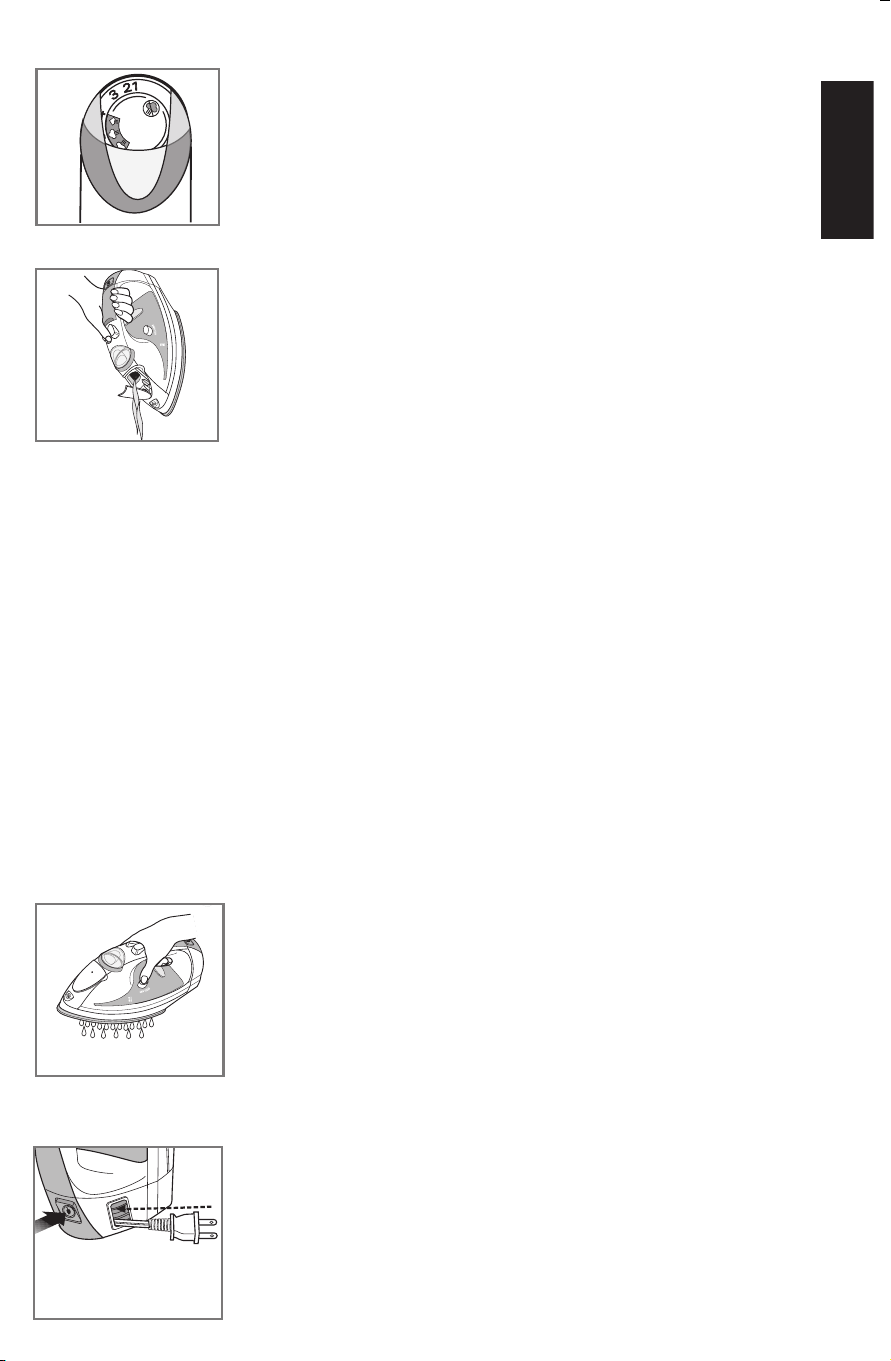
FILLING WATER TANK
. openthewater-fillcover(A).
. Tilttheironandusingacleanmeasuringcup,pourwaterinto
openinguntilthewaterreachestheMAXlevelmarkonthe
watertank(B).Donotoverfill.
. Closethewater-fillcover.
. Plugintheiron.Asolidredlightcomesonandstaysonuntil
thesettemperatureisreach.oncethesettemperatureis
reached,thelightturnssolidgreen (C).
Note: Ifyouneedtoaddwaterwhileironing,unplugtheironand
followabovesteps.
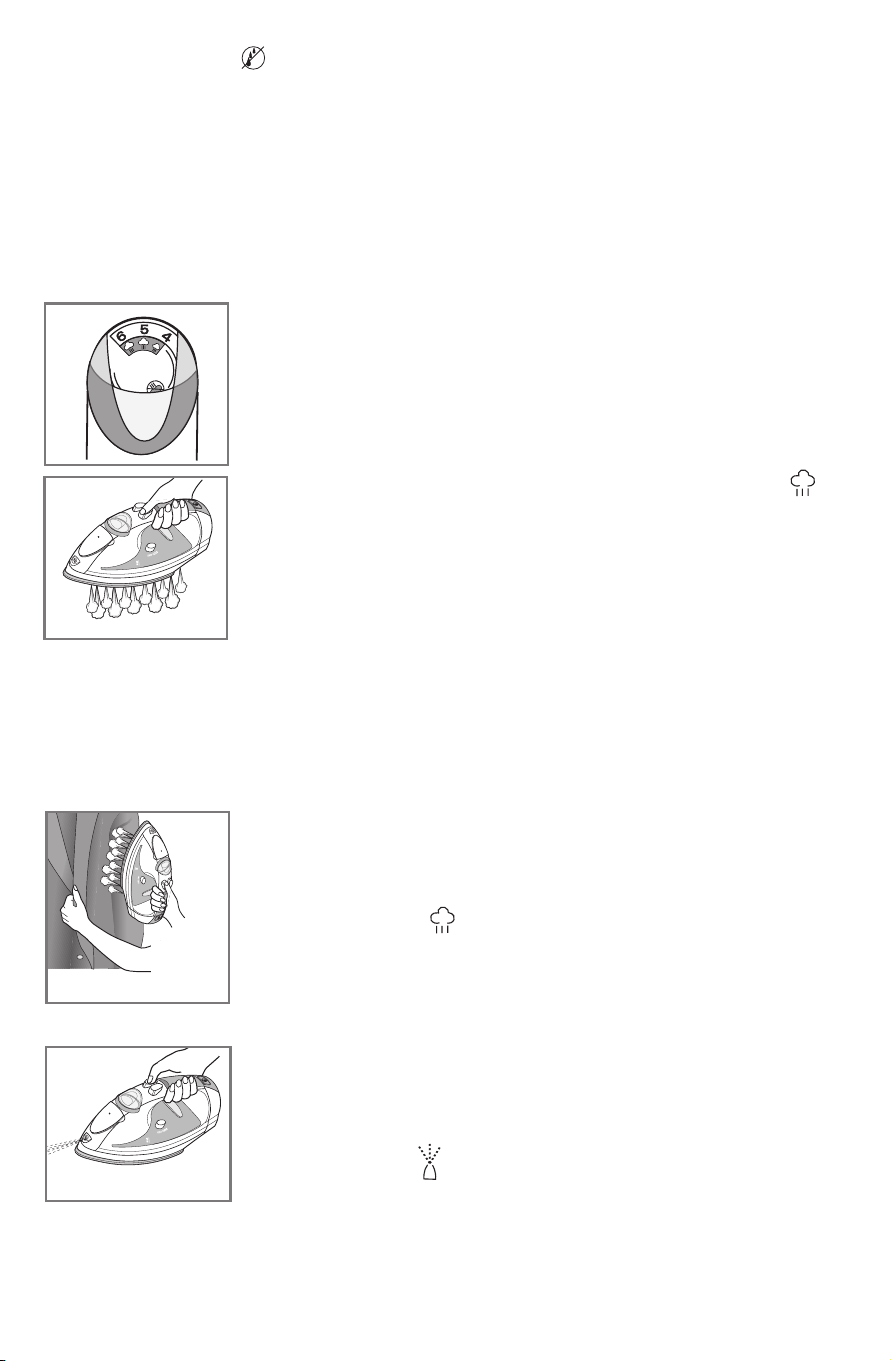
SPECIAL FEATURES
Automatic Shutoff in 3 Positions
• Yourironwillautomaticallyturnoffafter0secondsof
inactivityifleftonitssoleplateoronitsside.Ifleftverticallyon
itsheelrest,itwillturnoffafter8minutes(D).
• Theunitbeepsfivetimesandthereisaflashingredlightto
indicatetheironisintheautomaticshutoffposition.
• onceyoupickuptheiron,thelightwillturnsolidgreenagain
oncethesettemperatureisreached.Iftheironisnotfully
heated,asolidredlightwillappear;oncetheironisready,the
lightwillturnsolidgreen.
Note:Waitforirontoreheatcompletelybeforeresumingoperation.
Anti-Drip System
Theanti-dripsystempreventswaterspottingatlowtemperatures.
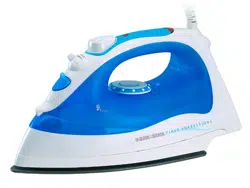
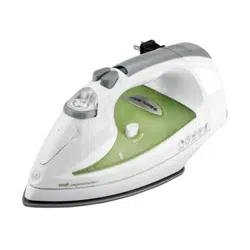
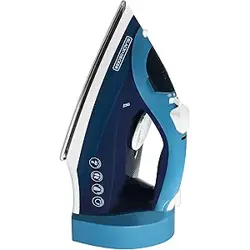
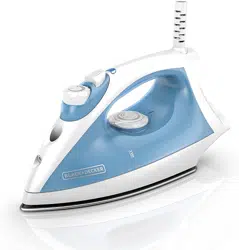
Product may vary slightly from what is illustrated.
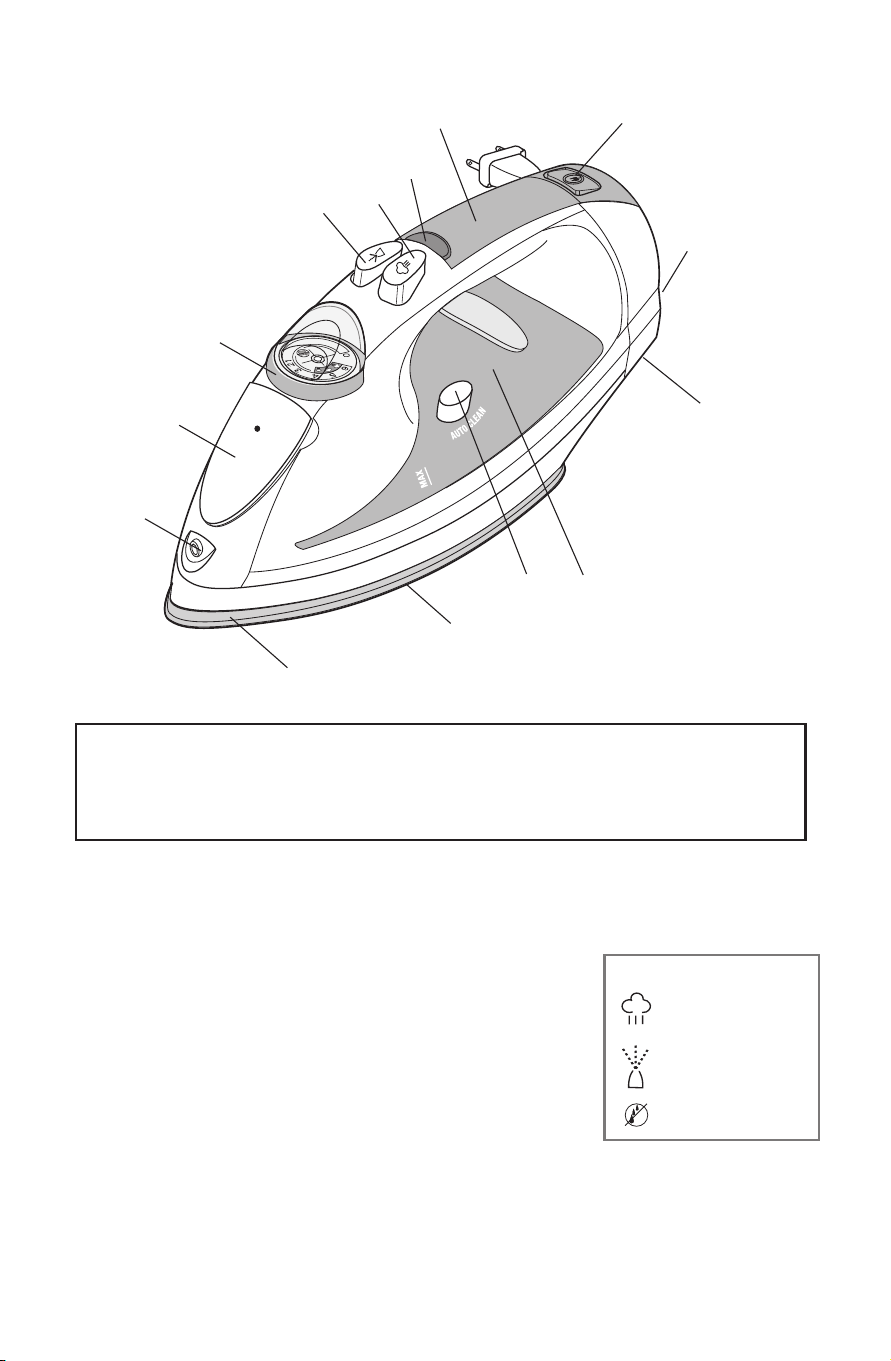
ENGLISH
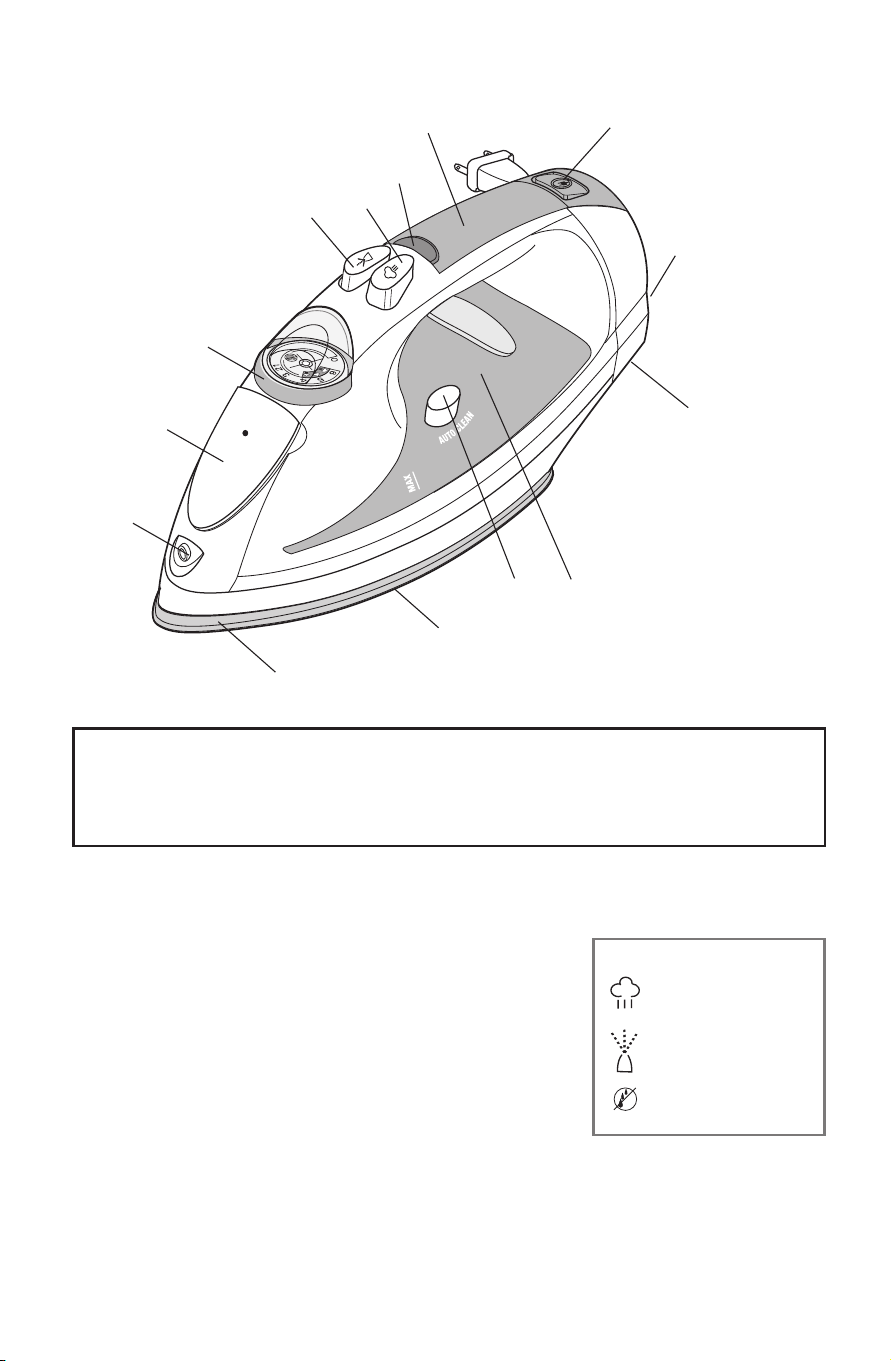
1. Spray nozzle
2. Water-fill cover
3. Fabric select dial
4. Spray button
5. Steam button
6. Automatic shutoff light
7. Comfort Grip
®
handle
8. Cord reel button
9. Slip-resistant heel
10. Fabric guide
11. Water tank
12. AUTO CLEAN
®
button
13. Soleplate
14. Button groove
Symbols
Surge of steam
Spray
Anti drip system
A
B
C
8 minutes
30 seconds
D
Fabric guide
1
Synthetic
2
Nylon • Silk
3
Polyester • Rayon
4
Cotton Blends
5
Wools
6
Cotton • Linen
5
How to Use
Thisapplianceisintendedforhouseholduseonly.
GETTING STARTED
•
Removeanylabels,stickersortagsattachedtothebodyorsoleplateoftheiron.
• Pleasegotowww.prodprotect.com/applicatoregisteryourwarranty.
Note:Useordinarytapwaterforironing.Donotusewaterprocessedthroughahome
softeningsystem.
Important: For optimum performance, let the iron stand for 90 seconds before
beginning to iron.
Tip:Ifunsureofagarment'sfiber,testasmallarea(onaninsideseamorhem)before
ironing.
FILLING WATER TANK
. openthewater-fillcover(A).
. Tilttheironandusingacleanmeasuringcup,pourwaterinto
openinguntilthewaterreachestheMAXlevelmarkonthe
watertank(B).Donotoverfill.
. Closethewater-fillcover.
. Plugintheiron.Asolidredlightcomesonandstaysonuntil
thesettemperatureisreach.oncethesettemperatureis
reached,thelightturnssolidgreen (C).
Note: Ifyouneedtoaddwaterwhileironing,unplugtheironand
followabovesteps.
SPECIAL FEATURES
Automatic Shutoff in 3 Positions
• Yourironwillautomaticallyturnoffafter0secondsof
inactivityifleftonitssoleplateoronitsside.Ifleftverticallyon
itsheelrest,itwillturnoffafter8minutes(D).
• Theunitbeepsfivetimesandthereisaflashingredlightto
indicatetheironisintheautomaticshutoffposition.
• onceyoupickuptheiron,thelightwillturnsolidgreenagain
oncethesettemperatureisreached.Iftheironisnotfully
heated,asolidredlightwillappear;oncetheironisready,the
lightwillturnsolidgreen.
Note:Waitforirontoreheatcompletelybeforeresumingoperation.
Anti-Drip System
Theanti-dripsystempreventswaterspottingatlowtemperatures.
Product may vary slightly from what is illustrated.
ENGLISH
1. Spray nozzle
2. Water-fill cover
3. Fabric select dial
4. Spray button
5. Steam button
6. Automatic shutoff light
7. Comfort Grip
®
handle
8. Cord reel button
9. Slip-resistant heel
10. Fabric guide
11. Water tank
12. AUTO CLEAN
®
button
13. Soleplate
14. Button groove
Symbols
Surge of steam
Spray
Anti drip system
A
B
C
8 minutes
30 seconds
D
Fabric guide
1
Synthetic
2
Nylon • Silk
3
Polyester • Rayon
4
Cotton Blends
5
Wools
6
Cotton • Linen
7
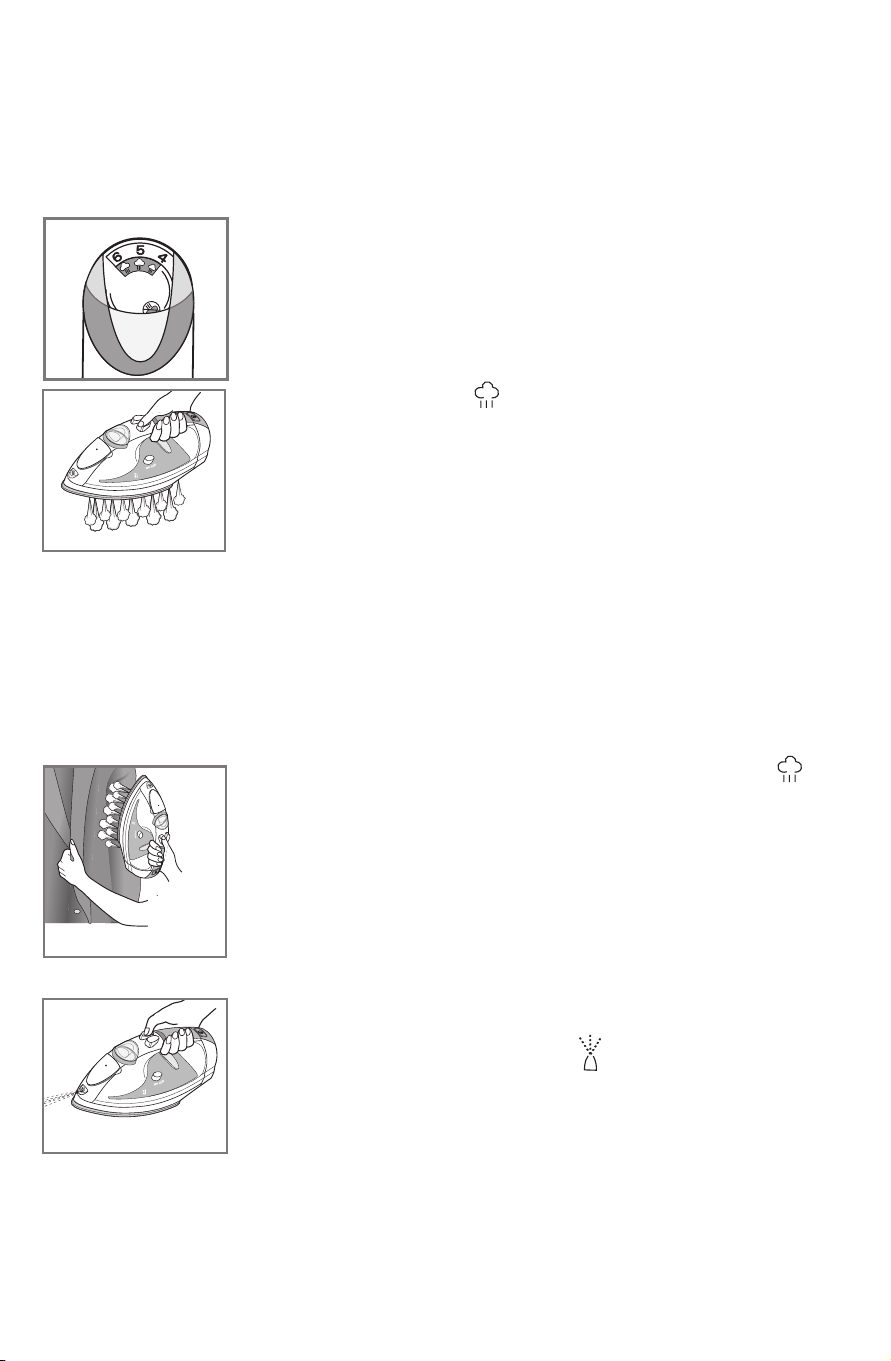
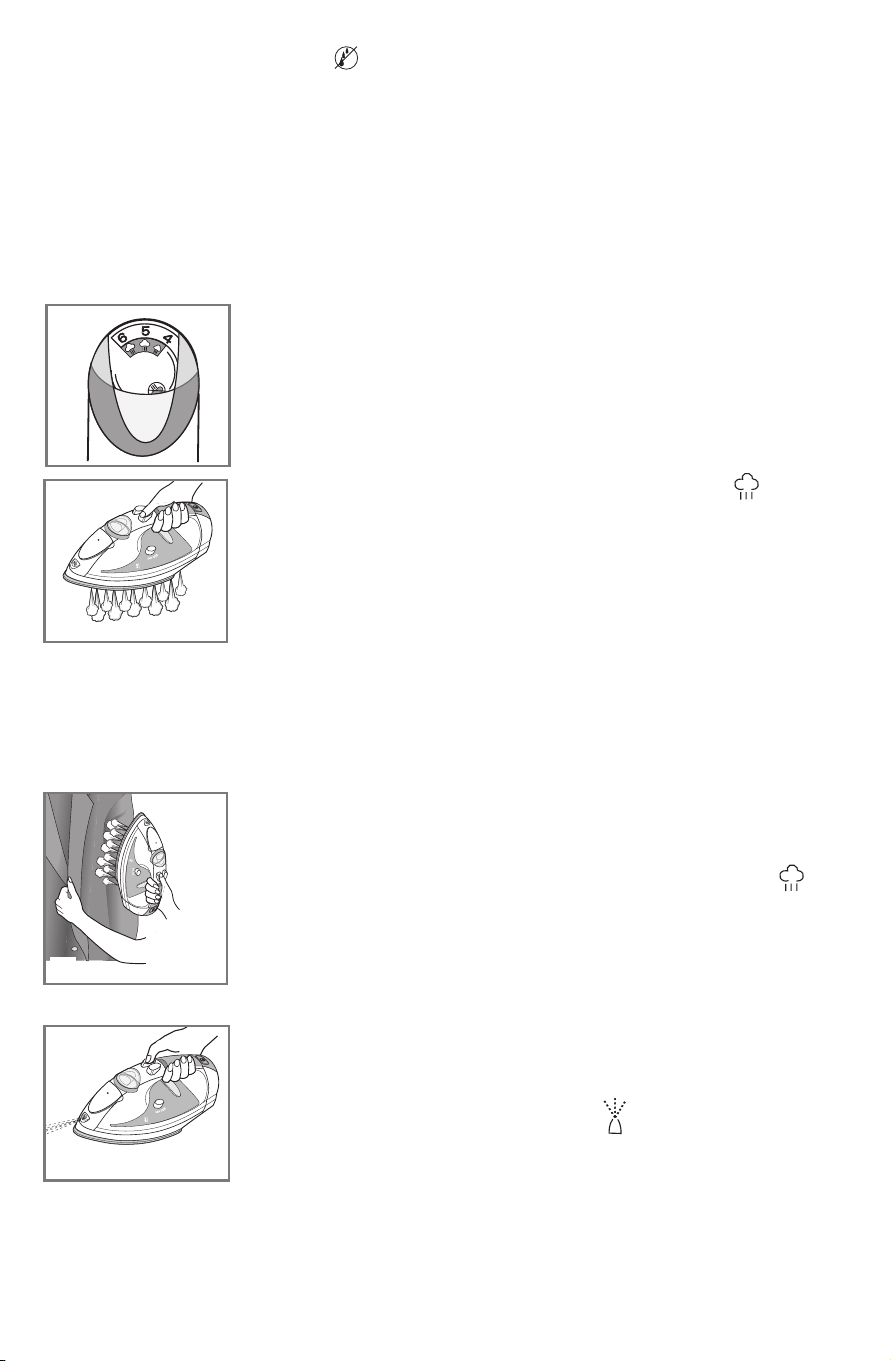
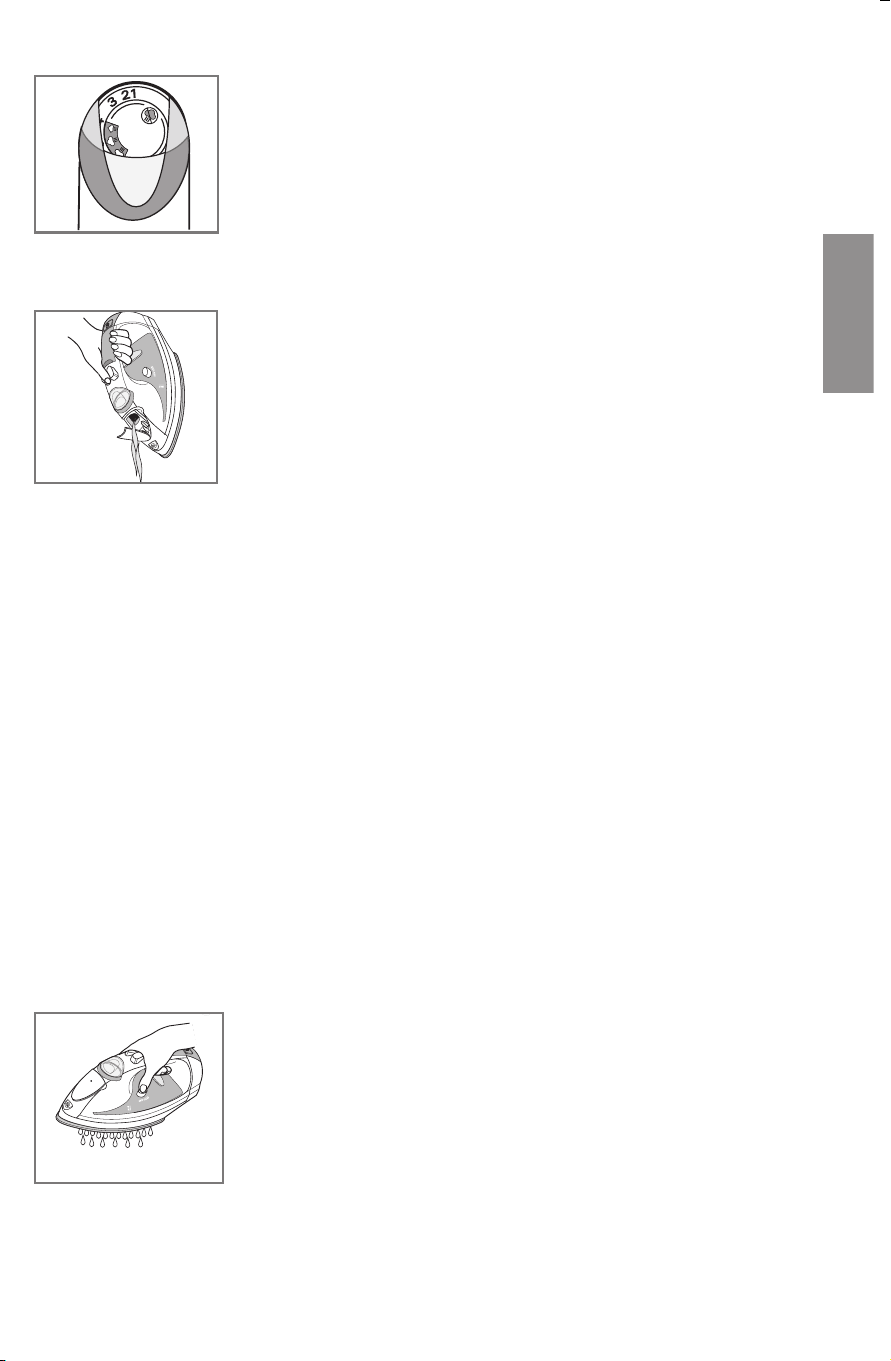
IRONING WITH STEAM
Smart Steam® Technology
Thesmartsteam®systemautomaticallygeneratestherightamountofsteamforthe
fabrictypeselected.onceyouselectthetemperature,thesmartsteam®technology
detectsthetemperatureandadjuststhesteampoweraccordingly.
Surge of Steam
Usetoremovestubbornwrinkles.
. WiththewatertankfilledtotheMAXmark,setfabricselectdial
toappropriatesetting(betweenand)foryourfabric(E).
Note: seefabricguideundertheheelrestandreadthegarment's
labeltohelpyoudeterminefabrictype.
. Besurethereiswaterinthetank.steamisautomaticallyturned
offbetweensettings0and.
. Pressthesteambutton togenerateasurgeofsteam(F).For
bestperformance,leaveanintervalof5secondsbetweenbursts.
. Whenfinishedironing,turnthefabricselectdialto0andunplug
theiron.
Important: Always stand the iron on its heel rest when powered on
but not in use.
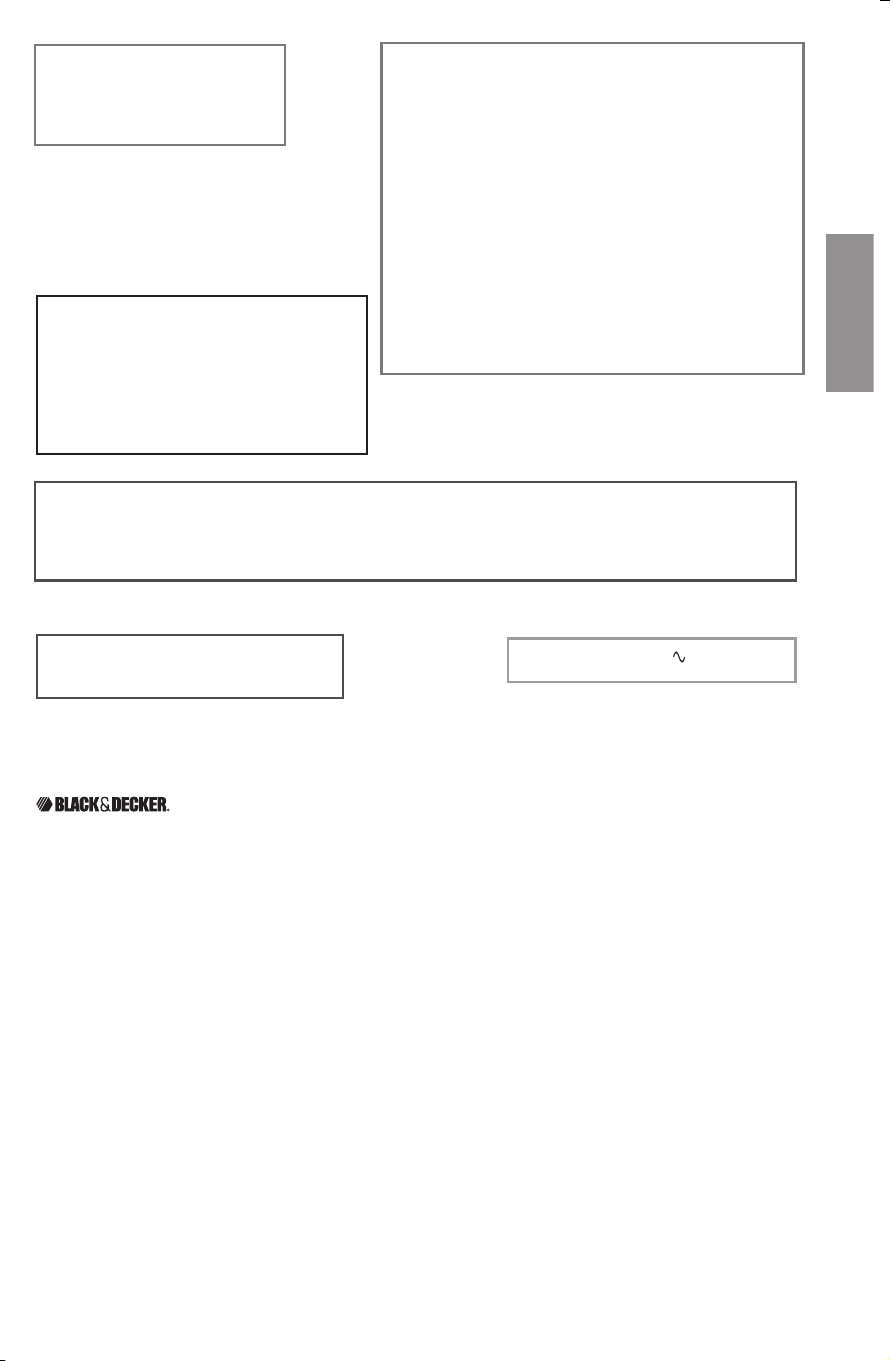
Vertical Steam
Useforremovingwrinklesfromhangingclothesanddrapes.
. BesurethewatertankisfilledtotheMAXmark.
. Hangthegarmenttobesteamedonaclotheshanger.(Curtainsordrapescanbe
steamedoncetheyarehung.)
. Turnthefabricselectdialtoappropriatesetting(betweenand)foryourfabric.
. Holdtheironcloseto(butnottouching)thefabric.
5. Pullthefabrictightinyourfreehandandpumpthesteam
buttonasyoumovetheironoverthefabric(G).
Important: Always stand the iron on its heel rest when powered
on but not in use.
USING SPRAY
Usetodampentoughwrinklesatanysetting(H).
. Besuretheironisfilledwithwater.
. onfirstuse,pumpthespraybutton severaltimes.
IRONING WITHOUT STEAM
. Turnthefabricselectdialtosettingbetweensettings0and
toironwithoutsteam(J).Thesmartsteam®systemwill
automaticallyturnoff.
. Todryironathighersettings,emptythewaterfromthetank
topreventsteaming.
EMPTYING WATER TANK (OPTIONAL)
Note:Itisnotnecessarytoemptythewateraftereachuse.
. Unplugtheironandletitcool.
. openthewater-fillcover.
. Toreleasethewater,holdtheironoverasinkwiththetip
pointingdown.Waterwillemptyoutofthewater-fillopening
(K).
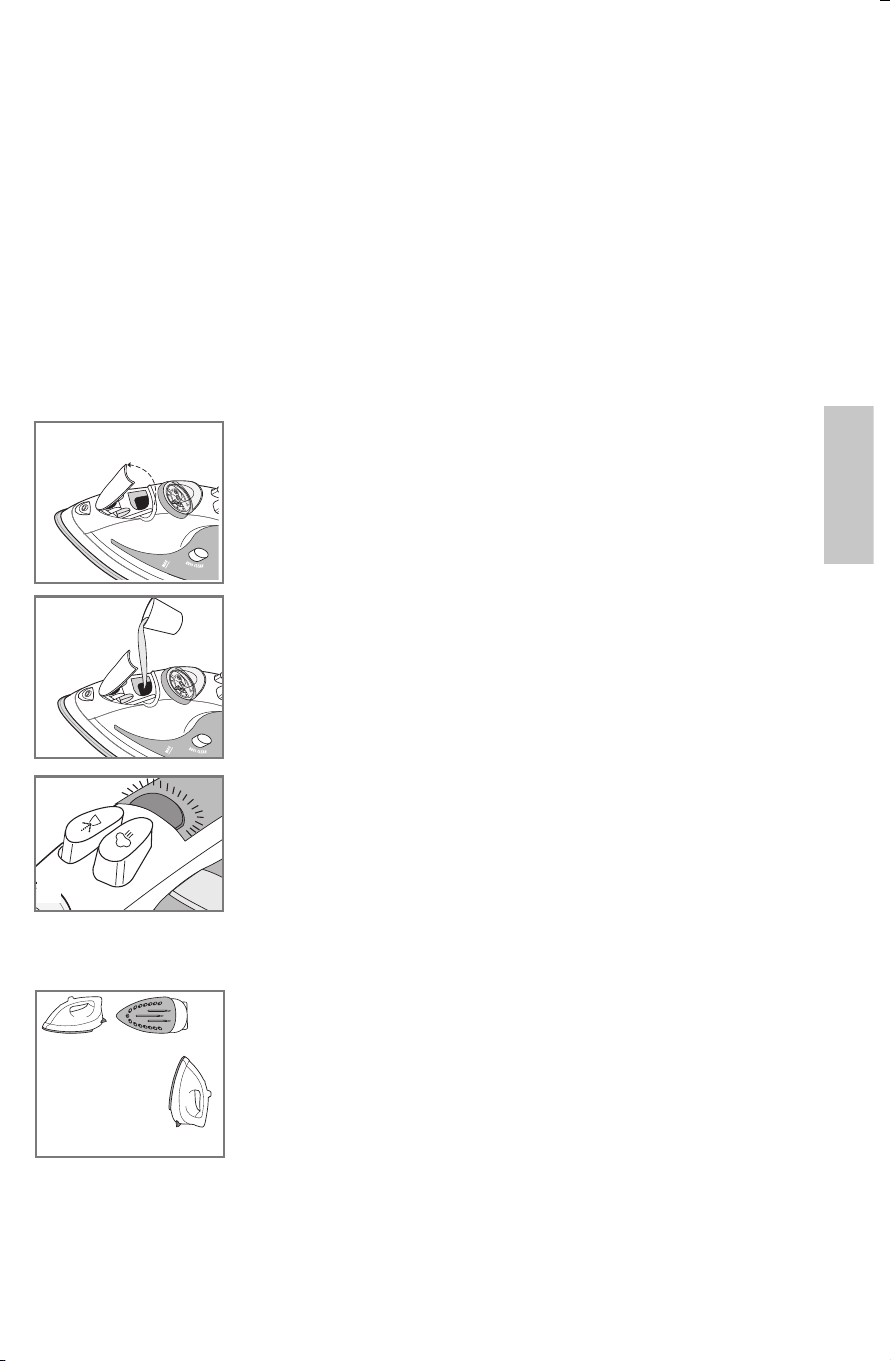
Care and Cleaning
Thisproductcontainsnouser-serviceableparts.Referservicetoqualifiedservice
personnel.
CLEANING OUTSIDE SURFACES
. Makesureironisunpluggedandhascooledcompletely.
. Wipethesoleplateandoutersurfaceswithasoftclothdampenedwithwater.
. Addmildhouseholddetergent.Neveruseabrasives,heavy-dutycleansers,vinegar
orscouringpadsthatmayscratchordiscolortheiron.
. Aftercleaning,steamironoveranoldclothtoremoveanyresiduefromthesteam
vents.
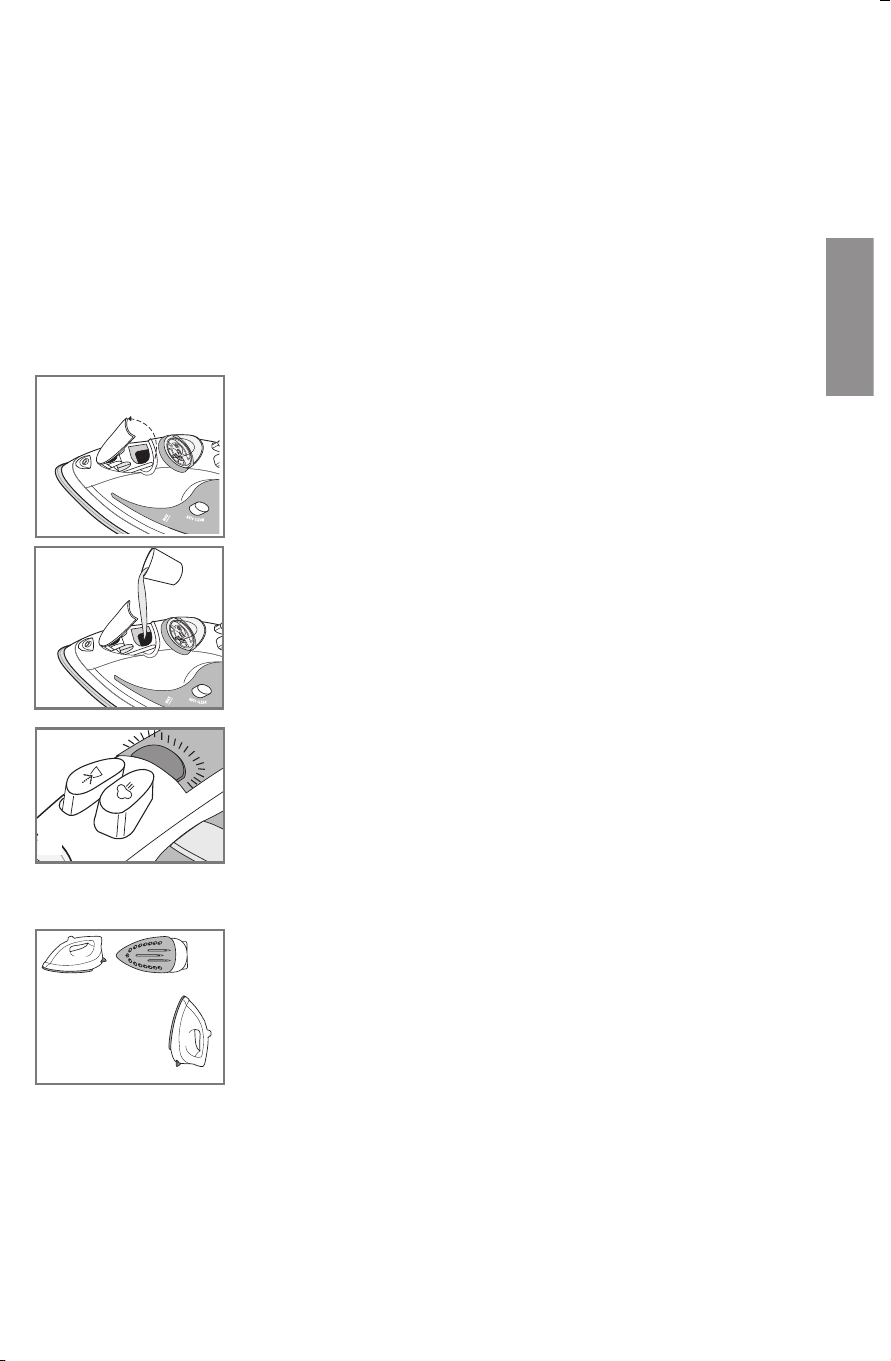
AUTO CLEAN
®
SYSTEM
Tokeepthesteamventsfreeofanybuildup,aboutonceamonthfollowthese
instructions.
. FillthewatertankwellbelowtheMAXline.Plugintheiron.
. Turnthefabricselectdialtoandstandtheirononitsheelrest.Allowittoheat
. Turnfabricselectdialto0,unplugtheironandholdoverasinkwiththesoleplate
facingdown.
. PressandholdtheAUToCLeAN
®
button.Becareful,asafter
severalseconds,hotwaterandsteamwillcomeoutofthe
steamvents(L).ContinuetoholdtheAUToCLeAN
®
button
untilallthewaterhasemptied.Ifnecessary,rockironsideto
sideandfronttoback.
5. Whenfinished,releasethebutton,standtheirononitsheel
restandplugitin.
. Heattheunitforaboutminutestodryoutanyremaining
water.
STORING YOUR IRON
. Unplugtheironandallowittocool.
. Checkthatthefabricselectdialissetto0.
. Pressandholdthecordreelbuttontoretractthecord(M).
. storeverticallyonitsheeltopreventwaterleakingfromthe
soleplate.
ENGLISH
E
F
G
H
J
K
L
M
7
IRONING WITH STEAM
Smart Steam® Technology
Thesmartsteam®systemautomaticallygeneratestherightamountofsteamforthe
fabrictypeselected.onceyouselectthetemperature,thesmartsteam®technology
detectsthetemperatureandadjuststhesteampoweraccordingly.
Surge of Steam
Usetoremovestubbornwrinkles.
. WiththewatertankfilledtotheMAXmark,setfabricselectdial
toappropriatesetting(betweenand)foryourfabric(E).
Note: seefabricguideundertheheelrestandreadthegarment's
labeltohelpyoudeterminefabrictype.
. Besurethereiswaterinthetank.steamisautomaticallyturned
offbetweensettings0and.
. Pressthesteambutton togenerateasurgeofsteam(F).For
bestperformance,leaveanintervalof5secondsbetweenbursts.
. Whenfinishedironing,turnthefabricselectdialto0andunplug
theiron.
Important: Always stand the iron on its heel rest when powered on
but not in use.
Vertical Steam
Useforremovingwrinklesfromhangingclothesanddrapes.
. BesurethewatertankisfilledtotheMAXmark.
. Hangthegarmenttobesteamedonaclotheshanger.(Curtainsordrapescanbe
steamedoncetheyarehung.)
. Turnthefabricselectdialtoappropriatesetting(betweenand)foryourfabric.
. Holdtheironcloseto(butnottouching)thefabric.
5. Pullthefabrictightinyourfreehandandpumpthesteam
buttonasyoumovetheironoverthefabric(G).
Important: Always stand the iron on its heel rest when powered
on but not in use.
USING SPRAY
Usetodampentoughwrinklesatanysetting(H).
. Besuretheironisfilledwithwater.
. onfirstuse,pumpthespraybutton severaltimes.
IRONING WITHOUT STEAM
. Turnthefabricselectdialtosettingbetweensettings0and
toironwithoutsteam(J).Thesmartsteam®systemwill
automaticallyturnoff.
. Todryironathighersettings,emptythewaterfromthetank
topreventsteaming.
EMPTYING WATER TANK (OPTIONAL)
Note:Itisnotnecessarytoemptythewateraftereachuse.
. Unplugtheironandletitcool.
. openthewater-fillcover.
. Toreleasethewater,holdtheironoverasinkwiththetip
pointingdown.Waterwillemptyoutofthewater-fillopening
(K).
Care and Cleaning
Thisproductcontainsnouser-serviceableparts.Referservicetoqualifiedservice
personnel.
CLEANING OUTSIDE SURFACES
. Makesureironisunpluggedandhascooledcompletely.
. Wipethesoleplateandoutersurfaceswithasoftclothdampenedwithwater.
. Addmildhouseholddetergent.Neveruseabrasives,heavy-dutycleansers,vinegar
orscouringpadsthatmayscratchordiscolortheiron.
. Aftercleaning,steamironoveranoldclothtoremoveanyresiduefromthesteam
vents.
AUTO CLEAN
®
SYSTEM
Tokeepthesteamventsfreeofanybuildup,aboutonceamonthfollowthese
instructions.
. FillthewatertankwellbelowtheMAXline.Plugintheiron.
. Turnthefabricselectdialtoandstandtheirononitsheelrest.Allowittoheat
. Turnfabricselectdialto0,unplugtheironandholdoverasinkwiththesoleplate
facingdown.
. PressandholdtheAUToCLeAN
®
button.Becareful,asafter
severalseconds,hotwaterandsteamwillcomeoutofthe
steamvents(L).ContinuetoholdtheAUToCLeAN
®
button
untilallthewaterhasemptied.Ifnecessary,rockironsideto
sideandfronttoback.
5. Whenfinished,releasethebutton,standtheirononitsheel
restandplugitin.
. Heattheunitforaboutminutestodryoutanyremaining
water.
STORING YOUR IRON
. Unplugtheironandallowittocool.
. Checkthatthefabricselectdialissetto0.
. Pressandholdthecordreelbuttontoretractthecord(M).
. storeverticallyonitsheeltopreventwaterleakingfromthe
soleplate.
ENGLISH
E
F
G
H
J
K
L
M

8
NEED HELP?
Forservice,repairoranyquestionsregardingyourappliance,calltheappropriate800
numberoncoverofthisbook.PleaseDO NOTreturntheproducttotheplaceofpurchase.
Also,pleaseDO NOTmailproductbacktomanufacturer,norbringittoaservicecenter.
Youmayalsowanttoconsultthewebsitelistedonthecoverofthismanual.
Two-Year Limited Warranty
(Applies only in the United States and Canada)
What does it cover?
• Anydefectinmaterialorworkmanshipprovided;however,Applica’sliabilitywillnot
exceedthepurchasepriceofproduct.
For how long?
• Twoyearsafterdateofpurchase.
What will we do to help you?
• Provideyouwithareasonablysimilarreplacementproductthatiseitherneworfactory
refurbished.
How do you get service?
• saveyourreceiptasproofofdateofsale.
• Visittheonlineservicewebsiteatwww.prodprotect.com/applica,orcalltoll-free
-800--78,forgeneralwarrantyservice.
• Ifyouneedpartsoraccessories,pleasecall-800-78-05.
What does your warranty not cover?
• Damagefromcommercialuse
• Damagefrommisuse,abuseorneglect
• Productsthathavebeenmodiedinanyway
• Productsusedorservicedoutsidethecountryofpurchase
• Glasspartsandotheraccessoryitemsthatarepackedwiththeunit
• shippingandhandlingcostsassociatedwiththereplacementoftheunit
• Consequentialorincidentaldamages(Pleasenote,however,thatsomestatesdo
notallowtheexclusionorlimitationofconsequentialorincidentaldamages,sothis
limitationmaynotapplytoyou.)
How does state law relate to this warranty?
• Thiswarrantygivesyouspeciclegalrights.Youmayalsohaveotherrightsthatvary
fromstatetostateorprovincetoprovince.
isatrademarkofTheBlack&DeckerCorporation,
Towson,Maryland,UsA
MadeinPeople’sRepublicofChina
PrintedinPeople’sRepublicofChina
NOTES
ENGLISH

0
Por favor lea este instructivo antes de usar el producto.
INSTRUCCIONES IMPORTANTES
DE SEGURIDAD
siemprequeutilicesuplancha,debeseguiralgunasprecaucionesbásicas
deseguridad,incluyendolassiguientes:
❍Leatodaslasinstruccionesantesdeutilizarelproducto.
❍Uselaplanchaúnicamenteparaplanchar.
❍Nosumerjalaplanchaenaguanienningúnotrolíquidoparaevitar
elriesgodeunchoqueeléctrico.
❍siempreapague[0]laplancha(vealasecciónCoMoUsAR)antesde
conectarlaodesconectarladeltomacorriente.Nuncatiredelcablepara
desconectarlo,sujeteelenchufeparahacerlo.
❍Nopermitaqueelcableentreencontactoconsuperficiescalientes.
Permitaquelaplanchaseenfríeantesdeguardarla.enrolleelcable
holgadamentealrededordelaplancha.
❍siempredesconectelaplanchacuandolalleneolavacíeycuandonoesté
enuso.
❍Nohagafuncionarlaplanchasiéstatienedañadoelcableosilaplancha
sehadejadocaerysehaestropeado.Afindereduciraunmínimoel
riesgodeunchoqueeléctrico,nodesarmelaplancha.Acudaauna
personadeservicio,calificadapararevisaryefectuarlasreparaciones
necesarias.elarmarlaplanchaincorrectamentepuedeocasionarel
riesgodeunchoqueeléctricocuandolaplanchaestéenfuncionamiento.
❍serequieresupervisióncuandocualquierunidadelectrónicaestésiendo
usadacercadelosniñosoporellosmismos.Nodesatiendalaplancha
mientrasestéconectadaocuandoestésobrelatabladeplanchar.
❍Puedenocurrirquemadurassisetocanlaspartesmetálicas,elagua
caliente,oelvapor.Tomeprecauciónalinvertirunaplanchadevaporya
quepuedehaberaguacalientedentrodeltanque.evitelosmovimientos
bruscosparanoderramaraguacaliente.
INSTRUCCIONES ESPECIALES
❍Paraevitarsobrecargas,noopereningúnotroaparatodealtoconsumo
decorrienteenelmismocircuito.
❍Paraevitarsobrecargas,noopereningúnotroaparatodealtoconsumo
decorrienteenelmismocircuito.sielusodeuncabledeextensión
esabsolutamentenecesario,sedeberáutilizarunode5amperios
y0voltiosounode7amperiosy0voltios.Loscablesdemenor
amperajesepuedensobrecalentar.sedebetenercuidadodeacomodar
elcabledemaneraquenadielohalenisetropiece.
.
CONSERVE ESTAS INSTRUCCIONES.
Este aparato eléctrico es para uso doméstico
únicamente.
ENCHUFE POLARIZADO
esteaparatocuentaconunenchufepolarizado(uncontactoesmásancho
queelotro).Afindereducirelriesgodeunchoqueeléctrico,esteenchufe
encajaenunatomadecorrientepolarizadaenunsolosentido.siel
enchufenoentraenlatomadecorriente,inviértaloysiaunasínoencaja,
consulteconunelectricista.Porfavornotratedealterarestamedidade
seguridad.
TORNILLO DE SEGURIDAD
Advertencia: Este aparato cuenta con un tornillo de seguridad para
evitar la remoción de la cubierta exterior del mismo. A fin de reducir
el riesgo de incendio o de choque eléctrico, por favor no trate de
remover la cubierta exterior. Este producto no contiene piezas
reparables por el consumidor. Toda reparación se debe llevar a cabo
únicamente por personal de servicio autorizado.
Nota: sielcordóndealimentaciónestadañado,enAméricaLatina
debesustituirseporpersonalcalificadooporelcentrodeservicio
autorizado.
ESPAÑOL
Este producto puede variar ligeramente del que aparece ilustrado.
Como usar
esteaparatoesparausodomésticosolamente.
PASOS PRELIMINARES
•
Retiretodaetiquetaocalcomaníaadheridaalcuerpooalasueladelaplancha.
• Porfavor,visitewww.prodprotect.com/applicapararegistrarsugarantía.
Nota:Utiliceaguadelallaveparallenareltanquedelaplancha.Noutiliceagua
procesadaporunablandadordeaguadoméstico.
Importante: Para óptimo rendimiento, se recomienda dejar reposar la plancha
durante 90 segundos antes de comenzar a planchar.
Consejo:Paraevitardañoalasprendas,sidesconocelafibradeciertotejido,ensaye
primerosobreunasuperficiepequeñayplancheunacosturaoruedointerior.
LLENAR EL TANQUE DE AGUA
. Abralatapadelorificiodellenado(A).
. Inclinelaplanchayconunatazademedirlimpia,vierta
aguaenelorificiohastaalcanzarlamarcadellenadoMAX
eneltanque(B).Noexcedaelniveldellenado.
. Cierrelatapadelorificiodellenado.
Nota:sitienequeagregaraguaduranteelprocesode
planchado,desconectelaplanchaysigalospasosindicados
arriba.
. enchufelaplancha.Unaluzrojaseiluminaypermaneceasí
hastaquelaplanchaalcanzalatemperaturadeseada.Una
vezqueestoocurralaluzseiluminaenverde(C).
FUNCIONES ESPECIALES
Apagado automático en tres posiciones
• suplanchaseapagaautomáticamentesipermanece
inactivasobrelasuelaodeladodurante0segundos.
Laplanchatambiénseapagasipermaneceinactiva
verticalmentesobreeltalóndedescansodurante8minutos
(D).
• Launidademite5sonidosyunaluzrojaparpadeapara
indicarquelaplanchaestáenlaposicióndeapagado
automático.
• Cuandoustedlevantelaplancha,laluzverdeseiluminaotravezhastaquela
planchaalcancelatemperaturaestablecida.silaplanchanoestácompletamente
caliente,unaluzrojaseenciende;cuandolaplanchaestálista,laluzcambiaa
verde.
ESPAÑOL
1. Boquilla de rociar
2. Tapa del orificio de llenado
3. Selector de tejidos
4. Botón de rociar
5. Botón de vapor
6. Luz de funcionamiento
7. Mango Comfort Grip®
8. Botón de cable retractable
9. Talón antideslizante
10. Guía de tejidos
11. Tanque de agua
12. Botón de limpieza automática AUTO CLEAN
®
13. Suela
14. Canal para los botones
Símbolos
Emisión de vapor
Rocío
Sistema de
antigoteo
8 minutos
30 segundos
D
A
B
C
Guía de tejidos
1
Sintético
2
Nylon • Seda
3
Poliester • Rayón
4
Tej. de Algodón
5
Lana
6
Algódon • Lino
5
SISTEMA A PRUEBA DE GOTEO
elsistemaapruebadegoteoevitalasmanchasdeaguaquepuedeocasionarlaplancha
atemperaturasbajas.
PLANCHADO A VAPOR
Tecnología Smart Steam®
elsistemasmartsteam®producelacantidaddevaporapropiadoautomáticamente
segúneltipodetejidodeterminado.Unavezqueunoajustalatemperatura,elsistema
smartsteam®detectalatemperaturayajustalaemisióndevaporrespectivamente.
Emisión de vapor
Apropiadoparadeshacerlasarrugaspersistentes.
. Lleneeltanquedeaguahastaalcanzarlamarcadellenado
MAXyajusteelselectordetejidosentreelnively,segúnel
tejidodelaprenda.Consultelaguíadetejidosdebajodeltalón
dedescansodelaplanchaylealaetiquetadelaprendapara
determinareltipodetejido(E).
. Asegúresedequehayaaguaeneltanque.Laemisióndevapor
seapagaautomáticamenteentreelnivel0y.
. Paramejorrendimiento,presioneelbotóndevapor
en
intervalosde5segundos(F).
. Cuandoterminedeplanchar,ajusteelselectordetejidosala
posición“0”ydesconectelaplancha.
Importante: Siempre coloque la plancha sobre el talón de
descanso cuando esté encendida o no en uso.
Vapor vertical
Utiliceparasuavizarlasarrugasdelasprendascolgantesodelascortinas.
. AsegúresedequeeltanquedeaguaestéllenohastaelnivelMAX.
. Cuelguelaprendaquedeseavaporizarenungancho.(Unopuedevaporizarlas
cortinasunavezinstaladas.)
. Ajusteelselectoralnivelapropiado(entreely),según
eltejido.
. sujetelaplanchacerca,peronoencontactoconeltejido.
5. Haleeltejidoconunamanoybombeeelbotóndelvapor
conlaotra,amedidapasalaplanchasobrelaprenda(G).
Importante: Siempre coloque la plancha sobre el talón de
descanso cuando esté encendida pero no en uso.
USO DEL ROCIADOR
Utiliceacualquierniveldetemperaturaparahumedecerlas
arrugaspersistentes(H).
. Asegúresedequeeltanquedeaguaestélleno.
. Paraelprimeruso,bombeeelbotón variasveces.
PLANCHADO A SECO
. Ajusteelselectordetejidosalaposiciónentreelnivel0y
afindeplancharsinvapor(J).elsistemasmartsteam®se
apagaautomáticamente.
. sideseaplancharensecoatemperaturasmáselevadas,
vacíeeltanqueporcompletoparaevitarlaemisióndevapor.
VACIADO DEL TANQUE (OPCIONAL)
Nota:Noesnecesariovaciareltanquedeaguadespuésdecadauso.
. Desconectelaplanchaypermitaqueseenfríe.
. Abralatapadelorificiodellenadodeltanque.
. Paravaciarelagua,sujetelaplanchaconlapuntahacia
abajosobreunlavabo.elaguasaleatravésdelorificiode
llenado(K).
Cuidado y limpieza
esteproductonocontienepiezasreparablesporelconsumidor.Paraservicio,acudaa
personalcalificado.
LIMPIEZA DE LAS SUPERFICIES EXTERIORES
. Asegúresedequelaplanchaestédesconectadayquesehayaenfriadobien.
. Limpielasuelaylassuperficiesexterioresconunpañosuavehumedecidocon
agua.
. Apliqueundetergentedomésticosuave.Jamásutiliceabrasivos,limpiadores
fuertes,vinagrenialmohadillasdefregarquepuedanrayarodecolorarlaplancha.
. Despuésdelimpiar,plancheavaporsobreunpañoviejoafinderetirarcualquier
residuoacumuladoenlosorificiosdevapor.
SISTEMA DE LIMPIEZA AUTOMÁTICA AUTO CLEAN
®
Afindemantenerlosorificiosdevaporlibresdeacumulaciones,sigalassiguientes
instruccionesporlomenosunavezalmes.
. LleneeltanquedeaguapordebajodelalíneaMAX.enchufelaplancha.
. Ajusteelselectordetejidosalnivelycoloquelaplanchasobreeltalónde
descanso.Permitaquelaplanchasecaliente.
. Gireelselectordetejidosalaposición“0”,desconecteysujetelaplanchasobre
unlavaboconlasuelaorientadahaciaabajo.
. PresioneysostengaelbotóndelimpiezaautomáticaAUTo
CLeAN
®
.Tengacuidadodelaguacalienteydelvaporque
emitenlosorificiosdevapor(L).Continúesosteniendoel
botóndelimpiezaautomáticaAUToCLeAN
®
hastavaciar
todaelagua.siesnecesario,muevalaplanchadeladoa
ladoydeatrásparaadelante.
5. Alterminar,suelteelbotón,coloquelaplanchasobreel
talóndedescansoyenchúfela.
. Permitaquelaplanchasecalienteunosdosminutoshastasecarsetodaelagua
sobrante.
ESPAÑOL
E
F
G
H
J
K
L

7
ALMACENAMIENTO DE LA PLANCHA
. Desconectelaplanchayesperequeseenfríe.
. Verifiquequeelselectordetemperaturaestéajustadoala
posición“0”.
. Presioneysostengaelbotóndecableretractable(M).
. Coloquelaplanchaverticalmentesobreeltalóndedescanso
paraevitarquelasuelagotee.
ESPAÑOL
¿NECESITA AYUDA?
Paraservicio,reparacionesopreguntasrelacionadasalproducto,porfavorllameal
númerodelcentrodeservicioenelpaísdondeustedcomprósuproducto.Nodevuelva
elproductoalfabricante.Llameolleveelproductoauncentrodeservicioautorizado.
DOS AÑOS DE GARANTÍA LIMITADA
(No aplica en México, Estados Unidos o Canadá)
¿Qué cubre la garantía?
• Lagarantíacubrecualquierdefectodematerialesodemanodeobra.Applicanose
responsabilizaporningúncostoqueexcedaelvalordecompradelproducto.
¿Por cuánto tiempo es válida la garantía?
• Pordosañosapartirdelafechaoriginaldecompra.
¿Cómo se puede obtener servicio?
• Conserveelrecibooriginaldecompra.
• Porfavorllamealnúmerodelcentrodeservicioautorizado.
Esta garantía no cubre:
• Losproductosquehansidoutilizadosencondicionesdistintasalasnormales
• Losdañosocasionadosporelmaluso,elabusoonegligencia.
• Losproductosquehansidoalteradosdealgunamanera
• Losdañosocasionadosporelusocomercialdelproducto
• Losproductosutilizadosoreparadosfueradelpaísoriginaldecompra
• Laspiezasdevidrioydemásaccesoriosempacadosconelaparato
• Losgastosdetramitaciónyembarqueasociadosalreemplazodelproducto
• Losdañosyperjuiciosindirectosoincidentales
Póliza de Garantía
(Válida sólo para México)
Duración
ApplicaManufacturing,s.deR.L.deC.V.garantizaesteproductoporañosapartir
delafechaoriginaldecompra.
¿Qué cubre esta garantía?
estaGarantíacubrecualquierdefectoquepresentenlaspiezas,componentesyla
manodeobracontenidasenesteproducto.
Requisitos para hacer válida la garantía
ParareclamarsuGarantíadeberápresentaralCentrodeservicioAutorizadolapóliza
selladaporelestablecimientoendondeadquirióelproducto.sinolatiene,podrá
presentarelcomprobantedecompraoriginal.
¿Donde hago válida la garantía?
Llamesincostoalteléfono0800750,paraubicarelCentrodeservicio
Autorizadomáscercanoasudomicilioendondeustedpodráencontrarpartes,
componentes,consumiblesyaccesorios.
Procedimiento para hacer válida la garantía
AcudaalCentrodeservicioAutorizadoconelproductoconlapólizadeGarantía
selladaoelcomprobantedecompraoriginal,ahísereemplazarácualquierpiezao
componentedefectuososincargoalgunoparaelusuarional.estaGarantíaincluye
losgastosdetransportaciónquesederivendesucumplimiento.
M

8
Argentina
servicioTécnicoCentral
Attendance
AtenciónalCliente
Ave.Monroe5
BuenosAires,Argentina
Tel.:080--8
Chile
servicioMáquinasy
HerramientasLtda.
Av.ApoquindoNo.87-
LasCondes
santiago,Chile
Tel.:(5)-0
Colombia
PLINARes
AvenidaQuito#88A-0
Bogotá,Colombia
Tel.sincosto
0800700870
Costa Rica
Aplicaciones
electromecanicas,s.A.
CalleBisyAve.
sanJose,CostaRica
Tel.:(50)57-57
-0
Ecuador
servicioMasterecuador
Av.deDiciembre7
yLosAlamos
Tel.(5)8-88
El Salvador
sedeblack
CallesanAntonioAbad
sansalvador,elsalvador
Tel.(50)8-87
Guatemala
MacPartessA
ªCalleZona
FrenteaTecun
Tel.(50)-500
-0
Honduras
serviTotal
ContiguaaTelecentro
Tegucigalpa,Honduras,
Tel.(50)5-7
México
Art.No.5
Col.Centro,C.P.0050
Deleg.Cuauhtemoc
Tel:08007-50
Nicaragua
serviTotal
Desemáforodeportezuelo
500metrosalsur.
Managua,Nicaragua,
Tel.(505)8-700
Panamá
serviciosTécnicosCAPRI
TumbamuertoBoulevard
elDorado
Panamá.
Tel.(507)0
(507)05
Perú
servicioTécnicoCentral
Fastservice
CalleJorgeMuelle
sanBorja
LimaPerú
Tel.
(05)57-0
Puerto Rico
Buckeyeservice
JesúsP.Piñero#0
PuertoNuevo,sJPR
000
Tel.:(787)78-75
Republica Dominicana
PlazaLama,s.A.
Av,Duarte#
santoDomingo,
RepúblicaDominicana
Tel.:(80)87-7
Trinidad and Tobago
A.s.Bryden&sons
(Trinidad)Limited
Independencesquare,
Portofspain
Trinidad,W.I.
Tel.:(88)-
Venezuela
InversionesBDRCA
Av.CasanovaC.C.
CityMarket
NivelPlazaLocal5,
DiagonalHotelMelia.
Caracas
Tel.(58)0
Porfavorllamealnúmerocorrespondientequeapareceenlalistaacontinuación
parasolicitarquesehagaefectivalagarantíaydondeUd.puedesolicitarservicio,
reparacionesopartesenelpaísdondeelproductofuécomprado.Tambiénpuede
consultarnosenele-mail.“servicio@applicamail.com.mx
Excepciones
estaGarantíanoseráválidacuandoelproducto:
A) sehubieseutilizadoencondicionesdistintasalasnormales.
B)Nohubiesesidooperadodeacuerdoconelinstructivodeusoqueleacompaña.
C) Cuandoelproductohubiesesidoalteradooreparadoporpersonasnoautorizadas
porApplicaManufacturing,s.deR.L.deC.V.
Nota:Ustedpodraencontrarpartes,componentes,consumiblesyaccesoriosenlos
centrosdeserviciosautorizados.estagarantíaincluyenlosgastosdetransportaciónque
sederivendesuscumplimientodentrodesusreddeservicio.
ESPAÑOL
sellodelDistribuidor:
Fechadecompra:
Modelo:
Comercializado por:
ApplicaManufacturing,s.deR.L.deC.V.
PresidenteMazarikNo,erPiso
Col.ChapultepecMorales,MexicoD.F
Deleg.MiguelHidalgo
CP570
MeXICo
Servicio y Reparación
Art.No.5
Col.Centro,C.P.0050
Deleg.Cuauhtemoc
Servicio al Consumidor,
VentadeRefaccionesyAccesorios
0800750
Código de fecha / Date Code
esunamarcaregistradadeTheBlack&DeckerCorporation,
Towson,Maryland,e.U.
Registre su producto por Internet en www.prodprotect.com/applica y tendrá la
oportunidad de GANAR $100,000!
Solamente para residentes de EE.UU
Accesorios/Partes (EE.UU/Canadá)
1-800-738-0245
FabricadoenlaRepúblicaPopulardeChina
ImpresoenlaRepúblicaPopulardeChina
Importado por / Imported by:
APPLICA AMERICAS, INC.
Av.JuanBJusto7Piso0
(C5FsA)CiudadAutonomadeBuenosAires
Argentina
C.U.I.T No. 0-78-0
Importado por / Imported by:
APPLICA MANUFACTURING, S. DE R. L. DE C. V.
PresidenteMazarikNo,erPiso
Col.ChapultepecMorales,MexicoD.F
Deleg.MiguelHidalgo
CP570
MeXICo
Teléfono:(55)5-00
Del interior marque sin costo
0(800)750
1 400 W 120 V
CAT . NO. E HB500
TYP E 1 160 W 120 V
AC O NLY 60 Hz
60 Hz

0
Veuillez lire et conserver ce guide d’entretien et d’utilisation.
IMPORTANTES MISES EN GARDE
Lorsqu’onutiliseunfer,ilfauttoujoursrespectercertainesrèglesdesécurité
fondamentales,notammentlessuivantes.
❍Liretouteslesdirectivesavantd’utiliser.
❍Utiliserleferseulementauxfinsauxquellesilaétéprévu.
❍Afind’éviterlesrisquesdesecoussesélectriques,nepasimmergerlefer.
❍Toujoursmettreleferhorstensionarrêt(voirUTILIsATIoN)avantde
lebrancheroudeledébrancher.Nejamaistirersurlecordonpour
débrancherlefer.Ilfautplutôtsaisirlaficheettirer.
❍Éviterdemettrelecordonencontactavecdessurfaceschaudes.Laisser
leferrefroidircomplètementavantdeleranger.enroulezlacorde
d’alimentationsansserrerautourduferàrepasserpourleranger.
❍Toujoursdébrancherleferpourleremplird’eau,pourlevideroupour
leranger.
❍Nepasutiliserlefersilecordonélectriqueestendommagéousilefera
ététombéouendommagé.Pouréviterlerisquedesecousseélectrique,
nepasdémonterlefer,l’apporteràunréparateurqualifiépourlefaire
examineretréparer.Malleremonterpeutcauserunrisquedesecousse
électriquequandonutiliselefer.
❍exerceruneétroitesurveillancelorsqueleferestutiliséprèsd’unenfantou
quecederniers’ensert.Nepaslaisserlefersanssurveillancelorsqu’ilest
branchéouqu’ilestplacésuruneplancheà-repasser.
❍Lespiècesmétalliques,l’eauchaudeoulavapeurpeuventoccasionner
desbrûlures.Renverseravecprécautionunferà-vapeurouprendregarde
lorsqu’onsesertdujetdevapeur,cardel’eaubrûlantepeuts’écoulerdu
réservoir.Éviterdefairedesmouvementsbrusqueslorsdurepassageafin
deminimiserl’écoulementaccidenteld’eaubrûlante.
MESURES SPÉCIALES
❍Afind’éviterlessurcharges,nepasbrancherd’autresappareilsàforte
consommationélectriquesurlemêmecircuit.
❍Lorsqu’ilfaututiliseruncordonderallonge,choisiruncordonde
5ampèreset0voltsouuncordonde7ampèreset0volts.
Lescordonsdontlecalibreestinférieurrisquentdesurchauffer.
Placerlecordondefaçonànepastrébuchersurcedernier,oudesorte
qu’ilnesoitpasdébranchéaccidentellement
.
CONSERVER CES MESURES.
L'appareil est conçu pour une utilisation domestique.
FICHE POLARISÉE (Modèles de 120 V seulement)
L'appareilestmunid'unefichepolarisée(unelamepluslargeque
l'autre).Afindeminimiserlesrisquesdesecoussesélectriques,ce
genredefichen'entrequed'unefaçondansuneprisepolarisée.
Lorsqu'onnepeutinsérerlaficheàfonddanslaprise,ilfauttenterde
lefaireaprèsavoirinverséleslamesdecôté.silafichen'entretoujours
pasdanslaprise,ilfautcommuniqueravecunélectriciencertifié.Ilne
fautpastenterdemodifierlafiche.
VIS INDESSERRABLE
Avertissement : L’appareil est doté d’une vis indesserrable empêchant
l’enlèvement du couvercle extérieur. Pour réduire les risques
d’incendie ou de secousses électriques, ne pas tenter de retirer le
couvercle extérieur. L’utilisateur ne peut pas remplacer les pièces
de l’appareil. En confier la réparation seulement au personnel des
centres de service autorisés.
Note :Lorsquelecordond’alimentationestendommagé,ilfautlefaire
remplacerpardupersonnelqualifiéou,enAmériquelatine,parle
personneld’uncentredeserviceautorisé.
FRANÇAIS
Le produit peut différer légèrement de celui illustré.
Utilisation
Cetappareilestconçuuniquementpouruneutilisationdomestique.
POUR COMMENCER
• Retirerlesétiquettesetlesautocollantsducorpsoudelasemelledufer
àrepasser.
• Veuillezalleràl’adressewww.prodprotect.com/applicapourenregistrervotre
garantie.
Note :Utiliserdel'eaudurobinetpourrepasser.Nepasseservird'eautraitéeparun
systèmed'adoucissementd'eaudomestique.
Important : Pour un rendement optimal, laisser le fer reposer pendant 90 secondes
avant de commencer à repasser.
Conseil :sivousneconnaissezpaslafibreduvêtement,testezunepetitesection(à
l'intérieurd'unecoutureoudel'ourlet)avantderepasser.
Remplissage du réservoir d'eau
. ouvrirlecouvercleduréservoir(A).
. Pencherleferet,àl'aided'unetasseàmesurerpropre,
verserdel'eaudansl'orificederemplissagejusqu'àqu'elle
atteignelamarqueMAXsurleréservoir(B).Nepastrop
remplir.
. Fermerlecouvercleduréservoir.
Note :sivousdevezajouterdel'eaupendantlerepassage,
débrancherleferetsuivrelesétapesci-dessus.
. Brancherlefer.Untémoinrouges'allume;ilresteraallumé
jusqu'àcequelatempératuresélectionnésoitatteinte.Une
foisquelatempératuresélectionnéeestatteinte,letémoin
devientvert(C).
CARACTÉRISTIQUES SPÉCIALES
Arrêt automatique à 3 positions
• Leferàrepassers'éteintautomatiquementaprès0
secondesd'inactivité,qu'ilsoitcouchésursasemelleousur
lecôté.sileferestplacéàlaverticalesursontalond'appui,
ils'éteintaprès8minutes(D).
• L'appareilémetcinqbipsetletémoinrougeclignoteensuite
pourindiquerqueleferestenpositiond'arrêtautomatique.
• Lorsquevoussoulevezlefer,letémoindefonctionnementredevientvertunefois
quelatempératuresélectionnéeaétéatteinte.silefern'estpasassezchaud,un
témoinrouges'allume;letémoindevientvertdèsqueleferestprêt.
Note :Attendrequelefersoitcomplètementréchaufféavantdepoursuivrele
repassage.
FRANÇAIS
1. Bec de pulvériseur
2. Couvercle du réservoir
3. Sélecteur de tissu
4. Bouton de pulvérisation
5. Bouton de vapeur
6. Éteindre automatique
7. Poignée Comfort Grip
MD
8. Bouton d'enrouleur de cordon
9. Talon caoutchouté antiadhésif
10. Guide de tissus
11. Réservoir d'eau
12. Bouton d'autonettoyage AUTO CLEAN
MD
13. Semelle
14. Encoche pour les boutons
Symboles
Jet de vapeur
Pulvérisation
Système
antigouttes
8 minutes
30 secondes
D
A
B
C
Guide de tissu
1
Synthétique
2
Nylon • Soie
3
Polyester • Rayonne
4
Mel. De Coton
5
Laine
6
Coton •
Toile
5
Système antigouttes
Lesystèmeantigouttesprotègelestissusdestachesd'eau,mêmeàbassetempérature.
REPASSAGE À LA VAPEUR
Technologie Smart Steam
MD
Lesystèmesmartsteam
MD
génèreautomatiquementlaquantitédevapeurnécessaire
pourletypedetissusélectionné.Unefoisquevousavezsélectionnélatempérature
désirée,latechnologiesmartsteam
MD
détectelatempératureetajustelejetdevapeur
enfonctiondeceréglage.
Jet de vapeur
Lejetdevapeureffacelesplislesplustenaces.
. Avecleréservoird'eauremplijusqu'àlamarqueMAX,réglez
lecadrandesélectiondutissuauréglageapproprié(entre
et)pourvotretissu.Consultezleguidedetissusousletalon
d'appuietlisezl'étiquetteduvêtementpourvousaider
àdéterminerletypedetissu(E).
. Assurez-vousqu'ilyadel'eaudansleréservoir.Lavapeur
s'arrêteautomatiquementdanslesréglagesde0à.
. Pourunmeilleurrendement,pomperleboutondevapeur
àdesintervallesde5secondes(F).
. Lorsquevousaurezfiniderepasser,remettezlecadrande
sélectiondetissuà0etdébranchezleferàrepasser.
Important : Mettez toujours le fer à repasser en marche sur son
talon d'appui lorsqu'il est sous tension, mais non utilisé.
Jet de vapeur vertical
Lejetdevapeurverticalvouspermetderepasserdesvêtementssuspendusetdes
rideaux.
. s'assurerqueleréservoird'eauestremplijusqu'àlamarqueMAX.
. suspendrelevêtementàrepassersuruncintre.(Lesrideauxoulesdraperies
peuventêtrevaporiséslorsqu'ilssontsuspendus.)
. Réglezlecadrandesélectiondutissuauréglageapproprié
(entreet)pourvotretissu.
. Tenirleferprèsdutissusansluitoucher.
5. Avecvotremainlibre,tirerfermementsurletissuetpomperle
boutondevapeur endéplaçantlefersurletissu(G).
Important : Toujours placer le fer à repasser sur son talon d'appui
lorsqu'il est en marche mais que vous ne l'utilisez pas.
PULVÉRISATION
onpeutl'utiliserpoureffacerlesplistenaces,peuimportele
réglage(H).
. s'assurerqueleferestremplid'eau.
. Aumomentdelapremièreutilisation,pomperlebouton
depulvérisation àplusieursreprises.
REPASSAGE SANS LA VAPEUR
. Mettezlecadrandesélectiondetissuauréglagedansle
réglagesde0àpourrepassersansvapeur(J).Lesystème
smartsteam
MD
s'éteindraautomatiquement.
. Pourrepasseràsecàdesréglagesplusélevés,retirezl'eau
duréservoirpourqu'iln'yaitpasdevapeur.
VIDAGE DU RÉSERVOIR D'EAU (FACULTATIF)
Note :Iln'estpasnécessairedeviderleréservoird'eauaprèschaqueutilisation.
. Débrancherleferetlelaisserrefroidir.
. ouvrirlecouvercleduréservoir.
. Pourviderlefer,letenirau-dessusd'unévier,lapointevers
lebas.L'eaus'écouleparl'orificederemplissage(K).
Entretien et nettoyage
L'utilisateurnepeuteffectuerlui-mêmel'entretiend'aucunepièceduproduit.Confier
l'entretienàuntechnicienqualifié.
NETTOYAGE DES SURFACES EXTÉRIEURES
. s'assurerqueleferestdébranchéetcomplètementfroid.
. essuyerlasemelleetlessurfacesexternesàl'aided'unlingehumidedoux.
. Ajouterdudétergeantdouxdomestique.Nejamaisutiliserdeproduitsnettoyants
abrasifsoupourserviceintensif,devinaigreoudetamponsàrécurerquipeuvent
égratigneroudécolorerlefer.
. Aprèslenettoyage,faireévacuerlavapeursurunvieuxlingepourenlevertousles
résidusdansleséventsàvapeur.
SYSTÈME D'AUTONETTOYAGE AUTO CLEAN
MD
Pourprévenirtouteaccumulationdansleséventsdevapeur,suivezcesinstructions
environunefoisparmois.
. Remplirleferdesortequeleniveaud'eausetrouvebienau-dessousduniveau
maximal(MAX).Brancherlefer.
. Mettezlecadrandesélectiondetissuàetdéposezleferàrepassersursontalon
d'appui.Laissez-lechauffer.
. Mettezlecadrandesélectiondetissuà0,débranchezleferàrepasserettenez-le
au-dessusd'unévieraveclasemelleverslebas.
. MaintenirenfoncéleboutonAUToCLeAN
MD
maissoyez
prudent,carl'eauchaudeetlavapeursortirontdesévents
(L)aprèsquelquessecondes.Continuerdemaintenir
enfoncéleboutonAUToCLeAN
MD
jusqu'àcequelefersoit
vide.Aubesoin,fairebasculerlefersurlescôtésetde
l'avantversl'arrière.
5. Unefoislefervide,relâcherleboutonetlaisserreposerle
fersursontalond'appuietlebrancher.
. Laisserleferchaufferpendantenvironminutesafinde
bienl'assécher.
FRANÇAIS
E
F
G
H
J
K
L