PLEASE READ AND SAVE THESE
IMPORTANT SAFETY INSTRUCTIONS
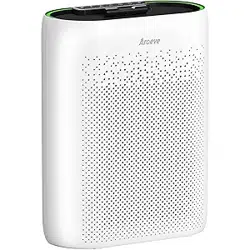
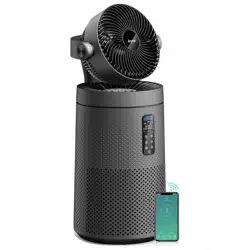
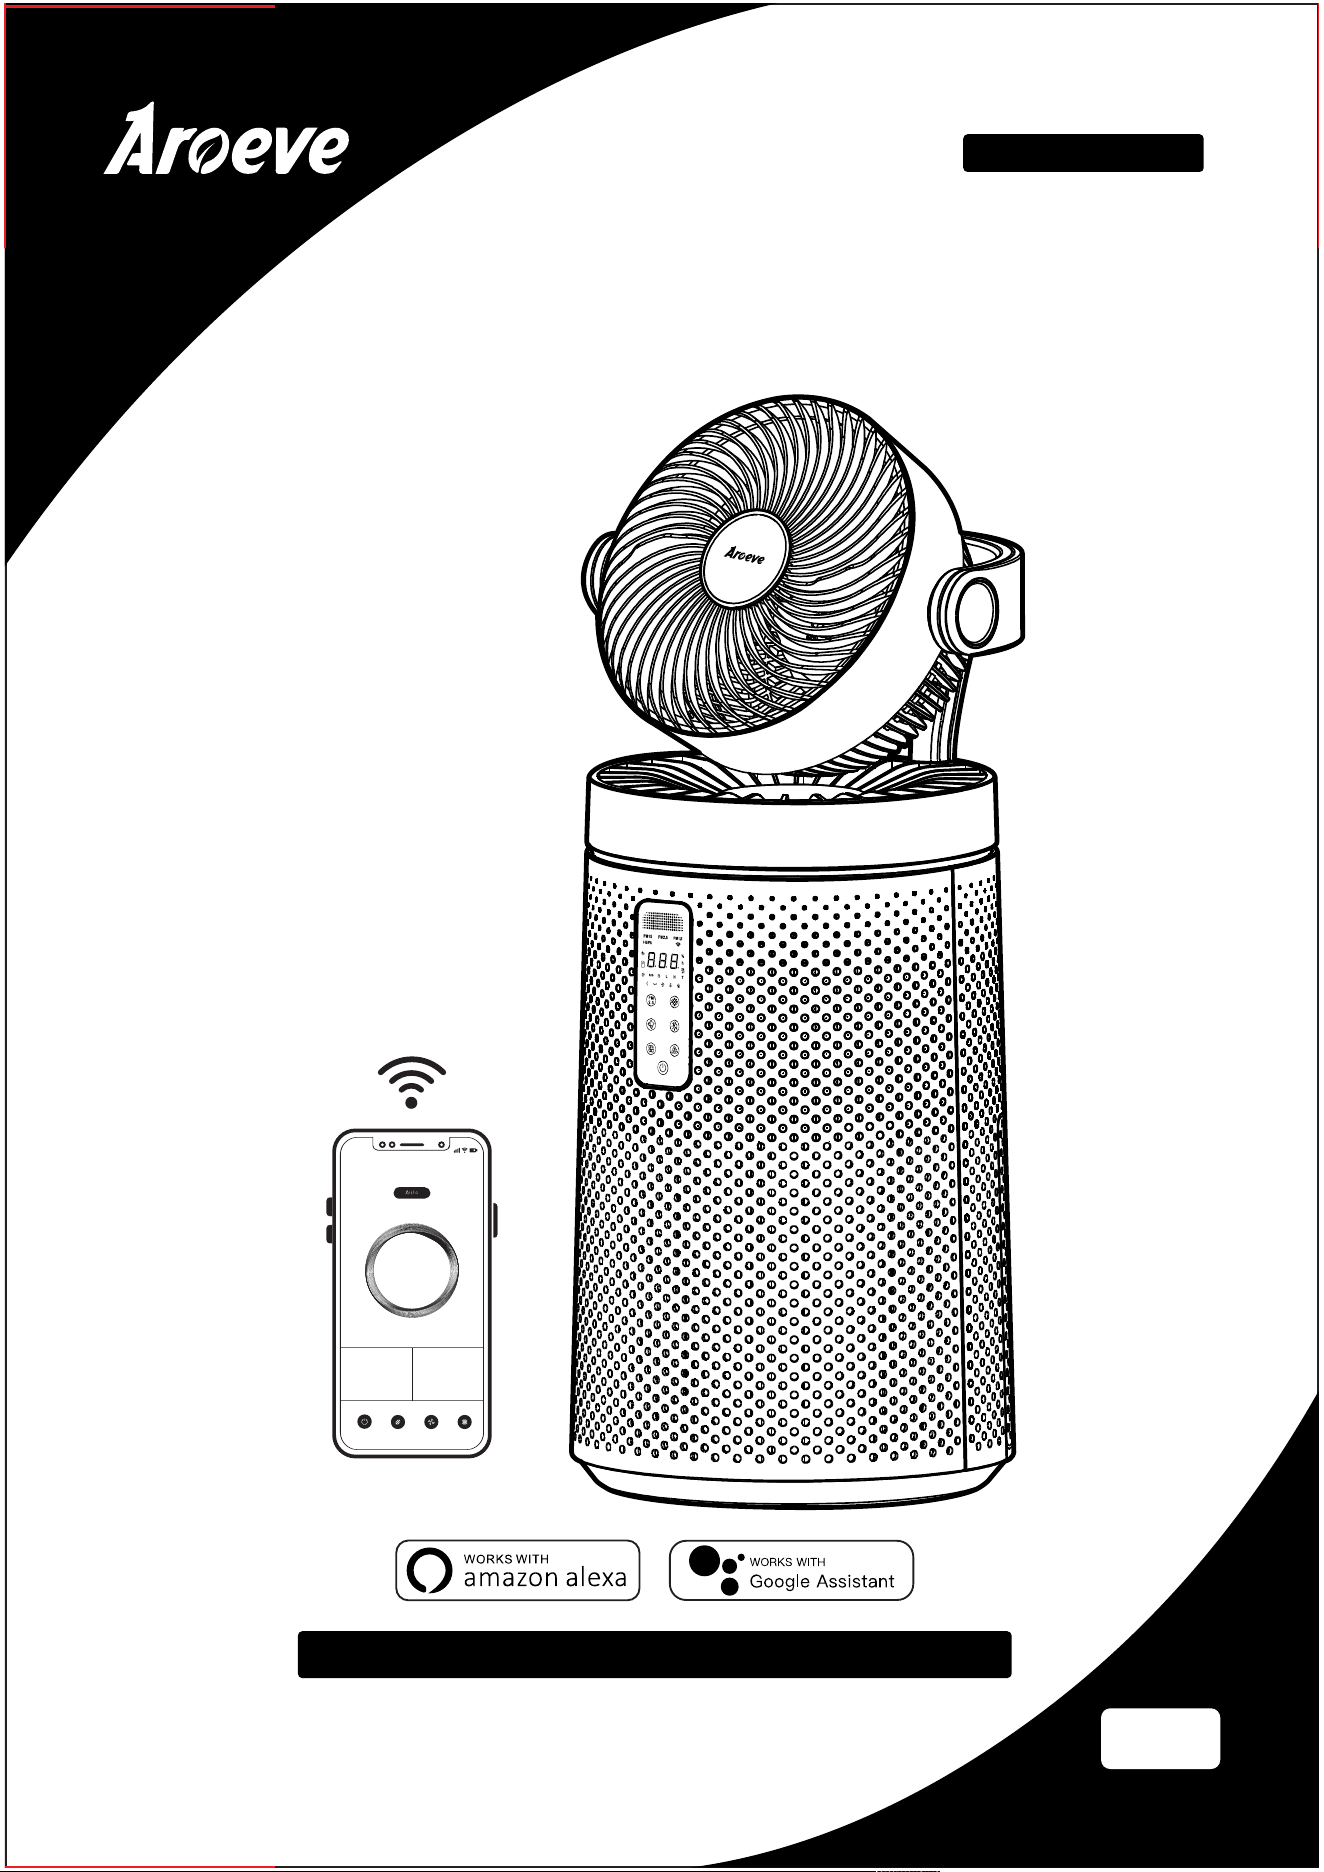
Smart Purifying Fan
User Manual
US
Customer Service: [email protected]
Model: MK08W
06:20
Switch
86°F California City/Mostly clear
MK08W
PM2.5
Indoor Air Quality: Great
Filter remaining 100%
Wind Speed :Low
PM10
26
ug/m³
18
ug/m³
PM1.0
26
Mode Speed Seing
CONTENTS
SAFETY INSTRUCTIONS
Important
Please read and comply with all of the instructions and warnings provided in this manual
before using the product. Failure to comply with the instructions and warnings provided
herein may result in inaccurate results or damage to the product itself.
01. Ensure the plug fits properly into a polarized power outlet.
02. This appliance should only be used in room with temperatures between 40°F and 95°F.
03. To avoid fire or shock hazard, connect the purifier into correct electrical outlet.
04. NEVER place on a soft surface such as a bed or sofa as this could cause the unit to tip over
and the air inlet or outlet grills to be blocked.
05. Do not place anything on top of unit.
06. Do not move or tilt the unit while it is in operation.
07. Do not insert fingers or objects into the air inlet and air outlet.
08. Do not use outdoors.This unit is only suitable for indoor use, please avoid strong sunlight
and rain.
09. Do not use near water to avoid electrical hazards.
10. Do not use the unit in wet or humid environments.
11. Do not handle the unit with wet hands.Thoroughly dry your hands before handling any
part of the air purifier.
12. Do not place the unit directly below an air conditioner to prevent any moisture from
getting in to the purifier.
13. Do not allow children,pet to play on or near the unit. Close supervision is necessary when
any appliance is used by or near children, or disabled persons.
14. Keep unit away from heated surfaces and naked flames such as stove tops,ovens, raditors
or computers.
15. Always turn the purifier off before unplugging it.
16. Always unplug the air purifier before moving or cleaning the unit, opening the rear cover,
changing the filter and whenever the unit is not in use.
17. To disconnect the unit, be sure to pull the plug instead of the cord.
18. This unit does not remove carbon monoxide or radon.It can not be used as a safety device
to prevent or clean up accidents with combustion processes and hazardous chemicals.
SAFETY INSTRUCTIONS
SPECIFICATION
GETTING TO KNOW YOUR AIR PURIFIER
GETTING STARTED
APP SETUP
SMART LIFE APP TROUBLESHOOTING
CONTROL AND DISPLAY
HOW TO USE AROMATHERAPY FUNCTION
CLEANING OF COMPLETE MACHINE
REMOVAL AND CLEANING OF CIRCULATING FAN
DISASSEMBLY AND CLEANING OF SCREEN
TROUBLESHOOTING
WARRANTY
1 - 2
2
3
4
5 - 7
7 -
9 - 12
13
13
13
14 - 15
15 - 16
16

1
SAFETY INSTRUCTIONS
19. NEVER use detergents,gasoline,glass purifier,furniture polish,paint thinner,or other
household solvents to clean any part of the purifier.
20. Non-professional personnel or unauthorized repair personnel shall not repair or transform
the machine by themselves.
21. Do not operate the appliance with a damaged cord or plug. If the motor fan fails to
operate or the unit has been dropped or damaged in any manner, contact the customer
service.
22. Always allow 15 inches of clearance on all sides of the purifier.
23. This product complies with the maximum allowable concentration of ozone of 0.050 parts
per million by volume (ppmv) in a 24-h period.
24. This product employs overload protection (fuse). A blown fuse indicates an overload or
short-circuit situation. If the fuse blows, unplug the product from the outlet. Replace the
fuse as per the user servicing instructions (follow product marking for proper fuse rating)
and check the product. If the replacement fuse blows, a short-circuit may be present and
the product should be discarded or returned to an authorized service facility for
examination and/or repair.
25. Do not operate any fan with a damaged cord or plug. Discard fan or return to an
authorized service facility for examination and/or repair.
26. Do not run cord under carpeting. Do not cover cord with throw rugs, runners, or similar
coverings. Do not route cord under furniture or appliances. Arrange cord away from trac
area and where it will not be tripped over.
27. Risk of fire. Do not replace attachment plug. Contains a safety device (fuse, AFCI, LCDI) that
should not be removed. Discard product if the attachment plug is damaged.
28. The appliance is not to be used by persons (including children) with reduced physical,
sensory or mental capabilities, or lack of experience and knowledge, unless they have been
given supervision or instruction.
Children being supervised not to play with the appliance.
Warn the user to unplug or disconnect the appliance from the power supply before servicing.
a) Include instructions pertaining to a risk of fire, electric shock, or injury to persons, for
cleaning and user-maintenance, such as lubrication; and
b) Warn the user to unplug or disconnect the appliance from the power supply before
servicing.
To Reduce The Risk Of Fire, Electric Shock Or Injury To Persons, Do Not Use
Replacement Parts That Have Not Been Recommended By The Manufacturer (e.g. Parts
Made At Home Using A 3D Printer).
To reduce the risk of electric shock, this equipment has a polarized plug (one blade is wider
than the other). This plug will fit in a polarized outlet only one way. If the plug does not fit fully
in the outlet, reverse the plug. If it still does not fit, contact qualified personnel to install the
proper outlet. Do not alter the plug in any way .
Warning: Any changes or modifications to this unit not expressly approved by the party
responsible for compliance could void the user's authority to operate the equipment.
This device complies with part 15 of the FCC Rules. Operation is subject to the following two
conditions: (1) This device may not cause harmful interference, and (2) this device must
accept any interference received, including interference that may cause undesired operation.
2
SAFETY INSTRUCTIONS
This appliance has a polarized plug (one blade is wider than the other). To reduce the risk of
electric shock, this plug is intended to fit in a polarized outlet only one way. If the plug does
not fit fully in the outlet, reverse the plug. If it still does not fit, contact a qualified electrician.
Do not attempt to defeat this safety feature
WARNING To Reduce The Risk Of Fire Or Electric Shock, Do Not Use This Fan With Any
Solid-State Speed Control Device.
NOTE: This equipment has been tested and found to comply with the limits for a Class B
digital device, pursuant to part 15 of the FCC Rules. These limits are designed to provide
reasonable protection against harmful interference in a residential installation. This equip-
ment generates, uses and can radiate radio frequency energy and, if not installed and used
in accordance with the instructions, may cause harmful interference to radio communica-
tions. However, there is no guarantee that interference will not occur in a particular installa-
tion. If this equipment does cause harmful interference to radio or television reception, which
can be determined by turning the equipment off and on, the user is encouraged to try to
correct the interference by one or more of the following measures:
—Reorient or relocate the receiving antenna.
—Increase the separation between the equipment and receiver.
—Connect the equipment into an outlet on a circuit different from that to which the receiver
is connected.
—Consult the dealer or an experienced radio/TV technician for help.
SPECIFICATION
Name Smart Purifying Fan
Rated Voltage : 120V~
Rated Current : 0.68A
Rated Frequency : 60Hz
Rated Power : 53W
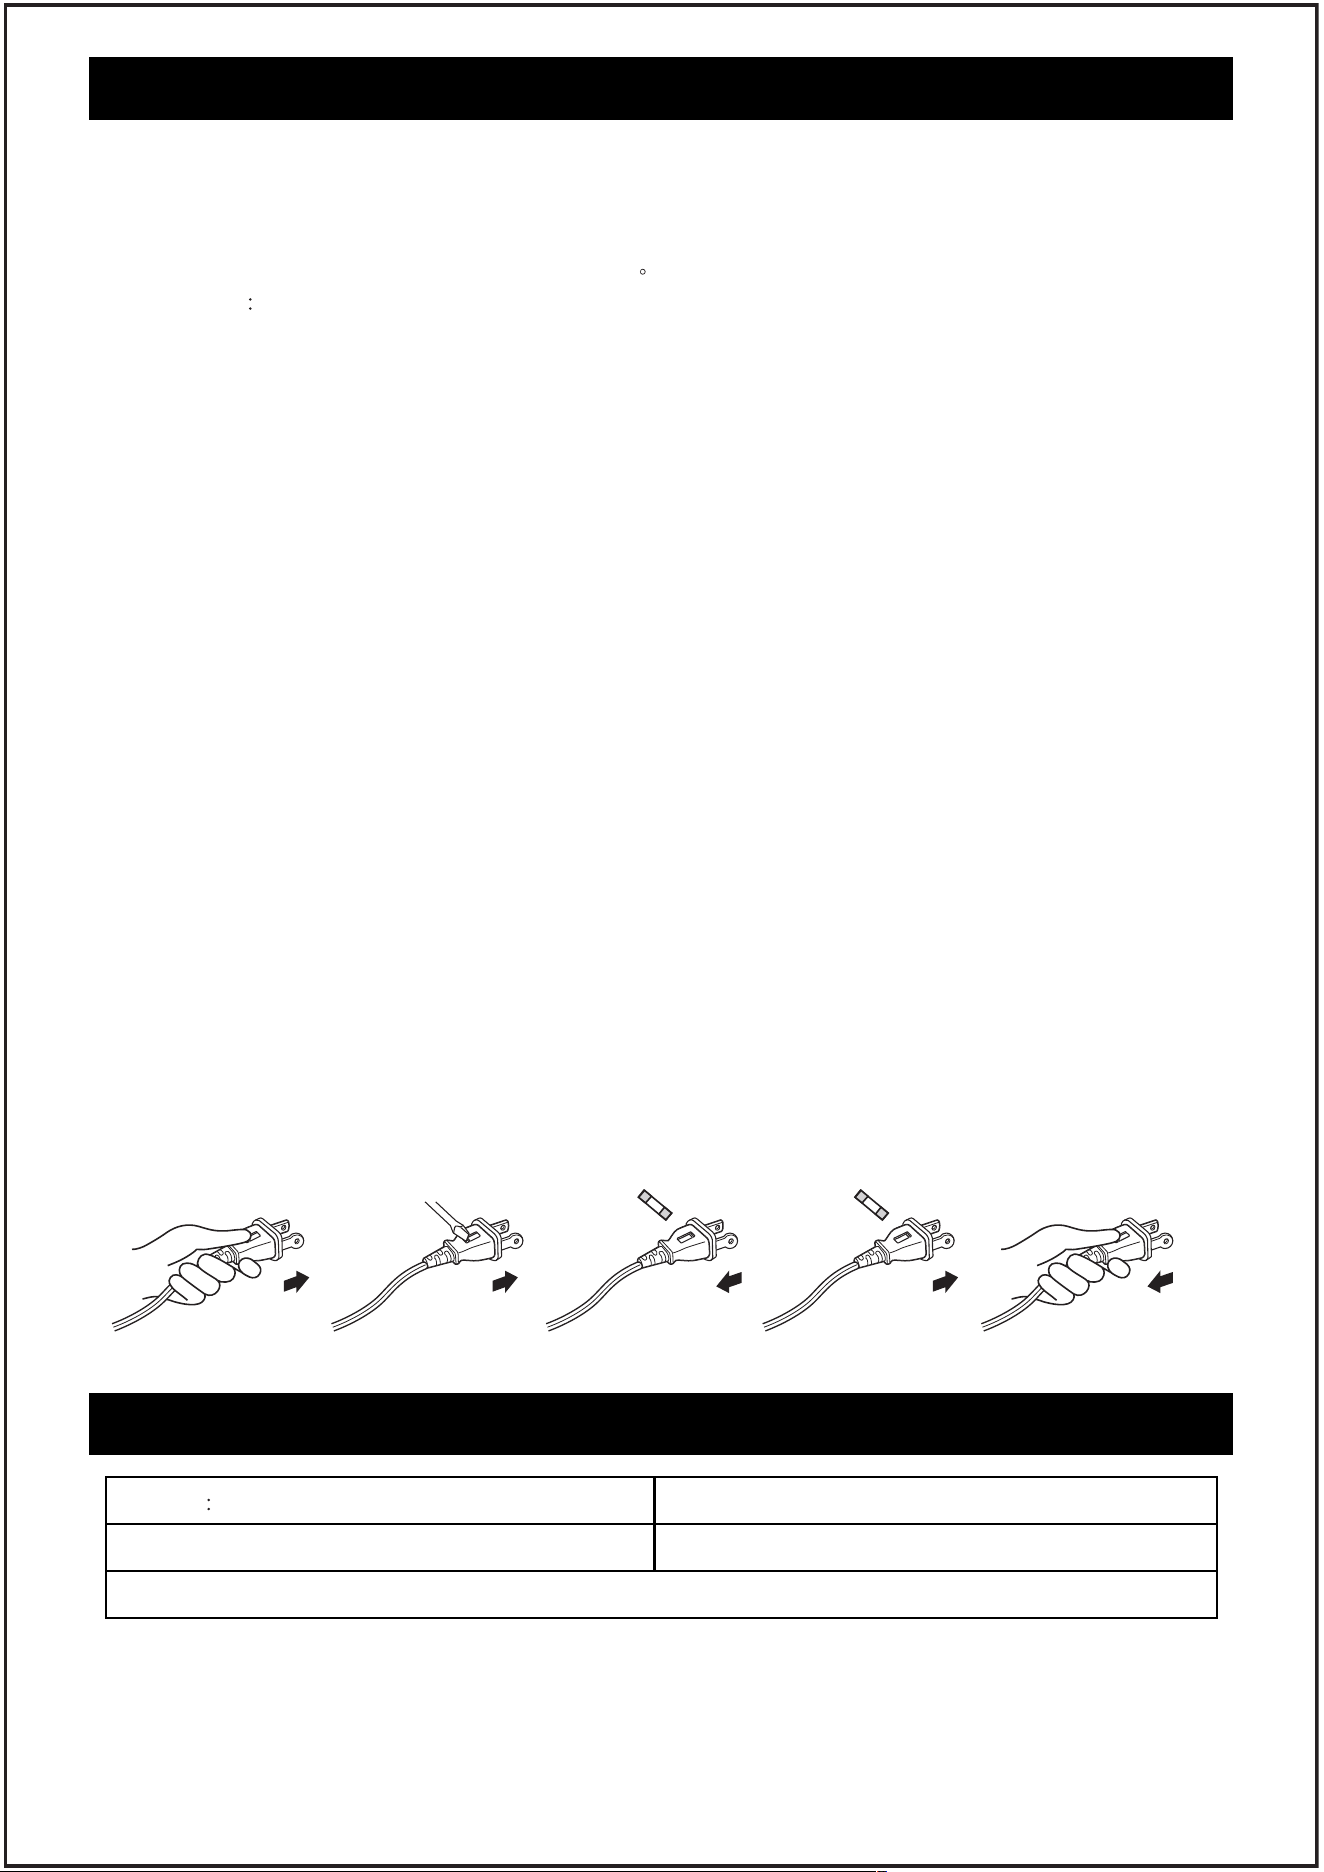
“User Servicing Instructions.”
a) Grasp plug and remove from thereceptacle or other outlet device, Do not unplug by
pulling on cord.
b) Open the fuse by sliding the fuse cover on the top of the plug towards the blades.
c) Remove fuse carefully by gently prying out the ends of the fuse from the receptacle.
d) Risk of fire, Replace the fuse only with 2.5 Amp, 125 Volt fuse. Gently install replacement
fuse back into the pins that will hold it in place.
e) Close fuse cover by sliding the fuse cover back over the fuse box in the plug until it is
completely closed.
f) Plug the fan back in and resume use.
a b c d e
P
L
E
A
S
E
R
E
A
D
A
N
D
S
A
V
E
T
H
E
S
E
I
M
P
O
R
T
A
N
T
S
A
F
E
T
Y
I
N
S
T
R
U
C
T
I
O
N
S
A
i
r
P
u
r
i
fi
e
r
U
s
e
r
M
a
n
u
a
l
U
S
C
u
s
t
o
m
e
r
S
e
r
v
i
c
e
:
s
up
po
r
t
@
a
r
o
e
v
e
.
c
o
m
M
o
d
e
l
:
M
K
0
8
W
0
6
:
2
0
S
w
i
t
c
h
8
6
°
F
C
a
li
f
o
r
n
i
a
C
i
t
y
/
M
o
s
t
l
y
c
le
a
r
M
K
0
4
W
P
M
2
.
5
In
d
o
o
r
A
ir
Q
u
a
li
ty
:
G
o
o
d
F
il
t
e
r
re
m
a
i
n
in
g
1
0
0
%
W
i
n
d
S
p
e
e
d
:L
o
w
3
M
o
d
e
S
p
e
e
d
S
e
i
n
g
3
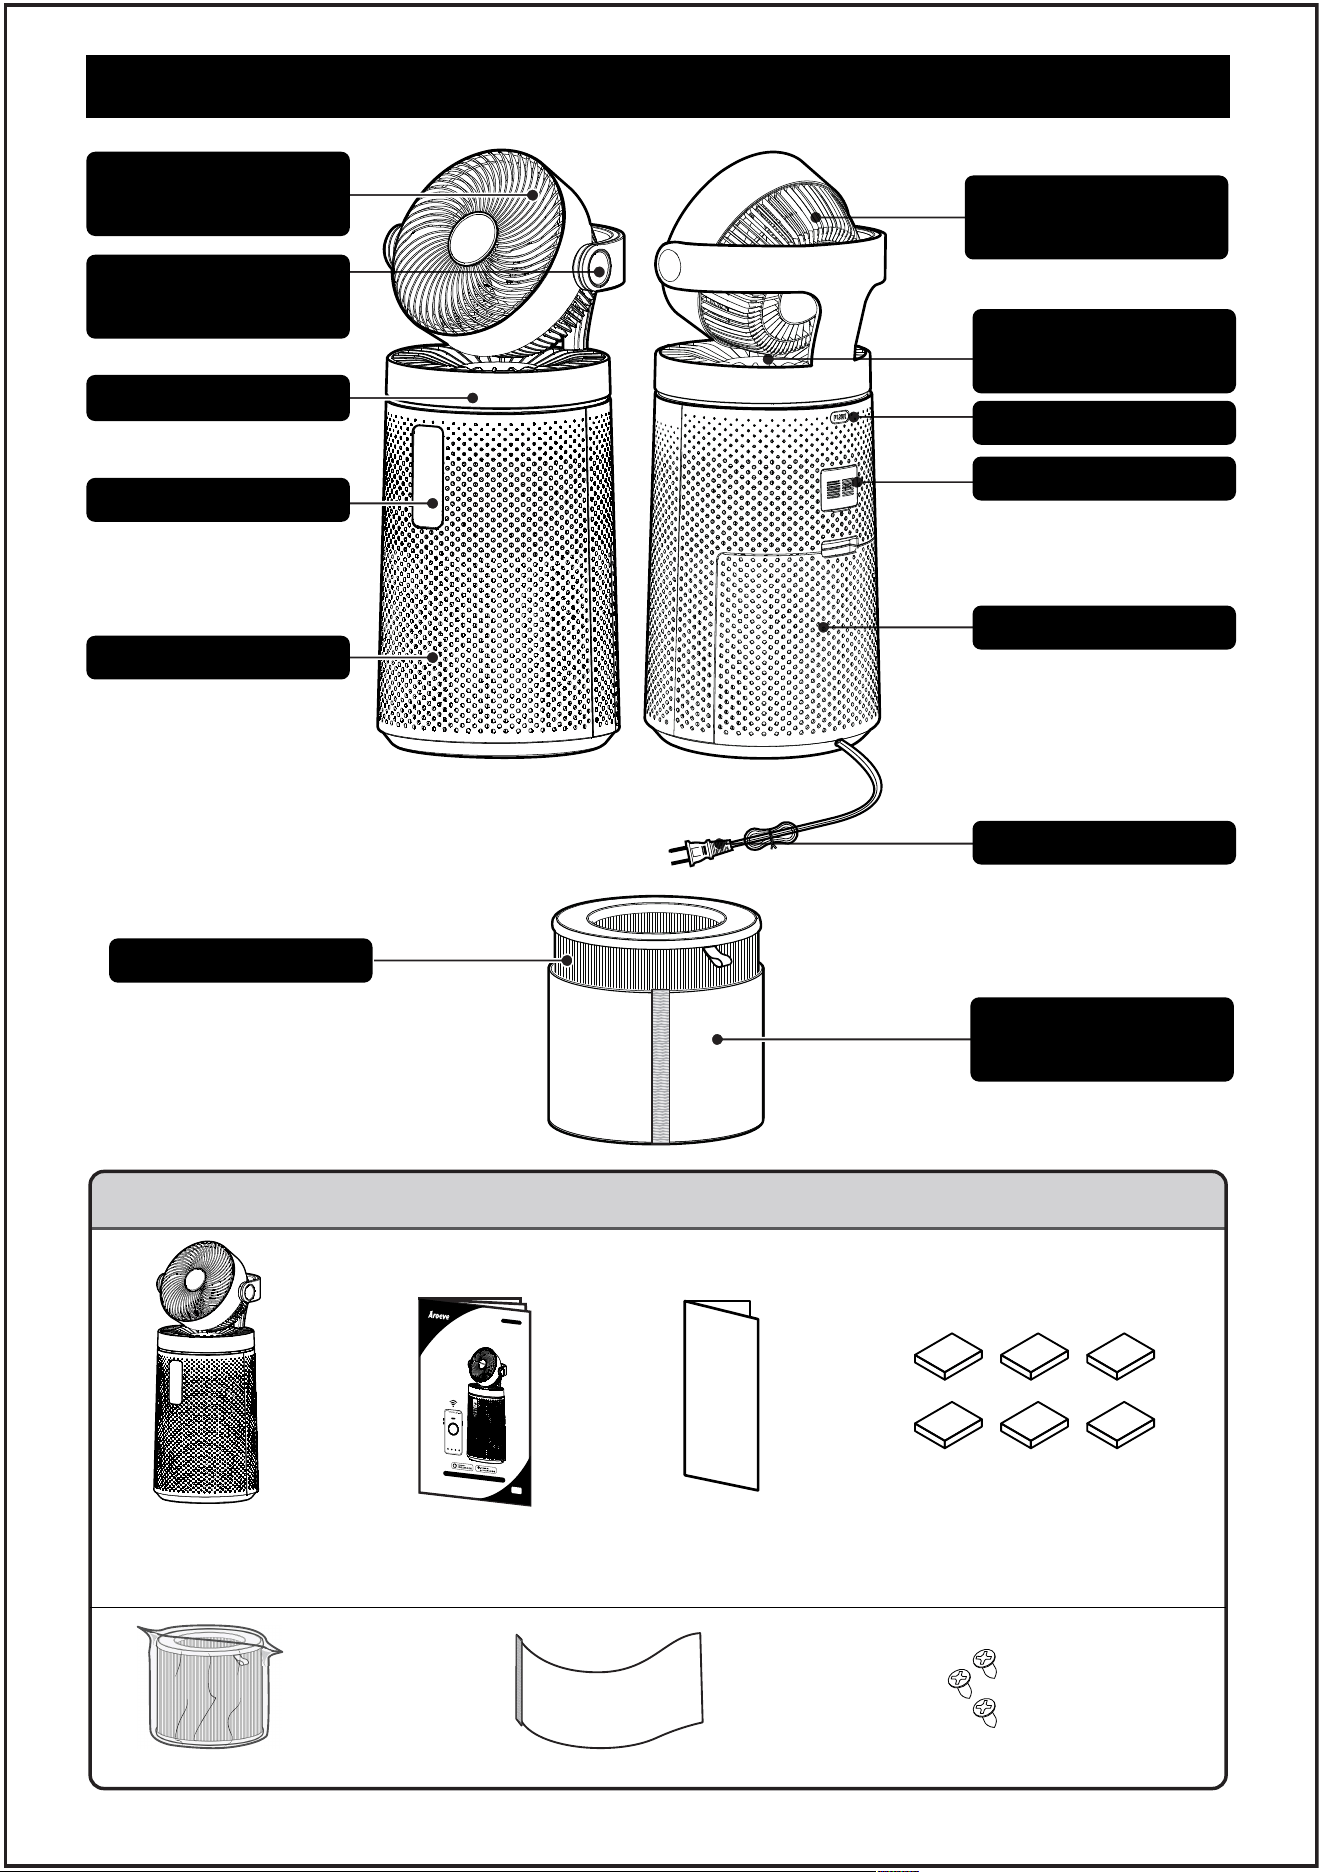
GETTING TO KNOW YOUR AIR PURIFIER
Circulation fan
intake grille
Up and down
oscillation knob
Air purifier
outlet grille
Essential oil box
Laser Sensor
Filter Cover
Power Cord
Air Filter
Circulation fan
out the air grille
Rotating base
Control Panel
Air purifier intake
Washable primary
filter screen
PACKAGE CONTENTS
1 X
Smart Purifying fan
1 X
Original Filter
(Pre-Installed)
1 X
User Manual
1 X
app download
and installation
guide
1 X
Washable
primary filter
screen
1 X
Original essential oil
pads (Complimentary
5 pads)
3 X
Circulating fan
replacement
screw
1
3
4
2
4
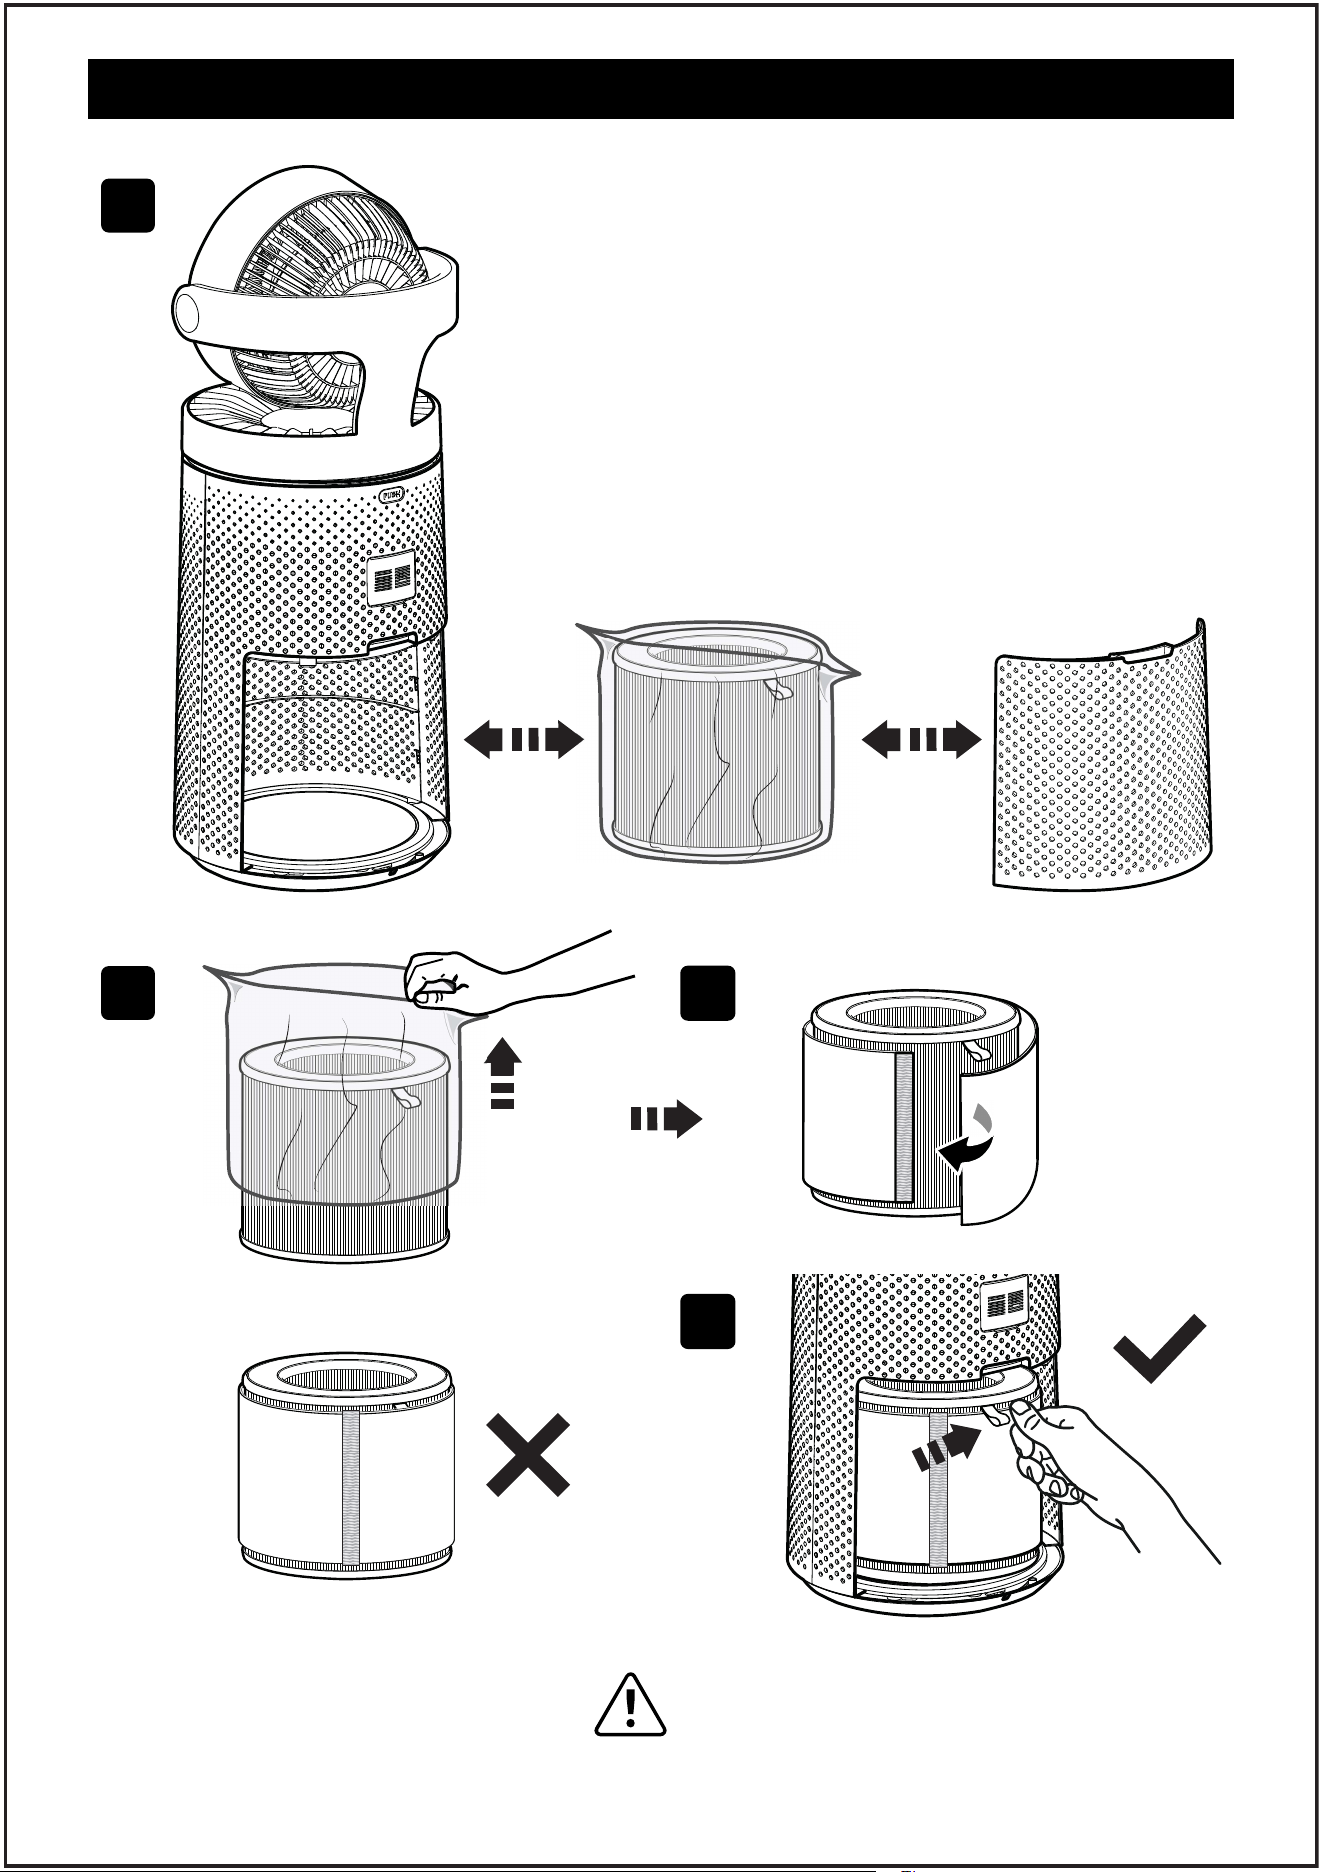
GETTING STARTED
Your air purifier comes with an original filter included.
Before use, do remember to remove the packaging
from the filter.
1. Place the air purifier on a flat, stable surface like the
floor. Open and remove the air intake grille on the
back of the machine. (See picture 1)
2. Tear open the filter bag and remove the HEPA filters.
(See picture 2)
3. Find the water wash strainer in the packing box and
assemble it according to this figure(See picture 3)
4. Combine the filters and insert them into the machine.
Close the grill to use. (See picture 4)
NOTE:
Ensure that the filter (the side with
the ribbon handle) is facing outward when
installing the filter.
5
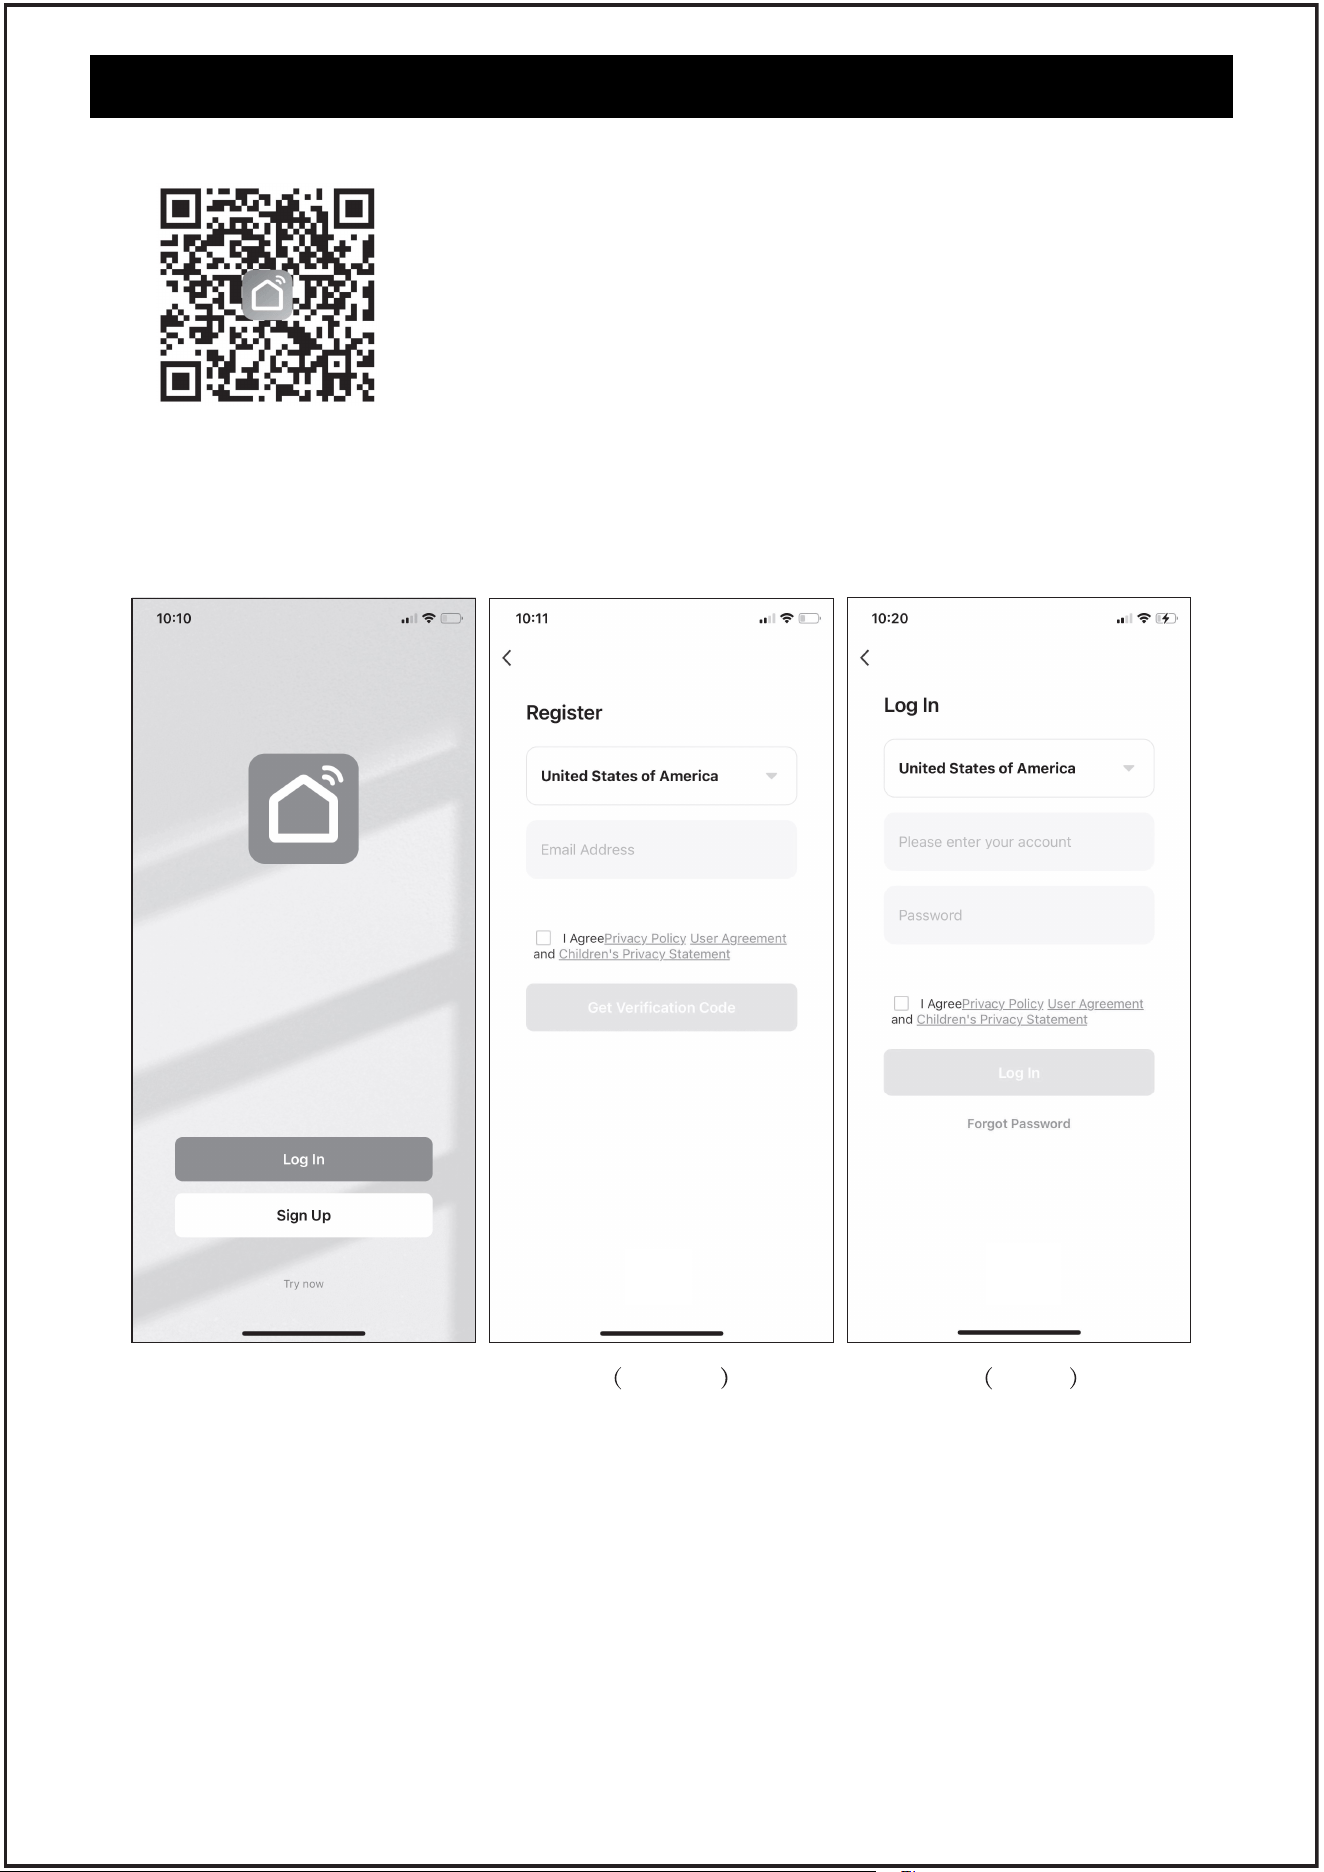
APP SETUP
1. Download Smart Life APP
2. Open the Smart Life Smart app. Log In or Sign Up.
To download the Smart Life Smart app, scan the QR code or search “Smart Life” in the
Apple App Store® or Google Play Store.
3. Ensure that the phone is connected to Wi-Fi, open the APP interface,
and enable the Wi-Fi pairing function of the product at the same time
(please refer to page 6 for product Wi-Fi pairing). Follow the following
steps for product pairing.
Sign Up Log In
6
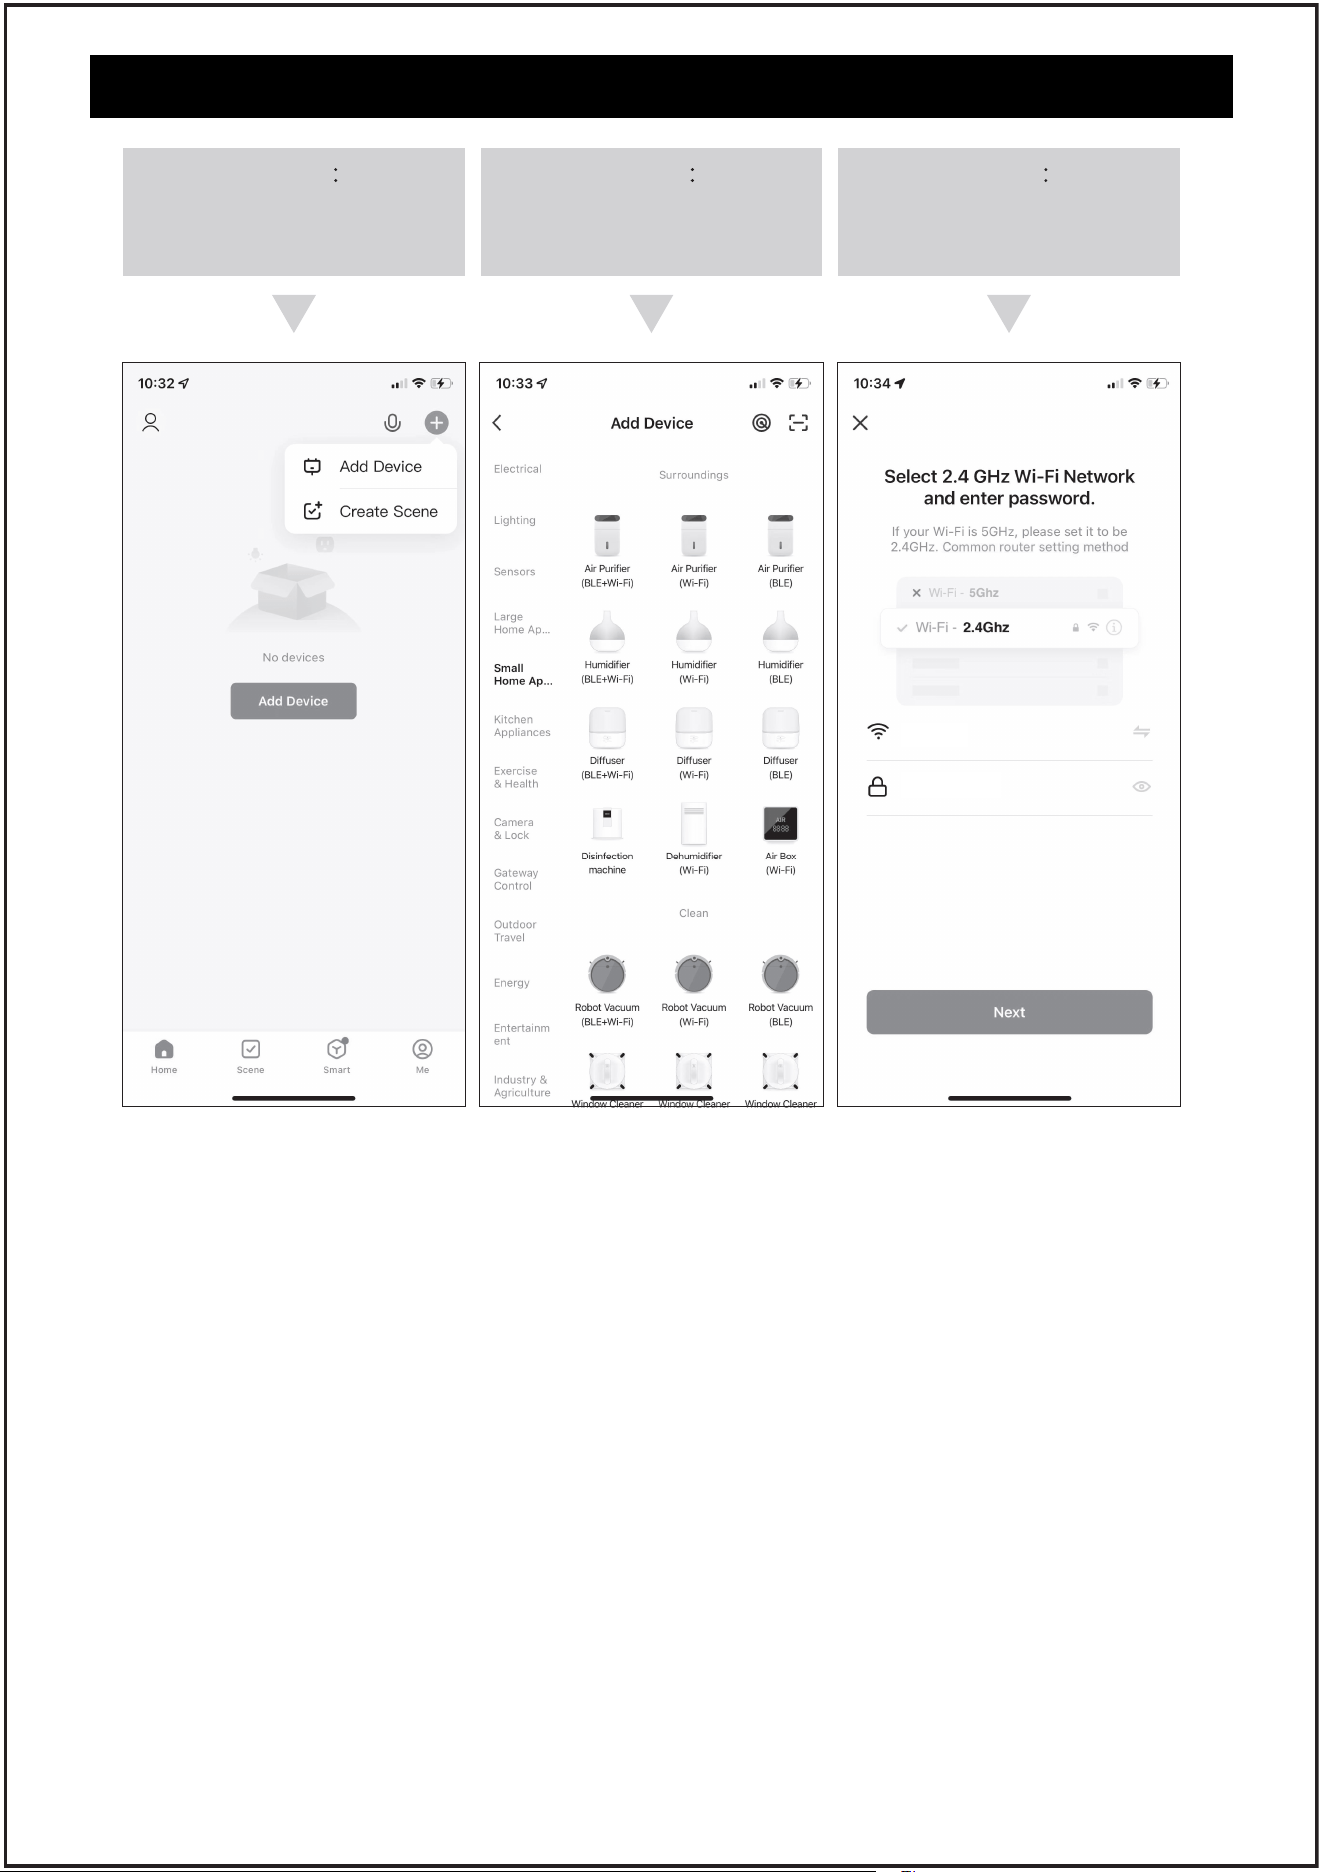
APP SETUP
Step 1
click “+”to Add Device
Step 3
Enter your Wi-Fi password
and click “Next”
SETUP TIPS:
Use this button to put your unit into Discovery Mode. Press and hold the Wi-Fi button for
3 seconds until the Wi-Fi symbol starts to flash.
WI-FI INSTRUCTIONS
1. Ensure that you are connected to a secure 2.4GHz Wi-Fi network during setup. Do not
use a 5GHz network as it will not pair successfully.
2. Complete pairing within 3 minutes. If the network distribution fails within this time,
the Wi-Fi indicator light will go out. To restart, press and hold the Wi-Fi button for 3
seconds.
3. While connected to Wi-Fi, press and hold the Wi-Fi button for 3 seconds to reset the
Wi-Fi connection. At this point, the device will enter pairing mode and need to be
re-paired.
4. In pairing mode, after a power outage, the Wi-Fi pairing mode is disabled. To re-enter
pairing mode, press the WIFI button for 3 seconds. The Wi-Fi indicator light will turn
on again.
Step 2
Manual Add Device, click
“Air Purifier(Wi-Fi)”
SMART LIFE APP TROUBLESHOOTING
My smart air purifier isn't connecting to the Smart Life app.
1. During the setup process, you must be on a secure 2.4GHz Wi-Fi network. (Please do not
use the 5G network, otherwise, the pairing cannot be successful.)
2. Confirm that the network is working correctly.
3. Make sure the Wi-Fi password you entered is correct.
TIPS
There should be no spaces at the beginning or end of the password.
Test the password by connecting a different electronic device to the router.
If you're manually typing in the SSID and password, double check that both are entered
correctly.
7
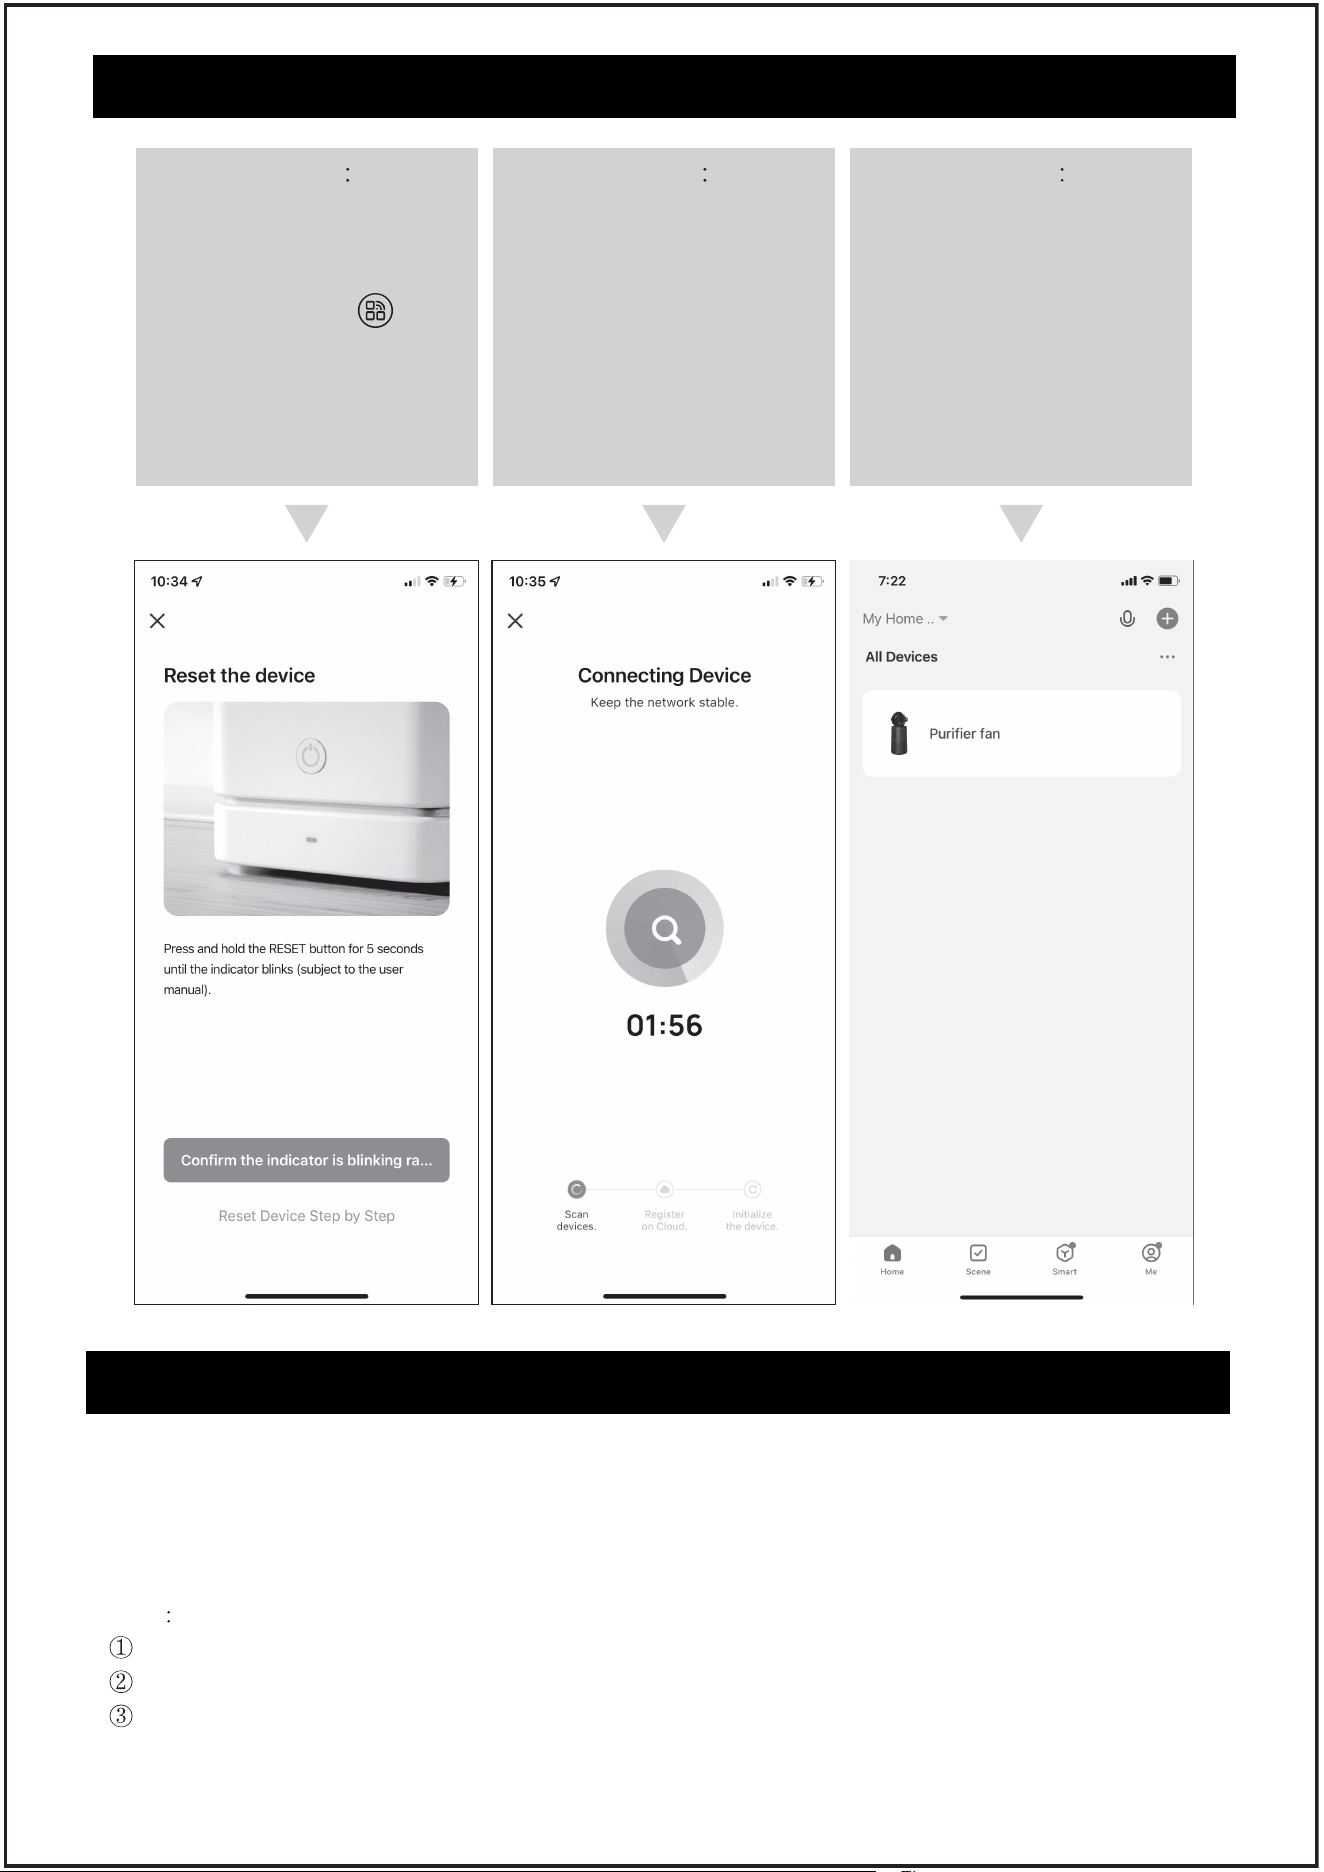
APP SETUP
Step 4
To confirm that the product
is powered on, please follow
the operation instructions,
and long press “ ” to
enable Wi-Fi matching, and
ensure that the Wi-Fi
indicator blinks.
(Choose the Blink Slowly)
Step 5
Open the search product,
enter the matching
moment
Step 6
The pairing is successful,
and the operation mode of
the smart APP is enabled

8
SMART LIFE APP TROUBLESHOOTING
4. Try moving your air purifier closer to the router.Your phone should be as close as possible
to your air purifier.
5. Your router may need to be at a higher location, away from obstructions.
6. Make sure your air purifier and router are away from appliances (such as microwave ovens,
refrigerators, electronic devices, etc.) to avoid signal interference.
7. If you're using a VPN, make sure it's turned off while setting up your air purifier.
8. Disable portal authentication for your Wi-Fi network.
NOTE
If portal authentication is enabled, the air purifier will not be able to access your Wi-Fi
network, and setup will fail.
My air purifier is oine.
1. Make sure the air purifier is plugged in and has power, then refresh the Smart Life menu
by swiping down on the screen.
2. Make sure your router is connected to the internet and your phone's network connection
is working.
3. Delete the oine air purifier from the Smart Life app. Long press and click Delete.
Reconfigure the air purifier with the Smart Life app.
NOTE:
Power outages, internet outages, or changing Wi-Fi routers will cause the air purifier to go
oine.
9
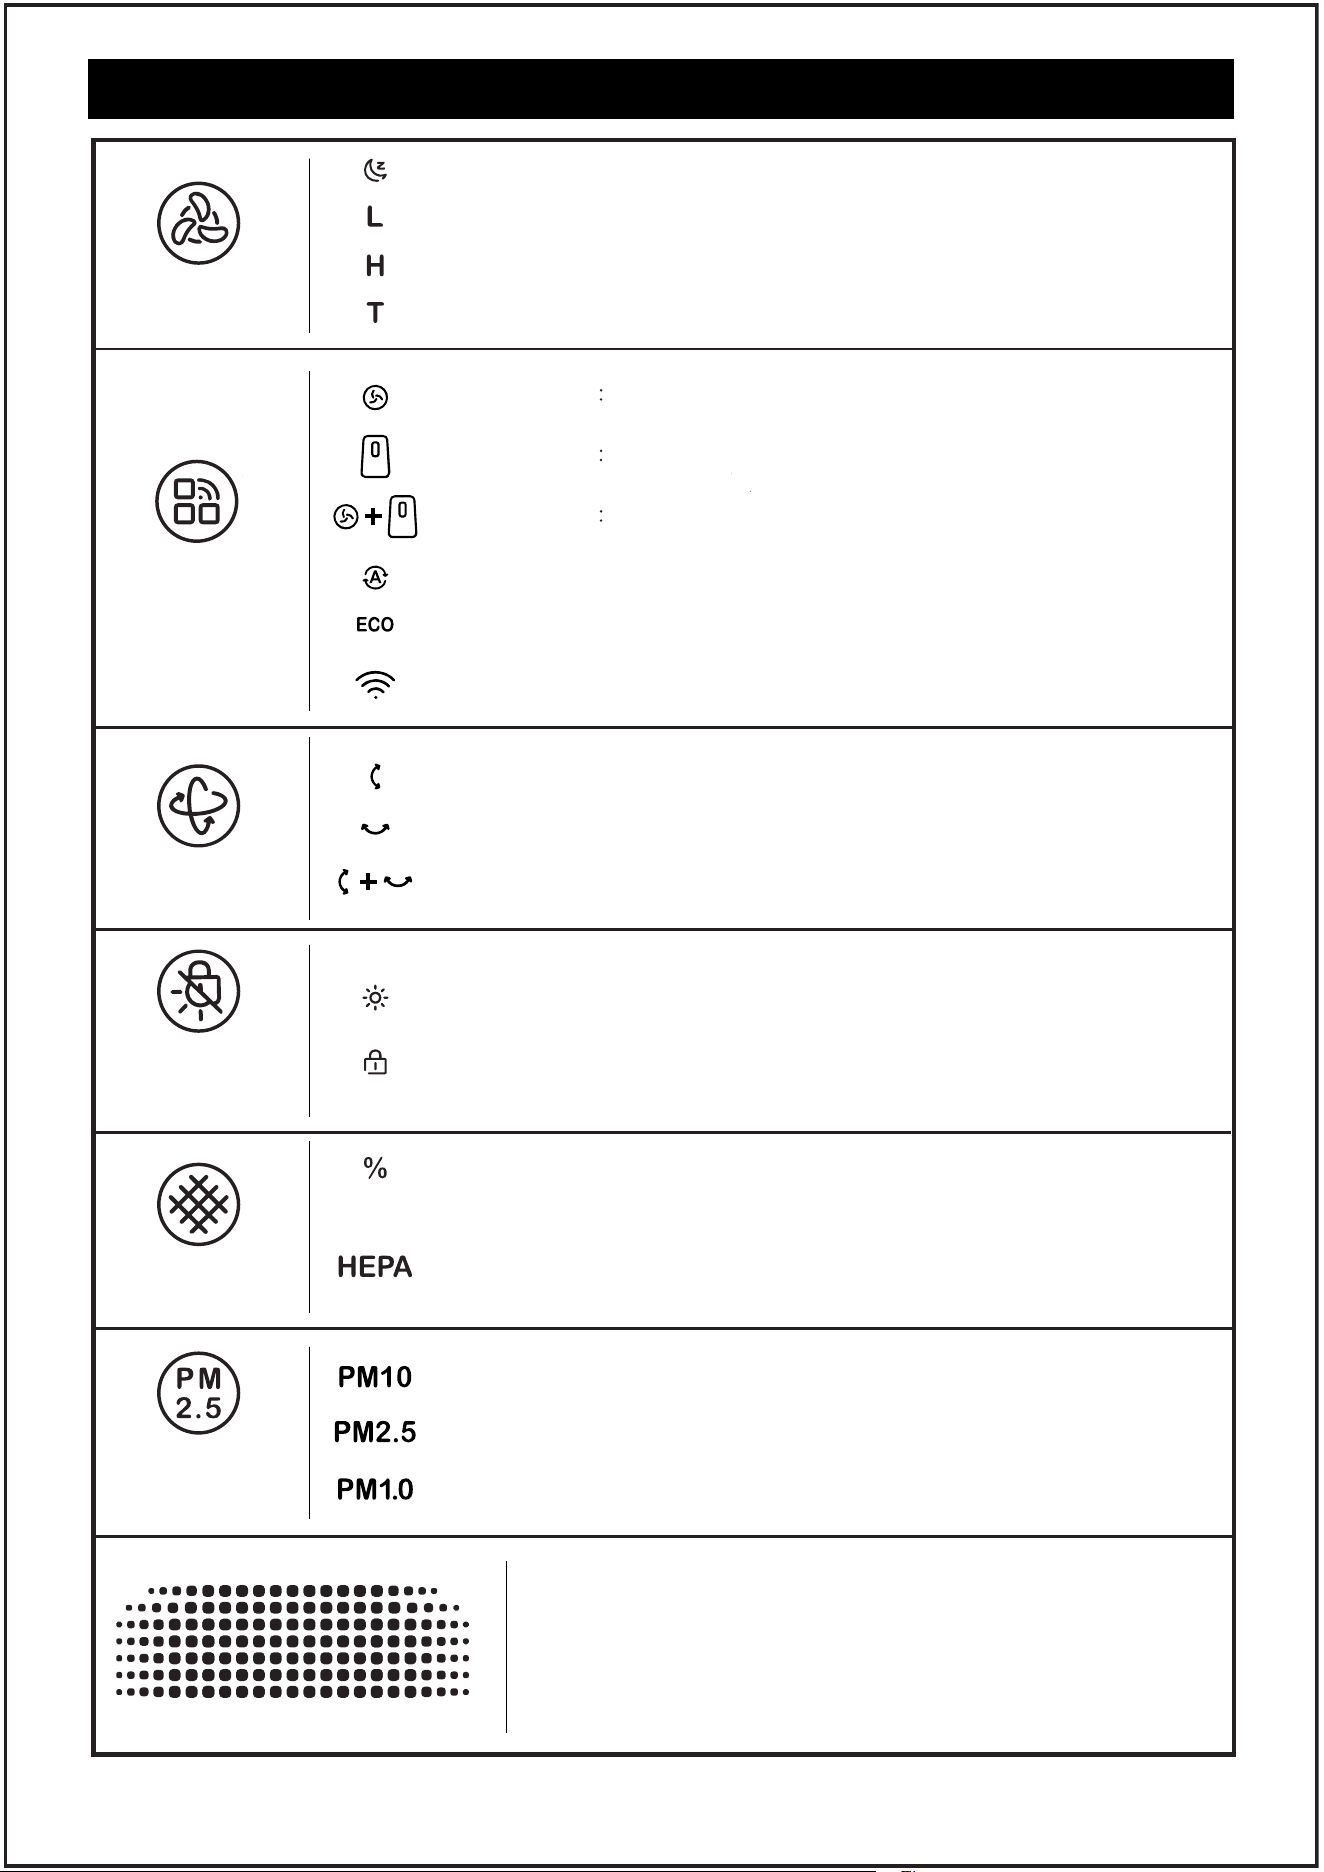
CONTROL AND DISPLAY
Speed Button
Mode&WIFI
Button
OSC Button
Light/Lock
Button
Filter Button
Air Info
Button
Sleep wind speed indicator
Manual gear Fan mode indicator
Manual gear Air purifier indicator
Manual gear Purifying fan indicator light
Automatic gear: Auto mode indicator
Automatic gear: Eco mode indicator
Left-right oscillation indicator
Up-down oscillation indicator
3D oscillation indicator
Atmosphere indicator light
The remaining life of the filter is displayed
If the indicator light starts blinking, it means that the filter needs
to be replaced. After replacing the filter, press and hold the
button for 3 seconds to reset.
WI-FI indicator (Press for 3s to turn on)
Low wind speed indicator
High wind speed indicator
Turbo wind speed indicator (App wake-up only)
Child lock indicator (Press for 3s to turn on)
The quantity of PM10 particles can be queried
Air quality display light
Air quality can be displayed in real time, and four colors
represent four states.
The quantity of PM2.5 particles can be queried
The quantity of PM1.0 particles can be queried
10
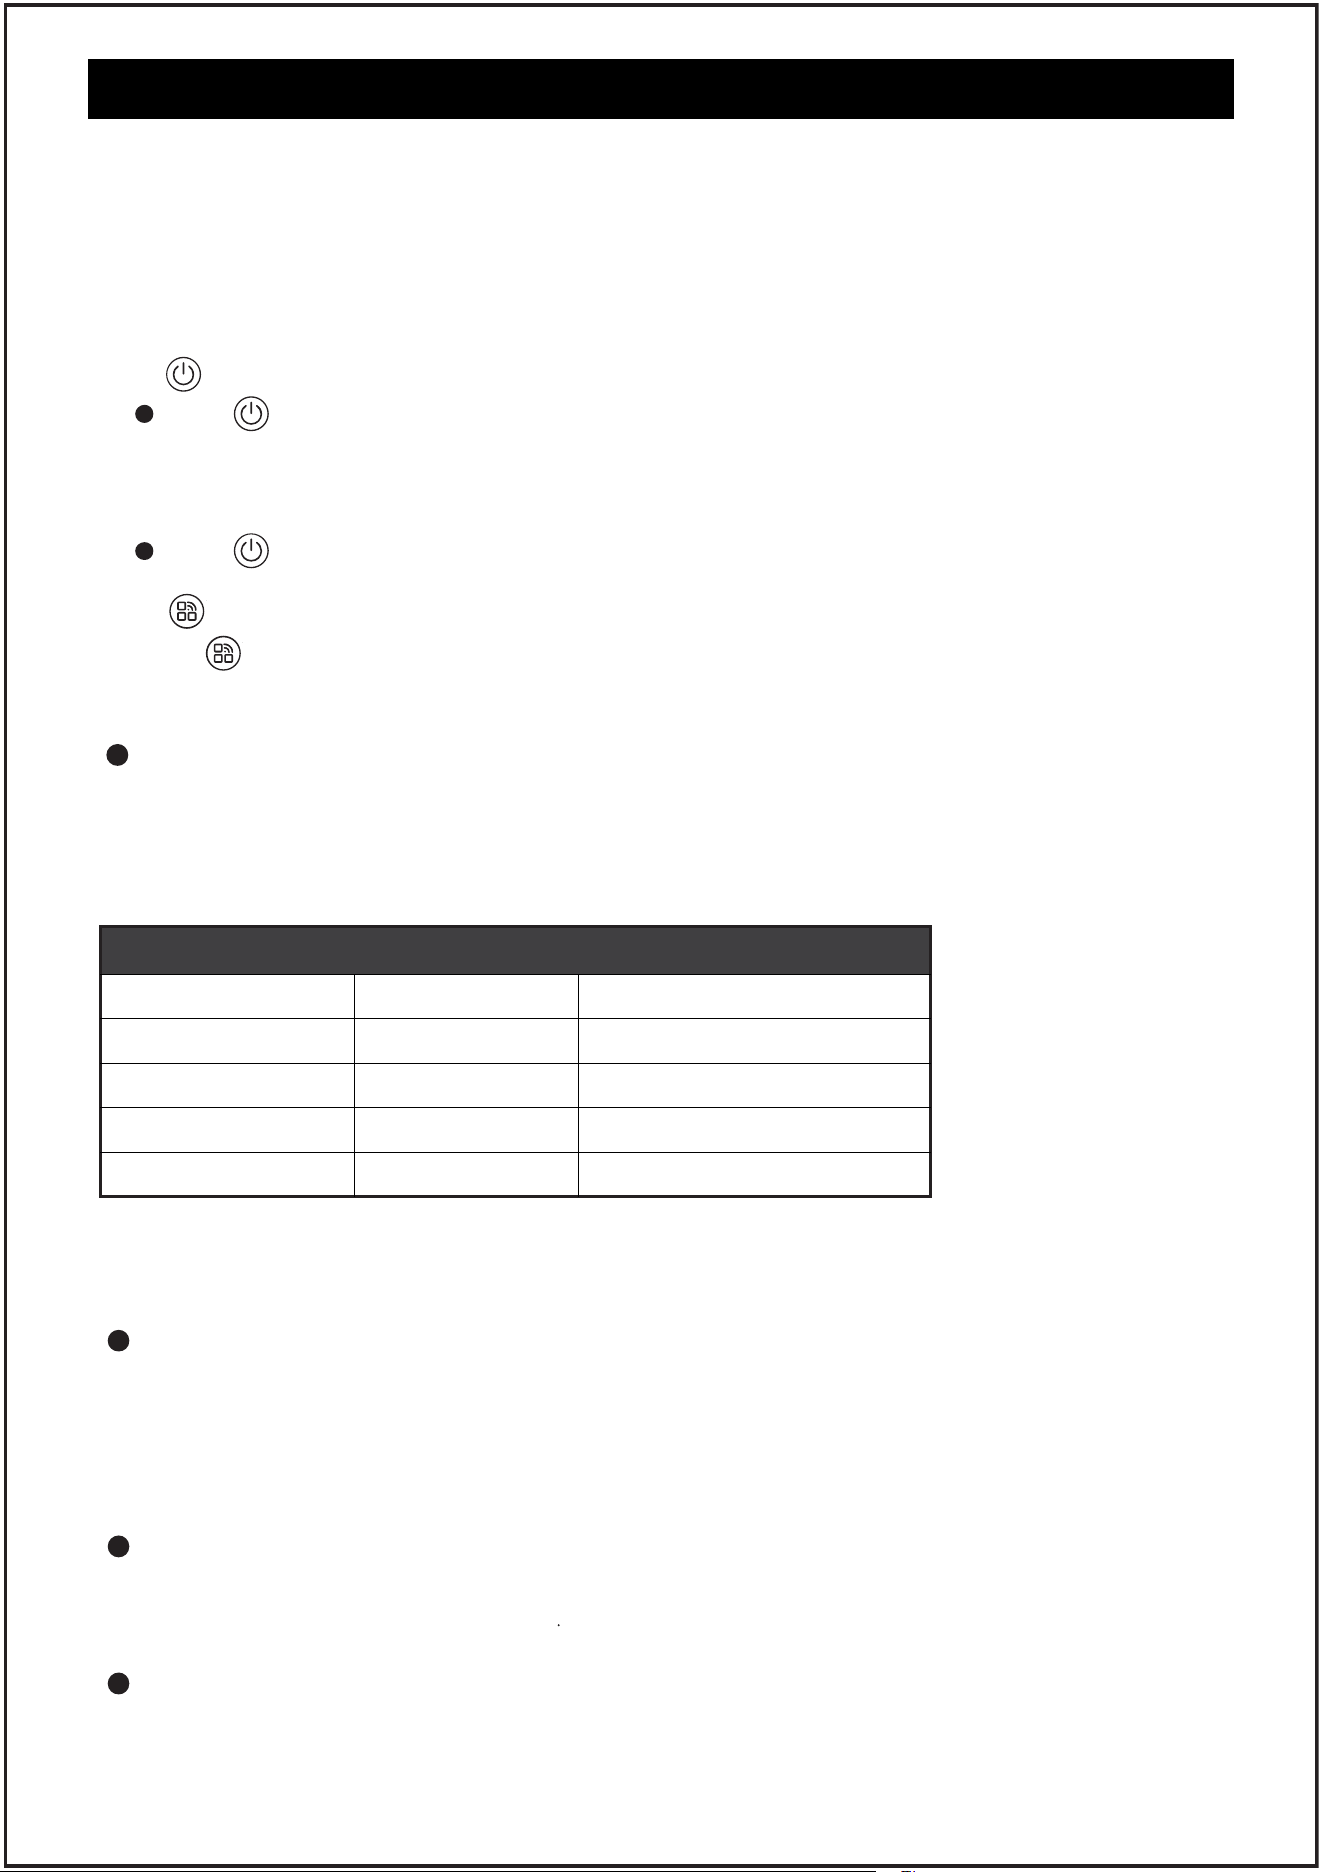
1. " " ON/OFF Buon
Tap " " to turn on the purifier. The fan will start working in automatic mode, and
the 3D shake head function will be enabled. At this point, the sensor begins to identify
the surrounding air quality, and the corresponding air quality will be displayed on the
screen.
Tap " " again to turn off the purifier.
2. " " Mode Button
Tap " " to switch between auto mode.ECO mode.fan mode.purifier mode and
purifying fan mode.Hold down for 3 seconds to enable wifi pairing.
About Auto mode
Auto mode uses a smart laser dust sensor to adjust fan speed automatically based on air
quality.
For example, if the air quality is bad, the fan will automatically set to a turbo speed. See
the figure below for details.
NOTE:
1. Install the filter as required, and connect it to the power supply
2. When the product is powered on for the first time, the PM2.5 sensor in the machine will
wake up, and the corresponding display light will also turn on synchronously. After the
preheating is completed, the prompt sound of "drip" will be heard before the machine
can be operated
Indicator Color
Blue
Green
Orange
Red
Air Quality
Very Good
Good
Moderate
Bad
Auto Mode Fan Speed
Sleep Mode
Low
High
Turbo
Air Quality indicator Chat
CONTROL AND DISPLAY
NOTE: In auto mode, the purifier starts synchronously with the fan by
default, and the wind speed cannot be set.
About ECO mode
ECO mode is highly energy-ecient compared to auto mode. In ECO mode, if the sensor
detects continuous good air quality for 30 minutes, the machine will enter standby mode
and stop operating. When the sensor detects poor air quality in standby mode, the
machine will resume operation.
About fan mode
In fan mode, only the fan function is enabled. In this case, you can adjust the wind speed
by pressing the wind speed button
About purifier mode
In purification mode, the product activates the purification function only, allowing you to
adjust the wind speed based on the actual conditions by pressing the speed button.
11
CONTROL AND DISPLAY
NOTE
In purification mode, for optimal purification eciency, the fan will
automatically return to a parallel position, and the oscillation function
cannot be operated at this time.
About purifying fan mode
In the purifying fan mode, the fan function is enabled, and the wind speed can be
adjusted by pressing the wind speed button according to the actual situation
About Wi-Fi pairing
long press the " " button for 3 seconds, Wi-Fi indicator will start flashing, the product
will enter the network distribution mode, open the APP at the same time, click Add
device to start pairing (please check the following APP Setup for pairing steps)
NOTE:
Indicator lights flashing:pairing is underway
Indicator Steady on:The pairing is successful
Indicator off:Pairing fails
TIPS:
1. During the setup process, you must be on a secure 2.4GHz Wi-Fi network. Confirm that
the network is working correctly.(Please do not use the 5G network, otherwise, the
pairing cannot be successful.)
2. Please complete the pairing within 3 minutes. If the network distribution fails within
3 minutes, the Wi-Fi indicator light will go out, and then stop the network distribution.
Long press the timing button for 3 seconds to restart the network distribution mode.
3. Turn off the wifi function, Long press the timing button for 3 seconds to restart the
network pairing mode. In pairing mode, when the machine restarts after a powerd
outage, Wi-Fi pairing mode is disabled.
3. " " Speed Button
Choose the wind speed button, you can freely switch between sleep gear, L gear, H gear;
Choose the right wind speed
NOTE:
The wind speed button can be adjusted only in manual mode, which includes purifying
mode, fan mode, and purifying fan mode
TIPS:
1. If you need to enable super turbo wind speed, you can do so on the app.
2. In sleep mode, the screen slackens for a better experience.
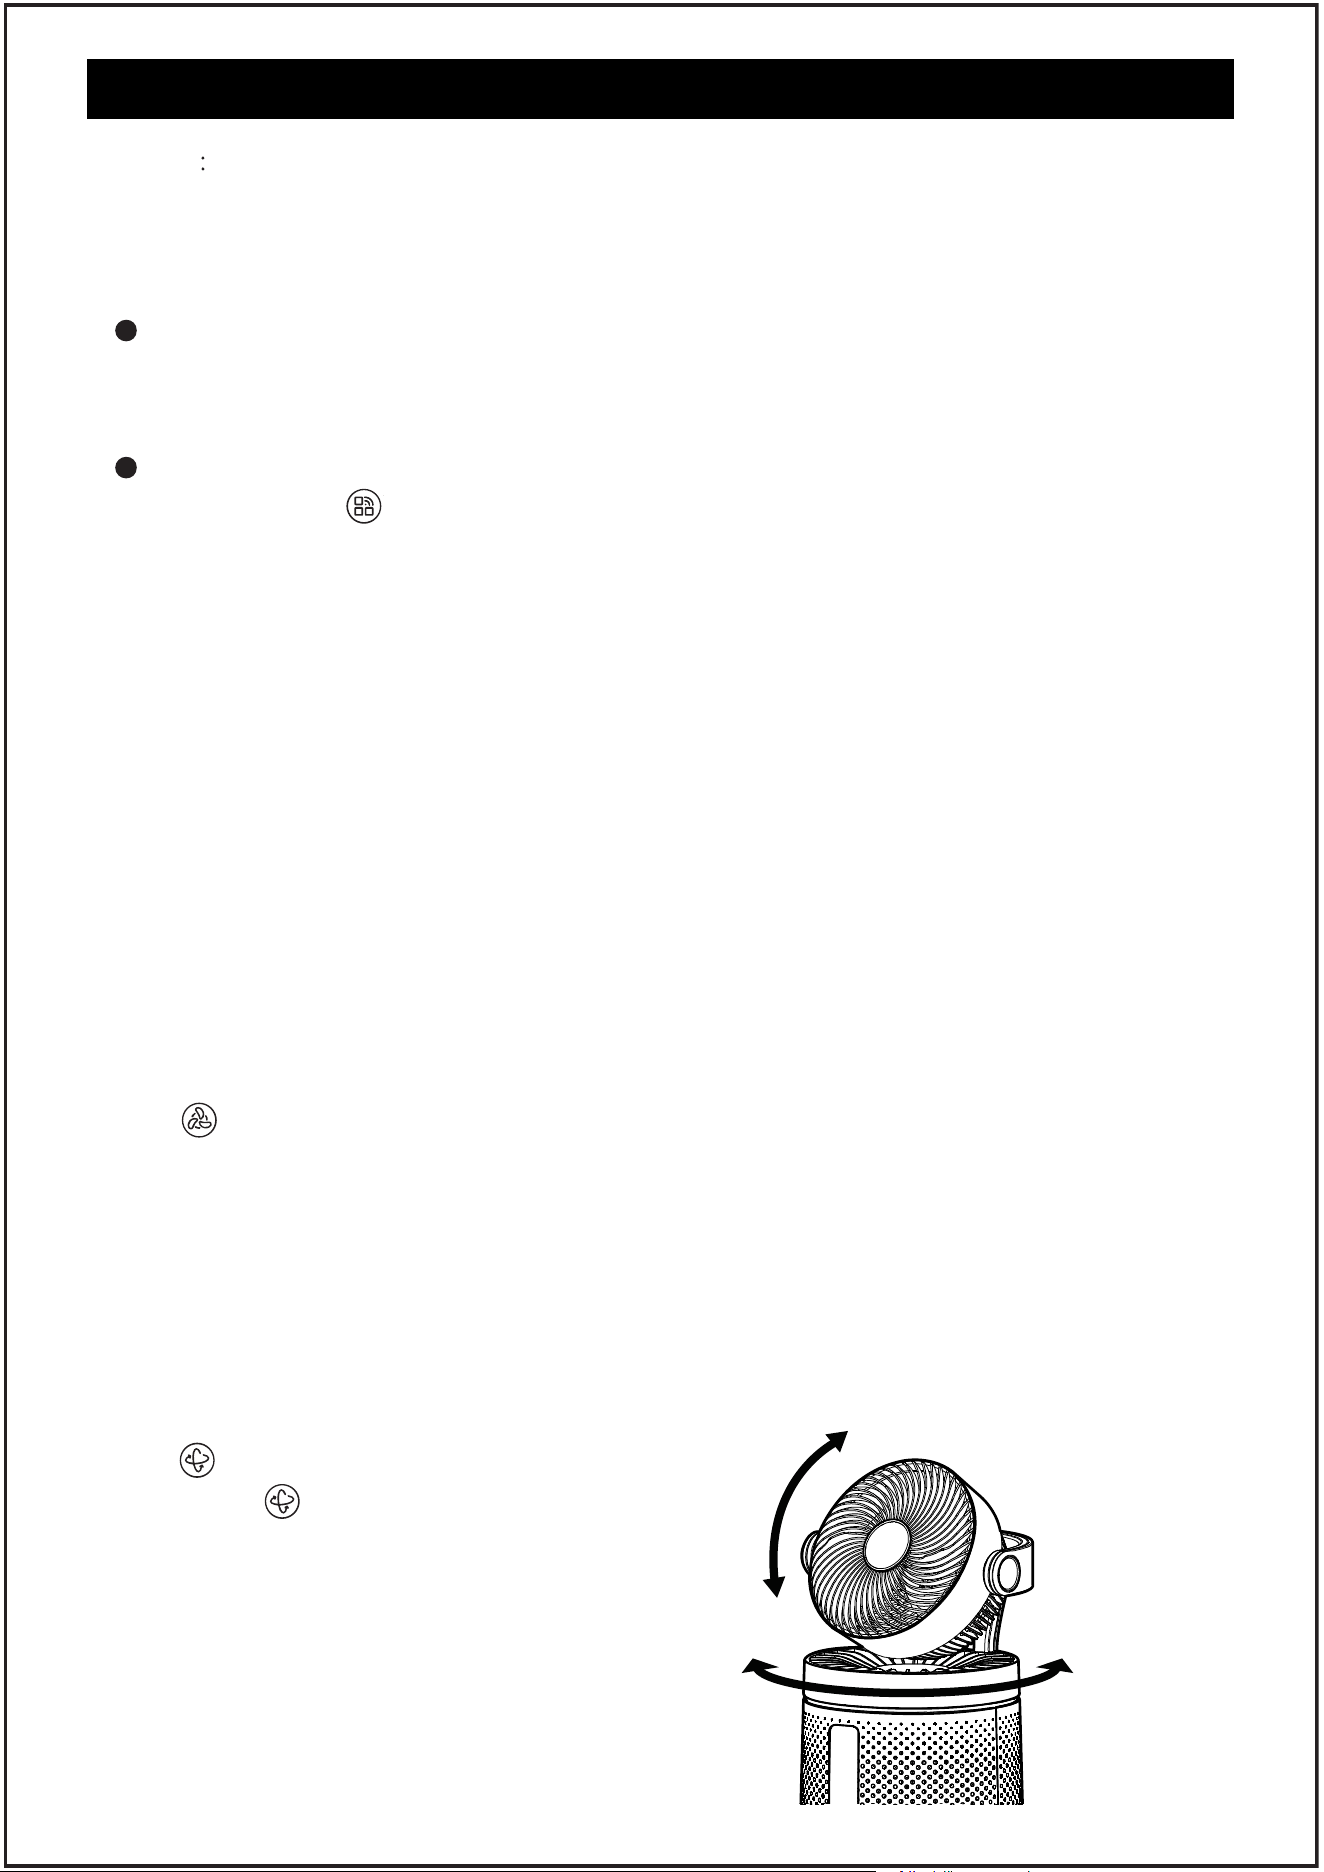
4. " " Osc Button
Tap the " " button to select 3D all-round
shake, or open the left and right shake, or up
and down shake.
NOTE:
In the purification mode, the state with the
optimal purification eciency is considered,
so the shake head function cannot be enabled
TIPS:
If you need to set the shaking Angle, you can
set it in the app.
90°
60°/90°
12
CONTROL AND DISPLAY
5. " " Light/Lock Button
Tap the " "button, you can open the night atmosphere lamp, at the same time long
press 3 seconds can open the child lock function, in case of children's misoperation.
TIPS:
If you need to adjust the brightness of the atmosphere lamp and change it, you can go to
the Settings in the APP.
6. " " Filter Button
1. Tap the " " button to query the remaining life of the filter. If the service life is too
low, the HEPA indicator lights on, indicating that the filter needs to be replaced.
TIPS:
Strainers can be purchased at the ocial AROEVE flagship store
2. After replacing the filter screen, long press the " " button for 3 seconds, the reset
is successful, the HEPA indicator stops blinking, and 5 seconds later it goes out and
returns to the main page.
7. " " Air Info Button
Tap the " " button, you can query the value of particulate matter under different
diameters (PM10,PM2.5,PM1.0);
TIPS
Generally, the lower the value, the better the air quality.
8. Memory function
Built-in memory function, normal shutdown can remember the mode, wind speed,
shaking head, lamp;
NOTE that the child lock and timing function does not carry on memory.
9. Timing function
This function can be set on the APP
10. Shutdown correction
The product has the function of automatic correction when the machine is shut down.
When the machine is shut down, the shaking head will continue to work, and a
countdown will appear on the display screen. When the countdown is over, the machine
will return to the original parallel state
“This product employs overload protection (fuse). A blown fuse indicates an overload or
short-circuit situation. If the fuse blows, unplug the product from the outlet. Replace the
fuse as per the user servicing instructions (follow product marking for proper fuse rating)
and check the product. If the replacement fuse blows, a short-circuit may be present and
the product should be discarded or returned to an authorized service facility for examination
and/or repair.”
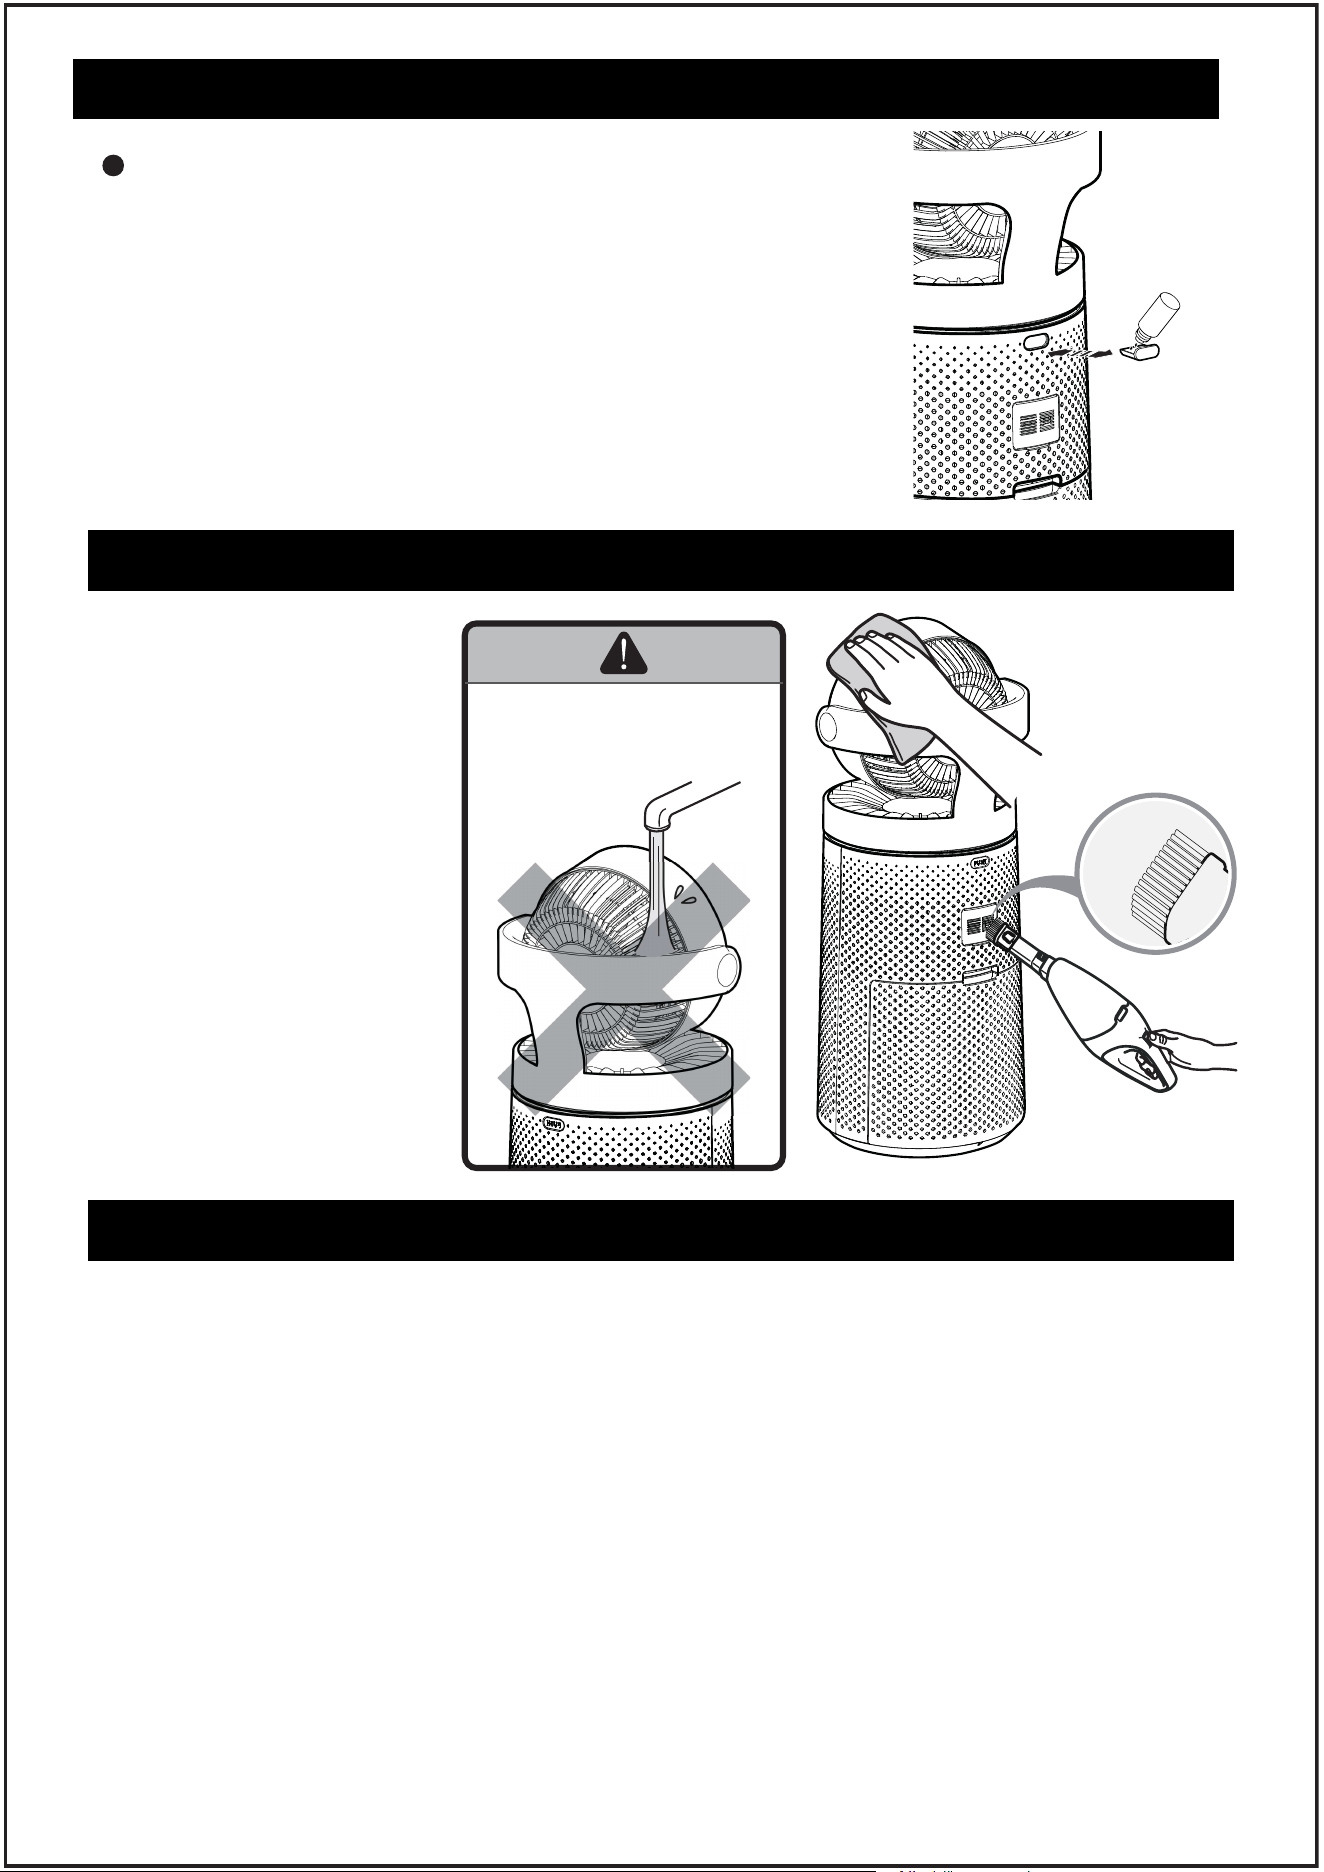
HOW TO USE AROMATHERAPY FUNCTION
PU
S
H
How To Use
1. Push to open
2. Add a few drops of the essential oils and close the chamber.
NOTES:
1. Shut off the machine before adding the essential oils.
2. Only use the droppers come with the essential oils, do not
pour in directly.
3. Add 4-5 drops each time.
13
Make sure that the machine
is in the state of power off
before cleaning
1. it is recommended to use
a vacuum cleaner to
remove the dust on the
surface
2. Use a clean and
semi-humid soft cloth to
wipe the stained part of
the fuselage clean
Do not use any chemicals
or corrosive agents to wipe
CLEANING OF COMPLETE MACHINE
NOTE: NO WASHING
Do not use water to flush
the machine directly
Please note: For your safety, make sure that the machine can be disassembled and cleaned
only when the power is off
1. Aim the Phillips screwdriver at the position of the screw to remove it. If the screw is lost
carelessly, there are 3 replacement screws in the packing box for use.
2. Hold the raised parts at both ends of the grille, rotate clockwise to remove the grille, and
the grille part can be washed
3. Turn the nut at the front end of the fan blade clockwise to remove the fan blade for washing
Please note: Only three parts, namely grille, nut and fan blade, can be cleaned. After cleaning,
they should be dried and assembled according to the following steps
1. Put the fan blade back into the motor shaft and fasten the nut counterclockwise
2. Find the lock icon above the air outlet grille, align it with the convex point on the machine,
and fix it in accordance with the direction of the lock
3. Align the screw with the bottom and tighten it counterclockwise.
Ensure that the fan is switched off from the supply mains before removing the guard.
Warn the user to unplug or disconnect the appliance from the power supply before servicing
REMOVAL AND CLEANING OF CIRCULATING FAN

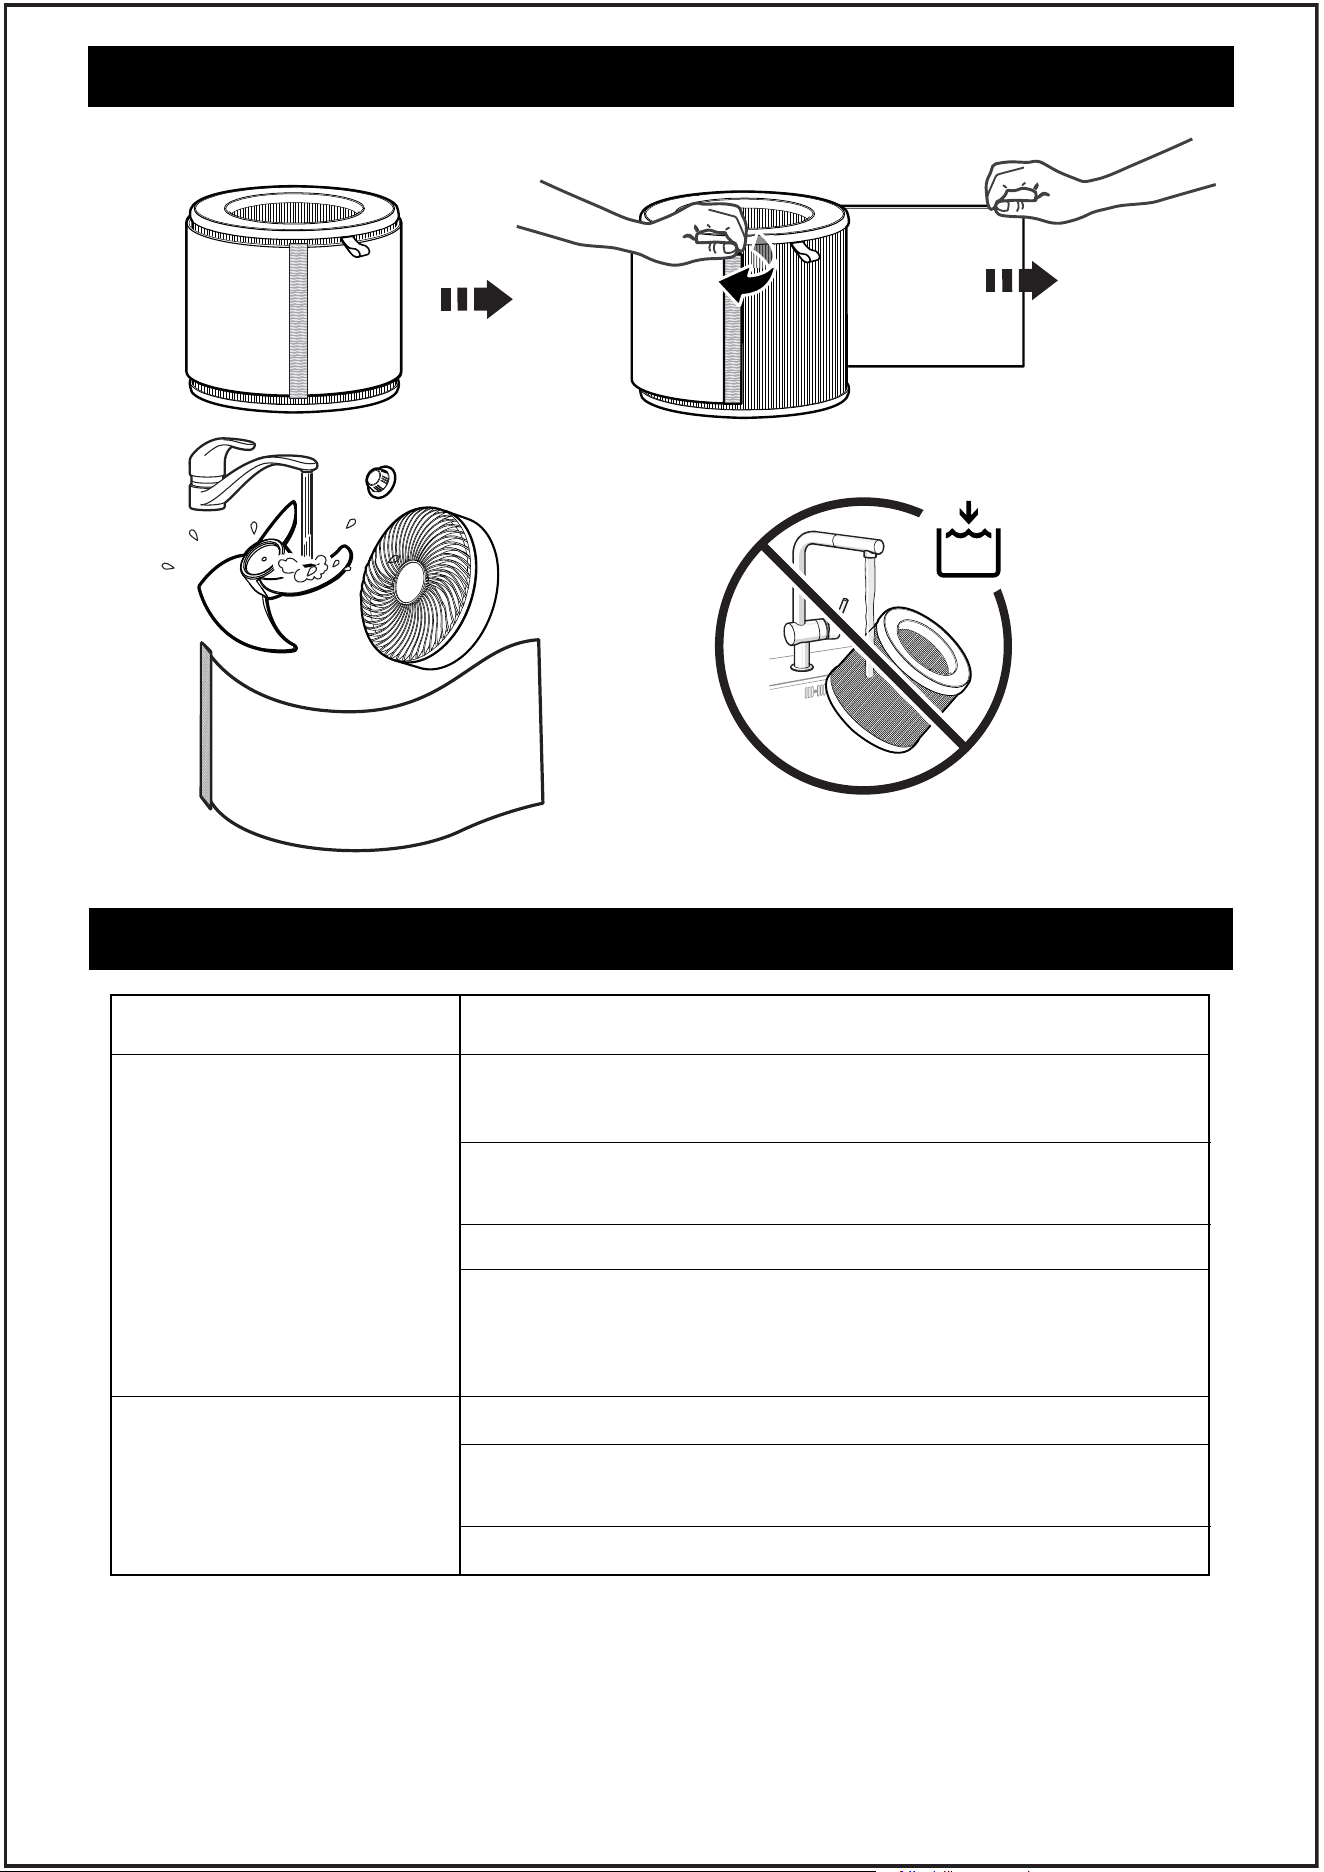
DISASSEMBLY AND CLEANING OF SCREEN
To ensure that the filter can be used for a long time, follow the following steps to clean and
maintain the filter:
It is recommended to check the state of the washable filter screen every half a month. If it is
found that there is much filter dust, it is recommended to clean it. The cleaning method is
as follows:
1. Take out the strainer component and check the state of the outermost washing strainer
2. Tear the strainer along the Velcro interface
3. Wash, clean, and dry
Please note: After drying, it can continue to use. Please according to the installation
instructions mentioned before assembly.
TIP: After repeated use of the wash screen 3 times, it is recommended to replace the wash
screen with a new one. Please visit Aroeve's ocial website to purchase.
About the filter
The service life of the HEPA filter is 3000h. If you need to replace the filter, please visit
Aroeve's ocial website to purchase it.
14
REMOVAL AND CLEANING OF CIRCULATING FAN
NOTE:
When installing the front grill of the fan,
align the lock with the protrusion on the
top. Rotate clockwise to open and
counterclockwise to lock tightly.
15
TROUBLESHOOTING
Problem Possible Solution
The air purifier makes an
unusual noise and the
outlet air is less.
Strange smell coming
from the purifier.
Make sure the filter is properly in place with plastic
packaging removed.
Make sure the air purifier is operating on a hard, flat, even
surface.
Replace the filter.
The air purifier may be damaged, or a foreign object may
be inside. Stop using the air purifier and contact Customer
Support . Do not try to repair the air purifier
Replace the filter element
Make sure not to use your purifier in an area with high
humidity or while diffusing essential oils.
Contact Customer Support.
DISASSEMBLY AND CLEANING OF SCREEN
16
WARRANTY
2-Year Warranty Statement
Thank you for choosing our product.
We are committed to delivering high-quality products
and excellent customer service, offering you a 2-year
warranty.
Warranty Coverage:
This warranty covers defects in materials or workmanship during normal use. If any
manufacturing defects occur within the warranty period, we will replace or refund. Please
note that this warranty only applies to purchases from authorized brand online stores and
our ocial website.
Warranty Period:
The warranty lasts for two years from the date of purchase.
Warranty Claim Process:
If you encounter any covered issues, follow these steps:
Contact our customer support within the warranty period, providing details.
Our team will guide you through troubleshooting or initiate a return/refund if needed.
Note:
Time to change the filter? Go & check out Aroeve Pureplus Membership on our ocial site.
Filter uses less than 3000
hours the environment
light has been on red
prompt to replace the
filter.
Tip 1: The service life of the filter depends on the
environment, if the environment is heavily polluted
or dusty, the filter is easy to accumulate dust and
becomes dirty. (Note: the environment with greater
ventilation is more likely to accumulate dust)
Tip 2: Humid weather air will be a little more small
molecules, more easily combined with dust to form
pm 2.5 particles, the sensor senses pm2.5 particles
after the red light will be on.
Measures 1: It may be necessary to replace the filter.
Check whether the filter has been very dirty
and needs to be replaced.
Measures 2: The room humidity of 75% or more or
opening the window on a rainy day, will
continue for 1~2 days with red light until the
ambient humidity drops to below 75%.
If your problem is not listed , please contact Customer Support.
TROUBLESHOOTING
Problem Possible Solution