1
AIR PURIFIER
OWNER’S
MANUAL
FOR MODEL:
1PAPUV27
Read and save these instructions.

IMPORTANT SAFETY INSTRUCTIONS
Maintenance
- When moving, cleaning or disassembling the purier, it must be stopped and disconnected from the
power supply
- It is forbidden to replace the power cord without authorization. If the power cord is damaged, it must be
replaced by a professional from the manufacturer, maintenance department or similar department in
order to avoid danger. Unit must be off and unplugged from the power supply
- Filter needs to be replaced regularly. To change the Filter, please contact the qualied service provider
authorized by our local company
Use
- Do not operate with wet hands
- Do not press hard on the top control panel of the machine
- Do not place items on the top of the machine
- Do not insert foreign objects into the air inlet and outlet
Use Restrictions
- Prohibit the storage of ammable and explosive gases at the place where the purier is used
- Avoid putting unit in long-term direct sunlight
- It is forbidden to use in places such as bathrooms where moisture is heavy and water easily accessed
- Do not place this machine on a slope or other uneven place
- Do not use this machine in an oily or smoky environments, such as kitchens
- Do not use this machine outdoors
Warning:
- This appliance has a polarized plug (one blade is wider than the other). To reduce the risk of electric
shock, this plug is intended to t in a polarized outlet only one way. If the plug does not t fully in the
outlet, reverse the plug. If it still does not t, contact a qualied electrician. Do not attempt to alter this
safety feature.
To Reduce The Risk Of Fire Or Electric Shock, Do Not Use This Fan With Any Solid-State Speed
Control Device.
- Skin or eye damage may result from directly viewing the light produced by the lamp in this apparatus.
Always disconnect power before replacing the lamp or servicing. Never replace the UV lamp unless you
are an authorized technician!
This product meets the relevant requirements of AHAM, ETL and Energy Star.
2
3
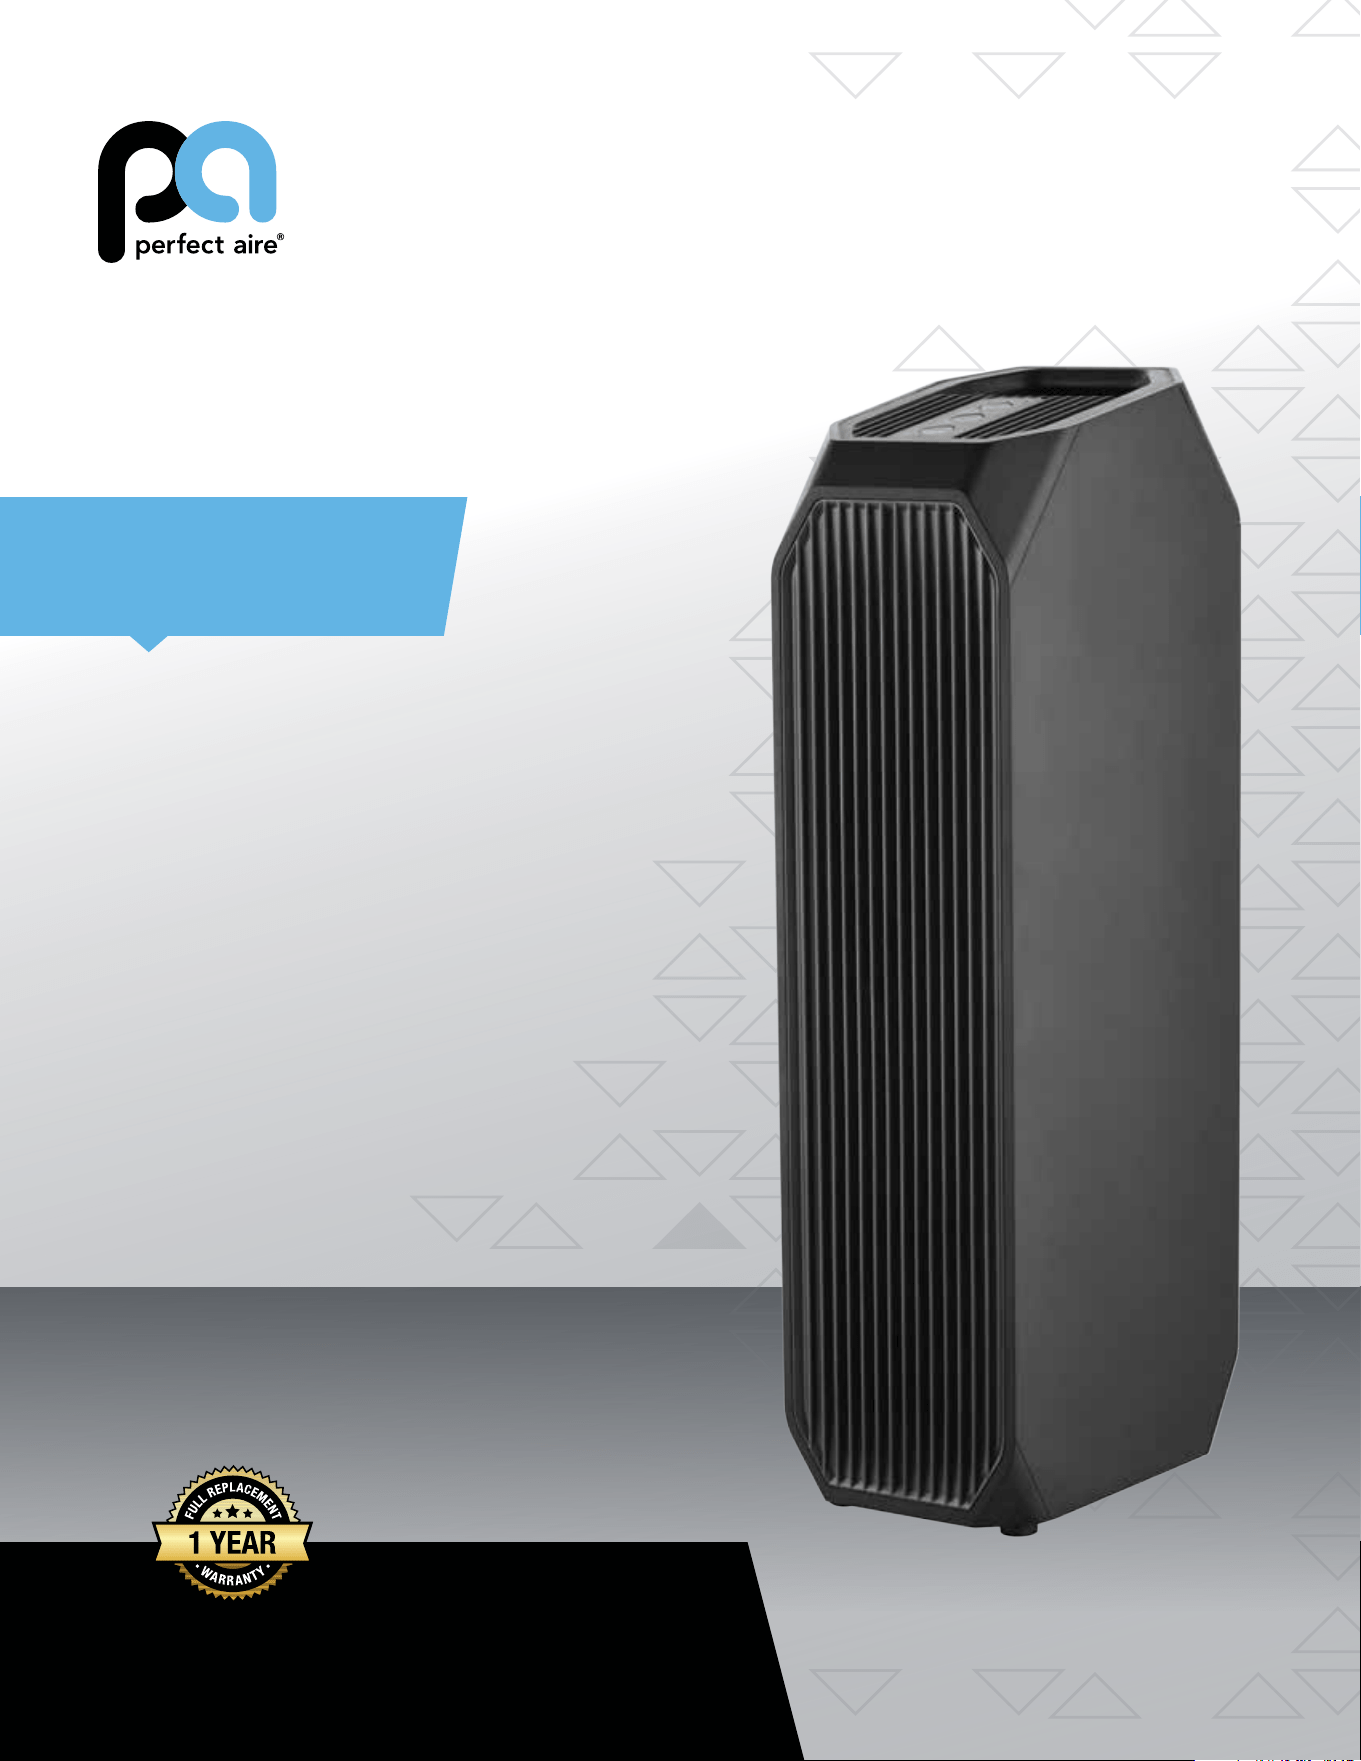
PARTS DIAGRAM
Lifting handle
Status Display and
Control Panel
Control Panel
Activated carbon
Filter HEPA Filter
Back cover
Lifting handle
Air outlet
Power cord
4
5

PARTS DIAGRAM
Lifting handle
Status Display and
Control Panel
Control Panel
Activated carbon
Filter HEPA Filter
Back cover
Lifting handle
Air outlet
Power cord
4
5
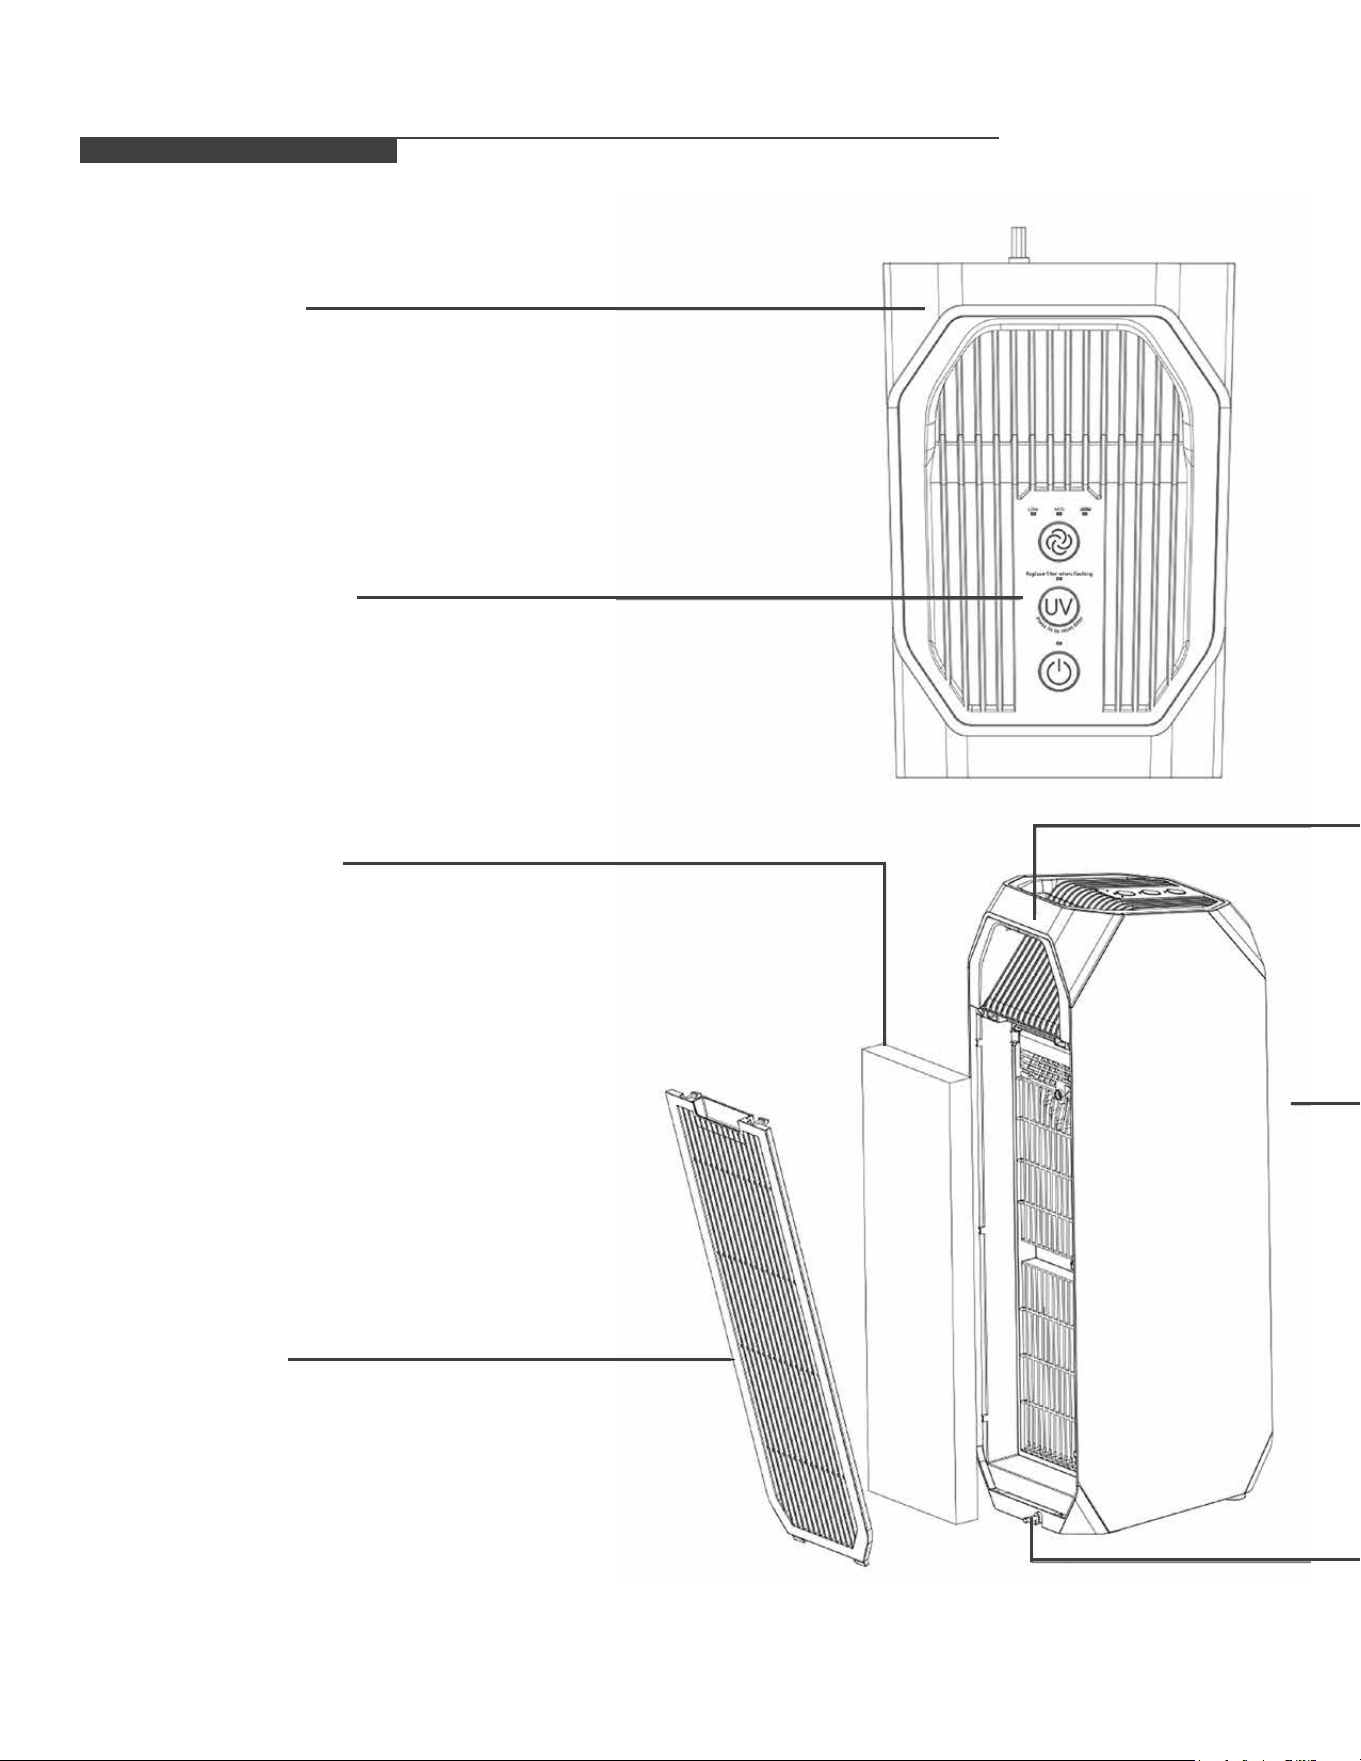
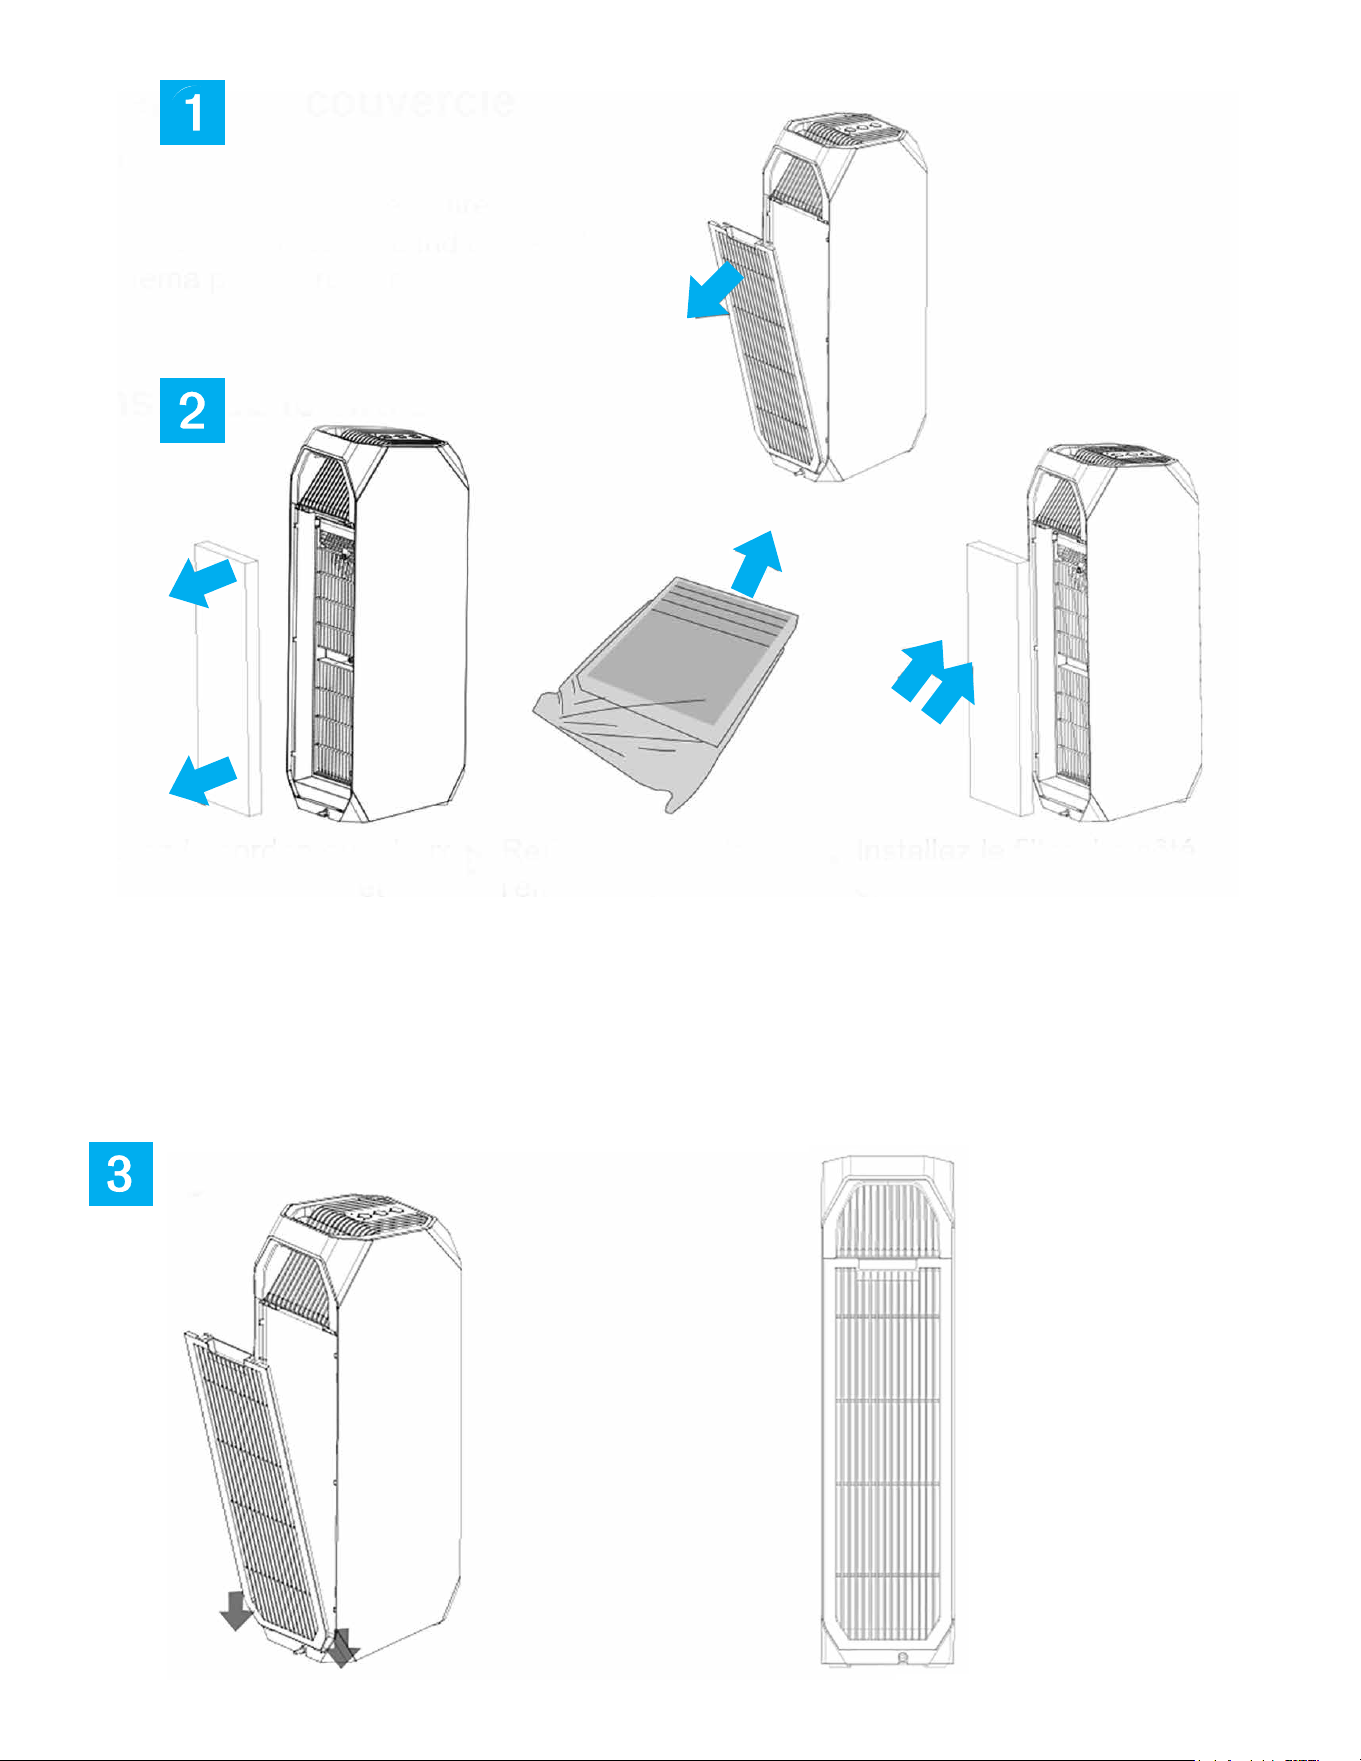
Install the Filter
Hold the drawstring at both
ends of the lter assembly
and remove the assembly.
➤
Remove the filter from the
packaging
➤ Install the Filter assembly.
The activated carbon Filter
is on the outside
Please make sure that the front side of lter elements is installed correctly.
INSTALLATION
Remove the back cover
Grasp the cover and pull outwards
as in the diagram to remove the
back cover remove the back cover
Install the back cover
➤
With both hands,
simultaneously slide the
two left and right buckles
at the bottom of the back
cover into the machine
body.
➤
Press the top with
both hands and
insert the top two
buckles into the
machine body.
The installation
is now complete.
➡
6
7
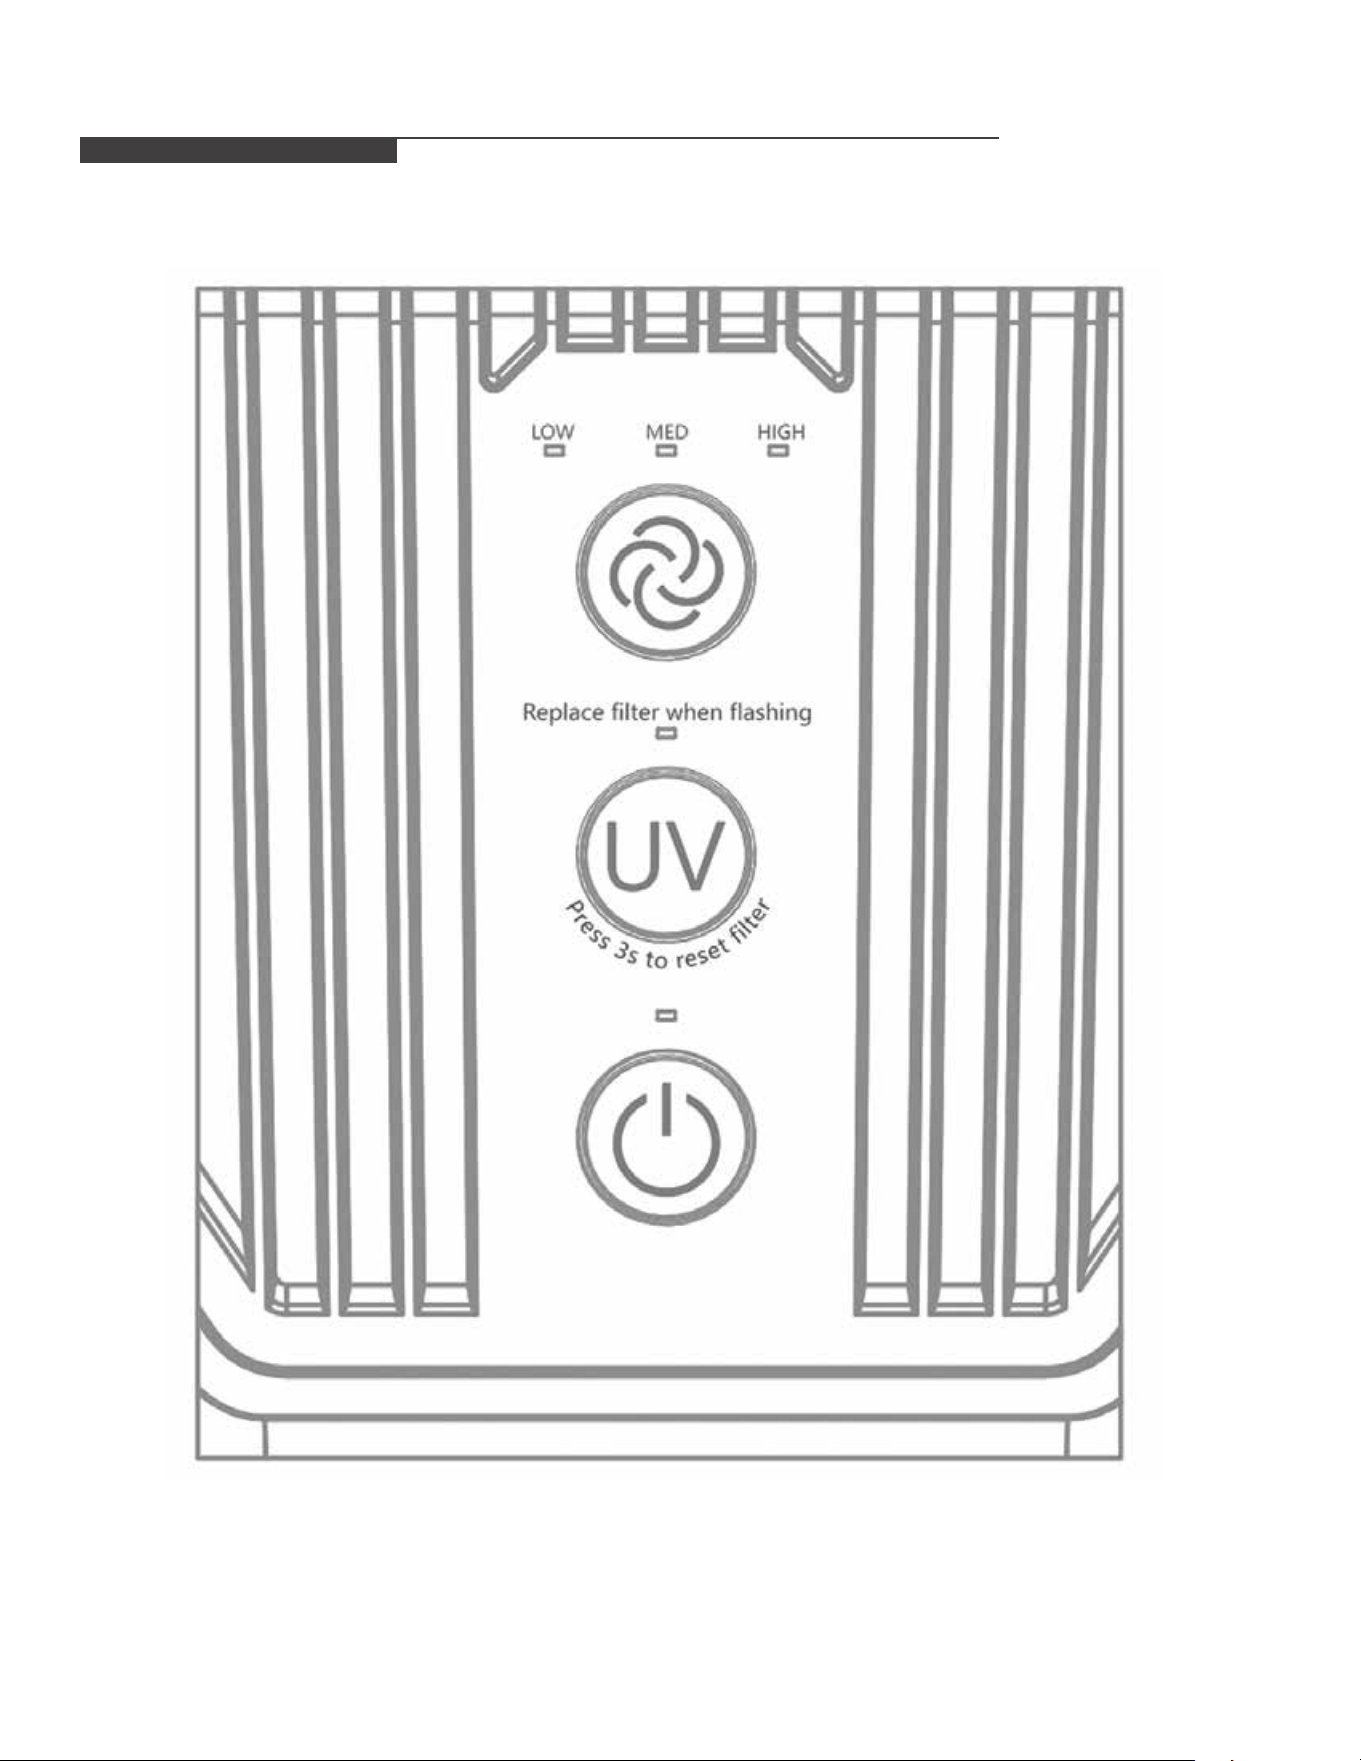
UNIT OPERATION
Purication volume button
Press this button to adjust the volume of purication, with high,
medium and low grades.
The status of the purication volume can be intuitively indicated
by three indicators: HIGH, MED, and LOW.
On/off button
This button will power the unit on and off when pressed.
Note: When the unit is powered on, by default, it will resume in
the setting that was last used.
UV button
Press this button to turn on the UV lamp when the switch is on,
then press to turn off.
You can see whether the UV lamp is working by the orange
light on its edge.
This product uses a certain algorithm to calculate the life of the
Filter with the opening time accumulated as a reference value.
When the lter life is reached, the UV indicator will ash to remind
the user to replace the lter.
After the lter replacement is completed, keep the UV button
pressed for 3 seconds in order to reset the lter replacement light.
UV indicator should not ash after doing so.
Control and Status Display Panel
8
9
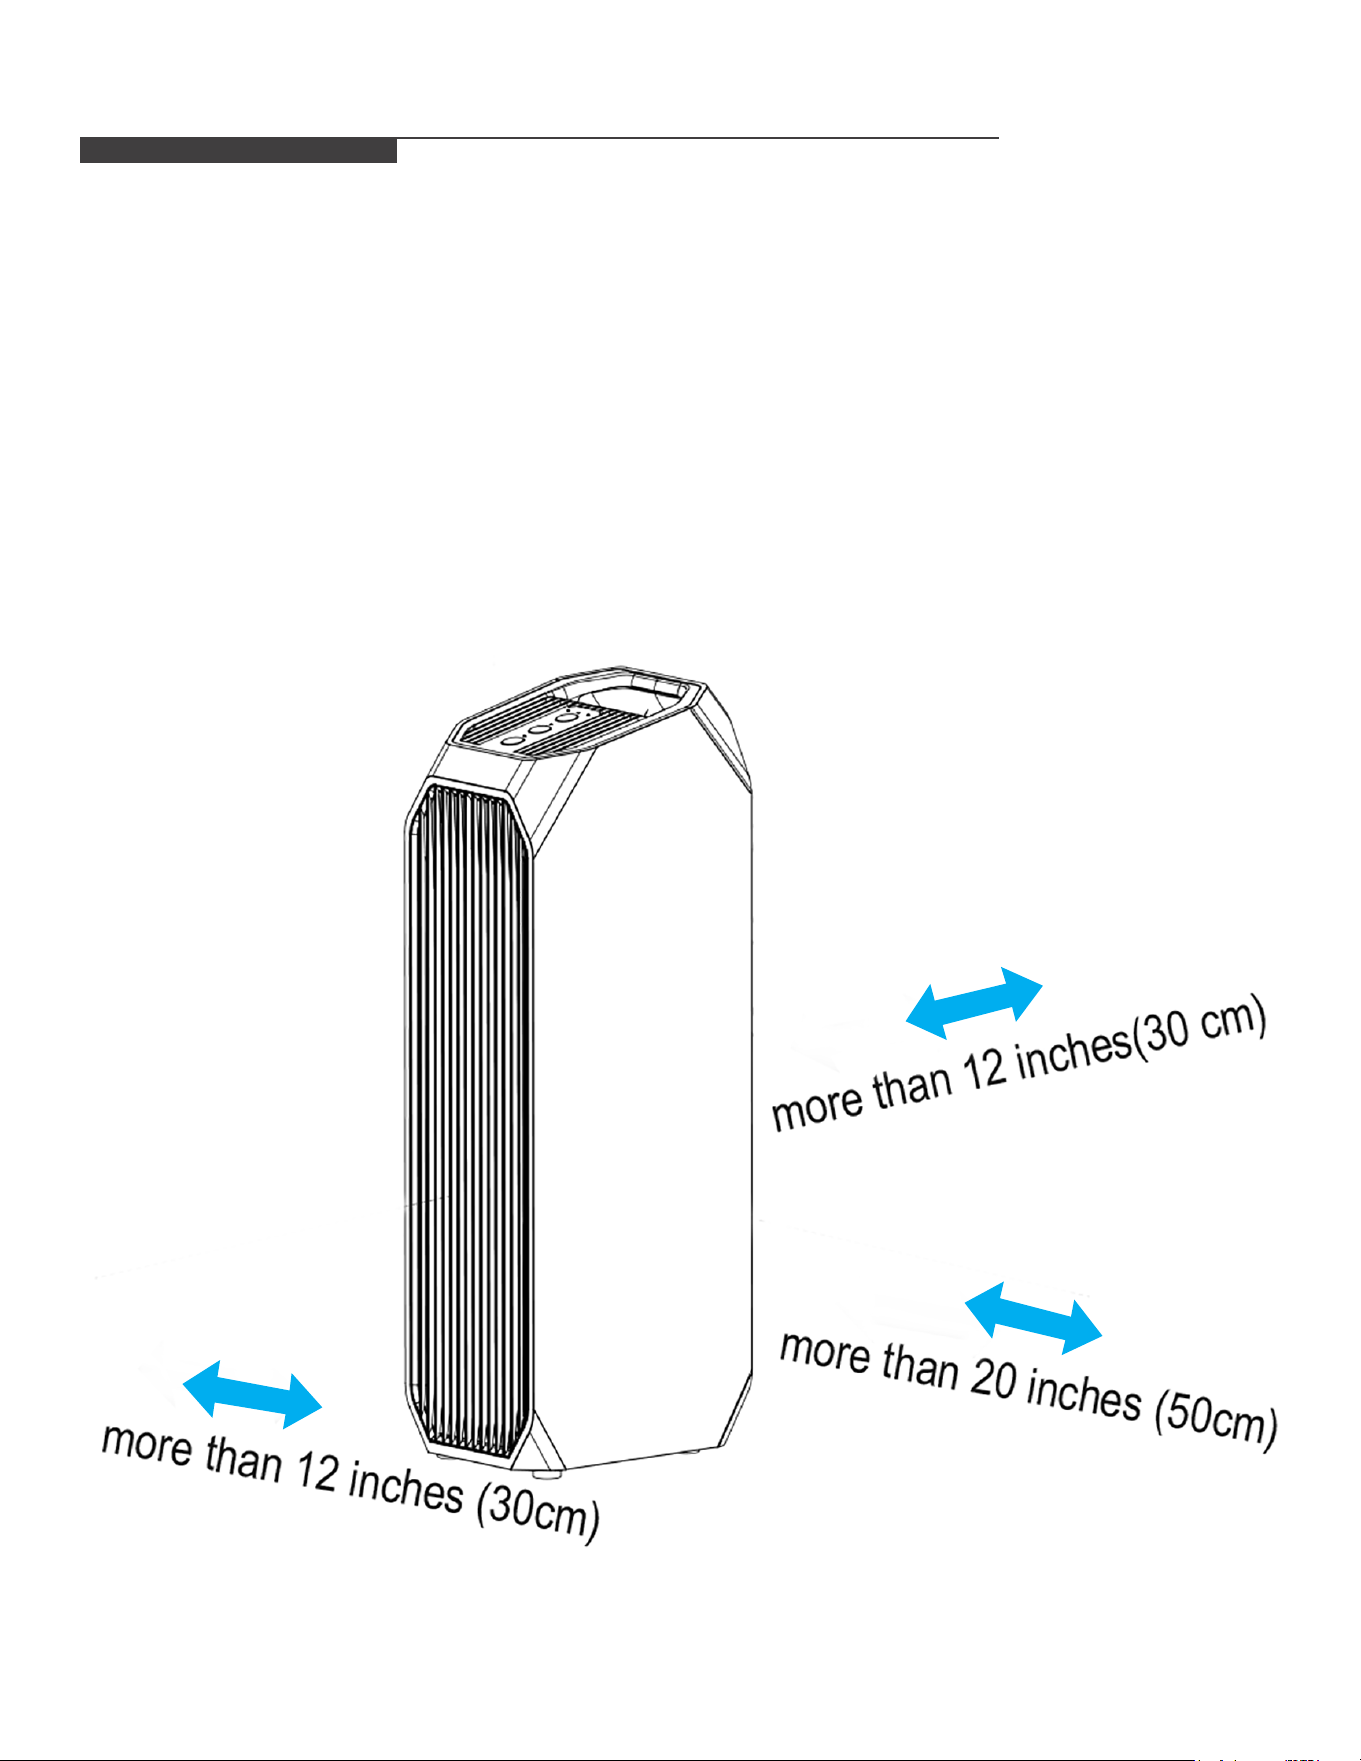
PLACEMENT
In order to achieve the best purication, please assure that the unit is placed at least 12 inches away from
any walls or other obstructions that may reduce proper air ow. Please maintain a distance of more than
20 inches (50cm) from the metal/appliances.
MAINTENANCE
Read and Save These Instructions
Warning: Risk of Electric Shock
These servicing instructions are for use by qualied personnel only. To reduce the risk of electric shock, do
not perform any servicing other than that contained in the operating instructions unless you are qualied to
do so!
Filter maintenance/replacement
Maintenance
When the UV light on the display panel ashes,
it prompts you to replace the lter.
Please select a lter that matches the model of the
machine for replacement. Please purchase from your
local authorized dealer.
For more details on the installation of the lter,
please see the “installation” section.
Press the UV button for 3 seconds, the
lter resets and the lter life will reset.
- It is recommended to clean the lter twice a week and replace the lter after 6months of life (adjust the
cleaning and replacement cycle according to the use;
- Do not place the lter in water, or rinse with water.
- Small soft brushes or household vacuum cleaners are recommended for lter cleaning.
- When using the brush to clean, it should be brushed horizontally along the lter. Avoid brushing vertically,
so as not to damage the lter;
- When cleaning with a vacuum cleaner, keep the suction outlet 5-1Omm away from the surface of the lter
so as not to damage the lter.
- When used around the strong odor produced by cigarettes, barbecues, etc., the lter may have a
prolonged odor for weeks or months. Please clean and dry lter (2-5 days). If you still cannot eliminate
the odor, replace the lter.
10
11
TECHNICAL SPECIFICATIONS
1. The performance parameters in the table are measured before delivery and are for reference only.
2. Due to product improvement, the following parameters may be changed and shall refer to the product
nameplate parameters.
3. The applicable area is according to the theoretical value calculated by (0.07 ~ 0.12) x CADR particulate
matter; with the use of different environments or outdoor pollution and other factors, the applicable area
will also change.
4. Purifying principle: The air purier blows air into the machine and lters the air through the built-in
lter core. It can mainly play the role of ltering dust (such as PM2.5), formaldehyde, odor, sterilization
and others.
Model
1PAPUV27
AHAM veride CADR (CFM)
smoke - 143 CFM
Dust - 145 CFM
Pollen - 220 CFM
Rated voltage (V) 120 - 15 A
Rated frequency (Hz)
60
Rated power (W)
58
Speed noise levels [dB(A)]
Low - 32 dB
Med - 45 dB
High - 52dB
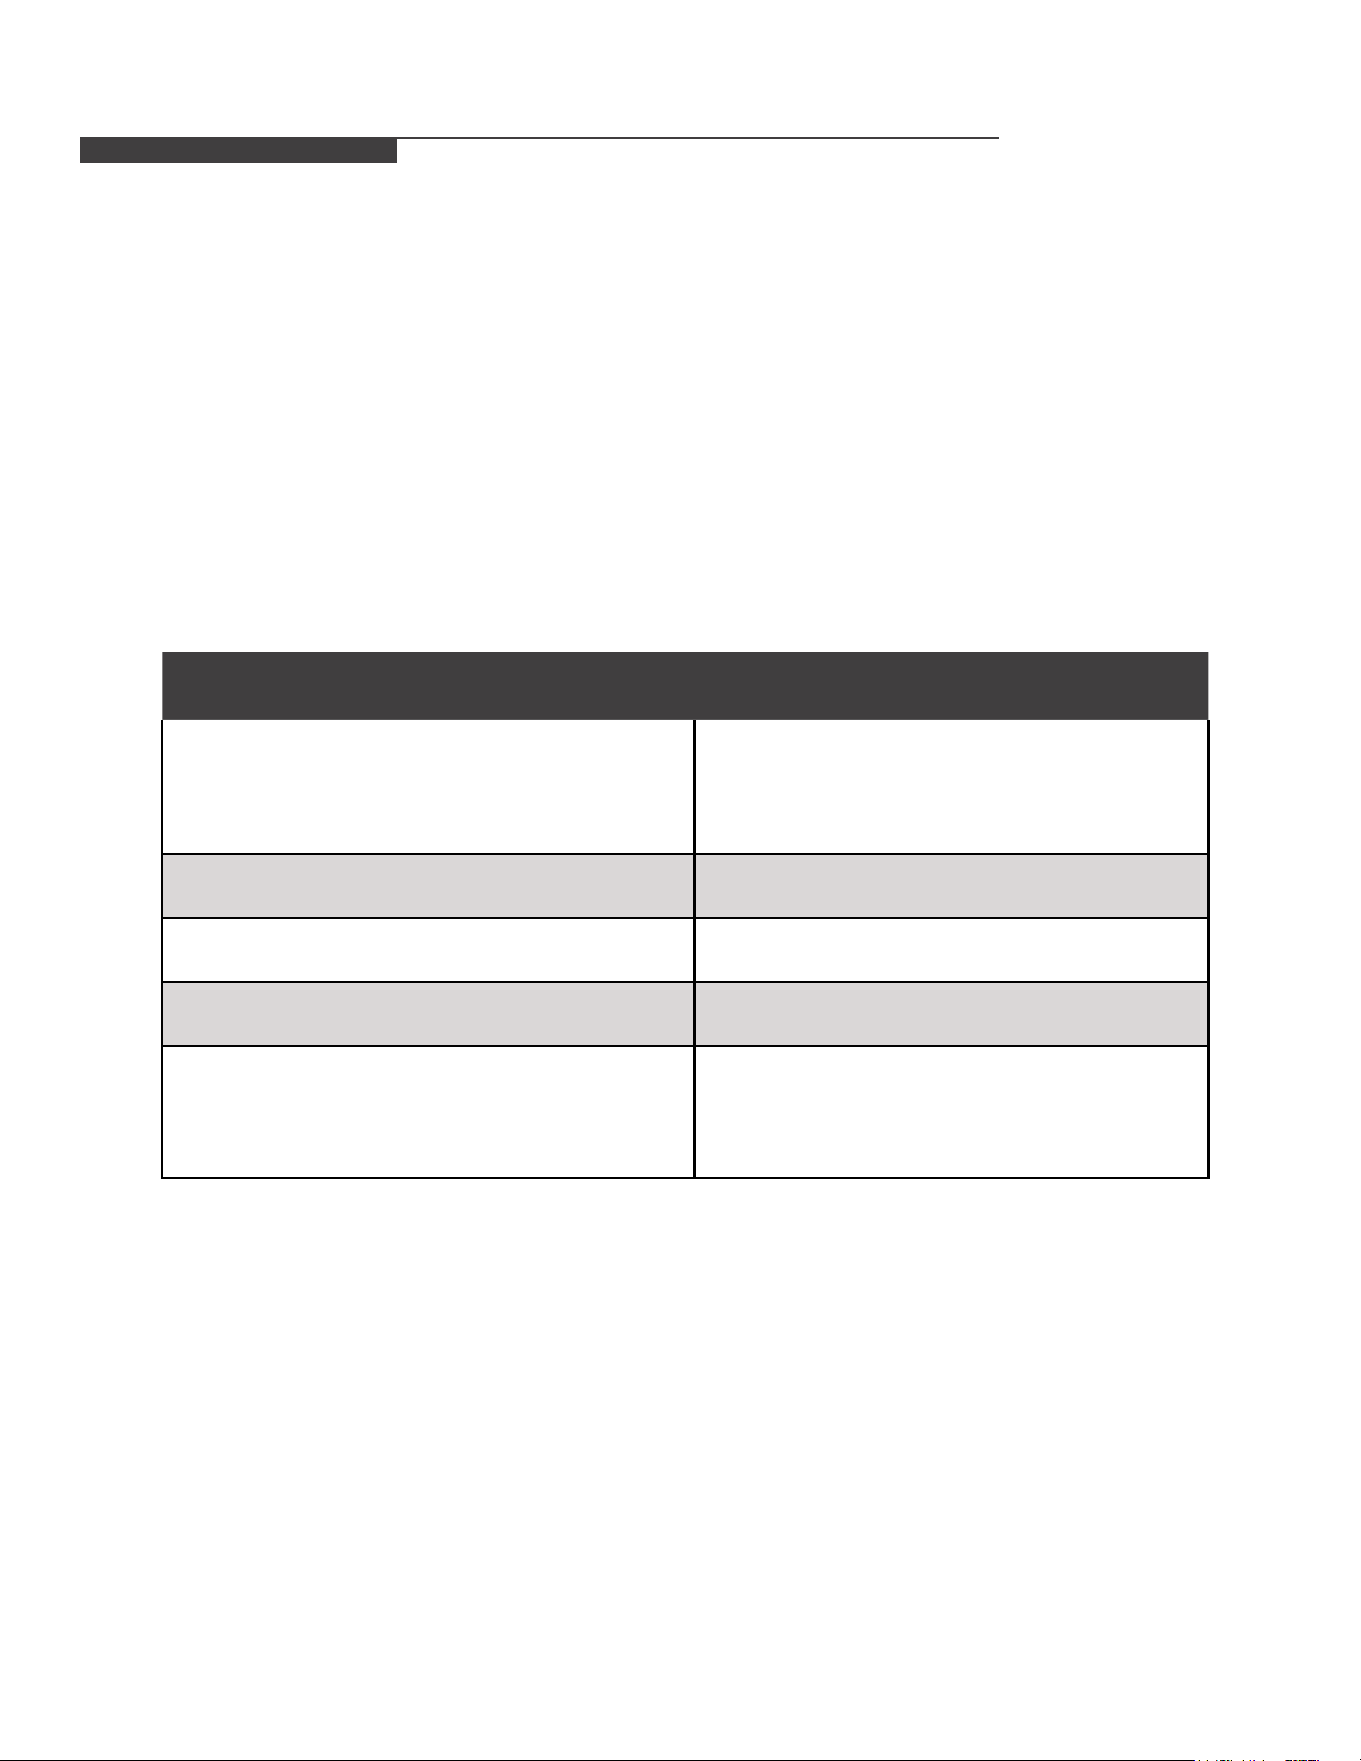
TROUBLESHOOTING
Before calling to report a problem , be sure to check the following:
Issue Encountered Possible Cause Possible Solution
Purier does not run
- It is possible that the power cord
is not plugged or poor contact
with power cord
- Make sure unit is powered on
- It is possible that the lter is not
installed in place and safety
switch has been triggered
- Make sure unit properly
connected at the electrical outlet
& assure unit is receiving proper
voltage
- Please turn on the power switch
- Please properly install the lter
and buckle the back cover
Unit is not properly
eliminating smoke
or odors
- It is possible that the lter may be
improperly installed
- It is possible that the lter
assembly has reached the end of
life and may need to be replaced
- It is possible that the air inlet may
be blocked
- Please properly install the lter
assembly
- Please replace the new lter
assembly
- Please remove any debris from
the air inlet
Filter cleaning light does
not reset.
- It may be that the “UV” button
was not pressed for 3 seconds
after the lter was replaced
- After cleaning the lter assembly,
hold the “UV” button for
3 seconds
Unit does not appear to be
purifying and ltering
odors/ smoke
- Please be sure to check that
lter has been removed from
packaging
- If lter has not been removed
from packaging please remove
and reinstall lter
12
13
TECHNICAL SPECIFICATIONS
1. The performance parameters in the table are measured before delivery and are for reference only.
2. Due to product improvement, the following parameters may be changed and shall refer to the product
nameplate parameters.
3. The applicable area is according to the theoretical value calculated by (0.07 ~ 0.12) x CADR particulate
matter; with the use of different environments or outdoor pollution and other factors, the applicable area
will also change.
4. Purifying principle: The air purier blows air into the machine and lters the air through the built-in
lter core. It can mainly play the role of ltering dust (such as PM2.5), formaldehyde, odor, sterilization
and others.
Model
1PAPUV27
AHAM veride CADR (CFM)
smoke - 143 CFM
Dust - 145 CFM
Pollen - 220 CFM
Rated voltage (V) 120 - 15 A
Rated frequency (Hz)
60
Rated power (W)
58
Speed noise levels [dB(A)]
Low - 32 dB
Med - 45 dB
High - 52dB
TROUBLESHOOTING
Before calling to report a problem , be sure to check the following:
Issue Encountered Possible Cause Possible Solution
Purier does not run
- It is possible that the power cord
is not plugged or poor contact
with power cord
- Make sure unit is powered on
- It is possible that the lter is not
installed in place and safety
switch has been triggered
- Make sure unit properly
connected at the electrical outlet
& assure unit is receiving proper
voltage
- Please turn on the power switch
- Please properly install the lter
and buckle the back cover
Unit is not properly
eliminating smoke
or odors
- It is possible that the lter may be
improperly installed
- It is possible that the lter
assembly has reached the end of
life and may need to be replaced
- It is possible that the air inlet may
be blocked
- Please properly install the lter
assembly
- Please replace the new lter
assembly
- Please remove any debris from
the air inlet
Filter cleaning light does
not reset.
- It may be that the “UV” button
was not pressed for 3 seconds
after the lter was replaced
- After cleaning the lter assembly,
hold the “UV” button for
3 seconds
Unit does not appear to be
purifying and ltering
odors/ smoke
- Please be sure to check that
lter has been removed from
packaging
- If lter has not been removed
from packaging please remove
and reinstall lter
12
13

14
Attention:
Pictures in the owner's manual are for reference only.
GD Midea Environment Appliances MFG.Co.,Ltd.
No.28, Dong Fu Road, Hesui East Industrial Area, Dong Feng Town, Zhongshan, Guangdong 528425 P.R.China
Perfect Aire, LLC
5401 Dansher Rd.
Countryside, IL 60525
844-4PA-AIRE | 844-472-2473
www.perfectaire.us
Distributed by:
PA/User_1PAPUV27_06232020
