User Manual
/
v2.0 2023.09
/ M30 EU / M30 T EU
2
©
2022 DJI All Rights Reserved.
User Manuals, instructions, and other material about product functions and specics are DJI condential
Materials. Users are licensed to use these materials only for purposes of operating and using DJI
Products. Unless otherwise authorized in this Terms, you are not eligible to use or allow others to use
the Materials or any part of the Materials by reproducing, transferring or selling the Materials. Users
should only refer to this document and the content thereof as instructions to operate DJI UAV. The
document should not be used for other purposes.
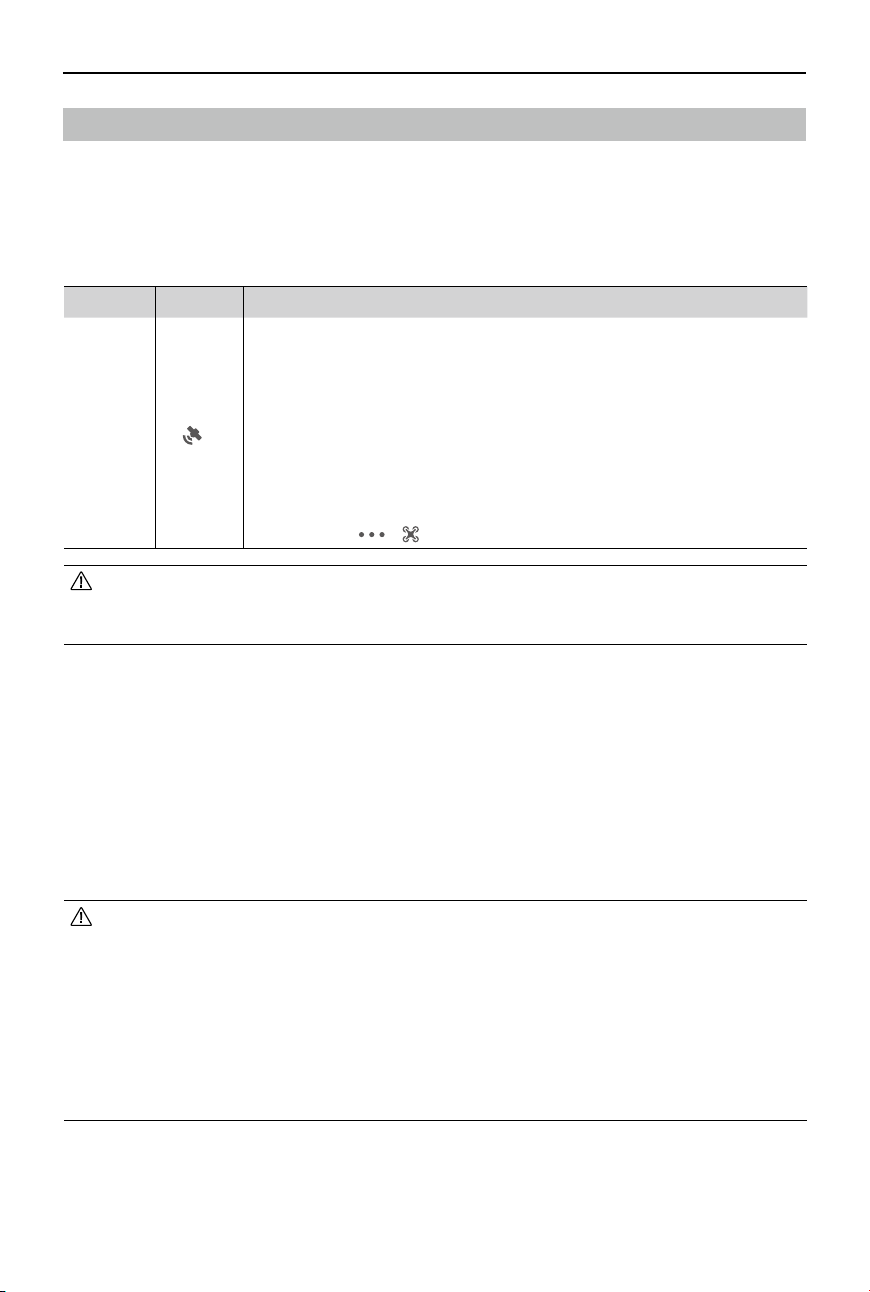
Searching for Keywords
Search for keywords such as “battery” and “install” to nd a topic. If you are using Adobe
Acrobat Reader to read this document, press Ctrl+F on Windows or Command+F on Mac to
begin a search.
Navigating to a Topic
View a complete list of topics in the table of contents. Click on a topic to navigate to that section.
Printing this Document
This document supports high resolution printing.
Version Date Revisions
v1.2 2022.7 Updated DJI AirSense and rear indicator descriptions.
v1.4 2023.5 Updated maximum wind resistance and rear indicator descriptions.
v2.0 2023.9 Updated RTH to Advanced RTH. Optimized the DJI Pilot 2 app contents.
Added EU C2 certication descriptions.
Revision Log
3
©
2022 DJI All Rights Reserved.
The operating temperature of this product is -20° to 50° C. It does not meet the standard
operating temperature for military grade application (-55° to 125° C), which is required to
endure greater environmental variability. Operate the product appropriately and only for
applications that it meets the operating temperature range requirements of that grade.
https://www.dji.com/matrice-30/video
Using This Manual
Legends
Important Hints and Tips Reference
Read Before Use
DJI
TM
provides users with tutorial videos and the following documents.
1. In the Box
2. Disclaimer and Safety Guidelines
3. Intelligent Flight Battery Safety Guidelines
4. Quick Start Guide
5. BS30 Intelligent Battery Station User Guide
6. User Manual
It is recommended to watch all the tutorial videos and read the Disclaimer and Safety Guidelines before
using for the rst time. Prepare for your rst ight by reviewing the quick start guide and refer to this
manual for more information.
Downloading DJI Assistant 2 (Enterprise Series)
Download and install DJI ASSISTANT
TM
2 (Enterprise Series) using the link below:
https://www.dji.com/matrice-30/downloads
Tutorial Videos
Go to the address below or scan the QR code to watch the DJI Matrice 30 tutorial videos, which
demonstrate how to use the Matrice 30 safely.

4
©
2022 DJI All Rights Reserved.
Contents
Using This Manual 3
Legends 3
Read Before Use 3
Downloading DJI Assistant 2 (Enterprise Series) 3
Tutorial Videos 3
Product Prole 9
Introduction 9
Feature Highlights 10
Flight Safety 12
Flight Environment Requirements 12
Wireless Communications Requirements 12
Vision System and Infrared Sensing System 13
Introduction 13
Detection Range 14
Calibrating the Vision System 15
Vision Positioning 15
Obstacle Sensing 16
Infrared Sensing System 16
Warnings 16
Return to Home 18
Advanced RTH 18
Straight Line RTH 22
Landing Protection 23
Flight Restrictions and Unlocking 24
GEO (Geospatial Environment Online) System 24
GEO Zones 24
Flight Restrictions in GEO Zones 24
Unlocking GEO Zones 27
Maximum Altitude & Distance Restrictions 28
Calibrating the Compass 29
Calibration Procedure 29
DJI AirSense 31
Pre-Flight Checklist 32
Flight Test 33
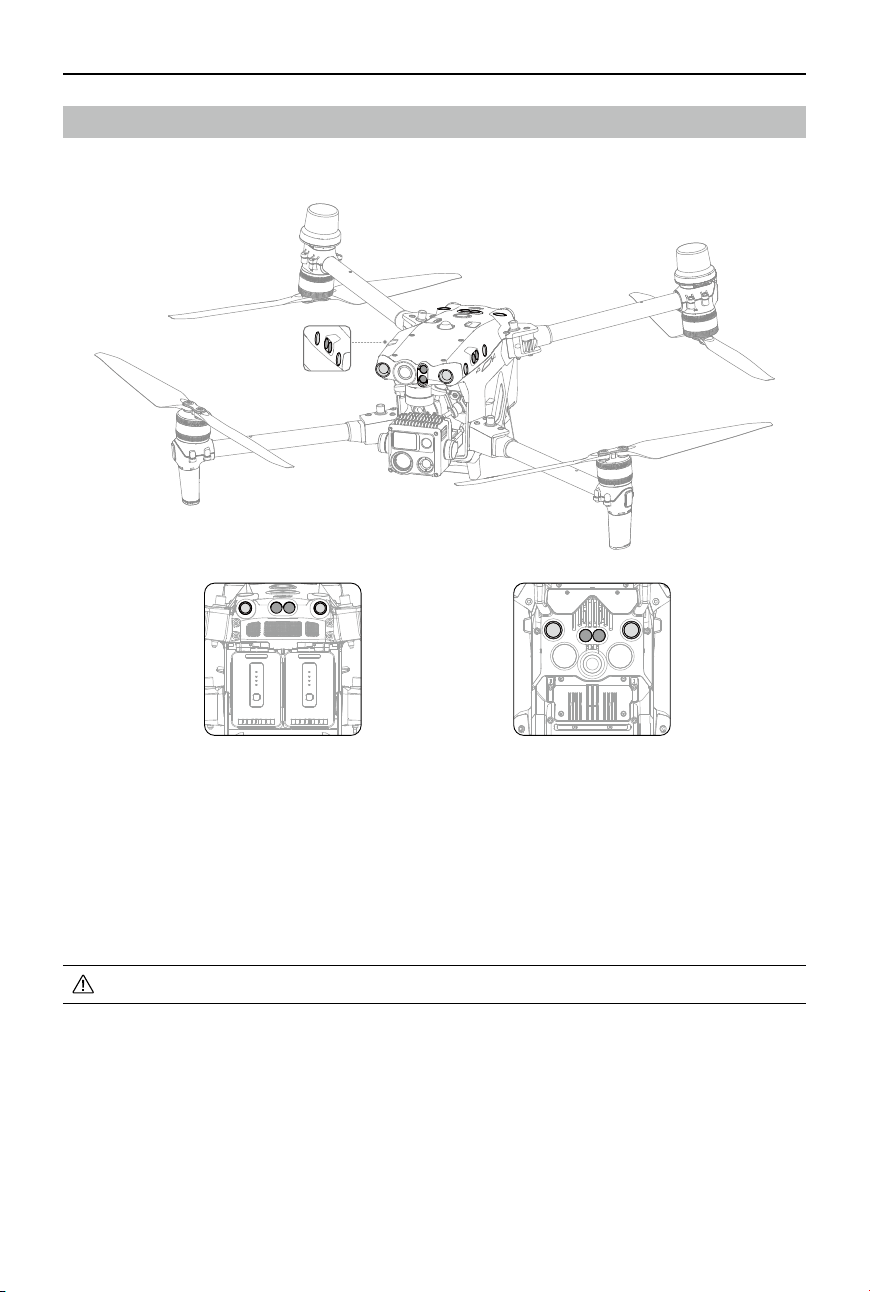
Aircraft 35
Activating the Aircraft 35
Aircraft Overview 35
FPV Camera 36

5
©
2022 DJI All Rights Reserved.
Propellers 36
Using the Propellers 36
Storing the Propellers 38
Replacing the Propeller Blades 38
Aircraft Indicators 39
Aircraft Beacons 40
Aircraft Auxiliary Lights 40
Gimbal Cameras 41
Operation 41
Using the microSD Card 42
Gimbal 42
Gimbal Lock 43
Gimbal Operation 43
Gimbal Mode 44
Aircraft RTK 46
RTK Module Introduction 46
Enabling/Disabling RTK 46
D-RTK 2 High Precision GNSS Mobile Station 46
Custom Network RTK 46
IP Rating 47
PSDK Port 47
Remote Controller 49
Starting and Activating the Remote Controller 49
Powering On/O 49
Activating the Remote Controller 49
Remote Controller Overview 50
Mounting the WB37 Intelligent Battery 53
Mounting the Dongle 53
Mounting the Strap and Bracket Kit 54
Adjusting the Antennas 55
IP Rating 55
User Interface 57
Home Screen 57
Screen Gestures 58
Shortcut Settings 58
Video Transmission 60
Remote Controller LEDs and Alert 60
Remote Controller LEDs 60
Remote Controller Alert 60
Charging the Remote Controller and Checking the Battery Level 61
Charging the Remote Controller 61
Checking the Battery Level 62

6
©
2022 DJI All Rights Reserved.
MATRICE 30 SERIES User Manual
Linking the Remote Controller and Control Stick Modes 63
Linking the Remote Controller 63
Control Stick Mode 64
Buttons Overview 67
RTH Button 67
L1/L2/L3/R1/R2/R3 Buttons 67
Button Customization and Combinations 67
Flight Mode Switch (N/S/F) 69
Calibrating the Compass 71
HDMI Settings 71
Advanced Dual Operator Mode 71
Intelligent Battery Station 74
Battery Station Overview 74
Warnings 75
Using the Battery Station 75
Battery Station LEDs and Alert 77
Battery Station LEDs Description 77
Buzzer Sound Description 77
Intelligent Flight Battery 79
Introduction 79
Battery Features 79
Using Paired Batteries 80
Powering On/Off 80
Checking Battery Level 80
Hot Battery Replacement 81
Warming the Battery 81
Battery Storage 82
Battery Maintenance 82
Capacity Calibration 82
Battery Maintenance 82
DJI Pilot 2 App 85
Homepage 85
Preight Check View 89
FPV Camera View 90
Using FPV Camera View 90
Primary Flight Display (PFD) 91
Navigation Display 92
Top Bar 94
Intelligent Flight Battery Level Indicator 95

7
©
2022 DJI All Rights Reserved.
MATRICE 30 SERIES User Manual
AR Projection 96
Gimbal Camera View 97
Using Gimbal Camera View 97
Wide Camera View 100
Thermal Camera View 100
Laser Rangender (RNG) 101
Smart Track 102
Map View 105
Annotation Management and Synchronization 106
PinPoint 106
Line and Area Annotation Management 109
Annotation Sharing 110
Mission Flight 111
Mission Flight Introduction 111
Mission Flight - Setting Waypoints 112
Mission Flight - Live Mission Recording 114
In-Flight Editing 116
Health Management System (HMS) 117
Intelligent Battery Station Status and Log Management 118
DJI FlightHub 2 118
Firmware Update 120
Using DJI Pilot 2 120
Aircraft and Remote Controller 120
Battery Station and TB30 Batteries 120
Oine Update 121
Using DJI Assistant 2 (Enterprise Series) 121
Aircraft and Remote Controller 121
Appendix 123
Introduction to the Carrying Case 123
Specications 124
Aircraft 124
Remote Controller 127
Intelligent Battery Station 128
Troubleshooting Procedures 130
Risk and Warnings 130
Disposal 131
C2 Certication 131
FAR Remote ID Compliance Information 136
After-Sales Information 137

8
©
2022 DJI All Rights Reserved.
Product Prole
This chapter introduces the major features
of the product.

9
©
2022 DJI All Rights Reserved.
Product Prole
Introduction
The DJI
TM
MATRICE
TM
30 Series is a powerful industrial drone platform with a multi-redundancy ight
controller system, 6 directional sensing and positioning system
[1]
, precise three-axis gimbal, high-
performance multi-camera load, and a new FPV camera with night vision. The DJI Pilot 2 app can be
used to observe the real-time view from the cameras and take photos and videos. The aircraft boasts
a ight time of up to 41 minutes
[2]
thanks to the advanced power management system along with the
dual batteries that ensure power supply and enhance ight safety.
Its airframe design gives it an IP55 rating, in accordance with the global IEC 60529 standard, which
eectively guarantees ight in all weather. The mechanical design, along with mounted folding arms and
propellers, makes it easy to transport and store. The arms can be locked directly after unfolding, which
can reduce the time needed to prepare for ight. The aircraft is also equipped with a PSDK port so
users can broaden its applications.
The built-in DJI AirSense system detects nearby aircraft in the surrounding airspace, providing alerts
in the DJI Pilot 2 app to ensure safety. Safety during takeo, ight, and landing are improved with the
safety beacons that help to identify the aircraft during flight and the auxiliary lights allow the vision
positioning system to achieve an even greater performance at night or when there is low light. The
built-in RTK provides more accurate navigational data for positioning to meet accurate operation
requirements and ensure safety.
The DJI RC Plus remote controller features O3 Enterprise, the latest version of DJI’s signature
OCUSYNC
TM
video transmission technology, and can transmit a live HD view from the camera of an
aircraft to display on the touchscreen. The remote controller comes with a wide range of functional
buttons as well as customizable buttons, which can easily control the aircraft and operate the camera.
The remote controller has a protection rating of IP54 (IEC 60529). The built-in 7.02 inch high brightness
1200 cd/m
2
screen boasts a resolution of 1920×1200 pixels. The Android operating system comes with
a variety of functions such as GNSS, Wi-Fi, and Bluetooth. The remote controller supports 65W fast
charging and has a maximum operating time of 3 hours 18 minutes
[3]
with the internal battery and up to
6 hours when used with an external WB37 intelligent battery.
[4]
[1] The vision system and infrared sensing system are aected by the surrounding environment. Read the
Disclaimer and Safety Guidelines for more information.
[2] The maximum ight time was tested using with the 1671 propellers in a laboratory environment and is for
reference only.
[3] The maximum operating time of the remote controller was tested in a lab environment at room temperature.
It is for reference only. Actual operating time may dier by scenario.
[4] The WB37 Intelligent Battery needs to be purchased separately. Read the WB37 Intelligent Battery Safety
Guidelines before use.
Compliance Version: The remote controller is compliant with local regulations.
Control Stick Mode: There are three modes (Mode 1, Mode 2, and Mode 3) available to
choose from in the DJI Pilot 2 App, with the default being Mode 2. It is recommended for
beginners to use Mode 2.
To avoid interference, DO NOT operate more than three aircraft simultaneously in the same area
(about the size of a football eld).

10
©
2022 DJI All Rights Reserved.
MATRICE 30 SERIES User Manual
Feature Highlights
PinPoints:
A PinPoint can be added for a target to select a point of interest in the gimbal camera view.
Besides generating its longitude and latitude, a PinPoint can be used to search and mark points of
interest, such as emergency rescues, security operations, and surveillance.
Live Annotations:
Users can add PinPoints, lines, and areas in the map view of the remote controller
and DJI FlightHub 2. Share annotation data to the companion controller in the Dual Control mode and
other devices logged in to DJI FlightHub 2. Data is shared in real time which facilitates operations across
the air and ground.
AR Projection:
DJI Pilot 2 supports the projection of Home Point, PinPoint, and Waypoint locations
in the FPV camera view or the gimbal camera view, providing users with clear ight targets and better
situation awareness.
Cloud Mapping:
When the remote controller is logged in to DJI FlightHub 2, the aircraft can perform a
cloud mapping task, which enables viewing of and generates a map on DJI FlightHub 2 simultaneously.*
* For more details, refer to the DJI FlightHub 2 User Guide which is available from the official DJI website
https://www.dji.com/ighthub-2/downloads.

11
©
2022 DJI All Rights Reserved.
Flight Safety
This chapter provides information about
flight environment requirements, wireless
communication requirements, and important
ight safety features of the aircraft.

12
©
2022 DJI All Rights Reserved.
Flight Safety
Make sure to have training and practice before operating any actual ight. Practice with the simulator
in DJI Assistant 2 or y under the guidance of experienced professionals. Pick a suitable area to y in
according to the following ight requirements and restrictions. Fly the aircraft below 120 m (400 ft). Any
ight altitude higher than that may violate local laws and regulations. Make sure you understand and
comply with the local laws and regulations before ying. Read the Disclaimer and Safety Guidelines
carefully to understand all safety precautions before ying.
Flight Environment Requirements
1. DO NOT y the aircraft in severe weather conditions. These include strong winds exceeding 12 m/s,
rain heavier than 100 mm (3.9 in) in 24 hours, snow, fog, hail, lightning, tornadoes, hurricanes, and
other weather with low visibility.
2. Place the aircraft on open and unobstructed at ground to take o. Make sure the aircraft is at a safe
distance from any surrounding obstacles, buildings, crowds, or trees. Fly the aircraft within the visual
line of sight (VLOS) to ensure ight safety.
3. If light conditions surrounding the aircraft are poor, the navigation information on DJI Pilot 2 will show
that the vision system or infrared sensing system is not functioning. This means the vision system
and the infrared sensing system may not be working properly and the aircraft is unable to sense
obstacles. Observe the surrounding environment at all times through the live FPV camera view and
maintain control of the aircraft to ensure ight safety.
4. Make sure the beacons and the auxiliary lights are enabled at night for ight safety.
5. DO NOT take o from a moving vehicle.
6. To avoid aecting the motor service life, DO NOT take o or land the aircraft on sandy or dusty areas.
7. Operate the aircraft, battery, remote controller, and charging device in a dry environment.
8. Make sure the temperature and humidity is suitable for the gimbal camera during usage.
9. This product shall not be used in potentially explosive atmospheres.
Wireless Communications Requirements
1. Make sure that the antennas on the front arms and the bottom of the aircraft body are not damaged
or loose.
2. Fly in wide open areas. Tall buildings, steel structures, mountains, rocks, or tall trees may aect the
accuracy of the GNSS and block the video transmission signal.
3. To avoid interference with the remote controller from other wireless equipment, make sure to power
o nearby Wi-Fi and Bluetooth devices when controlling the aircraft remotely.
4. Be extremely alert when ying near areas with magnetic or radio interference. Pay close attention
to the video transmission quality and signal strength on DJI Pilot 2. Sources of electromagnetic
interference include but are not limited to: high voltage lines, large scale power transmission stations
or mobile base stations, and broadcasting towers. The aircraft may behave abnormally or lose control
when ying in areas with too much interference. Return to the Home Point and land the aircraft if
prompted to do so in DJI Pilot 2.
13
©
2022 DJI All Rights Reserved.
MATRICE 30 SERIES User Manual
Vision System and Infrared Sensing System
Introduction
Rear View Bottom View
The main components of the vision system (cameras with stereo vision sensors) are located on the front,
rear, left, right, top and bottom of the aircraft. The infrared sensing system has two infrared sensors on
each side of the aircraft (front, rear, left, right, top, and bottom).
The vision system constantly scans for obstacles and uses image data to calculate the aircraft position,
and the infrared sensing system uses infrared sensors to detect obstacles and determine the flight
altitude. Both systems work together to position the aircraft and sense obstacles during ight.
To ensure a safe and steady ight, DO NOT block the vision and infrared sensors.
14
©
2022 DJI All Rights Reserved.
MATRICE 30 SERIES User Manual
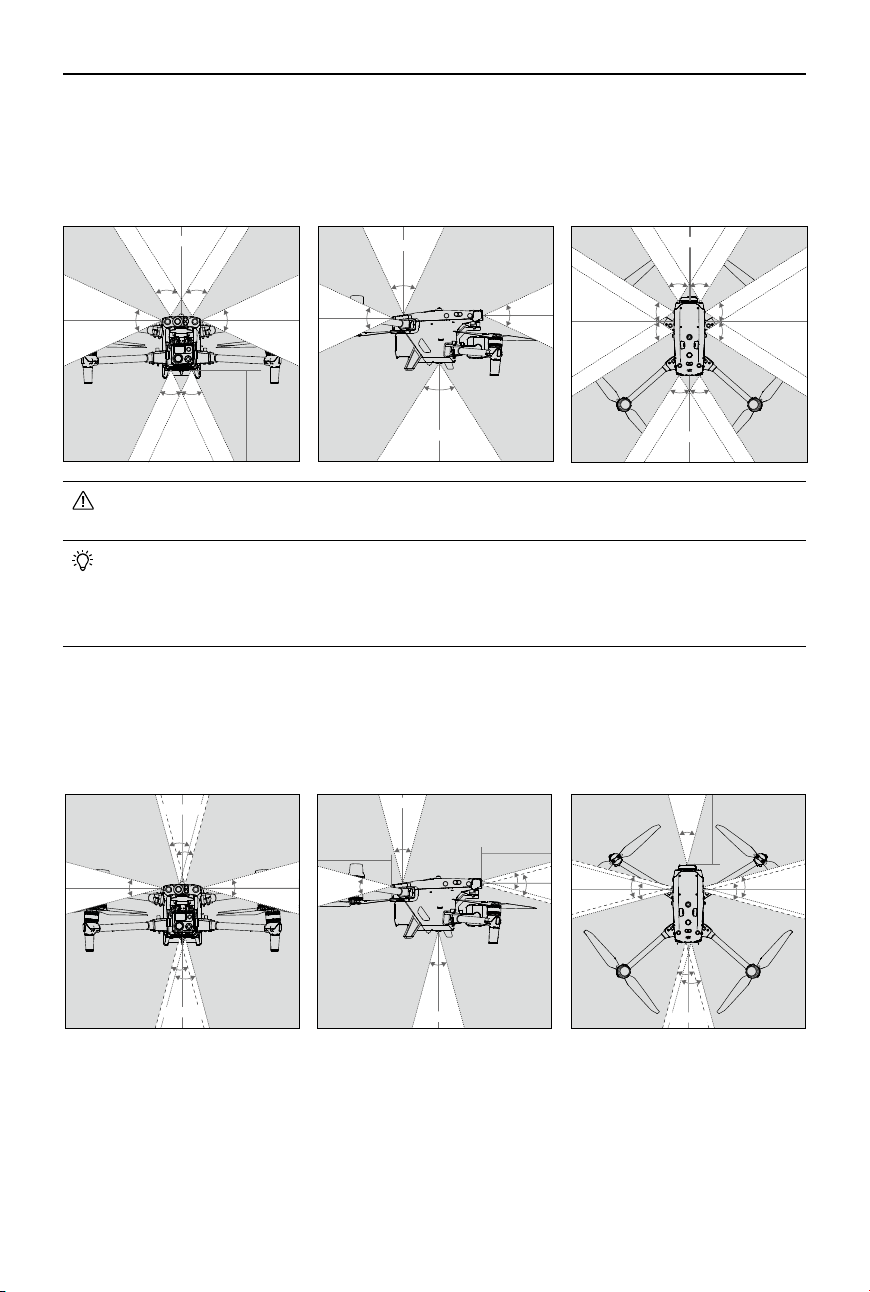
Detection Range
Detection Range of the Vision System
The detection range of the vision system is depicted below. Note that aircraft cannot sense obstacles
that are out of the detection range. Fly with caution.
65°65°
50°50°
50°
50°
0.5-33 m
0.5-33 m
0.5-33 m
0.5-33 m
30°
30°
30°
30°
30°
0.1-10 m
0.1-10 m
0.1-10 m
30°
0.1-10 m
65°
65°
65°
65°
65°
65°
65°65°
0.5-33 m
0.5-33 m
0.5-33 m
0.6-38 m
30°
30°
0.1-10 m
30°
0.1-10 m
30°
0.1-10 m
30°
30°
0.1-10 m
30°
50°
50°
65°
50°
0.5-33 m
0.5-33 m
0.5-33 m
0.6-38 m
30°
30°
30°
30°
30°
0.1-10 m
0.1-10 m
0.1-10 m
0.1-10 m
The gray area is the blind spot of the vision system, where the aircraft cannot detect
objects. Fly with caution.
Users can set the braking and warning distances in DJI Pilot 2. The aircraft brakes automatically
when approaching the braking distance. When the aircraft is in the warning distance, DJI Pilot 2 will
display an orange alert in obstacle information. When the aircraft is close to the braking distance, a
red alert will appear in obstacle information.
Detection Range of the Infrared Sensing System
The detection range of the infrared sensors is 0.1 to 10 m (0.33 to 33 ft). Be aware of the blind spot
(marked grey) of the infrared sensing system. The Aircraft cannot detect and avoid obstacles that are
out of the detection range.

15
©
2022 DJI All Rights Reserved.
MATRICE 30 SERIES User Manual
30 m
20 m 20 m
Calibrating the Vision System
The vision systems installed on the aircraft is factory calibrated. If the aircraft experiences a collision or
a signicant change in the operating temperature, calibration may be required. DJI Pilot 2 will display a
prompt when calibration is required. Follow these steps to calibrate the vision system when prompted:
1. Power on the aircraft.
2. Connect the assistant port of the aircraft to the computer.
3. Launch DJI Assistant 2 (Enterprise Series) and log in using a DJI account.
4. Select the M30 Series, then click the calibration button.
5. Position the aircraft with the vision system facing the dotted pattern displayed on the computer
screen, and follow the on-screen instructions to calibrate the vision sensors on each side.
DO NOT power off the aircraft or unplug the cable after calibration. Wait for the data
calculation to complete.
Vision Positioning
The vision system enables the aircraft to y indoors or in environments where GNSS is not available.
When the GNSS signal is available, the vision system provides information that improves aircraft
positioning accuracy. The vision system works well when ying within 30 m (98.43 ft) above the ground
and 20 m (65.62 ft) horizontally from any object to its side, provided that the object’s surface has clear
patterns or texture and the lighting is adequate. When the vision system is not working, the ight mode
will switch to Attitude Mode.
If the vision system is disabled or blocked by other objects, the aircraft will not be able to
hover indoors at a low altitude, and Landing Protection will not work. Control the landing
speed as high-speed landing may damage the aircraft.
16
©
2022 DJI All Rights Reserved.
MATRICE 30 SERIES User Manual
Obstacle Sensing
Obstacle sensing works best when the lighting is adequate and the obstacle is clearly textured. It does
not work well with obstacles that are less dense such as twigs on a tree. The aircraft must y at a speed
below 17 m/s with a maximum tilt angel of 25° to ensure a sucient braking distance. Aircraft cannot
sense obstacles that are out of the detection range.
50°
Infrared Sensing System
The infrared sensing system can only be used to sense large or highly reective obstacles and rough
surfaces. Aircraft cannot sense obstacles that are out of the detection range. The downward infrared
sensing system is used for positioning and assisting with altitude calculations during takeo and landing,
while the infrared sensing system on the other ve sides is for obstacle sensing.
Warnings
The measurement accuracy of the vision system is easily aected by the light intensity and the surface
texture of the object. The infrared sensing system can only be used to sense large or highly reective
obstacles and rough surfaces. The vision system may NOT function properly in the following situations:
a. Flying over monochrome surfaces (e.g., pure black, white, red, or green) or those without clear
texture.
b. Flying over surfaces with strong reected light or images.
c. Flying over water, ice, or transparent surfaces.
d. Flying over moving surfaces or objects (e.g., moving crowds, or swaying reeds, shrubs, or grass).
e. Flying in an area where lighting changes frequently or drastically or with direct exposure to strong
light.
f. Flying over extremely dark (< 15 lux) or extremely bright (> 10,000 lux) surfaces.
g. Flying at high speeds below 2 m above the ground (e.g., faster than 14 m/s at a 2m height or 5 m/s
at a 1m height).
h. Small obstacles (e.g., iron wires, cables, tree branches, or leaves).
i. The lens is dirty (e.g., from raindrops or ngerprints).
j. In low-visibility environments (e.g., heavy fog or snow).
17
©
2022 DJI All Rights Reserved.
MATRICE 30 SERIES User Manual
The infrared sensing systems may NOT detect the distance accurately in the following situations:
a. Flying over surfaces that can absorb sound waves (e.g., asphalt road surfaces).
b. A large area of strong reectors situated at a distance of more than 15 m (e.g., multiple trac signs
placed side by side).
c. Small obstacles (e.g., iron wires, cables, tree branches, or leaves).
d. Mirrors or transparent objects (e.g., water or glass).
e. In low-visibility environments (e.g., heavy fog or snow).
Keep the vision sensors clean at all times. Any dirt or stain may aect their function.
The vision system relies on surface patterns or texture to process image data and obtain
position information. Make sure the surrounding environment has sucient lighting and clearly
textured ground.
The vision system cannot function properly in dark environments and over surfaces without
clear patterns or texture such as water and ice.
The aircraft cannot avoid moving obstacles such as people, animals, or vehicles.
DJI M30 Series
User Manual
18
©
2023 DJI All Rights Reserved.
The Return to Home (RTH) function will automatically y the aircraft back to the last recorded Home
Point. RTH can be triggered in three ways: the user actively triggers, the aircraft has low battery, or the
control signal between the remote controller and the aircraft is lost. If the aircraft records the Home Point
successfully and the positioning system is functioning normally, when the RTH function is triggered, the
aircraft will automatically y back and land at the Home Point.
GNSS
Descriptions
Home
Point
10
The rst location where the aircraft receives a strong to moderately strong GNSS
signal (indicated by a white icon) will be recorded as the default Home Point.
The Home Point can be updated before takeo as long as the aircraft receives
another strong to moderately strong GNSS signal. If the signal is weak, the Home
Point will not be updated. After the Home Point is recorded, DJI Pilot 2 will issue a
voice prompt.
If it is necessary to update the Home Point during a flight (such as where the
position of the user has changed), the Home Point can be manually updated in
Camera View > > > Home Point Settings in DJI Pilot 2.
•
GEO zones may aect the RTH. Avoid ying near GEO zones.
•
The aircraft will exit RTH if the lighting and environment conditions are too complex to complete
RTH, even if the vision systems are working properly.
Advanced RTH
When Advanced RTH is triggered, the aircraft will automatically plan the best RTH path, which will be
displayed in DJI Pilot 2 and will adjust according to the environment.
During RTH, pressing the Flight Pause button or the RTH button on the remote controller will exit RTH if
the control signal between the remote controller and the aircraft is not lost. After exiting RTH, users will
regain control of the aircraft.
During RTH, the aircraft will automatically adjust the tilt and pan angles of the gimbal so that the gimbal
camera points towards the RTH path.
•
When using the remote controller dial to manually adjust the gimbal pan angle, the aircraft
orientation will change accordingly. Since the aircraft has visual blind spots, the aircraft's ight
speed will be aected after the orientation has changed. DO NOT manually adjust the gimbal
pan angle during RTH.
•
When the lighting and environment conditions are unsuitable for vision systems, the aircraft will
rely on the laser rangender on the gimbal camera to assist in distance measurement. Once
the user adjusts the gimbal pan angle from the RTH path, obstacles on the RTH path will not
be sensed, and ight safety risks will increase. DO NOT manually adjust the gimbal pan angle
during RTH.
Return to Home

DJI M30 Series
User Manual
19
©
2023 DJI All Rights Reserved.
Trigger Method
•
The user actively triggers RTH
Advanced RTH can be initiated by pressing and holding the RTH button on the remote controller
until it beeps.
•
Aircraft low battery
When the Intelligent Flight Battery level is too low and there is not enough power to return home,
land the aircraft as soon as possible.
To avoid unnecessary danger caused by insufficient power, the aircraft automatically calculates
if the battery power is sufficient to return to the Home Point according to the current position,
environment, and ight speed. A warning prompt will appear in DJI Pilot 2 when the battery level is
low and only enough to complete an RTH ight. The aircraft will automatically y to the Home Point if
no action is taken after a countdown.
The user can cancel RTH by pressing the RTH button on the remote controller. If RTH is canceled
following the warning, the Intelligent Battery may not have enough power for the aircraft to land
safely, which may lead to the aircraft crashing or being lost.
The aircraft will land automatically if the current battery level can only support the aircraft long
enough to descend from its current altitude. Auto landing cannot be canceled, but the remote
controller can be used to control the horizontal movement and the descent speed of the aircraft
during landing. If there is sucient power, the throttle stick can be used to make the aircraft ascend
at a speed of 1 m/s.
During auto landing, move the aircraft horizontally to find an appropriate place to land as soon as
possible. The aircraft will fall if the user keeps pushing the throttle stick upward until the power is
depleted.
•
Loss of remote controller signal
The action of the aircraft when the remote controller signal is lost can be set to RTH, land, or hover
in Camera View > > > Signal Lost Action in DJI Pilot 2. If the action is set to RTH, the Home
Point was successfully recorded and the compass is functioning normally, Failsafe RTH automatically
activates after the remote controller signal is lost for more than six seconds.
When the lighting is sucient and the vision systems are working normally, DJI Pilot 2 will display the
RTH path that was generated by the aircraft before the remote controller signal was lost. The aircraft
will start RTH using Advanced RTH according to the RTH settings. The aircraft will remain in RTH
even if the remote controller signal is restored. DJI Pilot 2 will update the RTH path accordingly.
When the lighting is not sufficient and the vision systems are not available, the aircraft will enter
Original Route RTH. The aircraft enters Preset RTH if the remote controller signal is restored during
Original Route RTH. The Original Route RTH procedure is as follows:
1. The aircraft brakes and hovers in place.
2. When RTH begins:
•
If the RTH distance (the horizontal distance between the aircraft and the Home Point) is
farther than 50 m, the aircraft adjusts its orientation and ies backward for 50 m on its original
ight route before entering Preset RTH.
•
If the RTH distance is farther than 5 m but less than 50 m, it adjusts its orientation and ies to
the Home Point in a straight line at the current altitude.
•
The aircraft lands immediately if the RTH distance is less than 5 m.
DJI M30 Series
User Manual
20
©
2023 DJI All Rights Reserved.
3. The aircraft begins to land when it reaches above the Home Point.
•
The aircraft may not be able to return to the Home Point if the positioning performance is
poor. In case of loss of remote controller signal, the aircraft may enter ATTI mode and will
automatically land.
•
It is important to set a suitable RTH altitude before each ight. Launch DJI Pilot 2 and set the
RTH altitude. The default RTH altitude is 100 m.
•
The aircraft cannot bypass obstacles during RTH if the lighting and environment conditions are
unsuitable for the vision systems.
•
The aircraft may not be able to return to a Home Point when the wind speed is too high. Fly
with caution.
•
Pay extra attention to small or ne objects (such as tree branches or power lines) or transparent
objects (such as water or glass) during RTH. Exit RTH and control the aircraft manually in an
emergency.
RTH Procedure
1. The Home Point is recorded.
2. Advanced RTH is triggered.
3. The aircraft brakes and hovers in place. When RTH begins:
•
The aircraft lands immediately if the RTH distance is less than 5 m.
•
If the RTH distance is farther than 5 m, the aircraft will plan the best path according to the RTH
settings, lighting, and environmental conditions.
4. The aircraft will y automatically according to the RTH settings, environment, and transmission signal
during RTH.
5. The aircraft lands and the motors stop after reaching the Home Point.
RTH Settings
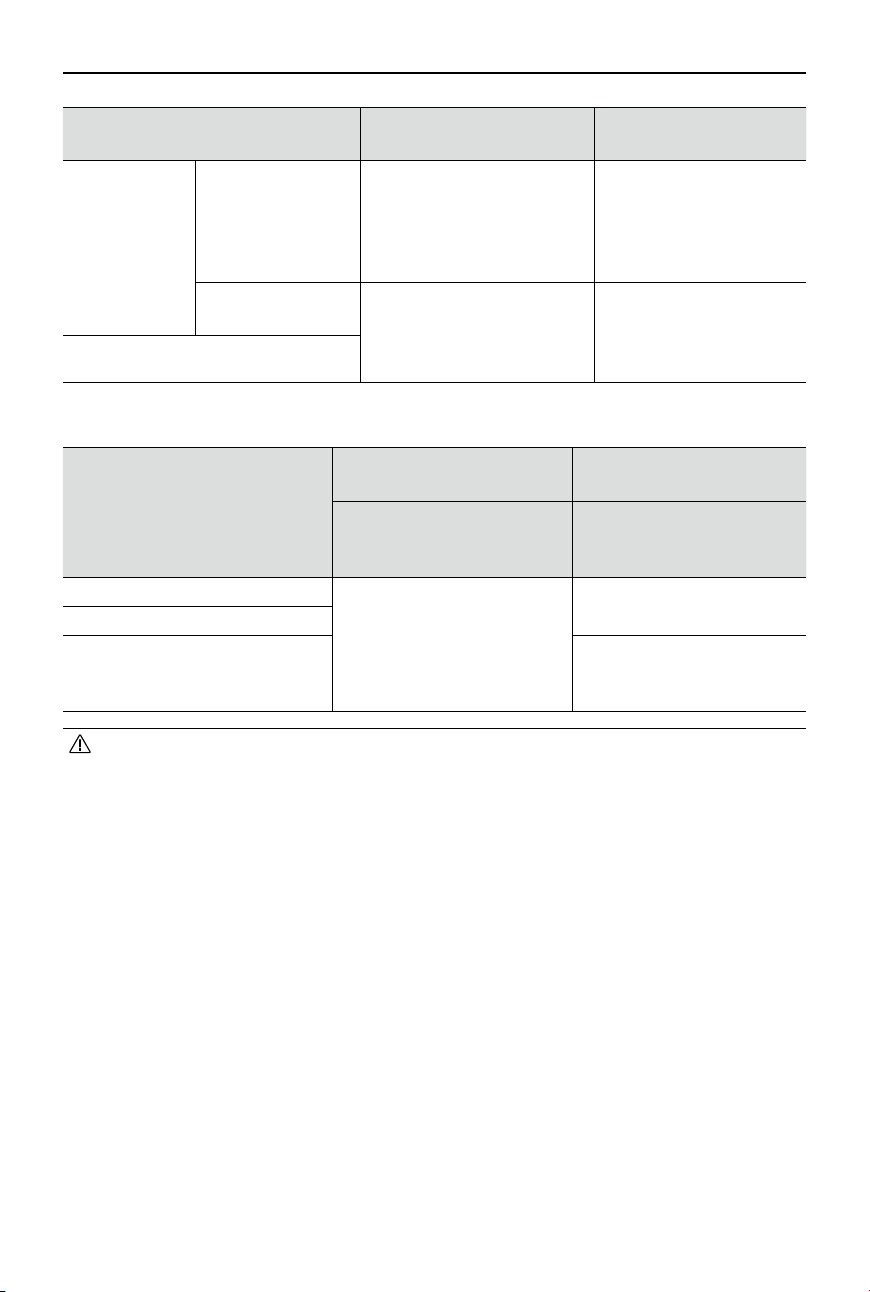
Advanced RTH will plan the RTH path using Preset RTH.
Preset:
DJI M30 Series
User Manual
21
©
2023 DJI All Rights Reserved.
Lighting and Environment
Conditions
Suitable for Vision Systems
Unsuitable for Vision
Systems
RTH distance >
50 m
Current altitude <
RTH altitude
The aircraft will plan the RTH
path, y to an open area while
bypassing obstacles, ascend
to the RTH altitude, and return
to home using the best path.
The aircraft will ascend to
the RTH altitude, adjust its
orientation and y to the
Home Point in a straight
line at the RTH altitude.
Current altitude ≥
RTH altitude
The aircraft will return to home
using the best path at the
current altitude.
The aircraft will adjust its
orientation and y to the
Home Point in a straight
line at the current altitude.
RTH distance is within 5-50 m
The RTH plans for dierent environments, RTH trigger methods, and RTH settings are as follows:
Lighting and Environment
Conditions
Suitable for Vision Systems
Unsuitable for Vision
Systems
The aircraft can bypass
obstacles and GEO zones
The aircraft cannot bypass
obstacles but can bypass GEO
zones
The user actively triggers RTH
Preset
Preset
Aircraft low battery
Loss of remote controller signal
Original route RTH,
Preset RTH will be executed
when the signal is restored
•
During Advanced RTH, the aircraft will adjust the flight speed automatically to suit
environmental factors such as wind speed and obstacles.
•
The aircraft cannot avoid small or ne objects such as tree branches or power lines. Fly the
aircraft to an open area before using RTH.
•
Set Advanced RTH as Preset if there are power lines or towers that the aircraft cannot bypass
on the RTH path and make sure the RTH Altitude is set higher than all obstacles.
•
The aircraft will brake and return to home according to the latest settings if the RTH settings
are changed during RTH.
•
If the max altitude is adjusted below the current altitude during RTH, the aircraft will descend to
the max altitude rst and then continue returning to home.
•
The RTH Altitude cannot be changed during RTH.
•
If there is a large dierence between the current altitude and the RTH altitude, the amount of
battery power used cannot be calculated accurately due to wind speed dierence at dierent
altitudes. Pay extra attention to the battery power prompts and warning prompts in DJI Pilot 2.
•
During Advanced RTH, if the lighting condition and environment becomes unsuitable for the
vision systems, the aircraft cannot bypass the obstacles on the RTH path. In this case, the
aircraft will use the infrared sensor and the laser rangender on the gimbal camera to assist in
distance measurement. Fly with caution. Make sure to set an appropriate RTH altitude before
entering RTH.

DJI M30 Series
User Manual
22
©
2023 DJI All Rights Reserved.
•
When the remote controller signal is normal during Advanced RTH, the pitch stick can be used
to control the ight speed, but the orientation and altitude cannot be controlled and the aircraft
cannot be controlled to y to the left or right. Constantly pushing the pitch stick to accelerate
will increase the battery power consumption speed. The aircraft cannot bypass obstacles if the
ight speed exceeds the eective sensing speed. The aircraft will brake and hover in place and
exit RTH if the pitch stick is pushed all the way down. The aircraft can be controlled after the
pitch stick is released.
•
If the aircraft reaches the altitude limit of the aircraft current location or of the Home Point while
it is ascending during Preset RTH, the aircraft stops ascending and returns to the Home Point
at the current altitude. Pay attention to ight safety during RTH.
•
If the Home Point is within the Altitude Zone but the aircraft is not, when the aircraft reaches
the Altitude Zone it will descend below the altitude limit, which may be lower than the set RTH
altitude. Fly with caution.
•
The aircraft will bypass any GEO zones encountered when it is ying forward during Advanced
RTH. Fly with caution.
Straight Line RTH
The aircraft will enter Straight Line RTH when the lighting is not sucient and the environment is not
suitable for the Advanced RTH.
During the Advanced RTH process, once there are dense obstacles (such as dense woods) on the RTH
path or obstacles are encountered on the RTH path at night, the aircraft will hover for 30 seconds and
then start a straight line RTH.
Straight Line RTH Procedure
1. The Home Point is recorded.
2. Straight Line RTH is triggered.
3. The aircraft brakes and hovers in place.
a. If the aircraft is farther than 50 m from the Home Point when RTH begins, the aircraft rst ascends
to a height of 20 m (this step will be skipped if the current height is higher than 20 m), then the
aircraft adjusts its orientation and ascends to the preset RTH altitude and ies to the Home Point.
If the current altitude is higher than the RTH altitude, the aircraft will y to the Home Point at the
current altitude.
b. If the aircraft is at a distance of 5 to 50 m from the Home Point when RTH begins, the aircraft
adjusts its orientation and ies to the Home Point at the current altitude. If the current altitude
is lower than 2 m when RTH begins, the aircraft will ascend to 2 m and ies back to the Home
Point.
c. The aircraft lands immediately if it is less than 5 m from the Home Point when RTH begins.
4. The aircraft lands and the motors stop after reaching the Home Point.
The user can also exit RTH by pushing the control stick in the opposite direction of the
ight (e.g., pushing the throttle stick down when the aircraft is ascending).
23
©
2022 DJI All Rights Reserved.
MATRICE 30 SERIES User Manual
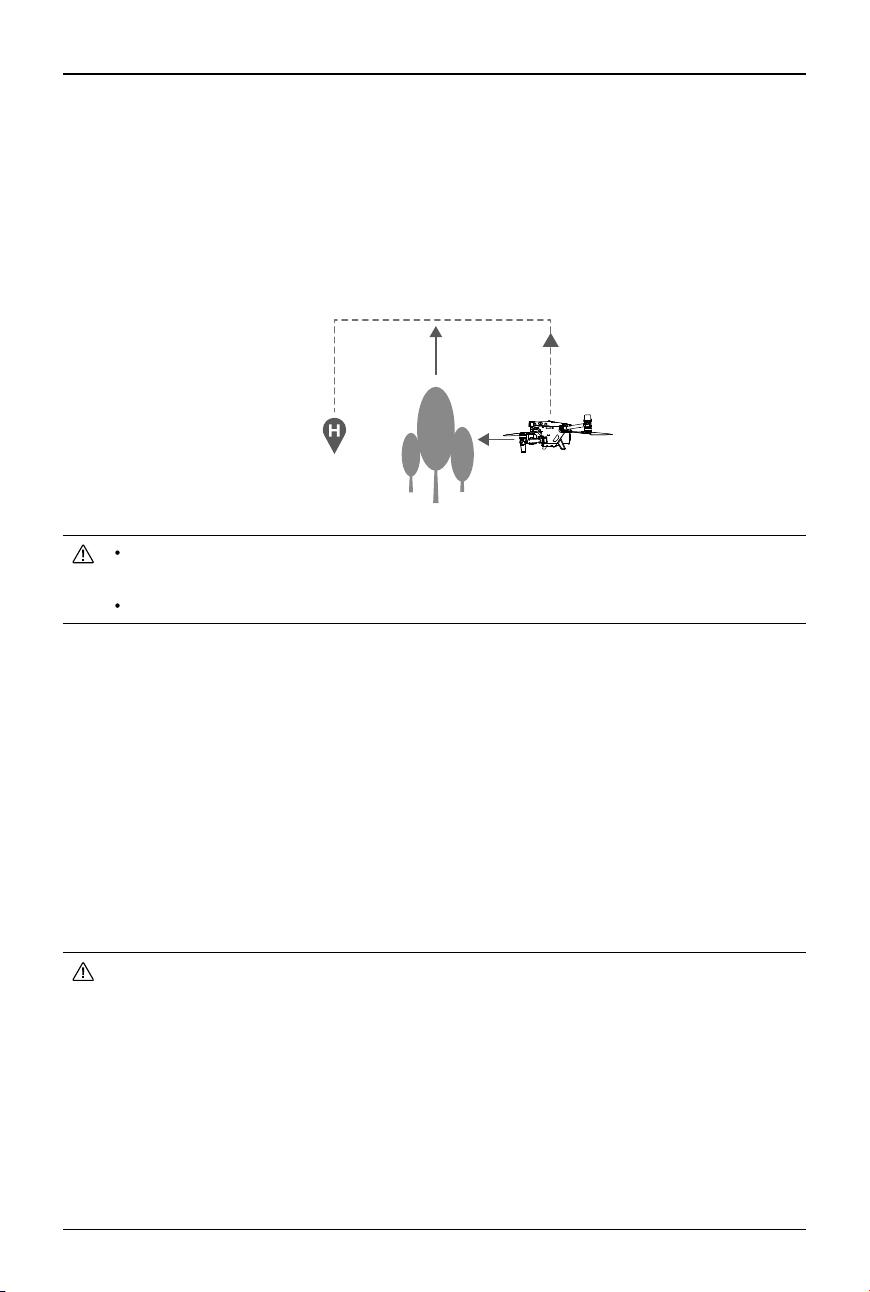
Obstacle Sensing during RTH
The aircraft can sense and avoid obstacles during RTH if the lighting is sucient for obstacle sensing.
The obstacle sensing procedure is as follows:
1. The aircraft decelerates when an obstacle is sensed at approximately 20 m (65.62 ft) ahead.
2. The aircraft stops and hovers, then ascends to avoid the obstacle. Eventually, the aircraft stops
ascending when it is at least 5 m (16.4 ft) above the detected obstacle.
3. The aircraft continues ying to the Home Point at its current altitude.
Approx. 5 meters
Approx. 20 meters
To ensure the aircraft ies forward to the Home Point, the user is unable to rotate the aircraft
during RTH.
During RTH, obstacles on either side of the aircraft cannot be detected or avoided.
Landing Protection
Make sure that the downward vision system is enabled in DJI Pilot 2.
Landing protection is activated during auto landing and is executed as follows:
1. The aircraft will land directly if landing protection determines the ground is suitable for landing.
2. If the ground is determined unsuitable for landing, the aircraft will hover. A prompt will appear in DJI
Pilot 2 pending the next action by the user. The aircraft will start descending only when the battery
level drops to 0%. During this process, the user can still control the orientation of the aircraft.
3. If landing protection is not functioning, DJI Pilot 2 will display a landing prompt when the aircraft
descends below 0.7 m (2.3 ft) above the ground. After making sure the environment is suitable for
landing, tap to conrm or push the throttle stick all the way down and hold for one second, and the
aircraft will land.
Landing protection will not work in the following circumstances:
a. When the downward vision system is disabled
b. When the user is operating the pitch/roll/throttle stick (landing protection will be re-activated
when the control stick is not in use).
c. When the positioning system is not functioning properly (e.g., position drift errors).
d. When the vision system needs calibrating. When the lighting is too dim for the vision system
to operate.
e. If an obstacle is within 1 m (3.28 ft) of the aircraft, no valid observation data is obtained, and
the ground conditions cannot be detected, the aircraft will descend to 0.7 m (2.3 ft) above
the ground and hover pending conrmation by the user to land.
24
©
2022 DJI All Rights Reserved.
MATRICE 30 SERIES User Manual
Flight Restrictions and Unlocking
GEO (Geospatial Environment Online) System
DJI’s Geospatial Environment Online (GEO) system is a global information system that provides real-time
information on ight safety and restriction updates and prevents UAVs from ying in restricted airspace.
Under exceptional circumstances, restricted areas can be unlocked to allow ights in. Prior to that, the
user must submit an unlocking request based on the current restriction level in the intended ight area.
The GEO system may not fully comply with local laws and regulations. Users shall be responsible for
their own ight safety and must consult with the local authorities on the relevant legal and regulatory
requirements before requesting to unlock a ight in a restricted area.
GEO Zones
DJI’s GEO system designates safe ight locations, provides risk levels and safety notices for individual
ights, and oers information on restricted airspace. All restricted ight areas are referred to as GEO
Zones, which are further divided into Restricted Zones, Authorization Zones, Warning Zones, Enhanced
Warning Zones, and Altitude Zones. Users can view such information in real time in DJI Pilot 2. GEO
Zones are specic ight areas, including but not limited to airports, large event venues, locations where
public emergencies have occurred (such as forest res), nuclear power plants, prisons, government
properties, and military facilities. By default, the GEO system limits takeos and ights in zones that may
cause safety or security concerns. A GEO Zone map that contains comprehensive information on GEO
Zones around the globe is available on the ocial DJI website: https://www.dji.com/ysafe/geo-map.
Flight Restrictions in GEO Zones
The following section describes in detail the ight restrictions for the abovementioned GEO Zones.
GEO Zone Flight Restriction Scenario
Restricted
Zones (Red)
UAVs are prohibited from flying
in Restricted Zones. If you have
obtained permission to fly in a
Restricted Zone, please visit https://
www.dji.com/flysafe or contact
[email protected] to unlock the zone.
Takeoff: The aircraft motors cannot be started in
Restricted Zones.
In Flight: When the aircraft ies inside a Restricted
Zone, a 100-second countdown will commence
in DJI Pilot 2. When the countdown is finished,
the aircraft will land immediately in semi-automatic
descent mode and turn o its motors after landing.
In Flight: When the aircraft approaches the boundary
of a Restricted Zone, the aircraft will automatically
decelerate and hover.
25
©
2022 DJI All Rights Reserved.
MATRICE 30 SERIES User Manual
Authorization
Zones (Blue)
The aircraft will not be able to take
o in an Authorization Zone unless
it obtains a permission to y in the
area.
Takeoff: The aircraft motors cannot be started in
Authorization Zones. To y in an Authorization Zone,
the user is required to submit an unlocking request
registered with a DJI-veried phone number.
In Flight: When the aircraft flies inside an
Authorization Zone, a100-second countdown will
commence in DJI Pilot 2. When the countdown is
finished, the aircraft will land immediately in semi-
automatic descent mode and turn off its motors
after landing.
Warning
Zones
(Yellow)
A warning will be displayed when
the aircraft flies inside a Warning
Zone.
The aircraft can fly in the zone but the user is
required to understand the warning.
Enhanced
Warning
Zones
(Orange)
When the aircraft flies in an
Enhanced Warning Zone, a warning
will be displayed prompting the
user to conrm the ight path.
The aircraft can continue to y once the warning is
conrmed.
Altitude
Zones (Gray)
The aircraft altitude is limited when
ying inside an Altitude Zone.
When the GNSS signal is strong, the aircraft cannot
y above the altitude limit.
In Flight: When the GNSS signal changes from weak
to strong, a 100-second countdown will commence
in DJI Pilot 2 if the aircraft exceeds the altitude limit.
When the countdown is finished, the aircraft will
descend below the altitude limit and hover.
When the aircraft approaches the boundary of an
Altitude Zone and the GNSS signal is strong, the
aircraft will decelerate automatically and hover if the
aircraft is above the altitude limit.
Semi-Automatic Descent: All stick commands except the throttle stick command and the RTH
button are available during descent and landing. The aircraft motors will turn o automatically after
landing. It is recommended to y the aircraft to a safe location before the semi-automatic descent.
Buffer Zone
Buer Zones for Restricted Zones/Authorization Zones: To prevent the aircraft from accidentally ying
into a Restricted or Authorization Zone, the GEO system creates a buffer zone of about 20 meters
wide outside each Restricted and Authorization Zone. As shown in the illustration below, the aircraft
can only take o and land in place or y toward an opposite direction of the Restricted or Authorization
Zone when inside the buer zone, and cannot y toward the Restricted or Authorization Zone unless an
unlocking request has been approved.
The aircraft cannot y back into the buffer zone after leaving
the buffer zone.
Buer Zones for Altitude Zones: A buer zone of about 20 meters wide is established outside each
Altitude Zone. As shown in the illustration below, when approaching the buer zone of an Altitude Zone
in a horizontal direction, the aircraft will gradually reduce its ight speed and hover outside the buer
26
©
2022 DJI All Rights Reserved.
MATRICE 30 SERIES User Manual
Ground
Restricted Zone/
Authorized Zone
Ground
Buffer Zone
Altitude Zone
Altitude Limit
20 m
20 m
20 m
20 m
zone. When approaching the buer zone from underneath in a vertical direction, the aircraft can ascend
and descend in altitude or y in an opposite direction of the Altitude Zone, but cannot y toward the
Altitude Zone.
The aircraft cannot y back into the buffer zone in a horizontal direction after leaving
the buffer zone.

27
©
2022 DJI All Rights Reserved.
MATRICE 30 SERIES User Manual
Unlocking GEO Zones
To satisfy the needs of dierent users, DJI provides two unlocking modes: Self-Unlocking and Custom
Unlocking. Users may request for either on the DJI Fly Safe website or via a mobile device.
Self-Unlocking
is intended for unlocking Authorization Zones. To complete Self-Unlocking, the user is
required to submit an unlocking request via the DJI Fly Safe website at https://www.dji.com/ysafe.
Once the unlocking request is approved, the user may synchronize the unlocking license through the
DJI Pilot 2 app (Live Self-Unlocking) to unlock the zone; alternatively, the user may launch or y the
aircraft directly into the approved Authorization Zone and follow the prompts in DJI Pilot 2 to unlock the
zone (Scheduled Self-Unlocking). For Live Self-Unlocking, the user can designate an unlocked period
during which multiple ights can be operated. Scheduled Self-Unlocking is only valid for one ight. If the
aircraft is restarted, the user will need to unlock the zone again.
Custom Unlocking
is tailored for users with special requirements. It designates user-dened custom
flight areas and provides flight permission documents specific to the needs of different users. This
unlocking option is available in all countries and regions and can be requested for via the DJI Fly Safe
website at https://www.dji.com/ysafe.
Unlocking on Mobile Device:
Run the DJI Pilot 2 app and tap GEO Zone Map on the home screen.
View the list of the unlocking licenses and tap to view details of the unlocking license. A link to the
unlocking license and a QR code will be displayed. Use your mobile device to scan the QR code and
apply to unlock directly from the mobile device.
For more information about unlocking, please visit https://www.dji.com/ysafe or contact [email protected].
28
©
2022 DJI All Rights Reserved.
MATRICE 30 SERIES User Manual
Maximum Altitude & Distance Restrictions
Maximum flight altitude restricts the aircraft flight altitude, while maximum flight distance restricts
the aircraft ight radius around the Home Point. These limits can be set using the DJI Pilot 2 app for
improved ight safety.
Strong GNSS Signal
Restriction Prompt in DJI Pilot 2
Max Altitude
Altitude of the aircraft cannot exceed the
value set in DJI Pilot 2.
Aircraft approaching max ight
altitude. Fly with caution.
Max Distance
The straight-line distance from the aircraft
to the Home Point cannot exceed the max
ight distance set in DJI Pilot 2.
Aircraft approaching max ight
distance. Fly with caution.
Weak GNSS Signal
Restriction Prompt in DJI Pilot 2
Max Altitude
When the GNSS signal is weak, namely
when the GNSS icon is yellow or red, and the
ambient light is too dark, the max altitude is
3 m (9.84 ft). The max altitude is the relative
altitude measured by the infrared sensor. When
the GNSS signal is weak but the ambient light
is sucient, the max altitude is 30 m (98.43 ft).
Aircraft approaching max ight
altitude. Fly with caution.
Max Distance No limit N/A
In the case where an aircraft exceeds a specied limit, the pilot can still control the aircraft but
is unable to y the aircraft any closer to the restricted area.
For safety reasons, DO NOT fly aircraft near airports, highways, railway stations, metro
stations, city centers, or other sensitive areas. Only y the aircraft in areas that are within your
direct line of sight.
Max Distance
Home Point
Height of aircraft
when powered on
Home Point not manually updated during ight
Maximum Altitude
29
©
2022 DJI All Rights Reserved.
MATRICE 30 SERIES User Manual
Calibrating the Compass
Calibrate the compass when prompted to do so by the DJI Pilot 2 app or the aircraft rear indicators.
Observe the following rules when calibrating the compass:
•
DO NOT calibrate the compass in locations with strong magnetic interference, such as near
magnets, parking lots, or construction sites with underground reinforced concrete structures.
•
DO NOT carry ferromagnetic materials such as mobile phones during calibration.
•
The DJI Pilot 2 app will display a prompt if the compass is aected by strong interference after
calibration is complete. Follow the displayed instructions to resolve the compass issue.
•
It is recommended to calibrate the compass before taking o in the following scenarios, taking
o for the rst time after the aircraft has been stored for extended period, taking o after being
placed near strong magnetic objects, or taking o at night.
Calibration Procedure
Perform the calibration in an open area and follow the steps below to complete the calibration.
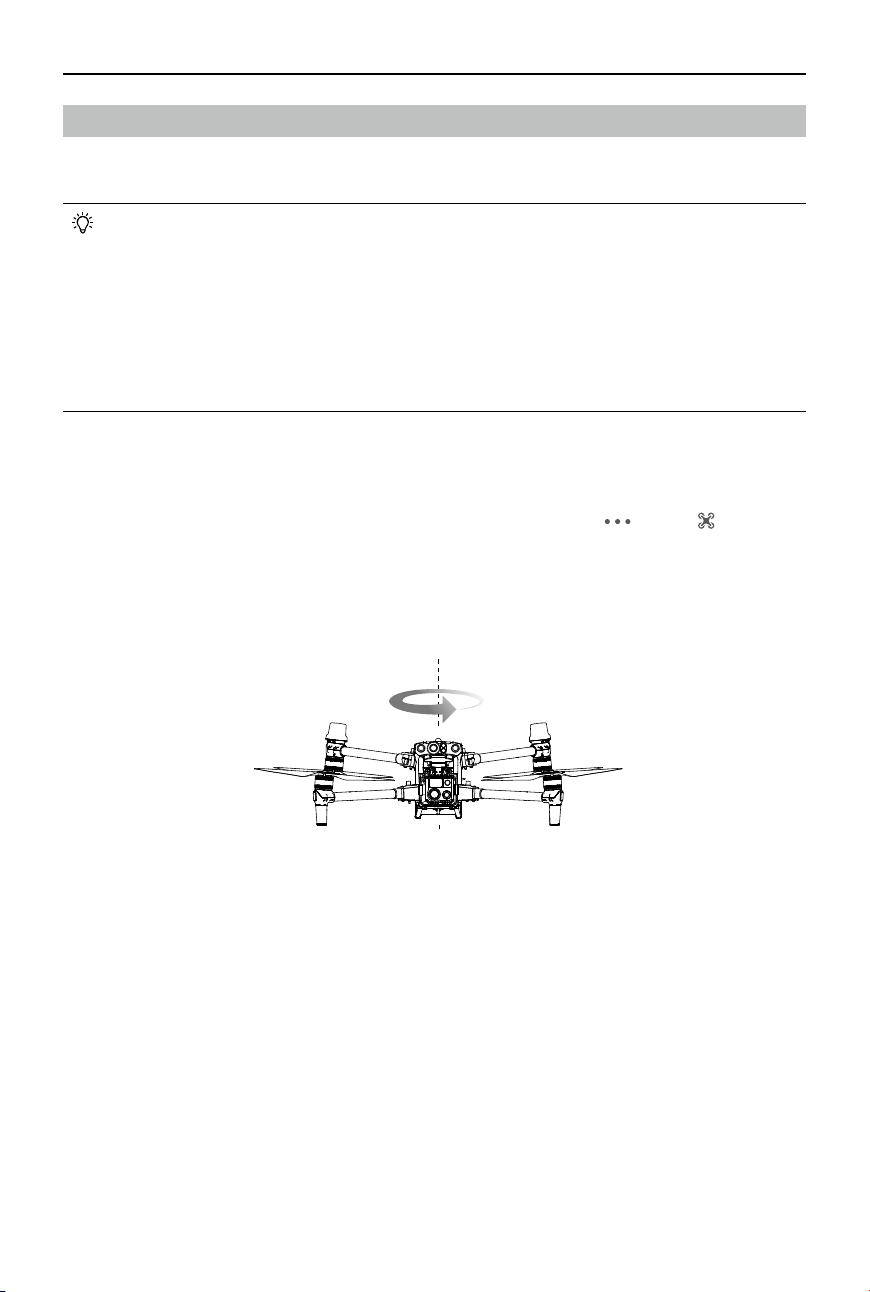
1. Run the DJI Pilot 2 app and enter camera view on the homepage. Tap and tap , then go to
Sensor Status, Compass, and Calibrate Compass to start the calibration. The aircraft rear indicators
will glow in solid yellow, which indicates that the calibration has started.
2. Hold the aircraft horizontally 1.5 m (4.92 ft) above the ground and rotate the aircraft 360 degrees.
The aircraft rear indicators will glow in solid green.
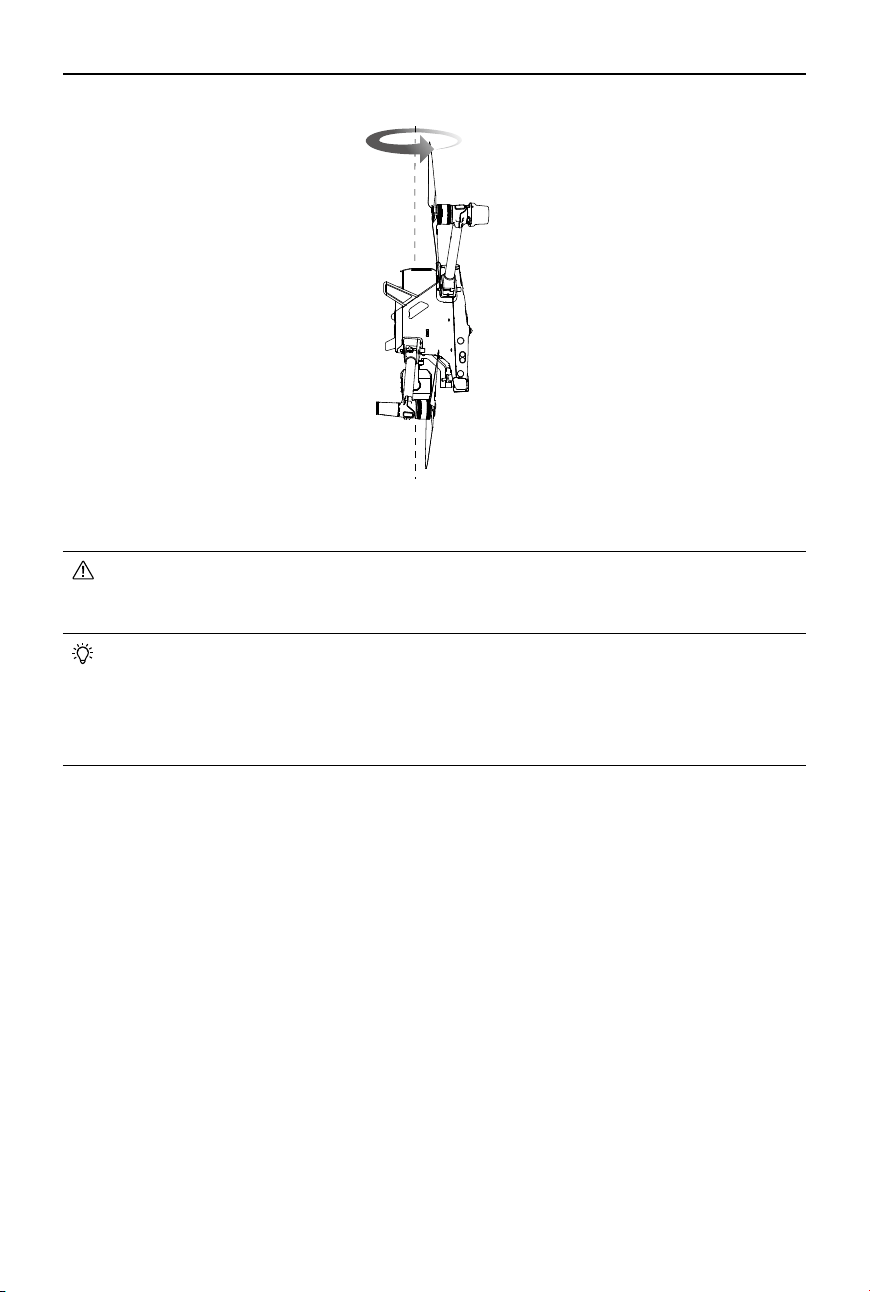
3. Hold the aircraft vertically with the nose pointing downward, and rotate the aircraft 360 degrees
around the center axis.
30
©
2022 DJI All Rights Reserved.
MATRICE 30 SERIES User Manual
4. Re-calibrate the aircraft if the Aircraft Rear Indicators blink red.
•
If the Aircraft Rear Indicators blink red and yellow alternately after the calibration is complete,
it indicates strong interference in the current location. Move the aircraft to a dierent location
and try again.
•
A prompt will appear in DJI Pilot 2 if compass calibration is required before takeoff. The
prompt will disappear after the calibration is complete.
•
If the compass calibration is complete, place the aircraft on the ground. If the prompt appears
again in DJI Pilot 2, try moving the aircraft to a different location before re-calibrating the
compass.

31
©
2022 DJI All Rights Reserved.
MATRICE 30 SERIES User Manual
DJI AirSense
Airplanes with an ADS-B transceiver will actively broadcast ight information including locations, ight
paths, speeds, and altitudes. DJI aircraft incorporated with the DJI AirSense technology are capable
of receiving flight information broadcast from ADS-B transceivers that comply with 1090ES or UAT
standards within a radius range of 10 kilometers. Based on the received ight information, DJI AirSense
can analyze and obtain the location, altitude, orientation, and velocity of the surrounding manned
airplanes, and compare such gures with the current position, altitude, orientation, and velocity of the
DJI aircraft to calculate in real time the potential risk of collision with the surrounding manned airplanes.
DJI AirSense will then display a warning message in DJI Pilot 2 according to the risk level.
DJI AirSense only issues warning messages on approaches by specic manned airplanes under special
circumstances. Always fly the aircraft within your visual line of sight and be cautious at all times to
ensure ight safety. Please be aware that DJI AirSense has the following limitations:
1. DJI AirSense can only receive messages sent by airplanes installed with an ADS-B Out device that is
in compliance with 1090ES (RTCA DO-260) or UAT (RTCA DO-282) standards. DJI devices cannot
receive broadcast messages from or display warnings on airplanes not equipped with properly
functioning ADS-B Out devices.
2. If there is an obstacle between a manned aircraft and a DJI aircraft, DJI AirSense will not be able
to receive ADS-B messages from the aircraft or send warnings to the user. Keenly observe your
surroundings and y with caution.
3. Warning prompts may be sent with delay if DJI AirSense experiences any interference from the
surrounding environment. Keenly observe your surroundings and y with caution.
4. Warning prompts may not be received if the DJI aircraft is unable to obtain information on its own
location.
5. DJI AirSense cannot receive ADS-B messages from manned airplanes or send warnings to the user
when it is disabled or miscongured.
When a risk is detected by the DJI AirSense system, the AR projection display will appear on the current
view in DJI Pilot 2, intuitively showing the distance between the DJI aircraft and the airplane, and issuing
a warning alert. Users should follow the instructions in DJI Pilot 2 upon receiving the alert.
a.
Notice:
A blue airplane icon will appear on the map.
b.
Caution:
The app will display the message: “Manned aircraft detected nearby. Fly with caution.”
A small orange square icon with the distance information will appear on the camera view, and an
orange airplane icon will appear on the map view.
c.
Warning:
The app will display the message: “Collision risk. Descend or ascend immediately.” If the
user is not operating, the app will display: "Collision risk. Fly with caution.” A small red square icon
with the distance information will appear on the camera view, and a red airplane icon will appear on
the map view. The remote controller will vibrate to alert.

32
©
2022 DJI All Rights Reserved.
MATRICE 30 SERIES User Manual
Pre-Flight Checklist
The pre-ight checklist can be used as a reference for pre-ight check in daily operations.
1. Make sure the remote controller and the aircraft batteries are fully charged, the TB30 batteries are
installed rmly, and the battery release toggles are locked.
2. Make sure the propellers are securely mounted and not damaged or deformed, that there are no
foreign objects in or on the motors or propellers, that the propeller blades and arms are unfolded,
and that the frame arm folding buttons are popped out in the locked position.
3. Make sure the lenses of the vision systems, cameras, FPV, the glass of the infrared sensors, and
the auxiliary lights are clean and not blocked in any way.
4. Make sure the gimbal is unlocked and the camera is facing the front of the aircraft.
5. Make sure the covers of microSD card slot, the PSDK port, and the dongle compartment have
been closed rmly.
6. Make sure the remote controller antennas are adjusted to the proper position.
7. Power on the aircraft and the remote controller, toggle the ight mode switch to N-mode. Make
sure the status LED and the aircraft authority button on the remote controller are solid green. This
indicates that the aircraft and the remote controller are linked and the remote controller is in control
of the aircraft.
8. Place the aircraft on open and flat ground. Make sure there is no obstacles, buildings, or trees
nearby, and that the aircraft is 5 m away from the pilot. The pilot should be facing the rear of the
aircraft.
9. To ensure ight safety, enter the ight view of DJI Pilot and check the parameters on the pre-ight
checklist such as the control stick mode, RTH height, obstacle distance, and failsafe settings. It is
recommended to set the failsafe action to RTH.
10. Divide the airspace for ight when multiple aircraft are operating simultaneously in order to avoid
collision mid-air.
11. Choose an appropriate place for landing.
12. Check if the Remote ID is up to date and working.
33
©
2022 DJI All Rights Reserved.
MATRICE 30 SERIES User Manual
Flight Test
Takeo/Landing Procedures
1. Place the aircraft in an open, at area with the aircraft rear facing towards the user.
2. Power on the remote controller and the aircraft.
3. Launch DJI Pilot 2 and enter the camera view.
4. Wait for the aircraft self-diagnostics to complete. If DJI Pilot 2 does not prompt any irregular warning,
the user can start the motors.
5. Push the throttle stick up slowly to takeo.
6. To land, hover over a level surface and push the throttle stick down to descend.
7. After landing, push the throttle down and hold. The motors will stop after three seconds.
8. Power o the aircraft before the remote controller.
Post-Flight Checklist:
•
Make sure to perform a visual inspection so that the aircraft, remote controller, gimbal camera,
Intelligent Flight Batteries, and propellers are in good condition. Contact DJI Support if any
damage is noticed.
•
Make sure that the camera lens and vision system sensors are clean.
•
Make sure to store aircraft correctly before transporting it.
•
DO NOT store the product in direct sunlight or in a humid or dusty area. Ideally, the aircraft shall
be stored in a cool and dry place at room temperature (25° C).
•
Land the aircraft immediately at a safe location if prompted to do so in DJI Pilot 2.
•
Make sure to operate the aircraft within the transmission range of the remote controller.
Otherwise, the remote controller and aircraft may be disconnected, and failsafe will be triggered
(default setting is RTH). Press the RTH button on the remote controller to initiate RTH (default
failsafe setting) instead of powering o the remote controller.
•
Tall buildings may adversely affect the failsafe function. Therefore, it is important to set an
appropriate failsafe altitude before each ight. The RTH altitude is related to the Home Point.
Make sure the RTH altitude is higher than any obstacle in the area.
•
The aircraft cannot avoid obstacles during failsafe RTH when there is insucient light. Exit RTH
and use the remote controller to control the aircraft when the remote controller signal is normal.
•
During RTH, continue to check the liveview and the aircraft altitude in case failsafe is disabled
due to the GNSS signal icon having less than three bars.
•
The Home Point can be updated manually. Make sure to avoid setting the Home Point inside or
near a building to prevent collisions during RTH or landing.
•
Return to Home and land the aircraft if an ESC warning prompt appears in DJI Pilot 2
concerning temperature, voltage, or an overload. When Return to Home is initiated, pay
attention to the ight status display in DJI Pilot 2 to ensure ight safety.

34
©
2022 DJI All Rights Reserved.
Aircraft
This chapter introduces the major features
of the aircraft.
35
©
2022 DJI All Rights Reserved.
Aircraft
The M30 Series aircraft mainly consists of the flight control system, communication system, vision
system, image processing system, propulsion system, and power and battery system. This chapter
provides a detailed introduction to the aircraft components and functions.
Activating the Aircraft
After the aircraft is linked to the remote controller (make sure the remote controller is connected to the
internet), the DJI Pilot 2 app will display the prompt: “There’s a DJI device not activated”. Follow the on-
screen instructions to activate the aircraft. Contact DJI Support if the activation fails. Refer to the Link
the Remote Controller section for details.
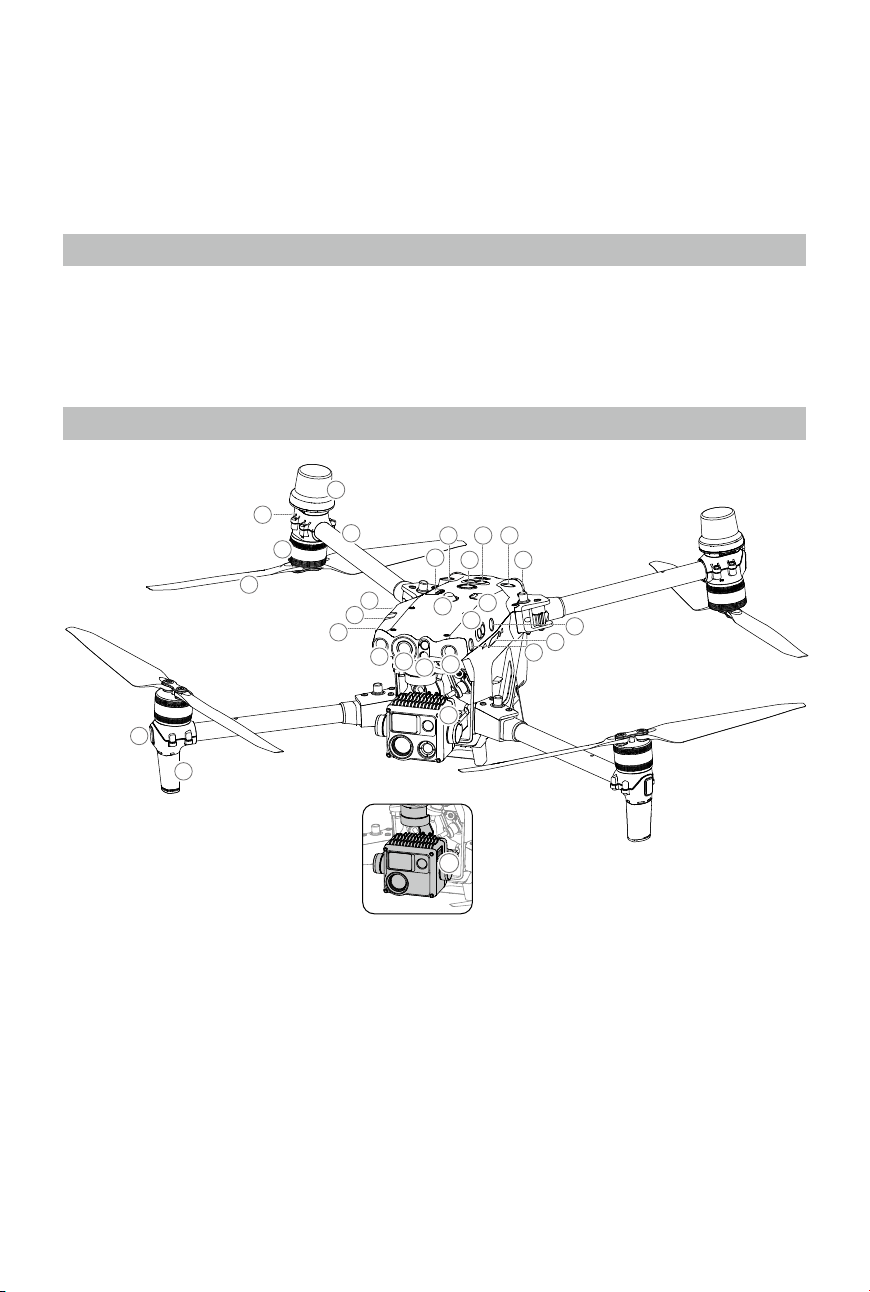
Aircraft Overview
1
2
3
5
14
16
19
2
0
15
18
3
11
12
21
5
4
4
4
4
6
9
10
7
7
8
13
17
21
M30 / M30 EU
M30T / M30T EU
1. FPV Camera
2. Forward Infrared Sensing System
3. Forward Vision System
4. Left and Right Vision Systems
5. Left and Right Infrared Sensing Systems
6. microSD Card Slot
7. Upward Vision System
8. Upward Infrared Sensing System
9. Power Button/Indicator
10. PSDK Port
11. Upward Beacon
12. Assistant Port
13. Frame Arm Folding Buttons
14. Frame Arms
15. Motors
16. Propellers
17. Aircraft Rear Indicators
18. GNSS Antennas
19. Video Transmission Antennas
20. Aircraft Front Indicators
21. Gimbal and Camera
[1]
[1] The M30/M30 EU and M30T/M30T EU are
equipped with different cameras. Refer to the
actual product purchased.
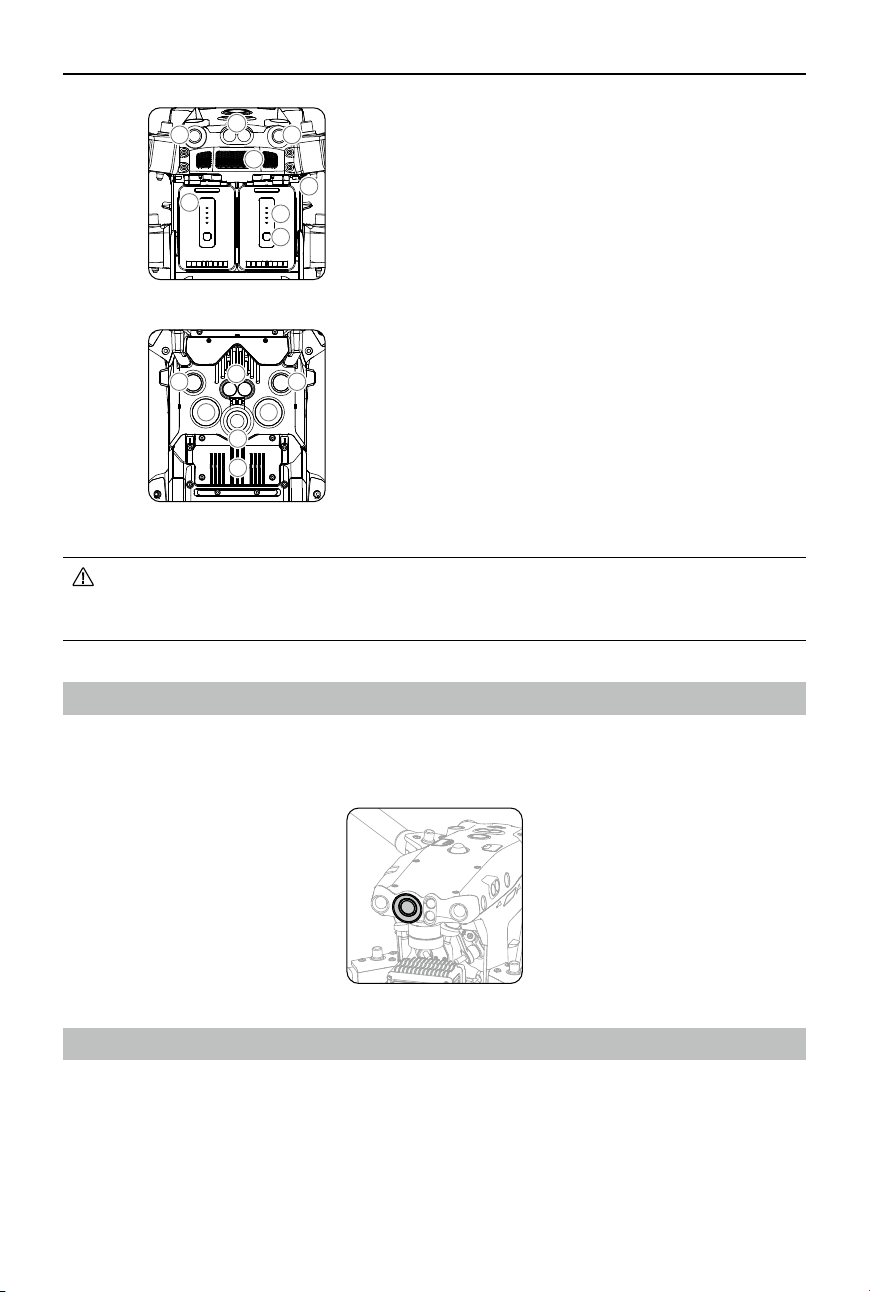
36
©
2022 DJI All Rights Reserved.
MATRICE 30 SERIES User Manual
Rear View
22 22
24
25
26
2
7
28
23
Bottom View
29 29
30
31 31
32
33
22. Backward Vision System
23. Backward Infrared Sensing System
24. Air Vent
25. TB30 Intelligent Flight Battery
26. Battery Level LEDs
27. Battery Level Button
28. Battery Release Toggle
29. Downward Vision System
30. Downward Infrared Sensing System
31. Bottom Auxiliary Light
32. Downward Beacon
33. Dongle Compartment
DO NOT disassemble the product without the assistance of a DJI authorized dealer (except for
components allowed to be disassembled by users in this guide), otherwise it will not be covered
under warranty.
FPV Camera
The M30 Series aircraft is equipped with a starlight FPV camera, which can optimize images in poor
lighting conditions at night. It helps the pilot to have better visibility of the ight environment and y
safely.
Propellers
Using the Propellers
The M30 Series aircraft supports both the 1671 Propeller and the 1676 High Altitude Propeller.* Refer to
the diagram below to choose the appropriate propellers according to the aircraft takeo weight and the
expected maximum ight altitude.
The service ceiling is the theoretical maximum altitude that the aircraft can fly at normally, on the
condition that the wind speed does not exceed 12 m/s. The aircraft braking and acceleration capabilities

37
©
2022 DJI All Rights Reserved.
MATRICE 30 SERIES User Manual
0
1000
2000
3000
4000
5000
6000
7000
8000
3.7 3.75 3.8 3.85 3.9 3.95 4 4.05 4.1 4.15 4.2 4.25
Flight Altitude (m)
Takeoff Weight (kg)
M30 Series Service Ceiling
1676 High Altitude Propeller
Service Ceiling
1671 Propeller Service Ceiling
Max. takeo weightTakeo weight
After attached with other payloads, the weight of the aircraft is various, and the recommended takeo
altitude and ying altitude when using the 1671 Propellers and the 1676 High Altitude Propeller will also
be various. The following typical data are measured in a breeze environment and are for reference only.
Using the Foldable Quick-Release Propellers Using the Foldable Quick-Release Propellers for
High Altitude
Takeo weight
(kg)
Minimum
takeo altitude
(m)
Maximum
takeo altitude
(m)
Takeo weight
(kg)
Minimum take-
o altitude (m)
Maximum
takeo altitude
(m)
3.8 0 5050 3.8 0 (3706
recommended)
7206
4 0 4400 4 0 (3000
recommended)
6500
4.069 0 4150 4.069 0 4735
Maximum ight altitude after takeo is according to the national regulations.
will be reduced when ying near the service ceiling. Use the 1676 High Altitude Propeller when ying at
altitudes higher than 3,000 m (9,842.5 ft) above sea level.
* Included propeller type varies according to dierent countries and regions, please refer to the actual purchase.
38
©
2022 DJI All Rights Reserved.
MATRICE 30 SERIES User Manual
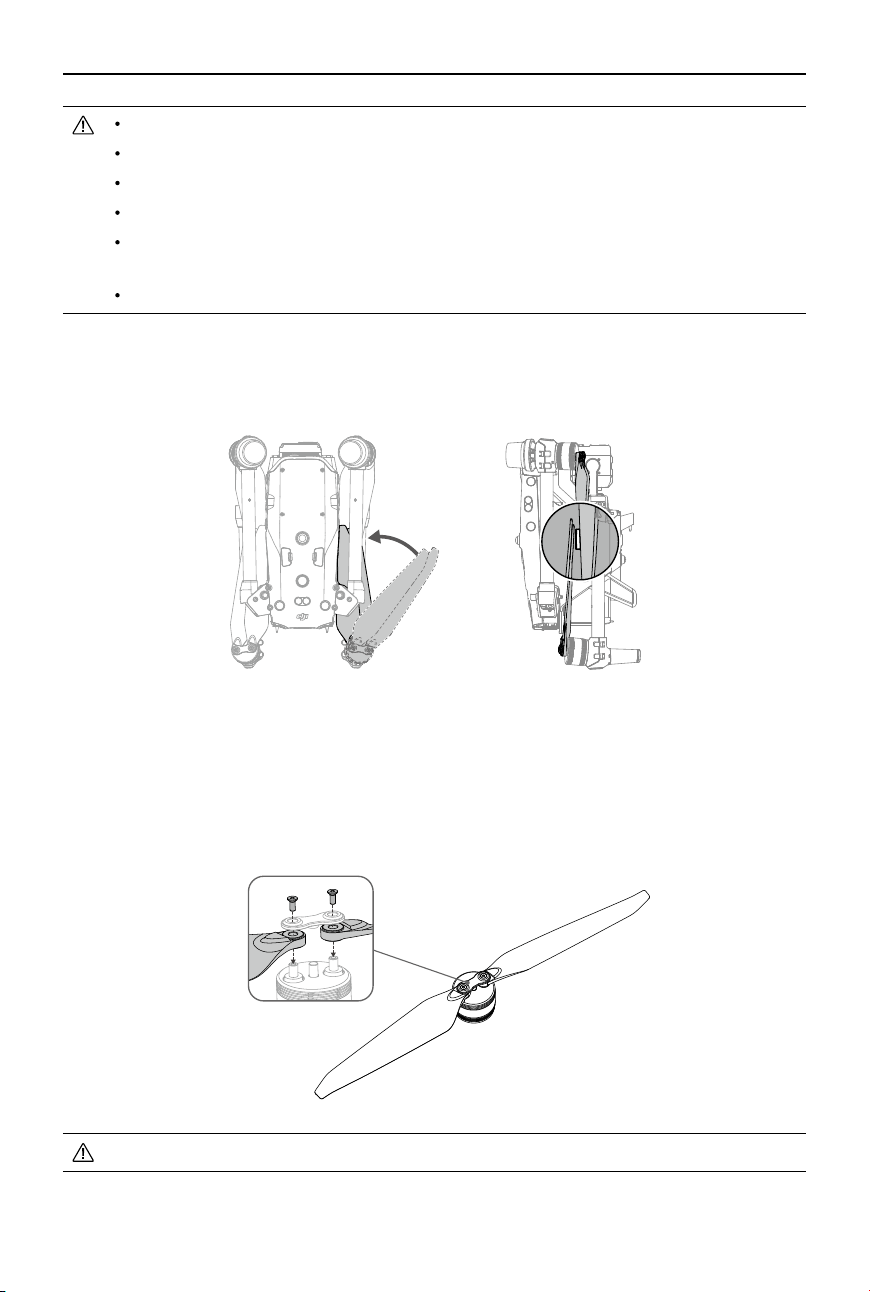
Using high altitude propellers for extended periods may reduce motor life.
Only use ocial DJI propellers. DO NOT mix propeller types.
Propellers are consumable components. Purchase additional propellers if necessary.
Make sure that the propellers and motors are installed securely before each ight.
Make sure that all propellers are in good condition before each ight. DO NOT use aged,
chipped, or broken propellers.
To avoid injury, stay away from rotating propellers or motors.
Storing the Propellers
Follow the diagram to fold and store the propellers.
Replacing the Propeller Blades
Use the H2.0 hex key to replace the propellers.
It is recommended to replace the propellers only in an emergency situation during operations. After the
ight is over, contact DJI Support or an authorized dealer for propeller check and maintenance as soon
as possible.
The propeller blades are sharp. Handle with care.
39
©
2022 DJI All Rights Reserved.
MATRICE 30 SERIES User Manual
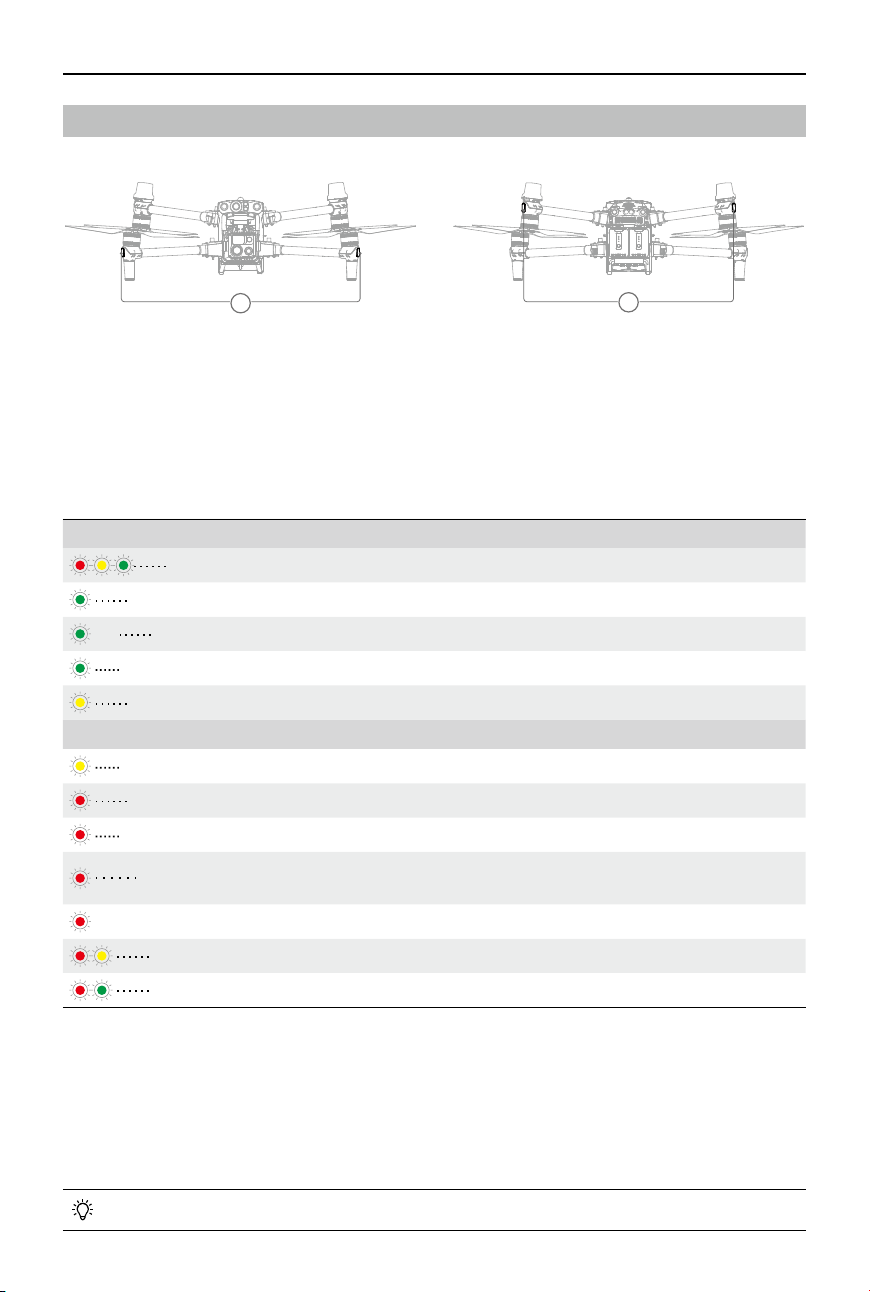
Aircraft Indicators
The aircraft has front and rear indicators. They can be turned o in DJI Pilot 2 for unobtrusive eld operations.
1. Front LED Indicators
2. Rear LED Indicators
When the aircraft is powered on but the motors are not running, the front indicators glow solid red to
display the orientation of the aircraft.
When the aircraft is powered on but the motors are not running,
the rear indicators display the status
of the flight control system. Refer to the table below for more information about the aircraft status
indicators.
Normal States
Blinks red, yellow, green alternately Powering on and performing self-diagnostic tests
Blinks green* Only GPS is used for positioning (RTK is not used)
×2 Blinks green twice* Vision systems are used for positioning
Blinks green quickly RTK enabled and RTK data is being used
Blinks yellow slowly Attitude mode (GNSS is not available)
Warning States
Blinks yellow quickly Remote controller signal lost
Blinks red slowly Low battery level, takeo is disabled **
Blinks red quickly Critically low battery level
Blinks red for ve seconds (when
performing CSC)
IMU error
—— Solid red Critical error
Blinks red and yellow alternately Compass calibration required
Blinks red and green alternately RTK enabled but RTK data unavailable
* Blink green slowly in N-mode and fast in S-mode.
**If the aircraft cannot takeo while the rear indicator is blinking red slowly, connect to the remote controller, run
DJI Pilot 2, and view the details.
After the motor starts,
the front indicators blink red and green alternately and the rear indicators blink
green. The green lights indicate the aircraft is a UAV and the red lights indicate the heading and position
of the aircraft.
Lighting requirements vary depending on the region. Observe local laws and regulations.
1
2
40
©
2022 DJI All Rights Reserved.
MATRICE 30 SERIES User Manual
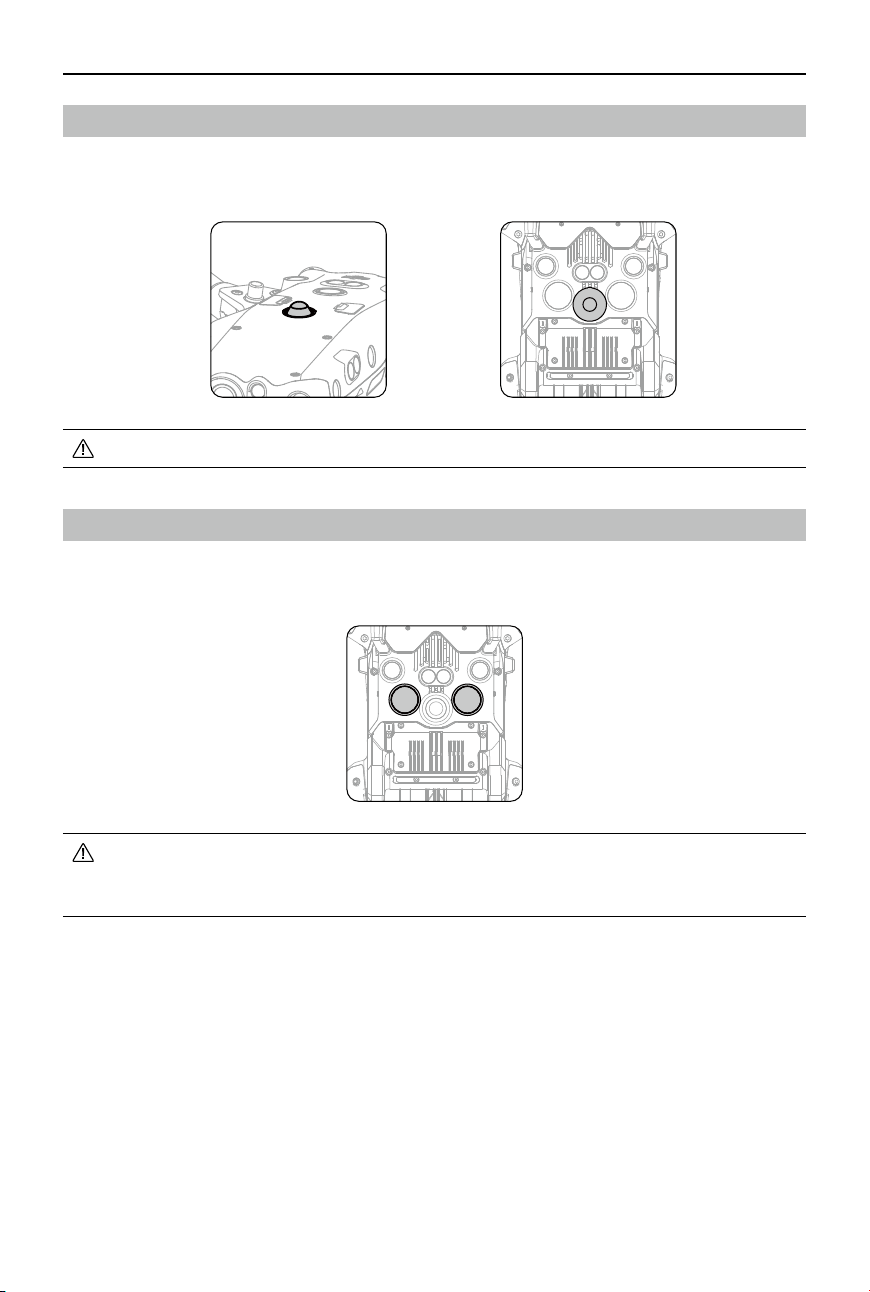
Aircraft Beacons
The upward and downward beacons on the aircraft enable you to nd the aircraft when ying at night.
The beacons can be manually turned on or o in DJI Pilot 2.
DO NOT look directly at the beacons when they are in use to avoid damaging your eyes.
Aircraft Auxiliary Lights
The auxiliary lights located at the bottom of the aircraft will automatically turn on in poor light conditions
to assist the downward vision system. The lights can also be manually turn on or o in DJI Pilot 2.
The auxiliary lights will automatically turn on in low-light environments when the ight altitude
is under 5 m. Note that the positioning performance of the vision systems may be aected. Fly
with caution if the GNSS signal is weak.
41
©
2022 DJI All Rights Reserved.
MATRICE 30 SERIES User Manual
Gimbal Cameras
The M30 Series integrates a zoom camera and a wide camera, which enable users to quickly switch
to a highly magnied zoom view for detailed observation after recognizing a target in the wide-angle
camera view. M30T/M30T EU is also equipped with a long-wave infrared thermal imaging camera, which
can shoot thermal images. Both the M30/M30 EU and M30T/M30T EU feature a laser rangefinder,
which can provide the location and distance information of a target during inspections or search-and-
rescue operations. The operator can quickly pinpoint the location of the target and improve operation
eciency. The functions and usage with M30T as an example.
1
2
3
4
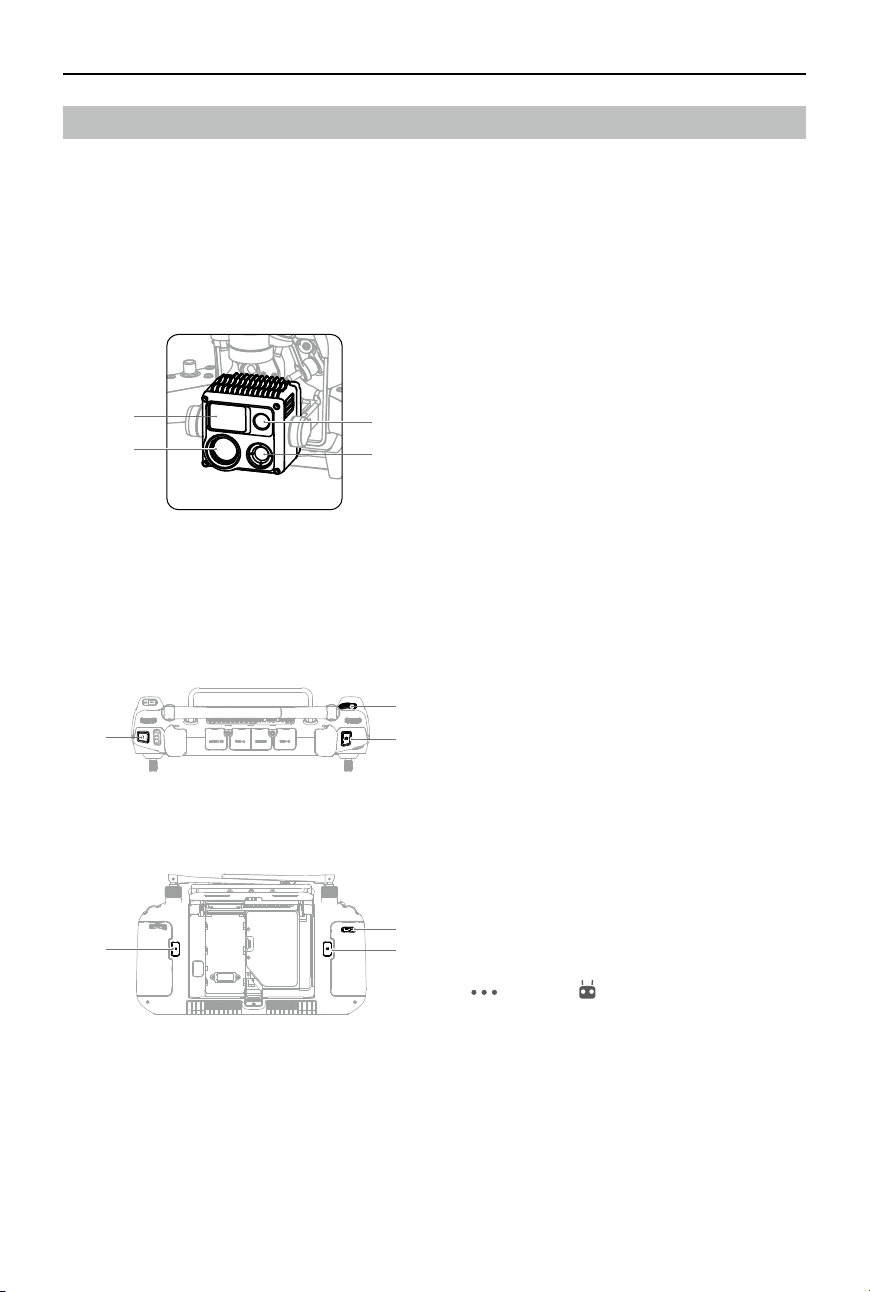
1. Laser Rangender
2. Zoom Camera
3. Thermal Camera (M30T/M30T EU only)
4. Wide Camera
Operation
Controlling the Camera with the Remote Controller
The following buttons and scroll wheel on the remote controller can be used to control the camera
remotely.
3
1
2
4
4
4
1. Focus/Shutter Button
Press halfway down to auto-focus and press all
the way down to take a photo. The photo mode
can be set in DJI Pilot 2.
2. Record Button
Press once to start or stop recording.
3. Scroll Wheel
Scroll left or right to adjust camera zoom when
used with M30 series aircraft.
4. C1/C2/C3 Buttons (customizable)
Run DJI Pilot 2 and enter camera view. Tap
and tap to select Customize RC
Buttons. Set the functions of the C1, C2, and
C3 buttons for quick and easy control of the
camera.
Controlling the Camera with DJI Pilot 2
For information about how to control the camera in DJI Pilot 2, refer to the Gimbal Camera View section
in the DJI Pilot 2 App chapter.
42
©
2022 DJI All Rights Reserved.
MATRICE 30 SERIES User Manual
Using the microSD Card
A 32 GB microSD card is in the microSD card slot when shipped. The aircraft supports microSD cards
with a maximum capacity of up to 128 GB. To ensure that the camera can quickly read and write data
for HD video recording, use a microSD card with UHS Speed Class 3 or above and a write speed
greater than 30 MB/s.
The following microSD cards are recommended:
Lexar 667x U3 A2 Class10 32G/64G/128G
Lexar 1066x U3 A2 V30 32G/64G/128G
SanDisk Extreme PRO U3 A2 V30 32G/64G/128G
SanDisk Extreme U3 A2 V30 32G/64G/128G
Stop the recording rst before removing the microSD card, to avoid losing the recorded videos.
To ensure the stability of the camera system, the recording time for a single video is limited to
30 minutes. If the recording time exceeds 30 minutes, the video recording will stop and have
to be restarted.
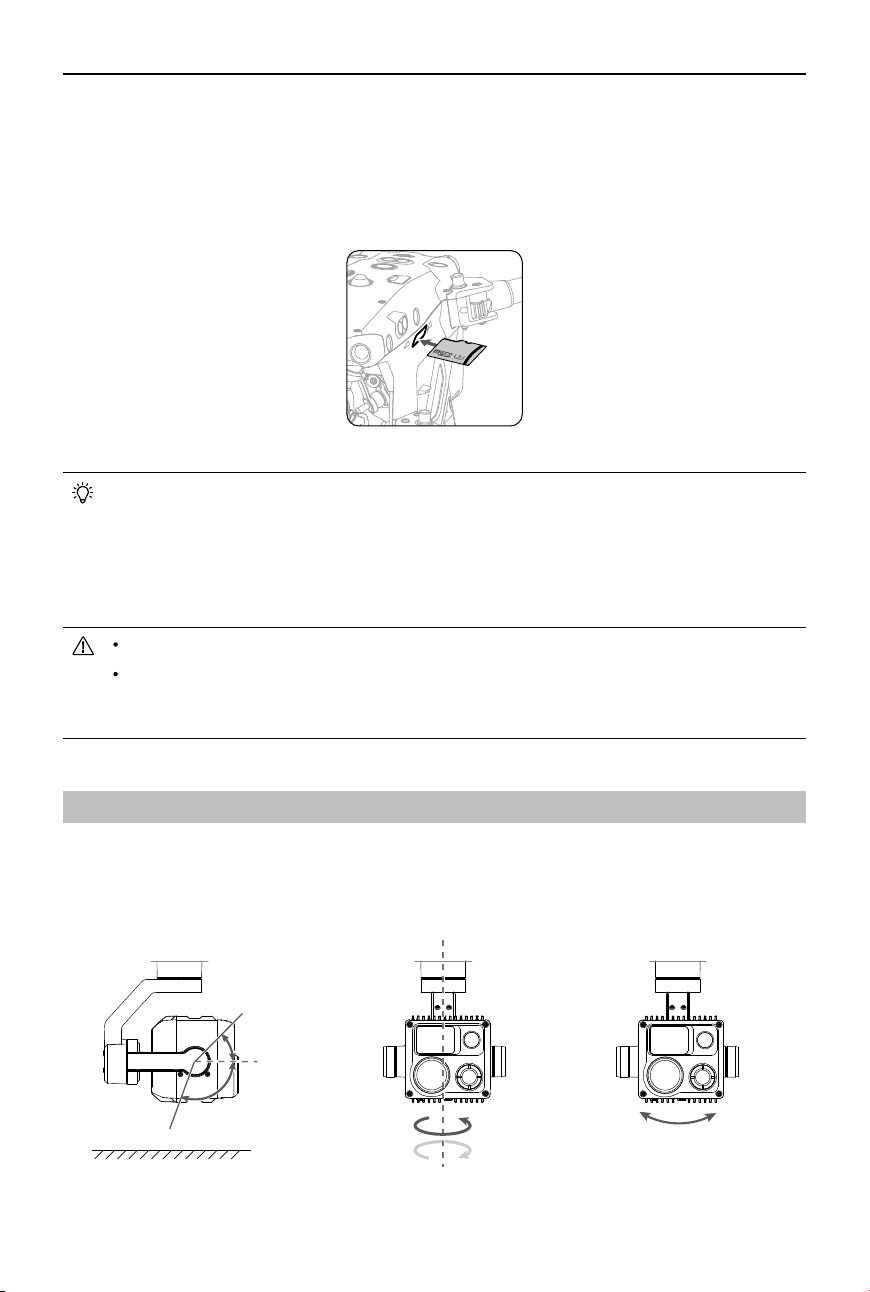
+45°
-90°
+90°
+35°-35°
-120°
0°
Ground
Gimbal
The 3-axis gimbal stabilizes the camera, allowing the aircraft to capture clear and steady images and
videos when in ight. Refer to the gure below for the tilt, pan, and roll range of the gimbal.
Tilt Pan Roll
Controllable Rotating Range
43
©
2022 DJI All Rights Reserved.
MATRICE 30 SERIES User Manual
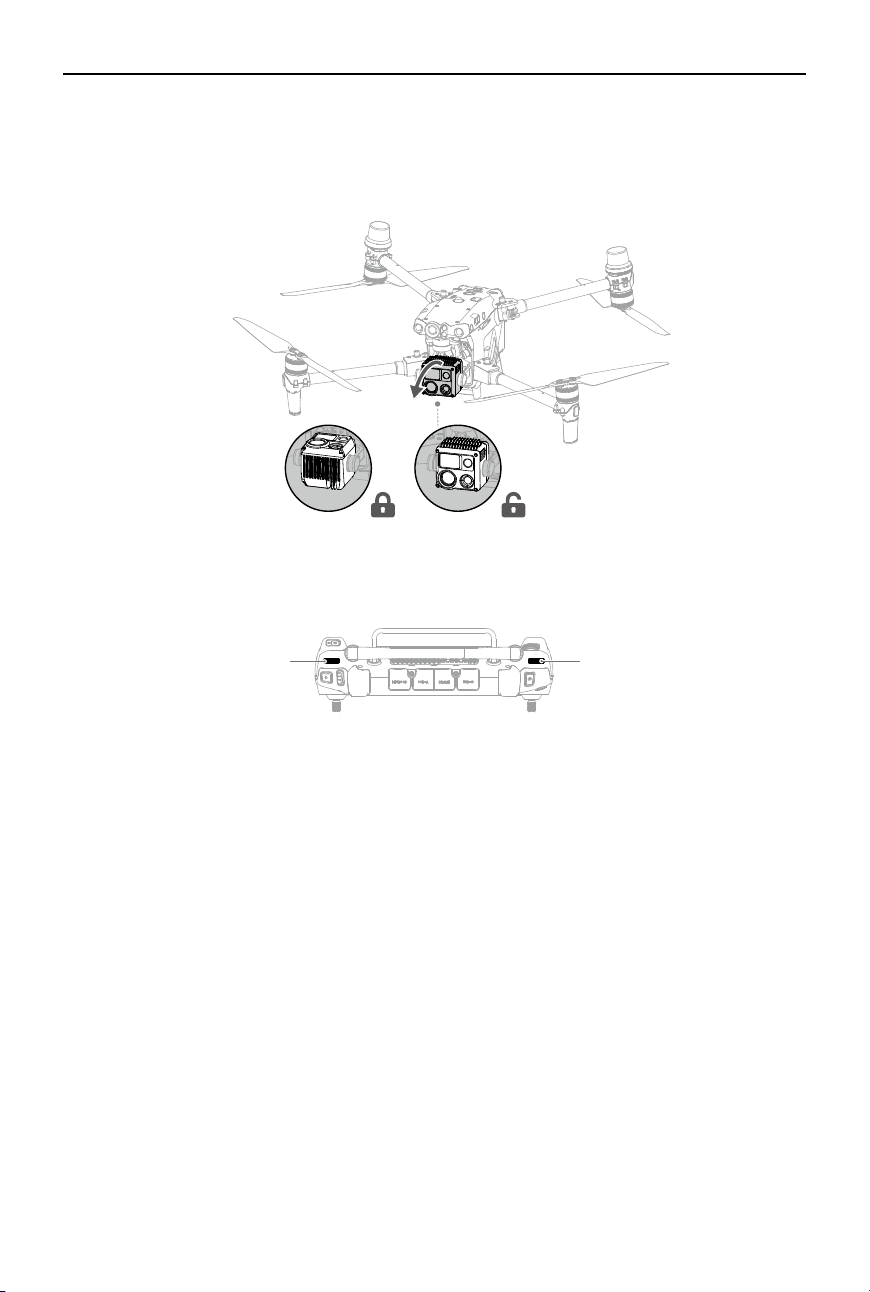
Gimbal Lock
Rotate the gimbal tilt down to 0° to unlock the gimbal before use.
It is recommended to rotate the gimbal tilt up to +90° to lock the gimbal after use.
Gimbal Operation
Controlling the Gimbal with the Remote Controller
2
1
1. Left Dial
The left dial controls the gimbal tilt. Dial left, the gimbal will tilt downwards. Dial right, the gimbal will
tilt upwards.
2. Right Dial
The right dial controls the gimbal pan. Dial left, the gimbal pan will rotate to the left. Dial right, the
gimbal pan will rotate to the right.
44
©
2022 DJI All Rights Reserved.
MATRICE 30 SERIES User Manual
Controlling the Gimbal with DJI Pilot 2
Hold and Drag
The user can control the gimbal in the gimbal camera view in DJI Pilot 2 as follows:
1. Launch DJI Pilot 2 and enter the gimbal camera view.
2. Tap anywhere on the screen and hold until a blue circle appears.
3. Drag the circle in any direction and the gimbal will rotate or tilt accordingly.
Double Tap a Target to Center the Target
Double tap a target in the gimbal camera view, and the target will be displayed at the center of the
current view.
Gimbal Mode
The gimbal can work in two modes for dierent shooting needs.
Follow Mode
When the aircraft rotates horizontally, the gimbal rotates accordingly with
the angle between the gimbal pan and the aircraft heading unchanged.
Free Mode
When the aircraft rotates horizontally, the gimbal orientation does not follow
the rotation of the aircraft.
Users can use the gimbal mode icon in the gimbal camera view in DJI Pilot 2 to quickly control the
gimbal and achieve the following:
Gimbal Recenter
The gimbal pan rotates to the center to be consistent with the aircraft
heading, and the gimbal tilt returns to the center (0°) from the current
position.
Gimbal Down
The gimbal pan rotates to the center to be consistent with the aircraft
heading, and the gimbal tilt changes to -90° from the current position.
45
©
2022 DJI All Rights Reserved.
MATRICE 30 SERIES User Manual
Gimbal Pan Recenter
The gimbal pan rotates to the center to be consistent with the aircraft
heading while the gimbal tilt remains unchanged.
Gimbal Tilt Down
The gimbal pan remains unchanged while the gimbal tilt changes to
-90° from the current position.
Make sure that there is nothing obstructing the gimbal’s movements. DO NOT tap or knock the
gimbal after the aircraft is powered on. Launch the aircraft from open and at ground to protect
the gimbal during takeo.
46
©
2022 DJI All Rights Reserved.
MATRICE 30 SERIES User Manual
Aircraft RTK
RTK Module Introduction
The built-in RTK module of the aircraft can withstand strong magnetic interference from metal structures
and high-voltage lines, ensuring safe and stable flights. When used with a D-RTK 2 High Precision
GNSS Mobile Station* (excluded) or a DJI-approved Network RTK service, more accurate positioning
data can be obtained.
* Both D-RTK 2 High Precision GNSS Mobile Station and D-RTK 2 High Precision GNSS Mobile Station for
Matrice Series are supported.
Enabling/Disabling RTK
Ensure that the RTK function is enabled and RTK service type is correctly set (D-RTK 2 Mobile
Station or Network RTK) before each use. Otherwise, RTK cannot be used for positioning. Go to
the camera view in the DJI Pilot 2 app, tap and then select to check the settings. Make
sure to disable the RTK function if not in use. Otherwise, the aircraft will not be able to take off
when there is no differential data.
RTK positioning can be enabled and disabled during flight. Remember to select an RTK
service type rst.
After RTK is enabled, Maintain Positioning Accuracy Mode can be used.
D-RTK 2 High Precision GNSS Mobile Station
1. Refer to the D-RTK 2 High Precision GNSS Mobile Station User Guide (available from https://www.
dji.com/matrice-30/downloads) to set up the D-RTK 2 Mobile Station and link the aircraft and the
station. Power on the D-RTK 2 Mobile Station and switch to the Broadcast mode for the M30 Series.
2. In the RTK settings in the app, select “D-RTK 2 Mobile Station” as the RTK service type, connect
to the mobile station by following the on-screen instructions, and wait for the system to search for a
satellite. When the status of the aircraft’s positioning in the status table shows “FIX”, it indicates that
the aircraft has obtained and used dierential data from the mobile station.
3. D-RTK 2 Mobile Station communication distance: 12 km (NCC/FCC), 6 km (SRRC/CE/MIC).
Custom Network RTK
To use Custom Network RTK, make sure that the remote controller has a Wi-Fi connection. Custom
Network RTK can be used to replace the D-RTK 2 Mobile Station. Connect the Custom Network RTK
account to the designated NTRIP server to send and receive dierential data. Keep the remote controller
turned on and connected to the internet when using this function.
1. Make sure that the remote controller is connected to the aircraft and the internet.
2. Go to the camera view in the DJI Pilot 2 app, tap and then select . Select “Custom Network
RTK” as the RTK service type and ll in the required information. Then tap “Save”.
3. Wait to connect to the NTRIP server. In the RTK settings, when the status of the aircraft’s positioning
in the status table shows “FIX”, it indicates that the aircraft has obtained and used dierential data
from Custom Network RTK.
47
©
2022 DJI All Rights Reserved.
MATRICE 30 SERIES User Manual
IP Rating
1. Under stable laboratory conditions, the aircraft achieves an IP55 protection rating by IEC 60529
standards when equipped with TB30 Intelligent Flight Batteries. The protection rating is not
permanent, however, and may reduce over an extended period.
a. DO NOT y when the amount of rainfall exceeds 100 mm in 24 hours.
b. DO NOT fold the frame arms in the rain. Make sure the aircraft is free of any liquid by wiping it
carefully before storing in the carrying case.
c. Make sure the battery ports, battery compartment ports, battery surfaces, and battery
compartment surfaces are dry before inserting the batteries.
d. Make sure the ports and surfaces of the battery are free from any liquid before charging.
e. The product warranty does not cover water damage.
2. The aircraft does not achieve IP55 protection rating in the following circumstances:
a. Frame arms are folded.
b. Batteries other than the TB30 Intelligent Flight Batteries are used.
c. The cover for the ports are not attached correctly.
d. The waterproong top shell plug is not rmly attached to the top shell.
e. The aircraft is broken in situations such as where the aircraft shell is cracked or the waterproof
adhesive is not secure.
3. The aircraft body uses ame retardant materials to improve safety performance, which may lead the
color of the appearance to be changed. Such change does not aect the performance and the IP
rating of the aircraft.
PSDK Port
The PSDK port on the top of the aircraft enables developers to connect PSDK payloads and develop
more expansion functions. Visit https://developer.dji.com/ for more information about SDK development.
Visit https://www.dji.com/matrice-30/downloads to learn more about the PSDK Mounting Bracket.
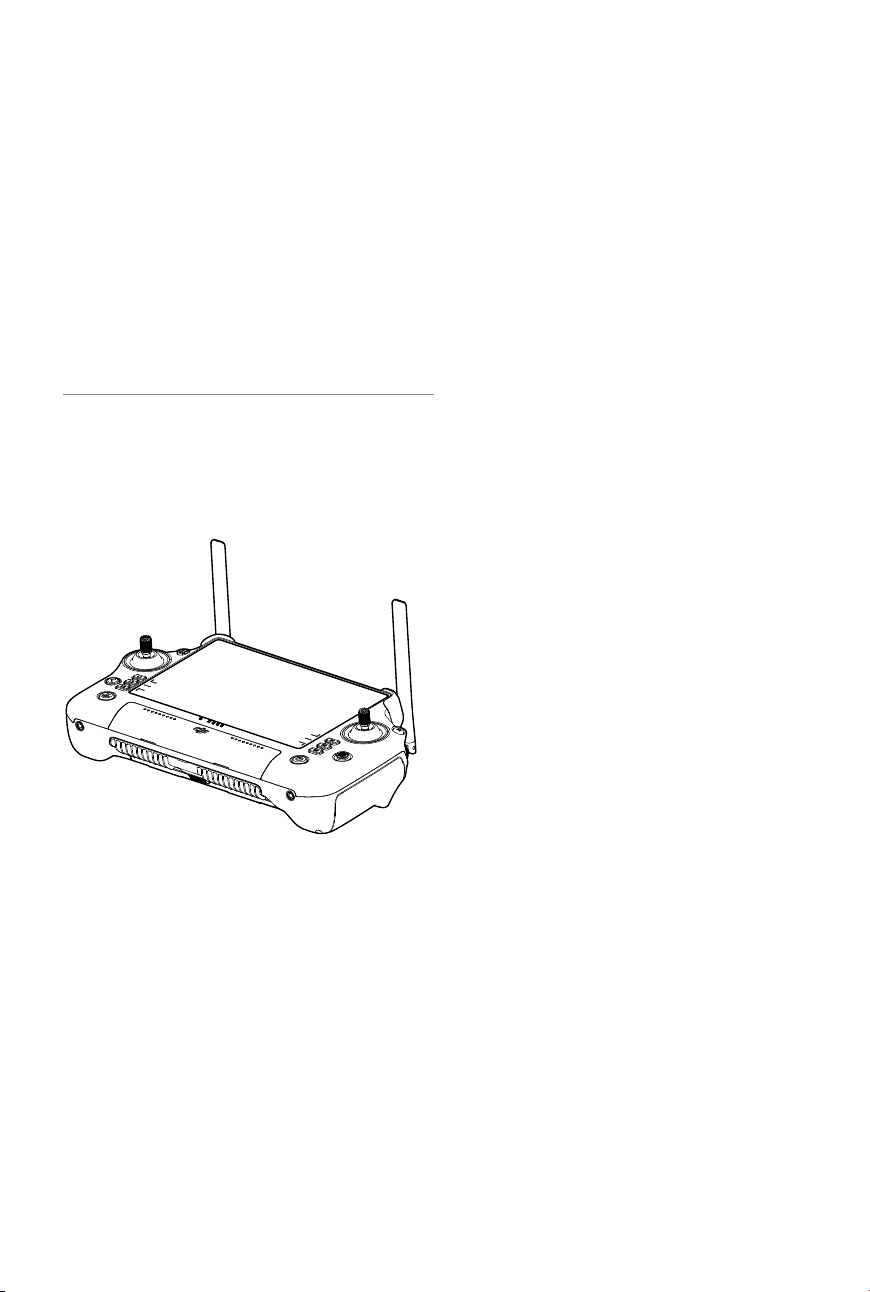
48
©
2022 DJI All Rights Reserved.
Remote Controller
This chapter introduces the features of the
remote controller and includes instructions
for controlling the aircraft.
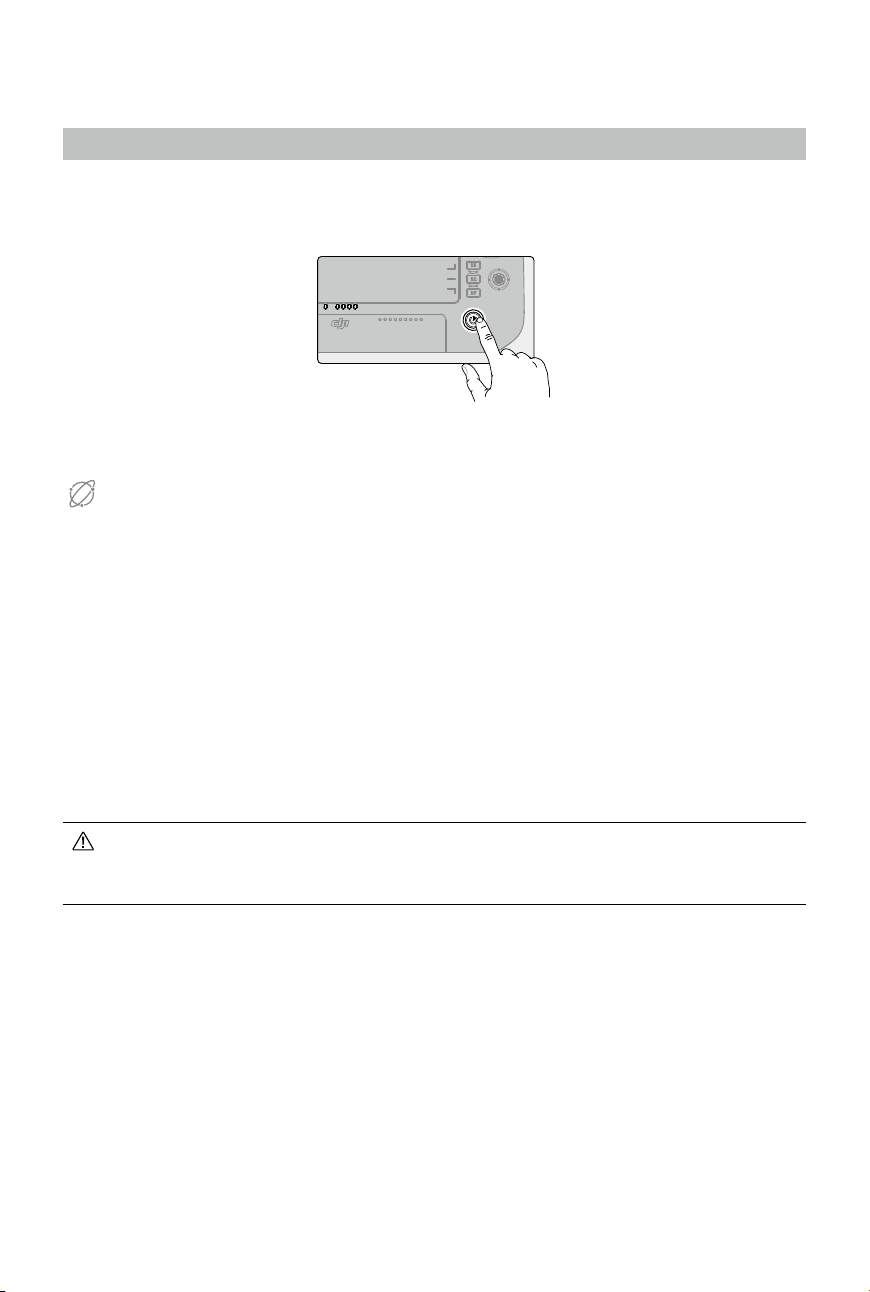
49
©
2022 DJI All Rights Reserved.
Remote Controller
Starting and Activating the Remote Controller
Powering On/O
Press once and then press again and hold for two seconds to power the remote controller on or o.
Activating the Remote Controller
Internet
The remote controller needs to be activated before rst use. Make sure the remote controller has
access to the internet during activation.
Follow the steps below to activate the remote controller:
1. Power on the remote controller. Select a language option and tap Next. Read the Terms of Use and
Privacy Policy carefully and tap Agree, then select your country/region.
2. Connect to a Wi-Fi network to access the internet. Then set the time zone, date, and time.
3. If you have a DJI account, log in with your password. If you are a new user, create a DJI account and
log in.
4. After logging in, tap Activate on the activation interface.
5. A prompt will appear on the screen, indicating that the remote controller is activated.
6. After activating the remote controller, choose if you would like to join the DJI Product Improvement
Project. Join this project to help DJI better understand your needs.
Check the internet connection if the activation fails. Make sure internet access is available and
try activating the remote controller again. Contact DJI Support if the activation fails multiple
times.

50
©
2022 DJI All Rights Reserved.
MATRICE 30 SERIES User Manual
Remote Controller Overview
34
32
4
1
4
1
36
35
33
37
38 39
8
13
5 5
7
7
1
4
4
3
15
2
10
11
9
9
16
17
18
19
25
26
27
28
3
0
29
21
22
23
24
31 31
31
4
0
2
0
2
0
12
6
14
1. External RC Antennas
Transmit control and video wireless signals
between the remote controller and the aircraft.
2. Touchscreen
Displays system and app views and supports
up to 10 touch points. Make sure the
touchscreen is clean, and completely dry
before use. Otherwise, viewing and touch
eects may be aected.
3. Aircraft Authority Button
When flying with a M30 series aircraft, the
aircraft authority button is used to take control
of the aircraft and indicate the aircraft control
status. Refer to Guide on the home screen for
more information.
4. Control Sticks
Flight control mode can be set in DJI Pilot 2.
5. Internal Wi-Fi Antennas
DO NOT block the internal Wi-Fi antennas
during usage. Otherwise, the signal may be
aected.
6. Back/Function Button
Press once to return to the previous screen.
Press twice to return to the home screen. Use
the back button and another button to activate
combination buttons. Refer to the Combination
Buttons section for more information.
7. L1/L2/L3/R1/R2/R3 Buttons
Go to camera view in DJI Pilot 2 to view the
specic functions of these buttons.
8. Return to Home (RTH) Button
Press and hold to initiate RTH. Press again to
cancel RTH.
9. Microphone
DO NOT block the microphones during usage.
10. Status LED
Indicates the status of the remote controller.
View detailed descriptions of the Status LED in
the Remote Controller LEDs and Alert section
or in Guide on the home screen of the remote
controller.
11. Battery Level LEDs
Display the current battery level of the remote
controller. View detailed descriptions of the
Battery Level LEDs in the Remote Controller
LEDs and Alert section.
12. Internal GNSS Antennas
DO NOT block internal GNSS antennas
during usage. Otherwise, the signal and the
positioning accuracy may be aected.
13. Power Button
Press once to check the current battery level.
Press once, then press again and hold for two
seconds to power the remote controller on or
o. When the remote controller is powered on,
press once to turn the touchscreen on or o.
14. 5D Button
View the default 5D button functions in DJI Pilot
2. Refer to Guide on the home screen for more
information.
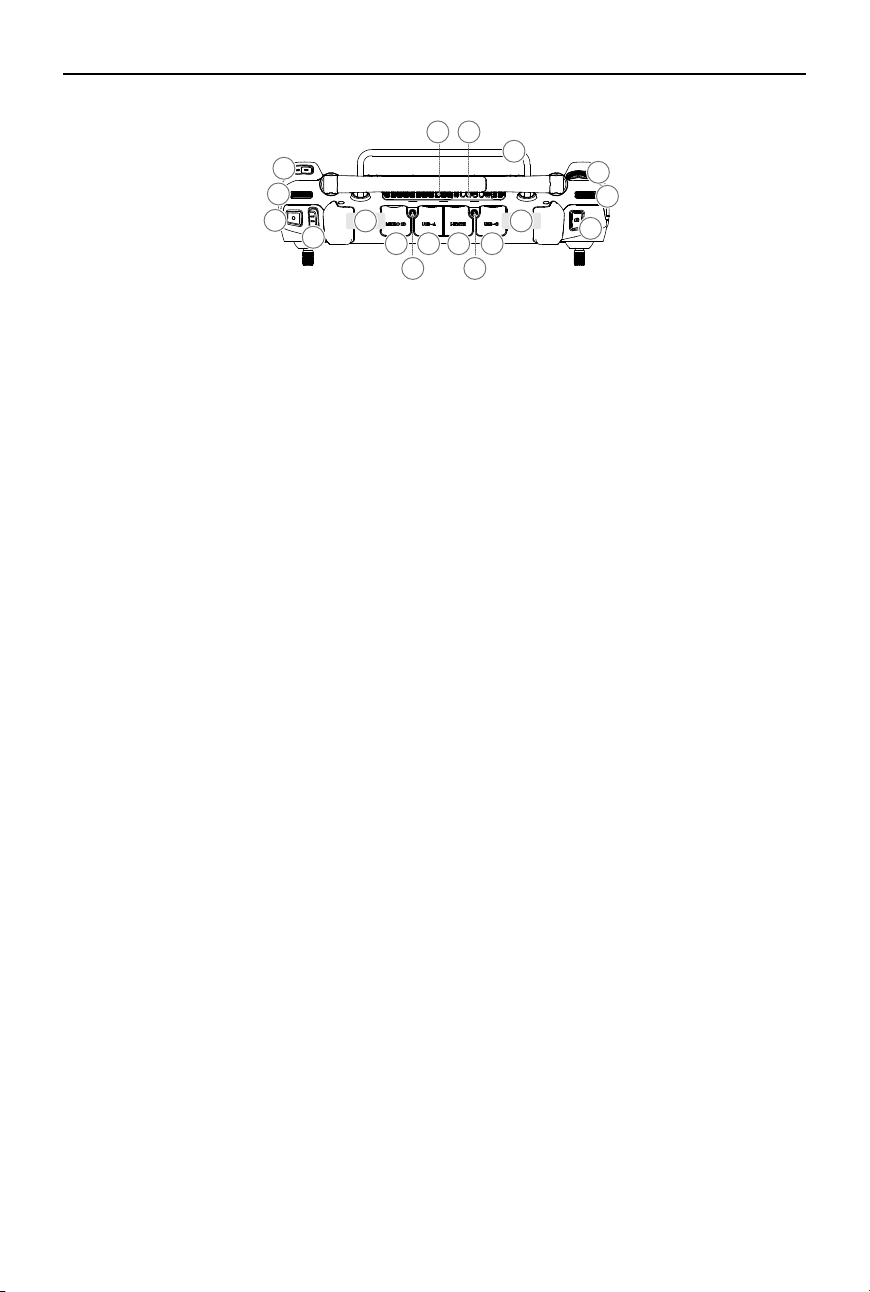
51
©
2022 DJI All Rights Reserved.
MATRICE 30 SERIES User Manual
34
32
4
1
4
1
36
35
33
37
38 39
8
13
5 5
7
7
1
4
4
3
15
2
10
11
9
9
16
17
18
19
25
26
27
28
3
0
29
21
22
23
24
31 31
31
4
0
2
0
2
0
12
6
14
15. Flight Pause Button
Press once to have the aircraft brake and
hover in place (only when GNSS or vision
systems are available).
16. C3 Button
Customize functions in DJI Pilot 2.
17. Left Dial
Controls the tilt of the gimbal.
18. Record Button
Press once to start or stop recording.
19. Flight Mode Switch
For switching between three flight modes:
N-mode (Normal), S-mode (Sport), and
F-mode (Function). F-mode can be set to
A-mode (Attitude) or T-mode (Tripod) in DJI
Pilot 2.
20. Internal RC Antennas
Transmit aircraft control and video wireless
signals. DO NOT block the internal RC
antennas during usage. Otherwise, the signal
may be aected.
21. microSD Card Slot
For inserting a microSD card.
22. USB-A Port
When flying with a Matrice series aircraft,
users can connect the remote controller to a
BS30 intelligent battery station for firmware
updates. Users can also insert third-party
devices, such as a USB flash drive or a
memory card.
23. HDMI Port
For outputting HDMI signal to an external
monitor.
24. USB-C Port
For charging the remote controller.
25. Focus/Shutter Button
Press the button halfway down for autofocus
and all the way down to take a photo.
26. Right Dial
Controls the pan of the gimbal.
27. Scroll Wheel
For adjusting camera zoom.
28. Handle
29. Speaker
30. Air Vent
For heat dissipation. DO NOT block the air
vent during usage.
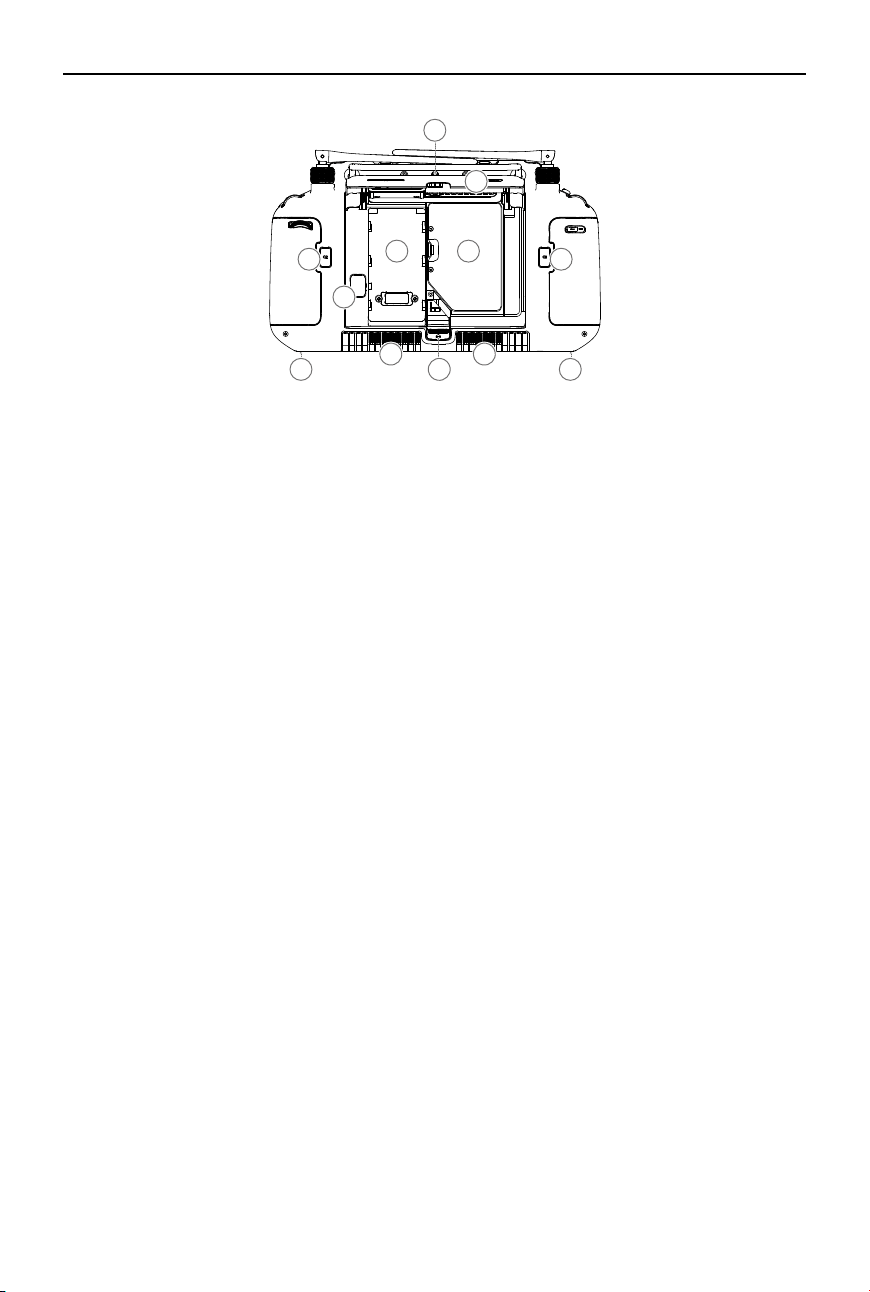
52
©
2022 DJI All Rights Reserved.
MATRICE 30 SERIES User Manual
31. Reserved Mounting Holes
For mounting external devices.
32. C1 Button
Customize functions in DJI Pilot 2.
33. C2 Button
Customize functions in DJI Pilot 2.
34. Rear Cover
35. Battery Release Button
36. Battery Compartment
For installing the WB37 intelligent battery.
34
32
4
1
4
1
36
35
33
37
38 39
8
13
5 5
7
7
1
4
4
3
15
2
10
11
9
9
16
17
18
19
25
26
27
28
3
0
29
21
22
23
24
31 31
31
4
0
2
0
2
0
12
6
14
37. Rear Cover Release Button
38. Alarm
39. Air Intake
For heat dissipation. DO NOT block the air
intake during usage.
40. Dongle Compartment
For inserting the dongle to the USB-C
connector.
41. M4 Screw Hole
For mounting the strap bracket.
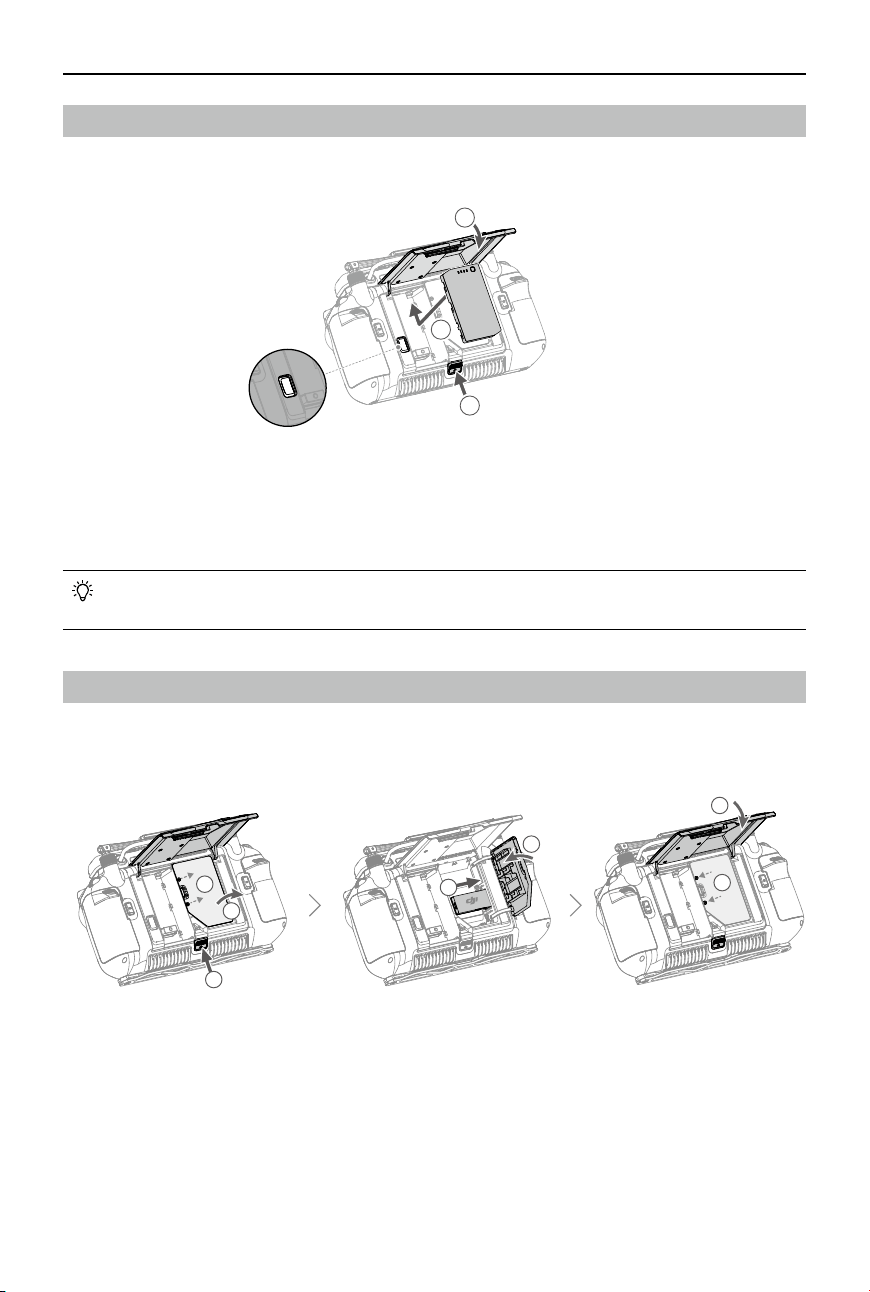
53
©
2022 DJI All Rights Reserved.
MATRICE 30 SERIES User Manual
Mounting the WB37 Intelligent Battery
A WB37 battery (excluded) can be mounted onto the remote controller in the following steps.
1
2
3
1. Push the rear cover release button to the end to open the rear cover.
2. Insert the WB37 battery into the battery compartment and push it to the top. There will be a clicking
sound to indicate the battery is installed rmly.
3. Close the rear cover.
To remove the WB37 battery, press and hold the battery release button and push the battery
downward.
Mounting the Dongle
The USB-C connector in the dongle compartment can be used to connect a USB-C dongle (excluded)
in the following steps.
1. Push the rear cover release button to the end to open the rear cover. Remove the screws to open
the dongle compartment.
2. Insert the dongle into the USB-C connector. Close the dongle compartment.
3. Attach the dongle compartment with the screws. Close the rear cover.
2
1
3
6
7
4
5
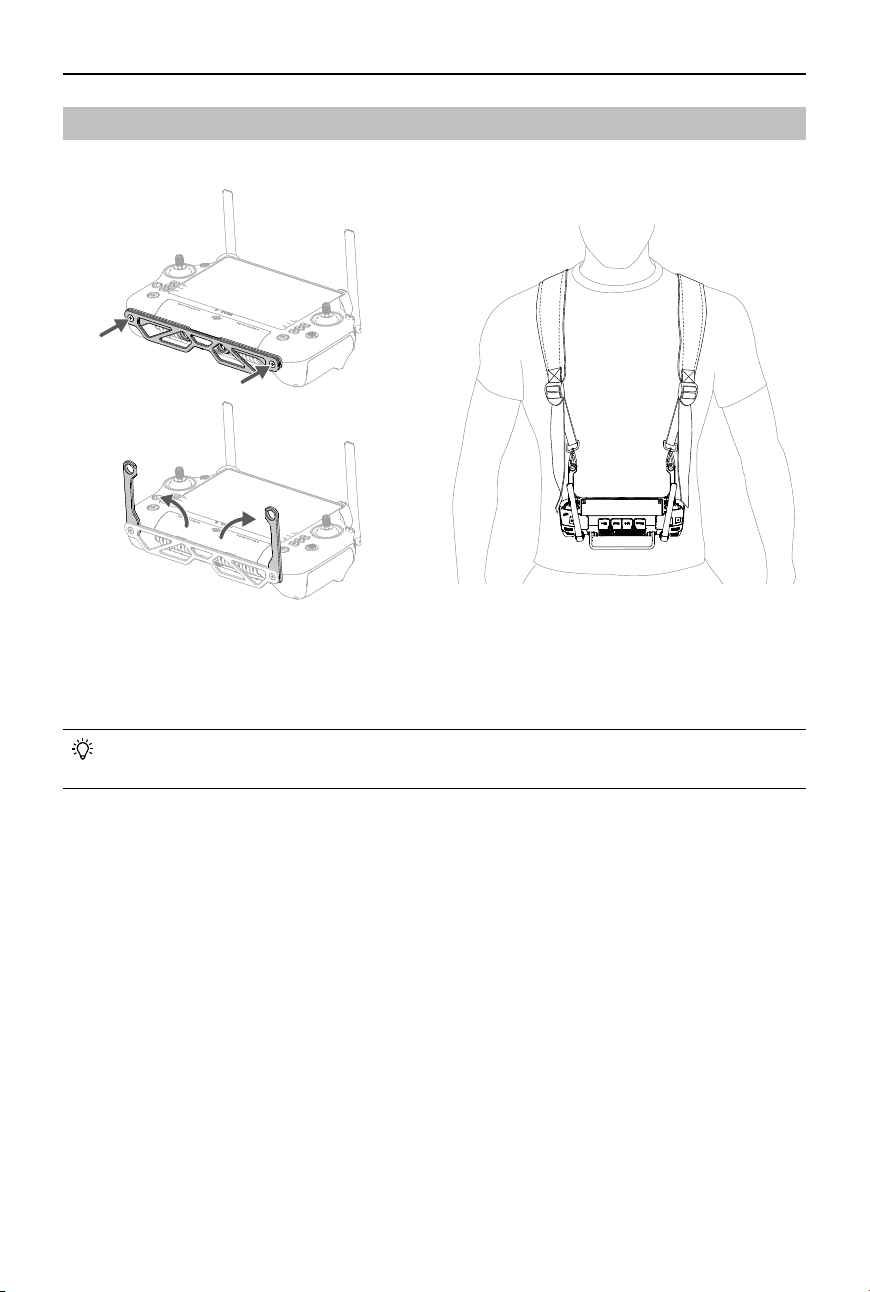
54
©
2022 DJI All Rights Reserved.
MATRICE 30 SERIES User Manual
Mounting the Strap and Bracket Kit
A strap and bracket (excluded) can be mounted onto the remote controller in the following steps.
1. Mount the bracket on the remote controller with two screws.
2. Unfold the two handles.
3. Wear the strap, and attach the strap hooks to the handle holes.
After use, hold the remote controller with one hand, unlock the strap hooks with the other hand
to remove the remote controller, and then take o the strap.
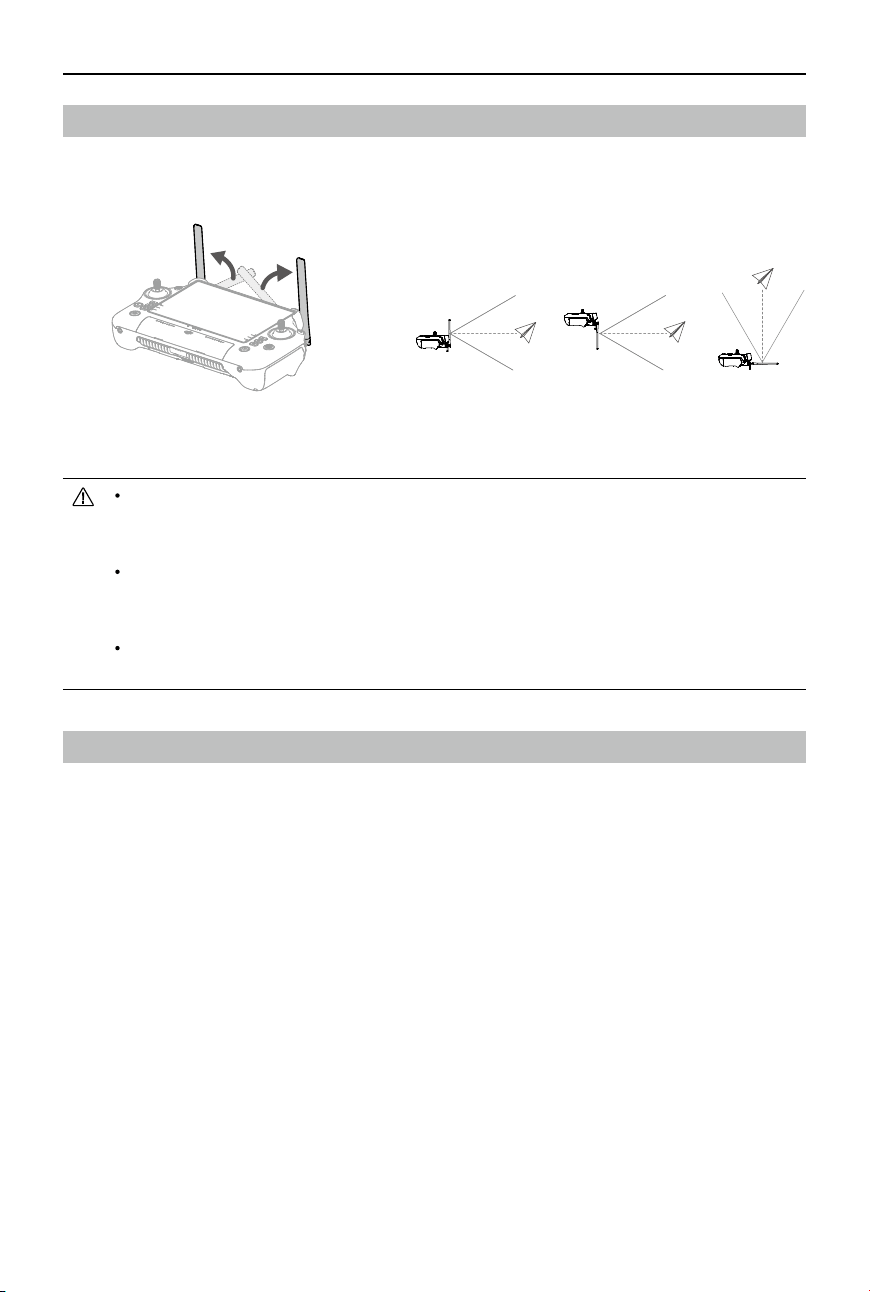
55
©
2022 DJI All Rights Reserved.
MATRICE 30 SERIES User Manual
Adjusting the Antennas
Lift and adjust the antennas. The strength of the remote controller signal is aected by the position of
the antennas.
Adjust the direction of the external RC antennas and make sure their at side is facing the aircraft, so
that the controller and aircraft are within the optimal transmission zone.
DO NOT overstretch the antennas, to avoid damage. Contact DJI Support to repair the
remote controller if the antennas are damaged. A damaged antenna will greatly decrease the
performance of the remote controller and might aect ight safety.
During the ight, DO NOT use other 2.4 GHz or 5.8 GHz communication devices in the same
frequency band at the same time, so as not to interfere with the communication signal of the
remote controller. Such as enable the mobile phone Wi-Fi.
A prompt will appear in DJI Pilot 2 if the transmission signal is weak during ight. Adjust the
antennas to make sure that the aircraft is in the optimal transmission range.
IP Rating
1. The DJI RC Plus remote controller has been tested in a lab environment and rated IP54 in
accordance with the global IEC 60529 standard. The protection rating is not permanent, however,
and may lower over an extended period.
a. DO NOT use the remote controller when the precipitation exceeds 50 mm in 24 hours.
b. DO NOT open any cover in the rain, including the external port cover, remote controller rear
cover, dongle compartment cover, or air vent and air intake covers. DO NOT mount or remove
control sticks or antennas in the rain. Before opening any cover or removing the control sticks or
antennas, move the remote controller indoors and make sure it is clean and completely dry.
c. When using the remote controller in the rain, make sure all covers are attached rmly and control
sticks are screwed in place securely.
d. It is normal to have water stains around the port when opening the port cover after use. Wipe o
water stains before using the external port.
e. The product warranty does not cover water damage.
2. The remote controller is not qualied for an IP54 rating in the following circumstances:
a. The cover of the external port is not attached rmly.
b. The remote controller rear cover is not attached rmly.
c. The air vent and air intake covers are not installed rmly.
d. The dongle compartment cover is not attached rmly.

56
©
2022 DJI All Rights Reserved.
MATRICE 30 SERIES User Manual
e. The control sticks are not screwed in place securely.
f. Antennas are not screwed in place securely.
g. The remote controller has suffered other damage such as a cracked shell or compromised
waterproof adhesive.
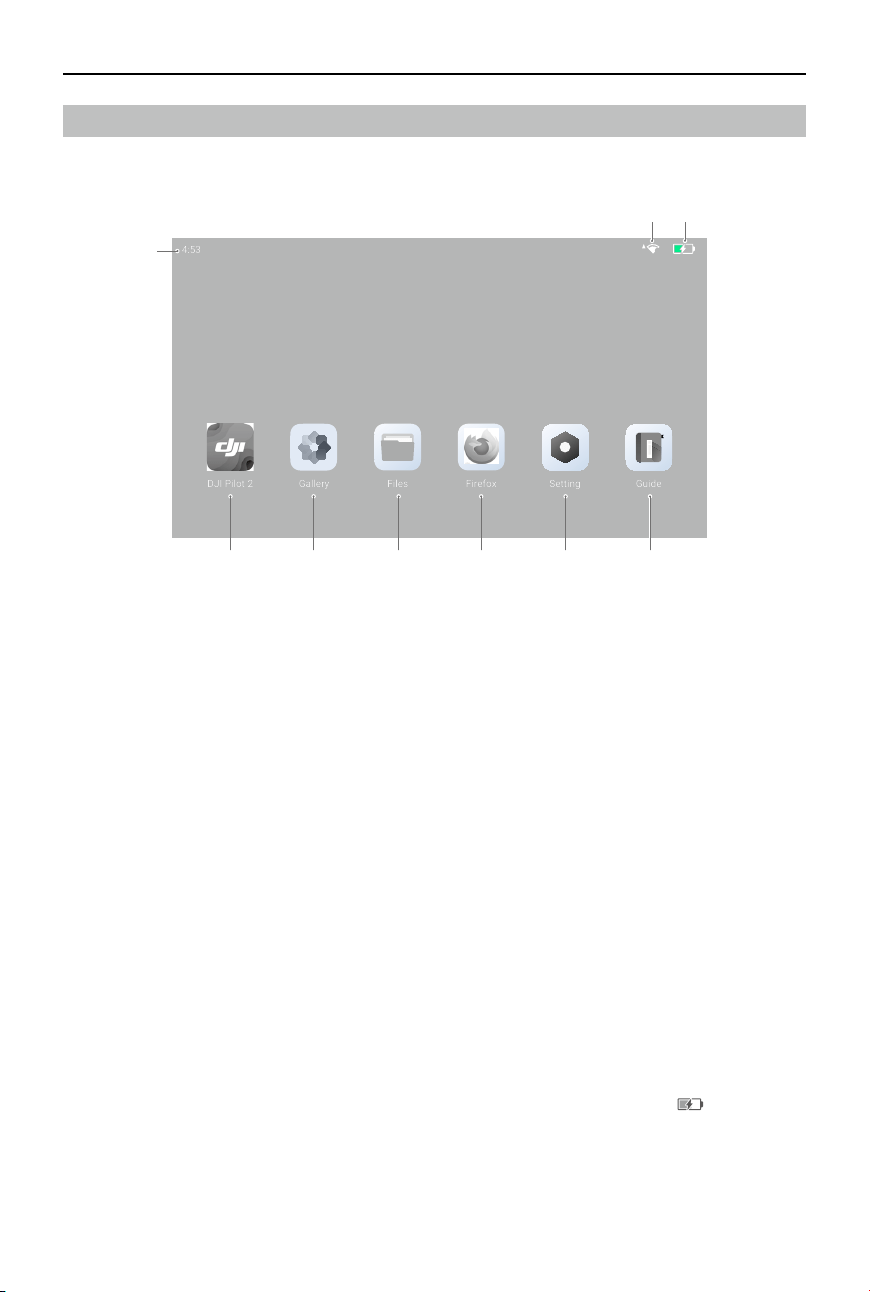
57
©
2022 DJI All Rights Reserved.
MATRICE 30 SERIES User Manual
User Interface
Home Screen
1. Time
Displays local time.
2. DJI Pilot 2
Tap to open DJI Pilot 2.
3. Gallery
Tap to view stored images and videos.
4. Files
Tap to view stored les.
5. Browser
Tap to open the browser.
6. Settings
Tap to open system settings.
7. Guide
Tap to read the guide with concise information on the remote controller buttons and LEDs.
8. Wi-Fi Signal
Displays Wi-Fi signal strength when connected to a Wi-Fi network. Wi-Fi can be enabled or
disabled in the shortcut settings or in the system settings.
9. Battery Level
Displays the battery level of the internal battery of the remote controller. The battery level of the
external WB37 intelligent battery will also be displayed when installed. The icon indicates that
the battery is charging.
4:53
5
DJI Pilot 2
Firefox
Guide
Setting
Gallery
Files
1
2 3 4 5 6 7
8 9
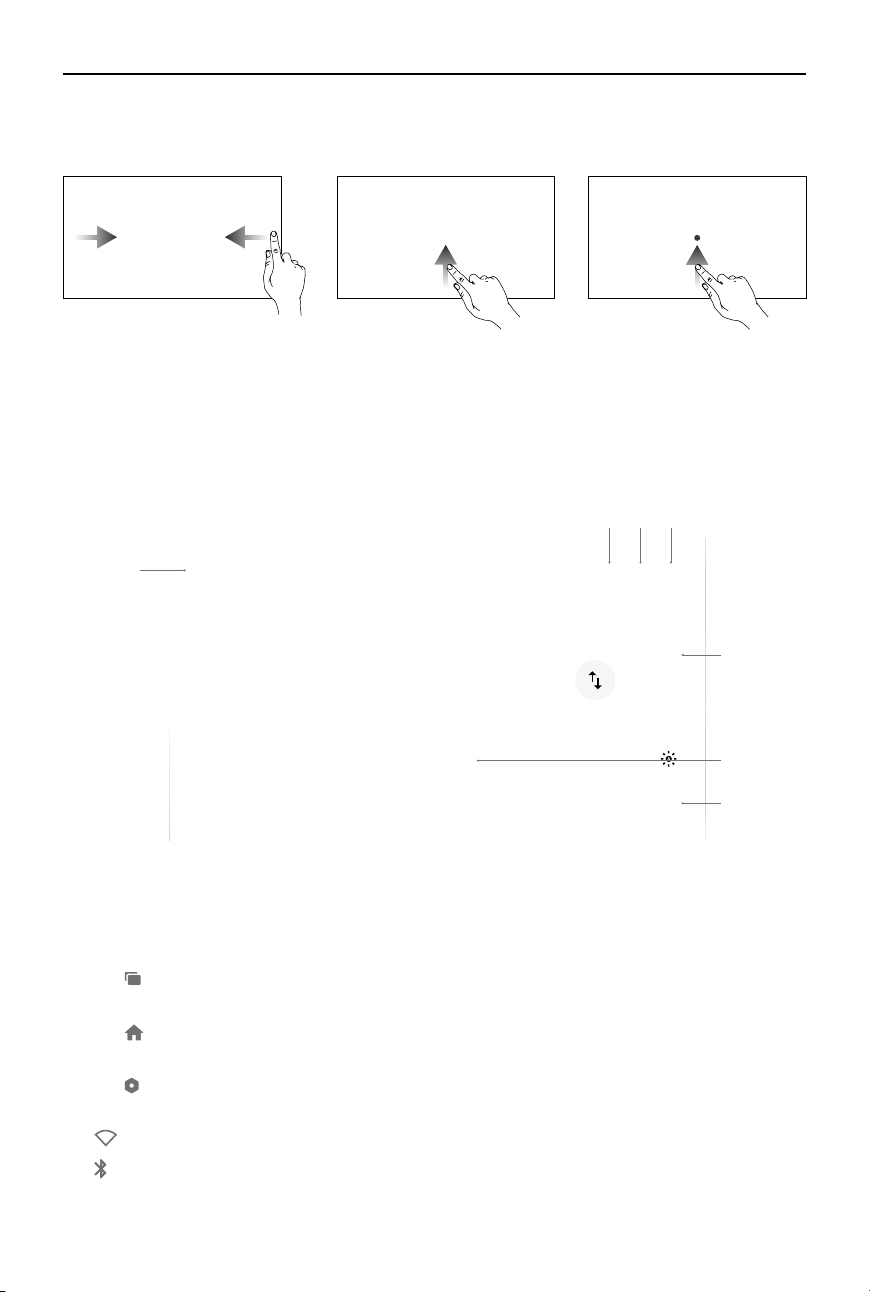
58
©
2022 DJI All Rights Reserved.
MATRICE 30 SERIES User Manual
Screen Gestures
Slide up from the bottom of
the screen and hold to access
recently opened apps.
Slide from the left or right to
the center of the screen to
return to the previous screen.
Slide up from the bottom of
the screen to return to the
home screen.
Shortcut Settings
2
Wi-Fi
Bluetooth
Do Not Dis
Enhanced Di
Notifications
3:05
PM
Mondy
Apr 18, 2022
Screenshot Mobile dat Airplane mo
Record Screen
3 4
5
7
6
1
1. Notications
View system or app notications.
2. Recent
Tap to view and switch to recently opened apps.
3. Home
Tap to return to the home screen.
4. System Settings
Tap to access system settings.
5. Shortcuts
: Tap to enable or disable Wi-Fi. Hold to enter settings and connect to or add a Wi-Fi network.
: Tap to enable or disable Bluetooth. Tap and hold to open settings and connect with nearby
Bluetooth devices.
59
©
2022 DJI All Rights Reserved.
MATRICE 30 SERIES User Manual
: Tap to enable DO NOT Disturb mode. In this mode, system prompts will be disabled.
: Display enhancement. Once enabled, the display brightness is enhanced to assist in shooting.
However, there are dierences between the source and display eect, while the source photo or
video taken by the aircraft is not aected.
: Tap to start screen recording.
: Tap to screenshot the screen.
: Mobile data. Tap to turn mobile data on or o; long press to set mobile data and diagnose
network connection status.
: Tap to enable Airplane mode. Wi-Fi, Bluetooth, and mobile data will be disabled.
6. Adjust Brightness
Slide the bar to adjust the brightness. Tap the icon to auto-brightness mode. Tap the icon or
slide the bar to switch to manual brightness mode.
7. Adjust Volume
Slide the bar to adjust the volume and tap to mute. Note that after muting, all sounds of the
remote controller will be completely disabled, including related alarm sounds. Please turn on the
mute with caution.
60
©
2022 DJI All Rights Reserved.
MATRICE 30 SERIES User Manual
Video Transmission
M30 series aircraft feature O3 Enterprise, which enables triple-channel 1080p video transmission and
supports Single Operator or Advanced Dual Operator mode.
1. When in Single Operator mode, the remote controller supports dual-channel 1080p video
transmission.
2. When in Advanced Dual Operator mode, the remote controller supports triple-channel 1080p video
transmission and allows seamless swapping between input feeds.
Remote Controller LEDs and Alert
Remote Controller LEDs
1 2
1. Status LED
The status LED indicates the status of the remote controller, the aircraft, and the link between them.
Blinking Patterns Descriptions
Solid red Disconnected with aircraft
Blinking red Low aircraft battery level
Solid green Connected with aircraft
Blinking blue The remote controller is linking to an aircraft
Solid yellow Firmware update failed
Blinking yellow Low remote controller battery level
Blinking cyan Control sticks not centered
2. Battery Level LEDs
The battery level LEDs indicate the battery level of the remote controller.
Battery Level Indicators Battery Level
75%~100%
50%~75%
25%~50%
0%~25%
Remote Controller Alert
The remote controller vibrates or beeps twice to indicate an error or warning. For detailed information,
see the real-time prompts on the touchscreen or in DJI Pilot 2. Swipe down from the top of the screen
to open Shortcut Settings and turn on Mute mode to disable all voice alerts.
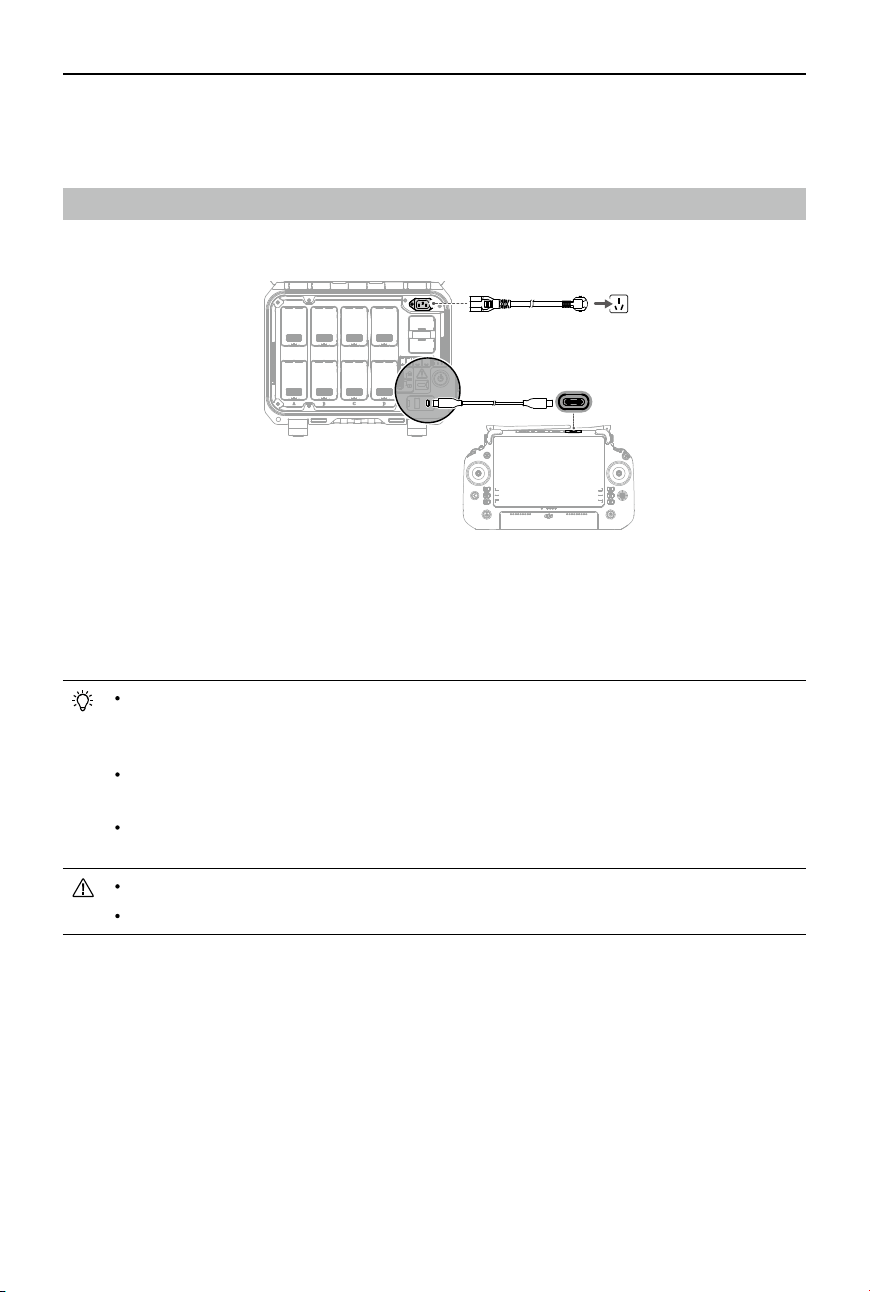
61
©
2022 DJI All Rights Reserved.
MATRICE 30 SERIES User Manual
Any voice prompts and alerts will be disabled in Mute mode, including alerts during RTH and low battery
alerts for the remote controller or aircraft. Use with caution.
Charging the Remote Controller and Checking the Battery Level
Charging the Remote Controller
1. Connect the BS30 Intelligent Battery Station to a power outlet using the AC power adaptor cable.
2. Connect the battery station and the remote controller USB-C ports using a USB-C to USB-C cable.
3. The battery level LEDs start to ash to indicate that the Internal battery is activated.
4. It takes approximately 2 hours to fully charge the remote controller internal battery.
It is recommended to use the DJI BS30 Battery Station for charging. Otherwise, use a
certied USB-C charger with a maximum rated power of 65 W and maximum voltage of 20 V
such as the DJI 65W Portable Charger.
Fully discharge and charge the remote controller every three months. The battery depletes
when stored for an extended period.
If a WB37 battery is installed in the remote controller, the WB37 battery will be charged at the
same time. The WB37 battery can also be charged by inserting to the BS30 battery station.
The remote controller cannot be powered on before activating the internal battery.
Make sure to use the included USB-C to USB-C cable for optimal charging.
Charging Options
A. The internal battery of the remote controller can be charged with a charging device or the inserted
external WB37 battery. It takes approximately two hours to fully charge the internal battery with a
charging device. The internal battery can be charged up to 50% with the external battery. Charging
with the external battery is not possible after the remote controller is powered o.
B. Duration for fully charging a WB37 battery with 0% power:
a. When mounted on the remote controller and the internal battery level is 0%, it takes
approximately 2 hours while fully charging the internal battery.
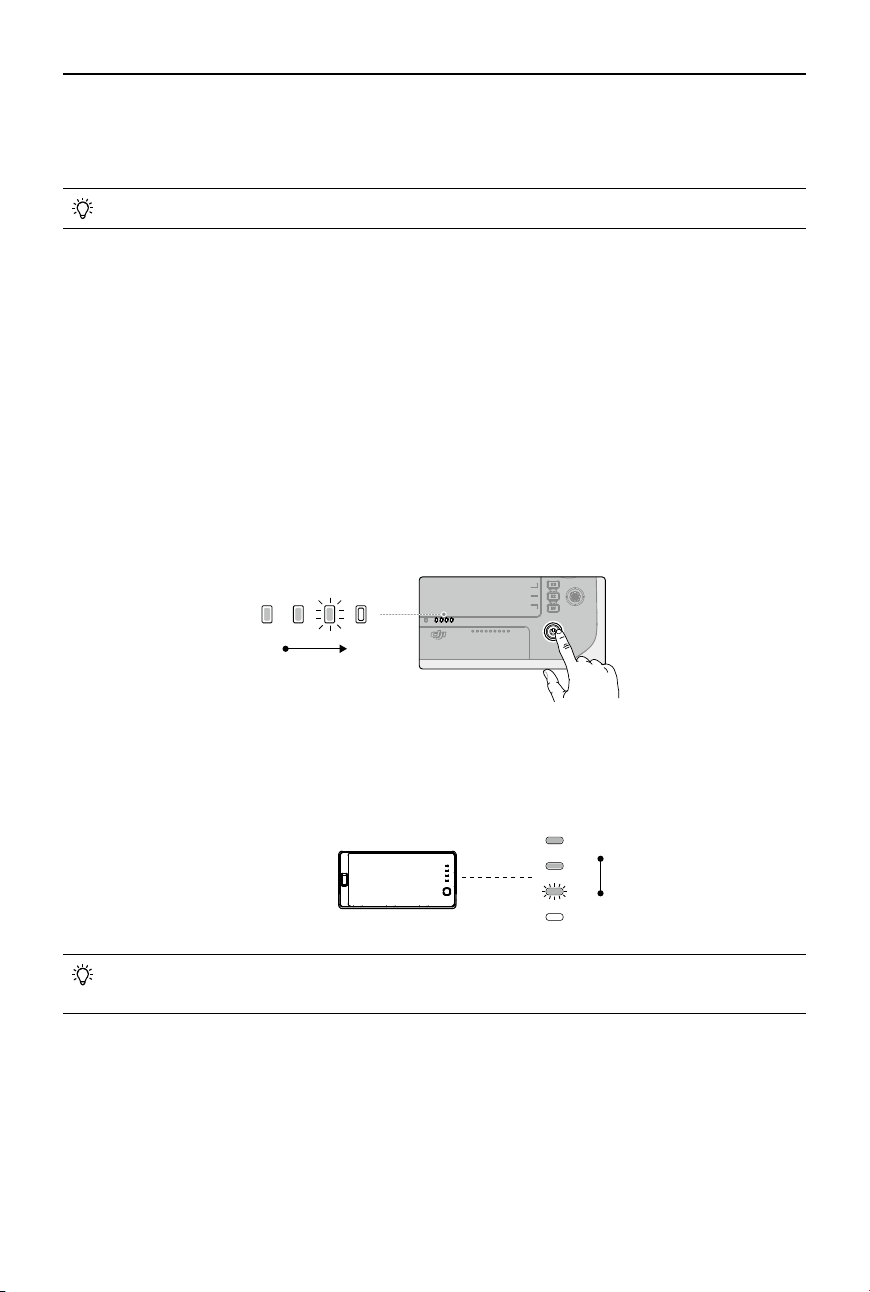
62
©
2022 DJI All Rights Reserved.
MATRICE 30 SERIES User Manual
b. When mounted on the remote controller and the internal battery level is 100%, it takes
approximately 1 hour and 10 minutes.
c. When inserted into the BS30 battery station, it takes approximately 1 hour and 20 minutes.
The charging time may vary with the ambient temperature.
Charging Mechanism
a. When the remote controller is connected with both a charging device and an external battery, the
remote controller will be powered by the charging device.
b. When the external battery is mounted and the remote controller is not connected with a charging
device, the remote controller will be powered by the external battery. When the external battery is
depleted, the remote controller will be powered by the internal battery.
Checking the Battery Level
Checking the Internal Battery Level
Press the power button once to check the current battery level.
Low
High
Checking the External Battery Level
Press the power button on the external battery, and the LEDs will indicate the current battery level of the
external battery.
Alternatively, go to the home screen of the remote controller and check the battery levels of
both the internal and external batteries on the status bar.
High
Low
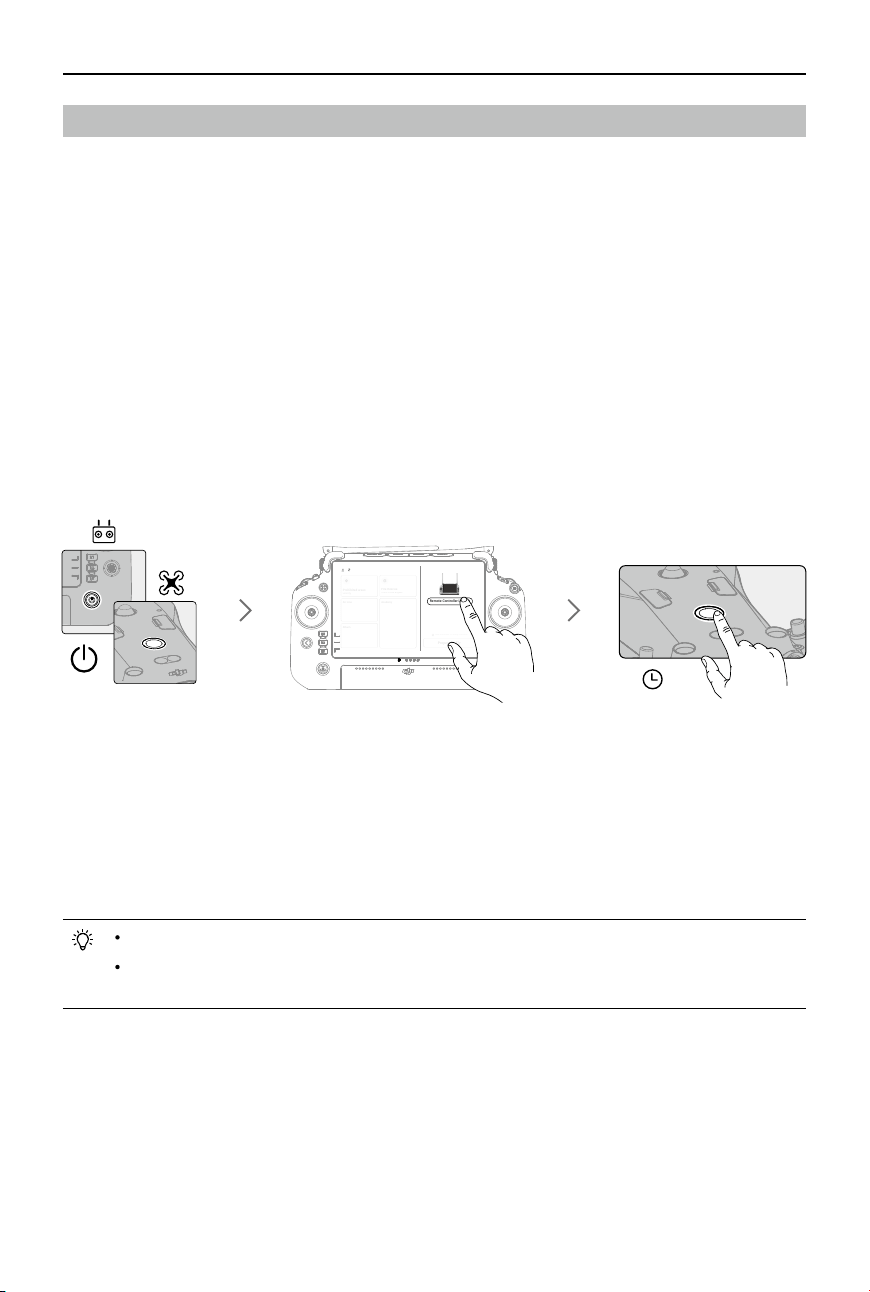
63
©
2022 DJI All Rights Reserved.
MATRICE 30 SERIES User Manual
Linking the Remote Controller and Control Stick Modes
Linking the Remote Controller
The remote controller is already linked to the aircraft when it is purchased together as part of a combo.
Otherwise, follow the steps below to link the remote controller and the aircraft after activation.
Method 1: Using Combination Buttons
1. Power on the remote controller and the aircraft.
2. Press the C1, C2, and Record buttons simultaneously until the status LED blinks blue and the remote
controller beeps twice.
3. Press and hold the power button on the aircraft for at least ve seconds. The aircraft power indicator
will blink and will beep twice to indicate linking has started. When linking is successful, the aircraft
rear indicators will blink green while the remote controller will beep twice, and the remote controller
status LEDs will turn solid green.
Method 2: Using DJI Pilot 2
New database for safty available
Prepare To Fly
Prohibited areas
Limit fly
Fire Rescue
Traffic Police Brigade
Academy
Album
Air Line
Remote Controller Linking
5s
1. Power on the aircraft and the remote controller.
2. Run DJI Pilot 2 and tap Link Remote Controller to link. The status LED of the remote controller will
blink blue, and the remote controller will beep during linking.
3. Press and hold the power button on the aircraft for at least ve seconds. The aircraft power indicator
will blink and will beep twice to indicate linking has started. When linking is successful, the aircraft
rear indicators will blink green while the remote controller will beep twice, and the remote controller
status LEDs will turn solid green.
Make sure the remote controller is within 50 cm (1.6 ft) of the aircraft during linking.
Make sure the remote controller is connected to the internet when logging in using a DJI
account.
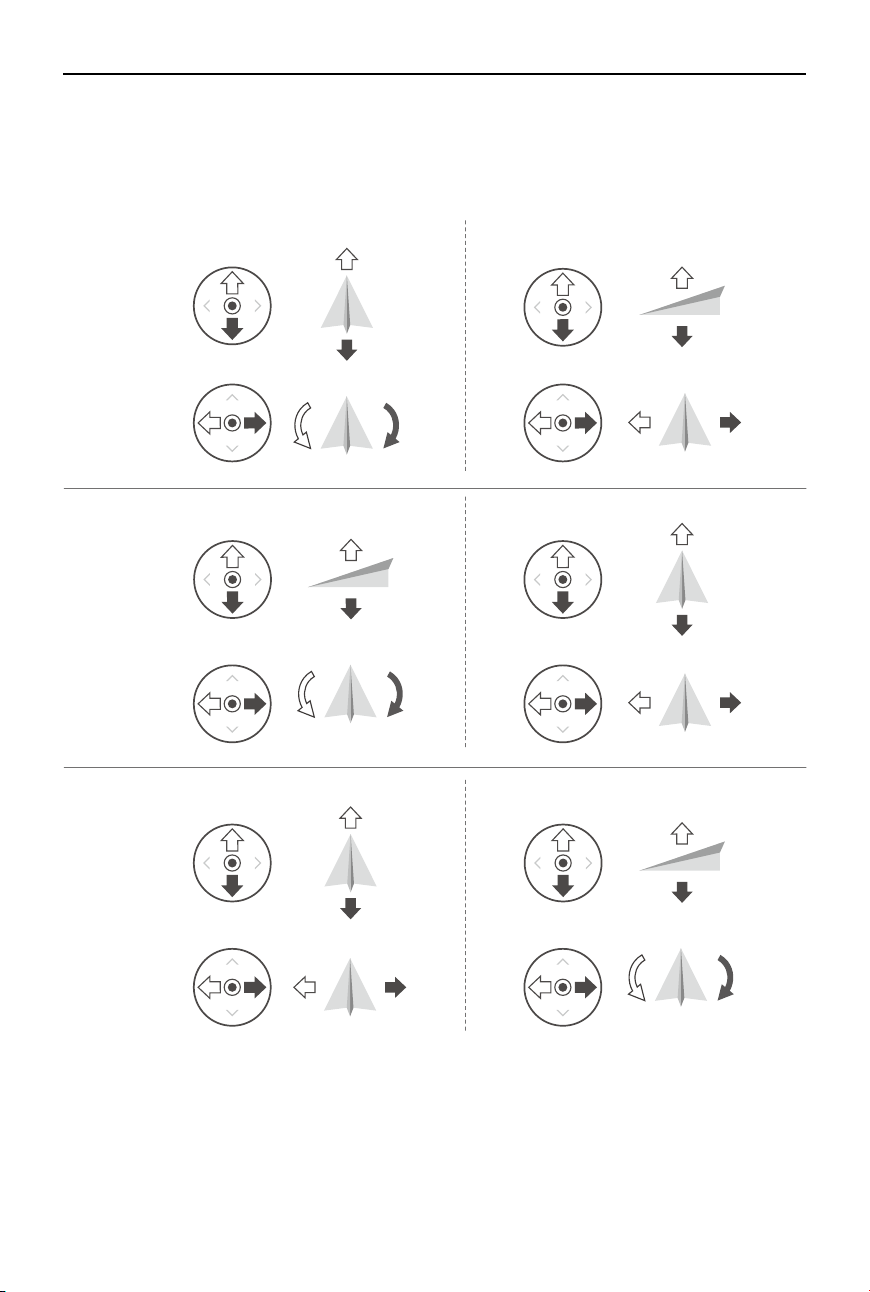
64
©
2022 DJI All Rights Reserved.
MATRICE 30 SERIES User Manual
Control Stick Mode
There are three pre-programmed modes as well as custom modes that can be congured in DJI Pilot 2.
The modes are Mode 1, Mode 2, and Mode 3.
Right StickLeft Stick
Turn RightTurn Left
Up
Down
RightLeft
Up
Down
Turn RightTurn Left
RightLeft
Forward
Backward
Left Stick Right Stick
Forward
Backward
Right Stick
Up
Down
Forward
Backward
Left Stick
Turn RightTurn Left
RightLeft
Mode 2
Mode 1
Mode 3
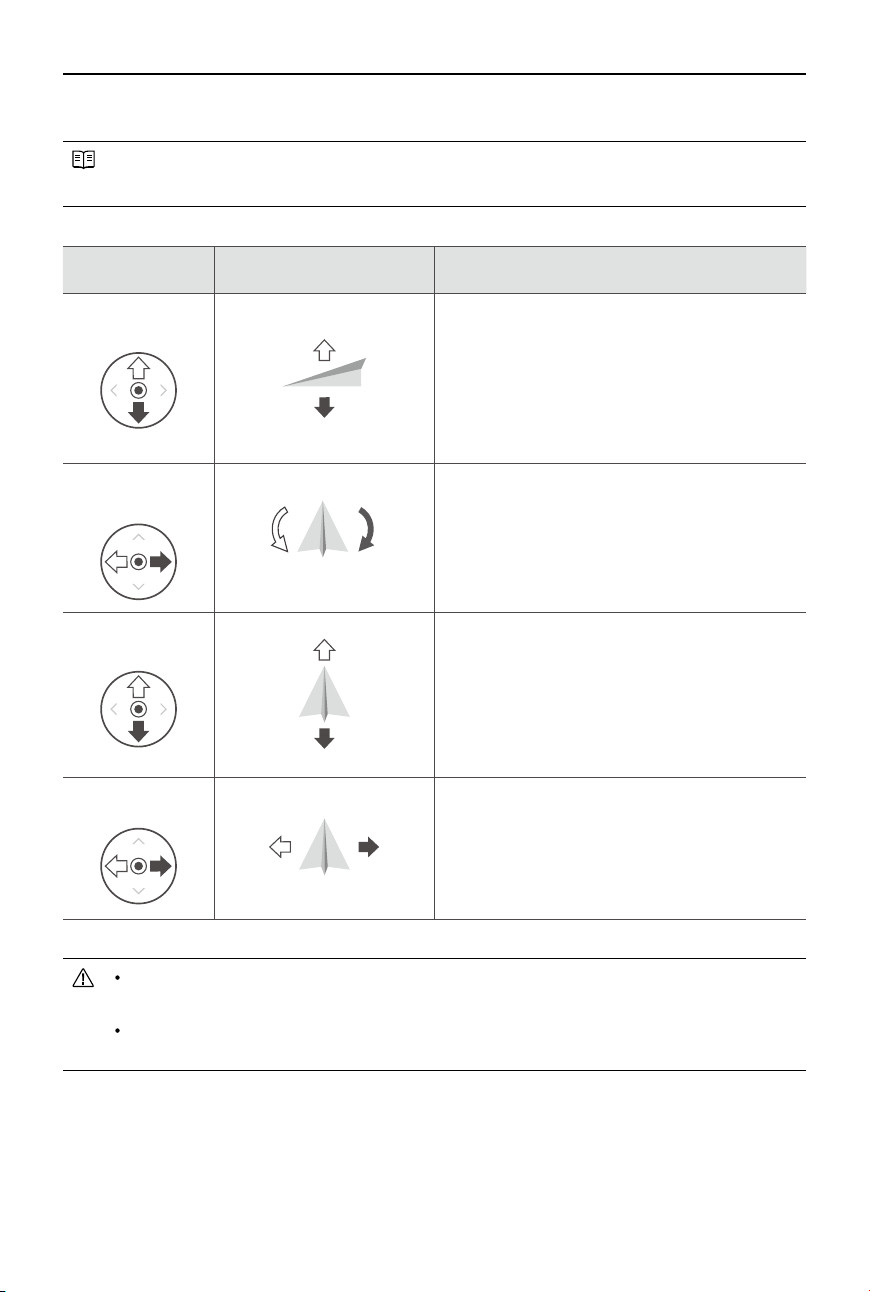
65
©
2022 DJI All Rights Reserved.
MATRICE 30 SERIES User Manual
Remote Controller
(Mode 2)
Aircraft Remarks
Left Stick
UP
Down
Moving the left stick up or down changes the
aircraft’s altitude. Push the stick up to ascend and
down to descend. The more the stick is pushed
away from the center position, the faster the
aircraft will change altitude. Push the stick gently
to prevent sudden and unexpected changes in
altitude.
Left Stick
Turn RightTurn Left
Moving the left stick to the left or right controls
the orientation of the aircraft. Push the stick left to
rotate the aircraft counter-clockwise and right to
rotate the aircraft clockwise. The more the stick is
pushed away from the center position, the faster
the aircraft will rotate.
Right Stick
Forward
Backward
Moving the right stick up and down changes the
aircraft’s pitch. Push the stick up to y forward
and down to y backward. The more the stick is
pushed away from the center position, the faster
the aircraft will move.
Right Stick
RightLeft
Moving the right stick to the left or right changes
the aircraft’s roll. Push the stick left to y left and
right to y right. The more the stick is pushed
away from the center position, the faster the
aircraft will move.
Keep the remote controller away from magnetic materials such as magnets and loudspeaker
boxes to avoid magnetic interference.
To avoid damage to the control sticks, it is recommended that the remote controller be stored
in the carrying case when being carried or transported.
The default mode is Mode 2. See the gures below to check the function of each control stick in the
three pre-programmed modes.
Center position: control sticks are centered.
Moving the control stick: control sticks are pushed away from the center.
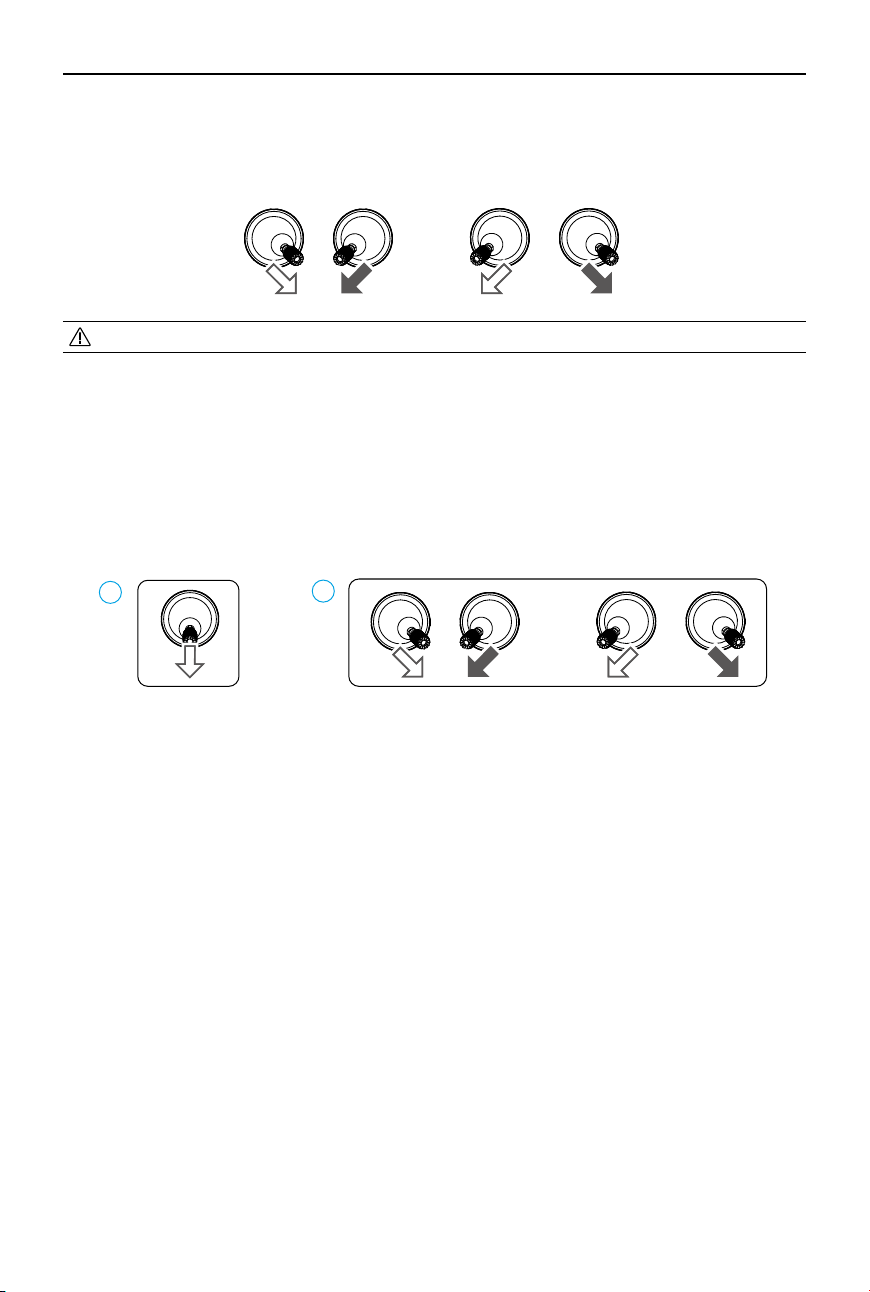
66
©
2022 DJI All Rights Reserved.
MATRICE 30 SERIES User Manual
Starting the Motors
A Combination Stick Command (CSC) is used to start the motors. Push both sticks to the inner or outer
bottom corners to start the motors. Once the motors start spinning, release both sticks simultaneously.
Stopping the Motors
The motors can be stopped in two ways:
Method 1: When the aircraft has landed, push the throttle stick down and hold. The motors will stop
after three seconds.
Method 2: When the aircraft has landed, push the throttle stick down, and perform the same CSC used
to start the motors. Release both sticks once the motors have stopped.
1
2
If the motor is started unexpectedly, use CSC to stop motors immediately.
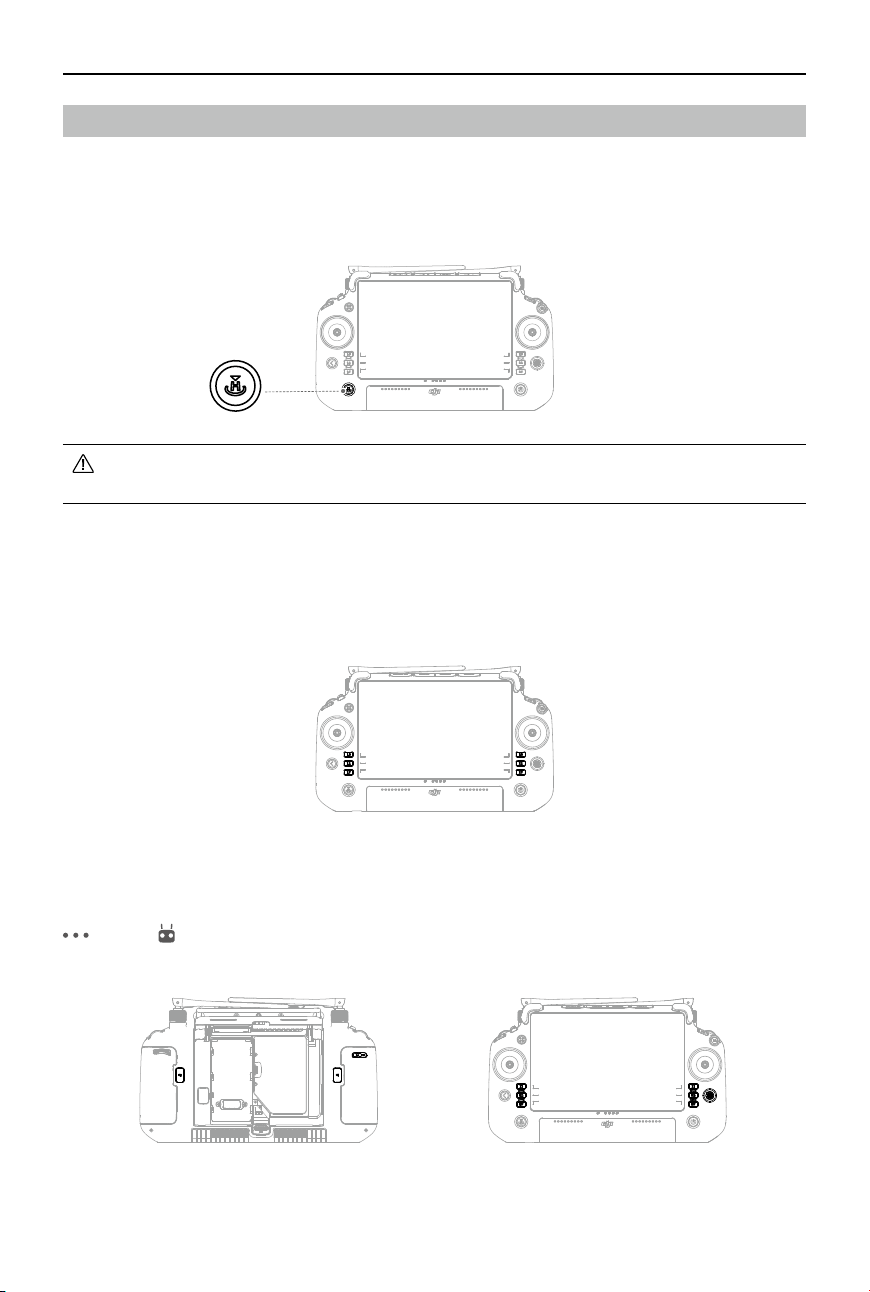
67
©
2022 DJI All Rights Reserved.
MATRICE 30 SERIES User Manual
Buttons Overview
RTH Button
Press and hold the RTH button until the remote controller beeps twice to start RTH. The aircraft will y
to the last updated Home Point. Press the button again to cancel RTH and regain control of the aircraft.
In Advanced Dual Operator mode, the user cannot start or cancel RTH using the RTH button
on the remote controller that does not have aircraft control.
L1/L2/L3/R1/R2/R3 Buttons
The remote controller will automatically switch the functions of these buttons depending on the camera
type on the aircraft. Find the descriptions of these button functions next to the L1/L2/L3/R1/R2/R3
buttons after running DJI Pilot 2.
Button Customization and Combinations
Customizable Buttons
The C1, C2, C3, and 5D buttons are customizable. Open DJI Pilot 2 and enter camera view. Tap
and tap to congure the functions of these buttons. In addition, combination buttons can be
customized using the C1, C2, and C3 buttons with the 5D button.

68
©
2022 DJI All Rights Reserved.
MATRICE 30 SERIES User Manual
Combination Buttons
Some frequently-used features can be activated by using combination buttons. To use combination
buttons, hold the back button and operate the other button in the combination. In actual use, enter the
home screen of the remote controller, and tap Guide to quickly check all available combination buttons.
The default combination buttons cannot be changed. The following table displays the function of each
default combination button. Use the back button and the other button at the same time to execute a
specic function.
Combination Operation Function
Back Button + Left Dial Adjust Brightness
Back Button + Right Dial Adjust Volume
Back Button + Record Button Record Screen
Back Button + Shutter Button Screenshot
Back Button + 5D Button Toggle up - Home; Toggle down - Shortcut settings; Toggle left -
Recently opened apps
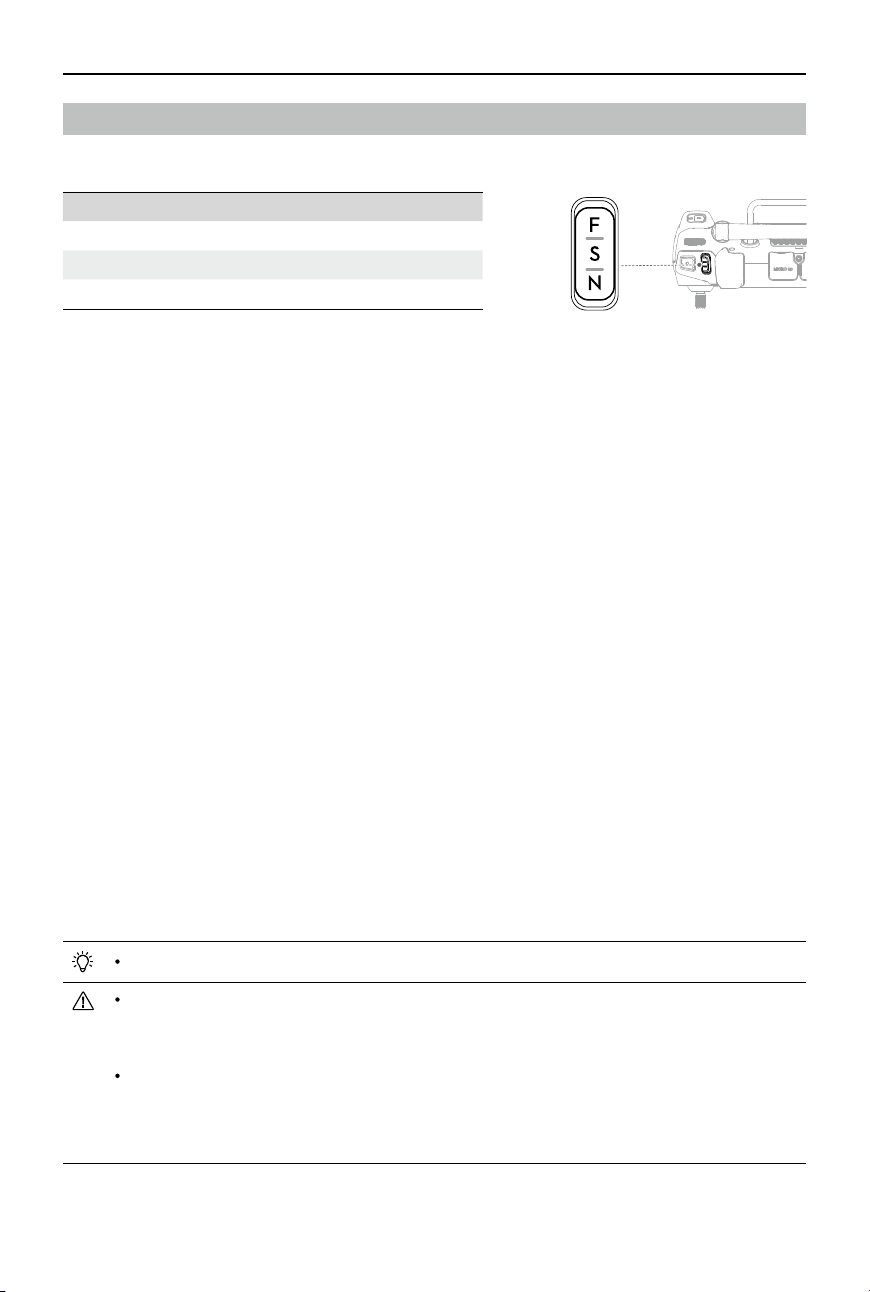
69
©
2022 DJI All Rights Reserved.
MATRICE 30 SERIES User Manual
Icon Flight Mode
F F-mode (Function)
S S-mode (Sport)
N N-mode (Normal)
Flight Mode Switch (N/S/F)
Toggle the switch to select a ight mode.
The ight controller system of the M30 series aircraft supports the following ight modes:
N-mode (Normal)
The aircraft utilizes the GNSS and the vision system that allows for obstacle sensing in six directions
to automatically stabilize itself. When the GNSS signal is strong, the aircraft uses the GNSS to locate
and stabilize itself. When the GNSS signal is weak but the lighting and other environment conditions
are sucient, the aircraft uses the vision systems to locate and stabilize itself. When obstacle sensing is
enabled and the lighting and other environment conditions are sucient, the maximum tilt angle of the
aircraft will be 25°. When the GNSS signal is weak and the lighting and other environment conditions
are insucient, the aircraft cannot hover precisely and can only maintain its altitude using the barometer.
S-mode (Sport)
The aircraft utilizes the GNSS and downward vision system to hover precisely. By adjusting the gain and
expo settings, the maximum ight speed of the aircraft can be increased to 23 m/s. When in S-mode,
obstacle sensing in the four horizontal directions will be disabled, and the aircraft cannot detect or
bypass obstacles in these directions. The upward and downward vision systems work normally in
S-mode.
F-mode (Function)
F-mode can be set to T-mode (Tripod mode) or A-mode (Attitude mode) in DJI Pilot 2. T-mode is based
on N-mode. The ight speed is limited to allow easier control of the aircraft. Attitude mode must be
used with caution.
If the aircraft is ying in the EU, the aircraft will switch to Low Speed mode when the ight mode is
switched to T-mode. Low Speed mode limits the maximum horizontal ight speed to 2.8 m/s based on
Normal mode, and there is no limit for the ascent or descent speed.
The ight mode is only valid for manual ight.
Obstacle sensing is disabled in S-mode, which means the aircraft cannot sense and brake to
avoid obstacles automatically. Pay attention to the surrounding environment and obstacles on
the route when ying the aircraft in S-mode.
Please note that when flying in S-mode, the flight speed of the aircraft will greatly increase
compared with that in N-mode (Normal). Accordingly, the braking distance will increase
signicantly. When ying in a windless environment, a minimum braking distance of 50 m (164 ft) is
required.

70
©
2022 DJI All Rights Reserved.
MATRICE 30 SERIES User Manual
A-mode (Attitude mode)
1. DO NOT switch from N-mode to either S-mode or F-mode unless you are suciently familiar with the
aircraft behavior under each ight mode. You must turn on Multiple Flight Modes in DJI Pilot 2 before
switching from N-mode to other modes.
2. Avoid ying in areas where GNSS signal is weak or in narrow and conned spaces. Otherwise, the
aircraft will be forced to enter Attitude mode*, leading to potential ight hazards. Land the aircraft in a
safe place as soon as possible.
3. When switching the GNSS to the BeiDou satellite positioning system in DJI Pilot 2, the aircraft only
uses a single positioning system and the satellite search capability becomes poor. Fly with caution.
* In Attitude mode, the vision systems and some intelligent features are disabled. The aircraft cannot position
itself or brake automatically in this mode and is easily affected by its surroundings, which may result in
horizontal shifting. Use the remote controller to control and position the aircraft.
71
©
2022 DJI All Rights Reserved.
MATRICE 30 SERIES User Manual
Calibrating the Compass
The compass may need to be calibrated after the remote controller is used in areas with electromagnetic
interference. A warning prompt will appear if the compass of the remote controller requires calibration.
Tap the warning prompt to start calibration. In other cases, follow the steps below to calibrate the
remote controller.
1. Enter the home screen.
2. Open Settings, swipe up, and select Compass.
3. Follow the diagram on the screen to calibrate the remote controller.
4. The user will receive a prompt when the calibration is successful.
If the remote controller compass is working normally, "Calibration Success" will be prompted
after entering the calibration view. It is not necessary to perform the calibration.
HDMI Settings
The touchscreen can be shared with a display screen via an HDMI cable. The resolution can be set in
Settings, Display, Advanced, and then HDMI.
Advanced Dual Operator Mode
M30 series aircraft support Advanced Dual Operator mode that allows two pilots to operate an aircraft
simultaneously remote controllers A and B. In this mode, both remote controllers have equal control
of the aircraft. The roles of both remote controllers operating the aircraft are not assigned in advance.
Instead, either pilot may gain control of the aircraft or the gimbal camera as needed, allowing for more
exibility during the operation.
Control over the aircraft is independent of control over the gimbal camera. When a remote controller
gains control of the aircraft or the gimbal camera, the user can use the controller to operate the aircraft
or control the movement of the gimbal camera respectively.
Setting the Advanced Dual Operator Mode
Before using Advanced Dual Operator mode, the pilot needs to link the aircraft with both remote
controllers A and B. Follow the steps below to link the remote controllers.
1. Run the DJI Pilot 2 app.
2. Enter the homepage and tap Remote Controller A/B to activate linking. During linking, the status LED
of the remote controller will blink blue and the remote controller will beep. Press and hold the power
button on the aircraft for at least ve seconds. The aircraft power indicator will blink and beep twice
to indicate that linking has started. When linking is successful, the aircraft rear indicators will blink
green, the remote controller beep twice, and the remote controller status LED turn solid green.
3. Thereafter, the aircraft control button on the remote controller with control of the aircraft will turn
green, and the aircraft control button of the other remote controller will turn white. Tap on the
upper right corner of the gimbal camera view in DJI Pilot 2 to gain control of the gimbal camera.
Link the two remote controllers one by one. Make sure to link the remote controller A with the
aircraft rst, and then link the remote controller B.

72
©
2022 DJI All Rights Reserved.
MATRICE 30 SERIES User Manual
Using Advanced Dual Operator Mode
1. Make sure both remote controllers are linked and connected with the aircraft before using Advanced
Dual Operator mode. By default, the rst remote controller connected with the aircraft is granted
control of both the aircraft and the gimbal camera, while the second remote controller is not given
any control.
2. When a remote controller has control of a device, whether it is the aircraft or the gimbal camera,
the pilot can control the device by pushing the control sticks, turning the dial, pressing the shortcut
buttons, or tapping the app’s user interface. The operation is the same as in Single Operator mode.
However, when a remote controller does not have control of a device, the pilot is unable to control
the device. Only the remote controller with aircraft control can be used to start or cancel RTH.
3. Either pilot can take over control of a device as needed. Press the aircraft control button to gain
control of the aircraft. Tap on the upper right corner of the gimbal camera view in DJI Pilot 2 to
gain control of the gimbal camera. After gaining aircraft control, the pilot can lock it by pressing and
holding the aircraft authority button on the remote controller. The aircraft authority button will turn
blue when the control is locked. The control sticks are used for operating the gimbal if the remote
controller only has control over the gimbal camera. When the remote controller has full control, the
control sticks are used for controlling the aircraft and the dials for adjusting gimbal movement.
4. In Advanced Dual Operator mode, a control transfer mechanism will be triggered if one of the
remote controllers is disconnected from the aircraft. When this happens, control of the gimbal
camera will shift from the disconnected remote controller to the other remote controller still
connected with the aircraft. If the disconnected remote controller also has aircraft control, the other
remote controller will receive a notication that the user may manually take over aircraft control. If
the pilot of the connected remote controller chooses not to take over aircraft control, the aircraft
will automatically perform the failsafe action. If the pilot of the connected remote controller does not
choose either option within a specied time period, the aircraft will also activate the failsafe action.
5. If the disconnected remote controller reconnects with the aircraft during the ight, it will not resume
its previous control and will by default have no control of any device. The pilot may gain control of
the devices again as needed.
6. Only the remote controller with control of the gimbal camera can be used to adjust relevant settings
for the gimbal and camera, and to download or play back media les.
7. Only the remote controller with the control over gimbal camera can perform the download and
playback operations of the gimbal camera.
8. Under normal circumstances, the pilots of both remote controllers can adjust ight-related settings,
such as for the ight controller system, vision systems, batteries, and video transmission. However,
if aircraft control is locked, only the remote controller with aircraft control can be used to adjust
these settings.
9. Other non ight-related operations can be performed using either remote controller.
10. The pilot of remote controller B cannot adjust settings for network RTK or custom network RTK.
11. Remote controller A can be used to update the rmware of all modules at once when connected
with the aircraft, but remote controller B can only be used to update the firmware of remote
controller B.
12. Uploading Logs Using DJI Pilot 2: The pilot can upload the logs of both the aircraft and remote
controller A through remote controller A, and can upload the logs of remote controller B through
remote controller B.
13. Remote controller B cannot be used to update the GEO Zone database.
73
©
2022 DJI All Rights Reserved.
Intelligent Battery
Station
This chapter introduces the features of
intelligent battery station.
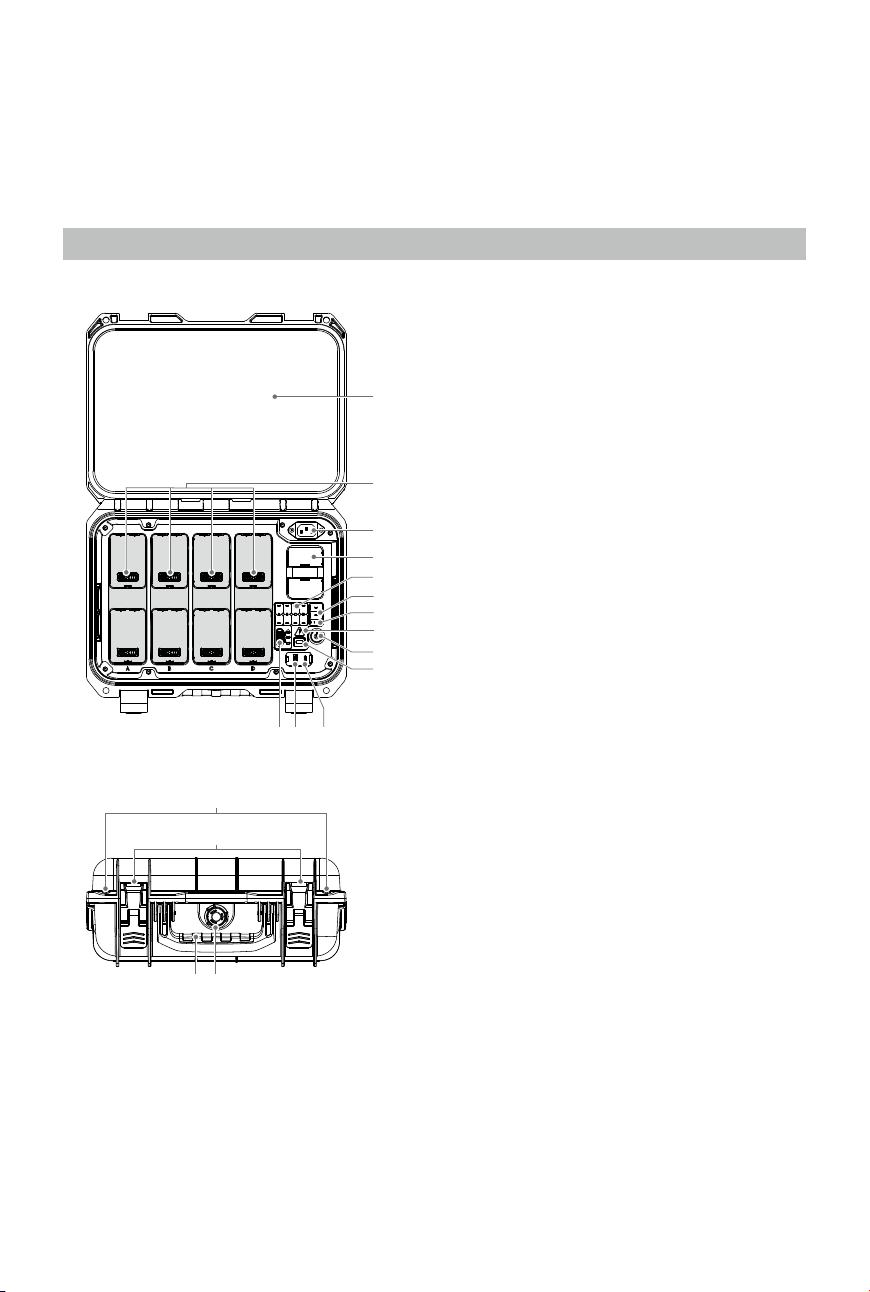
74
©
2022 DJI All Rights Reserved.
Intelligent Battery Station
The BS30 Intelligent Battery Station features eight TB30 battery ports, two WB37 battery ports, one
USB-C maintenance port, and one USB-A and one USB-C charging port. It can charge two TB30
batteries and one WB37 battery simultaneously.
Battery Station Overview
1. Cover
2. TB30 Battery Ports
3. Power Port
4. WB37 Battery Port
5. TB30 Battery Status LEDs
6. WB37 Battery Status LEDs
7. WB37 Battery Level LEDs
8. Battery Station Status LED
9. Power Button/Indicator
10. USB-C Maintenance Port
11. USB-C Charging Port (Recommended
for Remote Controller)
12. USB-A Charging Port
13. Charging Mode Switch
14. Padlock Holes
15. Lock Clip
16. Handle
17. Pressure Valve
1
2
3
4
5
7
9
6
8
10
13 12 11
14
15
16 17
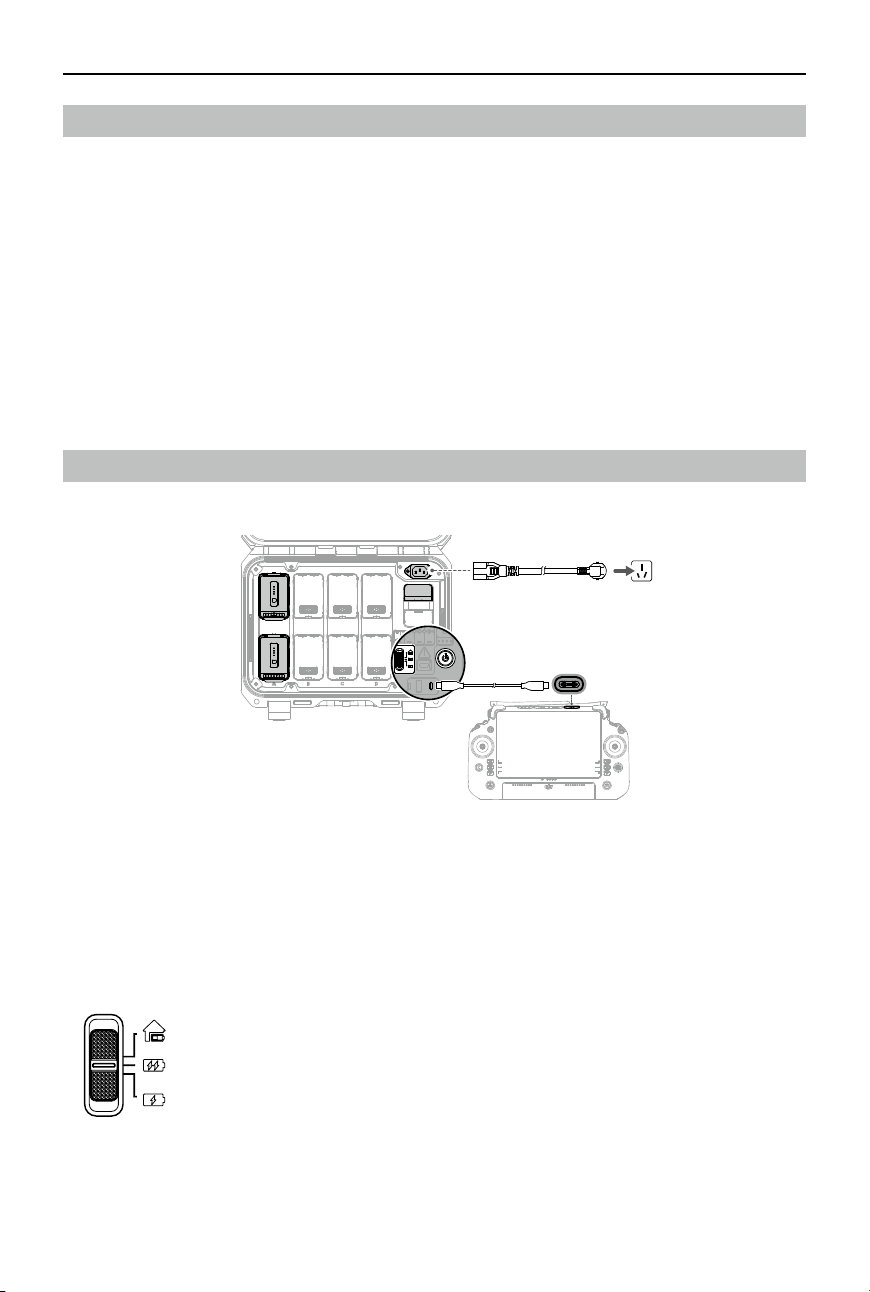
75
©
2022 DJI All Rights Reserved.
MATRICE 30 SERIES User Manual
Warnings
1. Keep liquids away from the inside of the battery station.
2. DO NOT close the cover of the battery station during charging. Make sure it is well-ventilated and
able to dissipate heat.
3. The battery station is only compatible with the TB30 battery and WB37 battery. DO NOT use the
battery station with any other battery models.
4. Place the battery station on a at and stable surface when in use. Make sure the device is properly
insulated to prevent re hazards.
5. DO NOT attempt to touch the metal terminals in the battery station. Clean the metal terminals with a
clean, dry cloth if there is any noticeable buildup after powering o.
6. Take care to avoid injuring your ngers when opening or closing the battery station.
Using the Battery Station
Chaging
1. Connect the battery station to a power outlet using the AC power adaptor cable.
2. Press the power button once to power on the battery station.
3. To charge the DJI RC Plus remote controller, connect the USB-C ports of the battery station and
remote controller using a USB-C to USB-C cable.
4. For TB30 batteries, make sure the charging mode is set to the mode required. The charging time is
shown in the diagram.
Storage Mode: Each battery pair is charged to 50% in sequence and kept at 50% after charging. *
Ready-to-Fly Mode: Each battery pair is charged to 90% in sequence and kept at 90% after
charging. *
Standard Mode: Each battery pair is charged to 100% in sequence.
* The battery station should be powered on to maintain the battery level in Storage Mode and Ready-to-Fly
Mode. Power o the battery station after charging, except for special situations such as re emergencies.
Maintaining high power level in Ready-to-Fly Mode will aect battery life.

76
©
2022 DJI All Rights Reserved.
MATRICE 30 SERIES User Manual
5. Insert the batteries into the battery ports to start charging.
A. For WB37 batteries, the battery station will charge the battery with the most power rst.
B. For TB30 batteries, their charging sequence is illustrated below.
a. Between paired and singular batteries, paired batteries will be charged rst. (Figure a)
b. Where there are multiple battery pairs (each formed by a top and bottom battery in the sequence
of A, B, C and D), the pair with the highest power will be charged rst. (Figure b)
c. If none of the batteries are paired, the two batteries with the highest power will be charged rst.
(Figure c)
10% 30%
20% 40%30%10%
10%
30%
30%
(Figure a) (Figure b) (Figure c)
Will charge rst.
When the power of the paired batteries are not the same, the battery station will charge the
one with less power rst.
Connect the maintenance port to the remote controller USB-C port to update the rmware or
diagnose the errors for battery station and batteries.
The battery station will automatically warm up a TB30 battery to 18° C (64.4° F) before
charging if the temperature of the battery is lower than 10° C (50° F) when inserted.
When the WB37 battery is charged at the same time, the TB30 battery charging time will be
slightly prolonged.
Battery Level: 20%
Standard Mode
Ready-to-Fly Mode
30 min
12 min
90% 100%
77
©
2022 DJI All Rights Reserved.
MATRICE 30 SERIES User Manual
Warming up and charging the battery at a low temperature
If the temperature of the battery is lower than 10° C (50° F) when inserted, the battery station will warm
up the battery after being powered on.
DO NOT charge in a low-temperature environment frequently. It may prolong the charging time
and shorten battery life.
Battery Station LEDs and Alert
Battery Station LEDs Description
LED Indicators Descriptions
Power Button
Solid green Powered on
Battery Status LEDs
Blinks green Charging
Solid green Charging completed
Blinking yellow Cooling down or warming up before charging
Solid yellow Waiting to charge
Blinking red
Battery port communication error. Reinsert the battery or try another
battery port.
Solid red Battery error*
Battery Station Status LED
Blinking yellow Updating battery station rmware
Solid red Battery station error*
* Connect to the remote controller, run DJI Pilot 2, and tap HMS to diagnose the error.
Buzzer Sound Description
The buzzer beeps to indicate the following errors:
a. When the battery status LED is red and the buzzer is beeping, it means there is an error with the
battery.
b. When the battery station status LED is red and the buzzer is beeping, it means there is an error with
the battery station.
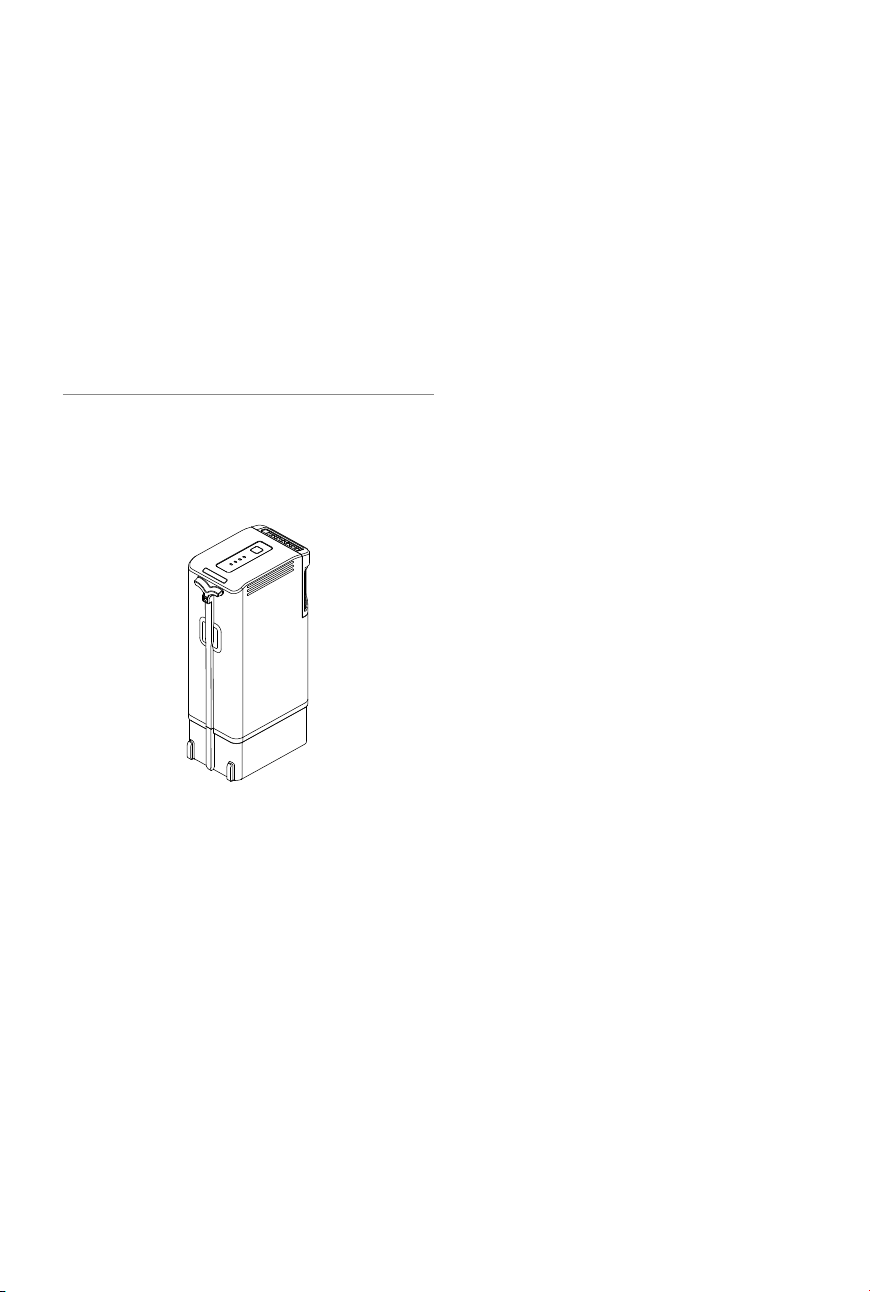
78
©
2022 DJI All Rights Reserved.
Intelligent Flight
Battery
This chapter introduces the features of
intelligent ight battery.
79
©
2022 DJI All Rights Reserved.
Intelligent Flight Battery
Introduction
The TB30 intelligent flight battery is equipped with high-energy battery cells and uses an advanced
battery management system to power the aircraft. Only use a DJI-approved charging device to charge
the intelligent ight battery. Make sure to fully charge the intelligent ight battery before using it for the
rst time. The rmware for the intelligent ight battery is included in the aircraft rmware. Make sure the
rmware of all intelligent ight batteries is updated to the latest version.
Battery Features
The intelligent ight battery has the following features:
1. Battery Level Display: The battery level LEDs display the current battery level.
2. Battery self-discharge will be triggered if the battery level is higher than 50%. Discharging the
battery level to 50% can extend battery life.
3. Balanced Charging: During charging, the voltages of the battery cells are automatically balanced.
4. Overcharge Protection: The battery stops charging automatically once fully charged.
5. Temperature Detection: To prevent any damage, the battery only charges when the temperature is
between -20° and 40° C (-4° and 104° F).
6. Overcurrent Protection: The battery stops charging if an excess current is detected.
7. Over-Discharge Protection: During flight, to ensure flight safety and allow users to have as
much time as possible to deal with emergencies, over-discharge protection is disabled to allow
continuous output. Therefore, pay attention to the remaining battery level during ight and land or
return to home immediately when prompted to do so in the app. Otherwise, the battery may be
dangerously over-discharged. When charging, an over-discharged battery may be a re hazard. To
prevent this, the battery will be locked and can no longer be charged or used.
8. Short Circuit Protection: The power supply is automatically cut if a short circuit is detected.
9. Battery Cell Damage Protection: The app will display a warning prompt when a damaged battery
cell is detected.
10. Hibernation Mode: The battery will be in Hibernation mode when not in use to save power.
11. Communication: Information about the voltage, battery level, and current of the battery is
transmitted to the aircraft.
12. Heating: The feature ensures the battery operates normally at a low temperature. Refer to the
“Warming the Battery” section for details.
13. Waterproofing and Dustproofing: After being installed in the aircraft, the battery meets the IP55
rating standards.
Refer to the user manual, safety guidelines, and battery labels before use. Users shall take full
responsibility for all operations and usage.
If only one battery is usable after takeo, land the aircraft promptly and replace the batteries.
PSDK port has a built-in temperature sensor. If the payload power is too large causing the
device to overheat, the aircraft will automatically cut o power supply for the payload.
Use batteries provided by DJI. DO NOT use other batteries.
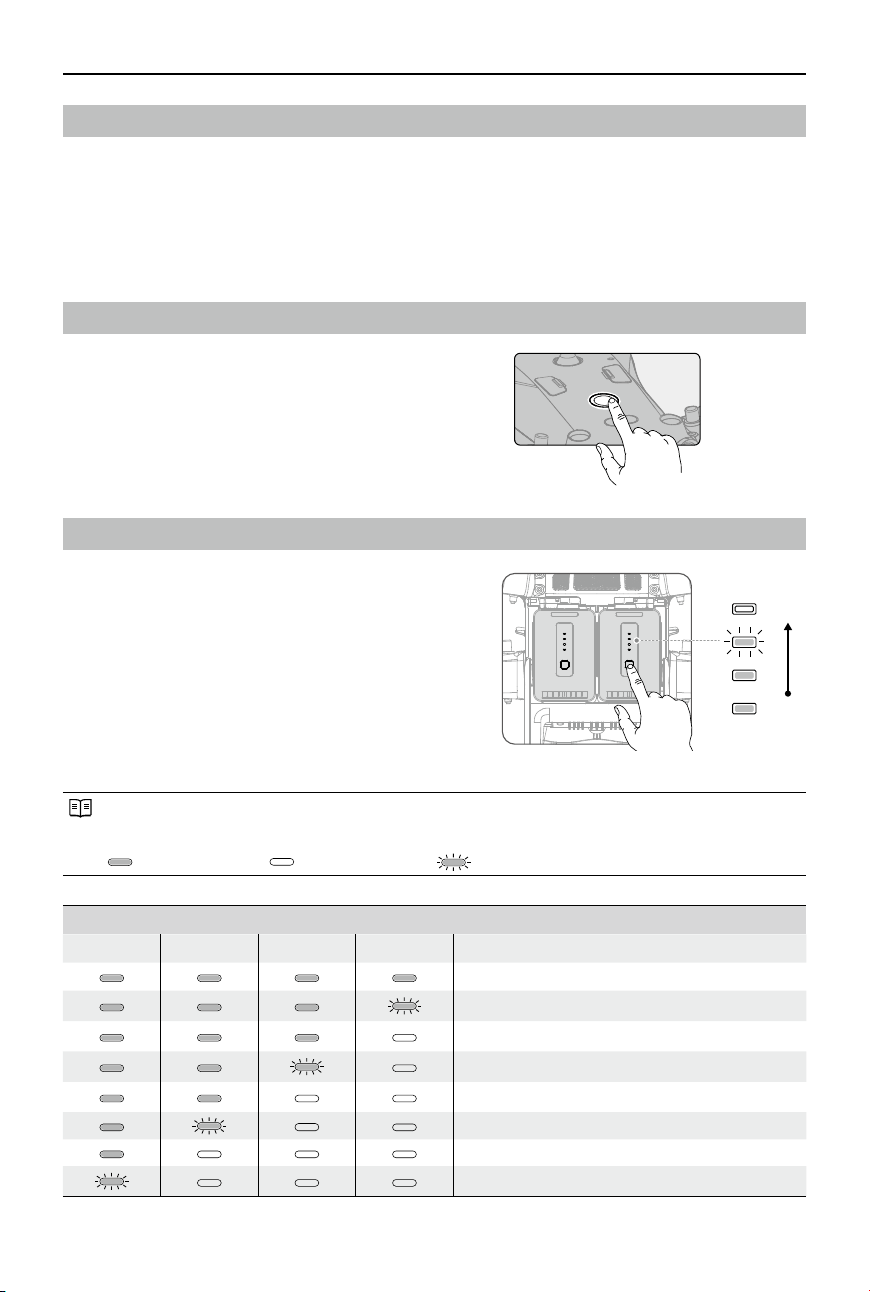
80
©
2022 DJI All Rights Reserved.
MATRICE 30 SERIES User Manual
Using Paired Batteries
Label the two batteries with paired battery stickers before use. Charge and discharge the two batteries
together to optimize ight performance and maximize battery life. After the batteries are inserted and
the aircraft is powered on, if there is a huge dierence between their battery life, the app will display a
prompt alerting the user to such condition of the batteries. In this case, it is recommended to replace
them with batteries with similar performance before use.
Powering On/Off
Checking Battery Level
Low
High
The Battery Level Indicators will also show the current battery level during discharging. The
indicators are dened below.
: LED is on. : LED is o.
: LED is ashing.
Battery Level
LED1 LED2 LED3 LED4 Battery Level
88%~100%
75%~88%
63%~75%
50%~63%
38%~50%
25%~38%
13%~25%
0%~13%
Install the batteries in the aircraft before powering on or o.
Power on/o: Press the power button, then press again
and hold for two seconds. The power button/indicator
glows solid after the aircraft is powered on. The power
button/indicator turns o after the aircraft is powered o.
Press the battery level button to check the current
battery level when the power supply is o. After turning
on the power, check the current battery level in the top
bar of the app.
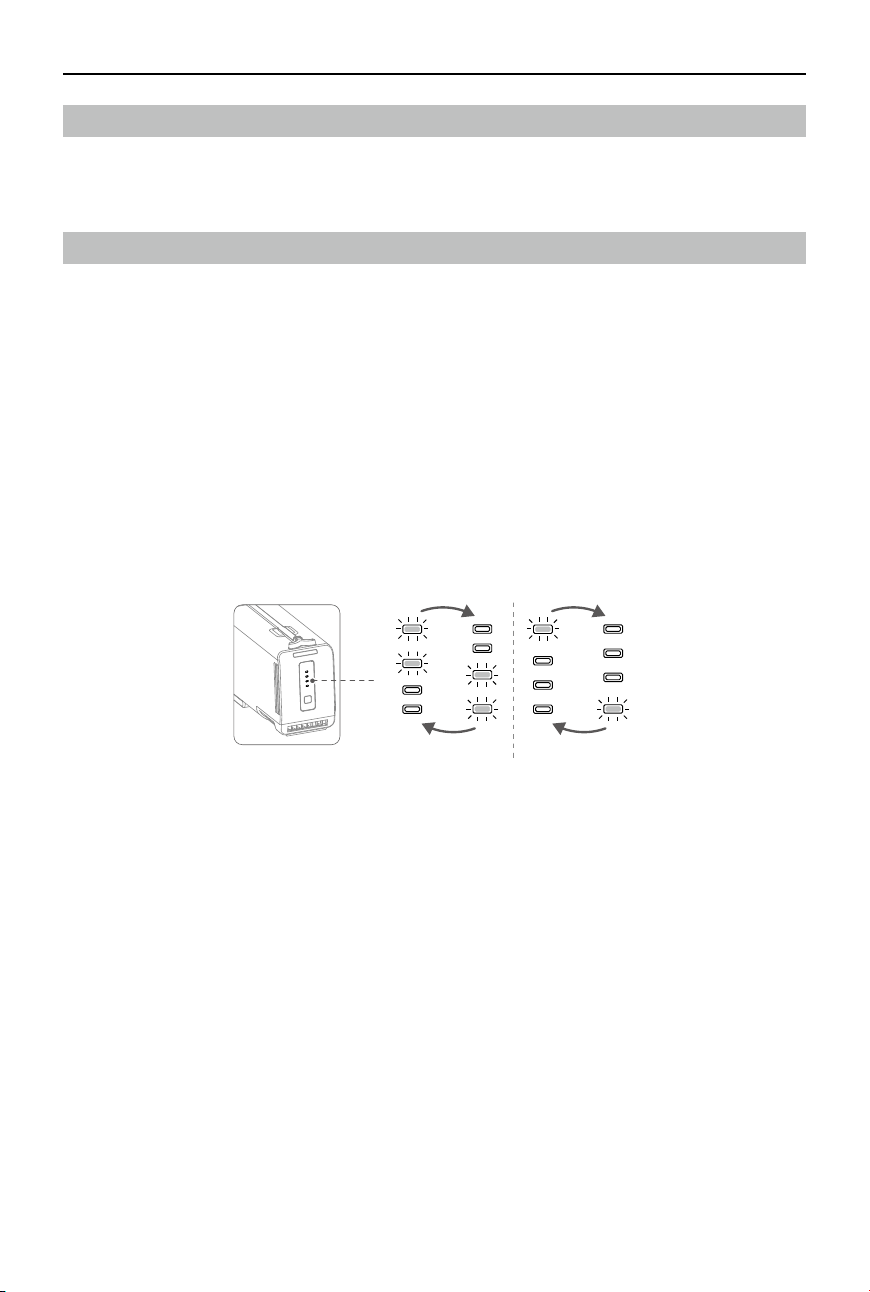
81
©
2022 DJI All Rights Reserved.
MATRICE 30 SERIES User Manual
Hot Battery Replacement
After landing, the aircraft does not have to be powered o for replacement of its batteries. First, insert a
fully charged battery and wait for three seconds before inserting another battery.
Warming the Battery
The battery has a built-in self-heating feature for when operating in low-temperature conditions:
1. When the battery temperature is lower than 18° C (64.4° F), self-heating starts once it is inserted into
the aircraft and powered on. Self-heating will turn o automatically after aircraft takeo. When the
battery temperature is lower than 10° C (50° F), the aircraft will not take o. Wait until the battery is
warmed up before operating the aircraft.
2. If the battery is not inserted in the aircraft, press and hold the battery level button for 5 seconds to
initiate self-heating. The battery will continue to keep warm with a temperature between 15° and
20° C (59° and 68° F) for approximately 30 minutes. Press and hold the battery level button for 5
seconds to stop self-heating.
3. If the battery is at a temperature below 10° C (50° F), the battery station will warm up the battery
once it is inserted in the powered on battery station.
4. The battery level LEDs will blink as follows when the battery is warming up and keeping warm.
Warming up Keeping warm
Notes for operating at low temperatures
1. At a temperature below 10° C (50° F), battery resistance increases and voltage decreases
signicantly, which in turn reduces battery capacity and performance. Make sure that the battery is
fully charged and the cell voltage is 4.4 V before use.
2. When the aircraft is in ight after the above conditions are satised, and the DJI Pilot 2 app shows a
critically low battery level warning, it is recommended to stop ying immediately and land the aircraft
in an appropriate place. During auto landing, users can still use the remote controller to control the
aircraft’s orientation. For example, users can push the throttle stick to lift the aircraft.
3. At extremely cold temperatures, the battery’s temperature may not be high enough for it to operate
even after warming up. In such scenarios, increase the insulation of the battery.
4. To ensure optimal performance, keep the temperature of the batteries above 18℃ (64.4° F) before
ight.
5. At low temperatures, the preheating period may be longer. It is recommended to insulate the
batteries in advance to shorten the preheating period.
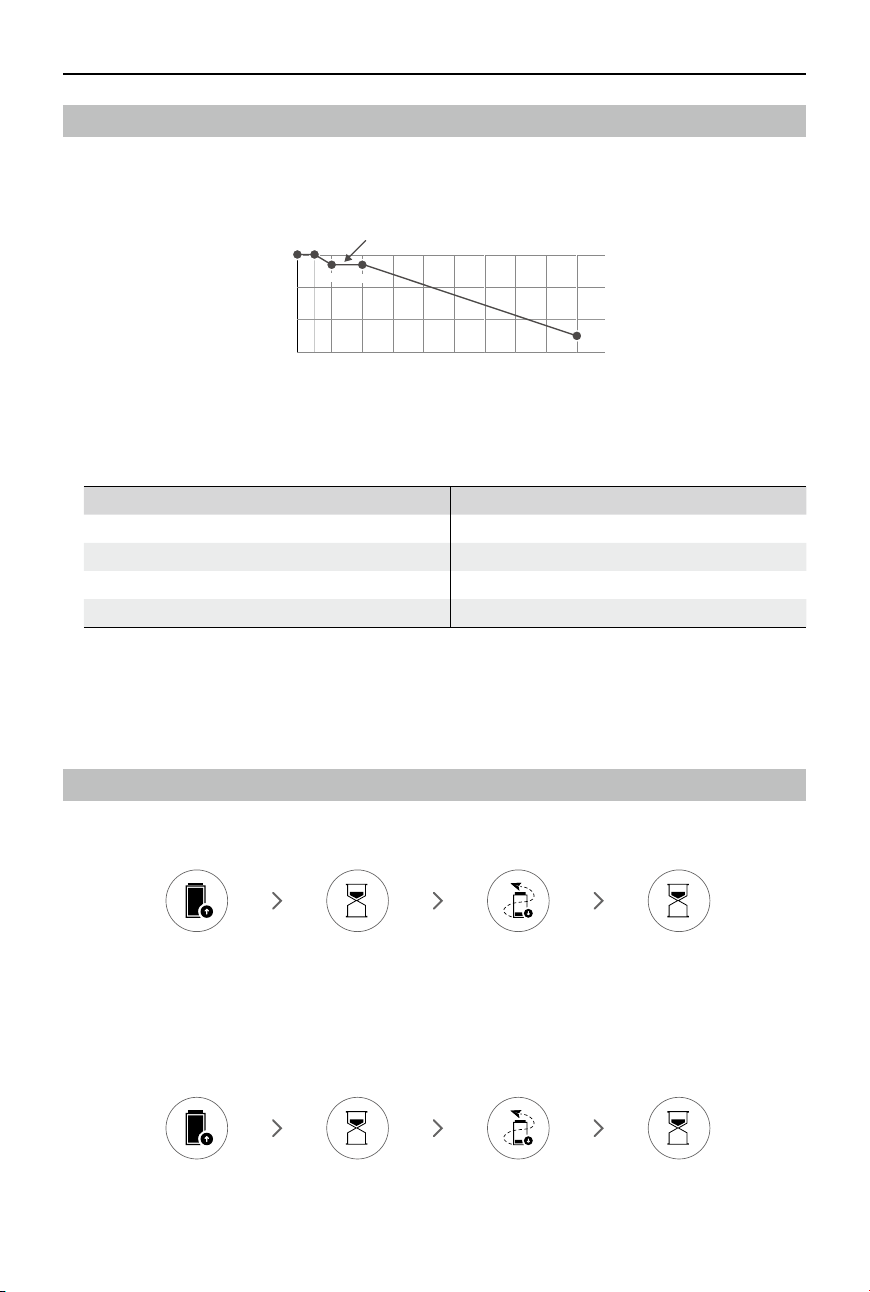
82
©
2022 DJI All Rights Reserved.
MATRICE 30 SERIES User Manual
Battery Storage
1. Battery self-discharge will be triggered if the battery level is higher than 50%. Discharging the battery
level to 50% can extend battery life. The battery self-discharge strategy is shown below.
0 3 4 5 6 7 8 910.5
40%
60%
80%
100%
2
(Day)
Battery Level
95%
95%
50%
Can be set as 0 to 9 days in DJI Pilot 2.
2. Storing power at proper levels can extend battery life. Use Storage Mode of the battery station to
charge the power to and store it at 50%. Refer to the table below for the maximum storage days
when battery power is below 50%.
Battery level Maximum storage days Battery level Maximum storage days
0% 12 20% 110
5% 36 30% 160
10% 60 40% 210
15% 86 50% 260
(1) The battery will be damaged once it exceeds the maximum storage period. The battery should
no longer be used.
(2) The actual maximum storage period will vary slightly due to the batteries being part of dierent
production batches and stored in dierent environments.
Battery Maintenance
Capacity Calibration
1. Follow the steps to complete capacity calibration when prompted to do so by DJI Pilot 2.
Charge to 100% Rest for 1 hour Discharge to
below 20%
Rest for 1 hour
Battery Maintenance
1. Battery performance will be aected if the battery is not used for an extended period.
2. Perform battery maintenance once every 50 cycles or 3 months or when prompted to do so by DJI
Pilot 2, in the following steps:
Charge to 100% Rest for 24 hours Discharge to
below 20%
Rest for 1 hour

83
©
2022 DJI All Rights Reserved.
MATRICE 30 SERIES User Manual
Charge the battery fully or to the proper power level for storage after completing battery maintenance.
Contact DJI Support if a maintenance failure persists.
In addition to the above, we recommend conducting the following checks for battery maintenance:
a. Insert the battery into the aircraft and power it on to view the battery information in DJI Pilot 2.
Make sure the dierence in cell voltage is less than 0.1 V and the battery rmware is updated to
the latest version.
b. Make sure the battery is not swollen, leaky, or damaged.
c. Make sure the battery terminals are clean.

84
©
2022 DJI All Rights Reserved.
DJI Pilot 2 App
This chapter introduces the main functions
of the DJI Pilot 2 app.
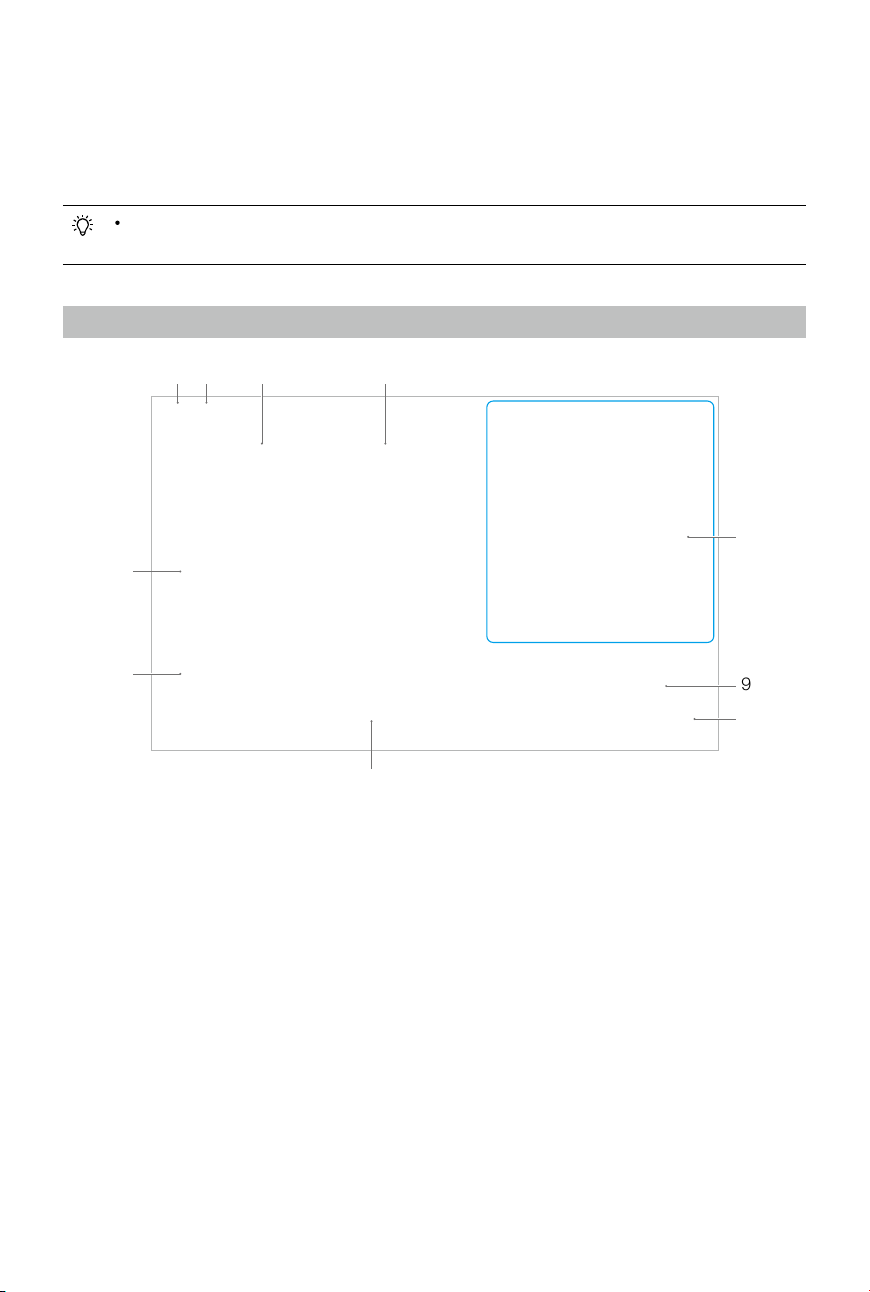
85
©
2022 DJI All Rights Reserved.
DJI Pilot 2 App
The DJI Pilot 2 app is specically developed for enterprise users. Manual ight integrates a variety of
professional features that make ying simple and intuitive. Mission ight supports ight planning and
autonomous operation of the aircraft, making your workow much simpler and more ecient.
The app images are for reference only. The actual interface varies according to the
appversion.
Homepage
1 2 3 4
5
6
7
9
10
8
1. Me
Tap to view flight records, download offline maps, manage GEO Zone unlocking, read help
documentation, select a language, and view app information.
2. Data and Privacy
Tap to manage network security modes, set security codes, manage app cache, and clear DJI
device logs.
3. GEO Zone Map
Tap to view the GEO Zone map, check oine whether the current operating area is in a restricted
zone or authorization zone, and the current yable altitude.
86
©
2022 DJI All Rights Reserved.
MATRICE 30 SERIES User Manual
a. Tap to enter and manage the unlocking certificate. If the aircraft is already connected to the
remote controller, users can select the unlocking certicate directly to unlock the aircraft.
b. A yellow dot displayed on the icon , if an update is available. Tap to view and update the GEO
Zone database.
•
It is available to search location by texts, GEO zone alerts, and by scanning a code to
obtain target point locations in Map.
4. Cloud Service
Tap to enter the cloud service page, view the connection status of the cloud service, select the type
of service, or switch from the currently connected service to another cloud service.
a. If the DJI account logged in by the user has the DJI FlightHub 2 license, tap the cloud service
on the app homepage to automatically log in to DJI FlightHub 2. DJI FlightHub 2 is a cloud-
based integrated online management platform for aircraft, providing users with real-time aircraft
monitoring and equipment and member management.
Visit the DJI FlightHub 2 page on the DJI ocial website for more information:
https://www.dji.com/ighthub-2
b. If connected to the GB28181 service, GB28181 and its connection status will be displayed.
c. If connected to a live service such as RTMP or RTSP, the corresponding live URL and connection
status will be displayed.
•
If the service is connected, the font will be displayed in dark black; if it is connecting, a
connecting prompt will appear in the upper right corner of the cloud service; if it is oine
or disconnected, an orange icon will appear in the upper right corner of the cloud service
as an abnormal alert.
5. Mission Flight
Tap to enter the mission ight library. Users can create and view all mission ights. Mission ights
can be imported from and exported in batches to the remote controller or another external mobile
storage device. If DJI FlightHub 2 is connected, you can also view all mission ights sent from or
upload local tasks to the cloud. Refer to the Mission Flight section for more details.
6. Album
Tap to view your masterpieces all in one place. You can save the photos or videos to the remote
controller. Note that photos and videos cannot be viewed if disconnected form the aircraft.
b
a
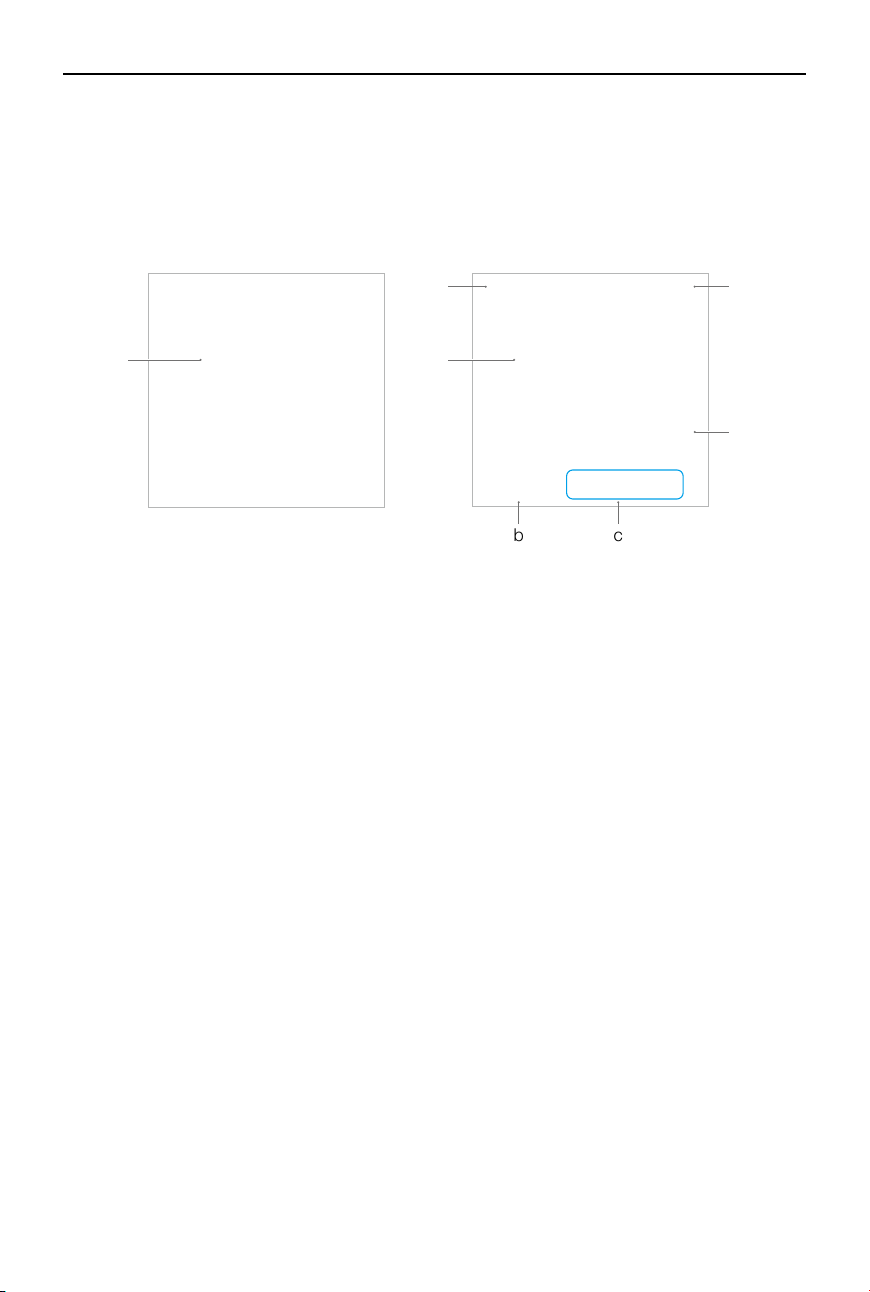
87
©
2022 DJI All Rights Reserved.
MATRICE 30 SERIES User Manual
7. Academy
Tap to view enterprise product tutorials, ight guides, industry cases, and download product manuals
to the remote controller.
8. Health Management System
Displays the health status of the aircraft, remote controller, and payload.
a a
e
b c
d
f
a. If the current remote controller is not connected to the aircraft, the picture of the remote controller
will be displayed. Tap to link the remote controller to the aircraft, and the aircraft model and
picture will be displayed after it is connected.
b. If the payload is abnormal, the payload name will appear in orange or red. Tap to view the error
information on the payload.
c. The current remote controller role is displayed as A or B (the role name of the current remote
controller appears in dark black). Tap to view the error information on the remote controller or
switch the remote controller role.
d. Tap to enter the health management system. The health status of the aircraft and the remote
controller is displayed here. If it appears in green (normal), the aircraft is normal and can take o.
If in orange (caution) or red (warning), the aircraft has an error and must be checked and cleared
before takeo. Read the Health Management System (HMS) section for more details.
e. The maintenance information of the current aircraft is displayed here. If the aircraft has DJI Care,
its validity period will also be shown. Tap to view the device information, including cycle count,
ight duration, ight history, activation time, and ight mileage.
f. Tap to select aircraft model.
9. Firmware Update Shortcut
If an update is necessary, a prompt will appear notifying the user that new rmware is available or a
consistent rmware update is needed for the aircraft and remote controller.
Inconsistent firmware versions will affect flight safety, therefore the app will prioritize consistent
rmware updates. Tap the prompt to enter the rmware update page.

88
©
2022 DJI All Rights Reserved.
MATRICE 30 SERIES User Manual
A consistent rmware update is required when the rmware versions of some modules of
the aircraft are inconsistent with the compatible version of the system. In a typical consistent
rmware update situation, the aircraft and remote controller will be updated to the latest
version except for extra batteries. When these batteries are used, a prompt will appear
requiring a consistent rmware update to ensure ight safety.
10. Camera View
Tap to enter Preight Check view and FPV camera view and switch to gimbal camera view. Refer to
the Preight Check View, FPV Camera View and Gimbal Camera View sections for more details.
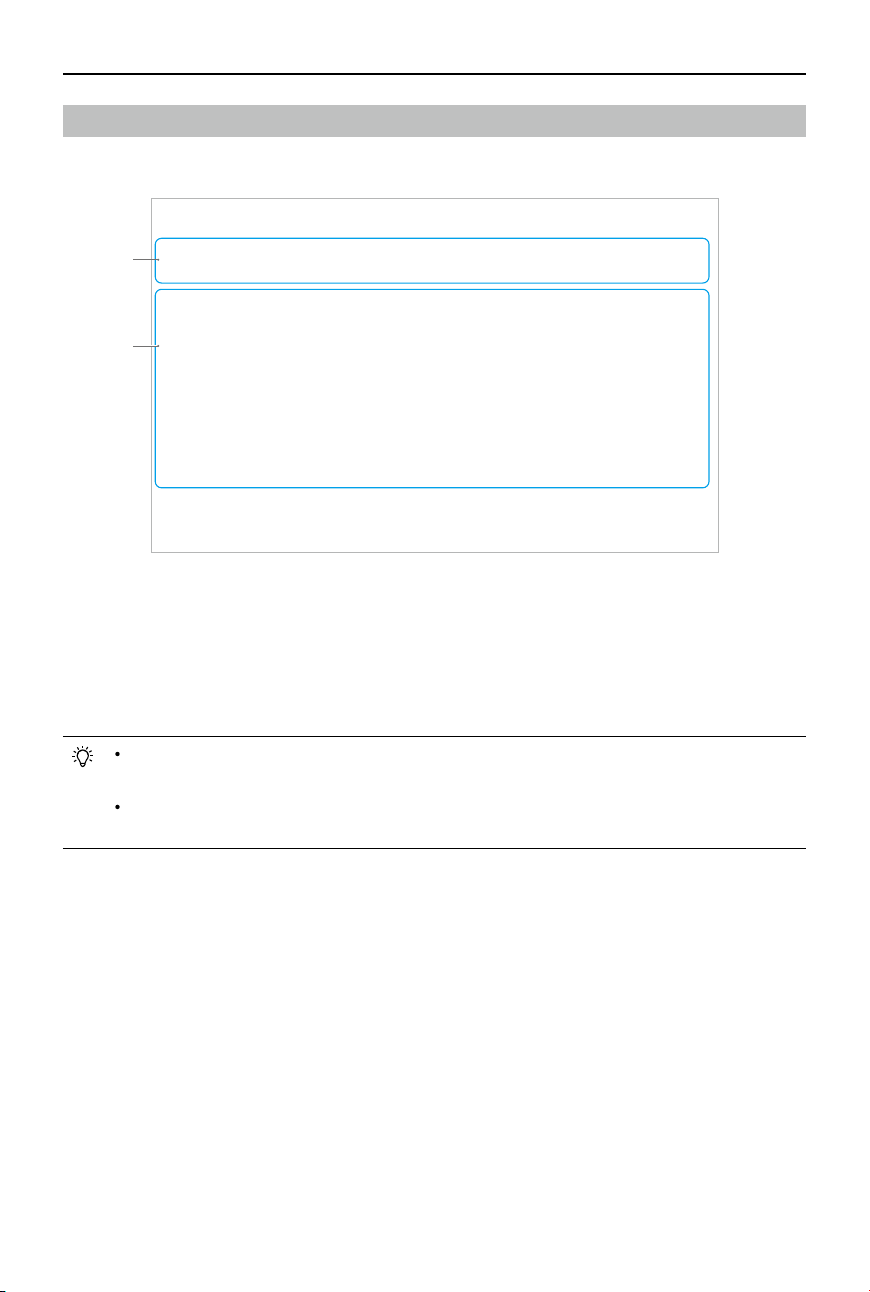
89
©
2022 DJI All Rights Reserved.
MATRICE 30 SERIES User Manual
1
2
Preight Check View
Tap Enter Camera View on the homepage of DJI Pilot 2 to enter Preight Check view.
1. View the aircraft's health information, ight mode, intelligent ight battery level, remote controller role,
remote controller internal and external battery levels, Home Point status, RTK status, and camera
microSD card storage information.
2. Set the return-to-home altitude, out-of-control action, maximum altitude and maximum flight
distance, update the Home Point, select the control stick mode, and set the battery warning
threshold, obstacle sensing switches and obstacle sensing distances.
It is recommended to carefully conduct the preflight check according to the operation
scenario and requirements before takeo.
Before executing a mission ight, conduct a preight check and verify the basic parameter
information of the mission ight. Refer to the Mission Flight section for details.
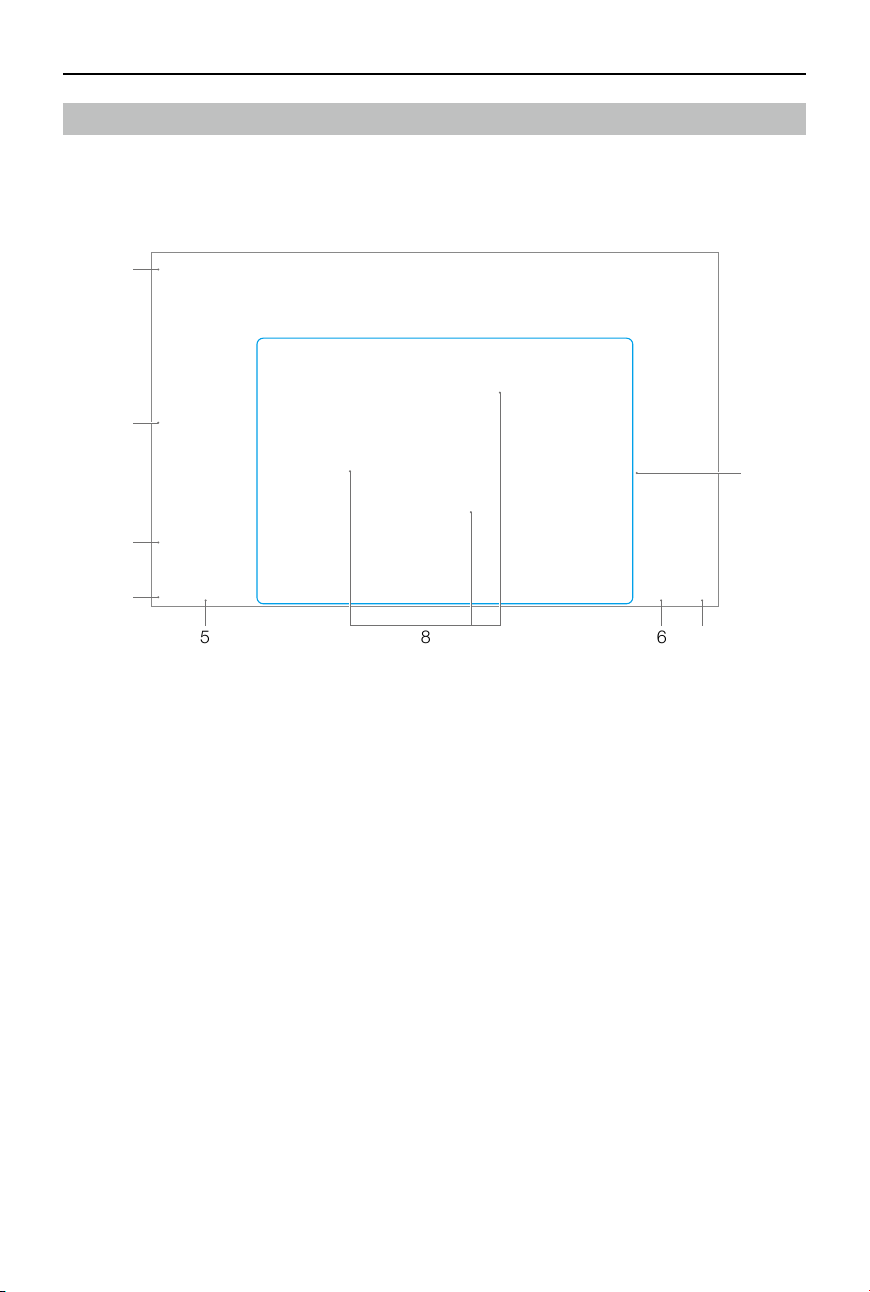
90
©
2022 DJI All Rights Reserved.
MATRICE 30 SERIES User Manual
FPV Camera View
Using FPV Camera View
After tapping Enter Camera View on the homepage of DJI Pilot 2 and nishing the preight check, you
will be directed to FPV camera view by default.
1
2
3
4
5 6 78
9
1. Top Bar: displays the aircraft status, ight mode, signal quality, etc. Refer to the Top Bar section for
more details.
2. Discreet Mode Switch: Tap to turn off the aircraft rear indicators and front indicators, beacons,
auxiliary light, and battery indicators. After enabling Discreet Mode, the auxiliary light will not turn on
during landing, which may present certain risks. Use Discreet Mode with caution.
3. Beacons Switch: Press the L1 button on the remote controller to turn the beacons on or o.
4. Switch to Map View: Press the L3 button on the remote controller to switch to map view.
5. Map View: Users can maximize or minimize the map. The map view supports zooming in and out.
6. Gimbal Camera View: Tap to switch to gimbal camera view. The gimbal camera view supports
zooming in and out.
7. Switch to Gimbal Camera View: Press the R3 button on the remote controller to switch to gimbal
camera view.
8. AR Projection: projects information such as PinPoints, waypoints, and the Home Point in FPV
camera view and gimbal camera view to improve ight perception. Refer to the AR Projection section
for more details.
9. Primary Flight Display (PFD): shows parameters such as attitude, speed, altitude, and wind speed
during a ight. Refer to the Primary Flight Display (PFD) section for more details.
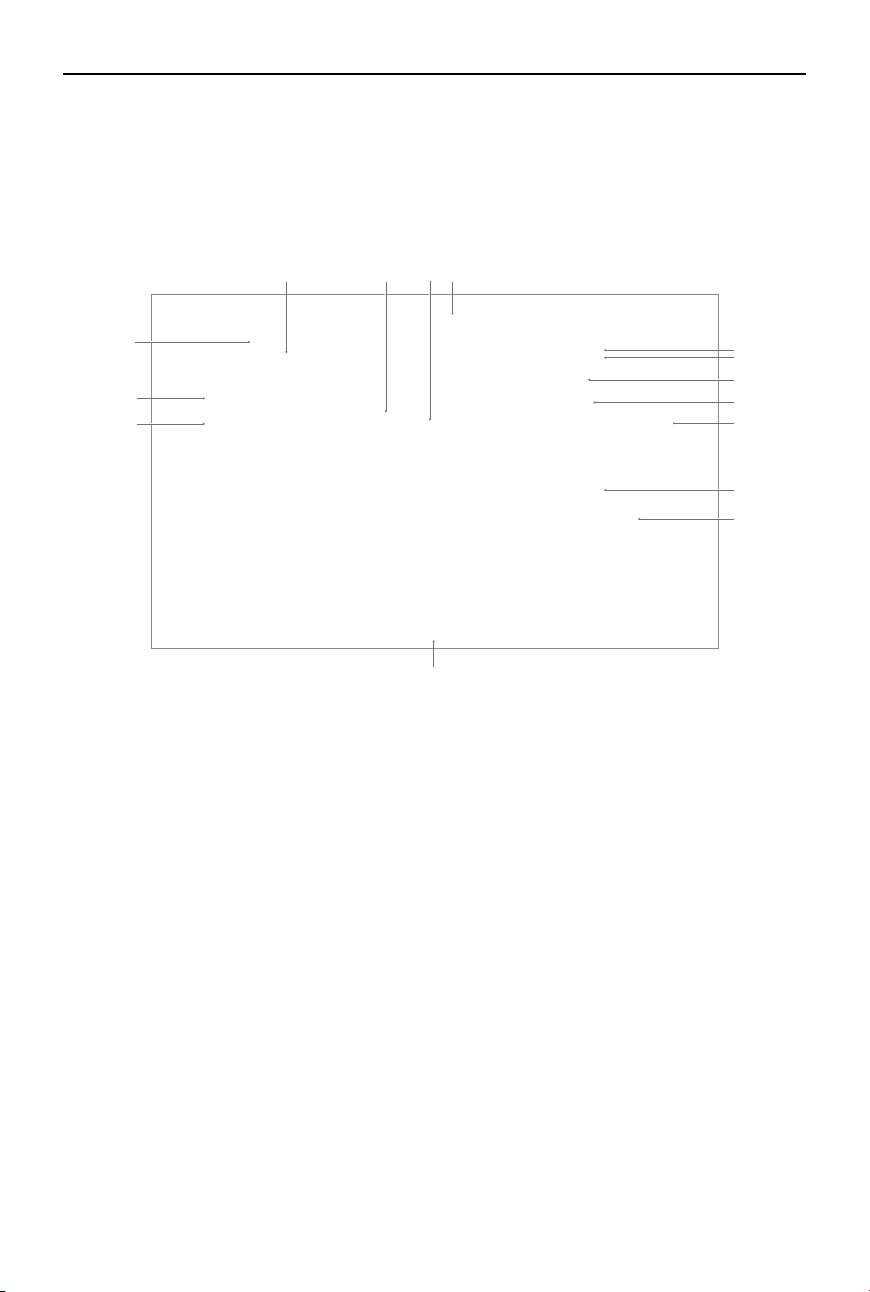
91
©
2022 DJI All Rights Reserved.
MATRICE 30 SERIES User Manual
Primary Flight Display (PFD)
Primary Flight Display (PFD) makes ying easier and more intuitive, enabling users to see and avoid
obstacles around the aircraft, as well as stop and adjust the ight trajectory if necessary.
Primary Flight Display may appear dierently when the main view is through an FPV camera or gimbal
camera (zoom camera/wide camera/thermal camera).
1
2
3
4 5 6 7
8
9
10
11
12
13
14
15
1. Speed wheel.
2. Wind speed and direction. The wind direction is relative to the aircraft.
3. Aircraft horizontal speed.
4. Preset speed of the ight route during the mission ight.
5. Articial Horizon: reects the attitude of the aircraft, which is opposite to its tilt angle.
6. Aircraft Heading Indicator: always in the middle of the camera view.
7. Flight Path Vector: the position the aircraft is about to reach.
8. Altitude Limit (LIM): congured by the ight controller setting.
9. Preset height of the ight route during the mission ight.
10. Vertical Obstacle Indicator: displays the vertical obstacle information of the aircraft. When there
is an obstacle above or below the aircraft, the information can be compared with the height of
the obstacle to detect any imminent collision and avoid accidents. When upward and downward
sensing are disabled, OFF will be displayed to remind the user that vertical obstacle sensing is
turned o.
11. Vertical Speed: displays the vertical speed of the aircraft when ascending or descending. The white
line shows the position of the aircraft in three seconds. The higher the vertical speed, the longer the
white line.
12. Altitude (ALT): displays the altitude of the aircraft relative to the takeo point.
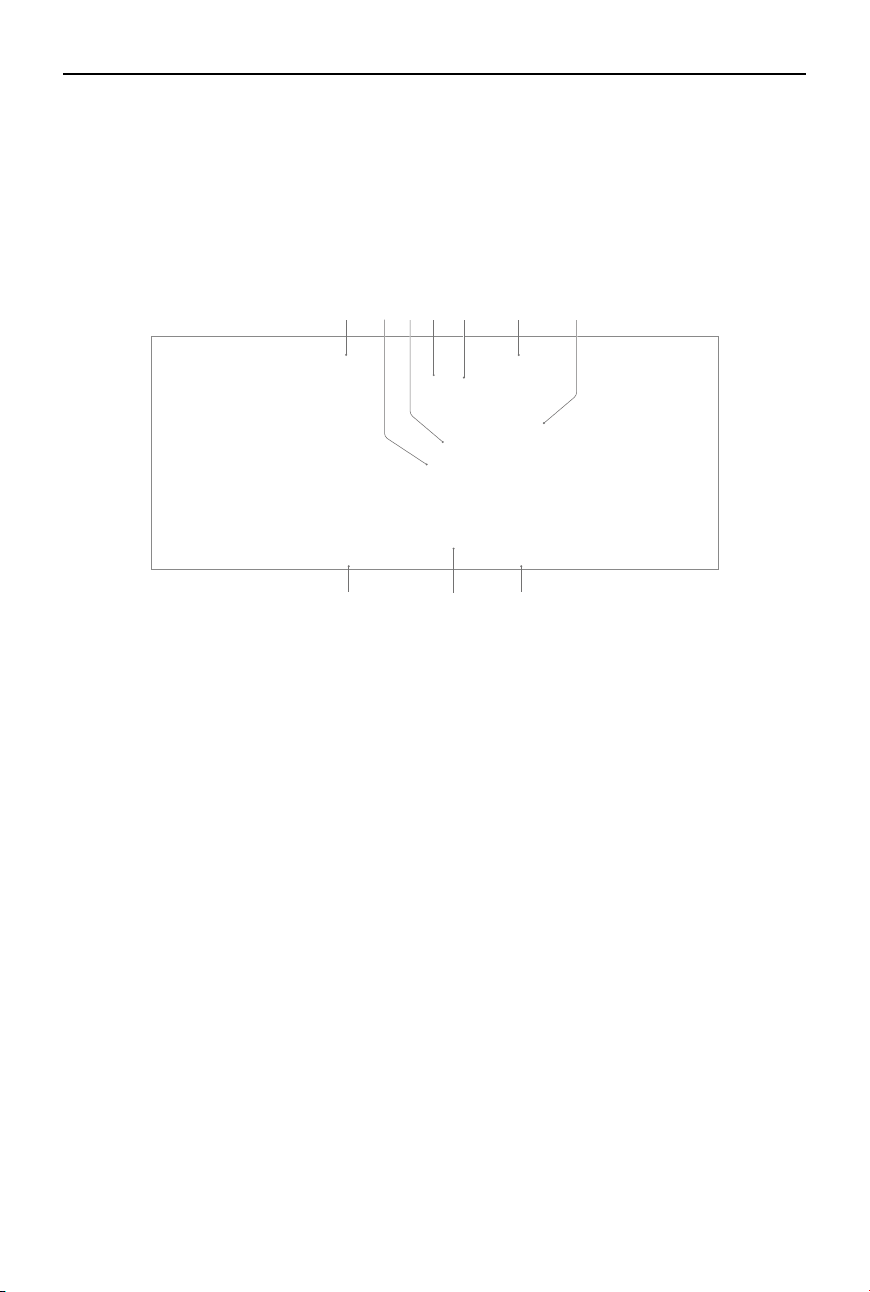
92
©
2022 DJI All Rights Reserved.
MATRICE 30 SERIES User Manual
13. RTH Altitude (RTH): displays the RTH altitude congured by the ight controller setting.
14. True Altitude (ASL): displays the true altitude of the aircraft.
15. Navigation Display: shows the aircraft and gimbal orientation, and obstacle avoidance information
from a top-down perspective. Refer to the Navigation Display section for more details.
Navigation Display
1 2 3 4
5 6
9 10
7
8
Navigation Display only shows the speed, altitude and other information on the left and right sides
in gimbal camera view. In FPV camera view, such information is shown in the form of Primary Flight
Display.
1. Aircraft: Navigation Display rotates with the aircraft.
2. Aircraft Horizontal Speed Vector: The white line drawn by the aircraft indicates the ight direction
and speed of the aircraft.
3. Aircraft Orientation: displays the current orientation of the aircraft. The displayed degree is counted
clockwise from the north, with the north assumed as 0 degrees and the step length being 30
degrees. For example, the number 24 in the compass indicates the heading of the aircraft after a
240-degree clockwise rotation from 0 degrees.
4. Gimbal Orientation: displays the orientation of the gimbal relative to the aircraft in real time. The icon
rotates with the gimbal.
5. Home Point and Remote Controller Orientations:
a. Displays the home position relative to the aircraft. When the Home Point horizontal distance
exceeds 16 m, the Home Point icon will stay on the edge of the Navigation Display.
b. When the relative distance between the Home Point and the remote controller is no more than 5
meters, only the Home Point will be displayed in Navigation Display. When the relative distance
is more than 5 meters, the remote controller will be displayed as a blue dot to indicate its
position. When the horizontal distance between the remote controller and the aircraft exceeds
16 meters, the remote controller position icon will stay on the edge of Navigation Display.
c. When the compass of the remote controller is working normally, the blue dot shows the
direction of the remote controller. If the signal is poor during ight, point the arrow of the remote
controller in Navigation Display to the direction of the aircraft.

93
©
2022 DJI All Rights Reserved.
MATRICE 30 SERIES User Manual
6. Home Point Distance: displays the horizontal distance between the Home Point and the aircraft.
7. PinPoint Information: displays the name of the PinPoint and the horizontal distance from the aircraft
to the PinPoint, when PinPoint is enabled.
8. Waypoint Information: displays the name of the waypoint, the horizontal distance from the aircraft to
the waypoint, and the ascending or descending trajectory of the ight route, during a mission ight.
9. RNG Target Point Information: displays the horizontal distance from the aircraft to the target point,
when the RNG laser rangender is enabled.
10. Vertical Obstacle Sensing Information: Once an obstacle is detected in the vertical direction, an
obstacle bar icon will appear. When the aircraft reaches the warning distance, the icon will glow
red and orange, and the remote controller will emit long beeping sounds. When the aircraft reaches
the obstacle braking distance, the icon will glow red, and the remote controller will emit short beep
sounds. Both the obstacle braking distance and the warning distance can be set in DJI Pilot 2.
Follow the prompted instructions in the app to set them.
Horizontal Obstacle Sensing Information: The light areas are the obstacle sensing areas of the
aircraft, while the dark areas are the blind spots. During ights, keep the aircraft speed vector line
out of the obstacle-sensing blind spots.
a. If the warning distance set in the app is from 16 m to 33 m, once an obstacle is detected, a
green arc will appear in the direction of the obstacle; when the obstacle reaches the warning
distance, it turns orange; when the obstacle approaches the obstacle breaking distance, it
changes to a red frame.

94
©
2022 DJI All Rights Reserved.
MATRICE 30 SERIES User Manual
b. If the warning distance set in the app is less than 16 m, and the obstacle is within 16 m but has
not reached the warning distance, the obstacle will be indicated by a green frame; when the
obstacle is within 16 m and reaches the warning distance, it turns orange; when the obstacle
approaches the obstacle breaking distance, it turns red.
c. When the obstacle sensing is disabled, OFF will be displayed; when obstacle sensing is turned
on, the vision systems are not working but infrared sensing systems are available, TOF will be
displayed; when obstacle sensing is turned on but not working, NA will be displayed.
Top Bar
1 2 3 4 5 6 7 8
1. Back: Tap to return to the homepage of the DJI Pilot 2 app.
2. System Status Bar: indicates the aircraft ight status and displays various warning messages. If a
new alert appears during ight, it will also be displayed here and continue ashing. Tap to view the
information and stop the ashing.
3. Flight Status:
a. The ight statuses include: standby, preparing to take o, ready to go, manual ight, mission
flight, pano in progress, ActiveTrack, returning to home, landing, forced landing, and vision
positioning.
b. When the aircraft is in vision positioning, standby, or manual ight status, the current ight mode
will be displayed, including: N-mode, S-mode, A-mode, and T-mode.
c. Tap to enter Preight Check view.
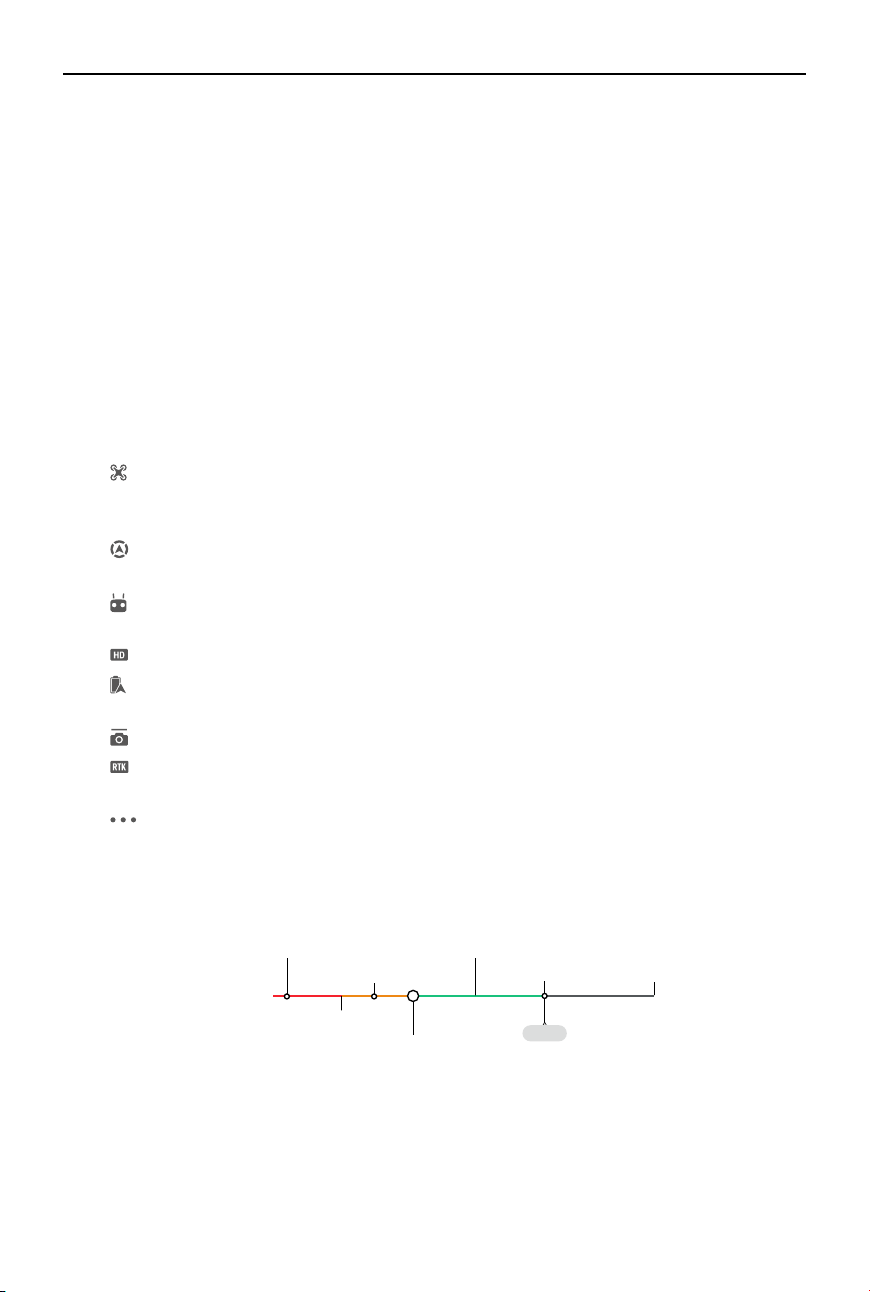
95
©
2022 DJI All Rights Reserved.
MATRICE 30 SERIES User Manual
4. Intelligent Flight Battery Level Indicator: The battery level indicator bar provides a dynamic display of
the remaining power of the current intelligent ight battery and the ying time. Each battery state is
indicated by a dierent color. When the battery level is lower than the warning threshold, the battery
icon on the right turns red, reminding the user to land the aircraft as soon as possible and replace
the batteries.
5. GNSS Positioning Status: displays the number of GNSS satellites. When the aircraft RTK module is
disabled, the RTK icon will turn gray; when it is enabled, the RTK icon will turn white. Tap the GNSS
positioning status icon to view the status of the RTK mode and GNSS positioning.
6. Signal Strength: includes HD video link quality and remote controller link quality. Three green dots
indicate strong signals; two yellow dots for medium signal strength; and one red dot for poor signal
quality. If the signal is lost, the icon will display a disconnected status in red.
7. Intelligent Flight Battery Level: displays the remaining battery level of the aircraft. Tap to view battery
level, voltage and temperature information.
8. Settings: Tap to expand the settings menu to set the parameters of each module.
a. Flight Control System Settings: include flight mode switch, Home Point, return to home
altitude, maximum altitude, distance limit, sensor status, out-of-control action, coordinated turn,
and GNSS.
b. Sensing System Settings: include obstacle sensing switch, vision positioning switch, and
precision landing switch.
c. Remote Controller Settings: include stick mode, customizable button settings, and remote
controller calibration and linking.
d. Video Transmission Settings: include work frequency, channel mode, and video output type.
e. Intelligent Flight Battery Settings: include battery information, smart return-to-home, low
battery warning thresholds, and number of days required for self-discharge.
f. Gimbal Settings: include gimbal pitch and pan settings, and gimbal auto calibration.
g. RTK Settings: include the RTK positioning function, RTK service type, and their corresponding
settings and status displays.
h. General Settings: include map selection, track display, unit setting, and lights setting.
Intelligent Flight Battery Level Indicator
12:29
H
Remaining ight time
Sufcient battery
level (Green)
Battery level Indicator
Power required to
return home (Yellow)
Critical Low battery
level warning
Low battery
level warning
Auto landing (Red)

96
©
2022 DJI All Rights Reserved.
MATRICE 30 SERIES User Manual
Battery Level Warning Description Flight Instructions
Low Battery RTH
The remaining battery level is
only enough for the aircraft to y
to the Home Point safely.
If RTH is selected, the aircraft will y to
the Home Point automatically and landing
protection will be enabled. Regain control of
the aircraft and land it manually during RTH.
The warning will not appear again after
choosing not to use RTH. Decide carefully
and ensure ight safety.
Auto Landing
The remaining battery level is
only enough for the aircraft to
descend from its current altitude.
The aircraft will land automatically and the
landing protection will be enabled.
Estimated Remaining
Flight Time
Estimated remaining ight time of
the aircraft is based on its current
battery level.
N/A
Low Battery Level
Warning
Tap and tap in camera
view to set the low battery level
threshold value.*
Long beeps will sound from the remote
controller. The user can still control the
aircraft.
Critical Low Battery
Level Warning
Tap and tap in camera
view to set the critical low battery
level threshold value. *
Short beeps will sound from the remote
controller. The user can still control the
aircraft. It is unsafe to continue ying the
aircraft. Land immediately.
* The threshold value is dierent from that of Low Battery RTH or auto landing.
During auto landing, the user can push the throttle stick to make the aircraft hover at its
current altitude or ascend, moving the aircraft to a more suitable landing location.
The colored zones and the estimated remaining ight time on the battery level indicator are
automatically adjusted according to the aircraft’s current location and status.
AR Projection
DJI Pilot 2 App supports AR projection, including:
a. Home Point: When the Home Point is beyond the current view, it will be displayed on the edge of the
view. The aircraft can be turned towards the Home Point by following the arrow.
b. PinPoints: A PinPoint appears bigger when near the aircraft and smaller when it is far. This allows
users to judge the distance between the PinPoint and the aircraft from the size of the PinPoint. When
a PinPoint selected is beyond the current view, it will be displayed on the edge of the view. The
aircraft can be turned towards the PinPoint by following the arrow.
c. Waypoints: In a mission ight, the two waypoints the aircraft is about to reach will be projected on
FPV camera view or gimbal camera view. The next waypoint to be reached will appear as a solid
triangle and a serial number; while the subsequent waypoint will appear as a dotted triangle and a
serial number.
d. ADS-B Manned Airplane: When a manned airplane is detected close by, it will be projected on FPV
camera view and gimbal camera view. Ascend or descend the aircraft as soon as possible to avoid
the manned airplane by following the prompted instructions.

97
©
2022 DJI All Rights Reserved.
MATRICE 30 SERIES User Manual
10
11
1
2 3 4 5 6 7
8
9
12
13
14
15
1617
18
19
20
21
22
23
24 25 26
Gimbal Camera View
Using Gimbal Camera View
Gimbal camera view will appear when you switch the main view to the gimbal camera. Below is an
illustration using the zoom camera of the M30T as the main view.
1. Navigation Display: Refer to the Navigation Display section for details. Note that in gimbal camera
view, the horizontal speed, wind speed, gimbal pitch angle and pitch scale, and the inclination of
the gimbal relative to the ground are shown on the left side. When the gimbal is at a key angle such
as -90°, 0°, or -45°, the number will be highlighted. The right side of Navigation Display shows the
altitude, relative altitude, vertical obstacle sensing information, and vertical speed bar.
2. Camera Type: displays the camera type for the current main view.
3. Camera Parameters: displays the camera’s current shoot/record parameters.
4. Auto Exposure Lock: Tap to lock the current exposure value.
5. Focus Mode: Tap to switch the focus mode, between MF (manual focus), AFC (continuous
autofocus) and AFS (single autofocus).
6. Storage Mode: displays the remaining storage capacity of the aircraft’s microSD card. Tap to switch
the display mode, to show the remaining number of photos that can be taken in photo mode or the
remaining recording time in video mode.
7. Switch to Auto/Manual Exposure: The zoom camera supports Auto and M modes. The EV can be
set in Auto mode, and the ISO and shutter can be set in M mode.
8. Camera Settings: Tap to enter the camera setting menu. The camera setting menu may vary by
camera type. Select a camera type to view its parameters.
9. Photo/Video Toggle: Tap to switch between photo and video modes, and select dierent shooting
or recording modes.

98
©
2022 DJI All Rights Reserved.
MATRICE 30 SERIES User Manual
a. The photo modes include single, smart, timed, High-Res Grid shooting, panorama, etc.
b. Various resolutions can be selected in video recording mode. The zoom camera and wide-angle
camera support resolutions of 3840×2160 and 1920×1080. For the thermal camera, the video
recording resolution is 1280×1024 when infrared super-resolution is enabled, and 640×512
when it is disabled.
10. Shoot/Record Button: Tap to take a photo or start or stop recording.
11. Playback: Tap to enter the album to view and download photos/videos stored in the aircraft's
microSD card.
12. Link Zoom (M30T only): Tap to link the lenses of the thermal camera and zoom camera to zoom.
The user can view the linked zoom eect by enabling the SBS button in the thermal camera view.
13. Press the R1 button on the remote controller, and the camera lens will zoom in.
14. Press the R2 button on the remote controller, and the camera lens will zoom out.
15. Press the R3 button on the remote controller to switch to FPV Camera View.
16. FPV Camera View: Tap to switch to FPV camera view. The FPV camera view supports zooming in
and out.
17. Map View: Tap to switch to map view. The map view supports zooming in and out.
18. PinPoint: Press the L3 button on the remote controller to add a PinPoint in the center of the screen.
Press and hold on the L3 button to expand the PinPoint settings panel, which allows you to set
the PinPoint color, view all target points, or enable the default display of target points in video
transmission view. Refer to the PinPoint section for more details.
19. Switch to Wide/Zoom Camera Lens: Press the L2 button on the remote controller to switch
between the wide-angle camera lens and the zoom camera lens.
20. Switch to Visible Light/Thermal Camera Lens (for M30T only): Press the L1 button on the remote
controller to switch between the visible light camera lens (wide-angle camera or zoom camera) and
the thermal camera lens.
21. Gimbal Mode: displays the current gimbal status as follow mode. Tap to select an action such as
gimbal recenter, gimbal pan recenter, gimbal tilt down, or gimbal down, or switch to gimbal free
mode. Refer to the sections on the aircraft gimbal working modes for the detailed description of
each mode.
22. Smart Track: The aircraft's gimbal camera can track the target (person/vehicle/boat) when Smart
Track is enabled. Refer to the Smart Track section for more details.
23. RNG Laser Rangender: The straight-line distance between the aircraft and the target, as well as
the height of the target can be measured using the RNG Laser Rangender. Refer to the RNG Laser
Rangender section for more details.
24. Look At: After selecting a PinPoint, the user can tap the Look At icon to rotate the gimbal, allowing
the camera to look at the target.
25. Status of Photo/Video Upload to Cloud: displays the status of a photo/video upload from DJI Pilot 2
to DJI FlightHub 2 or the connection status of a live stream; tap to view the details. If you are using
the DJI FlightHub 2 cloud service, you can quickly congure its media le upload settings.

99
©
2022 DJI All Rights Reserved.
MATRICE 30 SERIES User Manual
26. Mission Flight Control/Status: displays the progress of a mission ight in gimbal camera view. Tap
the Pause/Resume button to pause/resume the task, and tap the panel to view the mission ight
name and actions.

100
©
2022 DJI All Rights Reserved.
MATRICE 30 SERIES User Manual
Wide Camera View
This section mainly sets out the differences with zoom camera. Refer to the Gimbal Camera View
section for more details.
Zoom Frame: After switching to a wide-angle camera as the main view, the zoom frame will display the
eld of view and camera zoom rate.
Thermal Camera View
This section mainly sets out the differences with zoom camera. Refer to the Gimbal Camera View
section for more details.
1 2 3 4
5

101
©
2022 DJI All Rights Reserved.
MATRICE 30 SERIES User Manual
1. Palette/Isotherm: displays the highest and lowest temperature measurement values of the current
view. Tap to choose between different infrared temperature measurement palettes, or enable the
isotherm to set temperature measurement intervals. Note that if the measured area exceeds the
maximum or minimum temperature measurement values of the current view, the setting will not take
eect.
2. Gain Modes: High gain mode provides more accurate temperature measurements with a
measurement range from -20 to 150° C, while low gain mode supports a wider temperature
measurement range of 0 to 500° C. Note that the range is only a theoretical value, and even
though the thermal camera can measure temperatures beyond the range, the value may deviate
substantially.
3. Display Mode: The infrared screen is set as single infrared view by default. Tap to enable or disable
side-by-side view. When enabled, both the footage captured by the infrared thermal camera and the
zoom camera will be displayed side by side.
4. FFC Calibration: Tap to execute FFC calibration. FFC calibration is a function of the infrared thermal
camera that optimizes image quality for easy observation of temperature changes.
5. Zoom (Thermal Camera): Tap to adjust the digital zoom of the infrared thermal camera with a
maximum zoom capability of 20x. Tap and hold to zoom directly to 2x.
Laser Rangender (RNG)
1
2
3
4
5
1. Tap to enable the RNG.
2. The cross hair in the center of the lens will turn red, which means the laser rangender is aiming at
the target and measuring the altitude of the target and distance between the target and the aircraft.
The latitude and the longitude of the target can be obtained after a PinPoint is created on the target.
3. The linear distance between the target and the aircraft.
4. The altitude between the target and the aircraft.
5. The horizontal distance between the target and the aircraft.
102
©
2022 DJI All Rights Reserved.
MATRICE 30 SERIES User Manual
RNG positioning is limited by factors such as the GNSS positioning accuracy and gimbal
attitude accuracy. The GNSS position, horizontal distance, Navigation Display, and AR
projection are provided for reference only.
When the zoom camera is aiming, the cross hairs will be an upright cross, while with the
wide-angle camera or thermal camera it will turn into an X.
1
2
Smart Track
Introduction
When operating the gimbal camera, the pilot can use Smart Track to identify, lock and track targets such
as people, vehicles, boats, or other objects. After recognizing and locking the target, it will automatically
rotate the gimbal to situate the target in the center of the screen, and adjust the camera focal length to
an appropriate focus rate to track and view the target.
When the tracked target is set to objects, the tracking eect will be limited.
Use Smart Track in an open environment to avoid blocking the target.
When the aircraft is returning to the Home Point, landing or set to T-mode, Smart Track will
be disabled. The device will exit Smart Track immediately in any of the above situations.
Identifying and Locking a Target
Smart Track can be enabled after entering zoom view in the app.
1. Tap to start or stop Smart Track.
2. The feature identies a person, vehicle, or boat as the target. Alternatively, you can gesture on the
screen to select another object as the target.
103
©
2022 DJI All Rights Reserved.
MATRICE 30 SERIES User Manual
When Smart Track is enabled, a tracking frame will appear and select the target, and
the cross hairs in the center of the zoom lens will turn green, indicating that tracking is in
progress. If no target is conrmed, the tracking frame will not appear and the app will display
the message "Searching for targets ..." If the target is blocked or lost, the device will predict
and search for the trajectory of the target until it is reacquired before resuming the tracking.
Otherwise, the device will quit Smart Track.
If the user is selecting other types of targets by gesturing on the screen, any person, vehicle
or boat that appears in the frame will be selected as the target and tracked.
An object cannot be selected using gestures if the features of the object are not clear.
Tracking a Target
The gimbal mode will default to follow mode, and the camera will default to AFC mode when Smart
Track is enabled.
In gimbal follow mode, the orientation of the aircraft is always consistent with that of the gimbal, both
aiming at the target. The attitude of the gimbal will be adjusted automatically to situate the target in the
center, while the camera will adjust its zoom to re-size the target. The user can ne-tune the size of the
target in the eld of view using the right dial of the remote controller.
Target Prediction: If a target is lost, the device will predict the motion trajectory and the gimbal will rotate
automatically to search for the target.
Target Search: If the target is lost, the device will automatically search for its based on its predicted
position. The user can also manually control the gimbal rotation and camera zoom to nd the target.
Focus Tracking: The camera focus will be adjusted according to the distance of the target object.
In gimbal follow mode, “Smart Track” will be displayed on the top bar during tracking. The control mode
of the aircraft is slightly dierent from its normal ight mode. Make sure you are familiar with the following
controls and y with caution.
Operation on Remote
Controller
Action Performed Reminders
Pressing and holding
the Pause button
Exits Smart Track. /
Yaw stick Adjusts yaw movement of
gimbal
The adjustable range is limited during
tracking.
Pitch stick Flies the aircraft toward or away
from the target horizontally.
The maximum ight speed is
less than 17 m/s. Continue
operating the stick to keep
tracking the target.
When it is close to the target
horizontally, the aircraft’s speed in the
direction close to the target will be
limited. The aircraft cannot approach
the target in the following condition:
a. The aircraft is less than 5 meters
from the target.
b. The target is under the aircraft that
the gimbal tilt needs to be greater
than 80°.
104
©
2022 DJI All Rights Reserved.
MATRICE 30 SERIES User Manual
Roll stick The aircraft circles the target
horizontally. The maximum ight
speed is less than 17 m/s.
When it is close to the target
horizontally, the aircraft’s orbiting speed
will be limited.
Throttle stick Controls the aircraft altitude /
Left dial Adjusts the gimbal tilt The adjustable range is limited during
tracking.
Right dial Adjusts the camera zoom The adjustable range is limited during
tracking.
Switching the ight
mode
Exit Smart Track. /
To ensure optimal shooting of moving targets, taking photos during target tracking will not
lock the gimbal. Motion blur may occur due to a static background.
Poor recognition or tracking eect may occur in the below scenes:
a. Recognition may decline at night.
b. The tracking eect may decline when the payload is working at high magnication.
c. The tracking eect may decline in environments with poor visibility such as in a rain, fog, or
haze.
d. The tracked object/target may change in scenes with heavy trac, crowds, or large clusters
of similar objects.

105
©
2022 DJI All Rights Reserved.
MATRICE 30 SERIES User Manual
Map View
1
2
3
4
5
6
7
8
9
10
11
1. Tap to draw lines on the map.
2. Tap to draw an area on the map.
3. Tap to clear all points, lines, and annotations on the current view. If the user is logged in on DJI
FlightHub 2, performing this action will not clear the annotations distributed by DJI FlightHub 2.
4. PinPoint: Press the L1 button on the remote controller to add a PinPoint in the center of the view.
Press and hold on the L1 button to expand the PinPoint settings panel, which allows users to
change the PinPoint color, view all target points, or set the default display of the target point in
video transmission view.
5. Switch to FPV Camera View: Press the L3 button on the remote controller to switch to FPV camera
view.
6. Switch to Gimbal Camera View: Press the R3 button on the remote controller to switch to gimbal
camera view.
7. Tap to clear the ight track of the aircraft.
8. Map Layer Selection: Tap to select a satellite or street map (standard mode) according to operation
requirements.
9. Map Lock: If enabled, the map cannot be rotated; if disabled, the map can rotate freely.
10. Recenter Button: Tap to quickly center the remote controller in the view.
11. GEO Zone Layer Management: Tap to view all GEO Zone layer information and enable or disable
the GEO Zone layer.

106
©
2022 DJI All Rights Reserved.
MATRICE 30 SERIES User Manual
1
2
3
4
5
Annotation Management and Synchronization
PinPoint
Introduction to PinPoint
PinPoint can be used to set the location point of a target in gimbal camera view or map view, for quick
observation and information synchronization.
1. Steps to Create a PinPoint: Adjust the attitude of the aircraft and the gimbal to move the target to the
center of the current view. Press the L3 button of the remote controller to pin the target at the center.
The PinPoint can record the latitude, longitude and altitude of the target.
2. AR projection will be created for the target in gimbal camera view or FPV camera view. It will become
larger or smaller according to the distance between the aircraft and the PinPoint (big when near,
small when far).
3. Selected PinPoint:
a. A small frame will appear around the PinPoint indicating it is selected.
b. The lower left corner of Navigation Display shows the horizontal distance from the target to the
aircraft and the name of the point. The orientation of the point relative to the aircraft is shown
within Navigation Display.
c. If the selected PinPoint is outside the video transmission view, the PinPoint icon will stay on the
edge indicating the its orientation relative to the center of the view.
d. After selecting a PinPoint, the user can edit the name, color, latitude, longitude, and altitude of
the target point, or drag the PinPoint on the map.
4. Tap and tap to change the custom remote controller settings to PinPoint, delete the selected
PinPoint, or select the previous or next PinPoint. Users can quickly generate and select PinPoints by
using the buttons.
107
©
2022 DJI All Rights Reserved.
MATRICE 30 SERIES User Manual
5. Tap to switch to map view:
a. The PinPoint and its name will be displayed on the map accordingly.
b. In map view, you can also set a PinPoint by tapping the target. The point is at the cross hairs in
the center of the map, and the altitude is the current ight altitude of the aircraft.
c. Tap to select a PinPoint on the map to view the creator of the point, the distance between the
target point and the aircraft, the altitude, latitude and longitude of the target point, or set the
PinPoint as the Home Point, or edit or delete the PinPoint.
PinPoint positioning is limited by factors such as the GNSS positioning accuracy and
gimbal attitude accuracy. The latitude and longitude, horizontal distance, Navigation
Display, and AR projection are provided for reference only.
Editing PinPoints
1
2
3
1. Press and hold the L3 button on the remote controller to bring up the settings panel of the PinPoint.
There are ve color options for the PinPoint, and it is recommended to set a color for each type of
target as required by the operation scenario.
2. Tap to expand the PinPoint list to view all the target points.
3. Set whether to display the newly created PinPoint in video transmission view.

108
©
2022 DJI All Rights Reserved.
MATRICE 30 SERIES User Manual
1 2
3
4
5
6
7
1. Tap to export all PinPoints to the local folder of the remote controller.
2. Tap to close the current panel.
3. Filter the PinPoints by color. After a color is selected, it is displaying PinPoints of this color.
4. Filter the PinPoints by their visibility in video transmission view. The PinPoints can be ltered by any
of these three criteria: show all PinPoints on this list; only show PinPoints that are visible in video
transmission view on this list; only show PinPoints that are not visible in video transmission view on
this list.
5. Tap to sort PinPoints in forward or reverse chronological order, or in alphabetical order by their
names.
6. Tap to delete the PinPoint.
7. Tap to enable or disable AR projection display for the PinPoint in video transmission view.

109
©
2022 DJI All Rights Reserved.
MATRICE 30 SERIES User Manual
Line and Area Annotation Management
Users can draw lines and areas on the map for synchronizing key information of roads and land.
1
2
3
1
2
3
1. Tap to display the Edit Line view.
2. Tap to display the Edit Area view.
3. All the point, line and area information can be viewed on the map. Tap this icon to delete the
information.

110
©
2022 DJI All Rights Reserved.
MATRICE 30 SERIES User Manual
Annotation Sharing
The location of the target point identied by PinPoint can be synchronized with camera view, Navigation
Display, map view, and DJI FlightHub 2 for sharing of location information. It can be displayed on both
video transmission view and map view.
In Advanced Dual Operator mode, all point, line and area annotations can be synchronized with another
remote controller.
When connected to DJI Flighthub 2, the DJI Pilot 2 app and the point, line and area annotations of DJI
Flighthub 2 can be synchronized with each other. They can be viewed on the remote controller and
other devices logged into DJI Flighthub 2 for real-time sharing of locations and annotations.
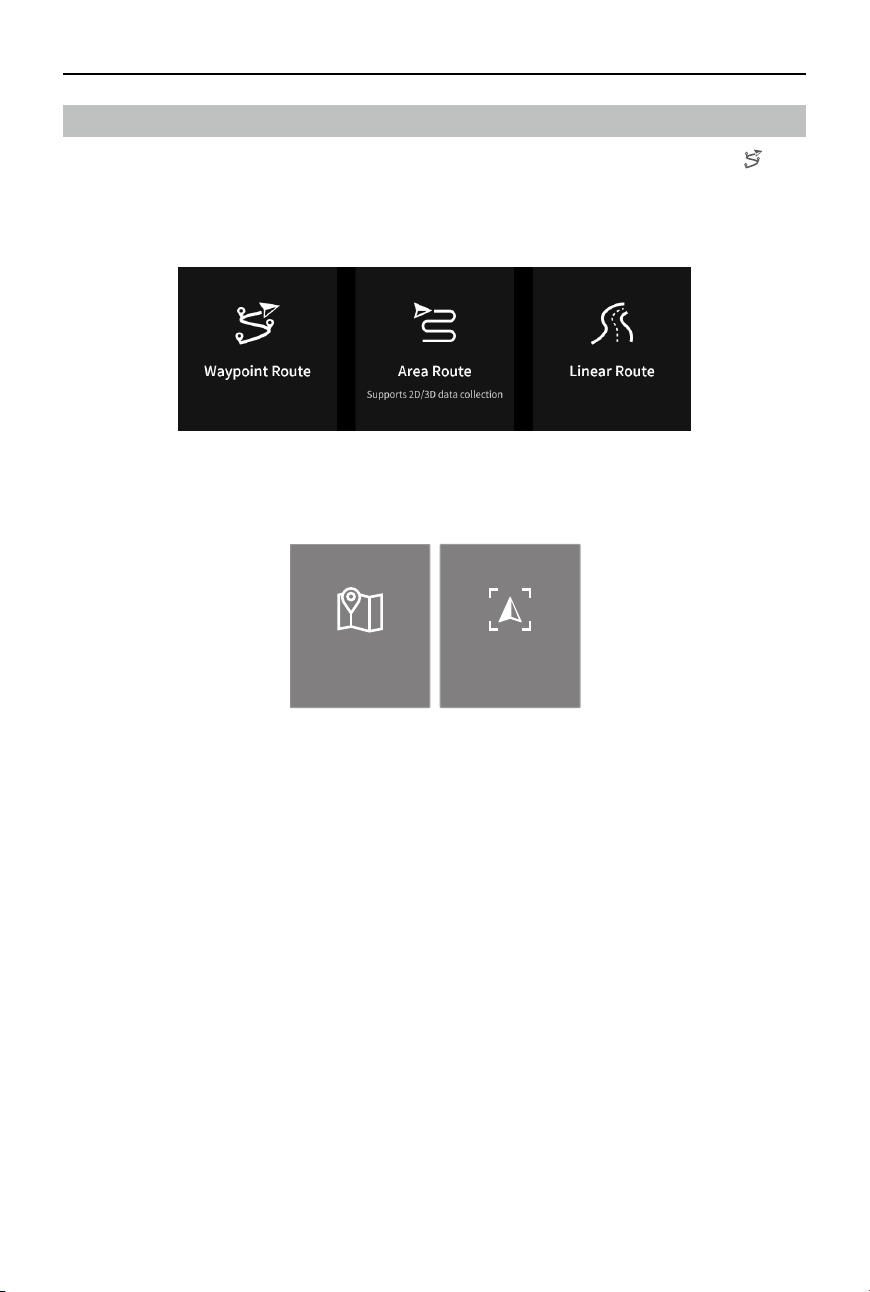
111
©
2022 DJI All Rights Reserved.
MATRICE 30 SERIES User Manual
Mission Flight
Tap on the home screen of DJI Pilot 2 to enter the ight route library, or tap the ight route icon in the
camera view or in the map view to enter the ight route library. Users can view ight tasks or create a
waypoint route, area route, or linear route ight task.These tasks are generated by the app. Meanwhile,
waypoint route ight tasks can also be created through Live Mission Recording.
Waypoint Mapping Oblique
Set Waypoints Live Mission
Recording
Mission Flight Introduction
The mission ight function is illustrated below with Waypoint Route ights as an example.
Waypoint Route ights can be planned in of two ways: Set Waypoints and Live Mission Recording. Use
Set Waypoints to create a route by adding editable waypoints on the map. Use Live Mission Recording
to create a route by adding waypoints and editing the target in photos captured along the route.

112
©
2022 DJI All Rights Reserved.
MATRICE 30 SERIES User Manual
Mission Flight - Setting Waypoints
Tap Create a Route, Waypoint Route ight, and then Set Waypoints to create a new ight route. Tap on
the map to add waypoints, then congure route and waypoint settings.
1. Enable or disable waypoint settings.
2. Reverse Path: tap to swap the start and end points to reverse the ight path. S refers to the start
point.
3. Delete Selected Waypoint: tap to delete the selected waypoint.
4. Point of Interest (POI): tap to enable the POI function and a POI will be displayed on the map. Drag
to adjust its position. After a POI is added, the aircraft yaw can be set as facing the POI so that
the aircraft nose points at the POI point during the mission. Tap this icon again to disable the POI
function.
5. Flight Route Information: displays the ight length, estimated ight time, waypoint quantity, photo
quantity.
6. Set Individual Waypoints: select a waypoint and set its parameters. Tap < or > to switch to the
previous or next waypoint. The settings are applied to the selected waypoint, including aircraft
speed, aircraft altitude, aircraft yaw mode, waypoint type, aircraft rotation, gimbal tilt, waypoint
actions, longitude and latitude.
7. Parameters List: edit the route name, advance ight route settings and altitude mode, and set the
aircraft type.
8. Route Settings: the settings are applied to the entire route, including safe takeo altitude, ascend
to start point, aircraft speed, aircraft altitude, aircraft yaw, gimbal control, waypoint type, and
completion action. These parameters will take eect for all waypoints in the route.
9. Save: tap to save the ight route. After the ight route is saved, the icon becomes the perform task
button, tap the button and then check the settings and status of the aircraft in the pop-up checklist.
Tap to upload the ight route. Once the upload is complete, tap the Start button to perform the
current task.
678
1
2
3
4
5
9
10

113
©
2022 DJI All Rights Reserved.
MATRICE 30 SERIES User Manual
10. No-Return Point: tap to enter the No-Return Point setting page, set accordingly to the instructions
in the app. When editing the waypoint route, the waypoint with obstacles above it can be marked
as a no-return point. Route from the previous waypoint of the no-return point to its next waypoint
will be marked as a no-return area (Both the previous and next waypoints are not included.) When
the aircraft is in the no-return area and safe RTH is triggered, the aircraft will follow the route and y
out of the area before ascending to the RTH altitude and returning to home.

114
©
2022 DJI All Rights Reserved.
MATRICE 30 SERIES User Manual
Mission Flight - Live Mission Recording
Tap Create a Route, Waypoint Route ight, and Live Mission Recording to record information on the
photos captured or aircraft position for the waypoint.
1. Control the gimbal, adjust the camera zoom and aim at the target, and tap to capture a photo
directly or press the C1 on the remote controller to set a waypoint. The waypoint and photo quantity
will increase accordingly.
2. The number of planned waypoints.
3. The number of planned photos.
4. Tap to switch to map view for editing or viewing. Tap to save current settings, and a ight route
is created, and tap Next to enter the AI Spot-check page for editing.
AI Spot-check
In AI Spot-check page, you can switch from dierent photos, drag-select photos and adjust the size.
When the route is executed, the selected object will be accurately photographed.
a. Back.
b. Displays the waypoint number and the photo number.
c. Displays the gimbal and lens of the photo.
d. Photo thumbnails, tap to select the photo that needs to be edited accurately. The photo has been
edited by AI Spot-check, and is marked with .
e. Gesture to select the object in the photo, adjust the selection box size, drag or delete the selection
box, and the selection box will follow the picture so as to enlarge or reduce. Tap once on the picture
to hide / show other buttons and tools on the screen.
f. Tap to save the flight route settings and the AI Spot-check configurations, and a flight route is
created.
2
1
4
3
115
©
2022 DJI All Rights Reserved.
MATRICE 30 SERIES User Manual
AI Spot-check can only be used in zoom camera view.
AI Spot-check takes photos at up to 10 times the focal length.
RTK should be used for photo capture and Planned Route ight of the AI Spot-check, and the
RTK base station coordinates of the photo capture and Planned Route ight must be the same.
AI Spot-check can support up to 750 photos.
The ratio of the selection box size of the photo to the area of the whole photo cannot be less
than 1/25 when using AI Spot-check.
The selection box position must be in the middle of the view and the size needs to be the
same as the target size.
If Advanced Dual Operator Mode is in use, Controller A must be used to complete the Demo
Flight and mission upload.
a
b
f
e
c
d

116
©
2022 DJI All Rights Reserved.
MATRICE 30 SERIES User Manual
In-Flight Editing
Enter the mission library, select a created ight route for editing or viewing.
1. Tap to perform the current mission.
2. Tap to enter the Set Waypoints page.
3. Tap to enter the In-Flight Editing view. The edits will be merged into the original route after they are
saved.
4. Tap to enter AI Spot-check page.
1
2
3
4
117
©
2022 DJI All Rights Reserved.
MATRICE 30 SERIES User Manual
1
2
3
4
5
6
Health Management System (HMS)
The HMS system includes the DJI Maintenance Program, DJI Care Enterprise, Firmware Update,
Manage Logs, Error Records, and Error Diagnosis.
1. Error Diagnosis: for checking the current health status of each module of the aircraft. Users can solve
errors by following the relevant prompted instructions.
Color Status
Green Normal
Orange Caution
Red Warning
2. DJI Maintenance Program: Users can view historical ight data and refer to the maintenance manual
to determine if maintenance is required.
3. DJI Care: Relevant information can be viewed if the device is bound to DJI Care.
4. Firmware Update: Tap to enter the Firmware Update view.
5. Manage Logs: displays the remote controller and aircraft log data of recent sorties. The user can
assist by extracting the relevant logs to local storage or upload them directly to the DJI Support
cloud, to facilitate troubleshooting by DJI Support.
6. Error Records: records of aircraft historical for determining if any serious problem has occurred
during aircraft operation. This helps users evaluate the stability of the aircraft and assists DJI Support
in conducting aftersales analysis.
Error Records are available for the batteries and battery station (the battery station must be
connected to the remote controller via the USB-C to USB-C cable).
Manage Logs is available for the batteries and battery station (the battery station must be
connected to the remote controller via the USB-C to USB-C cable).
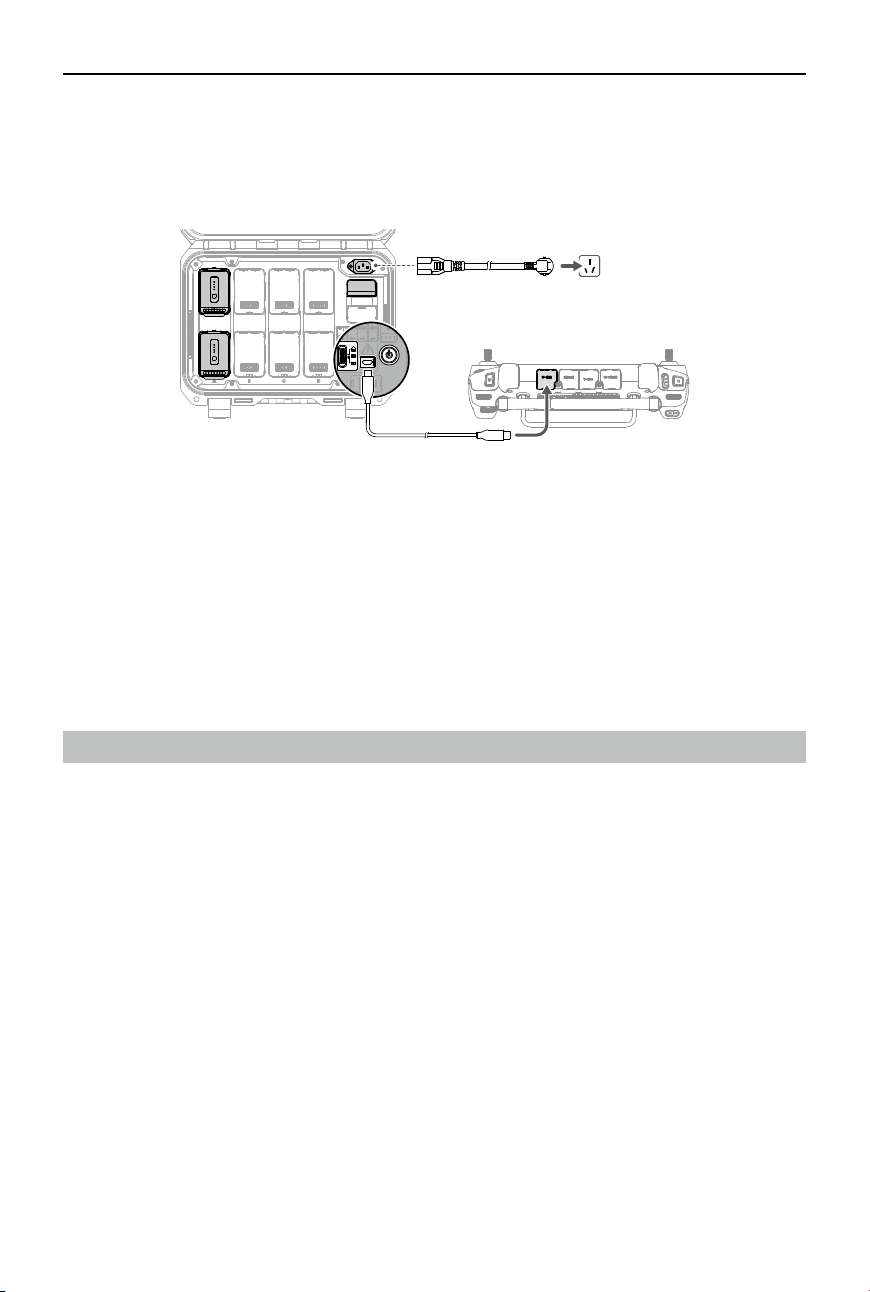
118
©
2022 DJI All Rights Reserved.
MATRICE 30 SERIES User Manual
Intelligent Battery Station Status and Log Management
To check the battery station status in HMS in DJI Pilot 2, connect the battery station to the remote
controller via a USB-C to USB-C cable. The user can also update the battery station and battery
rmware and export the battery station and battery logs in batches.
Checking the Battery Station Status
Run DJI Pilot 2, tap HMS to check the status of the battery station and batteries. If a warning appears,
tap it for more detailed information and follow the prompted instructions to resolve the issue.
Exporting Battery Station Logs
1. Run DJI Pilot 2, tap HMS, then Manage Logs, and select Battery Station Logs.
2. Check the logs of the battery station and all batteries.
3. Tap Upload Log and follow the prompted instructions to upload the selected logs.
DJI FlightHub 2
Paired with the DJI FlightHub 2 cloud platform, the M30 series oers integrated air and ground handling
with efficient operation management. The combined features of the two products makes a wide
range of real-time operations possible, including cloud mapping, point, line, and area annotation, ight
information syncing, live viewing, media le upload or download, mutual access to statuses of multiple
aircraft, mission ight syncing, and real-time control from mobile devices.
For more details, refer to the DJI FlightHub 2 User Guide which is available from the ocial DJI website
https://www.dji.com/ighthub-2/downloads.

119
©
2022 DJI All Rights Reserved.
Firmware Update
This chapter introduces the methods of
updating the rmware of the device.
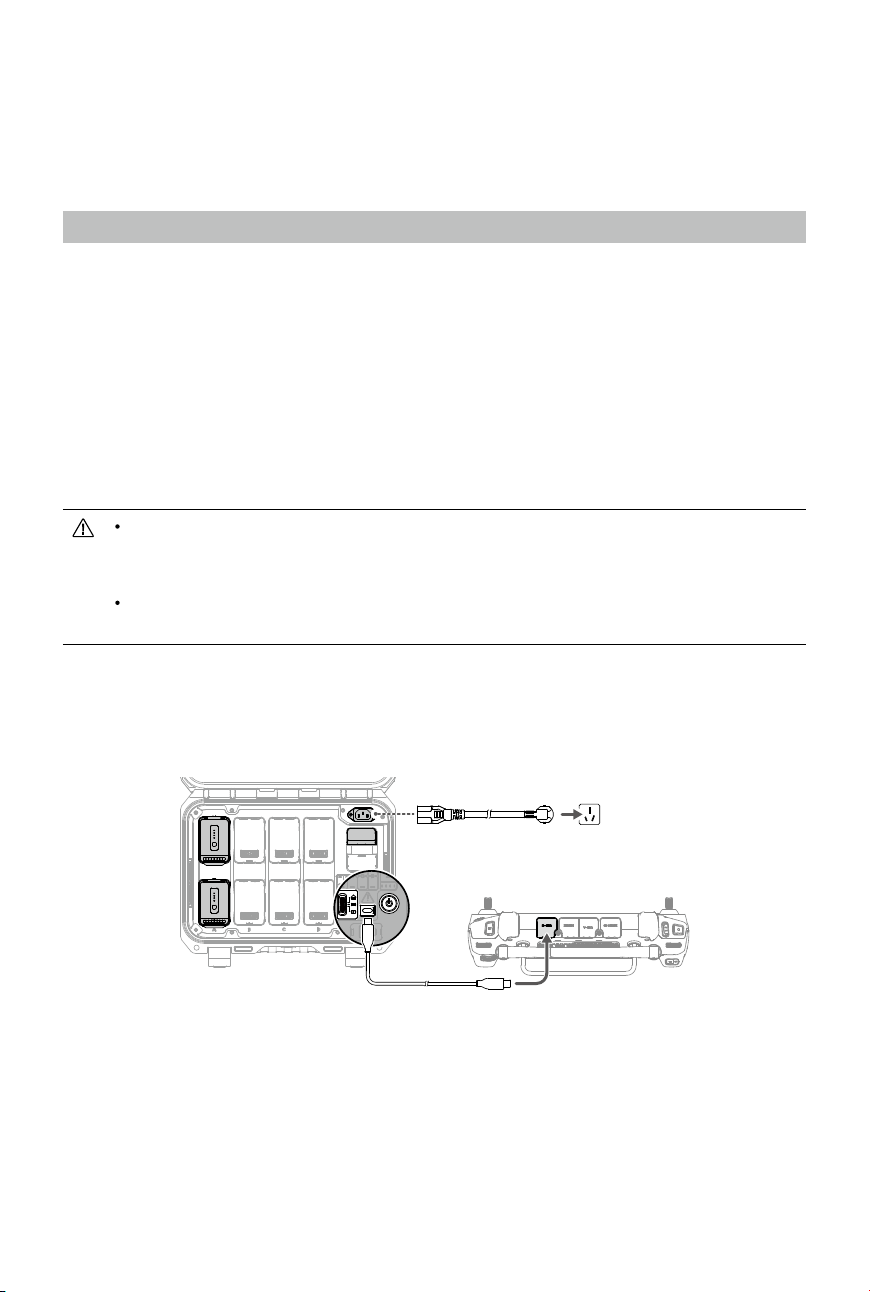
120
©
2022 DJI All Rights Reserved.
Firmware Update
Use DJI Pilot 2 or DJI Assistant 2 (Enterprise Series) to update the remote controller, aircraft and other
connected DJI devices.
Using DJI Pilot 2
Aircraft and Remote Controller
1. Power on the aircraft and remote controller. Ensure the aircraft is properly linked to the remote
controller, their battery levels are higher than 25%, and the remote controller is connected to the
internet.
2. Run DJI Pilot 2. A prompt will appear on the homepage if new rmware is available. Tap to enter the
Firmware Update view.
3. Tap Update All and DJI Pilot 2 will download the firmware and update the aircraft and remote
controller.
4. The aircraft and remote controller will automatically restart after the rmware update is completed.
Make sure the remote controller is charged over 25% before updating. The update takes
approximately 15 minutes (depending on network strength). Make sure the remote controller
is connected to the internet during the whole update process.
The TB30 intelligent flight batteries installed on the aircraft will be updated to the latest
rmware version.
Battery Station and TB30 Batteries
Use the DJI Pilot 2 app to update the rmware of the battery station as well as up to eight TB30 ight
batteries at the same time.
1. Insert the TB30 batteries into the battery port and power on the battery station.
2. Connect the battery station USB-C maintenance port to the remote controller USB-C port using a
USB-C to USB-C cable.
3. Power on the remote controller and make sure it is connected to the internet.
4. Run DJI Pilot 2. If a version update is available, the homepage will prompt that the battery station
rmware update is required. Tap to enter the battery station update page.
5. Tap the Update All button to begin the update, which takes approximately 10 minutes. The update is
completed when the update success prompt appears.
121
©
2022 DJI All Rights Reserved.
MATRICE 30 SERIES User Manual
Using DJI Assistant 2 (Enterprise Series)
DJI Assistant 2 (Enterprise Series) supports the updating of the remote controller and aircraft but not the
BS30 battery station. Please use the DJI Pilot 2 app to update the battery station.
Aircraft and Remote Controller
1. Connect the remote controller or aircraft to the PC one by one, as the assistant software does not
support the updating of multiple DJI devices at the same time.
2. Make sure the PC is connected to the internet and the DJI device is powered on with a battery level
higher than 25%.
3. Run the assistant software, log in with your DJI account and enter the main interface.
4. Tap the rmware update button on the left side of the main interface.
5. Select the rmware version and tap to update. The assistant software will download and update the
rmware automatically.
6. When the "Update successful" prompt appears, the device update is completed, and the DJI device
will restart automatically.
The battery rmware is included in the aircraft rmware. Be sure to update the rmware of all
batteries.
For the rmware update process, the battery levels of the aircraft and remote controller must
be higher than 25%.
Make sure all DJI devices are connected properly to the PC during an update.
During the update process, it is normal for the gimbal to go limp, the aircraft status indicators
to blink, and the aircraft to reboot. Wait patiently for the update to complete.
Make sure to keep the aircraft away from people and animals during a firmware update,
system calibration or parameter conguration.
For safety, make sure you are using the latest rmware version.
After the rmware update is completed, the remote controller and the aircraft may become
disconnected. Re-link them if necessary.
DO NOT use other Hardware or Software than specied by the manufacturer.
During a rmware update, DO NOT insert or remove the batteries to avoid battery update
failure.
During a rmware update, DO NOT unplug the cable to avoid rmware update failure.
Oine Update
An oine rmware package can be downloaded from the DJI ocial website to an external storage
device such as a microSD card or U disk. Run DJI Pilot 2, tap HMS, and then Firmware Update. Tap
Oine Update to select the rmware package of the remote controller, aircraft, or battery station from
the external storage device and tap Update All to update.

122
©
2022 DJI All Rights Reserved.
Appendix
This chapter provides the specications.
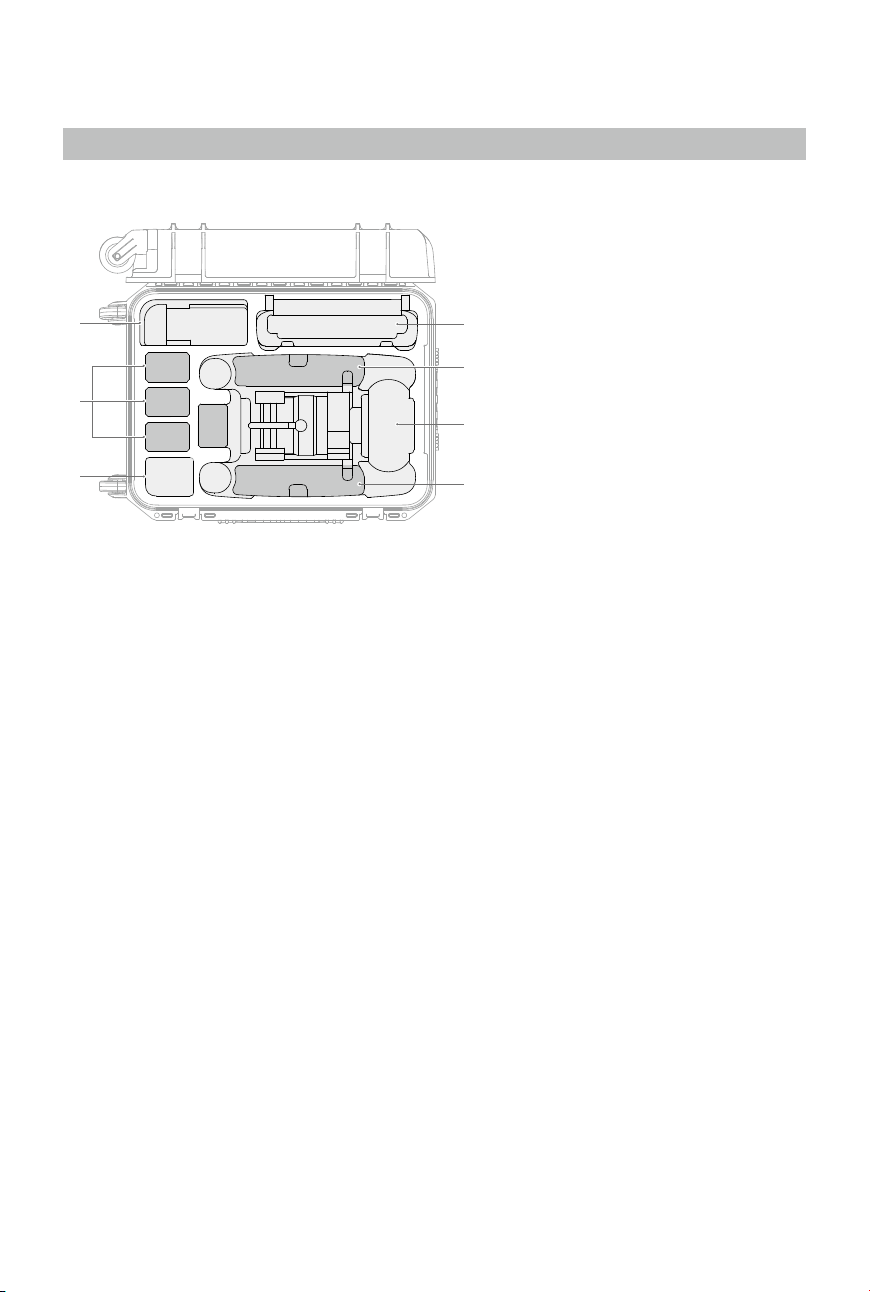
123
©
2022 DJI All Rights Reserved.
Appendix
Introduction to the Carrying Case
1
2
3
4
5
5
6
1. Cables and Screws
2. TB30 Intelligent Flight Battery
3. Reserved
4. Aircraft body
5. Propellers
6. Remote controller and manuals

124
©
2022 DJI All Rights Reserved.
MATRICE 30 SERIES User Manual
Specications
Aircraft
General
Dimensions
(unfolded, excl. propellers)
470×585×215 mm (L×W×H)
Dimensions (folded) 365×215×195 mm (L×W×H)
Diagonal Wheelbase 668 mm
Weight (incl. two batteries) 3770 ± 10 g
Max Takeo Weight 4069 g
Max Takeo Weight for C2
Certication in EU
3998 g
Operating Frequency
[1]
2.4000-2.4835 GHz, 5.725-5.850 GHz
Transmitter Power (EIRP)
2.4 GHz: <33 dBm (FCC); <20 dBm (CE/SRRC/MIC)
5.8 GHz: <33 dBm (FCC/SRRC);
<14 dBm (CE)
Hovering Accuracy
(windless or breezy)
Vertical: ±0.1 m (Vision System enabled); ±0.5 m (N-mode
with GPS); ±0.1 m (RTK)
Horizontal: ±0.3 m (Vision System enabled); ±1.5 m (N-mode
with GPS); ±0.1 m (RTK)
RTK Positioning Accuracy
(xed RTK enabled)
1 cm+1 ppm (horizontal)
1.5 cm+1 ppm (vertical)
Max Angular Velocity Pitch: 150°/s; Yaw: 100°/s
Max Tilt Angle 35° (N-mode and Forward Vision System enabled: 25°)
Max Ascent/Descent Speed 6 m/s; 5 m/s
Max Tilt Descent Speed 7 m/s
Max Horizontal Speed 23 m/s
Max Service Ceiling Above Sea Level
(without other payload)
5,000 m (with 1671 propellers)
7,000 m (with 1676 propellers)
Max Wind Resistance 12 m/s
Max Hover Time
[2]
36 min (with 1671 propellers)
34 min (with 1676 propellers)
Max Flight Time
[2]
41 min (with 1671 propellers)
38 min (with 1676 propellers)
Motor Model 3511
Propeller Model
1671
1676 High Altitude (must be used in countries and regions
with C2 certication)
Ingress Protection Rating
[3]
IP55
GNSS
GPS+Galileo+BeiDou+GLONASS (GLONASS is supported
only when RTK module is enabled)
Operating Temperature -20° to 50° C (-4° to 122° F)

125
©
2022 DJI All Rights Reserved.
MATRICE 30 SERIES User Manual
Gimbal
Angular Vibration Range ±0.01°
Controllable Range Pan: ±90° , Tilt: -120° to +45°
Mechanical Range Pan: ±105°, Tilt: -135° to +60°, Roll:±45°
Zoom Camera
Sensor 1/2" CMOS, Eective pixels: 48M
Lens
Focal length: 21-75 mm (equivalent: 113-405 mm)
Aperture: f/2.8-f/4.2
Focus: 5 m to ∞
Exposure Compensation ±3 ev (using 1/3 ev as step length)
Electronic Shutter Speed
Auto Mode:
Photo: 1/8000-1/2 s
Video: 1/8000-1/30 s
M Mode:
Photo: 1/8000-8 s
Video: 1/8000 -1/30 s
ISO Range 100-25600
Max. Video Resolution 3840×2160
Max Photo Size 8000×6000
Wide Camera
Sensor 1/2" CMOS, Eective pixels: 12M
Lens
DFOV: 84°
Focal length: 4.5 mm (equivalent: 24 mm)
Aperture: f/2.8
Focus: 1 m to ∞
Exposure Compensation ±3 ev (using 1/3 ev as step length)
Electronic Shutter Speed
Auto Mode:
Photo: 1/8000-1/2 s
Video: 1/8000-1/30 s
M Mode:
Photo: 1/8000-8 s
Video: 1/8000-1/30 s
ISO Range 100-25600
Max. Video Resolution 3840×2160
Photo Size 4000×3000
Thermal Camera
Thermal Imager Uncooled VOx Microbolometer
Lens
DFOV: 61°
Focal length: 9.1 mm (equivalent: 40 mm)
Aperture: f/1.0
Focus: 5 m to ∞
Noise Equivalent Temperature
Dierence (NETD)

126
©
2022 DJI All Rights Reserved.
MATRICE 30 SERIES User Manual
Infrared Temperature Measurement
Accuracy
[4]
±2°C or ±2% (using the larger value)
Video Resolution
Infrared Image Super-resolution Mode: 1280×1024
Normal Mode: 640×512
Photo Size
Infrared Image Super-resolution Mode: 1280×1024
Normal Mode: 640×512
Pixel Pitch 12 µm
Temperature Measurement Method Spot Meter, Area Measurement
Temperature Measurement Range
High Gain Mode: -20° to 150° C (-4° to 302° F)
Low Gain Mode: 0° to 500° C (32° to 932° F)
Temperature Alert Supported
Palette
White Hot/Black Hot/Tint/Iron Red/Hot Iron/Arctic/Medical/
Fulgurite/Rainbow 1/Rainbow 2
FPV Camera
Resolution 1920×1080
DFOV 161°
Frame Rate 30 fps
Laser Module
Wavelength 905 nm
Max Laser Power 3.5 mW
Single Pulse Width 6 ns
Measurement Accuracy
± (0.2 m + D×0.15%)
D is the distance to a vertical surface
Measuring Range 3-1,200 m (0.5×12 m vertical surface with 20% reectivity)
Safety Regulation Level Class 1M
Accessible Emission Limit (AEL) 304.8 nJ
Reference Aperture
18mm length, 18mm width (20.3mm diameter if equivalent to
circular)
Max Laser Pulse Emission Power
Within 5 Nanoseconds
60.96 W
Vision Systems
Obstacle Sensing Range
Forward: 0.6-38 m
Upward/Downward/Backward/Sideward: 0.5-33 m
FOV 65° (H), 50° (V)
Operating Environment Surfaces with clear patterns and adequate lighting (> 15 lux)
Infrared Sensing Systems
Obstacle Sensing Range 0.1-10 m
FOV 30°
Operating Environment Large, diuse, and reective obstacles (reectivity >10%)

127
©
2022 DJI All Rights Reserved.
MATRICE 30 SERIES User Manual
TB30 Intelligent Flight Battery
Capacity 5880 mAh
Voltage 26.1 V
Battery Type Li-ion 6S
Energy 131.6 Wh
Net Weight Approx. 685 g
Operating Temperature -20° to 50° C (-4° to 122° F)
Storage Temperature 20° to 30° C (68° to 86° F)
Charging Temperature
-20° to 40° C (-4° to 104° F)
(When the temperature is lower than 10° C (50° F), the self-
heating function will be automatically enabled. Charging in
a low temperature may shorten the lifetime of the battery)
Chemical System LiNiMnCoO2
Auxiliary Lights
Eective Illumination Distance 5 m
Illumination Type 60 Hz, solid glow
Remote Controller
General
Screen
7.02 inch LCD touchscreen, with a resolution of 1920×1200
pixels, and high brightness of 1200 cd/m
2
Dimensions (antennas folded) 268×162.7×94.3 mm (L×W×H)
Weight
Approx. 1.25 kg (excl. WB37 battery)
Approx. 1.42 kg (incl. WB37 battery)
Internal Battery
Type: Li-ion (6500 mAh @ 7.2 V)
Charge Type: Supports battery station or USB-C charger
maximum rated power 65W (max voltage of 20V)
Charge Time: 2 hours
Chemical System: LiNiCoAIO2
External Battery
(WB37 Intelligent Battery)
Capacity: 4920 mAh
Voltage: 7.6 V
Battery Type: Li-ion
Energy: 37.39 Wh
Chemical System: LiCoO2
Operating Time
[5]
Internal Battery: Approx. 3 hours 18 min
Internal Battery + External Battery: Approx. 6 hours
Ingress Protection Rating
[3]
IP54
GNSS GPS+Galileo+BeiDou
Operating Temperature -20° to 50° C (-4° to 122° F)
O3 Enterprise
Operating Frequency
[1]
2.4000-2.4835 GHz, 5.725-5.850 GHz

128
©
2022 DJI All Rights Reserved.
MATRICE 30 SERIES User Manual
Max Transmission Distance
(unobstructed, free of interference)
15 km (FCC); 8 km (CE/SRRC/MIC)
Max Transmission Distance
(with interference)
Strong Interference (urban landscape, limited line of sight, many
competing signals): 1.5-3 km (FCC/CE/SRRC/MIC)
Medium Interference (suburban landscape, open line of sight,
some competing signals): 3-9 km (FCC); 3-6 km (CE/SRRC/MIC)
Weak Interference (open landscape abundant line of sight, few
competing signals): 9-15 km (FCC); 6-8 km (CE/SRRC/MIC)
Transmitter Power (EIRP)
2.4 GHz: <33 dBm (FCC); <20 dBm (CE/SRRC/MIC)
5.8 GHz: <33 dBm (FCC); <14 dBm (CE); <23 dBm (SRRC)
Wi-Fi
Protocol Wi-Fi 6
Operating Frequency
[1]
2.4000-2.4835 GHz; 5.150-5.250 GHz;
5.725-5.850 GHz
Transmitter Power (EIRP)
2.4 GHz: <26 dBm (FCC); <20 dBm (CE/SRRC/MIC)
5.1 GHz: <26 dBm (FCC); <23 dBm (CE/SRRC/MIC)
5.8 GHz: <26 dBm (FCC/SRRC); <14 dBm (CE)
Bluetooth
Protocol Bluetooth 5.1
Operating Frequency 2.4000-2.4835 GHz
Transmitter Power (EIRP) <10 dBm
Intelligent Battery Station
Model CSX320-550
Dimensions 353×267×148 mm
Net Weight 3.95 kg
Compatible Battery Type
TB30 Intelligent Flight Battery
WB37 Intelligent Battery
Input 100-240 VAC, 50/60 Hz
Output
TB30 Battery Port: 26.1 V, 8.9 A (supported up to two outputs
simultaneously)
WB37 Battery Port: 8.7 V, 6 A
Output Power 525 W
USB-C Port Max. output power of 65 W
USB-A Port Max. output power of 10 W (5 V, 2 A)
Power Consumption
(when not charging battery)
< 8 W
Output Power
(when warming up battery)
Approx. 30 W
Operating Temperature -20° to 40° C (-4° to 104° F)

129
©
2022 DJI All Rights Reserved.
MATRICE 30 SERIES User Manual
Ingress Protection Rating IP55 (with the cover closed properly)
Charging Time
[6]
Approx. 30 min (charging two TB30 batteries from 20% to 90%)
Approx. 50 min (charging two TB30 batteries from 0% to 100%)
Protection Features
Anti-Backow Protection
Short Circuit Protection
Over Voltage Protection
Over Current Protection
Temperature Protection
[1] 5.8 and 5.1GHz frequencies are prohibited in some countries. In some countries, the 5.1GHz frequency is
only allowed for use indoors.
[2] The maximum ight time and the hover time were tested in a lab environment and is for reference only.
[3] This protection rating is not permanent and may reduce over time after long-term use.
[4] The infrared temperature measurement accuracy was tested in a lab environment and is for reference only.
[5] The maximum operating time was tested in a lab environment and is for reference only.
[6] The charging time was tested in a lab environment at room temperature. The value provided should be
used for reference only.

130
©
2022 DJI All Rights Reserved.
MATRICE 30 SERIES User Manual
Troubleshooting Procedures
1. Why can the battery not be used before the rst ight?
The battery must be activated by charging before using it for the rst time.
2. How to solve the gimbal drift issue during ight?
Calibrate IMU and compass in DJI Pilot 2. If the problem persists, contact DJI Support.
3. No function
Check if the Intelligent Batteries and the remote controller are activated by charging. If the problems
persist, contact DJI Support.
4. Power-on and start-up problems
Check if the battery has power. If yes, contact DJI Support if it cannot be started normally.
5. SW update issues
Follow the instructions in the user manual to update the rmware. If the rmware update fails, restart
all the devices and try again. If the problem persists, contact DJI Support.
6. Procedures to reset to factory default or last known working conguration
Use the DJI Pilot 2 app to reset to factory default.
7. Shutdown and power-o problems
Contact DJI Support.
8. How to detect careless handling or storage in unsafe conditions
Contact DJI Support.
Risk and Warnings
This product uses LED indicators, remote controller vibrations, and sounds and text messages
prompted in the app for warnings and alerts. Users can check the warnings and related operation
descriptions in the corresponding section of this document. Such as:
1. Aircraft LED indicators in the Aircraft Indicators section of the Aircraft chapter.
2. C2 link loss in the Failsafe RTH section of the Flight Safety chapter.
3. Critical low battery level in the Low Battery RTH section of the Flight Safety chapter.
4. Remote controller LED indicators and sound alerts in the Remote Controller LEDs and Alert section
of the Remote Controller chapter.
5. Make sure to read the whole manual to learn more before use.
When the aircraft detects a risk after powering on, there will be a warning prompt on DJI Pilot 2.
Pay attention to the list of situations below.
1. If the location is not suitable for takeo.
2. If an obstacle is detected during ight.
3. If the location is not suitable for landing.
4. If the compass and IMU experience interference and need to be calibrated.
5. Follow the on-screen instructions to operate the aircraft properly when prompted.
131
©
2022 DJI All Rights Reserved.
MATRICE 30 SERIES User Manual
Battery Disposal
Dispose of the batteries in specific recycling containers only after a complete discharge. DO NOT
dispose of the batteries in regular trash containers. Strictly follow the local regulations regarding the
disposal and recycling of batteries.
Dispose of a battery immediately if it cannot be powered on after over-discharging.
If the battery level button on the battery is disabled and the battery cannot be fully discharged, contact
a professional battery disposal/recycling agency for further assistance.
C2 Certication
M30 EU/M30T EU complies with C2 certification, there are some requirements and restrictions
when using M30 EU/M30T EU in European Economic Area (EEA, i.e. EU plus Norway, Iceland, and
Liechtenstein). Make sure the pilot has the A2 certication.
UAS Class C2
Sound Power Level 90 dB(A) @3998g
Maximum Propeller Speed 5800 RPM (1676 High Altitude Propeller)
Propeller Complied with C2 Certication 1676 High Altitude Propeller
Max Payload Dimension Complied with C2 Certication 120×120×100 mm
Max Payload Weight Complied with C2 Certication 228 g
MTOM Statement
The MTOM of M30 EU/M30T EU (Model M30 RTK EU/M30T RTK EU), including two batteries, a
microSD card, is not larger than 3998 g to comply with C2 requirement.
Users must follow the instructions below to comply with the MTOM C2 requirements. Otherwise, the
aircraft cannot be used as a C2 UAV:
1. Make sure that when installing any external devices that the total weight of the aircraft does not
exceed the maximum takeo weight (3998 g). In addition, the external device must be installed in a
location so that the center of gravity is maintained within the range of the aircraft top shell to keep the
aircraft stable and that the vision systems, the infrared sensing systems, and the auxiliary lights are not
blocked. Make sure that the MTOM is not larger than 3998 g for any ight.
2. DO NOT use any non-qualied replacement parts, such as intelligent ight batteries or propellers, etc.
3. DO NOT retrot the aircraft.
Disposal
Observe the local regulations related to electronic device when dispose the aircraft and remote
controller.

132
©
2022 DJI All Rights Reserved.
MATRICE 30 SERIES User Manual
Direct Remote ID
1. Transport Method: Wi-Fi Beacon.
2. Method of uploading the UAS Operator Registration Number to the aircraft: Enter DJI Pilot 2 > GEO
Zone Map > UAS Remote Identication, and then upload UAS Operator Registration Number.
3. According to applicable rules, operators shall provide the correct registration number to broadcast in
ight. Please make sure you understand and comply with the rules.
List of Items, Including Qualied Accessories
Part Weight Dimension
1676 High Altitude Propeller (1pcs) Approx. 13.2 g 40.6×19.3 cm
PSDK Mounting Bracket Approx.15.2 g 79.5×80.3×10.2 mm
TB30 Intelligent Flight Battery Approx. 685 g 150.4×72.8×47.4 mm
BS30 Intelligent Battery Station Approx.3.95 kg 353×267×148 mm
List of Spare and Replacement Parts
1676 High Altitude Propeller (Model: DJI 1676)
TB30 Intelligent Flight Battery (Model: TB30-5880-26.1)
Remote Controller Warnings
The remote controller indicator will glow red after disconnecting from the aircraft for more than two
seconds.
DJI Pilot 2 will prompt a warning after disconnecting from the aircraft.
There will be an alert if the remote controller is not used for ve minutes while it is powered on but the
touchscreen is o and it is not connected to the aircraft. It will automatically power o after a further 30
seconds. Move the control sticks or perform any other remote controller action to cancel the alert.
•
Avoid interference between the remote controller and other wireless device. Make sure to turn o the
Wi-Fi on nearby mobile devices. Land the aircraft as soon as possible if there is interference.
•
DO NOT operate the aircraft if lighting conditions are too bright or dark when using a remote
controller to monitor the ight. Users are responsible for correctly adjusting the display brightness
when using the remote controller in direct sunlight during ight operation.
•
Release the control sticks or press the ight pause button if an unexpected operation occurs.
C2 Firmware Version Information
Aircraft Firmware v07.01.00.26
Remote Controller Firmware v02.02.04.05
TB30 Intelligent Battery v02.00.20.58
DJI Pilot 2 v7.1.0.32
Refer to the M30 Series Release Notes for more rmware update information for traceability.
www.dji.com/matrice-30/downloads
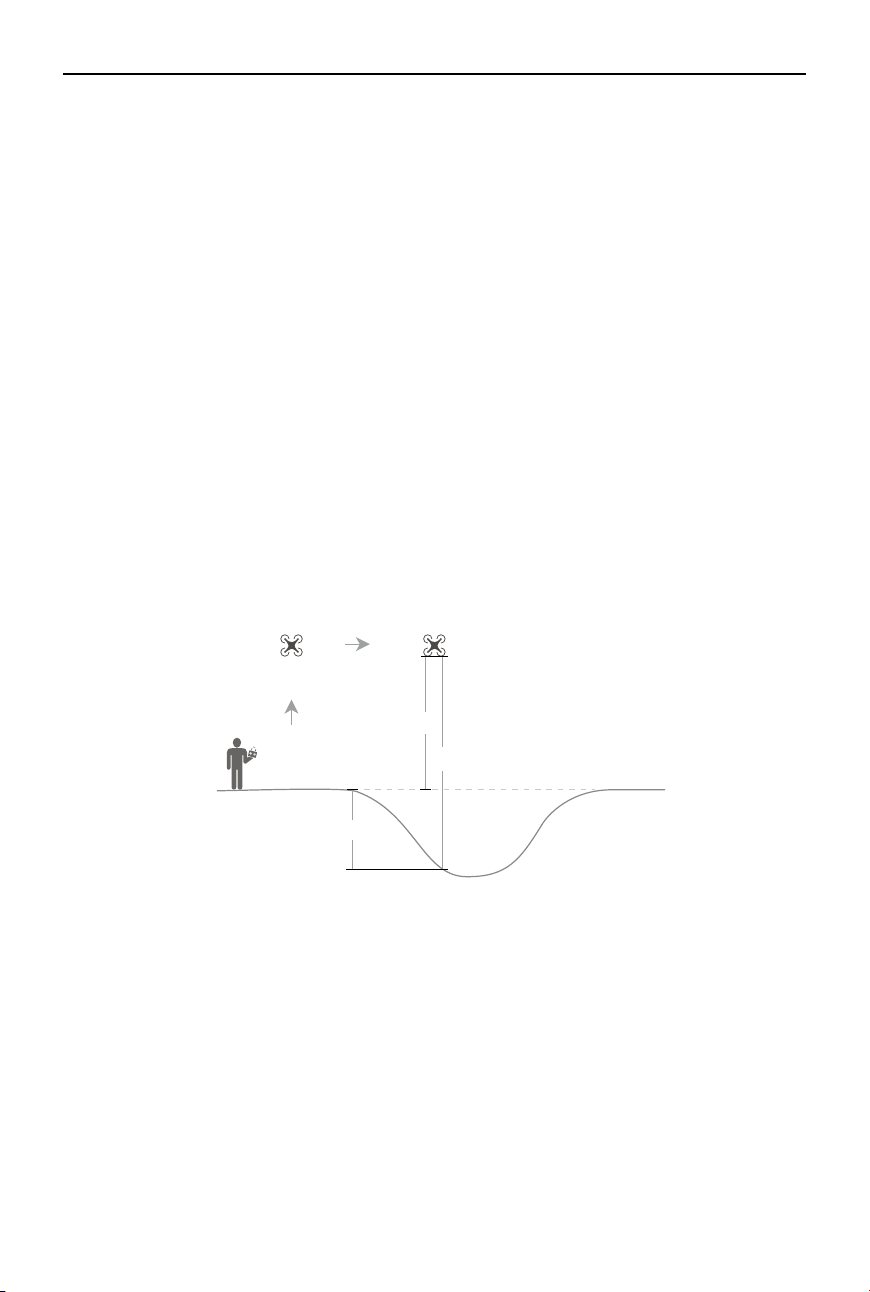
133
©
2022 DJI All Rights Reserved.
MATRICE 30 SERIES User Manual
Takeoff
AGL (not supported)
H
Height error
GEO Awareness
Drone Geo-Zones and DJI Geo Zones
DJI is committed to maintaining a safe ying environment. This includes abiding by local regulations and
Unmanned Geographical Zones (UGZs) dened by EU national authorities. DJI has its own Geospatial
Environment Online system (GEO) with broader geographical zones, including regulated areas where
ight may raise concerns. DJI's GEO system has been running successfully for many years, eectively
protecting ight safety and public safety in the absence of ocial UGZ databases.
In the future, DJI Geo zones will coexist with EU UGZs, as UGZs are still not available in many countries.
Users are responsible for checking local regulations and for any ight restrictions where they intend to
operate.
The GEO zones mentioned in the manual and DJI ocial website refers to the DJI Geo zones and Geo
fencing function, not the UGZs for Geo awareness function required by regulations.
AGL (Above Ground Level) Statement
The vertical limits of Geo-awareness may use the AMSL altitude or the AGL height. The choice between
these two references is specied individually for each UGZ. Neither AMSL altitude nor the AGL height
is supported by this product. H (Height) appears in the app camera view, which is the height from the
aircraft takeo point to the aircraft. The height above the takeo point may be used as an approximation
but may dier more or less from the given altitude/height for a specic UGZ. The remote pilot remains
responsible for not breaching the vertical limits of the UGZ.
DJI Geo Zones with Geo Fencing Function
DJI Geo zones are divided into seven categories with only ve of them taking eect. If more than one
restriction is set at the same position, the alert generated is in the following order:
Restricted Zones > Authorization Zones > Altitude Zones > Enhanced Warning Zones > Warning Zones
Restricted Zones
Appear red in the DJI app. Users will be prompted with a warning message, and ight is prevented. UA
(Unmanned Aircraft) cannot y or takeo in these zones. Restricted Zones may be unlocked, to unlock
contact [email protected] or go to Unlock A Zone at https://y-safe.dji.com/.
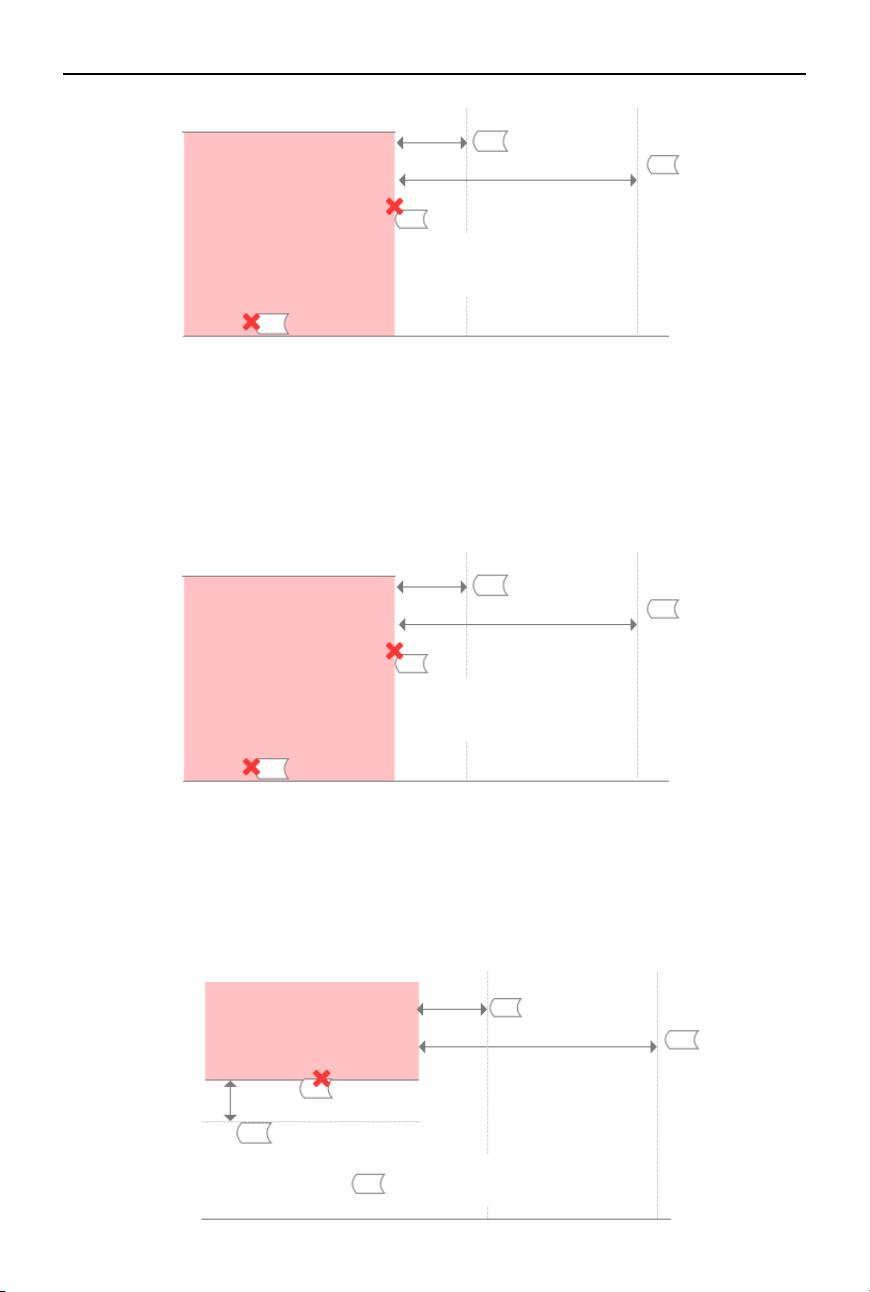
134
©
2022 DJI All Rights Reserved.
MATRICE 30 SERIES User Manual
Restricted Zone
Warning message appears
Limit maximum speed
Ground
When approaching:
1. Warning message appears
2. Cannot y in the zone
3. Users can apply on the DJI ocial website
after manual approval
When taking o:
1. Warning message appears
2. Cannot take o
3. Users can apply on the DJI ocial website after manual approval
100 m
20 m
Authorization Zones
Appear blue in the app. Users will be prompted with a warning message, and ight is limited by default.
UA cannot y or takeo in these zones unless authorized. Authorization Zones may be unlocked by
authorized users using a DJI veried account.
Authorization Zone
Warning message appears
Limit maximum speed
Ground
When approaching:
1. Warning message appears
2. Cannot y in the zone
3. Users can apply on the DJI App with a
phone number
100 m
20 m
When taking o:
1. Warning message appears
2. Cannot take o
3. Users can apply on the app with a phone number
Altitude Zones
Altitude zones are zones with a limited altitude and appear in gray on the map. When approaching,
users will receive a warning message in the app.
Altitude Zone
20 m
100 m
10 m
Warning message appears
Limit maximum speed
Limit maximum speed
1. UA can take o and y into these zones in specic
height with a warning message
2. User can apply for permission on the DJI ocial
website after manual approval
Ground
Limited altitude

135
©
2022 DJI All Rights Reserved.
MATRICE 30 SERIES User Manual
Enhanced Warning Zones
A warning message will prompt users when the drone reaches the edge of the zones.
Warning Zones
A warning message will prompt users when the drone reaches the edge of the zones.
Ground
1. UA can take o and y into these zones with a warning
message which needs user conrmation
Enhanced Warning
Zone
Ground
1. UA can take o and y into these zones with a warning
message
Warning Zones
Regulatory Restricted Zones
Due to local regulations and policies, flights are prohibited within the scope of some special areas.
(Example: Prisons)
Approved Zones for Light UAVs (China):
For Approved Zones, pilots of light UAVs ying at an altitude of 120 m or less are not required to obtain
permission to y. Pilots who are planning to y medium-sized UAVs in Approved Zones at an altitude
higher than 120 m, or in GEO Zones other than Approved Zones, must obtain permission via UTMISS
before taking o.
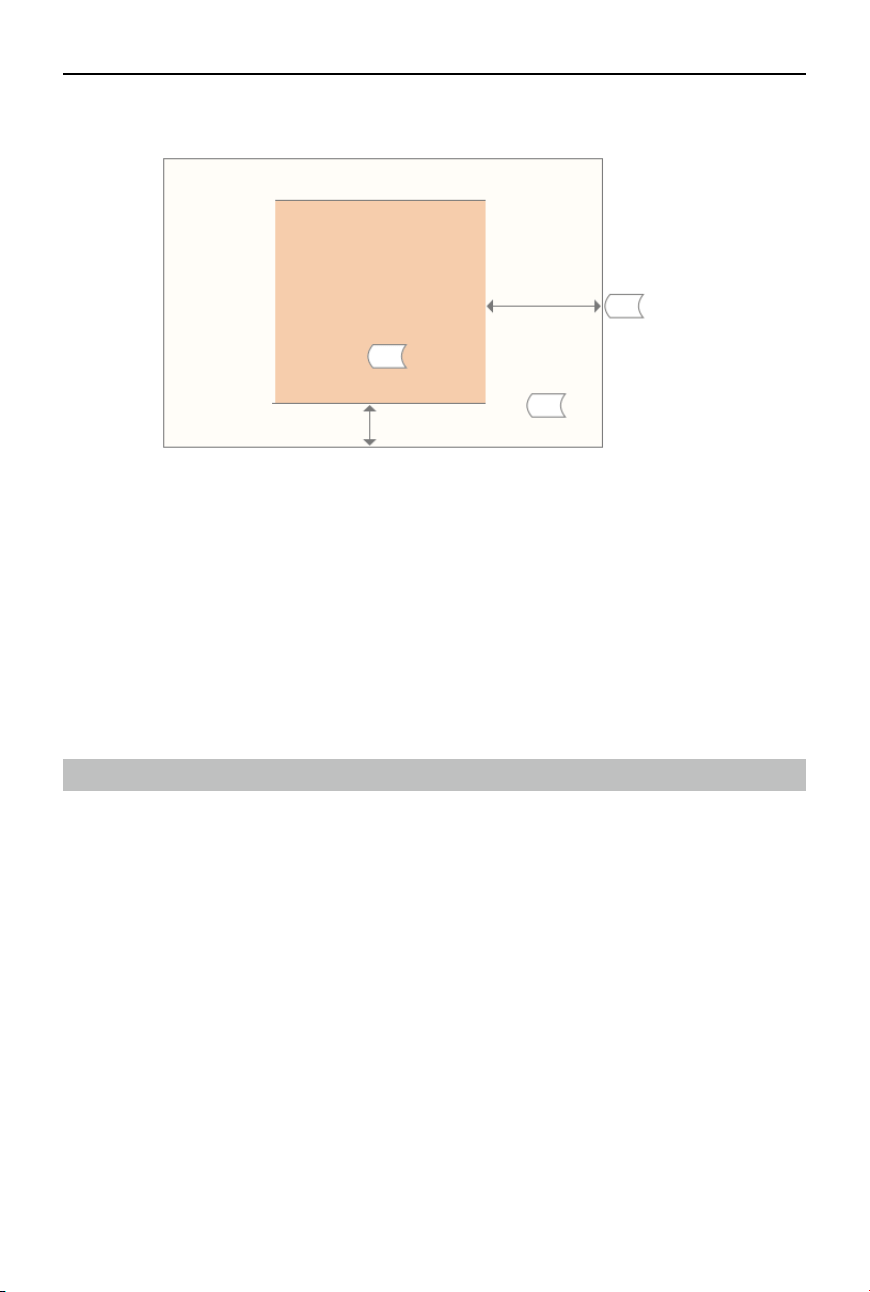
136
©
2022 DJI All Rights Reserved.
MATRICE 30 SERIES User Manual
UGZ Zone for Geo-awareness function
EASA Notice
Make sure to read the Drone Information Notices document included in the package before use.
Go to the address below for more EASA notice information for traceability.
https://www.easa.europa.eu/en/document-library/general-publications/drones-information-notices
Original Instructions
This manual is provided by SZ DJI Technology, Inc., and the content is subject to change.
Lobby of T2, DJI Sky City, No. 53 Xianyuan Road, Xili Community, Xili Street, Nanshan District,
Shenzhen, China, 518057.
FAR Remote ID Compliance Information
The aircraft complies with the requirements of 14 CFR Part 89:
•
The aircraft automatically initiates a pre-ight self-test (PFST) of the Remote ID system before takeo
and cannot take o if it does not pass the PFST
[1]
. The results of the PFST of the Remote ID system
can be viewed in a DJI ight control app such as DJI Pilot 2.
•
The aircraft monitors the Remote ID system functionality from pre-ight to shut down. If the Remote
ID system malfunctions or has a failure, an alarm will be displayed in a DJI ight control app such as
DJI Pilot 2.
•
The user shall keep the DJI ight control app running in the foreground and always allow it to obtain
the location information of the remote controller.
•
Developers who develop third-party applications based on the DJI Mobile SDK shall obtain and
display the PFST results and the failure status of the Remote ID system during operation by calling
specic APIs
[2]
.
[1] The pass criterion for PFST is that the hardware and software of the Remote ID required-data source and transmitter
radio in the Remote ID system are functioning properly.
[2] For detailed APIs information, please visit https://developer.dji.com/mobile-sdk/.
Enhanced Warning
Zone
(EU UGZ Zones)
220 m
40 m
1. UA can take o and y into EU UGZ
Zones and its nearby area with a
warning message
Nearby area

137
©
2022 DJI All Rights Reserved.
MATRICE 30 SERIES User Manual
After-Sales Information
Visit https://www.dji.com/support to learn more about after-sales service policies, repair services, and
support.
DJI and MATRICE are trademarks of DJI.
Copyright © 2022 DJI All Rights Reserved.
This content is subject to change without notice.
Download the latest version from
If you have any questions about this document, please contact DJI by sending a
message to
https://www.dji.com/matrice-30/downloads
CONTACT
DJI SUPPORT