2024.04v1.0
User Manual
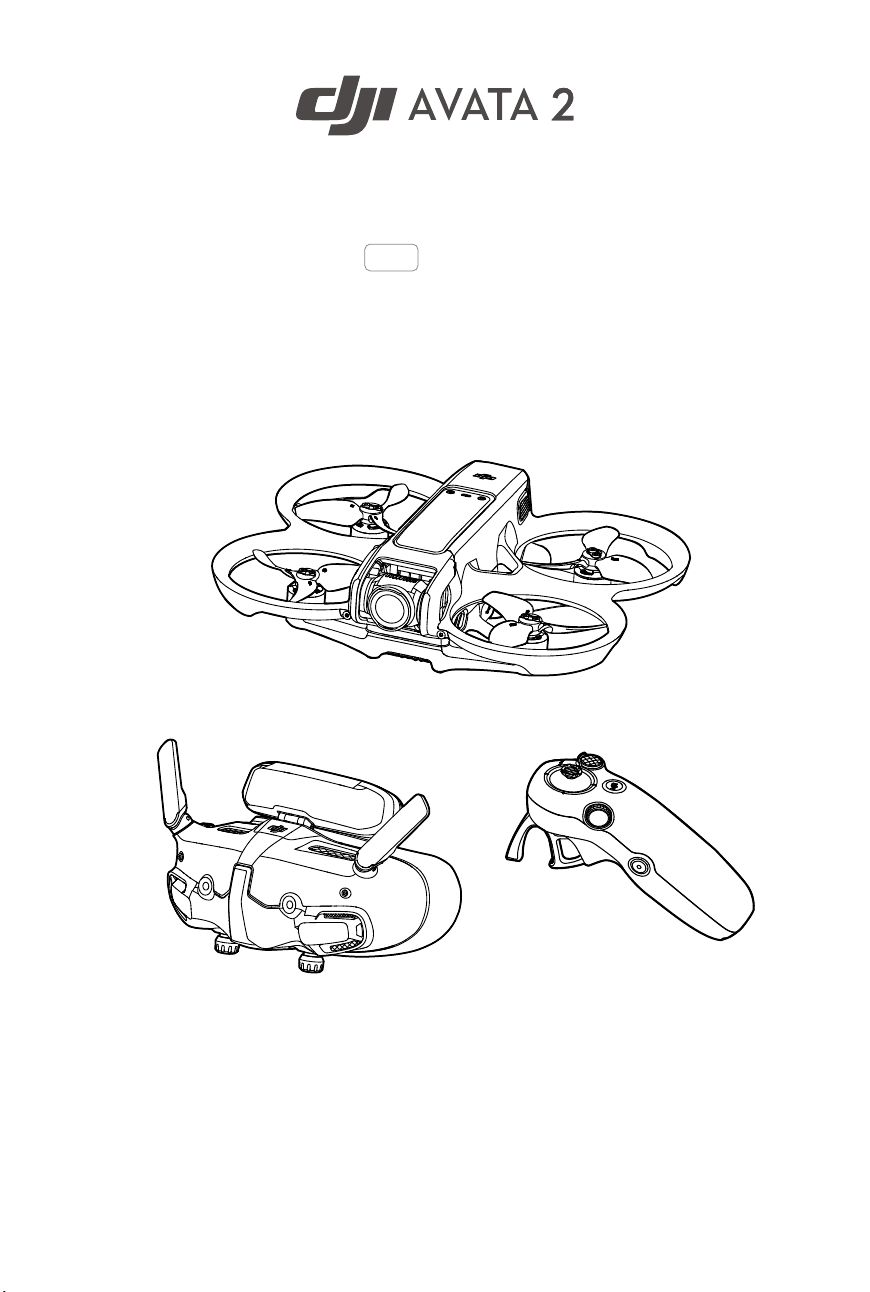
DJI Avata 2 User Manual
2
©
2024 DJI All Rights Reserved.
Searching for Keywords
Search for keywords such as “battery” and “install” to nd a topic. If you are using Adobe
Acrobat Reader to read this document, press Ctrl+F on Windows or Command+F on Mac
to begin a search.
Navigating to a Topic
View a complete list of topics in the table of contents. Click on a topic to navigate to that
section.
Printing this Document
This document supports high resolution printing.
This document is copyrighted by DJI with all rights reserved. Unless otherwise authorized by DJI,
you are not eligible to use or allow others to use the document or any part of the document by
reproducing, transferring, or selling the document. Users should only refer to this document
and the content thereof as instructions to operate DJI UAV. The document should not be used
for other purposes.
DJI Avata 2 User Manual
©
2024 DJI All Rights Reserved.
3
Using the Manual
Legend
Important Hints and Tips Reference
Read Before the First Flight
Read the following documents before using DJI AVATA
TM
2.
1. Safety Guidelines
2. Quick Start Guide
3. User Manual
It is recommended to watch all tutorial videos and read the safety guidelines before using for
the rst time. Prepare for your rst ight by reviewing the quick start guide and refer to this
user manual for more information.
Video Tutorials
Go to the address below or scan the QR code to watch the tutorial videos, which demonstrate
how to use the product safely:
https://www.dji.com/avata-2/video
Download the DJI Fly App
Make sure to use DJI Fly during ight. Scan the QR code to download the latest version.
• The Android version of DJI Fly is compatible with Android v7.0 and later. The iOS
version of DJI Fly is compatible with iOS v11.0 and later.
• The interface and functions of DJI Fly may vary as the software version is updated.
Actual usage experience is based on the software version used.
DJI Avata 2 User Manual
4
©
2024 DJI All Rights Reserved.
Download DJI Assistant 2
Download DJI ASSISTANT
TM
2 (Consumer Drones Series) at:
https://www.dji.com/downloads/softwares/dji-assistant-2-consumer-drones-series
• The operating temperature of this product is -10° to 40° C. It does not meet the
standard operating temperature for military-grade application (-55° to 125° C),
which is required to endure greater environmental variability. Operate the product
appropriately and only for applications that meet the operating temperature range
requirements of that grade.
* For increased safety, ight is restricted to a height of 98.4 ft (30 m) and a range of 164 ft (50 m) when not
connected or logged into the app during flight. This applies to DJI Fly and all apps compatible with DJI
aircraft.

©
2024 DJI All Rights Reserved.
5
Contents
Using the Manual 3
Legend 3
Read Before the First Flight 3
Video Tutorials 3
Download the DJI Fly App 3
Download DJI Assistant 2 4
Product Profile 10
Introduction 10
Using for the First Time 11
Preparing the Aircraft 11
Preparing DJI Goggles 3 13
Preparing DJI RC Motion 3 19
Linking 20
Activation 21
Updating Firmware 22
Overview 23
Aircraft 23
DJI Goggles 3 23
DJI RC Motion 3 24
Flight Safety 26
Flight Restrictions 26
GEO (Geospatial Environment Online) System 26
Flight Limits 26
Unlocking GEO Zones 28
Flight Environment Requirements 29
Operating the Aircraft Responsibly 30
Pre-Flight Checklist 30
Flight Operation 33
Basic Flight Operations 33
Taking Off, Braking and Landing 34
Flying Forward and Backward 35
Adjusting Aircraft Orientation 36
Making the Aircraft Ascend or Descend at an Angle 36
Controlling the Gimbal and Camera 37

DJI Avata 2 User Manual
6
©
2024 DJI All Rights Reserved.
Switching Flight Modes 37
Head Tracking 37
Easy ACRO 38
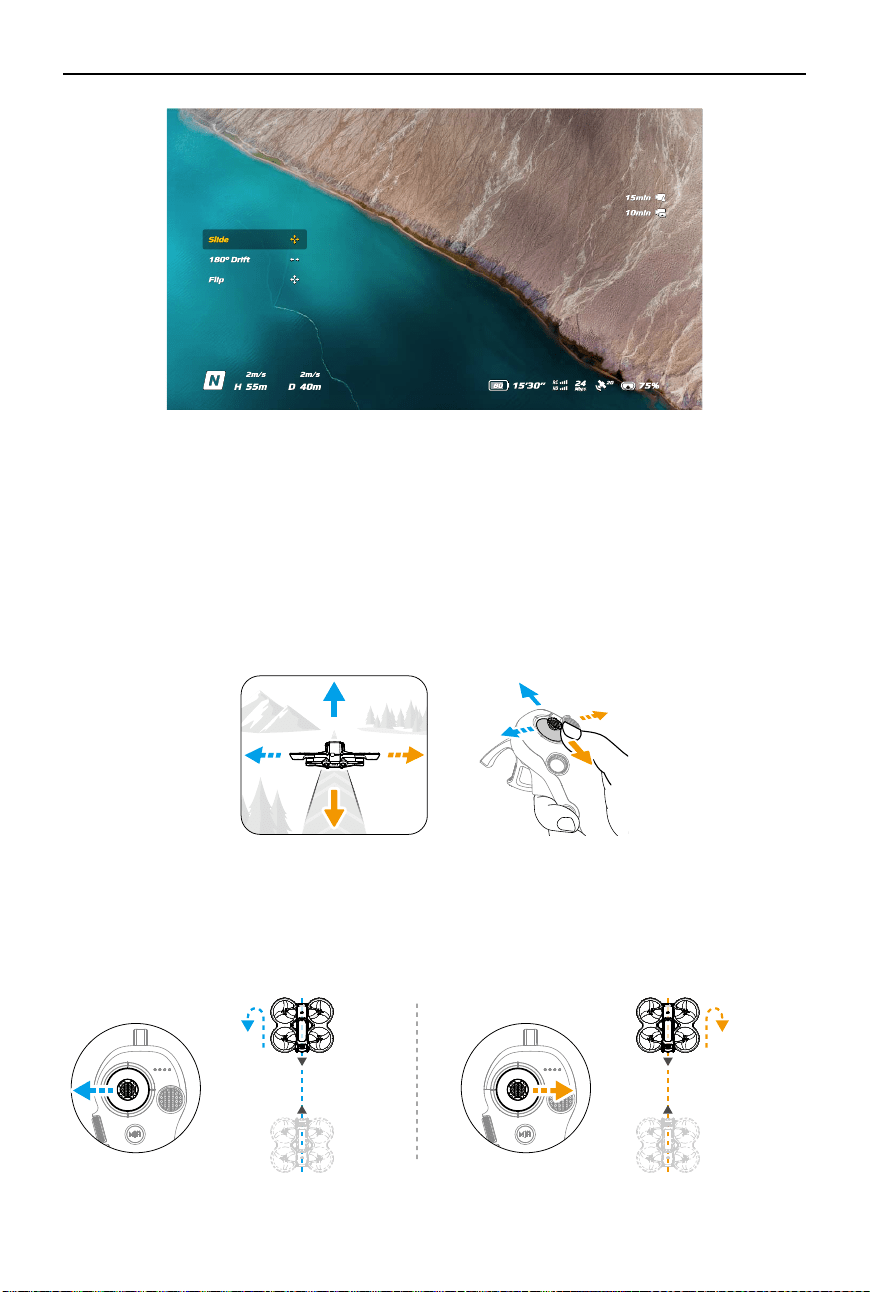
Slide 39
180° Drift 39
Flip 40
Video Recording Suggestions and Tips 40
Aircraft 42
Flight Modes 42
Aircraft Status Indicator 43
Return to Home 44
Warnings 44
Trigger Method 44
RTH Procedure 45
Landing Protection 45
Vision System and Infrared Sensing System 46
Detection Range 47
Propellers 48
Attaching and Detaching the Propellers 49
Intelligent Flight Battery 51
Warnings 51
Using the Battery 52
Inserting/Removing the Battery 52
Charging the Battery 54
Gimbal and Camera 58
Gimbal Profile 58
Warnings 59
Footage Storage and Export 59
Footage Storage 59
Footage Export 60
QuickTransfer 60
DJI Goggles 3 63
Operating the Goggles 63
Buttons 63
AR Cursor 64
Goggles Screen 67

DJI Avata 2 User Manual
©
2024 DJI All Rights Reserved.
7
FPV View 67
Shortcut Menu 68
Camera Settings 69
Goggles Menu 70
Goggles Footage Storage and Export 73
Footage Storage 73
Footage Export 73
Formatting the SD Card 73
Real View 74
Real View PiP 74
Liveview Sharing 74
Wired Connection with Mobile Device 75
Wireless Connection with Mobile Device 75
Broadcasting to Other Goggles 75
Panorama/3D Video Playback 76
DJI Motion Controller 78
Operation 78
Powering On/Off 78
Charging the Battery 78
Button Features 79
Optimal Transmission Zone 80
Motion Controller Alert 81
Motion Controller Calibration 81
DJI Fly App 83
Appendix 85
Specifications 85
DJI Avata 2 85
DJI Goggles 3 90
DJI RC Motion 3 93
Compatible Products 93
Updating Firmware 94
Using DJI Fly 94
Using DJI Assistant 2 (Consumer Drones Series) 94
Maintenance Instructions 95
Troubleshooting Procedures 96
Risk and Warnings 96

DJI Avata 2 User Manual
8
©
2024 DJI All Rights Reserved.
DJI Avata 2 96
DJI Goggles 3 96
Disposal 97
Battery Disposal 97
C1 Certification 98
MTOM Statement 98
Direct Remote ID 98
Low Blue Light Statement 98
List of Items, including qualified accessories 99
List of Spare and Replacement Parts 99
GEO Awareness 99
FAR Remote ID Compliance Information 103
Flight Data 104
Aftersales Information 104
Maintenance 105
Replacing the Foam Padding for Goggles 105
Cleaning and Maintenance of the Goggles 106

©
2024 DJI All Rights Reserved.
9
Product Prole
DJI Avata 2 User Manual
10
©
2024 DJI All Rights Reserved.
Product Prole
Introduction
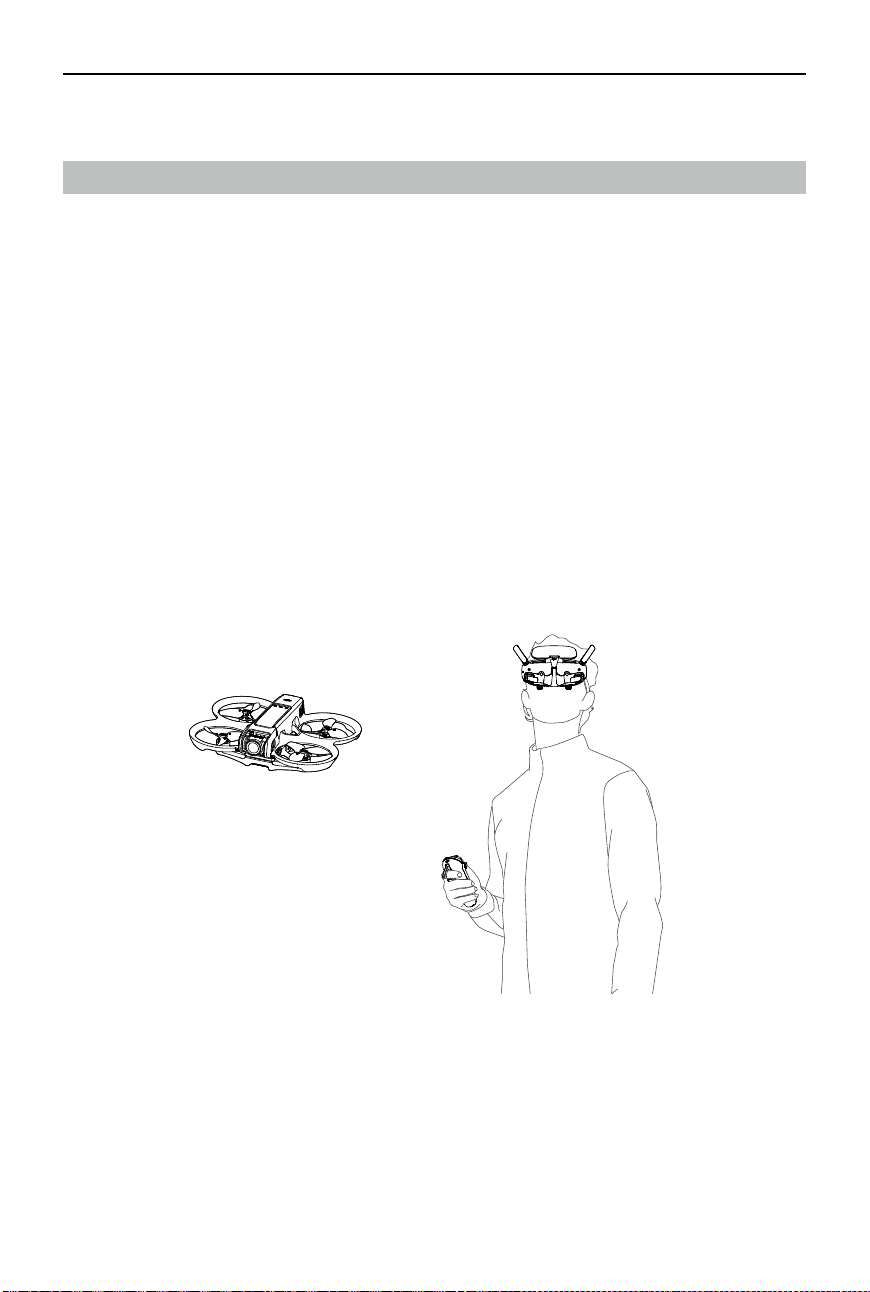
DJI Avata 2 is a compact and portable FPV camera drone equipped with built-in propeller
guards. The aircraft uses both GNSS and a Vision System, allowing for stable hovering and
smooth aerobatic maneuvers while ying both indoors and out. With a gimbal and 1/1.3″ sensor
camera, the aircraft shoots stable 4K 60fps ultra-HD video and 4K photos. The maximum ight
time of the aircraft is approximately 23 minutes
[1]
.
When the aircraft is used with the compatible goggles and remote control devices in an
unobstructed, interference-free environment, the maximum video transmission range can
reach 8 mi (13 km)
[2]
, with a bitrate up to 60 Mbps, providing an immersive ight experience.
DJI Goggles 3 (hereinafter referred to as goggles) are equipped with two high-performance
screens, giving you a real-time FPV experience. To provide a more comfortable experience for
users who wear glasses or have visual impairments, the goggles support diopter adjustment
so that glasses are not required during use. There are two cameras on the front side of the
goggles, so users can view the surrounding environment via Real View without having to take
off the goggles. With DJI Goggles 3 and DJI RC Motion 3 (hereinafter referred to as motion
controller), users can easily and intuitively control the aircraft, and enjoy a new and convenient
ight control experience.
[1] The maximum ight time of the aircraft is measured at a constant ying speed of 21.6 kph in a windless
environment at sea level, with camera parameters set to 1080p/30fps, video mode o, and from 100%
battery level until 0%. Data is for reference only. Always pay attention to reminders on the goggle screen
during your ight.
[2] The remote control devices reach their maximum transmission distance (FCC) in a wide open area with no
electromagnetic interference at an altitude of about 120 m (400 ft). The maximum transmission distance
refers to the maximum distance that the aircraft can still send and receive transmissions. It does not refer
to the maximum distance the aircraft can y in a single ight.
DJI Avata 2 User Manual
©
2024 DJI All Rights Reserved.
11
• Visit the official DJI website to check the goggles and remote control devices
supported by the aircraft. This manual only takes DJI Goggles 3 and DJI RC Motion 3
as examples for introduction. Refer to the user manuals of other supported devices
respectively for use.
• Using the goggles does not satisfy the requirement of visual line of sight (VLOS). Some
countries or regions require a visual observer to assist during flight. Make sure to
comply with local regulations when using the goggles.
• DJI Goggles 3, DJI RC Motion 3, DJI FPV Remote Controller 3, and all types of ND lters
are fully compatible with DJI Avata 2.
Using for the First Time
https://www.dji.com/avata-2/video
Click the link below or scan the QR
code to watch the tutorial video before
rst time use.
Preparing the Aircraft
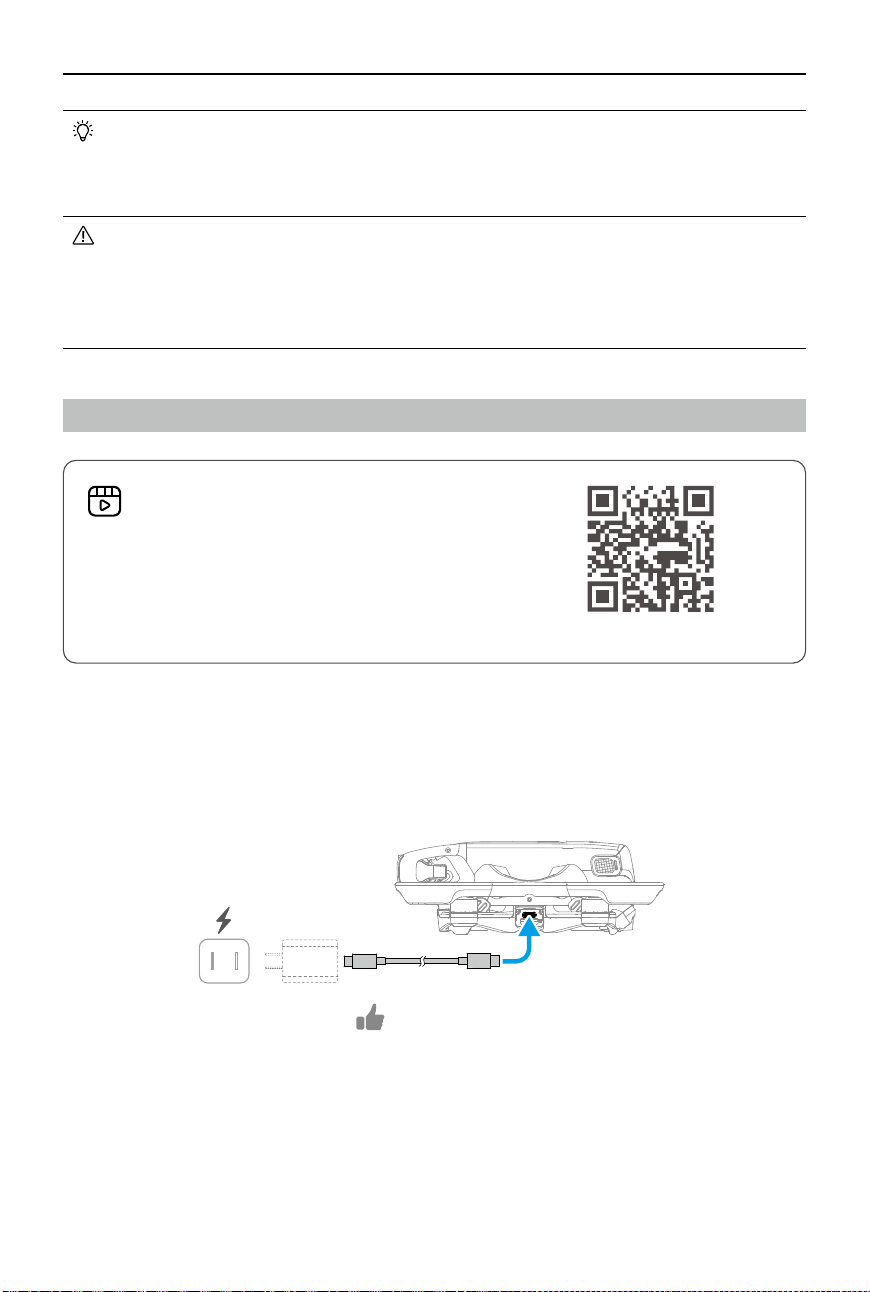
All Intelligent Flight Batteries are in hibernation mode before shipment to ensure safety. Charge
to activate the batteries before first use. Connect the USB charger to the USB-C port on the
aircraft to charge. The battery is activated when it begins charging.
≥30W
USB PD
DJI Avata 2 User Manual
12
©
2024 DJI All Rights Reserved.
• It is recommended to use the DJI 65W USB-C Charger or other USB Power Delivery
chargers with a charging power equal to or greater than 30W.
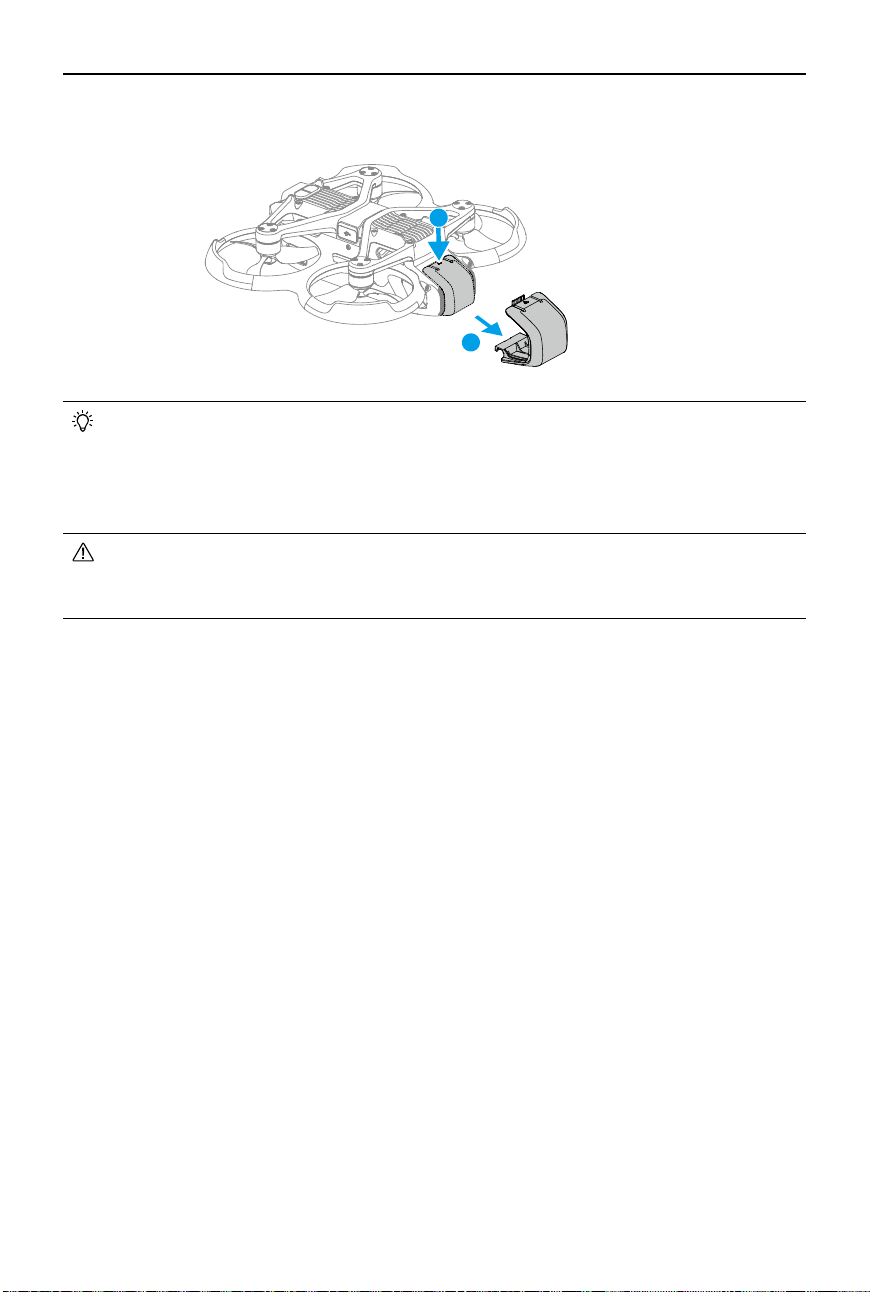
• It is recommended to attach the gimbal protector to protect the gimbal when the
aircraft is not in use. Adjust the camera to keep it facing forward and horizontal, then
install the gimbal protector and make sure it is secure.
• Peel o the protective stickers from the gimbal camera before rst use.
• Make sure to remove the gimbal protector before powering on the aircraft. Otherwise,
it may aect the aircraft when performing self-diagnostics.
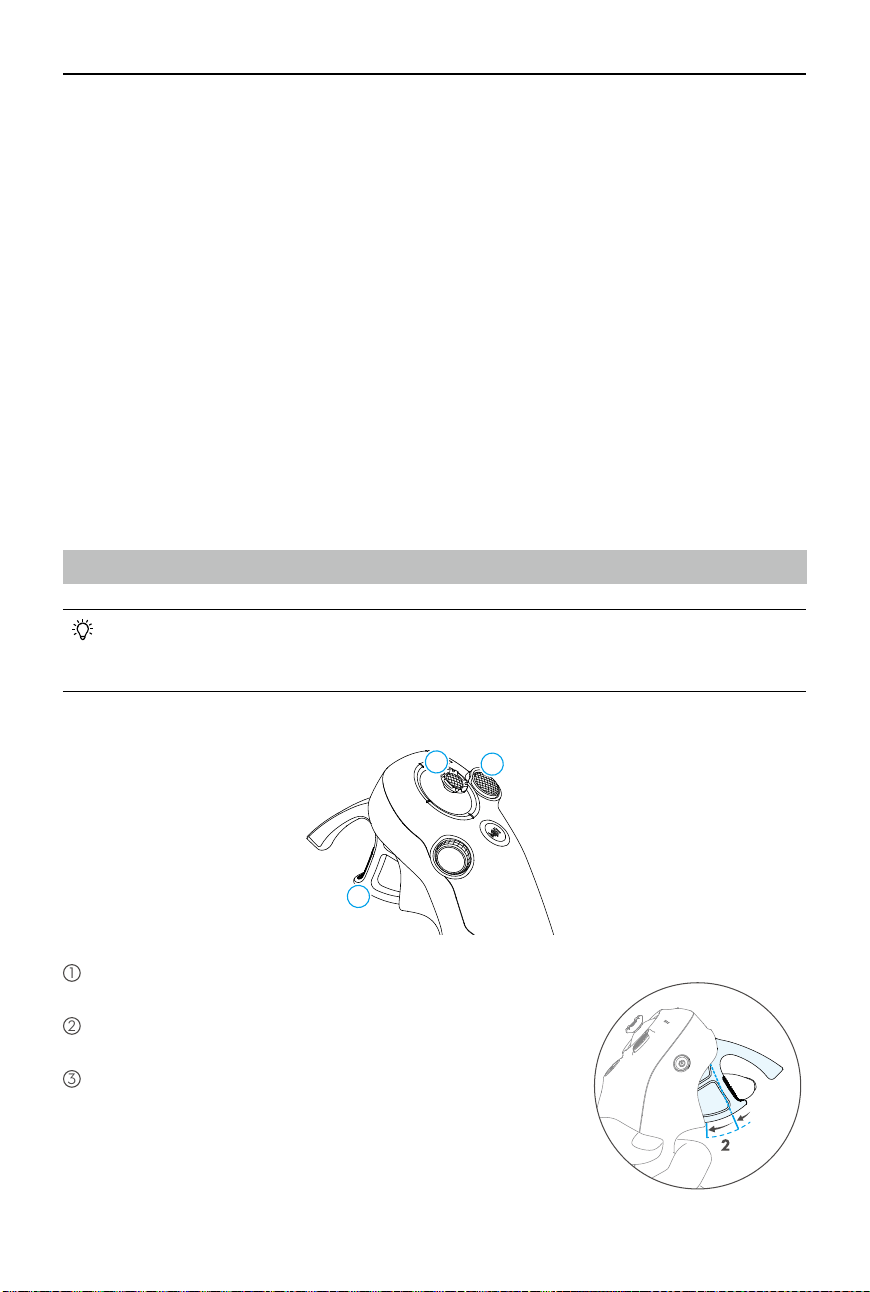
Remove the gimbal protector.
1
2

DJI Avata 2 User Manual
©
2024 DJI All Rights Reserved.
13
Preparing DJI Goggles 3
Powering on the Goggles
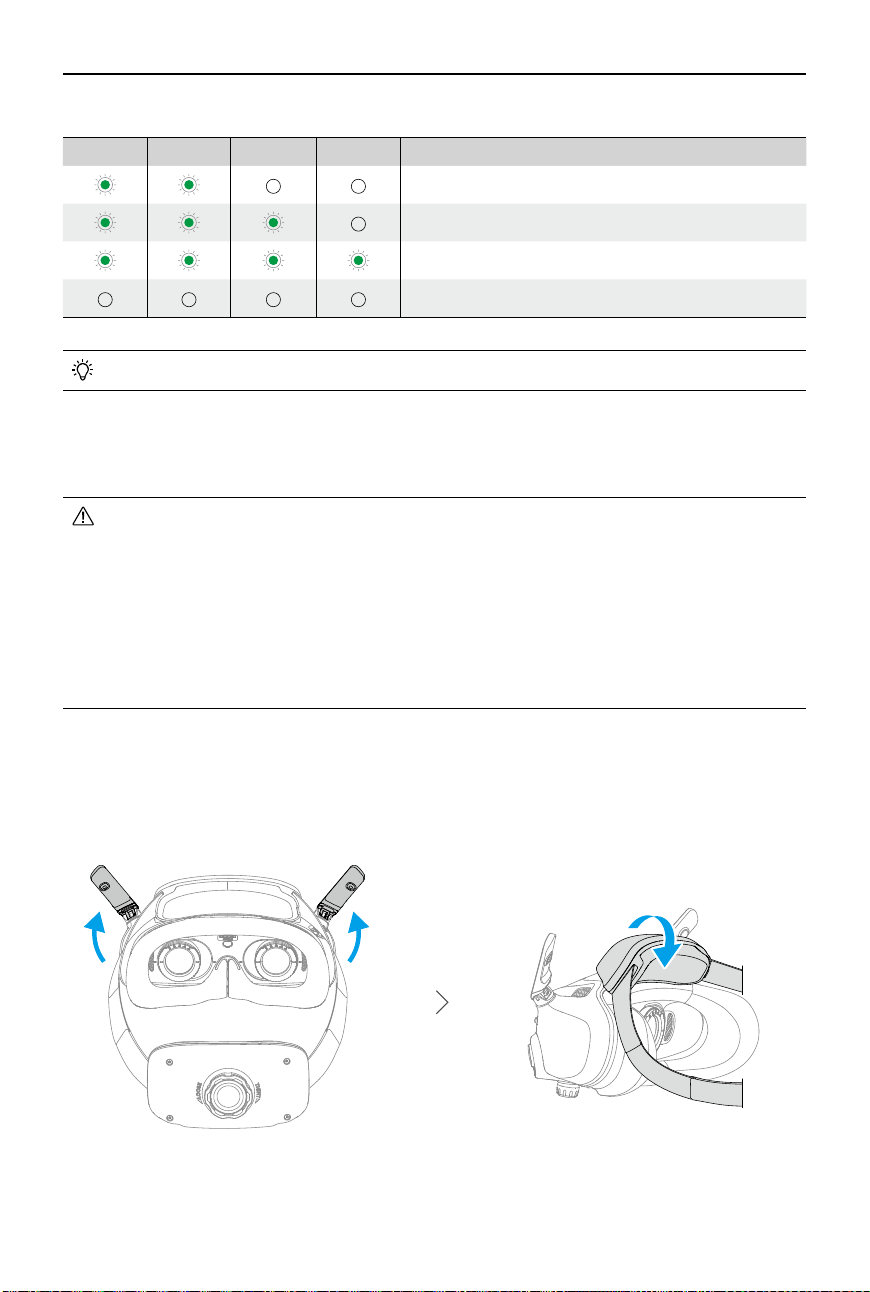
Press the power button once to check the current battery level.
Press once, then press and hold for two seconds to power the goggles on or o.
The battery level LEDs display the power level during charging and when in use:
LED is on
LED is ashing
LED is o
If the battery level is low, it is recommended to use a USB charger to charge the device.
LED1 LED2 LED3 LED4
Battery Level
89%-100%
76%-88%
64%-75%
51%-63%
39%-50%
26%-38%
14%-25%
1%-13%
DJI Avata 2 User Manual
14
©
2024 DJI All Rights Reserved.
• USB-C port spec: USB 2.0 (480 Mbps). The maximum input power is 9V/3A.
Wearing the Goggles
• The battery wires are embedded in the headband. DO NOT pull the headband with
force to avoid damaging the wires.
• Fold the antennas to avoid damage when the goggles are not in use.
• DO NOT tear or scratch the foam padding, the additional forehead pad, and the soft
side of the battery compartment with sharp objects.
• DO NOT bend the additional forehead pad with force.
• DO NOT rotate the headband adjustment knob or the diopter adjustment knob with
force to avoid component damage.
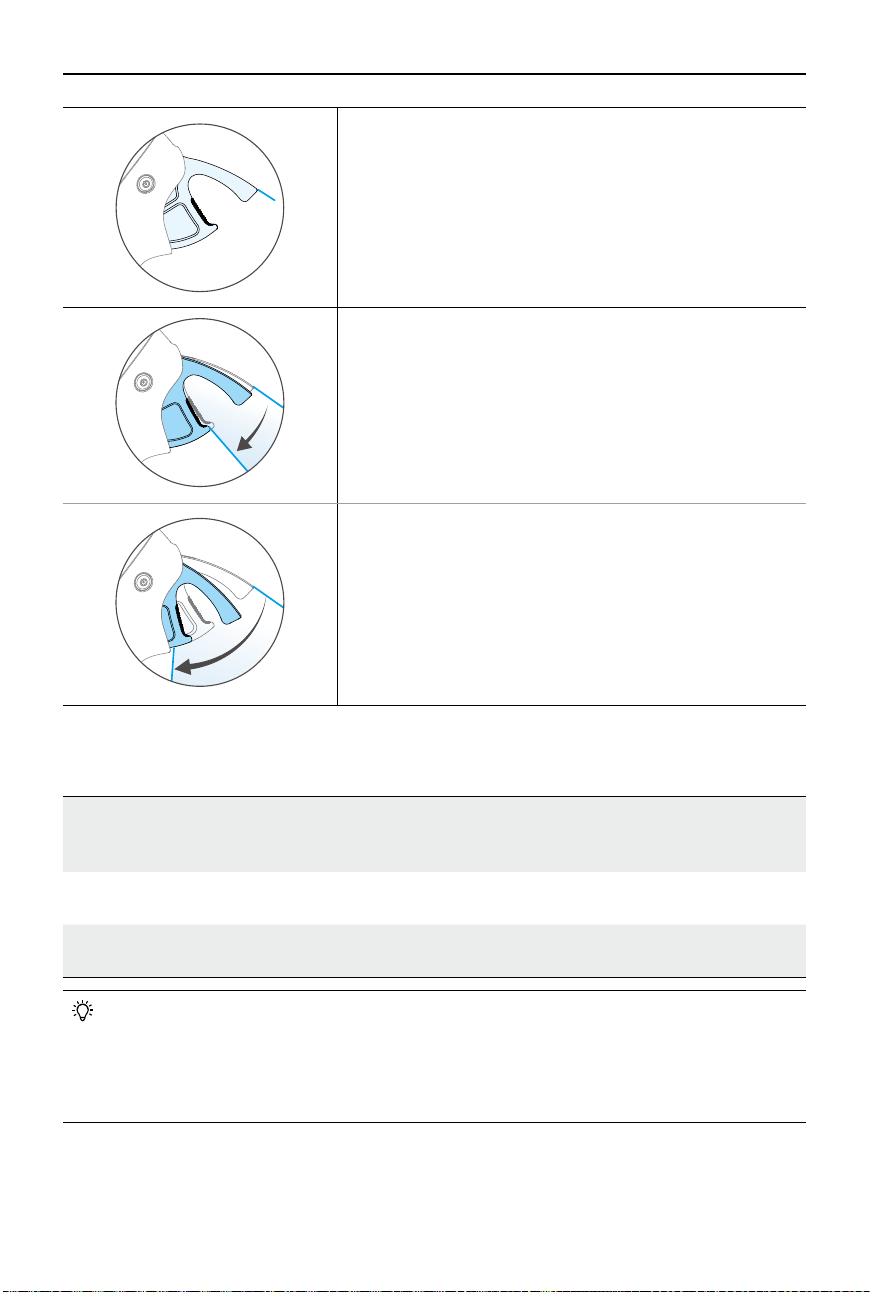
1. Unfold the antennas.
2. Adjust the forehead pad downward to the lowest position.
The table below shows the battery level during charging:
LED1 LED2 LED3 LED4
Battery Level
1%-50%
51%-75%
76%-99%
100%
DJI Avata 2 User Manual
©
2024 DJI All Rights Reserved.
15
3. Put on the goggles after the devices are powered on.
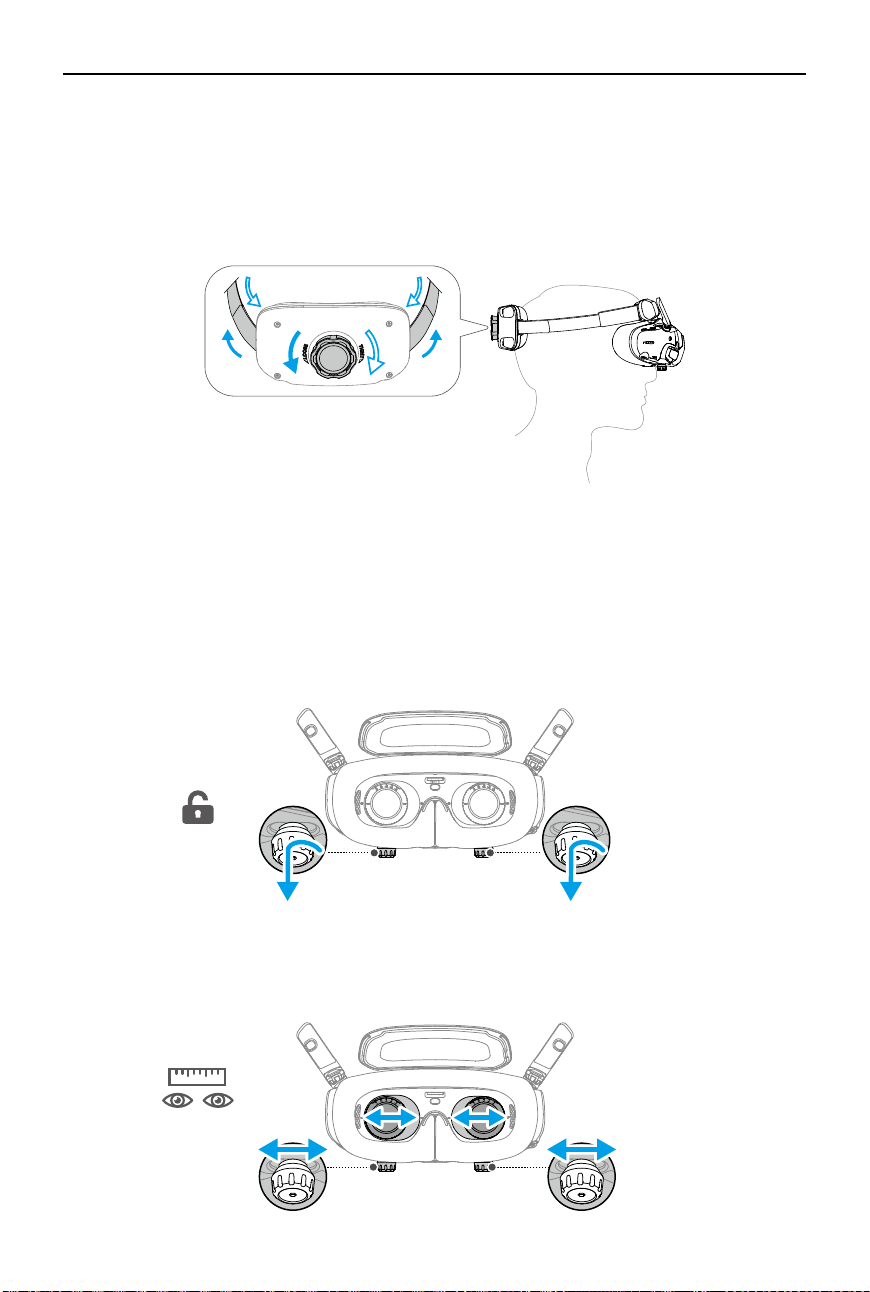
4. Rotate the headband adjustment knob on the battery compartment to adjust the length of
the headband. Rotate clockwise to tighten the headband and counterclockwise to loosen the
headband. It is recommended to wear the goggles with the battery compartment placed on
the upper back part of the head to avoid it sliding down.
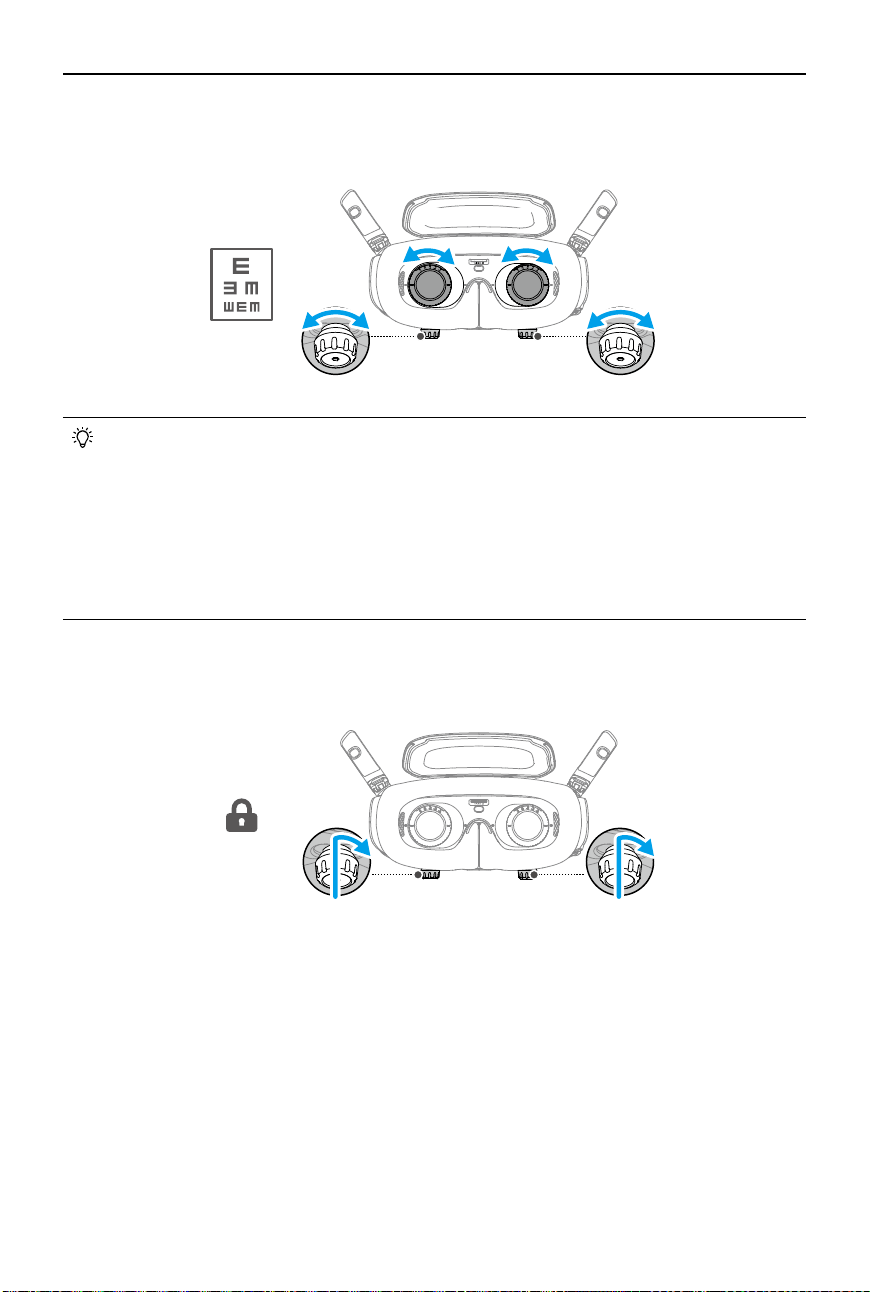
Getting Clear Vision
Rotate the knobs on the bottom of the goggles to adjust the diopters if your vision is in the
range of -6.0D to +2.0D. The screen in the goggles will display the diopter value when rotating.
1. Rotate both the knobs in the direction as shown to unlock them. Once unlocked, the knobs
will pop out.
2. Slide left and right to adjust the distance between the lenses until the image is properly
aligned.
56~72 mm56~72 mm
DJI Avata 2 User Manual
16
©
2024 DJI All Rights Reserved.
3. Slowly rotate the knobs to adjust the diopters. The supported adjustment range is from
-6.0D to +2.0D.
• The goggles do not support astigmatism correction. If you require astigmatism
correction or if the diopters of the goggles are unsuitable, you can purchase additional
lenses and use the corrective lenses frames provided to install them on the goggles.
Refer to “Using the Corrective Lenses” for more information.
• When adjusting the diopters for the rst time, you are advised to adjust to a degree
that is slightly lower than the strength of your actual eyeglasses. Give your eyes
enough time to adapt, then adjust the diopters again until you get a clear view. Do not
use a diopter value higher than your actual eyeglass power to avoid eyestrain.
4. After you get a clear view, press the knobs in and rotate them in the direction as shown to
lock in the lenses’ position of the lenses and the diopters.
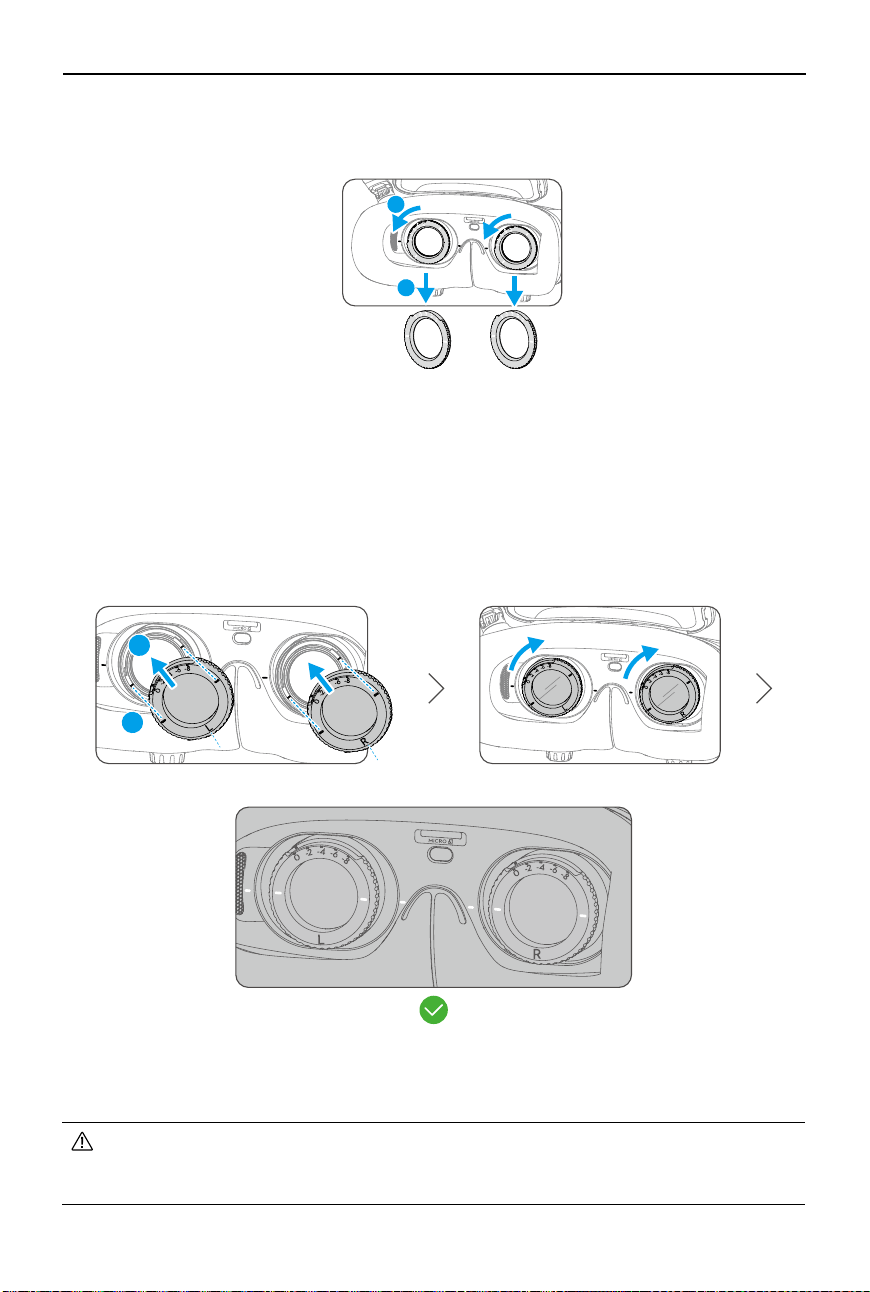
Using the Corrective Lenses
DJI Goggles 3 supports diopter adjustment from -6.0D to +2.0D.
If your vision is in the range of -6.0D to -8.0D, you can install the provided -2.0D Corrective
Lenses.
+2.0D ~ -6.0D +2.0D ~ -6.0D
DJI Avata 2 User Manual
©
2024 DJI All Rights Reserved.
17
1
2
+2.0D ~ -6.0D +2.0D ~ -6.0D
• After installing the -2.0D Corrective Lenses, the diopter value displayed on the screen
is not the actual diopter value. The actual diopter value is the sum of the on-screen
value and -2.0D.
2. Take out the -2.0D Corrective Lenses and peel o the protective lm. Distinguish the left and
right lenses via the L and R marks on the bottom.
3. Align the positioning marks on the left and right sides of the corrective lens frame with the
marks on the inner circle of the goggle lens frame. Mount the corrective lens by pressing it
down, and then rotate it clockwise until the marks on the corrective lens frame are aligned
with the marks on the goggle lens frame.
4. Adjust the diopters of the goggles according to your needs and lock the knobs.
L
1
2
R
0D ~ -8.0D0D ~ -8.0D
1. Detach the original lens frames from the goggles by rotating counterclockwise as shown.
DJI Avata 2 User Manual
18
©
2024 DJI All Rights Reserved.
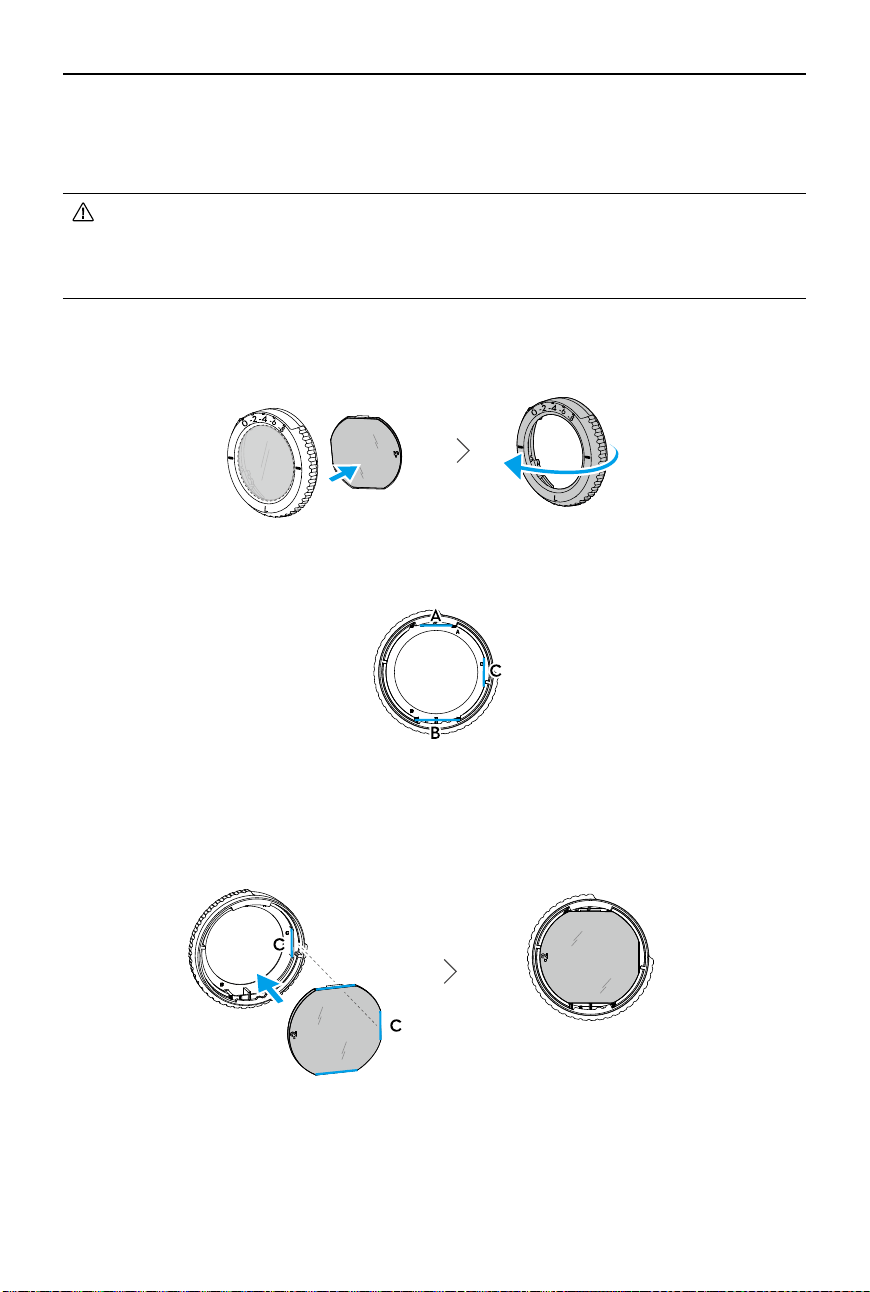
2. Identify the shortest cut edge (c) in the frame.
3. Take out the purchased lenses, also identify the shortest cut edge.
4. Distinguish the left and right lens and the corresponding frame. Align the shortest cut edge
and install the lens into the frame with the concave side of the lens facing the eye.
Purchasing and Installing Your Own Corrective Lenses
If you require astigmatism correction or the diopters of the goggles cannot meet your needs,
you can purchase suitable lenses and use the corrective lens frames to install them.
• When purchasing lenses, bring the full set of -2.0D Corrective Lenses (a pair with the
frames) to a professional optician to ensure that the shape, size, astigmatism axis,
and edge thickness (< 1.8 mm) of the lenses meet the installation requirements of the
corrective lens frames.
1. Push and remove the -2.0D lens from the frame. Turn the frame over.
5. Make sure the lens is installed in the correct way and not tilted. Clean the lens with the lens
cleaning cloth to wipe o ngerprints and dust.
6. Mount the corrective lenses to the goggles.
DJI Avata 2 User Manual
©
2024 DJI All Rights Reserved.
19
7. Adjust the diopters of the goggles according to your needs and lock the knobs.
• If you usually wear -9.0D glasses, you can purchase a pair of -3.0D lenses, and adjust
the diopters of the goggles to -6.0D. Then the overall diopter value will be -9.0D after
the self-prepared lenses are installed.
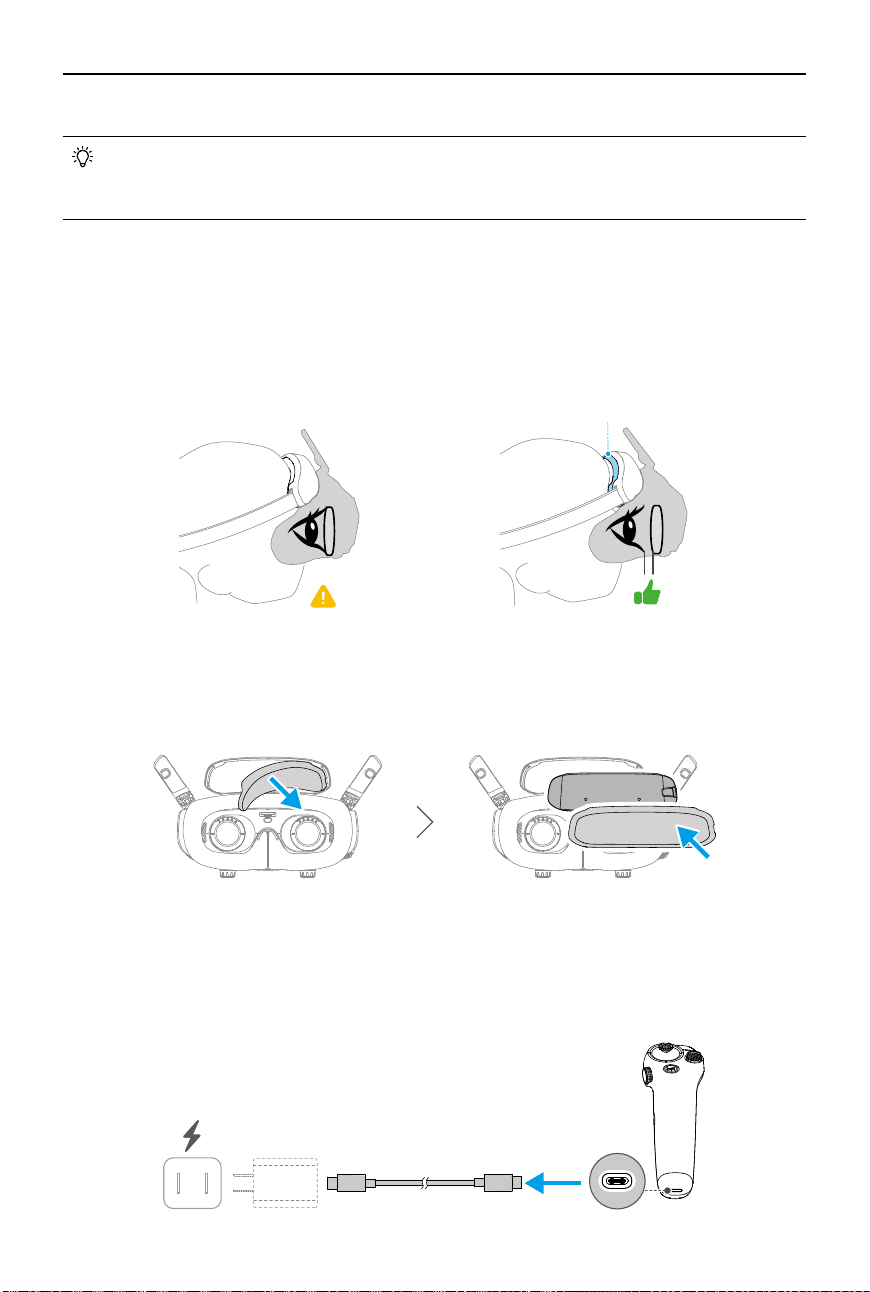
Using the Additional Forehead Pad
After installing the corrective lenses, the distance between the lenses and your eyes is reduced
and your eyelashes might sweep the lenses. If you feel any discomfort, install the additional
forehead pad.
1. Peel o the original forehead pad.
2. Attach the additional forehead pad and then install the original forehead pad on top.
Preparing DJI RC Motion 3
Press the power button once to check the current battery level. Charge before using if the
battery level is too low.
5V, 2A
Forehead Pad
DJI Avata 2 User Manual
20
©
2024 DJI All Rights Reserved.
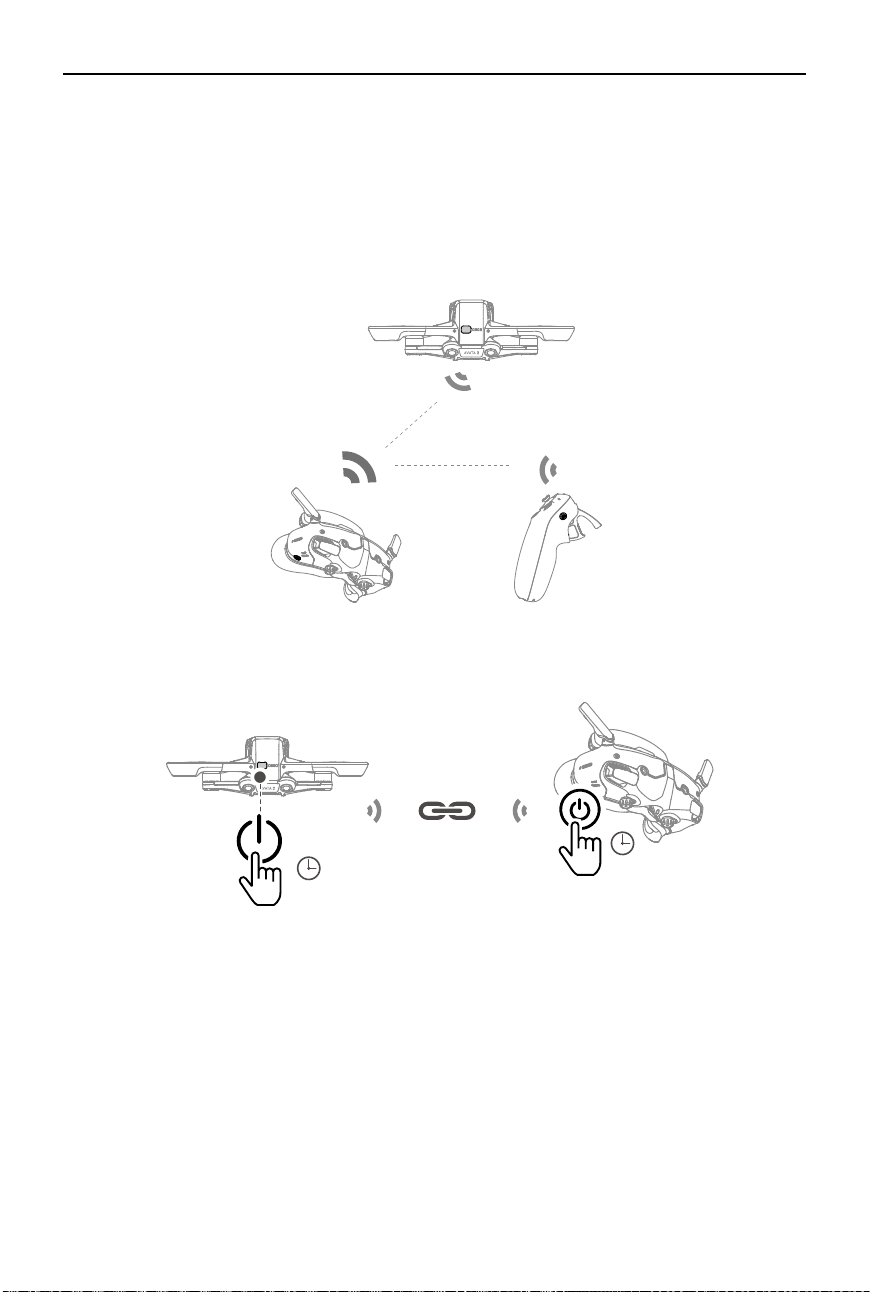
Linking
The aircraft, goggles, and motion controller are already linked when purchased together as a
combo. Otherwise, follow the steps below to link the devices.
Make sure that the devices used with the aircraft have been updated to the latest firmware
version via the DJI ASSISTANT
TM
2 (Consumer Drone Series) software before linking and
powered on.
1. Linking the aircraft and the goggles:
a
.
Press and hold the power button on the aircraft until it beeps once and the battery level
LEDs start to blink in sequence.
b
.
Press and hold the power button on the goggles until the goggles start to beep
continuously and the battery level LEDs start to blink in sequence.
c
.
Once linking is completed, the battery level LEDs of the aircraft turn solid and display
the battery level, the goggles stop beeping, and image transmission can be displayed
normally.
5s
5s
DJI Avata 2 User Manual
©
2024 DJI All Rights Reserved.
21
5s
5s
a
.
Press and hold the power button on the goggles until the goggles start to beep
continuously and the battery level LEDs start to blink in sequence.
b
.
Press and hold the power button on the motion controller until it starts to beep
continuously and the battery level LEDs start to blink in sequence.
c
.
Once linking is successful, the goggles and the motion controller stop beeping and both
the battery level LEDs turn solid and display the battery level.
• Make sure the devices are within 0.5 m of each other during linking.
• Restart the devices if the devices fail to link. Connect the goggles to a mobile
device, run the DJI Fly app, select Connection Guide, and then follow the on-screen
instructions to link.
• The aircraft can be controlled with only one remote control device during flight. If
your aircraft has been linked with multiple remote control devices, turn o the other
remote control devices before ight.
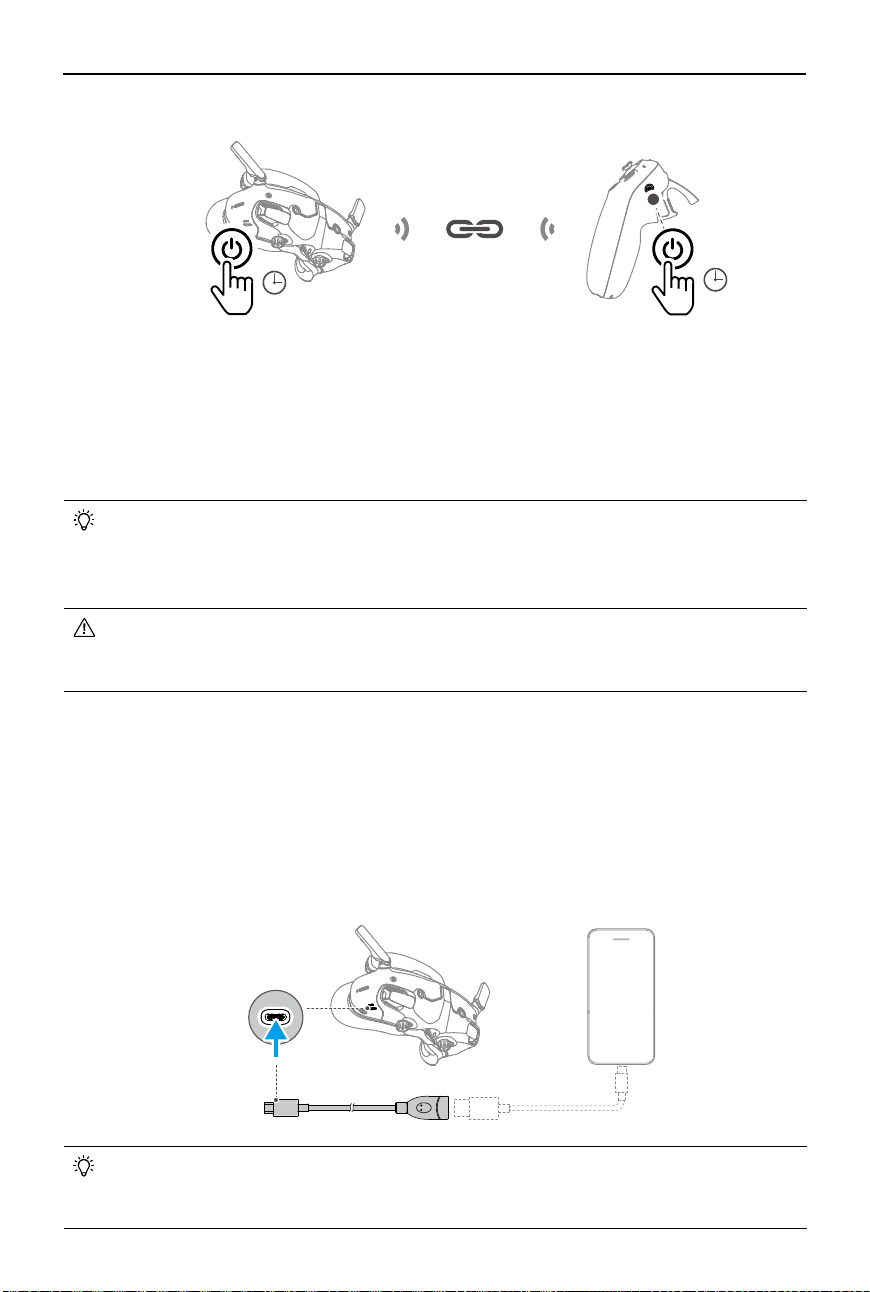
2. Linking the goggles and motion controller:
DJI Fly
App
Activation
DJI Avata 2 must be activated before using for the rst time. Make sure all devices are linked
after powering on the aircraft, goggles, and remote control device. Connect the USB-C port of
the goggles to the mobile device, run DJI Fly, and follow the prompts to activate. An internet
connection is required for activation. If automatic binding fails, follow the on-screen prompts
on DJI Fly to bind the aircraft and goggles. The aircraft and goggles must be bound to receive
service under warranty.
• The goggles only support standard USB-C protocols and MFi-certified Lightning
cables. Non-standard cables are not supported. If the devices do not respond after
connecting, use a dierent data cable and try again.

DJI Avata 2 User Manual
22
©
2024 DJI All Rights Reserved.
Updating Firmware
A prompt will appear in DJI Fly when new rmware is available. Update the rmware whenever
prompted to ensure optimal user experience. Refer to “Updating Firmware” for more
information.
DJI Avata 2 User Manual
©
2024 DJI All Rights Reserved.
23
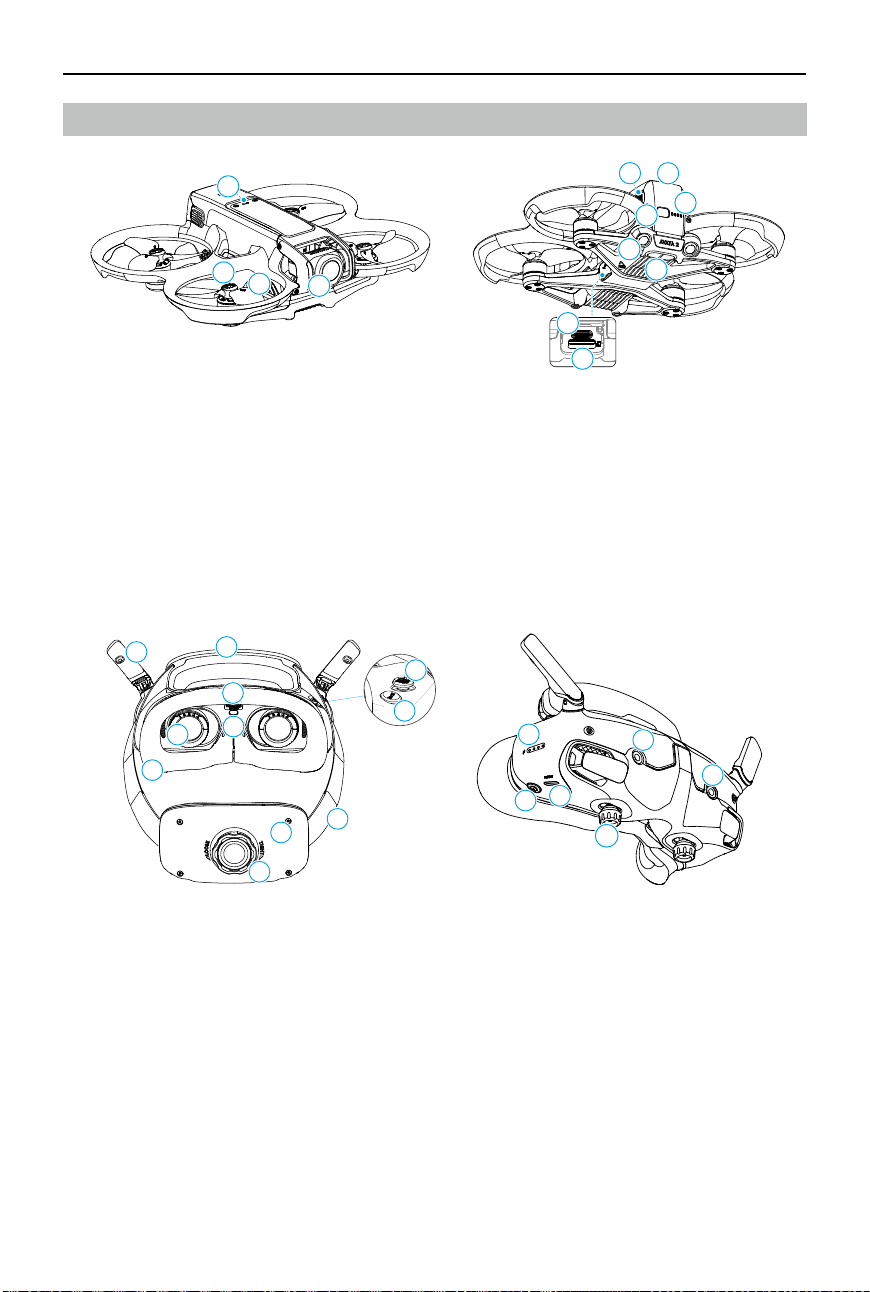
1
2
3
4
6
5
9
7
8
11
12
10
1
7
8
9
2
3
4
5
6
10
11
16
16
12
13
14
15
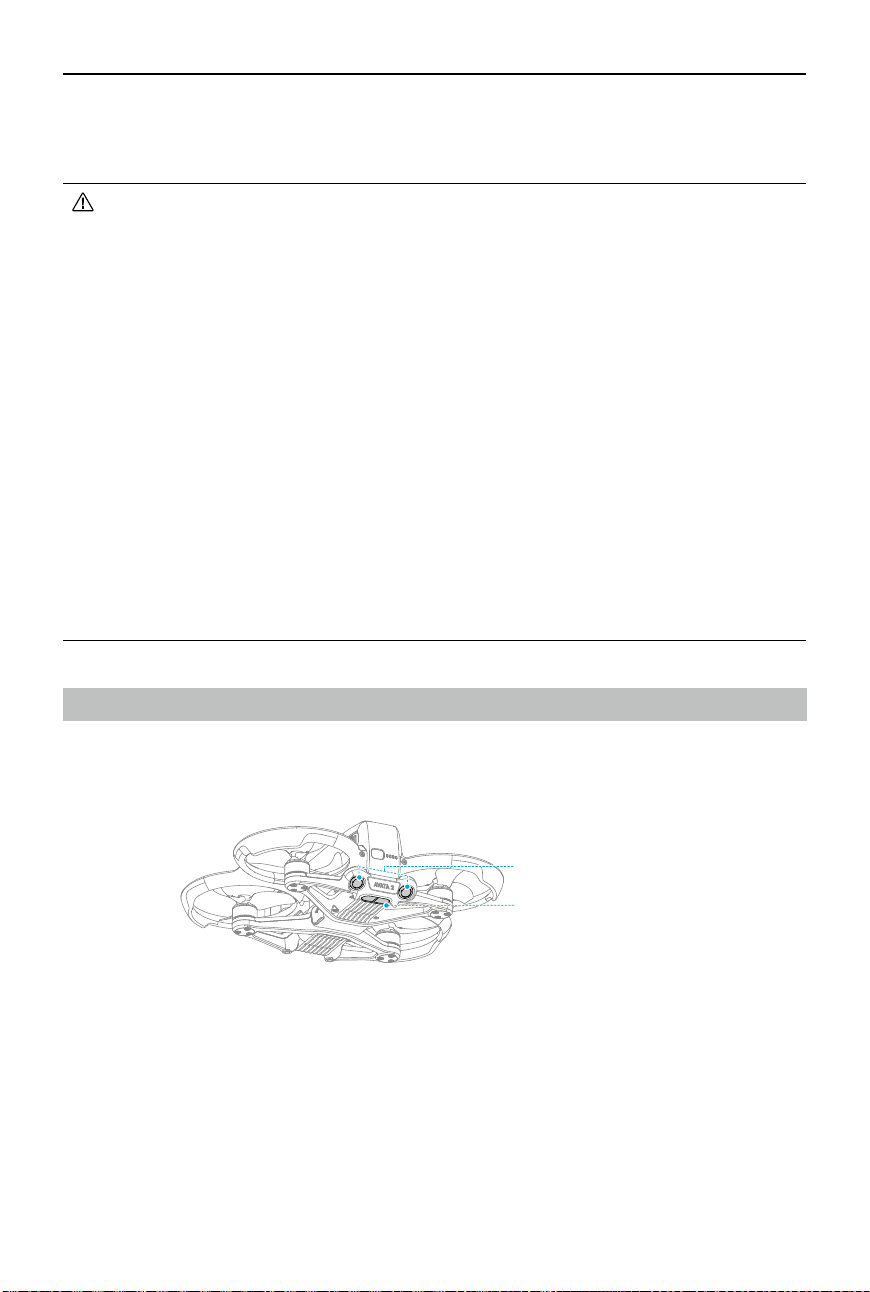
1. Gimbal and Camera
2. Propellers
3. Motors
4. Aircraft Status Indicator
5. Infrared Sensing System
6. Downward and Backward Vision System
7. Power Button
8. Battery Level LEDs
9. Intelligent Flight Battery
10. Battery Buckle
11. USB-C Port
12. microSD Card Slot
Overview
Aircraft
1. Antennas
2. Forehead Pad
3. microSD Card Slot
4. Proximity Sensor
Detects whether the user is wearing
the goggles and automatically turns the
screen on or o.
5. 5D Button
6. Back Button
7. Headband
8. Battery Compartment
9. Headband Adjustment Knob
10. Foam Padding
11. Lens
12. Battery Level LEDs
13. Power Button/Link Button
14. USB-C Ports
15. IPD (Interpupillary Distance) Slider /
Diopter Adjustment Knob (hereinafter
referred to as "knob")
16. Camera
DJI Goggles 3
DJI Avata 2 User Manual
24
©
2024 DJI All Rights Reserved.
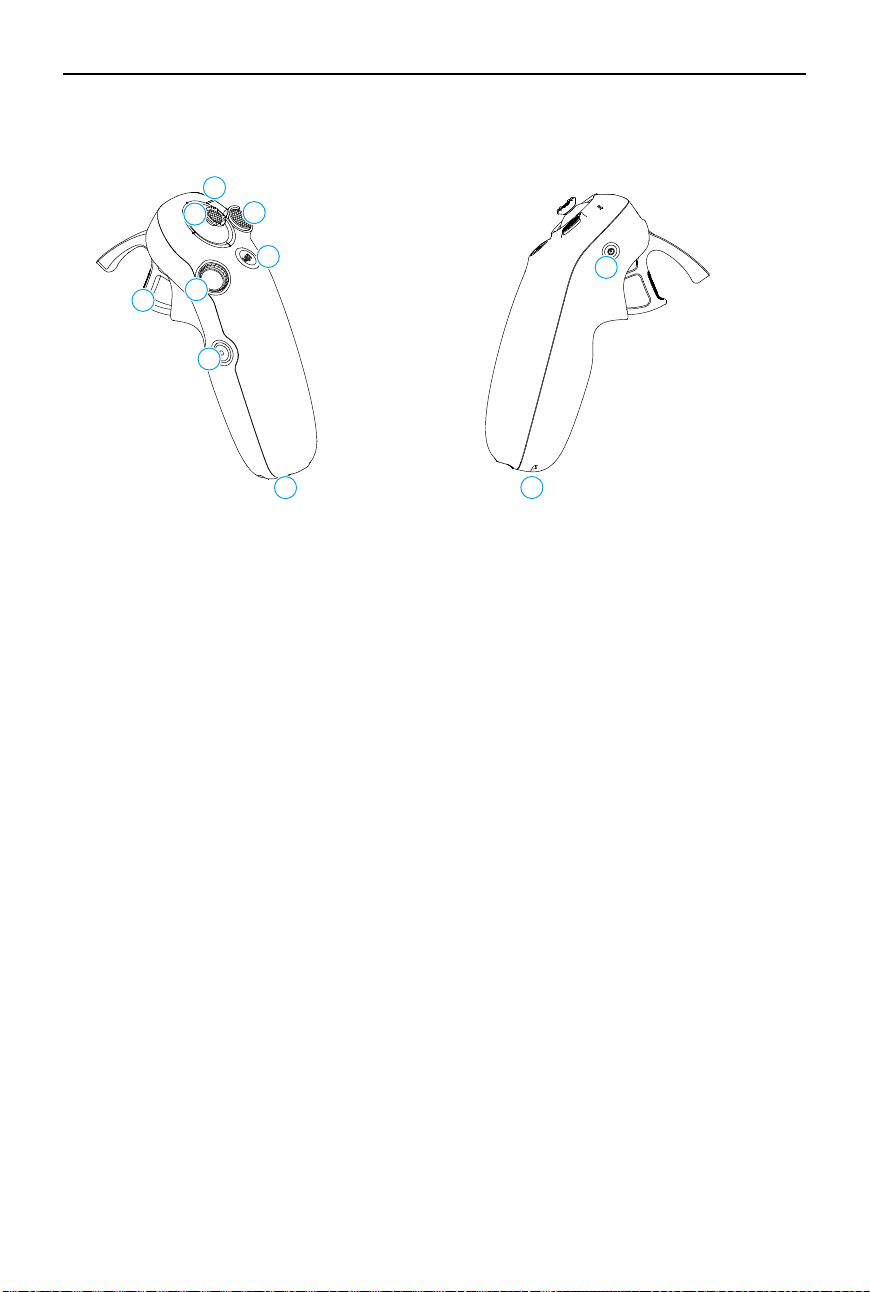
1
4
3
2
5
6
7
8
9
10
1. Battery Level LEDs
2. Lock Button
3. Joystick
4. Mode Button
5. Shutter/Record Button
6. Accelerator
7. Dial
8. USB-C Port
9. Power Button
10. Lanyard Hole
DJI RC Motion 3

©
2024 DJI All Rights Reserved.
25
Flight Safety

DJI Avata 2 User Manual
26
©
2024 DJI All Rights Reserved.
Flight Safety
After completing pre-flight preparations, it is recommended to train your flying skills and
practice ying safely. Pick a suitable area to y in according to the following ight requirements
and restrictions. Strictly abide by local laws and regulations when flying. Read the Safety
Guidelines before ight to ensure safe use of the product.
Flight Restrictions
GEO (Geospatial Environment Online) System
The DJI Geospatial Environment Online (GEO) System is a global information system that
provides real-time information on flight safety and restriction updates and prevents UAVs
from flying in restricted airspace. Under exceptional circumstances, restricted areas can
be unlocked to allow flights in. Prior to that, the user must submit an unlocking request
based on the current restriction level in the intended flight area. The GEO system may
not fully comply with local laws and regulations. Users shall be responsible for their
own flight safety and must consult with the local authorities on the relevant legal and
regulatory requirements before requesting to unlock a flight in a restricted area. For more
information about the GEO system, visit https://fly-safe.dji.com.
Flight Limits
For safety reasons, ight limits are enabled by default to help users operate this aircraft safely.
Users can set ight limits on height and distance. Altitude limits, distance limits, and GEO zones
function concurrently to manage flight safety when GNSS is available. Only altitude can be
limited when GNSS is unavailable.
Flight Altitude and Distance Limits
Max altitude restricts the ight altitude of the aircraft, while max distance restricts the ight
radius around the Home Point. These limits can be set using the goggles for improved ight
safety.
Max Distance
Home Point
Height of aircraft when taking off
The Last updated Home Point
Max Altitude
DJI Avata 2 User Manual
©
2024 DJI All Rights Reserved.
27
Strong GNSS Signal
Flight Restrictions Prompt in Goggles
Max Altitude Flight altitude must be below the preset height.
Max ight altitude
reached.
Max Distance
The straight-line distance from the aircraft to the
Home Point cannot exceed the max ight distance
set in the goggles.
Max ight distance
reached.
Weak GNSS Signal
Flight Restrictions Prompt in Goggles
Max Altitude
• Altitude is restricted to 50 m from the takeo point
if lighting is sucient.
• Altitude is restricted to 3 m above the ground if
lighting is not sufficient and the infrared sensing
system is operating.
• The altitude is restricted to 50 m from the takeo
point if lighting is not sufficient and the infrared
sensing system is not operating.
Max flight altitude
reached.
Max Distance No limits
• Each time the aircraft is powered on, the altitude limit of 3 m or 50 m will be automatically
removed as long as the GNSS signal ever becomes strong (GNSS signal display white
or yellow) once, and the limit will not take eect even if the GNSS signal becomes weak
afterwards.
• If the aircraft ies out of the set ight range due to inertia, users can still control the aircraft
but cannot y it any further. If the aircraft ies above the altitude limit, it will descend below
the altitude limit at 5 m/s. If the aircraft ies into an Altitude Zone, landing will be triggered
after a 100-second countdown.
• For safety reasons, DO NOT fly the aircraft close to airports, highways, railway stations,
railway lines, city centers, or other sensitive areas. Only y the aircraft within a visual line of
sight.
GEO Zones
The DJI GEO system designates safe ight locations, provides risk levels and safety notices for
individual flights and offers information on restricted airspace. All restricted flight areas are
referred to as GEO Zones, which are further divided into Restricted Zones, Authorization Zones,
Warning Zones, Enhanced Warning Zones, and Altitude Zones. Users can view such information
in real-time in DJI Fly. GEO Zones are specic ight areas, including but not limited to airports,
large event venues, locations where public emergencies have occurred (such as forest res),
nuclear power plants, prisons, government properties, and military facilities. By default, the
GEO system limits takeos and ights in zones that may cause safety or security concerns. A
GEO Zone map that contains comprehensive information on GEO Zones around the globe is
available on the ocial DJI website: https://y-safe.dji.com/nfz/nfz-query.
DJI Avata 2 User Manual
28
©
2024 DJI All Rights Reserved.
Unlocking GEO Zones
To satisfy the needs of dierent users, DJI provides two unlocking modes: Self-Unlocking and
Custom Unlocking. Users may make a request on the DJI Fly Safe website.
Self-Unlocking is intended for unlocking Authorization Zones. To complete Self-Unlocking, the user
must submit an unlocking request via the DJI Fly Safe website at https://y-safe.dji.com. Once the
unlocking request is approved, the user may synchronize the unlocking license through the DJI
Fly app. Alternatively, to unlock a zone, the user may launch or y the aircraft directly into the
approved Authorization Zone and follow the prompts in DJI Fly to unlock the zone.
Custom Unlocking is tailored for users with special requirements. It designates user-defined
custom ight areas and provides ight permission documents specic to the needs of dierent
users. This unlocking option is available in all countries and regions and can be requested via
the DJI Fly Safe website at https://www.dji.com/ysafe.
• To ensure flight safety, the aircraft will not be able to fly out of the unlocked zone after
entering it. If the Home Point is outside the unlocked zone, the aircraft will not be able to
return home.

DJI Avata 2 User Manual
©
2024 DJI All Rights Reserved.
29
Flight Environment Requirements
1. DO NOT operate the aircraft in severe weather conditions including wind speeds exceeding
10.7 m/s, snow, thunder and lightning, rain, and fog.
2. Only fly in open areas. Tall buildings and large metal structures may affect the accuracy
of the onboard compass and GNSS system. Therefore, DO NOT take o from a balcony or
anywhere within 15 m of buildings. Keep a distance of at least 15 m from buildings during
flight. After takeoff, make sure you are notified with the message prompt "Home Point
has been updated" before continuing ight. If the aircraft has taken o near buildings, the
accuracy of the Home Point cannot be guaranteed. In this case, pay close attention to the
current position of the aircraft during auto RTH. When the aircraft is close to the Home
Point, it is recommended to cancel auto RTH and manually control the aircraft to land at an
appropriate location.
3. When the GNSS signal is weak, fly the aircraft in environments with good lighting and
visibility. The vision system may not work properly in poor light conditions. Only fly the
aircraft in the daytime.
4. Avoid obstacles, crowds, trees, and bodies of water (recommended height is at least 6 m
above water).
5. Minimize interference by avoiding areas with high levels of electromagnetism, such as
locations near power lines, base stations, electrical substations, and broadcasting towers.
6. Try to keep a distance of more than 200 m from strong electromagnetic wave interference
sites, such as radar stations, microwave relay stations, mobile communication base stations,
and drone jamming equipment.
7. The performance of the aircraft and its battery is limited when flying at altitudes above
5000 m (16,404 ft). Fly with caution.
8. The braking distance of the aircraft is aected by the ight altitude. The higher the altitude,
the greater the braking distance. When ying at an altitude above 3000 m (9843 ft), the user
should reserve at least 20 m for vertical braking distance and 25 m for horizontal braking
distance to ensure ight safety.
9. GNSS cannot be used on the aircraft in polar regions. Use the vision system instead.
10. DO NOT take o from moving objects, such as cars and ships.
11. DO NOT take o from solid-colored surfaces or surfaces with strong reections such as a
car roof.
12. DO NOT operate the aircraft in an environment where there is risk of risk of a fire or
explosion.
13. Operate the aircraft, goggles, remote control device, battery, battery charger, and the
battery charging hub in a dry environment.
14. DO NOT use the aircraft, goggles, remote control device, battery, battery charger, and
the battery charging hub near accidents, fire, explosions, floods, tsunamis, avalanches,
landslides, earthquakes, dust, sandstorms, salt spray, or fungus.
15. DO NOT operate the aircraft near bird ocks.
16. DO NOT use the battery charger in humid environments.

DJI Avata 2 User Manual
30
©
2024 DJI All Rights Reserved.
Operating the Aircraft Responsibly
To avoid serious injury and property damage, observe the following rules:
1. Make sure you are NOT under the inuence of anesthesia, alcohol, or drugs or suering
from dizziness, fatigue, nausea, or other conditions that could impair the ability to operate
the aircraft safely.
2. When landing, power o the aircraft rst, then power o the remote control device.
3. DO NOT drop, launch, fire, or otherwise project any dangerous payloads on or at any
buildings, persons, or animals, which could cause personal injury or property damage.
4. DO NOT use an aircraft that has been crashed or accidentally damaged or an aircraft that is
not in good condition.
5. Make sure to train sufficiently and have contingency plans for emergencies or when an
incident occurs.
6. Make sure to have a ight plan. DO NOT y the aircraft recklessly.
7. Respect the privacy of others when using the camera. Make sure to comply with local
privacy laws, regulations, and moral standards.
8. DO NOT use this product for any reason other than general personal use.
9. DO NOT use it for illegal or inappropriate purposes such as spying, military operations, or
unauthorized investigations.
10. DO NOT use this product to defame, abuse, harass, stalk, threaten, or otherwise violate
legal rights such as the right to privacy and publicity of others.
11. DO NOT trespass onto the private property of others.
Pre-Flight Checklist
1. Make sure the goggles, remote control devices, Intelligent Flight Battery, and mobile device
are fully charged.
2. Make sure the propellers are mounted correctly and securely.
3. Make sure the Intelligent Flight Battery is properly connected and secure.
4. Make sure the dust-resistant covers of the USB-C port and the microSD card slot are rmly
closed.
5. Make sure the gimbal protector has been removed. Make sure all camera lenses and
sensors are clean.
6. Make sure the aircraft, the remote control device, the gimbal and the camera are
functioning normally.
7. Make sure the goggles antennas are unfolded.
8. Make sure that the goggles are functioning normally and display the video transmission.
9. Make sure the max ight altitude, max ight distance and RTH altitude are all set properly
in the goggles according to the local laws and regulations.
10. Only use genuine DJI parts or DJI-authorized parts. Unauthorized parts may cause system
malfunctions and compromise ight safety.

DJI Avata 2 User Manual
©
2024 DJI All Rights Reserved.
31
11. Check if the Remote ID is up to date and working.
12. DO NOT y over densely populated areas.

32
©
2024 DJI All Rights Reserved.
Flight Operation
DJI Avata 2 User Manual
©
2024 DJI All Rights Reserved.
33
Flight Operation
This section explains how to perform dierent actions with the aircraft. The steps below will
help users operate the aircraft properly.
1. Place the aircraft in an open, at area with the rear of the aircraft facing the user.
2. Power on the goggles, remote control device, and the aircraft.
3. Wait until the aircraft status indicator blinks green slowly and put on the goggles.
4. Start the motors.
5. Check the ight liveview in the goggles to make sure that there are no warning prompts and
that the GNSS signal is strong.
6. Press the lock button twice to start the aircraft motors, then press and hold to make the
aircraft take o. The aircraft will ascend to approximately 1.2 m and hover.
7. Press and hold the lock button while the aircraft is hovering to land it automatically and stop
the motors.
8. Power o the aircraft, goggles, and remote control device.
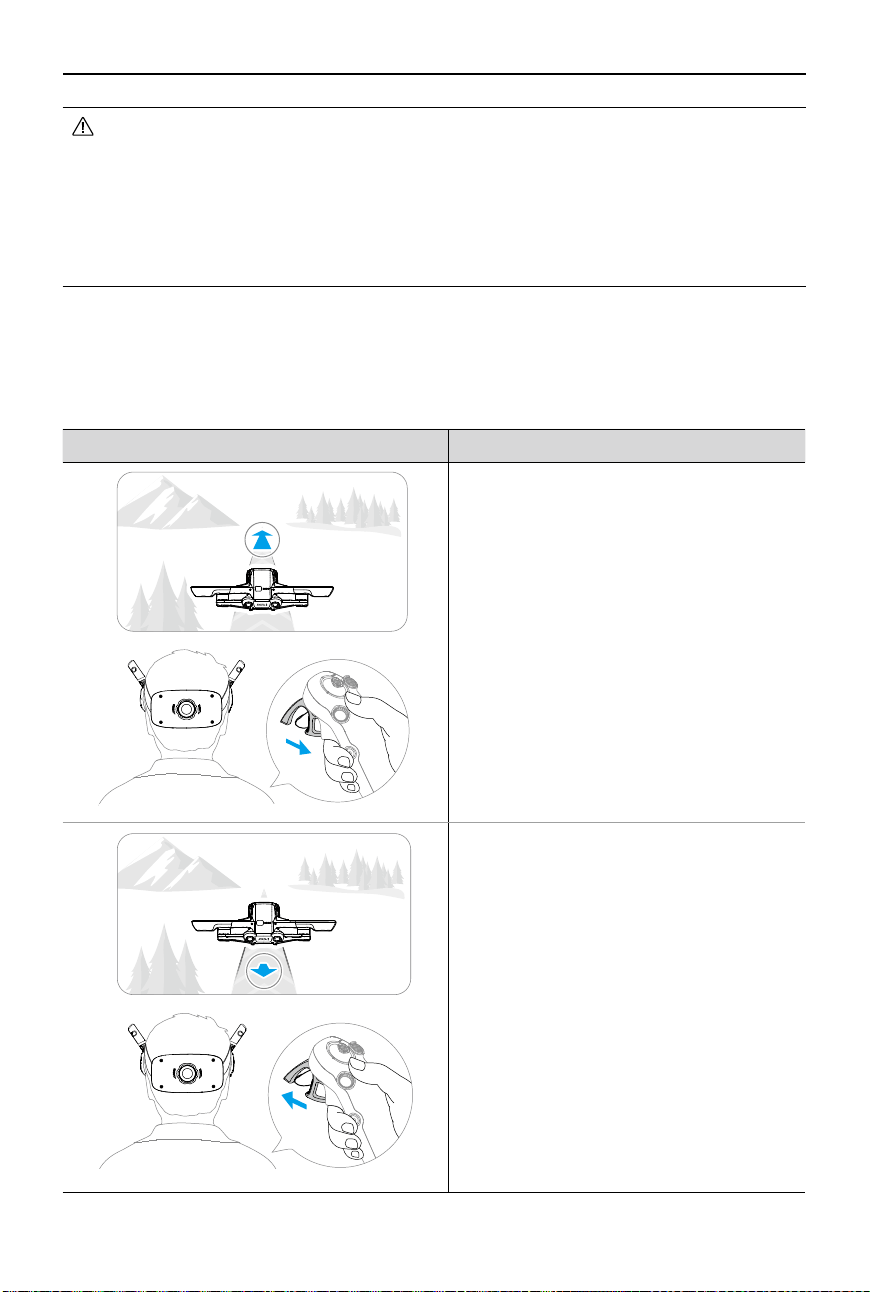
Basic Flight Operations
1
2
3
1
Use the lock button to control the takeoff, landing, and
braking of the aircraft.
2
Move the joystick to make the aircraft ascend, descend, or
move left or right horizontally*.
3
There are two levels of pressure when pressing the
accelerator. When gently pressing to the position in the
middle of the rst and second stop, you can feel a noticeable
pause. Press the accelerator to different stops to control
dierent actions of the aircraft.
* When Easy ACRO is not enabled or the Easy ACRO action is selected as
Slide.
1
2
• It is recommended to watch the tutorial guide in the goggles before the first flight.
Go to Settings > Control > Motion Controller > Flight Control > Motion Controller
Instructions.
Operate the aircraft by using the lock button
,
joystick
,
and accelerator of the DJI Motion
Controller 3.
DJI Avata 2 User Manual
34
©
2024 DJI All Rights Reserved.
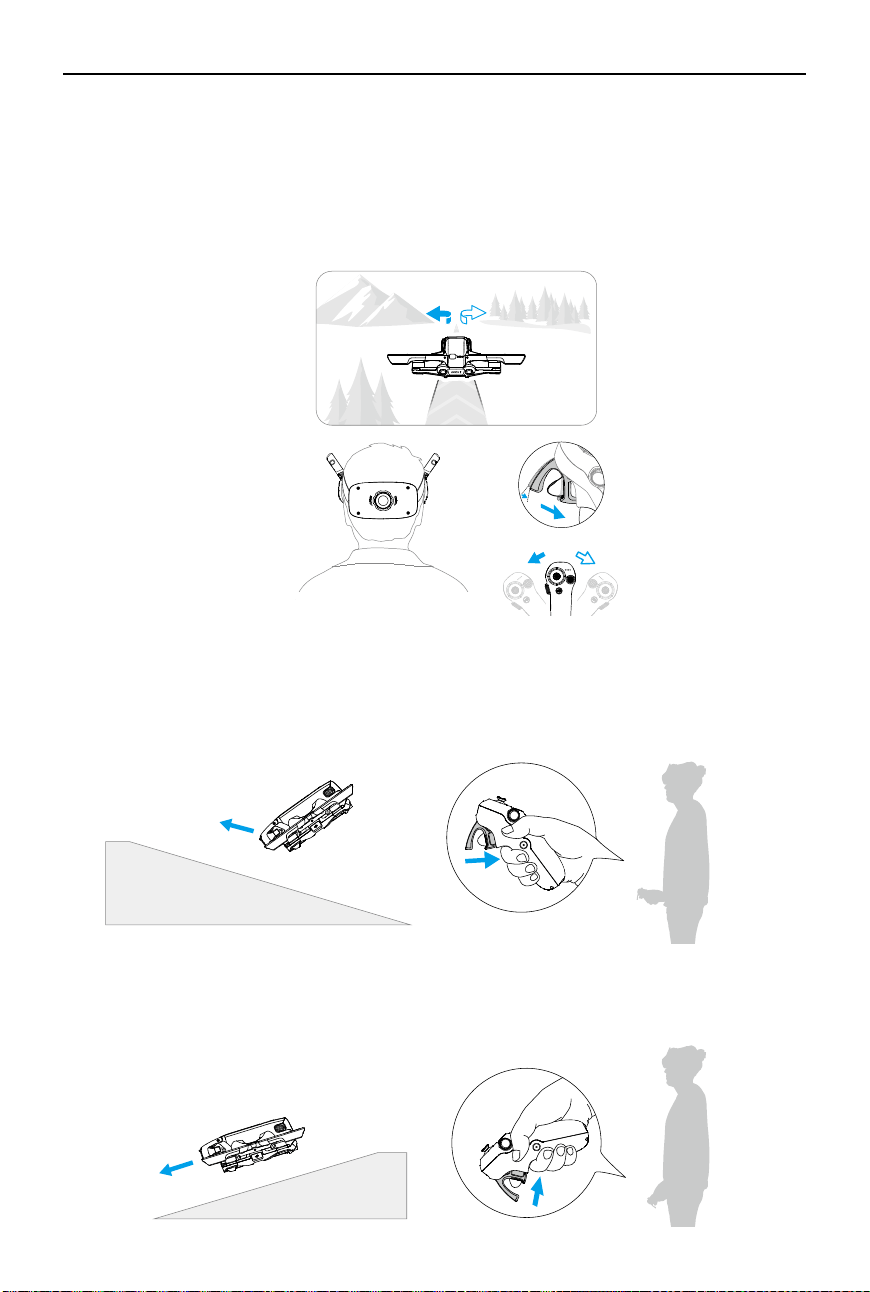
When the accelerator is not pressed, the aircraft will hover.
1
When gently pressing the accelerator to the rst stop, you
can adjust the aircraft orientation by tilting the motion
controller vertically to the left or right.
Note that the aircraft will not y forward at this time.
2
Press the accelerator to the second stop to make the
aircraft to y in the direction of the circle in the goggles.
Taking O, Braking and Landing
Takeo
Press the lock button twice to start the aircraft motors, then press and hold
the button again to make the aircraft take off. The aircraft will ascend to
approximately 1.2 m and hover.
Braking
Press the lock button during ight to make the aircraft brake and hover in place.
Press again to resume ight control.
Landing
Press and hold the lock button while the aircraft is hovering to land it
automatically and stop the motors.
• After the aircraft motors have been started by double-pressing the lock button, slowly
push the joystick up to make the aircraft take o.
• When Easy ACRO is disabled, once the aircraft ies to the landing position, gently push
the joystick downwards to land the aircraft. After landing, push the joystick down and
hold in position until the motors stop.
DJI Avata 2 User Manual
©
2024 DJI All Rights Reserved.
35
Flight Trajectory Remarks
Press the accelerator to the second stop to
make the aircraft y in the direction of the
circle in the goggles.
Push the accelerator forward to fly the
aircraft in reverse.
Flying Forward and Backward
Press or push the accelerator of the motion controller to y forward or backward. Apply more
pressure when pressing or pushing to accelerate. Release to stop and hover.
• If an emergency occurs (such as a collision or the aircraft is out of control) during
ight, pressing the lock button four times will trigger Stop Motors Mid-ight, which
will stop the aircraft motors immediately.
The Stop Motors Mid-ight function will
cause the aircraft to crash. Operate with caution.
• To ensure ight safety when using the motion controller, press the lock button once to
brake and hover before operating the goggles. Failure to do so is a safety risk and may
lead to the aircraft losing control or injury.
DJI Avata 2 User Manual
36
©
2024 DJI All Rights Reserved.
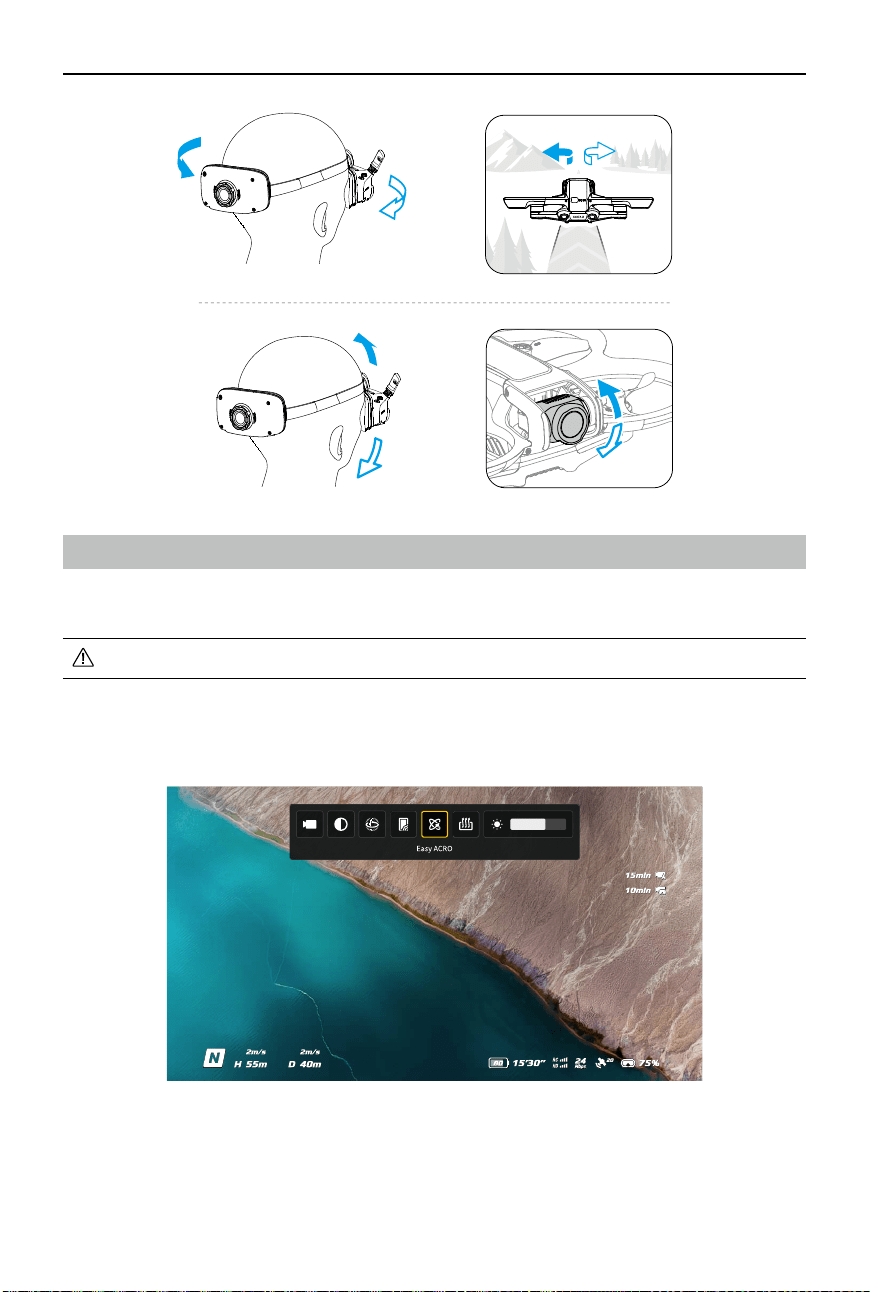
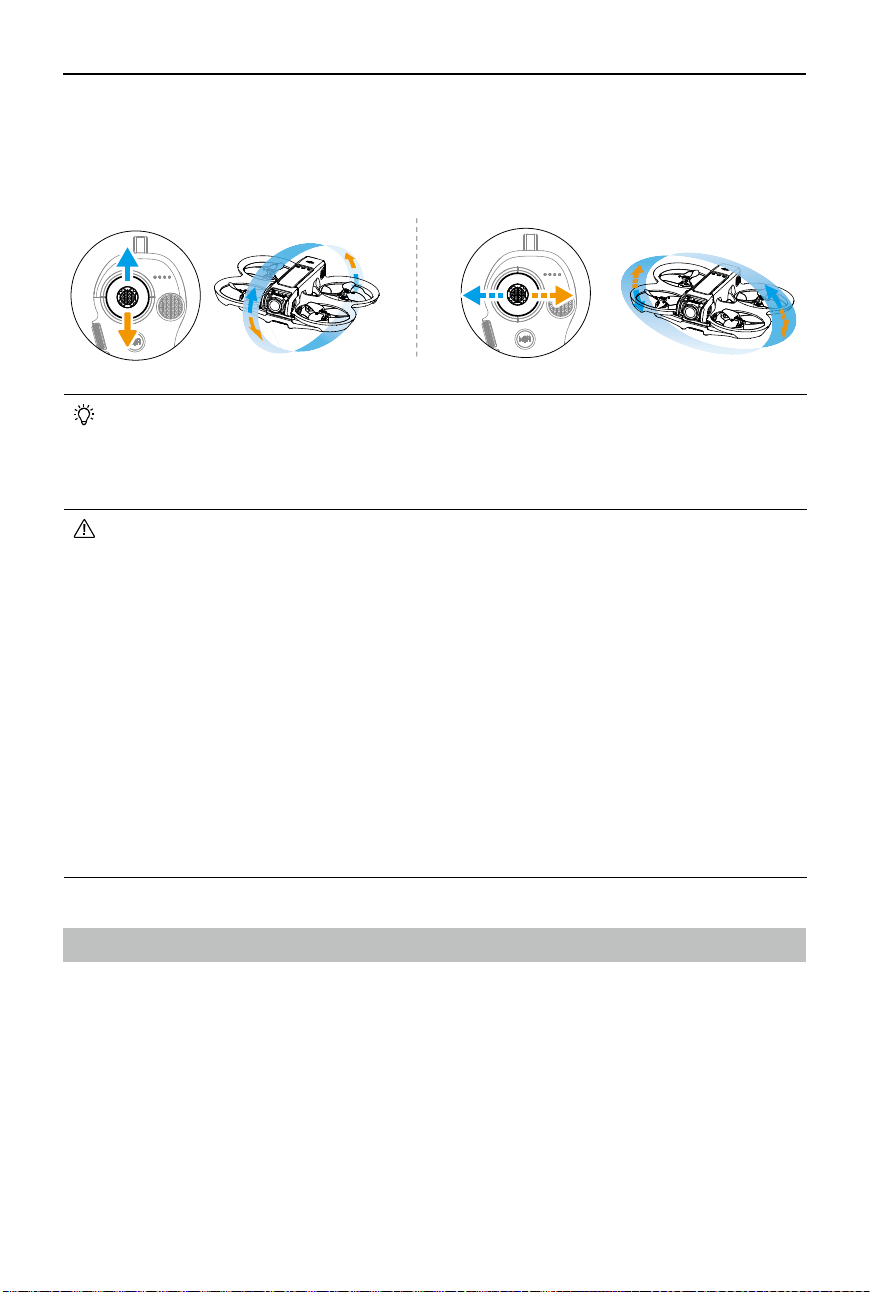
Adjusting Aircraft Orientation
Gently press the accelerator to the first stop and simultaneously tilt the top of the motion
controller in either direction to make the aircraft rotate. The greater the tilt angle of the motion
controller, the faster the aircraft will rotate. The circle in the goggles will move left and right and
the ight liveview will change accordingly.
+
Making the Aircraft Ascend or Descend at an Angle
When the aircraft needs to fly at an upward angle, press the accelerator to the second stop
while simultaneously tilting the motion controller up.
When the aircraft needs to y at an downward angle, press the accelerator to the second stop
while simultaneously tilting the motion controller down.
DJI Avata 2 User Manual
©
2024 DJI All Rights Reserved.
37
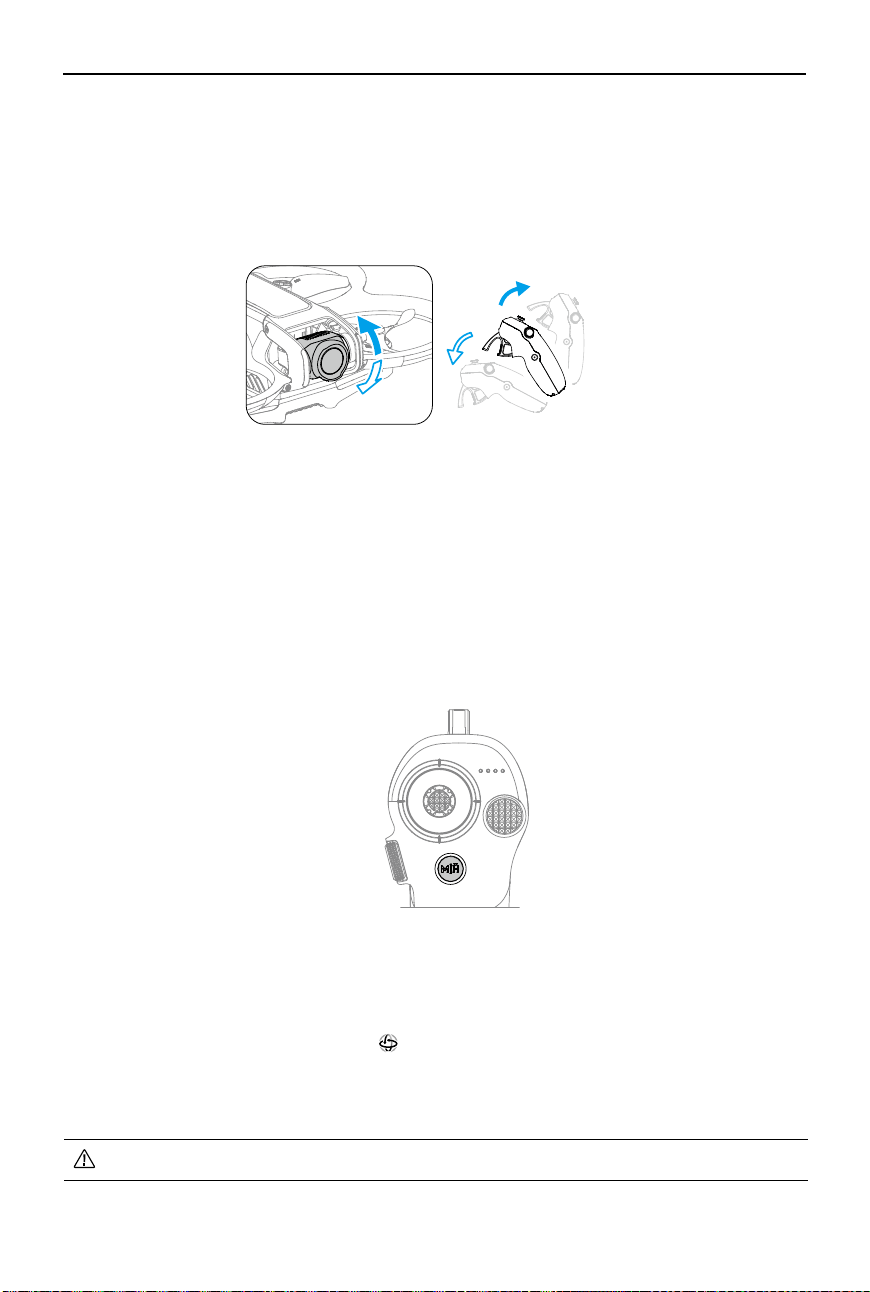
Controlling the Gimbal and Camera
Tilt the motion controller up and down to control the tilt of the gimbal. The tilt of the gimbal
changes with the tilt of the motion controller accordingly and is always consistent with the
orientation of the motion controller. The circle in the goggles will move up and down and the
ight liveview will change accordingly.
Switching Flight Modes
The motion controller has two modes: Normal mode and Sport mode. Normal mode is selected
by default.
Press the mode button once to switch between Normal mode and Sport mode. While ying
in Sport mode, the ight speed of the aircraft will be faster. The operation logic of the motion
controller remains the same in Sport mode as it is in Normal mode.
Refer to the section "Flight Modes" to know more about the difference between each flight
mode.
Head Tracking
When Head Tracking is enabled, the horizontal orientation of the aircraft and the gimbal tilt
can be controlled through head movements. Open the shortcut menu from the ight liveview,
access the quick control menu, and click
to enable Head Tracking.
Once in Head Tracking mode, the motion controller will not be able to control the gimbal tilt,
and only control via the aircraft is available. Users can still control the aircraft's heading by
tilting the motion controller without pressing the accelerator.
• Head Tracking is not available after taking o the goggles.
DJI Avata 2 User Manual
38
©
2024 DJI All Rights Reserved.
Easy ACRO
Use the motion controller to perform Easy ACRO actions including front ip, backip, roll, and
180° drift.
• For ight safety, perform Easy ACRO actions in an open environment.
1. Open the shortcut menu and select Easy ACRO. The aircraft will be in Easy ACRO mode. Easy
ACRO includes three actions: Slide, 180° Drift, and Flip. View the selected action on the left
side of liveview in the goggles.
DJI Avata 2 User Manual
©
2024 DJI All Rights Reserved.
39
2. Use the dial on the motion controller to switch between Easy ACRO actions.
3. When Easy ACRO is enabled, move the joystick to perform dierent Easy ACRO actions as
shown below.
Slide
Push the joystick up or down to make the aircraft ascend or descend.
Push the joystick left or right to make the aircraft move left or right horizontally.
180° Drift
Push the joystick left or right to make the aircraft 180° drift left or right.
The aircraft will not respond when pushing the joystick up or down in this action mode.
DJI Avata 2 User Manual
40
©
2024 DJI All Rights Reserved.
Flip
Push the joystick up or down to make the aircraft perform a front ip or backip.
Push the joystick left or right to make the aircraft do one roll to the left or right.
• Easy ACRO cannot be enabled in the following situations:
a. When recording video;
b. When Head Tracking is enabled;
c. When used with DJI FPV Remote Controller 3.
• Pay attention to surroundings and make sure there are no obstacles nearby before
performing Easy ACRO actions.
• Easy ACRO is unavailable in the following situations:
a. The aircraft is taking o, hovering, landing, or returning to home;
b. The aircraft is in Sport mode;
c. The aircraft battery level is lower than 25%;
d. The altitude of the aircraft is less than 1.5m;
e. Flying in an environment with strong wind (wind speed exceeding 10 m/s);
f. The positioning performance is not good (the GNSS signal is weak);
g. The aircraft is in a buffer zone of a Restricted Zone or an Altitude Zone, or is
approaching the Max Flight Distance.
• As the attitude angle of the aircraft increases (such as when making high-speed turns
or when accelerating or decelerating quickly), the aircraft altitude will also need to be
increased, otherwise Easy ACRO cannot be used.
Video Recording Suggestions and Tips
1. The pre-ight checklist is designed to help the user y and shoot videos safely. Go through
the full pre-ight checklist before each ight.
2. It is recommended to use Normal mode to take photos or record videos.
3. DO NOT y in bad weather such as on rainy or windy days.
4. Choose the camera settings that best suit your needs.
5. Perform ight tests to establish ight routes and preview scenes.
6. When ying, control the pressure applied on the accelerator to ensure smooth and stable
movement of the aircraft.

©
2024 DJI All Rights Reserved.
41
Aircraft
DJI Avata 2 User Manual
42
©
2024 DJI All Rights Reserved.
Aircraft
Flight Modes
The aircraft supports the following ight modes. Flight modes can be switched between Normal
mode and Sport mode using the Mode button on the motion controller.
Normal Mode:
The aircraft can hover precisely and y with stability in this mode, making it
suitable for most ight scenarios.
Sport Mode:
The maximum horizontal ight speed of the aircraft will increase in Sport mode.
Manual Mode:
Classic FPV aircraft control mode with the highest maneuverability. In Manual
mode, all ight assistance functions including precise hovering and auto-brake are disabled and
procient control skills are required.
In Normal or Sport mode, the aircraft will experience horizontal drift and RTH will be unavailable
when the downward vision system is unavailable or disabled and when the GNSS signal is
weak or the compass experiences interference. In this case, the aircraft cannot hover or brake
automatically. Land the aircraft as soon as possible in order to avoid accidents. Avoid ying in
conned spaces, or in areas where the GNSS signal is weak or the lighting is not sucient.
• For safety reasons, the aircraft ies in Beginner mode by default for the rst ight. In
Beginner mode, the maximum ight speed of the aircraft is 1 m/s. To exit Beginner
mode, open the menu on the goggles, go to Settings > Control > Beginner Mode.
• Manual mode is only supported when using the DJI FPV Remote Controller 3 to
operate the aircraft. Throttle stick resistance can also be adjusted. DJI Motion
Controller 3 does not support Manual mode. Refer to the DJI FPV Remote Controller 3
User Manual for more information on Manual mode.
• A minimum braking distance of 10 m is required in windless conditions while the
aircraft is ascending and descending in Sport mode or Normal mode.
• The maximum ight speed and braking distance of the aircraft signicantly increases
in Sport mode. A minimum braking distance of 30 m is required in windless conditions.
• The responsiveness of the aircraft signicantly increases in Sport mode, which means
a small control stick movement on the remote control device translates into the
aircraft moving a large distance. Make sure to maintain adequate maneuvering space
during ight.
DJI Avata 2 User Manual
©
2024 DJI All Rights Reserved.
43
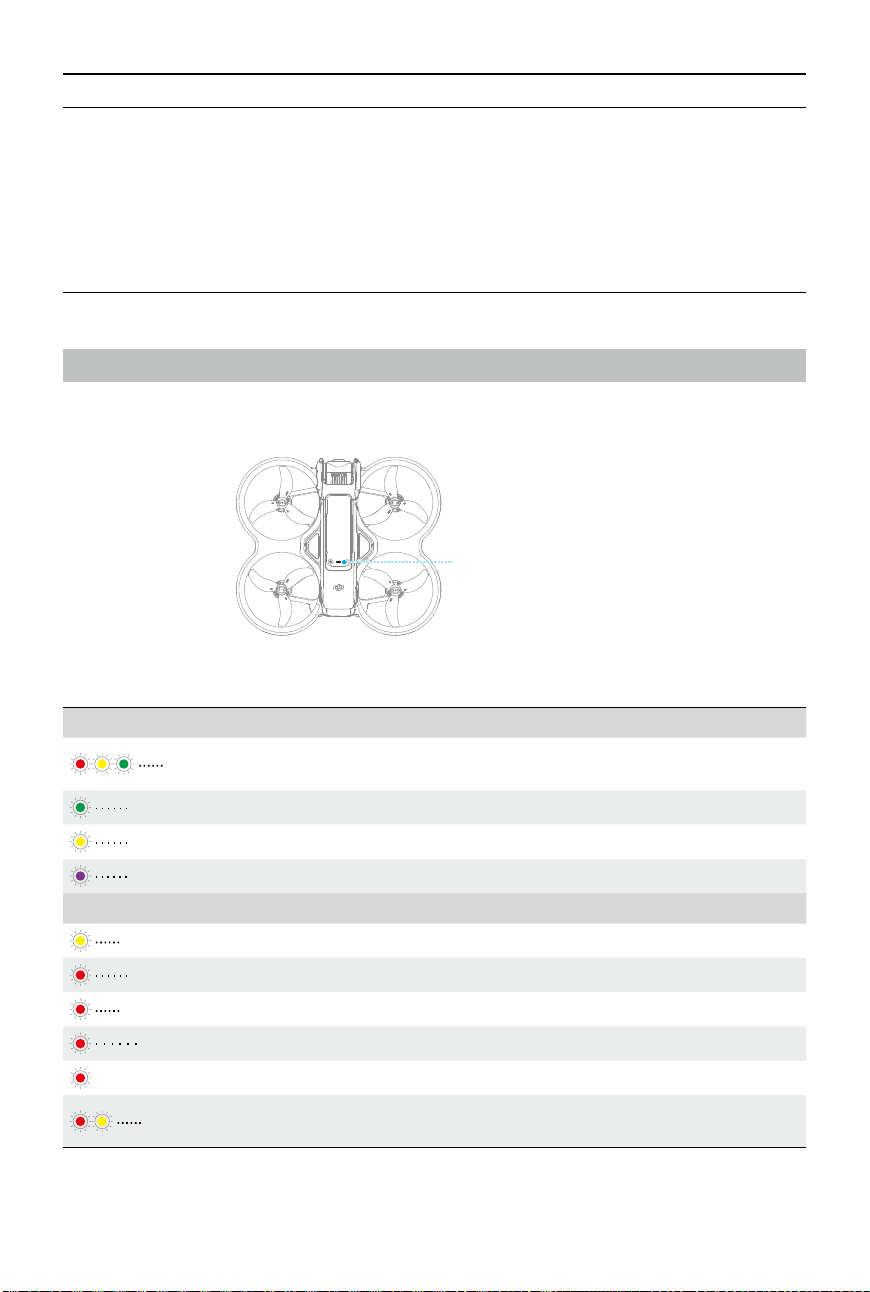
Aircraft Status Indicator
The aircraft has an aircraft status indicator on the top of the body.
Aircraft Status Indicator
Normal States
Blinks red, yellow, and
green alternately
Powering on and performing self-diagnostic tests
Blinks green slowly GNSS or vision system enabled for positioning
Blinks yellow slowly GNSS and vision system disabled
Blinks purple slowly The aircraft is in Manual mode
Warning States
Blinks yellow quickly Remote control device signal lost
Blinks red slowly Takeo is disabled, e.g. low battery
[1]
Blinks red quickly Critically low battery
Blinks red IMU error
——
Solid red Critical error
Blinks red and yellow
alternately
Compass calibration required
Aircraft Status Indicator Descriptions
• When the ight altitude of the aircraft is less than 5 m or when there are obstacles
within a radius of 5 m around the aircraft, use caution when enabling Manual mode.
The attitude may become unstable when turning the aircraft in Manual mode in the
situations mentioned below. Operate the aircraft with caution to ensure a stable ight.
a. When turning the aircraft at a high speed;
b. When the ight height is over 3000 meters above the sea level;
c. When the ight speed exceeds 13 m/s or the wind speed exceeds 7.9 m/s .
[1] If the aircraft cannot takeo while the status indicators are blinking red slowly, view the warning prompt
in the goggles.
DJI Avata 2 User Manual
44
©
2024 DJI All Rights Reserved.
Return to Home
The Return to Home (RTH) function will automatically y the aircraft back to the last recorded
Home Point. RTH can be triggered in three ways: the user actively triggers RTH, the aircraft has
low battery, or the remote control signal or video transmission signal has been lost (Failsafe
RTH is triggered). If the aircraft records the Home Point successfully and the positioning system
is functioning normally, when the RTH function is triggered, the aircraft will automatically y
back and land at the Home Point.
GNSS
Description
Home Point
10
The first location where the aircraft receives a strong to moderately
strong GNSS signal (indicated by a white icon) will be recorded as the
default Home Point. The Home Point can be updated when taking off as
long as the aircraft receives another strong to moderately strong GNSS
signal. If the signal is weak, the Home Point will not be updated. The
aircraft status indicator blinks green quickly and a prompt appears in the
goggles to confirm the Home Point has been updated.
During flight an H symbol is displayed in the goggles to indicate the
location of the last recorded Home Point of the aircraft.
Warnings
• During RTH, obstacles around and above the aircraft cannot be detected or avoided.
• The aircraft cannot return to the Home Point if the GNSS signal is weak or unavailable.
If the GNSS signal becomes weak or unavailable after Failsafe RTH is triggered, the
aircraft will automatically descend and land.
• Make sure set the RTH altitude before each flight. Go to Settings > Safety on the
goggles and set a suitable RTH altitude.
• GEO Zones will aect RTH. The aircraft will hover if it ies into a GEO Zone during RTH.
• The aircraft may not be able to return to the Home Point when the wind speed is too
high. Fly with caution.
• When the aircraft is ying in an environment surrounded by obstacles (such as near
tall buildings), or when the GNSS signal is weak, the location of the Home Point may
be inaccurate, leading to a large error in the horizontal distance between the aircraft
and the Home Point displayed on the goggles. Fly with caution.
Trigger Method
The user actively triggers RTH
Press and hold the Mode button on the motion controller to initiate RTH. The aircraft will y
back to the last updated Home Point. When the aircraft is performing RTH, press the lock button
DJI Avata 2 User Manual
©
2024 DJI All Rights Reserved.
45
once to cancel RTH. After exiting RTH, users will regain control of the aircraft.
Aircraft low battery
When the battery level is low and only sucient to y to the Home Point, a warning prompt
will appear in the goggles and RTH will be triggered following the prompt. RTH can be canceled
using the remote control devices. If RTH is canceled following a low battery warning, the
Intelligent Flight Battery may not have enough power for the aircraft to land safely, which may
lead to the aircraft being crashed or lost.
The aircraft will land automatically if the current battery level can only support the aircraft long
enough to descend from its current altitude. Auto landing cannot be canceled, but the remote
control devices can be used to control the horizontal movement of the aircraft during landing.
Loss of remote control or video transmission signal
When the remote control signal or video transmission signal is lost, the aircraft will
automatically initiate Failsafe RTH if the Signal Lost Action is set to RTH.
The aircraft will fly backwards 50 m along its original flight route and then perform the RTH
procedure. The aircraft will directly perform the RTH procedure if the signal is restored when
ying backward along the original ight route.
• The response of the aircraft when the wireless signal is lost can be modied in the
goggles. The aircraft will not perform Failsafe RTH if land or hover has been selected
in the settings.
RTH Procedure
1. The Home Point is recorded.
2. RTH is triggered.
3. When RTH begins, the RTH procedure varies according to different RTH distances (the
horizontal distance between the aircraft and the Home Point):
a. The aircraft lands immediately if the RTH distance is less than 5 m.
b. If the RTH distance is farther than 5 m but less than 20 m, it ies to the Home Point in a
straight line at the current altitude.
c. If RTH distance is farther than 20 m, it ascends to the RTH altitude and ies back to the
Home Point. The aircraft ies to the Home Point at the current altitude if the RTH altitude
is lower than the current altitude.
4. The aircraft begins to land when it reaches the spot above the Home Point.
Landing Protection
Landing Protection activates during RTH and auto landing.
1. During Landing Protection, the aircraft will automatically detect and carefully land on
suitable ground.
2. If the ground is determined unsuitable for landing, the aircraft will hover and wait for pilot
conrmation.
DJI Avata 2 User Manual
46
©
2024 DJI All Rights Reserved.
• Landing Protection only assists in determining the landing environment. Pay attention
to the surrounding environment during landing to ensure safety.
• In the following situations, Landing Protection may be unavailable and the aircraft
may land directly on unsuitable ground:
a. Flying over monochrome, reective, or low-light surfaces, a large area of surfaces
without clear texture, or surfaces with dynamic texture, such as smooth ceramic
tiles, garage ground with insucient light, and grass blowing in the wind;
b. Flying over obstacles without clear texture, such as large rocks, or reflective or
monochrome surfaces, such as raised tiles;
c. Flying over small or ne obstacles, such as power lines and tree branches;
d. Flying over surfaces that are similar to flat ground, such as trimmed and flat
shrubs, at tree tops, and hemispherical ground.
• In the following situations, Landing Protection may be triggered by mistake and a
prompt will appear in the goggles that the aircraft is unable to land:
a. Flying over surfaces that the vision system may confuse for water, such as wet
ground and areas with puddles;
b. Flying over at surfaces, but there are surfaces with clear texture (oblique surfaces
or stairs) nearby, such as monochrome car tops and monochrome tables.
3. If Landing Protection is not operational, the goggles will display a landing prompt when the
aircraft descends to 0.25 m. Press and hold the lock button on the motion controller and the
aircraft will land.
Vision System and Infrared Sensing System
The aircraft is equipped with both a Downward and Backward Vision System and Infrared
Sensing System.
Infrared Sensing System
Downward and Backward Vision System
The positioning function of the downward vision system is applicable when GNSS signals are
unavailable or weak. It is automatically enabled in Normal or Sport mode.
DJI Avata 2 User Manual
©
2024 DJI All Rights Reserved.
47
Detection Range
Backward
FOV: 78° (horizontal), 78° (vertical)
Downward
FOV: 78° (horizontal), 78° (vertical)
Precision Measurement Range: 0.3-20 m;
Precision Hovering Range: 0.3-10 m.
• Pay attention to the ight environment. The vision system and infrared sensing system
only work in certain scenarios and cannot replace human control and judgment.
During ight, pay attention to the surrounding environment and to the warnings on the
goggles. Be responsible for and maintain control of the aircraft at all times.
• The aircraft has a maximum hovering altitude of 20 m when using the vision system in
an open and at environment with clear texture. The vision system works best when
the aircraft is at an altitude from 0.5-10 m. Extra caution is required if the altitude of the
aircraft is above 10 m as vision positioning performance may be aected.
• The vision system may not work properly when the aircraft is flying near water.
Therefore, the aircraft may not be able to actively avoid water below it when landing.
It is recommended to maintain ight control at all times, make reasonable judgments
based on the surrounding environment, and avoid over-relying on the downward vision
system.
• The vision system and infrared sensing system may not function properly when the
aircraft is ying too fast.
• The vision system cannot work properly near surfaces without clear pattern variations
or where the light is too weak or too strong. The vision system cannot work properly in
the following situations:
a. Flying near monochrome surfaces (e.g., pure black, pure white, pure green);
b. Flying near highly reective surfaces;
c. Flying near water or transparent surfaces;
d. Flying near moving surfaces or objects;
e. Flying in an area where the lighting changes frequently or drastically;
f. Flying near extremely dark (< 10 lux) or bright (> 40,000 lux) surfaces;
g. Flying near surfaces that strongly reect or absorb infrared waves (e.g., mirrors);
h. Flying near surfaces without clear patterns or texture (e.g., power poles);
i. Flying near surfaces with repeating identical patterns or textures (e.g., tiles with the
same design);
j. Flying near obstacles with small surface areas (e.g., tree branches and power lines).
• Keep the sensors clean at all times. DO NOT tamper with the sensors. DO NOT use the
aircraft in environments with signicant dust or humidity. DO NOT obstruct the infrared
sensing system.
• If the aircraft is involved in a collision, it may be necessary to calibrate the vision system.
• DO NOT y when it is rainy, smoggy, or the visibility is lower than 100 m.

DJI Avata 2 User Manual
48
©
2024 DJI All Rights Reserved.
Propellers
There are two types of propellers, which are designed to spin in dierent directions. Make sure
to match the propellers and motors by following the instructions.
Propellers With Orange Marks Without Orange Marks
Illustration
Mounting
Position
Attach to the motors of the marked arm.
Attach to the motors of the
unmarked arm.
• Check the following every time before takeo:
a. Make sure there are no stickers or any other obstructions over the glass of the
infrared sensing system and vision system;
b. Use a soft cloth if there is any dirt, dust, or water on the glass of the vision systems
and infrared sensing systems. DO NOT use any cleaning product that contains
alcohol;
c. Contact DJI Support if there is any damage to the glass of infrared sensing system
and vision system.
DJI Avata 2 User Manual
©
2024 DJI All Rights Reserved.
49
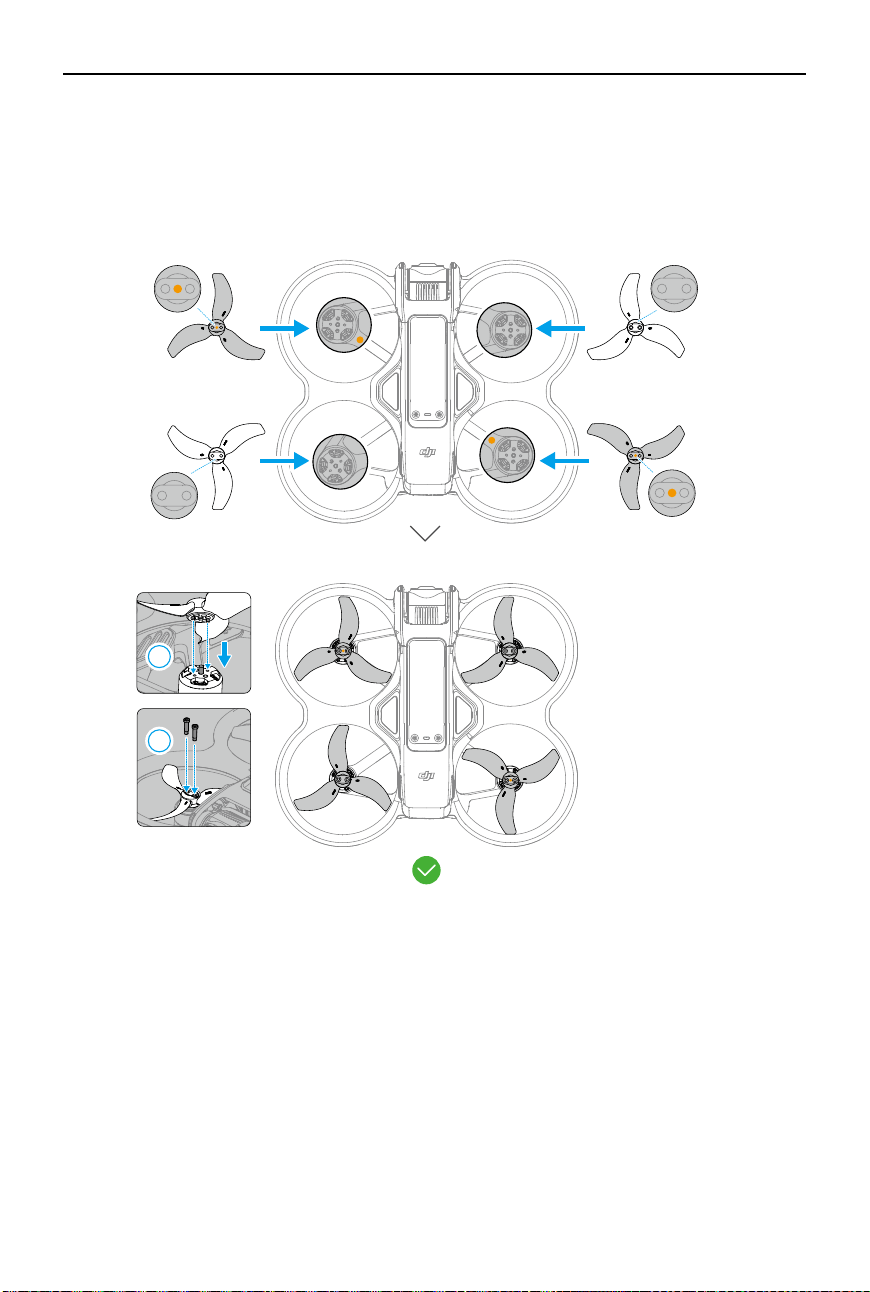
Attaching and Detaching the Propellers
Attach the marked propellers to the motors of the marked arm, and the unmarked propellers
to the motors of the unmarked arm. Use the 1.5mm screwdriver from the aircraft package to
mount the propellers. Make sure the propellers are secure.
1
2
DJI Avata 2 User Manual
50
©
2024 DJI All Rights Reserved.
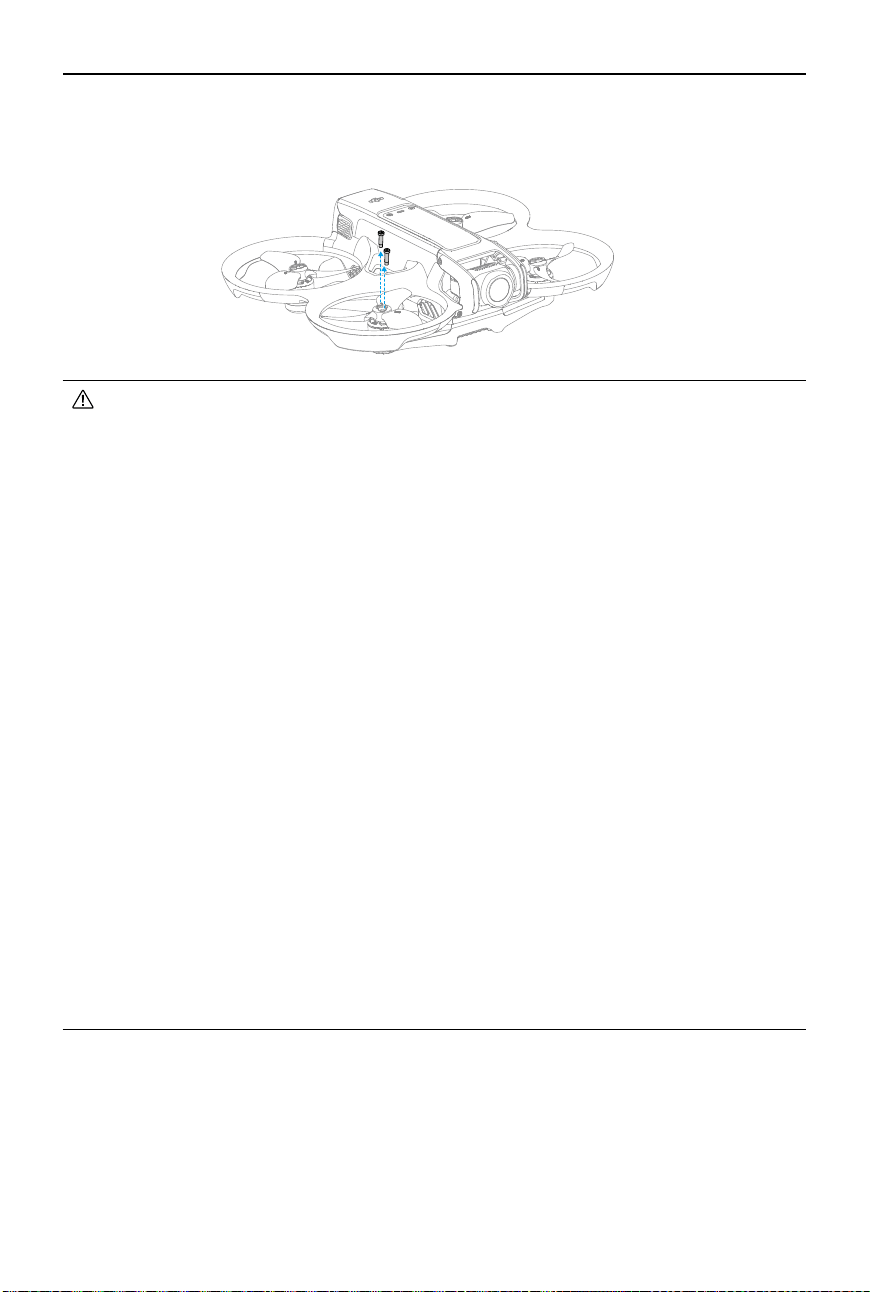
Use the screwdriver from the aircraft package to loosen the screws and detach the propellers
from the motors.
• Propeller blades are sharp. Handle with care.
• Only use ocial DJI propellers. DO NOT mix propeller types.
• Propellers are consumable components. Purchase additional propellers if necessary.
• Make sure to only use the screwdriver from the aircraft package for mounting
propellers. Using other screwdrivers may damage the screws.
• If a propeller is broken, remove the propeller and screws on the corresponding motor
and discard them.
• Make sure that the propellers and motors are installed securely before each ight.
Check to make sure the screws on the propellers are tightened after every 30 hours of
ying time (approx. 60 ights).
• Make sure that all propellers are in good condition and clean (without any foreign
matter in or on them) before each flight. DO NOT use aged, chipped, or broken
propellers. Clean the propellers with a soft, dry cloth if there is any foreign matter
attached.
• To avoid injury, stay away from rotating propellers or motors.
• To avoid damaging the propellers, pack the aircraft correctly for transportation or
storage. DO NOT squeeze or bend the propellers. If the propellers are damaged, the
ight performance may be aected.
• Make sure the motors are mounted securely and rotating smoothly. Land the aircraft
immediately if a motor is stuck and unable to rotate freely.
• DO NOT attempt to modify the structure of the motors.
• DO NOT touch or let hands or body parts come in contact with the motors after ight,
as they may be hot.
• DO NOT block any of the ventilation holes on the motors or the body of the aircraft.
• Make sure the aircraft beeps when powered on.

DJI Avata 2 User Manual
©
2024 DJI All Rights Reserved.
51
Intelligent Flight Battery
The aircraft can be used with DJI Avata 2 Intelligent Flight Battery (BWX520-2150-17.76).
This battery is a 14.76V, 2150mAh battery that adopts high-energy battery cells and uses an
advanced battery management system.
Warnings
• Refer to the Safety Guidelines and the stickers on the battery before use. Users shall
take full responsibility for all operation and usage.
1. DO NOT charge an Intelligent Flight Battery immediately after ight as it may be too hot.
Wait for the battery to cool down to the charging temperature before charging again.
2. To prevent damage, the battery only charges when the temperature is between 5° and 40° C (41°
and 104° F). The ideal charging temperature is from 22° to 28° C (71.6° to 82.4° F). Charging
stops automatically if the temperature of the battery cells exceed 55° C (131° F) during
charging.
3. Low Temperature Notice:
a. Batteries cannot be used in extremely low-temperature environments of lower than
-10° C (14° F).
b. Battery capacity is significantly reduced when flying at low temperatures from -10°
to 5° C (14° to 41° F). Make sure to fully charge the battery before takeoff. It is
recommended to hover the aircraft in place for a while to heat the battery.
c. When in low-temperature environments, end the ight as soon as the goggles display the
low battery voltage warning.
d. To ensure optimal performance, keep the battery temperature above 20° C (68° F).
e. The reduced battery capacity in low-temperature environments reduces the wind speed
resistance performance of the aircraft. Fly with caution.
f. Take extra caution when ying at a high elevation with a low temperature.
4. To prevent swelling, the battery automatically discharges to 96% of the battery level when
it is idle for three days, and automatically discharges to 60% of the battery level when it is
idle for nine days. Note that it is normal for the battery to emit heat during the discharging
process.
5. Over-discharging will lead to serious damage of the battery. If the battery level is too low, the
battery will enter Hibernation mode to prevent over-discharge.
DJI Avata 2 User Manual
52
©
2024 DJI All Rights Reserved.
6. Over-discharge protection is enabled and discharging stops automatically to prevent over-
discharge when the battery is not in use. Charge the battery to wake it from over-discharge
protection before using again. Over-discharge protection is not enabled when the battery is
in use.
7. Fully charge the battery at least once every three months to maintain battery health. If the
battery is not used for an extended period, battery performance may be aected or may
even cause permanent battery damage.
8. For safety purposes, keep the batteries at a low power level in transit. Before transportation,
it is recommended to discharge the batteries to 30% or lower.
Inserting/Removing the Battery
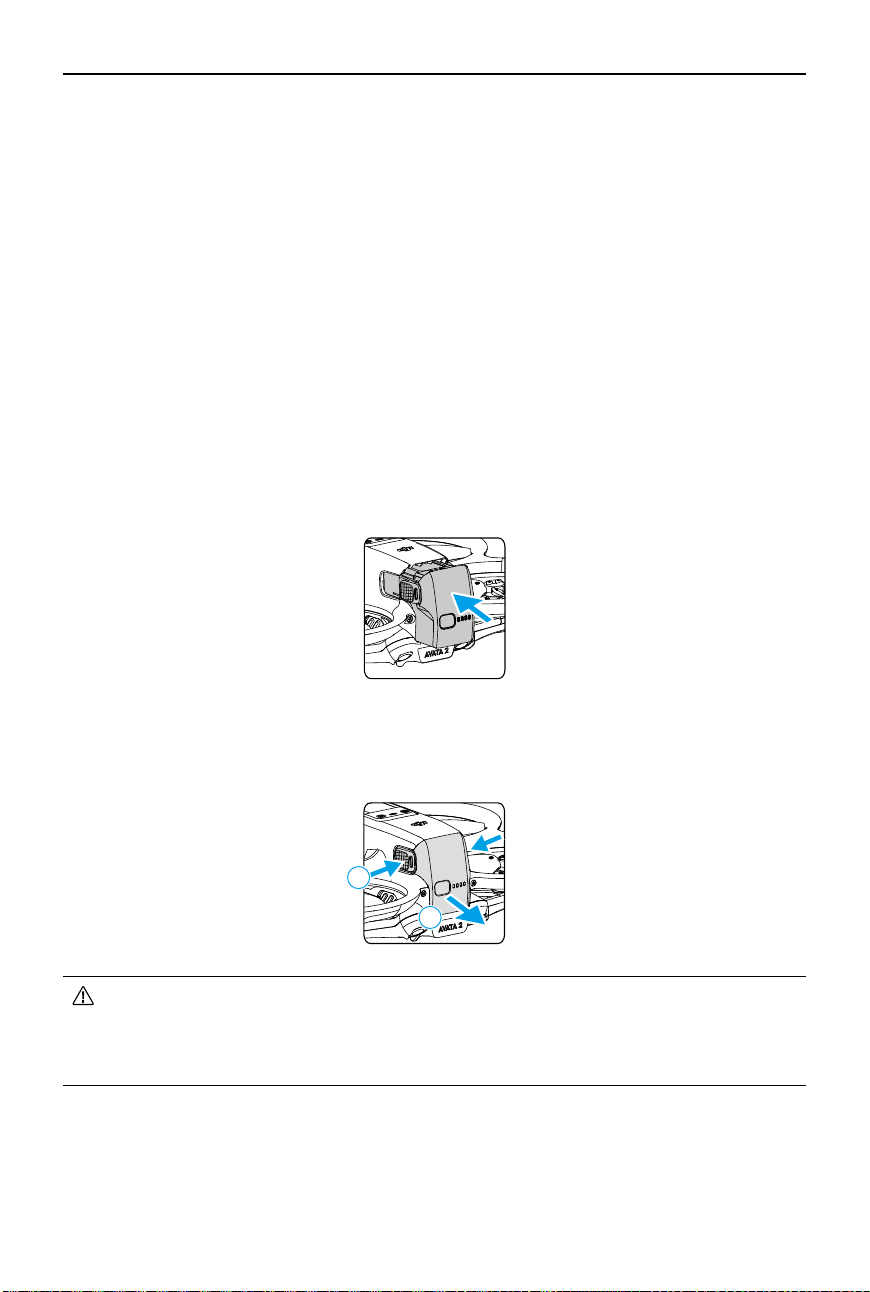
Insert the Intelligent Flight Battery into the battery compartment of the aircraft. Make sure the
battery is fully inserted with a clicking sound, which indicates the battery buckles are securely
fastened.
1
2
Press the textured part of the battery buckles on the sides of the battery to remove it from the
compartment.
• DO NOT insert or remove the battery while the aircraft is powered on.
• Make sure the battery is inserted with a clicking sound. DO NOT take o when the
battery is not securely mounted, as this may cause poor contact between the battery
and the aircraft and present hazards. Make sure the battery is mounted securely.
Using the Battery
Checking the Battery Level
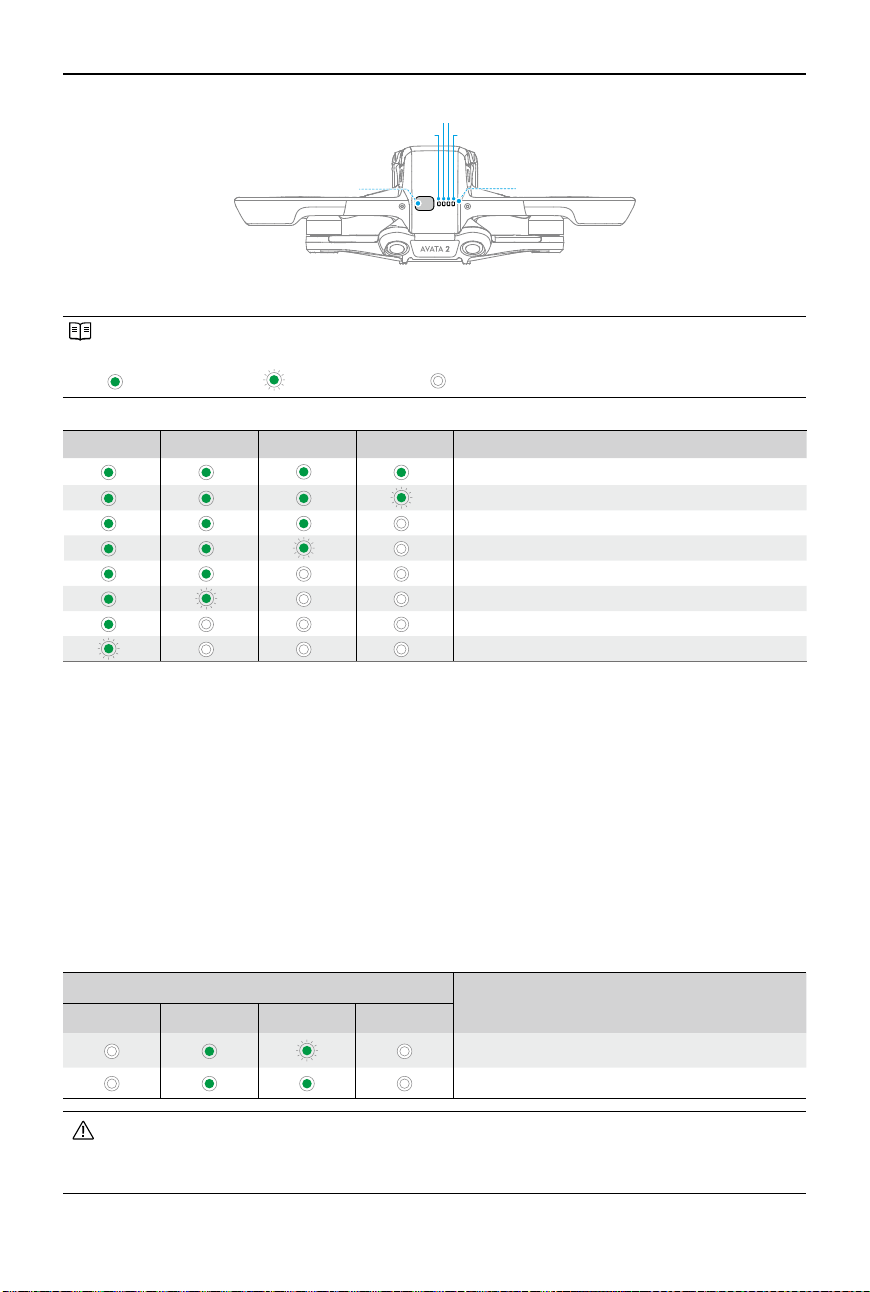
Press the power button once to check the current battery level.
DJI Avata 2 User Manual
©
2024 DJI All Rights Reserved.
53
Power Button
LED1
LED2 LED3
LED4
Battery Level LEDs
Powering On/O
Press the power button once and then press and hold for two seconds to power the aircraft
on or o. The battery level LEDs display the battery level when the aircraft is powered on. The
battery level LEDs turn o when the aircraft is powered o.
Updating Firmware
If an additional battery needs to be updated, insert it into the aircraft and power it on. A prompt
will appear in the goggles to update the battery. Make sure to update the battery before takeo.
The table below shows battery information during the update process and corresponding LED
blinking patterns.
Blinking Pattern
Information
LED1 LED2 LED3 LED4
Updating battery rmware
Firmware update failed
• If the update fails, reinsert the battery into the aircraft and power on, and retry
the firmware update using DJI Assistant 2 (Consumer Drones Series). Refer to the
Firmware Update section for more information.
The battery level LEDs display the power level of the battery during charging and
discharging. The statuses of the LEDs are dened below:
LED is on. LED is ashing. LED is o.
LED1 LED2 LED3 LED4
Battery Level
88%-100%
76%-87%
63%-75%
51%-62%
38%-50%
26%-37%
13%-25%
0%-12%
DJI Avata 2 User Manual
54
©
2024 DJI All Rights Reserved.
Charging the Battery
Fully charge the battery before each use. It is recommended to use the charging devices
provided by DJI, such as the DJI Avata 2 Two-Way Charging Hub, DJI 65W Portable Charger or
other USB Power Delivery chargers. The DJI Avata 2 Two-Way Charging Hub and the DJI 65W
Portable Charger are both optional accessories. Visit the official DJI online store for more
information.
• When charging a battery mounted in the aircraft, the maximum charging power
supported is 30 W.
Using a Charger
1. Make sure the battery has been correctly installed in the aircraft.
2. Connect a charger to an AC power supply (100-240 V, 50/60 Hz; use a power adapter if
necessary).
3. Connect the charger to the charging port on the aircraft.
4. The battery level LEDs display the current battery level during charging.
5. The battery is fully charged when all the battery level LEDs are o. Detach the charger when
the battery is fully charged.
• The battery cannot be charged if the aircraft is powered on.
https://s.dji.com/guide77
Visit the link below to watch the tutorial videos for DJI
Avata 2 Two-Way Charging Hub.
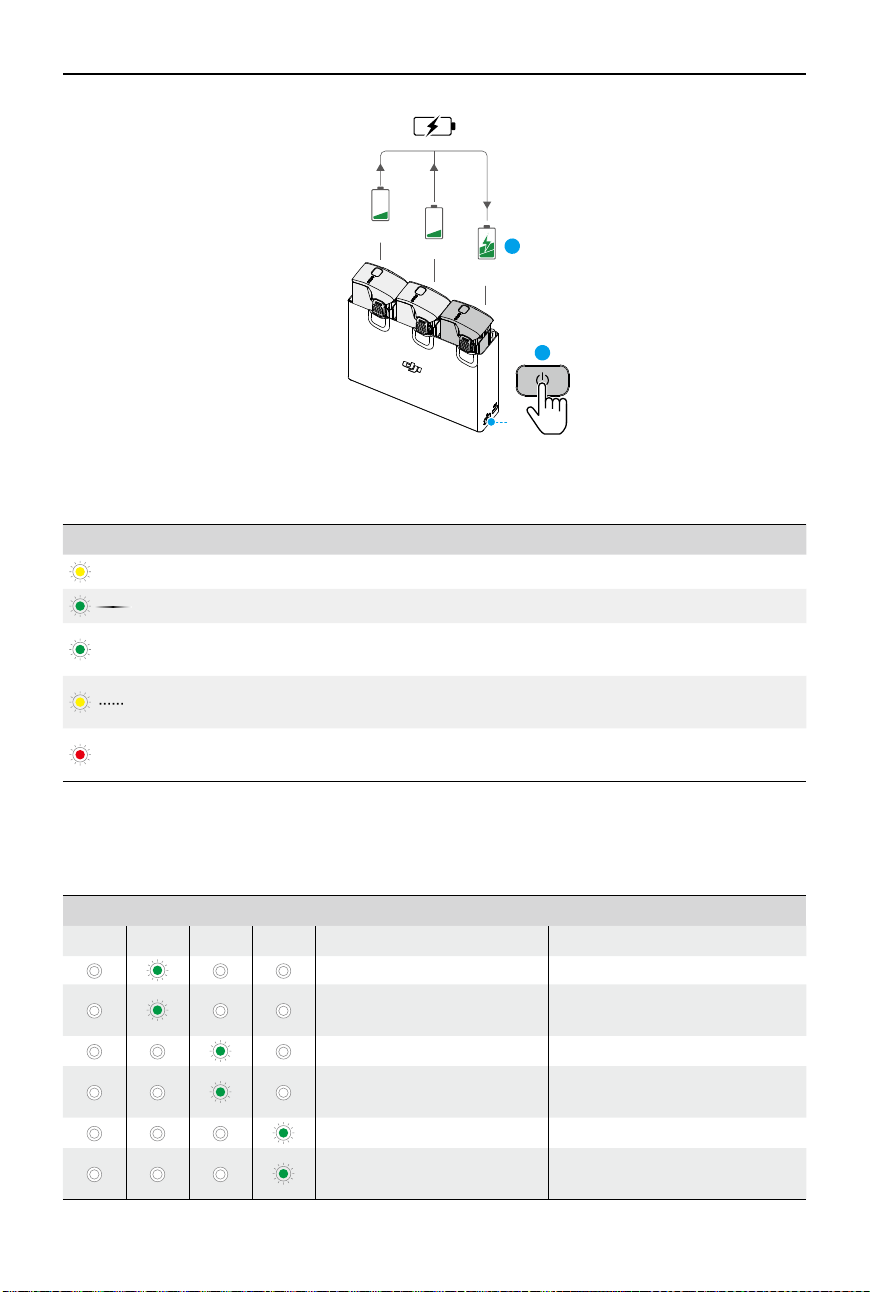
Using the Charging Hub
When used with a compatible charger, the DJI Avata 2 Two-Way Charging Hub can charge up to
three DJI Avata 2 Intelligent Flight Batteries in sequence from high to low power level. After the
Intelligent Flight Batteries are inserted, the charging hub can supply power to external devices
via the USB-C port, such as a remote controller or a mobile phone. The charging hub can also
use the power accumulation function to transfer the remaining power of multiple low-power
batteries into the battery with the highest remaining power.

DJI Avata 2 User Manual
©
2024 DJI All Rights Reserved.
55
1
2
3
4
1. Battery Port
2. USB-C Port
3. Function Button
4. Status LED
Charging Intelligent Flight Batteries
1. Insert the batteries into the charging hub until it clicks into place.
2. Connect the charging hub to a power outlet using a USB-C charger. The Intelligent Flight
Battery with the highest power level will be charged rst, and then the rest will be charged in
sequence according to their power levels. The status LED indicates the battery level during
charging. Refer to the Status LED Indicator Descriptions for more information about the
blinking patterns of the status LED indicator. Press the function button to check the battery
level of the inserted batteries.
3. The battery can be stored in the charging hub after charging. Remove the battery from the
charging hub for use.
• When using the charging hub to charge the Intelligent Flight Batteries, it is
recommended to use the DJI 65W Portable Charger or a USB Power Delivery charger.
When used with the DJI 65W Portable Charger, the charging hub can fully charge one
Intelligent Flight Battery in approximately 45 minutes.
• The charging hub is only compatible with the BWX520-2150-14.76 Intelligent Flight
Battery. DO NOT use the charging hub with other battery models.
• Place the charging hub on a at, stable surface with good ventilation when charging
an external device or accumulating power. Make sure the device is properly insulated
to prevent re hazards.
• DO NOT touch the metal terminals on the battery ports. Clean the metal terminals
with a clean, dry cloth if there is any noticeable buildup.
• Make sure to charge batteries with low battery power in time. It is recommended to
store the batteries in the charging hub.
Click
2
1
100%

DJI Avata 2 User Manual
56
©
2024 DJI All Rights Reserved.
Using the Charging Hub as a Power Bank
1. Insert an Intelligent Flight Battery into the charging hub. Connect an external device via the
USB-C port, such as a mobile phone or remote controller.
2. The battery with the lowest power level will be discharged rst, followed by the remaining
batteries which will be discharged sequentially. To stop charging the external device,
disconnect the external device from the charging hub.
• If the remaining charge of a battery is lower than 7%, the battery cannot charge the
external device.
• Press the function button to activate charging if charging does not start automatically.
Power Accumulation
1. Insert more than one battery into the charging hub, and press and hold the function button
until the status LED turns green. When the status LED of the charging hub pulses green, the
charge is transferred from the battery with the lowest power level to the battery with the
highest power level.
2. To stop accumulating power, press and hold the function button until the status LED turns
yellow. After stopping power accumulation, press the function button to check the power
level of the batteries.
• Power accumulation stops automatically in the following situations:
a. The receiving battery is fully charged, or the power of the output battery is lower
than 5%.
b. A charger or external device is connected to the charging hub or any battery is
inserted or withdrawn from the charging hub during power accumulation.
c. Power accumulation is interrupted for more than 15 minutes due to abnormal
battery temperature.
• After power accumulation, charge the battery with the lowest power level as soon as
possible to avoid over-discharge.
DJI Avata 2 User Manual
©
2024 DJI All Rights Reserved.
57
Status LED Indicator Descriptions
Blinking Pattern Description
—
Solid yellow The charging hub is idle
Pulses green Charging the battery or accumulating power
—
Solid green
All batteries fully charged or are supplying power to
external devices
Blinks yellow
Temperature of batteries is too low or too high (no
further operation needed)
—
Solid red
Power supply or battery error (remove and reinsert the
batteries or unplug and plug in the charger)
Battery Protection Mechanisms
The battery level LEDs can display battery protection notifications triggered by abnormal
charging conditions.
Battery Protection Mechanisms
LED1 LED2 LED3 LED4 Blinking Pattern Status
LED2 blinks twice per second Overcurrent detected
LED2 blinks three times per
second
Short circuit detected
LED3 blinks twice per second Overcharge detected
LED3 blinks three times per
second
Over-voltage charger detected
LED4 blinks twice per second Charging temperature is too low
LED4 blinks three times per
second
Charging temperature is too high
10%
10%
30%
2
1
DJI Avata 2 User Manual
58
©
2024 DJI All Rights Reserved.
-85°
0°
80°
If any of the battery protection mechanisms are activated, unplug the charger, and plug it in
again to resume charging. If the charging temperature is abnormal, wait for it to return to
normal. The battery will automatically resume charging without the need to unplug and plug
the charger again.
Gimbal and Camera
Gimbal Prole
The gimbal of the aircraft stabilizes the camera, allowing users to capture clear and steady
images and videos at a high ight speed.
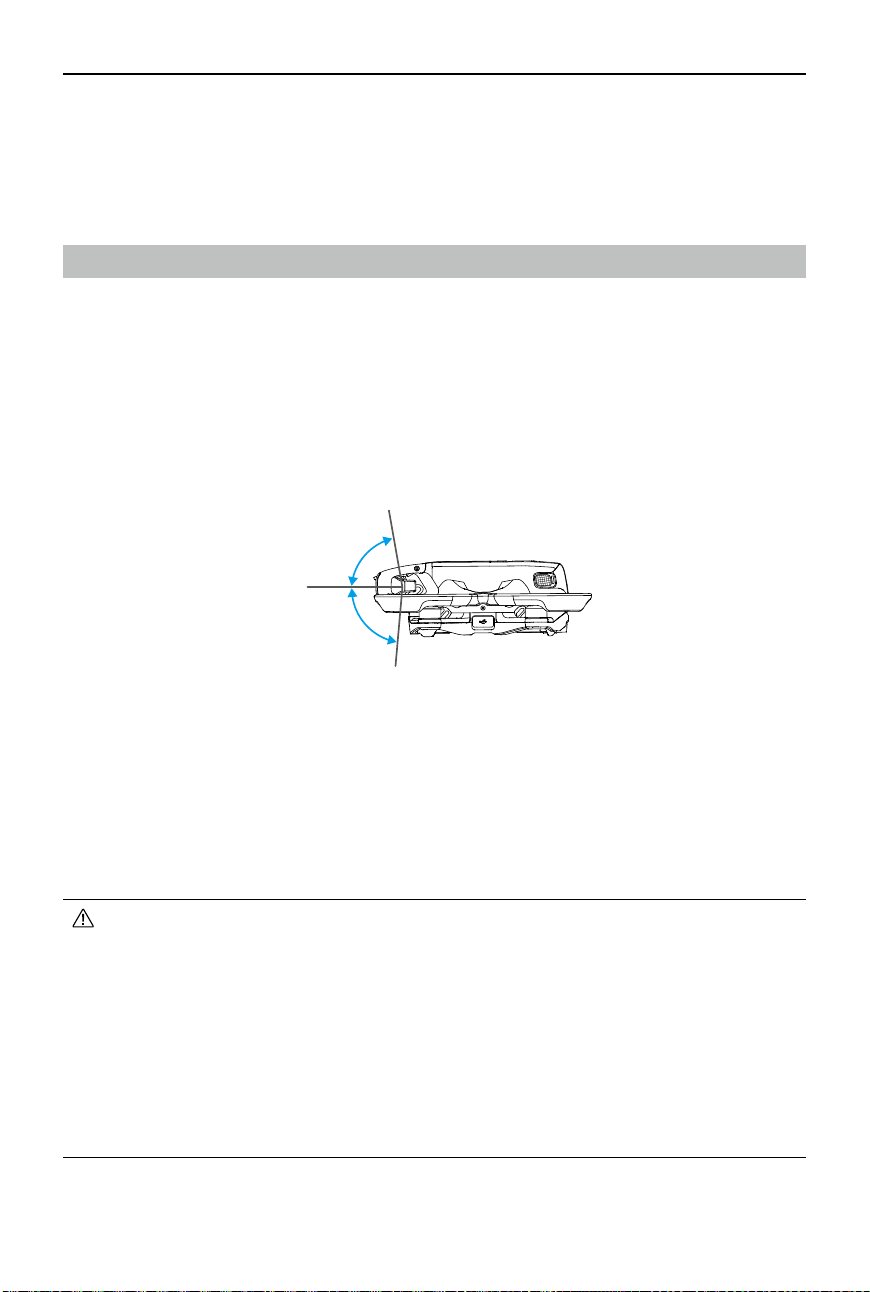
Gimbal Angle
The gimbal has a control tilt range of -85° to 80°. Use the remote control devices to control the
tilt of the camera.
Gimbal Mode
The gimbal mode will automatically switch according to the ight mode.
Normal/Sport mode:
The gimbal is in attitude stabilization mode. The tilt angle of the gimbal
remains stable relative to the horizontal plane, which is suitable for shooting stable images.
Manual mode:
The gimbal is in lock mode. The tilt angle of the gimbal remains stable relative
to the aircraft body.
• Make sure there are no stickers or objects on the gimbal before taking o. DO NOT
tap or knock the gimbal after the aircraft is powered on. Take off the aircraft from
open and at ground to protect the gimbal.
• Precision elements in the gimbal may be damaged by a collision or impact, which
may cause the gimbal to function abnormally. Make sure to protect the gimbal from
damage.
• Avoid getting dust or sand on the gimbal, especially in the gimbal motors.
• A gimbal motor error may occur if the aircraft is on uneven ground, the gimbal is
obstructed, or the gimbal experiences a collision or crash.
• DO NOT apply external force to the gimbal after the aircraft is powered on.
DJI Avata 2 User Manual
©
2024 DJI All Rights Reserved.
59
Warnings
1. DO NOT expose the camera lens to an environment with laser beams, such as a laser show,
or point the camera at intense light sources for an extended period, such as the sun on a
clear day, in order to avoid damaging the sensor.
2. Make sure the temperature and humidity are within suitable ranges for the camera during
use and storage.
3. Use a lens cleaner to clean the lens to avoid damage or poor image quality.
4. DO NOT block any ventilation holes on the camera as the heat generated may damage the
device or injure the user.
5. If oine stabilization software such as Gyroow is used for post-processing the recorded
videos, make sure to disable EIS and set the camera FOV to Wide in the goggles when
recording.
6. The cameras may not focus correctly in the following situations:
a. Shooting dark objects far away.
b. Shooting objects with repeating identical patterns and textures or objects without clear
patterns or textures.
c. Shooting shiny or reective objects (such as street lighting and glass).
d. Shooting ashing objects.
e. Shooting fast-moving objects.
f. When the aircraft or the gimbal is moving fast.
g. Shooting objects with varying distances in the focus range.
Footage Storage and Export
Footage Storage
The aircraft comes with a 46GB internal storage. Photos and videos can be saved in the internal
storage of the aircraft when no microSD card is available. The aircraft supports the use of a
microSD card to store photos and videos. A UHS-I Speed Grade 3 rating or above microSD card
is required due to the fast read and write speeds necessary for high-resolution video data. Refer
to the Specications for more information about recommended microSD cards.
It is recommended to use a microSD card for large data storage.
• DO NOT add any extra payload other than an official accessory to the gimbal, as
this may cause the gimbal to function abnormally or even lead to permanent motor
damage.
• Make sure to remove the gimbal protector before powering on the aircraft. Make sure
to mount the gimbal protector when the aircraft is not in use.
• Flying in heavy fog or clouds may make the gimbal wet, leading to temporary failure.
The gimbal will recover full functionality once it is dry.
DJI Avata 2 User Manual
60
©
2024 DJI All Rights Reserved.
• Photos and videos recorded by the aircraft can be previewed. Insert the microSD card
of the aircraft into the microSD card slot of the goggles.
• DO NOT remove the microSD card from the aircraft while it is powered on or taking
photos or videos. Otherwise, the microSD card may be damaged.
• Check camera settings before use to ensure they are congured correctly.
• Before shooting important photos or videos, shoot a few images to test whether the
camera is operating correctly.
• Make sure to power o the aircraft correctly. Otherwise, the camera parameters will
not be saved and any recorded videos may be aected. DJI is not responsible for any
loss caused by an image or video recorded in a way that is not machine-readable.
• The internal storage performance may be lowered after using for a long time. Follow
the instructions in the goggles to migrate and format the data to ensure good internal
storage performance.
Footage Export
Use QuickTransfer to export the footage to a mobile device. Refer to the QuickTransfer section
for more information.
1. Connect the aircraft to a computer using a data cable, export the footage in the internal
storage of the aircraft or in the microSD card mounted on the aircraft. The aircraft does not
need to be powered on during the exporting process.
2. Remove the microSD card from the aircraft and insert it into a card reader, and export the
footage in the microSD card through the card reader.
QuickTransfer
The aircraft can connect directly to mobile devices via Wi-Fi, enabling users to download photos
and videos from the aircraft to the mobile device through DJI Fly at a high rate.
Follow the steps below to export footage using QuickTransfer:
1. Power on the aircraft and wait until the self-diagnostic tests of the aircraft are complete.
2. Enable Bluetooth, Wi-Fi, and location services on the mobile device.
3. Run DJI Fly, tap the QuickTransfer card on the bottom left corner of the home screen,
and select the aircraft to be connected. When connecting DJI Fly to the aircraft for the rst
time, press and hold the power button for two seconds after a prompt appears on the app.
The battery level LEDs blink from inside to out and then turn solid. DJI Fly will prompt users
whether to connect to the aircraft or not.
4. Once successfully connected, the les on the aircraft can be accessed and downloaded at
high speed.
DJI Avata 2 User Manual
©
2024 DJI All Rights Reserved.
61
• When the aircraft is connected to DJI Fly using QuickTransfer, the aircraft will be
disconnected from the goggles and the remote controller. Connection will be
automatically restored after exiting QuickTransfer. If DJI Fly is closed abnormally,
connection can only be automatically restored after restarting the aircraft.
• The maximum download rate can only be achieved in countries and regions where
the 5.8 GHz frequency is permitted by laws and regulations, when using devices that
support 5.8 GHz frequency band and Wi-Fi connection, and in an environment without
interference or obstruction. If 5.8 GHz is not allowed by local regulations (such as in
Japan), or the mobile device of the user does not support the 5.8 GHz frequency band,
or the environment has severe interference, then QuickTransfer will use the 2.4 GHz
frequency band and its maximum download rate will be signicantly lowered.
• Use QuickTransfer in an unobstructed environment with no interference and stay
away from sources of interference such as wireless routers, Bluetooth speakers, or
headphones.
• DO NOT press the power button of the aircraft for a long time to avoid triggering the
linking process.

62
©
2024 DJI All Rights Reserved.
DJI Goggles 3
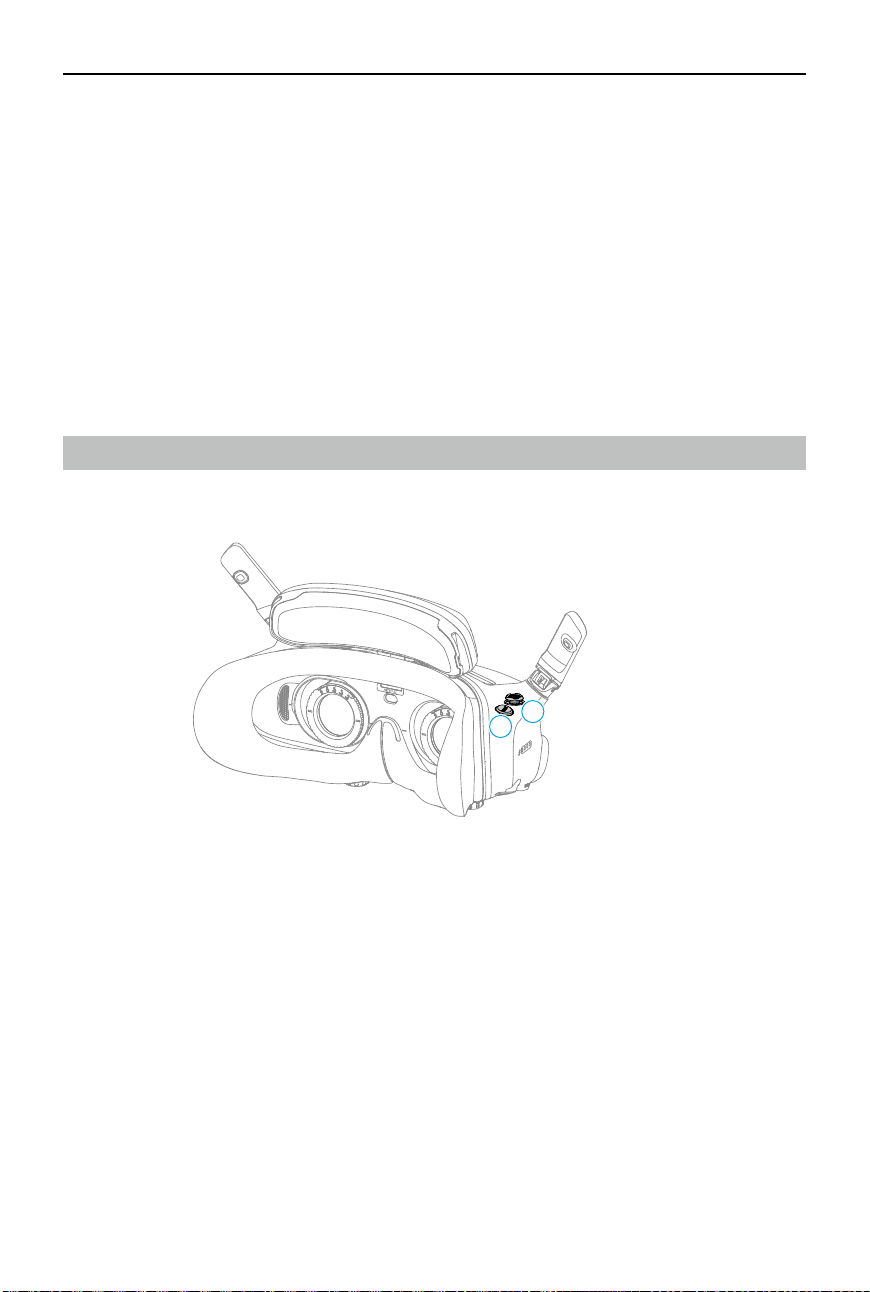
DJI Avata 2 User Manual
©
2024 DJI All Rights Reserved.
63
DJI Goggles 3
DJI Goggles 3 are equipped with two high-performance screens and ultra-low-latency image
transmission for use with DJI aircraft, allowing for a real-time aerial First Person View (FPV)
experience. DJI Goggles 3 supports the Head Tracking function. With this function, the aircraft
and gimbal can be controlled using head movements. When used with the DJI Motion Controller
3, users can control the aircraft and the gimbal camera freely to meet their shooting needs in
various scenarios.
To provide a more comfortable experience, the goggles support diopter adjustment so that
glasses are not required during use. Two cameras are positioned on the front side of the
goggles, in order to allow users to view the surrounding environment via Real View without
removing the goggles. The goggles can also share the liveview to a mobile device via Wi-Fi.
Operating the Goggles
Buttons
1
2
1. 5D Button
Press or push to the right to open the menu from the FPV view of the goggles. Push forward
to open the camera settings panel and push backward to open the shortcut menu.
After the settings panel is opened, push to navigate through the menu or adjust the
parameter value. Press to conrm the selection.
2. Back Button
Press to return to the previous menu or exit the current view.
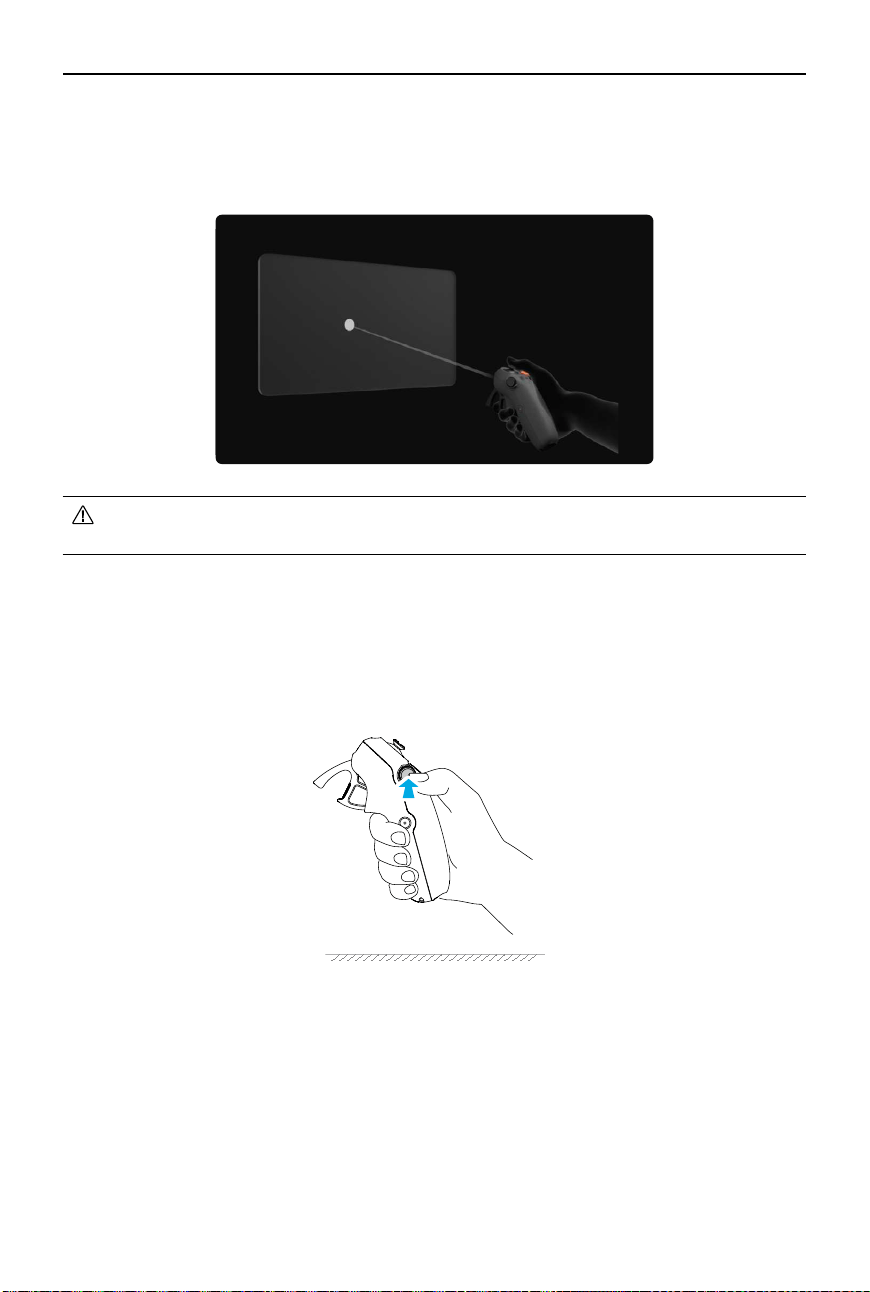
DJI Avata 2 User Manual
64
©
2024 DJI All Rights Reserved.
AR Cursor
Before takeo or when using the lock button to trigger the aircraft to hover, users can use the
AR Cursor (the white line with a circle at the end) to interact with the screen of the goggles.
Recenter the Cursor
If the cursor is not displayed on the screen of the goggles, hold the motion controller as shown
below, and then press and hold the dial on the left side of the motion controller to recenter the
cursor.
• AR Cursor cannot function properly when being used on moving objects, such as cars
and ships.
If the cursor still cannot be found, tilt the motion controller up or down until the cursor appears
on the screen.
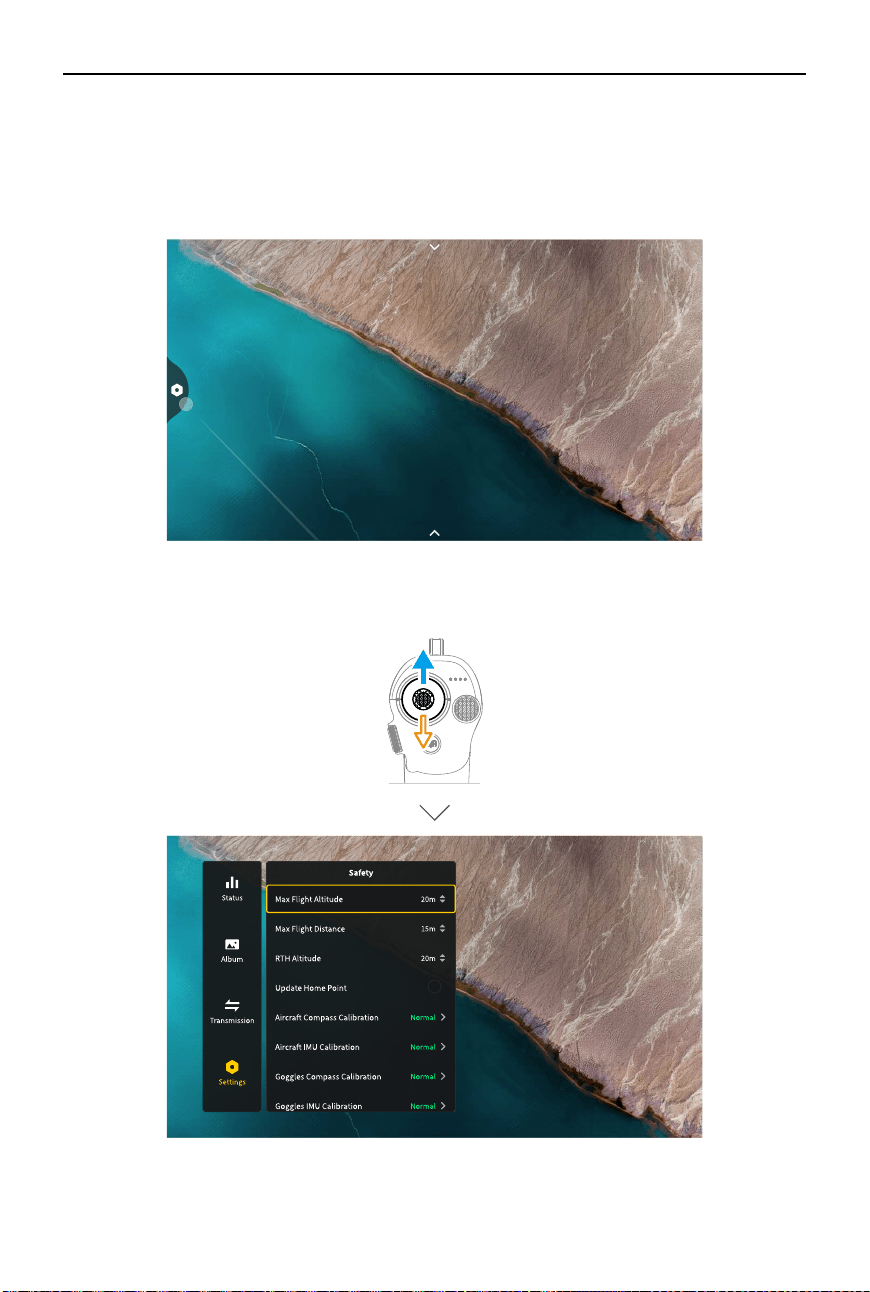
DJI Avata 2 User Manual
©
2024 DJI All Rights Reserved.
65
Operating the Menu
• Using motion controller movements, move the cursor to the arrow on the left side of the
screen. Gently press the accelerator to the first stop position, then the cursor will become
small and the menu will be opened.
Use the joystick on the motion controller to scroll up or down in the menu.
To exit or return to the previous menu, push the accelerator forward, or gently press the
accelerator when the cursor is on any empty spot on the screen.
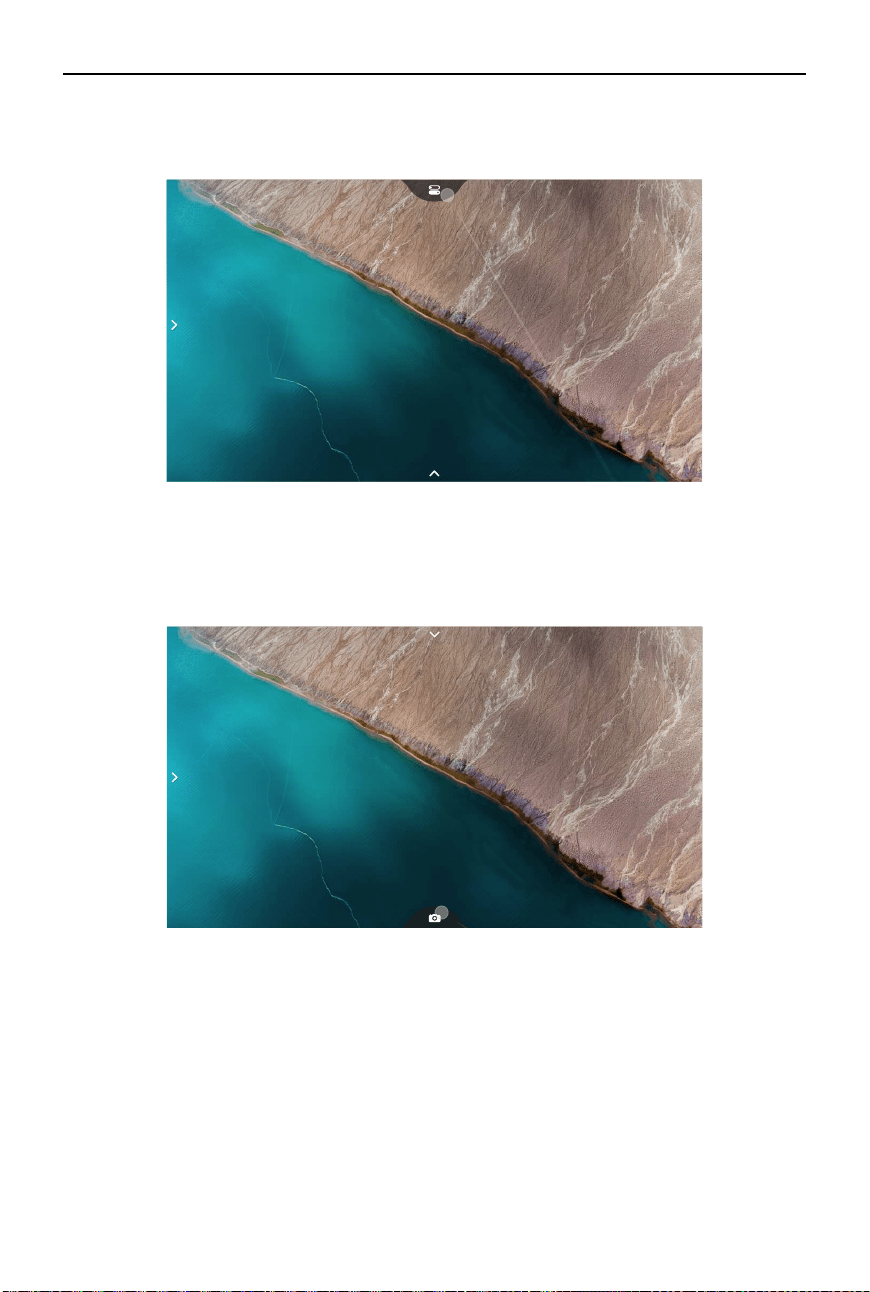
DJI Avata 2 User Manual
66
©
2024 DJI All Rights Reserved.
• Move the cursor to the arrow on the bottom of the screen, press the accelerator to enter
camera settings, and congure settings for the parameters of the aircraft camera.
Controlling Video Playback
When previewing photos or videos stored on the microSD card of the goggles, the cursor can be
used to control playback, or complete other operations such as:
• Press the accelerator to pause or continue to play, push the accelerator forward to exit.
• Move the cursor left or right while pressing the accelerator down to adjust the progress bar.
• Move the cursor to the arrow on the top of the screen, press down the accelerator to enter
playback settings and adjust the screen brightness or volume.
• Move the cursor to the arrow on the top of the screen, press the accelerator to enter the
shortcut menu, and congure settings such as Recording or Enhanced Display.
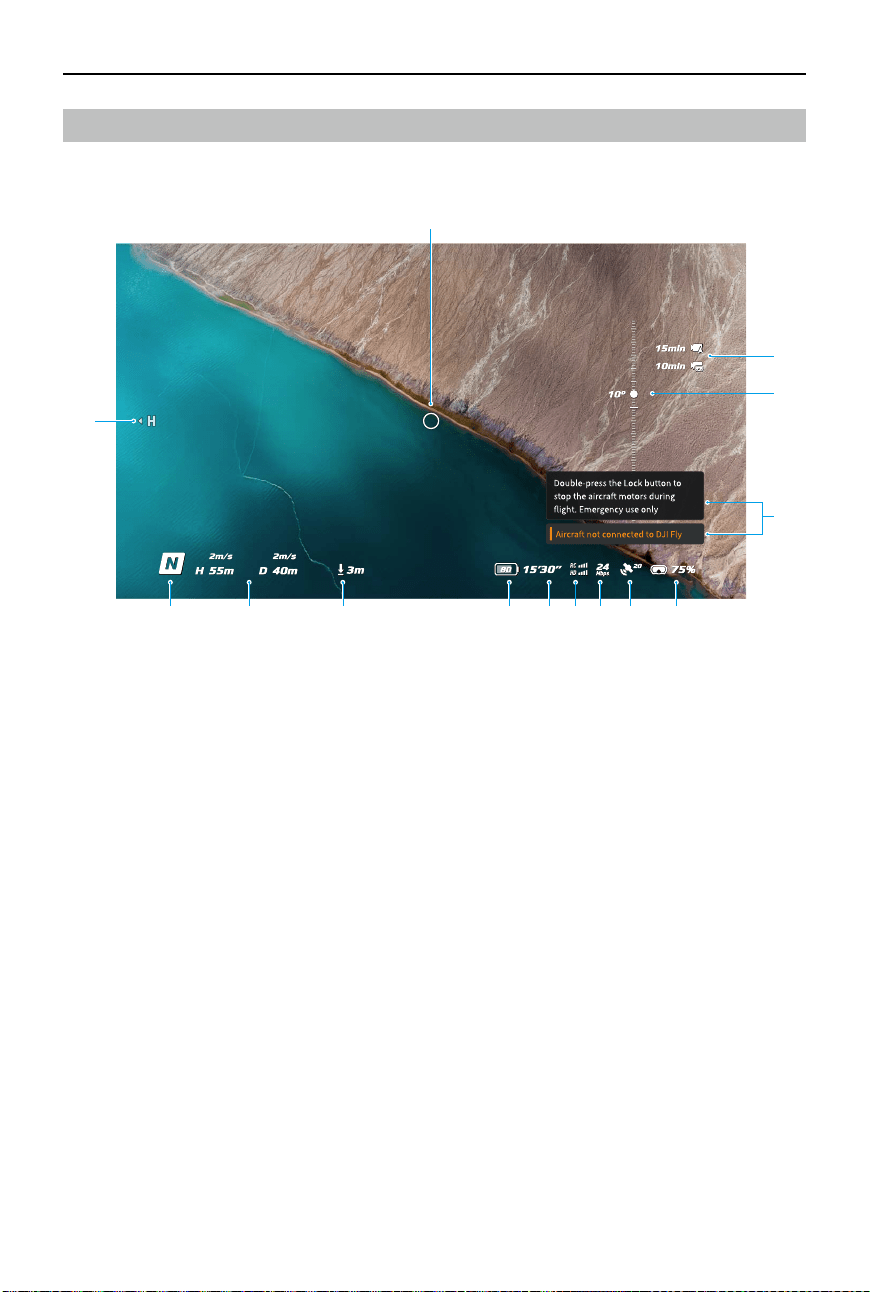
DJI Avata 2 User Manual
©
2024 DJI All Rights Reserved.
67
Goggles Screen
FPV View
1. Flight Direction Indicator
When controlling the aircraft with the motion controller, the circle indicates the direction in
which the aircraft is heading.
2. Storage Information
Displays the remaining capacity of the aircraft or goggles storage.
3. Gimbal Slider
Displays the gimbal tilt angle.
4. Prompts
Displays notications and information such as when a new mode is applied or the battery
level is low.
5. Goggles Battery Level
Displays the battery level of the goggles.
6. GNSS Status
Displays the current strength of the aircraft GNSS signal.
If the devices are not used for an extended period of time, it may take longer than usual to
search for the GNSS signal. If the signal is unobstructed, it takes approximately 20 seconds
to search for the GNSS signal when powering on and off within a short period of time.
When the icon is white, the GNSS signal is strong. When the icon is orange, the GNSS signal
is weak. When the icon is red, the GNSS signal is extremely weak.
1
2
3
4
568 7910111213
14

DJI Avata 2 User Manual
68
©
2024 DJI All Rights Reserved.
7. Video Bitrate
Displays the current video bitrate of the liveview.
8. Remote Controller and Image Transmission Signal Strength
Displays the signal strength of the remote control device, and the image transmission signal
strength between the aircraft and the goggles.
The icon is white when the signal is strong, and turns gray when the signal is lost.
The icon is orange when the signal is moderately weak, and turns red when the signal is
extremely weak. A prompt bar of the same color is displayed in the bottom of the ight
liveview.
9. Remaining Flight Time
Displays the remaining ight time of the aircraft.
10. Aircraft Battery Level
11. Distance to the Ground
Displays the current altitude information of the aircraft from the ground when the aircraft
is less than 10 m above the ground.
12. Flight Telemetry
Displays the horizontal distance (D) between the aircraft and the Home Point, height (H)
from the Home Point, aircraft horizontal speed, and aircraft vertical speed.
13. Flight Modes
Displays the current ight mode.
14. Home Point
Indicates the relative position of the Home Point.
Shortcut Menu
Push the 5D button backward to open the shortcut menu from the FPV view and access the
quick controls of the following functions:
• Take a photo, or start/stop recording
• Enable/disable Enhanced Display
• Enable/disable Head Tracking
• Enable/disable Share Liveview to Mobile Device via Wi-Fi
• Enable/disable Easy ACRO
• Enable/disable Goggles Defog
• Adjust brightness
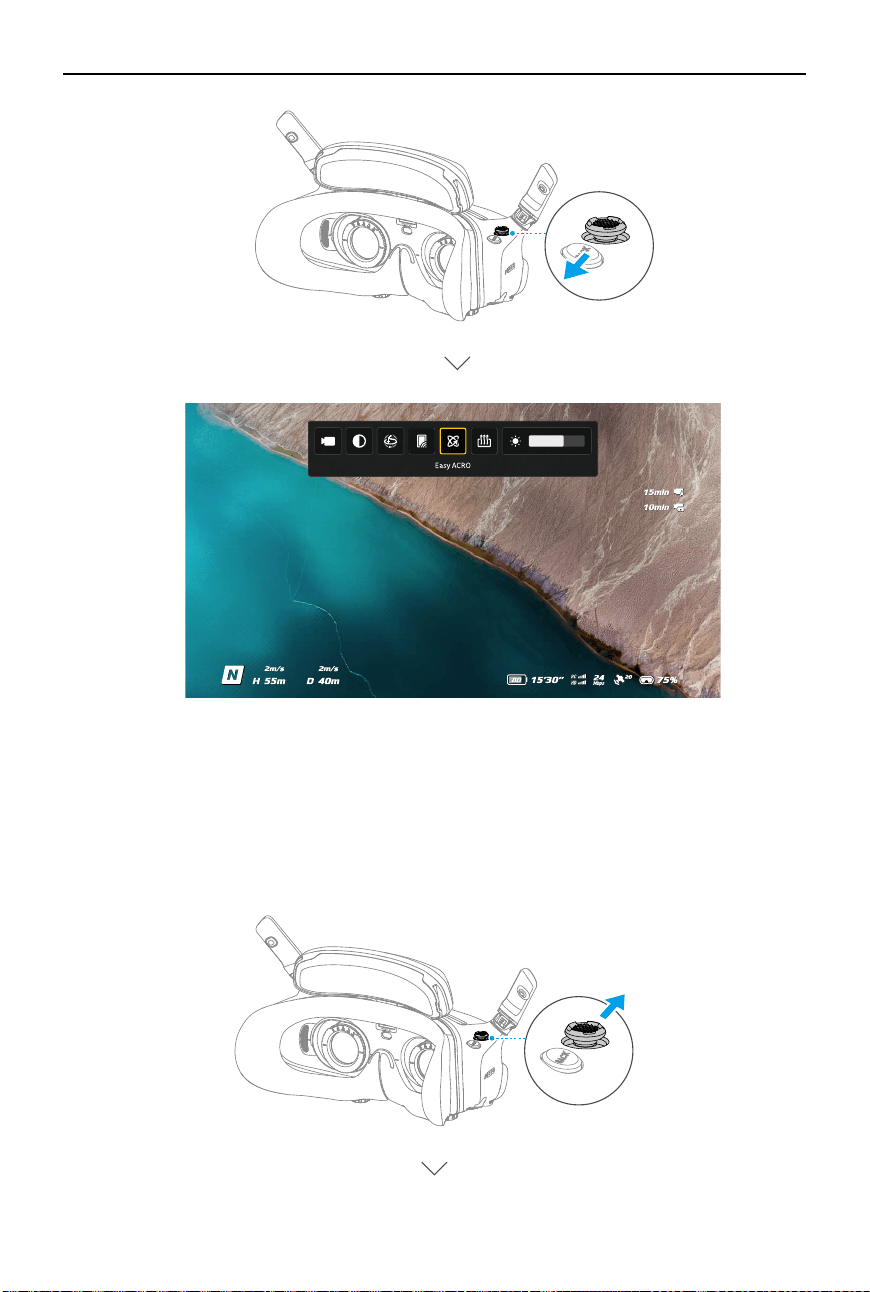
DJI Avata 2 User Manual
©
2024 DJI All Rights Reserved.
69
Camera Settings
Push the 5D button forward from the FPV view to open the camera settings panel and change
camera-related parameters.
In the parameter panel, push to the right to view and set more parameters.
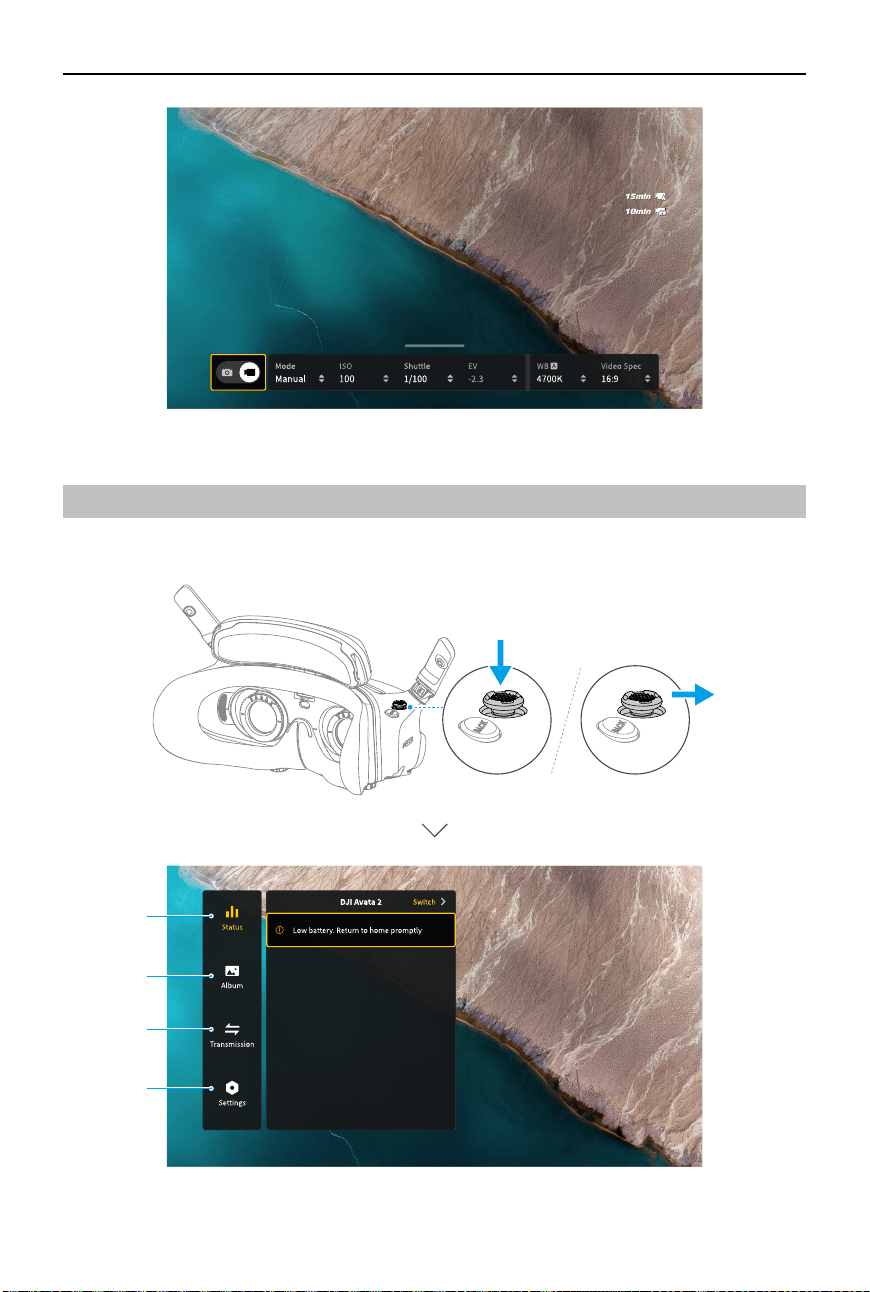
DJI Avata 2 User Manual
70
©
2024 DJI All Rights Reserved.
Goggles Menu
Press down the 5D button or push it to the right to open the menu from the FPV view.
1
2
3
4

DJI Avata 2 User Manual
©
2024 DJI All Rights Reserved.
71
1. Status
• Displays the in-use aircraft model and detailed information of prompt alerts.
• Use the switch function in the upper right corner to change the aircraft.
2. Album
Shows the photos or videos stored on the microSD card of the goggles. Select any le to
preview.
3. Transmission
The Transmission menu has a Pilot sub-menu and Audience sub-menu.
• The video transmission mode for the current device can be set under the Pilot sub-menu,
including but not limited to the following:
a) Enable or disable Broadcasting mode. The device number will be displayed when
Broadcasting mode is enabled so that other devices can nd the device and enter the
channel to see the ight liveview.
b) Disable the Focus mode, or set to auto.
c) Set the Channel mode to auto or manual. It is recommended to select auto so that the
video transmission will automatically switch between dierent frequency bands and
select the channel with the best signal.
d) Set the frequency band. If the channel mode is set to manual, either 2.4 or 5.8 GHz
can be selected.
e) Set the bandwidth of the video transmission. The number of channels available
varies according to the bandwidth. The channel with the best signal strength can be
manually selected. The higher the bandwidth, the higher video transmission rate
and clearer image quality. However, there will also be a higher chance of wireless
interference and the amount of equipment that can be accommodated will be more
limited. To avoid interference in a multiplayer competition, manually select a fixed
bandwidth and channel.
• If any nearby video transmission device turns on the Broadcasting mode, the device and
its signal strength can be viewed in the Audience sub-menu. Select a channel to see the
ight liveview.
4. Settings
• Safety
a) Set the safety congurations such as max ight altitude, max ight distance, and RTH
altitude. Users can also update the Home Point, and view the IMU and compass status
of the aircraft or the goggles and calibrate them if necessary.
b) Camera View Before Loss helps to nd the location of the aircraft on the ground by
using the cached video of the aircraft 30 seconds before signal is lost. If the aircraft
still has signal and battery power, turn on ESC beeping to locate the aircraft using a
beeping sound that is emitted from the aircraft.
c) Advanced Safety Settings include the following:
• Aircraft Signal Lost Action: The aircraft behavior can be set to hover, land, or RTH
when the remote controller signal is lost.
• Emergency Propeller Stop (disabled by default): When enabled, the motors of
the aircraft can be stopped mid-flight anytime once the user presses the motion
DJI Avata 2 User Manual
72
©
2024 DJI All Rights Reserved.
controller lock button four times. If the switch is disabled, the motors can only be
stopped with this action in an emergency, such as if a collision occurs, a motor
stalls, the aircraft rolls in the air, or the aircraft is out of control and is ascending or
descending quickly.
• Stopping motors mid-ight will cause the aircraft to crash. Operate with
caution.
• Control
a) Configure remote controller-related functions, such as setting the stick mode,
customizable buttons, and calibrating the IMU and compass.
b) View motion controller instructions, switch Handedness, adjust Gain Tuning, or
calibrate the motion controller.
c) Calibrate the gimbal, adjust the gimbal tilt speed, set the unit, or use turtle mode to
ip the overturned aircraft upright.
d) View the goggles tutorial.
• Camera
a) Set the aspect ratio, video quality, video format, gridlines, storage device, format the
SD card, and so on.
• Data cannot be recovered after formatting. Operate with caution.
b) Advanced Camera Settings:
• Set the recording device, screen related parameters, enable or disable auto record
at takeo, and so on.
• Camera View Recording (enabled by default): If disabled, the recording of the
goggles screen will not include the OSD elements.
c) Select Reset Camera Parameters to restore all camera settings to default.
• Display
a) Adjust screen brightness, display scaling, and display or hide the Home Point.
b) Goggles Defog: If enabled, the cooling fan will keep running at high speed to alleviate
the fogging of the lenses.
c) Set the display of Real View.
• About
a) View device information, such as the serial number, the rmware of the goggles, and
linked devices.
b) Set the system language.
c) OTG Wired Connection: In this mode, the goggles can be connected to the PC via the
USB-C fast charging cable.
d) View the compliance information.
e) Reset the goggles and the linked devices to their default settings.
f) Clear All Device Data: All user data generated during use and stored on the aircraft
will be erased.
DJI Avata 2 User Manual
©
2024 DJI All Rights Reserved.
73
Goggles Footage Storage and Export
Footage Storage
The goggles support the installation of a microSD card. After a microSD card is inserted, if
Record With is set to both the aircraft and the goggles while the aircraft is recording video the
goggles will simultaneously record the ight live view displayed on the screen and store it on
the microSD card of the goggles.
Footage Export
To export the recorded footage, follow the steps below:
1. Power on the goggles.
2. Connect the USB-C port of the goggles to a PC using a USB-A to USB-C cable, and follow the
on-screen prompts to export the footage.
• If the goggles are connected to a PC via the USB-C fast charging cable, go to the
goggles menu and select Settings > About, and enter the OTG Wired Connection mode
to export the footage.
The screen recording includes the OSD elements by default. To record the screen without the
OSD elements, change the settings as shown below:
1. Open the goggles menu.
2. Select Settings > Camera > Advanced Camera Settings, and disable Camera View Recording.
Formatting the SD Card
To format the microSD card, follow the steps as shown below:
1. Open the goggles menu.
2. Select Settings > Camera > Format
3. Select the storage device to format and follow the on-screen instructions to complete the
operation.
• Data cannot be recovered after formatting. Operate with caution.
microSD Card Slot
DJI Avata 2 User Manual
74
©
2024 DJI All Rights Reserved.
Real View
DJI Goggles 3 are equipped with binocular cameras, in order for users to view the surrounding
environment without removing the goggles.
Tap twice firmly on the right side of the goggles, or press twice on the dial of the motion
controller to enter Real View.
Perform the same action again to exit and return to the ight liveview.
Enter the goggles menu, select Settings > Display, and then Real View can be set to 2D or 3D.
3D will bring a more immersive three-dimensional real view. Please select based on personal
preference.
Real View PiP
When the goggles are used with the aircraft, Real View supports displaying the real-time ight
liveview.
1. Enter the goggles menu, select Settings > Display, and then enable Real View PiP.
2. Tap twice firmly on the right side of the goggles, or press twice on the motion controller
dial
,
the ight liveview will be displayed in the upper left corner of the real view. Both the
surroundings and the aircraft video transmission will be displayed on the goggles screen
simultaneously.
• If the Real View is set to 3D, the flight liveview cannot be displayed on the screen
simultaneously.
• When using Real View PiP, the ight liveview is only used to show the status of the
aircraft. DO NOT rely on this screen for ight.
Liveview Sharing
DJI Goggles 3 can share a ight liveview via three dierent methods.
• Power on the aircraft, goggles, and remote control device. Make sure all the devices
are linked.
• Operate Liveview Sharing prior to taking off, or when the aircraft is braking or
hovering, to avoid interfering with the pilot's operation.
• The goggles only support connecting to one mobile device for sharing the liveview
either in wireless or wired connection.
• When connected to a mobile device, liveview sharing will be paused if the goggles
switch to Real View, and the sharing will be recovered when the goggles switch back
the ight liveview.
• When connected to a mobile device, liveview sharing will be paused when viewing the
images or videos in the album. Exit the album to recover sharing.
DJI Avata 2 User Manual
©
2024 DJI All Rights Reserved.
75
Wired Connection with Mobile Device
1. It is recommended to use a suitable data cable or the USB-C OTG cable provided to connect
the mobile device to the USB-C port on the goggles.
2. Launch DJI Fly app and tap GO FLY in the lower right corner of the screen to enter the
liveview.
Wireless Connection with Mobile Device
1. Open the shortcut menu, and select Share Liveview to Mobile Device via Wi-Fi.
2. Turn on Wi-Fi and Bluetooth on your mobile device, and enable the Location feature on your
phone.
3. Launch the DJI Fly app, a new device available for Wi-Fi connection will appear in a box on
the home page.
4. Tap the box and select the goggles to be connected.
5. When connecting DJI Fly to the goggles for the rst time, press and hold the power button
on the goggles for two seconds when the prompt appears. The battery level LEDs blink from
inside to out and then turn solid. DJI Fly will prompt the user to connect to the goggles if
needed. Select Join.
6. Tap Watch Liveview to access the liveview from the goggles.
• DO NOT press the power button of the goggles for a long period of time to avoid
triggering the linking process.
• If Share Liveview to Mobile Device via Wi-Fi is enabled, wired connection with mobile
device is not supported.
• In wireless connection mode, disconnect the goggles from the current connected
mobile device before connecting the goggles to another new mobile device for
liveview sharing.
• If 5.8 GHz is not allowed by local regulations (such as in Japan), Share Liveview to
Mobile Device via Wi-Fi cannot be used.
Broadcasting to Other Goggles
Broadcasting mode is available for sharing the liveview to other goggles if there are other DJI
Goggles 3 nearby.
1. Enter the goggles menu, select Transmission and enter the Pilot sub-menu.
2. Turn on Broadcasting mode, and the device number will be displayed.
3. On the other DJI Goggles 3, enter the goggles menu, select Transmission and enter the
Audience sub-menu.
4. If any nearby DJI Goggles 3 turns on the Broadcasting mode, the device and its signal
strength can be viewed in the Audience sub-menu. Select the device number to access the
liveview. Switching to Pilot sub-menu to exit the shared liveview.
DJI Avata 2 User Manual
76
©
2024 DJI All Rights Reserved.
Panorama/3D Video Playback
The goggles support playing panoramic videos and 3D videos, bringing you an immersive
viewing experience.
1. Import panoramic/3D videos to a microSD card, and insert it into the goggles.
2. Enter the goggles menu and then Album, then select the video le to play.
3. Push the 5D button backward to open the playback menu, and select
2D
Display Switch
Settings.
4. Set the display mode.
• If the video is panoramic, select 2D rst, and then set the FOV to panorama.
• If the video is a 3D, first select the 3D display mode based on the video format, then
select the FOV, and whether to reverse left and right.
5. Exit the shortcut menu after conrming the selections, then the panoramic/3D video will be
played based on the display settings.
• Refer to the Specications for more information about the supported video formats.
• The goggles have no speaker but can be connected to headphones via the USB-C port.
Only supports Type-C headphones and headphone adapters with built-in DAC (digital-
to-analog converter).

©
2024 DJI All Rights Reserved.
77
DJI Motion Controller
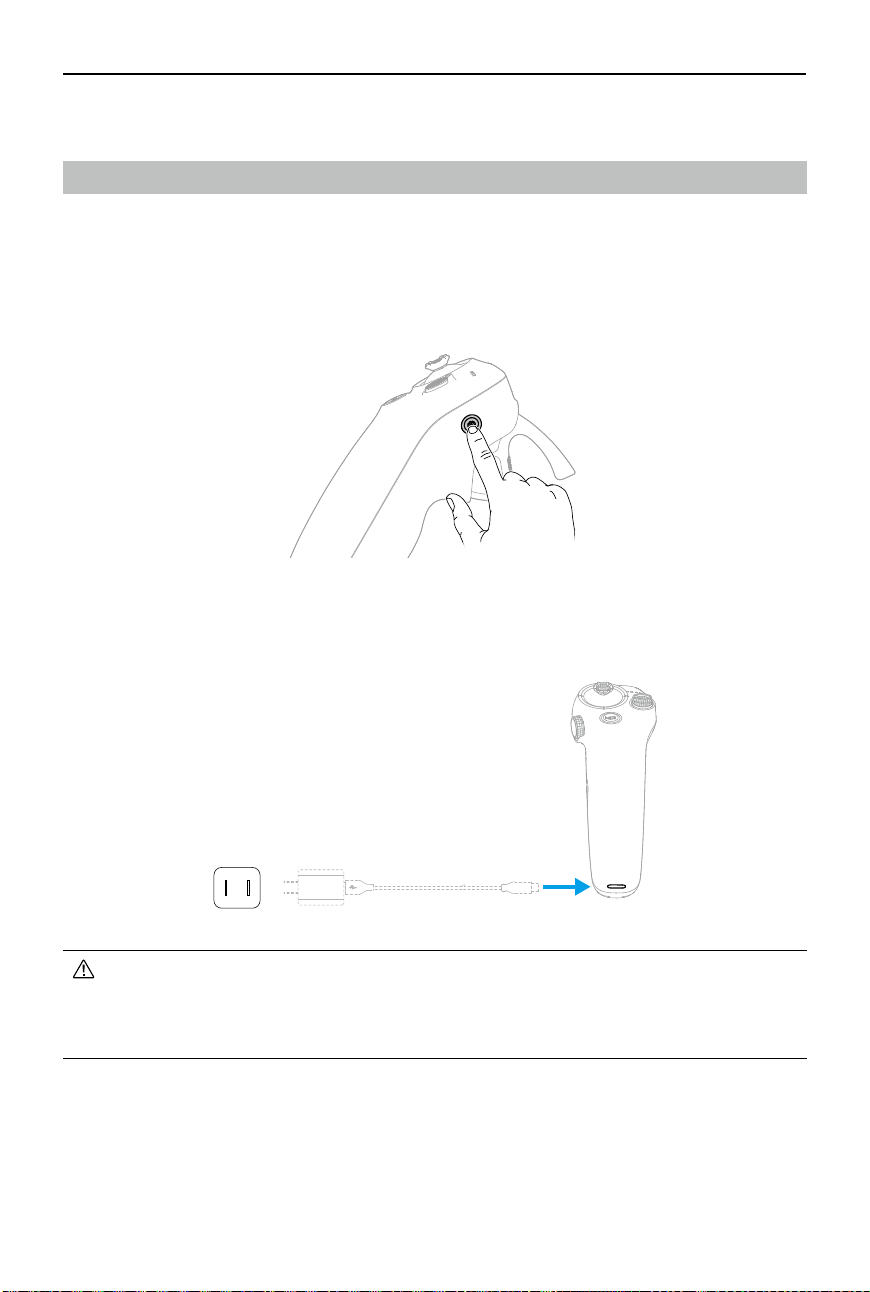
DJI Avata 2 User Manual
78
©
2024 DJI All Rights Reserved.
DJI Motion Controller
Operation
Powering On/O
Press the power button once to check the current battery level. Charge before using if the
battery level is too low.
Press once then press again and hold for two seconds to power the motion controller on or o.
Charging the Battery
Use a USB-C cable to connect a charger to the USB-C port of the motion controller.
• Fully charge the remote controller before each ight. The remote controller sounds an
alert when the battery level is low.
• Fully charge the battery at least once every three months to maintain good battery
health.
5V, 2A
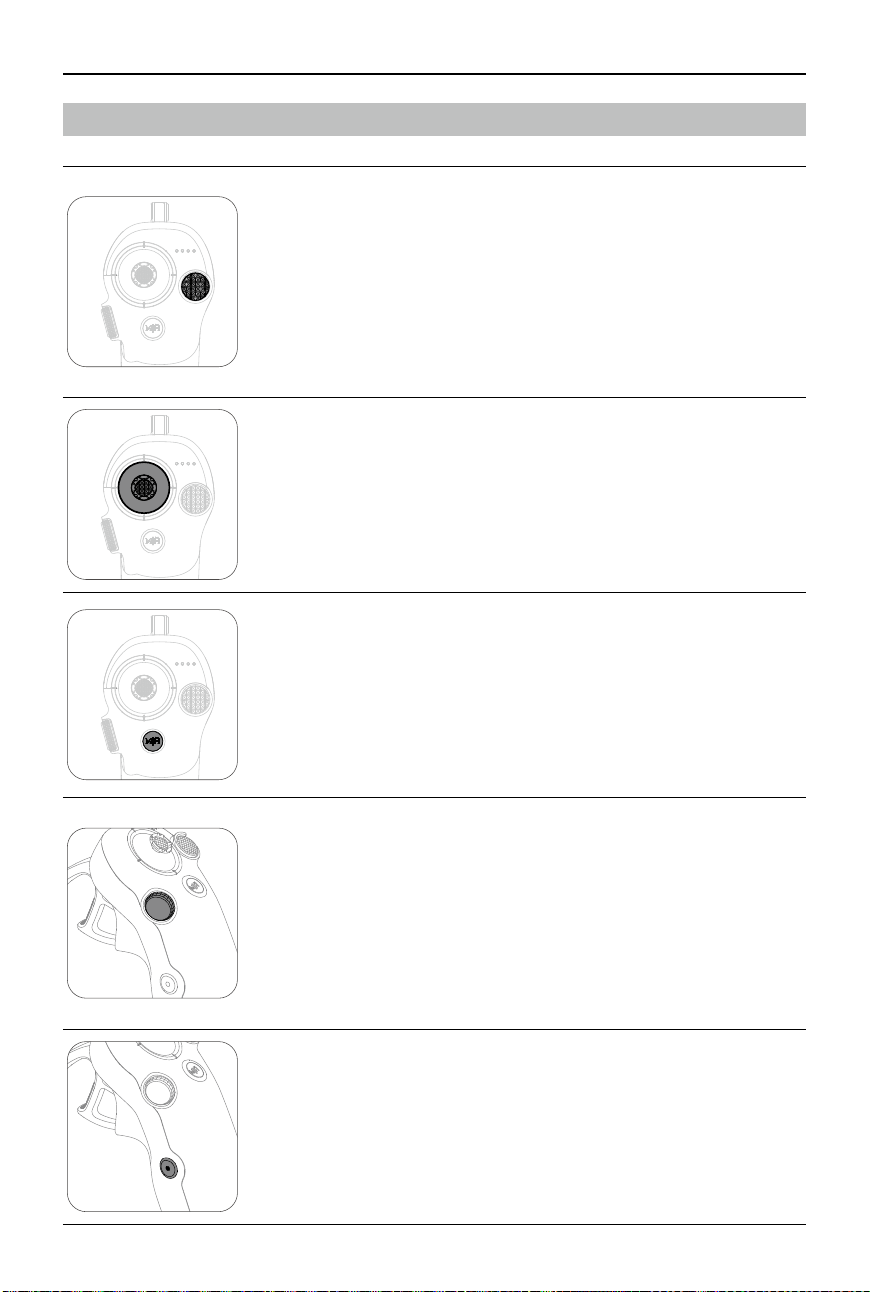
DJI Avata 2 User Manual
©
2024 DJI All Rights Reserved.
79
Button Features
Lock Button
• Takeoff: Press twice to start the aircraft motors, then press and
hold to make the aircraft take off. The aircraft will ascend to
approximately 1.2 m and hover.
• Landing: While the aircraft is hovering, press and hold to land the
aircraft and stop the motors.
• Brake: Press during ight to make the aircraft brake and hover in
place.
Joystick
• Move up or down to make the aircraft ascend or descend.
• Move it left or right to make the aircraft move left or right
horizontally.
When Easy ACRO is enabled, move the joystick to perform dierent
Easy ACRO actions.
Mode Button
• Press to switch between Normal and Sport mode.
• Press and hold to initiate RTH. When the aircraft is performing
RTH, press the mode button or lock button once to cancel RTH.
• When the battery level is low and only sucient to y to the Home
Point, a warning prompt will appear in the goggles and RTH will
be triggered following the prompt. Press the mode button once to
cancel the prompt.
Dial
• Press twice to switch between the ight liveview and Real View in
the goggles.
• Scroll up or down to tilt the camera before takeo or during RTH
and landing.
• Scroll the dial to switch between Easy ACRO actions when Easy
ACRO is enabled.
• Press and hold the dial to recenter the cursor on the screen when
using AR Cursor.
Shutter/Record Button
• Press once: Take a photo or start or stop recording.
• Press and hold: Switch between photo and video mode.
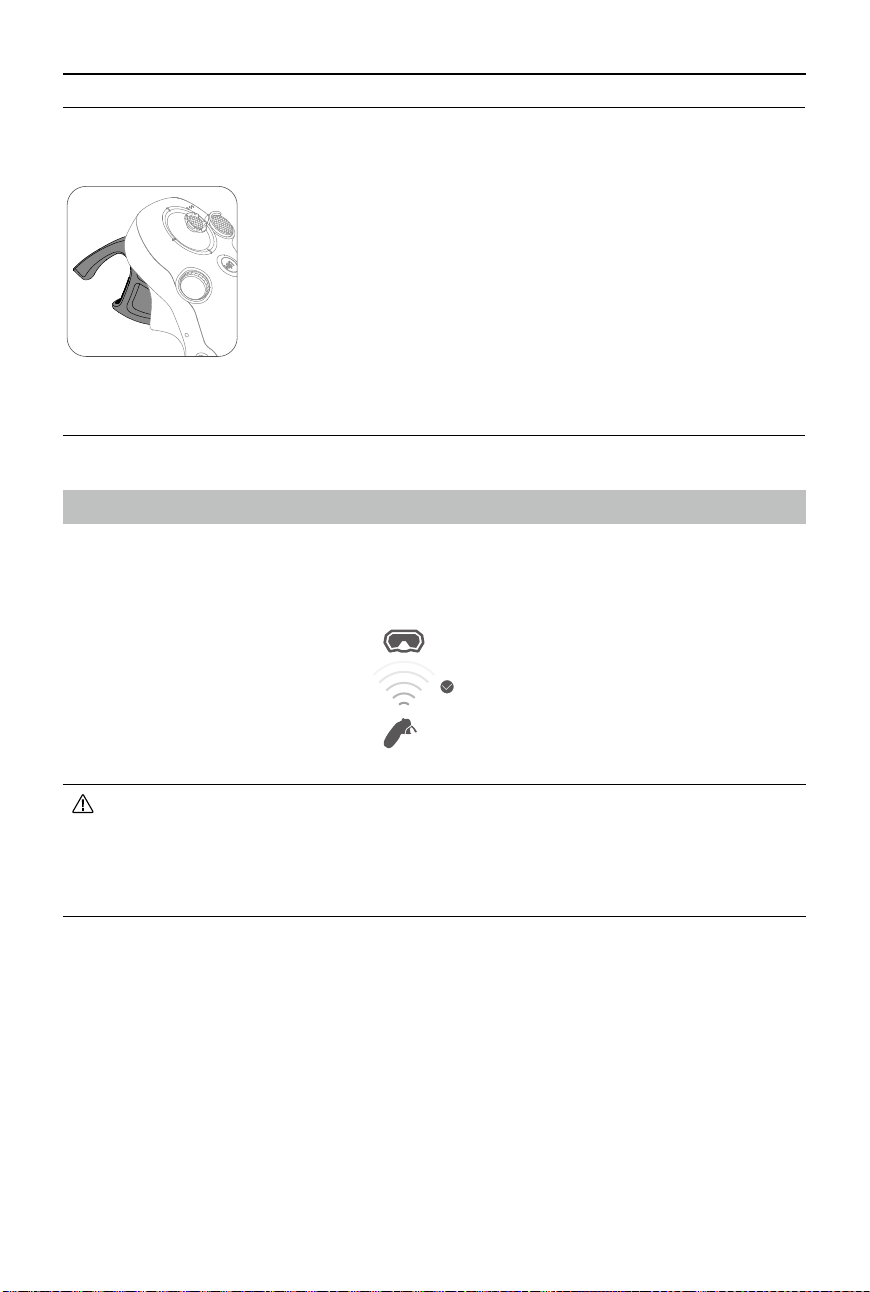
DJI Avata 2 User Manual
80
©
2024 DJI All Rights Reserved.
Accelerator
The accelerator is used for controlling aircraft orientation and
acceleration. There are two stops when pressing the accelerator.
After gently pressing the accelerator, users will feel noticeable
resistance when the accelerator reaches the rst stop.
• After gently pressing the accelerator to the first stop, users can
adjust the aircraft orientation by tilting the top of the motion
controller to the left or right. Note that the aircraft will not fly
forward at this time.
• Press the accelerator past the rst stop to y in the direction of the
circle in the goggles. Push the accelerator forward to y the aircraft
backward. Apply more pressure in either direction to accelerate.
• When the accelerator is not being pressed, the aircraft will hover.
≤3m
• It is recommended to use the device in an open, outdoor environment to avoid having
obstacles between the motion controller and the goggles. Otherwise, the transmission
may be aected.
• In order to avoid interference, DO NOT use other wireless devices on the same
frequency as the motion controller.
Optimal Transmission Zone
The signal between all the devices is most reliable when the relative distance between the
motion controller and the goggles is less than 3 m.
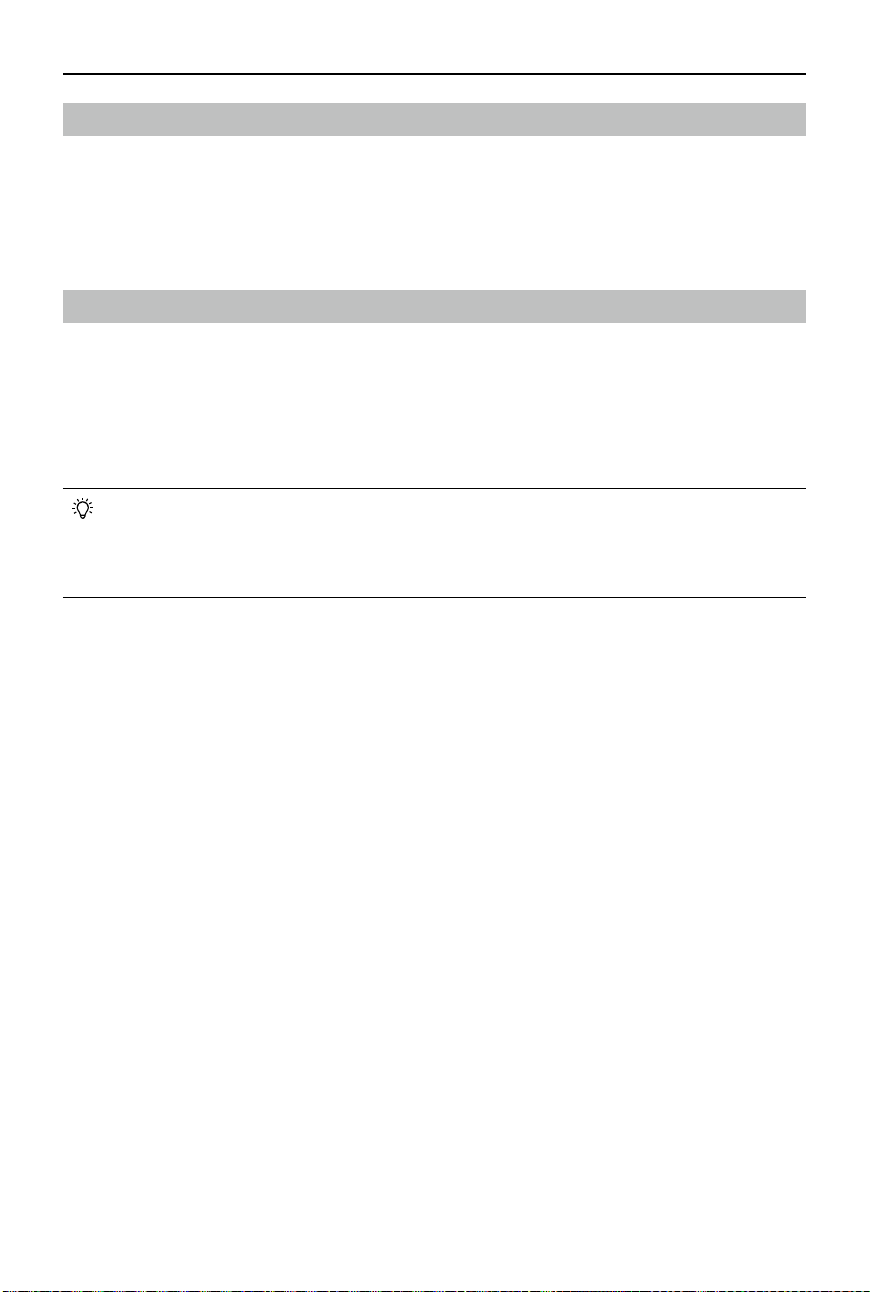
DJI Avata 2 User Manual
©
2024 DJI All Rights Reserved.
81
Motion Controller Alert
The remote controller sounds an alert when the battery level is between 6% and 10%. A low
battery level alert can be canceled by pressing the power button. A critical battery level alert
will sound when the battery level is less than 5% and cannot be canceled The remote controller
sounds an alert during RTH, which cannot be canceled.
Motion Controller Calibration
The compass, IMU, and accelerator of the motion controller can be calibrated.
Immediately calibrate any of the modules when prompted to do so:
1. Press down the 5D button in ight liveview to open the menu.
2. Select Settings > Control > Motion Controller >RC Calibration.
3. Select the module and follow the prompts to complete calibration.
• DO NOT calibrate the compass in locations with strong magnetic interference, such
as near magnets, parking lots, or construction sites with underground reinforced
concrete structures.
• DO NOT carry ferromagnetic materials such as mobile phones during calibration.

82
©
2024 DJI All Rights Reserved.
DJI Fly App
DJI Avata 2 User Manual
©
2024 DJI All Rights Reserved.
83
DJI Fly App
Connect the goggles to the mobile device, launch DJI Fly, and enter the home screen. Users can
do the following from the home screen:
• Discover recommended Fly Spots, check for GEO Zones and find information about local
laws and regulations, watch function tutorials, and read product manuals.
• Visit the album to view photos and videos, or explore more shared footage from SkyPixel.
• Log in with your DJI account to check your account information and ight records.
• Update rmware, locate a lost aircraft using Find My Drone, visit the DJI Forum, or shop the
DJI Store.
Tap GO FLY to display the video transmission, which allows you to share the FPV camera view.
• Fully charge your mobile device before launching DJI Fly.
• Mobile cellular data is required when using DJI Fly. Contact your wireless carrier
regarding data charges.
• DO NOT accept phone calls or use texting features during flight if you are using a
mobile phone as your display device.
• Read all safety prompts, warning messages, and disclaimers carefully. Familiarize
yourself with relevant regulations in your area. You are solely responsible for being
aware of all relevant regulations and ying in a way that is compliant.
• The use of the app is subject to DJI Fly Terms of Use and DJI Privacy Policy. These
Terms of Use and Privacy Policy limit some of DJI's legal responsibilities. Read them
carefully at https://developer.dji.com/policies/.

84
©
2024 DJI All Rights Reserved.
Appendix

DJI Avata 2 User Manual
©
2024 DJI All Rights Reserved.
85
Appendix
Specications
DJI Avata 2
Takeo Weight
Approx. 377 g
Dimensions
185×212×64 mm (L×W×H)
Max Ascent Speed
6 m/s (Normal mode)
9 m/s (Sport mode)
Max Descent Speed 6 m/s (Normal mode)
9 m/s (Sport mode)
Max Horizontal Speed
(near sea level, no wind)
8 m/s (Normal mode)
16 m/s (Sport mode)
27 m/s (Manual mode)
*
* No faster than 19 m/s with the Manual mode in the EU regions.
Max Takeo Altitude
[1]
5000 m
Max Flight Time
[2]
Approx. 23 mins
Max Hovering Time
[3]
Approx. 23 mins
Max Flight Distance
[4]
13.0 km
Max Wind Speed
Resistance
10.7 m/s (Level 5)
Operating Temperature
-10° to 40° C (14° to 104° F)
Global Navigation Satellite
System
GPS + Galileo + BeiDou
Hovering accuracy range Vertical:
±0.1 m (with vision positioning)
±0.5 m (with GNSS positioning)
Horizontal:
±0.3 m (with vision positioning)
±1.5 m (with GNSS positioning)
Internal Storage
46 GB
Camera
Image Sensor
1/1.3-inch image sensor
Eective Pixels: 12 MP
Lens FOV: 155°
Format Equivalent: 12 mm
Aperture: f/2.8
Focus: 0.6 m to ∞
ISO Range
100-25600 (Auto)
100-25600 (Manual)

DJI Avata 2 User Manual
86
©
2024 DJI All Rights Reserved.
Shutter Speed
Video: 1/8000-1/30 s
Photo: 1/8000-1/50 s
Max Image Size
4000×2256 (16
:
9)
4000×3000 (4:3)
Still Photography Mode
Single shot
Photo Format
JPEG
Video Resolution
4K (4:3): 3840×2880@30/50/60fps
4K (16:9): 3840×2160@30/50/60fps
2.7K (4:3): 2688×2016@30/50/60fps
2.7K (16:9): 2688×1512@30/50/120fps
1080p (4:3): 1440×1080@30/50/120fps
1080p (16:9): 1920×1080@30/50/120fps
Video Format
MP4 (H.264/H.265)
Max Video Bitrate
130 Mbps
Supported File System
exFAT
Color Mode
Standard
D-Log M
Camera FOV Supports standard mode, wide-angle mode, and super-wide-angle
mode,
EIS
Supports RockSteady 3.0+ and HorizonSteady
Can be disabled
*
* When stabilization is turned o, footage captured with the wide-angle view
supports oine stabilization Gyroow.
Gimbal
Stabilization
Single-axis mechanical gimbal (tilt)
Mechanical Range
Tilt: -95° to 90°
Controllable Range
Tilt: -85° to 80°
Max Control Speed (tilt)
100°/s
Angular Vibration Range
±0.01°
Electronic Roll Axis Real-time screen correction is unavailable during recording, but
can be applied to the footage recorded on the drone.
Sensing
Sensing Type
Downward and backward visual positioning
Downward
ToF Eective Measurement Height: 10 m
Precise Hovering Range: 0.3-10 m
Measurement Range: 0.3-20 m
FOV: Horizontal 78°, Vertical 78°
Backward
Measurement Range: 0.5-20 m
FOV: Horizontal 78°, Vertical 78°

DJI Avata 2 User Manual
©
2024 DJI All Rights Reserved.
87
Operating Environment
Diffuse reflective surfaces with discernible patterns, diffuse
reectivity > 20% (such as concrete pavement)
Adequate lighting (lux > 15, normal indoor lighting conditions)
Video Transmission
Video Transmission
System
O4
Live View Quality
1080p@30/50/60/100fps
Operating Frequency 2.4000-2.4835 GHz
5.170-5.250 GHz
*
5.725-5.850 GHz
*
* 5.170-5.250 GHz and 5.725-5.850 GHz can be used only in countries and
regions where permitted by local laws and regulations.
Transmitter Power (EIRP)
2.4 GHz: <33 dBm (FCC), <20 dBm (CE/SRRC/MIC)
5.1 GHz: < 23 dBm (CE)
5.8 GHz: <33 dBm (FCC), <30 dBm (SRRC), <14 dBm (CE)
Communication
Bandwidth
Max 60 MHz
Max Transmission
Distance (unobstructed,
free of interference)
[5]
FCC: 13 km (subject to the aircraft's max ight time)
CE: 10 km
SRRC: 10 km
MIC: 10 km
Max Transmission
Distance (unobstructed,
with interference)
[6]
Strong Interference: Urban landscape, approx. 1.5-4 km
Medium Interference: Suburban landscape, approx. 4-10 km
Low Interference: Suburb/seaside, approx. 10-13 km
Max Transmission
Distance (obstructed, with
interference)
[7]
Low Interference and Obstructed by Buildings: approx. 0-0.5 km
Low Interference and Obstructed by Trees: approx. 0.5-3 km
Max Download Speed Wi-Fi: 25 MB/s
*
* Measured in a laboratory environment with little interference in countries/
regions that support both 2.4 GHz and 5.8 GHz. Download speeds may
vary depending on the actual conditions.
Lowest Latency
With DJI Goggles 3:
1080p/100fps Video Transmission Quality: 24 ms
1080p/60fps Video Transmission Quality: 40 ms
Max Video Bitrate
60Mbps
Antennas
4 antennas, 2T4R
Wi-Fi
Protocol
802.11a/b/g/n/ac
Operating Frequency 2.4000-2.4835 GHz
5.725-5.850 GHz
Transmitter Power (EIRP) 2.4 GHz: <20 dBm (FCC/CE/SRRC/MIC)
5.8 GHz: <20 dBm (FCC/SRRC),< 14 dBm (CE)

DJI Avata 2 User Manual
88
©
2024 DJI All Rights Reserved.
Bluetooth
Protocol
Bluetooth 5.0
Operating Frequency
2.4000-2.4835 GHz
Transmitter Power (EIRP)
<10 dBm
Intelligent Flight Battery
Capacity
2150 mAh
Weight
Approx. 145 g
Standard Voltage
14.76 V
Max Charging Voltage
17 V
Battery Type
Li-ion
Energy
31.7 [email protected]
Charging Temperature
5° to 40° C (41° to 104° F)
Charging Time With Charging Hub (60W max charging power):
From 0 to 100%: approx. 45 min
From 10 to 90%: approx. 30 min
Directly Charging the Drone: (30W max charging power):
From 0 to 100%: approx. 88 min
From 10 to 90%: approx. 60 min
Charger
Recommended Charger DJI 65W Portable Charger
DJI 65W Car Charger
USB Power Delivery charger
Battery Charging Hub
Input
5-20 V, max 3 A
Charging Hub
Output (power
accumulation)
Max 65 W
Output (charging)
Max 17 V
Output (USB)
5 V, 2 A
Charging Type
Three batteries charged in sequence.
Compatibility
DJI Avata 2 Intelligent Flight Battery

DJI Avata 2 User Manual
©
2024 DJI All Rights Reserved.
89
Storage
Recommended microSD
Cards
SanDisk Extreme PRO 32GB U3 A1 V30 microSDHC
Lexar Professional 1066x 64GB U3 A2 V30 microSDXC
Lexar Professional 1066x 128GB U3 A2 V30 microSDXC
Lexar Professional 1066x 256GB U3 A2 V30 microSDXC
Lexar Professional 1066x 512GB U3 A2 V30 microSDXC
Kingston CANVAS Go! Plus 64GB U3 A2 V30 microSDXC
Kingston CANVAS Go! Plus 128GB U3 A2 V30 microSDXC
Kingston CANVAS React Plus 64GB U3 A1 V90 microSDXC
Kingston CANVAS React Plus 128GB U3 A1 V90 microSDXC
Kingston CANVAS React Plus 256GB U3 A1 V90 microSDXC
Samsung EVO Plus 512GB U3 A2 V30 microSDXC
[1] Measured in a windless environment when taking o from an altitude of 5000 m and ascending vertically
by 500 m, using Sport mode, and from 100% battery level until 20%. Data is for reference only. Always pay
attention to reminders on the goggles' screens during your ight.
[2] Measured when flying forward at a speed of 21.6 kph in a windless environment at sea level, with
camera parameters set to 1080p/30fps, video mode o, and from 100% battery level until 0%. Data is for
reference only. Always pay attention to reminders on the goggles' screens during your ight.
[3] Measured when hovering in a windless environment at sea level, with camera parameters set to
1080p/30fps, video mode o, and from 100% battery level until 0%. Data is for reference only. Always pay
attention to reminders on the goggles' screens during your ight.
[4] Measured when flying forward at a speed of 43.2 kph in a windless environment at sea level, with
camera parameters set to 1080p/30fps, video mode o, and from 100% battery level until 0%. Data is for
reference only. Always pay attention to reminders on the goggles' screens during your ight.
[5] Measured in an unobstructed outdoor environment free of interference. The above data shows the
farthest communication range for one-way, non-return ights under each standard. Always pay attention
to RTH reminders on the goggles screen during your ight.
[6] Data tested under FCC standard in unobstructed environments with typical interference. Used for
reference purposes only and provides no guarantee for actual transmission distance.
[7] Data tested under FCC standard in environments with typical low interference. Used for reference
purposes only and provides no guarantee for actual transmission distance.

DJI Avata 2 User Manual
90
©
2024 DJI All Rights Reserved.
DJI Goggles 3
Model TKGS3
Weight
Approx. 470 g
Dimensions (L×W×H) With antennas folded: 170×109×112 mm (L×W×H)
With antennas unfolded: 205×109×112 mm (L×W×H)
Screen Size (single screen)
0.49 inch
Resolution (single screen)
1920×1080
Refresh Rate
Up to 100 Hz
Interpupillary Distance
Range
56-72 mm
Diopter Adjustment
Range
-6.0 D to +2.0 D
FOV (single screen)
44°
Video Recording Format
MOV
Supported Video and
Audio Playback Formats
MP4, MOV (video coding formats: H.264, H.265; audio formats:
AAC, PCM)
Panoramic Video: Spherical 2D panoramic videos.
3D Video: Half-Side-by-Side (HSBS), Full-Side-by-Side (FSBS), Half
Over-Under (HOU), Full Over-Under (FOU).
Max Video Specication: 4K/60fps
Real View Display
1080p/60fps
Operating Temperature
-10° to 40° C (14° to 104° F)
Power Input
Built-in battery
Supported SD Cards
microSD (up to 512 GB)
Recommended microSD
Cards
Sandisk Extreme Pro 32GB U3 A1 V30 microSDHC
Lexar 1066x 64GB U3 A2 V30 microSDXC
Lexar 1066x 128GB U3 A2 V30 microSDXC
Lexar 1066x 256GB U3 A2 V30 microSDXC
Lexar 1066x 512GB U3 A2 V30 microSDXC
Kingston Canvas Go! Plus 64GB U3 A2 V30 microSDXC
Kingston Canvas Go! Plus 128GB U3 A2 V30 microSDXC
Kingston Canvas React Plus 64GB U3 A1 V90 microSDXC
Kingston Canvas React Plus 128GB U3 A1 V90 microSDXC
Kingston Canvas React Plus 256GB U3 A1 V90 microSDXC
Samsung EVO Plus 512GB U3 A2 V30 microSDXC

DJI Avata 2 User Manual
©
2024 DJI All Rights Reserved.
91
Video Transmission
Video Transmission When used with dierent aircrafts, the goggles will automatically
select the corresponding rmware to match the video
transmission specication of the aircraft.
With DJI Avata 2: DJI O4
Operating Frequency
[1]
2.4000-2.4835 GHz
5.170-5.250 GHz
5.725-5.850 GHz
Transmitter Power (EIRP) 2.4 GHz:
<
33 dBm (FCC),
<
20 dBm (CE/SRRC/MIC)
5.1 GHz:
<
23 dBm (CE)
5.8 GHz:
<
33 dBm (FCC),
<
30 dBm (SRRC),
<
14 dBm (CE)
Latency
[2]
With DJI Avata 2:
1080p/100fps video transmission quality: latency down to 24 ms
1080p/60fps video transmission quality: latency down to 40 ms
Max Transmission
Distance
When used with DJI Avata 2, DJI Goggles 3 can achieve the
following max video transmission distance:
13 km (FCC), 10 km (CE/SRRC/MIC)
Max Video Bitrate
[3]
60Mbps
Wi-Fi
Protocol
802.11a/b/g/n/ac
Operating Frequency
[1]
2.4000-2.4835 GHz
5.170-5.250 GHz
5.725-5.850 GHz
Transmitter Power
(EIRP)
2.4 GHz:
<
20 dBm (FCC/CE/SRRC/MIC)
5.1 GHz:
<
20 dBm (FCC/CE/MIC)
5.8 GHz:
<
20 dBm (FCC/SRRC),
<
14 dBm (CE)
Bluetooth
Protocol
Bluetooth 5.0
Operating Frequency
2.4000-2.4835 GHz
Transmitter Power
(EIRP)
<
10 dBm
GFSK
Operating Frequency
2.4000-2.4835 GHz
Transmitter Power
(EIRP)
<26 dBm (FCC),
<20 dBm (CE/SRRC/MIC)
Battery
Dimensions
121×65×52.5 mm (L×W×H)
Capacity
3000 mAh
Voltage
5.6-8.4 V
Category
Li-ion

DJI Avata 2 User Manual
92
©
2024 DJI All Rights Reserved.
Chemical System
LiNiMnCoO2
Energy
21.6 Wh
Charging Temperature
0° to 50° C (32° to 122° F)
Max Charging Power
20 W (charging when powered o)
Runtime
[4]
Approx. 3 hours
[1] Some countries and regions prohibit the use of the 5.1GHz or 5.8GHz frequency band, or both. In some
countries and regions, the 5.1GHz frequency is only allowed for indoor use. Before ying, make sure to
check and comply with local regulations.
[2] Measured in an open outdoor environment without interference. Actual data varies with dierent aircraft
models.
[3] Measured in an outdoor open environment without interference. Actual data varies with the operating
environment.
[4] The 3-hour max operating time was measured at an ambient temperature of 25° C (77° F), screen
brightness at 4, connected to the DJI Avata 2 aircraft, video transmission set to 1080p/100fps, Head
Tracking o, Real View o, and the goggles fully charged and not supplying power to external devices
such as smartphones.
DJI Avata 2 User Manual
©
2024 DJI All Rights Reserved.
93
Compatible Products
Visit the following link to view compatible products:
https://www.dji.com/avata-2/faq
DJI RC Motion 3
Model
TKMO3
Weight
Approx. 118 g
Operating Frequency
2.4000-2.4835 GHz
Transmitter Power (EIRP)
2.4000-2.4835 GHz: <26 dBm (FCC), <20 dBm (CE/SRRC/MIC)
Max Transmission
Distance (unobstructed,
free of interference)
[1]
With DJI Avata 2 and DJI Goggles 3:
FCC: 13 km
CE/SRRC/MIC: 10 km
Operating Temperature
-10° to 40° C (14° to 104° F)
Operating Time Approx. 10 hours
*
* Measured with an ambient temperature of 25° C (77° F), when connected
to DJI Avata 2, and in a stationary state.
Battery
Charging Temperature
0° to 50° C (32° to 122° F)
Charging Time
Approx. 2 hours
Charging Type
5 V, 2 A
Battery Capacity
2600 mAh
[1] Measured in an unobstructed outdoor environment free of interference. The above data shows the
farthest communication range for one-way, non-return ights under each standard. Always pay attention
to RTH reminders on the goggles screen during your ight.

DJI Avata 2 User Manual
94
©
2024 DJI All Rights Reserved.
Updating Firmware
Use one of the following methods to update the rmware:
1. Use the DJI Fly App to update the rmware for the entire set of devices including the aircraft,
goggles, and remote control device.
2. Use DJI Assistant 2 (Consumer Drones Series) to update the rmware for a single device.
Using DJI Fly
Power on the aircraft, goggles, and remote control device. Make sure all the devices are linked.
Connect the USB-C port of the goggles to the mobile device, run DJI Fly, and follow the prompt
to update. An internet connection is required.
Using DJI Assistant 2 (Consumer Drones Series)
1. Power on the device. Connect the device to a computer with a USB-C cable.
2. Launch DJI Assistant 2 (Consumer Drones Series) and log in with your DJI account.
3. Select the device and click Firmware Update on the left side of the screen.
4. Select and conrm the rmware version to update to.
5. Wait for the rmware to download. The rmware update will start automatically.
6. The device will restart automatically after the rmware update is complete.
• If there are any additional batteries that need to be updated, insert the battery into
the aircraft and power on the aircraft. A prompt will appear in the goggles to update
the battery. Make sure to update the battery before takeo.
• Make sure to follow all the steps to update the rmware, otherwise the update may
fail.
• Make sure the computer is connected to the internet during the update.
• Do not unplug the USB-C cable during an update.
• The rmware update will take several minutes. During the update process, it is normal
for the gimbal to go limp, the aircraft status indicators to blink, and the aircraft to
reboot and beep. Wait patiently for the update to complete.
• Before performing an update, make sure the goggles are at least 20% charged and the
remote control device is at least 15% charged.
• Note that the update may reset various ight parameters, such as the RTH altitude
and the maximum flight distance. Before updating, take note of your preferred
settings and readjust them after the update.
• DO NOT use Hardware and Software that is not specied by DJI.
Visit the following link and refer to the Release Notes for rmware update information:
https://www.dji.com/avata-2/downloads

DJI Avata 2 User Manual
©
2024 DJI All Rights Reserved.
95
Maintenance Instructions
To avoid serious injury to children and animals, observe the following rule:
1. Small parts, such as cables and straps, are dangerous if swallowed. Keep all parts out of
reach of children and animals.
2. Store the Intelligent Flight Battery and remote controller in a cool, dry place away from
direct sunlight to ensure the built-in LiPo battery does NOT overheat. Recommended
storage temperature: between 22° and 28° C (71° and 82° F) for storage periods of more
than three months. Never store in environments outside the temperature range of 14° to
113° F (-10° to 45° C).
3. DO NOT allow the camera to come into contact with or become immersed in water or
other liquids. If it gets wet, wipe dry with a soft, absorbent cloth. Turning on an aircraft that
has fallen in water may cause permanent component damage. DO NOT use substances
containing alcohol, benzene, thinners, or other ammable substances to clean or maintain
the camera. DO NOT store the camera in humid or dusty areas.
4. DO NOT connect this product to any USB interface older than version 3.0. DO NOT connect
this product to any “power USB” or similar devices.
5. Check every aircraft part after any crash or serious impact. If there are any problems or
questions, contact a DJI authorized dealer.
6. Regularly check the Battery Level Indicators to see the current battery level and overall
battery life. The battery is rated for 200 cycles. It is not recommended to continue use
afterward.
7. After-Flight Checklist
a. Make sure the Intelligent Flight Battery and the propellers are in good condition.
b. Make sure that the camera lens and Vision System sensors are clean.
c. Make sure to attach the gimbal protector before storing or transporting the aircraft.
8. Make sure to transport the aircraft with the arms folded when powered o.
9. Make sure to transport the remote controller with antennas folded when powered o.
10. The battery will enter sleep mode after long-term storage. Charge the battery to exit from
sleep mode.
11. Use the ND lter if the exposure time needs to prolonged. Refer to the product information
on how to install the ND lters.
12. Store the aircraft, remote controller, battery, and charger in a dry environment.
13. Remove the battery before servicing the aircraft (e.g., cleaning or attaching and detaching
the propellers). Make sure that the aircraft and the propellers are clean by removing any
dirt or dust with a soft cloth. Do not clean the aircraft with a wet cloth or use a cleanser that
contains alcohol. Liquids can penetrate the aircraft housing, which can cause a short circuit
and destroy the electronics.
14. Make sure to turn o the battery to replace or to check the propellers.

DJI Avata 2 User Manual
96
©
2024 DJI All Rights Reserved.
Troubleshooting Procedures
1. Why can the battery not be used before the rst ight?
The battery must be activated by charging before using it for the rst time.
2. How to solve the gimbal drift issue during ight?
Calibrate IMU and compass in DJI Fly. If the problem persists, contact DJI Support.
3. No function
Check if the Intelligent Flight battery and the remote controller are activated by charging. If
the problems persist, contact DJI support.
4. Power-on and start-up problems
Check if the battery has power. If yes, contact DJI support if it cannot be started normally.
5. SW update issues
Follow the instructions in the user manual to update the rmware. If the rmware update
fails, restart all the devices and try again. If the problem persists, contact DJI support.
6. Procedures to reset to factory default or last known working conguration
Open the goggles menu and select Settings > About > Reset to Factory Default.
7. Shutdown and power-o problems
Contact DJI support.
8. How to detect careless handling or storage in unsafe conditions
Contact DJI support.
9. How to restore use after long-term storage?
Fully charge the device rst and then it can be used normally.
Risk and Warnings
DJI Avata 2
When the aircraft detects a risk after powering on, there will be a warning prompt on DJI Fly.
Pay attention to the list of situations below.
1. If the location is not suitable for takeo.
2. If an obstacle is detected during ight.
3. If the location is not suitable for landing.
4. If the compass and IMU experience interference and need to be calibrated.
5. Follow the on-screen instructions when prompted.
DJI Goggles 3
When the aircraft detects any risk after powering on, there will be a warning prompt on the
goggles screen. Pay attention to the prompt during ight and take necessary actions accordingly
DJI Avata 2 User Manual
©
2024 DJI All Rights Reserved.
97
to avoid product damage or risk of injury.
If the Signal Lost Action of the aircraft is set to RTH, when the control signal or transmission
is lost during ight, the aircraft will automatically initiate Failsafe RTH and y back to the last
recorded Home Point.
In emergency situations during ight, such as if a collision occurs, a motor stalls, the aircraft
rolls in the air, or the aircraft is out of control and is ascending or descending quickly, the
motors can be stopped by pressing the motion controller lock button four times.
• Stopping motors mid-ight will cause the aircraft to crash. Operate with caution.
If the goggles screen goes off unexpectedly during flight, press the motion controller lock
button once to brake the aircraft rst, and then initiate RTH manually. After the aircraft is back,
check the goggles power level and try to restart the goggles. If the problem persists, contact DJI
support.
Disposal
Observe the local regulations related to electronic devices when disposing of the aircraft and
remote controller.
Battery Disposal
Dispose of the batteries in specific recycling containers only after a complete discharge. DO
NOT dispose of the batteries in regular trash containers. Strictly follow the local regulations
regarding the disposal and recycling of batteries.
Dispose of a battery immediately if it cannot be powered on after over-discharging.
If the power on/o button on the Intelligent Flight Battery is disabled and the battery cannot be
fully discharged, contact a professional battery disposal/recycling agency for further assistance.

DJI Avata 2 User Manual
98
©
2024 DJI All Rights Reserved.
C1 Certication
DJI Avata 2 is comply with C1 certification, there are some requirements and restrictions
when using DJI Avata 2 in European Economic Area (EEA, i.e. EU plus Norway, Iceland and
Liechtenstein).
UAS Class C1
Sound Power Level 81 dB
Maximum Propeller Speed 51430 RPM
MTOM Statement
The MTOM of DJI Avata 2 (Model QF3W4K), including the SD card, is 377 g to comply with C1
requirements.
Users must follow the instructions below to comply with the MTOM C1 requirements.
Otherwise, the aircraft cannot be used as a C1 UAV:
• DO NOT add any payload to the aircraft, such as the propeller guards, etc.
• DO NOT use any non-qualified replacement parts, such as intelligent flight batteries or
propellers, etc.
• DO NOT retrot the aircraft.
• The prompt "Low Battery RTH" will not appear in case of a horizontal distance between
the pilot and aircraft is lower than 5 m.
• The auxiliary LED is set to auto when used in the EU and cannot be changed. The
aircraft Front Arm LEDs are always on when used in the EU and cannot be changed.
Direct Remote ID
1. Transport Method: Wi-Fi Beacon
2. Method of uploading the UAS Operator Registration Number to the aircraft:
a. Connect the goggles to the mobile device.
b. Launch DJI Fly on the mobile device.
c. Enter DJI Fly > System Settings > Safety > UAS Remote Identication, and then upload UAS
Operator Registration Number.
Low Blue Light Statement
Light from displays can cause eyestrain and retina damage which can aect vision over time.
DJI Goggles 3 adopts micro-OLED eye-protection screens, which can eectively reduce the high-
energy shortwave blue light and its emission range, therefore protecting users from exposure
to harmful blue light. DJI Goggles 3 has obtained the Low Blue Light certication.
It is highly recommended to follow the instructions below to protect your eyes against
prolonged display use:
• Look away from the screen and then at a distant place for 20 seconds every 20 minutes.
• Rest your eyes for 10 minutes after 2 hours of continuous use.

DJI Avata 2 User Manual
©
2024 DJI All Rights Reserved.
99
• Roll your eyes upward and then in a large circle every few hours.
• When your eyes get tired, try to blink at a normal rate, then close your eyes and rest for a
minute.
List of Items, including qualied accessories
1. DJI Avata 2 Propellers (Pair) (Model: 3032S, 3.4g)
2. DJI Avata 2 ND Filters Set (ND 8/16/32) (2.1 g)
3. DJI Avata 2 Intelligent Flight Battery (Model: BWX520-2150-17.76, Approx. 145 g)
4. MicroSD Card (Approx. 0.3 g)
List of Spare and Replacement Parts
1. DJI Avata 2 Propellers (Model: 3032S)
2. DJI Avata 2 Intelligent Flight Battery (Model: BWX520-2150-17.76, Approx. 145 g)
GEO Awareness
Drone Geo-Zones UGZ Zone and DJI Geo Zone
DJI is committed to maintaining a safe flying environment. This includes abiding by local
regulations and Unmanned Geographical Zones (UGZs) dened by EU national authorities. DJI
has its own Geospatial Environment Online system (GEO) with broader geographical zones,
including regulated areas where ight may raise concerns. DJI's GEO system has been running
successfully for many years, eectively protecting ight safety and public safety in the absence
of ocial UGZ databases.
In the future, DJI Geo zones will coexist with EU UGZs, as UGZs are still not available in many
countries. Users are responsible for checking local regulations and for any flight restrictions
where they intend to operate.
The GEO zones mentioned in the manual and DJI ocial website refers to the DJI Geo zones and
Geo fencing function, not the UGZs for Geo awareness function required by regulations.
GEO Awareness contains the features listed below.
UGZ (Unmanned Geographical Zone) Data update: user can update the FlySafe data by using
the data update feature automatically or storing the data in the aircraft manually.
• Method 1: Go to Settings in DJI Fly, tap About > FlySafe Data, tap Check for Updates to
update the FlySafe data automatically.
• Method 2: Check on website of your national aviation authority regularly and obtain latest
UGZ data to import to your aircraft. Go to Settings in DJI Fly, tap About > FlySafe Data, tap
Import from Files, and then follow the on-screen instructions to store and import the UGZ
data manually.
Note: A prompt will appear in the DJI Fly app when the import completes successfully. If the
import fails due to improper data format, follow the on-screen prompt and retry.
GEO Awareness Map Drawing: after the latest UGZ data is updated, a flight map with a
restricted zone will be displayed in the DJI Fly app. Name, eective time, height limit, etc., can be
viewed by tapping the area.
DJI Avata 2 User Manual
100
©
2024 DJI All Rights Reserved.
GEO Awareness Pre-Warning: the app will prompt the user with warning information when the
aircraft is near or in a restricted area, the horizontal distance is less than 160 m, or the vertical
distance is less than 40 m from the zone to remind the user to y with caution.
• Before takeoff, users must download the latest GEO Zone data from the official
aviation regulation website of the country or region where the aircraft is being used.
It is the responsibility of the user to make sure that the GEO zone data is the latest
version and that it is applied to every ight.
AGL (Above Ground Level) Statement
The vertical part of “Geo-awareness” may use the AMSL altitude or the AGL height. The choice
between these two references is specied individually for each UGZ. Neither AMSL altitude nor
the AGL height is supported by DJI Avata 2. The height H appears in the DJI Fly app camera view,
which is the height from the aircraft takeo point to the aircraft. The height above the takeo
point may be used as an approximation but may dier more or less from the given altitude/
height for a specic UGZ. The remote pilot remains responsible for not breaching the vertical
limits of the UGZ.
Restricted Zones
Appear red in the DJI app. Users will be prompted with a warning, and flight is prevented.
UA cannot y or takeo in these zones. Restricted Zones may be unlocked, to unlock contact
[email protected] or go to Unlock A Zone at dji.com/ysafe.
Restricted Zones
Receiving a warning
Limit maximum speed
Ground
When approaching:
1. Receiving a warning
2. Can not fly in
3. User can apply on the DJI official website
after manual approval
When taking off:
1. Receiving a warning
2. Can not take off
3. User can apply on the DJI official website after manual approval
100 m
20 m
Takeoff
AGL (not supported)
H
Height error
DJI Avata 2 User Manual
©
2024 DJI All Rights Reserved.
101
Authorization Zones
Appear blue in the DJI app. Users will be prompted with a warning, and flight is limited by
default. UA cannot y or take o in these zones unless authorized. Authorization Zones may be
unlocked by authorized users using a DJI veried account.
Altitude Zones
Altitude zones are zones with a limited altitude and appear in gray on the map. When
approaching, users receive warnings in the DJI app.
Authorization Zones
Receiving a warning
Limit maximum speed
Ground
When approaching:
1. Receiving a warning
2. Can not fly in
3. User can quickly apply on the DJI App
with a phone number
100 m
20 m
Altitude Zone
20 m
100 m
10 m
Receiving a warning
Limit maximum speed
Limit maximum speed
1. UA can take off and fly into these zones in
specific height with a warning message
2. User can apply for permission on the DJI
official website after manual approval
Ground
Limited altitude
DJI Avata 2 User Manual
102
©
2024 DJI All Rights Reserved.
Enhanced Warning Zones
A warning message will prompt users when the drone reaches the edge of the zone.
• When the aircraft and DJI Fly app cannot obtain a GPS signal, the GEO awareness
function will be inoperative. Interference of the aircraft antenna or disabling the GPS
authorization in DJI Fly will cause the GPS signal fails to be obtained.
Ground
1. UA can take off and fly into these zones with a warning
message which needs user confirmation
Enhanced Warning
Zones
Warning Zones
A warning message will prompt users when the drone reaches the edge of the zone.
EASA Notice
Make sure to read the Drone Information Notices document included in the package before use.
Visit the link below for more EASA notice information on traceability.
https://www.easa.europa.eu/en/document-library/general-publications/drones-informationnotices
Original Instructions
This manual is provided by SZ DJI TECHNOLOGY CO., LTD., and the content is subject to change.
Address: Lobby of T2, DJI Sky City, No. 53 Xianyuan Road, Xili Community, Xili Street, Nanshan
District, Shenzhen, China.
Ground
1. UA can take off and fly into these zones with a warning
message
Warning Zones

DJI Avata 2 User Manual
©
2024 DJI All Rights Reserved.
103
FAR Remote ID Compliance Information
The unmanned aircraft system is equipped with a Remote ID system that meets the
requirements of 14 CFR Part 89.
The aircraft automatically broadcasts Remote ID messages from takeoff to shut down. An
external device such as a cell phone or tablet is required to be connected as a location source
to DJI mobile devices without an integrated GNSS system
[1]
, and must run the DJI ight control
app such as DJI Fly in the foreground and always allow the DJI ight control app to obtain its
accurate location information. The connected external device must minimally be one of the
following:
1) FCC Certied personal wireless device that uses GPS with SBAS (WAAS) for location services;
or
2) FCC Certied personal wireless device with integrated GNSS.
Also, the external device must be operated in a way that does not interfere with the location
reported and its correlation to the operator location.
• The aircraft automatically initiates a pre-flight self-test (PFST) of the Remote ID system
before takeo and cannot take o if it does not pass the PFST
[2]
. The results of the PFST of
the Remote ID system can be viewed in either a DJI ight control app such as DJI Fly or DJI
goggles.
• The aircraft monitors the Remote ID system functionality from pre-ight to shut down. If the
Remote ID system malfunctions or has a failure, an alarm will be displayed in either a DJI
ight control app such as DJI Fly or DJI goggles.
• You can visit the ocial website of FAA to learn more about aircraft registration and Remote
ID requirements.
Footnotes
[1] DJI mobile devices without an integrated GNSS system such as DJI RC Motion 3, DJI FPV Remote Controller 3.
[2] The pass criterion for PFST is that the hardware and software of the Remote ID required-data source and
transmitter radio in the Remote ID system are functioning properly.

DJI Avata 2 User Manual
104
©
2024 DJI All Rights Reserved.
Flight Data
Flight data including flight telemetry, aircraft status information, and other parameters are
automatically saved to the internal data recorder of the aircraft. The data can be accessed using
DJI Assistant 2 (Consumer Drones Series).
Aftersales Information
Visit https://www.dji.com/support to learn more about aftersales service policies, repair
services, and support.
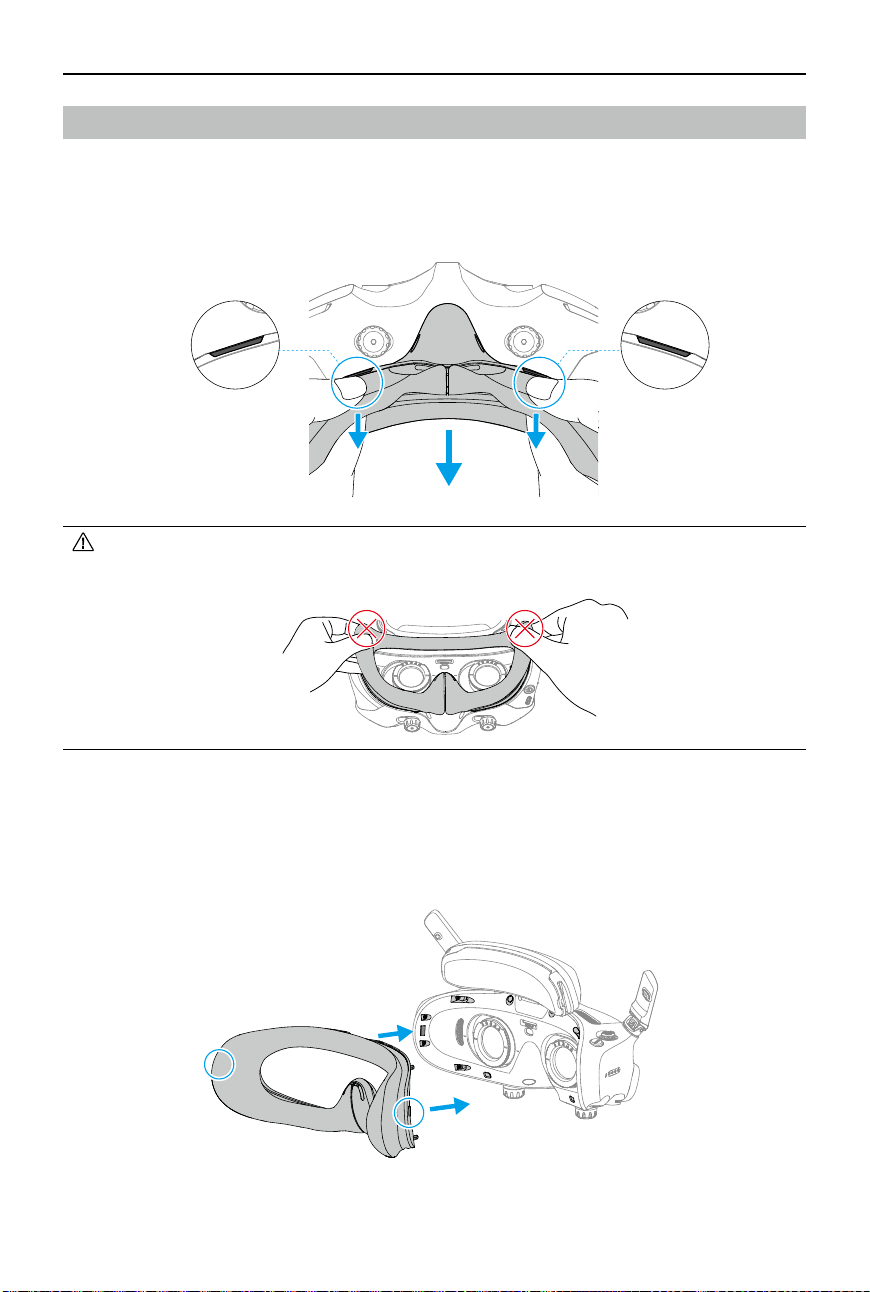
DJI Avata 2 User Manual
©
2024 DJI All Rights Reserved.
105
• DO NOT pull the sides when removing the foam padding. Otherwise, the padding
may be damaged.
Maintenance
Replacing the Foam Padding for Goggles
1. Hold the bottom of the foam padding and remove it gently, as shown below.
2. Align the positioning columns of the new foam padding with the positioning holes on the
goggles. Install it and press along the contour. You will hear a "click" sound when pressing
the two sides of the foam padding, check and make sure that there is no gap between the
foam padding and the goggles.

DJI Avata 2 User Manual
106
©
2024 DJI All Rights Reserved.
Cleaning and Maintenance of the Goggles
Clean the surface of the goggles with a soft, dry, clean cloth. Use the lens cleaning cloth to clean
the lenses in a circular motion from the center to the outer edges.
• DO NOT clean the integrated goggle lenses with alcohol wipes. The installed corrective
lenses can be cleaned with disposable alcohol pads.
• Clean the lenses gently. DO NOT scratch them as this will aect viewing quality.
• DO NOT use alcohol or other cleanser to wipe the foam padding and the soft side of
the battery compartment.
• DO NOT tear or scratch the foam padding, the additional forehead pad, and the soft
side of the battery compartment with sharp objects.
• Store the goggles in a dry place at room temperature to avoid damage to the lenses
and other optical components from high temperatures and humid environments.
• Keep the lenses away from direct sunlight to avoid screen damage.
This content is subject to change.
WE ARE HERE FOR YOU
Contact
DJI SUPPORT
If you have any questions about this document, please
contact DJI by sending a message to [email protected].
DJI and DJI AVATA are trademarks of DJI.
Copyright © 2024 DJI All Rights Reserved.
https://www.dji.com/avata-2/downloads