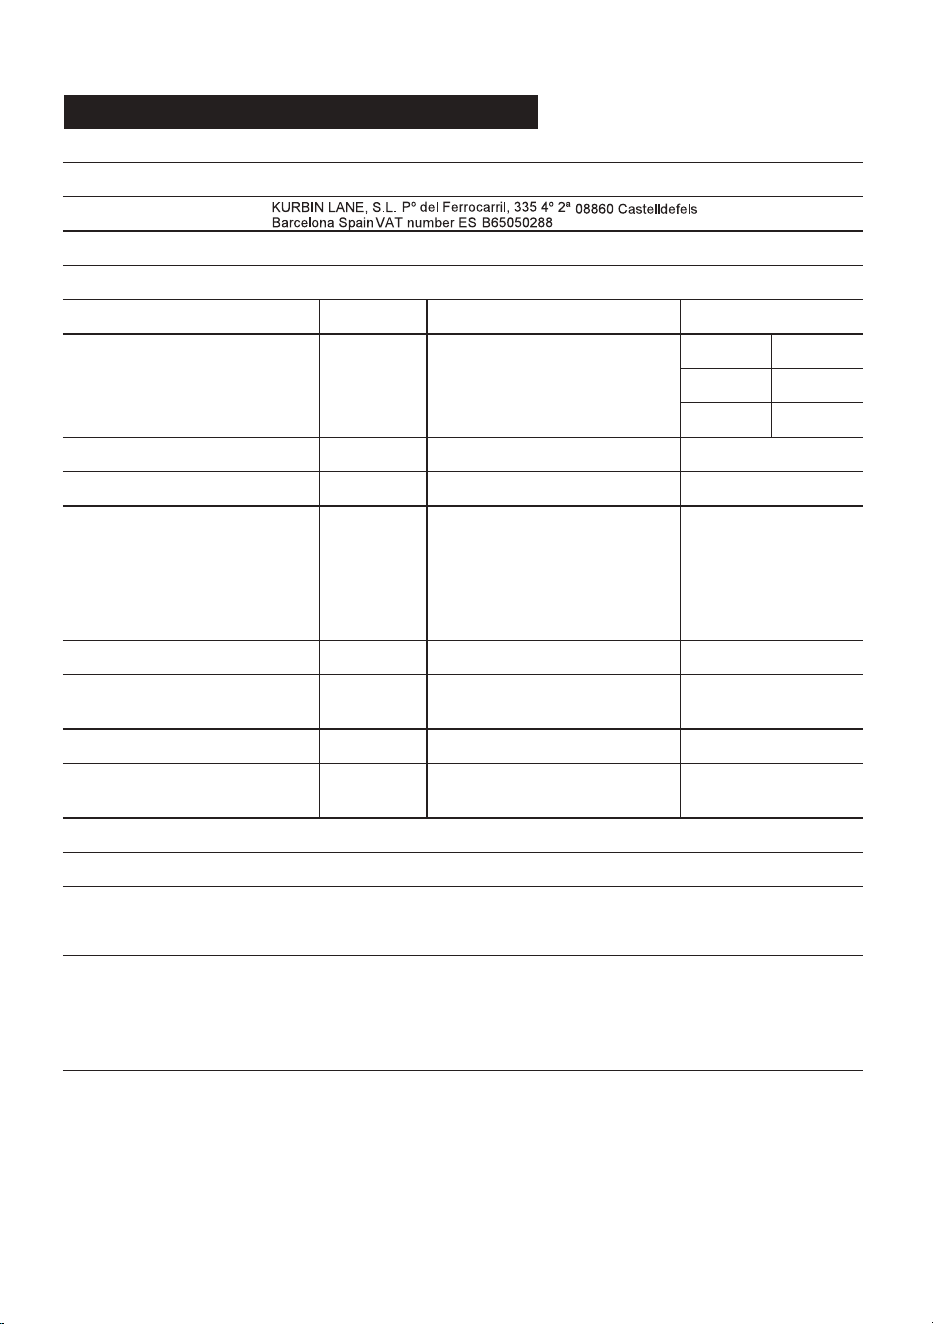
PART Ⅰ: Generic Version
Please read this manual carefully before using the dishwasher
Keep this manual for future reference.
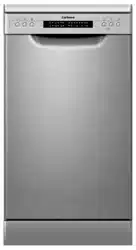
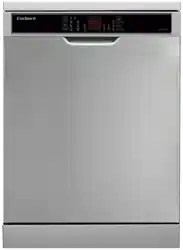
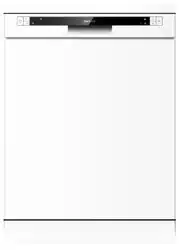
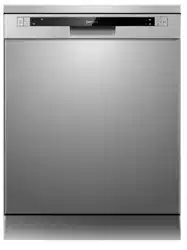
E-CLVM6419W
E-CLVM6419
X
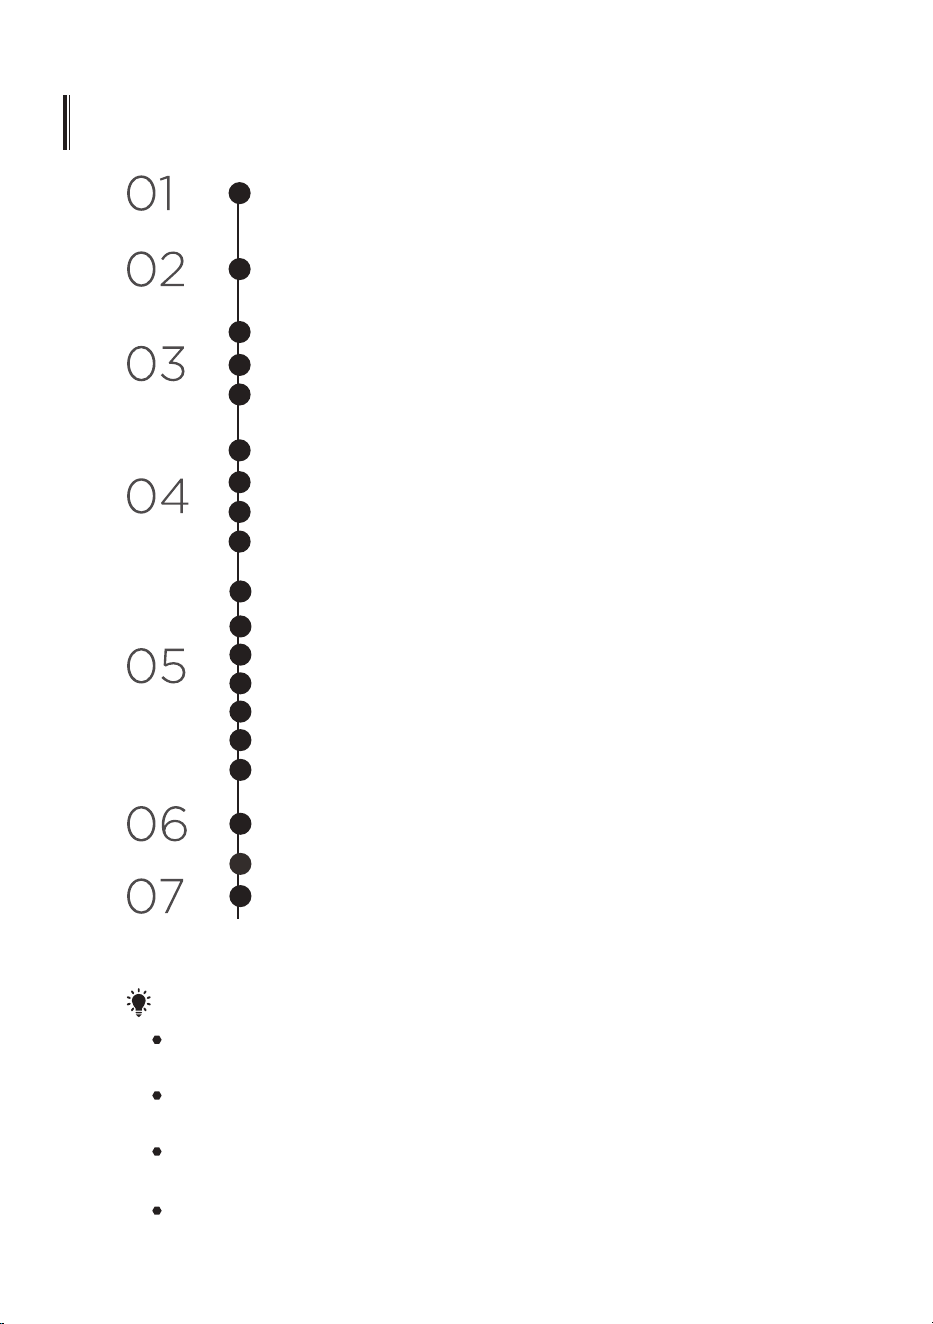
SAFETY INFORMATION
3
CONTENTS
PRODUCT OVERVIEW
8
MAINTENANCE AND CLEANING
External Care
Internal Care
Caring For The Dishwasher
12
12
12
15
NOTE:
Reviewing the section on troubleshooting Tips will help you solve some
common problems by yourself.
If you cannot solve the problems by yourself, please ask for help from a
professional technician.
The manufacturer, following a policy of constant development and updating of
the product, may make modifications without giving prior notice.
If lost or out-of-date, you can receive a new user manual from the manufacturer
or responsible vendor.
INSTALLATION INSTRUCTION
About Power Connection
Water Supply And Drain
Connection Of Drain Hoses
Position The Appliance
Free Standing Installation
Built-In Installation(for the integrated model)
16
16
17
18
19
19
TROUBLESHOOTING TIPS
25
LOADING THE BASKETS ACCORDING
29
20
USING YOUR DISHWASHER
Loading The Salt Into The Softener
Basket Used Tips
9
9
11
28
Availability Of Spare Parts

SAFETY INFORMATION
WARNING
When using your dishwasher, follow the
precautions listed below:
Installation and repair can only be carried out by a
qualified technician
This appliance is intended to be used in household
and similar applications such as:
-staff kitchen areas in shops, offices and other
working environments;
-farm houses;
-by clients in hotels, motels and other residential type
environments;
-bed and breakfast type environments.
This appliance can be used by children aged from 8
years and above and persons with reduced physical,
sensory or mental capabilities or lack of experience
and knowledge if they have been given supervision or
instruction concerning use of the appliance in a safe
way and understand the hazards involved.
Children shall not play with the appliance. Cleaning
and user maintenance shall not be done by children
without supervision. (For EN60335-1)
This appliance is not intended for use by persons
(including children ) with reduced physical, sensory or
3
mental capabilities, or lack of experience and
knowledge, unless they have been given supervision or
instruction concerning use of the appliance by a
person responsible for their safety. (For IEC60335-1 )
Packaging material could be dangerous for children!
This appliance is for indoor household use only.
To protect against the risk of electrical shock, do not
immerse the unit, cord or plug in water or other liquid.
Please unplug before cleaning and performing
maintenance on the appliance.
Use a soft cloth moistened with mild soap, and then
use a dry cloth to wipe it again.
Earthing Instructions
4
This appliance must be earthed. In the event of a
malfunction or breakdown, earthing will reduce the
risk of an electric shock by providing a path of least
resistance of electric current. This appliance is
equipped with an earthing conductor plug.
The plug must be plugged into an appropriate
outlet that is installed and earthed in accordance
with all local codes and ordinances.
Improper connection of the equipment-earthing
conductor can result in the risk of an electric shock.
Check with a qualified electrician or service
representative if you are in doubt whether the
appliance is properly grounded.

Do not modify the plug provided with the
appliance; If it does not fit the outlet.
Have a proper outlet installed by a qualified
electrician.
Do not abuse, sit on, or stand on the door or dish
rack of the dishwasher.
Do not operate your dishwasher unless all enclosure
panels are properly in place.
Open the door very carefully if the dishwasher is
operating, there is a risk of water squirting out.
Do not place any heavy objects on or stand on the
door when it is open. The appliance could tip
forward.
When loading items to be washed:
1) Locate sharp items so that they are not likely to
damage the door seal;
2) Warning: Knives and other utensils with sharp
points must be loaded in the basket with their
points facing down or placed in a horizontal
position.
Some dishwasher detergents are strongly alkaline.
They can be extremely dangerous if swallowed.
Avoid contact with the skin and eyes and keep
children away from the dishwasher when the door
is open.
Check that the detergent powder is empty after
completion of the wash cycle.
5

6
Do not wash plastic items unless they are marked
“dishwasher safe” or the equivalent.
For unmarked plastic items not so marked, check the
manufacturer's recommendations.
Use only detergent and rinse agents recommended for
use in an automatic dishwasher.
Never use soap, laundry detergent, or hand washing
detergent in your dishwasher.
The door should not be left open, since this could
increase the risk of tripping.
If the supply cord is damaged, it must be replaced by
the manufacturer or its service agent or a similarly
qualified person in order to avoid a hazard.
During installation, the power supply must not be
excessively or dangerously bent or flattened.
Do not tamper with controls.
The appliance needs to be connected to the main
water valve using new hose sets. Old sets should not be
reused.
To save energy, in stand by mode, the appliance will
switch off automatically while there is no any operation
in 15 minutes.
The maximum number of place settings to be washed
is 12.
The maximum permissible inlet water pressure is 1MPa.
The minimum permissible inlet water pressure is
0.04MPa.
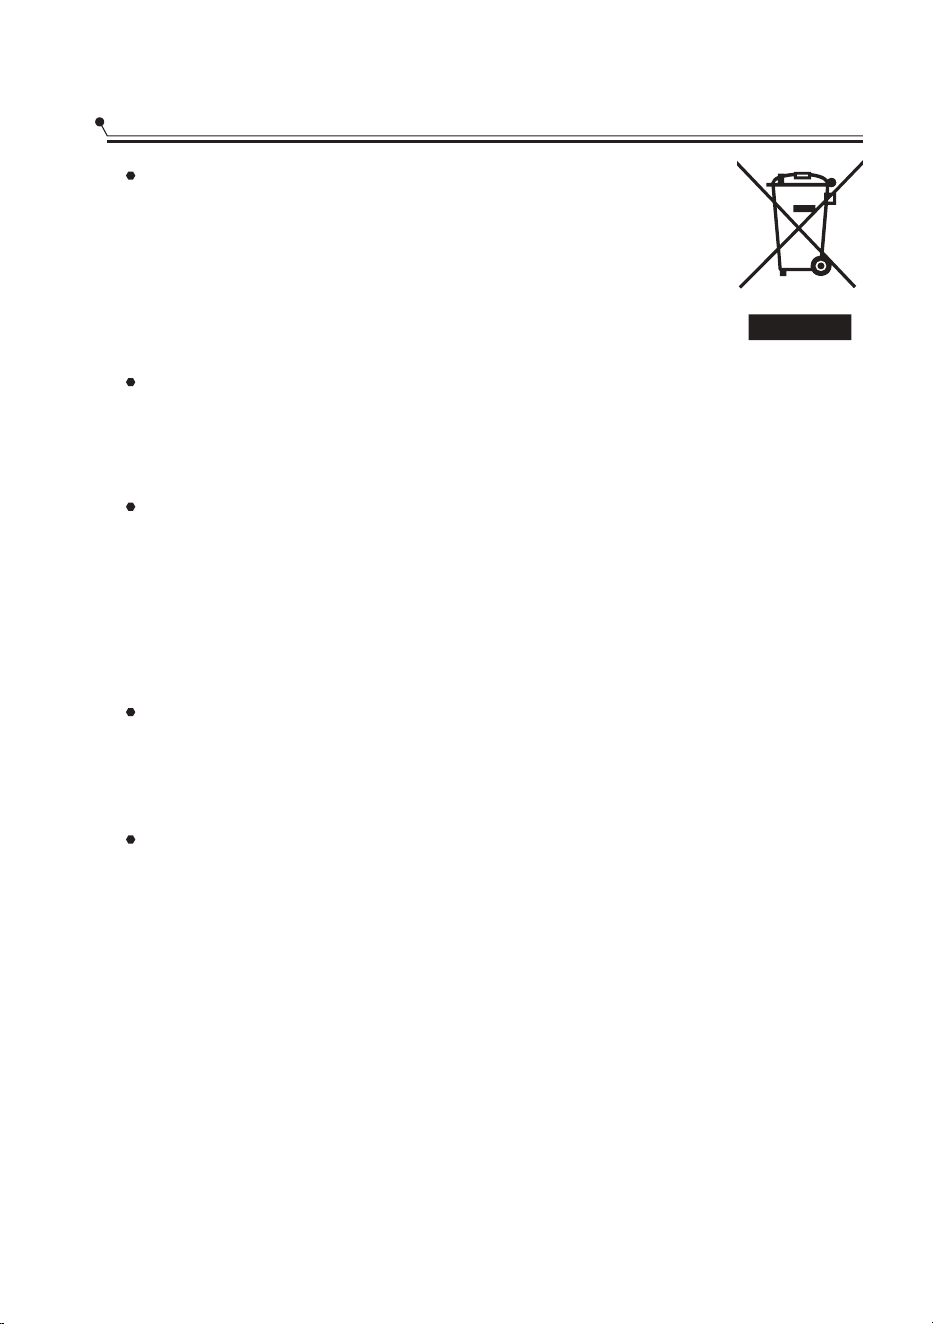
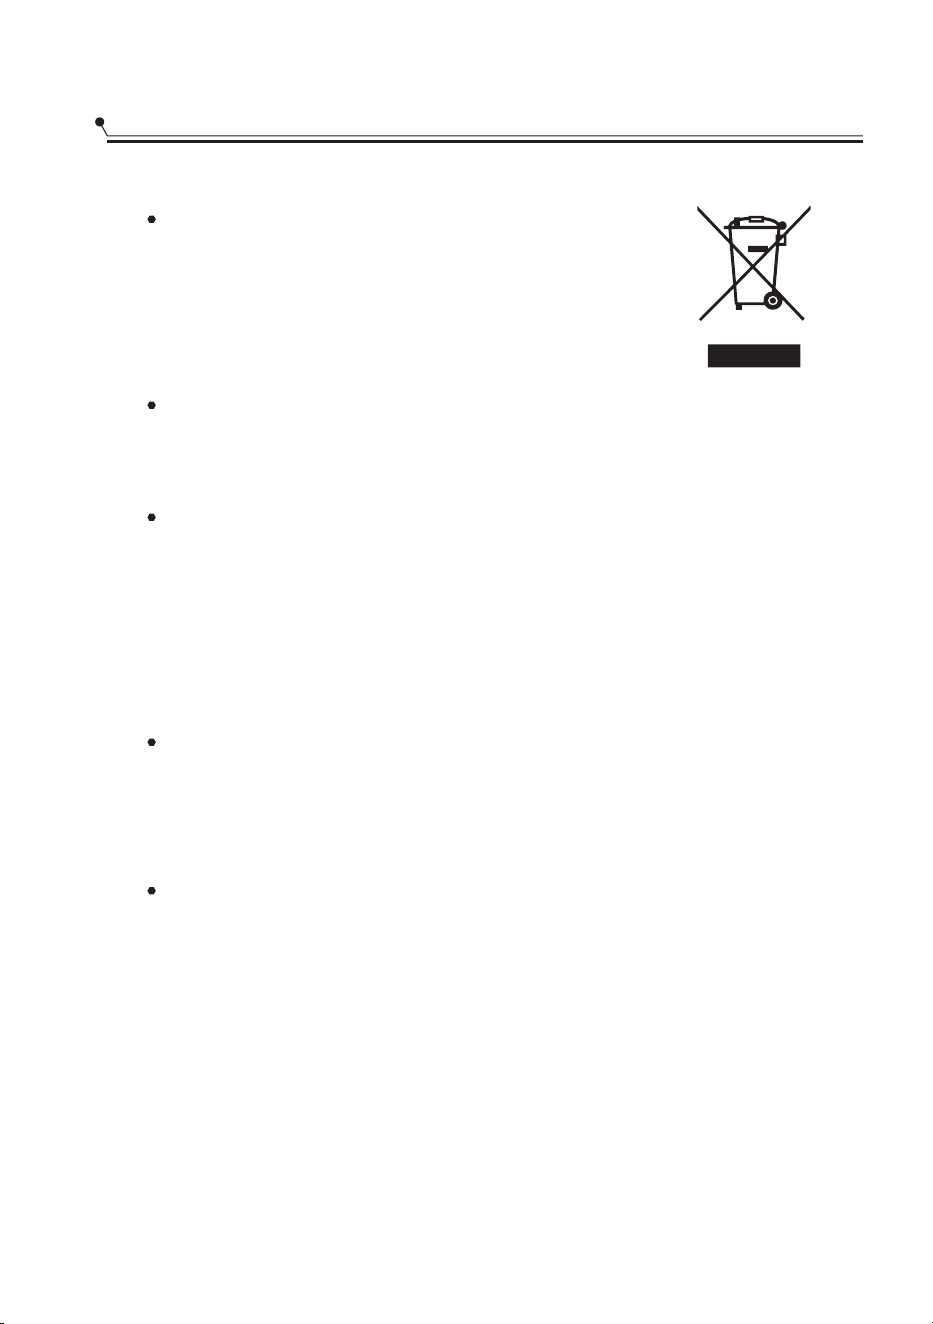
Disposal
For disposing of package and the
appliance please go to a recycling center.
Therefore cut off the power supply cable
and make the door closing device
unusable.
Cardboard packaging is manufactured from recycled
paper and should be disposed in the waste paper
collection for recycling.
By ensuring this product is disposed of correctly, you
will help prevent potential negative consequences
for the environment and human health, which could
otherwise be caused by inappropriate waste
handling of this product.
For more detailed information about recycling of this
product, please contact your local city office and
your household waste disposal service.
DISPOSAL: Do not dispose this product as
unsorted municipal waste. Collection of such
waste separately for special treatment is
necessary.
7
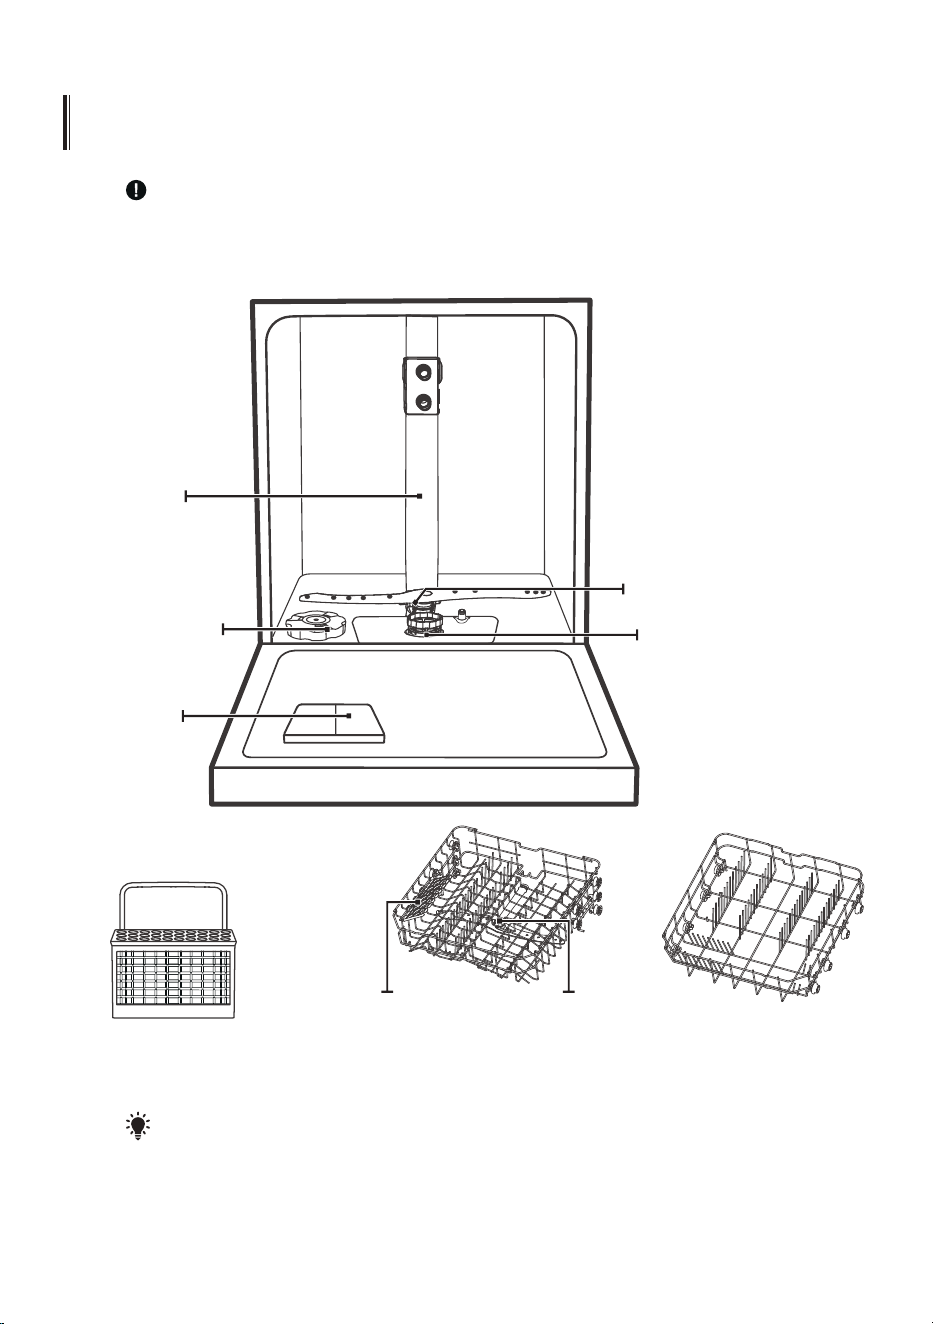
PRODUCT OVERVIEW
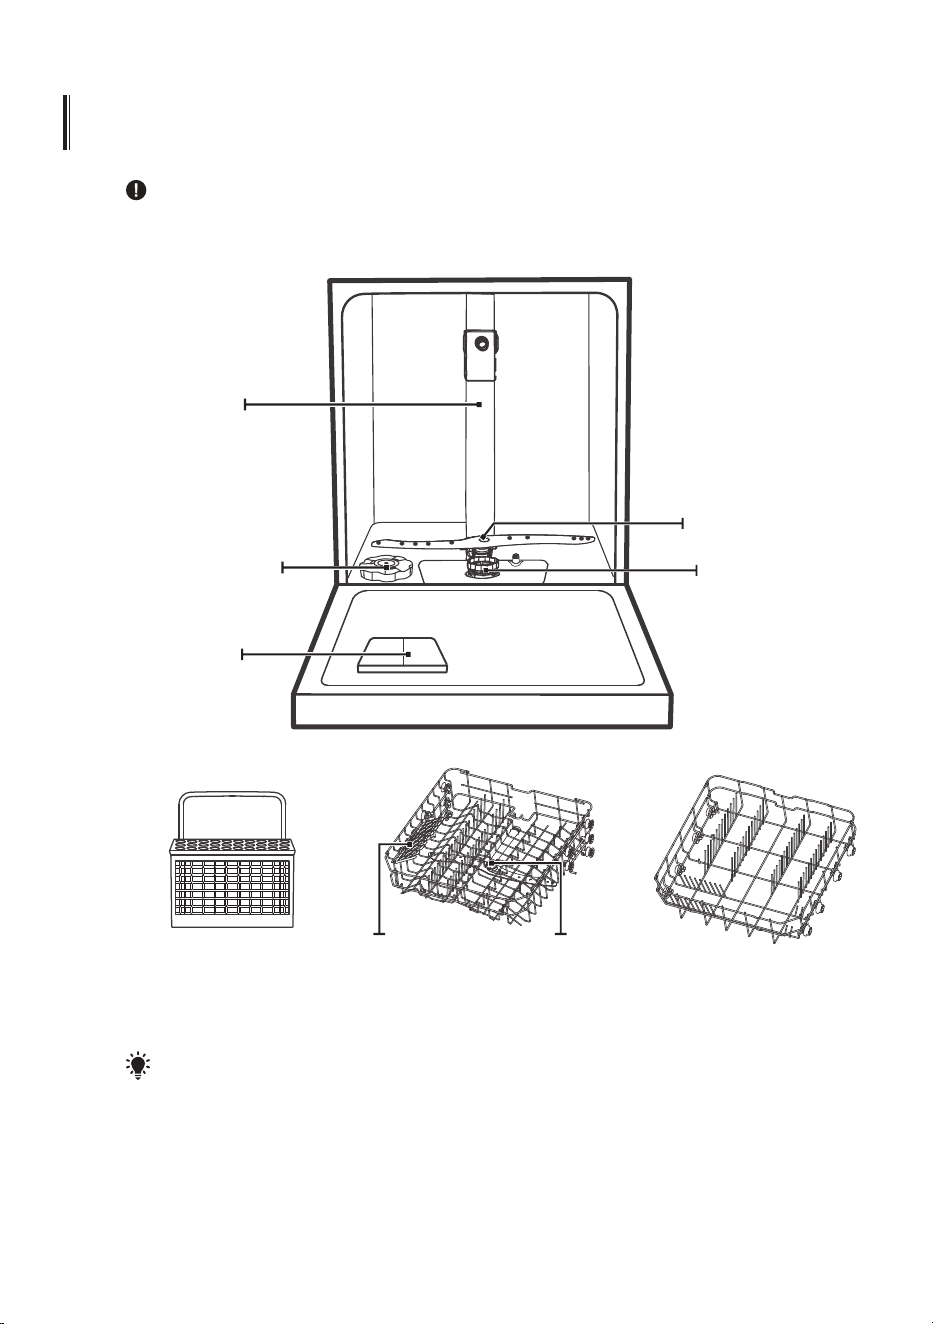
To get the best performance from your dishwasher, read all operating instructions
before using it for the first time.
IMPORTANT:
8
Cutlery basket
Lower basket
upper spray arm
Upper basket
Cup rack
Dispenser
Salt container
Filter assembly
Lower spray arm
Inner pipe
Pictures are only for reference, different models may be different. Please prevail
in kind.
NOTE:
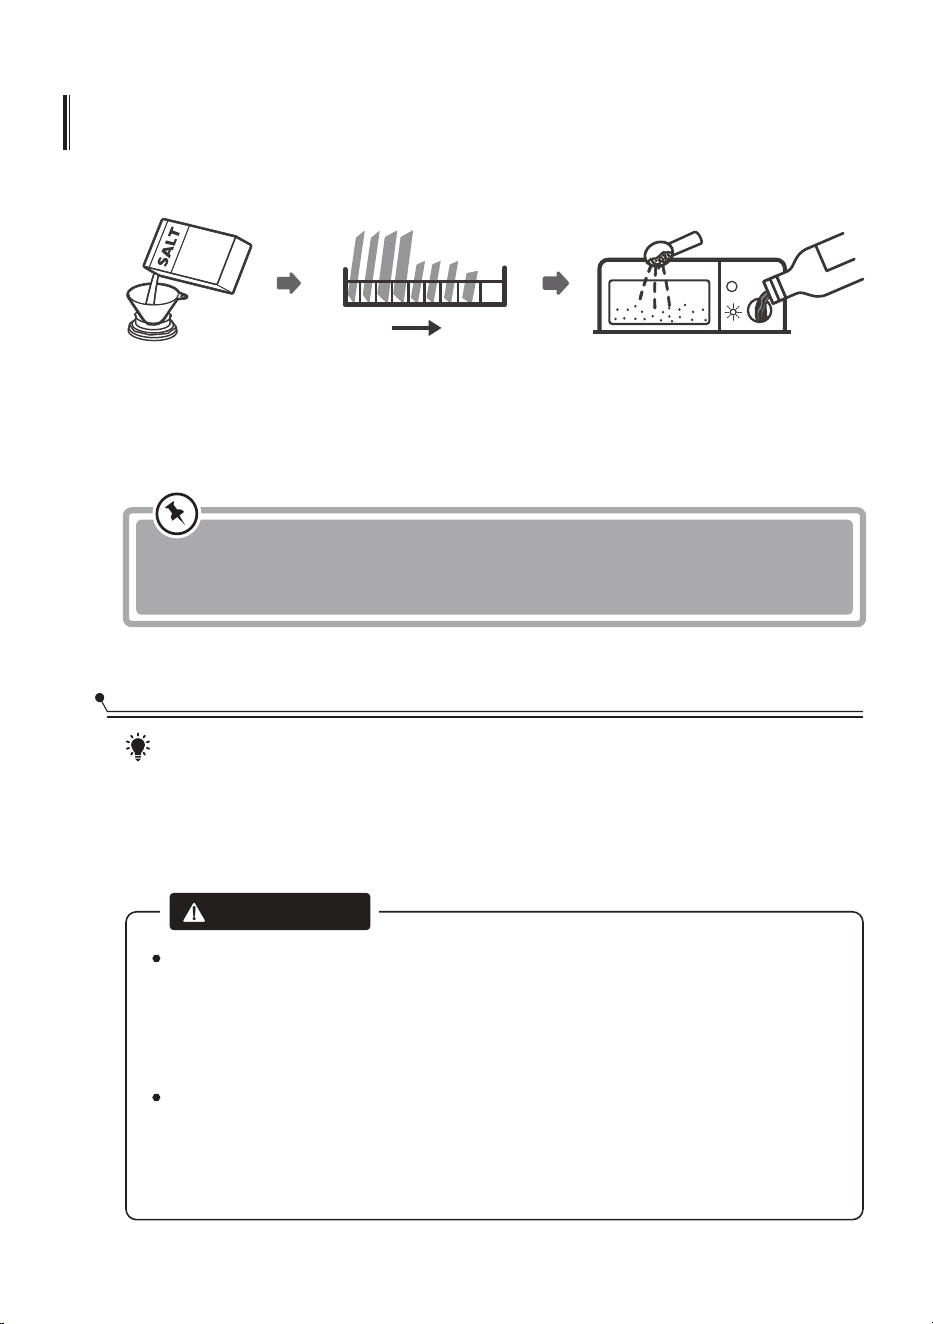
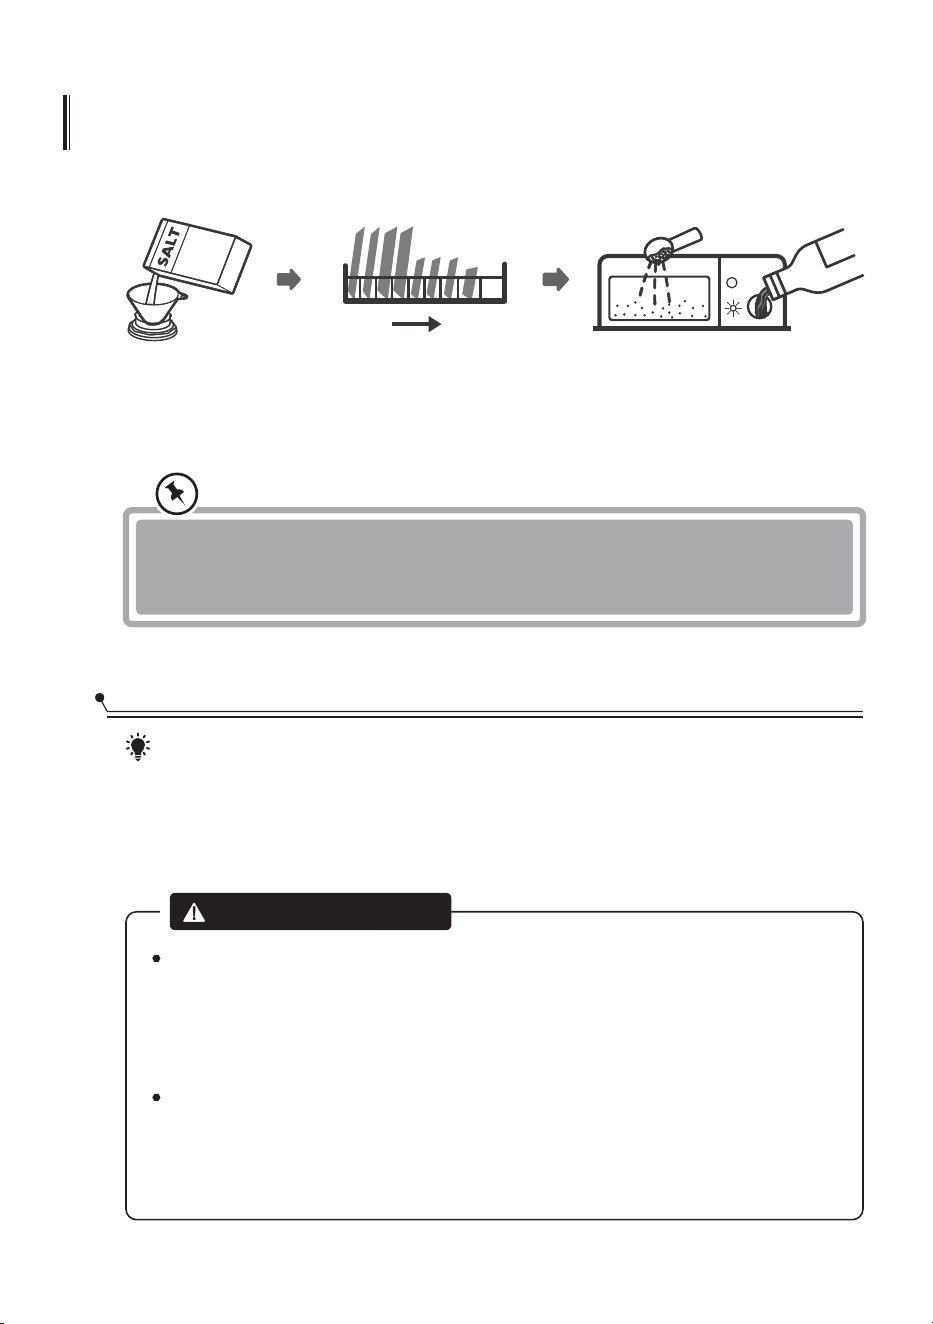
Loading The Salt Into The Softener
Only use salt specifically designed for dishwashers use!
Every other type of salt not specifically designed for dishwasher use,
especially table salt, will damage the water softener. In case of damages
caused by the use of unsuitable salt the manufacturer does not give any
warranty nor is liable for any damages caused.
Only fill with salt before running a cycle.
This will prevent any grains of salt or salty water, which may have been
spilled, remaining on the bottom of the machine for any period of time,
which may cause corrosion.
WARNING
Always use salt intended for dishwasher use.
The salt container is located beneath the lower basket and should be filled as
explained in the following:
Please check the section 1 “Water Softener” of PART Ⅱ: Special Version,
If you need to set the water softener .
Please check the section 1 “Water Softener” of PART Ⅱ: Special Version,
If you need to set the water softener .
9
If your model does not have any water softener, you may skip this section.
NOTE:
USING YOUR DISHWASHER
Before using your dishwasher :
Inside Outside
1. Set the water softener
2. Loading the salt Into the softener
3. Loading the basket
4. Fill the dispenser
10
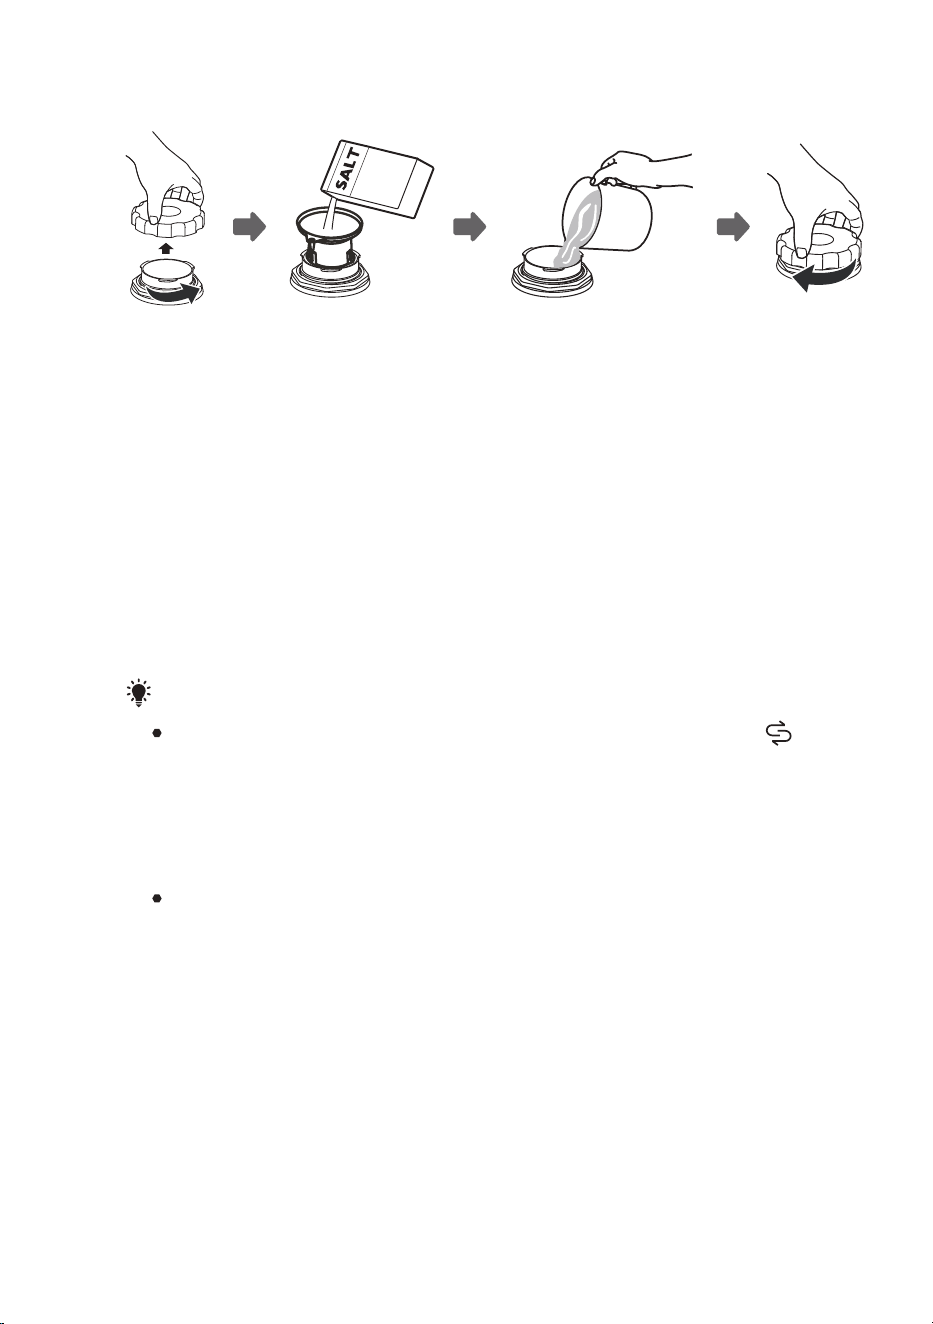
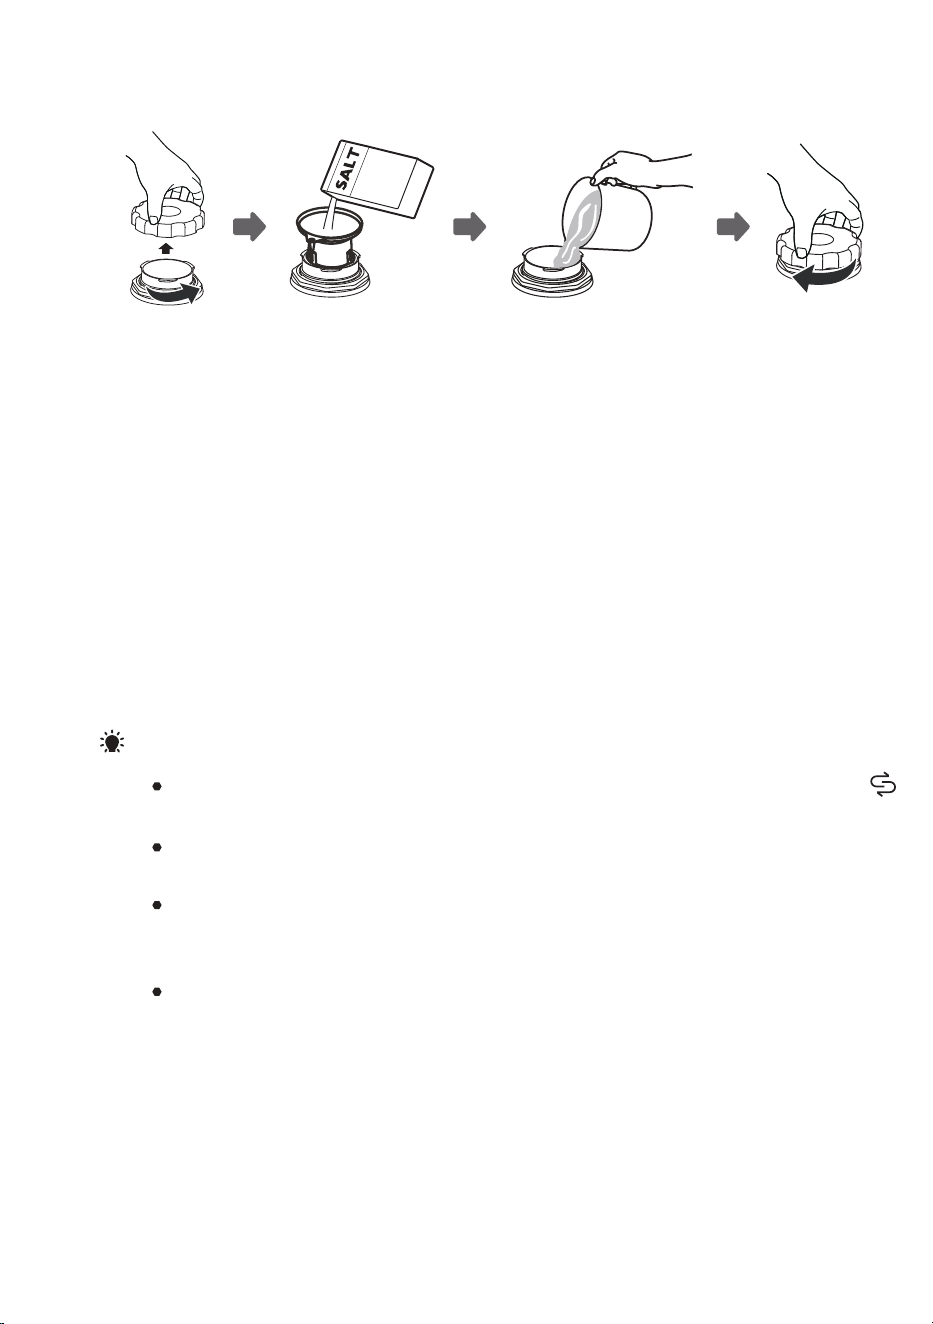
1. Remove the lower basket and unscrew the reservoir cap.
2. Place the end of the funnel (supplied) into the hole and pour in about 1.5kg of
dishwasher salt.
3. Fill the salt container to its maximum limit with water, It is normal for a small
amount of water to come out of the salt container.
4. After filling the container, screw back the cap tightly.
5. The salt warning light will stop being after the salt container has been filled with salt.
6. Immediately after filling the salt into the salt container, a washing program should
be started (We suggest to use a short program). Otherwise the filter system, pump
or other important parts of the machine may be damaged by salty water. This is
out of warranty.
NOTE:
The salt container must only be refilled when the salt warning light ( ) in the
control panel comes on. Depending on how well the salt dissolves, the salt
warning light may still be on even though the salt container is filled.
If there is no salt warning light in the control panel (for some Models), you can
estimate when to fill the salt into the softener by the cycles that the dishwasher
has run.
If salt has spilled, run a soak or quick program to remove it.
Please follow the steps below for adding dishwasher salt:

11
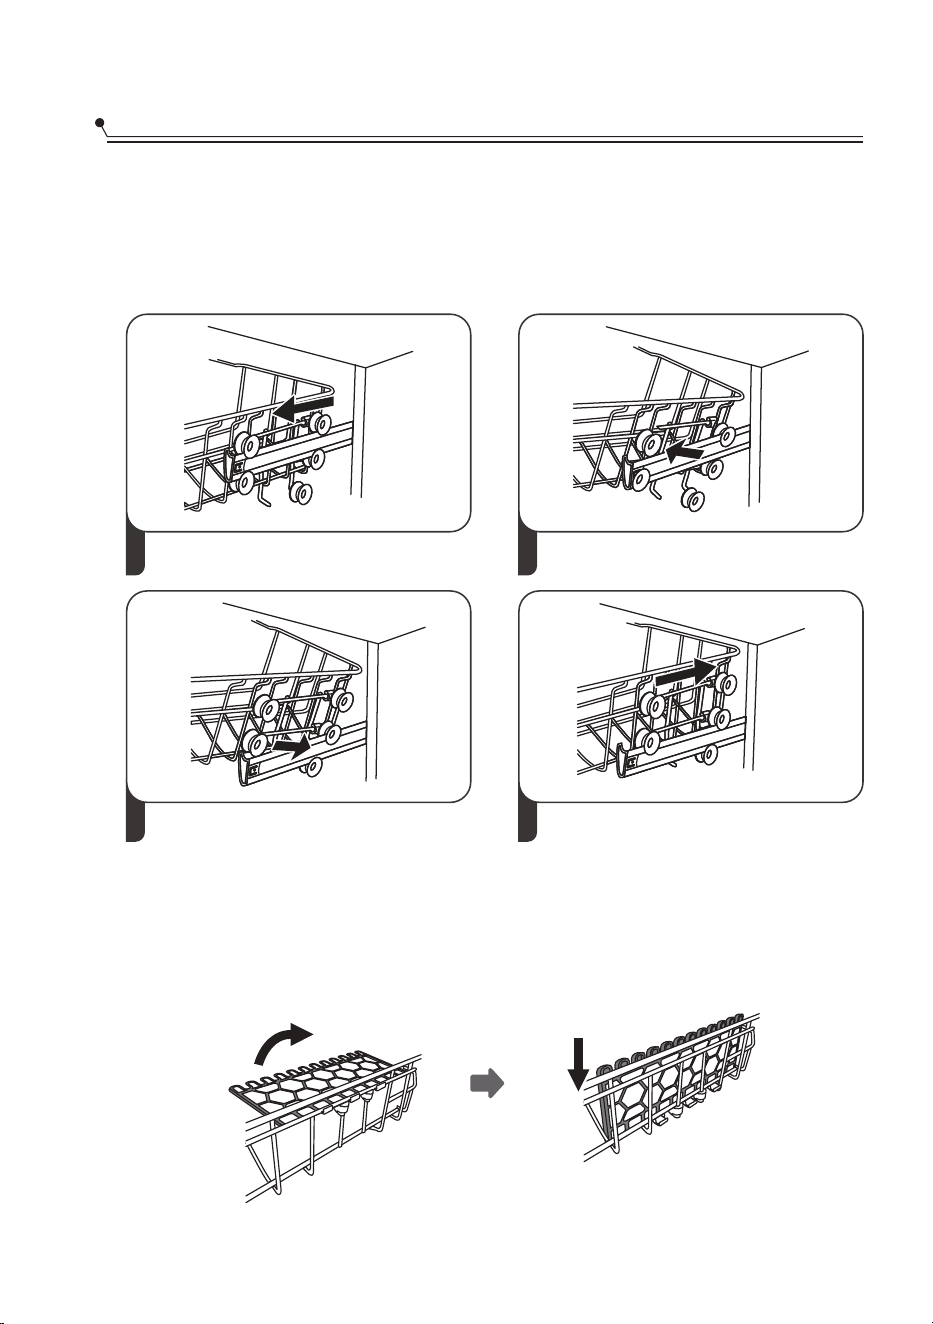
Adjusting the upper basket
The height of the upper basket can be easily adjusted to accommodate taller dishes
in either the upper or lower basket.
To adjust the height of the upper rack, follow these steps:
4
1
Pull out the upper basket.
2
Remove the upper basket.
3
Re-attach the upper basket to upper
or lower rollers.
Push in the upper basket.
lower position
upper position
Basket Used Tips
Folding back the cup shelves
To make room for taller items in the upper basket, raise the cup rack upwards.
You can then lean the tall glasses against it. You can also remove it when it is not
required for use.
12
MAINTENANCE AND CLEANING
External Care
The door and the door seal
Clean the door seals regularly with a soft damp cloth to remove food deposits.
When the dishwasher is being loaded, food and drink residues may drip onto the
sides of the dishwasher door. These surfaces are outside the wash cabinet and are not
accessed by water from the spray arms. Any deposits should be wiped off before the
door is closed.
The control panel
If cleaning is required, the control panel should be wiped with a soft damp cloth only.
To avoid penetration of water into the door lock and electrical components,
do not use a spray cleaner of any kind.
Never use abrasive cleaners or scouring pads on the outer surfaces because
they may scratch the finish. Some paper towels may also scratch or leave
marks on the surface.
WARNING
Internal Care
Filtering system
NOTE:
Pictures are only for reference, different models of the filtering system and spray
arms may be different.
The filtering system in the base of the wash cabinet retains coarse debris from the
washing cycle, including foreign objects such as tooth picks or shards. The collected
coarse debris may cause the filters to clog. Check the condition of the filters regularly,
carefully remove foreign objects and clean the parts of the filtering system if necessary
with water. Follow the steps below to clean the filter.
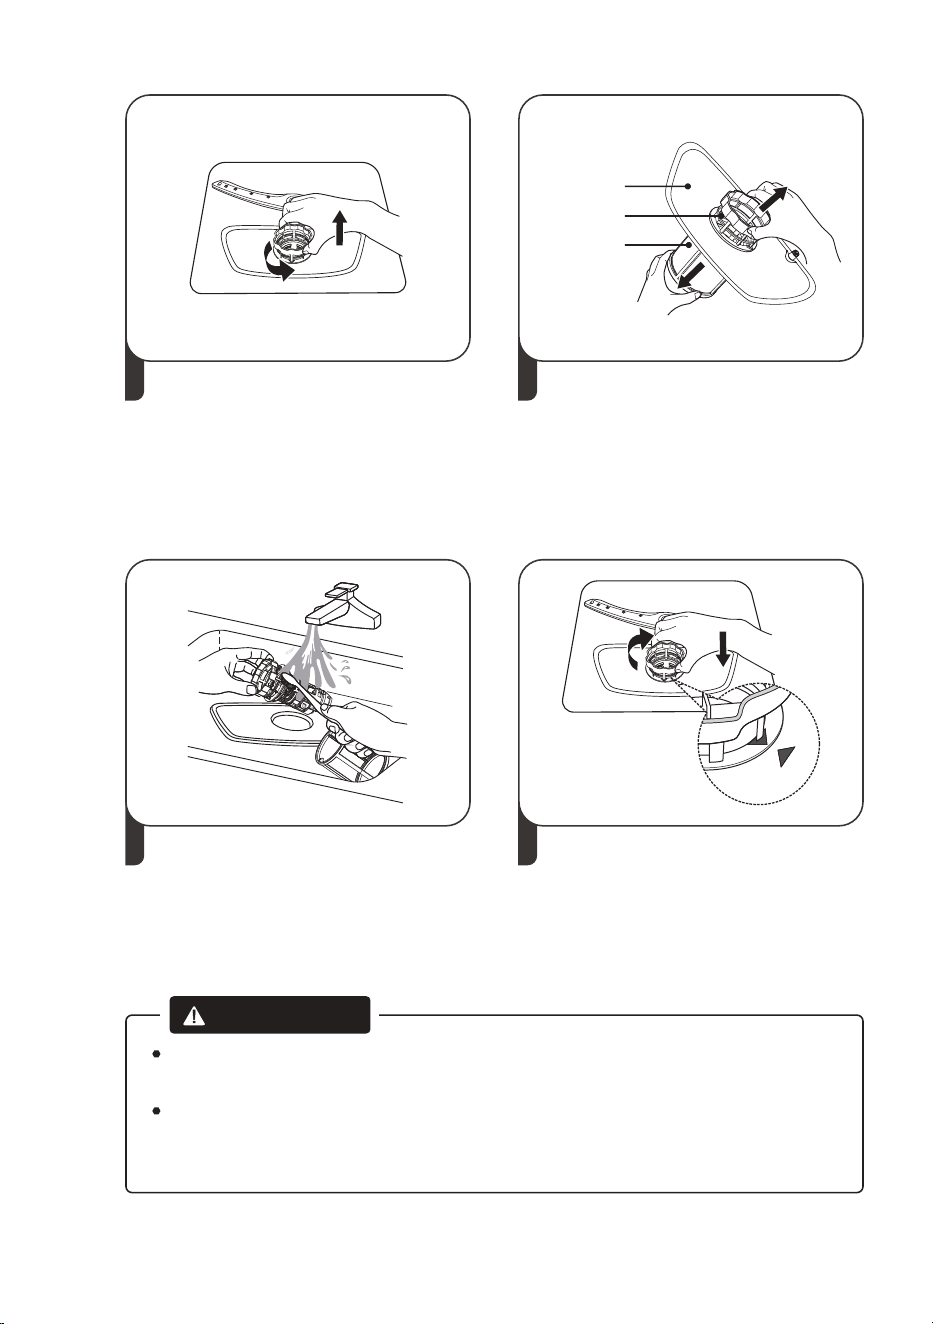
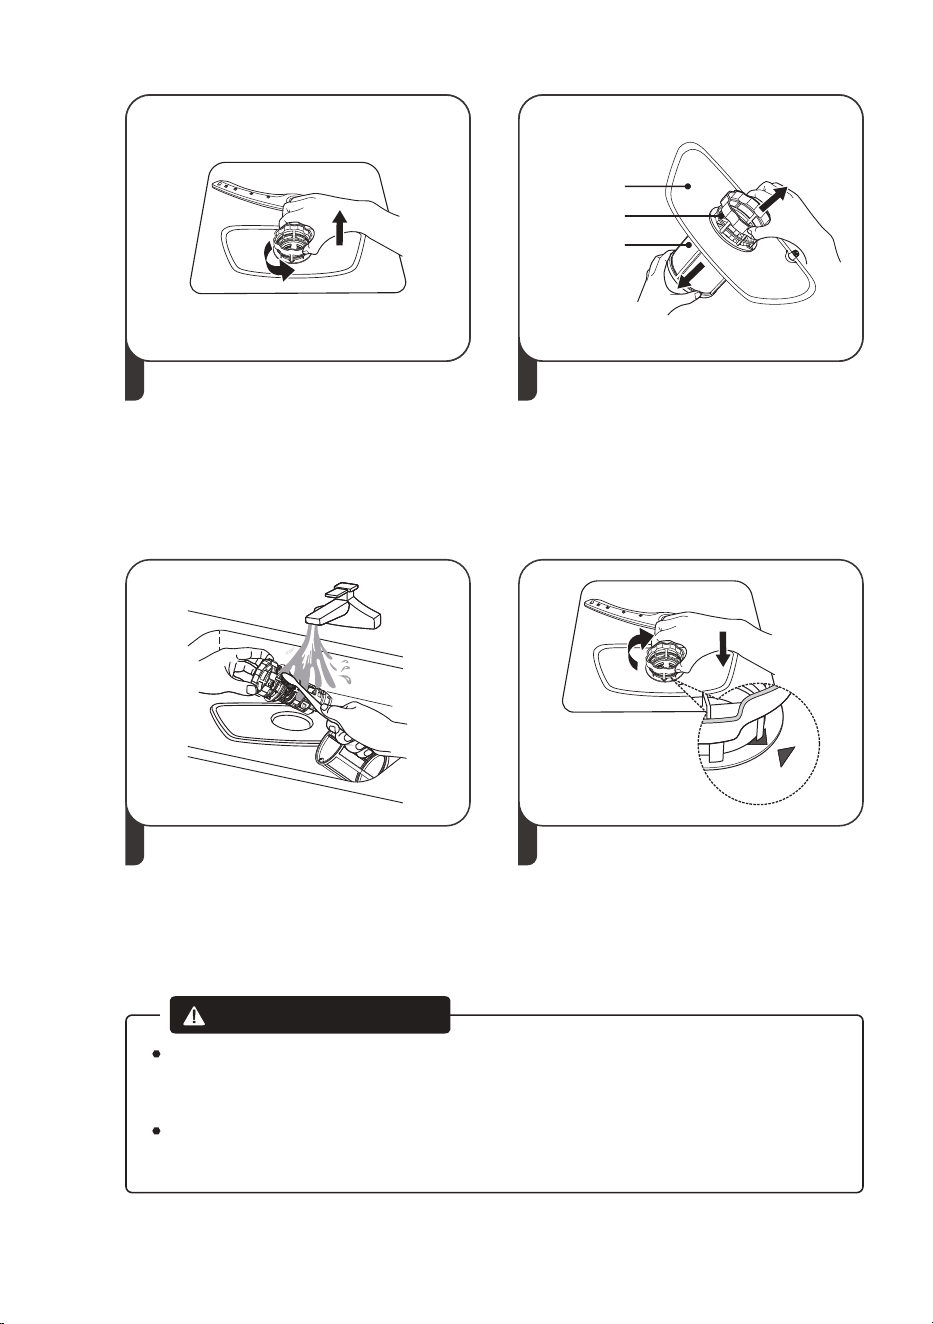
1 2
Hold the coarse filter and rotate it
anticlockwise to unlock the filter.
Lift the filter upwards and out of
the dishwasher.
The fine filter can be pulled off the
bottom of the filter assembly.
The coarse filter can be detached
from the main filter by gently
squeezing the tabs at the top and
pulling it away.
3 4
Larger food remnants can be
cleaned by rinsing the filter under
running water.
For a more thorough clean, use a
soft cleaning brush.
Reassemble the filters in the reverse
order of the disassembly, replace the
filter insert, and rotate clockwise to
the close arrow.
Do not over tighten the filters. Put the filters back in sequence securely,
otherwise coarse debris could get into the system and cause a blockage.
Never use the dishwasher without filters in place. Improper replacement of
the filter may reduce the performance level of the appliance and damage
dishes and utensils.
WARNING
13
Main filter Main filter
Coarse filterCoarse filter
Fine filter
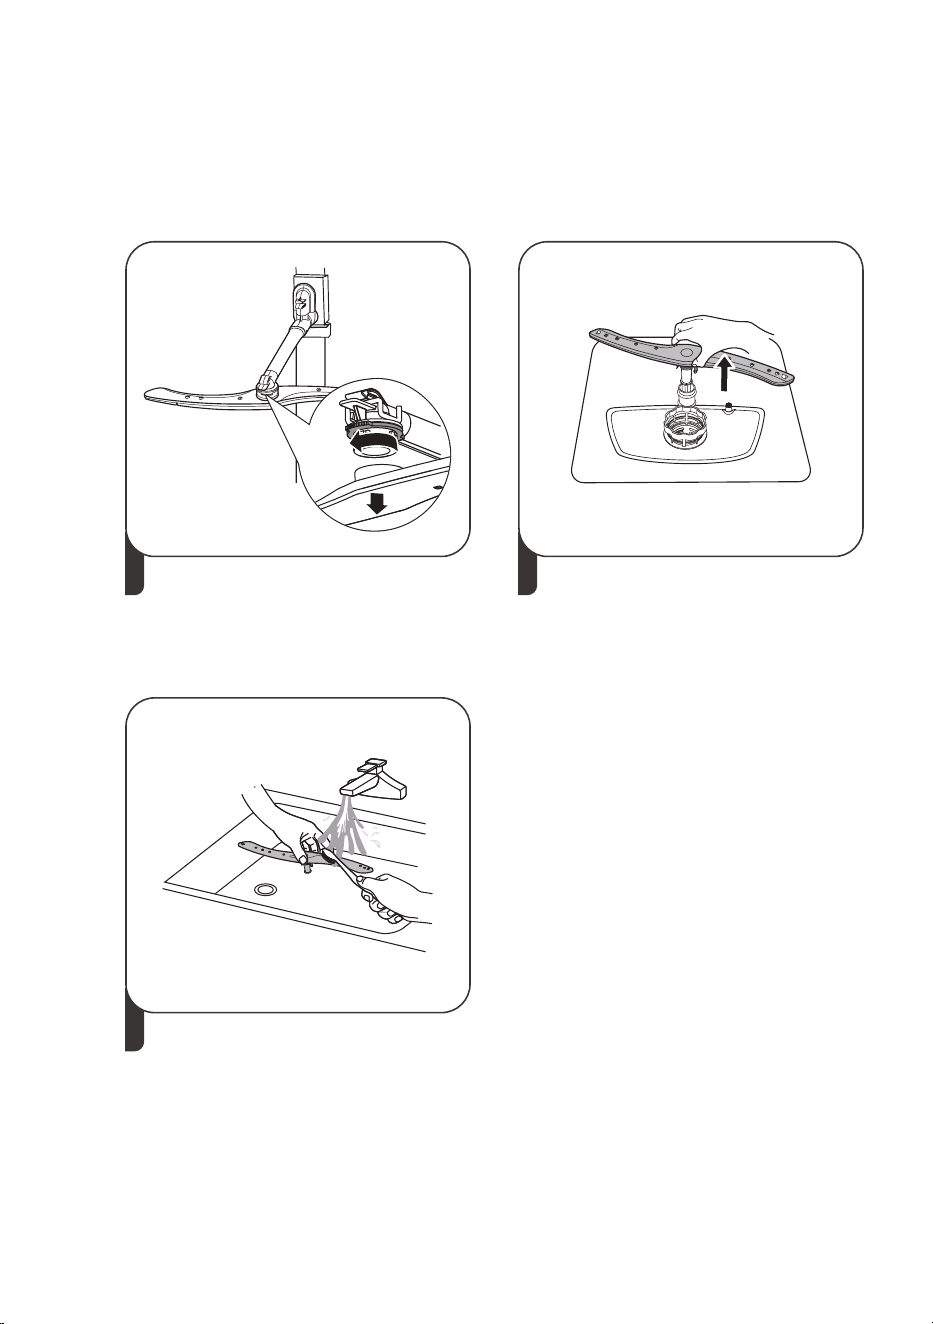
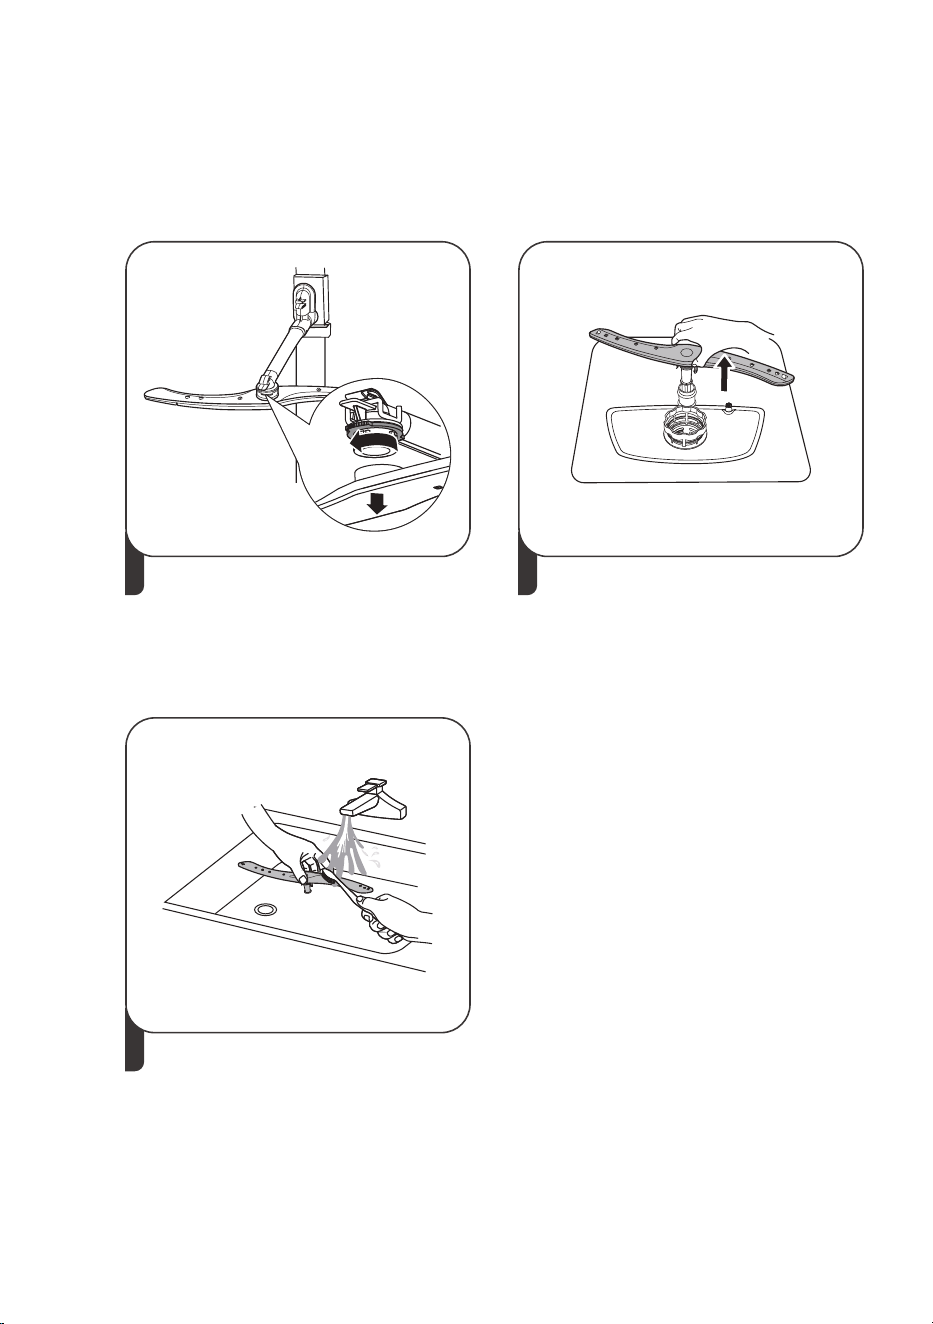
Spray arms
Wash the arms in soapy and warm
water and use a soft brush to clean
the jets. Replace them after rinsing
them thoroughly.
It is necessary to clean the spray arms regularly for hard water chemicals will clog the
spray arm jets and bearings.
To clean the spray arms, follow the instructions below:
2
3
To remove the lower spray arm, pull
out the spray arm upward.
14
1
To remove the upper spray arm,
hold the nut, rotate the arm
clockwise to remove it.

15
Caring For The Dishwasher
Frost precaution
Please take frost protection measures on the dishwasher in winter. Every time after
washing cycles, please operate as follows:
1. Cut off the electrical power to the dishwasher at the supply source.
2. Turn off the water supply and disconnect the water inlet pipe from the water valve.
3. Drain the water from the inlet pipe and water valve. (Use a pan to gather the water)
4. Reconnect the water inlet pipe to the water valve.
5. Remove the filter at the bottom of the tub and use a sponge to soak up water in
the sump.
After every wash
After every wash, turn off the water supply to the appliance and leave the door slightly
open so that moisture and odors are not trapped inside.
Remove the plug
Before cleaning or performing maintenance, always remove the plug from the socket.
No solvents or abrasive cleaning
To clean the exterior and rubber parts of the dishwasher, do not use solvents or
abrasive cleaning products. Only use a cloth with warm soapy water.
To remove spots or stains from the surface of the interior, use a cloth dampened with
water an a little vinegar, or a cleaning product made specifically for dishwashers.
When not in use for a longtime
It is recommend that you run a wash cycle with the dishwasher empty and then remove
the plug from the socket, turn off the water supply and leave the door of the
appliance slightly open. This will help the door seals to last longer and prevent odors
from forming within the appliance.
Moving the appliance
If the appliance must be moved, try to keep it in the vertical position. If absolutely
necessary, it can be positioned on its back.
Seals
One of the factors that cause odours to form in the dishwasher is food that remains
trapped in the seals. Periodic cleaning with a damp sponge will prevent this from
occurring.
16
INSTALLATION INSTRUCTION
Ensure the voltage and frequency of the power being corresponds to those on the
rating plate. Only insert the plug into an electrical socket which is earthed properly. If
the electrical socket to which the appliance must be connected is not appropriate for
the plug, replace the socket, rather than using a adaptors or the like as they could
cause overheating and burns.
Electrical requirements
Electrical connection
Ensure that proper earthing exists before use
About Power Connection
WARNING
For personal safety:
Do not use an extension cord or an adapter
plug with this appliance.
Do not, under any circumstances, cut or remove
the earthing connection from the power cord.
The installation of the pipes and electrical equipments should be done by professionals.
Attention
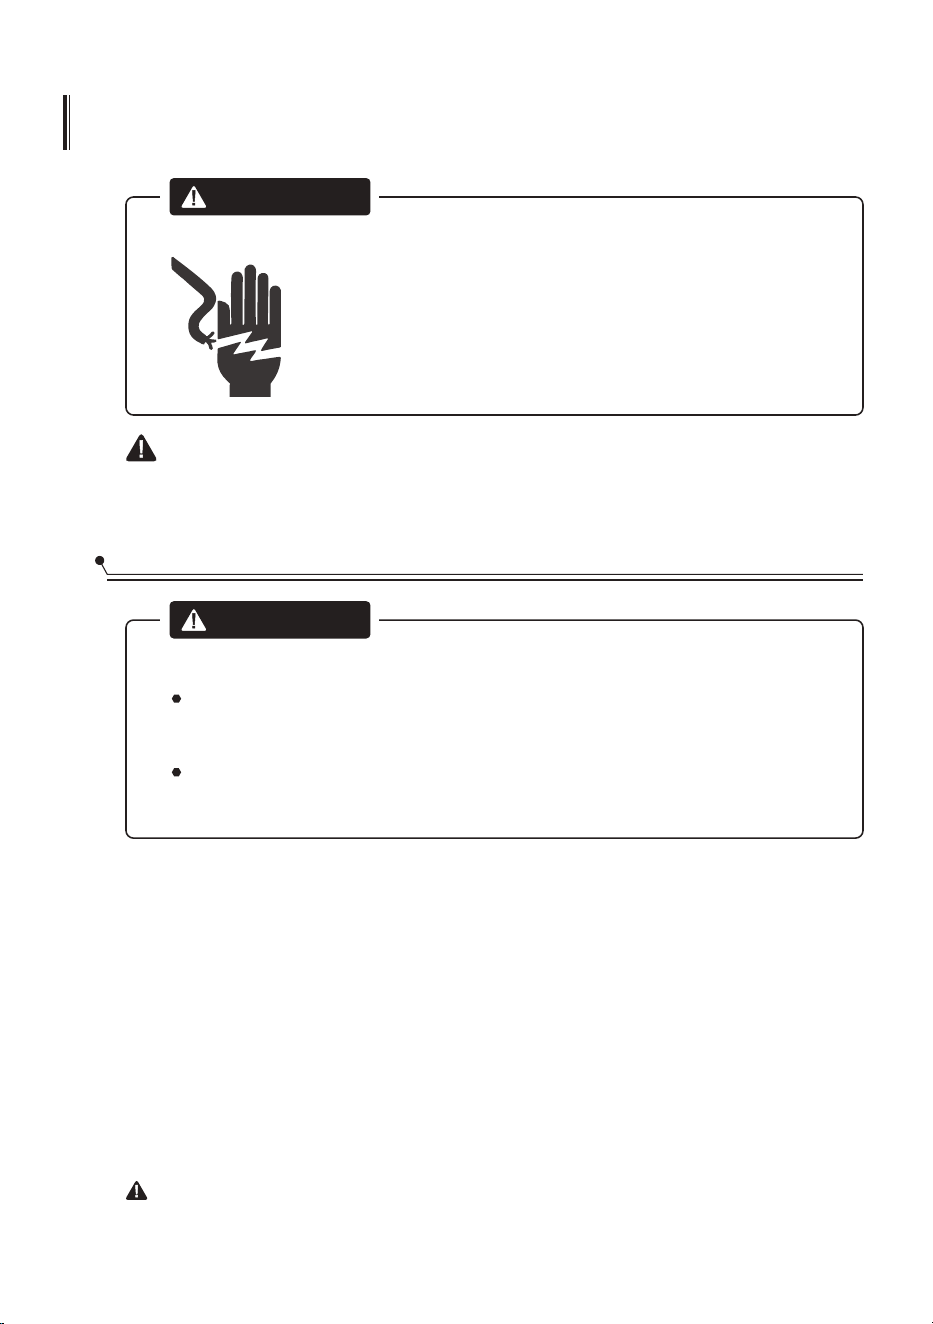
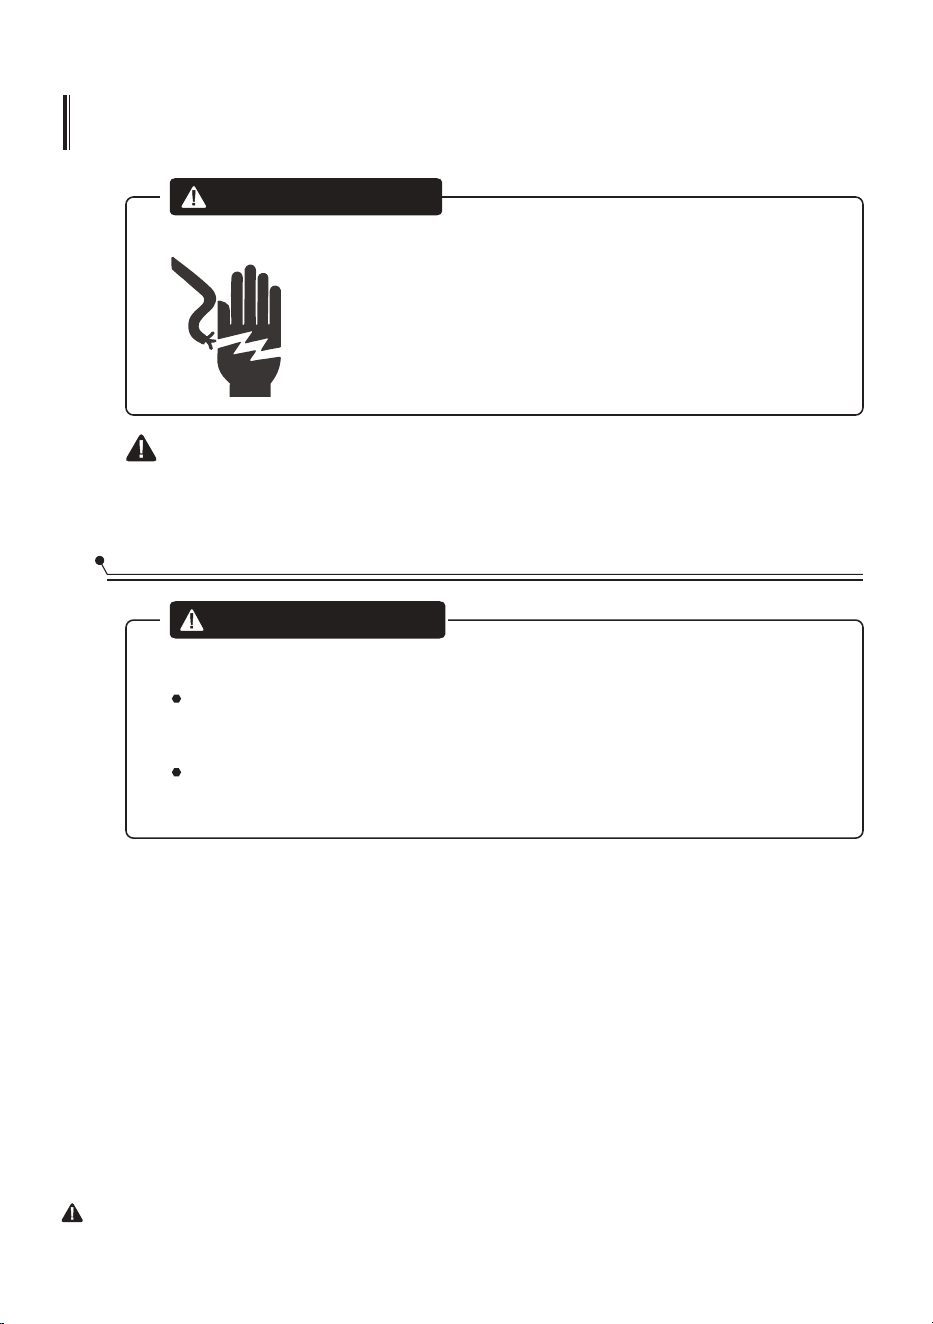
WARNING
Electrical Shock Hazard
Disconnect electrical power before
installing dishwasher.
Failure to do so could result in death or
electrical shock.
Please look at the rating label to know the rating voltage and connect the dishwasher
to the appropriate power supply. Use the required fuse 10A/13A/16A, time delay fuse
or circuit breaker recommended and provide separate circuit serving only this appliance.

Water Supply And Drain
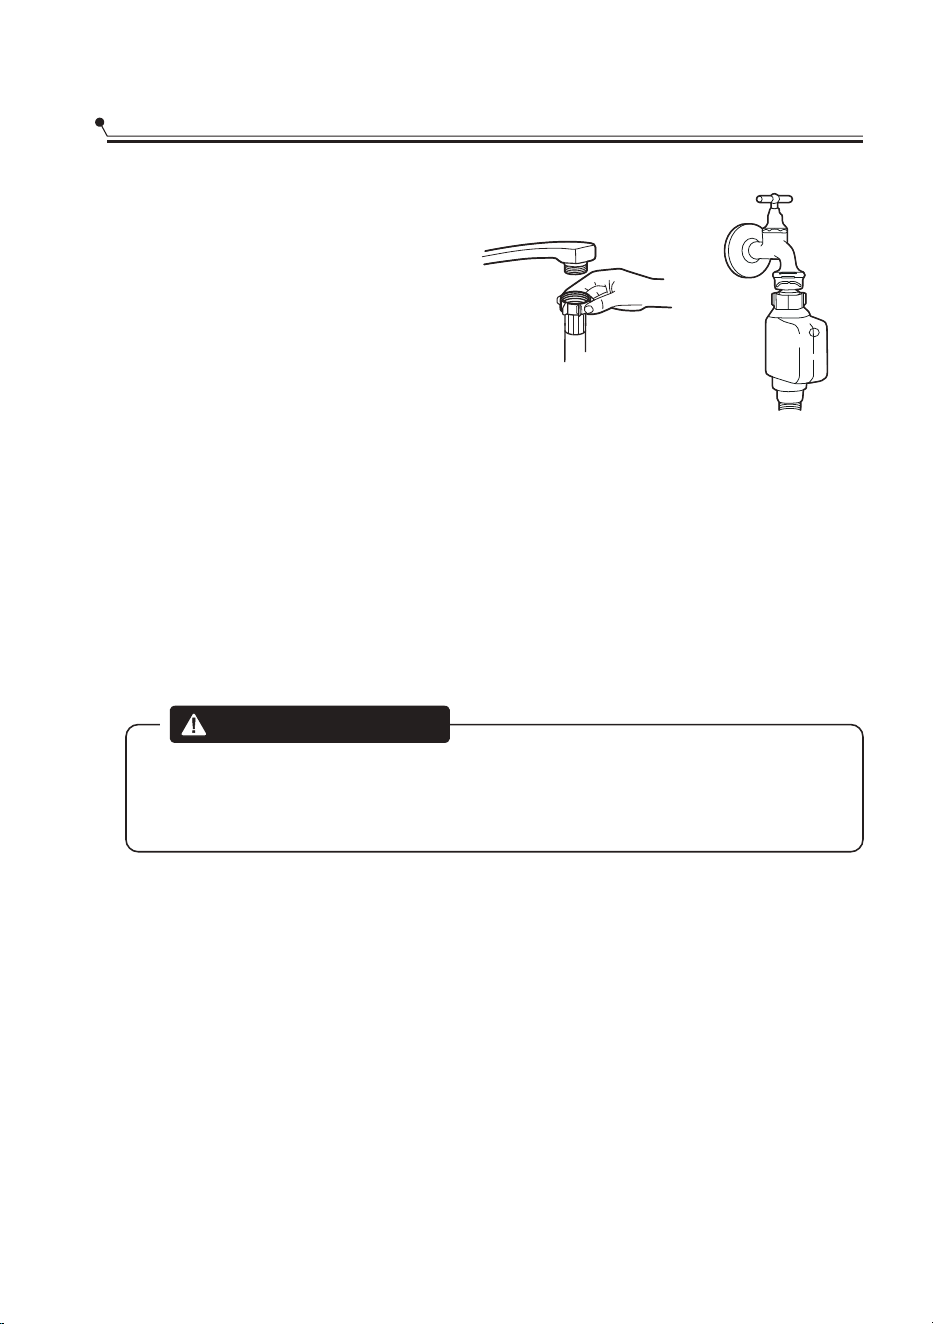
Cold water connection
Connect the cold water supply hose to
a threaded 3/4(inch) connector and
make sure that it is fastened tightly in
place.
If the water pipes are new or have not
been used for an extended period of
time, let the water run to make sure
that the water is clear. This precaution
is needed to avoid the risk of the
water inlet to be blocked and damage
the appliance.
safety supply hose
ordinary supply hose
About the safety supply hose
The safety supply hose consists of the double walls. The hose's system guarantees its
intervention by blocking the flow of water in case of the supply hose breaking and
when the air space between the supply hose itself and the outer corrugated hose is
full of water.
How to connect the safety supply hose
1. Pull The safety supply hoses completely out from storage compartment located at
rear of dishwasher.
2. Tighter the screws of the safety supply hose to the faucet with thread 3/4inch.
3. Turn water fully on before starting the dishwasher.
WARNING
A hose that attaches to a sink spray can burst if it is installed on the same
water line as the dishwasher. If your sink has one, it is recommended that
the hose be disconnected and the hole plugged.
How to disconnect the safety supply hose
1. Turn off the water.
2. Unscrew the safety supply hose from the faucet.
17
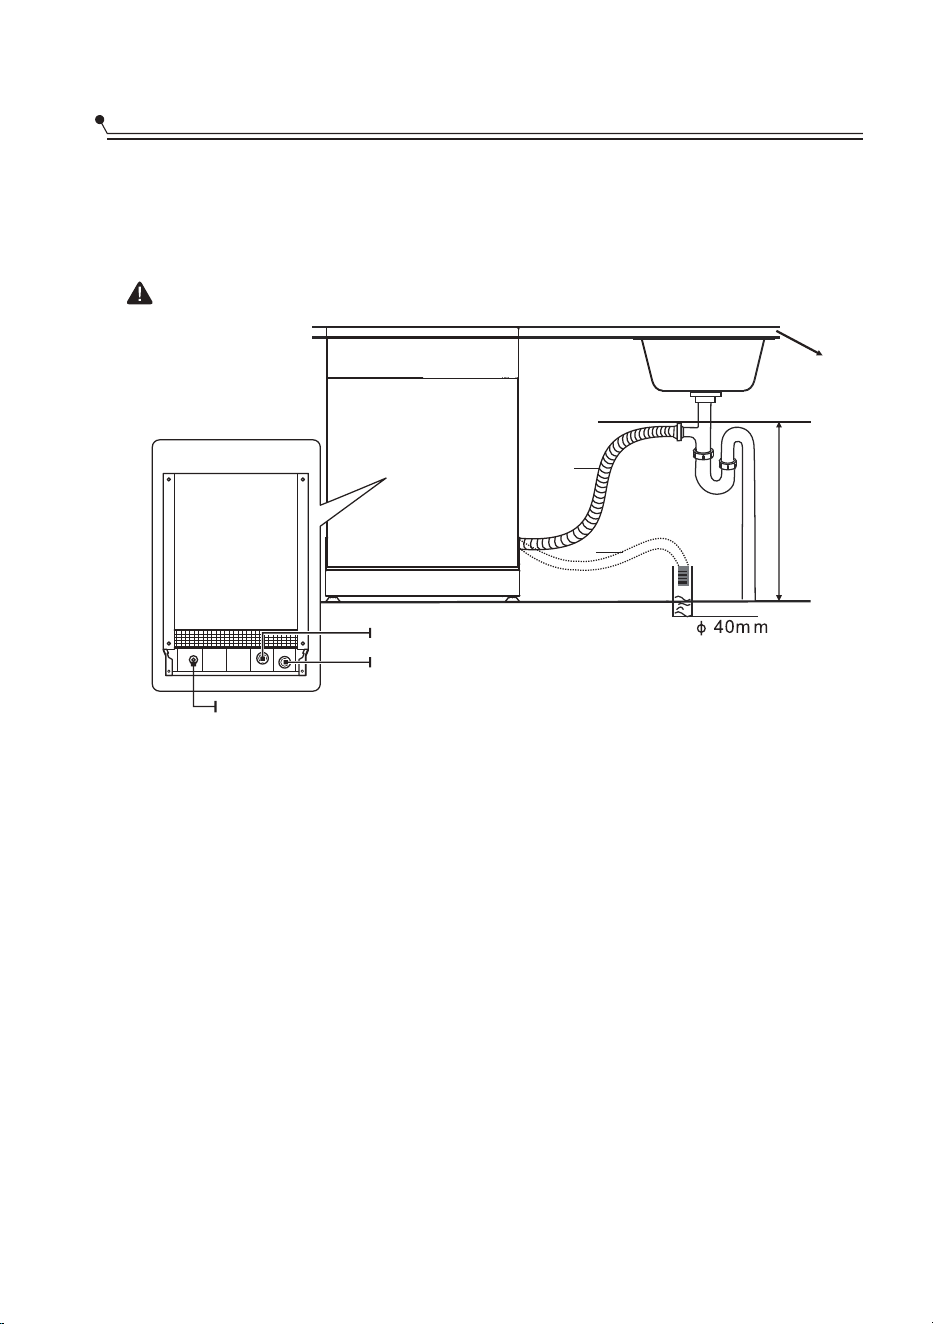
Connection Of Drain Hoses
Please securely fix the drain hose in either position A or position B
B
A
MAX 1000mm
Counter
Drain hose
Insert the drain hose into a drain pipe with a minimum diameter of 4 cm, or let it run
into the sink, making sure to avoid bending or crimping it. The height of drain pipe
must be less than 1000mm. The free end of the hose must not be immersed in water
to avoid the back flow of it.
Extension hose
Water outlet
How to drain excess water from hoses
Syphon connection
If the sink is 1000 higher from the floor, the excess water in hoses cannot be drained
directly into the sink. It will be necessary to drain excess water from hoses into a bowl
or suitable container that is held outside and lower than the sink.
Connect the water drain hose. The drain hose must be correctly fitted to avoid water
leaks. Ensure that the water drain hose is not kinked or squashed.
The waste connection must be at a height less than 100 cm (maximum) from the
bottom of the dish. The water drain hose should be fixed .
If you need a drain hose extension, make sure to use a similar drain hose.
It must be no longer than 4 meters; otherwise the cleaning effect of the dishwasher
could be reduced.
18
Back of dishwasher
Water Inlet
Drain Pipe
Mains Cable
19
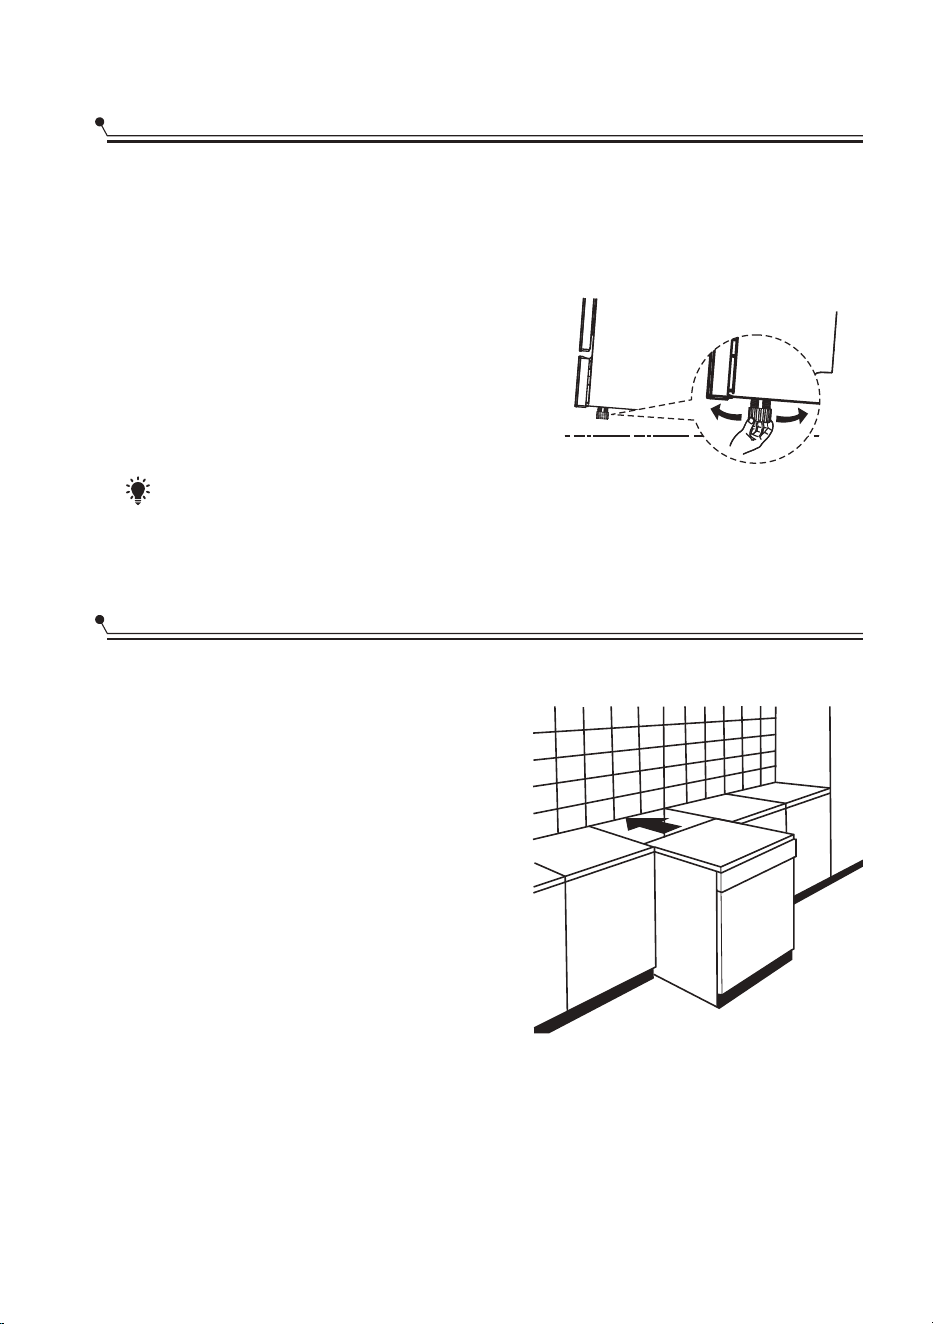
Position The Appliance
Position the appliance in the desired location. The back should rest against the wall
behind it, and the sides, along the adjacent cabinets or walls. The dishwasher is
equipped with water supply and drain hoses that can be positioned either to the right
or the left sides to facilitate proper installation.
Free Standing Installation
Fitting between existing carbinets
The height of the dishwasher, 845 mm, has
been designed in order to allow the machine
to be fitted between existing cabinets of the
same height in modern fitted kitchens. The
feet can be adjusted so that correct height is
reached.
The laminated top of the machine does not
require any particular care since it is
heatproof, scratchproof and stainproof.
Levelling the appliance
Once the appliance is positioned for levelling,
the height of the dishwasher may be altered via
adjustment of the screwing level of the feet.
In any case, the appliance should not be inclined
more than 2°.
NOTE:
Only apply to the free standing dishwasher.
20
Built-In Installation(for the integrated model)
Step 1. Selecting the best location for the dishwasher
The installation position of dishwasher should be near the existing inlet and drain hoses
and power cord.
Illustrations of cabinet dimensions and installation position of the dishwasher.
1. Less than 5 mm between the top of dishwasher and cabinet and the outer door
aligned to cabinet.
90 °
90 °
580mm580mm
820mm820mm
100100
Electrical, drain
and water supply
line entrances
Electrical, drain
and water supply
line entrances
Space between cabinet
bottom and floor
Space between cabinet
bottom and floor
600 mm(for 60cm model)
450 mm(for 45cm model)
8080
Underneath existing work top
(When fitting beneath a work top)
In most modern fitted kitchens there is only one
single work top under which cabinets and
electrical appliances are fitted. In this case remove
the work top of the dishwasher by unscrewing the
screws under the rear edge of the top (a).
a
a
b
b
After removing the work top, the screws must be screwed again under the rear edge
of the top (b).
Attention
The height will then be reduced to 815 mm, as scheduled by the International
Regulations (ISO) and the dishwasher will fit perfectly under the kitchen working top
21
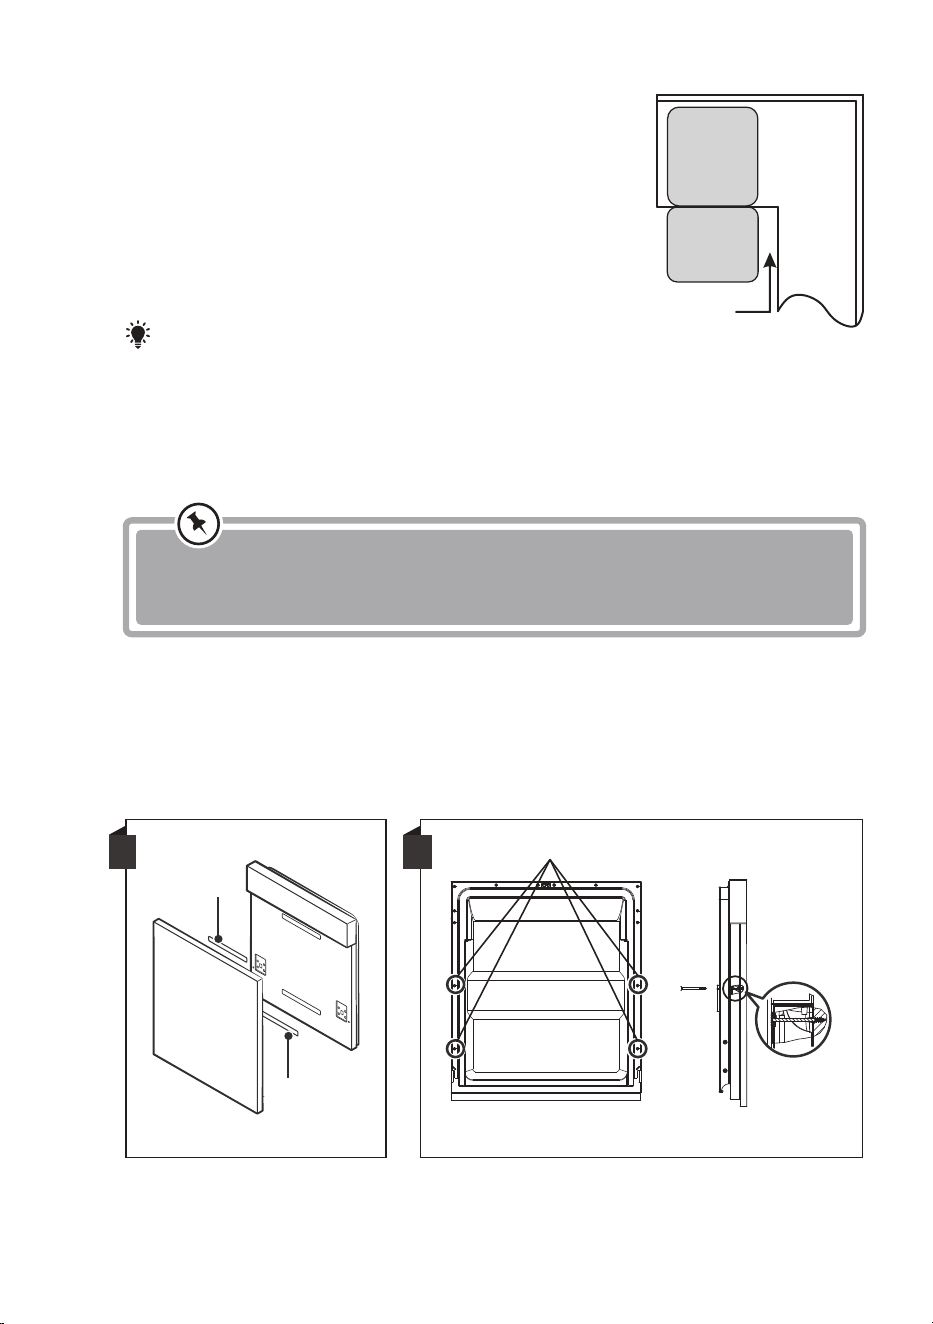
Step 2. Aesthetic panel's dimensions and installation
The aesthetic wooden panel could be processed according to the
installation drawings.
The aesthetic wooden panel could be processed according to the
installation drawings.
A
Magical paster
Magical paster
Magical paster A and magical paster B be disjoinedon ,magical paster A on the
aesthetic wooden panel and felted magical paster B of the outer door of dishwasher
(see figure A). After positioning of the panel , fix the panel onto the outer door by
screws and bolts (See figure B) .
Semi-integrated model
B
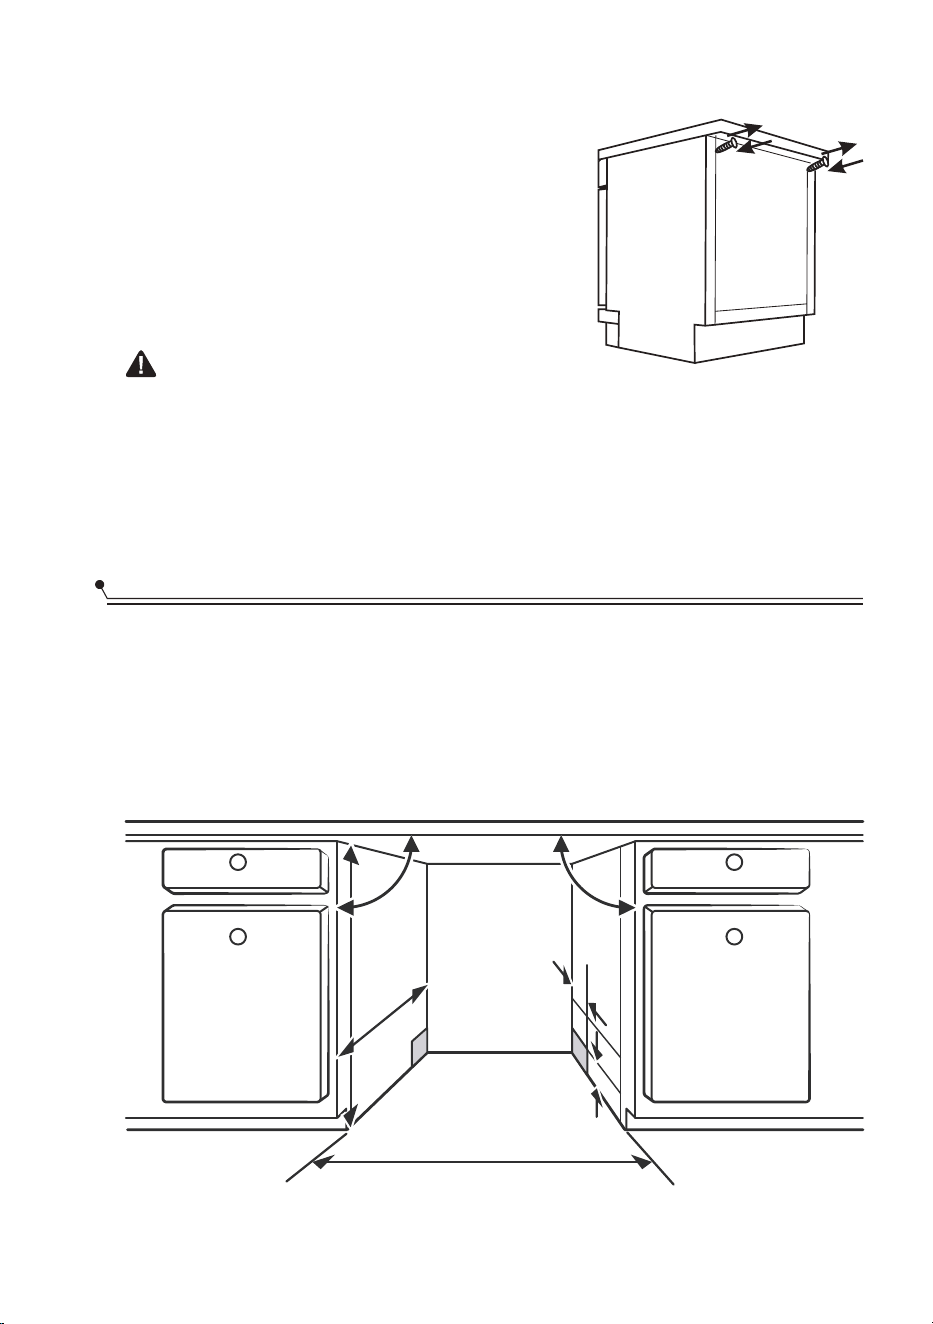
2.Pin up the four long screws
1.Take away the four short screws
2. If dishwasher is in stalled at the corner of the cabinet,
there should be some space when the door is opened.
CabinetDishwasher
Door of
dishwasher
Minimum space
of 50mm
NOTE:
Depending on where your electrical outlet is, you may need to cut a hole in the
opposite cabinet side.
Step 3. Tension adjustment of the door spring
1. The door springs are set at the factory to
the proper tension for the outer door. If
aesthetic wooden panel are installed, you
will have to adjust the door spring tension.
Rotate the adjusting screw to drive the
adjustor to strain or relax the steel cable.
2. Door spring tension is correct when the
door remains horizontal in the fully opened
position, yet rises to a close with the slight
lift of a finger.
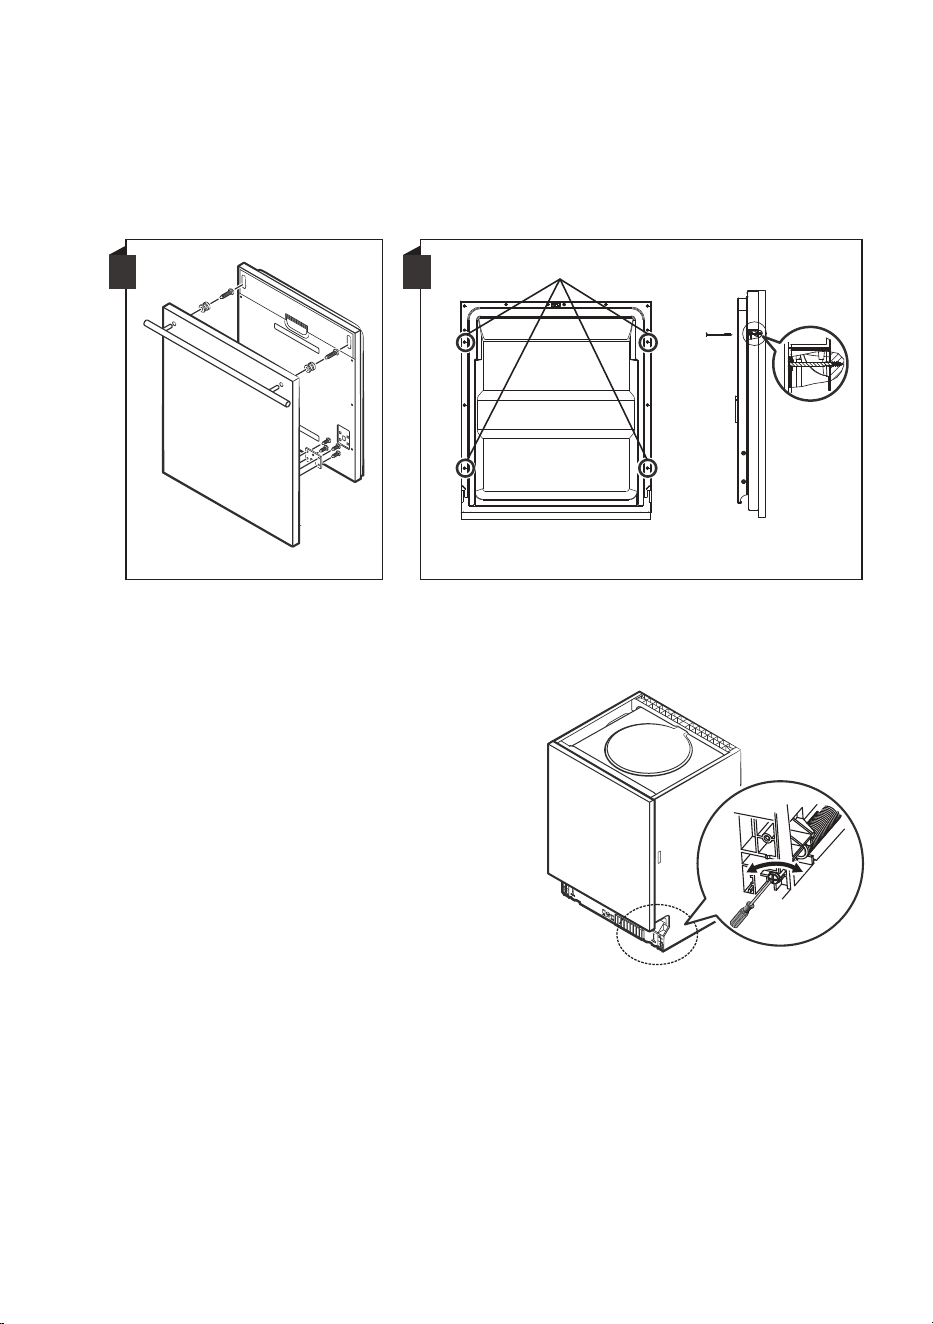
Install the hook on the aesthetic wooden panel and put the hook into the slot of the
outer door of dishwasher (see figure A). After positioning of the panel , fix the panel
onto the outer door by screws and bolts (See figure B).
B
2.Pin up the four long screws
A
1.Take away the four short screws
Full-integrated model
22

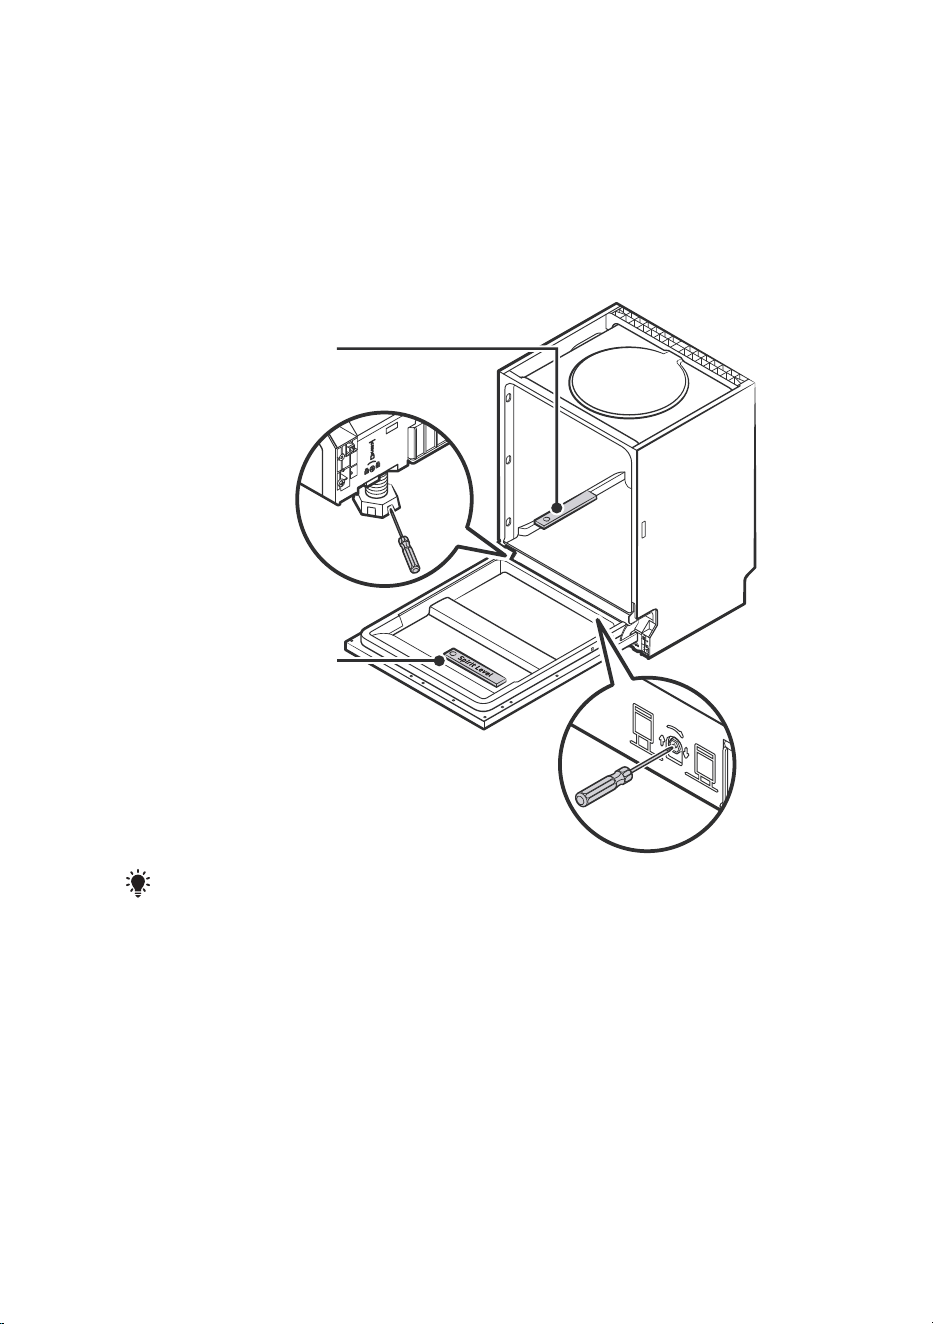
Step 4. Dishwasher installation steps
1. Affix the condensation strip under the work surface of cabinet. Please ensure the
condensation strip is flush with edge of work surface. (Step 2)
2. Connect the inlet hose to the cold water supply.
3. Connect the drain hose.
4. Connect the power cord.
5. Place the dishwasher into position. (Step 4)
6. Level the dishwasher. The rear foot can be adjusted from the front of the
dishwasher by turning the Philips screw in the middle of the base of dishwasher
use an Philips screw. To adjust the front feet, use a flat screw driver and turn the
front feet until the dishwasher is level. (Step 5 to Step 6)
7. Install the furniture door to the outer door of the dishwasher. (Step 7 to Step 10)
8. Adjust the tension of the door springs by using an Allen key turning in a clockwise
motion to tighten the left and right door springs. Failure to do this could cause
damage to your dishwasher. (Step 11)
9. The dishwasher must be secured in place. Fix the side with screws.
9
23
Please refer to the specified installation steps in the installation
drawings.
Please refer to the specified installation steps in the installation
drawings.
UP
DOWN
Check level
front to back
Check level
side to side
Step 5. Levelling the dishwasher
Dishwasher must be level for proper dish rack operation and wash performance.
Place a spirit level on door and rack track inside the tub as shown to check that the
dishwasher is level.
Level the dishwasher by adjusting the three levelling legs individually.
When level the dishwasher, please pay attention not to let the dishwasher tip over.
1.
2.
3.
The maximum adjustment height of the feet is 50 mm.
NOTE:
24
25
TROUBLESHOOTING TIPS
Before Calling For Service
Reviewing the charts on the following pages may save you from calling for service.
Problem Possible Causes What To Do
Dishwasher doesn't
start
Fuse blown, or the
circuit break tripped.
Replace fuse or reset circuit breaker.
Remove any other appliances sharing
the same circuit with the dishwasher.
Power supply is not
turned on.
Make sure the dishwasher is turned
on and the door is closed securely.
Make sure the power cord is
properly plugged into the wall socket.
Check that the water supply is
connected properly and the water
is turned on.
Door of dishwasher
not properly closed.
Make sure to close the door
properly and latch it.
Water not pumped
form dishwasher
Twisted or trapped
drain hose.
Filter clogged.
Kitchen sink clogged.
Check the drain hose.
Check coarse the filter.
Check the kitchen sink to make sure
it is draining well. If the problem is
the kitchen sink that is not draining ,
you may need a plumber rather than
a serviceman for dishwashers.
Suds in the tub Wrong detergent.
Water pressure is low
Use only the special dishwasher
detergent to avoid suds. If this occurs,
open the dishwasher and let suds
evaporate. Add 1 gallon of cold water
to the bottom of the dishwasher.
Close the dishwasher door, then select
any cycle. Initially, the dishwasher will
drain out the water. Open the door
after draining stage is complete and
check if the suds have disappeared.
Repeat if necessary.

26
Spilled rinse-aid. Always wipe up rinse-aid spills
immediately.
Stained tub interior Detergent with
colourant may
have been used.
Make sure that the detergent has no
colourant.
White film on
inside surface
Hard water minerals. To clean the interior, use a damp
sponge with dishwasher detergent
and wear rubber gloves. Never use
any other cleaner than dishwasher
detergent otherwise, it may cause
foaming or suds.
There are rust
stains on cutlery
The affected items
are not corrosion
resistant.
A program
was not run after
dishwasher salt was
added. Traces of
salt have gotten
into the wash cycle.
Always run a wash program
without any crockery after adding
salt. Do not select the Turbo function
(if present), after adding dishwasher
salt.
The lid of the softer
is loose.
Check the softener lid is secure.
Problem Possible Causes What To Do
Avoid washing items that are not
corrosion resistant in the dishwasher.
Knocking noise in
the dishwasher
A spray arm is knocking
against an item in a
basket
Interrupt the program and
rearrange the items which are
obstructing the spray arm.
Rattling noise in
the dishwasher
Items of crockery
are loose in the
dishwasher.
Interrupt the program and
rearrange the items of crockery.
Knocking noise in
the water pipes
This may be caused
by on-site installation
or the cross-section
of the piping.
This has no influence on the
dishwasher function. If in doubt,
contact a qualified plumber.
The dishes
are not clean
The dishes were not
loaded correctly.
See PART Ⅱ “Preparing And Loading
Dishes”.
The program was
not powerful enough.
Select a more intensive program.
27
Not enough detergent
was dispensed.
Use more detergent, or change
your detergent.
Items are blocking
the movement of
the spray arms.
Rearrange the items so that the spray
can rotate freely.
The filter combination
is not clean or is not
correctly fitted in the
base of wash cabinet.
This may cause the spray
arm jets to get blocked.
Clean and/or fit the filter correctly.
Clean the spray arm jets.
Cloudiness on
glassware.
Combination of soft
water and too much
detergent.
Use less detergent if you have soft
water and select a shorter cycle to
wash the glassware and to get
them clean.
Problem Possible Causes What To Do
The dishes
are not clean.
White spots
appear on dishes
and glasses.
Add more detergent.
Black or grey
marks on dishes
Aluminium utensils
have rubbed against
dishes
Use a mild abrasive cleaner to
eliminate those marks.
Hard water area
can cause limescale
deposits.
Improper loading Load the dishwasher as suggested in
the directions.
Dishes are removed
too soon
Do not empty your dishwasher
immediately after washing. Open
the door slightly so that the steam
can come out. Take out the dishes
until the inside temperature is safe
to touch. Unload the lower basket
first to prevent the dropping water
from the upper basket.
Detergent left in
dispenser
Dishes block
detergent dispenser
Re-loading the dishes properly.
The dishes aren't
drying
Problem
Wrong program has
been selected.
With a short program, the
washing temperature is lower,
decreasing cleaning performance.
Choose a program with a long
washing time.
Use of cutlery with a
low-quality coating.
Water drainage is more difficult with
these items. Cutlery or dishes of this
type are not suitable for washing in
the dishwasher.
Possible Causes What To Do
28
The dishes aren't
drying
Seven years after placing the last unit of the model on the market:
Motor, circulation and drain pump, heaters and heating elements, including
heat pumps (separately or bundled), piping and related equipment including
all hoses, valves, filters and aqua stops, structural and interior parts related to
door assemblies (separately or bundled), printed circuit boards, electronic
displays, pressure switches, thermostats and sensors, software and firmware
including reset software.
Ten years after placing the last unit of the model on the market:
Door hinge and seals, other seals, spray arms, drain filters, interior racks and
plastic peripherals such as baskets and lids.
Availability Of Spare Parts
WARNING
Self-repair or non-professional repair may cause serious risks to the safety
of the user of the appliance and impact warranty.
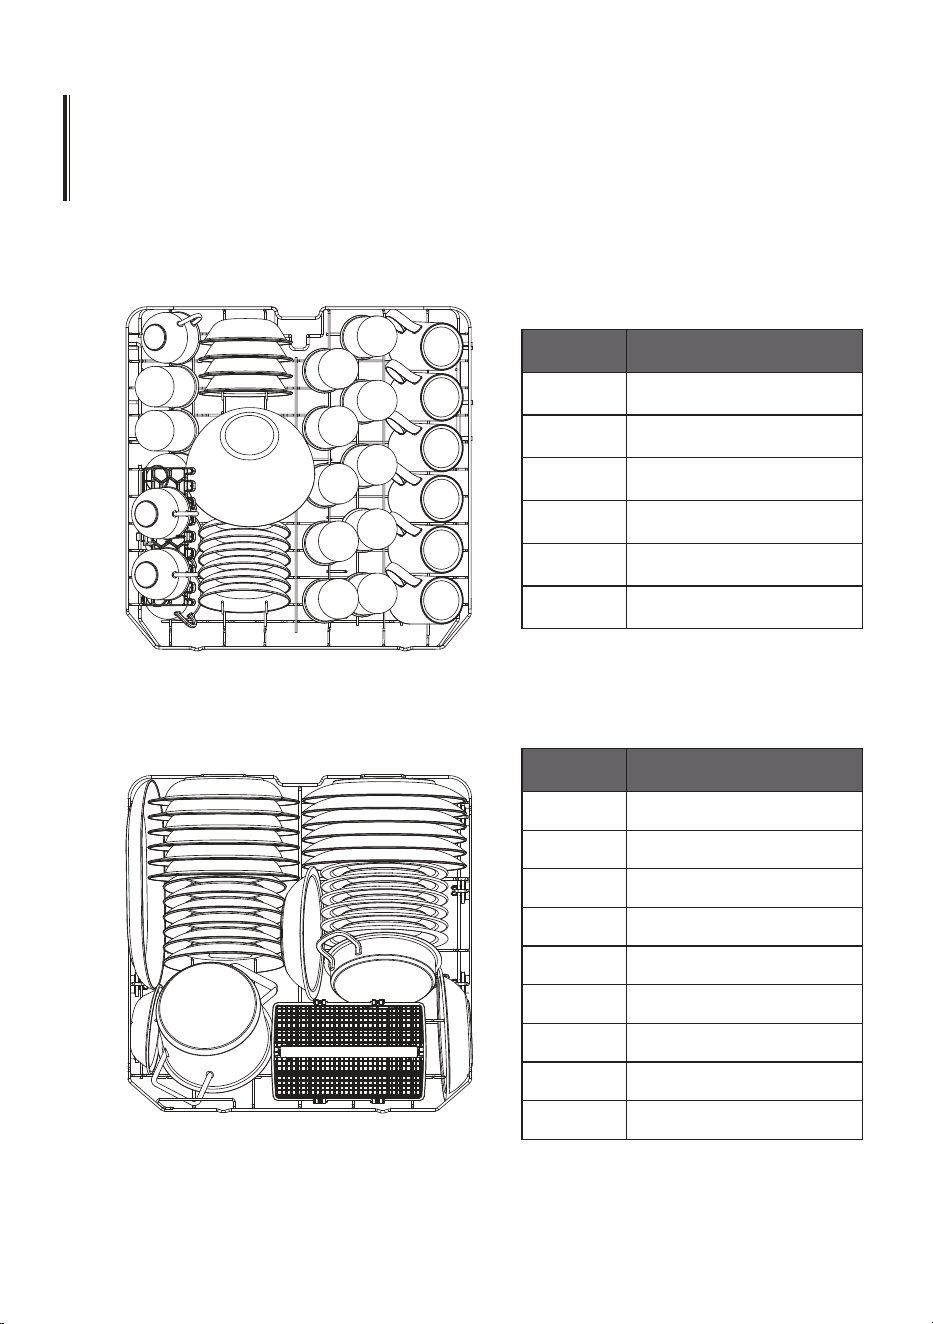
1.Upper basket:
2.Lower basket:
1
2
3
4
5
6
Cups
Dessert bowls
Glasses
Mugs
Saucers
Glass bowl
Item
Number
LOADING THE BASKETS
ACCORDING TO EN60436:
7
8
9
10
11
12
13
14
15
Oval platter
Small pot
Dessert plates
Soup plates
Cutlery basket
Melamine bowls
Oven pot
Melamine dessert plates
Dinner plates
Item
Number
11
11
22
33
44
55
66
77
44
88
99
1010
1515
1212
1414
1313
1212
29
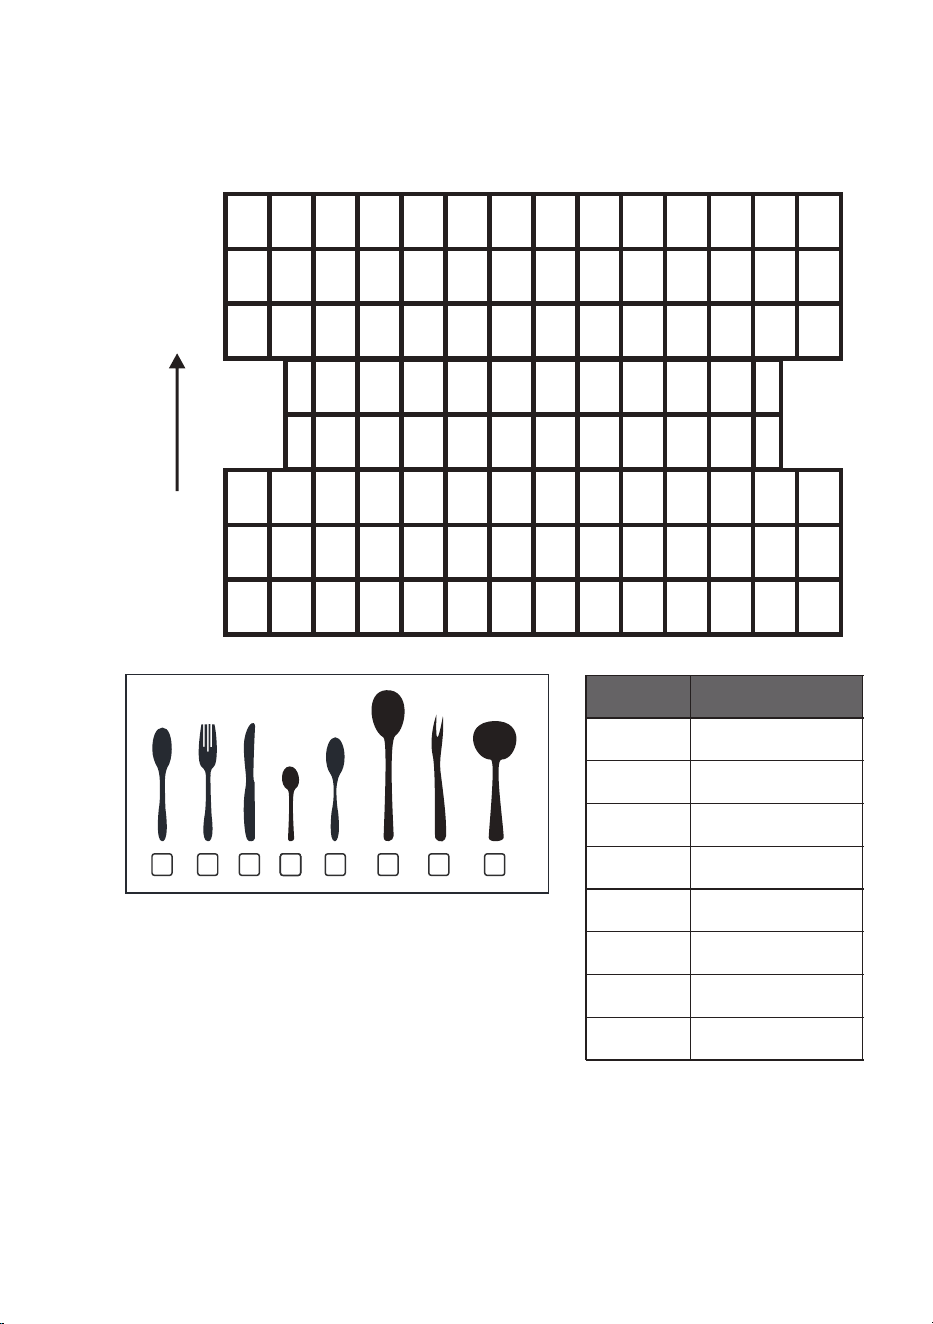
3.Cutlery basket:
1 32 6444 5 7 8
1
2
3
4
5
6
7
8
Soup spoons
Forks
Knives
Teaspoons
Dessert spoons
Serving spoons
Serving forks
Gravy ladles
Item
Number
Information for comparability
tests in accordance with EN60436
Capacity: 12 place settings
Position of the upper basket: lower position
Program: ECO
Rinse aid setting: Max
Softener setting: H3
3
1
2
1
2 2 2
1
2
1
4 4 4 4 4 4
8 7 3 3
1
1
1
2
1
2 2 2
1
2
1
5 5 5 5 5 5
3 3 3 3
3
6
2
2
1
3 1
3 3
6
3 3
4 4 4 4 4 4
5 5 5 5 5 5
IN
0

E-CLVM6419W
Please read this manual carefully
before using the dishwasher and
Keep this manual for future reference.
PART Ⅱ: Special Version
E-CLVM6419
X
CONTENTS
NOTE:
If you cannot solve the problems by yourself, please ask for help from a
professional technician.
The manufacturer, following a policy of constant development and updating of
the product, may make modifications without giving prior notice.
If lost or out-of-date, you can receive a new user manual from the manufacturer
or responsible vendor.
ERROR CODES
USING YOUR DISHWASHER
Control Panel
Water Softener
Preparing And Loading Dishes
Function Of The Rinse Aid And Detergent
Filling The Rinse Aid Reservoir
Filling The Detergent Dispenser
4
4
6
12
7
10
11
PROGRAMMING THE DISHWASHER
Wash Cycle Table
Starting A Cycle Wash
Changing The Program Mid-cycle
Forget To Add A Dish?
13
13
1
1
TECHNICAL INFORMATION
1
1
7
6
4
4
1
Saving Energy
15
4

5
QUICK USER GUIDE
Please read the corresponding content on the instruction manual for detailed
operating method.
2
Removing the larger residue on the
cutlery
3
Loading the baskets
4
Filling the dispenser Selecting a program and running
the dishwasher
Inside Outside
3
1
Install the dishwasher
(Please check the section 5 “INSTALLATION INSTRUCTION ”
of PART Ⅰ: Generic Version.)
USING YOUR DISHWASHER
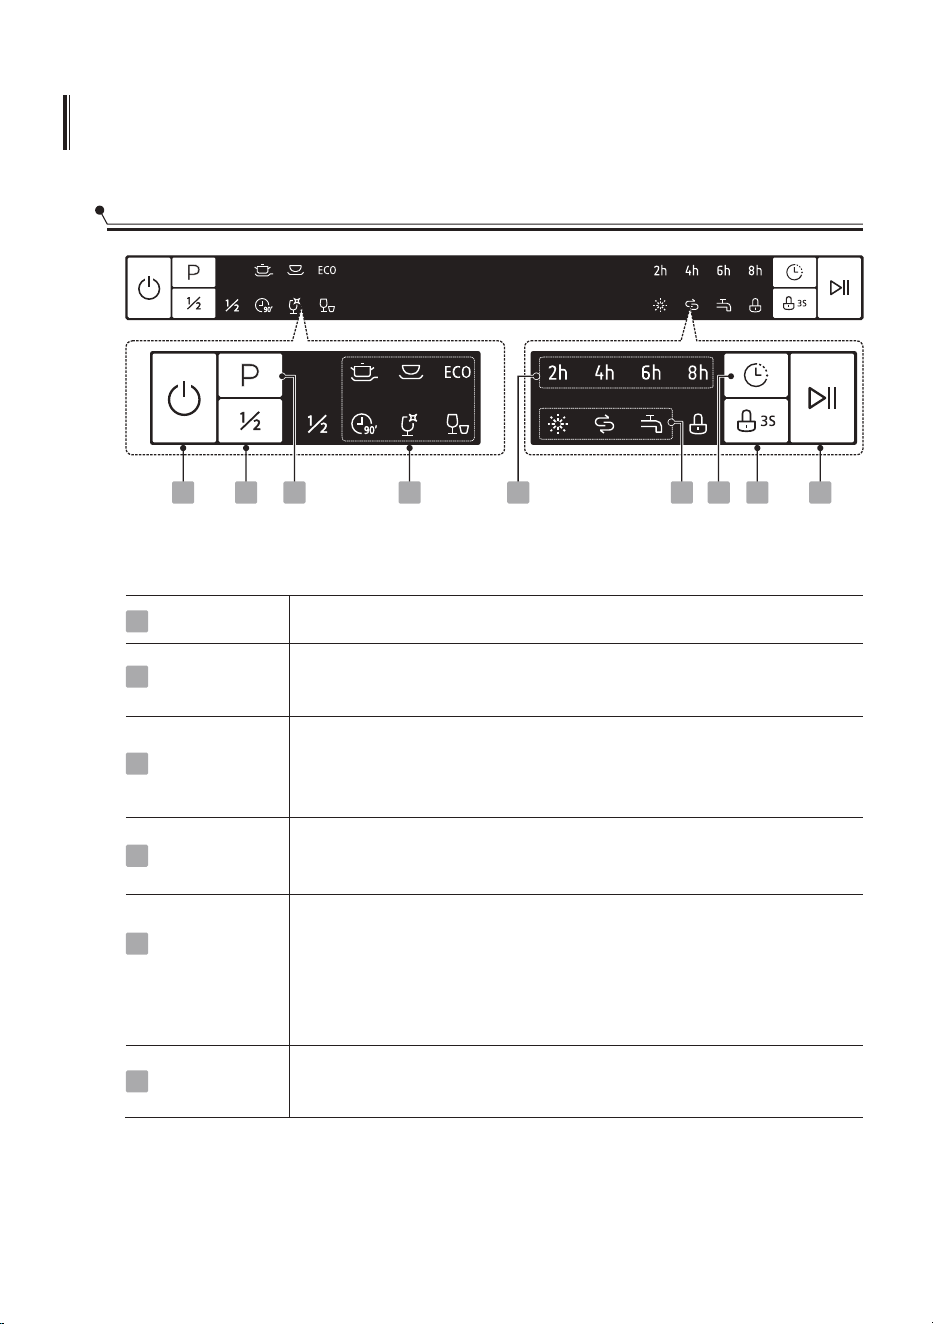
Control Panel
Operation (Button)
Power
Press this button to turn on your dishwashe.
4
1
5
Program
Select the appropriate washing program, the selected program
indicator will be lit.
2
Delay
Press the button to set the delay time, corresponding indicator
will be lit.
4
To start the selected washing program or pause it when the
dishwasher is working.
Start/Pause6
Child lock
This option allows you to lock the buttons on the control panel,
except the Power button, so children cannot accidently start the
dishwasher by pressing the buttons on the panel.
To lock or unlock the buttons on the control panel, hold the
button for 3 seconds.
1 3 2 7 5 648 9
3
Half-load
When you have about or less than 6 place setting dishware to
wash, you can choose this function to save energy and water.
(It can only be used with Intensive, Universal, ECO, 90 min.)
5
Display
Program
indicator
7
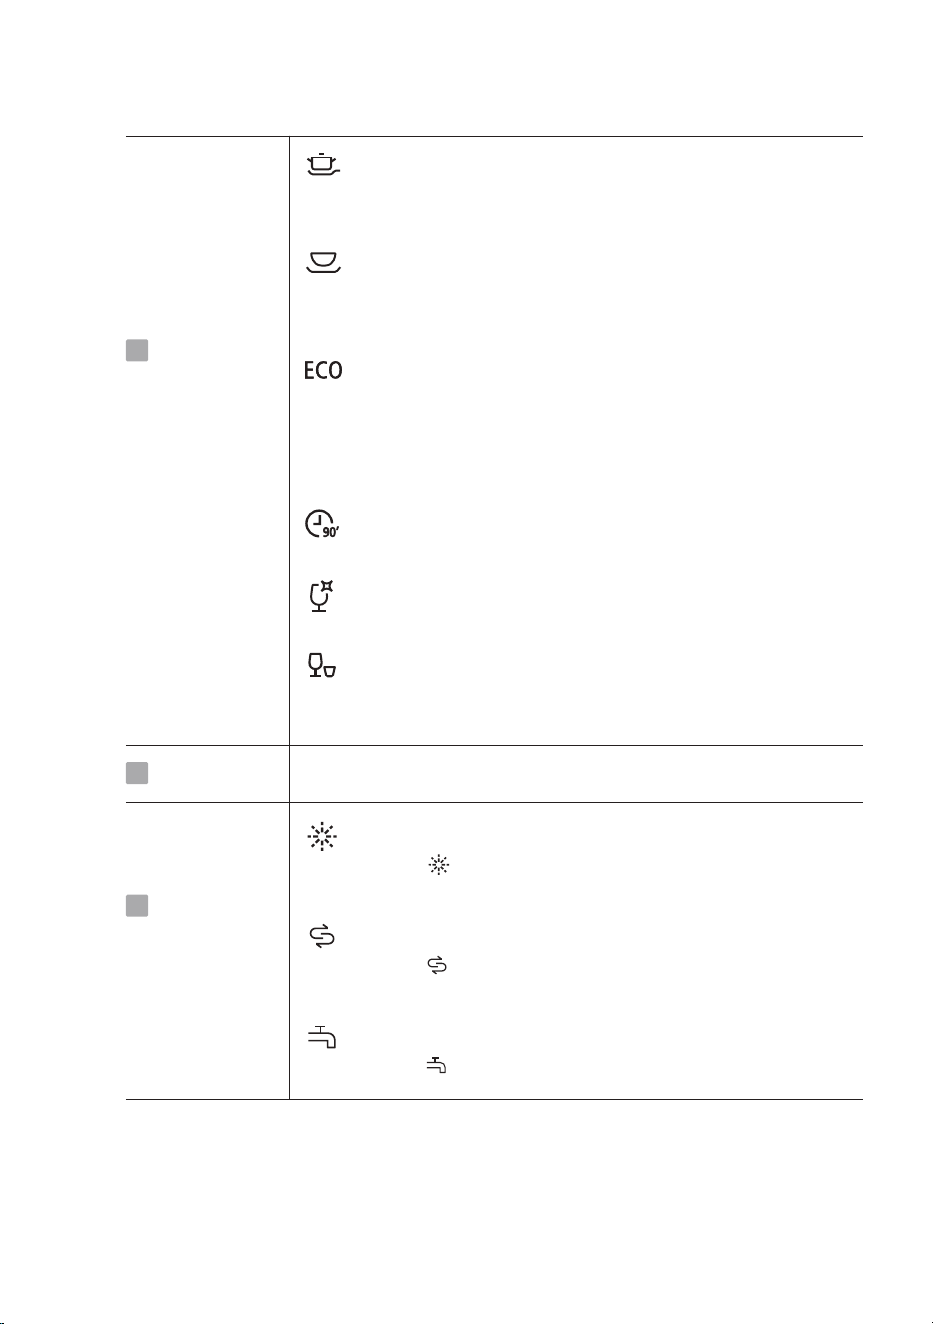
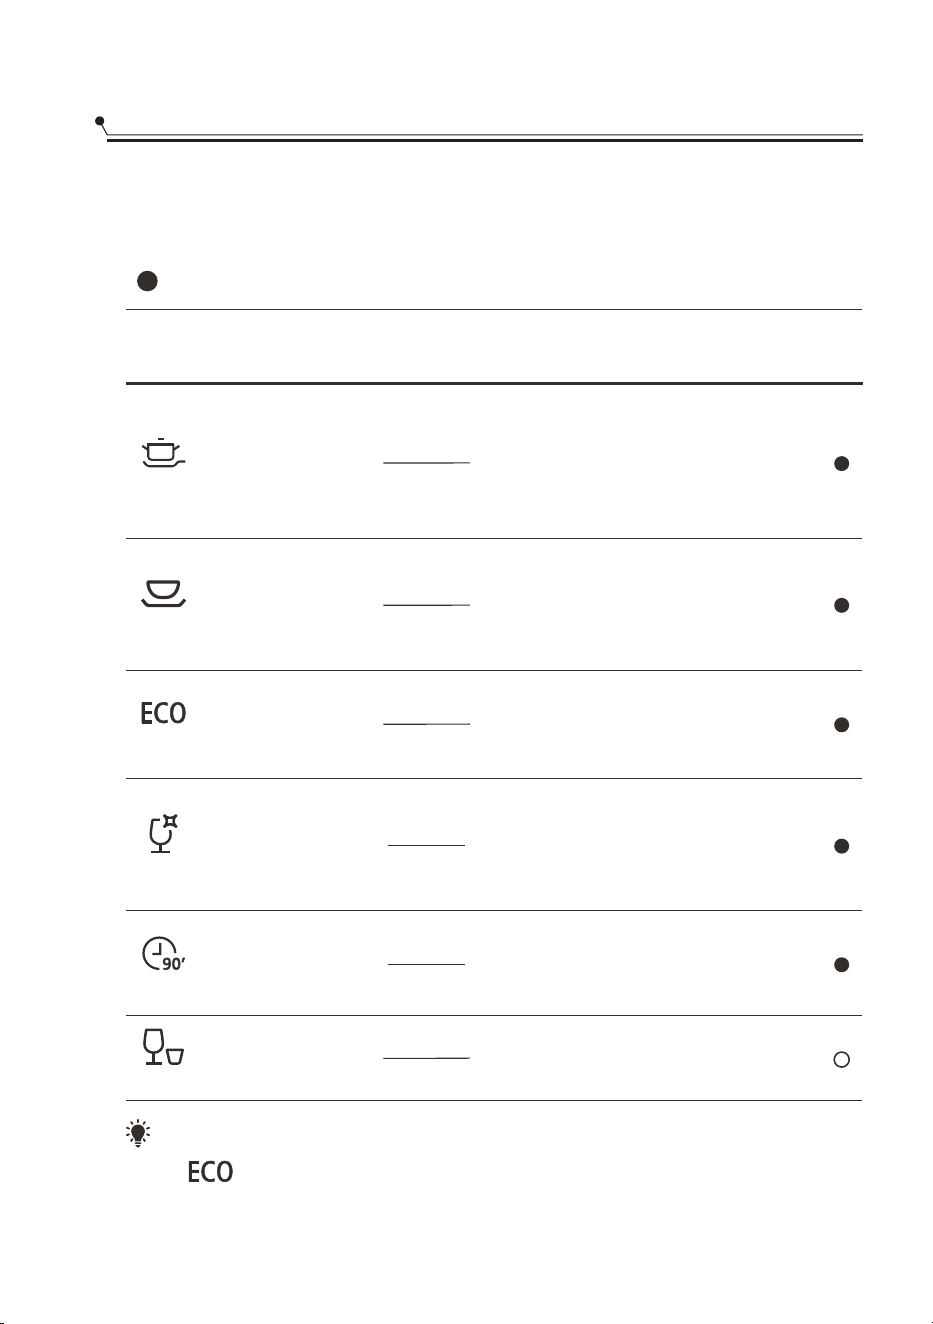
Intensive
For heaviest soiled crockery, and normally soiled pots,
pans, dishes etc. With dried-on food.
ECO
This is standard program, it is suitable to clean normally
soiled tableware and it is the most efficient program
in terms of its combined energy and water consumption
for that type of tableware.
Delay time
8
To show the delay time (2h/4h/6h/8h).
Glass
For lightly soiled crockery and glass.
90 min
For normally soiled loads that need quick wash.
Warning
indicator
9
Salt
If the “ ” indicator is lit, it means the dishwasher is low
on dishwasher salt and needs to be refilled.
Rinse Aid
If the “ ” indicator is lit, it means the dishwasher is low
on dishwasher rinse aid and requires a refill.
Water Faucet
If the “ ” indicator is lit, it means the water faucet closed.
Rapid
A shorter wash for lightly soiled loads that do not
need drying.
Universal
For normally soiled loads, such as pots, plates, glasses and
lightly soiled pans.
Water Softener
The water softener must be set manually, using the water hardness dial.
The water softener is designed to remove minerals and salts from the water, which
would have a detrimental or adverse effect on the operation of the appliance.
The more minerals there are, the harder your water is.
The softener should be adjusted according to the hardness of the water in your area.
Your local Water Authority can advise you on the hardness of the water in your area.
Adjusting salt consumption
The dishwasher is designed to allow for adjustment in the amount of salt consumed
based on the hardness of the water used. This is intended to optimise and customise
the level of salt consumption.
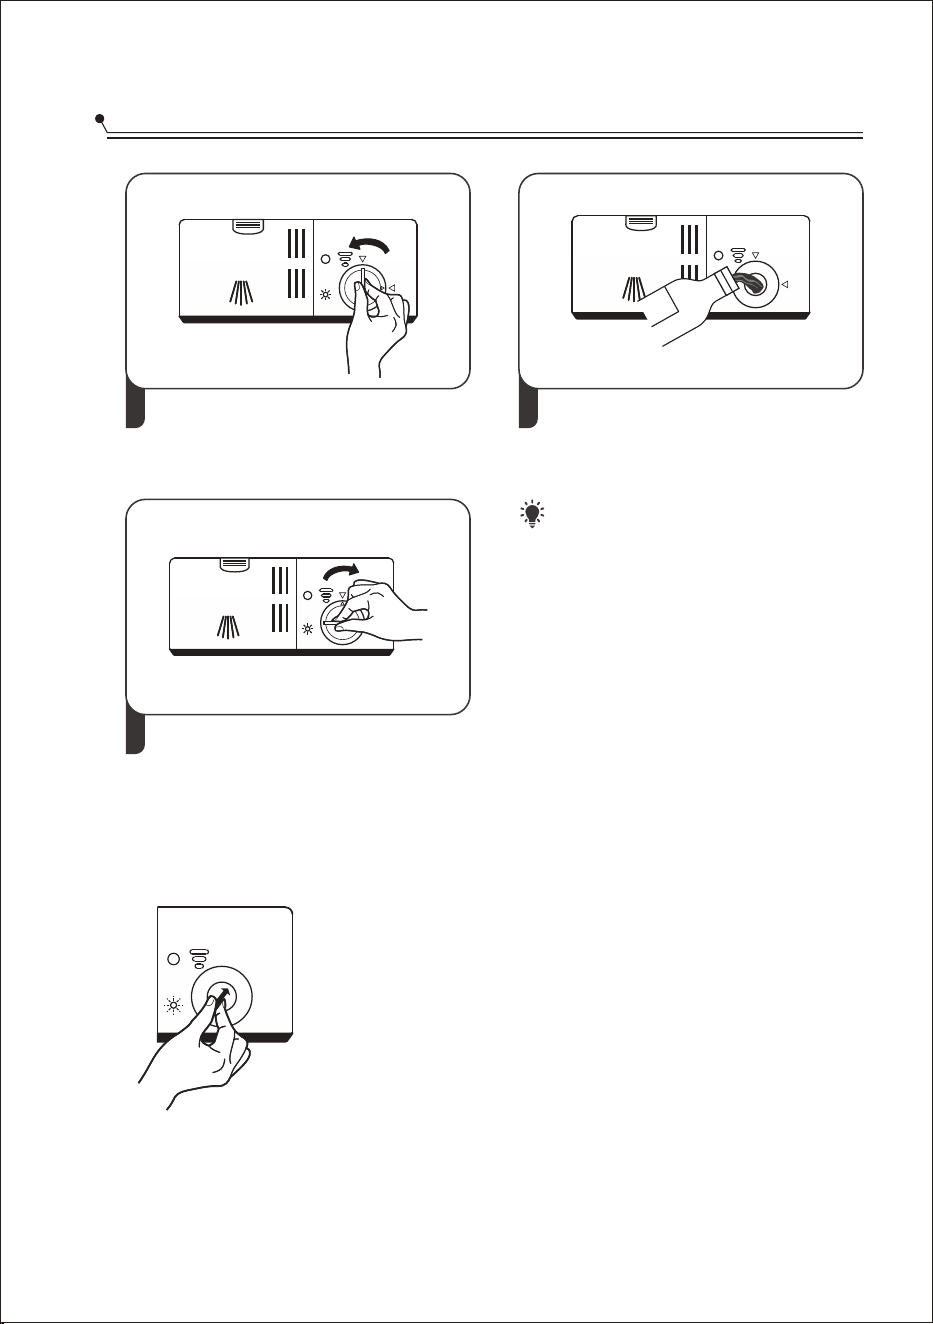
Please follow the steps below for adjustment in salt consumption.
6
Please follow the steps below for adjustment in salt consumption.
1. the door, on the appliance;Close switch
2. Within 60 seconds after the appliance was switched on press the program
button for more than 5 seconds to enter the water softener setting mode.
3. Press the to select the proper set according to your local program button again
environment, the will change in the following sequence: setting
H1->H2->H3->H4->H5->H6;
4. Press the Power button to end the .setting mode
dH=1.25 Clarke=1.78 fH=0.178mmol/l
°
°
°
1
The setting: H3factory
Every cycle with a regeneration operation consumes additional 2.0 litres of water,
the energy consumption increases by 0.02 kWh and the program extents by 4
minutes.
1)
0 - 5
6 - 11
12 - 17
18 - 22
23 - 34
35 - 55
German
German
dH
dH
German
dH
0 - 9
10 - 20
21 - 30
31 - 40
41 - 60
61 - 98
0 - 6
7 - 14
15 - 21
22 - 28
29 - 42
43 - 69
0 - 0.94
1.0 - 2.0
2.1 - 3.0
3.1 - 4.0
4.1 - 6.0
6.1 - 9.8
French French
fH fH
French
fH
Mmol/lMmol/lMmol/l
British British
ClarkeClarke
British
Clarke
WATER HARDNESS
Salt consumption
(gram/cycle)
0
9
12
20
30
60
Regeneration occurs
every X program
sequence
No regeneration
10
5
3
2
1
Water softner
level
H1->Rapid Light bright
H2-> Light brightGlass
H3-> , Light brightGlass Rapid
H4-> Light bright90 min
H5-> , Light bright90 min Rapid
H6->90 min, Glass Light bright
1)
NOTE:
If your model does not have any water softener, you may skip this section.
Water Softener
The hardness of the water varies from place to place. If hard water is used in the
dishwasher, deposits will form on the dishes and utensils.
The appliance is equipped with a special softener that uses a salt container
specifically designed to eliminate lime and minerals from the water.
Preparing And Loading Dishes
Consider buying utensils which are identified as dishwasher-proof.
For particular items, select a program with the lowest possible temperature.
To prevent damage, do not take glass and cutlery out of the dishwasher
immediately after the program has ended.
Cutlery with wooden, horn china or mother-of-pearl handles
Plastic items that are not heat resistant
Older cutlery with glued parts that are not temperature resistant
Bonded cutlery items or dishes
Pewter or cooper items
Crystal glass
Steel items subject to rusting
Wooden platters
Items made from synthetic fibres
Some types of glasses can become dull after a large number of washes
Silver and aluminum parts have a tendency to discolor during washing
Glazed patterns may fade if machine washed frequently
For washing the following cutlery/dishes
Are not suitable
Are of limited suitability
7
Please check the section 3 “Loading The Salt Into The Softener”
of PART Generic Version, If your dishwasher lacks salt.Ⅰ:
Please check the section 3 “Loading The Salt Into The Softener”
of PART Ⅰ: Generic Version, If your dishwasher lacks salt.

Items such as cups, glasses, pots/pans, etc. are faced downwards.
Curved items, or ones with recesses, should be loaded aslant so that water can run
off.
All utensils are stacked securely and can not tip over.
All utensils are placed in the way that the spray arms can rotate freely during
washing.
Load hollow items such as cups, glasses, pans etc. With the opening facing
downwards so that water cannot collect in the container or a deep base.
Dishes and items of cutlery must not lie inside one another, or cover each other.
To avoid damage, glasses should not touch one another.
The upper basket is designed to hold more delicate and lighter dishware such as
glasses, coffee and tea cups.
Long bladed knives stored in an upright position are a potential hazard!
Long and / or sharp items of cutlery such as carving knives must be positioned
horizontally in the upper basket.
Please do not overload your dishwasher. This is important for good results and for
reasonable consumption of energy.
NOTE:
Very small items should not be washed in the dishwasher as they could easily fall
out of the basket.
To prevent water dripping from the upper basket into the lower basket, we
recommend that you empty the lower basket first, followed by the upper basket.
Removing the dishes
WARNING
Items will be hot! To prevent damage, do not take glass and
cutlery out of the dishwasher for around 15 minutes after the
program has ended.
8
Recommendations for loading the dishwasher
Scrape off any large amounts of leftover food. Soften remnants of burnt food in
pans. It is not necessary to rinse the dishes under running water.
For best performance of the dishwasher, follow these loading guidelines.
(Features and appearance of baskets and cutlery baskets may vary from
your model.)
Place objects in the dishwasher in following way:

Loading the upper basket
The upper basket is designed to hold more delicate and
lighter dishware such as glasses, coffee and tea cups
and saucers, as well as plates, small bowls and shallow
pans (as long as they are not too dirty). Position the
dishes and cookware so that they will not get moved by
the spray of water.
WARNING
Do not let any item extend through
the bottom.
Always load sharp utensils with the
sharp point down!
Loading the cutlery basket
For the best washing effect, please load the baskets refer to standard
loading options on last section of PART Generic VersionⅠ:
For the best washing effect, please load the baskets refer to standard
loading options on last section of PART Ⅰ: Generic Version
Loading the lower basket
We suggest that you place large items and the most
difficult to clean items are to be placed into the lower
basket: such as pots, pans, lids, serving dishes and bowls,
as shown in the figure below. It is preferable to place
serving dishes and lids on the side of the racks in order to
avoid blocking the rotation of the top spray arm.
The maximum diameter advised for plates in front of the
detergent dispenser is of 19 cm, this not to hamper the
opening of it.
9
Cutlery should be placed in the cutlery basket separate from each other in the
appropriate positions. Avoid nesting of the cutlery to prevent insufficient cleaning
performance.
The rinse aid is released during the final rinse to prevent water from forming droplets
on your dishes, which can leave spots and streaks. It also improves drying by allowing
water to roll off the dishes. Your dishwasher is designed to use liquid rinse aids.
WARNING
Only use branded rinse aid for dishwasher. Never fill the rinse aid dispenser
with any other substances (e.g. Dishwasher cleaning agent, liquid detergent).
This would damage the appliance.
Function Of The Rinse Aid And Detergent
10
Function of detergent
The chemical ingredients that compose the detergent are necessary to remove, crush and
dispense all dirt out of the dishwasher. Most of the commercial quality detergents are
suitable for this purpose.
WARNING
Proper Use of Detergent
Use only detergent specifically made for dishwashers use. Keep your detergent
fresh and dry.
Don't put powdered detergent into the dispenser until you are ready to wash
dishes.
Dishwasher detergent is corrosive!Keep dishwasher
detergent out of the reach of children.
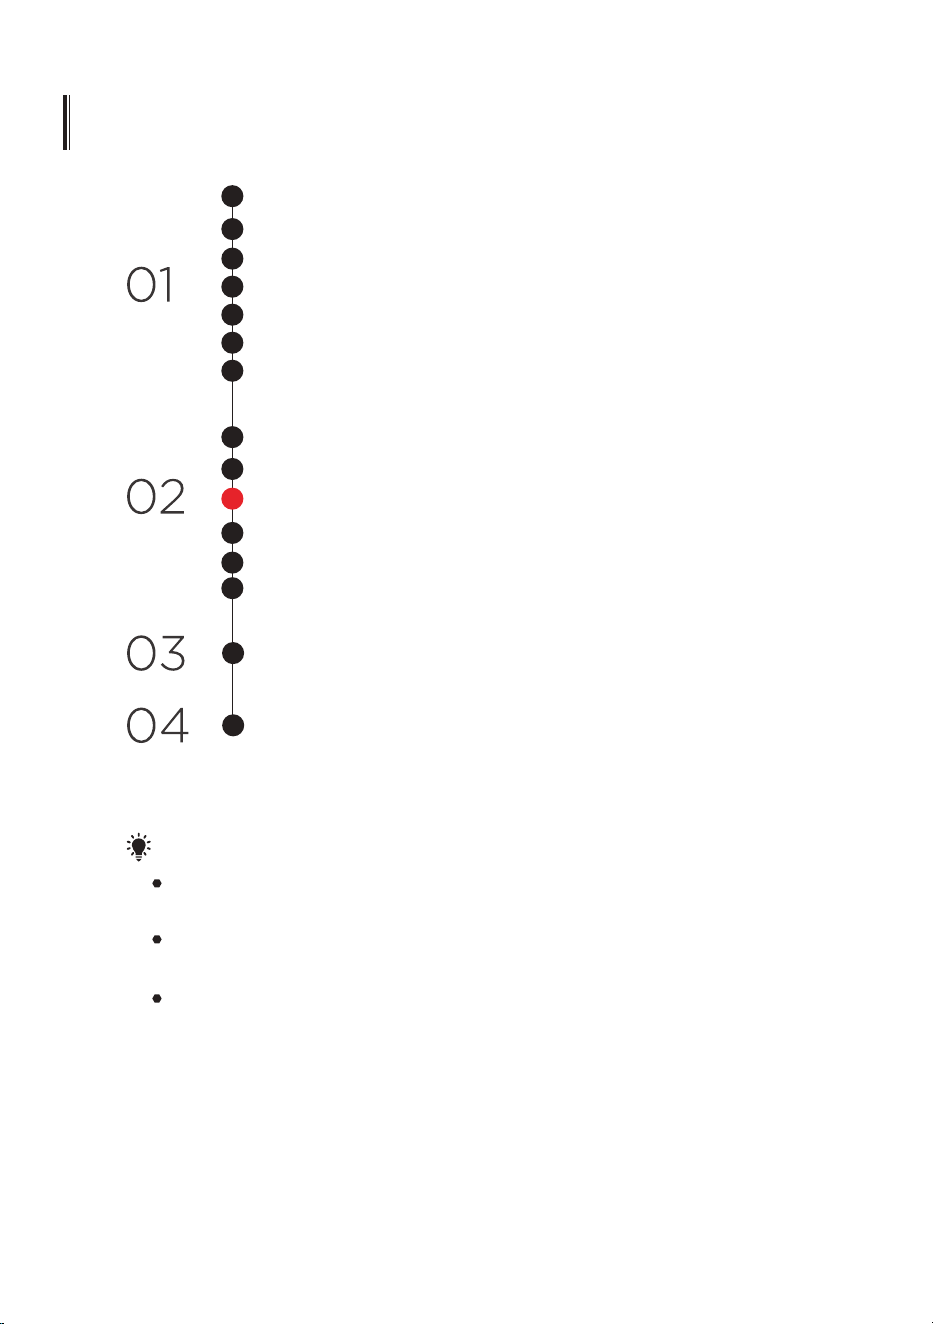
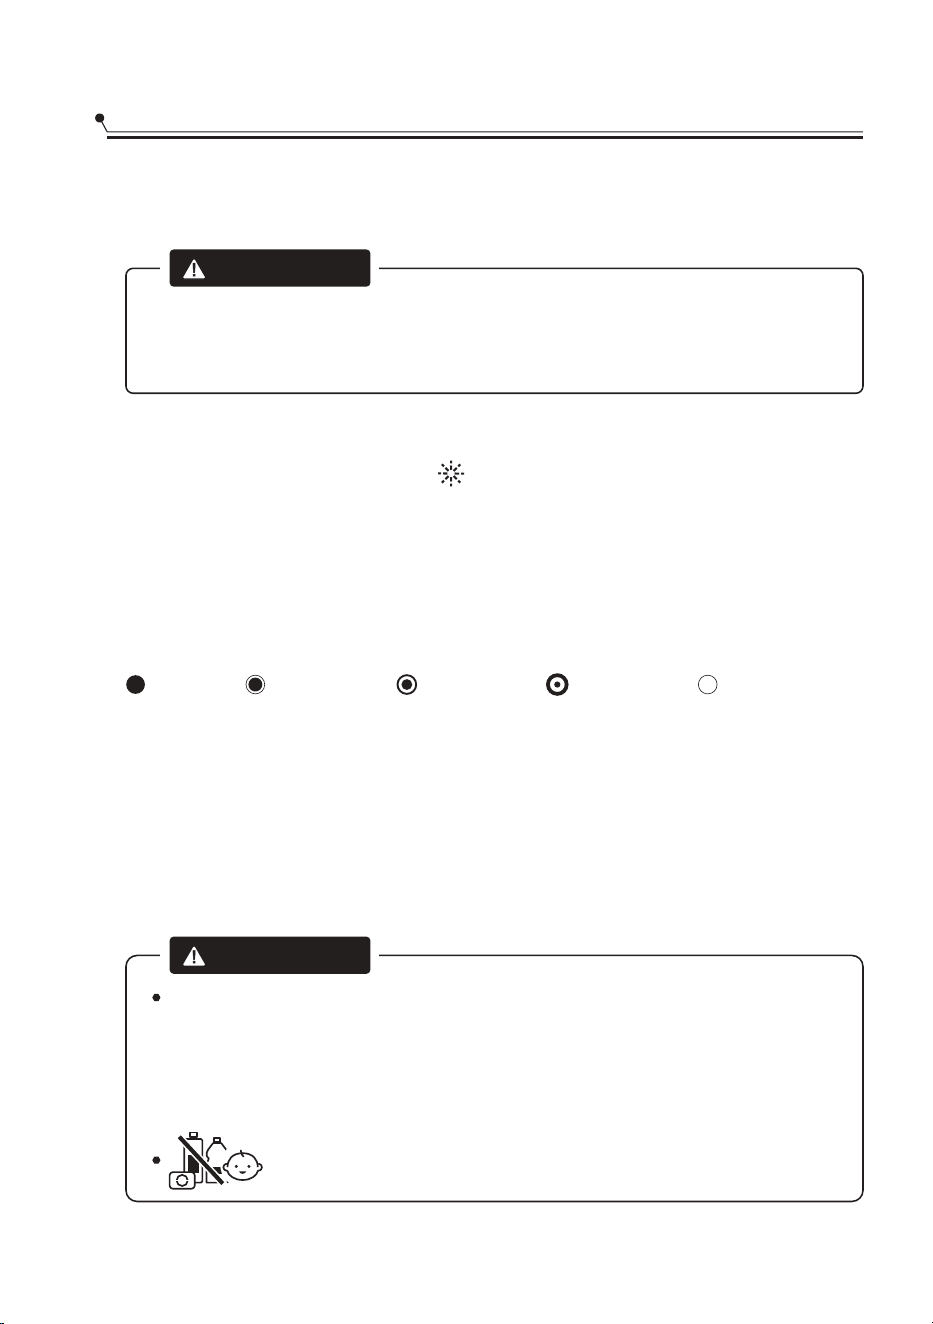
When to refill the rinse aid dispenser
Unless the rinse-aid warning light ( ) on the control panel is on, you can always
estimate the amount from the color of the optical level indicator located next to the
cap. When the rinse-aid container is full, the indicator will be fully dark. The size of the
dark dot decreases as the rinse-aid diminishes. You should never let the rinse aid level
be less than 1/4 full.
As the rinse aid diminishes, the size of the black dot on the rinse aid level indicator
changes, as illustrated below.
Full
3/4 full 1/2 full 1/4 full
Empty
3
Close the rinse aid reservoir cap by
rotating it clockwise.
NOTE:
Clean up any spilled rinse aid with
an absorbent cloth to avoid
excessive foaming during the next
wash.
1 2
Remove the rinse aid reservoir cap
by rotating it counterclockwise.
Carefully pour in the rinse-aid into
its dispenser, whilst avoiding it to
overflow.
Filling The Rinse Aid Reservoir
Adjusting the rinse aid reservoir
11
Turn the rinse aid indicator dial to a number. The higher the
number, the more rinse aid the dishwasher uses.
If the dishes are not drying properly or are spotted, adjust the
dial to the next higher number until your dishes are spot-free.
Reduce it if there are sticky whitish stains on your dishes or a
bluish film on glassware or knife blades.

Filling The Detergent Dispenser
1 2
Press the release catch on the detergent
dispenser to open the cover.
Push latch to open
AA
B
Add detergent into the larger cavity
(A) for the main wash cycle .
For more heavily soiled wash loads,
also add some detergent into the
smaller cavity (B) for the pre-wash
cycle .
3
Close the cover and press on it until
it locks into place.
NOTE:
Be aware that depending on the soiling of water, setting may be different.
Please observe the manufacturer's recommendations on the detergent packaging.
12
Wash Cycle Table
13
Program
Running
Time(min)
Energy
(kWh)
Water
(L)
Description
Of Cycle
Rinse
Aid
Detergent
Pre/Main Wash
230
0.923 11.0
Pre-wash
Wash(45℃)
Rinse(60℃)
Drying
(1 or 2 )tabs
4/16g
90 1.350 11.5
120
1.100
14.2
Pre-wash
Wash(50℃)
Rinse
Rinse(65℃)
Drying
4/16g
(1 or 2 )tabs
Wash(60℃)
Rinse
Rinse(65℃)
Drying
20g
(1 )tab
205
1.621
17.8
Pre-wash(50℃)
Wash(65℃)
Rinse
Rinse
Rinse(65℃)
Drying
(1 or 2 )tabs
4/16g
Pre-wash(45℃)
Wash(55℃)
Rinse
Rinse(65℃)
Drying
175 1.302
14.2
(1 or 2 )tabs
4/16g
Wash(50℃)
Rinse
Rinse(45℃)
30 0.751
11.2
(1 or 2 )tabs
20g
NOTE:
Glass
90 min
Intensive
Universal
Rapid
(*EN60436)
(*EN60436)
The table below shows which programs are best for the levels of food residue
on them and how much detergent is needed. It also show various information about
the programs.Consumption values and program duration are only indicative except
for ECO program.
: The ECO program is suitable to clean normally soiled tableware, that
for this use, it is the most efficient program in terms of its combined
energy and water consumption, and it is used to assess compliance
with the EU ecodesign legislation.
( ) indicates that the program uses rinse aid in the last rinse.
14
Starting A Cycle Wash
1. Draw out the lower and upper basket, load the dishes and push them back.
It is commended to load the lower basket first, then the upper one.
2. Pour in the detergent.
3. Insert the plug into the socket. The power supply refer to last page ”Product fiche”.
Make sure that the water supply is turned on to full pressure.
4. Close the door, press the Power button, to switch on the machine.
5. Choose a program, the response light will turn on. Then press the Start/Pause
button, the dishwasher will start its cycle.
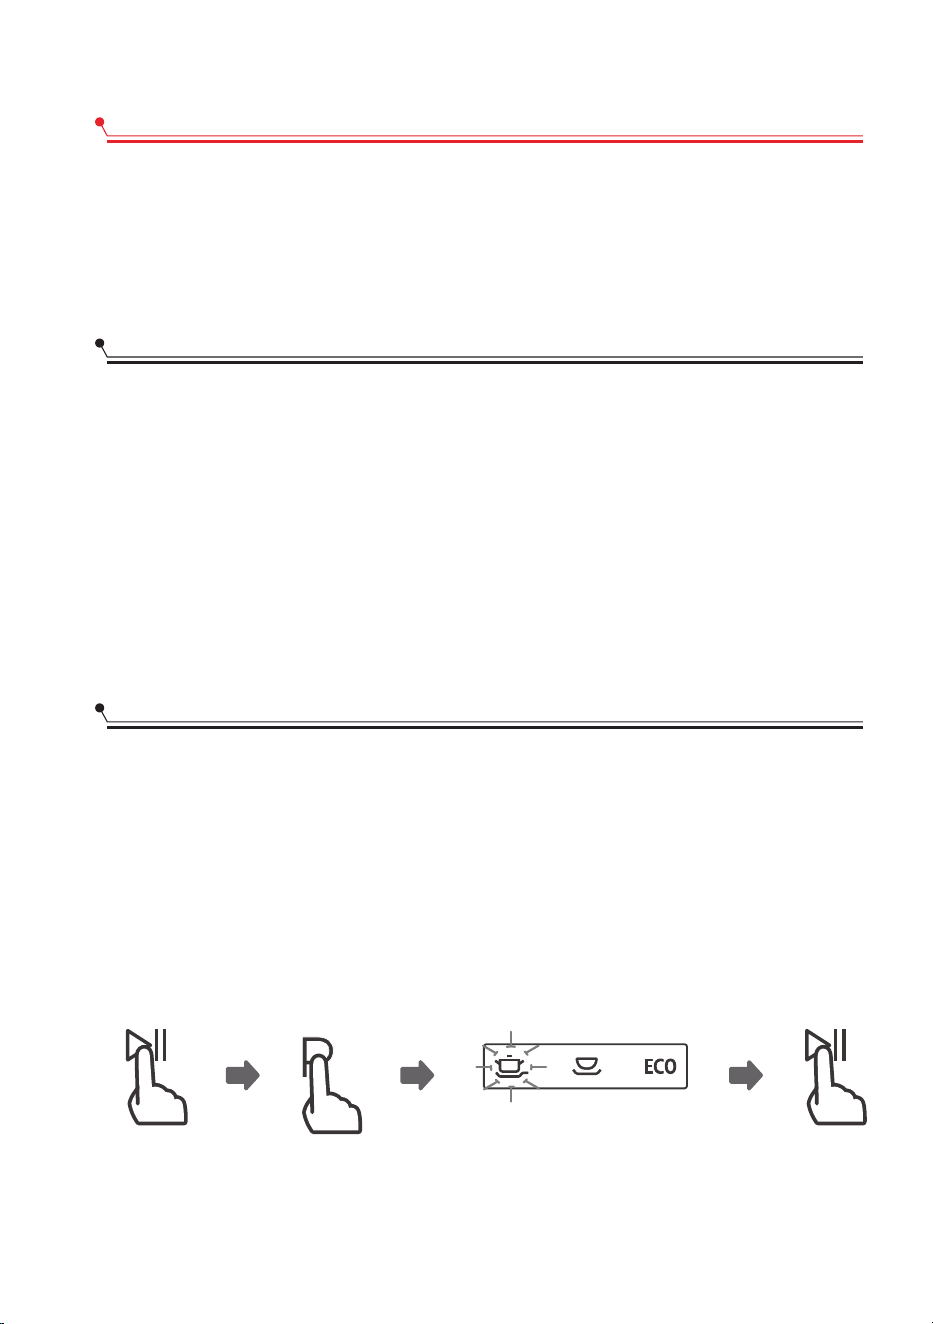
Changing The Program Mid-cycle
A wash cycle can only be changed if it has been running for a short time otherwise,
the detergent may have already been released and the dishwasher may have already
drained the wash water. If this is the case, the dishwasher needs to be reset and the
detergent dispenser must be refilled. To reset the dishwasher, follow the
instructions below:
1. Press the Start/Pause button to pause the washing.
2. Press Program button for more than 3 seconds - the program will cancel.
3. Press the Program button to select the desired program.
4. Press the Start/Pause button, after 10 seconds, the dishwasher will start.
3 sec
Saving Energy
1. Pre-rinsing of tableware items leads to increased water and energy consumption
and is not recommended.
2. Washing tableware in a household dishwasher usually consumes less energy and
water in the use phase than hand dishwashing when the household dishwasher is
used according to the instructions.

Forget To Add A Dish?
A forgotten dish can be added any time before the detergent dispenser opens. If
this is the case, follow the instructions below:
1. Press the Start/Pause button to pause the washing.
2. Wait 5 seconds then open the door.
3. Add the forgotten dishes.
4. Close the door.
5. Press the Start/Pause button after 10 seconds, the dishwasher will start.
After 5 sec
WARNING
It is dangerous to open the door
mid-cycle, as hot steam may
scald you.
15

ERROR CODES
If there is a malfunction, the dishwasher will display error codes to identify these:
Codes
Meanings
Possible Causes
Longer inlet time.
Not reaching required
temperature.
Overflow.
Malfunction of heating element.
Some element of dishwasher leaks.
Faucets is not opened, or water intake is
restricted, or water pressure is too low.
The Rapid light
flicker fleetly
The 90 min light
flicker fleetly
The Glass and Rapid
light flicker fleetly
1
Open circuit or break wiring for the
communication.
Failure of communication
between main PCB with
display PCB.
The ECO and Glass
indicator flicker
fleetly
6
WARNING
If there is an error code that cannot be solved, please request professional
assistance.
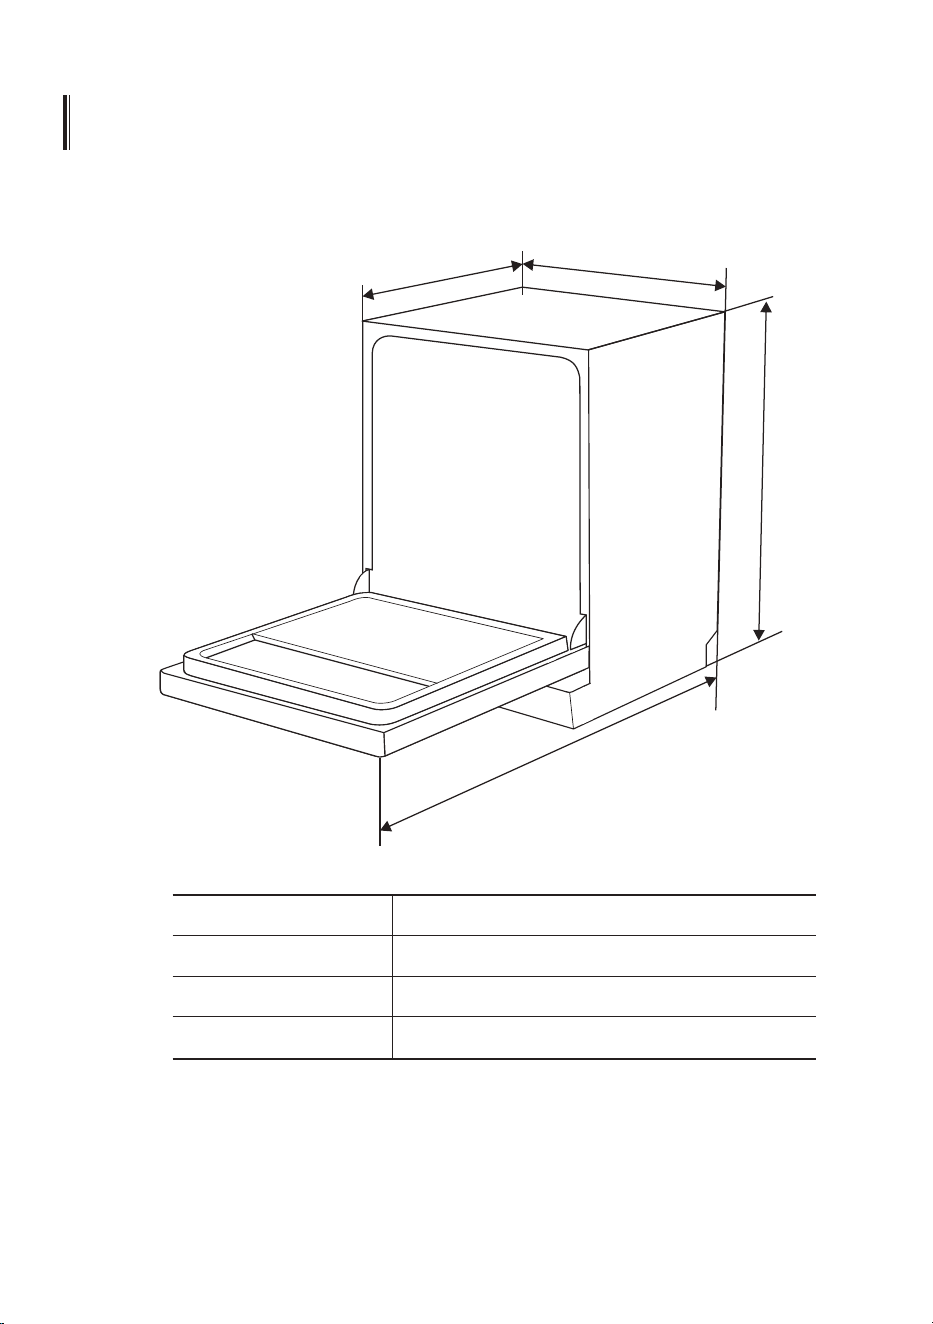
TECHNICAL INFORMATION
1
WW
D
1
D
1
HH
D
2
D
2
Height (H)
Width (W)
Depth (D1)
Depth (D2)
845mm
598mm
600mm (with the door closed)
1175mm (with the door opened 90°)
7
Supplier's name or trade mark:
Supplier's address ( ):
Model identifier:
General product parameters:
b
CORBERO
Parameter Parameter
Dimensions in cm
EEI ( )
Cleaning performance index ( )
Energy consumption in kWh
[per cycle], based on the eco
programme using cold
water fill. Actual energy
consumption will depend on
how the appliance is used.
Program duration ( ) (h:min)
Airborne acoustical noise
emissions ( ) (dB(A) re 1 pW)
Off-mode (W)
Delay start (W) (if applicable)
Minimum duration of the guarantee offered by the supplier ( ):
Rated capacity ( ) (ps)
a
a
a
a
a
Energy efficiency class ( )
Drying performance index ( )
Water consumption in litres
[per cycle], based on the eco
program. Actual water con-
sumption will depend on how
the appliance is used and on
the hardness of the water.
Type
Airborne acoustical noise
emission class ( )
Standby mode (W)
Networked standby (W)
(if applicable)
a
a
a
b
Additional information:
Weblink to the supplier’s website, where the information in point 6 of Annex II to
Commission Regulation (EU) 2019/2022 ( ) ( ) is found:
( ) for the eco program.
( ) changes to these items shall not be considered relevant for the purposes of paragraph 4 of
Article 4 of Regulation (EU) 2017/1369.
( ) if the product database automatically generates the definitive content of this cell the supplier
shall not enter these data.
a
b
c
1 b
( ) Commission Regulation (EU) 2019/2022 of 1 October 2019 laying down eco design requirements
for household dishwashers pursuant to Directive 2009/125/EC of the European Parliament and of
the Council amending Commission Regulation (EC) No 1275/2008 and repealing Commission
Regulation (EU) No 1016/2010 (see page 267 of this Official Journal).
1
Product information sheet (EN60436)
Value Value
Height
Width
Depth
12
11 0,
Free standing
N/A
N/A
E ( )
c
C ( )
c
55 9,
0 923,
3:50
49
0 49,
1 00,
18
E-CLVM6419W
E-CLVM6419
X
85
60
60
1,065
1,125
24 months of gurantee.
www.corbero.es

sersión Genérica
3$57(
I
>ĞĂĂƚĞŶƚĂŵĞŶƚĞĞƐƚĞŵĂŶƵĂů
ĂŶƚĞƐĚĞƵƚŝůŝnjĂƌĞůůĂǀĂǀĂũŝůůĂƐ
ŽŶƐĞƌǀĞ ĞƐƚĞŵĂŶƵĂůƉĂƌĂĨƵƚƵƌĂƐĐŽŶƐƵůƚĂƐ
Manual de Instrucciones
E-CLVM6419W
E-CLVM6419
X
,1)250$&,Ð1'(6(*85,'$'
3
&217(1,'2
'(6&5,3&,Ð1'(/352'8&72
8
9
9
11
13
13
13
16
86$1'268/$9$9$-,//$6
$BSHBSMBTBMFOFMEFTDBMDJGJDBEPS
&RQVHMRV
0$17(1,0,(172</,03,(=$&XLGDGRV
H[WHUQRV
&XLGDGRVLQWHUQRV
&XLGDGRGHOODYDYDMLOODV
,16758&&,21(6'(,167$/$&,Ð1
&RQH[LyQHOpFWULFD
$EDVWHFLPLHQWRGHDJXD\GUHQDMH
&RQH[LyQGHODVPDQJXHUDVGHGUHQDMH
&RORTXHHOGLVSRVLWLYR
,QVWDODFLyQOLEUH
,QVWDODFLyQLQFRUSRUDGDSDUDHOPRGHORGH
HQFDVWUH
17
17
18
19
20
20
$0/4&+041"3"40-6$*0/"3130#-&."4
26
$"3("/%0-"4$&45"4%&"$6&3%0$0/
30
21
127$:
5HYLVDUODVHFFLyQGH6XJHUHQFLDVSDUDODUHVROXFLyQGHSUREOHPDVOH
D\XGDUiDUHVROYHUDOJXQRVSUREOHPDVFRPXQHVSRUXVWHGPLVPR
6LQRSXHGHUHVROYHUORVSUREOHPDVXVWHGPLVPRVROLFLWHD\XGDGHXQ
WpFQLFRSURIHVLRQDO
(OIDEULFDQWHVLJXLHQGRXQDSROtWLFDGHFRQVWDQWHGHVDUUROOR\DFWXDOL]DFLyQ
GHOSURGXFWRSXHGHUHDOL]DUPRGLILFDFLRQHVVLQSUHYLRDYLVR
6LHVWiSHUGLGRRGHVDFWXDOL]DGRSXHGHUHFLELUXQQXHYRPDQXDOGHXVXDULR
GHOIDEULFDQWHRYHQGHGRUUHVSRQVDEOH
Disponibilidad de repuestos
28

*/'03."$*Ë/%&4&(63*%"%
$'9(57(1&,$
&XDQGRXVHVXODYDYDMLOODVVLJDODVSUHFDXFLRQHV
TXHVHGHWDOODQDFRQWLQXDFLyQ
(VWHGLVSRVLWLYRHVWiGHVWLQDGRDVHUXWLOL]DGRHQ
DSOLFDFLRQHVGRPpVWLFDV\VLPLODUHVWDOHVFRPR
iUHDVGHFRFLQDSDUDHOSHUVRQDOHQWLHQGDVRILFLQDV\
RWURVHQWRUQRVGHWUDEDMR
FDVDVGHFDPSR
SRUFOLHQWHVHQKRWHOHVPRWHOHV\RWURVHQWRUQRV
UHVLGHQFLDOHV
DPELHQWHVWLSREHGDQGEUHDNIDVW
(VWHDSDUDWRSXHGHVHUXWLOL]DGRSRUQLxRVDSDUWLUGH
DxRV\SHUVRQDVFRQFDSDFLGDGHVItVLFDVVHQVRULDOHVR
PHQWDOHVUHGXFLGDVRVLQH[SHULHQFLD\FRQRFLPLHQWRVL
VHOHVKDVXSHUYLVDGRRLQVWUXLGRVREUHHOXVRGHO
DUWHIDFWRGHXQDPDQHUDVHJXUD\HQWLHQGHQORV
SHOLJURV
/RVQLxRVQRGHEHQMXJDUFRQHODSDUDWR/DOLPSLH]D\
HOPDQWHQLPLHQWRSRUSDUWHGHOXVXDULRQRGHEHQVHU
UHDOL]DGRVSRUQLxRVVLQVXSHUYLVLyQ3DUD(1
(VWHDSDUDWRQRGHEHVHUXWLOL]DGRSRU
SHUVRQDVLQFOX\HQGRQLxRVFRQFDSDFLGDGHVItVLFDV
VHQVRULDOHVRPHQWDOHVUHGXFLGDVRIDOWDGHH[SHULHQFLD
\FRQRFLPLHQWRDPHQRVTXHKD\DQVLGRVXSHUYLVDGDVR
LQVWUXLGDVVREUHHOXVRGHODSDUDWRSRUXQDSHUVRQD
UHVSRQVDEOHGHVXVHJXULGDG3DUD,(&
3
£(OPDWHULDOGHHPEDODMHSRGUtDVHUSHOLJURVRSDUDORVQLxRV
(VWHDSDUDWRHVVRORSDUDXVRGRPpVWLFRHQLQWHULRUHV
3DUDSURWHJHUVHFRQWUDHOULHVJRGHGHVFDUJDHOpFWULFDQR
VXPHUMDODXQLGDGHOFDEOHRHOHQFKXIHHQDJXDXRWUROtTXLGR.
'HVFRQHFWHDQWHVGHOLPSLDU\UHDOL]DUWDUHDVGHPDQWHQLPLHQWR
HQHODSDUDWR
8VHXQSDxRVXDYHKXPHGHFLGRFRQMDEyQVXDYH\OXHJRXVH
XQSDxRVHFRSDUDOLPSLDUORQXHYDPHQWH
,QVWUXFFLRQHVGHWRPDGHWLHUUD
(VWHDSDUDWRGHEHHVWDUFRQHFWDGRDWLHUUD(QFDVRGHXQ
PDOIXQFLRQDPLHQWRRDYHUtDODFRQH[LyQDWLHUUDUHGXFLUi
HOULHVJRGHXQDGHVFDUJDHOpFWULFDDOSURSRUFLRQDUXQD
UXWDGHPHQRUUHVLVWHQFLDGHODFRUULHQWHHOpFWULFD(VWH
HOHFWURGRPpVWLFRHVWiHTXLSDGRFRQXQHQFKXIHGH
FRQGXFWRUGHSXHVWDDWLHUUD
(OHQFKXIHGHEHHQFKXIDUVHDXQDWRPDGHFRUULHQWH
DSURSLDGDTXHHVWpLQVWDODGD\FRQHFWDGDDWLHUUDGH
DFXHUGRFRQWRGRVORVFyGLJRV\RUGHQDQ]DVORFDOHV
/DFRQH[LyQLQFRUUHFWDGHOFRQGXFWRUGHSXHVWDDWLHUUDGHO
HTXLSRSXHGHSURYRFDUHOULHVJRGHXQDGHVFDUJDHOpFWULFD
&RQVXOWHFRQXQHOHFWULFLVWDRUHSUHVHQWDQWHGHVHUYLFLR
FDOLILFDGRVLWLHQHGXGDVVREUHVLHODUWHIDFWRHVWi
FRUUHFWDPHQWHFRQHFWDGRDWLHUUD
4

1RPRGLILTXHHOHQFKXIHSURYLVWRFRQHODSDUDWR6L
QRHQFDMDHQODWRPDGHFRUULHQWH
+DJDTXHXQHOHFWULFLVWDFDOLILFDGRLQVWDOHXQDWRPD
GHFRUULHQWHDGHFXDGD
1RDEXVHQLVHVLHQWHQLVHSDUHVREUHODSXHUWDR
ODUHMLOODGHOODYDYDMLOODV
1RRSHUHVXODYDYDMLOODVDPHQRVTXHWRGRVORV
SDQHOHVHVWpQFRORFDGRVFRUUHFWDPHQWH
$EUDODSXHUWDFRQPXFKRFXLGDGR6LHOODYDYDMLOODV
HVWiIXQFLRQDQGRH[LVWHHOULHVJRGHTXHVDOJDDJXD
1RFRORTXHREMHWRVSHVDGRVQLVHSDUHHQODSXHUWD
FXDQGRHVWpDELHUWD.
(ODSDUDWRSRGUtDYROFDUVHKDFLDDGHODQWH
$OFDUJDUDUWtFXORVSDUDODYDU
8ELTXHORVREMHWRVFRQILORSDUDTXHQRGDxHQ
HOVHOORGHODSXHUWD
$GYHUWHQFLDORVFXFKLOORV\RWURVXWHQVLOLRV
FRQSXQWDDILODGDGHEHQFDUJDUVHHQODFHVWDFRQ
VXVSXQWDVKDFLDDEDMRRFRORFDGRVHQSRVLFLyQ
KRUL]RQWDO
$OJXQRVGHWHUJHQWHVSDUDODYDYDMLOODVVRQ
IXHUWHPHQWHDOFDOLQRV3XHGHQVHUH[WUHPDGDPHQWH
SHOLJURVRVVLVHLQJLHUHQ(YLWHHOFRQWDFWRFRQOD
SLHO\ORVRMRV\PDQWHQJDDORVQLxRVDOHMDGRVGHO
ODYDYDMLOODVFXDQGRODSXHUWDHVWpDELHUWD
9HULILTXHTXHHOSROYRGHOGHWHUJHQWHHVWpYDFtR
GHVSXpVGHFRPSOHWDUHOFLFORGHODYDGR
5

6
1RODYHDUWtFXORVGHSOiVWLFRDPHQRVTXHHVWpQ
PDUFDGRVFRPRDSWRVSDUDODYDYDMLOODVRVX
HTXLYDOHQWH
3DUDDUWtFXORVGHSOiVWLFRQRPDUFDGRVYHULILTXHODV
UHFRPHQGDFLRQHVGHOIDEULFDQWH.
8VHVRORGHWHUJHQWHV\DJHQWHVGHHQMXDJXH
UHFRPHQGDGRVSDUDVXXVRHQXQODYDYDMLOODV.
1XQFDXVHMDEyQGHWHUJHQWHSDUDODURSDRGHWHUJHQWH
SDUDHOODYDGRGHPDQRVHQVXODYDYDMLOODV.
/DSXHUWDQRGHEHGHMDUVHDELHUWD\DTXHHVWRSRGUtD
DXPHQWDUHOULHVJRGHPDOIXQFLyQ
6LHOFDEOHGHDOLPHQWDFLyQHVWiGDxDGRGHEHVHU
UHHPSOD]DGRSRUHOIDEULFDQWHRVXDJHQWHGHVHUYLFLRR
XQDSHUVRQDFDOLILFDGDSDUDHYLWDUXQSHOLJUR
'XUDQWHODLQVWDODFLyQODIXHQWHGHDOLPHQWDFLyQQR
GHEHGREODUVHRDSODQDUVHGHIRUPDH[FHVLYDR
SHOLJURVD
1RDOWHUHORVFRQWUROHV.
(OHOHFWURGRPpVWLFRGHEHHVWDUFRQHFWDGRDODYiOYXOD
SULQFLSDOGHDJXDFRQQXHYRVMXHJRVGHPDQJXHUDV
/RVYLHMRVVHWVQRGHEHQVHUUHXWLOL]DGRV.
3DUDDKRUUDUHQHUJtDHQHOPRGRGHHVSHUDHODSDUDWR
VHDSDJDUiDXWRPiWLFDPHQWHPLHQWUDVQRKD\DQLQJXQD
RSHUDFLyQHQPLQXWRV
(OPi[LPRSHUPLWLGRSDUDODSUHVLyQGHOLQJUHVRGHO
DJXDHVGH03D
(OQ~PHURPi[LPRGHDMXVWHVSDUDODYDUHV
(OPtQLPRSHUPLWLGRGHSUHVLyQGHLQJUHVRGH
DJXDHV03D
15
&MJNJOBDJOEFSFTJEVPT
3DUDGHVHFKDUHOSDTXHWH\HO
HOHFWURGRPpVWLFRSRUIDYRUYD\DDXQFHQWUR
GHUHFLFODMH3RUORWDQWRFRUWHHOFDEOHGH
DOLPHQWDFLyQ\KDFHUTXHHOGLVSRVLWLYRGH
FLHUUHGHODSXHUWDTXHGHLQXWLOL]DEOH.
/RVHQYDVHVGHFDUWyQVHIDEULFDQFRQSDSHO
UHFLFODGR\GHEHQGHVHFKDUVHHQODUHFROHFFLyQGH
SDSHOXVDGRSDUDUHFLFODU
$ODVHJXUDUVHGHTXHHVWHSURGXFWRVHHOLPLQH
FRUUHFWDPHQWHD\XGDUiDHYLWDUSRVLEOHV
FRQVHFXHQFLDVQHJDWLYDVSDUDHOPHGLRDPELHQWH\
ODVDOXGKXPDQDTXHGHORFRQWUDULRSRGUtDQVHU
FDXVDGDVSRUHOPDQHMRLQDSURSLDGRGHHVWH
SURGXFWR
3DUDREWHQHULQIRUPDFLyQPiVGHWDOODGDVREUHHO
UHFLFODMHGHHVWHSURGXFWRFRPXQtTXHVHFRQOD
RILFLQDORFDOGHVXFLXGDG\VXVHUYLFLRGH
HOLPLQDFLyQGHGHVHFKRVGRPpVWLFRV
(/,0,1$&,Ï11RGHVHFKHHVWHSURGXFWRFRPR
GHVHFKRPXQLFLSDOVLQFODVLILFDU/DUHFROHFFLyQGH
WDOHVGHVHFKRVSRUVHSDUDGRSDUDXQWUDWDPLHQWR
HVSHFLDOHVQHFHVDULD
7
'(6&5,3&,Ï1'(/352'8&72
3DUDREWHQHUHOPHMRUUHQGLPLHQWRGHVXODYDYDMLOODVOHDWRGDVODV
LQVWUXFFLRQHVGHIXQFLRQDPLHQWRDQWHVGHXVDUORSRUSULPHUDYH]
,03257$17(:
8
/DVLPiJHQHVVRQVRORGHUHIHUHQFLDDOJXQRVPRGHORVSXHGHQVHU
GLIHUHQWHV
WHUFHUDEDQGHMD
FHVWDLQIHULRU
%UD]RGHSXOYHUL]DFLyQVXSHULRU
FHVWDVXSHULRU
]RQDSDUDFRSDV
'LVSHQVDGRU
&RQWHQHGRUGH
VDO
%UD]RGHSXOYHUL]DFLyQLQIHULRU
&RQMXQWRGHILOWUR
7XEHUtD
LQWHUQD
86$1'268/$9$9$-,//$6
$QWHVGHXVDUVXODYDYDMLOODV
'HQWUR )XHUD
&RQILJXUHHOGHVFDOFLILFDGRUGHDJXD
&DUJXHODVDOHQHOGHVFDOFLILFDGRU
&DUJXHODFDQDVWD
/OHQHHOGLVSHQVDGRU
$BSHBSMBTBMFOFMEFTDBMDJGJDBEPS
£6RORXVHVDOHVSHFtILFDPHQWHGLVHxDGDSDUDHOXVRGHODYDYDMLOODV
&XDOTXLHURWURWLSRGHVDOQRHVSHFtILFDPHQWHGLVHxDGDSDUDHOXVRGH
ODYDYDMLOODVHVSHFLDOPHQWHODVDOGHPHVDGDxDUiHODEODQGDGRUGHDJXD
(QFDVRGHGDxRVFDXVDGRVSRUHOXVRGHVDOLQDGHFXDGDHOIDEULFDQWHQR
GDQLQJXQDJDUDQWtDQLVHUHVSRQVDELOL]DSRUORVGDxRVFDXVDGRV.
6RORUHOOHQHFRQVDODQWHVGHHMHFXWDUXQFLFOR
(VWRHYLWDUiTXHORVJUDQRVGHVDORDJXDVDODGDTXHVHKD\DGHUUDPDGR
SHUPDQH]FDQHQHOIRQGRGHODPiTXLQDSRUXQSHUtRGRGHWLHPSRTXH
SXHGDFDXVDUFRUURVLyQ
$'9(57(1&,$
9
6LVXPRGHORQRWLHQHQLQJ~QDEODQGDGRUGHDJXDSXHGHRPLWLUHVWD
VHFFLyQ6LHPSUHXVHVDOSDUDXVRHQHOODYDYDMLOODV
(OFRQWHQHGRUGHVDOVHHQFXHQWUDGHEDMRGHODFHVWDLQIHULRU\GHEH
OOHQDUVHFRPRVHH[SOLFDDFRQWLQXDFLyQ
127$:
Consulte la sección 1 "%FTDBMDJGJDBEPS de agua" de MBPART&. Consulte la sección 1
"%FTDBMDJGJDBEPr de agua" de la PARTE Ⅱ: Ⅱ: Versión especial, Versión especial, sinecesita
configurar el ablandador de agua. Si necesita configurar el ablandador de agua, consulte
10
5HWLUHODFHVWDLQIHULRU\GHVDWRUQLOOHODWDSDGHOGHSyVLWR
&RORTXHHOH[WUHPRGHOHPEXGRVXPLQLVWUDGRHQHORULILFLR\YLHUWD
DSUR[LPDGDPHQWHNJGHVDOGHODYDYDMLOODV
/OHQHHOFRQWHQHGRUGHVDOKDVWDVXOtPLWHPi[LPRFRQDJXD(VQRUPDOTXHVDOJD
XQDSHTXHxDFDQWLGDGGHDJXDGHOFRQWHQHGRUGHVDO
'HVSXpVGHOOHQDUHOUHFLSLHQWHYXHOYDDDWRUQLOODUODWDSD
/DOX]GHDGYHUWHQFLDGHVDOGHMDUiGHHVWDUGHVSXpVGHTXHHOFRQWHQHGRUGHVDOVH
KD\DOOHQDGRFRQVDO
,QPHGLDWDPHQWHGHVSXpVGHOOHQDUODVDOHQHOFRQWHQHGRUGHVDOVHGHEHLQLFLDUXQ
SURJUDPDGHODYDGRVXJHULPRVXVDUXQSURJUDPDFRUWR'HORFRQWUDULRHOVLVWHPDGH
ILOWURODERPEDXRWUDVSDUWHVLPSRUWDQWHVGHODPiTXLQDSXHGHQGDxDUVHFRQDJXD
VDODGD(VWRHVWiIXHUDGHJDUDQWtD
NOTE:
(OFRQWHQHGRUGHVDOVRORGHEHUHOOHQDUVHFXDQGRODOX]GHDGYHUWHQFLDGHVDO
HQHOSDQHOGHFRQWUROVHHQFLHQGH
'HSHQGLHQGRGHTXpWDQELHQVHGLVXHOYDODVDOODOX]GHDGYHUWHQFLDGHVDO
D~QSXHGHHVWDUHQFHQGLGDDXQTXHHOFRQWHQHGRUGHVDOHVWpOOHQR
6LQRKD\OX]GHDGYHUWHQFLDGHVDOHQHOSDQHOGHFRQWUROSDUDDOJXQRV
PRGHORVSXHGHHVWLPDUFXiQGRVHGHEHOOHQDUODVDOHQHOVXDYL]DGRUSRU
ORVFLFORVTXHKDIXQFLRQDGRHOODYDYDMLOODV
6LODVDOVHKDGHUUDPDGRHMHFXWDXQSUHODYDGRRXQSURJUDPDUiSLGRSDUD
HOLPLQDUOD
6LJDORVSDVRVDFRQWLQXDFLyQSDUDDJUHJDUVDOODYDYDMLOODV
4
1 2
5HWLUHODFDQDVWDVXSHULRU
3
9XHOYDDFRORFDUODFDQDVWDVXSHULRU
HQORVURGLOORVVXSHULRUHVRLQIHULRUHV
3RVLFLyQEDMD
6DFDODFDQDVWDVXSHULRU
SRVLFLyQDOWD
(PSXMHODFDQDVWDVXSHULRU.
$MXVWDUODEDQGHMDVXSHULRU
7LSR
/DDOWXUDGHODFDQDVWDVXSHULRUVHSXHGHDMXVWDUIiFLOPHQWHSDUDDFRPRGDU
SODWRVPiVDOWRVHQODFDQDVWDVXSHULRURLQIHULRU
3DUDDMXVWDUODDOWXUDGHOHVWDQWHVXSHULRUVLJDHVWRVSDVRV
$POTFKPT
11
1MFHBOEPMPTFTUBOUFTEFMBTUB[BT
3DUDGHMDUHVSDFLRSDUDORVDUWtFXORVPiVDOWRVVXEDODUHMLOODGHODWD]DKDFLD
DUULED7DPELpQSXHGHTXLWDUORFXDQGRQRVHUHTXLHUDVXXVR

-*.1*&;":."/5&/*.*&/50
$VJEBEPTFYUFSOPT
-BQVFSUBZFMTFMMPEFMBQVFSUB
/LPSLHORVVHOORVGHODSXHUWDUHJXODUPHQWHFRQXQSDxRVXDYH\K~PHGRSDUD
HOLPLQDUORVGHSyVLWRVGHDOLPHQWRV&XDQGRVHFDUJDHOODYDYDMLOODVORVUHVLGXRVGH
FRPLGD\EHELGDSXHGHQJRWHDUHQORVODGRVGHODSXHUWDGHOODYDYDMLOODV(VWDV
VXSHUILFLHVHVWiQIXHUDGHOJDELQHWHGHODYDGR\QRVHDFFHGHSRUHODJXDGHVGH
ORVEUD]RVGHURFLDGR&XDOTXLHUGHSyVLWRGHEHOLPSLDUVHDQWHVGHTXHVHFLHUUHOD
SXHUWD
1BOFMEFDPOUSPM
(OSDQHOGHFRQWUROGHEHOLPSLDUVH62/$0(17(FRQXQSDxRVXDYH\K~PHGR
3DUDHYLWDUODSHQHWUDFLyQGHDJXDHQODFHUUDGXUDGHODSXHUWD\ORV
FRPSRQHQWHVHOpFWULFRVQRXVHXQOLPSLDGRUHQDHURVROGHQLQJ~QWLSR.
1XQFDXVHOLPSLDGRUHVDEUDVLYRVRHVWURSDMRVHQODVVXSHUILFLHV
H[WHUQDVSRUTXHSXHGHQUD\DUHODFDEDGR$OJXQDVWRDOODVGHSDSHO
WDPELpQSXHGHQUD\DURGHMDUPDUFDVHQODVXSHUILFLH
$'9(57(1&,$
$VJEBEPTJOUFSOPT
4JTUFNBEFGJMUSPT
/05":
/DVLPiJHQHVVRQVRORSDUDUHIHUHQFLDGLIHUHQWHVPRGHORVGHOVLVWHPDGH
ILOWUDGR\ORVEUD]RVURFLDGRUHVSXHGHQVHUGLIHUHQWHV
12
El sistema de filtrado en la base del gabinete de lavado retiene los residuos
gruesos del ciclo de lavado, incluidos los objetos extraños como palillos de
dientes o fragmentos. Los residuos gruesos recolectados pueden hacer que
los filtros se obstruyan. Compruebe el estado de los filtros con regularidad,
retire con cuidado los objetos extraños y limpie las partes del sistema de
filtrado si es necesario con agua. Siga los pasos a continuación para limpiar
el filtro.
1 2
6RVWHQJDHOILOWURJUXHVR\JtUHOR
HQVHQWLGRDQWLKRUDULRSDUD
GHVEORTXHDUHOILOWUR/HYDQWHHO
ILOWURKDFLDDUULED\IXHUDGHO
ODYDYDMLOODV
(OILOWURILQRVHSXHGHVDFDUGHOD
SDUWHLQIHULRUGHOFRQMXQWRGHOILOWUR(O
ILOWURJUXHVRVHSXHGHVHSDUDUGHO
ILOWURSULQFLSDODSUHWDQGRVXDYHPHQWH
ODVSHVWDxDVHQODSDUWHVXSHULRU\
WLUDQGRGHpO
3 4
/RVUHVWRVGHDOLPHQWRVPiVJUDQGHV
VHSXHGHQOLPSLDUHQMXDJDQGRHOILOWUR
FRQDJXDFRUULHQWH
3DUDXQDOLPSLH]DPiVFRPSOHWDXVH
XQFHSLOORGHOLPSLH]DVXDYH
9XHOYDDDUPDUORVILOWURVHQHO
RUGHQLQYHUVRDOGHOGHVPRQWDMH
YXHOYDDFRORFDUHOLQVHUWRGHOILOWUR
\JtUHORHQHOVHQWLGRGHODVDJXMDV
GHOUHORMKDVWDODIOHFKDGHFLHUUH
1RDSULHWHGHPDVLDGRORVILOWURV9XHOYDDFRORFDUORVILOWURVHQVHFXHQFLDGHIRUPD
VHJXUDGHORFRQWUDULRSRGUtDHQWUDUVXFLHGDGJUXHVDHQHOVLVWHPD\FDXVDUXQ
EORTXHR
181&$XVHHOODYDYDMLOODVVLQILOWURVHQVXOXJDU(OUHHPSOD]RLQFRUUHFWRGHOILOWUR
SXHGHUHGXFLUHOQLYHOGHUHQGLPLHQWRGHOHOHFWURGRPpVWLFR\GDxDUORVSODWRV\
XWHQVLOLRV
$'9(57(1&,$
13
Main filter
Coarse filter
Fine filter
/DYHORVEUD]RVHQDJXDMDERQRVD
\WLELD\XVHXQFHSLOORVXDYHSDUD
OLPSLDUORVFKRUURV5HHPSOiFHORV
GHVSXpVGHHQMXDJDUORV
FRPSOHWDPHQWH
#SB[PTQVMWFSJ[BEPSFT
(VQHFHVDULROLPSLDUORVEUD]RVGHURFLDGRUHJXODUPHQWHSDUDSURGXFWRVTXtPLFRV
GHDJXDGXUDTXHREVWUXLUiQORVFKRUURV\ORVFRMLQHWHVGHOEUD]RURFLDGRU
3DUDOLPSLDUORVEUD]RVURFLDGRUHVVLJDODVLQVWUXFFLRQHVDFRQWLQXDFLyQ
2
3
3DUDTXLWDUHOEUD]RURFLDGRU
LQIHULRUVDTXHHOEUD]RURFLDGRU
KDFLDDUULED
14
1
3DUDTXLWDUHOEUD]RURFLDGRUVXSHULRU
VRVWHQJDODWXHUFDHQHOFHQWURGHOD
UXHGD\JLUHHOEUD]RURFLDGRUHQHO
VHQWLGRFRQWUDULRDODVDJXMDVGHOUHORM
SDUDTXLWDUOR

$VJEBEPTQBSBFMMBWBWBKJMMBT
3UHFDXFLyQGHKHODGD
ORVFLFORVSRVWHULRUHVDOODYDGRRSHUDQGHODVLJXLHQWHPDQHUD
&RUWHODFRUULHQWHHOpFWULFDDOODYDYDMLOODVHQODIXHQWHGHVXPLQLVWUR
&LHUUHHOVXPLQLVWURGHDJXD\GHVFRQHFWHHOWXERGHHQWUDGDGHDJXDGHOD
YiOYXODGHDJXD
'UHQHHODJXDGHODWXEHUtDGHHQWUDGD\ODYiOYXODGHDJXD8VDXQDVDUWpQ
SDUDMXQWDUHODJXD
9XHOYDDFRQHFWDUHOWXERGHHQWUDGDGHDJXDDODYiOYXODGHDJXD
5HWLUHHOILOWURHQHOIRQGRGHODEDxHUD\XVHXQDHVSRQMDSDUDDEVRUEHUHODJXD
HQHOVXPLGHUR
%FTQV¤TEFDBEBMBWBEP
'HVSXpVGHFDGDODYDGRFLHUUHHOVXPLQLVWURGHDJXDDODSDUDWR\GHMHODSXHUWD
OLJHUDPHQWHDELHUWDSDUDTXHODKXPHGDG\ORVRORUHVQRTXHGHQDWUDSDGRVHQHO
LQWHULRU
3FUJSFFMFODIVGF
$QWHVGHOLPSLDURUHDOL]DUWDUHDVGHPDQWHQLPLHQWRVLHPSUHTXLWHHOHQFKXIHGHO
]yFDOR
4JOEJTPMWFOUFTOJMJNQJF[BBCSBTJWB
3DUDOLPSLDUHOH[WHULRU\ODVSLH]DVGHJRPDGHOODYDYDMLOODVQRXVHGLVROYHQWHVQL
SURGXFWRVGHOLPSLH]DDEUDVLYRV6RORXVHXQSDxRFRQDJXDWLELD\MDEyQ
3DUDHOLPLQDUPDQFKDVRPDQFKDVGHODVXSHUILFLHGHOLQWHULRUXVHXQSDxR
KXPHGHFLGRFRQDJXD\XQSRFRGHYLQDJUHRXQSURGXFWRGHOLPSLH]DKHFKR
HVSHFtILFDPHQWHSDUDODYDYDMLOODV
$VBOEPOPFTU×FOVTPEVSBOUFNVDIPUJFNQP
6HUHFRPLHQGDTXHHMHFXWHXQFLFORGHODYDGRFRQHOODYDYDMLOODVYDFtR\OXHJRUHWLUH
HOHQFKXIHGHODWRPDDSDJXHHOVXPLQLVWURGHDJXD\GHMHODSXHUWDGHODSDUDWR
OLJHUDPHQWHDELHUWD(VWRD\XGDUiDTXHORVVHOORVGHODSXHUWDGXUHQPiV\HYLWH
TXHVHIRUPHQRORUHVGHQWURGHODUWHIDFWR
.PWFSFMBQBSBUP
6LHOHOHFWURGRPpVWLFRGHEHPRYHUVHLQWHQWHPDQWHQHUORHQSRVLFLyQYHUWLFDO6LHV
DEVROXWDPHQWHQHFHVDULRSXHGHFRORFDUVHGHHVSDOGDV
15
7RPHPHGLGDVGHSURWHFFLyQFRQWUDKHODGDVHQHOODYDYDMLOODVHQLQYLHUQR7RGRV
*/4536$$*0/&4%&*/45"-"$*Ë/
$VHJ~UHVHGHTXHH[LVWDXQDFRUUHFWDFRQH[LyQDWLHUUDDQWHVGHOXVR
$'9(57(1&,$
3RUVHJXULGDGSHUVRQDO
1RXVHXQFDEOHGHH[WHQVLyQRXQHQFKXIH
DGDSWDGRUFRQHVWHHOHFWURGRPpVWLFR
%DMRQLQJXQDFLUFXQVWDQFLDFRUWHRUHWLUHOD
FRQH[LyQDWLHUUDGHOFDEOHGHDOLPHQWDFLyQ
/DLQVWDODFLyQGHODVWXEHUtDV\HTXLSRVHOpFWULFRVGHEHVHUUHDOL]DGDSRUSURIHVLRQDOHV.
"DFSDBEFMBDPOFYJOEFBMJNFOUBDJO
"UFODJO
$'9(57(1&,$
1FMJHSPEF$IPRVF&M¤DUSJDP
'HVFRQHFWHODHQHUJtDHOpFWULFD
DQWHVGHLQVWDODUHOODYDYDMLOODV
'HORFRQWUDULRSRGUtDSURGXFLUVHOD
PXHUWHRXQDGHVFDUJDHOpFWULFD
16
3FRVJTJUPTFM¤DUSJDPT
&RQVXOWHODHWLTXHWDGHFODVLILFDFLyQSDUDFRQRFHUHOYROWDMHQRPLQDO\FRQHFWHHOODYDYDMLOODVD
ODIXHQWHGHDOLPHQWDFLyQDGHFXDGD8WLOLFHHOIXVLEOH$$$UHTXHULGRIXVLEOHGH
UHWDUGRRGLV\XQWRUUHFRPHQGDGR\SURSRUFLRQHXQFLUFXLWRVHSDUDGRTXHVLUYDVRORDHVWH
HOHFWURGRPpVWLFR
$POFYJOFM¤DUSJDB
$VHJ~UHVHGHTXHHOYROWDMH\ODIUHFXHQFLDGHODFRUULHQWHFRUUHVSRQGDQDORVGHODSODFDGH
FDUDFWHUtVWLFDV6RORLQVHUWHHOHQFKXIHHQXQDWRPDGHFRUULHQWHTXHHVWpFRQHFWDGDDWLHUUD
FRUUHFWDPHQWH6LODWRPDHOpFWULFDDODTXHGHEHFRQHFWDUVHHODSDUDWRQRHVDSURSLDGDSDUD
HOHQFKXIHUHHPSODFHHOHQFKXIHHQOXJDUGHXVDUXQDGDSWDGRURVLPLODU\DTXHSRGUtDQ
FDXVDUVREUHFDOHQWDPLHQWR\TXHPDGXUDV
"CBTUFDJNJFOUPEFBHVBZESFOBKF
$POFYJOEFBHVBGS¥B
&RQHFWHODPDQJXHUDGHVXPLQLVWURGH
DJXDIUtDDXQFRQHFWRUURVFDGRGH
SXOJDGDV\DVHJ~UHVHGHTXHHVWp
ELHQVXMHWDHQVXOXJDU
6LODVWXEHUtDVGHDJXDVRQQXHYDVR
QRVHKDQXWLOL]DGRGXUDQWHXQSHUtRGR
SURORQJDGRGHWLHPSRGHMHFRUUHUHO
DJXDSDUDDVHJXUDUVHGHTXHHODJXD
HVWpOLPSLD(VWDSUHFDXFLyQHV
QHFHVDULDSDUDHYLWDUHOULHVJRGHTXHOD
HQWUDGDGHDJXDVHEORTXHH\GDxHHO
DSDUDWR
PDQJXHUDGH
VXPLQLVWURGH
VHJXULGDG
PDQJXHUDGH
VXPLQLVWURRUGLQDULR
"DFSDBEFMBNBOHVFSBEFTVNJOJTUSPEFTFHVSJEBE
/DPDQJXHUDGHVXPLQLVWURGHVHJXULGDGFRQVLVWHHQODVSDUHGHVGREOHV(O
VLVWHPDGHODPDQJXHUDJDUDQWL]DVXLQWHUYHQFLyQEORTXHDQGRHOIOXMRGHDJXDHQ
FDVRGHTXHVHURPSDODPDQJXHUDGHVXPLQLVWUR\FXDQGRHOHVSDFLRGHDLUH
HQWUHODPDQJXHUDGHVXPLQLVWUR\ODPDQJXHUDFRUUXJDGDH[WHULRUHVWpOOHQRGH
DJXD
$NPDPOFDUBSMBNBOHVFSBEFTVNJOJTUSPEFTFHVSJEBE
7LUHGHODVPDQJXHUDVGHVXPLQLVWURGHVHJXULGDGFRPSOHWDPHQWHIXHUDGHO
FRPSDUWLPLHQWRGHDOPDFHQDPLHQWRXELFDGRHQODSDUWHSRVWHULRUGHOODYDYDMLOODV
$MXVWHORVWRUQLOORVGHODPDQJXHUDGHVXPLQLVWURGHVHJXULGDGDOJULIRFRQ
URVFDGHSXOJ
(QFLHQGDFRPSOHWDPHQWHHODJXDDQWHVGHHQFHQGHUHOODYDYDMLOODV
$'9(57(1&,$
8QDPDQJXHUDTXHVHFRQHFWDDOIUHJDGHURSXHGHH[SORWDUVLHVWiLQVWDODGD
HQODPLVPDOtQHDGHDJXDTXHHOODYDYDMLOODV6LVXIUHJDGHURWLHQHXQRVH
UHFRPLHQGDGHVFRQHFWDUODPDQJXHUD\WDSDUHORULILFLR
$NPEFTDPOFDUBSMBNBOHVFSBEFTVNJOJTUSPEFTFHVSJEBE
$SDJDHODJXD
'HVHQURVTXHODPDQJXHUDGHVXPLQLVWURGHVHJXULGDGGHOJULIR
17

$POFYJOEFMBTNBOHVFSBTEFESFOBKF
)LMHFRQVHJXULGDGODPDQJXHUDGHGUHQDMHHQODSRVLFLyQ$RHQODSRVLFLyQ%
B
A
MAX 1000mm
(QFLPHUD
0DQJXHUD
GHGUHQDMH
,QVHUWDODPDQJXHUDGHGUHQDMHHQXQWXERGHGUHQDMHFRQXQGLiPHWURPtQLPRGH
FPRGpMDORHQWUDUDOIUHJDGHURDVHJXUiQGRWHGHHYLWDUGREODUORRHQJDU]DUOR
/DDOWXUDGHOWXERGHGUHQDMHGHEHVHULQIHULRUDPP(OH[WUHPROLEUHGHOD
PDQJXHUDQRGHEHVXPHUJLUVHHQDJXDSDUDHYLWDUHOUHWURFHVRGHOPLVPR
$NPESFOBSFMFYDFTPEFBHVBEFMBTNBOHVFSBT
6L HO IUHJDGHUR HVWi PiV DOWR GHVGH HO VXHOR HO H[FHVR GH DJXD HQ ODV
PDQJXHUDV QR VH SXHGH GUHQDU GLUHFWDPHQWH HQ HO IUHJDGHUR 6HUi QHFHVDULR
GUHQDU HO H[FHVR GH DJXD GH ODV PDQJXHUDV HQ XQ UHFLSLHQWH R UHFLSLHQWH
DGHFXDGRTXHVHPDQWHQJDDIXHUD\PiVEDMRTXHHOIUHJDGHUR
4BMJEBEFBHVB
&RQHFWHODPDQJXHUDGHGUHQDMHGHDJXD/DPDQJXHUDGHGUHQDMHGHEHHVWDU
FRUUHFWDPHQWHLQVWDODGDSDUDHYLWDUIXJDVGHDJXD$VHJ~UHVHGHTXHOD
PDQJXHUDGHGUHQDMHGHDJXDQRHVWpGREODGDQLDSODVWDGD
.BOHVFSBEFFYUFOTJO
6LQHFHVLWDXQDH[WHQVLyQGHPDQJXHUDGHGUHQDMHDVHJ~UHVHGHXVDUXQD
PDQJXHUDGHGUHQDMHVLPLODU
1RGHEHVXSHUDUORVPHWURVGHORFRQWUDULRHOHIHFWRGHOLPSLH]DGHOODYDYDMLOODV
SRGUtDVHUUHGXFLGR
$POFYJOEFTJGO
/DFRQH[LyQGHGHVHFKRVGHEHHVWDUDXQDDOWXUDLQIHULRUDFPPi[LPR
GHVGHHOIRQGRGHOSODWR/DPDQJXHUDGHGUHQDMHGHDJXDGHEHVHUILMD
18
3DUWHSRVWHULRUGHOODYDYDMLOODV
(QWUDGDGHDJXD
7XERGHGHVDJH
&DEOHGHUHG
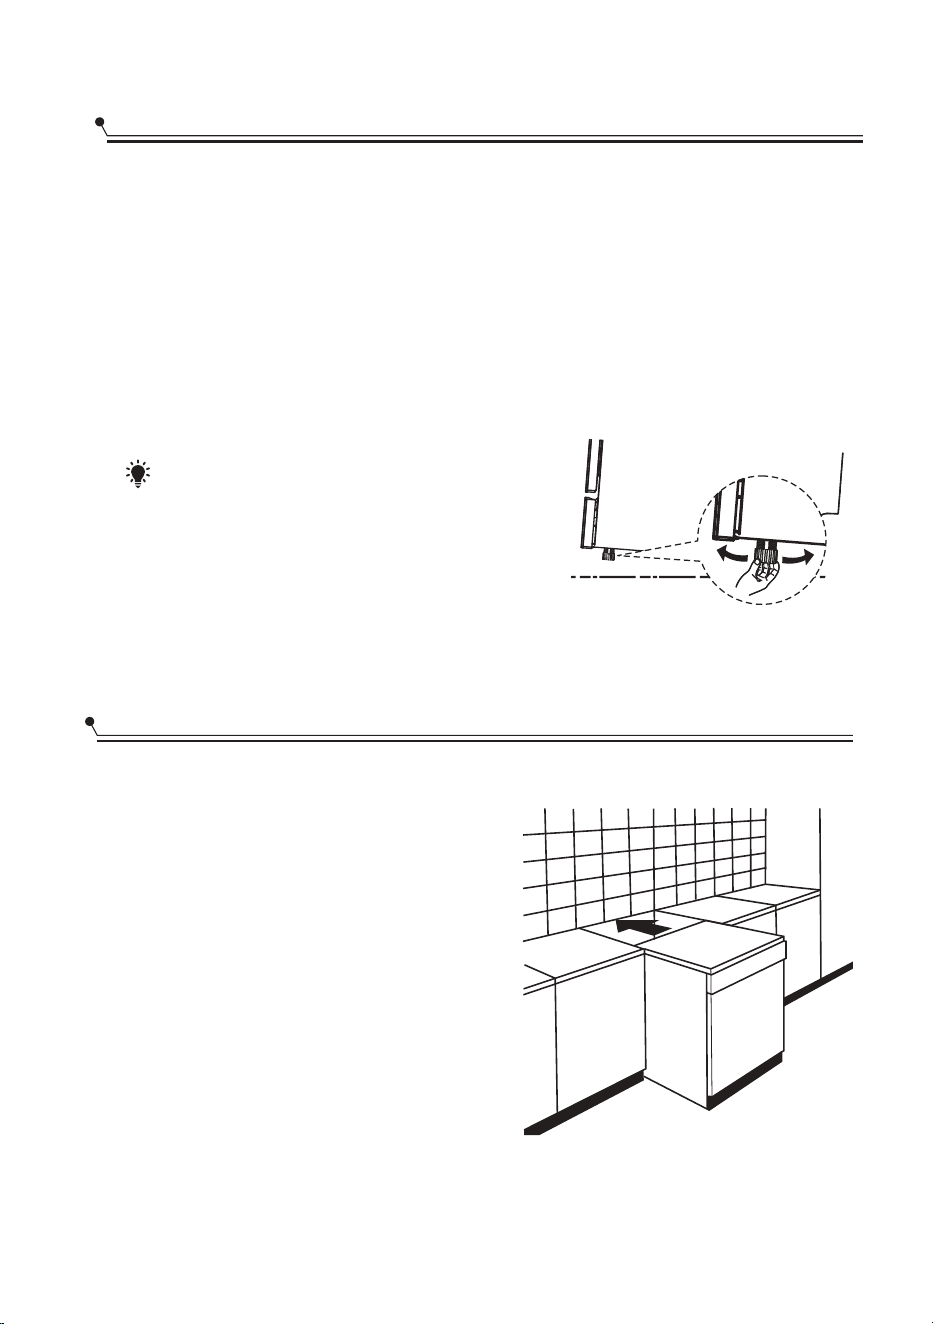
$PMPRVFFMEJTQPTJUJWP
&RORTXHHODSDUDWRHQODXELFDFLyQGHVHDGD/DSDUWHSRVWHULRUGHEHGHVFDQVDU
FRQWUDODSDUHGGHWUiVGHHOOD\ORVODGRVDORODUJRGHORVJDELQHWHVRSDUHGHV
DG\DFHQWHV(OODYDYDMLOODVHVWiHTXLSDGRFRQXQVXPLQLVWURGHDJXD\PDQJXHUDV
GHGUHQDMHTXHVHSXHGHQFRORFDUDODGHUHFKDRDODL]TXLHUGDSDUDIDFLOLWDUOD
LQVWDODFLyQ
/JWFMBDJOEFMEJTQPTJUJWP
8QDYH]TXHHOHOHFWURGRPpVWLFRHVWiSRVLFLRQDGRSDUDODQLYHODFLyQ
ODDOWXUDGHOODYDYDMLOODVSXHGHVHUDOWHUDGDDWUDYpVGH
DMXVWHGHOQLYHOGHDWRUQLOODGRGHORVSLHV
127$:
$SOLFDUVRORDOODYDSODWRVLQGHSHQGLHQWH
*OTUBMBDJOJOEFQFOEJFOUF
.POUBKFFOUSFHBCJOFUFT
FYJTUFOUFT
/DDOWXUDGHOODYDYDMLOODVPPVHKD
GLVHxDGRSDUDSHUPLWLUTXHODPiTXLQDVH
LQVWDOHHQWUHJDELQHWHVH[LVWHQWHVGHOD
PLVPDDOWXUDHQFRFLQDVPRGHUQDV
LQVWDODGDV/RVSLHVVHSXHGHQDMXVWDUSDUD
DOFDQ]DUODDOWXUDFRUUHFWD
/DSDUWHVXSHULRUODPLQDGDGHODPiTXLQDQR
UHTXLHUHQLQJ~QFXLGDGRHVSHFLDO\DTXHHV
UHVLVWHQWHDOFDORUDSUXHEDGHDUDxD]RV\D
SUXHEDGHPDQFKDV
19
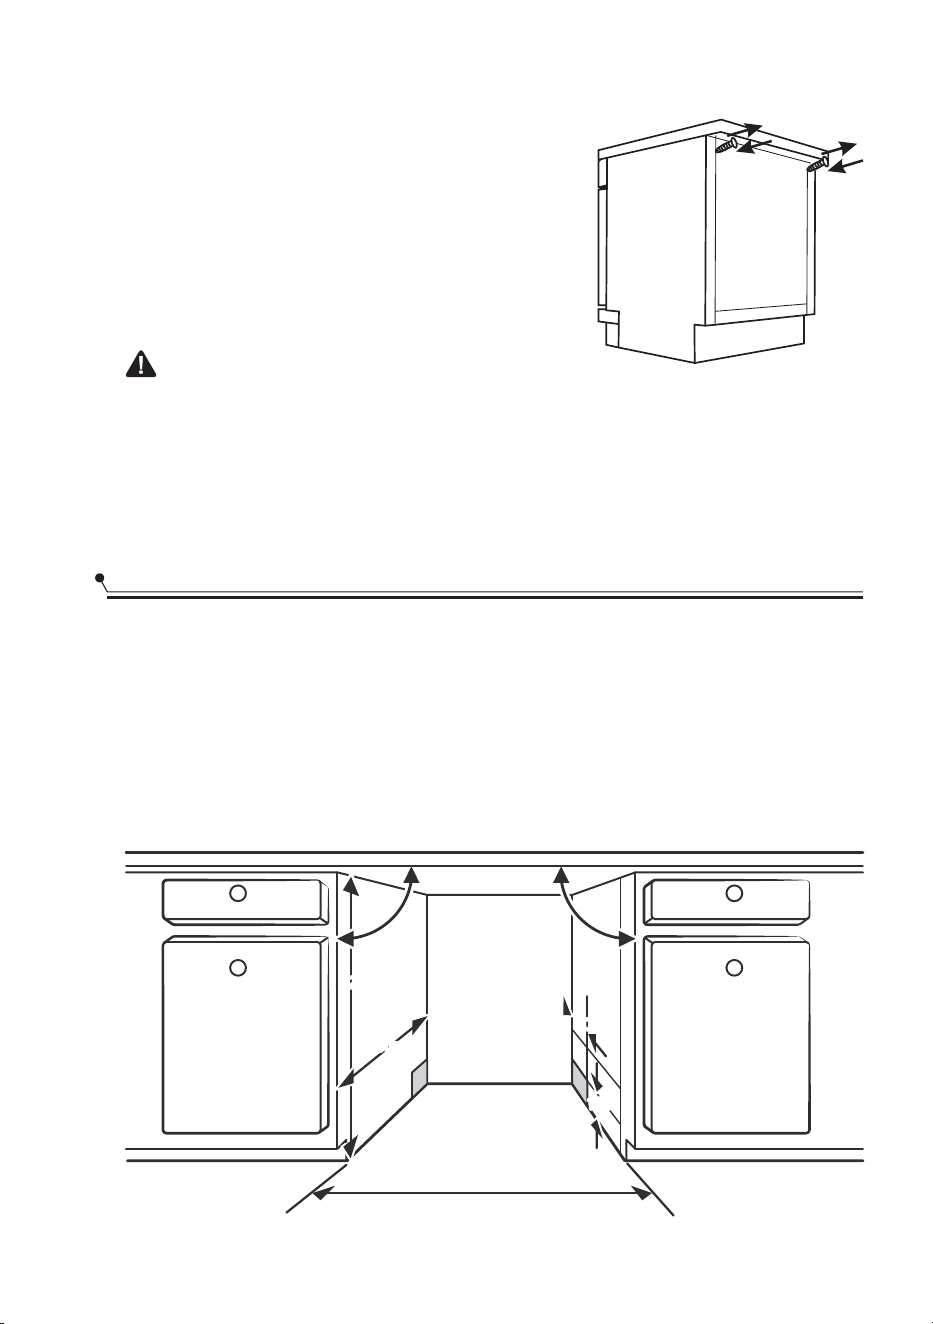
%FCBKPEFMUSBCBKPFYJTUFOUFBSSJCB
FXDQGRVHDMXVWDGHEDMRGHXQWDEOHURGHWUDEDMR
(QODPD\RUtDGHODVFRFLQDVPRGHUQDVLQVWDODGDV
VRORKD\XQDVRODHQFLPHUDGHEDMRGHODFXDOVH
LQVWDODQDUPDULRV\HOHFWURGRPpVWLFRV(QHVWH
FDVRTXLWHODSDUWHVXSHULRUGHWUDEDMRGHO
ODYDYDMLOODVGHVHQURVFDQGRORVWRUQLOORVGHEDMRGHO
ERUGHSRVWHULRUGHODSDUWHVXSHULRUD
a
a
b
b
1BTP4FMFDDJPOBSMBNFKPSVCJDBDJOQBSBFMMBWBWBKJMMBT
/DSRVLFLyQGHLQVWDODFLyQGHOODYDYDMLOODVGHEHHVWDUFHUFDGHODVPDQJXHUDVGHHQWUDGD\
GUHQDMHH[LVWHQWHV\GHOFDEOHGHDOLPHQWDFLyQ
SRVLFLyQGHLQVWDODFLyQGHOODYDYDMLOODVGHEHHVWDUFHUFDGHODVPDQJXHUDVGHHQWUDGD\GUHQDMH
H[LVWHQWHV\GHOFDEOHGHDOLPHQWDFLyQ
90 °
90 °
580mm
820mm
100
600 mm(
for 60cm model)
450
mm(for 45cm model)
80
"UFODJO
'HVSXpVGHUHWLUDUODSDUWHVXSHULRUGHODSLH]DGHWUDEDMRORVWRUQLOORV'(%(1YROYHUD
DWRUQLOODUVHGHEDMRGHOERUGHSRVWHULRUGHODSDUWHVXSHULRUE
/DDOWXUDVHUHGXFLUiDPPVHJ~QORSUHYLVWRSRUHO5HJODPHQWR,QWHUQDFLRQDO
,62\HOODYDYDMLOODVVHDMXVWDUiSHUIHFWDPHQWHGHEDMRGHODFRFLQD
*OTUBMBDJOJODPSQPSBEBQBSBFMNPEFMPJOUFHSBEP
20
,OXVWUDFLRQHVGHODVGLPHQVLRQHVGHOPXHEOH\ODSRVLFLyQGHLQVWDODFLyQGHOODYDYDMLOODV/D
,OXVWUDFLRQHVGHODVGLPHQVLRQHVGHOPXHEOH\ODSRVLFLyQGHLQVWDODFLyQGHOODYDYDMLOODV
0HQRVGHPPHQWUHODSDUWHVXSHULRUGHOODYDYDMLOODV\HOPXHEOH\ODSXHUWD
H[WHULRUDOLQHDGDDOPXHEOH
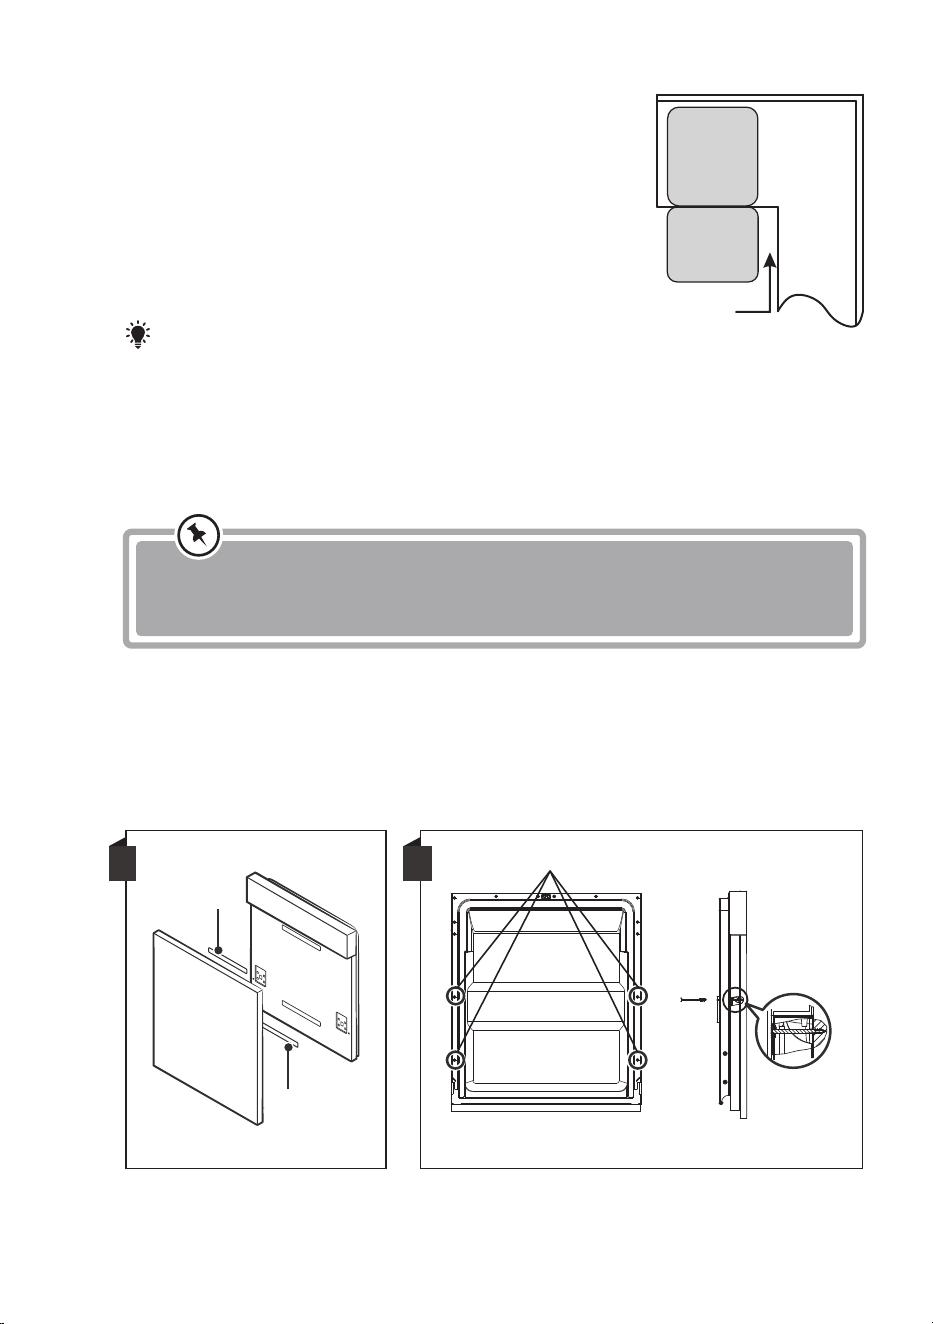
1BTP%JNFOTJPOFTFJOTUBMBDJOEFMQBOFMFTU¤UJDP
6LHOODYDYDMLOODVHVWiDWDVFDGRHQODHVTXLQDGHO
ODSXHUWD
(BCJOFUF-BWBWBKJMMBT
QVFSUBEFM
MBWBWBKJMMBT
of 50mm
NOTA:
'HSHQGLHQGRGHGyQGHVHHQFXHQWUHVXWRPDGHFRUULHQWHHVSRVLEOHTXH
WHQJDTXHKDFHUXQDJXMHURHQHOODGRRSXHVWRGHODUPDULR
21
(OSDQHOGHPDGHUDHVWpWLFRSRGUtDSURFHVDUVHGHDFXHUGRFRQHOSDQHOGH
PDGHUDHVWpWLFRSRGUtDVHUSURFHVDGRGHDFXHUGRFRQORVGLEXMRVGH
LQVWDODFLyQ'LEXMRVGHLQVWDODFLyQ
A
SHJDPHQWR
SHJDPHQWR
.PEFMPTFNJJOUFHSBEP
(OSDVDGRUPiJLFR$\HOSDVDGRUPiJLFR%VHGLVORFDQHOSDVDGRUPiJLFR$HQ
HOSDQHOGHPDGHUDHVWpWLFR\HOSDVDGRUPiJLFRDILHOWUDGR%GHODSXHUWD
H[WHULRUGHOODYDYDMLOODVFRQVXOWHODILJXUD$'HVSXpVGHFRORFDUHOSDQHOILMHHO
SDQHODODSXHUWDH[WHULRUPHGLDQWHWRUQLOORV\SHUQRVFRQVXOWHODILJXUD%
B
$SULHWDORVFXDWURWRUQLOORVODUJRV
7RPHORVFXDWURWRUQLOORVFRUWRV
mueble
GHEHKDEHUDOJRGHHVSDFLRFXDQGRVHDEUD

1BTP"KVTUFEFUFOTJOEFMSFTPSUFEFMBQVFSUB
/RVUHVRUWHVGHODSXHUWDVHDMXVWDQHQOD
IiEULFDDODWHQVLyQDGHFXDGDSDUDODSXHUWD
H[WHULRU6LWLHQHLQVWDODGRXQSDQHOGH
PDGHUDHVWpWLFRGHEHUiDMXVWDUODWHQVLyQ
GHOUHVRUWHGHODSXHUWD*LUHHOWRUQLOORGH
DMXVWHSDUDPRYHUHODMXVWDGRU\WHQVDUR
UHODMDUHOFDEOHGHDFHUR
/DWHQVLyQGHOUHVRUWHGHODSXHUWDHV
FRUUHFWDFXDQGRODSXHUWDSHUPDQHFH
KRUL]RQWDOHQODSRVLFLyQFRPSOHWDPHQWH
DELHUWDSHURVHHOHYDKDVWDHOILQDOFRQXQ
OLJHURPRYLPLHQWRGHXQGHGR
B
$SULHWDORVFXDWURWRUQLOORVODUJRV
A
7RPHORVFXDWURWRUQLOORVFRUWRV
.PEFMPUPUBMNFOUFJOUFHSBEP
,QVWDOH HO JDQFKR HQ HO SDQHO GH PDGHUD HVWpWLFR \ FRORTXH HO JDQFKR HQ OD
UDQXUDGHODSXHUWDH[WHULRUGHOODYDYDMLOODVYHDODILJXUD$'HVSXpVGHFRORFDU
HOSDQHOILMHHOSDQHODODSXHUWDH[WHULRUPHGLDQWHWRUQLOORV\SHUQRVFRQVXOWHOD
ILJXUD%
22

1BTP1BTPTEFJOTUBMBDJOEFMMBWBQMBUPT
)LMHODEDQGDGHFRQGHQVDFLyQGHEDMRGHODVXSHUILFLHGHWUDEDMRGHODUPDULR
$VHJ~UHVHGHTXHODEDQGDGHFRQGHQVDFLyQHVWpDOLQHDGDFRQHOERUGHGHOD
VXSHUILFLHGHWUDEDMR3DVR
&RQHFWHODPDQJXHUDGHHQWUDGDDOVXPLQLVWURGHDJXDIUtD
&RQHFWHODPDQJXHUDGHGUHQDMH
&RQHFWHHOFDEOHGHDOLPHQWDFLyQ
&RORTXHHOODYDYDMLOODVHQVXOXJDU(WDSD
1LYHOHHOODYDYDMLOODV/DFRPLGDWUDVHUDVHSXHGHDMXVWDUGHVGHODSDUWHIURQWDO
GHOODYDYDMLOODVJLUDQGRHOWRUQLOOR3KLOLSVHQHOPHGLRGHODEDVHGHOODYDYDMLOODVFRQ
XQWRUQLOOR3KLOLSV3DUDDMXVWDUODVSDWDVGHODQWHUDVXVHXQGHVWRUQLOODGRUSODQR\
JLUHODVSDWDVGHODQWHUDVKDVWDTXHHOODYDYDMLOODVHVWpQLYHODGR3DVRDOSDVR
,QVWDOHODSXHUWDGHOPXHEOHHQODSXHUWDH[WHULRUGHOODYDYDMLOODV3DVRDOSDVR
$MXVWHODWHQVLyQGHORVUHVRUWHVGHODVSXHUWDVFRQXQDOODYH$OOHQTXHJLUDHQHO
VHQWLGRGHODVDJXMDVGHOUHORMSDUDDSUHWDUORVUHVRUWHVL]TXLHUGR\GHUHFKRGHOD
SXHUWD'HORFRQWUDULRSRGUtDGDxDUVXODYDYDMLOODV3DVR
(OODYDYDMLOODVGHEHHVWDUDVHJXUDGRHQVXOXJDU+D\GRVPDQHUDVGHKDFHUHVWR
23
&RQVXOWHORVSDVRVGHLQVWDODFLyQHVSHFLILFDGRVHQODLQVWDODFLyQ
9

UP
DOWN
/JWFMEFWFSJGJDBDJØO
EFTEFFMGSFOUFIBDJBBUSBT
/JWFMEFWFSJGJDBDJØO
VOMBEPBPUSP
1BTP/JWFMBDJOEFMMBWBWBKJMMBT
(OODYDSODWRVGHEHHVWDUQLYHODGRSDUDHOFRUUHFWRIXQFLRQDPLHQWRGHOHVWDQWHSDUD
SODWRV\HOUHQGLPLHQWRGHOODYDGR
&RORTXHXQQLYHOGHEXUEXMDHQODSXHUWD\HQHOULHOGHQWURGHODEDxHUDFRPR
VHPXHVWUDSDUDYHULILFDUTXHHOODYDYDMLOODVHVWpQLYHODGR
1LYHOHHOODYDYDMLOODVDMXVWDQGRODVWUHVSDWDVQLYHODGRUDVLQGLYLGXDOPHQWH
&XDQGRQLYHOHHOODYDYDMLOODVSUHVWHDWHQFLyQSDUDQRGHMDUTXHHOODYDYDMLOODVVH
YXHOTXH
1.
2.
3.
127$
/DDOWXUDPi[LPDGHDMXVWHGHORVSLHVHVGHPP
24
25
$0/4&+041"3"40-6$*0/"3
130#-&."4
"OUFTEFMMBNBSBMTFSWJDJPU¤DOJDP
5HYLVDUORVFXDGURVHQODVSiJLQDVVLJXLHQWHVSXHGHHYLWDUOHOODPDUSDUDREWHQHUVHUYLFLR
3UREOHPD &DXVDSRVLEOH 4XpKDFHU"
(OODYDYDMLOODVQR
VHLQLFLD
)XVLEOHTXHPDGRR
FRUWRFLUFXLWR
5HHPSODFHHOIXVLEOHRUHLQLFLHHO
GLV\XQWRU5HWLUHFXDOTXLHURWUR
HOHFWURGRPpVWLFRTXHFRPSDUWDHOPLVPR
FLUFXLWRFRQHOODYDYDMLOODV
/DIXHQWHGH
DOLPHQWDFLyQQR
HVWiHQFHQGLGD
$VHJ~UHVHGHTXHHOODYDYDMLOODVHVWp
HQFHQGLGR\TXHODSXHUWDHVWpELHQ
FHUUDGD$VHJ~UHVHGHTXHHOFDEOHGH
DOLPHQWDFLyQHVWpHQFKXIDGRFRUUHFWDPHQWH
HQODWRPDGHFRUULHQWH
9HULILTXHTXHHOVXPLQLVWURGHDJXD
HVWpFRQHFWDGRFRUUHFWDPHQWH\TXHHO
DJXDHVWpHQFHQGLGD
/DSXHUWDGHOODYDYDMLOODV
QRHVWiELHQFHUUDGD
$VHJ~UHVHGHFHUUDUODSXHUWD
FRUUHFWDPHQWH\HQJDQFKDUOD
$JXDQR
ERPEHDGDGHVGH
HOODYDYDMLOODV
0DQJXHUDGHGUHQDMH
UHWRUFLGDRDWUDSDGD
)LOWURREVWUXLGR
)UHJDGHURGH
FRFLQDDWDVFDGR
9HULILTXHODPDQJXHUDGHGUHQDMH
&RPSUXHEHHOILOWURJUXHVR
9HULILTXHHOIUHJDGHURGHODFRFLQDSDUD
DVHJXUDUVHGHTXHHVWpGUHQDQGRELHQ
6LHOSUREOHPDHVTXHHOIUHJDGHURGHOD
FRFLQDQRHVWiGUHQDQGRHVSRVLEOHTXH
QHFHVLWHXQSORPHURHQOXJDUGHXQ
WpFQLFRSDUDODYDSODWRV
3RPSDVGHMDEyQ 'HWHUJHQWHLQFRUUHFWR
/DSUHVLyQGHODJXD
HVEDMD
8VHVRORHOGHWHUJHQWHHVSHFLDOSDUD
ODYDYDMLOODVSDUDHYLWDUHVSXPD6LHVWR
RFXUUHDEUDHOODYDYDMLOODV\SHUPLWDTXH
ODHVSXPDVHHYDSRUH$JUHJXHJDOyQ
GHDJXDIUtDDOIRQGRGHOODYDYDMLOODV
&LHUUHODSXHUWDGHOODYDYDMLOODVOXHJR
VHOHFFLRQHFXDOTXLHUFLFOR,QLFLDOPHQWHHO
ODYDYDMLOODVGUHQDUiHODJXD$EUDOD
SXHUWDGHVSXpVGHTXHODHWDSDGH
GUHQDMHHVWpFRPSOHWD\YHULILTXHVLOD
HVSXPDKDGHVDSDUHFLGR5HSLWDVLHV
QHFHVDULR

26
$\XGDGHHQMXDJXH
GHUUDPDGD
/LPSLHVLHPSUHORVGHUUDPHVGH
DEULOODQWDGRULQPHGLDWDPHQWH
,QWHULRUPDQFKDGR
6HSXHGHKDEHU
XVDGRGHWHUJHQWH
FRQFRORUDQWH
$VHJ~UHVHGHTXHHOGHWHUJHQWHQR
WHQJDFRORUDQWH
3HOtFXODEODQFDHQ
ODVXSHUILFLHLQWHULRU
0LQHUDOHVGHDJXD
GXUD
3DUDOLPSLDUHOLQWHULRUXVHXQD
HVSRQMDK~PHGDFRQGHWHUJHQWHSDUD
ODYDYDMLOODV\XVHJXDQWHVGHJRPD
1XQFDXVHQLQJ~QRWUROLPSLDGRUTXH
QRVHDGHWHUJHQWHSDUDODYDYDMLOODV
GHORFRQWUDULRSXHGHFDXVDUHVSXPD
RHVSXPD
+D\PDQFKDVGH
y[LGRHQORV
FXELHUWRV
/RVDUWtFXORVDIHFWDGRV
QRVRQUHVLVWHQWHVDOD
FRUURVLyQ
1RVHHMHFXWyXQ
SURJUDPDGHVSXpVGH
DJUHJDUODVDOGH
ODYDYDMLOODV/RV
UDVWURVGHVDOKDQ
HQWUDGRHQHOFLFORGH
ODYDGR
6LHPSUHHMHFXWHXQSURJUDPDGH
ODYDGRVLQYDMLOODGHVSXpVGH
DJUHJDUVDO1RVHOHFFLRQHOD
IXQFLyQ7XUERVLHVWiSUHVHQWH
/DWDSDHVWi
VXHOWD
9HULILTXHTXHODWDSDGHO
GHVFDOFLILFDGRUHVWpVHJXUD
3UREOHPD &DXVDSRVLEOH 4XpKDFHU"
(YLWHODYDUDUWtFXORVTXHQRVHDQ
UHVLVWHQWHVDODFRUURVLyQHQHO
ODYDYDMLOODV
5XLGRGHDOJR
JROSHDQGRHQHO
ODYDYDMLOODV
8QEUD]RURFLDGRUHVWi
JROSHDQGRFRQWUDXQ
DUWtFXORHQXQDFHVWD
,QWHUUXPSDHOSURJUDPD\
UHRUJDQLFHORVHOHPHQWRVTXH
REVWUX\HQHOEUD]RURFLDGRU
5XLGRHQHO
ODYDYDMLOODV
/RVDUWtFXORVGHYDMLOOD
HVWiQVXHOWRVHQHO
ODYDYDMLOODV
,QWHUUXPSDHOSURJUDPD\
UHRUJDQLFHORVHOHPHQWRVGH
ODYDMLOOD
5XLGRGHDOJR
JROSHDQGRHQ
ODVWXEHUtDVGH
DJXD
(VWRSXHGHVHUFDXVDGR
SRUODLQVWDODFLyQHQHO
VLWLRRSRUODVHFFLyQ
WUDQVYHUVDOGHODWXEHUtD
(VWRQRWLHQHLQIOXHQFLDHQOD
IXQFLyQGHOODYDYDMLOODV(Q
FDVRGHGXGDFRQWDFWHDXQ
SORPHURFDOLILFDGR
/RVSODWRVQR
HVWiQOLPSLRV
/RVSODWRVQRVH
FDUJDURQFRUUHFWDPHQWH
9HDODVQRWDVHQ&DUJD\
GHVFDUJDGHVXODYDYDMLOODV
(OSURJUDPDQRIXHOR
VXILFLHQWHPHQWHHILFD]
6HOHFFLRQHXQSURJUDPDPiVLQWHQVLYR

27
1RVHGLVSHQVy
VXILFLHQWHGHWHUJHQWH
8VHPiVGHWHUJHQWHR
FDPELHVXGHWHUJHQWH
/RVDUWtFXORVHVWiQ
EORTXHDQGRHO
PRYLPLHQWRGHORV
EUD]RVURFLDGRUHV
5HRUJDQLFHORVHOHPHQWRVSDUDTXH
ODSXOYHUL]DFLyQSXHGDJLUDU
OLEUHPHQWH
/DFRPELQDFLyQGHOILOWUR
QRHVWiOLPSLRRQRHVWi
FRUUHFWDPHQWHFRORFDGRHQ
ODEDVHGHOJDELQHWHGH
ODYDGR(VWRSXHGHFDXVDU
TXHORVFKRUURVGHOEUD]R
URFLDGRUVHEORTXHHQ
/LPSLH\RDMXVWHHOILOWUR
FRUUHFWDPHQWH/LPSLHORV
FKRUURVGHOEUD]RURFLDGRU
1XERVLGDGHQ
FULVWDOHUtD
&RPELQDFLyQGH
DJXDEODQGD\
GHPDVLDGR
GHWHUJHQWH
8VHPHQRVGHWHUJHQWHVLWLHQH
DJXDEODQGD\VHOHFFLRQHXQ
FLFORPiVFRUWRSDUDODYDUHO
PDWHULDOGHYLGULR\OLPSLDUOR
3UREOHPD &DXVDSRVLEOH 4XpKDFHU"
$SDUHFHQPDQFKDV
EODQFDVHQSODWRV\
YDVRV
$JUHJXHPiVGHWHUJHQWH
0DUFDVQHJUDVR
JULVHVHQORVSODWRV
8WHQVLOLRVGHDOXPLQLR
VHKDQIURWDGRFRQWUD
ORVSODWRV
8VHXQOLPSLDGRUDEUDVLYR
VXDYHSDUDHOLPLQDUHVDV
PDUFDV
(OiUHDGHDJXDGXUD
SXHGHFDXVDU
GHSyVLWRVGHFDO
&DUJDLQFRUUHFWD &DUJXHHOODYDYDMLOODVFRPRVH
VXJLHUHHQODVLQVWUXFFLRQHV
/RVSODWRVVH
HOLPLQDQ
GHPDVLDGRSURQWR
1RYDFtHVXODYDYDMLOODV
LQPHGLDWDPHQWHGHVSXpVGHOODYDGR
$EUDODSXHUWDOLJHUDPHQWHSDUDTXH
VDOJDHOYDSRU6DTXHORVSODWRVKDVWD
TXHODWHPSHUDWXUDLQWHULRUVHDVHJXUD
SDUDWRFDU'HVFDUJXHSULPHUROD
FHVWDLQIHULRUSDUDHYLWDUTXHFDLJD
DJXDGHODFHVWDVXSHULRU
(OGHWHUJHQWHVHGHMy
HQHOGLVSHQVDGRU
/RVSODWRVEORTXHDQHO
GLVSHQVDGRUGHGHWHUJHQWH
5HFDUJDUORVSODWRVDGHFXDGDPHQWH
/RVSODWRVQR
HVWiQOLPSLRV
/RVSODWRVQR
HVWiQOLPSLRV
3UREOHPD
(OSURJUDPD
HTXLYRFDGRKDVLGR
VHOHFFLRQDGR
&RQXQSURJUDPDFRUWROD
WHPSHUDWXUDGHODYDGRHVPHQRU
GLVPLQX\HQGRHOUHQGLPLHQWRGH
OLPSLH]D(OLMDXQSURJUDPDFRQXQ
ODUJRWLHPSRGHODYDGR
8VRGHFXELHUWRV
FRQXQ
UHFXEULPLHQWRGH
EDMDFDOLGDG
(OGUHQDMHGHDJXDHVPiVGLItFLOFRQ
HVWRVDUWtFXORV&XELHUWRVRSODWRVGH
HVWHWLSRQRVRQDGHFXDGRVSDUDODYDU
HQHOODYDYDMLOODV
3RVLEOHFDXVD 4XpKDFHU"
28
/RVSODWRVQR
HVWiQOLPSLRV
$'9(57(1&,$
La auto reparación o la reparación por no profesionales profesional pueden
causar serios riesgos para la seguridad del usuario del electrodoméstico y
afectar la garantía
Disponibilidad de repuestos
Siete años después de la puesta en el mercado de la última unidad del modelo:
Motor, bomba de circulación y drenaje, calentadores y elementos calefactores,
incluidos bombas de calor (por separado o agrupadas), tuberías y equipos
relacionados, incluidos todas las mangueras, válvulas, filtros y topes de agua,
partes estructurales e interiores relacionadas con conjuntos de puertas (por
separado o agrupados), placas de circuito impreso, pantallas, presostatos,
termostatos y sensores, software y firmware incluido el software de reinicio
Diez años después de la puesta en el mercado de la última unidad del modelo:
Bisagras y sellos de puerta, otros sellos, brazos rociadores, filtros de drenaje,
rejillas interiores y periféricos de plástico como cestas y tapas.
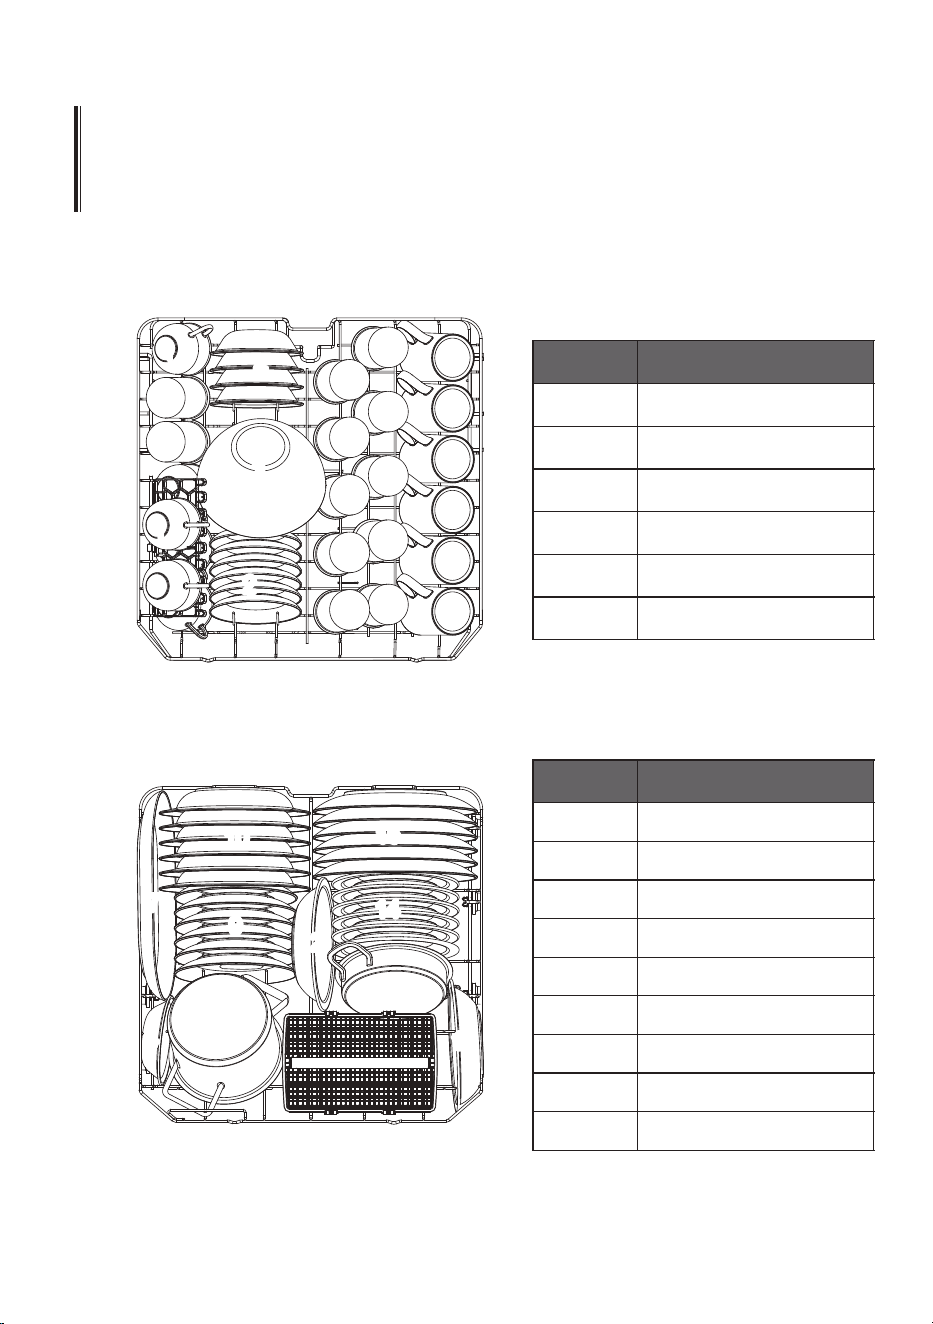
1. Cesta superior:
:
r
o
i
r
e
f
n
i
a
t
s
eC
.
2
CARGANDO LAS CESTAS
DE ACUERDO CON
1
1
2
3
4
5
6
7
4
8
9
10
15
12
14
13
12
1
2
3
4
5
6
tazas
tazon de postre
vasos
taza mediana
platillos
bol de vidrio
Item
Number
7
8
9
10
11
12
13
14
15
fuente ovalado
olla pequeña
platos de postre
platos de sopa
cesto de cubiertos
cuenco de melamina
olla de horno
platos de postre de melamina
platos de comida
Item
Number
EN60436:
Cargar el lavavajillas a su máxima capacidad contribuirá al ahorro de energía y agua.
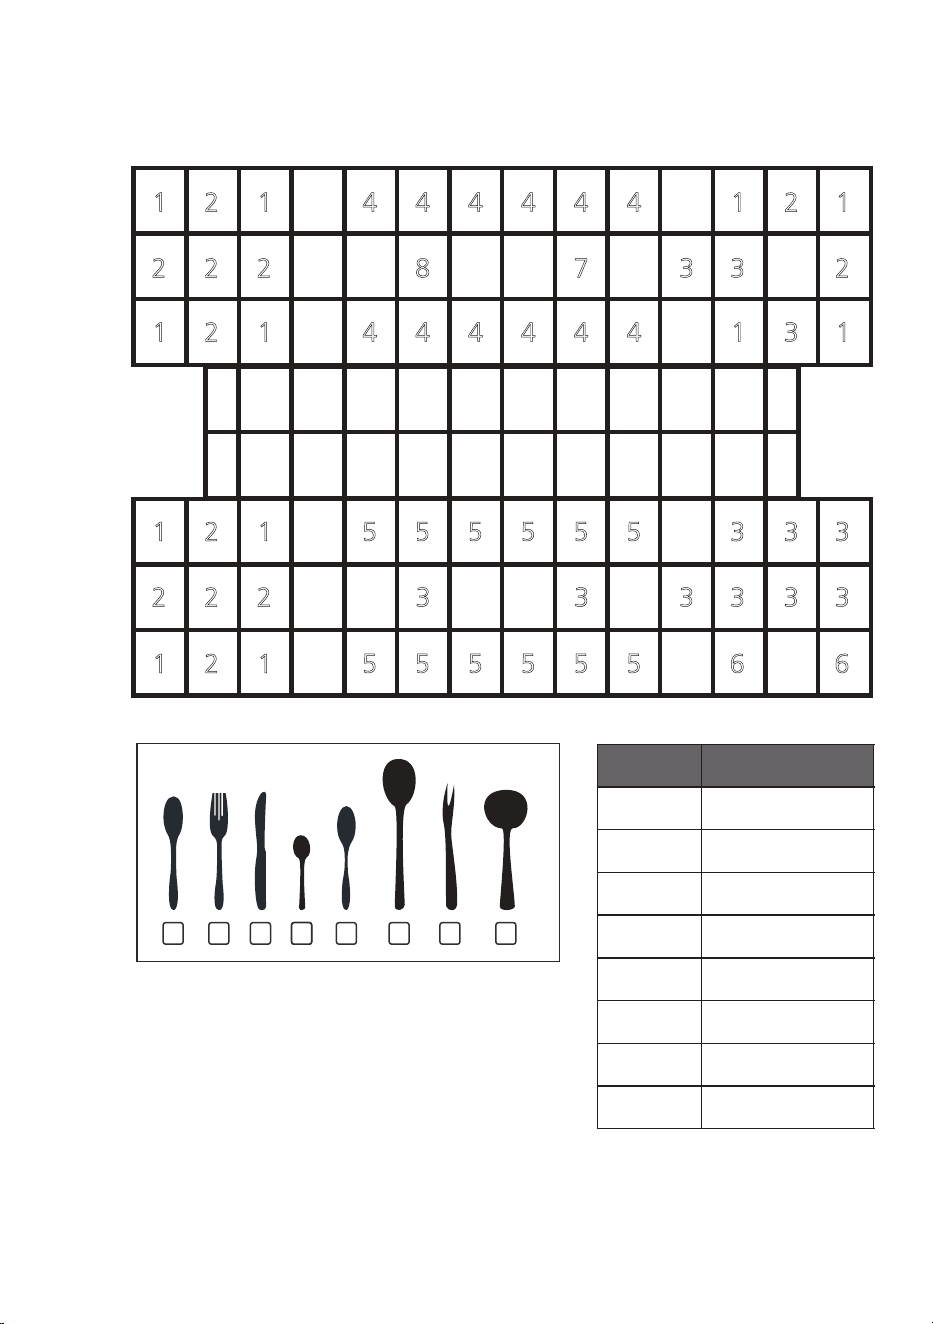
$FTUPEFDVCJFSUPT
1
3
2
6
4
4
4
5
7
8
1
2
3
4
5
6
7
8
&XFKDUDVGHVRSD
WHQHGRUHV
&XFKLOORV
&XFKDUDGLWDV
&XFKDUDVGHSRVWUH
6LUYLHQGRFXFKDUDV
6HUYLUWHQHGRUHV
&XFKDUDVGHVDOVD
Item
1~PHUR
,QIRUPDFLyQSDUDFRPSDUDELOLGDGSUXHEDVGH
DFXHUGRFRQ(1
&DSDFLGDGVHUYLFLRV
3RVLFLyQGHODFHVWDVXSHULRUSRVLFLyQLQIHULRU
3URJUDPD(&2
$MXVWHGHDEULOODQWDGRU
VXDYL]DGRU+
1
2
1
2 2 2
1
2
1
4 4 4 4 4 4
8 7 3 3
1
1
1
2
1
2 2 2
1
2
1
5 5 5 5 5 5
3 3 3 3
3
6
2
2
1
3 1
3 3
6
3 3
4 4 4 4 4 4
5 5 5 5 5 5
Max
3$57(Ⅱ9HUVLyQ(VSHFLDO
-FBFTUFNBOVBMEFUFOJEBNFOUFBOUFTEF
VTBS FM MBWBWBKJMMBT Z DPOTFSWF FTUF
NBOVBMQBSBGVUVSBTDPOTVMUBT
Manual de Instrucciones
E-CLVM6419W
E-CLVM6419
X
$0/5&/*%0
NOT":
4JOPQVFEFSFTPMWFSMPTQSPCMFNBTQPSTÓNJTNPTPMJDJUFBZVEBBVOUÏDOJDP
QSPGFTJPOBM
&MGBCSJDBOUFTJHVJFOEPVOBQPMÓUJDBEFEFTBSSPMMPZBDUVBMJ[BDJØODPOTUBOUFEFM
QSPEVDUPQVFEFSFBMJ[BSNPEJGJDBDJPOFTTJOQSFWJPBWJTP
4JTFQJFSEFPFTUÈEFTBDUVBMJ[BEPQVFEFSFDJCJSVOOVFWPNBOVBMEFVTVBSJPEFM
GBCSJDBOUFPQSPWFFEPSSFTQPOTBCMF
64"/%046-"7"7"+*--"4
1BOFMEFDPOUSPM
4VBWJ[BEPSEFBHVB
1SFQBSBDJØOZDBSHBEFQMBUPT
'VODJØOEFMBHFOUFEFFOKVBHVFZEFUFSHFOUF
-MFOBS&M%JTQFOTBEPS%F%FUFSHFOUF
$PNFO[BOEPVODJDMPEFMBWBEP
$BNCJBOEPFMQSPHSBNBEFNFEJPDJDMP
0MWÓEBUFEFBHSFHBSVOQMBUP
$»%*(04%&&3303
*/'03."$*»/5²$/*$"
Llenar el depósito de agente de enjuague
Tablo de ciclo de lavado
130(3"."/%0&--"7"7"+*--"4
4
4
6
12
7
10
11
13
13
1
1
1
1
7
6
4
4
15
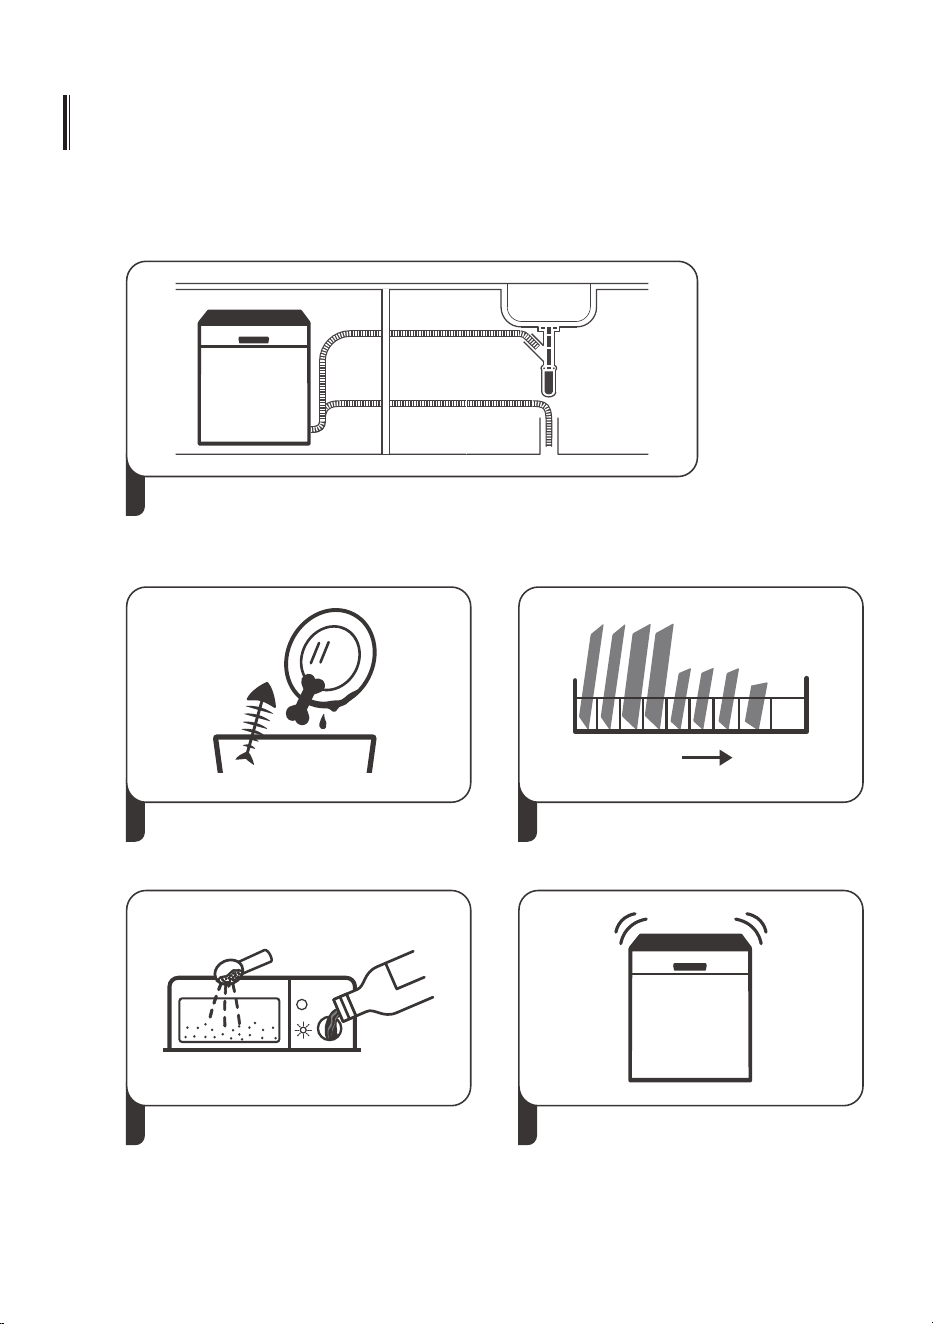
5
(6¶"3«1*%"1"3"&-646"3*0
-FBFMDPOUFOJEPDPSSFTQPOEJFOUFFOFMNBOVBMEFJOTUSVDDJPOFTQBSBDPOPDFSFM
NÏUPEPEFPQFSBDJØOEFUBMMBEP
2
&MJNJOBOEPFMSFTJEVPNÈTHSBOEFFO
MPTDVCJFSUPT
3
4
-MFOBOEPFMEJTQFOTBEPS
4FMFDDJPOBOEPVOQSPHSBNBZ
FKFDVUBOEPFMMBWBWBKJMMBT
%FOUSP
$BSHBOEPMBTDFTUBT
'VFSB
3
1
*OTUBMBSFMMBWBWBKJMMBT
1PSGBWPSWFSJGJRVFMBTFDDJØOi*/4536$$*0/&4%&*/45"-"$*»/w
EFMB1"35&Ⅰ7FSTJØO(FOÏSJDB
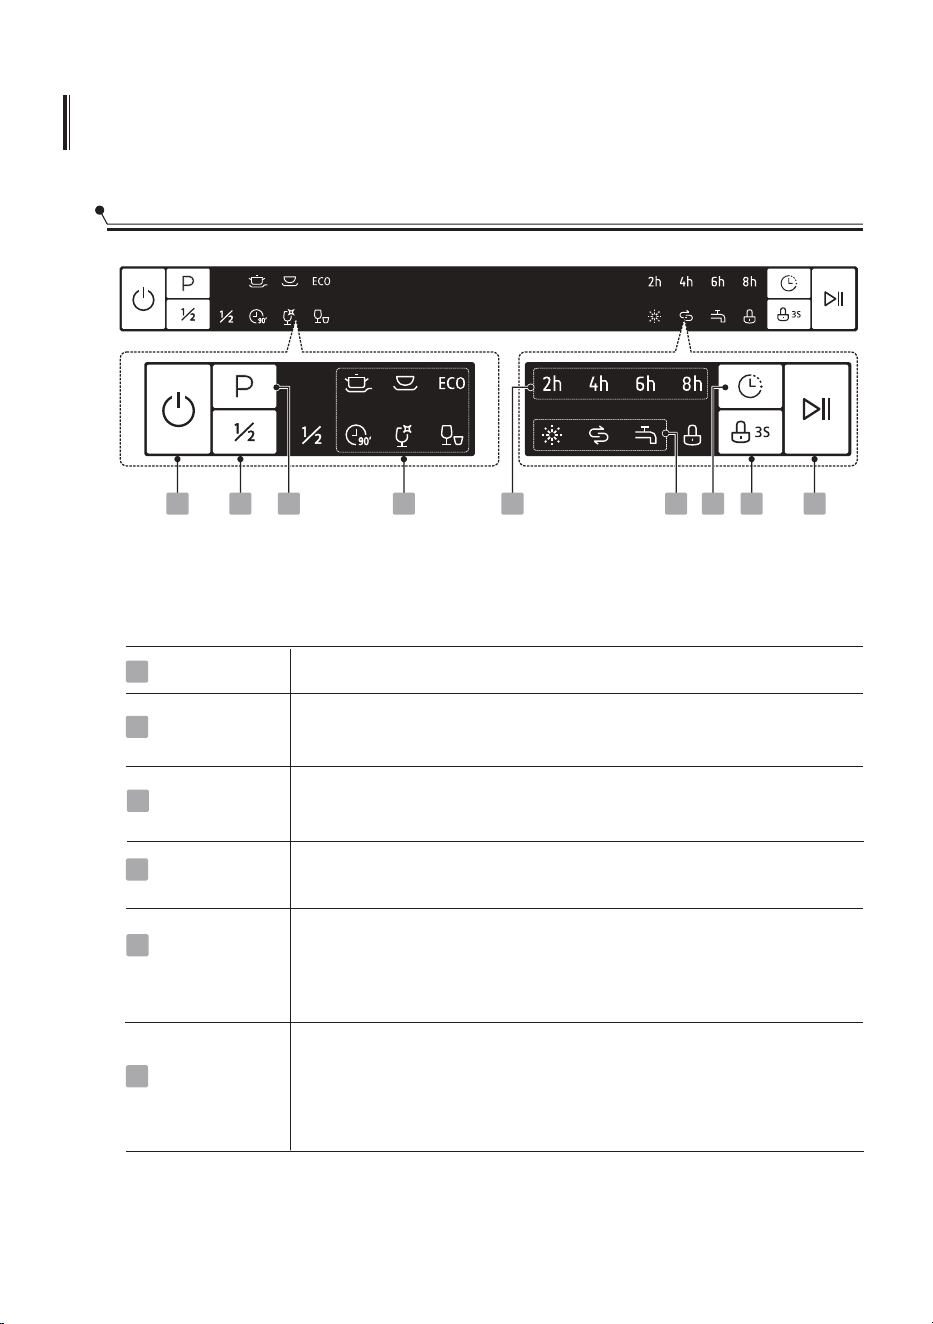
64"/%046-"7"7"+*--"4
1BOFMEFDPOUSPM
0QFSBDJØO#PUØO
&ODFOEJEP
1SFTJPOFFTUFCPUØOQBSBFODFOEFSTVMBWBWBKJMMBTMBQBOUBMMBTFJMVNJOB
4
1
1SPHSBNB
4FMFDDJPOFFMQSPHSBNBEFMBWBEPBQSPQJBEPFMJOEJDBEPSEFM
QSPHSBNBTFMFDDJPOBEPTFFODFOEFSÈ
2
3FUSBTP
1SFTJPOFFMCPUØOQBSBDPOGJHVSBSFMUJFNQPEFSFUBSEPTF
FODFOEFSÈFMJOEJDBEPSDPSSFTQPOEJFOUF
1BSBJOJDJBSFMQSPHSBNBEFMBWBEPTFMFDDJPOBEPPIBDFSVOB
QBVTBDVBOEPFMMBWBWBKJMMBTFTUÈGVODJPOBOEP
Start / Pause
1 3 2 7 5 648 9
3
4
5
6
DĞĚŝĂĂƌŐĂ
;^ŽůŽ ƐĞƉƵĞĚĞ ƵƚŝůŝnjĂƌĐŽŶ/ŶƚĞŶƐŝǀŽEŽƌŵĂůKϵϬŵŝŶƵƚŽƐͿ
ůŽƋƵĞŽƉĂƌĂ
ŶŝŹŽ
Ɛ
ƐƚĂ ŽƉĐŝóŶ ůĞƉĞƌŵŝƚĞďůŽƋƵĞĂƌ ůŽƐďŽƚŽŶĞƐ ĞŶĞůƉĂŶĞůĚĞĐŽŶƚƌŽů
ĞdžĐĞƉƚŽ
ĞůďŽƚóŶ
ĚĞ ŶĐĞŶĚŝĚŽ
ƉŽƌ ůŽƋƵĞůŽƐŶŝŹŽƐ ŶŽƉƵĞĚĞŶ ŝŶŝĐŝĂƌĂĐĐŝĚĞŶƚĂůŵĞŶƚĞĞů
ůĂǀĂǀĂũŝůůĂƐ
ƉƌĞƐŝŽŶĂŶĚŽ ůŽƐďŽƚŽŶĞƐ ĞŶĞů ƉĂŶĞů
WĂƌĂďůŽƋƵĞĂƌ ŽĚĞƐďůŽƋƵĞĂƌ
ůŽƐ ďŽƚŽŶĞƐĚĞů
ƉĂŶĞů ĚĞĐŽŶƚƌŽůŵĂŶƚĞŶŐĂƉƵůƐĂĚĂ ůĂƚĞĐůĂ
Žƚ
ó
ŶĚƵƌĂŶƚĞϯƐĞŐƵŶĚŽƐ
Cuando no completes la carga,
puede elegir este función para ahorrar energía y agua.

Display
*OEJDBEPS
EF
BEWFSUFOD
JB
*OEJDBEPS
EFQSPHSBNB
5
*OUFOTJWP
1BSBWBKJMMBTVDJBNÈTQFTBEBZPMMBTTBSUFOFTQMBUPTFUD
OPSNBMNFOUFTVDJPTDPOBMJNFOUPTTFDPT
&$0
&TUFFTVOQSPHSBNBFTUÈOEBSFTBEFDVBEPQBSBMJNQJBS
WBKJMMBTOPSNBMNFOUFTVDJBTZFTFMQSPHSBNBNÈTFGJDJFOUF
FOUÏSNJOPTEFTVDPOTVNPDPNCJOBEPEFFOFSHÓBZBHVB
QBSBFTFUJQPEFWBKJMMBT
NJOVUPT
1BSBDBSHBTOPSNBMNFOUFTVDJBTRVFOFDFTJUBOMBWBEP
SÈQJEP
3ÈQJEP
OFDFTJUBOTFDBEP
4JFM “
”JOEJDBEPSFTUÈFODFOEJEPMPRVFTJHOJGJDBRVFFM
MBWBWBKJMMBTUJFOFQPDBTBMEFMMBWBWBKJMMBTZEFCFSFMMFOBSTF
"CSJMMBOUBEPS
4JFM
&MJOEJDBEPSFTUÈFODFOEJEPTJHOJGJDBRVFFMMBWBWBKJMMBT
Sal
(SJGP
6LHO
&MJOEJDBEPSFTUÈFODFOEJEPTJHOJGJDBRVFFMHSJGPEFBHVB
FTUÈDFSSBEP
7
8
(2h/4h/6h/8h).
9
LJ
'ƌŝƐƚĂů
WĂƌĂǀĂũŝůůĂƐLJǀŝĚƌŝŽƐ ůŝŐĞƌĂŵĞŶƚĞƐƵĐŝŽƐ
6OMBWBEPNÈTDPSUPQBSBDBSHBTQPDPTVDJBTRVFOP
diferido
Boton inicio
1BSBNPTUSBS
el tiempo de inicio diferido
FOKVBHVFZSFRVJFSFVOBSFDBSHB
en el abrillantador
FTUÈCBKP
Universal
For normally soiled loads, such as pots, plates, glasses and
lightly soiled pans.
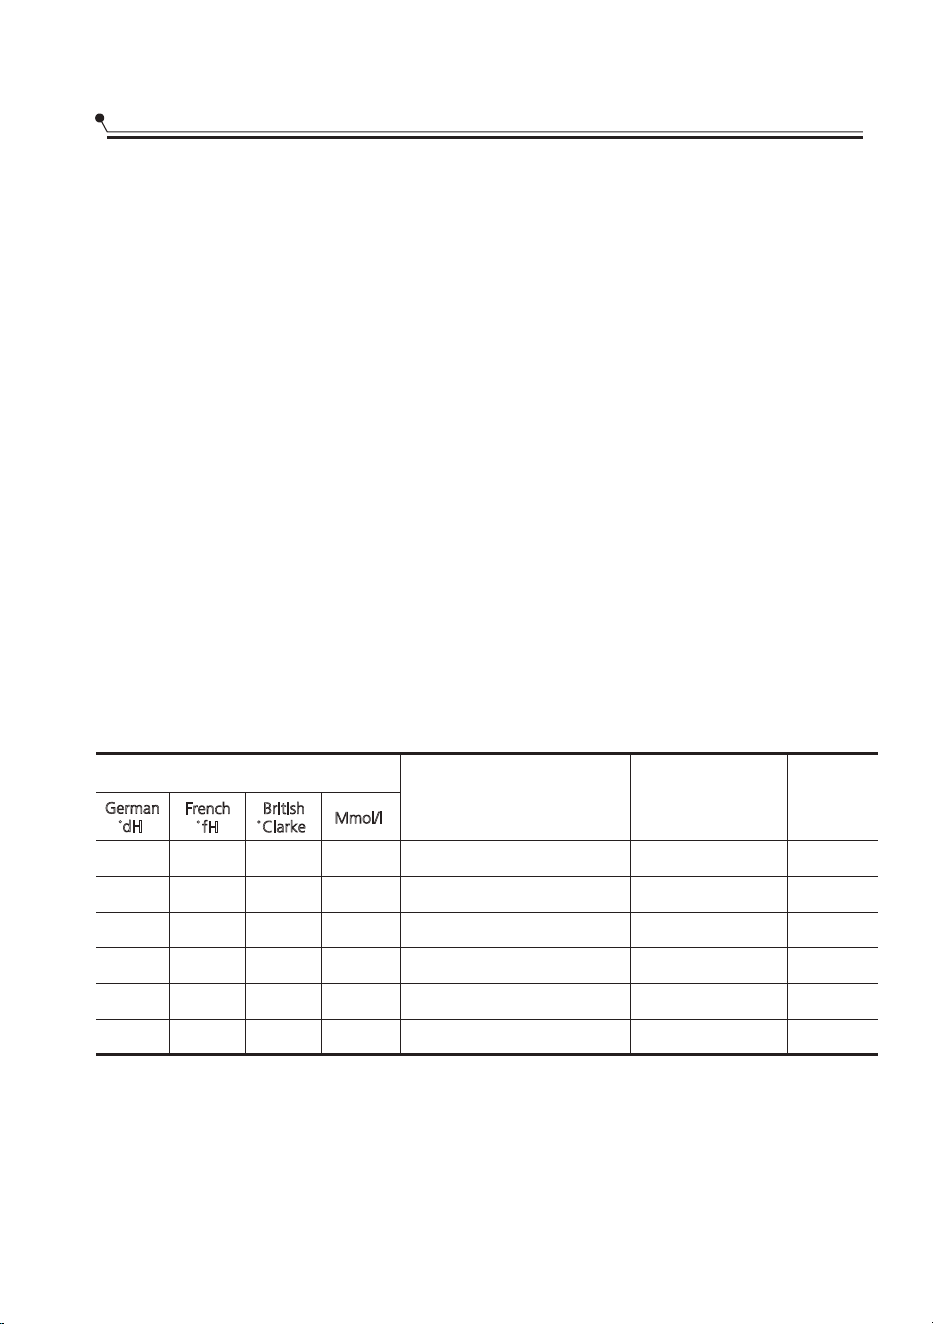
4VBWJ[BEPSEFBHVB
1.
2.
3.
4.
&ODJFOEBFMBQBSBUP
1SFTJPOFFMCPUØOEF*OJDJP1BVTBEVSBOUFNÈTEFTFHVOEPTQBSBJOJDJBSFMNPEFMPEF
DPOKVOUPEFBCMBOEBEPSEFBHVBEFOUSPEFMPTTFHVOEPTQPTUFSJPSFTBMBDPOFYJØOEFMBQBSBUP
ڀڀ1SFTJPOFFMCPUØO*OJDJP1BVTBQBSBTFMFDDJPOBSFMDPOKVOUPBEFDVBEPEFBDVFSEPDPOTV
FOUPSOPMPDBMMPTDPOKVOUPTDBNCJBSÈOFOMBTJHVJFOUFTFDVFODJB
ڀڀڀڀڀ))))))
ڀڀ1SFTJPOFFMCPUØOEF&ODFOEJEPQBSBGJOBMJ[BSFMNPEFMPEFDPOGJHVSBDJØO
&MBCMBOEBEPSEFBHVBTFEFCFDPOGJHVSBSNBOVBMNFOUFVTBOEPFMEJTDPEFEVSF[BEFM
BHVB
&MBCMBOEBEPSEFBHVBFTUÈEJTF×BEPQBSBFMJNJOBSNJOFSBMFTZTBMFTEFMBHVBMPRVF
QPESÓBUFOFSVOFGFDUPQFSKVEJDJBMPBEWFSTPFOFMGVODJPOBNJFOUPEFMBQBSBUP
$VBOUPTNÈTNJOFSBMFTIBZNÈTEVSBFTFMBHVB
&MBCMBOEBEPSEFCFBKVTUBSTFEFBDVFSEPDPOMBEVSF[BEFMBHVBFOTVÈSFB4V"VUPSJEBE
EF"HVBMPDBMQVFEFBDPOTFKBSMFTPCSFMBEVSF[BEFMBHVBFOTVÈSFB
"KVTUFEFMDPOTVNPEFTBM
&MMBWBWBKJMMBTFTUÈEJTF×BEPQBSBQFSNJUJSFMBKVTUFEFMBDBOUJEBEEFTBMDPOTVNJEBFO
GVODJØOEFMBEVSF[BEFMBHVBVUJMJ[BEB$POFMMPTFQSFUFOEFPQUJNJ[BSZQFSTPOBMJ[BSFM
OJWFMEFDPOTVNPEFTBM
4JHBMPTQBTPTBDPOUJOVBDJØOQBSBBKVTUBSFMDPOTVNPEFTBM
6
0 - 5
6 - 11
12 - 17
18 - 22
23 - 34
35 - 55
German
dH
0 - 9
10 - 20
21 - 30
31 - 40
41 - 60
61 - 98
0 - 6
7 - 14
15 - 21
22 - 28
29 - 42
43 - 69
0 - 0.94
1.0 - 2.0
2.1 - 3.0
3.1 - 4.0
4.1 - 6.0
6.1 - 9.8
0
9
12
20
30
60
French
fH
Mmol/l
/JWFMEFBCMBOEBEPSEFBHVB
British
Clarke
%63&;"%&-"(6"
H1->Rapid indicator flicker
H2->Glass indicators flicker
H3->Glass, Rapid indicators flicker
H4->90 mins indicator flicker
H5->90 mins, Rapid indicators flicker
H6->90 mins, Glass indicators flicker
1°dH=1,25 °Clarke=1,78 °fH=0,178mmol/l
Ajuste de fábrica: H3
1) Cada ciclo con operación de regeneración adicionalmente consumirá 2,0
litros de agua, el consumo de energía incrementa en 0,02kWh y el programa
se extenderá en 4 minutos
.
10
5
3
2
1
Aparecer regeneración
en secuencia de cada
X programas
Sin regeneración
de sal
(gramo/ciclo)
Consumo

/05"
4JTVNPEFMPOPUJFOFOJOHÞOBCMBOEBEPSEFBHVBQVFEFPNJUJSFTUBTFDDJØO4VBWJ[BEPS
EFBHVB
-BEVSF[BEFMBHVBWBSÓBEFVOMVHBSBPUSP4JTFVUJMJ[BBHVBEVSBFOFMMBWBQMBUPTTF
GPSNBSÈOEFQØTJUPTFOMPTQMBUPTZVUFOTJMJPT
&MBQBSBUPFTUÈFRVJQBEPDPOVOTVBWJ[BOUFFTQFDJBMRVFVUJMJ[BVOSFDJQJFOUFEFTBM
EJTF×BEPFTQFDÓGJDBNFOUFQBSBFMJNJOBSMBDBMZMPTNJOFSBMFTEFMBHVB
1SFQBSBDJØOZDBSHBEFQMBUPT
$POTJEFSFDPNQSBSVUFOTJMJPTRVFFTUÏOJEFOUJGJDBEPTDPNPBQUPTQBSBMBWBWBKJMMBT
1BSBBSUÓDVMPTQBSUJDVMBSFTTFMFDDJPOFVOQSPHSBNBDPOMBUFNQFSBUVSBNÈTCBKBQPTJCMF
1BSBFWJUBSEB×PTOPTBRVFMPTWBTPTZDVCJFSUPTEFMMBWBWBKJMMBTJONFEJBUBNFOUFEFTQVÏTEF
RVFFMQSPHSBNBIBZBUFSNJOBEP
1BSBMBWBSMPTTJHVJFOUFTDVCJFSUPTQMBUPT
/PTPOBEFDVBEPT
$VCJFSUPTDPONBOHPTEFNBEFSBQPSDFMBOBEFDVFSOPPOÈDBS
"SUÓDVMPTEFQMÈTUJDPRVFOPTPOSFTJTUFOUFTBMDBMPS
$VCJFSUPTNÈTWJFKPTDPOQBSUFTFODPMBEBTRVFOPTPOSFTJTUFOUFTBMB
UFNQFSBUVSB$VCJFSUPTPQMBUPTDVCJFSUPT
"SUÓDVMPTEFQFMUSFPDPCSF
7BTPEFDSJTUBM
"SUÓDVMPTEFBDFSPTVKFUPTBPYJEBDJØO
1MBUPTEFNBEFSB
"SUÓDVMPTIFDIPTEFGJCSBTTJOUÏUJDBT
4POEFJEPOFJEBEMJNJUBEB
"MHVOPTUJQPTEFWJESJPTQVFEFOWPMWFSTFPQBDPTEFTQVÏTEFVOHSBO
OÞNFSPEFMBWBEPT-BTQJF[BTEFQMBUBZBMVNJOJPUJFOFOUFOEFODJBB
EFDPMPSBSTFEVSBOUFFMMBWBEP-PTQBUSPOFTEFFTNBMUFQVFEFOEFTWBOFDFSTF
TJTFMBWBOBNÈRVJOBDPOGSFDVFODJB
7
la sal en el suaWi[ante” de la PART& de la PART&
Ⅰ: VersiØn genÏrica, si su laWaWaKillas carece
$onsulte la secciØn 3 “$argar
de
sal
.

2VJUBOEPMPTQMBUPT
1BSBFWJUBSRVFFMBHVBHPUFFEFMBDFTUBTVQFSJPSBMBDFTUBJOGFSJPSMFSFDPNFOEBNPT
RVFQSJNFSPWBDÓFMBDFTUBJOGFSJPSZMVFHPMBDFTUBTVQFSJPS
"%7&35&/$*"
`-PTBSUÓDVMPTFTUBSÈODBMJFOUFT1BSBFWJUBSEB×PTOPTBRVFMPT
WBTPTZDVCJFSUPTEFMMBWBWBKJMMBTEVSBOUFBQSPYJNBEBNFOUF
NJOVUPTEFTQVÏTEFRVFFMQSPHSBNBIBZBGJOBMJ[BEP
8
3FDPNFOEBDJPOFTQBSBDBSHBSFMMBWBWBKJMMBT
v 3BTQFMBTDBOUJEBEFTHSBOEFTEFDPNJEBTPCSBOUF"CMBOEBSMPTSFTUPTEFBMJNFOUPT
RVFNBEPTFOTBSUFOFT/PFTOFDFTBSJPFOKVBHBSMPTQMBUPTDPOBHVBDPSSJFOUF
v 1BSBPCUFOFSFMNFKPSSFOEJNJFOUPEFMMBWBWBKJMMBTTJHBFTUBTQBVUBTEFDBSHB
v -BTDBSBDUFSÓTUJDBTZFMBTQFDUPEFMBTDBOBTUBTZDBOBTUBTQBSBDVCJFSUPTQVFEFO
WBSJBSEFTVNPEFMP
v $PMPRVFMPTPCKFUPTFOFMMBWBWBKJMMBTEFMBTJHVJFOUFNBOFSB
v -PTBSUÓDVMPTDPNPUB[BTWBTPTPMMBTTBSUFOFTFUDFTUÈOPSJFOUBEPTIBDJBBCBKP
v -PTFMFNFOUPTDVSWPTPMPTRVFUJFOFOSFCBKFTEFCFODBSHBSTFEFNBOFSB
JODMJOBEBQBSBRVFFMBHVBQVFEBFTDVSSJSTF
v 5PEPTMPTVUFOTJMJPTFTUÈOBQJMBEPTEFGPSNBTFHVSBZOPQVFEFOWPMDBSTF
v 5PEPTMPTVUFOTJMJPTTFDPMPDBOEFNBOFSBRVFMPTCSB[PTSPDJBEPSFTQVFEBOHJSBS
MJCSFNFOUFEVSBOUFFMMBWBEP
v $BSHVFBSUÓDVMPTIVFDPTDPNPUB[BTWBTPTTBSUFOFTFUD$POMBBCFSUVSBIBDJB
BCBKPQBSBRVFFMBHVBOPQVFEBBDVNVMBSTFFOFMSFDJQJFOUFPFOVOBCBTF
QSPGVOEB
v -PTQMBUPTZBSUÓDVMPTEFDVCFSUFSÓBOPEFCFOFTUBSVOPEFOUSPEFMPUSPOJUBQBSTF
VOPTDPOPUSPT1BSBFWJUBSEB×PTMBTHBGBTOPEFCFOUPDBSTF
v -BDFTUBTVQFSJPSFTUÈEJTF×BEBQBSBDPOUFOFSWBKJMMBTNÈTEFMJDBEBTZMJHFSBTDPNP
WBTPTUB[BTEFDBGÏZUÏ
v `-PTDVDIJMMPTEFIPKBMBSHBBMNBDFOBEPTFOQPTJDJØOWFSUJDBMTPOVOQFMJHSP
QPUFODJBM
v -PTBSUÓDVMPTMBSHPTZPBGJMBEPTEFMPTDVCJFSUPTDPNPMPTDVDIJMMPTQBSBUSJODIBS
EFCFODPMPDBSTFIPSJ[POUBMNFOUFFOMBDFTUBTVQFSJPS
v 1PSGBWPSOPTPCSFDBSHVFTVMBWBWBKJMMBT&TUPFTJNQPSUBOUFQBSBPCUFOFSCVFOPT
SFTVMUBEPTZQBSBVODPOTVNPSB[POBCMFEFFOFSHÓB
/05"
-PTBSUÓDVMPTNVZQFRVF×PTOPEFCFOMBWBSTFFOFMMBWBQMBUPTZBRVFQPESÓBODBFSTF
GÈDJMNFOUFEFMBDBOBTUB

9
"%7&35&/$*"
/PEFKFTRVFOJOHÞOBSUÓDVMPTFFYUJFOEB
QPSMBQBSUFJOGFSJPS
`4JFNQSFDBSHVFMPTVUFOTJMJPTBGJMBEPT
DPOMBQVOUBBGJMBEBIBDJBBCBKP
$BSHBOEPMBDFTUBTVQFSJPS
-BDFTUBTVQFSJPSFTUÈEJTF×BEBQBSBBHVBOUBSNÈTEFMJDBEBZ
7BKJMMBNÈTMJHFSBDPNPWBTPTUB[BTEFDBGÏZUÏ
ZQMBUJMMPTBTÓDPNPQMBUPTUB[POFTQFRVF×PTZQPDPQSPGVOEPT
TBSUFOFTTJFNQSFRVFOPFTUÏONVZTVDJBT1PTJDJPOBSFM
QMBUPTZVUFOTJMJPTEFDPDJOBQBSBRVFOPTFBONPWJEPTQPS
&MTQSBZEFBHVB
$BSHBOEPMBDFTUBJOGFSJPS
-FTVHFSJNPTRVFDPMPRVFMPTBSUÓDVMPTHSBOEFTZMPTNÈT
-PTBSUÓDVMPTEJGÓDJMFTEFMJNQJBSTFDPMPDBSÈOFOMBQBSUFJOGFSJPS
DFTUBDPNPPMMBTTBSUFOFTUBQBTQMBUPTZUB[POFTQBSBTFSWJS
DPNPTFNVFTUSBFOMBTJHVJFOUFGJHVSB&TQSFGFSJCMFDPMPDBS
4JSWJFOEPQMBUPTZUBQBTFOFMMBEPEFMBTSFKJMMBTQBSB
&WJUFCMPRVFBSMBSPUBDJØOEFMCSB[PSPDJBEPSTVQFSJPS
&MEJÈNFUSPNÈYJNPBDPOTFKBEPQBSBQMBDBTGSFOUFBMB
&MEJTQFOTBEPSEFEFUFSHFOUFFTEFDNFTUPOPJNQJEFRVFMB
BQFSUVSBEFMBNJTNB
$BSHBOEPMBDBOBTUBEFDVCJFSUPT
-PTDVCJFSUPTEFCFODPMPDBSTFFOFMFTUBOUFEFMPTDVCJFSUPTTFQBSBEPTVOPTEFPUSPTFO
MBTQPTJDJPOFTBQSPQJBEBTZBTFHÞSFTFEFRVFMPTVUFOTJMJPTOPTFBOJEFOZBRVFFTUP
QVFEFDBVTBSVONBMEFTFNQF×P
Para obtener el NeKor efecto de laWado, cargVe las cestas, consVlte el estÈndar Para obtener el
NeKor efecto de laWado, cargVe las cestas, consVlte las opciones de carga estÈndar en la ÞltiNa
secciØn de las opciones de carga de PART&4 en la ÞltiNa secciØn de la PART& Ⅰ: G VersiØn
genÏrica VersiØn general
&MBHFOUFEFFOKVBHVFTFMJCFSBEVSBOUFFMFOKVBHVFGJOBMQBSBFWJUBSRVFFMBHVBGPSNFHPUBT
FOTVTQMBUPTMPRVFQVFEFEFKBSNBODIBTZSBZBT5BNCJÏONFKPSBFMTFDBEPBMQFSNJUJSRVF
FMBHVBTBMHBEFMPTQMBUPT4VMBWBQMBUPTFTUÈEJTF×BEPQBSBVTBSBZVEBTEFFOKVBHVFMÓRVJEP
"%7&35&/$*"
6UJMJDFÞOJDBNFOUFVOBHFOUFEFFOKVBHVFEFNBSDBQBSBMBWBWBKJMMBT/VODBMMFOF
FMEJTQFOTBEPSEFBHFOUFEFFOKVBHVFDPOOJOHVOBPUSBTVTUBODJBQPSFKFNQMP
BHFOUFEFMJNQJF[BQBSBMBWBWBKJMMBTEFUFSHFOUFMÓRVJEP&TUPEB×BSÓBFMBQBSBUP
'VODJØOEFMBBZVEBEFFOKVBHVFZEFUFSHFOUF
10
$VÈOEPSFMMFOBSFMEJTQFOTBEPSEFBCSJMMBOUBEPS
"NFOPTRVFMBMV[EFBEWFSUFODJBEFFOKVBHVFFOFM
DPOUSPM
$PNQMFUP
3/4 1/2 1/4
7BDÓP
'VODJØOEFMEFUFSHFOUF
-PTJOHSFEJFOUFTRVÓNJDPTRVFDPNQPOFOFMEFUFSHFOUFTPOOFDFTBSJPTQBSBFMJNJOBSBQMBTUBSZ
FMJNJOBSUPEBMBTVDJFEBEEFMMBWBWBKJMMBT-BNBZPSÓBEFMPTEFUFSHFOUFTEFDBMJEBEDPNFSDJBM
TPOBEFDVBEPTQBSBFTUFQSPQØTJUP
"%7&35&/$*"
6TPDPSSFDUPEFMEFUFSHFOUF
6UJMJDFÞOJDBNFOUFEFUFSHFOUFTIFDIPTFTQFDÓGJDBNFOUFQBSBMBWBWBKJMMBT.BOUFOHB
TVEFUFSHFOUFGSFTDPZTFDP
/PQPOHBEFUFSHFOUFFOQPMWPFOFMEJTQFOTBEPSIBTUBRVFFTUÏMJTUPQBSBMBWBS
QMBUPT
&MEFUFSHFOUFQBSBMBWBWBKJMMBTFTDPSSPTJWP.BOUFOHBFM
EFUFSHFOUFQBSBMBWBWBKJMMBTGVFSBEFMBMDBODFEFMPTOJ×PT
*OEJDBEPSEFOJWFMEFFOKVBHVF
$PMPSEFMJOEJDBEPSEFOJWFMØQUJDPTJUVBEPKVOUPBMBUBQB
$VBOEPFMDPOUFOFEPSEFFOKVBHVFFTUÏMMFOPFMJOEJDBEPSFTUBSÈ
DPNQMFUBNFOUFPTDVSP&MUBNB×PEFMQVOUPPTDVSPEJTNJOVZFBNFEJEBRVFFM
FOKVBHVF
MBBZVEBEJTNJOVZF/VODBEFCFTEFKBSRVFFMOJWFMEFBCSJMMBOUBEPSTFB
NFOPTEFMMFOP
"NFEJEBRVFEJTNJOVZFFMBHFOUFEFFOKVBHVFFMUBNB×PEFMQVOUPOFHSPFOFM
JOEJDBEPSEFOJWFMEFBHFOUFEFFOKVBHVFDBNCJBDPNPTFJMVTUSBBDPOUJOVBDJØO
FMQBOFMFTUÈFODFOEJEPTJFNQSFTFQVFEFFTUJNBSMBDBOUJEBEEFMB
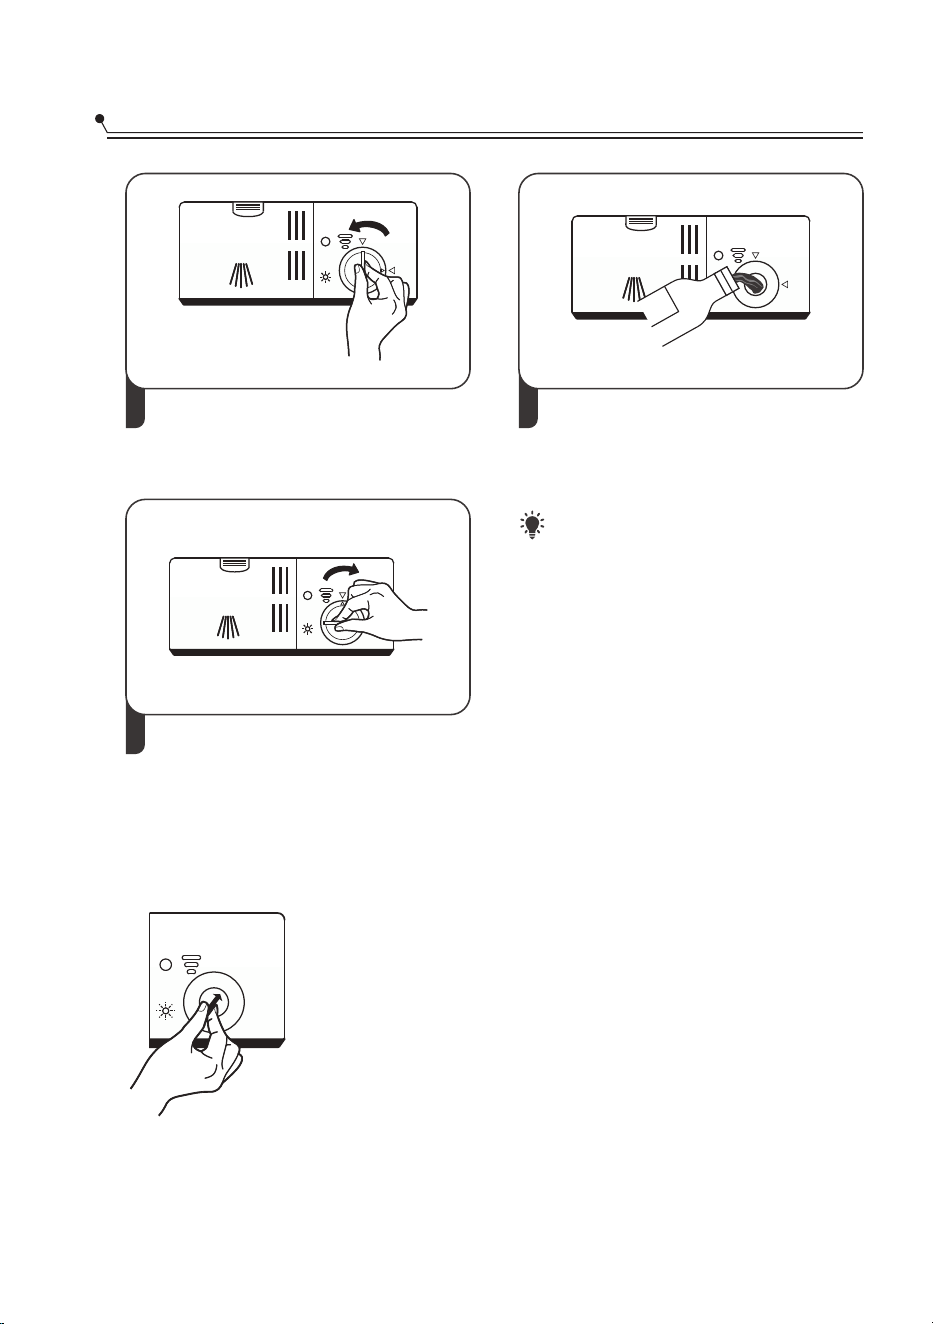
-MFOBEPEFMEFQØTJUPEFFOKVBHVF
11
3
1 2
7JFSUBDVJEBEPTBNFOUFFMFOKVBHVF
FOTVEJTQFOTBEPSFWJUBOEPRVFTF
EFTCPSEF
/05"
-JNQJFDVBMRVJFSBHFOUFEF
FOKVBHVFEFSSBNBEPDPOVOQB×P
BCTPSCFOUFQBSBFWJUBSMBGPSNBDJØO
EFFTQVNBFYDFTJWBEVSBOUFFM
QSØYJNPMBWBEP
"KVTUFEFMEFQØTJUPEFBCSJMMBOUBEPS
(JSFFMEJBMJOEJDBEPSEFBHFOUFEFFOKVBHVFBVOOÞNFSPFOUSFZ
$VBOUPNÈTBMUPTFBFMOÞNFSPNÈTMÓRVJEPEFFOKVBHVFVTBFM
MBWBWBKJMMBT4JMPTQMBUPTOPTFTFDBODPSSFDUBNFOUFPFTUÈO
NBODIBEPTBKVTUFFMEJBMBMTJHVJFOUFOÞNFSPNÈTBMUPIBTUBRVF
TVTQMBUPTOPUFOHBONBODIBT3FEÞ[DBMPTJIBZNBODIBTQFHBKPTBT
EFDPMPSCMBORVFDJOPFOTVTQMBUPTPVOBQFMÓDVMBB[VMBEBTPCSFMB
DSJTUBMFSÓBPMBTDVDIJMMBTEFMPTDVDIJMMPT
$JFSSFMBUBQBEFMEFQØTJUPEFBHFOUF
EFFOKVBHVFHJSÈOEPMBIBDJBMB
EFSFDIB
3FUJSFMBUBQBEFMEFQØTJUPEFBHFOUF
EFFOKVBHVFHJSÈOEPMBIBDJBMB
J[RVJFSEB
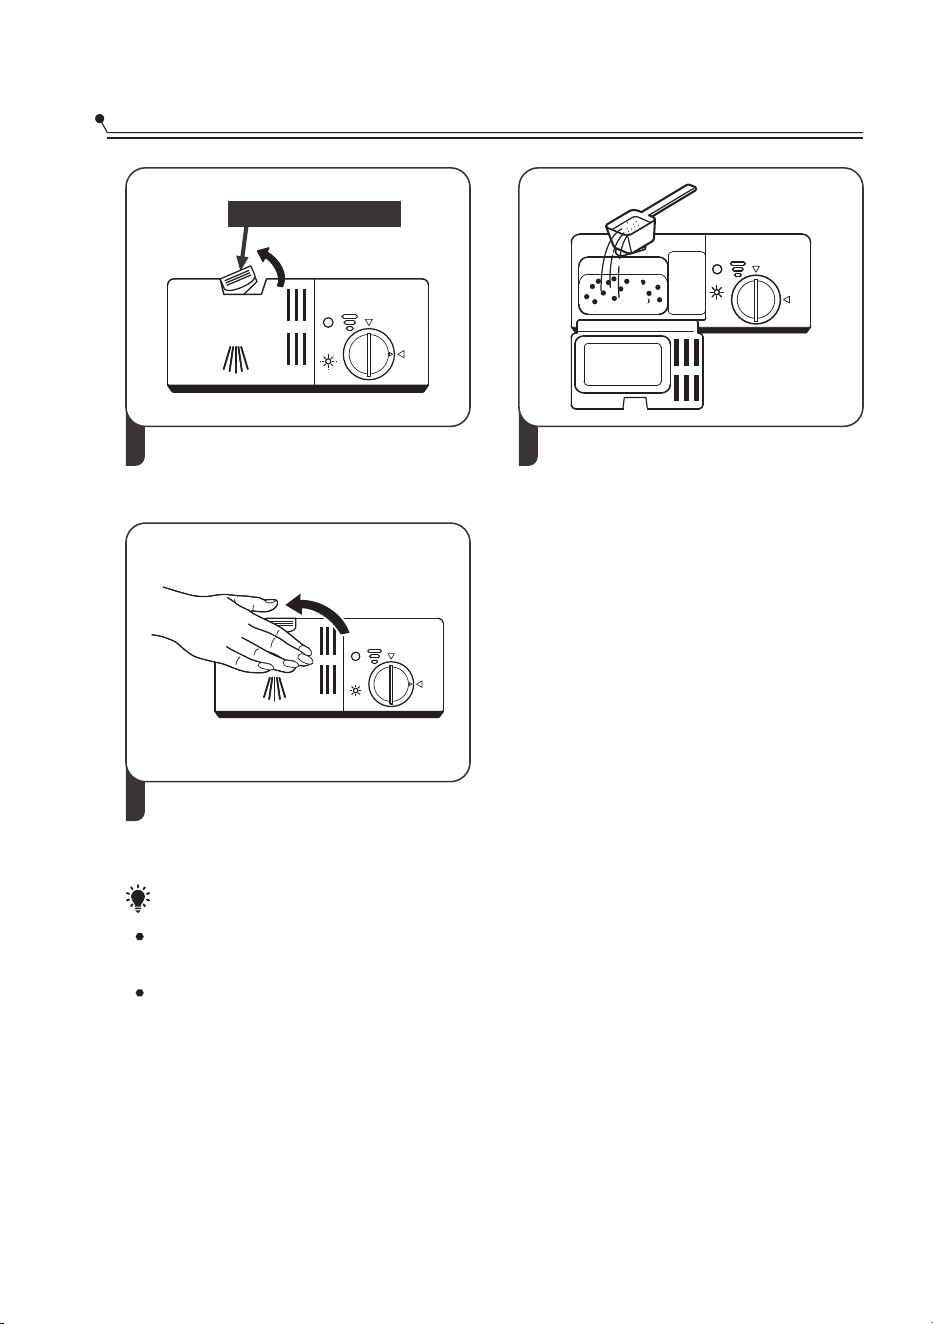
-MFOBS&M%JTQFOTBEPS%F%FUFSHFOUF
12
1
1SFTJPOFFMQFTUJMMPQBSBBCSJS1SFTJPOFMB
QFTUB×BEFMJCFSBDJØOEFMEJTQFOTBEPSEF
EFUFSHFOUFQBSBBCSJSMBUBQB
1SFTJPOFFMQFTUJMMPQBSBBCSJS
A
B
"HSFHVFEFUFSHFOUFFOMBDBWJEBENÈT
HSBOEF"QBSBFMDJDMPEFMBWBEP
QSJODJQBM
1BSBDBSHBTEFMBWBEPNÈTTVDJBT
UBNCJÏOBHSFHVFVOQPDPEF
EFUFSHFOUFFOMBDBWJEBENÈTQFRVF×B
#QBSBFMDJDMPEFQSFMBWBEP
3
$JFSSFMBUBQBZQSFTJPOFTPCSFFMMBIBTUB
TFCMPRVFBFOTVMVHBS
/05"
5FOHBFODVFOUBRVFEFQFOEJFOEPEFMBTVDJFEBEEFMBHVBMBDPOGJHVSBDJØOQVFEFTFS
EJGFSFOUF
5FOHBFODVFOUBMBTSFDPNFOEBDJPOFTEFMGBCSJDBOUFFOFMFOWBTFEFMEFUFSHFOUF
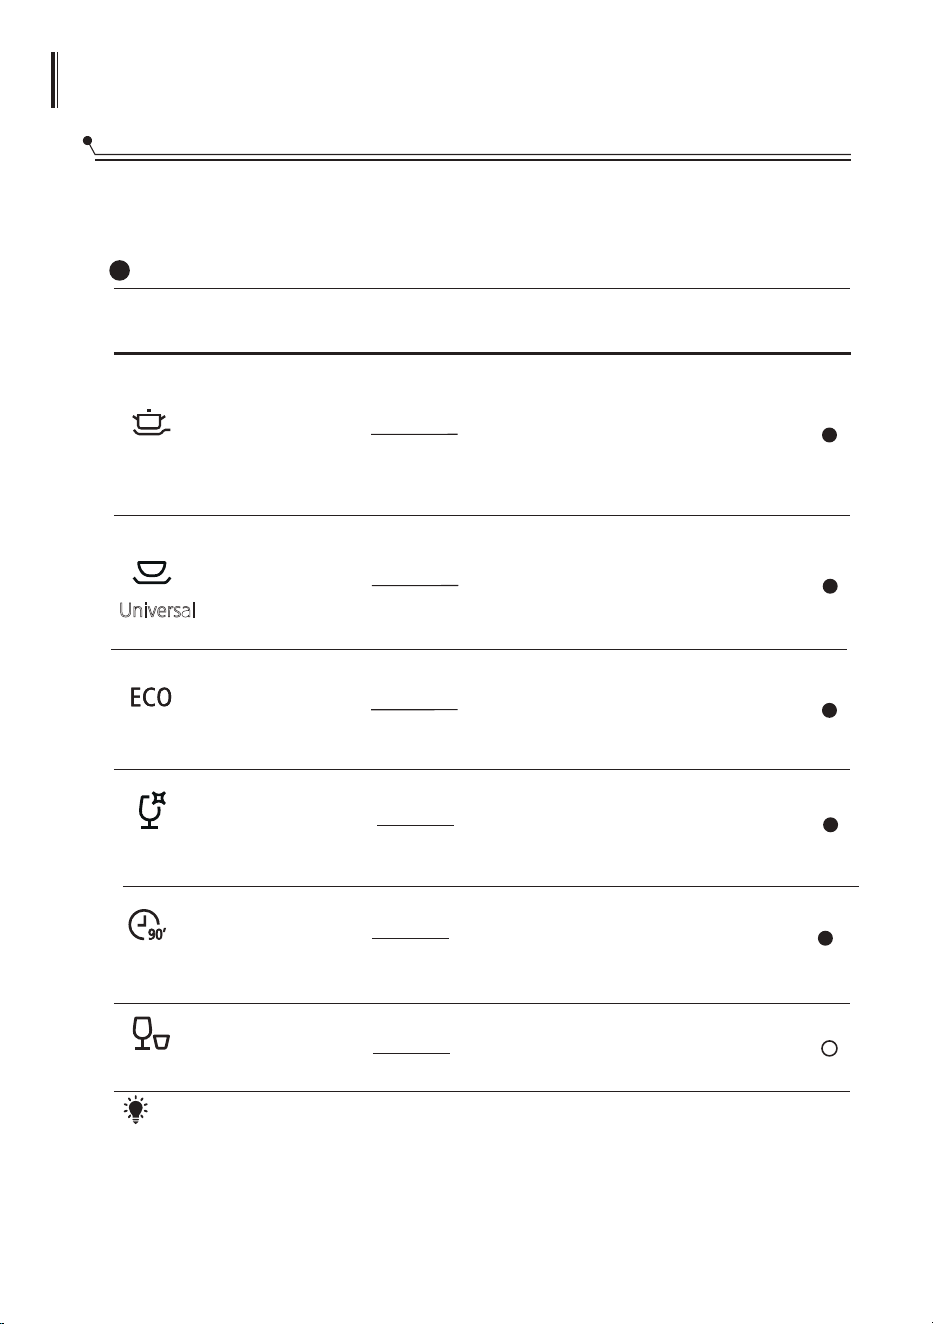
130(3"."/%0&--"7"7"+*--"4
.FTBEFDJDMPEFMBWBEP
-BTJHVJFOUFUBCMBNVFTUSBRVÏQSPHSBNBTTPONFKPSFTQBSBMPTOJWFMFTEFSFTJEVPTEFBMJNFOUPT
TPCSFFMMPTZDVÈOUPEFUFSHFOUFTFOFDFTJUB5BNCJÏONVFTUSBJOGPSNBDJØOWBSJBEBTPCSFMPT
QSPHSBNBT
.FEJPTFTOFDFTBSJPSFMMFOBSFMFOKVBHVFFOFMEJTQFOTBEPSEFFOKVBHVF
1SPHSBNB
5JFNQP(min)
&OFSHÓB "HVB
(L)
$JDMP
"CSJMMBOUBEPS
%FUFSHFOUF
1.621
17.8
11.0
1SFMBWBEP(50℃)
-BWBEP
&OKVBHVF
&OKVBHVF
&OKVBHVF(65℃)
4FDBEP
1SFMBWBEP
-BWBEP(45℃)
&OKVBHVF
4FDBEP
(1 or 2 pieces)
4/16g
(1 or 2 pieces)
4/16g
*OUFOTJWP
30 0.751 11.2
-BWBEP
&OKVBHVF
(50℃)
&OKVBHVF(45℃)
20g
90 1.35 11.5
-BWBEP
&OKVBHVF
&OKVBHVF(65℃)
4FDBEP
(1 piece)
90 mins
3ÈQJEP
0.923
175 1.302 14.2
(1 or 2 pieces)
4/16g
120 1.100
(1 piece)
Glass
-BWBEP
&OKVBHVF
&OKVBHVF
&OKVBHVF
4FDBEP
(45℃)
(65℃)
(55℃)
-BWBEP
&OKVBHVF
&OKVBHVF
&OKVBHVF
4FDBEP
(50℃)
230
(65℃)
205
(60℃)
(65℃)
14.2
(60℃)
4/16g
20g
(1 piece)
(*EN60436)
ECO (*EN60436): El programa ECO es aplicable para limpiar la vajilla sólida,
que para este uso, es el programa más eficiente en materia del consumo
combinado de energía y agua, y se lo utiliza para evaluar el performance con
legislación de diseño ecológico de EU.
NOTA:
Universal
13
(kWh)
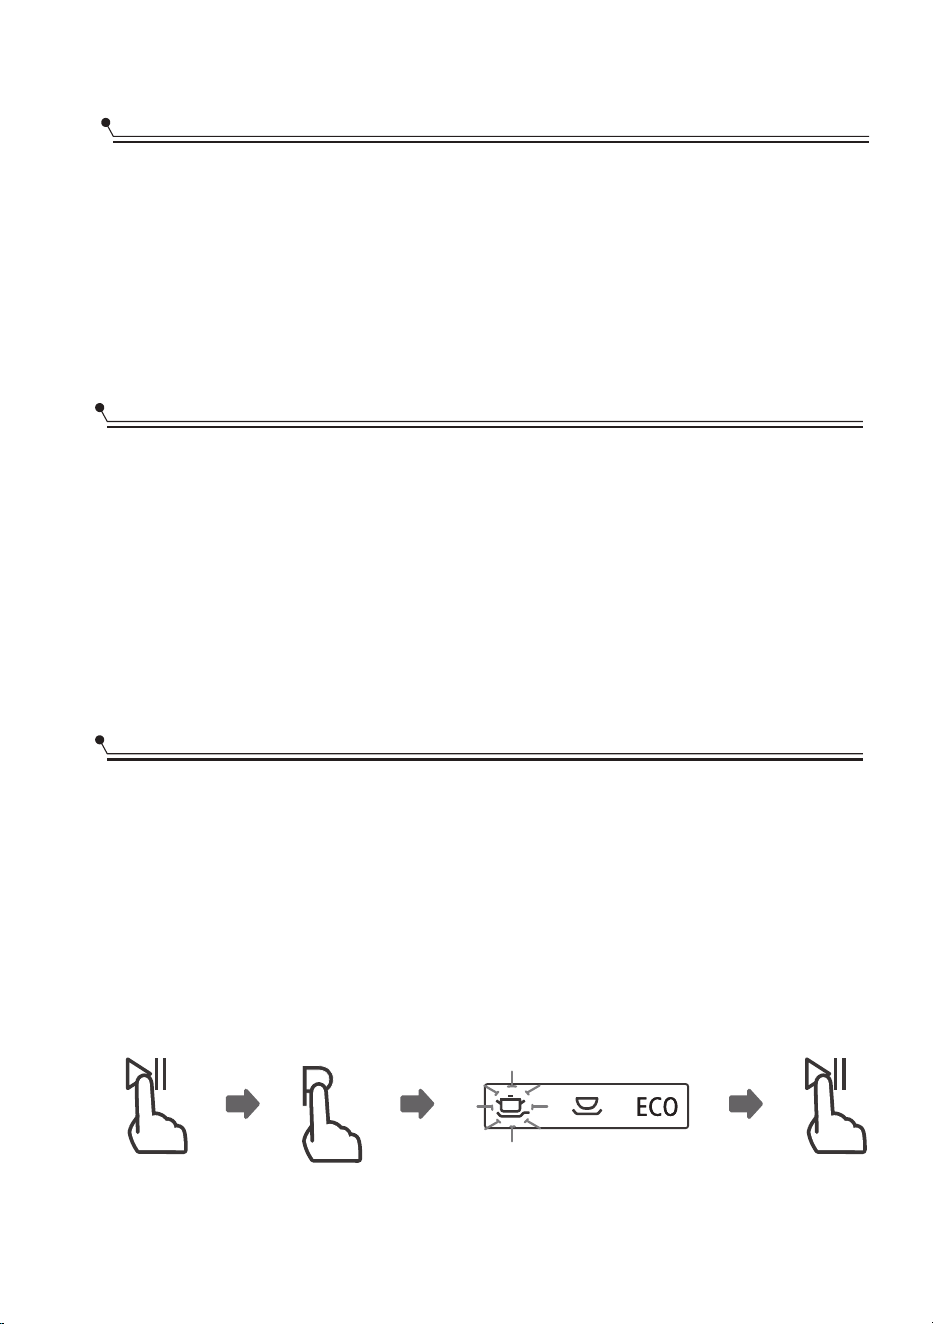
$PNFO[BOEPVODJDMPEFMBWBEP
4BRVFMBDFTUBJOGFSJPSZTVQFSJPSDBSHVFMPTQMBUPTZFNQÞKFMPTIBDJBBUSÈT
4FSFDPNJFOEBDBSHBSQSJNFSPMBDFTUBJOGFSJPSZMVFHPMBTVQFSJPS
*OTFSUFFMFODIVGFFOFM[ØDBMP-BGVFOUFEFBMJNFOUBDJØOTFSFGJFSFBMBÞMUJNBQÈHJOB
'JDIBEFQSPEVDUP"TFHÞSFTFEFRVFFMTVNJOJTUSPEFBHVBFTUÏBCJFSUPBMBQSFTJØO
NÈYJNB
$JFSSFMBQVFSUBQSFTJPOFFMCPUØOEF&ODFOEJEPQBSBFODFOEFSMBNÈRVJOB
&MJKBVOQSPHSBNBMBMV[EFSFTQVFTUBTFFODFOEFSÈ-VFHPQSFTJPOFFMCPUØO*OJDJP1BVTB
FMMBWBWBKJMMBTDPNFO[BSÈTVDJDMP
$BNCJBOEPFMQSPHSBNBEFNFEJPDJDMP
6ODJDMPEFMBWBEPTPMPTFQVFEFDBNCJBSTJIBFTUBEPGVODJPOBOEPQPSVODPSUPUJFNQP
EFMPDPOUSBSJPFTQPTJCMFRVFFMEFUFSHFOUFZBTFIBZBMJCFSBEPZRVFFMMBWBWBKJMMBTZB
IBZBESFOBEPFMBHVBEFMBWBEP4JFTUFFTFMDBTPTFEFCFSFJOJDJBSFMMBWBWBKJMMBTZTFEFCF
SFMMFOBSFMEJTQFOTBEPSEFEFUFSHFOUF1BSBSFTUBCMFDFSFMMBWBWBKJMMBTTJHBMBTJOTUSVDDJPOFT
BDPOUJOVBDJØO
1.
2.
3.
4.
1SFTJPOFFMCPUØO*OJDJP1BVTBQBSBQBVTBSFMMBWBEP
ڀڀ1SFTJPOFFMCPUØOEF1SPHSBNBQPSNÈTEFTFHVOEPTFMQSPHSBNBTFDBODFMBSÈ
1SFTJPOFFMCPUØO1SPHSBNBQBSBTFMFDDJPOBSFMQSPHSBNBEFTFBEP
ڀڀ1SFTJPOFFMCPUØOEF*OJDJP1BVTBEFTQVÏTEFTFHVOEPTFMMBWBWBKJMMBTDPNFO[BSÈ
BGVODJPOBS
3 sec
FMEFUFSHFOUF
Deposita
Ahorro de Energía
1. El pre-enjuague de los artículos de vajilla causará un consumo aumentado
de agua y energía, y no se lo recomienda.
2. Lavar la vajilla en el lavaplatos doméstico normalmente consumirá energía
y agua menores en la fase de uso que el lavado con mano si utiliza el lavaplatos
doméstico de acuerdo con las instrucciones.
14

0MWJEBTUFBHSFHBSVOQMBUP
4FQVFEFBHSFHBSVOQMBUPPMWJEBEPFODVBMRVJFSNPNFOUPBOUFTEFRVFTFBCSBFM
EJTQFOTBEPSEFEFUFSHFOUF4JFTUFFTFMDBTPTJHBMBTJOTUSVDDJPOFTBDPOUJOVBDJØO
1.
2.
3.
4.
5.
1SFTJPOFFMCPUØO*OJDJP1BVTBQBSBQBVTBSFMMBWBEP
ڀڀ&TQFSBTFHVOEPTZMVFHPBCSFMBQVFSUB
ڀڀ"×BEJSMPTQMBUPTPMWJEBEPT
ڀڀ$JFSSFMBQVFSUB
ڀڀ1SFTJPOFFMCPUØOEF*OJDJP1BVTBEFTQVÏTEFTFHVOEPTFMMBWBWBKJMMBTDPNFO[BSÈB
GVODJPOBS
After 5 sec
"%7&35&/$*"
&TQFMJHSPTPBCSJSMBQVFSUBB
NJUBEEFMDJDMPZBRVFFMWBQPS
DBMJFOUFQVFEFRVFNBSMF
15
CÓDIGOS DE ERROR
Si hay un mal funcionamiento, el lavavajillas mostrará códigos de error para identicarlos:
Códigos
Signicado
Posibles causas
Tiempo de entrada más
largo.
No alcanzar la
temperatura requerida.
Rebosar.
Mal funcionamiento del elemento calefactor.
Algún elemento del lavavajillas gotea.
Los grifos no están abiertos, o el consumo de
agua está restringido o la presión del agua es
demasiado baja.
La luz de 90min
parapadea
La luz de Rápido
parpadeo fugaz
La luz de 90 minutos
parpadeo fugaz
el circuito abierto or cable roto
Fallo de comunicación
entre la PCB principal
con el display.
la Luz de ECO y
VASOS parpadea
ADVERTENCIA
¤ Si se produce un desbordamiento, cerrar el suministro principal de agua y
llame al servicio de mantenimiento.
¤ Si hay agua en la fuente de la base por rebalsar o alguna pérdida de agua,
ésta debe extraerse antes de reiniciar el lavavajillas.
Si hay una falla, el lavavajillas mostrará un código de error. La
tabla muestra posibles códigos de error y sus causas.
¤
siguiente
16
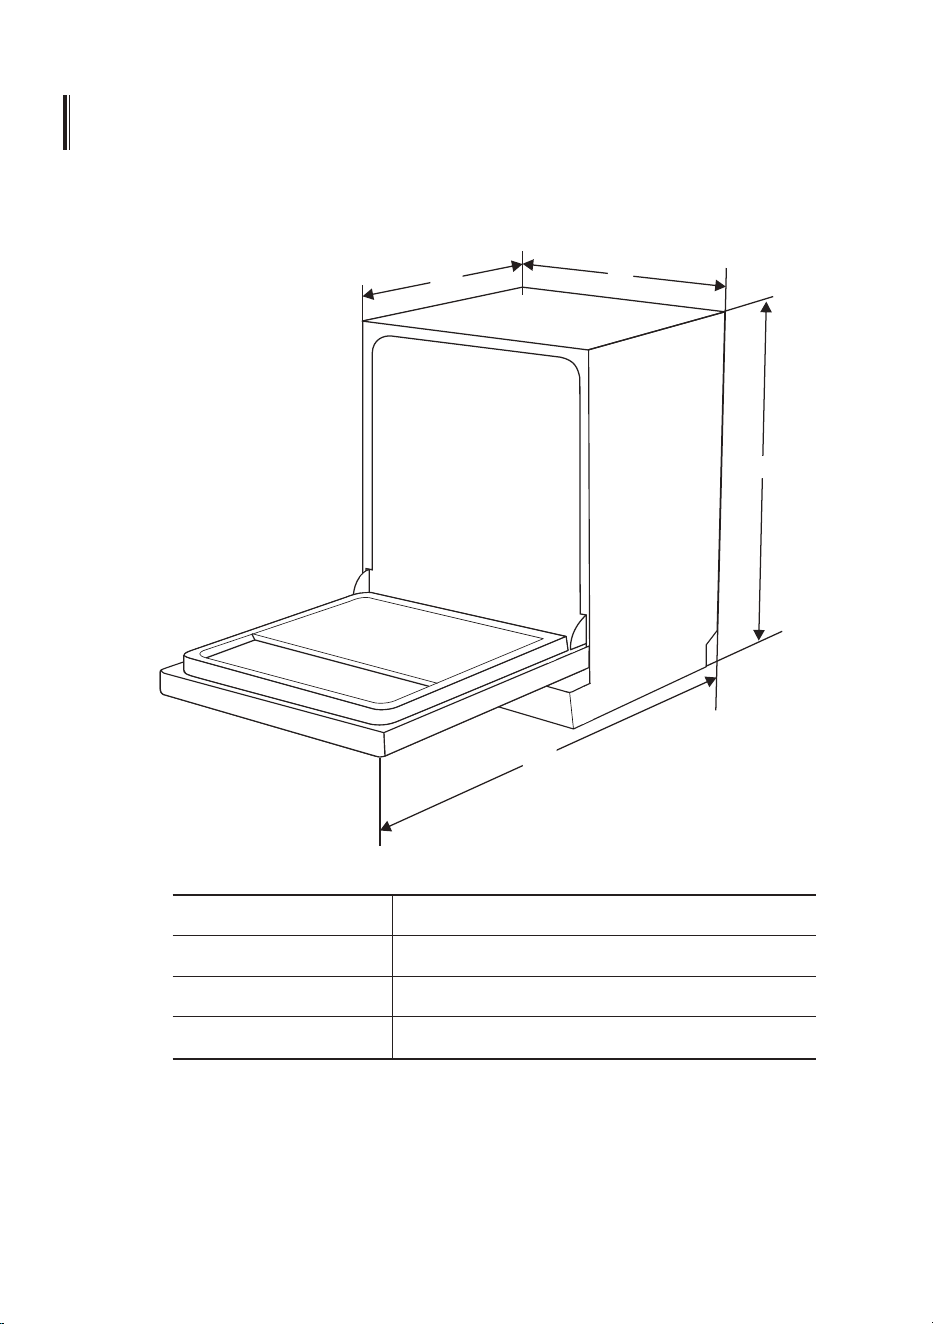
*/'03."$*»/5²$/*$"
"MUP (H)
"ODIP (W)
1SPGVOEJEBE (D1)
1SPGVOEJEBE (D2)
845mm
598mm
600mm (QVFSUBDFSSBEB)
1175mm (QVFSUBBCJFSUB 90°)
W
D
1
H
D2
17
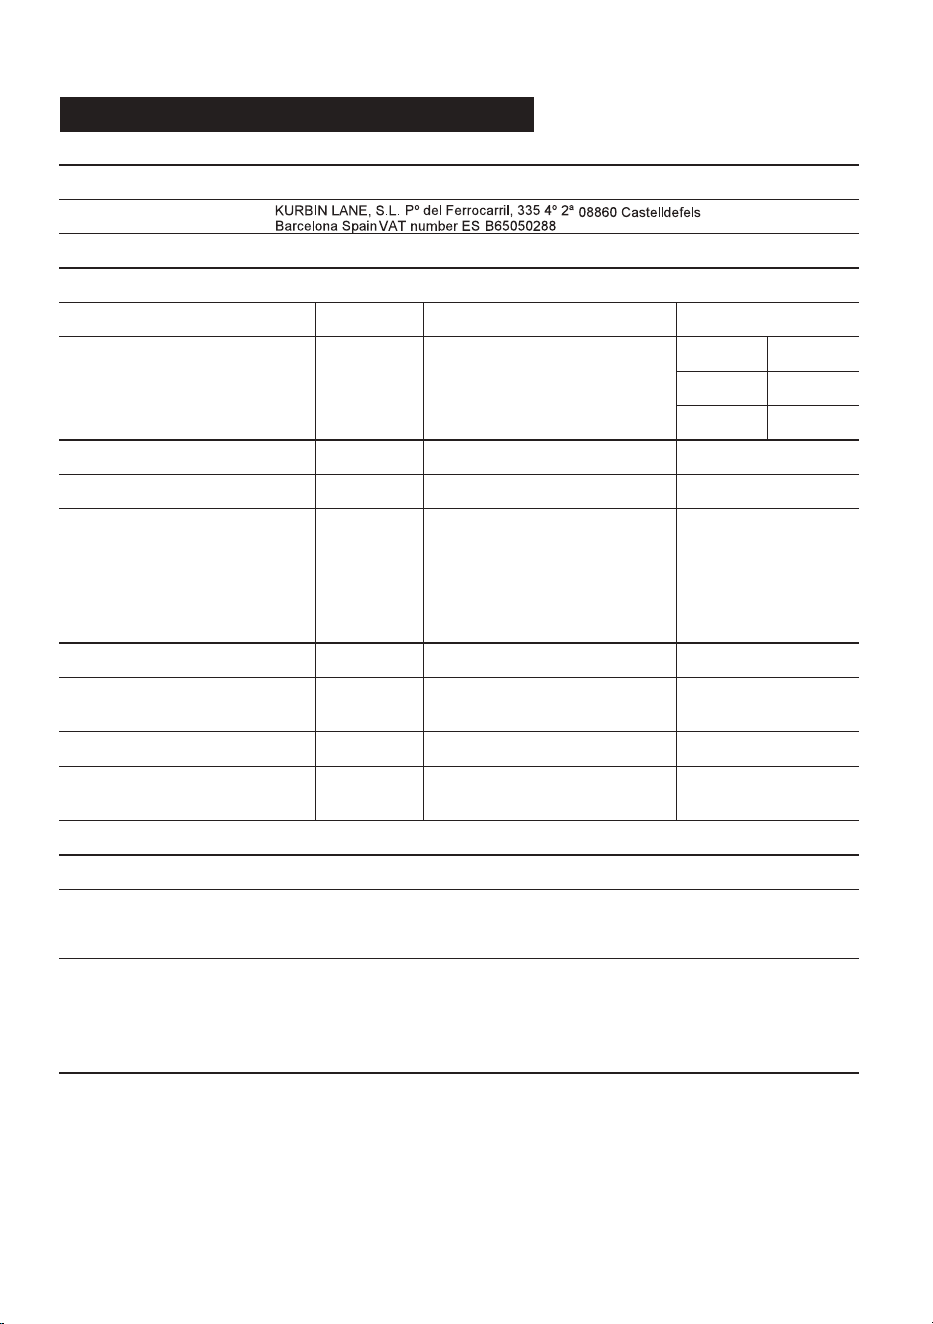
Proveedor: CORBERO
Dirección de Proveedor:
Modelo:
Ficha de producto:
Parametro Parameter
dimensiones en cm
EEI ( )
Índice de rendimiento de limpieza (a)
Consumo de energía en kWh
[por ciclo], basado en el
programa eco usando llenado
de agua fría. El consumo de
energía real dependerá de
cómo se utilice el aparato.
Duración del programa (a) (h: min)
Emisiones de ruido acústico
aéreo (a) (dB (A) re 1 pW)
modo apagado (w)
Inicio diferido (W) (si corresponde)
Duración mínima de la garantía ofrecida por el proveedor (b):
Capacidad nominal (a) (ps)
a
clase de eficiencia energética
Índice de rendimiento de secado (a)
Consumo de agua en litros
[por ciclo], basado en el
programa eco. El consumo
real de agua dependerá de
cómo se utilice el aparato y
de la dureza del agua.
tipo
Airborne acoustical noise
emission class ( )
Modo de espera (W)
networked standby (W)
(si corresponde)
a
Informacion adicional
Enlace web al sitio web del proveedor, donde se encuentra la información del punto 6 del anexo
II del Reglamento (UE) 2019/2022 de la Comisión (1)(b):
(a) para el programa eco.
(b) los cambios en estos elementos no se considerarán relevantes a los efectos del párrafo 4 del
Artículo 4 del Reglamento (UE) 2017/1369.
(c) si la base de datos de productos genera automáticamente el contenido definitivo de esta
celda, el proveedor no deberá ingresar estos datos.
(1)Reglamento (UE) 2019/2022 de la Comisión, de 1 de octubre de 2019, por el que se establecen
requisitos de diseño ecológico para lavavajillas domésticos de conformidad con la Directiva 2009/125 / CE
del Parlamento Europeo y del Consejo que modifica el Reglamento (CE) No. 1275/2008 de la Comisión y
deroga la Comisión. Reglamento (UE) No. 1016/2010 (véase la página 267 de este Diario Oficial).
(EN60436)
Valor Value
alto
ancho
profundo
12
11 0,
Free standing
N/A
N/A
E ( )
c
C ( )
c
55 9,
0 923,
3:50
49
0 49,
1 00,
E-CLVM6419W
E-CLVM6419
X
'JDIBEFQSPEVDUP
85
60
60
1,065
1,125
18
24 months.
www.corbero.es
Manual de Instruções
PARTE 1: Versão Genérica
E-CLVM6419W
E-CLVM6419X
Leia atentamente este manual
antes de usar a máquina de
lavar louça.
Guarde este manual para referência futura.
3
8
9
9
11
13
13
13
17
17
18
19
20
20
21
26
30
CONTEÚDO
Informação de segurança
Descrição do produto
Usar a máquina de lavar louça
Carregar o sal no descalcificador
Conselhos
MANUTENÇÃO E LIMPEZA
Cuidados externos
Cuidados internos
Cudado da máquina de lavar louça
INSTRUÇÕES DE INSTALAÇÃO
Ligação elétrica
Abastecimento de água e drenagem
Ligação das mangueiras de drenagem
Coloque o dispositivo
Instalação livre
Instalação incorporada (para o modelo embutido)
CONSELHOS PARA SOLUCIONAR PROBLEMAS
CARREGAR OS CESTOS DE ACORDO COM
NOTA:
Consultar a secção Sugestões para a resolução de problemas irá
ajudá-lo a resolver alguns problemas comuns.
Se não conseguir resolver os problemas sozinho, peça a ajuda de um
técnico profissional.
O fabricante, seguindo uma política de constante desenvolvimento e
atualização de produtos, pode fazer modificações sem aviso prévio.
Caso se perca ou esteja desatualizado, pode receber um novo manual do
fabricante ou vendedor responsável.

3
INFORMAÇÃO DE SEGURANÇA
Este dispositivo destina-se a ser usado em aplicações
domésticas e similares, tais como:
- áreas de cozinha em lojas, escritórios e outros
ambientes de trabalho;
- casas de campo;
- por clientes em hotéis, motéis e outros ambientes
residenciais;
- ambientes tipo bed and breakfast
Este aparelho pode ser utilizado por crianças a partir dos 8
anos de idade e por pessoas com capacidades físicas,
sensoriais ou mentais reduzidas ou com falta de
experiência e conhecimentos, se lhes tiver sido dada
supervisão ou instruções relativas à utilização do
eletrodoméstico de uma forma segura e eles
compreendam os perigos envolvidos.
As crianças não devem brincar com o aparelho. A limpeza
e a manutenção por parte do utilizador não devem ser
feitas por crianças sem supervisão. (Para EN60335-1)
Este aparelho não deve ser utilizado por pessoas (incluindo
crianças) com capacidades físicas, sensoriais ou mentais
reduzidas, ou falta de experiência e conhecimento, a menos que
tenham recebido supervisão ou instruções relativas ao uso do
aparelho por uma pessoa responsável pela sua segurança.
(Para IE60335-1)
ADVERTÊNCIA
Ao usar a sua máquina de lavar louça, siga as
precauções abaixo:
4
O material de embalagem pode ser perigoso para as
crianças!
Este aparelho é apenas para uso doméstico em interiores.
Para se proteger contra o risco de choque elétrico, não
mergulhe a unidade, o cabo ou a ficha em água ou outro
líquido.
Desligue antes dos trabalhos de limpeza e manutenção do
aparelho.
Use um pano macio humedecido com sabão suave e depois
use um pano seco para o limpar novamente.
Este aparelho deve ser ligado à terra. Em caso de mau
funcionamento ou avaria, a ligação à terra reduzirá o risco
de choque elétrico, proporcionando um caminho de menor
resistência à corrente elétrica. Este aparelho está
equipado com uma ficha condutora de ligação à terra.
A tomada deve ser ligada a uma tomada apropriada,
instalada e com ligação à terra de acordo com todos
os códigos e portarias locais.
A ligação incorreta do condutor de ligação à terra do
equipamento pode resultar num risco de choque elétrico.
Verifique com um eletricista qualificado ou um
representante da assistência técnica se tiver dúvidas sobre
se o aparelho está devidamente ligado à terra.
Instruções de ligação à terra

5
Não modifique a ficha fornecida com o aparelho; se este
não encaixar na tomada.
Peça a um eletricista qualificado para instalar uma
tomada adequada.
Não abuse, nem se sente ou fique em pé sobre a porta
ou o tabuleiro da máquina de lavar louça.
Não utilize a sua máquina de lavar loiça, a menos que
todos os painéis estejam corretamente posicionados.
Abra a porta com muito cuidado. Se a máquina de lavar
louça estiver a funcionar, há o risco de haver fugas de
água.
Não coloque objetos pesados ou fique de pé sobre a
porta quando ela estiver aberta.
O aparelho pode inclinar-se para a frente.
Ao carregar artigos para lavar:
1) Localize os objetos afiados para que não danifiquem a
vedação da porta;
2) Atenção: As facas e outros utensílios de ponta afiada
devem ser carregados no cesto com as pontas para
baixo ou colocados horizontalmente.
Alguns detergentes para máquinas de lavar louça são
fortemente alcalinos. Podem ser extremamente
perigosos se ingeridos. Evite o contacto com a pele e os
olhos e mantenha as crianças afastadas da máquina de
lavar louça quando a porta estiver aberta.
Verifique se o depósito do detergente está vazio após
completar o ciclo de lavagem.

6
Não lave artigos de plástico, a menos que
estejam marcados como "aptos para a máquina
de lavar louça" ou equivalente.
Para artigos de plástico não marcados, verifique as
recomendações do fabricante.
Utilize apenas detergentes e agentes de
enxaguamento recomendados para utilização na
máquina de lavar louça.
Nunca use sabão, detergente de roupa ou detergente
para lavar as mãos na sua máquina de lavar louça.
A porta não deve ser deixada aberta, pois isso poderia
aumentar o risco de mau funcionamento.
Se o cabo de alimentação estiver danificado, deve ser
substituído pelo fabricante, o seu agente de serviço ou
pessoas com qualificações semelhantes, a fim de evitar
qualquer perigo.
Durante a instalação, a fonte de alimentação não
deve ser dobrada ou achatada de forma excessiva ou
perigosa.
Não mexa nos controlos.
O eletrodoméstico deve ser ligado à válvula de água
principal com novos conjuntos de mangueiras. Os
acessórios antigos não devem ser reutilizados.
Para poupar energia, em modo de espera, o aparelho
desliga-se automaticamente quando não há
funcionamento durante 15 minutos.
O número máximo de ajustes para lavar é de 12.
A pressão máxima permitida de entrada de água é
de 1MPa.
A pressão mínima permitida de entrada de água é
de 0,04MPa.
7
Para eliminar a embalagem e o
eletrodoméstico, dirija-se a um centro de
reciclagem. Portanto, corte o cabo de
alimentação e inutilize o dispositivo de fecho
da porta.
As embalagens de cartão são feitas de papel
reciclado e devem ser descartadas em contentores
de reciclagem de papel usado.
Ao garantir que este produto seja descartado
corretamente, ajudará a evitar possíveis
consequências negativas para o meio ambiente e
para a saúde humana, que poderiam ser causadas
pelo manuseio inadequado deste produto.
Para informações mais detalhadas sobre a
reciclagem deste produto, por favor contacte o
escritório local da sua cidade e o seu serviço de
eliminação de resíduos domésticos.
ELIMINAÇÃO: Não elimine este produto como lixo
municipal não separado. Recicle esses resíduos
separadamente, pois é necessário um tratamento
especial.
Eliminação de resíduos
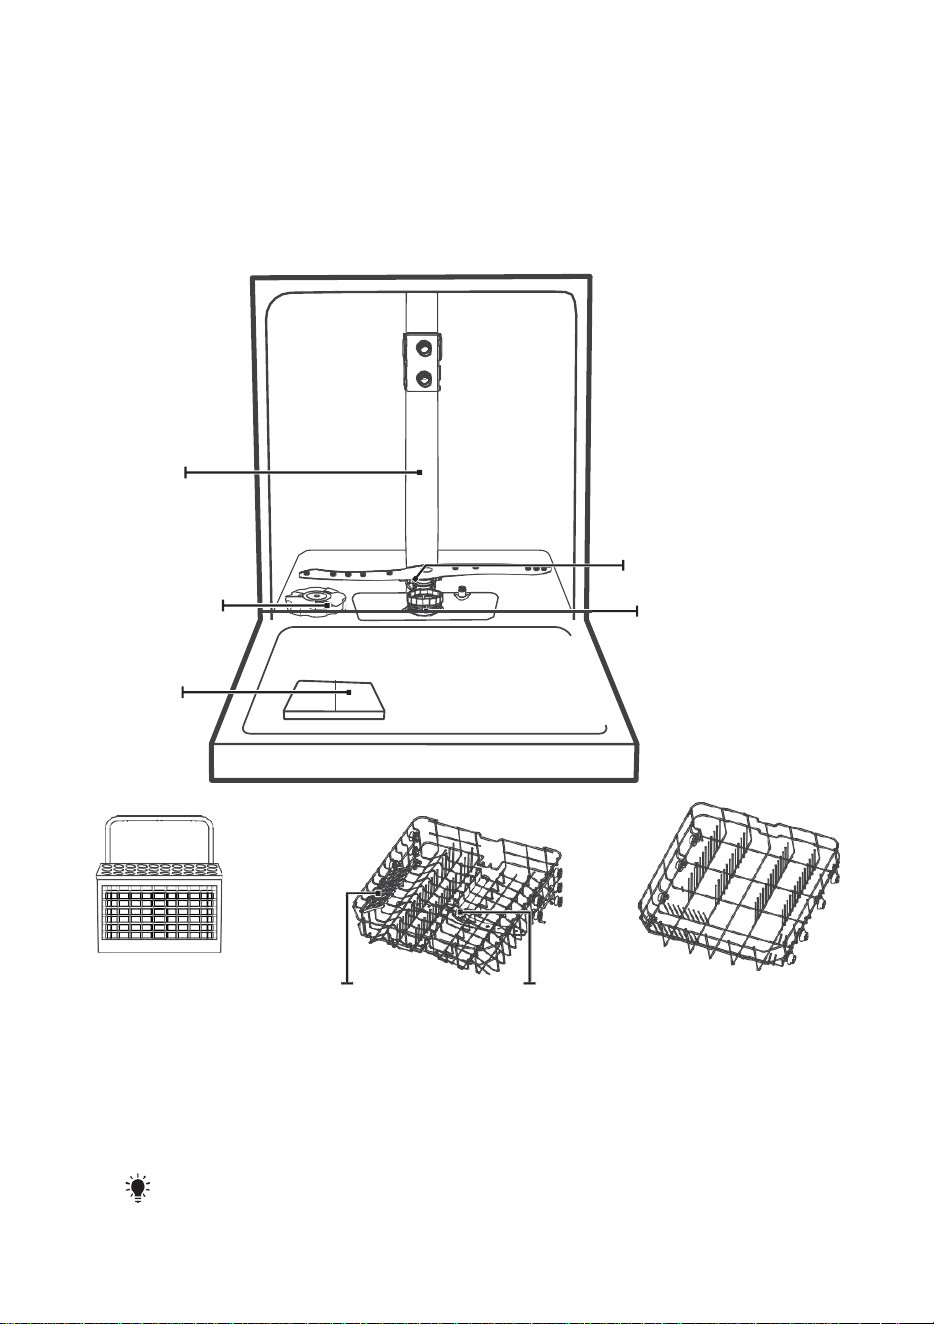
8
DESCRIÇÃO DO PRODUTO
IMPORTANTE:
Para obter o melhor desempenho da sua máquina de lavar loiça, leia
todas as instruções de utilização antes de a utilizar pela primeira vez.
Tubagem
interna
Recipiente de
sal
Braço de pulverização inferior
Conjunto de filtro
Dispensador
cesto para
talhere. Braço de pulverização superior zona para copos cesto inferior
Cesto superior
As imagens são apenas para referência, alguns modelos podem ser
diferentes

9
USAR A SUA MÁQUINA DE LAVAR
LOUÇA
Antes de usar a sua máquina de lavar louça:
Dentro Fora
1. Configure o descalcificador de água
2. Coloque o sal no descalcificador
3. Coloque o cesto
4. Encha o doseador
Consulte a secção 1 "Descalcificador de água" da PARTE I.
Consulte a secção 1 "Descalcificador de água" da PARTE II:
Versão especial.
Se precisar de configurar o descalcificador de água, consulte.
CARREGAR O SAL NO DESCALCIFICADOR
NOTA:
Se o seu modelo não tiver qualquer descalcificador de água, pode omitir
esta secção. Use sempre sal na máquina de lavar louça.
O recipiente de sal está localizado debaixo do cesto inferior e deve
ser enchido como explicado a seguir:
ADVERTÊNCIA
Use apenas sal especificamente concebido para uso na máquina de lavar louça!
Qualquer outro tipo de sal não especificamente concebido para uso na máquina de
lavar louça, especialmente sal de mesa, irá danificar o descalcificador de água.
Em caso de danos causados pelo uso de sal inadequado, o fabricante não dá qualquer
garantia e não se responsabiliza pelos danos causados.
Recarregue com sal antes de fazer um ciclo.
Isto evitará que grãos de sal ou água salgada derramada permaneçam no fundo da
máquina durante um período de tempo que possa causar corrosão.
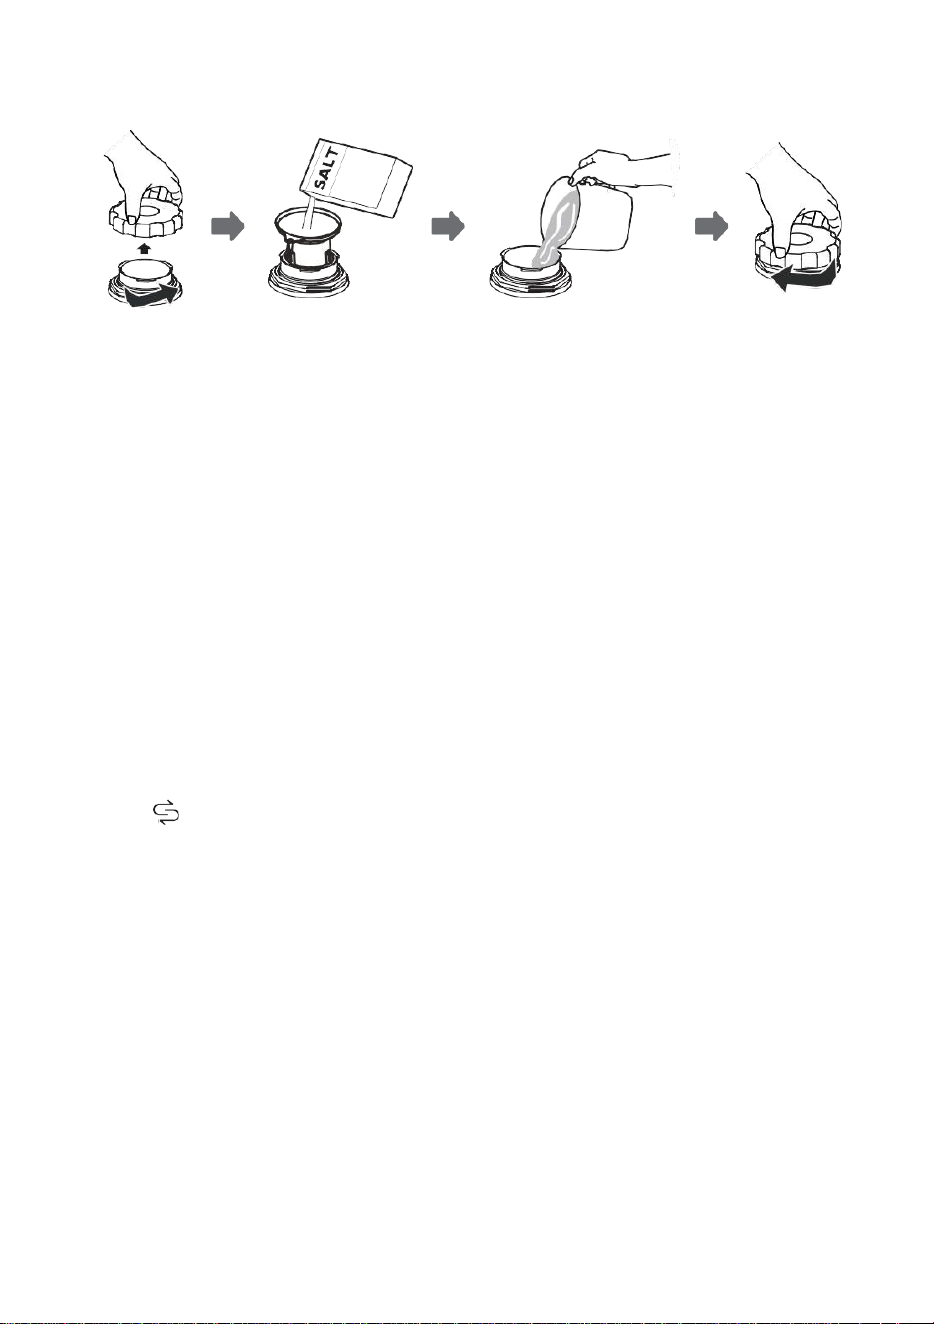
10
Siga os passos abaixo para adicionar sal à máquina de lavar louça:
1. Retire o cesto inferior e desenrosque a tampa do depósito.
2. Coloque a extremidade do funil (fornecido) no orifício e despeje
aproximadamente 1,5 kg de sal na máquina de lavar louça.
3. Encha o recipiente de sal até à sua capacidade máxima com água. É normal que
uma pequena quantidade de água saia do recipiente de sal.
4. Depois de encher o recipiente, volte a enroscar a tampa.
5. A luz de aviso de sal apagar-se-á depois de o recipiente de sal ter sido cheio com
sal.
6. Imediatamente após a colocação do sal no recipiente de sal, deve ser iniciado um
programa de lavagem (sugerimos a utilização de um programa curto). Caso contrário,
o sistema de filtragem, a bomba ou outras peças importantes da máquina podem ser
danificadas por água salgada. Isto está fora da garantia.
Nota:
O recipiente de sal só deve ser novamente cheio quando a luz de aviso de sal
no painel de controlo acender.
Dependendo de quão bem o sal esteja dissolvido, a luz de aviso de sal
ainda pode estar ligada, mesmo que o recipiente de sal esteja cheio.
Se não houver luz de aviso de sal no painel de controlo (para alguns
modelos), pode calcular quando o sal deve ser colocado no descalcificador
pelo número de ciclos de lavagem.
Se tiver derramado sal, faça uma pré-lavagem ou um programa rápido
para o remover.
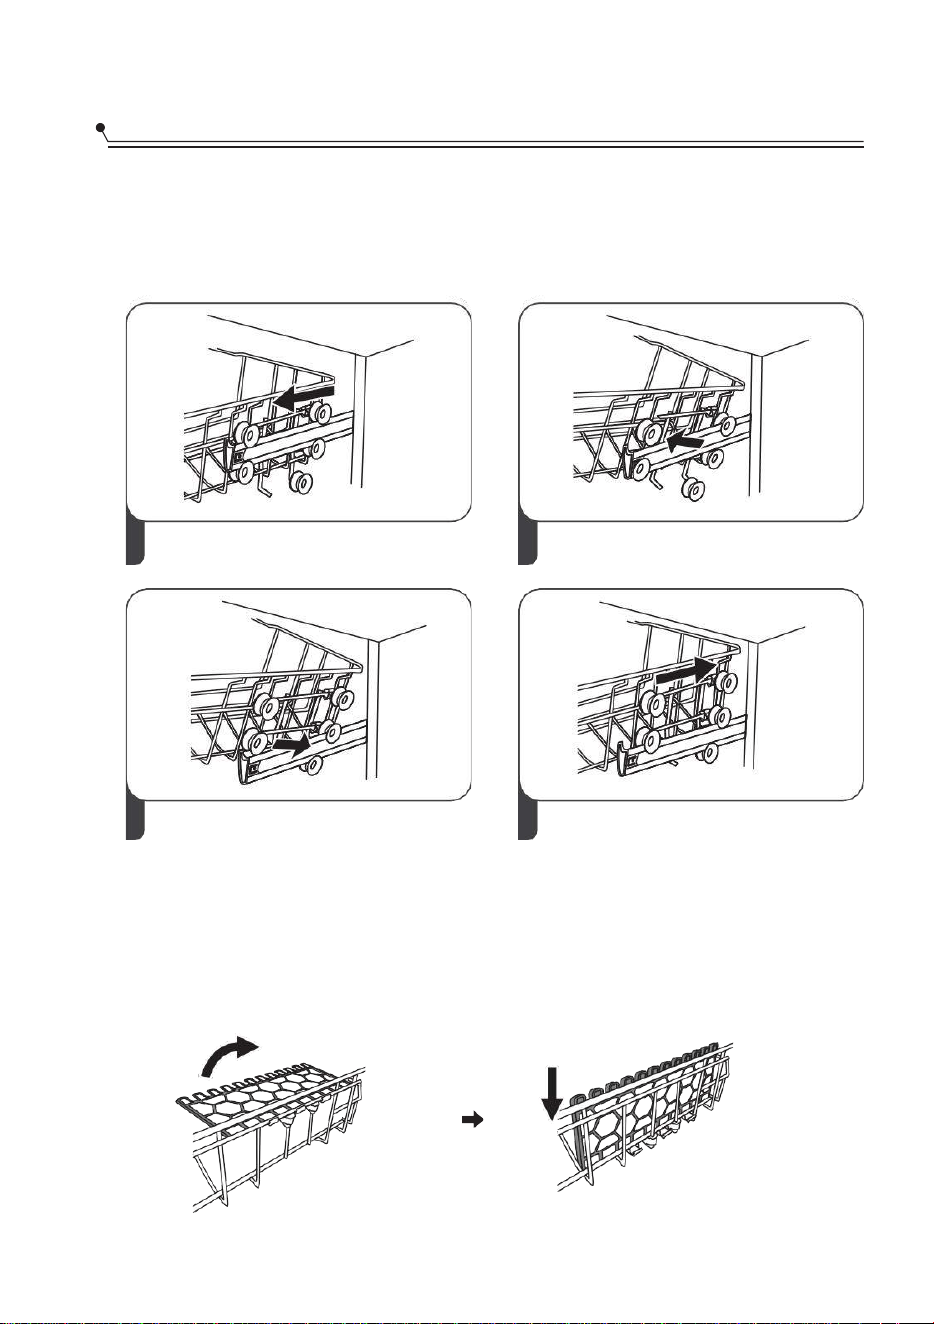
11
Ajustar o tabuleiro superior
A altura do tabuleiro superior pode ser facilmente ajustada para acomodar pratos
mais altos no tabuleiro superior ou inferior
Para ajustar a altura do tabuleiro superior, siga estes passos:
3 Volte a colocar o tabuleiro superior nas
rodas superiores ou inferiores.
Dobrar as prateleiras de copos
Para criar espaço para artigos mais altos, levante a grelha dos copos para
cima. Também pode eliminá-la quando o seu uso não for necessário.
Conselhos
Posição alta
4 Empurre o tabuleiro superior.
posição baixa
1 Puxe o tabuleiro superior.
2 Retire o tabuleiro superior.
12
LIMPEZA E MANUTENÇÃO
A porta e a vedação da porta
Limpe regularmente as vedações das portas com um pano macio e húmido para
remover depósitos de alimentos. Quando a máquina de lavar louça estiver
carregada, os resíduos de alimentos e bebidas podem pingar pelos lados da porta
da máquina de lavar louça. Estas superfícies estão fora da área de lavagem e a
água não provém dos braços de pulverização. Qualquer depósito deve ser limpo
antes de a porta ser fechada.
Painel de controlo
O painel de controlo deve ser limpo APENAS com um pano macio e húmido.
Sistema de filtros
O sistema de filtragem na base do armário de lavagem retém os detritos
grosseiros do ciclo de lavagem, incluindo objetos estranhos como palitos ou
fragmentos. Os detritos grosseiros recolhidos podem causar a obstrução dos
filtros. Verifique periodicamente o estado dos filtros. Remova cuidadosamente
os objetos estranhos e limpe as peças do sistema de filtragem com água, se
necessário. Siga os passos abaixo para limpar o filtro.
NOTA:
As imagens são apenas para referência, diferentes modelos do sistema de
filtração e os braços pulverizadores podem ser diferentes.
Cuidados externos
ADVERTÊNCIA
Para evitar a penetração de água na fechadura da porta e nos
componentes elétricos, não utilize um produto de limpeza em aerossol
de qualquer tipo.
Nunca utilize produtos de limpeza abrasivos ou esfregões em
superfícies externas, pois estes podem riscar o acabamento. Algumas
toalhas de papel também podem riscar ou deixar marcas na superfície.
Cuidados internos
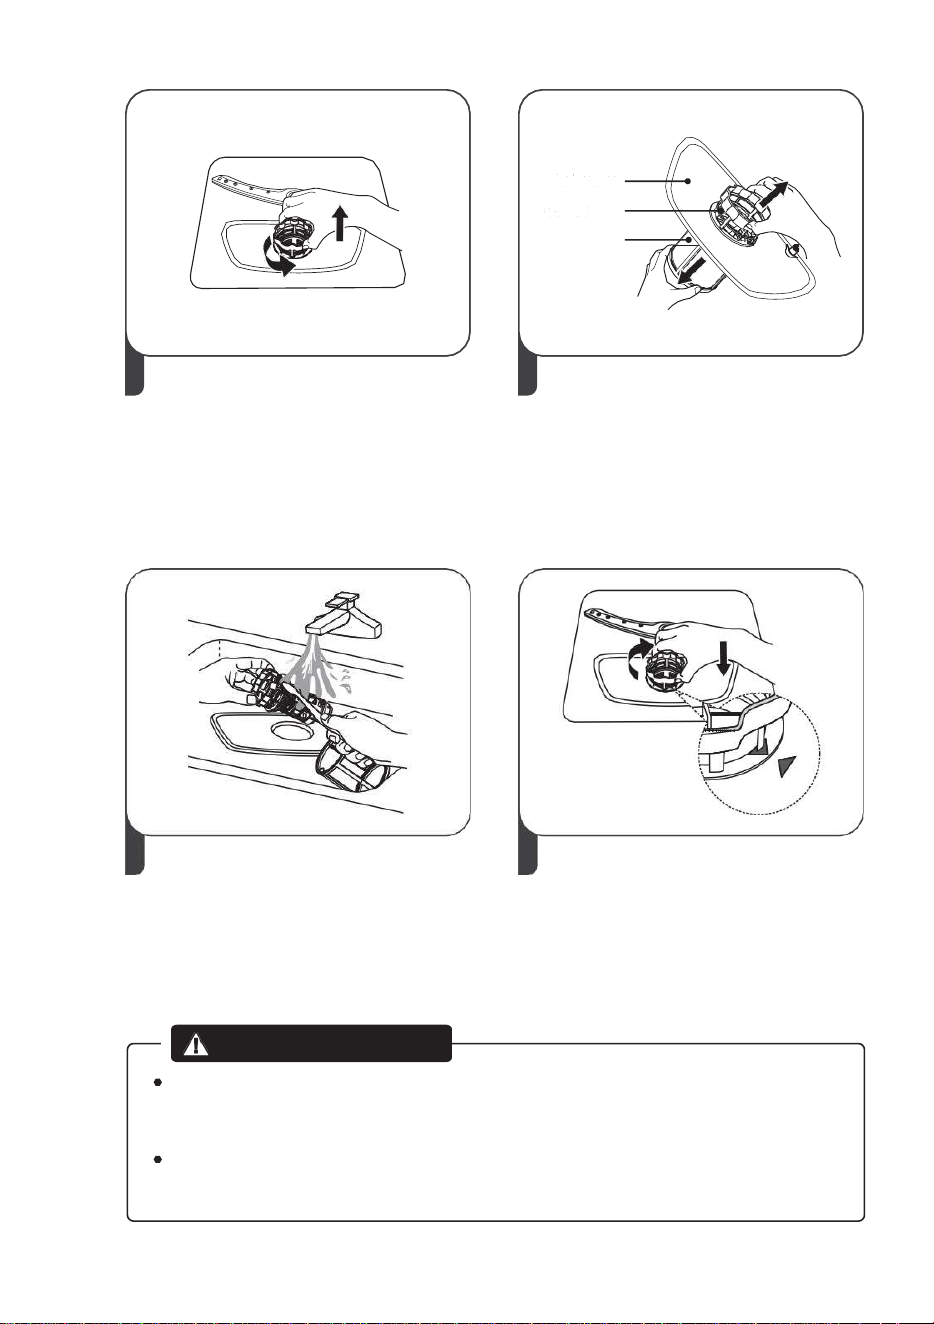
13
Filtro principal
Filtro grosso
Filtro fino
Segure o filtro grosso e gire-o no sentido O filtro fino pode ser removido do fundo
contrário aos ponteiros do relógio para destravar do conjunto do filtro. O filtro grosso
o filtro. Levante o filtro e retire-o da máquina pode ser separado do filtro principal
de lavar louça. apertando suavemente as abas na parte
superior e puxando-o para fora.
1
Os resíduos alimentares maiores
podem ser limpos lavando o filtro
com água corrente.
Para uma limpeza mais profunda,
utilize uma escova de limpeza macia.
4 Volte a colocar os filtros na ordem inversa
de desmontagem, volte a montar o filtro e
rode-o no sentido horário até à seta de
bloqueio.
ADVERTÊNCIA
Não aperte demasiado os filtros. Volte a colocar os filtros de forma segura em
sequência, caso contrário a sujidade grossa pode entrar no sistema e causar um
bloqueio.
NUNCA utilize a máquina de lavar louça sem os filtros instalados. A substituição
incorreta do filtro pode reduzir o nível de desempenho do eletrodoméstico e
danificar pratos e utensílios.
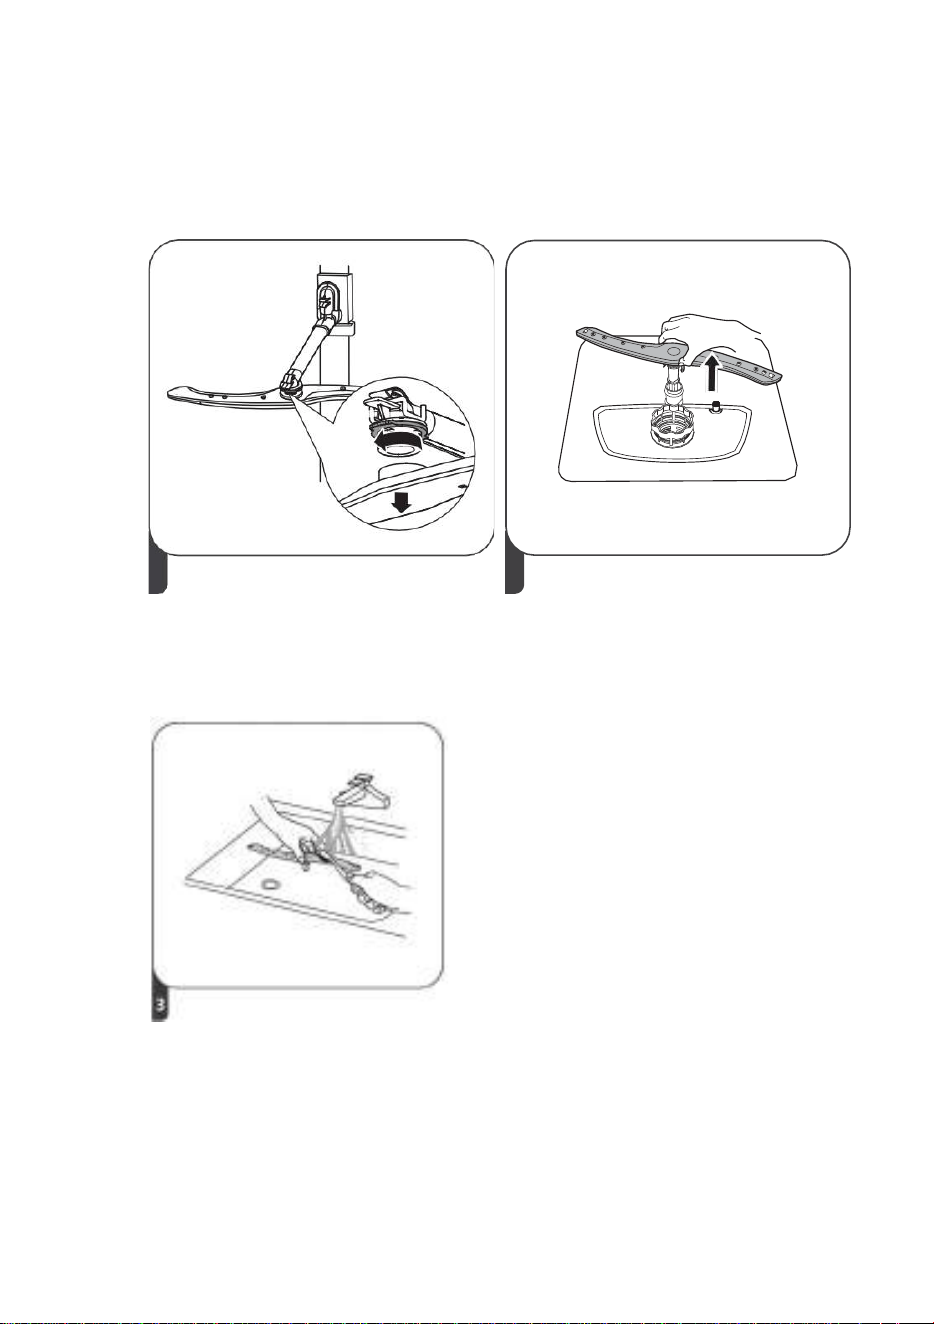
14
Braços pulverizadores
É necessário limpar regularmente os braços de pulverização, uma vez que os
químicos da água dura irão entupir os rolamentos e os jatos dos braços de
pulverização. Para limpar os braços de pulverização, siga as instruções abaixo:
1 Para remover o braço de
pulverização superior, segure a porca no
centro da roda e rode o braço de
pulverização no sentido contrário ao dos
ponteiros do relógio para o remover.
Para remover o braço de
pulverização inferior, puxe o
braço de pulverização para
cima.
3 Lave os braços em água morna e
ensaboada e use uma escova
macia para limpar os jatos.
Coloque-os depois de os
enxaguar completamente.

15
Precauções contra geada
Tome medidas de proteção contra geadas na máquina de lavar louça no
Inverno. Todos os ciclos pós-lavagem funcionam da seguinte forma:
1. Desligue a energia para a máquina de lavar louça na fonte de alimentação.
2. Desligue o fornecimento de água e desligue a tubagem de entrada de
água da válvula de água.
3. Drene a água da tubagem de entrada e a válvula de água. (Use uma
frigideira para recolher a água)
4. Volte a ligar o tubo de entrada de água à válvula de água.
5. Retire o filtro no fundo da cuba e use uma esponja para absorver a água no
dreno.
Depois de cada lavagem
Após cada lavagem, desligue o fornecimento de água ao aparelho e deixe a porta
ligeiramente aberta para que a humidade e os odores não fiquem retidos no
interior.
Retire a ficha
Antes da limpeza ou manutenção, retire sempre a ficha da tomada.
Sem solventes ou limpeza com abrasivos
Para limpar o exterior e as partes de borracha da máquina de lavar louça, não
utilize solventes ou agentes de limpeza abrasivos. Basta usar um pano com água
morna e sabão.
Para remover manchas ou manchas da superfície interior, utilize um pano
humedecido com água e um pouco de vinagre ou um produto de limpeza feito
especificamente para máquinas de lavar louça.
Quando não estiver em uso por um longo período de tempo
Recomenda-se que faça um ciclo de lavagem com a máquina de lavar loiça vazia e
depois retire a ficha da tomada, desligue o abastecimento de água e deixe a porta
do aparelho ligeiramente aberta. Isto ajudará a que as vedações das portas durem
mais tempo e evitará a formação de odores no interior do aparelho.
Mover o aparelho
Se o eletrodoméstico tiver de ser movido, tente mantê-lo na posição vertical. Se for
absolutamente necessário, pode ser colocado de costas.
Cuidados com a máquina de lavar
louça
16
INSTRUÇÕES DE INSTALAÇÃO
Atenção
A instalação de tubagens e equipamentos elétricos deve ser realizada por profissionais.
Requisitos elétricos
Consulte a etiqueta de classificação para a classificação de tensão nominal e ligue a máquina
de lavar loiça à fonte de alimentação apropriada. Utilize o fusível necessário 10A / 13A / 16A,
fusível de retardação ou disjuntor recomendado e forneça um circuito separado que sirva
apenas este eletrodoméstico.
Ligação elétrica
Certifique-se de que a tensão e a frequência da corrente correspondem às da placa de
características. Insira a ficha apenas numa tomada que esteja devidamente ligada à terra. Se
a tomada elétrica a que o aparelho vai ser ligado não for adequada para a ficha, substitua a
ficha, em vez de utilizar um adaptador ou similar, pois isso pode causar sobreaquecimento e
queimaduras.
Assegure uma ligação à terra adequada antes de usar
Sobre a ligação de alimentação
ADVERTÊNCIA
Perigo de choque elétrico Desligue
a energia elétrica antes de instalar a
máquina de lavar loiça.
Não o fazer pode resultar em morte ou
choque elétrico.
ADVERTÊNCIA
Para segurança pessoal:
Não utilize um cabo de extensão ou ficha
adaptadora com este eletrodoméstico.
Não corte ou remova a ligação à terra do cabo de
alimentação em nenhuma circunstância.
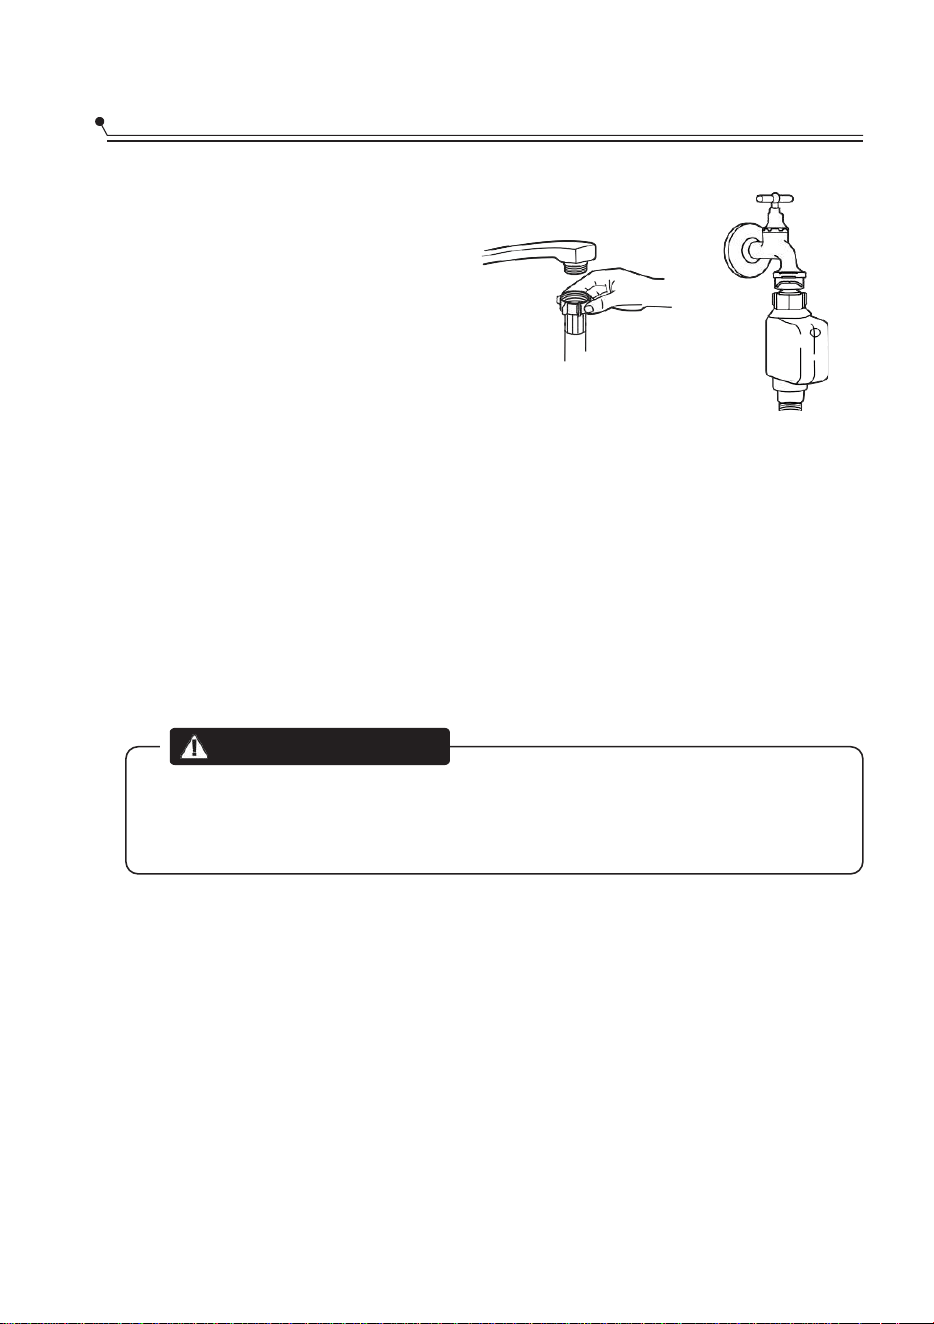
17
Ligação de água fria
Ligue a mangueira de abastecimento
de água fria a um conector roscado de
3/4 (polegadas) e certifique-se de que
está bem presa no lugar.
Se os tubos de água forem novos ou
não foram usados por um longo
período de tempo, deixe a água correr
para garantir que a água esteja limpa.
Esta precaução é necessária para
evitar o risco de a entrada de água ficar
bloqueada e danificar o aparelho.
Mangueira de
abastecimento
normal
Mangueira de
abastecimento
de segurança
Ligação da mangueira de abastecimento de segurança
A mangueira de abastecimento de segurança é constituída por paredes duplas.
O sistema da mangueira assegura a sua intervenção bloqueando o fluxo de
água em caso de rutura da mangueira de abastecimento e quando o espaço de
ar entre a mangueira de abastecimento e a mangueira externa estiver cheio de
água.
Como ligar a mangueira de abastecimento de segurança
1. Retire as mangueiras de segurança completamente do compartimento de
armazenamento na parte de trás da máquina de lavar louça.
2. Aperte os parafusos da mangueira de alimentação de segurança na
torneira roscada de ¾ polegadas.
3. Ligue a água completamente antes de ligar a máquina de lavar louça.
Como desligar a mangueira de abastecimento de segurança
1. Desligue a água.
2. Desaparafuse a mangueira de abastecimento de segurança da torneira.
Abastecimento e drenagem de água
ADVERTÊNCIA
Uma mangueira que se liga à pia pode rebentar se for instalada na mesma
linha de água que a máquina de lavar louça. Se o seu lava-louça tiver uma, é
recomendável desligar a mangueira e tapar o furo.
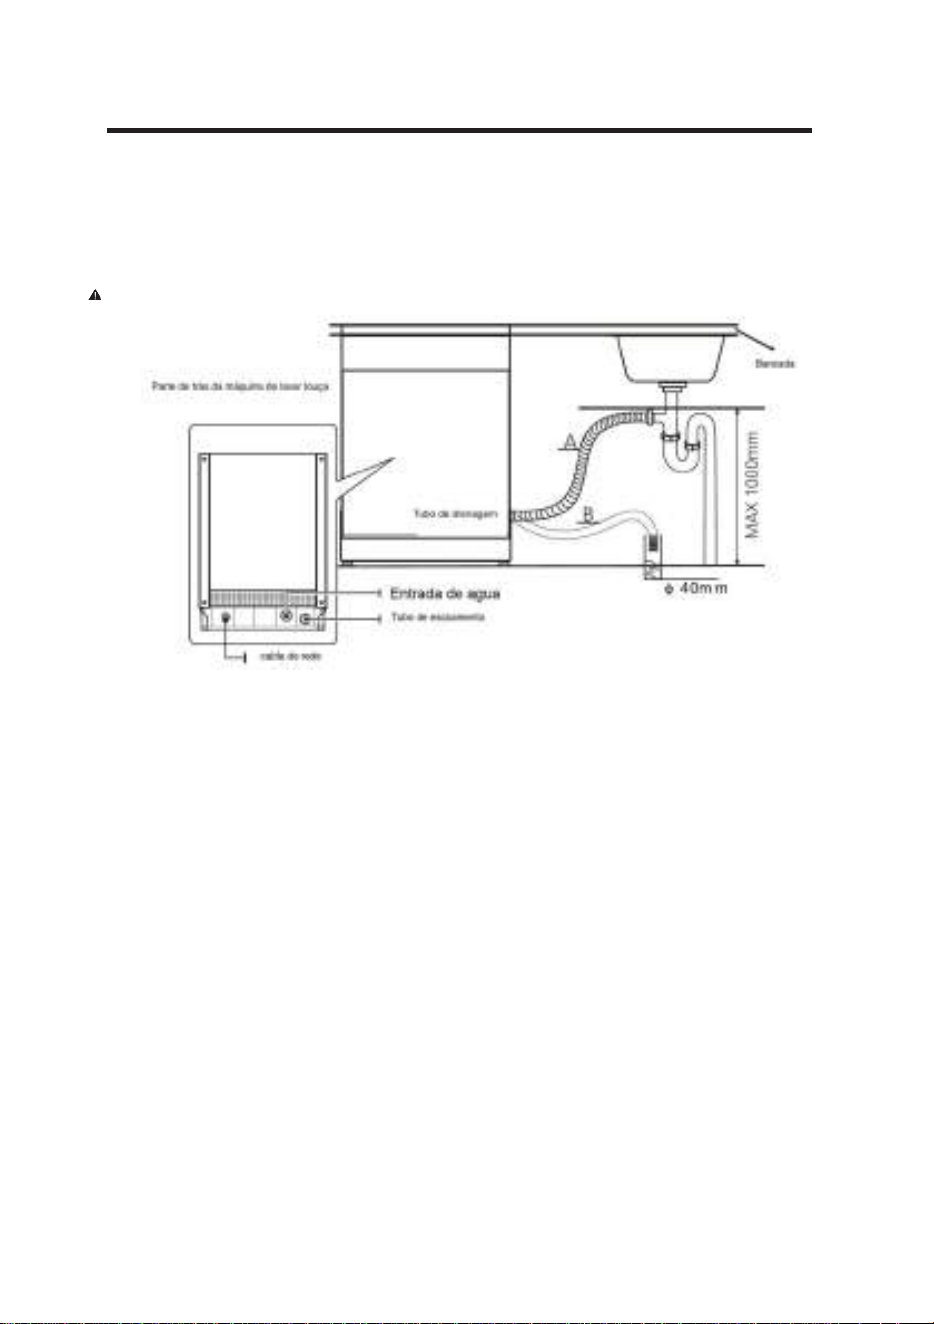
18
Ligação de mangueiras de drenagem
Insira a mangueira de drenagem num tubo de drenagem com um diâmetro
mínimo de 4 cm ou deixe-a entrar na pia, certificando-se de que não a dobra. A
altura do tubo de drenagem deve ser inferior a 1000 mm. A extremidade livre da
mangueira não deve ser imersa em água para evitar o recuo da mangueira.
Fixe com segurança a mangueira de drenagem na posição A ou na posição B
Como drenar o excesso de água das mangueiras
Se o lava-loiça estiver 1000 mm mais alta do que o chão, o excesso de água nas
mangueiras não pode escorrer diretamente para o lava-loiça. Será necessário
drenar o excesso de água das mangueiras para um recipiente adequado que é
mantido fora e mais baixo do que o lava-loiça.
Saída de água
Ligue a mangueira de drenagem de água A mangueira de drenagem deve ser
instalada corretamente para evitar vazamentos de água. Certifique-se de que
a mangueira de drenagem de água não está dobrada ou esmagada.
Mangueira de extensão
Se precisar de uma extensão de mangueira de drenagem, certifique-se de
usar uma mangueira de drenagem similar.
Não deve exceder os 4 metros, caso contrário, o efeito de limpeza da máquina de
lavar louça pode ser reduzido
Ligação do sifão
A ligação de resíduos deve estar a uma altura inferior a 100 cm (máximo) do
fundo da placa. A mangueira de drenagem de água deve ser fixada.
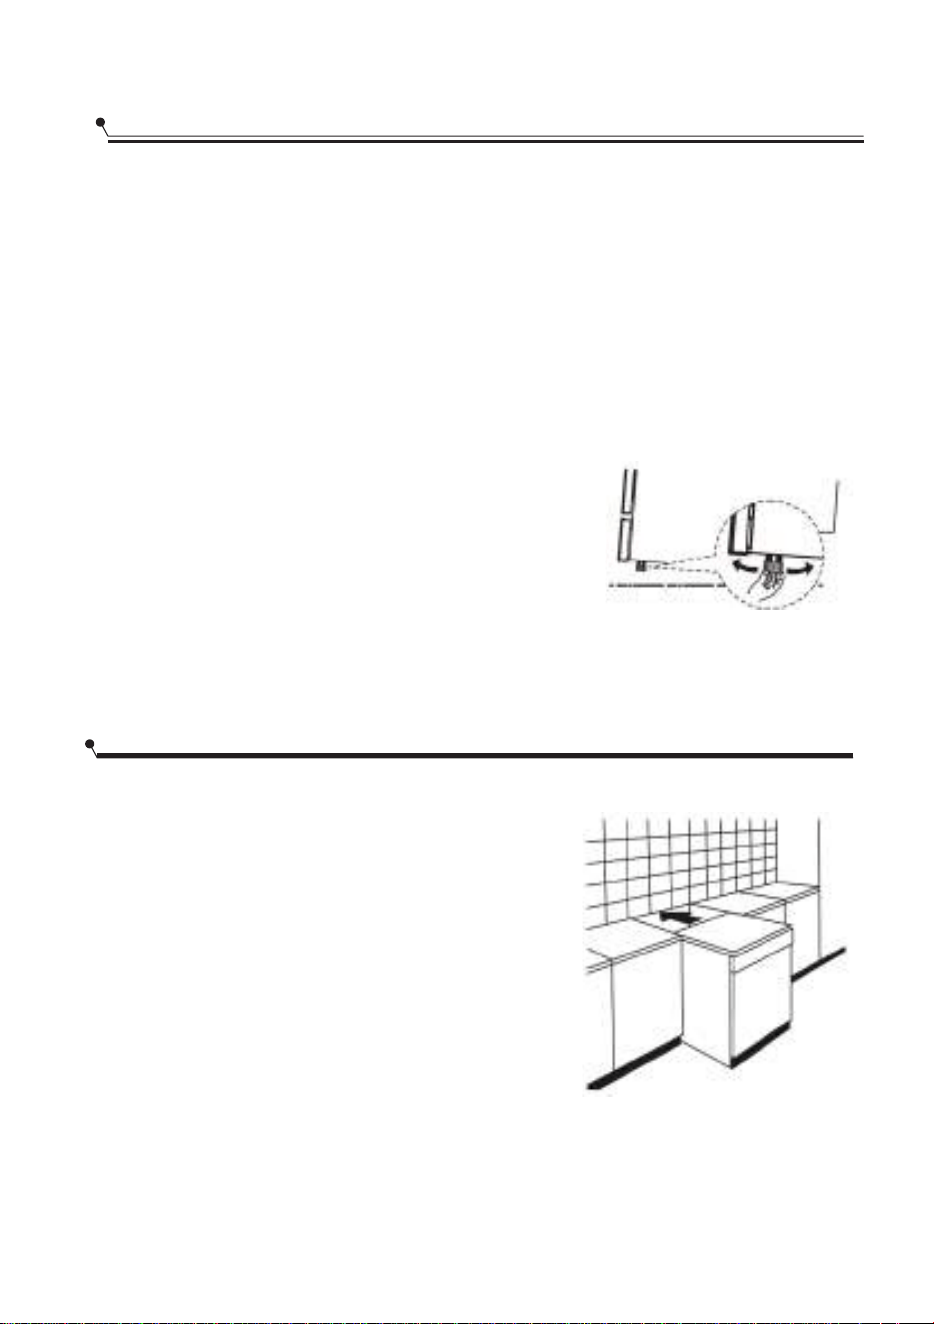
19
Coloque o dispositivo no local desejado. As costas devem apoiar-se contra a
parede atrás dela e os lados, ao longo dos móveis ou paredes adjacentes. A
máquina de lavar loiça está equipada com uma mangueira de abastecimento e
drenagem de água que pode ser posicionada à direita ou à esquerda para
facilitar a instalação.
Nivelamento do dispositivo
Uma vez posicionado o eletrodoméstico para o nivelamento, a altura da máquina
de lavar louça pode ser alterada através de ajuste do nível de aparafusamento
dos pés.
NOTA:
Aplicar apenas na máquina de lavar
louça independente.
Montagem entre móveis existentes
A altura da máquina de lavar louça, 845 mm,
foi concebida para permitir a instalação da
máquina entre unidades existentes da
mesma altura em cozinhas. Os pés podem
ser ajustados para atingir a altura correta.
A parte superior laminada da máquina não
requer nenhum cuidado especial, pois é
resistente ao calor, à prova de arranhões e
de manchas.
Coloque o dispositivo
Instalação independente
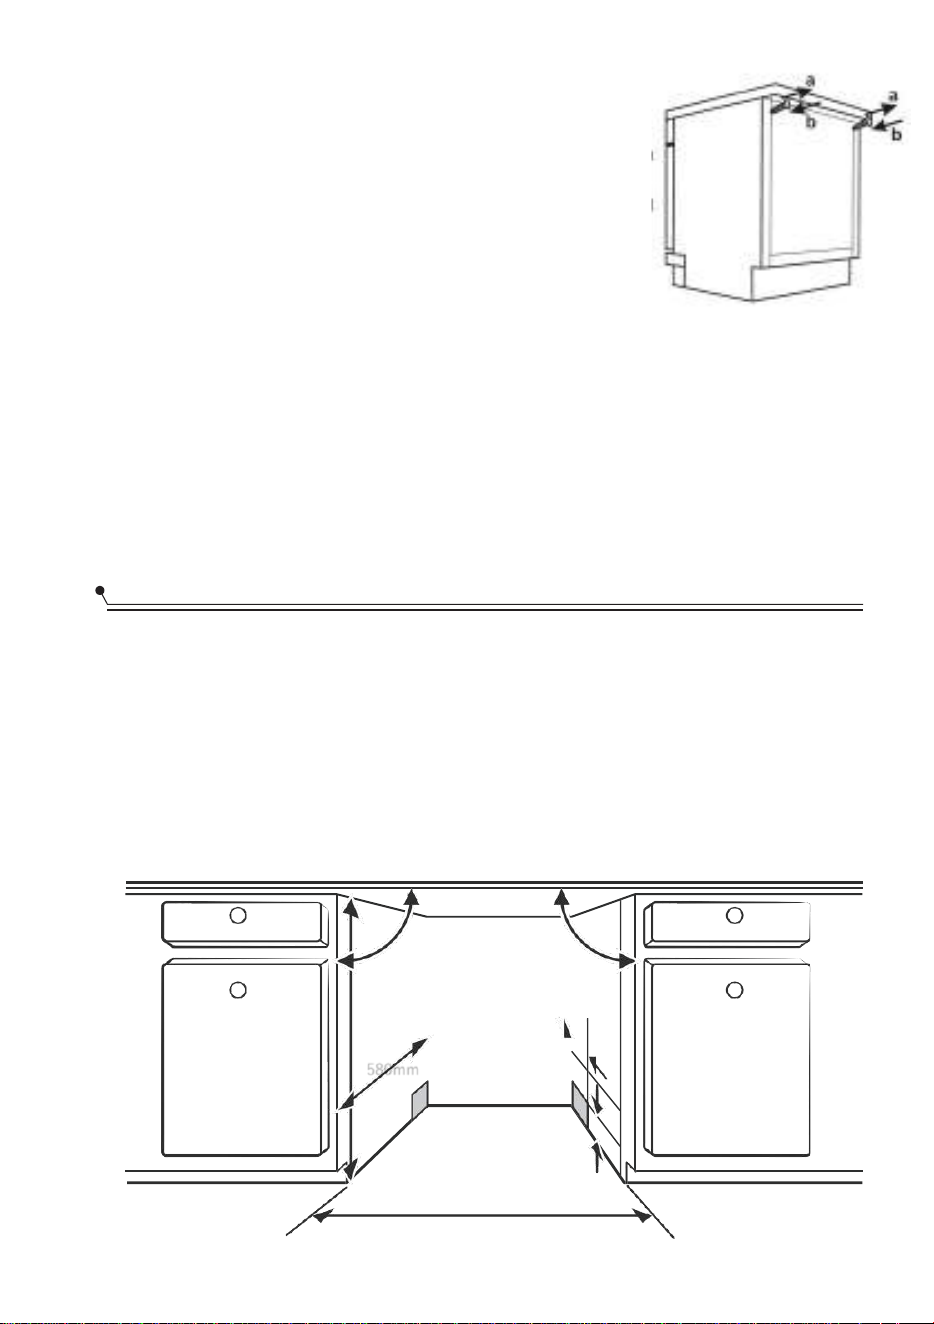
20
Sob uma bancada de trabalho
(quando instalada sob uma bancada de trabalho)
Na maioria das cozinhas modernas, existe apenas uma
bancada de trabalho sob a qual são instalados armários
e eletrodomésticos. Neste caso, retire a parte superior da
máquina de lavar louça, desaparafusando os parafusos
por baixo da extremidade traseira da parte superior (a).
Atenção
Após remover a parte superior da peça, os parafusos DEVEM ser aparafusados
novamente sob a aresta traseira da parte superior (b).
A altura deve ser reduzida para 815 mm, conforme exigido pela Norma
Internacional (ISO), e a máquina de lavar louça deve caber confortavelmente sob
o fogão.
Instalação embutida (para o modelo embutido)
Passo 1. Seleção da melhor localização para a máquina de
lavar loiça
A posição de instalação da máquina de lavar louça deve estar próxima das mangueiras
de entrada e de drenagem existentes e do cabo de alimentação.
Ilustrações das dimensões do móvel e da posição de instalação da máquina de lavar loiça. A
posição de instalação da máquina de lavar loiça deve estar próxima das mangueiras de
entrada e drenagem existentes e do cabo de alimentação.
Ilustrações das dimensões do móvel e da posição de instalação da máquina de lavar louça.
1. Menos de 5 mm entre a parte superior da máquina de lavar louça e o
armário e a porta exterior alinhada com o móvel.
90 °
90 °
820mm
80
580mm
100
modelo de 45cm)
600 mm (para o modelo de
60cm) 450 mm (para o
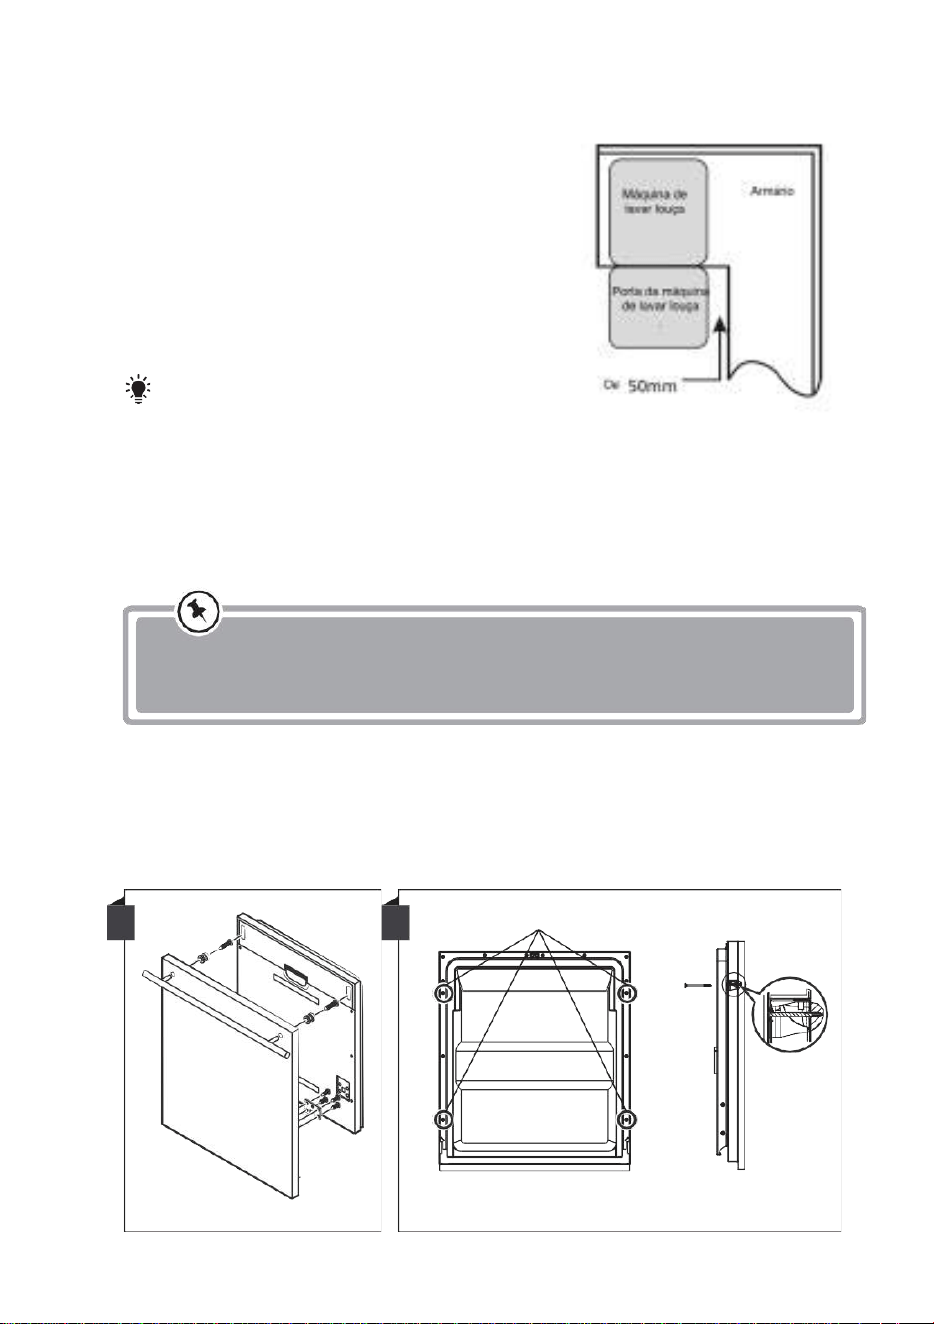
2
1
2.2. Se a máquina de lavar louça estiver presa no canto do móvel, deve haver
algum espaço quando a porta for aberta.
NOTA:
Dependendo da localização da sua tomada elétrica, pode ser que
tenha de fazer um furo no lado oposto do armário.
Passo 2: Dimensões e instalação do painel estético
Modelo semi-integrado
O grampo mágico A e o grampo mágico B deslocam-se, o grampo mágico A no
painel estético de madeira e o grampo mágico B feltrado na porta exterior da
máquina de lavar louça (ver figura A). Depois de montar o painel, fixe o painel à
porta exterior com parafusos e cavilhas (ver figura B).
A
B
1. Pegue nos quatro parafusos curtos
2. Aperte os quatro parafusos longos
O painel de madeira estético poderia ser processado de acordo com os
desenhos de instalação.
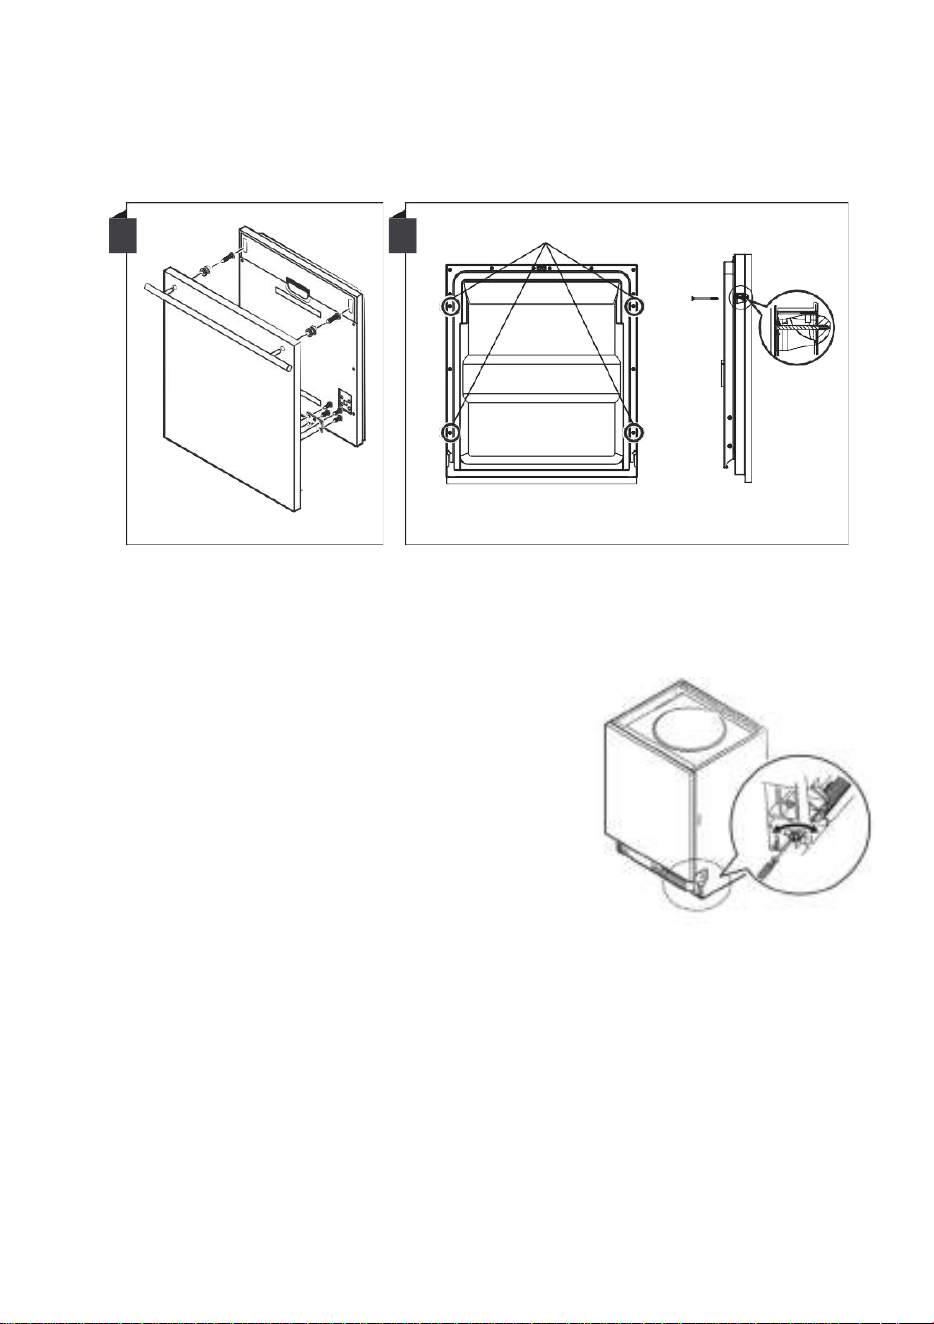
2
2
Modelo totalmente integrado
Instale o gancho no painel de madeira estético e coloque o gancho na ranhura da
porta exterior da máquina de lavar louça (ver figura A). Depois de montar o painel,
fixe o painel à porta exterior com parafusos e cavilhas (ver figura B).
Passo 3. Ajuste da tensão da mola da porta
1. As molas da porta são colocadas na
fábrica com a tensão apropriada para a
porta exterior. Se tiver um painel de
madeira estético instalado, precisará de
ajustar a tensão da mola da porta. Gire o
parafuso de ajuste para mover o ajustador
e aperte ou solte o cabo de aço.
2. A tensão da mola da porta está correta
quando a porta permanecer horizontal na
posição totalmente aberta, mas se elevar
até ao topo com um leve movimento de
um dedo.
A
B
1. Pegue nos quatro parafusos curtos
2. Aperte os quatro parafusos longos

2
3
Passo 4: Etapas de instalação da máquina de lavar louça
Consulte os passos de instalação especificados na instalação
1. Fixe a faixa de condensação sob a superfície de trabalho do armário.
Certifique-se de que a faixa de condensação está alinhada com a borda da
superfície de trabalho. (Passo 2)
2. Ligue a mangueira de entrada ao abastecimento de água fria.
3. Ligue a mangueira de drenagem.
4. Ligue o cabo de alimentação.
5. Ponha a máquina de lavar louça no lugar. (Passo 4)
6. Nivele a máquina de lavar louça. Os alimentos traseiros podem ser ajustados a
partir da frente da máquina de lavar loiça rodando o parafuso Philips no meio da
base da máquina de lavar loiça com um parafuso Philips. Para ajustar os pés
dianteiros, utilize uma chave de fendas plana e rode os pés dianteiros até que a
máquina de lavar louça esteja nivelada. (Passo 5 ao Passo 6)
7. Instale a porta do armário na porta exterior da máquina de lavar louça. (Passo 7
ao Passo 10)
8. Ajuste a tensão das molas da porta com uma chave Allen girando no sentido
horário para apertar as molas esquerda e direita da porta. Se não o fizer, pode
danificar a sua máquina de lavar louça. (Passo 11)
9. A máquina de lavar louça deve estar segura no lugar. Há duas maneiras de fazer isto:
9
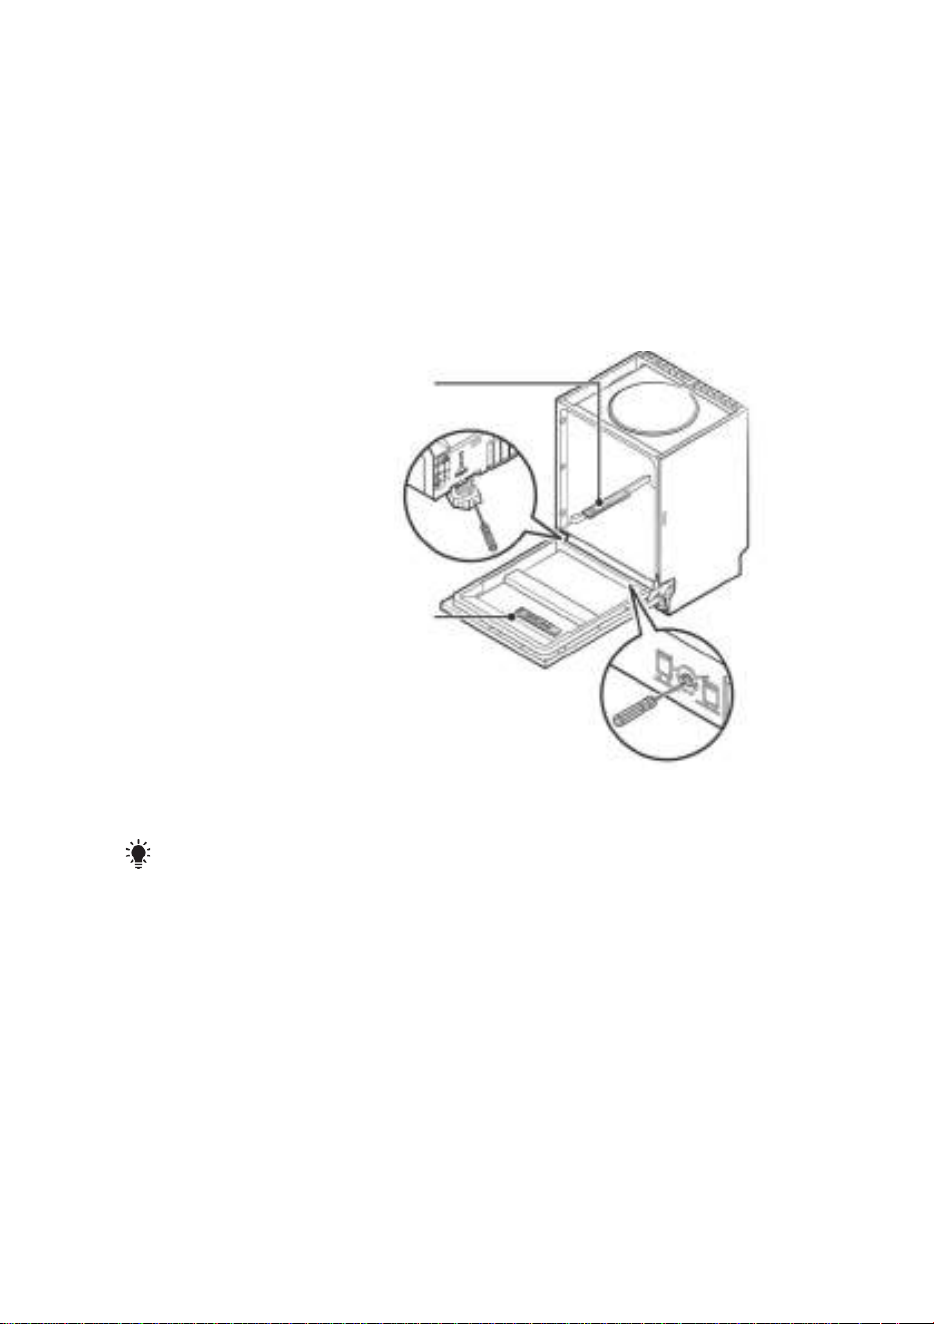
2
4
Passo 5. Nivelamento da máquina de lavar louça
A máquina de lavar louça deve estar nivelada para o bom funcionamento do
tabuleiro para pratos e para o desempenho da lavagem.
1.
Coloque um nível na porta e na calha dentro da cuba, como mostrado para
verificar se a máquina de lavar louça está nivelada.
2.
Nivele a máquina de lavar louça, ajustando os três pés niveladores individualmente.
3.
Ao nivelar a máquina de lavar loiça, tenha cuidado para não deixar a máquina
de lavar loiça tombar.
Nível de verificação da
frente para trás
Nível de verificação
de um lado ao
outro
PARA CIMA
PARA BAIXO
NOTA:
A altura máxima de ajuste dos pés é de 50 mm.
2
5
CONSELHOS PARA A
RESOLUÇÃO DE PROBLEMAS
Antes de ligar para o apoio técnico
A revisão dos gráficos nas páginas seguintes pode evitar ter de telefonar para o apoio
Problema
Causa Possível
O que fazer?
A máquina de
lavar louça não
arranca
Fusível queimado ou
curto-circuito
Substitua o fusível ou reinicie o disjuntor
Remova qualquer outro eletrodoméstico
que partilhe o mesmo
circuito com a máquina de lavar louça.
A fonte de
alimentação não
está ligada.
Certifique-se que a máquina de lavar loiça
está ligada e que a porta está devidamente
fechada. Certifique-se de que o cabo de
alimentação está corretamente ligado à
tomada elétrica.
A pressão da água
está baixa
Verifique se o abastecimento de água
está ligado corretamente e se a água
está ligada.
A porta da máquina de
lavar louça não está bem
fechada.
Certifique-se de fechar a porta
corretamente e de a trancar.
Água não
bombeada da
máquina de lavar
louça
A mangueira de
drenagem está dobrada
ou presa.
Verifique a mangueira de drenagem.
Filtro entupido
Verifique o filtro grosso.
A pia da cozinha
está entupida.
Verifique a pia da cozinha para ter a
certeza que está a escorrer corretamente.
Se o problema for que a pia da cozinha
não esteja a drenar, pode precisar de um
canalizador em vez de um técnico para a
máquina de lavar louça.
Espuma
Detergente incorreto
Use apenas detergente especial para
máquina de lavar louça para evitar espuma.
Se isso acontecer, abra a máquina de lavar
louça e deixe que a espuma evapore.
Acrescente água fria ao fundo da máquina
de lavar louça. Feche a porta da máquina
de lavar louça, depois selecione qualquer
ciclo. Inicialmente, a máquina de lavar louça
vai drenar a água. Abra a porta após a fase
de drenagem estar completa e verifique se
a espuma desapareceu. Repita, se
necessário.
técnico.
2
6
Problema
Causa Possível
O que fazer?
Auxiliar de enxaguamento
derramada.
Limpe sempre imediatamente os derrames
do abrilhantador.
Interior manchado
Pode ter sido usado um
detergente com corante.
Certifique-se de que o detergente não
contém corante.
Película branca na
superfície interna
Minerais de água dura
Para limpar o interior, use uma
esponja húmida com detergente para
máquina de lavar louça e use luvas de
borracha. Nunca utilize outro produto de
limpeza que não detergente para
máquinas de lavar louça, caso contrário
pode causar espuma.
Os talheres têm
manchas de
ferrugem
Os artigos afetados não
são resistentes à corrosão.
Evite lavar artigos não resistentes à
corrosão na máquina de lavar louça.
Não foi executado um
programa depois de
adicionar o sal à máquina
de lavar louça. Entraram
vestígios de sal no ciclo
de lavagem.
Execute sempre um programa de lavagem
sem louça depois de adicionar sal. Não
selecione a função Turbo (se existir).
A tampa está solta.
Verifique se a tampa do descalcificador
está segura.
Barulho de algo a bater
na máquina de lavar
louça
Um braço de pulverização
está a bater contra um
artigo num cesto
Interromper o programa e rearranjar os
elementos que obstruem o braço de
pulverização.
Ruído na máquina de
lavar louça
A louça está solta na
máquina de lavar louça.
Interromper o programa e reorganizar os
pratos.
Ruído de algo a bater
nos canos de água
Isto pode ser causado
pela instalação no local ou
pela secção transversal
da tubagem.
Isto não tem influência sobre a função da
máquina de lavar louça. Em caso de
dúvida, contacte um canalizador
qualificado.
Os pratos não
estão limpos
Os pratos não foram
carregados corretamente.
Veja as notas sobre "Carregar e
descarregar a sua máquina de
lavar louça".
O programa não foi
suficientemente eficaz.
Selecione um programa mais intensivo
2
7
Problema
Causa Possível
O que fazer?
Os pratos
não estão
limpos
Não foi dispensado
detergente suficiente.
Use mais detergente
ou mude o seu
detergente.
Os artigos estão a
bloquear o movimento
dos braços de
pulverização.
Reorganize os elementos para que
o pulverizador possa rodar
livremente.
A combinação do filtro não
está limpa ou não está
posicionada corretamente
na base da zona de
lavagem. Isto pode causar
o bloqueio dos jatos do
braço de pulverização.
Limpe e/ou ajuste o filtro
corretamente. Limpe os
jatos do braço de
pulverização.
Nebulosidade
do vidro.
Combinação de
água macia e
demasiado
detergente.
Utilize menos detergente se
tiver água macia e selecione
um ciclo mais curto para lavar
os vidros e limpá-los.
As manchas
brancas aparecem
em pratos e copos.
A área de água dura
pode causar
depósitos de
calcário.
Adicione mais detergente.
Marcas pretas ou
cinzentas nos
pratos
Os utensílios de
alumínio foram
esfregados contra os
pratos
Use um produto de
limpeza abrasivo suave
para remover estas
marcas.
O detergente ficou
no dispensador
Os pratos bloqueiam o
doseador de detergente
Recarregue os pratos
adequadamente
Os pratos
não estão
limpos
Carregamento incorreto
Carregue a máquina de lavar
louça como sugerido nas
instruções.
Os pratos são
descartados
muito cedo
Não esvazie a sua máquina de lavar
louça imediatamente após a lavagem.
Abra ligeiramente a porta para
permitir a fuga de vapor. Retire os
pratos quando a temperatura interior
for segura para tocar. Descarregue
primeiro o cesto inferior para evitar
que a água caia do cesto superior.

2
8
Os pratos não
Foi selecionado o
Com um programa curto,
programa errado
a temperatura de lavagem
é mais baixa, diminuindo o
rendimento da limpeza.
Escolha um programa com um
longo tempo de lavagem.
Uso de talheres
A drenagem da água é
com um
mais difícil com estes
revestimento de
artigos. Talheres ou pratos
baixa qualidade.
deste tipo não são adequados
para lavagem na máquina de
lavar louça.
Problema
Causa Possível
O que fazer?
estão limpos
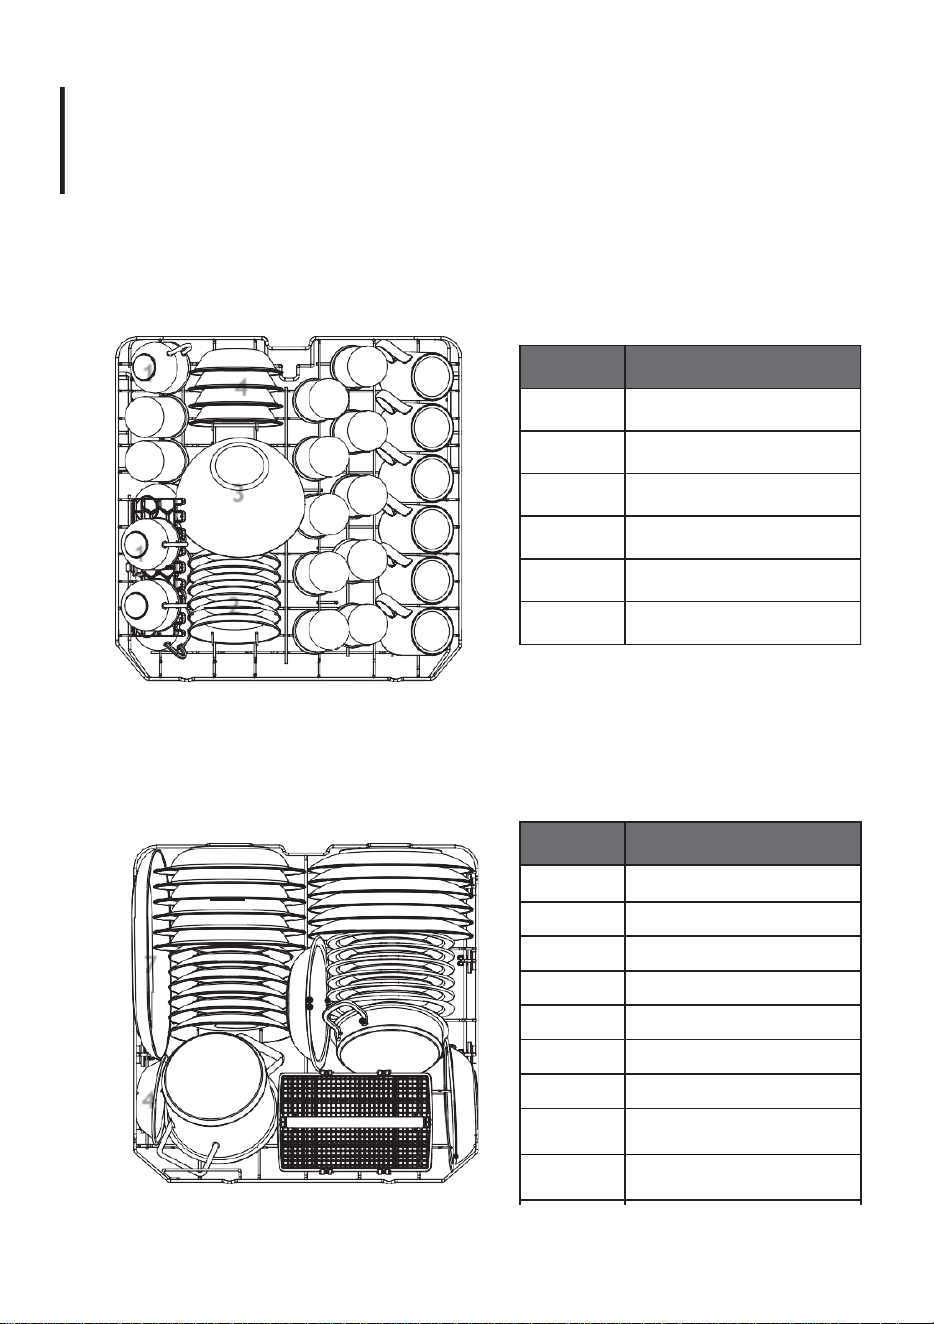
CARREGAR OS TABULEIROS DE
ACORDO COM EN60436:
1. Tabuleiro superior:
2. Tabuleiro inferior:
Número
Item
1
Chávenas
2
Pires
3
Taça de vidro
4
Taça de sobremesa
5
Copos
6
Taça média
Número
Item
7
Assadeira ovalada
8
Panela pequena
9
Pratos de sobremesa
10
Pratos de sopa
11
Cesto de talheres
12
Tigela de melanina
13
Panela de forno
14
Pratos de sobremesa de
melamina
15
Pratos rasos
1
4
3
5
6
1
2
10
15
7
9
14
12
13
4
8
12
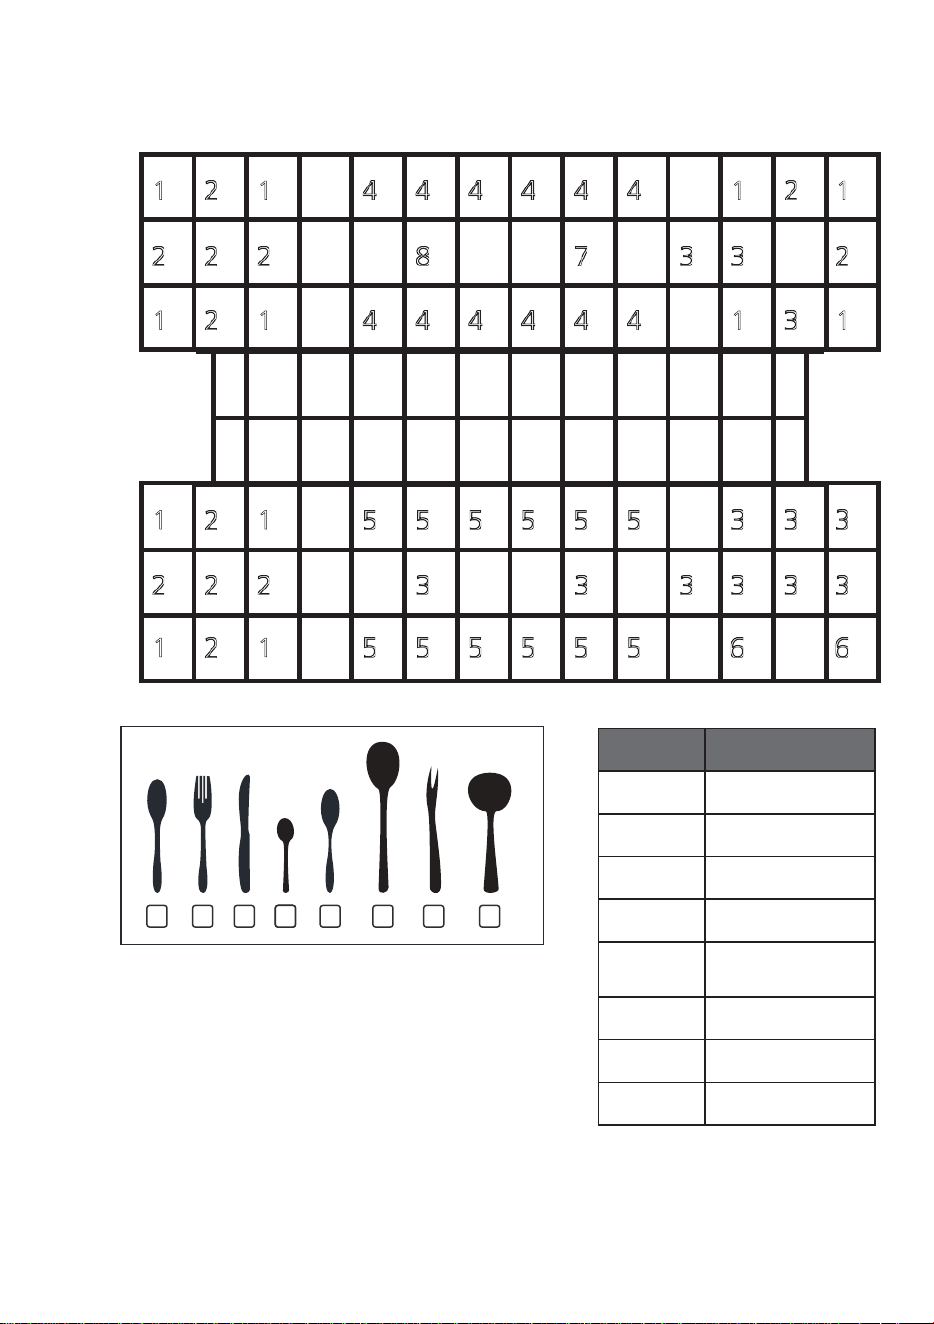
3. Cesto de talheres
Informações para testes de comparabilidade de
acordo com a EN 60436
Capacidade: 12 serviços
Posição do tabuleiro superior: posição
inferior
Programa: ECO
Ajuste do abrilhantador: Max
Amaciador: H3
Número
Item
1
Colher de sopa
2
Garfo
3
Faca de carne
4
Colher de café
5
Colher de
sobremesa
6
Colher de servir
7
Garfo de servir
8
Colher de molhos
1
3
2
6
4
4
4
5
7
8
Manual de Instruções
PARTE II: Versão Especial
E-CLVM6419W
E-CLVM6419X
Leia atentamente este manual
antes de usar a máquina de
lavar louça.
Guarde este manual para referência futura.

4
4
6
7
10
11
12
13
13
15
15
16
1
17
18
CONTEÚDO
4 USAR A SUA MÁQUINA DE LAVAR LOUÇA
4 Painel de controlo
6 Amaciador de água
8 Preparação e carregamento de pratos
11 Papel do abrilhantador e detergente
11 Enchimento do depósito do abrilhantador
12 Encher o dispensador de detergente
14 PROGRAMAÇÃO DA MÁQUINA DE LAVAR LOUÇA
14 Tabela do ciclo de lavagem
16 Iniciar um ciclo de lavagem
16 Mudar o programa de meio do ciclo
17 Esqueceu-se de adicionar um prato?
18 CÓDIGOS DE ERRO
19 INFORMAÇÃO TÉCNICA
NOTA:
Se não conseguir resolver os problemas sozinho, peça a ajuda a um técnico
profissional.
O fabricante, seguindo uma política de constante desenvolvimento e
atualização de produtos, pode fazer modificações sem aviso prévio.
Caso se perca ou esteja esta desatualizado, pode receber um novo manual
do fabricante ou fornecedor responsável.
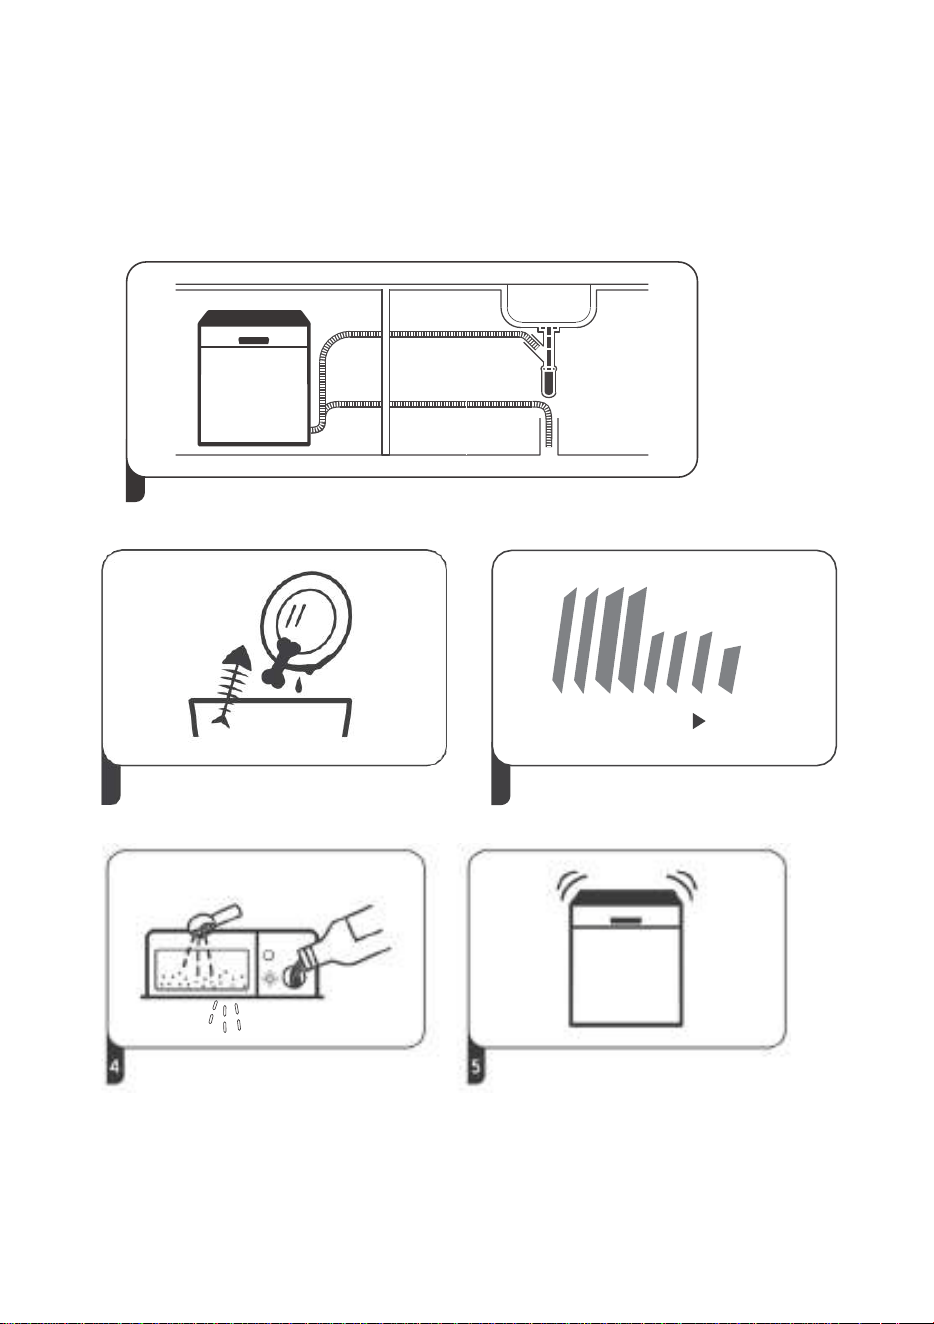
3
%FOU
SP
VFSB
GUIA RÁPIDO DO UTILIZADOR
Por favor, leia o conteúdo correspondente no manual de instruções para o
método detalhado de operação.
1
Instalar a máquina de lavar louça
(Consulte a seção 5 "INSTRUÇÕES DE INSTALAÇÃO" da PARTE I::
Versão Genérica)
3
4
5 Removendo o maior resíduo nos talheres. Carregar os tabuleiros
Selecionando um programa e
executando a máquina de lavar
louça.
Enchendo o dispensador
2 3
1
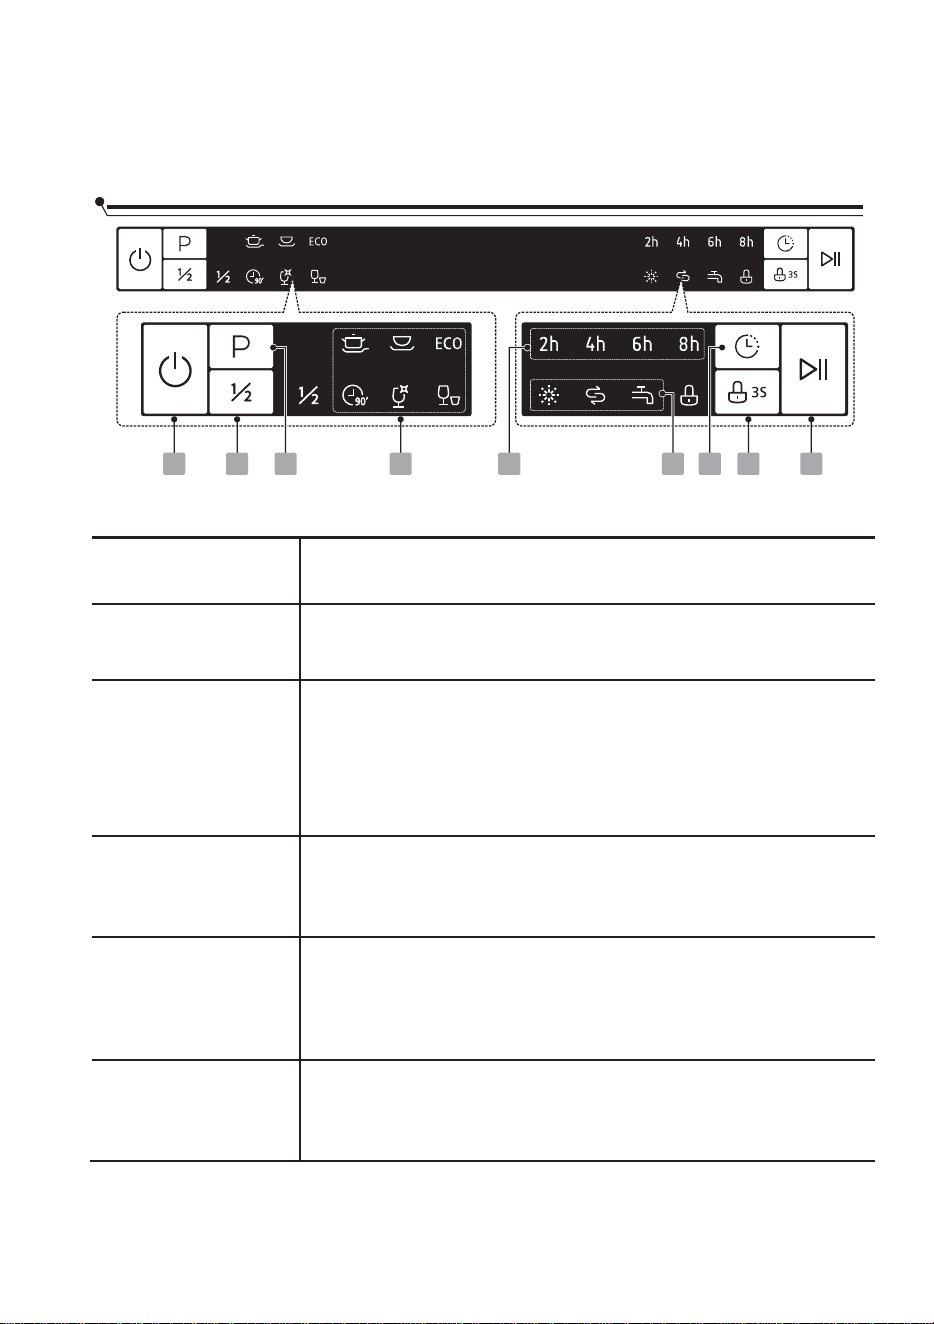
4
USAR A SUA MÁQUINA DE LAVAR LOUÇA
Operação (Botão)
1 Ignição
Pressione este botão para ligar a máquina de lavar louça, o visor
acender-se-á.
2 Programa
Selecione o programa de lavagem adequado e o indicador do
programa selecionado acender-se-á.
3 Meia carga
Se não tiver enchido a máquina de lavar louça, pode escolher
esta função para poupar energia e água. (Só pode ser usado com
programas Intensivo, , ECO, 90 min.) Universal
4 Inicio Diferido
Pressione este botão para definir os tempos de espera e o botão
correspondente acender-se-á.
5 Bloqueio para
crianças
Esta opção permite-lhe bloquear os botões do painel de controlo, exceto
o botão Ignição, para que as crianças não possam ligar a máquina de
lavar louça acidentalmente pressionando os botões do painel. Para
bloquear ou desbloquear os botões no painel de controlo, mantenha
premida a tecla Botão durante 3 segundos.
6 Início/ Pausa
Para iniciar o programa de lavagem selecionado ou fazer uma pause
quando a máquina de lavar louça estiver a funcionar.
Painel de controlo
1
3 2
7 5
648 9
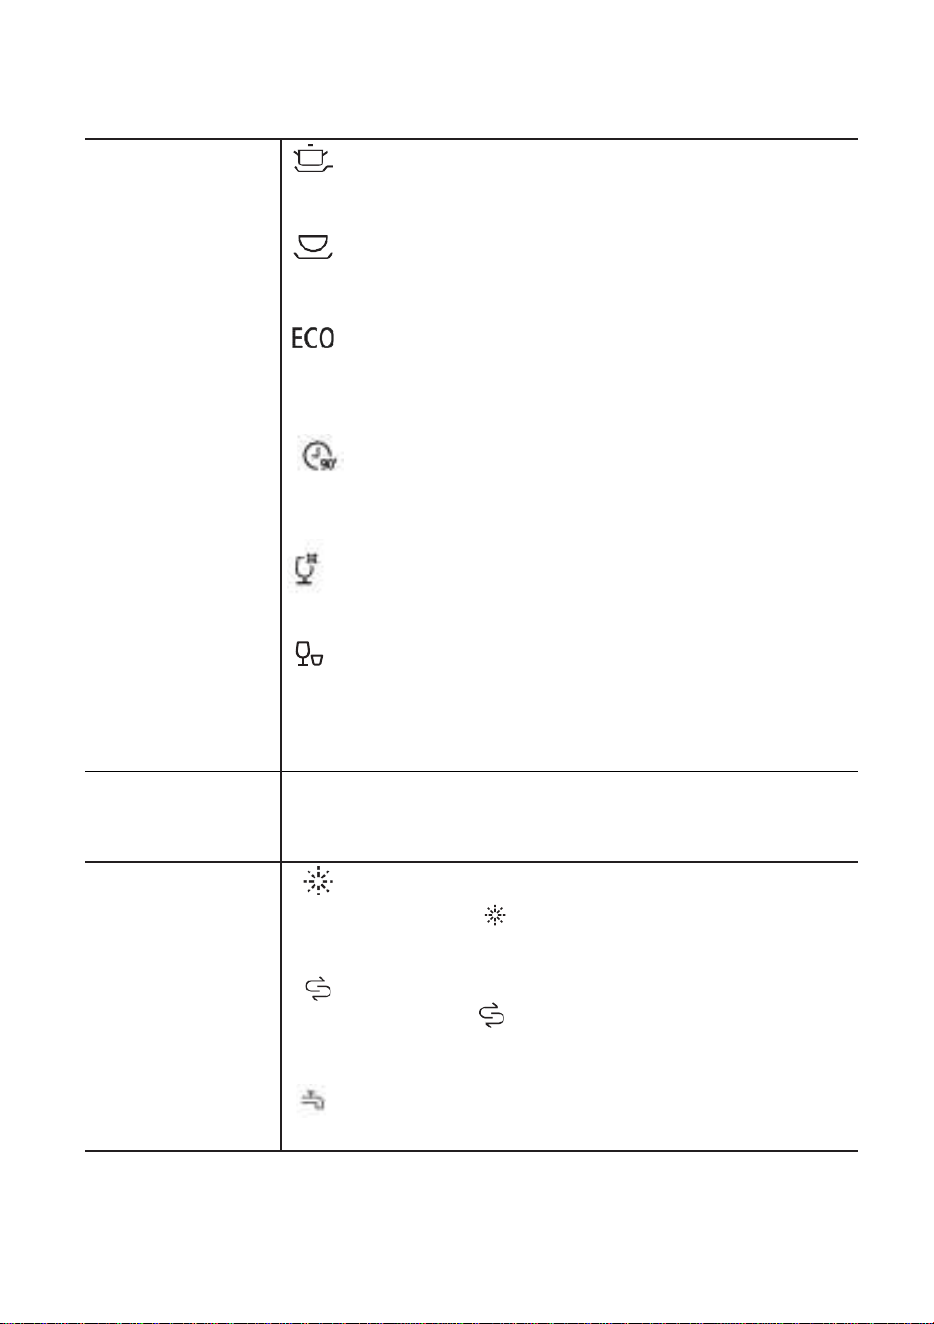
5
Ecrã
7 Indicador do
programa
Intensivo
Artigos muito sujos, incluindo tachos e panelas. Com
comida seca presa.
Universal
Para artigos normalmente sujos, como panelas, pratos,
copos e frigideiras ligeiramente sujas.
ECO
É o programa padrão adequado para cargas com um
sujidade normal e o programa mais eficiente em termos de
consumo combinado de energia e água para esse tipo de
louça.
90 min
Para cargas normalmente sujas que precisam de ser lavadas
rapidamente.
Vidro
Para chávenas e copos ligeiramente sujos.
Rápido
Um programa de lavagem mais curto para cargas ligeiramente
sujas que não necessitam de secar.
Botão
Para mostrar o tempo de início diferido (2h/ 4h/ 6h/ 8h)
9 Indicador de
advertência
Abrilhantador
Se o indicador " estiver aceso, significa que a máquina de
lavar louça não tem abrilhantador suficiente e deve ser
recarregado.
"
Sal
Se o indicador " " estiver aceso, resta muito pouco sal e
deve ser cheio de novo.
8 Botão início
diferido
Torneira
Se o indicador estiver aceso, significa que a torneira de
água está fechada.
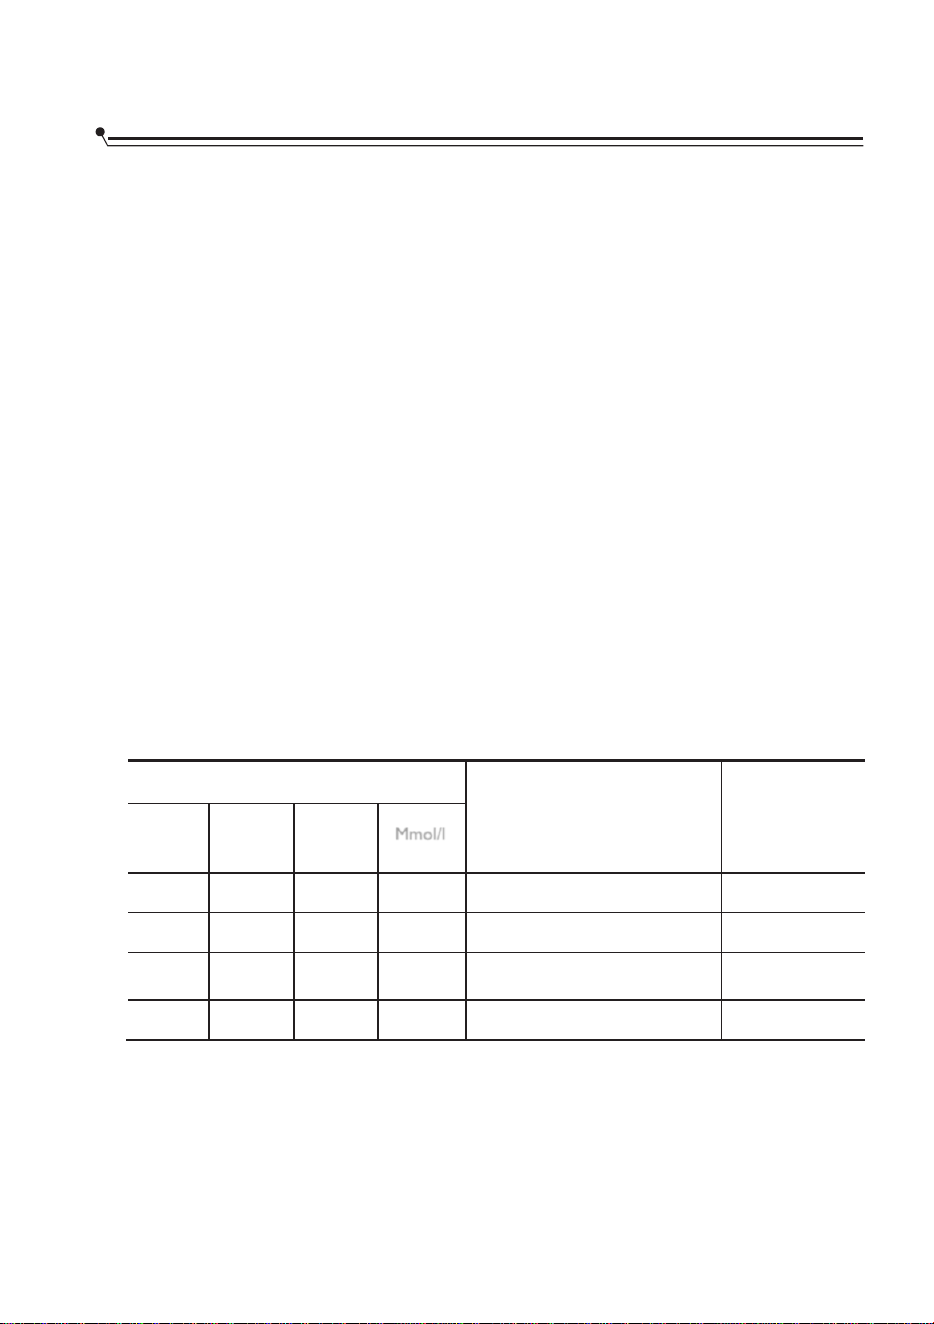
6
O amaciador de água deve ser ajustado manualmente, usando o disco de dureza
da água.
O amaciador de água é projetado para remover minerais e sais da água, o que
poderia ter um efeito prejudicial ou adverso sobre o funcionamento do
aparelho.
Quanto mais minerais houver, mais dura é a água.
O amaciador deve ser ajustado de acordo com a dureza da água na sua área. A sua
Autoridade de Água local pode aconselhá-lo sobre a dureza da água na sua área.
Ajustar o consumo de sal.
A máquina de lavar louça foi concebida para permitir o ajuste da quantidade de
sal consumida de acordo com a dureza da água utilizada. O objetivo é otimizar e
personalizar o nível de consumo de sal.
Siga os passos abaixo para ajustar o consumo de sal.
1. Ligue o aparelho;
2. Dentro de 60 segundos após ligar o aparelho, pressione a tecla Início/ Pausa mais de 5
segundos para entrar no modo de ajuste do amaciador de água.
3. Pressione a tecla Início/ Pausa para selecionar a configuração apropriada de acordo
com o seu ambiente local, irá mudar na seguinte sequência: H1-> H2-> H3-> H4-> H5->
H6;
4. Prima o botão Ignição para finalizar o modo de configuração
DUREZA DA ÁGUA
Nível de amaciador de água
Consumo de sal
(grama/ciclo)
Alemão
dH
Francê
s fH
Britâni
co
Clarke
Mmol/l
0 - 5
0 - 9
0 - 6
0 - 0,94
H1-> Rápido Indicador cintilante
0
6 - 11
10 - 20
7 - 14
1,0 - 2,0
H2-> Vidro Indicadores cintilantes
9
12 - 17
21 - 30
15 - 21
2,1 - 3,0
H3-> Vidro, rápido indicadores
cintilantes
12
18 - 22
31 - 40
22 - 28
3,1 - 4,0
H4->90 mins indicador cintilante
20
Amaciador de agua

7
23 - 34
41 - 60
29 - 42
4,1 - 6,0
H5->90 mins, rápido indicadores
cintilantes
30
35 - 55
61 - 98
43 - 69
6,1 - 9,8
H6->90 mins, Vidro indicadores
cintilantes
60
1 ° dH = 1,25 ° Clarke = 1,78 ° fH = 0,178 mmol
/ l Configuração de fábrica: H3
Contacte a sua administração de água local para obter informações sobre a dureza
do seu abastecimento de água.
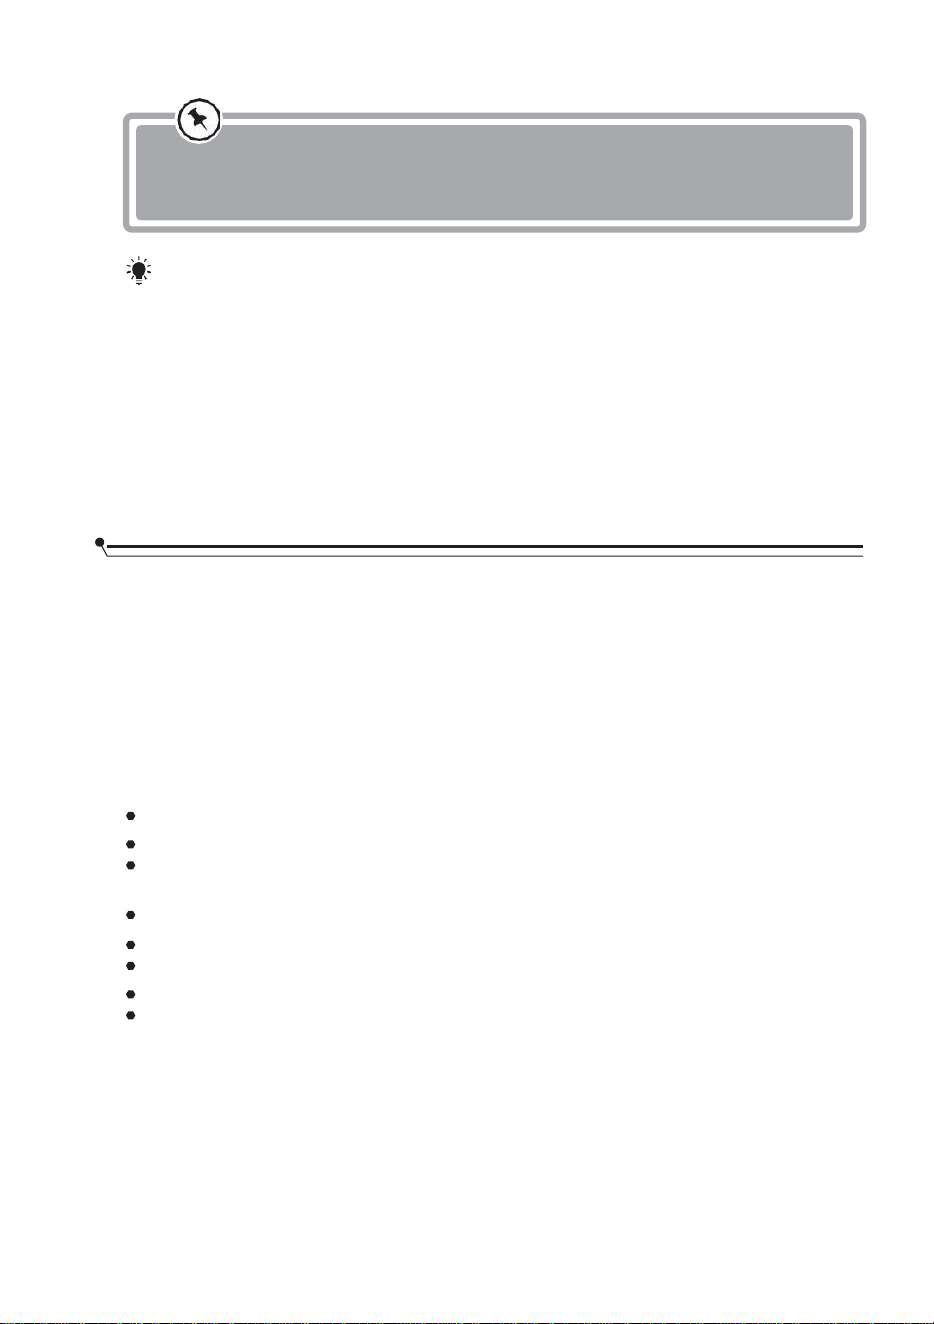
8
NOTA:
Se o seu modelo não tiver qualquer amaciante de água, pode omitir esta secção.
Amaciador de água
A dureza da água varia de lugar para lugar. Se for utilizada água dura na máquina
de lavar louça, formam-se depósitos nos pratos e utensílios.
O aparelho está equipado com um amaciador especial que utiliza um
recipiente de sal especificamente concebido para remover o calcário e os
minerais da água.
Considere comprar utensílios que sejam identificados como seguros para a máquina de
lavar louça.
Para determinados itens, selecione um programa com a temperatura mais baixa
possível. Para evitar danos, não retire os copos e talheres da máquina de lavar louça
imediatamente após o programa ter terminado.
Para lavar os seguintes talheres/pratos
Não são adequados
Talheres com cabos de madeira, porcelana em chifre ou madrepérola
Artigos de plástico que não são resistentes ao calor
Talheres mais antigos com peças coladas que não são resistentes à
temperatura. Talheres ou pratos revestidos.
Artigos de estanho ou cobre
Copos de cristal
Artigos de aço sujeitos a oxidação.
Pratos de madeira
Artigos feitos de fibras sintéticas.
Têm certas limitações
• Alguns tipos de vidro que podem tornar-se opacos após uma série de lavagens
• Os componentes de prata e alumínio tendem a perder a cor durante a lavagem
• Os padrões de vidro podem desvanecer-se se forem lavados frequentemente
Consulte a secção 3 “Colocar o sal no amaciador" da PARTE
Ⅰ: Versão genérica, se a sua máquina de lavar louça não tiver sal.
Preparação e carregamento de pratos

9
Recomendações para o carregamento da máquina de lavar louça.
Elimine grandes quantidades de restos de comida. Amoleça os restos de comida
queimada em frigideiras. Não é necessário enxaguar a louça com água corrente.
Para obter o melhor desempenho da sua máquina de lavar louça, siga estas
orientações de carregamento.
(As características e aparência dos cestos e cestos de talheres podem
variar do seu modelo).
Coloque os artigos na máquina de lavar louça da seguinte forma:
• Itens como chávenas, copos, potes/ panelas, etc. são orientados para baixo.
• Os elementos curvos, ou aqueles com reentrâncias, devem ser
carregados com uma inclinação que permita o escoamento da água.
• Todos os utensílios estão empilhados em segurança e não podem tombar.
• Todos os utensílios são posicionados de modo a que os braços de
pulverização possam rodar livremente durante a lavagem.
• Carregar itens ocos como chávenas, copos, frigideiras, etc. Com a abertura
virada para baixo para que a água não se possa acumular no recipiente ou
numa base profunda.
• Os pratos e talheres não devem ser colocados um dentro do outro, nem
devem ser cobertos um pelo outro. Para evitar danos, os vidros não devem
tocar-se.
• O cesto superior foi concebido para segurar loiça mais leve e delicada, como
copos, chávenas de café e de chá.
• Facas de lâmina comprida armazenadas na vertical são um perigo
potencial!
• Talheres compridos e/ou afiados, tais como facas de trinchar, devem ser
colocados horizontalmente no cesto superior.
• Por favor, não sobrecarregue a sua máquina de lavar louça. Isto é
importante para bons resultados e um consumo de energia razoável.
NOTA:
Itens muito pequenos não devem ser lavados na máquina de lavar louça, pois
podem facilmente cair do cesto.
Remoção dos pratos
Para evitar que a água pingue do cesto superior para o cesto inferior,
recomendamos que esvazie primeiro o cesto inferior e depois o cesto superior.
ADVERTÊNCIA
Os artigos vão estar quentes! Para evitar danos, não retire
copos e talheres da máquina de lavar louça durante cerca
de 15 minutos após o programa ter terminado.
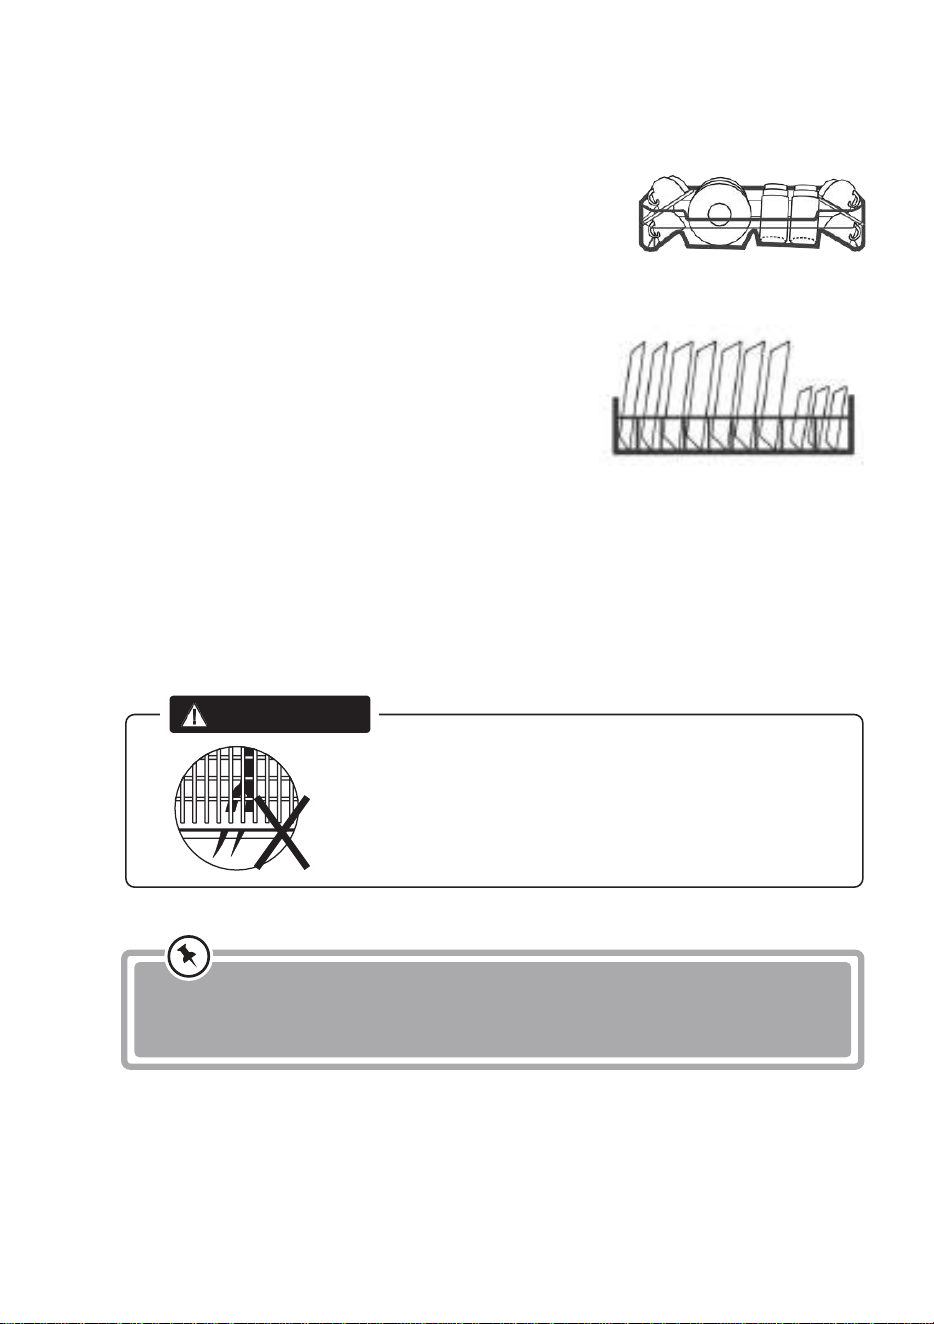
10
Carregar o cesto superior
O cesto superior foi concebido para segurar louça de
mesa mais delicada e leve, como copos, chávenas de café
e de chá
e pires, bem como pratos, pequenas tigelas rasas e
frigideiras (desde que não estejam muito sujas). Posicione
pratos e utensílios de cozinha para que não sejam movidos
pelo
spray de água.
Carregar o cesto inferior
Sugerimos que coloque os artigos maiores e os mais
difíceis de limpar no tabuleiro inferior: tais como
panelas, frigideiras, tampas, pratos e taças de servir,
como mostrado na figura abaixo. É preferível colocar os
pratos de servir e as tampas na lateral das grelhas para
evitar bloquear a rotação do braço de pulverização superior. O diâmetro
máximo recomendado para pratos contra o doseador de detergente é de 19
cm, o que não impede a sua abertura.
Carregar o cesto dos talheres
Os talheres devem ser colocados no cesto para talheres separados uns dos
outros nas posições apropriadas, e certifique-se de que os utensílios não se
amontoam, pois isso pode causar uma limpeza deficiente.
ADVERTÊNCIA
Não permita que nenhum item se
estenda através do fundo.
Carregue sempre utensílios afiados
com a ponta afiada para baixo!
Para um melhor efeito de lavagem, carregue os tabuleiros de acordo com
as instruções de carga standard da última secção das opções de carga
PEÇAS, na última secção da PARTE 1: Versão genérica
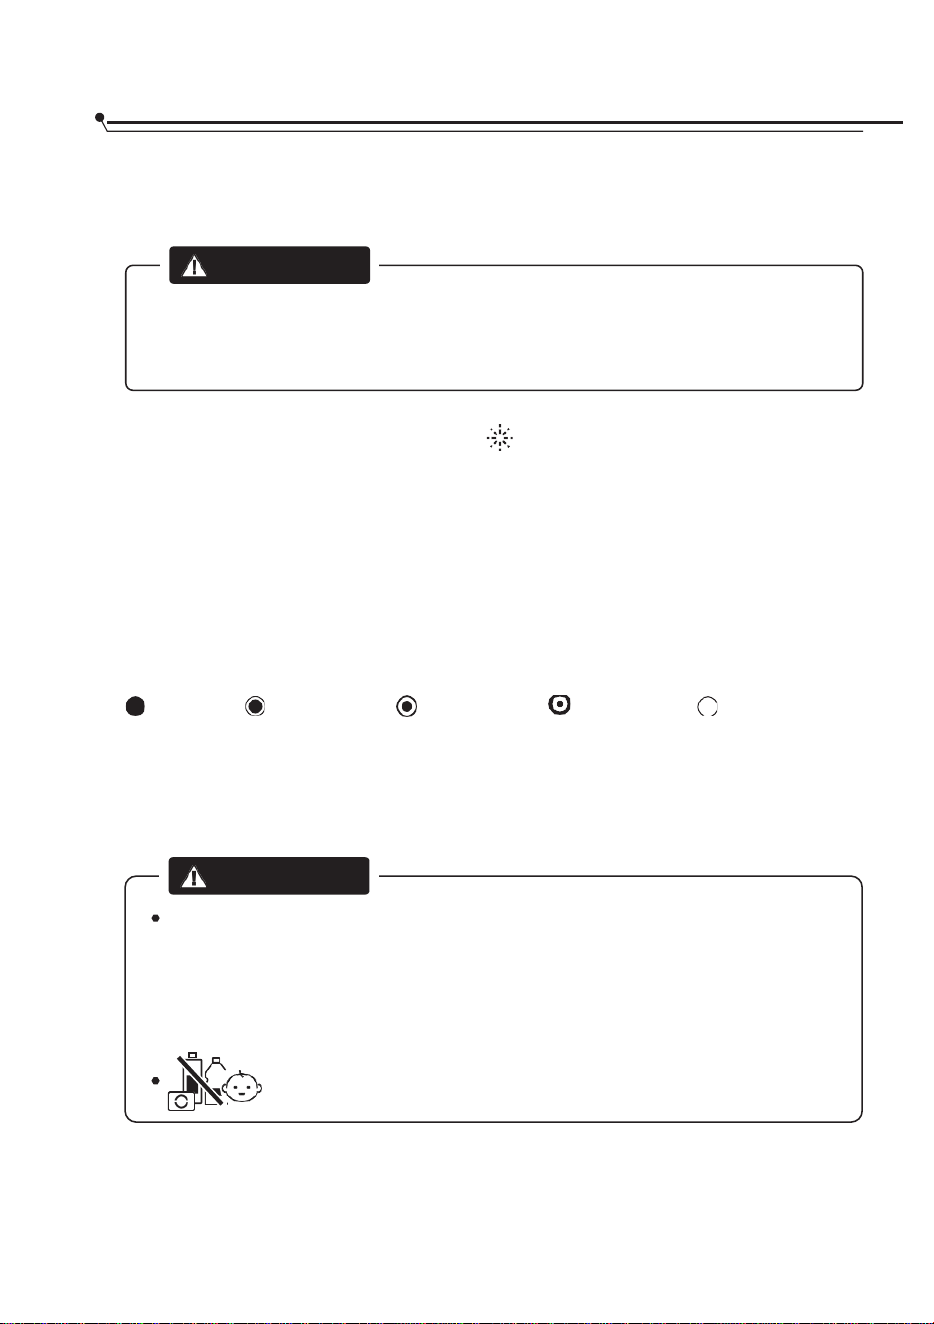
11
Função do agente de enxaguamento
e detergente
O agente de enxaguamento é libertado durante o enxaguamento final para evitar a
formação de gotículas de água na sua louça, o que pode deixar manchas e riscos.
Também melhora a secagem, permitindo que a água escorra da louça. A sua máquina
de lavar loiça foi concebida para utilizar um agente de enxaguamento líquido.
Quando reabastecer o dispensador de abrilhantador.
A menos que a luz de aviso do abrilhantador ( ) no painel
esteja acesa, pode sempre estimar a quantidade pela cor do
indicador do nível ótico junto à tampa.
Quando o reservatório do abrilhantador estiver cheio, o
indicador estará completamente escuro. O tamanho da
mancha escura diminui à medida que o abrilhantador se
esgota. Nunca deixe o nível do abrilhantador ficar abaixo
de 1/4 cheio.
Indicador do nível de
enxaguamento
À medida que o abrilhantador diminui, o tamanho do ponto negro no
indicador do nível do abrilhantador muda, como ilustrado abaixo.
Completo 3/4 1/2 1/4 Vazio
Função do detergente.
Os ingredientes químicos que compõem o detergente são necessários para
remover e dissolver toda a sujidade na máquina de lavar loiça. A maioria dos
detergentes de qualidade comercial são adequados para este fim.
ADVERTÊNCIA
Utilize apenas um agente de enxaguamento de marca para a sua máquina de lavar louça.
Nunca encha o dispensador de agente de enxaguamento com qualquer outra substância
(por exemplo, agente de limpeza para máquinas de lavar louça, detergente líquido). Isto
iria danificar o aparelho.
ADVERTÊNCIA
Uso correto do detergente
Utilize apenas detergentes feitos especificamente para máquinas de lavar
louça. Mantenha o seu detergente fresco e seco.
Não coloque detergente em pó no doseador até estar pronto para lavar a
louça
O detergente para máquina de lavar louça é
corrosivo! Mantenha o detergente para máquina de
lavar louça fora do alcance das crianças.
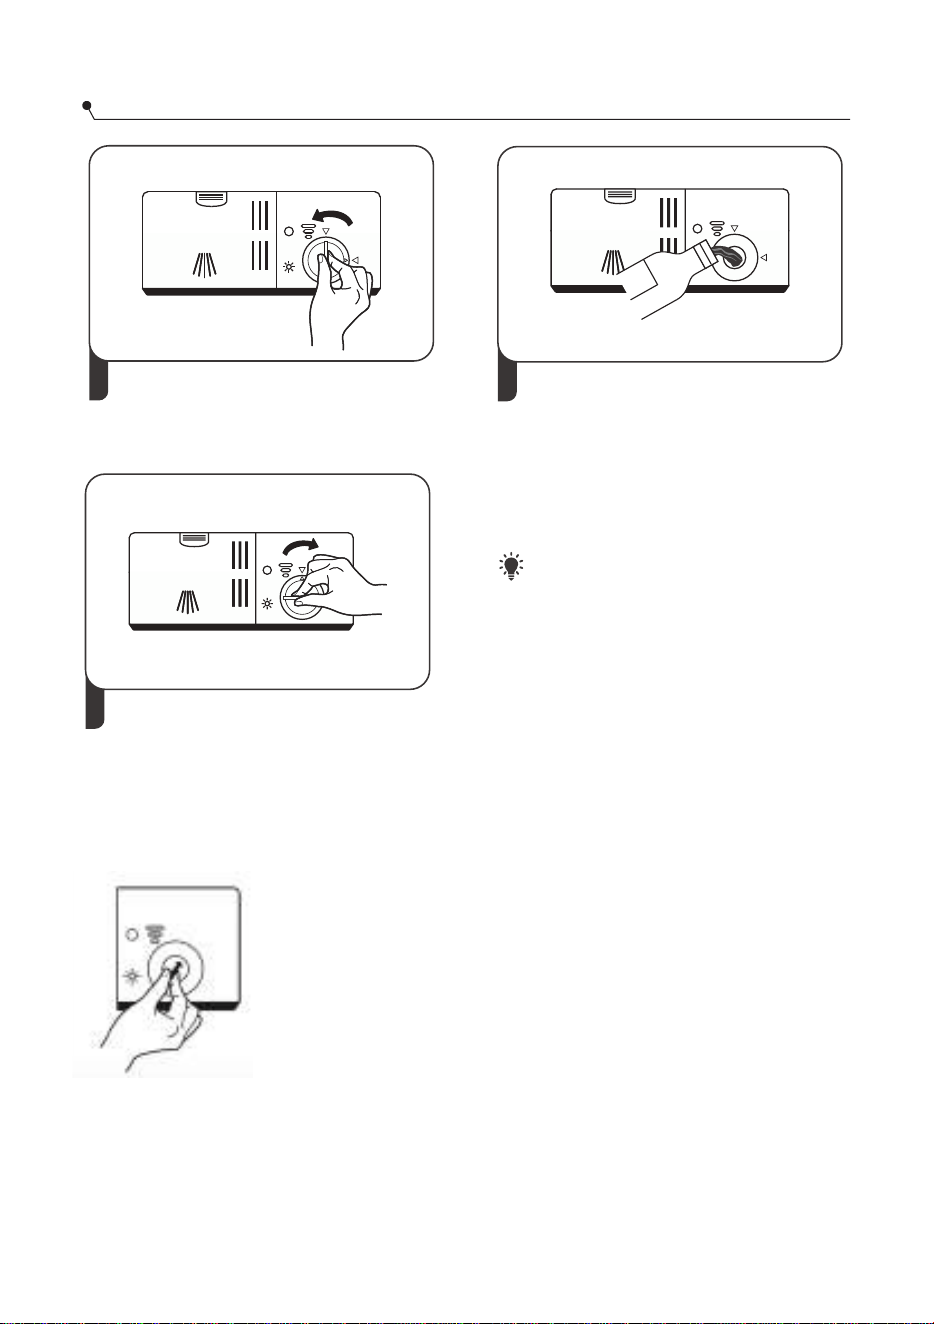
12
1
Retire a tampa do
reservatório do
abrilhantador girando-a para
a esquerda.
2 Deite cuidadosamente
o agente de brilho no
distribuidor de
abrilhantador, evitando
que este transborde.
NOTA:
Limpe o abrilhantador derramado
com um pano absorvente para evitar
a formação excessiva de espuma
durante a próxima lavagem.
3 Feche a tampa do
reservatório do
abrilhantador rodando-a no
sentido dos ponteiros do
relógio.
Ajuste do reservatório do abrilhantador
Rode o botão indicador de abrilhantador para um número entre 1
e 6. Quanto maior o número, mais líquido a
máquina de lavar louça usa. Se os pratos não
secarem corretamente ou ficarem manchados,
ajuste o mostrador para o próximo número mais
alto até que os seus pratos fiquem impecáveis.
Reduza-o se houver manchas pegajosas
esbranquiçadas nos seus pratos ou uma película
azulada nos vidros ou talheres.
Enchimento do reservatório do
1
2
3
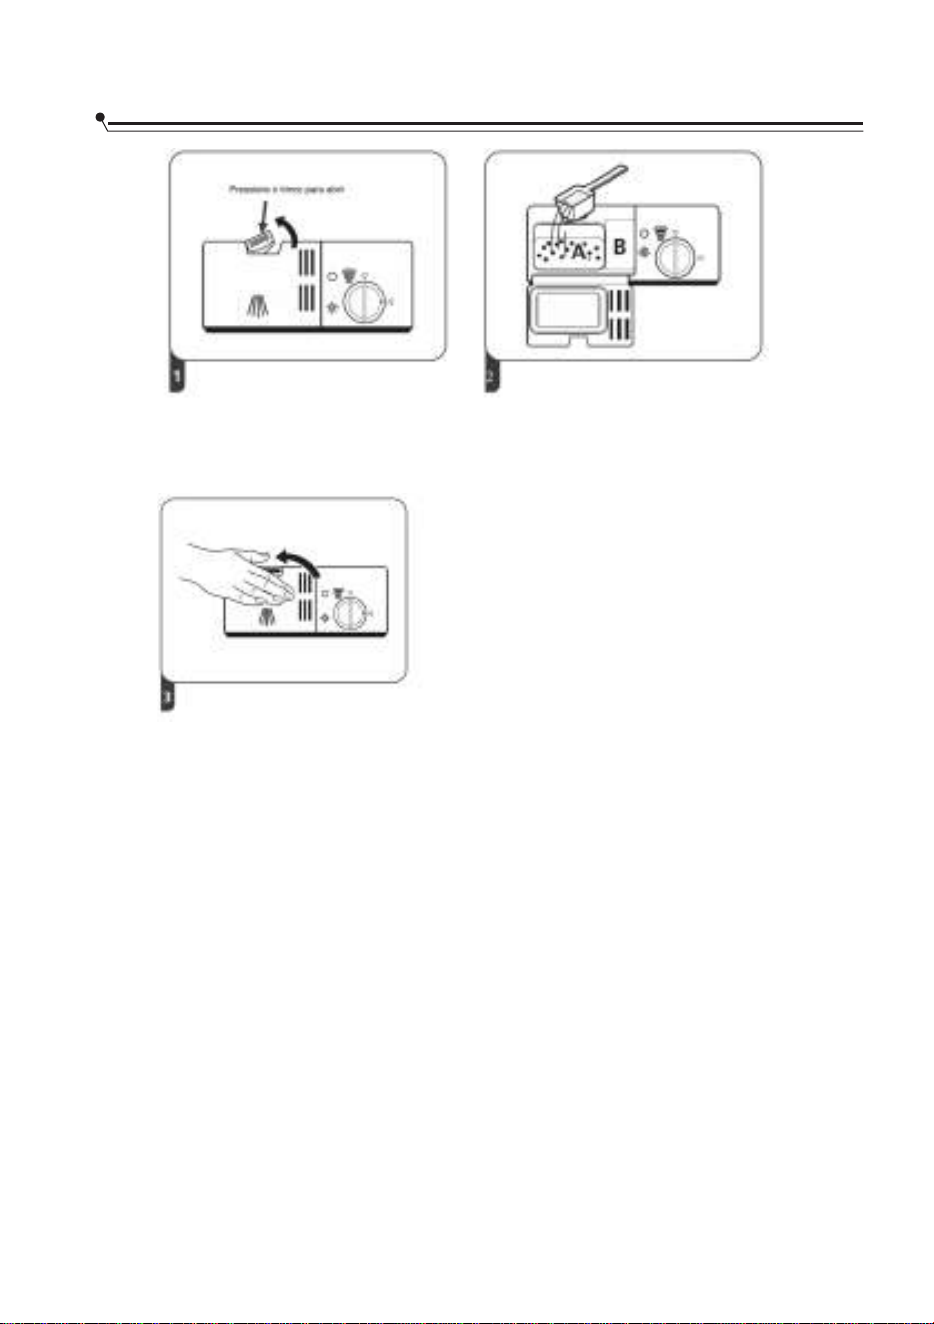
13
Pressione o trinco para abrir
para abrir a
tampa.
3
NOTA:
Por favor note que dependendo de quão suja a água está, a configuração pode
ser diferente.
Observe as recomendações do fabricante na embalagem do detergente.
Encher o dispensador de detergente
Adicione detergente na maior
cavidade (A) para o ciclo de
lavagem principal.
Para cargas de lavagem mais sujas,
adicione também um pouco de
detergente na cavidade mais
pequena
(B) para o ciclo de pré-lavagem.
Feche a tampa e pressione até que ela
se encaixe no lugar.
Pressione o trinco de libertação
do
distribuidor de detergente
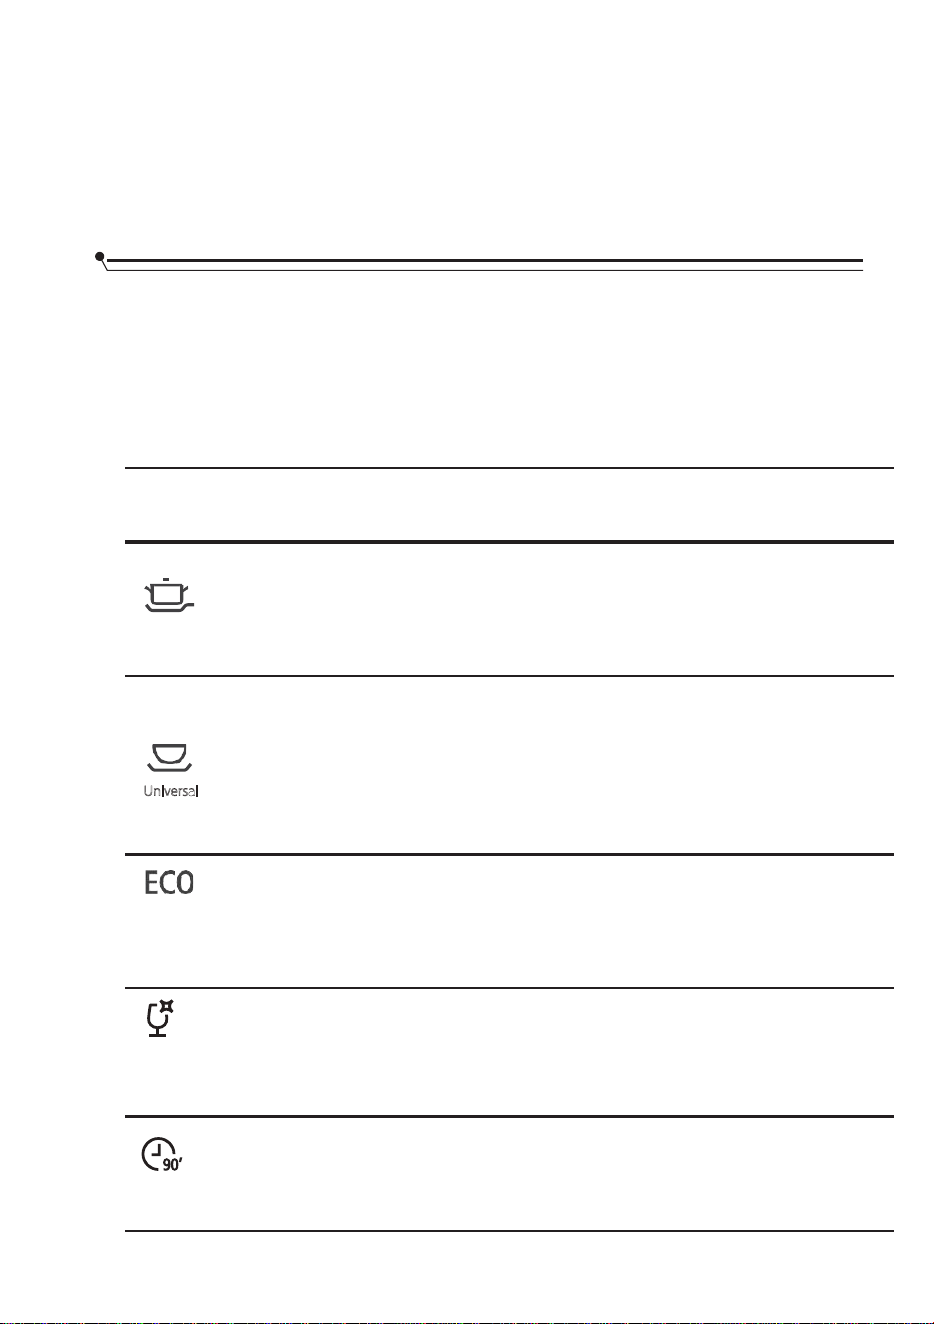
14
PROGRAMAÇÃO DA MÁQUINA DE LAVAR
LOUÇA
A tabela seguinte mostra que programas são melhores para os níveis de resíduos de
alimento e qual a quantidade de detergente necessária. Também exibe uma variedade de
informações sobre os programas.
Meios: é necessário recarregar o abrilhantador no distribuidor do abrilhantador.
Programa
Descrição do ciclo
Pré-lavagem
/ detergente
principal
Tempo de
funcionamento
(min)
Energia
(kWh)
Água
(l)
Abrilhantador
Pré-lavagem (50
°C)
⚫
Lavagem (65 °C)
Enxaguar
Enxaguar
Enxaguar (65 °C)
Secar
g
ou 2
unidades)
4/16
205
1,621 17,8
Intensivo
Pré-lavagem (45
°C)
175
1,302
14,2
⚫
Lavagem (55 °C)
Enxaguar
Enxaguar (65 °C)
Secar
(*EN 60436)
Pré-lavagem
Lavagem (45 °C)
Enxaguar
(60 °C)
230
0,923
11.0
⚫
Secagem
Lavar
Enxaguar (50 °C)
Enxaguar
Enxaguar (65 °C)
Secagem
Vidro
120 1,100 14,2
⚫
Lavagem (60 °C)
90
1.35
11,5 ⚫
Enxaguar
Enxaguar (65 °C)
Secagem
unidade)
20 g (1
90 min
Tabela do ciclo de lavagem
(1
Universal
g
ou 2
unidades)
4/16
(1
g
ou 2
unidades)
4/16
(1
g
ou 2
unidades)
4/16
(1

15
Rápido
Lavar (50 °C)
Enxaguar
Enxaguar (45 °C)
2 0 g
30
0,751
11.2
NOTA:
EN 60436:
Este programa é o ciclo de teste. A informação para o teste de
compatibilidade cumpre com a norma EN . 60436
(1
unidade)
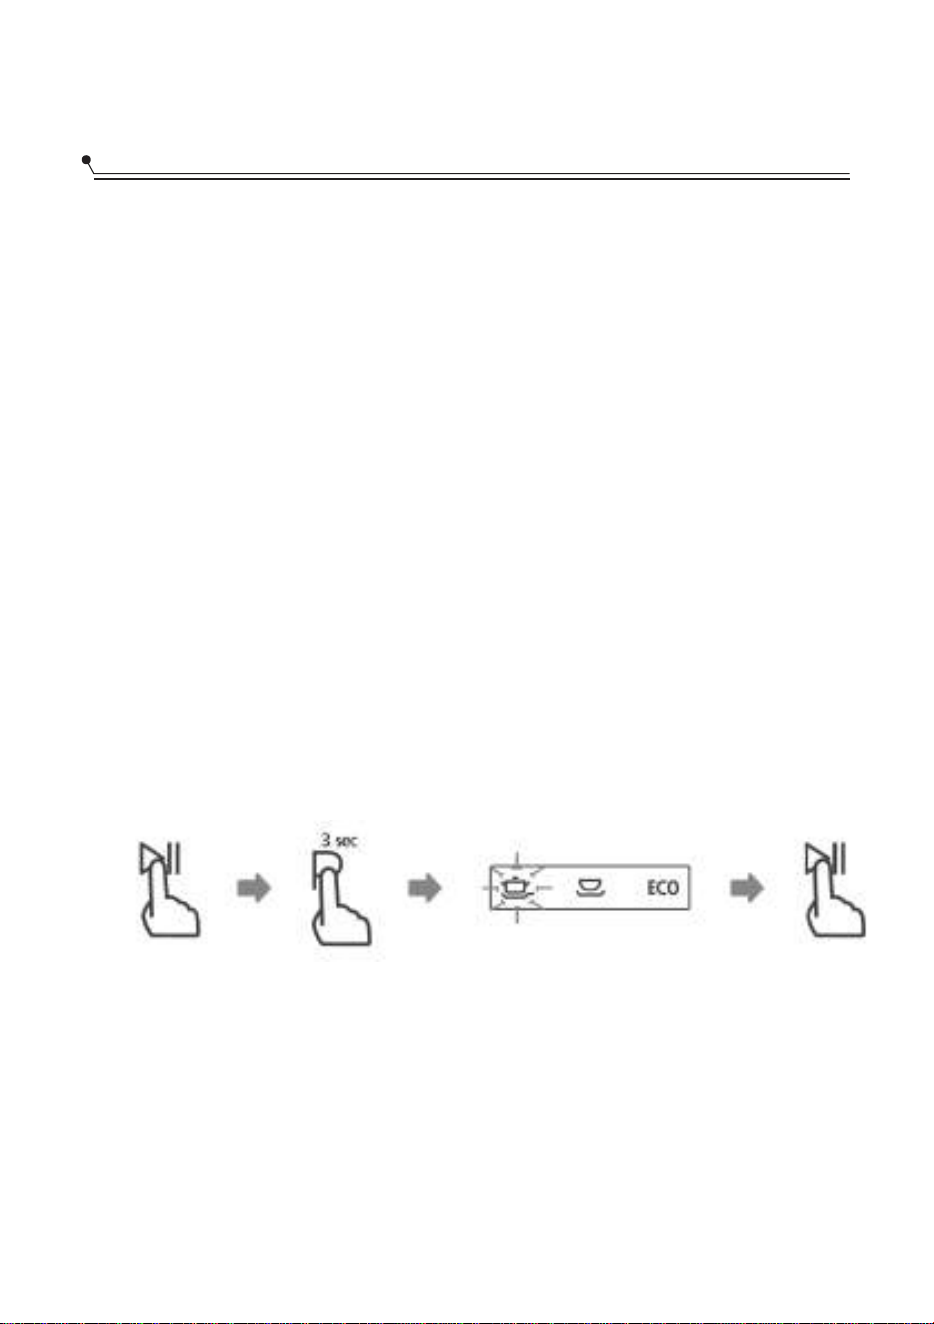
16
1. Retire o cesto inferior e superior, carregue a loiça e empurre-a para
trás. É recomendado carregar primeiro o cesto inferior e depois o cesto
superior.
2. Coloque o detergente.
3. Insira a ficha no rodapé. A fonte de alimentação refere-se à última página "Ficha
do produto". Certifique-se de que o abastecimento de água está ligado na pressão
máxima.
4. Feche a porta, pressione o botão Ignição para ligar a máquina.
5. Escolha um programa, a luz de resposta irá acender. Depois pressione o botão Início /
Pausa, a máquina de lavar louça iniciará o seu ciclo.
MUDAR O PROGRAMA A MEIO DO CICLO
Um ciclo de lavagem só pode ser alterado se estiver em funcionamento há pouco
tempo, caso contrário o detergente pode já ter sido libertado e a máquina de lavar
loiça já tiver drenado a água de lavagem. Se for este o caso, a máquina de lavar loiça
deve ser reiniciada e o doseador de detergente deve ser enchido de novo. Para
retomar o funcionamento da máquina de lavar louça, siga as instruções abaixo:
1. Pressione o botão Início/ Pausa para fazer uma pausa na lavagem.
2. Pressione o botão Programa durante mais de 3 segundos - o programa será cancelado.
3. Prima o Botão Programa para selecionar o programa desejado.
4. Pressione o botão Início/Pausa e após 10 segundos, a máquina de lavar louça começará
novamente a trabalhar.
Iniciar um ciclo de lavagem
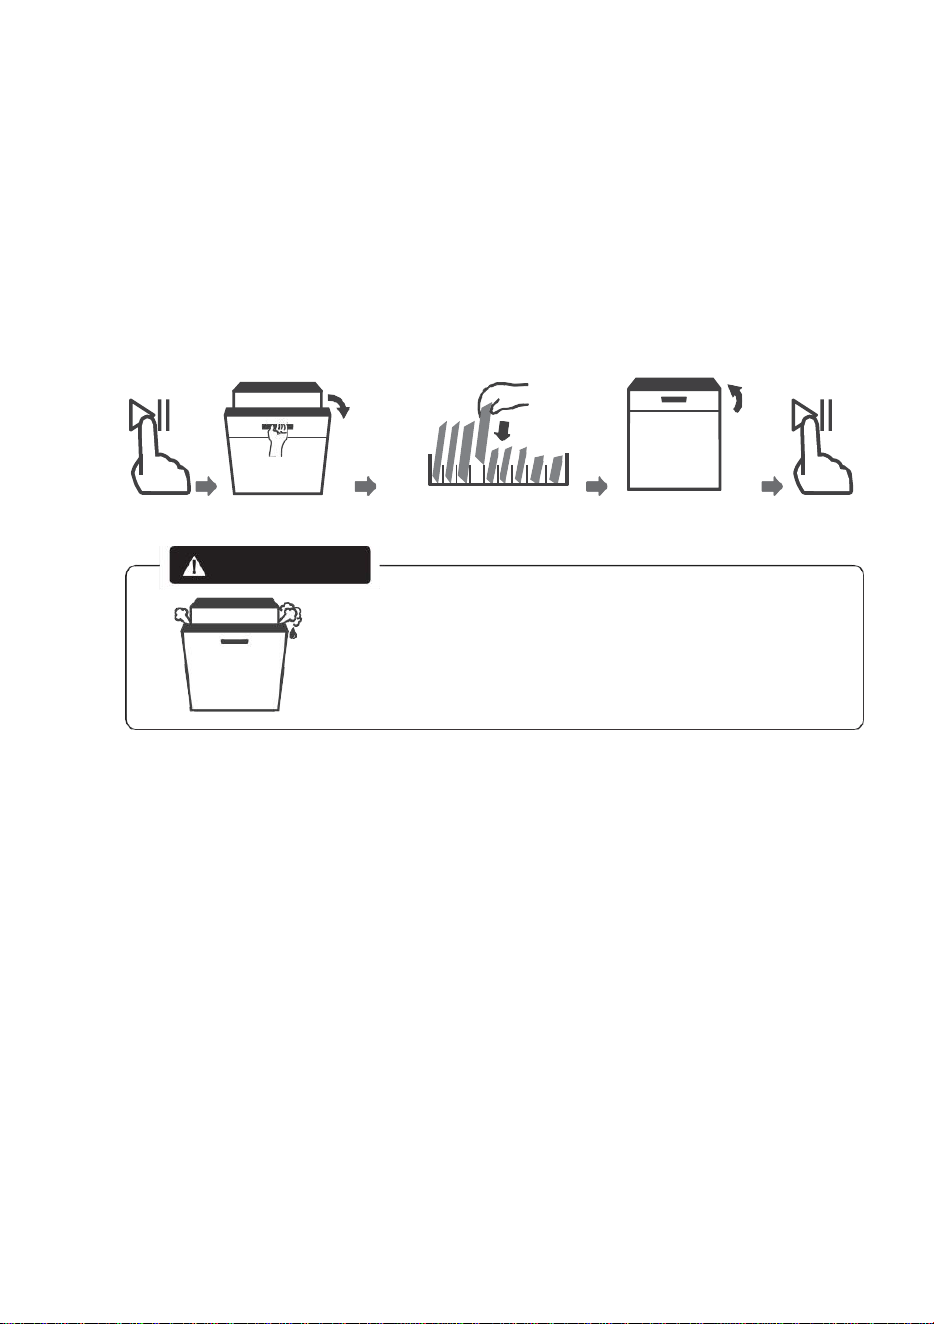
17
ESQUECEU-SE DE COLOCAR UM PRATO
Um prato esquecido pode ser adicionado a qualquer momento antes da
abertura do doseador de detergente. Se este for o caso, siga as instruções
abaixo:
1. Pressione o botão Início/ Pausa para fazer uma pausa na lavagem.
2. Espere 5 segundos e depois abra a porta.
3. Acrescente os pratos esquecidos.
4. Feche a porta.
5. Pressione o botão Início / Pausa após 10 segundos, a máquina de lavar louça começará a
funcionar. Depois de 5 segundos
ADVERTÊNCIA
É perigoso abrir a porta no
meio do ciclo, pois o vapor
quente pode queimá-lo.
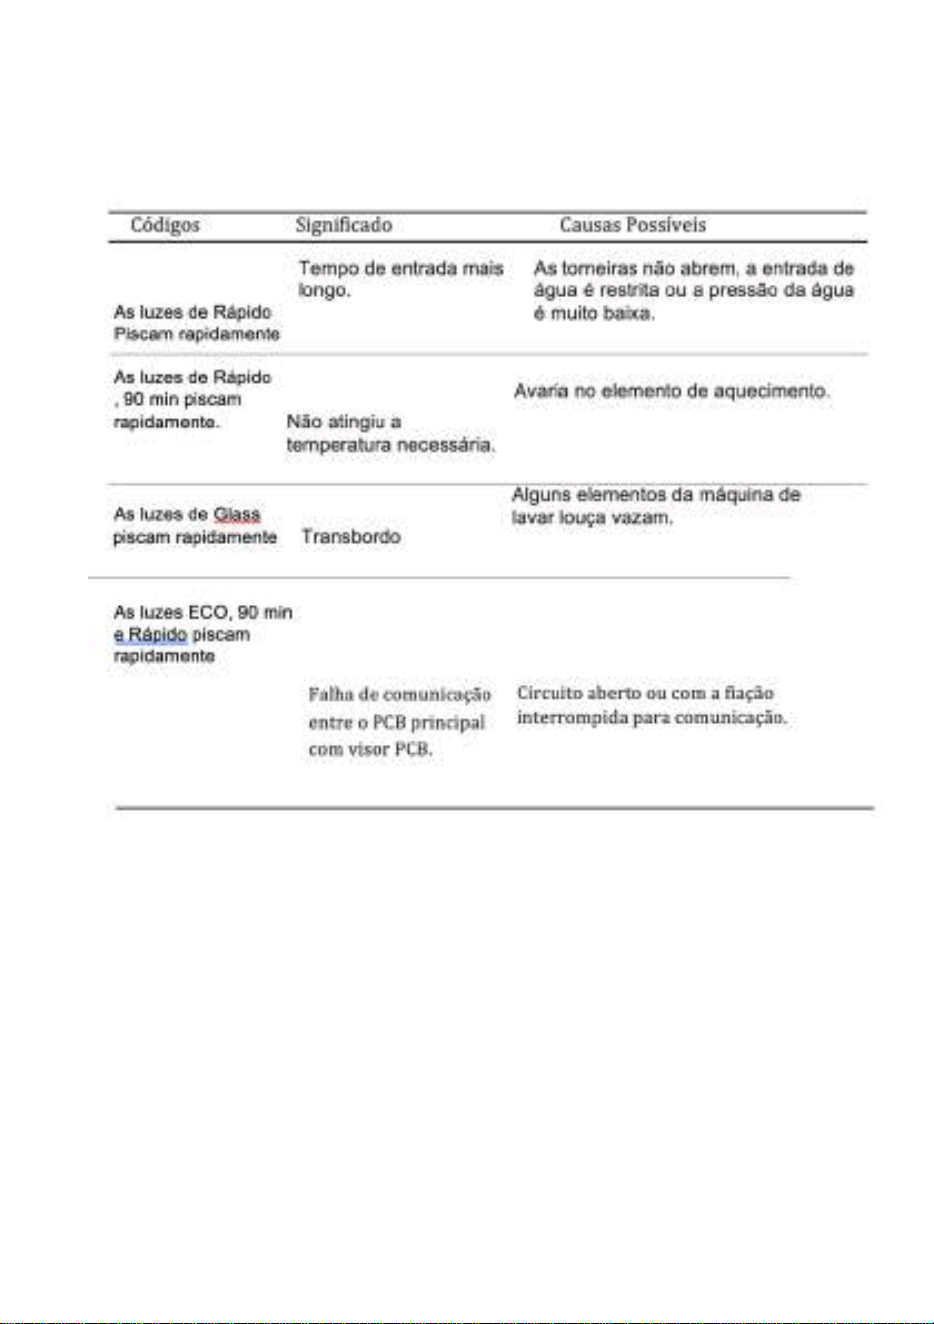
18
CÓDIGOS DE ERRO
Se houver uma avaria, a máquina de lavar loiça mostrará códigos de erro para os identificar:
Códigos Significado Causas Possíveis
Circuito aberto ou com a fiação
interrompida para comunicação.
ADVERTÊNCIA
Se ocorrer um transbordo, desligue o abastecimento principal de água antes de
contactar o apoio.
Se houver água na bandeja base devido ao enchimento excessivo ou a um pequeno
vazamento, a água deve ser removida antes de reiniciar a máquina de lavar louça.
ADVERTÊNCIA
Se ocorrer um transbordo, desligue o abastecimento principal de água antes de
contactar o apoio.
Se houver água na bandeja base devido ao enchimento excessivo ou a um pequeno
vazamento, a água deve ser removida antes de reiniciar a máquina de lavar louça.
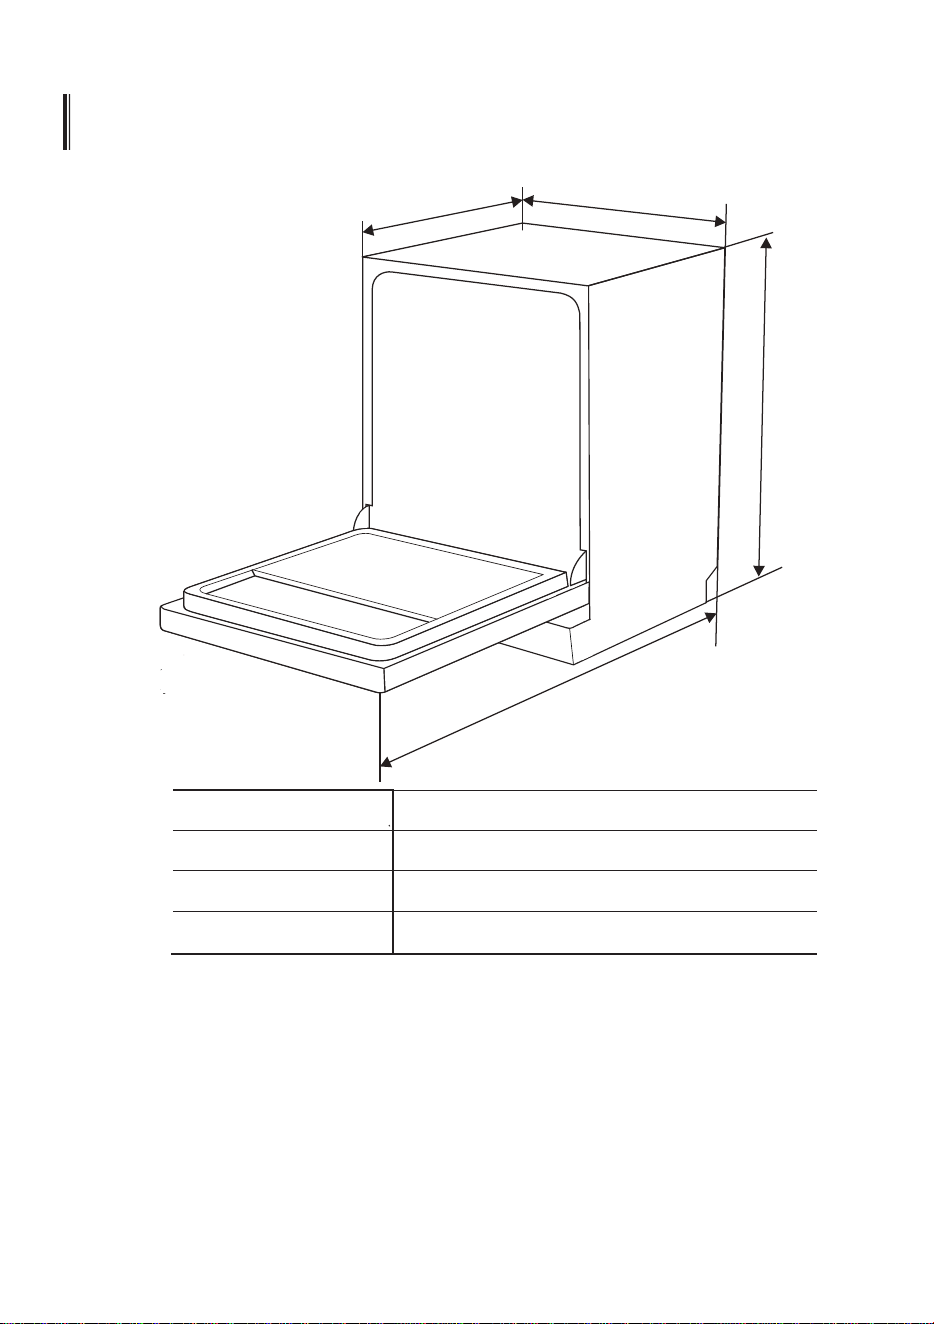
19
INFORMAÇÃO TÉCNICA
Altura (H)
845mm
Largura (W)
598mm
Profundidade (D1)
600mm (porta fechada)
Profundidade (D2)
1175mm (porta aberta 90°)
WW
D
1
D
1
HH
D
2
D
2
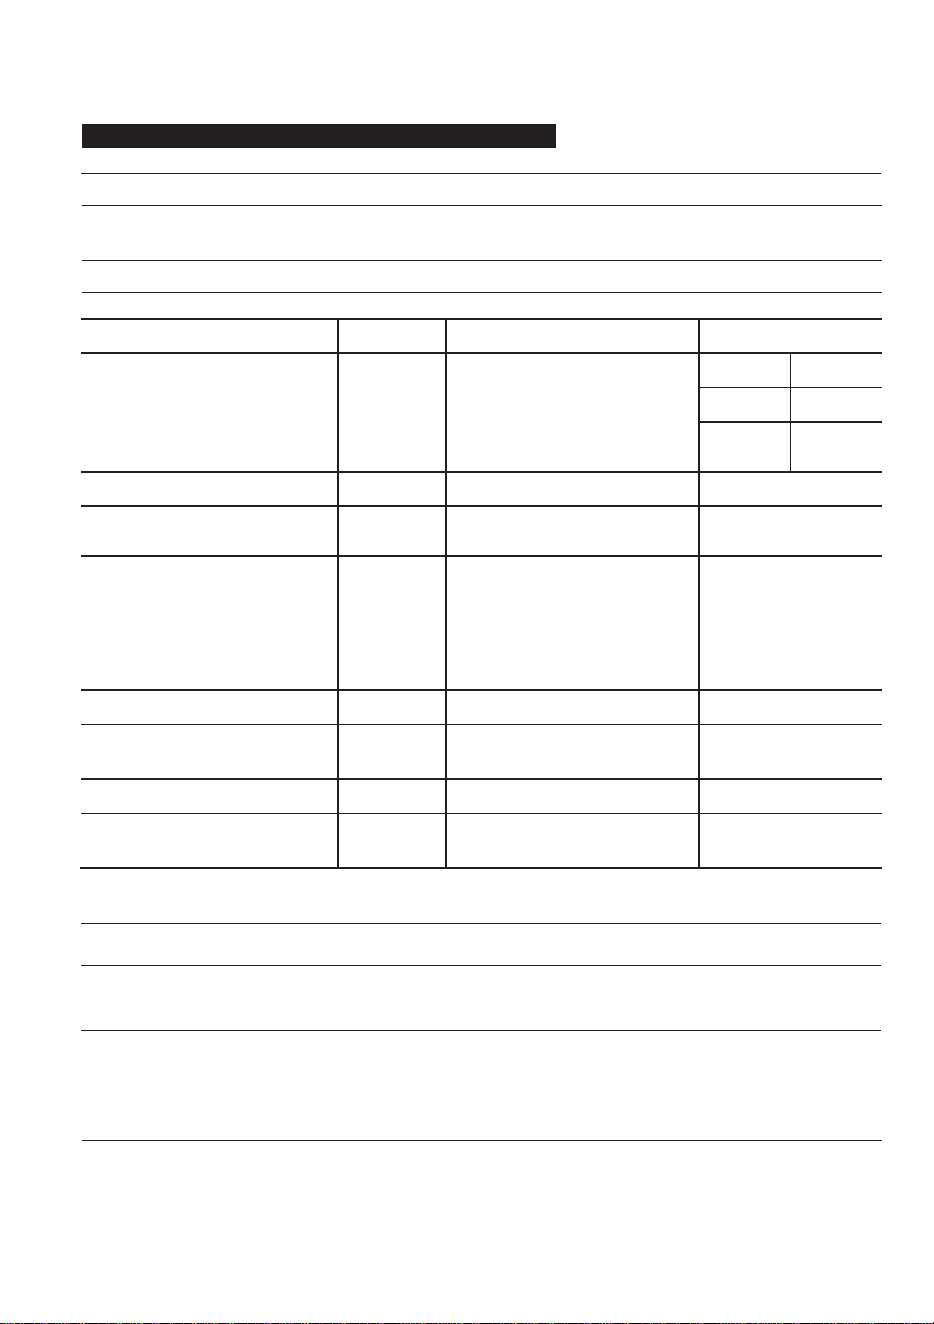
20
FICHA DE PRODUTO (EN60436)
Fornecedor: CORBERO
Endereço do fornecedor: KURBIN LANE, S.L. Pº del Ferrocarril, 335 4º 2ª 08860 Castel de Fels
Barcelona Espanha N.º IVA ES B65050288
Modelo: E-CLVM6419W E-CLVM6419X
Ficha de produto:
Parâmetro
Valor
Parâmetro
Valor
Capacidade nominal (a) (ps)
12
Dimensões em cm
Altura
85
Largura
60
Profundida
de
60
EEI (
a
)
55,9
Classe de eficiência energética
E (c )
Índice de desempenho de limpeza
(a)
1,125
Índice de desempenho de
secagem (a)
1,065
Consumo de energia em kWh
por ciclo, com base no
programa ECO usando água
fria. O consumo real de
energia dependerá da forma
como o aparelho for utilizado.
0,923
Consumo de água em litros
[por ciclo], com base no
programa eco. O consumo
real de água dependerá da
forma como o aparelho é
utilizado e da dureza da água.
11,0
Duração do programa (a) (h:min)
3:50
tipo
Em pé
Emissões de ruído acústico
aéreo (a) (dB(A) re 1 pW)
49
Classe de emissão acústica de
ruído
(a)
C (
c
)
Modo desligado (w)
0,49
Modo de espera (W)
N/A
Início diferido (w) (se aplicável)
1,00
espera em rede (W) (se
aplicável)
N/A
Duração mínima da garantia oferecida pelo fornecedor (b):
24months
Informação adicional
Link para o site do fornecedor, onde podem ser encontradas as informações do ponto 6 do Anexo
II do Regulamento da Comissão (UE) 2019/2022 (1)(b) www.corbero.es
(a) para o programa eco.
(b) As alterações a estes elementos não serão consideradas relevantes para efeitos do n.º 4 do
artigo 4.º do Regulamento [UE] 2017/1369.
(c) Se a base de dados de produtos gerar automaticamente o conteúdo final desta célula, o
fornecedor não introduzirá estes dados.
(1) Regulamento (UE) 2019/2022 da Comissão, de 1 de Outubro de 2019, que estabelece os requisitos de
conceção ecológica das máquinas de lavar loiça para uso doméstico nos termos da Diretiva 2009/125/CE do
Parlamento Europeu e do Conselho, que altera o Regulamento (CE) n.º 1275/2008 da Comissão e revoga o
Regulamento da Comissão. Regulamento (UE) nº 1016/2010 (ver a página 267 deste Jornal Oficial).


CERTIFICADO DE GARANTÍA
Imprescindible la presentación de la factura de compra acompañada del presente certicado de garantía.
Riesgos cubiertos.
Este aparato está garantizado contra cualquier defecto de funcionamiento, siempre que se destine a uso doméstico,
procediéndose a su reparación dentro del plazo de garantía y sólo por la red de SAT autorizados.
Nuestros electrodomésticos Corberó cuentan con la garantía legal del fabricante que cubre cualquier avería o defecto durante36
meses, desde su fecha factura de 1 de enero del 2022. En caso de que fuera necesario, nosotros nos ocupamos de cualquier posible
incidencia siempre que se deba a un componente defectuoso o fallo de fabricación.
Excepciones de garantía.
• Que la fecha del certicado no coincida con la fecha de venta de la factura original.
• Averías producidas por golpe, por caída o cualquier otra causa de fuerza mayor.
• Si el apa
rato ha sido manipulado por personal no autorizado.
• Las averías producidas o derivadas como consecuencia de un uso inadecuado, por defectos de instalación,
por introducir modicaciones en el aparato que alteren su funcionamiento.
• Puestas en marcha, mantenimiento, limpiezas, componentes sujetos a desgaste, lámparas, piezas estéticas,
oxidaciones, plásticos, gomas, carcasas y cristales.
“ESTAS EXCEPCIONES ANULAN LA GARANTÍA, SIENDO LA REPARACIÓN CON CARGO AL CLIENTE”
Periodo amparado en aparatos según ley de garantias en la venta de bienes de consumo Ley vigente es “RD 7/2021”
Horario de atención Lunes a Viernes de 9h00 a 19h00. Teléfono de contacto_ 911 08 08 08 Mail de contacto_ [email protected] web_ www.corbero.es
Dirección de Servicio técnico oficial_Vidal i Ribes 8-10 08950 Esplugues de Llobregat Barcelona
Sevicio Técnico Ocial: 911 08 08 08
Los hornos microondas (a excepción de los integrables) y los hornos sobremesa en el caso de cualquier incidencia de
funcionamiento, deben de llevarse al servicio técnico más próximo por parte del cliente. No se recojen ni reparan en el
domicilio.
•
Garantía termos eléctricos. Garantía de 3 años incluyendo los costes de desplazamiento y mano de obra que
correspondan de la reparación del producto, teniendo que tener un mantenimiento una vez cada 12 meses.
Especialmente si Ud. ha instalado un aparato a gas, tenga presente como titular de la instalación, la obligatoriedad de
realizar una revisión completa de los equipos, (según Real Decreto 238 / 2013, del 5 Abril. RITE. IT3, M. Lo termos
eléctricos y calderas que incluyen depósitos acumuladores de agua caliente, para que se aplique la prestación de la
Garantía, es obligatorio que el ánodo de magnesio esté operativo y que realice la función de protección
adecuadamente. Para ello es recomendable que el ánodo se revise bianualmente por el Servicio Oficial y sea renovado
cuando fuera necesario. Periodicidad que deberá ser anual en aquellas zonas con aguas críticas (contenido de CaCO3
superiores a 200mg/L, es decir a partir de 20ºfH de dureza). Depósitos sin el correcto estado del ánodo de protección, no
tienen la cobertura de la garantía. Independientemente del tipo de depósito o producto, todas las válvulas de
sobrepresión de calefacción o a.c.s., deberán ser canalizadas para evitar daños en Ia vivienda por descargas de agua. La
garantía del producto no asume los daños causados por Ia no canalización del agua derramada por esta válvula.
•

CERTIFICATE OF GUARANTEE
The presentation of the purchase invoice accompanied by this guarantee certificate is essential.
Covered Risks.
This appliance is guaranteed against any malfunction, provided that it is intended for domestic use, proceeding to its repair within
the warranty period and only by the authorized SAT network.
Our Corberó appliances have the manufacturer's legal warranty that covers any breakdown or defect for 36 months, from the
invoice date of January 1, 2022. If necessary, we take care of any possible incident whenever it is due to a defective component or
manufacturing fault. Warranty Exceptions
Warranty Exceptions
•
That the date of the certificate does not coincide with the date of sale of the original invoice.
•
Faults produced by blow, by fall or any other cause of force majeure.
•
If the device has been manipulated by unauthorized personnel.
•
Faults produced or derived as a consequence of improper use, installation defects, or modifications to the device that
alter its operation.
•
Start-up, maintenance, cleaning, components subject to wear, lamps, aesthetic parts,
oxidation, plastics, rubbers, housings and crystals.
“THESE EXCEPTIONS VOID THE WARRANTY, THE REPAIR BEING CHARGED TO THE CUSTOMER”
Period covered in devices according to the law of guarantees in the sale of consumer goods Current law is “RD 7/2021”
Hours of operation Monday to Friday from9h00 a 19h00. Telephone contact_ 911 08 08 08 Contact email_ [email protected] web_ www.corbero.es
Official Technical Service Address_Vidal i Ribes 8-10 08950 Esplugues de Llobregat Barcelona
Official Technical Service: 911 08 08 08
Microwave ovens (with the exception of built-in ones) and tabletop ovens in the event of any incident of
operation, they must be taken to the nearest technical service by the customer. They are not collected or repaired at
home.
•
Electric thermos guarantee. 3-year warranty including travel and labor costs that correspond to the repair of the
product, having to have maintenance once every 12 months. Especially if you have installed a gas appliance, keep in
mind as the owner of the installation, the obligation to carry out a complete review of the equipment, (according to
Royal Decree 238 / 2013, of April 5. RITE. IT3, M. Lo thermos electrical and boilers that include hot water storage tanks,
for the benefit of the Guarantee to apply, it is mandatory that the magnesium anode is operational and that it performs
the protection function adequately.For this, it is recommended that the anode be checked biannually by the Official
Service and is renewed when necessary Periodicity that must be annual in those areas with critical waters (CaCO3
content greater than 200mg/L, that is, from 20ºfH of hardness) Deposits without the correct state of the protection
anode are not covered by the warranty Regardless of the type of tank or product, all heating or DHW overpressure
valves must be channeled to avoid damage and n the house due to water discharges. The product warranty does not
cover damages caused by not channeling the water spilled by this valve.
•

CERTIFICADO DE GARANTIA
A apresentação da factura de compra acompanhada deste certificado de garantia é indispensável.
Riscos cobertos.
Este aparelho está garantido contra qualquer avaria, desde que se destine ao uso doméstico, reparando-o dentro do período de
garantia e apenas pela rede SAT autorizada.
Nossos eletrodomésticos Corberó têm garantia legal do fabricante que cobre qualquer avaria ou defeito por 36 meses, a partir da
data da fatura de 1º de janeiro de 2022. Se necessário, cuidamos de qualquer eventual incidente desde que seja devido a um
componente ou fabricação defeituoso falta.
Exceções de garantia.
•
Que a data do certificado não coincida com a data de venda da fatura original.
•
Avarias causadas por pancadas, quedas ou qualquer outra causa de força maior.
•
Se o dispositivo foi adulterado por pessoal não autorizado.
•
Avarias produzidas ou derivadas como resultado de uso indevido, defeitos de instalação, fazendo alterações no
dispositivo que alteram seu funcionamento.
•
Comissionamento, manutenção, limpeza, componentes sujeitos a desgaste, lâmpadas, peças estéticas,
oxidação, plásticos, borrachas, invólucros e vidros.
“ESTAS EXCEÇÕES ANULAM A GARANTIA, SENDO A REPARAÇÃO POR CONTA DO CLIENTE.” Período
abrangido em dispositivos de acordo com a lei de garantias na venda de bens de consumo A lei atual é "Decreto-Lei n.º 84/2021
"
Horário de atendimento de segunda a sexta das 9h às 19h. Telefone de contato_ 351 961 789 806 Email de contato_ [email protected]
web_ www.corbero.es Serviço Técnico Oficial Endereço_Vidal i Ribes 8-10 08950 Esplugues de Llobregat Barcelona
Serviço Técnico Oficial: 351 961 789 806
Fornos de microondas (exceto os embutidos) e fornos de mesa em caso de qualquer incidência de
operação, devem ser levados ao serviço técnico mais próximo pelo cliente. Eles não são recolhidos ou reparados em
casa.
•
Garantia térmica elétrica. Garantia de 3 anos incluindo despesas de deslocação e mão-de-obra que correspondam à
reparação do produto, devendo ter manutenção a cada 12 meses. Especialmente se instalou um aparelho a gás, tenha
em atenção como proprietário da instalação, a obrigação de realizar uma revisão completa do equipamento, (de acordo
com o Decreto-Lei n.º 84/2021. Lo thermos eléctricos e caldeiras que incluam acumuladores de água quente, para o
benefício da Garantia a aplicar, é obrigatório que o ânodo de magnésio esteja operacional e que desempenhe a função
de protecção de forma adequada. ser verificado a cada dois anos no Serviço Oficial e renovado quando necessário
Periodicidade que deve ser anual nas áreas com águas críticas (teor de CaCO3 superior a 200mg/L,
ou seja, a partir de 20ºfH de dureza) Depósitos sem o estado correto do ânodo de proteção não estão cobertos pela
garantia Independentemente do tipo de tanque ou produto, todas as válvulas de aquecimento ou de sobrepressão de
água quente sanitária devem ser canalizadas para evitar danos e na casa devido a descargas de água. A garantia do
produto não cobre danos causados pela não canalização da água derramada por esta válvula.
•