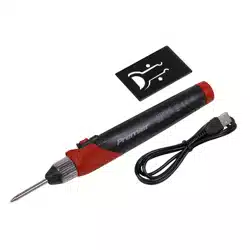

80W SOLDERING IRON
80W DIGITAL SOLDERING IRON
MODEL NO: SD001 / SD002
Thank you for purchasing a Sealey product. Manufactured to a high standard, this product will, if used according to these
instructions, and properly maintained, give you years of trouble free performance.
IMPORTANT: PLEASE READ THESE INSTRUCTIONS CAREFULLY. NOTE THE SAFE OPERATIONAL REQUIREMENTS, WARNINGS & CAUTIONS. USE
THE PRODUCT CORRECTLY AND WITH CARE FOR THE PURPOSE FOR WHICH IT IS INTENDED. FAILURE TO DO SO MAY CAUSE DAMAGE AND/OR
PERSONAL INJURY AND WILL INVALIDATE THE WARRANTY. KEEP THESE INSTRUCTIONS SAFE FOR FUTURE USE.
1. SAFETY
1.1. ELECTRICAL SAFETY
WARNING! It is the user’s responsibility to check the following:
Check all electrical equipment and appliances to ensure that they are safe before using. Inspect power supply leads, plugs and
all electrical connections for wear and damage. Sealey recommend that an RCD (Residual Current Device) is used with all electrical
products. You may obtain an RCD by contacting your local Sealey dealer.
If the product is used in the course of business duties, it must be maintained in a safe condition and routinely PAT (Portable
Appliance Test) tested.
Electrical safety information, it is important that the following information is read and understood.
1.1.1. Ensure that the insulation on all cables and on the appliance is safe before connecting it to the power supply.
1.1.2. Regularly inspect power supply cables and plugs for wear or damage and check all connections to ensure that they are secure.
1.1.3. IMPORTANT: Ensure that the voltage rating on the appliance suits the power supply to be used and that the plug is tted with the
correct fuse - see fuse rating in these instructions.
8 DO NOT pull or carry the appliance by the power cable.
8 DO NOT pull the plug from the socket by the cable.
8 DO NOT use worn or damaged cables, plugs or connectors. Ensure that any faulty item is repaired or is
replaced immediately by a qualied electrician.
1.1.4. This product is tted with a BS1363/A 13 Amp 3 pin plug.
If the cable or plug is damaged during use, switch the electricity supply and remove from use.
Ensure that repairs are carried out by a qualied electrician.
Replace a damaged plug with a BS1363/A 13 Amp 3 pin plug. If in doubt contact a qualied electrician.
a) Connect the GREEN/YELLOW earth wire to the earth terminal ‘E’.
b) Connect the BROWN live wire to the live terminal ‘L’.
c) Connect the BLUE neutral wire to the neutral terminal ‘N’.
Ensure that the cable outer sheath extends inside the cable restraint and that the restraint is tight.
Sealey recommend that repairs are carried out by a qualied electrician.
1.2 GENERAL SAFETY
WARNING! Ensure Health & Safety, local authority, and general workshop practice regulations are adhered to when using this
equipment.
9 Familiarise yourself with the application , limitations and potential hazards of the soldering iron.
9 Replace or repair damaged parts. Use genuine parts only. Unauthorised parts may be dangerous and will invalidate the warranty.
9 Locate soldering iron in a suitable working area, keep area clean and tidy and free from unrelated materials.
9 Keep the work area clean, uncluttered and ensure there is adequate lighting.
9 Keep the soldering iron clean for best and safest performance.
9 Ensure there are no flammable or combustible materials near the work area.
9 Wear approved safety eye protection (standard spectacles are not adequate).
9 Wear appropriate protective clothing.
9 Ensure the workpiece is adequately held before operating the soldering iron.
9 Always replace the soldering iron in an appropriate soldering iron stand when not in use.
9 Remove excess solder from the soldering iron by wiping the tip on a damp, natural sponge; not by abrupt force.
8 DO NOT attempt to remove excess solder from the soldering iron by shaking it. Hot solder may become airborne and land on skin
causing burns and blisters.
8 DO NOT allow children or pets into the area where the soldering is taking place.
8 DO NOT attempt to cool the gun with water.
NOTE: This appliance can be used by children aged from 8 years and above and persons with reduced physical, sensory or mental
capabilities or lack of experience and knowledge if they have been given supervision or instruction concerning use of the appliance in
a safe way and understand the hazards involved. Children shall not play with the appliance. Cleaning and user maintenance shall not
be made by children without supervision.
Recommended fuse rating
3 Amp
SD001 / SD002 | Issue 1 06/08/2019
Original Language Version
© Jack Sealey Limited
Refer to
instructions
Hot surfaces Indoor use
only
Warning Wear eye
protection
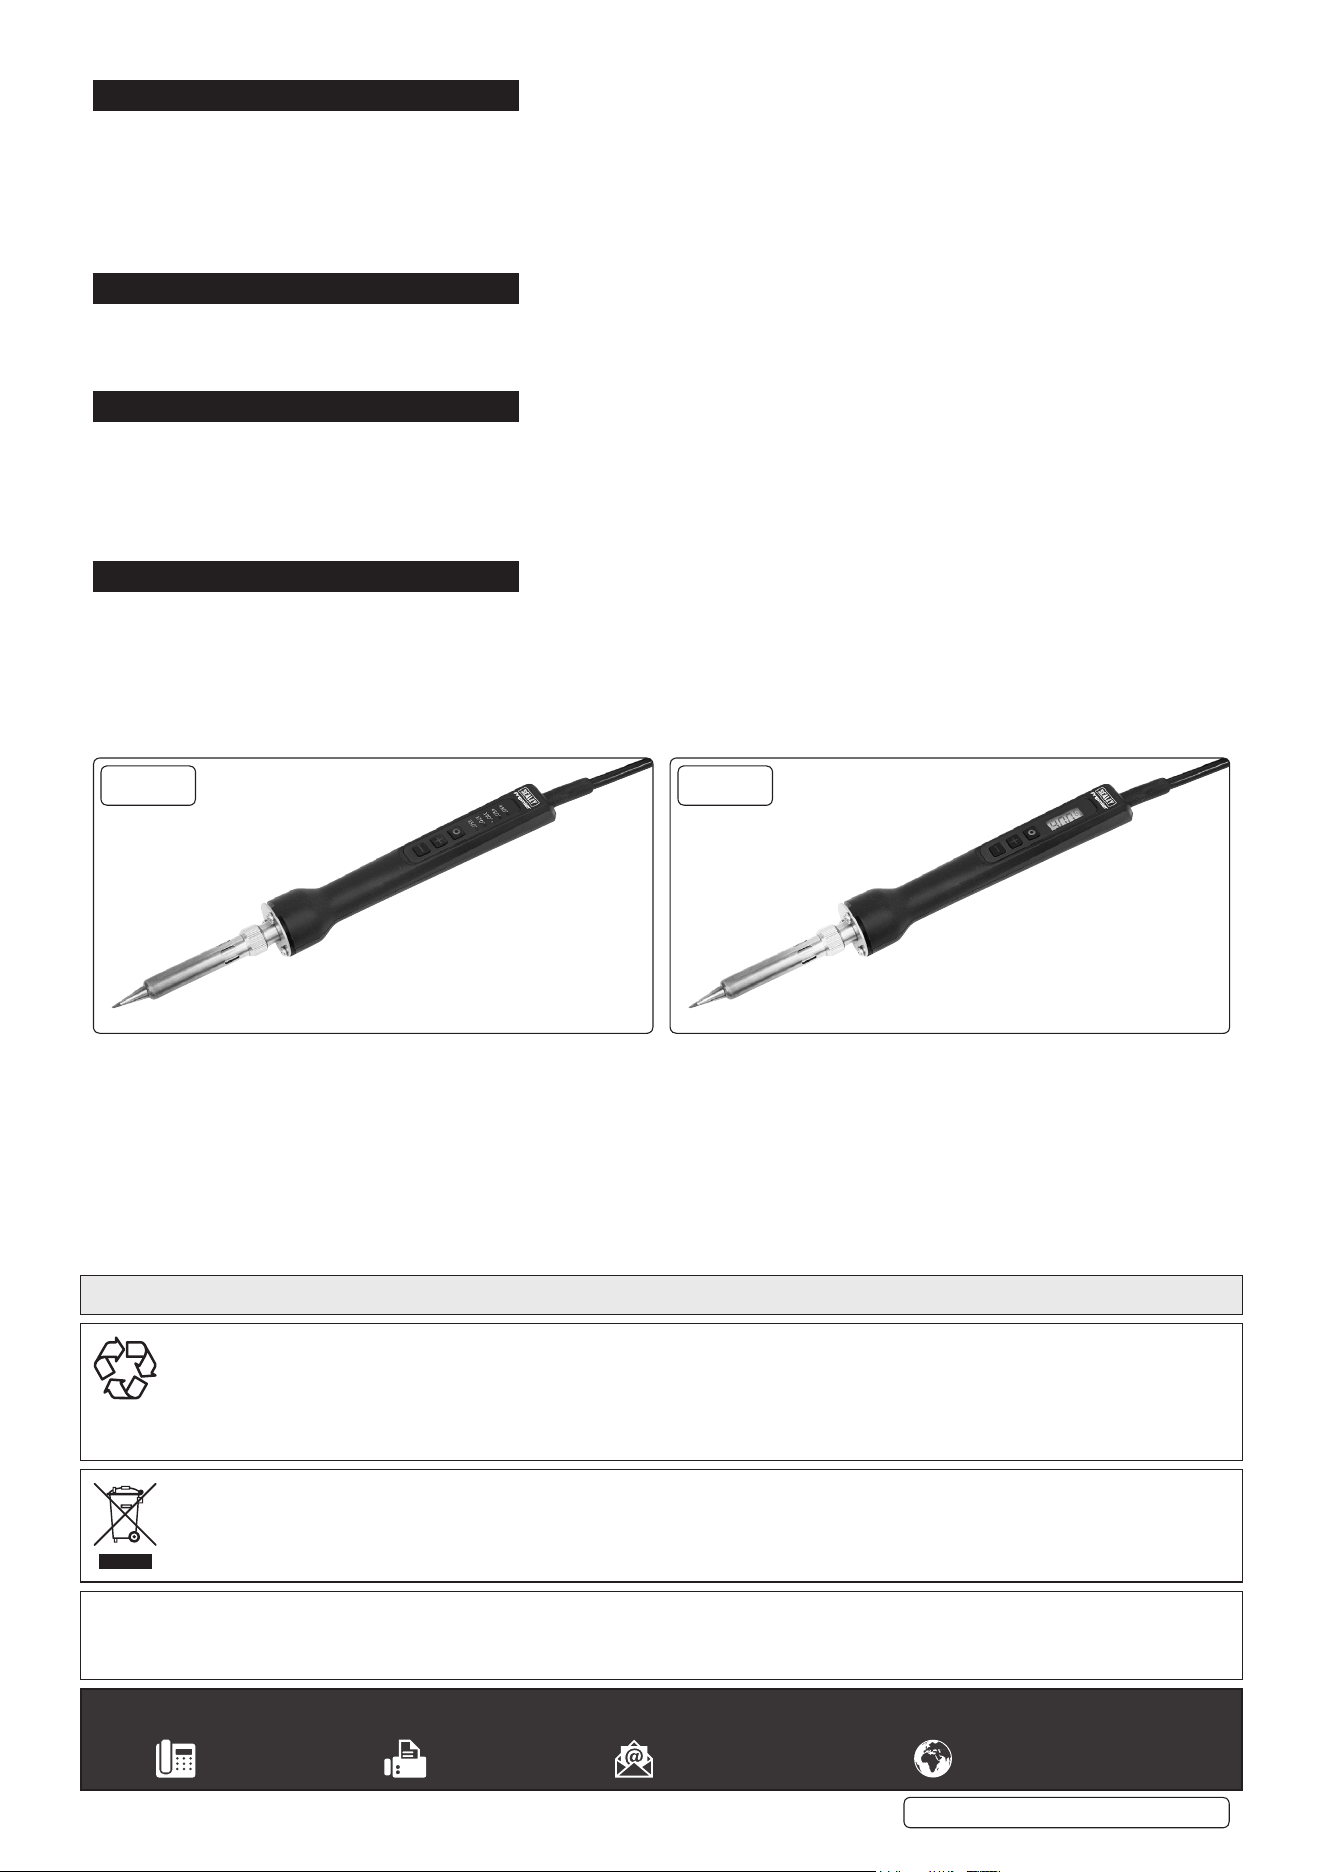
2. INTRODUCTION
Model No. SD001 - Ergonomic design reduces hand fatigue. 5 Position temperature LED display. Built-in PID system. Auto sleep and auto
shutdown. Includes 1.5m cable with 3-pin plug. Complies with Low Voltage Directive and Electromagnetic Compatibility Directives.
Model No. SD002 - Ergonomic design reduces hand fatigue. 9 Pre-set temperature LCD display. Built-in PID system. Auto sleep and
auto shutdown. Replaceable soldering tip. Includes 1.5m cable with 3-pin plug. Complies with Low Voltage Directive and Electromagnetic
Compatibility Directives.
3. SPECIFICATION
Model No: ............................SD001 ............SD002
Power Rating:............................80W ..............80W
Consumable Parts:......... Soldering Tip for both ........ SD001ST
4. OPERATION
WARNING! When plugged in, do not touch any part of the iron other than the grip. Failure to do so, may result in serious burns.
8 NEVER leave the iron unattended while plugged in.
4.1. Once plugged in to a suitable power supply, the iron will begin to get hot.
4.2. Change the temperature setting using the + or - buttons located on the handle (fig.1).
4.3. Unplug the soldering iron and wait for it to cool down completely before moving.
5. MAINTENANCE
8 DO NOT open the casing; there are no user-servicable parts inside. In case of malfunction, return to your Sealey stockist or Service Agent.
5.1. CLEANING
8 DO NOT shock the iron tip to remove excess solder; use the dampened sponge wiper.
9 Clean the casing with a moist, soapy cloth, having ensured that the unit is isolated from the electrical supply.
SD001 / SD002 | Issue 1 06/08/2019
Original Language Version
© Jack Sealey Limited
Sealey Group, Kempson Way, Suffolk Business Park, Bury St Edmunds, Suffolk. IP32 7AR
01284 757500 01284 703534 sales@sealey.co.uk www.sealey.co.uk
ENVIRONMENT PROTECTION
Recycle unwanted materials instead of disposing of them as waste. All tools, accessories and packaging should be sorted, taken to
a recycling centre and disposed of in a manner which is compatible with the environment. When the product becomes completely
unserviceable and requires disposal, drain any fluids (if applicable) into approved containers and dispose of the product and fluids
according to local regulations.
WEEE REGULATIONS
Dispose of this product at the end of its working life in compliance with the EU Directive on Waste Electrical and Electronic Equipment
(WEEE). When the product is no longer required, it must be disposed of in an environmentally protective way. Contact your local solid
waste authority for recycling information.
Note: It is our policy to continually improve products and as such we reserve the right to alter data, specifications and component parts without prior notice.
Important: No Liability is accepted for incorrect use of this product.
Warranty: Guarantee is 12 months from purchase date, proof of which is required for any claim.
Parts support is available for this product. Please log on to www.sealey.co.uk, email sales@sealey.co.uk or telephone 01284 757500
SD002SD001