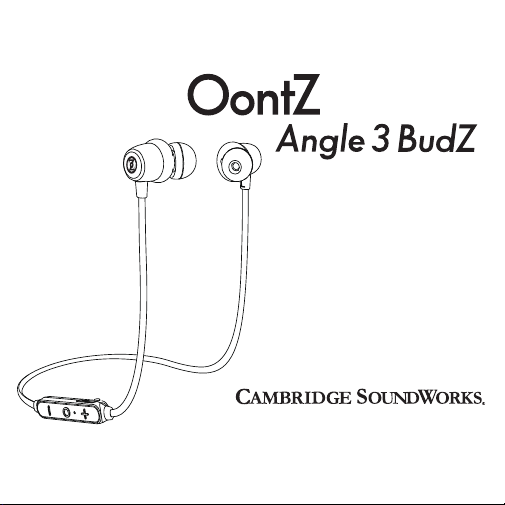
Bluetooth Headphones
Quick Start Guide
Designed and Engineered By
TheOontZ.com
OontZ Angle 3 BudZ Headphones
Quick Start Guide
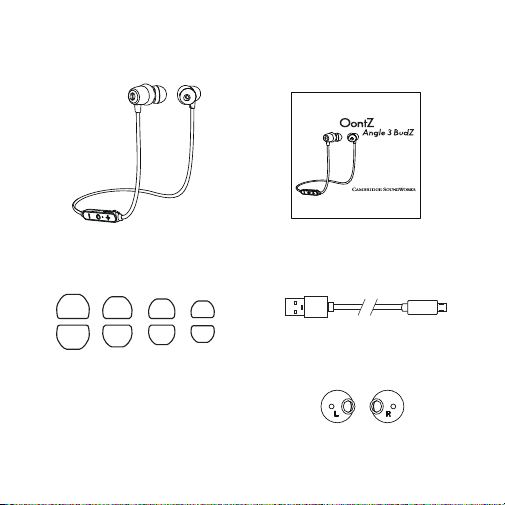
In the Package
1 Pair X-Large in-ear BudZ
1 Pair Large in-ear BudZ
1 Pair Medium In-Ear BudZ
1 Pair Small In-Ear BudZ
1 Pair Iso-Fit Cushions
(The Iso-Fit Cushions have already
been placed onto the earbuds)
Micro USB
Charging Cable
Bluetooth Headphones
Quick Start Guide
Designed and Engineered By
TheOontZ.com
XL L M
S

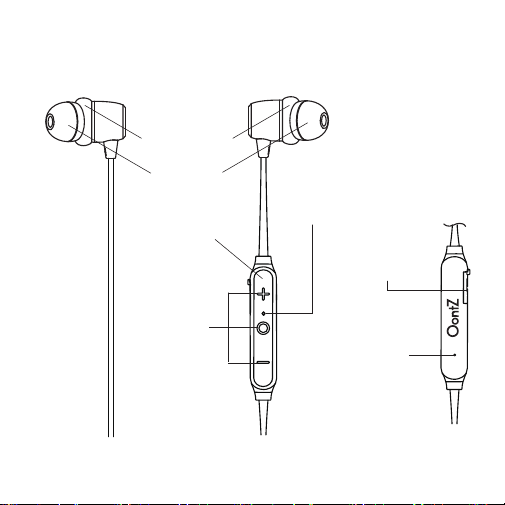
Getting to Know Your OontZ Angle 3 BudZ
Multi-Function Buttons
Phone Call Controls
Lights
Connectors & Built-In Mic
Battery Features
Charging the Battery
Pair and Connect Your Device
Comfort Fit with Iso-Fit Cushions
Select the Best Fitting In-Ear BudZ
Wearing Your OontZ Angle 3 BudZ Under-Ear
IPX7 Waterproof
Troubleshooting
Customer Support
Safety and Precautions
Table of Contents
Pages
1
2
3
4
5
6
7 - 8
9 - 10
11
12
13
14
15 - 16
17
18 - 19
1
Note: The In-Line Control Bar will be on your right side when you are
wearing the OontZ Angle 3 BudZ.
Getting to Know Your OontZ Angle 3 BudZ
Iso-Fit Cushion
Left Right
LED
Indicator
Light
Built-in Mic
for Phone Calls
Backside
of In-Line
Control Bar
Rubber Flap
Covers Micro USB
Charging Port
Multi-Function
Buttons
In-Line
Control Bar
In-Ear BudZ
2
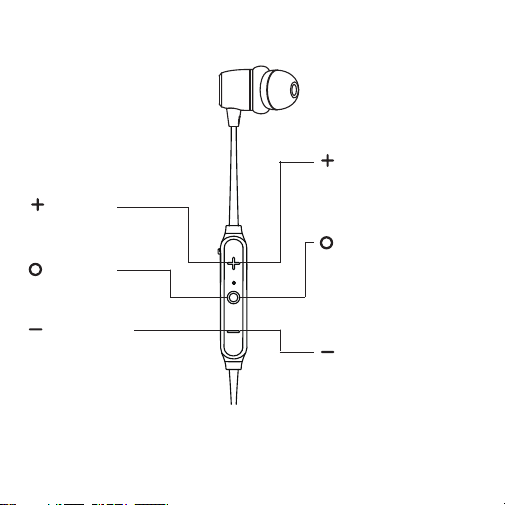
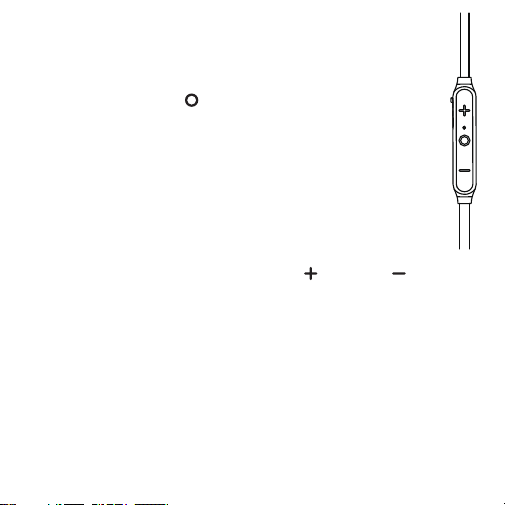
Multi-Function Buttons
Volume Up
Press to increase volume
Play/Pause
Press and Release to
Pause/Play
Volume Down
Press to decrease volume
Track Forward
Press and Hold Down
for 2 seconds to go
to the next track
Track Back
- Press and Hold Down
for 2 seconds to go the
beginning of the track
- Press and Hold Down
again for 2 seconds to go
to the previous track
Power
- Power On - Press and
Hold Down for 2 seconds
- Power O - Press and
Hold Down for 2 seconds
Right

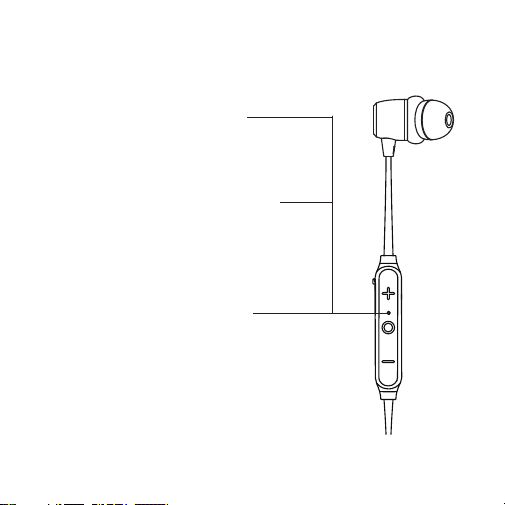
Phone Call Controls
3
To answer an incoming
call / to end a call
- Press and Release.
To reject an incoming call or
transfer call between the
Headphones and Smartphone
- Press and hold down for
2 seconds.
To redial the last number called
- Press and Release twice.
To mute a call
- Press and hold down for 2
seconds.
4
Lights
Blue Light lit when Headphone is on
- Flashing Blue
Headphone is in Bluetooth pairing mode
- Flashing Blue 3 times every 5 seconds
Headphone is connected
Red Light lit when Headphone is charging
- Slowly ashing Red
battery is charging
- Solid Red
battery is fully charged
- Rapidly ashing Red
indicates battery charge is low
Red Light will ash rapidly twice when
powered O
Right

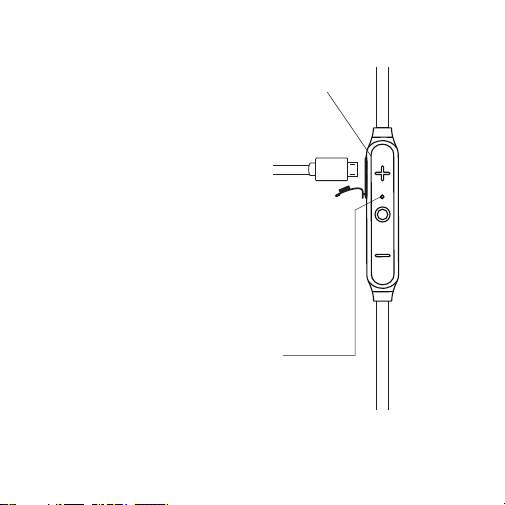
Connectors & Built-in Mic
5
Rubber Flap
- covers Micro USB Charging Port
- pull gently from the top to
access the Micro USB Charging
Port, it is a snug t as part of
the waterproong
Important:
- The Headphone is not water-
resistant or waterproof when
the ap is open.
- The rubber ap needs to be closed
before the Headphone is exposed to
water or sweat.
Built-in Mic for Phone Calls
Right
Backside of
In-Line
Control Bar

6
Battery Features
- The rechargable battery comes with a partial charge and the Headphones are
ready to play.
- For maximum playtime, fully charge the battery.
Low Charge Remaining
- When the battery charge has less than 10% remaining the Red Light will begin
ashing rapidly.
Music Play Time
- Up to 8 hours on a full charge, at 2/3 volume. Louder volumes will reduce the
battery play time.
Charging Time
- Up to 2 to 3 hours to fully charge a low battery.
Power Saving Feature
- The Headphones will turn o 15 minutes after being disconnected from your
device.
7
Charging the Battery
- The Rubber Flap covers the Micro USB Charging Port.
- Pull gently from the top to access the Micro USB
Charging Port, it is a snug t as it is part of the
waterproong.
- Insert the small end of the Micro USB Charging
Cable into the Micro USB Charging Port as shown.
- Insert the larger end of the Micro USB Charging Cable
into a USB wall charger for a Smartphone or iPhone,
or a USB port on your laptop/computer to charge
the battery (see illustrations on page 8).
Red Light lit when Headphones are charging
- Slowly ashing Red
battery is charging
- Solid Red
battery is fully charged
Note: When the Headphones are turned on and they are not charging, the red
light will ash rapidly when the battery charge is low with about 10% charge
remaining.
8
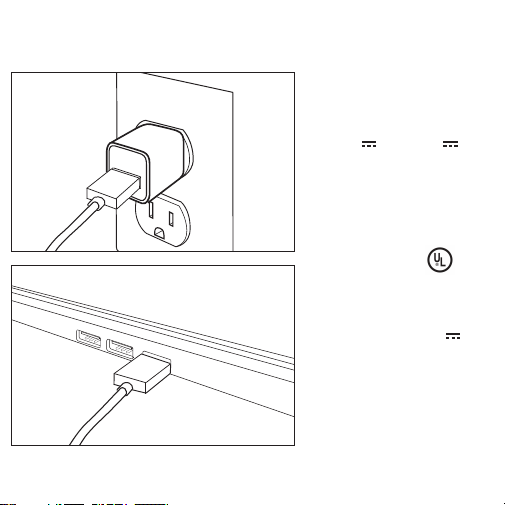
Charging the Battery (continued)
Insert the larger end of the Micro
USB Charging Cable into a USB
wall charger for a Smartphone
or iPhone (USB wall charger *
that is 5V 1A up to 5V 2.4A
maximum), or a USB port on your
laptop/computer to charge the
OontZ Angle 3 BudZ battery.
* Only use a USB wall charger
that is UL listed and on the
USB wall charger the
logo will be printed.
* Using a non UL listed USB wall
charger or a USB wall charger
supplying more than 5V 2.4A
could cause damage to the
Headphones.
9
Pair & Connect with Your Device - Step 1
Turn ON your OontZ Angle 3 BudZ Headphones
Power On - Press and Hold Down for 2 seconds.
Flashing Blue Light
- The Headphones are ready to pair and connect.
Blue Light ashing 3 times every 5 seconds
- Your device has connected to the Headphones and is ready to play
- The OontZ Angle 3 BudZ allow the last device it was connected with to automatically
reconnect with the Headphones each time the Headphones are turned on and that
device is within range.*
The OontZ Angle 3 BudZ can be connected to one device at a time.
- To connect to a dierent device, you need to rst disconnect the currently paired device.
- To disconnect the current device, press and hold down the button and the button
for 3 seconds.
- The Blue Light will begin ashing and the Headphones are ready to pair and connect to
the next device.
* Your device needs to be within 30 unobstructed feet of the OontZ Angle 3 BudZ to pair
and connect. If there is an issue when connecting please move your device closer to the
Headphones, then pair and connect.
* When the battery charge is too low indicated by a rapidly ashing red light on the Headphones,
your device will not be able to connect with the Headphones.

10
Pair & Connect with Your Device - Step 2
- With your Phone, iPad or iPod
- Go to Settings > Bluetooth, check Bluetooth is on
- Select ‘OontZ Angle 3 BudZ’ when it appears under DEVICES
- Your device will connect in a few seconds
- The Blue Light on the OontZ Angle 3 BudZ will ash 3 times every 5 seconds
- You can now play your audio wirelessly to your OontZ Angle 3 BudZ
- With your Smartphone, Tablet & Mobile Devices
- Go to Settings > Bluetooth, check Bluetooth is on
- Scan or Search and Select ‘OontZ Angle 3 BudZ’ when it appears under AVAILABLE DEVICES
- Your device will connect in a few seconds
- The Blue Light on the OontZ Angle 3 BudZ will ash 3 times every 5 seconds
- You can now play your audio wirelessly to your OontZ Angle 3 BudZ
- Note: Your Smartphone or Tablet instructions may vary
- With your Apple Mac or Windows Laptop/Computer
For pairing and connecting guide for your Apple Mac or Windows laptop/computer, please visit:
TheOontZ.com/pairing
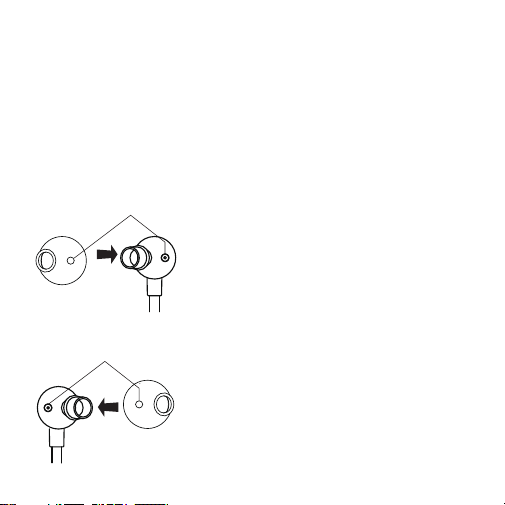
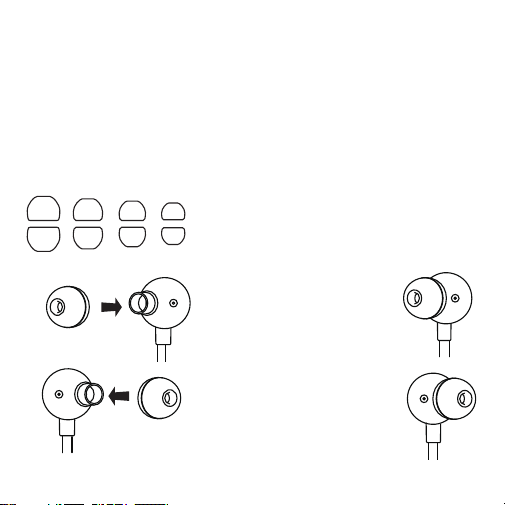
Step 1: With the In-Ear BudZ
removed, slide the right Iso-Fit
Cushion over the shaft of the
right earbud. Match up the
guide holes, as shown in the
illustration to the left.
Comfort Fit with Iso-Fit Cushions
11
Step 2: Repeat Step 1 to t the
left Iso-Cushion on the left
earbud.
Right Iso-Fit
Cushion
match up guide holes
The Iso-Fit Cushions help provide a comfortable secure t, perfect for
listening during sports and physical activity.
Note: The Iso-Fit Cushions have already been placed onto the earbuds.
The steps below show you how to place the Iso-Fit Cushions on to the
earbuds in the case you remove them.
Left Iso-Fit
Cushion
L
L
R
R
match up guide holes
12
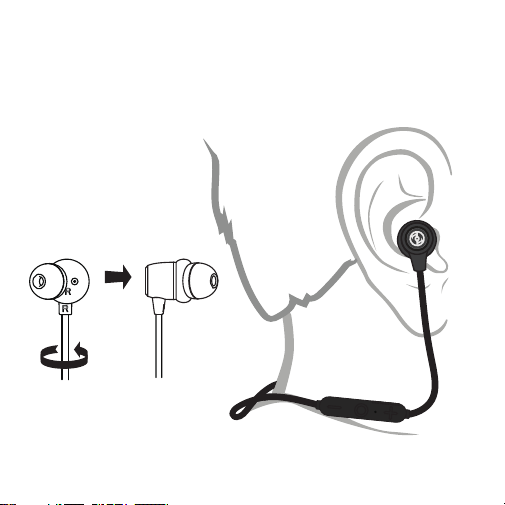
Select the Best Fitting In-Ear BudZ
A comfortable snug t of the In-Ear BudZ provides the highest quality listening
experience. We suggest starting with the medium (M) sized In-Ear BudZ to learn if
they are secure and comfortable. If they do not feel secure try the large (L) or
X-Large (XL) In-Ear BudZ, or if the medium are too tight try the small (S) In-Ear BudZ.
The largest size In-Ear BudZ that are comfortable will provide the best overall
sound experience.
To hear the best sound and best bass from you OontZ Angle 3 BudZ
In-Ear BudZ
Step 2: Slide an In-Ear BudZ
onto the right earbud shaft
Step 3: Slide an In-Ear BudZ
onto the left earbud shaft
Step 1: Select the best tting
In-Ear BudZ
In-Ear BudZ
XL L M
Step 4: Your OontZ Angle 3 BudZ are
now ready to insert into your ears
In-Ear BudZ
R
R
L
L
L
L
R
R
S
13
Wearing Your OontZ Angle 3 BudZ Under-Ear
The Iso-Fit Cushion should t comfortably and snugly in your ear,
allowing for the best sound quality.

14
IPX7 Waterproof
The OontZ Angle 3 BudZ are Waterproof and are IPX7 certied.
The perfect headphone for listening to your favorite music while exercising
or outdoors.
Perfect for taking to the beach or listening by the pool.
A little sweat or a lot of sweat are ne for the OontZ Angle 3 BudZ.
IPX7 means the OontZ Angle 3 BudZ are WaterProof and can handle sweat, water spray or being
splashed and can handle being partially or fully submerged in water up to a maximum of 3 feet
deep, for up to a maximum of 30 minutes. Do not keep the Headphones in a wet environment
for an extended period of time.
The rubber ap needs to be closed to keep the Headphones waterproof.
Important Safety Precaution: When the OontZ Angle 3 BudZ are plugged in to a charging
source with the Micro USB Charging Cable, keep the Headphones away from the shower, bath,
or near water, to prevent the risk of electric shock.

OontZ Angle 3 BudZ will not power on
- The battery may have become fully drained. Charge the battery using the Micro USB Charging
Cable by inserting the larger end of the Micro USB Charging Cable into a USB wall charger for a
Smartphone or iPhone, or a USB port on your laptop/computer to charge the OontZ Angle 3 BudZ
battery. Please see instructions on Page 7 and 8.
I am having trouble pairing and connecting with my mobile device
- Your mobile device may be out of range and you will hear a double beep every 15 seconds.
Move back within 30 unobstructed feet of your mobile device. The OontZ Angle 3 BudZ will
reconnect, there will be a voice prompt ‘connected’. Press the button to start playing again.
- Check that your OontZ Angle 3 BudZ have a sucient battery charge, the Headphones may not
connect when the battery has a low charge. Connect the OontZ Angle 3 BudZ to a charging
source and try again to pair and connect.
- Check the LED light to make sure it is ashing Blue rapidly. If the LED is ashing blue 3 times every
5 seconds the Headphones are already connected to another mobile device. The OontZ Angle 3
BudZ can be connected to one device at a time. You need to disconnect the connected device,
then you can connect to the next device. Please see instructions on page 9.
- Your mobile device may have a temporary Bluetooth connection issue. Please try the following
steps which can help resolve this.
For iPhone, iPad and iPod
- Turn o the OontZ Angle 3 BudZ, go to the Bluetooth device list on your iPhone, iPad or iPod
and check if the OontZ Angle 3 BudZ are listed. If it is listed press the icon next to the OontZ
Angle 3 BudZ and then select ‘forget this device’. With the OontZ Angle 3 BudZ removed from
the list or if it was not listed, do a hard reset on your iPhone, iPad or iPod by pressing and
holding down the Home and sleep buttons at the same time for about 10 seconds until the
Apple icon appears and it restarts. When it restarts, turn on the OontZ Angle 3 BudZ and then
try again to pair and connect.
Troubleshooting
15

16
I am having trouble pairing and connecting with my mobile device (continued)
For iPhone, iPad and iPod
- Turn o the OontZ Angle 3 BudZ, go to the Bluetooth device list on your Smartphone or Tablet
and check if the OontZ Angle 3 BudZ are listed. If it is listed press the icon next to the OontZ
Angle 3 BudZ and then select ‘Unpair this device’. With the OontZ Angle 3 BudZ unpaired from
the list or if it was not listed, do a hard reset on your Smartphone or Table. When it restarts, turn
on the OontZ Angle 3 BudZ and then try again to pair and connect.
No audio from your device
- Make sure the volume is up on your OontZ Angle 3 BudZ.
- Remove the OontZ Angle 3 BudZ from the Bluetooth device list on your device, restart your
device, and then re-pair and connect to the OontZ Angle 3 BudZ.
- Make sure your devcie is playing audio, not paused and the volume is turned up.
- Your device may be out of range, move closer to your device, to within 30 unobstructed feet.
- Turn your OontZ Angle 3 BudZ o and back on.
- Some devices have a default volume when they connect to a new device, try turning up the
volume on the OontZ Angle 3 BudZ and the device after connecting.
Poor sound quality from my device
- Your device may be out of range, move closer to within 30 unobstructed feet.
- If your iPhone, iPad or iPod has an option to select Stereo or Mono, select Stereo.
- Try another track or music app.
- Turn your OontZ Angle 3 BudZ o and back on.
- It may be that you need to re-pair the OontZ Angle 3 BudZ with your device. Remove it from your
paired devices list, restart the device and then follow the steps to re-pair and connect the
Headphones.
OontZ Angle 3 BudZ won’t t or stay in place
- Try one size larger In-Ear BudZ.
- Make sure you have the Iso-Fit Cushions in place.
- Be sure the OontZ Angle 3 BudZ are being worn correctly by checking on each earbud for
which side it should be worn on.
Troubleshooting (continued)

17
Customer Support
If you have a question about your OontZ Angle 3 BudZ or experience
an issue with the Headphones, our Customer Support Team wants
to assist you.
For online troubleshooting tips please visit:
TheOontZ.com/troubleshooting
and select the OontZ Angle 3 BudZ
Contact us at:
TheOontZ.com/support
and ll in our customer support form

Safety and Precautions
18
PLEASE LISTEN RESPONSIBLY
Avoid listening at excessive volume levels or for prolonged periods.
Do not use near trac.
1. When the OontZ Angle 3 BudZ is plugged in to a charging source with the Micro USB Charging
Cable, never use the Headphones in the shower, bath, or near water, to prevent risk of eletric shock.
2. Read and follow all instructions - All operating and use instructions should be followed.
3. Protect the Micro USB Charging Cable from being pinched, particularly at the connectors.
4. Unplug the Micro USB Charging Cable during lighning storms or when unused for long periods of
time.
5. Do not place the Headphones near any heat sources such as radiators, heat registers, stoves, or
other apparatus (including ampliers) that product heat.
6. Refer all servicing to qualied personnel. Servicing is required when the Headphones have been
damaged in any way.
7. Do not make alterations to these Headphones.
8. The battery in the Headphones is not replaceable. Do not attempt to change it.
9. Use these Headphones only with an agency approved power supply which meets local
regulatory requirements (e.g., UL, CSA, VDE, CCC) in accordance with the manufacture’s specications.
10. Do not place near naked ame sources, such as lighted candles, or or near the Headphones.
11. Do not expose these Headphones to excessive heat.
(e.g. from storage in direct sunlight, re or the like)
12. If the battery leaks, do not allow the liquid to come in contact with the skin or eyes. If contact is
made, seek medical advise.

Apple, iPhone, iPad, iPod, and Mac are registered trademarks of Apple Inc.
Windows is a registered trademark of Microsoft Corporation
Bluetooth is a registered trademark of Bluetooth SIG, Inc
UL is a registered trademark of UL.
Safety and Precautions (continued)
This device complies with Part 15 of the FCC Rules. Operation is subject to the following two
conditions:
(1) This device may not cause harmful interference, and (2) this device must accept any
interference received, including interference that may cause undesired operation.
Note 1: This equipment has been tested and found to comply with the limits for a Class B digital
device, pursuant to part 15 of the FCC Rules. These limits are designed to provide reasonable
protection against harmful interference in a residential installation. This equipment generates,
uses and can radiate radio frequency energy and, if not installed and used in accordance with
the instructions, may cause harmful interference to radio communications. However, there is no
guarantee that interference will not occur in a particular installation. If this equipment does cause
harmful interference to radio or television reception, which can be determined by turning the
equipment o and on, the user is encouraged to try to correct the interference by one or more of
the following reasons.
- Reorient or relocate the receiving antenna.
- Increase the separation between the equipment and receiver.
- Connect the equipment into an outlet on a circuit dierent from that to which the receiver is
connected.
- Consult the dealer or an experience radio/TV technician for help.
Note 2: Any changes or modications to this unit not expressly approved by the party responsible
for compliance could void the user’s authority to operate the equipment.
19