the Dual Boiler
™
BES920
EN
QUICK GUIDE

PAGE HEADER.....
2
additional safety when using
all electrical appliances.
Safety switches with a rated
operating current not more
than 30mA are recommended.
Consult an electrician for
professional advice.
• Remove and discard any
packaging materials safely,
before rst use.
• To eliminate a choking hazard
for young children, discard the
protective cover tted to the
power plug safely.
• Ensure the product is properly
assembled before rst use.
• This appliance is for household
use only. Do not use the
appliance for anything other
than its intended purpose.
Do not use in moving vehicles
or boats. Do not use outdoors.
Misuse may cause injury.
• Position the appliance on a
stable, heat resistant, level, dry
surface away from the counter
edge, and do not operate on
or near a heat source such as
a hot plate, oven or gas hob.
• Fully unwind the power cord
before operating.
• Do not let the power cord hang
over the edge of a counter
or table. Do not let the power
cord touch hot surfaces or
become knotted.
• Do not leave the appliance
unattended when in use.
SAGE
®
RECOMMENDS
SAFETY FIRST
At Sage
®
we are very safety
conscious. We design and
manufacture appliances
with your safety foremost in
mind. We also ask that you
exercise a degree of care
when using any electrical
appliance and adhere to
the following precautions.
READ ALL INSTRUCTIONS
BEFORE USE AND SAVE
FOR FUTURE REFERENCE
• A downloadable version of this
document is also available at
sageappliances.com
• Before using for the rst
time, please ensure that your
electricity supply is the same
as shown on the rating label on
the underside of the appliance.
If you have any concerns
please contact your local
electricity company.
• The installation of a residual
current safety switch is
recommended to provide
CONTENTS
2 Sage
®
Recommends Safety First
5 Know Your New Appliance
7 Operating Your New Appliance
17 Care & Cleaning
20 Troubleshooting
23 Guarantee

PAGE HEADER.....
3
EN
WE RECOMMEND SAFETY FIRST
• If the appliance is to be:
- left unattended
- cleaned
- moved
- assembled; or
- stored
Always switch o the espresso
machine by pressing the
POWER button to OFF.
Switch o and unplug
from the power outlet.
• Regularly inspect the power
cord, plug and actual appliance
for any damage. If found to
be damaged in any way,
immediately cease use of
the appliance and return the
entire appliance to the nearest
authorised Sage Service
Centre for examination,
replacement or repair.
• Keep the appliance and
accessories clean. Follow
the cleaning instructions
provided in this book. Any
procedure not listed in this
instruction booklet should be
performed at an authorised
Sage Service Centre.
• The appliance can be used by
children aged 8 or older and
persons with reduced physical,
sensory or mental capabilities
or a lack of experience and
knowledge, only if they have
been given supervision or
instruction concerning use of
the appliance in a safe way and
understand the hazards involved.
• Children should not play
with the appliance.
• Cleaning of the appliance
should not be carried out
by children unless they are
8 years or older and under
adult supervision.
• The appliance and its cord
should be kept out of reach
of children aged 8 years
and younger.
• Do not use attachments
other than those provided
with the appliances.
• Do not attempt to operate
the appliance by any method
other than those described in
this booklet.
• Do not move the appliance
whilst in operation.
• Do not use any other
liquid apart from cold mains/
town water. We do not
recommend the use of highly
ltered, de-mineralised or
distilled water as this may
aect the taste of the coee
and how the espresso machine
is designed to function.
• Never use the appliance
without water in the water tank.
• Ensure the portalter is rmly
inserted and secured into
the brewing head before
using the machine.
• Never remove the portalter
during the brewing operation as
the machine is under pressure.

PAGE HEADER.....
4
WE RECOMMEND SAFETY FIRST
• Do not place anything, other than
cups for warming, on top
of the appliance.
• Use caution when operating
machine as metal surfaces are
liable to get hot during use.
• Do not touch hot surfaces.
Allow the product to cool
down before moving or
cleaning any parts.
• Heating element surface is
subject to residual heat after use.
• Always ensure the appliance
is turned OFF, unplugged at
the power outlet and has been
allowed to cool before cleaning,
attempting to move or storing.
• The appliance is not intended
to be operated by means of
an external timer or separate
remote-control system.
• The use of attachments not sold
or recommended by Sage may
cause re, electric shock or injury.
• Always turn the appliance to
the o position, switch o at the
power outlet and unplug at the
power outlet when the appliance
is not in use.
• Any maintenance other than
cleaning should be performed
by an authorised Sage
®
service centre.
• Do not use the appliance
on a sink drain board.
• Do not operate the appliance
if it is in an enclosed space,
or within a cupboard.
• Use caution when descaling
as hot steam may be released.
Before descaling, ensure drip
tray is empty and inserted.
Refer to ‘Care & Cleaning’
for further instructions.
SPECIFIC INSTRUCTIONS
FOR WATER FILTER
• Filter cartridge should be kept
out of reach of children.
• Store lter cartridges in a dry
place in the original packaging.
• Protect cartridges from heat
and direct sunlight.
• Do not use damaged
lter cartridges.
• Do not open lter cartridges.
• If you are absent for a prolonged
period of time, empty the water
tank and replace the cartridge.
The symbol shown indicates
that this appliance should
not be disposed of in normal
household waste. It should
be taken to a local authority waste
collection centre designated for
this purpose or to a dealer
providing this service. For more
information, please contact your
local council oce.
To protect against electric
shock, do not immerse the
power cord, power plug
or appliance in water or any
other liquid.
FOR HOUSEHOLD USE ONLY
SAVE THESE INSTRUCTIONS

PAGE HEADER.....
5
EN
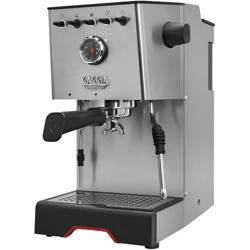
KNOW YOUR NEW APPLIANCE
G
H
E
F
C
D
B
A
I
J
K
L
M
N
O
Q
P
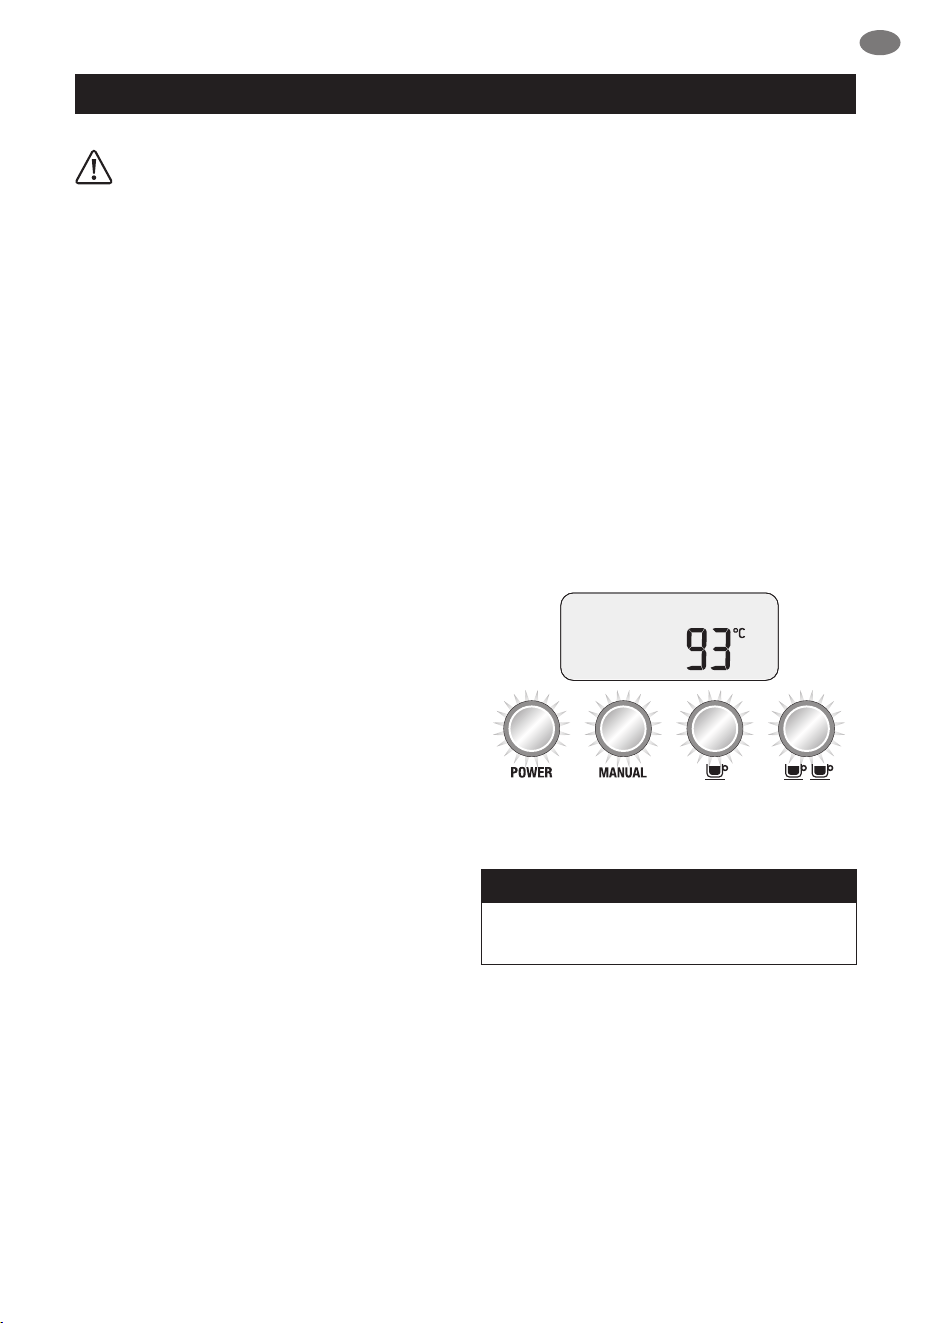
A
A. Top ll 2.5 litre removable water tank
B. POWER button
C. Backlit LCD interface
D. MENU access and DISPLAY
mode buttons
E. Espresso pressure gauge
F. Integrated & removable 58mm tamper
G. Actively heated 58mm group head with
embedded element
H. 58mm full stainless steel portalter
I. Convection heated 6 cup warming tray
J. Manual and programmable 1 & 2 cup volume
controls
K. Easy to operate steam lever
L. Dedicated hot water outlet
M. 360° swivel action steam wand
with 3 hole tip
N. De-scale access point
O. Integrated tool storage tray
P. Drop down swivel foot
Q. Removable drip tray
NOT SHOWN
15 bar Italian pump
Dual stainless steel boilers
Electronic PID temperature control
Over pressure valve
Low pressure pre-infusion
Power save mode
Safety thermal cut-out protection
PAGE HEADER.....
6
KNOW YOUR NEW APPLIANCE
Y
X
R
T
S
Single Wall
Dual Wall
U
V
W
Z
LCD INTERFACE
• Display Modes
• Shot Temp
• Shot Clock Timer
• Clock
Programmable Functions
• Shot Temp
• Shot Volume - 1 & 2 cup
• Pre-Infusion
• Auto Start
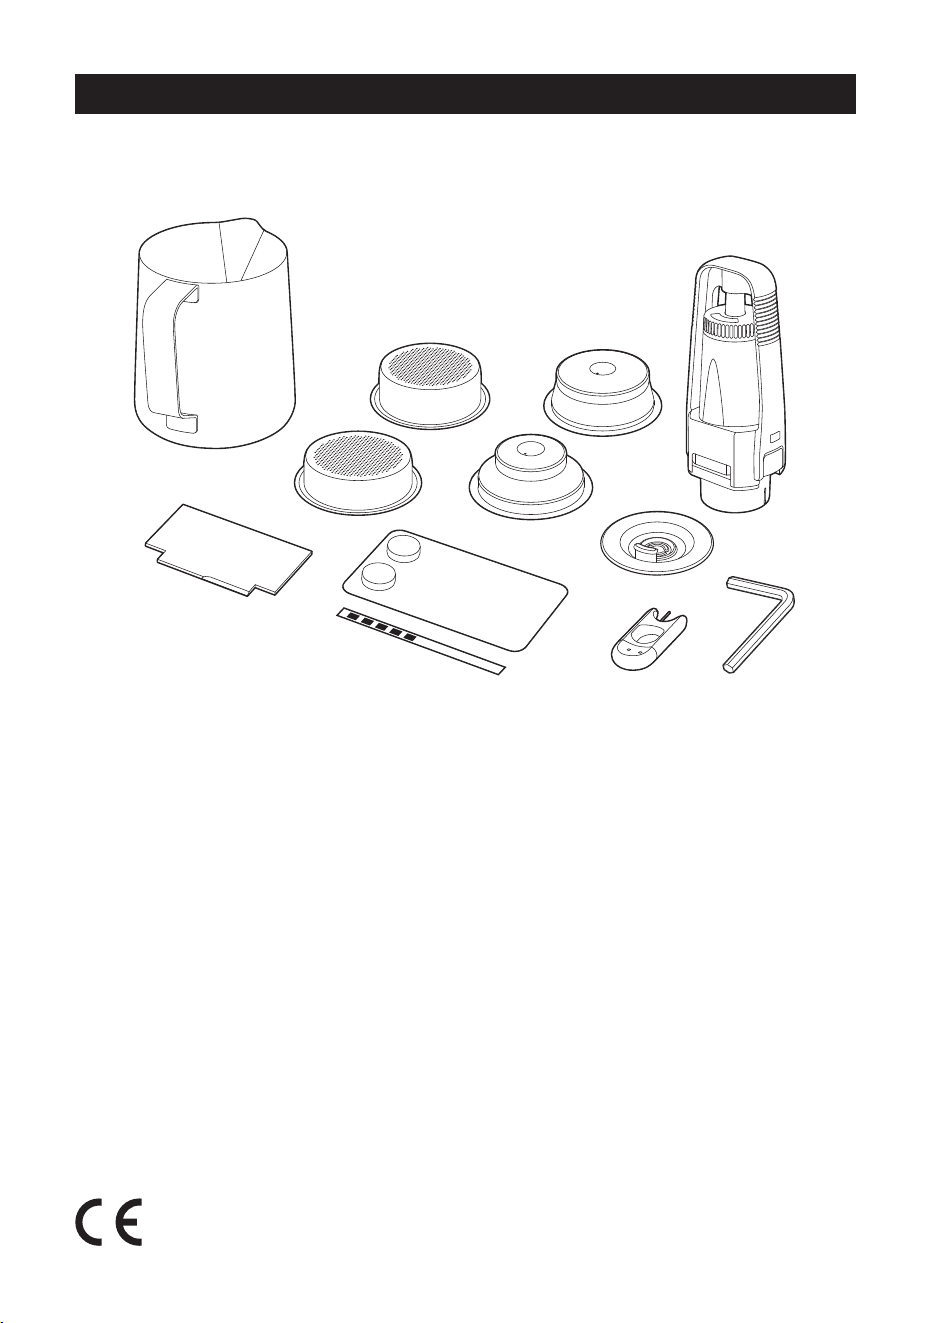
ACCESSORIES
R. Stainless steel frothing jug
S. Single & dual wall lter baskets
(1 & 2 cup)
T. Water lter holder with lter
U. Cleaning disc
V. Allen key
W. Cleaning tool
X. Espresso cleaning tablets
Y. Water hardness test strip
Z. Razor™ precision dosing tool
Rating Information
220–240V ~50–60Hz 1800–2200W
PAGE HEADER.....
7
EN
OPERATING YOUR NEW APPLIANCE
WARNING
Both the STEAM LEVER and
HOT WATER dial must be in the
CLOSED position for the machine
to enter START UP mode.
BEFORE FIRST USE
Machine Preparation
Remove and discard all labelling and packaging
materials attached to your espresso machine.
Ensure you have removed all parts and
accessories before discarding the packaging.
Clean parts and accessories (water tank,
portalter, lter baskets, jug) using warm water
and a gentle dish washing liquid and rinse well.
Conditioning the Water Filter
• Remove lter from the plastic bag and soak in
a cup of water for 5 minutes.
• Rinse lter under cold running water.
• Wash the stainless steel mesh in the plastic
lter compartment with cold water.
• Insert the lter into the lter holder.
• Set Date Dial 2 months ahead.
• To install lter, push down to lock
into place.
• Slide the water tank into position and
lock into place.
FIRST USE
Initial Start Up
• Fill tank with cold tap water.
• Dip Water Hardness Test Strip into water tank
for 1 second & set aside.
• Check Steam Lever and Hot Water dial are in
the CLOSED position.
• Press POWER On.
• Machine will prompt you to set water
hardness. Refer for test strip for your water
hardness. Use the Arrow UP or Arrow
DOWN keys to select water hardness 1–5.
Press Menu to set. Machine will beep to
conrm selection.
• Machine will reach operating temperature and
go into STANDBY mode.
Flushing The Machine
When the machine has reached STANDBY
mode, run the following 3 steps:
1. Press 2 Cup button to run water
through group head.
2. Run Hot Water for 30 seconds.
3. Activate Steam for 10 seconds.
START UP
Press the POWER button to switch the
machine ON. The POWER button will
ash and the LCD screen will display the
current espresso boiler temperature.
When the machine has reached operating
temperature, the POWER button light will stop
ashing and the MANUAL, 1 CUP and 2 CUP
buttons will illuminate.
The machine is now in STANDBY mode
ready for use.
NOTE
You will not be able to select 1 CUP, 2 CUP
or CLEANING CYCLE during START UP.
AUTO OFF MODE
The machine automatically switches
to AUTO OFF mode after 20 minutes.
PAGE HEADER.....
8
OPERATING YOUR NEW APPLIANCE
LCD INTERFACE
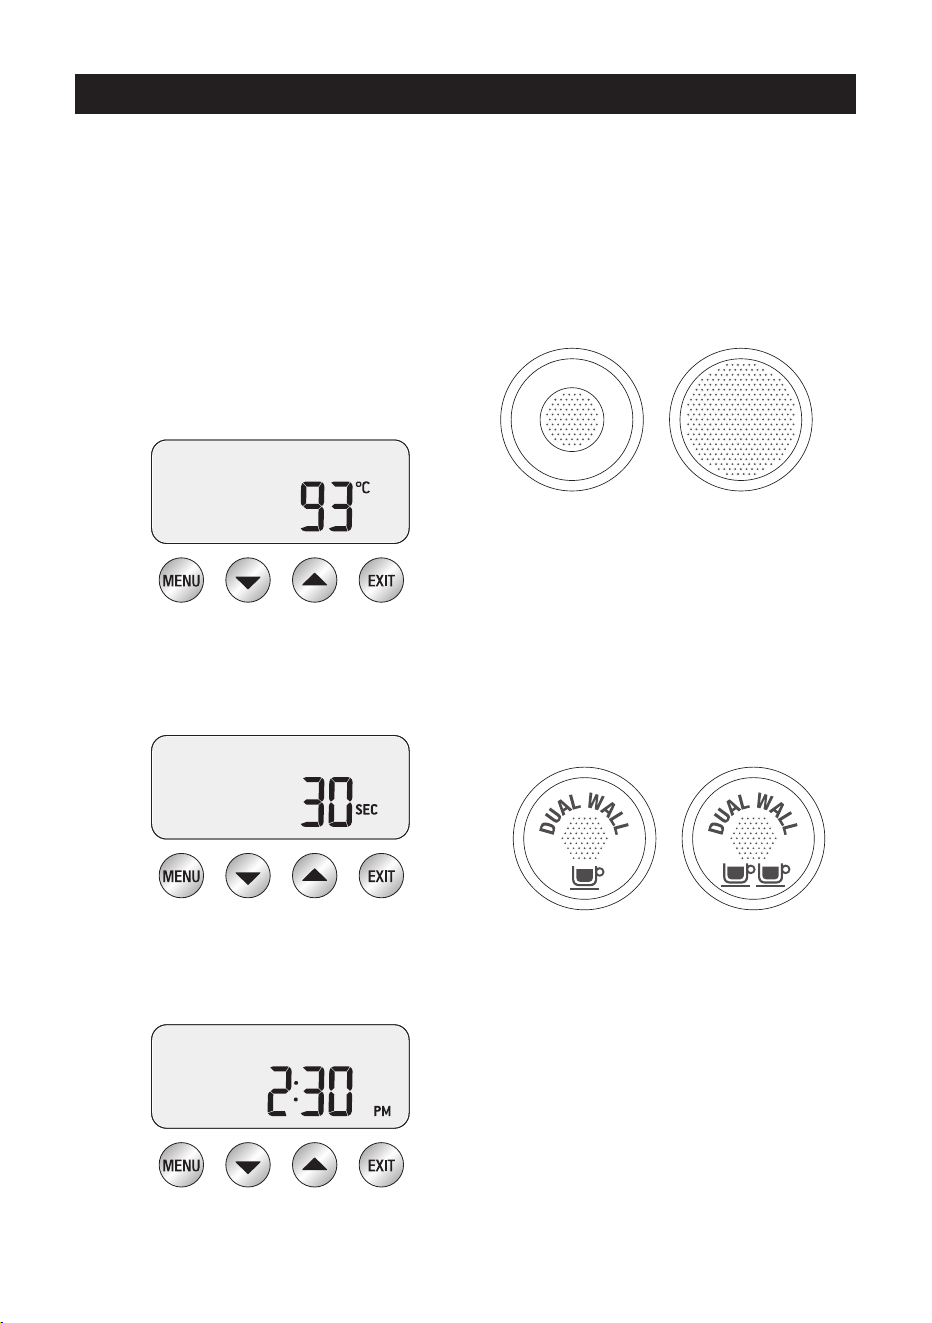
Display modes
3 modes can be displayed on the LCD screen:
Shot Temp, Shot Clock or Clock.
Press UP or DOWN arrow to change the display
mode between shot clock & clock. Shot temp
will be displayed during an extraction.
1. Shot Temp
Displays selected extraction temperature
(default set at 93°C), but can be changed
from 86°C – 96°C. See ‘Extraction
Temperature’, page 12.
2. Shot Clock
Temporarily displays duration of last espresso
extraction in seconds.
3. Clock
Temporarily displays current time (default set
at 12.00am if time has not been set).
SELECTING FILTER BASKET
SINGLE WALL Filter Baskets
Use Single Wall lter baskets when grinding fresh
whole coee beans.
Single Wall lter baskets allow you to experiment
with grind, dose and tamp to create a more
balanced espresso.
2 Cup1 Cup
1 Cup 2 Cup
• Use the 1 cup lter basket when brewing single
cups and the 2 cup lter basket when brewing
two cups, stronger single cups or mugs.
DUAL WALL Filter Baskets
Use Dual Wall lter baskets if using
pre-ground coee.
Dual Wall lter baskets regulate the pressure and
help to optimise the extraction regardless of the
grind, dose, tamp pressure or freshness.
1 Cup 2 Cup
2 Cup1 Cup
• Use the 1 cup lter basket when brewing single
cups and the 2 cup lter basket when brewing
two cups, stronger single cups or mugs.
COFFEE DOSE AND TAMPING
• Using Single Wall lter baskets, grind enough
coee to ll the coee basket.
• Tap the portalter several times to collapse
and distribute the coee evenly in the
lter basket.
• Tamp down rmly (using approx.
15 – 20kgs of pressure). The amount
of pressure is not as important as
consistent pressure every time.
PAGE HEADER.....
9
EN
OPERATING YOUR NEW APPLIANCE
• As a guide to dose, the top edge of the metal
cap on the tamper should be level with the
top of the lter basket AFTER the coee has
been tamped.
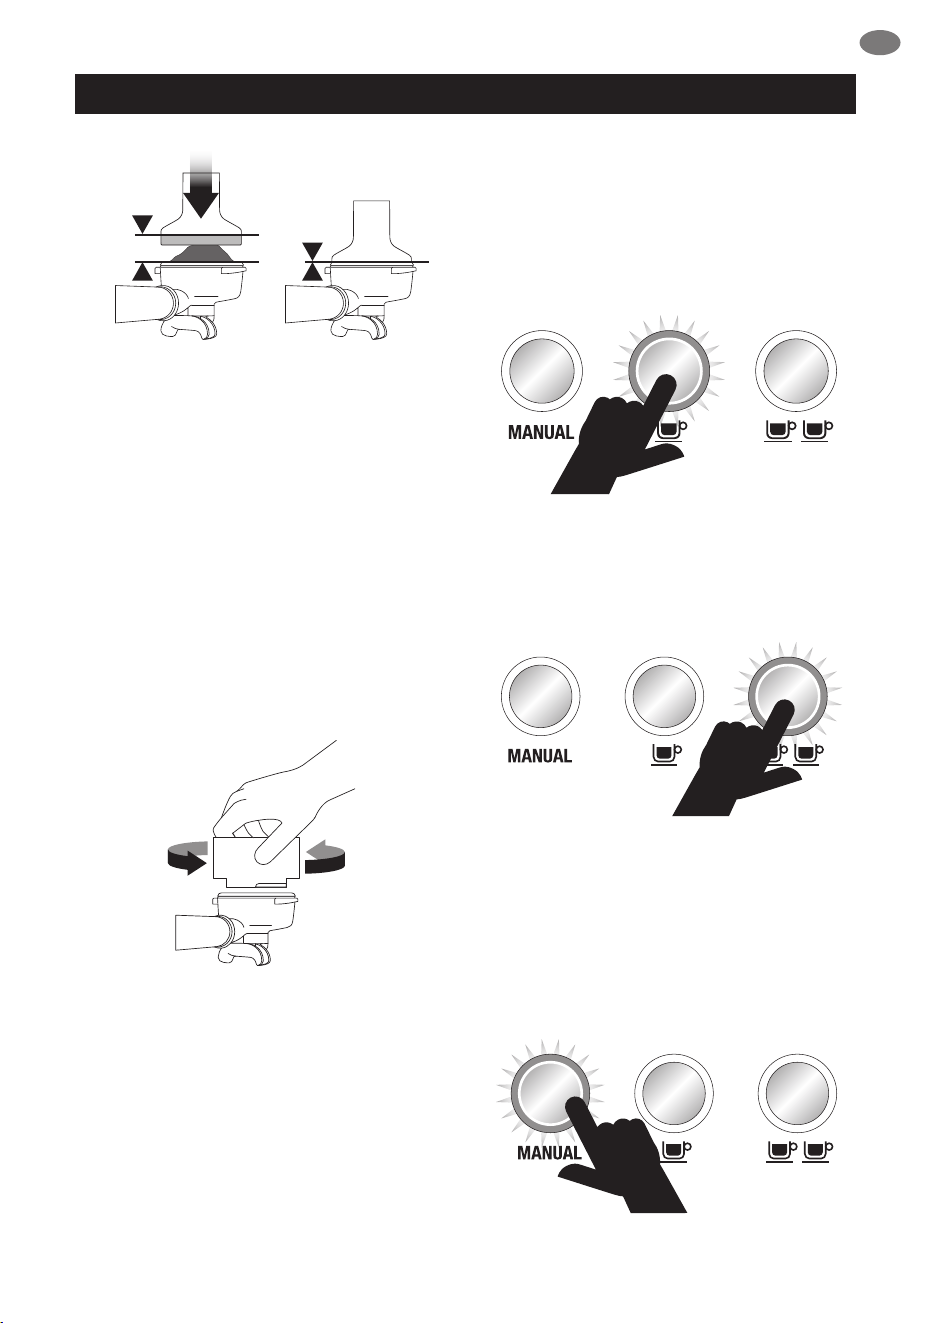
TRIMMING THE DOSE
• Insert the Razor™ dosing tool into the
coee basket until the shoulders of the tool
rest on the rim of the basket.
The blade of the dosing tool should
penetrate the surface of the tamped coee.
• Rotate the Razor™ dosing tool back and
forth while holding the portalter on an
angle over the knock box to trim o excess
coee grinds. Your coee lter basket is now
dosed with the correct amount of coee.
• Wipe excess coee from the rim of the lter
basket to ensure a proper seal is achieved in
the group head.
GENERAL OPERATION
1 CUP
Press 1 CUP once to extract a single shot
of espresso at the pre-programmed duration
(30secs). The extraction will start using the low
pressure pre-infusion.
2 CUP
Press 2 CUP button once to extract
a double shot of espresso at the
pre-programmed duration (30secs).
MANUAL
The MANUAL button allows you to control the
espresso pour volume to suit your preference.
Press MANUAL button once to start the
espresso extraction. The extraction will start
using the low pressure pre-infusion.
Press MANUAL button again to stop extraction.
PAGE HEADER.....
10
OPERATING YOUR NEW APPLIANCE
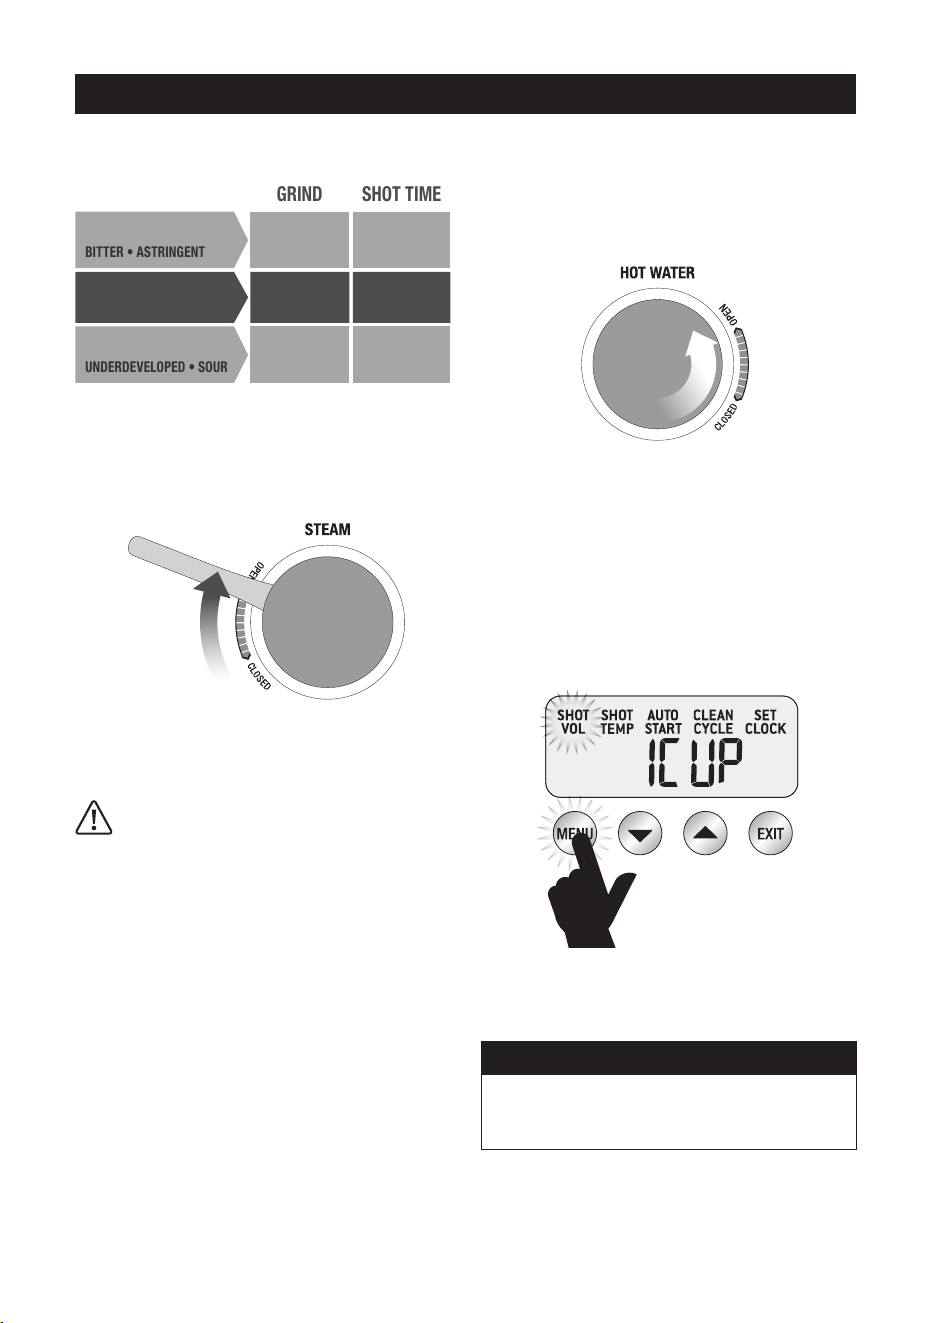
EXTRACTION GUIDE
OPTIMUM 25-35 SECBALANCED
GRIND SHOT TIME
TOO FINE OVER 40 SEC
OVER EXTRACTED
BITTER
•
ASTRINGENT
TOO COARSE UNDER 20 SEC
UNDERDEVELOPED
•
SOUR
UNDER EXTRACTED
STEAM
For instant steam, move STEAM LEVER to
OPEN position. The Steam LED will be On.
To turn STEAM o, move STEAM LEVER to
CLOSED position. The machine will return to
STANDBY mode.
CAUTION: BURN HAZARD
Pressurised steam can still be released, even
after machine has been switched o.
Children must always be supervised.
HOT WATER
For instant hot water, rotate the
HOT WATER dial to OPEN position.
The Hot Water LED will be On.
To turn HOT WATER o, rotate the HOT WATER
dial to CLOSED position. The machine will
return to STANDBY mode.
LCD PROGRAMMING FUNCTIONS
To program the machine, press MENU button
once. The LCD will display all programming
functions. Continue to press MENU button to
select your desired function.
At any stage during programming, press EXIT to
return to STANDBY mode.
NOTE
The MENU button is disabled when
the machine is extracting espresso or
delivering hot water.
PAGE HEADER.....
11
EN
OPERATING YOUR NEW APPLIANCE
SHOT DURATION
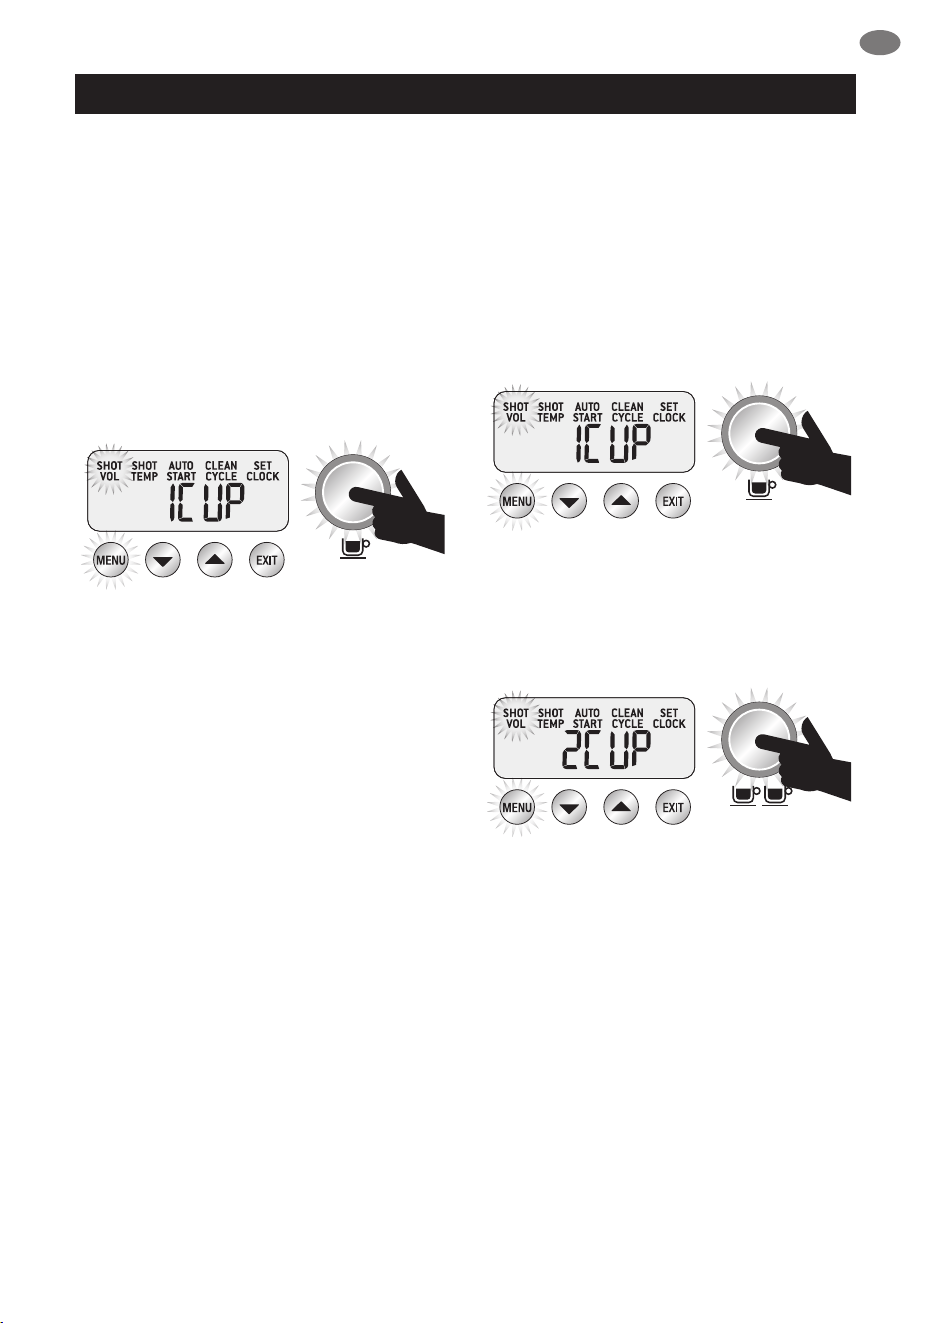
1 CUP Duration Programming
Press MENU button until SHOT VOL
icon ashes and 1 CUP is displayed on
the LCD screen.
Press 1 CUP button to start water ow from the
group head.
Press 1 CUP again once required extraction
duration has been reached.
The machine will beep twice to indicate the new
1 CUP duration has been set.
2 CUP Duration Programming
Press MENU button until SHOT VOL
icon ashes and 2 CUP is displayed on
the LCD screen.
Press 2 CUP button to start water ow from the
group head.
Press 2 CUP again once required extraction
duration has been reached.
The machine will beep twice to indicate the new
2 CUP duration has been set.
SHOT VOLUME
1 CUP Volume Programming
Press MENU button until SHOT VOL icon
ashes and 1 CUP is displayed on
the LCD screen.
Dose & tamp the portafilter with ground coee.
Press 1 CUP button to start espresso extraction.
Press 1 CUP again once desired volume of
espresso has been extracted.
2 CUP Volume Programming
Press MENU button until SHOT VOL
icon ashes and 2 CUP is displayed on
the LCD screen.
Dose & tamp the portalter with ground coee.
Press 2 CUP button to start espresso extraction.
Press 2 CUP again once desired volume of
espresso has been extracted.
PAGE HEADER.....
12
OPERATING YOUR NEW APPLIANCE
EXTRACTION TEMPERATURE
Press MENU button until SHOT TEMP
icon ashes. The LCD will display the current
shot temperature setting.
Press UP or DOWN arrow to adjust
SHOT TEMP to the desired setting
(range 86°C – 96°C).
The new SHOT TEMP setting will be displayed
on the LCD screen.
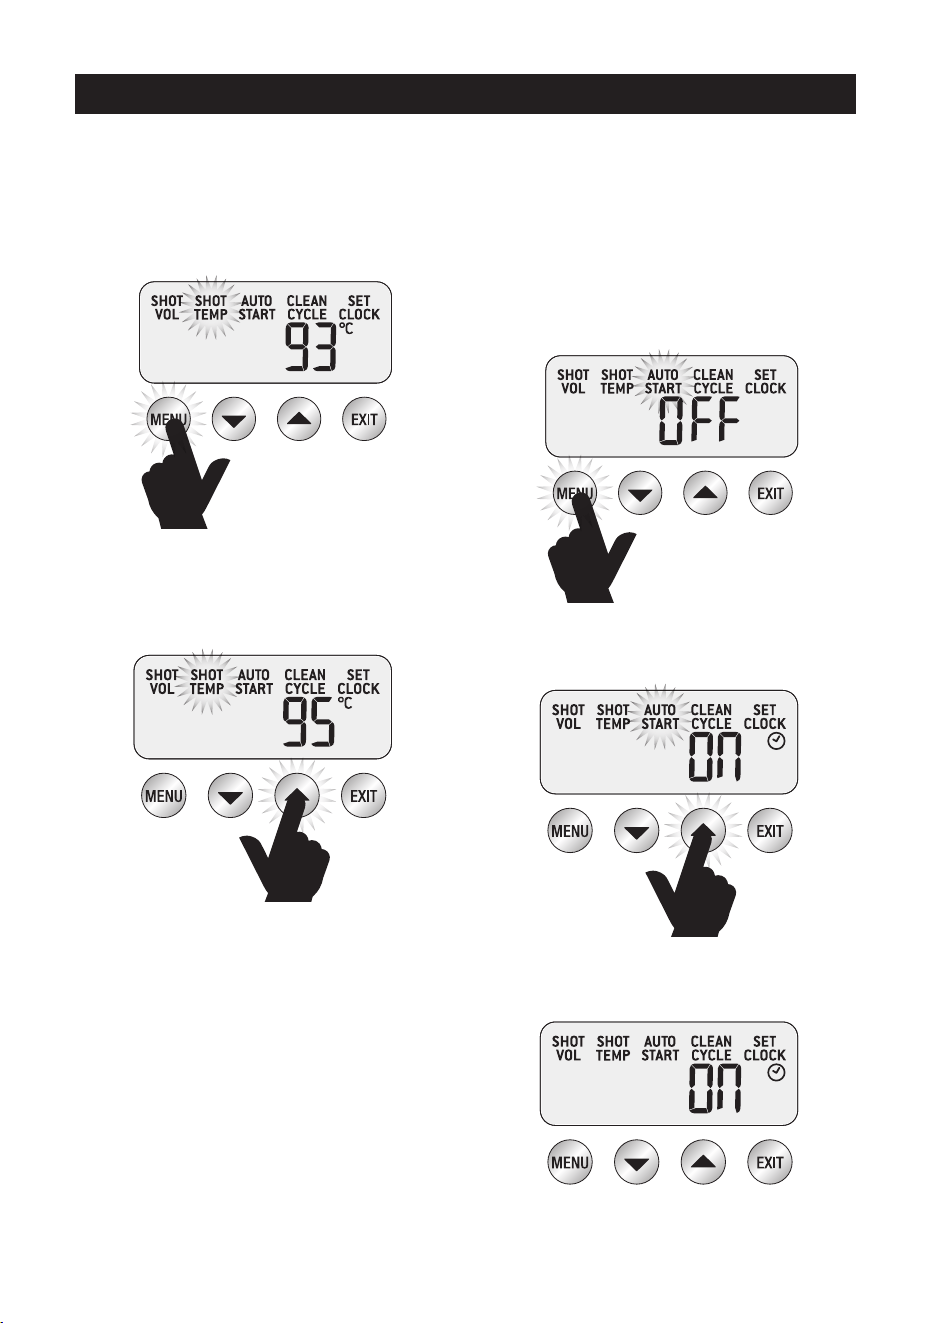
AUTO START
To use AUTO START, first ensure clock
has been set.
Auto Start ON/OFF
Press MENU button until AUTO START icon
ashes and the current Auto Start setting (ON
or OFF) is displayed on the LCD screen.
Press UP or DOWN arrow to set the
AUTO START to ON or OFF.
If AUTO START is ON, the LCD will
display a Clock icon.
PAGE HEADER.....
13
EN
OPERATING YOUR NEW APPLIANCE
Press MENU button and the current
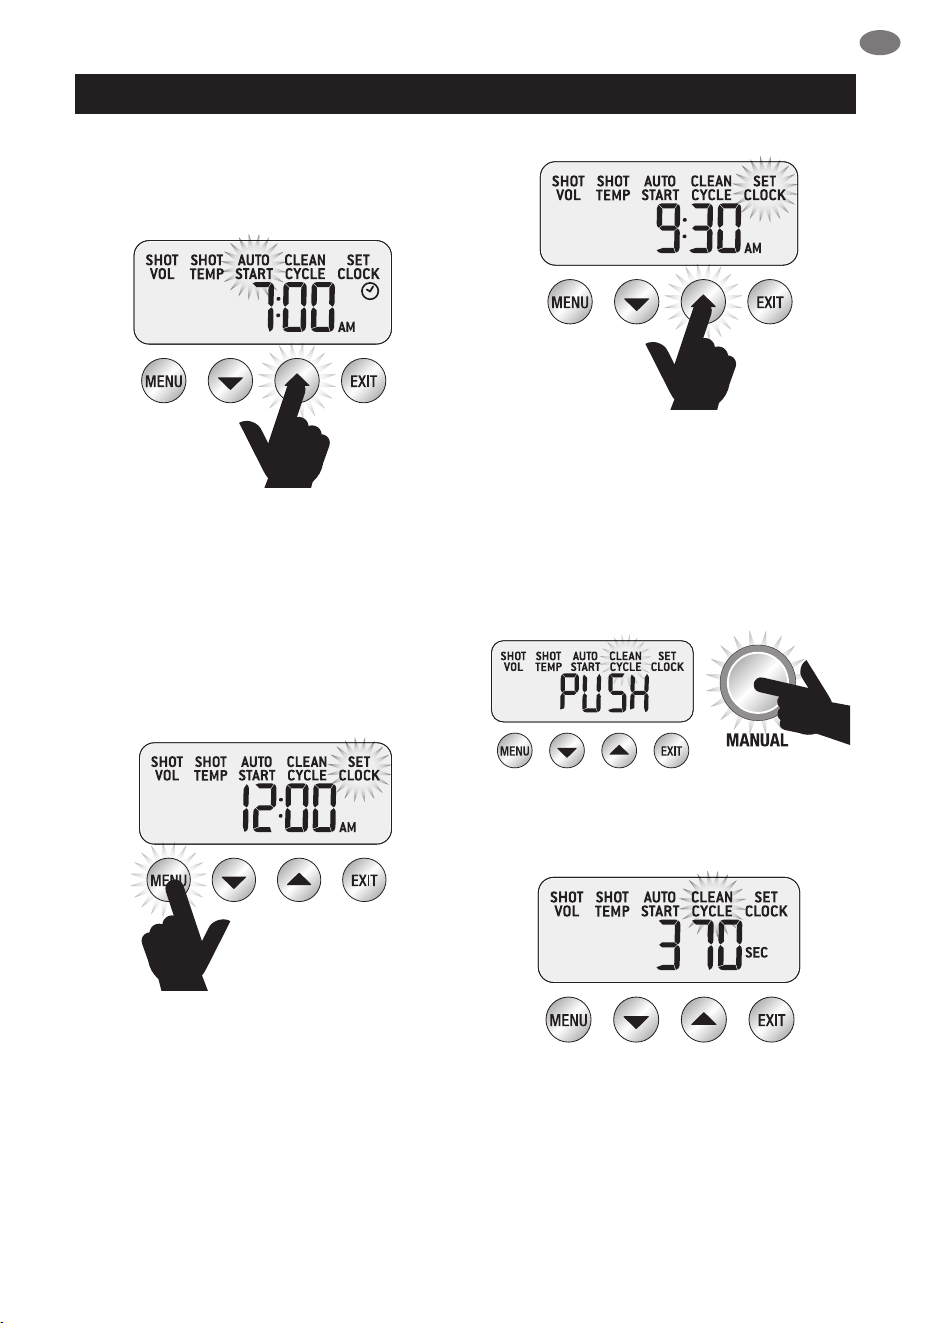
Auto Start time will be displayed on the
LCD screen.
Press UP or DOWN arrow to adjust
AUTO START to the desired time
(default AUTO START time set at 7:00am).
Press EXIT button.
SET CLOCK
Press MENU button until SET CLOCK
icon ashes. The current Clock Time will
be displayed on the LCD screen.
Press UP or DOWN arrow to adjust the time.
Press EXIT button.
CLEAN CYCLE
Press MENU button until CLEAN CYCLE icon
ashes and PUSH is displayed on the
LCD screen.
To start the CLEAN CYCLE press the
illuminated MANUAL button.
The CLEAN CYCLE icon will ash and
the machine will start to countdown from
370 seconds.
The machine will return to STANDBY
when the cleaning cycle has ended.
PAGE HEADER.....
14
OPERATING YOUR NEW APPLIANCE
ADVANCED ESPRESSO
FUNCTIONS
Press & Hold - 1 CUP
Press & hold 1 CUP to bypass the pre-infusion
phase and deliver water to the group head at
the full 9 bar pressure. Release button to stop
extraction. This function can be used when
purging the group head.
Press & Hold - 2 CUP
Press & hold 2 CUP to bypass the pre-infusion
phase and deliver water to the group head at
the full 9 bar pressure. Release button to stop
extraction. This function can be used when
purging the group head.
Press & Hold - MANUAL
Press & hold the MANUAL button to deliver
water to the group head at low pre-infusion
pressure. When MANUAL button is released,
water will continue at the full 9 bars of
pressure. Press MANUAL button again to
stop extraction.
This function can be used to manually control
the pre-infusion duration.
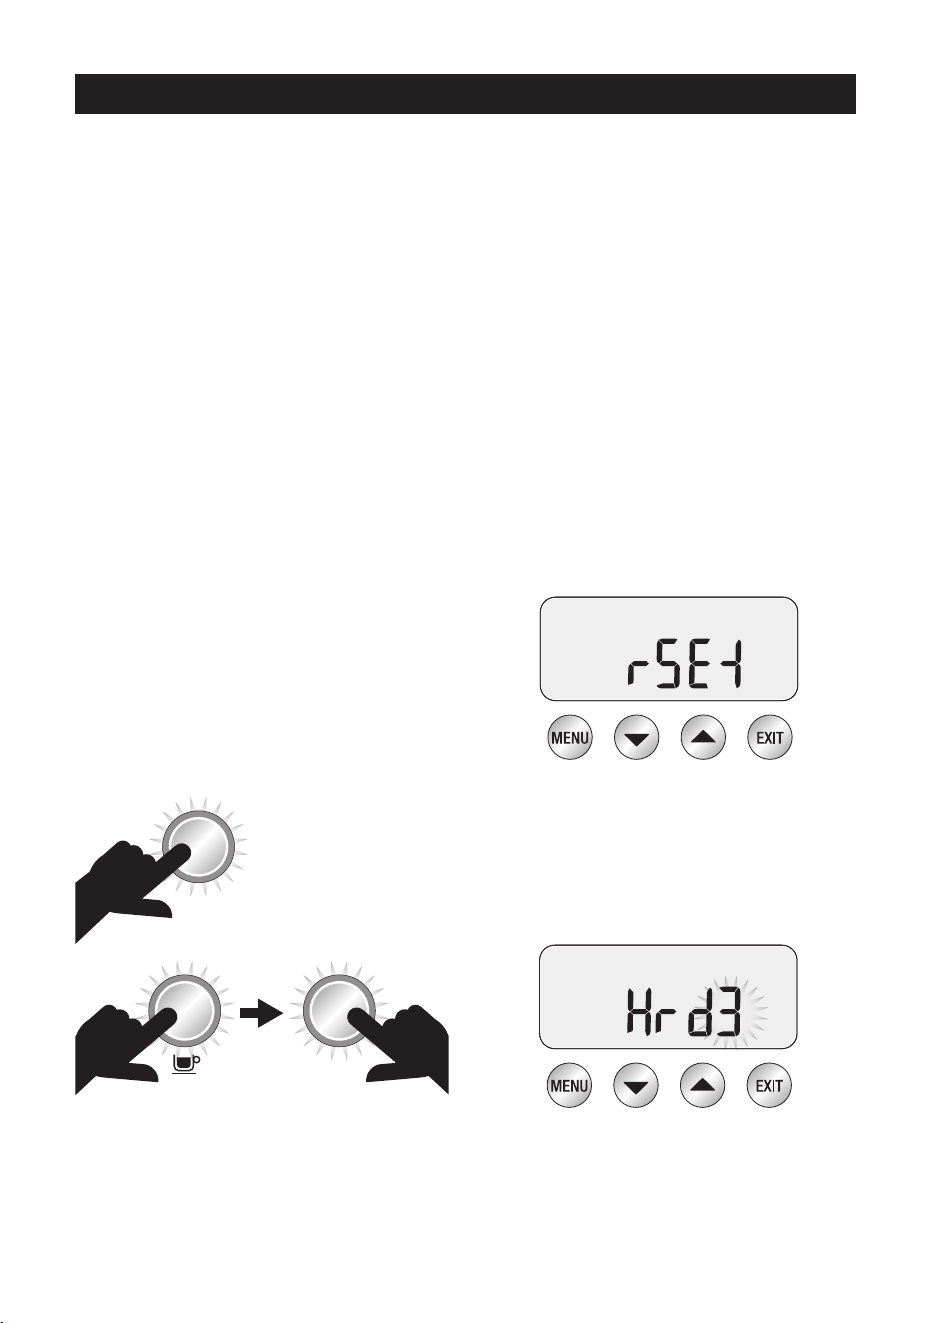
ACCESS ADVANCED MENU
To access the Advanced Menu:
With machine OFF, press and hold the
1 CUP button, then press the POWER button.
POWER
POWER
TURN
POWER OFF
THEN PRESS
& HOLD
Resetting default settings
The machine has the following default settings:
1.
Temperature – 93°C
2. Pre-Infusion – Duration Pr07
3. Pre-Infusion – Power PP60
4. Steam temperature – 135°C
5. Auto Start – OFF
6. Audio – LO
7. Water Hardness – 3
8. Espresso Volume durations
– 30/30 secs
9.
To reset machine to original default settings, rst
enter Advanced Menu. rSEt will be displayed on
the LCD. Press the MENU button to reset the
machine to the default settings.
The machine will then prompt you to set the
water hardness. Select your water hardness
using the UP & DOWN arrows & press
MENU to conrm or press EXIT to return to
STANDBY mode.

PAGE HEADER.....
15
EN
OPERATING YOUR NEW APPLIANCE
Temperature Unit - ˚C/˚F (SEt)
Temperature Unit will be displayed on the LCD
screen as SEt. Press MENU to Select.
Use UP and DOWN arrows to select desired
temperature unit. Press MENU to set.
Machine will beep once to conrm selection. Press
EXIT to return to STANDBY mode.
Steam Temperature (StEA)
Adjust Steam Temperature to control the pressure
of the steam being delivered. Lower steam
temperature to texture smaller volumes of milk or
have more control. Raise steam temperature to
texture larger volumes of milk.
Press MENU to Select STEAM.
Use UP and DOWN arrows to select required
steam temperature.
Press MENU to set.
Machine will beep once to conrm selection.
Machine Audio (Snd)
Machine Audio refers to the volume level
of the ‘beeps’ heard.
• HI - high volume
• LO - low volume
• OFF - volume o
Press the MENU button to select Audio.
Press UP or DOWN arrows to select
desired volume. Press MENU to set. Machine will
beep once to conrm selection.
Volumetric Control (vOL)
Use this function to set Duration or Volume to
control the espresso output.
Press the MENU button to select. Use the UP or
DOWN arrows to select FLo or SEc. Press MENU
to set. Machine will beep once to conrm selection.
PAGE HEADER.....
16
OPERATING YOUR NEW APPLIANCE
ADVANCED FEATURES
Pre-Infusion Programming
With machine in STANDBY mode, press
UP and DOWN arrows together to enter
Pre-Infusion programming mode.
Press MENU button to move between
Pre-infusion Duration and Power.
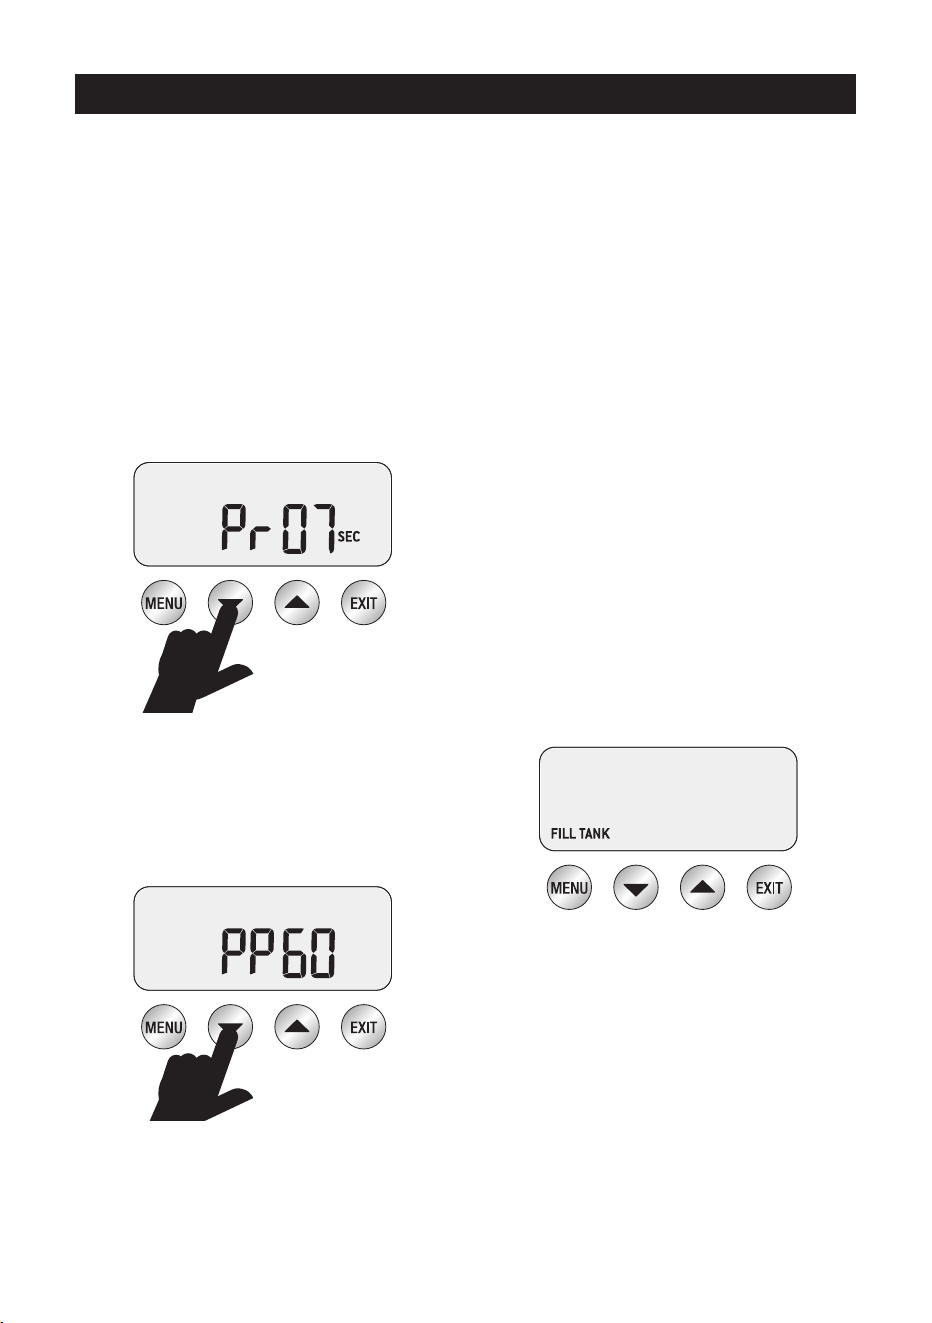
Pre-Infusion Duration
The LCD will display the current
Pre-Infusion Duration.
Press UP or DOWN arrow to vary time.
We recommend a range of between
5 - 15secs as being optimum.
Pre-Infusion Power
The LCD will display current Pre-Infusion Power.
Press UP or DOWN arrows to vary power.
We recommend a range of between 55–65
as being optimum. Press EXIT to conrm setting
and return to STANDBY mode.
ALERTS
STEAM LED Flashing At START UP
The machine will not enter START UP mode
when the STEAM LEVER is in the OPEN
position and the STEAM LED is ashing.
Move the STEAM LEVER to the
CLOSED position for the machine
to enter START UP mode.
HOT WATER LED Flashing At START UP
The machine will not enter START UP mode
when the HOT WATER dial is in the OPEN
position and the HOT WATER LED is ashing.
Move the HOT WATER dial to the
CLOSED position for the machine to
enter START UP mode.
HOT WATER LED Flashing
The HOT WATER LED will ash when the HOT
WATER function has been operating for longer
than 1 minute.
Move the HOT WATER dial to CLOSED position
for machine to enter STANDBY mode.
Fill Tank
The machine will detect a low water level. The FILL
TANK icon will be displayed on the LCD screen.
If FILL TANK icon is displayed, add
water to tank until machine returns to
STANDBY mode.
PAGE HEADER.....
17
EN
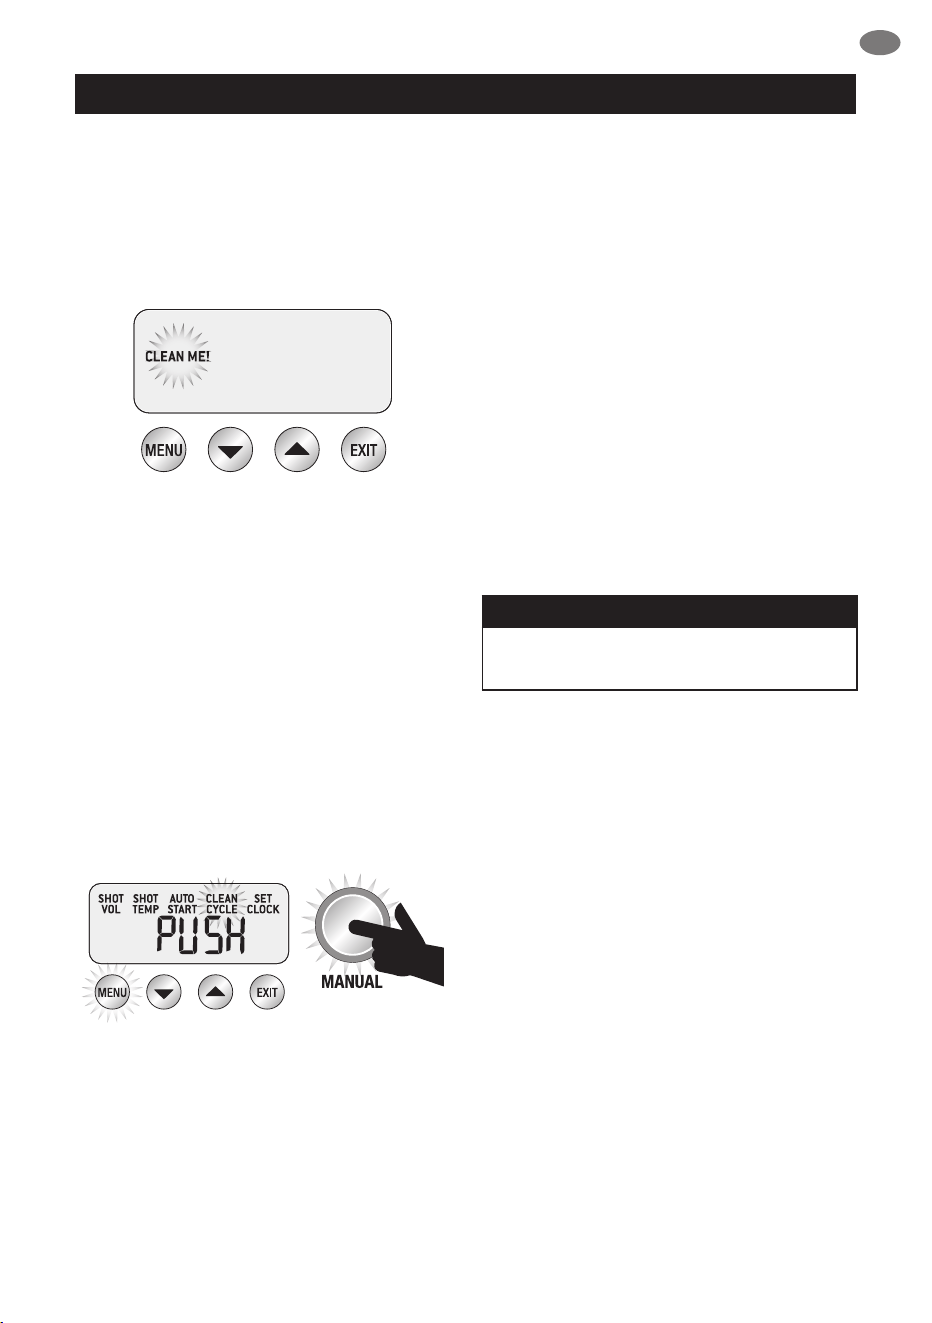
CARE & CLEANING
CLEAN ME!
The machine will detect when 200 extractions have
been carried out since the last clean cycle.
The CLEAN ME! icon will be displayed
on the LCD screen the next time the machine
enters START UP mode.
CLEANING CYCLE
• CLEAN ME! will be displayed on
LCD to indicate when a cleaning cycle
is required (approx. 200 shots).
• Insert the supplied cleaning disc, followed by
1 cleaning tablet into the 1 CUP lter basket.
• Insert the portalter and lock into
group head.
• Ensure the water tank is lled with
cold tap water.
• Ensure the drip tray is empty & inserted.
• Press MENU button until CLEAN CYCLE
icon ashes and PUSH is displayed on
the LCD screen.
• To start the Clean Cycle press the illuminated
MANUAL button.
• The CLEAN CYCLE icon will ash and
the machine will start to countdown from
370 seconds.
• When the cleaning cycle has nished,
remove the portalter and ensure the tablet
has completely dissolved. If the tablet has
not dissolved, repeat the steps above,
without inserting a new tablet.
• Rinse the lter basket and portalter
thoroughly before use.
INSTALLING WATER FILTERS
• Soak lter in a glass of water for 5 minutes.
• Rinse the lter and mesh under running water.
• Assemble lter into lter holder.
• Set replacement date forward 2 months.
• Install lter holder into water tank.
• Insert water tank into the machine. Ensure the
latch is locked into position.
• Replacing the water lter after three months
or 40L will reduce the need to descale the
machine. The limitation of 40L is based on
water hardness level 4. If you are in level 2
area, you can increase this to 60L.
NOTE
To purchase water lters visit Sage
®
webpage.
CLEANING THE STEAM WAND
• Wipe the steam wand with a damp cloth &
purge directly after texturing the milk.
• If the any of the holes in the tip of the steam
wand become blocked, ensure the STEAM
LEVER is in the CLOSED position and clean
using the pin on the end of the cleaning tool.
• If steam wand remains blocked, remove the tip
using the integrated spanner in the cleaning
tool and soak in hot water. Screw tip back onto
the steam wand using the integrated spanner
in the cleaning tool.
CLEANING THE FILTER BASKETS
AND PORTAFILTER
• The lter baskets and portalter should be
rinsed under hot water directly after use to
remove all residual coee oils.
If the holes in the lter baskets become
blocked, dissolve a cleaning tablet
in hot water and soak lter basket
and portalter in solution for approx.
20 minutes. Rinse thoroughly.
PAGE HEADER.....
18
CARE & CLEANING
CLEANING THE SHOWER SCREEN
• The group head interior and shower screen
should be wiped with a damp cloth to remove
any ground coee particles.
• Periodically run hot water through the
machine with the lter basket and portalter
in place, without ground coee, to rinse out
any residual coee.
CLEAR WATER BACK-FLUSH
• Insert the cleaning disc into the 1 cup
lter basket.
• Insert portalter into the group head.
• Press the 1 CUP button to build pressure
in the basket.
• Repeat several times to remove residual
coee oils in the espresso water paths.
CLEANING THE DRIP
& STORAGE TRAY
• The drip tray should be removed, emptied
and cleaned after each use or when the drip
tray indicator is showing Empty Me!
• Remove grill from the drip tray.
Wash the drip tray in warm soapy water. The
Empty Me! indicator can also be removed
from the drip tray.
• The storage tray can be removed and
cleaned with a soft, damp cloth (do not use
abrasive cleansers, pads or cloths which can
scratch the surface).
CLEANING THE OUTER HOUSING
& CUP WARMING TRAY
• The outer housing and cup warming tray can
be cleaned with a soft, damp cloth. Polish
with a soft, dry cloth. Do not use abrasive
cleaners, pads or cloths which can scratch
the surface.
NOTE
Do not clean any of the parts or
accessories in the dishwasher.
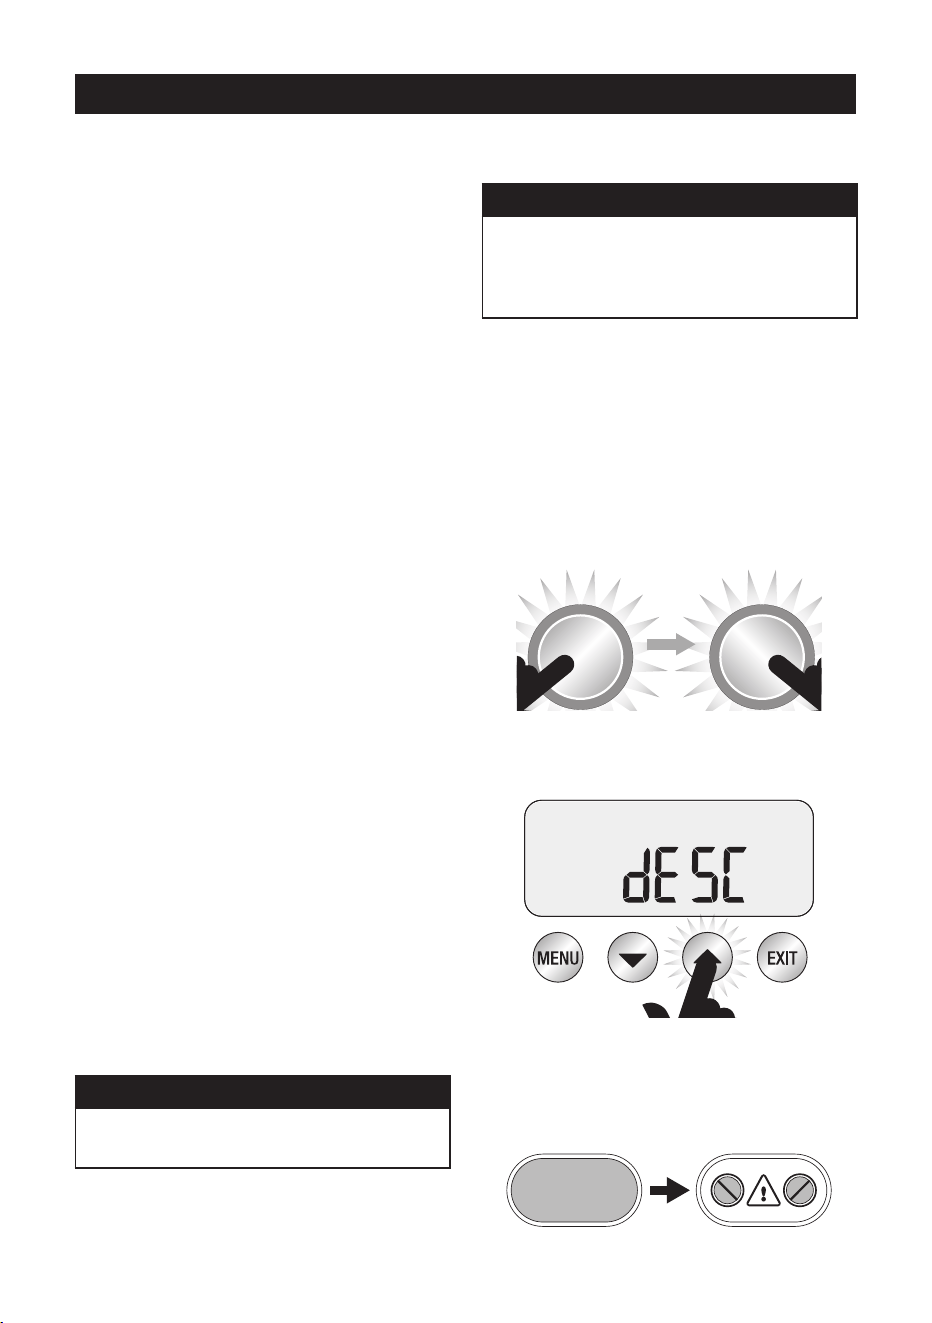
DESCALE (dESC)
NOTE
Even if you used the provided water lter,
we recommend you to descale if there is
scale build-up in the water tank.
Only descale via the descale menu.
1 – Prepare for Descale
a) Empty the drip tray and insert
into position.
b) Turn the machine o and allow to cool for at
least 4 hours. With the machine o, press and
hold the 1 CUP button, then press and hold
the POWER button together for 3 seconds.
rSEt will appear on the LCD.
POWERPOWER
THEN PRESS
& HOLD
THEN PRESS
& HOLD
c) Press UP or DOWN arrow to the ‘dESC’
then press MENU to conrm.
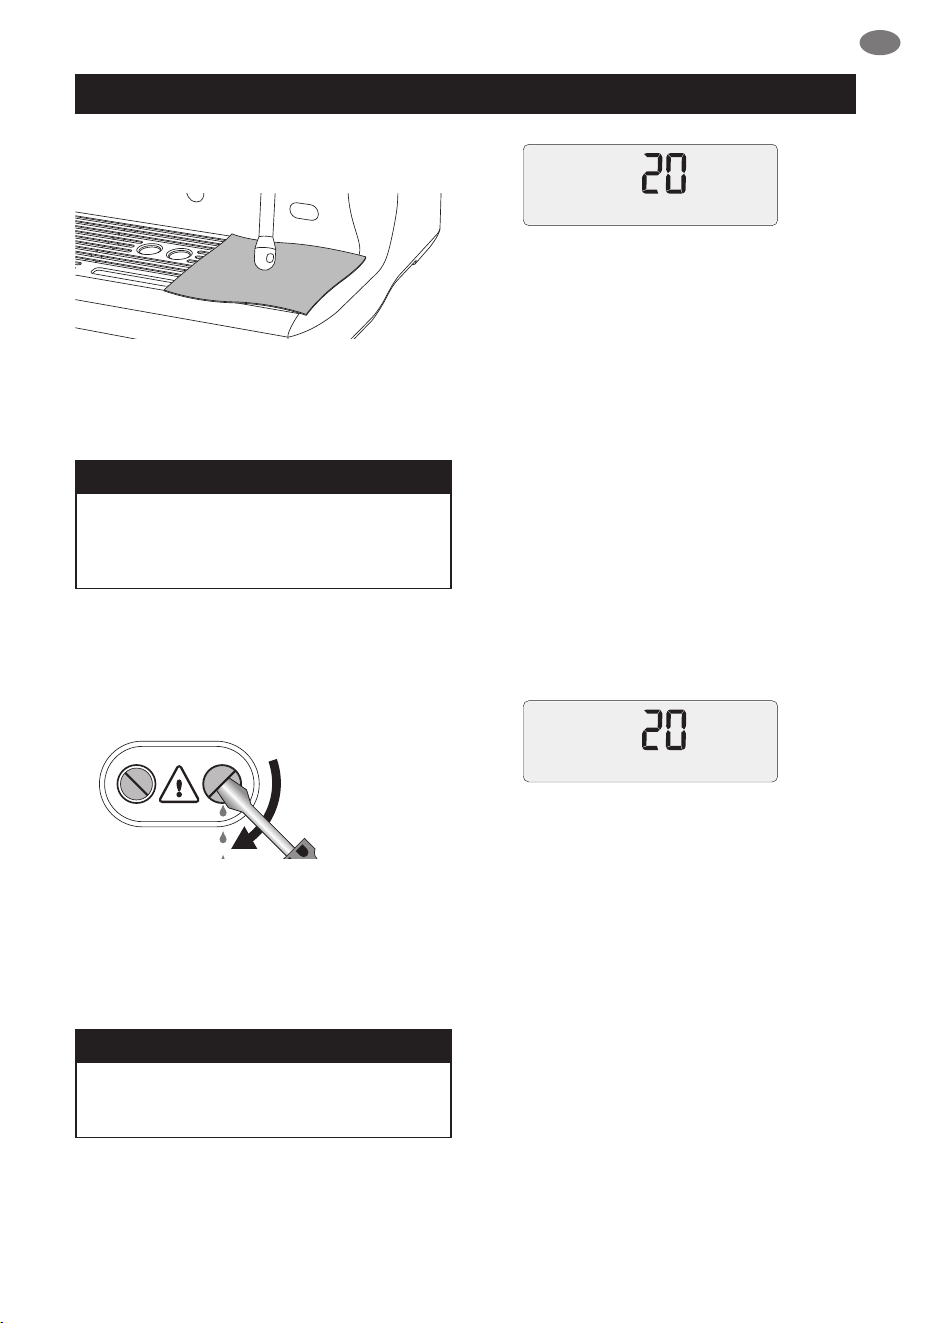
2 – Empty Boilers
a) Remove the grey silicone cover on the lower
front panel marked DESCALE ACCESS.
REMOVE
DESCALE ACCESSDESCALE ACCESS DESCALE ACCESSDESCALE ACCESS
PAGE HEADER.....
19
EN
CARE & CLEANING
b) Place a cloth over the drip tray to prevent
steam escaping.
c) Use a at head screw driver to rotate the
right valve counter-clockwise SLOWLY until
fully open. As the valve opens, steam may
be released.
NOTE
If there’s no water released into the drip tray,
press and hold the 1 CUP button for
3 seconds. This will release water from
the boiler.
When the water is completely empty, close the valve
by rotating screws clock-wise until seated. Do not
overtighten screws to avoid damage to the valves.
DESCALE ACCESSDESCALE ACCESS
d) Repeat the above process on the left valve.
e) Empty the drip tray, use caution as the drip tray
may be hot.
f) Empty water tank, remove water lter.
g) Dissolve 1 sachet of Sage
®
Descaler™ into
1 litre of warm water. Pour solution into the
water tank.
NOTE
If water tank has not been removed,
replaced or is empty, “FILL TANK” will
appear on the LCD.
3 – Begin Descale
a) Press 1 Cup button and the LCD screen will
show countdown time (20 minutes).
During this time, the machine will ll boilers with
descale solution and heat to temperature.
There may be some water ow through the group
head during this time.
Allow the countdown timer to reach 0 as this allows
solution sucient time to dissolve scale build up.
However you can proceed to the next step at any
time by pressing the 1 Cup button.
b) Place a cloth over the drip tray to stop
steam escaping.
c) Empty boilers by repeating steps
2c and 2d.
d) Empty drip tray and insert back to place.
e) Empty water tank then rinse and ll with
clean water to the MAX line. Lock water
tank back into position.
4 – Flush Boilers
a) Press 1 Cup button and the LCD screen will
show countdown time (20 minutes).
During this time, the machine will ll boilers with
fresh clean water and heat to temperature. You can
proceed to the next step at any time by pressing
the 1 Cup button.
b) Place a cloth over the drip tray to stop
steam escaping.
c) Empty boilers by repeating steps
2c and 2d.
d) Empty drip tray and insert back to place.
e) Empty water tank then rinse and ll with clean
water to the MAX line. Lock water tank back
into position.
5 – Repeat Step 4 Flush Boilers
We recommend ushing boilers again to ensure
any residual descale solution is released from
the boilers. Press POWER button to escape
the Descale mode. The descale process is now
complete and ready to use.
PAGE HEADER.....
20
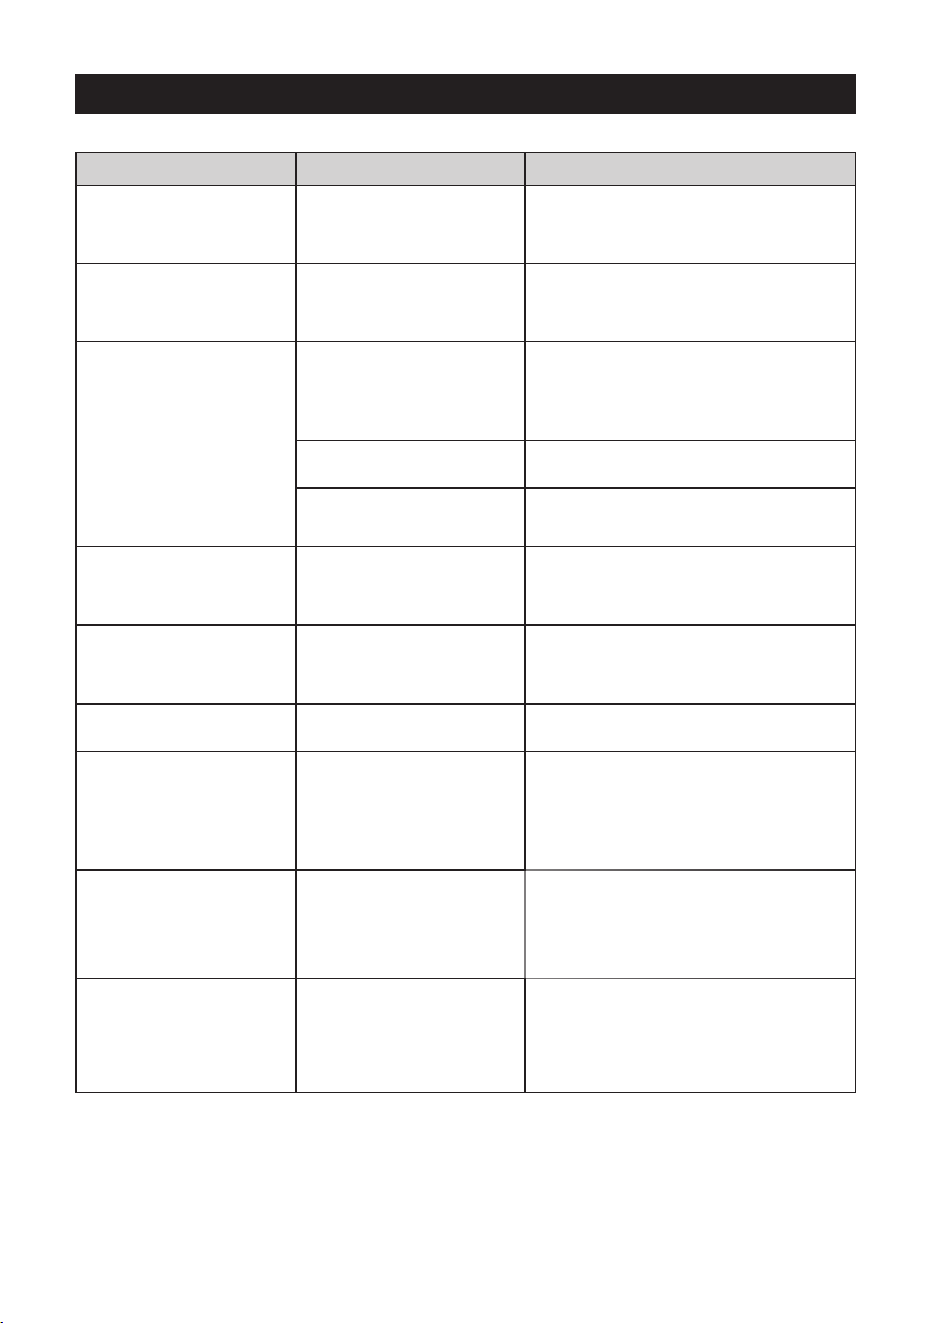
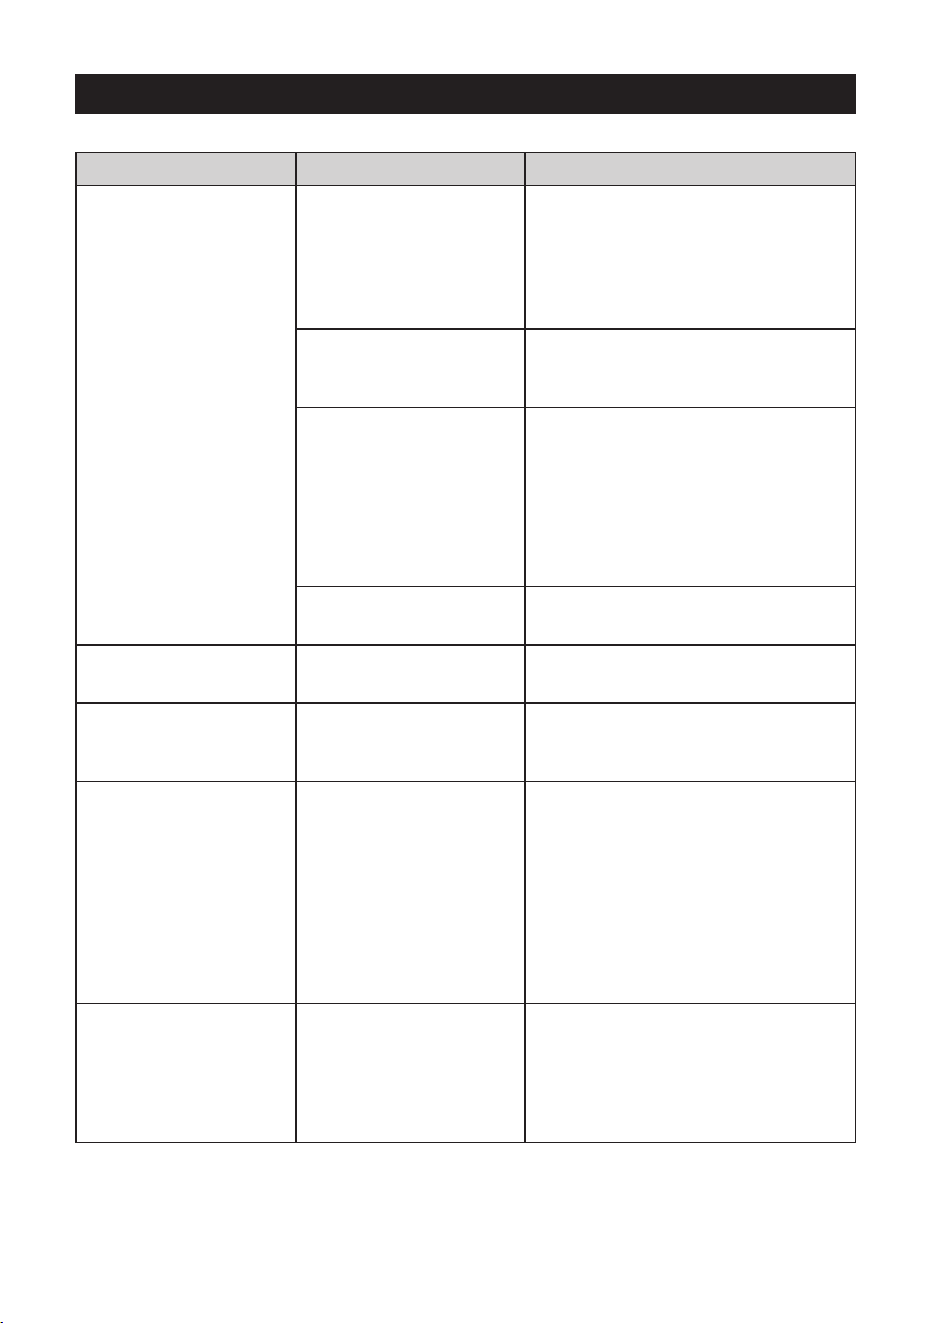
TROUBLESHOOTING
PROBLEM POSSIBLE CAUSES WHAT TO DO
The Hot Water LED
ashes when the
machine is turned On.
• Hot Water dial is open. Turn the Hot Water dial to the
CLOSED position.
The Steam LED
ashes when the
machine is turned On.
• Steam Lever is open. Move the Steam Lever to the
CLOSED position.
Water does not ow
from the group head.
• Machine has not
reached operating
temperature.
Allow time for the machine to reach
operating temperature. The POWER
light will stop ashing when machine
is ready.
• Water tank is empty. Fill Tank.
• Water tank not fully
inserted & locked.
Push water tank in fully and close
the latch.
FILL TANK displayed
on LCD, but water
tank is full.
• Water tank is not fully
inserted and locked into
position.
Push water tank in fully and close
the latch.
No Steam or Hot
Water.
• Machine is not turned on. Ensure the machine is plugged in,
switched On at the power outlet and
the POWER button is On.
No Hot Water.
• Water tank is empty. Fill water tank.
No Steam.
• Steam Wand is blocked. Use the pin on the cleaning tool to
clear the holes. If the steam wand
continues to be blocked remove the tip
of the steam wand using the spanner in
the cleaning tool and soak in hot water.
The machine is ‘On’
but ceases to operate.
Turn machine O. Wait for 60 minutes
and turn machine back On.
If problem persists, call Sage
®
Customer Service UK.
Steam pouring out of
group head.
Turn machine O. Wait for 60 minutes
and turn machine back On.
If problem persists, call Sage
®
Customer Service UK.

PAGE HEADER.....
21
EN
TROUBLESHOOTING
PROBLEM POSSIBLE CAUSES WHAT TO DO
Espresso just
drips from the
portalter spouts.
• Coee is ground
too nely.
Use slightly coarser grind.
• Too much coee in the
lter basket.
Lower dose of coee using the
RAZOR™ dosing tool.
• The lter basket may
be blocked.
Use the ne pin on the provided
cleaning tool to clear the outlet hole(s)
on the underside of the lter basket.
If it continues to be blocked, dissolve
a cleaning tablet in hot water and
soak lter basket and portalter in the
solution for approx. 20 minutes. Rinse
thoroughly.
Espresso runs out
too quickly.
• The coee is ground
too coarse.
Use slightly ner grind.
and/or
• Not enough coee in
the lter basket.
Increase dose of coee and use the
RAZOR™ dosing tool to trim o excess
coee after tamping.
Pressure gauge not
reaching 9 bar.
• Coee not tamped
rmly enough.
Tamp between 15-20kgs
of pressure.
If the above suggestions do not
help, check the machine. Place an
EMPTY Dual Wall lter basket into the
portalter (either 1 CUP or 2 CUP).
Press the MANUAL button.
If the pressure gauge reads over 5
bar the machine is OK. Ensure correct
dose by using the RAZOR™ dosing
tool. If the dose is correct, make the
grind ner.
If the pressure gauge reads below
5 bar, contact Sage
®
Customer
Service Centre.
Coee not hot enough.
• Cups not preheated. Rinse cups under hot water outlet and
place on cup warming tray.
• Milk not hot enough
(if making a cappuccino
or latte etc).
Heat milk until side of
the jug becomes hot
to touch.
No crema.
• Coee beans are stale. Buy freshly roasted coee with a
roasted-on date.
• Using Single Wall
Filter Baskets with
pre-ground coee.
Ensure you use Dual Wall Filter
Baskets with
pre-ground coee.
PAGE HEADER.....
22
TROUBLESHOOTING
PROBLEM POSSIBLE CAUSES WHAT TO DO
Espresso runs out
around the edge of
the portalter.
and/or
• Portalter not inserted in
the group head correctly.
Ensure portalter is rotated to the right
until the handle is past the centre and
is securely locked in place. Rotating
past the centre will not damage the
silicone seal.
Portalter comes out
of the group head
during an extraction.
• There are coee
grounds around the lter
basket rim.
Clean excess coee from the rim of the
lter basket to ensure a proper seal in
group head.
• Filter basket rim is
wet or underside of
portalter lugs are wet.
Wet surfaces reduce the
friction required to hold
the portalter in place
whilst under pressure
during an extraction.
Always ensure lter basket and
portalter are dried thoroughly before
lling with coee, tamping and
inserting into the group head.
• Too much coee in the
lter basket.
Trim coee dose using the RAZOR™
dosing tool after tamping.
Unable to set auto
start time.
• Clock not set. Set clock.
E1, E2 or E3 error
message on LCD
screen.
• An error that cannot
be reset by the user
has occurred.
Contact Sage
®
Customer
Service Centre UK.
Coee puck is sticking
to the shower screen.
• This is normal and
happens occasionally.
The dry puck feature
creates a slight vacuum
on top of the coee puck
which will occasionally
hold the puck against
the shower screen
instead of leaving it in
the lter basket.
Pumps continue to
operate / Steam is
very wet / Hot water
outlet leaks.
• Using de-mineralised
or distilled water which
is aecting how the
machine is designed
to function.
We recommend using cold, ltered
water. We do not recommend using
water with no/low mineral content
such as de-mineralised or distilled
water. If the problem persists, contact
Sage
®
Customer Service Centre.

PAGE HEADER.....
23
EN
2 YEAR LIMITED GUARANTEE
Sage Appliances guarantees this product for
domestic use in specied territories for 2 years
from the date of purchase against defects
caused by faulty workmanship and materials.
During this guarantee period Sage Appliances
will repair, replace, or refund any defective
product (at the sole discretion of Sage
Appliances).
All legal warranty rights under applicable
national legislation will be respected and will
not be impaired by our guarantee. For full terms
and conditions on the guarantee, as well as
instructions on how to make a claim, please visit
www.sageappliances.com.
GUARANTEE

www.sageappliances.com
GBR IRE
BRG Appliances Limited
Unit 3.2, Power Road Studios, 114 Power Road, London, W4 5PY
Freephone (UK Landline): +44 (0)808 178 1650
Mobile Calls (National Rate): 0333 0142 970
Registered in England & Wales No. 8223512.
• Due to continued product improvement, the products illustrated or photographed in this document may vary slightly from the actual product.
Copyright BRG Appliances 2019.
BES920 UG1 E19