Loading ...
Loading ...
Loading ...

Shure Incorporated
8/17
① Mute/Unmute Click the button to mute and unmute the MV7+. The MV7+ can also be muted or unmuted by touching the
LED panel.
② Mute Lock Selectthelockicontolockorunlockthemicrophonemutestatus.Whilelocked,themicrophonewillremainmut
ed or unmuted. When Mute Lock is enabled, the LED panel will flash red three times when touched.
Mute Lock doesn't persist through a power cycle and will turn off when the MV7+ restarts or is unplugged and plugged back in.
③ Firmware Update When a new firmware update is available, select the Firmware Update Availablebuttontoupdatethede
vice.
④ Gain Auto level mode automatically adjusts gain applied to the microphone. Manualmodegivesfullcontroloverthemicro
phone gain, compression, and limiting. Use the slider to adjust microphone gain in Manual mode.
⑤ Compressor (available in Manual mode) While in Manual mode, select the compression level. Select light, medium or
heavycompressiontoreducethedifferencebetweentheloudestandsoftestpartsofthesignal,makingtheoverallsoundloud
er and more consistent in volume
⑥ Limiter (available in Manual mode) While in Manual mode, enable or disable a limiter. Use a limiter to prevent distortion
from level peaks in your recording.
⑦ Monitor Mix Move the sliders to adjust the levels of mic and PC sound sources in the headphones connected to the device.
⑧ Tone Use the slider to adjust your tone between dark, natural, and bright.
⑨ Reverb Addstudio,plate,orhallreverbtotheoutput,directmonitor,orboth.Adjusttheintensityofthereverbwiththeslid
er.
⑩ Real-time Denoiser Enable or disable the Real-time Denoiser DSP to help reduce unwanted noise.
⑪ Popper Stopper Enable or disable the Popper Stopper DSP to detect and reduce plosives.
⑫ High Pass Filter Reduce unwanted low-frequency rumbling noise with a high pass filter at 75 Hz or 150 Hz.
⑬ LEDs The Live behavior mode uses your Touch Panel for mic level metering. Pulsing mode and Solid mode display colors of
your choice in a pulsing or solid pattern. Adjust the brightness to Low, Med, High, or Max. Select the color theme of the LED
panel in the Meter Color Theme dropdown menu. See LED Behavior for more information on the LED panel.
⑭ Reset to Defaults Select Reset to Defaults to reset your device to factory settings. This will remove all changes you have
made to the device.
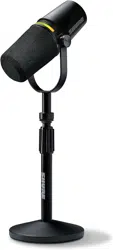
LED Touch Panel
Touch the LED bar to mute or unmute the microphone. When the device is muted, the LED panel will display red lights rippling
from the center outwards.
When Mute Lock is enabled, the MV7+ will not mute or unmute when touched, and the LED panel will flash red three times.
Change the color of the LED panel in the MOTIV Mix desktop application.
LED Behavior
USB-C Power on: When powered on via USB-C, the LED panel fades through red, amber and green.
USB-C connection success: On successful USB-C connection, the LED panel will turn green.
USB-C connection failure: If the microphone is unable to connect via USB-C, the LED panel will turn amber.
Mute: When the device is muted, the LED panel will display red lights rippling from the center outwards..
Mute lock: When mute lock is enabled in MOTIV Mix, the LED panel will flash red 3 times when touched.
Gain level: When you adjust gain in MOTIV Mix, a green sliding bar will show the gain level as you adjust.
Monitor mix adjustment: As you adjust the monitor mix in MOTIV Mix,agreenslidingbarwillshowthemiclevelandanam
ber sliding bar will show the PC level.
Loading ...
Loading ...
Loading ...