2024.04v1.0
User Manual
2
©
2024 DJI All Rights Reserved.
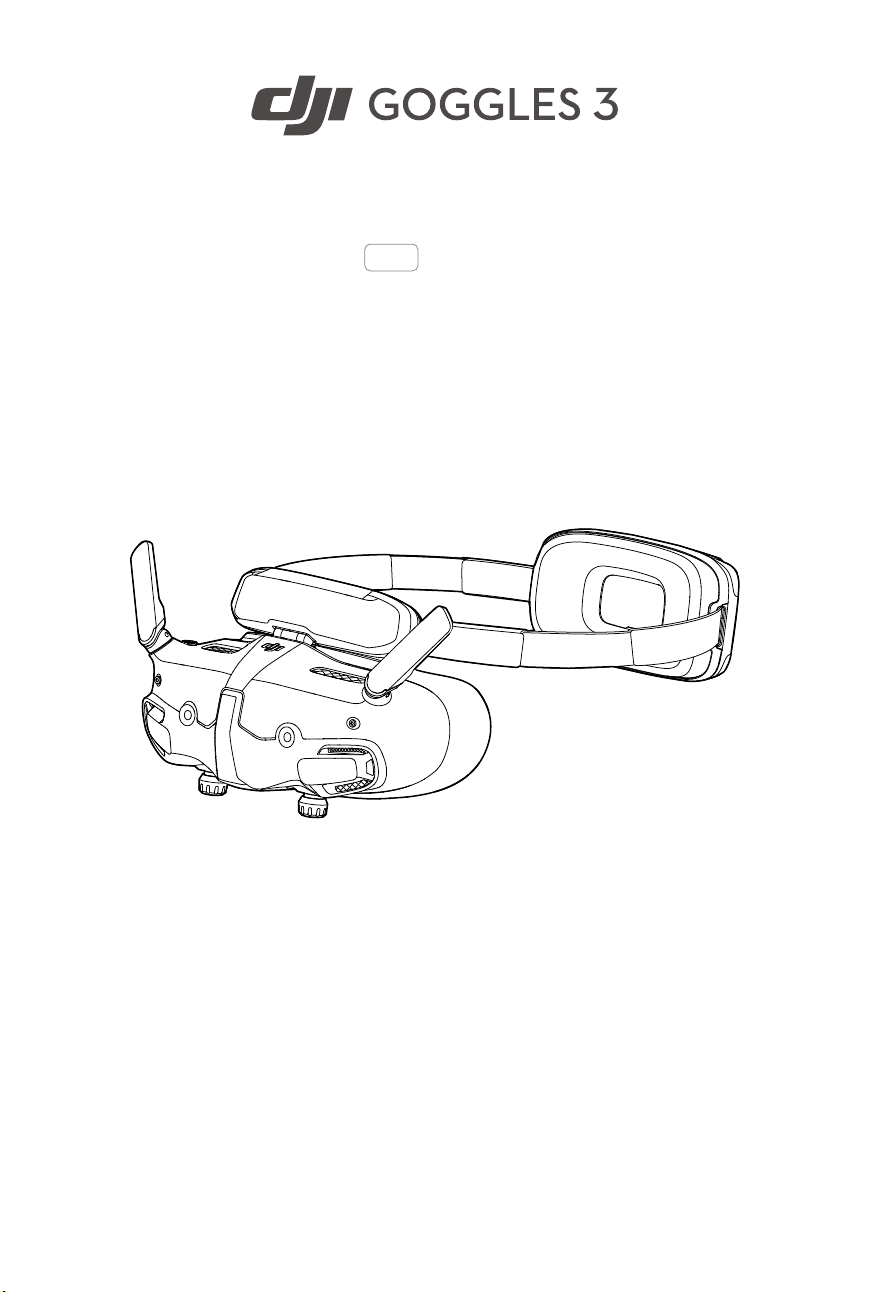
DJI Goggles 3 User Manual
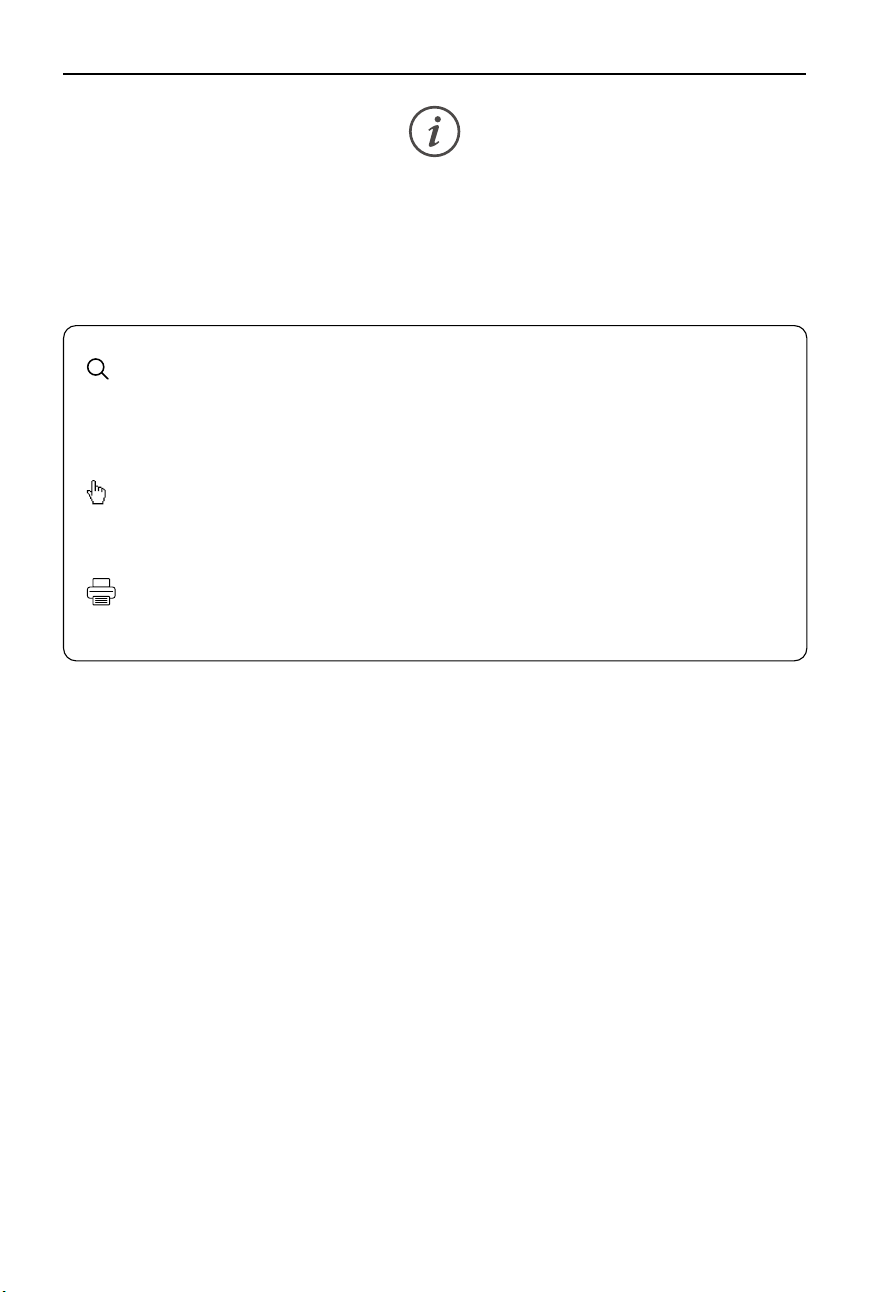
Searching for Keywords
Search for keywords such as “battery” and “install” to nd a topic. If you are using Adobe
Acrobat Reader to read this document, press Ctrl+F on Windows or Command+F on Mac
to begin a search.
Navigating to a Topic
View a complete list of topics in the table of contents. Click on a topic to navigate to that
section.
Printing this Document
This document supports high resolution printing.
This document is copyrighted by DJI with all rights reserved. Unless otherwise authorized by DJI,
you are not eligible to use or allow others to use the document or any part of the document by
reproducing, transferring, or selling the document. Users should only refer to this document
and the content thereof as instructions to operate DJI UAV. The document should not be used
for other purposes.
DJI Goggles 3 User Manual
©
2024 DJI All Rights Reserved.
3
https://www.dji.com/goggles-3/video
Using the Manual
Legend
Important Hints and Tips
Read Before First Use
Read the following documents before using DJI
TM
Goggles 3.
1. Safety Guidelines
2. Quick Start Guide
3. User Manual
It is recommended to watch all tutorial videos and read the safety guidelines before using for
the rst time. Prepare for your rst ight by reviewing the quick start guide and refer to this
user manual for more information.
• Using the goggles does not satisfy the requirement of visual line of sight (VLOS). Some
countries or regions require a visual observer to assist during flight. Make sure to
comply with local regulations when using the goggles. Fly the aircraft in environments
with good lighting and visibility.
Video Tutorials
Go to the address below or scan the QR code to watch the tutorial videos, which demonstrate
how to use the product safely:
Download the DJI Fly App
• The Android version of DJI Fly is compatible with Android v7.0 and later. The iOS
version of DJI Fly is compatible with iOS v11.0 and later.
• The interface and functions of DJI Fly may vary as the software version is updated.
Actual usage experience is based on the software version used.

DJI Goggles 3 User Manual
4
©
2024 DJI All Rights Reserved.
Download DJI Assistant 2
Download DJI ASSISTANT
TM
2 (Consumer Drones Series) at:
https://www.dji.com/downloads/softwares/dji-assistant-2-consumer-drones-series
• Compatible software version and OS version are listed on the same web site: https://
www.dji.com/goggles-3/downloads

©
2024 DJI All Rights Reserved.
5
Using the Manual 3
Legend 3
Read Before First Use 3
Video Tutorials 3
Download the DJI Fly App 3
Download DJI Assistant 2 4
Product Profile 7
Introduction 7
Overview 7
Getting Started 8
Preparing the Goggles 8
Powering on the Goggles 8
Wearing the Goggles 9
Getting Clear Vision 10
Using the Corrective Lenses 12
Using the Additional Forehead Pad 14
Activation 15
Linking 16
Linking via DJI Fly App (recommended) 16
Linking via Button 16
Using the Goggles 18
Operating the Goggles 18
Buttons 18
AR Cursor 18
Goggles Screen 22
FPV View 22
Shortcut Menu 24
Camera Settings 25
Goggles Menu 26
Goggles Footage Storage and Export 29
Footage Storage 29
Footage Export 29
Formatting the SD Card 29
Real View 30
Real View PiP 30
Contents

DJI Goggles 3 User Manual
6
©
2024 DJI All Rights Reserved.
Liveview Sharing 30
Wired Connection with Mobile Device 31
Wireless Connection with Mobile Device 31
Broadcasting to Other Goggles 31
Panorama/3D Video Playback 32
Using the Head Tracking Function (only supported by certain aircraft) 32
Maintenance 33
Replacing the Foam Padding 33
Cleaning and Maintenance of the Goggles 34
Updating Firmware 35
Using DJI Fly App 35
Using DJI Assistant 2 (Consumer Drones Series) 35
Appendix 37
Specifications 37
Compatible Products 39
Risk and Warnings 39
Troubleshooting 40
Direct Remote ID 40
Low Blue Light Statement 40
Aftersales Information 41
DJI Goggles 3 User Manual
©
2024 DJI All Rights Reserved.
7
Product Prole
Introduction
DJI Goggles 3 (hereinafter referred to as goggles) are equipped with two high-performance
screens and ultra-low-latency image transmission for use with DJI aircraft, allowing for a real-
time aerial First Person View (FPV) experience. DJI Goggles 3 supports the Head Tracking
function. With this function, the aircraft and gimbal can be controlled using head movements.
When used with the DJI RC Motion 3, users can control the aircraft and the gimbal camera freely
to meet their shooting needs in various scenarios.
To provide a more comfortable experience, the goggles support diopter adjustment so that
glasses are not required during use. Two cameras are positioned on the front side of the goggles,
in order to allow users to view the surrounding environment via Real View without removing the
goggles. The goggles can also share the liveview to a mobile device via Wi-Fi.
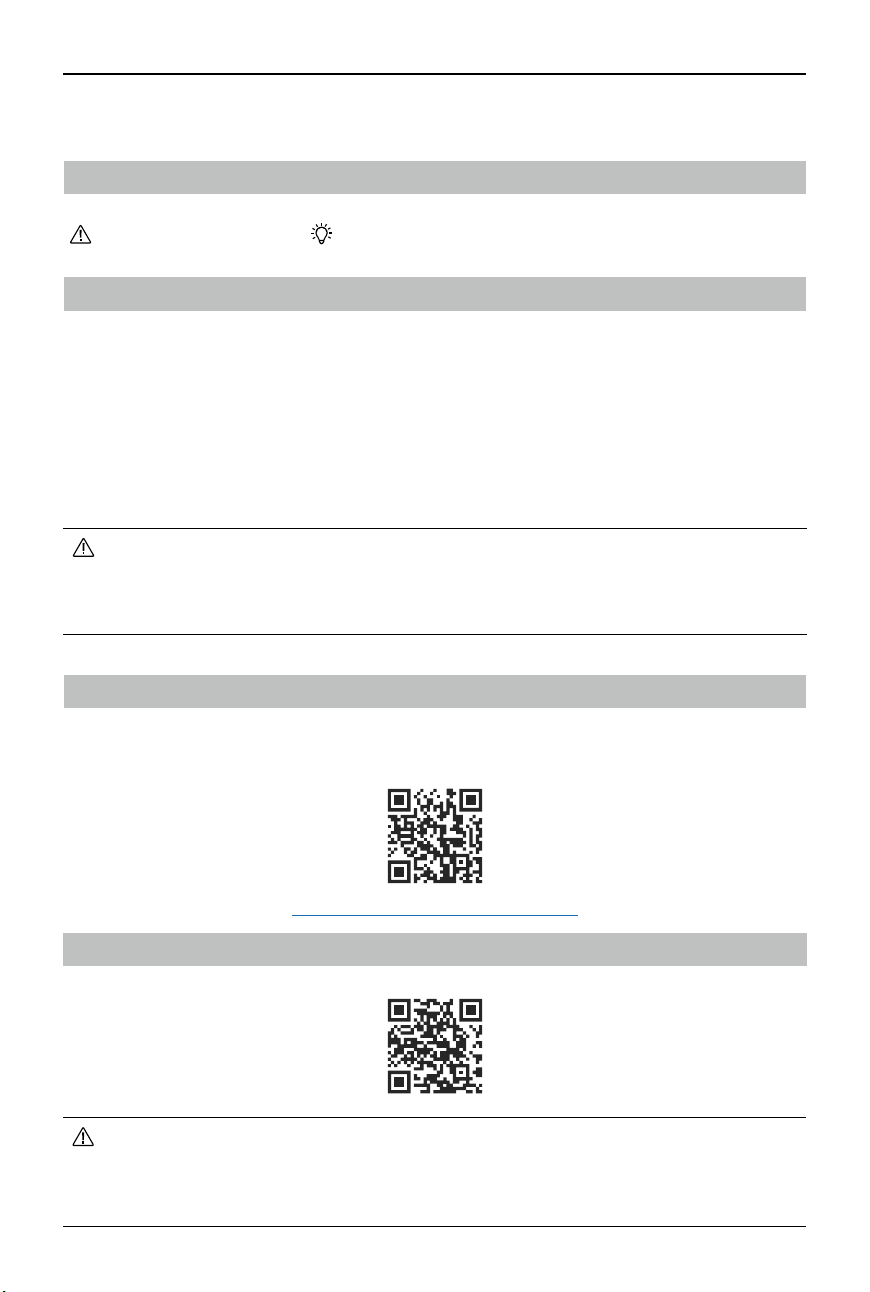
Overview
1
7
8
9
2
3
4
5
6
10
11
16
16
12
13
14
15
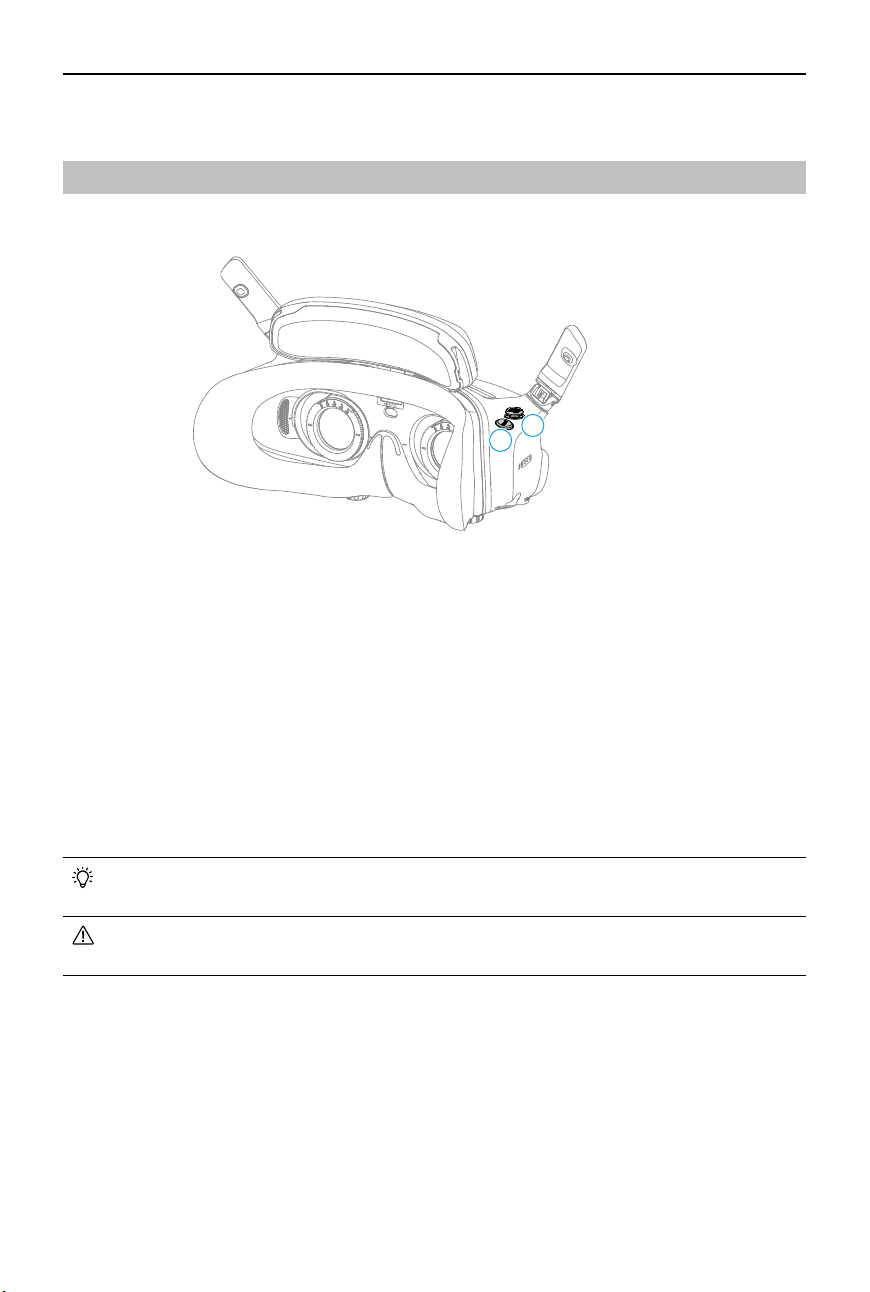
1. Antennas
2. Forehead Pad
3. microSD Card Slot
4. Proximity Sensor
Detects whether the user is wearing
the goggles and automatically turns the
screen on or o.
5. 5D Button
6. Back Button
7. Headband
8. Battery Compartment
9. Headband Adjustment Knob
10. Foam Padding
11. Lens
12. Battery Level LEDs
13. Power Button/Link Button
14. USB-C Ports
15. IPD (Interpupillary Distance) Slider /
Diopter Adjustment Knob (hereinafter
referred to as "knob")
16. Camera
DJI Goggles 3 User Manual
8
©
2024 DJI All Rights Reserved.
Getting Started
Preparing the Goggles
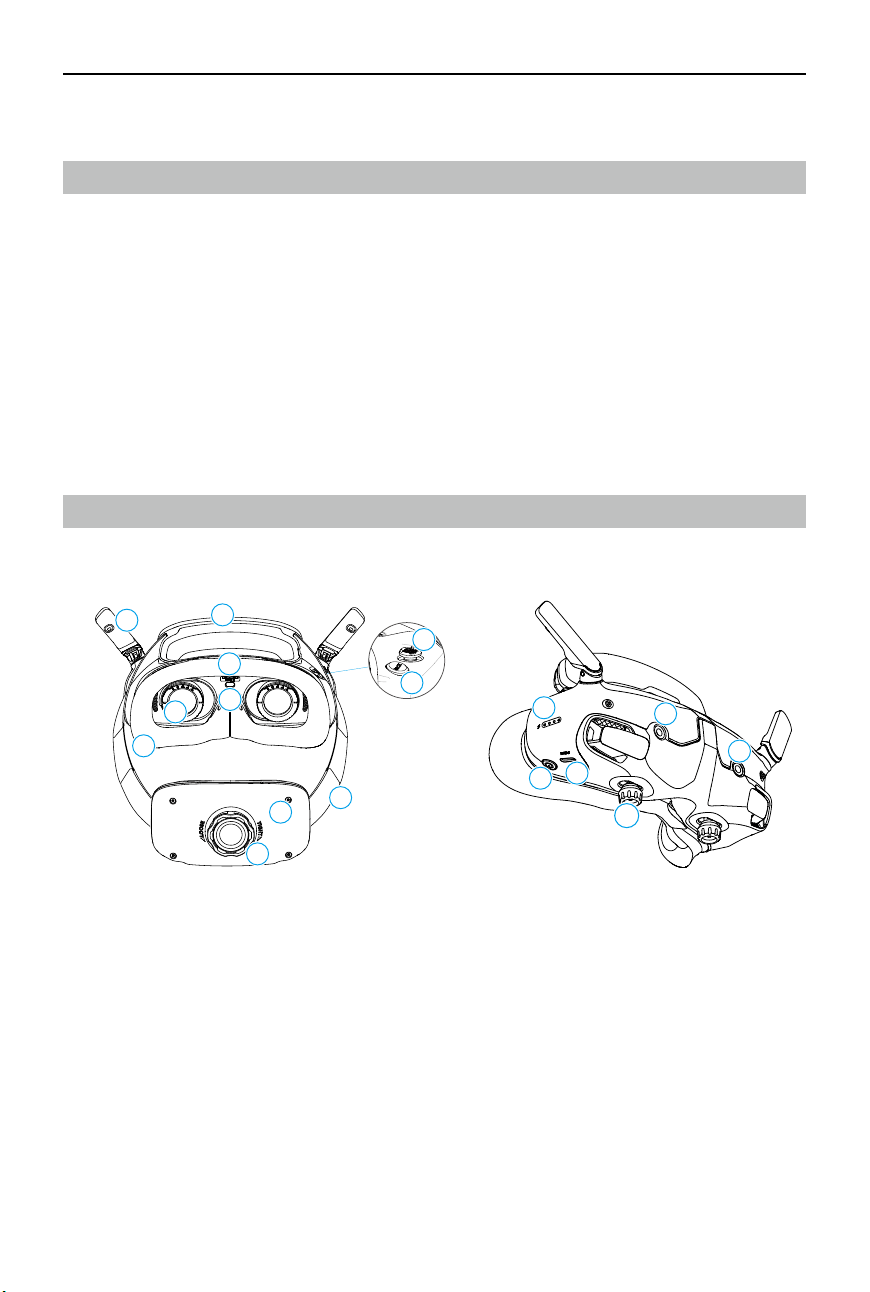
Powering on the Goggles
Press the power button once to check the current battery level.
Press once, then press and hold for two seconds to power the goggles on or o.
The battery level LEDs display the power level during charging and when in use:
LED is on
LED is ashing
LED is o
If the battery level is low, it is recommended to use a USB charger to charge the device.
LED1 LED2 LED3 LED4
Battery Level
89%-100%
76%-88%
64%-75%
51%-63%
39%-50%
26%-38%
14%-25%
1%-13%
DJI Goggles 3 User Manual
©
2024 DJI All Rights Reserved.
9
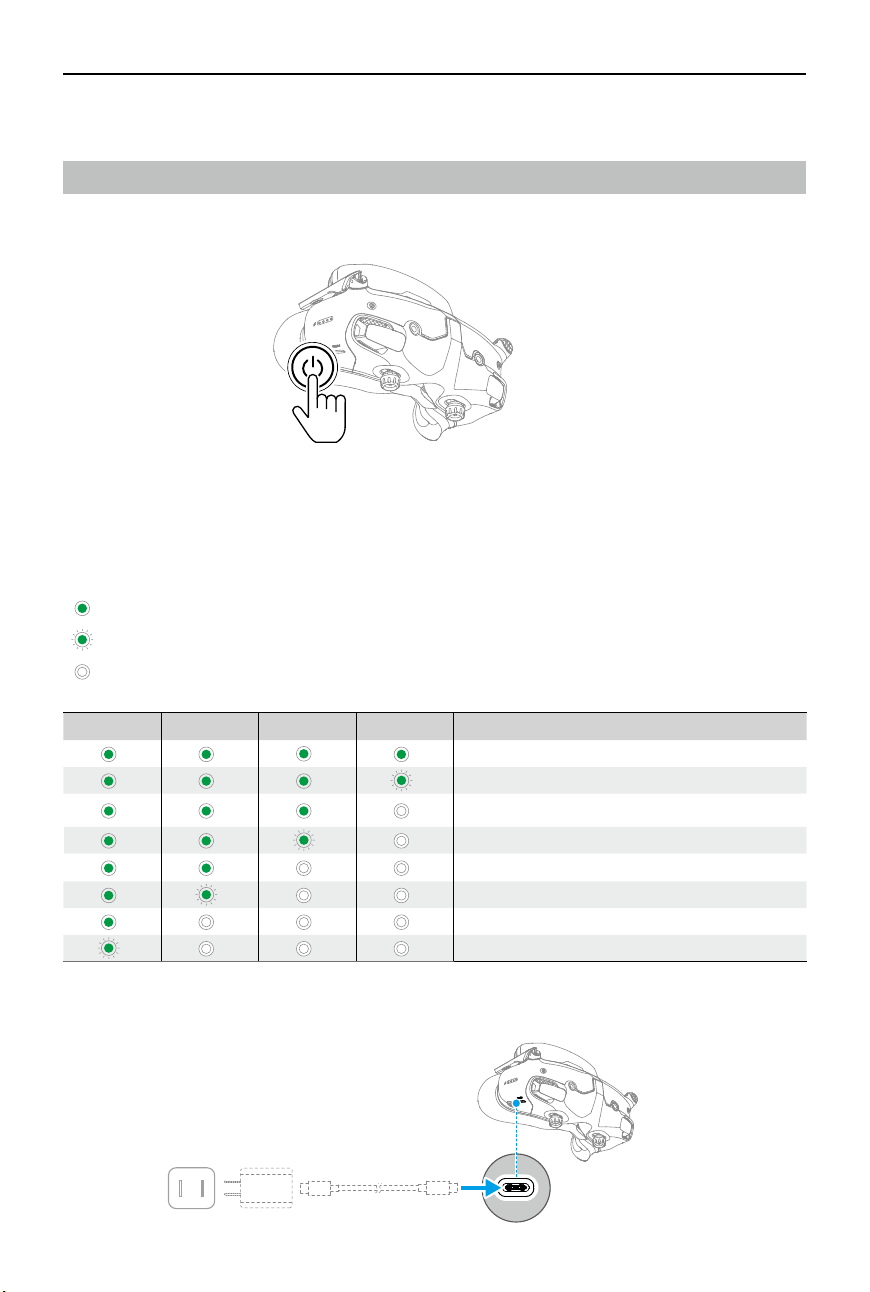
The table below shows the battery level during charging:
LED1 LED2 LED3 LED4
Battery Level
1%-50%
51%-75%
76%-99%
100%
• USB-C port spec: USB 2.0 (480 Mbps). The maximum input power is 9V/3A.
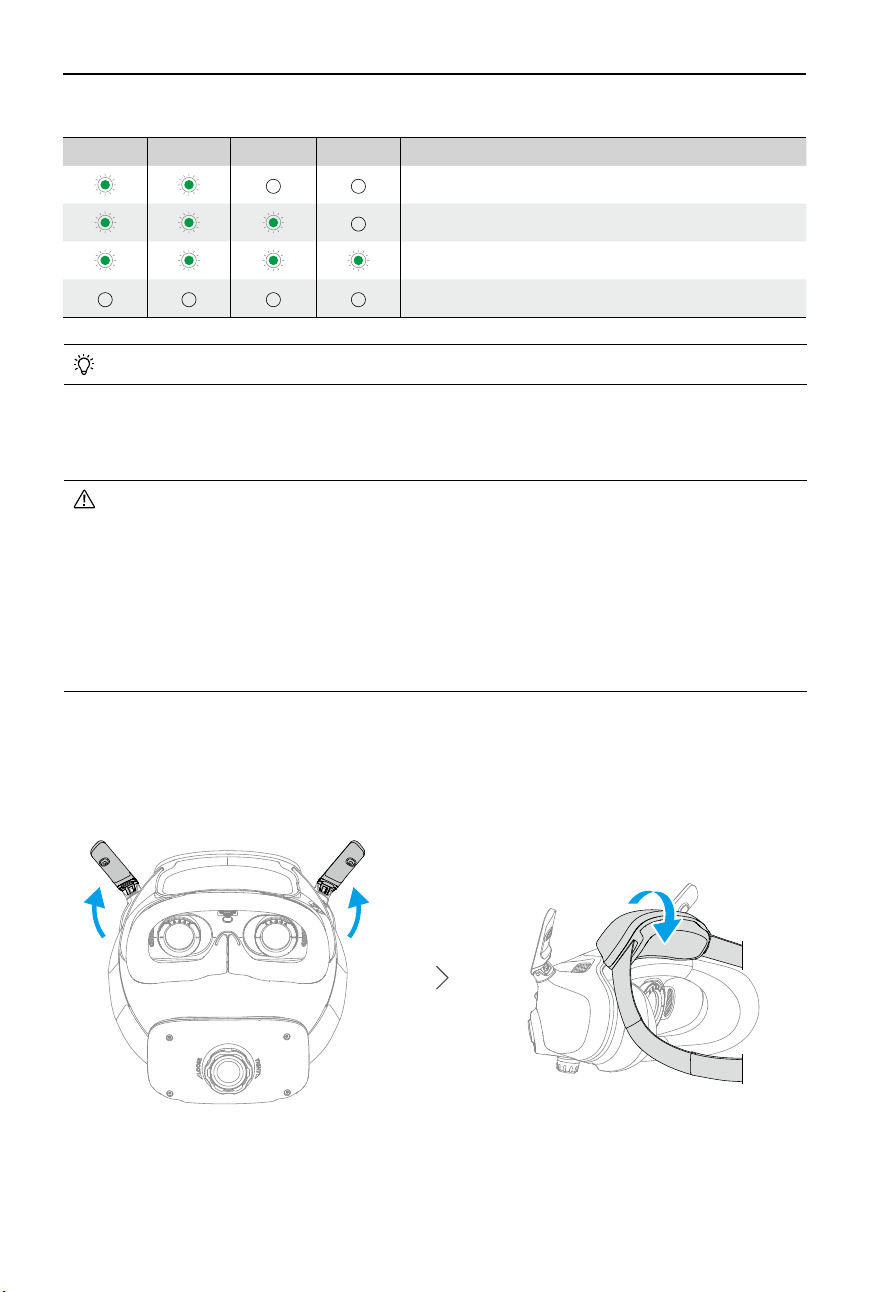
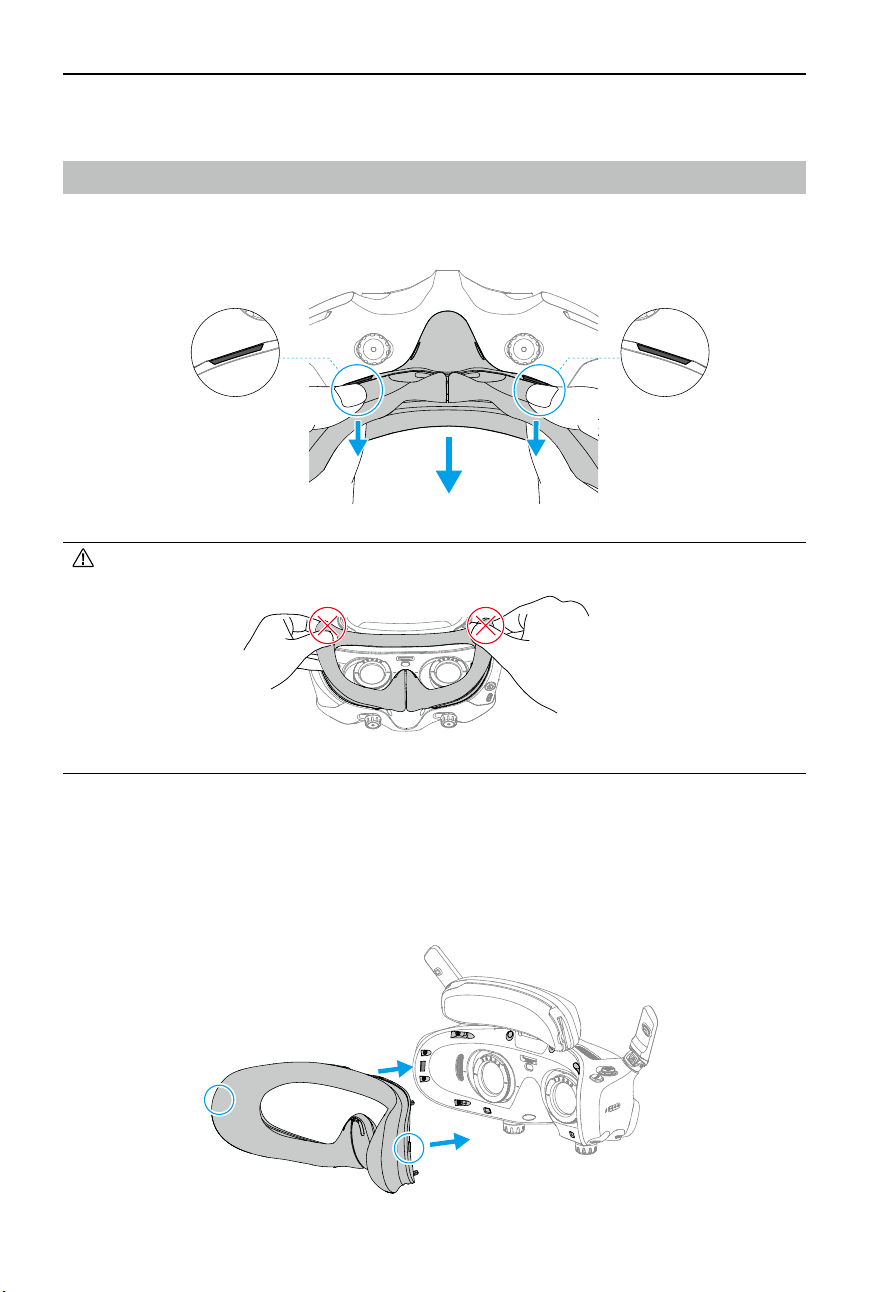
Wearing the Goggles
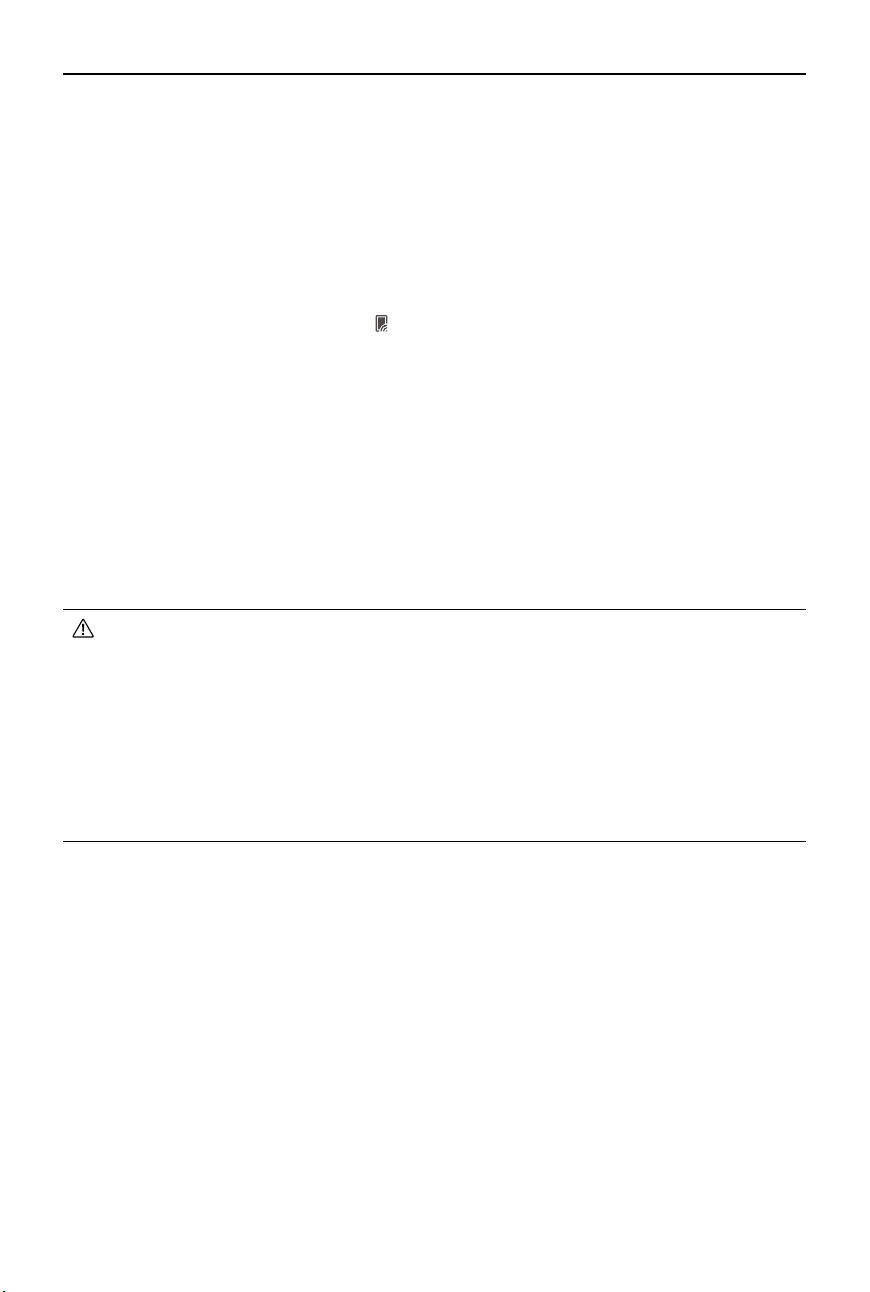
• The battery wires are embedded in the headband. DO NOT pull the headband with
force to avoid damaging the wires.
• Fold the antennas to avoid damage when the goggles are not in use.
• DO NOT tear or scratch the foam padding, the additional forehead pad, and the soft
side of the battery compartment with sharp objects.
• DO NOT bend the additional forehead pad with force.
• DO NOT rotate the headband adjustment knob or the diopter adjustment knob with
force to avoid component damage.
1. Unfold the antennas.
2. Adjust the forehead pad downward to the lowest position.
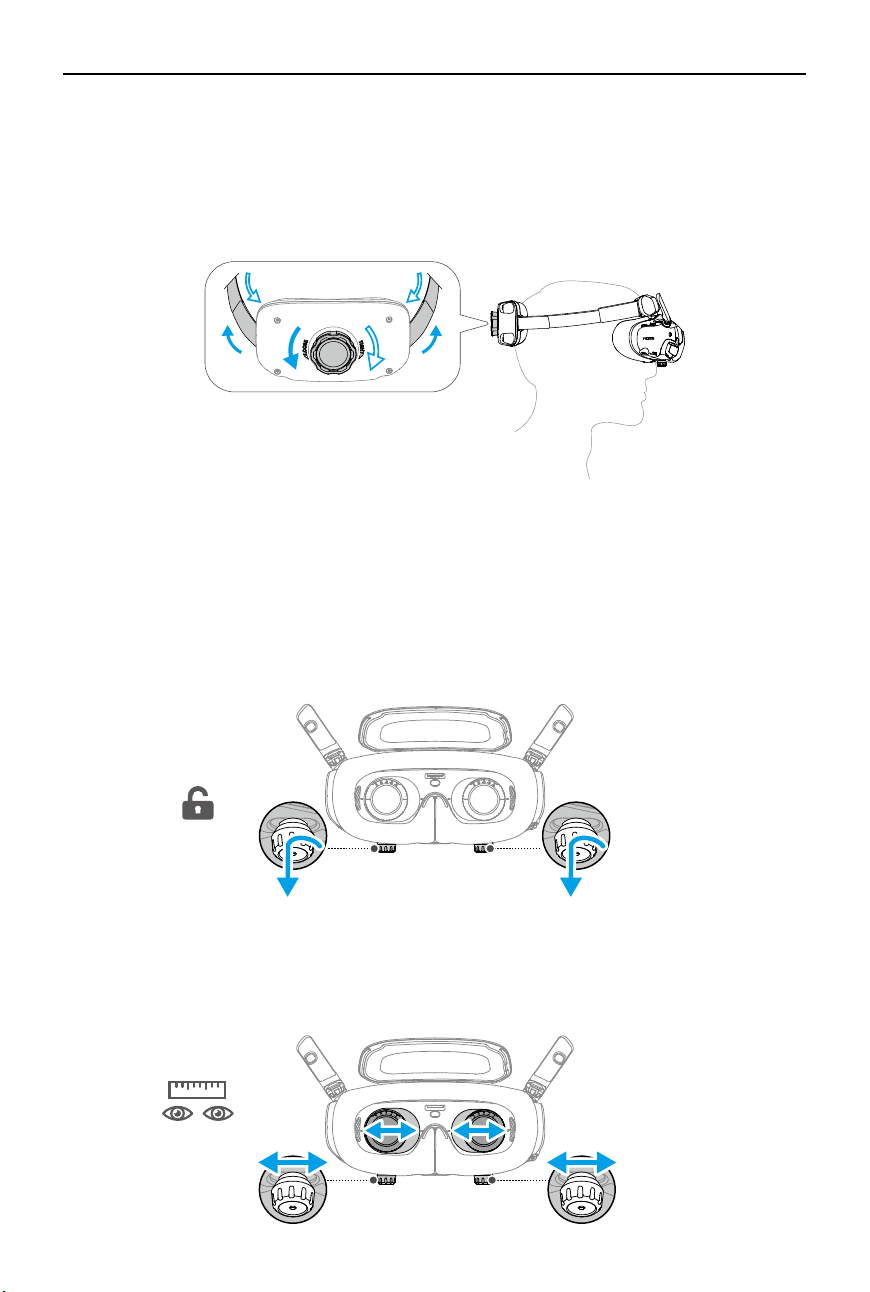
DJI Goggles 3 User Manual
10
©
2024 DJI All Rights Reserved.
3. Put on the goggles after the devices are powered on.
4. Rotate the headband adjustment knob on the battery compartment to adjust the length of
the headband. Rotate clockwise to tighten the headband and counterclockwise to loosen the
headband. It is recommended to wear the goggles with the battery compartment placed on
the upper back part of the head to avoid it sliding down.
56~72 mm56~72 mm
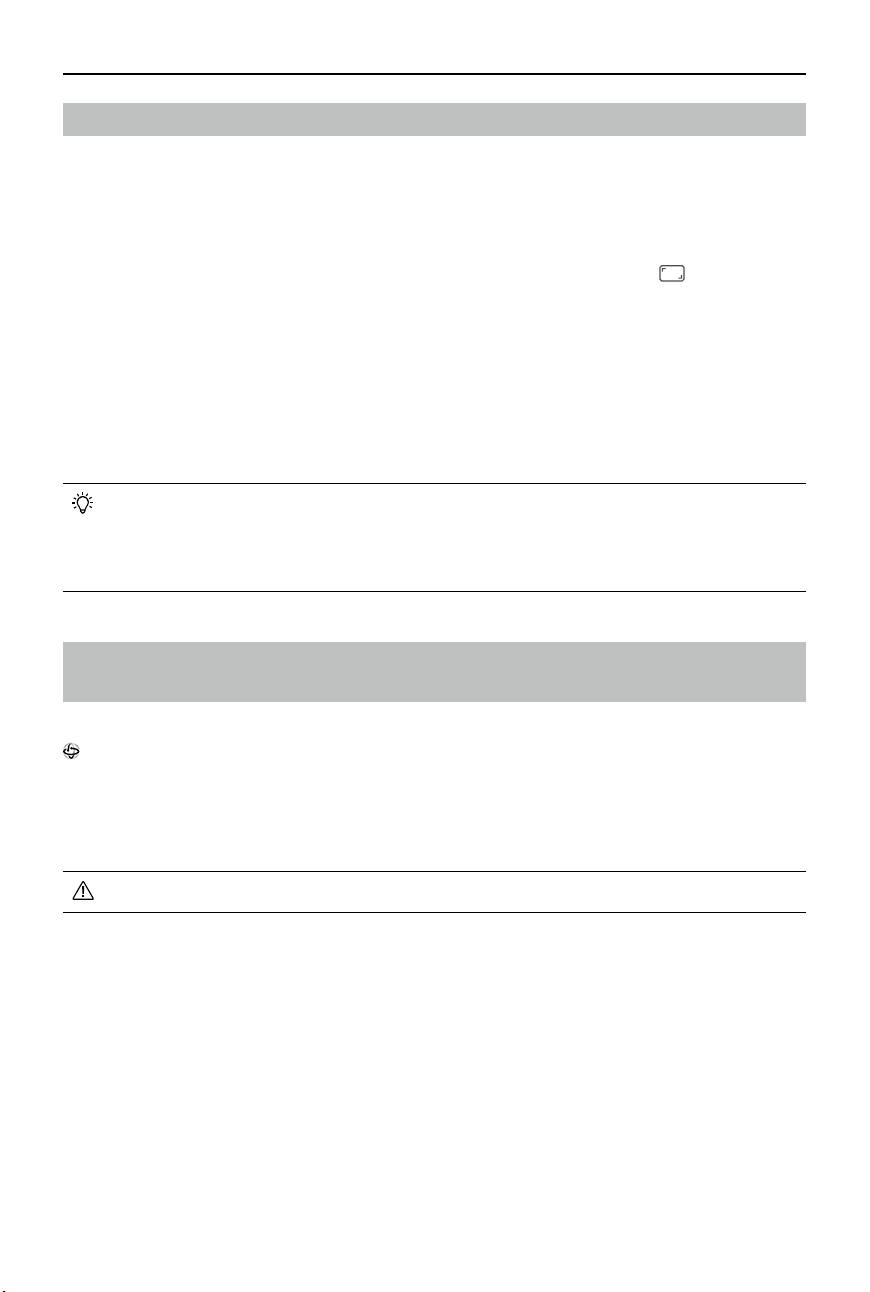
Getting Clear Vision
Rotate the knobs on the bottom of the goggles to adjust the diopters if your vision is in the
range of -6.0D to +2.0D. The screen in the goggles will display the diopter value when rotating.
1. Rotate both the knobs in the direction as shown to unlock them. Once unlocked, the knobs
will pop out.
2. Slide left and right to adjust the distance between the lenses until the image is properly
aligned.
DJI Goggles 3 User Manual
©
2024 DJI All Rights Reserved.
11
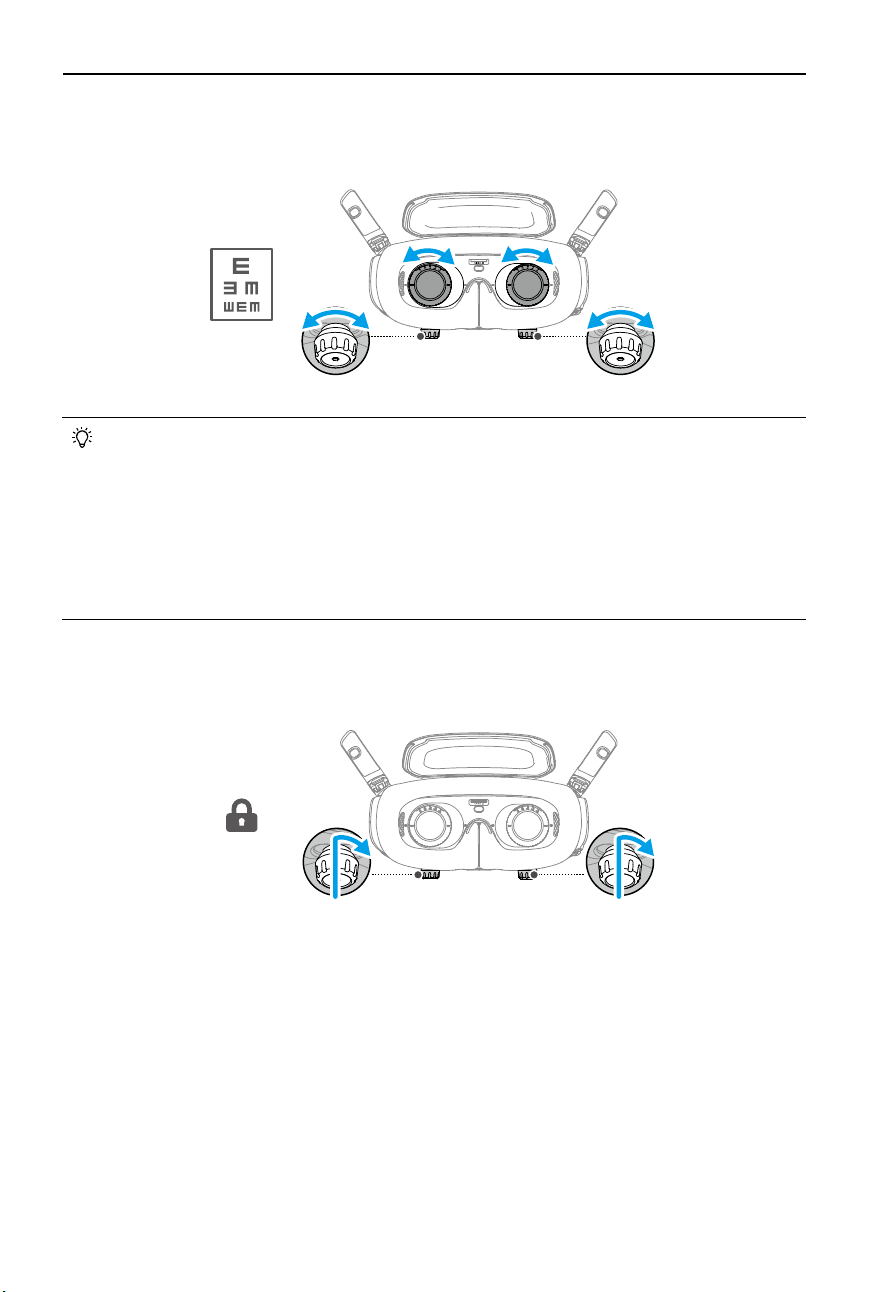
3. Slowly rotate the knobs to adjust the diopters. The supported adjustment range is from
-6.0D to +2.0D.
+2.0D ~ -6.0D +2.0D ~ -6.0D
• The goggles do not support astigmatism correction. If you require astigmatism
correction or if the diopters of the goggles are unsuitable, you can purchase additional
lenses and use the corrective lenses frames provided to install them on the goggles.
Refer to “Using the Corrective Lenses” for more information.
• When adjusting the diopters for the rst time, you are advised to adjust to a degree
that is slightly lower than the strength of your actual eyeglasses. Give your eyes
enough time to adapt, then adjust the diopters again until you get a clear view. Do not
use a diopter value higher than your actual eyeglass power to avoid eyestrain.
4. After you get a clear view, press the knobs in and rotate them in the direction as shown to
lock in the lenses’ position of the lenses and the diopters.
DJI Goggles 3 User Manual
12
©
2024 DJI All Rights Reserved.
0D ~ -8.0D0D ~ -8.0D
L
1
2
R
Using the Corrective Lenses
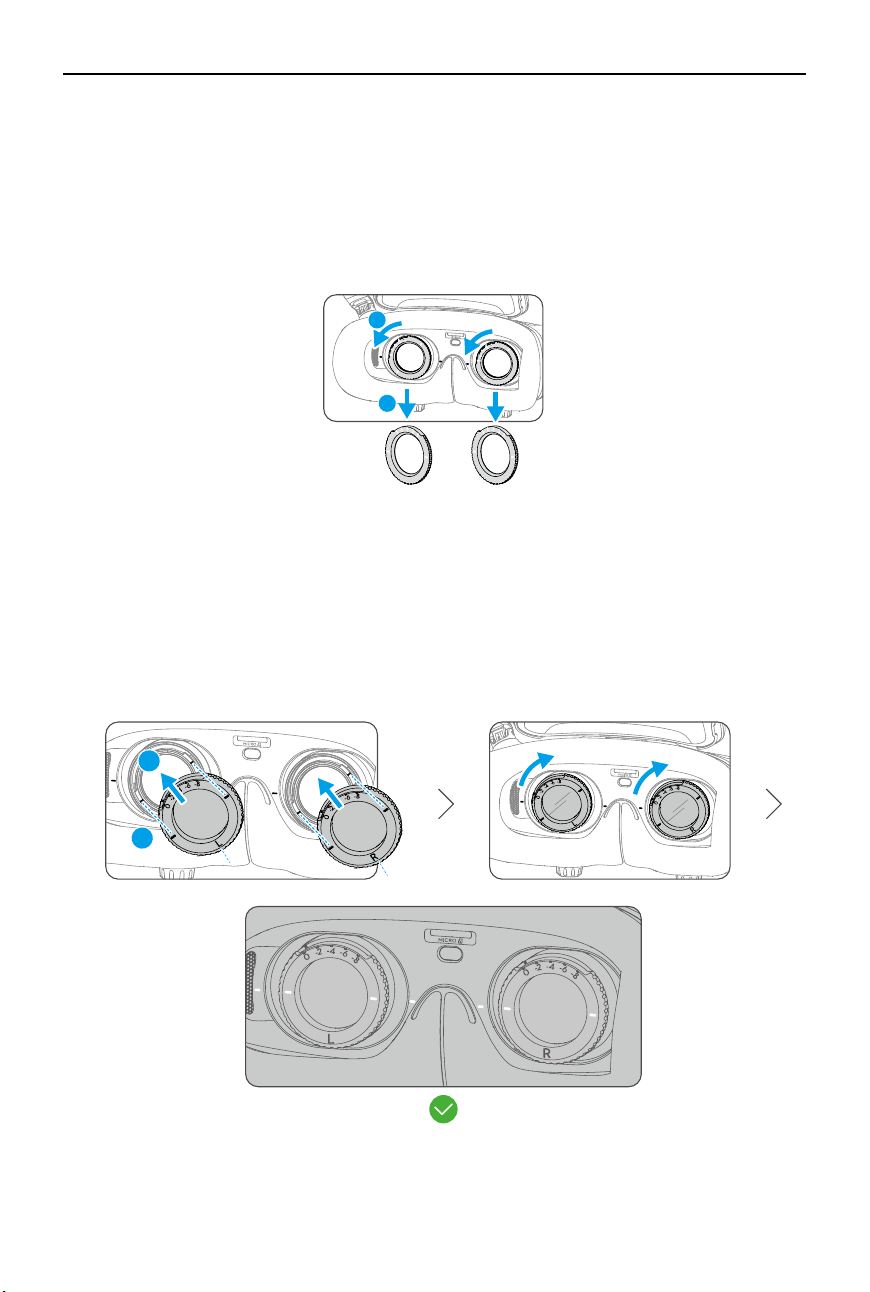
DJI Goggles 3 supports diopter adjustment from -6.0D to +2.0D.
If your vision is in the range of -6.0D to -8.0D, you can install the provided -2.0D Corrective
Lenses.
1. Detach the original lens frames from the goggles by rotating counterclockwise as shown.
1
2
+2.0D ~ -6.0D +2.0D ~ -6.0D
2. Take out the -2.0D Corrective Lenses and peel o the protective lm. Distinguish the left and
right lenses via the L and R marks on the bottom.
3. Align the positioning marks on the left and right sides of the corrective lens frame with the
marks on the inner circle of the goggle lens frame. Mount the corrective lens by pressing it
down, and then rotate it clockwise until the marks on the corrective lens frame are aligned
with the marks on the goggle lens frame.
DJI Goggles 3 User Manual
©
2024 DJI All Rights Reserved.
13
• After installing the -2.0D Corrective Lenses, the diopter value displayed on the screen
is not the actual diopter value. The actual diopter value is the sum of the on-screen
value and -2.0D.
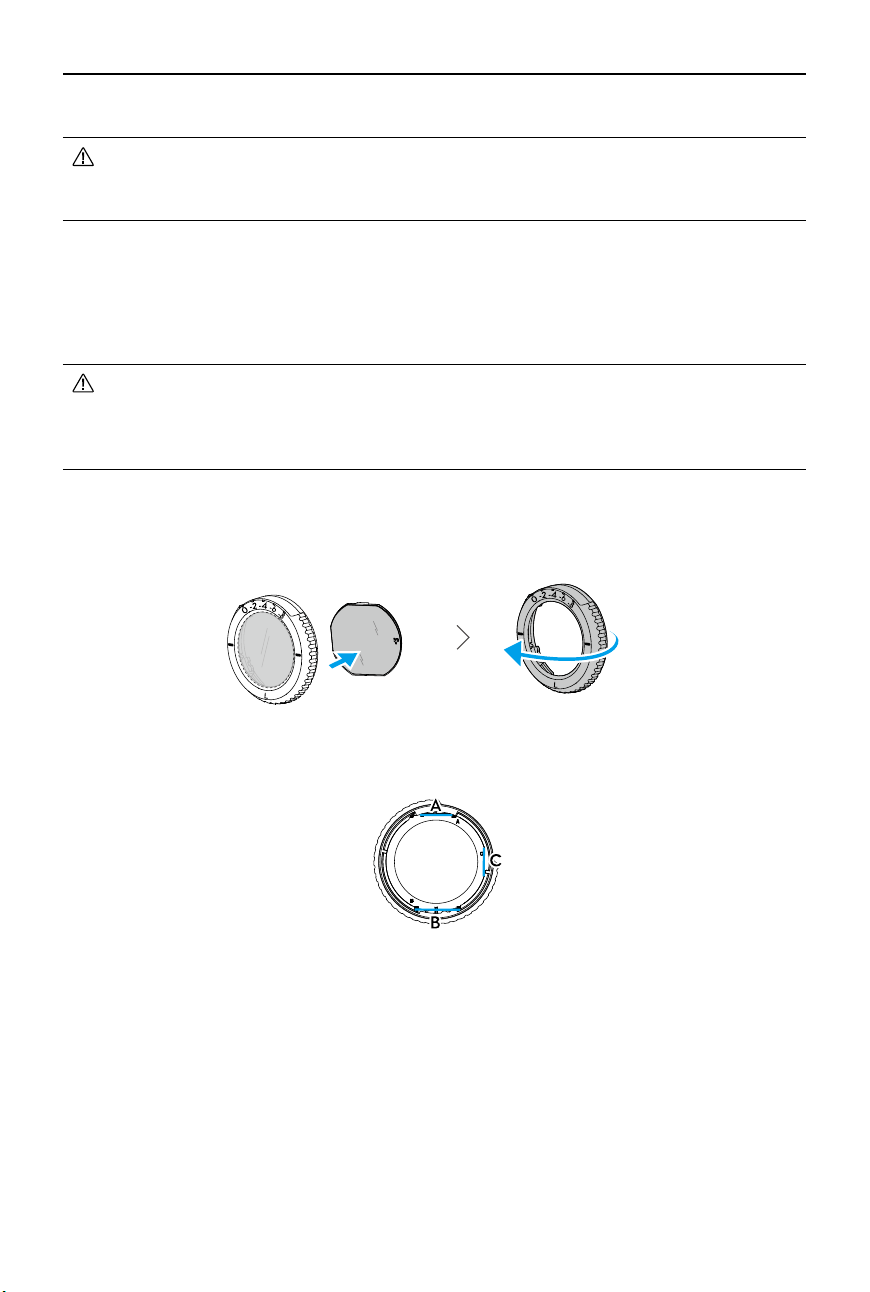
Purchasing and Installing Your Own Corrective Lenses
If you require astigmatism correction or the diopters of the goggles cannot meet your needs,
you can purchase suitable lenses and use the corrective lens frames to install them.
• When purchasing lenses, bring the full set of -2.0D Corrective Lenses (a pair with the
frames) to a professional optician to ensure that the shape, size, astigmatism axis,
and edge thickness (< 1.8 mm) of the lenses meet the installation requirements of the
corrective lens frames.
1. Push and remove the -2.0D lens from the frame. Turn the frame over.
4. Adjust the diopters of the goggles according to your needs and lock the knobs.
2. Identify the shortest cut edge (c) in the frame.

DJI Goggles 3 User Manual
14
©
2024 DJI All Rights Reserved.
Forehead Pad
3. Take out the purchased lenses, also identify the shortest cut edge.
4. Distinguish the left and right lens and the corresponding frame. Align the shortest cut edge
and install the lens into the frame with the concave side of the lens facing the eye.
5. Make sure the lens is installed in the correct way and not tilted. Clean the lens with the lens
cleaning cloth to wipe o ngerprints and dust.
6. Mount the corrective lenses to the goggles.
7. Adjust the diopters of the goggles according to your needs and lock the knobs.
• If you usually wear -9.0D glasses, you can purchase a pair of -3.0D lenses, and adjust
the diopters of the goggles to -6.0D. Then the overall diopter value will be -9.0D after
the self-prepared lenses are installed.
Using the Additional Forehead Pad
After installing the corrective lenses, the distance between the lenses and your eyes is reduced
and your eyelashes might sweep the lenses. If you feel any discomfort, install the additional
forehead pad.
DJI Goggles 3 User Manual
©
2024 DJI All Rights Reserved.
15
1. Peel o the original forehead pad.
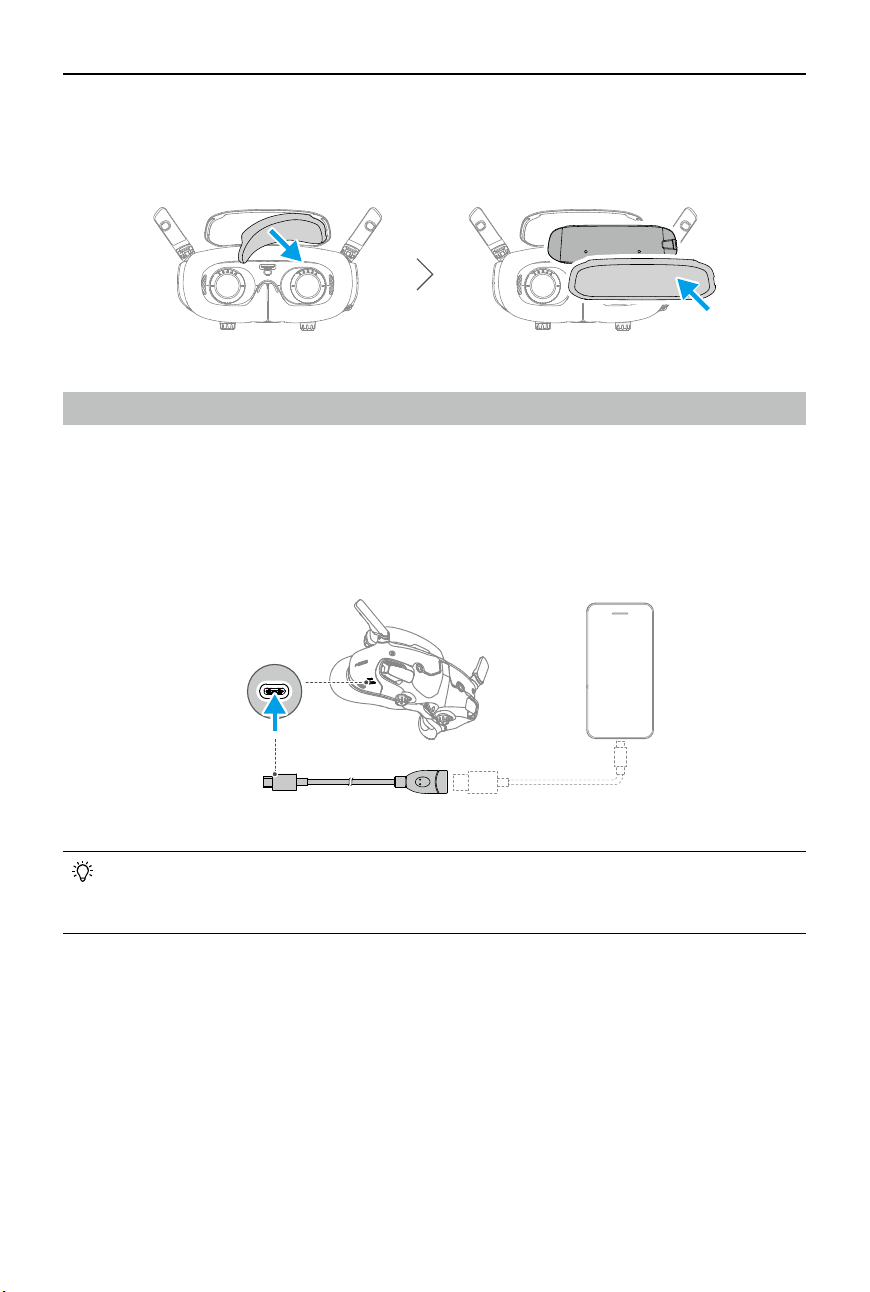
2. Attach the additional forehead pad and then install the original forehead pad on top.
DJI Fly
App
Activation
DJI Goggles 3 must be activated and updated before using for the rst time.
Connect the USB-C port of the goggles to the mobile device with the USB-C OTG cable and a
suitable data cable. Run DJI Fly app and follow the on-screen instructions to activate the device
and update the firmware. Make sure the mobile device is connected to the internet during
activation.
• The goggles only support standard USB-C protocols and MFi-certified Lightning
cables. Non-standard cables are not supported. If the devices do not respond after
connecting, use a dierent data cable and try again.
DJI Goggles 3 User Manual
16
©
2024 DJI All Rights Reserved.
Linking
Preparation before linking:
1. Power on the aircraft, the goggles, and the remote control device before linking. Make sure
the devices are within 0.5 m of each other during linking. Make sure the devices are updated
to the latest rmware version and have enough battery level.
2. Open the goggles menu, select Status and make sure that the aircraft model displayed at the
top of the menu is correct. Otherwise, select Switch from the upper right corner of the menu
and then select the correct aircraft.
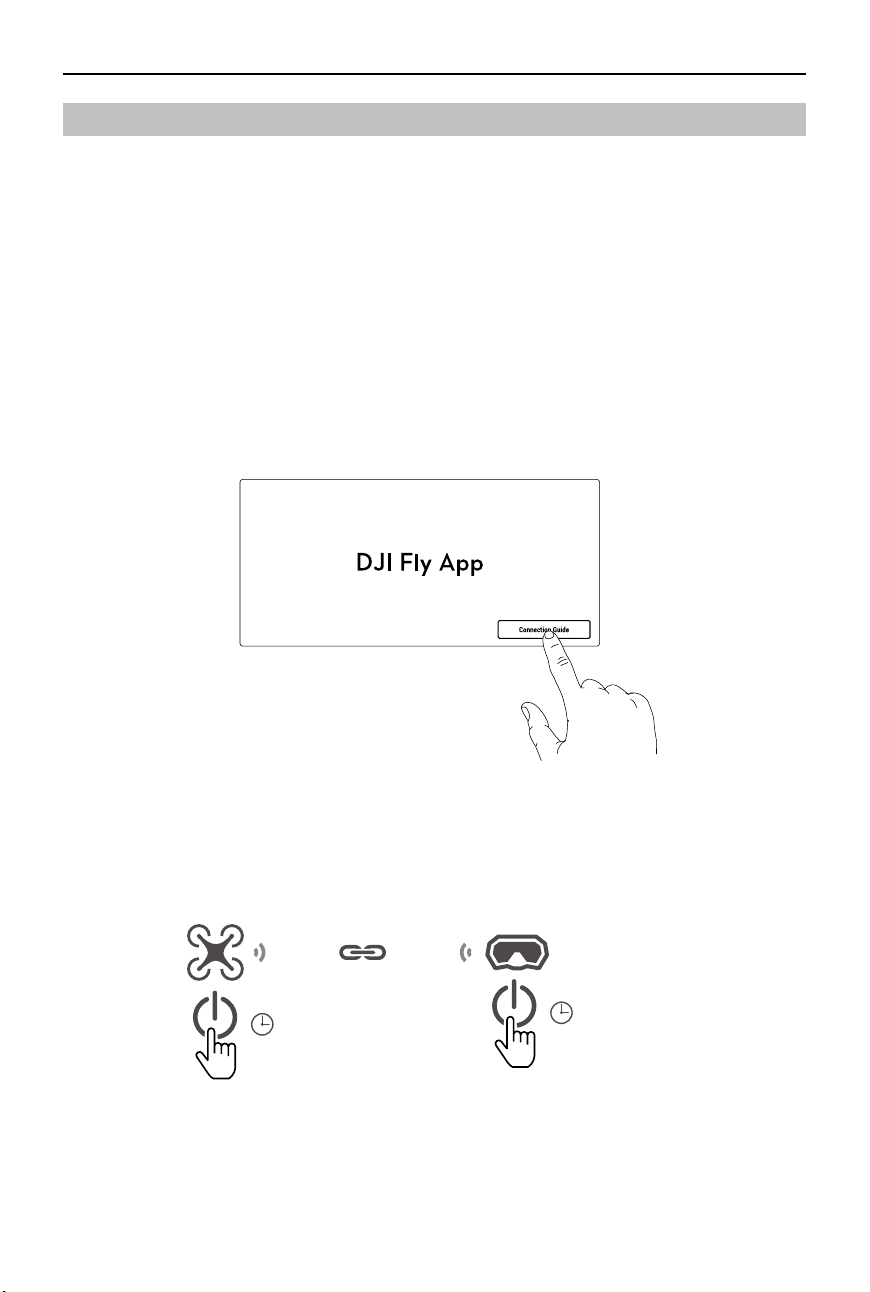
Linking via DJI Fly App (recommended)
Keep the goggles connected to the mobile device after activation. Tap Connection Guide on DJI
Fly from the mobile device and follow the on-screen instructions to connect the aircraft.
Linking via Button
1. Linking the aircraft and the goggles:
a. Press and hold the power button on the aircraft until it beeps once and the battery level
LEDs start to blink in sequence.
b. Press and hold the power button on the goggles until the goggles start to beep
continuously and the battery level LEDs start to blink in sequence.
5s
5s

DJI Goggles 3 User Manual
©
2024 DJI All Rights Reserved.
17
• If you are using DJI RC 2 or DJI RC-N2, make sure that the remote controller and
aircraft are linked, then link the aircraft with the goggles.
• The aircraft can be controlled with only one remote control device during flight. If
the aircraft has been linked with multiple remote control devices, turn o the other
remote control devices before linking.
a. Press and hold the power button on the goggles until the goggles start to beep
continuously and the battery level LEDs start to blink in sequence.
b. Press and hold the power button on the remote control device until it starts to beep
continuously and the battery level LEDs start to blink in sequence.
c. Once linking is completed, the goggles and remote control device stop beeping and both
the battery level LEDs turn solid and display the battery level.
5s
5s
5s
c. Once linking is completed, the battery level LEDs of the aircraft turn solid and display
the battery level, the goggles stop beeping, and image transmission can be displayed
normally.
2. Linking the goggles and remote control device:
DJI Goggles 3 User Manual
18
©
2024 DJI All Rights Reserved.
Using the Goggles
Operating the Goggles
Buttons
1
2
1. 5D Button
Press or push to the right to open the menu from the FPV view of the goggles. Push forward
to open the camera settings panel and push backward to open the shortcut menu.
After the settings panel is opened, push to navigate through the menu or adjust the
parameter value. Press to conrm the selection.
2. Back Button
Press to return to the previous menu or exit the current view.
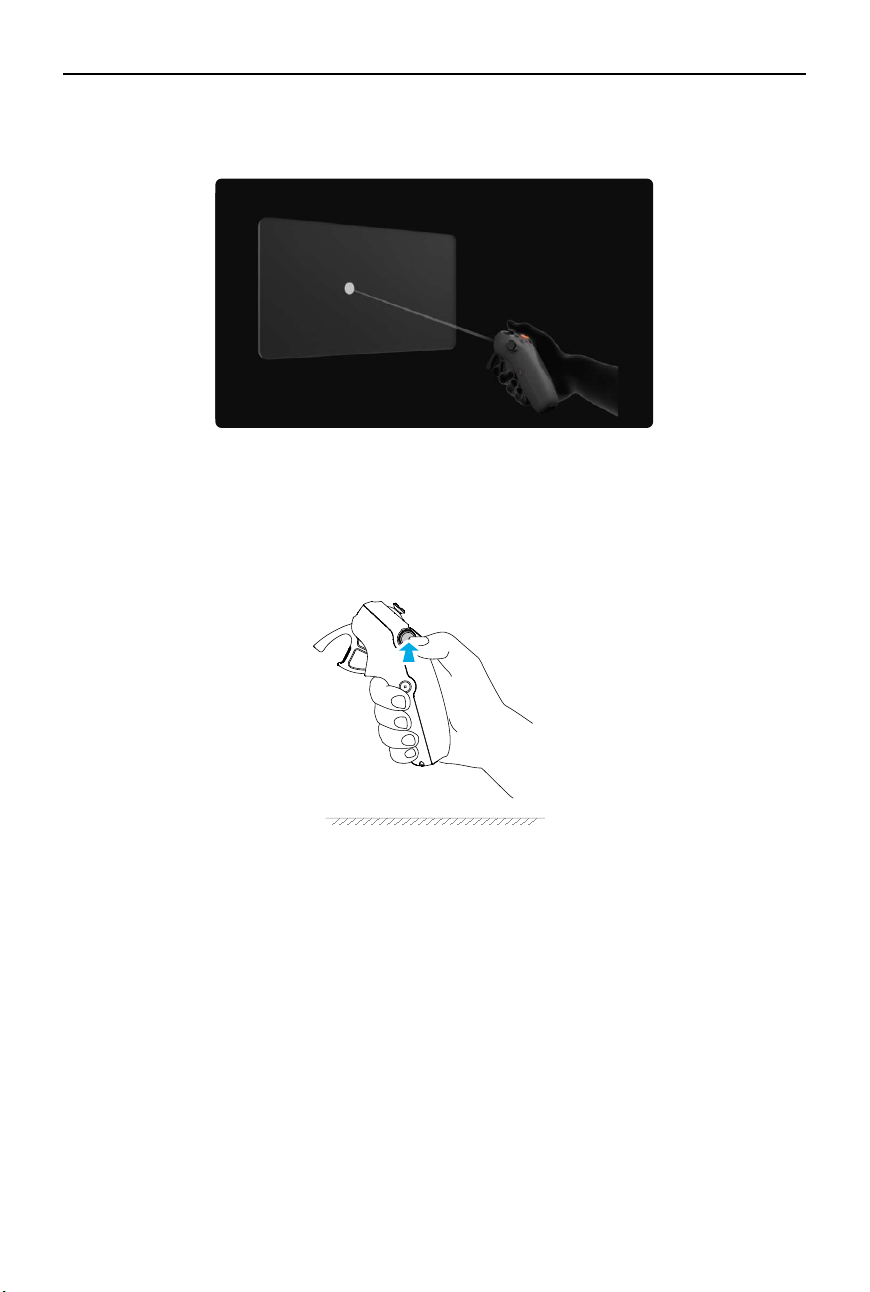
AR Cursor
• AR Cursor is only supported when used with DJI RC Motion 3 (hereinafter referred to
as motion controller).
• AR Cursor cannot function properly when being used on moving objects, such as cars
and ships.
DJI Goggles 3 User Manual
©
2024 DJI All Rights Reserved.
19
Before takeo or when using the lock button to trigger the aircraft to hover, users can use the
AR Cursor (the white line with a circle at the end) to interact with the screen of the googles.
Recenter the Cursor
If the cursor is not displayed on the screen of the goggles, hold the motion controller as shown
below, and then press and hold the dial on the left side of the motion controller to recenter the
cursor.
If the cursor still cannot be found, tilt the motion controller up or down until the cursor appears
on the screen.

DJI Goggles 3 User Manual
20
©
2024 DJI All Rights Reserved.
Use the joystick on the motion controller to scroll up or down in the menu.
Operating the Menu
• Using motion controller movements, move the cursor to the arrow on the left side of the
screen. Gently press the accelerator to the first stop position, then the cursor will become
small and the menu will be opened.
To exit or return to the previous menu, push the accelerator forward, or gently press the
accelerator when the cursor is on any empty spot on the screen.
DJI Goggles 3 User Manual
©
2024 DJI All Rights Reserved.
21
• Move the cursor to the arrow on the top of the screen, press the accelerator to enter the
shortcut menu, and congure settings such as Recording or Enhanced Display.
Controlling Video Playback
When previewing photos or videos stored on the microSD card of the goggles, the cursor can be
used to control playback, or complete other operations such as:
• Press the accelerator to pause or continue to play, push the accelerator forward to exit.
• Move the cursor left or right while pressing the accelerator down to adjust the progress bar.
• Move the cursor to the arrow on the top of the screen, press down the accelerator to enter
playback settings and adjust the screen brightness or volume.
• Move the cursor to the arrow on the bottom of the screen, press the accelerator to enter
camera settings, and congure settings for the parameters of the aircraft camera.
DJI Goggles 3 User Manual
22
©
2024 DJI All Rights Reserved.
Goggles Screen
1. Flight Direction Indicator
When controlling the aircraft with the motion controller, the circle indicates the direction in
which the aircraft is heading.
2. Storage Information
Displays the remaining capacity of the aircraft or goggles storage.
3. Gimbal Slider
Displays the gimbal tilt angle.
4. Zoom Ratio
If the aircraft supports Explore Mode, and Explore Mode is enabled in the shooting mode,
the current zoom ratio will be displayed. Scroll the dial on the goggles camera view to adjust
the camera zoom.
5. Prompts
Displays notications and information such as when a new mode is applied or the battery
level is low.
6. Goggles Battery Level
Displays the battery level of the goggles.
1
2
4
3
5
679 8101112131415
16
• The actual screen interface may dier from the descriptions in this manual, and vary
depending on the aircraft used and the rmware version of the goggles.
FPV View

DJI Goggles 3 User Manual
©
2024 DJI All Rights Reserved.
23
7. GNSS Status
Displays the current strength of the aircraft GNSS signal.
If the devices are not used for an extended period of time, it may take longer than usual to
search for the GNSS signal. If the signal is unobstructed, it takes approximately 20 seconds
to search for the GNSS signal when powering on and off within a short period of time.
When the icon is white, the GNSS signal is strong. When the icon is orange, the GNSS signal
is weak. When the icon is red, the GNSS signal is extremely weak.
8. Vision System Status
Displays the vision system status of the linked aircraft, this icon varies according to the
aircraft model. The icon is white when the vision system is working normally. Gray and red
respectively indicates that the vision system is turned o or working abnormally, note that
obstacles cannot be avoided at this time.
9. Video Bitrate
Displays the current video bitrate of the liveview.
10. Remote Controller and Image Transmission Signal Strength
Displays the signal strength of the remote control device, and the image transmission signal
strength between the aircraft and the goggles.
The icon is white when the signal is strong, and turns gray when the signal is lost.
The icon is orange when the signal is moderately weak, and turns red when the signal is
extremely weak. A prompt bar of the same color is displayed in the bottom of the ight
liveview.
11. Remaining Flight Time
Displays the remaining ight time of the aircraft.
12. Aircraft Battery Level
13. Distance to the Ground
Displays the current altitude information of the aircraft from the ground when the aircraft
is less than 10 m above the ground.
14. Flight Telemetry
Displays the horizontal distance (D) between the aircraft and the Home Point, height (H)
from the Home Point, aircraft horizontal speed, and aircraft vertical speed.
15. Flight Modes
Displays the current ight mode.
16. Home Point
Indicates the relative position of the Home Point.
DJI Goggles 3 User Manual
24
©
2024 DJI All Rights Reserved.
Shortcut Menu
Push the 5D button backward to open the shortcut menu from the FPV view and access the
quick controls of the following functions:
• Take a photo, or start/stop recording
• Enable/disable Enhanced Display
• Enable/disable Head Tracking (only supported by certain aircraft)
• Enable/disable Share Liveview to Mobile Device via Wi-Fi
• Enable/disable Easy ACRO (only supported by certain aircraft)
• Enable/disable Goggles Defog
• Adjust brightness
DJI Goggles 3 User Manual
©
2024 DJI All Rights Reserved.
25
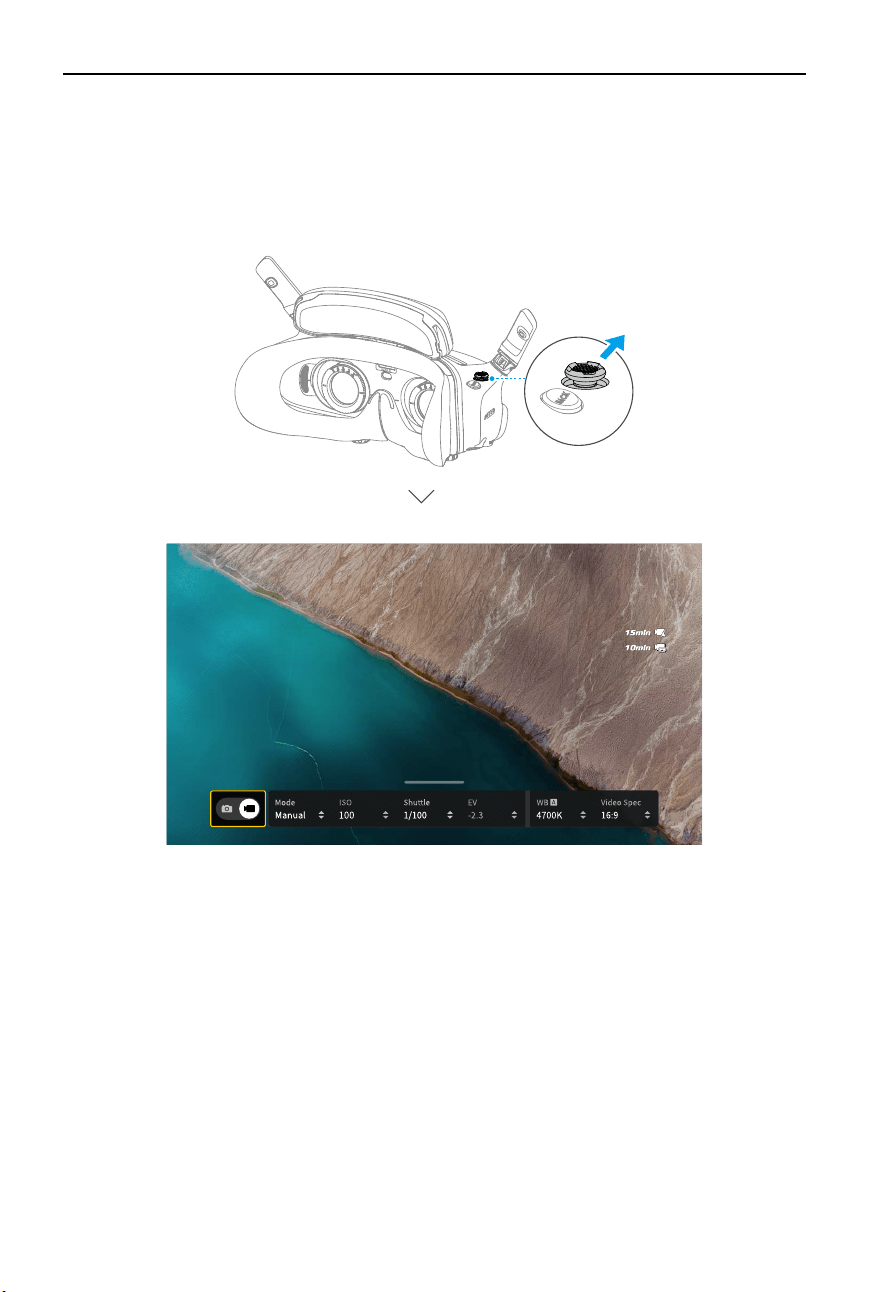
Camera Settings
Push the 5D button forward from the FPV view to open the camera settings panel and change
camera-related parameters.
In the parameter panel, push to the right to view and set more parameters.
DJI Goggles 3 User Manual
26
©
2024 DJI All Rights Reserved.
Goggles Menu
Press down the 5D button or push it to the right to open the menu from the FPV view.
• The actual menu options may dier from the descriptions in this manual, and vary
depending on the aircraft used and the rmware version of the goggles.
1. Status
• Displays the in-use aircraft model and detailed information of prompt alerts.
• Use the switch function in the upper right corner to change the aircraft.
2. Album
Shows the photos or videos stored on the microSD card of the goggles. Select any le to
preview.
3. Transmission
The Transmission menu has a Pilot sub-menu and Audience sub-menu.
• The video transmission mode for the current device can be set under the Pilot sub-menu,
including but not limited to the following:
a) Enable or disable Broadcasting mode (only supported by certain aircraft). The device
1
2
3
4

DJI Goggles 3 User Manual
©
2024 DJI All Rights Reserved.
27
number will be displayed when Broadcasting mode is enabled so that other devices
can nd the device and enter the channel to see the ight liveview.
b) Disable the Focus mode, or set to auto. (only supported by certain aircraft)
c) Set the Channel mode to auto or manual. It is recommended to select auto so that the
video transmission will automatically switch between dierent frequency bands and
select the channel with the best signal (some aircraft only support a single frequency
band).
d) Set the frequency band. If the channel mode is set to manual, either 2.4 GHz
or 5.8 GHz can be selected (some aircraft only support a single frequency
band).
e) Set the bandwidth of the video transmission. The number of channels available
varies according to the bandwidth. The channel with the best signal strength can be
manually selected. The higher the bandwidth, the higher video transmission rate
and clearer image quality. However, there will also be a higher chance of wireless
interference and the amount of equipment that can be accommodated will be more
limited. To avoid interference in a multiplayer competition, manually select a fixed
bandwidth and channel.
• If any nearby video transmission device turns on the Broadcasting mode, the device and
its signal strength can be viewed in the Audience sub-menu. Select a channel to see the
ight liveview.
4. Settings
• Safety
a) Set the safety congurations such as max ight altitude, max ight distance, and RTH
altitude. Users can also update the Home Point, set the obstacle avoidance behavior (if
the aircraft supports obstacle avoidance), and view the IMU and compass status of the
aircraft or the goggles and calibrate them if necessary.
b) Camera View Before Loss helps to nd the location of the aircraft on the ground by
using the cached video of the aircraft 30 seconds before signal is lost. If the aircraft
still has signal and battery power, turn on ESC beeping to locate the aircraft using a
beeping sound that is emitted from the aircraft.
c) Advanced Safety Settings include the following:
• Aircraft Signal Lost Action: The aircraft behavior can be set to hover, land, or RTH
when the remote controller signal is lost.
• AirSense: The goggles will notify users if there is a civil airplane approaching in
nearby airspace. This function is enabled by default. DO NOT disable it.
• Emergency Propeller Stop (disabled by default): When enabled, the motors of
the aircraft can be stopped mid-flight anytime once the user presses the motion
controller lock button four times. If the switch is disabled, the motors can only be
stopped with this action in an emergency, such as if a collision occurs, a motor
stalls, the aircraft rolls in the air, or the aircraft is out of control and is ascending or
descending quickly.
• Stopping motors mid-ight will cause the aircraft to crash. Operate with
caution.
DJI Goggles 3 User Manual
28
©
2024 DJI All Rights Reserved.
• Control
a) Configure remote controller-related functions, such as setting the stick mode,
customizable buttons, and calibrating the IMU and compass.
b) View motion controller instructions, switch Handedness, adjust Gain Tuning, or
calibrate the motion controller.
c) Calibrate the gimbal, adjust the gimbal tilt speed, set the unit, or use turtle mode to
ip the overturned aircraft upright (only certain aircraft support turtle mode).
d) View the goggles tutorial.
• Camera
a) Set the aspect ratio, video quality, video format, gridlines, storage device, format the
SD card, and so on.
• Data cannot be recovered after formatting. Operate with caution.
b) Advanced Camera Settings:
• Set the recording device, screen related parameters, enable or disable auto record
at takeo, and so on.
• Camera View Recording (enabled by default): If disabled, the recording of the
goggles screen will not include the OSD elements.
c) Select Reset Camera Parameters to restore all camera settings to default.
• Display
a) Adjust screen brightness, display scaling, and display or hide the Home Point.
b) Goggles Defog: If enabled, the cooling fan will keep running at high speed to alleviate
the fogging of the lenses.
c) Set the display of Real View.
• About
a) View device information, such as the serial number, the rmware of the goggles, and
linked devices.
b) Set the system language.
c) OTG Wired Connection: In this mode, the goggles can be connected to the PC via the
USB-C fast charging cable.
d) View the compliance information.
e) Reset the goggles and the linked devices to their default settings.
f) Clear All Device Data: All user data generated during use and stored on the aircraft
will be erased (only supported by certain aircraft).
DJI Goggles 3 User Manual
©
2024 DJI All Rights Reserved.
29
Footage Storage
The goggles support the installation of a microSD card. After a microSD card is inserted, if
Record With is set to both the aircraft and the goggles while the aircraft is recording video the
goggles will simultaneously record the ight live view displayed on the screen and store it on
the microSD card of the goggles.
Footage Export
To export the recorded footage, follow the steps below:
1. Power on the goggles.
2. Connect the USB-C port of the goggles to a PC using a USB-A to USB-C cable, and follow the
on-screen prompts to export the footage.
• If the goggles are connected to a PC via the USB-C fast charging cable, go to the
goggles menu and select Settings > About, and enter the OTG Wired Connection mode
to export the footage.
The screen recording includes the OSD elements by default. To record the screen without the
OSD elements, change the settings as shown below:
1. Open the goggles menu.
2. Select Settings > Camera > Advanced Camera Settings, and disable Camera View Recording.
Formatting the SD Card
To format the microSD card, follow the steps as shown below:
1. Open the goggles menu.
2. Select Settings > Camera > Format
3. Select the storage device to format and follow the on-screen instructions to complete the
operation.
• Data cannot be recovered after formatting. Operate with caution.
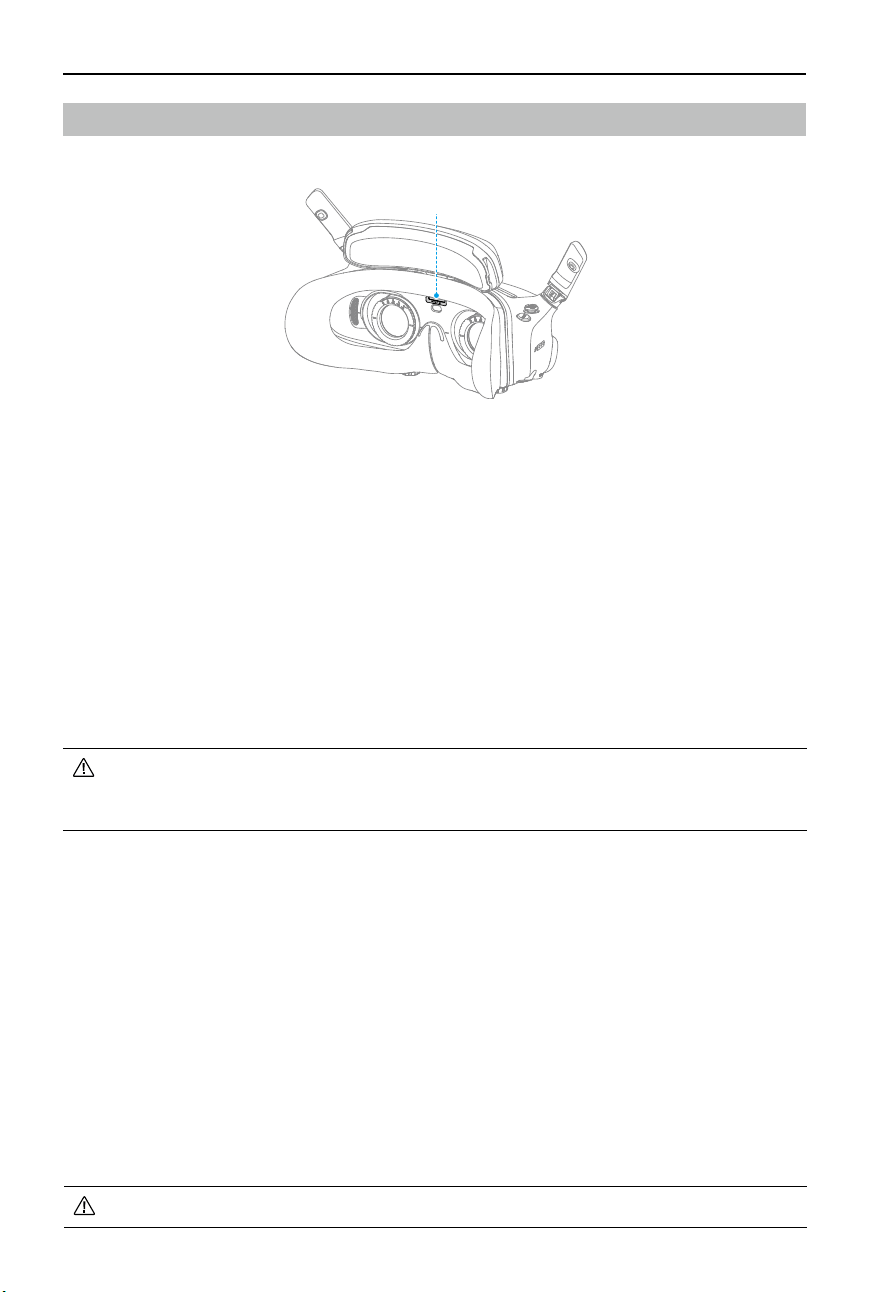
microSD Card Slot
Goggles Footage Storage and Export
DJI Goggles 3 User Manual
30
©
2024 DJI All Rights Reserved.
Real View
DJI Goggles 3 are equipped with binocular cameras, in order for users to view the surrounding
environment without removing the goggles.
Tap twice firmly on the right side of the goggles, or press twice on the dial of the motion
controller to enter Real View.
Perform the same action again to exit and return to the ight liveview.
Enter the goggles menu, select Settings > Display, and then Real View can be set to 2D or 3D.
3D will bring a more immersive three-dimensional real view. Please select based on personal
preference.
Real View PiP
When the goggles are used with the aircraft, Real View supports displaying the real-time ight
liveview.
1. Enter the goggles menu, select Settings > Display, and then enable Real View PiP.
2. Tap twice firmly on the right side of the goggles, or press twice on the motion controller
dial, the ight liveview will be displayed in the upper left corner of the real view. Both the
surroundings and the aircraft video transmission will be displayed on the goggles screen
simultaneously.
• If the Real View is set to 3D, the flight liveview cannot be displayed on the screen
simultaneously.
• When using Real View PiP, the ight liveview is only used to show the status of the
aircraft. DO NOT rely on this screen for ight.
Liveview Sharing
DJI Goggles 3 can share a ight liveview via three dierent methods.
• Power on the aircraft, goggles, and remote control device. Make sure all the devices
are linked.
• Operate Liveview Sharing prior to taking off, or when the aircraft is braking or
hovering, to avoid interfering with the pilot's operation.
• The goggles only support connecting to one mobile device for sharing the liveview
either in wireless or wired connection.
• When connected to a mobile device, liveview sharing will be paused if the goggles
switch to Real View, and the sharing will be recovered when the goggles switch back
the ight liveview.
• When connected to a mobile device, liveview sharing will be paused when viewing the
images or videos in the album. Exit the album to recover sharing.
DJI Goggles 3 User Manual
©
2024 DJI All Rights Reserved.
31
Wired Connection with Mobile Device
1. It is recommended to use a suitable data cable or the USB-C OTG cable provided to connect
the mobile device to the USB-C port on the goggles.
2. Launch DJI Fly app and tap GO FLY in the lower right corner of the screen to enter the
liveview.
Wireless Connection with Mobile Device
1. Open the shortcut menu, and select Share Liveview to Mobile Device via Wi-Fi.
2. Turn on Wi-Fi and Bluetooth on your mobile device, and enable the Location feature on your
phone.
3. Launch the DJI Fly app, a new device available for Wi-Fi connection will appear in a box on
the home page.
4. Tap the box and select the goggles to be connected.
5. When connecting DJI Fly to the goggles for the rst time, press and hold the power button
on the goggles for two seconds when the prompt appears. The battery level LEDs blink from
inside to out and then turn solid. DJI Fly will prompt the user to connect to the goggles if
needed. Select Join.
6. Tap Watch Liveview to access the liveview from the goggles.
• DO NOT press the power button of the goggles for a long period of time to avoid
triggering the linking process.
• If Share Liveview to Mobile Device via Wi-Fi is enabled, wired connection with mobile
device is not supported.
• In wireless connection mode, disconnect the goggles from the current connected
mobile device before connecting the goggles to another new mobile device for
liveview sharing.
• If 5.8 GHz is not allowed by local regulations (such as in Japan), Share Liveview to
Mobile Device via Wi-Fi cannot be used.
Broadcasting to Other Goggles
Broadcasting mode is available for sharing the liveview to other goggles if there are other DJI
Goggles 3 nearby.
1. Enter the goggles menu, select Transmission and enter the Pilot sub-menu.
2. Turn on Broadcasting mode, and the device number will be displayed.
3. On the other DJI Goggles 3, enter the goggles menu, select Transmission and enter the
Audience sub-menu.
4. If any nearby DJI Goggles 3 turns on the Broadcasting mode, the device and its signal
strength can be viewed in the Audience sub-menu. Select the device number to access the
liveview. Switching to Pilot sub-menu to exit the shared liveview.
DJI Goggles 3 User Manual
32
©
2024 DJI All Rights Reserved.
Panorama/3D Video Playback
The goggles support playing panoramic videos and 3D videos, bringing you an immersive
viewing experience.
1. Import panoramic/3D videos to a microSD card, and insert it into the goggles.
2. Enter the goggles menu and then Album, then select the video le to play.
3. Push the 5D button backward to open the playback menu, and select
2D
Display Switch
Settings.
4. Set the display mode.
• If the video is panoramic, select 2D rst, and then set the FOV to panorama.
• If the video is a 3D, first select the 3D display mode based on the video format, then
select the FOV, and whether to reverse left and right.
5. Exit the shortcut menu after conrming the selections, then the panoramic/3D video will be
played based on the display settings.
• Refer to the Specications for more information about the supported video formats.
• The goggles have no speaker but can be connected to headphones via the USB-C port.
Only supports Type-C headphones and headphone adapters with built-in DAC (digital-
to-analog converter).
Using the Head Tracking Function (only supported by certain
aircraft)
The head tracking function is only supported by certain aircraft and can be enabled by selecting
in the shortcut menu of the goggles.
After enabling the head tracking function, the horizontal orientation of the aircraft and the
gimbal tilt can be controlled using head movements during ight. The remote control device
will only control the ight path of the aircraft. The gimbal will not be able to be controlled by the
remote control device.
• Head Tracking is not available after removing the goggles.
DJI Goggles 3 User Manual
©
2024 DJI All Rights Reserved.
33
• DO NOT pull the sides when removing the foam padding. Otherwise, the padding may
be damaged.
Maintenance
Replacing the Foam Padding
1. Hold the bottom of the foam padding and remove it gently, as shown below.
2. Align the positioning columns of the new foam padding with the positioning holes on the
goggles. Install it and press along the contour. You will hear a "click" sound when pressing
the two sides of the foam padding, check and make sure that there is no gap between the
foam padding and the goggles.
DJI Goggles 3 User Manual
34
©
2024 DJI All Rights Reserved.
Cleaning and Maintenance of the Goggles
Clean the surface of the goggles with a soft, dry, clean cloth. Use the lens cleaning cloth to clean
the lenses in a circular motion from the center to the outer edges.
• DO NOT clean the integrated goggle lenses with alcohol wipes. The installed corrective
lenses can be cleaned with disposable alcohol pads.
• Clean the lenses gently. DO NOT scratch them as this will aect viewing quality.
• DO NOT use alcohol or other cleanser to wipe the foam padding and the soft side of
the battery compartment.
• DO NOT tear or scratch the foam padding, the additional forehead pad, and the soft
side of the battery compartment with sharp objects.
• Store the goggles in a dry place at room temperature to avoid damage to the lenses
and other optical components from high temperatures and humid environments.
• Keep the lenses away from direct sunlight to avoid screen damage.
DJI Goggles 3 User Manual
©
2024 DJI All Rights Reserved.
35
Updating Firmware
Use one of the following methods to update the rmware:
Using DJI Fly App
When used with DJI Avata 2, the aircraft, goggles, and remote control device can be updated
together.
Power on the aircraft, goggles, and remote control device. Make sure all the devices are linked.
Connect the USB-C port of the goggles to the mobile device, run DJI Fly, and follow the prompt
to update. An internet connection is required.
When used with other aircraft, the goggles rmware can be updated separately, or updated
with the remote control device together.
Power o the aircraft, and then power on the goggles and the remote control device. Connect
the USB-C port of the goggles to the mobile device, run DJI Fly, and follow the prompt to update.
An internet connection is required.
• The goggles only support standard USB-C protocols and MFi-certified Lightning
cables. Non-standard cables are not supported. If the devices do not respond after
connecting, use a dierent data cable and try again.
Using DJI Assistant 2 (Consumer Drones Series)
1. Power on the device. Connect the device to a computer with a USB-C cable.
• If the goggles are connected to a PC via the USB-C fast charging cable, go to the
goggles menu and select Settings > About, and then enter the OTG Wired Connection
mode to update.
2. Launch DJI Assistant 2 (Consumer Drones Series) and log in with your DJI account.
3. Select the device and click Firmware Update on the left side of the screen.
4. Select and conrm the rmware version to update to.
5. Wait for the rmware to download. The rmware update will start automatically.
6. The device will restart automatically after the rmware update is complete.
DJI Goggles 3 User Manual
36
©
2024 DJI All Rights Reserved.
• Make sure to follow all the steps to update the rmware, otherwise the update may
fail.
• The rmware update will take several minutes. It is normal for the screen to turn o or
the goggles to restart automatically during the update. Wait patiently for the rmware
update to complete.
• Make sure the computer is connected to the internet during the update.
• Make sure the device has sucient power before updating the rmware.
• Do not unplug the USB-C cable during the update.
• Note that the update may reset the parameters. Before updating, take note of your
preferred settings and recongure them after the update.
Visit the following link and refer to the Release Notes for rmware update information:
https://www.dji.com/goggles-3/downloads

DJI Goggles 3 User Manual
©
2024 DJI All Rights Reserved.
37
Appendix
Specications
Model TKGS3
Weight
Approx. 470 g
Dimensions (L×W×H) With antennas folded: 170×109×112 mm (L×W×H)
With antennas unfolded: 205×109×112 mm (L×W×H)
Screen Size (single screen)
0.49 inch
Resolution (single screen)
1920×1080
Refresh Rate
Up to 100 Hz
Interpupillary Distance
Range
56-72 mm
Diopter Adjustment
Range
-6.0 D to +2.0 D
FOV (single screen)
44°
Video Recording Format
MOV
Supported Video and
Audio Playback Formats
MP4, MOV (video coding formats: H.264, H.265; audio formats:
AAC, PCM)
Panoramic Video: Spherical 2D panoramic videos.
3D Video: Half-Side-by-Side (HSBS), Full-Side-by-Side (FSBS), Half
Over-Under (HOU), Full Over-Under (FOU).
Max Video Specication: 4K/60fps
Real View FOV
44°
Operating Temperature
-10° to 40° C (14° to 104° F)
Power Input
Built-in battery
Supported SD Cards
microSD (up to 512 GB)
Recommended microSD
Cards
Sandisk Extreme Pro 32GB U3 A1 V30 microSDHC
Lexar 1066x 64GB U3 A2 V30 microSDXC
Lexar 1066x 128GB U3 A2 V30 microSDXC
Lexar 1066x 256GB U3 A2 V30 microSDXC
Lexar 1066x 512GB U3 A2 V30 microSDXC
Kingston Canvas Go! Plus 64GB U3 A2 V30 microSDXC
Kingston Canvas Go! Plus 128GB U3 A2 V30 microSDXC
Kingston Canvas React Plus 64GB U3 A1 V90 microSDXC
Kingston Canvas React Plus 128GB U3 A1 V90 microSDXC
Kingston Canvas React Plus 256GB U3 A1 V90 microSDXC
Samsung EVO Plus 512GB U3 A2 V30 microSDXC

DJI Goggles 3 User Manual
38
©
2024 DJI All Rights Reserved.
Video Transmission
Video Transmission When used with dierent aircrafts, the goggles will automatically
select the corresponding rmware to match the video
transmission specication of the aircraft.
With DJI Avata 2: DJI O4
Operating Frequency
[1]
2.4000-2.4835 GHz
5.170-5.250 GHz
5.725-5.850 GHz
Transmitter Power (EIRP) 2.4 GHz:
<
33 dBm (FCC),
<
20 dBm (CE/SRRC/MIC)
5.1 GHz:
<
23 dBm (CE)
5.8 GHz:
<
33 dBm (FCC),
<
30 dBm (SRRC),
<
14 dBm (CE)
Latency
[2]
With DJI Avata 2:
1080p/100fps video transmission quality: latency down to 24 ms
1080p/60fps video transmission quality: latency down to 40 ms
Max Transmission
Distance
When used with DJI Avata 2, DJI Goggles 3 can achieve the
following max video transmission distance:
13 km (FCC), 10 km (CE/SRRC/MIC)
Max Video Bitrate
[3]
60Mbps
Wi-Fi
Protocol
802.11a/b/g/n/ac
Operating Frequency
[1]
2.4000-2.4835 GHz
5.170-5.250 GHz
5.725-5.850 GHz
Transmitter Power
(EIRP)
2.4 GHz:
<
20 dBm (FCC/CE/SRRC/MIC)
5.1 GHz:
<
20 dBm (FCC/CE/MIC)
5.8 GHz:
<
20 dBm (FCC/SRRC),
<
14 dBm (CE)
Bluetooth
Protocol
Bluetooth 5.0
Operating Frequency
2.4000-2.4835 GHz
Transmitter Power
(EIRP)
<
10 dBm
GFSK
Operating Frequency
2.4000-2.4835 GHz
Transmitter Power
(EIRP)
<26 dBm (FCC),
<20 dBm (CE/SRRC/MIC)
Battery
Dimensions
121×65×52.5 mm (L×W×H)
Capacity
3000 mAh
Voltage
5.6-8.4 V
Category
Li-ion
Chemical System
LiNiMnCoO2
DJI Goggles 3 User Manual
©
2024 DJI All Rights Reserved.
39
Energy
21.6 Wh
Charging Temperature
0° to 50° C (32° to 122° F)
Max Charging Power
20 W (charging when powered o)
Runtime
[4]
Approx. 3 hours
[1] Some countries and regions prohibit the use of the 5.1GHz or 5.8GHz frequency band, or both. In some
countries and regions, the 5.1GHz frequency is only allowed for indoor use. Before ying, make sure to
check and comply with local regulations.
[2] Measured in an open outdoor environment without interference. Actual data varies with dierent aircraft
models.
[3] Measured in an outdoor open environment without interference. Actual data varies with the operating
environment.
[4] The 3-hour max operating time was measured at an ambient temperature of 25° C (77° F), screen
brightness at 4, connected to the DJI Avata 2 aircraft, video transmission set to 1080p/100fps, Head
Tracking o, Real View o, and the goggles fully charged and not supplying power to external devices
such as smartphones.
Compatible Products
Visit the following link to view compatible products:
https://www.dji.com/goggles-3/faq
Risk and Warnings
When the aircraft detects any risk after powering on, there will be a warning prompt on the
goggles screen. Pay attention to the prompt during ight and take necessary actions accordingly
to avoid product damage or risk of injury.
If the Signal Lost Action of the aircraft is set to RTH, when the control signal or transmission
is lost during ight, the aircraft will automatically initiate Failsafe RTH and y back to the last
recorded Home Point.
In emergency situations during ight, such as if a collision occurs, a motor stalls, the aircraft
rolls in the air, or the aircraft is out of control and is ascending or descending quickly, the
motors can be stopped by pressing the motion controller lock button four times.
• Stopping motors mid-ight will cause the aircraft to crash. Operate with caution.
If the goggles screen goes off unexpectedly during flight, press the motion controller lock
button once to brake the aircraft rst, and then initiate RTH manually. After the aircraft is back,
check the goggles power level and try to restart the goggles. If the problem persists, contact DJI
support.

DJI Goggles 3 User Manual
40
©
2024 DJI All Rights Reserved.
Troubleshooting
1. Power-on and start-up problems
Check if the battery has power. Contact DJI support if it cannot be started normally.
2. Power-o and shutdown problems
Contact DJI support.
3. The device is not functioning after powering on.
Contact DJI Support.
4. SW update issues
Follow the instructions in the user manual to update the rmware. If the rmware update
fails, restart all the devices and try again. If the problem persists, contact DJI support.
5. Procedures to reset to factory default or last known working conguration
Open the goggles menu and select Settings > About > Reset to Factory Default.
6. How to restore use after long-term storage?
Fully charge the device rst and then it can be used normally.
Direct Remote ID
Method of uploading the UAS Operator Registration Number to the aircraft:
1. Connect the goggles to the mobile device.
2. Launch DJI Fly on the mobile device.
3. Enter DJI Fly > Safety > UAS Remote Identification, and then upload UAS Operator
Registration Number.
Low Blue Light Statement
Light from displays can cause eyestrain and retina damage which can aect vision over time.
DJI Goggles 3 adopts micro-OLED eye-protection screens, which can eectively reduce the high-
energy shortwave blue light and its emission range, therefore protecting users from exposure
to harmful blue light. DJI Goggles 3 has obtained the Low Blue Light certication.
It is highly recommended to follow the instructions below to protect your eyes against
prolonged display use:
• Look away from the screen and then at a distant place for 20 seconds every 20 minutes.
• Rest your eyes for 10 minutes after 2 hours of continuous use.
• Roll your eyes upward and then in a large circle every few hours.
• When your eyes get tired, try to blink at a normal rate, then close your eyes and rest for a
minute.

DJI Goggles 3 User Manual
©
2024 DJI All Rights Reserved.
41
Aftersales Information
Visit https://www.dji.com/support to learn more about aftersales service policies, repair
services, and support.
This content is subject to change.
WE ARE HERE FOR YOU
Contact
DJI SUPPORT
If you have any questions about this document, please
contact DJI by sending a message to [email protected].
https://www.dji.com/goggles-3/downloads
DJI and DJI AVATA are trademarks of DJI.
Copyright © 2024 DJI All Rights Reserved.