LED DESK LAMP
User Guide
EUROPE
E-mail:
EU Importer: ZBT International Trading GmbH
Address: Halstenbeker Weg 98C, 25462 Rellingen, Deutschland
NORTH AMERICA
E-mail : [email protected](US)
Tel:03-5542-0238(10~18時/土日祝除く)
US Distributor: SUNVALLEYTEK INTERNATIONAL INC.
Address:46724 Lakeview Blvd, Fremont, CA 94538
Manufacturer: Shenzhen NearbyExpress Technology Development Co.,Ltd.
Address: 333 Bulong Road, Shenzhen, China, 518129
MANUFACTURER
ASIA PACIFIC
E-mail: [email protected](JP)
Tel:03-5542-0238(10〜18時/土日祝除く)
JPImporter:株式会社SUNVALLEYJAPAN
Address:〒104-0032東京都中央区八丁堀3丁目18-6PMO京橋東9F
MODEL: TTDL038
TT-DL038_V1.7
MADE IN CHINA
www.taotronics.com

LED DESK LAMP
User Guide
EUROPE
E-mail:
support.uk@taotronics.com(UK)
support.de@taotronics.com(DE)
support.fr@taotronics.com(FR)
support.es@taotronics.com(ES)
support.it@taotronics.com(IT)
EU Importer: ZBT International Trading GmbH
Address: Halstenbeker Weg 98C, 25462 Rellingen, Deutschland
NORTH AMERICA
E-mail : support@taotronics.com(US)
support.ca@taotronics.com(CA)
Tel:03-5542-0238(10~18時/土日祝除く)
US Distributor: SUNVALLEYTEK INTERNATIONAL INC.
Address:46724 Lakeview Blvd, Fremont, CA 94538
Manufacturer: Shenzhen NearbyExpress Technology Development Co.,Ltd.
Address: 333 Bulong Road, Shenzhen, China, 518129
MANUFACTURER
ASIA PACIFIC
E-mail: support.jp@taotronics.com(JP)
Tel:03-5542-0238(10〜18時/土日祝除く)
JPImporter:株式会社SUNVALLEYJAPAN
Address:〒104-0032東京都中央区八丁堀3丁目18-6PMO京橋東9F
MODEL: TTDL038
TT-DL038_V1.7
MADE IN CHINA
www.taotronics.com

CONTENTS
English
Deutsch
Français
Español
Italiano
日本語
01/02
03/04
05/06
07/08
09/10
11/12

CONTENTS
English
Deutsch
Français
Español
Italiano
日本語
01/02
03/04
05/06
07/08
09/10
11/12
EN
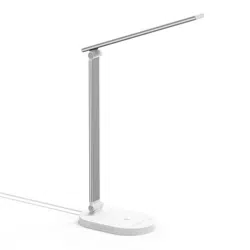
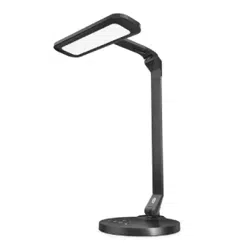
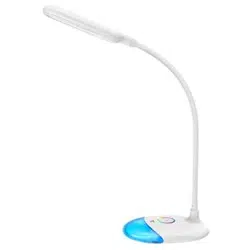
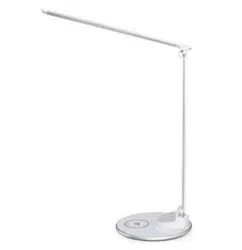
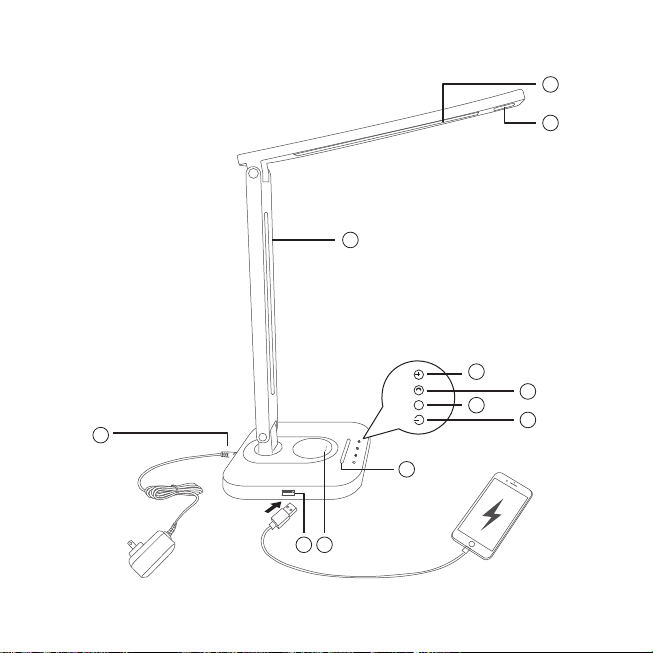
Product Diagram
1. Main Light
2. Night Light
3. Lamp Arm
4. Timer Button
5. Night Light Button
6. Mode Button -
Color Temperature
7. Power Button
8. Brightness Slider
9. Power Port
10. USB Output Port
11. Wireless Charger
DE
Produktabbildung
1. Hauptlicht
2. Nachtlicht
3. Lampenarm
4. Timer-Knopf
5. Nachtlicht-Knopf
6. Farbtemperatur-Regler
7. Power-Knopf
8. Helligkeitsregler
9. Stromanschluss
10. USB-Output
11. Qi Ladegerät
FR
Description du Produit
1. Lumière Principale
2. Veilleuse
3. Bras de Lampe
4. Bouton Minuterie
5. Bouton Veilleuse
6. Bouton Mode –
Température de Couleur
7. Interrupteur
8. Curseur de Luminosité
9. Prise Électrique
10. Port de Sortie USB
11. Chargeur Sans-l
ES
Diagrama del producto
1. Luz Principal
2. Luz Nocturna
3. Brazo de Lámpara
4. Botón de Temporizador
5. Botón de Luz Nocturna
6. Botón de Modo -
Temperatura de Color
7. Botón de Encendido
8. Control Deslizante de Brillo
9. Puerto de Alimentación
10. Puerto de salida USB
11. Cargador Inalámbrico
IT
Schema del Prodotto
1. Luce Principale
2. Luce Notturna
3. Braccio della Lampada
4. Pulsante Timer
5. Pulsante Luce Notturna
6. Pulsante Modalità -
Temperatura Colore
7. Pulsante di Accensione
8. Cursore Luminosità
9. Porta di Alimentazione
10. Uscita USB
11. Caricabatterie Wireless
JP
製品図
1.メインライト
2 . ナイトライト
3.ランプアーム
4.タイマーボタン
5 . ナイトライト ボ タン
6.モードボタン-色温度
7.電源ボタン
8.明るさスライダ
9.電源ポート
10.USB出力ポート
11.ワイヤレス充電
1
2
3
4
5
7
8
10 11
9
6
M

EN
Product Diagram
1. Main Light
2. Night Light
3. Lamp Arm
4. Timer Button
5. Night Light Button
6. Mode Button -
Color Temperature
7. Power Button
8. Brightness Slider
9. Power Port
10. USB Output Port
11. Wireless Charger
DE
Produktabbildung
1. Hauptlicht
2. Nachtlicht
3. Lampenarm
4. Timer-Knopf
5. Nachtlicht-Knopf
6. Farbtemperatur-Regler
7. Power-Knopf
8. Helligkeitsregler
9. Stromanschluss
10. USB-Output
11. Qi Ladegerät
FR
Description du Produit
1. Lumière Principale
2. Veilleuse
3. Bras de Lampe
4. Bouton Minuterie
5. Bouton Veilleuse
6. Bouton Mode –
Température de Couleur
7. Interrupteur
8. Curseur de Luminosité
9. Prise Électrique
10. Port de Sortie USB
11. Chargeur Sans-l
ES
Diagrama del producto
1. Luz Principal
2. Luz Nocturna
3. Brazo de Lámpara
4. Botón de Temporizador
5. Botón de Luz Nocturna
6. Botón de Modo -
Temperatura de Color
7. Botón de Encendido
8. Control Deslizante de Brillo
9. Puerto de Alimentación
10. Puerto de salida USB
11. Cargador Inalámbrico
IT
Schema del Prodotto
1. Luce Principale
2. Luce Notturna
3. Braccio della Lampada
4. Pulsante Timer
5. Pulsante Luce Notturna
6. Pulsante Modalità -
Temperatura Colore
7. Pulsante di Accensione
8. Cursore Luminosità
9. Porta di Alimentazione
10. Uscita USB
11. Caricabatterie Wireless
JP
製品図
1.メインライト
2 . ナイトライト
3.ランプアーム
4.タイマーボタン
5 . ナイトライト ボ タン
6.モードボタン-色温度
7.電源ボタン
8.明るさスライダ
9.電源ポート
10.USB出力ポート
11.ワイヤレス充電
1
2
3
4
5
7
8
10 11
9
6
M
01/02
EN
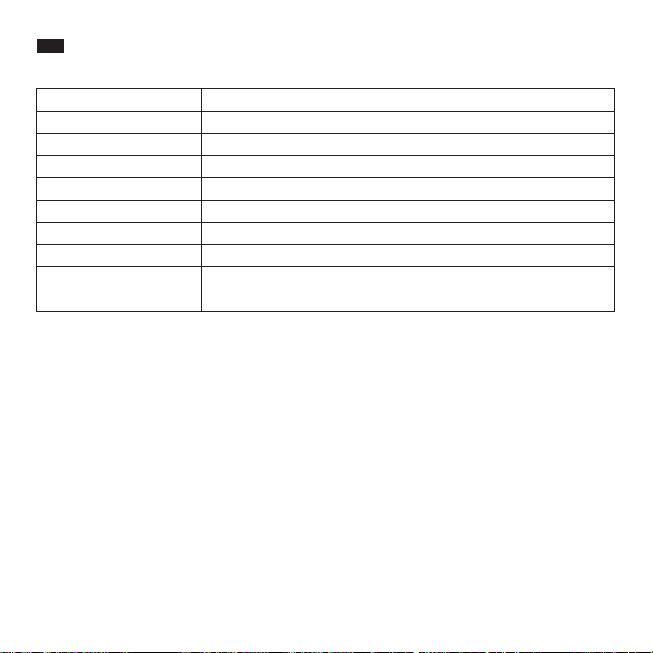
Specications
Model TT-DL038
>80Ra
DC 10V/3A
12W
DC 5V/1A
CRI
Operating Voltage
Power(Only for the Light)
USB Output
Wireless Charger Output
Lumens
Operating Temperature
Color Temperature
-20℃~ 40℃ /-4℉~104℉
2700-3000K(1), 4000K±200K(2), 4500K±200K(3), 5000K±300K(4),
6000-6500K(5)
10W Max
400lm
Set the Timer
• Tap the Timer Button once to set one hour timer for the main light and night light, the timer
indicator will blink to start the countdown. Tap again to exit the timer.
Night Light
• Tap the Night Light Button to activate the night light, the main light will turn o. All button
indicators (except the night light and power indicator) will turn o.
• Tap one more time to turn o the night light.
Memory Function
• With power connected, the lamp will resume the color temperature and brightness of the last use
when turned on.
Note: We suggest you set to a low brightness level before turning the lamp o to prevent glares
when you turn the light on again.
USB Port
Charge your smartphone, tablet, e-reader or any USB devices through the 5V/1A USB port.
Wireless Charger
· Place your phone with Qi-BPP compatibility on the wireless charging station to automatically start charging.
· The charger supports 7.5W wireless charging for newest iPhone X / 8 Plus / 8 in iOS 11.2 or above and 10W fast
charging to selected Samsung Galaxy, Google Nexus, or MicrosoftLumia phones.
Note:
If charging does not occur, adjust the phone so its receiver can be detected. Please note that dierent model
phones have their receivers in dierent positions.
Caution
• Please hold the lamp parts accordingly when adjusting the angle of the lamp head and arm.
• Please adjust the lamp within the allowed angle. Do not use excessive force to avoid damages
to the product.
How to Use
Use the included power adapter to connect to a power source, the lamp is now in standby mode
and the Power Button indicator will light up.
Power On / O the Main Light
• In standby mode, tap the Power Button once to turn on the main light. All the button indicators
will light up.
• Tap again to turn o the main light, only the power indicator will remain on.
Adjust the Color Temperature
• The lamp will enter warm light mode by default when turned on. Tap the Mode Button to cycle
through 5 color temperature modes.
Adjust the Brightness
• The lamp will enter the 3rd level brightness by default when turned on. Slide across the Brightness
Slider to adjust the light brightness, the brightness indicator will light up accordingly.

01/02
EN
Specications
Model TT-DL038
>80Ra
DC 10V/3A
12W
DC 5V/1A
CRI
Operating Voltage
Power(Only for the Light)
USB Output
Wireless Charger Output
Lumens
Operating Temperature
Color Temperature
-20℃~ 40℃ /-4℉~104℉
2700-3000K(1), 4000K±200K(2), 4500K±200K(3), 5000K±300K(4),
6000-6500K(5)
10W Max
400lm
Set the Timer
• Tap the Timer Button once to set one hour timer for the main light and night light, the timer
indicator will blink to start the countdown. Tap again to exit the timer.
Night Light
• Tap the Night Light Button to activate the night light, the main light will turn o. All button
indicators (except the night light and power indicator) will turn o.
• Tap one more time to turn o the night light.
Memory Function
• With power connected, the lamp will resume the color temperature and brightness of the last use
when turned on.
Note: We suggest you set to a low brightness level before turning the lamp o to prevent glares
when you turn the light on again.
USB Port
Charge your smartphone, tablet, e-reader or any USB devices through the 5V/1A USB port.
Wireless Charger
· Place your phone with Qi-BPP compatibility on the wireless charging station to automatically start charging.
· The charger supports 7.5W wireless charging for newest iPhone X / 8 Plus / 8 in iOS 11.2 or above and 10W fast
charging to selected Samsung Galaxy, Google Nexus, or MicrosoftLumia phones.
Note:
If charging does not occur, adjust the phone so its receiver can be detected. Please note that dierent model
phones have their receivers in dierent positions.
Caution
• Please hold the lamp parts accordingly when adjusting the angle of the lamp head and arm.
• Please adjust the lamp within the allowed angle. Do not use excessive force to avoid damages
to the product.
How to Use
Use the included power adapter to connect to a power source, the lamp is now in standby mode
and the Power Button indicator will light up.
Power On / O the Main Light
• In standby mode, tap the Power Button once to turn on the main light. All the button indicators
will light up.
• Tap again to turn o the main light, only the power indicator will remain on.
Adjust the Color Temperature
• The lamp will enter warm light mode by default when turned on. Tap the Mode Button to cycle
through 5 color temperature modes.
Adjust the Brightness
• The lamp will enter the 3rd level brightness by default when turned on. Slide across the Brightness
Slider to adjust the light brightness, the brightness indicator will light up accordingly.

03/04
DE
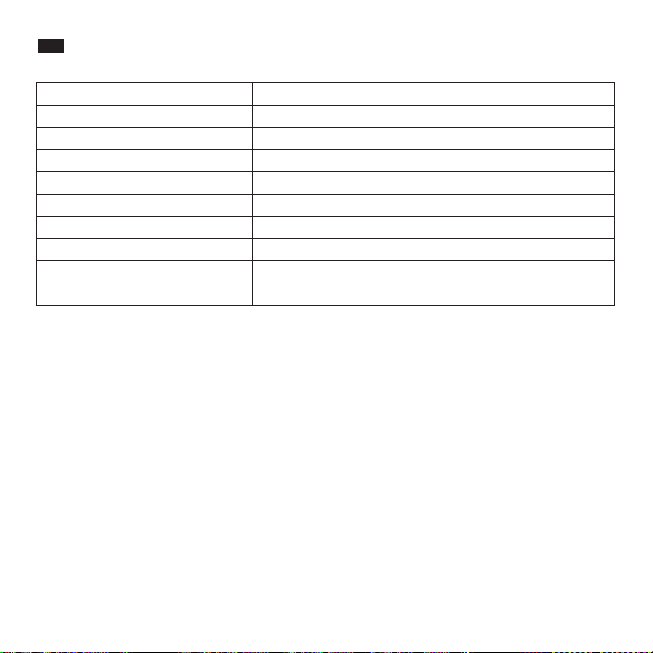
Spezikationen
Modell TT-DL038
>80Ra
DC 10V/3A
12W
DC 5V/1A
CRI
Betriebsspannung
Leistung (nur beim Licht)
USB-Ausgang
Qi Ladegerät-Ausgang
Lumen
Betriebstemperatur
Farbtemperatur
-20℃~ 40℃ /-4℉~104℉
2700-3000K(1), 4000K±200K(2), 4500K±200K(3), 5000K±300K(4),
6000-6500K(5)
10W Max
400lm
Anleitung
Verwenden Sie den mitgelieferten Stromadapter zum Anschluss an einer Stromquelle. Die Lampe
bendet sich jetzt im Standby-Modus und der Power-Knopf leuchtet auf.
Hauptlicht ein- / ausschalten
• Tippen Sie den Power-Knopf im Standby-Modus einmal an, um das Hauptlicht einzuschalten. Alle
Knopfanzeigen leuchten auf.
• Tippen Sie erneut, um das Hauptlicht auszuschalten; nur die Power-Anzeige bleibt an.
Farbtemperatur einstellen
• Die Lampe schaltet standardmäßig in den Warmlicht-Modus ein, wenn sie eingeschaltet wird.
Tippen Sie den Farbtemperatur-Regler an, um zwischen die 5 Farbtemperatur-Modi zu wechseln.
Helligkeit anpassen
• Die Lampe bendet sich standardmäßig auf der 3. Helligkeitsstufe, wenn sie eingeschaltet wird.
Lassen Sie Ihre Finger über den Helligkeitsregler gleiten, um die Helligkeit anzupassen; die
Helligkeitsanzeige leuchtet entsprechend auf.
Timer einstellen
• Tippen Sie den Timer-Knopf einmal an, um einen einstündigen Timer für Hauptlicht und Nachtlicht
einzustellen; die Timer-Anzeige blinkt und der Countdown beginnt. Tippen Sie erneut, um den
Timer zu beenden.
Nachtlicht
• Tippen Sie auf den Nachtlicht-Knopf, um das Nachtlicht zu aktivieren; das Hauptlicht schaltet sich
dann ab. Alle Knopfanzeigen (außer Nachtlicht- und Power-Anzeige) werden abgeschaltet.
• Tippen Sie erneut, um das Nachtlicht auszuschalten.
Speicherfunktion
• Solange die Lampe am Strom angeschlossen ist, wird die Lampe die zuletzt benutzte
Farbtemperatur und Helligkeit wiederaufnehmen, wenn sie eingeschaltet wird.
Anmerkung: Wir empfehlen Ihnen, eine niedrige Helligkeitsstufe einzustellen, bevor Sie die Lampe
ausschalten, damit Sie nicht geblendet werden, wenn Sie die Lampe wieder einschalten.
USB-Anschluss
Laden Sie Ihr Handy, Tablet, E-Reader oder andere USB-Geräte mit dem 5V/1A USB-Anschluss.
Kabellos auaden
· Legen Sie Ihr Handy mit Qi-BPP Kompatibilität auf die kabellose Ladestation, um es automatisch aufzuladen.
· Das Ladegerät unterstützt 7.5W kabelloses Laden für die neuesten iPhone X / 8 Plus / 8 mit dem aktuellen iOS 11.2
oder höher, und 10W Schnellladen für bestimmte Samsung Galaxy, Google Nexus und Microsoft Lumia.
Hinweis:
Wenn das Laden nicht automatisch beginnt, legen Sie Ihr Handy so hin, dass der Empfänger erkannt werden kann.
Bitte beachten Sie, dass verschiedene Handymodelle ihren Empfänger an unterschiedlichen Positionen haben.
Achtung
• Bitte halten Sie die Lampenteile entsprechend fest, wenn Sie die Ausrichtung des Lampenkopfs
und -arms verändern.
• Bitte richten Sie die Lampe nur innerhalb des erlaubten Winkels aus. Wenden Sie keine
übermäßige Gewalt an, um Schäden am Produkt zu vermeiden.

03/04
DE
Spezikationen
Modell TT-DL038
>80Ra
DC 10V/3A
12W
DC 5V/1A
CRI
Betriebsspannung
Leistung (nur beim Licht)
USB-Ausgang
Qi Ladegerät-Ausgang
Lumen
Betriebstemperatur
Farbtemperatur
-20℃~ 40℃ /-4℉~104℉
2700-3000K(1), 4000K±200K(2), 4500K±200K(3), 5000K±300K(4),
6000-6500K(5)
10W Max
400lm
Anleitung
Verwenden Sie den mitgelieferten Stromadapter zum Anschluss an einer Stromquelle. Die Lampe
bendet sich jetzt im Standby-Modus und der Power-Knopf leuchtet auf.
Hauptlicht ein- / ausschalten
• Tippen Sie den Power-Knopf im Standby-Modus einmal an, um das Hauptlicht einzuschalten. Alle
Knopfanzeigen leuchten auf.
• Tippen Sie erneut, um das Hauptlicht auszuschalten; nur die Power-Anzeige bleibt an.
Farbtemperatur einstellen
• Die Lampe schaltet standardmäßig in den Warmlicht-Modus ein, wenn sie eingeschaltet wird.
Tippen Sie den Farbtemperatur-Regler an, um zwischen die 5 Farbtemperatur-Modi zu wechseln.
Helligkeit anpassen
• Die Lampe bendet sich standardmäßig auf der 3. Helligkeitsstufe, wenn sie eingeschaltet wird.
Lassen Sie Ihre Finger über den Helligkeitsregler gleiten, um die Helligkeit anzupassen; die
Helligkeitsanzeige leuchtet entsprechend auf.
Timer einstellen
• Tippen Sie den Timer-Knopf einmal an, um einen einstündigen Timer für Hauptlicht und Nachtlicht
einzustellen; die Timer-Anzeige blinkt und der Countdown beginnt. Tippen Sie erneut, um den
Timer zu beenden.
Nachtlicht
• Tippen Sie auf den Nachtlicht-Knopf, um das Nachtlicht zu aktivieren; das Hauptlicht schaltet sich
dann ab. Alle Knopfanzeigen (außer Nachtlicht- und Power-Anzeige) werden abgeschaltet.
• Tippen Sie erneut, um das Nachtlicht auszuschalten.
Speicherfunktion
• Solange die Lampe am Strom angeschlossen ist, wird die Lampe die zuletzt benutzte
Farbtemperatur und Helligkeit wiederaufnehmen, wenn sie eingeschaltet wird.
Anmerkung: Wir empfehlen Ihnen, eine niedrige Helligkeitsstufe einzustellen, bevor Sie die Lampe
ausschalten, damit Sie nicht geblendet werden, wenn Sie die Lampe wieder einschalten.
USB-Anschluss
Laden Sie Ihr Handy, Tablet, E-Reader oder andere USB-Geräte mit dem 5V/1A USB-Anschluss.
Kabellos auaden
· Legen Sie Ihr Handy mit Qi-BPP Kompatibilität auf die kabellose Ladestation, um es automatisch aufzuladen.
· Das Ladegerät unterstützt 7.5W kabelloses Laden für die neuesten iPhone X / 8 Plus / 8 mit dem aktuellen iOS 11.2
oder höher, und 10W Schnellladen für bestimmte Samsung Galaxy, Google Nexus und Microsoft Lumia.
Hinweis:
Wenn das Laden nicht automatisch beginnt, legen Sie Ihr Handy so hin, dass der Empfänger erkannt werden kann.
Bitte beachten Sie, dass verschiedene Handymodelle ihren Empfänger an unterschiedlichen Positionen haben.
Achtung
• Bitte halten Sie die Lampenteile entsprechend fest, wenn Sie die Ausrichtung des Lampenkopfs
und -arms verändern.
• Bitte richten Sie die Lampe nur innerhalb des erlaubten Winkels aus. Wenden Sie keine
übermäßige Gewalt an, um Schäden am Produkt zu vermeiden.
05/06
FR
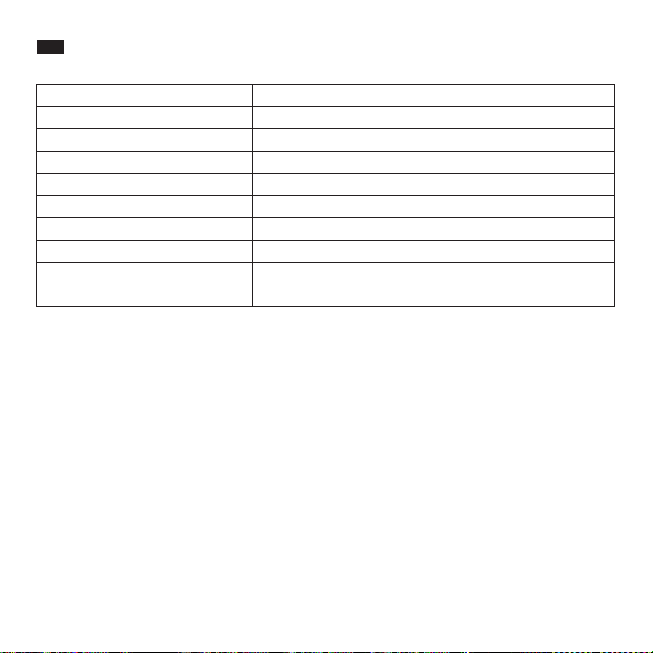
Spécications
Modèle TT-DL038
>80Ra
DC 10V/3A
12W
DC 5V/1A
CRI
Tension d’Alimentation
Puissance (lampe uniquement)
Sortie USB
Sortie Chargeur Sans-l
Lumens
Température de Fonctionnement
empérature de couleur
-20℃~ 40℃ /-4℉~104℉
2700-3000K(1), 4000K±200K(2), 4500K±200K(3),
5000K±300K(4),6000-6500K(5)
10W Max
400lm
Mode d’Emploi
Utilisez l'adaptateur d'alimentation inclus pour connecter la lampe à une source électrique, elle
sera alors en mode veille et le voyant de l’Interrupteur s'allumera.
Allumer / Éteindre la Lumière Principale
• En mode veille, appuyez une fois sur l’interrupteur pour allumer la lumière principale. Tous les
voyants des boutons s'allumeront.
• Appuyez à nouveau pour éteindre la lumière principale, seul le voyant d'alimentation restera
allumé.
Réglage de la Température de Couleur
• La lampe passe en mode lumière chaude par défaut lorsqu'elle est allumée. Appuyez sur le
Bouton Mode pour alterner entre les 5 modes de température de couleur.
Réglage de la Luminosité
• La lampe se met par défaut dans le 3ème niveau de luminosité lorsqu'elle est allumée. Glissez le
curseur de luminosité pour ajuster l’intensité de la lumière, le voyant du niveau de luminosité
correspondant s'allumera.
Réglage de la Minuterie
• Appuyez une fois sur le Bouton Minuterie pour régler la minuterie de la lumière principale et de la
veilleuse sur une heure. Le voyant de la minuterie clignote pour indiquer le démarrage du
compte à rebours. Appuyez à nouveau pour quitter la minuterie.
Veilleuse
• Appuyez sur le Bouton Veilleuse pour activer la veilleuse, la lumière principale s'éteindra. Tous les
voyants des boutons (sauf ceux de la veilleuse et de l'alimentation) s'éteindront.
• Appuyez une nouvelle fois pour éteindre la veilleuse.
Fonction Mémoire
• Si l'alimentation électrique est restée connectée, la lampe reviendra aux réglages de
température de couleur et de luminosité de la dernière utilisation quand vous l’allumerez.
Remarque: Nous vous suggérons de régler un niveau de luminosité faible avant d'éteindre la
lampe, pour éviter d’être éblouit lorsque vous la rallumerez.
Port USB
Chargez votre smartphone, tablette, liseuse électronique, ou tout autre périphérique USB
viale port USB 5V / 1A.
Chargeur sans ls
· Placez votre téléphone compatible Qi-BPP sur la station de charge sans ls pour démarrer automatiquement le
chargement.
· Le chargeur supporte la recharge sans ls de 7,5 W pour le dernier iPhone X / 8 Plus / 8 avec iOS 11.2 ou supérieur,
et le chargement rapide de 10W pour Samsung Galaxy, Google Nexus ou Microsoft Lumia sélectionné.
Remarque:
Si le chargement ne démarre pas, bougez le téléphone pour que son récepteur puisse être détecté. Veuillez noter
que suivant le modèle de téléphone, les récepteurs sont dans diérentes positions.
Mises en Garde
• Veuillez tenir les parties de la lampe correctement quand vous réglez l'angle de la lumière et du
bras de la lampe.
• Veuillez ajuster l’angle de la lampe dans les conditions prévues. Ne pas forcer pour éviter
d’endommager l’article.

05/06
FR
Spécications
Modèle TT-DL038
>80Ra
DC 10V/3A
12W
DC 5V/1A
CRI
Tension d’Alimentation
Puissance (lampe uniquement)
Sortie USB
Sortie Chargeur Sans-l
Lumens
Température de Fonctionnement
empérature de couleur
-20℃~ 40℃ /-4℉~104℉
2700-3000K(1), 4000K±200K(2), 4500K±200K(3),
5000K±300K(4),6000-6500K(5)
10W Max
400lm
Mode d’Emploi
Utilisez l'adaptateur d'alimentation inclus pour connecter la lampe à une source électrique, elle
sera alors en mode veille et le voyant de l’Interrupteur s'allumera.
Allumer / Éteindre la Lumière Principale
• En mode veille, appuyez une fois sur l’interrupteur pour allumer la lumière principale. Tous les
voyants des boutons s'allumeront.
• Appuyez à nouveau pour éteindre la lumière principale, seul le voyant d'alimentation restera
allumé.
Réglage de la Température de Couleur
• La lampe passe en mode lumière chaude par défaut lorsqu'elle est allumée. Appuyez sur le
Bouton Mode pour alterner entre les 5 modes de température de couleur.
Réglage de la Luminosité
• La lampe se met par défaut dans le 3ème niveau de luminosité lorsqu'elle est allumée. Glissez le
curseur de luminosité pour ajuster l’intensité de la lumière, le voyant du niveau de luminosité
correspondant s'allumera.
Réglage de la Minuterie
• Appuyez une fois sur le Bouton Minuterie pour régler la minuterie de la lumière principale et de la
veilleuse sur une heure. Le voyant de la minuterie clignote pour indiquer le démarrage du
compte à rebours. Appuyez à nouveau pour quitter la minuterie.
Veilleuse
• Appuyez sur le Bouton Veilleuse pour activer la veilleuse, la lumière principale s'éteindra. Tous les
voyants des boutons (sauf ceux de la veilleuse et de l'alimentation) s'éteindront.
• Appuyez une nouvelle fois pour éteindre la veilleuse.
Fonction Mémoire
• Si l'alimentation électrique est restée connectée, la lampe reviendra aux réglages de
température de couleur et de luminosité de la dernière utilisation quand vous l’allumerez.
Remarque: Nous vous suggérons de régler un niveau de luminosité faible avant d'éteindre la
lampe, pour éviter d’être éblouit lorsque vous la rallumerez.
Port USB
Chargez votre smartphone, tablette, liseuse électronique, ou tout autre périphérique USB
viale port USB 5V / 1A.
Chargeur sans ls
· Placez votre téléphone compatible Qi-BPP sur la station de charge sans ls pour démarrer automatiquement le
chargement.
· Le chargeur supporte la recharge sans ls de 7,5 W pour le dernier iPhone X / 8 Plus / 8 avec iOS 11.2 ou supérieur,
et le chargement rapide de 10W pour Samsung Galaxy, Google Nexus ou Microsoft Lumia sélectionné.
Remarque:
Si le chargement ne démarre pas, bougez le téléphone pour que son récepteur puisse être détecté. Veuillez noter
que suivant le modèle de téléphone, les récepteurs sont dans diérentes positions.
Mises en Garde
• Veuillez tenir les parties de la lampe correctement quand vous réglez l'angle de la lumière et du
bras de la lampe.
• Veuillez ajuster l’angle de la lampe dans les conditions prévues. Ne pas forcer pour éviter
d’endommager l’article.

07/08
ES
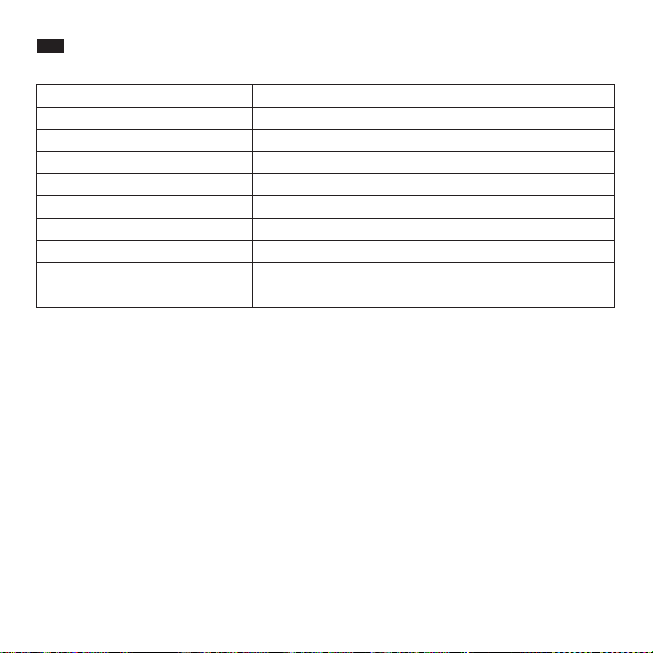
Especicaciones
Modelo TT-DL038
>80Ra
DC 10V/3A
12W
DC 5V/1A
CRI
Voltaje de Operación
Potencia (sólo para la luz)
Salida USB
Salida del Cargador Inalámbrico
Lúmenes
Temperatura de Operación
Temperatura de Color
-20℃~ 40℃ /-4℉~104℉
2700-3000K(1), 4000K±200K(2), 4500K±200K(3),
5000K±300K(4),6000-6500K(5)
10W Max
400lm
Cómo Usar
Use el adaptador de corriente incluido para conectar a una fuente de energía, ahora está la
lámpara en modo de espera y el indicador del Botón de Encendido se ilumina.
Encender/Apagar la Luz Principal
• En el modo de espera, presione el Botón de Encendido una vez para encender la luz principal.
Todos los indicadores de los botones se encenderán.
• Toque de nuevo para apagar la luz principal, sólo el indicador de encendido permanecerá
iluminado.
Ajustar la Temperatura de Color
• La lámpara entrará en modo de luz cálida de forma automática al encenderse. Toque el Botón
de Modo para elegir entre 5 modos de temperatura de color.
Ajustar el Brillo
• La lámpara estará en el tercer nivel de brillo automáticamente al encenderse. Deslícese a través
del Control de Brillo para ajustar el brillo de la luz, el indicador de brillo se iluminará en
consecuencia.
Establecer el Temporizador
• Toque el botón del temporizador una vez para jar el tiempo a una hora para la luz principal y la
de noche, el indicador del temporizador parpadeará para iniciar la cuenta regresiva. Toque de
nuevo para salir del temporizador.
Luz Nocturna
• Presione el Botón Luz Nocturna para activar la luz nocturna, la luz principal se apagará. Todos
los indicadores (excepto el de la Luz Nocturna y el indicador de encendido) se apagarán.
• Toque una vez más para apagar la luz de la noche.
Función de Memoria
• Contactada a una toma de energía, la lámpara reanudará la temperatura de color y el brillo
que está congurado en la última vez que se usa.
Aviso: le aconsejamos que congure el brillo a un nivel bajo antes de apagar la lámpara para
evitar deslumbramientos cuando la encienda nuevamente.
Puerto USB
Cargue su smartphone, tableta, e-reader o cualquier dispositivo USB a través del puerto USB 5V/1A.
Cargador Inalámbrico
· Coloque su teléfono con compatibilidad de Qi-BPP o en la estación de carga inalámbrica para comenzar la carga
automáticamente.
· El cargador soporta la carga inalámbrica de 7,5W para el nuevo iPhone X / 8 Plus / 8 con el sistema iOS 11.2 o más
superior y la de 10W para la carga rápida a dispositivos seleccionados de Samsung Galaxy, Google Nexus, o los
Lumia de Microsoft.
Nota:
Si no se inicia la carga, ajuste el teléfono para que se pueda detectar su receptor. Tenga en cuenta que diferentes
modelos de teléfono tienen sus receptores en diferentes lugares.
Precaución
• Por favor, mantenga las partes de la lámpara adecuadamente al ajustar el ángulo de la
cabeza y/o el brazo de la lámpara.
• Por favor, sólo ajuste la lámpara dentro del ángulo permitido. No use fuerza excesiva para evitar
daños al producto.

07/08
ES
Especicaciones
Modelo TT-DL038
>80Ra
DC 10V/3A
12W
DC 5V/1A
CRI
Voltaje de Operación
Potencia (sólo para la luz)
Salida USB
Salida del Cargador Inalámbrico
Lúmenes
Temperatura de Operación
Temperatura de Color
-20℃~ 40℃ /-4℉~104℉
2700-3000K(1), 4000K±200K(2), 4500K±200K(3),
5000K±300K(4),6000-6500K(5)
10W Max
400lm
Cómo Usar
Use el adaptador de corriente incluido para conectar a una fuente de energía, ahora está la
lámpara en modo de espera y el indicador del Botón de Encendido se ilumina.
Encender/Apagar la Luz Principal
• En el modo de espera, presione el Botón de Encendido una vez para encender la luz principal.
Todos los indicadores de los botones se encenderán.
• Toque de nuevo para apagar la luz principal, sólo el indicador de encendido permanecerá
iluminado.
Ajustar la Temperatura de Color
• La lámpara entrará en modo de luz cálida de forma automática al encenderse. Toque el Botón
de Modo para elegir entre 5 modos de temperatura de color.
Ajustar el Brillo
• La lámpara estará en el tercer nivel de brillo automáticamente al encenderse. Deslícese a través
del Control de Brillo para ajustar el brillo de la luz, el indicador de brillo se iluminará en
consecuencia.
Establecer el Temporizador
• Toque el botón del temporizador una vez para jar el tiempo a una hora para la luz principal y la
de noche, el indicador del temporizador parpadeará para iniciar la cuenta regresiva. Toque de
nuevo para salir del temporizador.
Luz Nocturna
• Presione el Botón Luz Nocturna para activar la luz nocturna, la luz principal se apagará. Todos
los indicadores (excepto el de la Luz Nocturna y el indicador de encendido) se apagarán.
• Toque una vez más para apagar la luz de la noche.
Función de Memoria
• Contactada a una toma de energía, la lámpara reanudará la temperatura de color y el brillo
que está congurado en la última vez que se usa.
Aviso: le aconsejamos que congure el brillo a un nivel bajo antes de apagar la lámpara para
evitar deslumbramientos cuando la encienda nuevamente.
Puerto USB
Cargue su smartphone, tableta, e-reader o cualquier dispositivo USB a través del puerto USB 5V/1A.
Cargador Inalámbrico
· Coloque su teléfono con compatibilidad de Qi-BPP o en la estación de carga inalámbrica para comenzar la carga
automáticamente.
· El cargador soporta la carga inalámbrica de 7,5W para el nuevo iPhone X / 8 Plus / 8 con el sistema iOS 11.2 o más
superior y la de 10W para la carga rápida a dispositivos seleccionados de Samsung Galaxy, Google Nexus, o los
Lumia de Microsoft.
Nota:
Si no se inicia la carga, ajuste el teléfono para que se pueda detectar su receptor. Tenga en cuenta que diferentes
modelos de teléfono tienen sus receptores en diferentes lugares.
Precaución
• Por favor, mantenga las partes de la lámpara adecuadamente al ajustar el ángulo de la
cabeza y/o el brazo de la lámpara.
• Por favor, sólo ajuste la lámpara dentro del ángulo permitido. No use fuerza excesiva para evitar
daños al producto.
09/10
IT
Speciche
Modello TT-DL038
>80Ra
DC 10V/3A
12W
DC 5V/1A
IRC
Tensione di Esercizio
Potenza (Luce)
Uscita USB
Uscita Caricabatterie Wireless
Lumen
Temperatura di Esercizio
Temperatura Colore
-20℃~ 40℃ /-4℉~104℉
2700-3000K(1), 4000K±200K(2), 4500K±200K(3),
5000K±300K(4),6000-6500K(5)
10W Max
400lm
Modalità di Utilizzo
Utilizzare l'adattatore di corrente compreso nella confezione per collegare ad una fonte di
alimentazione. La lampada entrerà in modalità stand-by e il Pulsante di Accensione si accenderà.
Accensione / Spegnimento della Luce Principale
• In modalità stand-by, premere il Pulsante di Accensione una volta per accendere la luce
principale. Tutti gli indicatori luminosi dei pulsanti si illumineranno.
• Premere nuovamente per spegnere la luce principale. Soltanto l'indicatore di accensione
resterà illuminato.
Regolare la Temperatura Colore
• La lampada entrerà nella modalità luce calda per default quando accesa. Premere il Pulsante
Modalità per passare in rassegna le 5 modalità di temperatura del colore.
Regolare la Luminosità
• La lampada attiverà il terzo livello di luminosità per default quando accesa. Scorrere sul Cursore
Luminosità per regolare la luminosità della luce. L'indicatore di luminosità si illuminerà di
conseguenza.
Impostare il Timer
• Premere il Pulsante Timer una volta per impostare il timer di un'ora per la luce principale e la luce
notturna. L'indicatore del timer lampeggerà ad indicare che è iniziato il conto alla rovescia.
Premere nuovamente per disattivare il timer.
Luce Notturna
• Premere il Pulsante Luce Notturna per attivare la luce notturna. La luce principale si spegnerà.
Tutti gli indicatori dei vari pulsanti si spegneranno (tranne quello della luce notturna e quello di
alimentazione.
• Premere ancora una volta per spegnere la luce notturna.
Funzione Memoria
• Se la lampada viene mantenuta collegata ad una presa di corrente, essa ripartirà con le
impostazioni di temperatura colore e luminosità utilizzate l'ultima volta.
Nota: Suggeriamo di impostare un livello di luminosità basso prima di spegnere la lampada per
evitare bagliori indesiderati quando la luce verrà accesa nuovamente.
Porta USB
Per ricaricare smartphone, tablet, e-reader o qualsiasi altro dispositivo USB attraverso la porta USB da 5V/1A.
Caricabatterie Wireless
· Appoggiare un telefono compatibile con lo standard Qi-BPP sulla base di ricarica wireless per iniziare
automaticamente la ricarica.
· Supporta wireless charging a 7.5W per l’iPhone X / 8 Plus / 8 con iOS 11.2 o superiore e fast charging a 10W per i
dispositivi
Samsung Galaxy, Google Nexus e Microsoft Lumia compatibili.
Nota:
Se la ricarica non parte, regolare il telefono in modo che il suo ricevitore possa essere rilevato. Si prega di notare che
non tutti i telefoni
hanno il ricevitore nella stessa posizione.
Attenzione
• Si prega di tenere salde le varie parti della lampada durante la regolazione dell'angolatura del
braccio e della testa della lampada.
• Si prega di regolare la lampada all'interno dell'angolo utile consentito. Non imprimere una forza
eccessiva per evitare danni al prodotto.
11/12
JP
仕様
モデル TT-DL038
>80Ra
DC10V/3A
12W
DC5V/1A
CRI
動作電圧
パワー(ライトのみ)
USB出力
ワイヤレス充電器出力
ルーメン
動作温度
色温度
-20℃~40℃/-4℉~104℉
2700-3000K(1),4000K±200K(2),4500K±200K(3),
5000K±300K(4),6000-6500K(5)
10WMax
400lm
使い方
付属の電源アダプタを使用して電源に接続すると、ランプはスタンバイモードになり、電源ボタンのインジケータ
が点灯します。
メインライトの電源をオン/オフする
• スタンバイモードでは、電源ボタンを1回タップしてメインライトを点灯させます。すべてのボタンインジケータ
ーが点灯します。
• もう一度タップするとメインライトが消灯し、電源インジケータのみが点灯します。
色温度を調整する
• オンにすると、ランプはデフォルトでウォームライトモードに入ります。モードボタンをタップすると、5つの色温
度モードが切り替わります。
明るさを調 整する
• オンにすると、ランプはデフォルトで第3レベルの明るさになります。輝度スライダをスライドさせて明るさを調整
すると、それに応じて明るさのインジケータが点灯します。
タイマーを設 定する
• タイマーボタンを一度タップすると、メインライトとナイトライトの1時間タイマーが設定され、タイマーインジケ
ーターが点滅してカウントダウンを開始します。もう一度タップするとタイマーを終了します。
ナイトラ イト
• ナイトライトボタンをタップして夜間灯を点灯させると、メインライトが消灯します。すべてのボタンインジケー
ター(ナイトライトと電源インジケーターを除く)はオフになります。
• もう一度タップして夜間照明を消します。
メモリ機能
• 電源が接続されていると、ランプは点灯時に最後に使用した色温度と明るさを再開します。
注:ライトを再びオンにしたときにグレアが発生しないように、ランプをオフにする前に輝度を低く設定することを
お勧めします。
USBポート
5V/1AUSBポートからスマートフォン、タブレットなどのUSBデバイスを充電できます。
ワイヤレス 充電 器
Qi-BPP(QiBaselinePowerProle)規格と互換性を備えたデバイスをワイヤレス充電スタンドに置くと自動的に充
電が開始されます。
注 意:
·充電が行われない場合は、検出されるようにスマホを調整してください。スマホのレシーバーの位置が異なりま
すから。
·iOS11.2及び以上のiPhoneX/8Plus/8は本製品を使用すれば、通常ワイヤレス(7.5W)充電が可能になります
。SamsungGalaxy/GoogleNexus/
MicrosoftLumia機種を急速充電(10W)することができます。
注意
• ランプヘッドとアームの角度を調整するときは、ランプの部品を適切に保持してください。
• ランプを許容角度内で調整してください。製品の損傷を避けるために無理な力を加えないでください。

Learn more about the EU Declaration of Conformity:
https://www.taotronics.com/downloads-TT-DL038-CE-Cert.html
NOTE: This device complies with Part 15 &18 of the FCC Rules. Operation is subject to the following two conditions:
(1) This device may not cause harmful interference, and (2) This device must accept any interference received,
including interference that may cause undesired operation.
However, there is no guarantee that interference will not occur in a particular installation. If this equipment does
cause harmful interference to radio or television reception, which can be determined by turning the equipment o
and on, the user is encouraged to try to correct the interference by one or more of the following measures:
- Reorient or relocate the receiving antenna.
- Increase the separation between the equipment and receiver.
-Connect the equipment into an outlet on a circuit dierent from that to which the receiver is
connected.
-Consult the dealer or an experienced radio/TV technician for help
Changes or modications not expressly approved by the party responsible for compliance could void the user's
authority to operate the equipment.
RF Exposure Warning Statements:
This equipment complies with FCC radiation exposure limits set forth for an uncontrolled environment. This
equipment shall be installed and operated with minimum distance 20cm between the radiator & body.
FCC Compliance
This device complies with Part 15 &18 of the FCC Rules. Operation is subject to the following two conditions:
(1) This device may not cause harmful interference, and (2) This device must accept any interference received,
including interference that may cause undesired operation.
WEEE Compliance
Correct Disposal of This Product (Waste Electrical & Electronic Equipment)
(Applicable in countries with separate collection systems)
This marking on the product, accessories or literature indicates that the product and its electronic accessories
should not be disposed of with other household waste at the end of their working life. To prevent possible harm to
the environment or human health from uncontrolled waste disposal, please separate these items from other types
of waste and recycle them responsibly to promote the sustainable reuse of material resources. Household users
should contact either the retailer where they purchased this product, or their local government oce, for details of
where and how they can take these items for environmentally safe recycling. Business users should contact their
supplier and check the terms and conditions of the purchase contract. This product and its electronic accessories
should not be mixed with other commercial wastes for disposal.