
Data de Correção: 16/08/2021
UG0214 - ENGLISH
- BESIDES THIS EQUIPMENT, A COMPLETE RANGE OF OTHER PRODUCTS ARE MANUFACTURED, CONSULT OUR DEALERS
- DUE TO THE CONSTANT IMPROVEMENTS INTRODUCED TO OUR EQUIPMENTS, THE INFORMATION CONTAINED IN THE PRESENT
INSTRUCTION MANUAL MAY BE MODIFIED WITHOUT PREVIOUS NOTICE.
Skyfood Equipament LLC
OFFICE
11900 Biscayne Blvd. Suite 616 - North Miami, FL 33181 - USA
1-800-503-7534 | 305-868-1603

1. INTRODUCTION .................................................................................3
2. UNPACKING .......................................................................................5
3. REPACKING INSTRUCTIONS ................................................................5
4. GETTING TO KNOW YOUR MEAT SLICER .............................................6
4.1 Replacement Parts ...........................................................................6
5. OPERATING YOUR MEAT SLICER .........................................................7
5.1 Food Slicing Tips .................................................................................................... 8
6. CLEANING YOUR MEAT SLICER ...........................................................9
6.1 To Disassemble Slicer ............................................................................................. 9
6.2 Storage .................................................................................................................11
6.3 Adjusng the Sliding Food Carriage .......................................................................11
7. General Safety Pracces ..................................................................12
7.1 Basic Operaon Procedures ..................................................................................12
7.2 Safety Procedures and Notes before Switching the Machine ON ...........................12
7.3 Roune Inspecon ................................................................................................13
7.4 Operaon .............................................................................................................13
7.6 Maintenance ........................................................................................................14
7.7 Warning ................................................................................................................14
7.5 Aer Finishing The Work .......................................................................................14
SKYFOOD EQUIPMENT LLC - SERVICE ...................................................15
SKYFOOD’S LIMITED WARRANTY .........................................................15
SUMMARY

1. INTRODUCTION
IMPORTANT SAFEGUARDS
When using electrical appliances, basic safety precauons should always be followed,
including the following:
1 . READ All INSTRUCTIONS.
2. CHECK FOR DAMAGED PARTS. Before using the Meat Slicer, check that all parts are
operang properly and perform the intended funcons. Check for alignment of moving
parts, binding of moving parts, mounng and any other condions that may affect the
operaon.
3. Unplug power cord from outlet when not in use, before pung on or taking off parts,
and before cleaning; Blade is exceponally sharp. Handle very carefully.
4. This appliance is NOT intended for use by persons (including children) with reduced
physical, sensory or mental capabilies, or lack of experience and knowledge, unless they
have been given supervision or instrucon concerning use of the appliance by a person
responsible for their safety. Children should be supervised to ensure that they do not play
with the appliance.
5. NEVER LEAVE MEAT SLICER UNATTENDED WHILE IT IS RUNNING!
6. Avoid contact with moving parts. NEVER PUT YOUR FINGERS NEAR THE BLADE WHILE
IT IS IN OPERATION.
7. Never put the unit near a hot burner, in an oven or in a dishwasher. NOT DISHWASHER
SAFE.
8. DO NOT operate the Meat Slicer, or any other electrical equipment, with a damaged
cord or plug or aer the unit malfuncons. Return unit to the Authorized Service Center
for examinaon, repair, or adjustment.
9. DO NOT use outdoors. This product is intended for Household Use Only.
10. DO NOT let cord hang over the edge of a table or counter, come into contact with sharp
edges, or touch hot surfaces.
11. DO NOT let cord become kinked, trapped under or let it wind around the slicer.
12. DO NOT PULL the power cord to disconnect.
13. To reduce the risk of electric shock, this product has a polarized plug (one prong is
wider than the other). The plug is intended to fit in a polarized outlet only one way. When
the plug does not fit fully in the outlet, reverse the plug. If it sll does not fit, contact a
qualified electrician to install the proper outlet. DO NOT make changes to the plug in any
way.
14. Place the appliance on a firm and stable surface. Ensure that the appliance is not placed
near the edge of the worktop, where it can be easily pushed off or fall.
15. DO NOT operate your slicer in an appliance garage or under a wall cabinet. When
storing in an appliance garage, always unplug the unit from the electrical outlet. Not doing
so could create a risk of fire, especially if the appliance touches the walls of the garage or
the door touches the unit as it closes.
16. NEVER plug in the appliance where water may flood the area.

17. To protect against risk of electrical shock, do not put appliance in water or other liquids.
18. DO NOT operate Meat Slicer with wet hands or while standing on a wet floor. DO NOT
use the Meat Slicer if it is wet or moist.
19. The use of aachments not recommended or sold by the manufacturer may cause fire,
electric shock or injury.
20. NEVER use abrasive cleaning agents or abrasive cloths when cleaning the unit.
21. Use the slicer to cut ONLY designated food. Do not aempt to slice frozen food, bones,
cardboard, plasc, etc.
22. DO NOT use appliance for other than intended use.
23. The Commercial Grade Food Slicer has a sharp blade. To avoid injury, never hand-feed
food to be sliced. Always use the unit when completely assembled with food carriage and
food pusher.
24. Touch the blade ONLY when the power is OFF to remove and clean according to
instrucons.
25. Follow instrucons when liing or moving the Meat Slicer.
26. When the blade is moving, place hands on the recommended push surface only.
27. Aer re-aaching the removable carriage, never use the slicer unless it is fully upright
and completely assembled.
28. To avoid accidental contact with the blade when the slicer is not in use or when liing
the slicer, always turn Adjustable Thickness Knob (2) to “O” so that the Adjustment Plate
(3) covers the edge of the blade.
29. When liing the slicer, carefully posion your body to avoid contact with the blade.
30. DO NOT use while under influence of drugs or alcohol.
31. The Manufacturer declines any responsibility in the case of improper use of Food Slicer
Improper use of the Meat Slicer voids the warranty.
WARNING
Before cleaning, assembling or disassembling the MEAT SLICER, check the plug and
make sure PLUG IS REMOVED FROM THE OUTLET/POWER SOURCE!
WARNING
HANDLE CAREFULLY! KEEP FINGERS AWAY FROM BLADE. NEVER USE FINGERS TO
FEED FOOD BY HAND. ALWAYS USE THE THE FOOD CARRIAGE! Always use the meat
slicer completely assembled with food carriage and food pusher. Use protecve
cut-resistant gloves whanever handling the blade.

above.
All products held at non-commercial facilies or domiciles, must be taken or shipped,
shipping charges prepaid, either to SKYFOOD’s facility or a SKYFOOD’s designated service
company (“Service Company”). Products held at commercial facilies and weighing
less than seventy (70) lbs. must be taken or shipped, shipping charges are prepaid, either
to SKYFOOD’s facility or to a Service Company. Mileage or travel me will NOT be paid.
SKYFOOD offers a limited on-site warranty for products ONLY held at commercial facilies,
whose net weight exceeds seventy (70) lbs., provided they are installed in a locaon that
is within a thirty (30) mile radius of a Service Company. End Users are responsible for
all extra travel and mileage rates. In this case, warranty services will be provided during
regular business hours.
This product will be replaced or repaired under warranty, for a period of (1) year,
beginning from the date of purchase by the original purchaser/user (“End User”), or
eighteen (18) months from the date of shipment from SKYFOOD’s warehouse, whichever
expires first.
Accessories will be replaced or repaired under warranty, for a period of (30) days, beginning
from the date of purchase by the original purchaser/user (“End User”), or eighteen (18)
months from the date of shipment from SKYFOOD’s warehouse, whichever expires first.
This warranty shall not take effect unl a properly completed and executed WARRANTY
REGISTRATION form has been received by SKYFOOD EQUIPMENT, LLC, within thirty (30)
days from the date of purchase. The WARRANTY REGISTRATION is available either in the
Instrucon Manual of every Product or at SKYFOOD’s website www.skyfood.us. The End
User must fill out the WARRANTY REGISTRATION form and send it to SKYFOOD according
to the instrucons posted on the referred website. Failure to do so will VOID the warranty.
No extended warranes for third party products. There are no other express warranes
or condions other than the one offered by each manufacturer for products sold by
SKYFOOD, not under the SKYFOOD brand.
For quesons or assistance, do not return the product or accessories to the store, please
call Toll Free 1-800-503-7534, or visit the Customer Service secon at www.skyfood.us. For
faster service please have the items name, serial number, and proof of purchase for the
operator to assist you.
SKYFOOD reserves the right to change the terms of its limited warranty at any me
without any prior noce. It also reserves the right to change the design and specificaons
of its equipment or any related documentaon at any me. The end user is not entled
to upgrades or refunds resulng from these changes.
Updates
These Terms and Condions were last updated on March 1st, 2015.
2. UNPACKING
1. IMPORTANT: To avoid injury when unpacking the unit, please follow these instrucons.
2. Put the box on a large, sturdy flat surface.
3. Remove the instrucon book and other literature.
4. Slide poly-foam packing up and off the unit. Li slicer out of box and place on sturdy flat
surface.
5. Remove the protecve bag.
6. To li and move the unit, bend your knees to avoid back injuries and place one hand on
the boom of the motor housing and the other one under the carriage of the meat slicer.
7. Remove orange blade guards from the cung blade before turning the unit on.
8. Please use extreme cauon when handling the blade. We suggest you save all the
packing material in the event that future shipping of the machine is needed.
9. Keep all plasc bags away from children.
3. REPACKING INSTRUCTIONS
10. Put food slicer on a large, sturdy flat surface.
11. Put food slicer into plasc bag.
12. Posion poly-foam inserts on each end of the food slicer.
13. Put the packaged unit into the upright box.
14. Replace top corrugated insert, instrucon book and other literature.
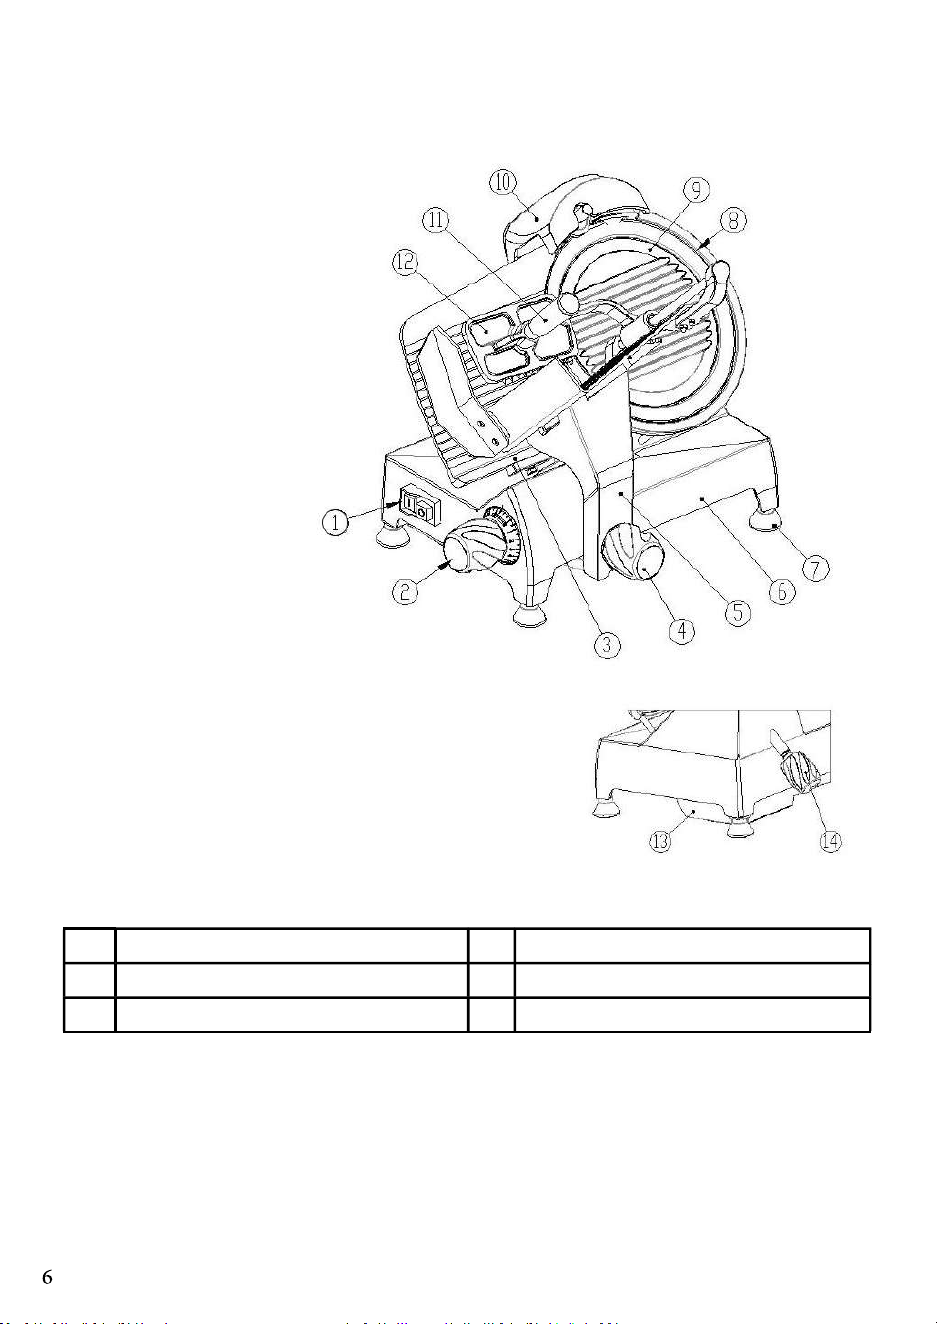
4. GETTING TO KNOW YOUR MEAT SLICER
1 - Safety On/Off (I/O)
Buon (Red & Green)
2 - Thickness Adjustment
Knob
3 - Adjustment Plate
4 - Carriage Removal Knob
5 - Sliding Food Carriage
6 - Housing
7 - Non-skid Feet
8 - Blade
9 - Blade Guard
10 - Blade Sharpener
(removable)
11 - Food Pusher Handle
12 - Food Pusher Arm
13 - Boom
14 - Blade Guard Knob
4.1 Replacement Parts
#5 Sliding Food Carriage #7 Non-skid Feet
#8 Blade #9 Blade Guard
#10 Blade Sharpener
WARNING
Read carefully and understand all instrucons before operang. Failure to follow the safety
rules and other basic safety precauons may result in serious personal injury. Save these
instrucons in a safe place and on hand so that they can be read when required.
SKYFOOD EQUIPMENT LLC - SERVICE
For quesons or assistance, call SKYFOOD EQUIPMENT Toll Free: 1-800-503-7534, or visit
the Customer Service secon at www.skyfood.us.
SKYFOOD’S LIMITED WARRANTY
Unless otherwise specified, new SKYFOOD products, excluding accessories, sold by
SKYFOOD EQUIPMENT, LLC. (“SKYFOOD”), for use only in the connental United States
(collecvely, “Products” or singularly, “Product”), are warranted to be free from defects in
materials and workmanship for a period of one (1) year from the date of purchase by the
original purchaser/user (“End User”), or eighteen (18) months from the date of shipment
from SKYFOOD’s warehouse, whichever expires first. Several new products and accessories
may be warranted for a period other than one (1) year while others may be subject to
travel limitaons, as specified on the products Instrucon Manual. Proof of purchase must
be presented; if not this warranty will be VOID. No warranty is given or implied to a
subsequent transferee or any other third party. This warranty is expressly condional upon
SKYFOOD being nofied of any defects in materials or workmanship within five (5) days of
its occurrence, within the warranted me period. If a noce of a claim under this warranty
is mely made by the End User, SKYFOOD or a SKYFOOD’s designated service company
(“Service Company”), will repair or replace the Product, at SKYFOOD’s discreon, subject
to the addional condions hereinaer described.
This warranty shall not apply if damage occurs from improper installaon or maintenance
performed by an unauthorized service company (“Service Company”), wrong voltage,
nor to the extent that Products or parts have been used other than in conformance with
operang and maintenance instrucons, subjected to misuse or abuse or damaged by
accident, acts of God, abnormal use, stress or any other maer unrelated to SKYFOOD,
and beyond its reasonable control. This warranty does NOT cover service labor and travel
to perform adjustments on products and/or accessories. In addion to wear and tear
of certain items, such as, but not limited to; glass parts, blades, stones, chopper cung
knives, plates, slicing knives, cung disc, gaskets, oil changes, sealing tape, heat seal wires,
worm gears, self-lubricang bushings, carbon brushes for electric motors, and other parts
expendable by nature and that need to be replaced frequently. Electrical components are
subject to natural wear and tear, and are NOT covered by this warranty. THIS WARRANTY
EXCLUDES ALL ORAL, STATUTORY, EXPRESS OR IMPLIED WARRANTIES WHICH MAY BE
APPLICABLE TO SKYFOOD, INCLUDING, BUT NOT LIMITED TO, ANY IMPLIED WARRANTY
OF MERCHANTABILITY AND FITNESS FOR PARTICULAR PURPOSE. Under no circumstances
shall SKYFOOD be liable for loss of use, revenue or profit or for incidental or consequenal
damages. SKYFOOD shall under no circumstances be liable for any loss, damage, concealed
damage, expense or delay of goods for any reason when said goods are in the custody,
possession or control of third pares selected by SKYFOOD to forward, enter, clear,
transport, or render other services with respect to such goods. The sole and exclusive
remedy for breach of any warranty is limited to the remedies provided in the paragraph

Never touch turning parts with your hands or any other way ,
NEVER operate the machine without any original safety devices under perfect condions.
7.5 Aer Finishing The Work
7.5.1 Precauons
Always TURN THE MACHINE OFF before cleaning by removing the plug from the socket.
Never clean the machine unless it has come to a complete stop.
Put all the components back to their funconal posions before turning the machine ON
again.
Check the level of liquids.
Do NOT insert your fingers in between belts and pulleys nor chains and gears.
IMPORTANT
Always remove the plug from the socket in any emergency situaon.
7.7 Warning
Electrical or mechanical maintenance has to be undertaken by qualified personnel.
The person in charge of maintenance has to be sure that the machine is under TOTAL
SAFETY condions when working.
7.6 Maintenance
7.6.1 Danger
Any maintenance with the machine in working situaon is dangerous. TURN IT OFF BY
PULLING THE PLUG OFF THE SOCKET DURING MAINTENANCE.
IMPORTANT
Before using your Slicer for the first me, wash all parts thoroughly, taking parcular care
to remove all grease and oil from surface. Dry all parts thoroughly before reassembling.
(REFER TO CLEANING & MAINTENANCE SECTION OF MANUAL)
5. OPERATING YOUR MEAT SLICER
Now that your Slicer is fully assembled and ready to use, it is me to slice your favorite
meats, cheeses and vegetables. Be sure to read and fully understand the General Safety
Rules at the beginning of this manual before you start.
1. Place the Meat Slicer on a flat stable surface.
Plug the appliance into a properly rated electrical outlet (120V AC, 60HZ).
NOTE: Be sure to remove protecve blade guards from the edge of the Blade #8 before
plugging slicer into outlet. These are used for shipping only.
2. Place food on to the Sliding Food Carriage #5 between the Adjustment Plate #3 and the
Food Pusher #12. To avoid injury, ALWAYS use the Food Pusher Handle #11. (Fig. 1)
3. Turn the Thickness Adjustment Knob #2 to set the Adjustment Plate #3 for the desired
cung thickness. Turn clockwise for thinner cuts, counter-clockwise for thicker slicing.
(Fig. 1)
FIGURE 01
WARNING
Before cleaning, assembling or disassembling the MEAT SLICER, check the plug and
make sure PLUG IS REMOVED FROM THE OUTLET/POWER SOURCE!
WARNING
HANDLE CAREFULLY! KEEP FINGERS AWAY FROM BLADE. NEVER USE FINGERS TO
FEED FOOD BY HAND. ALWAYS USE THE THE FOOD CARRIAGE! Always use the meat
slicer completely assembled with food carriage and food pusher. Use protecve
cut-resistant gloves whanever handling the blade.
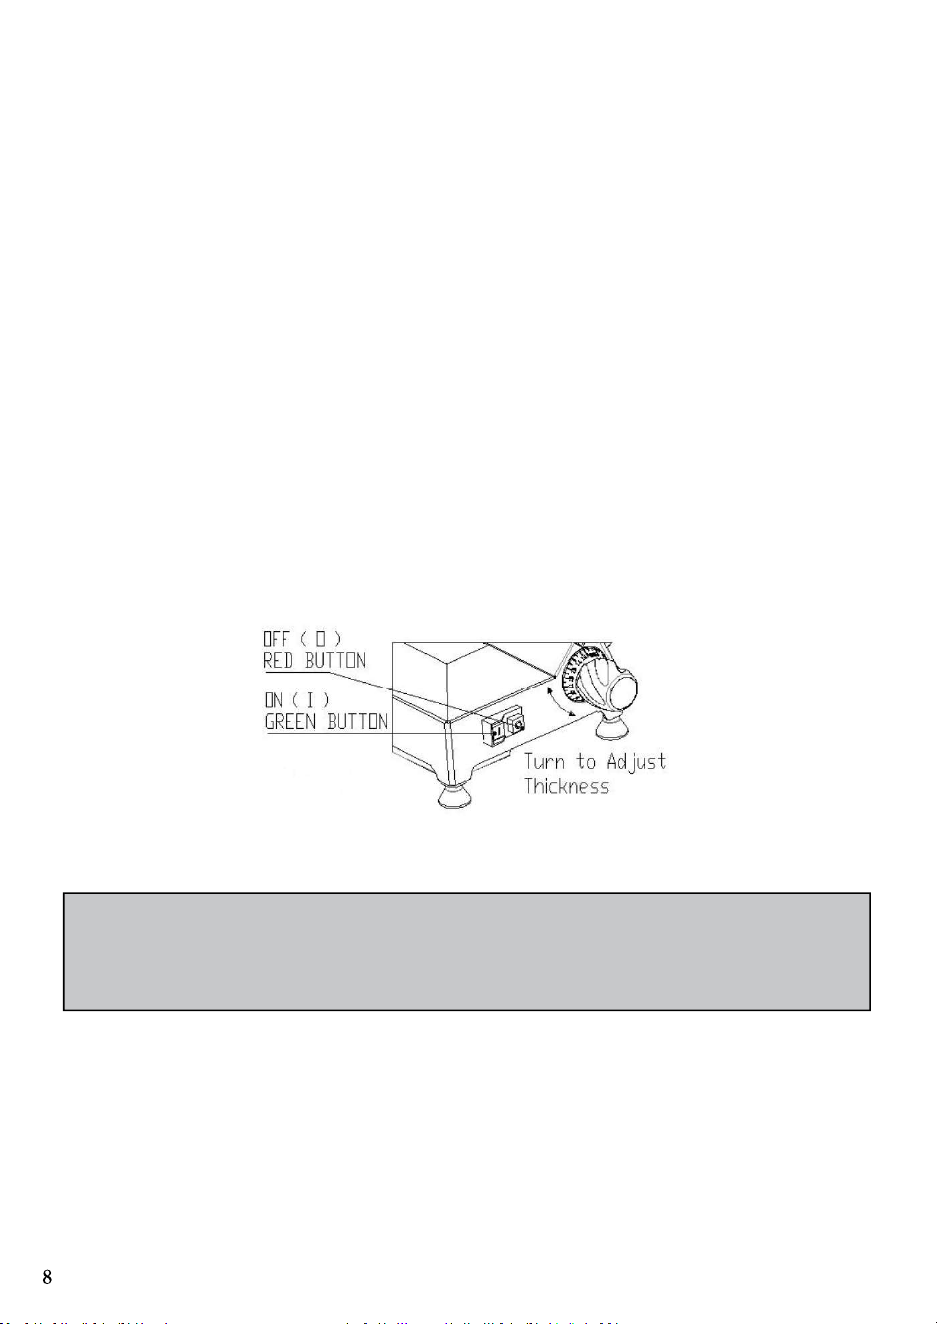
4. To turn the meat slicer ON, push the Green "I" buon. (Fig. 2)
5. To turn the meat slicer OFF, push the Red "O" buon.
6. When operang slicer, stand to the side of the slicer opposite the blade.
7. Place a tray or plate behind the Meat Slicer and below the Blade #8 to collect the sliced
food as it exits the blade area.
8. Hold the Food Pusher Handle #11 with right hand. Keep your hands protected behind
the Food Pusher #5.
9. NEVER USE THIS SLICER WITHOUT THE FOOD PUSHER #12
Important: Refer to "Food Slicing Tips" secon, when slicing different types of food items.
10. Using an even, steady moon, SLOWLY begin slicing. Apply light steady pressure with
the Food Pusher #12 to move food toward the Adjustment Plate #3 while SLOWLY sliding
Food Carriage #5 over Blade #8; This will help assure even slicing. Connue sliding SLOWLY,
back and forth, unl you have sliced the desired amount of meat.
NOTE: Meat slicer only makes slices during the forward moon.
11. When finished, turn the meat slicer "OFF" (0) by pushing the Red buon. (Fig. 2)
12. Always unplug meat slicer from power source when the Meat Slicer is not in use.
13. For safety, always rotate the Thickness Adjustment Knob #2 all the way to the "O"
posion aer use to properly shield the sharp edge of Blade #8.
5.1 Food Slicing Tips
FIGURE 02
WARNING
This Meat Slicer is not meant to cut through any bones! Severe damage to Meat
Slicer will occur and Warranty will be voided!
• Always debone meat before slicing
• Fruits should be free of seeds (peaches, apples, avocadoes etc.) The excepon is
tomatoes.
• DO NOT slice fully frozen foods.
• If you have to large of a cut of meat (roast or slab bacon) you may need to cut into a more
manageable slicing pieces.
• Food with an uneven texture, like fish and thin steaks, are oen difficult to slice. Put in
freezer for approx. 20 minutes to parally freeze.
IMPORTANT
Carefully read ALL INSTRUCTIONS of this manual before turning the machine ON.
Be sure to well understand all the informaon contained in this manual. If you
have any queson contact your supervisor or your nearest Dealer.
7.2.1 Danger
An electric cable or electric wire with damaged jacket or bad insulaon might cause
electrical shocks as well as electrical leak. Before use, check the condions of all wires
and cables.
7.2.2 Advices
Be sure to well understand all the informaon contained in this manual. Every operaon
funcon or procedure has to be thoroughly clear.
Before using any commands (switch, buons, lever), be sure it is the correct one. In case
of doubt, consult this manual.
7.2.3 Precauons
The electric cable has to be compable with the power required by the machine.
Cables touching the floor or close to the machine need to be protected against short
circuits.
7.3 Roune Inspecon
7.3.1 Advice
When checking the tension of the belts or chains, DO NOT insert your fingers between the
belts and the pulleys and nor between the chain and the gears.
7.3.2 Precauons
Check the motor and sliding or turning parts of the machine in case of abnormal noises.
Check the tension of the belts and chains and replace the set when belts or chains show
signs of wearing.
When checking the tension of belts or chains DO NOT insert your fingers between belts
and pulleys, nor between the chains and gears.
Check protecons and safety devices to make sure they are working properly.
7.4 Operaon
7.4.1 Warnings
Do not use the machine with long hair that could touch any part of the machine. This might
lead to a serious accident. Tie your hair up well and/or cover it with a scarf.
Only trained or skilled personnel shall operate this machine.

IMPORTANT
If any recommendaon is not applicable to your equipment, please ignore it .
IMPORTANT
Any change in the protecon systems and safety devices will during operaon,
create serious risks to the operator physical integrity
7. GENERAL SAFETY PRACTICES
The following safety instrucons are addressed to both the operator of the machine as
well as the person in charge of maintenance.
The machine has to be delivered only in perfect condions of use by the Distributor to the
user. The user shall operate the machine only aer being well acquainted with the safety
procedures described in the present manual. READ THIS MANUAL WITH ATTENTION.
7.1 Basic Operaon Procedures
7.1.1 Dangers
Some areas of the electric device have parts that are connected or have parts connected
to high voltage. These parts when touched may cause severe electrical shocks or even be
lethal.
given for each operaon step. Every step of the operaon shall be taken only if a sign has
been made and responded.
7.1.3 Advices
* In case of power shortage, immediately switch the machine off.* Use recommended or
equivalent lubricants, oils or greases.
* Avoid mechanical shocks, once they may cause damages or bad funconing.
* Avoid water, dirt or dust contact to the mechanical and electrical components of the
machine.
* DO NOT change the standard characteriscs of the machine.
* DO NOT remove, tear off or maculate any safety or idenficaon labels stuck on the
machine. If any labels have been removed or are no longer legible, contact your nearest
dealer for replacement.
7.2 Safety Procedures and Notes before Switching the Machine ON
Cold cuts: Cold cuts keep longer and retain flavor if sliced as needed. For best results,
chill to approx.:40°- 48°. Remove any plasc or hard casings before slicing. Use a constant,
gentle pressure for even slicing. See "IMPORTANT" for best slicing results.
Cheese: Cheese can be difficult to slice (especially so cheeses). A ny amount of Mineral
Oil can be lightly applied to blade with a paper towel, to keep the cheese from scking
during slicing. Cauon -Blade sharp. Chill cheese thoroughly to approx. 40° - 48° before
slicing. Before serving, allow cheese to reach room temperature.
IMPORTANT: If cheese is (scking to) binding on the blade when slicing:
A) Re-chill cheese so it is colder (not frozen).
B) Use less tension on the Food Pusher #12 against the blade.
C) Use SLOWER slicing strokes.
Breads & Cakes: Freshly baked bread should be cooled to room temperature before serving.
Use day old bread for extra thin slices for toast. Your slicer is ideal for all types of breads,
pound cake or fruit cake. Chill breads or cakes to approx. 40° - 48° for easier slicing and to
avoid tearing or crumbling.
Hot Roasts: Beef, Pork, Lamb, Turkey, Ham: When slicing warm boneless roasts, remove
from oven and let it set for 20-30 minutes (room temp) before slicing. They will retain
more natural juices and slice evenly without crumbling. Cut the roast if necessary, to fit on
6. CLEANING YOUR MEAT SLICER
6.1 To Disassemble Slicer
1. The slicer should be cleaned aer every use as perishable food scraps could accumulate
on the slicer or behind cung Blade #8.
2. Do not use steel wool or abrasives to clean any part of Meat Slicer.
3. Rotate the Thickness Adjustment Knob #2 all the way to the "O" posion.
4. To remove the Sliding Food Carriage #5 and Food Pusher Arm #12 unscrew the Carriage
Knob #4 underneath the Sliding Food Carriage #5 counterclockwise and li the food tray in
an slight upward and out moon. (Fig. 3)
WARNING
Before cleaning, assembling or disassembling the MEAT SLICER, make sure POWER is OFF &
PLUG IS REMOVED from the outlet/power source!
WARNING
BLADE SHARP! Handle Carefully!

FIGURE 03
5. With one hand flat on Blade Guard #9 turn the black Blade Guard Knob #14 (located, on
the back of the slicer, behind blade) counterclockwise unl the Blade Guard #9 is released.
(Fig. 4)
6. Remove the three Phillips head screws that hold Blade #8. (Fig. 4) IMPORTANT: Use
Extreme Cauon when handling or cleaning the Blade #8, as it is extremely sharp! It is
highly recommended
to wear cut-resistant gloves when removing, cleaning and re-installing the blade.
7. The Blade #8 is now released from sha and can be removed by gently pulling outward.
8. Clean the blade with a moist sponge or cloth. Wipe away from the Blade #8.
9. NEVER wipe toward the Blade.
10. NEVER clean Blade #8 underwater, handling sharp objects under water is Extremely
Dangerous.
11. The Blade #8, Blade Guard #9, Food Pusher #12 and Food Carriage #5 all can be hand
washed in hot soapy water. Because these parts come in contact with food, they should be
sanized properly. Allow sanized parts to air dry.
12. Never immerse the Motor Assembly of the Meat Slicer in water or other liquid.
13. Clean the outer surface of the Meat Slicer Body/Motor with a damp cloth and mild
detergent.
DO NOT WASH ANY PART OF THIS SLICER IN A DISHWASHER
To Re-assemble: USE EXTREME CAUTION! BLADE SHARP! Handle Carefully!
1. Be sure the Thickness Adjustment Knob #2 is all the way to the "O" posion.
2. Screw the Blade #8 back into place.
3. Line up Blade Guard #9 over the blade hole. Hold in place so the lines of the Blade Guard
#9 face, match the lines of Adjustment Plate #3 (horizontal). While holding Blade Guard
#9 in place, turn the Blade Guard Knob #14 clockwise unl the Blade Guard #9 screws into
place. As the Blade Guard Knob #14 is ghtens the Blade Guard #9 will become nearly flush
with blade.
FIGURE 04
6.3 Adjusng the Sliding Food Carriage
1. The carriage should slide freely along carriage rod when slicing.
2. Should these parts not slide smoothly, adjustments can be made.
3. At the boom of the carriage support, you will find a plasc screw. Turn the screw
clockwise to ghten carriage
(A). This will help to stabilize carriage. Turn the screw counterclockwise to loosen carriage
(B). This will help carriage slide more easily.
6.2 Storage
Make sure Blade #8 is securely ghtened and locked.
1. Rotate the Thickness Adjustment Knob #2 all the way to the "O" posion.
2. ALWAYS Align Adjustment Plate #3 with Blade #8 to protect the Blade #8 when the slicer
is stored.
3. A storage cover is provided, cover and store in a dry, warm, low humidity area.

IMPORTANT
If any recommendaon is not applicable to your equipment, please ignore it .
IMPORTANT
Any change in the protecon systems and safety devices will during operaon,
create serious risks to the operator physical integrity
7. GENERAL SAFETY PRACTICES
The following safety instrucons are addressed to both the operator of the machine as
well as the person in charge of maintenance.
The machine has to be delivered only in perfect condions of use by the Distributor to the
user. The user shall operate the machine only aer being well acquainted with the safety
procedures described in the present manual. READ THIS MANUAL WITH ATTENTION.
7.1 Basic Operaon Procedures
7.1.1 Dangers
Some areas of the electric device have parts that are connected or have parts connected
to high voltage. These parts when touched may cause severe electrical shocks or even be
lethal.
given for each operaon step. Every step of the operaon shall be taken only if a sign has
been made and responded.
7.1.3 Advices
* In case of power shortage, immediately switch the machine off.* Use recommended or
equivalent lubricants, oils or greases.
* Avoid mechanical shocks, once they may cause damages or bad funconing.
* Avoid water, dirt or dust contact to the mechanical and electrical components of the
machine.
* DO NOT change the standard characteriscs of the machine.
* DO NOT remove, tear off or maculate any safety or idenficaon labels stuck on the
machine. If any labels have been removed or are no longer legible, contact your nearest
dealer for replacement.
7.2 Safety Procedures and Notes before Switching the Machine ON
Cold cuts: Cold cuts keep longer and retain flavor if sliced as needed. For best results,
chill to approx.:40°- 48°. Remove any plasc or hard casings before slicing. Use a constant,
gentle pressure for even slicing. See "IMPORTANT" for best slicing results.
Cheese: Cheese can be difficult to slice (especially so cheeses). A ny amount of Mineral
Oil can be lightly applied to blade with a paper towel, to keep the cheese from scking
during slicing. Cauon -Blade sharp. Chill cheese thoroughly to approx. 40° - 48° before
slicing. Before serving, allow cheese to reach room temperature.
IMPORTANT: If cheese is (scking to) binding on the blade when slicing:
A) Re-chill cheese so it is colder (not frozen).
B) Use less tension on the Food Pusher #12 against the blade.
C) Use SLOWER slicing strokes.
Breads & Cakes: Freshly baked bread should be cooled to room temperature before serving.
Use day old bread for extra thin slices for toast. Your slicer is ideal for all types of breads,
pound cake or fruit cake. Chill breads or cakes to approx. 40° - 48° for easier slicing and to
avoid tearing or crumbling.
Hot Roasts: Beef, Pork, Lamb, Turkey, Ham: When slicing warm boneless roasts, remove
from oven and let it set for 20-30 minutes (room temp) before slicing. They will retain
more natural juices and slice evenly without crumbling. Cut the roast if necessary, to fit on
6. CLEANING YOUR MEAT SLICER
6.1 To Disassemble Slicer
1. The slicer should be cleaned aer every use as perishable food scraps could accumulate
on the slicer or behind cung Blade #8.
2. Do not use steel wool or abrasives to clean any part of Meat Slicer.
3. Rotate the Thickness Adjustment Knob #2 all the way to the "O" posion.
4. To remove the Sliding Food Carriage #5 and Food Pusher Arm #12 unscrew the Carriage
Knob #4 underneath the Sliding Food Carriage #5 counterclockwise and li the food tray in
an slight upward and out moon. (Fig. 3)
WARNING
Before cleaning, assembling or disassembling the MEAT SLICER, make sure POWER is OFF &
PLUG IS REMOVED from the outlet/power source!
WARNING
BLADE SHARP! Handle Carefully!

4. To turn the meat slicer ON, push the Green "I" buon. (Fig. 2)
5. To turn the meat slicer OFF, push the Red "O" buon.
6. When operang slicer, stand to the side of the slicer opposite the blade.
7. Place a tray or plate behind the Meat Slicer and below the Blade #8 to collect the sliced
food as it exits the blade area.
8. Hold the Food Pusher Handle #11 with right hand. Keep your hands protected behind
the Food Pusher #5.
9. NEVER USE THIS SLICER WITHOUT THE FOOD PUSHER #12
Important: Refer to "Food Slicing Tips" secon, when slicing different types of food items.
10. Using an even, steady moon, SLOWLY begin slicing. Apply light steady pressure with
the Food Pusher #12 to move food toward the Adjustment Plate #3 while SLOWLY sliding
Food Carriage #5 over Blade #8; This will help assure even slicing. Connue sliding SLOWLY,
back and forth, unl you have sliced the desired amount of meat.
NOTE: Meat slicer only makes slices during the forward moon.
11. When finished, turn the meat slicer "OFF" (0) by pushing the Red buon. (Fig. 2)
12. Always unplug meat slicer from power source when the Meat Slicer is not in use.
13. For safety, always rotate the Thickness Adjustment Knob #2 all the way to the "O"
posion aer use to properly shield the sharp edge of Blade #8.
5.1 Food Slicing Tips
FIGURE 02
WARNING
This Meat Slicer is not meant to cut through any bones! Severe damage to Meat
Slicer will occur and Warranty will be voided!
• Always debone meat before slicing
• Fruits should be free of seeds (peaches, apples, avocadoes etc.) The excepon is
tomatoes.
• DO NOT slice fully frozen foods.
• If you have to large of a cut of meat (roast or slab bacon) you may need to cut into a more
manageable slicing pieces.
• Food with an uneven texture, like fish and thin steaks, are oen difficult to slice. Put in
freezer for approx. 20 minutes to parally freeze.
IMPORTANT
Carefully read ALL INSTRUCTIONS of this manual before turning the machine ON.
Be sure to well understand all the informaon contained in this manual. If you
have any queson contact your supervisor or your nearest Dealer.
7.2.1 Danger
An electric cable or electric wire with damaged jacket or bad insulaon might cause
electrical shocks as well as electrical leak. Before use, check the condions of all wires
and cables.
7.2.2 Advices
Be sure to well understand all the informaon contained in this manual. Every operaon
funcon or procedure has to be thoroughly clear.
Before using any commands (switch, buons, lever), be sure it is the correct one. In case
of doubt, consult this manual.
7.2.3 Precauons
The electric cable has to be compable with the power required by the machine.
Cables touching the floor or close to the machine need to be protected against short
circuits.
7.3 Roune Inspecon
7.3.1 Advice
When checking the tension of the belts or chains, DO NOT insert your fingers between the
belts and the pulleys and nor between the chain and the gears.
7.3.2 Precauons
Check the motor and sliding or turning parts of the machine in case of abnormal noises.
Check the tension of the belts and chains and replace the set when belts or chains show
signs of wearing.
When checking the tension of belts or chains DO NOT insert your fingers between belts
and pulleys, nor between the chains and gears.
Check protecons and safety devices to make sure they are working properly.
7.4 Operaon
7.4.1 Warnings
Do not use the machine with long hair that could touch any part of the machine. This might
lead to a serious accident. Tie your hair up well and/or cover it with a scarf.
Only trained or skilled personnel shall operate this machine.

Never touch turning parts with your hands or any other way ,
NEVER operate the machine without any original safety devices under perfect condions.
7.5 Aer Finishing The Work
7.5.1 Precauons
Always TURN THE MACHINE OFF before cleaning by removing the plug from the socket.
Never clean the machine unless it has come to a complete stop.
Put all the components back to their funconal posions before turning the machine ON
again.
Check the level of liquids.
Do NOT insert your fingers in between belts and pulleys nor chains and gears.
IMPORTANT
Always remove the plug from the socket in any emergency situaon.
7.7 Warning
Electrical or mechanical maintenance has to be undertaken by qualified personnel.
The person in charge of maintenance has to be sure that the machine is under TOTAL
SAFETY condions when working.
7.6 Maintenance
7.6.1 Danger
Any maintenance with the machine in working situaon is dangerous. TURN IT OFF BY
PULLING THE PLUG OFF THE SOCKET DURING MAINTENANCE.
IMPORTANT
Before using your Slicer for the first me, wash all parts thoroughly, taking parcular care
to remove all grease and oil from surface. Dry all parts thoroughly before reassembling.
(REFER TO CLEANING & MAINTENANCE SECTION OF MANUAL)
5. OPERATING YOUR MEAT SLICER
Now that your Slicer is fully assembled and ready to use, it is me to slice your favorite
meats, cheeses and vegetables. Be sure to read and fully understand the General Safety
Rules at the beginning of this manual before you start.
1. Place the Meat Slicer on a flat stable surface.
Plug the appliance into a properly rated electrical outlet (120V AC, 60HZ).
NOTE: Be sure to remove protecve blade guards from the edge of the Blade #8 before
plugging slicer into outlet. These are used for shipping only.
2. Place food on to the Sliding Food Carriage #5 between the Adjustment Plate #3 and the
Food Pusher #12. To avoid injury, ALWAYS use the Food Pusher Handle #11. (Fig. 1)
3. Turn the Thickness Adjustment Knob #2 to set the Adjustment Plate #3 for the desired
cung thickness. Turn clockwise for thinner cuts, counter-clockwise for thicker slicing.
(Fig. 1)
FIGURE 01
WARNING
Before cleaning, assembling or disassembling the MEAT SLICER, check the plug and
make sure PLUG IS REMOVED FROM THE OUTLET/POWER SOURCE!
WARNING
HANDLE CAREFULLY! KEEP FINGERS AWAY FROM BLADE. NEVER USE FINGERS TO
FEED FOOD BY HAND. ALWAYS USE THE THE FOOD CARRIAGE! Always use the meat
slicer completely assembled with food carriage and food pusher. Use protecve
cut-resistant gloves whanever handling the blade.

4. GETTING TO KNOW YOUR MEAT SLICER
1 - Safety On/Off (I/O)
Buon (Red & Green)
2 - Thickness Adjustment
Knob
3 - Adjustment Plate
4 - Carriage Removal Knob
5 - Sliding Food Carriage
6 - Housing
7 - Non-skid Feet
8 - Blade
9 - Blade Guard
10 - Blade Sharpener
(removable)
11 - Food Pusher Handle
12 - Food Pusher Arm
13 - Boom
14 - Blade Guard Knob
4.1 Replacement Parts
#5 Sliding Food Carriage #7 Non-skid Feet
#8 Blade #9 Blade Guard
#10 Blade Sharpener
WARNING
Read carefully and understand all instrucons before operang. Failure to follow the safety
rules and other basic safety precauons may result in serious personal injury. Save these
instrucons in a safe place and on hand so that they can be read when required.
SKYFOOD EQUIPMENT LLC - SERVICE
For quesons or assistance, call SKYFOOD EQUIPMENT Toll Free: 1-800-503-7534, or visit
the Customer Service secon at www.skyfood.us.
SKYFOOD’S LIMITED WARRANTY
Unless otherwise specified, new SKYFOOD products, excluding accessories, sold by
SKYFOOD EQUIPMENT, LLC. (“SKYFOOD”), for use only in the connental United States
(collecvely, “Products” or singularly, “Product”), are warranted to be free from defects in
materials and workmanship for a period of one (1) year from the date of purchase by the
original purchaser/user (“End User”), or eighteen (18) months from the date of shipment
from SKYFOOD’s warehouse, whichever expires first. Several new products and accessories
may be warranted for a period other than one (1) year while others may be subject to
travel limitaons, as specified on the products Instrucon Manual. Proof of purchase must
be presented; if not this warranty will be VOID. No warranty is given or implied to a
subsequent transferee or any other third party. This warranty is expressly condional upon
SKYFOOD being nofied of any defects in materials or workmanship within five (5) days of
its occurrence, within the warranted me period. If a noce of a claim under this warranty
is mely made by the End User, SKYFOOD or a SKYFOOD’s designated service company
(“Service Company”), will repair or replace the Product, at SKYFOOD’s discreon, subject
to the addional condions hereinaer described.
This warranty shall not apply if damage occurs from improper installaon or maintenance
performed by an unauthorized service company (“Service Company”), wrong voltage,
nor to the extent that Products or parts have been used other than in conformance with
operang and maintenance instrucons, subjected to misuse or abuse or damaged by
accident, acts of God, abnormal use, stress or any other maer unrelated to SKYFOOD,
and beyond its reasonable control. This warranty does NOT cover service labor and travel
to perform adjustments on products and/or accessories. In addion to wear and tear
of certain items, such as, but not limited to; glass parts, blades, stones, chopper cung
knives, plates, slicing knives, cung disc, gaskets, oil changes, sealing tape, heat seal wires,
worm gears, self-lubricang bushings, carbon brushes for electric motors, and other parts
expendable by nature and that need to be replaced frequently. Electrical components are
subject to natural wear and tear, and are NOT covered by this warranty. THIS WARRANTY
EXCLUDES ALL ORAL, STATUTORY, EXPRESS OR IMPLIED WARRANTIES WHICH MAY BE
APPLICABLE TO SKYFOOD, INCLUDING, BUT NOT LIMITED TO, ANY IMPLIED WARRANTY
OF MERCHANTABILITY AND FITNESS FOR PARTICULAR PURPOSE. Under no circumstances
shall SKYFOOD be liable for loss of use, revenue or profit or for incidental or consequenal
damages. SKYFOOD shall under no circumstances be liable for any loss, damage, concealed
damage, expense or delay of goods for any reason when said goods are in the custody,
possession or control of third pares selected by SKYFOOD to forward, enter, clear,
transport, or render other services with respect to such goods. The sole and exclusive
remedy for breach of any warranty is limited to the remedies provided in the paragraph

above.
All products held at non-commercial facilies or domiciles, must be taken or shipped,
shipping charges prepaid, either to SKYFOOD’s facility or a SKYFOOD’s designated service
company (“Service Company”). Products held at commercial facilies and weighing
less than seventy (70) lbs. must be taken or shipped, shipping charges are prepaid, either
to SKYFOOD’s facility or to a Service Company. Mileage or travel me will NOT be paid.
SKYFOOD offers a limited on-site warranty for products ONLY held at commercial facilies,
whose net weight exceeds seventy (70) lbs., provided they are installed in a locaon that
is within a thirty (30) mile radius of a Service Company. End Users are responsible for
all extra travel and mileage rates. In this case, warranty services will be provided during
regular business hours.
This product will be replaced or repaired under warranty, for a period of (1) year,
beginning from the date of purchase by the original purchaser/user (“End User”), or
eighteen (18) months from the date of shipment from SKYFOOD’s warehouse, whichever
expires first.
Accessories will be replaced or repaired under warranty, for a period of (30) days, beginning
from the date of purchase by the original purchaser/user (“End User”), or eighteen (18)
months from the date of shipment from SKYFOOD’s warehouse, whichever expires first.
This warranty shall not take effect unl a properly completed and executed WARRANTY
REGISTRATION form has been received by SKYFOOD EQUIPMENT, LLC, within thirty (30)
days from the date of purchase. The WARRANTY REGISTRATION is available either in the
Instrucon Manual of every Product or at SKYFOOD’s website www.skyfood.us. The End
User must fill out the WARRANTY REGISTRATION form and send it to SKYFOOD according
to the instrucons posted on the referred website. Failure to do so will VOID the warranty.
No extended warranes for third party products. There are no other express warranes
or condions other than the one offered by each manufacturer for products sold by
SKYFOOD, not under the SKYFOOD brand.
For quesons or assistance, do not return the product or accessories to the store, please
call Toll Free 1-800-503-7534, or visit the Customer Service secon at www.skyfood.us. For
faster service please have the items name, serial number, and proof of purchase for the
operator to assist you.
SKYFOOD reserves the right to change the terms of its limited warranty at any me
without any prior noce. It also reserves the right to change the design and specificaons
of its equipment or any related documentaon at any me. The end user is not entled
to upgrades or refunds resulng from these changes.
Updates
These Terms and Condions were last updated on March 1st, 2015.
2. UNPACKING
1. IMPORTANT: To avoid injury when unpacking the unit, please follow these instrucons.
2. Put the box on a large, sturdy flat surface.
3. Remove the instrucon book and other literature.
4. Slide poly-foam packing up and off the unit. Li slicer out of box and place on sturdy flat
surface.
5. Remove the protecve bag.
6. To li and move the unit, bend your knees to avoid back injuries and place one hand on
the boom of the motor housing and the other one under the carriage of the meat slicer.
7. Remove orange blade guards from the cung blade before turning the unit on.
8. Please use extreme cauon when handling the blade. We suggest you save all the
packing material in the event that future shipping of the machine is needed.
9. Keep all plasc bags away from children.
3. REPACKING INSTRUCTIONS
10. Put food slicer on a large, sturdy flat surface.
11. Put food slicer into plasc bag.
12. Posion poly-foam inserts on each end of the food slicer.
13. Put the packaged unit into the upright box.
14. Replace top corrugated insert, instrucon book and other literature.

17. To protect against risk of electrical shock, do not put appliance in water or other liquids.
18. DO NOT operate Meat Slicer with wet hands or while standing on a wet floor. DO NOT
use the Meat Slicer if it is wet or moist.
19. The use of aachments not recommended or sold by the manufacturer may cause fire,
electric shock or injury.
20. NEVER use abrasive cleaning agents or abrasive cloths when cleaning the unit.
21. Use the slicer to cut ONLY designated food. Do not aempt to slice frozen food, bones,
cardboard, plasc, etc.
22. DO NOT use appliance for other than intended use.
23. The Commercial Grade Food Slicer has a sharp blade. To avoid injury, never hand-feed
food to be sliced. Always use the unit when completely assembled with food carriage and
food pusher.
24. Touch the blade ONLY when the power is OFF to remove and clean according to
instrucons.
25. Follow instrucons when liing or moving the Meat Slicer.
26. When the blade is moving, place hands on the recommended push surface only.
27. Aer re-aaching the removable carriage, never use the slicer unless it is fully upright
and completely assembled.
28. To avoid accidental contact with the blade when the slicer is not in use or when liing
the slicer, always turn Adjustable Thickness Knob (2) to “O” so that the Adjustment Plate
(3) covers the edge of the blade.
29. When liing the slicer, carefully posion your body to avoid contact with the blade.
30. DO NOT use while under influence of drugs or alcohol.
31. The Manufacturer declines any responsibility in the case of improper use of Food Slicer
Improper use of the Meat Slicer voids the warranty.
WARNING
Before cleaning, assembling or disassembling the MEAT SLICER, check the plug and
make sure PLUG IS REMOVED FROM THE OUTLET/POWER SOURCE!
WARNING
HANDLE CAREFULLY! KEEP FINGERS AWAY FROM BLADE. NEVER USE FINGERS TO
FEED FOOD BY HAND. ALWAYS USE THE THE FOOD CARRIAGE! Always use the meat
slicer completely assembled with food carriage and food pusher. Use protecve
cut-resistant gloves whanever handling the blade.

1. INTRODUCTION
IMPORTANT SAFEGUARDS
When using electrical appliances, basic safety precauons should always be followed,
including the following:
1 . READ All INSTRUCTIONS.
2. CHECK FOR DAMAGED PARTS. Before using the Meat Slicer, check that all parts are
operang properly and perform the intended funcons. Check for alignment of moving
parts, binding of moving parts, mounng and any other condions that may affect the
operaon.
3. Unplug power cord from outlet when not in use, before pung on or taking off parts,
and before cleaning; Blade is exceponally sharp. Handle very carefully.
4. This appliance is NOT intended for use by persons (including children) with reduced
physical, sensory or mental capabilies, or lack of experience and knowledge, unless they
have been given supervision or instrucon concerning use of the appliance by a person
responsible for their safety. Children should be supervised to ensure that they do not play
with the appliance.
5. NEVER LEAVE MEAT SLICER UNATTENDED WHILE IT IS RUNNING!
6. Avoid contact with moving parts. NEVER PUT YOUR FINGERS NEAR THE BLADE WHILE
IT IS IN OPERATION.
7. Never put the unit near a hot burner, in an oven or in a dishwasher. NOT DISHWASHER
SAFE.
8. DO NOT operate the Meat Slicer, or any other electrical equipment, with a damaged
cord or plug or aer the unit malfuncons. Return unit to the Authorized Service Center
for examinaon, repair, or adjustment.
9. DO NOT use outdoors. This product is intended for Household Use Only.
10. DO NOT let cord hang over the edge of a table or counter, come into contact with sharp
edges, or touch hot surfaces.
11. DO NOT let cord become kinked, trapped under or let it wind around the slicer.
12. DO NOT PULL the power cord to disconnect.
13. To reduce the risk of electric shock, this product has a polarized plug (one prong is
wider than the other). The plug is intended to fit in a polarized outlet only one way. When
the plug does not fit fully in the outlet, reverse the plug. If it sll does not fit, contact a
qualified electrician to install the proper outlet. DO NOT make changes to the plug in any
way.
14. Place the appliance on a firm and stable surface. Ensure that the appliance is not placed
near the edge of the worktop, where it can be easily pushed off or fall.
15. DO NOT operate your slicer in an appliance garage or under a wall cabinet. When
storing in an appliance garage, always unplug the unit from the electrical outlet. Not doing
so could create a risk of fire, especially if the appliance touches the walls of the garage or
the door touches the unit as it closes.
16. NEVER plug in the appliance where water may flood the area.

1. INTRODUCTION .................................................................................3
2. UNPACKING .......................................................................................5
3. REPACKING INSTRUCTIONS ................................................................5
4. GETTING TO KNOW YOUR MEAT SLICER .............................................6
4.1 Replacement Parts ...........................................................................6
5. OPERATING YOUR MEAT SLICER .........................................................7
5.1 Food Slicing Tips .................................................................................................... 8
6. CLEANING YOUR MEAT SLICER ...........................................................9
6.1 To Disassemble Slicer ............................................................................................. 9
6.2 Storage .................................................................................................................11
6.3 Adjusng the Sliding Food Carriage .......................................................................11
7. General Safety Pracces ..................................................................12
7.1 Basic Operaon Procedures ..................................................................................12
7.2 Safety Procedures and Notes before Switching the Machine ON ...........................12
7.3 Roune Inspecon ................................................................................................13
7.4 Operaon .............................................................................................................13
7.6 Maintenance ........................................................................................................14
7.7 Warning ................................................................................................................14
7.5 Aer Finishing The Work .......................................................................................14
SKYFOOD EQUIPMENT LLC - SERVICE ...................................................15
SKYFOOD’S LIMITED WARRANTY .........................................................15
SUMMARY

Data de Correção: 16/08/2021
UG0214 - ENGLISH
- BESIDES THIS EQUIPMENT, A COMPLETE RANGE OF OTHER PRODUCTS ARE MANUFACTURED, CONSULT OUR DEALERS
- DUE TO THE CONSTANT IMPROVEMENTS INTRODUCED TO OUR EQUIPMENTS, THE INFORMATION CONTAINED IN THE PRESENT
INSTRUCTION MANUAL MAY BE MODIFIED WITHOUT PREVIOUS NOTICE.
Skyfood Equipament LLC
OFFICE
11900 Biscayne Blvd. Suite 616 - North Miami, FL 33181 - USA
1-800-503-7534 | 305-868-1603