
PAWRUNNER PET TREADMILL
READY,
SET, PRO
USER MANUAL

Regular exercise
has enormous
benefits for your
pet’s body, brain,
and mental health.
Many pets,
especially dogs,
need daily exercise
for optimal health.
HELLO THERE.
Joel and I are athletes who suffered from
severe ACL injuries a few months apart.
We purchased multiple pieces of exercise
equipment for our in-home rehab but were left
disappointed and frustrated by fitness gear
that made big promises but gave no support, no
well-thought-out plan to follow, and no results.
And that’s how Lifepro came about, and why
the Endurance Training collection was created
— we’ve set out to change all of that. It’s why
every piece of equipment bearing our name
not only undergoes rigorous scrutiny to make
sure it delivers on power and efficacy, but also
comes with built-in support from our ‘guiding
angels’ and a built-in lifetime warranty so that
you’re never left hanging.
Welcome to Lifepro.
We’re in this together now.
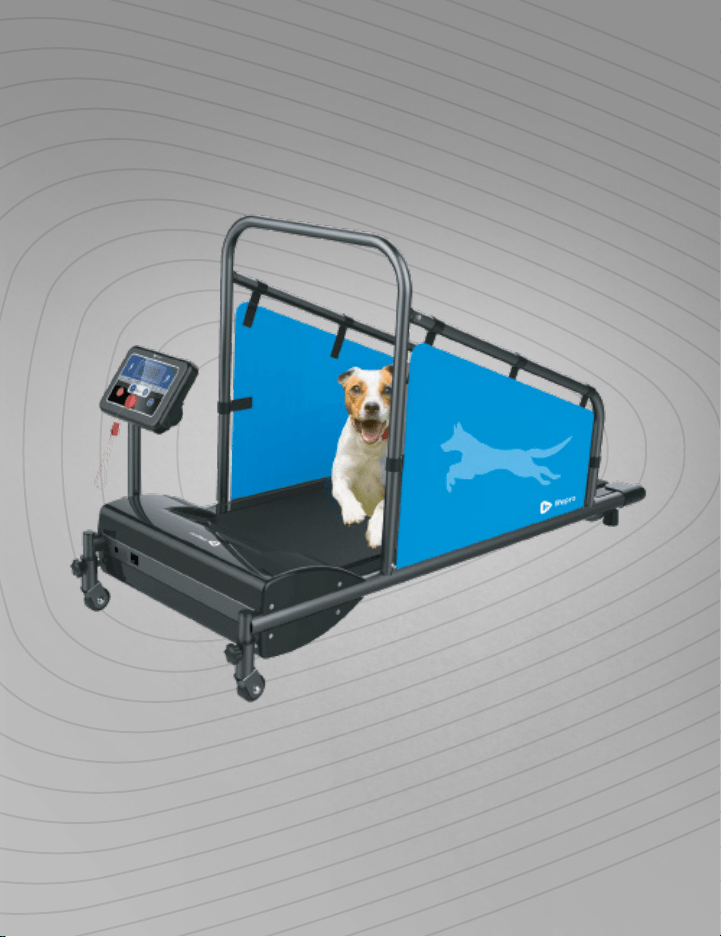
With the Lifepro PawRunner Pet Treadmill, you can help your pet improve
cardiovascular fitness, build muscle strength, and lose weight—all from the
comfort of home. The PawRunner’s ultra-quiet motor is designed specifically
for in-home use.
The PawRunner is perfect for anyone who finds it difficult to take their
pet for regular walks due to very hot or cold weather, rain or snow, busy
streets, lack of parks or sidewalks, or a busy work or family schedule. The
PawRunner is also ideal for pets that require high levels of exercise and
mental stimulation.
It is estimated that half of dogs and cats are overweight or obese. If
your pet is experiencing mobility issues, joint pain, high blood pressure, or
diabetes due to being overweight, combine a nutritious, portion-controlled
diet with regular walks on the PawRunner treadmill to help them reach a
healthy weight.
The PawRunner treadmill has a speed-range of 0.5–7.5 mph. Twelve preset
exercise programs provide your pet with endless workout challenges. Three
countdown modes allow you to set specific workout goals such as distance
walked, workout duration, or calories burned. With the Lifepro PawRunner,
your pet can walk or run to improved strength, stamina, and cardiovascular
health. See results in as little as 15–20 minutes a day.
Redefine your workouts and experience the
transformative power of the Lifepro PawRunner:
Increase strength & stamina: improves stability and muscle tone
Regulate weight: boosts your heart rate and burn calories.
Decrease chronic pain: improves core strength & circulation
Boost your metabolism: encourages your body to burn fat faster
Decrease your stress: increases serotonin and decreases cortisol
Lower blood pressure: improves circulation
Develop stronger bones: increases bone density
Check out the information in this manual for ways to get started using your
PawRunner. Next, be sure to visit our website pawrunner.lifeprofitness.com
for access to our FREE library of workout videos which demonstrate how to
easily incorporate the PawRunner into your pet’s fitness routine.
Endurance Training Collection 5

6 PawRunner User Manual Lifepro Endurance Training Collection 7
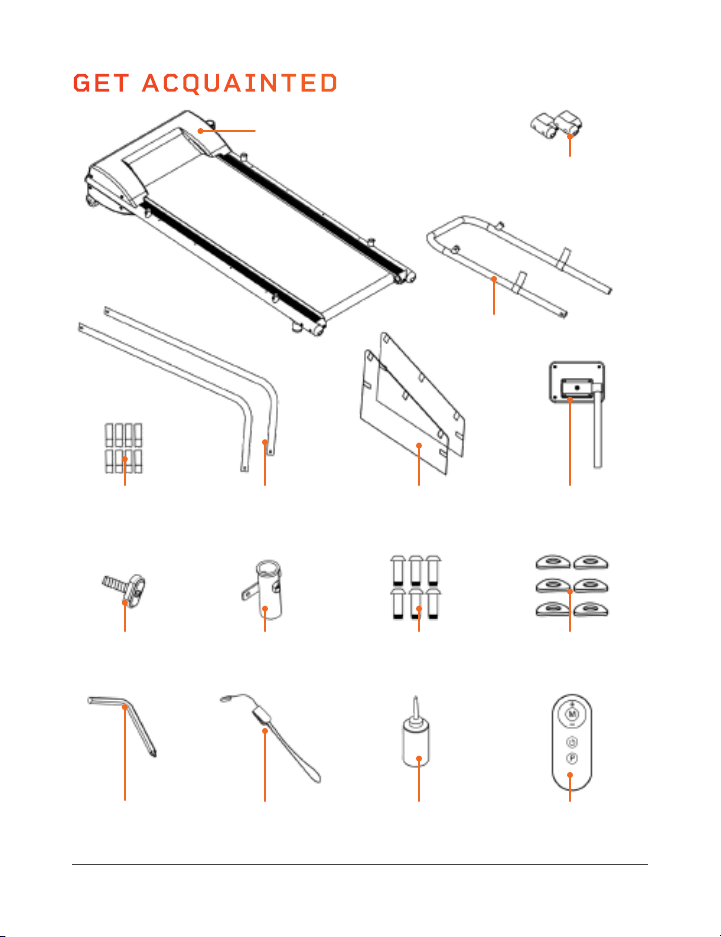
GET ACQUAINTED
Lifepro PawRunner
Pet Treadmill
Baseframe (A)
Two Baseframe
End Caps (B)
Crossbar (C)
Ten Velcro
®
Strips (D)
Six Curved
Washers (M)
Magnetic
Safety Key (O)
Bottle of
Maintenance Oil (P)
T-Knob (J) T-Knob Post (K) Six M6×6mm
Screws (L)
Console &
Adjustment Post (I)
Remote
Control (Q)
Hex Key (N)
Left (G) & Right (H)
Side Panels
Left (E) & Right (F)
Sidebars
GET STARTED
WHAT’S IN THE BOX
A. Treadmill Baseframe
B. Baseframe End Caps (2)
C. Crossbar
D. Velcro
®
Strips (10)
E. Left Sidebar
F. Right Sidebar
G. Left Fabric Side Panel
H. Right Fabric Side Panel
I. Console and Adjustment Post
CUSTOMER SUPPORT
If you have any questions about assembling and using your PawRunner
treadmill, we’re here to help. Call or email us and an experienced
customer support representative will be happy to assist you:
support@lifeprofitness.com or (732) 456-6063.
PAWRUNNER
PET TREADMILL
ENDURANCE TRAINING
FIRST STEP
1. Remove all packaging from the treadmill baseframe, parts, and hardware.
Have someone to assist you with lifting the treadmill baseframe from the
packaging , it is heavy and bulky.
2. Confirm that all parts and hardware listed above are included.
3. Read carefully through this user manual, especially USING THE MAGNETIC
SAFETY KEY on page 9 , GETTING YOUR PET READY on page 20, PET
EXERCISE SAFETY on pages 23–25, and SAFETY INSTRUCTIONS on
pages 44–46 before assembling and using the treadmill.
4. Go to pawrunner.lifeprofitness.com and register your product within
14 days of purchase to activate your lifetime warranty.
5. Complete the steps in the 10MINUTE ASSEMBLY GUIDE on page 11 to
assemble your PawRunner.
6. Then, see GETTING YOUR PET READY, EXERCISE RECOMMENDATIONS,
and OPERATING INSTRUCTIONS to get started using the PawRunner.
J. T-Knob
K. T-Knob Post
L. M6×6mm Socket Head Screws (6)
M. Curved Washers (6)
N. Hex Key
O. Magnetic Safety Key
P. Bottle of Maintenance Oil
Q. Remote Control
R. User Manual
6 PawRunner User Manual Lifepro Endurance Training Collection 7
GET ACQUAINTED
Lifepro PawRunner
Pet Treadmill
Baseframe (A)
Two Baseframe
End Caps (B)
Crossbar (C)
Ten Velcro
®
Strips (D)
Six Curved
Washers (M)
Magnetic
Safety Key (O)
Bottle of
Maintenance Oil (P)
T-Knob (J) T-Knob Post (K) Six M6×6mm
Screws (L)
Console &
Adjustment Post (I)
Remote
Control (Q)
Hex Key (N)
Left (G) & Right (H)
Side Panels
Left (E) & Right (F)
Sidebars
GET STARTED
WHAT’S IN THE BOX
A. Treadmill Baseframe
B. Baseframe End Caps (2)
C. Crossbar
D. Velcro
®
Strips (10)
E. Left Sidebar
F. Right Sidebar
G. Left Fabric Side Panel
H. Right Fabric Side Panel
I. Console and Adjustment Post
CUSTOMER SUPPORT
If you have any questions about assembling and using your PawRunner
treadmill, we’re here to help. Call or email us and an experienced
customer support representative will be happy to assist you:
support@lifeprofitness.com or (732) 456-6063.
PAWRUNNER
PET TREADMILL
ENDURANCE TRAINING
FIRST STEP
1. Remove all packaging from the treadmill baseframe, parts, and hardware.
Have someone to assist you with lifting the treadmill baseframe from the
packaging , it is heavy and bulky.
2. Confirm that all parts and hardware listed above are included.
3. Read carefully through this user manual, especially USING THE MAGNETIC
SAFETY KEY on page 9 , GETTING YOUR PET READY on page 20, PET
EXERCISE SAFETY on pages 23–25, and SAFETY INSTRUCTIONS on
pages 44–46 before assembling and using the treadmill.
4. Go to pawrunner.lifeprofitness.com and register your product within
14 days of purchase to activate your lifetime warranty.
5. Complete the steps in the 10MINUTE ASSEMBLY GUIDE on page 11 to
assemble your PawRunner.
6. Then, see GETTING YOUR PET READY, EXERCISE RECOMMENDATIONS,
and OPERATING INSTRUCTIONS to get started using the PawRunner.
J. T-Knob
K. T-Knob Post
L. M6×6mm Socket Head Screws (6)
M. Curved Washers (6)
N. Hex Key
O. Magnetic Safety Key
P. Bottle of Maintenance Oil
Q. Remote Control
R. User Manual
8 PawRunner User Manual Lifepro
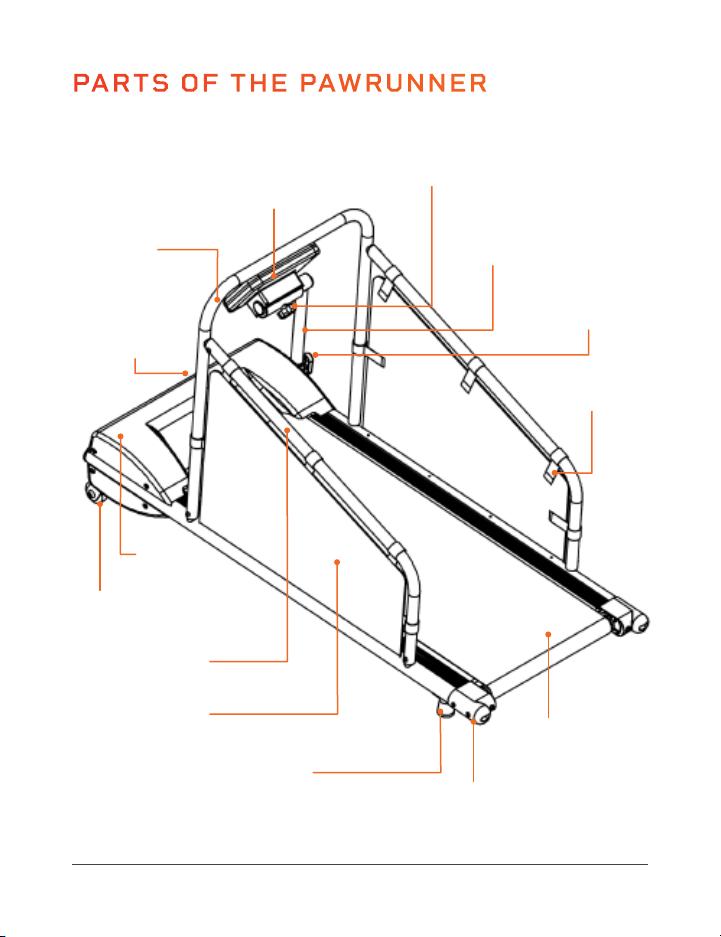
PARTS OF THE PAWRUNNER
Endurance Training Collection 9
USING THE MAGNETIC SAFETY KEY
THE MAGNETIC SAFETY KEY
The safety key MUST be in place before the treadmill can be used.
The error code “Err” or “E00” will show on the console until the magnetic
safety key is in place on the magnetic port on the treadmill console. If
the safety key is removed from its port during use, the treadmill will stop
automatically and cannot be restarted until the safety key is back in position.
This safety feature causes the treadmill to stop immediately in the event
your pet trips, falls, or another emergency occurs.
WHAT TO DO IN AN EMERGENCY
WARNING: You must clip the magnetic safety key to your pet’s collar
every time the treadmill is used.
• Stop the treadmill immediately if you realize that your pet cannot keep up
with the pace, or if any other emergency arises.
• Pulling the cord will remove the magnetic safety key from its port; this
will cause the treadmill to stop immediately.
• Make sure that all third parties are familiar with all safety instructions in
this manual and that they always use the magnetic safety key correctly.
DISABLING THE PAWRUNNER FOR SAFETY
To prevent the treadmill from being used by unauthorized third parties,
always remove the safety key when you have finished using the treadmill.
Keep the safety key stored in a separate place, out of the reach of
unauthorized people, especially children.
FRONT
REAR
Non-Skid Feet (2)
Running Belt
Plastic End
Caps (2)
Fabric Side
Panels (2)
Motor
Housing
Wheels (2)
Crossbar
T-Knob
(adjusts console
height and angle
from side-to-side)
Console Tilt Knob
(adjusts console
angle up-and-back)
Console
Adjustment
Post
Sidebars (2)
Power Switch
& Integrated
Power Cord
Console
Velcro
®
Tabs
(5 per side panel)

8 PawRunner User Manual Lifepro
PARTS OF THE PAWRUNNER
Endurance Training Collection 9
USING THE MAGNETIC SAFETY KEY
THE MAGNETIC SAFETY KEY
The safety key MUST be in place before the treadmill can be used.
The error code “Err” or “E00” will show on the console until the magnetic
safety key is in place on the magnetic port on the treadmill console. If
the safety key is removed from its port during use, the treadmill will stop
automatically and cannot be restarted until the safety key is back in position.
This safety feature causes the treadmill to stop immediately in the event
your pet trips, falls, or another emergency occurs.
WHAT TO DO IN AN EMERGENCY
WARNING: You must clip the magnetic safety key to your pet’s collar
every time the treadmill is used.
• Stop the treadmill immediately if you realize that your pet cannot keep up
with the pace, or if any other emergency arises.
• Pulling the cord will remove the magnetic safety key from its port; this
will cause the treadmill to stop immediately.
• Make sure that all third parties are familiar with all safety instructions in
this manual and that they always use the magnetic safety key correctly.
DISABLING THE PAWRUNNER FOR SAFETY
To prevent the treadmill from being used by unauthorized third parties,
always remove the safety key when you have finished using the treadmill.
Keep the safety key stored in a separate place, out of the reach of
unauthorized people, especially children.
FRONT
REAR
Non-Skid Feet (2)
Running Belt
Plastic End
Caps (2)
Fabric Side
Panels (2)
Motor
Housing
Wheels (2)
Crossbar
T-Knob
(adjusts console
height and angle
from side-to-side)
Console Tilt Knob
(adjusts console
angle up-and-back)
Console
Adjustment
Post
Sidebars (2)
Power Switch
& Integrated
Power Cord
Console
Velcro
®
Tabs
(5 per side panel)

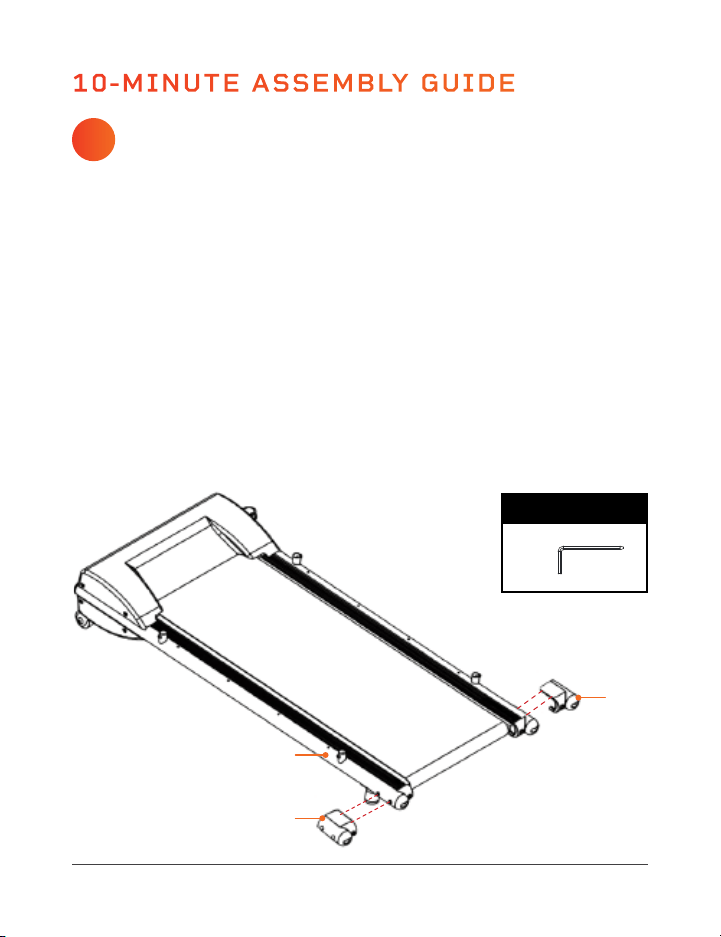
INSTALL THE BASEFRAME END CAPS
You will need: treadmill baseframe (A), 2 end caps (B),
hex key (N)
Endurance Training Collection 11
SAFE PLACEMENT OF YOUR PAWRUNNER TREADMILL
• Use the treadmill in a well-ventilated room and avoid using in rooms that
are too warm to prevent heat exhaustion and heat stroke.
• Set up the treadmill with at least 7 feet of clearance from walls and
furniture at the back and at least 4 feet of clearance at the front and
sides of the treadmill. Never place the treadmill with the back of the
running belt against a wall, door, stairs, or any other obstruction.
• Do not use outdoors or in high-moisture, high-temperature, or high-dust
environments.
• Only operate and store the PawRunner on a flat, non-slip floor.
• Ensure the running deck is level to the ground. If the deck is positioned on
an uneven surface, it could cause damage to the electrical system.
• If setting up in a carpeted room, check underneath the treadmill to ensure
clearance between the carpet and the running deck. If there is not enough
clearance, or you’re not sure, place a mat or rug under the PawRunner.
Ensure the mat or rug is at least 55” × 30” and will not slip during use.
• Sometimes after an extended amount of use, you will find a fine black
dust under the treadmill. This is normal wear and does not mean there is
anything wrong with the treadmill. The dust can be easily vacuumed up. If
you wish to prevent the dust from getting on your flooring or carpet, place
a mat or rug under the treadmill.
SAFE PLACEMENT OF THE TREADMILL 10-MINUTE ASSEMBLY GUIDE
10 PawRunner User Manual Lifepro
1. Lay the treadmill baseframe (A) on a flat, non-slip floor.
2. Locate the four screws on the outside-rear of the treadmill baseframe.
There are two screws above each of the two non-skid feet.
3. Use the hex key (N) to remove the two screws on the left side of the
baseframe.
4. Align one plastic end cap (B) with the two screw holes.
5. Re-insert the two screws to secure the end cap.
6. Repeat 2–5 above to install the second end cap to the right side of the
baseframe.
7. Use the hex key (N) to fully tighten the screws.
A
B
B
TOOLS & HARDWARE
(N)
1
12 PawRunner User Manual Lifepro
Endurance Training Collection 13
ATTACH THE CROSSBAR TO THE BASEFRAME
You will need: crossbar (C), 2 M6×6 screws (L),
2 curved washers (M), hex key (N)
ATTACH VELCRO
®
STRIPS TO THE CROSSBAR
You will need: crossbar (C), 2 Velcro
®
strips (D)
1. Insert the base of the crossbar (C) onto the two round inserts on either
side of the treadmill baseframe (A), just behind the motor housing.
2. Place a curved washer (M) onto one of the screws (L).
3. Insert the screw/washer combination through the screw holes on the
left side of the crossbar (C) and into the baseframe (A).
4. Repeat 3–4 above to attach the right side of the crossbar to the
baseframe.
5. Use the hex key (N) to fully tighten each screw.
1. Loop one Velcro
®
strip (D) around the left side of the crossbar (C) and
one strip around the right side:
• The smooth side of the Velcro
®
strip will face to the INSIDE of
the treadmill. The hook and loop side of the Velcro
®
will face to the
OUTSIDE of the treadmill.
• Loop just enough of the Velcro
®
strip around the crossbar to be
able to close the loop. The rest of the strip will extend straight out
creating a Velcro
®
tab. This tab will be used to attach the fabric side
panels.
• Position the two loops a few inches from the base of the crossbar.
• The loops should be loose enough that they can be repositioned
along the crossbar, if necessary.
C
C
D
A
D
(L)
(M)
x2
x2
TOOLS & HARDWARE
(N)
L
M
32

14 PawRunner User Manual Lifepro
Endurance Training Collection 15
ATTACH VELCRO
®
STRIPS TO THE SIDEBARS
You will need: 8 Velcro
®
strips (D), left sidebar (E),
right sidebar (F)
NOTE: The two sidebars are identical until the Velcro
®
strips are applied,
then one will be the left sidebar (E) and the other will be the right
sidebar (F).
1. Set one sidebar on the ground on the left side of the treadmill.
2. Loop four Velcro
®
strips (D) along the sidebar:
• The smooth side of the Velcro
®
strip will face to the INSIDE (RIGHT)
of the treadmill. The hook and loop side of the Velcro
®
strip will face
to the OUTSIDE (LEFT) of the treadmill.
• Loop just enough of the Velcro
®
strip around the crossbar to be able
to close the loop. The rest will extend straight out creating a Velcro
®
tab. This tab will be used to attach the fabric side panels.
• Position three loops along the long side of the sidebar and one loop
on the short side of the sidebar.
• The loops should be loose enough that they can be repositioned
along the side panel, if necessary.
3. Lay the left sidebar (E) on the ground until the next step.
4. Set the second sidebar along the right side of the treadmill.
5. Loop four Velcro
®
strips (D) along the sidebar in the same manner:
• The smooth side of the Velcro
®
strip will face to the INSIDE
(LEFT) of the treadmill. The
hook and loop side of the
Velcro
®
strip will face to the
OUTSIDE (RIGHT) of the
treadmill.
6. Lay the right sidebar (F) on the
ground until the next step.
4
INSTALL THE SIDEBARS TO THE BASEFRAME
You will need: left sidebar (E), right sidebar (F),
4 M6x6 screws (L), 4 curved washers (M), hex key (N)
5
1. Insert the left sidebar (E) (the Velcro
®
tabs face OUTSIDE/LEFT) onto
the rounded inserts on the left side of the crossbar and on the top of
the baseframe.
2. Put a curved washer (M) onto one of the screws (L).
3. Insert the screw/washer combination through the screw holes in the
left sidebar (E) and crossbar (C). Don’t tighten the screw yet.
4. Place another washer onto another screw.
5. Insert the screw/washer combination through the screw holes in the
sidebar (E) and baseframe (A). Don’t tighten the screw yet.
6. Repeat 1–5 above to attach the right sidebar (F) to the right side of the
crossbar (C) and baseframe (A).
7. Use the hex key (N) to fully tighten all four screws.
A
(L)
(M)
x4
x4
TOOLS & HARDWARE
(N)
L
M
F
B
E
L
M
16 PawRunner User Manual Lifepro
Endurance Training Collection 17
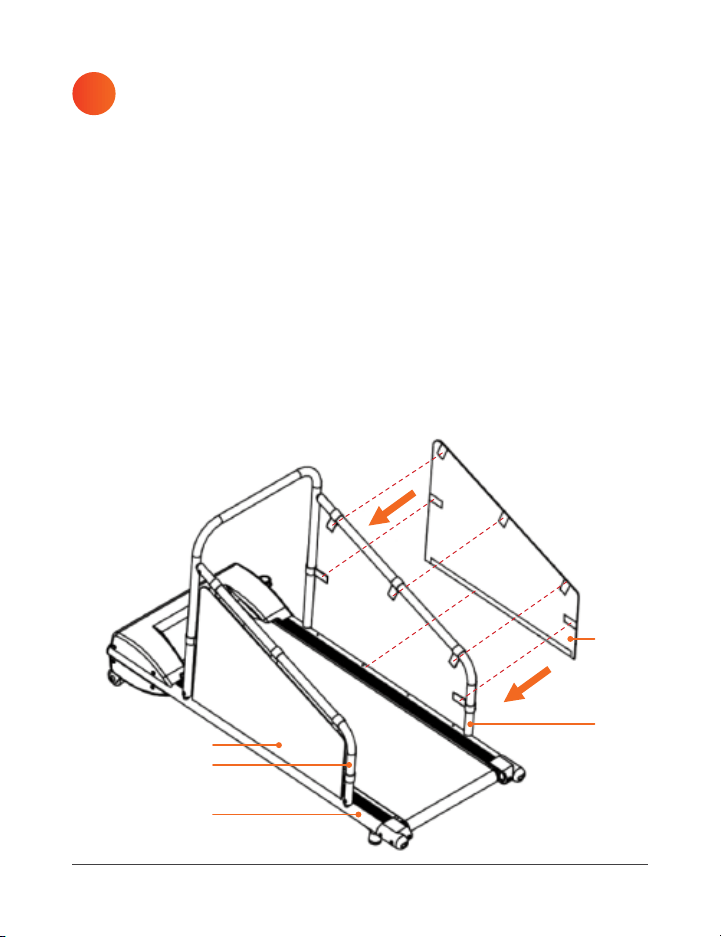
ATTACH THE FABRIC SIDE PANELS TO THE SIDEBARS
You will need: left fabric side panel (G), right fabric side panel (H)
6
A
G
E
F
H
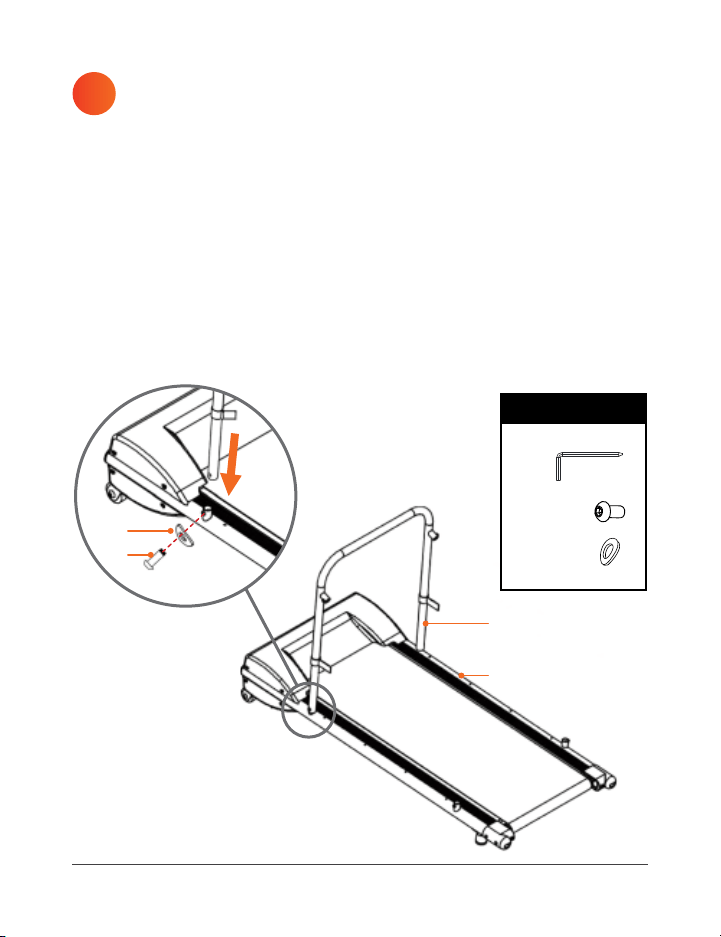
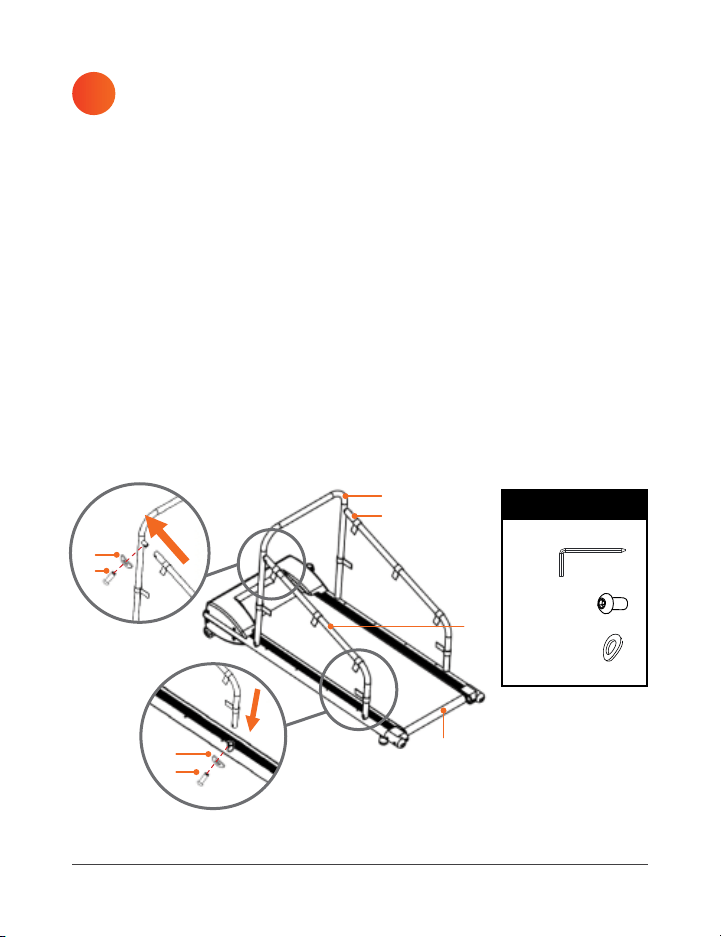
INSTALL THE T-KNOB AND T-KNOB POST
You will need: T-knob (J), T-knob post (K), hex key (N)
7
1. Screw the T-knob (J) clockwise into the threaded insert in the side of
the T-knob post (K). Do not fully tighten the knob yet.
2. Locate the metal tube running along the right side of the treadmill
baseframe (A).
3. Locate the two socket-head screws inserted into the metal tube
towards the front of the treadmill.
4. Use the hex key (N) to remove the two screws.
5. Align the T-knob post (K) with the two screw holes. The lip on the
T-knob post goes UP.
6. Re-insert the two socket-head screws to secure the T-knob post.
7. Use the hex key (N) to fully tighten the screws.
K
J
TOOLS & HARDWARE
(N)
1. Identify the left fabric side panel (G): the Velcro
®
tabs on the backside
of the fabric side panels face to the INSIDE. The tabs on the backside
of the left panel face RIGHT; the tabs on the backside of the right
panel face LEFT. See figure below.
2. Stick the bottom strip of Velcro
®
on the back of the left fabric side
panel (G) to the corresponding Velcro
®
strip along the left side of the
baseframe (A).
3. Stick the five Velcro
®
tabs on the back of the left side panel (G) to the
corresponding tabs on the left sidebar (E) and crossbar (C). Reposition
the tabs along the sidebar and crossbar, if necessary to line up the
Velcro
®
.
4. Repeat steps 2–3 to attach the right fabric side panel (H) in the same
manner.

16 PawRunner User Manual Lifepro
Endurance Training Collection 17
ATTACH THE FABRIC SIDE PANELS TO THE SIDEBARS
You will need: left fabric side panel (G), right fabric side panel (H)
6
A
G
E
F
H
INSTALL THE T-KNOB AND T-KNOB POST
You will need: T-knob (J), T-knob post (K), hex key (N)
7
1. Screw the T-knob (J) clockwise into the threaded insert in the side of
the T-knob post (K). Do not fully tighten the knob yet.
2. Locate the metal tube running along the right side of the treadmill
baseframe (A).
3. Locate the two socket-head screws inserted into the metal tube
towards the front of the treadmill.
4. Use the hex key (N) to remove the two screws.
5. Align the T-knob post (K) with the two screw holes. The lip on the
T-knob post goes UP.
6. Re-insert the two socket-head screws to secure the T-knob post.
7. Use the hex key (N) to fully tighten the screws.
K
J
TOOLS & HARDWARE
(N)
1. Identify the left fabric side panel (G): the Velcro
®
tabs on the backside
of the fabric side panels face to the INSIDE. The tabs on the backside
of the left panel face RIGHT; the tabs on the backside of the right
panel face LEFT. See figure below.
2. Stick the bottom strip of Velcro
®
on the back of the left fabric side
panel (G) to the corresponding Velcro
®
strip along the left side of the
baseframe (A).
3. Stick the five Velcro
®
tabs on the back of the left side panel (G) to the
corresponding tabs on the left sidebar (E) and crossbar (C). Reposition
the tabs along the sidebar and crossbar, if necessary to line up the
Velcro
®
.
4. Repeat steps 2–3 to attach the right fabric side panel (H) in the same
manner.

18 PawRunner User Manual Lifepro
Endurance Training Collection 19
INSTALL THE CONSOLE
You will need: console and adjustment post (I)
8
LUBRICATE THE RUNNING BELT
Before using your PawRunner treadmill for the first time, you must
lubricate the running belt with the included bottle of maintenance
oil (P). Follow the steps in
LUBRICATING THE RUNNING BELT on
page 38.
9
1. Ensure the console cable exists the bottom of the adjustment post (I).
Pull the end of the cable out of the bottom of the post, if necessary.
2. Insert the adjustment post (I) into the T-knob post (K).
3. Turn the T-knob (J) clockwise to tighten it and secure the console and
adjustment post to the treadmill.
4. Pull the console cable through the bottom of the T-knob post.
5. Connect the console cable with the corresponding cable exiting the
right side of the treadmill.
I
J
K
I
J
CUSTOMIZING THE TREADMILL
ADJUSTING THE CONSOLE HEIGHT AND VIEWING ANGLE
The console may be raised or lowered and rotated from side to side for
easy viewing.
1. Loosen the T-knob by turning it counterclockwise.
2. Slide the console up or down to the desired height.
3. Rotate the adjustment post from side to side until the console is facing
the desired direction.
4. Tighten the T-knob by turning it clockwise to secure the console in place.
The console may be tilted up and back via the tilt adjustment knob. There are
two tilt options.
1. Loosen the tilt adjustment knob by turning it counterclockwise.
2. Tilt the console up or back to the desired angle.
3. Tighten the tilt adjustment knob by turning it clockwise.
ADJUSTING THE INCLINE OF THE TREADMILL
The treadmill deck can be tilted to three different incline levels: 4.5°, 5.1°,
and 5.7°. The treadmill arrives at the lowest level. To adjust the tilt:
1. Twist the two incline adjustment knobs counterclockwise to loosen them.
2. Hold the base of the treadmill with one hand. With your other hand, pull
the head of the knob out as you pull the incline adjustment post down.
You will hear a click with the incline adjustment knob clicks into the
next incline level. Repeat with the second knob.
3. Adjust until the incline is at your desired angle.
1 2 3

Endurance Training Collection 21
GETTING YOUR PET READY
BEFORE USING THE TREADMILL
1. Take your pet to the veterinarian for a checkup and to get exercise
frequency, duration, and intensity guidelines for your pet’s specific
breed, age, size, and overall health. This is especially important for older
pets, those that are overweight, have heart/circulatory problems, joint
problems such as arthritis and hip dysplasia, or have not been regularly
active for some time. Make sure to write down your questions and
any concerns before your appointment so you don’t forget to address
anything important.
2. Have your pet’s toenails clipped to avoid injury due to a snagged toenail
and/or damage to the treadmill belt.
3. Help your pet get comfortable with the treadmill before using it. See
GETTING YOUR PET FAMILIAR WITH THE TREADMILL below.
4. Purchase an appropriate-length leash and collar, if necessary. See
STEP3: DETERMINING THE APPROPRIATE LEASH LENGTH on the
next page.
GETTING YOUR PET FAMILIAR WITH THE TREADMILL
It is important to get your pet comfortable with and excited about using the
treadmill before using it. Be sure to use lots of treats, petting, and words
of encouragement to help keep your pet at ease and build their confidence
around the treadmill.
Observe your pet for signs of stress during each step and do not move on to
the next step until they are completely comfortable. It could several days,
or even a week, before your pet feels completely comfortable with a step
and ready to move on to the next step. The goal is for your pet to love the
treadmill and to look forward to using it as much as they look forward to
treats, play time, or walks outside.
Don’t rush your pet through the steps as this could cause them to build a
negative association with the treadmill. Never force your pet to get on the
treadmill. If your pet feels fear or hesitation around the treadmill, stop and
try again after a few hours or days.
20 PawRunner User Manual Lifepro
STEP 1: GETTING FAMILIAR WITH THE TREADMILL WHILE OFF
With the treadmill powered OFF:
1. Let your pet walk around the treadmill. Give them a few minutes to get
familiar with it.
2. Practice getting on and off the treadmill with your pet. You may find
treats helpful for enticing them to get on the treadmill.
STEP 2: GETTING FAMILIAR WITH THE TREADMILL WHILE ON
Once your pet has gotten comfortable getting on and off the treadmill, it’s
time to get them used to the sounds and movement of the working treadmill:
1. First, have your pet get on the treadmill and flip the power switch to turn
the treadmill on. Don’t start the treadmill belt yet. This is just to help
your pet get used to the sounds the treadmill makes while turned on.
2. Now, have your pet get off the treadmill.
3. Stand near the front of the treadmill with your pet next to you on-leash.
4. Select an exercise program to begin the treadmill belt.
5. Walk around the treadmill with your pet. Be careful not to let them get
too close to the treadmill.
6. Practice 1–5 above a few times so your pet can get used to the noises
the treadmill makes, especially at higher speeds.
STEP 3: DETERMINING THE APPROPRIATE LEASH LENGTH
Leash Length Guidelines:
• The leash should be a couple of inches longer than the safety key cord.
This is to ensure that, if your pet trips or stops suddenly, the safety key
will be yanked from the console causing the treadmill to stop BEFORE
your pet reaches the end of their leash. If the leash is too short, your pet
could be injured when the treadmill stops in an emergency.
• The leash should be no more than ½ the length of the treadmill belt. This
is to ensure your pet will not fall of the back end of the treadmill and get
injured.
You will need to adjust the length of the leash according to the size/length
of your pet.
1. With the treadmill OFF, stand at the front of the treadmill and have your
pet stand on the running belt.

2. Loop one end of your pet’s leash around the treadmill crossbar.
3. Clip the other end of the leash to your pet’s collar.
4. Place the magnetic safety key in place on its port on the treadmill
console.
5. Clip the free end of the safety key cord to your pet’s collar.
6. Verify that the leash is at least a few inches longer than the safety cord.
If it’s not, you’ll need use a different leash.
7. Remove the safety key clip from your pet’s collar.
8. Have your pet walk to the back of the treadmill belt as far as the leash
will allow to ensure they will not go off the back edge. Shorten the length
of the leash (or use a shorter leash), if necessary.
STEP 4: USING THE MOVING TREADMILL FOR THE FIRST TIME
The safety key MUST be in place before the treadmill can be used.
1. Ensure the treadmill is plugged in but powered off.
2. Stand at the front of the treadmill and have your pet stand on the
running belt.
3. Loop one end of your pet’s leash around the treadmill crossbar.
4. Clip the other end of the leash to your pet’s collar.
5. Place the magnetic safety key in place on its port on the treadmill
console.
6. Clip the free end of the safety key cord to your pet’s collar. Give the cord
a firm tug to ensure the clip won’t come off accidentally.
7. Turn the treadmill on to the lowest speed.
CAUTION: Be ready to yank the safety key from the console to stop the
treadmill in case your pet gets scared, falls, or tries to run off the treadmill.
8. As the treadmill belt begins to move, your pet may begin walking on their
own. If they do not, try calling to your pet or coaxing them with treats to
get them to walk forward on the treadmill.
9. Practice this process several times until your pet gets comfortable with
and excited about walking on the treadmill AND your pet can walk by
themselves on the treadmill without needing treats or coaxing.
GETTING YOUR PET READY
Endurance Training Collection 23
22 PawRunner User Manual Lifepro
PET EXERCISE SAFETY
SAFETY DURING EXERCISE
CAUTION: Never leave your pet unattended while using the treadmill.
• Do not exceed the maximum pet weight of 200 lbs. The recommended
weight for this treadmill is 130 or less.
• Always secure your pet’s leash to the crossbar. Always clip the safety
key’s cord securely to your pet’s collar.
• Never allow your pet to get on or off the treadmill while it is already
moving. Only begin a workout after your pet is standing in place on the
treadmill and appropriately leashed. Completely stop the treadmill before
allowing your pet to get down.
• Do not use the treadmill without the fabric side panels in place. The side
panels help your pet use the treadmill without distractions which might
cause them to leap off the side of the treadmill and get hurt.
• Stop the treadmill immediately if your pet displays any of the signs of
overexertion. See PREVENTING OVER-EXERCISE AND OVEREXERTION
on pages 24–25.
• Always exercise within the exercise frequency, duration, and intensity
guidelines provided by your veterinarian.
• Carefully observe your pet for signs of discomfort or pain after each
exercise session, especially after the first few sessions and after
increasing the exercise frequency, duration, or speed. Often muscle
soreness can appear several hours to days after exercise.
• If your pet shows any signs of discomfort or pain after a workout, make
sure to give them plenty of time to rest and adjust their exercise routine
as needed.
• Start with short, low speed exercises. Increase the duration, frequency,
and intensity/speed of your pet’s workouts slowly over time.
• Do not increase both the speed and length of a typical exercise session at
the same time as this could cause overexertion. If you would like to see if
your pet can handle a slightly more challenging workout, it’s a good idea
to increase either the speed or the duration. Then, wait a few days before
exercising again to observe your pet for signs of discomfort or pain.
• Ensure your pet stays well hydrated before, during, and after exercise.

Endurance Training Collection 25
24 PawRunner User Manual Lifepro
• Pets with arthritis or other joint or mobility issues may need a slow, short
warm up before exercise. A warm up could be a few minutes walking around
the yard, or a five-minute walk on the treadmill at the lowest speed.
• Pets with arthritis or other joint or mobility issues should avoid running on
the treadmill as this could cause pain and further joint issues.
• Small pets, such as cats and smaller dog breeds, are not well-suited for
jogging and running, and thus it is important to keep the speed low for
them.
• Do not exercise puppies until they are cleared for exercise by your
veterinarian.
• Never force your pet to get on the treadmill as this could create a negative
association for them.
• Use the treadmill in a well-ventilated room and avoid using in rooms that
are too warm to prevent heat exhaustion and heat stroke.
• Do not place the treadmill with the back of the running belt against a wall,
door, stairs, or any other obstruction. Ensure there is at least 7 feet of
clear space behind the treadmill.
• Never allow more than one pet to use the treadmill at a time.
• Take your pet out to so they can relieve themselves before exercise.
• Always wait at least 1 hour after meal to begin your pet’s workout.
PREVENTING OVER-EXERCISE AND OVEREXERTION
It is very important to closely supervise your pet during exercise to
prevent injury and overexertion. Some breeds have a tendency to overexert
themselves; however, any pet could become overexerted if exercised
incorrectly or if allowed to exercise too intensely or for too long.
WARNING: Overexertion, excessive or incorrect exercise can cause
sore paws or muscles, joint pain or injury, heat exhaustion or heat stroke,
and even death.
Signs* your pet needs to stop exercising and rest:
• Your pet is panting heavily (during or after exercise) and seems unable to
catch its breath.
• Your pet slows down or stops exercising altogether.
• Your pet begins to limp.
• Your pet seems unusually tired, or sleeps or lays around more than
normal after exercise.
• Your pet seems stiff or sore after exercise. This may not appear until
hours or even days after exercise, so it’s important to keep careful notes
about how long each session lasts and how your pet seems in the days
after exercise. See
EXERCISE DOCUMENTATION on page 27.
• Your pet’s gums are an unusual color, including purple/blue, gray, or
bright red, which could indicate dehydration.
• Your pet seems extremely thirsty.
• Your pet seems confused or can’t focus.
• Your pet shows signs of heat exhaustion or heat stroke, symptoms of
which include:
• Dehydration: a dry nose, sunken eyes, excessive tiredness or panting,
and unusual coloring of the gums can indicate dehydration.
• Fever: a hot, dry nose (rather than wet and cool) can indicate fever.
• Excessive drooling: lots of drool, or drool that is thicker or sticker than
normal.
• Rapid pulse.
• Shivering or muscle tremors.
• Lethargy or weakness.
• Lack of urine.
• Dizziness.
• Vomiting or diarrhea.
WARNING: If you think your pet may be experiencing heat exhaustion
or heat stroke, get them to a cool location and contact your veterinarian
or an emergency veterinary clinic right away.
NOTE: The above signs and symptoms of overexertion, heat exhaustion, and
heat stroke are primarily seen in dogs. Consult your veterinarian for specific
signs and symptoms of overexertion and heat exhaustion in cats, ferrets,
and other pets.
PET EXERCISE SAFETY

26 PawRunner User Manual Lifepro
Endurance Training Collection 27
EXERCISE RECOMMENDATIONS
HYDRATION
Adequate hydration is essential. Ensure your pet gets enough water before,
during, and after exercise. Dehydration can lead to heat exhaustion or heat
stroke.
EXERCISE FREQUENCY, DURATION, AND INTENSITY
Regular exercise is important for your pet’s health. The optimal exercise
frequency (how many exercise sessions per week) and duration (the length
of each exercise session), and intensity (the speed) for your pet will depend
on their specific breed, size, age, weight, and overall health. Consult with
your veterinarian for guidance on how often, how long, and how intensely
your pet should exercise.
Always make sure to give your pet enough time to recover between workout
sessions. Some pets are young and healthy enough to handle daily exercise,
some are not. Always check with your veterinarian to avoid over-exercising
your pet.
DURATION OF INDIVIDUAL EXERCISE SESSIONS
If your pet is older, overweight, has heart/circulatory or joint problems, or
has not exercised for some time, start with short exercise sessions of 10
minutes or less in the first few weeks and slowly increase exercise duration
week to week. Pets who are younger and/or used to regular exercise can
exercise for longer periods of time, but exercise duration should still be
increased slowly over time.
CAUTION: Always make sure to exercise your pet within the frequency,
duration, and intensity guidelines provided by your veterinarian.
Carefully observe your pet for signs of discomfort or pain after the first few
exercise sessions. Often muscle soreness can appear several hours to days
after exercise (called delayed onset muscle soreness or DOMS). If your pet
experiences discomfort after an exercise session, this can tell you that the
exercise session was too long or that your pet did not have enough time to
rest between exercise sessions.
SAMPLE WEEKLY EXERCISE PLAN
Week: ________________ Month: ______________ Year: _________________
Day Date
Exercise
Duration
Exercise
Distance
Calories
Burned
Notes
Mon.
Tues.
Wed.
Thur.
Fri.
Sat.
Sun.
Weekly Totals:
EXERCISE DOCUMENTATION
To evaluate your pet’s fitness and/or weight-loss progress, and to help
prevent over-exercising your pet, we highly recommend creating a plan
before beginning a new exercise routine. In your plan, document data from
each exercise session, such as distance, exercise duration, and calories
burned. You will also want to include information such as your pet’s current
weight, notes about how each exercise session went, and notes about any
discomfort you observe in the days after each exercise. See the SAMPLE
WEEKLY EXERCISE PLAN below.
28 PawRunner User Manual Lifepro
Endurance Training Collection 29
Scan Speed
Mode
Speed
Time Dist. Cal.
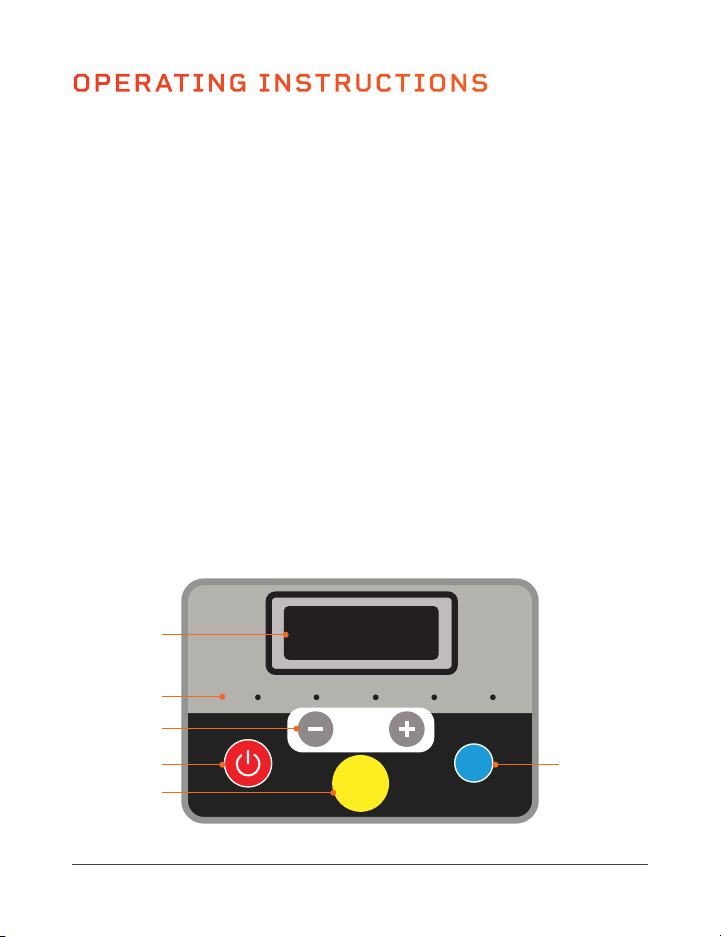
OPERATING INSTRUCTIONS
USING THE CONTROL PANEL TO OPERATE THE PAWRUNNER
1. Window: Shows the value of the selected display mode: scan, speed, time,
distance, or calories burned. Scan mode shows the value of each mode in turn.
2. Display Mode LEDs: The LEDs indicate which display mode is currently selected:
scan, speed, time, distance, or calories burned.
3. Speed + / - Buttons: During exercise, use the buttons to increase/decrease
the speed from 0.5–7.5 mph, in 0.1 mph increments. In standby mode, use the
buttons to adjust the time before starting a preset program or to adjust the
settings when selecting a countdown mode: increase/decrease the time goal
from 5–99 minutes, in 1-minute increments, the distance goal from 0.4–99
miles, or the calorie goal from 10–990 kilocalories.
4. Start/Stop Button: Press once to start the selected preset program or
countdown mode workout. Press again to pause the workout. While paused,
press a third time to restart the workout.
5. Magnetic Safety Key Port: The magnetic safety key must be in place on the
magnetic port in order to begin using the treadmill.
6. Mode Button: In standby mode, press to toggle through the three countdown
modes: time, distance, calories, then the 12 preset programs (the window
shows: 30:00, 1.00, 50.0, P01–P12). During a workout, press the button
to toggle through the display modes in order: scan, speed, time, distance,
and calories burned. The Display Mode LEDs indicate which display mode is
currently selected.
6
1
2
3
4
5
*Speed cannot be adjusted
for preset programs.
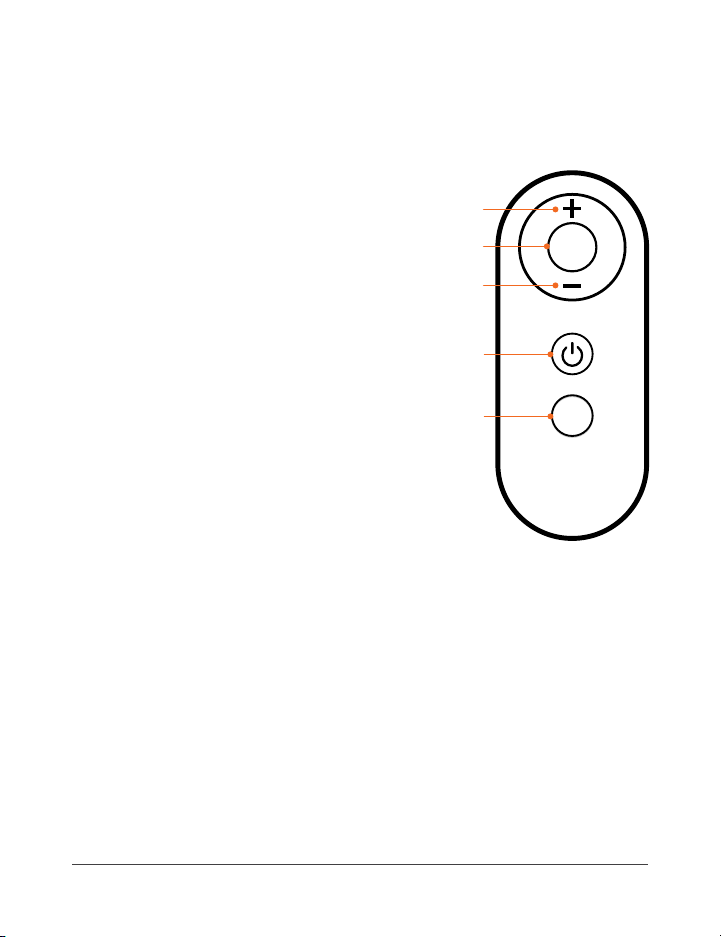
USING THE REMOTE CONTROL TO
OPERATE THE PAWRUNNER
1. +/- Buttons*: During exercise, use the
buttons to increase/decrease the speed
from 0.5–7.5 mph, in 0.1 mph increments.
In standby mode, use the buttons to adjust
the time before starting a preset program
or to adjust the settings when selecting a
countdown mode: increase/decrease the
time goal from 5–99 minutes, in 1-minute
increments, the distance goal from 0.4–99
miles, or the calorie goal from 10–990
kilocalories.
2. Mode Button: In standby mode, press to
toggle through the three countdown modes:
time, distance, calories (the window shows:
30:00, 1.00, 50.0). During a workout, press the
button to toggle through the display modes in
order: scan, speed, time, distance, and calories.
The Display Mode LEDs on the control panel
indicate which display mode is currently selected.
3. Start/Stop Button: Press once to start the selected preset program or
countdown mode workout. Press again to pause the workout. While paused,
press a third time to restart the workout.
4. Program Button: Press to toggle through the twelve preset programs,
P01–P12.
*Speed cannot be adjusted for preset programs.
MODES
Standby Mode: The PawRunner is powered on, but no workout is in progress.
Program Mode: Choose from twelve preset programs: P1–P12.
Countdown Mode: Choose between time, distance, and calorie countdown modes.
P
M
1
1
2
3
4
28 PawRunner User Manual Lifepro
Endurance Training Collection 29
Scan Speed
Mode
Speed
Time Dist. Cal.
OPERATING INSTRUCTIONS
USING THE CONTROL PANEL TO OPERATE THE PAWRUNNER
1. Window: Shows the value of the selected display mode: scan, speed, time,
distance, or calories burned. Scan mode shows the value of each mode in turn.
2. Display Mode LEDs: The LEDs indicate which display mode is currently selected:
scan, speed, time, distance, or calories burned.
3. Speed + / - Buttons: During exercise, use the buttons to increase/decrease
the speed from 0.5–7.5 mph, in 0.1 mph increments. In standby mode, use the
buttons to adjust the time before starting a preset program or to adjust the
settings when selecting a countdown mode: increase/decrease the time goal
from 5–99 minutes, in 1-minute increments, the distance goal from 0.4–99
miles, or the calorie goal from 10–990 kilocalories.
4. Start/Stop Button: Press once to start the selected preset program or
countdown mode workout. Press again to pause the workout. While paused,
press a third time to restart the workout.
5. Magnetic Safety Key Port: The magnetic safety key must be in place on the
magnetic port in order to begin using the treadmill.
6. Mode Button: In standby mode, press to toggle through the three countdown
modes: time, distance, calories, then the 12 preset programs (the window
shows: 30:00, 1.00, 50.0, P01–P12). During a workout, press the button
to toggle through the display modes in order: scan, speed, time, distance,
and calories burned. The Display Mode LEDs indicate which display mode is
currently selected.
6
1
2
3
4
5
*Speed cannot be adjusted
for preset programs.
USING THE REMOTE CONTROL TO
OPERATE THE PAWRUNNER
1. +/- Buttons*: During exercise, use the
buttons to increase/decrease the speed
from 0.5–7.5 mph, in 0.1 mph increments.
In standby mode, use the buttons to adjust
the time before starting a preset program
or to adjust the settings when selecting a
countdown mode: increase/decrease the
time goal from 5–99 minutes, in 1-minute
increments, the distance goal from 0.4–99
miles, or the calorie goal from 10–990
kilocalories.
2. Mode Button: In standby mode, press to
toggle through the three countdown modes:
time, distance, calories (the window shows:
30:00, 1.00, 50.0). During a workout, press the
button to toggle through the display modes in
order: scan, speed, time, distance, and calories.
The Display Mode LEDs on the control panel
indicate which display mode is currently selected.
3. Start/Stop Button: Press once to start the selected preset program or
countdown mode workout. Press again to pause the workout. While paused,
press a third time to restart the workout.
4. Program Button: Press to toggle through the twelve preset programs,
P01–P12.
*Speed cannot be adjusted for preset programs.
MODES
Standby Mode: The PawRunner is powered on, but no workout is in progress.
Program Mode: Choose from twelve preset programs: P1–P12.
Countdown Mode: Choose between time, distance, and calorie countdown modes.
P
M
1
1
2
3
4
30 PawRunner User Manual Lifepro
Endurance Training Collection 31
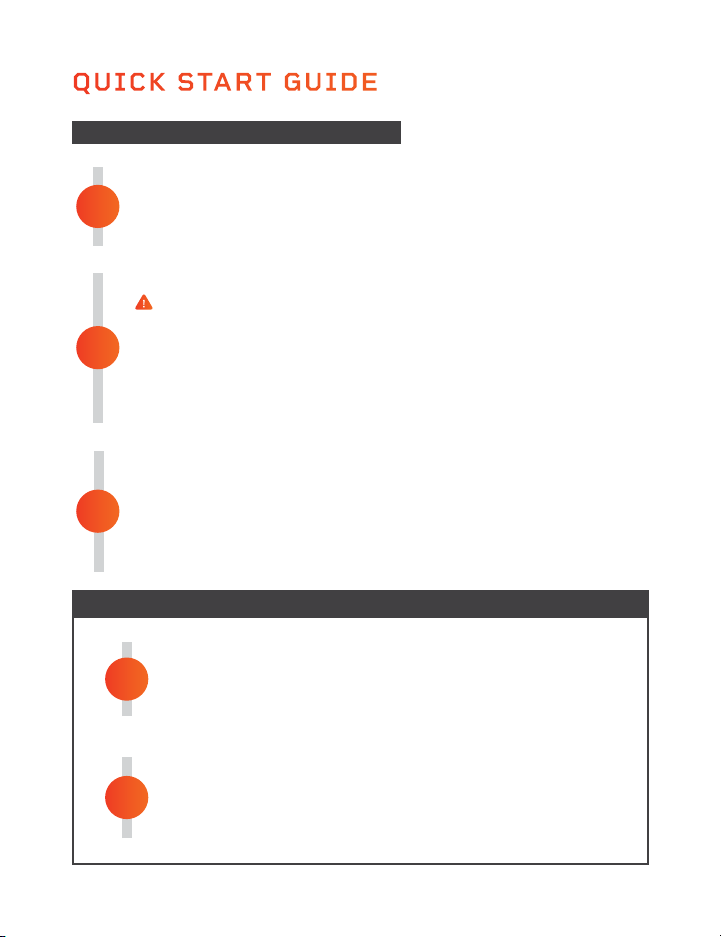
QUICK START GUIDE
POWER ON THE TREADMILL
1. Plug the power cord into a grounded wall outlet.
2. Flip the power switch at the front of the motor housing to the ON
position. The console will light up and all values will be set to zero.
POWER OFF AND UNPLUG THE PAWRUNNER
1. Remove the safety key and store it in a separate location.
2. Flip the power switch to the OFF position.
3. Unplug the power cord from the wall outlet.
2
1
STARTING THE TREADMILL
1. Ensure your pet is in place on the treadmill, on leash, and ready to go.
2. Secure your pet’s leash to the treadmill crossbar. See
DETERMINING
APPROPRIATE LEASH LENGTH
on page 21.
3. Power on the treadmill and begin a workout. See
CREATING A
WORKOUT
on pages 31–33 for instructions.
STOP THE TREADMILL AND UNHOOK YOUR PET
1. Press the red Stop button to stop the running belt.
2. Wait until the treadmill has come to a complete stop before
unhooking your pet from the crossbar.
2
1
PLACE THE MAGNETIC SAFETY KEY
The safety key MUST be in place before the treadmill can be operated.
The safety key cuts power to the treadmill in case your pet falls or an emergency
occurs. See
USING THE MAGNETIC SAFETY KEY on page 9.
1. Place the safety key on the round magnetic port on the console.
2. Clip the other end of the safety key securely to your pet’s collar.
3. Give the clip a tug to make sure it won’t release from the collar.
STARTING THE TREADMILL
STOPPING THE TREADMILL
CREATING A WORKOUT
CREATING A COUNTDOWN-MODE WORKOUT
Three countdown modes allow you to set a specific exercise goal, time,
distance, or a certain number of calories to be burned, for your pet’s
workout. During the workout, the specific exercise goal will count down and
the treadmill will automatically stop when the goal is reached.
TIME COUNTDOWN MODE
1. Press the Mode button once to choose time countdown mode. The red
LED next to “Time” will be lit.
2. The default time “30:00” will flash on the screen. Enter the desired
exercise time, from 5:00–99:00 minutes, in one-minute increments, by
pressing the +/- buttons.
3. Press the Start/Stop button to begin the workout.
4. Use the +/- buttons to adjust the speed at any time during your
workout.
DISTANCE COUNTDOWN MODE
1. Press the Mode button twice to choose distance countdown mode. The
red LED next to “Dist.” will be lit.
2. The default distance “1.00” will flash on the screen. Enter the desired
distance, from 0.4–99 miles, by pressing the +/- buttons.
3. Press the Start/Stop button to begin the workout.
4. Use the +/- buttons to adjust the speed at any time during your
workout.
3

30 PawRunner User Manual Lifepro
Endurance Training Collection 31
QUICK START GUIDE
POWER ON THE TREADMILL
1. Plug the power cord into a grounded wall outlet.
2. Flip the power switch at the front of the motor housing to the ON
position. The console will light up and all values will be set to zero.
POWER OFF AND UNPLUG THE PAWRUNNER
1. Remove the safety key and store it in a separate location.
2. Flip the power switch to the OFF position.
3. Unplug the power cord from the wall outlet.
2
1
STARTING THE TREADMILL
1. Ensure your pet is in place on the treadmill, on leash, and ready to go.
2. Secure your pet’s leash to the treadmill crossbar. See
DETERMINING
APPROPRIATE LEASH LENGTH
on page 21.
3. Power on the treadmill and begin a workout. See
CREATING A
WORKOUT
on pages 31–33 for instructions.
STOP THE TREADMILL AND UNHOOK YOUR PET
1. Press the red Stop button to stop the running belt.
2. Wait until the treadmill has come to a complete stop before
unhooking your pet from the crossbar.
2
1
PLACE THE MAGNETIC SAFETY KEY
The safety key MUST be in place before the treadmill can be operated.
The safety key cuts power to the treadmill in case your pet falls or an emergency
occurs. See
USING THE MAGNETIC SAFETY KEY on page 9.
1. Place the safety key on the round magnetic port on the console.
2. Clip the other end of the safety key securely to your pet’s collar.
3. Give the clip a tug to make sure it won’t release from the collar.
STARTING THE TREADMILL
STOPPING THE TREADMILL
CREATING A WORKOUT
CREATING A COUNTDOWN-MODE WORKOUT
Three countdown modes allow you to set a specific exercise goal, time,
distance, or a certain number of calories to be burned, for your pet’s
workout. During the workout, the specific exercise goal will count down and
the treadmill will automatically stop when the goal is reached.
TIME COUNTDOWN MODE
1. Press the Mode button once to choose time countdown mode. The red
LED next to “Time” will be lit.
2. The default time “30:00” will flash on the screen. Enter the desired
exercise time, from 5:00–99:00 minutes, in one-minute increments, by
pressing the +/- buttons.
3. Press the Start/Stop button to begin the workout.
4. Use the +/- buttons to adjust the speed at any time during your
workout.
DISTANCE COUNTDOWN MODE
1. Press the Mode button twice to choose distance countdown mode. The
red LED next to “Dist.” will be lit.
2. The default distance “1.00” will flash on the screen. Enter the desired
distance, from 0.4–99 miles, by pressing the +/- buttons.
3. Press the Start/Stop button to begin the workout.
4. Use the +/- buttons to adjust the speed at any time during your
workout.
3

32 PawRunner User Manual Lifepro
Endurance Training Collection 33
CREATING A WORKOUT
CALORIE COUNTDOWN MODE
1. Press the Mode button three times to choose calorie countdown mode.
The red LED next to “Cal.” will be lit.
2. The default calorie goal “50.0” will flash on the screen. Enter the
desired calorie goal, from 00.0–990.0 calories, by pressing the
+/- buttons.
3. Press the Start/Stop button to begin the workout.
4. Use the +/- buttons to adjust the speed at any time during your
workout.
NOTE: The three countdown modes are not available for preset programs.
NOTE: When the Start/Stop button is pressed, the console will show a
3-second countdown (you will hear accompanying tones). The workout
will begin after the countdown completes and the treadmill will begin
automatically. The treadmill will stop automatically when the countdown
mode goal has completed.
CREATING A PRESET-PROGRAM WORKOUT
The PawRunner has twelve preset exercise programs, P1–P12, to help keep
your pet interested in and excited about using the treadmill. Each preset
exercise program is divided into 20 segments, each with a preset speed.
See the
PRESET PROGRAM SPEED CHART on page 34. To begin a preset
program:
1. Press the Mode button, to toggle through the programs (the
countdown modes will appear first, then the preset programs will
appear). Choose one of the preset programs: P1–P12.
2. The default time of “30:00” will flash on the screen. Use the
+/- buttons to adjust the workout time from 5:00–99:00 minute, in one-
minute increments.
3. Press the Start/Stop button to begin the preset program.
4. Press the Start/Stop button again to pause the workout at any time.
NOTE: When the Start/Stop button is pressed, the console will show a
3-second countdown (you will hear accompanying tones). The exercise
timer will begin after the countdown completes and the treadmill will
begin automatically. The treadmill will stop automatically when the preset
program finishes.
NOTE: Speed is automatically set for preset programs and cannot be
adjusted.
CHANGING THE DISPLAY MODE SHOWN ON THE CONSOLE
While working out, you can change the display mode which is the workout
value displayed on the console.
1. During the workout, press the Mode button to toggle, in order, through
the display modes choices: scan, speed, time, distance, and calories.
NOTE: A lit red LED to the right of the display mode name indicates the
current selected display mode.
NOTE: Scan mode shows each value, in turn, for five seconds.
NOTE: The display mode cannot be changed while in standby mode (before
a workout has begun).
Scan Speed
Mode
Speed
Time Dist. Cal.
Mode Button
Display Mode
LEDs (5)
Display Mode
Names (5)
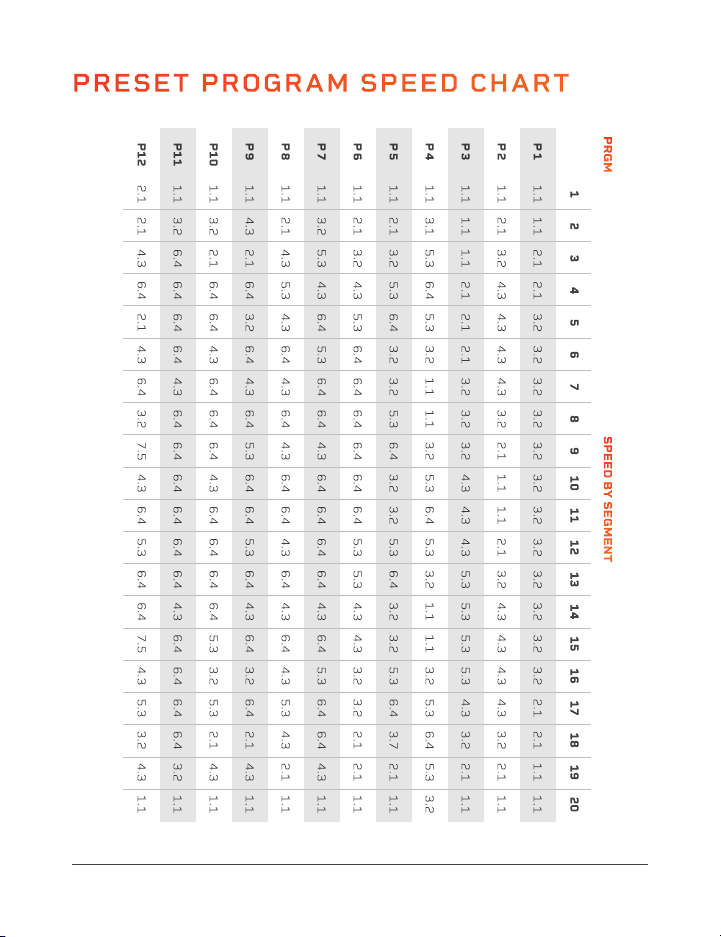
34 PawRunner User Manual Lifepro
Endurance Training Collection 35
MOVING AND STORING THE PAWRUNNER
CAUTION:
• Always power OFF the treadmill at the power switch and unplug the
treadmill before moving or storing.
• Never allow children to move the treadmill.
• Always ensure there are no children, pets, or objects under or in front of
the treadmill when it is being moved.
MOVING THE TREADMILL
The PawRunner has two front wheels for easy transportation. To move
1. Power off the treadmill and unplug it from the electrical outlet.
2. Wrap the power cord up and out of the way.
3. Grasp the back of the treadmill deck with both hands and lift the back
half of the treadmill so that the weight is on the two front wheels.
4. Roll the treadmill to its new location.
NOTE: Make sure there are no children, pets, or objects in the way when
you are moving the treadmill.
STORING THE TREADMILL
• Make sure to store the treadmill in a cool, dry location.
• Don’t store the treadmill in direct sunlight, in high-humidity, high-
temperature, or high-dust environments.
PRESET PROGRAM SPEED CHART

36 PawRunner User Manual Lifepro
Endurance Training Collection 37
MAINTENANCE AND CARE
CAUTION: Before you perform any care, cleaning, maintenance, repair, or
similar work on your treadmill, switch off the power and remove the power cable
from the electrical outlet. Check before starting the planned work that your
treadmill is completely disconnected and switched off. Only when all work is fully
completed, and the device is completely re-assembled, may the treadmill be
reconnected to a wall outlet and switched on.
BEFORE FIRST USE OR AFTER A LONG BREAK FROM USE
Check that the treadmill is safe. There must be no objects on or under the device.
Make sure that there is a continuous film of lubricant (silicone) on the running
deck. If this is not the case, then use the supplied silicone to apply a lubricant
film. See LUBRICATING THE RUNNING BELT on page 38.
MAINTENANCE & CLEANING INTERVALS
CHECK ON AND AROUND THE TREADMILL: BEFORE EACH USE
Check that there are no objects on or under the treadmill that could interfere
with safe usage.
CHECK TIGHTNESS OF ALL BOLTS/NUTS/KNOBS: BEFORE EACH USE
Check all bolts, nuts, and knobs before each use. Fully tighten, if necessary.
CLEAN THE TREADMILL: AFTER EACH USE
• After each workout, clean the treadmill with a damp cloth and mild, non-
abrasive detergent to remove any dirt, saliva, or other residues.
• Never use solvents or chemical, corrosive, abrasive, or solvent cleaners.
• Dry the cleaned areas thoroughly.
CHECK THE LUBRICATION OF THE RUNNING BELT: ONCE A WEEK
If your regular checks show that there is no longer enough lubrication, lubricate
the belt immediately and shorten the inspection interval accordingly. Please see
LUBRICATING THE RUNNING BELT on page 38 for instructions.
CHECK THE ALIGNMENT OF THE RUNNING BELT: ONCE A WEEK
The alignment of the running belt must be checked regularly. If you notice that
the belt is running to one side, this must be corrected immediately. Please see
ADJUSTING THE RUNNING BELT on page 40.
CLEAN THE MOTOR COMPARTMENT: ONCE A MONTH
To clean the motor compartment, remove the motor cover bolts and cover.
Vacuum the visible dust with the small nozzle of a vacuum cleaner. Never use
detergent or compressed air under any circumstances.
CAUTION: This work may only be performed when the treadmill is switched
off and the power plug is removed.
WHY IS MAINTENANCE OF MY TREADMILL SO IMPORTANT?
In order to enjoy using your treadmill for many years, it is important to regularly
and consistently do basic maintenance. The maintenance interval will depend
very much on how often you use your treadmill, and therefore the intervals may
need to be shorter than specified.
WHAT CAN HAPPEN IF THERE IS A LACK OF MAINTENANCE?
There is friction between the running belt and the running deck when in use.
Any kind of friction creates wear which reduces the life of your treadmill. By
lubricating between the running belt and the running deck with silicone oil, this
friction is reduced, thus increasing the life of both parts. If the treadmill runs dry,
the running deck will get hot, and the surface of the running deck and the running
belt may be damaged or destroyed. Friction can also lead to a static charge which
can discharge on contact with the frame. This is not only unpleasant but can also
destroy the treadmill’s electronics.
WHY DO I HAVE TO CLEAN THE MOTOR COMPARTMENT?
Due to movement of the running belt and ventilation of the motor, the treadmill
attracts dust from the environment. This dust will be deposited both under and in
the machine. Without cleaning, the interior of the treadmill would at some point
get so dusty that a short would be caused in the electronic components. To avoid
this, regular cleaning is necessary.
DAMAGE CAUSED BY NEGLECT OR LACK OF MAINTENANCE AND CARE
ARE EXCLUDED FROM THE WARRANTY.

38 PawRunner User Manual Lifepro
Endurance Training Collection 39
MAINTENANCE AND CARE
WARNING: Always flip the power switch to the OFF position and unplug the
power cord before starting any maintenance, cleaning, or repairs.
CLEANING & GENERAL MAINTENANCE
• Wipe down the PawRunner after use. Clean only with a slightly damp cloth.
Do not use chemical or solvent cleaners.
• Inspect for visible damage before use. Do not use if damaged or malfunctioning.
• Inspect and tighten all external bolts periodically.
• Only use with the original parts and accessories provided by the manufacturer.
• Never open the motor housing, other than to perform cleaning and
maintenance procedures described in this manual, or unless instructed to do so
by an authorized service representative. Servicing other than the procedures in
this manual should be performed by an authorized service representative only.
• Never insert or drop any object into any opening.
LUBRICATING THE RUNNING BELT
The most important maintenance for a treadmill is regular, timely lubrication and
care and maintenance of the running belt.
• The running belt must be lubricated if a significant increase in friction is noted.
This will be apparent if the belt makes jerking movements during use.
• Insufficient lubrication and the resulting increase in friction will inevitably
lead to an increase in wear and cause damage to the treadmill’s running belt,
deck, motor, and circuit board.
• How often the treadmill is used will generally determine how often you must
perform maintenance. Typically, treadmills will only need to be lubricated
every few months. However, as use-time will vary greatly from pet to pet, we
recommend you keep a maintenance log and set a specific day each week in
the first 6 months of use to check the lubrication of the running belt.
• To check the belt lubrication, lift up the front third of the belt and feel with
your hand for lubrication under the center of the belt. If lubrication is present,
then write “OK” next to the date in your maintenance log. If there is little or no
lubrication present, then lubricate the belt and record in your maintenance book
accordingly. Over time, you will be able to see how often lubrication is needed.
Even if you choose not to keep a maintenance log, you MUST check the
lubrication of the running belt at least once a week.
• If the treadmill is not used for a long period, you must check the lubrication
of the belt before use and lubricate it if necessary.
CAUTION: Only use the included bottle of silicone maintenance oil to lubricate
the running belt. Do NOT use any other kinds of silicone, lubricants, or silicone
sprays.
HOW TO LUBRICATE THE RUNNING BELT
1. Make sure that the treadmill is switched off, unplugged,
and that the belt is not moving.
2. Open the bottle of silicone maintenance oil. See Fig. 1.
3. Lubrication must be applied under the center of the belt.
Lift one side of the belt high enough that you can reach
the center with the end of bottle’s applicator tip. See
Fig. 2.
4. Apply one line of silicone oil, about 15ml or 3 teaspoons,
under the center of the belt, from the front to the back
of the treadmill. See Fig. 3.
5. If too much oil is applied it can lead to the running belt
slipping. If this occurs, use a dry cloth to remove the
excess oil from the running deck and drive rollers with a
dry cloth.
6. After applying the lubrication, let the running belt run
without any load (no pet on the treadmill) at a speed of
2.5 mph for 3 minutes to evenly distribute the silicone oil.
Rear Drive
Roller
Center of
Running
Belt
Line of
Silicone Oil
Running
Belt
Running
Deck
Bottle of
Silicone Oil
Motor
Housing
Figure 3
Figure 1
Figure 2
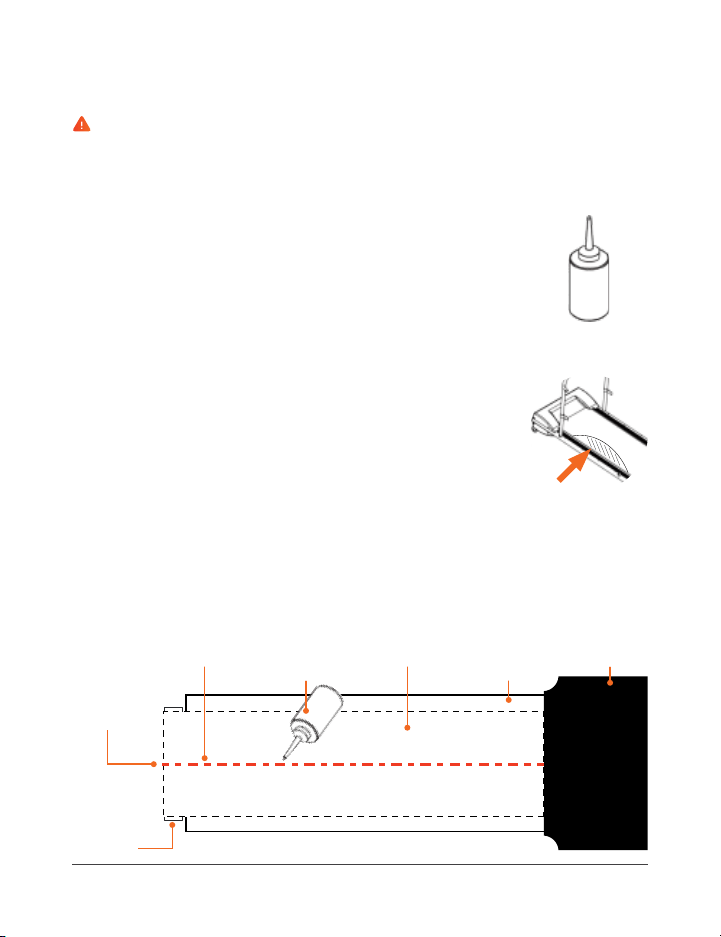

40 PawRunner User Manual Lifepro
Endurance Training Collection 41
MAINTENANCE AND CARE
WARNING: Always power off the treadmill, by flipping the power switch
to the OFF position, and unplug the power cord before starting any
maintenance, cleaning, or repairs.
ADJUSTING THE RUNNING BELT
WARNING: If the running belt has become so displaced that it is rubbing
along one of the side rails, this will cause friction and defects to the running
belt. Damage caused by failure to adjust the belt or insufficient adjustments
will not be covered by the warranty under any circumstances.
To achieve as long a service life as possible, the running belt should always
be kept running straight along the center of the running deck. Therefore, it
is important to examine the belt before each exercise session to see if it is
straight and running in the center of the deck or if it has changed position.
Possible reasons for the running belt changing position are:
• The ground on which the treadmill is standing is either uneven or at an
incline.
• Your pet’s walking or running style (for example, distribution of weight to
one side).
HOW TO ADJUST THE RUNNING BELT
If the Belt Is Running to the Left of Center:
1. Start the treadmill and set the speed to
1.5–2 mph with no load (no pet on the
treadmill).
2. Use the provided hex key to turn the left
adjustment screw, located at the back end
of the belt, ¼ turn clockwise.
3. Allow the treadmill to run with no load for
1–2 minutes to see if the belt is now running along the center.
4. If the running belt is now running in the center of the running deck, the
adjustment was successful. If the belt is still off-center, repeat steps
1–3 until the belt is running in the center.
If the Belt Is Running to the Right of Center:
1. Start the treadmill and set the speed to
1.5–2 mph with no load (no pet on the
treadmill).
2. Use the provided hex key to turn the right
adjustment screw, located at the back end
of the belt, ¼ turn clockwise.
3. Allow the treadmill to run with no load for
1–2 minutes to see if the belt is now running
along the center.
4. If the running belt is now running in the center of the running deck, the
adjustment was successful. If still off-center, repeat steps 1–3 until
the belt is running in the center.
NOTE: If the belt cannot be adjusted, please contact a support
representative immediately.
HOW TO FIX A JAMMED RUNNING BELT
If the Belt Is Jammed and Cannot Move:
1. Start the treadmill and set the speed to
1.5–2 mph with no load (no pet on the
treadmill).
2. Use the provided hex key to turn the
left and right adjustment screws ½ turn
clockwise.
3. Allow the treadmill to run with no load for
1–2 minutes to see if the belt is now running along the center.
4. If the running belt is now unjammed, the adjustment was successful. If
the belt is still off-center, repeat steps 1–3 until the belt is running in
the center.
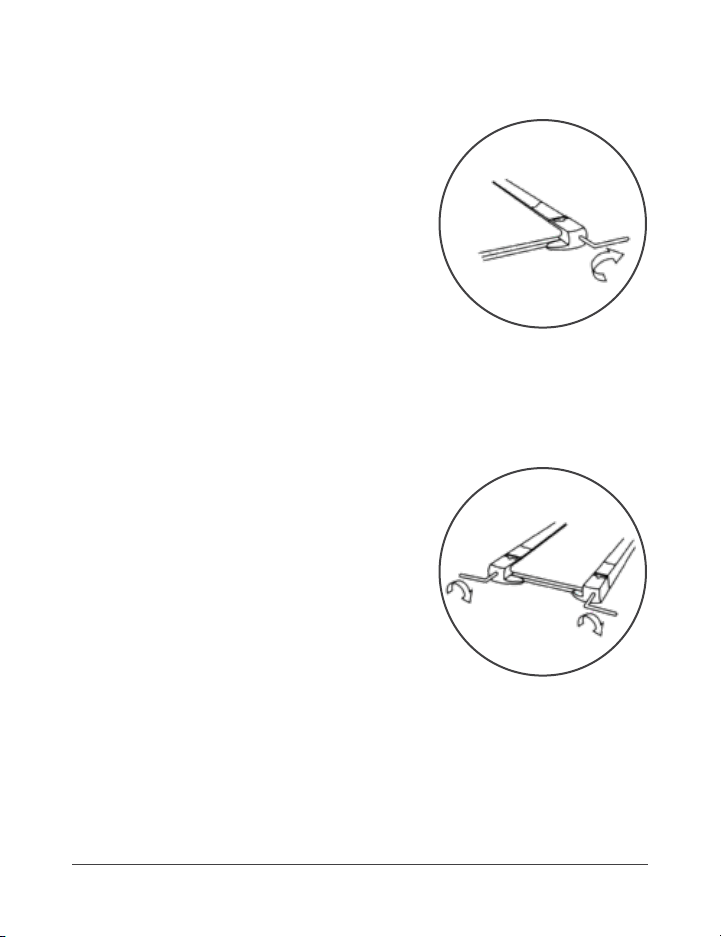

42 PawRunner User Manual Lifepro
ERROR
CODE
POSSIBLE REASON HOW TO RESOLVE
Err (or E00)
Magnetic safety key is missing or
improperly positioned.
Place the safety key in its place
on the treadmill console.
Console is defective. Contact customer support.
E2 Console is broken. Contact customer support.
E4 Console is broken. Contact customer support.
E5
Over-current protection: control
board has short-circuited or the
motor is blocked.
Contact customer support.
E6
Motor is broken or motor cable
failure.
Contact customer support.
E7
The console cables have been
disconnected.
Check to see if the console
cables are correctly connected.
E8
Overload protection: excess
of electricity or the maximum
weight capacity has been
exceeded.
Maximum weight capacity is
200 lbs. If maximum weight
has not been exceeded, contact
customer support.
E9
The machine has worked too
long or the motor temperature is
too high.
Stop the machine and allow it
to cool down for at least 1 hour.
PROBLEM POSSIBLE REASON HOW TO RESOLVE
Treadmill is not
working.
No power.
Plug the power cord into a wall
outlet.
Power switched off.
Flip the power switch to the ON
position.
Magnetic safety key is
not in position.
Place the magnetic safety key in
position on the magnetic port on the
front of the treadmill.
Treadmill has entered
sleep mode.
Press any button on the control panel
to exit sleep mode.
Short circuit. Contact customer support.
Fuse burned out. Contact customer support.
Console does
not show all
data.
PCB screws are loose. Contact customer support.
Console is defective. Contact customer support.
Keypad not
functioning.
Broken or
disconnected buttons.
Contact customer support.
Running belt is
not smooth.
Not enough
lubrication.
Lubricate with the belt with
silicone oil. See LUBRICATING THE
RUNNING BELT on page 38.
Running belt too tight
or off center.
Adjust the belt. See ADJUSTING THE
RUNNING BELT on page 40.
TROUBLESHOOTING & ERROR CODES
Endurance Training Collection 43
Quickly troubleshoot simple issues you might experience with your
PawRunner Treadmill using the table below.
Please contact a customer support representative for additional assistance
at: (732) 456-6063 or support@lifeprofitness.com. Please do not attempt
to repair the treadmill on your own.

SAFETY INSTRUCTIONS
PLEASE KEEP THIS MANUAL IN A SAFE PLACE FOR REFERENCE.
WARNING: To reduce the risk of burns, fire, electric shock, injury to persons,
or damage to equipment, read the following important precautions and
information before operating the PawRunner Pet Treadmill.
RESPONSIBILITIES
1. It is the responsibility of the owner to ensure that all users of the
PawRunner are adequately informed of all warnings and precautions.
2. Use the PawRunner only as instructed in this manual.
3. Check treadmill and power cord for damage prior to every use. Check for
loose screws and knobs before use. Tighten any loose screws/knobs before
use. Do not use if damaged, faulty, or defective. Do not use if the device
emits unusual sounds or odors.
4. Never leave your pet unattended while using the treadmill.
5. Never allow children to use the PawRunner. Always remove the magnetic
safety key and unplug the power cable when not in use to prevent
inappropriate and uncontrolled use by others, especially children.
6. Keep children away from the PawRunner at all times. Do not allow children
to play on or around the treadmill.
7. Keep the bottle of maintenance oil out of reach of children and pets to
prevent accidental ingestion.
8. Do not allow more than one pet to use the treadmill at a time.
9. Do not exceed the maximum weight capacity of 200 lbs.
10. The treadmill will automatically stop working after the set working time.
Do not allow it to run continuously for more than two hours at a time.
11. The PawRunner is intended for in-home use only. Do not use the
PawRunner in any commercial, rental, institutional, therapeutic, or school
setting.
ELECTRICAL SAFETY
12. Only power the treadmill using the integrated power cord.
13. Do not plug into a power strip. It is not recommended to use an extension
cable.
14. Plug the PawRunner into an appropriately grounded outlet, installed by a
44 PawRunner User Manual Lifepro
professional electrician and on a dedicated circuit. It is important that no
sensitive electronic equipment, such as computers or TVs, share the same
electrical circuit as the PawRunner.
15. Do not connect other appliances to the same outlet as the PawRunner.
16. Do not use outdoors. Do not use the treadmill in high-temperature, high-
moisture, or high-dust environments. Do not use or store in direct sunlight.
Do not use during severe storms. Unplug the device immediately in the
event of a power failure.
17. The treadmill is not waterproof. Never spill water or beverages onto or
into the treadmill body or operating components as this may cause electric
shock or fire. Do not use in a place where the treadmill may become wet
or damp. Do not immerse in water. If the treadmill becomes wet, unplug it,
and do not use.
18. Keep the PawRunner and power cord away from flammable or explosive
items, chemicals, direct sunlight, open flames, and heat sources such as
central heating, portable heaters, stoves, fireplaces, and ovens. Excessive
heat can potentially cause fire, electrocution, or injury to people, pets, or
property.
19. Do not operate in the presence of aerosol (spray) products or corrosive
gases, or where concentrated oxygen is being administered.
20. Always unplug the PawRunner when it is not in use. Always unplug the
treadmill before cleaning, doing maintenance, moving, or storing.
21. Always unplug the power cord by pulling gently from the plug. Never
unplug by pulling on the cord itself.
22. Never operate the treadmill or unplug the power cord with wet hands.
23. The treadmill should only be powered on and off using the power switch on
the front of the motor housing.
24. Always place the power cable where it won’t be damaged, stepped on, or
create a tripping hazard. Never leave the power cord where your pet could
chew on it.
25. Never place heavy objects on the power cord. Never cut, bend, tie, or
destroy the power cord.
Endurance Training Collection 45

46 PawRunner User Manual Lifepro
PET EXERCISE SAFETY
26. The magnetic safety key must be in place before the treadmill can be used.
27. Take your pet to the veterinarian for a checkup and to get exercise
frequency and duration recommendations for your pet’s specific breed,
age, size, and overall health. This is especially important for older pets,
those that are overweight, have heart/circulatory problems, joint problems
such as arthritis and hip dysplasia, or have not been active for some time.
28. See full list of pet exercise safety instructions on pages 23–25.
EXERCISE ENVIRONMENT
29. Use and store the treadmill only on a sturdy, flat, clean floor and in a dry
environment between 50–86°F.
30. Ensure there is at least seven feet of clearance behind the treadmill, and
at least four feet of clearance to the front and sides.
31. It is recommended to place a floor covering (rug, carpet, mat) beneath the
PawRunner to protect floors that could be damaged, such as carpet, wood,
laminates, and floor tiles. Ensure that the floor covering does not slide
around before beginning exercise.
32. Do not place the PawRunner on white or light-colored carpets or rugs as
the feet could leave marks or discoloring.
33. Use the PawRunner in a well-ventilated room, so that an optimal amount of
oxygen is available during exercise. Avoid drafty areas.
CLEANING, STORAGE & MAINTENANCE
34. Flip the power switch to the OFF position, unplug the power cable, and let
the treadmill completely cool down before cleaning, storing, or transporting.
35. Wipe down the treadmill with a soft, slightly damp cloth after each use.
Ensure the treadmill is completely dry before using again. Do not use
abrasive, corrosive, solvent, or chemical cleaners or harsh detergents.
36. Store the treadmill in a cool, dry location. Do not store in a garage or
covered patio, or near water.
37. Store the magnetic safety key separately to prevent unauthorized use of
the treadmill, especially by children.
38. Never open the motor housing unless instructed to do so by an authorized
service representative. Servicing other than the procedures in this manual
should be performed by an authorized service representative only.
39. Never insert or drop any object into any opening.
LIFETIME
WARRANTY
Lifepro Fitness creates quality,
durable exercise products and
we stand by that quality with a
lifetime warranty on all of our
products. If your PawRunner
ever breaks (and we doubt it will),
we’ll send you replacement parts
and show you how to repair it.
If your PawRunner cannot be
repaired, we’ll replace it—free of
charge. Register your PawRunner
at pawrunner.lifeprofitness.com
to activate your warranty within
14 days of purchase.
Endurance Training Collection 47

48 PawRunner User Manual Lifepro
PRODUCT
SPECIFICATIONS
MADE IN CHINA
UNIT SPECS
Dimensions: 48” L × 22.8” W × 42” H
Running Surface: 38.2” L × 14.2” W
Side Panels: 18.6” L × 27.0” W
Net Weight: 47.5 lbs.
Maximum User Weight: 200 lbs.
Max Consumption: 800 W
Motor Power: 0.5 HP
Voltage: 110 V
Amplitude: 50–60 Hz
Maximum Pet Weight: 200 lbs.
Recomm. Max Weight: 130 lbs.
Maximum Pet Height: .35.4”
Maximum Pet Length: 29.5”
Decibel Rating: 65–70 dB
Speed Range: 0.5–7.5 mph
Preset Programs: 12
Countdown Modes: 3
PAWRUNNER
PET TREADMILL
ENDURANCE TRAINING
FROM OUR SPORTS RECOVERY COLLECTION
Enjoy all of the benefits of foam
rolling and vibration technology
together with the Surger Vibrating
Foam Roller. Use the Surger before
or after your workout as part of
your warm-up or recovery routine
to gain more flexibility and to help
prevent soreness and injuries.
Deep compression of muscle
fibers and tissues (self-myofascial
release) combined with the
Surger’s vibration technology
breaks up muscle knots and relaxes
tight muscles and fascia. Choose
from four vibration speed levels
to apply the perfect amount of
intensity every time.
SURGER
VIBRATING FOAM ROLLER
SURGER BENEFITS
• Increase workout
effectiveness
• Reduce soreness
• Speed up recovery
• Prevent injury
• Boost circulation
• Improve muscle flexibility
and performance
• Decrease pain and
inflammation
• Loosen knots, trigger points,
and tightness in your muscles
and fascia.
Endurance Training Collection 49

FROM OUR SPORTS RECOVERY COLLECTION
SONIC
VIBRATING MASSAGE GUN
The Sonic Vibrating Massage Gun is a deep tissue massager
that helps eliminate the aches and pains caused by long hours
of sitting. Use the Sonic to release muscle tension and relax
after a long day at work. Get relief from stiffness and pain in
your shoulders, neck, wrists, and hands caused by prolonged
digital device use.
The Sonic’s vibration technology penetrates deeply into
your muscles and fascia—treating areas that human
hands have difficulty reaching. High-frequency
vibrations loosen tight muscles, increase blood
flow to the area, and reduce inflammation.
The Sonic is lightweight and portable, making
it the perfect device to massage your own
shoulders and back. Five speeds allow you
to choose the intensity that will give you
the most relief as you target specific
muscle pain and stiffness.
SONIC BENEFITS
• Reduce muscle pain
and inflammation
• Release toxins
• Improve circulation
• Increase flexibility
• Reduce stress
• Loosen tight muscles
FROM OUR VIBRATION THERAPY COLLECTION
50 PawRunner User Manual Lifepro Endurance Training Collection 51
The Rhythm Vibration Platform works
by creating rapid vibrations throughout
the body, especially on the muscles
specifically targeted. These vibrations
cause the muscles to stretch, flex,
and relax at a rapid rate. This results
in increased muscle and bone
growth, improved flexibility, and
boosted metabolism—all of which
increase the number of calories
you burn.
The Rhythm can be used by people
from every fitness level. If you have
suffered an injury or you experience
joint or back pain, find relief and help
prevent future injuries by adding the
Rhythm to your rehab routine.
RHYTHM
VIBRATION PLATFORM
RHYTHM BENEFITS
• Improve mobility
• Prevent injury
• Increase strength
• Boost metabolism
• Improve sleep
• Develop stronger bones
• Increase circulation

Access Lifepro TV, our library of free
personal training videos on the web at
pawrunner.lifeprofitness.com to learn how to
get the most out of your Lifepro
®
PawRunner
and achieve the results you want.
Lifeprousa Lifeprousa support@lifeprofitness.com
YOU’VE
GOT
THIS